
AutoCAD / Microsoft Office Integration - augi.com · AutoCAD / Microsoft Office Integration 4...
20
AutoCAD / Microsoft Office Integration Presented by Jerry Winters Of VB CAD On November 29, 2001 Autodesk University 2001 Las Vegas, NV
Transcript of AutoCAD / Microsoft Office Integration - augi.com · AutoCAD / Microsoft Office Integration 4...

AutoCAD / Microsoft Office Integration
1
Presented by
Jerry Winters Of
V B C A D On November 29, 2001
Autodesk University 2001 Las Vegas, NV

AutoCAD / Microsoft Office Integration
2
Integration Means Communication AutoCAD can engage in bi-directional communication with many applications. Most Microsoft Office applications provide the ability to communicate with AutoCAD. The applications we will focus on in this seminar are: • Microsoft Excel • Microsoft Word • Microsoft Outlook In addition to working with these applications, we will be utilizing Microsoft Access to create a database and will be using ActiveX Data Objects to communicate with this database. An introduction to Active Server Pages will also be provided to allow for the utilization of web-entered information.
How Applications Communicate With Each Other • ActiveX Automation is the means of communicating with applications. • We open up the communication channels by using GetObject or CreateObject.
• GetObject is used when an application is already running • Dim X as Object • Set X = GetObject(, “Excel.Application”)
• Notice the comma before “Excel.Application” when you use GetObject. • CreateObject is used when either an application is not running or if you want to launch a new instance of the
application. • Dim X as Object • Set X = CreateObject(“Excel.Application”)
Variables Used In Communication • Applications we communicate with are Objects. We can declare the variable that will represent those applications as
an Object. An Object type variable is a generic variable. The Object type variable can be used for the Excel Application, the Word Application, as well as other non-application objects such as an AcadLine, AcadCircle, AcadModelSpace, etc. When we use an Object type variable, we are using something called “Late Binding”. This means that the variable takes on it’s properties, methods, and events AFTER it is set. The code you write is essentially the same as when you use “Early Binding”.
• “Early Binding” is when we declare a variable as a specific type of object. • Dim X as Excel.Application • Dim Y as Word.Application • Dim Z as AcadModelSpace
• Early Binding is accomplished when the Type Library of the object is available. When programming with VBA in AutoCAD for AutoCAD-specific objects, the Type Library is already referenced.
• For a look at the Type Libraries that are referenced in your VBA project, go to the toolbar in the VBA Environmnet. • Tools -> References

AutoCAD / Microsoft Office Integration
3
• The above dialog box pops up when you click Tools -> References. Notice that three references are already added to this VBA project:
• Visual Basic for Applications • AutoCAD 2000 Type Library • OLE Automation
• Select additional references if you want to utilize Early Binding for other applications. • Selecting some items in References not only provide Early Binding benefits of speed, Auto List, Auto Quick Info, and
Auto Data Tips, but also the functionality of the selected Applications or Dlls.
• Here we see that after adding a reference to the Microsoft Excel Object Library, Excel shows up in your Auto List as a valid variable declaration type.
• Although you can develop applications by using Late Binding (declaring a variable as an ‘Object’), it is more difficult to develop in if you are not thoroughly acquainted with the object model of the application you are attempting to communicate with.

AutoCAD / Microsoft Office Integration
4
Communicating with Microsoft Excel 1. Start a new VBA project. 2. Insert a new UserForm. 3. Add a button to the Form. 4. This new button will automatically be named “CommandButton1”. 5. Change the caption of the Button to “Set cell “A4” to a value of 3.14”
6. Go to the click event of the Button. 7. Type the following code:
8. Since we used GetObject to attach to Excel, we need to make sure Excel is already running. 9. We talk to the Cell “A4” by walking through the Excel hierarchy. First, we need the Application, then we want to go
to ActiveSheet, then to the Range of “A4”. 10. Add a Scroll Bar to your Form.
11. Go to the Change Event of the Scroll Bar. Copy the code from the Command Button and Paste it into the Change Event. Modify it to match what is shown in the next graphic.

AutoCAD / Microsoft Office Integration
5
12. After getting the code in as shown above, run the Form and adjust the Scroll Bar. As shown here, the value of “A4” changes based on the value of the ScrollBar.
13. Adding a formula in “B4” that uses the value from “A4” shows that modifying the value of “A4” using the ScrollBar results in a change in value of “B4” as well. Any guess as to what the formula in “B4” is? =A4*2
AutoCAD / Microsoft Office Integration
6
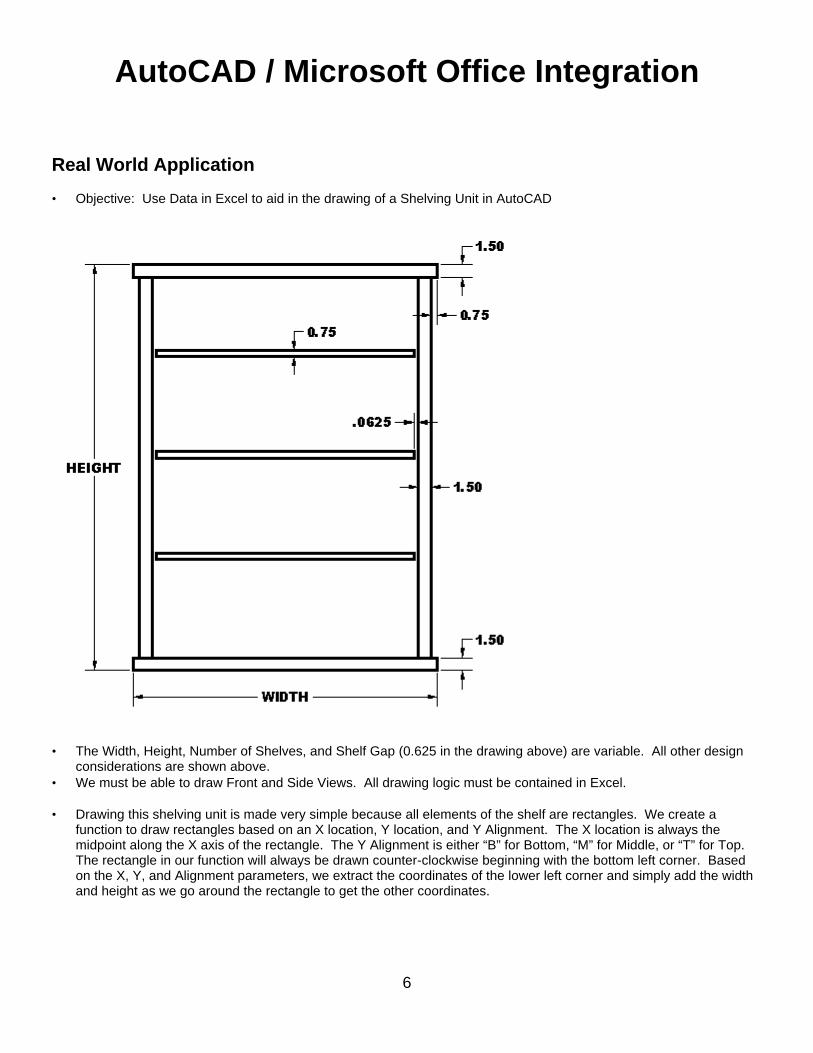
Real World Application • Objective: Use Data in Excel to aid in the drawing of a Shelving Unit in AutoCAD
• The Width, Height, Number of Shelves, and Shelf Gap (0.625 in the drawing above) are variable. All other design
considerations are shown above. • We must be able to draw Front and Side Views. All drawing logic must be contained in Excel. • Drawing this shelving unit is made very simple because all elements of the shelf are rectangles. We create a
function to draw rectangles based on an X location, Y location, and Y Alignment. The X location is always the midpoint along the X axis of the rectangle. The Y Alignment is either “B” for Bottom, “M” for Middle, or “T” for Top. The rectangle in our function will always be drawn counter-clockwise beginning with the bottom left corner. Based on the X, Y, and Alignment parameters, we extract the coordinates of the lower left corner and simply add the width and height as we go around the rectangle to get the other coordinates.

AutoCAD / Microsoft Office Integration
7
• Width, Height, and Number of Shelves are Variables. • Material Thickness and Shelf Gap is used in equations so we can change them as well.
• Equations are shown here so you can see how we are deriving the various numbers. Sub DrawFrontView2() Dim MyExcel As Excel.Application Dim MySht As Excel.Worksheet Set MyExcel = GetObject(, "Excel.Application") Set MySht = MyExcel.ActiveSheet Dim RecWidth As Double Dim RecHeight As Double Dim RecX As Double Dim RecY As Double Dim RecYAlign As String Dim RecLayer As String Dim I As Integer 'Draw Unchanging Rectangles For I = 11 To 14 RecWidth = MySht.Range("B" & I) RecHeight = MySht.Range("C" & I) RecX = MySht.Range("D" & I) RecY = MySht.Range("E" & I) RecYAlign = MySht.Range("F" & I) RecLayer = MySht.Range("G" & I) DrawRec RecX, RecY, RecWidth, RecHeight, RecYAlign, RecLayer Next I RecWidth = MySht.Range("B15") RecHeight = MySht.Range("C15") RecX = MySht.Range("D15")

AutoCAD / Microsoft Office Integration
8
Dim ShelfY As Double ShelfY = MySht.Range("E15") RecYAlign = MySht.Range("F15") RecLayer = MySht.Range("G15") For I = 1 To MySht.Range("B5") DrawRec RecX, ShelfY, RecWidth, RecHeight, RecYAlign, RecLayer ShelfY = ShelfY + MySht.Range("E15") Next I Set MySht = Nothing Set MyExcel = Nothing End Sub Sub DrawSideView2() Dim MyExcel As Excel.Application Dim MySht As Excel.Worksheet Set MyExcel = GetObject(, "Excel.Application") Set MySht = MyExcel.ActiveSheet Dim RecWidth As Double Dim RecHeight As Double Dim RecX As Double Dim RecY As Double Dim RecYAlign As String Dim RecLayer As String Dim I As Integer 'Draw Unchanging Rectangles For I = 11 To 14 RecWidth = MySht.Range("H" & I) RecHeight = MySht.Range("I" & I) RecX = MySht.Range("J" & I) RecY = MySht.Range("K" & I) RecYAlign = MySht.Range("L" & I) RecLayer = MySht.Range("M" & I) If RecWidth > 0 Then DrawRec RecX + MySht.Range("B11") / 1 + 12, RecY, RecWidth, RecHeight, RecYAlign, RecLayer End If Next I RecWidth = MySht.Range("H15") RecHeight = MySht.Range("I15") RecX = MySht.Range("J15") Dim ShelfY As Double ShelfY = MySht.Range("K15") RecYAlign = MySht.Range("L15") RecLayer = MySht.Range("M15") For I = 1 To MySht.Range("B5") DrawRec RecX + MySht.Range("B11") / 1 + 12, ShelfY, RecWidth, RecHeight, RecYAlign, RecLayer ShelfY = ShelfY + MySht.Range("K15") Next I Set MySht = Nothing Set MyExcel = Nothing End Sub Function DrawRec(XLoc As Double, YLoc As Double, _ Width As Double, Height As Double, _ YAlign As String, Layer As String) As AcadLWPolyline Dim LwPts(0 To 7) As Double Dim LLX As Double Dim LLY As Double LLX = XLoc - Width / 2 Select Case YAlign Case "B" LLY = YLoc Case "M" LLY = YLoc - Height / 2 Case "T" LLY = YLoc - Height End Select LwPts(0) = LLX LwPts(1) = LLY LwPts(2) = LLX + Width LwPts(3) = LLY LwPts(4) = LLX + Width LwPts(5) = LLY + Height LwPts(6) = LLX LwPts(7) = LLY + Height Set DrawRec = ThisDrawing.ModelSpace.AddLightWeightPolyline(LwPts) DrawRec.Closed = True DrawRec.Layer = Layer DrawRec.Update End Function

AutoCAD / Microsoft Office Integration
9
• Now we need a Visual Interface in AutoCAD. Scroll Bars will drive the Width, Height, and Shelves values in Excel. The Labels on the left of the Scroll Bars will show the current values for the different parameters. User can also enter a Shelf Number in the Box and a Text entity will be drawn below the Front View. When the user clicks on the “Draw Shelf” button, the following code is executed: Private Sub CommandButton1_Click() DrawFrontView2 DrawSideView2 AddShelfNumber TextBox1.Text End Sub
The AddShelfNumber is as follows: Function AddShelfNumber(ShelfNumber As String) As AcadText Dim InsPt(0 To 2) As Double InsPt(1) = -2 Set AddShelfNumber = ThisDrawing.ModelSpace.AddText("Shelf " & ShelfNumber, InsPt, 1) AddShelfNumber.Alignment = acAlignmentBottomCenter AddShelfNumber.TextAlignmentPoint = InsPt AddShelfNumber.Update End Function To keep from using GetObject each time we change a value on a Scroll Bar, we use it once in the Form-Initialize event, setting Excel to variables declared in the General Declarations area. 'General Declarations Area Dim MyExcel As Excel.Application Dim MySht As Excel.Worksheet Private Sub ScrollBar1_Change() MySht.Range("B2") = ScrollBar1.Value Label2.Caption = "Width: " & ScrollBar1.Value End Sub Private Sub ScrollBar1_Scroll() MySht.Range("B2") = ScrollBar1.Value Label2.Caption = "Width: " & ScrollBar1.Value End Sub Private Sub ScrollBar2_Change() MySht.Range("B3") = ScrollBar2.Value Label3.Caption = "Height: " & ScrollBar2.Value End Sub Private Sub ScrollBar2_Scroll() MySht.Range("B3") = ScrollBar2.Value Label3.Caption = "Height: " & ScrollBar2.Value End Sub Private Sub ScrollBar3_Change() MySht.Range("B5") = ScrollBar3.Value Label4.Caption = "Width: " & ScrollBar3.Value End Sub Private Sub ScrollBar3_Scroll() MySht.Range("B5") = ScrollBar3.Value Label4.Caption = "Width: " & ScrollBar3.Value End Sub
Private Sub UserForm_Initialize() Set MyExcel = GetObject(, "Excel.Application") Set MySht = MyExcel.ActiveSheet End Sub

AutoCAD / Microsoft Office Integration
10
Working with Access • I like Access for two things: Creating Database Structures and Initial Data Entry. • Here we have created a new Access Database • Notice the Structure of the ‘Shelves’ table.
• After entering data, your table will look something like this:
• Our goal is to remove data entry from the list of things a drafter/designer needs to do. Create a database and have
someone else do data entry. They can then ask the drafter/designer to draw up all shelves for a particular job number and the drafter/designer can simply enter the job number in AutoCAD and let the program do the rest.
ActiveX Data Objects • First things first . . . Add a reference to
Microsoft ActiveX Data Objects.

AutoCAD / Microsoft Office Integration
11
• We have the code to draw Shelves based on Widths, Heights, and Number of Shelves. Now we want to talk to the database and draw each Shelf for a specified project.
• First question is: Where’s the Database? Answer the question by creating a UDL file. Create a directory named “c:\udls” where you will put all udl files. In this directory, right-click and select “New” then go down to Text Document. After you have a new Text Document in this directory, change the filename AND the file extension to “shelf.udl” You will be asked if you are sure you want to change the file extension. Click on the “Yes” button.
• Next, double-click on the UDL file to open it up and go to the “Provider Tab” and select Microsoft Jet OLE DB Provider.
• On the Connector tab, browse to the location of your database. • Click on the “Test Connection” button. You should see a message box
that says the connection succeeded. If not, try closing down Access and that usually fixes things.
OK. We have a reference in our code. We have a UDL file to point to. The next step is to re-write our code to take several parameters so data from the database can be used to update Excel’s values, then draw the shelves. Sub DrawFrontView3(Width As Long, Height As Long, Shelves As Long) Dim MyExcel As Excel.Application Dim MySht As Excel.Worksheet Set MyExcel = GetObject(, "Excel.Application") Set MySht = MyExcel.ActiveSheet Dim RecWidth As Double Dim RecHeight As Double Dim RecX As Double Dim RecY As Double Dim RecYAlign As String Dim RecLayer As String Dim I As Integer MySht.Range("B2") = Width MySht.Range("B3") = Height MySht.Range("B5") = Shelves 'Draw Unchanging Rectangles For I = 11 To 14

AutoCAD / Microsoft Office Integration
12
RecWidth = MySht.Range("B" & I) RecHeight = MySht.Range("C" & I) RecX = MySht.Range("D" & I) RecY = MySht.Range("E" & I) RecYAlign = MySht.Range("F" & I) RecLayer = MySht.Range("G" & I) DrawRec RecX, RecY, RecWidth, RecHeight, RecYAlign, RecLayer Next I RecWidth = MySht.Range("B15") RecHeight = MySht.Range("C15") RecX = MySht.Range("D15") Dim ShelfY As Double ShelfY = MySht.Range("E15") RecYAlign = MySht.Range("F15") RecLayer = MySht.Range("G15") For I = 1 To MySht.Range("B5") DrawRec RecX, ShelfY, RecWidth, RecHeight, RecYAlign, RecLayer ShelfY = ShelfY + MySht.Range("E15") Next I Set MySht = Nothing Set MyExcel = Nothing End Sub • Next, we write code to ask the user for a project number, query the database based on that number, step through
each record with that project number, draw the current shelf, save the drawing, then move to the next shelf. I have already created a template for AutoCAD named aushelf.dwt. This template has the OBJ and HID layers added to it as well as the Hidden linetype applied to the HID layer. The LTScale is set to 6. A directory named “C:\aushelves” has also been created in which we will save the shelves. The filename for the drawings will be a concatenation of the project number and the shelf number.
Sub DrawFromDBase() Dim MyDB As ADODB.Connection Dim MyRS As ADODB.Recordset Set MyDB = CreateObject("ADODB.Connection") Set MyRS = CreateObject("ADODB.Recordset") MyDB.Open "File Name=c:\udls\shelf.udl" Dim ProjNumber As Long ProjNumber = ThisDrawing.Utility.GetInteger(vbCrLf & "Enter the Project Number: ") MyRS.Open "Select * from shelves where ProjectNumber = " & ProjNumber, _ MyDB, adOpenStatic, adLockReadOnly If MyRS.RecordCount > 0 Then While MyRS.EOF = False Application.Documents.Add "aushelf" ThisDrawing.Utility.Prompt vbCrLf & "Drawing shelf " & MyRS("shelfnumber") DrawFrontView3 MyRS("width"), MyRS("height"), MyRS("numofshelves") DrawSideView2 AddShelfNumber MyRS("shelfnumber") Application.ZoomExtents ThisDrawing.SaveAs "c:\aushelves\" & ProjNumber & "-" & MyRS("shelfnumber") ThisDrawing.Close MyRS.MoveNext Wend End If MyRS.Close MyDB.Close Set MyRS = Nothing Set MyDB = Nothing End Sub

AutoCAD / Microsoft Office Integration
13
Jerry Winters’ Programming Rule #2: Do as little as is necessary • We have already taken the responsibility of data entry off of the drafter/designer and onto someone else in your
organization. The next step is to take the data entry job out of your organization entirely and put it into the hands of your clients.
Using Microsoft Front Page
• Create a new file named shelfentry.asp. It contains a form with two “One-line text boxes” and three “Drop down menus”. The names for these items are shown in the picture above in parentheses.
<html> <head> <meta http-equiv="Content-Language" content="en-us"> <meta http-equiv="Content-Type" content="text/html; charset=windows-1252"> <meta name="GENERATOR" content="Microsoft FrontPage 4.0"> <meta name="ProgId" content="FrontPage.Editor.Document"> <title>Project Number</title> </head> <body> <form method="POST" action="addshelf.asp"> <table border="1" width="84%" height="102"> <tr> <td width="46%" height="23">Project Number</td> <td width="81%" height="23"><input type="text" name="projnumber" size="20" <% if request("projnum") <> "" Then response.write "value=""" & request("projnum") & """" end if %> >(projnumber)</td> </tr> <tr> <td width="46%" height="23">Shelf Number</td> <td width="81%" height="23"><input type="text" name="shelfnumber" size="20">(shelfnumber)</td>

AutoCAD / Microsoft Office Integration
14
</tr> <tr> <td width="46%" height="17">Width</td> <td width="81%" height="17"><select size="1" name="SWidth"> <option selected>24</option> <option>30</option> <option>36</option> <option>42</option> <option>48</option> </select>(swidth)</td> </tr> <tr> <td width="46%" height="19">Height</td> <td width="81%" height="19"><select size="1" name="SHeight"> <option selected>24</option> <option>30</option> <option>36</option> <option>42</option> <option>48</option> <option>54</option> <option>60</option> <option>66</option> <option>72</option> <option>78</option> </select>(sheight)</td> </tr> <tr> <td width="46%" height="19"># of Shelves</td> <td width="81%" height="19"><select size="1" name="SShelves"> <option selected>1</option> <option>2</option> <option>3</option> <option>4</option> <option>5</option> <option>6</option> <option>7</option> <option>8</option> </select>(sshelves)</td> </tr> </table> <p><input type="submit" value="Submit" name="B1"><input type="reset" value="Reset" name="B2"></p> </form> </body> </html>
• The above code shows one snippet of ASP code. It lies between the ‘<%’ and the ‘%>‘ characters near the beginning of the form. It is there so the user does not need to re-enter the project number after each shelf is posted to the database.
• Next, create a file named ‘addshelf.asp’. This file will take the data entered in the form and post it to the database. If you look at the code closely, you will see that much of it can be copied and pasted from the code in AutoCAD’s VBA area.
<% Dim MyDB Dim MyRS Set MyDB = Server.CreateObject("ADODB.Connection") Set MyRS = Server.CreateObject("ADODB.Recordset") MyDB.Open "File Name=c:\udls\shelf.udl" MyRS.Open "shelves", MyDB, 1, 2 myrs.addnew

AutoCAD / Microsoft Office Integration
15
myrs("ProjectNumber") = request.form("projnumber") myrs("ShelfNumber") = request.form("shelfnumber") myrs("Width") = request.form("swidth") myrs("Height") = request.form("sHeight") myrs("NumOfShelves") = request.form("sshelves") myrs.update myrs.close mydb.close set myrs = nothing set mydb = nothing response.redirect "shelfentry.asp?projnum=" & request.form("projnumber") %>
• After a customer goes to your web site and enters their shelves, they can call you on the phone and tell you that they have entered a new project and ask you to generate the drawings. You can now run the macro already in place, enter the project number they give you, and e-mail them the drawings.
• If you read the above step, you may break out in a sweat thinking of all the work involved of picking up the phone, typing in the macro name, running the macro, typing in your customer’s e-mail address, finding the files, attaching them to the e-mail, and sending the e-mail. I’m out of breath just thinking of all the work. Too much work. Back to rule #2. Do as little as is necessary.
• Modify the ‘shelfentry.asp’ file, adding another TextBox named ’email’ to allow for the entry of an e-mail address. Also modify your ‘addshelf.asp’ file as shown below.
<% Dim MyDB Dim MyRS Set MyDB = Server.CreateObject("ADODB.Connection") Set MyRS = Server.CreateObject("ADODB.Recordset") MyDB.Open "File Name=c:\udls\shelf.udl" MyRS.Open "shelves", MyDB, 1, 2 myrs.addnew myrs("ProjectNumber") = request.form("projnumber") myrs("ShelfNumber") = request.form("shelfnumber") myrs("Width") = request.form("swidth") myrs("Height") = request.form("sHeight") myrs("NumOfShelves") = request.form("sshelves") myrs("email") = request.form("email") myrs.update myrs.close mydb.close set myrs = nothing set mydb = nothing SendMail "[email protected]", request.form("email"), "", _ "***PROJECT" & request.form("projnumber") & "~" & request.form("shelfnumber") response.redirect "shelfentry.asp?projnum=" & request.form("projnumber") Function SendMail(MailTo, MailFrom, MailBody, MailSubject) Dim iMsg Dim iConf Dim Flds Dim strHTML Const cdoSendUsingPort = 2 Set iMsg = CreateObject("CDO.Message") Set iConf = CreateObject("CDO.Configuration") Set Flds = iConf.Fields With Flds .Item("http://schemas.microsoft.com/cdo/configuration/sendusing") = cdoSendUsingPort .Item("http://schemas.microsoft.com/cdo/configuration/smtpserver") = "pop.slkc.qwest.net" .Item("http://schemas.microsoft.com/cdo/configuration/smtpconnectiontimeout") = 10

AutoCAD / Microsoft Office Integration
16
.Update End With With iMsg Set .Configuration = iConf .To = MailTo .From = MailFrom .Subject = MailSubject .HTMLBody = mailbody .Send End With Set iMsg = Nothing Set iConf = Nothing Set Flds = Nothing End Function %> • Now we are capturing the person’s e-mail address as well as sending ourselves an e-mail each time they submit a
shelf. If you are going to play with this code, please remove my e-mail address and put yours in it’s place. • Now we need to prepare AutoCAD to receive data from Outlook. Go to your AutoCAD VBA area. Copy and Paste
the macro ‘DrawFromDBase’, renaming the new one ‘DrawFromDBase2’. We need to modify it so it can receive data from Outlook and draw our shelf correctly.
Public Sub DrawFromDBase2() Dim MyDB As ADODB.Connection Dim MyRS As ADODB.Recordset Set MyDB = CreateObject("ADODB.Connection") Set MyRS = CreateObject("ADODB.Recordset") MyDB.Open "File Name=c:\udls\shelf.udl" Dim ProjNumber As Long Dim ShelfNumber As String ProjNumber = ThisDrawing.Utility.GetInteger(vbCrLf & "Enter the Project Number: ") ShelfNumber = ThisDrawing.Utility.GetString(False, vbCrLf & "Enter the Shelf Number: ") MyRS.Open "Select * from shelves where ProjectNumber = " & _ ProjNumber & " and ShelfNumber = '" & ShelfNumber & "'", _ MyDB, adOpenStatic, adLockReadOnly If MyRS.RecordCount > 0 Then DrawFrontView3 MyRS("width"), MyRS("height"), MyRS("numofshelves") DrawSideView2 AddShelfNumber MyRS("shelfnumber") Application.ZoomExtents ThisDrawing.SaveAs "c:\aushelves\" & ProjNumber & "-" & MyRS("shelfnumber") End If MyRS.Close MyDB.Close Set MyRS = Nothing Set MyDB = Nothing End Sub • Please notice that we added a query for the Shelf Number. We also removed a ‘Prompt’ statement because we want to interact as little as possible with the command line in this macro. After saving the drawing, we are not closing it.
Communicating with Outlook • As it is, we are set up to receive e-mail telling us what the project number is and what shelf number the e-mail
relates to. We need to set up Outlook to work with the e-mails so Outlook can do the work. • In Outlook, create two new e-mail folders under your ‘Personal Folders’ area. One is to be named ‘drawshelves’ and
the other ‘drawnshelves’. After doing this, create a new rule to move any incoming e-mails with ‘***Project’ in the Subject to the ‘drawshelves’ folder. Look on the next page for what it looks like after the rule is complete.

AutoCAD / Microsoft Office Integration
17
• Next, we need to get into the VBA development environment in Outlook. In the Outlook menu, go to Tools->Macro->Visual Basic Editor.
• Look in the “ThisOutlookSession” class. • Go to the Application.NewMail Event. This event is
triggered every time new mail is received. The mail we are concerned about should be moved to the ‘drawshelves’ folder by the time this event is fired. We want to find the ‘drawshelves’ folder, extract the project number and shelf number from the Subject, launch AutoCAD, run our ‘DrawFromDBase2’ macro, close AutoCAD, attach the file created from the AutoCAD macro to a new e-mail and e-mail it to the person who requested the shelf. Run-on sentence? Yes. Big one!
• Before writing any code, add a reference to the AutoCAD Type Library in the Outlook References.
Private Sub Application_NewMail() Dim InFolder As Outlook.MAPIFolder Dim OutFolder As Outlook.MAPIFolder Dim myFolder as Outlook.MAPIFolder Dim MyMsg As MailItem Set myFolder = Application.Session.Folders(1) Dim OFolder As Outlook.MAPIFolder Dim I As Long Set InFolder = myFolder.Folders("drawshelves") Set OutFolder = myFolder.Folders("drawnshelves") For I = 1 To InFolder.Items.Count Set MyMsg = InFolder.Items.Item(1) Dim ProjNum As String Dim ShelfNum As String Dim MailTo As String Dim TildLoc As Long TildLoc = InStr(1, MyMsg.Subject, "~") MailTo = MyMsg.SenderName ProjNum = Mid(MyMsg.Subject, 11, TildLoc - 11) ShelfNum = Mid(MyMsg.Subject, TildLoc + 1) Dim MyCAD As AcadApplication Dim MyFile As AcadDocument Set MyCAD = CreateObject("AutoCAD.Application") MyCAD.Visible = True Set MyFile = MyCAD.Documents.Add("aushelf") MyFile.SendCommand "-vbarun" & vbCr & "autocadoffice.module1.drawfromdbase2" & vbCr & _ ProjNum & vbCr & ShelfNum & vbCr Dim RetMail As MailItem MyCAD.Quit Set MyCAD = Nothing Set MyFile = Nothing Set RetMail = OutFolder.Items.Add RetMail.Subject = "Here is the shelf you requested." RetMail.Body = "Project Number: " & ProjNum & vbCr & "Shelf Number: " & ShelfNum RetMail.Recipients.Add MailTo RetMail.Attachments.Add "c:\aushelves\" & ProjNum & "-" & ShelfNum & ".dwg" RetMail.Send MyMsg.Move OutFolder Next I End Sub

AutoCAD / Microsoft Office Integration
18
What about Word? • After creating a drawing of a shelf, it may be nice to include a small letter to the person who will be receiving the e-
mail. Let’s use Word to send a letter on letterhead. • Create a Word Template named ‘letterhead.dot’. Private Sub Application_NewMail() Dim InFolder As Outlook.MAPIFolder Dim OutFolder As Outlook.MAPIFolder Dim MyMsg As MailItem Set myFolder = Application.Session.Folders(1) Dim I As Long Set InFolder = myFolder.Folders("drawshelves") Set OutFolder = myFolder.Folders("drawnshelves") For I = 1 To InFolder.Items.Count Set MyMsg = InFolder.Items.Item(1) Dim ProjNum As String Dim ShelfNum As String Dim MailTo As String Dim TildLoc As Long TildLoc = InStr(1, MyMsg.Subject, "~") MailTo = MyMsg.SenderName ProjNum = Mid(MyMsg.Subject, 11, TildLoc - 11) ShelfNum = Mid(MyMsg.Subject, TildLoc + 1) Dim MyCAD As AcadApplication Dim MyFile As AcadDocument Set MyCAD = CreateObject("AutoCAD.Application") MyCAD.Visible = True Set MyFile = MyCAD.Documents.Add("aushelf") MyFile.SendCommand "-vbarun" & vbCr & "autocadoffice.module1.drawfromdbase2" & vbCr & _ ProjNum & vbCr & ShelfNum & vbCr Dim RetMail As MailItem MyFile.SaveAs "c:\aushelves\" & ProjNum & "-" & ShelfNum MyCAD.Quit Set MyCAD = Nothing Set MyFile = Nothing Dim MyWord As Word.Application Set MyWord = CreateObject("Word.Application") MyWord.Visible = True Dim MyWFile As Word.Document Set MyWFile = MyWord.Documents.Add("letterhead") MyWord.Selection.TypeText "Re: Project Number " & ProjNum & vbCr & _ "To Whom It May Concern: " & vbCr & _ "Thank you for requesting a drawing of Shelf Number " & ShelfNum & "." & vbCr & _ "Our shelves are made of only the highest quality wood. If you need " & _ "any further information, please don't hesitate to give me a call." & vbCr & _ vbCr & vbCr & vbCr & "Jerry Winters" & vbCr & "President, Shelves R Us" & vbCr MyWFile.SaveAs "c:\aushelves\" & ProjNum & "-" & ShelfNum MyWord.Quit False Set MyWord = Nothing Set MyWFile = Nothing Set RetMail = OutFolder.Items.Add RetMail.Subject = "Drawing for Shelf Project " & ProjNum & " Shelf " & ShelfNum RetMail.Body = "Project Number: " & ProjNum & vbCr & "Shelf Number: " & ShelfNum RetMail.Recipients.Add MailTo RetMail.Attachments.Add "c:\aushelves\" & ProjNum & "-" & ShelfNum & ".dwg" RetMail.Attachments.Add "c:\aushelves\" & ProjNum & "-" & ShelfNum & ".doc" RetMail.Send MyMsg.Move OutFolder Next I

AutoCAD / Microsoft Office Integration
19
• Adding a few lines of code to launch Word and put a little text in the body of the Word document is easy to do. Adding one more line of code attaches the new Word document to the e-mail as well as the AutoCAD drawing.
This content for this class has been designed to provide an overview of one way Microsoft Office products can be used with AutoCAD to simplify and economize your drafting and design processes. I truly hope the class has been not only informative but has helped you to imagine ways in which you can increase your own productivity by using the power and functionality of Microsoft Office and AutoCAD. It is anticipated that a Question and Answer session will take up the last few minutes of this class. All code generated throughout the course of this class will be posted at www.vbcad.com/au for the space of 3 weeks. If you are interested in having the code, please download it quickly as it will not be available forever. Thank you for your time and I hope your experience at Autodesk University has been a good one. Jerry Winters VB CAD Inc. [email protected] www.vbcad.com

AutoCAD / Microsoft Office Integration
20


![ArcGIS for AutoCAD.PPT - mapi.gov.il · 2007,2008,2009 AutoCAD, AutoCAD Map ESRI רתאמ םניח הדרוהל ... Microsoft PowerPoint - ArcGIS_for_AutoCAD.PPT [Compatibility Mode]](https://static.fdocuments.net/doc/165x107/5ac3b7ac7f8b9af91c8c4dbd/arcgis-for-mapigovil-20082009-autocad-autocad-map-esri-.jpg)


