Talentnow - Recruitment Management Software / Applicant Tracking Software
Auto Tracking Software Operation Manual...Auto Tracking Software Operation Manual Introduction Auto...
99
Auto Tracking Software Operation Manual Introduction Auto Tracking Software is application software that runs on a Windows PC. By operating this software on a PC to which a Panasonic remote camera is connected, tracking of persons shot by the remote camera can be assisted. Main Functions The main functions of this software are as described below. 1. Tracking assist for tracking target The tracking of a person selected from the images shot by the remote camera can be assisted. A stable tracking operation can be performed by the face authentication function that detects the face of the set person and the human body detection by deep learning. 2. Auto detection of tracking target The face or movement of a person in the images shot by the remote camera can be detected automatically and tracked. 3. Setting the display position of the tracking target You can set the position on the screen on which the tracking target is to be displayed. 4. Setting the Zoom magnification during tracking The zoom magnification of the camera image during tracking can be set. 5. PTZ control of the remote camera Pan/Tilt control and Zoom position control can be performed for the remote camera. The limitation of the working range of Pan/Tilt can be set or canceled. 6. Registering/calling the remote camera preset The Pan/Tilt/Zoom position of the remote camera can be registered or called as a preset. 7. Crop frame control of remote cameras You can control the Crop frame of a remote camera if it has a Crop function.
Transcript of Auto Tracking Software Operation Manual...Auto Tracking Software Operation Manual Introduction Auto...

Auto Tracking Software Operation Manual
Introduction Auto Tracking Software is application software that runs on a Windows PC.
By operating this software on a PC to which a Panasonic remote camera is connected, tracking of persons shot by the remote camera can be assisted.
Main Functions
The main functions of this software are as described below.
1. Tracking assist for tracking target
The tracking of a person selected from the images shot by the remote camera can be assisted.
A stable tracking operation can be performed by the face authentication function that detects the face of the set person and the human body detection by deep learning.
2. Auto detection of tracking target
The face or movement of a person in the images shot by the remote camera can be detected automatically and tracked.
3. Setting the display position of the tracking target
You can set the position on the screen on which the tracking target is to be displayed.
4. Setting the Zoom magnification during tracking
The zoom magnification of the camera image during tracking can be set.
5. PTZ control of the remote camera
Pan/Tilt control and Zoom position control can be performed for the remote camera.
The limitation of the working range of Pan/Tilt can be set or canceled.
6. Registering/calling the remote camera preset
The Pan/Tilt/Zoom position of the remote camera can be registered or called as a preset.
7. Crop frame control of remote cameras
You can control the Crop frame of a remote camera if it has a Crop function.

2
Configuration of the Software
This software is available in two versions, namely, the standalone version that is to be used on a single PC, and the Web application version that is to be used on a combination of a server PC and a client PC. You may install either of these according to your operating environment.
PTZ mode and Crop mode are available as tracking operation modes. In PTZ mode, you can track with pan-tilt on the remote camera, and in Crop mode, you can track with Crop frame on the remote camera.
To set the operation mode, see “Tracking Operation in PTZ Mode”→”Default Settings”→”Remote Camera Installation Settings” or “Tracking Operation in Crop Mode”→ “Default Settings”→”Remote Camera Installation Settings” in this manual.
*Note that the design of the Main screen changes depending on the operation mode (PTZ or Crop).
For details, see the section on the Main Screen in this manual.
<Notes>
• This is paid software.
To enable you to test the functions of the software, we offer a trial period of 90 days from the day of start of the trial of this software. Therefore, you can use it for free during this period, but you must purchase the key code (license) after the expiry of the trial period, and activate the software.
For details on how to activate the software, see the section on activation in this manual.
Caution
• This software detects and tracks a single target, such as the lecturer of a lecture recording, and does not track a single target among several targets, and is also not meant to be used when there are several moving objects within the camera angle.
• Since this software uses image processing, the target may be wrongly detected. In order to deal with situations where the target is wrongly detected, use this software in an environment in which the correction task can be performed by the operator.
• Depending on the shooting environment (camera angle, distance, and speed), the camera may not be able to track the target (the tracking target may be lost). In order to deal with situations where the target is lost, use this software in an environment in which the correction task can be performed by the operator.
3
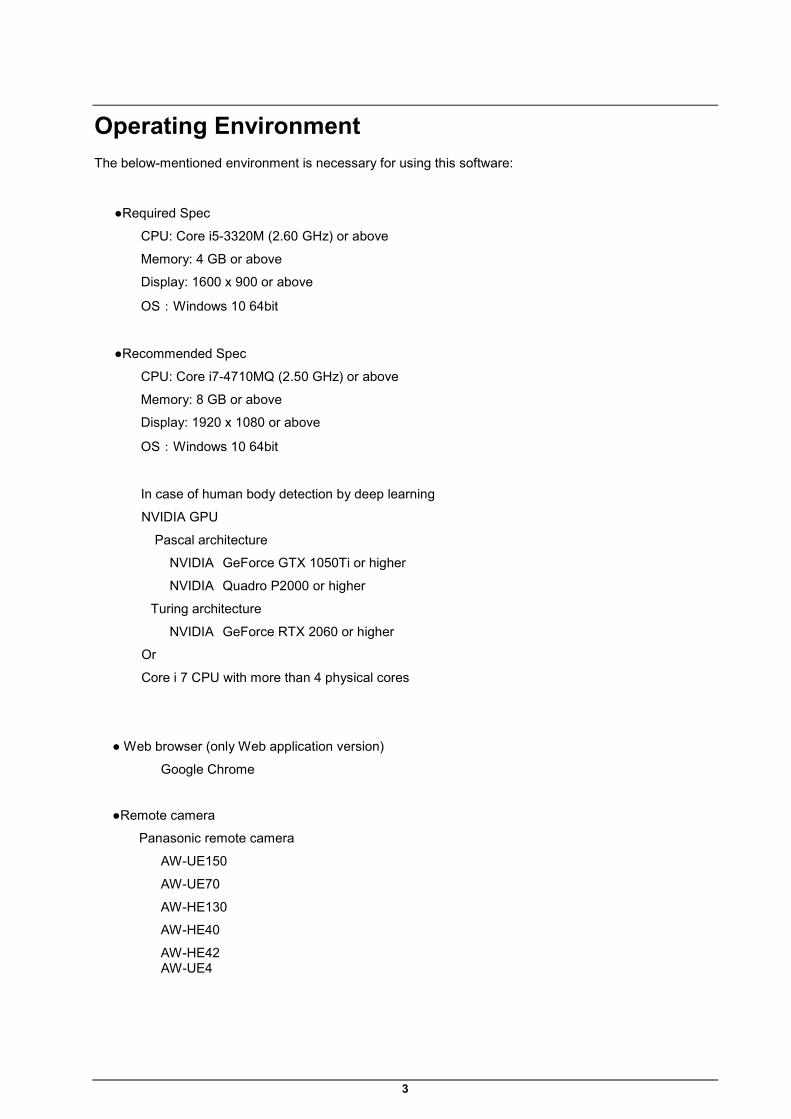
Operating Environment The below-mentioned environment is necessary for using this software:
●Required Spec
CPU: Core i5-3320M (2.60 GHz) or above
Memory: 4 GB or above
Display: 1600 x 900 or above
OS:Windows 10 64bit
●Recommended Spec
CPU: Core i7-4710MQ (2.50 GHz) or above
Memory: 8 GB or above
Display: 1920 x 1080 or above
OS:Windows 10 64bit
In case of human body detection by deep learning
NVIDIA GPU
Pascal architecture
NVIDIA GeForce GTX 1050Ti or higher
NVIDIA Quadro P2000 or higher
Turing architecture
NVIDIA GeForce RTX 2060 or higher
Or
Core i 7 CPU with more than 4 physical cores
● Web browser (only Web application version)
Google Chrome
●Remote camera
Panasonic remote camera
AW-UE150
AW-UE70
AW-HE130
AW-HE40
AW-HE42 AW-UE4

4
<Notes>
• Only Windows 10 64 bit supports Crop mode, and the only supported remote camera is AW-UE150.
• If you are using the Web application version, you must install Google Chrome. You may download and install it from the Google Website.
• Use the latest version of the remote camera firmware. You can download the firmware from the following Website:
http://pro-av.panasonic.net/en/
• Panasonic recommends a wired network connection between the PC and remote camera. In the case of a wireless connection, sufficient tracking performance may not be achieved.
• When using GPU for human body detection through deep learning, you must install CUDA Toolkit in the server pc. Please install CUDA Toolkit 10.1 referring to the following procedure.
https://eww.pass.panasonic.co.jp/pro-av/support/content/download/DEF/soft/man/CUDA_Toolkit_10.1_InstallationProcedures_eng.pdf
About the Descriptions in this File • The illustrations and screen displays in this file may be different from those in reality.
• In this file, a personal computer is mentioned as a "PC".
About Registration and Registered Trademarks • Microsoft, Windows, and Internet Explorer are registered trademarks of Microsoft Corporation in
the United States.
• Intel, Intel Core 2 Duo, Intel Core i7, and Intel Xeon are trademarks or registered trademarks of Intel Corporation or its subsidiaries in the United Sates and other countries.
• All other names, company names, and product names are trademarks or registered trademarks of each company. TM and the mark are not specified in this manual.

5
Tracking Operation in PTZ Mode
About PTZ Mode In PTZ mode, you can perform tracking by using pan-tilt on a remote camera.
6
Description of Screens
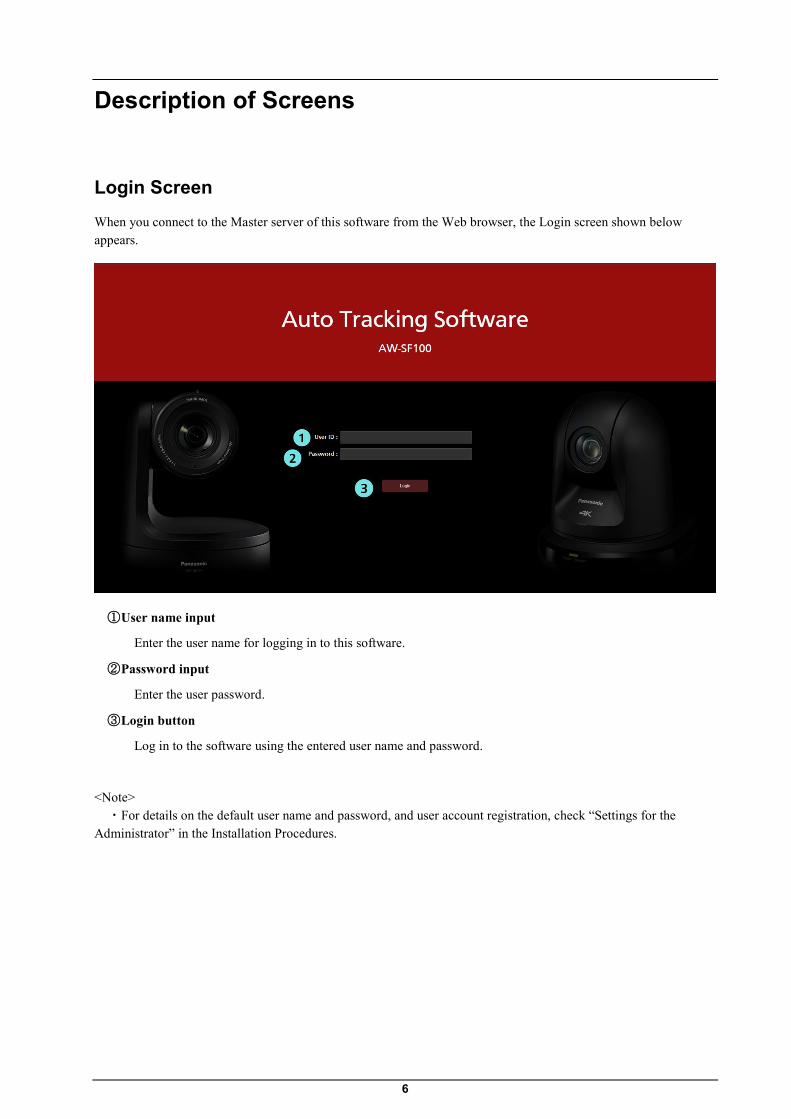
Login Screen When you connect to the Master server of this software from the Web browser, the Login screen shown below appears.
① User name input
Enter the user name for logging in to this software.
② Password input
Enter the user password.
③ Login button
Log in to the software using the entered user name and password.
<Note> ・For details on the default user name and password, and user account registration, check “Settings for the Administrator” in the Installation Procedures.
7
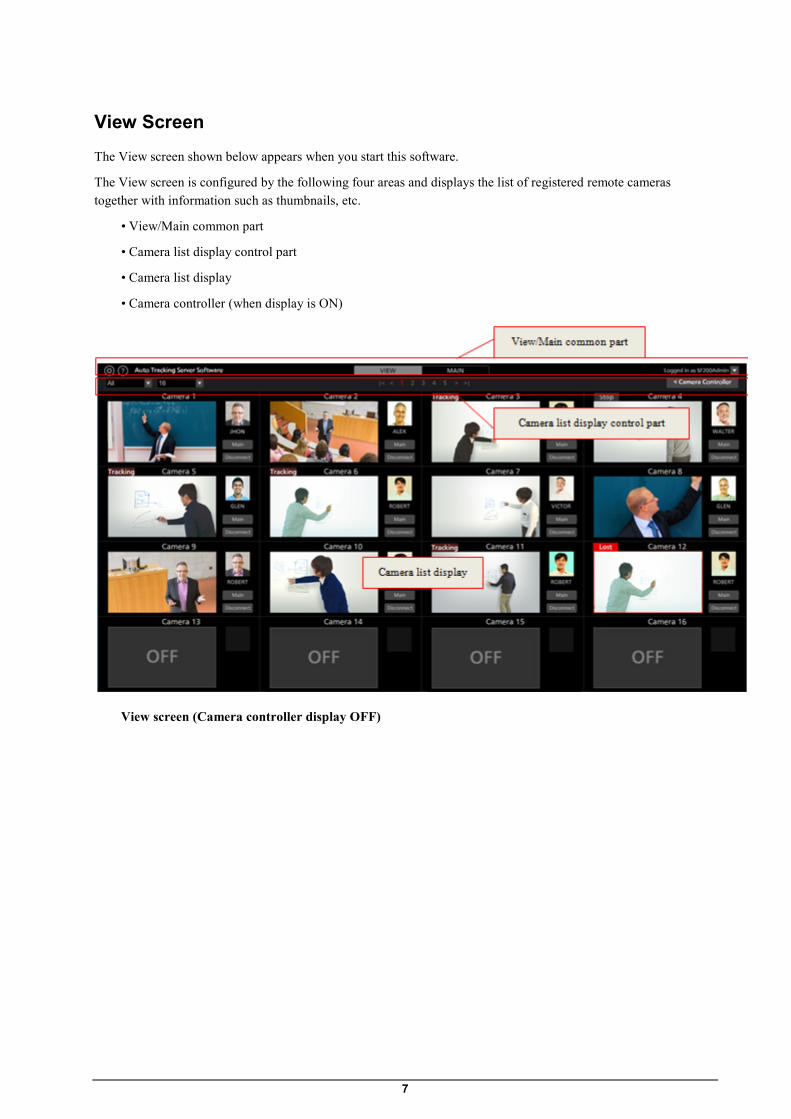
View Screen The View screen shown below appears when you start this software.
The View screen is configured by the following four areas and displays the list of registered remote cameras together with information such as thumbnails, etc.
• View/Main common part
• Camera list display control part
• Camera list display
• Camera controller (when display is ON)
View screen (Camera controller display OFF)

8
View screen (Camera controller display ON)
• View/Main common part
The display of the top part of the screen is common in both View screen and Main screen.
① Settings button
Used to move to the Settings screen.
② Help button
Used to display the help file (this document) under another tab of the Web browser.
③ View/Main selection tab
Used to switch between the View screen and Main screen.
④ Logout/Version menu
Click ▼ to view the menu described below.
Logout: Used to log out from this software and return to the login screen.
Version: Used to view the version information of this software.
• Camera list upper part
Buttons are arranged in the upper part of the camera list display for switching the list display.
① List for selecting the display count from the list of cameras
The number of cameras to be displayed per page is changed from a drop-down list.
② Page selection button

9
Used to select a page in the camera list display.
③ Show/hide camera controller selection button
Used to show or hide the camera controller.
• Camera list display
Display contents of each camera in the camera list display. The background of the selected camera appears in red color.
① Status display
Displays the status of the camera.
Lost: This is the state in which the tracking target has been lost
Tracking: This is the state during tracking
Stop: This is the state prior to the start of tracking
Disconnect: This is the state in which a connection has not been established with the camera
② Camera name display
Displays the name of the registered camera.
③ Thumbnail image display
Displays the thumbnails of camera images.
If the camera is not found (the power is OFF, or the camera is not connected to the network, etc.), “OFF” is displayed.
④ Tracking target face image display
Displays the face image of the person selected as the tracking target.
⑤ Tracking target name display
Displays the name of the person selected as the tracking target.
⑥ Main screen display button
Used to switch to the Main screen.
⑦ Connect/Disconnect button
Used to connect or disconnect the remote camera.
• Camera controller
The camera controller provides various operating functions of the camera. The camera selected in the camera list display is the operating target.
For details on the operating method, refer to the “Operation of the Camera Controller” section of this manual.

10
① PTZ control part
You can perform Pan/Tilt/Zoom control for the remote camera.
② Focus control part
You can perform Focus control for the remote camera.
③ Preset control part
You can perform Preset control for the remote camera.
④ Image Adjust part
You can adjust the images shot by the remote camera.
⑤ USER button
This button does not function in the current version.
⑥ Web Camera Ctrl button
Click the Go button to open the Web management screen of the remote camera on the Web browser.

11
Main Screen If you click the Main tab at the top of the screen, the Main screen appears.
The Main screen is configured by the following three areas:
• Camera list display
• Tracking operation area
• Camera controller
Main screen
• Camera list display
In the camera list display area of the Main screen, each camera is arranged vertically.
① Page selection button
Used to select a page in the camera list display.
② Camera list display
Displays the status of each camera.

12
This area is same as that on the View screen except that the Main button does not exist.
• Tracking operation area
The buttons for performing the tracking operation are arranged in this area. The camera selected in the camera list display is the operating target.
① Camera name
Displays the registered name of the camera for which operations are to be performed.
The background becomes red in color if the tracking target is lost out of sight.
② Camera image
The image acquired from the remote camera is displayed.
③ Tracking target display
This is a rectangular display that shows the tracking target.
・When the tracking method is Template matching
The blue-framed rectangle shows the position of the tracking target.
Also, if the face of the tracking target is detected, a yellow-framed rectangle is displayed.
No frame is displayed if a tracking target does not exist, or if the tracking target is lost sight of.

13
・When the tracking method is Deep Learning (CPU) or Deep Learning (GPU)
The blue-framed rectangle shows the position of the tracking target and the red-framed rectangle shows the detected human.
Also, if the face of the tracking target is detected, a yellow-framed rectangle is displayed.
No frame is displayed if a tracking target does not exist, or if the tracking target is lost sight of.
④ Mask area setting slider
Used to set the mask area (the area that is not used during detection within the camera images) when detecting the tracking target.
The area can be set at both the top and bottom of the screen.
⑤ Tracking Start/Stop button
This button is used to set whether to perform the Pan/Tilt operation of the remote camera if a tracking target exists.
ON (red color):
The Pan/Tilt operation is performed in accordance with the movement of the tracking target.
OFF (gray color):
The Pan/Tilt operation is not performed.
⑥ Tracking setting button
Click to view the Tracking Setting window.
⑦ Face Recognition ON/OFF button
This button is used to set the operation of the face recognition function.
ON (red color):
The face recognition function is used.
A process is performed for comparing the face of the person that is set as the recognition source and the face detected in the camera images, and only the face determined to be of the same person is set as the target of the tracking process.
If the recognition source has not been set, all faces detected in the camera images are set as the target of the tracking process regardless of whose face it is.
OFF (gray color):
The face recognition function is not used.
⑧ Face setting display
The face photograph and name of the person set as the recognition source of face recognition is displayed.
⑨ Select Face button
Used to display the Select Face window.
In the Select Face window, you can select the face data to be used as the recognition source of face recognition.
⑩ Auto Face Search checkbox
When checked, a comparison process is performed between the face of the person registered for face authentication and the face detected in the camera video. When any person is detected, the person is set as a target of the tracking process.
⑪ Add Face button
The Add Face screen for registering the face data for face authentication is displayed.

14
⑫ Target Position Set button
Used to set the operation when a camera image is left-clicked.
ON (red color):
When you left-click the camera image, the display position of the tracking target changes to the clicked position.
OFF (gray color):
When you left-click the camera image, the object that exists at that position is set as the tracking target.
⑬ Angle specification button
This button specifies the angle of view during tracking.
Upper Body :
Sets the angle of view so that the part of the body of the tracking target above the chest is displayed.
Full Body :
Sets the angle of view so that almost the entire body of the tracking target is displayed.
Full :
Sets the angle of view so that the tracking target and its surroundings are displayed.
OFF :
Retains the current angle of view.
⑭ Pan/Tilt Limitation ON/OFF button
This button is used to set the Pan/Tilt limitation of the camera. The limitation in each direction can be set to ON/OFF with the use of the four Top/Bottom/Left/Right buttons.
• Camera controller
The function is same as that on the View screen.
• Tracking Setting window
This window appears when you click the Setting button in the Tracking field of the Main screen.
You can make settings regarding the tracking operation in this window.

15
① Auto Tracking Start
Set the operation to be performed when the tracking target is detected.
If the check mark is ON, the tracking operation of the camera starts automatically when the tracking target is detected.
② Stop Tracking with manual preset recall
Sets the operation to be performed when a preset is called.
If the check mark is ON, tracking operation is stopped when a preset is called.
③ Trigger of lost state judgement
Sets the subject for lost state judgment.
Body:
Triggers lost state judgment when no body is detected.
Face:
Also triggers lost state judgment when no face is detected for a specified time even after a body has been detected.
④ Duration before judgement of lost state
Sets the time (in seconds) before the judgment of lost state is made after a face is no longer detected when Face is selected in trigger of lost state judgement.
You can set a value in the range of 1 to 30.
⑤ Home position
Set the operation to be performed when the tracking target is lost.
NONE:
The camera position remains the same after the tracking target is lost.
Preset 1 to Preset 9:
When the stipulated time elapses after the tracking target is lost, the camera position is returned to the specified preset position.

16
⑥ Duration before execution of home position preset
When the Home position is set to Preset 1 to Preset 9, set the time (secs.) from when the tracking target is lost until when the camera position is returned to the preset position.
You can set a value in the range of 1 to 30.
⑦ Sensitivity Level
Set the sensitivity of the tracking operation of the camera with respect to the movement of the tracking target as a value in the range of 1 to 10.
The higher the value, the higher the sensitivity.
⑧ Tracking Disable Area
Set the area in which the tracking operation of the camera is not to be performed.
You can set the width up to 640 and the height up to 360.
The camera does not perform the tracking operation when the tracking target moves inside the area set here.
This area can also be set by right-clicking on the camera image and dragging.
When canceling the setting, right-click outside the range of the camera image.
⑨ OK button
Used to enable the setting and close the window.
⑩ Cancel button
Used to cancel the setting and close the window.
• Select Face window
This window appears when you click the Select Face button on the Main screen.
On this window, you can set the face of the person that is the tracking target.
① Face data list display
This is a list of the registered face data.
You can select or cancel the face data by clicking. The background of the selected face data appears in red color.
② Page selection button

17
You can select a page in the face data list display.
③ OK button
Used to enable the setting and close the window.
④ Cancel button
Used to cancel the setting and close the window.

18
Settings - Camera Screen This screen is used to make the settings of the remote camera used in this software.
Click the Settings button at the top left of the screen, and then click the Camera tab at the center of the screen to move to this screen.
For details on the remote camera settings, refer to “Default Settings - Remote Camera Installation Settings” in this manual.
① ID
Displays the registration number of the registered camera.
② Name
Displays the name of the registered camera.
③ IP Address
Displays the IP address of each camera.
④ Port No.
Displays the port number that each camera uses for communication.
⑤ Now Connecting
A ● mark is displayed for the camera to which a connection is being established.
⑥ Search box
Used when searching the camera by name.
If you enter a string, only the cameras that include the string in the name are displayed in the list.
To return the display to the original display, clear the entered contents.
⑦ Add button
Used to move to the Register Camera screen.
⑧ Edit button

19
Used to move to the Edit Camera screen.
⑨ Delete button
Used to delete the selected camera.
<Note>
You cannot delete a camera to which a connection is being established.
You cannot delete a camera registered in categories.
• Register/Edit Camera screen
The display moves to this screen when you click the Add button/Edit button.
You can register a new camera and edit already-registered camera information.
① Name
Enter any optional remote camera name.
② IP Address
Enter the IP address of the remote camera.
③ Port No.
Enter the port number that the remote camera uses for communication.
④ Login
Enter the user name of the remote camera.
⑤ Password
Enter the password of the remote camera.
⑥ Height
Set the height at which the remote camera is installed in cm/feet.
⑦ Distance

20
Set the distance from the position where the remote camera is installed up to the position where the tracking target mainly exists in cm/feet.
⑧ Max Zoom
Set the maximum Zoom magnification of the remote camera.
You can set a value in the range of 0 to 100.
⑨ Angle Zoom (Upper Body)
Set the Zoom magnification when Upper Body is selected in the Angle specification of the Main screen.
You can set a value in the range of 0 to 100.
The set Zoom magnification is enabled only when Auto check is OFF. When the Auto check is ON, the Zoom magnification is decided automatically from the value of Height and Distance.
⑩ Angle Zoom (Full Body)
Set the Zoom magnification when Full Body is selected in the Angle specification of the Main screen.
You can set a value in the range of 0 to 100.
The set Zoom magnification is enabled only when Auto check is OFF. When the Auto check is ON, the Zoom magnification is decided automatically from the value of Height and Distance.
⑪ Angle Zoom (Full)
Set the Zoom magnification when Full is selected in the Angle specification of the Main screen.
You can set a value in the range of 0 to 100.
The set Zoom magnification is enabled only when Auto check is OFF. When the Auto check is ON, the Zoom magnification is decided automatically from the value of Height and Distance.
⑫ Auto Search button
When you click this button, the list of cameras present on the network is displayed.
When you select any one camera from the list and then close the window by clicking the OK button, values are entered automatically for some items.
⑬ Image Capture Type You can select the image acquisition method from the camera. JPEG: Images are acquired by JPEG images. H.264: Images are acquired by H.264 stream.
⑭ Tracking Mode
Sets the operation mode of tracking. PTZ: Operation in PTZ mode Crop: Operation in Crop mode
⑮ Crop Mode
Sets the Crop frame size when the mode is Crop mode.
1080: Operates at a clip size of 1920x1080 resolution. 720: Operates at a clip size of 1280x720 resolution.
⑯ Operation after connection
Set the operation after connecting to the camera from the following.
Facing the front: After connection, the camera turns to the front.
Move to preset position: After connection, the camera moves to the selected preset position.
Do nothing: The camera keeps its position before connection.

21
⑰ OK button
Used to apply the settings and return to the Camera screen.
⑱ Cancel button
Used to cancel the settings and return to the Camera screen.
<Notes>
• The Crop setting of Tracking Mode can be selected only when the remote camera is an AW-UE150.

22
Settings – Face Recognition Screen This screen is used to make face data settings of the person, who is the tracking target.
Click the Settings button at the top left of the screen, and then click the Face Recognition tab at the center of the screen to move to this screen.
For details on the face data settings, refer to “Data Settings for Face Recognition” in this manual.
① Face data list display
Displays the list of registered face data.
② Search box
Used when searching the face data.
If you enter a string, only the face data that includes the string in the name is displayed in the list.
To return the display to the original display, clear the entered contents.
③ Add button
Used to move to the Register Face Data screen.
④ Edit button
Used to move to the Edit Face Data screen.
⑤ Delete button
Used to delete the selected face data.
You cannot delete the face data that is set as the tracking target in any remote camera.
⑥ Page selection button
Used to select the page to be displayed.
• Register/Edit Face Data screen
The display moves to this screen when you click the Add button/Edit button.
You can register new face data and edit already-registered face data.

23
① Browse button
If you click this button, a Select Image dialog box appears, and you can import an existing JPEG image.
② Camera selection box
Select the target camera for capturing the images. Only the connected cameras are displayed in the list.
③ Get button
If you click this button, the images from the camera selected in the camera selection box are captured and imported.
④ Image display area
The images imported through the operation of the Browse button or Get button are displayed.
⑤ Face detection display frame
When a face is detected in an imported image, a frame appears around the face.
If you click the frame, the face is selected as the target.
⑥ Face image display
The image of the selected face appears.
⑦ Name input field
Enter the registered name of the selected face.
⑧ Add button
If you click this button, the image and name of the selected face are registered.
⑨ Close button
Click this button to return to the Face Recognition screen.

24
Settings – Tracking Screen This screen is used to set the tracking method.
Click the Settings button at the top left of the screen, and then click the Tracking tab to move to this screen.
For details on the face data settings, refer to “Default Settings - Setting tracking method” in this manual.

25
Default Settings
Remote camera main unit setting Before using this software, make settings on the remote camera main unit.
As a method of acquiring images from remote cameras, it is possible to select either acquisition by JPEG image or acquisition by H.264 stream.
When using acquisition by JPEG image, set the [Image capture type] to JPEG on the [Settings – Camera] screen of this software.
When using acquisition by H.264 stream, set the [Image capture type] to H.264 on the [Settings – Camera] screen of this software.
• Setting of AW-UE150
Tracking performance is higher when using acquisition with JPEG image.
- When acquiring images with JPEG images
Change [Setup] -> [Video over IP] -> [JPEG (1)] to the following settings on the web page of the camera.
Image capture size: 1280 x 720 or higher
Refresh interval: 15 fps or higher (NTSC), 12.5fps or higher (PAL)
- When acquiring images with H.264 stream
Change [Setup] -> [Video over IP] -> [H.264 (1)] to the following settings on the web page of the camera.
H.264 transmission: On
Image capture size: 1280 x 720 or higher
Transmission priority: Frame rate
Frame rate: 15 fps or higher (NTSC), 12.5fps or higher (PAL)
• Setting of AW-HE130
Tracking performance is higher when using acquisition with H.264 stream.
- When acquiring images with JPEG images
Set each item as follows on the web page of the camera.
Initial display settings for “Live” page
Stream: JPEG(1)
Refrash interval (JPEG) : 15 fps or higher (NTSC), 12.5fps or higher (PAL)
JPEG(1)
JPEG transmission: On
Image capture size: 1280x720
H.264(1)
H.264 transmission: Off
26
H.264(2)
H.264 transmission: Off
H.264(3)
H.264 transmission: Off
H.264(4)
H.264 transmission: Off
- When acquiring images with H.264 stream
Change [Setup] -> [Image / Audio] -> [H.264 (1)] to the following settings on the web page of the camera.
H.264 transmission: On
Image capture size: 1280 x 720 or higher
Transmission priority: Frame rate
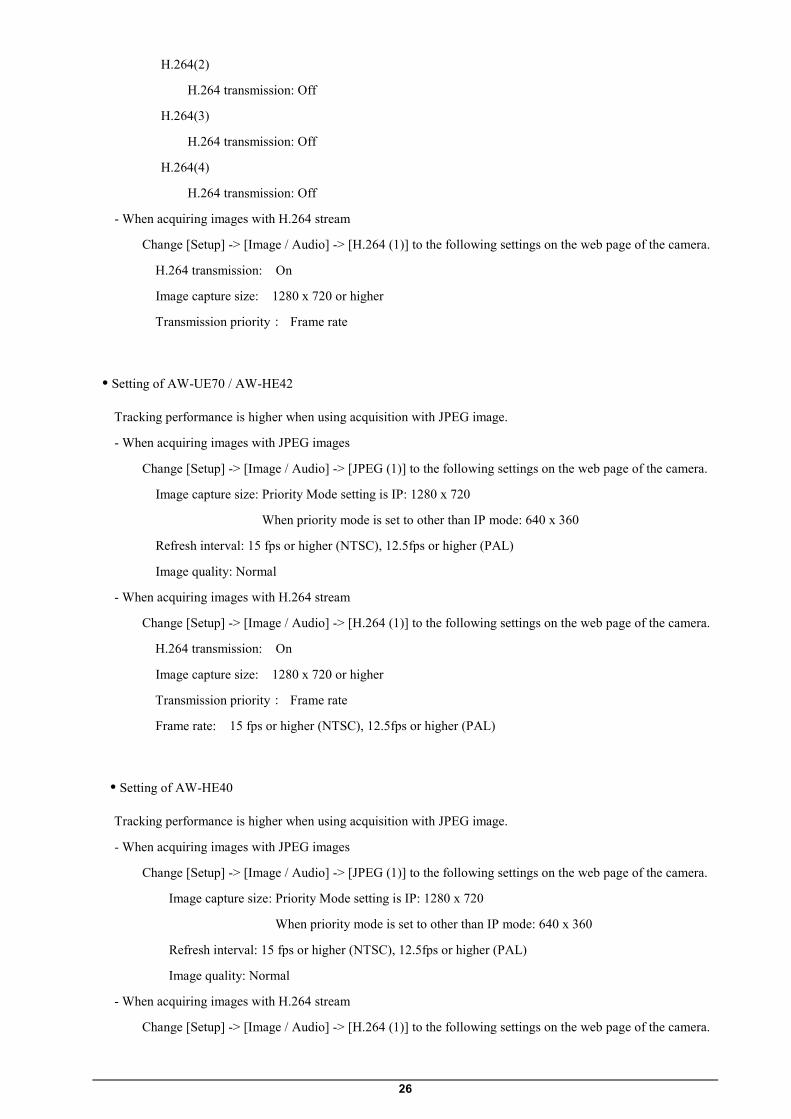
• Setting of AW-UE70 / AW-HE42
Tracking performance is higher when using acquisition with JPEG image.
- When acquiring images with JPEG images
Change [Setup] -> [Image / Audio] -> [JPEG (1)] to the following settings on the web page of the camera.
Image capture size: Priority Mode setting is IP: 1280 x 720
When priority mode is set to other than IP mode: 640 x 360
Refresh interval: 15 fps or higher (NTSC), 12.5fps or higher (PAL)
Image quality: Normal
- When acquiring images with H.264 stream
Change [Setup] -> [Image / Audio] -> [H.264 (1)] to the following settings on the web page of the camera.
H.264 transmission: On
Image capture size: 1280 x 720 or higher
Transmission priority: Frame rate
Frame rate: 15 fps or higher (NTSC), 12.5fps or higher (PAL)
• Setting of AW-HE40
Tracking performance is higher when using acquisition with JPEG image.
- When acquiring images with JPEG images
Change [Setup] -> [Image / Audio] -> [JPEG (1)] to the following settings on the web page of the camera.
Image capture size: Priority Mode setting is IP: 1280 x 720
When priority mode is set to other than IP mode: 640 x 360
Refresh interval: 15 fps or higher (NTSC), 12.5fps or higher (PAL)
Image quality: Normal
- When acquiring images with H.264 stream
Change [Setup] -> [Image / Audio] -> [H.264 (1)] to the following settings on the web page of the camera.

27
H.264 transmission: On
Image capture size: 1280 x 720 or higher
Transmission priority: Frame rate
Frame rate: 15 fps or higher (NTSC), 12.5fps or higher (PAL)
■ AW-UE4 settings
The tracking performance is higher when images are captured as JPEG images.
・When images are captured as JPEG images
On the Web screen of the camera, set Setup-> Basic-> Priority mode to IP.
Make the following settings from Setup -> Image/Audio -> JPEG
Image capture size: 1280 x 720
Frame rate: During NTSC: 10, During PAL: 10
・When images are captured as an H.264 stream
On the Web screen of the camera, set Setup-> Basic-> Priority mode to IP.
Make the following settings from Setup -> Image/Audio -> H.264/H.265
Stream transmission: On
Codec: H.264
Image capture size: 1280 x 720
Frame rate: During NTSC: 15, During PAL: 10
28
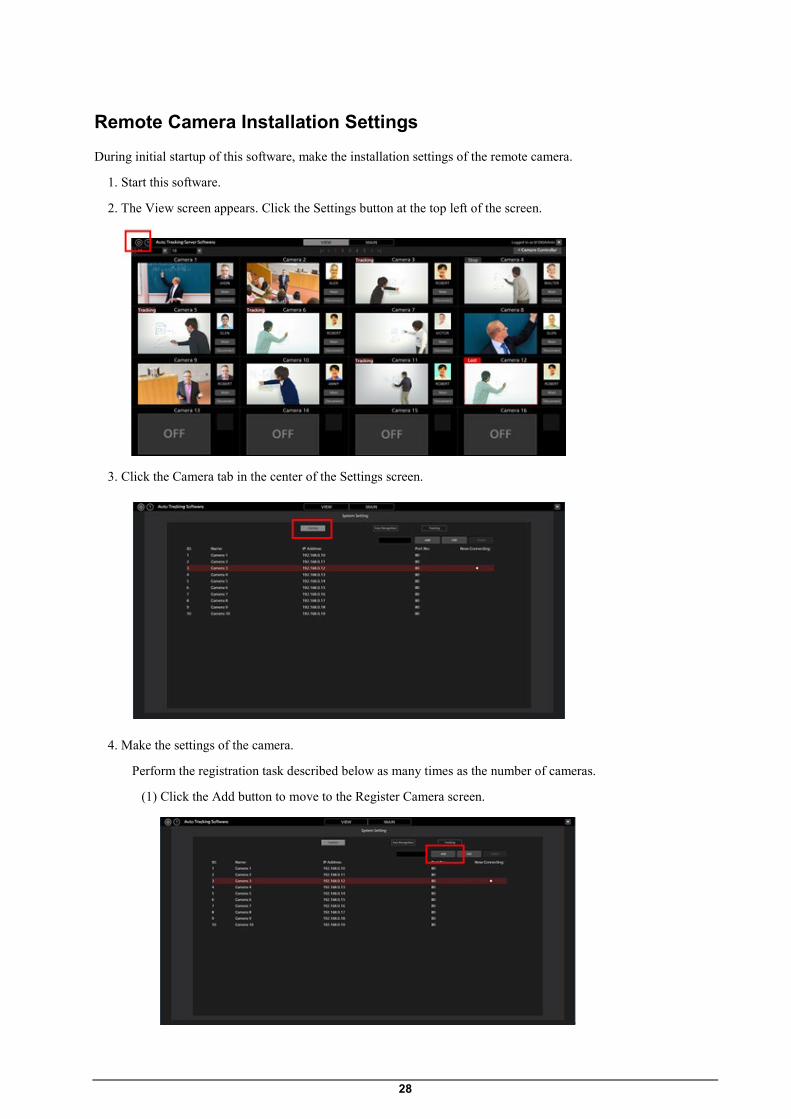
Remote Camera Installation Settings During initial startup of this software, make the installation settings of the remote camera.
1. Start this software.
2. The View screen appears. Click the Settings button at the top left of the screen.
3. Click the Camera tab in the center of the Settings screen.
4. Make the settings of the camera.
Perform the registration task described below as many times as the number of cameras.
(1) Click the Add button to move to the Register Camera screen.

29
(2) Make an entry in the following items.
You can make an entry in the items either manually, or automatically by searching the camera.
Name: Name of the camera
IP Address: IP address of the camera
PortNo: Port number used by the camera (the default value is 80)
Login: Camera account
Password: Camera password
Height: Camera installation height
Distance: Camera installation distance
・When an entry is made manually
1. Move to the box of each item and enter the value.
2. Set the tracking operation mode to PTZ mode.
Tracking Mode: Select PTZ.
3. Click the OK button to complete registration.
・When an entry is made automatically
1. Set the tracking operation mode to PTZ mode.
Tracking Mode: Select PTZ.
2. Click the Auto Search button
The list of cameras present on the network is displayed.
When you select any one camera from the list and then close the window by clicking the OK button, values are entered automatically for some items.

30
3. Click the OK button to complete registration.
Setting tracking method
You can set the tracking method to be used with this software.
1. Click the Settings button at the top left of the screen.
2. Click the Tracking tab in the Settings screen.
3. In the Tracking method field, select the tracking method to use.
Template matching:It is a normal detection method with low CPU utilization.

31
Deep Learning (CPU):It is a method of human body detection by deep learning using CPU.
Compared to Template matching, the CPU utilization will be higher, but more accurate detection can be done. *This is available in PTZ mode only. This tracking method cannot be used in Crop mode.
Deep Learning (GPU):It is a method of human body detection by deep learning using GPU.
Because it uses GPU, faster detection is possible with lower CPU utilization than when using CPU.
<Notes>
・To use the Deep Learning (GPU) method, it is necessary for the PC environment to satisfy the following conditions:
- A NVIDIA GPU board must be provided in the PC.
The supported GPU boards are as follows:
Pascal architecture
NVIDIA GeForce GTX 1050Ti or later
NVIDIA Quadro P2000 or later
Turing architecture
NVIDIA GeForce RTX 2060 or later
- Both the OS and this software must be 64-bit versions. Use Windows 10 as the OS.
- NVIDIA CUDA Toolkit must be installed in the PC.
Please install CUDA Toolkit 10.1 referring to the following procedure.
https://eww.pass.panasonic.co.jp/pro-av/support/content/download/DEF/soft/man/CUDA_Toolkit_10.1_InstallationProcedures_eng.pdf

32
Data Settings for Face Recognition
Registering the Face Data Since this software enables tracking by detecting the face of a specified person with the help of the face recognition function, a stable tracking operation is implemented.
You can register beforehand the face data that is used as a recognition source of the person to be tracked. There are two methods of registering the face data, namely a method of using an existing JPEG image, and a method of using an image captured from camera images.
Register the face data according to the procedure described below.
1. Start this software.
2. The View screen appears. Click the Settings button at the top left of the screen.
3. To capture from the camera images, click the Connect button of the camera to use to set the camera to the connected state.
4. Click the Face Recognition tab in the center of the Settings screen.
5. Click the Add button at the top right of the screen.

33
6. The Register Face Data screen appears.
7. Import the face data according to the procedure described below.
• When using an existing JPEG file:
If you click the Browse button for the “from file:” field, a dialog box for selecting the image file appears. Select the JPEG image showing the face.
• When capturing from the camera images:
Select the camera to use in the box for the “from camera:” field, and then click the Get button to perform capturing.
8. The image is displayed in the center of the Register Face Data screen. If a face is detected in the image, a frame appears around the face.
If a frame does not appear, repeat step 7.
9. Click the frame of the face you want to register. The face image appears in the “Image:” field.
10. Enter the name of the face data in the “Name:” field.
11. If you click the Add button, the new face data that has been selected is registered.
<Notes>
• If several faces are detected in the image, you can collectively register several face data instances by repeating steps 9 to 11 described above.
• Up to 10 faces can be detected in one image.

34
Editing the Face Data
You can change the photograph and name in the already registered face data.
There are two methods of editing the face data, namely a method of using the existing JPEG image, and a method of using the image captured from camera images.
Edit the face data according to the procedure described below.
1. Perform the same operation as in steps 1 to 4 of “Registering the Face Data” to display the Face Recognition screen.
2. After selecting the face data to be registered by clicking its number part, click the Edit button at the top right of the screen.
3. If you perform the same operation as in steps 6 to 11 of “Registering the Face Data”, the face data changes.
Deleting the Face Data
Delete the registered face data according to the procedure described below.
1. Perform the same operation as in steps 1 to 4 of “Registering the Face Data” to display the Face Recognition screen.
2. After selecting the face data to be deleted by clicking its number part, click the Delete button at the top right of the screen.
3. A window for confirmation of data deletion appears. If you click the Yes button, the face data is deleted.
<Notes>
• If the selected face data is being used by some camera, the Delete button is disabled, and you will not be able to delete the face data. To delete face data, make sure it is not in use by any camera.
If a camera is using face data that is to be deleted, the name of the camera is displayed as "Used by Camera 01" or something similar, when you place the mouse cursor on the face data.
Sorting the Face Data

35
You can sort the display order of the registered face data.
The display order of the face data affects the priority order of detection when tracking is performed with the Auto Face Search set to ON (when the tracking target is detected from among all persons for whom the face data is registered). The smaller the ID, the higher the priority order of detection.
1. Perform the same operation as in steps 1 to 4 of “Registering the Face Data” to display the Face Recognition screen.
2. Click the photograph of the face from the face data you want to sort, and drag it.
3. If the dragged face data is dropped to the location of another face data, the face data moves to the dropped location.

36
Explanation of the Tracking Operation
Connecting to or Disconnecting from the Remote Camera When performing the tracking process, you must connect to the remote camera, and when ending the tracking process, you must disconnect from the remote camera.
• Connection procedure
1. On the View screen or Main screen, click the Connect button of the camera to be connected.
2. If the connection is established properly, the Connect button changes to the Disconnect button.
• Disconnection procedure
1. On the View screen or Main screen, click the Disconnect button of the camera to be disconnected.
37
Upper Limit of the Number of Cameras that can be Connected Up to one camera can be connected with this software.
If you want to connect to another camera, disconnect the connected camera and then perform the connection operation.
Starting the Tracking Process
• When tracking is started automatically
Tracking can be started by detecting the tracking target automatically.
The functions described below have been prepared as functions for automatic detection, and you can set whether or not to use each function.
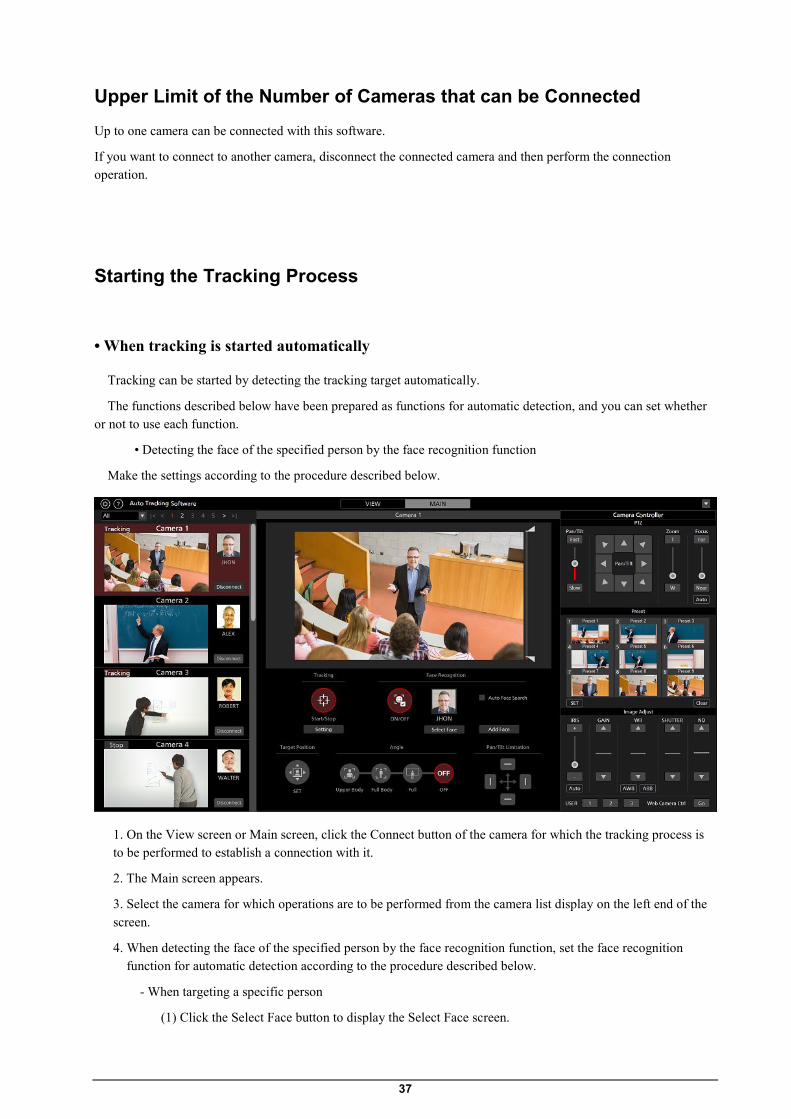
• Detecting the face of the specified person by the face recognition function
Make the settings according to the procedure described below.
1. On the View screen or Main screen, click the Connect button of the camera for which the tracking process is to be performed to establish a connection with it.
2. The Main screen appears.
3. Select the camera for which operations are to be performed from the camera list display on the left end of the screen.
4. When detecting the face of the specified person by the face recognition function, set the face recognition function for automatic detection according to the procedure described below.
- When targeting a specific person
(1) Click the Select Face button to display the Select Face screen.

38
(2) On the Select Face screen, select the face data of the person to be set as the tracking target, and then click the OK button to close the Select Face screen.
(3) Set the Face Recognition ON/OFF button to ON.
(4) The tracking process starts automatically when the face of the tracking target is detected in a camera image.
- When targeting all the people whose face data is registered
(1) Check [Auto Face Search] box.
(2) Set the Face Recognition ON/OFF button to ON.
(3) When any of the persons whose face data is registered in the camera video is detected, tracking processing is started.
5. If you set the Tracking Start/Stop button to ON, the Pan/Tilt operation of the remote camera is enabled, and the tracking operation starts.
<Notes>
• If in the Tracking Setting window displayed by the Setting button in the Tracking field, the check mark for Auto Tracking Start is ON, the Pan/Tilt operation of the remote camera is enabled at the same time when the tracking target is detected.
• The face data setting of the face recognition function is stored for each camera.
• When tracking is started manually
To start tracking by selecting the tracking target manually, follow the procedure described below.
1. On the View screen or Main screen, click the Connect button of the camera for which the tracking process is to be performed to establish a connection with it.
2. The Main screen appears.
3. Select the camera for which operations are to be performed from the camera list display on the left end of the screen.
4. If face data for face recognition has been selected, click the Select Face button to display the Select Face screen, and cancel the selection of the face data.
5. If you left-click the location to be tracked in a camera image, the tracking process starts by assuming the object at that location to be the tracking target.
6. If you set the Tracking Start/Stop button to ON, the Pan/Tilt operation of the remote camera is enabled, and the tracking operation starts.
<Notes>
• If the face of a person is detected at the location that was left-clicked in step 4, the corresponding face data is automatically set as the recognition source of face recognition. This face data is not stored. To cancel the specified face data, disconnect the camera once, and then re-connect it.
• When a person’s face is detected in a camera image and you double click the face, sets the face data as the recognition basis for face recognition. This face data is not stored. To cancel the set face data, select the Auto Face Search checkbox, and then deselect the Auto Face Search checkbox.
39
• If in the Tracking Setting window displayed by the Setting button in the Tracking field, the check mark for Auto Tracking Start is ON, the Pan/Tilt operation of the remote camera is enabled at the same time when the tracking target is detected.
Discontinuing the Tracking Process
To discontinue the tracking process, perform the operation described below:
1. If the Face Recognition ON/OFF button is in the ON state (red color), click the Face Recognition ON/OFF button to set it to the OFF state (gray color).
2. Set the Tracking Start/Stop button to the OFF state (gray).
3. The tracking process will be discontinued.
Changing the Tracking Target To change the tracking target during the tracking operation, perform the operation described below.
• When the face recognition function is used
1. Click the Select Face button to display the Select Face screen.
2. On the Select Face screen, select the face data of the person to be set as the new tracking target, and then click the OK button to close the Select Face screen.
3. Set the Face Recognition ON/OFF button to ON.
4. If the face of the person set as the new tracking target is detected in a camera image, the tracking process is started.
<Notes>
• When a person’s face is detected in a camera image and you double click the face, sets the face data as the recognition basis for face recognition. This face data is not stored. To cancel the set face data, select the Auto Face Search checkbox, and then deselect the Auto Face Search checkbox.
• When the face recognition function is not used
Left-click the camera image.
Processing is started with the object at the left-clicked location as the new tracking target.

40
Changing the Display Position of the Tracking Target The display position of the tracking target is displayed as a white cross on the Main screen.
In the initial state, the tracking target is displayed in the center of the camera image.
To change the display position of the tracking target, perform the operation described below.
1. The Main screen appears.
2. Select the camera for which operations are to be performed from the camera list display on the left end of the screen.
3. Set the Target Position Set button to the ON state (red color). The current display position is indicated by a cross.
4. Left-click the camera image to set the display position.
<Notes>
• You cannot set the display position at the outer periphery of the camera image.
Setting the Zoom Magnification during Tracking
You can set the zoom magnification during tracking according to the procedure described below:
1. The Main screen appears.
2. Select the camera for which operations are to be performed from the camera list display on the left end of the screen.
3. To manually set the Zoom magnification, make the settings with the Zoom position control slider/button of the camera controller.

41
4. To set to a predetermined Zoom magnification, click any of the Upper Body / Full Body / Full buttons under Angle. The Zoom magnification will change according to the selected item.
<Notes>
• If the Zoom magnification is changed significantly in a short period of time, the tracking target may be lost.
• If zooming is performed in the magnification direction in a state when the display position of the tracking target is other than the center of the screen, the tracking target may be lost.
• If any one of Upper Body / Full Body / Full is selected under Angle, the Zoom magnification will change automatically according to the selected item when the tracking target is detected. If you do not want to change the Zoom magnification, set the Angle to OFF.
Tracking Target Detection Mask Area Setting
You can set the mask area (the area that is not used during detection within the camera images) when detecting the tracking target.
Make the settings according to the procedure described below.
1. The Main screen appears.
2. Select the camera for which operations are to be performed from the camera list display on the left end of the screen.
3. Operate the knob of the slider on the right side of the camera image to set the mask area at the top and bottom of the screen. The setting is reflected immediately.
42
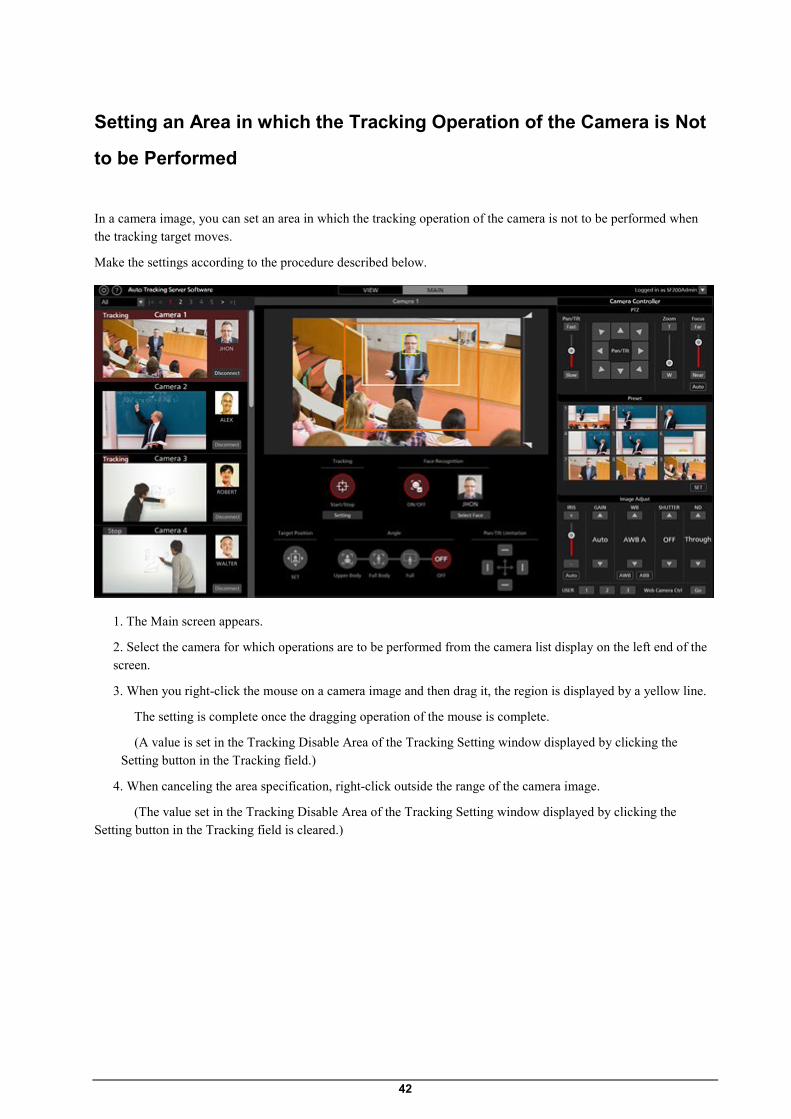
Setting an Area in which the Tracking Operation of the Camera is Not
to be Performed
In a camera image, you can set an area in which the tracking operation of the camera is not to be performed when the tracking target moves.
Make the settings according to the procedure described below.
1. The Main screen appears.
2. Select the camera for which operations are to be performed from the camera list display on the left end of the screen.
3. When you right-click the mouse on a camera image and then drag it, the region is displayed by a yellow line.
The setting is complete once the dragging operation of the mouse is complete.
(A value is set in the Tracking Disable Area of the Tracking Setting window displayed by clicking the Setting button in the Tracking field.)
4. When canceling the area specification, right-click outside the range of the camera image.
(The value set in the Tracking Disable Area of the Tracking Setting window displayed by clicking the Setting button in the Tracking field is cleared.)

43
Setting the Pan/Tilt Limitation of the Camera You can set the Pan/Tilt limitation of the remote camera.
1. The Main screen appears.
2. Select the camera for which operations are to be performed from the camera list display on the left end of the screen.
3. Set the limitation in each of the top, bottom, left, and right directions using the respective button of the Pan/Tilt Limitation item.
When the button is changed from the OFF (gray color) state to the ON (red color) state:
The position of the camera when it is turned ON is set as the limit of the working range of the camera in that direction.
When the button is changed from the ON (red color) state to the OFF (gray color) state:
The setting of the limitation in the direction in which the camera is turned OFF is canceled.
44
Tracking Operation in Crop Mode
About Crop Mode In Crop mode, you can perform tracking operation by using the Crop frame of the remote camera.
You can perform tracking operation by setting a different tracking target for each of the three Crop frames of yellow, green, and magenta.
45
Description of Screens
View Screen See “Tracking Operation in PTZ Mode”→”Description of Screens”→”View Screen” in this manual.
46
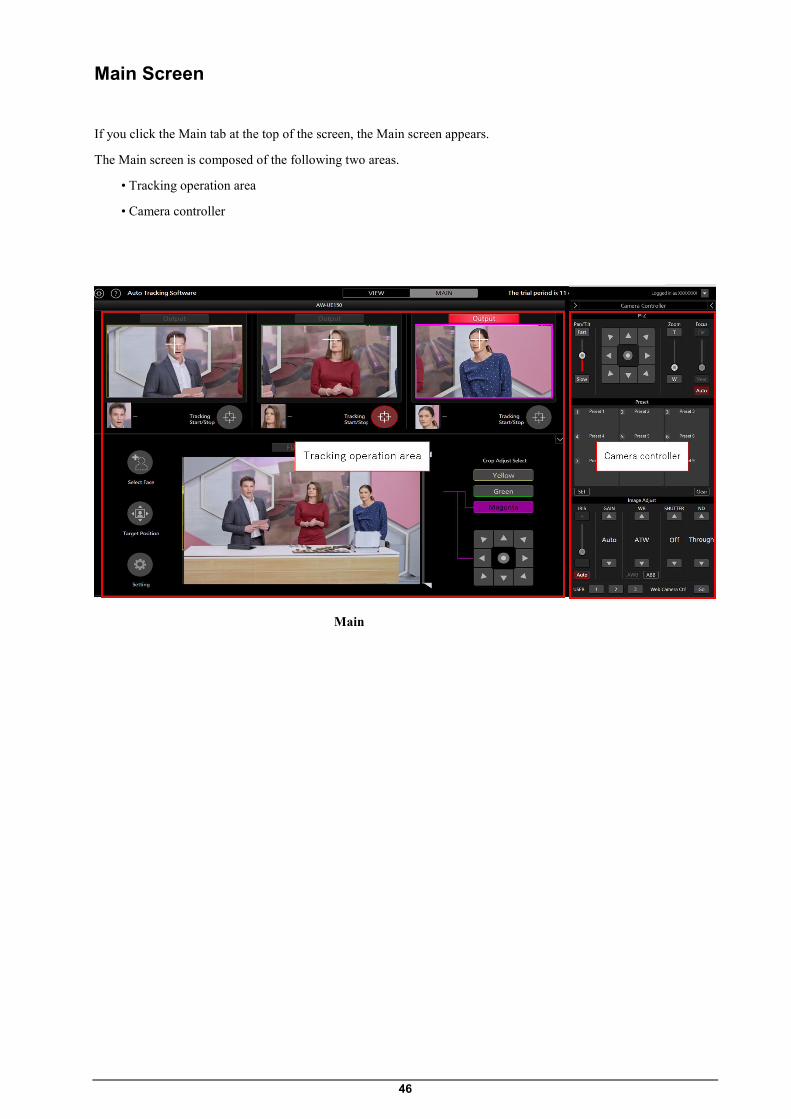
Main Screen
If you click the Main tab at the top of the screen, the Main screen appears.
The Main screen is composed of the following two areas.
• Tracking operation area
• Camera controller
Main

47
・Tracking operation area
The buttons for performing tracking operations can be found in this area.
①Camera name
Displays the registered name of the camera for which operations are to be performed.
②SDI output
Lights red when video is output from 3G-SDIOut.
By clicking the Output button, you can switch the SDI output of the camera.
③ Crop video
The cropped video is displayed.
④Face setting display
The face photograph and name of the person set as the recognition source for face recognition is displayed.
⑤Tracking Start/Stop button
Sets whether to perform Crop frame control of the remote camera or not when a tracking target exists.
ON (red color):
Performs Crop frame control for each color according to the movement of the tracking target.
OFF (gray color):
Crop frame control is not performed.
⑥Select Face button
Used to display the Select Face window.
In the Select Face window, you can select the face data to be used as the recognition source for face recognition.
48
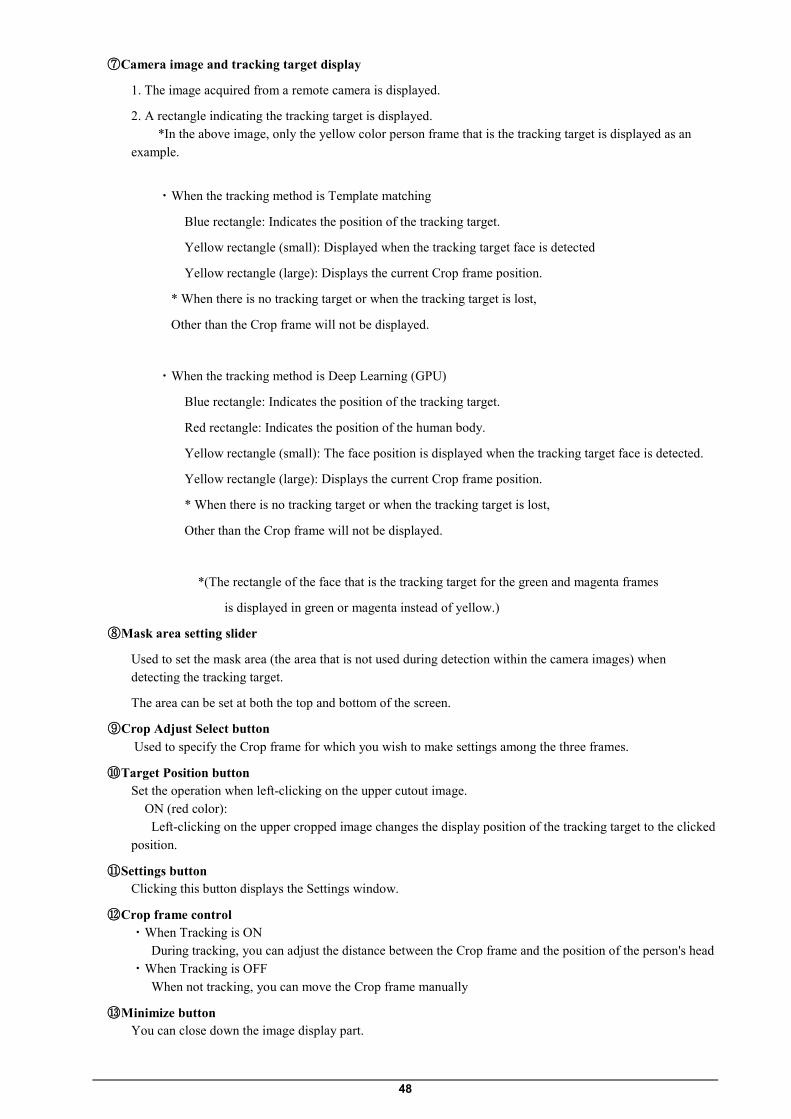
⑦Camera image and tracking target display
1. The image acquired from a remote camera is displayed.
2. A rectangle indicating the tracking target is displayed. *In the above image, only the yellow color person frame that is the tracking target is displayed as an example.
・When the tracking method is Template matching
Blue rectangle: Indicates the position of the tracking target.
Yellow rectangle (small): Displayed when the tracking target face is detected
Yellow rectangle (large): Displays the current Crop frame position.
* When there is no tracking target or when the tracking target is lost,
Other than the Crop frame will not be displayed.
・When the tracking method is Deep Learning (GPU)
Blue rectangle: Indicates the position of the tracking target.
Red rectangle: Indicates the position of the human body.
Yellow rectangle (small): The face position is displayed when the tracking target face is detected.
Yellow rectangle (large): Displays the current Crop frame position.
* When there is no tracking target or when the tracking target is lost,
Other than the Crop frame will not be displayed.
*(The rectangle of the face that is the tracking target for the green and magenta frames
is displayed in green or magenta instead of yellow.)
⑧Mask area setting slider
Used to set the mask area (the area that is not used during detection within the camera images) when detecting the tracking target.
The area can be set at both the top and bottom of the screen.
⑨Crop Adjust Select button Used to specify the Crop frame for which you wish to make settings among the three frames.
⑩ Target Position button Set the operation when left-clicking on the upper cutout image. ON (red color): Left-clicking on the upper cropped image changes the display position of the tracking target to the clicked position.
⑪ Settings button Clicking this button displays the Settings window.
⑫ Crop frame control ・When Tracking is ON During tracking, you can adjust the distance between the Crop frame and the position of the person's head ・When Tracking is OFF When not tracking, you can move the Crop frame manually
⑬ Minimize button You can close down the image display part.

49
⑭ Release fold down button You can display the image display part once again.
・Camera controller
The function is the same as that on the View screen.

50
・Settings window
Clicking the Settings button on the Main screen displays this window.
In this window, you can make settings related to image display and tracking.
① Crop Frame Display ON/OFF
Sets whether to display the Crop frame in the image display on the Main screen or not. When checked: Frame is displayed When not checked: Frame is not displayed
② Target Lost Action ON/OFF
Sets whether to return to Home Position or not when lost When checked: Return to Home Position when lost When not checked: No action
③ Trigger of lost state judgement
Sets the target for the lost judgment.
Body:
When no human body is detected, it is judged as lost.
Face:
When a face is not detected for a specified time, it is judged as lost even if a human body is detected.
④ Duration before judgement of lost state
Sets the time (in seconds) from when the face is no longer detected until it is determined to be lost when Face is selected in trigger of lost state judgment.
You can set a value in the range of 1 to 30

51
⑤ Duration before execution of home position
Sets the time (in seconds) from when the tracking target is lost until the Crop frame position returns to the home position. (1-30)
⑥ Home position button Sets the position where the Crop frame returns when the tracking target is lost. Clicking the button opens the settings window. ・Home Position window
①Home Position Setting Mode
When it is in the mode for setting Home Position, the display will be as above.
②OK button
Used to enable settings and close the window.
③Cancel button
Used to cancel settings and close the window.
④Crop Adjust Select button
Used to specify which Crop frame to control.
⑤Crop frame control
You can use the cross key to control the Crop frame, and move it to the position you want within the Home Position.
⑦ Sensitivity Level
作成者
原文に英文がある場合、単語間にスペースがないものがありますが、文書内画像や旧版から判断して、訳文では単語間にスペースを挿入しております。
52
Set the sensitivity of the Crop frame operation for the movement of the tracking target to a value between 1 and 10.
The greater the value, the higher the sensitivity.
⑧ OK Button
Enable the settings and close the window.
⑨ Cancel Button
Cancel the settings and close the window.
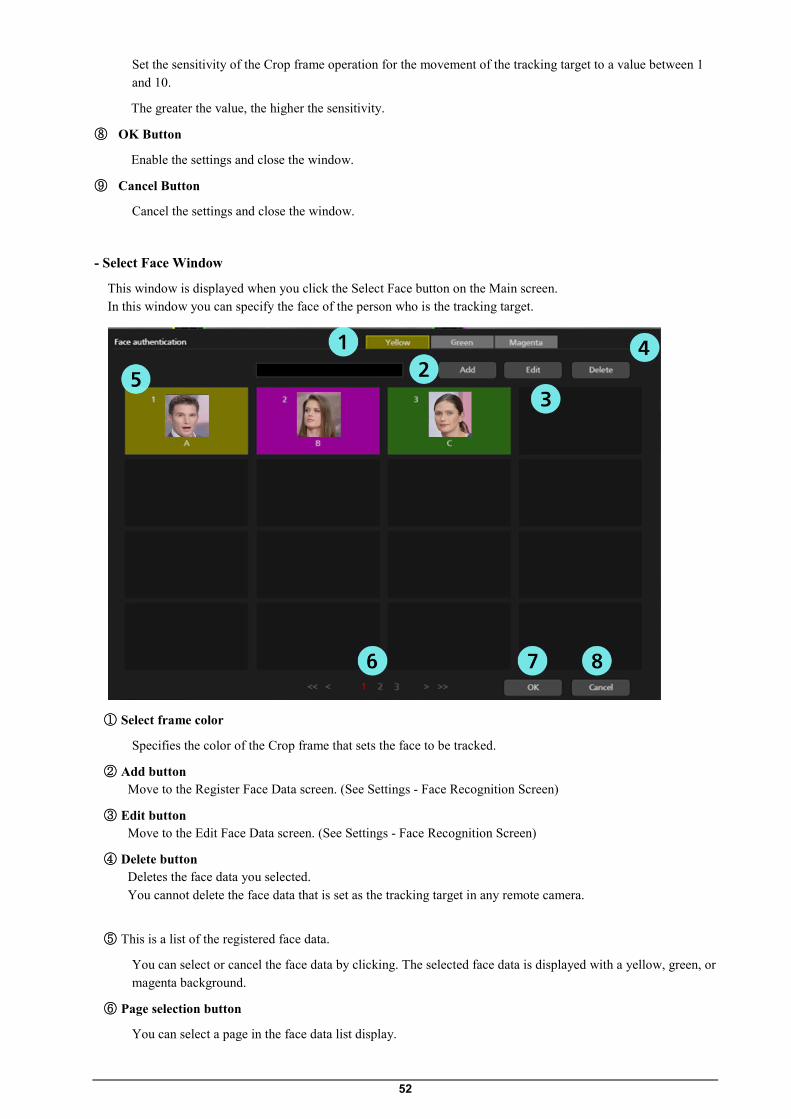
- Select Face Window
This window is displayed when you click the Select Face button on the Main screen. In this window you can specify the face of the person who is the tracking target.
① Select frame color
Specifies the color of the Crop frame that sets the face to be tracked.
② Add button Move to the Register Face Data screen. (See Settings - Face Recognition Screen)
③ Edit button Move to the Edit Face Data screen. (See Settings - Face Recognition Screen)
④ Delete button Deletes the face data you selected. You cannot delete the face data that is set as the tracking target in any remote camera.
⑤ This is a list of the registered face data.
You can select or cancel the face data by clicking. The selected face data is displayed with a yellow, green, or magenta background.
⑥ Page selection button
You can select a page in the face data list display.
53
⑦ OK button
Used to enable settings and close the window.
⑧ Cancel button Used to cancel settings and close the window.

54
Settings - Camera Screen See “Tracking Operation in PTZ Mode”→”Description of Screens”→“Settings” in this manual.
Settings - Face Recognition Screen See “Tracking Operation in PTZ Mode”→”Description of Screens”→“Settings” in this manual.
Settings - Tracking Screen See “Tracking Operation in PTZ Mode”→”Description of Screens”→“Settings” in this manual.

55
Default Settings
Remote Camera Settings Refer to “Tracking Operation in PTZ Mode”→“Default Settings”→“Remote Camera Settings” in this manual.
Remote Camera Installation Settings When starting this software for the first time, add a remote camera.
1. Click the Settings button at the top left of the screen.
2. Click the Camera tab on the Settings screen.
3. Make the settings of the camera.

56
Perform the registration task described below for each camera.
(1) Click the Add button to move to the camera registration screen.
(2) Enter the following items.
You can make an entry in the items either manually, or automatically by searching for the camera.
Name: Name of the camera
IP Address: IP address of the camera
Port No: Port number used by the camera (the default value is 80)
Login: Camera account
Password: Camera password

57
• When an entry is made manually
①Move to the box of each item and enter the value.
②Set the tracking operation mode to Crop mode.
Tracking Mode: Select Crop.
Crop Mode: Select the size of the Crop frame.
③Click the OK button to complete registration.
・•When an entry is made automatically
①Set the tracking operation mode to Crop mode.
Tracking Mode: Select Crop.
Crop Mode: Select the size of the Crop frame.
②Click the Auto Search buttonm
The list of cameras present on the network is displayed.
When you select any one camera from the list and then close the window by clicking the OK button,
values are entered automatically for some items.
③Click the OK button to complete registration.
*Height, Distance, Max Zoom Angle Zoom (Upper Body, Full Body, Full) items are not used in Crop mode.Therefore, you may leave the default values as it is.
Tracking Method Setting See “Tracking Operation in PTZ Mode”→”Default Settings”→“Tracking Method Setting” in this manual.

58
Data Settings for Face Recognition See “Tracking Operation in PTZ Mode”→”Data Settings for Face Recognition” in this manual.

59
Explanation of the Tracking Operation
Connecting to or Disconnecting from the Remote Camera When performing the tracking process, you must connect to the remote camera, and when ending the tracking process, you must disconnect from the remote camera.
• Connection procedure
1. On the View screen or Main screen, click the Connect button of the camera to be connected.
2. If the connection is established properly, the Connect button changes to the Disconnect button.
• Disconnection procedure
On the View screen or the Main screen, click the Disconnect button of the camera to be disconnected.
Maximum Number of Cameras that can be Connected Up to one camera can be connected with this software.
If you want to connect to another camera, disconnect the connected camera before connecting the other camera.
60
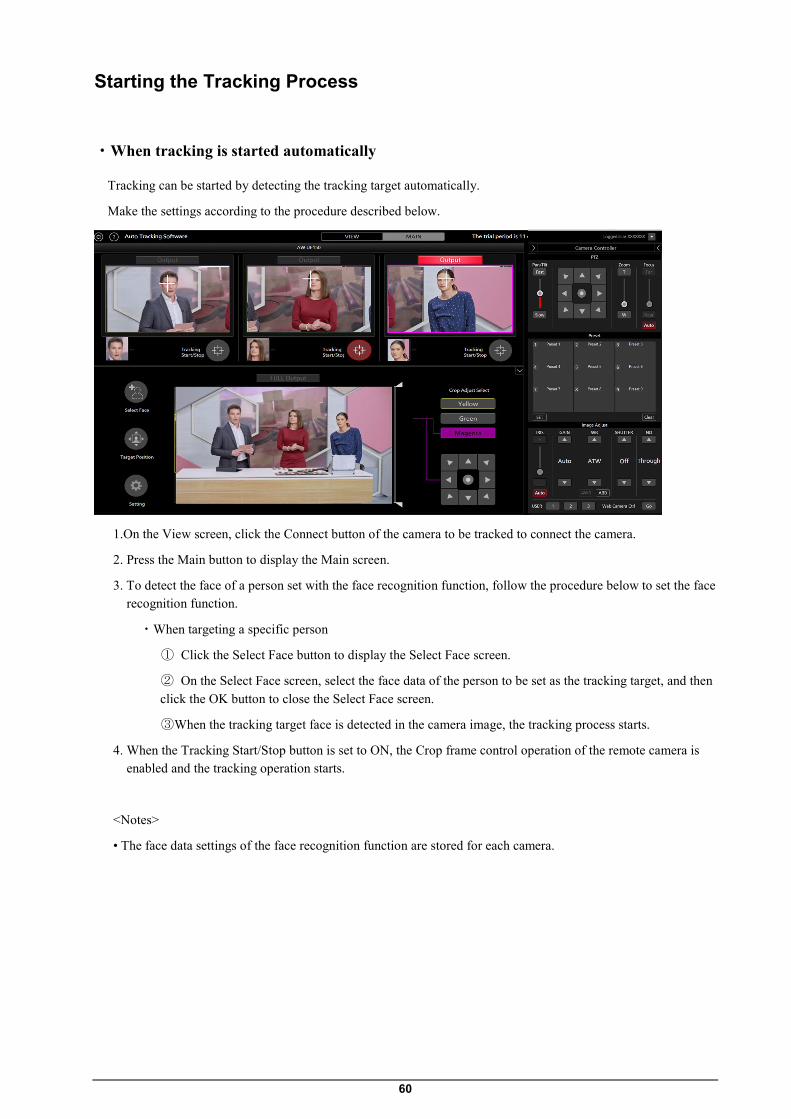
Starting the Tracking Process
・When tracking is started automatically
Tracking can be started by detecting the tracking target automatically.
Make the settings according to the procedure described below.
1.On the View screen, click the Connect button of the camera to be tracked to connect the camera.
2. Press the Main button to display the Main screen.
3. To detect the face of a person set with the face recognition function, follow the procedure below to set the face recognition function.
・When targeting a specific person
① Click the Select Face button to display the Select Face screen.
② On the Select Face screen, select the face data of the person to be set as the tracking target, and then click the OK button to close the Select Face screen.
③When the tracking target face is detected in the camera image, the tracking process starts.
4. When the Tracking Start/Stop button is set to ON, the Crop frame control operation of the remote camera is enabled and the tracking operation starts.
<Notes>
• The face data settings of the face recognition function are stored for each camera.

61
・When tracking is started manually
To start tracking by selecting the tracking target manually, follow the procedure described below.
1. On the View screen, click the Connect button of the camera to be tracked to connect the camera.
2. The Main screen appears.
3. If face data for face recognition has been selected, click the Select Face button to display the Select Face screen, and cancel the selection of the face data.
4. With Crop Adjust Select, select the color of the frame for which you want to set the tracking target.
5. If you left-click the location to be tracked in a camera image, the tracking process starts by assuming the object at that location to be the tracking target.
6. When the Tracking Start/Stop button is set to ON, the Crop frame control operation of the remote camera is enabled and the tracking operation starts.
<Notes>
・With Crop Adjust Select, select the color of the frame for which you want to set the tracking target. If a human face is detected in the camera image, double-clicking the face sets the face data as the recognition source for face recognition. This face data is not stored. To cancel the face data you have set, select another face on the Select Face screen, and then cancel the selection.

62
Discontinuing the Tracking Process
To discontinue the tracking process, perform the operation described below:
1. Set the Tracking Start/Stop button to the OFF state (gray).
2. The tracking process will be discontinued.
Changing the Tracking Target To change the tracking target during the tracking operation, perform the operation described below.
• When the face recognition function is used
1. Click the Select Face button to display the Select Face screen.
2. On the Select Face screen, select the face data of the person to be set as the new tracking target, and then click the OK button to close the Select Face screen.
3. If the face of the person set as the new tracking target is detected in a camera image, the tracking process is started.
<Notes>
If a human face is detected in the camera image, double-clicking the face sets the face data as the recognition source for face recognition. This face data is not stored. To cancel the face data you have set, select another face on the Select Face screen, and then cancel the selection.
・When the face recognition function is not used 1. With Crop Adjust Select, select the color of the frame you wish to use for the tracking target.
2. Left click on the camera image.
3. Processing starts with the object located at the place left clicked as the new tracking target.

63
Manual Control of Crop Frame
You can manually move the Crop frame by using Crop Adjust Select on the Main screen and the cross key below it.
Make the settings according to the procedure described below.
1. Use CropAdjustSelect to select the color you want to move.
2. Use the four-way controller to move the frame.
* Restrictions
Manual operations cannot be performed on frames for which Tracking is ON.
Tracking Target Detection Mask Area Setting
You can set the mask area (the area that is not used during detection within the camera images) when detecting the tracking target.
Make the settings according to the procedure described below.
d
1. The Main screen appears.
2. Use the slider on the right side of the camera image to set the mask area at the top and bottom of the screen. The setting is reflected immediately.

64
Setting an Area for no Camera Tracking
In a camera image, you can set an area for no camera tracking when the tracking target moves.
Make the settings according to the procedure described below.
1. The Main screen appears.
2. With Crop Adjust Select, select the color of the frame you want to use for the tracking target.
3. If you drag the mouse after right-clicking on the camera image, the area is displayed with a yellow dotted line when the yellow frame is selected (green when green is selected, magenta when magenta is selected).
The setting is complete once the dragging operation of the mouse is complete.
4. When canceling the area specification, right-click outside the range of the camera image.
65
Operations of the Camera Controller
About the Camera Controller The camera controller can be used to perform various operations of the remote camera.
The supported operations are as described below.
• PTZ operation
• Registering/calling the preset
• Adjusting the image
• Calling the Web screen
When using the camera controller, you must enable the operations by following the procedure described below.
1. Connect to the camera from the View screen or Main screen.
2. Select the camera for which operations are to be performed from the camera list display of the View screen or Main screen.
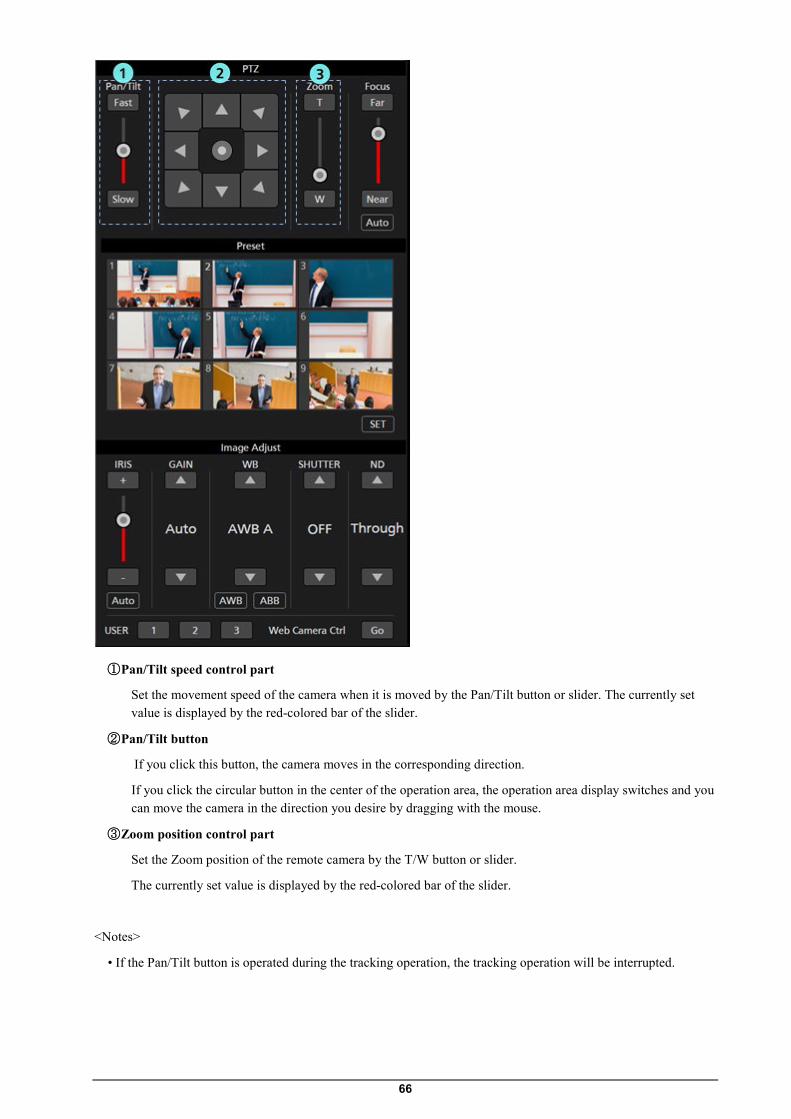
PTZ Operation of the Camera You can perform the Pan/Tilt and Zoom operations of the remote camera.
66
① Pan/Tilt speed control part
Set the movement speed of the camera when it is moved by the Pan/Tilt button or slider. The currently set value is displayed by the red-colored bar of the slider.
② Pan/Tilt button
If you click this button, the camera moves in the corresponding direction.
If you click the circular button in the center of the operation area, the operation area display switches and you can move the camera in the direction you desire by dragging with the mouse.
③ Zoom position control part
Set the Zoom position of the remote camera by the T/W button or slider.
The currently set value is displayed by the red-colored bar of the slider.
<Notes>
• If the Pan/Tilt button is operated during the tracking operation, the tracking operation will be interrupted.

67
Registering/Calling/Clearning the Camera Preset You can perform preset registration/calling/Clearning for the remote camera.
• Registering the preset
1. Move the camera to the position that you want to register using the Pan/Tilt button and Zoom position control slider/button.
2. Click the SET button at the bottom left of the Preset area to set the camera to the ON state (red color).
3. Click any one of the Preset 1 to Preset 9 buttons in the Preset area to register the current camera position in the preset. The thumbnail during registration is displayed on the button.
• Calling the preset
1. Click the SET button at the bottom left of the Preset area to set the camera to the OFF state (gray color).
2. Click any one of the Preset 1 to Preset 9 buttons in the Preset area to call the preset.

68
・Clearing the preset
1. Click the Clear button at the bottom right of the Preset area to set the camera to the ON state (red color).
2. Click any one of the Preset 1 to Preset 9 buttons in the Preset area to clear the preset.
<Notes>
• If the preset calling operation is performed during the tracking operation, the tracking operation will be interrupted.
Adjusting the Image of the Remote Camera You can adjust the images shot by the remote camera.
The items described below can be adjusted:
• Focus
• Iris
• Gain
• White balance
• Shutter
• ND Filter
69
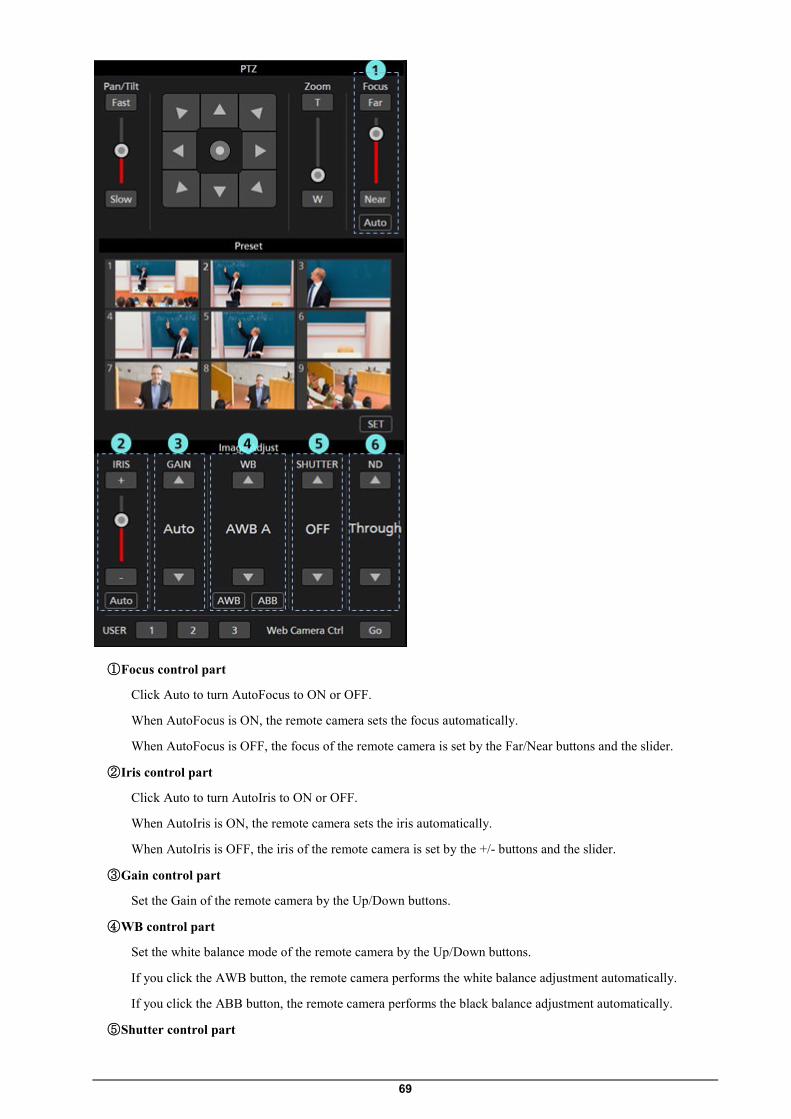
① Focus control part
Click Auto to turn AutoFocus to ON or OFF.
When AutoFocus is ON, the remote camera sets the focus automatically.
When AutoFocus is OFF, the focus of the remote camera is set by the Far/Near buttons and the slider.
② Iris control part
Click Auto to turn AutoIris to ON or OFF.
When AutoIris is ON, the remote camera sets the iris automatically.
When AutoIris is OFF, the iris of the remote camera is set by the +/- buttons and the slider.
③ Gain control part
Set the Gain of the remote camera by the Up/Down buttons.
④ WB control part
Set the white balance mode of the remote camera by the Up/Down buttons.
If you click the AWB button, the remote camera performs the white balance adjustment automatically.
If you click the ABB button, the remote camera performs the black balance adjustment automatically.
⑤ Shutter control part

70
Set the shutter of the remote camera by the Up/Down buttons.
⑥ ND Filter control part
Set the ND Filter of the remote camera by the Up/Down buttons.
<Notes>
• It may not be possible to adjust some items depending on the type of the remote camera and combination of the operation modes. For details, refer to the operation manual of each remote camera.
Calling the Web Screen of the Camera You can call the Web screen of the remote camera.
Click the Go button at the bottom right of the camera controller to open the Web management screen of the remote camera in another tab of the Web browser.

71
<Note>
Depending on your Web browser, symptoms such as disorder of part of the Web management screen of the remote camera may occur.

72
Activation
Procedure for starting trial use We offer a 90-day trial period for this software from the day of start of the trial during which it can be used free of cost. You can start the trial use of this software according to the procedure described below.
1. If you are using the standalone version of this software:
From the Windows menu, click [Start] [Programs]
[Panasonic Auto Tracking Software (Ver. 4)] [Activation].
If you are using the Web application version of this software:
From the Windows menu, click [Start] [Programs]
[Panasonic Auto Tracking Software (Web appli (Ver. 4))] [Activation].
2. When you start the activation program for the first time, a screen for registering user information appears. Enter the information in each item, and then click the Apply button.
3. The window of the activation program is displayed.

73
4. Select the Model No W0100 column, and then click the Trial button.
5. You can start using this software for the trial period.
<Notes>
• The remaining number of days of the trial period is displayed at the bottom left of the Camera Select screen.
Procedure of activation registration
After the end of the trial period, you will not be able to connect to the remote camera and use this software. To continue using this software, you must purchase the key code and perform activation registration according to the procedure described below.
1. Connect your PC to the Internet.
2. If you are using the standalone version of this software:
From the Windows menu, click [Start] [Programs] [Panasonic Auto Tracking Software]
[Activation].
If you are using the Web application version of this software:
From the Windows menu, click [Start] [Programs] [Panasonic Auto Tracking Software
(Web appli)] [Activation].
3. The window of the activation program is displayed.
74
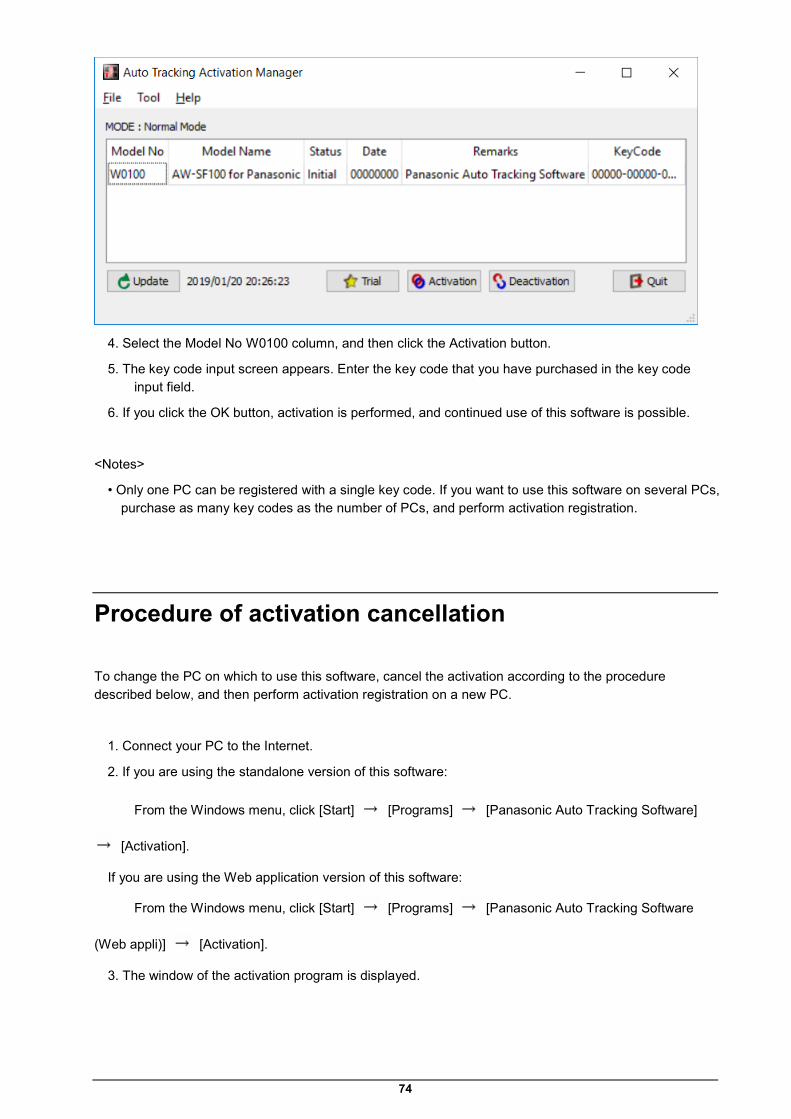
4. Select the Model No W0100 column, and then click the Activation button.
5. The key code input screen appears. Enter the key code that you have purchased in the key code input field.
6. If you click the OK button, activation is performed, and continued use of this software is possible.
<Notes>
• Only one PC can be registered with a single key code. If you want to use this software on several PCs, purchase as many key codes as the number of PCs, and perform activation registration.
Procedure of activation cancellation
To change the PC on which to use this software, cancel the activation according to the procedure described below, and then perform activation registration on a new PC.
1. Connect your PC to the Internet.
2. If you are using the standalone version of this software:
From the Windows menu, click [Start] [Programs] [Panasonic Auto Tracking Software]
[Activation].
If you are using the Web application version of this software:
From the Windows menu, click [Start] [Programs] [Panasonic Auto Tracking Software
(Web appli)] [Activation].
3. The window of the activation program is displayed.

75
4. Select the Model No W0100 column, and then click the Deactivation button.
5. Activation is canceled.
<Notes>
• Once you have canceled the activation, you cannot use this software on the PC on which you have canceled the activation until you perform activation registration again.
76
Appendix
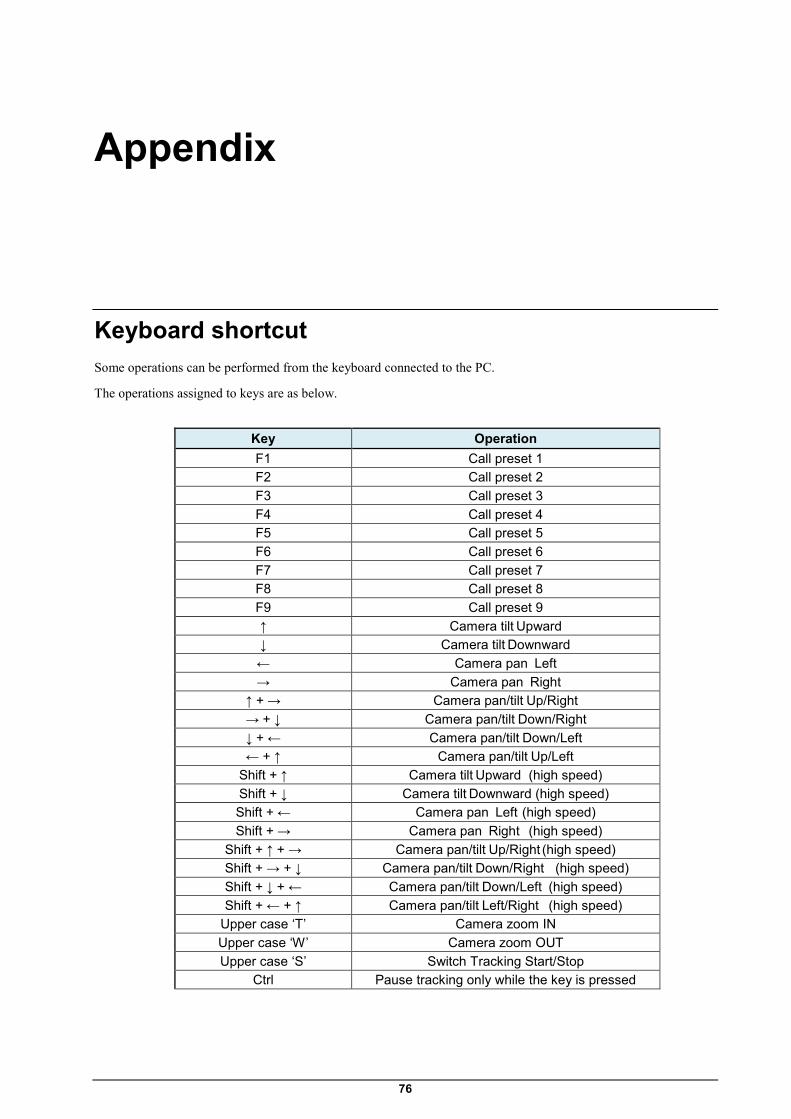
Keyboard shortcut Some operations can be performed from the keyboard connected to the PC.
The operations assigned to keys are as below.
Key Operation F1 Call preset 1 F2 Call preset 2 F3 Call preset 3 F4 Call preset 4 F5 Call preset 5 F6 Call preset 6 F7 Call preset 7 F8 Call preset 8 F9 Call preset 9 ↑ Camera tilt Upward ↓ Camera tilt Downward ← Camera pan Left → Camera pan Right
↑ + → Camera pan/tilt Up/Right → + ↓ Camera pan/tilt Down/Right ↓ + ← Camera pan/tilt Down/Left ← + ↑ Camera pan/tilt Up/Left
Shift + ↑ Camera tilt Upward (high speed) Shift + ↓ Camera tilt Downward (high speed) Shift + ← Camera pan Left (high speed) Shift + → Camera pan Right (high speed)
Shift + ↑ + → Camera pan/tilt Up/Right (high speed) Shift + → + ↓ Camera pan/tilt Down/Right (high speed) Shift + ↓ + ← Camera pan/tilt Down/Left (high speed) Shift + ← + ↑ Camera pan/tilt Left/Right (high speed)
Upper case ‘T’ Camera zoom IN Upper case ‘W’ Camera zoom OUT Upper case ‘S’ Switch Tracking Start/Stop
Ctrl Pause tracking only while the key is pressed
77
Troubleshooting This section shows the causes of the symptoms that occur during the execution of this software, and the actions to be taken:
Nothing is displayed on the Camera Select screen.
Cause 1:
• You are not using the latest version of the remote camera firmware.
Action 1:
• Download the latest version of the remote camera firmware from the Website provided below, and update the firmware.
http://pro-av.panasonic.net/en/
The Camera Status display does not change even after performing the connection process on the Camera Select screen.
Cause:
• The PC and remote camera are not connected properly.
Action:
• Make sure the PC and remote camera are properly connected via the network, and the correct remote camera IP address has been set on the Setting screen of this software.
Images are not displayed properly on the Camera View screen.
Cause:
• The settings of the remote camera have not been made properly.
Action:
• Carefully read "Setting the Remote Camera" in the Installation Procedures of this software, and set the remote camera accordingly.
The tracking target switches to another object during the tracking operation.
Cause 1:
• There is an object that is moving close to the original tracking target.
Action 1:
• If there is an object that is moving close to the tracking target (inside the white rectangle of Camera View), the tracking target may switch to that object. Make sure there is no moving object close to the object that is to be set as the tracking target.
Cause 2:

78
• A stationary object with strong straight-line edges exists in the background.
Action 2:
• If a stationary object (straight-line edges) enters inside the red frame during tracking, the tracking target may switch to that object.
The tracking target is lost during the tracking operation.
Cause:
• The tracking target is a stationary object.
Action:
• The tracking target may be lost if it is a stationary object. Left-click the camera image to make the settings of the tracking target again, or set Auto Detect ON/OFF to the ON state (red color), and make sure the object is set as the tracking target when it moves.
When auto detection is enabled, the hands and legs of a person are detected instead of his/her head.
Cause:
• The hands and legs are moving significantly.
Action:
• Set the face data of the person to be tracked, and then set the Face Recognition ON/OFF button to the ON state (red color). Since face recognition starts functioning and the face of the person can be detected, the tracking operation is likely to improve.
• During auto detection, this software prioritizes the detection of the moving part. Therefore, if the hands and legs are moving significantly, the hands and legs are detected. This can be resolved by setting the auto detection mask area, and setting only the upper body in the detection area.
When there are several persons in the camera image, an unintended person is set as the tracking target.
Cause:
• An object that is moving more than the object to be set as the target exists.
Action:
• Set the face data of the person to be tracked, and then set the Face Recognition ON/OFF button to the ON state (red color). Since face recognition starts functioning and the face of the person can be detected, the tracking operation is likely to improve.
• During auto detection, this software prioritizes the detection of the moving part. Therefore, the object that moves first is detected. This can be resolved by setting the auto detection mask area, and setting the area that need not be detected.

79
Uninstallation Procedure 1. From the Windows Control Panel, select [Programs and Features].
2. From the list of programs, select [Auto Tracking Software] and then click [Uninstall]. A confirmation window appears.
3. Click [Yes] on the confirmation window to uninstall the software.
<Notes>
• You can uninstall only the standalone version.
• Since you cannot uninstall the Web application version, if you want to stop the operation of this software, make the settings shown below from the service management screen of Windows.
1. Stop the two services, namely "Panasonic Auto Tracking Server" and "Panasonic Tracking Control".
2. Change the Startup Type of the "Panasonic Auto Tracking Server" and "Panasonic Tracking Control" services to "Manual".
Software Information Relating to This Product 1. This product includes software developed by the OpenSSL Project for use in the OpenSSL Toolkit (http://www.openssl.org/).
2. Software licensed in accordance with the Microsoft Public License is included in this software.
3. Software licensed in accordance with the OpenBSD License is included in this software.
4. Software licensed in accordance with the BSD License is included in this software.
Microsoft Public License (Ms-PL)
Published: October 12, 2006
This license governs use of the accompanying software. If you use the software, you accept this license. If you do not accept the license, do not use the software.
1. Definitions
The terms “reproduce,” “reproduction,” “derivative works,” and “distribution” have the same meaning here as under U.S. copyright law.
A “contribution” is the original software, or any additions or changes to the software.
80
A “contributor” is any person that distributes its contribution under this license.
“Licensed patents” are a contributor’s patent claims that read directly on its contribution.
2. Grant of Rights
(A) Copyright Grant- Subject to the terms of this license, including the license conditions and limitations in section 3, each contributor grants you a non-exclusive, worldwide, royalty-free copyright license to reproduce its contribution, prepare derivative works of its contribution, and distribute its contribution or any derivative works that you create.
(B) Patent Grant- Subject to the terms of this license, including the license conditions and limitations in section 3, each contributor grants you a non-exclusive, worldwide, royalty-free license under its licensed patents to make, have made, use, sell, offer for sale, import, and/or otherwise dispose of its contribution in the software or derivative works of the contribution in the software.
3. Conditions and Limitations
(A) No Trademark License- This license does not grant you rights to use any contributors’ name, logo, or trademarks.
(B) If you bring a patent claim against any contributor over patents that you claim are infringed by the software, your patent license from such contributor to the software ends automatically.
(C) If you distribute any portion of the software, you must retain all copyright, patent, trademark, and attribution notices that are present in the software.
(D) If you distribute any portion of the software in source code form, you may do so only under this license by including a complete copy of this license with your distribution. If you distribute any portion of the software in compiled or object code form, you may only do so under a license that complies with this license.
(E) The software is licensed “as-is.” You bear the risk of using it. The contributors give no express warranties, guarantees or conditions. You may have additional consumer rights under your local laws which this license cannot change. To the extent permitted under your local laws, the contributors exclude the implied warranties of merchantability, fitness for a particular purpose and non-infringement.
By downloading, copying, installing or using the software you agree to this license.
If you do not agree to this license, do not download, install,
copy or use the software.
License Agreement
For Open Source Computer Vision Library
(3-clause BSD License)

81
Redistribution and use in source and binary forms, with or without modification,
are permitted provided that the following conditions are met:
* Redistributions of source code must retain the above copyright notice,
this list of conditions and the following disclaimer.
* Redistributions in binary form must reproduce the above copyright notice,
this list of conditions and the following disclaimer in the documentation
and/or other materials provided with the distribution.
* Neither the names of the copyright holders nor the names of the contributors
may be used to endorse or promote products derived from this software
without specific prior written permission.
This software is provided by the copyright holders and contributors "as is" and
any express or implied warranties, including, but not limited to, the implied
warranties of merchantability and fitness for a particular purpose are disclaimed.
In no event shall copyright holders or contributors be liable for any direct,
indirect, incidental, special, exemplary, or consequential damages
(including, but not limited to, procurement of substitute goods or services;
loss of use, data, or profits; or business interruption) however caused
and on any theory of liability, whether in contract, strict liability,
or tort (including negligence or otherwise) arising in any way out of
the use of this software, even if advised of the possibility of such damage.
Boost Software License - Version 1.0 - August 17th, 2003
Permission is hereby granted, free of charge, to any person or organization
obtaining a copy of the software and accompanying documentation covered by
this license (the "Software") to use, reproduce, display, distribute,
execute, and transmit the Software, and to prepare derivative works of the
Software, and to permit third-parties to whom the Software is furnished to
do so, all subject to the following:
The copyright notices in the Software and this entire statement, including
the above license grant, this restriction and the following disclaimer,
must be included in all copies of the Software, in whole or in part, and

82
all derivative works of the Software, unless such copies or derivative
works are solely in the form of machine-executable object code generated by
a source language processor.
THE SOFTWARE IS PROVIDED "AS IS", WITHOUT WARRANTY OF ANY KIND, EXPRESS OR
IMPLIED, INCLUDING BUT NOT LIMITED TO THE WARRANTIES OF MERCHANTABILITY,
FITNESS FOR A PARTICULAR PURPOSE, TITLE AND NON-INFRINGEMENT. IN NO EVENT
SHALL THE COPYRIGHT HOLDERS OR ANYONE DISTRIBUTING THE SOFTWARE BE LIABLE
FOR ANY DAMAGES OR OTHER LIABILITY, WHETHER IN CONTRACT, TORT OR OTHERWISE,
ARISING FROM, OUT OF OR IN CONNECTION WITH THE SOFTWARE OR THE USE OR OTHER
DEALINGS IN THE SOFTWARE.
Copyright (c) 2006, Google Inc.
All rights reserved.
Redistribution and use in source and binary forms, with or without
modification, are permitted provided that the following conditions are
met:
* Redistributions of source code must retain the above copyright
notice, this list of conditions and the following disclaimer.
* Redistributions in binary form must reproduce the above
copyright notice, this list of conditions and the following disclaimer
in the documentation and/or other materials provided with the
distribution.
* Neither the name of Google Inc. nor the names of its
contributors may be used to endorse or promote products derived from
this software without specific prior written permission.
THIS SOFTWARE IS PROVIDED BY THE COPYRIGHT HOLDERS AND CONTRIBUTORS
"AS IS" AND ANY EXPRESS OR IMPLIED WARRANTIES, INCLUDING, BUT NOT
LIMITED TO, THE IMPLIED WARRANTIES OF MERCHANTABILITY AND FITNESS FOR
A PARTICULAR PURPOSE ARE DISCLAIMED. IN NO EVENT SHALL THE COPYRIGHT
OWNER OR CONTRIBUTORS BE LIABLE FOR ANY DIRECT, INDIRECT, INCIDENTAL,
SPECIAL, EXEMPLARY, OR CONSEQUENTIAL DAMAGES (INCLUDING, BUT NOT
LIMITED TO, PROCUREMENT OF SUBSTITUTE GOODS OR SERVICES; LOSS OF USE,
DATA, OR PROFITS; OR BUSINESS INTERRUPTION) HOWEVER CAUSED AND ON ANY
THEORY OF LIABILITY, WHETHER IN CONTRACT, STRICT LIABILITY, OR TORT

83
(INCLUDING NEGLIGENCE OR OTHERWISE) ARISING IN ANY WAY OUT OF THE USE
OF THIS SOFTWARE, EVEN IF ADVISED OF THE POSSIBILITY OF SUCH DAMAGE.
Copyright (c) 2008, Google Inc.
All rights reserved.
Redistribution and use in source and binary forms, with or without
modification, are permitted provided that the following conditions are
met:
* Redistributions of source code must retain the above copyright
notice, this list of conditions and the following disclaimer.
* Redistributions in binary form must reproduce the above
copyright notice, this list of conditions and the following disclaimer
in the documentation and/or other materials provided with the
distribution.
* Neither the name of Google Inc. nor the names of its
contributors may be used to endorse or promote products derived from
this software without specific prior written permission.
THIS SOFTWARE IS PROVIDED BY THE COPYRIGHT HOLDERS AND CONTRIBUTORS
"AS IS" AND ANY EXPRESS OR IMPLIED WARRANTIES, INCLUDING, BUT NOT
LIMITED TO, THE IMPLIED WARRANTIES OF MERCHANTABILITY AND FITNESS FOR
A PARTICULAR PURPOSE ARE DISCLAIMED. IN NO EVENT SHALL THE COPYRIGHT
OWNER OR CONTRIBUTORS BE LIABLE FOR ANY DIRECT, INDIRECT, INCIDENTAL,
SPECIAL, EXEMPLARY, OR CONSEQUENTIAL DAMAGES (INCLUDING, BUT NOT
LIMITED TO, PROCUREMENT OF SUBSTITUTE GOODS OR SERVICES; LOSS OF USE,
DATA, OR PROFITS; OR BUSINESS INTERRUPTION) HOWEVER CAUSED AND ON ANY
THEORY OF LIABILITY, WHETHER IN CONTRACT, STRICT LIABILITY, OR TORT
(INCLUDING NEGLIGENCE OR OTHERWISE) ARISING IN ANY WAY OUT OF THE USE
OF THIS SOFTWARE, EVEN IF ADVISED OF THE POSSIBILITY OF SUCH DAMAGE.
A function gettimeofday in utilities.cc is based on
http://www.google.com/codesearch/p?hl=en#dR3YEbitojA/COPYING&q=GetSystemTimeAsFileTime%20license:bsd
84
The license of this code is:
Copyright (c) 2003-2008, Jouni Malinen <[email protected]> and contributors
All Rights Reserved.
Redistribution and use in source and binary forms, with or without
modification, are permitted provided that the following conditions are
met:
1. Redistributions of source code must retain the above copyright
notice, this list of conditions and the following disclaimer.
2. Redistributions in binary form must reproduce the above copyright
notice, this list of conditions and the following disclaimer in the
documentation and/or other materials provided with the distribution.
3. Neither the name(s) of the above-listed copyright holder(s) nor the
names of its contributors may be used to endorse or promote products
derived from this software without specific prior written permission.
THIS SOFTWARE IS PROVIDED BY THE COPYRIGHT HOLDERS AND CONTRIBUTORS
"AS IS" AND ANY EXPRESS OR IMPLIED WARRANTIES, INCLUDING, BUT NOT
LIMITED TO, THE IMPLIED WARRANTIES OF MERCHANTABILITY AND FITNESS FOR
A PARTICULAR PURPOSE ARE DISCLAIMED. IN NO EVENT SHALL THE COPYRIGHT
OWNER OR CONTRIBUTORS BE LIABLE FOR ANY DIRECT, INDIRECT, INCIDENTAL,
SPECIAL, EXEMPLARY, OR CONSEQUENTIAL DAMAGES (INCLUDING, BUT NOT
LIMITED TO, PROCUREMENT OF SUBSTITUTE GOODS OR SERVICES; LOSS OF USE,
DATA, OR PROFITS; OR BUSINESS INTERRUPTION) HOWEVER CAUSED AND ON ANY
THEORY OF LIABILITY, WHETHER IN CONTRACT, STRICT LIABILITY, OR TORT
(INCLUDING NEGLIGENCE OR OTHERWISE) ARISING IN ANY WAY OUT OF THE USE
OF THIS SOFTWARE, EVEN IF ADVISED OF THE POSSIBILITY OF SUCH DAMAGE.
Copyright Notice and License Terms for
HDF5 (Hierarchical Data Format 5) Software Library and Utilities
-----------------------------------------------------------------------------
HDF5 (Hierarchical Data Format 5) Software Library and Utilities
Copyright 2006-2013 by The HDF Group.

85
NCSA HDF5 (Hierarchical Data Format 5) Software Library and Utilities
Copyright 1998-2006 by the Board of Trustees of the University of Illinois.
All rights reserved.
Redistribution and use in source and binary forms, with or without
modification, are permitted for any purpose (including commercial purposes)
provided that the following conditions are met:
1. Redistributions of source code must retain the above copyright notice,
this list of conditions, and the following disclaimer.
2. Redistributions in binary form must reproduce the above copyright notice,
this list of conditions, and the following disclaimer in the documentation
and/or materials provided with the distribution.
3. In addition, redistributions of modified forms of the source or binary
code must carry prominent notices stating that the original code was
changed and the date of the change.
4. All publications or advertising materials mentioning features or use of
this software are asked, but not required, to acknowledge that it was
developed by The HDF Group and by the National Center for Supercomputing
Applications at the University of Illinois at Urbana-Champaign and
credit the contributors.
5. Neither the name of The HDF Group, the name of the University, nor the
name of any Contributor may be used to endorse or promote products derived
from this software without specific prior written permission from
The HDF Group, the University, or the Contributor, respectively.
DISCLAIMER:
THIS SOFTWARE IS PROVIDED BY THE HDF GROUP AND THE CONTRIBUTORS
"AS IS" WITH NO WARRANTY OF ANY KIND, EITHER EXPRESSED OR IMPLIED. In no
event shall The HDF Group or the Contributors be liable for any damages
suffered by the users arising out of the use of this software, even if
advised of the possibility of such damage.
86
-----------------------------------------------------------------------------
-----------------------------------------------------------------------------
Contributors: National Center for Supercomputing Applications (NCSA) at
the University of Illinois, Fortner Software, Unidata Program Center (netCDF),
The Independent JPEG Group (JPEG), Jean-loup Gailly and Mark Adler (gzip),
and Digital Equipment Corporation (DEC).
-----------------------------------------------------------------------------
Portions of HDF5 were developed with support from the Lawrence Berkeley
National Laboratory (LBNL) and the United States Department of Energy
under Prime Contract No. DE-AC02-05CH11231.
-----------------------------------------------------------------------------
Portions of HDF5 were developed with support from the University of
California, Lawrence Livermore National Laboratory (UC LLNL).
The following statement applies to those portions of the product and must
be retained in any redistribution of source code, binaries, documentation,
and/or accompanying materials:
This work was partially produced at the University of California,
Lawrence Livermore National Laboratory (UC LLNL) under contract
no. W-7405-ENG-48 (Contract 48) between the U.S. Department of Energy
(DOE) and The Regents of the University of California (University)
for the operation of UC LLNL.
DISCLAIMER:
This work was prepared as an account of work sponsored by an agency of
the United States Government. Neither the United States Government nor
the University of California nor any of their employees, makes any
warranty, express or implied, or assumes any liability or responsibility
for the accuracy, completeness, or usefulness of any information,
apparatus, product, or process disclosed, or represents that its use
would not infringe privately- owned rights. Reference herein to any
specific commercial products, process, or service by trade name,

87
trademark, manufacturer, or otherwise, does not necessarily constitute
or imply its endorsement, recommendation, or favoring by the United
States Government or the University of California. The views and
opinions of authors expressed herein do not necessarily state or reflect
those of the United States Government or the University of California,
and shall not be used for advertising or product endorsement purposes.
Copyright (c) 2011 The LevelDB Authors. All rights reserved.
Redistribution and use in source and binary forms, with or without
modification, are permitted provided that the following conditions are
met:
* Redistributions of source code must retain the above copyright
notice, this list of conditions and the following disclaimer.
* Redistributions in binary form must reproduce the above
copyright notice, this list of conditions and the following disclaimer
in the documentation and/or other materials provided with the
distribution.
* Neither the name of Google Inc. nor the names of its
contributors may be used to endorse or promote products derived from
this software without specific prior written permission.
THIS SOFTWARE IS PROVIDED BY THE COPYRIGHT HOLDERS AND CONTRIBUTORS
"AS IS" AND ANY EXPRESS OR IMPLIED WARRANTIES, INCLUDING, BUT NOT
LIMITED TO, THE IMPLIED WARRANTIES OF MERCHANTABILITY AND FITNESS FOR
A PARTICULAR PURPOSE ARE DISCLAIMED. IN NO EVENT SHALL THE COPYRIGHT
OWNER OR CONTRIBUTORS BE LIABLE FOR ANY DIRECT, INDIRECT, INCIDENTAL,
SPECIAL, EXEMPLARY, OR CONSEQUENTIAL DAMAGES (INCLUDING, BUT NOT
LIMITED TO, PROCUREMENT OF SUBSTITUTE GOODS OR SERVICES; LOSS OF USE,
DATA, OR PROFITS; OR BUSINESS INTERRUPTION) HOWEVER CAUSED AND ON ANY
THEORY OF LIABILITY, WHETHER IN CONTRACT, STRICT LIABILITY, OR TORT
(INCLUDING NEGLIGENCE OR OTHERWISE) ARISING IN ANY WAY OUT OF THE USE
OF THIS SOFTWARE, EVEN IF ADVISED OF THE POSSIBILITY OF SUCH DAMAGE.
The OpenLDAP Public License
Version 2.8, 17 August 2003

88
Redistribution and use of this software and associated documentation
("Software"), with or without modification, are permitted provided
that the following conditions are met:
1. Redistributions in source form must retain copyright statements
and notices,
2. Redistributions in binary form must reproduce applicable copyright
statements and notices, this list of conditions, and the following
disclaimer in the documentation and/or other materials provided
with the distribution, and
3. Redistributions must contain a verbatim copy of this document.
The OpenLDAP Foundation may revise this license from time to time.
Each revision is distinguished by a version number. You may use
this Software under terms of this license revision or under the
terms of any subsequent revision of the license.
THIS SOFTWARE IS PROVIDED BY THE OPENLDAP FOUNDATION AND ITS
CONTRIBUTORS ``AS IS'' AND ANY EXPRESSED OR IMPLIED WARRANTIES,
INCLUDING, BUT NOT LIMITED TO, THE IMPLIED WARRANTIES OF MERCHANTABILITY
AND FITNESS FOR A PARTICULAR PURPOSE ARE DISCLAIMED. IN NO EVENT
SHALL THE OPENLDAP FOUNDATION, ITS CONTRIBUTORS, OR THE AUTHOR(S)
OR OWNER(S) OF THE SOFTWARE BE LIABLE FOR ANY DIRECT, INDIRECT,
INCIDENTAL, SPECIAL, EXEMPLARY, OR CONSEQUENTIAL DAMAGES (INCLUDING,
BUT NOT LIMITED TO, PROCUREMENT OF SUBSTITUTE GOODS OR SERVICES;
LOSS OF USE, DATA, OR PROFITS; OR BUSINESS INTERRUPTION) HOWEVER
CAUSED AND ON ANY THEORY OF LIABILITY, WHETHER IN CONTRACT, STRICT
LIABILITY, OR TORT (INCLUDING NEGLIGENCE OR OTHERWISE) ARISING IN
ANY WAY OUT OF THE USE OF THIS SOFTWARE, EVEN IF ADVISED OF THE
POSSIBILITY OF SUCH DAMAGE.
The names of the authors and copyright holders must not be used in
advertising or otherwise to promote the sale, use or other dealing
in this Software without specific, written prior permission. Title
to copyright in this Software shall at all times remain with copyright
holders.

89
OpenLDAP is a registered trademark of the OpenLDAP Foundation.
Copyright 1999-2003 The OpenLDAP Foundation, Redwood City,
California, USA. All Rights Reserved. Permission to copy and
distribute verbatim copies of this document is granted.
Copyright (c) 2011-2014, The OpenBLAS Project
All rights reserved.
Redistribution and use in source and binary forms, with or without
modification, are permitted provided that the following conditions are
met:
1. Redistributions of source code must retain the above copyright
notice, this list of conditions and the following disclaimer.
2. Redistributions in binary form must reproduce the above copyright
notice, this list of conditions and the following disclaimer in
the documentation and/or other materials provided with the
distribution.
3. Neither the name of the OpenBLAS project nor the names of
its contributors may be used to endorse or promote products
derived from this software without specific prior written
permission.
THIS SOFTWARE IS PROVIDED BY THE COPYRIGHT HOLDERS AND CONTRIBUTORS "AS IS"
AND ANY EXPRESS OR IMPLIED WARRANTIES, INCLUDING, BUT NOT LIMITED TO, THE
IMPLIED WARRANTIES OF MERCHANTABILITY AND FITNESS FOR A PARTICULAR PURPOSE
ARE DISCLAIMED. IN NO EVENT SHALL THE COPYRIGHT OWNER OR CONTRIBUTORS BE
LIABLE FOR ANY DIRECT, INDIRECT, INCIDENTAL, SPECIAL, EXEMPLARY, OR CONSEQUENTIAL
DAMAGES (INCLUDING, BUT NOT LIMITED TO, PROCUREMENT OF SUBSTITUTE GOODS OR
SERVICES; LOSS OF USE, DATA, OR PROFITS; OR BUSINESS INTERRUPTION) HOWEVER
CAUSED AND ON ANY THEORY OF LIABILITY, WHETHER IN CONTRACT, STRICT LIABILITY,
OR TORT (INCLUDING NEGLIGENCE OR OTHERWISE) ARISING IN ANY WAY OUT OF THE
USE OF THIS SOFTWARE, EVEN IF ADVISED OF THE POSSIBILITY OF SUCH DAMAGE.
This license applies to all parts of Protocol Buffers except the following:

90
- Atomicops support for generic gcc, located in
src/google/protobuf/stubs/atomicops_internals_generic_gcc.h.
This file is copyrighted by Red Hat Inc.
- Atomicops support for AIX/POWER, located in
src/google/protobuf/stubs/atomicops_internals_power.h.
This file is copyrighted by Bloomberg Finance LP.
Copyright 2014, Google Inc. All rights reserved.
Redistribution and use in source and binary forms, with or without
modification, are permitted provided that the following conditions are
met:
* Redistributions of source code must retain the above copyright
notice, this list of conditions and the following disclaimer.
* Redistributions in binary form must reproduce the above
copyright notice, this list of conditions and the following disclaimer
in the documentation and/or other materials provided with the
distribution.
* Neither the name of Google Inc. nor the names of its
contributors may be used to endorse or promote products derived from
this software without specific prior written permission.
THIS SOFTWARE IS PROVIDED BY THE COPYRIGHT HOLDERS AND CONTRIBUTORS
"AS IS" AND ANY EXPRESS OR IMPLIED WARRANTIES, INCLUDING, BUT NOT
LIMITED TO, THE IMPLIED WARRANTIES OF MERCHANTABILITY AND FITNESS FOR
A PARTICULAR PURPOSE ARE DISCLAIMED. IN NO EVENT SHALL THE COPYRIGHT
OWNER OR CONTRIBUTORS BE LIABLE FOR ANY DIRECT, INDIRECT, INCIDENTAL,
SPECIAL, EXEMPLARY, OR CONSEQUENTIAL DAMAGES (INCLUDING, BUT NOT
LIMITED TO, PROCUREMENT OF SUBSTITUTE GOODS OR SERVICES; LOSS OF USE,
DATA, OR PROFITS; OR BUSINESS INTERRUPTION) HOWEVER CAUSED AND ON ANY
THEORY OF LIABILITY, WHETHER IN CONTRACT, STRICT LIABILITY, OR TORT
(INCLUDING NEGLIGENCE OR OTHERWISE) ARISING IN ANY WAY OUT OF THE USE
OF THIS SOFTWARE, EVEN IF ADVISED OF THE POSSIBILITY OF SUCH DAMAGE.
Code generated by the Protocol Buffer compiler is owned by the owner

91
of the input file used when generating it. This code is not
standalone and requires a support library to be linked with it. This
support library is itself covered by the above license.
Faster R-CNN
The MIT License (MIT)
Copyright (c) 2015 Microsoft Corporation
Permission is hereby granted, free of charge, to any person obtaining a copy
of this software and associated documentation files (the "Software"), to deal
in the Software without restriction, including without limitation the rights
to use, copy, modify, merge, publish, distribute, sublicense, and/or sell
copies of the Software, and to permit persons to whom the Software is
furnished to do so, subject to the following conditions:
The above copyright notice and this permission notice shall be included in
all copies or substantial portions of the Software.
THE SOFTWARE IS PROVIDED "AS IS", WITHOUT WARRANTY OF ANY KIND, EXPRESS OR
IMPLIED, INCLUDING BUT NOT LIMITED TO THE WARRANTIES OF MERCHANTABILITY,
FITNESS FOR A PARTICULAR PURPOSE AND NONINFRINGEMENT. IN NO EVENT SHALL THE
AUTHORS OR COPYRIGHT HOLDERS BE LIABLE FOR ANY CLAIM, DAMAGES OR OTHER
LIABILITY, WHETHER IN AN ACTION OF CONTRACT, TORT OR OTHERWISE, ARISING FROM,
OUT OF OR IN CONNECTION WITH THE SOFTWARE OR THE USE OR OTHER DEALINGS IN
THE SOFTWARE.
************************************************************************
THIRD-PARTY SOFTWARE NOTICES AND INFORMATION
This project, Faster R-CNN, incorporates material from the project(s)
listed below (collectively, "Third Party Code"). Microsoft is not the
original author of the Third Party Code. The original copyright notice
and license under which Microsoft received such Third Party Code are set
out below. This Third Party Code is licensed to you under their original
license terms set forth below. Microsoft reserves all other rights not

92
expressly granted, whether by implication, estoppel or otherwise.
1. Caffe, (https://github.com/BVLC/caffe/)
COPYRIGHT
All contributions by the University of California:
Copyright (c) 2014, 2015, The Regents of the University of California (Regents)
All rights reserved.
All other contributions:
Copyright (c) 2014, 2015, the respective contributors
All rights reserved.
Caffe uses a shared copyright model: each contributor holds copyright
over their contributions to Caffe. The project versioning records all
such contribution and copyright details. If a contributor wants to
further mark their specific copyright on a particular contribution,
they should indicate their copyright solely in the commit message of
the change when it is committed.
The BSD 2-Clause License
Redistribution and use in source and binary forms, with or without
modification, are permitted provided that the following conditions
are met:
1. Redistributions of source code must retain the above copyright notice,
this list of conditions and the following disclaimer.
2. Redistributions in binary form must reproduce the above copyright
notice, this list of conditions and the following disclaimer in the
documentation and/or other materials provided with the distribution.
THIS SOFTWARE IS PROVIDED BY THE COPYRIGHT HOLDERS AND CONTRIBUTORS
"AS IS" AND ANY EXPRESS OR IMPLIED WARRANTIES, INCLUDING, BUT NOT
LIMITED TO, THE IMPLIED WARRANTIES OF MERCHANTABILITY AND FITNESS FOR
A PARTICULAR PURPOSE ARE DISCLAIMED. IN NO EVENT SHALL THE COPYRIGHT

93
HOLDER OR CONTRIBUTORS BE LIABLE FOR ANY DIRECT, INDIRECT, INCIDENTAL,
SPECIAL, EXEMPLARY, OR CONSEQUENTIAL DAMAGES (INCLUDING, BUT NOT LIMITED
TO, PROCUREMENT OF SUBSTITUTE GOODS OR SERVICES; LOSS OF USE, DATA, OR
PROFITS; OR BUSINESS INTERRUPTION) HOWEVER CAUSED AND ON ANY THEORY OF
LIABILITY, WHETHER IN CONTRACT, STRICT LIABILITY, OR TORT (INCLUDING
NEGLIGENCE OR OTHERWISE) ARISING IN ANY WAY OUT OF THE USE OF THIS
SOFTWARE, EVEN IF ADVISED OF THE POSSIBILITY OF SUCH DAMAGE.
************END OF THIRD-PARTY SOFTWARE NOTICES AND INFORMATION**********
PSF LICENSE AGREEMENT FOR PYTHON 2.7.13
1. This LICENSE AGREEMENT is between the Python Software Foundation ("PSF"), and
the Individual or Organization ("Licensee") accessing and otherwise using Python
2.7.13 software in source or binary form and its associated documentation.
2. Subject to the terms and conditions of this License Agreement, PSF hereby
grants Licensee a nonexclusive, royalty-free, world-wide license to reproduce,
analyze, test, perform and/or display publicly, prepare derivative works,
distribute, and otherwise use Python 2.7.13 alone or in any derivative
version, provided, however, that PSF's License Agreement and PSF's notice of
copyright, i.e., "Copyright ゥ 2001-2016 Python Software Foundation; All Rights
Reserved" are retained in Python 2.7.13 alone or in any derivative version
prepared by Licensee.
3. In the event Licensee prepares a derivative work that is based on or
incorporates Python 2.7.13 or any part thereof, and wants to make the
derivative work available to others as provided herein, then Licensee hereby
agrees to include in any such work a brief summary of the changes made to Python
2.7.13.
4. PSF is making Python 2.7.13 available to Licensee on an "AS IS" basis.
PSF MAKES NO REPRESENTATIONS OR WARRANTIES, EXPRESS OR IMPLIED. BY WAY OF
EXAMPLE, BUT NOT LIMITATION, PSF MAKES NO AND DISCLAIMS ANY REPRESENTATION OR
WARRANTY OF MERCHANTABILITY OR FITNESS FOR ANY PARTICULAR PURPOSE OR THAT THE
USE OF PYTHON 2.7.13 WILL NOT INFRINGE ANY THIRD PARTY RIGHTS.
5. PSF SHALL NOT BE LIABLE TO LICENSEE OR ANY OTHER USERS OF PYTHON 2.7.13

94
FOR ANY INCIDENTAL, SPECIAL, OR CONSEQUENTIAL DAMAGES OR LOSS AS A RESULT OF
MODIFYING, DISTRIBUTING, OR OTHERWISE USING PYTHON 2.7.13, OR ANY DERIVATIVE
THEREOF, EVEN IF ADVISED OF THE POSSIBILITY THEREOF.
6. This License Agreement will automatically terminate upon a material breach of
its terms and conditions.
7. Nothing in this License Agreement shall be deemed to create any relationship
of agency, partnership, or joint venture between PSF and Licensee. This License
Agreement does not grant permission to use PSF trademarks or trade name in a
trademark sense to endorse or promote products or services of Licensee, or any
third party.
8. By copying, installing or otherwise using Python 2.7.13, Licensee agrees
to be bound by the terms and conditions of this License Agreement.
BEOPEN.COM LICENSE AGREEMENT FOR PYTHON 2.0
BEOPEN PYTHON OPEN SOURCE LICENSE AGREEMENT VERSION 1
1. This LICENSE AGREEMENT is between BeOpen.com ("BeOpen"), having an office at
160 Saratoga Avenue, Santa Clara, CA 95051, and the Individual or Organization
("Licensee") accessing and otherwise using this software in source or binary
form and its associated documentation ("the Software").
2. Subject to the terms and conditions of this BeOpen Python License Agreement,
BeOpen hereby grants Licensee a non-exclusive, royalty-free, world-wide license
to reproduce, analyze, test, perform and/or display publicly, prepare derivative
works, distribute, and otherwise use the Software alone or in any derivative
version, provided, however, that the BeOpen Python License is retained in the
Software, alone or in any derivative version prepared by Licensee.
3. BeOpen is making the Software available to Licensee on an "AS IS" basis.
BEOPEN MAKES NO REPRESENTATIONS OR WARRANTIES, EXPRESS OR IMPLIED. BY WAY OF
EXAMPLE, BUT NOT LIMITATION, BEOPEN MAKES NO AND DISCLAIMS ANY REPRESENTATION OR
WARRANTY OF MERCHANTABILITY OR FITNESS FOR ANY PARTICULAR PURPOSE OR THAT THE
USE OF THE SOFTWARE WILL NOT INFRINGE ANY THIRD PARTY RIGHTS.

95
4. BEOPEN SHALL NOT BE LIABLE TO LICENSEE OR ANY OTHER USERS OF THE SOFTWARE FOR
ANY INCIDENTAL, SPECIAL, OR CONSEQUENTIAL DAMAGES OR LOSS AS A RESULT OF USING,
MODIFYING OR DISTRIBUTING THE SOFTWARE, OR ANY DERIVATIVE THEREOF, EVEN IF
ADVISED OF THE POSSIBILITY THEREOF.
5. This License Agreement will automatically terminate upon a material breach of
its terms and conditions.
6. This License Agreement shall be governed by and interpreted in all respects
by the law of the State of California, excluding conflict of law provisions.
Nothing in this License Agreement shall be deemed to create any relationship of
agency, partnership, or joint venture between BeOpen and Licensee. This License
Agreement does not grant permission to use BeOpen trademarks or trade names in a
trademark sense to endorse or promote products or services of Licensee, or any
third party. As an exception, the "BeOpen Python" logos available at
http://www.pythonlabs.com/logos.html may be used according to the permissions
granted on that web page.
7. By copying, installing or otherwise using the software, Licensee agrees to be
bound by the terms and conditions of this License Agreement.
CNRI LICENSE AGREEMENT FOR PYTHON 1.6.1
1. This LICENSE AGREEMENT is between the Corporation for National Research
Initiatives, having an office at 1895 Preston White Drive, Reston, VA 20191
("CNRI"), and the Individual or Organization ("Licensee") accessing and
otherwise using Python 1.6.1 software in source or binary form and its
associated documentation.
2. Subject to the terms and conditions of this License Agreement, CNRI hereby
grants Licensee a nonexclusive, royalty-free, world-wide license to reproduce,
analyze, test, perform and/or display publicly, prepare derivative works,
distribute, and otherwise use Python 1.6.1 alone or in any derivative version,
provided, however, that CNRI's License Agreement and CNRI's notice of copyright,
i.e., "Copyright ゥ 1995-2001 Corporation for National Research Initiatives; All
Rights Reserved" are retained in Python 1.6.1 alone or in any derivative version
prepared by Licensee. Alternately, in lieu of CNRI's License Agreement,
Licensee may substitute the following text (omitting the quotes): "Python 1.6.1
is made available subject to the terms and conditions in CNRI's License

96
Agreement. This Agreement together with Python 1.6.1 may be located on the
Internet using the following unique, persistent identifier (known as a handle):
1895.22/1013. This Agreement may also be obtained from a proxy server on the
Internet using the following URL: http://hdl.handle.net/1895.22/1013."
3. In the event Licensee prepares a derivative work that is based on or
incorporates Python 1.6.1 or any part thereof, and wants to make the derivative
work available to others as provided herein, then Licensee hereby agrees to
include in any such work a brief summary of the changes made to Python 1.6.1.
4. CNRI is making Python 1.6.1 available to Licensee on an "AS IS" basis. CNRI
MAKES NO REPRESENTATIONS OR WARRANTIES, EXPRESS OR IMPLIED. BY WAY OF EXAMPLE,
BUT NOT LIMITATION, CNRI MAKES NO AND DISCLAIMS ANY REPRESENTATION OR WARRANTY
OF MERCHANTABILITY OR FITNESS FOR ANY PARTICULAR PURPOSE OR THAT THE USE OF
PYTHON 1.6.1 WILL NOT INFRINGE ANY THIRD PARTY RIGHTS.
5. CNRI SHALL NOT BE LIABLE TO LICENSEE OR ANY OTHER USERS OF PYTHON 1.6.1 FOR
ANY INCIDENTAL, SPECIAL, OR CONSEQUENTIAL DAMAGES OR LOSS AS A RESULT OF
MODIFYING, DISTRIBUTING, OR OTHERWISE USING PYTHON 1.6.1, OR ANY DERIVATIVE
THEREOF, EVEN IF ADVISED OF THE POSSIBILITY THEREOF.
6. This License Agreement will automatically terminate upon a material breach of
its terms and conditions.
7. This License Agreement shall be governed by the federal intellectual property
law of the United States, including without limitation the federal copyright
law, and, to the extent such U.S. federal law does not apply, by the law of the
Commonwealth of Virginia, excluding Virginia's conflict of law provisions.
Notwithstanding the foregoing, with regard to derivative works based on Python
1.6.1 that incorporate non-separable material that was previously distributed
under the GNU General Public License (GPL), the law of the Commonwealth of
Virginia shall govern this License Agreement only as to issues arising under or
with respect to Paragraphs 4, 5, and 7 of this License Agreement. Nothing in
this License Agreement shall be deemed to create any relationship of agency,
partnership, or joint venture between CNRI and Licensee. This License Agreement
does not grant permission to use CNRI trademarks or trade name in a trademark
sense to endorse or promote products or services of Licensee, or any third
97
party.
8. By clicking on the "ACCEPT" button where indicated, or by copying, installing
or otherwise using Python 1.6.1, Licensee agrees to be bound by the terms and
conditions of this License Agreement.
CWI LICENSE AGREEMENT FOR PYTHON 0.9.0 THROUGH 1.2
Copyright ゥ 1991 - 1995, Stichting Mathematisch Centrum Amsterdam, The
Netherlands. All rights reserved.
Permission to use, copy, modify, and distribute this software and its
documentation for any purpose and without fee is hereby granted, provided that
the above copyright notice appear in all copies and that both that copyright
notice and this permission notice appear in supporting documentation, and that
the name of Stichting Mathematisch Centrum or CWI not be used in advertising or
publicity pertaining to distribution of the software without specific, written
prior permission.
STICHTING MATHEMATISCH CENTRUM DISCLAIMS ALL WARRANTIES WITH REGARD TO THIS
SOFTWARE, INCLUDING ALL IMPLIED WARRANTIES OF MERCHANTABILITY AND FITNESS, IN NO
EVENT SHALL STICHTING MATHEMATISCH CENTRUM BE LIABLE FOR ANY SPECIAL, INDIRECT
OR CONSEQUENTIAL DAMAGES OR ANY DAMAGES WHATSOEVER RESULTING FROM LOSS OF USE,
DATA OR PROFITS, WHETHER IN AN ACTION OF CONTRACT, NEGLIGENCE OR OTHER TORTIOUS
ACTION, ARISING OUT OF OR IN CONNECTION WITH THE USE OR PERFORMANCE OF THIS
SOFTWARE.
Copyright 2011, Google Inc.
All rights reserved.
Redistribution and use in source and binary forms, with or without
modification, are permitted provided that the following conditions are
met:
* Redistributions of source code must retain the above copyright
notice, this list of conditions and the following disclaimer.
* Redistributions in binary form must reproduce the above
copyright notice, this list of conditions and the following disclaimer

98
in the documentation and/or other materials provided with the
distribution.
* Neither the name of Google Inc. nor the names of its
contributors may be used to endorse or promote products derived from
this software without specific prior written permission.
THIS SOFTWARE IS PROVIDED BY THE COPYRIGHT HOLDERS AND CONTRIBUTORS
"AS IS" AND ANY EXPRESS OR IMPLIED WARRANTIES, INCLUDING, BUT NOT
LIMITED TO, THE IMPLIED WARRANTIES OF MERCHANTABILITY AND FITNESS FOR
A PARTICULAR PURPOSE ARE DISCLAIMED. IN NO EVENT SHALL THE COPYRIGHT
OWNER OR CONTRIBUTORS BE LIABLE FOR ANY DIRECT, INDIRECT, INCIDENTAL,
SPECIAL, EXEMPLARY, OR CONSEQUENTIAL DAMAGES (INCLUDING, BUT NOT
LIMITED TO, PROCUREMENT OF SUBSTITUTE GOODS OR SERVICES; LOSS OF USE,
DATA, OR PROFITS; OR BUSINESS INTERRUPTION) HOWEVER CAUSED AND ON ANY
THEORY OF LIABILITY, WHETHER IN CONTRACT, STRICT LIABILITY, OR TORT
(INCLUDING NEGLIGENCE OR OTHERWISE) ARISING IN ANY WAY OUT OF THE USE
OF THIS SOFTWARE, EVEN IF ADVISED OF THE POSSIBILITY OF SUCH DAMAGE.
SZIP Copyright and License Notice
The SZIP Science Data Lossless Compression Program is Copyright (C) 2001
Science & Technology Corporation @ UNM. All rights released.
Copyright (C) 2003-2005 Lowell H. Miles and Jack A. Venbrux.
Licensed to ICs, LLC, for distribution by the University of Illinois'
National Center for Supercomputing Applications as a part of the
HDF data storage and retrieval file format and software library
products package. All rights reserved. Do not modify or use for other
purposes.
SZIP implements an extended Rice adaptive lossless compression algorithm
for sample data. The primary algorithm was developed by R. F. Rice at
Jet Propulsion Laboratory.
SZIP embodies certain inventions patented by the National Aeronautics &
Space Administration. United States Patent Nos. 5,448,642, 5,687,255,
and 5,822,457 have been licensed to ICs, LLC, for distribution with the
99
HDF data storage and retrieval file format and software library products.
All rights reserved.
Revocable (in the event of breach by the user or if required by law),
royalty-free, nonexclusive sublicense to use SZIP decompression software
routines and underlying patents is hereby granted by ICs, LLC, to all users
of and in conjunction with HDF data storage and retrieval file format and
software library products.
Revocable (in the event of breach by the user or if required by law),
royalty-free, nonexclusive sublicense to use SZIP compression software
routines and underlying patents for non-commercial, scientific use only
is hereby granted by ICs, LLC, to users of and in conjunction with HDF
data storage and retrieval file format and software library products.
For commercial use license to SZIP compression software routines and
underlying patents, please contact ICs, LLC, at
Address: ICs, LLC, 2040 Warren Wagon Road, P.O. Box 2236
McCall, ID 83638
Phone: (208) 315-2877. Fax: (208) 634-7720.
Email: [email protected]