Authentication Types - · PDF fileauthentication types, ... th e root device sends an...
26
Americas Headquarters: Cisco Systems, Inc., 170 West Tasman Drive, San Jose, CA 95134-1706 USA © 2008 Cisco Systems, Inc. All rights reserved. Authentication Types This document describes how to configure authentication types. It contains the following sections: • Understanding Authentication Types, page 1 • Configuring Certificates Using the crypto pki CLI, page 7 • Configuring Authentication Types, page 15 • Matching Authentication Types on Root Devices and Non-Root Bridges, page 25 Understanding Authentication Types This section describes the authentication types that you can configure on the WMIC. The authentication types are tied to the service set identifier (SSID) that you configure on the WMIC. Before wireless devices can communicate, they must authenticate to each other using open, 802.1x/Extensible Authentication Protocol (EAP)-based or shared key authentication. Among these authentication types, for maximum security, wireless devices should authenticate using EAP authentication, which relies on an authentication server on the network. The supplicant and the back-end RADIUS authenticate each other using the certificates for each other that are obtained from the same CA server. The WMIC uses four authentication mechanisms or types and can use more than one at the same time: • Open Authentication to the WMIC, page 2 • Shared Key Authentication to the WMIC, page 2 • EAP Authentication to the Network, page 3 • MAC Address Authentication to the Network, page 6
Transcript of Authentication Types - · PDF fileauthentication types, ... th e root device sends an...

Authentication Types
This document describes how to configure authentication types. It contains the following sections:
• Understanding Authentication Types, page 1
• Configuring Certificates Using the crypto pki CLI, page 7
• Configuring Authentication Types, page 15
• Matching Authentication Types on Root Devices and Non-Root Bridges, page 25
Understanding Authentication TypesThis section describes the authentication types that you can configure on the WMIC. The authentication types are tied to the service set identifier (SSID) that you configure on the WMIC.
Before wireless devices can communicate, they must authenticate to each other using open, 802.1x/Extensible Authentication Protocol (EAP)-based or shared key authentication. Among these authentication types, for maximum security, wireless devices should authenticate using EAP authentication, which relies on an authentication server on the network. The supplicant and the back-end RADIUS authenticate each other using the certificates for each other that are obtained from the same CA server.
The WMIC uses four authentication mechanisms or types and can use more than one at the same time:
• Open Authentication to the WMIC, page 2
• Shared Key Authentication to the WMIC, page 2
• EAP Authentication to the Network, page 3
• MAC Address Authentication to the Network, page 6
Americas Headquarters:Cisco Systems, Inc., 170 West Tasman Drive, San Jose, CA 95134-1706 USA
© 2008 Cisco Systems, Inc. All rights reserved.

Authentication Types Understanding Authentication Types
Open Authentication to the WMICOpen authentication allows any wireless device to authenticate and then attempt to communicate with another wireless device. Open authentication does not rely on a RADIUS server on your network.
Figure 0-1 shows the authentication sequence between a non-root bridge and a root device using open authentication. In this example, the non-root bridge’s WEP key does not match the bridge’s key, so it can authenticate but it cannot pass data.
Figure 0-1 Sequence for Open Authentication
Shared Key Authentication to the WMICCisco provides shared key authentication to comply with the IEEE 802.11b and IEEE 802.11g standards. However, because of shared key’s security flaws, we recommend that you use another method of authentication, such as EAP, in environments in which security is an issue.
During shared key authentication, the root device sends an unencrypted challenge text string to the client device that is attempting to communicate with the root device. The client device that is requesting authentication encrypts the challenge text and then sends it back to the root device.
Both the unencrypted challenge and the encrypted challenge can be monitored, however, which leaves the root device open to attack from an intruder who can calculate the WEP key by comparing the unencrypted and encrypted text strings.
Figure 0-2 shows the authentication sequence between a device trying to authenticate and a bridge using shared key authentication. In this example the device’s WEP key matches the bridge’s key, so it can both authenticate and communicate.
8890
2
Switch onLAN 1
1. Authentication request
Switch onLAN 2
Non-Root Bridgewith
WEP key = 321
Root Bridgewith
WEP key = 123
2. Authentication response
2Cisco 3200 Series Wireless MIC Software Configuration Guide

Authentication Types Understanding Authentication Types
Figure 0-2 Sequence for Shared Key Authentication
EAP Authentication to the NetworkEAP authentication to the network provides the highest level of security for a wireless network. By using the Extensible Authentication Protocol (EAP) to interact with an EAP-compatible RADIUS server, the root device helps the authenticating device and the RADIUS server perform mutual authentication and derive a dynamic session key, which the root device and the authenticating device use to further derive the unicast key. The root generates the broadcast key and sends it to the authenticating device after encrypting it with unicast key. The unicast key is used to exchange unicast data between the root device and authenticated device, and the broadcast key is used to exchange multicast and broadcast data between them.
When you enable EAP on your bridges, authentication to the network occurs in the sequence shown in Figure 0-3.
8890
3
Switch onLAN 1
1. Authentication request
Switch onLAN 2
Non-Root Bridgewith
WEP key = 123
Root Bridgewith
WEP key = 123
2. Unencrypted challenge
3. Encrypted challenge response
4. Authentication response
3Cisco 3200 Series Wireless MIC Software Configuration Guide

Authentication Types Understanding Authentication Types
Figure 0-3 Sequence for EAP Authentication
In Figure 0-3, a non-root bridge and a RADIUS server on a wired LAN use 802.1x and EAP to perform a mutual authentication through the root device. The RADIUS server sends an authentication challenge to the non-root bridge. The non-root bridge uses a one-way encryption of the user-supplied password to generate a response to the challenge and sends that response to the RADIUS server. Using information from its user database, the RADIUS server creates its own response and compares that to the response from the non-root bridge. When the RADIUS server authenticates the non-root bridge, the process repeats in reverse, and the non-root bridge authenticates the RADIUS server.
When mutual authentication is complete, the RADIUS server and the non-root bridge determine a session key that is unique to this session between the RADIUS server and the non-root bridge and that provides the non-root bridge with an appropriate level of network access. The RADIUS server encrypts and sends the session key over the wired LAN to the root device. The root device and the non-root bridge derive the unicast key from this session key. The root generates the broadcast key and sends it to the non-root bridge after encrypting it with the unicast key. The non-root bridge uses the unicast key to decrypt it. The non-root bridge and the root device activate WEP and use the unicast and broadcast WEP keys for all communications during the remainder of the session.
There is more than one type of EAP authentication, but the bridge behaves the same way for each type. It relays authentication messages from the wireless client device to the RADIUS server and from the RADIUS server to the wireless client device. See the “Assigning Authentication Types to an SSID” section on page 16 for instructions on setting up EAP on the WMIC.
Note If you use EAP authentication, you can select open or share-key authentication, but you do not have to. EAP authentication controls authentication both to your bridge and to your network.
8890
1
Switch onLAN 1
1. Authentication request
Authenticationserver
Non-RootBridge
Root Bridge
2. Identity request
3. Username
(Relay to non-root bridge)
5. Authentication response
(Relay to non-root bridge)
7. Authentication challenge
(Relay to non-root bridge)
9. Authentication success
(Relay to server)
4. Authentication challenge
(Relay to server)
6. Authentication success
(Relay to server)
8. Authentication response
(Relay to server)
4Cisco 3200 Series Wireless MIC Software Configuration Guide
Authentication Types Understanding Authentication Types
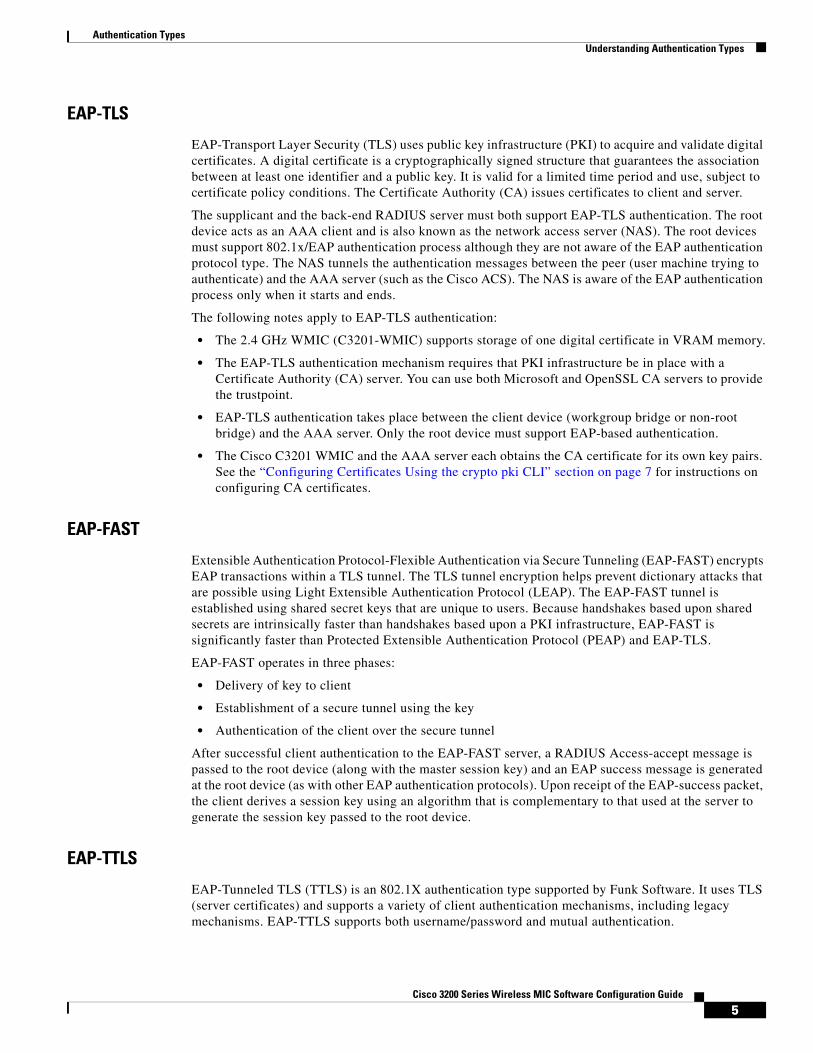
EAP-TLS
EAP-Transport Layer Security (TLS) uses public key infrastructure (PKI) to acquire and validate digital certificates. A digital certificate is a cryptographically signed structure that guarantees the association between at least one identifier and a public key. It is valid for a limited time period and use, subject to certificate policy conditions. The Certificate Authority (CA) issues certificates to client and server.
The supplicant and the back-end RADIUS server must both support EAP-TLS authentication. The root device acts as an AAA client and is also known as the network access server (NAS). The root devices must support 802.1x/EAP authentication process although they are not aware of the EAP authentication protocol type. The NAS tunnels the authentication messages between the peer (user machine trying to authenticate) and the AAA server (such as the Cisco ACS). The NAS is aware of the EAP authentication process only when it starts and ends.
The following notes apply to EAP-TLS authentication:
• The 2.4 GHz WMIC (C3201-WMIC) supports storage of one digital certificate in VRAM memory.
• The EAP-TLS authentication mechanism requires that PKI infrastructure be in place with a Certificate Authority (CA) server. You can use both Microsoft and OpenSSL CA servers to provide the trustpoint.
• EAP-TLS authentication takes place between the client device (workgroup bridge or non-root bridge) and the AAA server. Only the root device must support EAP-based authentication.
• The Cisco C3201 WMIC and the AAA server each obtains the CA certificate for its own key pairs. See the “Configuring Certificates Using the crypto pki CLI” section on page 7 for instructions on configuring CA certificates.
EAP-FAST
Extensible Authentication Protocol-Flexible Authentication via Secure Tunneling (EAP-FAST) encrypts EAP transactions within a TLS tunnel. The TLS tunnel encryption helps prevent dictionary attacks that are possible using Light Extensible Authentication Protocol (LEAP). The EAP-FAST tunnel is established using shared secret keys that are unique to users. Because handshakes based upon shared secrets are intrinsically faster than handshakes based upon a PKI infrastructure, EAP-FAST is significantly faster than Protected Extensible Authentication Protocol (PEAP) and EAP-TLS.
EAP-FAST operates in three phases:
• Delivery of key to client
• Establishment of a secure tunnel using the key
• Authentication of the client over the secure tunnel
After successful client authentication to the EAP-FAST server, a RADIUS Access-accept message is passed to the root device (along with the master session key) and an EAP success message is generated at the root device (as with other EAP authentication protocols). Upon receipt of the EAP-success packet, the client derives a session key using an algorithm that is complementary to that used at the server to generate the session key passed to the root device.
EAP-TTLS
EAP-Tunneled TLS (TTLS) is an 802.1X authentication type supported by Funk Software. It uses TLS (server certificates) and supports a variety of client authentication mechanisms, including legacy mechanisms. EAP-TTLS supports both username/password and mutual authentication.
5Cisco 3200 Series Wireless MIC Software Configuration Guide

Authentication Types Understanding Authentication Types
MAC Address Authentication to the NetworkThe access point relays the wireless client device’s MAC address to a RADIUS server on the network, and the server checks the address against a list of allowed MAC addresses. Because intruders can create counterfeit MAC addresses, MAC-based authentication is less secure than EAP authentication. However, MAC-based authentication does provide an alternate authentication method for client devices that do not have EAP capability.
Tip If you do not have a RADIUS server on your network, you can create a list of allowed MAC addresses on the access point’s Advanced Security: MAC Address Authentication page. Devices with MAC addresses not on the list are not allowed to authenticate.
Tip If MAC-authenticated clients on your wireless LAN roam frequently, you can enable a MAC authentication cache on your access points. MAC authentication caching reduces overhead because the access point authenticates devices in its MAC-address cache without sending the request to your authentication server. See the “Configuring MAC Authentication Caching” section on page 11-15 for instructions on enabling this feature.
Using CCKM Key ManagementUsing Cisco Centralized Key Management (CCKM), EAP-authenticated client devices can roam from one root device to another without any perceptible delay during reassociation. A root device or switch on the network provides Wireless Domain Services (WDS) and creates a cache of security credentials for CCKM-enabled devices on the subnet. The WDS device’s cache of credentials dramatically reduces the time required for reassociation when a CCKM-enabled client device roams to a new root device.
When a client device roams and tries to reassociate to a root device served by the same WDS device that served the previous root device, the WDS device authenticates the client by using its cache of clients’ credentials rather than requiring the RADIUS server to authenticate the client. The reassociation process is reduced to a two-packet exchange between the roaming client device and the new root device. Roaming client devices reassociate quickly enough for there to be no perceptible delay in voice or other time-sensitive applications
See the “Assigning Authentication Types to an SSID” section on page 16 for instructions on enabling CCKM on your bridge.
Using WPA Key ManagementWi-Fi Protected Access (WPA) is a standards-based, interoperable security enhancement that strongly increases the level of data protection and access control for existing and future wireless LAN systems. It is derived from the IEEE 802.11i standard. WPA leverages Temporal Key Integrity Protocol (TKIP) and/or Advanced Encryption Standard (AES) for data protection.
WPA key management supports two mutually exclusive management types: WPA and WPA-pre-shared key (WPA-PSK). Using WPA key management, the client device and the authentication server authenticate with each other using the EAP authentication method, and the client device and server generate a pairwise master key (PMK). Using WPA, the server generates the PMK dynamically and passes it to the root device. With WPA-PSK, you configure a pre-shared key on both the client device and the root device, and that pre-shared key is used as the PMK.
6Cisco 3200 Series Wireless MIC Software Configuration Guide

Authentication Types Configuring Certificates Using the crypto pki CLI
Note Unicast and multicast cipher suites advertised in the WPA information element (and negotiated during 802.11 association) might potentially mismatch with the cipher suite supported in an explicitly assigned VLAN. If the RADIUS server assigns a new VLAN ID which uses a different cipher suite from the previously negotiated cipher suite, there is no way for the root device and the client device to switch back to the new cipher suite. Currently, the WPA and CCKM protocols do not allow the cipher suite to be changed after the initial 802.11 cipher negotiation phase. In this scenario, the non-root bridge is disassociated from the wireless LAN.
See the “Assigning Authentication Types to an SSID” section on page 16 for instructions on configuring WPA key management on your bridge.
Configuring Certificates Using the crypto pki CLIThis section explains how to import CA and router certificates using the crypto PKI CLI and how to add a trustpoint to the dot1x credentials. Before any PKI operations can begin, the CA generates its own public key pair and creates a self-signed CA certificate; thereafter, the CA can sign certificate requests and begin peer enrollment for the PKI.
Note The domain name and clock must be set prior to enrollment of certificates.
You can import the CA and router certificates in any of the following ways:
• Configuration using cut and paste—This is useful when there is no connection between the router and the CA or in cases where scripting is required. In this method, the certificate request generated on the router is copied to the CA server to receive certificate for the router’s key pair. Both the CA and router certificate are imported using the CLI.
• Configuration using TFTP—In this method, the certificate request generated on the router is automatically copied to the TFTP server. The CA and router certificates are automatically imported from the TFTP server after they are copied to the TFTP server from the CA server.
• Configuration using SCEP—In this method, the CA and router certificates are automatically imported from the CA server.
Configuration Using the Cut and Paste MethodTo manually configure a trustpoint and import the CA and router certificate, follow these steps:
Command Purpose
Step 1 configure terminal Enters global configuration mode.
Step 2 crypto pki trustpoint name Specifies the name of the trustpoint.
Step 3 enrollment terminal Specifies that the terminal is to be used for certificate enrollment.
Step 4 rsakeypair name 1024 Specifies that a manual key with the given name will be generated with length 1024.
7Cisco 3200 Series Wireless MIC Software Configuration Guide

Authentication Types Configuring Certificates Using the crypto pki CLI
The following example shows the manual configuration method:
maldives-ap#maldives-ap#conf tEnter configuration commands, one per line. End with CNTL/Z.maldives-ap(config)#crypto pki trustpoint TFTP-CUT-PASTEmaldives-ap(ca-trustpoint)#enrollment terminalmaldives-ap(ca-trustpoint)#rsakeypair manual-keys 1024maldives-ap(ca-trustpoint)#exit
!maldives-ap#show run...crypto pki trustpoint TEST-TFTP enrollment terminal rsakeypair manual-keys 1024!
After the trustpoint was defined for enrollment via the terminal, the CA certificate must be imported:
maldives-ap(config)#crypto pki authenticate TFTP-CUT-PASTE Enter the base 64 encoded CA certificate.End with a blank line or the word “quit” on a line by itself -----BEGIN CERTIFICATE-----MIIC5zCCApGgAwIBAgIQdngf6fp6ZqdEX1QPnzgqiDANBgkqhkiG9w0BAQUFADB9MQswCQYDVQQGEwJBVTEMMAoGA1UECBMDTlNXMQ8wDQYDVQQHEwZTeWRuZXkxFjAUBgNVBAoTDUNpc2NvIFN5c3RlbXMxFDASBgNVBAsTC1dOQlUgU3lkbmV5MSEwHwYDVQQDExh3bmJ1LXN5ZC1hY3MtYS5jaXNjby5jb20wHhcNMDUwNjE1MDQ1MzQ5WhcNMDgwNjE1MDUwMzM0WjB9MQswCQYDVQQGEwJBVTEMMAoGA1UECBMDTlNXMQ8wDQYDVQQHEwZTeWRuZXkxFjAUBgNVBAoTDUNpc2NvIFN5c3RlbXMxFDASBgNVBAsTC1dOQlUgU3lkbmV5MSEwHwYDVQQDExh3bmJ1LXN5ZC1hY3MtYS5jaXNjby5jb20wXDANBgkqhkiG9w0BAQEFAANLADBIAkEAnDZq1u+RhYyC8uNdsuXDwOve1yEZvKJerrb6XFVyJZV4jfSKSnZ2ZRNf3VX3NcRyQxKSszgCHMGcUyBnH350ZwIDAQABo4HsMIHpMAsGA1UdDwQEAwIBxjAPBgNVHRMBAf8EBTADAQH/MB0GA1UdDgQWBBSB9hMkazhsebKHX3b9qw8VPilQRzCBlwYDVR0fBIGPMIGMMEOgQaA/hj1odHRwOi8vd25idS1zeWQtYWNzLWEvQ2VydEVucm9sbC93bmJ1LXN5ZC1hY3MtYS5jaXNjby5jb20uY3JsMEWgQ6BBhj9maWxlOi8vXFx3bmJ1LXN5ZC1hY3MtYVxDZXJ0RW5yb2xsXHduYnUt
Step 5 subject-name CN=name Adds the subject name in the certificate. The name should be same as the user name defined in the dot1x credentials name command.
Step 6 exit Returns to global configuration mode.
Step 7 crypto pki authenticate name Enters the process of importing the certificate. The script prompts you to enter (copy and paste) the CA certificate.
Step 8 quit Exits the import CA certificate process.
Step 9 crypto pki enroll name Requests a router certificate from a CA. This step generates the certificate request that should be copied on the CA server to receive a router certificate.
Step 10 crypto pki import name certificate Imports a router certificate.
Step 11 quit Completes the router certificate import process.
Step 12 end Ends EXEC mode.
Step 13 copy running-config startup-config (Optional) Saves your entries in the configuration file.
Command Purpose
8Cisco 3200 Series Wireless MIC Software Configuration Guide

Authentication Types Configuring Certificates Using the crypto pki CLI
c3lkLWFjcy1hLmNpc2NvLmNvbS5jcmwwEAYJKwYBBAGCNxUBBAMCAQAwDQYJKoZIhvcNAQEFBQADQQA7G8rL3ZHFfc3EdeklxMz72qdSnXg05uZZ51USuAMJKc1rGJUTC0Bkre8+ov2xmZGVHC8xOpDk7bZzs/iinLnq-----END CERTIFICATE-----quitCertificate has the following attributes:Fingerprint: 45EC6866 A66B4D8F 2E05960F BC5C1B76% Do you accept this certificate? [yes/no]: yesTrustpoint CA certificate accepted.% Certificate successfully imported The next step is to generate the keys and an enrollment request (see below). Note that although it is possible to explicitly generate the keys, it is not necessary as the enrollment process will automatically generate (or re-generate if previously configured) the required keys. This request must then be submitted to the Certificate Authority to have it signed and a certificate issued.
maldives-ap(config)#crypto pki enroll TEST-CUT-PASTE% Start certificate enrollment.. % The fully-qualified domain name in the certificate will be: maldives-ap.cisco.com% The subject name in the certificate will be: maldives-ap.cisco.com% Include the router serial number in the subject name? [yes/no]:yesJun 29 12:17:08.232: %CRYPTO-6-AUTOGEN: Generated new 1024 bit key pair% The serial number in the certificate will be: 80AD5AD4% Include an IP address in the subject name? [no]:Display Certificate Request to terminal? [yes/no]: yesCertificate Request follows: MIIBmDCCAQECAQAwNzE1MA8GA1UEBRMIODBBRDVBRDQwIgYJKoZIhvcNAQkCFhVtYWxkaXZlcy1hcC5jaXNjby5jb20wgZ8wDQYJKoZIhvcNAQEBBQADgY0AMIGJAoGBAOexwH9eW7n+3MEivmSHpBO3kqSdvZnf5dvOKyVoy8ZJpM2O6j0jfzOTD3IxHeQEMUiEzWKybt2k/HQTuND+zVhbgWQd9J3JnCrvUMij48fV7MydyZYQ2eHDgQEN64d4RBPFi51C+2xX1SzELJfGU2oxeQ6AsW/A/2S7GCycFW7rAgMBAAGgITAfBgkqhkiG9w0BCQ4xEjAQMA4GA1UdDwEB/wQEAwIFoDANBgkqhkiG9w0BAQQFAAOBgQBoph/jDHMh7U4yN0lYUS3OfpCtDl8e5QBp1MFYqMDP4aWeL/AdKVTNWBBElQh+M96uMyY2/AEwFfsJsU1q6u3Kg4kJWht8F7a60OhQRfQ1CSiy18Z9vqA4KY15hbWhwj3JtuTAkpqCzR30u+auN7WuS/PnVr+vnSCMt69P6wLHHw== ---End - This line not part of the certificate request--- Redisplay enrollment request? [yes/no]: nomaldives-ap(config)#
After the certificate (or multiple certificates if separate signature and encryption certs are required) is issued by the CA, it must be imported into the device via:
maldives-ap(config)#crypto pki import ? WORD Trustpoint label to associate certificate or pkcs-12 file with maldives-ap(config)#crypto pki import TEST-CUT-PASTE ? certificate Import a certificate from a TFTP server or the terminal pem Import from PEM files pkcs12 Import from PKCS12 file maldives-ap(config)#crypto pki import TEST-CUT-PASTE certificate% The fully-qualified domain name in the certificate will be: maldives-ap.cisco.com Enter the base 64 encoded certificate.End with a blank line or the word “quit” on a line by itself -----BEGIN CERTIFICATE-----MIIERjCCA/CgAwIBAgIKHVHsoQAAAAAAJzANBgkqhkiG9w0BAQUFADB9MQswCQYDVQQGEwJBVTEMMAoGA1UECBMDTlNXMQ8wDQYDVQQHEwZTeWRuZXkxFjAUBgNVBAoT
9Cisco 3200 Series Wireless MIC Software Configuration Guide

Authentication Types Configuring Certificates Using the crypto pki CLI
DUNpc2NvIFN5c3RlbXMxFDASBgNVBAsTC1dOQlUgU3lkbmV5MSEwHwYDVQQDExh3bmJ1LXN5ZC1hY3MtYS5jaXNjby5jb20wHhcNMDUwNjI5MDExMzQyWhcNMDYwNjI5MDEyMzQyWjA5MREwDwYDVQQFEwg4MEFENUFENDEkMCIGCSqGSIb3DQEJAhMVbWFsZGl2ZXMtYXAuY2lzY28uY29tMIGfMA0GCSqGSIb3DQEBAQUAA4GNADCBiQKBgQDnscB/Xlu5/tzBIr5kh6QTt5Kknb2Z3+XbzislaMvGSaTNjuo9I38zkw9yMR3kBDFIhM1ism7dpPx0E7jQ/s1YW4FkHfSdyZwq71DIo+PH1ezMncmWENnhw4EBDeuHeEQTxYudQvtsV9UsxCyXxlNqMXkOgLFvwP9kuxgsnBVu6wIDAQABo4ICUDCCAkwwDgYDVR0PAQH/BAQDAgWgMB0GA1UdDgQWBBRdEW6dE+j3/3/CCJrjDCzA9r47oDCBtwYDVR0jBIGvMIGsgBSB9hMkazhsebKHX3b9qw8VPilQR6GBgaR/MH0xCzAJBgNVBAYTAkFVMQwwCgYDVQQIEwNOU1cxDzANBgNVBAcTBlN5ZG5leTEWMBQGA1UEChMNQ2lzY28gU3lzdGVtczEUMBIGA1UECxMLV05CVSBTeWRuZXkxITAfBgNVBAMTGHduYnUtc3lkLWFjcy1hLmNpc2NvLmNvbYIQdngf6fp6ZqdEX1QPnzgqiDCBlwYDVR0fBIGPMIGMMEOgQaA/hj1odHRwOi8vd25idS1zeWQtYWNzLWEvQ2VydEVucm9sbC93bmJ1LXN5ZC1hY3MtYS5jaXNjby5jb20uY3JsMEWgQ6BBhj9maWxlOi8vXFx3bmJ1LXN5ZC1hY3MtYVxDZXJ0RW5yb2xsXHduYnUtc3lkLWFjcy1hLmNpc2NvLmNvbS5jcmwwgcYGCCsGAQUFBwEBBIG5MIG2MFgGCCsGAQUFBzAChkxodHRwOi8vd25idS1zeWQtYWNzLWEvQ2VydEVucm9sbC93bmJ1LXN5ZC1hY3MtYV93bmJ1LXN5ZC1hY3MtYS5jaXNjby5jb20uY3J0MFoGCCsGAQUFBzAChk5maWxlOi8vXFx3bmJ1LXN5ZC1hY3MtYVxDZXJ0RW5yb2xsXHduYnUtc3lkLWFjcy1hX3duYnUtc3lkLWFjcy1hLmNpc2NvLmNvbS5jcnQwDQYJKoZIhvcNAQEFBQADQQCEqZgEAMExlMAiQ3aOiajY/NjuKeXXA5yMsTxQIWxVmj+o1U4T2dvYk60/ab/9hV1n6h3msKVcoYUFj8otLtAs-----END CERTIFICATE-----quit% Router Certificate successfully imported The following show commands can be used to view the trustpoint and certificates status:maldives-ap#sh crypto pki trust TEST-CUT-PASTETrustpoint TEST-CUT-PASTE: Subject Name: cn=wnbu-syd-acs-a.cisco.com ou=WNBU Sydney o=Cisco Systems l=Sydney st=NSW c=AU Serial Number: 76781FE9FA7A66A7445F540F9F382A88 Certificate configured.
maldives-ap#show crypto pki cert TEST-CUT-PASTECertificate Status: Available Certificate Serial Number: 1D51ECA1000000000027 Certificate Usage: General Purpose Issuer: cn=wnbu-syd-acs-a.cisco.com ou=WNBU Sydney o=Cisco Systems l=Sydney st=NSW c=AU Subject: Name: maldives-ap.cisco.com Serial Number: 80AD5AD4 hostname=maldives-ap.cisco.com serialNumber=80AD5AD4 CRL Distribution Point: http://wnbu-syd-acs-a/CertEnroll/wnbu-syd-acs-a.cisco.com.crl Validity Date: start date: 12:13:42 AEST Jun 29 2005 end date: 12:23:42 AEST Jun 29 2006 renew date: 11:00:00 AEST Jan 1 1970 Associated Trustpoints: TEST-CUT-PASTE
10Cisco 3200 Series Wireless MIC Software Configuration Guide

Authentication Types Configuring Certificates Using the crypto pki CLI
Configuration Using the TFTP MethodTFTP certificate enrollment is similar to manual enrollment, except that a TFTP server supplies the CA and router certificates. To use TFTP, follow these steps, beginning in privileged EXEC mode:
Note the following regarding the TFTP method:
• If a filename is included in the URL, the router will appends extension onto the file. When you enter the crypto pki authenticate, the router retrieves the certificate of the CA from the specified TFTP server.
• To look for the CA certificate on the TFTP server, the router appends the extension .ca to the filename, if it is specified in the URL, or to the fully qualified domain name (FQDN). For example, if a URL option is tftp://TFTP-server/TFTPfiles/router1, the file TFTPfiles/router1.ca is read from the TFTP server TFTP-server. If the routers FQDN is router1.cisco.com, and URL option is tftp://tftp.cisco.com, the file router1.cisco.com.ca is read from the TFTP server tftp.cisco.com. The file must contain the certificate of the CA in binary format (Distinguished Encoding Rules (DER) or base 64-encoded (Privacy Enhanced Mail (PEM)).
• When a user enrolls the router using the crypto pki enroll command, the user is prompted for information regarding the enrollment. The filename is already determined at this point, and an extension of .req is appended to indicate that this is a certificate request. For usage keys, two requests are generated and two certificates are expected to be granted. Thus, the extension for the certificate requests are -sign.req and -encr.req.
• After the user enters the crypto pki import command, the router attempts to fetch the granted certificate using the same filename that was used to send the request, except that .req extension is replaced by a .crt extension. The certificates should be base 64 encoded Personal Information Exchange Syntax Standard (PCKS)#10 format.
Command Purpose
Step 1 configure terminal Enters global configuration mode.
Step 2 crypto pki trustpoint name Specifies the name of the trustpoint.
Step 3 enrollment url tftp://address Specifies the URL to be used for certificate enrollment.
Step 4 rsakeypair name 1024 Specifies that a manual key with the given name will be generated with length 1024.
Step 5 subject-name CN=name Adds the subject name in the certificate. The name should be same as the user name defined in the dot1x credentials name command.
Step 6 exit Returns to global configuration mode.
Step 7 crypto pki authenticate name Enters the process of importing the certificate.
Step 8 quit Exits the import CA certificate process.
Step 9 crypto pki enroll name Requests a router certificate from a CA. This step generates the certificate request and puts it onto TFTP server. This request should then be copied on to CA server to receive router certificate.
Step 10 crypto pki import name certificate Imports a router certificate.
Step 11 end Ends EXEC mode.
Step 12 copy running-config startup-config (Optional) Saves your entries in the configuration file.
11Cisco 3200 Series Wireless MIC Software Configuration Guide

Authentication Types Configuring Certificates Using the crypto pki CLI
The following example shows the TFTP configuration method:
maldives-ap#show run...crypto pki trustpoint TEST-TFTP enrollment url tftp://10.67.64.21/ndupreez/my-acs revocation-check crl rsakeypair 1024
Configuration Using SCEPConfiguration using Certificate Enrollment Protocol (SCEP) is available when a Windows 2003 server is used as the CA server, and is a convenient way of importing CA and router certificates. Follow these steps to use SCEP:
Tip You can install the SCEP Add-on for Windows 2003 server from the following link: http://www.microsoft.com/downloads/details.aspx?displaylang=en&familyid=9f306763-d036-41d8-8860-1636411b2d01
It is recommended that you use Windows Server 2003 Enterprise Edition as the Windows operating system when SCEP is selected to acquire a certificate under the Enterprise Certificate Server (CA) mode for the Windows CA server that works with the Cisco ACS server. Windows Server 2003 Enterprise Edition allows the modification of the CA server template. For use of SCEP with the Enterprise CA server, you must modify the IPSec template (offline request) so that its enhanced key usage extension is same as that for the user template. Use certtmpl.msc to modify the template and ertsrv.msc to install the modified template.
The following example shows SCEP certificate enrollment:
maldives-ap#maldives-ap#conf t
Command Purpose
Step 1 configure terminal Enters global configuration mode.
Step 2 crypto pki trustpoint name Specifies the name of the trustpoint.
Step 3 enrollment url http://address Specifies the URL to be used for certificate enrollment.
Step 4 rsakeypair name 1024 Specifies that a scep key is will be generated with length 1024.
Step 5 subject-name CN=name Adds the subject name in the certificate. The name should be same as the user name defined in the dot1x credentials name command.
Step 6 exit Returns to global configuration mode.
Step 7 crypto pki authenticate name Enters the process of importing the CA certificate.
Step 8 crypto pki enroll name Requests a router certificate from a CA. This step generates the certificate request and puts it onto TFTP server. This request should then be copied on to CA server to receive router certificate.
Step 9 end Ends EXEC mode.
Step 10 copy running-config startup-config (Optional) Saves your entries in the configuration file.
12Cisco 3200 Series Wireless MIC Software Configuration Guide

Authentication Types Configuring Certificates Using the crypto pki CLI
Enter configuration commands, one per line. End with CNTL/Z.maldives-ap(config)#crypto pki trustpoint TEST-SCEPmaldives-ap(ca-trustpoint)#enrollment url http://10.67.73.11/certsrv/mscep/mscep.dllmaldives-ap(ca-trustpoint)#rsakeypair scep-keys 1024maldives-ap(ca-trustpoint)#exitmaldives-ap(config)#
!maldives-ap#show run...crypto pki trustpoint TEST-SCEP enrollment mode ra enrollment url http://10.67.73.11:80/certsrv/mscep/mscep.dll serial-number ip-address BVI1 revocation-check crl rsakeypair scep-keys 1024!
And to retrieve the CA certificate:
maldives-ap(config)#crypto pki authenticate TEST-SCEPCertificate has the following attributes:Fingerprint: 45EC6866 A66B4D8F 2E05960F BC5C1B76% Do you accept this certificate? [yes/no]: yesTrustpoint CA certificate accepted.maldives-ap(config)#
Finally to enroll the router certificate(s):
maldives-ap(config)#maldives-ap(config)#crypto pki enroll TEST-SCEP%% Start certificate enrollment..% Create a challenge password. You will need to verbally provide this password to the CA Administrator in order to revoke your certificate. For security reasons your password will not be saved in the configuration. Please make a note of it. Password:Jun 29 13:18:46.606: %CRYPTO-6-AUTOGEN: Generated new 1024 bit key pairRe-enter password: % The fully-qualified domain name in the certificate will be: maldives-ap.cisco.com% The subject name in the certificate will be: maldives-ap.cisco.com% Include the router serial number in the subject name? [yes/no]: yes% The serial number in the certificate will be: 80AD5AD4% Include an IP address in the subject name? [no]: yesEnter Interface name or IP Address[]: BVI1Request certificate from CA? [yes/no]: yes% Certificate request sent to Certificate Authority% The certificate request fingerprint will be displayed.
maldives-ap(config)#Jun 29 13:19:12.776: CRYPTO_PKI: Fingerprint: 6BF9EAC9 BE515B76 E7767395 8FA00FCCJun 29 13:19:12.776:Jun 29 13:19:15.161: %PKI-6-CERTRET: Certificate received from Certificate Authoritymaldives-ap(config)# end
The crypto show commands are used to view the certificates associated with the trustpoint, in this case both the CA and single router certificate:
maldives-ap#show crypto pki cert TEST-SCEP
13Cisco 3200 Series Wireless MIC Software Configuration Guide
Authentication Types Configuring Certificates Using the crypto pki CLI
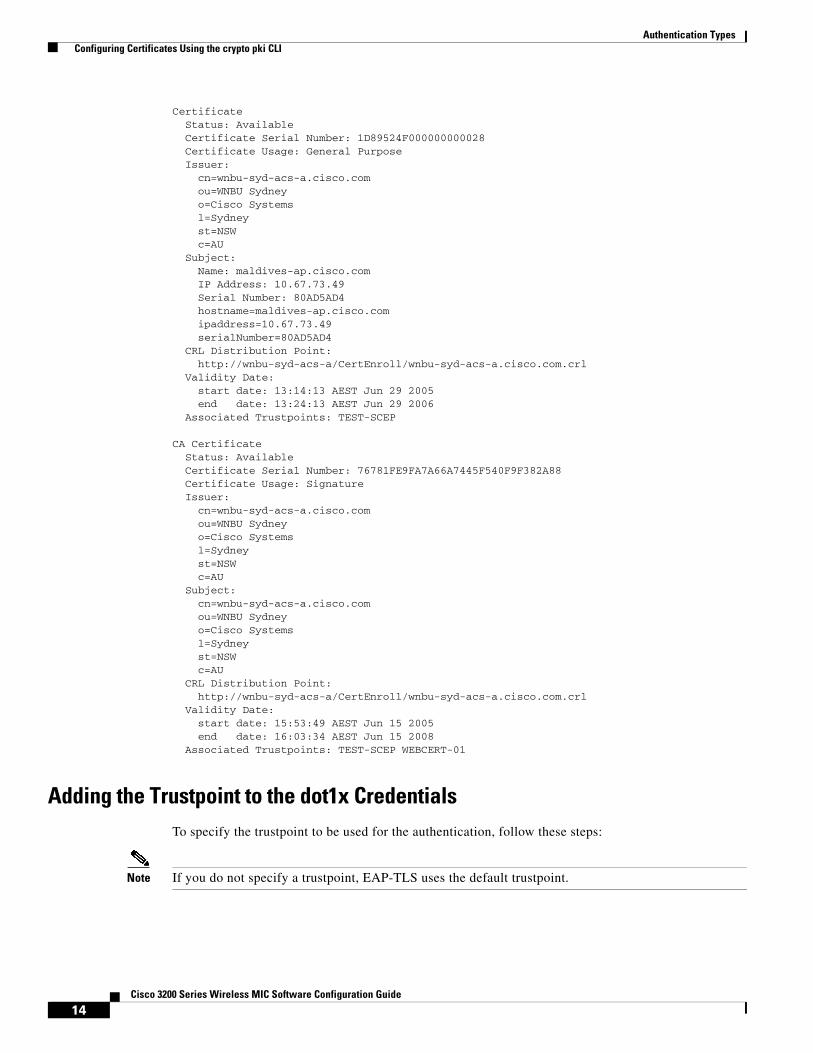
Certificate Status: Available Certificate Serial Number: 1D89524F000000000028 Certificate Usage: General Purpose Issuer: cn=wnbu-syd-acs-a.cisco.com ou=WNBU Sydney o=Cisco Systems l=Sydney st=NSW c=AU Subject: Name: maldives-ap.cisco.com IP Address: 10.67.73.49 Serial Number: 80AD5AD4 hostname=maldives-ap.cisco.com ipaddress=10.67.73.49 serialNumber=80AD5AD4 CRL Distribution Point: http://wnbu-syd-acs-a/CertEnroll/wnbu-syd-acs-a.cisco.com.crl Validity Date: start date: 13:14:13 AEST Jun 29 2005 end date: 13:24:13 AEST Jun 29 2006 Associated Trustpoints: TEST-SCEP
CA Certificate Status: Available Certificate Serial Number: 76781FE9FA7A66A7445F540F9F382A88 Certificate Usage: Signature Issuer: cn=wnbu-syd-acs-a.cisco.com ou=WNBU Sydney o=Cisco Systems l=Sydney st=NSW c=AU Subject: cn=wnbu-syd-acs-a.cisco.com ou=WNBU Sydney o=Cisco Systems l=Sydney st=NSW c=AU CRL Distribution Point: http://wnbu-syd-acs-a/CertEnroll/wnbu-syd-acs-a.cisco.com.crl Validity Date: start date: 15:53:49 AEST Jun 15 2005 end date: 16:03:34 AEST Jun 15 2008 Associated Trustpoints: TEST-SCEP WEBCERT-01
Adding the Trustpoint to the dot1x CredentialsTo specify the trustpoint to be used for the authentication, follow these steps:
Note If you do not specify a trustpoint, EAP-TLS uses the default trustpoint.
14Cisco 3200 Series Wireless MIC Software Configuration Guide

Authentication Types Configuring Authentication Types
The following example shows how to specify a trustpoint:
keeling-ap#conf tEnter configuration commands, one per line. End with CNTL/Z.keeling-ap(config)#dot1x credentials testkeeling-ap(config-dot1x-creden)#username mynamekeeling-ap(config-dot1x-creden)#password mypasskeeling-ap(config-dot1x-creden)#pki-trustpoint TP_001keeling-ap(config-dot1x-creden)#end
keeling-ap#sh run | beg testdot1x credentials test username myname password 7 060B16314D5D1A pki-trustpoint TP_001
Configuring Authentication TypesThis section describes how to configure authentication types. You attach authentication types to the WMIC’s SSID. See “Service Set Identifiers” for details on setting up the WMIC SSID. This section contains these topics:
• Default Authentication Settings, page 15
• Assigning Authentication Types to an SSID, page 16
• Configuring Authentication Holdoffs, Timeouts, and Intervals, page 24
Default Authentication SettingsThe default SSID on the WMIC is autoinstall. Table 1 shows the default authentication settings for the default SSID:
Command Purpose
Step 1 configure terminal Enters global configuration mode.
Step 2 dot1x credentials name Specifies the name of the trustpoint.
Step 3 username name Specifies the user name for setting up the trustpoint.
Step 4 password password Specifies the user password for setting up the trustpoint.
Step 5 pki-trustpoint name Specifies the pki-trustpoint name.
Step 6 end Returns to privileged EXEC mode.
Table 1 Default Authentication Configuration
Feature Default Setting
SSID autoinstall
15Cisco 3200 Series Wireless MIC Software Configuration Guide

Authentication Types Configuring Authentication Types
Assigning Authentication Types to an SSIDBeginning in privileged EXEC mode, follow these steps to configure authentication types for SSIDs on the root device:
Guest mode SSID autoinstall (The WMIC broadcasts this SSID in its beacon and allows client devices with no SSID to associate.)
Authentication types assigned to autoinstall open
Table 1 Default Authentication Configuration
Feature Default Setting
Command Purpose
Step 1 configure terminal Enters global configuration mode.
Step 2 dot11 ssid ssid-string Creates an SSID. The SSID can consist of up to 32 alphanumeric characters. SSIDs are case sensitive.
Note Do not include spaces in SSIDs.
16Cisco 3200 Series Wireless MIC Software Configuration Guide

Authentication Types Configuring Authentication Types
Step 3 authentication open [mac-address list-name [alternate]] [[optional] eap list-name]
Sets the authentication type to open for this SSID. Open authentication allows any client device to authenticate and then attempt to communicate with the WMIC.
Note One of the commands list in Step3, Step 4, or Step 5 must be used.
• (Optional) Set the SSID’s authentication type to open with MAC address authentication. The access point forces all client devices to perform MAC-address authentication before they are allowed to join the network. For list-name, specify the authentication method list. Click this link for more information on method lists: http://www.cisco.com/univercd/cc/td/doc/product/software/ios122/122cgcr/fsecur_c/fsaaa/scfathen.htm#xtocid2
Use the alternate keyword to allow client devices to join the network using either MAC or EAP authentication; clients that successfully complete either authentication are allowed to join the network.
• (Optional) Set the SSID’s authentication type to open with EAP authentication. The WMIC forces all other client devices to perform EAP authentication before they are allowed to join the network. For list-name, specify the authentication method list.
Use the optional keyword to allow client devices using either open or EAP authentication to associate and become authenticated. This setting is used mainly by service providers that require special client accessibility.
Note A root device configured for EAP authentication forces all client devices that associate to perform EAP authentication. Client devices that do not use EAP cannot communicate with the root device.
Step 4 authentication shared[mac-address list-name] [eap list-name]
Sets the authentication type for the SSID to shared key.
Note One of the commands list in Step3, Step 4, or Step 5 must be used.
Note Because of shared key security flaws, we recommend that you avoid using it.
Note You can assign shared key authentication to only one SSID.
• (Optional) Set the SSID’s authentication type to shared key with MAC address authentication. For list-name, specify the authentication method list.
• (Optional) Set the SSID’s authentication type to shared key with EAP authentication. For list-name, specify the authentication method list.
Command Purpose
17Cisco 3200 Series Wireless MIC Software Configuration Guide

Authentication Types Configuring Authentication Types
Step 5 authentication network-eap list-name [mac-address list-name]
Sets the authentication type for the SSID to use EAP for authentication and key distribution.
Note One of the commands list in Step3, Step 4, or Step 5 must be used.
• (Optional) Set the SSID’s authentication type to Network-EAP with MAC address authentication. All client devices that associate to the access point are required to perform MAC address authentication. For list-name, specify the authentication method list.
Step 6 authentication key-management {[wpa] [cckm]} [optional]
(Optional) Sets the key-management type for the SSID to WPA, CCKM, or both. If you use the optional keyword, client devices not configured for WPA or CCKM can use this SSID. If you do not use the optional keyword, only WPA or CCKM client devices are allowed to use the SSID.
To enable CCKM for an SSID, you must also enable Network-EAP authentication. To enable WPA for an SSID, you must also enable open authentication or Network-EAP or both.
Note Only 802.11b and 802.11g radios support WPA and CCKM simultaneously.
Note Before you can enable CCKM or WPA, you must set the encryption mode to a cipher suite that includes TKIP/AES-CCMP. To enable both CCKM and WPA, you must set the encryption mode to a cipher suite that includes TKIP. See the “Cipher Suites and WEP” for instructions on configuring the VLAN encryption mode.
Note If you enable WPA for an SSID without a pre-shared key, the key management type is WPA. If you enable WPA with a pre-shared key, the key management type is WPA-PSK. See the “Configuring Additional WPA Settings” section on page 23 for instructions on configuring a pre-shared key.
Note To support CCKM, your root device must interact with the WDS device on your network. See the “Configuring the Root Device to Interact with the WDS Device” section on page 23 for instructions on configuring your root device to interact with your WDS device.
Step 7 end Returns to privileged EXEC mode.
Step 8 copy running-config startup-config (Optional) Saves your entries in the configuration file.
Command Purpose
18Cisco 3200 Series Wireless MIC Software Configuration Guide

Authentication Types Configuring Authentication Types
Configuring Up 2.4 the WMIC Radio as an EAP Client
Beginning in privileged EXEC mode, follow these steps to configure authentication types for SSIDs on the non-root side:
Setting up a 2.4 WMIC as a EAP client requires three major steps:
• Creating an authentication username and password for the WMIC on your authentication server.
• Configuring EAP authentication on the root device to which the WMIC associates.
• Configuring the WMIC to act as a EAP client.
To configure EAP authentication type for SSID on the client side, follow these steps, beginning in privileged EXEC mode:
Command Purpose
Step 1 configure terminal Enters global configuration mode.
Step 2 dot1x credentials profile Creates a dot1x credentials profile and enters the dot1x credentials configuration submode.
Step 3 username name Specifies the authentication user name for the WMIC.
Step 4 password password Specifies the authentication password for the WMIC.
Step 5 crypto pki trustpoint name Specifies the name of the trustpoint.
Step 6 exit Returns to global configuration mode.
Step 7 eap profile profile-name-string Creates the EAP profile.
Step 8 method [ fast | gtc | leap | md5 | mschapv2 | tls ]
Chooses an EAP authentication method for authentication purpose.
Note In client mode, the WMIC supports only the FAST, LEAP, and TLS methods.
Note A root device configured for EAP authentication forces all client devices that associate to perform EAP authentication. Client devices that do not use EAP cannot communicate with the root device.
Step 9 exit Returns to global configuration mode.
Step 10 dot11 ssid ssid-string Enters global ssid mode.
Step 11 authentication network-eap list-name
(Optional) Sets the authentication type for the SSID to use EAP for authentication and key distribution.
Step 12 dot1x credentials profile Specifies the dot1x credentials profile created in Step 2 and enters the dot1x credentials configuration submode.
Step 13 eap profile profile-name-string Specifies the EAP profile created in Step 7.
19Cisco 3200 Series Wireless MIC Software Configuration Guide

Authentication Types Configuring Authentication Types
Use the no form of the SSID commands to disable the SSID or to disable SSID features.
The following example sets authentication type for the SSID bridgeman to perform EAP authentication with AES encryption on the root device. The root device using this SSID attempts authentication using the EAP method name eap_adam. The example also shows the related RADIUS/AAA configuration on the root side.
bridge# configure terminalbridge(config)# dot11 ssid bridgemanbridge(config-ssid)# authentication network-eap eap_adambridge(config-ssid)# authentication key-management wpabridge(config-ssid)# infrastructure-ssidbridge(config-ssid)# exit
bridge(config)# interface dot11radio 0bridge(config-if)# encryption mode ciphers aes-ccmbridge(config-if)# ssid bridgemanbridge(config-if)# end
Step 14 authentication key-management {[wpa] [cckm]} [optional]
(Optional) Sets the key-management type for the SSID to WPA, CCKM, or both. If you use the optional keyword, client devices not configured for WPA or CCKM can use this SSID. If you do not use the optional keyword, only WPA or CCKM client devices are allowed to use the SSID.
To enable CCKM for an SSID, you must also enable Network-EAP authentication. To enable WPA for an SSID, you must also enable Open authentication or Network-EAP or both.
Note Only 802.11b and 802.11g radios support WPA and CCKM simultaneously.
Note Before you can enable CCKM or WPA, you must set the encryption mode to a cipher suite that includes TKIP/AES-CCMP. To enable both CCKM and WPA, you must set the encryption mode to a cipher suite that includes TKIP. See the “Cipher Suites and WEP” for instructions on configuring the VLAN encryption mode.
Note If you enable WPA for an SSID without a pre-shared key, the key management type is WPA. If you enable WPA with a pre-shared key, the key management type is WPA-PSK. See the “Configuring Additional WPA Settings” section on page 23 for instructions on configuring a pre-shared key.
Note To support CCKM, your root device must interact with the WDS device on your network. See the “Configuring the Root Device to Interact with the WDS Device” section on page 23 for instructions on configuring your root device to interact with your WDS device.
Step 15 end Returns to privileged EXEC mode.
Step 16 copy running-config startup-config (Optional) Saves your entries in the configuration file.
Command Purpose
20Cisco 3200 Series Wireless MIC Software Configuration Guide
Authentication Types Configuring Authentication Types
bridge# configure terminalbridge(config)# aaa new-modelbridge(config)# aaa group server radius rad_eapbridge(config-sg-radius)# server 13.1.1.99 auth-port 1645 acct-port 1646bridge(config)# aaa authentication login eap_adam group rad_eapbridge(config)# aaa session-id commonbridge(config)# radius-server host 13.1.1.99 auth-port 1645 acct-port 1646 key 7 141B1309bridge(config)# radius-server authorization permit missing Service-Typebridge(config)# ip radius source-interface BVI1bridge(config)# end
The following example sets the authentication type for the SSID bridgeman to perform EAP-TLS authentication with AES encryption on the client device (workgroup bridge or non-root bridge).
bridge# configure terminalbridge(config)# eap profile authProfilebridge(config-eap-profile)# method tlsbridge(config-eap-profile)# exit
bridge(config)# dot1x credentials authCredentialsbridge(config-dot1x-creden)# username adambridge(config-dot1x-creden)# password adambridge(config-dot1x-creden)# exit
bridge(config)# dot11 ssid bridgemanbridge(config-ssid)# authentication network-eap eap_adambridge(config-ssid)# authentication key-management wpabridge(config-ssid)# dot1x eap_profile authProfilebridge(config-ssid)# dot1x credentials authCredentialsbridge(config-ssid)# infrastructure-ssidbridge(config-ssid)# exit
bridge(config)# interface dot11radio 0bridge(config-if)# encryption mode ciphers aes-ccmbridge(config-if)# ssid bridgemanbridge(config-if)# end
bridge# configure terminalbridge(config)# aaa new-modelbridge(config)# aaa group server radius rad_eapbridge(config-sg-radius)# server 13.1.1.99 auth-port 1645 acct-port 1646bridge(config)# aaa authentication login eap_adam group rad_eapbridge(config)# aaa session-id commonbridge(config)# radius-server host 13.1.1.99 auth-port 1645 acct-port 1646 key 7 141B1309bridge(config)# radius-server authorization permit missing Service-Typebridge(config)# ip radius source-interface BVI1bridge(config)# end
Setting Up a Non-Root Bridge as a LEAP Client for 4.9 WMIC Radios
For 4.9-GHz radios, you can set up a non-root bridge to authenticate to your network like other wireless client devices. After you provide a network username and password for the non-root bridge, it authenticates to your network using LEAP, the Cisco wireless authentication protocol, and receives and uses dynamic WEP keys.
Setting up a non-root bridge as a LEAP client requires three main steps:
1. Create an authentication username and password for the non-root bridge on your authentication server.
2. Configure LEAP authentication on the root device to which the non-root bridge associates.
21Cisco 3200 Series Wireless MIC Software Configuration Guide
Authentication Types Configuring Authentication Types
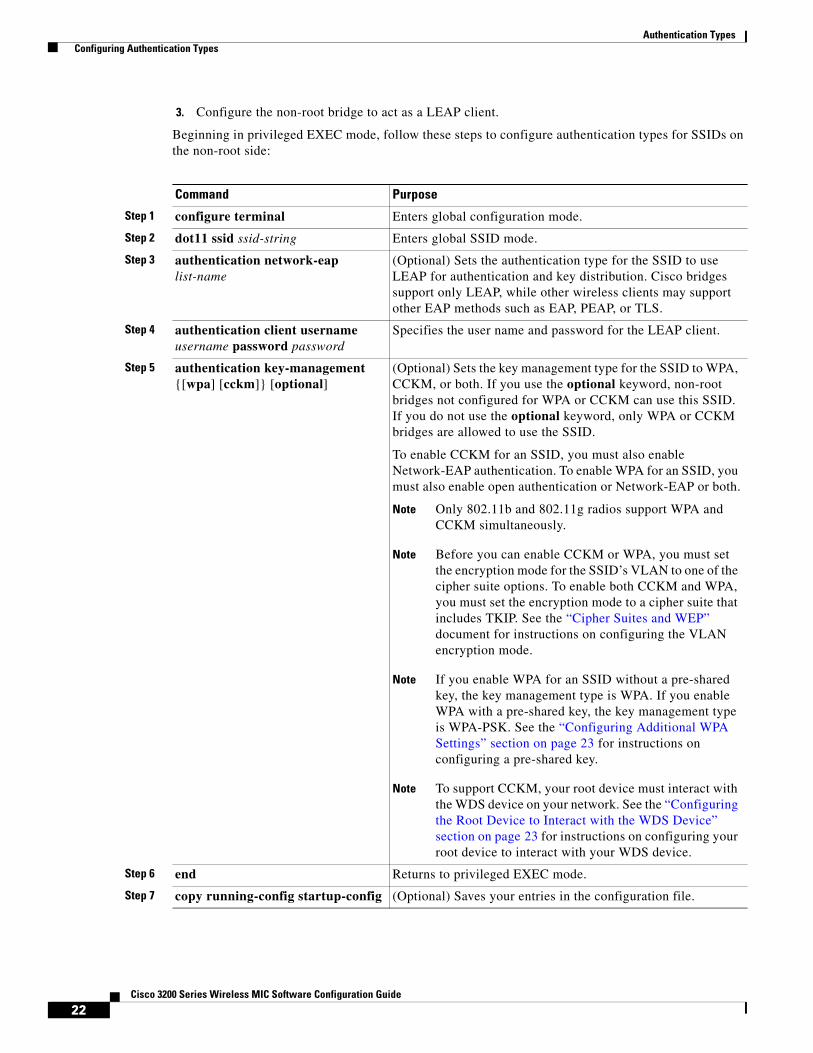
3. Configure the non-root bridge to act as a LEAP client.
Beginning in privileged EXEC mode, follow these steps to configure authentication types for SSIDs on the non-root side:
Command Purpose
Step 1 configure terminal Enters global configuration mode.
Step 2 dot11 ssid ssid-string Enters global SSID mode.
Step 3 authentication network-eap list-name
(Optional) Sets the authentication type for the SSID to use LEAP for authentication and key distribution. Cisco bridges support only LEAP, while other wireless clients may support other EAP methods such as EAP, PEAP, or TLS.
Step 4 authentication client username username password password
Specifies the user name and password for the LEAP client.
Step 5 authentication key-management {[wpa] [cckm]} [optional]
(Optional) Sets the key management type for the SSID to WPA, CCKM, or both. If you use the optional keyword, non-root bridges not configured for WPA or CCKM can use this SSID. If you do not use the optional keyword, only WPA or CCKM bridges are allowed to use the SSID.
To enable CCKM for an SSID, you must also enable Network-EAP authentication. To enable WPA for an SSID, you must also enable open authentication or Network-EAP or both.
Note Only 802.11b and 802.11g radios support WPA and CCKM simultaneously.
Note Before you can enable CCKM or WPA, you must set the encryption mode for the SSID’s VLAN to one of the cipher suite options. To enable both CCKM and WPA, you must set the encryption mode to a cipher suite that includes TKIP. See the “Cipher Suites and WEP” document for instructions on configuring the VLAN encryption mode.
Note If you enable WPA for an SSID without a pre-shared key, the key management type is WPA. If you enable WPA with a pre-shared key, the key management type is WPA-PSK. See the “Configuring Additional WPA Settings” section on page 23 for instructions on configuring a pre-shared key.
Note To support CCKM, your root device must interact with the WDS device on your network. See the “Configuring the Root Device to Interact with the WDS Device” section on page 23 for instructions on configuring your root device to interact with your WDS device.
Step 6 end Returns to privileged EXEC mode.
Step 7 copy running-config startup-config (Optional) Saves your entries in the configuration file.
22Cisco 3200 Series Wireless MIC Software Configuration Guide

Authentication Types Configuring Authentication Types
The following example sets authentication type for the SSID bridgeman to perform LEAP authentication with AES encryption on the client device (workgroup bridge or non-root bridge).
bridge(config)# interface dot11radio 0bridge(config-if)# encryption mode ciphers aes-ccmbridge(config)# dot11 ssid bridgemanbridge(config-ssid)# authentication network-eap eap_adambridge(config-ssid)# authentication key-management wpabridge(config-ssid)# authentication client username adam password adam bridge(config-ssid)# infrastructure-ssidbridge(config-if)# end
Configuring the Root Device to Interact with the WDS Device
To support non-root bridges using CCKM, your root device must interact with the WDS device on your network, and your authentication server must be configured with a username and password for the root device. For detailed instructions on configuring WDS and CCKM on your wireless LAN, see Chapter 11 in the Cisco IOS Software Configuration Guide for Cisco Access Points.
On your root device, enter this command in global configuration mode:
bridge(config)# wlccp ap username username password password
You must configure the same username and password pair when you set up the root device as a client on your authentication server.
Configuring Additional WPA Settings
Use two optional settings to configure a pre-shared key on the bridge and adjust the frequency of group key updates.
Setting a Pre-Shared Key
To support WPA on a wireless LAN where 802.1x-based authentication is not available, you must configure a pre-shared key on the bridge. You can enter the pre-shared key as ASCII or hexadecimal characters. If you enter the key as ASCII characters, you enter between 8 and 63 characters, and the bridge expands the key using the process described in the Password-based Cryptography Standard (RFC 2898). If you enter the key as hexadecimal characters, you must enter 64 hexadecimal characters.
Configuring Group Key Updates
In the second optional WPA setting, the root device distributes a group key to the authenticated non-root bridge. You can use these optional settings to configure the root device to change and distribute the group key based on association and disassociation of non-root bridges:
• Membership termination—the root device generates and distributes a new group key when any authenticated non-root bridge disassociates from the root device. This feature keeps the group key private for associated bridges.
• Capability change—the root device generates and distributes a dynamic group key when the last non-key management (static WEP) non-root bridge disassociates, and it distributes the statically configured WEP key when the first non-key management (static WEP) non-root bridge authenticates. In WPA migration mode, this feature significantly improves the security of key-management capable clients when there are no static-WEP bridges associated to the root device.
To configure a WPA pre-shared key, follow these steps, beginning in privileged EXEC mode.
23Cisco 3200 Series Wireless MIC Software Configuration Guide

Authentication Types Configuring Authentication Types
This example shows how to configure a pre-shared key for non-root bridges using WPA:
bridge# configure terminalbridge(config)# dot11 ssid batmanbridge(config-ssid)# wpa-psk ascii batmobile65bridge(config-ssid)# end
Configuring Authentication Holdoffs, Timeouts, and IntervalsBeginning in privileged EXEC mode, follow these steps to configure holdoff times, reauthentication periods, and authentication timeouts for non-root bridges authenticating through your root device:
Use the no form of these commands to reset the values to default settings.
Command Purpose
Step 1 configure terminal Enters global configuration mode.
Step 2 dot11 ssid ssid-string Enters SSID configuration mode for the SSID.
Step 3 wpa-psk { hex | ascii } [ 0 | 7 ] encryption-key
Enters a pre-shared key for bridges using WPA that also use static WEP keys.
Enters the key using either hexadecimal or ASCII characters. If you use hexadecimal, you must enter 64 hexadecimal characters to complete the 256-bit key. If you use ASCII, you must enter a minimum of 8 letters, numbers, or symbols, and the bridge expands the key for you. You can enter a maximum of 63 ASCII characters.
Step 4 end Returns to privileged EXEC mode.
Step 5 copy running-config startup-config (Optional) Saves your entries in the configuration file.
Command Purpose
Step 1 configure terminal Enters global configuration mode.
Step 2 dot11 holdoff-time seconds Enters the number of seconds a root device must wait before it disassociates an idle client. Enter a value from 1 to 65555 seconds.
Step 3 dot1x reauth-period seconds [server]
Enters the interval, in seconds, that the WMIC waits before forcing an authenticated non-root bridge to reauthenticate.
• (Optional) Enter the server keyword to configure the bridge to use the reauthentication period specified by the authentication server. If you use this option, configure your authentication server with RADIUS attribute 27, Session-Timeout. This attribute sets the maximum number of seconds of service to be provided to the non-root bridge before termination of the session or prompt. The server sends this attribute to the root device when a non-root bridge performs EAP authentication.
Step 4 end Return to privileged EXEC mode.
Step 5 copy running-config startup-config (Optional) Save your entries in the configuration file.
24Cisco 3200 Series Wireless MIC Software Configuration Guide

Authentication Types Matching Authentication Types on Root Devices and Non-Root Bridges
Matching Authentication Types on Root Devices and Non-Root Bridges
To use the authentication types described in this section, the root device authentication settings must match the settings on the non-root bridges that associate to the root device.
Note Root devices include root bridges and access points. Non-root bridges include workgroup bridges, and non-root bridges.
Table 2 lists the settings required for each authentication type on the root and non-root bridges.
Table 2 Client and Bridge Security Settings
Security Feature Non-Root Bridge Setting Root Device Setting
Static WEP with open authentication
Set up and enable WEP and enable open Authentication.
Set up and enable WEP and enable open Authentication.
Static WEP with shared key authentication
Set up and enable WEP and enable shared key authentication.
Set up and enable WEP and enable shared key Authentication.
LEAP authentication Configure a LEAP username and password and enable network-EAP authentication.
Enable network-EAP authentication.
CCKM key management Set up and enable WEP and enable CCKM authentication.
Set up and enable WEP and enable CCKM authentication, configure the root device to interact with your WDS device, and add the root device to your authentication server as a client device.
WPA key management Set up and enable WEP and enable WPA authentication.
Set up and enable WEP and enable WPA authentication.
25Cisco 3200 Series Wireless MIC Software Configuration Guide

Authentication Types Matching Authentication Types on Root Devices and Non-Root Bridges
26Cisco 3200 Series Wireless MIC Software Configuration Guide