Austerlitz to Waterloo Playsheet - Wargame Rules and … to Waterloo is a set of rules for playing...
31
Austerlitz to Waterloo Rules for Tabletop Wargames Set in the Napoleonic Era Using 25-30mm Size Model Soldiers By Wes Rogers ©2015-2016 Wes Rogers
-
Upload
truongliem -
Category
Documents
-
view
227 -
download
3
Transcript of Austerlitz to Waterloo Playsheet - Wargame Rules and … to Waterloo is a set of rules for playing...
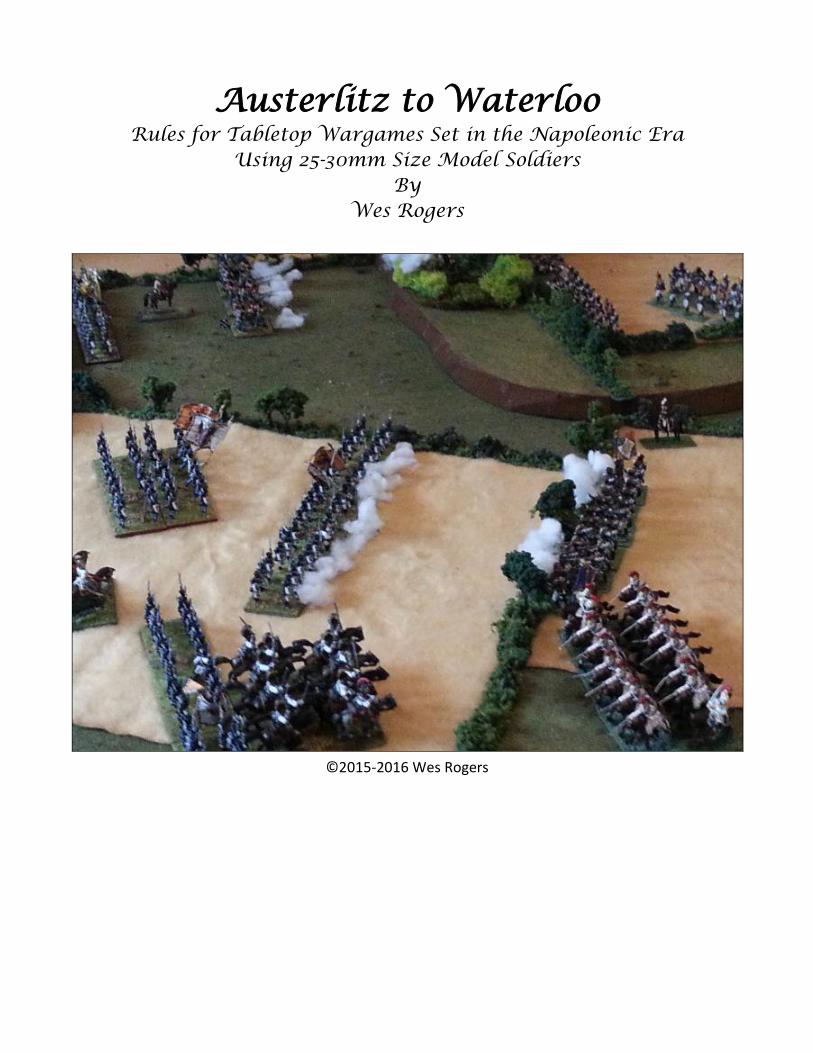
Austerlitz to Waterloo Rules for Tabletop Wargames Set in the Napoleonic Era
Using 25-30mm Size Model Soldiers By
Wes Rogers
©2015-2016 Wes Rogers


Austerlitz to Waterloo
I 11/14/16
TABLE OF CONTENTS 1 INTRODUCTION .................................................................................................................................... 1
2 GAME SCALES, DICE AND MEASUREMENTS ........................................................................................ 1
3 TROOP TYPES AND MORALE GRADES .................................................................................................. 2
4 MOUNTING FIGURES ON BASES ........................................................................................................... 2
4.1 Infantry .......................................................................................................................................... 3
4.2 Cavalry ........................................................................................................................................... 3
4.3 Artillery .......................................................................................................................................... 3
4.4 Generals and Staff ......................................................................................................................... 4
5 GROUPING FIGURES INTO UNITS ......................................................................................................... 4
6 MORALE STATES ................................................................................................................................... 4
7 GENERALS ............................................................................................................................................. 4
7.1 Moving Generals, Attaching Generals to Units ............................................................................. 4
7.2 Command Distance and Confusion ............................................................................................... 5
7.3 Danger to Generals ........................................................................................................................ 5
8 MEASURING DAMAGE TO UNITS ......................................................................................................... 5
8.1 Damage Hits and Rout Hits ............................................................................................................ 5
8.2 Testing for Rout Hits ...................................................................................................................... 5
9 ORDER AND STEADINESS...................................................................................................................... 6
9.1 Steady Units ................................................................................................................................... 6
9.2 Disorder ......................................................................................................................................... 6
9.2.1 Recovering from Disorder ....................................................................................................... 6
9.2.2 Exhaustion ............................................................................................................................... 7
10 TURN SEQUENCE .................................................................................................................................. 7
11 RALLYING FROM SHAKEN STATUS ....................................................................................................... 7
12 MOVEMENT AND MANEUVER ............................................................................................................. 8
12.1 Movement Chart ........................................................................................................................ 8
12.2 Formations ................................................................................................................................. 8
12.3 Pinned Units (Optional) .............................................................................................................. 8
12.4 Restrictions on Moving in Square .............................................................................................. 9
12.5 Sidestepping, backstepping or oblique moves .......................................................................... 9
12.6 Changing formation and/or facing ............................................................................................. 9
12.7 Cost to change formation/facing ............................................................................................. 10
12.8 How to Change Formation ....................................................................................................... 10
12.9 Elbow Room (Optional) ............................................................................................................ 10
12.10 Movement Debt ....................................................................................................................... 11
12.11 Wheeling .................................................................................................................................. 11
12.12 Pass through a friend: Interpenetration .................................................................................. 11
12.13 Bent Lines ................................................................................................................................. 11
12.14 Limbering and Unlimbering Artillery ........................................................................................ 11
12.15 Dismounting Dragoons ............................................................................................................. 11
12.16 The Hasty Square...................................................................................................................... 12
13 SKIRMISHERS ...................................................................................................................................... 12
13.1 Moving Skirmishers .................................................................................................................. 12
Austerlitz to Waterloo
II 11/14/16
13.2 Evading Enemy Attacks ............................................................................................................ 12
13.2.1 Gun Crews Evading ............................................................................................................ 12
13.3 Forming and Reforming from Skirmish Order .......................................................................... 13
13.4 Skirmish Screens ....................................................................................................................... 13
13.4.1 Screen vs. Screen ............................................................................................................... 13
14 ATTACK MOVES .................................................................................................................................. 13
14.1 No countercharges ................................................................................................................... 14
14.2 Cavalry Attacking a Steady Square ........................................................................................... 14
14.2.1 Exposing a Flank when Attacking ...................................................................................... 14
14.3 Flank/Rear Attacks and Bookending ........................................................................................ 14
14.4 Restrictions on Attack Moves .................................................................................................. 14
15 RETREAT MOVES ................................................................................................................................ 14
15.1 Distance and Direction of Retreat Moves ................................................................................ 15
15.2 Voluntary Retreat Moves ......................................................................................................... 15
16 SHOOTING .......................................................................................................................................... 15
16.1 Procedure ................................................................................................................................. 15
16.2 Ranks of Figures Eligible to Shoot ............................................................................................ 15
16.3 Dice to roll when shooting ....................................................................................................... 15
16.4 Moving and Shooting ............................................................................................................... 15
16.5 Dense targets ........................................................................................................................... 16
16.6 Howitzers .................................................................................................................................. 16
16.7 Restrictions on Shooting .......................................................................................................... 16
16.8 Shooting Through Skirmishers ................................................................................................. 16
16.9 Fire Chart and Modifiers .......................................................................................................... 16
16.10 The Fire Test ............................................................................................................................. 17
16.11 Arc of Fire and Splitting Fire ..................................................................................................... 17
16.12 Overhead Fire ........................................................................................................................... 17
16.13 Firing Through a Gap between Obstacles ................................................................................ 17
16.14 Dismounting Guns .................................................................................................................... 17
16.15 Ballshot Carrythrough (Optional) ............................................................................................. 18
16.16 Artillery Duel (Optional) ........................................................................................................... 18
17 CLOSE COMBAT .................................................................................................................................. 18
17.1 Combat Points (CP)................................................................................................................... 18
17.2 Figures Eligible to Strike ........................................................................................................... 18
17.3 Defensive Fire Bonus ................................................................................................................ 19
17.4 Disorder Due to Combat .......................................................................................................... 19
17.5 Losing a Combat ....................................................................................................................... 19
17.6 Artillery in Combat ................................................................................................................... 19
17.7 Combat Tables .......................................................................................................................... 20
17.8 Cavalry Reinforcing a Combat (Optional)................................................................................. 20
17.9 Cavalry Breakthrough (Optional) ............................................................................................. 20
18 IRREGULARS ....................................................................................................................................... 20
18.1 Fanatics ..................................................................................................................................... 21
18.2 Heavy Weapons ........................................................................................................................ 21
Austerlitz to Waterloo
III 11/14/16
19 TERRAIN EFFECTS ............................................................................................................................... 21
19.1 Hills ........................................................................................................................................... 21
19.2 Rough ground ........................................................................................................................... 21
19.3 Open Woods ............................................................................................................................. 21
19.4 Dense Woods ........................................................................................................................... 21
19.5 Obstacles, Streams and Rivers ................................................................................................. 22
19.6 Roads ........................................................................................................................................ 22
19.7 Town Blocks .............................................................................................................................. 22
19.8 Fieldworks ................................................................................................................................ 23
19.9 Visibility .................................................................................................................................... 23
20 POINT VALUES .................................................................................................................................... 23

Austerlitz to Waterloo
Austerlitz to Waterloo
1 11/14/16
1 INTRODUCTION
Austerlitz to Waterloo is a set of rules for playing tabletop wargames representing battles in the Napoleonic period of European history, using 25-30mm size model soldiers. The rules cover the period roughly 1805-1815.
Napoleonic warfare is marked by a rough equality between infantry, cavalry and artillery. The footmen are not as well-drilled as in the earlier “lace wars” decades. If cavalry can catch them out of square they will usually overrun them. Cavalry is powerful but relatively more expensive due to the mass conscription of infantry and more efficient cannon production methods. Artillery is coming into its own as the battle-winning arm of service but still needs support to survive on the field of battle. Command and control has improved due to permanent grand-tactical formations: Brigades and divisions. This is reflected with an increased radius of command compared to lace wars armies.
A typical game has about a dozen units per side. A game like this should take about four hours for a pair of opponents familiar with the rules to complete.
Game setup usually involves two fairly equal forces facing one another across a table laid out with terrain models representing hills, woods, streams, etc.
Victory conditions to win a game vary widely. Often one player wins when a stated number of the enemy’s units have been eliminated. Other games hinge on the capture of a key terrain feature such as a bridge, hill or village within a certain number of turns.
The rules in earlier sections will sometimes make reference to terms explained in later sections. It is good to read through the entire set one time, and then re-read them from the start.
You will find the following equipment and markers (besides of course model soldiers and terrain) very helpful when playing the game:
1. A couple handfuls of 6-sided dice 2. Rulers or measuring tapes marked in inches 3. Markers to denote disordered and shaken units 4. Markers or rings to denote damage to units. In the game “hit” figures are removed from play. If
you have singleton figures in your units you can remove them as they are hit, or use markers until an entire stand is lost and then remove it.
Optional Rules: Various rules are marked “(optional)” and printed in italics. Decide and declare at the start of the game which if any you will be using.
2 GAME SCALES, DICE AND MEASUREMENTS
The game is played using model soldiers painted to represent the troops of the period and glued onto stands of a set size to enforce frontages. A model figure stands in for a certain number of actual men, one inch on the game table stands in for a certain number of actual feet, and a turn stands in for a certain amount of actual time. These ratios are the scales of the game.
Models (figures) One model infantry or cavalry figure represents 25 actual men. One cannon model represents two actual guns. Two gunner or crew figures represent enough personnel to serve one actual gun; therefore a fully-crewed gun model would have 4 gunner models.
Measurements All distance and range measurements in the game are made in inches.
Austerlitz to Waterloo
2 11/14/16
Distance Scale One inch on the game table represents 20 actual paces (about 50 feet), taking an average of the many shifting definitions of a “pace” as two and one-half feet.
Turn Length A turn in the game represents more or less 15 minutes of real time: a lot of “hurry up and wait” mixed with bursts of intense activity.
Dice Dice are used to determine the outcome of variable events such as firing and combat. All dice used in the game are 6-sided.
3 TROOP TYPES AND MORALE GRADES
Troops are classed by arm and type, and by morale grade.
Arm and Type:
Line infantry Line infantry operate in close order with the figures in each unit touching bases.
Light infantry (LI) Light infantry may operate either in close order or in a cloud of skirmishers.
Light cavalry
(LC)
Light cavalry ride small horses and rely on speed rather than shock power on the battlefield. Hussars are the typical light cavalry of this era.
Medium cavalry (MC)
Medium cavalry ride larger horses that are used for shock power but are cheaper to maintain than the true heavies. Dragoons are typical medium cavalry.
Heavy cavalry
(HC)
Heavy cavalry ride the largest horses and the troopers often wear a metal helmet and breastplate. But it is the size of the man and the horse that makes the heavies “heavy”.
Light artillery Cannons firing four-pound shot weight or lighter
Medium artillery Cannons firing shot lighter than 12 pounds but also including light 12-pounders
Heavy artillery Cannons firing shot of 12-pound weight or heavier
Howitzers Fire exploding shells on a high arc
Horse artillery Light or medium artillery equipped with large numbers of horses to draw the limbers. The crews are mounted like cavalry and more highly trained than most foot gunners.
Morale Grade:
Morale Grade A Grade A is for the best and rarest troops, representing elite veterans such as French Guards.
Morale Grade B Grade B is used for most other guard and elite units such as grenadiers and veteran troops.
Morale Grade C Grade C is for the majority of troops: Average properly-trained soldiers.
Morale Grade D Grade D is assigned to newly-raised, unreliable, poorly-supplied, or disaffected units. Examples would be conscripts, landwehr or militia.
4 MOUNTING FIGURES ON BASES
The base sizes given below use millimeters. They correspond to those used in many other sets of rules. It is common to mount several figures per base for stability and ease of movement. When units using differing basing systems engage in combat adjust the figures on each side so as not to penalize the unit with the wider frontage per figure.
Austerlitz to Waterloo
3 11/14/16
4.1 Infantry
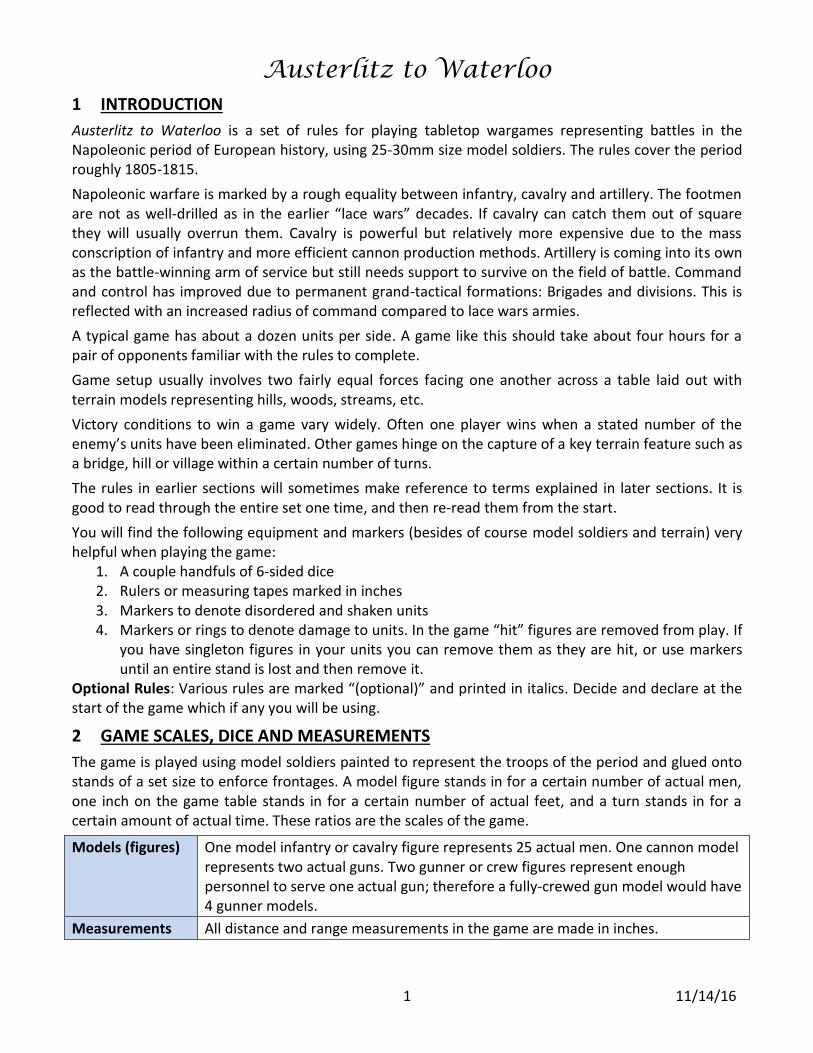
Mount infantry figures on bases with a frontage of 15-20mm per figure and a depth of 15-20mm.
The most common basing system has 4-6 figures per base mounted 2 X 2 or 3 X 2. But this is not mandatory. The rules calculate firing and combat effects by figure not by stand or unit.
Two common infantry basing schemes: 6 bases of 4 or 4 bases of 6
When in close order the figures in an infantry unit must be placed into at least two ranks of figures. It is common to glue the figures onto bases in two ranks as shown above.
Skirmishing infantry occupies a frontage and depth of 25mm. But since light troops can operate either in close order or skirmish order it is convenient to mount them on two-figure close-order bases. Then you can spread the unit into a skirmish cloud when desired.
4.2 Cavalry
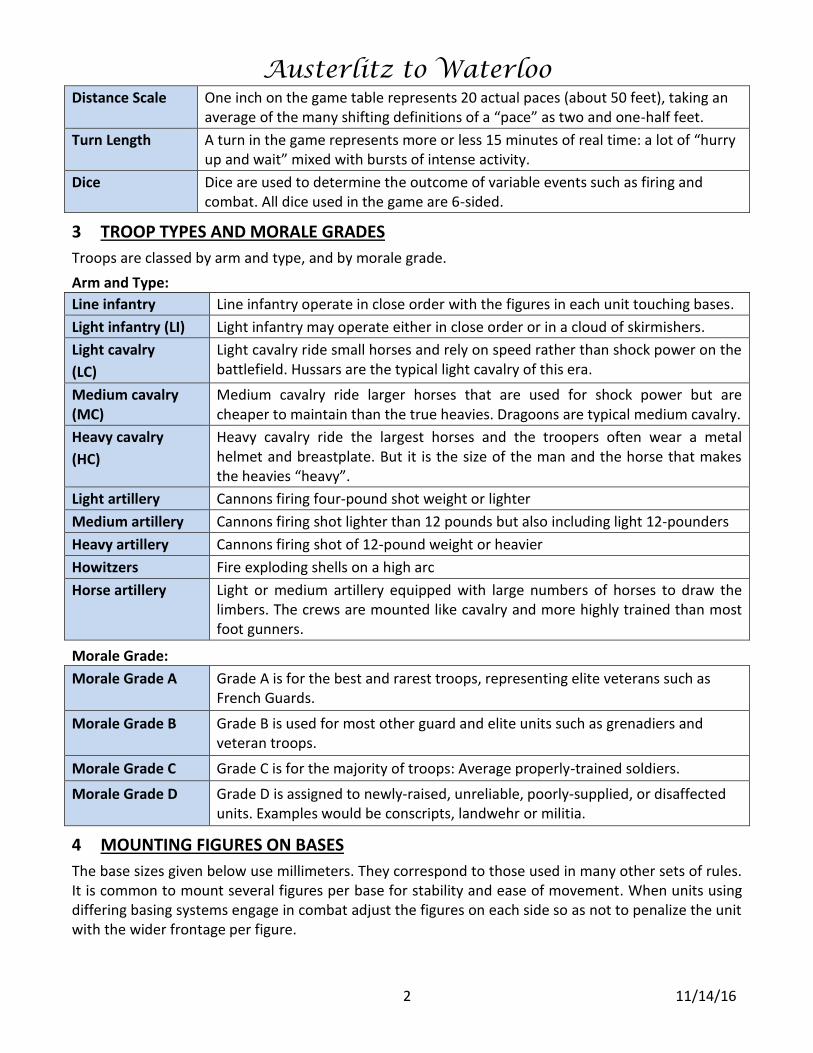
Mount cavalry on bases 20-25mm wide X 40-50mm deep per figure. Most cavalry units should be 12-16 figures strong. It is visually appealing to mount medium and heavy cavalry figures on a 20mm frontage and light or irregular cavalry figures on a looser 25mm frontage. Skirmishing cavalry occupies a 50mm frontage per figure.
An example of a cavalry unit
4.3 Artillery
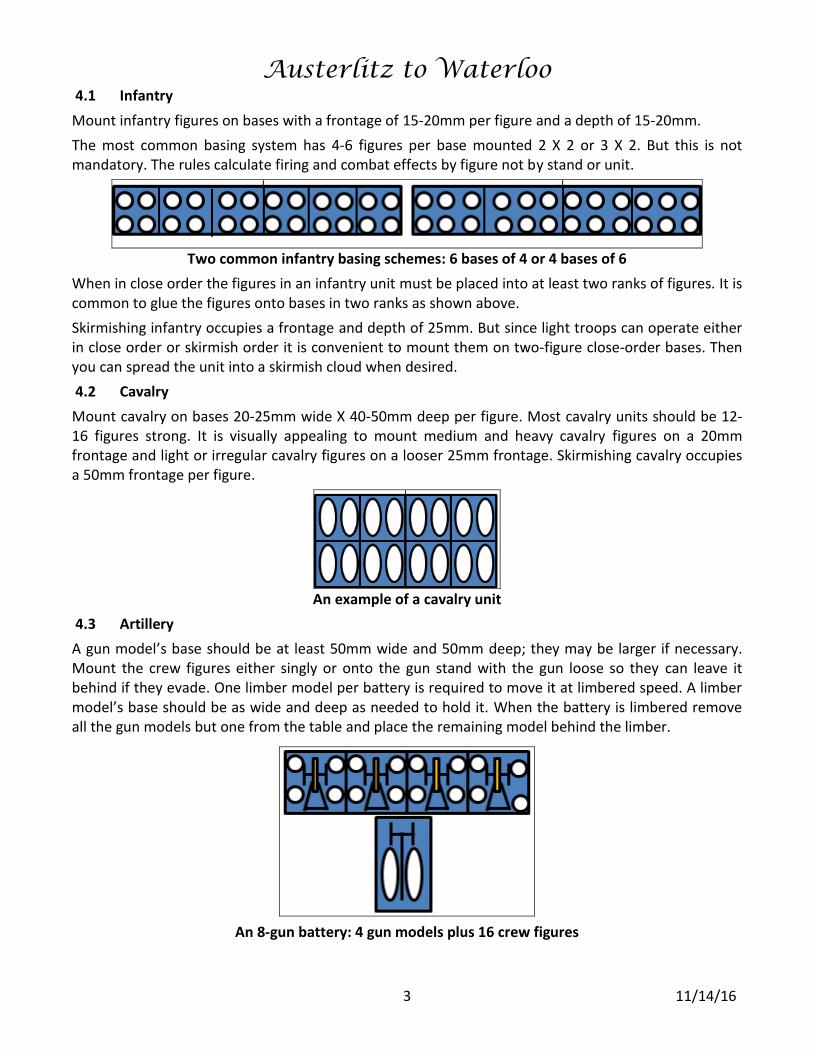
A gun model’s base should be at least 50mm wide and 50mm deep; they may be larger if necessary. Mount the crew figures either singly or onto the gun stand with the gun loose so they can leave it behind if they evade. One limber model per battery is required to move it at limbered speed. A limber model’s base should be as wide and deep as needed to hold it. When the battery is limbered remove all the gun models but one from the table and place the remaining model behind the limber.
An 8-gun battery: 4 gun models plus 16 crew figures
Austerlitz to Waterloo
4 11/14/16
4.4 Generals and Staff
You may mount your generals and staff models onto bases of any reasonable size and shape; circular is popular. Command measurements are made from the head of the model so base sizes do not matter.
5 GROUPING FIGURES INTO UNITS
A unit is a set of figures acting as one body. The game is played using units representing battalions of infantry, regiments of cavalry, and batteries of artillery. These are the basic playing pieces of the game.
There are exceptions but in general all the figures in a unit must be of the same arm, type, and grade, and must be lined up in straight rows and facing in the same direction. A typical unit is a battalion of 16-40 infantry figures (400-1000 men), a regiment of 12-24 cavalry figures (2-4 squadrons of 150 troopers), or a battery of 2-6 gun models representing 4-12 actual cannons.
6 MORALE STATES
Morale state is a measure of a unit’s willingness to obey orders in the stress of battle. A unit’s morale grade will not change during a game but its state may change based on its reaction to events.
A unit in may be in one of four states of morale: Good, halted, shaken or shattered. There is no “routed” morale state as such. The effects of panic are accounted for via mandatory retreat moves.
Good Units in good morale act normally.
Halted Units in halted morale may not move closer to the enemy but otherwise act normally. No figure in the unit may move closer to a visible enemy. Recovery is automatic after one full active turn if the unit does not become shaken or shattered.
Shaken The unit is on the verge of collapse. A shaken unit suffers numerous penalties and must pass a rally test to recover its morale. Shaken units may not advance.
Shattered The unit has collapsed or been dispersed. Remove it from play at the end of the current phase. Any unit reduced to 25% or less of its original strength is shattered. Other conditions such as skirmishers being overrun or gunners losing or tying a round of combat will also shatter a unit.
7 GENERALS
General figures represent the command and control (staffwork) of an army. Any general may control any unit; there is no “chain of command”. Generals may not fire or strike in combat.
7.1 Moving Generals, Attaching Generals to Units
Generals may be moved up to 36” per turn freely in any direction. They ignore terrain penalties but you may not move them across impassable terrain or into contact with enemy units.
You may attach a general to a unit during your active movement phase (see Turn Sequence below). Attaching a general represents special attention being paid to a particular situation along with a risk of disruption. The general’s Command Distance drops to zero (meaning he may influence only that unit) but the unit he joins gains a number of advantages. The biggest advantage is that it gains a combat point in close combat. This is often enough to ensure the unit will win that round.
You also detach generals during your active movement phase.
A general attached to a shattered unit remains in play but must make a retreat move.
Austerlitz to Waterloo
5 11/14/16
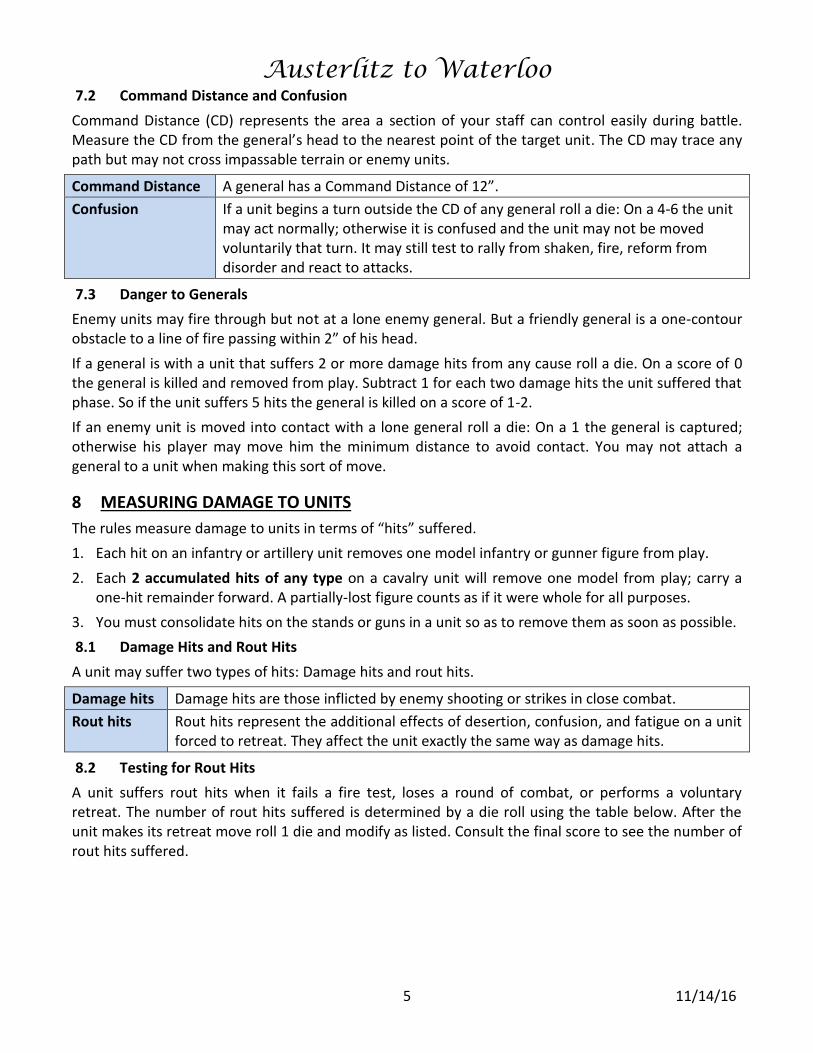
7.2 Command Distance and Confusion
Command Distance (CD) represents the area a section of your staff can control easily during battle. Measure the CD from the general’s head to the nearest point of the target unit. The CD may trace any path but may not cross impassable terrain or enemy units.
Command Distance A general has a Command Distance of 12”.
Confusion If a unit begins a turn outside the CD of any general roll a die: On a 4-6 the unit may act normally; otherwise it is confused and the unit may not be moved voluntarily that turn. It may still test to rally from shaken, fire, reform from disorder and react to attacks.
7.3 Danger to Generals
Enemy units may fire through but not at a lone enemy general. But a friendly general is a one-contour obstacle to a line of fire passing within 2” of his head.
If a general is with a unit that suffers 2 or more damage hits from any cause roll a die. On a score of 0 the general is killed and removed from play. Subtract 1 for each two damage hits the unit suffered that phase. So if the unit suffers 5 hits the general is killed on a score of 1-2.
If an enemy unit is moved into contact with a lone general roll a die: On a 1 the general is captured; otherwise his player may move him the minimum distance to avoid contact. You may not attach a general to a unit when making this sort of move.
8 MEASURING DAMAGE TO UNITS
The rules measure damage to units in terms of “hits” suffered.
1. Each hit on an infantry or artillery unit removes one model infantry or gunner figure from play.
2. Each 2 accumulated hits of any type on a cavalry unit will remove one model from play; carry a one-hit remainder forward. A partially-lost figure counts as if it were whole for all purposes.
3. You must consolidate hits on the stands or guns in a unit so as to remove them as soon as possible.
8.1 Damage Hits and Rout Hits
A unit may suffer two types of hits: Damage hits and rout hits.
Damage hits Damage hits are those inflicted by enemy shooting or strikes in close combat.
Rout hits Rout hits represent the additional effects of desertion, confusion, and fatigue on a unit forced to retreat. They affect the unit exactly the same way as damage hits.
8.2 Testing for Rout Hits
A unit suffers rout hits when it fails a fire test, loses a round of combat, or performs a voluntary retreat. The number of rout hits suffered is determined by a die roll using the table below. After the unit makes its retreat move roll 1 die and modify as listed. Consult the final score to see the number of rout hits suffered.
Austerlitz to Waterloo
6 11/14/16
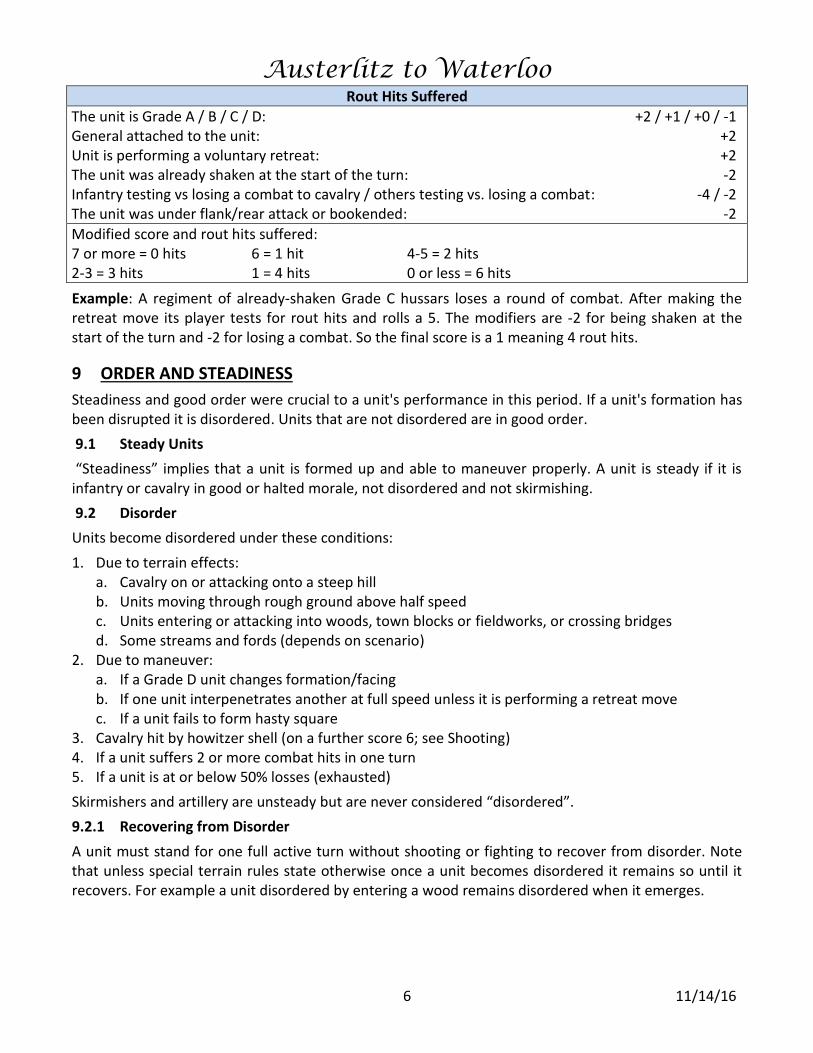
Rout Hits Suffered
The unit is Grade A / B / C / D: +2 / +1 / +0 / -1 General attached to the unit: +2 Unit is performing a voluntary retreat: +2 The unit was already shaken at the start of the turn: -2 Infantry testing vs losing a combat to cavalry / others testing vs. losing a combat: -4 / -2 The unit was under flank/rear attack or bookended: -2
Modified score and rout hits suffered: 7 or more = 0 hits 6 = 1 hit 4-5 = 2 hits 2-3 = 3 hits 1 = 4 hits 0 or less = 6 hits
Example: A regiment of already-shaken Grade C hussars loses a round of combat. After making the retreat move its player tests for rout hits and rolls a 5. The modifiers are -2 for being shaken at the start of the turn and -2 for losing a combat. So the final score is a 1 meaning 4 rout hits.
9 ORDER AND STEADINESS
Steadiness and good order were crucial to a unit's performance in this period. If a unit's formation has been disrupted it is disordered. Units that are not disordered are in good order.
9.1 Steady Units
“Steadiness” implies that a unit is formed up and able to maneuver properly. A unit is steady if it is infantry or cavalry in good or halted morale, not disordered and not skirmishing.
9.2 Disorder
Units become disordered under these conditions:
1. Due to terrain effects: a. Cavalry on or attacking onto a steep hill b. Units moving through rough ground above half speed c. Units entering or attacking into woods, town blocks or fieldworks, or crossing bridges d. Some streams and fords (depends on scenario)
2. Due to maneuver: a. If a Grade D unit changes formation/facing b. If one unit interpenetrates another at full speed unless it is performing a retreat move c. If a unit fails to form hasty square
3. Cavalry hit by howitzer shell (on a further score 6; see Shooting) 4. If a unit suffers 2 or more combat hits in one turn 5. If a unit is at or below 50% losses (exhausted)
Skirmishers and artillery are unsteady but are never considered “disordered”.
9.2.1 Recovering from Disorder
A unit must stand for one full active turn without shooting or fighting to recover from disorder. Note that unless special terrain rules state otherwise once a unit becomes disordered it remains so until it recovers. For example a unit disordered by entering a wood remains disordered when it emerges.
Austerlitz to Waterloo
7 11/14/16
9.2.2 Exhaustion
Once a unit has suffered 50% or more losses it is exhausted. Exhausted units are permanently disordered. To make an attack move with an exhausted unit you must roll a 4-6 on 1D6. There is no recovery from exhaustion.
10 TURN SEQUENCE
The game is played in a series of turns; first one side goes, then the other. Each turn one side will be either active or passive. At the start of the game decide the first active side and then follow the phases below, trading roles each turn:
1. Rally a. The active side takes rally tests for shaken units.
2. Move a. The active side checks for confused units and then moves all desired units; this includes making attack moves.
b. The passive side reacts to attack moves.
3. Shooting a. The active side performs shooting. b. The passive side takes fire tests, makes retreats and removes shattered units.
5. Close Combat
a. Both sides conduct one round of close combat with engaged units. b. Both sides make retreat moves with losing units and remove shattered units. c. Both sides do cavalry break-through moves (if used) and resolve any resulting
combats. Repeat until all breakthrough moves are completed. d. The active side reforms eligible disordered units that stood for the whole turn.
11 RALLYING FROM SHAKEN STATUS
At the start of each turn the active side takes rally tests for its shaken units.
To take the test roll one die and modify as listed in the chart below. If the unit passes it is once more in good morale and may act normally. If the unit fails it remains in shaken status. If the unit is also disordered it may still stand for the turn to reform from disorder, but will remain shaken.
See also Section 14.3.3 Exposing a Flank during an Attack for an additional test using this table.
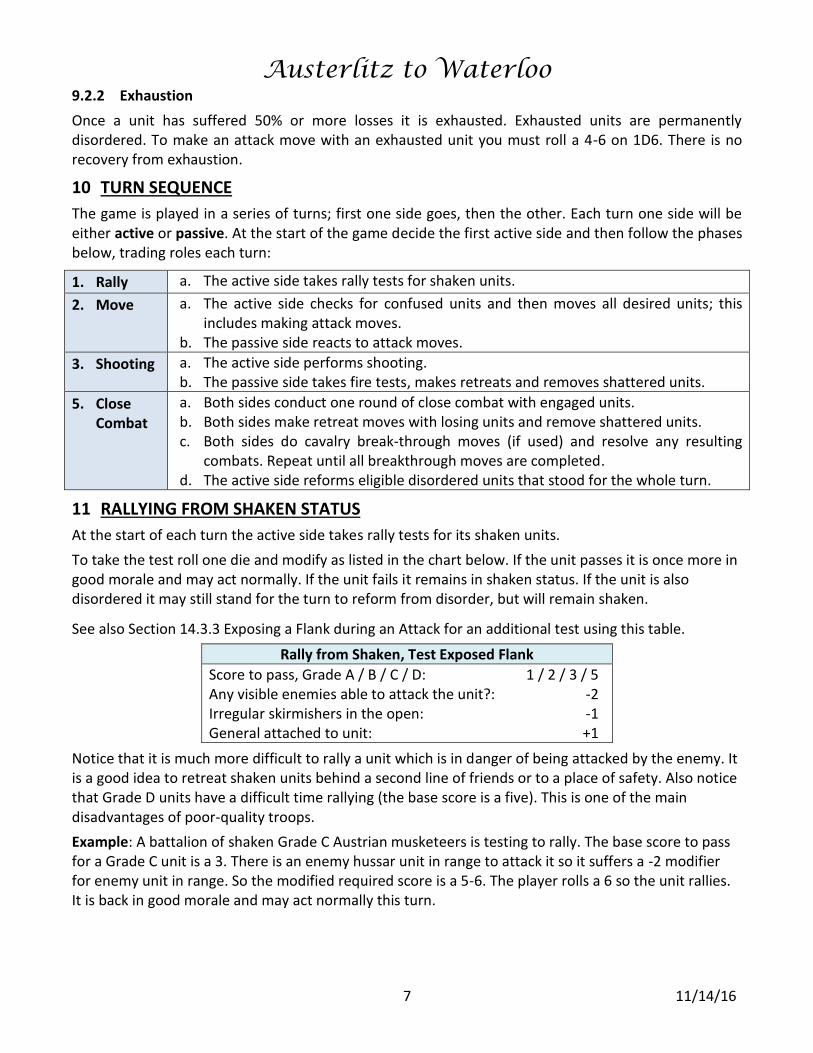
Rally from Shaken, Test Exposed Flank
Score to pass, Grade A / B / C / D: 1 / 2 / 3 / 5 Any visible enemies able to attack the unit?: -2 Irregular skirmishers in the open: -1 General attached to unit: +1
Notice that it is much more difficult to rally a unit which is in danger of being attacked by the enemy. It is a good idea to retreat shaken units behind a second line of friends or to a place of safety. Also notice that Grade D units have a difficult time rallying (the base score is a five). This is one of the main disadvantages of poor-quality troops.
Example: A battalion of shaken Grade C Austrian musketeers is testing to rally. The base score to pass for a Grade C unit is a 3. There is an enemy hussar unit in range to attack it so it suffers a -2 modifier for enemy unit in range. So the modified required score is a 5-6. The player rolls a 6 so the unit rallies. It is back in good morale and may act normally this turn.
Austerlitz to Waterloo
8 11/14/16
12 MOVEMENT AND MANEUVER
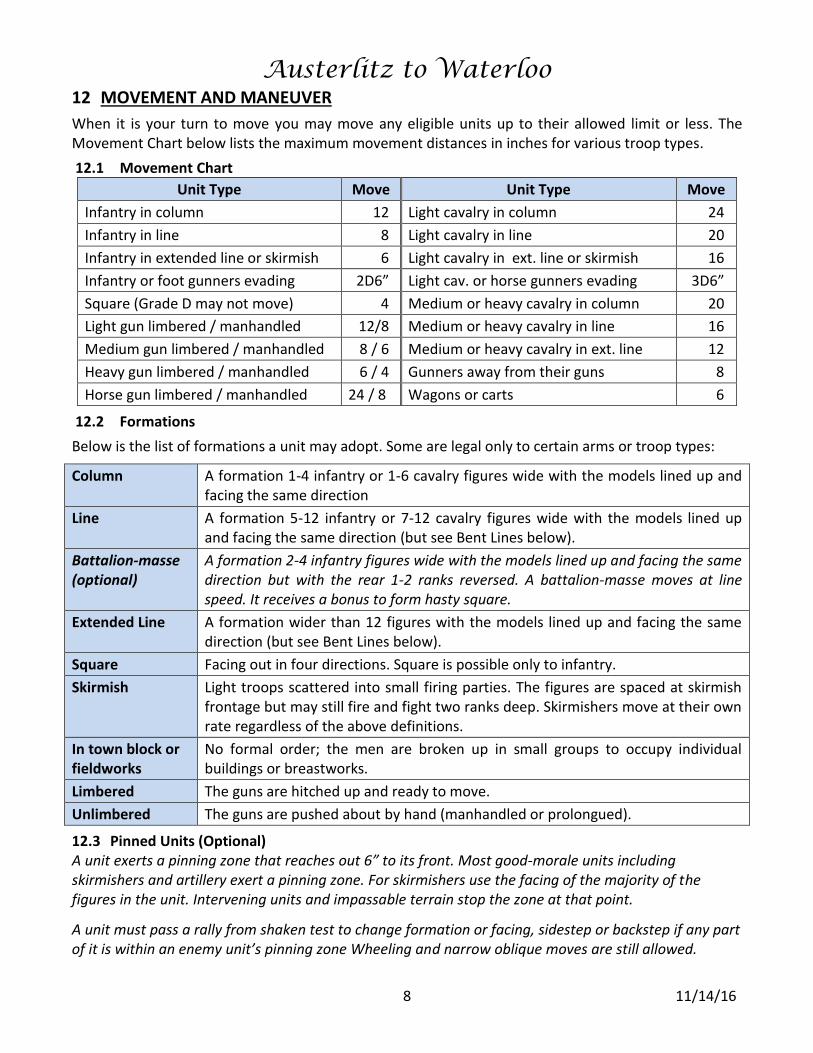
When it is your turn to move you may move any eligible units up to their allowed limit or less. The Movement Chart below lists the maximum movement distances in inches for various troop types.
12.1 Movement Chart
Unit Type Move Unit Type Move
Infantry in column 12 Light cavalry in column 24
Infantry in line 8 Light cavalry in line 20
Infantry in extended line or skirmish 6 Light cavalry in ext. line or skirmish 16
Infantry or foot gunners evading 2D6” Light cav. or horse gunners evading 3D6”
Square (Grade D may not move) 4 Medium or heavy cavalry in column 20
Light gun limbered / manhandled 12/8 Medium or heavy cavalry in line 16
Medium gun limbered / manhandled 8 / 6 Medium or heavy cavalry in ext. line 12
Heavy gun limbered / manhandled 6 / 4 Gunners away from their guns 8
Horse gun limbered / manhandled 24 / 8 Wagons or carts 6
12.2 Formations
Below is the list of formations a unit may adopt. Some are legal only to certain arms or troop types:
Column A formation 1-4 infantry or 1-6 cavalry figures wide with the models lined up and facing the same direction
Line A formation 5-12 infantry or 7-12 cavalry figures wide with the models lined up and facing the same direction (but see Bent Lines below).
Battalion-masse (optional)
A formation 2-4 infantry figures wide with the models lined up and facing the same direction but with the rear 1-2 ranks reversed. A battalion-masse moves at line speed. It receives a bonus to form hasty square.
Extended Line A formation wider than 12 figures with the models lined up and facing the same direction (but see Bent Lines below).
Square Facing out in four directions. Square is possible only to infantry.
Skirmish Light troops scattered into small firing parties. The figures are spaced at skirmish frontage but may still fire and fight two ranks deep. Skirmishers move at their own rate regardless of the above definitions.
In town block or fieldworks
No formal order; the men are broken up in small groups to occupy individual buildings or breastworks.
Limbered The guns are hitched up and ready to move.
Unlimbered The guns are pushed about by hand (manhandled or prolongued).
12.3 Pinned Units (Optional) A unit exerts a pinning zone that reaches out 6” to its front. Most good-morale units including skirmishers and artillery exert a pinning zone. For skirmishers use the facing of the majority of the figures in the unit. Intervening units and impassable terrain stop the zone at that point.
A unit must pass a rally from shaken test to change formation or facing, sidestep or backstep if any part of it is within an enemy unit’s pinning zone Wheeling and narrow oblique moves are still allowed.
Austerlitz to Waterloo
9 11/14/16
The following units exert no pinning zone: 1. Shaken units 2. Units in square 3. Units in fieldworks or town blocks
12.4 Restrictions on Moving in Square Squares have no flanks or rear for combat purposes but for maneuver their command stand position marks the unit’s front center; a square must sidestep or backstep the same as a line or column.
1. A Grade D unit may not move if in square (except to change formation out of square). 2. A unit in square may not move if within 8” of any visible enemy unit.
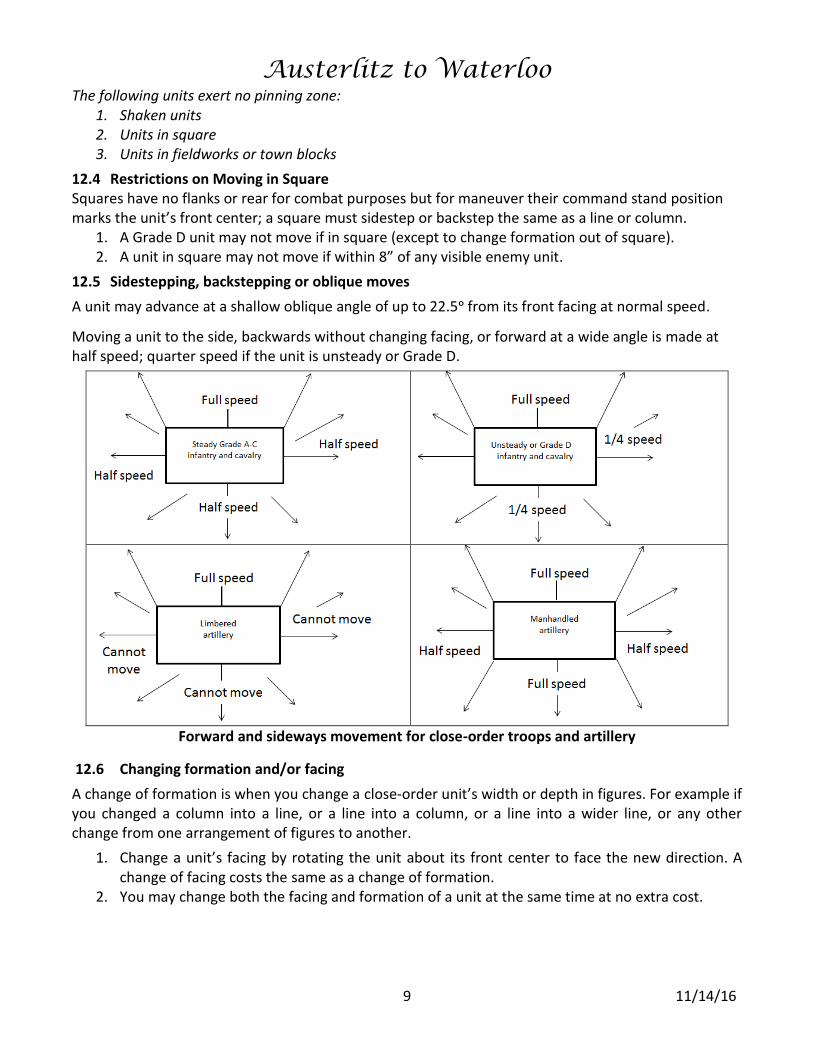
12.5 Sidestepping, backstepping or oblique moves
A unit may advance at a shallow oblique angle of up to 22.5ᵒ from its front facing at normal speed.
Moving a unit to the side, backwards without changing facing, or forward at a wide angle is made at half speed; quarter speed if the unit is unsteady or Grade D.
Forward and sideways movement for close-order troops and artillery
12.6 Changing formation and/or facing
A change of formation is when you change a close-order unit’s width or depth in figures. For example if you changed a column into a line, or a line into a column, or a line into a wider line, or any other change from one arrangement of figures to another.
1. Change a unit’s facing by rotating the unit about its front center to face the new direction. A change of facing costs the same as a change of formation.
2. You may change both the facing and formation of a unit at the same time at no extra cost.
Austerlitz to Waterloo
10 11/14/16
12.7 Cost to change formation/facing
Below are the movement costs for a unit to change formation and/or facing:
Grade A-B unit Half a move
Grade C unit Full move
Grade D unit Full move; the unit becomes disordered
If disordered or shaken Double the above costs (see movement debt)
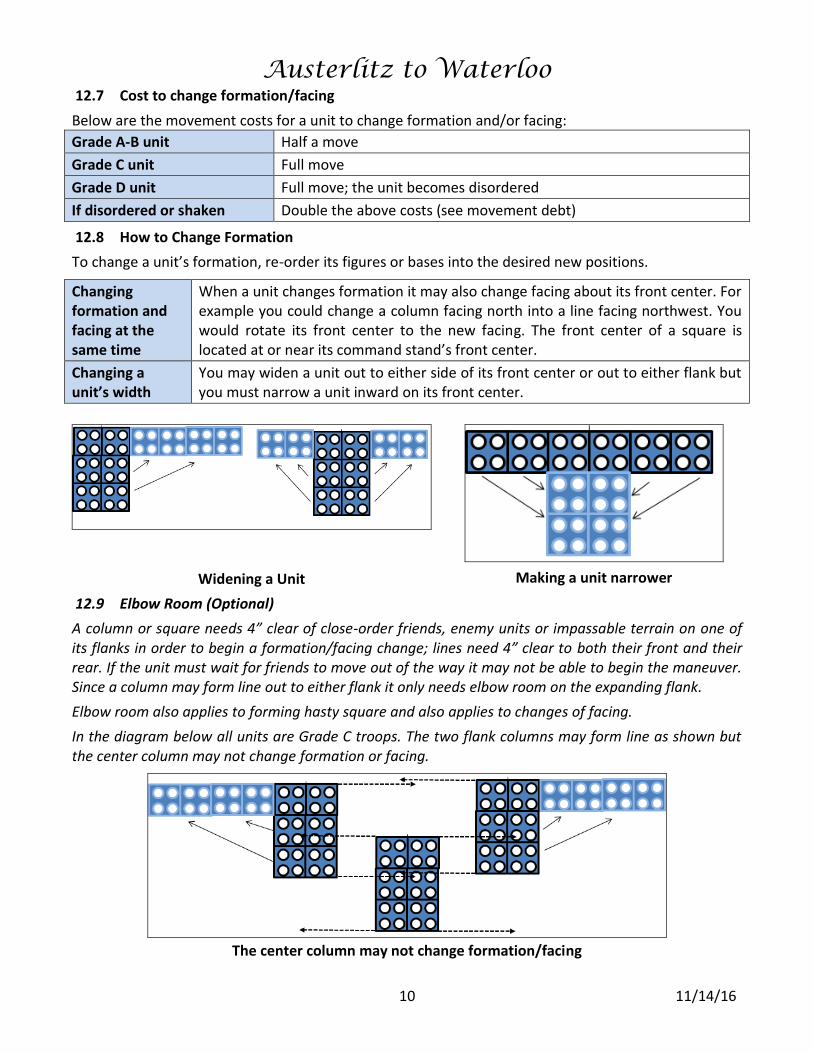
12.8 How to Change Formation
To change a unit’s formation, re-order its figures or bases into the desired new positions.
Changing formation and facing at the same time
When a unit changes formation it may also change facing about its front center. For example you could change a column facing north into a line facing northwest. You would rotate its front center to the new facing. The front center of a square is located at or near its command stand’s front center.
Changing a unit’s width
You may widen a unit out to either side of its front center or out to either flank but you must narrow a unit inward on its front center.
Widening a Unit
Making a unit narrower
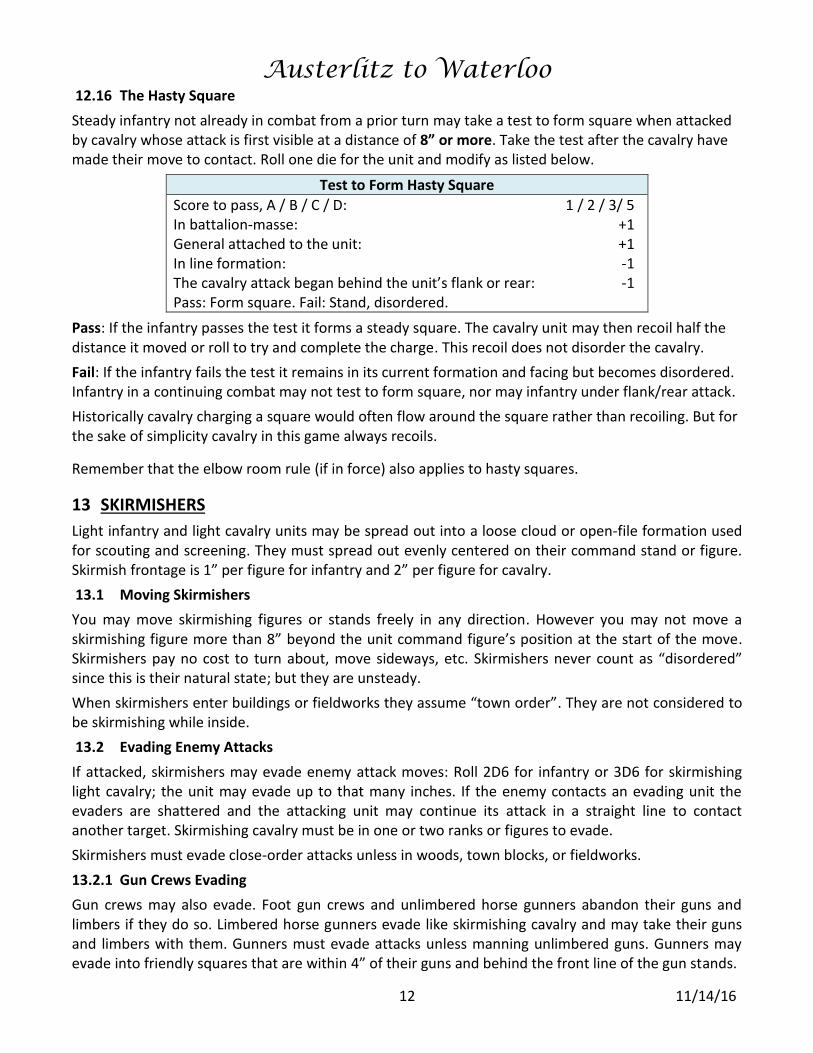
12.9 Elbow Room (Optional)
A column or square needs 4” clear of close-order friends, enemy units or impassable terrain on one of its flanks in order to begin a formation/facing change; lines need 4” clear to both their front and their rear. If the unit must wait for friends to move out of the way it may not be able to begin the maneuver. Since a column may form line out to either flank it only needs elbow room on the expanding flank.
Elbow room also applies to forming hasty square and also applies to changes of facing.
In the diagram below all units are Grade C troops. The two flank columns may form line as shown but the center column may not change formation or facing.
The center column may not change formation/facing
Austerlitz to Waterloo
11 11/14/16
12.10 Movement Debt
It may sometimes cost 2 moves for a unit to change formation/facing. In this case complete the maneuver normally. But the unit must then stand for one more active turn to pay off the movement debt. Treat the unit as shaken during this time.
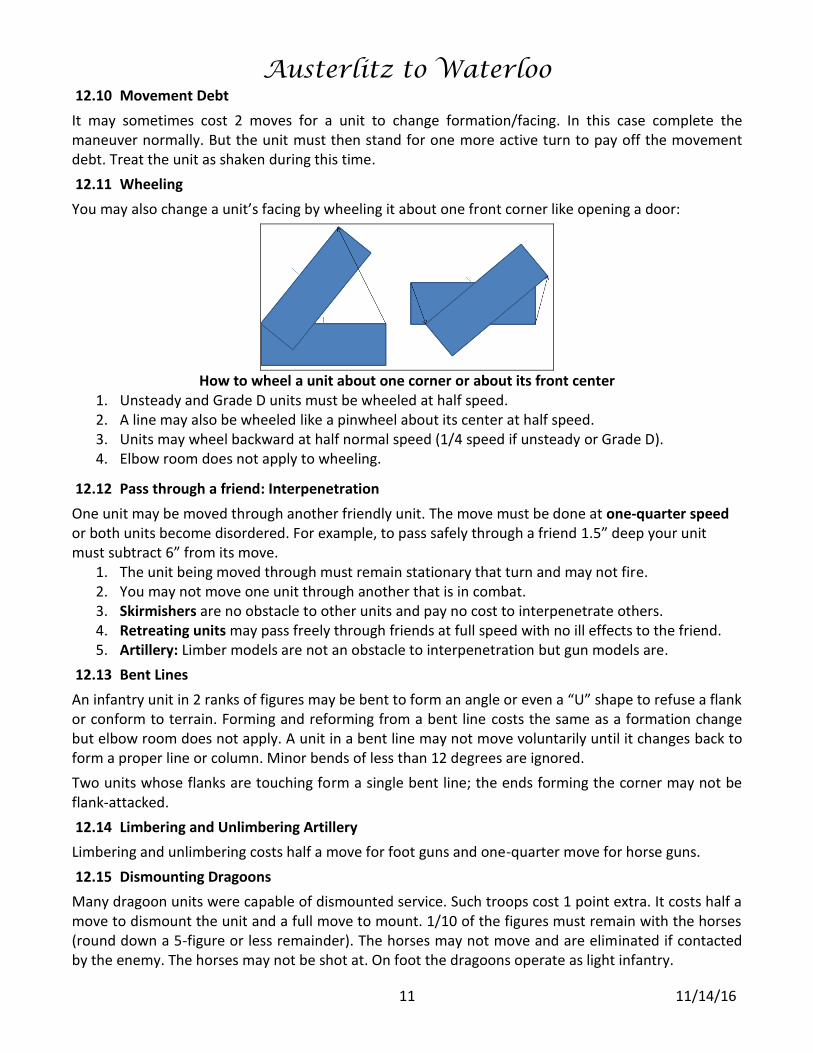
12.11 Wheeling
You may also change a unit’s facing by wheeling it about one front corner like opening a door:
How to wheel a unit about one corner or about its front center
1. Unsteady and Grade D units must be wheeled at half speed. 2. A line may also be wheeled like a pinwheel about its center at half speed. 3. Units may wheel backward at half normal speed (1/4 speed if unsteady or Grade D). 4. Elbow room does not apply to wheeling.
12.12 Pass through a friend: Interpenetration
One unit may be moved through another friendly unit. The move must be done at one-quarter speed or both units become disordered. For example, to pass safely through a friend 1.5” deep your unit must subtract 6” from its move.
1. The unit being moved through must remain stationary that turn and may not fire. 2. You may not move one unit through another that is in combat. 3. Skirmishers are no obstacle to other units and pay no cost to interpenetrate others. 4. Retreating units may pass freely through friends at full speed with no ill effects to the friend. 5. Artillery: Limber models are not an obstacle to interpenetration but gun models are.
12.13 Bent Lines
An infantry unit in 2 ranks of figures may be bent to form an angle or even a “U” shape to refuse a flank or conform to terrain. Forming and reforming from a bent line costs the same as a formation change but elbow room does not apply. A unit in a bent line may not move voluntarily until it changes back to form a proper line or column. Minor bends of less than 12 degrees are ignored.
Two units whose flanks are touching form a single bent line; the ends forming the corner may not be flank-attacked.
12.14 Limbering and Unlimbering Artillery
Limbering and unlimbering costs half a move for foot guns and one-quarter move for horse guns.
12.15 Dismounting Dragoons
Many dragoon units were capable of dismounted service. Such troops cost 1 point extra. It costs half a move to dismount the unit and a full move to mount. 1/10 of the figures must remain with the horses (round down a 5-figure or less remainder). The horses may not move and are eliminated if contacted by the enemy. The horses may not be shot at. On foot the dragoons operate as light infantry.
Austerlitz to Waterloo
12 11/14/16
12.16 The Hasty Square
Steady infantry not already in combat from a prior turn may take a test to form square when attacked by cavalry whose attack is first visible at a distance of 8” or more. Take the test after the cavalry have made their move to contact. Roll one die for the unit and modify as listed below.
Test to Form Hasty Square
Score to pass, A / B / C / D: 1 / 2 / 3/ 5 In battalion-masse: +1 General attached to the unit: +1 In line formation: -1 The cavalry attack began behind the unit’s flank or rear: -1 Pass: Form square. Fail: Stand, disordered.
Pass: If the infantry passes the test it forms a steady square. The cavalry unit may then recoil half the distance it moved or roll to try and complete the charge. This recoil does not disorder the cavalry.
Fail: If the infantry fails the test it remains in its current formation and facing but becomes disordered. Infantry in a continuing combat may not test to form square, nor may infantry under flank/rear attack.
Historically cavalry charging a square would often flow around the square rather than recoiling. But for the sake of simplicity cavalry in this game always recoils.
Remember that the elbow room rule (if in force) also applies to hasty squares.
13 SKIRMISHERS
Light infantry and light cavalry units may be spread out into a loose cloud or open-file formation used for scouting and screening. They must spread out evenly centered on their command stand or figure. Skirmish frontage is 1” per figure for infantry and 2” per figure for cavalry.
13.1 Moving Skirmishers
You may move skirmishing figures or stands freely in any direction. However you may not move a skirmishing figure more than 8” beyond the unit command figure’s position at the start of the move. Skirmishers pay no cost to turn about, move sideways, etc. Skirmishers never count as “disordered” since this is their natural state; but they are unsteady.
When skirmishers enter buildings or fieldworks they assume “town order”. They are not considered to be skirmishing while inside.
13.2 Evading Enemy Attacks
If attacked, skirmishers may evade enemy attack moves: Roll 2D6 for infantry or 3D6 for skirmishing light cavalry; the unit may evade up to that many inches. If the enemy contacts an evading unit the evaders are shattered and the attacking unit may continue its attack in a straight line to contact another target. Skirmishing cavalry must be in one or two ranks or figures to evade.
Skirmishers must evade close-order attacks unless in woods, town blocks, or fieldworks.
13.2.1 Gun Crews Evading
Gun crews may also evade. Foot gun crews and unlimbered horse gunners abandon their guns and limbers if they do so. Limbered horse gunners evade like skirmishing cavalry and may take their guns and limbers with them. Gunners must evade attacks unless manning unlimbered guns. Gunners may evade into friendly squares that are within 4” of their guns and behind the front line of the gun stands.

Austerlitz to Waterloo
13 11/14/16
13.3 Forming and Reforming from Skirmish Order Forming and reforming from skirmish order is a type of formation change. Skirmishers form up with their unit command model in the front center; it does not move when reforming but may change facing to indicate the reformed unit’s facing.
Reforming from skirmish order
13.4 Skirmish Screens
A skirmish screen is part of a main or parent unit placed in front of it in skirmish order. Line infantry may use skirmish screens if all the unit’s figures are paid to be able to screen. Light infantry and light cavalry may use skirmish screens at no extra cost. To form a screen the parent unit may send out up to 1/3 of its figures as skirmishers; light infantry may send out up to 2/3 of its figures to form a screen. They must stay within 2” of its parent unit.
There is no movement cost to send out or recover a screen. If the parent unit enters combat or makes a retreat move the screen joins it at once. Measure attack moves from the parent unit’s position. The screen moves at the rate of its parent unit; if the parent is in square the screen may move about it at skirmish rate but must keep within 2” of the parent unit. Screens move at the rate of their parent units.
A skirmish screen
13.4.1 Screen vs. Screen You may attack an enemy skirmish screen with skirmishers of your own. In this case, if the enemy skirmishers choose to meet the attack, the skirmishers fight with no intervention from their parent units. The losing screen suffers no rout hits and does not become shaken, but must fall back to rejoin its parent and may not emerge again. The winning screen may replenish its losses from its parent unit.
14 ATTACK MOVES
An attack move is when a player moves one of his units into contact with an enemy unit or units. It is used to begin a close combat.
1. An attack move is made at normal speed; there is no “charge speed” in the game. 2. To attack with a unit you must move as much of its front into contact with the target or targets as
movement and spacing will allow. 3. A unit may wheel or oblique but not change formation, sidestep or backstep into contact. 4. The target of the attack need not be visible at the start of the turn. 5. When in contact with the enemy a unit remains fixed in position until the combat ends.
Austerlitz to Waterloo
14 11/14/16
6. If the target evades you may stop your attack at the evading unit’s initial position or continue moving the unit straight forward as far as desired up to the end of its move.
14.1 No countercharges
There are no countercharges or support charges. Passive units may only react to attack moves by forming hasty square, evading where eligible, or making voluntary retreats where eligible.
14.2 Cavalry Attacking a Steady Square
In order for a cavalry unit make an attack move against a steady square it must roll one die. A score of 5-6 indicates it may make the attack move. Otherwise the cavalry are halted that turn.
14.2.1 Exposing a Flank when Attacking
If an attack move ends with a visible enemy behind its front facing and within 8” it must pass a rally from shaken test. If it fails it recoils 4” and is shaken. All test modifiers apply. The enemy unit must be in good or halted morale and be capable of attacking the testing unit next turn. If the enemy unit is itself under attack or in combat it does not pose a threat.
14.3 Flank/Rear Attacks and Bookending
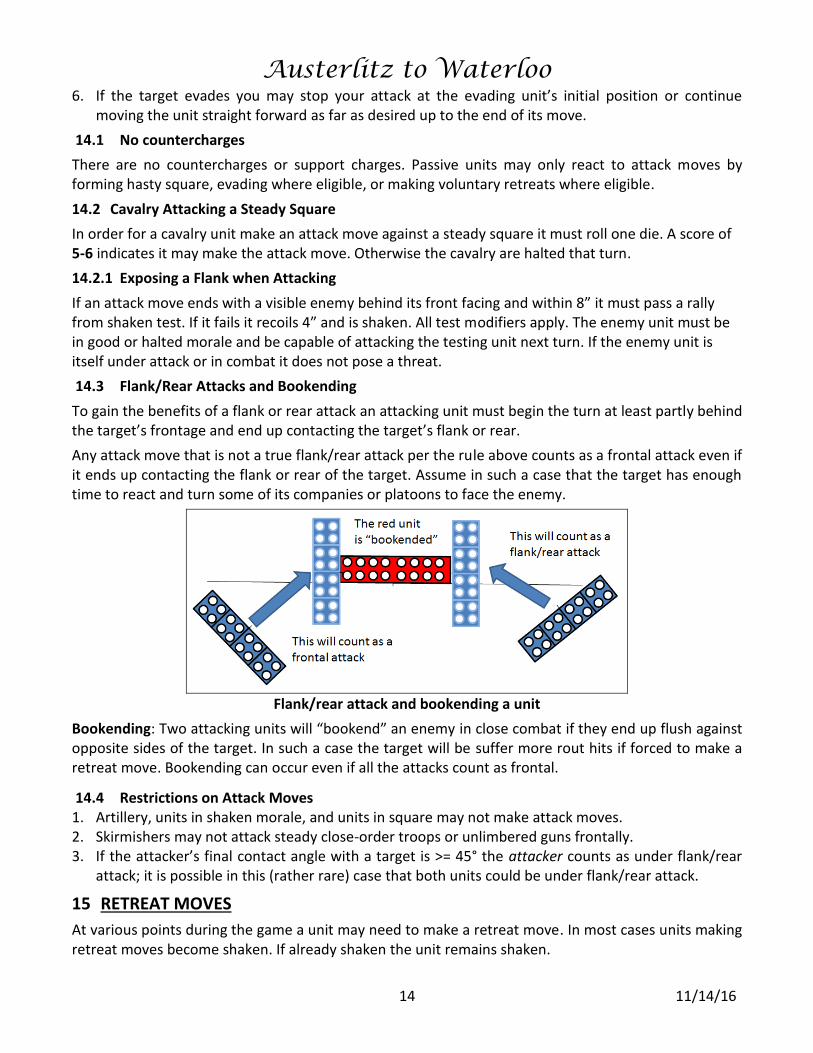
To gain the benefits of a flank or rear attack an attacking unit must begin the turn at least partly behind the target’s frontage and end up contacting the target’s flank or rear.
Any attack move that is not a true flank/rear attack per the rule above counts as a frontal attack even if it ends up contacting the flank or rear of the target. Assume in such a case that the target has enough time to react and turn some of its companies or platoons to face the enemy.
Flank/rear attack and bookending a unit
Bookending: Two attacking units will “bookend” an enemy in close combat if they end up flush against opposite sides of the target. In such a case the target will be suffer more rout hits if forced to make a retreat move. Bookending can occur even if all the attacks count as frontal.
14.4 Restrictions on Attack Moves 1. Artillery, units in shaken morale, and units in square may not make attack moves. 2. Skirmishers may not attack steady close-order troops or unlimbered guns frontally. 3. If the attacker’s final contact angle with a target is >= 45° the attacker counts as under flank/rear
attack; it is possible in this (rather rare) case that both units could be under flank/rear attack.
15 RETREAT MOVES
At various points during the game a unit may need to make a retreat move. In most cases units making retreat moves become shaken. If already shaken the unit remains shaken.
Austerlitz to Waterloo
15 11/14/16
In the basic game a retreat move does not disorder the unit and you may move a retreating unit through/around friends at no cost. This is to keep the flow of movement simple.
15.1 Distance and Direction of Retreat Moves
A retreating unit must be moved 6-36” away from the direction of the attack or fire within a 22.5 arc to either side of that line. The unit’s player decides how far to retreat it within those limits. If under attack from several directions split the difference. If retreating due to a failed fire test, treat the direction of enemy fire as the direction of the attack.
1. Retreating gunners take their guns and limbers if the battery is limbered. 2. Squares form column when they retreat. 3. Units retreating out of town blocks or fieldworks form column. 4. A retreating unit may face the enemy or about face.
If a retreating unit is surrounded or cannot avoid moving its front center into contact with a new enemy unit during its retreat then it is shattered and removed from play. But retreating cavalry may flow around enemy infantry columns and squares freely.
15.2 Voluntary Retreat Moves
Active-side units may make voluntary retreats if not in combat. Active-side cavalry units may make voluntary retreats out of combat with infantry or away from infantry attack moves. Active-side light cavalry may make voluntary retreats out of combat or away from attacks by medium or heavy cavalry. Voluntary retreats are made in the movement phase. After making the retreat the unit becomes shaken and must test to see how many rout hits it suffers.
16 SHOOTING
Shooting includes fire from small arms such as muskets and rifles, and artillery fire. During the fire phase the active side may fire once with all units having a visible target within range and arc of fire.
16.1 Procedure
The fire chart below shows the base chance to hit with various weapons at a given range. Hits on artillery remove gunner models; but see also Dismounting Guns below. You must make the required score on each die to cause a hit.
16.2 Ranks of Figures Eligible to Shoot
Two ranks of infantry figures may shoot. The second-rank figures use the range and arc of fire of their front-rank partners. Artillery must be unlimbered to fire and may not fire through other guns in its unit or through its own limber model.
16.3 Dice to roll when shooting
Use the table below to determine how many dice to roll when a unit fires:
Small arms Roll 1 die per 4 figures in the unit’s front two ranks that are in range and arc of fire to the target unit. Round up a 3-figure remainder.
Artillery Roll 1 die per gun model in the battery with at least 2 gunners, up to 2 dice per gun model. A one-gunner remainder does not count toward shooting. So a battery with 4 gun models and 16 gunners would roll 8 dice, but only 7 dice if it had 15 gunners.
16.4 Moving and Shooting
Units may make half a move and fire at a penalty. This includes artillery.
Austerlitz to Waterloo
16 11/14/16
16.5 Dense targets
Squares, lines enfiladed at 22.5 or less, and close-order units three or more ranks of figures deep are dense targets. Ballshot gains a bonus when shooting at a dense target. If any part of a close-order unit is more than two figures deep then the target is dense.
16.6 Howitzers
Howitzer models move like medium guns. They fire either canister using the range of light guns or explosive shells on a high arc. They may fire shell over obstacles if the target is visible and not within 4” of a friendly unit. Shell negates cover.
For each shell hit on cavalry roll again: On a score of 6 the cavalry are disordered.
16.7 Restrictions on Shooting 1. Shaken units may not fire. 2. Cavalry may not fire. 3. Limbered artillery may not fire. 4. A unit may not shoot into a combat (including one that started this turn). 5. There is no pass-through fire. 6. Units making an attack move or making more than half a move may not fire. 7. Units in combat may not fire (but see the defensive fire bonus). 8. A howitzer may not fire shell at a target that has a unit friendly to the howitzer within 4”.
16.8 Shooting Through Skirmishers
There is a penalty for firing through enemy skirmishers. This represents a morale advantage the target gets when it has friends between itself and the enemy. This includes fire through a screen at its parent unit. A unit may not fire through friendly skirmishers.
16.9 Fire Chart and Modifiers
The chart below lists the ranges and base chances to hit for the weapons used in the game. It also lists the modifiers to base chance to hit.
For example muskets have a close range of 4” and a long range of 8”. At close range they hit on a base 3-6 score per die; at long range they hit on a base 5-6. The modifiers adjust the dice scores.
Weapon Close Range Far Range Shooting Modifiers
Muskets Rifles Canister Light gun Medium gun Heavy gun Ballshot: Light gun Medium gun Heavy gun Howitzer shell
4: 3-6 8: 4-6 8: 3-6 12: 3-6 16: 3-6 16: 5-6 24: 5-6 30: 5-6 12-48: 6
8: 5-6 16: 5-6 32: 6 48: 6 60: 6
Firer is Grade A/B/C/D: +2/+1/+0/-1 Firer moved: -1 Firer is in square: -1 Ballshot vs. a dense target: +1 Firing unit is disordered: -1 Firing at unlimbered artillery*: -1 Firing through skirmishers or screen*: -1 Firing at skirmishers*: -2 Vs. soft cover*: -1 Vs. hard cover*: -2 *Ignore this modifier if firing shell
Need 7+ to hit? Roll a 6 then a 4-6 to score a hit.
Austerlitz to Waterloo
17 11/14/16
16.10 The Fire Test
If a unit suffers any shooting hits it must take a fire test. To take the test, roll one die and consult the chart below. The modifiers adjust the die scores. A hit counts even if it does not remove a whole figure.
Fire Test
Base score to pass, Grade A / B / C / D: -1 / 0 / 1 / 2 Each 2 shooting hits suffered hits this turn: -1 The unit is shaken: -2 The unit is in square: +1 General attached to unit: +1
Pass: If the unit passes it carries on in its current state.
Fail: If the unit advanced at least 4” on its most recent move it drops to halted morale status. In other cases it becomes shaken and must make a retreat move, rolling for rout hits.
To count as advancing every figure in the unit must have moved at least 4” closer to the enemy.
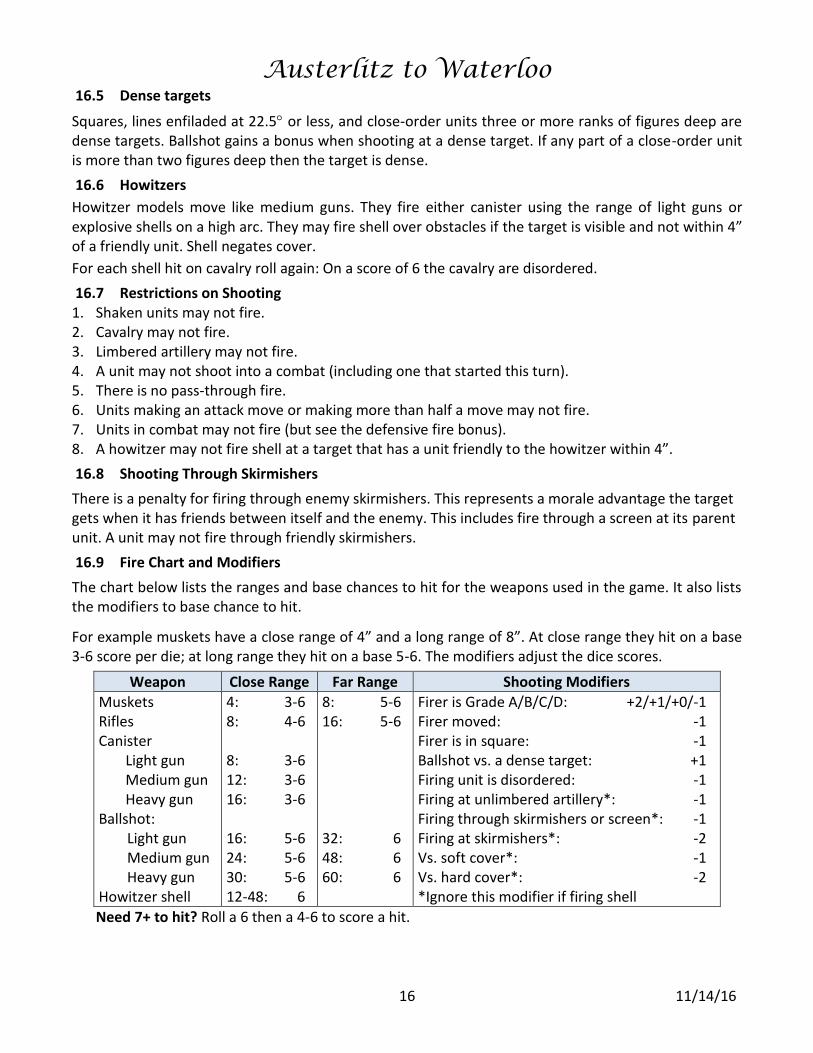
16.11 Arc of Fire and Splitting Fire
The arc of fire is 22.5 to either side of each firing figure or gun model.
A unit may split its fire among several targets if some firing figures are out of range or arc of fire to the initial target. In the figure below 8 of the blue unit’s figures may shoot at the red unit. The rest may shoot at some other eligible target.
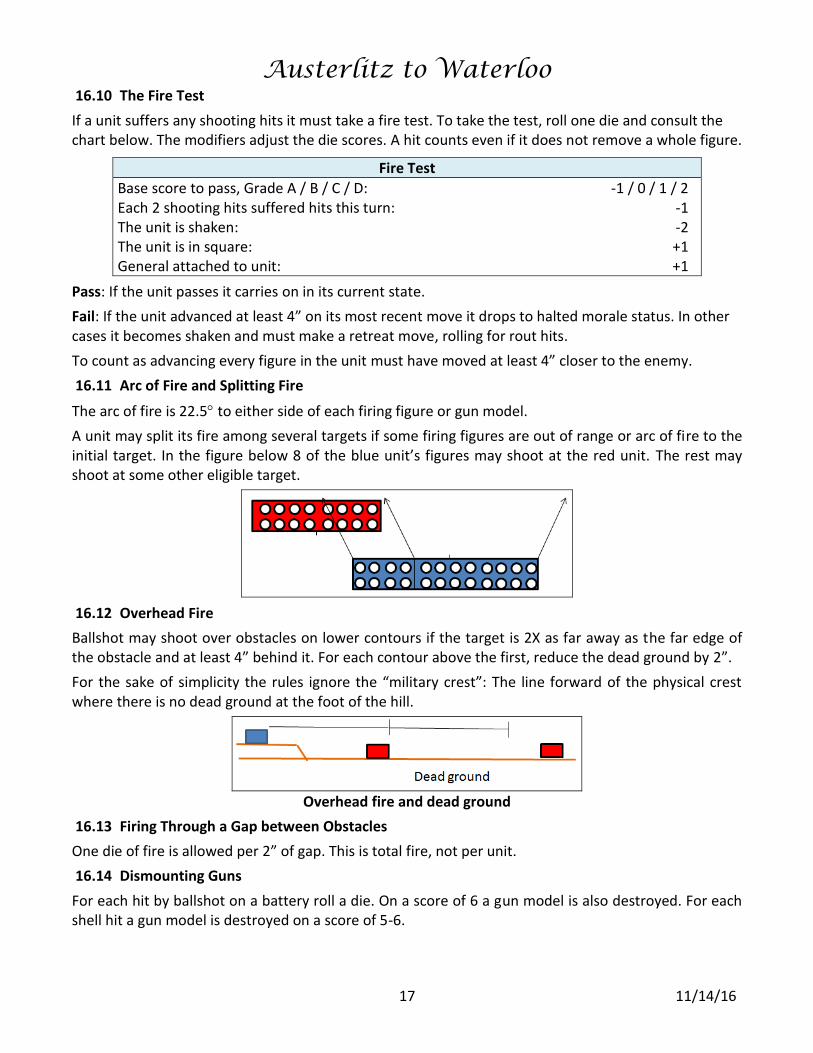
16.12 Overhead Fire
Ballshot may shoot over obstacles on lower contours if the target is 2X as far away as the far edge of the obstacle and at least 4” behind it. For each contour above the first, reduce the dead ground by 2”.
For the sake of simplicity the rules ignore the “military crest”: The line forward of the physical crest where there is no dead ground at the foot of the hill.
Overhead fire and dead ground
16.13 Firing Through a Gap between Obstacles
One die of fire is allowed per 2” of gap. This is total fire, not per unit.
16.14 Dismounting Guns
For each hit by ballshot on a battery roll a die. On a score of 6 a gun model is also destroyed. For each shell hit a gun model is destroyed on a score of 5-6.
Austerlitz to Waterloo
18 11/14/16
16.15 Ballshot Carrythrough (Optional)
This rule allows ballshot to bounce through an initial target into rearward units in the line of fire. Take a line from the front center of the firing unit to the nearest point of the target, and then extend it for the listed number of inches. Any new units the extended line crosses are also targets. Rivers, woods, town blocks, fieldworks, crestlines, and fire plunging down two or more contours stops carrythrough.
Carrythrough distances are 8” for light guns, 12” for medium guns and 16” for heavy guns.
16.16 Artillery Duel (Optional)
If artillery was fired on by enemy artillery last turn it must fire back if possible unless the player rolls a 5-6 on one die, or it has a target within canister range or a general is within 2” of the unit. If multiple required targets exist, it must shoot at the nearest.
17 CLOSE COMBAT
Close combat represents point-blank firing during a charge plus hand-to-hand fighting. A round of close combat may be taken to include a series of point-blank volleys, squadron wave-attacks, bayonet charges, and sometimes a drawn-out melee. Very few close combats will last more than one round.
17.1 Combat Points (CP)
The basis of the close combat system is the use of combat points (CP) to establish a relative difference between two units. Each type of unit receives a basic CP amount, which circumstances modify. Each player compares his unit’s modified combat points vs. those of the enemy unit. The more CP a unit has vs. the enemy the better its chance to cause hits and the worse the target’s chance is to hit in return.
It will often happen that a unit must strike at several targets. In a case like this a unit will often count different CP totals against different targets. This is normal and expected.
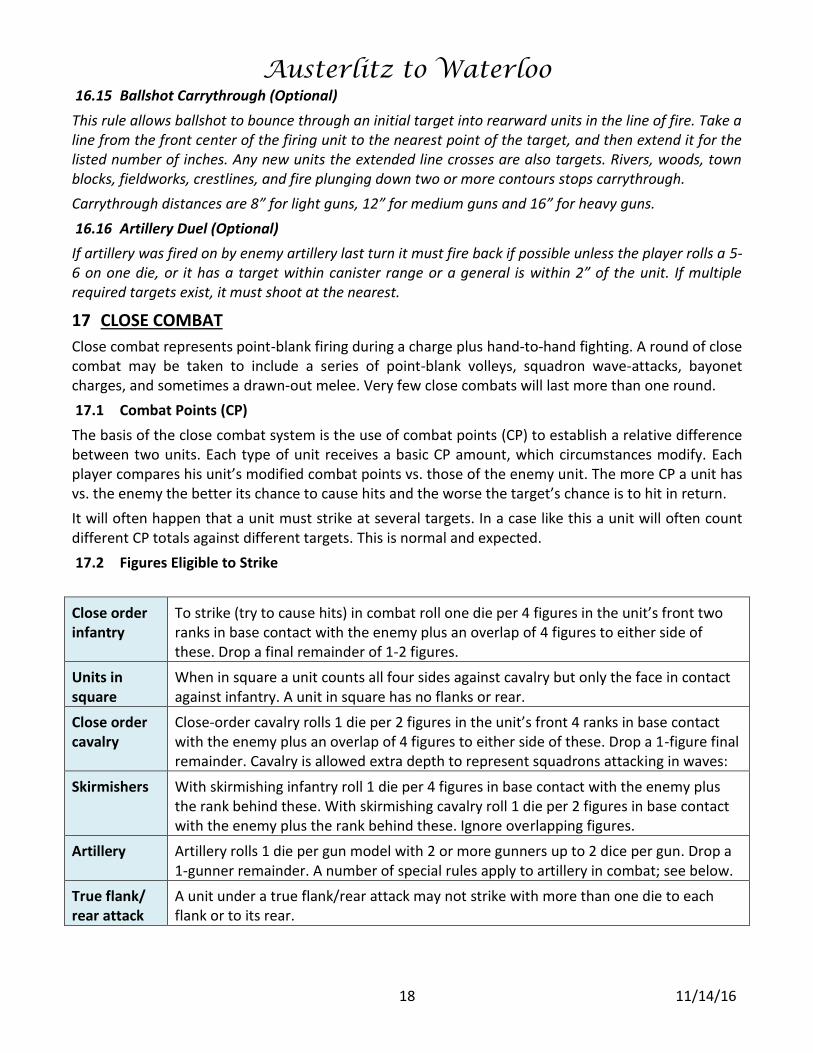
17.2 Figures Eligible to Strike
Close order infantry
To strike (try to cause hits) in combat roll one die per 4 figures in the unit’s front two ranks in base contact with the enemy plus an overlap of 4 figures to either side of these. Drop a final remainder of 1-2 figures.
Units in square
When in square a unit counts all four sides against cavalry but only the face in contact against infantry. A unit in square has no flanks or rear.
Close order cavalry
Close-order cavalry rolls 1 die per 2 figures in the unit’s front 4 ranks in base contact with the enemy plus an overlap of 4 figures to either side of these. Drop a 1-figure final remainder. Cavalry is allowed extra depth to represent squadrons attacking in waves:
Skirmishers With skirmishing infantry roll 1 die per 4 figures in base contact with the enemy plus the rank behind these. With skirmishing cavalry roll 1 die per 2 figures in base contact with the enemy plus the rank behind these. Ignore overlapping figures.
Artillery Artillery rolls 1 die per gun model with 2 or more gunners up to 2 dice per gun. Drop a 1-gunner remainder. A number of special rules apply to artillery in combat; see below.
True flank/ rear attack
A unit under a true flank/rear attack may not strike with more than one die to each flank or to its rear.
Austerlitz to Waterloo
19 11/14/16
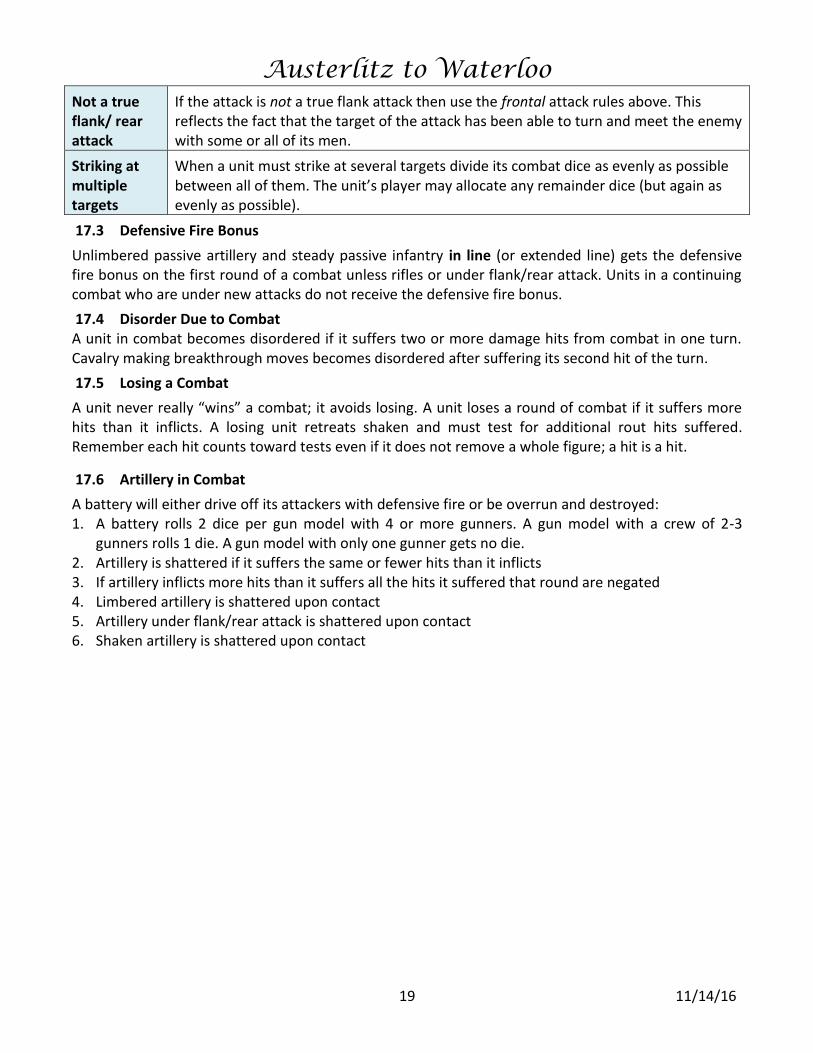
Not a true flank/ rear attack
If the attack is not a true flank attack then use the frontal attack rules above. This reflects the fact that the target of the attack has been able to turn and meet the enemy with some or all of its men.
Striking at multiple targets
When a unit must strike at several targets divide its combat dice as evenly as possible between all of them. The unit’s player may allocate any remainder dice (but again as evenly as possible).
17.3 Defensive Fire Bonus
Unlimbered passive artillery and steady passive infantry in line (or extended line) gets the defensive fire bonus on the first round of a combat unless rifles or under flank/rear attack. Units in a continuing combat who are under new attacks do not receive the defensive fire bonus.
17.4 Disorder Due to Combat A unit in combat becomes disordered if it suffers two or more damage hits from combat in one turn. Cavalry making breakthrough moves becomes disordered after suffering its second hit of the turn.
17.5 Losing a Combat
A unit never really “wins” a combat; it avoids losing. A unit loses a round of combat if it suffers more hits than it inflicts. A losing unit retreats shaken and must test for additional rout hits suffered. Remember each hit counts toward tests even if it does not remove a whole figure; a hit is a hit.
17.6 Artillery in Combat
A battery will either drive off its attackers with defensive fire or be overrun and destroyed: 1. A battery rolls 2 dice per gun model with 4 or more gunners. A gun model with a crew of 2-3
gunners rolls 1 die. A gun model with only one gunner gets no die. 2. Artillery is shattered if it suffers the same or fewer hits than it inflicts 3. If artillery inflicts more hits than it suffers all the hits it suffered that round are negated 4. Limbered artillery is shattered upon contact 5. Artillery under flank/rear attack is shattered upon contact 6. Shaken artillery is shattered upon contact
Austerlitz to Waterloo
20 11/14/16
17.7 Combat Tables
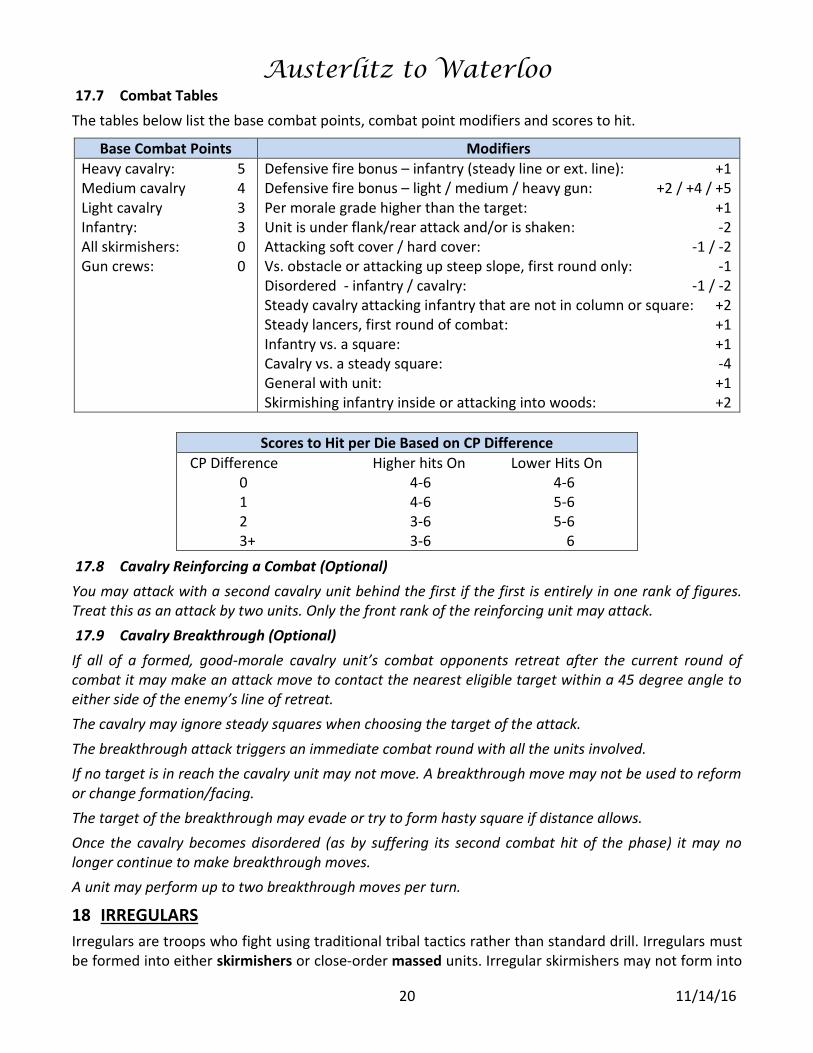
The tables below list the base combat points, combat point modifiers and scores to hit.
Base Combat Points Modifiers
Heavy cavalry: 5 Medium cavalry 4 Light cavalry 3 Infantry: 3 All skirmishers: 0 Gun crews: 0
Defensive fire bonus – infantry (steady line or ext. line): +1 Defensive fire bonus – light / medium / heavy gun: +2 / +4 / +5 Per morale grade higher than the target: +1 Unit is under flank/rear attack and/or is shaken: -2 Attacking soft cover / hard cover: -1 / -2 Vs. obstacle or attacking up steep slope, first round only: -1 Disordered - infantry / cavalry: -1 / -2 Steady cavalry attacking infantry that are not in column or square: +2 Steady lancers, first round of combat: +1 Infantry vs. a square: +1 Cavalry vs. a steady square: -4 General with unit: +1 Skirmishing infantry inside or attacking into woods: +2
Scores to Hit per Die Based on CP Difference
CP Difference Higher hits On Lower Hits On 0 4-6 4-6 1 4-6 5-6 2 3-6 5-6 3+ 3-6 6
17.8 Cavalry Reinforcing a Combat (Optional)
You may attack with a second cavalry unit behind the first if the first is entirely in one rank of figures. Treat this as an attack by two units. Only the front rank of the reinforcing unit may attack.
17.9 Cavalry Breakthrough (Optional)
If all of a formed, good-morale cavalry unit’s combat opponents retreat after the current round of combat it may make an attack move to contact the nearest eligible target within a 45 degree angle to either side of the enemy’s line of retreat.
The cavalry may ignore steady squares when choosing the target of the attack.
The breakthrough attack triggers an immediate combat round with all the units involved.
If no target is in reach the cavalry unit may not move. A breakthrough move may not be used to reform or change formation/facing.
The target of the breakthrough may evade or try to form hasty square if distance allows.
Once the cavalry becomes disordered (as by suffering its second combat hit of the phase) it may no longer continue to make breakthrough moves.
A unit may perform up to two breakthrough moves per turn.
18 IRREGULARS
Irregulars are troops who fight using traditional tribal tactics rather than standard drill. Irregulars must be formed into either skirmishers or close-order massed units. Irregular skirmishers may not form into
Austerlitz to Waterloo
21 11/14/16
close order; massed units may not skirmish. When in fieldworks or town blocks however the skirmishers are treated as if in close order. 1. Irregulars may not be Grade A. 2. All irregulars maneuver as if Grade D and are never considered to be “steady”. 3. Command Distance to irregular units is always 4”.
18.1 Fanatics
Massed irregular units may be fanatics. Fanatics get +1 combat point and a +1 bonus to pass fire tests until they lose a round of combat or fail a fire test. They then fight at their normal value.
18.2 Heavy Weapons
Massed irregular infantry units may be armed with heavy weapons (2-handed weapons, swords-and-shields, etc.). They may not shoot but get +1 combat point.
19 TERRAIN EFFECTS
19.1 Hills
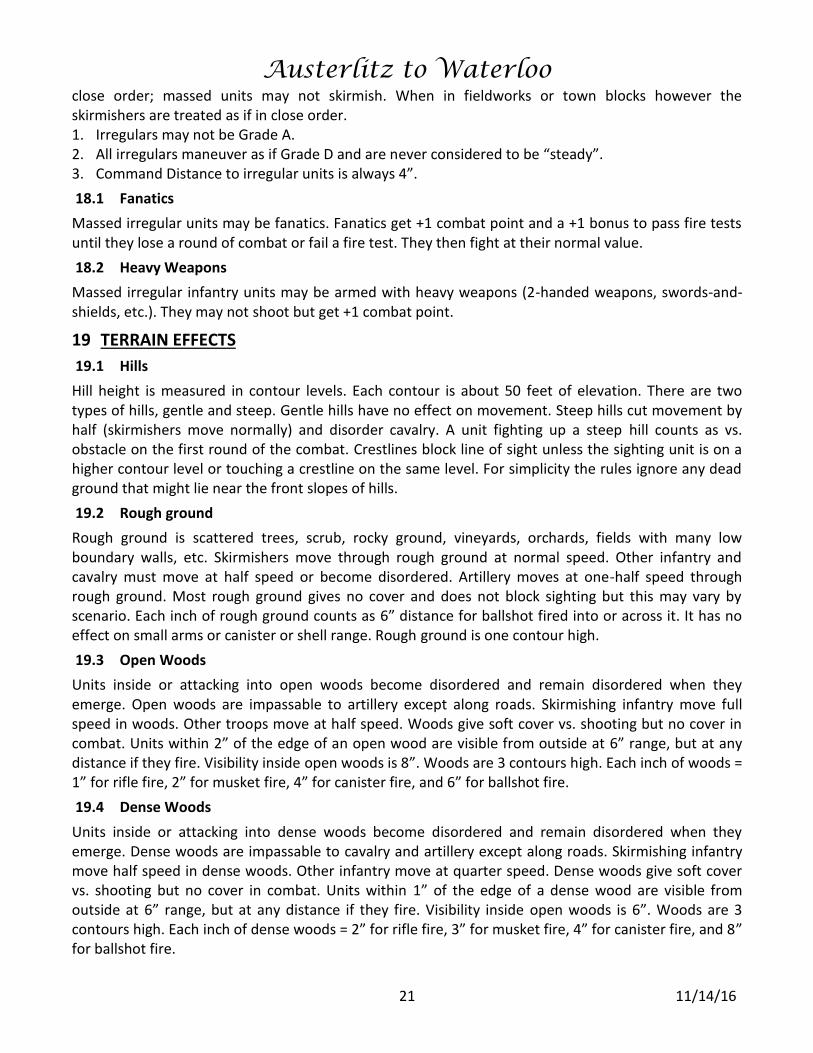
Hill height is measured in contour levels. Each contour is about 50 feet of elevation. There are two types of hills, gentle and steep. Gentle hills have no effect on movement. Steep hills cut movement by half (skirmishers move normally) and disorder cavalry. A unit fighting up a steep hill counts as vs. obstacle on the first round of the combat. Crestlines block line of sight unless the sighting unit is on a higher contour level or touching a crestline on the same level. For simplicity the rules ignore any dead ground that might lie near the front slopes of hills.
19.2 Rough ground
Rough ground is scattered trees, scrub, rocky ground, vineyards, orchards, fields with many low boundary walls, etc. Skirmishers move through rough ground at normal speed. Other infantry and cavalry must move at half speed or become disordered. Artillery moves at one-half speed through rough ground. Most rough ground gives no cover and does not block sighting but this may vary by scenario. Each inch of rough ground counts as 6” distance for ballshot fired into or across it. It has no effect on small arms or canister or shell range. Rough ground is one contour high.
19.3 Open Woods
Units inside or attacking into open woods become disordered and remain disordered when they emerge. Open woods are impassable to artillery except along roads. Skirmishing infantry move full speed in woods. Other troops move at half speed. Woods give soft cover vs. shooting but no cover in combat. Units within 2” of the edge of an open wood are visible from outside at 6” range, but at any distance if they fire. Visibility inside open woods is 8”. Woods are 3 contours high. Each inch of woods = 1” for rifle fire, 2” for musket fire, 4” for canister fire, and 6” for ballshot fire.
19.4 Dense Woods
Units inside or attacking into dense woods become disordered and remain disordered when they emerge. Dense woods are impassable to cavalry and artillery except along roads. Skirmishing infantry move half speed in dense woods. Other infantry move at quarter speed. Dense woods give soft cover vs. shooting but no cover in combat. Units within 1” of the edge of a dense wood are visible from outside at 6” range, but at any distance if they fire. Visibility inside open woods is 6”. Woods are 3 contours high. Each inch of dense woods = 2” for rifle fire, 3” for musket fire, 4” for canister fire, and 8” for ballshot fire.
Austerlitz to Waterloo
22 11/14/16
19.5 Obstacles, Streams and Rivers
Obstacles are low walls, fences, streams, hedgerows, etc. Their effects vary greatly, so define them carefully. They usually cost 2” to cross. Some will give soft cover vs. shooting, but usually no cover vs. ballshot. Streams usually cost 2X width to cross and may be disordering terrain. Units may only cross rivers at bridges or fords. Units cross bridges in one-stand-wide columns and are disordered. The effects of fords will vary based on the scenario.
19.6 Roads
A column or limbered guns on a road may move at 1.5X speed but if it does so may not attack.
19.7 Town Blocks
Rather than trying to show individual houses in towns or villages, the game uses “blocks” of buildings. Represent a block with a piece of felt or cloth, usually rectangular and about 6” X 8”. Place on it one or two model buildings to show the relative strength of the block. For example a very strong town block might have models of brick or stone structures, while a weak village might get wattle hut models. Blocks usually hold 24-48 figures and are 1-2 contours high.
It costs nothing to enter a block but half a move to emerge. You may split a unit among contiguous blocks. But if the troops in any block must retreat the whole unit must retreat.
Units in or attacking blocks become disordered and remain disordered when they emerge.
Protection inside Town Blocks: Cover for troops in town blocks can vary. Define it carefully at the start of the game. Most town blocks give soft cover against medium or heavy ballshot and hard cover vs. other fire or in combat. But a block representing a mere cluster of huts might provide no cover vs. ballshot and soft cover in combat.
Town Blocks and Shooting: The garrison can shoot from inside a block. It can fire from any or all sides with one die per 1” of block frontage, up to its total dice.
Town Blocks and Combat: In combat the entire garrison fights, dividing its dice among all attacking units. The attacker may attack each side of the block with figures equal to twice the maximum garrison size of the block, in any number of ranks. For example if the attackers are in a column six ranks deep, all six ranks may attack.
1. Units retreat out of town blocks in column. 2. The attacker may occupy the block if all the defenders are forced out. 3. Cavalry may not attack town blocks. 4. The garrison of a town block has no flanks or rear. 5. The garrison of a town block exerts no pinning zone.
Units in town blocks have no flanks or rear and may not be “bookended”. They are only eliminated on a retreat if all sides of the block are under attack.
Strongpoints and Walled Enclosures: Some town blocks may represent walled enclosures or large single structures such as Hougomont or the granary at Essling. In a case like this only the first two ranks of an attacking unit may strike, and only figures overlapping the structure by 4 to either side.
Ruined Blocks: 8 hits from medium or heavy ballshot or 4 hits from shell will ruin a typical town block. Adjust this number up or down depending on the relative size and strength of a particular block. You may wish to have “wrecked” versions of model buildings to represent ruined blocks. A ruined block provides one level of cover less than normal, with soft cover becoming an obstacle.
Austerlitz to Waterloo
23 11/14/16
Setting Blocks on Fire: Roll one die for each shell hit against a town block. On a score of 6 the block is set afire. The garrison must abandon it on their next active move or be eliminated.
19.8 Fieldworks
Typical works cost 2” to cross, and are passable only to infantry. Their cover effects can vary. Most fieldworks give hard cover vs shooting and soft cover in combat.
Define a “disorder zone” behind or inside the works, usually 2” deep. Troops in this zone move like skirmishers, but at half speed, and are disordered.
Troops entering or attacking fieldworks become disordered.
19.9 Visibility
Visibility is 60” unless blocked. Visibility is blocked by some terrain and all close-order units including artillery. A close-order unit is taken to produce enough smoke, dust and distraction that observers must be at least one hill contour above to see over them.
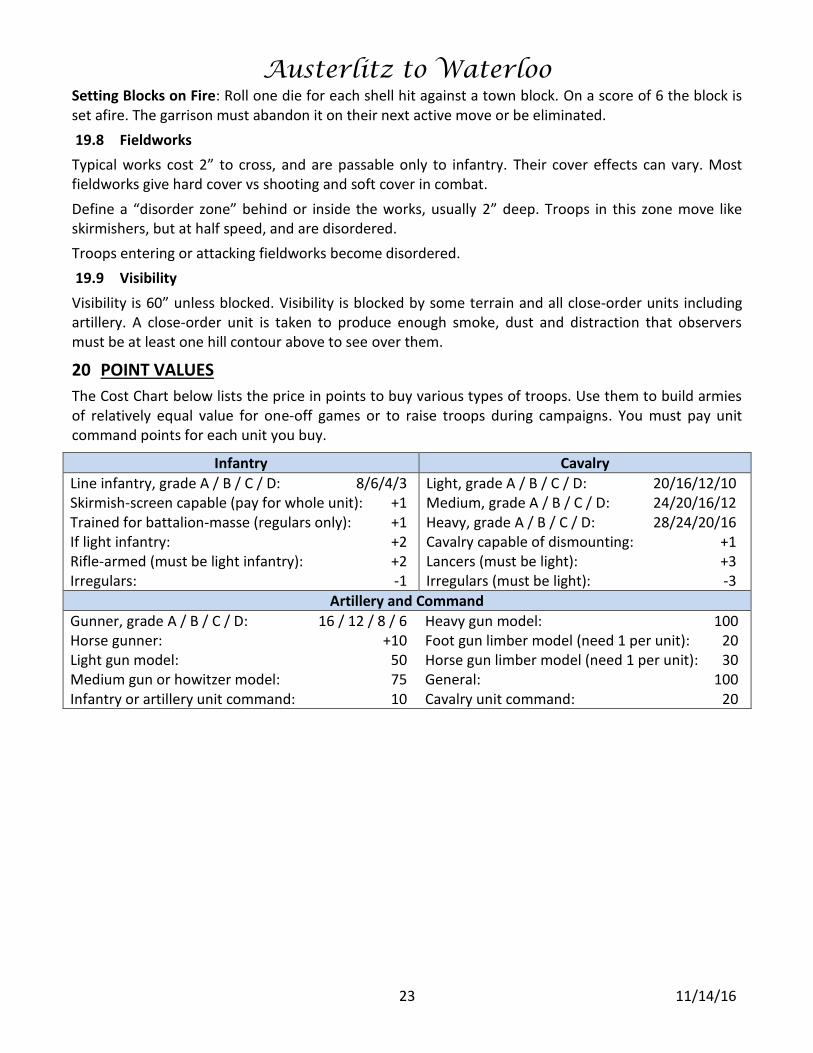
20 POINT VALUES
The Cost Chart below lists the price in points to buy various types of troops. Use them to build armies of relatively equal value for one-off games or to raise troops during campaigns. You must pay unit command points for each unit you buy.
Infantry Cavalry
Line infantry, grade A / B / C / D: 8/6/4/3 Skirmish-screen capable (pay for whole unit): +1 Trained for battalion-masse (regulars only): +1 If light infantry: +2 Rifle-armed (must be light infantry): +2 Irregulars: -1
Light, grade A / B / C / D: 20/16/12/10 Medium, grade A / B / C / D: 24/20/16/12 Heavy, grade A / B / C / D: 28/24/20/16 Cavalry capable of dismounting: +1 Lancers (must be light): +3 Irregulars (must be light): -3
Artillery and Command
Gunner, grade A / B / C / D: 16 / 12 / 8 / 6 Heavy gun model: 100 Horse gunner: +10 Foot gun limber model (need 1 per unit): 20 Light gun model: 50 Horse gun limber model (need 1 per unit): 30 Medium gun or howitzer model: 75 General: 100 Infantry or artillery unit command: 10 Cavalry unit command: 20

Austerlitz to Waterloo
Austerlitz to Waterloo Playsheet
http://www.wargamerulesandtools.com 11/14/2016
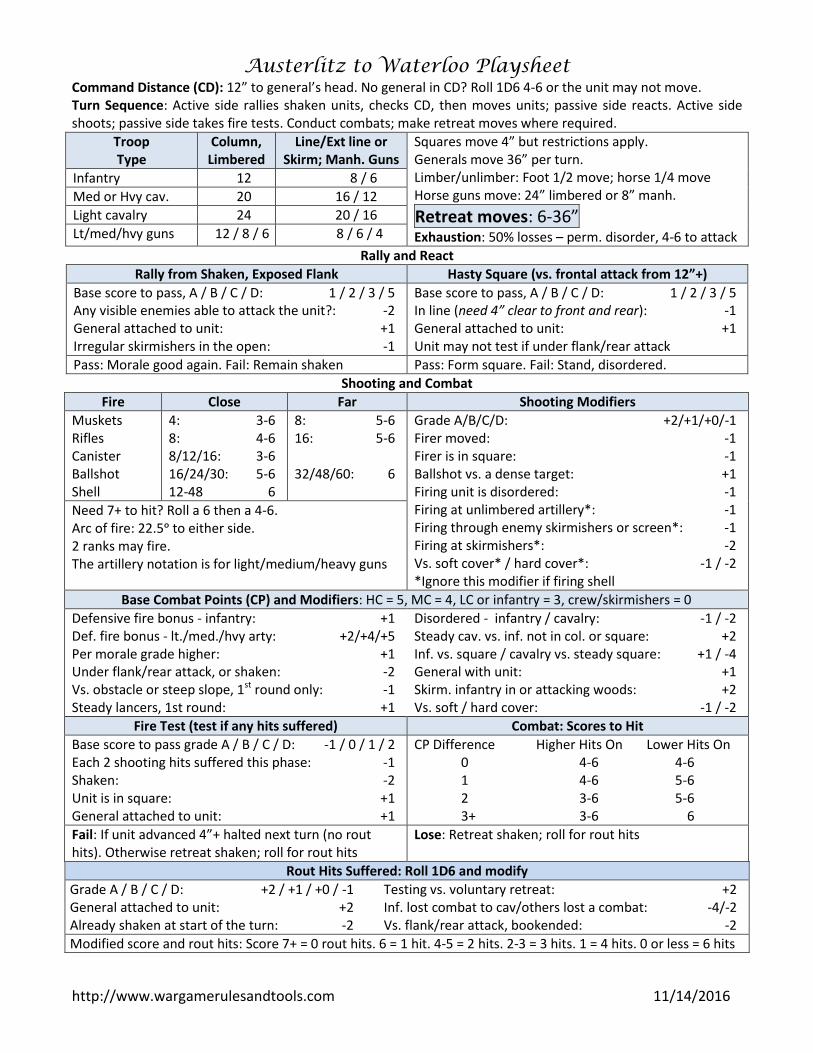
Command Distance (CD): 12” to general’s head. No general in CD? Roll 1D6 4-6 or the unit may not move. Turn Sequence: Active side rallies shaken units, checks CD, then moves units; passive side reacts. Active side shoots; passive side takes fire tests. Conduct combats; make retreat moves where required.
Troop Type
Column, Limbered
Line/Ext line or Skirm; Manh. Guns
Squares move 4” but restrictions apply. Generals move 36” per turn. Limber/unlimber: Foot 1/2 move; horse 1/4 move Horse guns move: 24” limbered or 8” manh.
Retreat moves: 6-36” Exhaustion: 50% losses – perm. disorder, 4-6 to attack
Infantry 12 8 / 6
Med or Hvy cav. 20 16 / 12
Light cavalry 24 20 / 16
Lt/med/hvy guns 12 / 8 / 6 8 / 6 / 4
Rally and React
Rally from Shaken, Exposed Flank Hasty Square (vs. frontal attack from 12”+)
Base score to pass, A / B / C / D: 1 / 2 / 3 / 5 Any visible enemies able to attack the unit?: -2 General attached to unit: +1 Irregular skirmishers in the open: -1
Base score to pass, A / B / C / D: 1 / 2 / 3 / 5 In line (need 4” clear to front and rear): -1 General attached to unit: +1 Unit may not test if under flank/rear attack
Pass: Morale good again. Fail: Remain shaken Pass: Form square. Fail: Stand, disordered.
Shooting and Combat
Fire Close Far Shooting Modifiers
Muskets Rifles Canister Ballshot Shell
4: 3-6 8: 4-6 8/12/16: 3-6 16/24/30: 5-6 12-48 6
8: 5-6 16: 5-6 32/48/60: 6
Grade A/B/C/D: +2/+1/+0/-1 Firer moved: -1 Firer is in square: -1 Ballshot vs. a dense target: +1 Firing unit is disordered: -1 Firing at unlimbered artillery*: -1 Firing through enemy skirmishers or screen*: -1 Firing at skirmishers*: -2 Vs. soft cover* / hard cover*: -1 / -2 *Ignore this modifier if firing shell
Need 7+ to hit? Roll a 6 then a 4-6. Arc of fire: 22.5ᵒ to either side. 2 ranks may fire. The artillery notation is for light/medium/heavy guns
Base Combat Points (CP) and Modifiers: HC = 5, MC = 4, LC or infantry = 3, crew/skirmishers = 0
Defensive fire bonus - infantry: +1 Def. fire bonus - lt./med./hvy arty: +2/+4/+5 Per morale grade higher: +1 Under flank/rear attack, or shaken: -2 Vs. obstacle or steep slope, 1st round only: -1 Steady lancers, 1st round: +1
Disordered - infantry / cavalry: -1 / -2 Steady cav. vs. inf. not in col. or square: +2 Inf. vs. square / cavalry vs. steady square: +1 / -4 General with unit: +1 Skirm. infantry in or attacking woods: +2 Vs. soft / hard cover: -1 / -2
Fire Test (test if any hits suffered) Combat: Scores to Hit
Base score to pass grade A / B / C / D: -1 / 0 / 1 / 2 Each 2 shooting hits suffered this phase: -1 Shaken: -2 Unit is in square: +1 General attached to unit: +1
CP Difference Higher Hits On Lower Hits On 0 4-6 4-6 1 4-6 5-6 2 3-6 5-6 3+ 3-6 6
Fail: If unit advanced 4”+ halted next turn (no rout hits). Otherwise retreat shaken; roll for rout hits
Lose: Retreat shaken; roll for rout hits
Rout Hits Suffered: Roll 1D6 and modify
Grade A / B / C / D: +2 / +1 / +0 / -1 Testing vs. voluntary retreat: +2 General attached to unit: +2 Inf. lost combat to cav/others lost a combat: -4/-2 Already shaken at start of the turn: -2 Vs. flank/rear attack, bookended: -2
Modified score and rout hits: Score 7+ = 0 rout hits. 6 = 1 hit. 4-5 = 2 hits. 2-3 = 3 hits. 1 = 4 hits. 0 or less = 6 hits