Audiometry and Tympanmetry Manual - cdc.gov
75
NATIONAL HEALTH AND NUTRITION EXAMINATION SURVEY III NHANES III AUDIOMETRY AND TYMPANOMETRY FOR HEALTH TECHNICIANS’ MANUAL Westat, Inc. 1650 Research Boulevard Rockville, MD Revised March 1991
Transcript of Audiometry and Tympanmetry Manual - cdc.gov

NATIONAL HEALTH AND NUTRITION EXAMINATION SURVEY III
NHANES III
AUDIOMETRY AND TYMPANOMETRY
FOR
HEALTH TECHNICIANS’ MANUAL
Westat, Inc.1650 Research Boulevard
Rockville, MD
Revised March 1991
TABLE OF CONTENTS
Chapter Page
1 INTRODUCTION . . . . . . . . . . . . . . . . . . . . . . . . . . . . . . . . . . . . . . . . . . . . 1-1
1.1 General Overview of Audiometry andTympanometry Exam Components. . . . . . . . . . . . . . . . . . . . . . . . . . . 1-1
1.1.1 Background on Audition. . . . . . . . . . . . . . . . . . . . . . . . . . . . 1-31.1.2 Properties of Sound. . . . . . . . . . . . . . . . . . . . . . . . . . . . . . . 1-3
1.2 General Overview of Procedures. . . . . . . . . . . . . . . . . . . . . . . . . . . . 1-5
1.2.1 Method of Audiometry. . . . . . . . . . . . . . . . . . . . . . . . . . . . . 1-51.2.2 Method of Tympanometry. . . . . . . . . . . . . . . . . . . . . . . . . . . 1-5
2 EQUIPMENT . . . . . . . . . . . . . . . . . . . . . . . . . . . . . . . . . . . . . . . . . . . . . . . 2-1
2.1 Description of Exam Room in MEC. . . . . . . . . . . . . . . . . . . . . . . . . . 2-12.2 Description of Audiometry Equipment and Supplies. . . . . . . . . . . . . . . 2-1
2.2.1 Inventory of Supplies and Equipment. . . . . . . . . . . . . . . . . . . 2-1
2.3 Equipment Setup Procedures. . . . . . . . . . . . . . . . . . . . . . . . . . . . . . . 2-2
2.3.1 Start of Stand Procedures. . . . . . . . . . . . . . . . . . . . . . . . . . . 2-22.3.2 Calibration Procedures. . . . . . . . . . . . . . . . . . . . . . . . . . . . . 2-62.3.3 Daily Procedures. . . . . . . . . . . . . . . . . . . . . . . . . . . . . . . . . 2-13
2.4 Care and Maintenance of Audiometry Equipment. . . . . . . . . . . . . . . . . 2-13
2.4.1 Cleaning. . . . . . . . . . . . . . . . . . . . . . . . . . . . . . . . . . . . . . . 2-132.4.2 Malfunctions . . . . . . . . . . . . . . . . . . . . . . . . . . . . . . . . . . . . 2-14
2.5 End of Stand Procedures. . . . . . . . . . . . . . . . . . . . . . . . . . . . . . . . . . 2-14
2.5.1 Equipment Breakdown. . . . . . . . . . . . . . . . . . . . . . . . . . . . . 2-142.5.2 Packing Supplies and Equipment. . . . . . . . . . . . . . . . . . . . . . 2-14
2.6 Description of Tympanometry Equipment and Supplies. . . . . . . . . . . . . 2-14
2.6.1 Inventory of Supplies and Equipment. . . . . . . . . . . . . . . . . . . 2-14
iii
TABLE OF CONTENTS (continued)
Chapter Page
2.7 Equipment Setup Procedures. . . . . . . . . . . . . . . . . . . . . . . . . . . . . . . 2-15
2.7.1 Start of Stand Procedures. . . . . . . . . . . . . . . . . . . . . . . . . . . 2-152.7.2 Calibration Procedures. . . . . . . . . . . . . . . . . . . . . . . . . . . . . 2-152.7.3 Daily Procedures. . . . . . . . . . . . . . . . . . . . . . . . . . . . . . . . . 2-17
2.8 Care and Maintenance of Tympanometry Equipment. . . . . . . . . . . . . . 2-17
2.8.1 Cleaning and Maintenance. . . . . . . . . . . . . . . . . . . . . . . . . . . 2-172.8.2 Malfunctions . . . . . . . . . . . . . . . . . . . . . . . . . . . . . . . . . . . . 2-19
2.9 End of Stand Procedures. . . . . . . . . . . . . . . . . . . . . . . . . . . . . . . . . . 2-19
3 EXAMINATION PROTOCOL . . . . . . . . . . . . . . . . . . . . . . . . . . . . . . . . . . . 3-1
3.1 Eligibility Criteria . . . . . . . . . . . . . . . . . . . . . . . . . . . . . . . . . . . . . . . 3-13.2 Pre-examination Procedures for Audiometric Testing. . . . . . . . . . . . . . 3-13.3 Examination Procedures. . . . . . . . . . . . . . . . . . . . . . . . . . . . . . . . . . 3-1
3.3.1 Protocol Procedures for Audiometry. . . . . . . . . . . . . . . . . . . . 3-13.3.2 Protocol Procedures for Tympanometry. . . . . . . . . . . . . . . . . 3-73.3.3 Examination Form for Audiometry and Tympanometry. . . . . . . 3-10
4 LOGS AND RECORDS. . . . . . . . . . . . . . . . . . . . . . . . . . . . . . . . . . . . . . . . 4-1
4.1 Daily Log . . . . . . . . . . . . . . . . . . . . . . . . . . . . . . . . . . . . . . . . . . . . 4-1
4.1.1 Hard Copy - Audio and Impedance Daily Log Sheet. . . . . . . . 4-14.1.2 Automated Log Forms. . . . . . . . . . . . . . . . . . . . . . . . . . . . . 4-3
4.2 Calibration Logs. . . . . . . . . . . . . . . . . . . . . . . . . . . . . . . . . . . . . . . . 4-34.3 Shipment of Forms and Logs. . . . . . . . . . . . . . . . . . . . . . . . . . . . . . . 4-3
5 QUALITY CONTROL . . . . . . . . . . . . . . . . . . . . . . . . . . . . . . . . . . . . . . . . . 5-1
iv
TABLE OF CONTENTS (continued)
Chapter Page
6 SAFETY PROCEDURES. . . . . . . . . . . . . . . . . . . . . . . . . . . . . . . . . . . . . . . 6-1
6.1 Equipment Precautions. . . . . . . . . . . . . . . . . . . . . . . . . . . . . . . . . . . 6-1
6.1.1 Infection Control . . . . . . . . . . . . . . . . . . . . . . . . . . . . . . . . . 6-1
6.2 SP Movement and Positioning. . . . . . . . . . . . . . . . . . . . . . . . . . . . . . 6-16.3 Emergency Procedures. . . . . . . . . . . . . . . . . . . . . . . . . . . . . . . . . . . 6-2
List of Appendices
Appendix
A Audiometry/Tympanometry Examination Form. . . . . . . . . . . . . . . . . . . . . . . . A-1B Examples of Screening Question Screens. . . . . . . . . . . . . . . . . . . . . . . . . . . . B-1C Spanish Version - Examination Form. . . . . . . . . . . . . . . . . . . . . . . . . . . . . . . C-1
List of Exhibits
Exhibit
1-1 The ear . . . . . . . . . . . . . . . . . . . . . . . . . . . . . . . . . . . . . . . . . . . . . . . . . . . . 1-42-1 Audiometer front panel controls. . . . . . . . . . . . . . . . . . . . . . . . . . . . . . . . . . . 2-32-2 Daily checklist. . . . . . . . . . . . . . . . . . . . . . . . . . . . . . . . . . . . . . . . . . . . . . . 2-42-3 Field calibration form. . . . . . . . . . . . . . . . . . . . . . . . . . . . . . . . . . . . . . . . . . 2-82-4 Environmental noise survey form. . . . . . . . . . . . . . . . . . . . . . . . . . . . . . . . . . 2-122-5 Tympanometer. . . . . . . . . . . . . . . . . . . . . . . . . . . . . . . . . . . . . . . . . . . . . . . 2-162-6 The ear probe. . . . . . . . . . . . . . . . . . . . . . . . . . . . . . . . . . . . . . . . . . . . . . . 2-183-1 Tympanometer front panel. . . . . . . . . . . . . . . . . . . . . . . . . . . . . . . . . . . . . . 3-83-2 Introductory screen. . . . . . . . . . . . . . . . . . . . . . . . . . . . . . . . . . . . . . . . . . . . 3-113-3 Screening question screen. . . . . . . . . . . . . . . . . . . . . . . . . . . . . . . . . . . . . . . 3-123-4 Screen question screen. . . . . . . . . . . . . . . . . . . . . . . . . . . . . . . . . . . . . . . . . 3-133-5 Audiometry test screen. . . . . . . . . . . . . . . . . . . . . . . . . . . . . . . . . . . . . . . . . 3-153-6 Audiometry results screen. . . . . . . . . . . . . . . . . . . . . . . . . . . . . . . . . . . . . . . 3-163-7 Tympanometry results screen. . . . . . . . . . . . . . . . . . . . . . . . . . . . . . . . . . . . 3-173-8 Reasons test incomplete or not done for audiometry and tympanometry. . . . . . . 3-184-1 Audio and impedance daily log sheet. . . . . . . . . . . . . . . . . . . . . . . . . . . . . . . 4-2
v
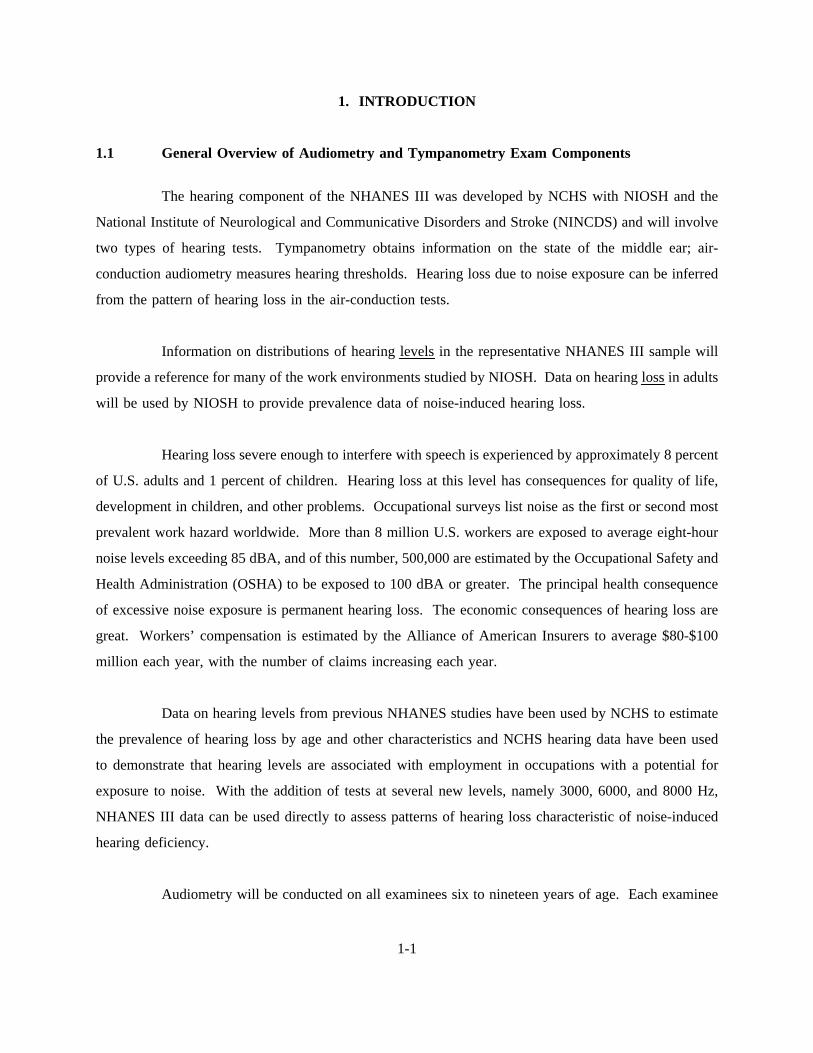
1. INTRODUCTION
1.1 General Overview of Audiometry and Tympanometry Exam Components
The hearing component of the NHANES III was developed by NCHS with NIOSH and the
National Institute of Neurological and Communicative Disorders and Stroke (NINCDS) and will involve
two types of hearing tests. Tympanometry obtains information on the state of the middle ear; air-
conduction audiometry measures hearing thresholds. Hearing loss due to noise exposure can be inferred
from the pattern of hearing loss in the air-conduction tests.
Information on distributions of hearing levelsin the representative NHANES III sample will
provide a reference for many of the work environments studied by NIOSH. Data on hearing lossin adults
will be used by NIOSH to provide prevalence data of noise-induced hearing loss.
Hearing loss severe enough to interfere with speech is experienced by approximately 8 percent
of U.S. adults and 1 percent of children. Hearing loss at this level has consequences for quality of life,
development in children, and other problems. Occupational surveys list noise as the first or second most
prevalent work hazard worldwide. More than 8 million U.S. workers are exposed to average eight-hour
noise levels exceeding 85 dBA, and of this number, 500,000 are estimated by the Occupational Safety and
Health Administration (OSHA) to be exposed to 100 dBA or greater. The principal health consequence
of excessive noise exposure is permanent hearing loss. The economic consequences of hearing loss are
great. Workers’ compensation is estimated by the Alliance of American Insurers to average $80-$100
million each year, with the number of claims increasing each year.
Data on hearing levels from previous NHANES studies have been used by NCHS to estimate
the prevalence of hearing loss by age and other characteristics and NCHS hearing data have been used
to demonstrate that hearing levels are associated with employment in occupations with a potential for
exposure to noise. With the addition of tests at several new levels, namely 3000, 6000, and 8000 Hz,
NHANES III data can be used directly to assess patterns of hearing loss characteristic of noise-induced
hearing deficiency.
Audiometry will be conducted on all examinees six to nineteen years of age. Each examinee
1-1
will be tested on his/her ability to hear 7 frequencies: 1000 Hz, 2000 Hz, 3000 Hz, 4000 Hz, 6000 Hz
and 8000 Hz, 1000 Hz and 500 Hz. At each frequency, the sound in each ear will be tested separately,
starting with the right ear if the examinee number is even and the left ear if the examinee number is odd,
unless while asking the audiometry questions the technician ascertains that the examinee hears better in
one ear than in the other. In that case, the ear in which the examinee hears better will be tested first. By
testing the better ear first, the amount of time for testing will be reduced, since if the poorer ear were
tested first, that ear would require a repeat test using the masking procedure on the better ear. The
masking noise prevents the tones from being heard by the better ear and a false level of hearing being
recorded for the poorer ear. The 1000 Hz frequency will be tested twice in order to check on the accuracy
and reliability of the examinee’s responses.
Tympanometry testing will be conducted on all examinees age six to nineteen. The
tympanometer will test the function of the middle ear by first measuring the impedance or flexibility of
the eardrums and then by measuring the integrity of the bones in the middle ear. Each ear will be tested
separately, randomly starting with the right ear if the examinee number is even and with the left ear if the
examinee number is odd.
Although these tests may appear simple, accurate measurement depends on many factors. This
section of the manual has been devised to help you understand how to accurately obtain information
regarding the sense of hearing and to minimize errors that can occur.
Standardized procedures have been established for this survey. Because the measurements must
be obtained in a uniform manner for each subject, it is critical that you always follow these procedures.
You will be trained in the standard procedures and tested on them. During the survey a
supervisor will, at times, accompany you in the field to observe the procedures and check the accuracy
of the testing procedures. The supervisor will assist you with any problems you have and conduct a brief
retraining session. These steps are necessary to assure the completeness and reliability of measurements
throughout the survey.
1-2
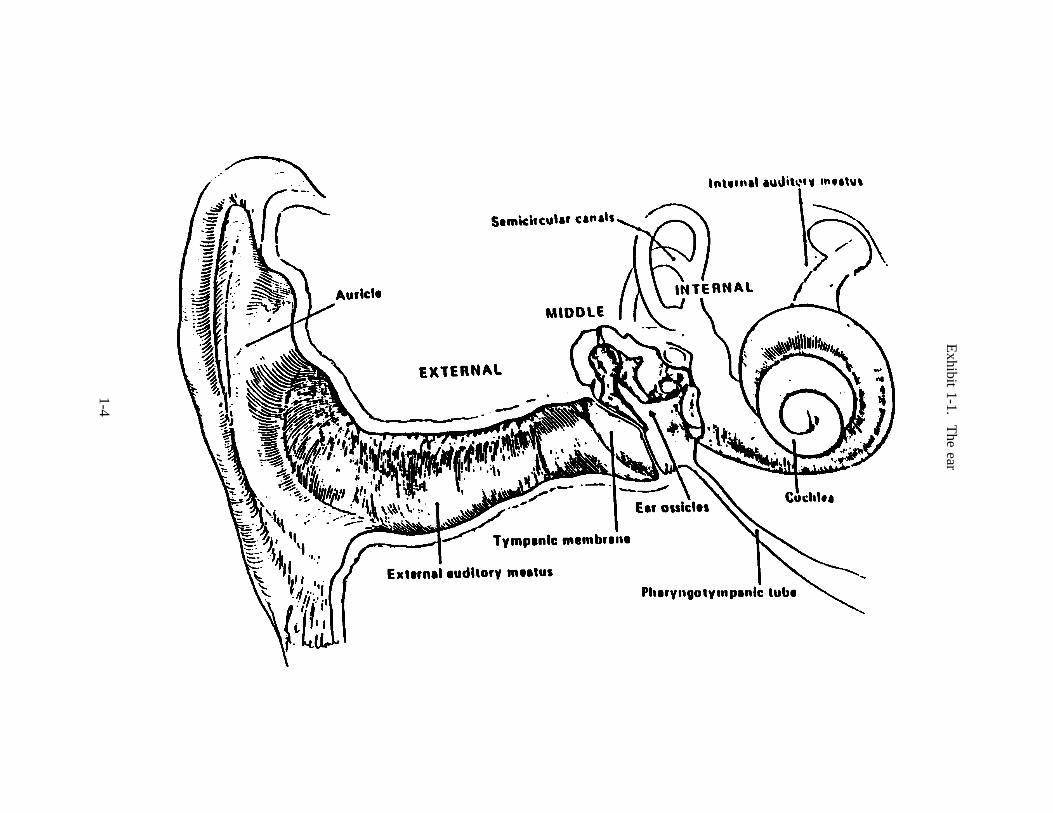
1.1.1 Background on Audition
Audition is the ability to hear. Hearing is the function of the body by which sound is
perceived. The ear is the part of the body which enables this function to take place. The ear (Exhibit 1-1)
is contained mostly within the temporal bone, which is one of the lateral surfaces of the base of the skull.
The ear is subdivided into external, middle and inner ear. Sound waves picked up and directed by the
external ear travel to the eardrum (middle ear) and cause it to vibrate. These vibrations move three small
bones in the middle ear which set in motion the fluid in the internal ear. This fluid movement stimulates
the nerve cells located there and they in turn transmit impulses to the hearing centers of the brain.
1.1.2 Properties of Sound
Sound has three important characteristics: pitch, loudness and quality.
Pitch or tone is that feature of sound which is dependent upon the frequency of the sound
waves (frequency being the number of vibrations or cycles of the sound waves per second).
Loudness is that feature of sound which is dependent on the intensity of the sound waves.
Quality is that feature of sound which is dependent upon the higher parts of the sound or
overtones. Sounds begin by vibrating as a whole and then rapidly divide into parts which vibrate on their
own at their own frequency. Thus, although a sound may have the same frequency and intensity, the
quality allows us to distinguish whether it is a zither or a drum.
1-3
Exhibit
1-1.T
heear
1-4
1.2 General Overview of Procedures
1.2.1 Method of Audiometry
Auditory sensitivity may best be ascertained by the use of an audiometer, which is an electronic
oscillator capable of emitting pure tones over a wide range. The examinee is seated in a soundproof room
and fitted with a set of earphones to measure his/her threshold (slightest perceptible sound) for pure tone.
The hearing loss is measured in decibels (dB’s). Various frequencies are selected and the dB’s varied until
the examinee reports s/he can hear sound. The threshold for each frequency is recorded. The entire range
of audible pitches is tested and plotted on an audiogram. The audiogram discloses deviations from normal
values in the entire range of audible frequencies. The greater the number of decibels, the greater the
hearing loss.
1.2.2 Method of Tympanometry
Tympanometry is a test of the status of the middle ear measured at the level of the eardrum
(tympanic membrane). It is a test of the middle ear function only and does not assess hearing ability.
The test is conducted by inserting a plastic tip into the ear. There are usually three connections through
the plug: a pressure gauge, a pure tone source and a calibrated microphone. A pure tone is sent through
the tympanometer and the depth of the tone sent back from the eardrum, recorded by means of the tube
connected to the microphone. In this way, the flexibility (impedance) of the eardrum can be calculated.
There is a standard range of flexibility of the eardrum which is considered normal. Any disease process
that either increases (fluid in the middle ear) or decreases (perforated eardrum) the flexibility of the
eardrum interferes with the efficiency with which sound can be transmitted through the middle ear and
may be an indication of a hearing loss.
1-5

2. EQUIPMENT
2.1 Description of Exam Room in MEC
The audiometry/tympanometry room in the Mobile Examination Center (MEC) is specially
equipped to insure that a soundproof environment is achieved for accurate hearing tests. The room has
double doors for this purpose. The room setup includes an audiometer, tympanometer, computer terminal
and keyboard, and desk area for the technician. The room is arranged so that the examinee is seated
adjacent to the technician and therefore cannot observe what the technician is doing or how the equipment
is being operated. This is necessary to prevent any cuing to the examinee when he/she is tested on the
various frequency levels.
The exam component entitled Central Nervous System (CNS) Testing is also conducted in the
audiometry/tympanometry room.
2.2 Description of Audiometry Equipment and Supplies
The equipment supplied for you to obtain the audiograms is listed below:
Grason-Stadler audiometer, Model GSI 16G&K sound level meter, Model 2235B&K artificial ear coupler, Model 4151B&K condenser microphone, Model 4144 (1")B&K condenser microphone, Model 4155 (½")B&K octave band filter, Model 1624B&K acoustic calibrator, Model 4230B&K Adaptor DB 0375500-gram weight
2.2.1 Inventory of Supplies and Equipment
An inventory of the audiometry and tympanometry equipment and supplies is conducted at the
beginning and the end of each stand. A health technician will be assigned to the room by the MEC
manager to do the inventory. Inventory forms will be provided at the time.
2-1
2.3 Equipment Setup Procedures
2.3.1 Start of Stand Procedures
Daily Field Checks
1. Preliminary Procedure
a. Turn the power on and allow the GSI 16 to warm up 10 minutes.
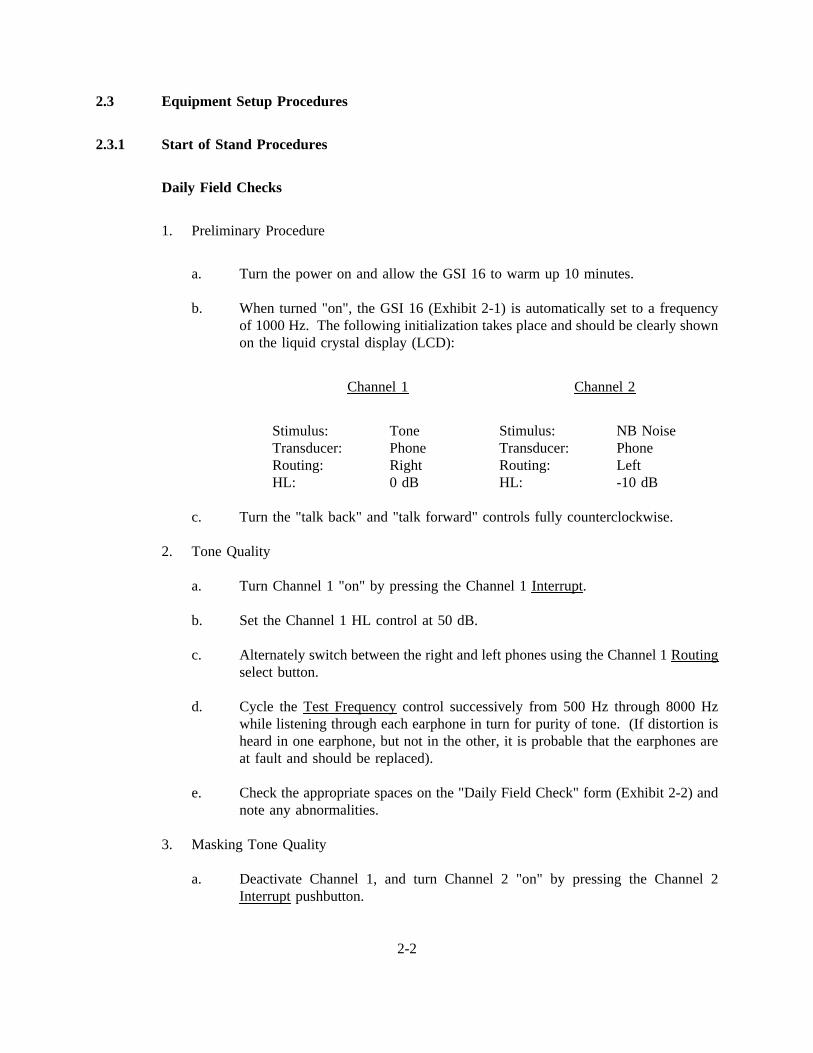
b. When turned "on", the GSI 16 (Exhibit 2-1) is automatically set to a frequencyof 1000 Hz. The following initialization takes place and should be clearly shownon the liquid crystal display (LCD):
Channel 1 Channel 2
Stimulus:Transducer:Routing:HL:
TonePhoneRight0 dB
Stimulus:Transducer:Routing:HL:
NB NoisePhoneLeft-10 dB
c. Turn the "talk back" and "talk forward" controls fully counterclockwise.
2. Tone Quality
a. Turn Channel 1 "on" by pressing the Channel 1 Interrupt.
b. Set the Channel 1 HL control at 50 dB.
c. Alternately switch between the right and left phones using the Channel 1 Routingselect button.
d. Cycle the Test Frequencycontrol successively from 500 Hz through 8000 Hzwhile listening through each earphone in turn for purity of tone. (If distortion isheard in one earphone, but not in the other, it is probable that the earphones areat fault and should be replaced).
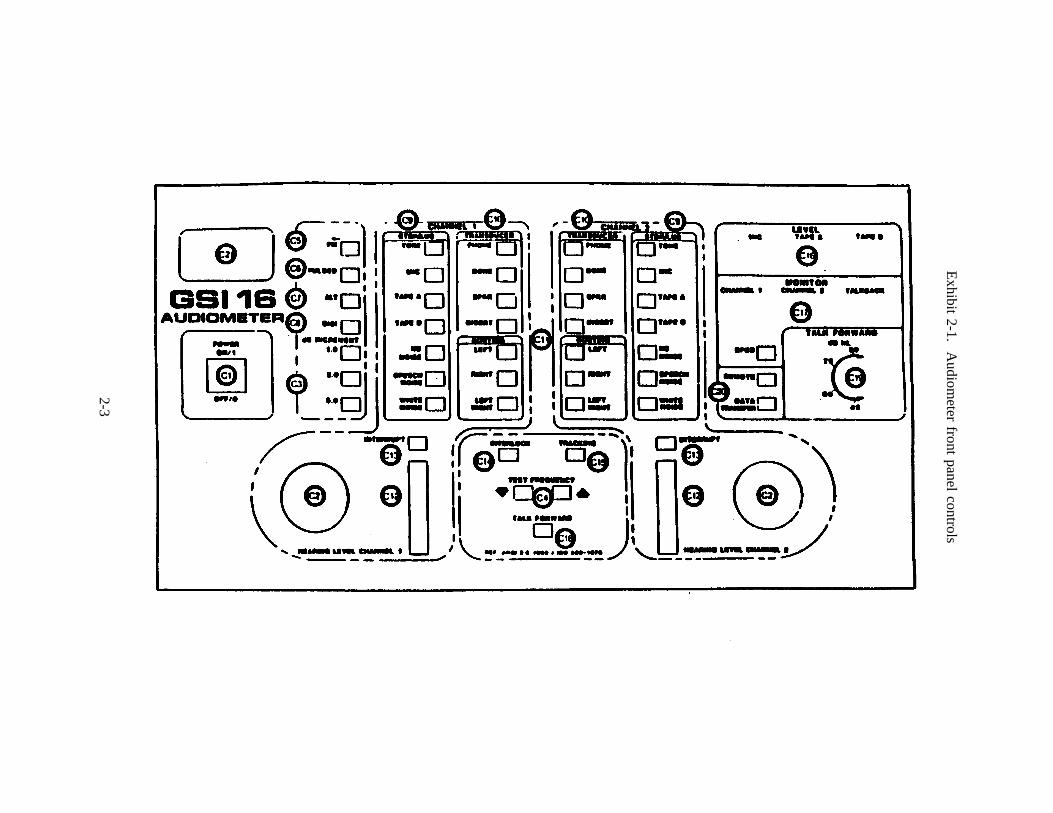
e. Check the appropriate spaces on the "Daily Field Check" form (Exhibit 2-2) andnote any abnormalities.
3. Masking Tone Quality
a. Deactivate Channel 1, and turn Channel 2 "on" by pressing the Channel 2Interruptpushbutton.
2-2
Exhibit
2-1.A
udiometer
frontpanelcontrols
2-3
Exhibit 2-2. Daily checklist
2-4
b. Be sure the Channel 2 display still indicates "NB Noise" and the Channel 2 HLcontrol is set at 50 dB.
c. Set the Test Frequencycontrol to 500 Hz.
d. While listening through each earphone, turn the Channel 2 Routingcontrolalternately from the left to the right earphone.
e. Cycle the Test Frequencycontrol successively from 500 Hz to 8000 Hz. Listenfor a smooth, even hiss at each frequency.
f. Check the appropriate spaces on the "Daily Field Check" form and note anyabnormalities found.
4. Hearing Level Control
a. Select a test frequency of 2000 Hz.
b. With the audiometer set for Toneand routed through the right earphone, turnChannel 1 "on."
c. While listening through the right earphone, turn the Channel 1 Hearing Levelcontrol from 0 to 60 dB HL and back to 0, slow enough to perceive eachintensity change. Listen for scratches, abrupt changes in loudness, low frequencyhum, or other extraneous signals.
d. Repeat this procedure with the Channel 2 Hearing Levelcontrol while using"narrow band noise".
e. Check the appropriate spaces on the "Daily Field Check" form as each phone ischecked and note any abnormal conditions in the "Remarks" section.
5. Earphone Cords
a. Select a Test Frequencyof 1000 Hz.
b. Activate the Tonemode for the right phone in Channel 1 and the left phone inChannel 2.
c. Set both HL controls to 50 dB.
d. While wearing the earphones, flex the cord next to the plug at both ends of eachearphone. Listen for an intermittent signal, abrupt changes in signal level, or ascratchy sound that coincides with the flexing of the cord.
2-5

e. If the tone is interrupted or changes loudness, tighten the set screws holding theearphone cord in the earphone. Also, tighten and clean the connector jack at theback of the audiometer with a rubber eraser. Finally, if necessary, replace thecords. If these actions do not correct the fault, replace the audiometer, and notifythe biomedical engineer.
f. IF it is necessary to replace an earphone cord, notify your supervisor in order forrepair or replacement to take place.
6. Internal Controls Check
a. On occasion, the front panel controls might lock into one state and it is notpossible to change any parameter; turn the power off. For example, the words"CAL" or "HELP" may appear in the LCD of either Channel 1 or 2. Wait oneminute and then power up again, as it may be a temporary failure. If thecondition persists, replace the unit.
b. If a portion of the LCD should not light up, be aware that the individual segmentof the LCD may be burned out with the functioning of the unit still intact.Replace the unit.
7. Consequences of Field Check Failure
If a unit becomes defective, notify the MEC manager. If neither audiometer worksproperly, the MEC manager will then contact the engineer at headquarters for furtherinstruction. When a unit is replaced with a back-up, the defective audiometer should besent for repair and the biomedical engineer notified.
2.3.2 Calibration Procedures
2.3.2.1 Field Calibration
1. General
a. Do a field calibration of the audiometer at the beginning and the end of eachstand. Also calibrate the audiometer in use weekly. The chief technician and/orMEC manager will have the field calibration report forms that give the expectedreading at each frequency and the tolerance limits allowed around that reading.The expected readings were determined for each set of field calibration equipmentat AML’s laboratory. If a microphone requires replacement, the MEC managerwill arrange to send the calibration equipment back to AML for a determinationof new expected readings for the new microphone. The MEC manager will bein contact with the engineer at headquarters to discuss equipment replacement.
2-6
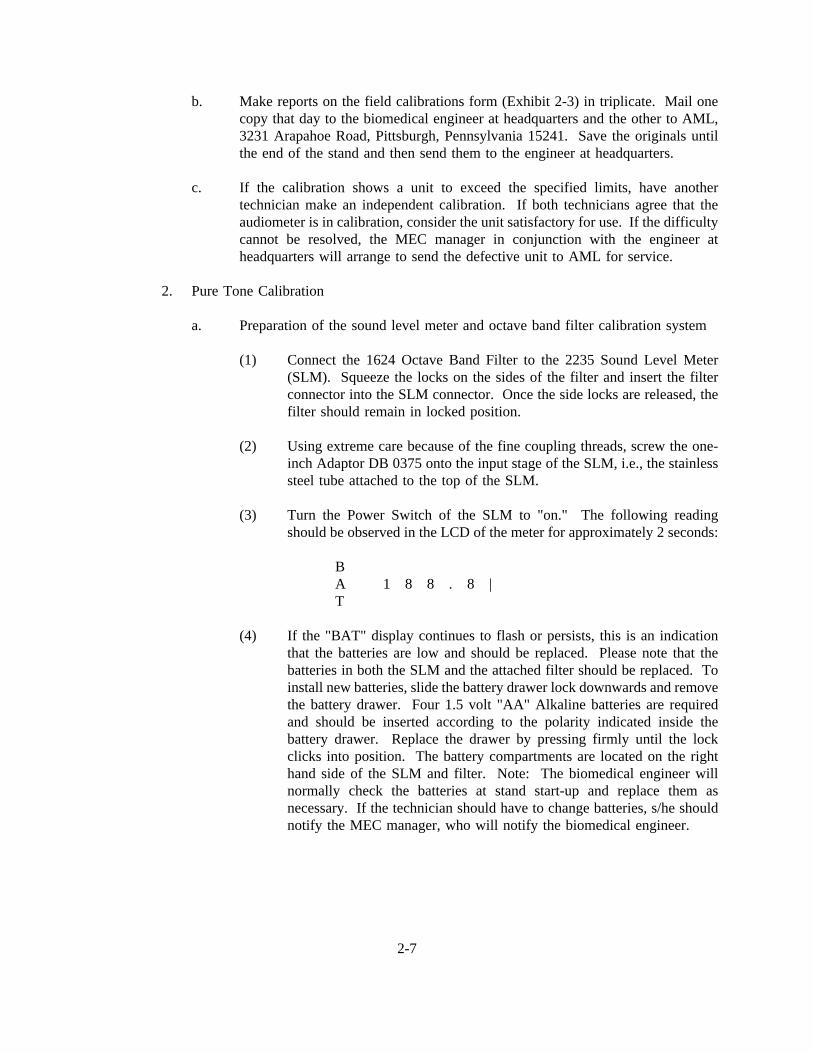
b. Make reports on the field calibrations form (Exhibit 2-3) in triplicate. Mail onecopy that day to the biomedical engineer at headquarters and the other to AML,3231 Arapahoe Road, Pittsburgh, Pennsylvania 15241. Save the originals untilthe end of the stand and then send them to the engineer at headquarters.
c. If the calibration shows a unit to exceed the specified limits, have anothertechnician make an independent calibration. If both technicians agree that theaudiometer is in calibration, consider the unit satisfactory for use. If the difficultycannot be resolved, the MEC manager in conjunction with the engineer atheadquarters will arrange to send the defective unit to AML for service.
2. Pure Tone Calibration
a. Preparation of the sound level meter and octave band filter calibration system
(1) Connect the 1624 Octave Band Filter to the 2235 Sound Level Meter(SLM). Squeeze the locks on the sides of the filter and insert the filterconnector into the SLM connector. Once the side locks are released, thefilter should remain in locked position.
(2) Using extreme care because of the fine coupling threads, screw the one-inch Adaptor DB 0375 onto the input stage of the SLM, i.e., the stainlesssteel tube attached to the top of the SLM.
(3) Turn the Power Switch of the SLM to "on." The following readingshould be observed in the LCD of the meter for approximately 2 seconds:
BA 1 8 8 . 8 |T
(4) If the "BAT" display continues to flash or persists, this is an indicationthat the batteries are low and should be replaced. Please note that thebatteries in both the SLM and the attached filter should be replaced. Toinstall new batteries, slide the battery drawer lock downwards and removethe battery drawer. Four 1.5 volt "AA" Alkaline batteries are requiredand should be inserted according to the polarity indicated inside thebattery drawer. Replace the drawer by pressing firmly until the lockclicks into position. The battery compartments are located on the righthand side of the SLM and filter. Note: The biomedical engineer willnormally check the batteries at stand start-up and replace them asnecessary. If the technician should have to change batteries, s/he shouldnotify the MEC manager, who will notify the biomedical engineer.
2-7

Exhibit 2-3. Field calibration form
2-8
(5) Turn SLM Power Switch to "off."
(6) Connect the artificial ear coupler to the SLM through the Adaptor withthe cable provided. Note: The SLM should be lying face up for thisprocedure.
(7) Unscrew the top half of the coupler.
(8) Remove the plastic cover with desiccant material from the microphone.Thengentlyscrew the microphone cartridge (one inch in diameter) withthe protective grid onto the bottom half of the coupler. If binding occurs,please do notcontinue to force the microphone onto the coupler. [Thethreads are very delicate and can be easily damaged.] Unscrew themicrophone and try againor have someone else do it.
(9) Set SLM controls for calibration as follows:
Range: 40-110 dBDisplay: Inst.Time weighting: SlowPol. Voltage: 200 vFrequency weighting: LinSound Incidence: FrontalExt. Filter: Out
(10) Now turn SLM back "on."
(11) Remove the half-inch adaptor from the acoustic calibrator and set thecalibrator firmly over the microphone.
(12) Press the tone actuator (on the side of the calibrator) once and release it.The sound level meter should read 94 dB. If not, use a screw driver(supplied with the meter) to turn the adjustment [Sens. Adj.] screw on theside of the SLM to produce the desired reading. (If the tone hasdisappeared, reactivate the calibrator.) The sound level meter is now incalibration. [Note: the tone should persist for 30-60 seconds. If the tonelasts for greater than 30 seconds the battery in the calibrator should bereplaced.]
b. Mounting of the Earphone
(1) Screw the top of the coupler back on.
(2) Set the earphone to be tested over the cavity of the coupler, making surethat the earphone rests squarely on the coupler. Note: Remove theearphone from the headpiece. Pull the clip to the ear set out of the earphone.
2-9
(3) Place the 500-gram weight on top of the earphone.
c. Calibration Procedures
(1) Set Ext. Filter setting on SLM to "In." All other settings should remainas before.
(2) Set the Center Frequencyselect switch on the filter to 500 Hz.
(3) Select the earphone to be tested using Channel 1 controls.
(4) Set the audiometer to a frequency of 500 Hz and a hearing level of 70dB. The Channel 1 display should indicate the earphone being tested.
(5) Activate the tone signal with the Channel 1 Interruptbutton. Move theearphone and 500 gm weight slightly until a maximum reading isobtained on the SLM.
(6) Record the sound level meter reading on the report form. The tolerancepermitted for the sound level at each frequency is also shown on the FieldCalibration form.
(7) Without touching the coupler, earphone and 500 gm weight, continuetesting at the other frequencies indicated on the report form. In eachcase, the report form provides the expected values for the sound levelmeter readings and the appropriate settings for the Center Frequencyselect switch on the filter. [Note: sometimes the expected values are notshown. The MEC manager, chief tech or biomedical engineer will checkthem for you.]
(8) To test the other earphone, remove the weight and lift the earphonealready tested off the coupler. Place the other phone on the coupler andput the weight back on. Repeat steps (c.) through (g.).
d. Masking Noise Calibration
[Note: The masking noise calibration can be performed on an earphoneimmediately following the puretone calibration; 1) it saves time, 2) the earphoneis already positioned for maximum read-out, 3) you only need to change switchsettings on SLM vs dismantling and remounting earphones twice.]
(1) Set up the field calibration system as before.
(2) Change the initial setting of the SLM controls as follows:
Frequency Weighting: CExt. Filter: Out
(3) Ensure that Channel 1 is deactivated.
2-10
(4) A Test Frequency of 500 Hz should be selected.
(5) The Channel 2 HL control should be used to select a HL of 60 dB asindicated on the report form provided for narrow band noise masking.
(6) Select the earphone to be tested; this is the earphone mounted on thecoupler.
(7) Activate the Channel 2 "NB Noise" signal.
(8) Record the SLM reading on the Field Calibration report form. The ChiefTechnician will have the expected reading at this frequency and willcompare that expected reading with the values obtained. If the SLMreading is within the tolerances shown on the report form, then it iscalibrated in this frequency band.
(9) Repeat this procedure at the other test frequencies indicated on the FieldCalibration report form. Again the Chief Technician will have theexpected value for each test frequency and will compare that expectedvalue with the values obtained.
(10) Repeat this procedure for the other earphone (steps 4 through 10).
2.3.2.2 Environmental Noise Survey
1. General
A noise survey is to be done during the setup day before the start of each stand. Sendone copy of the completed Environmental Noise Survey form (Exhibit 2-4) immediatelyto the biomedical engineer at headquarters and one to AML. Steps f through k belowshould be done with the trailer’s air conditioning/heating unit on.
2. Procedure
a. Gentlyscrew the half or one-inch microphone (with the protective grid in place)directly onto the connector on the B&K sound level meter. Remember not toforce the microphone. If resistance is met, unscrew it and try again. Note:There is no need for the technician to remove the protective grid. The protectedsurface could be damaged if touched.
b. Set the control of the SLM, check the battery condition, and calibrate the SLMaccording to the previous calibration instructions.
2-11
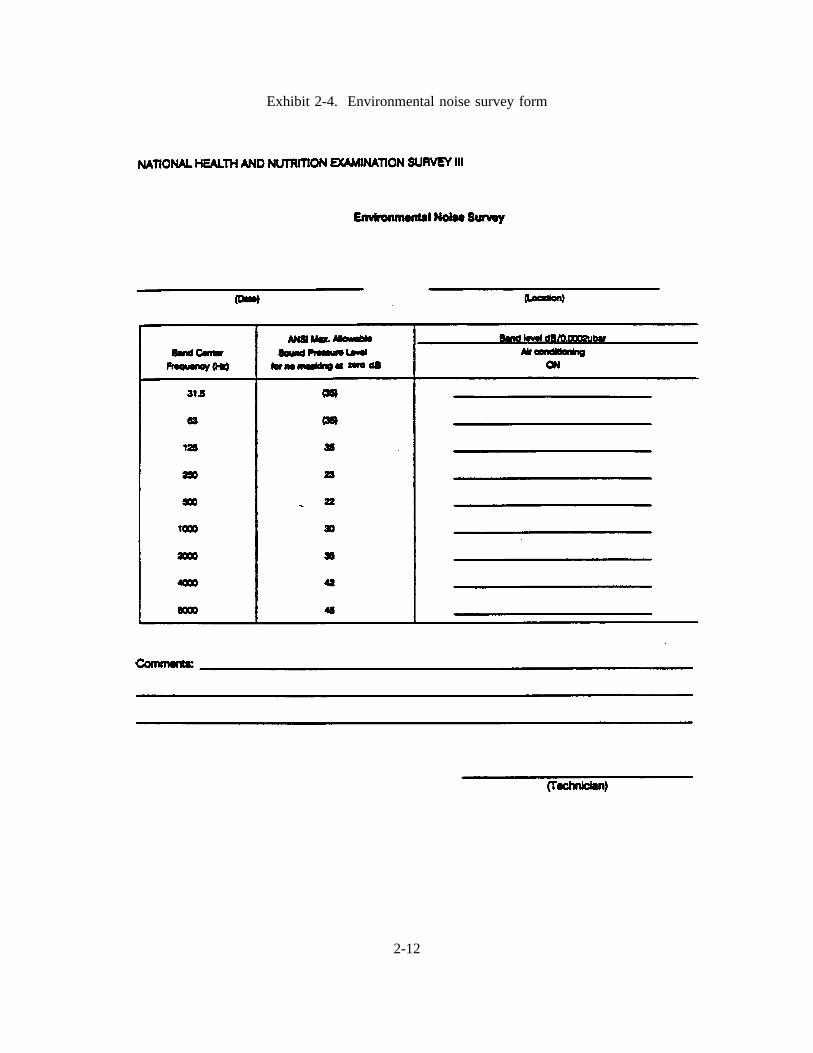
Exhibit 2-4. Environmental noise survey form
2-12
c. Change the controls of the SLM as follows:
Range: 0-70 dBExt. Filter: InDisplay: Max Hold
d. Close both doors to the audiometry room.
e. Turn off all hearing test equipment and the CNS computer.
f. On the Octave Band Filter set the Center Frequencyselect switch to 31.5 Hz.
g. When ready to measure, press the SLM "Reset" button. The MAX HOLD settingwill hold at the highest SPL in the band. Record the sound level shown in thedisplay on the Environmental Noise Survey form.
h. Select a Center Frequency of 63 Hz on the Filter.
i. Repeat step g to obtain a new reading.
j. Proceed through the remaining octave bands from 125 Hz through 8000 Hz,obtaining a sound level reading at each frequency band.
k. Under "Comments" explain the circumstances, if possible, where theenvironmental noise levels exceed ANSI allowable levels.
l. Remove both battery packs when finished.
2.3.3 Daily Procedures
For the daily procedures for setup of audiometry equipment, refer to Sections 2.3.1 and 2.3.2.
2.4 Care and Maintenance of Audiometry Equipment
2.4.1 Cleaning
Prior to conducting audiometric testing, clean the ear cushions with a damp cloth moistened
with warm water and a mild detergent. Wipe the surfaces dry afterward.
2-13
2.4.2 Malfunctions
For maintenance and malfunction procedures involving the audiometer and earphone cords,
refer to Section 2.3.1, #5, 6, and 7.
2.5 End of Stand Procedures
2.5.1 Equipment Breakdown
2.5.2 Packing Supplies and Equipment
A health technician will be assigned by the MEC manager to the audiometry/tympanometry
room at the end of the stand to assist in equipment breakdown and packing procedures. All equipment
should be cleaned (refer to Section 2.4) prior to securing it for travel. All supplies are to be packed in
designated cabinets and storage bins. An inventory of supplies will be conducted at the time. Supply
needs are to be communicated to the MEC manager, so that the items can be obtained for the next stand.
2.6 Description of Tympanometry Equipment and Supplies
The equipment and supplies needed to obtain tympanograms are listed below:
Tympanometer - TA-7A Automatic Impedance MeterEar Probe AssemblyEartips KitPower Supply CordChart paper
2.6.1 Inventory of Supplies and Equipment
Refer to Section 2.2.1.
2.7 Equipment Setup Procedures
2-14
2.7.1 Start of Stand Procedures
Make sure the handheld probe assembly is connected to the PRESSURE and HEADSET
connectors of the rear of the unit (A) (see Exhibit 2-5). Since the RS-232 computer interface is being
used, make sure the cable is attached to the RS-232 connector (B). Also make sure the power plug is
attached to the power connector (C) and that it is plugged into an appropriate receptacle.
For operator comfort, the front panel of the TA-7A can be used either raised or lowered.
HINT: If you will be sitting during testing, you may prefer to raise the panel. If you will be standing
during testing, you may prefer to lower the panel. To raise the front panel, place finger in the cutout (D)
and lift. Reach around panel, push at top of plate (E), allowing it to swing out. Lower panel, making sure
the plate is properly positioned against back of recess. To lower the panel, lift slightly, reach behind the
panel to press the plate flat, then lower the panel.
Check to see that the printer paper is properly loaded. Also check to see that paper release
lever (F) is all the way toward the rear of the unit. Otherwise, the printer will not work.
2.7.2 Calibration Procedures
To check the integrity of the system, the health technician should perform an impedance test
on himself/herself at the beginning of each examining day. In order to perform this daily check:
a. Select the proper size ear tip for yourear.
b. Place the probe assembly in your ear with one hand while gently pulling your ear lobeaway from and slightly to the rear of your head with the other hand. The probe light willbe blinking red and green.
c. Hold the probe as still as possible.
d. If one beep is heard, the test is successfully completed. Remove the probe from the firstear and perform the impedance test on the other ear.
2-15

Exhibit 2-5. Tympanometer
2-16
e. If three beeps are heard, the test has aborted. Remove the probe from your ear, wait forthe probe light to blink red and green and replace the probe as instructed in b.
2.7.3 Daily Procedures
Refer to previous Section, 2.7.2.
2.8 Care and Maintenance of Tympanometry Equipment
2.8.1 Cleaning and Maintenance
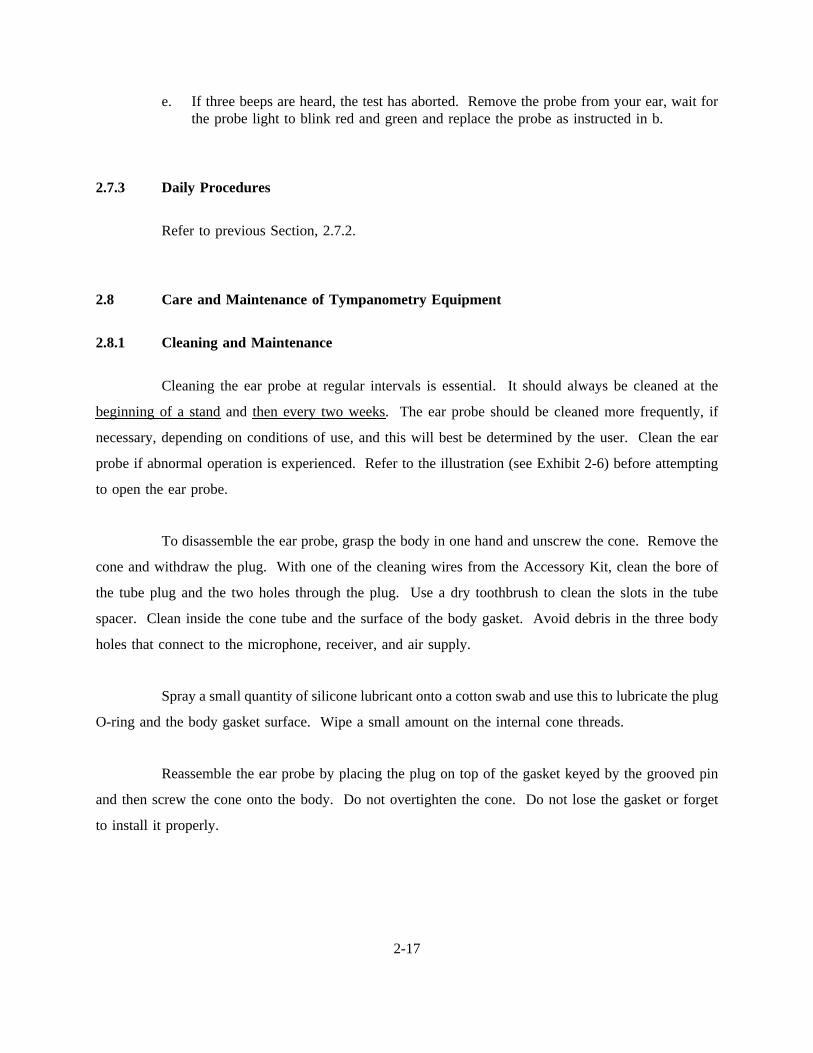
Cleaning the ear probe at regular intervals is essential. It should always be cleaned at the
beginning of a standand then every two weeks. The ear probe should be cleaned more frequently, if
necessary, depending on conditions of use, and this will best be determined by the user. Clean the ear
probe if abnormal operation is experienced. Refer to the illustration (see Exhibit 2-6) before attempting
to open the ear probe.
To disassemble the ear probe, grasp the body in one hand and unscrew the cone. Remove the
cone and withdraw the plug. With one of the cleaning wires from the Accessory Kit, clean the bore of
the tube plug and the two holes through the plug. Use a dry toothbrush to clean the slots in the tube
spacer. Clean inside the cone tube and the surface of the body gasket. Avoid debris in the three body
holes that connect to the microphone, receiver, and air supply.
Spray a small quantity of silicone lubricant onto a cotton swab and use this to lubricate the plug
O-ring and the body gasket surface. Wipe a small amount on the internal cone threads.
Reassemble the ear probe by placing the plug on top of the gasket keyed by the grooved pin
and then screw the cone onto the body. Do not overtighten the cone. Do not lose the gasket or forget
to install it properly.
2-17
Exhibit 2-6. The ear probe
2-18
Clean the cabinet of the tympanometer with a damp cloth moistened with warm water and mild
detergent. Wipe the surfaces dry afterward.
When testing is completed for the day, all used ear tips should be thoroughly cleaned.
Immersion in and brushing with a Zephrin (benzalkonium chloride) or Betadine (polymerized iodine)
solution is recommended. Rinse in hot water and set aside to drain. When dry, dust lightly with
powdered talc to prevent stickiness. Store in a clean, dry place.
2.8.2 Malfunctions
The MEC manager should be notified of any problems with the tympanometer. If one or both
of the tympanometers are in need of repair, the MEC manager will contact the engineer at headquarters
for further instruction regarding the servicing of the equipment.
2.9 End of Stand Procedures
Refer to Section 2.5.
2-19
3. EXAMINATION PROTOCOL
3.1 Eligibility Criteria
The age specifications for examinees to receive audiometry and tympanometry testing is six
to nineteen (6-19) years. The screening questions that are presented to the examinee prior to testing are
to ascertain what conditions, if any, are present that would affect the test results or exclude the examinee
from audiometric and tympanogram testing.
3.2 Pre-examination Procedures for Audiometric Testing
At the beginning of each examination session, turn on the audiometer at least ten minutes
before doing the daily field check. Both doors to the audiometry room should be closed while testing.
3.3 Examination Procedures
3.3.1 Protocol Procedures for Audiometry
1. General instructions
Perform pure tone audiometric tests for both ears in the sequence indicated. The left earwill be examined first if the examinee number is odd. The right ear will be examinedfirst if the examinee number is even. If, while asking the audiometry questions, youascertain that the examinee hears better in one ear than the other, test the better ear first.When testing the stated poorer ear, use the masking procedure (item 5) on the better earfor the first signal to ascertain if the difference in thresholds is 40 dB or greater. If it is40 dB or greater, continue masking; if it is not 40 dB or greater, no further masking willbe necessary.
2. Instructions to the technician
a. Points to be stressed in detail
(1) The technician should be sure to wash his/her hands between eachexaminee.
(2) Prior to using the tympanometer, cleanse the plastic tip with a wipe, andthen using the same wipe, cleanse the ear cushions of the audiometer.
3-1
3. Instructions to the examinee
a. Points that should be stressed in detail to the examinee
(1) Tell the examinee that once the earphones are placed by the technician,the examinee must not touch them. The technician should ask if theheadphones are comfortable and readjust them if necessary. Never allowthe examinee to put on own earphones.
(2) Tell the examinee that s/he will hear tones that are high and low and thatthey will become softer and softer until s/he will have difficulty hearingthem. When s/he hears a tone, s/he should depress the response buttonand release it when the tone is no longer heard. Remind him/her toconcentrate very hard when the tones are soft.
(3) Close the test room doors.
(4) Have the examinee sit adjacent to the technician so that s/he can see thetechnician, but not observe what the technician is doing or how theequipment is being operated.
(5) Have the examinee remove eyeglasses, earrings, chewing gum, wigs andhair ornaments if they interfere with proper placement of the headset.
(6) Have the examinee remove any hearing aids so that audiometry andtympanometry can be conducted.
(7) Before placing the earphone, make sure the ears are not obstructed withcotton or other foreign objects.
(8) Facing the examinee, hold the red earphone in your left hand and the blueearphone in right hand. Place the red earphone on the examinee’s rightear. Holding the red earphone firmly in place, stretch the headset overthe head and place the blue earphone on the examinee’s left ear. Tightenor adjust the headband with both hands so that it rests solidly on crownof the examinee’s head and exerts full pressure on both ears. Make surethat each earphone is over the ear canal and that it has a good sealagainst the examinee’s ear. Ask the examinee if the headset iscomfortable before proceeding with the examination.
(9) Never place an earphone over an ear that has discharge or drainage.Place the earphone over the normal ear and shorten the headset so thatthe earphone sits securely on the temple above the draining ear.
3-2
b. Example of verbal instructions for examinees from 7 years of age and up
We are going to see how well you hear some tones from these earphones. Youwill hear short tones that are both high and low. They will become softer andsofter. Each time you hear a tone, please press this button (techniciandemonstrates with response button) and when you no longer hear the tone let thebutton up. Listen carefully when the tone starts to get softer, but even if youthink you hear it, press the button and I will be able to tell if you hear it. Firstyou will hear the tones in your right/left ear (point) and then in your other ear.If the tone seems to be in this ear (point to nontest ear), please tell me.Remember to press the button when you hear a tone and let it up when you nolonger hear it. Do you have any questions? (If so, clarify as necessary. Let theexaminee know when you are ready to begin.)
c. Example of verbal instructions for 6 year olds and immature older children
(Bring the child into position to face the audiometer. With a 50 dB, 1,000 Hztone in one phone, hold it to the child’s ear.) We are going to see how well youcan hear some tones from these earphones. Listen to this one. Every time I playa tone, the red light goes on. Do you see it? (Demonstrate.) If you listencarefully and hear the tone, you can turn it off by pressing this button and makingthe white light go on. (Indicate by depressing response button.) (Hand theresponse button to the examinee and present the tone, encouraging the child topress the response button. When s/he does, release the stimulus tone. Repeat thesequence at least once or until you feel that the child understands his/her task.Reinforce the child’s performance with a positive comment.) Good. Now wewill play this game while you sit in that chair. (Indicate the chair and hand thechild the response button.) (Place the headset on the child.) First you will hearthe tones in this ear (indicate right or left) and then you will hear them in yourother ear. Are you ready?
d. Examples of verbal instructions when masking of the better ear is required (whenthe difference between the hearing levels of the two ears is 40 dB or greater atany frequency)
Now you will hear the tone in your right/left ear (point to the "poorer" ear). Atthe same time you will hear a noise, like wind, in your other ear (point to the"better" ear). The noise is to keep you from hearing the tone in that ear, so don’tpay any attention to it. I want you to listen for the tones in your right/left ear(point to the "poorer" ear) and press the button whenever you hear them. Do youunderstand ? (If not, clarify as necessary.)
3-3
4. Specific procedure for hearing test
a. Make sure that the audiometer is ready for the test by checking that it is set asfollows:
Channel I
Machine Panel Correct Setting
Power SwitchChannel I StimulusFrequencyDecibels
OnTone1,000 Hz40 dB1
Channel II
Machine Panel Correct Setting
Power SwitchChannel II StimulusFrequency and InputDecibels
OnOff (unless using)NB Noise0 or -10 dB1
1 When masking is required, the Channel II Stimulus should be set at ‘Off,’the Interrupt Switch should show Channel II "On" on the screen and thedecibels should be set at 50 dB.
b. Review the audiometry questions at the beginning of the procedure. Select theear to be used following the rules set forth in item 1, General instructions.
c. Introduce the 1,000 Hz tone to the first ear to be tested at a level of 40 dB forabout one second. This should be well within the range of audibility for mostexaminees and will serve as listening practice. If the tone is not heard at 40 dB,increase the level in 10 dB steps until the examinee responds to it. You will beable to increase the level to 120 dB for the 500-6000 Hz frequencies. A level of115 dBs is the highest level for testing at the 8000 Hz frequency.
d. When the examinee responds, set the intensity dial 10 dB below the previousstimulus intensity (30 dB) and present the tone for one or two seconds.
e. Decrease the level of the tone in 10 dB steps with a minimum of at least onepresentation per level until no response is obtained. Obviously, if no response isobtained to the first presentation at least one more stimulus should be presented.
f. Then increase the intensity dial by 5 dB and present a stimulus.
g. If a response is obtained at this level, reduce the intensity by 10 dB. If no
3-4
response is obtained, increase the intensity by 5 dB. Always descend by 10 dBincrements and count the number of responses at the lowest level while ascendingin intensity in 5 dB steps.
h. Enter as the threshold the lowest dial reading at which more than half of theresponses are obtained to ascending presentations, that is, two out of three orthree out of five trials. Below this level, less than 50 percent response isobtained, and above this level, 100 percent response is approached.
i. Repeat the procedure, presenting each successive frequency in the order listed onthe examination screen to the test ear, and then shift to the other ear as indicateduntil the pure tone test has been completed for all frequencies in both ears.
5. Masking procedure is to be used when the difference in thresholds between the two earsis 40 dB or greater at the same frequency. The reason for performing masking, briefly,follows: When a test tone is presented to the poorer ear of an examinee with unilateralor asymmetrical hearing loss, the sound intensity may be such that it is transmitted acrossthe skull and heard in the better ear before it reaches the threshold level in the test ear.This may result in false threshold levels for the poorer ear. In this case, masking isnecessary.
a. At any frequency, regardless if it is just one, when the threshold of one ear ispoorer than the other ear by 40 dB or more, retest the poorer ear while using amasking noise in the better ear.
b. Inform examinee that there is one additional part of the exam. Remove theheadset to explain the masking procedure as described in 3d.
c. At each frequency that must be retested, introduce the masking noise at 50 db inthe better ear. Then introduce the test tone at 40 db, as usual, in the poorer ear,and re-establish the threshold.
6. Procedure necessary for threshold accuracy
a. Avoid rhythmic presentation of signals to the examinee. The examinee mayrespond to the rhythm rather than to the sound. This is especially true of youngerpersons.
b. Avoid the long, drawn-out search for a threshold that tends to lessen the interestand cooperation of the person being tested and to produce fatigue. If necessary,test at another frequency, then return to the problem frequency later. Enter anychange in the order of the test in the Comments section.
3-5
c. Avoid giving visual or auditory cues when the tone is presented; for example,looking at the person each time a tone is presented or making a click with theinterrupter switch.
d. Double check the dial readings.
e. Check whether or not the interrupter switch was in the "off" position.
f. Avoid activity which will distract the examinee.
g. Check the response of the examinee occasionally by leaving the tone off forseveral seconds and then presenting the tone to see if he is respondingconsistently.
h. Avoid presentation of the test tone for longer than three seconds. This may leadto a false response.
i. Count only the ascending responses in determining the threshold.
j. Avoid being influenced by the threshold obtained for the first 1,000 Hz tone whenobtaining the threshold for the second presentation of this tone.
k. Make sure all computer entries are complete. If the test is not done orincomplete, enter the reason why.
7. Special Problems
A. Testing the Deaf Child
All deaf or "hard of hearing" children should be given audiometry andtympanometry exams. Most deaf children have been tested audiometrically moretimes than the rest of us ever will. Therefore, they are not completely naive withrespect to what to expect when they see an audiometer and have the phonesplaced on their ears.
Deaf children use either sign language or spoken language, or a combination ofthe two. If a child relies on signing, ask the family member or guardian tointerpret instructions. If the examinee is verbal, face the child when you speak.Speak a little more slowly than usual, without exaggerated face movements.Look directly at the child; do not turn away or put hands in front of face.
a. Remove hearing aid(s).
b. Begin at 40 dB and ascend in intensity in 5 dB steps to establishthreshold. As in the usual protocol when a response is obtained, descendby 10 dB increments and count the number of responses at the lowestintensity.
3-6
c. Some children will have responses at high thresholds throughout most ofthe frequency range; others may have hearing at only one or twofrequencies or not at all. Some children may tell you, "I can feel that,but not hear it" at high intensity levels. Tactile (feeling) thresholdsshould not be recorded as auditory thresholds. Search for thresholds ashigh as 110 dB, ascending in 5 dB steps.
d. Tympanometry should be performed, as usual.
B. The Uncooperative Child
If a child is very fidgety or loses interest during the exam, the followingsuggestions may help avoid the long drawn out search for a threshold, and ensureaccuracy of results.
a. Provide constant verbal reinforcement. Let the child know that he/she isdoing a good job. Also, inform the child when he/she has completed afrequency, and to begin again.
b. Stop the exam for several minutes and get the child a drink of water orjuice. Proceed when the child is ready.
c. Show patience. Your frustration with a bored child will only prolong theexamination.
3.3.2 Protocol Procedures for Tympanometry
1. Have the examinee sit in a comfortable, relaxed position (infants and children could beheld by a parent). Explain to the examinee what the test involves and why it is beingdone.
2. Push the PRINT button and hold.
3. Turn on the power switch (G) (Exhibit 2-5) on the rear of the unit. Wait until theTeledyne11
* Avionics logo (J) (Exhibit 3-1) disappears from the display and then release thePRINT button (H) (Exhibit 3-1). When the PAPER ADV. button (K) is pressed,the paper will advance (see Exhibit 3-1).
1 If the failure message appears after applying power, notify your supervisor. Use thumbwheel (L) to adjust the intensity of thedisplay.
3-7
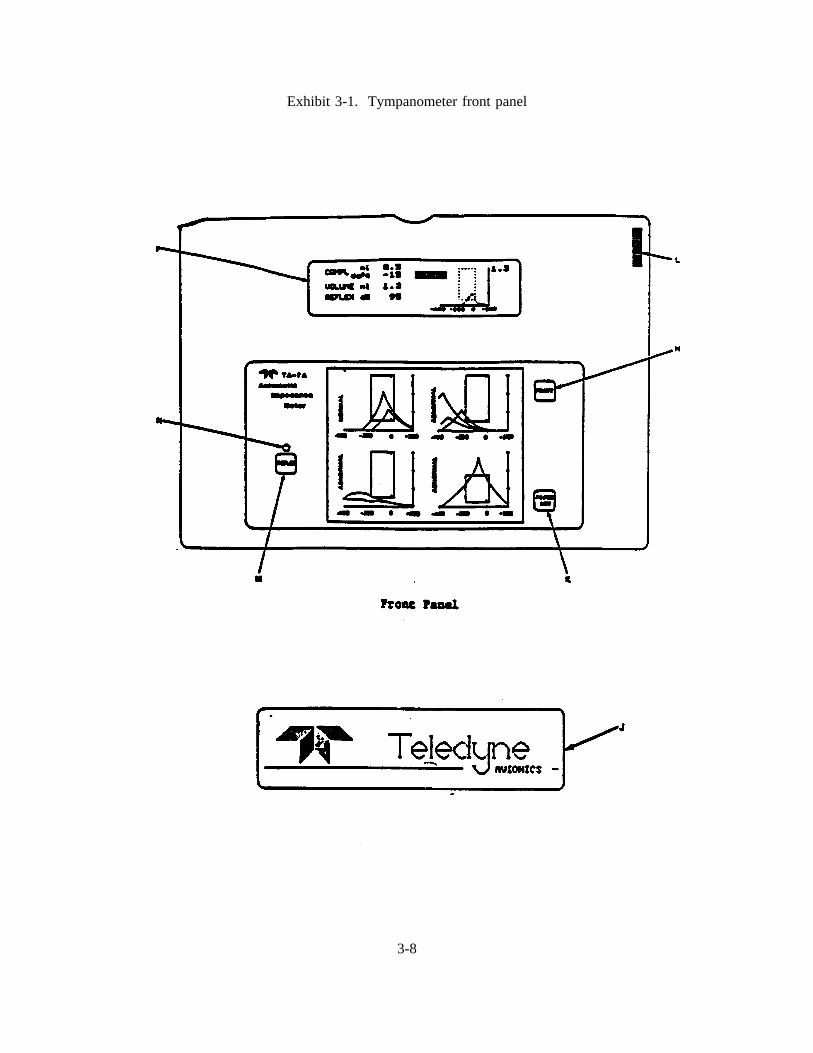
Exhibit 3-1. Tympanometer front panel
3-8
4. Press the REFLEX button (M). Observe that the REFLEX test light (N) is on. Toeliminate the reflex test, simply press the REFLEX button (M) and observe that the light(N) goes out.2
5. Look in the ear to determine the size and direction of the ear canal. Select an eartip ofthe proper size to seal the ear canal. Place the ear tip on the hand held probe, makingsure it fits snugly against the shoulder of the probe.
6. Lightly pull up and back on the ear to straighten the ear canal. During this procedure,watch the probe light -- it will be blinking red and green. Seal the canal by placing theprobe against the ear canal opening. Maneuver the probe slowly until the green lightappears on the probe. Hold the probe as still as possible until the green light goes out.
7. Look at the lights on the probe. Do not watch the tympanometer. If you watch thetympanometer, the probe tip may move against the canal wall and void the test.Movement of the probe during the test may cause the test to abort or give false testresults. If the probe light changes from green to red and three beeps are heard, the testwas aborted. Remove the probe from the ear, wait for the probe light to blink red andgreen, and then repeat the test in sequence. If the probe light changes from green to redand one beep is heard, the test has been successfully completed.
8. The test results will appear on the screen and automatically be stored in the automatedsystem.
Instructions to the examinee
1. Example of verbal instructions for examinees seven years old and older
This is a test to check the status of your middle ear. In a moment, I’ll insert a smallrubber tip into your ear. You’ll feel a slightly raised pressure in your ear for a momentfollowed by a beep which ends the exam. If you would like, you may watch the screenrecording the mobility of your eardrum while the test is being done. Please don’t move,speak, or swallow from the time I place the tip in your ear until I remove it.
2 The reflex selection can only be changed when the READY flag appears on the display screen.
3-9
3.3.3 Examination Form for Audiometry and Tympanometry
3.3.3.1 Hard Copy Exam Form
Although both the audiometry and tympanometry forms are automated for the main survey, it
will still be necessary to know how to record on the hard copy form for those instances when the
automated system is down.
The Audiometry and Tympanometry Examination form is used to record SP responses to the
screening questions and to record the results of the audiometric (air conduction) and tympanogram tests.
An example of the examination form is shown in Appendix A.
The screening questions on the examination form will also be available in Spanish to assist
those SPs who do not understand English. A health technician or translator who is fluent in the Spanish
language will be available to instruct the SP in the exam procedure. An example of the Spanish test
instructions is included in Appendix C.
When using the hard copy form, the technician completes the top section of the form listing
staff identification number, the audiometer and tympanometer number and places the SP’s bar code ID
label in the box labelled "Sample No." After completing the identifier information, the technician asks
the examinee the 10 screening questions. If there are no reasons to exclude the examinee from the exam,
the technician should begin the testing procedures.
3.3.3.2 Automated System
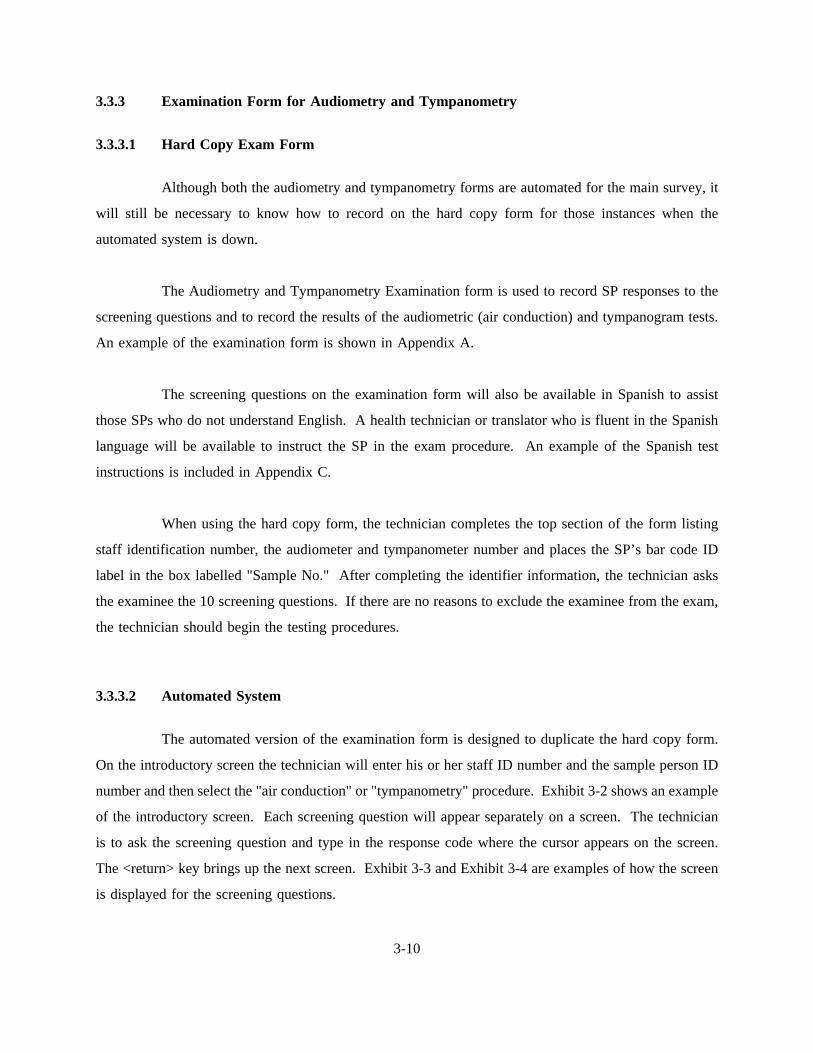
The automated version of the examination form is designed to duplicate the hard copy form.
On the introductory screen the technician will enter his or her staff ID number and the sample person ID
number and then select the "air conduction" or "tympanometry" procedure. Exhibit 3-2 shows an example
of the introductory screen. Each screening question will appear separately on a screen. The technician
is to ask the screening question and type in the response code where the cursor appears on the screen.
The <return> key brings up the next screen. Exhibit 3-3 and Exhibit 3-4 are examples of how the screen
is displayed for the screening questions.
3-10
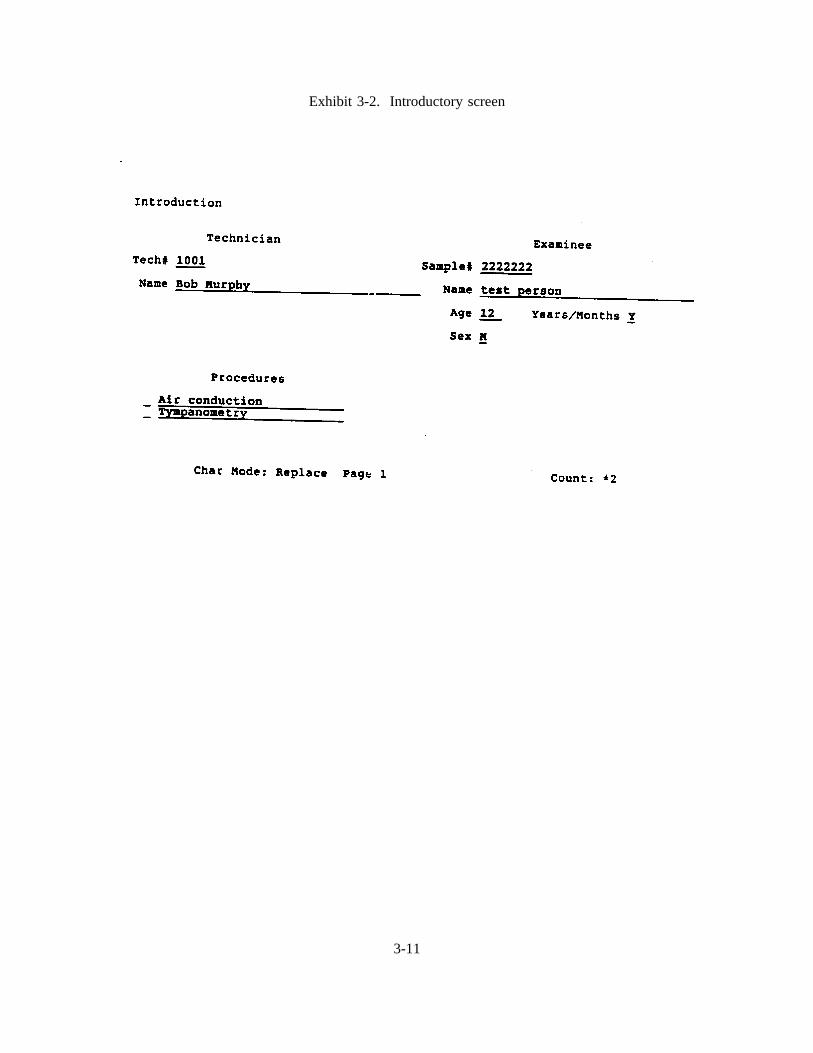
Exhibit 3-2. Introductory screen
3-11
Exhibit 3-3. Screening question screen
3-12
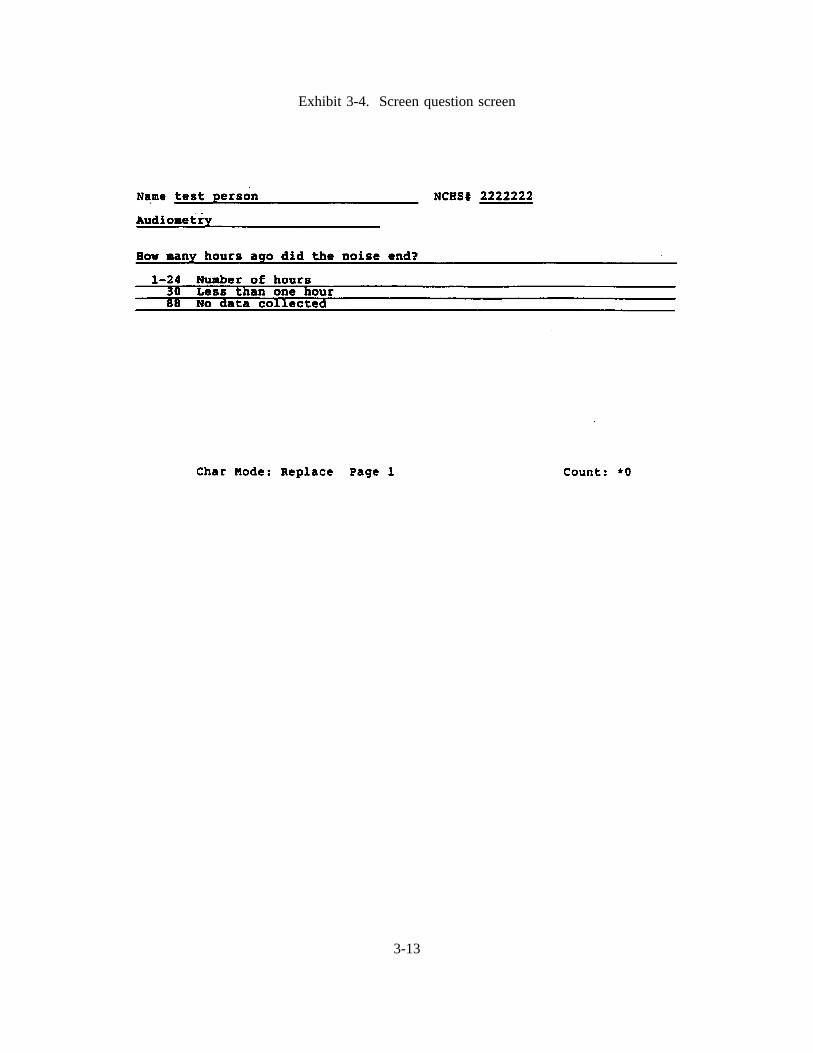
Exhibit 3-4. Screen question screen
3-13
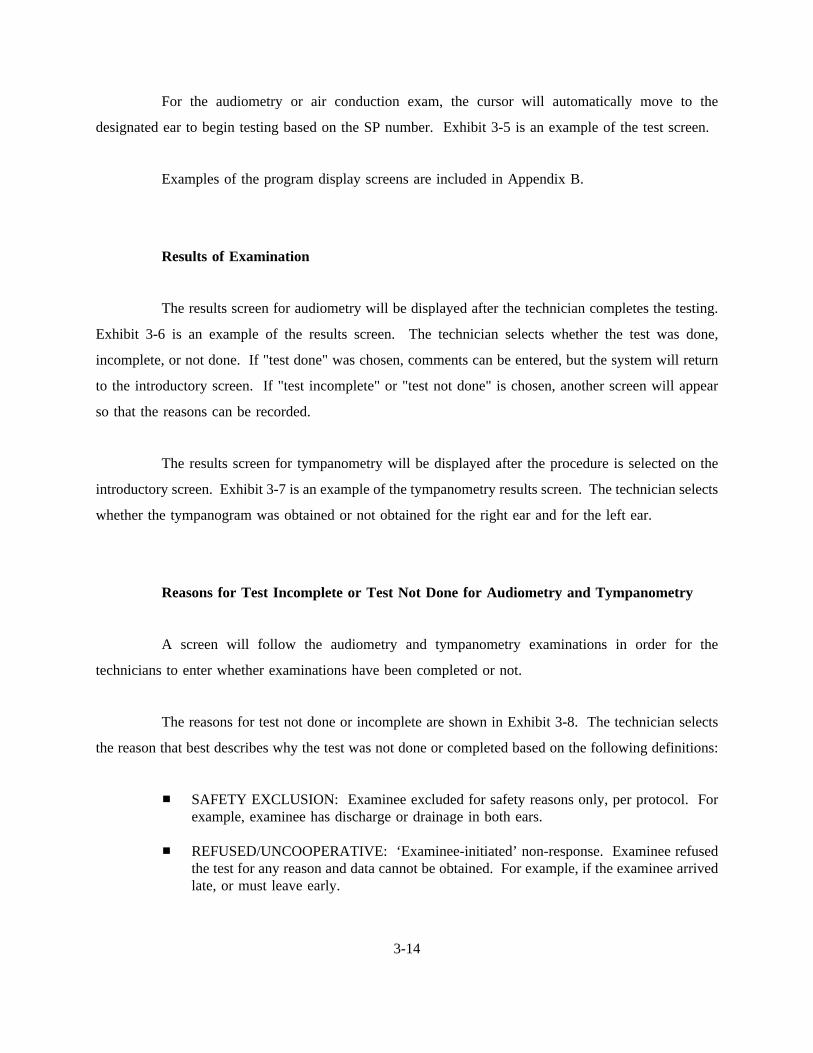
For the audiometry or air conduction exam, the cursor will automatically move to the
designated ear to begin testing based on the SP number. Exhibit 3-5 is an example of the test screen.
Examples of the program display screens are included in Appendix B.
Results of Examination
The results screen for audiometry will be displayed after the technician completes the testing.
Exhibit 3-6 is an example of the results screen. The technician selects whether the test was done,
incomplete, or not done. If "test done" was chosen, comments can be entered, but the system will return
to the introductory screen. If "test incomplete" or "test not done" is chosen, another screen will appear
so that the reasons can be recorded.
The results screen for tympanometry will be displayed after the procedure is selected on the
introductory screen. Exhibit 3-7 is an example of the tympanometry results screen. The technician selects
whether the tympanogram was obtained or not obtained for the right ear and for the left ear.
Reasons for Test Incomplete or Test Not Done for Audiometry and Tympanometry
A screen will follow the audiometry and tympanometry examinations in order for the
technicians to enter whether examinations have been completed or not.
The reasons for test not done or incomplete are shown in Exhibit 3-8. The technician selects
the reason that best describes why the test was not done or completed based on the following definitions:
SAFETY EXCLUSION: Examinee excluded for safety reasons only, per protocol. Forexample, examinee has discharge or drainage in both ears.
REFUSED/UNCOOPERATIVE: ‘Examinee-initiated’ non-response. Examinee refusedthe test for any reason and data cannot be obtained. For example, if the examinee arrivedlate, or must leave early.
3-14
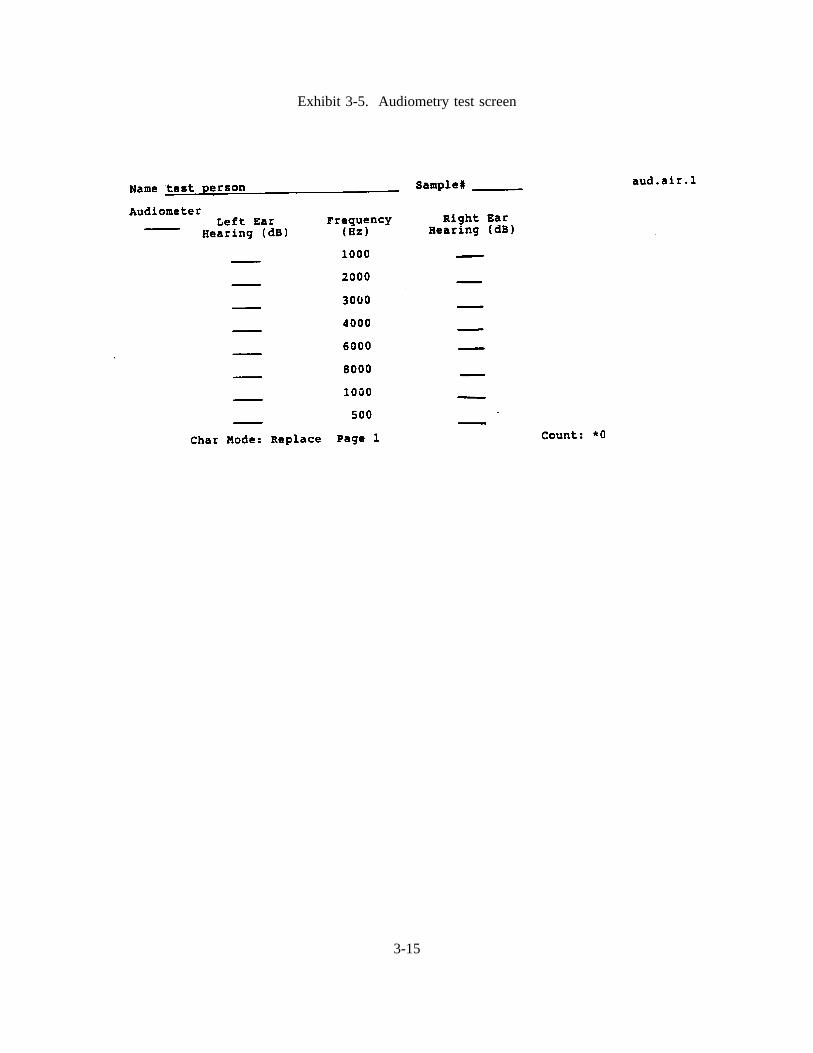
Exhibit 3-5. Audiometry test screen
3-15
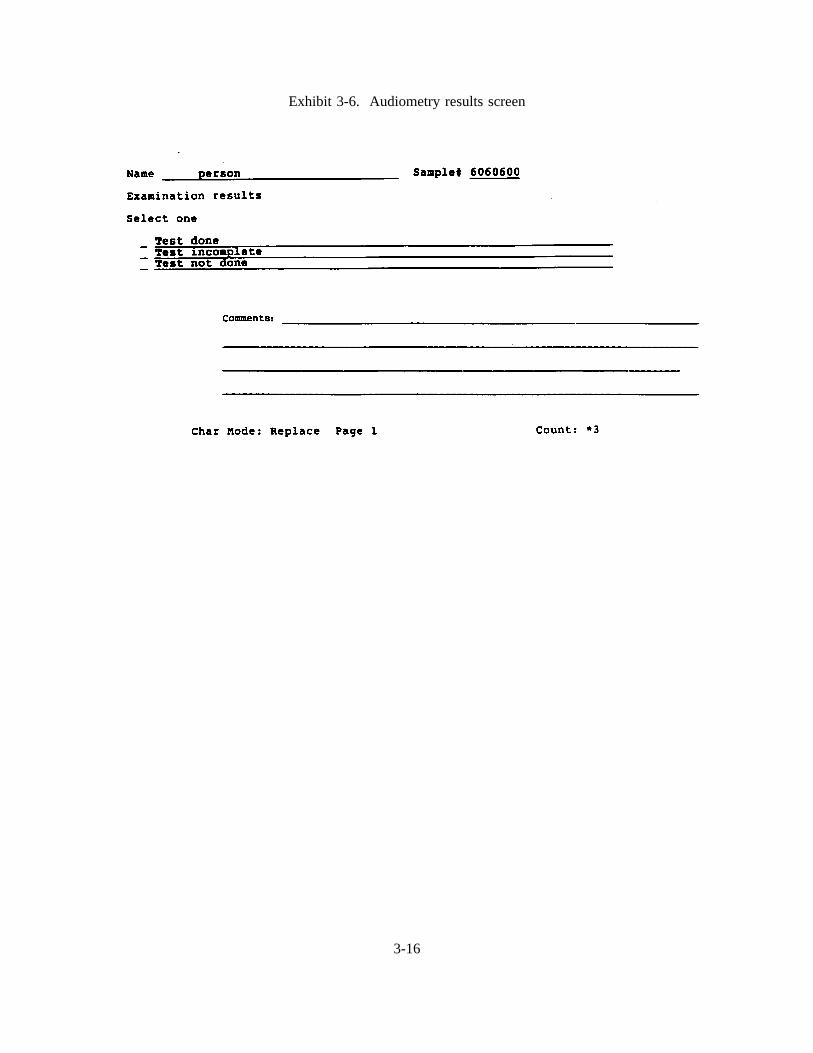
Exhibit 3-6. Audiometry results screen
3-16
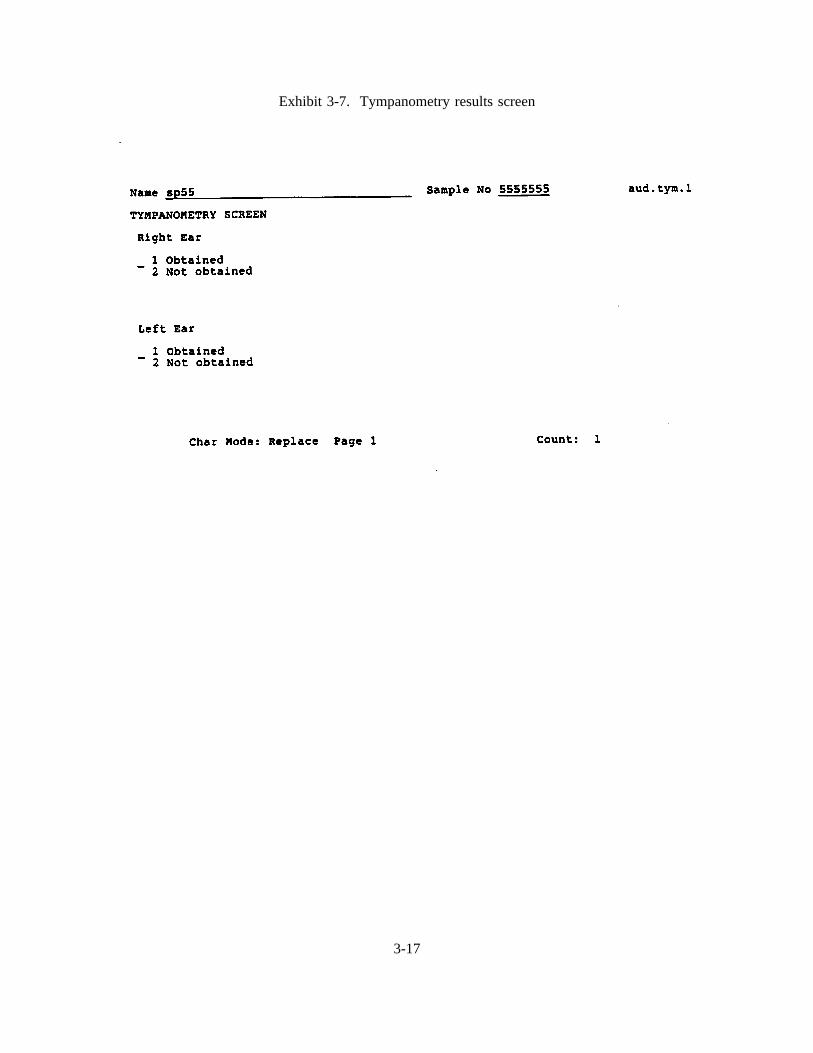
Exhibit 3-7. Tympanometry results screen
3-17
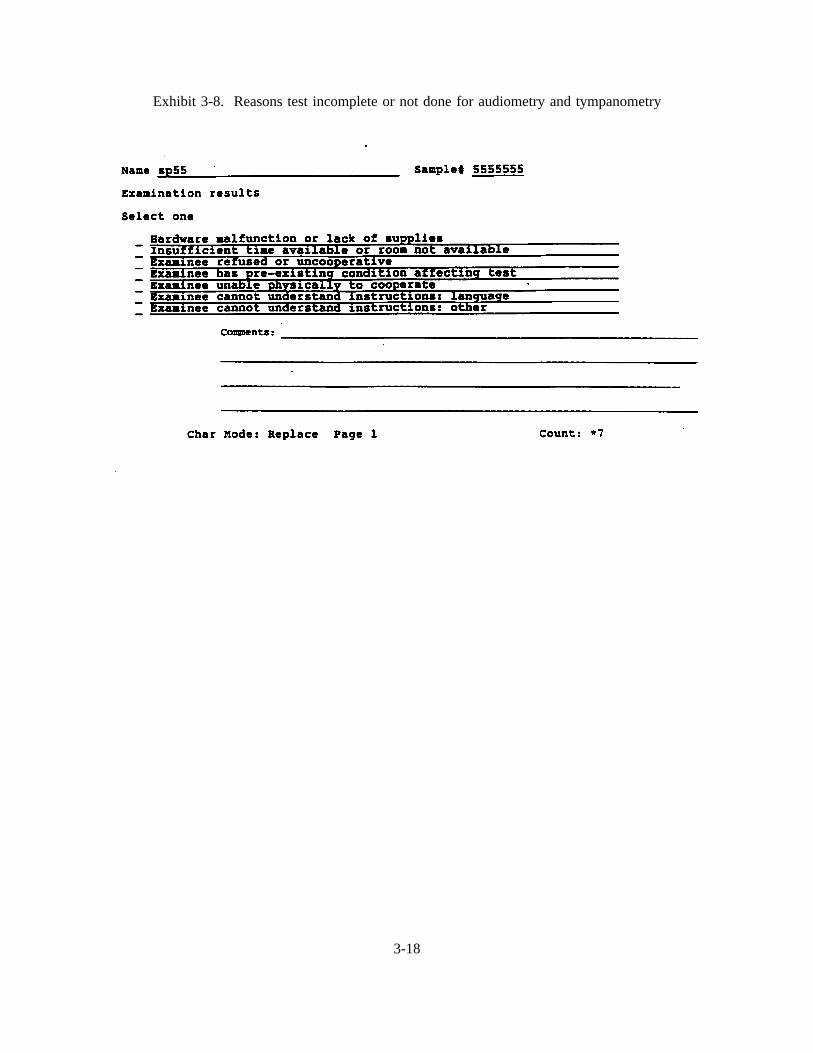
Exhibit 3-8. Reasons test incomplete or not done for audiometry and tympanometry
3-18
OUT OF TIME: End of session and no time to conduct the examination.
PHYSICALLY UNABLE TO COOPERATE: Examinee physically not able to performthe test. For example, the examinee cannot wear the head set or operate the button.
EXAMINEE UNABLE TO UNDERSTAND INSTRUCTIONS: Examinee unable tounderstand instructions to perform the test because of language, cognitive impairment orother communication impairment.
EQUIPMENT PROBLEM: Hardware or software problem. OTHER REASONS: Limituse of this code to reasons that cannot be coded with the above categories. For example,the examinee was sent home or excluded by the physician.
3.3.3.3 Question-by-Question Examination Specifications
Question-by-question specifications follow.
This section of the manual contains some brief general directions and question-by-question
specifications (QxQ Spex) for the Audiometry and Tympanic Impedance forms. The QxQ spex are
designed to help you better understand theintent of each question and/or test procedure and to provide
you with specific procedures to make the administration of the exam as smooth as possible. Use these
specifications as a reference source during the training, interviewing, using the automated system, and
during the editing phases of your work. When you have a question about making an entry into the
computer, always look at the QxQ spex first to try to resolve the problem. The objective is to achieve
comparability without rigidity across technicians in the way they administer, interpret and record for
questions and testing procedures.
General Specifications
Before beginning the specific question-by-question review, please note the following general
specifications.
Testing and recording for the left ear will be completed first if the examinee number isodd. Testing and recording for the right ear will be completed first if the examineenumber is even. If, while asking the audiometry questions, you ascertain that theexaminee hears better in one ear versus the other, then the better ear will be tested andrecorded first.
3-19
Read all questions as written.
If a respondent replies "Don’t Know" to a question, probe for an answer. If after theprobe, the examinee still maintains the "Don’t Know" response, select "8" for no datacollected.
If any part of the test cannot be completed (i.e., the machine fails after testing at 3000Hz), select "2" for test incomplete and then select the reason in the section entitled,"Reasons test incomplete or not done." If the test is not done (i.e., prior to the beginningof the audiometry testing the examinee refuses to have test done), select "3" test not donein the section for "Results of audiometry examination" and indicate the reason(s) in thesection entitled, "Reasons test incomplete or not done."
Zero filling - When you record an answer involving dates or numbers, all boxes (spaces)must be filled. Zero fill the empty boxes starting from the left. For example, if there arethree spaces ___ ___ ___ for the tympanometer number, which is 21, it would be filledin as follows: 0 2 1 .
Perhaps most important,listen carefully. Be aware of exactly what the question is askingand then listen carefully to the respondent’s answer so that you are sure s/he is providingthe information you have asked for. If you think the respondent has misunderstood thequestion, probe by repeating the question with a preface such as "Just to make sure I havethis right, ..." If the respondent asks for clarification, repeat the question or portion of thequestion which provides the information s/he needs in order to answer correctly. If thereis any misunderstanding, always probe to verify/clarify the response.
Before beginning the audiometry testing, verify the identifying information which appears on
the computer screen with the examinee.
Prior to the actual audiometry testing, you will ask the examinee a series of questions:
QA.1 This question asks whether the examinee has had a cold or sinus problems within the past
week. A cold for purposes of this study will be defined as a disorder of the upper respiratory
track, which may be viral, a mixed infection or an allergic reaction. It is marked by acute
discharge from the nose, slight rise in temperature, chilly sensation and general indisposition.
Sinus problems will be defined as a condition that causes an inflammation of a sinus. The
condition may or may not contain pus, be chronic or acute. It may involve the ethmoid,
frontal, maxillary or sphenoid sinus.
Select the "yes" box if the examinee states that s/he has had a cold or sinus problems within
3-20
the last seven days and go on to QA.2. Select the "no" box if the examinee states that s/he has
not had a cold or sinus problems within the last seven days and skip to QA.3. Select the "no
data collected" box if the examinee states that s/he does not know if s/he has had a cold or
sinus problems within the last seven days or if the examinee refuses to answer or decides not
to complete the testing.
QA.2 This question will only be asked if the examinee answered yes to QA.1 and if the examinee
has a cold or sinus problems today. See Q.1 for definition of cold or sinus problems. Note
the time frame "TODAY". Select the "yes" box if the examinee states that s/he does have a
cold or sinus problems today. Select the "no" box if the examinee states s/he does not have
a cold or sinus problems today. Select the "no data collected" box if the examinee states s/he
does not know if s/he has a cold or sinus problems today or if the examinee refuses to answer
or decides not to complete the testing.
QA.3 This question asks whether the examinee has been exposed to a very loud noise within the past
24 hours. Note the time frame of "24 hours". Select the "yes" box if the examinee states that
s/he has been exposed to a very loud noise within the past 24 hours and ask QA.4. Select the
"no" box if the examinee states s/he has not been exposed to a very loud noise within the past
24 hours and skip to QA.5. Select the "no data collected" box if the examinee states s/he does
not know if s/he has been exposed to a very loud noise within the past 24 hours or if the
examinee refuses to answer or decides not to complete the testing.
QA.4 QA.4 will only be asked of those examinees that respond "yes" to QA.3. It asks how many
hours ago did the noise end. Enter the number of hours, to the nearest hour, using the
rounding rule. Select the "Less than 1 hour" box if the time lapsed is less than one hour.
QA.5 This question asks the examinee if s/he has listened to music with headphones or earphones
within the past 24 hours. Note the time frame of "24 hours". Select the "yes" box if the
examinee responds yes, s/he has listened to music with headphones or earphones within the
past 24 hours. Select the "no" box if the examinee responds that s/he has not listened to music
with headphones or earphones within the past 24 hours. Select the "no data collected" box if
the examinee states s/he does not know if s/he has listened to music with headphones or
3-21
earphones within the past 24 hours or if the examinee refuses to answer or decides not to
complete the testing.
QA.6 QA.6 will only be asked of those examinees that respond "yes" to QA.5. It asks how many
hours ago did you stop listening. Enter the number of hours, to the nearest hour, using the
rounding rule. Select the "Less than 1 hour" box if the time lapsed is less than one hour.
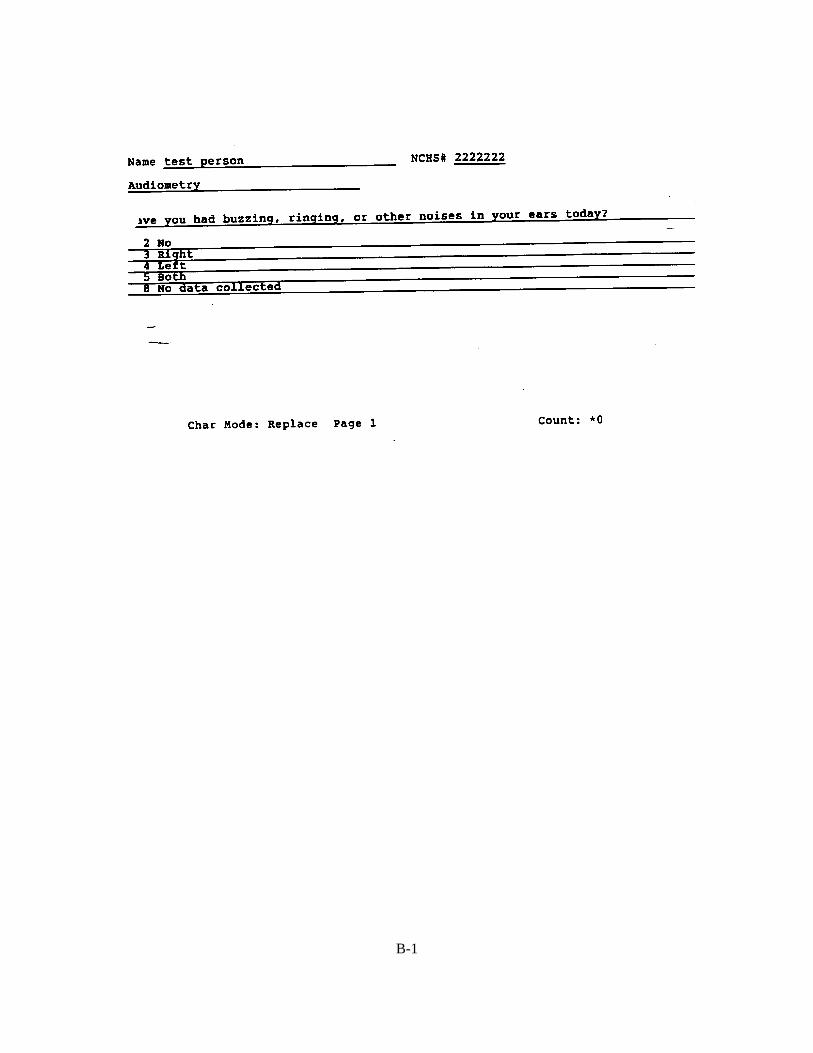
QA.7 QA.7 asks the examinee if s/he has had buzzing, ringing or other noises in his/her ears today.
Note that the time frame is "today." Select the "no" box if the examinee states that s/he has
not had buzzing, ringing or other noises in his/her ears today. Select the "right" box if the
examinee states that s/he has had a buzzing, ringing or other noises in the rightear today.
Select the "left" box if the examinee states that s/he has had a buzzing, ringing or other noises
in the leftear today. Select the "both" box if the examinee states that s/he has had a buzzing,
ringing, or other noises in bothears today.
QA.8 Ask the examinee if s/he has had an earache within the past week. An earache for purposes
of this study will be defined as any pain in the ear, regardless of severity. The time frame for
this question is the past week or last seven days. Select the "no" box if the examinee states
that s/he has not had an earache within the past week. Select the "right" box if the examinee
states that s/he has had an earache in the rightear within the past week. Select the "left" box
if the examinee states s/he has had an earache in the leftear within the past week. Select the
"both" box if the examinee states that s/he has had an earache in bothears within the last
week.
QA.9 QA.9 asks the examinee if s/he now has a tube in the right or left ear. Tube will be defined
as when an examinee has had tubes inserted in one or both eardrum(s). Note that the time
frame is "now." Select the "no" box if the examinee states that now (at the time of testing)
s/he does not have a tube in the right or left ear. Select the "right" box if the examinee states
that s/he has a tube in the rightear. Select the "left" box if the examinee states that s/he has
a tube in the leftear. Select the "both" box if the examinee states that s/he has a tube in both
ears.
3-22
If tubes are present in one or both ears, tympanometry will not be conducted.
QA.10 QA.10 asks the examinee if s/he has drainage/discharge from either ear. Drainage/discharge
will be defined as an exudate or substance noted in or from the ear which may be watery,
purulent (consisting of or containing pus) or bloody. Audiometry and tympanometry exams
will be conducted only on the ear withoutdrainage/discharge. It is imperative that the ear
cushions (earphones) never be placed on a draining ear. The headset should be shorted and
ear cushion placed on the examinee’s temple as described in section 3a(8).
QB.1 Air Conduction Results - Left ear. You will be recording the air conduction results for the left
ear first if the examinee sample number is odd. In column B.1.a, for each frequency, enter the
threshold for the lowest dial reading at which more than half of the responses are obtained to
ascending presentations, that is, two or three out of five trials.
In column B.1.c, enter the results when the masking procedure is used. That is, the left ear
tested with masking on the right ear.
QB.2 Air Conduction Results - Right ear. You will be recording the air conduction results for the
right ear first if the examinee sample number is even. In column B.2.a, for each frequency,
enter the threshold for the lowest dial reading at which more than half of the responses are
obtained to ascending presentations, that is, two or three out of five trials.
In column B.2.c, enter the results when the masking procedure is used. That is, the right ear
tested with masking on the left ear.
3-23
4. LOGS AND RECORDS
4.1 Daily Log
The technician conducting audiometry and tympanometry testing will complete two forms for
the exam: the audiometry/tympanometry exam form and the "Audio and Impedance Daily Log Sheet."
These forms are part of the automated system; however, it is important that the health technician be
familiar with the hard copy versions in the event that the automated system is not in operation.
4.1.1 Hard Copy - Audio and Impedance Daily Log Sheet
The audiometry and tympanometry (impedance) daily log sheet will be kept in the exam room.
An example of the daily log sheet is shown in Exhibit 4-1. Identifier information is to be completed by
the technician in the upper right corner of the form.
Stand No. - Enter the stand number.
Location - Enter the stand location.
Date - Enter the date the testing is being performed.
The log is designed to be able to use the SP barcode ID label and accommodate 10 SP entries
(one exam session) per sheet.
SP ID # - Place the SP ID label in this space.
Examiner No. - Enter your four-digit ID number.
Age - Enter the age of the SP, using the rounding rule as applicable.
Time In/Time Out - Enter the time the SP enters the room and leaves the room.
Air Conduct - Check this box if the audiometry was completed successfully in bothearsand leave the box blank if audiometry was completed successfully in only one ear or notat all. Make a note in the comments section if you were unable to complete theaudiometry testing in both ears.
4-1
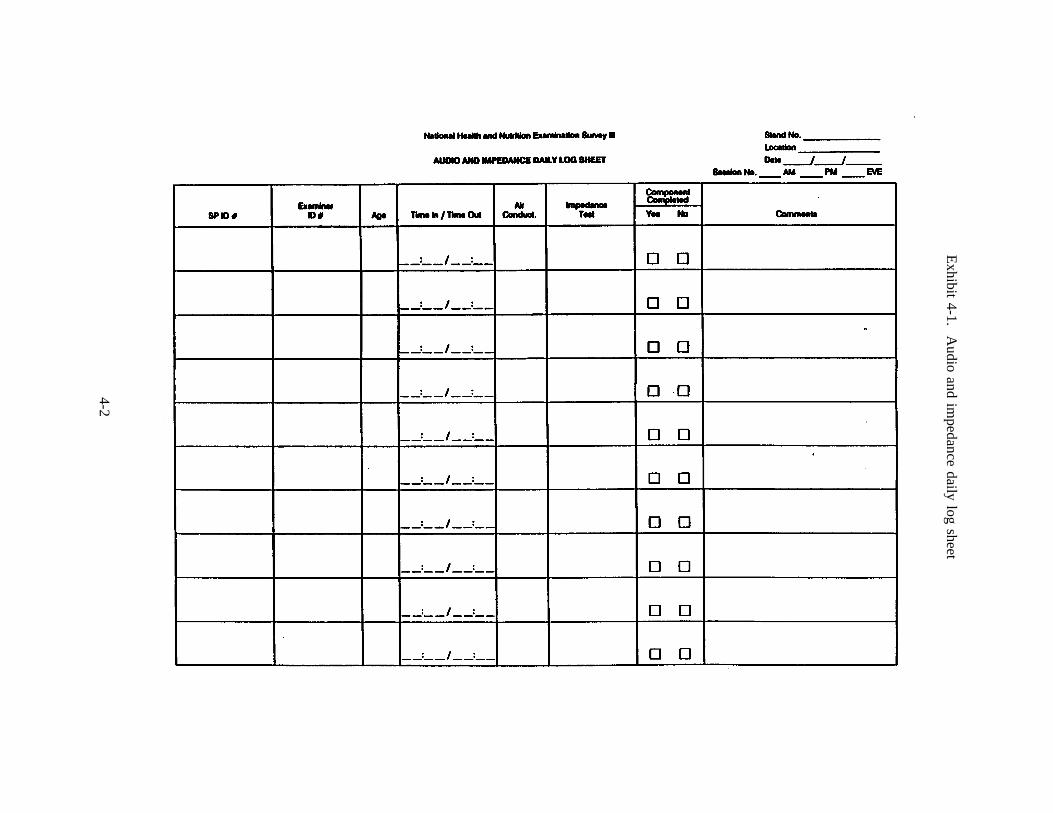
Exhibit
4-1.A
udioand
impedance
dailylog
sheet
4-2
Impedance Test - Check this box if the tympanometry was completed successfully in bothears and leave the box blank if tympanometry/audiometry was completed successfully inonly one ear or not at all. Make a note in the comments section if you were unable tocomplete the tympanometry testing in both ears.
Component Completed - Check one box. You must make a note in the comments sectionif the component was not done.
Comments - You must make a note in the comments section if any part of the exam wasunsuccessful. You should also make notes to explain any unusual situation.
It is important that all information on the log sheet be recorded as accurately and completely
as possible. All entries need to be clear and legible. Any unusual occurrences or problems should be
recorded in the "Comments" section so that information can be easily retrieved if needed.
4.1.2 Automated Log Forms
The automated system incorporates the audiometry and tympanometry log form. The
introductory screen in the automated program provides for data entry of the necessary identifier
information for the SP, the technician, and the time. The comments section on the results screen provides
for only unusual occurrences, problems, etc., to be recorded.
4.2 Calibration Logs
Refer to Sections 2.3.1, 2.3.2 for calibration log procedures.
4.3 Shipment of Forms and Logs
Refer to Part 1, Section No. 2, Standardized Procedures for information concerning the
shipment of forms and logs from the MEC.
4-3
5. QUALITY CONTROL
Quality Control Procedures
To ensure complete and accurate data collection and to document the data collection process,
a variety of quality control procedures have been developed for this survey. This section describes
procedures to be followed by you and the audiometry consultant.
Editing the Hard Copy of the Audiometry/Tympanometry Form
After filling in information on the hard copy form for Audiometry and Tympanometry while
proceeding through the testing process for a particular examinee, the technician should review the form
for completeness, accuracy and legibility before the examinee leaves the exam room so that data can be
retrieved, if necessary. The technician should make the following checks of the Audiometry and
Tympanometry Forms:
On all pages, see that:
The second digit of all hearing level values must be a "5" or a "0";
A response has been marked for all appropriate items, keeping the age of the examineein mind;
No conflicting responses have been marked for the same item;
Appropriate skip patterns have been followed; and
All entries are legible.
Verifying Daily Examinee Schedule
The technician should check off each examinee on the schedule provided by the coordinator
as s/he is about to begin the audiometry/tympanometry testing. At the end of each day’s session, the
technician should review the schedule and check it against the control section of the automated system
5-1
to make sure that all examinees who were scheduled were seen by the technician. If any examinees were
missed, the technician should notify the coordinator immediately.
Quarterly Observations and Replications
Four times a year, the audiometry/tympanometry consultant will be responsible for observing
a sample of about 20 audiometry/tympanometry tests given by the technician. Using an observation
checklist, the consultant will observe whether all appropriate frequencies were checked and whether the
procedures for the testing were strictly followed, including the position of the examinee, position of the
earphones and position of the ear probe for each part of the testing. Any deviation from standard
procedures, as well as any problems that arise, will be noted by the consultant.
Variations in procedures and problems will be reviewed with the technician at the end of the
day. If problems or other issues are considered to be serious by NCHS or the audiometry/tympanometry
consultant, retraining will be scheduled.
In addition to the testing components, the consultant will review a sample of Audiometry and
Tympanometry Report Forms for completeness and accuracy.
One other measure of quality control may be instituted - that is, replication of some of the
audiometry and tympanometry tests by the consultant. Since it is impractical to ask an examinee to submit
to two complete examinations by two examiners, replicate examinations, if feasible at all, may be
conducted on the dry run at the beginning of a stand or the day before.
5-2
6. SAFETY PROCEDURES
6.1 Equipment Precautions
Environmental - The GSI 16 audiometer meets the ANSI S3.6-1969 standards for temperature
and humidity specifications, and it meets the Underwriters Laboratories (UL) 544 standards in terms of
shock hazards and leakage.
6.1.1 Infection Control
Procedures that have been developed to prevent the transmission of infections among staff and
between SPs and staff include:
Strict handwashing between each examinee.
Cleaning of the audiometer ear cushions between SPs.
Daily cleansing of ear tips used for exam sessions with a disinfectant solution.
Bi-weekly cleaning of the ear probe and tympanometer.
Screening SPs to determine if there is any drainage or discharge from one or both ears;if there is a positive response to this particular screening question, the ear cushions areto be cleaned with a damp cloth moistened with disinfectant solution after the SP leavesthe exam room.
6.2 SP Movement and Positioning
The SP is to be seated for both the audiometry and tympanometry exams. The SP is positioned
so that he/she is adjacent to the technician but facing away from the technician toward the test room doors.
This positioning will prevent the SP from being cued to respond to the various frequency levels by
observing what the technician is doing or how the equipment is being operated.
6-1
6.3 Emergency Procedures
There is no medical risk to SPs that participate in audiometry and tympanometry testing.
However, should a medical emergency arise while the SP is being tested, the MEC emergency procedures
as discussed in Part I, Section 3 of this manual should be followed. If there is ever a question or concern
about the physical condition or status of an SP during the exam, the physician should be notified as per
standard MEC procedure.
6-2

APPENDIX A
Audiometry/Tympanometry Examination Form
A-1
A-2
A-3

APPENDIX B
Examples of Screening Question Screens
B-1

B-2
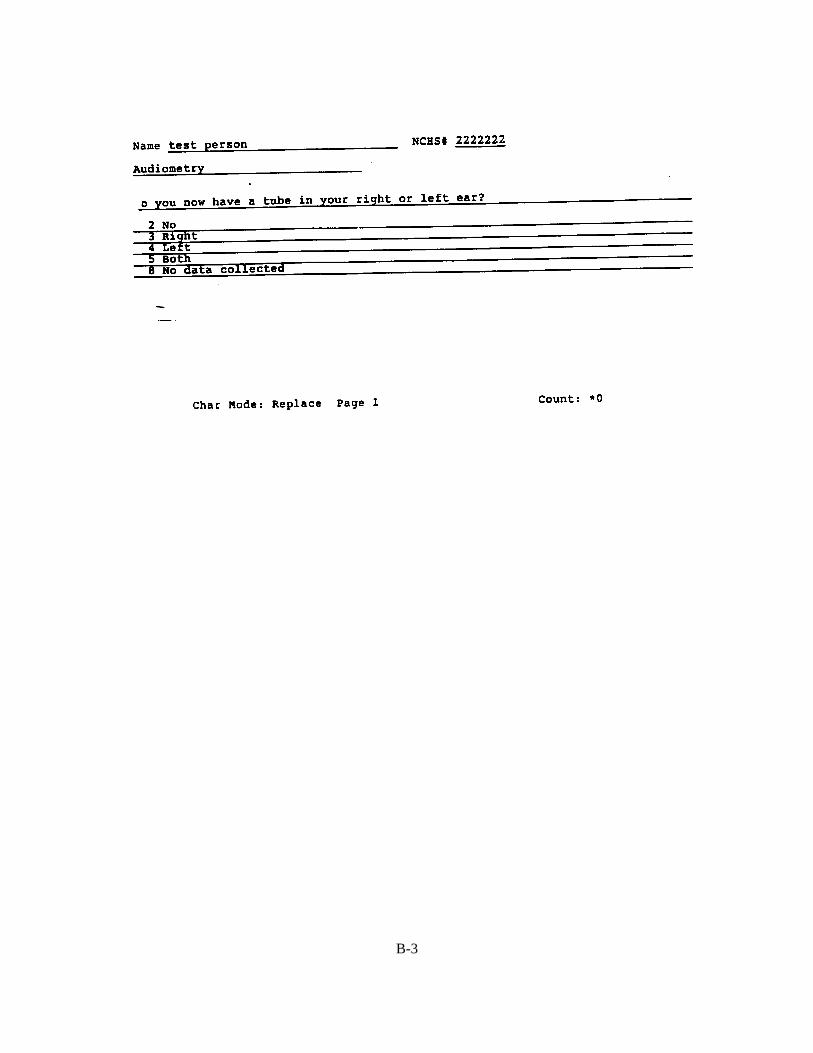
B-3
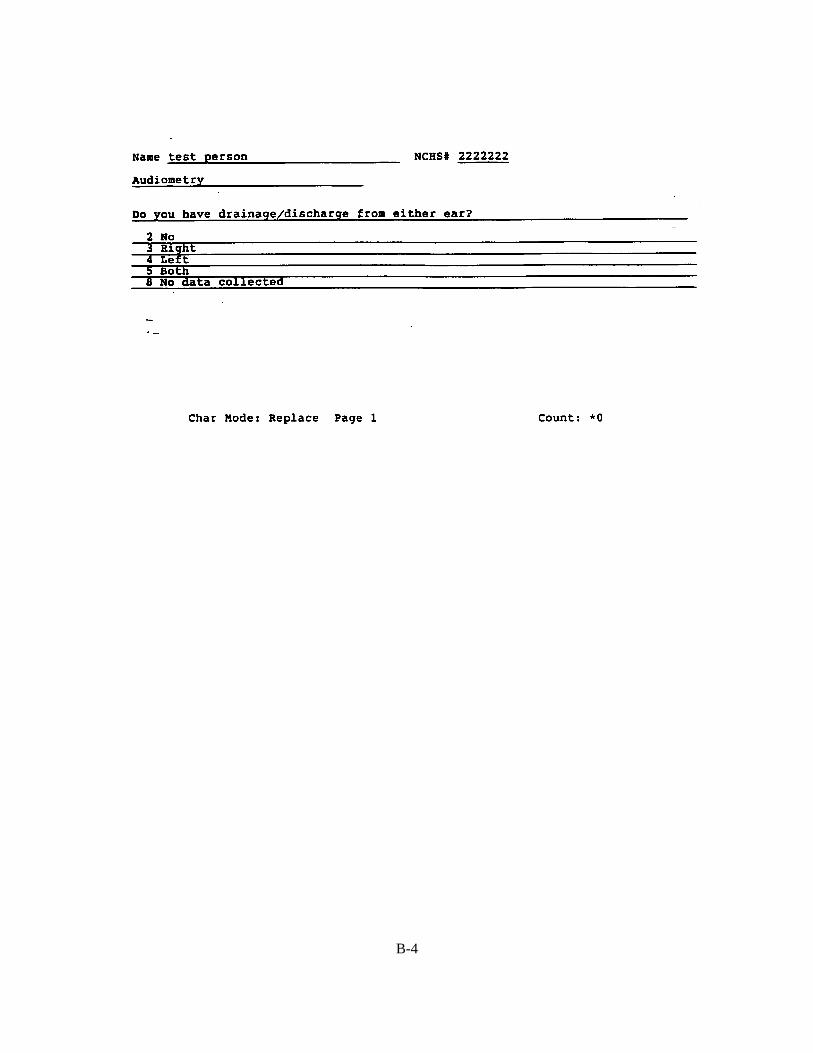
B-4
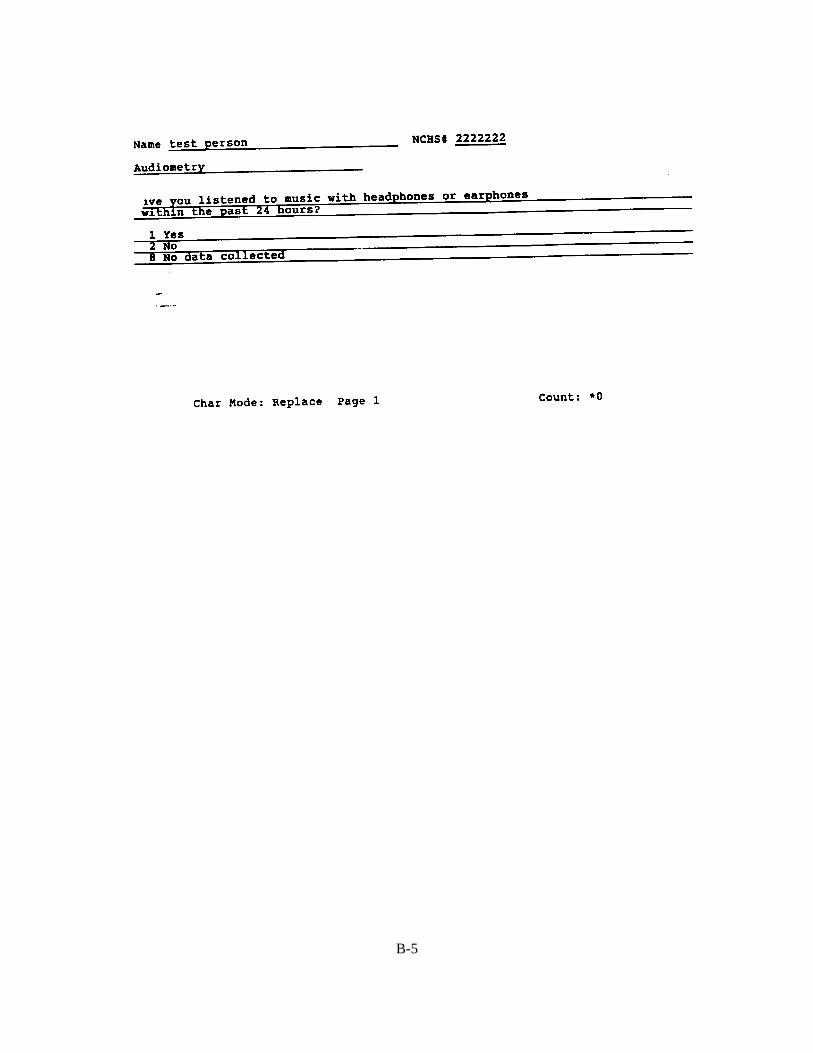
B-5
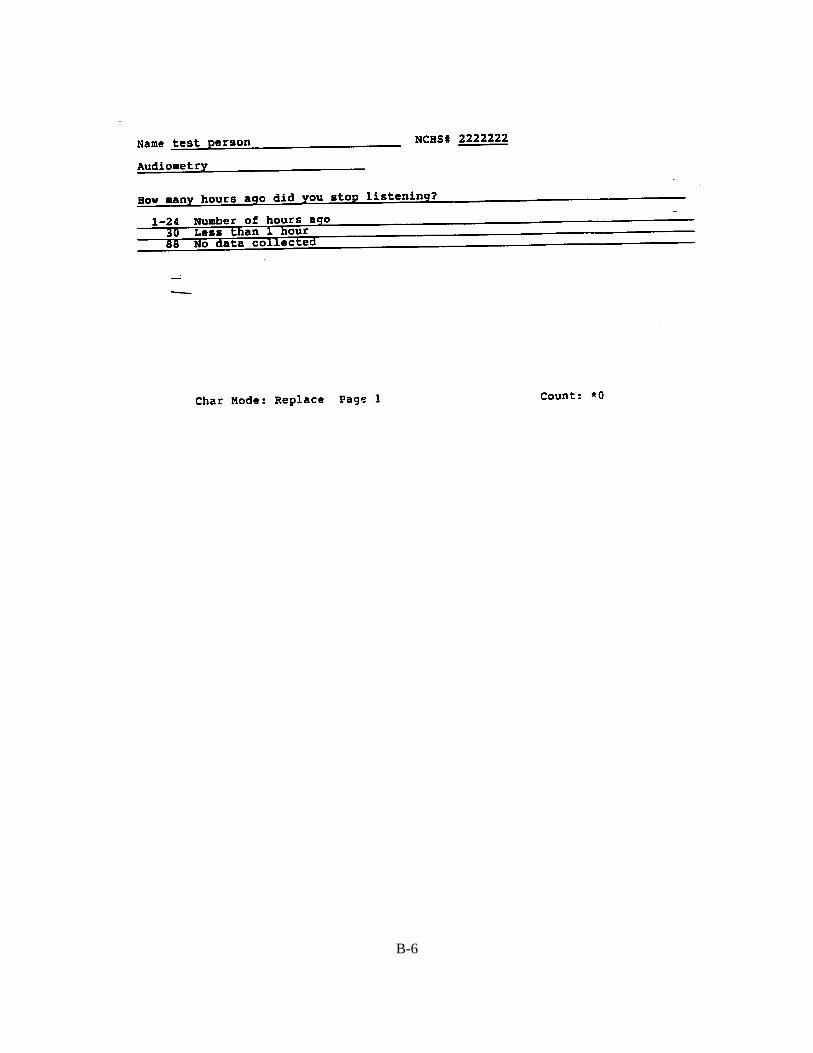
B-6
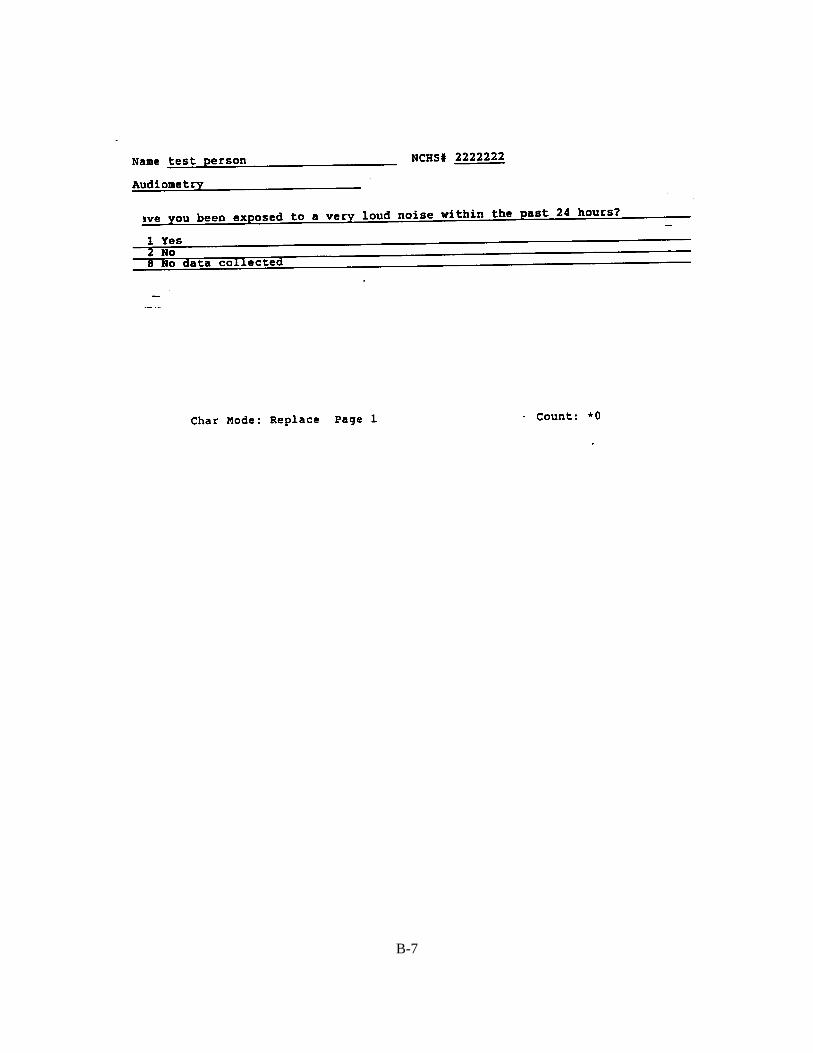
B-7
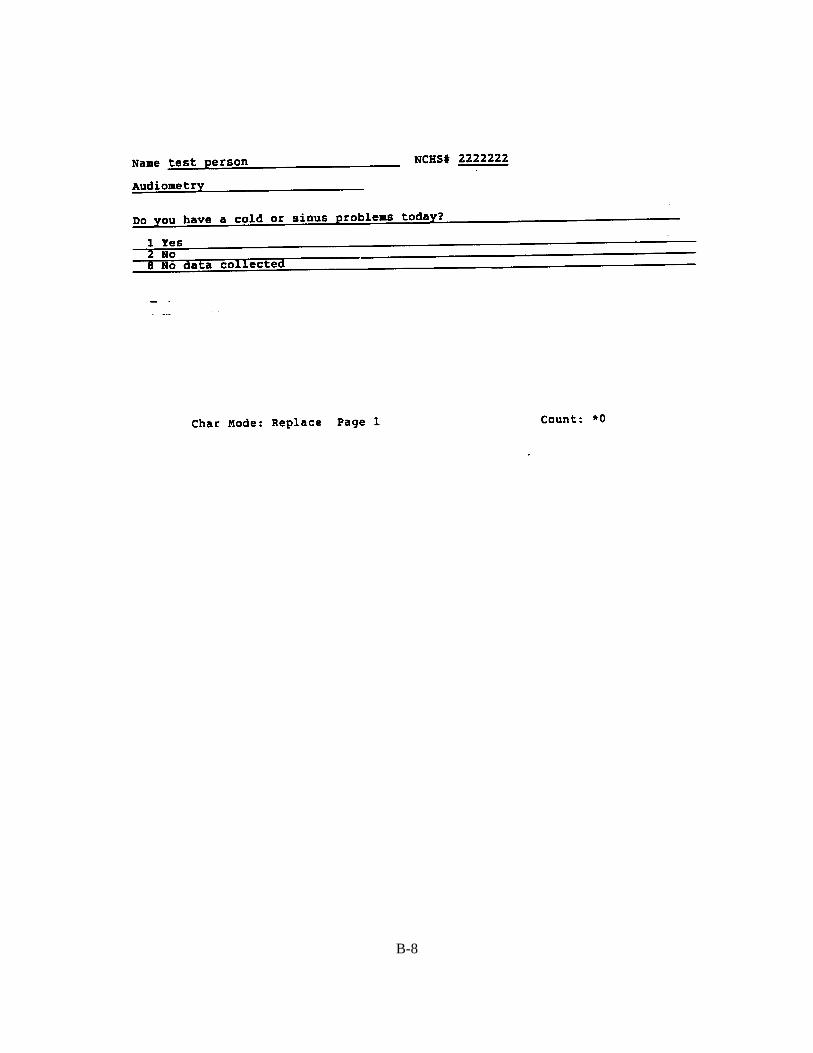
B-8

APPENDIX C
Spanish Version
Examination Form
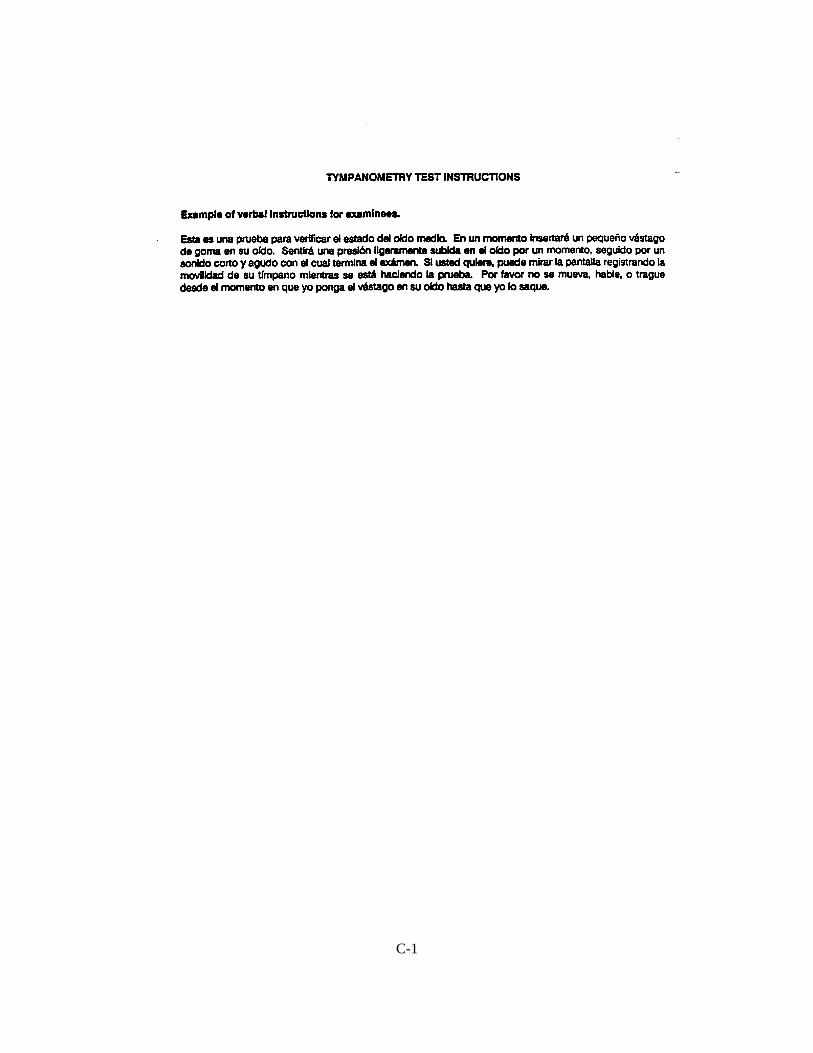
C-1
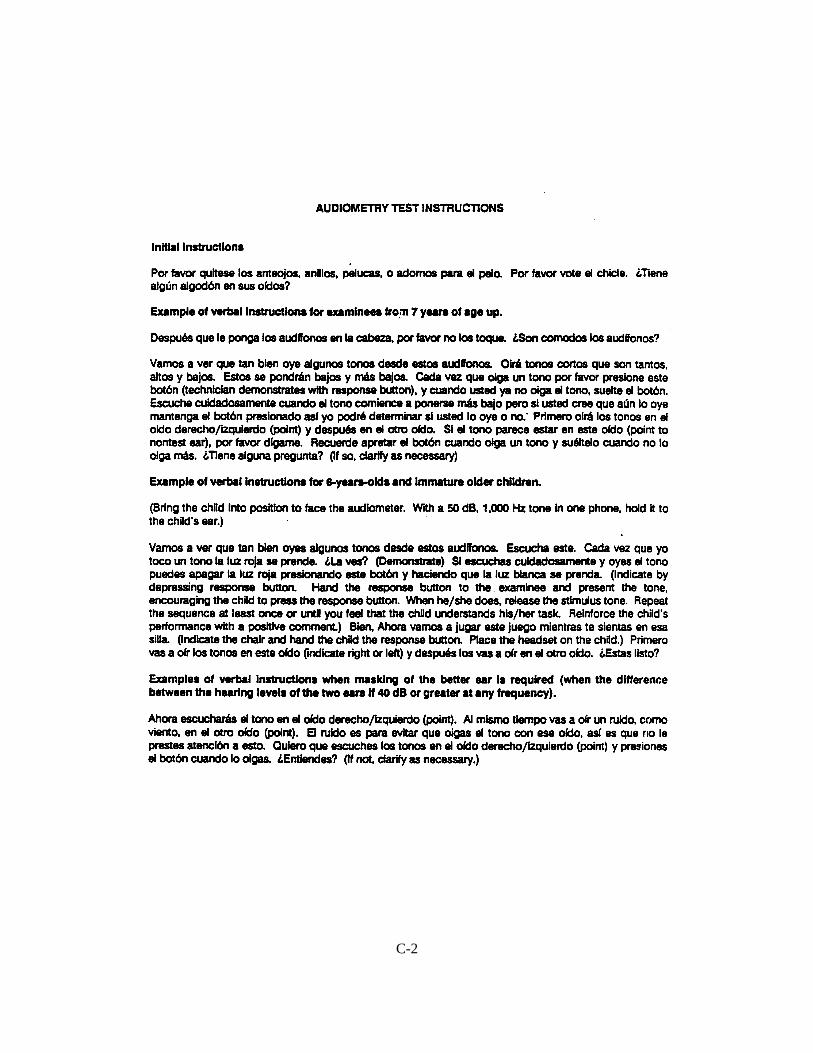
C-2
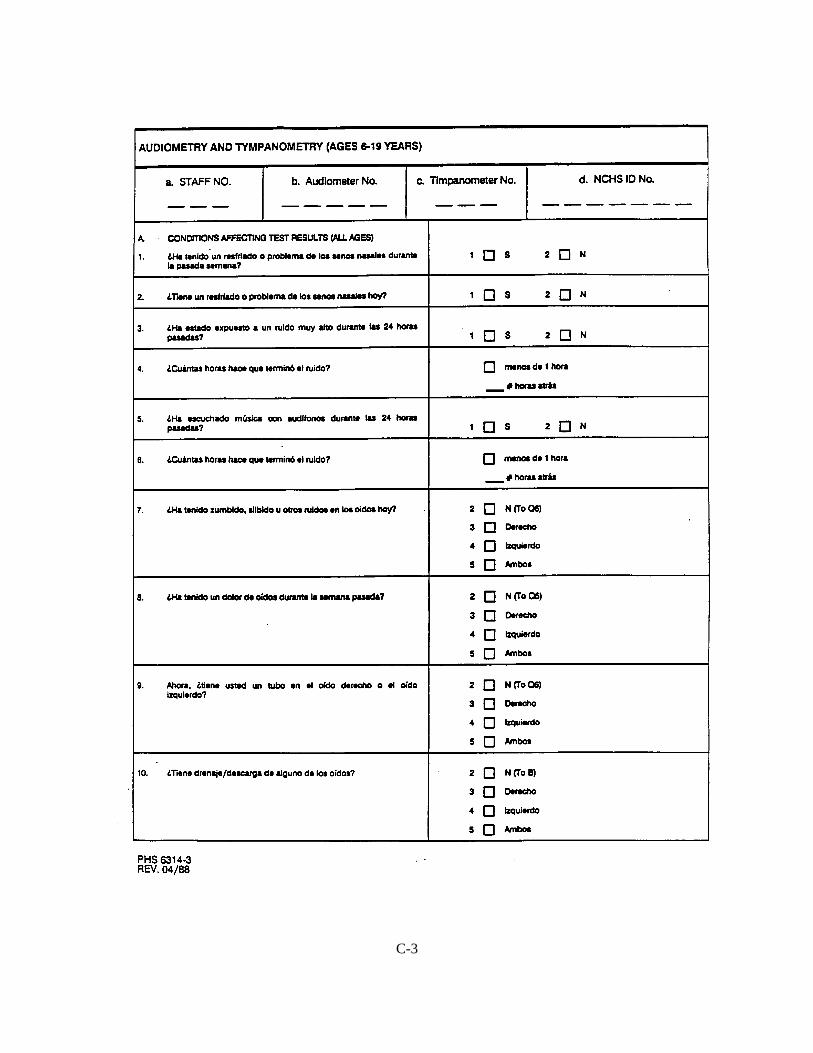
C-3