
Attendant Pro User Manual - Landis Technologies LLCCurrent Call Panel The current call panel display...
51
⌂ Page | 1 Attendant Pro User Manual (en English)
Transcript of Attendant Pro User Manual - Landis Technologies LLCCurrent Call Panel The current call panel display...

⌂
Page | 1
Attendant Pro
User Manual (en English)

⌂
Page | 2
Contents
Prerequisites ....................................................................................................................................................................... 5
Installation ........................................................................................................................................................................... 5
Registering Your Attendant Pro ............................................................................................................................... 8
Upgrading Attendant Pro ............................................................................................................................................. 10
Click Once Upgrade ................................................................................................................................................... 10
MSI Upgrade ................................................................................................................................................................ 10
Attendant Pro Quick Tour ............................................................................................................................................. 11
Overall Screen Layout ............................................................................................................................................... 12
My Information Panel ........................................................................................................................................... 12
Incoming Calls Panel ............................................................................................................................................. 14
Current Call Panel .................................................................................................................................................. 16
Handled Calls Panel .............................................................................................................................................. 17
Contact Groups Panel ........................................................................................................................................... 18
Contact Search Panel ............................................................................................................................................ 18
Quick Access Shortcuts ........................................................................................................................................ 20
Contact Card Panel ............................................................................................................................................... 20
RGS (Response Group Service) Agent Groups Panel .................................................................................. 22
Options and Voicemail Area ............................................................................................................................... 22
Caller Information (Incoming Call Pop) Panel ................................................................................................ 23
Notification Area ....................................................................................................................................................24
Status Area ............................................................................................................................................................... 25
Call Recording ......................................................................................................................................................... 26
Contacts / Contact Layouts .......................................................................................................................................... 27
Smart Call ..................................................................................................................................................................... 28
Presence ........................................................................................................................................................................ 28
Context Menu Options ............................................................................................................................................. 28
Contact Layout Double Click Action ..................................................................................................................... 30
Running Through Some Scenarios Using the Attendant Pro ............................................................................. 30
Answer and Blind Transfer (or Unattended Transfer) Using Keyboard ....................................................... 30
Answer and Consult Transfer Using the Keyboard ........................................................................................... 30

⌂
Page | 3
Answer, Hold and Retrieve from Hold Call Using Keyboard .......................................................................... 31
Dial a Number ............................................................................................................................................................. 31
Options Configuration ................................................................................................................................................... 32
General .......................................................................................................................................................................... 33
Groups ...........................................................................................................................................................................34
Contacts ........................................................................................................................................................................34
Search ............................................................................................................................................................................ 36
Basic Search (Default) ........................................................................................................................................... 36
Advanced Search ................................................................................................................................................... 36
Current Call .................................................................................................................................................................. 36
Transfer ......................................................................................................................................................................... 37
Call Recording Settings ............................................................................................................................................. 37
Reporting ...................................................................................................................................................................... 38
Caller Information ....................................................................................................................................................... 38
Shortcut Keys ............................................................................................................................................................... 38
Quick Access Shortcuts ............................................................................................................................................. 39
Message Templates ...................................................................................................................................................40
Configuration Information .......................................................................................................................................40
Centralized Setting Management............................................................................................................................... 41
Configuring Contact Notes & Shared Contact Notes (EWS Dependent) .......................................................46
Knowledge Base Articles ............................................................................................................................................... 47
When I answer a call on my Lync Phone Edition device the call disappears from Attendant Pro. ..... 47
What I answer a call it just disappears from Attendant Pro. .......................................................................... 47
Incoming calls show both on the Lync 2013 Call Notification & Attendant Pro. ...................................... 47
Appendix I – Contact Card Fields ...............................................................................................................................48
Appendix II – CRM/ERP Call Popup Examples & Tips .......................................................................................... 50
Salesforce ...................................................................................................................................................................... 50
Whitepages .................................................................................................................................................................. 50
Appendix III – Settings ................................................................................................................................................... 50
Appendix IV – Search Filters (in Advanced Search mode) .................................................................................. 51

⌂
Page | 4

⌂
Page | 5
Prerequisites The Skype for Business (Lync) client must be installed, running and logged in. To use all features
Skype for Business (Lync) full edition (not Microsoft Skype for Business Basic) must be installed.
Installation Installing Attendant Pro is probably the easiest thing you will do during a Skype for Business (Lync
2013) deployment as it is just a 1-minute task.
NOTE: As noted above, make sure that Skype for Business (Lync 2013) is installed, running and
logged in. Attendant Pro requires that Skype for Business (Lync 2013) is running.
You can install using Click Once (updates delivered automatically) or an MSI (you install updates).
Browse the Attendant Pro downloads page and either run the Click Once installer or download &
install an MSI installer.
Click “Run”

⌂
Page | 6
If you see the below "Attendant Pro Setup" window, click "Next" (otherwise this will be automatic)
Progress through the installer and change the install folder location if necessary.

⌂
Page | 7
Following the folder selection window, you should see an installer progress bar.

⌂
Page | 8
Once the installation is complete, you will see the screen below, with the option to launch Attendant
Pro when “Finish” is selected. There will also be a shortcut on your desktop which will launch
Attendant Pro
Registering Your Attendant Pro
Click on the Options | General as shown below and then click “Get Key” button. Attendant Pro will
prompt you for some contact information and when this is submitted a 30 day, fully functional key will
be retrieved. (This key will be used for any subsequent users on this SIP domain)
NOTE: Retrieving the key may take a few seconds.
NOTE: Your PC will need access to http://lcregistration.cloudapp.net/ so make sure your firewall is not
blocking this domain.

⌂
Page | 9
If this is the first time your organization is getting keys, you will be asked for contact information.
Enter the information and you will be automatically given a key.

⌂
Page | 10
WARNING! If you do not register you will be able to run Attendant Pro but calls will be ended at 15-
30 seconds. This means that calls made with Skype for Business (Lync) or Attendant Pro will be cut off
after 15-30 seconds if you are running Attendant Pro and do not have a valid Trial or Full key.
Upgrading Attendant Pro
Click Once Upgrade
Upgrading Attendant Pro is as easy as exiting the program and running it again. Every time you start
Attendant Pro it checks for new updates via "Click Once" technology and you can decide if you want
the new version. You can upgrade to the latest version with one click and your previous settings will
be retained.
MSI Upgrade
Upgrading Attendant Pro when it has been installed using an MSI is up the user or administrator at
their discretion.

⌂
Page | 11
Attendant Pro Quick Tour Below we’ll give a quick overview of the Attendant Pro main window layout and functionality.
Attendant Pro is made up of several panels listed below:
• My Information
• Incoming Calls
• Current Call
• Handled Calls
• Contact Groups
• Contact Search
o Dial pad (optional)
• Quick Access Shortcuts
• Contact Card (optional)
• RGS Agent Groups (optional)
• Caller Information (optional)
• Options & Voicemail
• Notifications
• Status
Some of these panels can be turned off. These are noted as optional and can be turned on or off
using one of several ways: using the menu on the Contact Groups header, the Options menu or the
Options window.

⌂
Page | 12
Overall Screen Layout
We'll give a quick tour of the overall layout of Attendant Pro.
My Information Panel

⌂
Page | 13
“My Information” shows information and gives control over the current user logged into Skype for
Business (Lync). This includes:
• Displaying the user photo and presence
• Displays the user name
o If the user is a delegate for another user or part of an anonymous response group
there will be a dropdown menu that gives the ability to change who the user is
impersonating for calls.
• Ability to change presence
• Ability to change the current user note
My Phone & Presence
Shows the current users' presence and note and lets these settings be changed.
Username (Delegate/RGS Call As)
The user name is a drop down that allows you to change who you are calling out as. (This could be
another user you are a delegate for, an anonymous response group or yourself) By default you’re
“Call As” identity will be set back to yourself after one call, but this can be changed in Options.
My Presence
You can set your presence.

⌂
Page | 14
My Note
You can set the note others see.
Incoming Calls Panel
The Incoming Calls Panel is where incoming calls will appear.

⌂
Page | 15
Attendant Pro can accommodate unlimited incoming calls. The area for how many calls can be
displayed at once is dependent on the monitor resolution and after that there will be a scroll bar to
show more. A shortcut key can be defined to answer incoming calls on a FIFO (first in, first out) basis.
NOTE: Calls can be answered using the Skype for Business (Lync) call toast as well.

⌂
Page | 16
Current Call Panel
The current call panel display controls for the current active call. The call that is active and you are
speaking to will be shown in the Current Call panel.
From here you can put a call on hold or park, transfer, mute or hang-up. All call handling options are
displayed on the screen for one click access.
• Mute/Unmute
• Hang Up
• Hold
• Park
• Park for Group
• Blind Transfer
• Safe Transfer
• Consultative Transfer
• Instant Message Consult Transfer
• Add/Invite a Contact to the call
• Video Call (start video)
• Instant Message
NOTE: If this user does not use all these options, some can be turned off in Options | Current Call. See
Current Call.

⌂
Page | 17
Handled Calls Panel
"Handled Calls" is where you will see calls that have been placed on hold or park.
A timer will indicate time on hold and/or park orbit number. Clicking on retrieve will bring the call to
"Current Call" panel. Clicking on the “More” button will display a menu that gives more options you
can do to this call.

⌂
Page | 18
Contact Groups Panel
The "Contact Groups" area shows all the Contact Groups you have configured in the Skype for
Business (Lync) client. If you click on one of the Contact Groups, the contacts in that group will be
shown. You can use the contacts in "Contact Groups" to call or transfer calls. To see a detailed
description of how Contacts work, see “Contacts” below.
There are several Contact Group layouts. See Options | Groups.
Contact Search Panel
The contact search panel lets you easily search for an existing contact or dial a new number.

⌂
Page | 19
"Contact Search" has a hotkey to set the focus into the Search field. The "Contact Search" field can be
changed in the Options. Now you can type in a phone number, extension number or contact name. If
you press [ENTER] the focus will jump to the first returned contact. You can now use the arrow keys to
select the correct contact or press [ENTER] if you are on the correct contact already. Of course, you
can also use the mouse and single click a contact to select or double click as well.
If Advanced Search is configured, you can filter using key fields. Go to Search Filters to see more on
search filtering.
Go to Contacts (aka Contact Layouts) to learn more details.
Keypad (Optional)
The keypad enables dialing and DTMF input entirely using touch or the mouse. It also provides a
Redial button for quick access to redial the last previously dialed number or contact.
⌂
Page | 20
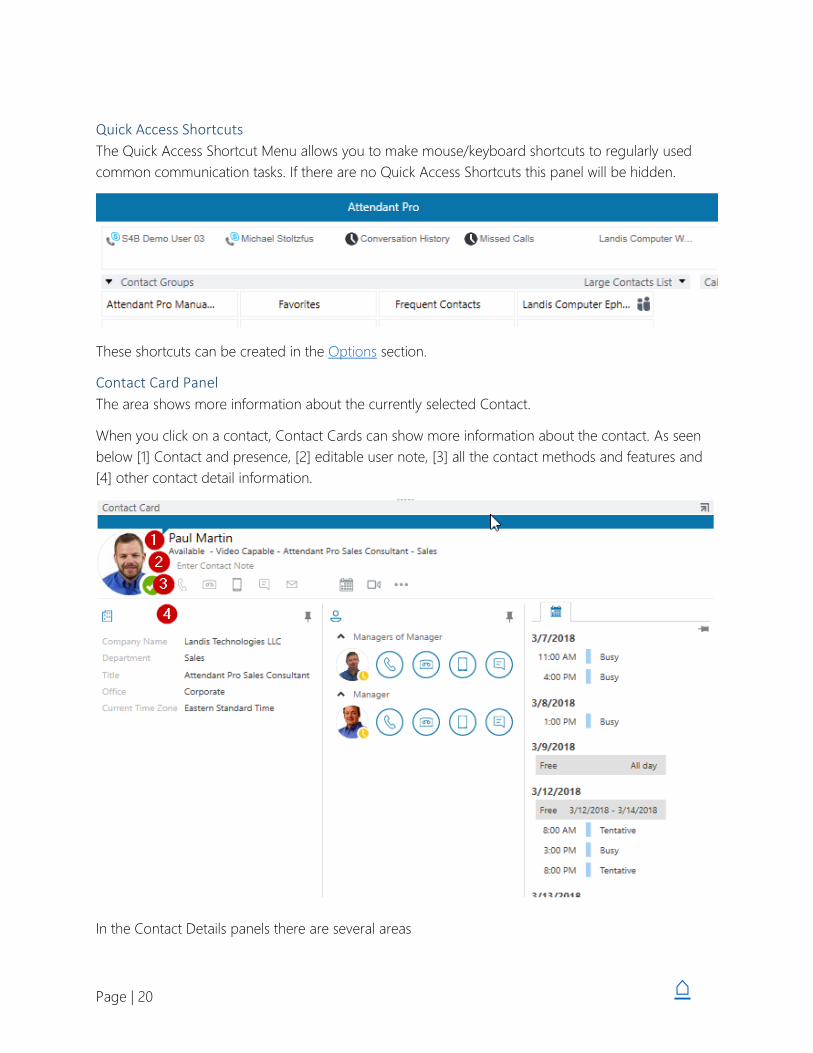
Quick Access Shortcuts
The Quick Access Shortcut Menu allows you to make mouse/keyboard shortcuts to regularly used
common communication tasks. If there are no Quick Access Shortcuts this panel will be hidden.
These shortcuts can be created in the Options section.
Contact Card Panel
The area shows more information about the currently selected Contact.
When you click on a contact, Contact Cards can show more information about the contact. As seen
below [1] Contact and presence, [2] editable user note, [3] all the contact methods and features and
[4] other contact detail information.
In the Contact Details panels there are several areas

⌂
Page | 21
• Contact Information
• Quick Calendar View (Current & Next Appointment)
• Related Contacts
Contact Information
This area gives additional area to display at a glance information and controls. This is very similar to
Skype for Business (Lync) contact cards except that any controls in this area can be used to transfer
and handle calls just like on a contact.
Quick Calendar View
This calendar view shows the current and next appointment. It is dependent on the Skype for Business
(Lync) client giving you access to see this via Skype for Business (Lync) Privacy Relationship. The user
you want to see this information needs to assign you a Workgroup Privacy Relationship.
You can double click on the quick calendar view to open this user’s calendar in Outlook if your
administrator has granted you access to their calendar in Exchange. For more details see Configuring
Exchange Shared Calendars
A deprecated method of accessing a user’s calendar is to click the calendar icon on the contact action
bar.
Related Contacts
On the right side of the Contact Details you will see contacts related to this contact. These contacts
have all the functionality of contacts which means you can transfer a call to a related contact or use
the right click menu for more action options. For more details see Contacts.

⌂
Page | 22
RGS (Response Group Service) Agent Groups Panel
This panel (shown above) displays the Skype for Business (Lync) agent groups that the currently
signed in user is a part of, signed in status and how many calls and wait times.
Options and Voicemail Area
On the right side of the Attendant Pro main screen you will see the Voicemail, Options and Option
menu buttons.
My Voicemail shows how many voicemails are waiting. The Options button opens the
Options/Settings window to configure Attendant Pro. (Discussed in detail here) The Options Menu
button display a menu to give you access to advanced features.

⌂
Page | 23
Caller Information (Incoming Call Pop) Panel

⌂
Page | 24
The incoming call pop area will show an URL you can define. You can pass the incoming phone
number as well. Caller Information is setup in Options (click here)
Notification Area
When there are notifications, warnings or errors, they will display in the lower right side of Attendant
Pro main screen.

⌂
Page | 25
A notification can be dismissed by clicking Dismiss. If there is not enough room to display the entire
notification message you can hover to see the message displayed as a tool tip.
Status Area
The status area gives at a glance, keyboard shortcuts and status of Attendant Pro.
Moving from left to right:
• Keyboard Shortcuts
o See more details under section "Global Hotkeys"
• Transfer mode:
o Off
o Blind
o Blind Safe

⌂
Page | 26
o Consultative
• Keypad Mode
o Dialing
o DTMF
Call Recording
Attendant Pro has call recording functionality built into it. Its features include:
• The ability to record every call (no click) or On-Demand with 1-Click
• A policy to determine if users can stop recording in “Always Record” mode
• Easily listen to recordings locally using the default media player.
• Auto-upload recordings to OneDrive or corporate shared drive for easy manager access to
recordings
• Recording will auto-select the Skype for Business audio device
When configured for on-demand, recording
can be started by clicking the small recording
button in the bottom right-hand corner of the
Attendant Pro window
When call recording is active, the call
recording button will appear as depicted
above. If configured to allow the stopping of a
recording, clicking the button will stop call
recording.
Right-clicking the call recording button will
give the option to open the folder where the
call recording audio files are stored. This
location can be changed in Attendant Pro’s
Options (more details here).

⌂
Page | 27
The Call Recording functionality does have some limitations
• Works with all Skype for Business Optimized USB devices (USB headsets/handsets (does not
currently work with IP phones).
• Does not currently support switching the audio device during a call.
• Not targeted for legal or compliance scenarios.
Contacts / Contact Layouts Contacts are displayed and acted on in Attendant Pro using a Contact Layout. You can see Contacts
in several different places: Search, Contact Groups, Contact Details, & Related Contacts.
Contact Layouts are much like Contacts you see in Skype for Business (Lync) with several key
differences:
• Contact Layouts are designed with 1-click access to commonly used contact methods (no
hovers or pop out menus to navigate for common tasks)
• More information about a Contact Layout can be shown by turning on the Contact Details
panel. (more click here)
• Contact Layouts are contextual (if you are not in transfer mode, they will call the contact, if
you are in transfer mode they will transfer the call to the contact)
• Because of this Contact Layouts can be used to transfer or call a contact unlike the Skype for
Business (Lync) contact list. (in Skype for Business (Lync) you can’t use your contact list &
groups to transfer a call, it is another more simplified window)
• Contact Layouts can be customized to specifically tailor to a user’s preferences in Options
(click here)
Let’s go over the characteristics of a contact layout in more detail.
---
On each contact you will see the presence, contact name and buttons for Skype Call or Call
Voicemail. If you would like to use another contact method you can open the other contact methods
menu in several ways:

⌂
Page | 28
• Right click on the Contact button
• Press the Menu button on your Windows Keyboard
• Press [Shift]+[F10]
If you double left click a Contact or press [ENTER] when a Contact is selected it will use the "Contact
Double Click Action" (setup in settings) method to call to call the contact.
• Smart
• Work
• Mobile
• Lync Call
• Voice Mail
Most of these contact methods are probably self-explanatory except "Smart".
Smart Call
"Smart Call" will look at contact and if there is only 1 contact method will use that. If there is more than
one contact method, it will use "Skype Call". The default "Contact Double Click Action" is "Smart".
NOTE: If you have the "Contact Double Click Action" set to a method that is not valid for the current
contact, Attendant Pro will fall back to "Smart".
---
Presence
Each contact layout will show the presence of this contact. The presence states are indicated:
Icon Status
Available
Busy
In a Call (at a glance indication if someone is on a call)
Away
Offline
No Contact
The "Contact" panel works the same in "Contact Groups" and "Contact Search".
Context Menu Options
Each contact layout includes a context menu/right click menu that will include all the contact methods
plus some other features even the Contact Layout design does not.

⌂
Page | 29
The Other Contact Methods menu can be opened by:
• Right click on Contact Name
• Press the Windows keyboard Menu Key (shown below)
This menu adds:
• Manage contact groups
• Tag a contact for presence changes

⌂
Page | 30
Contact Layout Double Click Action
What happens we a contact layout is double clicked can be configured in the Options. (see more click
here)
Running Through Some Scenarios Using the Attendant Pro
Answer and Blind Transfer (or Unattended Transfer) Using Keyboard
First, we’ll run through a scenario answering a call and transferring the call entirely using the
keyboard.
When you see an incoming call press F6
The call will now be answered, and you can transfer by press F9. The focus will move to “Contact
Search” so you can now type in the extension number of the person you want to transfer to, say,
“101”. After we type in 101 we press [ENTER] to move to the Contact area and since the first contact is
the one we want we can press [ENTER] again to complete the transfer.
All key presses to transfer this call:
• F6
• F9
• 101 (Extension number to transfer to)
• [ENTER] [ENTER] (finalize transfer)
Answer and Consult Transfer Using the Keyboard
When you see an incoming call press F6
The call will now be answered, and you can start the consult transfer by pressing F9. You are now in
Consult Transfer mode. (as shown at in the indicator area at the bottom of the screen.) The focus will
move to “Contact Search” so you can now type in the extension number of the person you want to
consult/transfer to, say, “101”. After we type in 101 we press [ENTER] to move the Contact area and
since the first contact is the one we want we can press [ENTER] again to call this contact. Now you can
consult with this person. When you are ready to transfer the call to them, just press F9 to complete
the transfer.
All key presses to transfer this call:
• F6
• F9
• 101 (Extension number to transfer to)
• [ENTER] [ENTER] (now you can "consult")
• Press F9 when you are ready to transfer the original caller.

⌂
Page | 31
Answer, Hold and Retrieve from Hold Call Using Keyboard
When you see an incoming call press F6. To put the call on Hold just press F7. To retrieve you press
F8. Note that F8 retrieves in FIFO order.
• F6
• F7
• F8
Dial a Number
• Windows + A (or just click in Contact Search field)
• 101 (Extension number to dial)
• [ENTER] [ENTER]

⌂
Page | 32
Options Configuration The Settings screen is where you can change the setup of Attendant Pro. As soon as you change the
setting it will be saved and take effect.
There are several sections which include:
• General
• Groups
• Contacts
• Search
• Current Call
• Transfer
• Recording
• Reporting
• Caller Information
• Shortcut Keys
• Quick Access Shortcuts
• Message Templates
• Configuration Information
We will look at these sections in further detail.

⌂
Page | 33
General
This section includes various settings that configure how Attendant Pro works.
• Activation Key: Your organizations key will be displayed here.
• Default Language: This will be set based on operating system language, or you can manually
set it using this setting.
• User Interface: Choose the “look and feel” you want for Attendant Pro. You can choose from
Lync 2013, Skype for Business 2015, Skype for Business 2016, and Microsoft Teams.
• Focus on Incoming Call: Should Attendant Pro be set to foreground and restored on
incoming call
• Enable Button Click: an audible sound when a button is clicked. (touch scenario)
• Search Box Sends DTMF During Active Call: when user types into search box during a call it
will send DTMF and search.
• Revert “Call For” Delegate/RGS to Myself After 1 Call: If a user changes “Call As” should it
revert to self after 1 call or stay as set “Call As” (More on changing Call As: click here)
• Show Keypad: Turning this off does not hide Search ability, just keypad. Turning this off might
be desired in a non-touchscreen scenario to optimize search results space
• Show Caller Information Panel
• Show Contact Details Panel
• Show RGS Agent Group Information Panel

⌂
Page | 34
• Suppress Active Call Window: This will minimize the Skype for Business (Lync) conversation
window so it does not pop up in front of Attendant Pro.
• Suppress Call Toast/Alert: This will minimize the Skype for Business (Lync) incoming call
toast/alert/notification for those who don’t want to see it. Do note that a call can be answered
for Attendant Pro using the Skype for Business (Lync) Call Toast or Attendant Pro Incoming
Calls area.
Groups
There are several Contact Group Layouts:
• Horizontal
• Vertical
• Dropdown
A Default Contact Group to be selected when Attendant Pro starts can also be configured.
Contacts
The contacts section offers several options for contact layout and appearance on the main Attendant
Pro window, as well as the option to customize what action double-clicking a contact will activate.
This section also includes the Contact Designer, which allows users to easily configure contact labels
and buttons to a layout of their organizational needs.
The default contact layout

⌂
Page | 35
If you would like to add the “Company Name” to Row 2 of the Contact, just select from the dropdown
and click Insert. If you regularly use “Call Back Reminder” & not Mobile & Instant Message, just insert
the buttons you wish, in the order you wish.
Note that Contact Designer will change all the Contact Layouts: Small, Medium, Large, Small List,
Medium List & Large List.
Label Options
Button Options
Note: We recommend using this method to modify Contact Layouts over the deprecated XAML
Custom Contact method.

⌂
Page | 36
Search
By default, Attendant Pro uses Basic contact search which uses the Skype for Business SDK logic for
searching for contacts. We have now added advanced contact search which increases performance,
add more flexible filtering, adds ability to search external contact lists and adds some other features.
Basic Search (Default)
Basic search has one setting that can be configured: “Search Result Limit” which determines how
many contacts are returned on a search.
Advanced Search
The Advanced Search is enhancements on top of Basic Search except that it does not include Skype
for Business search. (Which means if you want to use Advanced Search you would effectively need to
enable download Exchange GAL contact list to replicate Skype for Business-like contact list.)
Basic (Skype4B SDK) Advanced (Attendant Pro)
Search Performance Improvements Yes Yes
Narrow Name Search by adding field filter Yes Yes
Saved Searches Yes Yes
Download Lync/Skype4B Contacts Locally Yes Yes
Local User Defined Contact List Support [1] No Yes
Download Exchange GAL Contact Locally [2] No Yes
Use External LOB Contact Lists No Yes
Support Multiple Contact Lists No Yes
Filter by Any Contact Field No Yes
Adhoc Contact Groups No Yes
Explanation of Advanced Search Functionality
(more coming)
Advanced Search Settings
• Search Result Limit
• Search Contact List Providers
o Exchange Web Service Address Book (Global Address Book)
o Personal Outlook Contacts
o EWS Public Folder (1 or more)
o CSV Contact Lists (1 or more)
▪ User
▪ Computer
Current Call
If you do not use all the transfer methods or controls on the current call panel, they can be hidden.
(minimized). The controls that can be hidden include:

⌂
Page | 37
• Park
• Park For
• Blind Transfer
• Safe Transfer
• Consult Transfer
• IM Consult Transfer
• Add Participant
• Video Call
• Send an IM
These changes will take effect immediately.
Transfer
• Transfer Mode on Answer: The transfer mode a call set to when a call is answered. It can be
set to None, which means you need to click one after answering a call.
• Hold on Begin Transfer: Determines if call is placed on hold while user searches for a contact
to transfer to
• Clear Transfer Mode on Hold: whether transfer mode will be cleared when a call is put on
hold
(more coming)
Call Recording Settings
The Recording Menu allows you to specify the recording mode to either “Disabled”, “On Demand”,
“Always Record (Can Stop)”, and “Always Record (Can’t Stop)”. The Recording Filename can be set to
a custom format. The Upload Folder Setting allows you to specify a location in OneDrive, a corporate
shared drive, or other backup location for manager access to recordings. Other settings allow for
recordings to be compressed to MP3 and for specific audio devices to be selected for call recording.

⌂
Page | 38
Reporting
(more coming)
Caller Information
You can setup the call pop URL under "Settings". Below is a public page you can call as an example:
• http://www.whitepages.com/phone/{phoneno}
The Lookup URL will take effect immediately and there is no need to restart Attendant Pro.
NOTE: The above White pages example is just a sample to demonstrate the capability of Attendant
Pro call pop functionality and you will likely want to use an internal web server that returns
information from your CRM, ERP or other line of business application (LOB). If you do not currently
have a web server that can deliver this kind of information out of your LOB application, take a look at
SQL Server Reporting Services (aka SSRS). More information on SSRS is available here:
http://technet.microsoft.com/en-us/library/ms159106.aspx
(more coming)
Shortcut Keys
Here you can define what key you want assigned to Attendant Pro functions. Just type a key
combination in the field and decide if you want this shortcut to only work in Attendant Pro application
or anywhere in Windows (Global).
The global hotkeys work even if Attendant Pro does not have the focus. The global hotkeys will not
even cause Attendant Pro to get the focus, except in the case of F9 or Windows + A as noted below.
• F6 - This will Answer an incoming call
• F7 - This will place the current call on hold
• F8 - This will retrieve the first call put on hold (using FIFO)
• F9 - Transfer a call (using Blind Transfer at this time, to be configurable in future. (See Options
Configuration on page 32) Also note that F9 is special in that it sets the focus to Attendant
Pro and puts your cursor in the "Contact Search" field. This means that you can press F9, then
type extension or username, press [ENTER] [ENTER] to transfer a call.)
• F10 - Disconnect or Hang-up the current call
• Windows + F4 - Toggles Mute on Current Call
• Windows + A - Attendant Pro gets focus and cursor is put on "Contact Search".
All of the above actions can also be achieved by clicking on screen buttons as well.

⌂
Page | 39
Quick Access Shortcuts
Quick Access Shortcuts Menu allows you to setup macro-like 1-Click shortcuts to commonly used
communication tasks. Each shortcut can be assigned a hotkey that is application or operating system
wide in scope.

⌂
Page | 40
Message Templates
Setup templates for Call Back Email and Call Park For instant message.
Configuration Information
(more coming)

⌂
Page | 41
Centralized Setting Management You can either manually enter Attendant Pro settings in the Settings screen or you can push the
settings out via Group Policy by setting registry settings.
Below is a list of settings that can be set by registry setting via Group Policy or directly.
• DefaultContactGroup
o The Contact Group selected on startup. (this needs to be a Contact Group defined for
this Lync user)
• AuthorizationKey
o Your registration authorization key.
• BaseLookupURL
o The URL that will be invoked on incoming call popup. Substitute {phoneno} will be the
incoming phone number as transformed by [PhoneNumberPattern] and
[PhoneNumberTranslation].
• PhoneNumberPattern
o Phone Number Regex Pattern to Match
o An example of matching USA E164 like +18005551212 would be:
▪ ^\+1(\d{10})
• PhoneNumberTranslation
o Phone Number Regex Translation Pattern.
o An example of translation for USA E164 like +18005551212 would be:
▪ $1
• HotkeyTransferType
o When you press the global hotkey for transfer, what type of transfer is initiated
o The options are
▪ Blind
▪ Safe
▪ Consult
• DefaultContactLayout
o The default contact layout and size.
o The options are
▪ Small
▪ Medium
▪ Large
• HotkeyAnswer
o The Global hotkey for answering a call.

⌂
Page | 42
o Valid values are
▪ Alt
▪ Control
▪ None
▪ Shift
▪ Windows
• HotkeyModifierAnswer
You can directly add the registry key to test:
HKEY_CURRENT_USER\Software\Policies\LandisComputer\AttendantPro
In the LandisComputer\AttendantPro folder, right click and add New | String Value with the name of
one of the settings above and an appropriate value.
The setting will take effect immediately. In the Attendant Pro Setting screen the setting will now be
locked and not editable since you have set this setting from the registry.

⌂
Page | 43
Attendant Pro provides the ability for console operators to easily open Exchange shared calendars
directly from contact layouts in Attendant Pro. This requires no additional Attendant Pro servers or
specialty Attendant Pro knowledge to configure and depends entirely on existing Microsoft Exchange
infrastructure. There is no configuration required in Attendant Pro but you may need to do some
configuration on the Exchange/Outlook side of things.
Requirements
• Exchange Server and shared calendars implemented
• Calendars shared with attendant console user at least Permission Level of “Reviewer”
• The attendant console user’s Outlook has cached mode disabled.
Attendant Pro “Open Calendar” functionality depends on Exchange being installed. The next step is
making sure the calendars are shared with the minimum Permission Level of “Reviewer”. This can be
done centrally using Exchange Powershell by the administrator.
Alternatively it can be done by the user who wants to share their calendar with the console operator.
(We will demonstrate how to configure share permission using Outlook 2013, but some older versions
of Outlook will work as well.) On the PC of the user that wants to share their calendar with the console
operator users open Microsoft Outlook 2013 and go to Calendar panel. Now right click on the user’s
own calendar, in the right-click menu click “Share” | “Calendar Permissions”.
In the “Calendar Properties” click the “Permissions”. Now set the “Permission Level” for the console
operator(s) to “Reviewer” or higher permission. Click “Apply”.

⌂
Page | 44
The next step is to disable “Cached Mode” in Outlook 2013 and will be performed on the attendant
console user’s PC. Open Outlook 2013, click File | Account Settings | Accounts Settings as shown
below:

⌂
Page | 45
Now under “E-mail” tab select the attendant console user | “Change” | uncheck “Use Cached
Exchange Mode | Next | Ok | Finish

⌂
Page | 46
Now you will need to restart attendant console users’ Outlook 2013.
NOTE: We have noticed that the attendant console user needs to restart Outlook 2013 after calendar
permissions are changed for other users. So if the administrator gives attendant console user
permissions to view new calendars, the attendant console user needs to restart Outlook 2013. This
appears to be a limitation of Outlook 2013
Now the attendant console user can right-click on any contact layout and click “Open Calendar” and
the Outlook 2013 calendar will be opened. (Exchange security is strictly observed, so operator can
only access calendars they have been given permissions of course)
Configuring Contact Notes & Shared Contact Notes (EWS
Dependent) The Contact Notes & Shared Contact Notes feature allows Attendant Pro users to add their own
notes to a Skype for Business contact or phone number. This note is displayed in several places:
• Current Call panel (shown below)
• Contact Details panel

⌂
Page | 47
The only steps that need to be done
• Requires Exchange Server 2013 or newer Exchange infrastructure (or Office 365 equivalent)
• Ensure that EWS Integration is enabled (it should be by default)
• And if you want this Attendant Pro user to use “Shared Notes” (a centrally shared Exchange
mailbox) enter the username of the centrally shared Exchange account in “Central Notes
Mailbox” field
To ensure that EWS Integration is enable in Attendant Pro: Options | Configuration Information, and
then make sure “Enable EWS Integration” is enabled.
TIP: Take a look at “EWS Status” on the same screen to see if the EWS connection was successful.
Knowledge Base Articles
When I answer a call on my Lync Phone Edition device the call disappears from
Attendant Pro.
This means that the Lync Phone edition device is not properly paired to the Lync 2013 client. Make
sure that LPE device works with Lync 2013. Take a look at the lower right of the Lync 2013 client to see
if there are any errors.
If you see this error you may need to sign out of Lync 2013 and in again. After you have the LPE
device properly working with Lync 2013, restart Attendant Pro.
What I answer a call it just disappears from Attendant Pro.
Verify you have a default audio device configured. (if you answer a call without an audio device
configured the call will be sent to voicemail and appear to have "dropped")
Incoming calls show both on the Lync 2013 Call Notification & Attendant Pro.
This is how Attendant Pro is designed. You can answer anywhere you like and the call will be taken by
Attendant Pro.

⌂
Page | 48
Appendix I – Contact Card Fields
Below is a list of the possible fields on a contact card: (currently not editable) Names are case sensitive
in XAML.
Attendant Pro Lync What it does Notes
Displayname Contact display name
Companyname AD companyname
ContactNote OutOfficeNote or
PersonalNote
“What’s happening
today?” note in lync
Availability Availability Exchange/Calendar
free/busy/away/idle
ActivityString Activity Available, In a meeting,
In a call, Away, etc
Photostream Contact photo Needs to be coverted
using "{Binding
PhotoStream,
Converter={StaticResou
rce
LyncImageConverter}}"
IconStream Type of contact: skype,
AOL, etc
Needs to be coverted
using "{Binding
IconStream,
Converter={StaticResou
rce
LyncImageConverter}}"
AvailabilityImageURI Square presence
indicator
Uri Uri Sip: + URI.
Ie=sip:[email protected]
om
DefaultNote DefaultNote <empty>
contactTimeZone TimeZone
MeetingSubject MeetingSubject
MeetingLocation MeetingLocation
DepartmentName Department
contactCapabilityString CapabilityString Video Capable, No IM,
etc
contactCapabilityDetails CapabilityDetails [objects] not useful
contactAttributionString AtrributionString External Network,
Skype/AOL/etc,
CompanyName,
contactIdleStartTime IdleStartTime
contactCurrentCalendarState CurrentCalendarSt
ate
0,3,5 etc

⌂
Page | 49
contactTimeZoneBias TimeZoneBias
contactTitle
PrimaryEmail PrimaryEmailAddr
ess
Email address
WorkPhone
HomePhone
MobilePhone <empty>
OtherPhone
Voicemail
contactNextCalendarState
contactNextCalendarStateStart
Time
http://msdn.microsoft.com/en-
us/library/microsoft.lync.model.contactinformationtype_di_3_uc_ocs14mreflyncclnt(v=office.14).aspx

⌂
Page | 50
Appendix II – CRM/ERP Call Popup Examples & Tips
Salesforce
• You will need to enter the password into Salesforce on the first “call pop”. To enter the
password copy it into the field as you will not be able to type it. (using single sign on can
avoid needing to type the password)
• You will likely want to change the “Search Results” screen in Salesforce to fit the “Caller
Information” area better (see Salesforce documentation for this)
• To open a record, use Shift + left click to open the record in a new browser instead of inside
the “Caller Information” window.
• The “Lookup URL” will look something like below (except that the “na17” will be unique to your
server)
o https://na17.salesforce.com/_ui/search/ui/UnifiedSearchResults?searchType=2&str={p
honeno}
• Salesforce search requires that the phone number be formatted with parenthesis and dashes.
For example in the USA a number needs to look like: 717-733-0000. To do this use “Phone
Number Pattern/Translation”
Whitepages
• http://www.whitepages.com/phone/{phoneno}
Appendix III – Settings
Setting What it does Notes
DefaultContactGroup The Contact Group selected on startup.
AuthorizationKey Your registration authorization key.
BaseLookupURL The URL that will be invoked on incoming call and
shown in the call pop area. Substitute {phoneno}
will be the incoming phone number as
transformed by [PhoneNumberPattern] and
[PhoneNumberTranslation].
Must be http not www.
PhoneNumberPattern Phone Number Regex Pattern to Match
PhoneNumberTranslation Phone Number Regex Translation Pattern.
Test Phone Number This is a number you can use to test if your
[PhoneNumberPattern] and
[PhoneNumberTranslation] regex is working
correctly and simulate a incoming call pop to test
your [BaseLookupURL].
Not exactly a setting, but it
is saved for future use.
HotkeyTransferType This determines what transfer type is initiated
when a user presses the global hotkey for transfer.

⌂
Page | 51
DefaultContactLayout The default contact layout and size.
FocusOnIncomingCall Attendant Pro will restore or maximize on
incoming call
Yes or No
ContactDoubleClickAction What action will occur when you double click on
an contact
Smart
Work
Mobile
Lync Call
Voice Mail
Appendix IV – Search Filters (in Advanced Search mode)
Advanced Search allows filters to be applied using the format: department:(departmentname). To
search for users in the Sales department: department:(Sales).
The search filters available are:
• department
• office
• locationname
• title
• displayname
• company
• firstname
• lastname


