Attendant Management System Attendant Statisticspdf.textfiles.com/manuals/TELECOM-F-R/NEC Attendant...
110
ATTENDANT MANAGEMENT SYSTEM ATTENDANT STATISTICS OPERATIONS MANUAL NEC America, Inc. NDA-30058-002 Revision 2 February, 1996 Stock Number 241711
Transcript of Attendant Management System Attendant Statisticspdf.textfiles.com/manuals/TELECOM-F-R/NEC Attendant...
ATTENDANT MANAGEMENT SYSTEMATTENDANT STATISTICS
OPERATIONS MANUAL
NEC America, Inc.
NDA-30058-002Revision 2
February, 1996Stock Number 241711
LIABILITY DISCLAIMER
NEC America reserves the right to change the specifications, func-tions, or features in this document at any time without notice. NEC America has prepared this document for use by its employees and customers. The information contained herein is the property of NEC America and shall not be reproduced without prior written approval from NEC America.
Copyright 1996
NEC America, Inc.
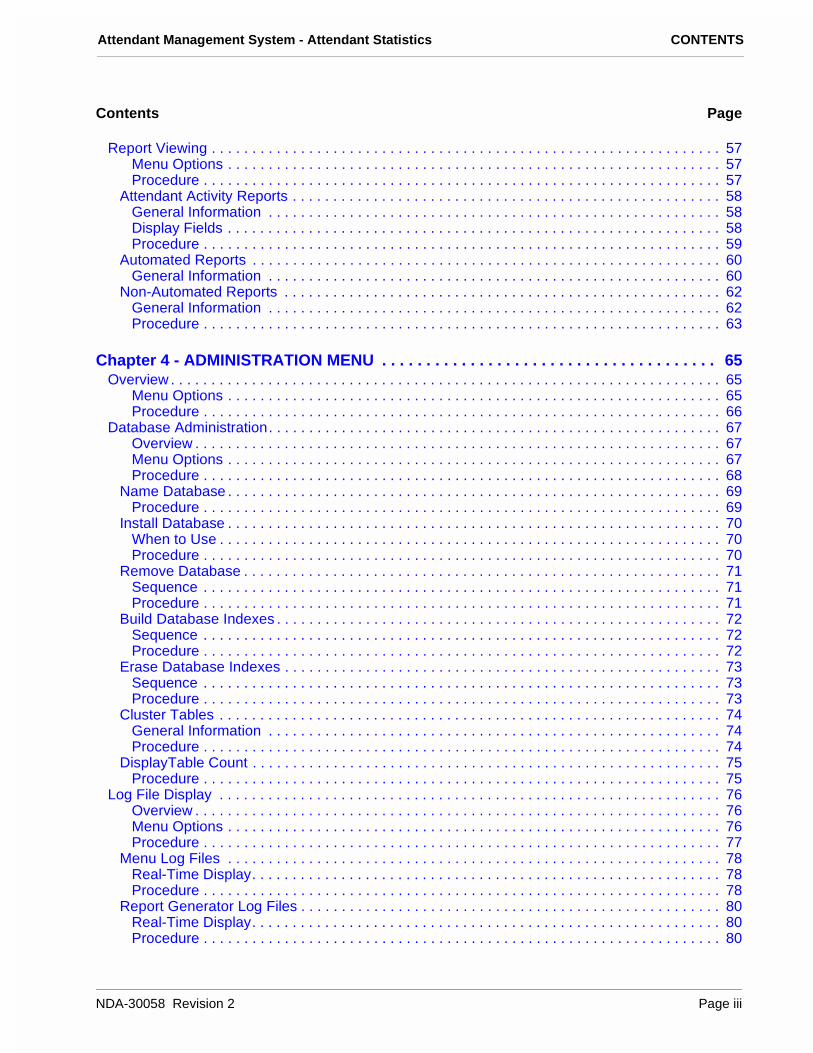
Attendant Management System - Attendant Statistics CONTENTS
TABLE OF CONTENTSPage
Chapter 1 - INTRODUCTION . . . . . . . . . . . . . . . . . . . . . . . . . . . . . . . . . . . . . . . . . . . . . . . 1Manual Organization. . . . . . . . . . . . . . . . . . . . . . . . . . . . . . . . . . . . . . . . . . . . . . . . . . . . . . . . . . . . 2Chapter Layout . . . . . . . . . . . . . . . . . . . . . . . . . . . . . . . . . . . . . . . . . . . . . . . . . . . . . . . . . . . . . . . . 2Procedures . . . . . . . . . . . . . . . . . . . . . . . . . . . . . . . . . . . . . . . . . . . . . . . . . . . . . . . . . . . . . . . . . . . 3General Key Use. . . . . . . . . . . . . . . . . . . . . . . . . . . . . . . . . . . . . . . . . . . . . . . . . . . . . . . . . . . . . . . 3
Chapter 2 - INSTALLATION AND SETUP. . . . . . . . . . . . . . . . . . . . . . . . . . . . . . . . . . . . . 5Introduction . . . . . . . . . . . . . . . . . . . . . . . . . . . . . . . . . . . . . . . . . . . . . . . . . . . . . . . . . . . . . . . . . . . 5Application Configuration . . . . . . . . . . . . . . . . . . . . . . . . . . . . . . . . . . . . . . . . . . . . . . . . . . . . . . . . 5
Step 1: Application Characteristics . . . . . . . . . . . . . . . . . . . . . . . . . . . . . . . . . . . . . . . . . . . . . 6Step 2: Primary Configuration Parameters . . . . . . . . . . . . . . . . . . . . . . . . . . . . . . . . . . . . . . . 6Step 3: User-defined Parameters. . . . . . . . . . . . . . . . . . . . . . . . . . . . . . . . . . . . . . . . . . . . . . . 7
Database Support . . . . . . . . . . . . . . . . . . . . . . . . . . . . . . . . . . . . . . . . . . . . . . . . . . . . . . . . . . . . . . 8Statcfg Database Information . . . . . . . . . . . . . . . . . . . . . . . . . . . . . . . . . . . . . . . . . . . . . . . . . 8
Initialization . . . . . . . . . . . . . . . . . . . . . . . . . . . . . . . . . . . . . . . . . . . . . . . . . . . . . . . . . . . . . . . . . . . 9Stats_Logger Component: . . . . . . . . . . . . . . . . . . . . . . . . . . . . . . . . . . . . . . . . . . . . . . . . . . . . 9Att_Stats_Admin Component:. . . . . . . . . . . . . . . . . . . . . . . . . . . . . . . . . . . . . . . . . . . . . . . . . . 9
Chapter 3 - MAIN MENU OPTIONS . . . . . . . . . . . . . . . . . . . . . . . . . . . . . . . . . . . . . . . . . 11Introduction . . . . . . . . . . . . . . . . . . . . . . . . . . . . . . . . . . . . . . . . . . . . . . . . . . . . . . . . . . . . . . . . . . 11
General Process . . . . . . . . . . . . . . . . . . . . . . . . . . . . . . . . . . . . . . . . . . . . . . . . . . . . . . . . . . . 11Menu Options . . . . . . . . . . . . . . . . . . . . . . . . . . . . . . . . . . . . . . . . . . . . . . . . . . . . . . . . . . . . . 12Procedure . . . . . . . . . . . . . . . . . . . . . . . . . . . . . . . . . . . . . . . . . . . . . . . . . . . . . . . . . . . . . . . . 13
Report Formats . . . . . . . . . . . . . . . . . . . . . . . . . . . . . . . . . . . . . . . . . . . . . . . . . . . . . . . . . . . . . . . 14General Description . . . . . . . . . . . . . . . . . . . . . . . . . . . . . . . . . . . . . . . . . . . . . . . . . . . . . . . . 14Available Statistics . . . . . . . . . . . . . . . . . . . . . . . . . . . . . . . . . . . . . . . . . . . . . . . . . . . . . . . . . 15Intervals of Statistics . . . . . . . . . . . . . . . . . . . . . . . . . . . . . . . . . . . . . . . . . . . . . . . . . . . . . . . . 17Procedure . . . . . . . . . . . . . . . . . . . . . . . . . . . . . . . . . . . . . . . . . . . . . . . . . . . . . . . . . . . . . . . . 19
Add a Report Format . . . . . . . . . . . . . . . . . . . . . . . . . . . . . . . . . . . . . . . . . . . . . . . . . . . . . . . . . 20General Process . . . . . . . . . . . . . . . . . . . . . . . . . . . . . . . . . . . . . . . . . . . . . . . . . . . . . . . . . . . 20Procedure . . . . . . . . . . . . . . . . . . . . . . . . . . . . . . . . . . . . . . . . . . . . . . . . . . . . . . . . . . . . . . . . 21
Modify a Report Format . . . . . . . . . . . . . . . . . . . . . . . . . . . . . . . . . . . . . . . . . . . . . . . . . . . . . . . 23General Process . . . . . . . . . . . . . . . . . . . . . . . . . . . . . . . . . . . . . . . . . . . . . . . . . . . . . . . . . . . 23Procedure . . . . . . . . . . . . . . . . . . . . . . . . . . . . . . . . . . . . . . . . . . . . . . . . . . . . . . . . . . . . . . . . 24
Delete a Report Format . . . . . . . . . . . . . . . . . . . . . . . . . . . . . . . . . . . . . . . . . . . . . . . . . . . . . . . 25General Process . . . . . . . . . . . . . . . . . . . . . . . . . . . . . . . . . . . . . . . . . . . . . . . . . . . . . . . . . . . 25Report Title Expansion . . . . . . . . . . . . . . . . . . . . . . . . . . . . . . . . . . . . . . . . . . . . . . . . . . . . . . 25Procedure . . . . . . . . . . . . . . . . . . . . . . . . . . . . . . . . . . . . . . . . . . . . . . . . . . . . . . . . . . . . . . . . 26
View a Report Format . . . . . . . . . . . . . . . . . . . . . . . . . . . . . . . . . . . . . . . . . . . . . . . . . . . . . . . . 27General Process . . . . . . . . . . . . . . . . . . . . . . . . . . . . . . . . . . . . . . . . . . . . . . . . . . . . . . . . . . . 27Procedure . . . . . . . . . . . . . . . . . . . . . . . . . . . . . . . . . . . . . . . . . . . . . . . . . . . . . . . . . . . . . . . . 28
Print a Report Format . . . . . . . . . . . . . . . . . . . . . . . . . . . . . . . . . . . . . . . . . . . . . . . . . . . . . . . . 29General Process . . . . . . . . . . . . . . . . . . . . . . . . . . . . . . . . . . . . . . . . . . . . . . . . . . . . . . . . . . . 29Procedure . . . . . . . . . . . . . . . . . . . . . . . . . . . . . . . . . . . . . . . . . . . . . . . . . . . . . . . . . . . . . . . . 29
NDA-30058 Revision 2 Page i
CONTENTS Attendant Management System - Attendant Statistics
Contents Page
Report Generation . . . . . . . . . . . . . . . . . . . . . . . . . . . . . . . . . . . . . . . . . . . . . . . . . . . . . . . . . . . . 30General Process . . . . . . . . . . . . . . . . . . . . . . . . . . . . . . . . . . . . . . . . . . . . . . . . . . . . . . . . . . . 30Range of Date and Time. . . . . . . . . . . . . . . . . . . . . . . . . . . . . . . . . . . . . . . . . . . . . . . . . . . . . 31Access to Generated Reports. . . . . . . . . . . . . . . . . . . . . . . . . . . . . . . . . . . . . . . . . . . . . . . . . 31Procedure . . . . . . . . . . . . . . . . . . . . . . . . . . . . . . . . . . . . . . . . . . . . . . . . . . . . . . . . . . . . . . . . 31
Automated Report Generation . . . . . . . . . . . . . . . . . . . . . . . . . . . . . . . . . . . . . . . . . . . . . . . . . . . 33General Information . . . . . . . . . . . . . . . . . . . . . . . . . . . . . . . . . . . . . . . . . . . . . . . . . . . . . . . . 33Menu Options . . . . . . . . . . . . . . . . . . . . . . . . . . . . . . . . . . . . . . . . . . . . . . . . . . . . . . . . . . . . . 33Procedure . . . . . . . . . . . . . . . . . . . . . . . . . . . . . . . . . . . . . . . . . . . . . . . . . . . . . . . . . . . . . . . . 34
Automated Reports . . . . . . . . . . . . . . . . . . . . . . . . . . . . . . . . . . . . . . . . . . . . . . . . . . . . . . . . . . 35General Information . . . . . . . . . . . . . . . . . . . . . . . . . . . . . . . . . . . . . . . . . . . . . . . . . . . . . . . . 35Access to Automatically Generated Reports . . . . . . . . . . . . . . . . . . . . . . . . . . . . . . . . . . . . . 35Current Time Interval . . . . . . . . . . . . . . . . . . . . . . . . . . . . . . . . . . . . . . . . . . . . . . . . . . . . . . . 35Procedure . . . . . . . . . . . . . . . . . . . . . . . . . . . . . . . . . . . . . . . . . . . . . . . . . . . . . . . . . . . . . . . . 36Set a Generation Schedule. . . . . . . . . . . . . . . . . . . . . . . . . . . . . . . . . . . . . . . . . . . . . . . . . . . 37General Process . . . . . . . . . . . . . . . . . . . . . . . . . . . . . . . . . . . . . . . . . . . . . . . . . . . . . . . . . . . 37Reports With Current Interval . . . . . . . . . . . . . . . . . . . . . . . . . . . . . . . . . . . . . . . . . . . . . . . . . 37Procedure . . . . . . . . . . . . . . . . . . . . . . . . . . . . . . . . . . . . . . . . . . . . . . . . . . . . . . . . . . . . . . . . 38Modify a Generation Schedule . . . . . . . . . . . . . . . . . . . . . . . . . . . . . . . . . . . . . . . . . . . . . . . . 39General Process . . . . . . . . . . . . . . . . . . . . . . . . . . . . . . . . . . . . . . . . . . . . . . . . . . . . . . . . . . . 39Procedure . . . . . . . . . . . . . . . . . . . . . . . . . . . . . . . . . . . . . . . . . . . . . . . . . . . . . . . . . . . . . . . . 40Cancel Generation of a Report . . . . . . . . . . . . . . . . . . . . . . . . . . . . . . . . . . . . . . . . . . . . . . . . 41General Process . . . . . . . . . . . . . . . . . . . . . . . . . . . . . . . . . . . . . . . . . . . . . . . . . . . . . . . . . . . 41Procedure . . . . . . . . . . . . . . . . . . . . . . . . . . . . . . . . . . . . . . . . . . . . . . . . . . . . . . . . . . . . . . . . 42View Scheduled Reports. . . . . . . . . . . . . . . . . . . . . . . . . . . . . . . . . . . . . . . . . . . . . . . . . . . . . 43General Process . . . . . . . . . . . . . . . . . . . . . . . . . . . . . . . . . . . . . . . . . . . . . . . . . . . . . . . . . . . 43Procedure . . . . . . . . . . . . . . . . . . . . . . . . . . . . . . . . . . . . . . . . . . . . . . . . . . . . . . . . . . . . . . . . 44Print Scheduled Reports . . . . . . . . . . . . . . . . . . . . . . . . . . . . . . . . . . . . . . . . . . . . . . . . . . . . . 45General Process . . . . . . . . . . . . . . . . . . . . . . . . . . . . . . . . . . . . . . . . . . . . . . . . . . . . . . . . . . . 45Procedure . . . . . . . . . . . . . . . . . . . . . . . . . . . . . . . . . . . . . . . . . . . . . . . . . . . . . . . . . . . . . . . . 45
Time Indices. . . . . . . . . . . . . . . . . . . . . . . . . . . . . . . . . . . . . . . . . . . . . . . . . . . . . . . . . . . . . . . . 46General Information . . . . . . . . . . . . . . . . . . . . . . . . . . . . . . . . . . . . . . . . . . . . . . . . . . . . . . . . 46Recommendation . . . . . . . . . . . . . . . . . . . . . . . . . . . . . . . . . . . . . . . . . . . . . . . . . . . . . . . . . . 46Procedure . . . . . . . . . . . . . . . . . . . . . . . . . . . . . . . . . . . . . . . . . . . . . . . . . . . . . . . . . . . . . . . . 47Add a Time Index . . . . . . . . . . . . . . . . . . . . . . . . . . . . . . . . . . . . . . . . . . . . . . . . . . . . . . . . . . 48Guidelines . . . . . . . . . . . . . . . . . . . . . . . . . . . . . . . . . . . . . . . . . . . . . . . . . . . . . . . . . . . . . . . . 48Recommendation . . . . . . . . . . . . . . . . . . . . . . . . . . . . . . . . . . . . . . . . . . . . . . . . . . . . . . . . . . 49Procedure . . . . . . . . . . . . . . . . . . . . . . . . . . . . . . . . . . . . . . . . . . . . . . . . . . . . . . . . . . . . . . . . 49Modify a Time Index . . . . . . . . . . . . . . . . . . . . . . . . . . . . . . . . . . . . . . . . . . . . . . . . . . . . . . . . 50General Process . . . . . . . . . . . . . . . . . . . . . . . . . . . . . . . . . . . . . . . . . . . . . . . . . . . . . . . . . . . 50Restriction on Changes. . . . . . . . . . . . . . . . . . . . . . . . . . . . . . . . . . . . . . . . . . . . . . . . . . . . . . 50Procedure . . . . . . . . . . . . . . . . . . . . . . . . . . . . . . . . . . . . . . . . . . . . . . . . . . . . . . . . . . . . . . . . 51Delete a Time Index . . . . . . . . . . . . . . . . . . . . . . . . . . . . . . . . . . . . . . . . . . . . . . . . . . . . . . . . 52Restriction on Deletion . . . . . . . . . . . . . . . . . . . . . . . . . . . . . . . . . . . . . . . . . . . . . . . . . . . . . . 52Procedure . . . . . . . . . . . . . . . . . . . . . . . . . . . . . . . . . . . . . . . . . . . . . . . . . . . . . . . . . . . . . . . . 52View Time Indices. . . . . . . . . . . . . . . . . . . . . . . . . . . . . . . . . . . . . . . . . . . . . . . . . . . . . . . . . . 53General Process . . . . . . . . . . . . . . . . . . . . . . . . . . . . . . . . . . . . . . . . . . . . . . . . . . . . . . . . . . . 53Procedure . . . . . . . . . . . . . . . . . . . . . . . . . . . . . . . . . . . . . . . . . . . . . . . . . . . . . . . . . . . . . . . . 54Print Time Indices . . . . . . . . . . . . . . . . . . . . . . . . . . . . . . . . . . . . . . . . . . . . . . . . . . . . . . . . . . 55General Process . . . . . . . . . . . . . . . . . . . . . . . . . . . . . . . . . . . . . . . . . . . . . . . . . . . . . . . . . . . 55Procedure . . . . . . . . . . . . . . . . . . . . . . . . . . . . . . . . . . . . . . . . . . . . . . . . . . . . . . . . . . . . . . . . 56
Page ii NDA-30058 Revision 2
Attendant Management System - Attendant Statistics CONTENTS
Contents Page
Report Viewing . . . . . . . . . . . . . . . . . . . . . . . . . . . . . . . . . . . . . . . . . . . . . . . . . . . . . . . . . . . . . . . 57Menu Options . . . . . . . . . . . . . . . . . . . . . . . . . . . . . . . . . . . . . . . . . . . . . . . . . . . . . . . . . . . . . 57Procedure . . . . . . . . . . . . . . . . . . . . . . . . . . . . . . . . . . . . . . . . . . . . . . . . . . . . . . . . . . . . . . . . 57
Attendant Activity Reports . . . . . . . . . . . . . . . . . . . . . . . . . . . . . . . . . . . . . . . . . . . . . . . . . . . . . 58General Information . . . . . . . . . . . . . . . . . . . . . . . . . . . . . . . . . . . . . . . . . . . . . . . . . . . . . . . . 58Display Fields . . . . . . . . . . . . . . . . . . . . . . . . . . . . . . . . . . . . . . . . . . . . . . . . . . . . . . . . . . . . . 58Procedure . . . . . . . . . . . . . . . . . . . . . . . . . . . . . . . . . . . . . . . . . . . . . . . . . . . . . . . . . . . . . . . . 59
Automated Reports . . . . . . . . . . . . . . . . . . . . . . . . . . . . . . . . . . . . . . . . . . . . . . . . . . . . . . . . . . 60General Information . . . . . . . . . . . . . . . . . . . . . . . . . . . . . . . . . . . . . . . . . . . . . . . . . . . . . . . . 60
Non-Automated Reports . . . . . . . . . . . . . . . . . . . . . . . . . . . . . . . . . . . . . . . . . . . . . . . . . . . . . . 62General Information . . . . . . . . . . . . . . . . . . . . . . . . . . . . . . . . . . . . . . . . . . . . . . . . . . . . . . . . 62Procedure . . . . . . . . . . . . . . . . . . . . . . . . . . . . . . . . . . . . . . . . . . . . . . . . . . . . . . . . . . . . . . . . 63
Chapter 4 - ADMINISTRATION MENU . . . . . . . . . . . . . . . . . . . . . . . . . . . . . . . . . . . . . . 65Overview . . . . . . . . . . . . . . . . . . . . . . . . . . . . . . . . . . . . . . . . . . . . . . . . . . . . . . . . . . . . . . . . . . . . 65
Menu Options . . . . . . . . . . . . . . . . . . . . . . . . . . . . . . . . . . . . . . . . . . . . . . . . . . . . . . . . . . . . . 65Procedure . . . . . . . . . . . . . . . . . . . . . . . . . . . . . . . . . . . . . . . . . . . . . . . . . . . . . . . . . . . . . . . . 66
Database Administration. . . . . . . . . . . . . . . . . . . . . . . . . . . . . . . . . . . . . . . . . . . . . . . . . . . . . . . . 67Overview . . . . . . . . . . . . . . . . . . . . . . . . . . . . . . . . . . . . . . . . . . . . . . . . . . . . . . . . . . . . . . . . . 67Menu Options . . . . . . . . . . . . . . . . . . . . . . . . . . . . . . . . . . . . . . . . . . . . . . . . . . . . . . . . . . . . . 67Procedure . . . . . . . . . . . . . . . . . . . . . . . . . . . . . . . . . . . . . . . . . . . . . . . . . . . . . . . . . . . . . . . . 68
Name Database . . . . . . . . . . . . . . . . . . . . . . . . . . . . . . . . . . . . . . . . . . . . . . . . . . . . . . . . . . . . . 69Procedure . . . . . . . . . . . . . . . . . . . . . . . . . . . . . . . . . . . . . . . . . . . . . . . . . . . . . . . . . . . . . . . . 69
Install Database . . . . . . . . . . . . . . . . . . . . . . . . . . . . . . . . . . . . . . . . . . . . . . . . . . . . . . . . . . . . . 70When to Use . . . . . . . . . . . . . . . . . . . . . . . . . . . . . . . . . . . . . . . . . . . . . . . . . . . . . . . . . . . . . . 70Procedure . . . . . . . . . . . . . . . . . . . . . . . . . . . . . . . . . . . . . . . . . . . . . . . . . . . . . . . . . . . . . . . . 70
Remove Database . . . . . . . . . . . . . . . . . . . . . . . . . . . . . . . . . . . . . . . . . . . . . . . . . . . . . . . . . . . 71Sequence . . . . . . . . . . . . . . . . . . . . . . . . . . . . . . . . . . . . . . . . . . . . . . . . . . . . . . . . . . . . . . . . 71Procedure . . . . . . . . . . . . . . . . . . . . . . . . . . . . . . . . . . . . . . . . . . . . . . . . . . . . . . . . . . . . . . . . 71
Build Database Indexes . . . . . . . . . . . . . . . . . . . . . . . . . . . . . . . . . . . . . . . . . . . . . . . . . . . . . . . 72Sequence . . . . . . . . . . . . . . . . . . . . . . . . . . . . . . . . . . . . . . . . . . . . . . . . . . . . . . . . . . . . . . . . 72Procedure . . . . . . . . . . . . . . . . . . . . . . . . . . . . . . . . . . . . . . . . . . . . . . . . . . . . . . . . . . . . . . . . 72
Erase Database Indexes . . . . . . . . . . . . . . . . . . . . . . . . . . . . . . . . . . . . . . . . . . . . . . . . . . . . . . 73Sequence . . . . . . . . . . . . . . . . . . . . . . . . . . . . . . . . . . . . . . . . . . . . . . . . . . . . . . . . . . . . . . . . 73Procedure . . . . . . . . . . . . . . . . . . . . . . . . . . . . . . . . . . . . . . . . . . . . . . . . . . . . . . . . . . . . . . . . 73
Cluster Tables . . . . . . . . . . . . . . . . . . . . . . . . . . . . . . . . . . . . . . . . . . . . . . . . . . . . . . . . . . . . . . 74General Information . . . . . . . . . . . . . . . . . . . . . . . . . . . . . . . . . . . . . . . . . . . . . . . . . . . . . . . . 74Procedure . . . . . . . . . . . . . . . . . . . . . . . . . . . . . . . . . . . . . . . . . . . . . . . . . . . . . . . . . . . . . . . . 74
DisplayTable Count . . . . . . . . . . . . . . . . . . . . . . . . . . . . . . . . . . . . . . . . . . . . . . . . . . . . . . . . . . 75Procedure . . . . . . . . . . . . . . . . . . . . . . . . . . . . . . . . . . . . . . . . . . . . . . . . . . . . . . . . . . . . . . . . 75
Log File Display . . . . . . . . . . . . . . . . . . . . . . . . . . . . . . . . . . . . . . . . . . . . . . . . . . . . . . . . . . . . . . 76Overview . . . . . . . . . . . . . . . . . . . . . . . . . . . . . . . . . . . . . . . . . . . . . . . . . . . . . . . . . . . . . . . . . 76Menu Options . . . . . . . . . . . . . . . . . . . . . . . . . . . . . . . . . . . . . . . . . . . . . . . . . . . . . . . . . . . . . 76Procedure . . . . . . . . . . . . . . . . . . . . . . . . . . . . . . . . . . . . . . . . . . . . . . . . . . . . . . . . . . . . . . . . 77
Menu Log Files . . . . . . . . . . . . . . . . . . . . . . . . . . . . . . . . . . . . . . . . . . . . . . . . . . . . . . . . . . . . . 78Real-Time Display. . . . . . . . . . . . . . . . . . . . . . . . . . . . . . . . . . . . . . . . . . . . . . . . . . . . . . . . . . 78Procedure . . . . . . . . . . . . . . . . . . . . . . . . . . . . . . . . . . . . . . . . . . . . . . . . . . . . . . . . . . . . . . . . 78
Report Generator Log Files . . . . . . . . . . . . . . . . . . . . . . . . . . . . . . . . . . . . . . . . . . . . . . . . . . . . 80Real-Time Display. . . . . . . . . . . . . . . . . . . . . . . . . . . . . . . . . . . . . . . . . . . . . . . . . . . . . . . . . . 80Procedure . . . . . . . . . . . . . . . . . . . . . . . . . . . . . . . . . . . . . . . . . . . . . . . . . . . . . . . . . . . . . . . . 80
NDA-30058 Revision 2 Page iii
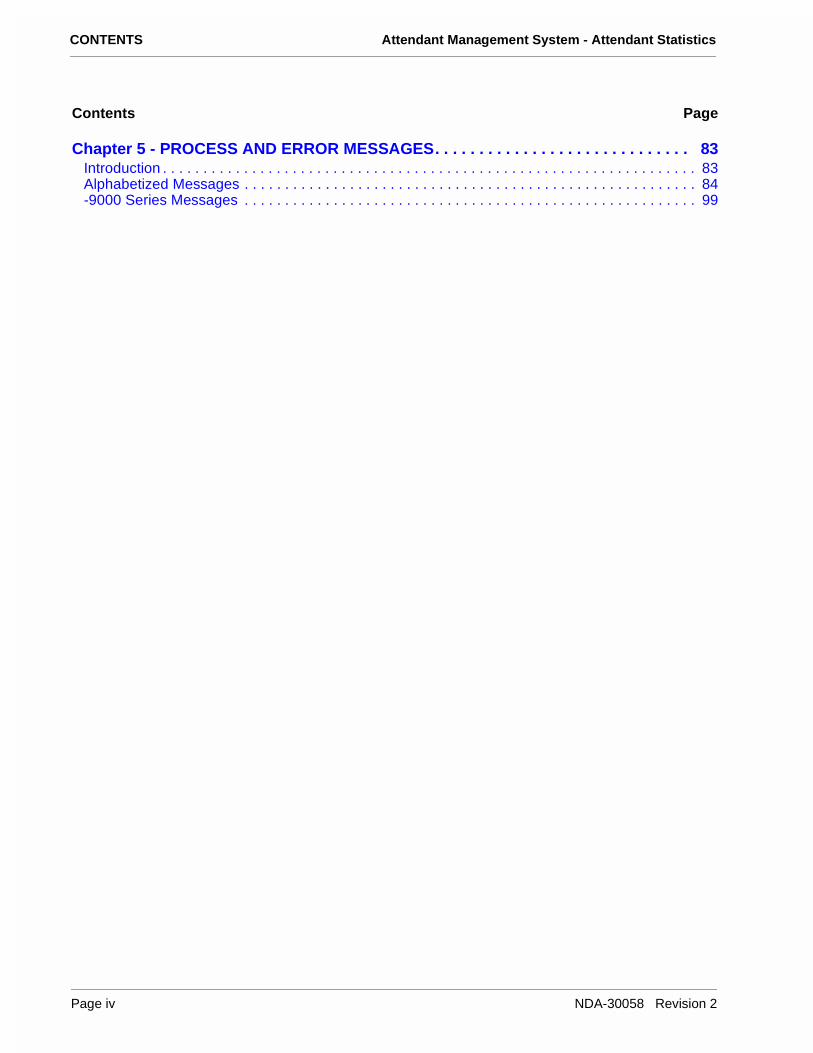
CONTENTS Attendant Management System - Attendant Statistics
Contents Page
Chapter 5 - PROCESS AND ERROR MESSAGES. . . . . . . . . . . . . . . . . . . . . . . . . . . . . 83Introduction . . . . . . . . . . . . . . . . . . . . . . . . . . . . . . . . . . . . . . . . . . . . . . . . . . . . . . . . . . . . . . . . . . 83Alphabetized Messages . . . . . . . . . . . . . . . . . . . . . . . . . . . . . . . . . . . . . . . . . . . . . . . . . . . . . . . . 84-9000 Series Messages . . . . . . . . . . . . . . . . . . . . . . . . . . . . . . . . . . . . . . . . . . . . . . . . . . . . . . . . 99
Page iv NDA-30058 Revision 2
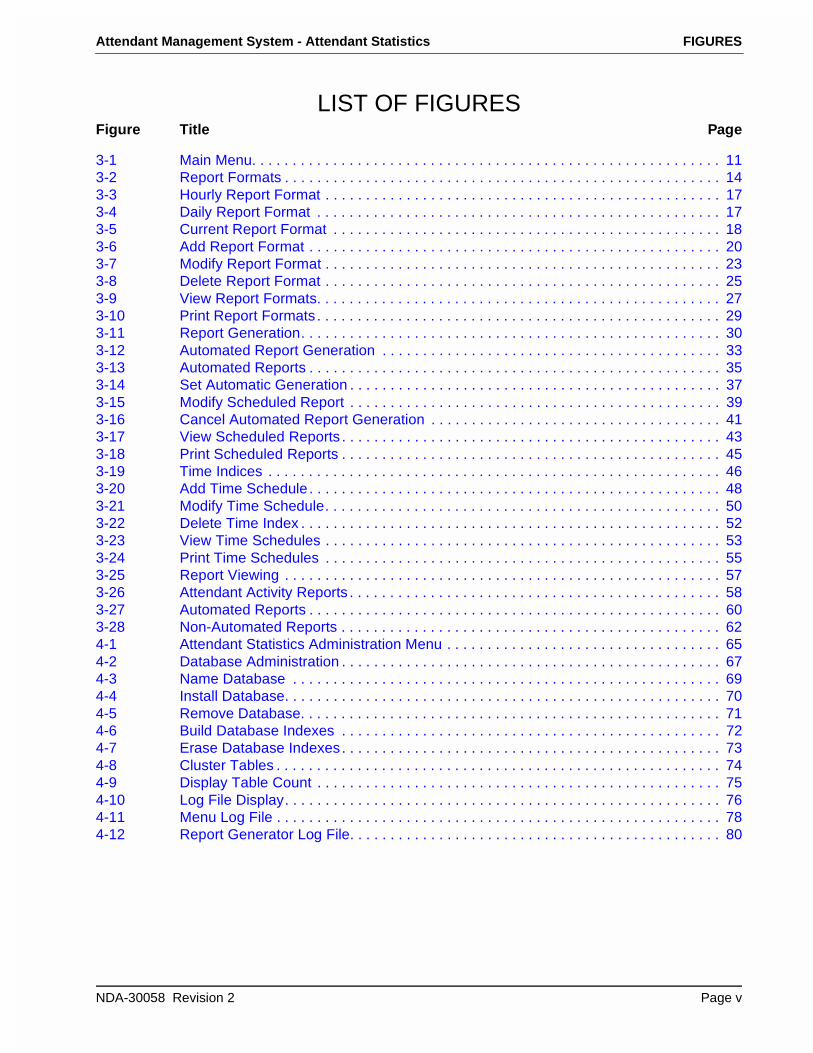
Attendant Management System - Attendant Statistics FIGURES
LIST OF FIGURESFigure Title Page
3-1 Main Menu. . . . . . . . . . . . . . . . . . . . . . . . . . . . . . . . . . . . . . . . . . . . . . . . . . . . . . . . . . 113-2 Report Formats . . . . . . . . . . . . . . . . . . . . . . . . . . . . . . . . . . . . . . . . . . . . . . . . . . . . . . 143-3 Hourly Report Format . . . . . . . . . . . . . . . . . . . . . . . . . . . . . . . . . . . . . . . . . . . . . . . . . 173-4 Daily Report Format . . . . . . . . . . . . . . . . . . . . . . . . . . . . . . . . . . . . . . . . . . . . . . . . . . 173-5 Current Report Format . . . . . . . . . . . . . . . . . . . . . . . . . . . . . . . . . . . . . . . . . . . . . . . . 183-6 Add Report Format . . . . . . . . . . . . . . . . . . . . . . . . . . . . . . . . . . . . . . . . . . . . . . . . . . . 203-7 Modify Report Format . . . . . . . . . . . . . . . . . . . . . . . . . . . . . . . . . . . . . . . . . . . . . . . . . 233-8 Delete Report Format . . . . . . . . . . . . . . . . . . . . . . . . . . . . . . . . . . . . . . . . . . . . . . . . . 253-9 View Report Formats. . . . . . . . . . . . . . . . . . . . . . . . . . . . . . . . . . . . . . . . . . . . . . . . . . 273-10 Print Report Formats . . . . . . . . . . . . . . . . . . . . . . . . . . . . . . . . . . . . . . . . . . . . . . . . . . 293-11 Report Generation. . . . . . . . . . . . . . . . . . . . . . . . . . . . . . . . . . . . . . . . . . . . . . . . . . . . 303-12 Automated Report Generation . . . . . . . . . . . . . . . . . . . . . . . . . . . . . . . . . . . . . . . . . . 333-13 Automated Reports . . . . . . . . . . . . . . . . . . . . . . . . . . . . . . . . . . . . . . . . . . . . . . . . . . . 353-14 Set Automatic Generation . . . . . . . . . . . . . . . . . . . . . . . . . . . . . . . . . . . . . . . . . . . . . . 373-15 Modify Scheduled Report . . . . . . . . . . . . . . . . . . . . . . . . . . . . . . . . . . . . . . . . . . . . . . 393-16 Cancel Automated Report Generation . . . . . . . . . . . . . . . . . . . . . . . . . . . . . . . . . . . . 413-17 View Scheduled Reports . . . . . . . . . . . . . . . . . . . . . . . . . . . . . . . . . . . . . . . . . . . . . . . 433-18 Print Scheduled Reports . . . . . . . . . . . . . . . . . . . . . . . . . . . . . . . . . . . . . . . . . . . . . . . 453-19 Time Indices . . . . . . . . . . . . . . . . . . . . . . . . . . . . . . . . . . . . . . . . . . . . . . . . . . . . . . . . 463-20 Add Time Schedule . . . . . . . . . . . . . . . . . . . . . . . . . . . . . . . . . . . . . . . . . . . . . . . . . . . 483-21 Modify Time Schedule. . . . . . . . . . . . . . . . . . . . . . . . . . . . . . . . . . . . . . . . . . . . . . . . . 503-22 Delete Time Index . . . . . . . . . . . . . . . . . . . . . . . . . . . . . . . . . . . . . . . . . . . . . . . . . . . . 523-23 View Time Schedules . . . . . . . . . . . . . . . . . . . . . . . . . . . . . . . . . . . . . . . . . . . . . . . . . 533-24 Print Time Schedules . . . . . . . . . . . . . . . . . . . . . . . . . . . . . . . . . . . . . . . . . . . . . . . . . 553-25 Report Viewing . . . . . . . . . . . . . . . . . . . . . . . . . . . . . . . . . . . . . . . . . . . . . . . . . . . . . . 573-26 Attendant Activity Reports . . . . . . . . . . . . . . . . . . . . . . . . . . . . . . . . . . . . . . . . . . . . . . 583-27 Automated Reports . . . . . . . . . . . . . . . . . . . . . . . . . . . . . . . . . . . . . . . . . . . . . . . . . . . 603-28 Non-Automated Reports . . . . . . . . . . . . . . . . . . . . . . . . . . . . . . . . . . . . . . . . . . . . . . . 624-1 Attendant Statistics Administration Menu . . . . . . . . . . . . . . . . . . . . . . . . . . . . . . . . . . 654-2 Database Administration . . . . . . . . . . . . . . . . . . . . . . . . . . . . . . . . . . . . . . . . . . . . . . . 674-3 Name Database . . . . . . . . . . . . . . . . . . . . . . . . . . . . . . . . . . . . . . . . . . . . . . . . . . . . . 694-4 Install Database. . . . . . . . . . . . . . . . . . . . . . . . . . . . . . . . . . . . . . . . . . . . . . . . . . . . . . 704-5 Remove Database. . . . . . . . . . . . . . . . . . . . . . . . . . . . . . . . . . . . . . . . . . . . . . . . . . . . 714-6 Build Database Indexes . . . . . . . . . . . . . . . . . . . . . . . . . . . . . . . . . . . . . . . . . . . . . . . 724-7 Erase Database Indexes. . . . . . . . . . . . . . . . . . . . . . . . . . . . . . . . . . . . . . . . . . . . . . . 734-8 Cluster Tables . . . . . . . . . . . . . . . . . . . . . . . . . . . . . . . . . . . . . . . . . . . . . . . . . . . . . . . 744-9 Display Table Count . . . . . . . . . . . . . . . . . . . . . . . . . . . . . . . . . . . . . . . . . . . . . . . . . . 754-10 Log File Display. . . . . . . . . . . . . . . . . . . . . . . . . . . . . . . . . . . . . . . . . . . . . . . . . . . . . . 764-11 Menu Log File . . . . . . . . . . . . . . . . . . . . . . . . . . . . . . . . . . . . . . . . . . . . . . . . . . . . . . . 784-12 Report Generator Log File. . . . . . . . . . . . . . . . . . . . . . . . . . . . . . . . . . . . . . . . . . . . . . 80
NDA-30058 Revision 2 Page v
FIGURES Attendant Management System - Attendant Statistics
This Page Left Blank.
Page vi NDA-30058 Revision 2
Attendant Management System - Attendant Statistics INTRODUCTION
Chapter 1 INTRODUCTION
Attendant Statistics (Attendant Stats) supplements the Attendant Management System (AMS), the on-screen, dynamic computer emulation and enhancement of attendant console capabilities. Attendant Stats collects data from AMS operator call processing and produces statistical reports for display or printing. The reporting capabilities of Attendant Stats are twofold:
• Routine Attendant Activity Reports AMS routinely collects call processing data from which Attendant Stats computes statistics that reflect operator activity. These attendant activity statistics are computed every day at midnight and reflect such things as number of internal and external calls answered and total numbers of calls processed through the AMS Directory Assistance, Call Parking, and Parked-Call Retrieval functions.
• Formatted and Generated Reports The Attendant Stats Main Menu provides options for design and production of any number of reports from a variety of available statistics about either attendant processing or types of calls processed by attendants. Statistics can be calculated by the hour, by the day, or for the current day, up until the current time. The design process involves naming the report, selecting the statistics it is to contain, and naming the time interval by which those statistics are to be calculated. Once formatted, a report can be generated from the Main Menu to reflect statistics calculated from call processing data collected before or scheduled for automatic generation either once in the future or on a named recurring basis (i.e., Monday morning at 1:00 a.m., every week and month of the year). Data is collected for a preset length of time, up to one week. The list of statistics available through Attendant Stats during report formatting is extensive and includes totals, percentages, ranges, and averages calculated from such things as number and types of calls queued and answered, connected and idle periods, calls waiting in queue for available operators, and abandoned calls.
Attendant Stats retains all saved reports for a period of one week (whether formatted and generated through the menus or routinely produced by Attendant Stats), during which time they can be displayed and printed from a Main Menu option.
NDA-30058 Revision 2 Page 1
INTRODUCTION Attendant Management System - Attendant Statistics
Manual Organization
Chapter 2 describes the installation and setup of Attendant Stats. Attendant Stats can only be installed on a system on which the AMS is already successfully installed, since it shares basic configuration material with the AMS.
Chapter 3 describes the Attendant Stats Main Menu options in detail, with screen illustrations, information required for the use of each option, and step-by-step instructions for formatting, generating, and accessing reports.
Chapter 4 describes the Attendant Stats capabilities for managing the Informix database, in which it maintains call processing data for statistical calculation and generated reports, and for display and printing of log file contents.
Chapter 5 contains a list of process and error messages for which description and required recovery procedures would be helpful during work in the Attendant Stats menus.
Chapter Layout
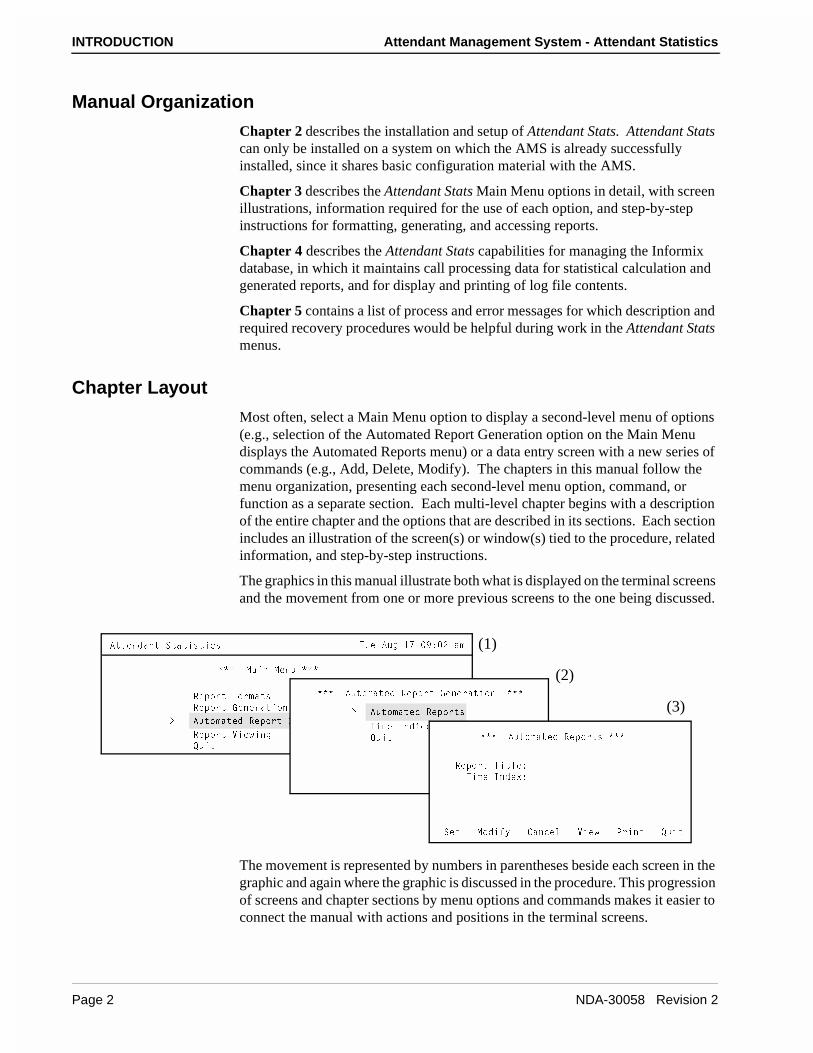
Most often, select a Main Menu option to display a second-level menu of options (e.g., selection of the Automated Report Generation option on the Main Menu displays the Automated Reports menu) or a data entry screen with a new series of commands (e.g., Add, Delete, Modify). The chapters in this manual follow the menu organization, presenting each second-level menu option, command, or function as a separate section. Each multi-level chapter begins with a description of the entire chapter and the options that are described in its sections. Each section includes an illustration of the screen(s) or window(s) tied to the procedure, related information, and step-by-step instructions.
The graphics in this manual illustrate both what is displayed on the terminal screens and the movement from one or more previous screens to the one being discussed.
The movement is represented by numbers in parentheses beside each screen in the graphic and again where the graphic is discussed in the procedure. This progression of screens and chapter sections by menu options and commands makes it easier to connect the manual with actions and positions in the terminal screens.
BU`_bd 6_b]Qdc
BU`_bd 7U^UbQdY_^
1ed_]QdUT BU`_bd 7U^UbQdY_^
BU`_bd FYUgY^W
AeYd
��� =QY^ =U^e ���
1ddU^TQ^d CdQdYcdYSc DeU 1eW !' )* " Q]
.
��� 1ed_]QdUT BU`_bd 7U^UbQdY_^ ���
1ed_]QdUT BU`_bdc
DY]U 9^TYSUc
AeYd
.
��� 1ed_]QdUT BU`_bdc ���
BU`_bd DYd\U*
DY]U 9^TUh*
CUd =_TYVi 3Q^SU\ FYUg @bY^d AeYd
(1)
(2)
(3)
Page 2 NDA-30058 Revision 2
Attendant Management System - Attendant Statistics INTRODUCTION
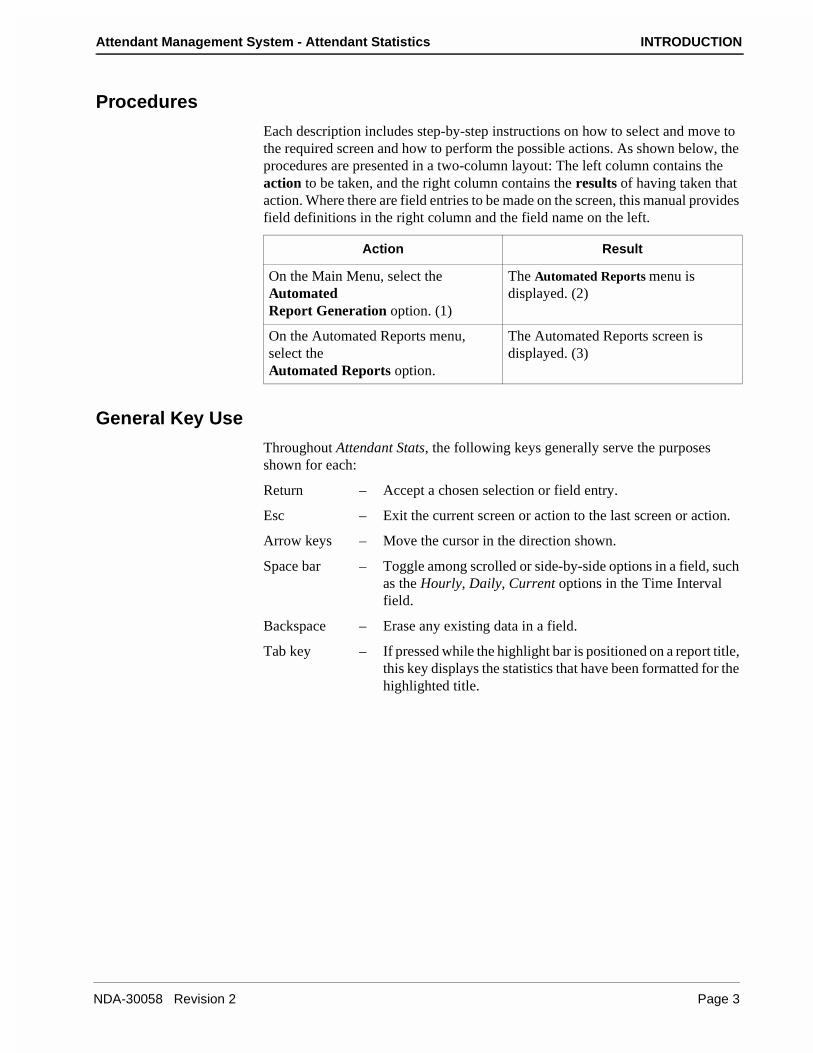
Procedures
Each description includes step-by-step instructions on how to select and move to the required screen and how to perform the possible actions. As shown below, the procedures are presented in a two-column layout: The left column contains the action to be taken, and the right column contains the results of having taken that action. Where there are field entries to be made on the screen, this manual provides field definitions in the right column and the field name on the left.
General Key Use
Throughout Attendant Stats, the following keys generally serve the purposes shown for each:
Return – Accept a chosen selection or field entry.
Esc – Exit the current screen or action to the last screen or action.
Arrow keys – Move the cursor in the direction shown.
Space bar – Toggle among scrolled or side-by-side options in a field, such as the Hourly, Daily, Current options in the Time Interval field.
Backspace – Erase any existing data in a field.
Tab key – If pressed while the highlight bar is positioned on a report title, this key displays the statistics that have been formatted for the highlighted title.
Action Result
On the Main Menu, select the AutomatedReport Generation option. (1)
The Automated Reports menu is displayed. (2)
On the Automated Reports menu, select the Automated Reports option.
The Automated Reports screen is displayed. (3)
NDA-30058 Revision 2 Page 3

INTRODUCTION Attendant Management System - Attendant Statistics
Page 4 NDA-30058 Revision 2
This Page Left Blank.

Attendant Management System - Attendant Statistics INSTALLATION AND SETUP
Chapter 2 INSTALLATION AND SETUP
Introduction
This chapter provides a step-by-step description of the installation and setup of Attendant Stats. Before proceeding with the installation, make sure that the SCO UNIX operating system, the Applications Manager (APM) platform software, and the Attendant Management System (AMS) are all installed on the system.
The Applications Manager Operations Manual provides detailed instructions for using the APM menus and for completing the data entry screens illustrated in this manual. NEAX2400 IMS system manuals provide the procedures for making the data assignments at the NEAX MAT.
Application Configuration
Since Attendant Stats is internally supported by the APM, its two components must be configured in the APM environment. This section provides the information that must be entered into the APM configuration file.
Attendant Stats is set up in the APM system using the Add function of the Application Configuration option on the APM System Administration menu.
1. Enter the APM option from the APM Platform Management menu.
2. Enter the System Administrator password at the APM password screen.
3. Enter the Application Configuration option from the System Administration menu.
The following sections contain the information that should be entered into the configuration file for the components listed below:
Att_Stats_Admin – Clears the database of old records, clears directories of old reports and old log files, and date-stamps the log files.
Stat_Logger – Logs attendant on-line, off-line, login, and logout messages. It also logs call messages — incoming, answer, abandon, recall, and release. Messages are logged in the Informix database.
For instructions on what these parameters mean and how to make these entries, use the APM Operations Manual.
NDA-30058 Revision 2 Page 5
INSTALLATION AND SETUP Attendant Management System - Attendant Statistics
Application Configuration (Cont)
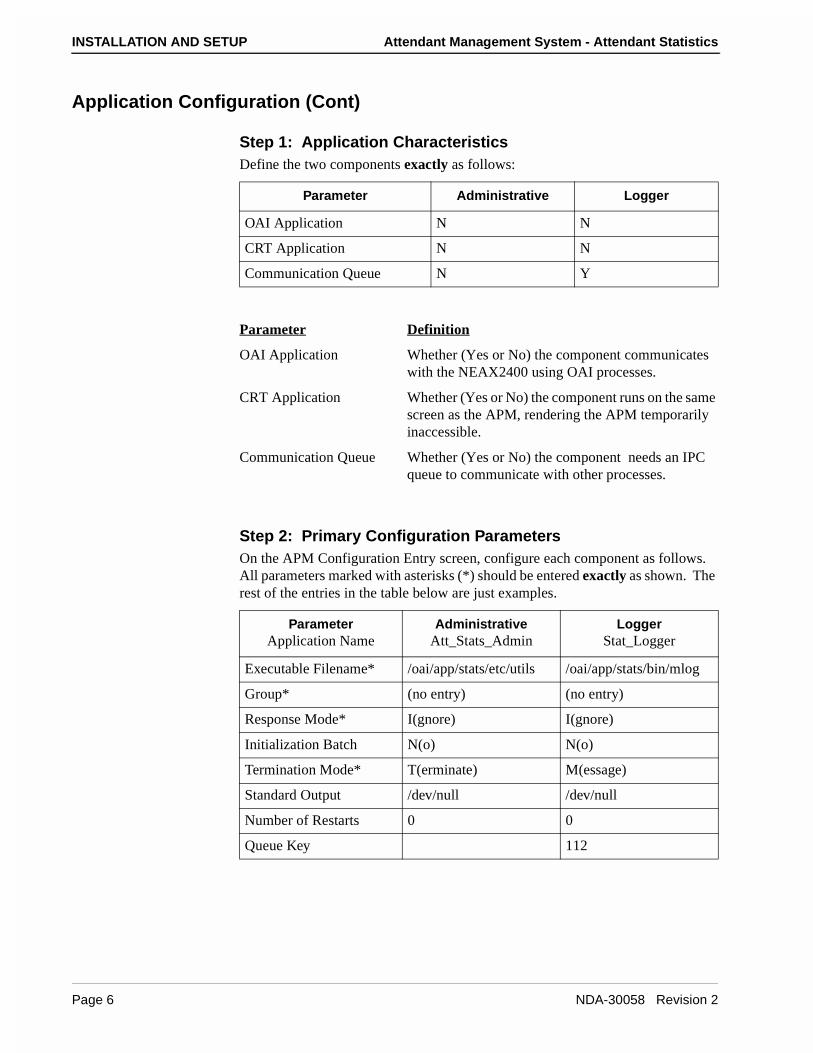
Step 1: Application CharacteristicsDefine the two components exactly as follows:
Parameter Definition
OAI Application Whether (Yes or No) the component communicates with the NEAX2400 using OAI processes.
CRT Application Whether (Yes or No) the component runs on the same screen as the APM, rendering the APM temporarily inaccessible.
Communication Queue Whether (Yes or No) the component needs an IPC queue to communicate with other processes.
Step 2: Primary Configuration ParametersOn the APM Configuration Entry screen, configure each component as follows. All parameters marked with asterisks (*) should be entered exactly as shown. The rest of the entries in the table below are just examples.
Parameter Administrative Logger
OAI Application N N
CRT Application N N
Communication Queue N Y
ParameterApplication Name
AdministrativeAtt_Stats_Admin
LoggerStat_Logger
Executable Filename* /oai/app/stats/etc/utils /oai/app/stats/bin/mlog
Group* (no entry) (no entry)
Response Mode* I(gnore) I(gnore)
Initialization Batch N(o) N(o)
Termination Mode* T(erminate) M(essage)
Standard Output /dev/null /dev/null
Number of Restarts 0 0
Queue Key 112
Page 6 NDA-30058 Revision 2
Attendant Management System - Attendant Statistics INSTALLATION AND SETUP
Application Configuration (Cont)
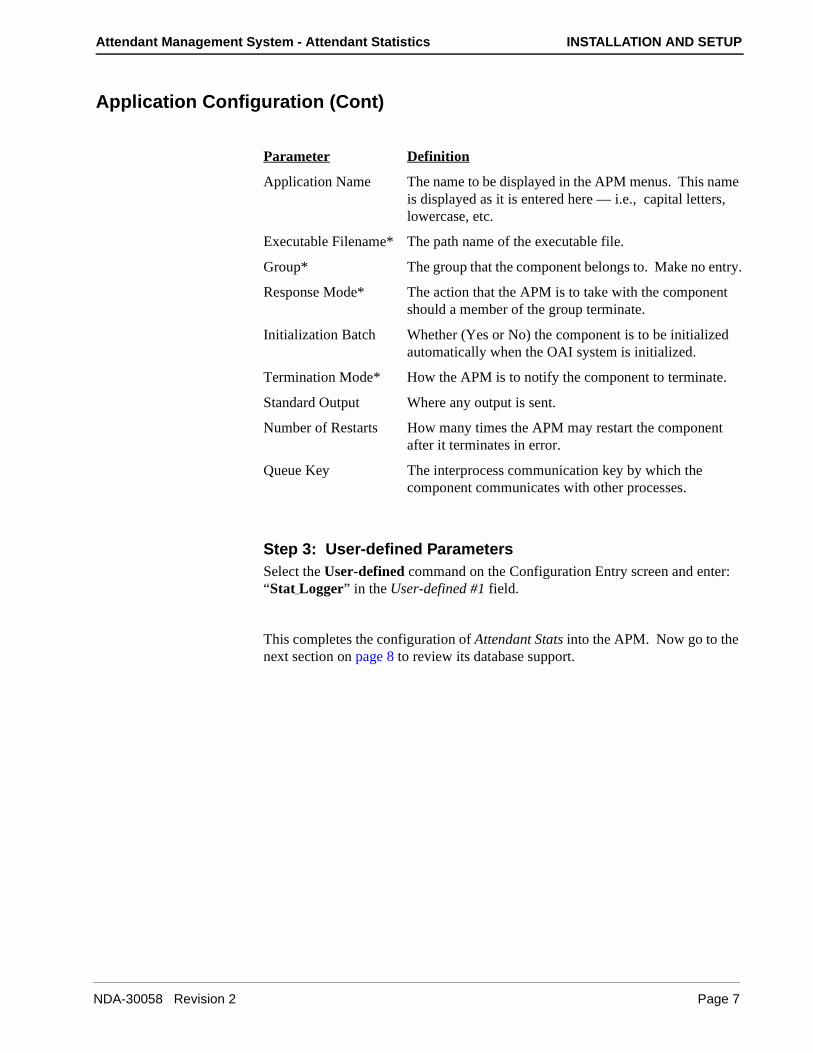
Parameter Definition
Application Name The name to be displayed in the APM menus. This name is displayed as it is entered here — i.e., capital letters, lowercase, etc.
Executable Filename* The path name of the executable file.
Group* The group that the component belongs to. Make no entry.
Response Mode* The action that the APM is to take with the component should a member of the group terminate.
Initialization Batch Whether (Yes or No) the component is to be initialized automatically when the OAI system is initialized.
Termination Mode* How the APM is to notify the component to terminate.
Standard Output Where any output is sent.
Number of Restarts How many times the APM may restart the component after it terminates in error.
Queue Key The interprocess communication key by which the component communicates with other processes.
Step 3: User-defined ParametersSelect the User-defined command on the Configuration Entry screen and enter: “Stat_Logger” in the User-defined #1 field.
This completes the configuration of Attendant Stats into the APM. Now go to the next section on page 8 to review its database support.
NDA-30058 Revision 2 Page 7
INSTALLATION AND SETUP Attendant Management System - Attendant Statistics
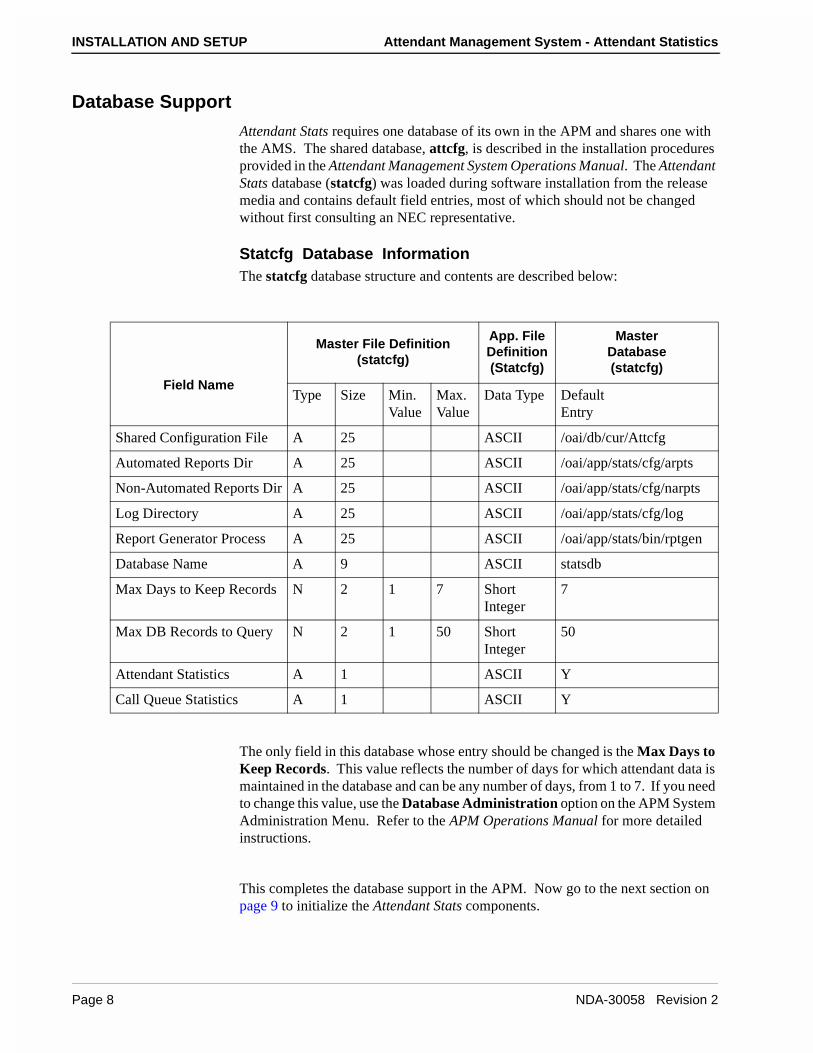
Database Support
Attendant Stats requires one database of its own in the APM and shares one with the AMS. The shared database, attcfg, is described in the installation procedures provided in the Attendant Management System Operations Manual. The Attendant Stats database (statcfg) was loaded during software installation from the release media and contains default field entries, most of which should not be changed without first consulting an NEC representative.
Statcfg Database InformationThe statcfg database structure and contents are described below:
The only field in this database whose entry should be changed is the Max Days to Keep Records. This value reflects the number of days for which attendant data is maintained in the database and can be any number of days, from 1 to 7. If you need to change this value, use the Database Administration option on the APM System Administration Menu. Refer to the APM Operations Manual for more detailed instructions.
This completes the database support in the APM. Now go to the next section on page 9 to initialize the Attendant Stats components.
Field Name
Master File Definition(statcfg)
App. FileDefinition(Statcfg)
MasterDatabase(statcfg)
Type Size Min.Value
Max.Value
Data Type DefaultEntry
Shared Configuration File A 25 ASCII /oai/db/cur/Attcfg
Automated Reports Dir A 25 ASCII /oai/app/stats/cfg/arpts
Non-Automated Reports Dir A 25 ASCII /oai/app/stats/cfg/narpts
Log Directory A 25 ASCII /oai/app/stats/cfg/log
Report Generator Process A 25 ASCII /oai/app/stats/bin/rptgen
Database Name A 9 ASCII statsdb
Max Days to Keep Records N 2 1 7 Short Integer
7
Max DB Records to Query N 2 1 50 Short Integer
50
Attendant Statistics A 1 ASCII Y
Call Queue Statistics A 1 ASCII Y
Page 8 NDA-30058 Revision 2
Attendant Management System - Attendant Statistics INSTALLATION AND SETUP
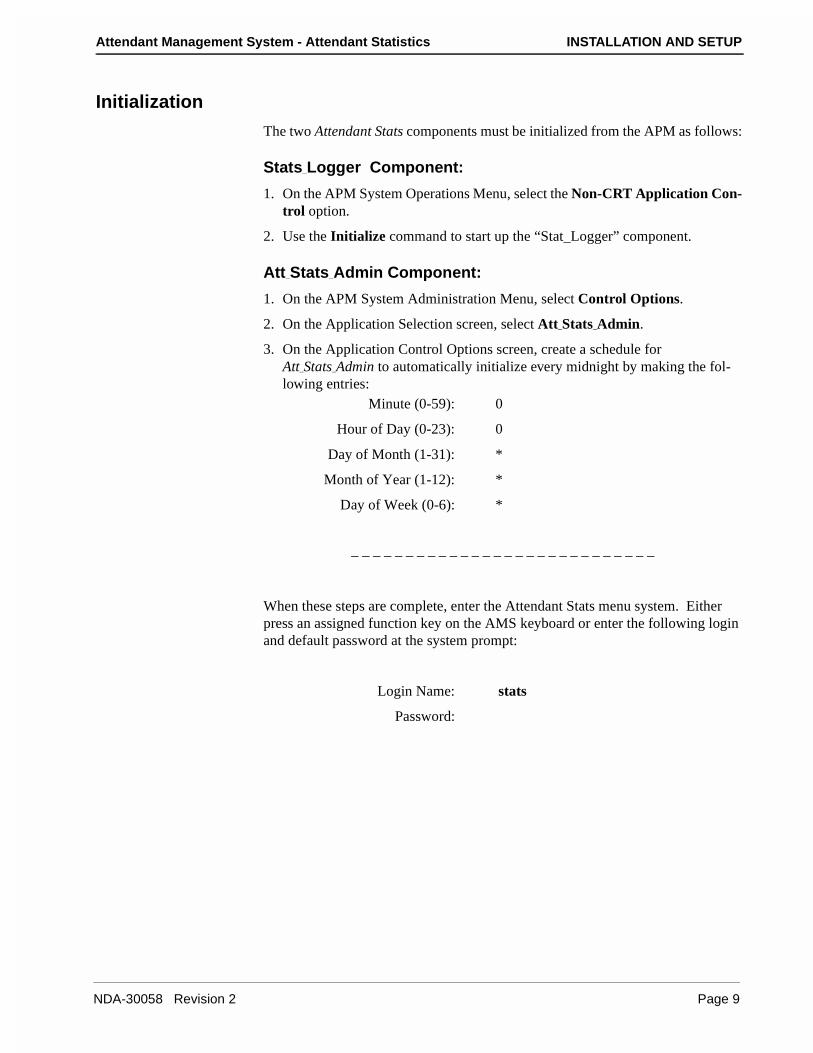
Initialization
The two Attendant Stats components must be initialized from the APM as follows:
Stats_Logger Component:
1. On the APM System Operations Menu, select the Non-CRT Application Con-trol option.
2. Use the Initialize command to start up the “Stat_Logger” component.
Att_Stats_Admin Component:
1. On the APM System Administration Menu, select Control Options.
2. On the Application Selection screen, select Att_Stats_Admin.
3. On the Application Control Options screen, create a schedule for Att_Stats_Admin to automatically initialize every midnight by making the fol-lowing entries:
Minute (0-59): 0
Hour of Day (0-23): 0
Day of Month (1-31): *
Month of Year (1-12): *
Day of Week (0-6): *
– – – – – – – – – – – – – – – – – – – – – – – – – – – –
When these steps are complete, enter the Attendant Stats menu system. Either press an assigned function key on the AMS keyboard or enter the following login and default password at the system prompt:
Login Name: stats
Password:
NDA-30058 Revision 2 Page 9

INSTALLATION AND SETUP Attendant Management System - Attendant Statistics
Page 10 NDA-30058 Revision 2
This Page Left Blank.
Attendant Management System - Attendant Statistics MAIN MENU OPTIONS
Chapter 3 MAIN MENU OPTIONS
Introduction
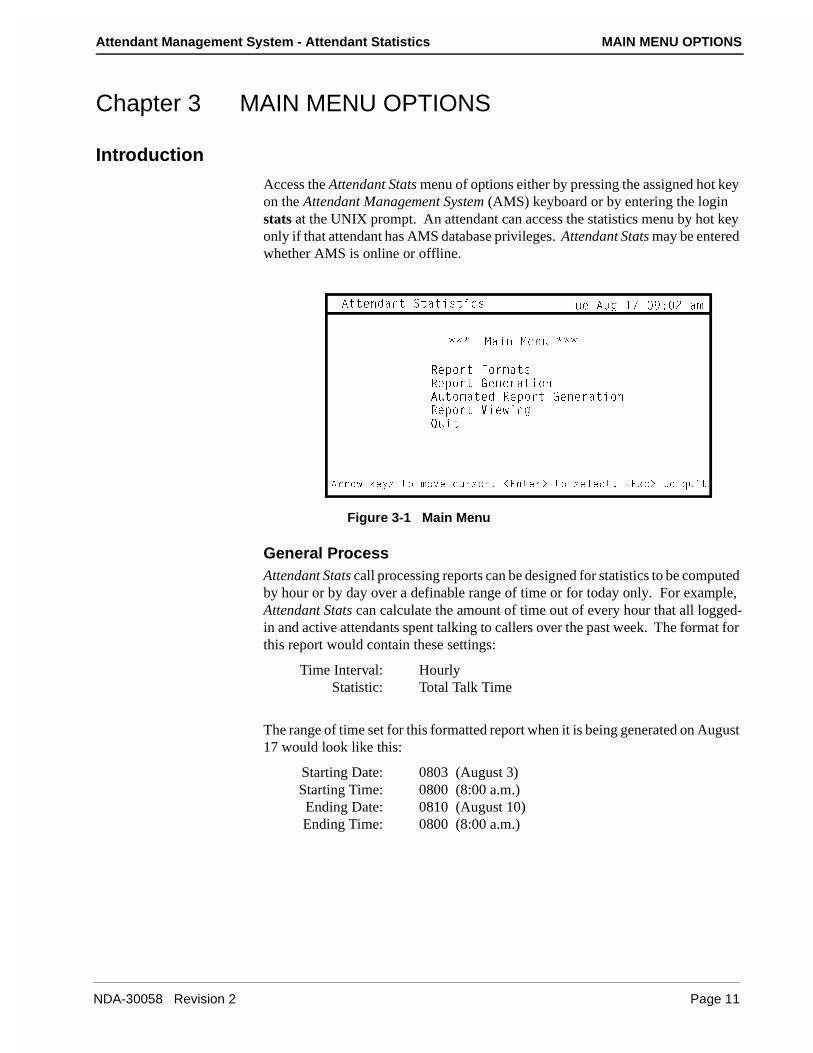
Access the Attendant Stats menu of options either by pressing the assigned hot key on the Attendant Management System (AMS) keyboard or by entering the login stats at the UNIX prompt. An attendant can access the statistics menu by hot key only if that attendant has AMS database privileges. Attendant Stats may be entered whether AMS is online or offline.
Figure 3-1 Main Menu
General ProcessAttendant Stats call processing reports can be designed for statistics to be computed by hour or by day over a definable range of time or for today only. For example, Attendant Stats can calculate the amount of time out of every hour that all logged-in and active attendants spent talking to callers over the past week. The format for this report would contain these settings:
Time Interval: HourlyStatistic: Total Talk Time
The range of time set for this formatted report when it is being generated on August 17 would look like this:
Starting Date: 0803 (August 3)Starting Time: 0800 (8:00 a.m.)Ending Date: 0810 (August 10)Ending Time: 0800 (8:00 a.m.)
1ddU^TQ^d CdQdYcdYSc DeU 1eW !' )* " Q]
BU`_bd 6_b]QdcBU`_bd 7U^UbQdY_^1ed_]QdUT BU`_bd 7U^UbQdY_^BU`_bd FYUgY^WAeYd
��� =QY^ =U^e ���
1bb_g [Uic d_ ]_fU Sebc_b� ,5^dUb. d_ cU\USd� ,5cS. d_ aeYd
NDA-30058 Revision 2 Page 11
MAIN MENU OPTIONS Attendant Management System - Attendant Statistics
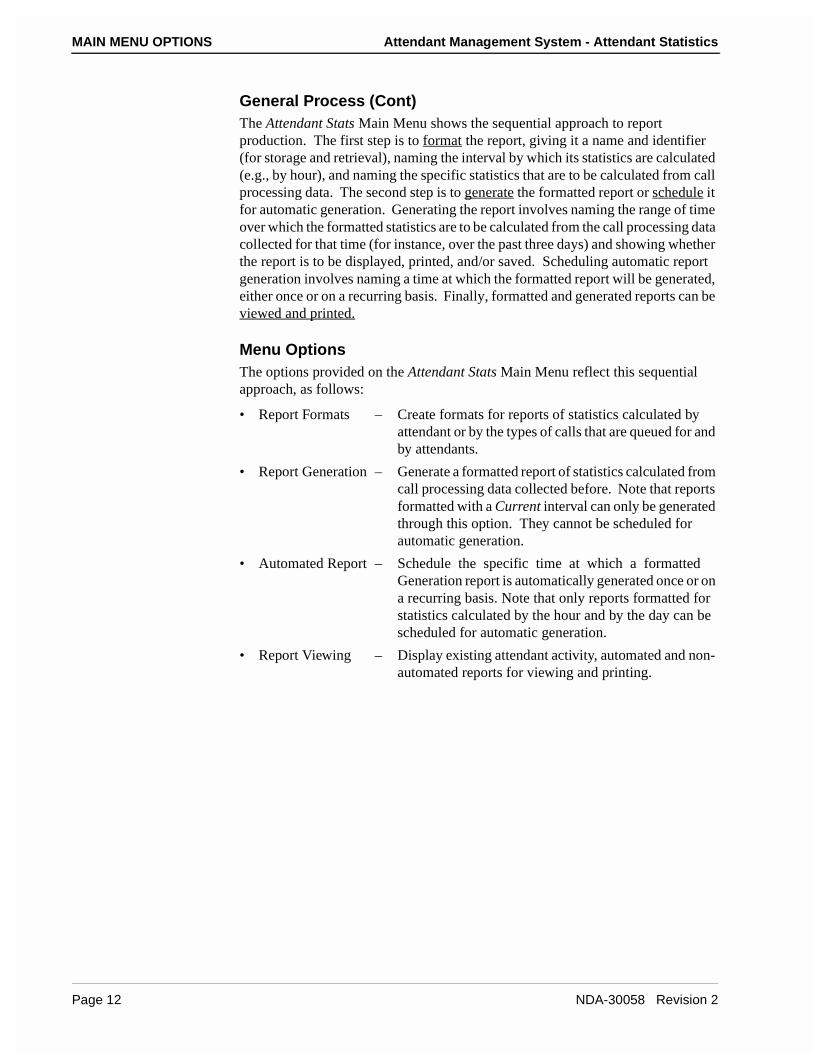
General Process (Cont)The Attendant Stats Main Menu shows the sequential approach to report production. The first step is to format the report, giving it a name and identifier (for storage and retrieval), naming the interval by which its statistics are calculated (e.g., by hour), and naming the specific statistics that are to be calculated from call processing data. The second step is to generate the formatted report or schedule it for automatic generation. Generating the report involves naming the range of time over which the formatted statistics are to be calculated from the call processing data collected for that time (for instance, over the past three days) and showing whether the report is to be displayed, printed, and/or saved. Scheduling automatic report generation involves naming a time at which the formatted report will be generated, either once or on a recurring basis. Finally, formatted and generated reports can be viewed and printed.
Menu OptionsThe options provided on the Attendant Stats Main Menu reflect this sequential approach, as follows:
• Report Formats – Create formats for reports of statistics calculated by attendant or by the types of calls that are queued for and by attendants.
• Report Generation – Generate a formatted report of statistics calculated from call processing data collected before. Note that reports formatted with a Current interval can only be generated through this option. They cannot be scheduled for automatic generation.
• Automated Report – Schedule the specific time at which a formatted Generation report is automatically generated once or on a recurring basis. Note that only reports formatted for statistics calculated by the hour and by the day can be scheduled for automatic generation.
• Report Viewing – Display existing attendant activity, automated and non- automated reports for viewing and printing.
Page 12 NDA-30058 Revision 2
Attendant Management System - Attendant Statistics MAIN MENU OPTIONS
Procedure
Action Result
Enter Attendant Stats in one of two ways:
• Type the name stats at the system login prompt and the word stats at the password prompt.
• Press the assigned hot key on the AMS keyboard. Refer to the “Preparing Attendant Stations” sections in the AMS Operations Manual.
The Main Menu is displayed.
Choose options in one of two ways:
• Type the key letter of the desired option. The key letter is typically highlighted or shown in boldface type and is the first letter of the option unless that letter has been used before. The procedures in this manual use this selection process.
• Use the arrow keys to place the cursor on the desired option and press Enter.
Then refer to the instructions provided in this chapter for use of each option.
To exit the Main Menu, press q (quit). The Attendant Statistics Main Menu is displayed.
NDA-30058 Revision 2 Page 13
MAIN MENU OPTIONS Attendant Management System - Attendant Statistics
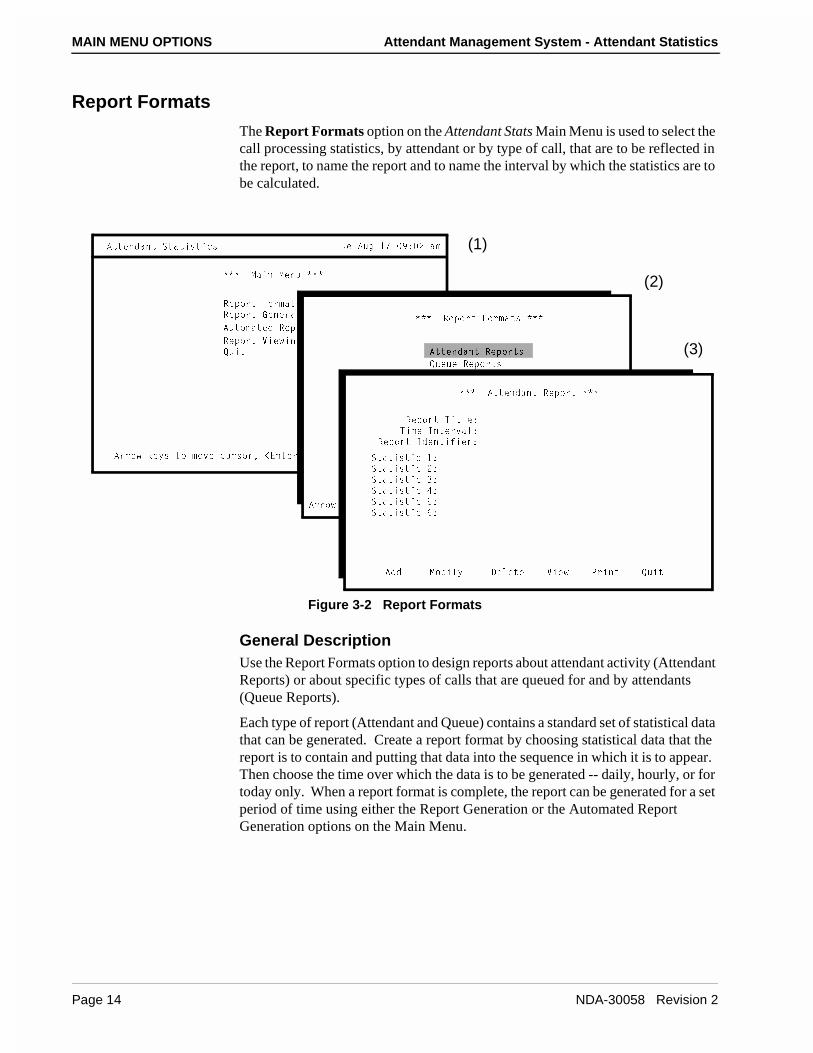
Report Formats
The Report Formats option on the Attendant Stats Main Menu is used to select the call processing statistics, by attendant or by type of call, that are to be reflected in the report, to name the report and to name the interval by which the statistics are to be calculated.
Figure 3-2 Report Formats
General DescriptionUse the Report Formats option to design reports about attendant activity (Attendant Reports) or about specific types of calls that are queued for and by attendants (Queue Reports).
Each type of report (Attendant and Queue) contains a standard set of statistical data that can be generated. Create a report format by choosing statistical data that the report is to contain and putting that data into the sequence in which it is to appear. Then choose the time over which the data is to be generated -- daily, hourly, or for today only. When a report format is complete, the report can be generated for a set period of time using either the Report Generation or the Automated Report Generation options on the Main Menu.
1bb_g [Uic d_ ]_fU Sebc_b� ,5^dUb. d_ cU\USd� ,5cS. d_ aeYd
BU`_bd 6_b]Qdc
BU`_bd 7U^UbQdY_^
1ed_]QdUT BU`_bd 7U^UbQdY_^
BU`_bd FYUgY^W
AeYd
��� =QY^ =U^e ���
1ddU^TQ^d CdQdYcdYSc DeU 1eW !' )* " Q]
��� BU`_bd 6_b]Qdc ���
1bb_g [Uic d_ ]_fU Sebc_b� ,B5D. d_ cU\USd� ,5C3. d_ aeYd
1ddU^TQ^d BU`_bdc
AeUeU BU`_bdc
AeYd
��� 1ddU^TQ^d BU`_bd ���
BU`_bd DYd\U*
DY]U 9^dUbfQ\*
BU`_bd 9TU^dYVYUb*
CdQdYcdYS !*CdQdYcdYS "*
CdQdYcdYS #*
CdQdYcdYS $*
CdQdYcdYS %*
CdQdYcdYS &*
1TT =_TYVi 4U\UdU FYUg @bY^d AeYd
(1)
(2)
(3)
Page 14 NDA-30058 Revision 2
Attendant Management System - Attendant Statistics MAIN MENU OPTIONS
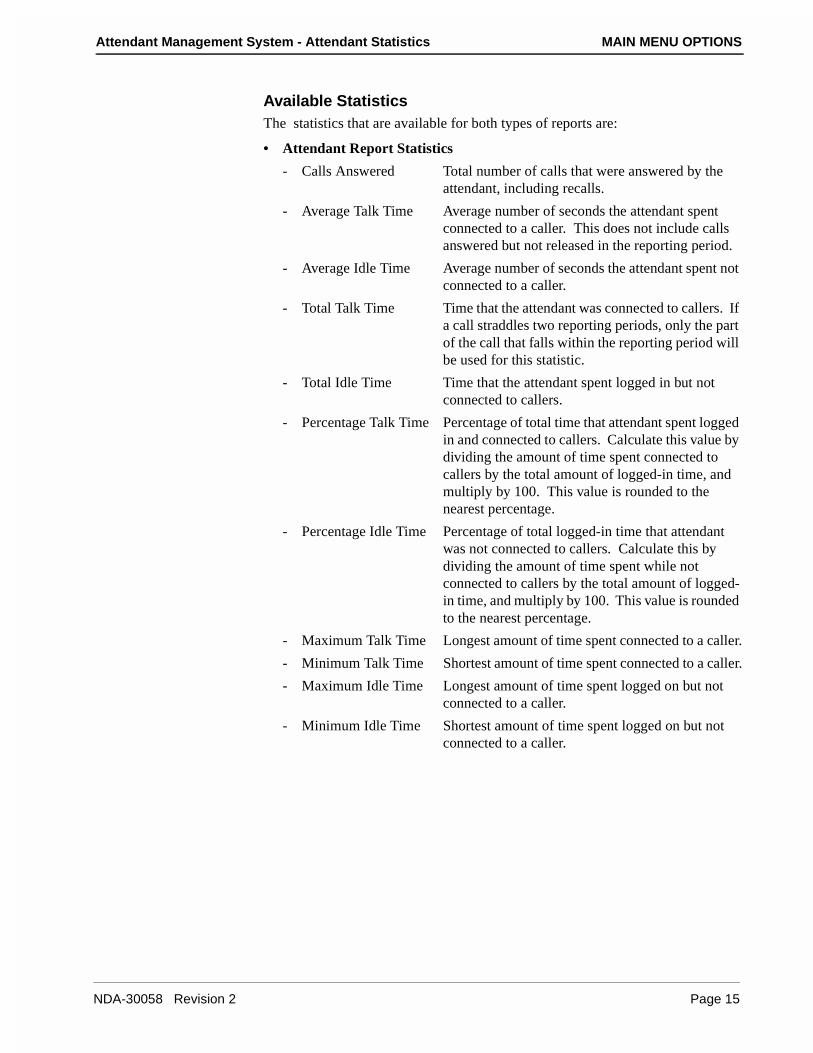
Available StatisticsThe statistics that are available for both types of reports are:
• Attendant Report Statistics
- Calls Answered Total number of calls that were answered by the attendant, including recalls.
- Average Talk Time Average number of seconds the attendant spent connected to a caller. This does not include calls answered but not released in the reporting period.
- Average Idle Time Average number of seconds the attendant spent not connected to a caller.
- Total Talk Time Time that the attendant was connected to callers. If a call straddles two reporting periods, only the part of the call that falls within the reporting period will be used for this statistic.
- Total Idle Time Time that the attendant spent logged in but not connected to callers.
- Percentage Talk Time Percentage of total time that attendant spent logged in and connected to callers. Calculate this value by dividing the amount of time spent connected to callers by the total amount of logged-in time, and multiply by 100. This value is rounded to the nearest percentage.
- Percentage Idle Time Percentage of total logged-in time that attendant was not connected to callers. Calculate this by dividing the amount of time spent while not connected to callers by the total amount of logged-in time, and multiply by 100. This value is rounded to the nearest percentage.
- Maximum Talk Time Longest amount of time spent connected to a caller.
- Minimum Talk Time Shortest amount of time spent connected to a caller.
- Maximum Idle Time Longest amount of time spent logged on but not connected to a caller.
- Minimum Idle Time Shortest amount of time spent logged on but not connected to a caller.
NDA-30058 Revision 2 Page 15
MAIN MENU OPTIONS Attendant Management System - Attendant Statistics
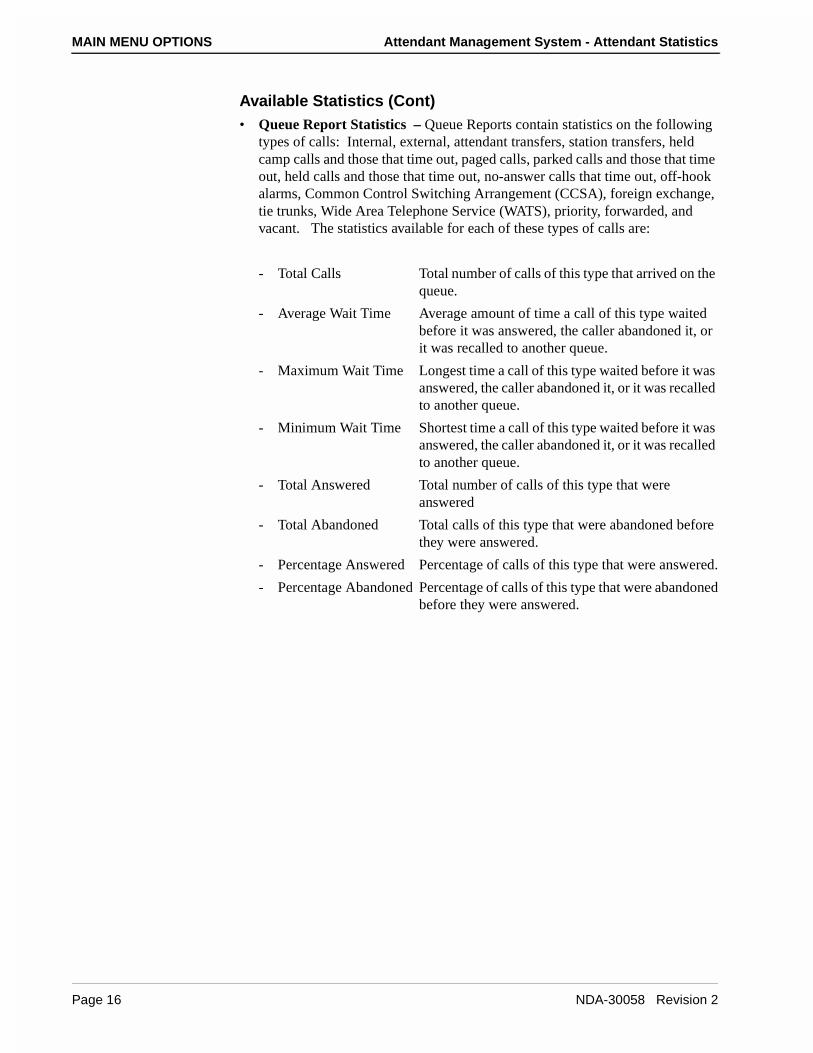
Available Statistics (Cont)• Queue Report Statistics – Queue Reports contain statistics on the following
types of calls: Internal, external, attendant transfers, station transfers, held camp calls and those that time out, paged calls, parked calls and those that time out, held calls and those that time out, no-answer calls that time out, off-hook alarms, Common Control Switching Arrangement (CCSA), foreign exchange, tie trunks, Wide Area Telephone Service (WATS), priority, forwarded, and vacant. The statistics available for each of these types of calls are:
- Total Calls Total number of calls of this type that arrived on the queue.
- Average Wait Time Average amount of time a call of this type waited before it was answered, the caller abandoned it, or it was recalled to another queue.
- Maximum Wait Time Longest time a call of this type waited before it was answered, the caller abandoned it, or it was recalled to another queue.
- Minimum Wait Time Shortest time a call of this type waited before it was answered, the caller abandoned it, or it was recalled to another queue.
- Total Answered Total number of calls of this type that were answered
- Total Abandoned Total calls of this type that were abandoned before they were answered.
- Percentage Answered Percentage of calls of this type that were answered.
- Percentage Abandoned Percentage of calls of this type that were abandonedbefore they were answered.
Page 16 NDA-30058 Revision 2
Attendant Management System - Attendant Statistics MAIN MENU OPTIONS
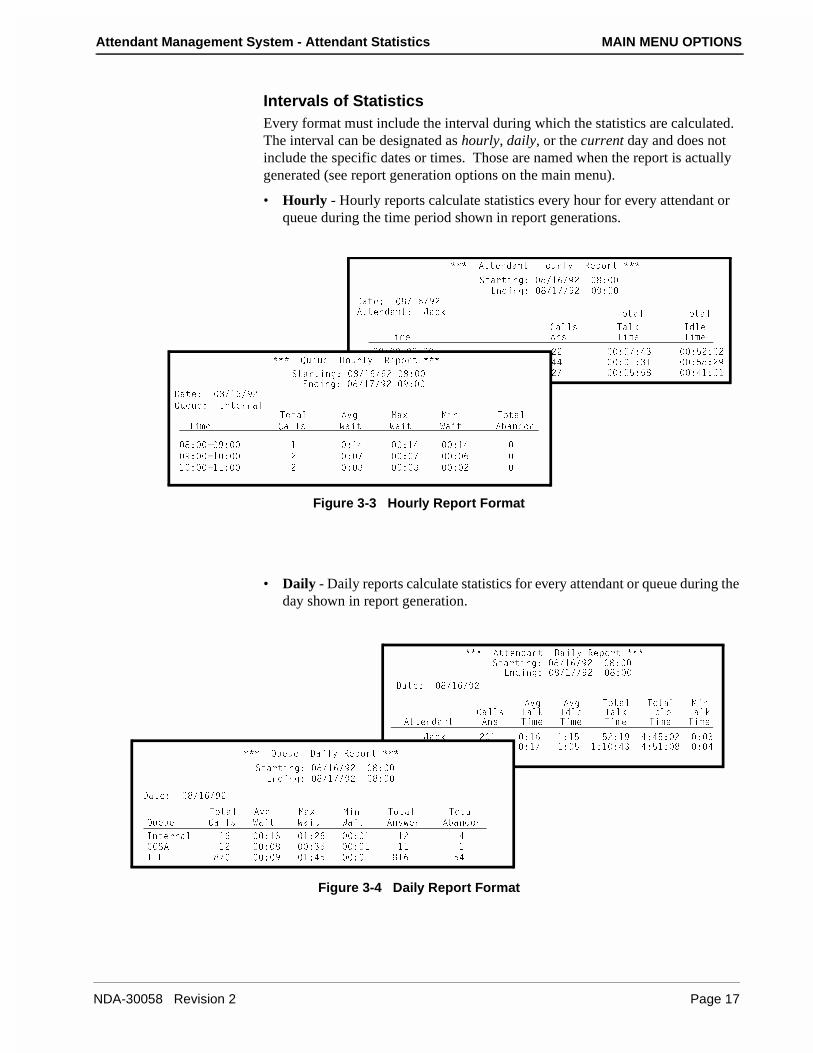
Intervals of StatisticsEvery format must include the interval during which the statistics are calculated. The interval can be designated as hourly, daily, or the current day and does not include the specific dates or times. Those are named when the report is actually generated (see report generation options on the main menu).
• Hourly - Hourly reports calculate statistics every hour for every attendant or queue during the time period shown in report generations.
Figure 3-3 Hourly Report Format
• Daily - Daily reports calculate statistics for every attendant or queue during the day shown in report generation.
Figure 3-4 Daily Report Format
��� 1ddU^TQ^d 8_eb\i BU`_bd ���
CdQbdY^W* (�!&�)" (* 5^TY^W* (�!'�)" )*
4QdU* (�!&�)"1ddU^TQ^d* :QS[ D_dQ\ D_dQ\
3Q\\c DQ\[ 9T\UDY]U 1^c DY]U DY]U
(* ° )* "" * '*$# *%"* " )* �! * $$ * !*#! *%(*")! * �!!* "' * %*%( *$!* !
��� AeUeU 8_eb\i BU`_bd ���
CdQbdY^W* (�!&�)" (* 5^TY^W* (�!'�)" )*
4QdU* (�!&�)"
AeUeU* 9^dUb^Q\D_dQ\ 1fW =Qh =Y^ D_dQ\
DY]U 3Q\\c GQYd GQYd GQYd 1RQ^T_^
(* ° )* ! *!$ *!$ *!$
)* �! * " * ' * ' * &
! * �!!* " * # * # * "
��� 1ddU^TQ^d 4QY\i BU`_bd ���CdQbdY^W* (�!&�)" (*
5^TY^W* (�!'�)" (*
4QdU* (�!&�)"
1fW 1fW D_dQ\ D_dQ\ =Y^3Q\\c DQ\[ 9T\U DQ\[ 9T\U DQ\[
1ddU^TQ^d 1^c DY]U DY]U DY]U DY]U DY]U
:QS[ " ! *!& !*!% %"*!) $*$%* " * #2bU^TQ "%' *!' !* % !*! *$# $*%!* ( * $
��� AeUeU 4QY\i BU`_bd ���
CdQbdY^W* (�!&�)" (* 5^TY^W* (�!'�)" (*
4QdU* (�!&�)"
D_dQ\ 1fW =Qh =Y^ D_dQ\ D_dQ\AeUeU 3Q\\c GQYd GQYd GQYd 1^cgUb 1RQ^T_^
9^dUb^Q\ !& *!# !*"& * ! !" $33C1 !" * ( *#& * ! !! !D95 (' * ) !*$% * ! (!& %$
NDA-30058 Revision 2 Page 17
MAIN MENU OPTIONS Attendant Management System - Attendant Statistics
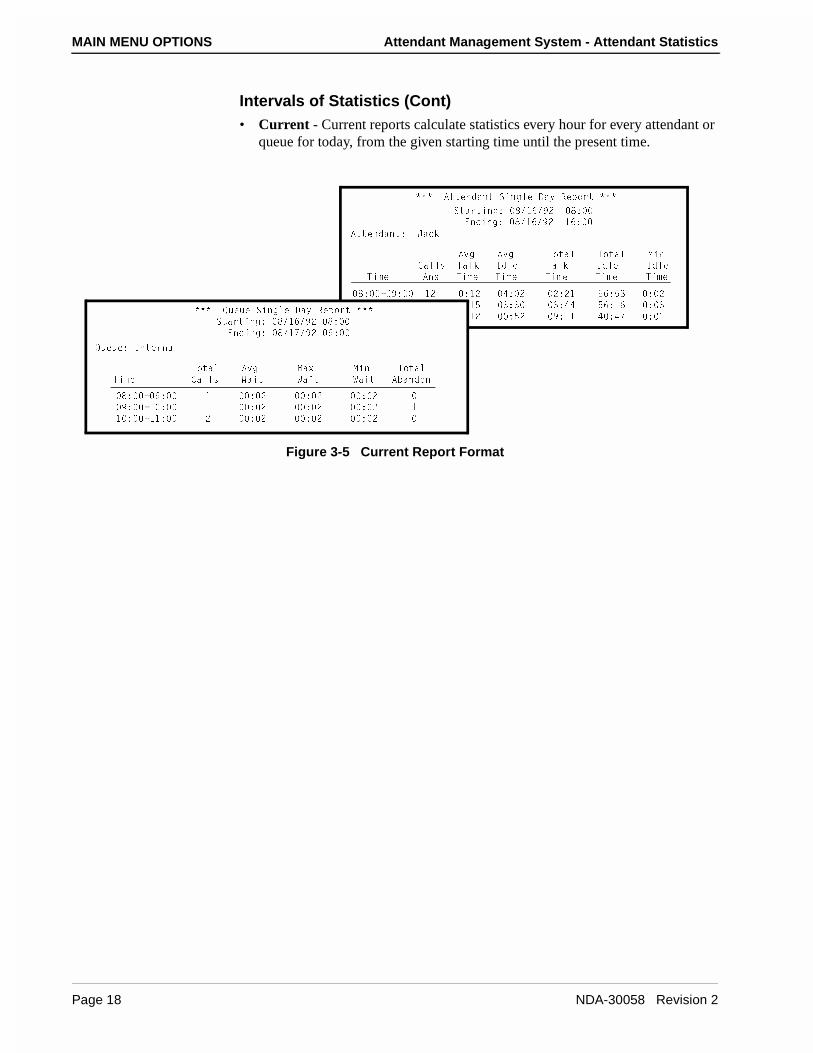
Intervals of Statistics (Cont)• Current - Current reports calculate statistics every hour for every attendant or
queue for today, from the given starting time until the present time.
Figure 3-5 Current Report Format
��� 1ddU^TQ^d CY^W\U 4Qi BU`_bd ���
CdQbdY^W* (�!&�)" (*
5^TY^W* (�!&�)" !&*
1ddU^TQ^d* :QS[
1fW 1fW D_dQ\ D_dQ\ =Y^
3Q\\c DQ\[ 9T\U DQ\[ 9T\U 9T\U
DY]U 1^c DY]U DY]U DY]U DY]U DY]U
(* � )* !" *!" $* " "*"! %&*%# * "
)* �! * !% *!% #*# #*$$ %&*!& * #
! * �!!* $$ *!" *%" )*!! $ *$' * !��� AeUeU CY^W\U 4Qi BU`_bd ���
CdQbdY^W* (�!&�)" (*
5^TY^W* (�!'�)" )*
AeUeU* 9^dUb^Q\
D_dQ\ 1fW =Qh =Y^ D_dQ\
DY]U 3Q\\c GQYd GQYd GQYd 1RQ^T_^
(* ° )* ! * " * " * "
)* �! * ! * " * " * " !
! * �!!* " * " * " * "
Page 18 NDA-30058 Revision 2
Attendant Management System - Attendant Statistics MAIN MENU OPTIONS
Report Formats (Cont)
Procedure
Action Result
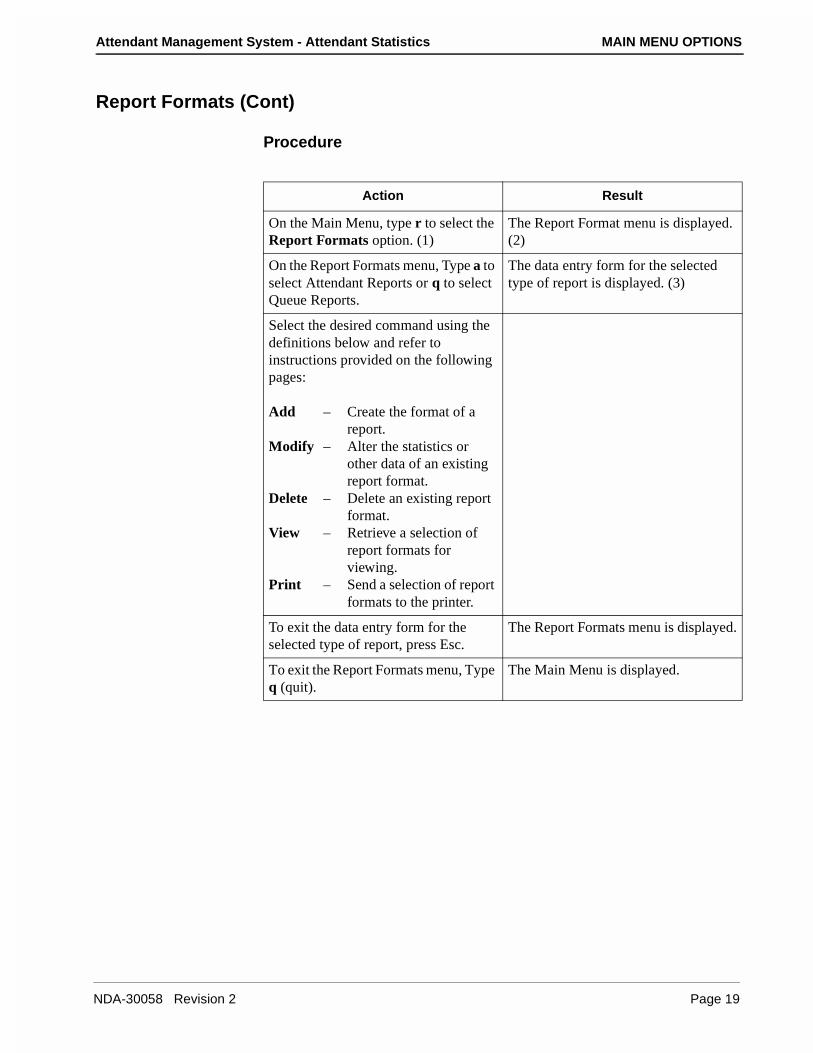
On the Main Menu, type r to select the Report Formats option. (1)
The Report Format menu is displayed. (2)
On the Report Formats menu, Type a to select Attendant Reports or q to select Queue Reports.
The data entry form for the selected type of report is displayed. (3)
Select the desired command using the definitions below and refer to instructions provided on the following pages:
Add – Create the format of a report.
Modify – Alter the statistics or other data of an existing report format.
Delete – Delete an existing report format.
View – Retrieve a selection of report formats for viewing.
Print – Send a selection of report formats to the printer.
To exit the data entry form for the selected type of report, press Esc.
The Report Formats menu is displayed.
To exit the Report Formats menu, Type q (quit).
The Main Menu is displayed.
NDA-30058 Revision 2 Page 19

MAIN MENU OPTIONS Attendant Management System - Attendant Statistics
Report Formats (Cont)
Add a Report Format
The Add command on both the Attendant Report and the Queue Report screens is used to create a report format.
Figure 3-6 Add Report Format
(Shown Here for Attendant Report)
General ProcessAfter the format has been titled and its interval and identifier shown, the highlight moves to the first statistic field and a pop-up window to the right displays the list of statistics available. A statistic is selected by moving the highlight to it and pressing Enter. The selected statistic name is placed in the Statistic # field to the left in which the highlight is placed. After all desired statistics are added to the format, the None option in the pop-up window can be chosen for any remaining Statistic # fields. Once the None option is selected, any remaining fields also contain it.
1ddU^TQ^d CdQdYcdYSc
��� 1ddU^TQ^d BU`_bd ���
BU`_bd DYd\U*
DY]U 9^dUbfQ\*
BU`_bd 9TU^dYVYUb*
CdQdYcdYS !*
CdQdYcdYS "*
CdQdYcdYS #*
CdQdYcdYS $*
CdQdYcdYS %*
CdQdYcdYS &*
1TT =_TYVi 4U\UdU FYUg @bY^d AeYd
GUT ?Sd " (*!! Q]
��� 1ddU^TQ^d BU`_bd ���
BU`_bd DYd\U*
DY]U 9^dUbfQ\*
BU`_bd 9TU^dYVYUb*
CdQdYcdYS !*
CdQdYcdYS "*
CdQdYcdYS #*
CdQdYcdYS $*
CdQdYcdYS %*
CdQdYcdYS &*
DQ\[ 3_]`QbYc_^c
8_eb\i
D3]`
1bb_g [Uic d_ ]_fU Sebc_b� ,5^dUb. d_ cU\USd� ,5cS. d_ aeYd
3Q\\c 1^cgUbUT
1fUbQWU DQ\[ DY]U
1fUbQWU 9T\U DY]U
D_dQ\ DQ\[ DY]U
D_dQ\ 9T\U DY]U
@UbSU^dQWU DQ\[ DY]U
@UbSU^dQWU 9T\U DY]U
=QhY]e] DQ\[ DY]U
=Y^Y]e] DQ\[ DY]U
=QhY]e] 9T\U DY]U
=Y^Y]e] 9T\U DY]U
>_^U
(1)
(2)
Page 20 NDA-30058 Revision 2
Attendant Management System - Attendant Statistics MAIN MENU OPTIONS
Add a Report Format (Cont)
Procedure
Action Result
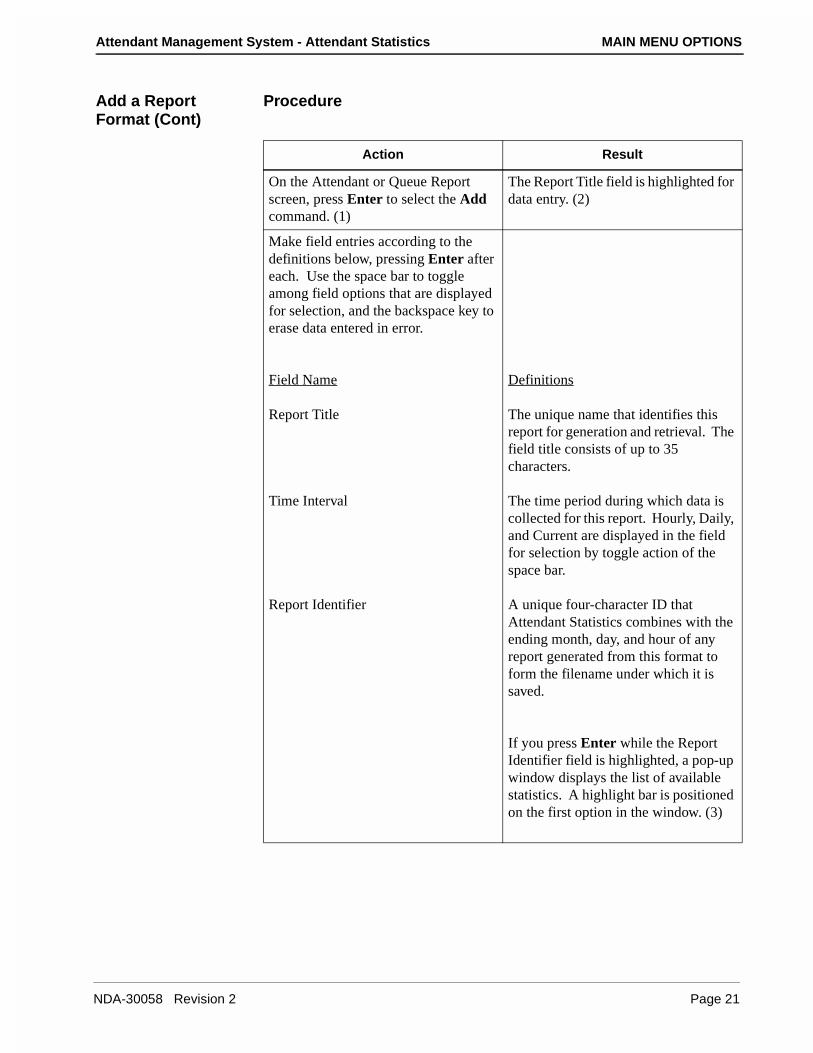
On the Attendant or Queue Report screen, press Enter to select the Add command. (1)
The Report Title field is highlighted for data entry. (2)
Make field entries according to the definitions below, pressing Enter after each. Use the space bar to toggle among field options that are displayed for selection, and the backspace key to erase data entered in error.
Field Name
Report Title
Time Interval
Report Identifier
Definitions
The unique name that identifies this report for generation and retrieval. The field title consists of up to 35 characters.
The time period during which data is collected for this report. Hourly, Daily, and Current are displayed in the field for selection by toggle action of the space bar.
A unique four-character ID that Attendant Statistics combines with the ending month, day, and hour of any report generated from this format to form the filename under which it is saved.
If you press Enter while the Report Identifier field is highlighted, a pop-up window displays the list of available statistics. A highlight bar is positioned on the first option in the window. (3)
NDA-30058 Revision 2 Page 21
MAIN MENU OPTIONS Attendant Management System - Attendant Statistics
Add a Report Format (Cont)
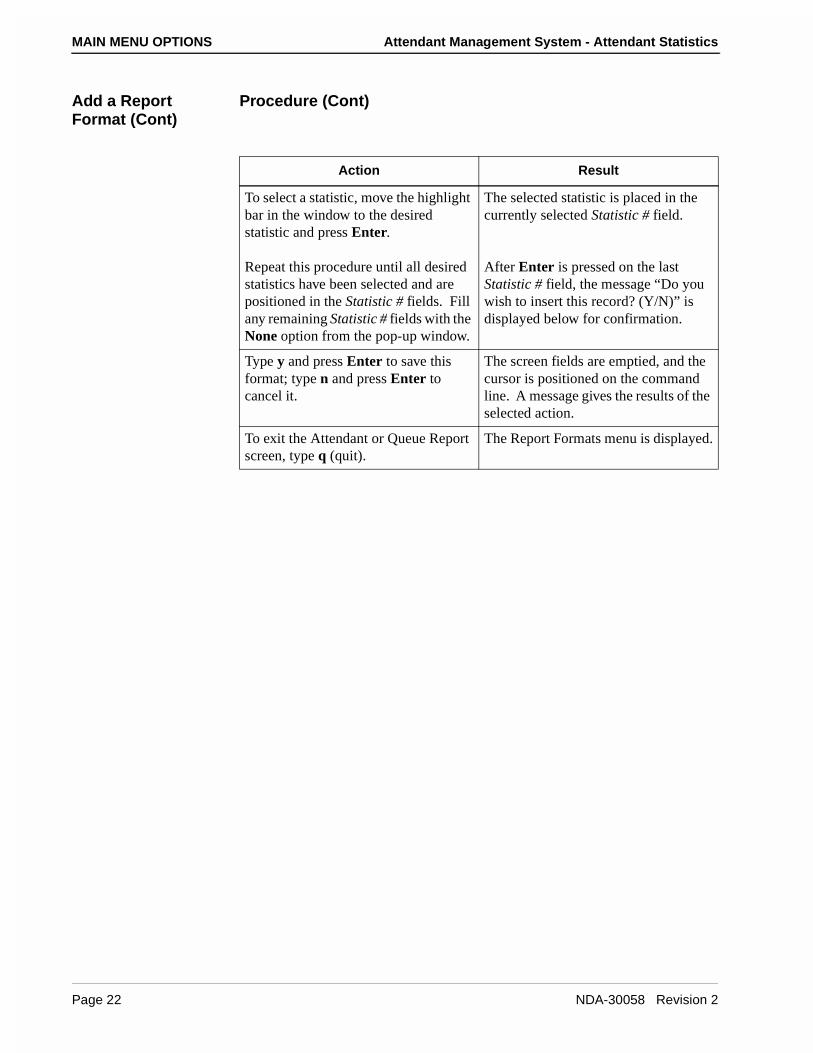
Procedure (Cont)
Action Result
To select a statistic, move the highlight bar in the window to the desired statistic and press Enter.
Repeat this procedure until all desired statistics have been selected and are positioned in the Statistic # fields. Fill any remaining Statistic # fields with the None option from the pop-up window.
The selected statistic is placed in the currently selected Statistic # field.
After Enter is pressed on the last Statistic # field, the message “Do you wish to insert this record? (Y/N)” is displayed below for confirmation.
Type y and press Enter to save this format; type n and press Enter to cancel it.
The screen fields are emptied, and the cursor is positioned on the command line. A message gives the results of the selected action.
To exit the Attendant or Queue Report screen, type q (quit).
The Report Formats menu is displayed.
Page 22 NDA-30058 Revision 2
Attendant Management System - Attendant Statistics MAIN MENU OPTIONS
Report Formats (Cont)
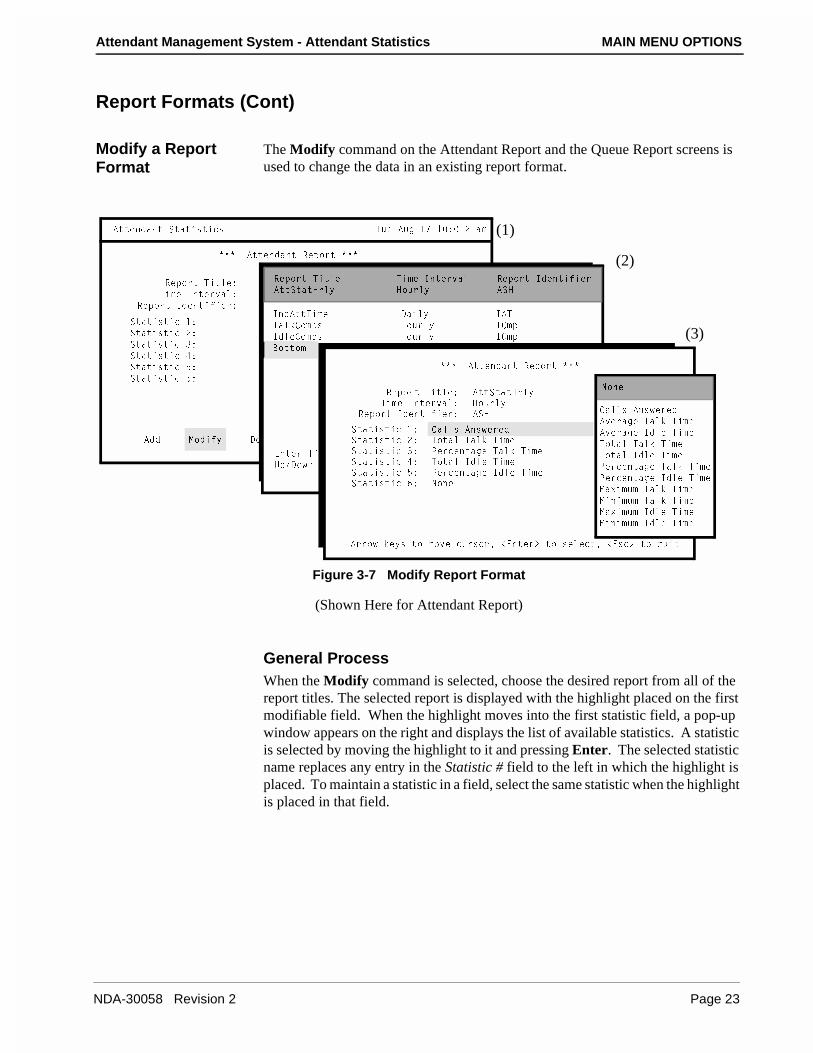
Modify a Report Format
The Modify command on the Attendant Report and the Queue Report screens is used to change the data in an existing report format.
Figure 3-7 Modify Report Format
(Shown Here for Attendant Report)
General ProcessWhen the Modify command is selected, choose the desired report from all of the report titles. The selected report is displayed with the highlight placed on the first modifiable field. When the highlight moves into the first statistic field, a pop-up window appears on the right and displays the list of available statistics. A statistic is selected by moving the highlight to it and pressing Enter. The selected statistic name replaces any entry in the Statistic # field to the left in which the highlight is placed. To maintain a statistic in a field, select the same statistic when the highlight is placed in that field.
1ddU^TQ^d CdQdYcdYSc
��� 1ddU^TQ^d BU`_bd ���
BU`_bd DYd\U*
DY]U 9^dUbfQ\*
BU`_bd 9TU^dYVYUb*
CdQdYcdYS !*
CdQdYcdYS "*
CdQdYcdYS #*
CdQdYcdYS $*
CdQdYcdYS %*
CdQdYcdYS &*
1TT =_TYVi 4U\UdU FYUg @bY^d AeYd
DeU 1eW !' ! * !" Q]
BU`_bd DYd\U DY]U 9^dUbfQ\ BU`_bd 9TU^dYVYUb1ddCdQd8b\i 8_eb\i 1C8
9^T1ddDY]U 4QY\i 91D
DQ\[3_]`c 8_eb\i D3]`
9T\U3_]`c 8_eb\i 93]`
2_dd_]
5^dUb DYd\U DYd\U*
E`�4_g^ 1bb_gc d_ ]_fU� ,B5D. d_ cU\USd� ,D12. d_ Uh`Q^T
��� 1ddU^TQ^d BU`_bd ���
BU`_bd DYd\U*DY]U 9^dUbfQ\*
BU`_bd 9TU^dYVYUb*
CdQdYcdYS !*CdQdYcdYS "*CdQdYcdYS #*CdQdYcdYS $*CdQdYcdYS %*CdQdYcdYS &*
1ddCdQd8b\i8_eb\i1C8
1bb_g [Uic d_ ]_fU Sebc_b� ,5^dUb. d_ cU\USd� ,5cS. d_ aeYd
3Q\\c 1^cgUbUTD_dQ\ DQ\[ DY]U@UbSU^dQWU DQ\[ DY]UD_dQ\ 9T\U DY]U@UbSU^dQWU 9T\U DY]U>_^U
3Q\\c 1^cgUbUT
1fUbQWU DQ\[ DY]U
1fUbQWU 9T\U DY]U
D_dQ\ DQ\[ DY]U
D_dQ\ 9T\U DY]U
@UbSU^dQWU DQ\[ DY]U
@UbSU^dQWU 9T\U DY]U
=QhY]e] DQ\[ DY]U
=Y^Y]e] DQ\[ DY]U
=QhY]e] 9T\U DY]U
=Y^Y]e] 9T\U DY]U
>_^U
(1)
(2)
(3)
NDA-30058 Revision 2 Page 23
MAIN MENU OPTIONS Attendant Management System - Attendant Statistics
Modify a Report Format (Cont)
Procedure
Action Result
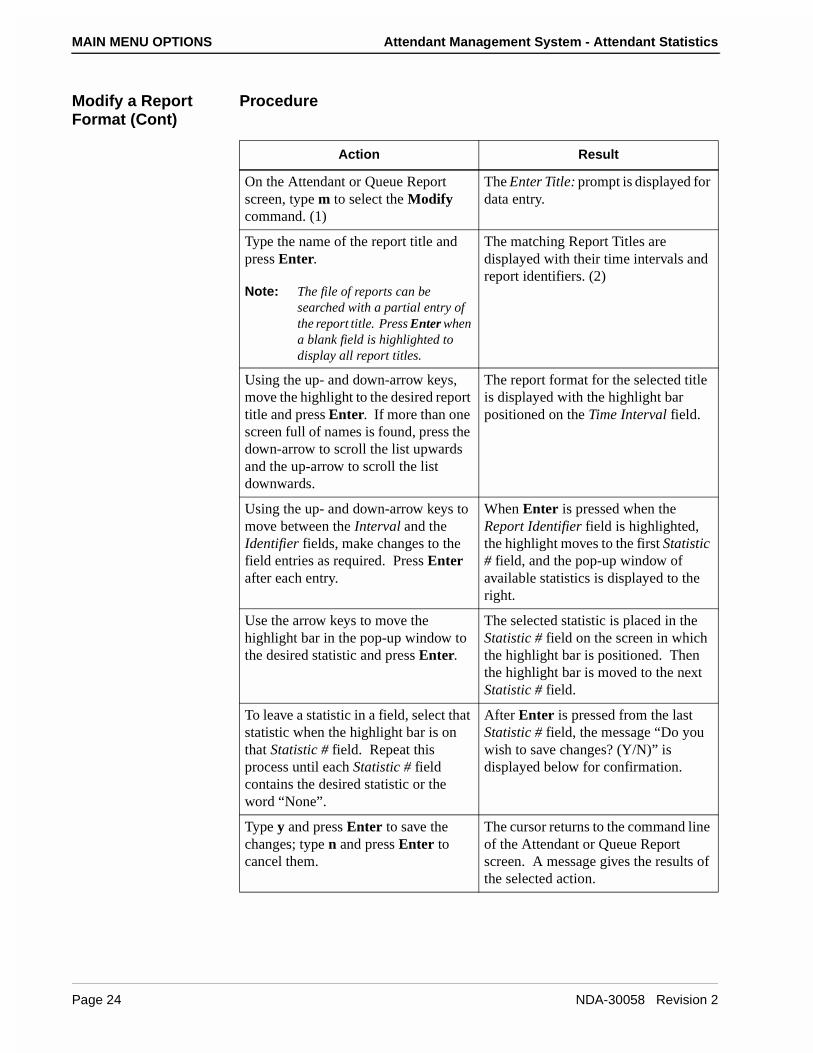
On the Attendant or Queue Report screen, type m to select the Modify command. (1)
The Enter Title: prompt is displayed for data entry.
Type the name of the report title and press Enter.
Note: The file of reports can be searched with a partial entry of the report title. Press Enter when a blank field is highlighted to display all report titles.
The matching Report Titles are displayed with their time intervals and report identifiers. (2)
Using the up- and down-arrow keys, move the highlight to the desired report title and press Enter. If more than one screen full of names is found, press the down-arrow to scroll the list upwards and the up-arrow to scroll the list downwards.
The report format for the selected title is displayed with the highlight bar positioned on the Time Interval field.
Using the up- and down-arrow keys to move between the Interval and the Identifier fields, make changes to the field entries as required. Press Enter after each entry.
When Enter is pressed when the Report Identifier field is highlighted, the highlight moves to the first Statistic # field, and the pop-up window of available statistics is displayed to the right.
Use the arrow keys to move the highlight bar in the pop-up window to the desired statistic and press Enter.
The selected statistic is placed in the Statistic # field on the screen in which the highlight bar is positioned. Then the highlight bar is moved to the next Statistic # field.
To leave a statistic in a field, select that statistic when the highlight bar is on that Statistic # field. Repeat this process until each Statistic # field contains the desired statistic or the word “None”.
After Enter is pressed from the last Statistic # field, the message “Do you wish to save changes? (Y/N)” is displayed below for confirmation.
Type y and press Enter to save the changes; type n and press Enter to cancel them.
The cursor returns to the command line of the Attendant or Queue Report screen. A message gives the results of the selected action.
Page 24 NDA-30058 Revision 2
Attendant Management System - Attendant Statistics MAIN MENU OPTIONS
Report Formats (Cont)
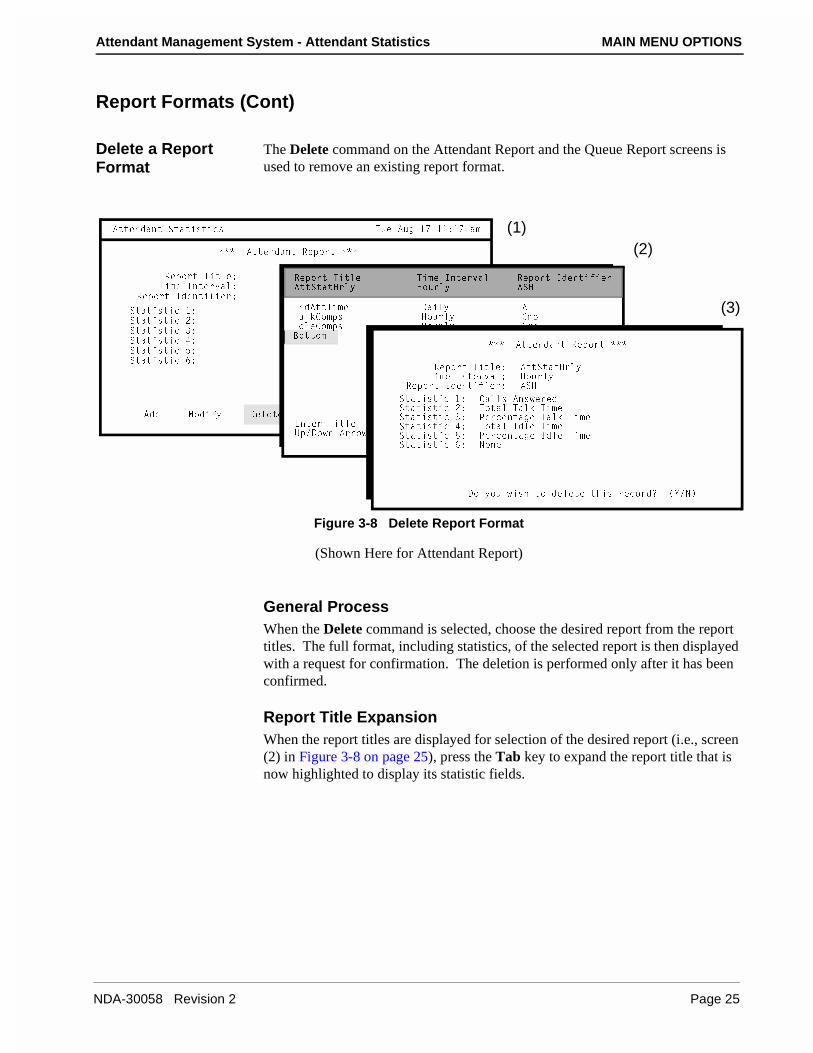
Delete a Report Format
The Delete command on the Attendant Report and the Queue Report screens is used to remove an existing report format.
Figure 3-8 Delete Report Format
(Shown Here for Attendant Report)
General ProcessWhen the Delete command is selected, choose the desired report from the report titles. The full format, including statistics, of the selected report is then displayed with a request for confirmation. The deletion is performed only after it has been confirmed.
Report Title ExpansionWhen the report titles are displayed for selection of the desired report (i.e., screen (2) in Figure 3-8 on page 25), press the Tab key to expand the report title that is now highlighted to display its statistic fields.
1ddU^TQ^d CdQdYcdYSc
��� 1ddU^TQ^d BU`_bd ���
BU`_bd DYd\U*DY]U 9^dUbfQ\*
BU`_bd 9TU^dYVYUb*
CdQdYcdYS !*CdQdYcdYS "*CdQdYcdYS #*CdQdYcdYS $*CdQdYcdYS %*CdQdYcdYS &*
1TT =_TYVi 4U\UdU FYUg @bY^d AeYd
DeU 1eW !' !!*!' Q]
BU`_bd DYd\U DY]U 9^dUbfQ\ BU`_bd 9TU^dYVYUb1ddCdQd8b\i 8_eb\i 1C8
9^T1ddDY]U 4QY\i 91DDQ\[3_]`c 8_eb\i D3]`9T\U3_]`c 8_eb\i 93]`2_dd_]
5^dUb DYd\U DYd\U*E`�4_g^ 1bb_gc d_ ]_fU� ,B5D. d_ cU\USd� ,D12. d_ Uh`Q^T
��� 1ddU^TQ^d BU`_bd ���
BU`_bd DYd\U*DY]U 9^dUbfQ\*
BU`_bd 9TU^dYVYUb*
CdQdYcdYS !*CdQdYcdYS "*CdQdYcdYS #*CdQdYcdYS $*CdQdYcdYS %*CdQdYcdYS &*
1ddCdQd8b\i8_eb\i1C8
3Q\\c 1^cgUbUTD_dQ\ DQ\[ DY]U@UbSU^dQWU DQ\[ DY]UD_dQ\ 9T\U DY]U@UbSU^dQWU 9T\U DY]U>_^U
4_ i_e gYcX d_ TU\UdU dXYc bUS_bT/ �I�>�
(1)(2)
(3)
NDA-30058 Revision 2 Page 25
MAIN MENU OPTIONS Attendant Management System - Attendant Statistics
Delete a Report Format (Cont)
Procedure
Action Result
On the Attendant or Queue Report screen, type d to select the Delete command. (1)
The Enter Title: prompt is displayed for data entry.
Type the name of the report title and press Enter.
Note: The file of reports can be searched with partial entry of the report title. Press Enter when a blank field is highlighted to display all report titles.
The matching Report Titles are displayed with their time intervals. (2)
Using the up- and down-arrow keys, move the highlight to the desired report title and press Enter. If more than one screening of names is found, press the down arrow to scroll the list upwards and the up arrow to scroll the list downwards.
The report format for the selected title is displayed with the message “Do you wish to delete this? (Y/N)” shown below for confirmation. (3)
Type y and press Enter to delete the given report format; type n and press Enter to cancel the deletion.
A message gives results of the selected action.
Page 26 NDA-30058 Revision 2
Attendant Management System - Attendant Statistics MAIN MENU OPTIONS
Report Formats (Cont)
View a Report Format
The View command on both the Attendant Report and the Queue Report screens is used to display selected report formats for on-screen viewing.
Figure 3-9 View Report Formats
(Shown Here for Attendant Report)
General ProcessWhen the View command is selected, a window is displayed for entry of the alphabetical range within which all report formats are displayed. Any number of report formats can be displayed by naming the first report title and the last. Attendant Stats then retrieves and displays every report format whose title falls within the specified range.
1ddU^TQ^d CdQdYcdYSc
��� 1ddU^TQ^d BU`_bd ���
BU`_bd DYd\U*
DY]U 9^dUbfQ\*
BU`_bd 9TU^dYVYUb*
CdQdYcdYS !*
CdQdYcdYS "*
CdQdYcdYS #*
CdQdYcdYS $*
CdQdYcdYS %*
CdQdYcdYS &*
1TT =_TYVi 4U\UdU FYUg @bY^d AeYd
DeU 1eW !' !!*#" Q]
��� 1ddU^TQ^d BU`_bd ���
CdQbdY^W ;Ui*
5^TY^W ;Ui*
,5^dUb. d_ RUWY^� ,5C3. d_ bUdeb^ d_ S_]]Q^T \Y^U
CUQbSX VYU\T* BU`_bd DYd\U
D_` _V 6Y\U��� 1ddU^TQ^d BU`_bdc ���
BU`_bd DYd\U DY]U 9^dUbfQ\ BU`_bd 9TU^dYVYUb
1ddCdQd8b\i 8_eb\i 1C8
CdQdYcdYS !* 3Q\\c 1^cgUbUT
CdQdYcdYS "* D_dQ\ DQ\[ DY]U
CdQdYcdYS #* @UbSU^dQWU DQ\[ DY]U
CdQdYcdYS $* D_dQ\ 9T\U DY]U
CdQdYcdYS %* @UbSU^dQWU 9T\U DY]U
CdQdYcdYS &* =QhY]e] DQ\[ DY]U
=_bU
4_g^@QWU E`@QWU CUQbSX D_` 2_dd_] @bY^d AeYd
=_bU
(1)
(2)
(3)
NDA-30058 Revision 2 Page 27
MAIN MENU OPTIONS Attendant Management System - Attendant Statistics
View a Report Format (Cont)
Procedure
Action Result
On the Attendant or Queue Report screen, type v to select the View command. (1)
A window is displayed for entry of the first report title (starting key) and the last report title (ending key) within which all report formats are to be displayed. (2)
Type the requested report titles, pressing Enter after each entry.
The Attendant Reports screen displays the given report formats. (3)
Use the DownPage command to move forward one page, the UpPage command to move back one page, the Top command to move to the beginning of the display, and the Bottom command to move to the end of the display.
Search the Display: Type s to select the Search command. At the prompt, type the desired pattern and press Enter.
Print the Display: Type p to select the Print command. At the prompt, type f to print the whole file or s to print just the screen and press Enter.
All occurrences of the given pattern on that page are highlighted.
There is a pause while the file or screen is sent to the printer. Then the command line is returned.
To exit the display, type q (quit). The record type screen is redisplayed, and the cursor is positioned on the command line.
Page 28 NDA-30058 Revision 2
Attendant Management System - Attendant Statistics MAIN MENU OPTIONS
Report Formats (Cont)
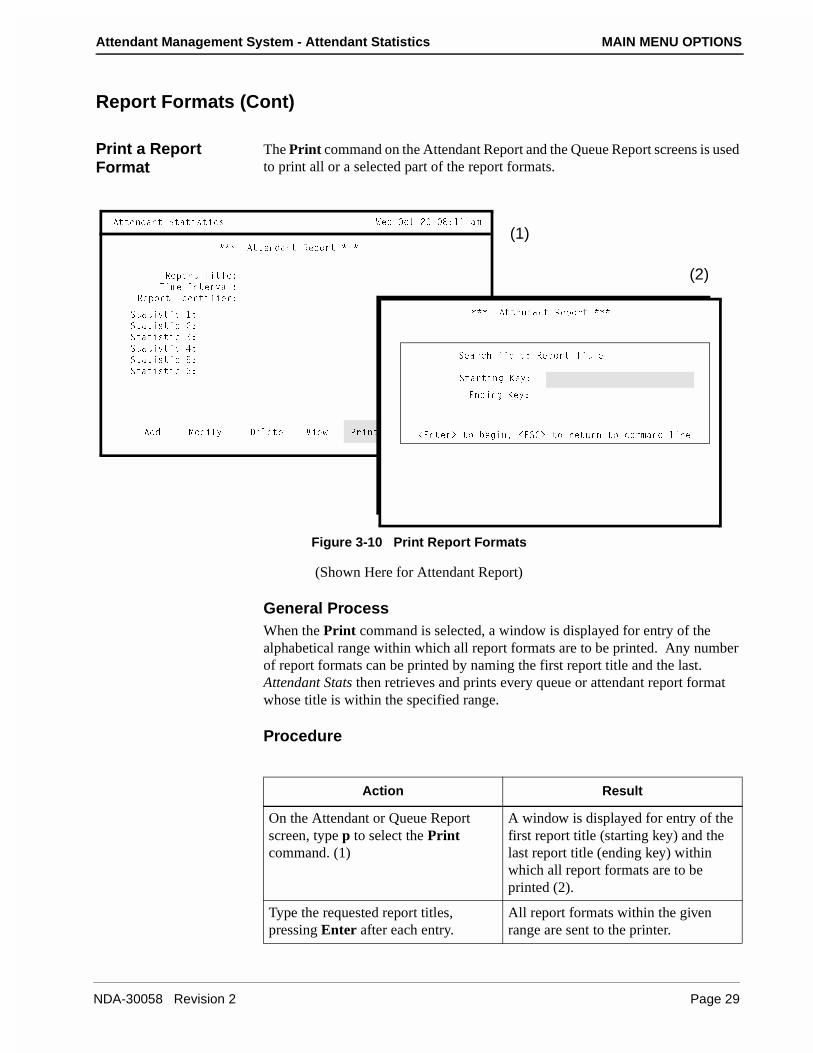
Print a Report Format
The Print command on the Attendant Report and the Queue Report screens is used to print all or a selected part of the report formats.
Figure 3-10 Print Report Formats
(Shown Here for Attendant Report)
General ProcessWhen the Print command is selected, a window is displayed for entry of the alphabetical range within which all report formats are to be printed. Any number of report formats can be printed by naming the first report title and the last. Attendant Stats then retrieves and prints every queue or attendant report format whose title is within the specified range.
Procedure
1ddU^TQ^d CdQdYcdYSc
��� 1ddU^TQ^d BU`_bd ���
BU`_bd DYd\U*
DY]U 9^dUbfQ\*
BU`_bd 9TU^dYVYUb*
CdQdYcdYS !*
CdQdYcdYS "*
CdQdYcdYS #*
CdQdYcdYS $*
CdQdYcdYS %*
CdQdYcdYS &*
1TT =_TYVi 4U\UdU FYUg @bY^d AeYd
GUT ?Sd " (*!! Q]
��� 1ddU^TQ^d BU`_bd ���
CdQbdY^W ;Ui*
5^TY^W ;Ui*
,5^dUb. d_ RUWY^� ,5C3. d_ bUdeb^ d_ S_]]Q^T \Y^U
CUQbSX VYU\T* BU`_bd DYd\U
(1)
(2)
Action Result
On the Attendant or Queue Report screen, type p to select the Print command. (1)
A window is displayed for entry of the first report title (starting key) and the last report title (ending key) within which all report formats are to be printed (2).
Type the requested report titles, pressing Enter after each entry.
All report formats within the given range are sent to the printer.
NDA-30058 Revision 2 Page 29
MAIN MENU OPTIONS Attendant Management System - Attendant Statistics
Report Generation
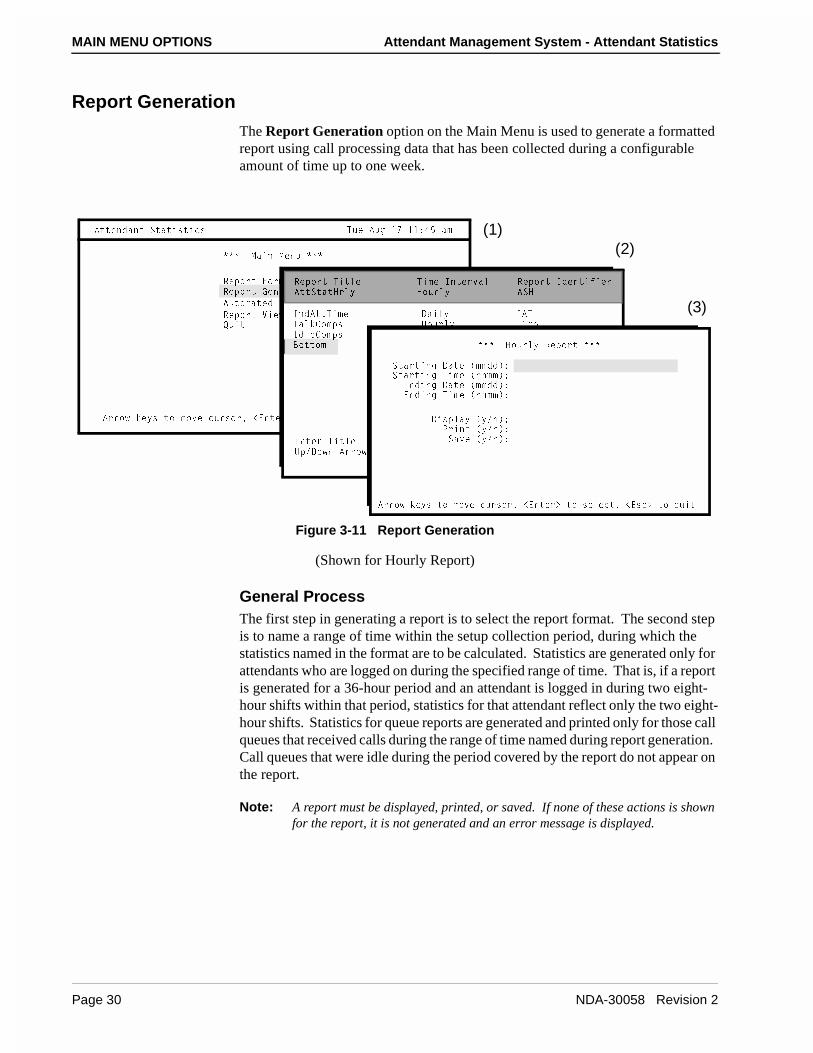
The Report Generation option on the Main Menu is used to generate a formatted report using call processing data that has been collected during a configurable amount of time up to one week.
Figure 3-11 Report Generation
(Shown for Hourly Report)
General ProcessThe first step in generating a report is to select the report format. The second step is to name a range of time within the setup collection period, during which the statistics named in the format are to be calculated. Statistics are generated only for attendants who are logged on during the specified range of time. That is, if a report is generated for a 36-hour period and an attendant is logged in during two eight-hour shifts within that period, statistics for that attendant reflect only the two eight-hour shifts. Statistics for queue reports are generated and printed only for those call queues that received calls during the range of time named during report generation. Call queues that were idle during the period covered by the report do not appear on the report.
Note: A report must be displayed, printed, or saved. If none of these actions is shown for the report, it is not generated and an error message is displayed.
1bb_g [Uic d_ ]_fU Sebc_b� ,5^dUb. d_ cU\USd� ,5cS. d_ aeYd
BU`_bd 6_b]QdcBU`_bd 7U^UbQdY_^
1ed_]QdUT BU`_bd 7U^UbQdY_^
BU`_bd FYUgY^WAeYd
��� =QY^ =U^e ���
1ddU^TQ^d CdQdYcdYSc DeU 1eW !' !!*$% Q]
BU`_bd DYd\U DY]U 9^dUbfQ\ BU`_bd 9TU^dYVYUb1ddCdQd8b\i 8_eb\i 1C8
9^T1ddDY]U 4QY\i 91DDQ\[3_]`c 8_eb\i D3]`9T\U3_]`c 8_eb\i 93]`2_dd_]
5^dUb DYd\U DYd\U*E`�4_g^ 1bb_gc d_ ]_fU� ,B5D. d_ cU\USd� ,D12. d_ Uh`Q^T
��� 8_eb\i BU`_bd ���
CdQbdY^W 4QdU �]]TT�*CdQbdY^W DY]U �XX]]�*
5^TY^W 4QdU �]]TT�*5^TY^W DY]U �XX]]�*
4Yc`\Qi �i�^�*@bY^d �i�^�*CQfU �i�^�*
1bb_g [Uic d_ ]_fU Sebc_b� ,5^dUb. d_ cU\USd� ,5cS. d_ aeYd
(1)
(3)
(2)
Page 30 NDA-30058 Revision 2
Attendant Management System - Attendant Statistics MAIN MENU OPTIONS
Range of Date and TimeChoosing the desired report title display the Hourly, Daily, or Current Report screen, depending upon the interval named in the selected report format. The Daily Report screen is identical to the Hourly Report screen illustrated in Figure 3-11 on page 30. The Current Report screen prompts for entry of only the starting time and the display, print, or save selections. It covers the day on which the report is generated and calculates statistics only up to the present time.
Access to Generated ReportsAttendant Stats maintains generated reports for one week, during which they can be viewed and printed via the Report Viewing option on the Main Menu. The filename for the report comprises the report identifier that is named in the report format and the month, day, and hour at which the report is generated. After a report has been in storage for two weeks, Attendant Stats deletes it.
Procedure
Action Result
On the Main Menu, type g to select the Report Generation option. (1)
The Enter Title: prompt is displayed for data entry.
Type the name of the report title and press Enter.
Note: The search can be performed from a partial entry. Press Enter when a blank field is highlighted to display all formatted report titles.
The matching Report Titles are displayed with their time intervals and identifiers. (2)
Using the up- and down-arrow keys, move the highlight to the desired report title and press Enter. If more than one screen full of titles is found, press the down-arrow to scroll the list upwards and the up-arrow to scroll the list downwards.
The Hourly, Daily, or Current Report screen displays fields for entry of the range of time over which the data is to be collected according to the report format. (3)
NDA-30058 Revision 2 Page 31
MAIN MENU OPTIONS Attendant Management System - Attendant Statistics
Report Generation (Cont)
Procedure (Cont)
Action Result
Enter data in the fields according to the definitions below, pressing Enter after each. Use the backspace key to erase data.
Field Name
Starting Date
Starting Time
Ending Date
Ending Time
Display
Save
Field Definition
The date on which statistics collection starts, entered in the form mmdd. This date must fall within the preset period of data collection.
The time at which statistics collection starts on the date shown, using a 24-hour clock and entered in the form hhmm.
The date on which statistics collection stops, entered in the form mmdd. This date must fall within the preset period of data collection and be later than the starting date.
The time at which statistics collection stops on the date shown, using a 24-hour clock and entered in the form hhmm.
Whether the generated report is to be displayed.
Whether the generated report is to be sent to the printer.
Whether the generated report is to be saved in storage.
After Enter is pressed when the cursor is in the last field, the message “Generating report” is displayed.
To exit the screen, press Esc. The Attendant Stats Main Menu is displayed.
Page 32 NDA-30058 Revision 2
Attendant Management System - Attendant Statistics MAIN MENU OPTIONS
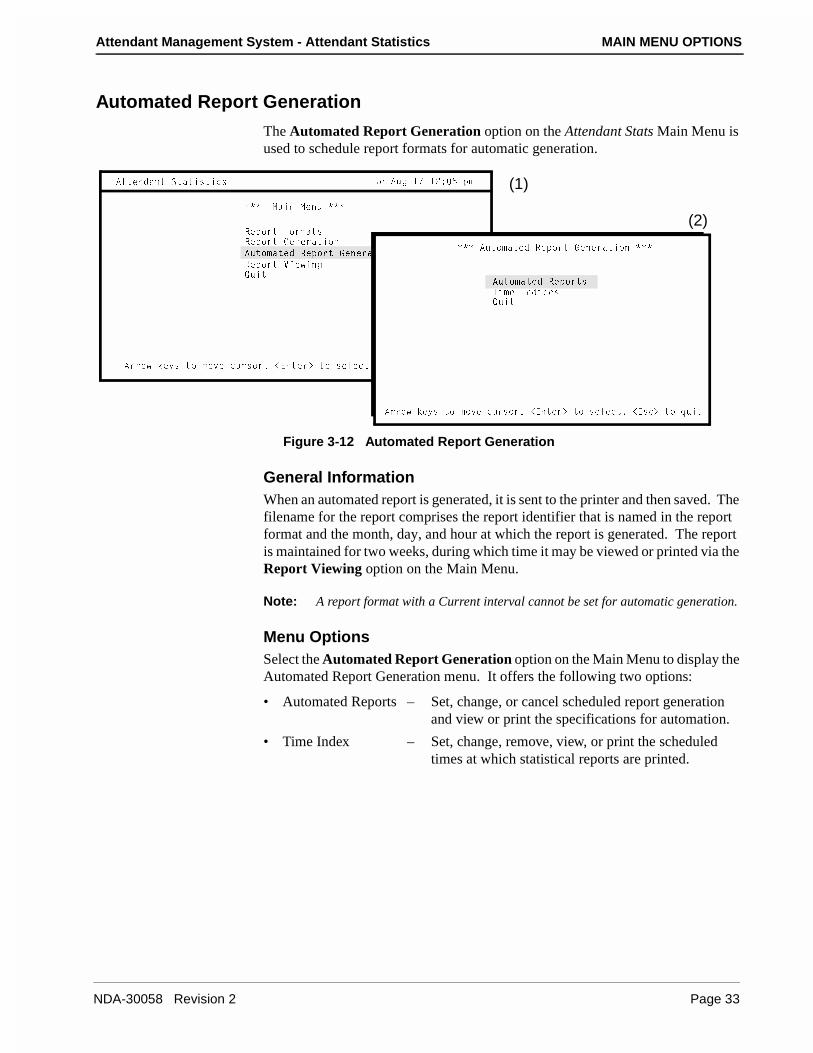
Automated Report Generation
The Automated Report Generation option on the Attendant Stats Main Menu is used to schedule report formats for automatic generation.
Figure 3-12 Automated Report Generation
General InformationWhen an automated report is generated, it is sent to the printer and then saved. The filename for the report comprises the report identifier that is named in the report format and the month, day, and hour at which the report is generated. The report is maintained for two weeks, during which time it may be viewed or printed via the Report Viewing option on the Main Menu.
Note: A report format with a Current interval cannot be set for automatic generation.
Menu OptionsSelect the Automated Report Generation option on the Main Menu to display the Automated Report Generation menu. It offers the following two options:
• Automated Reports – Set, change, or cancel scheduled report generation and view or print the specifications for automation.
• Time Index – Set, change, remove, view, or print the scheduled times at which statistical reports are printed.
1bb_g [Uic d_ ]_fU Sebc_b� ,5^dUb. d_ cU\USd� ,5cS. d_ aeYd
BU`_bd 6_b]QdcBU`_bd 7U^UbQdY_^
1ed_]QdUT BU`_bd 7U^UbQdY_^
BU`_bd FYUgY^WAeYd
��� =QY^ =U^e ���
1ddU^TQ^d CdQdYcdYSc DeU 1eW !' !"* % `]
��� 1ed_]QdUT BU`_bd 7U^UbQdY_^ ���
1ed_]QdUT BU`_bdc
DY]U 9^TYSUcAeYd
1bb_g [Uic d_ ]_fU Sebc_b� ,5^dUb. d_ cU\USd� ,5cS. d_ aeYd
(1)
(2)
NDA-30058 Revision 2 Page 33
MAIN MENU OPTIONS Attendant Management System - Attendant Statistics
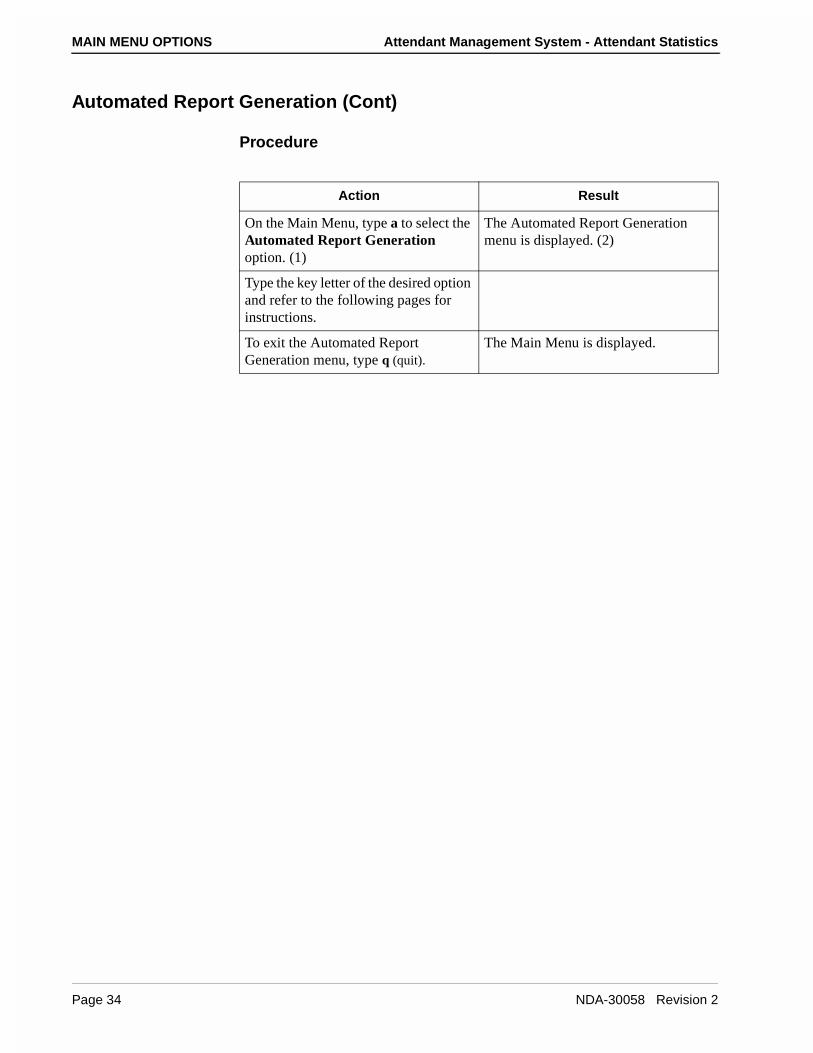
Automated Report Generation (Cont)
Procedure
Action Result
On the Main Menu, type a to select the Automated Report Generation option. (1)
The Automated Report Generation menu is displayed. (2)
Type the key letter of the desired option and refer to the following pages for instructions.
To exit the Automated Report Generation menu, type q (quit).
The Main Menu is displayed.
Page 34 NDA-30058 Revision 2
Attendant Management System - Attendant Statistics MAIN MENU OPTIONS
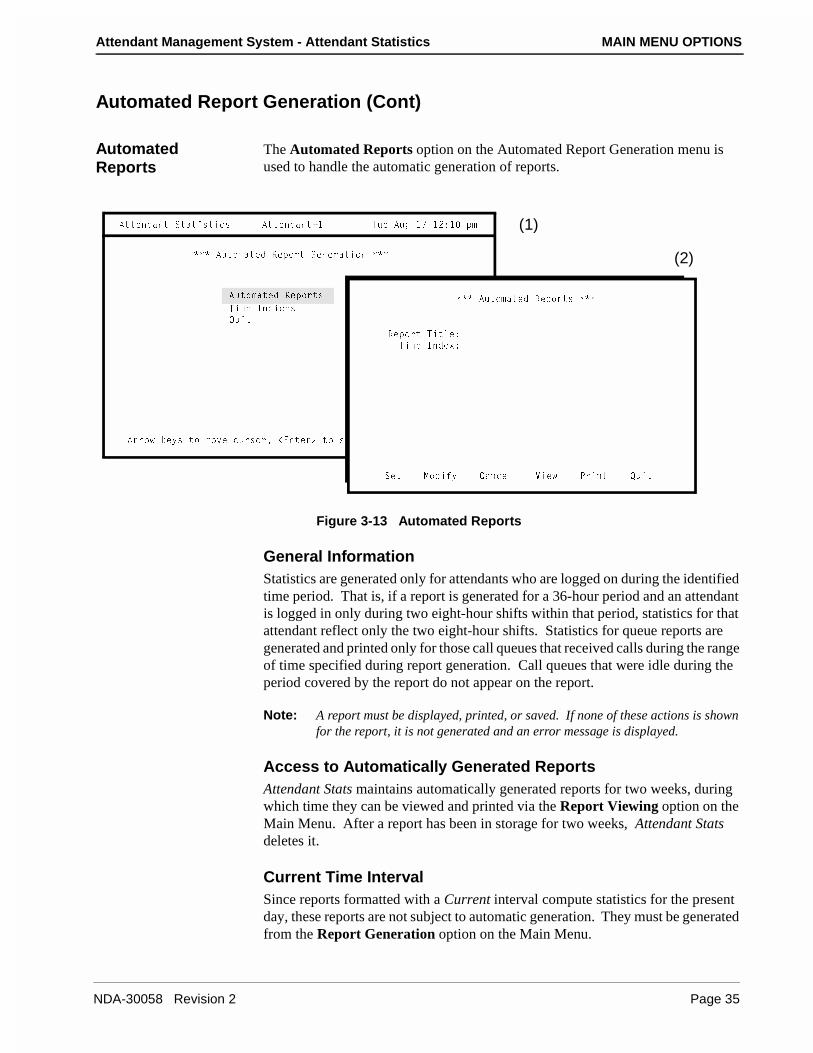
Automated Report Generation (Cont)
Automated Reports
The Automated Reports option on the Automated Report Generation menu is used to handle the automatic generation of reports.
Figure 3-13 Automated Reports
General InformationStatistics are generated only for attendants who are logged on during the identified time period. That is, if a report is generated for a 36-hour period and an attendant is logged in only during two eight-hour shifts within that period, statistics for that attendant reflect only the two eight-hour shifts. Statistics for queue reports are generated and printed only for those call queues that received calls during the range of time specified during report generation. Call queues that were idle during the period covered by the report do not appear on the report.
Note: A report must be displayed, printed, or saved. If none of these actions is shown for the report, it is not generated and an error message is displayed.
Access to Automatically Generated ReportsAttendant Stats maintains automatically generated reports for two weeks, during which time they can be viewed and printed via the Report Viewing option on the Main Menu. After a report has been in storage for two weeks, Attendant Stats deletes it.
Current Time IntervalSince reports formatted with a Current interval compute statistics for the present day, these reports are not subject to automatic generation. They must be generated from the Report Generation option on the Main Menu.
1bb_g [Uic d_ ]_fU Sebc_b� ,5^dUb. d_ cU\USd� ,5cS. d_ aeYd
1ddU^TQ^d CdQdYcdYSc DeU 1eW !' !"*! `]
��� 1ed_]QdUT BU`_bd 7U^UbQdY_^ ���
1ed_]QdUT BU`_bdc
DY]U 9^TYSUc
AeYd
1ddU^TQ^d�!
��� 1ed_]QdUT BU`_bdc ���
BU`_bd DYd\U*
DY]U 9^TUh*
CUd =_TYVi 3Q^SU\ FYUg @bY^d AeYd
(1)
(2)
NDA-30058 Revision 2 Page 35
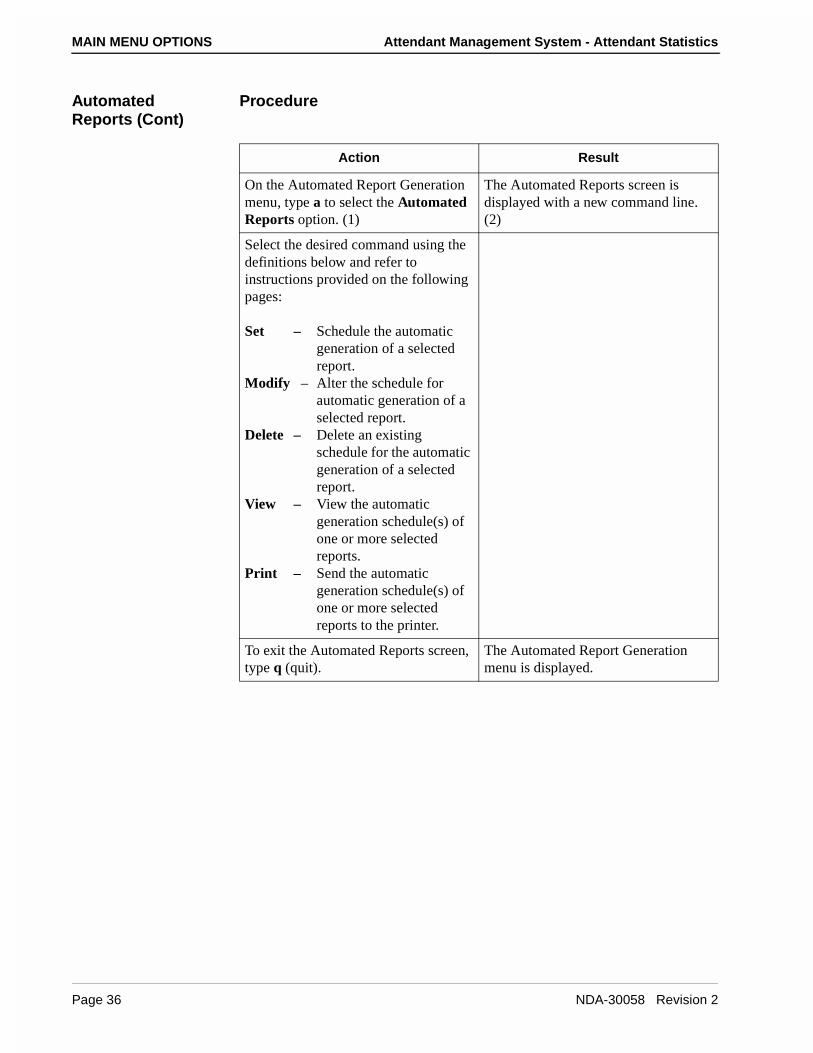
MAIN MENU OPTIONS Attendant Management System - Attendant Statistics
Automated Reports (Cont)
Procedure
Action Result
On the Automated Report Generation menu, type a to select the Automated Reports option. (1)
The Automated Reports screen is displayed with a new command line. (2)
Select the desired command using the definitions below and refer to instructions provided on the following pages:
Set – Schedule the automatic generation of a selected report.
Modify – Alter the schedule for automatic generation of a selected report.
Delete – Delete an existing schedule for the automatic generation of a selected report.
View – View the automatic generation schedule(s) of one or more selected reports.
Print – Send the automatic generation schedule(s) of one or more selected reports to the printer.
To exit the Automated Reports screen, type q (quit).
The Automated Report Generation menu is displayed.
Page 36 NDA-30058 Revision 2
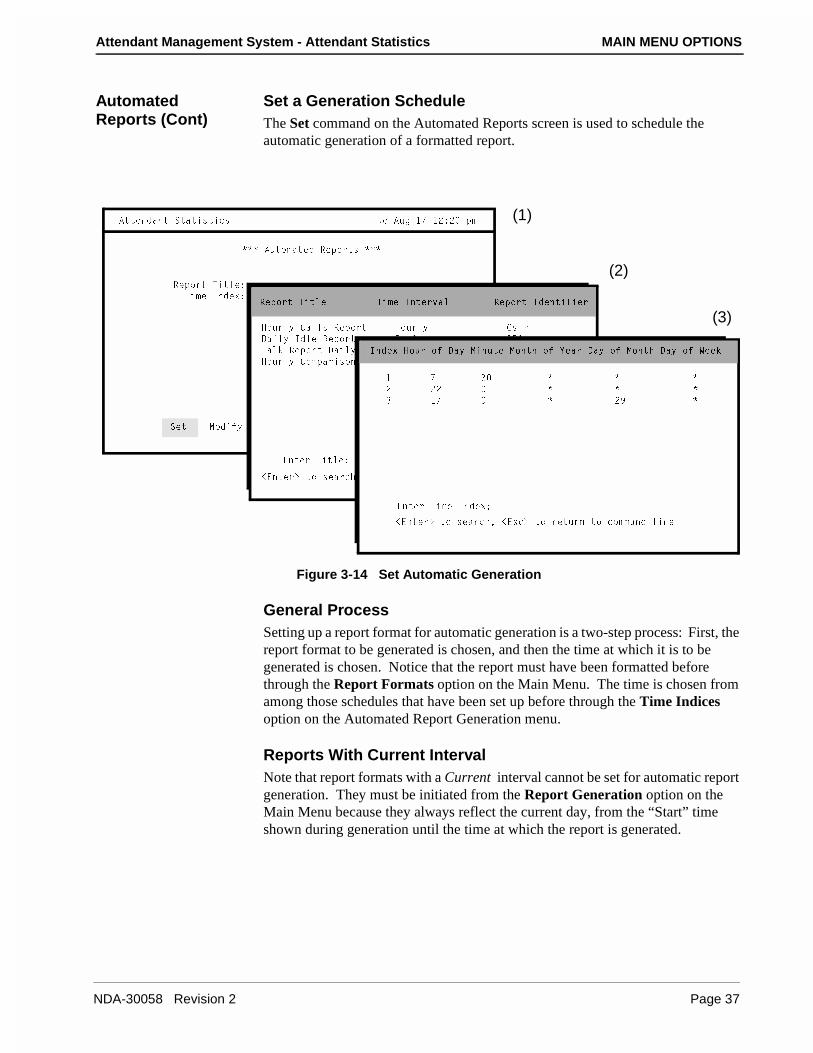
Attendant Management System - Attendant Statistics MAIN MENU OPTIONS
Automated Reports (Cont)
Set a Generation ScheduleThe Set command on the Automated Reports screen is used to schedule the automatic generation of a formatted report.
Figure 3-14 Set Automatic Generation
General ProcessSetting up a report format for automatic generation is a two-step process: First, the report format to be generated is chosen, and then the time at which it is to be generated is chosen. Notice that the report must have been formatted before through the Report Formats option on the Main Menu. The time is chosen from among those schedules that have been set up before through the Time Indices option on the Automated Report Generation menu.
Reports With Current Interval Note that report formats with a Current interval cannot be set for automatic report generation. They must be initiated from the Report Generation option on the Main Menu because they always reflect the current day, from the “Start” time shown during generation until the time at which the report is generated.
1ddU^TQ^d CdQdYcdYSc DeU 1eW !' !"*" `]
��� 1ed_]QdUT BU`_bdc ���
BU`_bd DYd\U*
DY]U 9^TUh*
CUd =_TYVi 3Q^SU\ FYUg @bY^d AeYd
BU`_bd DYd\U DY]U 9^dUbfQ\ BU`_bd 9TU^dYVYUb
8_eb\i 3Q\\c BU`_bd 8_eb\i 3c8b
4QY\i 9T\U BU`_bd 4QY\i 94\i
DQ\[ BU`_bd 4QY\i 4QY\i D4\i
8_eb\i 3_]`QbYc_^ 8_eb\i 3]`X
5^dUb DYd\U*
,5^dUb. d_ cUQbSX� ,5C3. d_ bUdeb^ d_ S_]]Q^T \Y^U
9^TUh 8_eb _V 4Qi =Y^edU =_^dX _V IUQb 4Qi _V =_^dX 4Qi _V GUU[
! ' # � � �
" "" � � �
# !' � ") �
5^dUb DY]U 9^TUh*
,5^dUb. d_ cUQbSX� ,5cS. d_ bUdeb^ d_ S_]]Q^T \Y^U
(1)
(2)
(3)
NDA-30058 Revision 2 Page 37
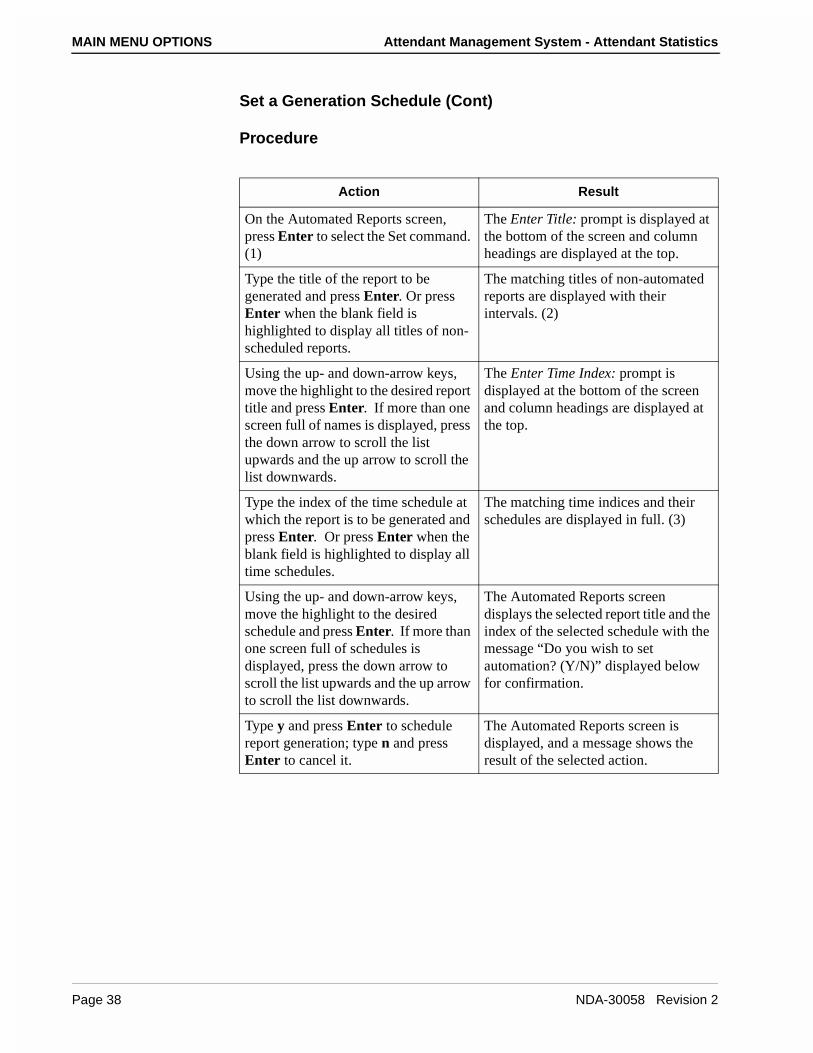
MAIN MENU OPTIONS Attendant Management System - Attendant Statistics
Set a Generation Schedule (Cont)
Procedure
Action Result
On the Automated Reports screen, press Enter to select the Set command. (1)
The Enter Title: prompt is displayed at the bottom of the screen and column headings are displayed at the top.
Type the title of the report to be generated and press Enter. Or press Enter when the blank field is highlighted to display all titles of non-scheduled reports.
The matching titles of non-automated reports are displayed with their intervals. (2)
Using the up- and down-arrow keys, move the highlight to the desired report title and press Enter. If more than one screen full of names is displayed, press the down arrow to scroll the list upwards and the up arrow to scroll the list downwards.
The Enter Time Index: prompt is displayed at the bottom of the screen and column headings are displayed at the top.
Type the index of the time schedule at which the report is to be generated and press Enter. Or press Enter when the blank field is highlighted to display all time schedules.
The matching time indices and their schedules are displayed in full. (3)
Using the up- and down-arrow keys, move the highlight to the desired schedule and press Enter. If more than one screen full of schedules is displayed, press the down arrow to scroll the list upwards and the up arrow to scroll the list downwards.
The Automated Reports screen displays the selected report title and the index of the selected schedule with the message “Do you wish to set automation? (Y/N)” displayed below for confirmation.
Type y and press Enter to schedule report generation; type n and press Enter to cancel it.
The Automated Reports screen is displayed, and a message shows the result of the selected action.
Page 38 NDA-30058 Revision 2
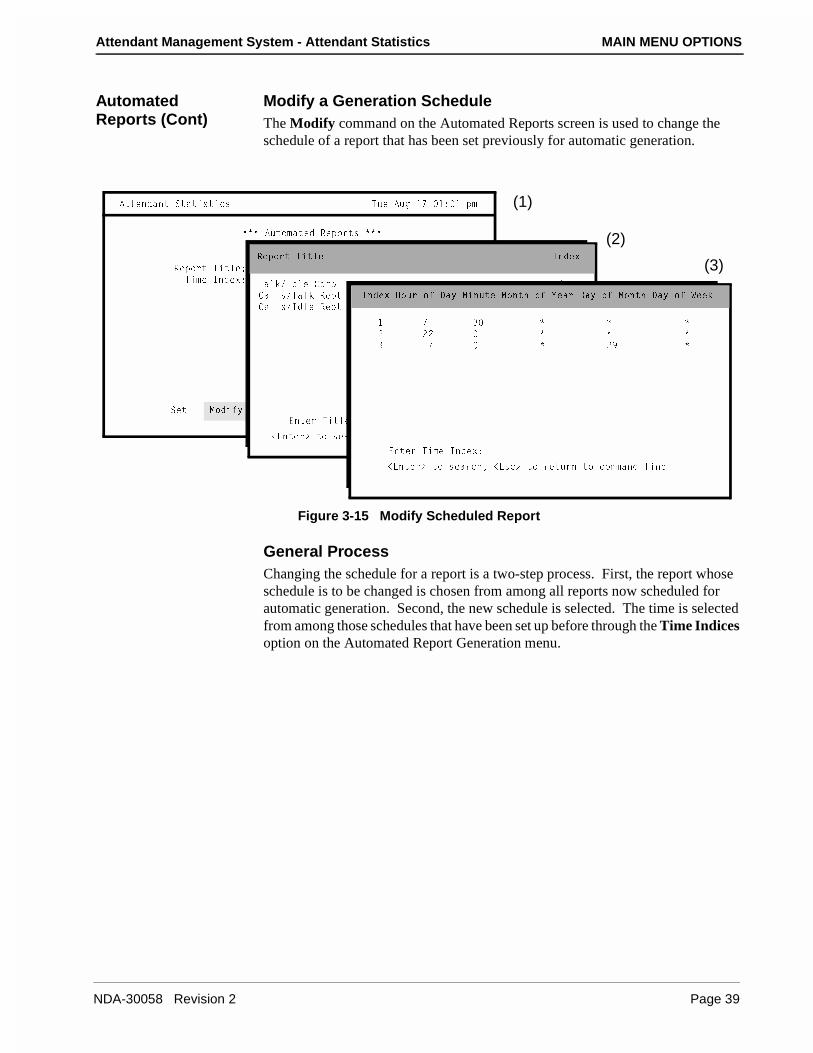
Attendant Management System - Attendant Statistics MAIN MENU OPTIONS
Automated Reports (Cont)
Modify a Generation ScheduleThe Modify command on the Automated Reports screen is used to change the schedule of a report that has been set previously for automatic generation.
Figure 3-15 Modify Scheduled Report
General ProcessChanging the schedule for a report is a two-step process. First, the report whose schedule is to be changed is chosen from among all reports now scheduled for automatic generation. Second, the new schedule is selected. The time is selected from among those schedules that have been set up before through the Time Indices option on the Automated Report Generation menu.
1ddU^TQ^d CdQdYcdYSc DeU 1eW !' !* ! `]
��� 1ed_]QdUT BU`_bdc ���
BU`_bd DYd\U*
DY]U 9^TUh*
CUd =_TYVi 3Q^SU\ FYUg @bY^d AeYd
BU`_bd DYd\U 9^TUh
DQ\[�9T\U 3_]`
3Q\\c�DQ\[ BU`d
3Q\\c�9T\U BU`d
5^dUb DYd\U*
,5^dUb. d_ cUQbSX� ,5C3. d_ bUdeb^ d_ S_]]Q^T \Y^U
"
!
!
9^TUh 8_eb _V 4Qi =Y^edU =_^dX _V IUQb 4Qi _V =_^dX 4Qi _V GUU[
! ' # � � �
" "" � � �
# !' � ") �
5^dUb DY]U 9^TUh*
,5^dUb. d_ cUQbSX� ,5cS. d_ bUdeb^ d_ S_]]Q^T \Y^U
(1)
(3)
(2)
NDA-30058 Revision 2 Page 39

MAIN MENU OPTIONS Attendant Management System - Attendant Statistics
Modify a Generation Schedule (Cont)
Procedure
Action Result
On the Automated Reports screen, type m to select the Modify command. (1)
The Enter Title: prompt is displayed at the bottom of the screen and column headings are displayed at the top.
Type the title of the report and press Enter, or press Enter when the blank field is highlighted to display all scheduled reports.
The matching Report Titles are displayed with the Index of their current schedule. (2)
Using the up- and down-arrow keys, move the highlight to the desired report title and press Enter. If more than one screen full of titles is displayed, press the down arrow to scroll the list upwards and the up arrow to scroll the list downwards.
The Enter Time Index: prompt is displayed at the bottom of the screen, and column headings are displayed at the top.
Type the index of the new time schedule for the report and press Enter, or press Enter when the blank field is highlighted to display all time schedules.
The matching time indices and their schedules are displayed in full. (3)
Using the up- and down-arrow keys, move the highlight to the desired schedule and press Enter. If more than one screen full of schedules is displayed, press the down arrow to scroll the list upwards and the up arrow to scroll the list downwards.
The Automated Reports screen displays the selected report title and the index of the new schedule with the message “Do you wish to save changes? (Y/N)” displayed below for confirmation.
Type y and press Enter to accept the new schedule; type n and press Enter to cancel it.
The Automated Reports screen is displayed, and a message gives the results of the chosen action.
Page 40 NDA-30058 Revision 2
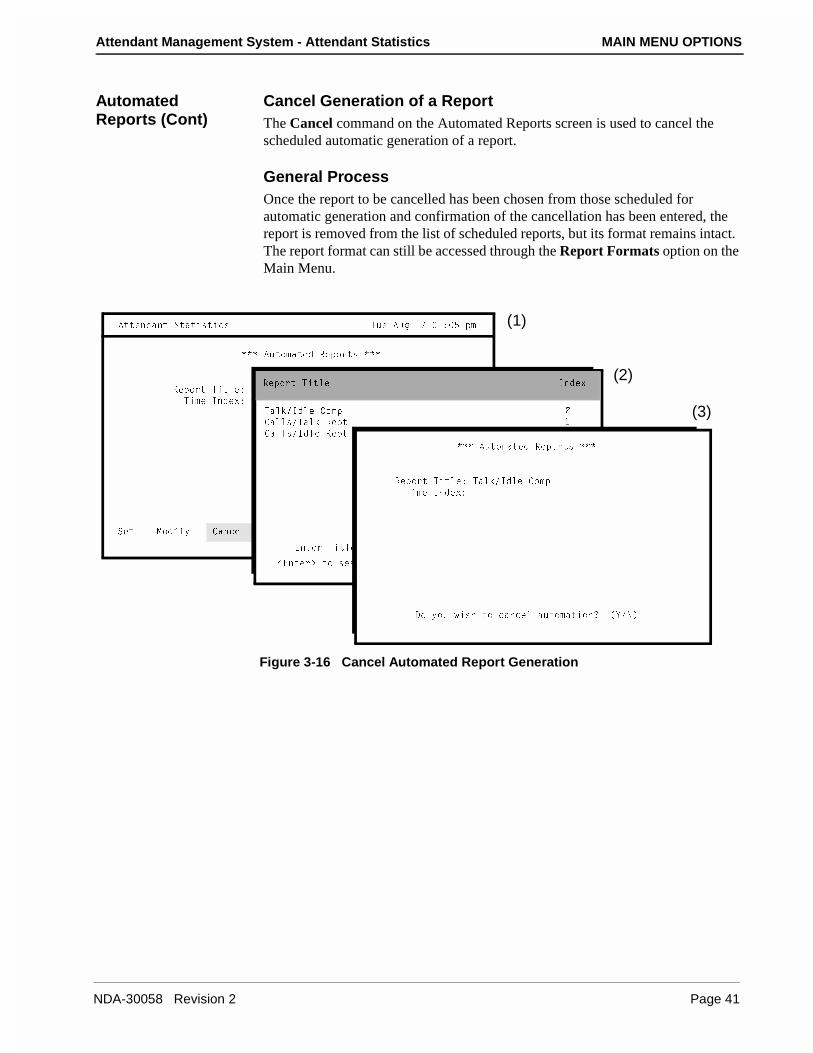
Attendant Management System - Attendant Statistics MAIN MENU OPTIONS
Automated Reports (Cont)
Cancel Generation of a ReportThe Cancel command on the Automated Reports screen is used to cancel the scheduled automatic generation of a report.
General ProcessOnce the report to be cancelled has been chosen from those scheduled for automatic generation and confirmation of the cancellation has been entered, the report is removed from the list of scheduled reports, but its format remains intact. The report format can still be accessed through the Report Formats option on the Main Menu.
Figure 3-16 Cancel Automated Report Generation
1ddU^TQ^d CdQdYcdYSc DeU 1eW !' !* % `]
��� 1ed_]QdUT BU`_bdc ���
BU`_bd DYd\U*
DY]U 9^TUh*
CUd =_TYVi 3Q^SU\ FYUg @bY^d AeYd
BU`_bd DYd\U 9^TUh
DQ\[�9T\U 3_]`
3Q\\c�DQ\[ BU`d
3Q\\c�9T\U BU`d
5^dUb DYd\U*
,5^dUb. d_ cUQbSX� ,5C3. d_ bUdeb^ d_ S_]]Q^T \Y^U
"
!
!
��� 1ed_]QdUT BU`_bdc ���
BU`_bd DYd\U* DQ\[�9T\U 3_]`
DY]U 9^TUh*
4_ i_e gYcX d_ SQ^SU\ Qed_]QdY_^/ �I�>�
(1)
(2)
(3)
NDA-30058 Revision 2 Page 41
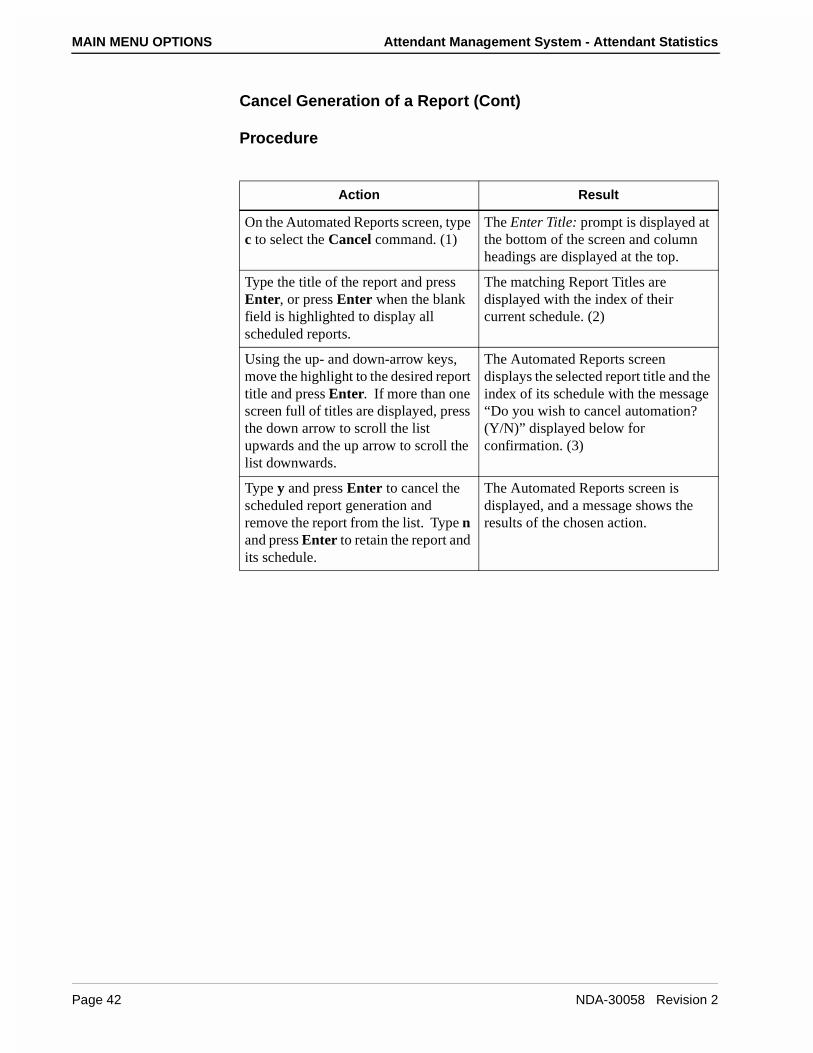
MAIN MENU OPTIONS Attendant Management System - Attendant Statistics
Cancel Generation of a Report (Cont)
Procedure
Action Result
On the Automated Reports screen, type c to select the Cancel command. (1)
The Enter Title: prompt is displayed at the bottom of the screen and column headings are displayed at the top.
Type the title of the report and press Enter, or press Enter when the blank field is highlighted to display all scheduled reports.
The matching Report Titles are displayed with the index of their current schedule. (2)
Using the up- and down-arrow keys, move the highlight to the desired report title and press Enter. If more than one screen full of titles are displayed, press the down arrow to scroll the list upwards and the up arrow to scroll the list downwards.
The Automated Reports screen displays the selected report title and the index of its schedule with the message “Do you wish to cancel automation? (Y/N)” displayed below for confirmation. (3)
Type y and press Enter to cancel the scheduled report generation and remove the report from the list. Type n and press Enter to retain the report and its schedule.
The Automated Reports screen is displayed, and a message shows the results of the chosen action.
Page 42 NDA-30058 Revision 2
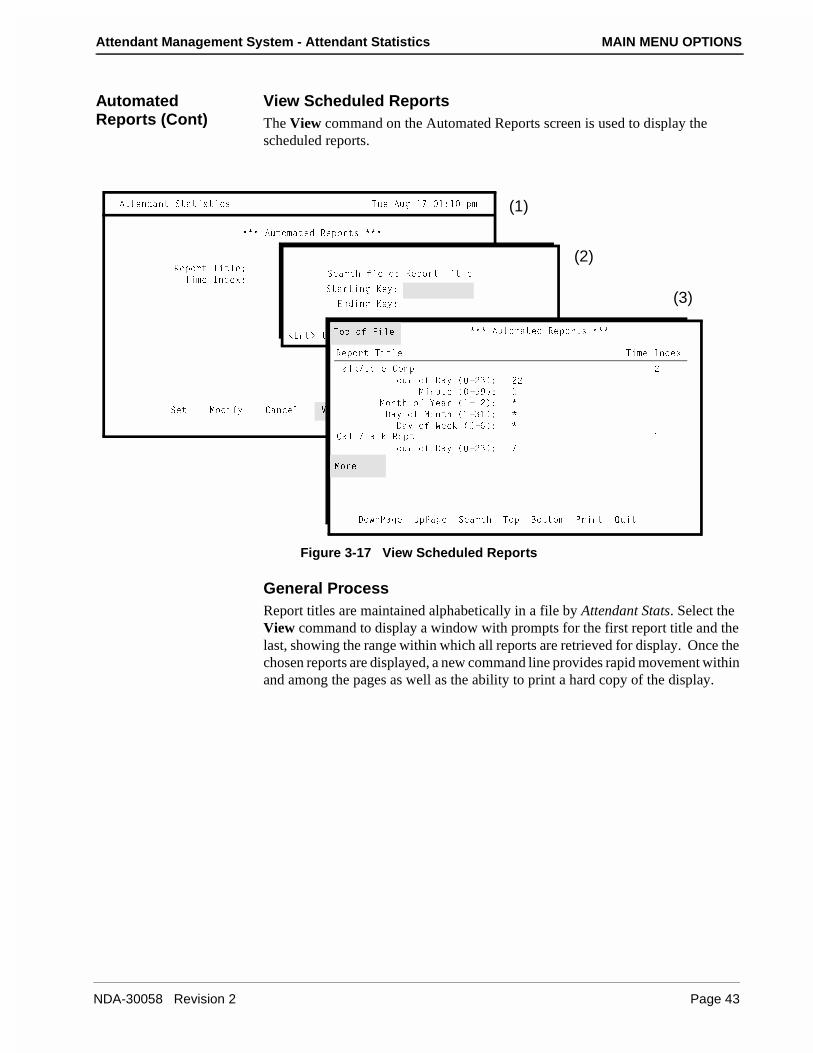
Attendant Management System - Attendant Statistics MAIN MENU OPTIONS
Automated Reports (Cont)
View Scheduled ReportsThe View command on the Automated Reports screen is used to display the scheduled reports.
Figure 3-17 View Scheduled Reports
General ProcessReport titles are maintained alphabetically in a file by Attendant Stats. Select the View command to display a window with prompts for the first report title and the last, showing the range within which all reports are retrieved for display. Once the chosen reports are displayed, a new command line provides rapid movement within and among the pages as well as the ability to print a hard copy of the display.
1ddU^TQ^d CdQdYcdYSc DeU 1eW !' !*! `]
��� 1ed_]QdUT BU`_bdc ���
BU`_bd DYd\U*
DY]U 9^TUh*
CUd =_TYVi 3Q^SU\ FYUg @bY^d AeYd
CUQbSX VYU\T* BU`_bd DYd\U
CdQbdY^W ;Ui*
5^TY^W ;Ui*
,5^d. d_ RUWY^� ,5C3. d_ bUdeb^ d_ S_]]Q^T \Y^UD_` _V 6Y\U ��� 1ed_]QdUT BU`_bdc ���
BU`_bd DYd\U DY]U 9^TUh
DQ\[�9T\U 3_]`
8_eb _V 4Qi � �"#�*
=Y^edU � �%)�*
=_^dX _V IUQb �!�!"�*
4Qi _V =_^dX �!�#!�*
4Qi _V GUU[ � �&�*3Q\\�DQ\[ BU`d
8_eb _V 4Qi � �"#�*
4_g^@QWU E`@QWU CUQbSX D_` 2_dd_] @bY^d AeYd
=_bU
"
""
�
�
�
'
!
(1)
(3)
(2)
NDA-30058 Revision 2 Page 43
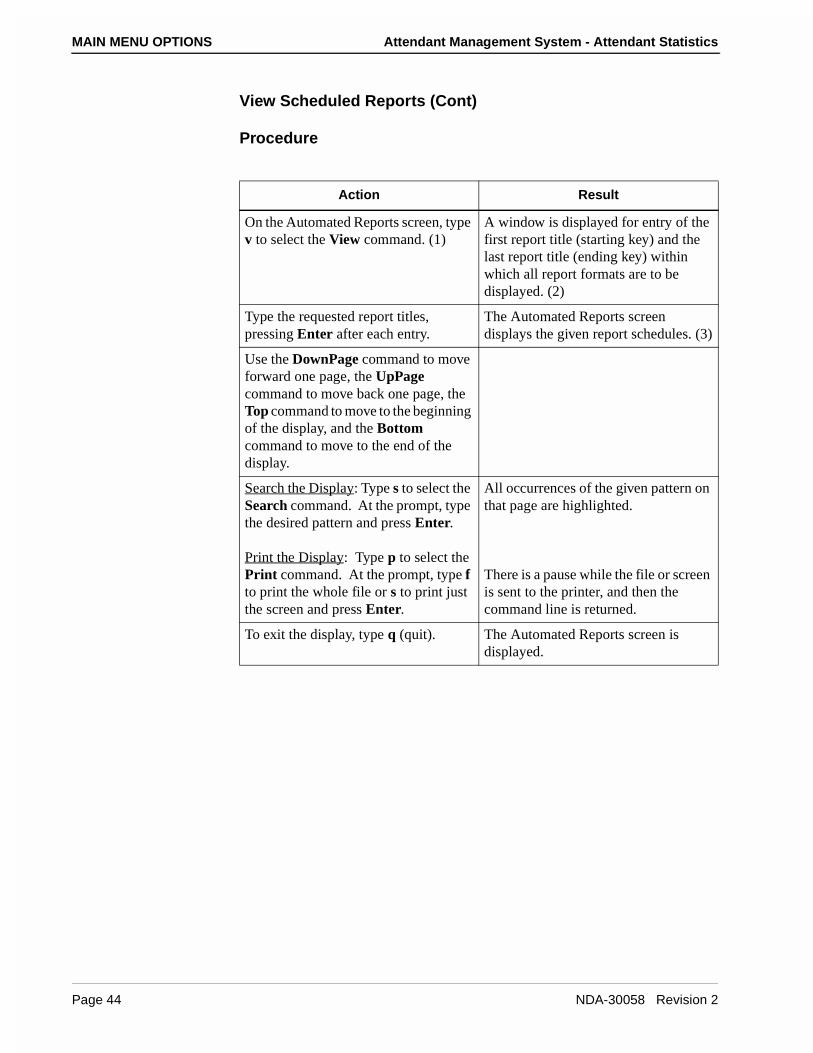
MAIN MENU OPTIONS Attendant Management System - Attendant Statistics
View Scheduled Reports (Cont)
Procedure
Action Result
On the Automated Reports screen, type v to select the View command. (1)
A window is displayed for entry of the first report title (starting key) and the last report title (ending key) within which all report formats are to be displayed. (2)
Type the requested report titles, pressing Enter after each entry.
The Automated Reports screen displays the given report schedules. (3)
Use the DownPage command to move forward one page, the UpPage command to move back one page, the Top command to move to the beginning of the display, and the Bottom command to move to the end of the display.
Search the Display: Type s to select the Search command. At the prompt, type the desired pattern and press Enter.
Print the Display: Type p to select the Print command. At the prompt, type f to print the whole file or s to print just the screen and press Enter.
All occurrences of the given pattern on that page are highlighted.
There is a pause while the file or screen is sent to the printer, and then the command line is returned.
To exit the display, type q (quit). The Automated Reports screen is displayed.
Page 44 NDA-30058 Revision 2
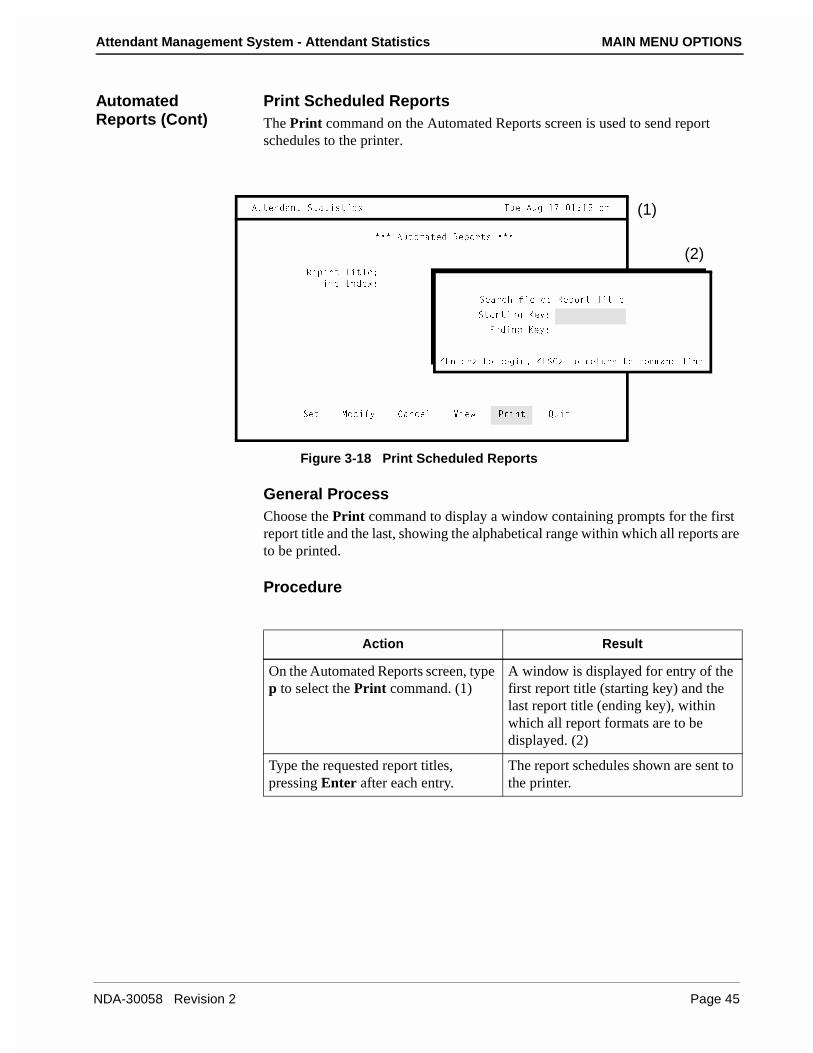
Attendant Management System - Attendant Statistics MAIN MENU OPTIONS
Automated Reports (Cont)
Print Scheduled ReportsThe Print command on the Automated Reports screen is used to send report schedules to the printer.
Figure 3-18 Print Scheduled Reports
General ProcessChoose the Print command to display a window containing prompts for the first report title and the last, showing the alphabetical range within which all reports are to be printed.
Procedure
1ddU^TQ^d CdQdYcdYSc DeU 1eW !' !*!% `]
��� 1ed_]QdUT BU`_bdc ���
BU`_bd DYd\U*
DY]U 9^TUh*
CUd =_TYVi 3Q^SU\ FYUg @bY^d AeYd
CUQbSX VYU\T* BU`_bd DYd\U
CdQbdY^W ;Ui*
5^TY^W ;Ui*
,5^dUb. d_ RUWY^� ,5C3. d_ bUdeb^ d_ S_]]Q^T \Y^U
(2)
(1)
Action Result
On the Automated Reports screen, type p to select the Print command. (1)
A window is displayed for entry of the first report title (starting key) and the last report title (ending key), within which all report formats are to be displayed. (2)
Type the requested report titles, pressing Enter after each entry.
The report schedules shown are sent to the printer.
NDA-30058 Revision 2 Page 45
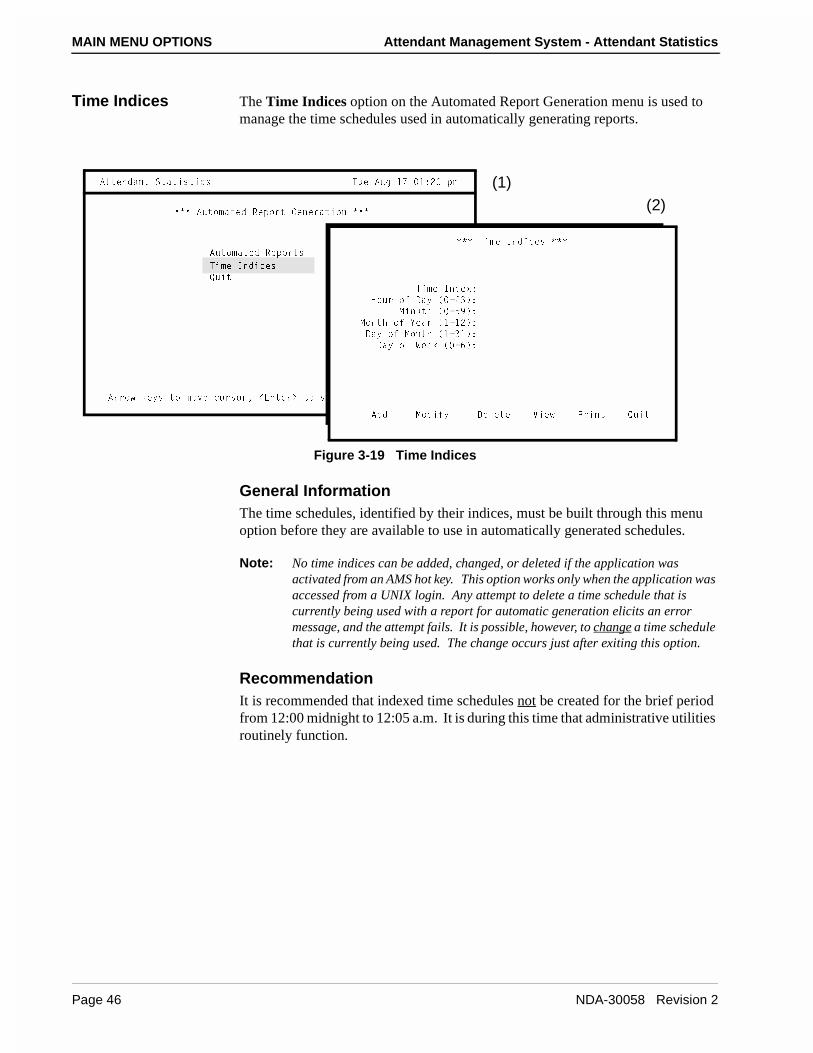
MAIN MENU OPTIONS Attendant Management System - Attendant Statistics
Time Indices The Time Indices option on the Automated Report Generation menu is used to manage the time schedules used in automatically generating reports.
Figure 3-19 Time Indices
General InformationThe time schedules, identified by their indices, must be built through this menu option before they are available to use in automatically generated schedules.
Note: No time indices can be added, changed, or deleted if the application was activated from an AMS hot key. This option works only when the application was accessed from a UNIX login. Any attempt to delete a time schedule that is currently being used with a report for automatic generation elicits an error message, and the attempt fails. It is possible, however, to change a time schedule that is currently being used. The change occurs just after exiting this option.
RecommendationIt is recommended that indexed time schedules not be created for the brief period from 12:00 midnight to 12:05 a.m. It is during this time that administrative utilities routinely function.
1bb_g [Uic d_ ]_fU Sebc_b� ,5^dUb. d_ cU\USd� ,5cS. d_ aeYd
1ddU^TQ^d CdQdYcdYSc DeU 1eW !' !*" `]
��� 1ed_]QdUT BU`_bd 7U^UbQdY_^ ���
1ed_]QdUT BU`_bdc
DY]U 9^TYSUc
AeYd
��� DY]U 9^TYSUc ���
DY]U 9^TUh*
8_eb _V 4Qi � �"#�*
=Y^edU � �%)�*
=_^dX _V IUQb �!�!"�*
4Qi _V =_^dX �!�#!�*
4Qi _V GUU[ � �&�*
1TT =_TYVi 4U\UdU FYUg @bY^d AeYd
(1)(2)
Page 46 NDA-30058 Revision 2
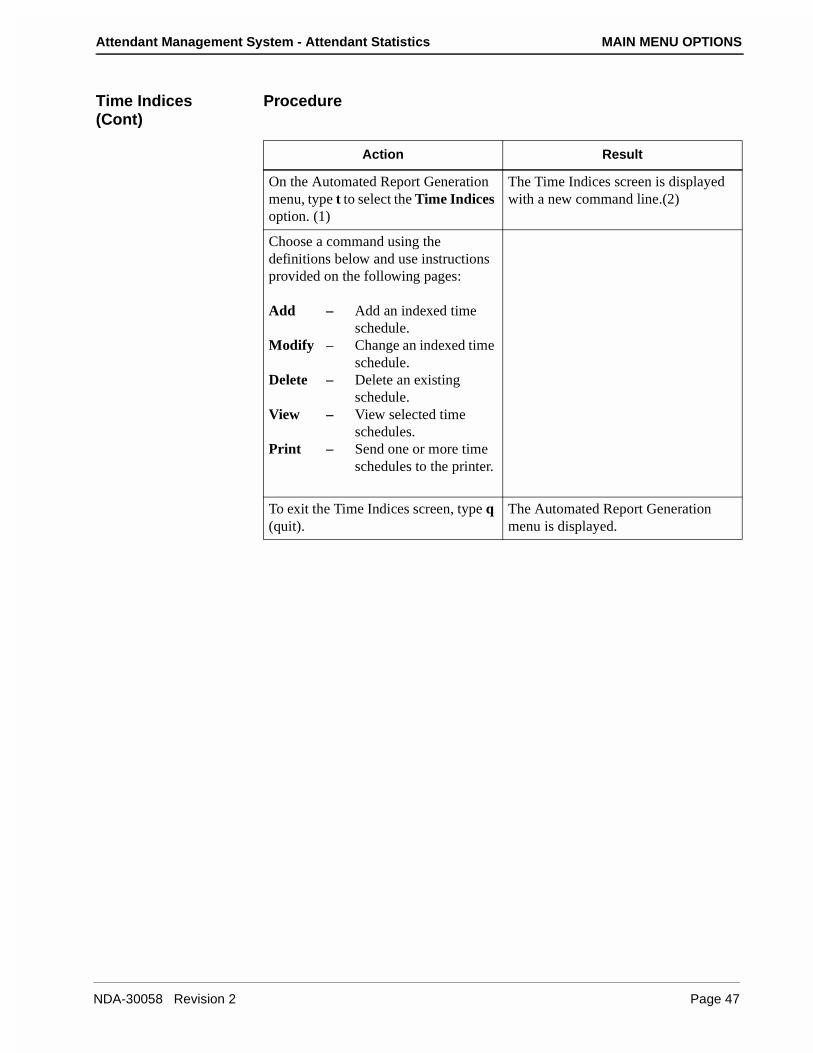
Attendant Management System - Attendant Statistics MAIN MENU OPTIONS
Time Indices (Cont)
Procedure
Action Result
On the Automated Report Generation menu, type t to select the Time Indices option. (1)
The Time Indices screen is displayed with a new command line.(2)
Choose a command using the definitions below and use instructions provided on the following pages:
Add – Add an indexed time schedule.
Modify – Change an indexed time schedule.
Delete – Delete an existing schedule.
View – View selected time schedules.
Print – Send one or more time schedules to the printer.
To exit the Time Indices screen, type q (quit).
The Automated Report Generation menu is displayed.
NDA-30058 Revision 2 Page 47
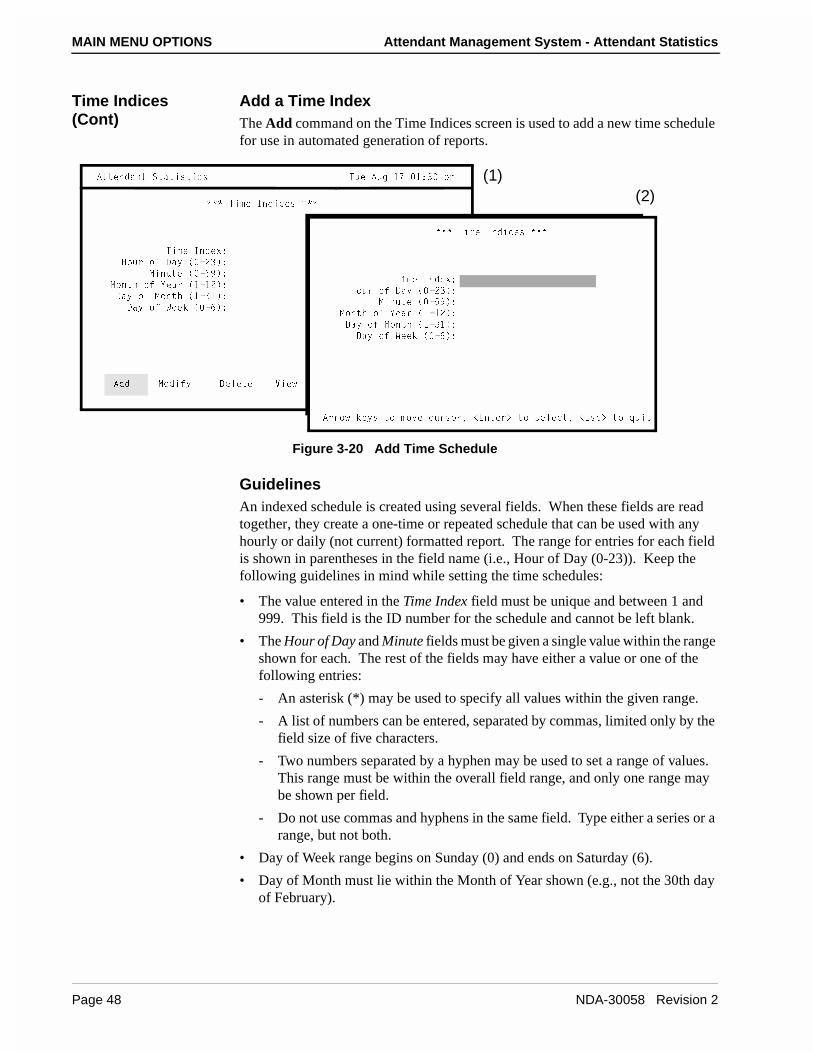
MAIN MENU OPTIONS Attendant Management System - Attendant Statistics
Time Indices (Cont)
Add a Time IndexThe Add command on the Time Indices screen is used to add a new time schedule for use in automated generation of reports.
Figure 3-20 Add Time Schedule
GuidelinesAn indexed schedule is created using several fields. When these fields are read together, they create a one-time or repeated schedule that can be used with any hourly or daily (not current) formatted report. The range for entries for each field is shown in parentheses in the field name (i.e., Hour of Day (0-23)). Keep the following guidelines in mind while setting the time schedules:
• The value entered in the Time Index field must be unique and between 1 and 999. This field is the ID number for the schedule and cannot be left blank.
• The Hour of Day and Minute fields must be given a single value within the range shown for each. The rest of the fields may have either a value or one of the following entries:
- An asterisk (*) may be used to specify all values within the given range.
- A list of numbers can be entered, separated by commas, limited only by the field size of five characters.
- Two numbers separated by a hyphen may be used to set a range of values. This range must be within the overall field range, and only one range may be shown per field.
- Do not use commas and hyphens in the same field. Type either a series or a range, but not both.
• Day of Week range begins on Sunday (0) and ends on Saturday (6).
• Day of Month must lie within the Month of Year shown (e.g., not the 30th day of February).
1ddU^TQ^d CdQdYcdYSc DeU 1eW !' !*# `]
1TT =_TYVi 4U\UdU FYUg @bY^d AeYd
��� DY]U 9^TYSUc ���
DY]U 9^TUh*
8_eb _V 4Qi � �"#�*
=Y^edU � �%)�*
=_^dX _V IUQb �!�!"�*
4Qi _V =_^dX �!�#!�*
4Qi _V GUU[ � �&�*
��� DY]U 9^TYSUc ���
DY]U 9^TUh*
8_eb _V 4Qi � �"#�*
=Y^edU � �%)�*
=_^dX _V IUQb �!�!"�*
4Qi _V =_^dX �!�#!�*
4Qi _V GUU[ � �&�*
1bb_g [Uic d_ ]_fU Sebc_b� ,5^dUb. d_ cU\USd� ,5cS. d_ aeYd
(1)(2)
Page 48 NDA-30058 Revision 2
Attendant Management System - Attendant Statistics MAIN MENU OPTIONS
Add a Time Index (Cont)
RecommendationIt is recommended that indexed time schedules not be created for the brief period from 12:00 midnight to 12:05 a.m. Administrative utilities usually run at that time.
Procedure
Action Result
On the Time Indices screen, press Enter to select the Add command. (1)
The first field is highlighted for data entry. (2)
Use the arrow keys to move among fields and the backspace key to erase any data entered in error. Make entries to the fields within the ranges shown for each and within the guidelines provided above. Press Enter after each field entry.
After Enter is pressed on the last field, the message “Do you wish to insert this record? (Y/N)” is displayed below for confirmation.
Type y and press Enter to save the new time index. Type n and press Enter to cancel it.
The cursor is positioned on the command line, and a message gives the results of the selected action.
Note: When a time index is added, changed, or deleted, the message “Warning: commands will be executed using /bin/sh.” is displayed. This is not an error condition, and it requires no action.
NDA-30058 Revision 2 Page 49
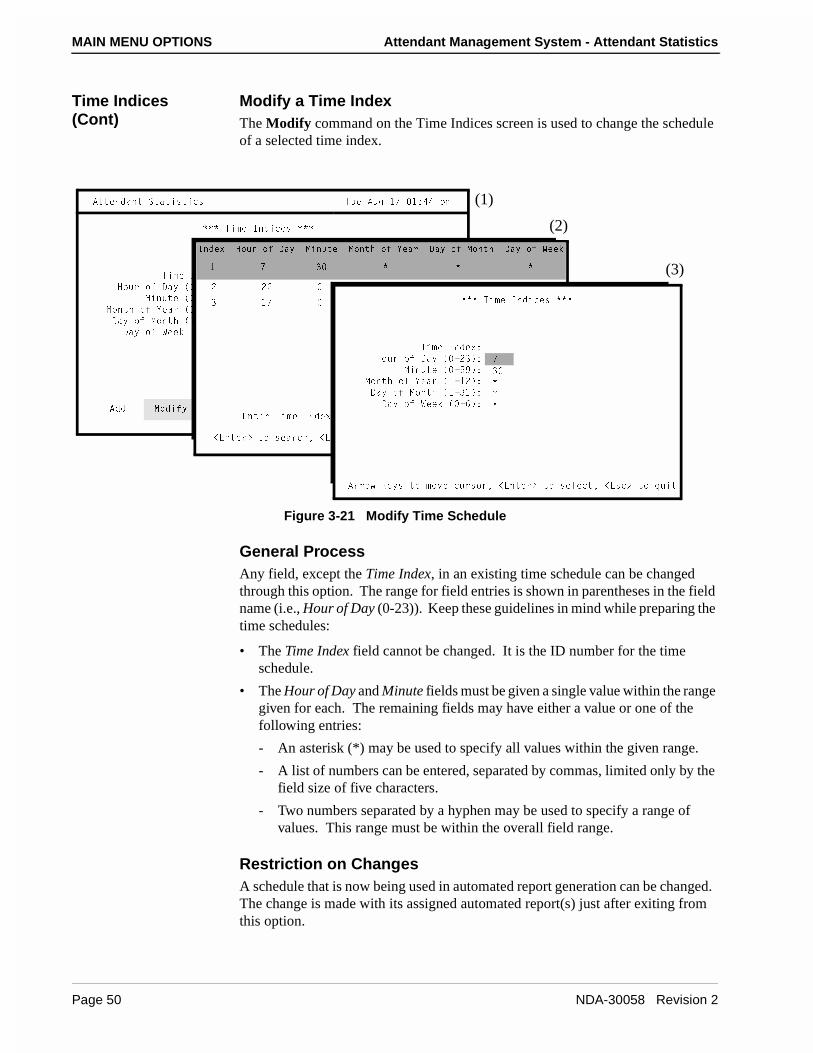
MAIN MENU OPTIONS Attendant Management System - Attendant Statistics
Time Indices (Cont)
Modify a Time IndexThe Modify command on the Time Indices screen is used to change the schedule of a selected time index.
Figure 3-21 Modify Time Schedule
General ProcessAny field, except the Time Index, in an existing time schedule can be changed through this option. The range for field entries is shown in parentheses in the field name (i.e., Hour of Day (0-23)). Keep these guidelines in mind while preparing the time schedules:
• The Time Index field cannot be changed. It is the ID number for the time schedule.
• The Hour of Day and Minute fields must be given a single value within the range given for each. The remaining fields may have either a value or one of the following entries:
- An asterisk (*) may be used to specify all values within the given range.
- A list of numbers can be entered, separated by commas, limited only by the field size of five characters.
- Two numbers separated by a hyphen may be used to specify a range of values. This range must be within the overall field range.
Restriction on ChangesA schedule that is now being used in automated report generation can be changed. The change is made with its assigned automated report(s) just after exiting from this option.
1ddU^TQ^d CdQdYcdYSc DeU 1eW !' !*$$ `]
1TT =_TYVi 4U\UdU FYUg @bY^d AeYd
��� DY]U 9^TYSUc ���
DY]U 9^TUh*
8_eb _V 4Qi � �"#�*
=Y^edU � �%)�*
=_^dX _V IUQb �!�!"�*
4Qi _V =_^dX �!�#!�*
4Qi _V GUU[ � �&�*
!
'
#
�
�
�
9^TUh 8_eb _V 4Qi =Y^edU =_^dX _V IUQb 4Qi _V =_^dX 4Qi _V GUU[
! ' # � � �
" "" � � �
# !' � ") �
5^dUb DY]U 9^TUh*
,5^dUb. d_ cUQbSX� ,5C3. d_ bUdeb^ d_ S_]]Q^T \Y^U
��� DY]U 9^TYSUc ���
DY]U 9^TUh*
8_eb _V 4Qi � �"#�*
=Y^edU � �%)�*
=_^dX _V IUQb �!�!"�*
4Qi _V =_^dX �!�#!�*
4Qi _V GUU[ � �&�*
1bb_g [Uic d_ ]_fU Sebc_b� ,5^dUb. d_ cU\USd� ,5cS. d_ aeYd
!
'
#
�
�
�
(1)
(2)
(3)
Page 50 NDA-30058 Revision 2
Attendant Management System - Attendant Statistics MAIN MENU OPTIONS
Modify a Time Index (Cont)
Procedure
Action Result
On the Time Indices screen, type m to select the Modify command. (1)
The Enter Time Index: prompt is displayed at the bottom of the screen. Column headings are displayed at the top.
Type the index of the desired schedule and press Enter, or press Enter on the blank field to display all indexed schedules.
The matching indices are displayed with their full schedules. (2)
Using the up- and down-arrow keys, move the highlight to the desired schedule and press Enter. If more than one screen of schedules is displayed, press the down arrow to scroll the list upwards and the up arrow to scroll the list downwards.
The Time Indices screen is displayed again and contains the field entries of the selected time index with the data entry highlight positioned on the second field. (3)
Using the arrow keys to move among fields and the backspace key to erase existing data, change field entries as necessary within the ranges shown for each and within the guidelines provided above. Press Enter after each field entry.
After Enter is pressed in the last field, the message “Do you wish to save changes? (Y/N)” is displayed below for confirmation.
Type y and press Enter to save the changes; type n and press Enter to cancel them.
The Time Indices screen is displayed with its original command line, and a message gives the results of the chosen action.
NDA-30058 Revision 2 Page 51
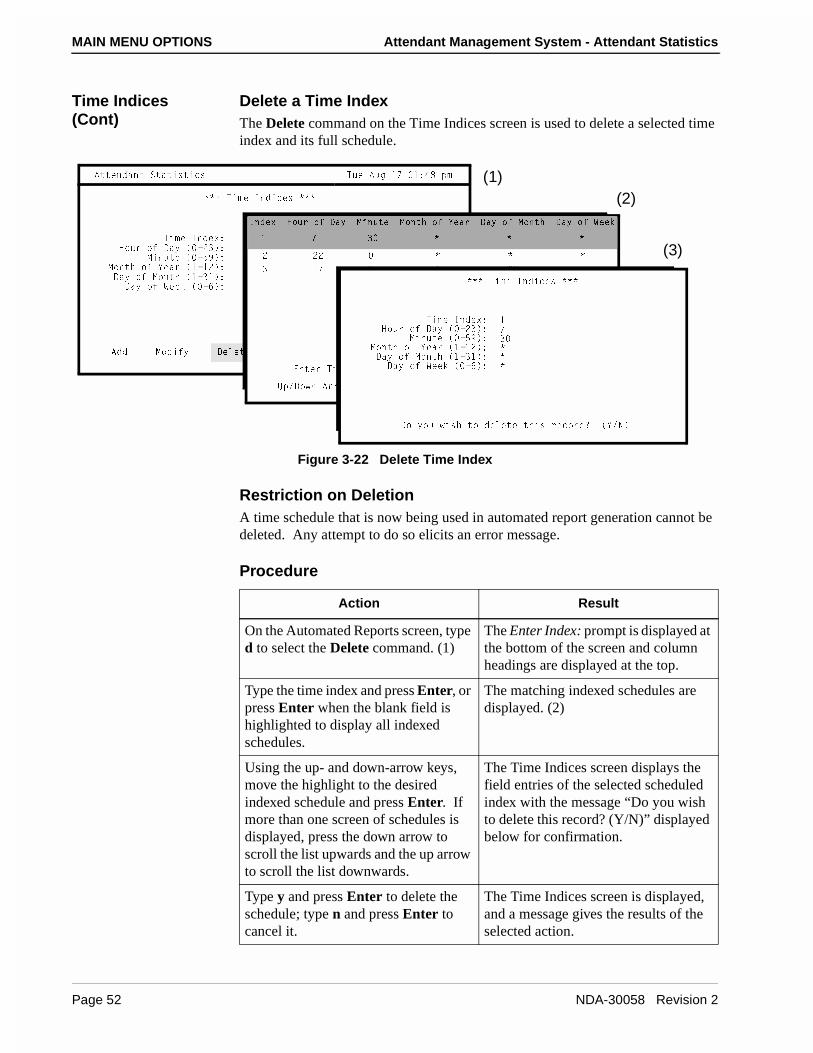
MAIN MENU OPTIONS Attendant Management System - Attendant Statistics
Time Indices (Cont)
Delete a Time IndexThe Delete command on the Time Indices screen is used to delete a selected time index and its full schedule.
Figure 3-22 Delete Time Index
Restriction on DeletionA time schedule that is now being used in automated report generation cannot be deleted. Any attempt to do so elicits an error message.
Procedure
1ddU^TQ^d CdQdYcdYSc DeU 1eW !' !*$( `]
1TT =_TYVi 4U\UdU FYUg @bY^d AeYd
��� DY]U 9^TYSUc ���
DY]U 9^TUh*8_eb _V 4Qi � �"#�*
=Y^edU � �%)�*=_^dX _V IUQb �!�!"�*4Qi _V =_^dX �!�#!�*
4Qi _V GUU[ � �&�*
9^TUh 8_eb _V 4Qi =Y^edU =_^dX _V IUQb 4Qi _V =_^dX 4Qi _V GUU[
! ' # � � �
" "" � � �
# !' � ") �
5^dUb DY]U 9^TUh*
E`�4_g^ 1bb_gc d_ ,5C3. d_ bUdeb^ d_ S_]]Q^T \Y^U
��� DY]U 9^TYSUc ���
DY]U 9^TUh*8_eb _V 4Qi � �"#�*
=Y^edU � �%)�*=_^dX _V IUQb �!�!"�*4Qi _V =_^dX �!�#!�*
4Qi _V GUU[ � �&�*
!'# ���
4_ i_e gYcX d_ TU\UdU dXYc bUS_bT/ �I�>�
(1)(2)
(3)
Action Result
On the Automated Reports screen, type d to select the Delete command. (1)
The Enter Index: prompt is displayed at the bottom of the screen and column headings are displayed at the top.
Type the time index and press Enter, or press Enter when the blank field is highlighted to display all indexed schedules.
The matching indexed schedules are displayed. (2)
Using the up- and down-arrow keys, move the highlight to the desired indexed schedule and press Enter. If more than one screen of schedules is displayed, press the down arrow to scroll the list upwards and the up arrow to scroll the list downwards.
The Time Indices screen displays the field entries of the selected scheduled index with the message “Do you wish to delete this record? (Y/N)” displayed below for confirmation.
Type y and press Enter to delete the schedule; type n and press Enter to cancel it.
The Time Indices screen is displayed, and a message gives the results of the selected action.
Page 52 NDA-30058 Revision 2
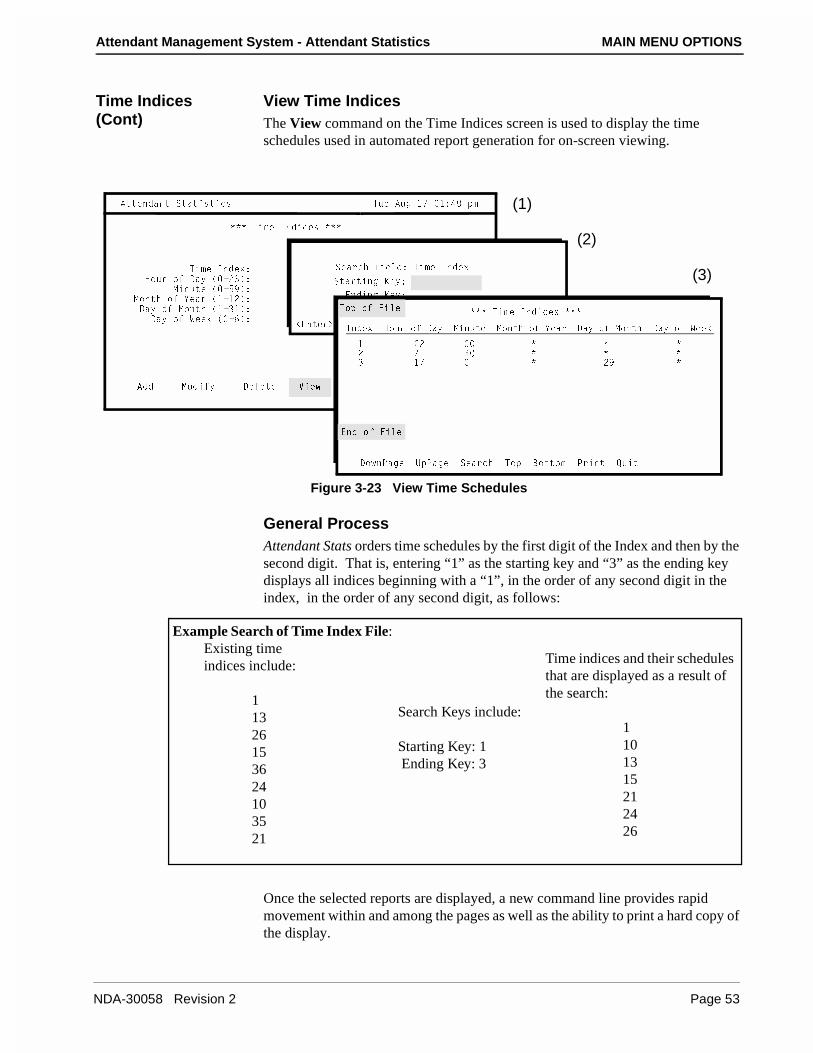
Attendant Management System - Attendant Statistics MAIN MENU OPTIONS
Time Indices (Cont)
View Time IndicesThe View command on the Time Indices screen is used to display the time schedules used in automated report generation for on-screen viewing.
Figure 3-23 View Time Schedules
General ProcessAttendant Stats orders time schedules by the first digit of the Index and then by the second digit. That is, entering “1” as the starting key and “3” as the ending key displays all indices beginning with a “1”, in the order of any second digit in the index, in the order of any second digit, as follows:
Once the selected reports are displayed, a new command line provides rapid movement within and among the pages as well as the ability to print a hard copy of the display.
1ddU^TQ^d CdQdYcdYSc DeU 1eW !' !*$( `]
1TT =_TYVi 4U\UdU FYUg @bY^d AeYd
��� DY]U 9^TYSUc ���
DY]U 9^TUh*8_eb _V 4Qi � �"#�*
=Y^edU � �%)�*=_^dX _V IUQb �!�!"�*4Qi _V =_^dX �!�#!�*
4Qi _V GUU[ � �&�*
CUQbSX VYU\T* DY]U 9^TUh
CdQbdY^W ;Ui*
5^TY^W ;Ui*
,5^dUb. d_ RUWY^� ,5C3. d_ bUdeb^ d_ S_]]Q^T \Y^U
D_` _V 6Y\U ��� DY]U 9^TYSUc ���
9^TUh 8_eb _V 4Qi =Y^edU =_^dX _V IUQb 4Qi _V =_^dX 4Qi _V GUU[
! "" � � �" ' # � � �# !' � ") �
5^T _V 6Y\U
4_g^@QWU E`@QWU CUQbSX D_` 2_dd_] @bY^d AeYd
(1)
(2)
(3)
Example Search of Time Index File:Existing timeindices include:
11326153624103521
Time indices and their schedules that are displayed as a result of the search:
1101315212426
Search Keys include:
Starting Key: 1 Ending Key: 3
NDA-30058 Revision 2 Page 53
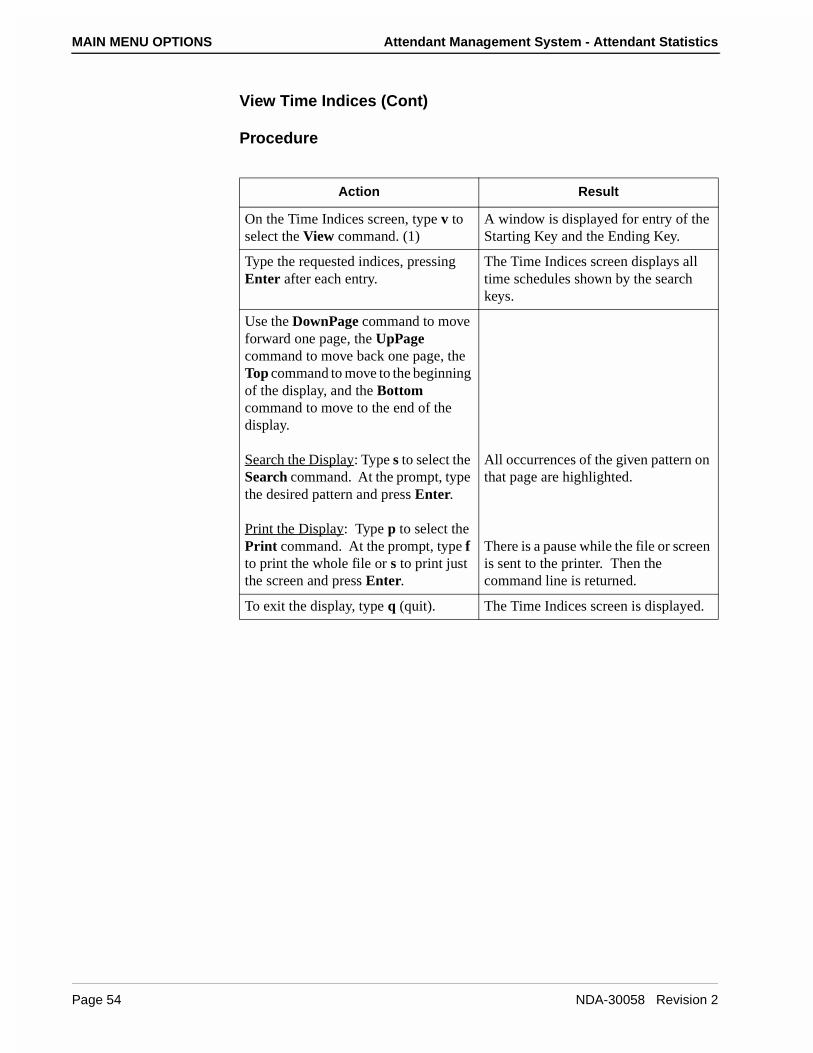
MAIN MENU OPTIONS Attendant Management System - Attendant Statistics
View Time Indices (Cont)
Procedure
Action Result
On the Time Indices screen, type v to select the View command. (1)
A window is displayed for entry of the Starting Key and the Ending Key.
Type the requested indices, pressing Enter after each entry.
The Time Indices screen displays all time schedules shown by the search keys.
Use the DownPage command to move forward one page, the UpPage command to move back one page, the Top command to move to the beginning of the display, and the Bottom command to move to the end of the display.
Search the Display: Type s to select the Search command. At the prompt, type the desired pattern and press Enter.
Print the Display: Type p to select the Print command. At the prompt, type f to print the whole file or s to print just the screen and press Enter.
All occurrences of the given pattern on that page are highlighted.
There is a pause while the file or screen is sent to the printer. Then the command line is returned.
To exit the display, type q (quit). The Time Indices screen is displayed.
Page 54 NDA-30058 Revision 2
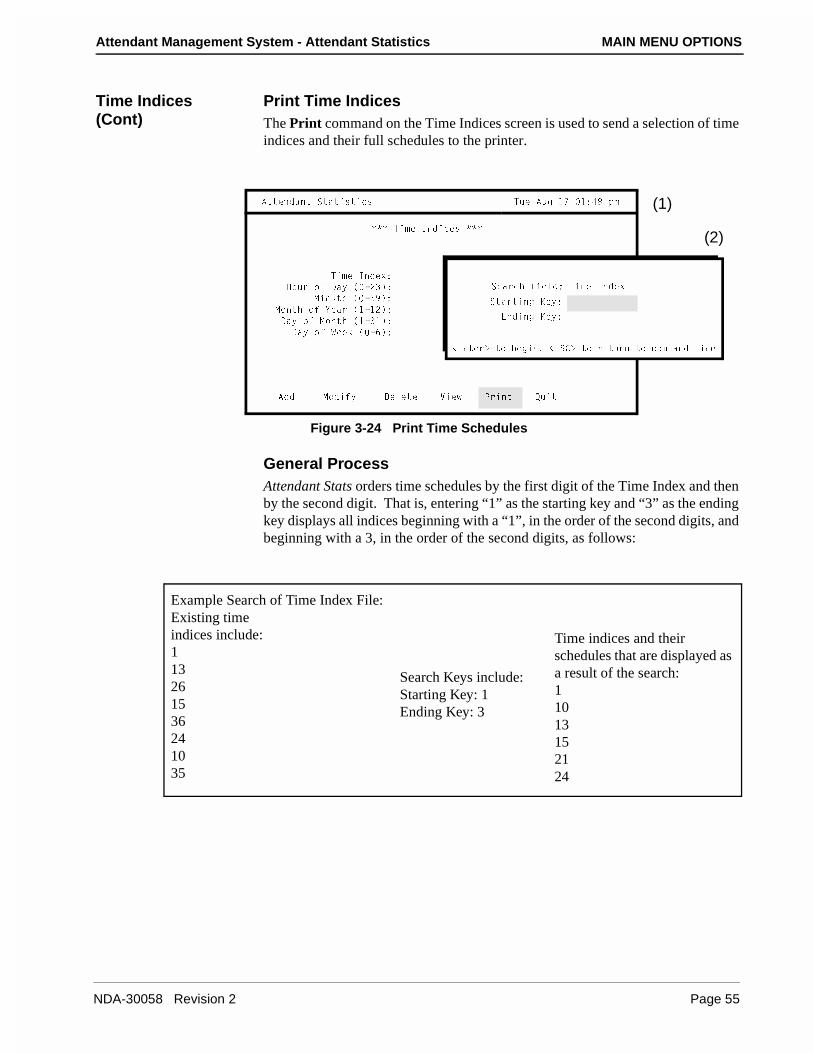
Attendant Management System - Attendant Statistics MAIN MENU OPTIONS
Time Indices (Cont)
Print Time IndicesThe Print command on the Time Indices screen is used to send a selection of time indices and their full schedules to the printer.
Figure 3-24 Print Time Schedules
General ProcessAttendant Stats orders time schedules by the first digit of the Time Index and then by the second digit. That is, entering “1” as the starting key and “3” as the ending key displays all indices beginning with a “1”, in the order of the second digits, and beginning with a 3, in the order of the second digits, as follows:
1ddU^TQ^d CdQdYcdYSc DeU 1eW !' !*$( `]
1TT =_TYVi 4U\UdU FYUg @bY^d AeYd
��� DY]U 9^TYSUc ���
DY]U 9^TUh*
8_eb _V 4Qi � �"#�*
=Y^edU � �%)�*
=_^dX _V IUQb �!�!"�*
4Qi _V =_^dX �!�#!�*
4Qi _V GUU[ � �&�*
CUQbSX VYU\T* DY]U 9^TUh
CdQbdY^W ;Ui*
5^TY^W ;Ui*
,5^dUb. d_ RUWY^� ,5C3. d_ bUdeb^ d_ S_]]Q^T \Y^U
(1)
(2)
Example Search of Time Index File:Existing timeindices include:113261536241035
Time indices and their schedules that are displayed as a result of the search:11013152124
Search Keys include:Starting Key: 1Ending Key: 3
NDA-30058 Revision 2 Page 55

MAIN MENU OPTIONS Attendant Management System - Attendant Statistics
Print Time Indices (Cont)
Procedure
Action Result
On the Time Indices screen, type p to select the Print command. (1)
A window is displayed for entry of the starting key and the ending key of the schedules to be printed. (2)
Type the requested time indices, pressing Enter after each entry.
The given schedules are sent to the printer.
Page 56 NDA-30058 Revision 2
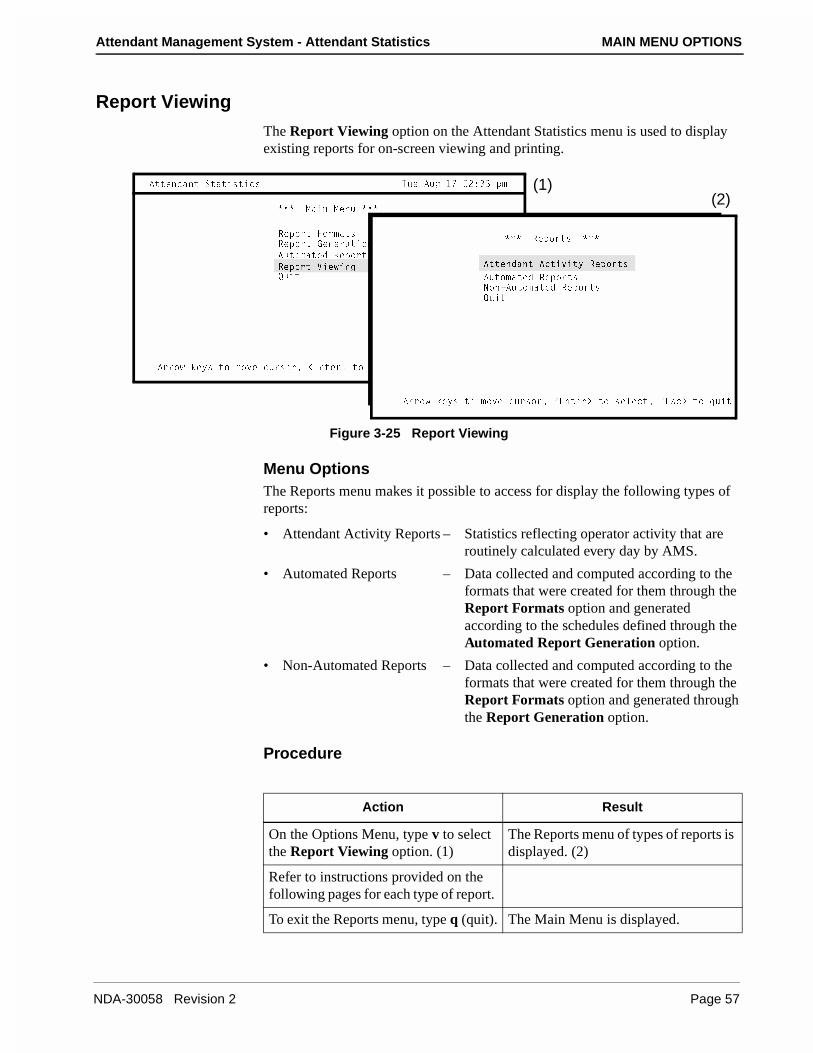
Attendant Management System - Attendant Statistics MAIN MENU OPTIONS
Report Viewing
The Report Viewing option on the Attendant Statistics menu is used to display existing reports for on-screen viewing and printing.
Figure 3-25 Report Viewing
Menu OptionsThe Reports menu makes it possible to access for display the following types of reports:
• Attendant Activity Reports – Statistics reflecting operator activity that are routinely calculated every day by AMS.
• Automated Reports – Data collected and computed according to the formats that were created for them through the Report Formats option and generated according to the schedules defined through the Automated Report Generation option.
• Non-Automated Reports – Data collected and computed according to the formats that were created for them through the Report Formats option and generated through the Report Generation option.
Procedure
1bb_g [Uic d_ ]_fU Sebc_b� ,5^dUb. d_ cU\USd� ,5cS. d_ aeYd
BU`_bd 6_b]QdcBU`_bd 7U^UbQdY_^
1ed_]QdUT BU`_bd 7U^UbQdY_^
BU`_bd FYUgY^WAeYd
��� =QY^ =U^e ���
1ddU^TQ^d CdQdYcdYSc DeU 1eW !' "*## `]
��� BU`_bdc ���
1ddU^TQ^d 1SdYfYdi BU`_bdc
1ed_]QdUT BU`_bdc>_^�1ed_]QdUT BU`_bdcAeYd
1bb_g [Uic d_ ]_fU Sebc_b� ,5^dUb. d_ cU\USd� ,5cS. d_ aeYd
(1)(2)
Action Result
On the Options Menu, type v to select the Report Viewing option. (1)
The Reports menu of types of reports is displayed. (2)
Refer to instructions provided on the following pages for each type of report.
To exit the Reports menu, type q (quit). The Main Menu is displayed.
NDA-30058 Revision 2 Page 57

MAIN MENU OPTIONS Attendant Management System - Attendant Statistics
Report Viewing (Cont)
Attendant Activity Reports
The Attendant Activity Reports option on the Reports menu is used to display the statistics that are routinely calculated by AMS to reflect operator activity for any specific day.
Figure 3-26 Attendant Activity Reports
General InformationEach night at midnight, statistics are calculated from data gathered for AMS operators since the previous night at midnight and labeled with the month and day covered. For example, the statistics gathered from midnight of July 6 to midnight of July 7 are stored in a file named 07.07. The current day’s statistics, therefore, can be viewed only after they have been formatted at midnight. Attendant Stats maintains each statistic file for two weeks, after which it deletes the file from the system. For example, the attendant activity statistics file for July 7 is removed on July 21. Note that AMS error messages are displayed at the bottom of the statistics file when the reports are viewed.
Display FieldsThe statistics show operator activity in these fields:
• Login / Logout – The times at which the operator logged into and then out of the console, with the total work time computed for each operator.
• Internal Answered – The number of calls from internal sources that the operator answered while on-line.
1bb_g [Uic d_ ]_fU Sebc_b� ,5^dUb. d_ cU\USd� ,5cS. d_ aeYd
1ddU^TQ^d CdQdYcdYSc DeU 1eW !' #* $ `]
��� BU`_bdc ���
1ddU^TQ^d 1SdYfYdi BU`_bdc
1ed_]QdUT BU`_bdc>_^�1ed_]QdUT BU`_bdc
AeYd
��� 1ddU^TQ^d 1SdYfYdi BU`_bdc ���
(� # (�!
(� $ (�!!
(� % (�!"
(� & (�!#
(� ' (�!$
(� ( (�!%
(� ) (�!&
,C86.T ^Uhd `QWU�,C86.e `bUfY_ec `QWU ,5^dUb. d_ cU\USd� ,5cS. d_ aeYd
.
D_` _V 6Y\U��� 1ddU^TQ^d 1SdYfYdi BU`_bd ���
(� #
9^dUb^Q\ 5hdUb^Q\ 4Yb�
?`UbQd_b <_WY^ <_W_ed 1^cgUbUT 1^cgUbUT 1ccYcd @Qb[ Bdbf
ZQS[ )* Q !"* ` ! !") $
!* "` $*%'` % !#$ &
&X%% & "&# !
RbU^TQ ! *! Q !* ` " ! ! ! !
"* %` &* %` $ ! $ # " "
&X% & " $ $ # #
=_bU
4_g^@QWU E`@QWU CUQbSX D_` 2_dd_] @bY^d AeYd
(1)
(3)
(2)
Page 58 NDA-30058 Revision 2
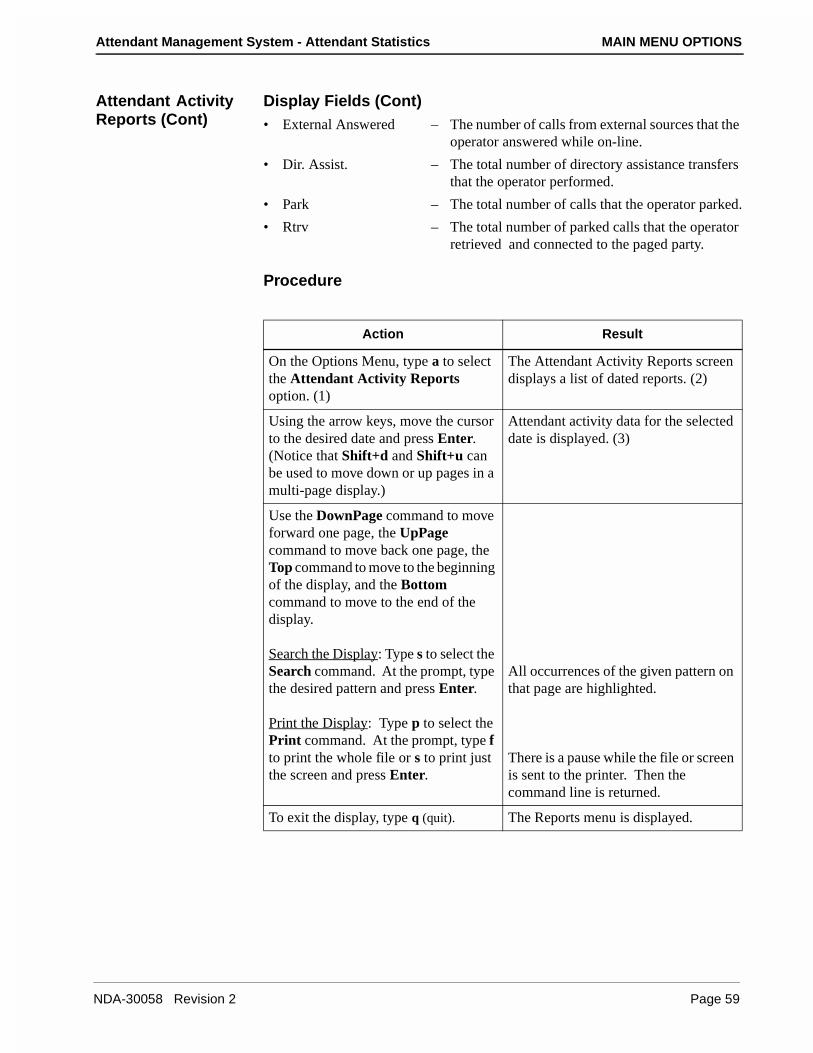
Attendant Management System - Attendant Statistics MAIN MENU OPTIONS
Attendant Activity Reports (Cont)
Display Fields (Cont)• External Answered – The number of calls from external sources that the
operator answered while on-line.
• Dir. Assist. – The total number of directory assistance transfers that the operator performed.
• Park – The total number of calls that the operator parked.
• Rtrv – The total number of parked calls that the operator retrieved and connected to the paged party.
Procedure
Action Result
On the Options Menu, type a to select the Attendant Activity Reports option. (1)
The Attendant Activity Reports screen displays a list of dated reports. (2)
Using the arrow keys, move the cursor to the desired date and press Enter. (Notice that Shift+d and Shift+u can be used to move down or up pages in a multi-page display.)
Attendant activity data for the selected date is displayed. (3)
Use the DownPage command to move forward one page, the UpPage command to move back one page, the Top command to move to the beginning of the display, and the Bottom command to move to the end of the display.
Search the Display: Type s to select the Search command. At the prompt, type the desired pattern and press Enter.
Print the Display: Type p to select the Print command. At the prompt, type f to print the whole file or s to print just the screen and press Enter.
All occurrences of the given pattern on that page are highlighted.
There is a pause while the file or screen is sent to the printer. Then the command line is returned.
To exit the display, type q (quit). The Reports menu is displayed.
NDA-30058 Revision 2 Page 59
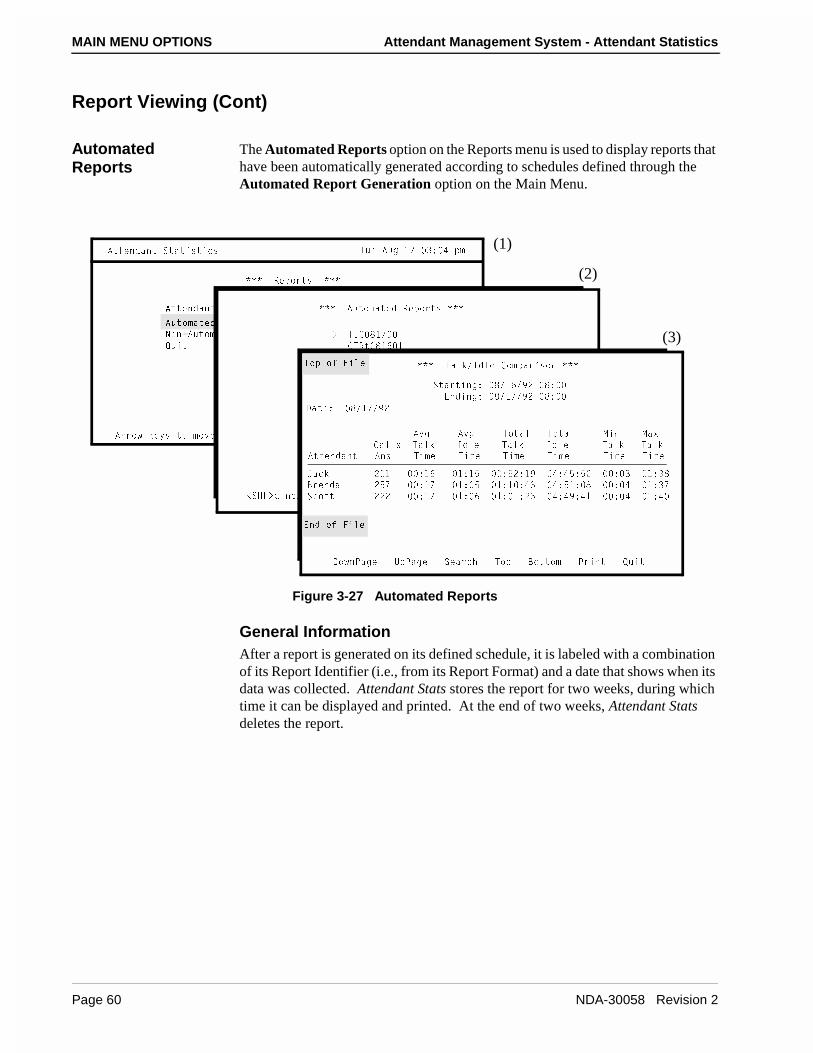
MAIN MENU OPTIONS Attendant Management System - Attendant Statistics
Report Viewing (Cont)
Automated Reports
The Automated Reports option on the Reports menu is used to display reports that have been automatically generated according to schedules defined through the Automated Report Generation option on the Main Menu.
Figure 3-27 Automated Reports
General InformationAfter a report is generated on its defined schedule, it is labeled with a combination of its Report Identifier (i.e., from its Report Format) and a date that shows when its data was collected. Attendant Stats stores the report for two weeks, during which time it can be displayed and printed. At the end of two weeks, Attendant Stats deletes the report.
1bb_g [Uic d_ ]_fU Sebc_b� ,5^dUb. d_ cU\USd� ,5cS. d_ aeYd
1ddU^TQ^d CdQdYcdYSc DeU 1eW !' #* $ `]
��� BU`_bdc ���
1ddU^TQ^d 1SdYfYdi BU`_bdc
1ed_]QdUT BU`_bdc>_^�1ed_]QdUT BU`_bdc
AeYd
��� 1ed_]QdUT BU`_bdc ���
.
3DBd (!& !
3\\�9TB`d (!& "
,C86.T ^Uhd `QWU�,C86.e `bUfY_ec `QWU� ,5^dUb. d_ cU\USd�
D93 (!'
��� DQ\[�9T\U 3_]`QbYc_^ ���
CdQbdY^W* (�!&�)" (*
5^TY^W* (�!'�)" (*
4QdU* (�!'�)"
1fW 1fW D_dQ\ D_dQ\ =Y^ =Qh
3Q\\c DQ\[ 9T\U DQ\[ 9T\U DQ\[ DQ\[
1ddU^TQ^d 1^c DY]U DY]U DY]U DY]U DY]U DY]U
:QS[ " ! *!& !*!% *%"*!) $*$%*%" * # !*#(
2bU^TQ "%' *!' !* % !*! *$# $*%!* ( * $ !*#'
CS_dd """ *!' !* & !* !*"# $*$)*$! * $ !*$
5^T _V 6Y\U
4_g^@QWU E`@QWU CUQbSX D_` 2_dd_] @bY^d AeYd
D_` _V 6Y\U
(1)
(2)
(3)
Page 60 NDA-30058 Revision 2
Attendant Management System - Attendant Statistics MAIN MENU OPTIONS
Automated Reports (Cont)
Procedure
Action Result
On the Options Menu, type r to select the Automated Reports option. (1)
The Automated Reports screen displays a list of reports. (2)
Using the arrow keys, move the cursor to the desired report and press Enter. (Notice that Shift+d and Shift+u can be used to move down or up pages in a multi-page display.)
The selected report is displayed. (3)
Use the DownPage command to move forward one page, the UpPage command to move back one page, the Top command to move to the beginning of the display, and the Bottom command to move to the end of the display.
Search the Display: Type s to select the Search command. At the prompt, type the desired pattern and press Enter.
Print the Display: Type p to select the Print command. At the prompt, type f to print the whole file or s to print just the screen and press Enter.
All occurrences of the given pattern on that page are highlighted.
There is a pause while the file or screen is sent to the printer. Then the command line is returned.
To exit the display, type q (quit). The reports menu is displayed.
NDA-30058 Revision 2 Page 61
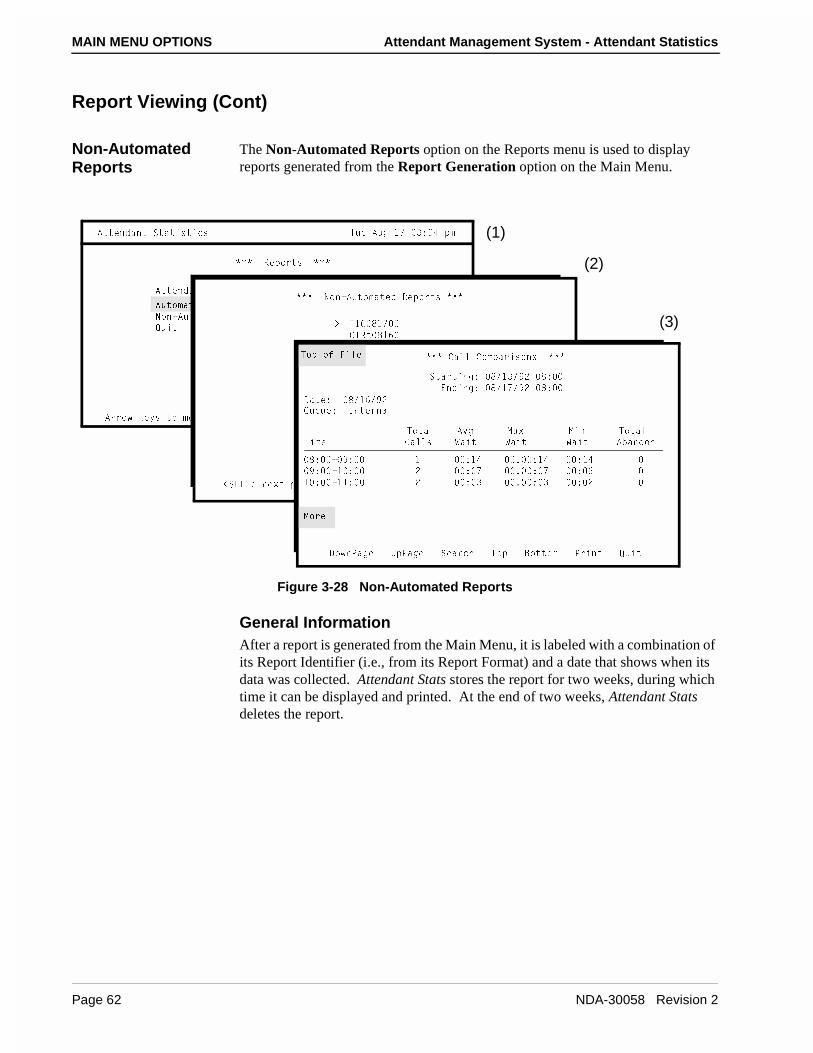
MAIN MENU OPTIONS Attendant Management System - Attendant Statistics
Report Viewing (Cont)
Non-Automated Reports
The Non-Automated Reports option on the Reports menu is used to display reports generated from the Report Generation option on the Main Menu.
Figure 3-28 Non-Automated Reports
General InformationAfter a report is generated from the Main Menu, it is labeled with a combination of its Report Identifier (i.e., from its Report Format) and a date that shows when its data was collected. Attendant Stats stores the report for two weeks, during which time it can be displayed and printed. At the end of two weeks, Attendant Stats deletes the report.
1bb_g [Uic d_ ]_fU Sebc_b� ,5^dUb. d_ cU\USd� ,5cS. d_ aeYd
1ddU^TQ^d CdQdYcdYSc DeU 1eW !' #* $ `]
��� BU`_bdc ���
1ddU^TQ^d 1SdYfYdi BU`_bdc
1ed_]QdUT BU`_bdc>_^�1ed_]QdUT BU`_bdc
AeYd
��� >_^�1ed_]QdUT BU`_bdc ���
.
3DBd (!& !
3\\�9TB`d (!& "
,C86.T ^Uhd `QWU�,C86.e `bUfY_ec `QWU� ,5^dUb. d_ cU\USd�
D93 (!'
��� 3Q\\ 3_]`QbYc_^c ���
CdQbdY^W* (�!#�)" (*
5^TY^W* (�!'�)" (*
4QdU* (�!&�)"
D_dQ\ 1fW =Qh =Y^ D_dQ\
DY]U 3Q\\c GQYd GQYd GQYd 1RQ^T_^
(* ° )* ! *!$ � *!$ *!$
)* �! * " * ' � * ' * &
! * �!!* " * # � * # * "
=_bU
4_g^@QWU E`@QWU CUQbSX D_` 2_dd_] @bY^d AeYd
D_` _V 6Y\U
AeUeU* 9^dUb^Q\
(1)
(3)
(2)
Page 62 NDA-30058 Revision 2
Attendant Management System - Attendant Statistics MAIN MENU OPTIONS
Non-Automated Reports (Cont)
Procedure
Action Result
On the Options Menu, type n to select the Non-Automated Reports option. (1)
The Non-Automated Reports screen displays a list of dated reports. (2)
Using the arrow keys, move the cursor to the desired report and press Enter. (Notice that Shift+d and Shift+u can be used to move down or up pages in a multi-page display.)
The selected report is displayed. (3)
Use the DownPage command to move forward one page, the UpPage command to move back one page, the Top command to move to the beginning of the display, and the Bottom command to move to the end of the display.
Search the Display: Type s to select the Search command. At the prompt, type the desired pattern and press Enter.
Print the Display: Type p to select the Print command. At the prompt, type f to print the whole file or s to print just the screen and press Enter.
All occurrences of the given pattern on that page are highlighted.
There is a pause while the file or screen is sent to the printer. Then the command line is returned.
To exit the display, type q (quit). The Reports menu is displayed.
NDA-30058 Revision 2 Page 63

MAIN MENU OPTIONS Attendant Management System - Attendant Statistics
This Page Left Blank.
Page 64 NDA-30058 Revision 2
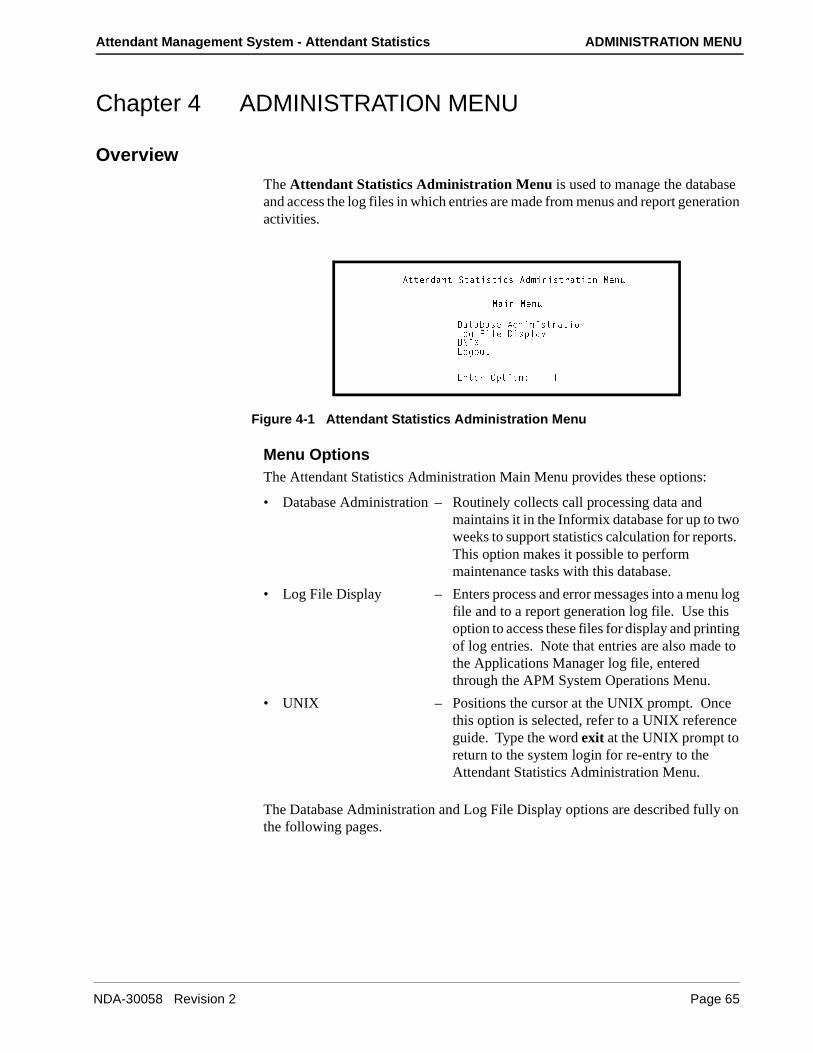
Attendant Management System - Attendant Statistics ADMINISTRATION MENU
Chapter 4 ADMINISTRATION MENU
Overview
The Attendant Statistics Administration Menu is used to manage the database and access the log files in which entries are made from menus and report generation activities.
Figure 4-1 Attendant Statistics Administration Menu
Menu OptionsThe Attendant Statistics Administration Main Menu provides these options:
• Database Administration – Routinely collects call processing data and maintains it in the Informix database for up to two weeks to support statistics calculation for reports. This option makes it possible to perform maintenance tasks with this database.
• Log File Display – Enters process and error messages into a menu log file and to a report generation log file. Use this option to access these files for display and printing of log entries. Note that entries are also made to the Applications Manager log file, entered through the APM System Operations Menu.
• UNIX – Positions the cursor at the UNIX prompt. Once this option is selected, refer to a UNIX reference guide. Type the word exit at the UNIX prompt to return to the system login for re-entry to the Attendant Statistics Administration Menu.
The Database Administration and Log File Display options are described fully on the following pages.
1ddU^TQ^d CdQdYcdYSc 1T]Y^YcdbQdY_^ =U^e
=QY^ =U^e
4QdQRQcU 1T]Y^YcdbQdY_^
<_W 6Y\U 4Yc`\Qi
E>9H<_W_ed
5^dUb ?`dY_^* K M
NDA-30058 Revision 2 Page 65
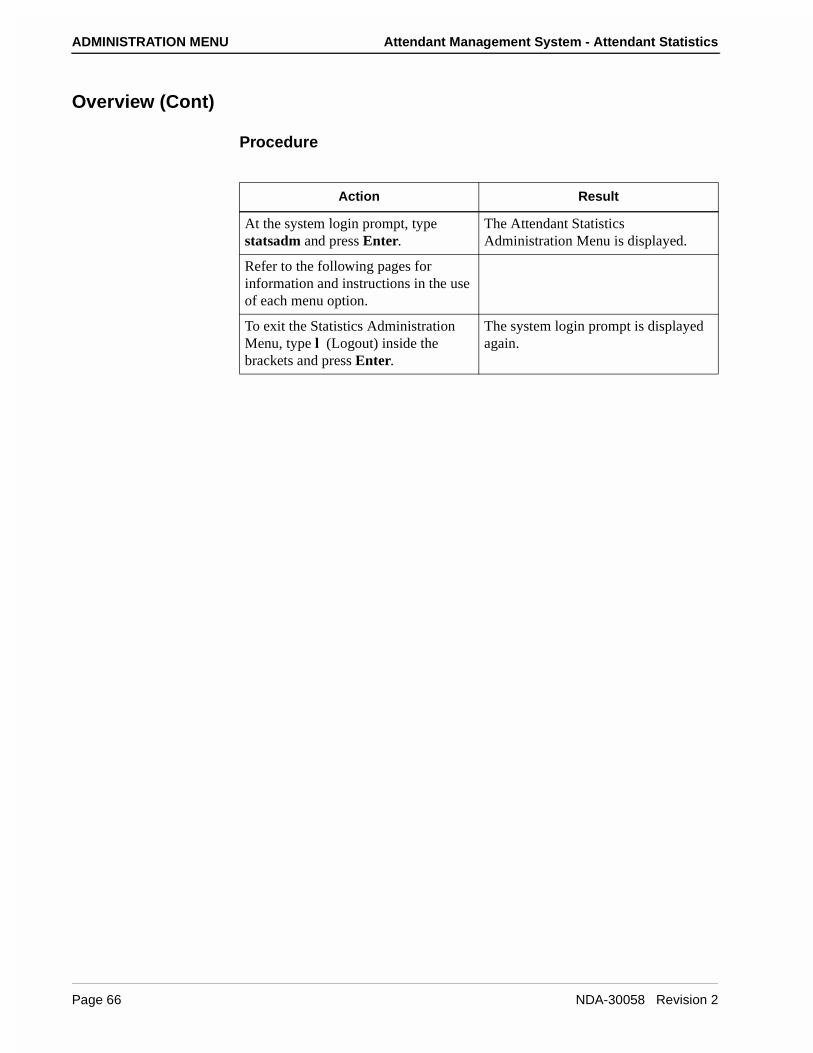
ADMINISTRATION MENU Attendant Management System - Attendant Statistics
Overview (Cont)
Procedure
Action Result
At the system login prompt, type statsadm and press Enter.
The Attendant Statistics Administration Menu is displayed.
Refer to the following pages for information and instructions in the use of each menu option.
To exit the Statistics Administration Menu, type l (Logout) inside the brackets and press Enter.
The system login prompt is displayed again.
Page 66 NDA-30058 Revision 2
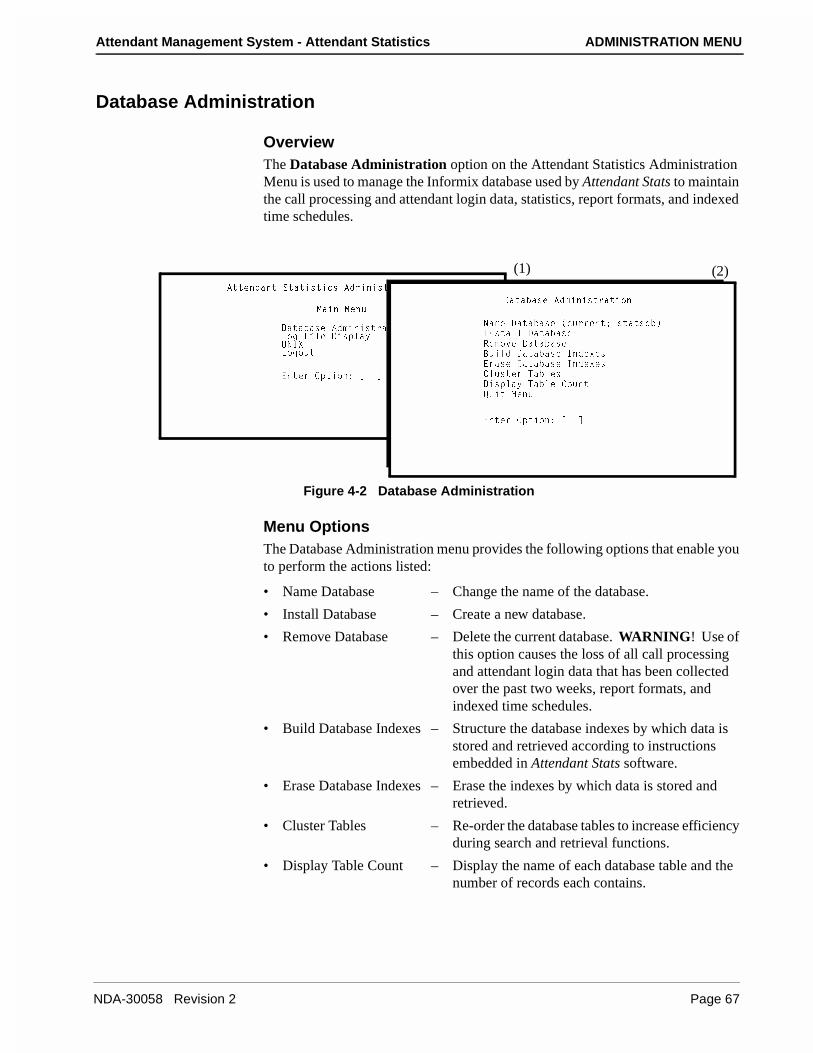
Attendant Management System - Attendant Statistics ADMINISTRATION MENU
Database Administration
OverviewThe Database Administration option on the Attendant Statistics Administration Menu is used to manage the Informix database used by Attendant Stats to maintain the call processing and attendant login data, statistics, report formats, and indexed time schedules.
Figure 4-2 Database Administration
Menu OptionsThe Database Administration menu provides the following options that enable you to perform the actions listed:
• Name Database – Change the name of the database.
• Install Database – Create a new database.
• Remove Database – Delete the current database. WARNING! Use of this option causes the loss of all call processing and attendant login data that has been collected over the past two weeks, report formats, and indexed time schedules.
• Build Database Indexes – Structure the database indexes by which data is stored and retrieved according to instructions embedded in Attendant Stats software.
• Erase Database Indexes – Erase the indexes by which data is stored and retrieved.
• Cluster Tables – Re-order the database tables to increase efficiency during search and retrieval functions.
• Display Table Count – Display the name of each database table and the number of records each contains.
1ddU^TQ^d CdQdYcdYSc 1T]Y^YcdbQdY_^ =U^e
=QY^ =U^e
4QdQRQcU 1T]Y^YcdbQdY_^<_W 6Y\U 4Yc`\QiE>9H<_W_ed
5^dUb ?`dY_^* K M
4QdQRQcU 1T]Y^YcdbQdY_^
>Q]U 4QdQRQcU �SebbU^d* cdQdcTR�
9^cdQ\\ 4QdQRQcU
BU]_fU 4QdQRQcU
2eY\T 4QdQRQcU 9^TUhUc
5bQcU 4QdQRQcU 9^TUhUc
3\ecdUb DQR\Uc
4Yc`\Qi DQR\U 3_e^d
AeYd =U^e
5^dUb ?`dY_^* K M
(1) (2)
NDA-30058 Revision 2 Page 67
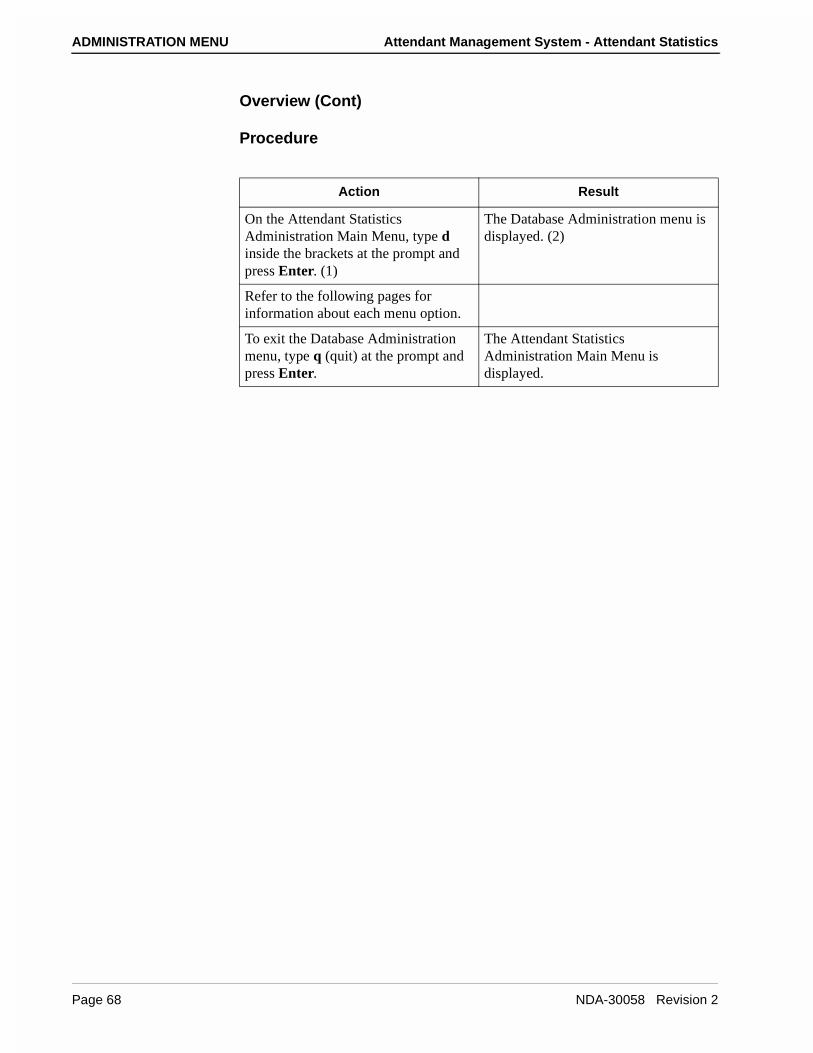
ADMINISTRATION MENU Attendant Management System - Attendant Statistics
Overview (Cont)
Procedure
Action Result
On the Attendant Statistics Administration Main Menu, type d inside the brackets at the prompt and press Enter. (1)
The Database Administration menu is displayed. (2)
Refer to the following pages for information about each menu option.
To exit the Database Administration menu, type q (quit) at the prompt and press Enter.
The Attendant Statistics Administration Main Menu is displayed.
Page 68 NDA-30058 Revision 2
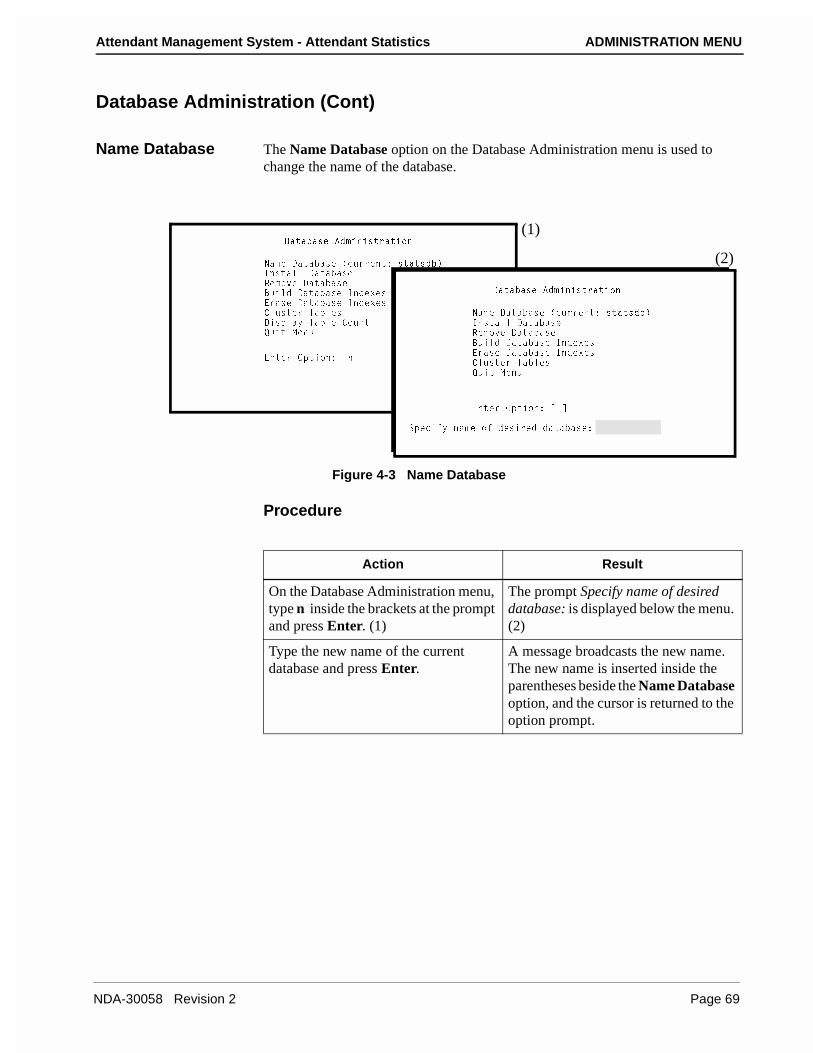
Attendant Management System - Attendant Statistics ADMINISTRATION MENU
Database Administration (Cont)
Name Database The Name Database option on the Database Administration menu is used to change the name of the database.
Figure 4-3 Name Database
Procedure
4QdQRQcU 1T]Y^YcdbQdY_^
>Q]U 4QdQRQcU �SebbU^d* cdQdcTR�
9^cdQ\\ 4QdQRQcU
BU]_fU 4QdQRQcU
2eY\T 4QdQRQcU 9^TUhUc
5bQcU 4QdQRQcU 9^TUhUc
3\ecdUb DQR\Uc
4Yc`\Qi DQR\U 3_e^d
AeYd =U^e
5^dUb ?`dY_^* K^M
C`USYVi ^Q]U _V TUcYbUT TQdQRQcU*
4QdQRQcU 1T]Y^YcdbQdY_^
>Q]U 4QdQRQcU �SebbU^d* cdQdcTR�
9^cdQ\\ 4QdQRQcU
BU]_fU 4QdQRQcU
2eY\T 4QdQRQcU 9^TUhUc
5bQcU 4QdQRQcU 9^TUhUc
3\ecdUb DQR\Uc
AeYd =U^e
5^dUb ?`dY_^* K M
(1)
(2)
Action Result
On the Database Administration menu, type n inside the brackets at the prompt and press Enter. (1)
The prompt Specify name of desired database: is displayed below the menu. (2)
Type the new name of the current database and press Enter.
A message broadcasts the new name. The new name is inserted inside the parentheses beside the Name Database option, and the cursor is returned to the option prompt.
NDA-30058 Revision 2 Page 69

ADMINISTRATION MENU Attendant Management System - Attendant Statistics
Database Administration (Cont)
Install Database The Install Database option on the Database Administration menu is used to create new database fields according to instructions embedded in Attendant Stats software.
Figure 4-4 Install Database
When to UseThis option is typically only performed during installation or (rarely) when the database is removed. Once the new database fields are created through this option, use the Build Database Indexes option to name the database indexes that are used during search and retrieval functions.
Procedure
4QdQRQcU 1T]Y^YcdbQdY_^
>Q]U 4QdQRQcU �SebbU^d* cdQdcTR�
9^cdQ\\ 4QdQRQcU
BU]_fU 4QdQRQcU
2eY\T 4QdQRQcU 9^TUhUc
5bQcU 4QdQRQcU 9^TUhUc
3\ecdUb DQR\Uc
4Yc`\Qi DQR\U 3_e^d
AeYd =U^e
5^dUb ?`dY_^* KYM
9^cdQ\\ 4QdQRQcU
9^cdQ\\Y^W TQdQRQcU ²cdQdcTR³�
6Y^YcXUT Y^cdQ\\Y^W TQdQRQcU ²cdQdcTR³�
@bUcc BUdeb^ d_ S_^dY^eU�
(1)
(2)
Action Result
On the Database Administration menu, type i inside the brackets at the prompt and press Enter. (1)
The Install Database screen is displayed with messages that show status of the installation. (2)
Press Enter when the installation is complete.
The Database Administration menu is displayed.
Page 70 NDA-30058 Revision 2
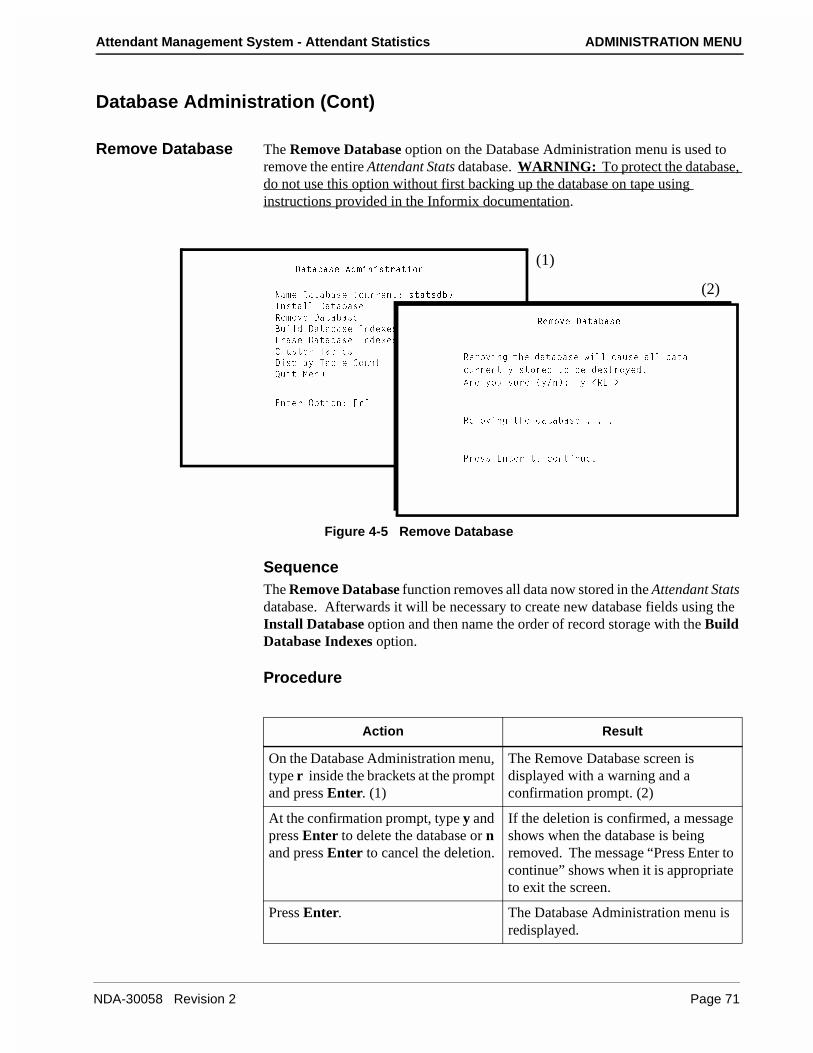
Attendant Management System - Attendant Statistics ADMINISTRATION MENU
Database Administration (Cont)
Remove Database The Remove Database option on the Database Administration menu is used to remove the entire Attendant Stats database. WARNING: To protect the database, do not use this option without first backing up the database on tape using instructions provided in the Informix documentation.
Figure 4-5 Remove Database
SequenceThe Remove Database function removes all data now stored in the Attendant Stats database. Afterwards it will be necessary to create new database fields using the Install Database option and then name the order of record storage with the Build Database Indexes option.
Procedure
4QdQRQcU 1T]Y^YcdbQdY_^
>Q]U 4QdQRQcU �SebbU^d* cdQdcTR�
9^cdQ\\ 4QdQRQcU
BU]_fU 4QdQRQcU
2eY\T 4QdQRQcU 9^TUhUc
5bQcU 4QdQRQcU 9^TUhUc
3\ecdUb DQR\Uc
4Yc`\Qi DQR\U 3_e^d
AeYd =U^e
5^dUb ?`dY_^* KbM
BU]_fU 4QdQRQcU
BU]_fY^W dXU TQdQRQcU gY\\ SQecU Q\\ TQdQ
SebbU^d\i cd_bUT d_ RU TUcdb_iUT�
1bU i_e cebU �i�^�* i ,B5D.
BU]_fY^W dXU TQdQRQcU � � �
@bUcc 5^dUb d_ S_^dY^eU�
(1)
(2)
Action Result
On the Database Administration menu, type r inside the brackets at the prompt and press Enter. (1)
The Remove Database screen is displayed with a warning and a confirmation prompt. (2)
At the confirmation prompt, type y and press Enter to delete the database or n and press Enter to cancel the deletion.
If the deletion is confirmed, a message shows when the database is being removed. The message “Press Enter to continue” shows when it is appropriate to exit the screen.
Press Enter. The Database Administration menu is redisplayed.
NDA-30058 Revision 2 Page 71
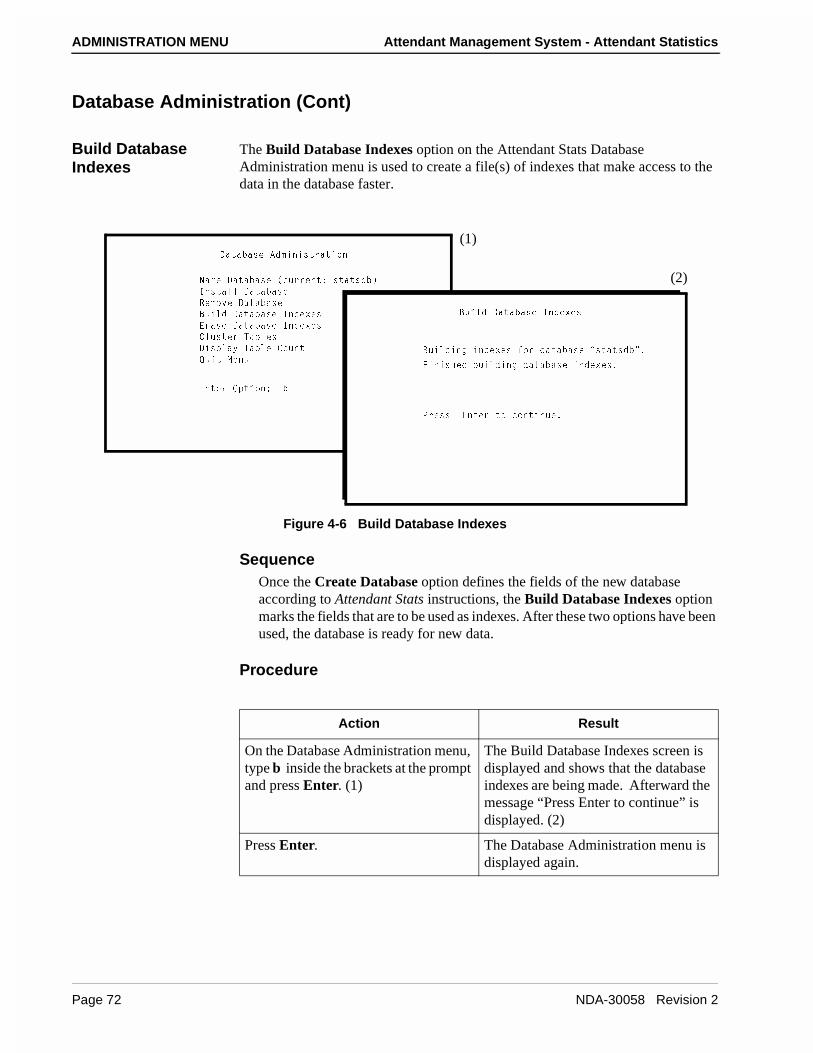
ADMINISTRATION MENU Attendant Management System - Attendant Statistics
Database Administration (Cont)
Build Database Indexes
The Build Database Indexes option on the Attendant Stats Database Administration menu is used to create a file(s) of indexes that make access to the data in the database faster.
Figure 4-6 Build Database Indexes
SequenceOnce the Create Database option defines the fields of the new database according to Attendant Stats instructions, the Build Database Indexes option marks the fields that are to be used as indexes. After these two options have been used, the database is ready for new data.
Procedure
4QdQRQcU 1T]Y^YcdbQdY_^
>Q]U 4QdQRQcU �SebbU^d* cdQdcTR�
9^cdQ\\ 4QdQRQcU
BU]_fU 4QdQRQcU
2eY\T 4QdQRQcU 9^TUhUc
5bQcU 4QdQRQcU 9^TUhUc
3\ecdUb DQR\Uc
4Yc`\Qi DQR\U 3_e^d
AeYd =U^e
5^dUb ?`dY_^* KRM
2eY\T 4QdQRQcU 9^TUhUc
2eY\TY^W Y^TUhUc V_b TQdQRQcU ²cdQdcTR³�
6Y^YcXUT ReY\TY^W TQdQRQcU Y^TUhUc�
@bUcc 5^dUb d_ S_^dY^eU�
(1)
(2)
Action Result
On the Database Administration menu, type b inside the brackets at the prompt and press Enter. (1)
The Build Database Indexes screen is displayed and shows that the database indexes are being made. Afterward the message “Press Enter to continue” is displayed. (2)
Press Enter. The Database Administration menu is displayed again.
Page 72 NDA-30058 Revision 2
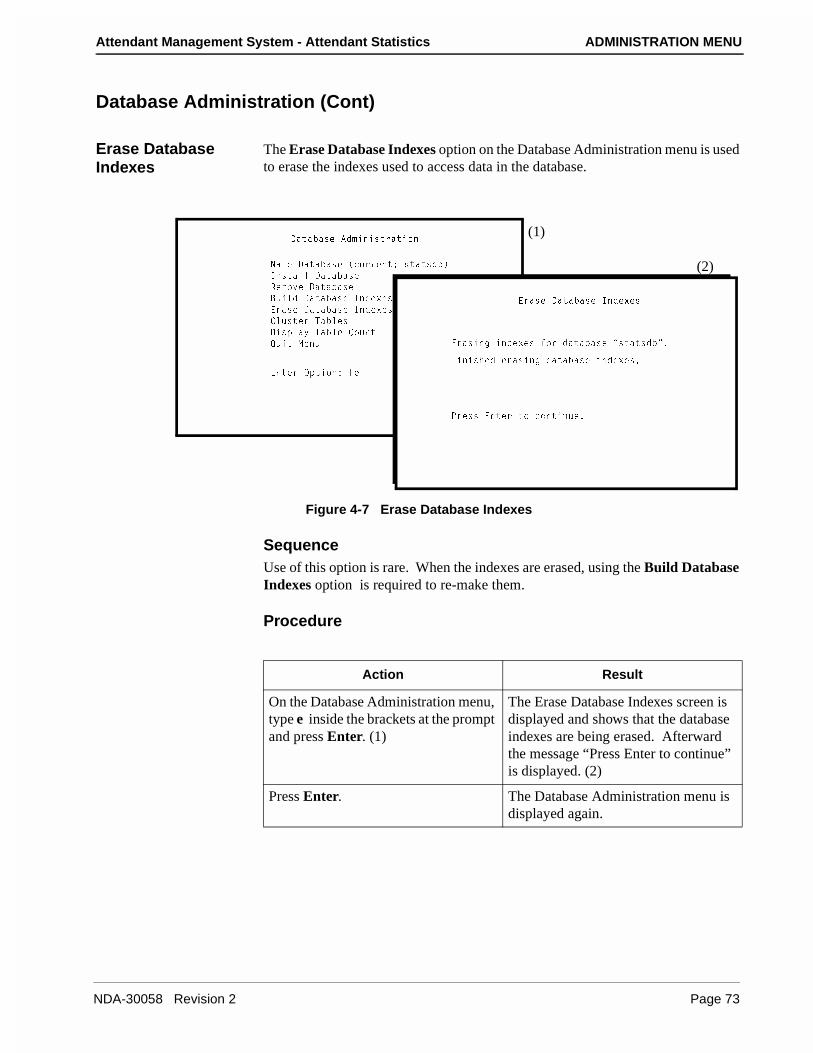
Attendant Management System - Attendant Statistics ADMINISTRATION MENU
Database Administration (Cont)
Erase Database Indexes
The Erase Database Indexes option on the Database Administration menu is used to erase the indexes used to access data in the database.
Figure 4-7 Erase Database Indexes
SequenceUse of this option is rare. When the indexes are erased, using the Build Database Indexes option is required to re-make them.
Procedure
4QdQRQcU 1T]Y^YcdbQdY_^
>Q]U 4QdQRQcU �SebbU^d* cdQdcTR�
9^cdQ\\ 4QdQRQcU
BU]_fU 4QdQRQcU
2eY\T 4QdQRQcU 9^TUhUc
5bQcU 4QdQRQcU 9^TUhUc
3\ecdUb DQR\Uc
4Yc`\Qi DQR\U 3_e^d
AeYd =U^e
5^dUb ?`dY_^* KUM
5bQcU 4QdQRQcU 9^TUhUc
5bQcY^W Y^TUhUc V_b TQdQRQcU ²cdQdcTR³�
6Y^YcXUT UbQcY^W TQdQRQcU Y^TUhUc�
@bUcc 5^dUb d_ S_^dY^eU�
(1)
(2)
Action Result
On the Database Administration menu, type e inside the brackets at the prompt and press Enter. (1)
The Erase Database Indexes screen is displayed and shows that the database indexes are being erased. Afterward the message “Press Enter to continue” is displayed. (2)
Press Enter. The Database Administration menu is displayed again.
NDA-30058 Revision 2 Page 73
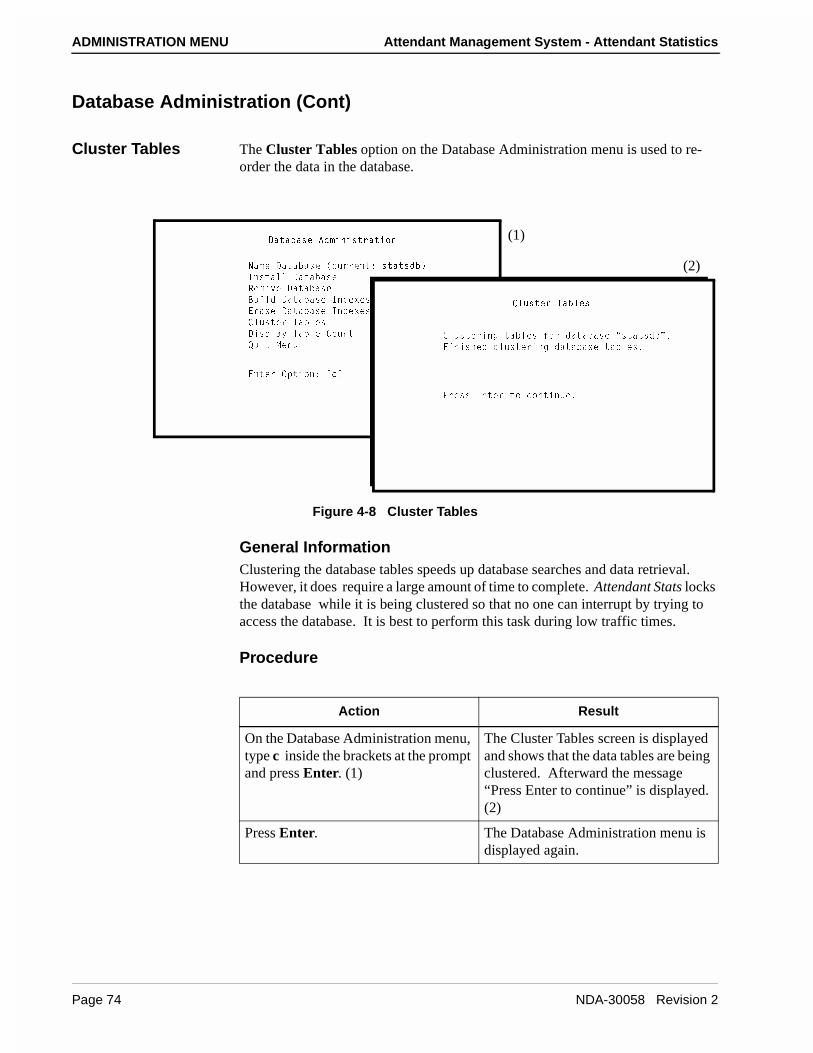
ADMINISTRATION MENU Attendant Management System - Attendant Statistics
Database Administration (Cont)
Cluster Tables The Cluster Tables option on the Database Administration menu is used to re-order the data in the database.
Figure 4-8 Cluster Tables
General InformationClustering the database tables speeds up database searches and data retrieval. However, it does require a large amount of time to complete. Attendant Stats locks the database while it is being clustered so that no one can interrupt by trying to access the database. It is best to perform this task during low traffic times.
Procedure
4QdQRQcU 1T]Y^YcdbQdY_^
>Q]U 4QdQRQcU �SebbU^d* cdQdcTR�
9^cdQ\\ 4QdQRQcU
BU]_fU 4QdQRQcU
2eY\T 4QdQRQcU 9^TUhUc
5bQcU 4QdQRQcU 9^TUhUc
3\ecdUb DQR\Uc
4Yc`\Qi DQR\U 3_e^d
AeYd =U^e
5^dUb ?`dY_^* KSM
3\ecdUb DQR\Uc
3\ecdUbY^W dQR\Uc V_b TQdQRQcU ²cdQdcTR³�
6Y^YcXUT S\ecdUbY^W TQdQRQcU dQR\Uc�
@bUcc 5^dUb d_ S_^dY^eU�
(1)
(2)
Action Result
On the Database Administration menu, type c inside the brackets at the prompt and press Enter. (1)
The Cluster Tables screen is displayed and shows that the data tables are being clustered. Afterward the message “Press Enter to continue” is displayed. (2)
Press Enter. The Database Administration menu is displayed again.
Page 74 NDA-30058 Revision 2
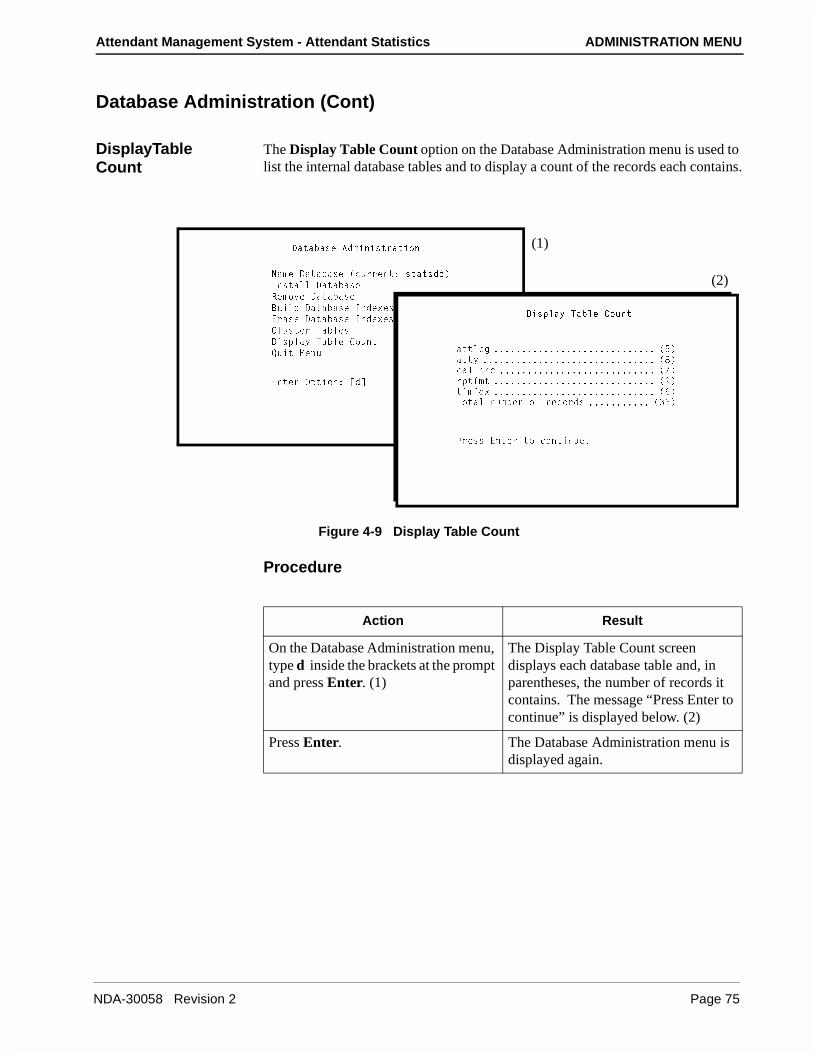
Attendant Management System - Attendant Statistics ADMINISTRATION MENU
Database Administration (Cont)
DisplayTable Count
The Display Table Count option on the Database Administration menu is used to list the internal database tables and to display a count of the records each contains.
Figure 4-9 Display Table Count
Procedure
4QdQRQcU 1T]Y^YcdbQdY_^
>Q]U 4QdQRQcU �SebbU^d* cdQdcTR�
9^cdQ\\ 4QdQRQcU
BU]_fU 4QdQRQcU
2eY\T 4QdQRQcU 9^TUhUc
5bQcU 4QdQRQcU 9^TUhUc
3\ecdUb DQR\Uc
4Yc`\Qi DQR\U 3_e^d
AeYd =U^e
5^dUb ?`dY_^* KTM
4Yc`\Qi DQR\U 3_e^d
Qdd\_W ����������������������������� �%�
Qddi ������������������������������� �(�
SQ\\`bS ���������������������������� �'�
b`dV]d ����������������������������� �)�
dY]YTh ����������������������������� �&�
D_dQ\ ^e]RUb _V bUS_bTc ����������� �#%�
@bUcc 5^dUb d_ S_^dY^eU�
(1)
(2)
Action Result
On the Database Administration menu, type d inside the brackets at the prompt and press Enter. (1)
The Display Table Count screen displays each database table and, in parentheses, the number of records it contains. The message “Press Enter to continue” is displayed below. (2)
Press Enter. The Database Administration menu is displayed again.
NDA-30058 Revision 2 Page 75
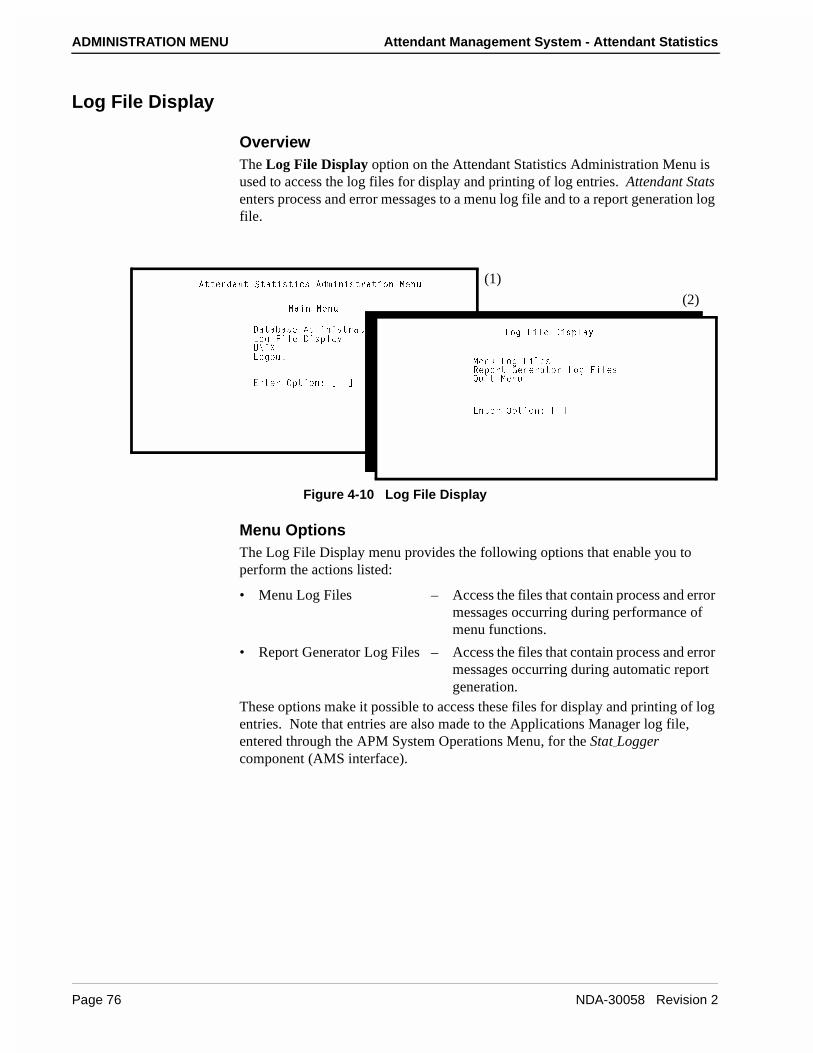
ADMINISTRATION MENU Attendant Management System - Attendant Statistics
Log File Display
OverviewThe Log File Display option on the Attendant Statistics Administration Menu is used to access the log files for display and printing of log entries. Attendant Stats enters process and error messages to a menu log file and to a report generation log file.
Figure 4-10 Log File Display
Menu OptionsThe Log File Display menu provides the following options that enable you to perform the actions listed:
• Menu Log Files – Access the files that contain process and error messages occurring during performance of menu functions.
• Report Generator Log Files – Access the files that contain process and error messages occurring during automatic report generation.
These options make it possible to access these files for display and printing of log entries. Note that entries are also made to the Applications Manager log file, entered through the APM System Operations Menu, for the Stat_Logger component (AMS interface).
1ddU^TQ^d CdQdYcdYSc 1T]Y^YcdbQdY_^ =U^e
=QY^ =U^e
4QdQRQcU 1T]Y^YcdbQdY_^
<_W 6Y\U 4Yc`\Qi
E>9H<_W_ed
5^dUb ?`dY_^* K M
<_W 6Y\U 4Yc`\Qi
=U^e <_W 6Y\Uc
BU`_bd 7U^UbQd_b <_W 6Y\Uc
AeYd =U^e
5^dUb ?`dY_^* K M
(1)
(2)
Page 76 NDA-30058 Revision 2
Attendant Management System - Attendant Statistics ADMINISTRATION MENU
Log File Display (Cont)
Procedure
Action Result
On the Attendant Statistics Administration Main Menu, type l inside the brackets at the prompt and press Enter. (1)
The Log File Display menu is displayed. (2)
Refer to the following pages for information about each menu option.
To exit the Log File Display menu, type q at the prompt and press Enter.
The Attendant Statistics Administration Main Menu is displayed.
NDA-30058 Revision 2 Page 77
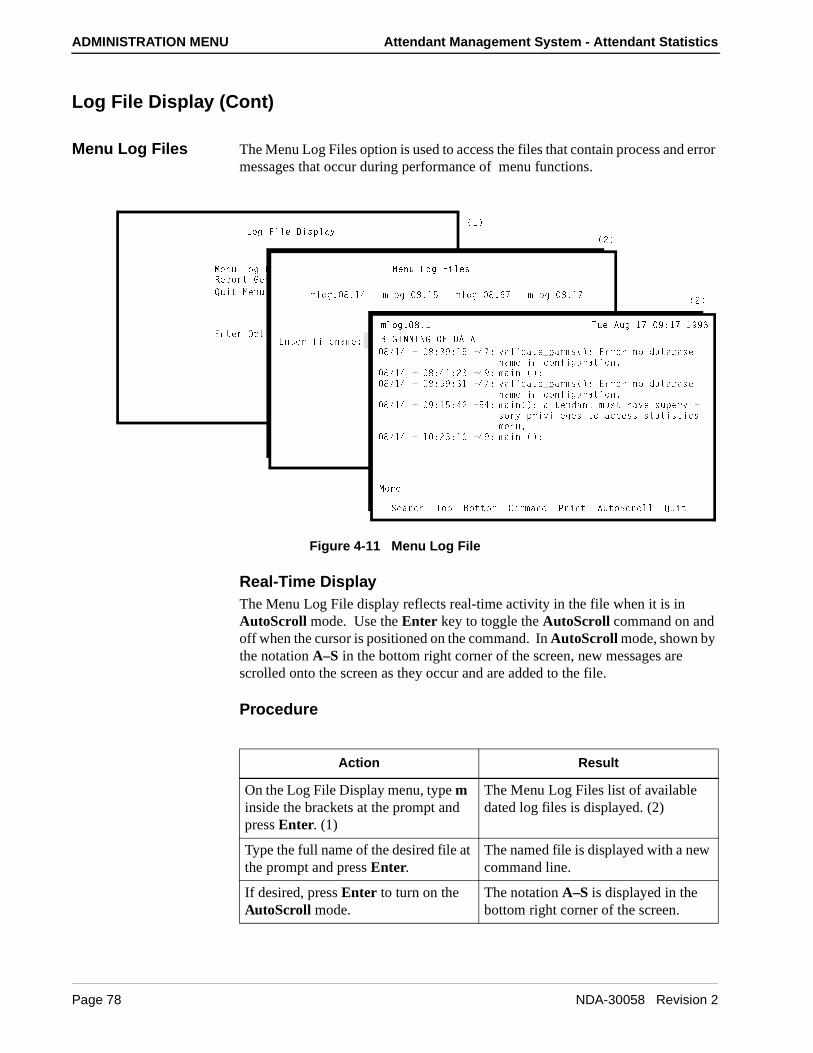
ADMINISTRATION MENU Attendant Management System - Attendant Statistics
Log File Display (Cont)
Menu Log Files The Menu Log Files option is used to access the files that contain process and error messages that occur during performance of menu functions.
Figure 4-11 Menu Log File
Real-Time DisplayThe Menu Log File display reflects real-time activity in the file when it is in AutoScroll mode. Use the Enter key to toggle the AutoScroll command on and off when the cursor is positioned on the command. In AutoScroll mode, shown by the notation A–S in the bottom right corner of the screen, new messages are scrolled onto the screen as they occur and are added to the file.
Procedure
<_W 6Y\U 4Yc`\Qi
=U^e <_W 6Y\Uc
BU`_bd 7U^UbQd_b <_W 6Y\Uc
AeYd =U^e
5^dUb ?`dY_^* K M
=U^e <_W 6Y\Uc
]\_W� (�!$ ]\_W (�!% ]\_W (�&' ]\_W (�!'
5^dUb VY\U^Q]U*
]\_W� (�! DeU 1eW !' )*!' !))#
2579>>9>7 ?6 41D1
=_bU
CUQbSX D_` 2_dd_] 3_]]Q^T @bY^d 1ed_CSb_\\ AeYd
(�!$ � (*#)*!% �$'* fQ\YTQdUO`Qb]c��* 5bb_b ^_ TQdQRQcU
^Q]U Y^ S_^VYWebQdY_^�
(�!$ � (*$!*"# �$)* ]QY^ ��*
(�!$ � (*%)*#! �$'* fQ\YTQdUO`Qb]c��* 5bb_b ^_ TQdQRQcU
^Q]U Y^ S_^VYWebQdY_^�
(�!$ � )*!%*$" �%$* ]QY^��* QddU^TQ^d ]ecd XQfU ce`UbfY�
c_bi `bYfY\UWUc d_ QSSUcc cdQdYcdYSc
]U^e�
(�!$ � ! *"#*! �$)* ]QY^ ��*
�!�
�"�
�"�
Action Result
On the Log File Display menu, type m inside the brackets at the prompt and press Enter. (1)
The Menu Log Files list of available dated log files is displayed. (2)
Type the full name of the desired file at the prompt and press Enter.
The named file is displayed with a new command line.
If desired, press Enter to turn on the AutoScroll mode.
The notation A–S is displayed in the bottom right corner of the screen.
Page 78 NDA-30058 Revision 2
Attendant Management System - Attendant Statistics ADMINISTRATION MENU
Menu Log Files (Cont)
Procedure (Cont)
Action Result
Use the Top command to move to the beginning of the display and the Bottom command to move to the end of the display.
To Search the Display:Type s and press Enter to select the Search command. At the prompt type the desired pattern and press Enter.
All occurrences of the given pattern on that page are highlighted.
To Print the Screen or File:Type p and press Enter to select the Print command. At the prompt, type f to print the whole file or s to print just the screen and press Enter. (Press Esc to return the cursor to the command line, cancelling the print request.)
There is a pause while the file or screen is sent to the printer. Then the command line is returned.
To Work at UNIX Level:Type c and press Enter to select the Command choice on the command line.
The message Enter UNIX command and press Enter is displayed, and the cursor is positioned on a UNIX prompt.
To exit the display, type q at the prompt and press Enter.
The Log File Display menu is displayed.
NDA-30058 Revision 2 Page 79
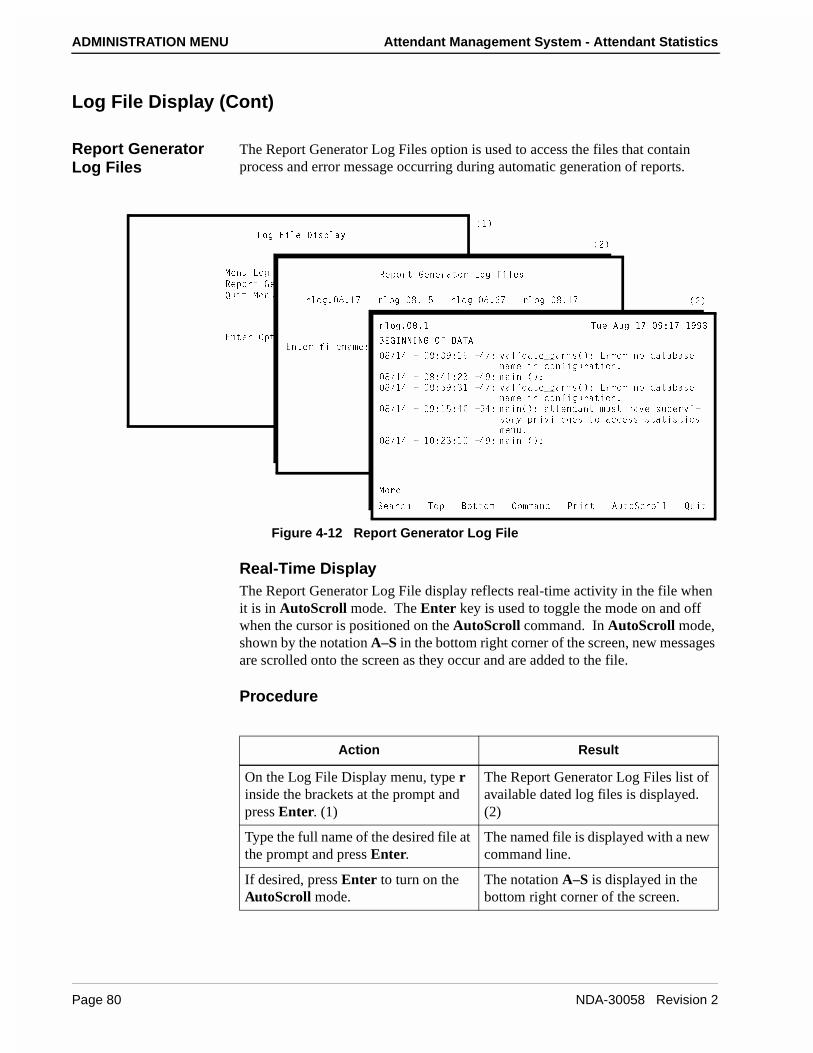
ADMINISTRATION MENU Attendant Management System - Attendant Statistics
Log File Display (Cont)
Report Generator Log Files
The Report Generator Log Files option is used to access the files that contain process and error message occurring during automatic generation of reports.
Figure 4-12 Report Generator Log File
Real-Time DisplayThe Report Generator Log File display reflects real-time activity in the file when it is in AutoScroll mode. The Enter key is used to toggle the mode on and off when the cursor is positioned on the AutoScroll command. In AutoScroll mode, shown by the notation A–S in the bottom right corner of the screen, new messages are scrolled onto the screen as they occur and are added to the file.
Procedure
<_W 6Y\U 4Yc`\Qi
=U^e <_W 6Y\Uc
BU`_bd 7U^UbQd_b <_W 6Y\Uc
AeYd =U^e
5^dUb ?`dY_^* K]M
BU`_bd 7U^UbQd_b <_W 6Y\Uc
b\_W� (�!' b\_W (�!% b\_W (�&' b\_W (�!'
5^dUb VY\U^Q]U*
b\_W� (�! DeU 1eW !' )*!' !))#
2579>>9>7 ?6 41D1
=_bU
CUQbSX D_` 2_dd_] 3_]]Q^T @bY^d 1ed_CSb_\\ AeYd
(�!$ � (*#)*!% �$'* fQ\YTQdUO`Qb]c��* 5bb_b ^_ TQdQRQcU
^Q]U Y^ S_^VYWebQdY_^�
(�!$ � (*$!*"# �$)* ]QY^ ��*
(�!$ � (*%)*#! �$'* fQ\YTQdUO`Qb]c��* 5bb_b ^_ TQdQRQcU
^Q]U Y^ S_^VYWebQdY_^�
(�!$ � )*!%*$" �%$* ]QY^��* QddU^TQ^d ]ecd XQfU ce`UbfY�
c_bi `bYfY\UWUc d_ QSSUcc cdQdYcdYSc
]U^e�
(�!$ � ! *"#*! �$)* ]QY^ ��*
�!�
�"�
�"�
Action Result
On the Log File Display menu, type r inside the brackets at the prompt and press Enter. (1)
The Report Generator Log Files list of available dated log files is displayed. (2)
Type the full name of the desired file at the prompt and press Enter.
The named file is displayed with a new command line.
If desired, press Enter to turn on the AutoScroll mode.
The notation A–S is displayed in the bottom right corner of the screen.
Page 80 NDA-30058 Revision 2
Attendant Management System - Attendant Statistics ADMINISTRATION MENU
Report Generator Log Files (Cont)
Procedure (Cont)
Action Result
Use the Top command to move to the beginning of the display and the Bottom command to move to the end of the display.
On the Log File Display menu, type r inside the brackets at the prompt and press Enter. (1)
The Report Generator Log Files list of available dated log files is displayed. (2)
Type the full name of the desired file at the prompt and press Enter.
The named file is displayed with a new command line.
If desired, press Enter to turn on the AutoScroll mode.
The notation A–S is displayed in the bottom right corner of the screen.
Use the Top command to move to the beginning of the display and the Bottom command to move to the end of the display.
To Search the Display:Type s and press Enter to select the Search command. At the prompt, type the desired pattern and press Enter.
All occurrences of the given pattern on that page are highlighted.
To Print the Screen or File:Type p and press Enter to select the Print command. At the prompt, type f to print the whole file or s to print just the screen and press Enter. (Pressing Esc returns the cursor to the command line, cancelling the print request.)
There is a pause while the file or screen is sent to the printer. Then the command line is returned.
To Work at UNIX Level:Type c and press Enter to select the Command choice on the command line.
The message “Enter UNIX command and press Enter” is displayed, and the cursor is positioned on a UNIX prompt.
To exit the display, type q at the prompt and press Enter.
The Log File Display menu is displayed.
NDA-30058 Revision 2 Page 81

ADMINISTRATION MENU Attendant Management System - Attendant Statistics
This Page Left Blank.
Page 82 NDA-30058 Revision 2

Attendant Management System - Attendant Statistics PROCESS AND ERROR MESSAGES
Chapter 5 PROCESS AND ERROR MESSAGES
Introduction
This chapter contains two listings of processing and error messages that may be displayed on-screen during operator or supervisor functions. These messages may also appear in the APM log and the Attendant Stats Menu and Report Generation logs. One list is alphabetical and the other is numerical, containing all database errors that are displayed following a –9,000 series number.
These two lists are provided in the following sections:
• “Alphabetized Messages” on page 84
• “-9000 Series Messages” on page 99Attendant Stats process and error messages are listed in this chapter with descriptions of their meaning. Recovery steps are given for error conditions, if necessary. The Attendant Stats’ messages that can also occur with the AMS appear in the AMS Operations Manual, Chapter 11, “Process and Error Messages.” Therefore, if a displayed message cannot be found in this chapter, refer to the AMS Operations Manual.
Note: For error detail and any required recovery from errors that are displayed following a –10,000 number, refer to the Informix documentation.
NDA-30058 Revision 2 Page 83
PROCESS AND ERROR MESSAGES Attendant Management System - Attendant Statistics
Alphabetized Messages
Attendant must have supervisory privileges to access statistics menu.
Access to Attendant Stats is permitted only when the login and password used to enter AMS is tied to supervisory authority.
Be more specific.
There are more matches to the given pattern than can be displayed according to the Attendant Stats setup. Enter more characters for the search pattern to make the search more specific.
Cannot add, modify, or delete records at this time.
Only one person may add, change, or delete a time index at a time, and someone else is doing it now. Retry the function later.
Cannot delete. Time index used in automated report.
An attempt to delete a time index failed because the schedule tied to the time index is now in use for automatic report generation. Find the automated report using the schedule, remove or alter the schedule used for that report, and then delete the unused schedule.
Cannot delete. Report format used for automated report.
An attempt to delete a report format has failed because the format is now scheduled for automated generation. Cancel automatic generation of the formatted report before the format can be deleted.
Commas must be followed by a number.
Re-enter the data in the correct form.
Database error. Cannot delete.
An error occurred while the application was trying to make a deletion from the database. For error detail and required recovery, find the message in this chapter if it is a -9,000 number or in the Informix manual if it is a -10,000 number. If it is a 10,000 number, the last three digits are the Informix error code.
Date entered precedes date of statistical data maintained by the system.
Attendant Stats maintains call processing data for a preset amount of time up to two weeks. The date entered is too far back. Call processing data is no longer available for the given date. Try again with a new date.
Date must be in the form MMDD.
Re-enter the date in the correct form.
Date entered is a future date.
The date entered at this prompt must be past. The requested statistics are to be calculated from call processing data collected during the past two weeks.
Day must be between 1 and 31.
Re-enter a date within the range shown.
Page 84 NDA-30058 Revision 2
Attendant Management System - Attendant Statistics PROCESS AND ERROR MESSAGES
Alphabetized Messages (Cont)
Day not valid for month entered.
The date entered at the prompt is not appropriate for this month. (For example, it may be 31 for a month that has only 30 days.) Re-enter an earlier date or change the month.
Day of week must be between 0 and 6.
Re-enter a day within the range 0=Sunday through 6=Saturday.
Day too large for month entered.
The date entered at the prompt is not appropriate for this month. (For example, it may be 31 for a month that has only 30 days.) Re-enter an earlier date or change the month.
Discrepancy between time index records and report automation.
An error occurred because two people tried to add, change, or delete a time index at the same time. This has caused a difference between the Informix database and other internal system tables that must agree. This is a rare but significant error occurring between Informix and the operating system. When this message is displayed, add, change, or delete a time index record. In the process, Informix and the system “clean up” the results of the previous error.
Do not intermix commas and hyphens.
Re-enter the data using either commas or hyphens, but not both.
Do not use more than one hyphen.
Use a hyphen to show a range. Show only one range per field.
Errno > sys_nerr.
This is a UNIX system error. Refer to the UNIX system manuals for more information. If the problem cannot be resolved, call the system distributor.
Error accessing configuration file.
The application is unable to access the stats_cfg or att_cfg configuration file. Check the preset file permissions. If the problem persists, reinstall the database from the Administration menu.
Error adding attendant record.
An error occurred while the application was trying to add an attendant record to the database. For error detail and required recovery, find the message in this chapter if it is a -9,000 number or in the Informix manual if it is a -10,000 number. If the number is in the 10,000 series, the last three digits are the Informix error code.
Error deleting attendant record.
An error occurred while the application was trying to delete an attendant record from the database. For error detail and required recovery, find the message in this chapter if it is a -9,000 number or in the Informix manual if it is a -10,000 number. If the number is in the 10,000 series, the last three digits are the Informix error code.
NDA-30058 Revision 2 Page 85
PROCESS AND ERROR MESSAGES Attendant Management System - Attendant Statistics
Alphabetized Messages (Cont)
Error deleting record from report format table.
An error occurred while the application was trying to delete a record from a database table. For error detail and required recovery, find the message in this chapter if it is a -9,000 number or in the Informix manual if it is a -10,000 number. If the number is in the 10,000 series, the last three digits are the Informix error code.
Error deleting record from time index table.
An error occurred while the application was trying to delete a record from a database table. For error detail and required recovery, find the message in this chapter if it is a -9,000 number or in the Informix manual if it is a -10,000 number. If the number is in the 10,000 series, the last three digits are the Informix error code.
Error deleting record from tidx table. Db & automated rpt gen discrepancy.
An error occurred because two people have attempted to add, modify, or delete a time index at the same time. This has caused a difference between the Informix database and other internal system tables that must be in agreement. This is a rare but significant error occurring between Informix and the operating system. When this message displays, it is necessary to add, modify, or delete a time index record. In the process, Informix and the system “clean up” the results of the previous error.
Error deleting extension call record.
An error occurred while the application was trying to delete an extension call record from the database. For error detail and required recovery, find the message in this chapter if it is a -9,000 number or in the Informix manual if it is a -10,000 number. If the number is in the 10,000 series, the last three digits are the Informix error code.
Error deleting route/trunk call record.
An error occurred while the application was trying to delete a route/trunk call record from the database. For error detail and required recovery, find the message in this chapter if it is a -9,000 number or in the Informix manual if it is a -10,000 number. If the number is in the 10,000 series, the last three digits are the Informix error code.
Error deleting att extn call record.
An error occurred while the application was trying to delete an attendant extension call record from the database. For error detail and required recovery, find the message in this chapter if it is a -9,000 number or in the Informix manual if it is a -10,000 number. If the number is in the 10,000 series, the last three digits are the Informix error code.
Page 86 NDA-30058 Revision 2
Attendant Management System - Attendant Statistics PROCESS AND ERROR MESSAGES
Alphabetized Messages (Cont)
Error getting attendant login records.
An error occurred while the application was trying to generate statistics from attendant login records. For error detail and required recovery, find the message in this chapter if it is a -9,000 number or in the Informix manual if it is a -10,000 number. If the number is in the 10,000 series, the last three digits are the Informix error code.
Error getting call records.
An error occurred while the application was trying to generate statistics from call records. For error detail and required recovery, find the message in this chapter if it is a -9,000 number or in the Informix manual if it is a -10,000 number. If the number is in the 10,000 series, the last three digits are the Informix error code.
Error getting call abandon records.
An error occurred while the application was trying to generate statistics from abandoned call records. For error detail and required recovery, find the message in this chapter if it is a -9,000 number or in the Informix manual if it is a -10,000 number. If the number is in the 10,000 series, the last three digits are the Informix error code.
Error getting call answer records.
An error occurred while the application was trying to generate statistics from answered call records. For error detail and required recovery, find the message in this chapter if it is a -9,000 number or in the Informix manual if it is a -10,000 number. If the number is in the 10,000 series, the last three digits are the Informix error code.
Error getting first set of call records.
An error occurred while the application was trying to generate statistics from call records. For error detail and required recovery, find the message in this chapter if it is a -9,000 number or in the Informix manual if it is a -10,000 number. If the number is in the 10,000 series, the last three digits are the Informix error code.
Error getting incoming call records.
An error occurred while the application was trying to generate statistics from incoming call records. For error detail and required recovery, find the message in this chapter if it is a -9,000 number or in the Informix manual if it is a -10,000 number. If the number is in the 10,000 series, the last three digits are the Informix error code.
NDA-30058 Revision 2 Page 87
PROCESS AND ERROR MESSAGES Attendant Management System - Attendant Statistics
Alphabetized Messages (Cont)
Error getting informix password.
An error occurred while the application was trying to access the Informix password. For error detail and required recovery, find the message in this chapter if it is a -9,000 number or in the Informix manual if it is a -10,000 number. The last three digits in a 10,000-level number are the Informix error code.
Error getting second set of call records.
An error occurred while the application was trying to generate statistics from call records. For error detail and required recovery, find the message in this chapter if it is a -9,000 number or in the Informix manual if it is a -10,000 number. If the number is in the 10,000 series, the last three digits are the Informix error code.
Error getting third set of call records.
An error occurred while the application was trying to generate statistics from call records. For error detail and required recovery, find the message in this chapter if it is a -9,000 number or in the Informix manual if it is a -10,000 number. If the number is in the 10,000 series, the last three digits are the Informix error code.
Error in configuration file parameter.
Something is wrong with the configuration file (stat_cfg). This error rarely occurs. Check to make sure that the file is in the directory named in the APM configuration. If the problem persists, call the system distributor.
Error in file size expected.
The AMS password file is corrupted or has no attendant passwords in it.
Error in menu command.
Attendant Stats is unable to display the given file. Call the system distributor.
Error initializing the database.
An error occurred while the application was trying to initialize the database. For error detail and required recovery, find the message in this chapter if it is a -9,000 number or in the Informix manual if it is a -10,000 number. If the number is in the 10,000 series, the last three digits are the Informix error code.
Error inserting record into report format table.
An error occurred while the application was trying to add a record to the given database table. For error detail and required recovery, find the message in this chapter if it is a -9,000 number or in the Informix manual if it is a -10,000 number. If the number is in the 10,000 series, the last three digits are the Informix error code.
Page 88 NDA-30058 Revision 2
Attendant Management System - Attendant Statistics PROCESS AND ERROR MESSAGES
Alphabetized Messages (Cont)
Error inserting record into time index table.
An error occurred while the application was trying to add a record to the given database table. For error detail and required recovery, find the message in this chapter if it is a -9,000 number or in the Informix manual if it is a -10,000 number. If the number is in the 10,000 series, the last three digits are the Informix error code.
Error inserting record into tidx table. Db & automated rpt gen discrepancy.
An error occurred because two people have attempted to add, change, or delete a time index at the same time. The time index was deleted from the Informix database but not from other internal system tables. Attendant Stats tried to insert the record into the Informix database, but the attempt failed. Add, change, or delete any time index from the menu. In the process, the affected tables will be cleaned up.
Error locking att extn call record.
Before Attendant Stats can make the given change to a database record, it locks the record so that it cannot be accessed by another user during the process. An error occurred in the attempt to lock an attendant extension call record in the Informix database. For error detail and required recovery, find the message in this chapter if it is a -9,000 number or in the Informix manual if it is a -10,000 number. If the number is in the 10,000 series, the last three digits are the Informix error code.
Error locking attendant record.
Before Attendant Stats can make the given change to a database record, it locks the record so that it cannot be accessed by another user during the process. An error occurred in the attempt to lock an attendant record in the Informix database. For error detail and required recovery, find the message in this chapter if it is a -9,000 number or in the Informix manual if it is a -10,000 number. The last three digits in a 10,000-level number are the Informix error code.
Error locking configuration file.
An error occurred while the application was trying to lock the configuration file to read it. Check the two configuration databases in the APM for accuracy. Then process and install both using the APM menu options.
Error locking extension call record.
Before Attendant Stats can make a given change to a database record, it locks the record so that it cannot be accessed by another user during the process. An error occurred in the attempt to lock an extension call record in the Informix database. For error detail and required recovery, find the message in this chapter if it is a -9,000 number or in the Informix manual if it is a -10,000 number.
NDA-30058 Revision 2 Page 89
PROCESS AND ERROR MESSAGES Attendant Management System - Attendant Statistics
Alphabetized Messages (Cont)
Error locking record in report format table.
Before Attendant Stats can make a given change to a database record, it locks the record so that it cannot be accessed by another user during the process. An error occurred in the attempt to lock a record in the report format database table. For error detail and required recovery, find the message in this chapter if it is a -9,000 number or in the Informix manual if it is a -10,000 number. The last three digits in a 10,000-level number are the Informix error code.
Error locking record in time index table.
Before Attendant Stats can make a given change to a database record, it locks the record so that it cannot be accessed by another user during the process. An error occurred in the attempt to lock a record in the time index database table. For error detail and required recovery, find the message in this chapter if it is a -9,000 number or in the Informix manual if it is a -10,000 number. If the number is in the 10,000 series, the last three digits are the Informix error code.
Error locking route/trunk call record.
Before Attendant Stats can make a given change to a database record, it locks the record so that it cannot be accessed by another user during the process. An error occurred in the attempt to lock a route or trunk call record in the Informix database. For error detail and required recovery, find the message in this chapter if it is a -9,000 number or in the Informix manual if it is a -10,000 number. The last three digits in a 10,000-level number are the Informix error code.
Error modifying ans/abn/rcl call record.
An error occurred while the application was trying to make a change to a call record in the Informix database. For error detail and required recovery, find the message in this chapter if it is a -9,000 number or in the Informix manual if it is a -10,000 number. If the number is in the 10,000 series, the last three digits are the Informix error code.
Error modifying att extn call record.
An error occurred while the application was trying to make a change to an attendant extension call record in the Informix database. For error detail and required recovery, find the message in this chapter if it is a -9,000 number or in the Informix manual if it is a -10,000 number. If the number is in the 10,000 series, the last three digits are the Informix error code.
Error modifying attendant record.
An error occurred while the application was trying to make a change to an attendant record in the Informix database. For error detail and required recovery, find the message in this chapter if it is a -9,000 number or in the Informix manual if it is a -10,000 number. If the number is in the 10,000 series, the last three digits are the Informix error code.
Page 90 NDA-30058 Revision 2
Attendant Management System - Attendant Statistics PROCESS AND ERROR MESSAGES
Alphabetized Messages (Cont)
Error modifying change party call record.
An error occurred while the application was trying to modify a change-party call record in the Informix database. For error detail and required recovery, find the message in this chapter if it is a -9,000 number or in the Informix manual if it is a -10,000 number. If the number is in the 10,000 series, the last three digits are the Informix error code.
Error modifying record in the report format table.
An error occurred while the application was trying to modify a record in the report format table. For error detail and required recovery, find the message in this chapter if it is a -9,000 number or in the Informix manual if it is a -10,000 number. The last three digits in a 10,000-level number are the Informix error code.
Error modifying record in time index table.
An error occurred while the application was trying to make a change to a record in the time index database table. For error detail and required recovery, find the message in this chapter if it is a -9,000 number or in the Informix manual if it is a -10,000 number. If the number is in the 10,000 series, the last three digits are the Informix error code.
Error modifying record in tidx table. Db & automated rpt gen discrepancy.
An error occurred because two people have attempted to add, modify, or delete a time index at the same time. This has caused a difference between the Informix database and other internal system tables that must agree. This is a rare but significant error occurring between Informix and the operating system. When this message is displayed, add, change, or delete any time index record. In the process, Informix and the system “clean up” the results of the previous error.
Error modifying release call record.
An error occurred while the application was trying to make a change to a release call record in the Informix database. For error detail and required recovery, find the message in this chapter if it is a -9,000 number or in the Informix manual if it is a -10,000 number. If the number is in the 10,000 series, the last three digits are the Informix error code.
Error no database name in configuration.
There is no Informix database name in the Stat_cfg file. Enter that database file through the APM screens and enter the default name statsdb in the Database Name field. Remember to process and install the database afterwards.
Error opening configuration file.
An error occurred while the application was trying to access the stat_cfg or att_cfg file. Check the permissions for file access. Make sure the configuration file is there and has not been removed in error. Then call the system distributor if the problem persists.
NDA-30058 Revision 2 Page 91
PROCESS AND ERROR MESSAGES Attendant Management System - Attendant Statistics
Alphabetized Messages (Cont)
Error querying attendant login table.
An error occurred while the application was querying the attendant login table. For error detail and required recovery, find the message in this chapter if it is a -9,000 number or in the Informix manual if it is a -10,000 number. The last three digits in a 10,000-level number are the Informix error code.
Error querying database for attendant record.
An error occurred while the application was querying the database for an attendant record. For error detail and required recovery, find the message in this chapter if it is a -9,000 number or in the Informix manual if it is a -10,000 number. If the number is in the 10,000 series, the last three digits are the Informix error code.
Error querying database for call record.
An error occurred while the application was querying the database for a call record. For error detail and required recovery, find the message in this chapter if it is a -9,000 number or in the Informix manual if it is a -10,000 number. The last three digits in a 10,000-level number are the Informix error code.
Error querying report format table.
An error occurred while the application was querying the report format table for matches to the given pattern. For error detail and required recovery, find the message in this chapter if it is a -9,000 number or in the Informix manual if it is a -10,000 number. The last three digits in a 10,000-level number are the Informix error code.
Error querying time index table.
An error occurred while the application was querying the time index table for matches to the given pattern. For error detail and required recovery, find the message in this chapter if it is a -9,000 number or in the Informix manual if it is a -10,000 number. If the number is in the 10,000 series, the last three digits are the Informix error code.
Error querying time index table. No tidx for auto report.
An error occurred while the application was querying the time index table. For error detail and required recovery, find the message in this chapter if it is a - 9,000 number or in the Informix manual if it is a -10,000 number. If the number is in the 10,000 series, the last three digits are the Informix error code.
Error reading configuration file.
An error occurred while the application was trying to read the stats_cfg or att_cfg configuration file. Check the file permissions. If the problem persists, reinstall the software.
Page 92 NDA-30058 Revision 2
Attendant Management System - Attendant Statistics PROCESS AND ERROR MESSAGES
Alphabetized Messages (Cont)
Error setting informix environment.
An error occurred while the application was trying to initialize the Informix database. For error detail and required recovery, find the message in this chapter if it is a -9,000 number or in the Informix manual if it is a -10,000 number. If the number is in the 10,000 series, the last three digits are the Informix error code.
Fatal error.
This is a back-up error message that occurs when a spurious error message is generated in error. An attempt to generate a report failed. Try again. If this message is displayed again, call the system distributor. It may indicate an unidentified problem.
Format expected is either ‘nn’ or ‘nn,nn’.
Re-enter data in the correct format.
Format expected is either ‘nn”, ‘nn,nn’ or ‘nn-nn’.
Re-enter data in the correct format.
Hour must be between 0 and 23.
Re-enter an hour within the range.
Hyphens must be preceded by a number.
Hyphens are used to show the range between the number that precedes it and the number that follows it. Re-enter data in the correct format.
Hyphens must be followed by a number.
Hyphens are used to show the range between the number that precedes it and the number that follows it. Re-enter data in the correct format.
Incomplete att record found in database.
The OAI link has gone down and an attendant login/logout record has been lost. Any statistic generated during this time with this data will be skewed because of the loss.
Incomplete call record found in database.
The OAI link has gone down and a call record has been lost. Any statistic generated during this time with this data will be skewed because of the loss.
Internal error. Invalid type of query.
An error occurred while the application was trying a database query. For error detail and required recovery, find the message in this chapter if it is a -9,000 number or in the Informix manual if it is a -10,000 number. If the number is in the 10,000 series, the last three digits are the Informix error code.
NDA-30058 Revision 2 Page 93
PROCESS AND ERROR MESSAGES Attendant Management System - Attendant Statistics
Alphabetized Messages (Cont)
Invalid att and/or queue stats parameter.
In the stats_cfg configuration file, both the Attendant Statistics and the Queue Statistics parameters have been set to “No”. (At least one of these parameters must be set to “Yes”; both should be set to “Yes” for AMS).
Invalid date and/or time.
The date and/or time entered is invalid. Re-enter a valid date.
Invalid Deletion: Report format used in automated report.
A report format that is now scheduled for automatic generation may not be deleted. Cancel the scheduled generation before attempting to delete the format.
Invalid parm: max days to keep records.
The entry made to the given parameter in the stat_cfg file lies outside of the allowable range of 1 to 14 days. Check the configuration data for accuracy. Then process and install the database using the APM menu options.
Invalid time due to daylight savings change.
The date entered does not exist because of Daylight Savings Time. Re-enter a time that is valid in Daylight Savings Time.
Malloc error.
A request for memory has been denied because the system has no memory available. Check the log files for more information about the error. Check the configuration for process management on the UNIX kernel. The kernel may need to be retuned, rebuilt or reconfigured. Use the UNIX system documents for instructions.
Malloc returned NULL.
A request for memory has been denied because the system has none available. Check the log files for more information about the error. Check the configuration for process management on the UNIX kernel. The kernel may need to be retuned, rebuilt or reconfigured. Use the UNIX system documents for instructions.
Must add, modify, or delete a time index record to resolve discrepancy.
This message is displayed immediately after the message “Error (inserting, modifying, or deleting) record in tidx table. Db & automated rpt gen discrepancy” to show what to do when an error occurred that has caused a difference between the Informix database and other internal system tables. Add, change, or delete any time index record. In the process, Informix and the system “clean up” the results of the previous error.
Page 94 NDA-30058 Revision 2
Attendant Management System - Attendant Statistics PROCESS AND ERROR MESSAGES
Alphabetized Messages (Cont)
No answer rec found in db for release msg.
To calculate statistics, Attendant Stats connects release records to answer records to incoming call records, showing that an incoming call has been answered and completed. The OAI link has gone down. The process, of connecting the records has been interrupted. As a result, any generated statistic that reflect the affected call records are skewed.
No answer rec found in db for release msg.
To calculate the statistics, Attendant Stats connects release records to answer records to incoming call records, showing that an incoming call has been answered and completed. The OAI link has gone down and it has interrupted connecting the given records. As a result, any generated statistics that reflect the affected call records are skewed.
No attendants for which to generate report. Report not generated.
There are no attendant passwords for which to calculate the statistics. The AMS password file is empty.
No data within time frame for which to generate report. Report not generated.
Within the time period shown, there is no data from which to calculate statistics.
No incoming rec found in db for answer msg.
To calculate statistics, Attendant Stats connects release records to answer records to incoming call records, showing that an incoming call has been answered and completed. The OAI link has gone down. It has interrupted connecting the given records. As a result, any generated statistics that reflect the affected call records are skewed.
No incoming rec found in db for abandon msg.
To calculate statistics, Attendant Stats connects abandoned call records to incoming call records, showing that an incoming call has been abandoned. The OAI link has gone down. It has interrupted connecting the given records. Any generated statistics that reflect the affected call records are skewed.
No incoming rec found in db for recall msg.
To calculate statistics, Attendant Stats connects recall records to incoming call records, showing that an incoming call has been recalled. The OAI link has gone down. It has interrupted connecting the given records. Any generated statistics that reflect the affected call records are skewed.
No incoming rec found in db for chgpty msg.
To calculate statistics, Attendant Stats connects the record of the parties in a call being changed to the incoming record on that call, showing that an incoming call has been answered and transferred. The OAI link has gone down. It has interrupted connecting the given records. Any generated statistics that reflect the affected call records are skewed.
NDA-30058 Revision 2 Page 95
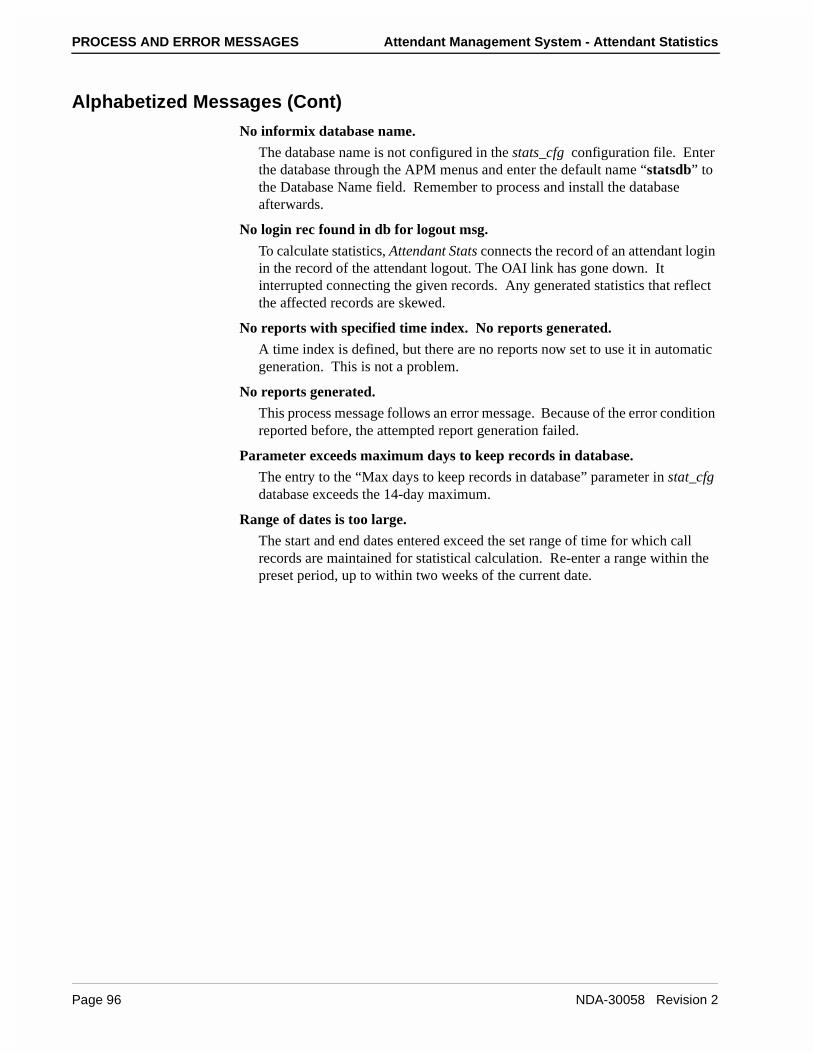
PROCESS AND ERROR MESSAGES Attendant Management System - Attendant Statistics
Alphabetized Messages (Cont)
No informix database name.
The database name is not configured in the stats_cfg configuration file. Enter the database through the APM menus and enter the default name “statsdb” to the Database Name field. Remember to process and install the database afterwards.
No login rec found in db for logout msg.
To calculate statistics, Attendant Stats connects the record of an attendant login in the record of the attendant logout. The OAI link has gone down. It interrupted connecting the given records. Any generated statistics that reflect the affected records are skewed.
No reports with specified time index. No reports generated.
A time index is defined, but there are no reports now set to use it in automatic generation. This is not a problem.
No reports generated.
This process message follows an error message. Because of the error condition reported before, the attempted report generation failed.
Parameter exceeds maximum days to keep records in database.
The entry to the “Max days to keep records in database” parameter in stat_cfg database exceeds the 14-day maximum.
Range of dates is too large.
The start and end dates entered exceed the set range of time for which call records are maintained for statistical calculation. Re-enter a range within the preset period, up to within two weeks of the current date.
Page 96 NDA-30058 Revision 2
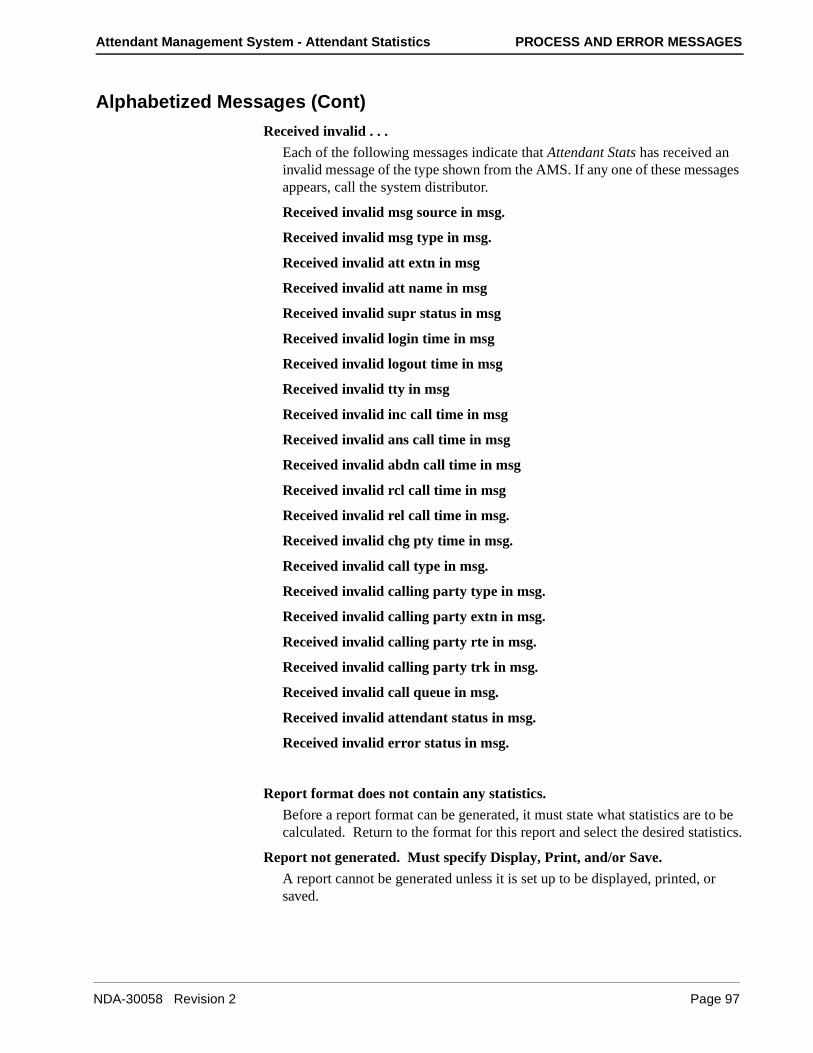
Attendant Management System - Attendant Statistics PROCESS AND ERROR MESSAGES
Alphabetized Messages (Cont)
Received invalid . . .
Each of the following messages indicate that Attendant Stats has received an invalid message of the type shown from the AMS. If any one of these messages appears, call the system distributor.
Received invalid msg source in msg.
Received invalid msg type in msg.
Received invalid att extn in msg
Received invalid att name in msg
Received invalid supr status in msg
Received invalid login time in msg
Received invalid logout time in msg
Received invalid tty in msg
Received invalid inc call time in msg
Received invalid ans call time in msg
Received invalid abdn call time in msg
Received invalid rcl call time in msg
Received invalid rel call time in msg.
Received invalid chg pty time in msg.
Received invalid call type in msg.
Received invalid calling party type in msg.
Received invalid calling party extn in msg.
Received invalid calling party rte in msg.
Received invalid calling party trk in msg.
Received invalid call queue in msg.
Received invalid attendant status in msg.
Received invalid error status in msg.
Report format does not contain any statistics.
Before a report format can be generated, it must state what statistics are to be calculated. Return to the format for this report and select the desired statistics.
Report not generated. Must specify Display, Print, and/or Save.
A report cannot be generated unless it is set up to be displayed, printed, or saved.
NDA-30058 Revision 2 Page 97
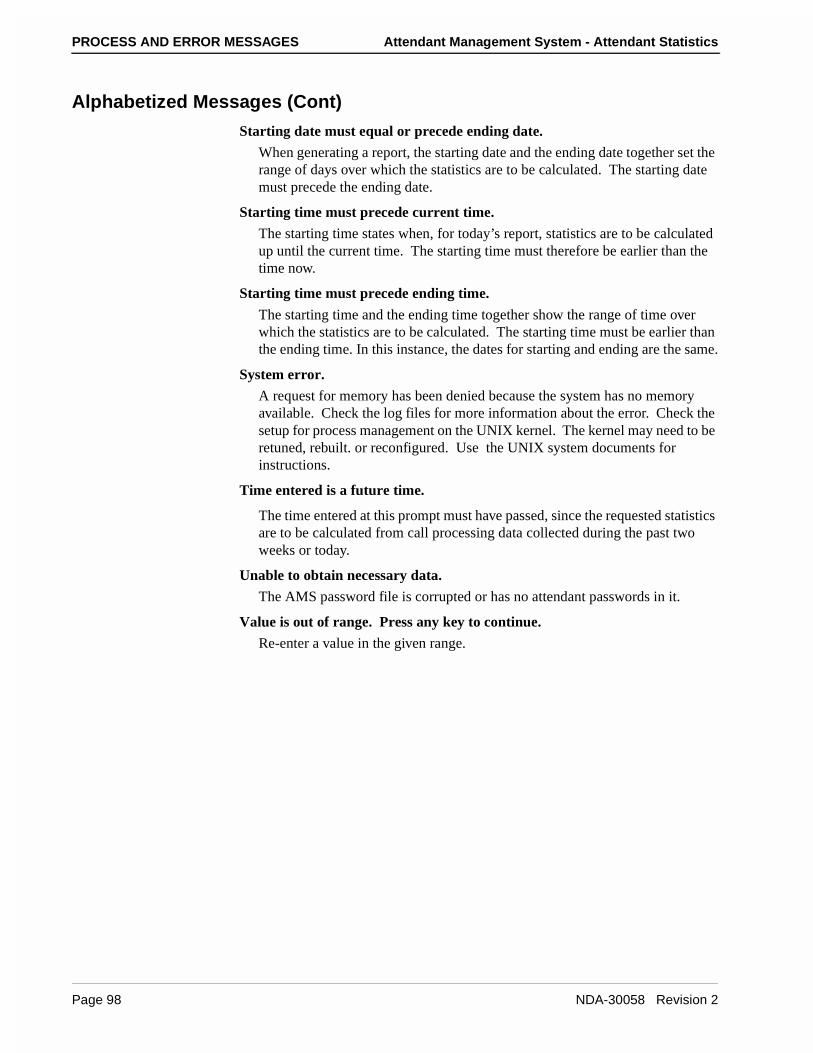
PROCESS AND ERROR MESSAGES Attendant Management System - Attendant Statistics
Alphabetized Messages (Cont)
Starting date must equal or precede ending date.
When generating a report, the starting date and the ending date together set the range of days over which the statistics are to be calculated. The starting date must precede the ending date.
Starting time must precede current time.
The starting time states when, for today’s report, statistics are to be calculated up until the current time. The starting time must therefore be earlier than the time now.
Starting time must precede ending time.
The starting time and the ending time together show the range of time over which the statistics are to be calculated. The starting time must be earlier than the ending time. In this instance, the dates for starting and ending are the same.
System error.
A request for memory has been denied because the system has no memory available. Check the log files for more information about the error. Check the setup for process management on the UNIX kernel. The kernel may need to be retuned, rebuilt. or reconfigured. Use the UNIX system documents for instructions.
Time entered is a future time.
The time entered at this prompt must have passed, since the requested statistics are to be calculated from call processing data collected during the past two weeks or today.
Unable to obtain necessary data.
The AMS password file is corrupted or has no attendant passwords in it.
Value is out of range. Press any key to continue.
Re-enter a value in the given range.
Page 98 NDA-30058 Revision 2
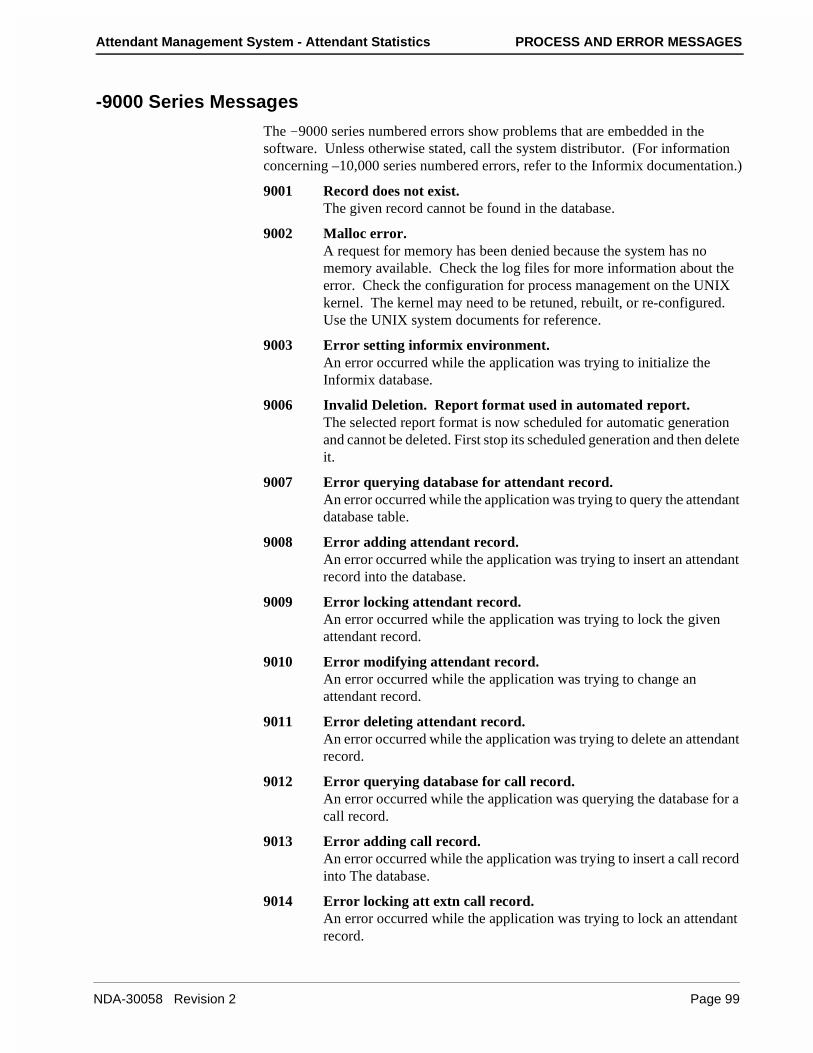
Attendant Management System - Attendant Statistics PROCESS AND ERROR MESSAGES
-9000 Series Messages
The –9000 series numbered errors show problems that are embedded in the software. Unless otherwise stated, call the system distributor. (For information concerning –10,000 series numbered errors, refer to the Informix documentation.)
9001 Record does not exist.The given record cannot be found in the database.
9002 Malloc error.A request for memory has been denied because the system has no memory available. Check the log files for more information about the error. Check the configuration for process management on the UNIX kernel. The kernel may need to be retuned, rebuilt, or re-configured. Use the UNIX system documents for reference.
9003 Error setting informix environment.An error occurred while the application was trying to initialize the Informix database.
9006 Invalid Deletion. Report format used in automated report.The selected report format is now scheduled for automatic generation and cannot be deleted. First stop its scheduled generation and then delete it.
9007 Error querying database for attendant record.An error occurred while the application was trying to query the attendant database table.
9008 Error adding attendant record.An error occurred while the application was trying to insert an attendant record into the database.
9009 Error locking attendant record.An error occurred while the application was trying to lock the given attendant record.
9010 Error modifying attendant record.An error occurred while the application was trying to change an attendant record.
9011 Error deleting attendant record.An error occurred while the application was trying to delete an attendant record.
9012 Error querying database for call record.An error occurred while the application was querying the database for a call record.
9013 Error adding call record.An error occurred while the application was trying to insert a call record into The database.
9014 Error locking att extn call record.An error occurred while the application was trying to lock an attendant record.
NDA-30058 Revision 2 Page 99
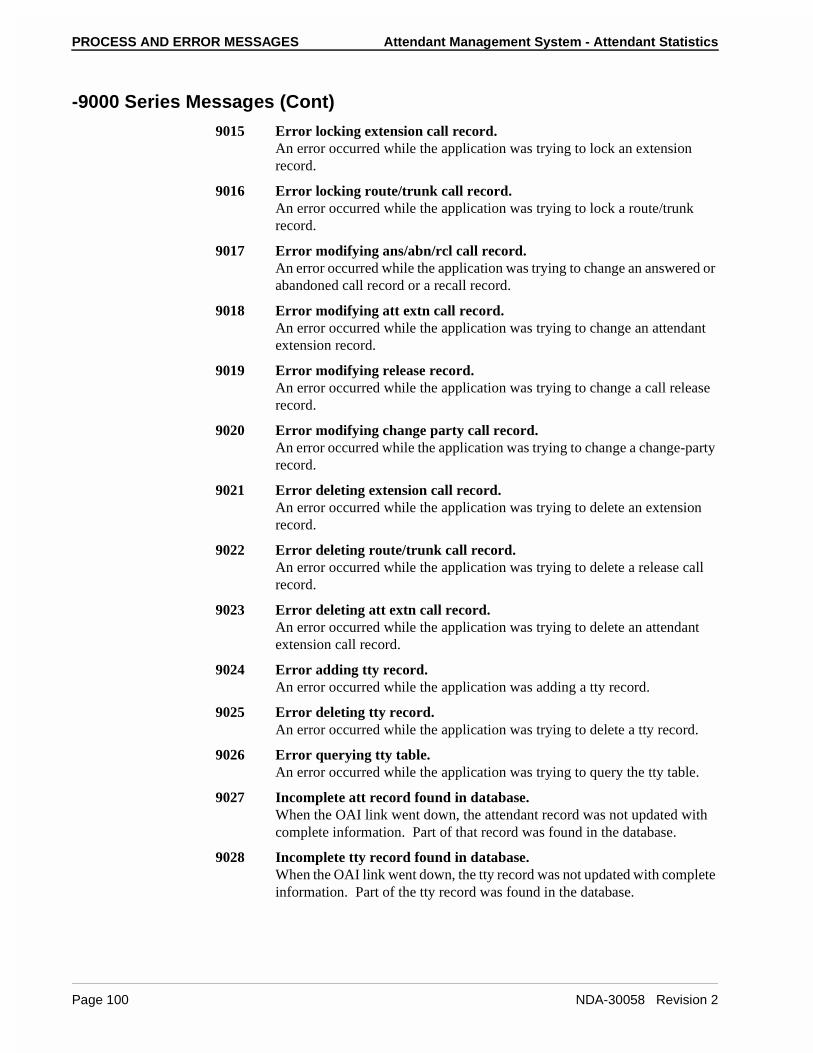
PROCESS AND ERROR MESSAGES Attendant Management System - Attendant Statistics
-9000 Series Messages (Cont)
9015 Error locking extension call record.An error occurred while the application was trying to lock an extension record.
9016 Error locking route/trunk call record.An error occurred while the application was trying to lock a route/trunk record.
9017 Error modifying ans/abn/rcl call record.An error occurred while the application was trying to change an answered or abandoned call record or a recall record.
9018 Error modifying att extn call record.An error occurred while the application was trying to change an attendant extension record.
9019 Error modifying release record.An error occurred while the application was trying to change a call release record.
9020 Error modifying change party call record.An error occurred while the application was trying to change a change-party record.
9021 Error deleting extension call record.An error occurred while the application was trying to delete an extension record.
9022 Error deleting route/trunk call record.An error occurred while the application was trying to delete a release call record.
9023 Error deleting att extn call record.An error occurred while the application was trying to delete an attendant extension call record.
9024 Error adding tty record.An error occurred while the application was adding a tty record.
9025 Error deleting tty record.An error occurred while the application was trying to delete a tty record.
9026 Error querying tty table.An error occurred while the application was trying to query the tty table.
9027 Incomplete att record found in database.When the OAI link went down, the attendant record was not updated with complete information. Part of that record was found in the database.
9028 Incomplete tty record found in database.When the OAI link went down, the tty record was not updated with complete information. Part of the tty record was found in the database.
Page 100 NDA-30058 Revision 2
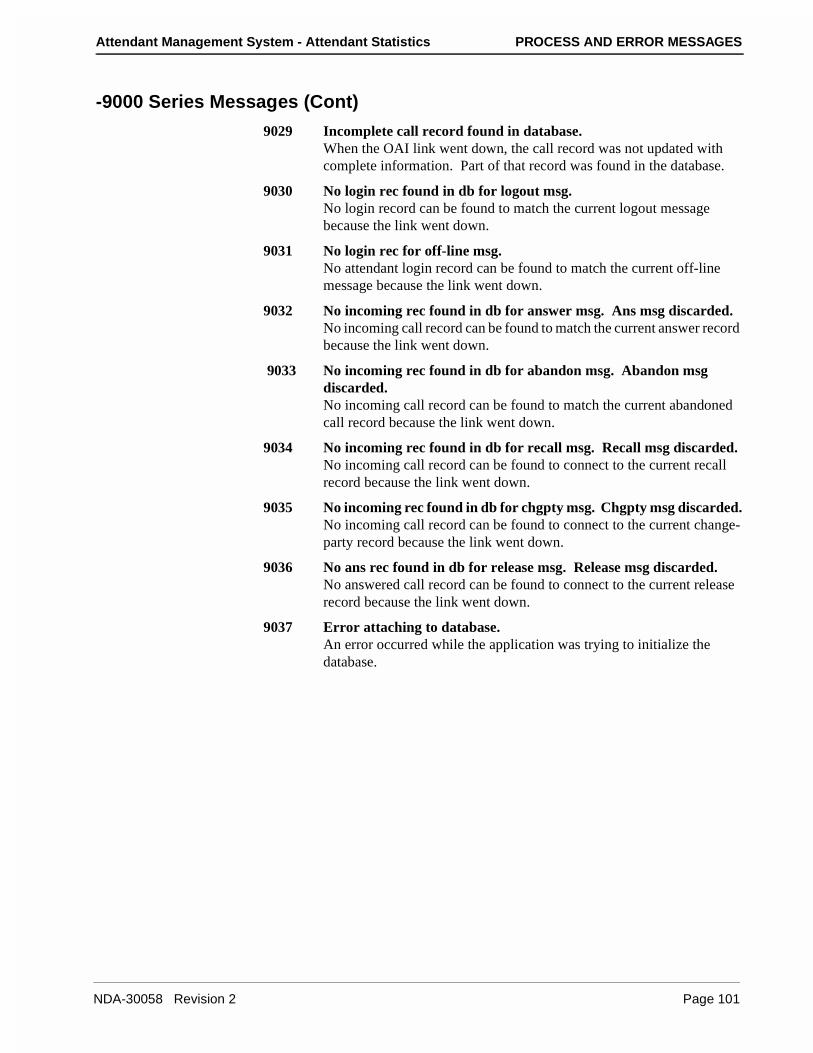
Attendant Management System - Attendant Statistics PROCESS AND ERROR MESSAGES
-9000 Series Messages (Cont)
9029 Incomplete call record found in database.When the OAI link went down, the call record was not updated with complete information. Part of that record was found in the database.
9030 No login rec found in db for logout msg.No login record can be found to match the current logout message because the link went down.
9031 No login rec for off-line msg.No attendant login record can be found to match the current off-line message because the link went down.
9032 No incoming rec found in db for answer msg. Ans msg discarded.No incoming call record can be found to match the current answer record because the link went down.
9033 No incoming rec found in db for abandon msg. Abandon msg discarded.No incoming call record can be found to match the current abandoned call record because the link went down.
9034 No incoming rec found in db for recall msg. Recall msg discarded.No incoming call record can be found to connect to the current recall record because the link went down.
9035 No incoming rec found in db for chgpty msg. Chgpty msg discarded.No incoming call record can be found to connect to the current change-party record because the link went down.
9036 No ans rec found in db for release msg. Release msg discarded.No answered call record can be found to connect to the current release record because the link went down.
9037 Error attaching to database.An error occurred while the application was trying to initialize the database.
NDA-30058 Revision 2 Page 101

PROCESS AND ERROR MESSAGES Attendant Management System - Attendant Statistics
This Page Left Blank.
Page 102 NDA-30058 Revision 2