
Atomix LT Installation Guide (Version 2.0)
72
Atomix LT Installation Guide (Version 2.0) PCI Video Board Atomix LT Installation Guide
Transcript of Atomix LT Installation Guide (Version 2.0)
Atomix LT Installation Guide (Version 2.0)
PCI Video Board
Atomix LT
Installation Guide


2
1
3
I
4
A
Atomix LT Installation Guide
Introduction
Overview
Installation
Maintenance
Appendix
Index
Installation Guide Version 2.0 for Atomix LT
Copyright © 2012 by DVS Digital Video Systems GmbH, a Rohde & Schwarz company, Hanover. All rights reserved.
The manuals as well as the soft- and/or hardware described here and all their constituent parts are protected by copyright. Without the express permission of DVS Digital Video Systems GmbH any form of use which goes beyond the narrow bounds prescribed by copyright legislation is prohibited and liable to prosecution.
This particularly applies to duplication, copying, translation, processing, evaluation, publishing, and storing and/or processing in an electronic system.
Specifications and data may change without notice. We offer no guarantee that this documentation is correct and/or complete. In no event shall DVS Digital Video Systems GmbH be liable for any damages whatsoever (including without limitation any special, indirect or consequential damages, and damages resulting from loss of use, data or profits, or business interruption) arising out of the use of or inability to use the hardware, software and/or manual materials.
Those parts of this documentation that describe optional software or hardware features usually contain a corresponding note. Anyway, a lack of this note does not mean any commitment from DVS Digital Video Systems GmbH.
DVS is a registered trademark of DVS Digital Video Systems GmbH. Apple, Mac and Mac OS are trademarks of Apple Inc., registered in the U.S. and other countries. Intel, Pentium and Pentium 4 are trademarks, service marks or registered trademarks of Intel Corporation in the U.S. and/or other countries. Linux is a registered trademark of Linus Torvalds. Microsoft, Windows, and Windows Vis-ta are registered trademarks or trademarks of Microsoft Corporation in the United States and/or other countries. Red Hat and Fedora are either registered trademarks or trademarks of Red Hat, Inc. in the United States and other countries.
Any other product names mentioned in this documentation may be trademarks or registered trade-marks of their respective owners and as such are subject to the usual statutory provisions.

Headquarters:
Support:
For the Americas:
Support:
DVS Digital Video Systems GmbHKrepenstr. 830165 HannoverGERMANY
Phone: +49-511-67807-0
Fax: +49-511-630070
E-mail: [email protected]
Internet: http://www.dvs.de
Phone: +49-511-67807-125
Fax: +49-511-371985
E-mail: [email protected]
U.S. Headquarters:
DVS Digital Video, Inc.300 East Magnolia Boulevard, Suite 102Burbank, CA 91502USA
Phone: +1-818-846-3600
Fax: +1-818-846-3648
E-mail: [email protected]
Internet: http://www.dvsus.com
E-mail: [email protected]

Registration Form
Dear customer,
this product was developed and tested thoroughly. Unfortu-nately, the possibility of problems and errors can never be ruled out. To support us in helping you as fast as possible if such a case occurs, please fill in this registration form and send or fax it to the address on the right.
You may also use our online registration form which can be accessed from the following internet page: http://www.dvs.de/support/support-login.html
Customer
Name:
Company:
Contact:
Address:
Phone:
Fax:
Vendor:
Atomix LT
Serial No.:
Remarks:
Computer
Brand: Type:
Operating System: Version:
Connected devices(Brand and type of edit controller, VTR, color grading system, etc.)
PLEASE SEND TO:DVSKrepenstr. 830165 HannoverGERMANYFax: +49-511-630070


i
CContents
1 Introduction ............................................................................... 1-1
1.1 Overview ............................................................................. 1-2
1.2 Target Group ........................................................................ 1-3
1.3 Conventions Used in this User Guide .................................... 1-3
1.4 Safety Instructions ................................................................ 1-4
1.5 Important Notes ................................................................... 1-6
1.6 System Requirements ........................................................... 1-8
2 Overview .................................................................................... 2-1
2.1 Overview of the Video Board Product .................................. 2-2
2.2 Overview of the Board ......................................................... 2-32.2.1 The Different Variants of the Board ............................... 2-32.2.2 Overview of the Component Side ................................. 2-42.2.3 Overview of the Soldering Side ..................................... 2-62.2.4 Digital Video I/Os of the Atomix LT Board ..................... 2-7
2.3 Overview of the Panels ...................................................... 2-102.3.1 Note About the Audio Setup ...................................... 2-102.3.2 Audio and RS-422 Panel ............................................ 2-112.3.3 Audio Panel .............................................................. 2-122.3.4 RS-422 Panel ............................................................ 2-142.3.5 GPI Panel ................................................................. 2-14
3 Installation ................................................................................. 3-1
3.1 Hardware Installation ........................................................... 3-23.1.1 Preparations ............................................................... 3-23.1.2 Installation of the Board ............................................... 3-43.1.3 Installation of the Panels .............................................. 3-5
ii
Atomix LT Installation Guide
3.1.4 Setting up the Remaining Internal Connections ............. 3-103.1.5 Finishing the Installation ............................................. 3-11
3.2 Software Installation ........................................................... 3-12
3.3 Setting the License Key....................................................... 3-12
3.4 Upgrading the Firmware ..................................................... 3-143.4.1 Determining the Firmware Version .............................. 3-143.4.2 Upgrading the Firmware ............................................ 3-15
3.5 Testing the Installation ........................................................ 3-17
4 Maintenance .............................................................................. 4-1
A Appendix ....................................................................................A-1
A.1 Technical Data ......................................................................A-1
A.2 Hardware Specifications .......................................................A-2
A.3 Baud Rate of RS-422 Ports ...................................................A-3
A.4 Video Rasters .......................................................................A-4
A.5 GPI (Optocoupler) ................................................................A-5A.5.1 Technical Data ............................................................A-5A.5.2 Block Diagrams ...........................................................A-5
A.6 Signal In- and Outputs .........................................................A-7
A.7 Conformity Declarations .....................................................A-11A.7.1 RoHS Compliance .....................................................A-11A.7.2 EC Declaration of Conformity (CE Marking) .................A-11A.7.3 FCC Compliance Statement ........................................A-11
A.8 Short Reference: Atomix LT Boards .....................................A-13
I Index ............................................................................................. I-1
1-1
1
1
2
3
I
4
A
Introduction
This documentation describes Atomix LT, a high-end uncompressed video and audio I/O hardware manufactured by DVS.
Atomix LT is centered around the Atomix LT board, a 2/3-length PCIe bus single board for a real-time input and output of uncompressed vid-eo and audio signals. All major video and film formats are supported from SD video up to 2K film via SDI I/O, supplemented by up to 16 channels audio either over AES/EBU or embedded in the video stream. With the help of the DVS software development kit (SDK) you can build your own powerful video and film solutions, for example, for HDTV post production or broadcast applications.
For Atomix LT there are two variants of PCI video boards available: one providing 5 BNC connectors on its slot panel (called Atomix LT) and one providing 4 BNC and a VGA-style connector (called Atomix LT 4 BNC).
Key Features
– Capture and play-out of uncompressed video via two 3-Gbit/s SDI ports
– Two independent video channels with independent input and out-puts
– Programmable up-/downscaler for format adjustments– Mixer/keyer– 1D LUT for range and gamma changes– Low latency between input and output– 16 embedded and 16 AES/EBU audio channels (Atomix LT 4 BNC:
8 AES/EBU audio channels)– LTC input and output– 2 × RS-422 for remote control– Watchdog to switch SDI input to output in case of failure– Drivers and SDK for Windows, Linux and Mac OS– Sophisticated SDK, compatible among DVS video boards– Highly skilled and qualified support, from developers for developers– Optional breakout box (not for Atomix LT 4 BNC) with
– 2 × RS-422

1-2
Atomix LT Installation Guide
– Analog audio output– AES/EBU audio– LTC input and output
1.1 Overview
This guide informs you about the installation of Atomix LT as well as all connection possibilities. Furthermore, it provides information about the setting of license keys, the upgrade of the firmware, the testing of the installation, and of maintenance work that you may perform on your own.
In detail the chapters contain the following information:
Chapter 1 Begins with a short introduction to Atomix LT, followed by a note regarding the audience this manual is written for and an explanation of the conventions used in this manual. Beside the system requirements necessary to run Atomix LT, it provides safety instructions that you must adhere to and some important notes that you should read.
Chapter 2 Gives an overview of Atomix LT as a video board product and describes shortly its individ-ual components. Furthermore, the items, switches and connectors of the Atomix LT board and its additional panels are detailed in this chapter.
Chapter 3 Describes the installation of Atomix LT. First the hardware installation is explained, followed by some hardware related settings and upgrades to be effected with the software.
Chapter 4 Details service and maintenance work in case of a firmware upgrade failure.
Appendix Provides technical details and general informa-tion about Atomix LT. This chapter also con-tains a short reference to the items available on the Atomix LT board.
Index This chapter facilitates the search for specific terms.
1-3
Introduction
1
2
3
I
4
A
1.2 Target Group
To use this manual you should have experience installing hardware components in a computer system and be familiar with the hardware structure and interior of such a system. Additionally, you should have knowledge in the field of digital video in general and be used to operate with computer software.
1.3 Conventions Used in this User Guide
The following typographical conventions will be used in this documen-tation:
Texts preceded by this symbol describe activities that you must per-form in the order indicated.
– Texts preceded by this symbol are parts of a list.
Texts preceded by this symbol are general notes intended to fa-cilitate work and help avoid errors.
You must pay particular attention to text that follows this symbol to avoid errors and possible resulting damages there-of.
Texts following this symbol you must pay particular atten-tion to to avoid dangers and personal injuries.
“ ” Texts enclosed by quotation marks are references to other man-uals, guides, chapters, or sections.
Directory/File Directory structure or file
Command Indicates a command (e.g. at a command line), a syntax or contents of a file/output
[Key] A key on a keyboard
1-4
Atomix LT Installation Guide
1.4 Safety Instructions
To use Atomix LT correctly please heed the following:
General
Atomix LT has been built according to the applying safety regulations. To minimize the possibility of a faulty operation of the device all man-uals and guides must be available at all times at the operation site. Be-fore installing and/or using Atomix LT the manuals and guides delivered with Atomix LT must be read and observed.
– Use Atomix LT only in apparent good technical order.– The system you are trying to install Atomix LT in works with volt-
ages that can be hazardous to your health. Never work on the sys-tem or access its interior with the power cable(s) being plugged in. Make sure the power supply is disconnected from the components you intend to work on.
– Computer hardware contains components that are sensitive to elec-trostatic discharge. If you touch them without precautionary mea-sures, they can be destroyed. Use a wrist strap connected to ground when accessing electronic parts and take care of grounding the sys-tem. Avoid touching the internal components of the computer sys-tem and Atomix LT whenever possible.
– Computer hardware contains components that are sensitive to changing voltages. Connecting or disconnecting Atomix LT to or from peripheral hardware while any of them is switched on may damage the hardware. Switch off all peripheral hardware before connecting or disconnecting anything.
– Use, store and transport Atomix LT only in compliance with the technical data laid out in section “Technical Data” on page A-1.
– Atomix LT must not be misused, abused, physically damaged, neglected, exposed to fire, water or excessive changes in the cli-mate or temperature, or operated outside maximum rating.
– Do not perform any changes or extensions to Atomix LT whatso-ever.
Environmental Conditions
For error-free working and a long service life Atomix LT needs some ba-sic environmental conditions:
Please read the following safety instructions carefully before attempting any installation and/or performing any work on Atomix LT.
If Atomix LT is not used in compliance with the safety instruc-tions, the warranty and all resulting liability claims will be void.

1-5
Introduction
1
2
3
I
4
A
– Do not expose Atomix LT to sources of heat, such as direct sunlight or a radiator.
– The chassis of the computer system where the Atomix LT board is installed must be equipped with a sufficient ventilation for cooling reasons.
– Avoid areas with high humidity or dust. Best operating conditions are given in an air-conditioned site.
– Do not expose Atomix LT to strong electric or magnetic fields.– Avoid areas where Atomix LT will be subject to vibrations or shocks.
1-6
Atomix LT Installation Guide
1.5 Important Notes
The following provides information about warranty and the conformity of the product. Furthermore, it includes an important note if you want to unplug cables and some information about optionally available breakout boxes.
Warranty Information
This product is warranted to be free of defects in materials and work-manship for a period of one year from the date of purchase. DVS ex-tends this Limited Warranty to the original purchaser.
In the event of a defect or failure to confirm to this Limited Warranty, DVS will repair or replace the product without charge. In order to make a claim under this Limited Warranty, the purchaser must notify DVS or their representative in writing of the product failure. In this Limited Warranty the customer must upon DVS’s request return the product to the place of purchase or send the defective device to a given address for the necessary repairs to be performed. If the customer is not satis-fied with the repair, DVS will have the option to either attempt a further repair, exchange the product or refund the purchase price.
This warranty does not cover:
– Products not developed by DVS Digital Video Systems GmbH.– Products not used in compliance with the safety instructions
detailed in section “Safety Instructions” on page 1-4.– Products on which warranty stickers or product serial numbers have
been removed, altered or rendered illegible.– The costs of installations, removals, transportations, or reinstalla-
tions.– Costs for transportation damages.– Damages caused to any other item.– Any special, indirect or consequential damages, and damages
resulting from loss of use, data or profits, or business interruption.
Declaration of Conformity
This product has been tested according to the applying national and international di-rectives and regulations. Further information about this can be found in section “Confor-mity Declarations” on page A-11.
Unplugging Cables
If you want to unplug one of the flat cables after its installation on the board, please observe the following:
1-7
Introduction
1
2
3
I
4
A
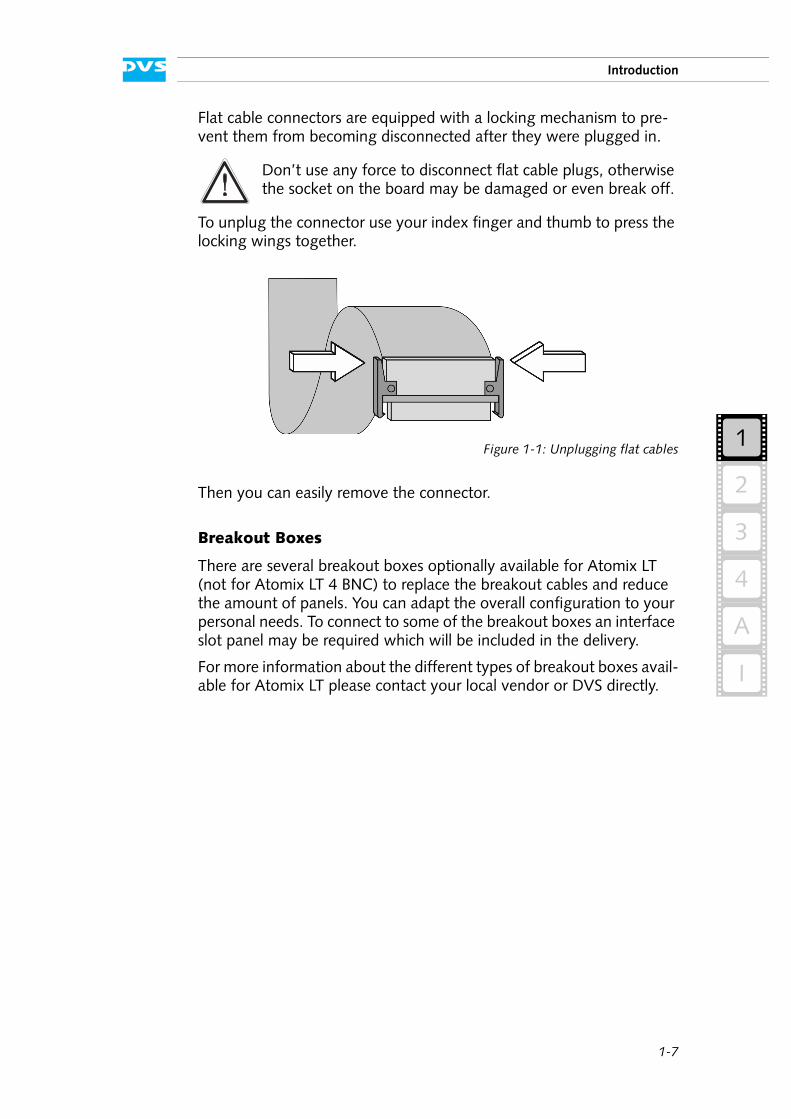
Flat cable connectors are equipped with a locking mechanism to pre-vent them from becoming disconnected after they were plugged in.
To unplug the connector use your index finger and thumb to press the locking wings together.
Figure 1-1: Unplugging flat cables
Then you can easily remove the connector.
Breakout Boxes
There are several breakout boxes optionally available for Atomix LT (not for Atomix LT 4 BNC) to replace the breakout cables and reduce the amount of panels. You can adapt the overall configuration to your personal needs. To connect to some of the breakout boxes an interface slot panel may be required which will be included in the delivery.
For more information about the different types of breakout boxes avail-able for Atomix LT please contact your local vendor or DVS directly.
Don’t use any force to disconnect flat cable plugs, otherwise the socket on the board may be damaged or even break off.
1-8
Atomix LT Installation Guide
1.6 System Requirements
Required Hardware
These are the minimum hardware requirements that the computer sys-tem has to meet if you want to use Atomix LT.
– Pentium 4 or similar with at least 2.2 GHz– Mainboard with PCIe bus providing 8 lanes (x4 elect.) or more– 1 free slot in a bus-master capable PCI segment supporting PCIe– 1024 MB RAM
Supported Operating Systems
Atomix LT can be used with the following operating systems:
– Windows XP, Vista or 7– Linux (Red Hat and Fedora)– Mac OS X
Required Software
Atomix LT needs the DVS video board driver. Furthermore, to be pro-grammed for applications the SDK by DVS is necessary. Both software items should be included in your delivery. They are also available online on the DVS web site after registering/logging in to access restricted in-formation (http://www.dvs.de/products/video-boards/atomix-lt.html).
Be sure that you have installed the newest Service Packs for your system, otherwise you may encounter soft- and/or hard-ware problems.

2-1
2
2
1
3
I
4
A
Overview
This chapter shows an overview of Atomix LT thereby detailing all items, switches and connectors of the Atomix LT board and its addition-al panels. First the components of the DVS video board product as it is delivered to you are described shortly. Afterwards an overview of the Atomix LT board is provided. The chapter will be concluded with a de-tailed overview of the slot panels that may have been delivered to you.

2-2
Atomix LT Installation Guide
2.1 Overview of the Video Board Product
Atomix LT as a video board product consists of various individual com-ponents that combined will give you the opportunity to develop your own real-time video and film solutions. The diagram below shows the different components included in the delivery of Atomix LT:
Figure 2-1: Atomix LT overview
The components of Atomix LT can be divided into hardware and soft-ware components:
To the hardware components belong the items described in this instal-lation guide. Atomix LT is centered around the Atomix LT board, a 2/3-length PCIe bus single board for the real-time input and output of un-compressed video and audio signals. All major video and film formats are supported from SD video up to 2K film via SDI I/O, supplemented by up to 16 channels audio either over AES/EBU or embedded in the video stream. To use all the features of Atomix LT several slot panels may have been included in your delivery as well as other accessories such as breakout cables. All these items and their installation will be de-scribed in this manual.
Among the software components you can find the DVS software de-velopment kit (DVS SDK) which can be used to build editing and stor-age solutions with Atomix LT. The DVS SDK is compatible among the video board products by DVS meaning your code can be used with oth-er DVS video boards as well. Several tools for hardware setup and di-agnostics complement the SDK. To run properly the video board driver has to be loaded prior to using Atomix LT which can be done with the tools for the hardware setup. The video board driver controls the Atomix LT board and thus the in- and output of signals. The DVS SDK as well as all other software components are described in the separate SDK documentation.

2-3
Overview
2
1
3
I
4
A
2.2 Overview of the Board
The PCI video board delivered with Atomix LT is a complex piece of technology. This section provides an overview of the Atomix LT board including a detailed description of the items, switches and connectors present on the PCI video board.
2.2.1 The Different Variants of the Board
The Atomix LT board can be delivered in two variants: One providing 5 BNC connectors on its slot panel (called Atomix LT) and one provid-ing 4 BNC and a VGA-style connector (called Atomix LT 4 BNC).
Figure 2-2: Variants of the Atomix LT board
The Atomix LT 4 BNC video board can be used in systems where less space is available. The VGA-style connector offers LTC, reference input, RS-422, and analog audio output via a breakout cable. The breakout cable is included in the delivery.
The two boards are in most respects identical. Most of the signals avail-able for the Atomix LT via slot panels are provided for the Atomix LT 4 BNC via the breakout cable. The only limitations are that the Atomix LT 4 BNC provides eight digital audio channels instead of 16 and just one ’Fail Safe’ connector.
Atomix LT:
Atomix LT 4 BNC:

2-4
Atomix LT Installation Guide
2.2.2 Overview of the Component Side
The following provides overviews of the component sides of the Atomix LT boards, describing all items, switches and connectors on these sides of the boards. The different items of the two variants of the PCI video board will be mentioned in the table explicitly.
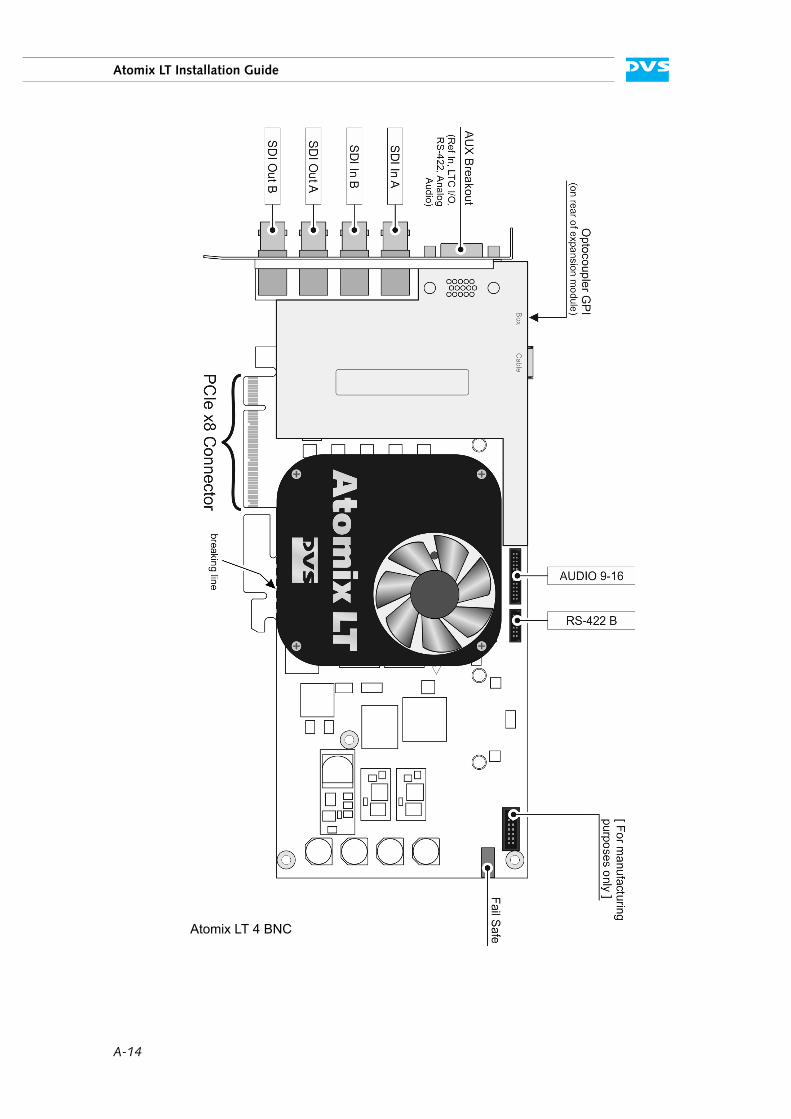
Figure 2-3: Overview of the items and connectors on the Atomix LT board
The items on the Atomix LT boards which are not described in the following are either used during the manufacturing process only or reserved for future use.
For a concise overview of the PCI video boards see section “Short Reference: Atomix LT Boards” on page A-13.
7
1
2
3
4
5
6
8 9 10
PCIe x8 connector 11
12
PCIe x8 connector
13

2-5
Overview
2
1
3
I
4
A
No. Item Explanation
1 SDI Out B BNC connector for an output of digital video signals (serial digital interface, port B); usually used for an output of the second video channel in single-link (YUV) or dual-link modes (3-Gbit/s SDI); can also be used for the first video channel for the second dual-link stream of YUVA or RGB[A]
2 SDI Out A BNC connector for an output of digital video signals (serial digital interface, port A); usually used for an output of the first video channel in single-link (YUV) or dual-link modes (either 3-Gbit/s SDI or first dual-link stream of YUVA or RGB[A])
3 SDI In B BNC connector for an input of digital video sig-nals (serial digital interface, port B); usually used for an input of the second video channel in single-link (YUV) or dual-link modes (3-Gbit/s SDI); can also be used for the first video channel for the second dual-link stream of YUVA or RGB[A]
4 SDI In A BNC connector for an input of digital video sig-nals (serial digital interface, port A); usually used for an input of the first video channel in single-link (YUV) or dual-link modes (either 3-Gbit/s SDI or first dual-link stream of YUVA or RGB[A])
5 Ref In Only available for Atomix LT: BNC connector for the reference input
6 Fail Safe 0 Only available for Atomix LT: See Fail Safe 1
7 AUDIO 1-8/LTC
Only available for Atomix LT: Flat cable con-nector for analog audio, the digital audio channels 1 to 8 and LTC
8 AUDIO 9-16 Flat cable connector for the digital audio channels 9 to 16
9 RS-422 A/B Flat cable connector for an in- and output of RS-422 signals (main remote ports)

2-6
Atomix LT Installation Guide
2.2.3 Overview of the Soldering Side
This section shows the operation items located at the soldering side of the PCI video board. They can be found at the top left of the soldering side:
10 Fail Safe 1 For a bypass of the SDI input signals to the SDI outputs in case of power loss; connect either this connector or Fail Safe 0 (not available for Atomix LT 4 BNC) to a rechargeable battery (accu, see section “Technical Data” on page A-1)
11 breaking line The printed circuit board provides at its bottom an extension void of any electrical parts; it may serve to stabilize the installation of the board in a computer system; when not needed or inter-fering, you can carefully break it off the circuit board at the breaking line
12 AUX Breakout Only available for Atomix LT 4 BNC: DB-15 (VGA-style) connector to connect a proprietary breakout cable, providing:
– 2 × XLR connectors for LTC in- and output– 1 × BNC for reference input– 1 × DB-9 for RS-422 (i.e. RMT In/Out 1)– 1 × 3.5 mm unbalanced stereo headphone
jack for analog audio output
For further details about the connectors see the slot panels described in section “Overview of the Panels” on page 2-10 on which the con-nectors are available
13 Accessory Only available for Atomix LT 4 BNC: Flat cable connector for a connection to a general pur-pose interface (GPI); this connector is located on the rear side of the expansion module mounted to the PCI video board
No. Item Explanation

2-7
Overview
2
1
3
I
4
A
Figure 2-4: Items on the Atomix LT board’s soldering side
2.2.4 Digital Video I/Os of the Atomix LT Board
This section contains some information about the digital video in- and outputs of Atomix LT.
DVS usually names the input/output channels (connectors/ports) of the digital video signals alphabetically: the main video stream is then available, for instance, on port A and the secondary video stream on port B. For YUV you normally require one link (connectors named ’A’,
Item Explanation
DIP switch for Flash controller
Controls the operation of the on-board Flash controller. It determines whether the main or the fallback map will be loaded at startup (see also chapter “Maintenance” on page 4-1).
Default/factory setting of the DIP switch for the Flash controller (main map). Please observe the orientation of the switch on the board.
For normal operations the default setting has to be used.
LEDs Indicate that the programmable chips (FPGAs) are programmed. If both are illuminated, the firmware is programmed and the board will op-erate properly. If even one is extinguished, you have to perform a firmware programming/up-date (see section “Upgrading the Firmware” on page 3-15).
DIP switch LEDs
2-8
Atomix LT Installation Guide
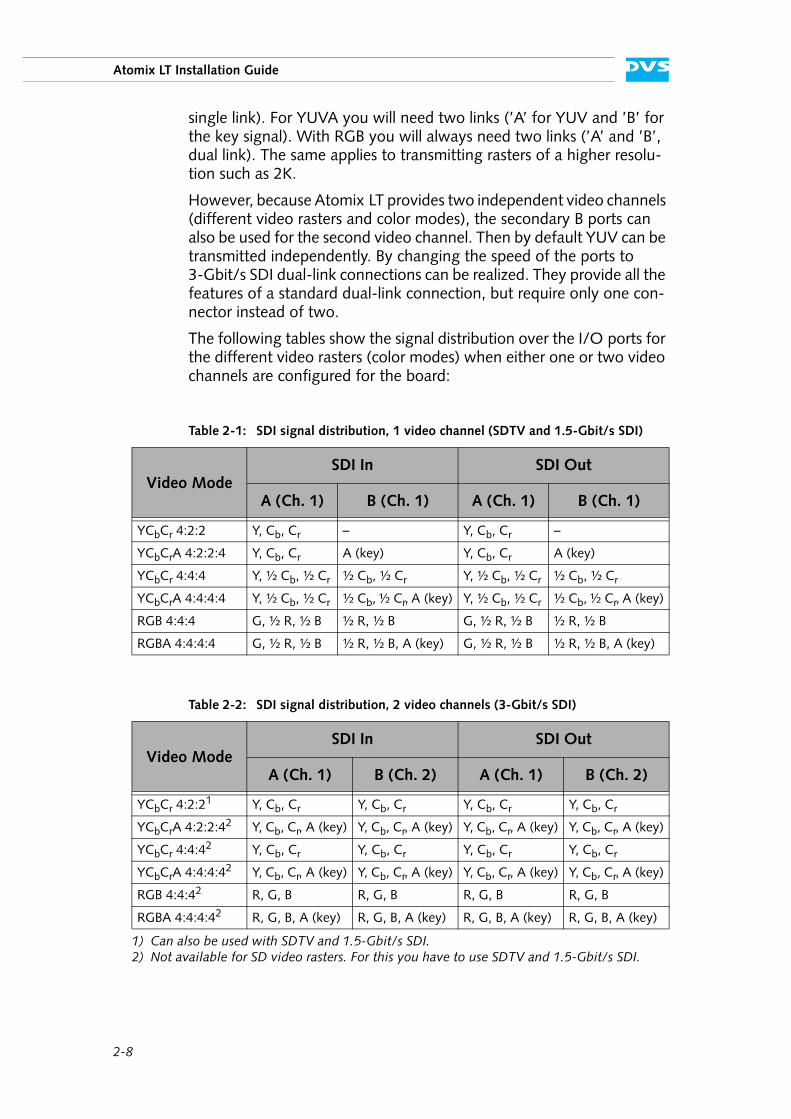
single link). For YUVA you will need two links (’A’ for YUV and ’B’ for the key signal). With RGB you will always need two links (’A’ and ’B’, dual link). The same applies to transmitting rasters of a higher resolu-tion such as 2K.
However, because Atomix LT provides two independent video channels (different video rasters and color modes), the secondary B ports can also be used for the second video channel. Then by default YUV can be transmitted independently. By changing the speed of the ports to 3-Gbit/s SDI dual-link connections can be realized. They provide all the features of a standard dual-link connection, but require only one con-nector instead of two.
The following tables show the signal distribution over the I/O ports for the different video rasters (color modes) when either one or two video channels are configured for the board:
Table 2-1: SDI signal distribution, 1 video channel (SDTV and 1.5-Gbit/s SDI)
Video ModeSDI In SDI Out
A (Ch. 1) B (Ch. 1) A (Ch. 1) B (Ch. 1)
YCbCr 4:2:2 Y, Cb, Cr – Y, Cb, Cr –
YCbCrA 4:2:2:4 Y, Cb, Cr A (key) Y, Cb, Cr A (key)
YCbCr 4:4:4 Y, ½ Cb, ½ Cr ½ Cb, ½ Cr Y, ½ Cb, ½ Cr ½ Cb, ½ Cr
YCbCrA 4:4:4:4 Y, ½ Cb, ½ Cr ½ Cb, ½ Cr, A (key) Y, ½ Cb, ½ Cr ½ Cb, ½ Cr, A (key)
RGB 4:4:4 G, ½ R, ½ B ½ R, ½ B G, ½ R, ½ B ½ R, ½ B
RGBA 4:4:4:4 G, ½ R, ½ B ½ R, ½ B, A (key) G, ½ R, ½ B ½ R, ½ B, A (key)
Table 2-2: SDI signal distribution, 2 video channels (3-Gbit/s SDI)
Video ModeSDI In SDI Out
A (Ch. 1) B (Ch. 2) A (Ch. 1) B (Ch. 2)
YCbCr 4:2:21
1) Can also be used with SDTV and 1.5-Gbit/s SDI.
Y, Cb, Cr Y, Cb, Cr Y, Cb, Cr Y, Cb, Cr
YCbCrA 4:2:2:42
2) Not available for SD video rasters. For this you have to use SDTV and 1.5-Gbit/s SDI.
Y, Cb, Cr, A (key) Y, Cb, Cr, A (key) Y, Cb, Cr, A (key) Y, Cb, Cr, A (key)
YCbCr 4:4:42 Y, Cb, Cr Y, Cb, Cr Y, Cb, Cr Y, Cb, Cr
YCbCrA 4:4:4:42 Y, Cb, Cr, A (key) Y, Cb, Cr, A (key) Y, Cb, Cr, A (key) Y, Cb, Cr, A (key)
RGB 4:4:42 R, G, B R, G, B R, G, B R, G, B
RGBA 4:4:4:42 R, G, B, A (key) R, G, B, A (key) R, G, B, A (key) R, G, B, A (key)

2-9
Overview
2
1
3
I
4
A
Mixed operations between the two tables are possible with the limita-tion that as soon as you set up two physical links for dual link, only one video channel will be available.
2-10
Atomix LT Installation Guide
2.3 Overview of the Panels
To provide all the connection possibilities of the board at a computer casing, several panels may have been delivered with the board. This section provides an overview of the panels available for Atomix LT.
2.3.1 Note About the Audio Setup
Atomix LT provides up to 16 channels digital audio (AES/EBU).
With 16 channels digital audio up to two panels for audio can be deliv-ered with the Atomix LT:
– One that has to be connected to the AUDIO 1-8/LTC connector on the Atomix LT board (in this guide referred to as ’audio panel #1’).
– One that has to be connected to the AUDIO 9-16 connector on the Atomix LT board (referred to as ’audio panel #2’).
There are two types of panels for audio available:
– One with analog and digital audio connections (called ’audio panel’, see section “Audio Panel” on page 2-12).
– One with digital audio plus RS-422 connection (called ’audio and RS-422 panel, see section “Audio and RS-422 Panel” on page 2-11).
The following tables show the possible combinations of the two types of panels and their recommended installations:
Please note that the panels are optionally available and will be part of your delivery only if you have ordered them.
For Atomix LT 4 BNC the slot panels as mentioned below are available. However, the Atomix LT 4 BNC provides only 8 channels digital audio. So, whichever audio panel you have received, it has to be connected to the AUDIO 9-16 connector on the Atomix LT board (i.e. as audio panel #2). For Atomix LT 4 BNC the DVS SDK provides special defines to configure the audio channels of this connector.
Delivered Panels Install as…
1 × audio panel audio panel #1 (AUDIO 1-8/LTC)
1 × audio panel audio panel #2 (AUDIO 9-16)

2-11
Overview
2
1
3
I
4
A
When only one panel for audio has been delivered to you, it should al-ways be set up as audio panel #1 (i.e. connected to AUDIO 1-8/LTC).
2.3.2 Audio and RS-422 Panel
The audio and RS-422 panel provides a DB-25 connector for digital au-dio (AES/EBU) and LTC signals as well as a DB-9 connector for a stan-dard RS-422 connection for remote control.
To the DB-25 connector you can connect a breakout cable providing eight XLR connectors to interface directly with audio devices. The pin-out of the RS-422 port can be can be switched between master and slave mode in the software. Pin-outs of the DB-9 and DB-25 connectors can be found in section “Signal In- and Outputs” on page A-7.
Figure 2-5: Panel with audio and remote control connections
Delivered Panels Install as…
1 × audio panel audio panel #1 (AUDIO 1-8/LTC)
1 × audio and RS-422 panel audio panel #2 (AUDIO 9-16)
Digital Audio (AES/EBU)
Remote In/Out
2-12
Atomix LT Installation Guide
2.3.3 Audio Panel
Up to two audio panels can be included in your Atomix LT delivery (see section “Note About the Audio Setup” on page 2-10). They provide each a DB-25 connector for digital audio (AES/EBU). One of the panels provides also an analog stereo headphone output and can be config-ured to transmit LTC signals.
To the DB-25 connectors you can connect breakout cables providing each eight XLR connectors to interface directly with audio devices. Pin-outs of the DB-25 connectors can be found in section “Signal In- and Outputs” on page A-7.
Item Explanation
Digital Audio(AES/EBU)
DB-25 connector (female) for audio and LTC in- and output; provides either four stereo channels digital audio (channels 1 to 8) or three channels audio plus LTC; alternatively it can be used to provide the digital audio channels 9 to 16; for Atomix LT 4 BNC the DVS SDK provides special defines to configure the audio channels of this connector
Remote In/Out DB-9 connector (female), serial RS-422 inter-face for master or slave control; for Atomix LT this port is RMT In/Out 1, for Atomix LT 4 BNC it is RMT In/Out 2
In a setup that contains this panel as well as one of the audio panels described in section “Audio Panel” on page 2-12, it is recommended to install it as audio panel #2 (see section “Note About the Audio Setup” on page 2-10).
Prior to the installation of the panel you have to set/check the jumpers on the printed circuit boards for the appropriate set-tings (see section “Jumper Settings of the Audio and RS-422 Panel” on page 3-3).

2-13
Overview
2
1
3
I
4
A
Figure 2-6: Panels for analog and digital audio
Audio Panel
Item Explanation
#1 Analog Audio 3.5 mm unbalanced stereo headphone jack to monitor the audio output
Digital Audio (AES/EBU)
DB-25 connector (female) for audio sig-nal and LTC in- and output; provides ei-ther four stereo channels digital audio (channels 1 to 8) or three channels audio plus LTC
#2 Analog Audio Without function
Digital Audio (AES/EBU)
DB-25 connector (female) for audio sig-nal in- and output; provides the digital audio channels 9 to 16; for Atomix LT 4 BNC the DVS SDK provides special de-fines to configure the audio channels of this connector
Prior to the installation of the panels you have to set/check the jumpers on their printed circuit boards for the appropriate set-tings (see section “Jumper Settings of the Audio Panel(s)” on page 3-4).
Analog Audio
Digital Audio (AES/EBU)
audio panel #1 audio panel #2
2-14
Atomix LT Installation Guide
2.3.4 RS-422 Panel
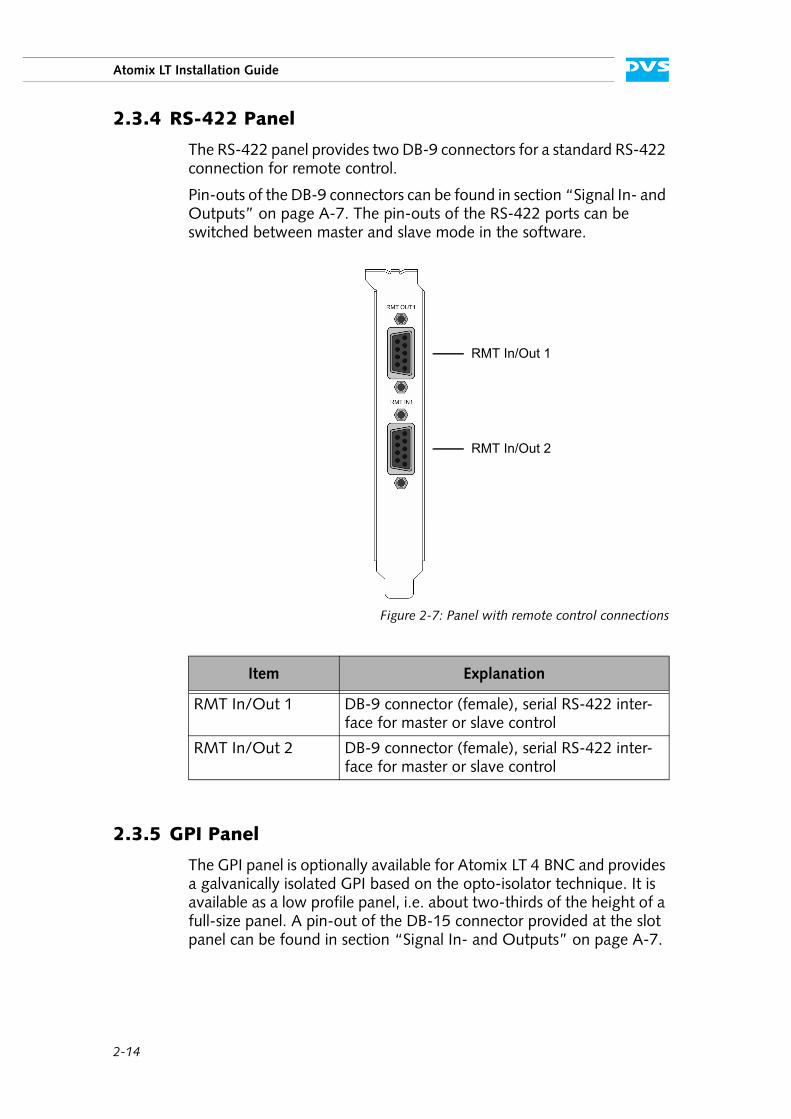
The RS-422 panel provides two DB-9 connectors for a standard RS-422 connection for remote control.
Pin-outs of the DB-9 connectors can be found in section “Signal In- and Outputs” on page A-7. The pin-outs of the RS-422 ports can be switched between master and slave mode in the software.
Figure 2-7: Panel with remote control connections
2.3.5 GPI Panel
The GPI panel is optionally available for Atomix LT 4 BNC and provides a galvanically isolated GPI based on the opto-isolator technique. It is available as a low profile panel, i.e. about two-thirds of the height of a full-size panel. A pin-out of the DB-15 connector provided at the slot panel can be found in section “Signal In- and Outputs” on page A-7.
Item Explanation
RMT In/Out 1 DB-9 connector (female), serial RS-422 inter-face for master or slave control
RMT In/Out 2 DB-9 connector (female), serial RS-422 inter-face for master or slave control
RMT In/Out 2
RMT In/Out 1

2-15
Overview
2
1
3
I
4
A
Figure 2-8: Panel with GPI connection
Item Explanation
GPI DB-15 connector (male) providing the general purpose interface
GPI

2-16
Atomix LT Installation Guide
3-1
3
3
2
1
I
4
A
Installation
This chapter details all the information necessary to install Atomix LT in a computer system.
First, the installation of the board and its panels is described. After that follows a description on how to activate the ordered features. Atomix LT offers various features. Some of these are included in the standard version of the video board, some belong to optional packages and have to be ordered explicitly if you want to use them. Via a license key the whole feature set that you have ordered with Atomix LT can be activated.
For some installations it may be necessary to upgrade the firmware of Atomix LT. This is described in this chapter as well.
Once everything is set, you may test your installation and system con-figuration if everything is working properly.
The DVS driver to control the board is part of the SDK software package. For information on how to install the DVS driver please refer to the separate SDK documentation.

3-2
Atomix LT Installation Guide
3.1 Hardware Installation
How to install Atomix LT in a computer system is described in this sec-tion. The installation has to be performed in several steps: First, you have to prepare the computer system and the panels for the installa-tion. After that the board itself must be installed, followed by the instal-lation of the different panels. Afterwards you have to set up the remaining connections, and finally in the last step the hardware instal-lation has to be finished.
3.1.1 Preparations
Before installing the Atomix LT board the computer system and some of the panels have to be prepared for the installation. The necessary preparations will be described in the following.
Preparing the Computer System
To prepare the computer system where Atomix LT has to be installed perform the following:
Disconnect all cables (especially the power cords) from the com-puter system where Atomix LT should be installed.
Open the computer casing. For details on how to do this please refer to the respective manufacturer’s manual.
If you want to disconnect flat cables from the board once they are plugged in, please read section “Unplugging Cables” on page 1-6.
Please note that the availability of the panels depends on the ordered feature set.
The computer system you are trying to install Atomix LT in usually works with voltages that can be hazardous to your health.
Never work on the system or access its interior with the power cable(s) being plugged in. Make sure the power supply is disconnected from the components you intend to work on.
Computer hardware contains components that are sensitive to electrostatic discharge. If you touch them without precau-tionary measures, they can be destroyed.
Use a wrist strap connected to ground when accessing elec-tronic parts and take care of grounding the video system. Avoid touching the components of the computer and Atomix LT whenever possible.
3-3
Installation
3
2
1
I
4
A
The computer system is now ready for the installation and you have to proceed with the checking of the panels for their correct jumper set-tings.
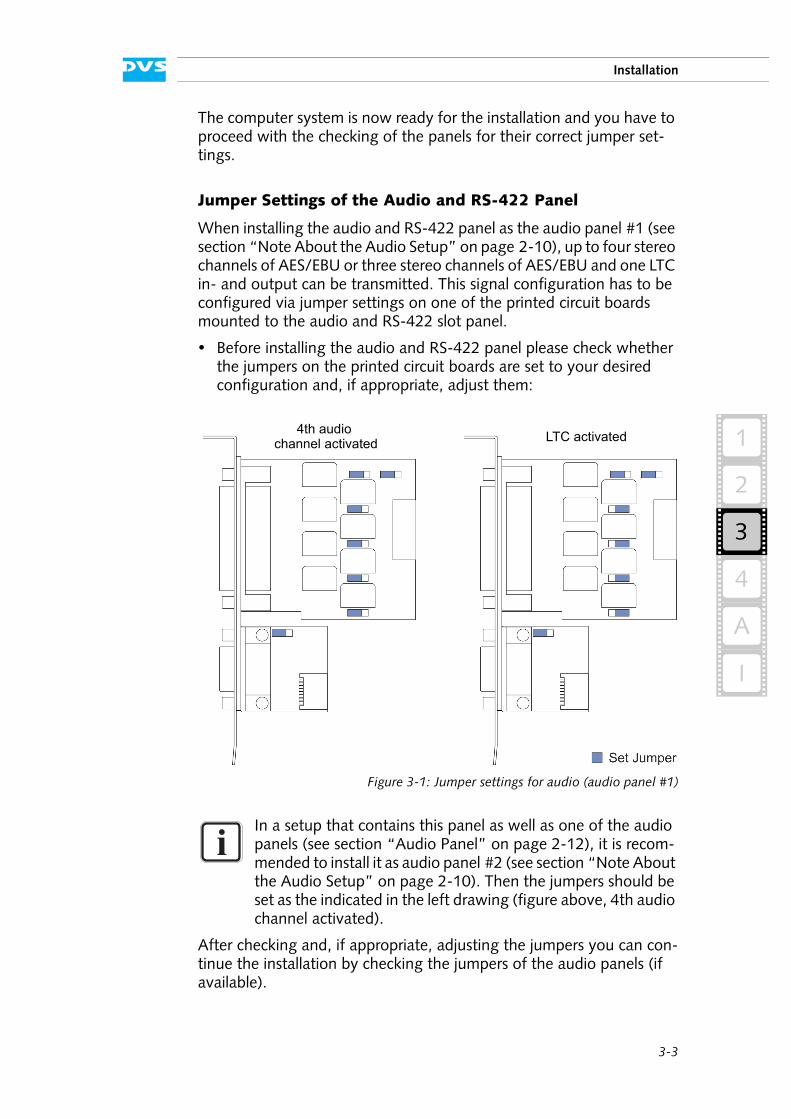
Jumper Settings of the Audio and RS-422 Panel
When installing the audio and RS-422 panel as the audio panel #1 (see section “Note About the Audio Setup” on page 2-10), up to four stereo channels of AES/EBU or three stereo channels of AES/EBU and one LTC in- and output can be transmitted. This signal configuration has to be configured via jumper settings on one of the printed circuit boards mounted to the audio and RS-422 slot panel.
Before installing the audio and RS-422 panel please check whether the jumpers on the printed circuit boards are set to your desired configuration and, if appropriate, adjust them:
Figure 3-1: Jumper settings for audio (audio panel #1)
After checking and, if appropriate, adjusting the jumpers you can con-tinue the installation by checking the jumpers of the audio panels (if available).
In a setup that contains this panel as well as one of the audio panels (see section “Audio Panel” on page 2-12), it is recom-mended to install it as audio panel #2 (see section “Note About the Audio Setup” on page 2-10). Then the jumpers should be set as the indicated in the left drawing (figure above, 4th audio channel activated).
LTC activated4th audio
channel activated

3-4
Atomix LT Installation Guide
Jumper Settings of the Audio Panel(s)
On the audio panel that should be installed as the audio panel #1 (see section “Note About the Audio Setup” on page 2-10) up to four stereo channels of AES/EBU or three stereo channels of AES/EBU and one LTC in- and output can be transmitted. This signal configuration has to be configured via jumper settings on the printed circuit board mounted to the audio slot panel.
Before installing the audio panel #1 please check whether the jump-ers on the printed circuit board are set to your desired configuration and, if appropriate, adjust them:
Figure 3-2: Jumper settings for audio (audio panel #1)
If available, check the jumper settings of the audio panel that should be installed as the audio panel #2. They should be set as the indicated in the left drawing (figure above, 4th audio channel acti-vated).
After checking and, if appropriate, adjusting the jumpers of the audio panels to their correct settings you can go on with the next step and install the board into the computer system.
3.1.2 Installation of the Board
With the second step the Atomix LT board will be installed in the pre-pared computer system. For this perform the following:
LTC activated4th audio
channel activated
3-5
Installation
3
2
1
I
4
A
In the computer system remove the slot bracket from the PCI slot where the Atomix LT board should be installed.
Insert the Atomix LT board into the PCI slot without using excessive force or bending it.
Afterwards fasten the board with the screw from the slot bracket.
With this the Atomix LT board is installed in the computer system and you can move on to the next step, i.e. to the installation of the panels.
3.1.3 Installation of the Panels
As the third step you have to connect the delivered panels internally to the Atomix LT board and install them in your computer system. For this perform the following:
Remove as many slot brackets as you need for the additional pan-els.
Now install the panels: Insert the panels of Atomix LT into the empty slots and fasten each with a screw from the slot brackets.
Connect the cables to the appropriate Atomix LT board interfaces as detailed in the following:
The Atomix LT board must be installed in a PCIe x8 or x16 slot (four or more electrical lanes).
During the next step please observe not to break off any parts of the PCI video board. Apply pressure to the slot panel and/or the printed circuit board only, not to any of its attached parts.
The chassis of the computer system where the Atomix LT board is installed must be equipped with a sufficient ventila-tion for cooling reasons.

3-6
Atomix LT Installation Guide
Connecting the Audio and RS-422 Panel
Depending on your setup the audio and RS-422 panel can be installed as the audio panel #1 or 2 (see section “Note About the Audio Setup” on page 2-10). The connection is made with a 26-pin flat cable to the Atomix LT board. The remote control connection is made with a 12-pin flat cable. Perform the internal connections as shown in the following figure:
Figure 3-3: Internal connections of the audio and RS-422 panel
Prior to the installation of the panel you have to set/check the jumpers on the printed circuit boards for the appropriate set-tings (see section “Jumper Settings of the Audio and RS-422 Panel” on page 3-3).
3-7
Installation
3
2
1
I
4
A
Connecting the Audio Panel(s)
Depending on your setup the audio panel(s) can be installed as audio panel #1 and/or audio panel #2 (see section “Note About the Audio Setup” on page 2-10). The connections are made with 26-pin flat ca-bles to the Atomix LT board. To perform the internal connections you can connect the audio panel(s) to the board as shown in the following figure:
Figure 3-4: Internal connections of the audio panel(s)
Prior to the installation of the panels you have to set/check the jumpers on their printed circuit boards for the appropriate set-tings (see section “Jumper Settings of the Audio Panel(s)” on page 3-4).
3-8
Atomix LT Installation Guide
Connecting the RS-422 Panel
The connection of the RS-422 panel to the board is made with a 12-pin flat cable. Set up the connection as shown in the following figure:
Figure 3-5: Internal connection of the RS-422 panel
3-9
Installation
3
2
1
I
4
A
Connecting the GPI Panel
A 12-pin flat cable is used to make the connection of the GPI panel to the board. The connector on the board is located on the rear side of the expansion module. Set up the connection as shown in the following fig-ure:
Figure 3-6: Internal connection of the GPI panel
Once all panels are properly connected to the Atomix LT board, you have to continue the installation with the next step and set up the re-maining internal connections.

3-10
Atomix LT Installation Guide
3.1.4 Setting up the Remaining Internal Connections
To finish the cabling inside the computer system you may want to con-nect a rechargeable battery (accu) to the fail safe connector. In the event of a power loss it will provide a bypass of the SDI input signals to the SDI outputs. The rechargeable battery can be internally connected to either the Fail Safe 1 connector as shown in the following figure or externally to Fail Safe 0 (see section “Overview of the Component Side” on page 2-4). For further details about the accu see section “Technical Data” on page A-1.
Figure 3-7: Remaining internal connections
When the internal connections are all set up, Atomix LT is properly con-nected to your computer system. As a last step you must now finish the installation.

3-11
Installation
3
2
1
I
4
A
3.1.5 Finishing the Installation
This step of installing the Atomix LT board is the last step to be per-formed. To finish the hardware installation do the following:
Close the computer casing.
Connect all cables to the computer system again.
Connect your audio and video equipment to the Atomix LT connec-tors.
After this start the computer system.
Once the computer system has finished the loading of the operating system, the installation of the hardware of Atomix LT is complete. To use the board and activate its features you have to install the DVS soft-ware as well (see section “Software Installation” on page 3-12).
3-12
Atomix LT Installation Guide
3.2 Software Installation
Beside the files for software development, the DVS SDK software pack-age also includes the Atomix LT board driver and tools for a basic hard-ware setup and diagnostics.
For descriptions of the software and driver as well as their installations please refer to the separate SDK documentation.
Once the software installation is completed, you have to activate the feature set available for Atomix LT with the delivered license key.
3.3 Setting the License Key
This section explains how to set the license key on the computer system equipped with Atomix LT. The license key activates the individual fea-tures that you have ordered for your DVS product. After the SDK and the driver are installed, you have to set the license key for Atomix LT to be able to use the full feature set.
Atomix LT is capable of holding two license keys. The first key is usually used for licensing the features that you have ordered with Atomix LT. The second key is usually used for temporary licenses that you may have received for evaluation purposes. Each license key enables one or more (optional) features of Atomix LT until date of expiration (if appli-cable). Each time Atomix LT starts the keys are checked and their fea-tures are combined.
To set the license key(s) for Atomix LT you have to perform the follow-ing:
Save the license key that you have received with Atomix LT in a text file at a location of your choice on the computer.
Open a command line (shell, or in case of Windows command prompt (cmd)).
Enter the command svram licence keyfile1 <text file>. For <text file> insert the path and file name to the text file that holds the license key.
In case the driver is not already loaded, load the driver. Further information about this can be found in the separate SDK doc-umentation.
In case you have several Atomix LT boards installed, use the environment variable SCSIVIDEO_CMD and set it to PCI,card:<x> (with <x> as the number of the board, nor-mally counting from zero (0)) to access a particular board. Please refer to the SDK documentation for details about setting the variable SCSIVIDEO_CMD.

3-13
Installation
3
2
1
I
4
A
The new license key is now set and will be stored non-volatile in Atomix LT.
Repeat the described steps to activate the features for the second key (’keyfile2’), if appropriate, by altering the command respec-tively.
If you have more than one Atomix LT board installed in your com-puter system, use the environment variable SCSIVIDEO_CMD to access the respective board and repeat the steps to activate its fea-tures.
Reboot the computer system.
Once the system has started, all licensed features will be available to Atomix LT.
The features activated with this license key can be checked with the command svram licence show.
It is recommended to have the latest released firmware version installed on the Atomix LT board. More information about this can be found in section “Upgrading the Firmware” on page 3-14.
To be sure your Atomix LT board works properly, you may also test your installation. Details on how to perform a testing of your installation can be found in section “Testing the Installa-tion” on page 3-17.

3-14
Atomix LT Installation Guide
3.4 Upgrading the Firmware
It is recommended to have the latest released firmware version installed on the Atomix LT board. Depending on the currently installed firmware it may require an upgrade. This can be done with a program named ’atomixltup’. This section explains how to determine whether you need and how to perform a firmware upgrade.
3.4.1 Determining the Firmware Version
Before upgrading the firmware you have to determine the firmware version that is currently installed on your Atomix LT board and compare it with the version suitable for your DVS SDK. For this perform the fol-lowing:
Open a command line (shell, or in case of Windows command prompt (cmd)).
Enter at the command line svram version info and press [Enter].
In the output look for the line that says Firmware Version: 5.4.0.6_5.2.4 or similar.
The numbers indicate the installed firmware version. In detail they stand for two version numbers that are separated by an underscore, i.e. with the pattern <v1>_<v2>.
Next check the readme.txt and changelog.txt of the DVS SDK for information about the required firmware version. Notable dependencies will be stated in these files.
An upgrade should be performed by qualified personnel only. Before upgrading the firmware close all other applications.
Be aware of a power failure. If this happens, you have to use the fallback firmware version of the Atomix LT board as de-tailed in chapter “Maintenance” on page 4-1.
If the driver is not already loaded, load the driver. Further infor-mation about this can be found in the separate SDK documen-tation.
In case you have several Atomix LT boards installed, use the environment variable SCSIVIDEO_CMD and set it to PCI,card:<x> (with <x> as the number of the board, nor-mally counting from zero (0)) to access a particular board. Please refer to the SDK documentation for details about setting the variable SCSIVIDEO_CMD.

3-15
Installation
3
2
1
I
4
A
Then compare the version numbers of the output separately with the numbers stated in the DVS SDK.
If one of the version numbers is lower than the respective numbers stat-ed in the DVS SDK, the firmware should be upgraded (see section “Up-grading the Firmware” on page 3-15).
3.4.2 Upgrading the Firmware
In case you determined that a firmware upgrade is required, perform the following:
Log on to the DVS web site (see section “Required Software” on page 1-8) and download the required firmware.
Open a command line (shell, or in case of Windows command prompt (cmd)).
Run the update program atomixltup### (### is the firmware version that the Atomix LT board will be upgraded to) and follow the instructions given on the screen while observing the following:
– During the procedure you will be asked if you want to upgrade all installed Atomix LT boards in a single step or one board only. With the latter option selected, the program will loop through all installed Atomix LT boards and you can decide for each if it should be upgraded.
– Each board upgrade takes several minutes.– The program will terminate itself when all upgrades are fin-
ished.
When the upgrade procedure is finished, shut down the computer and wait at least ten seconds before rebooting it.
This will safely erase the old firmware from the Atomix LT board(s).
Start the computer and, after the operating system has loaded, check the firmware version as described in section “Determining the Firmware Version” on page 3-14.
Treat the two version numbers as any version number, where <a>, as in e.g. <a>.<b>.<c>, has priority over <b> and both over <c>.
Make sure that the firmware version matches the used DVS SDK. Notable dependencies will be stated on the DVS web site and/or in the readme.txt and changelog.txt of the DVS SDK.
Only officially released firmware versions are suitable for end user delivery.

3-16
Atomix LT Installation Guide
If the firmware version is upgraded, the procedure is finished. If it is not upgraded, perform the procedure again and give the board(s) more time to erase the old information.
3-17
Installation
3
2
1
I
4
A
3.5 Testing the Installation
After having installed and set up everything, you should test if the Atomix LT installation has been successful. The tools delivered with the DVS SDK software package offer you the possibility to generate and display test pictures to check the Atomix LT hardware.
To test the installation perform the following:
Connect a video monitor to the video output connectors of Atomix LT (see chapter “Overview” on page 2-1).
Open a command line (shell, or in case of Windows command prompt (cmd)).
Now the computer system is ready to display test frames:
Use svram mode, svram sync, svram analog, etc. to select the desired video and audio settings (further information about the commands can be found in the SDK documentation).
Enter svram colorbar to display a color bar at the output.
If this works, you have successfully completed the Atomix LT installa-tion. Together with the DVS SDK some sample programs are delivered that can also be used for testing.
If the driver is not already loaded, load the driver. Further infor-mation about this can be found in the separate SDK documen-tation.
In case you have several Atomix LT boards installed, use the environment variable SCSIVIDEO_CMD and set it to PCI,card:<x> (with <x> as the number of the board, nor-mally counting from zero (0)) to access a particular board. Please refer to the SDK documentation for details about setting the variable SCSIVIDEO_CMD.
The svram program only affects the buffer and the I/O func-tions of the Atomix LT board. For testing optionally installed video hard disks you have to use your own test routines.

3-18
Atomix LT Installation Guide

4-1
4
4
2
1
3
I
A
Maintenance
This chapter explains maintenance work that you may perform on your own, i.e. it will be explained in detail what to do in case of a firmware upgrade failure (see section “Upgrading the Firmware” on page 3-15).
An upgrade of the firmware is a delicate procedure comparable to a BIOS upgrade of a computer motherboard. If, for example, an environ-mental extreme like a power failure occurs while the upgrade program is running, the PCI video board may loose all its programming.
In case the programming of the PCI video board is lost, act as described in the following to restore it:
If appropriate, turn off the computer system where Atomix LT is installed and disconnect its power cable(s).
Open the casing of the computer system. For details on how to do this please refer to the respective manufacturer’s manual.
Set the DIP switch for the Flash controller on the PCI video board (see section “Overview of the Soldering Side” on page 2-6) to the setting indicated in the following figure:
Prior to performing the procedure for a firmware upgrade fail-ure contact the DVS service department to make sure that this procedure is really necessary.
The computer system you are working on usually works with voltages that can be hazardous to your health.
Never work on the system or access its interior with the power cable(s) being plugged in. Make sure the power supply is disconnected from the components you intend to work on.
Computer hardware contains components that are sensitive to electrostatic discharge. If you touch them without precau-tionary measures, they can be destroyed.
Use a wrist strap connected to ground when accessing elec-tronic parts and take care of grounding the video system. Avoid touching the components of the computer and the printed circuit board(s) of Atomix LT.

4-2
Atomix LT Installation Guide
Figure 4-1: Setting of Flash controller DIP switch
This setting will load a safe mode programming (fallback map) when the PCI video board is initialized during start-up. Now use this fallback map to perform the firmware upgrade once again:
Close the casing of the computer system and plug in its power cable(s).
Turn on the computer system.
After the start-up of the computer and the loading of the operating system run the firmware upgrade program (atomixltup###, see section “Upgrading the Firmware” on page 3-15) once again.
When the upgrade program has finished the procedure, shut down the computer.
You must now set the DIP switch for the Flash controller back to its de-fault position:
Disconnect the power cable(s) of the computer system.
Open the casing of the computer system.
Then set the DIP switch for the Flash controller back to its default setting as shown in the respective figure in section “Overview of the Soldering Side” on page 2-6.
Close the casing and plug in the power cable(s).
Now start the computer.
After the operating system has loaded check the firmware version as described in section “Determining the Firmware Version” on page 3-14.
If the firmware version is upgraded, the procedure is finished.
Never operate the PCI video board with the fallback map en-abled. Make sure that for normal operations the DIP switch is set back to its default position.

A-1
A
2
1
3
I
4
A
Appendix
This chapter provides technical data and general information about Atomix LT.
A.1 Technical Data
The following shows the technical data of the Atomix LT board.
The chassis of the computer system where the Atomix LT board is installed must be equipped with a sufficient ventila-tion for cooling reasons.
PCI bus requirements
PCIe x8 (elect. x4)
Board size approx. 2/3 length, single-slot
Electrical type 3.3/12 volt
PCIe conformity Specification 1.1
Operating environ-mental conditions
5°C (41°F) to 40°C (104°F)20% to 80% relative humidity,non-condensing
Storage environ-mental conditions
-17°C (0°F) to 70°C (158°F)10% to 80% relative humidity,non-condensing
Rechargeable battery
Li-ion accu3.7 V (nominal), 4.7 V (charging)min. 2400 mAh (approx. 1.5 h bypass)

A-2
Atomix LT Installation Guide
A.2 Hardware Specifications
The following table shows the hardware specifications of Atomix LT.
Table A-1: Atomix LT specifications
Video Input Output
Serial digital 4:2:2 8/10 bit (single link) 2 streams via2 BNC
2 streams via2 BNC
Serial digital 4:4:4 8/10/12 bit (dual link) 1 stream via2 BNC
1 stream via2 BNC
Serial digital 4:4:4 8/10/12 bit (3 Gbit/s) 2 streams via2 BNC
2 streams via2 BNC
Key Input Output
Serial digital 4:0:0 8/10/12 bit for 4:2:2:4 and 4:4:4:4 modes
1 BNC per stream (via Video In)
1 BNC per stream (via Video Out)
Reference Input Output
Analog reference genlock 1 BNC
Audio Input Output
Embedded audio, 16 digital channels (mono)
1 BNC per stream (via Video In)
1 BNC per stream (via Video Out)
AES/EBU, 16 (8) digital mono channels (in brackets Atomix LT 4 BNC)
8 (4) XLR female 8 (4) XLR male
Analog audio 1 stereo head-phone jack
Timecode Input Output
Longitudinal (LTC) 1 XLR female 1 XLR male
Vertical (VITC) 1 BNC per stream (via Video In)
1 BNC per stream (via Video Out)
Data and Control Interfaces Input Output
Serial RS-422 Up to 2 DB-9 female (software switch-able)
GPI 1 DB-15 male (optocoupler)

A-3
Appendix
2
1
3
I
4
A
A.3 Baud Rate of RS-422 Ports
The baud rate (data transfer speed) of the RS-422 ports of Atomix LT can be set up via the DVS software.
The following settings are possible:
– 9600 baud– 19200 baud– 38400 baud– 57600 baud
The maximum baud rate is 57600 baud.
Data Formats
Color Modes YCbCr 4:2:2YCbCrA 4:2:2:4RGB 4:4:4RGBA 4:4:4:4
Storage Format Uncompressed YUV(A) 4:2:2(:4) / RGB(A) 4:4:4(:4) 8/10/12 bit, user selectable
Internal Processing Color space conversionLow-pass filtering (4:4:4 4:2:2)User definable LUT (1D)Frame repetitionReal-time mixerReal-time scalerInput raster detection3:2 & 2:3 pulldown insertion/removalWatchdog with hardware relay
Audio Formats 48 kHz, 20/24 bit
For more information about how to set the baud rate of the RS-422 ports please refer to the SDK documentation.
Table A-1: Atomix LT specifications (cont.)
A-4
Atomix LT Installation Guide
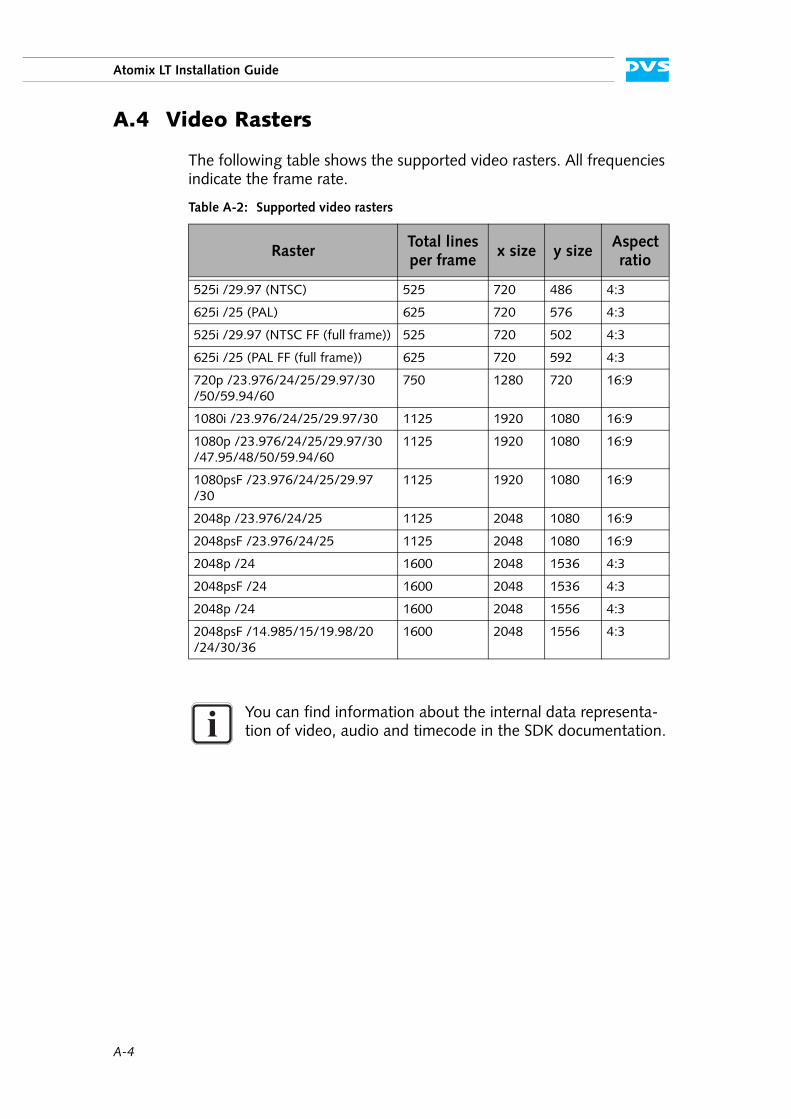
A.4 Video Rasters
The following table shows the supported video rasters. All frequencies indicate the frame rate.
Table A-2: Supported video rasters
RasterTotal lines per frame
x size y sizeAspect ratio
525i /29.97 (NTSC) 525 720 486 4:3
625i /25 (PAL) 625 720 576 4:3
525i /29.97 (NTSC FF (full frame)) 525 720 502 4:3
625i /25 (PAL FF (full frame)) 625 720 592 4:3
720p /23.976/24/25/29.97/30/50/59.94/60
750 1280 720 16:9
1080i /23.976/24/25/29.97/30 1125 1920 1080 16:9
1080p /23.976/24/25/29.97/30/47.95/48/50/59.94/60
1125 1920 1080 16:9
1080psF /23.976/24/25/29.97/30
1125 1920 1080 16:9
2048p /23.976/24/25 1125 2048 1080 16:9
2048psF /23.976/24/25 1125 2048 1080 16:9
2048p /24 1600 2048 1536 4:3
2048psF /24 1600 2048 1536 4:3
2048p /24 1600 2048 1556 4:3
2048psF /14.985/15/19.98/20/24/30/36
1600 2048 1556 4:3
You can find information about the internal data representa-tion of video, audio and timecode in the SDK documentation.

A-5
Appendix
2
1
3
I
4
A
A.5 GPI (Optocoupler)
This section provides further details about the GPI based on optocou-pler technology (see section “GPI Panel” on page 2-14).
A.5.1 Technical Data
The following shows some technical data of the optocoupler GPI:
A.5.2 Block Diagrams
This section shows block diagrams of the GPI in- and output.
GPI Input
The inputs turn on if you feed a current between 2 mA and 40 mA to the positive pins, negative must then be connected to ground.
Output DC or peak AC load voltage 200 V
continuous DC load current 200 mA bidirectional
Input min. voltage to turn to ON 2 V DC
max. voltage to turn to ON 14 V DC

A-6
Atomix LT Installation Guide
GPI Output
The output can switch loads with a maximum current of 200 mA at a voltage range from 0 V to 200 V, or up to 200 V (peak with AC) at no current.

A-7
Appendix
2
1
3
I
4
A
A.6 Signal In- and Outputs
This section provides pin-out information about some of the connectors provided by Atomix LT.
AUX Breakout for Breakout Cable (15-Pin D-Sub HD Connector)
The RS-422 port provided via the breakout cable is RMT In/Out 1. It can be switched between master and slave mode via the software.
Analog Audio (3.5 mm Headphone Jack)
Pin No. Signal Pin No. Signal
1 Genlock IN 9 –
2 RS422_TX 10 DigGND
3 /RS422_TX 11 /LTC_TX
4 LTC_TX 12 LTC_RX
5 Audio Right 13 RS422_RX
6 Genlock GND 14 /RS422_RX
7 DigGND 15 /LTC_RX
8 Audio Left
Output Impedance 75 Ohm
Output Level 1.55 V (at 600 Ohm)

A-8
Atomix LT Installation Guide
Digital Audio (25-Pin D-Sub Connector)
Table A-3: Digital Audio Ch. 1-8/LTC
Pin No. Signal Pin No. Signal
1 Audio OUT CH 7/8, orLTC OUT
14 /Audio OUT CH 7/8, or/LTC OUT
2 GND 15 Audio OUT CH 5/6
3 /Audio OUT CH 5/6 16 GND
4 Audio OUT CH 3/4 17 /Audio OUT CH 3/4
5 GND 18 Audio OUT CH 1/2
6 /Audio OUT CH 1/2 19 GND
7 Audio IN CH 7/8, orLTC IN
20 /Audio IN CH 7/8, or/LTC IN
8 GND 21 Audio IN CH 5/6
9 /Audio IN CH 5/6 22 GND
10 Audio IN CH 3/4 23 /Audio IN CH 3/4
11 GND 24 Audio IN CH 1/2
12 /Audio IN CH 1/2 25 GND
13 –
Table A-4: Digital Audio Ch. 9-16
Pin No. Signal Pin No. Signal
1 Audio OUT CH 15/16 14 /Audio OUT CH 15/16
2 GND 15 Audio OUT CH 13/14
3 /Audio OUT CH 13/14 16 GND
4 Audio OUT CH 11/12 17 /Audio OUT CH 11/12
5 GND 18 Audio OUT CH 9/10
6 /Audio OUT CH 9/10 19 GND
7 Audio IN CH 15/16 20 /Audio IN CH 15/16
8 GND 21 Audio IN CH 13/14
9 /Audio IN CH 13/14 22 GND

A-9
Appendix
2
1
3
I
4
A
RMT In/Out 1 and RMT In/Out 2 (9-Pin D-Sub Connectors)
The RS-422 connector(s) can be switched between master and slave mode via the software, i.e. between RMT OUT and RMT IN.
10 Audio IN CH 11/12 23 /Audio IN CH 11/12
11 GND 24 Audio IN CH 9/10
12 /Audio IN CH 9/10 25 GND
13 –
RMT IN RMT OUT
Pin No. Signal Pin No. Signal
1 – 1 –
2 /TX_B_CON 2 /RX_A_CON
3 RX_B_CON 3 TX_A_CON
4 GND 4 GND
5 – 5 –
6 GND 6 GND
7 TX_B_CON 7 RX_A_CON
8 /RX_B_CON 8 /TX_A_CON
9 – 9 –
Table A-4: Digital Audio Ch. 9-16 (cont.)
Pin No. Signal Pin No. Signal
A-10
Atomix LT Installation Guide
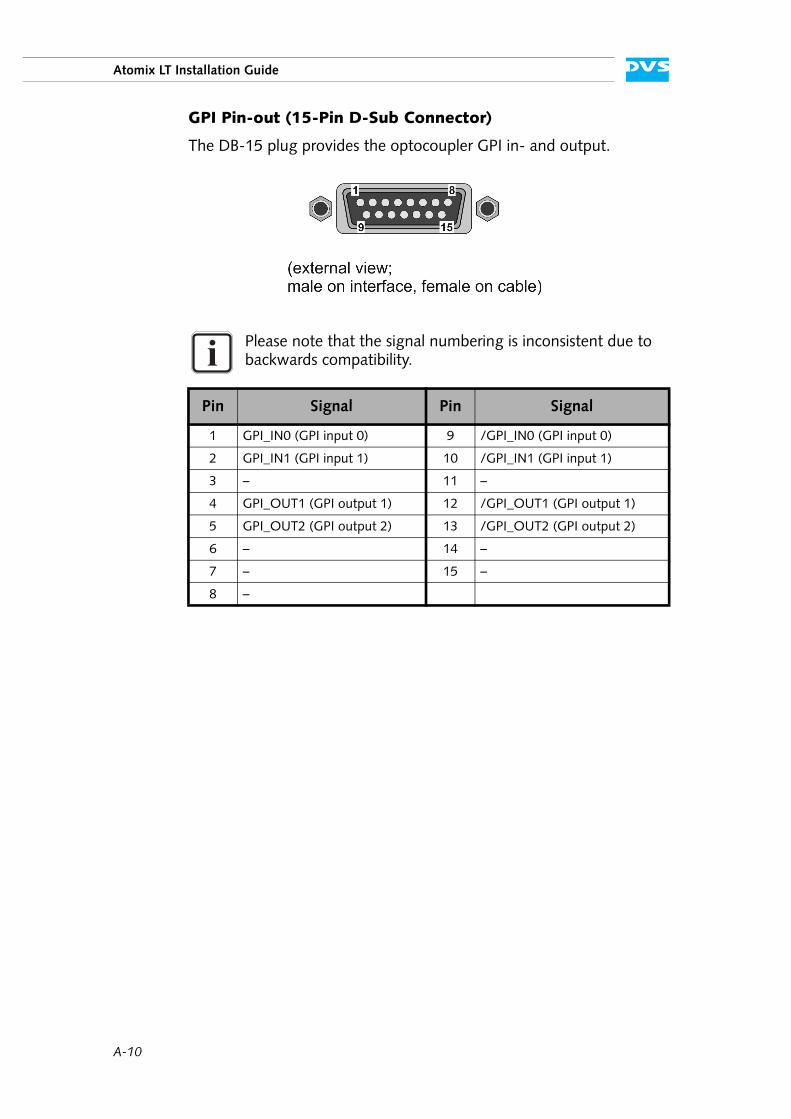
GPI Pin-out (15-Pin D-Sub Connector)
The DB-15 plug provides the optocoupler GPI in- and output.
Please note that the signal numbering is inconsistent due to backwards compatibility.
Pin Signal Pin Signal
1 GPI_IN0 (GPI input 0) 9 /GPI_IN0 (GPI input 0)
2 GPI_IN1 (GPI input 1) 10 /GPI_IN1 (GPI input 1)
3 – 11 –
4 GPI_OUT1 (GPI output 1) 12 /GPI_OUT1 (GPI output 1)
5 GPI_OUT2 (GPI output 2) 13 /GPI_OUT2 (GPI output 2)
6 – 14 –
7 – 15 –
8 –

A-11
Appendix
2
1
3
I
4
A
A.7 Conformity Declarations
Atomix LT has been tested according to the applying national and in-ternational directives and regulations. The following states further in-formation about the compliances and conformities.
A.7.1 RoHS Compliance
The EU directive 2002/95/EC ’Restriction of Hazardous Substances (RoHS)’ prohibits the use of certain substances in electrical and elec-tronic equipment. All DVS products are manufactured in compliance with this directive.
A.7.2 EC Declaration of Conformity (CE Marking)
DVS Digital Video Systems GmbH herewith declares that the following product(s) according to the provisions of the mentioned EC Directives – including their relevant revisions at the time of this declaration – is (are) in conformity with the detailed standards or other normative docu-ments:
A.7.3 FCC Compliance Statement
DVS Digital Video Systems GmbH herewith declares that the following equipment has been tested according to the applying valid FCC regu-lations:
– Atomix LT– Atomix LT 4 BNC
Atomix LT
Atomix LT 4 BNC
EC Directives:
– EMC Directive 2004/108/EC– Low-Voltage Directive 2006/95/EC
Applied Harmonized Standards:
– EN 55022– EN 55024– IEC 61000-4-2– IEC 61000-4-3– IEC 61000-4-4– IEC 61000-4-5– IEC 61000-4-6– IEC 61000-4-8

A-12
Atomix LT Installation Guide
FCC Notice
This equipment has been tested and found to comply with the limits for a Class A digital device, pursuant to Part 15 of the FCC Rules. These limits are designed to provide reasonable protection against harmful in-terference when the equipment is operated in a commercial environ-ment. This equipment generates, uses, and can radiate radio frequency energy and, if not installed and used in accordance with the instruction manual, may cause harmful interference to radio communications. Op-eration of this equipment in a residential area is likely to cause harmful interference in which case the user will be required to correct the inter-ference at his own expense.
Note: Connecting this device to peripheral devices that do not comply with Class A requirements or using an unshielded peripheral data cable could also result in harmful interference to radio or television reception. The user is cautioned that any changes or modifications not expressly approved by the party responsible for compliance could void the user’s authority to operate this equipment. To ensure that the use of this prod-uct does not contribute to interference, it is necessary to use shielded I/O cables.

A-13
Appendix
2
1
3
I
4
A
A.8 Short Reference: Atomix LT Boards
This section provides short references to the Atomix LT boards.
Atomix LT
A-14
Atomix LT Installation Guide
Atomix LT 4 BNC

I-1
I
I
2
1
3
4
A
Index
Numerics
3-Gbit/s SDI ...........................2-5, 2-89-pin D-Sub connector pin-out ........A-915-pin D-Sub connector pin-out .....A-7,
A-1025-pin D-Sub connector pin-out ......A-8
A-C
accu ............................ 2-6, 3-10, A-1analog audio .................................. 2-5
output ............................2-6, 2-12output specifications .................A-7
Atomix LT ..................................... 2-3see also video board product
Atomix LT 4 BNC ........................... 2-3audio panels ........................... 2-10breakout cable .......... 2-3, 2-6, A-7limitations ................................ 2-3
Atomix LT boardsee PCI video board
atomixltup### ......................3-14, 4-2audio
analog ..................................... 2-5analog output ......... 2-6, 2-12, A-7digital .. 2-5, 2-11, 2-12, 2-13, A-8jumper settings ..................3-3, 3-4panel ..............................2-12, 3-7pin-out ....................................A-8
audio and RS-422 panel ................ 2-11Atomix LT 4 BNC .................... 2-10installation ............................... 3-6
audio panel ................................. 2-12Atomix LT 4 BNC .................... 2-10installation ............................... 3-7
baud rate (RS-422 ports) .................A-3breaking line .................................. 2-6breakout box ..........................1-1, 1-7
breakout cable ...............................2-2Atomix LT 4 BNC .......2-3, 2-6, A-7audio ............................2-11, 2-12replacement .............................1-7
bypass .........................................3-10chapter overview ............................1-2cmd ................3-12, 3-14, 3-15, 3-17color modes ...................................2-8command prompt ..... 3-12, 3-14, 3-15,
3-17conformity declaration .......... 1-6, A-11conventions
of user guide ............................1-3cooling .................................. 1-5, A-1
D-F
DB-9 connector ...........2-11, 2-14, A-9DB-15 connector ........ 2-14, A-7, A-10DB-25 connector .........2-11, 2-12, A-8declaration of conformity ...... 1-6, A-11digital audio ........................2-11, 2-12
Ch. 1-8/LTC .. 2-5, 2-12, 2-13, A-8Ch. 9-16 ....... 2-5, 2-12, 2-13, A-8
digital video ...................................2-5in- and outputs .........................2-7
DIP switch for Flash controller ..2-7, 4-1, 4-2default/factory setting ...............2-7
driver ...................................3-1, 3-12dual link .................................2-5, 2-8DVS driver ............................3-1, 3-12DVS SDK .......................................2-2
installation .............................3-12DVS web site ........................1-8, 3-15environmental conditions ................1-4environmental extreme ...................4-1factory setting
DIP switch for Flash controller ....2-7
I-2
Atomix LT Installation Guide
fail safe ........................2-6, 3-10, A-1fallback map .................................. 4-2firmware upgrade ......................... 3-14
failure ...................................... 4-1firmware version .......................... 3-14flat cable connectors ....................... 1-6
G-I
GPIpin-out ..................................A-10
GPI panel .................................... 2-14installation ............................... 3-9
guarantee ...................................... 1-6hardware ....................................... 2-2important notes ............................. 1-6independent video channels ............ 2-8installation
driver .................................... 3-12DVS SDK ............................... 3-12panels ..................................... 3-5PCI video board ........................ 3-4test ....................................... 3-17video board product .................. 3-2
instructionsfirmware upgrade ................... 3-14firmware upgrade failure ............ 4-1hardware installation ................. 3-2safety ...................................... 1-4setting of license key ............... 3-12software installation ................ 3-12test of installation ................... 3-17
J-L
jumper settings .......................3-3, 3-4key channel ........................... 2-8, A-2layout (video board) .....................A-13LEDs ............................................. 2-7license key ................................... 3-12
setting ................................... 3-12limitations (Atomix LT 4 BNC) .......... 2-3low profile slot panel ..................... 2-14LTC .....2-5, 2-11, 2-12, 3-3, 3-4, A-8
M-O
maintenance .................................. 4-1master control ..... 2-11, 2-14, A-7, A-9
overviewof chapters ...............................1-2of component side (video board) 2-4of panels ................................2-10of PCI video board .......... 2-3, A-13of soldering side (video board) ....2-6of video board product ..............2-2
P-R
panelaudio ............................. 2-12, 3-7audio and RS-422 ........... 2-11, 3-6GPI ................................ 2-14, 3-9installation ................................3-5low profile ..............................2-14overview ................................2-10RS-422 .......................... 2-14, 3-8
PCI video board ...................... 1-1, 2-2firmware upgrade ....................3-14installation ................................3-4layout ................................... A-13overview ........................ 2-3, A-13overview component side ...........2-4overview soldering side ..............2-6short reference ....................... A-13technical data ...................A-1, A-5variants ....................................2-3
pin-out9-pin D-Sub connector ............. A-915-pin D-Sub connector ...A-7, A-1025-pin D-Sub connector ............ A-8audio ...................................... A-8GPI ....................................... A-10remote control (9-pin D-Sub) .... A-9
power failure ..................................4-1Ref In ............................................2-5reference input ...............................2-5remote control
pin-out 15-pin D-Sub ............... A-7see RS-422
RS-422 .......................... 2-5, A-7, A-9baud rate ................................ A-3main ports ................................2-5pin-outs .................................. A-9
RS-422 panel ...............................2-14installation ................................3-8
S-T
safety instructions ...........................1-4SCSIVIDEO_CMD ...... 3-12, 3-14, 3-17
I-3
Index
I
2
1
3
4
A
SDI (serial digital interface) .............. 2-53-Gbit/s SDI ......................2-5, 2-8in- and outputs ......................... 2-8
SDKsee DVS SDK
setting (jumper for audio) .........3-3, 3-4shell ................ 3-12, 3-14, 3-15, 3-17single link ...............................2-5, 2-8slave control ....... 2-11, 2-14, A-7, A-9software ........................................ 2-2specification(s)
analog audio output ..................A-7video board product ..................A-2
svram program ...................3-14, 3-17system requirements ....................... 1-8target group .................................. 1-3technical data ........................ A-1, A-5test of installation ......................... 3-17test pictures ................................. 3-17typographical conventions ............... 1-3
U-Z
unplugging flat cables .....................1-6variants of the board .......................2-3video board
see PCI video boardvideo board product .......................1-1
audio breakout cable ......2-11, 2-12board overview ............... 2-3, A-13breakout box .....................1-1, 1-7breakout cable ...1-7, 2-2, 2-3, 2-6,
A-7installation ...............................3-2maintenance .............................4-1overview ..................................2-2specifications ............................A-2technical data ...................A-1, A-5
video channels (independent) ..........2-8video raster ............................ 2-8, A-4warranty ........................................1-6web site ...............................1-8, 3-15XLR connectors ...................2-11, 2-12

I-4
Atomix LT Installation Guide