AsteriskNOW Setup Guide - Packet8 - Support Information...
5
The 8x8, Inc. logo are registered trademarks of 8x8, Inc. 8x8, Inc. is a publicly traded company. © 2009 NASDAQ-LISTED: EGHT Virtual Trunking AsteriskNOW Setup Guide Adding a SIP Trunk Step 1: From the Trunks tab select Add Sip Trunk. Step 2: In the Outbound Caller ID box enter your Packet8 telephone number in the format shown in the example. Step 3: Check the box next to Never Override CallerID. Step 4: Under Outgoing Settings in the Trunk Name box enter Packet8.
Transcript of AsteriskNOW Setup Guide - Packet8 - Support Information...
The 8x8, Inc. logo are registered trademarks of 8x8, Inc. 8x8, Inc. is a publicly traded company.
© 2009 NASDAQ-LISTED: EGHT
Virtual Trunking
AsteriskNOW Setup Guide
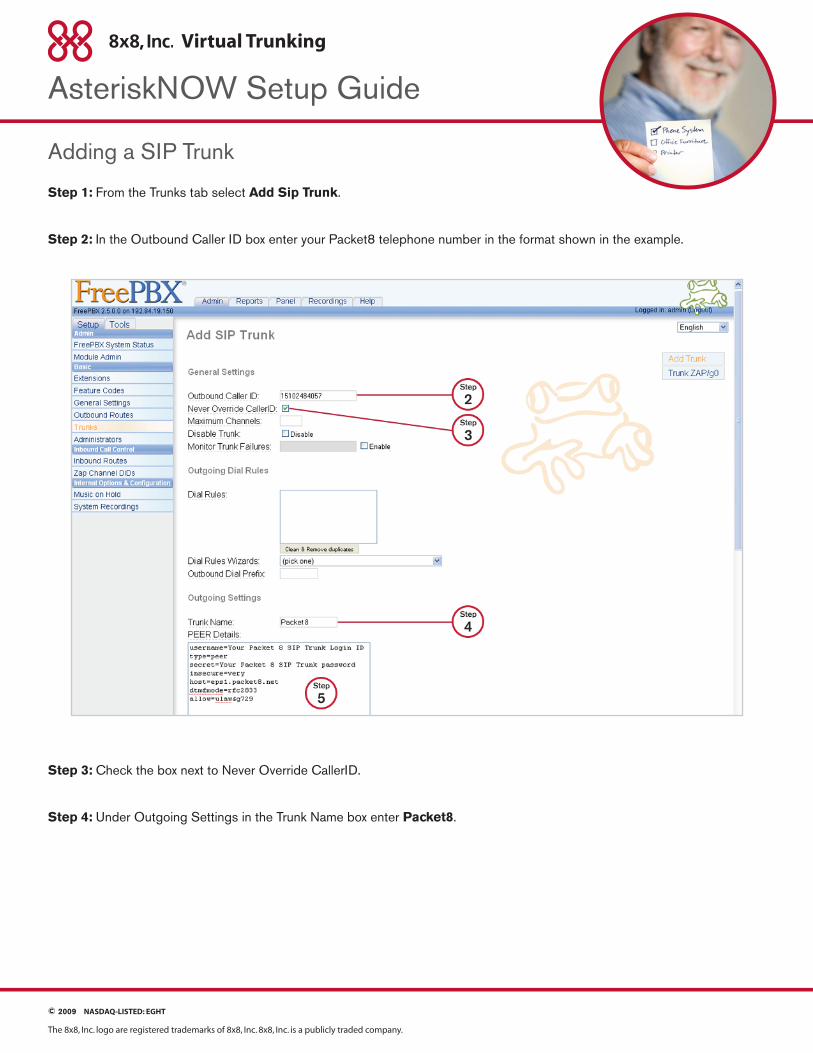
Adding a SIP Trunk
Step 1: From the Trunks tab select Add Sip Trunk.
Step 2: In the Outbound Caller ID box enter your Packet8 telephone number in the format shown in the example.
Step 3: Check the box next to Never Override CallerID.
Step 4: Under Outgoing Settings in the Trunk Name box enter Packet8.

Packet8, the Packet8 logo, and the 8x8, Inc. logo are registered trademarks of 8x8, Inc. 8x8, Inc. is a publicly traded company. © 2009 NASDAQ-LISTED: EGHT
Virtual Trunking
Step 5: In the PEER details box enter the following information with your Packet8 SIP Trunk account username and password:
username = “Your Packet8 SIP Trunk Login ID”
type = peer
secret = “Your Packet8 SIP Trunk Authorization Password”
insecure = very
host = eps1.packet8.net
dtmfmode = rfc2833
allow = ulaw&g729
Step 6: Remove the text in the USER Details box under Incomming Settings.
Note: In the example both G.711(ulaw) and G.729 codecs are selected. Packet8 supports both, however you will need to purchase a desired number of licenses from Digium to utilize the G.729 codec.
Packet8, the Packet8 logo, and the 8x8, Inc. logo are registered trademarks of 8x8, Inc. 8x8, Inc. is a publicly traded company. © 2009 NASDAQ-LISTED: EGHT
Virtual Trunking
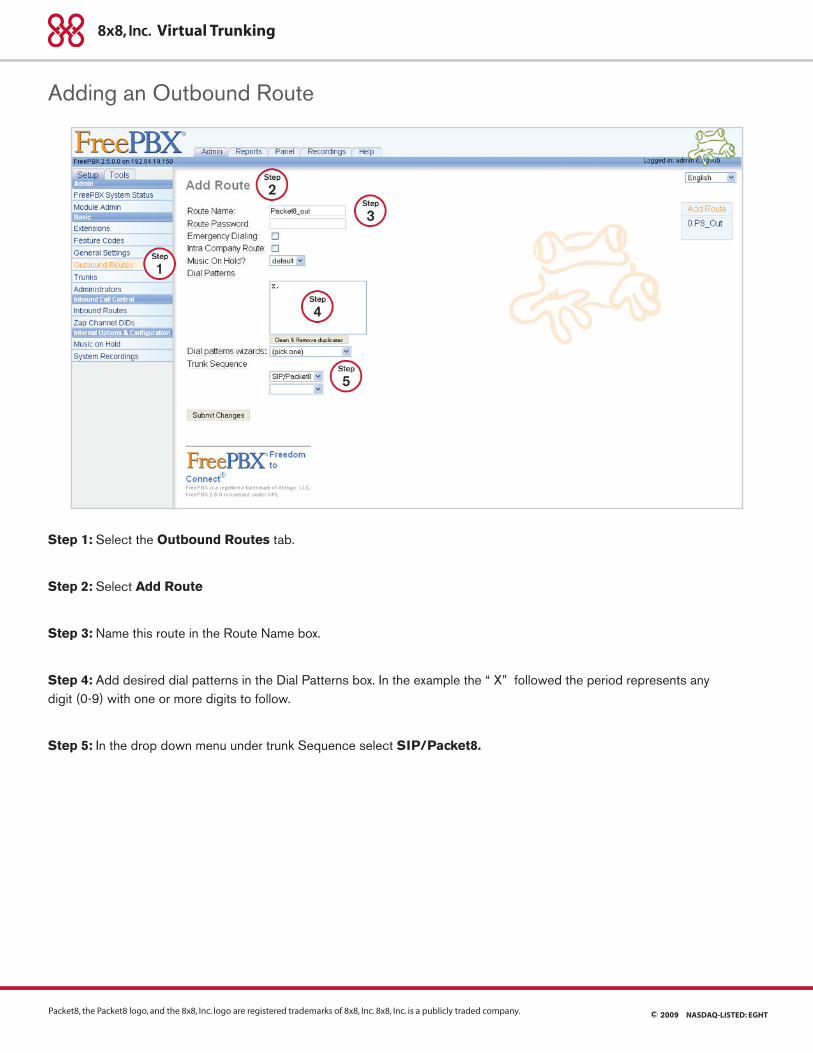
Adding an Outbound Route
Step 1: Select the Outbound Routes tab.
Step 2: Select Add Route
Step 3: Name this route in the Route Name box.
Step 4: Add desired dial patterns in the Dial Patterns box. In the example the “ X” followed the period represents any digit (0-9) with one or more digits to follow.
Step 5: In the drop down menu under trunk Sequence select SIP/Packet8.

Packet8, the Packet8 logo, and the 8x8, Inc. logo are registered trademarks of 8x8, Inc. 8x8, Inc. is a publicly traded company. © 2009 NASDAQ-LISTED: EGHT
Virtual Trunking
Adding an Inbound Route
Step 1: Select the Inbound Routes tab.
Step 2: In the Description box enter a name for this route.
Step 3: In the DID Number box enter your Packet8 DID. As in the example include the “+” and “1” in your entry.
Step 4: Under Set Destination select a valid reachable destination.

Packet8, the Packet8 logo, and the 8x8, Inc. logo are registered trademarks of 8x8, Inc. 8x8, Inc. is a publicly traded company. trunk04009digium-switchvox
NASDAQ-LISTED: EGHT© 2009
Virtual Trunking
Saving Changes
Remember to Submit and Apply Configuration Changes.


![[ASTERISK PBX] - Gonzalo Nazareno · 2020. 9. 13. · A2Billing. Distribuciones basadas en Asterisk AsteriskNow TrixBox Elastix Otras herramientas de administración de Asterisk.](https://static.fdocuments.net/doc/165x107/611b475d72b4dc4ab87d7421/asterisk-pbx-gonzalo-nazareno-2020-9-13-a2billing-distribuciones-basadas.jpg)