Assignment 11 SQL Integration Services - … 11 SQL Integration Services H. Installing the Samples...
21
Assignment 11 SQL Integration Services 1. SQL 2005 AdventureWorks samples A. Google AdventureWorksBICI.msi or 1. http://www.microsoft.com/downloads/details.aspx?FamilyId=E719ECF7- 9F46-4312-AF89-6AD8702E4E6E&displaylang=en 2. B. Get the BICI (business intelligence: case insensitive) C. D. Attach the AdventureWorksDW database E. F. Security . Logins .ASP/Net properties . Map to AdventureWorksDW as datareader and datawriter G. Page 1
-
Upload
truongkhue -
Category
Documents
-
view
229 -
download
1
Transcript of Assignment 11 SQL Integration Services - … 11 SQL Integration Services H. Installing the Samples...

Assignment 11 SQL Integration Services
1. SQL 2005 AdventureWorks samples A. Google AdventureWorksBICI.msi or
1. http://www.microsoft.com/downloads/details.aspx?FamilyId=E719ECF7-9F46-4312-AF89-6AD8702E4E6E&displaylang=en
2. B. Get the BICI (business intelligence: case insensitive)
C. D. Attach the AdventureWorksDW database
E. F. Security . Logins .ASP/Net properties . Map to AdventureWorksDW as
datareader and datawriter
G.
Page 1

Assignment 11 SQL Integration Services H. Installing the Samples should create the following
I.
2. SQL Integration Services A. Part of new SQL 2005 BI Services B. Successor to SQL 2000 DTS (data transformation services)
1. But all new… not an upgrade C. Its throughout SQL… SQL Maintenance Plan is an SSIS package
3. The BI “Platform” = Integrate; Analyze; Report A. Integration Services to acquire and transform data B. Analysis Services to enrich and discover (data mining) with hierarchical
views C. Report Services to present data…. Into information.
4. DTS -> SSIS… limited migration path A. Recommend rewrites B. BUT DTS still runs C. DTS uses scripting; SSIS uses components D. SSIS is much faster with complex logic…(X7)
5. So what problems are we trying to solve A. Data from many diverse sources
1. Text, Binary (legacy), Current OLTP database 2. These need to be mined, transformed and cleaned. 3. Then compile into a data warehouse. 4. This used to required many stages and applications
B. Now we have one data pipeline that sends data directly to warehouse. 1. Includes all steps to consolidate data
Page 2

Assignment 11 SQL Integration Services
6. Example 1 Creating a ETL (Extract – Transfer – Load ) Package A. Big Picture: Source is a text file in a specific format
1. Destination is a SQL Table BUT 2 of the text columns must be “transformed” from their strings into foreign keys.
2. You will create a package with 4 parts a) Source (connection) b) Transform 1 c) Transform 2 d) Destination. (connection)
B. Open the following text file. 1. "C:\Program Files\Microsoft SQL Server\90\Samples\Integration
Services\Tutorial\Creating a Simple ETL Package\Sample Data\SampleCurrencyData.txt"
C. 1. AverageRate (ie 1) 2. Currency Type (USD) 3. DateTime (time 0:00 is not a issue) 4. End of Day Rate
D. Now check the destination in AdventureWorksDW .
E. F. Both CurrencyKey and TimeKey are foreign keys related to “lookup” tables
DimTime and DimCurrency. 1. So we will have to “transform” the data from the flat file into “keys”
G. AverageRate and EndofDayRate are floats.
Page 3

Assignment 11 SQL Integration Services
7. Use Visual Studio (BI Development Studio) A. File . New Project BIProject Integration Services Project: as Shown:
1.
B. Rename package to CurrencyImport..
C.
8. Connection Managers: Templates for future connection tasks A. Pre-build your connections so you can reuse them.
Page 4
Assignment 11 SQL Integration Services
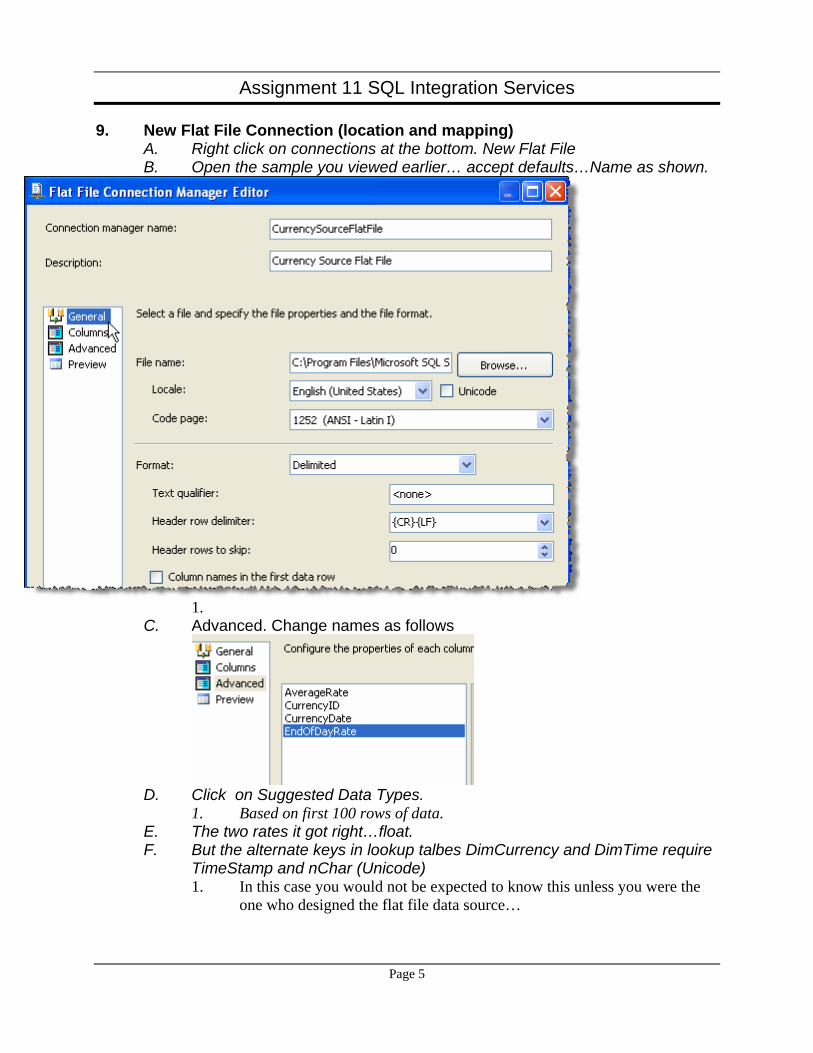
9. New Flat File Connection (location and mapping) A. Right click on connections at the bottom. New Flat File B. Open the sample you viewed earlier… accept defaults…Name as shown.
1.
C. Advanced. Change names as follows
D. Click on Suggested Data Types.
1. Based on first 100 rows of data. E. The two rates it got right…float. F. But the alternate keys in lookup talbes DimCurrency and DimTime require
TimeStamp and nChar (Unicode) 1. In this case you would not be expected to know this unless you were the
one who designed the flat file data source…
Page 5

Assignment 11 SQL Integration Services
G.
H. I. Now the Flat File Data Source is ready… but its just a template.
10. Create the Other End point… the Database connection A. New AdventureWorksDW OLE DB connection B. Right click on connections tab on the bottom
C.
Page 6
Assignment 11 SQL Integration Services
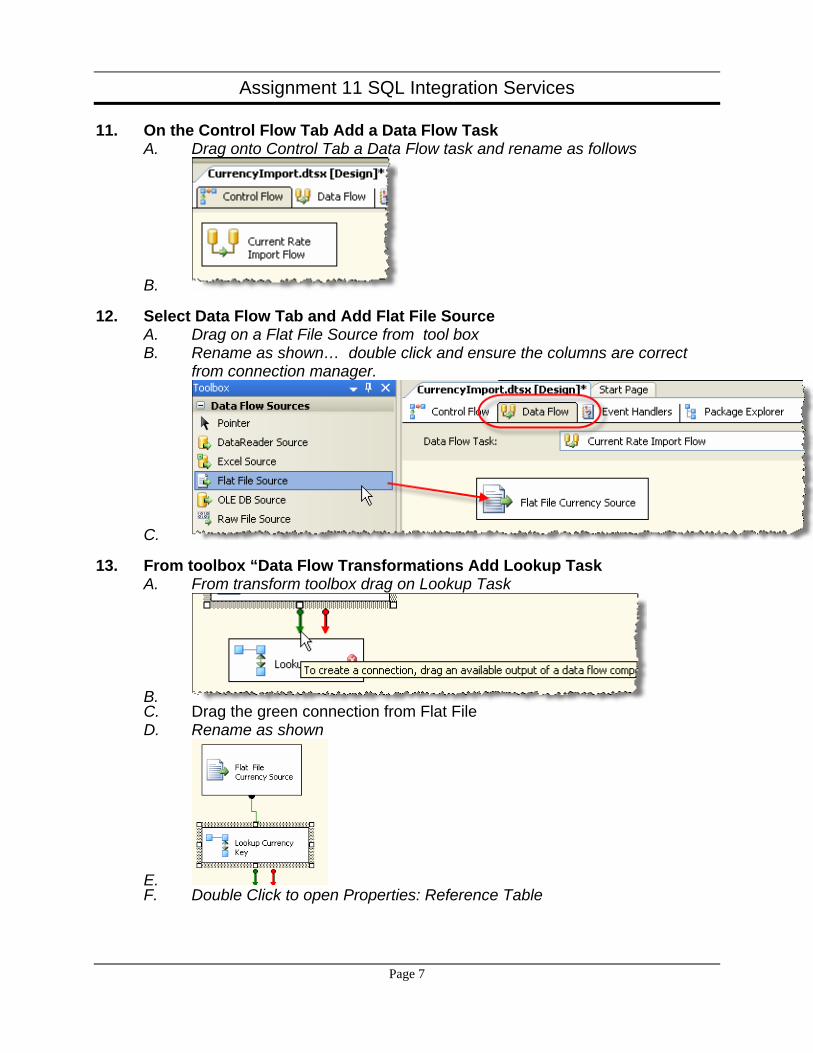
11. On the Control Flow Tab Add a Data Flow Task A. Drag onto Control Tab a Data Flow task and rename as follows
B.
12. Select Data Flow Tab and Add Flat File Source A. Drag on a Flat File Source from tool box B. Rename as shown… double click and ensure the columns are correct
from connection manager.
C.
13. From toolbox “Data Flow Transformations Add Lookup Task A. From transform toolbox drag on Lookup Task
B. C. Drag the green connection from Flat File D. Rename as shown
E. F. Double Click to open Properties: Reference Table
Page 7

Assignment 11 SQL Integration Services
G. H. Columns tab use drag from left to right to link fields
I. 1. This says “Link CurrenyID from the flat file to CurrencyAlternateKey in
DimCurrency and return the CurrencyKey into a new column called CurrencyKey a) This task adds another column to the table called CurrencyKey b) If data types do not match this will blow up…
Page 8
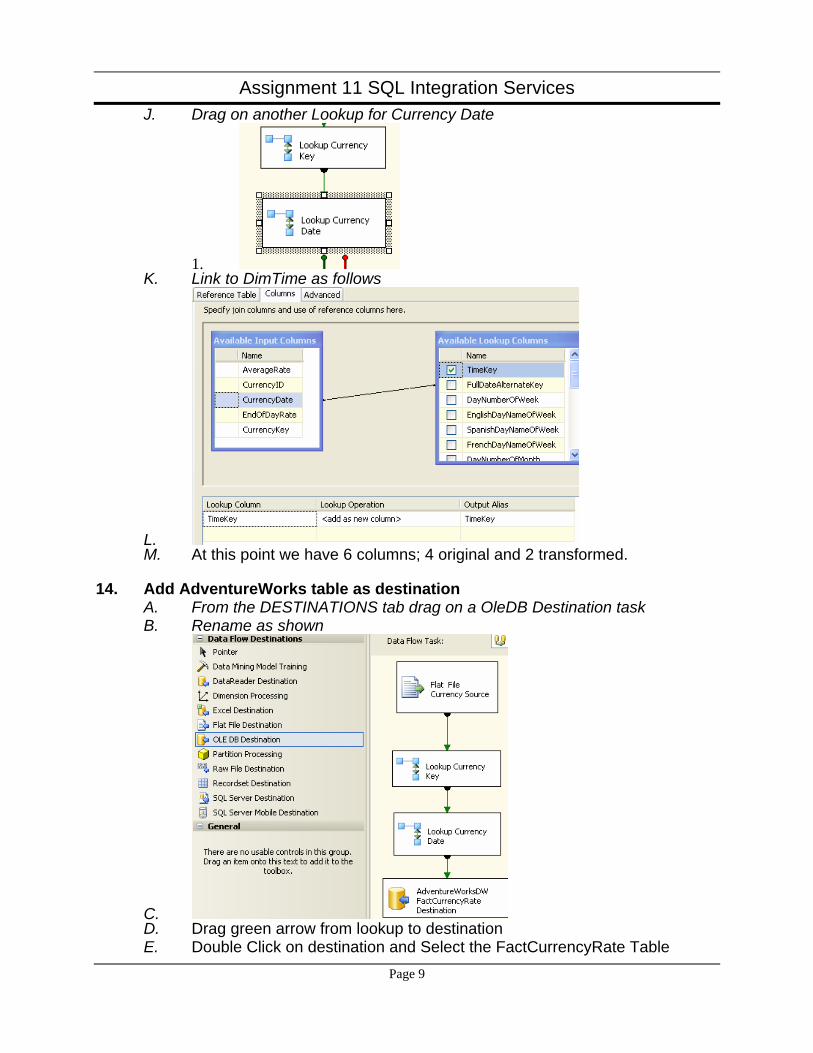
Assignment 11 SQL Integration Services J. Drag on another Lookup for Currency Date
1. K. Link to DimTime as follows
L. M. At this point we have 6 columns; 4 original and 2 transformed.
14. Add AdventureWorks table as destination A. From the DESTINATIONS tab drag on a OleDB Destination task B. Rename as shown
C. D. Drag green arrow from lookup to destination E. Double Click on destination and Select the FactCurrencyRate Table
Page 9

Assignment 11 SQL Integration Services F. Check Mappings… G. Note we are mapping only 4 of the six columns
1. Two original and two transformed.
a)
Page 10
Assignment 11 SQL Integration Services
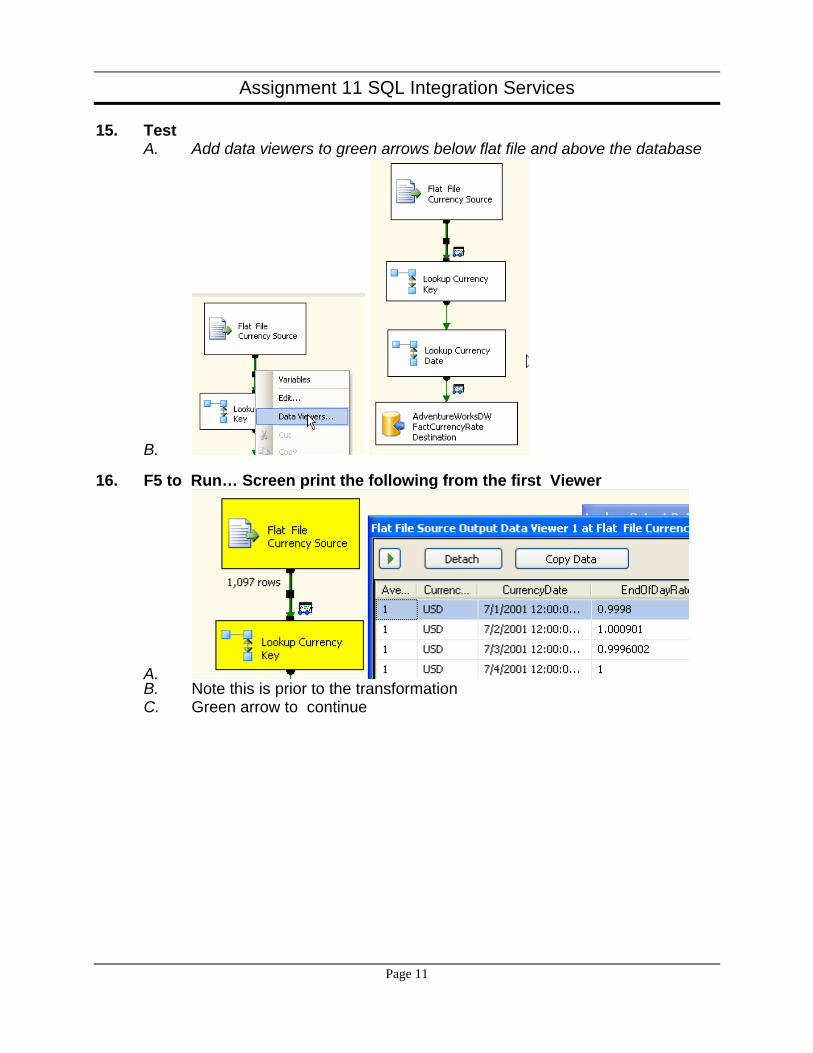
15. Test A. Add data viewers to green arrows below flat file and above the database
B.
16. F5 to Run… Screen print the following from the first Viewer
A. B. Note this is prior to the transformation C. Green arrow to continue
Page 11
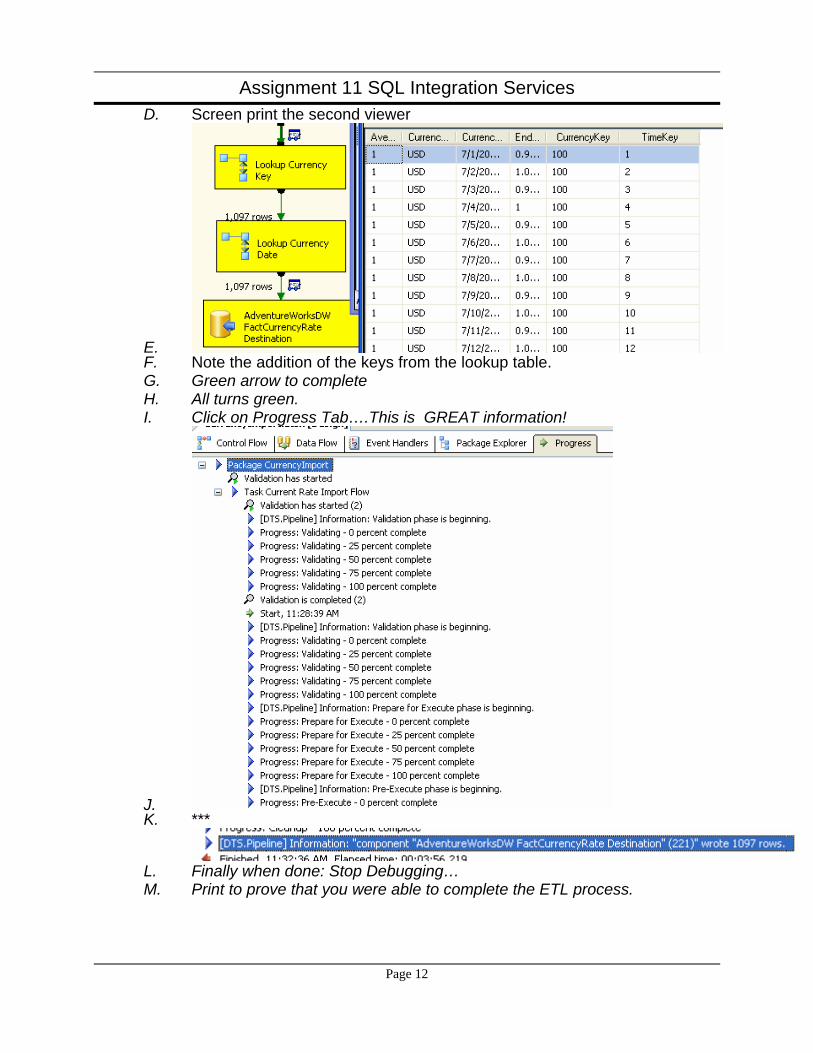
Assignment 11 SQL Integration Services D. Screen print the second viewer
E. F. Note the addition of the keys from the lookup table. G. Green arrow to complete H. All turns green. I. Click on Progress Tab….This is GREAT information!
J. K. ***
L. Finally when done: Stop Debugging… M. Print to prove that you were able to complete the ETL process.
Page 12
Assignment 11 SQL Integration Services
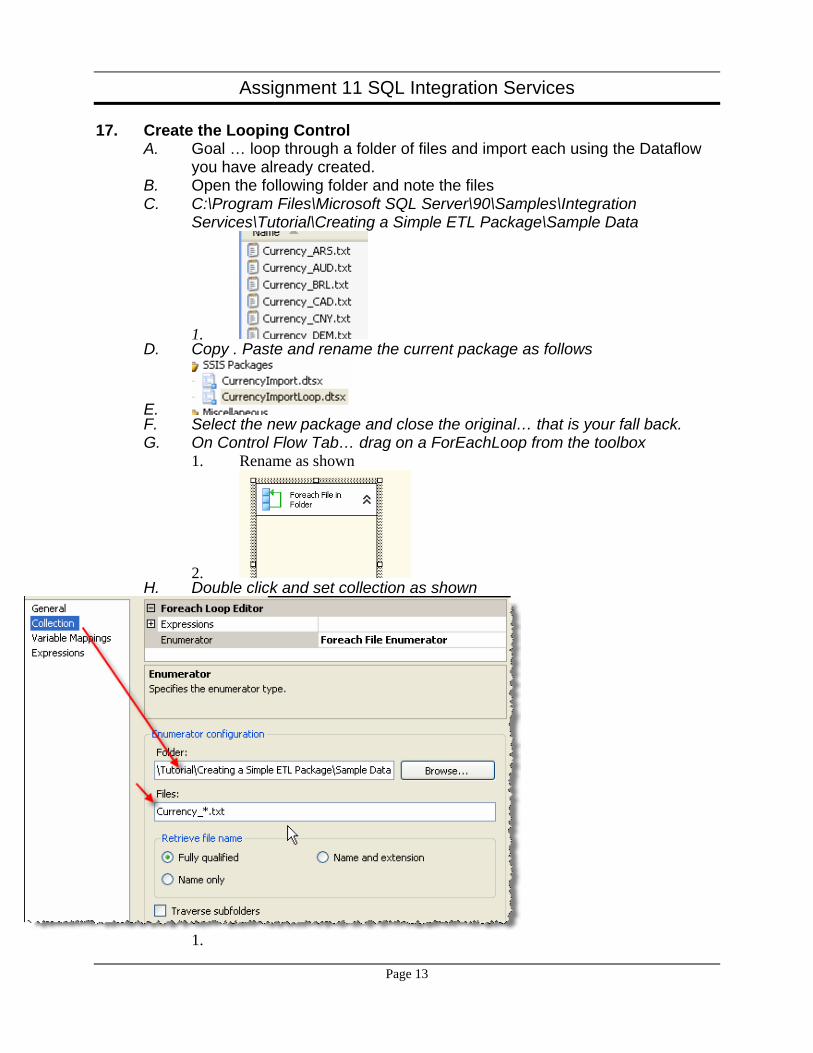
17. Create the Looping Control A. Goal … loop through a folder of files and import each using the Dataflow
you have already created. B. Open the following folder and note the files C. C:\Program Files\Microsoft SQL Server\90\Samples\Integration
Services\Tutorial\Creating a Simple ETL Package\Sample Data
1. D. Copy . Paste and rename the current package as follows
E. F. Select the new package and close the original… that is your fall back. G. On Control Flow Tab… drag on a ForEachLoop from the toolbox
1. Rename as shown
2. H. Double click and set collection as shown
1.
Page 13

Assignment 11 SQL Integration Services I. In Variable Mappings
1. Create a new variable
2. Name varFileName… accept defaults 3. OK back to Control Flow
J. Drag Data Flow into the Loop as shown
K.
18. Modify the Flat File connection to accept variable A. Open properties of CurrencySourceFlatFile B. Click on the Ellipsis… of Expressions
C. D. Select ConnectString Property from the dropdown’
Page 14
Assignment 11 SQL Integration Services
Page 15
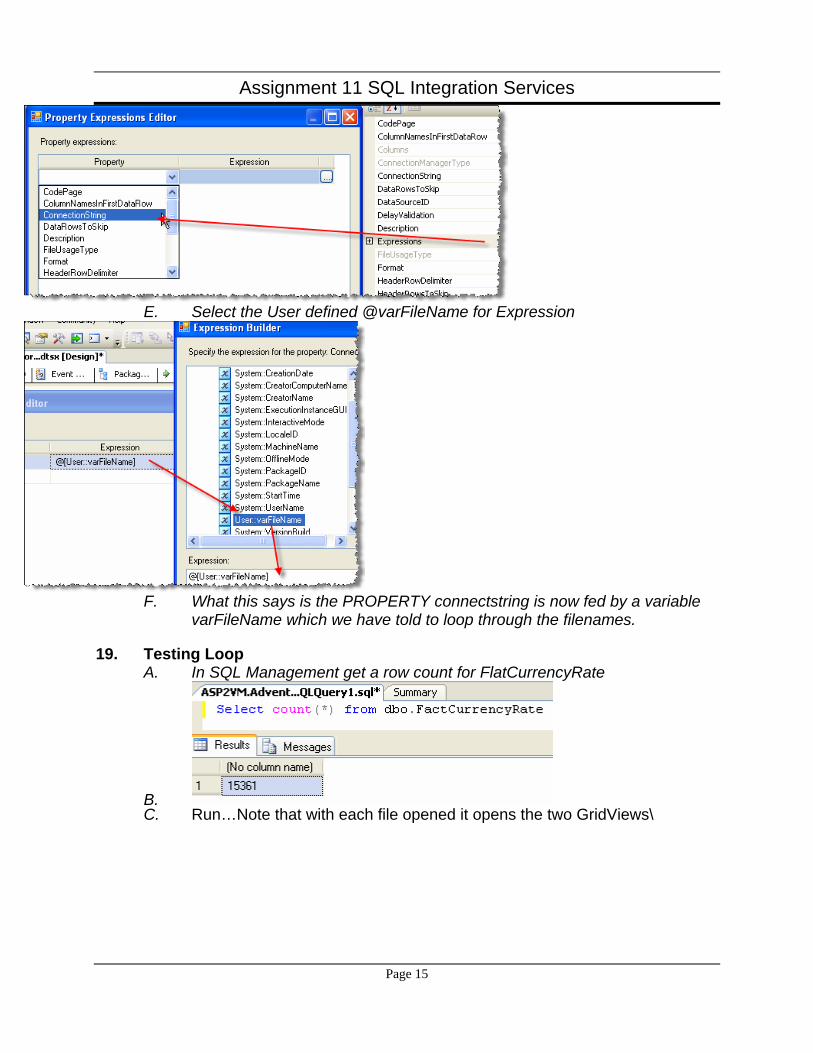
E. Select the User defined @varFileName for Expression
F. What this says is the PROPERTY connectstring is now fed by a variable
varFileName which we have told to loop through the filenames.
19. Testing Loop A. In SQL Management get a row count for FlatCurrencyRate
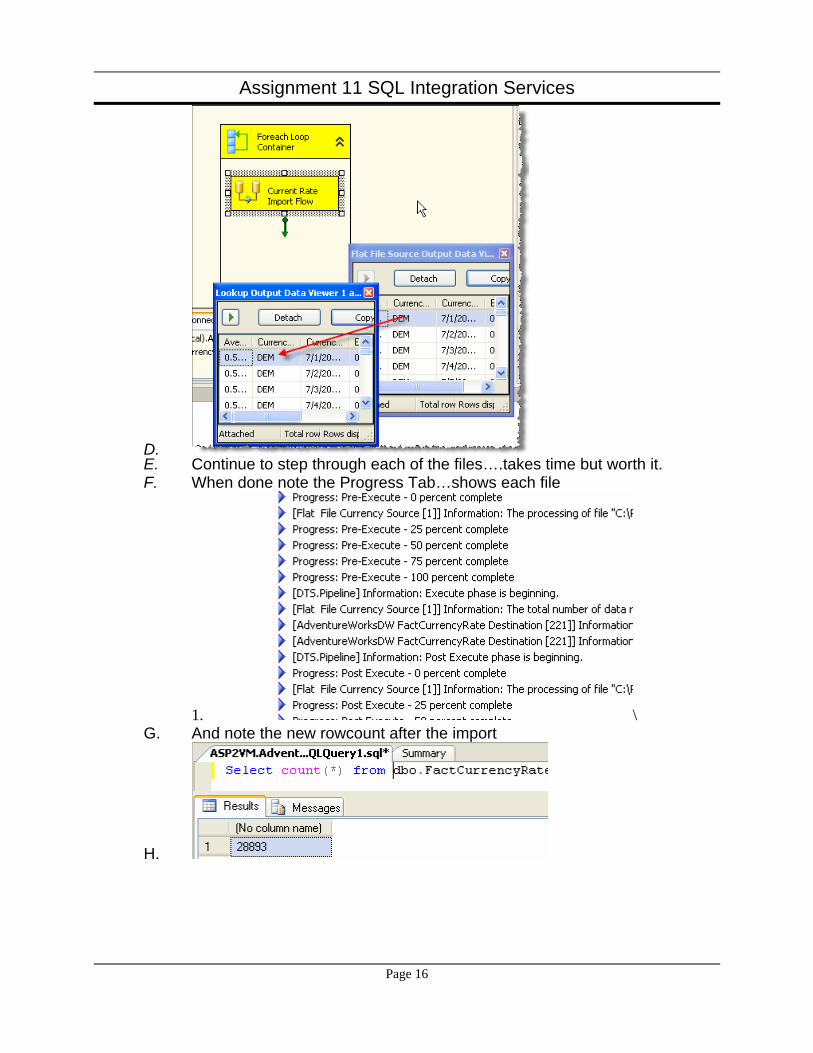
B. C. Run…Note that with each file opened it opens the two GridViews\
Assignment 11 SQL Integration Services
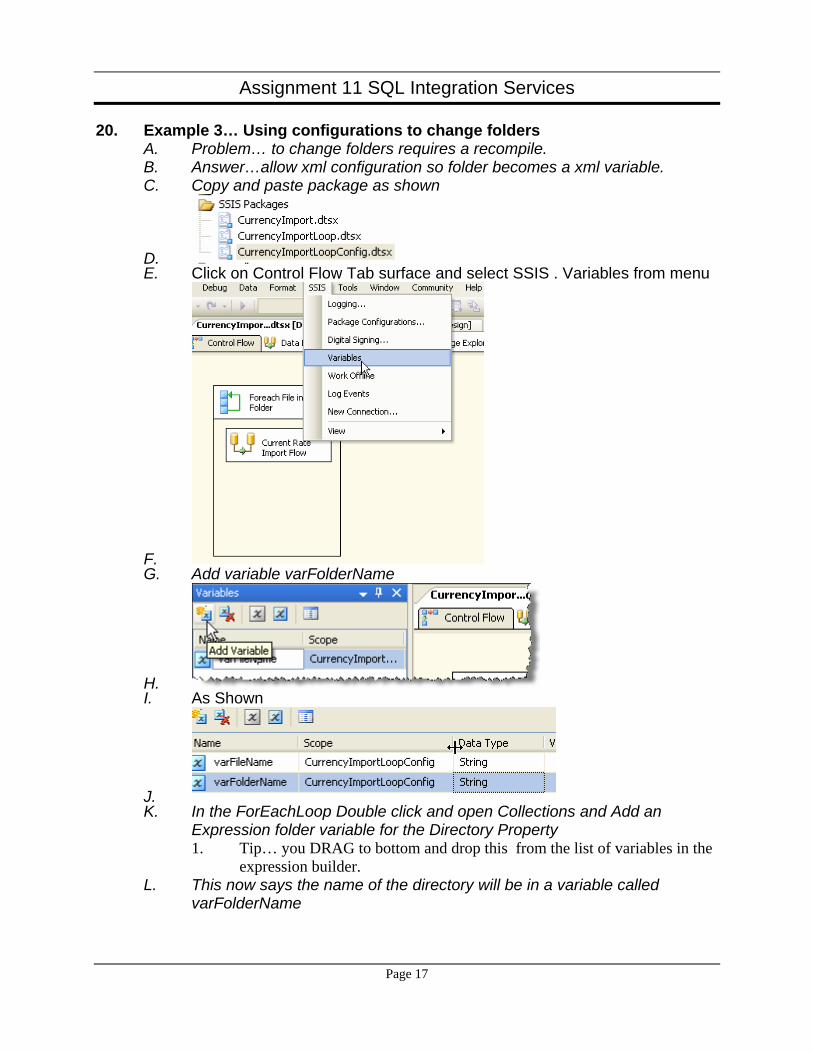
D. E. Continue to step through each of the files….takes time but worth it. F. When done note the Progress Tab…shows each file
1. \ G. And note the new rowcount after the import
H.
Page 16
Assignment 11 SQL Integration Services
20. Example 3… Using configurations to change folders A. Problem… to change folders requires a recompile. B. Answer…allow xml configuration so folder becomes a xml variable. C. Copy and paste package as shown
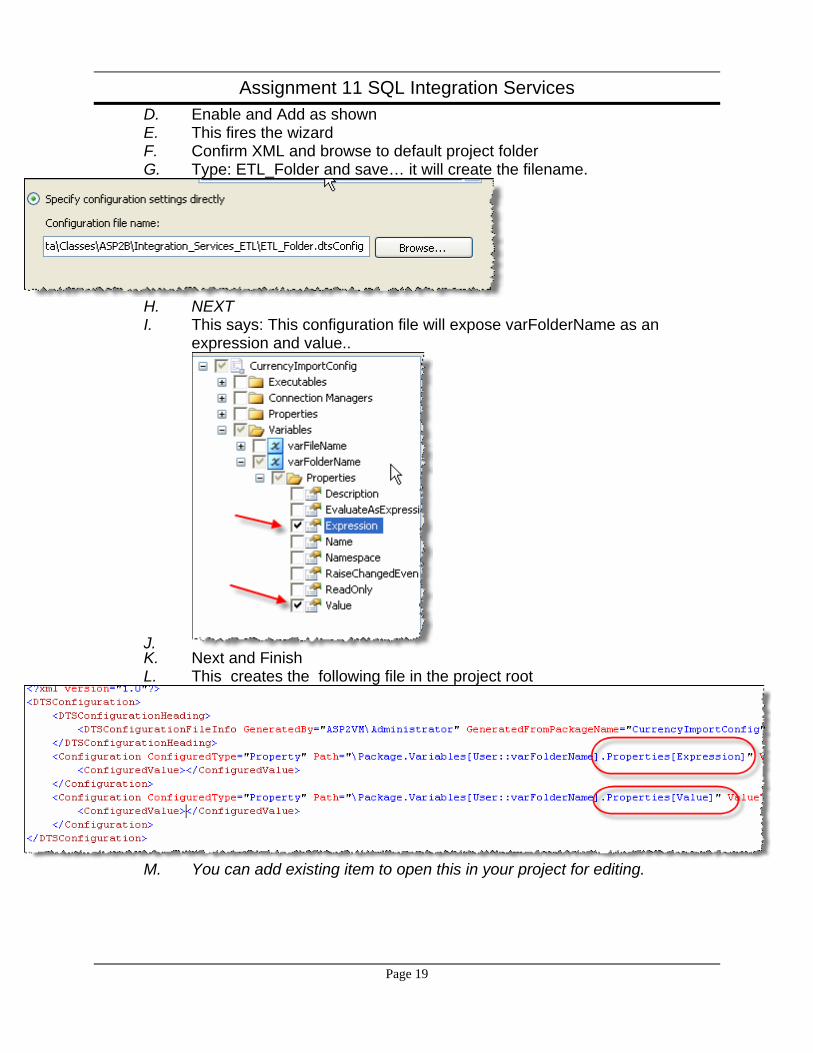
D. E. Click on Control Flow Tab surface and select SSIS . Variables from menu
F. G. Add variable varFolderName
H. I. As Shown
J. K. In the ForEachLoop Double click and open Collections and Add an
Expression folder variable for the Directory Property 1. Tip… you DRAG to bottom and drop this from the list of variables in the
expression builder. L. This now says the name of the directory will be in a variable called
varFolderName
Page 17

Assignment 11 SQL Integration Services
Page 18
21. Enable Package Configurations… A. Click on Control Tab back ground to set scope B. Select Package configurations from the SSIS menu
C.
Assignment 11 SQL Integration Services D. Enable and Add as shown E. This fires the wizard F. Confirm XML and browse to default project folder G. Type: ETL_Folder and save… it will create the filename.
H. NEXT I. This says: This configuration file will expose varFolderName as an
expression and value..
J. K. Next and Finish L. This creates the following file in the project root
M. You can add existing item to open this in your project for editing.
Page 19
Assignment 11 SQL Integration Services
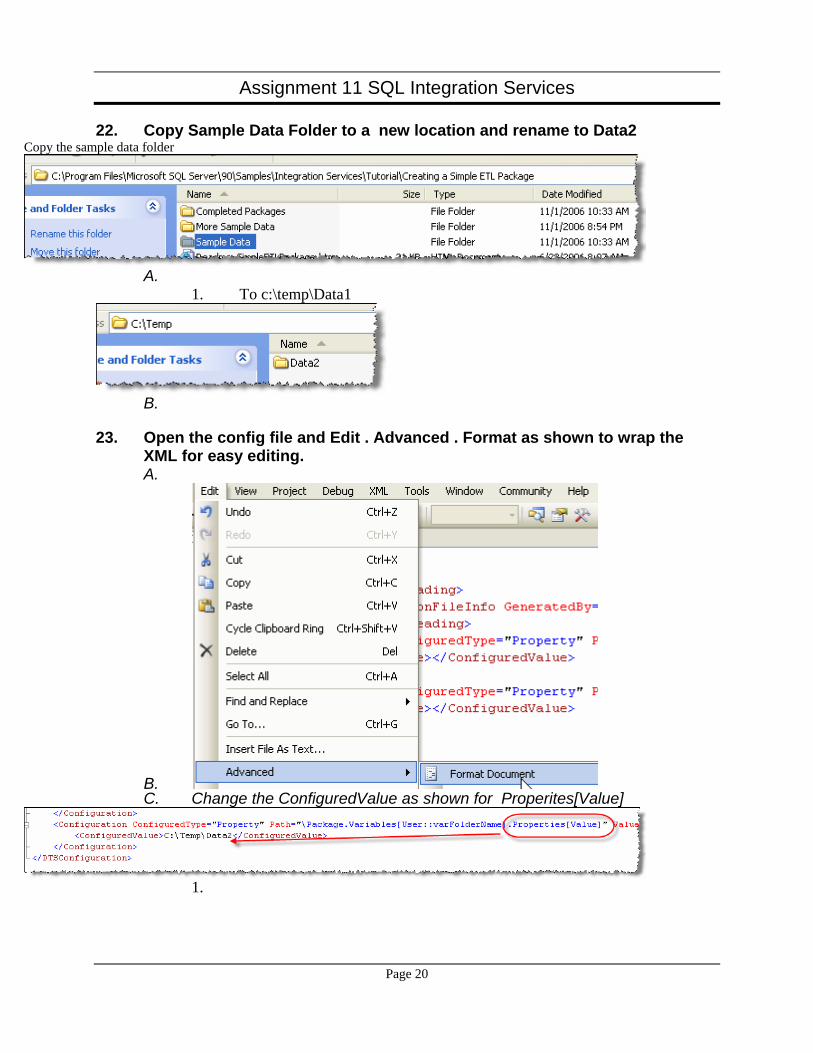
22. Copy Sample Data Folder to a new location and rename to Data2 Copy the sample data folder
A.
1. To c:\temp\Data1
B.
23. Open the config file and Edit . Advanced . Format as shown to wrap the XML for easy editing. A.
B. C. Change the ConfiguredValue as shown for Properites[Value]
1.
Page 20

Assignment 11 SQL Integration Services D. Save and Test… Note the progress tab… E. It should display the new file path.. F. Step through and finish
G.
24. Just to prove it all works… Get another row count on the destination table
A. B. Note yours will be different but it should have changed.
25. Hand in all screen prints to prove this all works…
Page 21