
ASP Getting Started Guide - Amazon Web Services · Marketplace Design, Mechanical Turk, Amazon...
56
Amazon Simple Pay Getting Started Guide API Version 2010-08-28
Transcript of ASP Getting Started Guide - Amazon Web Services · Marketplace Design, Mechanical Turk, Amazon...

Amazon Simple Pay Getting Started Guide
API Version 2010-08-28

ASP Getting Started Guide
i
Amazon Web Services
Copyright © 2012 - 2013 Amazon Web Services, Inc. and/or its affiliates. All rights reserved.
The following are trademarks of Amazon Web Services, Inc.: Amazon, Amazon Web Services Design, AWS, Amazon CloudFront, Cloudfront, Amazon DevPay, DynamoDB, Elasticache, Amazon EC2, Amazon Elastic Compute Cloud, Amazon Glacier, Kindle, Kindle Fire, AWS Marketplace Design, Mechanical Turk, Amazon Redshift, Amazon Route 53, Amazon S3, Amazon VPC. In addition, Amazon.com graphics, logos, page headers, button icons, scripts, and service names are trademarks, or trade dress of Amazon in the U.S. and/or other countries. Amazon's trademarks and trade dress may not be used in connection with any product or service that is not Amazon's, in any manner that is likely to cause confusion among customers, or in any manner that disparages or discredits Amazon. All other trademarks not owned by Amazon are the property of their respective owners, who may or may not be affiliated with, connected to, or sponsored by Amazon..

ASP Getting Started Guide
ii
Table of Contents
Welcome .................................................................................................................................... 1
How Do I...?............................................................................................................................ 1
Amazon Simple Pay Introduction ............................................................................................... 2
Key Features .......................................................................................................................... 2
Fast and Simple Button Creation ........................................................................................ 2
Five Commonly Used Buttons ............................................................................................. 2
Your Account Activity Center............................................................................................... 3
Co-Branding with Amazon Simple Pay ................................................................................ 3
Amazon Simple Pay Security .............................................................................................. 4
Before You Begin ....................................................................................................................... 5
How to Get an Amazon Payments Business Account ............................................................. 5
How to Get an Amazon Payments Sandbox Account ............................................................. 5
Creating Simple Pay Buttons ..................................................................................................... 6
Available Simple Pay Buttons ................................................................................................. 6
Creating a Standard Button .................................................................................................... 7
How to Generate the HTML for a Standard Button .............................................................. 7
Standard Button HTML Components .................................................................................. 9
Test Your Simple Pay Standard Button ..............................................................................10
Advanced Standard Button Features .................................................................................11
Creating a Subscription Button ..............................................................................................11
How to Generate the HTML for a Subscription Button ........................................................12
Subscription Button HTML Components ............................................................................15
Test Your Simple Pay Subscription Button .........................................................................16
Advanced Subscription Button Features ............................................................................16
Creating a Marketplace Button ..............................................................................................17
How to Generate the HTML for a Marketplace Button ........................................................17
Marketplace Button HTML Components ............................................................................20
Test Your Simple Pay Marketplace Button .........................................................................23
Advanced Marketplace Button Features ............................................................................23
Creating a Basic Donation Button ..........................................................................................23

ASP Getting Started Guide
iii
How to Generate the HTML for a Donation Button .............................................................24
Donation Button HTML Components ..................................................................................27
Test Your Simple Pay Donation Button ..............................................................................28
Advanced Donation Button Features ..................................................................................28
Creating a Marketplace-Enabled Donation Button .................................................................29
How to Generate the HTML for a Marketplace-Enabled Donation Button ...........................29
Marketplace-Enabled Donation Button HTML Components ...............................................32
Test Your Marketplace-Enabled Donation Button ...............................................................34
Advanced Marketplace-Enabled Donation Button Features ...............................................35
Getting Notification about Your Payments .............................................................................35
Notification through E-mail Messages ................................................................................36
Notification through Account History ..................................................................................36
Notification through Return URL Redirect ..........................................................................37
Notification through IPN .....................................................................................................37
Configuring Default Button Values .........................................................................................37
Testing Your Simple Pay Buttons ..............................................................................................39
Overview of Advanced Features ...............................................................................................41
Creating More than One Button per Page ..............................................................................41
Settling Immediately ..............................................................................................................42
Using the Settle and Refund User Interfaces .....................................................................42
Handling the Return URL.......................................................................................................43
Using Immediate Return ........................................................................................................44
Using Instant Payment Notification ........................................................................................44
Advantages of Signing Your Buttons .....................................................................................45
Other Advanced Features of Amazon Simple Pay .................................................................46
Amazon Simple Pay Resources ................................................................................................47
Glossary....................................................................................................................................48
Document History .....................................................................................................................51

Welcome
1
Welcome
The Amazon Simple Pay Getting Started Guide introduces you to Amazon Simple Pay, helps you setup required accounts, and provides walk-throughs for each of the Simple Pay buttons.
Amazon Simple Pay is an Amazon Payments service that enables you to quickly add payment features to your website. Your customers can make one-time payments, subscriptions, marketplace payments or a combination of these using the payment information stored in their Amazon.com accounts. To implement Amazon Simple Pay, you simply copy and paste a small amount of HTML code to the web pages where you want the buttons to appear.
Note
The Amazon Payments service has been designed and developed for use within a web browser only. Our service cannot be used within a native application (including, without limitation, iOS, Android, RIM and Windows operating systems). Amazon Payments reserves the right to suspend the Payment Account of any user of our services that has implemented our Services within a native application.
How Do I...? How do I? Relevant Sections Get started with Amazon Simple Pay Quickly
Amazon Simple Pay Getting Started Guide (this guide), especially the two sections Before You Begin and Creating Simple Pay Buttons, in that order
Learn about Amazon Simple Pay Amazon Simple Pay Introduction Get ready to use Amazon Simple Pay
Before You Begin
Learn how to create, test, and respond to each type of button available with Amazon Simple Pay
Creating Simple Pay Buttons
Learn about testing buttons using the Amazon Payments sandbox, and how to simulate errors.
Testing Your Simple Pay Buttons
Learn about advanced features specific to implementing Amazon Simple Pay buttons.
Overview of Advanced Features

Amazon Simple Pay Introduction
2
Amazon Simple Pay Introduction
Amazon Simple Pay is a set of payment-only products that allow your customers to use their Amazon.com account as a payment method. Instead of creating payment functionality by writing application code, you enter basic information into an Amazon Simple Pay form to create a fully-functional payment button, which you then add to your page. When your customers click the button, they can begin making a secure payment.
Key Features
Fast and Simple Button Creation Implementing Amazon Simple Pay is quick and easy. Once your accounts are set up, you simply choose the type of button, fill out a web form, copy some HTML, and paste it into your web page. Here is the process in more detail:
Amazon Simple Pay Implementation Process 1. First, you need a current Amazon Payments business account in order to use Amazon
Simple Pay. In addition, you need a Amazon Payments sandbox account so you can test your buttons without actually transferring money.
2. Next, you create an HTML button using the Amazon Simple Pay user interface. Amazon Payments returns to you the HTML code which includes a form element that creates the button and provides the exact functionality and features that you want. For more information about the kinds of buttons you can create using Amazon Simple Pay, see “Five Commonly Used Buttons.”
3. You then paste the new HTML form element into your website. This causes the HTML button to display on your web page.
4. When the button is clicked, the user is redirected to the Amazon Payments website where the payment is authorized. You need to add the code to your website to handle the response when someone clicks the button.
Five Commonly Used Buttons Amazon Simple Pay enables you to create five different payment buttons that online shoppers use to purchase items. Each button perform a different task:
• Standard Button—You use standard buttons to offer Amazon Simple Pay as a standalone payment method for one-time purchases.
• Marketplace Button—The marketplace button lets you display and sell the goods of other sellers, optionally charging them a fee for the service. The marketplace button is

Amazon Simple Pay Introduction
3
similar to the standard button in appearance. Only the functionality is different, because it involves three parties instead of only two.
• Basic Donation Button—Donation buttons are an easy-to-use and secure way for US-based, IRS-certified 501(c)3 non-profit organizations to solicit donations.
• Marketplace-Enabled Donation Button—A special donation button which enables third parties to collect donation funds on behalf of a 501(c)3 non-profit organization.
• Subscription Button—Subscription buttons enable an easy way to charge your customers a recurring fee. You can also offer free trials and introductory offers with a subscription button.
Your Account Activity Center Your Amazon Payments Business account, located at http://payments.amazon.com, has an account activity page that gives you the ability to check your balance, to add or withdraw funds, to view the account history, and to edit the account settings.
Your account history updates whenever a transaction occurs, and this information can be used as notification of the payment. For more information, see “Notification through Account History.”
Co-Branding with Amazon Simple Pay Co-branding is simply adding your merchant logo to each of the payment authorization web pages.
When your buyers click one of your Amazon Simple Pay buttons, they are redirected to the Amazon Simple Pay payment authorization web pages (hosted by Amazon). These web pages ask the buyer to sign in, specify a payment method such as a credit card, and authorize the payment. If you have ever purchased something on Amazon.com, you're familiar with the checkout process.
Clicking an Amazon Simple Pay button redirects buyers away from the merchant's website. However, by including your merchant branding on the payment authorization web pages, buyers don't feel as if they've completely left your website to pay. Jumping from your website to Amazon's without co-branding could confuse buyers. Co-branding provides continuity between the shopping and purchasing experience.
For more information about setting up co-branding, see “Configuring Default Button Values.”

Amazon Simple Pay Introduction
4
Amazon Simple Pay Security Amazon Simple Pay uses the following means of securing requests and responses:
SSL —All requests communicate over Secure Sockets Layer using HTTPS.
Signed Buttons —If you choose, you can sign your buttons with a signature based on the button parameters and your AWS access identifiers. The method of signing is based on Signature version 2, which supports the SHA1 and SHA256 encryption algorithms. Signing your buttons is strongly recommended. To help decide whether to choose to sign your buttons or not, see “Advantages of Signing Your Buttons.”
Signed and Verifiable Responses —Both the Return URL and IPN responses are also signed, using the Signature version 2 method. In addition, the FPS Action VerifySignature enables you to easily check that the content in the response has not been modified after sending. For information on VerifySignature, see “VerifySignature” in the Amazon Simple Pay Advanced User Guide.

Before You Begin
5
Before You Begin
Before you can get started with Amazon Simple Pay, you must have an Amazon Payments business account so you can receive payments by credit card. You also need an Amazon Payments Sandbox account to test your buttons.
How to Get an Amazon Payments Business Account The Amazon Payments business account is necessary in order to create and use Amazon Simple Pay buttons. The account also enables you to receive payments from Amazon.
To sign up for an Amazon Payments business account To sign up for the Amazon Payments business account, go to Amazon Payments Account Management and follow the instructions you find there.
Note If you plan to use Amazon Simple Pay donation buttons, keep in mind that they are intended to benefit US-based, IRS-certified 501(c)3 non-profit organizations. To collect donation funds on your own behalf, you must specify a Non-Profit Organization account type when you set up your Amazon Payments business account. Amazon verifies this status when you sign up.
How to Get an Amazon Payments Sandbox Account The Amazon Payments Sandbox is accessible through your Amazon Payments Sandbox account. In the sandbox; you can try out your applications without incurring charges or making purchases.
Important You should create and test all of your Amazon Simple Pay buttons in the sandbox before exposing them on your website.
To sign up for an Amazon Payments Sandbox account To sign up for the Amazon Payments Sandbox account, go to https://payments-sandbox.amazon.com/sdui/sdui/premiumaccount and follow the instructions on the screen.

Creating Simple Pay Buttons
6
Creating Simple Pay Buttons
Creating Simple Pay buttons requires no programming expertise. Simply complete an Amazon Simple Pay form to set up your functionality, and then click a button to generate the HTML code you need. You then insert the HTML into the appropriate web page on your website. The HTML code causes the button to display and to function according to your specifications.
This section contains basic implementation instructions for each of the five buttons that are part of Amazon Simple Pay. For your website, you might need to use only one of these buttons. It is not necessary to read about the implementation of each button type in order to proceed. Just follow the instructions for the type of button that you need on your web site. You will find all the information you need in that section.
If your application design requires more features than a basic implementation can provide, a button-specific Advanced Features section helps get you started with enhancing your chosen button.
Available Simple Pay Buttons Amazon Simple Pay lets you create functioning payment buttons for your website so that online shoppers can purchase items using Amazon Payments. Each button is designed to perform a different task.
This guide describes how to create the following Amazon Simple Pay buttons:
Button Description Standard Button You use standard payment buttons to offer Amazon Simple Pay as a
standalone payment method for one-time purchases. To get started with a Standard button, see “Creating a Standard Button.”
Subscription Button Subscription payment buttons enable an easy way to charge your customers a recurring fee. To get started with a subscription button, see “Creating a Subscription Button.”
Marketplace Button The Marketplace payment button lets you display and sell other seller's goods, optionally charging the seller a fee for the service. To get started with a Marketplace button, see “Creating a Marketplace Button.”
Basic Donation Button
Basic donation buttons enable US-based, IRS-certified 501(c)3 non-profit organizations to solicit donations on their own behalf. To get started with a basic donation button, see “Creating a Basic Donation Button.”
Marketplace- Marketplace-enabled donation buttons provide you the option of acting

Creating Simple Pay Buttons
7
enabled Donation Button
as a third party hosting a donation site for another organization, optionally collecting a fee for each donation you process. To get started with a marketplace-enabled donation button, see “Creating a Marketplace-Enabled Donation Button.”
Creating a Standard Button Amazon Simple Pay standard buttons can be used to sell physical goods, digital content, or services for immediate payment.
In this section you learn how to create an Amazon Simple Pay standard button and insert it on your web page.
How to Generate the HTML for a Standard Button The following procedure guides you through generating the HTML for a standard button.
Important We strongly recommend that you create and test all of your requests in the sandbox before exposing them on your website. For more information, see “Testing Your Simple Pay Buttons.”
Note You can set several of the fields in the form to default values using your seller preferences. For more information, see “Configuring Default Button Values.”
To generate the HTML for a standard button 1. Go to http://payments.amazon.com and log into your Amazon Payments Business
Account. For more information on your Amazon Payments Business Account, see “Before You Begin.”
2. From here, go to https://payments.amazon.com/sdui/sdui/standardbutton to show the Amazon Simple Pay > Standard page, which contains a form where you fill in information about the standard button.
Note To create a button in the sandbox, go to https://payments-sandbox.amazon.com/sdui/sdui/standardbutton instead.
3. Use the following table to fill in the entry fields that are on the screen.
Tip You can also hold the mouse pointer over most fields of the online form to display usage tips in the right side of the form.

Creating Simple Pay Buttons
8
Field Action Amount Enter the amount you want to collect for the item.
Corresponds to the amount field in the button html. Description Enter a description of the item.
Corresponds to the description field in the button html.
Reference Optionally enter an ID that uniquely identifies this transaction for your records. Corresponds to the referenceId field in the button html.
Return URL Optionally enter the URL where buyers should be redirected after they complete the transaction. This field overrides the setting in Your Account > Edit My Account Settings > Manage Developer and Seller Preferences, as described in How to Configure Default Button Values. Corresponds to the returnUrl field in the button html.
User Abandon URL Optionally, enter the URL where senders should be redirected if they cancel their transaction. Corresponds to the abandonUrl field in the button html.
URL for Instant Payment Notification (IPN)
Optionally, type the URL of your host page to which Amazon Payments should send the IPN transaction information. This is an advanced feature. For more information, see “Using Instant Payment Notification.” This field overrides the setting in Your Account > Edit My Account Settings > Manage Developer and Seller Preferences, as described in How to Configure Default Button Values. Corresponds to the ipnUrl field in the button html.
Immediate Return Optionally, if you want to skip the final status page in Amazon Payments, select this check box. This is an advanced feature. If you select this option, you can parse the return values and display a final status page to the user yourself. For more information, see “Using Immediate Return.” Corresponds to the immediateReturn field in the button html.
Collect the shipping address?
If you want Amazon Payments to return the buyer's shipping address as part of the transaction information, select this check box. Corresponds to the collectShippingAddress field in the button html.
Do you want to settle immediately?
This is an advanced feature. For more information, see “Settling Immediately.” Corresponds to the processImmediate field in the button html.
Your website Background Select the type of button background you need. The white option sets a white background. The color option produces a button with a transparent background (that is,

Creating Simple Pay Buttons
9
Field Action your website theme colors will show).
Button Type Select the button image that you want to appear on your website. Corresponds to the src attribute for the image in the button html.
4. Click Generate HTML. Amazon Payments which produces the application-specific HTML form for the standard button, and displays it in the text area underneath the Generate HTML button. Typical HTML for a standard button is shown in Standard Button HTML Components. Copy the HTML and paste it in the appropriate page on your website. It will be displayed on the web page as a Pay Now button.
5. When you have finished copying the generated HTML, you can clear the Amazon Simple Pay Standard Creation Page user interface by clicking the Create Another Widget button. The form clears, and you can create another standard button.
Note You can continue to create as many standard buttons as you need using this procedure. However, if you plan to add more than one button to a single web page, there are implementation issues for you to consider. For more information, see “Creating More than One Button per Page.”
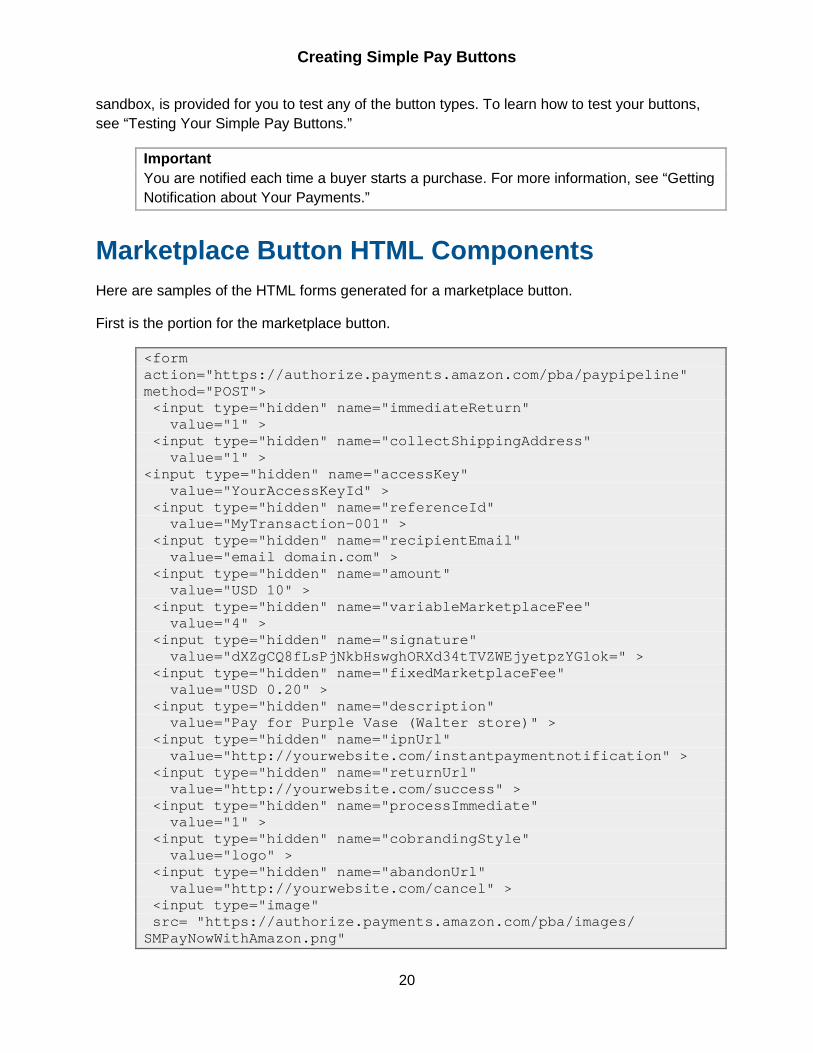
Important You are notified each time a buyer starts a payment request. For more information, see “Getting Notification about Your Payments.”
You can begin using your new button immediately. However, Amazon recommends you test every button before deploying it to production. A testing environment, the Amazon Payments sandbox, is provided for you to test any of the button types. To learn how to test your buttons, see “Testing Your Simple Pay Buttons.”
Standard Button HTML Components Here is a sample of an HTML form generated for a standard button.
<form action ="https://authorize.payments.amazon.com/pba/paypipeline" method ="POST"> <input type ="hidden" name ="immediateReturn" value ="1"> <input type ="hidden" name ="collectShippingAddress" value ="0"> <input type ="hidden" name ="accessKey"

Creating Simple Pay Buttons
10
value ="YourAccessKeyId"> <input type ="hidden" name ="referenceId" value ="MyTransaction-001"> <input type ="hidden" name ="amount" value ="USD 10"> <input type ="hidden" name ="signature" value ="K2ryWe7s/0AHI0/PbuAveuUPksTefhmNCzDTold2VYA="> <input type ="hidden" name ="description" value ="pay for dinner"> <input type ="hidden" name ="ipnUrl" value ="http://yourwebsite.com/instantpaymentnotification"> <input type ="hidden" name ="returnUrl" value ="http://yourwebsite.com/success"> <input type ="hidden" name ="processImmediate" value ="1"> <input type ="hidden" name ="cobrandingStyle" value ="logo"> <input type ="hidden" name ="abandonUrl" value ="http://yourwebsite.com/abandon"> <input type ="image" src ="https://authorize.payments.amazon.com/pba/images/ SLPayNowWithLogo.png" border ="0"> <input type ="hidden" name ="signatureVersion" value ="2"> <input type ="hidden" name ="signatureMethod" value ="HmacSHA256"> </form>
Test Your Simple Pay Standard Button Amazon Simple Pay provides a testing environment, the Amazon Payments Sandbox, for testing the buttons you create. Using the sandbox you can try out your applications without incurring charges or making purchases. We strongly recommend that you create and test all of your requests in the sandbox before exposing them on your website.
All the simple pay buttons are tested in the same way, and you can test a button whether you plan to use it in your website or not. To learn how to all test Amazon Simple Pay buttons, see “Testing Your Simple Pay Buttons.”

Creating Simple Pay Buttons
11
Advanced Standard Button Features Within this section, we present the following advanced topics in passing which are not required to implement basic features. Please refer to the sections following for detailed information.
In preceding procedure you worked with the features of the standard button that are quickest to build. There are many other features of Amazon Simple Pay and the Amazon Flexible Payments Service that can make your website more sophisticated and usable. Some of the topics which may be of interest to you are:
• Customizing Amazon Simple Pay Buttons • Simulating Amazon Simple Pay Button Errors • Adding Amazon Simple Pay as an Additional Payment Option • Programmatic APIs for canceling, settling, and refunding transactions, as well as getting
a transaction status, and verifying signatures in Return URL and IPN notifications. • Configuring Instant Payment Notification and Handling Instant Payment Notifications • Using Amazon Simple Pay Actions
To learn how to do some of these tasks, see the Amazon Simple Pay Advanced User Guide, For complete details on the capabilities of Amazon Simple Pay, please see the suggested documentation listed in Amazon Simple Pay Resources.
Creating a Subscription Button Amazon Simple Pay makes it easy to offer subscriptions for services and products. Subscribers go to your website and use the subscription button to pay for subscriptions. Subscribers do not need to supply a shipping address, payment instrument, or create a login name or password. All of that information is already in their Amazon customer account. At the time the subscription begins, and at the prescribed intervals, Amazon Payments automatically makes the subscription payment.
Subscription Button Features
• Free Trials—You can set up a free trial subscription by delaying the start date for a subscription
• Introductory Rates—You can configure special or discounted pricing for the beginning of the subscription

Creating Simple Pay Buttons
12
How to Generate the HTML for a Subscription Button The following procedure guides you through generating the HTML for a subscription button.
Important We strongly recommend that you create and test all of your requests in the sandbox before exposing them on your website. For more information, see “Testing Your Simple Pay Buttons.”
To generate the HTML for a subscription button Note
You can set several of the fields in the form to default values using your seller preferences. For more information, see “Configuring Default Button Values.”
1. Go to http://payments.amazon.com and log into your Amazon Payments Business Account. For more information, see “Before You Begin.”
2. From here, go to https://payments.amazon.com/sdui/sdui/subscriptionbutton to show the Amazon Simple Pay > Subscriptions page, which contains a form where you fill in subscription button information.
Note To create a button in the sandbox, go to https://payments-sandbox.amazon.com/sdui/sdui/subscriptionbutton instead.
3. Use the following table to fill in the form’s entry fields.
Tip You can also hold the mouse pointer over most fields of the online form to display usage tips in the right side of the form.
Field Action Charge Enter the subscription payment, how often the subscriber
will be charged, and the duration of the subscription, respectively. There is maximum of two decimal places in the Charge amount field. Note Payments will occur on the closest valid day for the subscription period. For example, for a monthly subscription, a payment on 2009-01-31 is followed by a payment on 2009-02-28. The same holds true for annual subscriptions. A payment on 2008-02-29 is followed by 2009-02-28. Corresponds to the amount field in the button html.
Creating Simple Pay Buttons
13
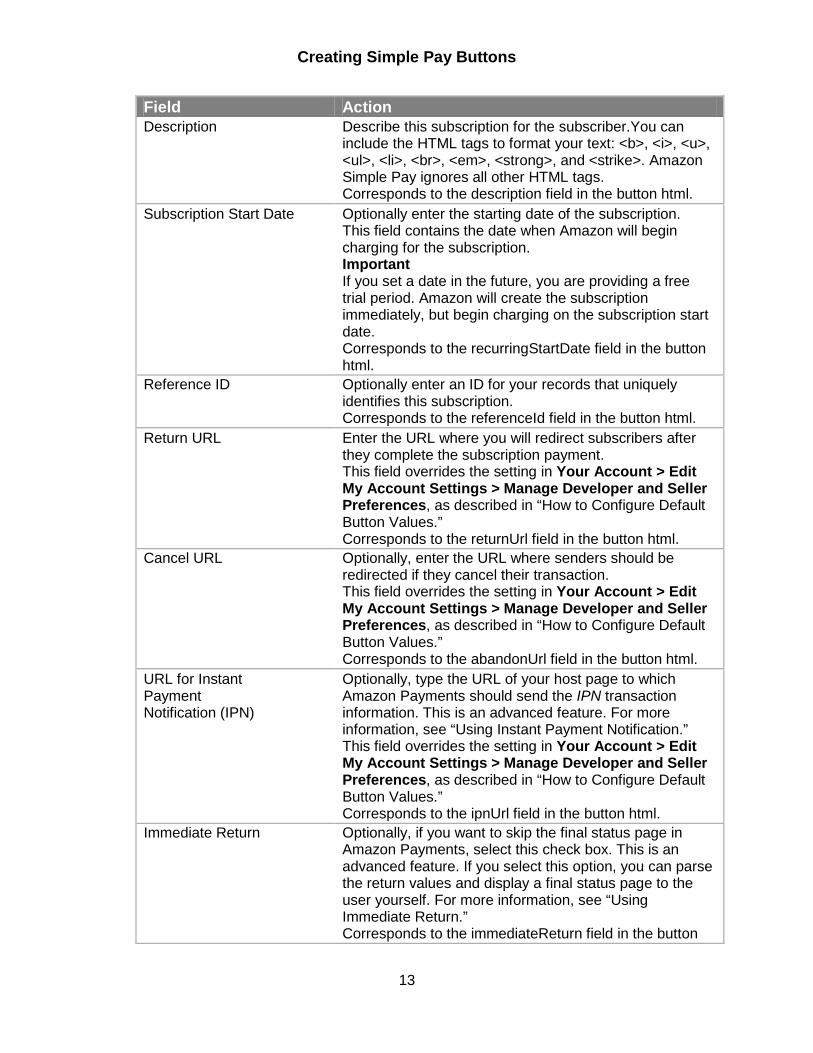
Field Action Description Describe this subscription for the subscriber.You can
include the HTML tags to format your text: <b>, <i>, <u>, <ul>, <li>, <br>, <em>, <strong>, and <strike>. Amazon Simple Pay ignores all other HTML tags. Corresponds to the description field in the button html.
Subscription Start Date Optionally enter the starting date of the subscription. This field contains the date when Amazon will begin charging for the subscription. Important If you set a date in the future, you are providing a free trial period. Amazon will create the subscription immediately, but begin charging on the subscription start date. Corresponds to the recurringStartDate field in the button html.
Reference ID Optionally enter an ID for your records that uniquely identifies this subscription. Corresponds to the referenceId field in the button html.
Return URL Enter the URL where you will redirect subscribers after they complete the subscription payment. This field overrides the setting in Your Account > Edit My Account Settings > Manage Developer and Seller Preferences, as described in “How to Configure Default Button Values.” Corresponds to the returnUrl field in the button html.
Cancel URL Optionally, enter the URL where senders should be redirected if they cancel their transaction. This field overrides the setting in Your Account > Edit My Account Settings > Manage Developer and Seller Preferences, as described in “How to Configure Default Button Values.” Corresponds to the abandonUrl field in the button html.
URL for Instant Payment Notification (IPN)
Optionally, type the URL of your host page to which Amazon Payments should send the IPN transaction information. This is an advanced feature. For more information, see “Using Instant Payment Notification.” This field overrides the setting in Your Account > Edit My Account Settings > Manage Developer and Seller Preferences, as described in “How to Configure Default Button Values.” Corresponds to the ipnUrl field in the button html.
Immediate Return Optionally, if you want to skip the final status page in Amazon Payments, select this check box. This is an advanced feature. If you select this option, you can parse the return values and display a final status page to the user yourself. For more information, see “Using Immediate Return.” Corresponds to the immediateReturn field in the button

Creating Simple Pay Buttons
14
Field Action html.
Collect the shipping address?
If you want Amazon Payments to return the buyer's shipping address as part of the transaction information, select this check box. Corresponds to the collectShippingAddress field in the button html.
Allow trial period If you want to provide an introductory subscription price, select this check box. Use the Charge, every, and for fields to specify the trial period and its costs. For example: Charge 1.00 every 1 month for 1 months. In this example, the introductory price, $1.00, is for the first month of the subscription only. Note that there is maximum of two decimal places in the Charge field. Corresponds to the noOfPromotionTransactions and promotionAmount fields in the button html.
Your website Background Select the type of button background you need. The white option sets a white background. The color option produces a button with a transparent background (that is, your website theme colors will show).
Button Type Select the button image that you want to appear on your website. Corresponds to the src attribute for the image in the button html.
4. Click Generate HTML. Amazon Payments produces the application-specific HTML form for the subscription button, and displays it in the text area underneath the Generate HTML button. Typical HTML for a subscription button is shown in Subscription Button HTML Components. Copy the HTML and paste it in the appropriate page on your website. It will be displayed on the web page as a Pay Now button.
5. When you have finished copying the generated HTML, you can clear the Amazon Simple Pay Subscription Creation Page user interface by clicking the Create Another Widget button. The form clears, and you can create another subscription button.
Note You can continue to create as many subscription buttons as you need using this procedure. However, if you plan to add more than one button to a single web page, there are implementation issues for you to consider. For more information, see “Creating More than One Button per Page.”

Creating Simple Pay Buttons
15
Important You are notified each time a subscriber starts a subscription request. For more information, see “Getting Notification about Your Payments.” Subscribers can use their Amazon Payments account at payments.amazon.com to track information about subscriptions they have purchased.
You can begin using your new button immediately. However, Amazon recommends you test every button before deploying it to production. A testing environment, the Amazon Payments sandbox, is provided for you to test any of the button types. To learn how to test your buttons, see “Testing Your Simple Pay Buttons.”
Subscription Button HTML Components Here is a sample of an HTML form that is generated for a Subscription button.
<form action="https://authorize.payments.amazon.com/pba/paypipeline" method="POST"> <input type="hidden" name="immediateReturn" value="1" > <input type="hidden" name="noOfPromotionTransactions" value="2" > <input type="hidden" name="recurringStartDate" value="1250161950" > <input type="hidden" name="collectShippingAddress" value="1" > <input type="hidden" name="promotionAmount" value="USD 1" > <input type="hidden" name="accessKey" value="YourAccessKeyId" > <input type="hidden" name="referenceId" value="MyTransaction-001" > <input type="hidden" name="recurringFrequency" value="1 month" > <input type="hidden" name="amount" value="USD 10.05" > <input type="hidden" name="signature" value="L8I/R5inJ3RtGIz/uYvyYlIu1ibDcSlaSn3/IwK6ciA=" > <input type="hidden" name="isAutoRenewal" value="0" > <input type="hidden" name="description" value="Daily NYT Delivery" > <input type="hidden" name="ipnUrl" value="http://yourwebsite.com/instantpaymentnotification" > <input type="hidden" name="returnUrl" value="http://yourwebsite.com/success" > <input type="hidden" name="processImmediate" value="0" > <input type="hidden" name="cobrandingStyle"

Creating Simple Pay Buttons
16
value="logo" > <input type="hidden" name="abandonUrl" value="http://yourwebsite.com/cancel" > <input type="image" src= "https://authorize.payments-sandbox.amazon.com/pba/images/ GMSubscribeWithLogo.png" border="0"> <input type="hidden" name="signatureVersion" value="2" > <input type="hidden" name="signatureMethod" value="HmacSHA256" > </form>
Test Your Simple Pay Subscription Button Amazon Simple Pay provides a testing environment, the Amazon Payments Sandbox, for testing the buttons you create. Using the sandbox you can try out your applications without incurring charges or making purchases. We strongly recommend that you create and test all of your requests in the sandbox before exposing them on your website.
All the simple pay buttons are tested in the same way, and you can test a button whether you plan to use it in your website or not. To learn how to all test Amazon Simple Pay buttons, see “Testing Your Simple Pay Buttons.”
Advanced Subscription Button Features Within this section, we present the following advanced topics in passing which are not required to implement basic features. Please refer to the sections for detailed information.
• Creating More than One Button per Page • Handling the Return URL • Using Immediate Return • Settling Immediately • Using Instant Payment Notification • Advantages of Signing Your Buttons
In the preceding procedure you worked with the features of the subscription button that are quickest to build. There are many other features of Amazon Simple Pay and the Amazon Flexible Payments Service that can make your website more sophisticated and usable. Some of the topics which may be of interest to you are:
• Customizing Amazon Simple Pay Buttons • Simulating Amazon Simple Pay Button Errors • Adding Amazon Simple Pay as an Additional Payment Option • Programmatic APIs for canceling subscriptions, refunding transactions, getting
transaction status, and verifying signatures in Return URL and IPN notifications.

Creating Simple Pay Buttons
17
• Configuring Instant Payment Notification and Handling Instant Payment Notifications • Using Amazon Simple Pay Actions
To learn how to do some of these tasks, see the Amazon Simple Pay Advanced User Guide. For complete details on the capabilities of Amazon Simple Pay, please see the suggested documentation listed in “Amazon Simple Pay Resources.”
Creating a Marketplace Button Marketplace buttons are used to website owners to host goods sold by other sellers. The owner merely facilitates the sale, usually in return for a fee.
There are three parties involved in a marketplace sale:
• Website owner—Hosts a website that sells goods for others. The website owner creates two buttons. One form displays the marketplace fee Button, which sellers use to contract space on the website. The other form is a Pay Now button, which buyers use to purchase the seller's product.
• Seller—By clicking the marketplace fee button and filling out a web form to accept the contract, the seller establishes a contract with the website owner to sell products on the website. Usually the seller pays a commission to the website owner when goods are sold.
• Buyer—Shops on the website and pays for items. The marketplace function does not change the buying experience.
Amazon Payments marketplace buttons handle these payments seamlessly. When the buyer clicks the button, the seller is paid the required amount and the specified commission is transferred from the seller to the website owner.
In this section you learn how to create a marketplace button and insert both it and the corresponding marketplace fee form on your web page.
How to Generate the HTML for a Marketplace Button The following procedure guides you through generating the HTML for a marketplace button.
Important We strongly recommend that you create and test all of your requests in the sandbox before exposing them on your website. For more information, see “Testing Your Simple Pay Buttons.”

Creating Simple Pay Buttons
18
Note You can set many of the fields in the form to default values using your seller preferences. For more information, see “Configuring Default Button Values.”
To generate the HTML for a Marketplace button
1. Go to http://payments.amazon.com and log into your Amazon Payments Business Account. For more information, see “Before You Begin.”
2. From here, go to https://payments.amazon.com/sdui/sdui/marketplace to show the Amazon Simple Pay > Marketplaces page, which contains a form for you to enter information about the Marketplace button.
Note To create a button in the sandbox, go to https://payments-sandbox.amazon.com/sdui/sdui/marketplace
3. Use the following table to fill in the entry fields.
Tip You can also hold the mouse pointer over most fields of the online form to display usage tips in the right side of the form.
Field Action Amount Enter the amount you want to collect for the item.
Corresponds to the amount field in the button html. Item Name/Payment Description
Enter a description of the item. Corresponds to the description field in the button html.
Reference Optionally enter an ID for your records that will uniquely identify the transaction. Corresponds to the referenceId field in the button html.
Return URL Optionally enter the URL where buyers should be redirected after they complete the transaction, for example. Corresponds to the returnUrl field in the button html.
User Abandon URL
Optionally enter the URL where buyers should be redirected if they cancel their transaction. This field overrides the setting in Your Account > Edit My Account Settings > Manage Developer and Seller Preferences, as described in How to Configure Default Button Values. Corresponds to the abandonUrl field in the button html.
URL for Instant Payment Notification (IPN)
Optionally, type the URL of your host page to which Amazon Payments should send the IPN transaction information. This is an advanced feature. For more information, see “Using Instant Payment Notification.” This field overrides the setting in Your Account > Edit My Account Settings > Manage Developer and Seller Preferences, as described in How to Configure Default Button Values. Corresponds to the ipnUrl field in the button html.
Seller Email Enter the email address for the seller. Immediate Optionally, if you want to skip the final status page in Amazon

Creating Simple Pay Buttons
19
Field Action Return Payments, select this check box. If you select this option, you can parse
the return values and display a final status page to the user yourself. This is an advanced feature. For more information, see “Using Immediate Return.” Corresponds to the immediateReturn field in the button html.
Collect Shipping Address?
If you want Amazon Payments to return the buyer's shipping address as part of the transaction information, select this check box. Corresponds to the collectShippingAddress field in the button html.
Do you want to settle immediately?
This is an advanced feature. For more information, see “Settling Immediately.” Corresponds to the processImmediate field in the button html.
Do you want to charge a Marketplace fee?
Optionally if you want to add a fee when collecting the purchase, select this check box. When you check this option, the Configure the marketplace fee button form section displays, containing the Return URL, Marketplace Fee, and Market Fee Button options. (Step 6).
Your website Background
Select the appropriate option that describes the background color of your website. This option changes the color of the marketplace buttons.
Button Type Select the marketplace button you want to post on your website. Corresponds to the src attribute for the image in the button html.
4. If you want to charge a marketplace fee to your sellers and have checked the Do you want to charge a Marketplace fee? check box, the Configure the marketplace fee button form displays. Use the following table to complete the form.
Field Action Return URL Type the URL the seller returns to after accepting the per-
transaction fee. Marketplace Fee fields Enter the marketplace fee you will charge.You can specify a
percentage of the transaction, a fixed fee per transaction, or both. Corresponds to the maxVariableFee, maxFixedFee, and recipientPaysFee fields in the marketplace fee button html.
Market Free Button Select the button image you want to display on your marketplace Fee form. Corresponds to the src attribute for the image in the button html.
5. Click Generate HTML. Amazon Payments produces the HTML form for the both the
marketplace button the buyer uses to purchase the item, and the marketplace fee button, the seller uses to accept your conditions. Each is displayed in its own text area underneath the Generate HTML button. Typical HTML forms for a marketplace-enabled donation button are shown in “Marketplace Button HTML Components.”
Copy each HTML form in turn and paste it in the appropriate page on your website.
You can begin using your new buttons immediately. However, Amazon recommends you test every button before deploying it to production. A testing environment, the Amazon Payments
Creating Simple Pay Buttons
20
sandbox, is provided for you to test any of the button types. To learn how to test your buttons, see “Testing Your Simple Pay Buttons.”
Important You are notified each time a buyer starts a purchase. For more information, see “Getting Notification about Your Payments.”
Marketplace Button HTML Components Here are samples of the HTML forms generated for a marketplace button.
First is the portion for the marketplace button.
<form action="https://authorize.payments.amazon.com/pba/paypipeline" method="POST"> <input type="hidden" name="immediateReturn" value="1" > <input type="hidden" name="collectShippingAddress" value="1" > <input type="hidden" name="accessKey" value="YourAccessKeyId" > <input type="hidden" name="referenceId" value="MyTransaction-001" > <input type="hidden" name="recipientEmail" value="email domain.com" > <input type="hidden" name="amount" value="USD 10" > <input type="hidden" name="variableMarketplaceFee" value="4" > <input type="hidden" name="signature" value="dXZgCQ8fLsPjNkbHswghORXd34tTVZWEjyetpzYG1ok=" > <input type="hidden" name="fixedMarketplaceFee" value="USD 0.20" > <input type="hidden" name="description" value="Pay for Purple Vase (Walter store)" > <input type="hidden" name="ipnUrl" value="http://yourwebsite.com/instantpaymentnotification" > <input type="hidden" name="returnUrl" value="http://yourwebsite.com/success" > <input type="hidden" name="processImmediate" value="1" > <input type="hidden" name="cobrandingStyle" value="logo" > <input type="hidden" name="abandonUrl" value="http://yourwebsite.com/cancel" > <input type="image" src= "https://authorize.payments.amazon.com/pba/images/ SMPayNowWithAmazon.png"

Creating Simple Pay Buttons
21
border="0"> <input type="hidden" name="signatureVersion" value="2" > <input type="hidden" name="signatureMethod" value="HmacSHA256" > </form>
Here is the form for the marketplace fee.
<form action="https://authorize.payments.amazon.com/cobranded-ui/actions/start" method="get"> <input type="hidden" name="signature" value="8UVrm+bK/O8I92e6RKlWKg76els=" > <input type="hidden" name="accessKey" value="AKIAIOSFODNN7EXAMPLE" > <input type="hidden" name="callerReference" value="983fab72-6695-4b53-a69f-5bf5fb47c25e" > <input type="hidden" name="collectEmailAddress" value="true" > <input type="hidden" name="maxFixedFee" value="0.2" > <input type="hidden" name="maxVariableFee" value="4.00" > <input type="hidden" name="pipelineName" value="Recipient" > <input type="hidden" name="recipientPaysFee" value="true" > <input type="hidden" name="returnURL" value="http://yourwebsite.com/returnurl" > <input type="hidden" name="signatureVersion" value="2" > <input type="hidden" name="signatureMethod" value="HmacSHA256" > <input type="image" src= "http://g-ecx.images-amazon.com/images/G/01/asp/MarketPlaceFeeWithLogo.gif" border="0"> </form>

Creating Simple Pay Buttons
22

Creating Simple Pay Buttons
23
Test Your Simple Pay Marketplace Button Amazon Simple Pay provides a testing environment, the Amazon Payments Sandbox, for testing the buttons you create. Using the sandbox you can try out your applications without incurring charges or making purchases. We strongly recommend that you create and test all of your requests in the sandbox before exposing them on your website.
All the simple pay buttons are tested in the same way, and you can test a button whether you plan to use it in your website or not. To learn how to all test Amazon Simple Pay buttons, see “Testing Your Simple Pay Buttons.”
Advanced Marketplace Button Features Within this section, we present the following advanced topics in passing which are not required to implement basic features. Please refer to the sections for detailed information.
• Creating More than One Button per Page • Handling the Return URL • Using Immediate Return • Settling Immediately • Using Instant Payment Notification • Advantages of Signing Your Buttons
In the preceding procedure worked with the features of the marketplace button that are quickest to build. There are many other features of Amazon Simple Pay and the Amazon Flexible Payments Service that can make your website more sophisticated and usable. Some of the topics which may be of interest to you are:
• Customizing Amazon Simple Pay Buttons • Simulating Amazon Simple Pay Button Errors • Adding Amazon Simple Pay as an Additional Payment Option • Programmatic APIs for canceling, settling, and refunding transactions, as well as getting
a transaction status, and verifying signatures in Return URL and IPN notifications. • Configuring Instant Payment Notification and Handling Instant Payment Notifications • Using Amazon Simple Pay Actions
To learn how to do some of these tasks, see the Amazon Simple Pay Advanced User Guide, For complete details on the capabilities of Amazon Simple Pay, please see the suggested documentation listed in “Amazon Simple Pay Resources.”
Creating a Basic Donation Button If you are a non-profit organization, you can use Amazon Simple Pay to add a donation button to your website. Amazon Simple Pay donation buttons are an easy-to-use and secure way for

Creating Simple Pay Buttons
24
US-based, IRS-certified 501(c)3 non-profit organizations to solicit donations. You can set a fixed or minimum amount, or let donors choose an amount, starting with as little as $1.00. Donations are charged to the donor's payment instrument and sent to the non-profit organization immediately.
Note With the Amazon Simple Pay donation button you also have the option of enabling the marketplace feature, so that you as a third party can host the donation site for an organization and optionally collect a marketplace fee for this service. If you do want to use the marketplace feature of a donation button, see “Creating a Marketplace-Enabled Donation Button” instead.
When you create your account, we verify the tax-exempt status and respond to you by email. If your organization is eligible, you can begin using Amazon Simple Pay donation buttons to collect donations on your own behalf within 1-2 business days.
Note Amazon Simple Pay donation buttons are intended to benefit US-based, IRS-certified 501(c)3 non-profit organizations. The Amazon Payments business account you use must be a Non-Profit Organization account type. To set this, go to https://payments.amazon.com, sign in, and navigate to Your Account tab, Edit My Account Settings page.
In this section you learn how to create an Amazon Simple Pay donation button and insert it on your web page.
How to Generate the HTML for a Donation Button The following procedure guides you through generating the HTML for donation button.
Important We strongly recommend that you create and test all of your requests in the sandbox before exposing them on your website. For more information, see “Testing Your Simple Pay Buttons.”
To create the HTML for a donation button
Note You can set many of the fields in the form to default values using your seller preferences. For more information, see “Configuring Default Button Values.”
1. Go to http://payments.amazon.com and log into your Amazon Payments Business Account. For more information, see “Before You Begin.”

Creating Simple Pay Buttons
25
2. From here, go to https://payments.amazon.com/sdui/sdui/donationbutton to show the Amazon Simple Pay > Donations page, which contains a form for you to fill in information about the donation button.
Note To create a button in the sandbox, go to https://payments-sandbox.amazon.com/sdui/sdui/donationbutton instead.
3. Use the following table to fill in the entry fields.
Tip You can also hold the mouse pointer over most fields of the online form to display usage tips in the right side of the form.
Field Action Amount Select the amount type and enter the amount, where
appropriate.
• Any Amount allows the donor to specify any amount. • Minimum Amount requires the donor to contribute at
least this amount.
For example, if you specify $10, the donor must contribute at least $10 in order to complete the form. Corresponds to the minimumDonationAmount field in the button html.
• Fixed Amount lets the donor contribute only the specified amount. If you specify $10, the donor must contribute exactly $10.
Reason for donation Enter a purpose for the donation Corresponds to the description field in the button html.
Reference Optionally enter an ID for your records that will uniquely identify the donation. Corresponds to the referenceId field in the button html.
Return URL Optionally enter the URL where contributors should be redirected after completing the donation payment. This field overrides the setting in Your Account > Edit My Account Settings > Manage Developer and Seller Preferences, as described in How to Configure Default Button Values. Corresponds to the returnUrl field in the button html.
User Abandon URL Optionally enter the URL where contributors should be redirected if they cancel their donation. This field overrides the setting in Your Account > Edit My Account Settings > Manage Developer and Seller Preferences, as described in How to Configure Default Button Values. Corresponds to the abandonUrl field in the button html.

Creating Simple Pay Buttons
26
Field Action URL for Instant Payment Notification (IPN)
Optionally, type the URL of your host page to which Amazon Payments should send the IPN transaction information. This is an advanced feature. For more information, see “Using Instant Payment Notification.” This field overrides the setting in Your Account > Edit My Account Settings > Manage Developer and Seller Preferences, as described in How to Configure Default Button Values. Corresponds to the ipnUrl field in the button html.
Immediate Return Optionally, if you want to skip the final status page in Amazon Payments, select this check box. If you select this option, you can parse the return values and display a final status page to the user yourself. This is an advanced feature. For more information, see “Using Immediate Return.” Corresponds to the immediateReturn field in the button html.
Collect the shipping address?
If you want Amazon Payments to return the subscriber's shipping address as part of the transaction information, select this check box. Corresponds to the collectShippingAddress field in the button html.
Do you want to enable marketplace feature?
Leave this check box cleared to create a basic donation button. For detailed information on properly enabling the marketplace feature for a donation button, see “Creating a Marketplace-Enabled Donation Button.”
Your website Background
Select the type of button background you need. The white option sets a white background. The color option produces a button with a transparent background (that is, your website theme colors will show).
Button Type Select the button image that you want to appear on your website. Corresponds to the src attribute for the image in the button html.
4. Click Generate HTML. Amazon Payments produces the HTML form for the donation button, and displays it in the text area underneath the Generate HTML button. Typical HTML for a standard button is shown in Donation Button HTML Components. Copy the HTML and paste it in the appropriate page on your website. It will be displayed on the web page as a Donate button.
You can begin using your new button immediately. However, Amazon recommends you test every button before deploying it to production. A testing environment, the Amazon Payments sandbox, is provided for you to test any of the button types. To learn how to test your buttons, see “Testing Your Simple Pay Buttons.”
Important You are notified each time a contributor starts a donation. For more information, see “Getting Notification about Your Payments.”

Creating Simple Pay Buttons
27
Donation Button HTML Components Here is a sample of an HTML form generated for a donation button.
<form action="https://authorize.payments.amazon.com/pba/paypipeline" method="POST"> <input type="image" src= "https://authorize.payments.amazon.com/pba/images/GSDonationWithLogo.png" border="0"> <input type="hidden" name="immediateReturn" value="1" > <input type="hidden" name="collectShippingAddress" value="1" > <input type="hidden" name="accessKey" value="YourAccessKeyId" > <input type="hidden" name="minimumDonationAmount" value="USD 50" > <input type="hidden" name="referenceId" value="MyTransaction-001" > <input type="text" name="amount" size="8" value="50" > <input type="hidden" name="isDonationWidget" value="1" > <input type="hidden" name="fixedMarketplaceFee" value="" > <input type="hidden" name="description" value="City Mission" > <input type="hidden" name="ipnUrl" value="http://yourwebsite.com/instantpaymentnotification" > <input type="hidden" name="returnUrl" value="http://yourwebsite.com/success" > <input type="hidden" name="processImmediate" value="1" > <input type="hidden" name="cobrandingStyle" value="logo" > <input type="hidden" name="abandonUrl" value="http://yourwebsite.com/abandon"> <input type="hidden" name="signature" value="JL9k2iY4H2IQ0A+2zvFi31zLnPmOFEfMwzpLYG0Rao8=" > <input type="hidden" name="signatureVersion" value="2" > <input type="hidden" name="signatureMethod" value="HmacSHA256" >

Creating Simple Pay Buttons
28
</form>
Test Your Simple Pay Donation Button Amazon Simple Pay provides a testing environment, the Amazon Payments Sandbox, for testing the buttons you create. Using the sandbox you can try out your applications without incurring charges or making purchases. We strongly recommend that you create and test all of your requests in the sandbox before exposing them on your website.
All the simple pay buttons are tested in the same way, and you can test a button whether you plan to use it in your website or not. To learn how to all test Amazon Simple Pay buttons, see “Testing Your Simple Pay Buttons.”
Advanced Donation Button Features Within this section, we present the following advanced topics in passing which are not required to implement basic features. Please refer to the sections for detailed information.
• Handling the Return URL • Using Immediate Return • Using Instant Payment Notification • Advantages of Signing Your Buttons
In the preceding procedure you worked with the features of the donation button that are quickest to build. There are many other features of Amazon Simple Pay and the Amazon Flexible Payments Service that can make your website more sophisticated and usable. Some of the topics which may be of interest to you are:
• Customizing Amazon Simple Pay Buttons • Simulating Amazon Simple Pay Button Errors • Adding Amazon Simple Pay as an Additional Payment Option • Programmatic APIs for canceling, settling, and refunding transactions, as well as getting
a transaction status, and verifying signatures in Return URL and IPN notifications. • Configuring Instant Payment Notification and Handling Instant Payment Notifications • Using Amazon Simple Pay Actions
To learn how to do some of these tasks, see the Amazon Simple Pay Advanced User Guide. For complete details on the capabilities of Amazon Simple Pay, please see the suggested documentation listed in “Amazon Simple Pay Resources.”
Creating Simple Pay Buttons
29
Creating a Marketplace-Enabled Donation Button You can enable a marketplace feature with Amazon Simple Pay donation buttons. This allows you as a third party to host a donation site for others, and optionally collect a marketplace fee from them for the service. This topic details that procedure. If you are a non-profit organization, and only want to configure a basic donation button which does not incorporate the marketplace feature, see the simplified procedure detailed in “Creating a Basic Donation Button” instead.
Note Amazon Simple Pay donation buttons are intended to benefit US-based, IRS-certified 501(c)3 non-profit organizations. The Amazon Payments business account for which you collect money must be a Non-Profit Organization account. The 501(c)3 organization representative must navigate to https://payments.amazon.com, sign in the organization's Amazon account, navigate to the Your Account tab, Edit My Account Settings page, and set the account type there.
Three parties are involved in a marketplace-enabled donation website
• Web site owner—Hosts the website that provides a 501(c)3 organization a service for soliciting donations. By enabling the marketplace fee button, the website owner creates a contract for the organization representative to sign to begin accepting donations. That contract may include a transaction fee.
• 501(c)3 Organization—By clicking the marketplace fee button and filling out a web form to accept the contract, the organization representative obtains a contract with the website owner to list donations on the website.
• Contributor—Elects to make donations on the website using the donation button. The marketplace function does not change the interaction for the contributor, who is treated just like someone purchasing any other good or service.
In this section you learn how to create a marketplace-enabled donation button and place both it and the corresponding marketplace fee form on your web page.
How to Generate the HTML for a Marketplace-Enabled Donation Button The following procedure guides you through generating the HTML for a donation button.
Important We strongly recommend that you create and test all of your requests in the sandbox before exposing them on your website. For more information, see “Testing Your Simple Pay Buttons.”

Creating Simple Pay Buttons
30
To create the HTML for a Marketplace-Enabled Donation button
Note You can set many of the fields in the form to default values using your seller preferences. For more information, see “Configuring Default Button Values.”
1. Go to http://payments.amazon.com and log into your Amazon Payments Business Account. For more information, see “Before You Begin.”
2. From here, go to https://payments.amazon.com/sdui/sdui/donationbutton to show the Amazon Simple Pay > Donations page, which contains the following a form for you to fill in information about the Marketplace-Enabled Donation button.
Note To create a button in the sandbox, go to https://payments-sandbox.amazon.com/sdui/sdui/donationbutton
3. Use the following table to fill in the entry fields.
Tip You can also hold the mouse pointer over most fields of the online form to display usage tips in the right side of the form.
Field Action Amount Select the amount type and enter the amount, where
appropriate.
• Any Amount allows the donor to specify any amount. • Minimum Amount requires the donor to contribute at
least this amount.
For example, if you specify $10, the donor must contribute at least $10 in order to complete the form. Corresponds to the minimumDonationAmount field in the button html.
• Fixed Amount lets the donor contribute only the specified amount. If you specify $10, the donor must contribute exactly $10.
Reason for Donation Enter a purpose for the donation Corresponds to the description field in the button html.
Reference Optionally enter an ID for your records that will uniquely identify the donation. Corresponds to the referenceId field in the button html.
Return URL Optionally enter the URL where contributors should be redirected after completing the donation payment. This field overrides the setting in Your Account > Edit My Account Settings > Manage Developer and Seller Preferences, as described in “How to Configure Default Button Values.”

Creating Simple Pay Buttons
31
Field Action Corresponds to the returnUrl field in the button html.
User Abandon URL Optionally enter the URL where contributors should be redirected if they cancel their donation. This field overrides the setting in Your Account > Edit My Account Settings > Manage Developer and Seller Preferences, as described in How to Configure Default Button Values. Corresponds to the abandonUrl field in the button html.
URL for Instant Payment Notification (IPN)
Optionally, type the URL of your host page to which Amazon Payments should send the IPN transaction information. This is an advanced feature. For more information, see “Using Instant Payment Notification.” This field overrides the setting in Your Account > Edit My Account Settings > Manage Developer and Seller Preferences, as described in How to Configure Default Button Values. Corresponds to the ipnUrl field in the button html.
Immediate Return Optionally, if you want to skip the final status page in Amazon Payments, select this check box. If you select this option, you can parse the return values and display a final status page to the user yourself. This is an advanced feature. For more information, see “Using Immediate Return.” Corresponds to the immediateReturn field in the button html.
Collect the shipping address?
If you want Amazon Payments to return the contributor's shipping address as part of the transaction information, select this check box. Corresponds to the collectShippingAddress field in the button html.
Do you want to enable marketplace feature?
Optionally, if you as a third party plan to host the donation site for a 501(c)3 organization, select this check box.The Recipient Email and Market Fee Button: options appear.
Recipient's Email text box
Enter the email address of the tax exempt organization receiving the donation. Corresponds to the recipientEmail field in the button html.
Your website Background
Select the type of button background you need. The white option sets a white background. The color option produces a button with a transparent background (that is, your website theme colors will show).
Button Type Select the button image that you want to appear on your form for the donation. Corresponds to the src attribute for the image in the button html.
Do you want to charge a Marketplace fee?
Optionally, if you want to add a fee when collecting the donation, select this check box. When you check this option, the Configure the marketplace fee button form section displays, containing the Return URL, Marketplace Fee, and Market Fee Button options.

Creating Simple Pay Buttons
32
4. If you want to charge a marketplace fee to the 501(c)3, and have checked the Do you want to charge a Marketplace fee? check box, the Configure the marketplace fee button form displays.
Field Action Return URL Type the URL the seller returns to after accepting the per-transaction
fee. Corresponds to the returnUrl field in the marketplace fee button html.
Marketplace Fee Fields
Enter the marketplace fee you will charge. You can specify a percentage of the transaction, a fixed fee per transaction, or both. Corresponds to the maxVariableFee, maxFixedFee, and recipientPaysFee fields in the marketplace fee button html.
Market Fee Button Select the button image you want to display on your marketplace fee form. Corresponds to the src attribute for the image in the button html.
5. Click Generate HTML. Amazon Payments produces the HTML form for the both the donation button and the marketplace fee button. Each is displayed in its own text area underneath the Generate HTML button. Typical HTML forms for a marketplace-enabled donation button are shown in Marketplace-Enabled Donation Button HTML Components. Copy the HTML and paste it in the appropriate page on your website. It will be displayed on the web page as a Donate button.
You can begin using your new button immediately. However, Amazon recommends you test every button before deploying it to production. A testing environment, the Amazon Payments sandbox, is provided for you to test any of the button types. To learn how to test your buttons, see “Testing Your Simple Pay Buttons.”
Important You are each time a contributor starts a donation. For more information, see “Getting Notification about Your Payments.”
Marketplace-Enabled Donation Button HTML Components Here are samples of the HTML forms generated for a donation button that incorporates the marketplace fee feature.
First, is the portion for the donation button.
<form action="https://authorize.payments.amazon.com/pba/paypipeline"

Creating Simple Pay Buttons
33
Amazon Simple Pay Getting Started Guide Marketplace-Enabled Donation Button HTML Components method="post"> <input type="hidden" name="immediateReturn" value="1" > <input type="hidden" name="collectShippingAddress" value="1" > <input type="hidden" name="accessKey" value="AKIAIOSFODNN7EXAMPLE" > <input type="hidden" name="minimumDonationAmount" value="USD 50" > <input type="hidden" name="referenceId" value="MyTransaction-001" > <input type="hidden" name="recipientEmail" value="email domain.com" > <input type="hidden" name="variableMarketplaceFee" value="3" > <input type="hidden" name="signature" value="nVPwhhP9VqTJGUEilNlBcGVVTOs=" > <input type="hidden" name="fixedMarketplaceFee" value="USD 0.20" > <input type="hidden" name="isDonationWidget" value="1" > <input type="hidden" name="description" value="City Mission" > <input type="hidden" name="amazonPaymentsAccountId" value="WFQISAVAYLSB2VZ1LVCDJ2KLJ8H1BVUEXAMPLE" > <input type="hidden" name="ipnUrl" value="http://yourwebsite.com/instantpaymentnotification" > <input type="hidden" name="returnUrl" value="http://yourwebsite.com/success" > <input type="hidden" name="processImmediate" value="1" > <input type="hidden" name="cobrandingStyle" value="logo" > <input type="hidden" name="abandonUrl" value="http://yourwebsite.com/abandon" > <input type="image" src= "https://authorize.payments.amazon.com/pba/images/ GSDonationWithLogo.png" border="0"> <input type="hidden" name="signatureVersion" value="2" > <input type="hidden" name="signatureMethod" value="HmacSHA256" > </form>
Here is the form for the marketplace fee.
<form

Creating Simple Pay Buttons
34
action="https://authorize.payments.amazon.com/cobranded-ui/actions/ start" method="get"> <input type="hidden" name="maxVariableFee" value="3.00" > <input type="hidden" name="maxFixedFee" value="0.2" > <input type="hidden" name="callerAccountId" value="WFQISAVAYLSB2VZ1LVCDJ2KLJ8H2BVUEXAMPLE" > <input type="hidden" name="recipientPaysFee" value="True" > <input type="hidden" name="returnURL" value="http://yourwebsite.com/returnurl" > <input type="hidden" name="signature" value="HmZ3hZyRXbJh+7yfLSuE/P4wBlY=" > <input type="hidden" name="collectEmailAddress" value="True" > <input type="hidden" name="callerReference" value="939d61ff-85b0-4a12-aa2d-c2e84a30805f" > <input type="hidden" name="callerKey" value="AKIAIOSFODNN7EXAMPLE" > <input type="hidden" name="pipelineName" value="Recipient" > <input type="image" src= "https://authorize.payments.amazon.com/pba/images/MarketPlaceFeeWithOutLogo.png" border="0"> <input type="hidden" name="signatureVersion" value="2" > <input type="hidden" name="signatureMethod" value="HmacSHA256" > </form>
Test Your Marketplace-Enabled Donation Button Amazon Simple Pay provides a testing environment, the Amazon Payments Sandbox, for testing the buttons you create. Using the sandbox you can try out your applications without incurring charges or making purchases. We strongly recommend that you create and test all of your requests in the sandbox before exposing them on your website.
All the simple pay buttons are tested in the same way, and you can test a button whether you plan to use it in your website or not. To learn how to all test Amazon Simple Pay buttons, see “Testing Your Simple Pay Buttons.”

Creating Simple Pay Buttons
35
Advanced Marketplace-Enabled Donation Button Features Within this section, we present the following advanced topics in passing which are not required to implement basic features. Please refer to the sections for detailed information.
• Handling the Return URL • Using Immediate Return • Using Instant Payment Notification • Advantages of Signing Your Buttons
In the previous procedure you worked with the features of the marketplace-enabled donation button that are quickest to build. There are many other features of Amazon Simple Pay and the Amazon Flexible Payments Service that can make your website more sophisticated and usable. Some of the topics which may be of interest to you are:
• Customizing Amazon Simple Pay Buttons • Simulating Amazon Simple Pay Button Errors • Adding Amazon Simple Pay as an Additional Payment Option • Programmatic APIs for canceling, settling, and refunding transactions, as well as getting
a transaction status, and verifying signatures in Return URL and IPN notifications. • Configuring Instant Payment Notification and Handling Instant Payment Notifications • Using Amazon Simple Pay Actions
To learn how to do some of these tasks, see the Amazon Simple Pay Advanced User Guide. For complete details on the capabilities of Amazon Simple Pay, please see the suggested documentation listed in “Amazon Simple Pay Resources.”
Getting Notification about Your Payments Amazon has four ways to notify you of a payment status:
• Sending an email message to your business email account • Displaying the transaction in your Amazon Payments Account Activity page • Sending transaction information by way of redirect values to your Return URL • Through Instant Payment Notification (IPN)
The first three methods always occur. Notification through IPN is available only if you have set up the IPN Return URL.

Creating Simple Pay Buttons
36
Notification through E-mail Messages Whenever a buyer completes a transaction, Amazon Payments sends you an email message similar to that shown in the following figure. Transaction details are listed in the body of the email message.
The content of the email message sent out depends on the transaction and its status.
Notification through Account History The second way to get notification from Amazon about the success of your transaction is to use your Amazon Payments account. This account logs all the transactions and gives you the amount paid, when it was paid, to whom, the status of the payment, and any fees associated with the transaction.
To view your account activity and transaction details
1. Go to http://payments.amazon.com. 2. Click the Your Account tab.
The Account Activity page appears. • From here you can do a simple search based on the Activity: and Within: drop-
down menus. • You can also click Advanced Search Options and display a page that lets you
specify a particular date range. 3. Make your selections and click View. The results are displayed in a tabular form.

Creating Simple Pay Buttons
37
4. Click the Details link on a particular transaction to view its details.
Notification through Return URL Redirect When your customers authorize payments with Amazon using your button, Amazon redirects them to the location you specified as the Return URL when you created the button. The redirection POST data contains name=value pairs which comprise the transaction details. To take advantage of this method, your Return URL page must process the values. For more information, see “Handling the Return URL.”
Notification through IPN If you have configured the Amazon Simple Pay button to use an IPN URL, Amazon sends you the transaction details using Instant Payment Notification (IPN).
IPN is an HTTP POST notification that Amazon sends whenever a transaction is completed successfully or a transaction fails. Like Return URL redirection, it communicates transaction data that you must process programmatically. For more information, see “Using Instant Payment Notification.”
Configuring Default Button Values The user interfaces that help you create Amazon Simple Pay buttons ask you to enter a variety of information. Many of the buttons ask for the same information, such as a URL to redirect buyers to once they successfully authorize a payment. Amazon Simple Pay enables you to set default values for common button parameter values. Even though you set default values, you can still specify different values when generating an individual button. The values you enter in the user interfaces that create the buttons override the default values.
To configure the default values for your buttons
1. Go to http://payments.amazon.com and log in to your business account. 2. Click the Your Account tab. 3. Go to the Developer and Seller Preferences page at
https://payments.amazon.com/sdui/sdui/managecobranding.
Note To set your Developer and Seller Preferences in the Amazon FPS Sandbox, go to https://payments-sandbox.amazon.com/sdui/sdui/managecobranding instead. The settings for the sandbox and production environments are separate.
4. Use the following table to help you fill in the text fields or make choices.

Creating Simple Pay Buttons
38
Field Action Header and Footer
If you want to add your company logo to the upper left corner on all of the Amazon Payment order pipeline pages, select Co-branded header image and enter the URL for the logo image. Otherwise, select No co-branding. Adding your logo helps your customers know that while they're paying for their purchases using Amazon Payments, they're still connected to your website. Your logo is placed on a white background. The image can be no greater than 215 pixels wide by 40 pixels high and the URL must always be available. If there is no logo available when your customers check out (either because there was no logo specified or because the logo URL is not available), the name of your company is displayed instead. The default is for no Co-branding.
Return URL Optionally, enter the URL where you want the system to redirect buyers after they authorize the payment. You might want to return your customers to your home page or to a custom "Thank You for Purchasing" page. If you do not specify a return URL, the Amazon Payments "Thank You" page appears instead. This means that your customers might not navigate back to your website. We recommend that you always specify a return URL, even if it's just your home page.
User Abandon URL
Optionally, enter the URL where you want the system to redirect buyers after they choose to cancel the payment. If you do not supply a value, Amazon Simple Pay redirects the buyer to the Return URL. This URL is used when the buyer decides not to authorize the purchase and clicks the Cancel button.
Subscription Cancellation URL
Enter the URL to your website where subscribers can be redirected when they try to cancel their subscription on payments.amazon.com. If you do not include a URL, subscribers will only be able to cancel their subscription through the Amazon Payments website.
URL for Instant Payment Notification (IPN)
Optionally, type the URL of your host page to which Amazon Payments should send the IPN transaction information. This is an advanced feature. For more information, see “Using Instant Payment Notification.”
Sign the buttons?
If you want Amazon to provide a secure signature in the HTML form, select this check box, which will enable encryption. We recommend you select this option. For more information, see “Advantages of Signing Your Buttons.”
Registration Referral Link
If you are an integrator/3rd party developer offering integration services or selling solutions on top of Amazon Payments to businesses, an Amazon Payments Business Account is a pre-requisite for your customers. Use this URL and the referrringcaller on your website that enables your customers to register for an account: https://payment.amazon.com/sdui/sdui/premiumaccount?referringcaller=
5. Click Confirm. Your choices are saved.

Testing Your Simple Pay Buttons
39
Testing Your Simple Pay Buttons
The Amazon Payments sandbox enables you to create a fully functioning button in a test environment. Simple Pay buttons created in the sandbox contain all the functionality, look, and feel of buttons created for a production environment. The only difference is no charges are incurred.
The Amazon Payments sandbox pages appear nearly identical to the Amazon Payments business account pages. Most will display the Amazon Payments sandbox logo in the upper left corner of the page, and the front part of your browser address will display http://payments-sandbox.amazon.com the entire time.
Note You can simulate any task in the sandbox which you can do in Amazon Simple Pay. Explore the sandbox at http://payments-sandbox.amazon.com.
We recommend you create and test your buttons in the Amazon Payments sandbox before deploying them into production.
To test a button
1. If you are logged into your Business account at http://payments.amazon.com, sign out now.
2. Go to http://payments-sandbox.amazon.com and log into your Amazon Payments Sandbox account. If you do not yet have a Amazon Payments Sandbox account, see “How to Get an Amazon Payments Sandbox Account.”
3. Create your Simple Pay button using the appropriate procedure in Creating Simple Pay Buttons, but within the Amazon Payments sandbox.
4. Once you have created the button, add it to your web page, and test all its functionality without incurring any charges.
5. Go back to your Amazon Payments Sandbox account, and navigate to the Your Account tab. The actions you performed with the button appear as recent transactions in the Account Activity table. You can open and inspect the results of each by clicking the Details link associated with a transaction.
6. If the button doesn't function to your satisfaction, repeat steps 3-5 until it produces the transaction you need.
7. When your button works correctly, log out of your Amazon Payments Sandbox account, log into your Amazon Payments business account, and create the final version of the button for your production environment.
Testing Your Simple Pay Buttons
40
Note Do not copy the HTML code you created in the sandbox to your production environment. Instead, make careful notes and recreate the button using your business account. For best results, test the button again in the production environment.
Developers can use the Amazon Payments sandbox to perform sophisticated button testing, testing signatures based on your AWS Access Key ID, and returning specific return values and error codes. For more information, see “Overview of Advanced Features.”

Overview of Advanced Features
41
Overview of Advanced Features
As its name implies, this guide gets you up and running with Amazon Simple Pay. Within the sections, we present advanced features, which are not required to implement the buttons. This section provides more background for selected features to help you understand their role in Amazon Simple Pay.
Creating More than One Button per Page Each button is set up for a certain amount of money and a certain description, so each button is limited to a single item for sale. Depending on your application, you may want to place more than one Amazon Simple Pay button on a page. You can have multiple Amazon Simple Pay buttons of each type on a page by adding them one at a time.
The number of buttons you have to add might influence whether you place them manually or programmatically.
Quantity Technique 1 to 10 Items If you have more than one item, but only a limited number of items for
sale, you can create Amazon Simple Pay buttons one at a time using the same procedures in “Creating Simple Pay Buttons.” Be sure that the amount and the description for each button that you place on your web page is correct with respect to the intended item for sale.
More than 10 Items If you have so many items that creating them singly is undesirable, you can generate all Amazon Simple Pay buttons programmatically and automatically place them on the web page. Creating buttons programmatically is something you must do as a developer, which requires an Amazon Payments developer account. For more information, see the Amazon Simple Pay Advanced User Guide, as well as the Developer tab accessible through your Amazon Payments business account.

Overview of Advanced Features
42
Settling Immediately When you create an Amazon Simple Pay button, you have the choice of charging the buyer's payment instrument immediately or later, such as when a product is shipped. To charge a buyer immediately, make sure you select the Do you want to settle immediately? check box when you are creating the button. However, if you clear this check box, the buyer is not charged until you send a Settle request.
It's much simpler to allow Amazon Payments to settle immediately, but at times you will need to settle afterwards. You have two ways you can do this. The first way is to settle using the form available through your Amazon Payments business account. For information on using the form, see the following section, “Using the Settle and Refund User Interfaces.”
The second way to settle is to use code. However, to exercise programmatic control over your transactions, you must have an Amazon Payments Developer account. For more information, see "Settling and Refunding Transactions Programmatically" in the Amazon Simple Pay Advanced User Guide.
Note You can only opt to settle later with standard, marketplace, and donation buttons.
Using the Settle and Refund User Interfaces This section describes how to use the user interface to settle charges and make refunds. Settling and refunds go hand in hand, so both procedures are listed following.
Using the Settle User Interface When you create a button, if the Do you want to settle immediately? check box is cleared, you will have to make any settlements that come up. You can manually settle a transaction using the Settle user interface, or programmatically using the Settle API. The one you choose typically depends upon the number of settlements you need to make. The more settlements you need to make, the more likely you'll prefer to do so programmatically. For more information, see “Settling and Refunding Transactions Programmatically” in the Amazon Simple Pay Advanced User Guide.
If you have relatively few settlements to make, use the following procedure.
To settle a transaction using the Amazon Payments UI
1. Go to https://payments.amazon.com/. 2. Click the Your Account tab. 3. In the Account Activity section of the Your Account tab, search for the transaction you
want to settle. 4. Click the Settle button associated with the transaction that you reserved. 5. Enter the amount you want to settle and click Confirm.

Overview of Advanced Features
43
Using the Refund User Interface Along with settling, Amazon Simple Pay offers you the opportunity to manually refund money either by using the Refund user interface, or programmatically using the Refund API. The one you choose typically depends upon the number of refunds you need to make. For more information on programmatic refunding, see “Settling and Refunding Transactions Programmatically” in the Amazon Simple Pay Advanced User Guide.
To refund a transaction using the user interface
1. If the transaction was reserved, settle it using the procedure described in the previous procedure, Using the Settle User Interface.
2. Go to https://payments.amazon.com/. 3. In the Account Activity section of the Your Account tab, search for the transaction you
want to refund. 4. Click the Details link for the transaction you want to refund. 5. Enter the amount you want to refund and click Refund associated with the transaction.
Refunds are processed in batch so they often take a while before completing.
Important Only the recipients of payments can use the Amazon Payments user interface to make refunds. Recipients, however, cannot refund a marketplace fee (if any) that was charged by a marketplace developer. The marketplace developer must use a programmatic Refund request to refund the marketplace fees he or she collected. For more information, see “Settling and Refunding Transactions Programmatically” in the Amazon Simple Pay Advanced User Guide.
Handling the Return URL When a user clicks an Amazon Simple Pay button you have included on your web page, control is transferred to Amazon Payments. Once the payment has been authorized, the user is redirected to your return URL. Included in the redirection are transaction details about the purchase just made.
You can choose to ignore the information contained within the return URL, because you are also notified of this information through other methods. However, if you want to process the transaction information in a custom way immediately, you must work as a developer and write custom code.
To learn about using the Return URL to validate and process payment response, the values it returns, and validating the returnUrl signatures, see “Handling Button Response Data” in the Amazon Simple Pay Advanced User Guide. The Advanced Guide also has information on getting a developer account in the section, Amazon Payments Developer Account.

Overview of Advanced Features
44
For more information on the types of notification Amazon Simple Pay provides, see “Getting Notification about Your Payments.”
Using Immediate Return When a user clicks an Amazon Simple Pay button you have included on your web page, control is transferred to Amazon payments. Typically the user goes through a number of actions, such as include signing up and signing in. Once the payment has been authorized, the last thing Amazon does before the user is redirected to your Return URL is to display an Amazon Thank You page which details the purchase the buyer just made. A Continue button is provided to navigate to your Return URL.
Each Simple Pay button provides you with the choice to skip this final Amazon Payments status page, redirecting to your Return URL right away. In this case, if you want to display any information typically presented to the buyer on the Amazon Payments final status page, your Return URL page must contain code to present it.
Note This is an optional feature. Do not check this check box if you want the convenience of the Amazon Payments final status page.
Using Instant Payment Notification Instant Payment Notification (IPN) is an optional feature of Amazon Payments. All the Amazon Simple Pay buttons may take advantage of this service.
IPN works by sending a separate HTTP POST from Amazon Payments to a custom script you have provided. The IPN POST is sent separately from the final status page, which uses the value specified for Return URL.
Among other things, IPN gives you the ability to check the transaction sent to your Return URL. To take advantage of IPN features and of the transaction information provided by the service, you must work as a developer with custom code. This in turn requires an Amazon Payments Developer account.
For more information about IPN, the transaction information it provides, and verifying the signature, see "Setting Up Instant Payment Notification" in the Amazon Simple Pay Advanced User Guide. The Advanced Guide also has information on getting a developer account in the section, “Amazon Payments Developer Account.”

Overview of Advanced Features
45
Advantages of Signing Your Buttons When you create Simple Pay buttons, they are configured to use Secure Sockets Layer transmission (SSL). This protects the form from being modified while it is being submitted. However, this doesn't prevent a malicious buyer from copying the form's source HTML from your web page, modifying the parameters, and sending a hijacked form.
A signed button protects you from this vulnerability. You can specify that Amazon sign your buttons by choosing the Sign the Buttons option in your Developer and Seller Preferences. For more information, see “Configuring Default Button Values.”
The minor trade off for signing Simple Pay buttons when you create them is –once signed– any changes you want to make to the button (such as changing the price) require you to create the button again. If the button is unsigned, you can change the parameters freely.
Once you determine that signing is to your benefit, you need to decide whether the signature generated during button creation is secure enough.
With the Sign the Buttons option set, all buttons you create with Amazon Simple Pay contain a signature based on Amazon's access identifiers. This provides enhanced security to the request that you send to Amazon. If you choose to dynamically sign your button, using the API and using your Amazon access identifiers, Amazon provides a signature on the return URL and you must verify the signature using the API. For more information on the Amazon Simple Pay API, see the Amazon Simple Pay Advanced User Guide.
Signing with your own AWS Access Key ID is an optional security enhancement that protects the transaction information Amazon Payments sends to you. If you do choose to use your own AWS Access Key ID, you must modify the HTML generated whenever you create a Simple Pay button. Instructions for doing this are found in the "Creating Button Forms Dynamically" section of the Amazon Simple Pay Advanced User Guide. For more information on AWS Access Key ID, see "Using Access Identifiers" in the Amazon Simple Pay Concepts of the Amazon Simple Pay Advanced User Guide.
Note that whether you choose to the sign button or not, you can still check the conditions of each payment using the information in your Amazon Payments business account Activity Center. In addition, you can programmatically verify the price and other parameters using Instant Payment Notification. For more information, see "Using Instant Payment Notification" in the Amazon Simple Pay Advanced User Guide.

Overview of Advanced Features
46
Other Advanced Features of Amazon Simple Pay This Getting Started Guide gives you the basics for using Amazon Simple Pay. There are many other features of Amazon Simple Pay and the Amazon Flexible Payments Service that can make your web site more sophisticated. Some of the topics which may be of interest to you are:
• Customizing Amazon Simple Pay Buttons • Simulating Amazon Simple Pay Button Errors • Generating signatures based on your AWS Access Key ID
Note You can now rotate your AWS access keys that you use to sign the buttons. For more information, see https://aws-portal.amazon.com/gp/ aws/developer/account/index.html?ie=UTF8 &action=access-keyCredentials, on the Amazon Web Services web site.
• Validating signatures in returnURL and IPN using the VerifySignature API. • Adding Amazon Simple Pay as an Additional Payment Option • Programmatic APIs for Cancel, Settle, and Refund • Configuring Instant Payment Notification and Handling Instant Payment Notifications • Using Amazon Simple Pay Actions
To learn how to do some of these tasks, see the Amazon Simple Pay Advanced User Guide, For complete details on the capabilities of Amazon Simple Pay, please see the suggested documentation listed in “Amazon Simple Pay Resources.”

Amazon Simple Pay Resources
47
Amazon Simple Pay Resources
The table below lists related resources that you'll find useful as you work with this service.
Resource Description Amazon Simple Pay Advanced User Guide
The Advanced Guide provides a detailed explanation of how to use the advanced features of Amazon Simple Pay for each button type.
Amazon Simple Pay FAQs
Frequently-asked questions about using Amazon Simple Pay on your website.
Amazon Simple Pay Release Notes
The release notes give a high-level overview of the current release. They specifically note any new features, corrections, and known issues.
Product information about Amazon Simple Pay
The primary web page for information about Amazon Simple Pay.
Amazon Flexible Payments Service Technical Documentation
Amazon Simple Pay derives its functionality from Amazon FPS
Amazon Simple Pay and FPS Discussion Forum
A community-based forum for developers to discuss technical questions related to Amazon Simple Pay and FPS.
For questions related to your AWS account: Contact Us
This is only for account questions. For technical questions, use the Discussion Forums.
Conditions of Use Detailed information about the copyright and trademark usage at Amazon.com.

Glossary
48
Glossary
501(c)3 Organization Organizations who may receive funds by way of the Amazon Simple Pay donation button. Amazon Payments validates your 501(c)3 organization before you can begin using the donation button.
Amazon Payments business Account
The account that enables you to use Amazon Simple Pay buttons on your production website.
Amazon Payments Sandbox Account
The account that enables you to test Amazon Simple Pay buttons in the Amazon Payments Sandbox.
AWS Access Key ID A string distributed by AWS that uniquely identifies an AWS developer. The value of this ID is included in every Amazon Simple Pay request.
Contributor A person donating money by way of an Amazon Simple Pay donation button
Amazon Simple Pay Donation
A button that enables you to collect periodic payments for a 501c organization.
Amazon Simple Pay Marketplace
A button that enables you to collect payments on behalf of another seller.
Amazon Simple Pay Standard
A button that enables you to collect one-time payments for your products.
Amazon Simple Pay Subscription
A button that enables you to collect periodic payments for your products.
Buyer Individual who sends a payment using an Amazon Simple Pay button. The buyer pays the seller for a product or service.
Abandon URL, Cancel URL Your Amazon Simple Pay buttons have the AbandonURL or CancelURL property which notifies Amazon Payments the location to which your customers should be returned if they choose to cancel the operation.
co-branding You can opt to have display your merchant logo on payment authorization pages hosted by Amazon, providing for a more consistent user experience.
Flexible Payments Service (FPS)
Amazon Simple Pay uses Amazon Flexible Payments Service actions to perform its payment operations.

Glossary
49
Amazon FPS Actions Most Actions, or API calls, provided by Amazon FPS are available to developers using Amazon Simple Pay. For more information see Amazon Simple Pay Advanced User Guide.
free trial subscription When you create a subscription button, you are prompted to optionally provide a starting subscription date. If that date is in the future, you are providing a free trial.
HTML Form A block of HTML code that contains the endpoint and parameters for an Amazon Simple Pay request.
HMAC Hash Message Authentication Code.
Amazon Simple Pay uses an HMAC for signatures to enhance the security of your buttons.
immediate return An Amazon Simple Pay option for developers who want to create a custom final status page (bypassing the default final status page provided by Amazon Payments).
inbound request Button click or other form request to Amazon Payments
Instant Payment Notification Also IPN. A notification (separate from the buyer redirect) that is sent whenever a payment, refund, or reserved payment completes successfully or fails. The developer must host this notification service and provide Amazon Simple Pay with an IPN response URL. For more information, see “Notification through IPN.”
Marketplace See Amazon Simple Pay Marketplace, above.
Marketplace Fee Button A button that enables you to collect a fee from another seller for providing that seller's products for sale on your website. Used with Amazon Simple Pay Donation and Amazon Simple Pay Marketplace buttons.
outbound notifications Response from Amazon Payments to your Simple Pay application by way of Return URL or IPN.
RSA-SHA1 Amazon Simple Pay uses RSA-SHA1 as the signature method for outbound notifications.
Refund The act of returning funds paid by the customer to that customer. Amazon Simple Pay enables you to refund money using your account tools (at https://payments.amazon.com), or using the Amazon Flexible Payments Service Refund action.
Return URL Your Amazon Simple Pay buttons have the ReturnURL property which notifies Amazon Payments the location to which your customers should be returned after payments have been made.

Glossary
50
Seller Individual who receives a payment from a buyer using an Amazon Simple Pay button. The seller receives money from a buyer in exchange for a service or product.
server-side signature verification
With Amazon Simple Pay, you can use server-side verification to validate IPN and Return URL responses with the FPS Action, VerifySignature. For information about the VerifySignature FPS action, see Amazon Simple Pay Advanced User Guide.
Settle The act of delaying the completion of a transaction. If a buyer is not charged immediately upon the initiation of the purchase, the transaction is settled later, such as when the purchased product is shipped. Amazon Simple Pay does not support settling purchases. You have to use the Settle operation in the Amazon Flexible Payments Service API to implement that functionality.
SHA1, SHA256 Secure Hash Algorithms used for Amazon Web Services signatures. SHA1 is an earlier version of the algorithm, which is currently being deprecated for Amazon Web Services. SHA256 is its more secure replacement.
Signature A URL encoded string composed of request parameters and their values encrypted using an HMAC algorithm. Signatures are used to authenticate and safeguard requests
Signature Signature version 2 is the preferred button signing feature for Amazon Simple Pay. It is a secure method that uses SHA256.
subscription start date The date when Amazon Payments begins charging for a subscription.
website owner A developer who creates any Amazon Simple Pay button.

Document History
51
Document History
This documentation is associated with the 2010-08-28 release of Amazon Simple Pay.
The following table describes the important changes since the last release of the Amazon Simple Pay documentation. This guide was last updated on 10-March-2013.
Change Description Release Date New Feature Amazon Simple Pay now provides the
GetSubscriptionDetails and GetTransactionsForSubscription action. For more information, see “GetSubscriptionDetails” and “GetTransactionsForSubscription” in the Amazon Simple Pay Advanced User Guide. This release also incorporates a new WSDL version, 2010-08-28.
In this Release
Enhancement Added minor changes and typographical fixes applied from a maintenance edit.
In this Release
Feature Rollback Amazon FPS has discontinued support for signature verification using signature version 1. If your application is using this feature, you must convert to a server-side call with the VerifySignature action. For more information, see the Amazon Simple Pay Advanced User Guide.
2010-02-01
Feature Rollback Amazon FPS has discontinued support for client-side signature verification using PKI. If your application is using this feature, you must convert to a server-side call with the VerifySignature action. For more information, see the Amazon Simple Pay Advanced User Guide.
2010-09-14
Enhancement Minor changes and typographical fixes applied from a maintenance edit.
2010-06-11
New Feature Amazon Simple Pay now supports signature version 2. The enhanced security features include
• A more secure way of calculating signatures for inbound requests and outbound notifications.
• Support for SHA256 signing algorithm • The new VerifySignature FPS Action for
server-side testing of return URL responses and IPN notifications.
• (Deprecated as of 2010-09-14) Support for PKI based authentication for client-side testing of return URL responses and
2009-12-04

Document History
52
IPN notification.
The techniques of signing your buttons is not discussed in this guide. You can find more information about signature security in the Amazon Simple Pay Advanced User Guide.
Enhancement The Access Keys page has been renamed the Security Credentials page, located at https://aws.amazon.com/security-credentials.
2009-09-09
Correction Editorial Updates 2009-09-02 Clarification Rules for subscription cancellation due to
payment problems have been clarified. Please see “What Happens When Subscription Payments Fail” in the Amazon Simple Pay Advanced User Guide.
2009-07-25
Correction References to the AWS Developer Resource Center and AWS Support Center have been removed.
2013-09-10
Editorial Update Added language to clarify that the Amazon Payments service has been designed and developed for use within a web browser only. Our service cannot be used within a native application (including, without limitation, iOS, Android, RIM and Windows operating systems).
2013-10-18