AS-interface / Profibus Gateway Art. Nr. 56451 V1 · AS-interface / Profibus Gateway Art. Nr. 56451...
8
V1.0 AS-interface / Profibus Gateway Art. Nr. 56451 Installationsanleitung - Installations notes - Instructions d'installation - Istruzioni d'uso - Instrucciones de uso Abmessungen - Dimensions - Encombrements- Dimensioni- Dimensiones - Manual (de/en/fr) - GSD-File Download: www.murrelektronik.com Headquarters Select: English Version Service Technical data Profibus (GSD) AS-i Gateway B B B B 1 2 3 4 5 6 7 8 9 Diagnose : PROFIBUS -3 : B (red) -5 : 0V -6 : 5V -8 : A (green) 120 mm 75 mm 55 mm 76 mm 7 mm 4,0 diam. 0,5 - 1,5mm² Anschluss - Connection - Raccordement - Collegamento - Conexionado PS2 / RS232 Zubehör - Accessories - Accessoires Accessori - Accessorios Ref. 56451 Functional Earth 1 Montage - Fitting - Montage Montaggio - Montaje 1 2 3 Rail TH35mm (EN60715) LISTED IND. CONT. EQ. 1HD8 C U L US ® +ASI1- AS-i Master +ASI1- ASI +PWR- + + + - - - ASI1 Power Supply MAX. 8A Functional Earth AS-i-Kreis /AS-i circuit /Bus AS-i AS-i-Kreis /AS-i circuit /Bus AS-i Murrelektronik GmbH Postfach 1165 D-71567 Oppenweiler Telefon +49(0)7191/47-0 Falkenstraße 3 D-71570 Oppenweiler Telefax +49(0)7191/47-130 [email protected] http://www.murrelektronik.com
-
Upload
truongphuc -
Category
Documents
-
view
234 -
download
3
Transcript of AS-interface / Profibus Gateway Art. Nr. 56451 V1 · AS-interface / Profibus Gateway Art. Nr. 56451...

V1.0AS-interface / Profibus Gateway Art. Nr. 56451Installationsanleitung - Installations notes - Instructions d'installation - Istruzioni d'uso - Instrucciones de uso
Abmessungen - Dimensions - Encombrements- Dimensioni- Dimensiones
- Manual (de/en/fr)
- GSD-File Download:www.murrelektronik.com
HeadquartersSelect: English Version
ServiceTechnical dataProfibus (GSD)AS-i Gateway
�
�
�
�
12345
6789
Diagnose :
PROFIBUS
-3 : B (red)-5 : 0V-6 : 5V-8 : A (green)
120 mm 75 mm
55 mm
76 mm
7 mm
4,0
diam. 0,5 - 1,5mm²
Anschluss - Connection - Raccordement - Collegamento - Conexionado
PS2 / RS232
Zubehör - Accessories - AccessoiresAccessori - Accessorios
Ref. 56451
Functional Earth
1
Montage - Fitting - MontageMontaggio - Montaje
1
2
3
Rail TH35mm (EN60715)
LISTEDIND. CONT. EQ.
1HD8
CUL US®
+ASI1-
AS-i Master
+ASI1-ASI
+PWR-
+ + +- - -
ASI1 Power Supply
MAX. 8A
Functional Earth
AS-i-Kreis /AS-i circuit /Bus AS-i
AS-i-Kreis /AS-i circuit /Bus AS-i
Murrelektronik GmbH Postfach 1165 D-71567 Oppenweiler Telefon +49(0)7191/47-0Falkenstraße 3 D-71570 Oppenweiler Telefax +49(0)7191/[email protected] http://www.murrelektronik.com

V1.0AS-interface / Profibus Gateway Art. Nr. 56451Installationsanleitung - Installations notes - Instructions d'installation - Istruzioni d'uso - Instrucciones de uso
1. Inbetriebnahme - Startup - Démarrage - Partenza - Arranque
1.1 Wechsel in - -erweiterten Anzeigemodus switch to advanced display mode
PROFIBUSQUICK SETUPSETUPSLAVE ADR TOOLUNKNOWN SLAVE
1. 12A
1.2 Einstellen der Profibus-DP-Adresse - Setting the Profibus-DP address - Réglage de l'adresse PROFIBUS-DP
2x
PROFIBUSQUICK SETUPSETUP
PROFIBUS ADDRESSPROFIBUS STATUS
PROFIBUS ADDRESSOLD ADDRESS 3NEW ADDRESS 000
PROFIBUS ADDRESSOLD ADDRESS 3NEW ADDRESS 000
erweiterter Anzeigemodusadvanced display modemode d'affichage étendumodo di visualizzazione estesomodo de visualisación avanzada
ESC
Mettere l'indirizzo PROFIBUS-DP - Ajuste de la direcion PROFIBUS-DP
OK
OK
OK
OK
klassische Anzeigeclassical displayaffichage classiqueindicazione classicoindicacion clasico
2
Aufbau siehe Zusatzblattstructure see additional pagestructure voir page supplémentairestruttura vedi pagina supplementareestructura ver página adicional
LCDLCD
LCD LCD
LCD LCD
passer en mode affichage étendu - conmutar a señal ampliada - commutare a modalità display avanzato

V1.0AS-interface / Profibus Gateway Art. Nr. 56451Installationsanleitung - Installations notes - Instructions d'installation - Istruzioni d'uso - Instrucciones de uso
1.3 AS-Interface Slave anschliessen - Connect AS-interface slaves - Connecter les esclaves AS-interface
2x
PROFIBUSQUICK SETUPSETUP
PROFIBUS ADDRESSOLD ADDRESS 14NEW ADDRESS 000
PROFIBUS ADDRESSOLD ADDRESS 3NEW ADDRESS 010
Connettere schiavos AS-interface - Conectar esclavosAS-interface
ESC
2xESC
4x
OK2xOK
OK
Das Gerät ist werkseitig auf Adresse 3 eingestelltThe device is set to address 3 at the factoryL'appareil esr réglé en usine à l'adresse 3Il dispositivito viene de la fabrica con l'indrizzo 3El aparato viene ajustado de fabrica en la direccion 3
. 1
. 5
PowerProfibusConfig errorU AS-iAS-i activeprg enableprj mode
AS
-Inte
rface
Maste
r
. 24
0,5 s
0,5 s
0,5 s
3
. 41SEARCHING SLAVE
LCD
LCD
LCD
AS-Interface
PowerProfibusConfig errorU AS-iAS-i activeprg enableprj mode
AS
-Inte
rface
Maste
r
AS-Interface
LCD
LCD
LCD
LCD
AS-InterfaceSlave 1
AS-InterfaceSlave 5
AS-InterfaceSlave 24
AS-InterfaceSlave 1
AS-InterfaceSlave 5
AS-InterfaceSlave 24

V1.0AS-interface / Profibus Gateway Art. Nr. 56451Installationsanleitung - Installations notes - Instructions d'installation - Istruzioni d'uso - Instrucciones de uso
2x
WARNING:OUTPUTS MAY BERESET
STORE AS-ICONFIGURATIONSTORE + RUNSTORE + PRJ MODE
OK
HOST ERRORNO CONNECTION
. 5
config error
.CONFIGURATION OK
PROFIBUSQUICK SETUPSETUPIO + PARAM. TEST
STORE AS-INTERFACECONFIGURATIONOKSTORE + PRJ MODE
ESC
1.4 Quick-setup - Quick setup - Quick Setup - Quick - Setup - Quick setup
4
LCD
OK1x
LCD
LCD
OK
LCD
OK
LCD
LCD
LCD

V1.0AS-interface / Profibus Gateway Art. Nr. 56451Installationsanleitung - Installations notes - Instructions d'installation - Istruzioni d'uso - Instrucciones de uso
2. Fehlersuche - Error tracing - Dépistage des erreurs - Tracciaco di errore - Trazo de error
2.1 Fehlerhafte slaves - Icorrect slaves - Esclaves en défaut - Schiavi errati - Esclavos correctos
2,0 s
2,0 s
. 24MISSING SLAVE
. 1MISSING SLAVE
2.2 Fehler Anzeige (letzte Fehler) - Error display (last error) - Affichage d'erreur (dernière erreur)
Mostra di errore (ultimo errore) - Despliegue del error (ultimo error)
HOST ERRORNO CONNECTION
24
set/
5
PowerProfibusConfig errorU AS-iAS-i activeprg enableprj mode
AS
-Inte
rface
Maste
r
AS-Interface
AS-InterfaceSlave 1
AS-InterfaceSlave 5
AS-InterfaceSlave 24
PowerProfibusConfig errorU AS-iAS-i activeprg enableprj mode
AS
-Inte
rface
Maste
r
AS-Interface
AS-InterfaceSlave 1
AS-InterfaceSlave 5
AS-InterfaceSlave 24
PowerProfibusConfig errorU AS-iAS-i activeprg enableprj mode
AS
-Inte
rface
Maste
r
AS-Interface
AS-InterfaceSlave 1
AS-InterfaceSlave 5
AS-InterfaceSlave 24
LCD
LCD
LCD
V1.0AS-interface / Profibus Gateway Art. Nr. 56451Installationsanleitung - Installations notes - Instructions d'installation - Istruzioni d'uso - Instrucciones de uso
OK
LCD
2x
LCD
LCD
LCD
LCD
LCD
LCD
LCD
OK
SLAVE ADR TOOLOLD ADDRESS 2NEW ADDRESS 6PRG
SLAVE ADR TOOL
OLD ADDRESSNEW ADDRESS
CONNECT NEW SLAVE
1x
OK
2x
1x
PROFIBUSQUICK SETUPSLAVE ADR TOOLSLAVE TEST TOOL
SLAVE ADR TOOLOLD ADDRESS 2NEW ADDRESS 3PRG
ESC
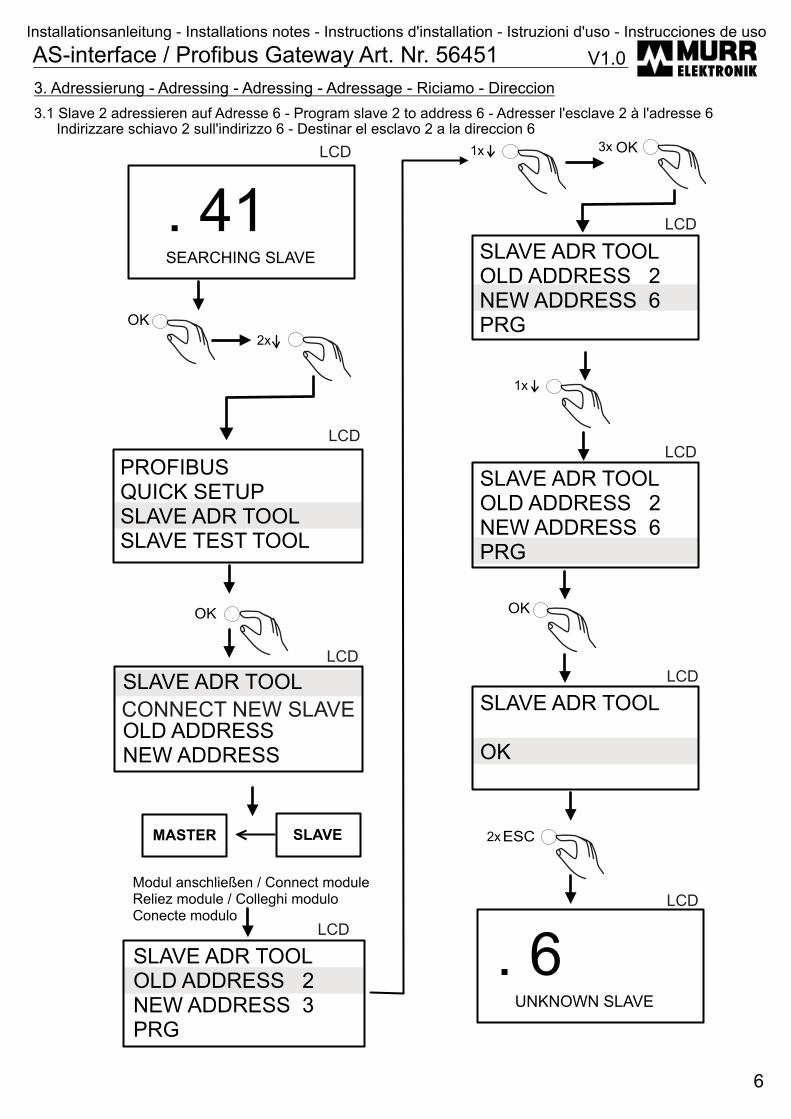
3. Adressierung - Adressing - Adressing - Adressage - Riciamo - Direccion
3.1 Slave 2 adressieren auf Adresse 6 - Program slave 2 to address 6 - Adresser l'esclave 2 à l'adresse 6Indirizzare schiavo 2 sull'indirizzo 6 - Destinar el esclavo 2 a la direccion 6
. 41SEARCHING SLAVE
. 6UNKNOWN SLAVE
OK3x
6
SLAVE ADR TOOL
OK
SLAVE ADR TOOLOLD ADDRESS 2NEW ADDRESS 6PRG
Modul anschließen / Connect moduleReliez module / Colleghi moduloConecte modulo
MASTER SLAVE

V1.0AS-interface / Profibus Gateway Art. Nr. 56451Installationsanleitung - Installations notes - Instructions d'installation - Istruzioni d'uso - Instrucciones de uso
4 Bedienung im erweiterten Anzeigemodus
Die Funktion LANGUAGE ermöglicht die Auswahl der gewünschten Menüsprache. Die in dieserAnleitung beschriebene Menüsprache ist Englisch.
4.1 Übersicht
ModeGrundsätzliche Bedienung
Basic Operation
Das Gerät startet im traditionellen Modus. Mit ESC oder OK kann zwischen beiden Modi gewechselt werden. Im erweiterten Modus wirdein Cursor mit den beiden Pfeil-Tasten bewegt. OK bringt ins nächsthöhere Menü (in der Zeichnung weiter nach rechts). ESC bringtzurück ins vorherige Menü. Wenn Werte editiert werden, werden sie zunächst mit dem Cursor markiert, dann mit OK ausgewählt, mitden Pfeiltasten verändert und schließlich mit OK übernommen. ESC bricht das Editieren ab.
The device starts in the traditional mode. You can switch between the two modes with ESC or OK. In the advanced mode the cursor ismoved by both arrow buttons. Pushing OK puts you to the superior menue (in the drawing one step to the right side). ESC puts youback to the previous menue. To edit data you first mark them with the cursor and then select them with OK, change them with the arrowbuttons and finally apply them with OK. Pushing ESC cancels the editing
7

V1.0AS-interface / Profibus Gateway Art. Nr. 56451Installationsanleitung - Installations notes - Instructions d'installation - Istruzioni d'uso - Instrucciones de uso
ModeGrundsätzliche Bedienung
Basic Operation
Das Gerät startet im traditionellen Modus. Mit ESC oder OK kann zwischen beiden Modi gewechselt werden. Im erweiterten Modus wirdein Cursor mit den beiden Pfeil-Tasten bewegt. OK bringt ins nächsthöhere Menü (in der Zeichnung weiter nach rechts). ESC bringtzurück ins vorherige Menü. Wenn Werte editiert werden, werden sie zunächst mit dem Cursor markiert, dann mit OK ausgewählt, mitden Pfeiltasten verändert und schließlich mit OK übernommen. ESC bricht das Editieren ab.
The device starts in the traditional mode. You can switch between the two modes with ESC or OK. In the advanced mode the cursor ismoved by both arrow buttons. Pushing OK puts you to the superior menue (in the drawing one step to the right side). ESC puts youback to the previous menue. To edit data you first mark them with the cursor and then select them with OK, change them with the arrowbuttons and finally apply them with OK. Pushing ESC cancels the editing. 8