Aruba Instant IAP Setup Notes June 2012 Version...
14
Aruba Instant IAP Setup Notes June 2012 – Version 3 Aruba Instant (or IAP) is a simple to deploy turn-key WLAN solution consisting of one or more access points. As long as you have an Ethernet port with connectivity to the Internet you can have the system up and running in less than 10 minutes. Although Aruba Instant is easy to deploy it contains many of the high-end RF and network management features of an enterprise WLAN solution. Aruba Instant is designed specifically for ease of deployment and proactive management for small customers or remote locations that don’t have on-site engineers (network or RF) or immediate access to help desk personnel. Aruba Instant consists of at least one IAP access point as a virtual controller (VC). The virtual controller resides within one (any) of the access points. The Access Point (AP) housing the virtual controller functions like any other AP with full RF scalability. The beauty of Aruba Instant is you don’t know or specify which AP is running the virtual controller. This is done automatically and provides redundancy should the assigned Master VC have issues, another IAP in the cluster will automatically become the new Master VC. You need to configure the first AP during the Aruba Instant deployment. After the initial AP is deployed all subsequent APs inherit all necessary information from the virtual controller. Aruba Instant continually monitors the network to determine which AP should function as the virtual controller. When necessary the virtual controller will move from AP to AP without any impact to the network. Contents Easy Setup 1 (DHCP Server) .................................................................................................................................................... 2 Easy Setup 2 (no DHCP Server) ............................................................................................................................................... 2 Connect to the instant SSID - Login......................................................................................................................................... 2 Creating a Basic User / Employee SSID ................................................................................................................................... 4 Step 1 – Basic Info ............................................................................................................................................................... 4 Step 2 – Client IP and VLAN assignment ............................................................................................................................. 5 Step 3 – Security ................................................................................................................................................................. 6 Step 4 - Access..................................................................................................................................................................... 7 Changing the Setup ............................................................................................................................................................. 9 Changing the AP Name ....................................................................................................................................................... 9 Other Settings and Control ..................................................................................................................................................... 9 Creating a Guest Network SSID ............................................................................................................................................. 10 Guest Step 1 – Basic Info................................................................................................................................................... 10 Guest Step 2 - VLAN section.............................................................................................................................................. 10 Guest Step 3 - Security ...................................................................................................................................................... 11 Guest Step 4 - Access ........................................................................................................................................................ 12
Transcript of Aruba Instant IAP Setup Notes June 2012 Version...
Aruba Instant IAP Setup Notes
June 2012 – Version 3
Aruba Instant (or IAP) is a simple to deploy turn-key WLAN solution consisting of one or more access points. As long as you have an Ethernet port with connectivity to the Internet you can have the system up and running in less than 10 minutes. Although Aruba Instant is easy to deploy it contains many of the high-end RF and network management features of an enterprise WLAN solution. Aruba Instant is designed specifically for ease of deployment and proactive management for small customers or remote locations that don’t have on-site engineers (network or RF) or immediate access to help desk personnel.
Aruba Instant consists of at least one IAP access point as a virtual controller (VC). The virtual controller resides within one (any) of the access points. The Access Point (AP) housing the virtual controller functions like any other AP with full RF scalability. The beauty of Aruba Instant is you don’t know or specify which AP is running the virtual controller. This is done automatically and provides redundancy should the assigned Master VC have issues, another IAP in the cluster will automatically become the new Master VC.
You need to configure the first AP during the Aruba Instant deployment. After the initial AP is deployed all subsequent APs inherit all necessary information from the virtual controller. Aruba Instant continually monitors the network to determine which AP should function as the virtual controller. When necessary the virtual controller will move from AP to AP without any impact to the network.
Contents Easy Setup 1 (DHCP Server) .................................................................................................................................................... 2
Easy Setup 2 (no DHCP Server) ............................................................................................................................................... 2
Connect to the instant SSID - Login ......................................................................................................................................... 2
Creating a Basic User / Employee SSID ................................................................................................................................... 4
Step 1 – Basic Info ............................................................................................................................................................... 4
Step 2 – Client IP and VLAN assignment ............................................................................................................................. 5
Step 3 – Security ................................................................................................................................................................. 6
Step 4 - Access..................................................................................................................................................................... 7
Changing the Setup ............................................................................................................................................................. 9
Changing the AP Name ....................................................................................................................................................... 9
Other Settings and Control ..................................................................................................................................................... 9
Creating a Guest Network SSID ............................................................................................................................................. 10
Guest Step 1 – Basic Info ................................................................................................................................................... 10
Guest Step 2 - VLAN section.............................................................................................................................................. 10
Guest Step 3 - Security ...................................................................................................................................................... 11
Guest Step 4 - Access ........................................................................................................................................................ 12

Setup with DHCP Server Ensure a DHCP Server is available on the subnet you are connecting the IAP to
Connect to the IAP Console port and start a Terminal emulator
Connect the IAP into a PoE port
Determine the DHCP IP address assigned
After determining the IAP IP Address, use a browser to connect to the IP address and login (default admin/admin)
Setup with no DHCP Server Connect to the IAP Console port and start a Terminal emulator
Connect the IAP into a PoE port
Watch the Console, “Hit <Enter> to stop autoboot”
Set the following IP settings in the IAP (examples)
apboot> setenv ipaddr 192.168.4.201
apboot> setenv netmask 255.255.255.0
apboot> setenv gatewayip 192.168.4.1
apboot> save (save the entries)
Saving Environment to Flash...
Un-Protected 1 sectors
.done
Erased 1 sectors
Writing
apboot> reset (reset the IAP)
Connect to the instant SSID - Login
Connect the IAP to a network switch and power up the unit. After a short period (booting) the IAP will begin broadcasting the default SSID. Connect to the “instant” wifi SSID
Then using a web browser
Navigate to the URL “http://instant.arubanetworks.com/” (default admin/admin) OR
Navigate to the URL “http://{IP Address}/” (default admin/admin)
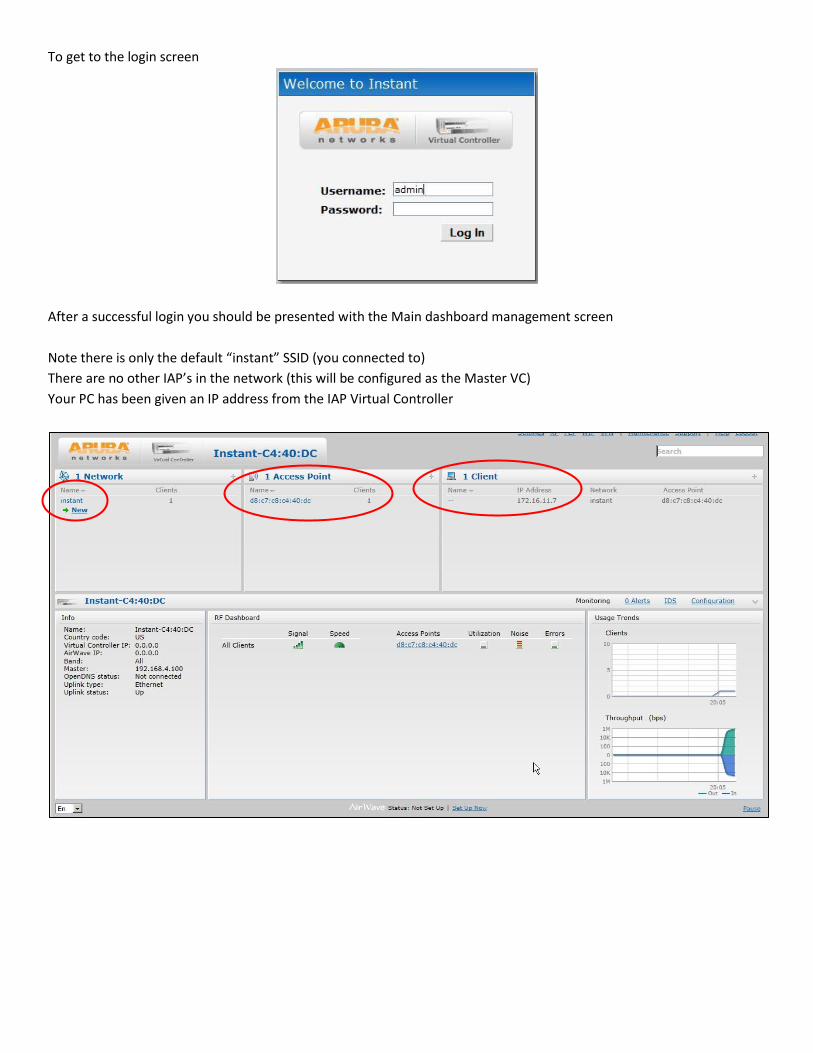
To get to the login screen
After a successful login you should be presented with the Main dashboard management screen
Note there is only the default “instant” SSID (you connected to)
There are no other IAP’s in the network (this will be configured as the Master VC)
Your PC has been given an IP address from the IAP Virtual Controller
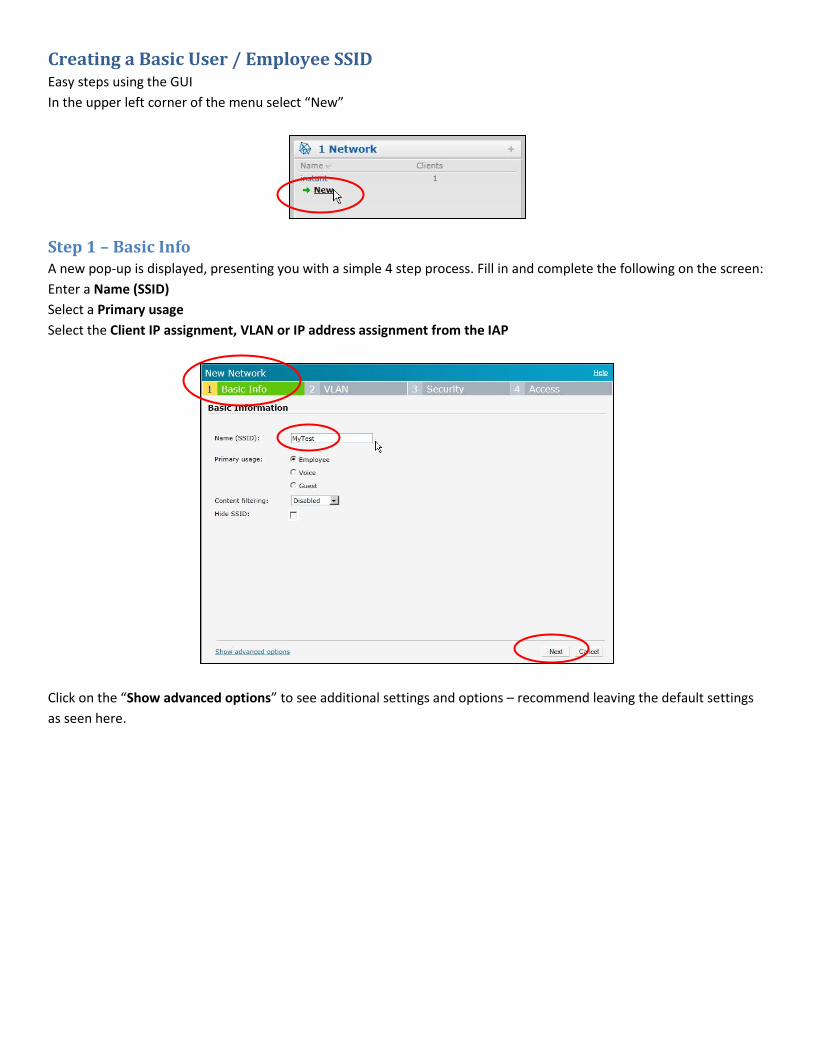
Creating a Basic User / Employee SSID Easy steps using the GUI
In the upper left corner of the menu select “New”
Step 1 – Basic Info A new pop-up is displayed, presenting you with a simple 4 step process. Fill in and complete the following on the screen:
Enter a Name (SSID)
Select a Primary usage
Select the Client IP assignment, VLAN or IP address assignment from the IAP
Click on the “Show advanced options” to see additional settings and options – recommend leaving the default settings
as seen here.
It is recommended not changing the advanced options on this page until reading the manual and becoming familiar with
the functions and effects on clients and traffic.
When complete select “Next”
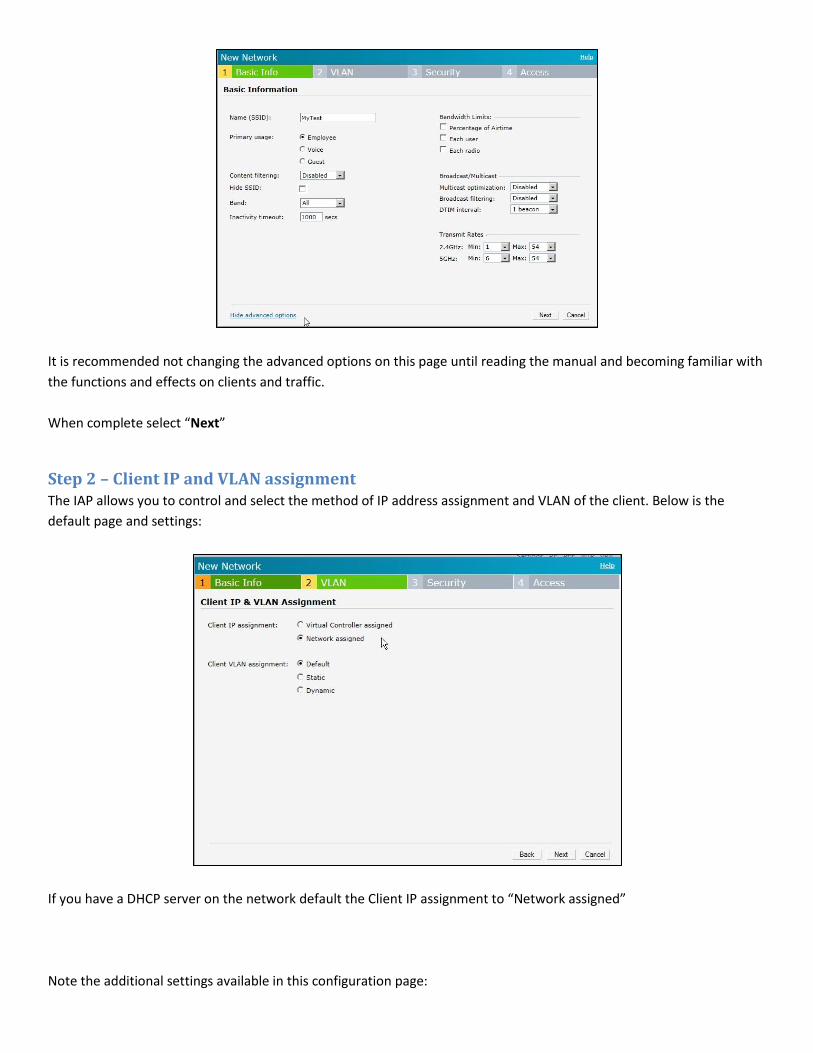
Step 2 – Client IP and VLAN assignment The IAP allows you to control and select the method of IP address assignment and VLAN of the client. Below is the
default page and settings:
If you have a DHCP server on the network default the Client IP assignment to “Network assigned”
Note the additional settings available in this configuration page:

Statically assign the Client VLAN
Dynamically assign based on Server Derivation rules from the Authentication Server
Step 3 – Security By default the Security setting presented is WPA2-Persona (Pre-Shared Key). Using the slide bar and pull down menu’s
on the left you can change the level of Authentication and Security as required.
Other Options are Available (next page)
WPA- Enterprise via Internal Database or NEW external Radius Server (via pull down)
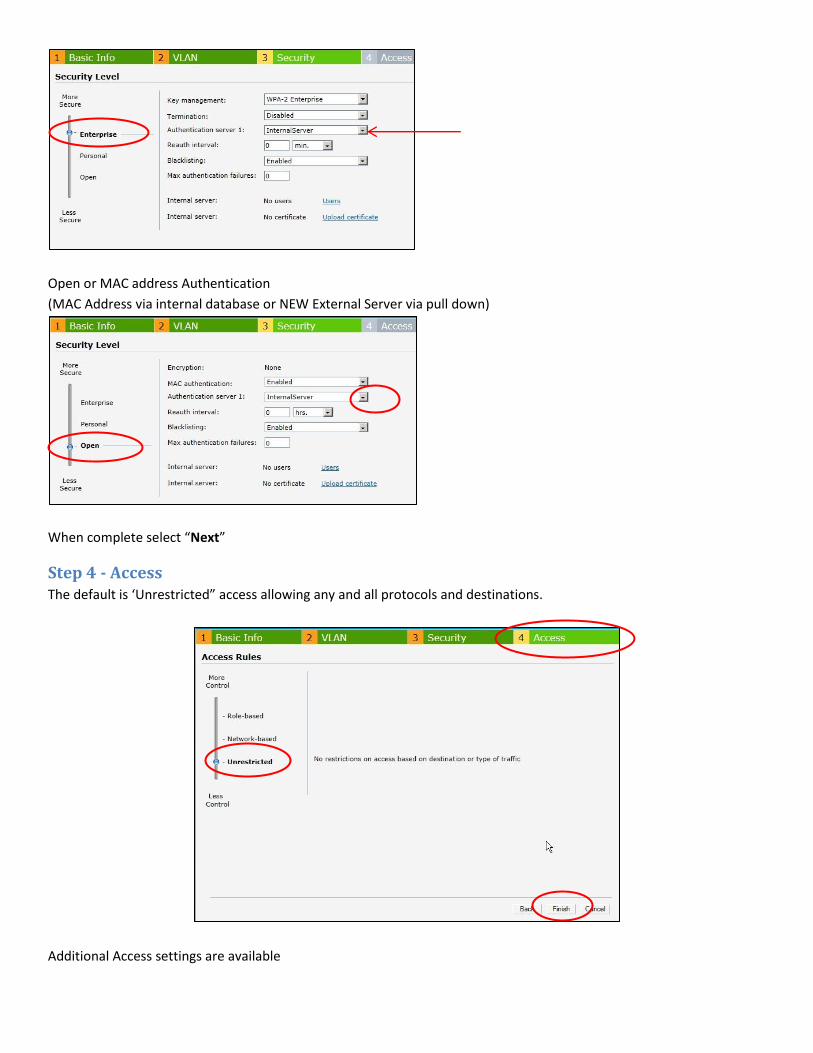
Open or MAC address Authentication
(MAC Address via internal database or NEW External Server via pull down)
When complete select “Next”
Step 4 - Access The default is ‘Unrestricted” access allowing any and all protocols and destinations.
Additional Access settings are available
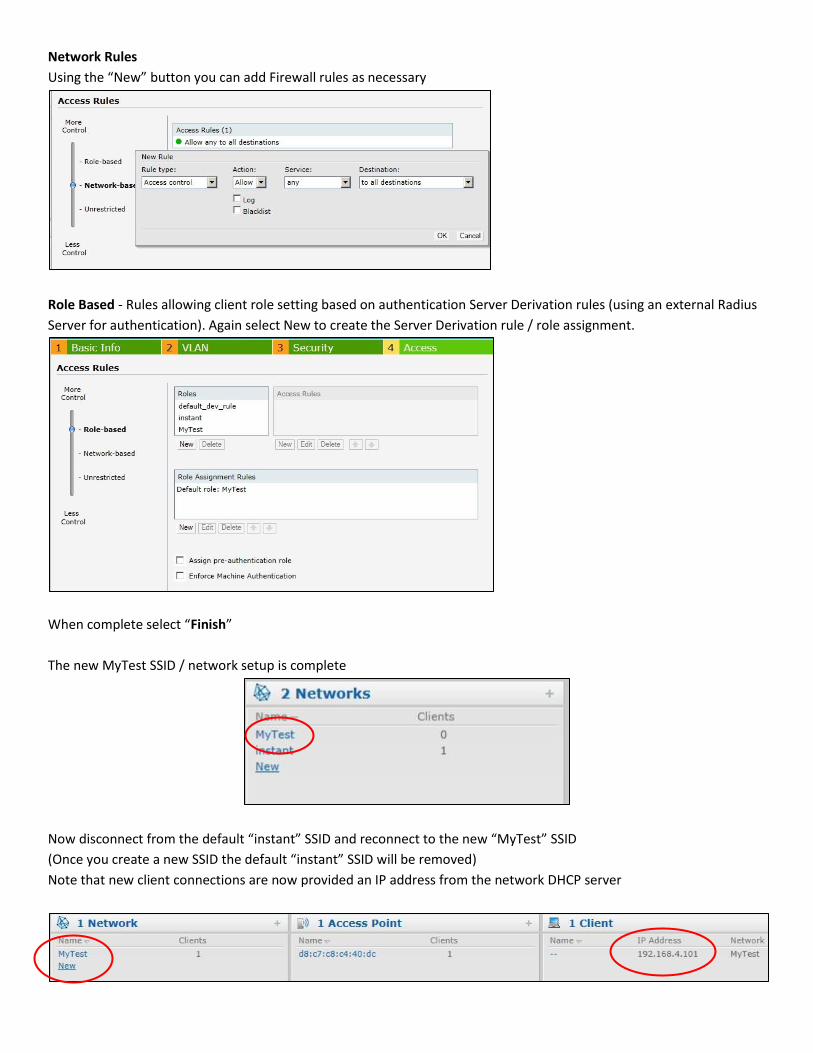
Network Rules
Using the “New” button you can add Firewall rules as necessary
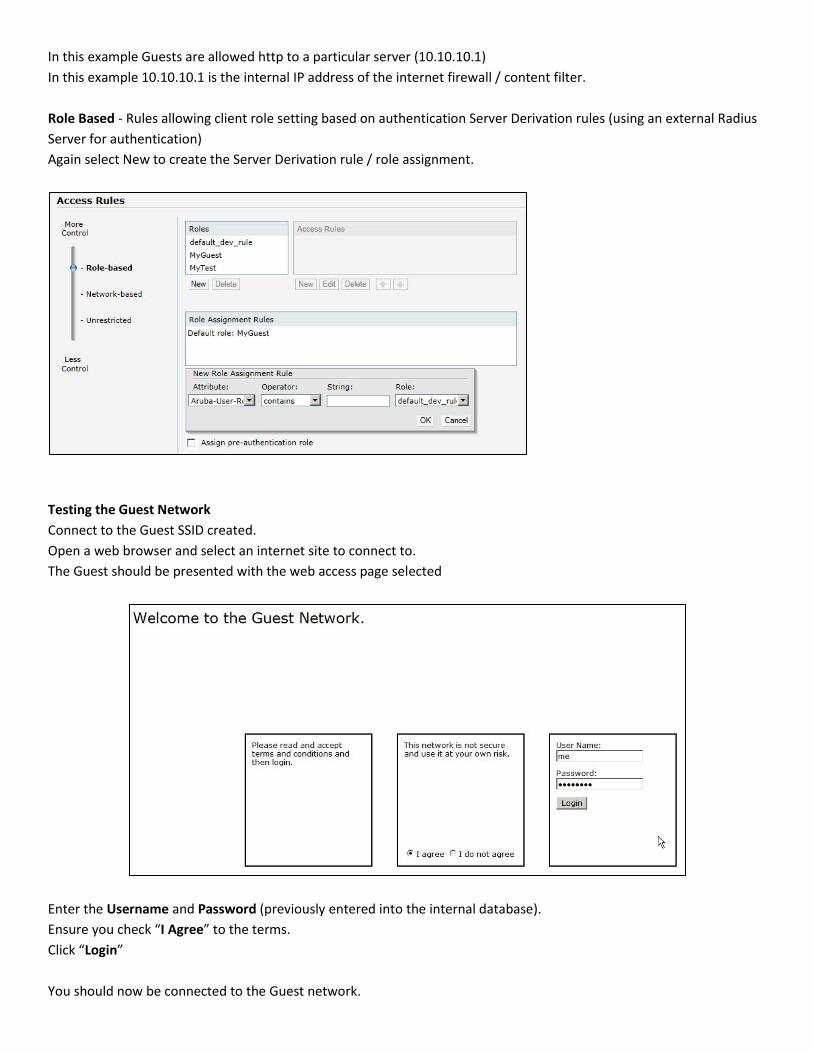
Role Based - Rules allowing client role setting based on authentication Server Derivation rules (using an external Radius
Server for authentication). Again select New to create the Server Derivation rule / role assignment.
When complete select “Finish”
The new MyTest SSID / network setup is complete
Now disconnect from the default “instant” SSID and reconnect to the new “MyTest” SSID
(Once you create a new SSID the default “instant” SSID will be removed)
Note that new client connections are now provided an IP address from the network DHCP server
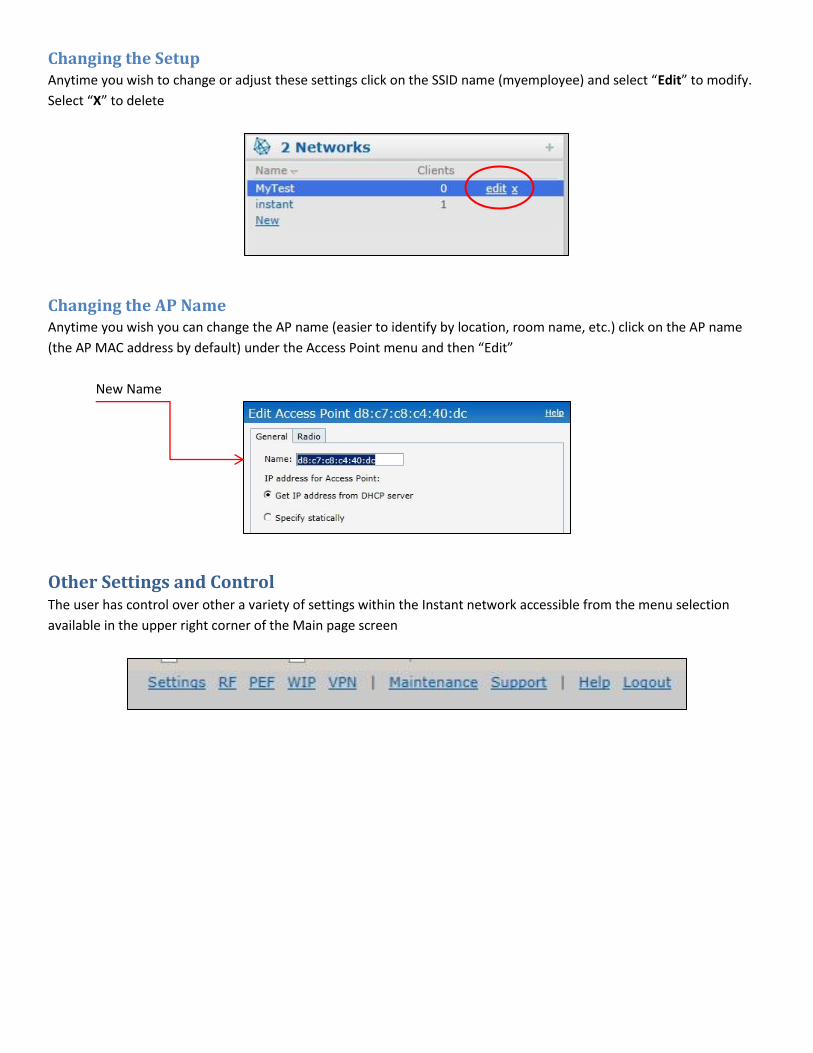
Changing the Setup Anytime you wish to change or adjust these settings click on the SSID name (myemployee) and select “Edit” to modify.
Select “X” to delete
Changing the AP Name Anytime you wish you can change the AP name (easier to identify by location, room name, etc.) click on the AP name
(the AP MAC address by default) under the Access Point menu and then “Edit”
New Name
Other Settings and Control The user has control over other a variety of settings within the Instant network accessible from the menu selection
available in the upper right corner of the Main page screen
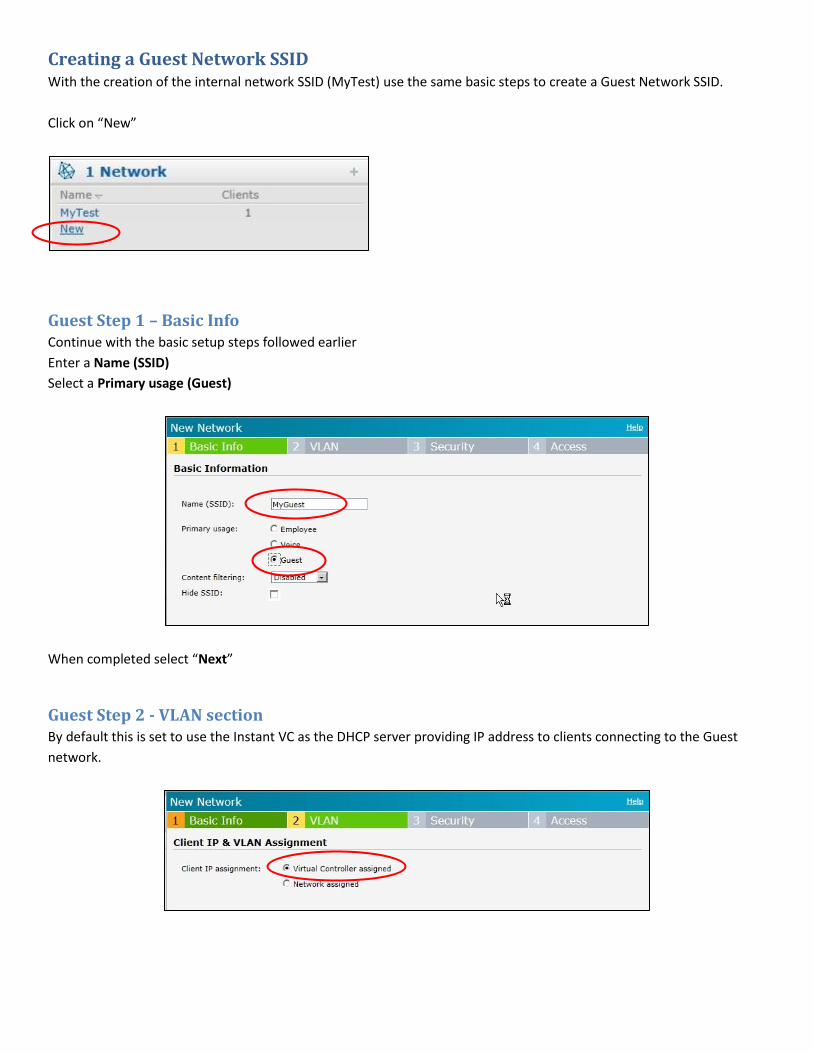
Creating a Guest Network SSID With the creation of the internal network SSID (MyTest) use the same basic steps to create a Guest Network SSID.
Click on “New”
Guest Step 1 – Basic Info Continue with the basic setup steps followed earlier
Enter a Name (SSID)
Select a Primary usage (Guest)
When completed select “Next”
Guest Step 2 - VLAN section By default this is set to use the Instant VC as the DHCP server providing IP address to clients connecting to the Guest
network.
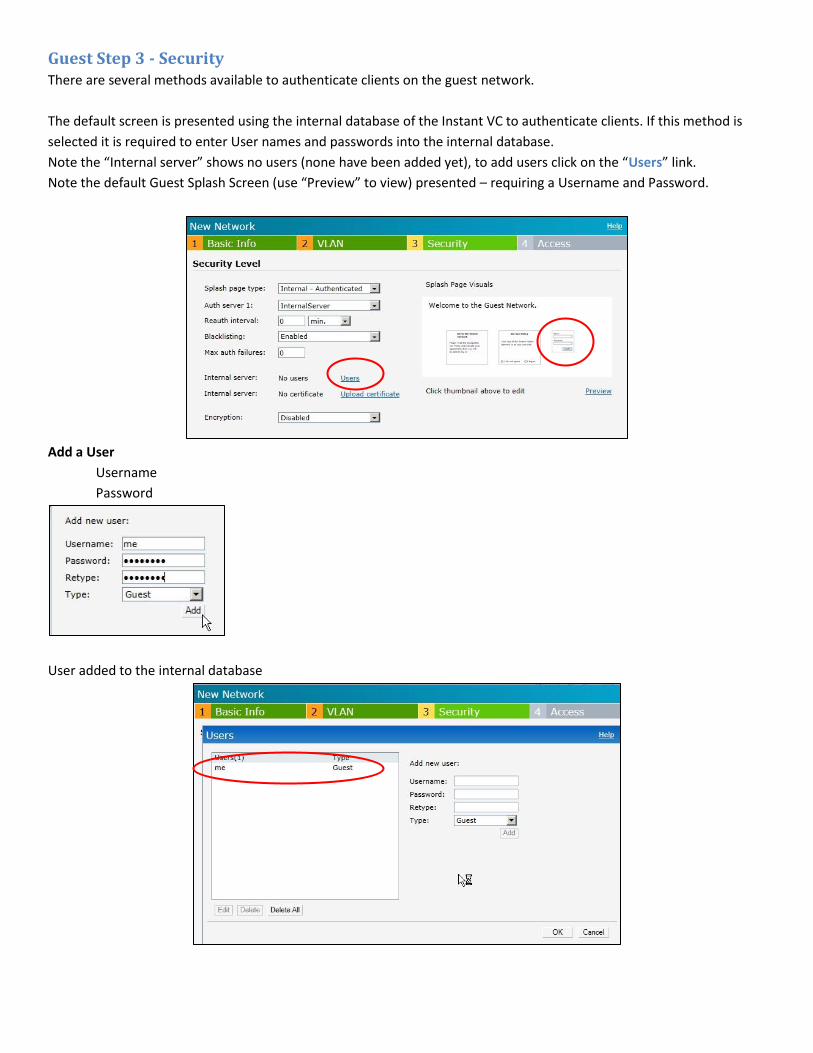
Guest Step 3 - Security There are several methods available to authenticate clients on the guest network.
The default screen is presented using the internal database of the Instant VC to authenticate clients. If this method is
selected it is required to enter User names and passwords into the internal database.
Note the “Internal server” shows no users (none have been added yet), to add users click on the “Users” link.
Note the default Guest Splash Screen (use “Preview” to view) presented – requiring a Username and Password.
Add a User
Username
Password
User added to the internal database
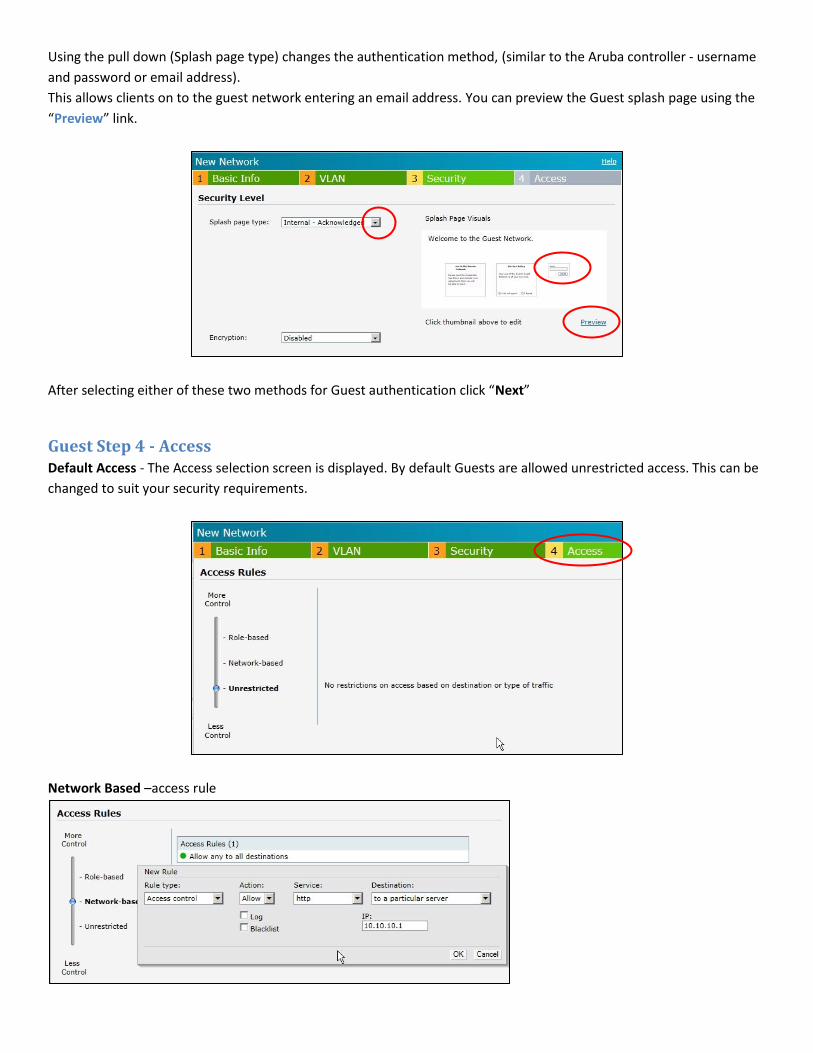
Using the pull down (Splash page type) changes the authentication method, (similar to the Aruba controller - username
and password or email address).
This allows clients on to the guest network entering an email address. You can preview the Guest splash page using the
“Preview” link.
After selecting either of these two methods for Guest authentication click “Next”
Guest Step 4 - Access Default Access - The Access selection screen is displayed. By default Guests are allowed unrestricted access. This can be
changed to suit your security requirements.
Network Based –access rule
In this example Guests are allowed http to a particular server (10.10.10.1)
In this example 10.10.10.1 is the internal IP address of the internet firewall / content filter.
Role Based - Rules allowing client role setting based on authentication Server Derivation rules (using an external Radius
Server for authentication)
Again select New to create the Server Derivation rule / role assignment.
Testing the Guest Network
Connect to the Guest SSID created.
Open a web browser and select an internet site to connect to.
The Guest should be presented with the web access page selected
Enter the Username and Password (previously entered into the internal database).
Ensure you check “I Agree” to the terms.
Click “Login”
You should now be connected to the Guest network.
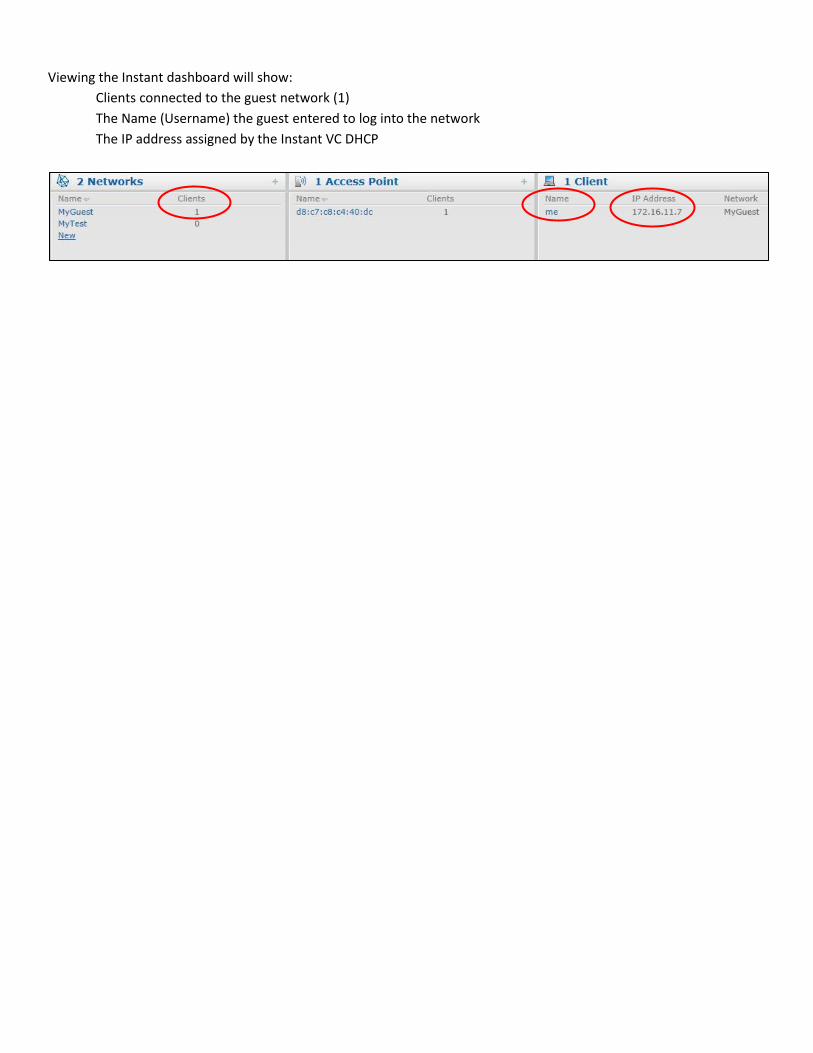
Viewing the Instant dashboard will show:
Clients connected to the guest network (1)
The Name (Username) the guest entered to log into the network
The IP address assigned by the Instant VC DHCP