Artistically Inked Tutorial
9
Artistically Inked Tutorial Card Making Online Class With Mitosu Crafts Facebook Group
Transcript of Artistically Inked Tutorial

Artistically InkedTutorial
Card Making Online Class With Mitosu CraftsFacebook Group
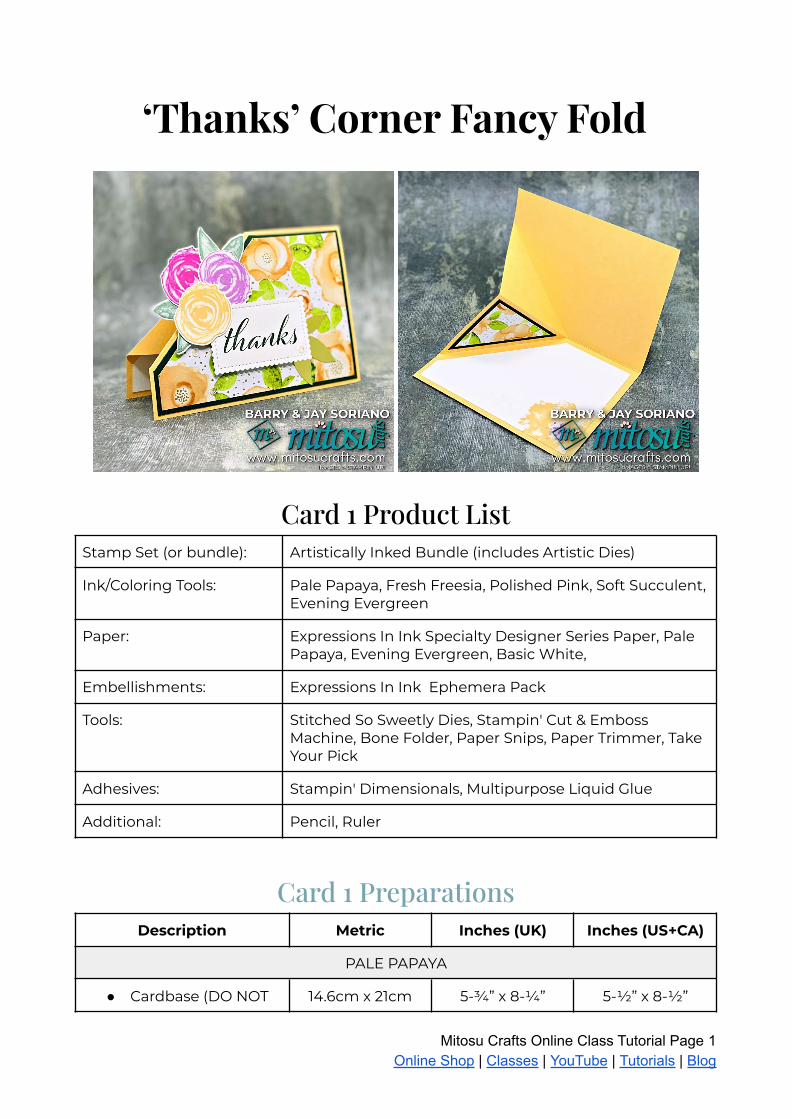
‘Thanks’ Corner Fancy Fold
Card 1 Product ListStamp Set (or bundle): Artistically Inked Bundle (includes Artistic Dies)
Ink/Coloring Tools: Pale Papaya, Fresh Freesia, Polished Pink, Soft Succulent,Evening Evergreen
Paper: Expressions In Ink Specialty Designer Series Paper, PalePapaya, Evening Evergreen, Basic White,
Embellishments: Expressions In Ink Ephemera Pack
Tools: Stitched So Sweetly Dies, Stampin' Cut & EmbossMachine, Bone Folder, Paper Snips, Paper Trimmer, TakeYour Pick
Adhesives: Stampin' Dimensionals, Multipurpose Liquid Glue
Additional: Pencil, Ruler
Card 1 PreparationsDescription Metric Inches (UK) Inches (US+CA)
PALE PAPAYA
● Cardbase (DO NOT 14.6cm x 21cm 5-¾” x 8-¼” 5-½” x 8-½”
Mitosu Crafts Online Class Tutorial Page 1Online Shop | Classes | YouTube | Tutorials | Blog

SCORE YET)
EVENING EVERGREEN
● Layer 1 14.1cm x 10cm 5-9/16” x 3-15/16” 5-5/16” x 4-1/16”
EXPRESSIONS IN INK DESIGNER SERIES PAPER (PALE PAPAYA FLOWERS)
● Layer 2 13.6cm x 9.5cm 5-⅜” x 3-¾” 5-⅛” x 3-⅞”
BASIC WHITE
● Inside Layer 13.6cm x 9.5cm 5-⅜” x 3-¾” 5-⅛” x 3-⅞”
● Stamping/Die Cut 21cm x 14.8cm 5-¾” x 8-¼” 5-½” x 8-½”
Prepare all elements using Measurements above before creating your card with theinstructions below
Directions1. Score your card base in half (10.5cm) (4-⅛”) (4-¼”) along the long edge.2. With your card base folded & measuring from the left, put a small pencil mark at
(7.5cm) (2-15/16”) on the long edge3. Turn 90˚and mark from the left at (3cm) (1-3/16”) on the short edge.4. Score between these 2 marks at a diagonal. Press hard to get through both sides.5. Open up and fold the corner in on itself.6. Mark Layer 1, Layer 2 & Inside Layer with a small pencil mark at (7.5cm)
(2-15-16”) on the long edge and (2.5cm) (1”) on the short edge and cut betweenthese marks.
7. Remove (1cm) (⅜”) from the Layer 1 triangle off cut.8. Remove (2cm) (13/16”) from the Layer 2 triangle off cut.9. Adhere the larger Layer 2 to the larger Layer 1 and stick the the front of the card10. Repeat with the smaller triangles and then
stick to the inside of the card.11. Stamp a flower to the bottom right of the
Inside Layer & stick to inside of card12. Stamp 3 flowers, 2 leaves, sentiment & die
cut out.13. Adhere the above elements to the front of
the card with dimensionals placing someof the gold Expressions In Ink EphemeraPack element under the sentiment bottomright corner.
14. Decorate the front with 5 Sequins from theExpressions In Ink Ephemera Pack
Mitosu Crafts Online Class Tutorial Page 2Online Shop | Classes | YouTube | Tutorials | Blog
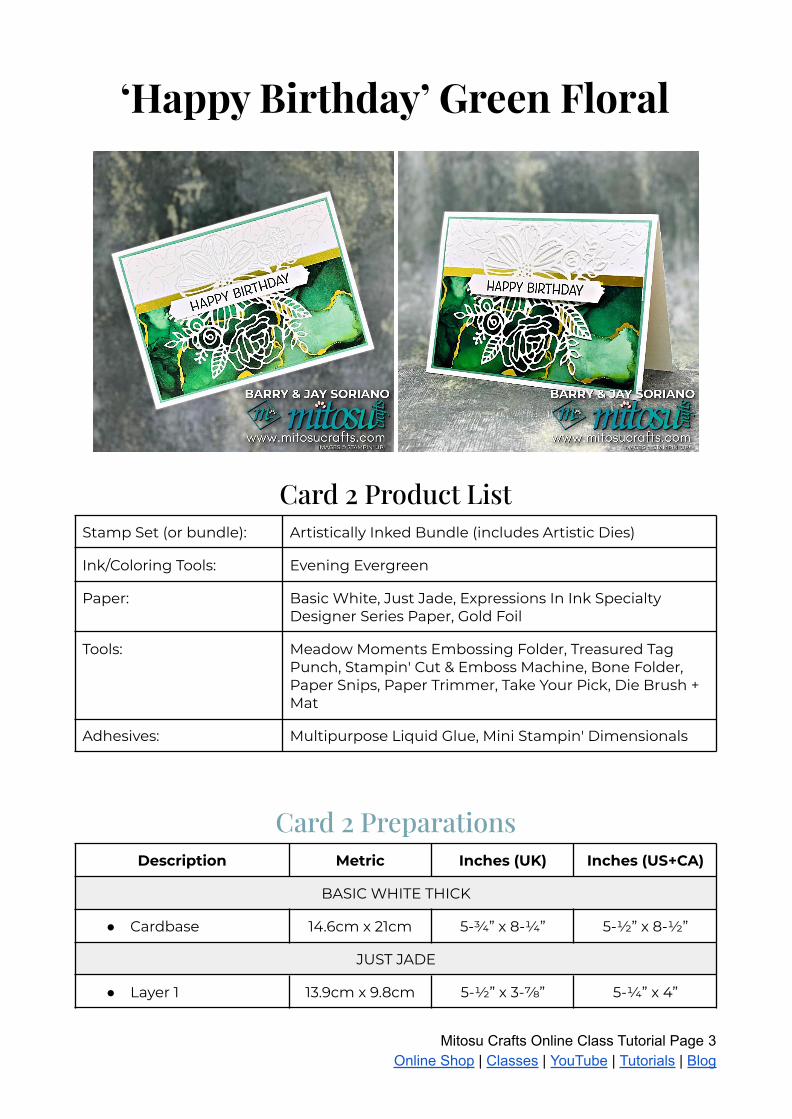
‘Happy Birthday’ Green Floral
Card 2 Product ListStamp Set (or bundle): Artistically Inked Bundle (includes Artistic Dies)
Ink/Coloring Tools: Evening Evergreen
Paper: Basic White, Just Jade, Expressions In Ink SpecialtyDesigner Series Paper, Gold Foil
Tools: Meadow Moments Embossing Folder, Treasured TagPunch, Stampin' Cut & Emboss Machine, Bone Folder,Paper Snips, Paper Trimmer, Take Your Pick, Die Brush +Mat
Adhesives: Multipurpose Liquid Glue, Mini Stampin' Dimensionals
Card 2 PreparationsDescription Metric Inches (UK) Inches (US+CA)
BASIC WHITE THICK
● Cardbase 14.6cm x 21cm 5-¾” x 8-¼” 5-½” x 8-½”
JUST JADE
● Layer 1 13.9cm x 9.8cm 5-½” x 3-⅞” 5-¼” x 4”
Mitosu Crafts Online Class Tutorial Page 3Online Shop | Classes | YouTube | Tutorials | Blog
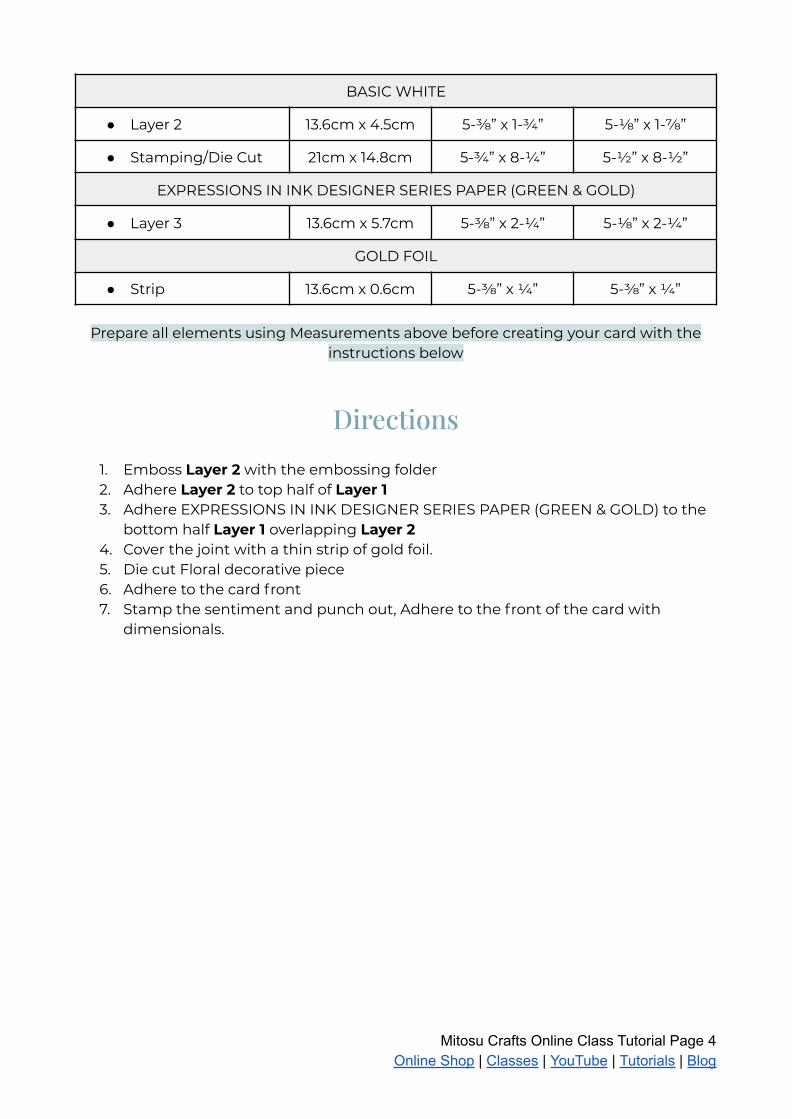
BASIC WHITE
● Layer 2 13.6cm x 4.5cm 5-⅜” x 1-¾” 5-⅛” x 1-⅞”
● Stamping/Die Cut 21cm x 14.8cm 5-¾” x 8-¼” 5-½” x 8-½”
EXPRESSIONS IN INK DESIGNER SERIES PAPER (GREEN & GOLD)
● Layer 3 13.6cm x 5.7cm 5-⅜” x 2-¼” 5-⅛” x 2-¼”
GOLD FOIL
● Strip 13.6cm x 0.6cm 5-⅜” x ¼” 5-⅜” x ¼”
Prepare all elements using Measurements above before creating your card with theinstructions below
Directions1. Emboss Layer 2 with the embossing folder2. Adhere Layer 2 to top half of Layer 13. Adhere EXPRESSIONS IN INK DESIGNER SERIES PAPER (GREEN & GOLD) to the
bottom half Layer 1 overlapping Layer 24. Cover the joint with a thin strip of gold foil.5. Die cut Floral decorative piece6. Adhere to the card front7. Stamp the sentiment and punch out, Adhere to the front of the card with
dimensionals.
Mitosu Crafts Online Class Tutorial Page 4Online Shop | Classes | YouTube | Tutorials | Blog

Leafy ‘Hello’
Card 3 Product ListStamp Set (or bundle): Artistically Inked Bundle (includes Artistic Dies)
Ink/Coloring Tools: Evening Evergreen, Evening Evergreen Stampin’ Blends
Paper: Basic White, Expressions In Ink Specialty Designer SeriesPaper
Embellishments: Linen Thread, Gold Glitter Enamel Dots
Tools: Tasteful Textile 3D Embossing Folder, Stampin' Cut &Emboss Machine, Bone Folder, Paper Snips, PaperTrimmer, Take Your Pick, Die Brush + Mat
Adhesives: Multipurpose Liquid Glue, Mini Glue Dots, Mini Stampin'Dimensionals
Card 3 PreparationsDescription Metric Inches (UK) Inches (US+CA)
BASIC WHITE THICK
● Cardbase 21cm x 14.6cm 8-¼” x 5-¾” 8-½” x 5-½”
BASIC WHITE
● Layer 1 9cm x 13.1cm 3-9/16” x 5-3/16” 3-¾” x 5”
Mitosu Crafts Online Class Tutorial Page 5Online Shop | Classes | YouTube | Tutorials | Blog
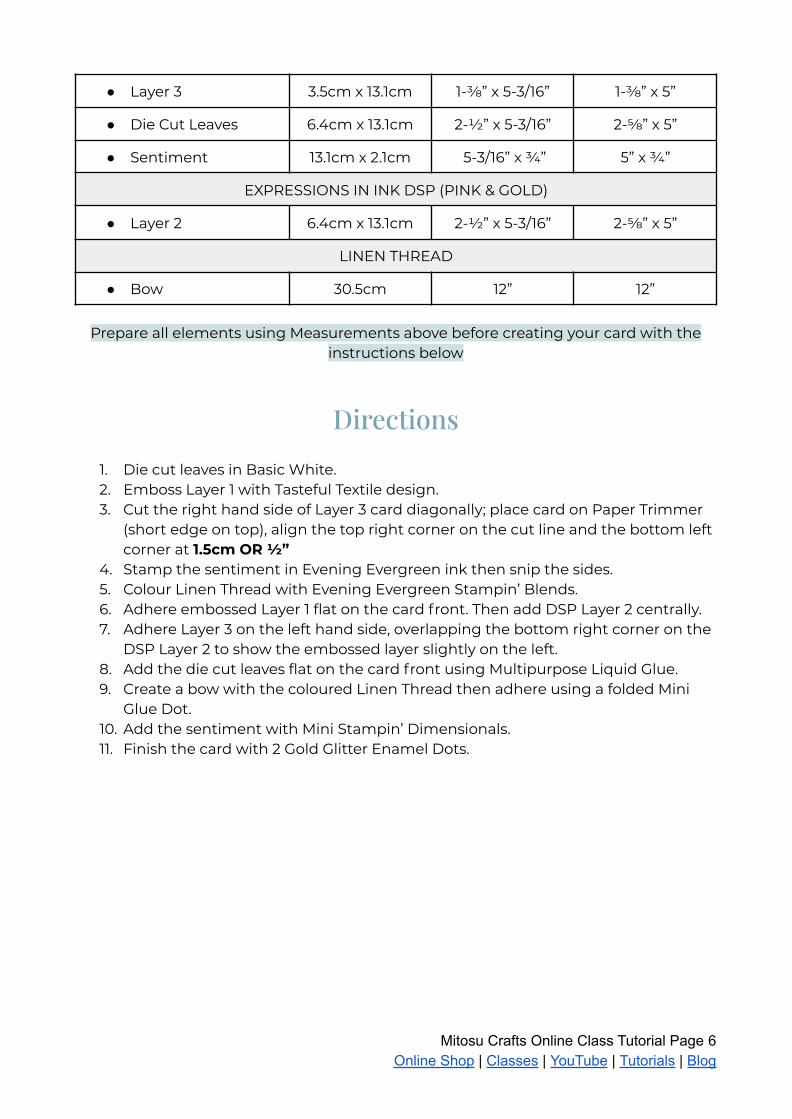
● Layer 3 3.5cm x 13.1cm 1-⅜” x 5-3/16” 1-⅜” x 5”
● Die Cut Leaves 6.4cm x 13.1cm 2-½” x 5-3/16” 2-⅝” x 5”
● Sentiment 13.1cm x 2.1cm 5-3/16” x ¾” 5” x ¾”
EXPRESSIONS IN INK DSP (PINK & GOLD)
● Layer 2 6.4cm x 13.1cm 2-½” x 5-3/16” 2-⅝” x 5”
LINEN THREAD
● Bow 30.5cm 12” 12”
Prepare all elements using Measurements above before creating your card with theinstructions below
Directions1. Die cut leaves in Basic White.2. Emboss Layer 1 with Tasteful Textile design.3. Cut the right hand side of Layer 3 card diagonally; place card on Paper Trimmer
(short edge on top), align the top right corner on the cut line and the bottom leftcorner at 1.5cm OR ½”
4. Stamp the sentiment in Evening Evergreen ink then snip the sides.5. Colour Linen Thread with Evening Evergreen Stampin’ Blends.6. Adhere embossed Layer 1 flat on the card front. Then add DSP Layer 2 centrally.7. Adhere Layer 3 on the left hand side, overlapping the bottom right corner on the
DSP Layer 2 to show the embossed layer slightly on the left.8. Add the die cut leaves flat on the card front using Multipurpose Liquid Glue.9. Create a bow with the coloured Linen Thread then adhere using a folded Mini
Glue Dot.10. Add the sentiment with Mini Stampin’ Dimensionals.11. Finish the card with 2 Gold Glitter Enamel Dots.
Mitosu Crafts Online Class Tutorial Page 6Online Shop | Classes | YouTube | Tutorials | Blog

Artistically Inked Product ListStamp Set (or bundle): Artistically Inked Bundle (English) [155456]
Ink/Coloring Tools: Pale Papaya Classic Stampin' Pad [155670]Fresh Freesia Classic Stampin' Pad [155611]Polished Pink Classic Stampin' Pad [155712]Soft Succulent Classic Stampin' Pad [155778]Evening Evergreen Classic Stampin' Pad [155576]Evening Evergreen Stampin' Blends Combo Pack [155517]
Paper: Expressions In Ink 12" X 12" (30.5 X 30.5 Cm) SpecialtyDesigner Series Paper [155464]Pale Papaya A4 Cardstock [155669]Evening Evergreen A4 Cardstock [155575]Basic White A4 Cardstock [159228]Basic White A4 Thick Cardstock [159230]Just Jade A4 Cardstock [153084]Gold Foil Sheets [132622]
Embellishments: Expressions In Ink Ephemera Pack [155465]Linen Thread [104199]Gold Glitter Enamel Dots
Tools: Stitched So Sweetly Dies [151690]Meadow Moments Embossing Folders [153126]Treasured Tags Pick A Punch [154425]Tasteful Textile 3 D Embossing Folder [152718]Take Your Pick Die Brush Tip [149655]Stampin' Cut & Emboss Machine [149653]Bone Folder [102300]Paper Snips [103579]Paper Trimmer [152392]Take Your Pick [144107]
Adhesives: Stampin' Dimensionals [104430]Multipurpose Liquid Glue [154974]Mini Stampin' Dimensionals [144108]Mini Glue Dots [103683]
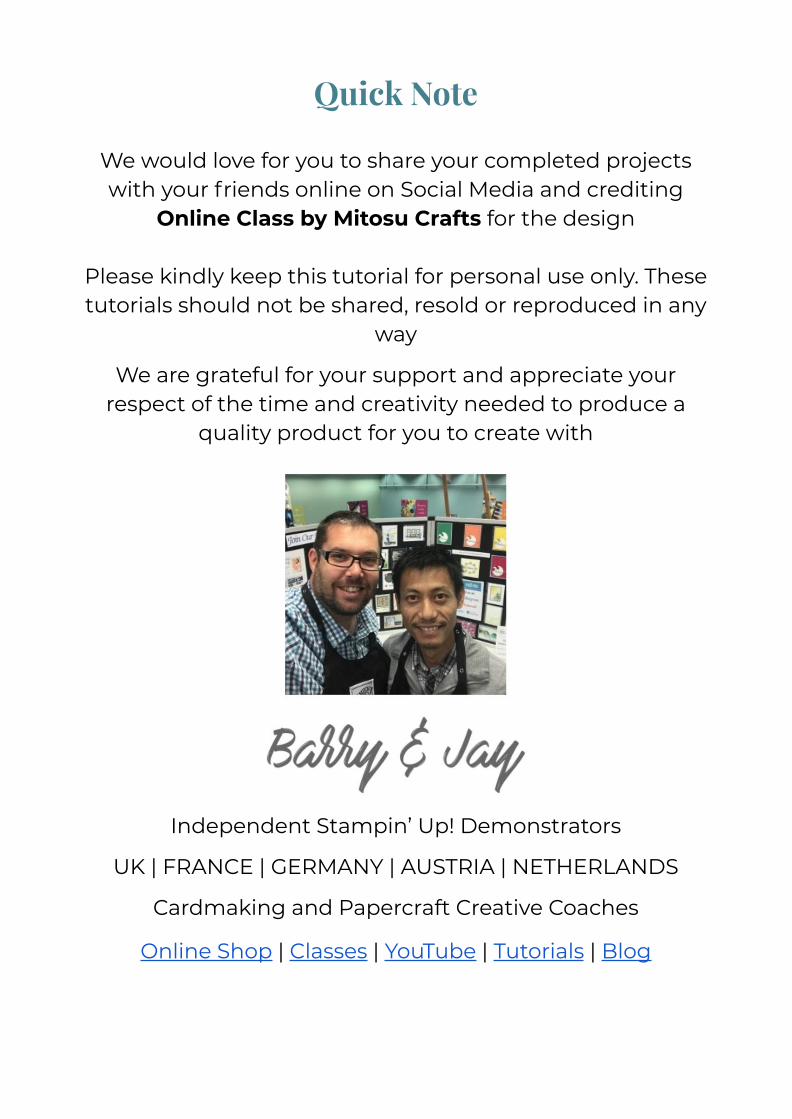
Quick Note
We would love for you to share your completed projectswith your friends online on Social Media and crediting
Online Class by Mitosu Crafts for the design
Please kindly keep this tutorial for personal use only. Thesetutorials should not be shared, resold or reproduced in any
way
We are grateful for your support and appreciate yourrespect of the time and creativity needed to produce a
quality product for you to create with
Independent Stampin’ Up! Demonstrators
UK | FRANCE | GERMANY | AUSTRIA | NETHERLANDS
Cardmaking and Papercraft Creative Coaches
Online Shop | Classes | YouTube | Tutorials | Blog