ARPMiner Manual
13
A A R R P P M M i i n n e e r r Installation & Configuration Guide Version 2.2
-
Upload
yasin-kaplan -
Category
Software
-
view
62 -
download
1
Transcript of ARPMiner Manual

AARRPPMMiinneerr
Installation & Configuration Guide
Version 2.2

AARRPPMMiinneerr Version 2.2 - Installation & Configuration Guide
© 2013-2016 KaplanSoft - http://www.kaplansoft.com/ 2
Document Revision 1.8
http://www.kaplansoft.com/
ARPMiner is built by Yasin KAPLAN
Read “Readme.txt” for last minute changes and updates which can be found under
application directory.
Copyright © 2013-2016 KaplanSoft. All Rights Reserved. This document is supplied by KaplanSoft.
No part of this document may be reproduced, republished or retransmitted in any form or by any
means whatsoever, whether electronically or mechanically, including, but not limited to, by way of
photocopying, recording, information recording or through retrieval systems, without the written
permission of KaplanSoft. If you would like permission to use any of this material, please contact
KaplanSoft.
KaplanSoft reserves the right to revise this document and make changes at any time without prior
notice. Specifications contained in this document are subject to change without notice. Please send
your comments by email to [email protected].
KaplanSoft is registered trademark of Kaplan Bilisim Teknolojileri Yazılım ve Ticaret Ltd.
Microsoft, Win32, Windows 2000, Windows, Windows NT and Windows Vista are either registered
trademarks or trademarks of Microsoft Corporation in the United States and/or other countries.

AARRPPMMiinneerr Version 2.2 - Installation & Configuration Guide
© 2013-2016 KaplanSoft - http://www.kaplansoft.com/ 3

AARRPPMMiinneerr Version 2.2 - Installation & Configuration Guide
© 2013-2016 KaplanSoft - http://www.kaplansoft.com/ 4
Table of Contents
Table of Contents ............................................................................................................................. 4 Introduction ...................................................................................................................................... 5 System Requirements ....................................................................................................................... 5 Installation ........................................................................................................................................ 5
Configuration ................................................................................................................................... 5 Settings Tab.................................................................................................................................. 5 NAT Tab ...................................................................................................................................... 6 Authentication Tab ....................................................................................................................... 7 Accounting Tab ............................................................................................................................ 8
Users................................................................................................................................................. 9 Application Log ............................................................................................................................. 10 User Defined Login Interface ........................................................................................................ 10
Supported RADIUS Attributes ...................................................................................................... 11 Starting TekSpot ............................................................................................................................ 12 Troubleshooting ............................................................................................................................. 13
TekSpot Messages in TekSpot logs ........................................................................................... 13

AARRPPMMiinneerr Version 2.2 - Installation & Configuration Guide
© 2013-2016 KaplanSoft - http://www.kaplansoft.com/ 5
Introduction
ARPMiner is a simple captive portal / hotspot software runs under Windows (Vista/7/8, 2008/2012
Server). Major features;
Simple design and easy to use user interface.
Simple interface for user definitions.
Real time monitoring of connected users.
RADIUS AAA support (Commercial editions only). ARPMiner accepts Packet of
Disconnect (PoD) from RADIUS servers.
WISPr authentication and partial RADIUS dictionary support.
Customizable HTTP interface
Performance monitoring through Windows Performance Monitor.
ARPMiner consists of a GUI and a service application called TekSpot. TekSpot has built-in HTTP
server and a proxy DNS server. TekSpot provides NAT services through Windows Internet
Connection Sharing (ICS).
RADIUS Accounting is supported in only SP edition.
System Requirements
1. A Windows system (Vista, 7, 8, 2008/2012 Server) with at least 2 GBytes of RAM.
2. Microsoft.NET Framework 4.0 Client Profile (Min.)
3. 8 MB of disk space for installation.
4. One Ethernet interface for Hotspot zone and another for then Internet connection.
5. Administrative privileges.
6. Windows Firewall must be disabled for proper operation.
Installation
Unzip “ARPMiner.zip” and click “Setup.exe” comes with the distribution. Follow the instruction of
setup wizard. Setup will install ARPMiner and TekSpot Service, add a shortcut for ARPMiner to
desktop and the start menu.
Configuration
Run ARPMiner from Start Menu / Program Files / ARPMiner. ARPMiner automatically configures
itself at first run.
Settings Tab
Click Settings Tab to start configuration. Settings tab has four sub sections. Enter following
information:

AARRPPMMiinneerr Version 2.2 - Installation & Configuration Guide
© 2013-2016 KaplanSoft - http://www.kaplansoft.com/ 6
Logging / Startup: Select logging level of TekSpot. Select “None” if you do not want
logging, select “Errors” to log errors and select “Sessions” to log session information and
errors. Log files are located under <Application Directory>\Logs directory. Set TekSpot
service startup mode, Manual or Automatic. You can also disable service startup.
TLS Enabled: You can use HTTPS for HotSpot login form when you enable TLS. You
must select a server certificate after enabling TLS.
Server Certificate: Select server certificate for TLS.
Root Directory: You can set directory where alternative login, info and error message html
file resides. Please see User Defined Login Interface section of this manual.
Idle Timeout: Set idle timeout in seconds. User will be assumed offline after this amount of
time if no network activity occurs.
DNS TTL: DNS TTL value replaced with TTL value received in forwarded DNS replies to
client machines.
WISPr Enable: You can enable WISPr authentication by setting this option. TekRADIUS
will add WISPr-Location-ID and WISPr-Location-Name to RADIUS accounting requests.
WISPr Location Name: Enter a descriptive name for HotSpot location.
WISPr Location: Enter a description for HotSpot location.
Figure - 1. ARPMiner Settings tab
NAT Tab
Click NAT Tab to configure Internet connection and Private Network (Wireless e.g.) connection
interface. Default settings should be suitable for most of configurations. Default Private Interface
Address is 192.168.137.1. If you change this address you must specify the initial address of the new
network as Private Interface Address.

AARRPPMMiinneerr Version 2.2 - Installation & Configuration Guide
© 2013-2016 KaplanSoft - http://www.kaplansoft.com/ 7
Figure - 2. ARPMiner Settings / NAT tab
You cannot start ARPMiner service (TekSpot) if you have configured Windows Internet Connection
Sharing (ICS) already on a different interface.
If you experience startup problems please check if IPv6 is enabled on both selected public and
private interfaces. You must disable IPv6 on public and private interfaces if IPv6 is enabled.
Authentication Tab
Authentication is enabled by default and ARPMiner uses built database to keep user accounts.
Enterprise edition of ARPMiner supports also RADIUS authentication. Please also see supported
RADIUS attributes section.
Encrypt Passwords: Set this option to keep the endpoint passwords in encrypted form in
SQLite database TekSpot.db3 under ARPMiner application directory.
Blacklist IP Endpoints: If selected, TekSpot monitors failed login attempts from suspicious
endpoints and blacklists them.
Cache Sessions: ARPminer can cache user credentials for a specified period. ARPminer
will auto provide login if client browser submits a valid HTTP cookie.
Use RADIUS: If you prefer to direct authentication requests to a RADIUS Server, check
this option. If you do not check this option, TekSpot will use the local users database to
authenticate the login attempts.
RADIUS Server: Enter a valid IPv4 address for the RADIUS server.
RADIUS Port: Enter the UDP port number of the RADIUS server. Default is UDP port
1813.

AARRPPMMiinneerr Version 2.2 - Installation & Configuration Guide
© 2013-2016 KaplanSoft - http://www.kaplansoft.com/ 8
RADIUS Secret: Enter the RADIUS secret key for the RADIUS Server.
RADIUS Timeout / Retry: You can set an amount of time which TekSpot waits for a reply
for the RADIUS accounting packets from the RADIUS Server. You can also specify how
many attempts will be made by TekSpot to deliver RADIUS accounting packets to the
RADIUS server.
Figure - 3. ARPMiner Settings / Authentication tab
Accounting Tab
Accounting is available in only SP editions of ARPMiner. Please also see supported RADIUS
attributes section
Accounting Enabled: RADIUS accounting is disabled by default. Click “Accounting
Enabled” to enable RADIUS accounting.
Stop Only: If you prefer to send only RADIUS Accounting stop messages to the RADIUS
server, select this option.
RADIUS Server: Enter a valid IPv4 address for the RADIUS server.
RADIUS Port: Enter the UDP port number of the RADIUS server. Default is UDP port
1813.
RADIUS Secret: Enter the RADIUS secret key for the RADIUS Server.
RADIUS Timeout / Retry: You can set an amount of time which TekSpot waits for a reply
for the RADIUS accounting packets from the RADIUS Server. You can also specify how
many attempts will be made by TekSpot to deliver RADIUS accounting packets to the
RADIUS server.
AARRPPMMiinneerr Version 2.2 - Installation & Configuration Guide
© 2013-2016 KaplanSoft - http://www.kaplansoft.com/ 9
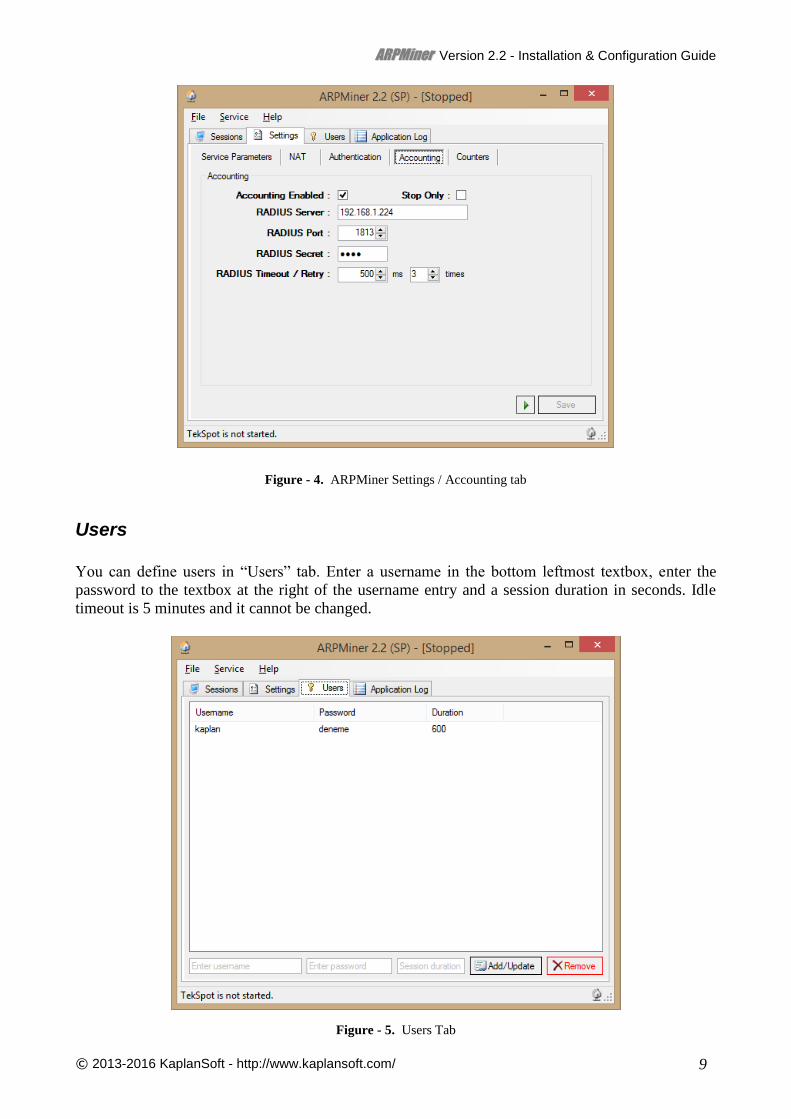
Figure - 4. ARPMiner Settings / Accounting tab
Users
You can define users in “Users” tab. Enter a username in the bottom leftmost textbox, enter the
password to the textbox at the right of the username entry and a session duration in seconds. Idle
timeout is 5 minutes and it cannot be changed.
Figure - 5. Users Tab

AARRPPMMiinneerr Version 2.2 - Installation & Configuration Guide
© 2013-2016 KaplanSoft - http://www.kaplansoft.com/ 10
Application Log
You can monitor system events in Application Log tab. You can manually refresh log entries and
clear log entries. Click Enable Auto Refresh option to refresh log list every seconds.
Figure - 6. Application Log Tab
User Defined Login Interface
You can use your own defined login, info and error pages. TekSpot uses built in html resources for
this pages. TekSpot looks for alternative login.html, info.html and error.html files. If any of them
found, TekSpot uses user defined html file. Login.html must have following form and form objects;
<form name="LoginForm" method="post" action="tslogin" id="HotSpotLoginForm">
<input name="Username" type="Text" id="Username">
<input name="Password" type="Password" id="Password">
<input type="submit" name="Login" value="Login" id="Login">
You can display user’s connection date and remained credit by adding %connected% and
%remained% variables to info.html. You can optionally add %url% variable if you would like to
provide an option user to continue web browsing. TekSpot will replace last tried URL with %url%
variable in info.html. TekSpot will replace real values of these variables prior to send html
response.
You can display TekSpot generated error message in error.html file using %error% variable.
Here is a sample login.html;

AARRPPMMiinneerr Version 2.2 - Installation & Configuration Guide
© 2013-2016 KaplanSoft - http://www.kaplansoft.com/ 11
<html>
<head>
<title>HotSpot Login</title>
</head>
<body style="font-size: 12px; font-family: Arial">
<form name="LoginForm" method="post" action="tslogin" id="HotSpotLoginForm">
<table id="FormTable border="2" style="color: black;
background-color: lightgray; border-color: lightgray; border-collapse: collapse;">
<tr style="color: White; background-color: Navy; border-color: lightgray;">
<td colspan="2">
<b>HotSpot Login%message%</b></td>
</tr>
<tr style="background-color: lightgray; border-color: lightgray;>
<td colspan="2" style="background-color: lightgray; border-color: lightgray;">
<font size="1px"> </font></td>
</tr>
<tr style="background-color: lightgray; border-color: lightgray;">
<td align="right" style="background-color: lightgray; border-color: lightgray;>
<b>Username : </b>
</td>
<td style="background-color: lightgray; border-color: lightgray; width: 141px">
<input name="Username" type="Text" id="Username" style="width: 200px;" /></td>
</tr>
<tr style="background-color: lightgray; border-color: lightgray;">
<td align="right" style="background-color: lightgray; border-color: lightgray;>
<b>Password : </b>
</td>
<td style="background-color: lightgray; border-color: lightgray; width: 141px">
<input name="Password" type="Password" id="Password" style="width: 200px;" />
<input name="Host" type="hidden" value="%url%" /></td>
</tr>
<tr style="background-color: lightgray; border-color: lightgray;">
<td style="background-color: lightgray; border-color: lightgray;>
</td>
<td align="right" style="background-color: lightgray; border-color: lightgray;>
<input type="submit" name="Login" value="Login" id="Login" /> </td>
</tr>
</table>
</form>
<br />
</body>
</html>
Supported RADIUS Attributes
TekSpot RADIUS authentication request packets contains following RADIUS attributes;
User-Name
User-Password or CHAP-Password
NAS-IP-Address (Scope address)
Called-Station-Id (ARPMiner Private Interface MAC Address)
Calling-Station-Id (User Ethernet MAC address)
TekSpot expects following RADIUS attributes in an Access-Accept reply;
Session-Timeout
Idle-Timeout
TekSpot RADIUS accounting start packets contains following RADIUS attributes;
Acct-Status-Type = Start
Calling-Station-Id
Called-Station-Id
Framed-IP-Address
NAS-IP-Address

AARRPPMMiinneerr Version 2.2 - Installation & Configuration Guide
© 2013-2016 KaplanSoft - http://www.kaplansoft.com/ 12
Acct-Session-Id
User-Name
TekSpot RADIUS accounting stop packets contains following RADIUS attributes;
Acct-Status-Type = Stop
Acct-Terminate-Cause
Acct-Session-Time
Calling-Station-Id
Called-Station-Id
Framed-IP-Address
NAS-IP-Address
Acct-Session-Id
User-Name
Starting TekSpot
Click “Service” menu and select “Start” to run TekSpot after making necessary configuration and
saving configuration. If service starts successfully you will see “TekSpot is started” message at
bottom left message section of ARPMiner. Optionally you can start/stop TekSpot using the button
on Settings tab. When you make any change(s) in configuration, TekSpot will be restarted when
you save the settings.
If TekSpot cannot start please examine Application Log tab as well as TekSpot log file under
<Application Directory>\Logs if you were enabled logging in Settings tab.
Figure - 7. TekSpot on Windows Performance Monitor

AARRPPMMiinneerr Version 2.2 - Installation & Configuration Guide
© 2013-2016 KaplanSoft - http://www.kaplansoft.com/ 13
Troubleshooting
TekSpot provides many messages when problems occur. You can see error messages on ARPMiner
Status bar or in the log file of TekSpot service. You can enable logging in Settings Tab. There are
three levels of logging; None, Errors, Sessions. If you select Errors, TekSpot logs just error
messages. If you select Sessions both Session and Error messages will be logged. You have to save
or apply settings changes if you change logging level setting. Log files are located under
<Application Directory>\Logs directory.
TekSpot also utilizes Windows Performance Monitor providing numerous counters;
Used Memory
Number of Ethernet MAC entries
Number of Authorized Users
Number of DNS Requests Received
DNS Requests Receive Rate
You can add and monitor them using Windows Performance Monitor (Perfmon.exe). You can also
monitor these counters through ARPMiner interface.
TekSpot Messages in TekSpot logs
ARPMiner Service x.y.0.0 (Revision 0) is being started (<Windows
version>).
This message notifies that TekSpot is being started.
Registration Key is valid; running in commercial mode.
You see this message when a valid Registration.key file exists under ARPMiner application
directory.
User defined login form read into memory
You see this message when a valid user defined login form html file exists under Root Directory.
Debug Message: Could not set default firewall rules, exiting...
TekSpot adds default firewall rules at the initialization phase. TekSpot service stops if this fails.