Arlo Go Quick Start Guide · 3 Activate Your SIM Card The camera uses Telguard’s cellular...
16
1 Arlo Go Quick Start Guide
Transcript of Arlo Go Quick Start Guide · 3 Activate Your SIM Card The camera uses Telguard’s cellular...

1
Arlo Go Quick Start Guide
2
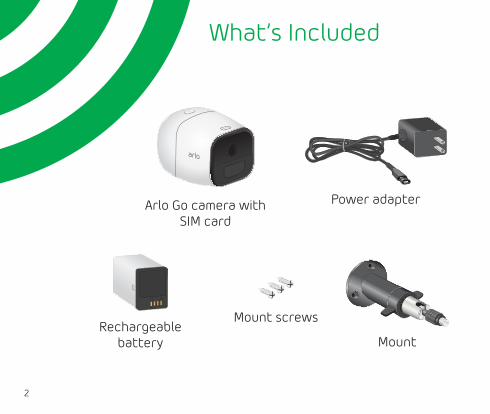
What’s Included
Rechargeable battery
Arlo Go camera with SIM card
Power adapter
Mount
Mount screws

3
Activate Your SIM CardThe camera uses Telguard’s cellular partners to send pictures and videos to your Arlo account in the cloud.
Only authorized Telguard dealers can activate Telguard services.
¾ To activate your Telguard service plan:
1. Locate your camera’s ICCID.This number appears on the bottom of the Arlo Go box. If you cannot find your Arlo Go box, contact Telguard customer service for assistance.
2. Enter www.telguard.com/portal from your favorite browser..
3. Follow the registration process prompts.
4. Register the SIM card using the ICCID provided.After the registration is complete, the SIM card is active and ready to use.

4
Get the Arlo AppFor the best experience, download the Arlo app for your smartphone by scanning this QR code.
arlo.netgear.com

5
Insert the SIM Card Into Your Arlo Go Camera
The Arlo Go camera comes with a SIM card installed. If a SIM card is not installed, insert a card into the SIM card slot.
¾ To insert a SIM card:
1. Unlock the battery compartment by pressing and holding the latch.
2. Gently pull the battery door back to open the compartment.
3. Align the gold SIM contacts.
4. Insert the SIM card into the SIM card slot.
SD card slot
SIM card slot
Note: If you plan to store video recordings on an SD card, insert the SD card now.

6
Insert the Battery Into Your Arlo Go Camera
If power is available, you can plug your camera in and use it in powered mode. Best practice is to insert the battery into your Arlo Go camera even if you plan to power the camera using the power adapter.
¾ To insert the battery:
1. Align the battery contacts.
2. Insert the battery.
3. Close the battery door.

7
Set Up Your Arlo Go CameraUse the Arlo app and your Arlo account to set up your Arlo Go camera. If you already set up an Arlo account, you can add the Arlo Go camera to your account.
During set up, your Arlo Go camera must be connected to the mobile network coverage area. Note: This requires that you have an active SIM card and that the SIM card is registered in the Telguard portal. Coverage and service are not available everywhere.
After you add your Arlo Go camera to your Arlo account, you can place the Arlo Go camera anywhere in your mobile network coverage area.
For information about optimizing mobile connectivity, scan this QR code or visit http://tinyurl.com/jyoysqo.

8
¾ To create a new Arlo account:
1. Launch the Arlo app from your smartphone, tap the New System Setup button, and select Arlo Go.If you are using a computer, visit arlo.netgear.com.
2. Follow the on-screen instructions.

9
¾ To add an Arlo Go camera to an existing Arlo account:
1. If you already set up an Arlo account, log in and click or tap Add Device.
2. Follow the on-screen instructions.

10
Place Your CameraYou can place your camera on a flat surface or mount it.

11
¾ To mount the camera on a wall:
1. Place the wall plate and secure it with three screws.
2. Attach the camera to the wall plate.If you’re mounting the camera to drywall, be sure to use the included plastic drywall anchors.

12
Charge Your Arlo Go BatteryThe Arlo Go battery is partially charged when it leaves the factory.
¾ To recharge the battery:
1. Connect the power adapter to the camera.
Caution: You must use an Arlo Go power adapter to charge the battery. Do not try to power the camera or charge the battery with any power adapter other than the one provided with the Arlo Go camera.
2. Plug the power adapter into an electrical outlet.
The camera LED lights solid blue for two seconds when the camera battery is fully charged.

13
Arlo Go Access and Cloud StorageThe Arlo Go camera is designed to connect to a cellular network Coverage and service are not available everywhere.
During set up, the Arlo app uses the cellular network to find your Arlo Go camera so that you can add the camera to your Arlo account.
After set up, the Arlo Go camera uses the cellular network to send recordings to the cloud storage associated with your Arlo account.

14
You’re Done!Congratulations! Your Arlo Go camera is set up and ready to go.
The camera comes with an SD card slot that supports SD cards (sold separately) with a capacity of up to 32G of storage. If you inserted an SD card and your camera is offline, the camera recordings are stored on the SD card.
Note: You must insert the SD card before powering the camera on.
To view tutorial videos, find troubleshooting tips, or get support, visit support.arlo.com.
15
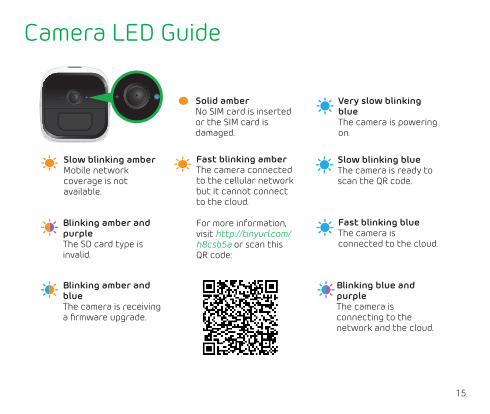
Solid amberNo SIM card is inserted or the SIM card is damaged.
Fast blinking amberThe camera connected to the cellular network but it cannot connect to the cloud.
For more information, visit http://tinyurl.com/h8csb5a or scan this QR code:
Very slow blinking blueThe camera is powering on.
Slow blinking blueThe camera is ready to scan the QR code.
Fast blinking blueThe camera is connected to the cloud.
Slow blinking amberMobile network coverage is not available.
Blinking amber and purpleThe SD card type is invalid.
Camera LED Guide
Blinking blue and purpleThe camera is connecting to the network and the cloud.
Blinking amber and blueThe camera is receiving a firmware upgrade.

©NETGEAR, Inc., NETGEAR, the NETGEAR Logo, and Arlo are trademarks of NETGEAR, Inc.
© In Canada, Telguard products and services are offered and sold under the Telular brand. Telguard, Telular, and the Telguard logo are trademarks of Telguard.
ComplianceFor the current EU Declaration of Conformity, visit http://kb.netgear.com/app/answers/detail/a_id/11621/.For regulatory compliance information, visit http://www.netgear.com/about/regulatory/.
NETGEAR INTL LTD Building 3, University Technology Center Curraheen Road, Cork, Ireland
350 East Plumeria Drive San Jose, CA 95134 USA
February 2017