Arduino Robot - Jameco Electronics...Arduino Robot With the Arduino Robot, you can learn about...
14
Arduino Robot With the Arduino Robot, you can learn about electronics, mechanics, and software. It is a tiny computer on wheels. It comes with a number of of project examples you can easily replicate, and it is a powerful robotics platform that you can hack to perform all sorts of tasks. The robot comes with a large number of inputs; two potentiometers, five buttons, a digital compass, five floor sensors, and an SD card reader. It also has a speaker, two motors, and a color screen as outputs. You can control all these sensors and actuators through the Robot library . There are two different boards on the Robot: the Control Board (top) and the Motor Board (bottom). If you're just getting started with electronics and programming, you should work with the Control Board. As you become more experienced, you may want to tinker with the Motor Board.
Transcript of Arduino Robot - Jameco Electronics...Arduino Robot With the Arduino Robot, you can learn about...

Arduino Robot
With the Arduino Robot, you can learn about electronics, mechanics, and software. It is a tiny computer on wheels. Itcomes with a number of of project examples you can easily replicate, and it is a powerful robotics platform that you canhack to perform all sorts of tasks.
The robot comes with a large number of inputs; two potentiometers, five buttons, a digital compass, five floor sensors,and an SD card reader. It also has a speaker, two motors, and a color screen as outputs. You can control all these sensorsand actuators through the Robot library.
There are two different boards on the Robot: the Control Board (top) and the Motor Board (bottom). If you're just gettingstarted with electronics and programming, you should work with the Control Board. As you become more experienced,you may want to tinker with the Motor Board.

Robot Control board

Robot Motor Board
Setting up the RobotContent on the SD cardConnecting the robot to your computerInstalling the drivers
OSXWindowsLinux
Hello User!Uploading a test sketchMoving the Robot
Read the buttonsChange the motor speed with the potentiometerMaking some noiseNext steps
Setting up the Robot
When you first open the robot, you'll need to set up a pair of things before it is ready to roll.
First, you'll need to insert the SD card into the slot on the backside of the TFT screen, and then insert the screen into thesocket on the control board of the robot. The screen should be oriented so that the blue text with the text "SD Card" is

close to the buttons and speaker.
Once that's in place, you'll need to attach the protective cover for the botom board. This will help prevent any objects onthe ground from damaging the motor board. Attach the protective covering to the underside of the robot as shown below.

Content on the SD card
The SD card is used to store information for the robot to read. It comes preloaded with images and sound files used inthe Explore examples. Once comfortable with the robot's functionality, you should be able to add your own files. If youever accidentally remove files used by the explore sketches, you can copy them over from the SDcontent directory foundin the robot library.
Connecting the robot to your computer
Each board on the robot has a microcontroller, which is programmed independently of the other. It is recommended thatyou should only program the control board (the top board) until you are familiar with the robot's functionality. The motorboard (the bottom board) has a stock firmware that fulfills most general purpose applications.

Connect the control board to your computer with a USB cable.
After you have connected the board, the green LED labelled as PWR on the Control Board will be on. LED1 beneath itwill flash a few times. On the Motor Board, the red LEDs labelled as LED1 to LED5 (opposite side to the power switch)should be on as well.
If the LEDs on either board do not turn on, check if the flat 10-pin communication cable next to the power switch isconnected to both boards.
Installing the drivers
OSX
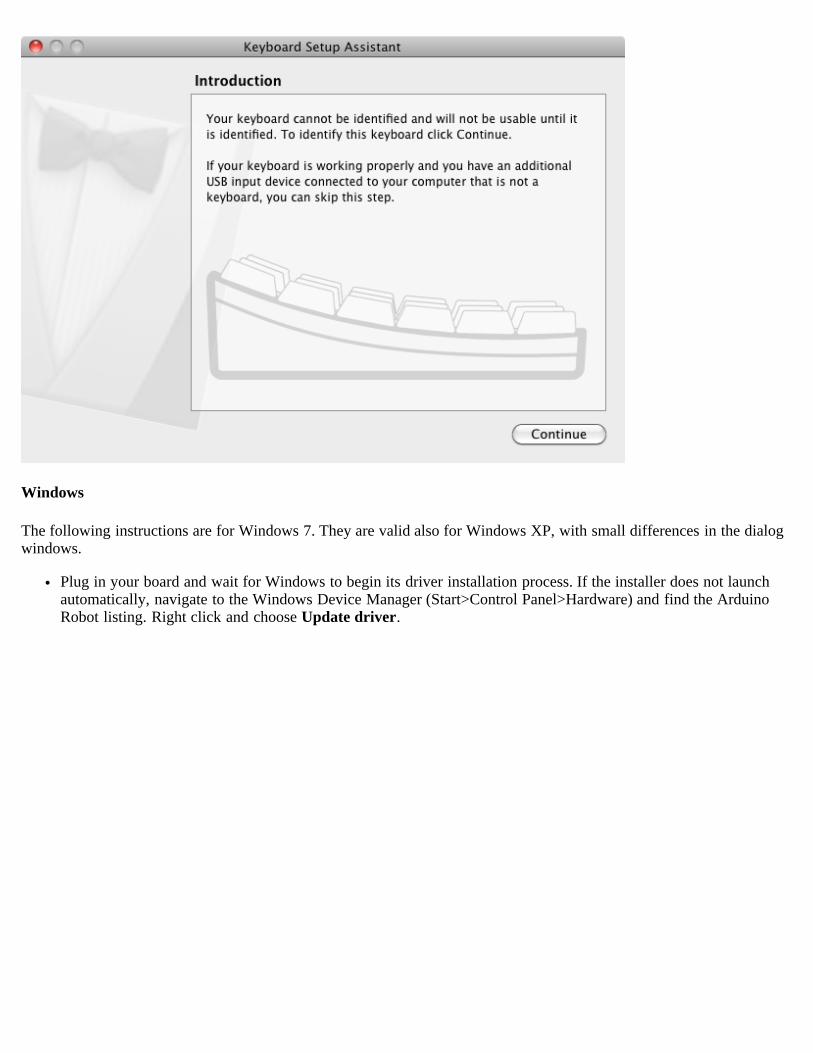
The first time you plug a robot into a computer running OSX, the "Keyboard Setup Assistant" will launch. There'snothing to configure with the robot, so you can close this dialogue by clicking the red button in the top left of thewindow.
Windows
The following instructions are for Windows 7. They are valid also for Windows XP, with small differences in the dialogwindows.
Plug in your board and wait for Windows to begin its driver installation process. If the installer does not launchautomatically, navigate to the Windows Device Manager (Start>Control Panel>Hardware) and find the ArduinoRobot listing. Right click and choose Update driver.

At the next screen, choose "Browse my computer for driver software", and click Next.

Click the Browse... button. Another dialog appears: navigate to the folder with the Arduino software that you justdownloaded. Select the drivers folder an click OK, then click Next.

You will receive a notification that the board has not passed Windows Logo testing. Click on the button ContinueAnyway.
After a few moments, a window will tell you the wizard has finished installing software for Arduino Robot. Pressthe Close button.
Linux
There is no need to install drivers for Linux. (Tested with Ubuntu 12.04)
Hello User!
The Arduino Robot comes with a preloaded application that will ask for your name, what you want to name the robot,and where you are located. Look at the screen on the robot for information on how to input your information using thebuttons and potentiometer.
You can power the robot by with 4 AAA batteries, or connect a USB cable to either the motor or control board.

Once you have gone through the setup process with the robot, you can start writing your own programs to control it.
Uploading a test sketch
To program the robot, connect the Control Board to your computer via USB. Open the Arduino IDE, and load thesketch located in File > Examples > Robot_Control > learn > MotorTest.
You need to tell the IDE which Arduino board you are targeting with your software, so open the Tools > Board menuand choose Arduino Robot Control.
The Arduino IDE must know which of your USB ports the robot is connected to. The Tools > Serial menu lists theavailable ports.
if only one item is shown, click on that one.if two or more are shown, you can disconnect the Control Board and re-open the menu; the entry that disappearsshould be the robot. Reconnect the board and select that serial port.
Click the "Upload" button in the top left of the IDE window. Wait a few seconds - you should see the RX and TX ledson the board flashing. If the upload is successful, the message "Done uploading." will appear in the status bar of thesoftware. Once this appears, you can disconnect the robot from the USB cable
With batteries in the robot, turn on the power switch and put it on the ground. The robot should show you a few basicmoves. Congratulations! You've gotten the robot up and running.

If the robot is not moving, turn the power switch off. Connect the motor board to the computer with a USB cable. Loadthe File > Examples > Robot_Motor > Robot_Motor_Core sketch in the IDE, and select Arduino Robot Motor fromthe Boards menu. Upload this sketch, disconnect from the computer and try turning it on again.
Note: If no Serial port shows up after you plug in the robot, and restarting the IDE/unplug-replug the robot doesnot help, follow the steps below:
Open a very simple sketch, like Blink or BareMinimumPress the upload buttonWhen the status bar shows "Uploading...", double press the reset button on the Control BoardThe Serial port should appear as normally.
Moving the Robot
This sketch moves the robot back and forth repeatedly.
Whenever you're writing code for the robot, make sure to include <ArduinoRobot.h> at the beginning of the sketch. Thisimports the necessary libraries to control the robot.
There's no need to initialize the Robot object.
To get the wheels to move, call Robot.motorsWrite(). motorsWrite() requires 2 arguments, the speed of the left motor,and the speed of the right motor. These values range from -255 to 255, where -255 is full reverse, and 255 is full speedforward. If you pass a value of 0, the motor will stop spinning the wheel.
Once you've uploaded the sketch, unplug the USB cable for the robot. Whenever the USB is connected, the robot'smotors are disengaged. Turn on the power and watch it move around!
#include <ArduinoRobot.h> // import the robot library
void setup(){ Robot.begin(); // initialize the library}
void loop(){ // move forward for one second Robot.motorsWrite(255,255); delay(1000);
Robot.motorsWrite(0,0); // stop moving delay(1000);
// move backwards for one second Robot.motorsWrite(-255,-255); delay(1000);
Robot.motorsWrite(0,0); // stop moving delay(1000);}[Get Code]
Read the buttons
You'll be writing a sketch that prints the button presses to the screen.

First, you need to include the Robot library.
#include <ArduinoRobot.h>[Get Code]
In setup(), start the robot and the screen.
void setup(){ Robot.begin(); Robot.beginLCD();}[Get Code]
In loop(), every 100ms, read the state of the buttons. If one is being pressed, write the name to the screen.
void loop(){ Robot.debugPrint(Robot.keyboardRead(), 10, 10); delay(100);}[Get Code]
In the explore folder of the robot examples, there is a sketch called Logo, which incorporates this example with the robotmovement from above.
Change the motor speed with the potentiometer
This lets you control the speed at which the robot moves in a straight line. By turning the knob and mapping the valuesto -255 to 255, you will set the speed and direction (forward or backwards) of the robot.
First, you need to include the Robot library.
#include <ArduinoRobot.h>[Get Code]
In setup(), you must call Robot.begin() to initialize the robot's functions. Also call Robot.beginLCD() to initialize thescreen.
void setup(){
Robot.begin(); Robot.beginLCD();}[Get Code]
In loop(), read the value of the potentiometer with Robot.knobRead(). Map its value (a number between 0 and 1023) to-255 to 255. Print this value to the screen, and use it to change the speed of the motors.
void loop(){ int val=map(Robot.knobRead(),0,1023,-255,255); Robot.debugPrint(val); Robot.motorsWrite(val,val); delay(10);}[Get Code]
The robot's motor is disengaged when plugged in via USB. After programming the robot, unplug the USB cable and add

batteries. Turn on the power switch and watch the robot move. Catch the robot, and change the knob to change its speed.
Making some noise
The robot has two different means of producing sounds. There's simple beeping, but the robot can also create morecomplex sounds by reading sequenced music off the SD card. In this example you'll start with the beeping. To learnabout the more complex playback, see the Melody example in the learn folder.
First, you need to include the Robot library.
#include <ArduinoRobot.h>[Get Code]
In setup(), you must call Robot.begin() to initialize the robot's functions. Also call Robot.beginSpeaker() toinitialize the speaker.
void setup(){ Robot.begin(); Robot.beginSpeaker();}[Get Code]
In loop(), you can call Robot.beep() to create a beep. There are three different kinds of beeping; a simple beep, adouble beep, and a long beep.
void loop() { Robot.beep(BEEP_SIMPLE); delay(1000); Robot.beep(BEEP_DOUBLE); delay(1000); Robot.beep(BEEP_LONG); delay(1000);}[Get Code]
Next steps
There are many things you can do with the robot. The few examples on this page don't do it justice. To see some morecomplex examples that of what the robot can do, look at the sketches found in the Explore folder of the robot examples.These are more complete examples that show you some different applications for the robot.
To learn about more of the functionality of the specific inputs and outputs of the robot, look at the learn folder in therobot examples.
Be sure to check out the Robot's library page and the hardware page for more information about the technical aspects ofthe Robot.
The text of the Arduino getting started guide is licensed under a Creative Commons Attribution-ShareAlike 3.0 License.Code samples in the guide are released into the public domain.