Arcinsys Manual · chives Hessen and Niedersachsen and of the municipal archives Weiterstadt. It is...
40
Arcinsys version 20 December 3, 2018 Arcinsys Manual
Transcript of Arcinsys Manual · chives Hessen and Niedersachsen and of the municipal archives Weiterstadt. It is...
Arcinsys version 20 December 3, 2018
Arcinsys
Manual
TABLE OF CONTENTS ARCINSYS MANUAL
Arcinsys Manual Page II
Table of Contents
1 Introduction ................................................................................................ 4
1.1 Technical requirements ...................................................................... 4
1.2 Person designations .......................................................................... 4
1.3 Arcinsys range of offers and functions ............................................... 5
1.4 Organisation of Arcinsys .................................................................... 6
1.4.1 User interface ........................................................................ 6
1.4.2 Control elements ................................................................... 7
1.5 Organisation of the manual .............................................................. 10
2 Navigator ................................................................................................... 12
2.1 Navigation tree ................................................................................. 12
2.2 List view ........................................................................................... 14
2.3 Detail page ....................................................................................... 18
3 Search ....................................................................................................... 22
3.1 Notes for simple and extended search ............................................. 22
3.2 Simple search .................................................................................. 23
3.3 Identifier search ............................................................................... 24
3.4 Extended search .............................................................................. 24
3.5 Result list ......................................................................................... 28
3.6 Save search ..................................................................................... 30
3.7 Load or delete a saved search ......................................................... 31
4 Registration and log in ............................................................................. 33
4.1 Registration ...................................................................................... 33
4.1.1 Username ............................................................................ 33
4.1.2 Enter e-mail address ........................................................... 33
4.1.3 Create a password .............................................................. 33
4.1.4 Enter and submit your address ........................................... 34
4.2 Log in ............................................................................................... 34
4.3 Change data .................................................................................... 35
4.4 Reset a forgotten password ............................................................. 35
TABLE OF CONTENTS ARCINSYS MANUAL
Arcinsys Manual Page III
5 Submitting requests for access .............................................................. 36
5.1 Submit a request for access ............................................................ 36
5.2 Show and print requests for access ................................................. 36
6 Ordering and using archival material ..................................................... 38
6.1 Create a memo list ........................................................................... 38
6.2 Order archival items ......................................................................... 39
6.3 Show information on ordered archival items .................................... 40
Introduction ARCINSYS MANUAL
Arcinsys Manual Page 4
1 Introduction
The archival information system Arcinsys was developed by the Federal State Ar-
chives Hessen (Hesse) in cooperation with the Niedersachsen (Lower Saxony)
Federal State Archives between 2011 and 2014. It has been in use since the end of
2014, and it continues to be further developed. The Federal State Archives Schles-
wig-Holstein was the third partner to join the association of archives in the end of
2016.
The installations of Arcinsys can be accessed at the following Internet addresses:
Hessen: https://arcinsys.hessen.de
Niedersachsen: https://www.arcinsys.niedersachsen.de
An additional joint website contains overviews for the archives that work with Arcin-
sys, as well as for their respective archival and data-protection regulations:
http://arcinsys.de
1.1 Technical requirements
Arcinsys is a web-based application that can be used without the local installation of
special software. Archives employees in the association as well as external users
are consequently able to access the archival information system from any computer
that has an Internet connection and a current browser.
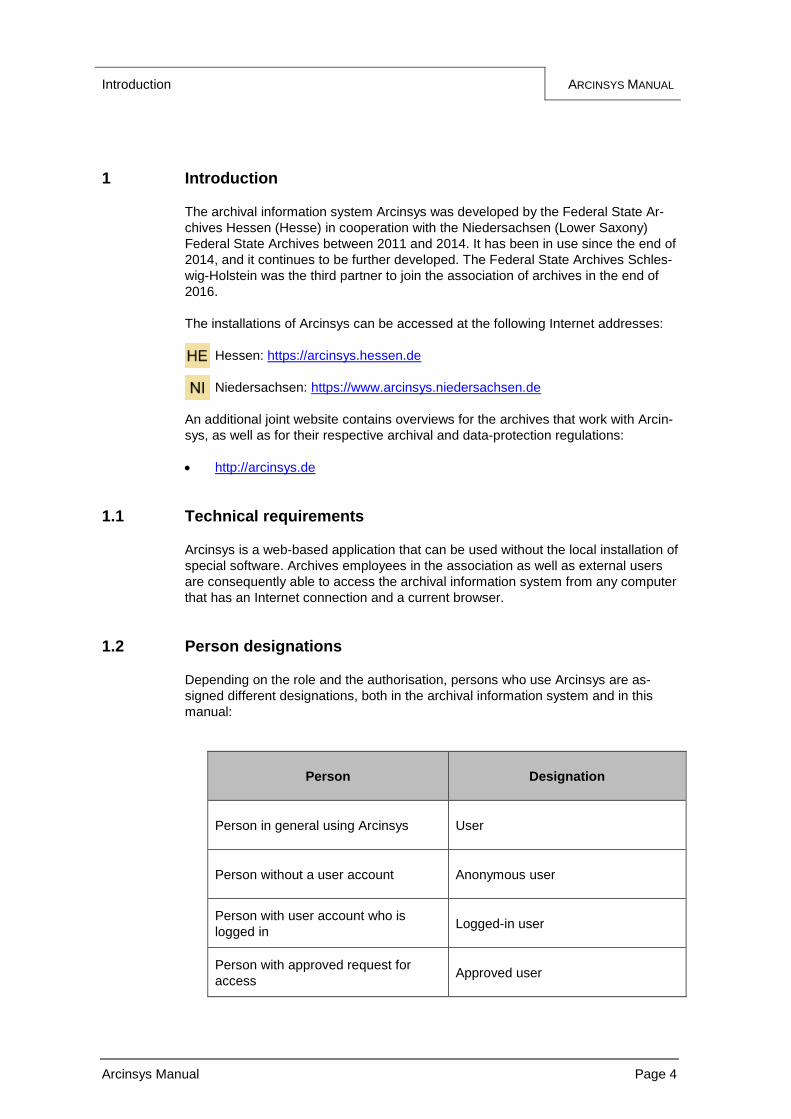
1.2 Person designations
Depending on the role and the authorisation, persons who use Arcinsys are as-
signed different designations, both in the archival information system and in this
manual:
Person Designation
Person in general using Arcinsys User
Person without a user account Anonymous user
Person with user account who is
logged in Logged-in user
Person with approved request for
access Approved user
Introduction ARCINSYS MANUAL
Arcinsys Manual Page 5
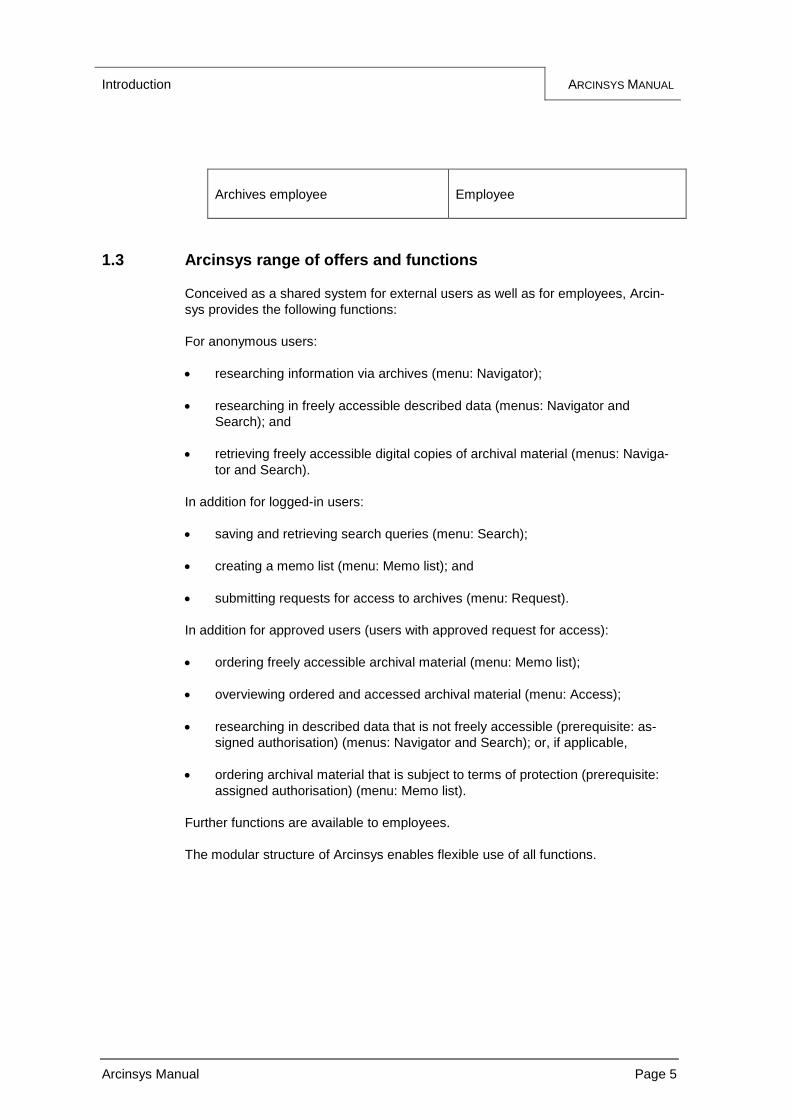
Archives employee Employee
1.3 Arcinsys range of offers and functions
Conceived as a shared system for external users as well as for employees, Arcin-
sys provides the following functions:
For anonymous users:
researching information via archives (menu: Navigator);
researching in freely accessible described data (menus: Navigator and
Search); and
retrieving freely accessible digital copies of archival material (menus: Naviga-
tor and Search).
In addition for logged-in users:
saving and retrieving search queries (menu: Search);
creating a memo list (menu: Memo list); and
submitting requests for access to archives (menu: Request).
In addition for approved users (users with approved request for access):
ordering freely accessible archival material (menu: Memo list);
overviewing ordered and accessed archival material (menu: Access);
researching in described data that is not freely accessible (prerequisite: as-
signed authorisation) (menus: Navigator and Search); or, if applicable,
ordering archival material that is subject to terms of protection (prerequisite:
assigned authorisation) (menu: Memo list).
Further functions are available to employees.
The modular structure of Arcinsys enables flexible use of all functions.
Introduction ARCINSYS MANUAL
Arcinsys Manual Page 6
1.4 Organisation of Arcinsys
1.4.1 User interface
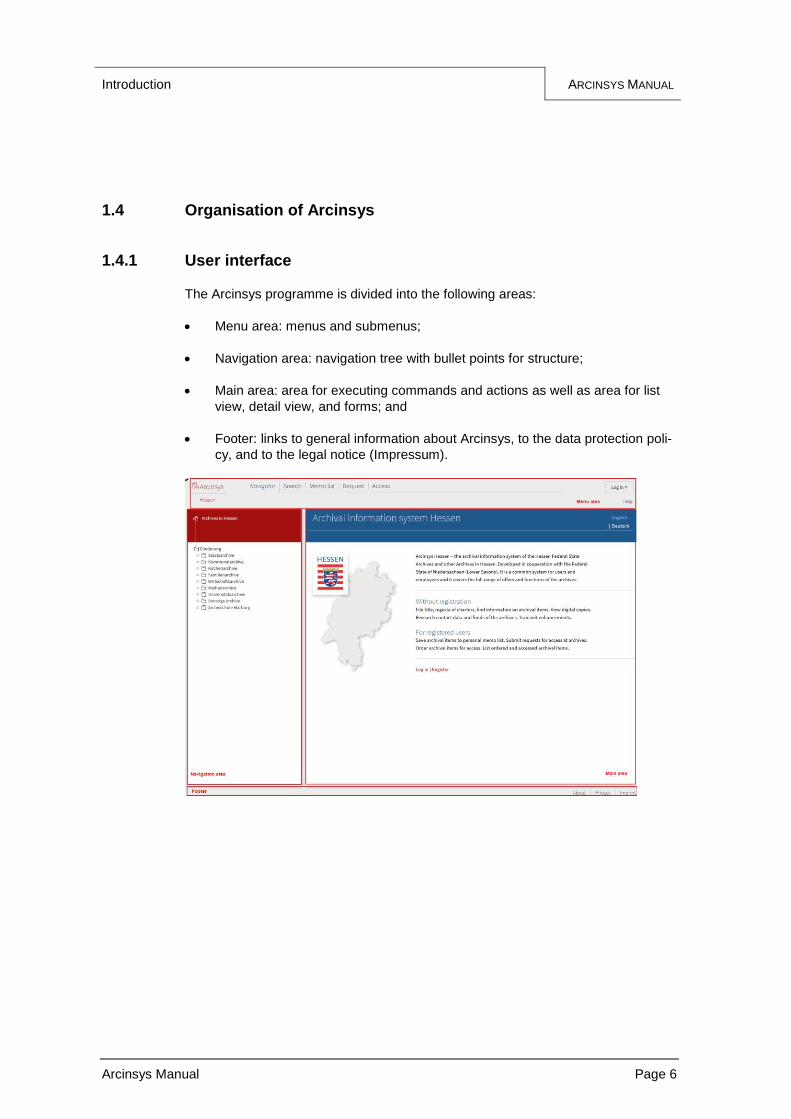
The Arcinsys programme is divided into the following areas:
Menu area: menus and submenus;
Navigation area: navigation tree with bullet points for structure;
Main area: area for executing commands and actions as well as area for list
view, detail view, and forms; and
Footer: links to general information about Arcinsys, to the data protection poli-
cy, and to the legal notice (Impressum).
Introduction ARCINSYS MANUAL
Arcinsys Manual Page 7
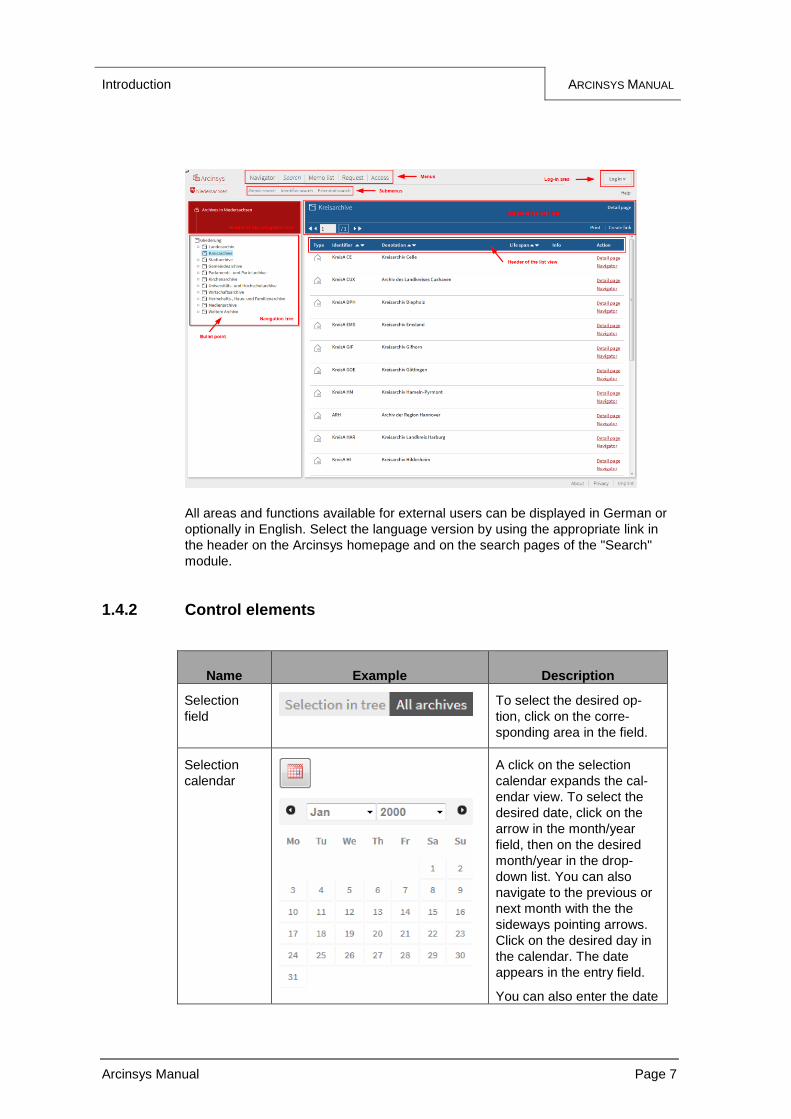
All areas and functions available for external users can be displayed in German or
optionally in English. Select the language version by using the appropriate link in
the header on the Arcinsys homepage and on the search pages of the "Search"
module.
1.4.2 Control elements
Name Example Description
Selection
field To select the desired op-
tion, click on the corre-
sponding area in the field.
Selection
calendar
A click on the selection
calendar expands the cal-
endar view. To select the
desired date, click on the
arrow in the month/year
field, then on the desired
month/year in the drop-
down list. You can also
navigate to the previous or
next month with the the
sideways pointing arrows.
Click on the desired day in
the calendar. The date
appears in the entry field.
You can also enter the date
Introduction ARCINSYS MANUAL
Arcinsys Manual Page 8
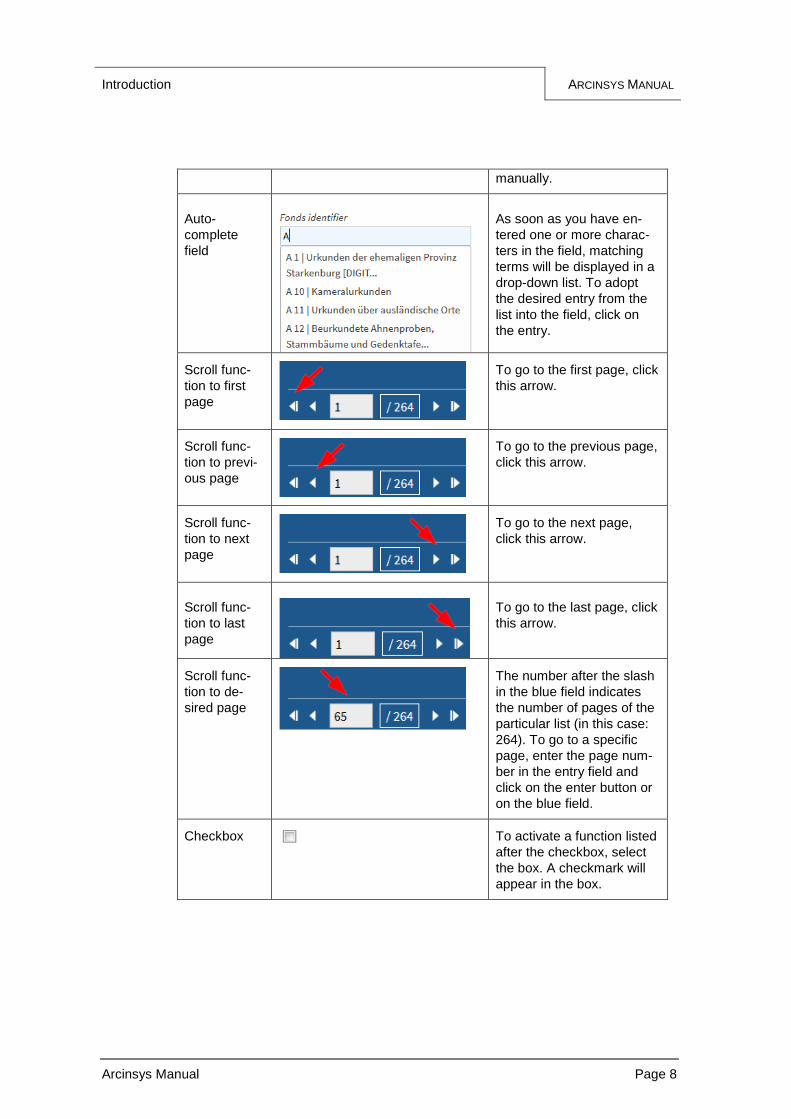
manually.
Auto-
complete
field
As soon as you have en-
tered one or more charac-
ters in the field, matching
terms will be displayed in a
drop-down list. To adopt
the desired entry from the
list into the field, click on
the entry.
Scroll func-
tion to first
page
To go to the first page, click
this arrow.
Scroll func-
tion to previ-
ous page
To go to the previous page,
click this arrow.
Scroll func-
tion to next
page
To go to the next page,
click this arrow.
Scroll func-
tion to last
page
To go to the last page, click
this arrow.
Scroll func-
tion to de-
sired page
The number after the slash
in the blue field indicates
the number of pages of the
particular list (in this case:
264). To go to a specific
page, enter the page num-
ber in the entry field and
click on the enter button or
on the blue field.
Checkbox
To activate a function listed
after the checkbox, select
the box. A checkmark will
appear in the box.
Introduction ARCINSYS MANUAL
Arcinsys Manual Page 9
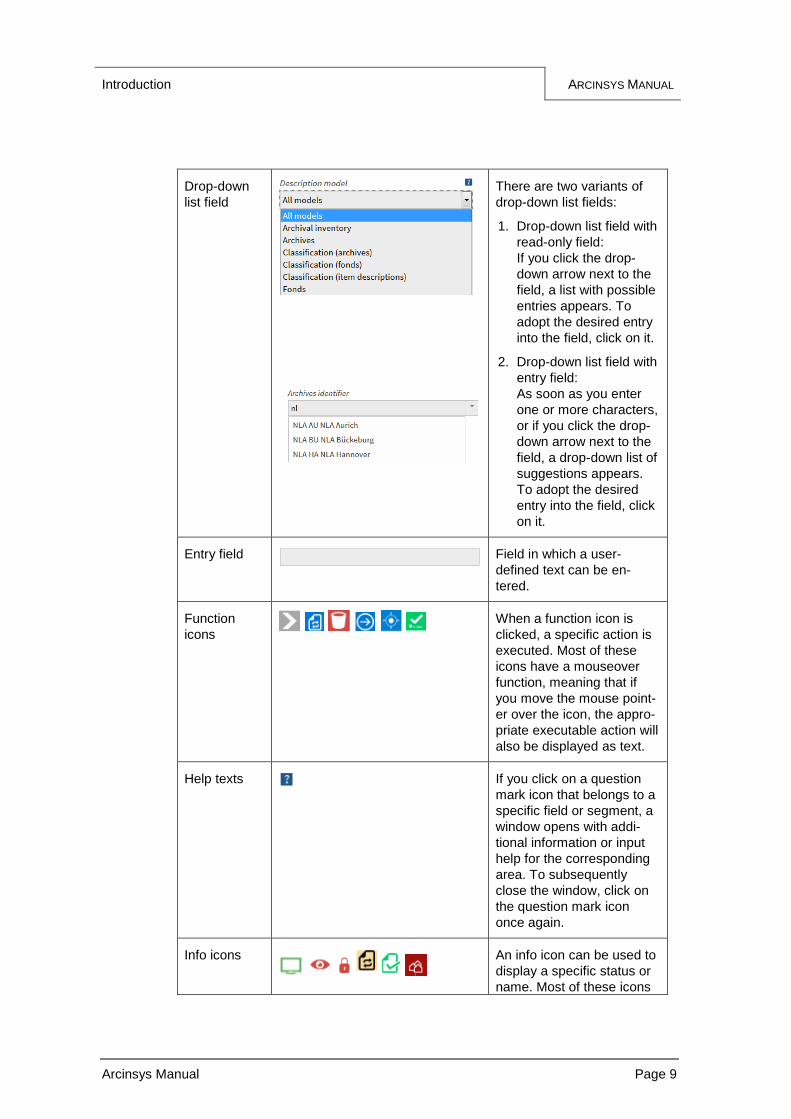
Drop-down
list field
There are two variants of
drop-down list fields:
1. Drop-down list field with
read-only field:
If you click the drop-
down arrow next to the
field, a list with possible
entries appears. To
adopt the desired entry
into the field, click on it.
2. Drop-down list field with
entry field:
As soon as you enter
one or more characters,
or if you click the drop-
down arrow next to the
field, a drop-down list of
suggestions appears.
To adopt the desired
entry into the field, click
on it.
Entry field
Field in which a user-
defined text can be en-
tered.
Function
icons
When a function icon is
clicked, a specific action is
executed. Most of these
icons have a mouseover
function, meaning that if
you move the mouse point-
er over the icon, the appro-
priate executable action will
also be displayed as text.
Help texts If you click on a question
mark icon that belongs to a
specific field or segment, a
window opens with addi-
tional information or input
help for the corresponding
area. To subsequently
close the window, click on
the question mark icon
once again.
Info icons
An info icon can be used to
display a specific status or
name. Most of these icons
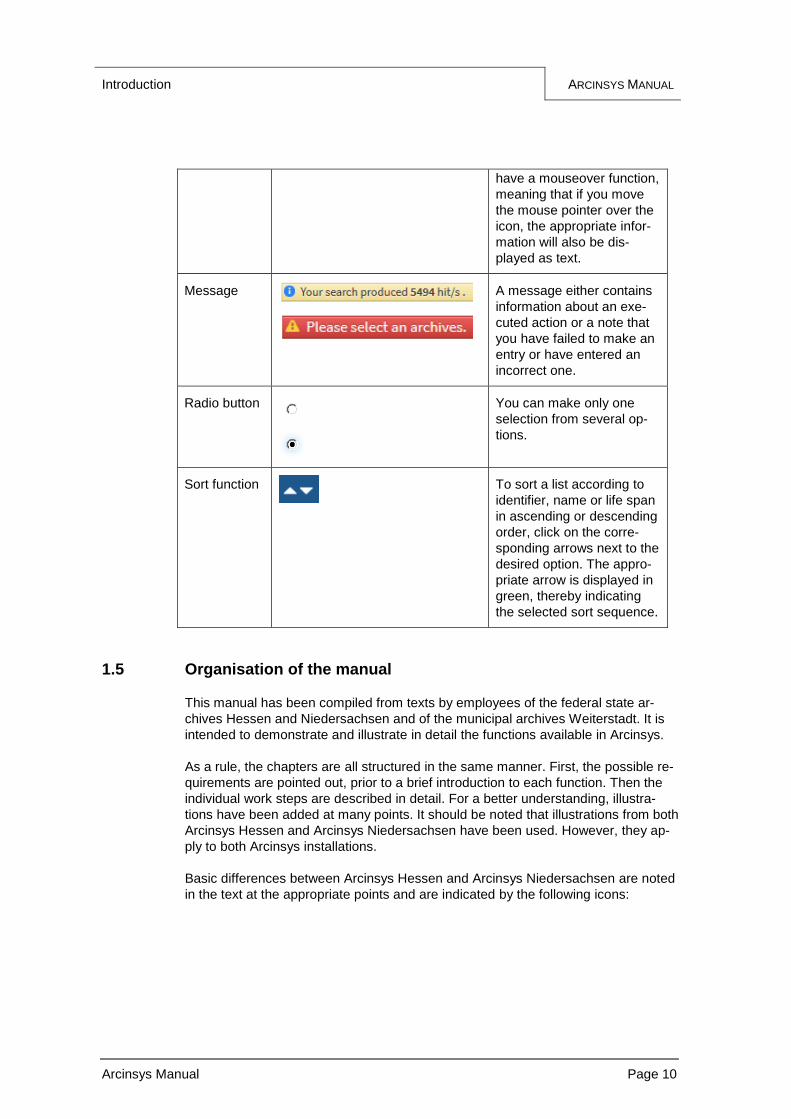
Introduction ARCINSYS MANUAL
Arcinsys Manual Page 10
have a mouseover function,
meaning that if you move
the mouse pointer over the
icon, the appropriate infor-
mation will also be dis-
played as text.
Message
A message either contains
information about an exe-
cuted action or a note that
you have failed to make an
entry or have entered an
incorrect one.
Radio button
You can make only one
selection from several op-
tions.
Sort function
To sort a list according to
identifier, name or life span
in ascending or descending
order, click on the corre-
sponding arrows next to the
desired option. The appro-
priate arrow is displayed in
green, thereby indicating
the selected sort sequence.
1.5 Organisation of the manual
This manual has been compiled from texts by employees of the federal state ar-
chives Hessen and Niedersachsen and of the municipal archives Weiterstadt. It is
intended to demonstrate and illustrate in detail the functions available in Arcinsys.
As a rule, the chapters are all structured in the same manner. First, the possible re-
quirements are pointed out, prior to a brief introduction to each function. Then the
individual work steps are described in detail. For a better understanding, illustra-
tions have been added at many points. It should be noted that illustrations from both
Arcinsys Hessen and Arcinsys Niedersachsen have been used. However, they ap-
ply to both Arcinsys installations.
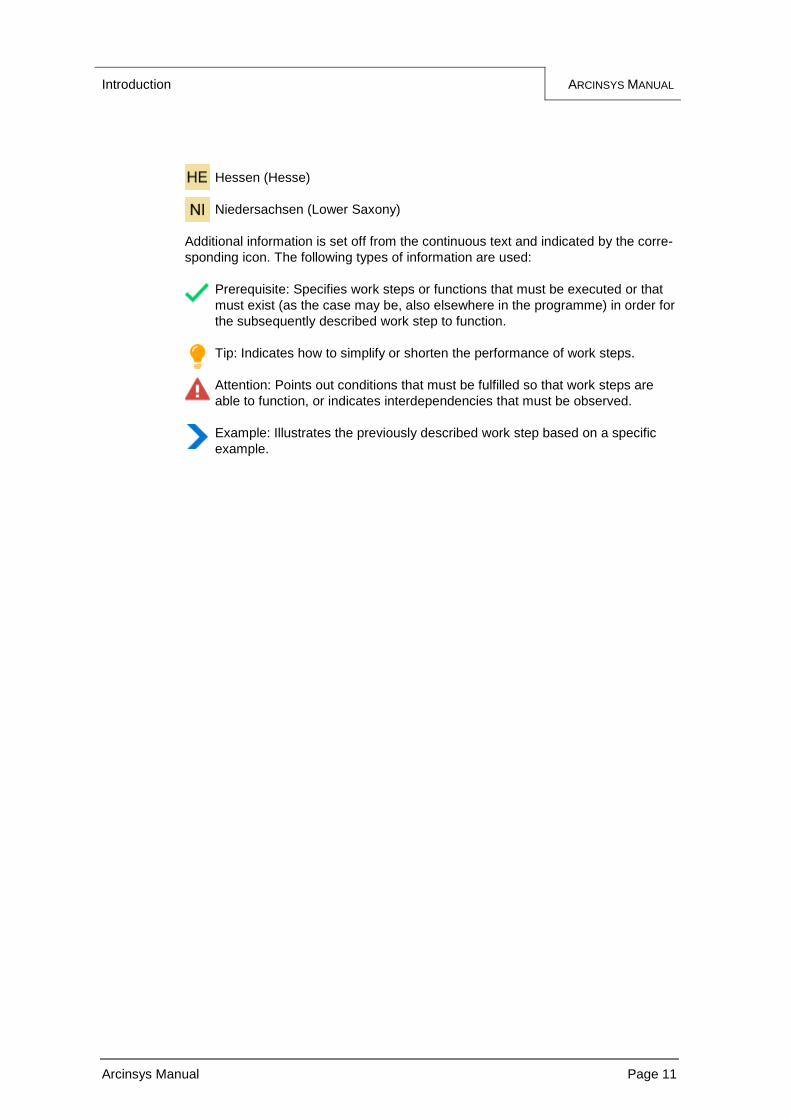
Basic differences between Arcinsys Hessen and Arcinsys Niedersachsen are noted
in the text at the appropriate points and are indicated by the following icons:
Introduction ARCINSYS MANUAL
Arcinsys Manual Page 11
Hessen (Hesse)
Niedersachsen (Lower Saxony)
Additional information is set off from the continuous text and indicated by the corre-
sponding icon. The following types of information are used:
Prerequisite: Specifies work steps or functions that must be executed or that
must exist (as the case may be, also elsewhere in the programme) in order for
the subsequently described work step to function.
Tip: Indicates how to simplify or shorten the performance of work steps.
Attention: Points out conditions that must be fulfilled so that work steps are
able to function, or indicates interdependencies that must be observed.
Example: Illustrates the previously described work step based on a specific
example.
Navigator ARCINSYS MANUAL
Arcinsys Manual Page 12
2 Navigator
The "Navigator" menu enables you to research according to archives, fonds and ar-
chival items as well as to access information on these. The research is carried out
in a navigation tree that is structured in hierarchical levels.
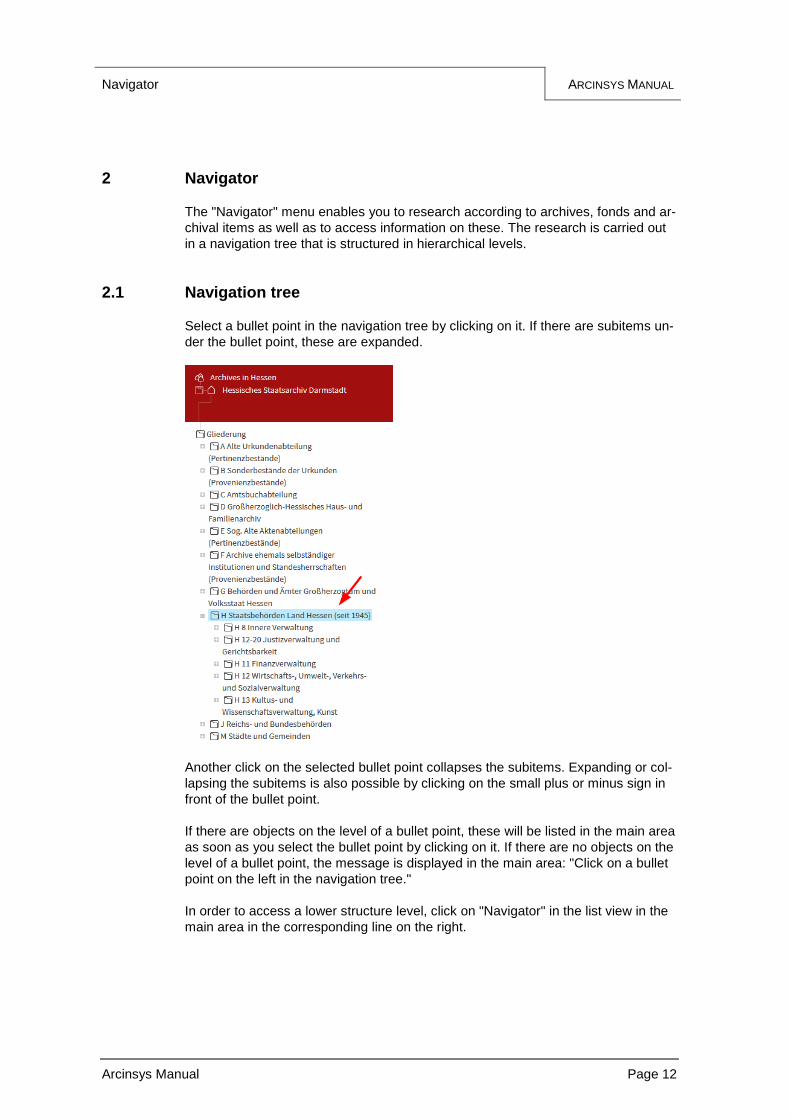
2.1 Navigation tree
Select a bullet point in the navigation tree by clicking on it. If there are subitems un-
der the bullet point, these are expanded.
Another click on the selected bullet point collapses the subitems. Expanding or col-
lapsing the subitems is also possible by clicking on the small plus or minus sign in
front of the bullet point.
If there are objects on the level of a bullet point, these will be listed in the main area
as soon as you select the bullet point by clicking on it. If there are no objects on the
level of a bullet point, the message is displayed in the main area: "Click on a bullet
point on the left in the navigation tree."
In order to access a lower structure level, click on "Navigator" in the list view in the
main area in the corresponding line on the right.
Navigator ARCINSYS MANUAL
Arcinsys Manual Page 13
When starting Arcinsys, the navigation tree displays the archival landscape. If you
click on a bullet point, the archives of an archival division are displayed in the list
view. In order to access the level of an archives, click on "Navigator" in the corre-
sponding line of the list. The navigation tree now displays the tectonics of the ar-
chives.
When you click on a bullet point in the navigation tree of the archival tectonics, the
fonds series and fonds assigned to the bullet point will be displayed in the list view.
In order to access the fonds of a fonds series, click on "Navigator" in the corre-
sponding line of the list on the right. In order to return from the list view of the fonds
series to the list view of the tectonics item, click on "Close series" in the header of
the main area. In order to access the level of a fonds, click on "Navigator" on the
right in the corresponding line of the list. The navigation tree now displays the clas-
sification of the fonds.
When you click a bullet point in the navigation tree of the classification system, the
item series and descriptions that are assigned to that particular classification item
are displayed in the list view. In order to access the descriptions of an item series,
click on "Navigator" in the corresponding line of the list on the right. In order to re-
turn from the list view of the item series to the list view of the classification item,
click on "Close series" in the header of the main area.
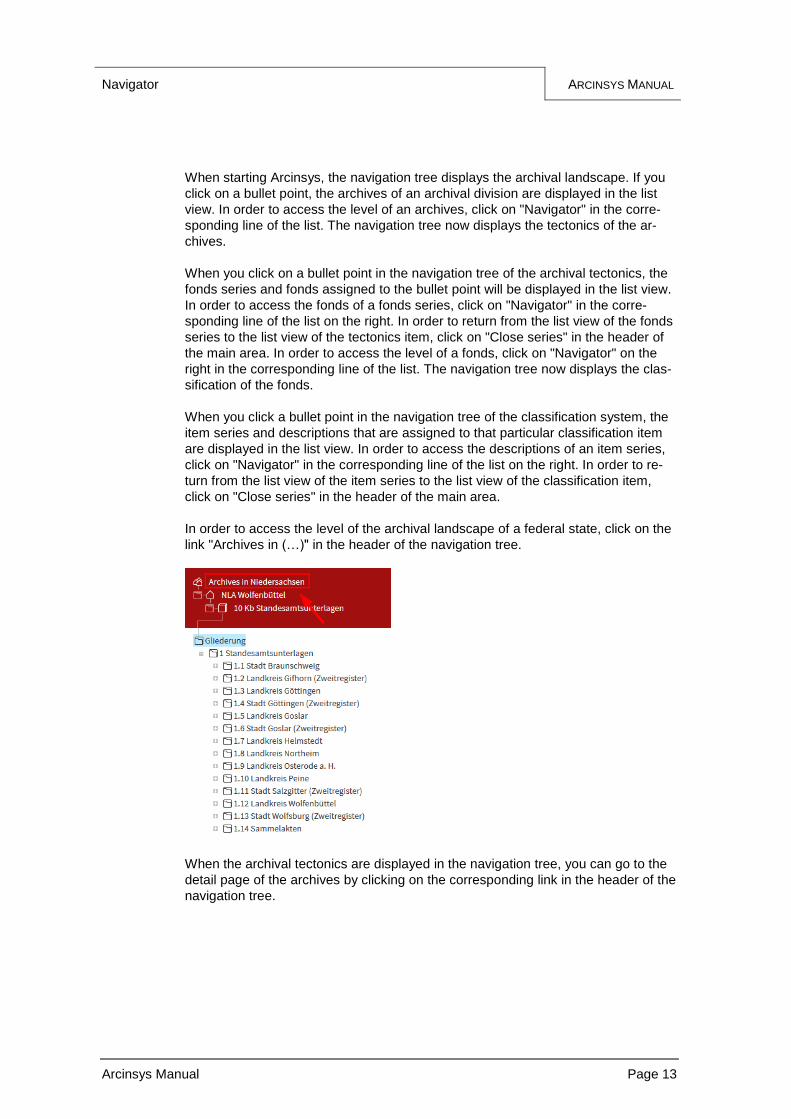
In order to access the level of the archival landscape of a federal state, click on the
link "Archives in (…)" in the header of the navigation tree.
When the archival tectonics are displayed in the navigation tree, you can go to the
detail page of the archives by clicking on the corresponding link in the header of the
navigation tree.
Navigator ARCINSYS MANUAL
Arcinsys Manual Page 14
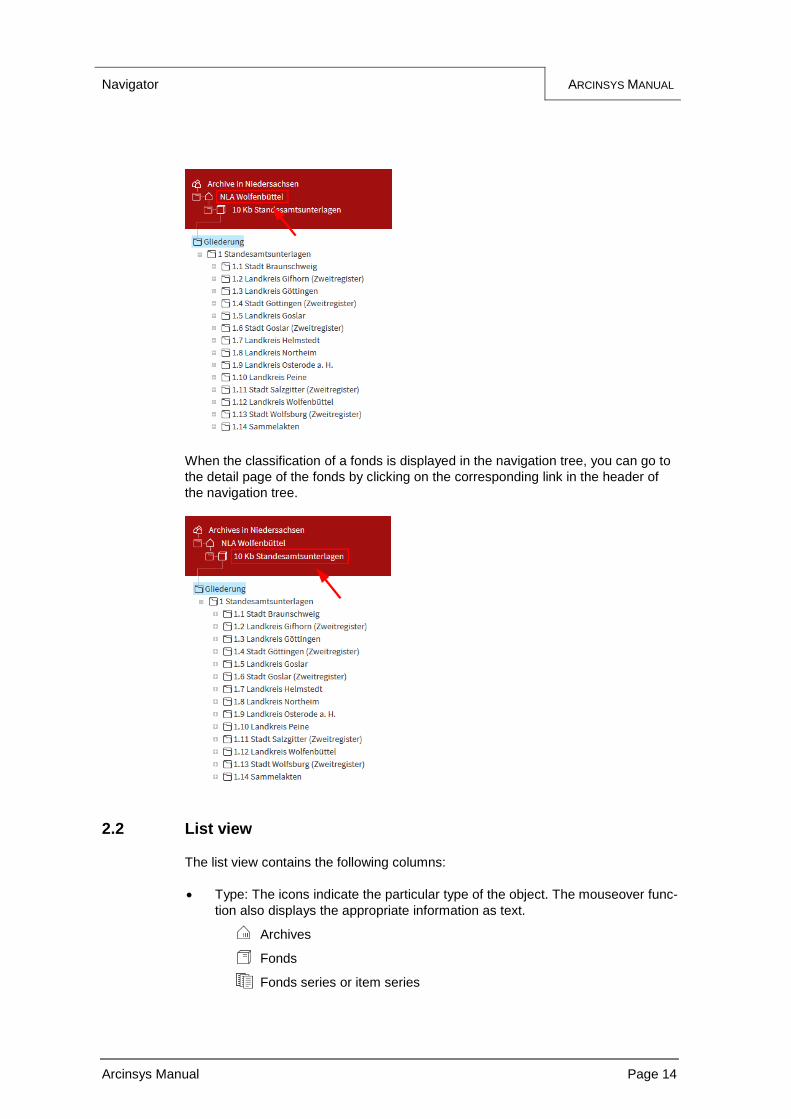
When the classification of a fonds is displayed in the navigation tree, you can go to
the detail page of the fonds by clicking on the corresponding link in the header of
the navigation tree.
2.2 List view
The list view contains the following columns:
Type: The icons indicate the particular type of the object. The mouseover func-
tion also displays the appropriate information as text.
Archives
Fonds
Fonds series or item series
Navigator ARCINSYS MANUAL
Arcinsys Manual Page 15
Description
Identifier: For the archives type, the identifier is comprised of the archival ID
For the fonds and fonds series types, the identifier is comprised of the archival
ID and of the fonds identifier or fonds series identifier, as the case may be. For
the item series and description types, the identifier is comprised of the archival
ID and the identifier of the fonds and the identifier of the item or the item se-
ries, as the case may be. For descriptions for which a stored fonds is entered,
the identifier is comprised of the archival ID, the identifier of the stored fonds,
and the identifier of the item.
Name: As a general rule, this is the title (e.g. of the description or the fonds) or
the name of the archives. In the case of longer titles, only an abbreviated
name is displayed in the list.
Life span: This is the time of entry and creation of the archival items.
Info:
The following info icons provide additional information. The corresponding in-
formation is displayed as text using the mouseover function.
Monitor: Digital copies available in the fonds
Padlock: The object is restricted for use due to a legal term of
protection or other legal requirements. Blocked archival items can only
be ordered with a special authorisation.
Eye: The object is hidden, and it will only be displayed for approved
users with a corresponding authorisation.
Red cross: The object is flagged for deletion.
Published digital copies, meaning freely available for use without logging in,
are displayed as a thumbnail.
Action: The links "Navigator" and "Detail page" enable the selection of various
levels. Logged-in users can adopt archival items onto their memo list using the
link "Order" (see 6.1 Create a memo list).
Navigator ARCINSYS MANUAL
Arcinsys Manual Page 16
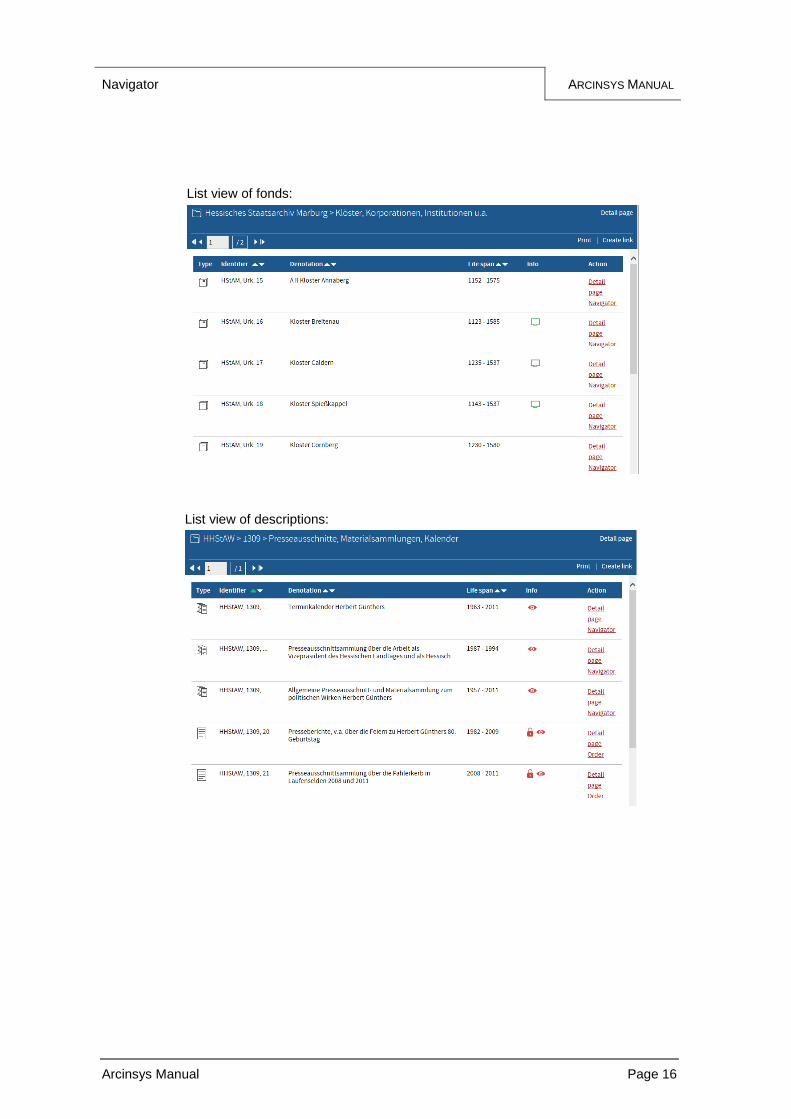
List view of fonds:
List view of descriptions:
Navigator ARCINSYS MANUAL
Arcinsys Manual Page 17
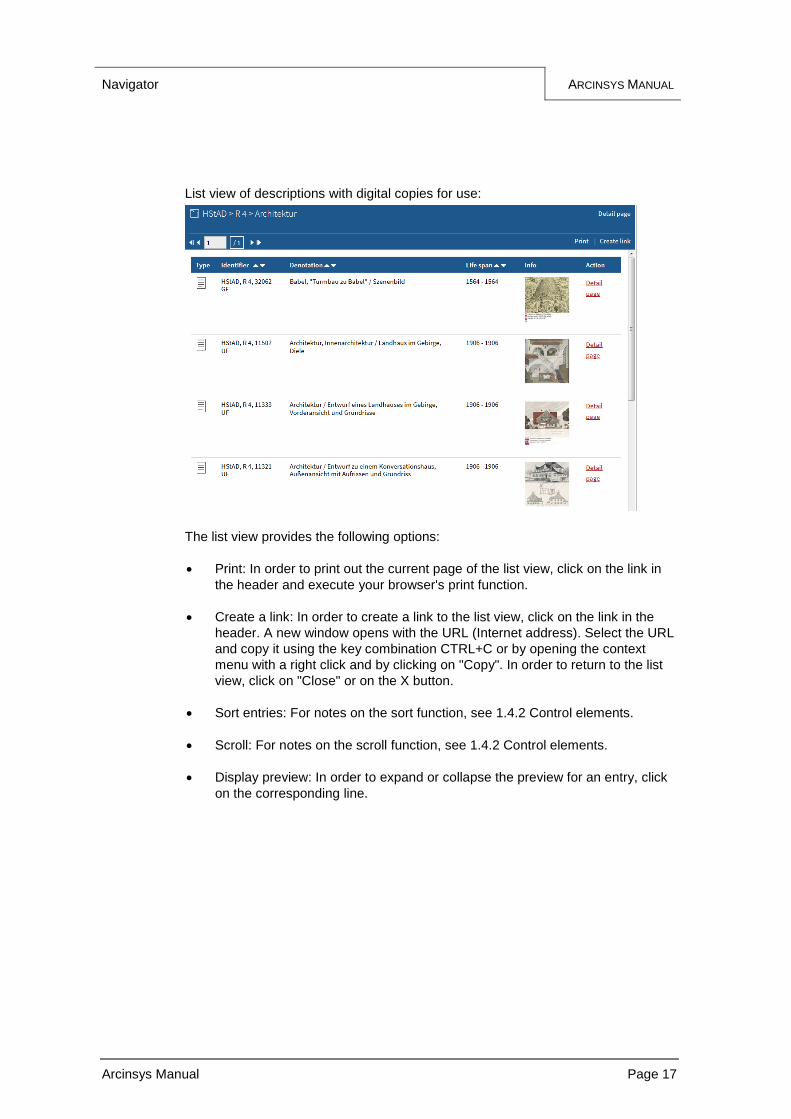
List view of descriptions with digital copies for use:
The list view provides the following options:
Print: In order to print out the current page of the list view, click on the link in
the header and execute your browser's print function.
Create a link: In order to create a link to the list view, click on the link in the
header. A new window opens with the URL (Internet address). Select the URL
and copy it using the key combination CTRL+C or by opening the context
menu with a right click and by clicking on "Copy". In order to return to the list
view, click on "Close" or on the X button.
Sort entries: For notes on the sort function, see 1.4.2 Control elements.
Scroll: For notes on the scroll function, see 1.4.2 Control elements.
Display preview: In order to expand or collapse the preview for an entry, click
on the corresponding line.
Navigator ARCINSYS MANUAL
Arcinsys Manual Page 18
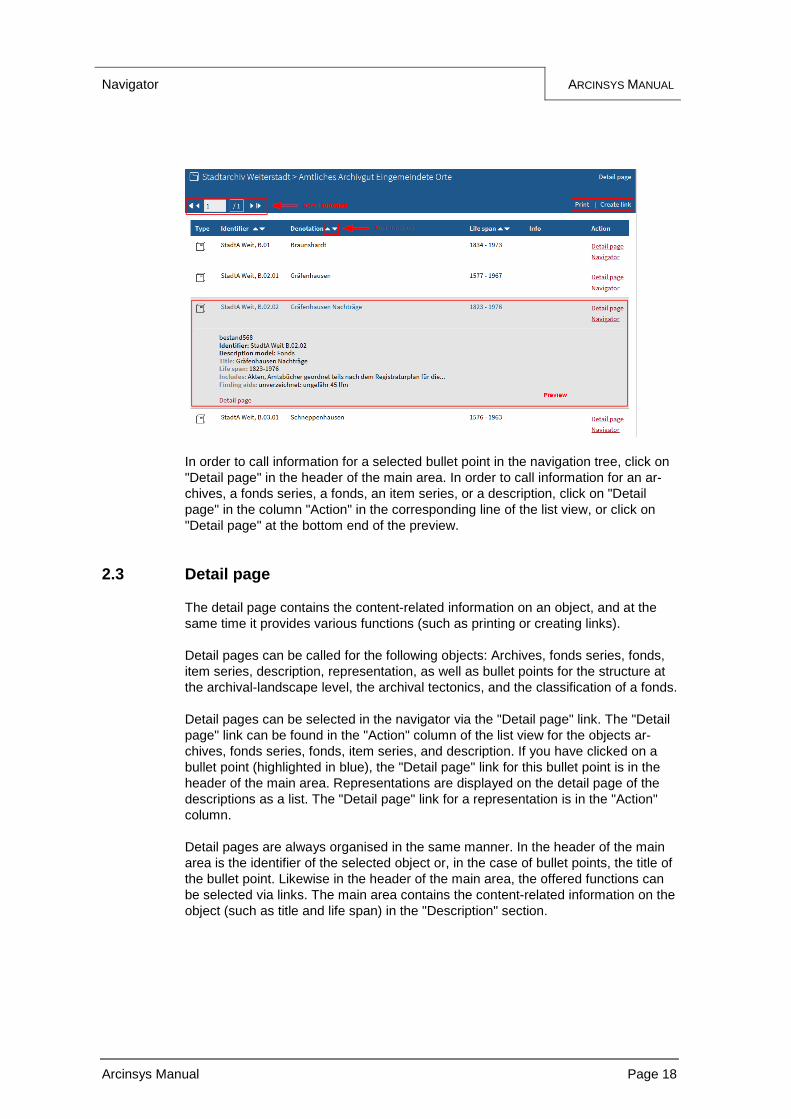
In order to call information for a selected bullet point in the navigation tree, click on
"Detail page" in the header of the main area. In order to call information for an ar-
chives, a fonds series, a fonds, an item series, or a description, click on "Detail
page" in the column "Action" in the corresponding line of the list view, or click on
"Detail page" at the bottom end of the preview.
2.3 Detail page
The detail page contains the content-related information on an object, and at the
same time it provides various functions (such as printing or creating links).
Detail pages can be called for the following objects: Archives, fonds series, fonds,
item series, description, representation, as well as bullet points for the structure at
the archival-landscape level, the archival tectonics, and the classification of a fonds.
Detail pages can be selected in the navigator via the "Detail page" link. The "Detail
page" link can be found in the "Action" column of the list view for the objects ar-
chives, fonds series, fonds, item series, and description. If you have clicked on a
bullet point (highlighted in blue), the "Detail page" link for this bullet point is in the
header of the main area. Representations are displayed on the detail page of the
descriptions as a list. The "Detail page" link for a representation is in the "Action"
column.
Detail pages are always organised in the same manner. In the header of the main
area is the identifier of the selected object or, in the case of bullet points, the title of
the bullet point. Likewise in the header of the main area, the offered functions can
be selected via links. The main area contains the content-related information on the
object (such as title and life span) in the "Description" section.
Navigator ARCINSYS MANUAL
Arcinsys Manual Page 19
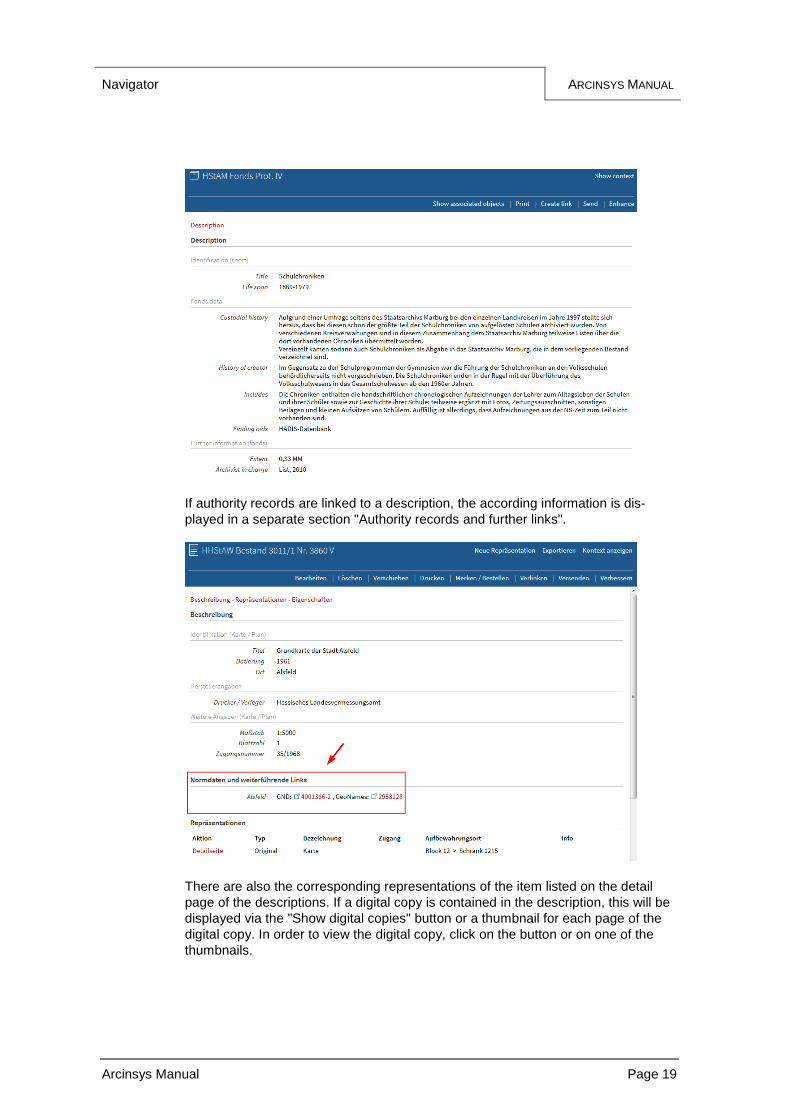
If authority records are linked to a description, the according information is dis-
played in a separate section "Authority records and further links".
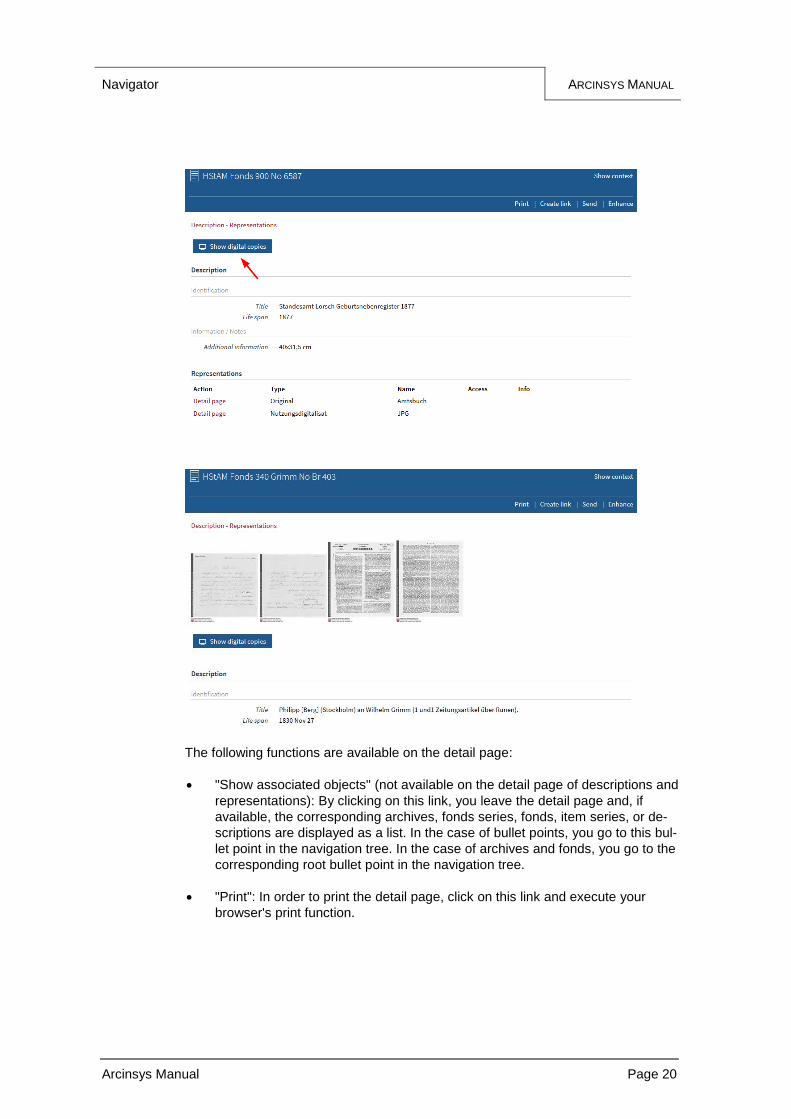
There are also the corresponding representations of the item listed on the detail
page of the descriptions. If a digital copy is contained in the description, this will be
displayed via the "Show digital copies" button or a thumbnail for each page of the
digital copy. In order to view the digital copy, click on the button or on one of the
thumbnails.
Navigator ARCINSYS MANUAL
Arcinsys Manual Page 20
The following functions are available on the detail page:
"Show associated objects" (not available on the detail page of descriptions and
representations): By clicking on this link, you leave the detail page and, if
available, the corresponding archives, fonds series, fonds, item series, or de-
scriptions are displayed as a list. In the case of bullet points, you go to this bul-
let point in the navigation tree. In the case of archives and fonds, you go to the
corresponding root bullet point in the navigation tree.
"Print": In order to print the detail page, click on this link and execute your
browser's print function.
Navigator ARCINSYS MANUAL
Arcinsys Manual Page 21
"Create link": In order to create a link to the detail page, click on this link. A
new window opens with the URL (Internet address). Select the URL and copy
it using the key combination CTRL+C or by opening the context menu with a
right click and by clicking on "Copy". In order to return to the list view, click on
"Close" or on the X button.
"Send": In order to send a reference to this page via e-mail to yourself or to
another person, click on this link. A new window opens. Make the entries in the
mandatory fields "* E-mail recipient" and "* Sender" and then click on the
"Send" button. The message appears: "The e-mail has been successfully
sent." In order to return to the detail page, click on "Close" or on the X button.
"Improvements": In order to send a suggestion for improvement to the ar-
chives, click on this link. A new window opens. Make the entries in the fields "*
Sender" (mandatory field) and "Message". In order to give the archives the op-
portunity of asking questions or giving you feedback, enter your e-mail address
in the field "E-mail". Change the default subject, if required. Click on the button
"Send now". The message appears: "The e-mail has been successfully sent."
In order to return to the detail page, click on "Close" or on the X button.
"Close detail page" or "Show context" or "Show description", as the case may
be:
"Close detail page": In order to close the detail page of a bullet point,
click on this link. You will receive the list view of the objects associated
with the closed bullet point.
"Show context": In order to close the detail pages of archives, fonds
series, fonds, item series, or descriptions, click on this link. You will re-
ceive the list view of the level of the closed object.
"Show description": In order to close the detail page of a representa-
tion, click on this link. You will receive the detail page of the description
associated with the closed representation.
Search ARCINSYS MANUAL
Arcinsys Manual Page 22
3 Search
Arcinsys offers the following search functions:
Simple search: Allows searching for one or more words or terms. The search
can also be narrowed down to a certain period of time. Optionally, the search
is performed in an area previously selected via the navigator or in all archives
of the archival information system.
Identifier search: Allows direct selection of a known identifier.
Extended search: Allows limiting the search to certain archives, fonds, and life
spans as well as combining search words with description models and the ap-
propriate fields (description elements).
3.1 Notes for simple and extended search
Search results are displayed in a result list. You can save search queries and reo-
pen them for a new search of the same kind.
Search words:
Search words can be truncated by using * at the end (example: searching for "fran*"
will find "Frankfurt" and "France"). Truncating the beginning of a word, as in
"*place", is not possible. Please refine your search term in this case (e.g. "birth-
place"). You can use letters and numbers. The entry is not case-sensitive. "Ä","ö",
"ü", and "ß" are equivalent to "ae", "oe", "ue", and "ss".
Entering several search words will return only records containing all requested
search words (AND operator).
Use OR between the search words to retrieve records containing either of the
words (OR operator).
Use NOT before a search word to exclude that word from your search.
Several words or terms enclosed in double quotes will prompt a search for the exact
phrase. The terms have to appear in exactly the same order in the result as typed in
(e.g. "The Great War").
Specific time period:
You can limit your search to the time of entry and creation of an archival item (the
so-called life span). You will also find hits that only partly overlap with the specified
period.
All time periods will be considered if no specific time period is entered in the fields
"Time period from" and "to".
If you want to search from a specific year onwards, enter that year into the field
"Time period from". If you want to search up to a specific year, enter that year only
into the field "to". If you want to limit the search to one single, specific year, enter
the same year into both fields.
In order to remove all current entries from the form to create a new search query,
click on the link "Reset" in the header of the main area.
Search ARCINSYS MANUAL
Arcinsys Manual Page 23
3.2 Simple search
Open the menu "Search" and then open the submenu "Simple search".
Enter one or more words in the auto-complete field "*Search words" (mandatory
field). The search words must have at least two characters (letters and/or numbers).
Tip: The numbers in brackets behind the words in the suggestion list indicate
the number of results containing the specific word.
You can limit your search to a specific time or time period using the fields "Time pe-riod from" and/or "to".
In the selection field "Search area", you have the following possibilities for determin-
ing the search area:
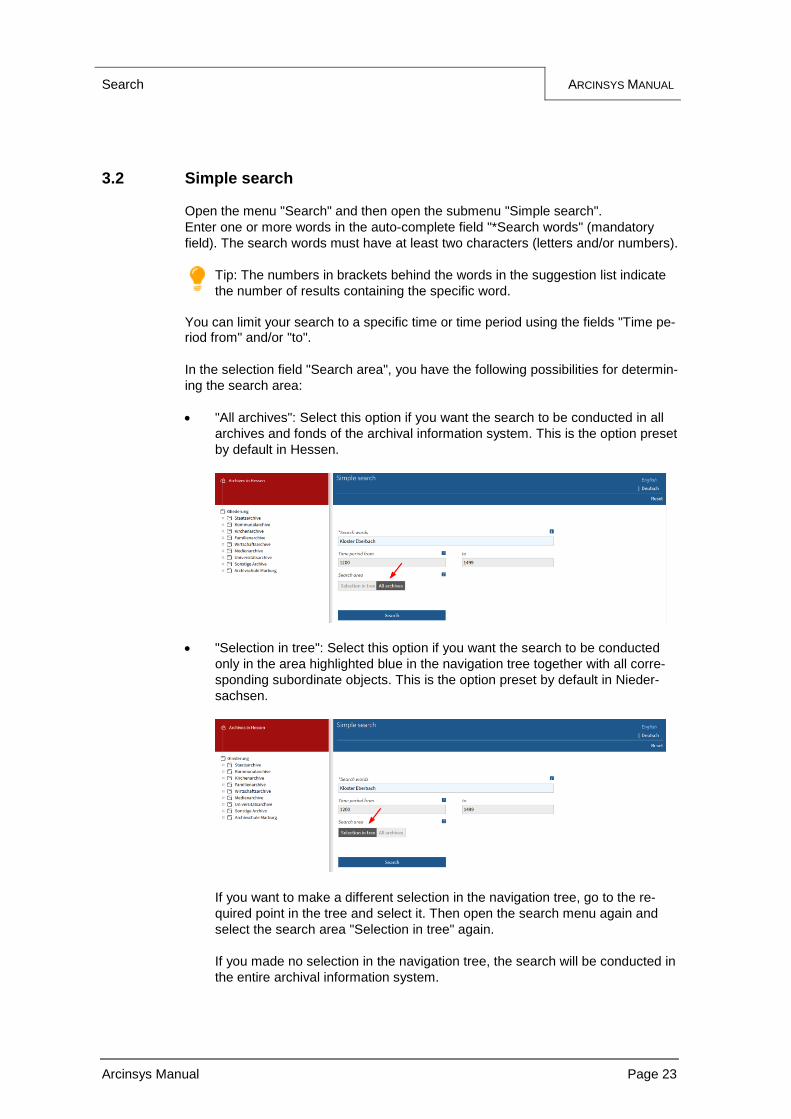
"All archives": Select this option if you want the search to be conducted in all
archives and fonds of the archival information system. This is the option preset
by default in Hessen.
"Selection in tree": Select this option if you want the search to be conducted
only in the area highlighted blue in the navigation tree together with all corre-
sponding subordinate objects. This is the option preset by default in Nieder-
sachsen.
If you want to make a different selection in the navigation tree, go to the re-
quired point in the tree and select it. Then open the search menu again and
select the search area "Selection in tree" again.
If you made no selection in the navigation tree, the search will be conducted in
the entire archival information system.
Search ARCINSYS MANUAL
Arcinsys Manual Page 24
Start the search by clicking on the button "Search".
Results will be displayed in a list (see 3.5 Result list). If the search produced no re-sults, the according message will be displayed: "Your simple search produced no results."
3.3 Identifier search
Open the menu "Search" and then open the submenu "Identifier search".
Enter the archives or the archival ID in the drop-down list field "Archives identifier"
and optionally the identifier of the fonds identifier in the auto-complete field "Fonds
identifier" and the identifier of the archival item in the auto-complete field "Item iden-
tifier". The archives has to be selected in the drop-down list. Truncating is not pos-
sible for "Archives identifier". "Fonds identifier" and "Item identifier" can be selected
using the drop-down list. You can also enter the identifier manually. Truncating is
possible.
In order to search simultaneously for several identifiers starting with one or more
characters that are the same, truncate the fonds identifier or the item identifier by
using a "*" at the end.
Example: Searching for 12* will find 123, 124, and 1231.
Attention: When making entries in the field "Item identifier", the first characters
in the identifiers always have to be used. Entering "No. 1" or "No. *" or "No.
1*", for example, will result in finding the item with the identifier "No. 1". If only
"1" or "1*", for example, is entered, however, the item "No. 1" will not be found.
If you only make an entry in the field "Archives identifier", the archives will be dis-
played as a result. If you only make entries in the two fields "Archives identifier" and
"Fonds identifier", the fonds will be displayed as a result.
Start the search by clicking on the button "Search". Results will be displayed in a list. If the search produced no results, the according message will be displayed: "Your identifier search produced no results."
3.4 Extended search
The submenu "Extended search" allows you to limit the search to certain archives and/or fonds as well as to combine search words with description models and the appropriate description elements.
Open the menu "Search" and then open the submenu "Extended search".
In the selection field "Search area", you have the following possibilities for determin-ing the search area:
Search ARCINSYS MANUAL
Arcinsys Manual Page 25
"All archives" (see 3.2 Simple search). This is the option preset by default in
Hessen.
"Selection in tree" (see 3.2 Simple search). This is the option preset by default
in Niedersachsen.
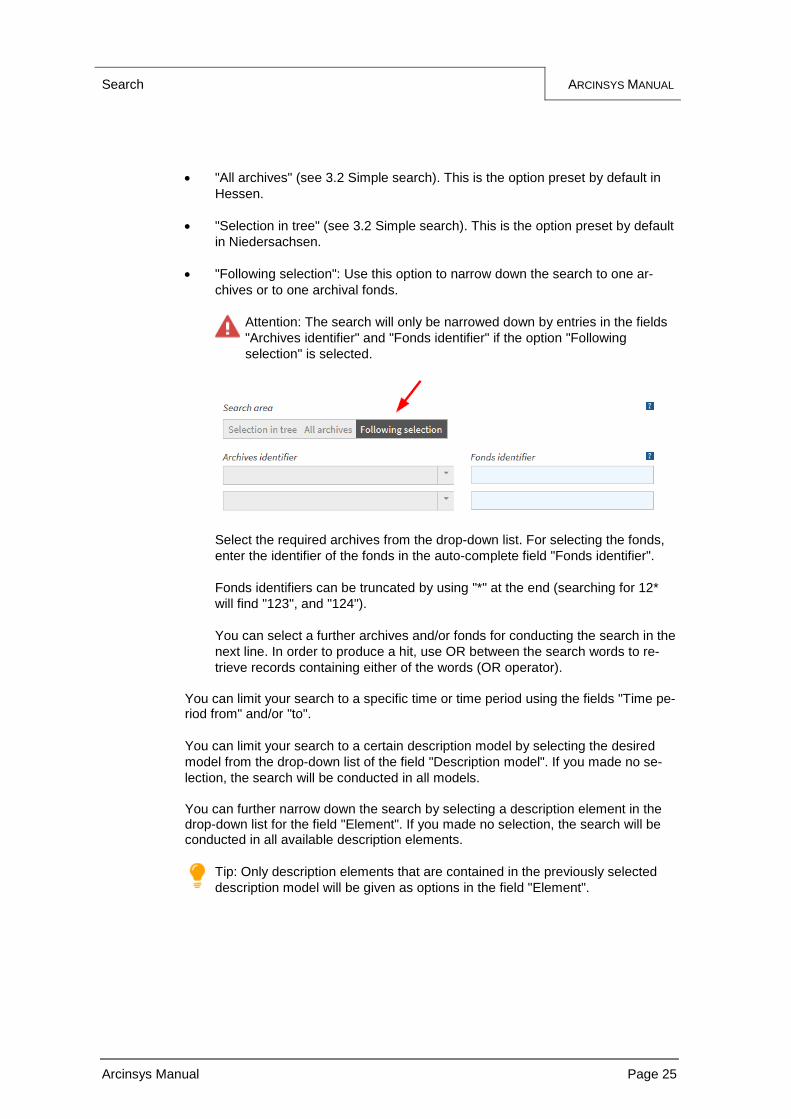
"Following selection": Use this option to narrow down the search to one ar-
chives or to one archival fonds.
Attention: The search will only be narrowed down by entries in the fields
"Archives identifier" and "Fonds identifier" if the option "Following
selection" is selected.
Select the required archives from the drop-down list. For selecting the fonds,
enter the identifier of the fonds in the auto-complete field "Fonds identifier".
Fonds identifiers can be truncated by using "*" at the end (searching for 12*
will find "123", and "124").
You can select a further archives and/or fonds for conducting the search in the
next line. In order to produce a hit, use OR between the search words to re-
trieve records containing either of the words (OR operator).
You can limit your search to a specific time or time period using the fields "Time pe-riod from" and/or "to".
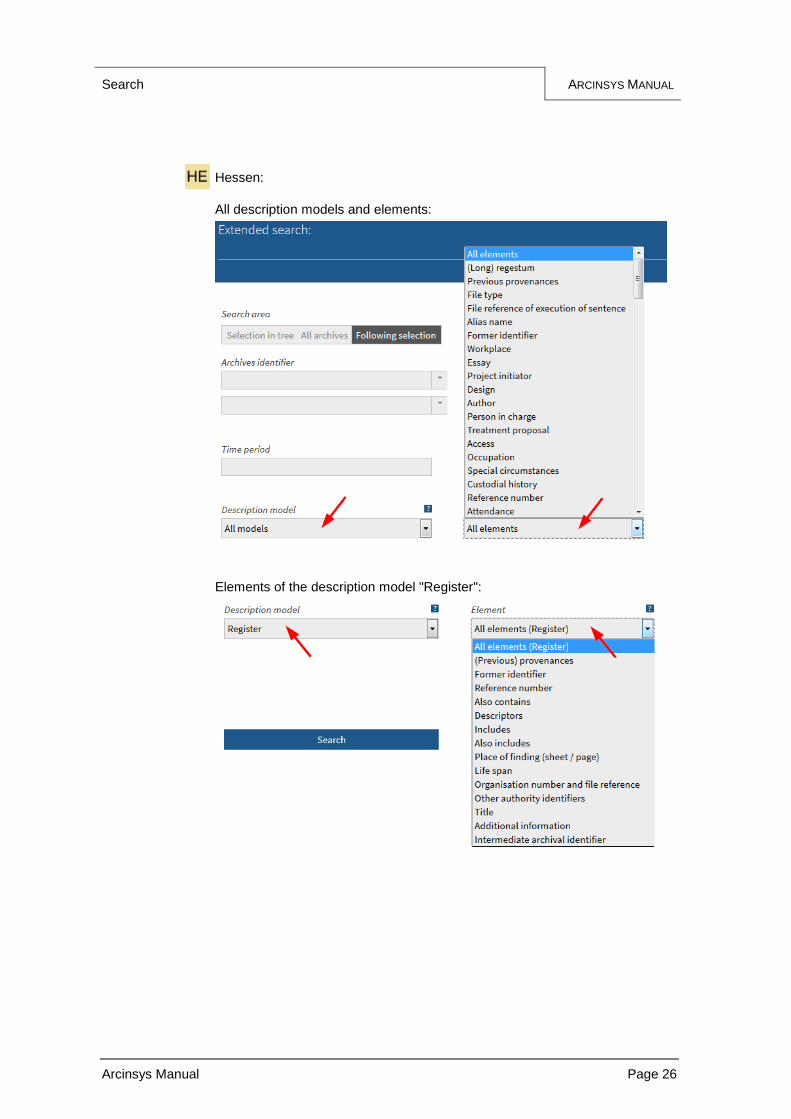
You can limit your search to a certain description model by selecting the desired
model from the drop-down list of the field "Description model". If you made no se-
lection, the search will be conducted in all models.
You can further narrow down the search by selecting a description element in the drop-down list for the field "Element". If you made no selection, the search will be conducted in all available description elements.
Tip: Only description elements that are contained in the previously selected
description model will be given as options in the field "Element".
Search ARCINSYS MANUAL
Arcinsys Manual Page 26
Hessen:
All description models and elements:
Elements of the description model "Register":
Search ARCINSYS MANUAL
Arcinsys Manual Page 27
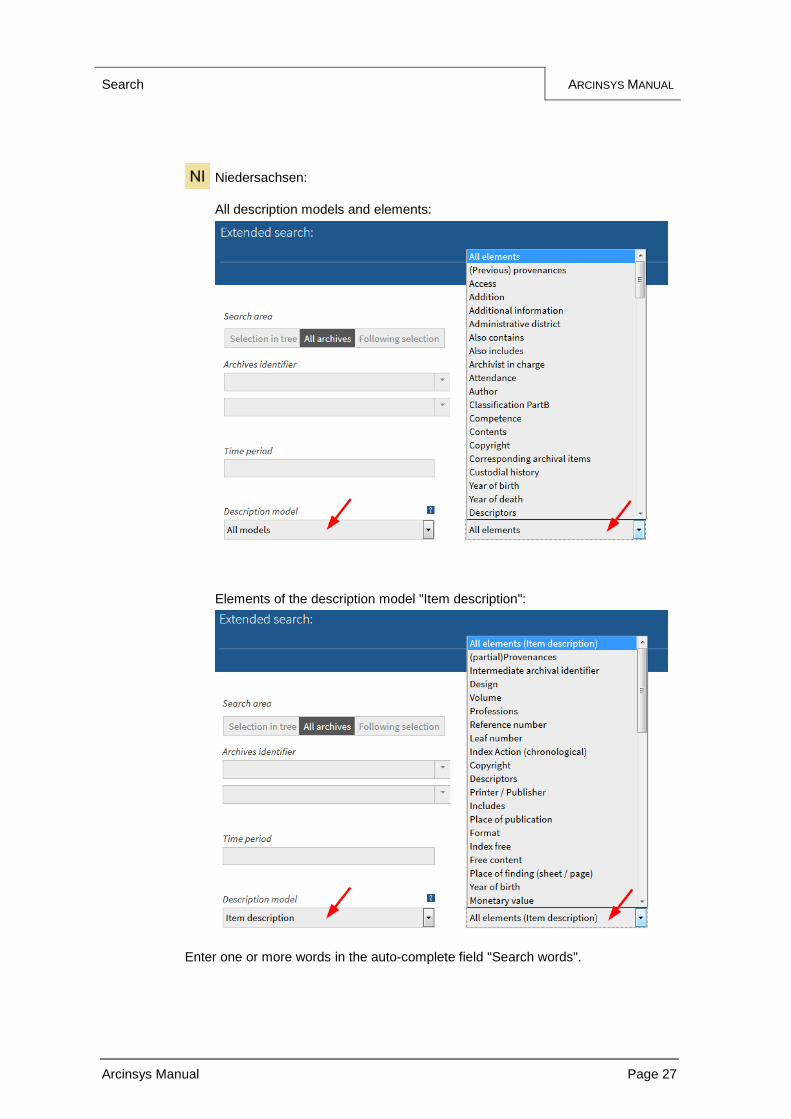
Niedersachsen:
All description models and elements:
Elements of the description model "Item description":
Enter one or more words in the auto-complete field "Search words".
Search ARCINSYS MANUAL
Arcinsys Manual Page 28
Tip: The numbers in brackets behind the words in the suggestion list indicate
the number of results containing the specific word.
Other than with the simple search, for which at least two characters have to be en-
tered in the field "Search words", here a search is possible for only one letter or
number. Searching without any search words at all is also possible, provided that
other search options are selected.
In one or two further lines, as the case may be, it is possible to select one descrip-tion element each and/or to enter search words. This selection also refers to the previously selected description model. In order to produce a hit, all entries in the two or three lines, as the case may be, have to apply (AND operator between the lines).
Start the search by clicking on the button "Search". Results will be displayed in a list. If the search produced no results, the according message will be displayed: "Your extended search produced no results."
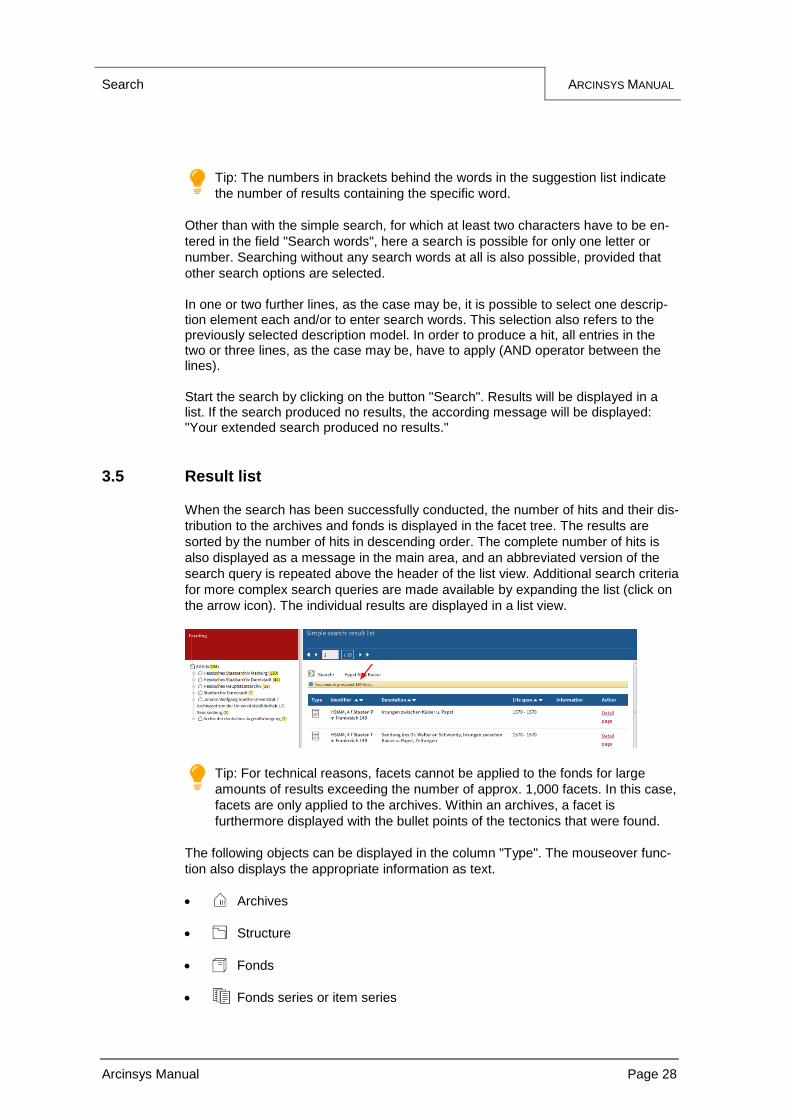
3.5 Result list
When the search has been successfully conducted, the number of hits and their dis-
tribution to the archives and fonds is displayed in the facet tree. The results are
sorted by the number of hits in descending order. The complete number of hits is
also displayed as a message in the main area, and an abbreviated version of the
search query is repeated above the header of the list view. Additional search criteria
for more complex search queries are made available by expanding the list (click on
the arrow icon). The individual results are displayed in a list view.
Tip: For technical reasons, facets cannot be applied to the fonds for large
amounts of results exceeding the number of approx. 1,000 facets. In this case,
facets are only applied to the archives. Within an archives, a facet is
furthermore displayed with the bullet points of the tectonics that were found.
The following objects can be displayed in the column "Type". The mouseover func-
tion also displays the appropriate information as text.
Archives
Structure
Fonds
Fonds series or item series

Search ARCINSYS MANUAL
Arcinsys Manual Page 29
Description
In order to facet the search result, i.e. to display only the results from a certain ar-
chives or fonds, click on the corresponding facet point in the facet tree.
If the result list has several pages, you can use the scroll function (see 1.4.2 Control
elements) in the header of the main area to view further results.
Use the respective sort function (see 1.4.2 Control elements) in the header of the
list view to sort the result list by identifier, name, or life span in ascending or de-
scending order.
By clicking on the appropriate line, you can expand and collapse a preview for the
individual results. The search word is color-highlighted in the preview.
Additional information is displayed in the column "Information" via the following info
icons. The mouseover function also displays the appropriate information as text.
Monitor: Digital copies available in the fonds
Padlock: The object is restricted for use due to a legal term of protection or
other legal requirements. Blocked archival items can only be ordered with a
special authorisation.
Eye: The object is hidden, and it will only be displayed for approved users
with a corresponding authorisation.
Red cross: The object is flagged for deletion.
Published digital copies, meaning freely available for use without logging in, are
displayed in the column “Information” as a thumbnail.
In order to call the detail page of a result, click on the link "Detail page" in the corre-
sponding line on the right or in the preview at the bottom left. The search word is
color-highlighted on the detail page.
Tip: The detail page will open in a new tab of the browser. You can return to
the result list by clicking on the previous tab.
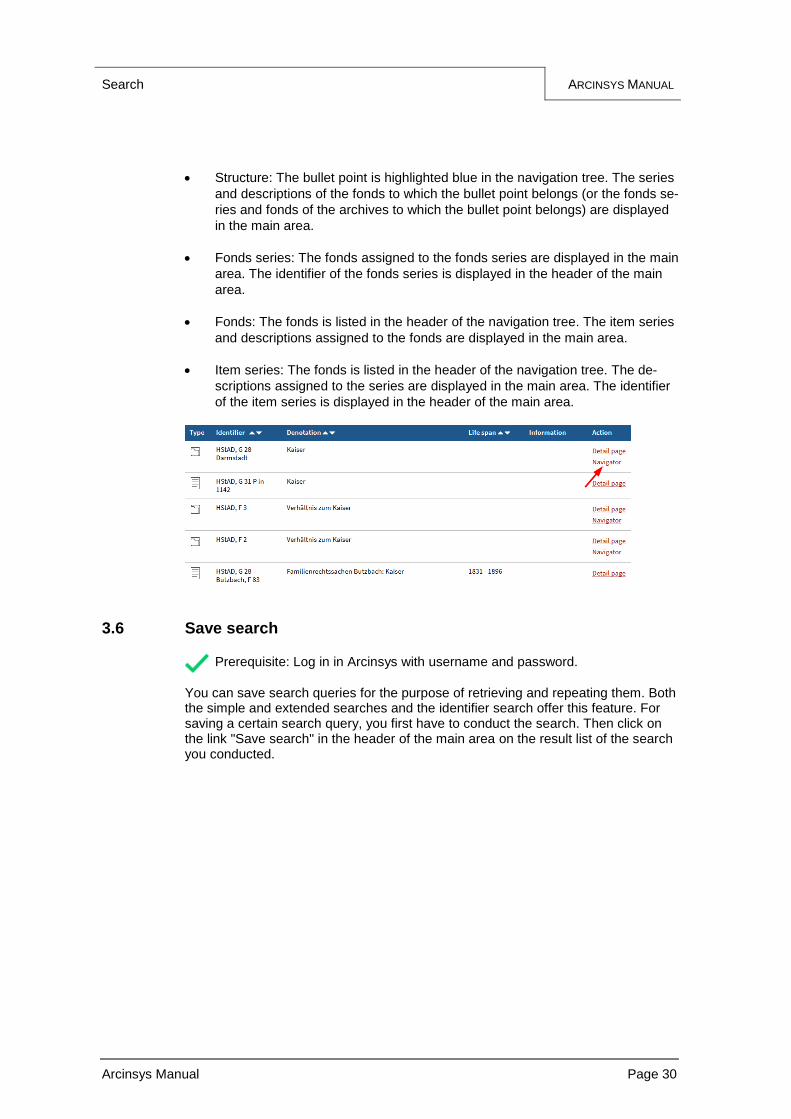
Clicking "Navigator" in the appropriate line will give you a display of the correspond-
ing objects on a new page:
Search ARCINSYS MANUAL
Arcinsys Manual Page 30
Structure: The bullet point is highlighted blue in the navigation tree. The series
and descriptions of the fonds to which the bullet point belongs (or the fonds se-
ries and fonds of the archives to which the bullet point belongs) are displayed
in the main area.
Fonds series: The fonds assigned to the fonds series are displayed in the main
area. The identifier of the fonds series is displayed in the header of the main
area.
Fonds: The fonds is listed in the header of the navigation tree. The item series
and descriptions assigned to the fonds are displayed in the main area.
Item series: The fonds is listed in the header of the navigation tree. The de-
scriptions assigned to the series are displayed in the main area. The identifier
of the item series is displayed in the header of the main area.
3.6 Save search
Prerequisite: Log in in Arcinsys with username and password.
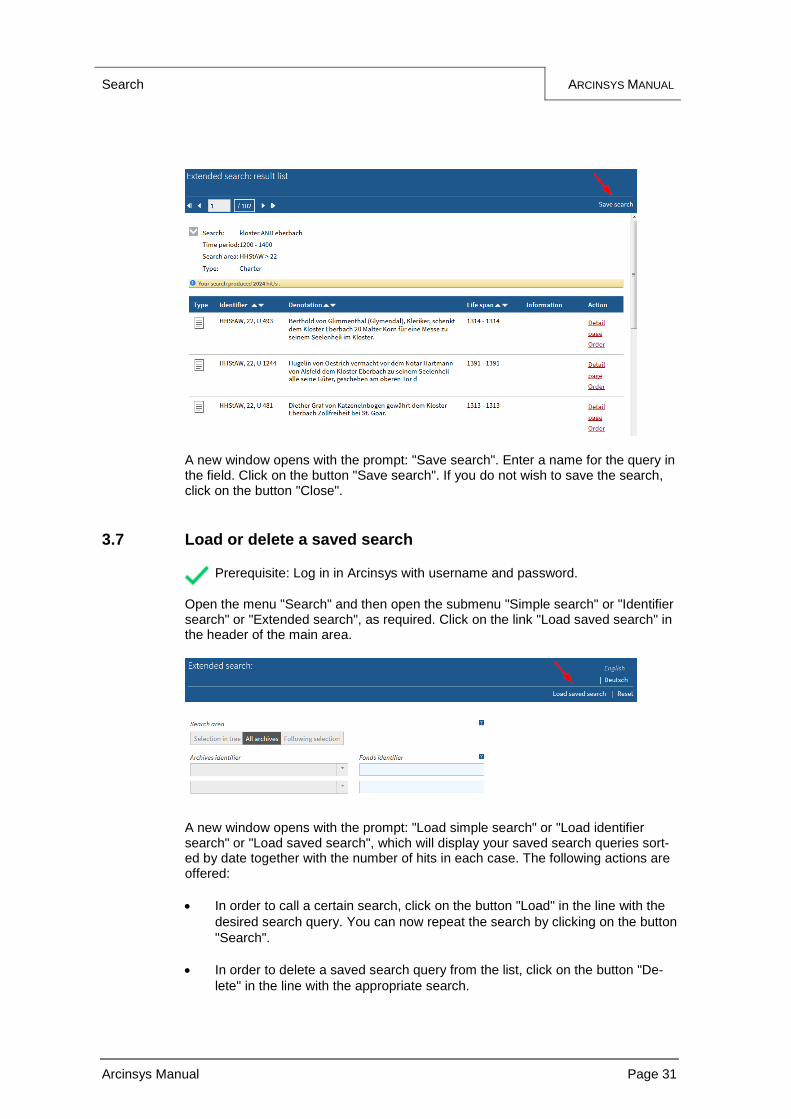
You can save search queries for the purpose of retrieving and repeating them. Both the simple and extended searches and the identifier search offer this feature. For saving a certain search query, you first have to conduct the search. Then click on the link "Save search" in the header of the main area on the result list of the search you conducted.
Search ARCINSYS MANUAL
Arcinsys Manual Page 31
A new window opens with the prompt: "Save search". Enter a name for the query in the field. Click on the button "Save search". If you do not wish to save the search, click on the button "Close".
3.7 Load or delete a saved search
Prerequisite: Log in in Arcinsys with username and password.
Open the menu "Search" and then open the submenu "Simple search" or "Identifier search" or "Extended search", as required. Click on the link "Load saved search" in the header of the main area.
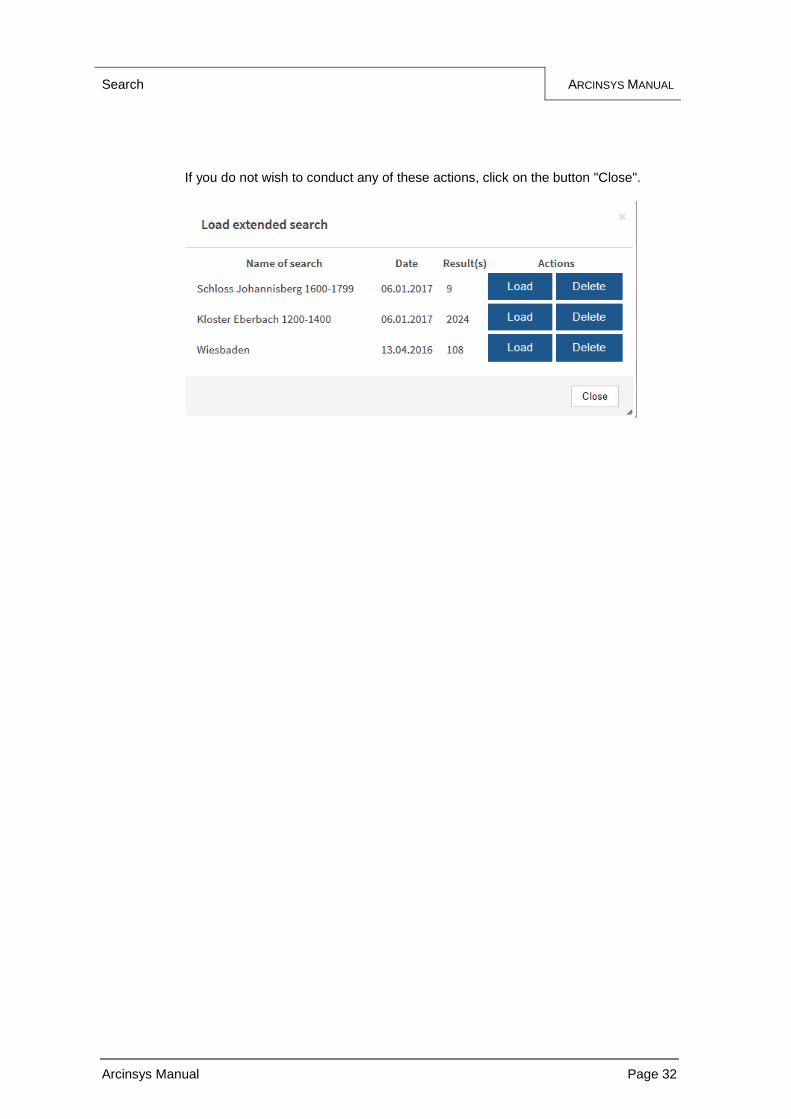
A new window opens with the prompt: "Load simple search" or "Load identifier search" or "Load saved search", which will display your saved search queries sort-ed by date together with the number of hits in each case. The following actions are offered:
In order to call a certain search, click on the button "Load" in the line with the
desired search query. You can now repeat the search by clicking on the button
"Search".
In order to delete a saved search query from the list, click on the button "De-
lete" in the line with the appropriate search.
Search ARCINSYS MANUAL
Arcinsys Manual Page 32
If you do not wish to conduct any of these actions, click on the button "Close".
Registration and log in ARCINSYS MANUAL
Arcinsys Manual Page 33
4 Registration and log in
4.1 Registration
To use Arcinsys beyond mere research, you have to be registered first. By register-
ing, you will open a user account, which is protected by a username and a pass-
word that you selected.
Only you can make changes to the registration data. Also, the data will only be for-
warded when you submit a request for access at an archives.
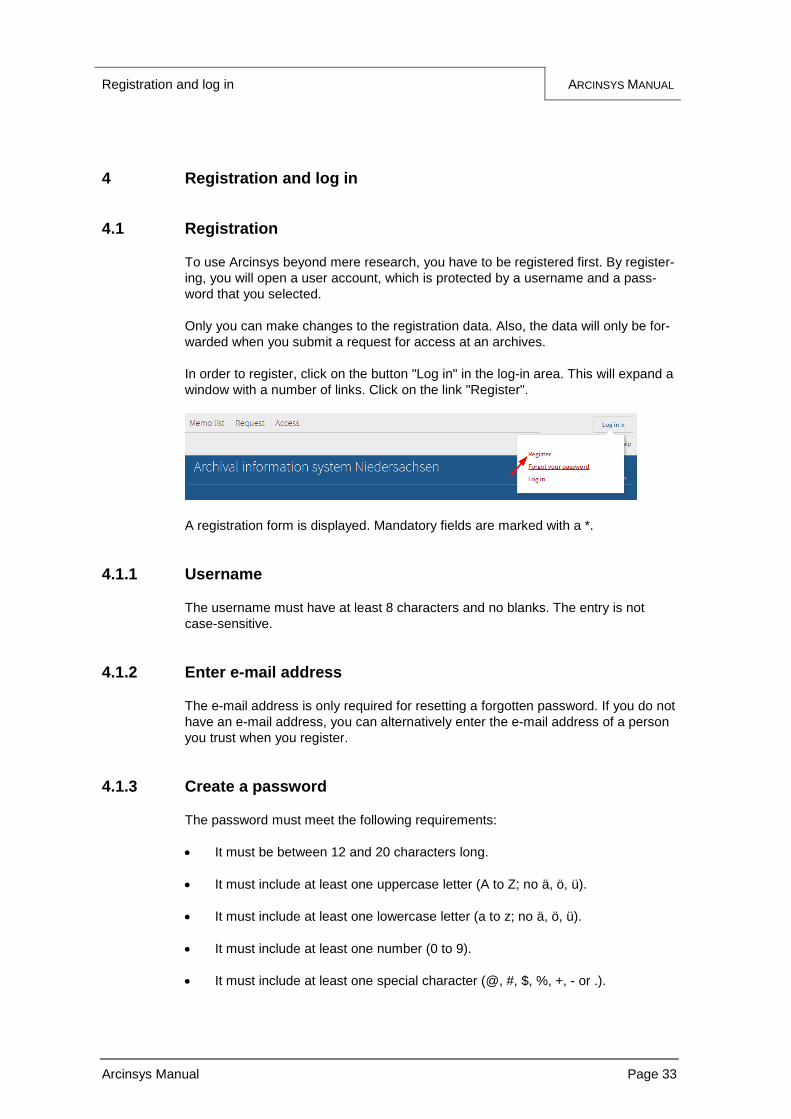
In order to register, click on the button "Log in" in the log-in area. This will expand a
window with a number of links. Click on the link "Register".
A registration form is displayed. Mandatory fields are marked with a *.
4.1.1 Username
The username must have at least 8 characters and no blanks. The entry is not
case-sensitive.
4.1.2 Enter e-mail address
The e-mail address is only required for resetting a forgotten password. If you do not
have an e-mail address, you can alternatively enter the e-mail address of a person
you trust when you register.
4.1.3 Create a password
The password must meet the following requirements:
It must be between 12 and 20 characters long.
It must include at least one uppercase letter (A to Z; no ä, ö, ü).
It must include at least one lowercase letter (a to z; no ä, ö, ü).
It must include at least one number (0 to 9).
It must include at least one special character (@, #, $, %, +, - or .).
Registration and log in ARCINSYS MANUAL
Arcinsys Manual Page 34
While entering your password, the requirements that you still have to meet will be
displayed at the bottom right under "Password quality check".
When you re-enter your password in the field "* Repeat password", the correct entry
is confirmed on the right by green dots. The error message "Wrong entry" will be
displayed in the instance of a typing error.
4.1.4 Enter and submit your address
Tip: It is not necessary to enter a postal address for registration. You will then
be required, however, to specify your address with each request for access. If
you enter your address data once during registeration, it will be automatically
copied into the form used when you submit a future request for access.
Click on the button "Submit address" in order to enter your address data. Further
fields for entering your address and your phone and fax numbers will be displayed.
Click on the button "Register" to complete the registration. A new window opens to
confirm successful registration. You have the options of clicking the buttons "Go to
log in" for immediately logging in or "Log in later" for logging in another time.
4.2 Log in
Prerequisite: Registration in Arcinsys.
After log in, you can use the memo list (see 6.1 Create a memo list) for saving your
research results and you can submit requests for access to archives (see 5.1 Sub-
mit a request for access).
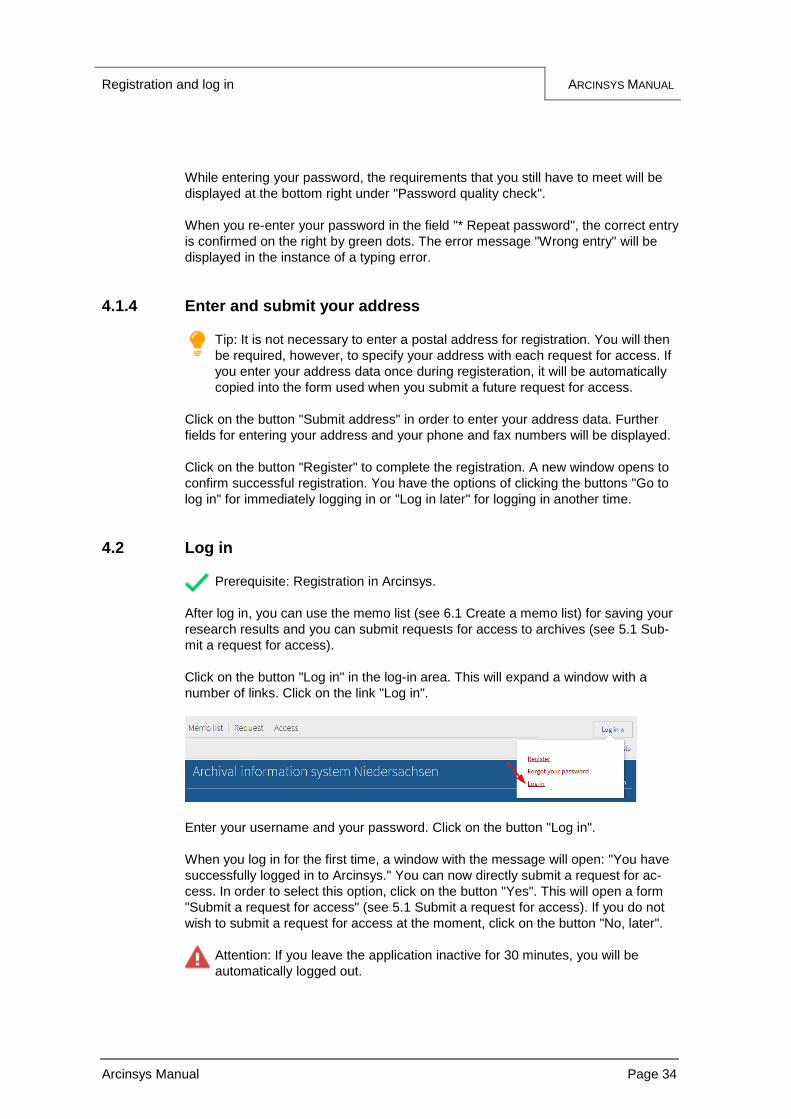
Click on the button "Log in" in the log-in area. This will expand a window with a
number of links. Click on the link "Log in".
Enter your username and your password. Click on the button "Log in".
When you log in for the first time, a window with the message will open: "You have
successfully logged in to Arcinsys." You can now directly submit a request for ac-
cess. In order to select this option, click on the button "Yes". This will open a form
"Submit a request for access" (see 5.1 Submit a request for access). If you do not
wish to submit a request for access at the moment, click on the button "No, later".
Attention: If you leave the application inactive for 30 minutes, you will be
automatically logged out.
Registration and log in ARCINSYS MANUAL
Arcinsys Manual Page 35
4.3 Change data
After log in, you can call the link "My data" in the log-in area to update your infor-
mation in the registration form. You can also change your password here. If you
change data apart from changing your password, you will be prompted to enter your
current password twice. In order to save the changed data, click on the button
"Save". The changed data in the user account will not affect already existing re-
quests for access. The new data will be used only for new requests.
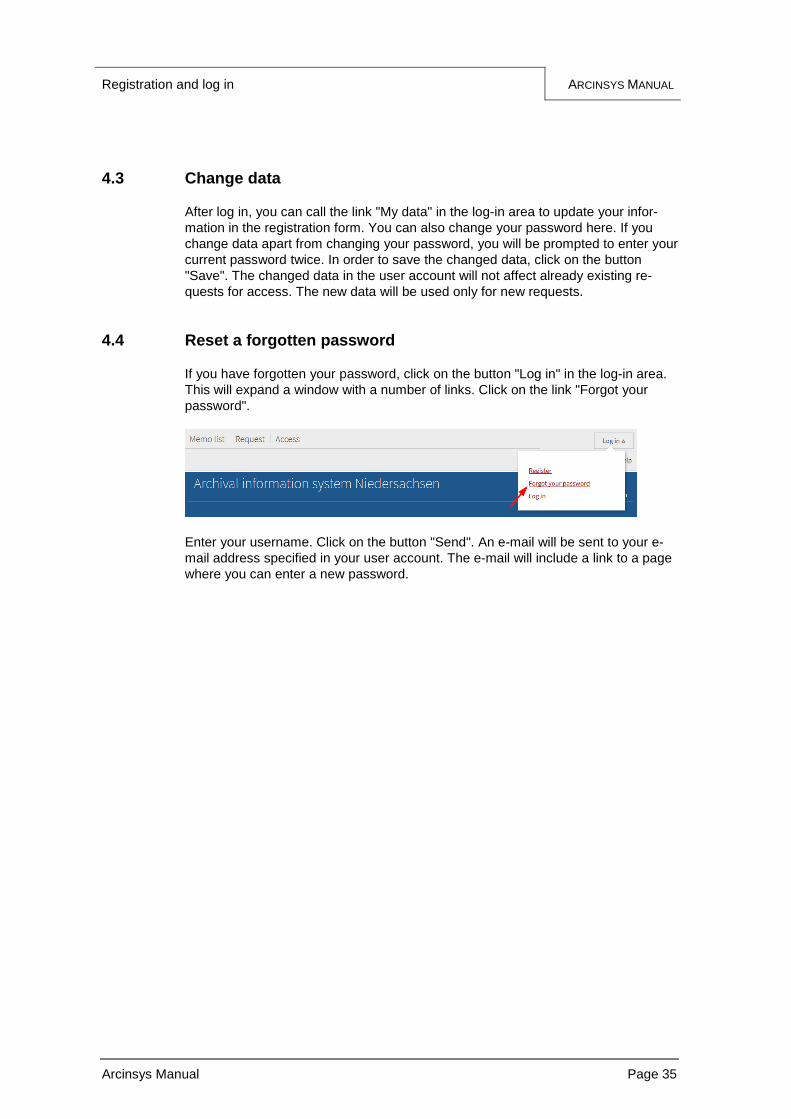
4.4 Reset a forgotten password
If you have forgotten your password, click on the button "Log in" in the log-in area.
This will expand a window with a number of links. Click on the link "Forgot your
password".
Enter your username. Click on the button "Send". An e-mail will be sent to your e-
mail address specified in your user account. The e-mail will include a link to a page
where you can enter a new password.
Submitting requests for access ARCINSYS MANUAL
Arcinsys Manual Page 36
5 Submitting requests for access
In order to access archival material, you must first submit a request for access. The
request is addressed to the repository archives, which also grants the approval. On-
ly after the request has been granted approval is it possible to order archival items.
5.1 Submit a request for access
Prerequisite: Log in in Arcinsys with username and password.
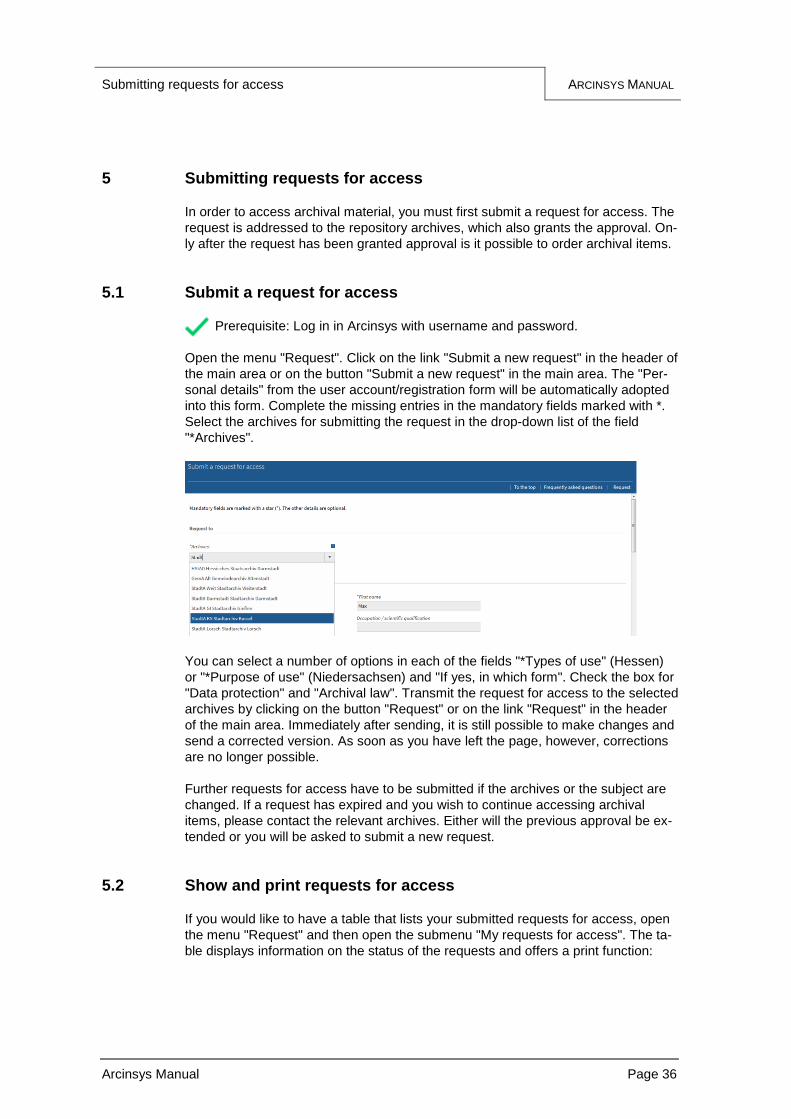
Open the menu "Request". Click on the link "Submit a new request" in the header of
the main area or on the button "Submit a new request" in the main area. The "Per-
sonal details" from the user account/registration form will be automatically adopted
into this form. Complete the missing entries in the mandatory fields marked with *.
Select the archives for submitting the request in the drop-down list of the field
"*Archives".
You can select a number of options in each of the fields "*Types of use" (Hessen)
or "*Purpose of use" (Niedersachsen) and "If yes, in which form". Check the box for
"Data protection" and "Archival law". Transmit the request for access to the selected
archives by clicking on the button "Request" or on the link "Request" in the header
of the main area. Immediately after sending, it is still possible to make changes and
send a corrected version. As soon as you have left the page, however, corrections
are no longer possible.
Further requests for access have to be submitted if the archives or the subject are
changed. If a request has expired and you wish to continue accessing archival
items, please contact the relevant archives. Either will the previous approval be ex-
tended or you will be asked to submit a new request.
5.2 Show and print requests for access
If you would like to have a table that lists your submitted requests for access, open
the menu "Request" and then open the submenu "My requests for access". The ta-
ble displays information on the status of the requests and offers a print function:
Submitting requests for access ARCINSYS MANUAL
Arcinsys Manual Page 37
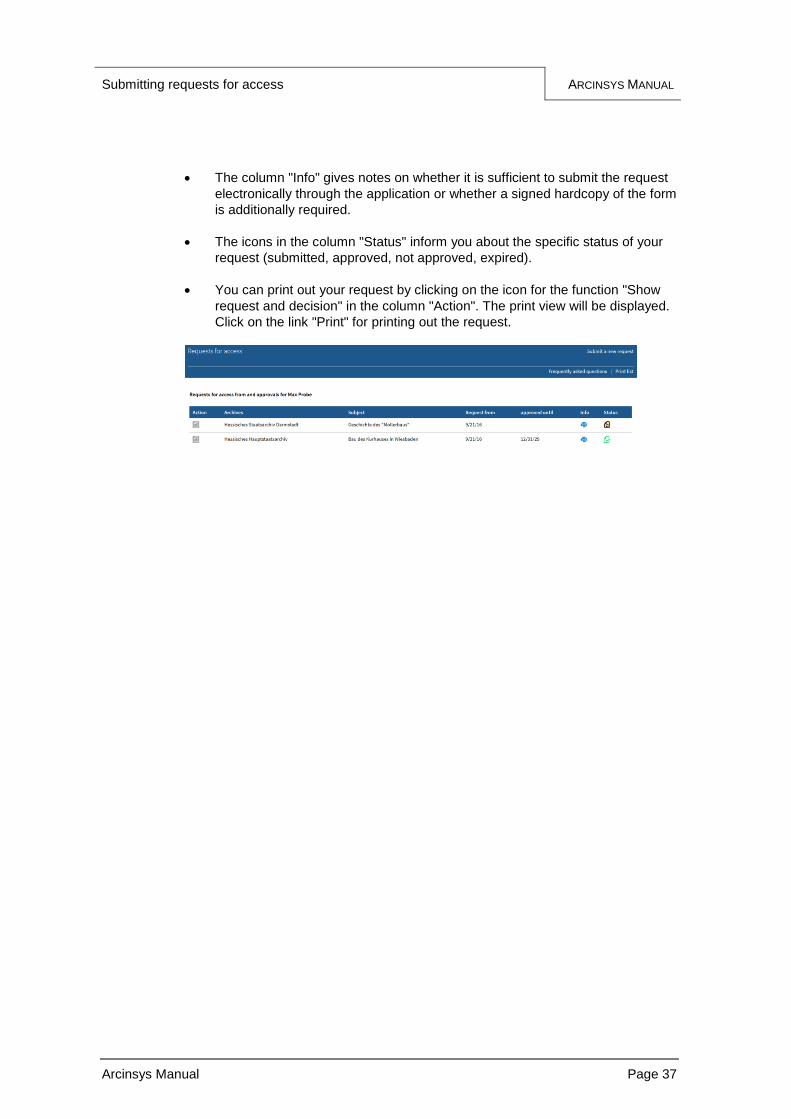
The column "Info" gives notes on whether it is sufficient to submit the request
electronically through the application or whether a signed hardcopy of the form
is additionally required.
The icons in the column "Status" inform you about the specific status of your
request (submitted, approved, not approved, expired).
You can print out your request by clicking on the icon for the function "Show
request and decision" in the column "Action". The print view will be displayed.
Click on the link "Print" for printing out the request.
Ordering and using archival material ARCINSYS MANUAL
Arcinsys Manual Page 38
6 Ordering and using archival material
6.1 Create a memo list
Prerequisite: Log in in Arcinsys with username and password.
The memo list serves as an interim storage for archival items you want to order lat-
er. For creating a memo list, you first have to conduct a search. Research results
are displayed in lists (see 2.2 List view and 3.5 Result list). As a logged-in user, you
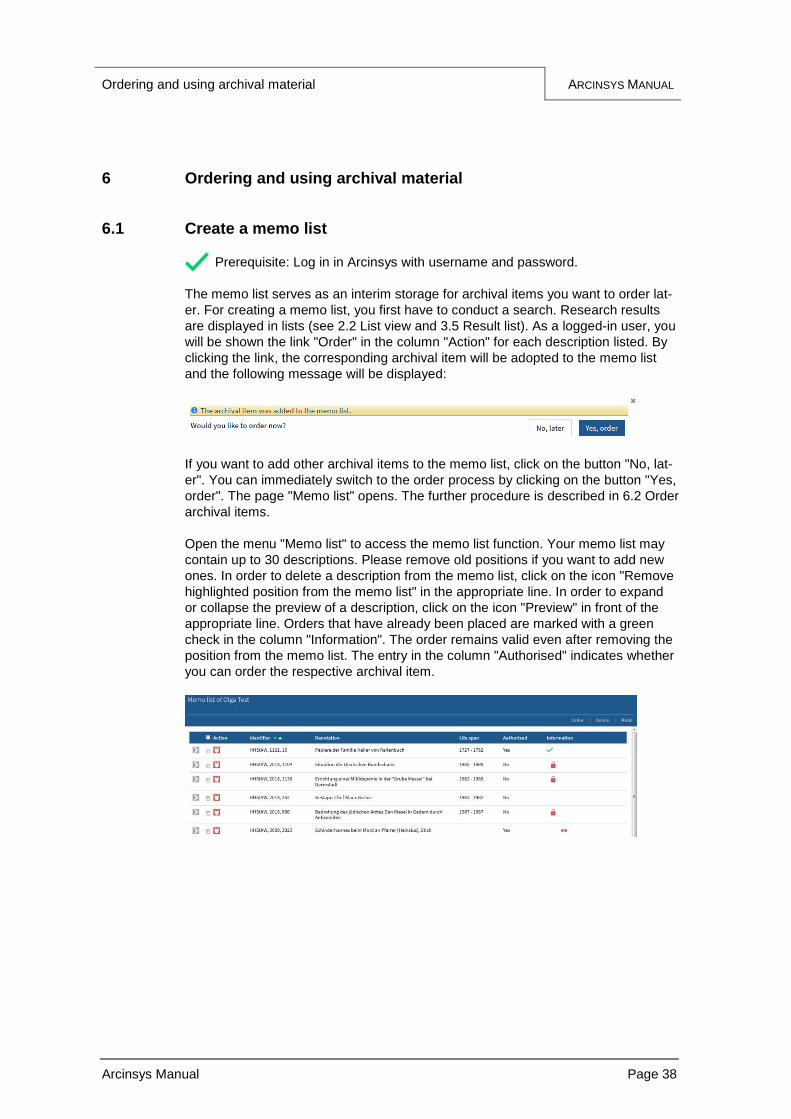
will be shown the link "Order" in the column "Action" for each description listed. By
clicking the link, the corresponding archival item will be adopted to the memo list
and the following message will be displayed:
If you want to add other archival items to the memo list, click on the button "No, lat-
er". You can immediately switch to the order process by clicking on the button "Yes,
order". The page "Memo list" opens. The further procedure is described in 6.2 Order
archival items.
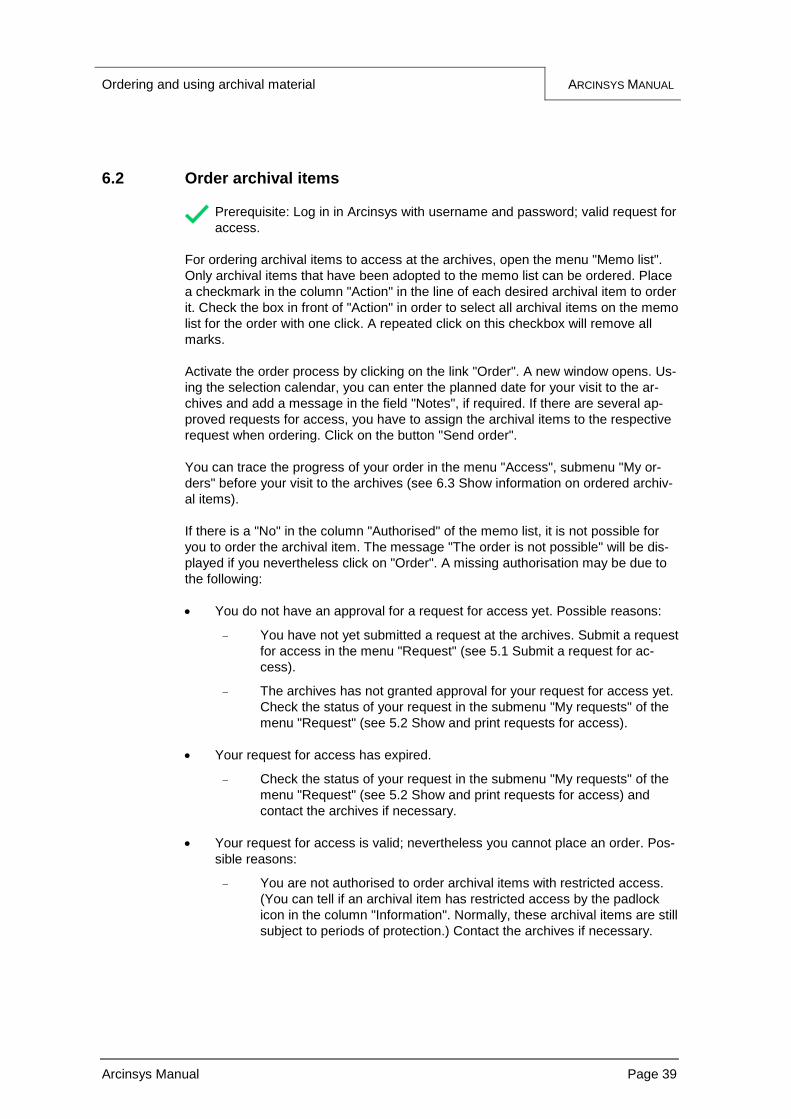
Open the menu "Memo list" to access the memo list function. Your memo list may
contain up to 30 descriptions. Please remove old positions if you want to add new
ones. In order to delete a description from the memo list, click on the icon "Remove
highlighted position from the memo list" in the appropriate line. In order to expand
or collapse the preview of a description, click on the icon "Preview" in front of the
appropriate line. Orders that have already been placed are marked with a green
check in the column "Information". The order remains valid even after removing the
position from the memo list. The entry in the column "Authorised" indicates whether
you can order the respective archival item.
Ordering and using archival material ARCINSYS MANUAL
Arcinsys Manual Page 39
6.2 Order archival items
Prerequisite: Log in in Arcinsys with username and password; valid request for
access.
For ordering archival items to access at the archives, open the menu "Memo list".
Only archival items that have been adopted to the memo list can be ordered. Place
a checkmark in the column "Action" in the line of each desired archival item to order
it. Check the box in front of "Action" in order to select all archival items on the memo
list for the order with one click. A repeated click on this checkbox will remove all
marks.
Activate the order process by clicking on the link "Order". A new window opens. Us-
ing the selection calendar, you can enter the planned date for your visit to the ar-
chives and add a message in the field "Notes", if required. If there are several ap-
proved requests for access, you have to assign the archival items to the respective
request when ordering. Click on the button "Send order".
You can trace the progress of your order in the menu "Access", submenu "My or-
ders" before your visit to the archives (see 6.3 Show information on ordered archiv-
al items).
If there is a "No" in the column "Authorised" of the memo list, it is not possible for
you to order the archival item. The message "The order is not possible" will be dis-
played if you nevertheless click on "Order". A missing authorisation may be due to
the following:
You do not have an approval for a request for access yet. Possible reasons:
You have not yet submitted a request at the archives. Submit a request
for access in the menu "Request" (see 5.1 Submit a request for ac-
cess).
The archives has not granted approval for your request for access yet.
Check the status of your request in the submenu "My requests" of the
menu "Request" (see 5.2 Show and print requests for access).
Your request for access has expired.
Check the status of your request in the submenu "My requests" of the
menu "Request" (see 5.2 Show and print requests for access) and
contact the archives if necessary.
Your request for access is valid; nevertheless you cannot place an order. Pos-
sible reasons:
You are not authorised to order archival items with restricted access.
(You can tell if an archival item has restricted access by the padlock
icon in the column "Information". Normally, these archival items are still
subject to periods of protection.) Contact the archives if necessary.
Ordering and using archival material ARCINSYS MANUAL
Arcinsys Manual Page 40
6.3 Show information on ordered archival items
Open the menu "Access" and then the submenu "My orders". The current status of
processing your order is shown in the column "Order status". The message "Or-
dered" indicates that your order has been received at the respective archives. The
message "Charged-out" indicates that the ordered archival items have been deliv-
ered to the reading room. The message "Made available" indicates that the archival
item has been retrieved from the stack area. The column "Representation" contains
information on the form in which the archival item has been made available to you
(e.g. original, digital copy, fiche, etc.). The type of use says whether the archival
items are physically submitted (in the reading room) or whether digital access is
granted (of digital representations). Most of the archives generally do not provide
other types of use (such as delivery or collection). In order to open the detail view
for a certain archival item, click on the icon "Open detail view in the context" in the
appropriate line.
Tip: The detail page of the archival item will open in a new tab of the browser.
You can return to the list of ordered and accessed archival items by clicking on
the previous tab.
You will find information on earlier accesses to archival items in the menu "Access"
and there in the submenu "All my accesses".