ARB 4x4 ACCESSORIES...Kilsyth, Victoria Fax: +61 (3) 9761 6807 . AUSTRALIA 3137 . Australian...
9
Last Rev Date: 08/07/13 Page 1 of 8 Fitting instructions# 3783332 Copyright © 2005 by ARB Corporation Limited. All rights reserved, this document must not be reproduced without the express authority of ARB Corporation Ltd Part Number: 3500620 Product Description: WARN ZEON SYNTHETIC WINCH FITTING KIT. Suited to vehicle/s: AS NOTED IN CHART ON PAGES 3-4. WARNING REGARDING VEHICLES EQUIPPED WITH SRS AIRBAG; When installed in accordance with these instructions, the front protection bar does not affect operation of the SRS airbag. ALSO, NOTE THE FOLLOWING: ♦ This product must be installed exactly as per these instructions using only the hardware supplied. ♦ In the event of damage to any bull bar component, contact your nearest authorised ARB stockist. Repairs or modifications to the impact absorption system must not be attempted. ♦ Do not remove labels from this product (if fitted). ♦ The installation of this product may require the use of specialized tools and/or techniques ♦ It is recommended that this product is only installed by trained personnel ♦ These instructions are correct as at the publication date. ARB Corporation Ltd. cannot be held responsible for the impact of any changes subsequently made by the vehicle manufacturer ♦ During installation, it is the duty of the installer to check correct operation/clearances of all components ♦ Work safely at all times ♦ Unless otherwise instructed, tighten fasteners to specified torque ARB 4x4 ACCESSORIES Corporate Head Office 42-44 Garden St Tel: +61 (3) 9761 6622 Kilsyth, Victoria Fax: +61 (3) 9761 6807 AUSTRALIA 3137 Australian enquiries [email protected] North & South American enquiries [email protected] Other international enquiries [email protected] www.arb.com.au
Transcript of ARB 4x4 ACCESSORIES...Kilsyth, Victoria Fax: +61 (3) 9761 6807 . AUSTRALIA 3137 . Australian...

Last Rev Date: 08/07/13 Page 1 of 8 Fitting instructions# 3783332 Copyright © 2005 by ARB Corporation Limited. All rights reserved, this document must not be reproduced without the express authority of ARB Corporation Ltd
Part Number: 3500620
Product Description:
WARN ZEON SYNTHETIC WINCH FITTING KIT.
Suited to vehicle/s:
AS NOTED IN CHART ON PAGES 3-4.
WARNING REGARDING VEHICLES EQUIPPED WITH SRS AIRBAG; When installed in accordance with these instructions, the front protection bar does not affect operation of the SRS airbag. ALSO, NOTE THE FOLLOWING:
♦ This product must be installed exactly as per these instructions using only the hardware supplied. ♦ In the event of damage to any bull bar component, contact your nearest authorised ARB stockist.
Repairs or modifications to the impact absorption system must not be attempted. ♦ Do not remove labels from this product (if fitted). ♦ The installation of this product may require the use of specialized tools and/or techniques ♦ It is recommended that this product is only installed by trained personnel ♦ These instructions are correct as at the publication date. ARB Corporation Ltd. cannot be held
responsible for the impact of any changes subsequently made by the vehicle manufacturer ♦ During installation, it is the duty of the installer to check correct operation/clearances of all
components ♦ Work safely at all times ♦ Unless otherwise instructed, tighten fasteners to specified torque
ARB 4x4 ACCESSORIES Corporate Head Office
42-44 Garden St Tel: +61 (3) 9761 6622 Kilsyth, Victoria Fax: +61 (3) 9761 6807 AUSTRALIA 3137
Australian enquiries [email protected] North & South American enquiries [email protected] Other international enquiries [email protected]
www.arb.com.au

Last Rev Date: 08/07/13 Page 2 of 8 Fitting instructions# 3783332 Copyright © 2005 by ARB Corporation Limited. All rights reserved, this document must not be reproduced without the express authority of ARB Corporation Ltd
GENERAL CARE AND MAINTENANCE As part of any Pre Trip Preparation, or on an annual basis, it is recommended that a thorough visual
inspection of the bar and accessories is carried out, making sure that all bolts and other components are torqued to the correct specification. Also check that all wiring sheaths, connectors, and fittings are free of damage. Replace any components as necessary. This service can be performed by your local authorized ARB Stockist.
FITTING REQUIREMENTS
REQUIRED TOOLS FOR FITMENT OF PRODUCT: Basic tool kit
TORX keys or sockets.
HAVE AVAILABLE THESE SAFETY ITEMS WHEN FITTING PRODUCT:
Protective eyewear
Hearing protection
NOTE: ‘WARNING’ notes in the fitting procedure relate to OHS situations, where to avoid a potentially hazardous situation it is suggested that protective safety gear be worn or a safe work procedure be employed. If these notes and warnings are not heeded, injury may result.
FASTENER TORQUE SETTINGS: SIZE Torque Nm Torque lbft M6 9Nm 7lbft M8 22Nm 16lbft M10 44Nm 32lbft M12 77Nm 57lbft

Last Rev Date: 08/07/13 Page 3 of 8 Fitting instructions# 3783332 Copyright © 2005 by ARB Corporation Limited. All rights reserved, this document must not be reproduced without the express authority of ARB Corporation Ltd
PARTS LISTING APPLICATION. PART NO. QTY DESCRIPTION
WINCH TO BAR
6250013 6250014 3194521 6520011 6250015 6522912 6151508 6151091 6151509 6151614 6151217 6151615 4581040 4584296
4 4 1 2 2 1 2 2 2 2 4 2 2 2
ALUMINIUM SPACER 25MM ALUMINIUM SPACER 15MM SEAT ALUMINIUM BLOCKS ALUMINIUM SQUARE SPACER ALUMINIUM SPACER INTERNAL COVER PANEL HAWSE BOLT M10 X 90 BOLT M10 X 60 BOLT M10 X 110 BOLT M10 X 70 BOLT M10 X 50 BOLT M10 X 80 WASHER FLAT M10 X 25 X 3 WASHER FLAT M10 X 30 X 5
CONTROL BOX TO BAR
3751884 6151402 4584295 6821258 6821112
1 4 4 3 9
MOUNT CONTROL BOX BOLT M6 X 16 WASHER FLAT M6 13MM DIA SPLIT TUBING X 440MM CABLE TIES
PLEASE NOTE: Control box must be removed from ZEON for all bars except those that suit a high mount winch. Warn relocation kit W89965 will be required for all bars except those to suit high mount winches.
SPACING AND FAIRLEAD TYPES. GUIDE ONLY. VEHICLE. SPACING. HAWSE. HANDLE ROTATION.
Y62 PATROL 15MM CENTRE
Y61 PATROL 15MM CENTRE
Y61 COMMERCIAL 15MM OFFSET
NISSAN D40 (WILL NOT FIT DIESEL V6)
NO SPACING OFFSET

Last Rev Date: 08/07/13 Page 4 of 8 Fitting instructions# 3783332 Copyright © 2005 by ARB Corporation Limited. All rights reserved, this document must not be reproduced without the express authority of ARB Corporation Ltd
SPACING AND FAIRLEAD TYPES. GUIDE ONLY. VEHICLE. SPACING. HAWSE. HANDLE ROTATION.
TOYOTA LC200 25MM CENTRE
TOYOTA LC70 NO SPACING
(15MM FOR COMMERCIAL
ONLY)
OFFSET
TOYOTA 150 PRADO NO SPACING CENTRE
TOYOTA TACOMA NO SPACING OFFSET
ISUZU DMAX HOLDEN COLORADO
15MM OFFSET

Last Rev Date: 08/07/13 Page 5 of 8 Fitting instructions# 3783332 Copyright © 2005 by ARB Corporation Limited. All rights reserved, this document must not be reproduced without the express authority of ARB Corporation Ltd

Last Rev Date: 08/07/13 Page 6 of 8 Fitting instructions# 3783332 Copyright © 2005 by ARB Corporation Limited. All rights reserved, this document must not be reproduced without the express authority of ARB Corporation Ltd
FITTING PROCEDURE
1. WINCH FITMENT WITH NO SPACING. 2. Use above chart as a guide to positioning the
clutch handle. Generally they are in the 72° or 144° anti-clockwise position. Remove the gearbox fasteners and rotate gearbox to required position. DO NOT REMOVE GEARBOX COMPLETELY.
3. Place the M10 nuts in the winch as shown in the ZEON manual. Use 2 x M10 x 50 bolts and 5mm thick M10 flat washers to secure the upper mount to bar. Do not tighten.
4. Using the images shown determine whether you are fitting to offset or centred lower holes.
M10 - 44 Nm.
5. CENTRE MOUNTING OF HAWSE FAIRLEAD. Assemble Hawse spacer kit as shown using square aluminium and 23mm long round aluminium blocks. Flat linking plate is placed at rear.
6. Place cover panel on the back of the Hawse fairlead as shown making sure the flat section is at the top. Secure to spacers and winch using 2 x M10 x 90 bolts and 2 x M10 x 3mm thick washers. Tighten all bolts.
M10 - 44 Nm.
2 X M10 X 50 BOLTS 2 X M10 X 5MM THICK BOLTS
OFFSET
CENTRE
Last Rev Date: 08/07/13 Page 7 of 8 Fitting instructions# 3783332 Copyright © 2005 by ARB Corporation Limited. All rights reserved, this document must not be reproduced without the express authority of ARB Corporation Ltd
FITTING PROCEDURE
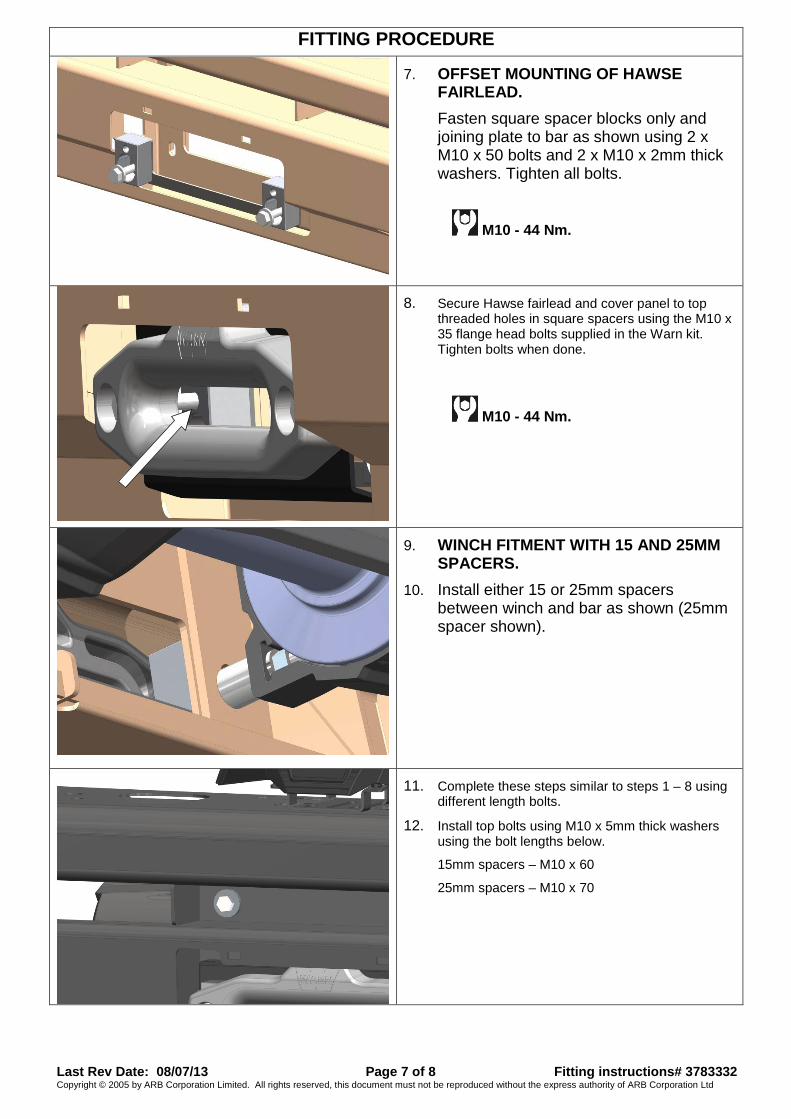
7. OFFSET MOUNTING OF HAWSE FAIRLEAD. Fasten square spacer blocks only and joining plate to bar as shown using 2 x M10 x 50 bolts and 2 x M10 x 2mm thick washers. Tighten all bolts.
M10 - 44 Nm.
8. Secure Hawse fairlead and cover panel to top threaded holes in square spacers using the M10 x 35 flange head bolts supplied in the Warn kit. Tighten bolts when done.
M10 - 44 Nm.
9. WINCH FITMENT WITH 15 AND 25MM SPACERS.
10. Install either 15 or 25mm spacers between winch and bar as shown (25mm spacer shown).
11. Complete these steps similar to steps 1 – 8 using different length bolts.
12. Install top bolts using M10 x 5mm thick washers using the bolt lengths below.
15mm spacers – M10 x 60
25mm spacers – M10 x 70
Last Rev Date: 08/07/13 Page 8 of 8 Fitting instructions# 3783332 Copyright © 2005 by ARB Corporation Limited. All rights reserved, this document must not be reproduced without the express authority of ARB Corporation Ltd
FITTING PROCEDURE
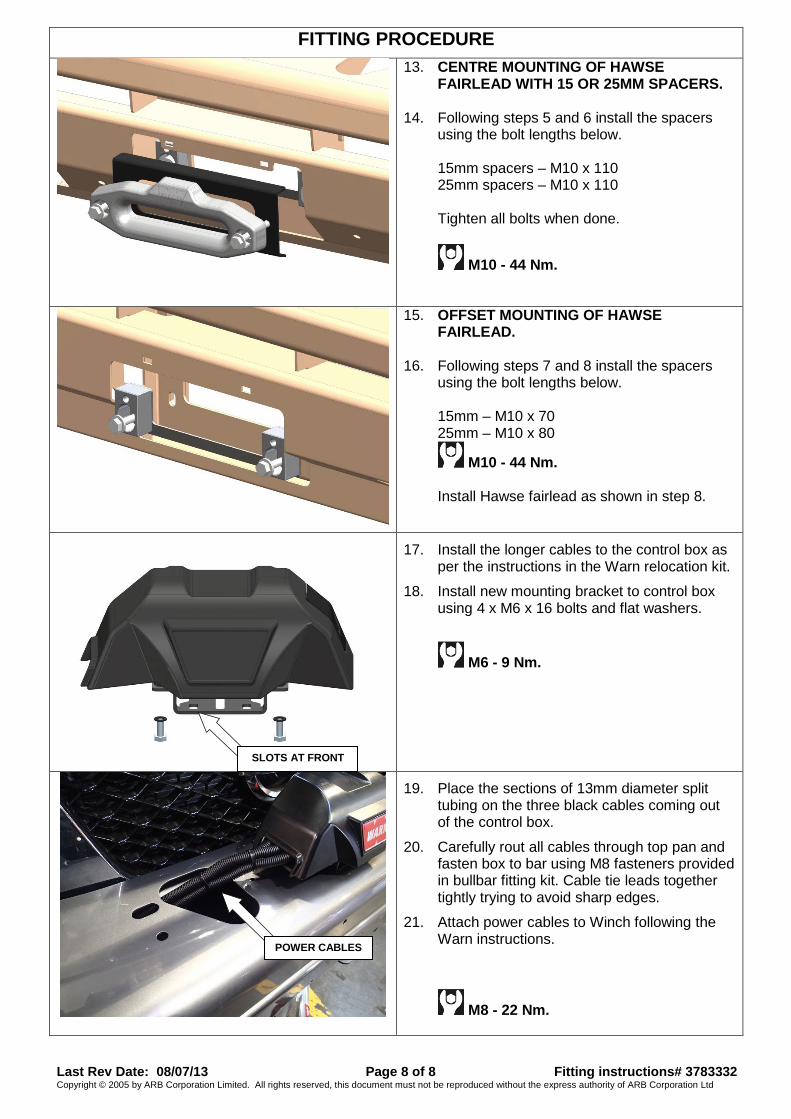
13. CENTRE MOUNTING OF HAWSE FAIRLEAD WITH 15 OR 25MM SPACERS.
14. Following steps 5 and 6 install the spacers using the bolt lengths below. 15mm spacers – M10 x 110 25mm spacers – M10 x 110 Tighten all bolts when done.
M10 - 44 Nm.
15. OFFSET MOUNTING OF HAWSE FAIRLEAD.
16. Following steps 7 and 8 install the spacers using the bolt lengths below. 15mm – M10 x 70 25mm – M10 x 80
M10 - 44 Nm.
Install Hawse fairlead as shown in step 8.
17. Install the longer cables to the control box as per the instructions in the Warn relocation kit.
18. Install new mounting bracket to control box using 4 x M6 x 16 bolts and flat washers.
M6 - 9 Nm.
19. Place the sections of 13mm diameter split tubing on the three black cables coming out of the control box.
20. Carefully rout all cables through top pan and fasten box to bar using M8 fasteners provided in bullbar fitting kit. Cable tie leads together tightly trying to avoid sharp edges.
21. Attach power cables to Winch following the Warn instructions.
M8 - 22 Nm.
SLOTS AT FRONT
POWER CABLES

Last Rev Date: 08/07/13 Page 9 of 8 Fitting instructions# 3783332 Copyright © 2005 by ARB Corporation Limited. All rights reserved, this document must not be reproduced without the express authority of ARB Corporation Ltd
FITTED PRODUCT