Apron in an hour tutorial - jonag.typepad.com in an hour tutorial.pdf · Apron in an hour tutorial...
10
Apron in an hour tutorial by Jona Giammalva This apron is great because it only requires one fat quarter (the floral in this one) for the main apron piece and 1/2 yard of fabric (the stripes of course!) for the waistband and ties. Pleeeeeeease remember, your apron is only going to be as pretty as the fabric you use so be sure to pick some fabrics that you love and you will love the apron you make! An original pattern by Jona Giammalva. Not for resale (just for fun!).
-
Upload
truongtruc -
Category
Documents
-
view
216 -
download
0
Transcript of Apron in an hour tutorial - jonag.typepad.com in an hour tutorial.pdf · Apron in an hour tutorial...

Apron in an hour tutorialby Jona Giammalva
This apron is great because it only requires one fat quarter (the floral in this one) for the main apron piece and 1/2 yard of fabric (the stripes of
course!) for the waistband and ties.
Pleeeeeeease remember, your apron is only going to be as pretty as the fabric you use so be sure to pick some fabrics that you love and you will love
the apron you make!
An original pattern by Jona Giammalva. Not for resale (just for fun!).

Let's get started!Begin with 1 fat quarter for your main apron piece and 1/2 yard for your
waistband and ties.
Remove the selvedges from your waistband fabric. I just snip the end and rip it so it stays on grain.
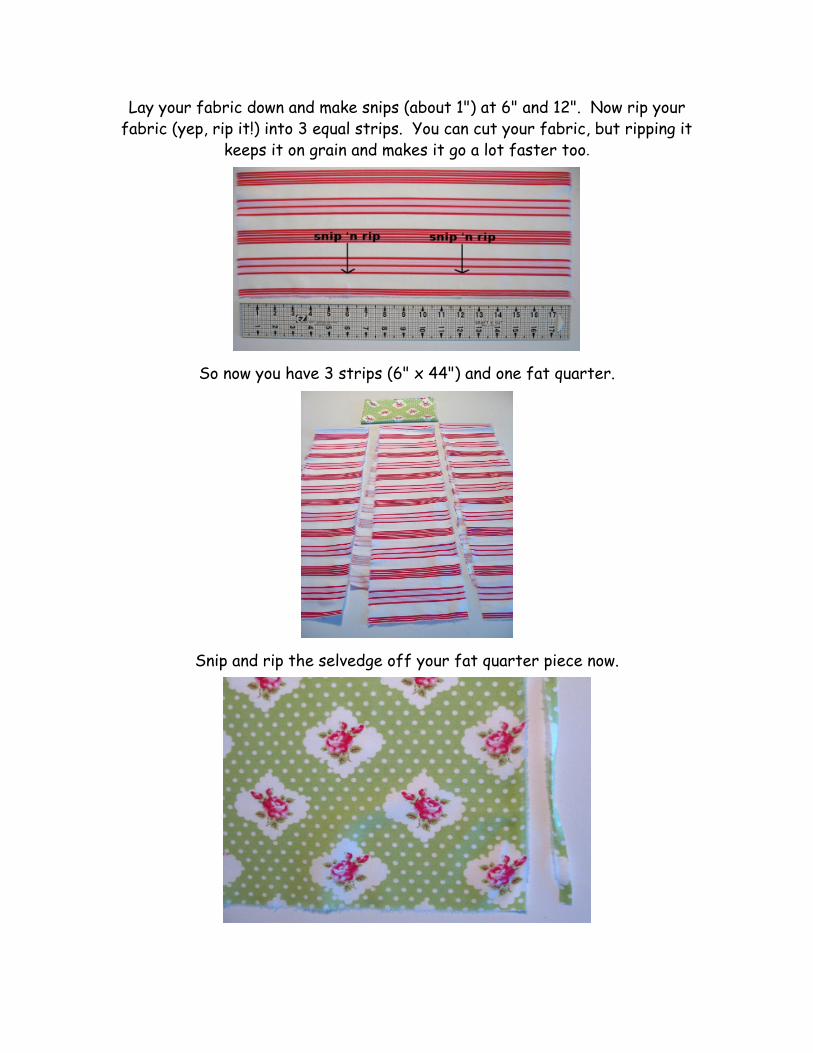
Lay your fabric down and make snips (about 1") at 6" and 12". Now rip your fabric (yep, rip it!) into 3 equal strips. You can cut your fabric, but ripping it
keeps it on grain and makes it go a lot faster too.
So now you have 3 strips (6" x 44") and one fat quarter.
Snip and rip the selvedge off your fat quarter piece now.

Take one of your 6" waistband strips and cut a piece off the same width as your fat quarter (22" or thereabouts, not the 18" side). Save the remaining
length of this waistband strip for later.
Fold your strip in half and press well.
Now put your fat quarter and folded strip together (on the right side of your fat quarter) so the raw edges all match up. Stitch in place using about
a 1/3 inch seam allowance.
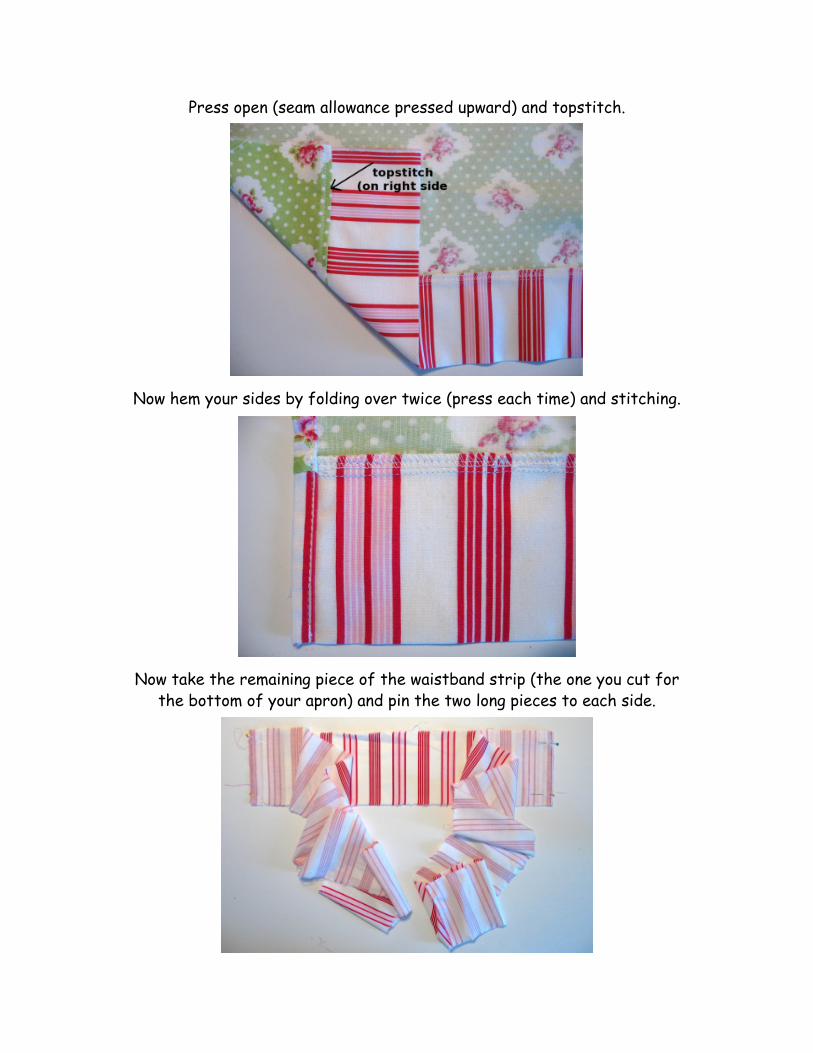
Press open (seam allowance pressed upward) and topstitch.
Now hem your sides by folding over twice (press each time) and stitching.
Now take the remaining piece of the waistband strip (the one you cut for the bottom of your apron) and pin the two long pieces to each side.

Stitch both seams and then press them open.
Now lay your main apron piece on the center piece of the waistband, right sides together (be sure to center it evenly) and stitch pieces together
across the top of the apron piece using a 1/3" seam allowance.
Fold and press the unfinished edge of your waistband strip directly above the main apron piece (just fold the part above the apron, not the whole
length of the waistband).
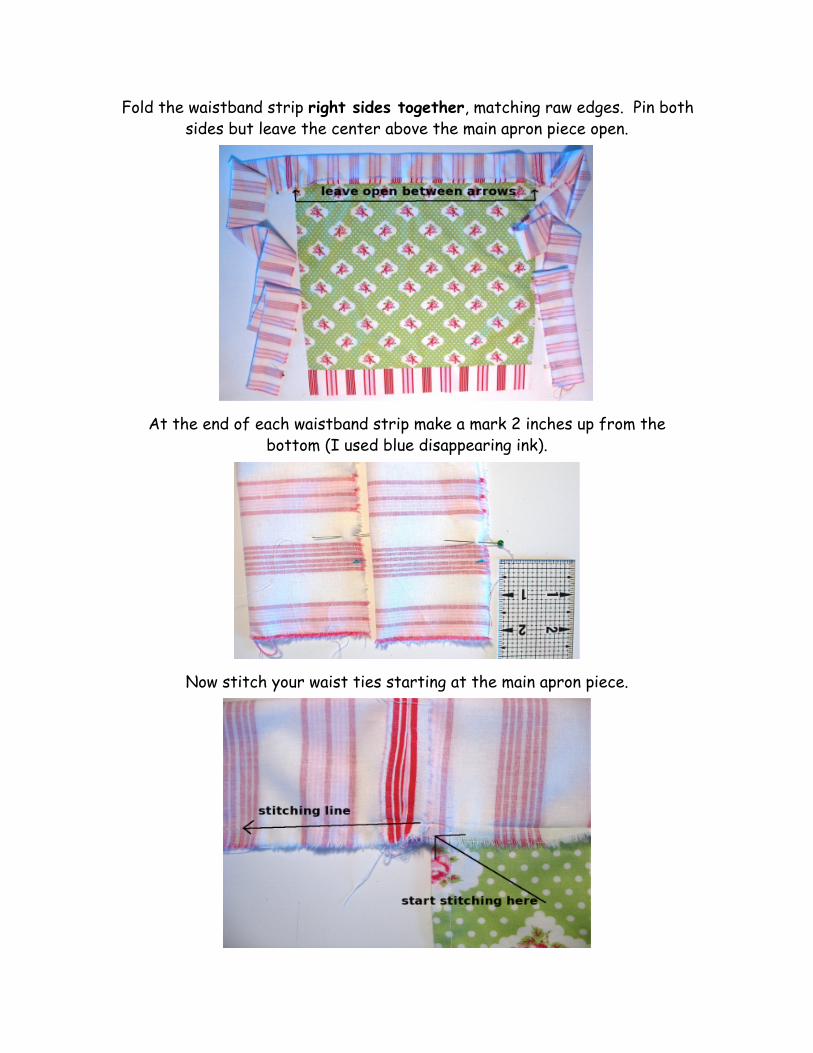
Fold the waistband strip right sides together, matching raw edges. Pin both sides but leave the center above the main apron piece open.
At the end of each waistband strip make a mark 2 inches up from the bottom (I used blue disappearing ink).
Now stitch your waist ties starting at the main apron piece.

When you reach the mark you made (2" up from the bottom) lower your needle, pivot, and stitch a straight line ending just above the corner where
the fold meets the raw edge.
Trim the extra fabric away below your stitch line.
Turn your ties right side out (I use my Turn-it-all tool, which I love).

Now press your ties nice and flat (take your time so you get a nice crisp edge). Fold the unsewn part of the waistband over so that the folded edge
covers the stitch line. Pin in place on right side (use lots of pins).
Now use a small zigzag stitch on the right side of your apron and stitch all the way across the top where the main apron piece meets the waistband
piece.
Trim all your loose strings and iron your apron. Now you have a lovely gift for a very special person and they don't need to know that it only took you an hour. Or you can keep it for yourself and look oh-so-sassy while baking!
If you make this apron I'd love it if you added it to my Flickr group! I really want to see what everyone comes up with! Thank you!
Be sure to visit www.fabritopia.com for beautiful fabrics and patterns! And stop by my blog www.jonag.typepad.com for plenty of inspiration and chatter!