
Aprilia Atlantic 125 200 2002
226
www.serviceaprilia.com workshopmanual ATLANTIC 125 - 200 1101 2 00/2002-12 8140674 UK
-
Upload
brandi-parks -
Category
Documents
-
view
98 -
download
2
Transcript of Aprilia Atlantic 125 200 2002

ww
w.s
erv
iceapri
lia.c
om
workshopmanual
ATLANTIC 125 - 200
1101 200/2002-12
8140
674
UK

FOREWORD
0 - 1
ATLANTIC 125 - 200
FOREWORD 0
GENERAL INFORMATION 1
ROUTINE MAINTENANCE 2
LUBRICATION 3
FUEL SYSTEM 4
COOLING SYSTEM 5
ENGINE 6
CHASSIS 7
ELECTRICAL SYSTEM 8

FOREWORD
0 - 2
ATLANTIC 125 - 200
SUMMARY 0.1. FOREWORD .................................................................................................................................... 3
0.1.1. FOREWORD ........................................................................................................................... 3 0.1.2. REFERENCE MANUALS ........................................................................................................ 4 0.1.3. ABBREVIATIONS/SYMBOLS/CONVENTIONS...................................................................... 5
FOREWORD
0 - 3
ATLANTIC 125 - 200
0.1. FOREWORD
0.1.1. FOREWORD
- This manual provides the information required for normal servicing. - This manual is intended for use by aprilia Dealers and their qualified mechanics. Certain information has been
omitted intentionally, as this manual does not purport to provide a comprehensive treatise on mechanics. The persons who will use this manual must be fully conversant with the basics of mechanics and with the basic procedures of motorcycle repair. Repairing or inspecting a motorcycle when one does not possess such basic knowledge or training could result in improper servicing and make the motorcycle unsafe to ride. For the same reason, certain basic precautions have been omitted in the descriptions of repair and inspection procedures. Take special care to avoid damage to motorcycle components or injury to persons. aprilia s.p.a.'s mission is to constantly enhance the riding pleasure of final users through the on-going improvement of its products as well as of the relevant technical literature. All aprilia Points of Sale and Subsidiaries worldwide are kept updated on major engineering changes and modifications to repair procedures. Such changes and modifications are then reflected in the next release of the relevant manual. When in doubt about an inspection or repair procedure, please contact the aprilia CONSUMER SERVICE (A.C.S.) DEPARTMENT, who will be glad to provide full information on the procedure in question as well as on any updates or engineering changes affecting the motorcycle under consideration.
aprilia s.p.a. reserves the right to make changes to its products at any time, barring any such changes as may alter the essential features of a product as specified in the relevant manual. All rights of storage using electronic means, reproduction and total or partial adaptation, whatever the means adopted, are reserved in all countries. Any reference to products or services provided by outside suppliers is for information only and by no means binding, and implies no warranties or responsibilities as to the performance or use of any such products and/or services. For more detailed information, please read 0.1.2. Original release: December 2002 Produced and printed by: DECA s.r.l. via Risorgimento, 23/1 - 48022 Lugo (RA) - Italy Tel. +39 - 0545 35235 Fax +39 - 0545 32844 E-mail: [email protected] www.decaweb.it for: aprilia s.p.a. via G. Galilei, 1 - 30033 Noale (VE) - Italy Tel. +39 – (0)41 58 29 111 Fax +39 – (0)41 58 29 190 www.aprilia.com www.serviceaprilia.com
FOREWORD
0 - 4
ATLANTIC 125 - 200
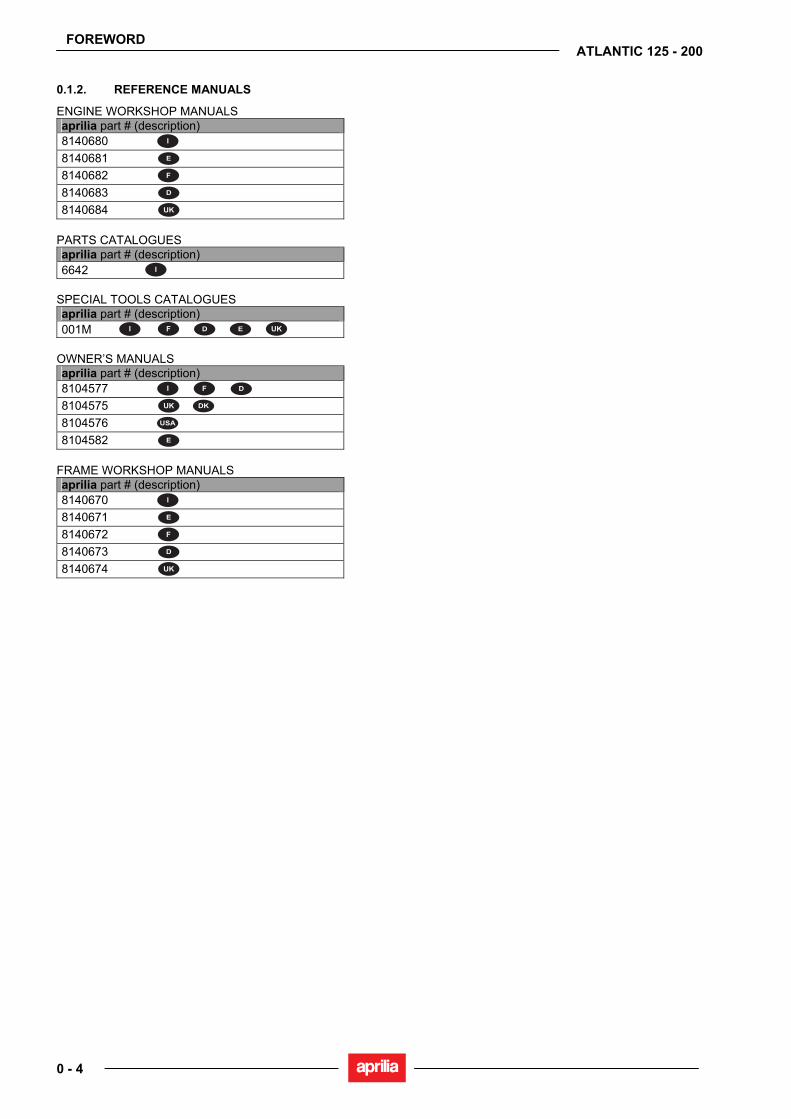
0.1.2. REFERENCE MANUALS
ENGINE WORKSHOP MANUALS aprilia part # (description) 8140680 8140681 8140682 8140683 8140684
PARTS CATALOGUES aprilia part # (description) 6642
SPECIAL TOOLS CATALOGUES aprilia part # (description) 001M
OWNER’S MANUALS aprilia part # (description) 8104577 8104575 8104576 8104582
FRAME WORKSHOP MANUALS aprilia part # (description) 8140670 8140671 8140672 8140673 8140674
FOREWORD
0 - 5
ATLANTIC 125 - 200
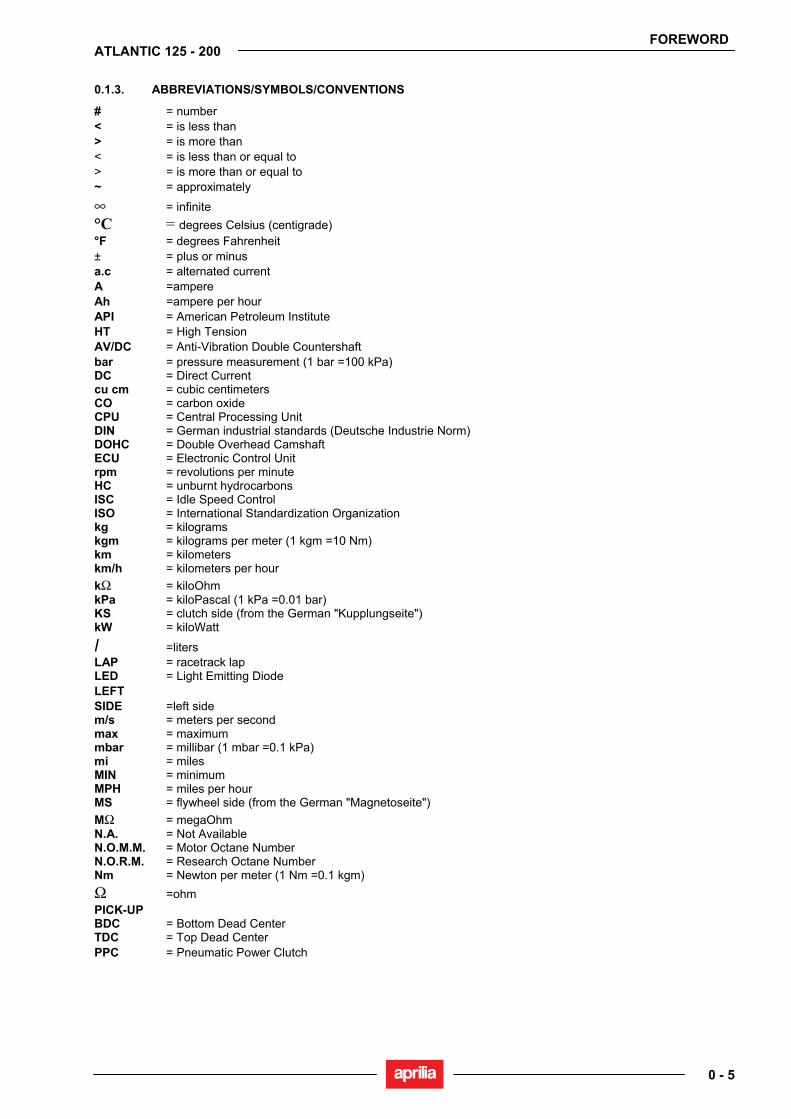
0.1.3. ABBREVIATIONS/SYMBOLS/CONVENTIONS
# = number < = is less than > = is more than < = is less than or equal to > = is more than or equal to ~ = approximately ∞ = infinite °C = degrees Celsius (centigrade) °F = degrees Fahrenheit ± = plus or minus a.c = alternated current A =ampere Ah =ampere per hour API = American Petroleum Institute HT = High Tension AV/DC = Anti-Vibration Double Countershaft bar = pressure measurement (1 bar =100 kPa) DC = Direct Current cu cm = cubic centimeters CO = carbon oxide CPU = Central Processing Unit DIN = German industrial standards (Deutsche Industrie Norm) DOHC = Double Overhead Camshaft ECU = Electronic Control Unit rpm = revolutions per minute HC = unburnt hydrocarbons ISC = Idle Speed Control ISO = International Standardization Organization kg = kilograms kgm = kilograms per meter (1 kgm =10 Nm) km = kilometers km/h = kilometers per hour kΩ = kiloOhm kPa = kiloPascal (1 kPa =0.01 bar) KS = clutch side (from the German "Kupplungseite") kW = kiloWatt l =liters LAP = racetrack lap LED = Light Emitting Diode LEFT SIDE =left side m/s = meters per second max = maximum mbar = millibar (1 mbar =0.1 kPa) mi = miles MIN = minimum MPH = miles per hour MS = flywheel side (from the German "Magnetoseite") MΩ = megaOhm N.A. = Not Available N.O.M.M. = Motor Octane Number N.O.R.M. = Research Octane Number Nm = Newton per meter (1 Nm =0.1 kgm) Ω =ohm PICK-UP BDC = Bottom Dead Center TDC = Top Dead Center PPC = Pneumatic Power Clutch

FOREWORD
0 - 6
ATLANTIC 125 - 200
RIGHT SIDE = right side SAE = Society of Automotive Engineers T.B.E.I. = crowned-head Allen screw T.C.E.I. = cheese-headed Allen screw T.E. =hexagonal head TEST = diagnostic check T.P. =flat head screw TSI = Twin Spark Ignition UPSIDE- DOWN = inverted fork V =volt W =watt Ø = Diameter

GENERAL INFORMATION
1 - 1
ATLANTIC 125 - 200
GENERAL INFORMATION 1
GENERAL INFORMATION
1 - 2
ATLANTIC 125 - 200
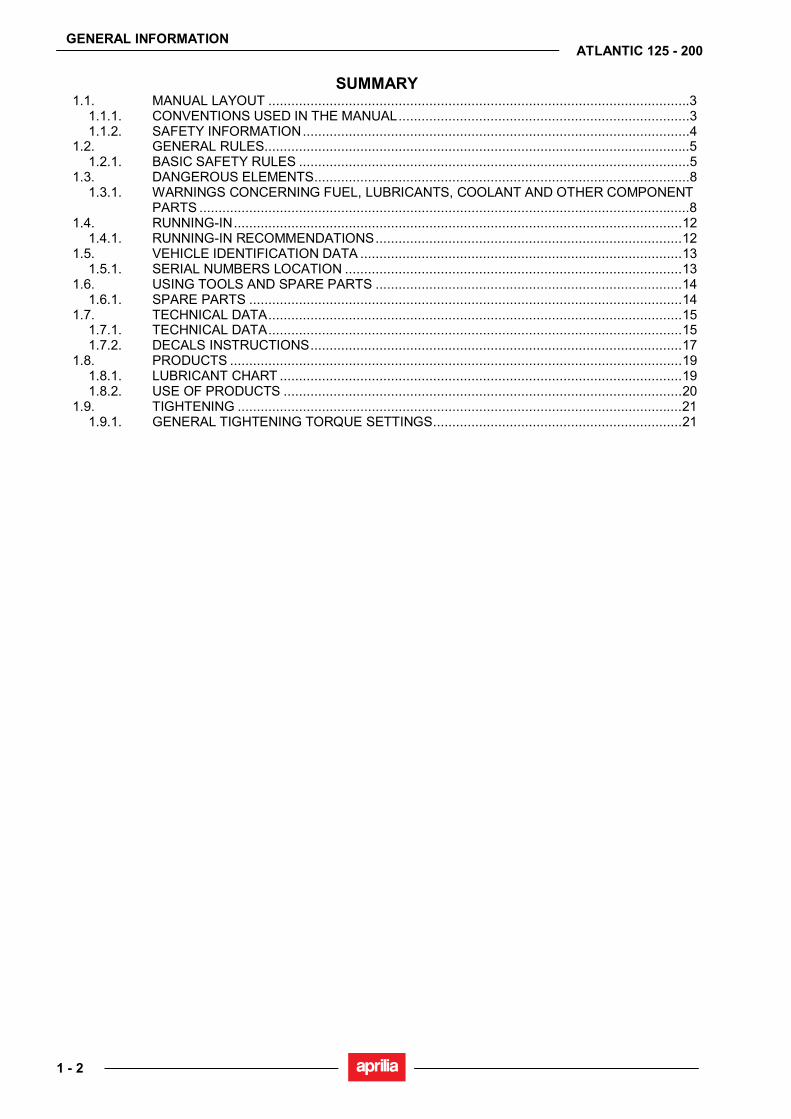
SUMMARY 1.1. MANUAL LAYOUT ..............................................................................................................3
1.1.1. CONVENTIONS USED IN THE MANUAL............................................................................3 1.1.2. SAFETY INFORMATION.....................................................................................................4
1.2. GENERAL RULES...............................................................................................................5 1.2.1. BASIC SAFETY RULES ......................................................................................................5
1.3. DANGEROUS ELEMENTS..................................................................................................8 1.3.1. WARNINGS CONCERNING FUEL, LUBRICANTS, COOLANT AND OTHER COMPONENT
PARTS ................................................................................................................................8 1.4. RUNNING-IN.....................................................................................................................12
1.4.1. RUNNING-IN RECOMMENDATIONS................................................................................12 1.5. VEHICLE IDENTIFICATION DATA ....................................................................................13
1.5.1. SERIAL NUMBERS LOCATION ........................................................................................13 1.6. USING TOOLS AND SPARE PARTS ................................................................................14
1.6.1. SPARE PARTS .................................................................................................................14 1.7. TECHNICAL DATA............................................................................................................15
1.7.1. TECHNICAL DATA............................................................................................................15 1.7.2. DECALS INSTRUCTIONS.................................................................................................17
1.8. PRODUCTS ......................................................................................................................19 1.8.1. LUBRICANT CHART .........................................................................................................19 1.8.2. USE OF PRODUCTS ........................................................................................................20
1.9. TIGHTENING ....................................................................................................................21 1.9.1. GENERAL TIGHTENING TORQUE SETTINGS.................................................................21
GENERAL INFORMATION
1 - 3
ATLANTIC 125 - 200
1.1. MANUAL LAYOUT 1.1.1. CONVENTIONS USED IN THE MANUAL
• This manual is divided in sections and subsections, each covering a set of the most significant components.
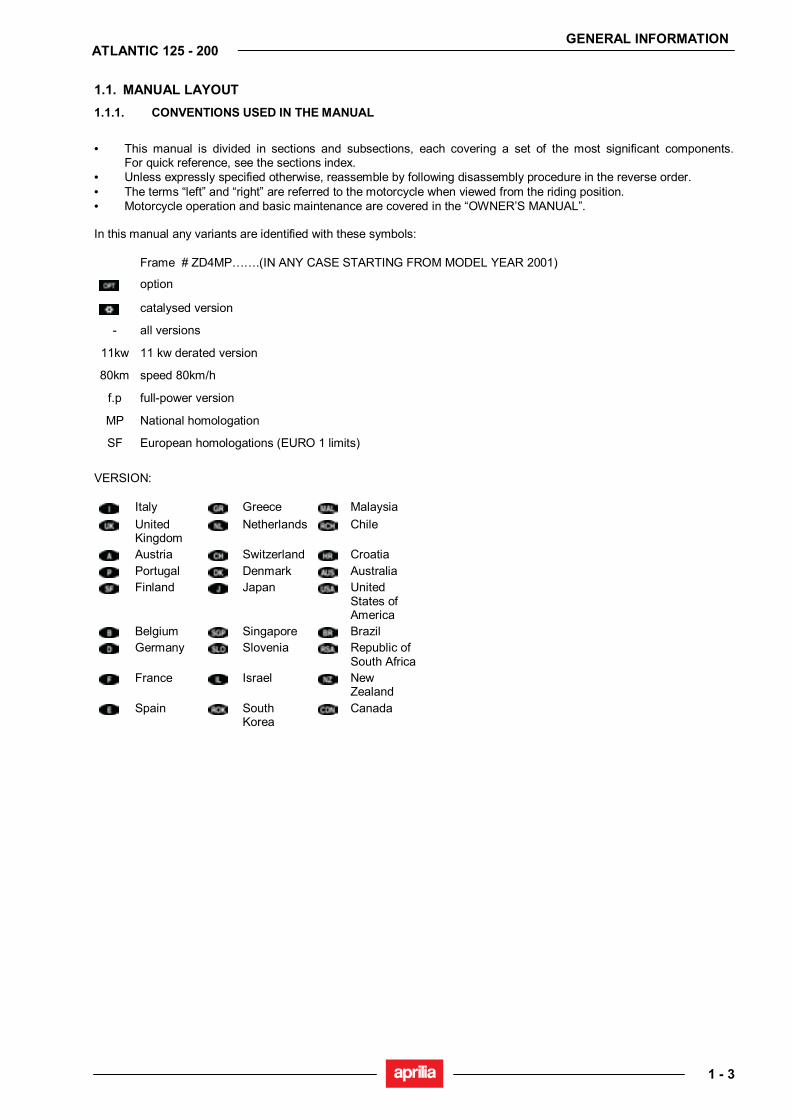
For quick reference, see the sections index. • Unless expressly specified otherwise, reassemble by following disassembly procedure in the reverse order. • The terms “left” and “right” are referred to the motorcycle when viewed from the riding position. • Motorcycle operation and basic maintenance are covered in the “OWNER’S MANUAL”. In this manual any variants are identified with these symbols: Frame # ZD4MP…….(IN ANY CASE STARTING FROM MODEL YEAR 2001)
option
catalysed version
- all versions
11kw 11 kw derated version
80km speed 80km/h
f.p full-power version
MP National homologation
SF European homologations (EURO 1 limits)
VERSION:
Italy Greece Malaysia
United Kingdom
Netherlands Chile
Austria Switzerland Croatia Portugal Denmark Australia Finland Japan United
States of America
Belgium Singapore Brazil Germany Slovenia Republic of
South Africa France Israel New
Zealand Spain South
Korea Canada
GENERAL INFORMATION
1 - 4
ATLANTIC 125 - 200
1.1.2. SAFETY INFORMATION
The following conventions are used to identify safety information throughout the manual:
This symbol identifies safety-related information. Whenever you see this symbol in the manual or attached to the motorcycle, use utmost care to avoid the risk of injury. Disregarding the instructions identified by this symbol may put your safety, as well as that of other persons or of the motorcycle at risk!
DANGER Disregarding these indications may lead to severe injury or death.
WARNING Disregarding these indications may lead to minor injury or motorcycle damage.
NOTE The term "NOTE" in this manual precedes important information or instructions.
GENERAL INFORMATION
1 - 5
ATLANTIC 125 - 200
1.2. GENERAL RULES 1.2.1. BASIC SAFETY RULES
CARBON MONOXIDE Should it be necessary to perform some operations with the vehicle running, make sure to work outdoors or in a well-ventilated room. Avoid starting the engine in closed or badly-ventilated rooms. In case you are working indoors, make use of an exhaust gases scavenging system.
DANGER Exhaust gases contain carbon monoxide, which is extremely toxic if inhaled and may cause loss of consciousness or even lead to death by asphyxia.
FUEL
DANGER The fuel used to operate engines is highly flammable and becomes explosive under particular conditions. Refueling and engine service should take place in a well-ventilated area with the engine stopped. Do not smoke when refueling or in the proximity of sources of fuel vapors, avoid flames, sparks and any element that could ignite fuel or provoke explosions. DO NOT DISPOSE OF FUEL IN THE ENVIRONMENT. KEEP AWAY FROM CHILDREN.
HIGH-TEMPERATURE COMPONENTS The engine and the exhaust system parts become hot and continue to be hot even for some time after the engine has been stopped. Before handling these parts, wear heatproof gloves or wait for the engine and the exhaust system to cool completely down. USED GEARBOX AND FORK OILS
DANGER In case any maintenance operation should be required, it is advisable to use latex gloves. Gear oil may cause serious damage to the skin if handled daily and for long periods. Wash your hands carefully after use. Put it in a sealed container and take it to the filling station where you usually buy it or to an oil salvage center. In case any maintenance operation should be required, it is advisable to use latex gloves. DO NOT DISPOSE OF OIL IN THE ENVIRONMENT KEEP AWAY FROM CHILDREN.
BRAKE FLUID
WARNING When using the brake fluid, take care not to spill it on the plastic, rubber or painted parts, since it can damage them. When carrying out the maintenance operations on the braking system, use a clean cloth to cover these parts. Always wear eye protectors when working on the braking system. The brake fluid is highly irritant. Avoid contact with your eyes. If the brake fluid gets in contact with the skin or the eyes, carefully wash the parts of your body that get in contact with the fluid and consult a doctor. KEEP AWAY FROM CHILDREN. COOLANT
The coolant is composed of ethylene glycol that, under certain conditions, can become inflammable and send out invisible flames causing severe burns.

GENERAL INFORMATION
1 - 6
ATLANTIC 125 - 200
DANGER Be careful not to spill the coolant on the red-hot parts of the engine and the exhaust system: it may catch fire and send out invisible flames. In case any maintenance operation should be required, it is advisable to use latex gloves. Even if toxic, coolant has a sweet flavour. Never leave it inside open containers or within the reach of animals to prevent the risk of drinking. KEEP AWAY FROM CHILDREN. Do not remove the radiator plug when the engine is hot. The coolant is under pressure and could cause severe burns.
HYDROGEN GAS AND BATTERY ELECTROLYTE
DANGER The battery electrolyte is a toxic, caustic substance containing sulphuric acid and thus able to cause severe burns in case of contact. Always wear tight gloves and protective clothes when handling this fluid. If the electrolyte gets in contact with the skin, carefully wash the parts of your body that get in contact with the fluid with abundant fresh water. Always use a protection for your eyes since also a very small amount of the battery fluid can cause blindness. In the event of contact with your eyes, carefully wash them with water for fifteen minutes and then consult immediately an eye specialist. Should you accidentally drink some fluid, drink abundant water or milk, then drink magnesia milk or vegetable oil and consult immediately a doctor. Battery releases explosive gases. Keep flames, sparks, cigarettes and any other heat source away from the battery. Make sure the room is well-ventilated when servicing or recharging the battery. KEEP AWAY FROM CHILDREN. The battery fluid is corrosive Do not pour it on the plastic parts. Make sure that the electrolyte acid is suitable for the type of battery used.
GENERAL PRECAUTIONS AND INFORMATION Follow these instructions closely when repairing, disassembling or reassembling the motorcycle or its components.
DANGER Using bare flames is strictly forbidden when working on the motorcycle. Before servicing or inspecting the motorcycle: stop the engine and remove the key from the ignition switch; allow for the engine and exhaust system to cool down; where possible, lift the motorcycle using adequate equipment placed on firm and level ground. Be careful of any parts of the engine or exhaust system which may still be hot to the touch to avoid scalds or burns. Never put any mechanical parts or other vehicle components in your mouth when you have both hands busy. None of the motorcycle components is edible. Some components are harmful to the human body or toxic. Unless expressly specified otherwise, motorcycle assemblies are refitted or re-assembled by following the removal or disassembly procedure in the reverse order. Where a procedure is cross-referred to relevant sections in the manual, proceed sensibly to avoid disturbing any parts unless strictly necessary. Never attempt to polish matte-finished surfaces with lapping compounds. Never use fuel instead of solvent to clean the motorcycle. Do not clean any rubber or plastic parts or the seat with alcohol, petrol or solvents. Clean with water and neutral detergent. Always disconnect the battery negative (–) lead before soldering any electrical components. When two or more persons service the same motorcycle together, special care must be taken to avoid personal injury. Carefully read 1.3.1.
BEFORE DISASSEMBLING ANY COMPONENTS • Clean off all dirt, mud and dust and clear any foreign objects from the vehicle before disassembling any
components. • Use the model-specific special tools where specified.

GENERAL INFORMATION
1 - 7
ATLANTIC 125 - 200
DISASSEMBLING THE COMPONENTS - Never use pliers or similar tools to slacken and/or tighten nuts and bolts. Always use a suitable spanner. - Mark all connections (hoses, wiring, etc.) with their positions before disconnecting them. Identify each connection
using a distinctive symbol or convention. - Mark each part clearly to avoid confusion when refitting. - Thoroughly clean and wash any components you have removed using a detergent with low flash point. - Mated parts should always be refitted together. These parts will have seated themselves against one another in
service as a result of normal wear and tear and should never be mixed up with other similar parts on refitting. - Certain components are matched-pair parts and should always be replaced as a set. - Keep the motorcycle and its components well away from heat sources. REASSEMBLING THE COMPONENTS
DANGER Never reuse a circlip or snap ring. These parts must always be renewed once they have been disturbed. When fitting a new circlip or snap ring, take care to move the open ends apart just enough to allow fitment to the shaft. Make a rule to check that a newly –fitted circlip or snap ring has located fully into its groove. Never clean a bearing with compressed air.
NOTE All bearings must rotate freely with no hardness or noise. Replace any bearings that do not meet these requirements.
- Use aprilia ORIGINAL SPARE PARTS only. - Use the specified lubricants and consumables. - Where possible, lubricate a part before assembly. - When tightening nuts and bolts, start with the largest or innermost nut/bolt and observe a cross pattern. Tighten
evenly in subsequent steps until achieving the specified torque. - Replace any self-locking nuts, gaskets, seals, circlips or snap rings, O-rings, split pins, bolts and screws which
have a damaged thread. - Lubricate the bearings abundantly before assembly. - Make a rule to check that all components you have fitted are correctly in place. - After repairing the motorcycle and after each service inspection, perform the preliminary checks, and then operate
the motorcycle in a private estate area or in a safe area away from traffic. - Clean all joint surfaces, oil seal edges and gaskets before assembly. Apply a light coat of lithium grease along the
edges of oil seals. Fit oil seals and bearings with the marking or serial number facing outwards (in view). ELECTRICAL CONNECTORS To disconnect the electrical connector, follow the procedures below. Failure to comply with these procedures may lead to irreparable damages to the connector and the wiring as well. If present, press the special safety hooks.
WARNING Do not pull cables to disconnect the two connectors.
• Grasp the two connectors and disconnect them by pulling them in the two opposite directions. • In case of dirt, rust, moisture, etc.., thoroughly clean the inside of the connectors with compressed air. • Make sure that the cables are correctly fitted inside the connectors terminals.
NOTE The two connectors have just one correct positioning. Make sure to position them in the right direction.
• Then fit the two connectors. Make sure they are correctly coupled (if the special hooks are present, a click will be heard).
TIGHTENING TORQUE SETTINGS
DANGER Always remember that the tightening torque settings of all wheel, brake, wheel shaft and other suspension parts play a fundamental role to ensure vehicle safety. Make sure that these values are always within the specified limits. Check fastening parts tightening torque settings at regular intervals. Upon reassembly, always use a torque wrench. Failure to comply with these recommendations could lead to the loosening and detachment of one of these parts with a consequent locking of the wheel or other serious troubles affecting the vehicle maneuverability, and thus the risk of falls and serious injuries or death..
GENERAL INFORMATION
1 - 8
ATLANTIC 125 - 200
1.3. DANGEROUS ELEMENTS 1.3.1. WARNINGS CONCERNING FUEL, LUBRICANTS, COOLANT AND OTHER COMPONENT PARTS
DANGER The fuel used to operate engines is highly flammable and becomes explosive under particular conditions. Refueling and engine service should take place in a well-ventilated area with the engine stopped. Do not smoke when refueling or in the proximity of sources of fuel vapors. Avoid contact with bare flames, sources of sparks or any other source which may ignite the fuel or lead to explosion. Take care not to spill fuel out of the filler, or it may ignite when in contact with hot engine parts. In the event of accidental fuel spillage, make sure the affected area is fully dry before starting the engine. Fuel expands from heat and when left under direct sunlight. Never fill the fuel tank up to the rim. Tighten the filler cap securely after each refueling. Avoid contact with skin. Do not inhale vapors. Do not swallow fuel. Do not transfer fuel between different containers using a hose. DO NOT RELEASE FUEL INTO THE ENVIRONMENT. KEEP AWAY FROM CHILDREN.
Use only premium grade unleaded petrol, min. O.N. 95 (N.O.R.M.) and 85 (N.O.M.M.). LUBRICANTS
DANGER A good lubrication ensures the vehicle safety. Failure to keep the lubricants at the recommended level or the use of a non-suitable new and clean type of lubricant can lead to the engine or gearbox seizure, thus leading to serious accidents, personal injury or even death. Gear oil may cause serious damage to the skin if handled daily and for long periods. Wash your hands carefully after use. Do not dispose of oil into the environment. Take it to the filling station where you usually buy it or to an oil salvage center.
WARNING When filling the vehicle with oil, take care not to spill it out since it could damage the vehicle paintwork. In case of contact with oil, the tyres surface will become very slippery, thus becoming a serious danger for your safety. In case of leaks, do not use the vehicle. Check and trace the cause of leaks and proceed to repair.
ENGINE OIL
DANGER Prolonged or repeated contact with engine oil may cause severe skin damage. Wash your hands thoroughly after handling engine oil. Do not release into the environment. Dispose of engine oil through the nearest waste oil reclamation firm or through the supplier. Wear latex gloves during servicing.
Change engine after the first 1000 km (621 mi) and then every 6000 km (3728 mi), 2.11.2. (Recommended) oil fork , see 1.8.1. FRONT FORK OIL
DANGER Modifying the suspension settings or the viscosity of the front fork oil will affect its response. Standard oil viscosity: SAE 20 W. Choose the oil viscosity to determine the type of response required (SAE 5W for a softer suspension, 20W for a stiffer suspension). The two grades can also be mixed in varying solutions to obtain the desired response.
F.A. or Fork have special properties, which enable them to retain virtually the same viscosity regardless of temperature to give constant damping response.
(Recommended) front forks oil, see 1.8.1.
GENERAL INFORMATION
1 - 9
ATLANTIC 125 - 200
BRAKE FLUID
NOTE This vehicle is fitted with front and rear disc brakes. Each braking system is operated by an independent hydraulic circuit. The information provided below applies to both braking systems.
DANGER Do not use the vehicle in case brakes are worn out or do not work properly! The brakes are the parts that most ensure your safety and for this reason they must always be perfectly working. Failure to comply with these recommendations will probably lead to a crash or an accident, with a consequent risk of personal injury or death. A wet surface reduces brakes efficiency.
DANGER In case of wet ground the braking distance will be doubled, since both brakes and tyres drives on the road surface are extremely reduced by the water present on the road surface. Any water on brakes, after washing the vehicle or driving on a wet road surface or crossing puddles or gips, can wet brakes so as to greatly reduce their efficiency. Failure to comply with these recommendations may lead to serious accidents, with a consequent risk of severe personal injuries or death. Brakes are critical safety components. Do not ride the vehicle in case brakes are not working at their best. Check for brakes proper operation before every trip. Brake fluid is an irritant. Avoid contact with eyes or skin. In the event of accidental contact, wash affected body parts thoroughly. In the event of accidental contact with eyes, contact an eye specialist or seek medical advice. DO NOT RELEASE BRAKE FLUID INTO THE ENVIRONMENT. KEEP AWAY FROM CHILDREN. When handling brake fluid, take care not to spill it onto plastic or paint-finished parts or they will damage. Check brake fluid level after the first 1000 Km (621 mi) and then every 6000 Km (3728 mi). See 2.10.1. and 2.10.4.; change brake fluid every two years, see 2.10.2.
Recommended) brake fluid, see 1.8.1.
DANGER Do not use any brake fluids other than the specified type. Never mix different types of fluids to top up level, as this will damage the braking system. Do not use brake fluid from containers which have been kept open or in storage for long periods. Any sudden changes in play or hardness in the brake levers are warning signs of problems with the hydraulic circuits. Ensure that the brake discs and friction material have not become contaminated with oil or grease. This is particularly important after servicing or inspections. Make sure the brake lines are not twisted or worn. Prevent accidental water or dust from accidentally entering the circuit. Wear latex gloves when servicing the hydraulic circuit.
GENERAL INFORMATION
1 - 10
ATLANTIC 125 - 200
DISC BRAKES
DANGER The brakes are the parts that most ensure your safety and for this reason they must always be perfectly working; check them before every trip. A dirty disc soils the pads. Dirty pads must be replaced, while dirty discs must be cleaned with a high-quality degreaser. Perform the maintenance operations with half the indicated frequency if the vehicle is used in rainy or dusty areas, on uneven surfaces or on racetracks, see 2.1.2.. Check brake pads for wear, see 2.10.3.. When the disc pads wear out, the level of the fluid decreases to automatically compensate for their wear. The front brake fluid reservoir is located on the right handlebar, near the front brake lever. The rear brake fluid reservoir is located under the right fairing. Do not use the vehicle if the braking system leaks fluid.
COOLANT
DANGER Coolant is toxic when ingested and is an irritant, contact with eyes or skin may cause irritation. In the event of contact with eyes, rinse repeatedly with abundant water and seek medical advice. In the event of ingestion, induce vomiting, rinse mouth and throat with abundant water and seek medical advice immediately. DO NOT RELEASE INTO THE ENVIRONMENT. KEEP AWAY FROM CHILDREN.
DANGER Take care not to spill coolant onto hot engine parts. It may ignite and produce invisible flames. Wear latex gloves when servicing. Do not ride when coolant is below the minimum level.
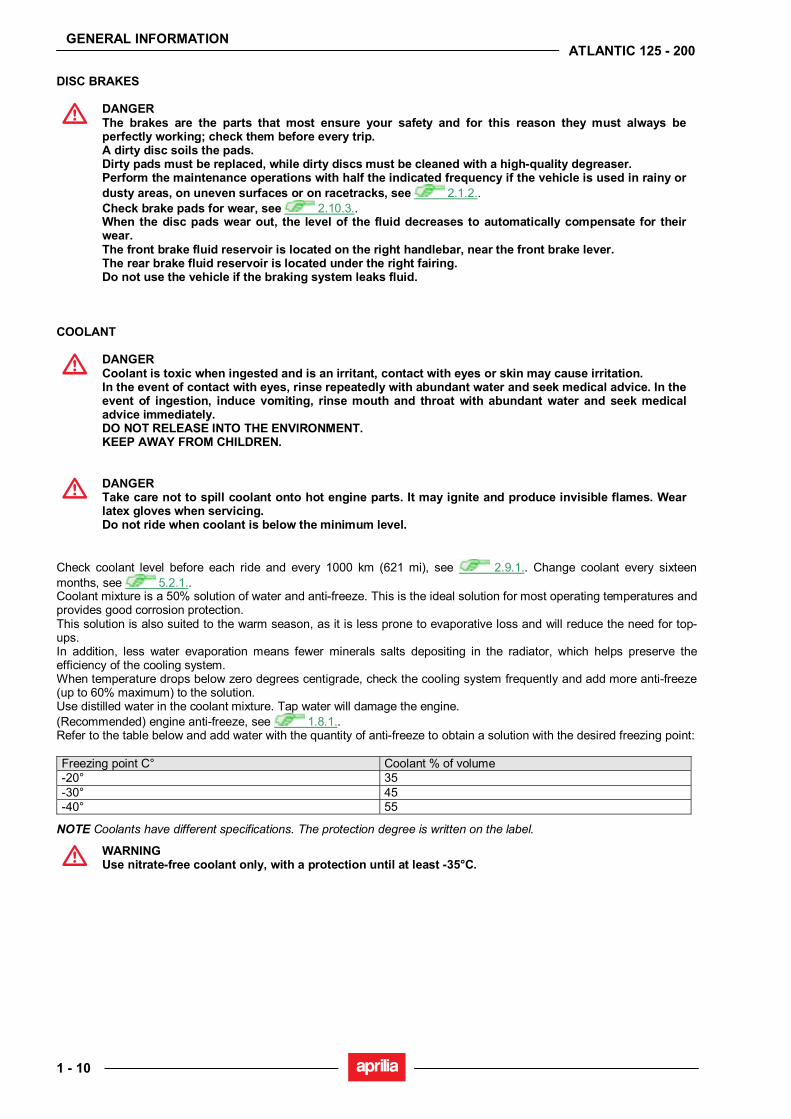
Check coolant level before each ride and every 1000 km (621 mi), see 2.9.1.. Change coolant every sixteen months, see 5.2.1.. Coolant mixture is a 50% solution of water and anti-freeze. This is the ideal solution for most operating temperatures and provides good corrosion protection. This solution is also suited to the warm season, as it is less prone to evaporative loss and will reduce the need for top-ups. In addition, less water evaporation means fewer minerals salts depositing in the radiator, which helps preserve the efficiency of the cooling system. When temperature drops below zero degrees centigrade, check the cooling system frequently and add more anti-freeze (up to 60% maximum) to the solution. Use distilled water in the coolant mixture. Tap water will damage the engine. (Recommended) engine anti-freeze, see 1.8.1.. Refer to the table below and add water with the quantity of anti-freeze to obtain a solution with the desired freezing point: Freezing point C° Coolant % of volume -20° 35 -30° 45 -40° 55
NOTE Coolants have different specifications. The protection degree is written on the label.
WARNING Use nitrate-free coolant only, with a protection until at least -35°C.
GENERAL INFORMATION
1 - 11
ATLANTIC 125 - 200
TYRES
WARNING If tyres are excessively inflated, the vehicle will be hard and uneasy to ride, thus making you feel not at your ease. In addition the roadworthiness, mainly on wet surfaces and during cornering, will be impaired. Flat tyres (insufficient pressure) can slip on the rim and make you lose the control of the vehicle. In this case too, both vehicle roadworthiness, maneuverability and brake efficiency will be impaired. Tyres changing, repair, maintenance and balancing must be carried out by specialized technicians using suitable equipment. When new, tyres can have a thin slippery protective coating. Drive carefully for the first kilometers (miles). Never use rubber treating substances on tyres. In particular, avoid contact with fluids/fuels, leading to a rapid wear. In case of contact with oil or fuel, do not clean but change tyres.
DANGER Some of the factory-assembled tyres of this vehicle are provided with wear indicators. There are several kinds of wear indicators. For more information on how to check the wear, contact your Dealer. Visually check if the tyres are worn and in this case have them changed. If a tyre deflates while driving, stop immediately. Avoid hard brakings or moves and do not close throttles too abruptly. Slowly close throttle grip, move to the edge of the road and make use of the engine brake to slow down until coming to a halt. Failure to comply with these recommendations can lead to serious accidents and consequent personal injuries or death. Do not install tyres with air tube on rims for tubeless tyres and vice-versa.
GENERAL INFORMATION
1 - 12
ATLANTIC 125 - 200
1.4. RUNNING-IN 1.4.1. RUNNING-IN RECOMMENDATIONS
The running-in of the engine is essential to ensure its duration and correct functioning. If possible, drive on hilly roads and/or roads with many bends, so that the engine, the suspensions and the brakes undergo a more effective running-in. During running-in, change speed. In this way the components are first "loaded" and then "relieved" and the engine parts can thus cool down. Even if it is important to stress the engine components during running-in, take care not to exceed.
WARNING Only after the first 1500 km (932 mi) of running-in you can expect the best performance levels from the vehicle.
Keep to the following indications: • Do not open the throttle completely if the speed is low, both during and after the running-in. • During the first 100 km (62 mi) pull the brakes with caution, avoiding sharp and prolonged brakings. This ensures a
correct bedding-in of the pads on the brake disc. • During the first 1000 km (621 mi), never use the vehicle beyond 80% of the max. speed, do not fully open throttle
and do not keep the vehicle at a constant speed for a long time.
WARNING After the first 1000 km (621 mi), carry out the checks indicated in the column “After running-in”, see
2.1.2., in order to avoid injuries to rider and/or other people and/or damaging the vehicle. • After the first 1000 km (621 mi), increase speed step by step until reaching top performance.

GENERAL INFORMATION
1 - 13
ATLANTIC 125 - 200
1.5. VEHICLE IDENTIFICATION DATA 1.5.1. SERIAL NUMBERS LOCATION
The vehicle serial numbers are used for its homologation.
NOTE Do not alter the identification numbers if you do not want to incur severe penal and administrative sanctions. In particular, the alteration of the frame number results in the immediate invalidity of the guarantee. FRAME NUMBER The frame number is stamped on the steering column.
ENGINE NUMBER The engine number is stamped on the rear part of the engine, near the shock absorber.
MANUFACTURER IDENTIFICATION PLATE • Remove the right rubber pad. • Raise block (1).
GENERAL INFORMATION
1 - 14
ATLANTIC 125 - 200
1.6. USING TOOLS AND SPARE PARTS 1.6.1. SPARE PARTS
Should some parts be replaced, use aprilia Original Spare Parts only. aprilia high-quality Original Spare Parts have been expressly designed and manufactured for aprilia vehicles.
WARNING The use of aprilia non-original spare parts can impair the vehicle performance or cause serious damage to the vehicle itself.
GENERAL INFORMATION
1 - 15
ATLANTIC 125 - 200
1.7. TECHNICAL DATA 1.7.1. TECHNICAL DATA
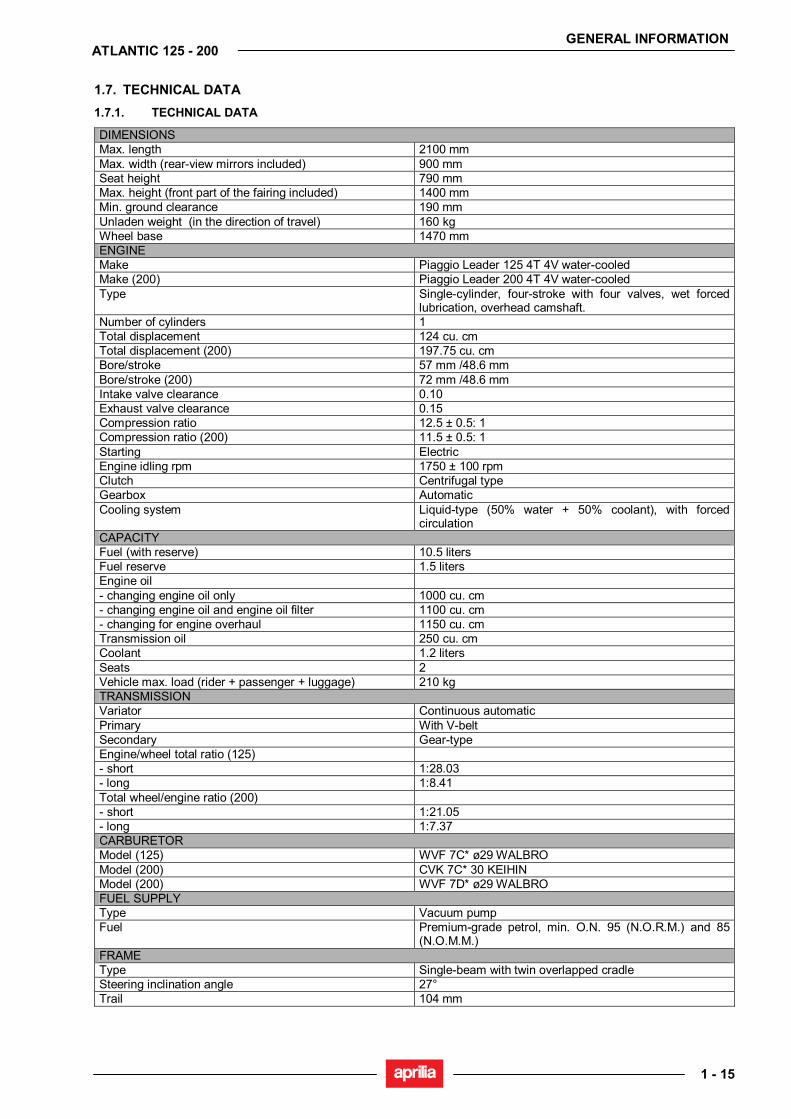
DIMENSIONS Max. length 2100 mm Max. width (rear-view mirrors included) 900 mm Seat height 790 mm Max. height (front part of the fairing included) 1400 mm Min. ground clearance 190 mm Unladen weight (in the direction of travel) 160 kg Wheel base 1470 mm ENGINE Make Piaggio Leader 125 4T 4V water-cooled Make (200) Piaggio Leader 200 4T 4V water-cooled Type
Single-cylinder, four-stroke with four valves, wet forced lubrication, overhead camshaft.
Number of cylinders 1 Total displacement 124 cu. cm Total displacement (200) 197.75 cu. cm Bore/stroke 57 mm /48.6 mm Bore/stroke (200) 72 mm /48.6 mm Intake valve clearance 0.10 Exhaust valve clearance 0.15 Compression ratio 12.5 ± 0.5: 1 Compression ratio (200) 11.5 ± 0.5: 1 Starting Electric Engine idling rpm 1750 ± 100 rpm Clutch Centrifugal type Gearbox Automatic Cooling system
Liquid-type (50% water + 50% coolant), with forced circulation
CAPACITY Fuel (with reserve) 10.5 liters Fuel reserve 1.5 liters Engine oil - changing engine oil only 1000 cu. cm - changing engine oil and engine oil filter 1100 cu. cm - changing for engine overhaul 1150 cu. cm Transmission oil 250 cu. cm Coolant 1.2 liters Seats 2 Vehicle max. load (rider + passenger + luggage) 210 kg TRANSMISSION Variator Continuous automatic Primary With V-belt Secondary Gear-type Engine/wheel total ratio (125) - short 1:28.03 - long 1:8.41 Total wheel/engine ratio (200) - short 1:21.05 - long 1:7.37 CARBURETOR Model (125) WVF 7C* ø29 WALBRO Model (200) CVK 7C* 30 KEIHIN Model (200) WVF 7D* ø29 WALBRO FUEL SUPPLY Type Vacuum pump Fuel Premium-grade petrol, min. O.N. 95 (N.O.R.M.) and 85
(N.O.M.M.) FRAME Type Single-beam with twin overlapped cradle Steering inclination angle 27° Trail 104 mm
GENERAL INFORMATION
1 - 16
ATLANTIC 125 - 200
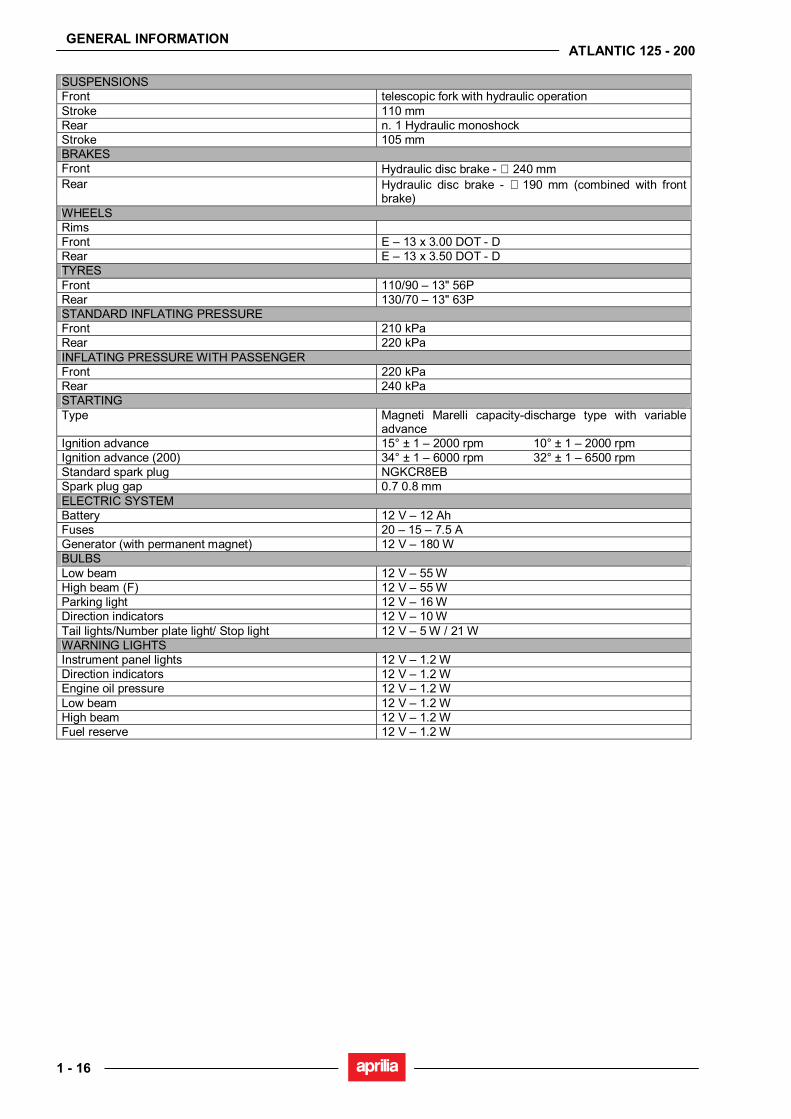
SUSPENSIONS Front telescopic fork with hydraulic operation Stroke 110 mm Rear n. 1 Hydraulic monoshock Stroke 105 mm BRAKES Front Hydraulic disc brake - ∅ 240 mm Rear Hydraulic disc brake - ∅ 190 mm (combined with front
brake) WHEELS Rims Front E – 13 x 3.00 DOT - D Rear E – 13 x 3.50 DOT - D TYRES Front 110/90 – 13" 56P Rear 130/70 – 13" 63P STANDARD INFLATING PRESSURE Front 210 kPa Rear 220 kPa INFLATING PRESSURE WITH PASSENGER Front 220 kPa Rear 240 kPa STARTING Type Magneti Marelli capacity-discharge type with variable
advance Ignition advance 15° ± 1 – 2000 rpm 10° ± 1 – 2000 rpm Ignition advance (200) 34° ± 1 – 6000 rpm 32° ± 1 – 6500 rpm Standard spark plug NGKCR8EB Spark plug gap 0.7 0.8 mm ELECTRIC SYSTEM Battery 12 V – 12 Ah Fuses 20 – 15 – 7.5 A Generator (with permanent magnet) 12 V – 180 W BULBS Low beam 12 V – 55 W High beam (F) 12 V – 55 W Parking light 12 V – 16 W Direction indicators 12 V – 10 W Tail lights/Number plate light/ Stop light 12 V – 5 W / 21 W WARNING LIGHTS Instrument panel lights 12 V – 1.2 W Direction indicators 12 V – 1.2 W Engine oil pressure 12 V – 1.2 W Low beam 12 V – 1.2 W High beam 12 V – 1.2 W Fuel reserve 12 V – 1.2 W
GENERAL INFORMATION
1 - 17
ATLANTIC 125 - 200
1.7.2. DECALS INSTRUCTIONS
Should some frame parts be removed:
NOTE Plastic and painted parts shall be handled with care. Do not score or damage them. Operate with care. Do not damage keys and/or keyways. When sticking decals, carefully follow the instructions listed below.
Recommended tools: - Medium-strength spatule (1);
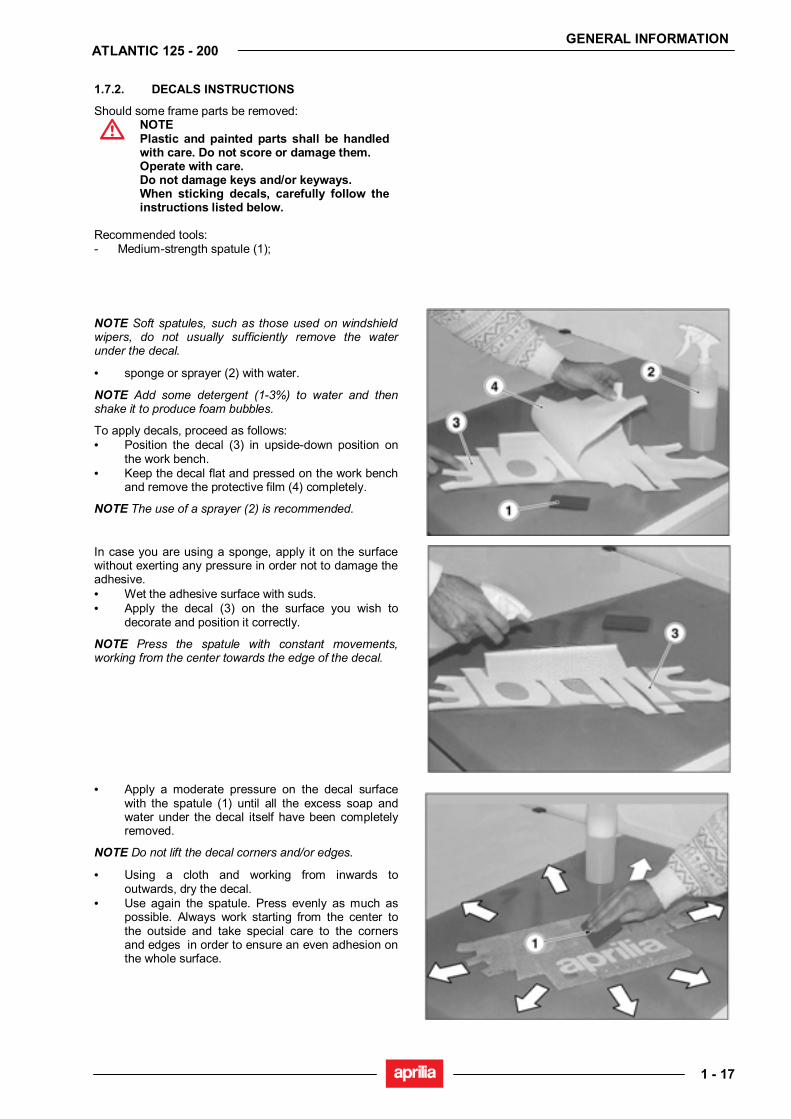
NOTE Soft spatules, such as those used on windshield wipers, do not usually sufficiently remove the water under the decal.
• sponge or sprayer (2) with water.
NOTE Add some detergent (1-3%) to water and then shake it to produce foam bubbles.
To apply decals, proceed as follows: • Position the decal (3) in upside-down position on
the work bench. • Keep the decal flat and pressed on the work bench
and remove the protective film (4) completely.
NOTE The use of a sprayer (2) is recommended.
In case you are using a sponge, apply it on the surface without exerting any pressure in order not to damage the adhesive. • Wet the adhesive surface with suds. • Apply the decal (3) on the surface you wish to
decorate and position it correctly.
NOTE Press the spatule with constant movements, working from the center towards the edge of the decal.
• Apply a moderate pressure on the decal surface with the spatule (1) until all the excess soap and water under the decal itself have been completely removed.
NOTE Do not lift the decal corners and/or edges.
• Using a cloth and working from inwards to outwards, dry the decal.
• Use again the spatule. Press evenly as much as possible. Always work starting from the center to the outside and take special care to the corners and edges in order to ensure an even adhesion on the whole surface.
GENERAL INFORMATION
1 - 18
ATLANTIC 125 - 200
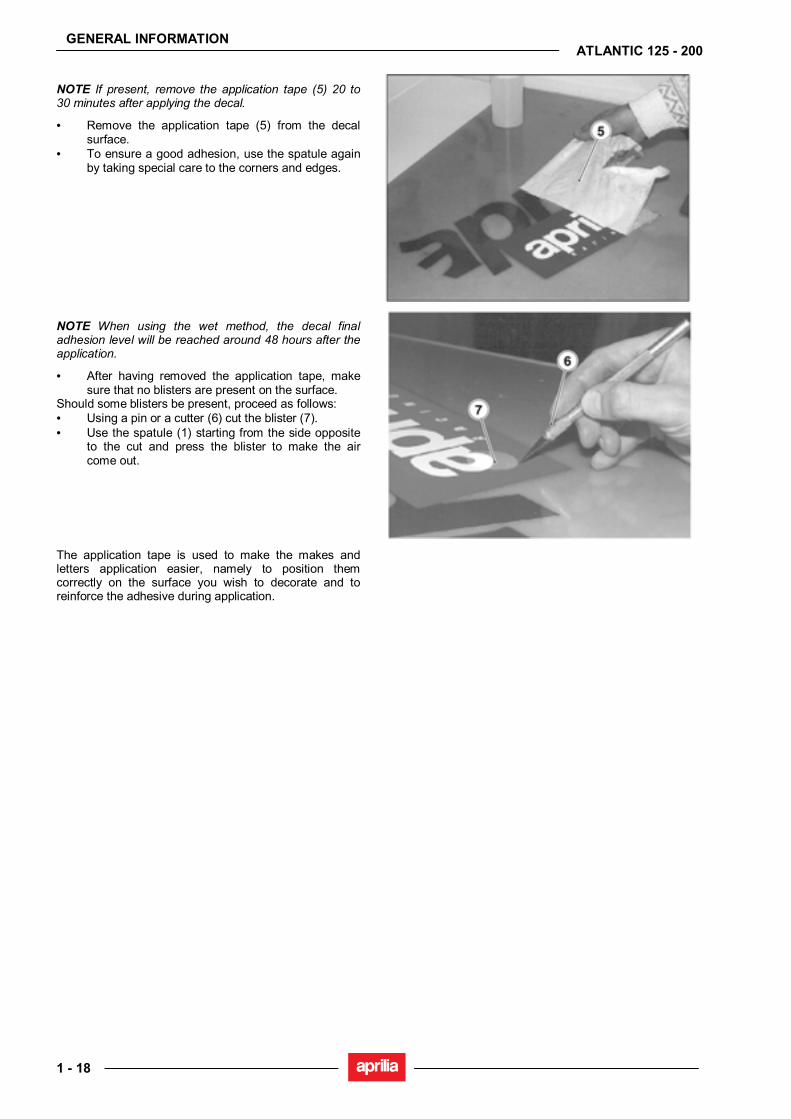
NOTE If present, remove the application tape (5) 20 to 30 minutes after applying the decal.
• Remove the application tape (5) from the decal surface.
• To ensure a good adhesion, use the spatule again by taking special care to the corners and edges.
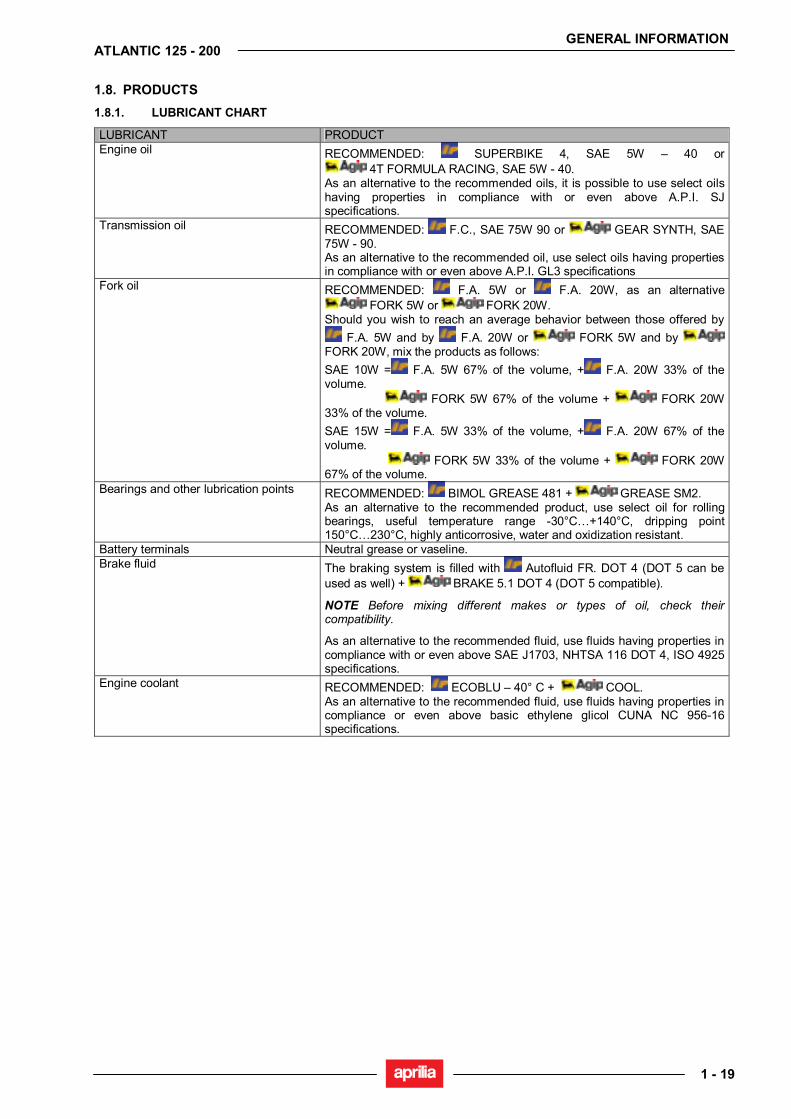
NOTE When using the wet method, the decal final adhesion level will be reached around 48 hours after the application.
• After having removed the application tape, make sure that no blisters are present on the surface.
Should some blisters be present, proceed as follows: • Using a pin or a cutter (6) cut the blister (7). • Use the spatule (1) starting from the side opposite
to the cut and press the blister to make the air come out.
The application tape is used to make the makes and letters application easier, namely to position them correctly on the surface you wish to decorate and to reinforce the adhesive during application.
GENERAL INFORMATION
1 - 19
ATLANTIC 125 - 200
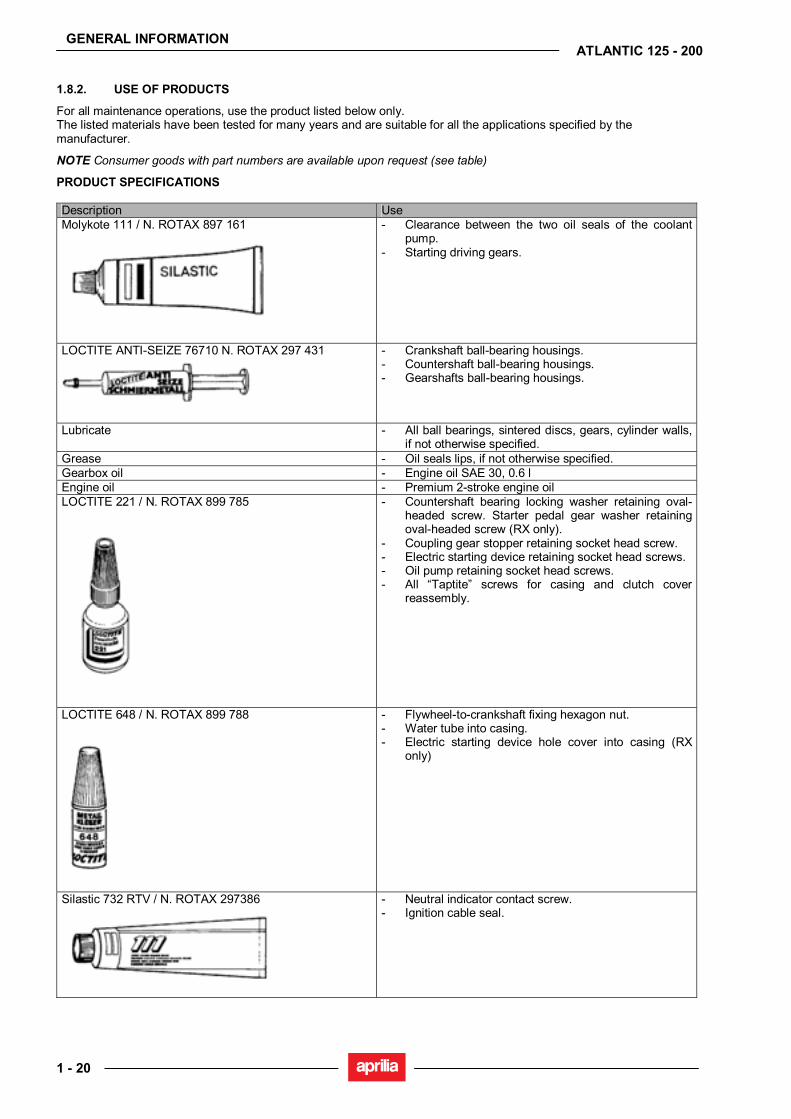
1.8. PRODUCTS 1.8.1. LUBRICANT CHART
LUBRICANT PRODUCT Engine oil RECOMMENDED: SUPERBIKE 4, SAE 5W – 40 or
4T FORMULA RACING, SAE 5W - 40. As an alternative to the recommended oils, it is possible to use select oils having properties in compliance with or even above A.P.I. SJ specifications.
Transmission oil RECOMMENDED: F.C., SAE 75W 90 or GEAR SYNTH, SAE 75W - 90. As an alternative to the recommended oil, use select oils having properties in compliance with or even above A.P.I. GL3 specifications
Fork oil RECOMMENDED: F.A. 5W or F.A. 20W, as an alternative FORK 5W or FORK 20W.
Should you wish to reach an average behavior between those offered by F.A. 5W and by F.A. 20W or FORK 5W and by
FORK 20W, mix the products as follows: SAE 10W = F.A. 5W 67% of the volume, + F.A. 20W 33% of the volume. FORK 5W 67% of the volume + FORK 20W 33% of the volume. SAE 15W = F.A. 5W 33% of the volume, + F.A. 20W 67% of the volume. FORK 5W 33% of the volume + FORK 20W 67% of the volume.
Bearings and other lubrication points RECOMMENDED: BIMOL GREASE 481 + GREASE SM2. As an alternative to the recommended product, use select oil for rolling bearings, useful temperature range -30°C…+140°C, dripping point 150°C…230°C, highly anticorrosive, water and oxidization resistant.
Battery terminals Neutral grease or vaseline. Brake fluid The braking system is filled with Autofluid FR. DOT 4 (DOT 5 can be
used as well) + BRAKE 5.1 DOT 4 (DOT 5 compatible).
NOTE Before mixing different makes or types of oil, check their compatibility.
As an alternative to the recommended fluid, use fluids having properties in compliance with or even above SAE J1703, NHTSA 116 DOT 4, ISO 4925 specifications.
Engine coolant RECOMMENDED: ECOBLU – 40° C + COOL. As an alternative to the recommended fluid, use fluids having properties in compliance or even above basic ethylene glicol CUNA NC 956-16 specifications.
GENERAL INFORMATION
1 - 20
ATLANTIC 125 - 200
1.8.2. USE OF PRODUCTS
For all maintenance operations, use the product listed below only. The listed materials have been tested for many years and are suitable for all the applications specified by the manufacturer.
NOTE Consumer goods with part numbers are available upon request (see table)
PRODUCT SPECIFICATIONS Description Use Molykote 111 / N. ROTAX 897 161
- Clearance between the two oil seals of the coolant pump.
- Starting driving gears.
LOCTITE ANTI-SEIZE 76710 N. ROTAX 297 431
- Crankshaft ball-bearing housings. - Countershaft ball-bearing housings. - Gearshafts ball-bearing housings.
Lubricate - All ball bearings, sintered discs, gears, cylinder walls, if not otherwise specified.
Grease - Oil seals lips, if not otherwise specified. Gearbox oil - Engine oil SAE 30, 0.6 l Engine oil - Premium 2-stroke engine oil LOCTITE 221 / N. ROTAX 899 785
- Countershaft bearing locking washer retaining oval-headed screw. Starter pedal gear washer retaining oval-headed screw (RX only).
- Coupling gear stopper retaining socket head screw. - Electric starting device retaining socket head screws. - Oil pump retaining socket head screws. - All “Taptite” screws for casing and clutch cover
reassembly.
LOCTITE 648 / N. ROTAX 899 788
- Flywheel-to-crankshaft fixing hexagon nut. - Water tube into casing. - Electric starting device hole cover into casing (RX
only)
Silastic 732 RTV / N. ROTAX 297386
- Neutral indicator contact screw. - Ignition cable seal.
GENERAL INFORMATION
1 - 21
ATLANTIC 125 - 200
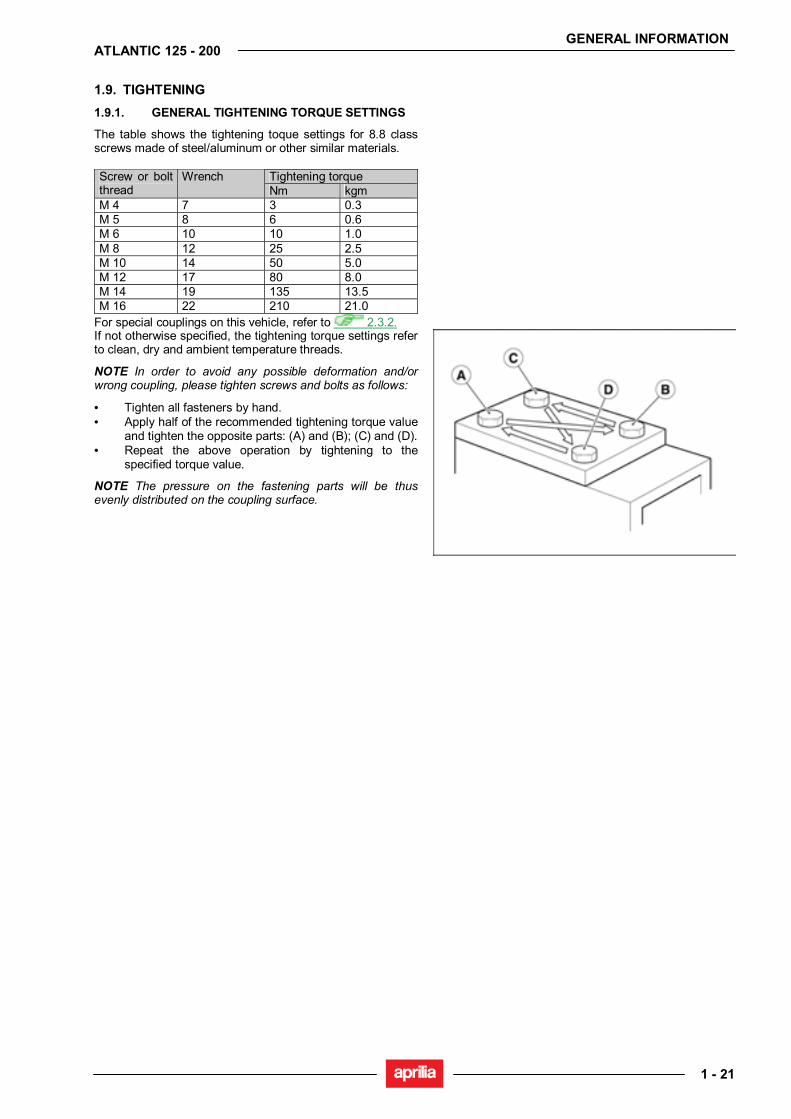
1.9. TIGHTENING 1.9.1. GENERAL TIGHTENING TORQUE SETTINGS
The table shows the tightening toque settings for 8.8 class screws made of steel/aluminum or other similar materials.
Tightening torque Screw or bolt thread
Wrench Nm kgm
M 4 7 3 0.3 M 5 8 6 0.6 M 6 10 10 1.0 M 8 12 25 2.5 M 10 14 50 5.0 M 12 17 80 8.0 M 14 19 135 13.5 M 16 22 210 21.0
For special couplings on this vehicle, refer to 2.3.2.
If not otherwise specified, the tightening torque settings refer to clean, dry and ambient temperature threads.
NOTE In order to avoid any possible deformation and/or wrong coupling, please tighten screws and bolts as follows:
• Tighten all fasteners by hand. • Apply half of the recommended tightening torque value
and tighten the opposite parts: (A) and (B); (C) and (D). • Repeat the above operation by tightening to the
specified torque value.
NOTE The pressure on the fastening parts will be thus evenly distributed on the coupling surface.
ROUTINE MAINTENANCE
2 - 1
ATLANTIC 125 - 200
ROUTINE MAINTENANCE 2
ROUTINE MAINTENANCE
2 - 2
ATLANTIC 125 - 200
SUMMARY 2.1. ROUTINE MAINTENANCE .............................................................................................................. 3
2.1.1. INTRODUCTION ..................................................................................................................... 3 2.1.2. ROUTINE MAINTENANCE TABLE......................................................................................... 4
2.2. POINTS TO BE LUBRICATED ........................................................................................................ 5 2.2.1. POINTS TO BE LUBRICATED................................................................................................ 5
2.3. TIGHTENING ................................................................................................................................... 6 2.3.1. NUT, BOLT, SCREW TIGHTENING ....................................................................................... 6 2.3.2. FASTENING ELEMENTS........................................................................................................ 7
2.4. BATTERY......................................................................................................................................... 9 2.4.1. BATTERY ................................................................................................................................ 9 2.4.2. CHECKING AND CLEANING THE TERMINALS.................................................................. 10 2.4.3. CHECKING THE BATTERY ELECTROLYTE LEVEL .......................................................... 11 2.4.4. RECHARGING THE BATTERY ............................................................................................ 12 2.4.5. LONG INACTIVITY OF THE BATTERY................................................................................ 13
2.5. ELECTRICAL PARTS .................................................................................................................... 14 2.5.1. ELECTRICAL PARTS............................................................................................................ 14
2.6. SPARK PLUGS .............................................................................................................................. 15 2.6.1. SPARK PLUGS ..................................................................................................................... 15
2.7. AIR CLEANER................................................................................................................................ 17 2.7.1. AIR CLEANER....................................................................................................................... 17
2.8. TUBES............................................................................................................................................ 18 2.8.1. TUBES................................................................................................................................... 18
2.9. COOLANT ...................................................................................................................................... 19 2.9.1. CHECKING AND TOPPING UP THE COOLANT LEVEL.................................................... 19 2.9.2. CLEANING THE RADIATOR................................................................................................. 20
2.10. BRAKE FLUID............................................................................................................................ 21 2.10.1. CHECKING AND TOPPING UP THE BRAKE FLUID........................................................... 21 2.10.2. CHANGING THE BRAKE FLUID .......................................................................................... 23 2.10.3. CHECKING THE BRAKE PAD WEAR.................................................................................. 24 2.10.4. BLEEDING THE BRAKING SYSTEMS................................................................................. 25
2.11. ENGINE OIL............................................................................................................................... 28 2.11.1. CHECKING THE ENGINE OIL LEVEL AND TOPPING UP.................................................. 28 2.11.2. CHANGING THE ENGINE OIL AND THE OIL FILTER ........................................................ 29
2.12. TRANSMISSION OIL................................................................................................................. 30 2.12.1. CHECKING AND TOPPING UP THE TRANSMISSION OIL ................................................ 30 2.12.2. CHANGING THE TRANSMISSION OIL................................................................................ 31
2.13. THROTTLE ................................................................................................................................ 32 2.13.1. THROTTLE............................................................................................................................ 32 2.13.2. IDLING ADJUSTMENT.......................................................................................................... 34
2.14. FRONT END .............................................................................................................................. 35 2.14.1. STEERING ............................................................................................................................ 35 2.14.2. FRONT SUSPENSION.......................................................................................................... 36
2.15. REAR AXLE............................................................................................................................... 37 2.15.1. CHECKING THE ENGINE AXLE .......................................................................................... 37 2.15.2. REAR SUSPENSION INSPECTION ..................................................................................... 38
2.16. WHEELS .................................................................................................................................... 39 2.16.1. WHEELS................................................................................................................................ 39
2.17. TYRES ....................................................................................................................................... 40 2.17.1. TYRES................................................................................................................................... 40
2.18. EXHAUST SYSTEM .................................................................................................................. 41 2.18.1. EXHAUST MANIFOLD NUTS ............................................................................................... 41

ROUTINE MAINTENANCE
2 - 3
ATLANTIC 125 - 200
2.1. ROUTINE MAINTENANCE 2.1.1. INTRODUCTION
To keep your vehicle in top performance conditions, aprilia strongly recommends to respect the routine maintenance schedule for the different parts of the vehicle. This section describes the routine maintenance operations for vehicle main components.
DANGER Before beginning any service operations or inspection of the vehicle, switch off the engine and remove the key, wait until the engine and the exhaust system have cooled down and, if possible, lift the vehicle with the proper equipment onto firm and flat ground. Keep away from the red-hot parts of the engine and of the exhaust system, in order to avoid burns. Do not hold any mechanical piece or other parts of the vehicle with your mouth: the components are not edible and some of them are harmful or even toxic. If not expressly indicated otherwise, for the reassembly of the units repeat the disassembly operations in reverse order.
ROUTINE MAINTENANCE
2 - 4
ATLANTIC 125 - 200
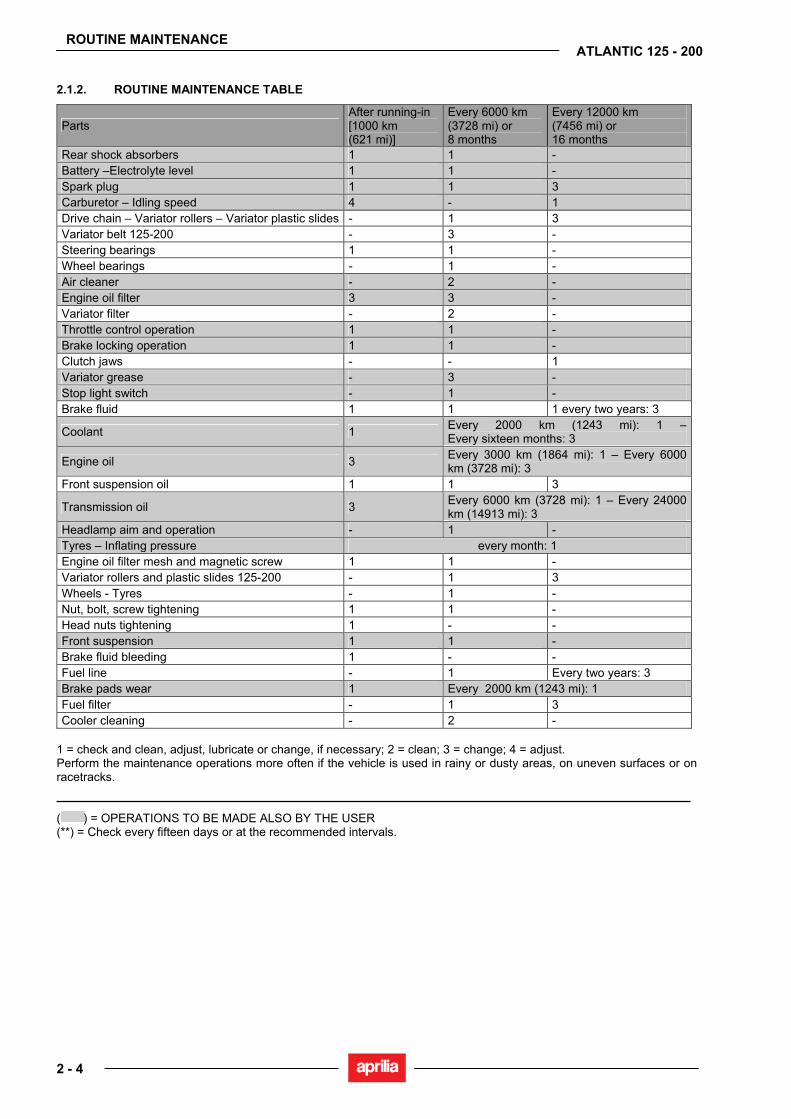
2.1.2. ROUTINE MAINTENANCE TABLE
Parts After running-in [1000 km (621 mi)]
Every 6000 km (3728 mi) or 8 months
Every 12000 km (7456 mi) or 16 months
Rear shock absorbers 1 1 - Battery –Electrolyte level 1 1 - Spark plug 1 1 3 Carburetor – Idling speed 4 - 1 Drive chain – Variator rollers – Variator plastic slides - 1 3 Variator belt 125-200 - 3 - Steering bearings 1 1 - Wheel bearings - 1 - Air cleaner - 2 - Engine oil filter 3 3 - Variator filter - 2 - Throttle control operation 1 1 - Brake locking operation 1 1 - Clutch jaws - - 1 Variator grease - 3 - Stop light switch - 1 - Brake fluid 1 1 1 every two years: 3
Coolant 1 Every 2000 km (1243 mi): 1 – Every sixteen months: 3
Engine oil 3 Every 3000 km (1864 mi): 1 – Every 6000 km (3728 mi): 3
Front suspension oil 1 1 3
Transmission oil 3 Every 6000 km (3728 mi): 1 – Every 24000 km (14913 mi): 3
Headlamp aim and operation - 1 - Tyres – Inflating pressure every month: 1 Engine oil filter mesh and magnetic screw 1 1 - Variator rollers and plastic slides 125-200 - 1 3 Wheels - Tyres - 1 - Nut, bolt, screw tightening 1 1 - Head nuts tightening 1 - - Front suspension 1 1 - Brake fluid bleeding 1 - - Fuel line - 1 Every two years: 3 Brake pads wear 1 Every 2000 km (1243 mi): 1 Fuel filter - 1 3 Cooler cleaning - 2 -
1 = check and clean, adjust, lubricate or change, if necessary; 2 = clean; 3 = change; 4 = adjust. Perform the maintenance operations more often if the vehicle is used in rainy or dusty areas, on uneven surfaces or on racetracks. ( ) = OPERATIONS TO BE MADE ALSO BY THE USER (**) = Check every fifteen days or at the recommended intervals.
ROUTINE MAINTENANCE
2 - 5
ATLANTIC 125 - 200
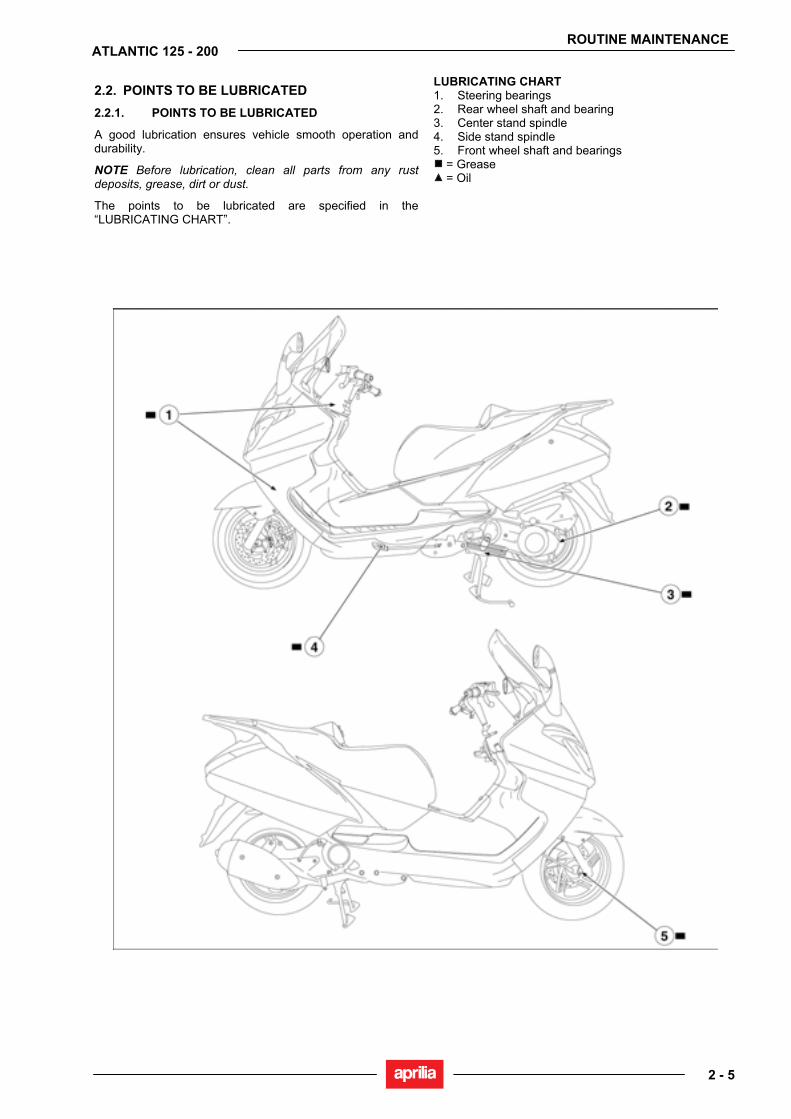
2.2. POINTS TO BE LUBRICATED 2.2.1. POINTS TO BE LUBRICATED
A good lubrication ensures vehicle smooth operation and durability.
NOTE Before lubrication, clean all parts from any rust deposits, grease, dirt or dust.
The points to be lubricated are specified in the “LUBRICATING CHART”.
LUBRICATING CHART 1. Steering bearings 2. Rear wheel shaft and bearing 3. Center stand spindle 4. Side stand spindle 5. Front wheel shaft and bearings
= Grease = Oil
ROUTINE MAINTENANCE
1 - 6
ATLANTIC 125 - 200
2.3. TIGHTENING 2.3.1. NUT, BOLT, SCREW TIGHTENING
Check all fastening parts with accuracy. Mainly check all safety-related components and, in particular: - Handlebar-to-upper plate fastener; - Front brake control lever; - Clutch control lever; - Fuel delivery line; - Plate-to-front fork fastener; - Front wheel shaft fork clamps; - Front wheel; - Front brake line couplings; - Front brake disc; - Front brake calliper; - Engine; - Sprocket; - Rear brake control lever; - Rear swingarm; - Rear swingarm levers; - Rear shock absorber; - Rear wheel; - Rear brake disc; - Rear brake calliper; - Rear brake line couplings.
WARNING The fastening elements shall be tightened to the specified torque value. Apply LOCTITE ONLY where indicated, see 2.3.2. Lubricate only the parts specified in the table
2.3.2.

ROUTINE MAINTENANCE
2 - 7
ATLANTIC 125 - 200
2.3.2. FASTENING ELEMENTS
Check and, if necessary, tighten after the first 1000 km (621 mi) and after every 6000 km (3728 mi) or 8 months.
WARNING The fastening elements specified in the table must be tightened to the specified torque value using a torque wrench and, where recommended, applying LOCTITE ®. The highlighted parts ( ) are safety components.
Notes: L243 = tighten with Loctite® 243 Lub = lubricate
FRAME Description Q.ty Screw/Nut Nm Kgm Notes Splitter-to-frame fitting M6 10 1.0 Arc-to-frame fixing M6 12 1.2 Locking ring nut 3 M25x1.5 45 4.5 Key-operated switch retaining tear screw 1 M6x25 Tearing Tearing Key-operated switch fastening screw 4 M6x25 8.5 0.85 STAND Description Q.ty Screw/Nut Nm Kgm Notes Centre stand-to-engine fastener 1 M10 27 2.7 Side stand-to-frame fastener M10 20 2.0 CONNECTING RODS Description Q.ty Screw/Nut Nm Kgm Notes Con-rod-to frame fixing M12 pin 60 6.0 Con-rod-to-engine fixing M10 pin 40 4.0 Con-rod/con-rod fixing M12 pin 60 6.0 Silencer fixing M8 25 2.5 REAR SUSPENSION Description Q.ty Screw/Nut Nm Kgm Notes Rear shock absorber-to- frame fastener M10 50 5.0 Rear shock absorber-to- engine fastener M10 50 5.0 Rear shock absorber-to-frame fasteners M8x50 25 2.5 FILTER BOX Description Q.ty Screw/Nut Nm Kgm Notes Filter box-to-engine fastener 1 M6x45 8 0.8 Filter box-to-engine fastener 1 M6x55 8 0.8 EXHAUST SYSTEM Description Q.ty Screw/Nut Nm Kgm Notes Manifold-to-head fixing 2 M7 nut 17 1.7 Plate-silencer fixing 3 M8x40 25 2.5 Manifold clamp fixing 1 10 1.0 Muffler mount fixing 2 M8x40 25 2.5 FRONT WHEEL Description Q.ty Screw/Nut Nm Kgm Notes Wheel shaft 1 M12 40 4.0 Safety screw M6 12 1.2 REAR WHEEL Description Q.ty Screw/Nut Nm Kgm Notes Wheel nut M16x1.5 110 11.0

ROUTINE MAINTENANCE
2 - 8
ATLANTIC 125 - 200
FRONT AND REAR BRAKES Description Q.ty Screw/Nut Nm Kgm Notes Front calliper fixing 1 M8x40 25 2.5 Front calliper fixing 1 M8x45 25 2.5 Rear calliper fixing 2 M8x40 25 2.5 Rear brake cable retainer 1 M6x20 12 1.2 Front calliper fixing 2 M6x35 12 1.2 HANDLEBARS AND CONTROLS Description Q.ty Screw/Nut Nm Kgm Notes Clamp closing screw 1 M10 45 4.5 Safety screw 1 M8 20 2.0 FRONT BODY Description Q.ty Screw/Nut Nm Kgm Notes Mudguard-to-fork fixing M5 collar 0.7 0.07 Mirrors-to-arc fixing M6x30 10 1.0 CENTRAL BODY Description Q.ty Screw/Nut Nm Kgm Notes Self-tapping screw 4.2 0.3 0.03 Screw with collar M5 REAR BODY Description Q.ty Screw/Nut Nm Kgm Notes Handgrip-to-frame fixing 2 M8x60 24 2.4 Handgrip-to-frame fixing 2 M6x40 10 1.0
ROUTINE MAINTENANCE
2 - 9
ATLANTIC 125 - 200
2.4. BATTERY 2.4.1. BATTERY
Carefully read 1.2.1. Two different types of battery are available on the market: - battery needing to be maintained with plugs; - maintenance-free battery without plugs needing no
electrolyte level check and topping up. After the first 1000 km (621 mi) and then every 6000 km (3728 mi) or 8 months, check the electrolyte level and the terminals correct tightening.
DANGER The battery electrolyte is a toxic, caustic substance containing sulphuric acid and thus able to cause severe burns in case of contact. Always wear protective clothes, a mask and/or eye protectors when handling this fluid. If the electrolyte gets in contact with the skin, carefully wash the parts of your body that get in contact with the fluid with abundant fresh water. In the event of contact with your eyes, carefully wash them with water for fifteen minutes and then consult immediately an eye specialist. Should you accidentally drink some fluid, drink abundant water or milk, then drink magnesia milk or vegetable oil and consult immediately a doctor. Battery releases explosive gases. Keep flames, sparks, cigarettes and any other heat source away from the battery. During recharging or use, make sure that the room is properly ventilated and avoid inhaling the gases released during recharging. KEEP AWAY FROM CHILDREN. Take care not to lean the vehicle to avoid dangerous spills of the battery fluid.
WARNING Never reverse connection of the battery cables. Connect and disconnect the battery with the ignition switch in position “ ”. Connect first the positive cable (+) and then the negative cable (-). Disconnect following the reverse order.
ROUTINE MAINTENANCE
2 - 10
ATLANTIC 125 - 200
2.4.2. CHECKING AND CLEANING THE TERMINALS
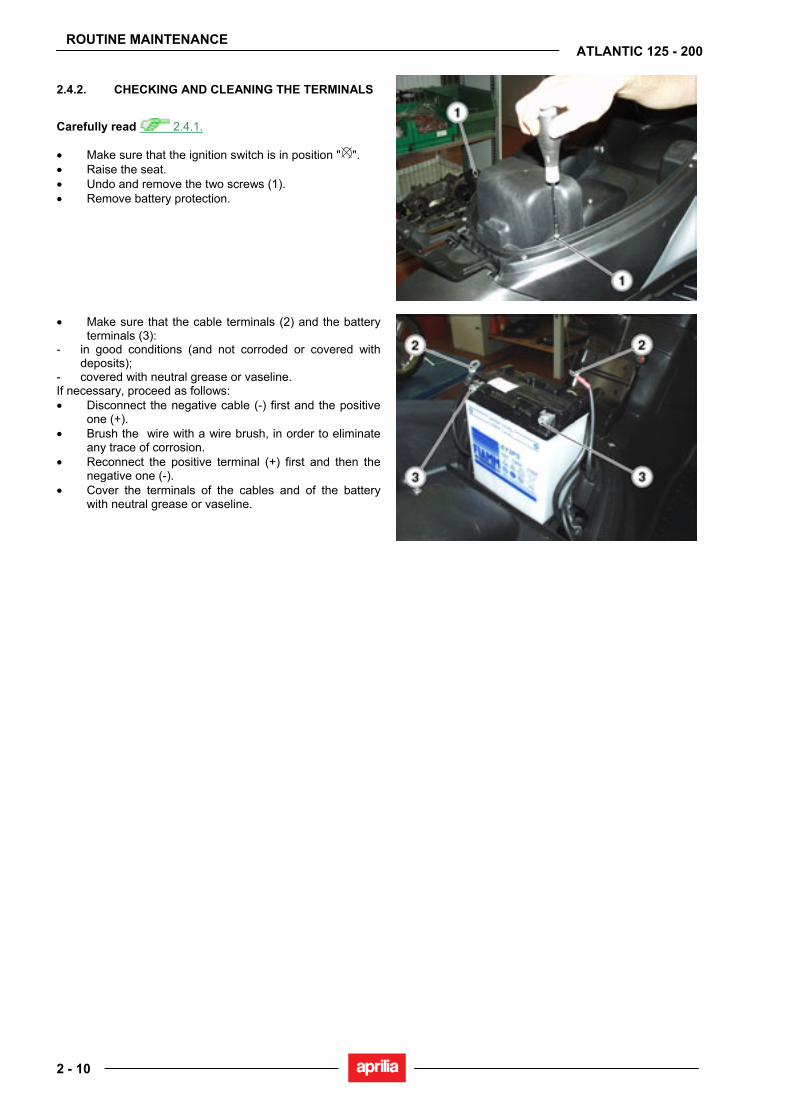
Carefully read 2.4.1. • Make sure that the ignition switch is in position " ". • Raise the seat. • Undo and remove the two screws (1). • Remove battery protection.
• Make sure that the cable terminals (2) and the battery terminals (3):
- in good conditions (and not corroded or covered with deposits);
- covered with neutral grease or vaseline. If necessary, proceed as follows: • Disconnect the negative cable (-) first and the positive
one (+). • Brush the wire with a wire brush, in order to eliminate
any trace of corrosion. • Reconnect the positive terminal (+) first and then the
negative one (-). • Cover the terminals of the cables and of the battery
with neutral grease or vaseline.
ROUTINE MAINTENANCE
2 - 11
ATLANTIC 125 - 200
2.4.3. CHECKING THE BATTERY ELECTROLYTE LEVEL
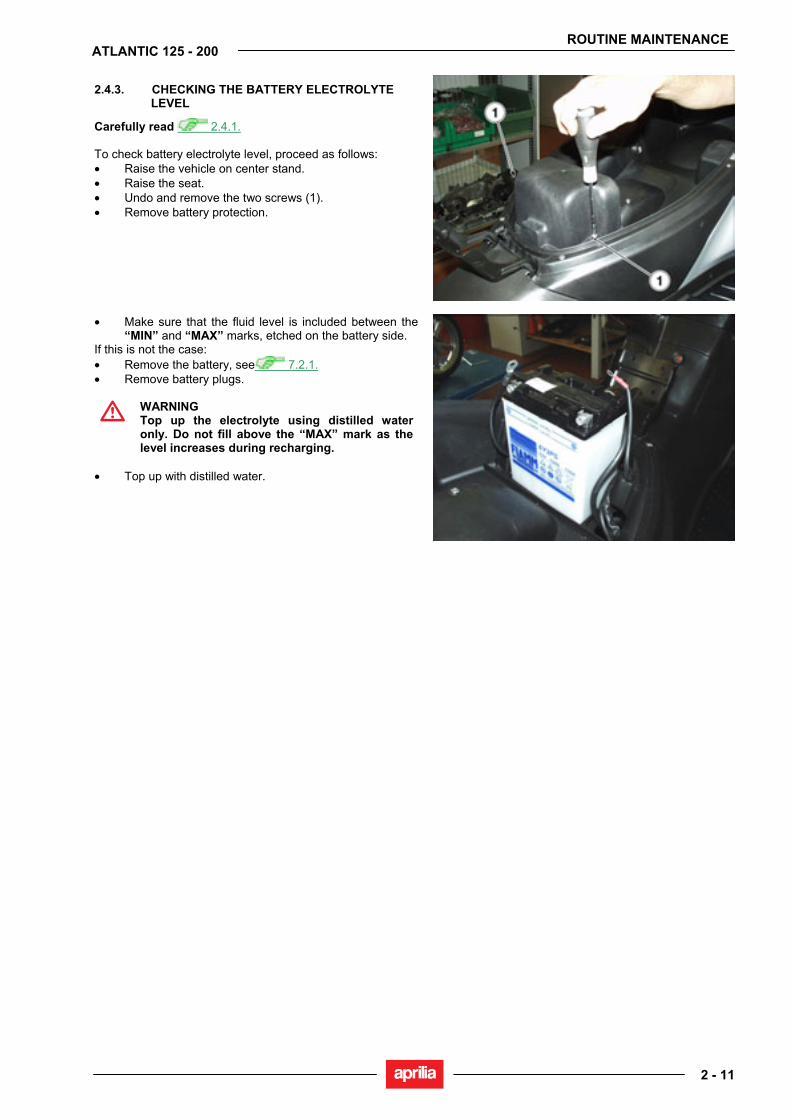
Carefully read 2.4.1. To check battery electrolyte level, proceed as follows: • Raise the vehicle on center stand. • Raise the seat. • Undo and remove the two screws (1). • Remove battery protection.
• Make sure that the fluid level is included between the “MIN” and “MAX” marks, etched on the battery side.
If this is not the case: • Remove the battery, see 7.2.1. • Remove battery plugs.
WARNING Top up the electrolyte using distilled water only. Do not fill above the “MAX” mark as the level increases during recharging.
• Top up with distilled water.
ROUTINE MAINTENANCE
2 - 12
ATLANTIC 125 - 200
2.4.4. RECHARGING THE BATTERY
Carefully read 2.4.1.
NOTE If the battery is almost fully flat, when the starting button " " is pressed, the starting relay will issue a vibrating noise.
Do not remove the battery plugs: without plugs the battery may be damaged.
• Remove the battery, see 7.2.1. • Remove plugs. • Check the battery electrolyte level, see 2.4.3. • Connect the battery with a battery charger. • Recharge the battery with 1/10th of its amperage. • Once finished, check the electrolyte level once again
and, if necessary, top up using distilled water. • Refit battery plugs.
WARNING Reassemble the battery only 5 to 10 minutes after disconnecting the recharge apparatus, since the battery continues to produce gas for a short lapse of time.

ROUTINE MAINTENANCE
2 - 13
ATLANTIC 125 - 200
2.4.5. LONG INACTIVITY OF THE BATTERY
Carefully read 2.4.1.
WARNING If the vehicle remains unused for more than twenty days, disconnect the 20A fuses. The removal of the 20A fuses requires the setting to zero of the following functions: digital clock and red line setting. To reset these functions.
• If the vehicle remains unused for more than fifteen
days, it is necessary to recharge the battery, in order to prevent its sulphation, see 2.4.4.
• Remove the battery, see 7.2.1., and put it in a cool and dry place.
• It is important to check the charge periodically (about once a month), during the winter or when the vehicle remains unused, in order to prevent the deterioration of the battery.
• Recharge it completely with a normal charge, see 2.4.4.
NOTE If the battery remains on the vehicle, disconnect the cables from the terminals.
ROUTINE MAINTENANCE
2 - 14
ATLANTIC 125 - 200
2.5. ELECTRICAL PARTS 2.5.1. ELECTRICAL PARTS
Carefully read 1.2.1. • Position the vehicle on the stand. • Make sure that all lighting devices are working
properly. • Make sure that headlamp is properly adjusted,
8.13.1. and 8.13.2. • Make sure that all connectors are well fitted. • Make sure that all switches are correctly fitted and
operational: - 8.4.1. - 8.10.1. • Check for speedometer and air sensor correct fitting
and operation.
WARNING The sensors sensitive area must be always clean. Any mud, dirt or other deposit could alter the readings and the following data transmission.
ROUTINE MAINTENANCE
2 - 15
ATLANTIC 125 - 200
2.6. SPARK PLUGS 2.6.1. SPARK PLUGS
TIGHTENING TORQUE SETTINGS Spark plug: 20 Nm (2.0 kgm). Check the spark plug after the first 1000 km (621 mi) and then every 6000 km (3728 mi), change it every 12000 km (7456 mi). • Periodically remove the spark plug and clean it carefully,
removing carbon deposits; change it if necessary. To reach the spark plug, proceed as follows:
DANGER Let the engine cool down until it reaches room temperature.
• Remove seat right front lock, 7.1.3. For the removal and cleaning, proceed as follows:
DANGER Do not disconnect the spark plug cap with the engine running. The starting system could generate a strong discharge.
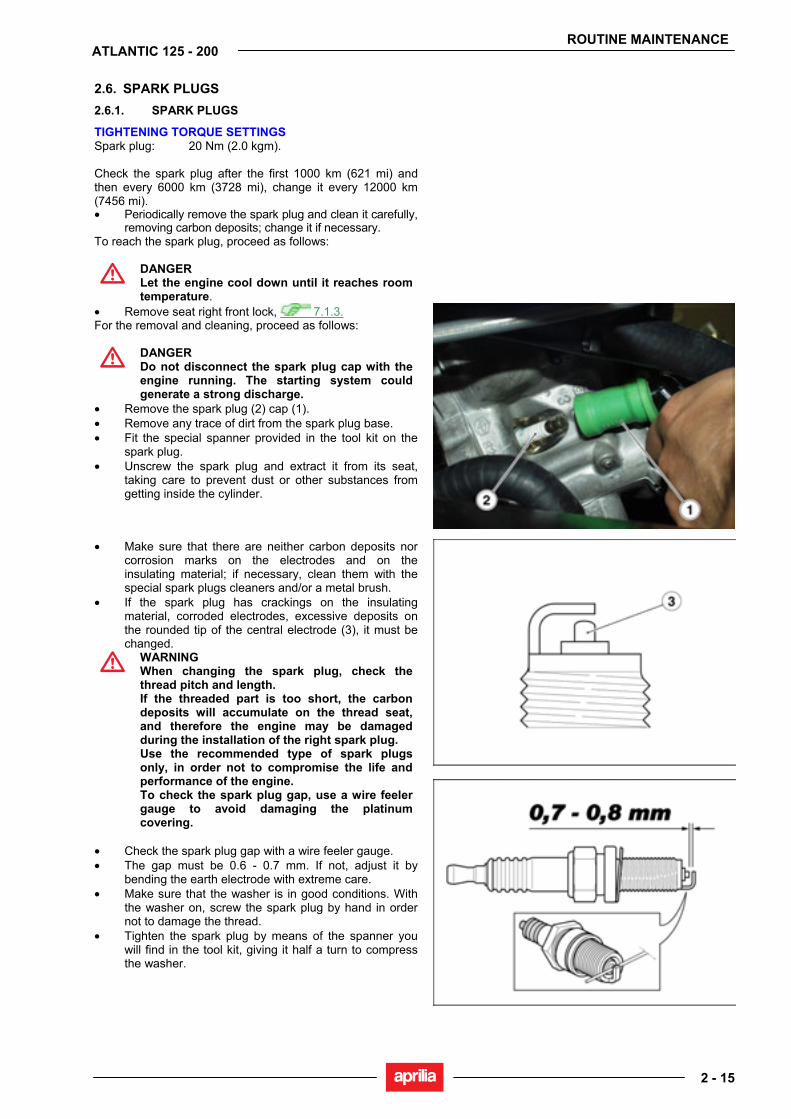
• Remove the spark plug (2) cap (1). • Remove any trace of dirt from the spark plug base. • Fit the special spanner provided in the tool kit on the
spark plug. • Unscrew the spark plug and extract it from its seat,
taking care to prevent dust or other substances from getting inside the cylinder.
• Make sure that there are neither carbon deposits nor corrosion marks on the electrodes and on the insulating material; if necessary, clean them with the special spark plugs cleaners and/or a metal brush.
• If the spark plug has crackings on the insulating material, corroded electrodes, excessive deposits on the rounded tip of the central electrode (3), it must be changed.
WARNING When changing the spark plug, check the thread pitch and length. If the threaded part is too short, the carbon deposits will accumulate on the thread seat, and therefore the engine may be damaged during the installation of the right spark plug. Use the recommended type of spark plugs only, in order not to compromise the life and performance of the engine. To check the spark plug gap, use a wire feeler gauge to avoid damaging the platinum covering.
• Check the spark plug gap with a wire feeler gauge. • The gap must be 0.6 - 0.7 mm. If not, adjust it by
bending the earth electrode with extreme care. • Make sure that the washer is in good conditions. With
the washer on, screw the spark plug by hand in order not to damage the thread.
• Tighten the spark plug by means of the spanner you will find in the tool kit, giving it half a turn to compress the washer.
ROUTINE MAINTENANCE
2 - 16
ATLANTIC 125 - 200
WARNING The spark plug must be well tightened, otherwise the engine may overheat and be seriously damaged. Use the recommended type of spark plugs only, in order not to compromise the life and performance of the engine.
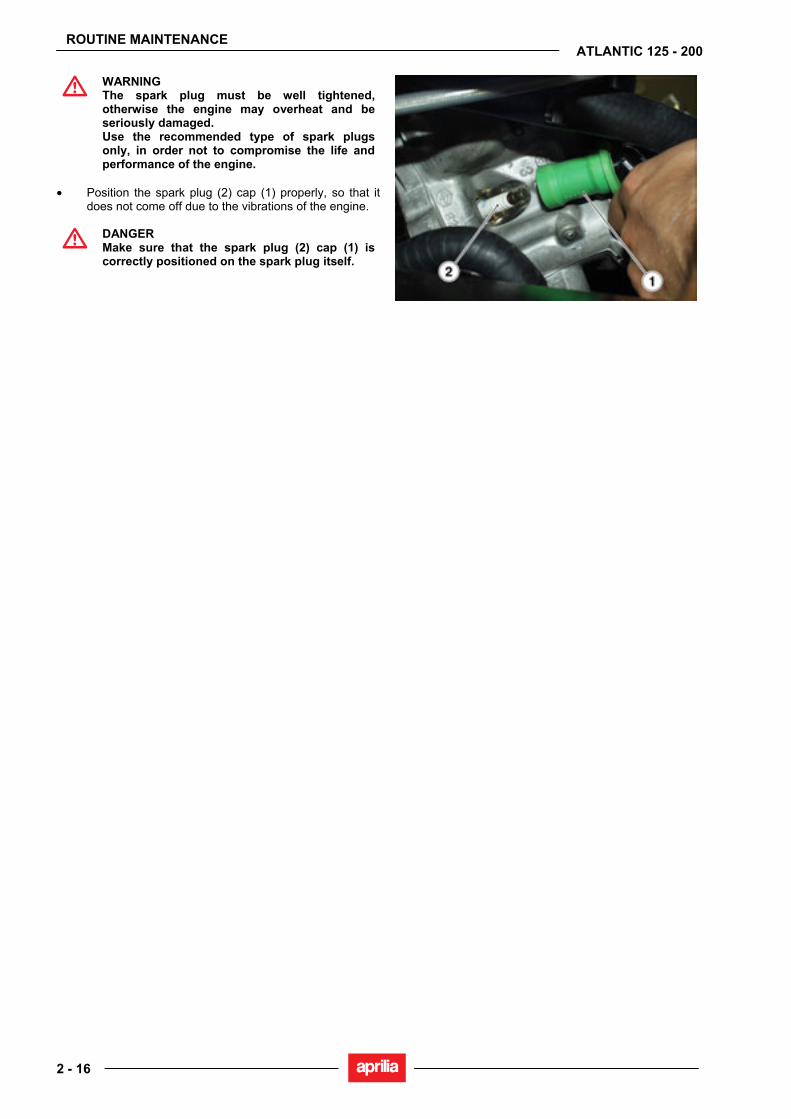
• Position the spark plug (2) cap (1) properly, so that it
does not come off due to the vibrations of the engine.
DANGER Make sure that the spark plug (2) cap (1) is correctly positioned on the spark plug itself.
ROUTINE MAINTENANCE
2 - 17
ATLANTIC 125 - 200
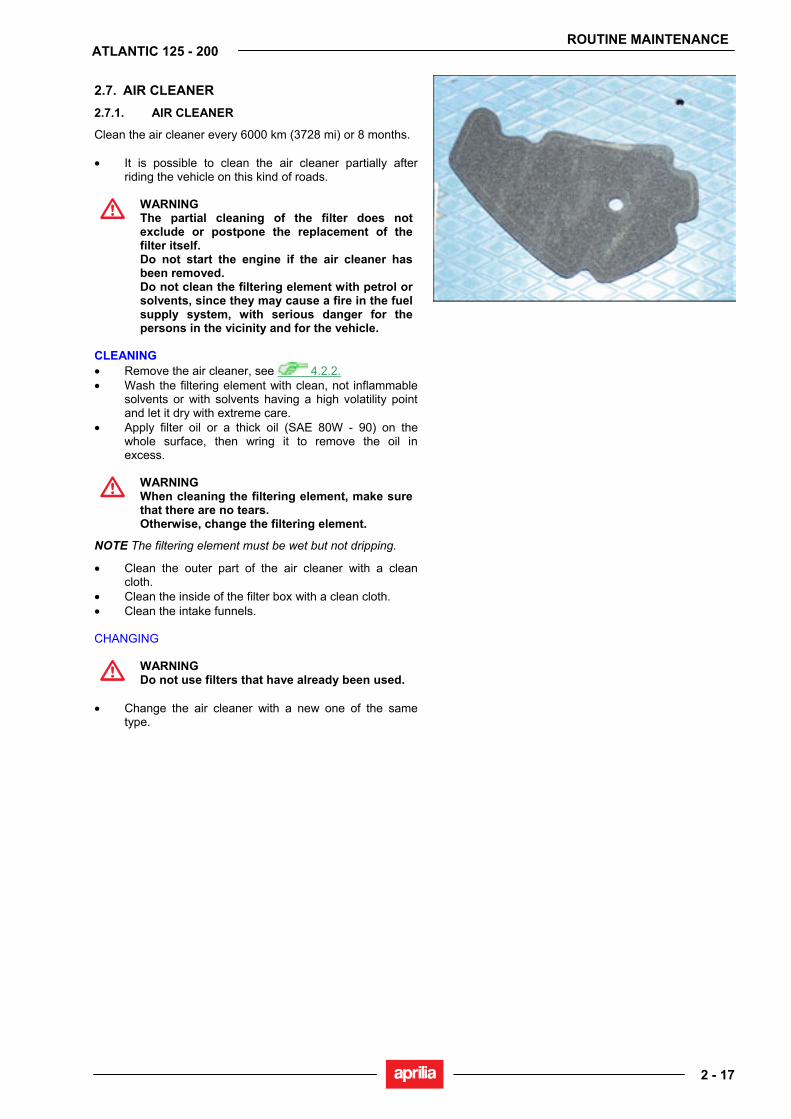
2.7. AIR CLEANER 2.7.1. AIR CLEANER
Clean the air cleaner every 6000 km (3728 mi) or 8 months. • It is possible to clean the air cleaner partially after
riding the vehicle on this kind of roads.
WARNING The partial cleaning of the filter does not exclude or postpone the replacement of the filter itself. Do not start the engine if the air cleaner has been removed. Do not clean the filtering element with petrol or solvents, since they may cause a fire in the fuel supply system, with serious danger for the persons in the vicinity and for the vehicle.
CLEANING • Remove the air cleaner, see 4.2.2. • Wash the filtering element with clean, not inflammable
solvents or with solvents having a high volatility point and let it dry with extreme care.
• Apply filter oil or a thick oil (SAE 80W - 90) on the whole surface, then wring it to remove the oil in excess.
WARNING When cleaning the filtering element, make sure that there are no tears. Otherwise, change the filtering element.
NOTE The filtering element must be wet but not dripping.
• Clean the outer part of the air cleaner with a clean cloth.
• Clean the inside of the filter box with a clean cloth. • Clean the intake funnels. CHANGING
WARNING Do not use filters that have already been used.
• Change the air cleaner with a new one of the same
type.
ROUTINE MAINTENANCE
2 - 18
ATLANTIC 125 - 200
2.8. TUBES 2.8.1. TUBES
Carefully read 1.2.1. FUEL Check fuel lines every 6000 km (3728 mi) or 8 months. Change them every two years.
WARNING In case of wear, cracking or other damage, change the fuel lines.
For further information, see section 4 (FUEL SYSTEM).
BRAKES
WARNING In case of wear, cracking or other damage, change the brake lines.
COOLING SYSTEM
WARNING In case of wear, cracking or other damage, change the cooling system tubes.
ROUTINE MAINTENANCE
2 - 19
ATLANTIC 125 - 200
2.9. COOLANT 2.9.1. CHECKING AND TOPPING UP THE
COOLANT LEVEL
Carefully read 1.2.1. and 1.3.1. • Check the coolant level before starting and change it
every two years.
WARNING Check the coolant level and top up the expansion reservoir with cold engine.
• Stop the engine and wait until it has cooled down.
NOTE Place the vehicle on a firm and flat surface.
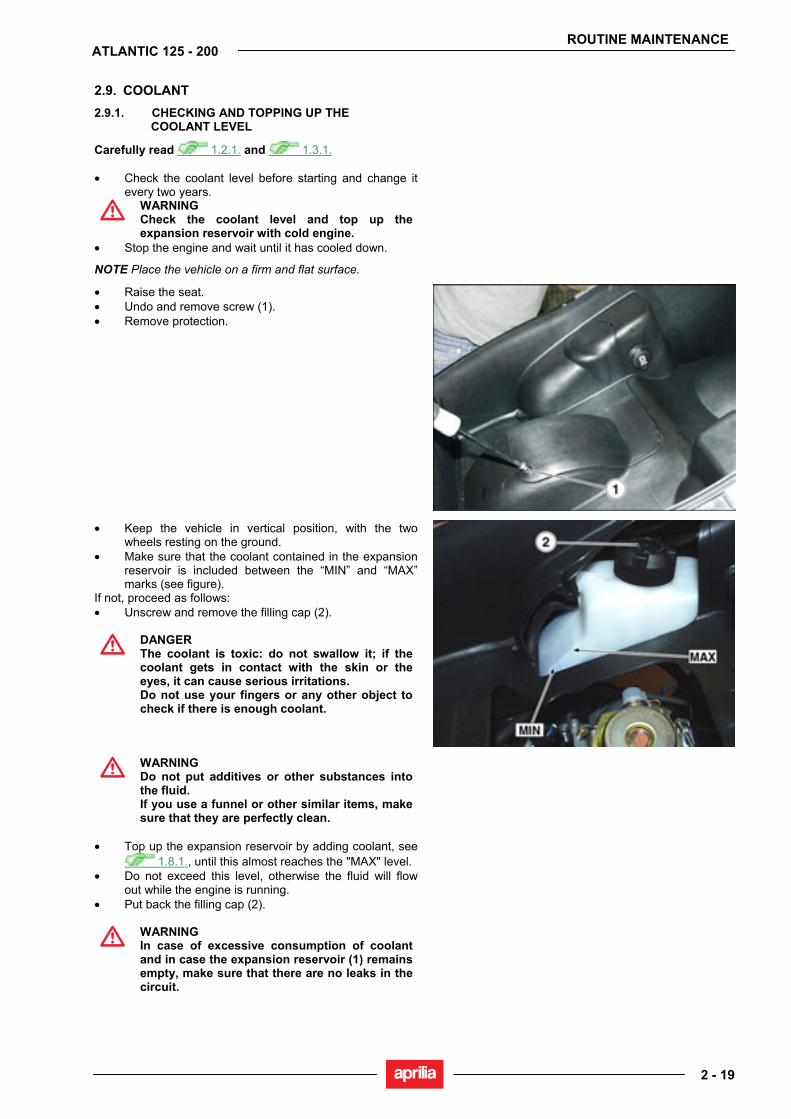
• Raise the seat. • Undo and remove screw (1). • Remove protection.
• Keep the vehicle in vertical position, with the two wheels resting on the ground.
• Make sure that the coolant contained in the expansion reservoir is included between the “MIN” and “MAX” marks (see figure).
If not, proceed as follows: • Unscrew and remove the filling cap (2).
DANGER The coolant is toxic: do not swallow it; if the coolant gets in contact with the skin or the eyes, it can cause serious irritations. Do not use your fingers or any other object to check if there is enough coolant.
WARNING Do not put additives or other substances into the fluid. If you use a funnel or other similar items, make sure that they are perfectly clean.
• Top up the expansion reservoir by adding coolant, see
1.8.1., until this almost reaches the "MAX" level. • Do not exceed this level, otherwise the fluid will flow
out while the engine is running. • Put back the filling cap (2).
WARNING In case of excessive consumption of coolant and in case the expansion reservoir (1) remains empty, make sure that there are no leaks in the circuit.
ROUTINE MAINTENANCE
2 - 20
ATLANTIC 125 - 200
2.9.2. CLEANING THE RADIATOR
NOTE The radiator can be cleaned without being removed from vehicle.
• Wash with a pressurized water jet aimed from behind the rear wheel air inlets. • Blow from below with compressed air.

ROUTINE MAINTENANCE
2 - 21
ATLANTIC 125 - 200
2.10. BRAKE FLUID 2.10.1. CHECKING AND TOPPING UP THE BRAKE
FLUID
Carefully read 1.2.1. and 1.3.1.. Check the brake fluid after the first 1000 km (621 mi) and then every 6000 km (3728 mi) or 8 months, change it every two years.
NOTE These operations apply to both front and rear brakes.
WARNING In case of excessive stroke of the brake lever, excessive elasticity or air bubbles, bleed the air out of the circuit, see 2.10.4.. When using the brake fluid, take care not to spill it on the plastic or painted parts, since it can damage them. Before starting, check that the brake lines are neither twisted nor worn out and that the connectors are not leaking. Do not use or mix different types of silicone or oil fluids. Do not use neither old brake fluid nor fluid taken from containers opened for a long time. Prevent water or dust from accidentally getting into the circuit.
CHECK
NOTE Place the vehicle on a firm and flat surface.
• Position the vehicle on the center stand. • Make sure that the fluid level exceeds the “MIN” mark. • If the fluid does not reach at least the "MIN" mark,
proceed as follows:
WARNING When the disc pads wear out, the level of the fluid decreases progressively to compensate for their wear.
• Check the brake pad wear, see 2.10.3.. • If the pads and/or the disc do not need replacing,
provide for topping up.
TOPPING UP
WARNING The brake fluid may flow out of the tank. Do not operate the front brake lever if the screws (1) are loose or, most important, if the brake fluid reservoir cover has been removed. Use a cloth under the brake fluid reservoir.
• Undo and remove the four screws (1).
WARNING Avoid any prolonged exposure of the brake fluid to the air. The brake fluid is hygroscopic and when in contact with the air it absorbs its humidity. Leave the brake fluid tank open ONLY for the time necessary for topping up.
ROUTINE MAINTENANCE
2 - 22
ATLANTIC 125 - 200
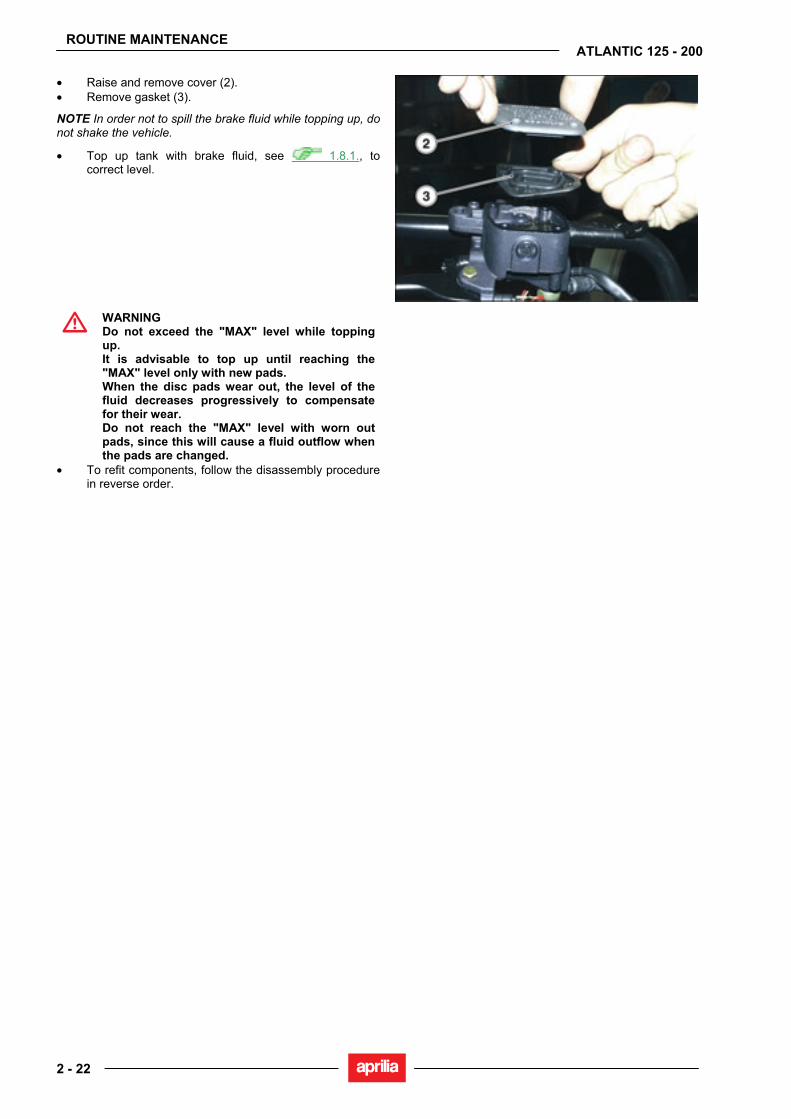
• Raise and remove cover (2). • Remove gasket (3).
NOTE In order not to spill the brake fluid while topping up, do not shake the vehicle.
• Top up tank with brake fluid, see 1.8.1., to correct level.
WARNING Do not exceed the "MAX" level while topping up. It is advisable to top up until reaching the "MAX" level only with new pads. When the disc pads wear out, the level of the fluid decreases progressively to compensate for their wear. Do not reach the "MAX" level with worn out pads, since this will cause a fluid outflow when the pads are changed.
• To refit components, follow the disassembly procedure in reverse order.
ROUTINE MAINTENANCE
2 - 23
ATLANTIC 125 - 200
2.10.2. CHANGING THE BRAKE FLUID
Carefully read 1.2.1. and 1.3.1. • Brake fluid must be changed every two years.
NOTE These operations apply to both front and rear brakes.
WARNING When using the fluid, take care not to spill it on the plastic and painted parts, since it damages them.
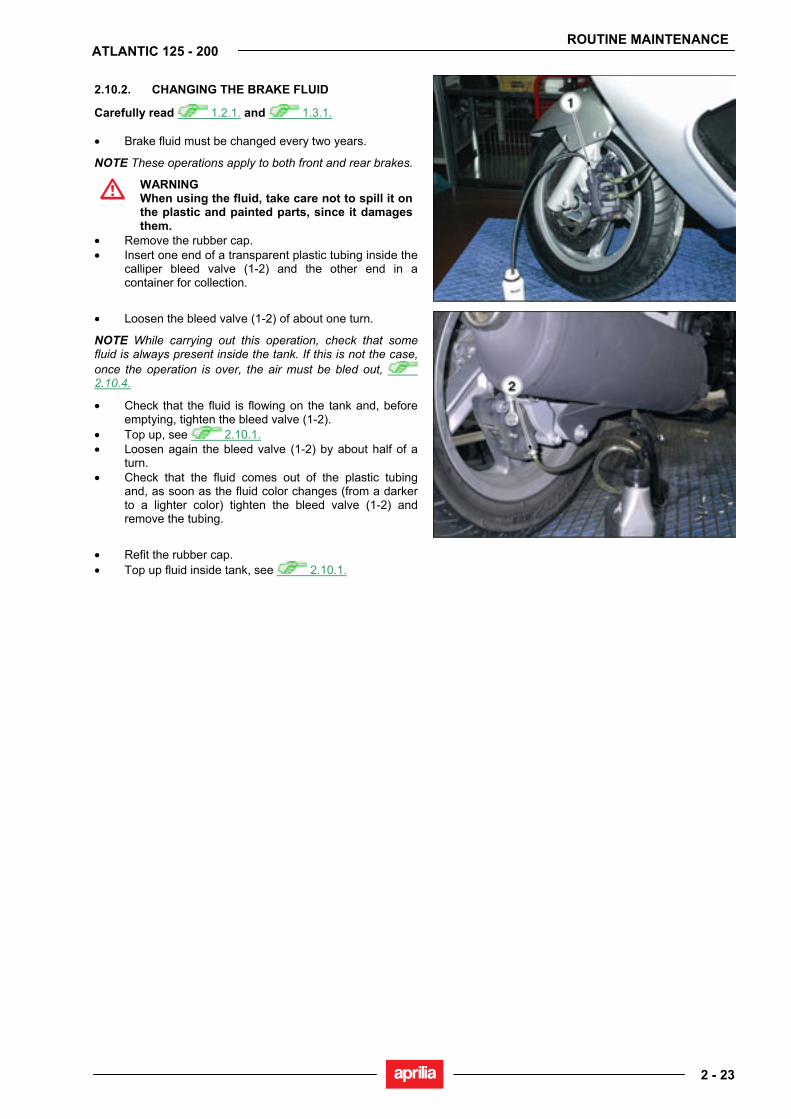
• Remove the rubber cap. • Insert one end of a transparent plastic tubing inside the
calliper bleed valve (1-2) and the other end in a container for collection.
• Loosen the bleed valve (1-2) of about one turn.
NOTE While carrying out this operation, check that some fluid is always present inside the tank. If this is not the case, once the operation is over, the air must be bled out, 2.10.4.
• Check that the fluid is flowing on the tank and, before emptying, tighten the bleed valve (1-2).
• Top up, see 2.10.1. • Loosen again the bleed valve (1-2) by about half of a
turn. • Check that the fluid comes out of the plastic tubing
and, as soon as the fluid color changes (from a darker to a lighter color) tighten the bleed valve (1-2) and remove the tubing.
• Refit the rubber cap. • Top up fluid inside tank, see 2.10.1.
ROUTINE MAINTENANCE
2 - 24
ATLANTIC 125 - 200
2.10.3. CHECKING THE BRAKE PAD WEAR
Carefully read 1.2.1. , 1.3.1. and 2.1.2.
NOTE The following instructions apply to both brakes.
Check the brake pad wear after the first 1000 km (621 mi) and successively every 2000 km (1242 mi). The wear of the disc brake pads depends on the use, on the kind of drive and on the road.
WARNING Check the wear of the brake pads, especially before every trip.
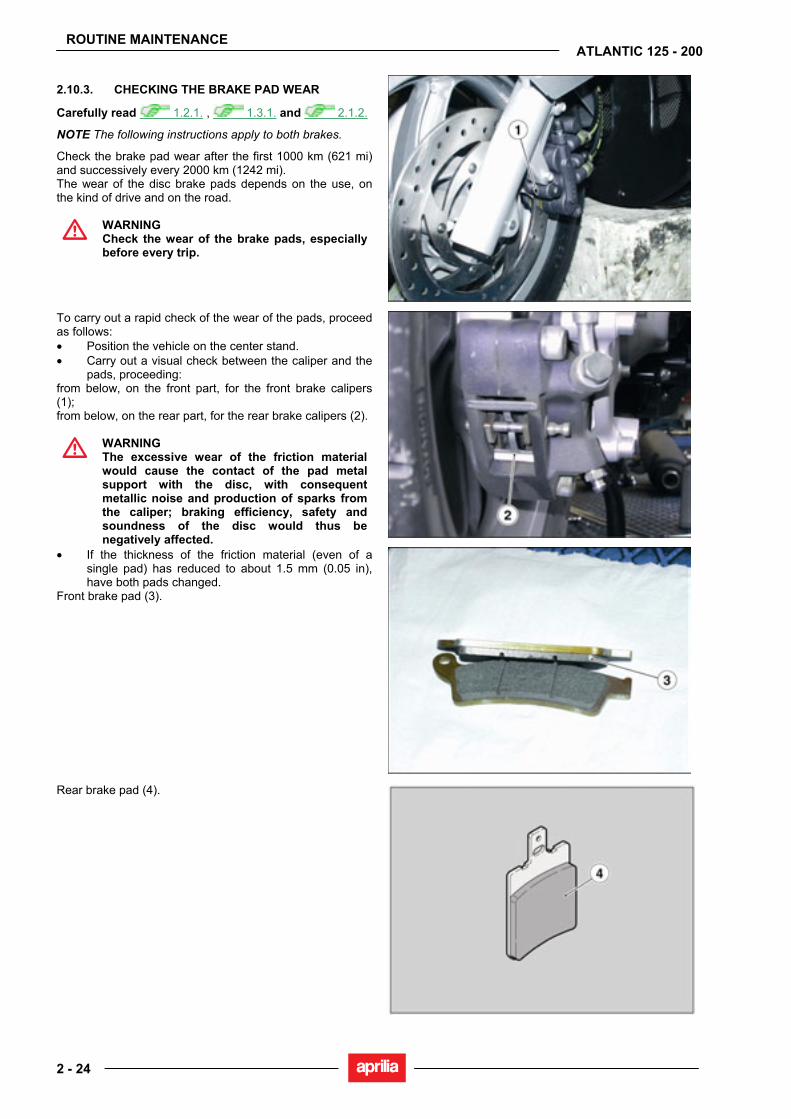
To carry out a rapid check of the wear of the pads, proceed as follows: • Position the vehicle on the center stand. • Carry out a visual check between the caliper and the
pads, proceeding: from below, on the front part, for the front brake calipers (1); from below, on the rear part, for the rear brake calipers (2).
WARNING The excessive wear of the friction material would cause the contact of the pad metal support with the disc, with consequent metallic noise and production of sparks from the caliper; braking efficiency, safety and soundness of the disc would thus be negatively affected.
• If the thickness of the friction material (even of a single pad) has reduced to about 1.5 mm (0.05 in), have both pads changed.
Front brake pad (3).
Rear brake pad (4).
ROUTINE MAINTENANCE
2 - 25
ATLANTIC 125 - 200
2.10.4. BLEEDING THE BRAKING SYSTEMS
Carefully read 1.2.1. and 1.3.1.. For maintenance operations schedule, see 2.1.2. The air, if any, present inside the hydraulic circuit will serve as “pad” by absorbing most of the pressure coming from the brake master cylinder and thus reducing the callipers efficiency during braking. If some air is present inside the circuit, the brake control is “spongy” and the braking efficiency is reduced.
DANGER Safety critical operation. In order to avoid any damage to both rider and vehicle, after brake reassembly and after having restored the braking system standard operation, make sure that all air is bled out of the hydraulic circuit. If the brake fluid gets in contact with the skin or the eyes, it can cause serious irritations. Carefully wash the parts of your body that get in contact with the fluid. Consult a doctor or an eye specialist if the fluid gets in contact with your eyes.
WARNING Handle the brake fluid with extreme care: it may damage the vehicle paintwork and the plastic, rubber and other parts. In case maintenance operations are to be performed on the hydraulic circuit, it is advisable to use latex gloves. When using the brake fluid, take care not to spill it on the plastic or painted parts, since it can damage them.
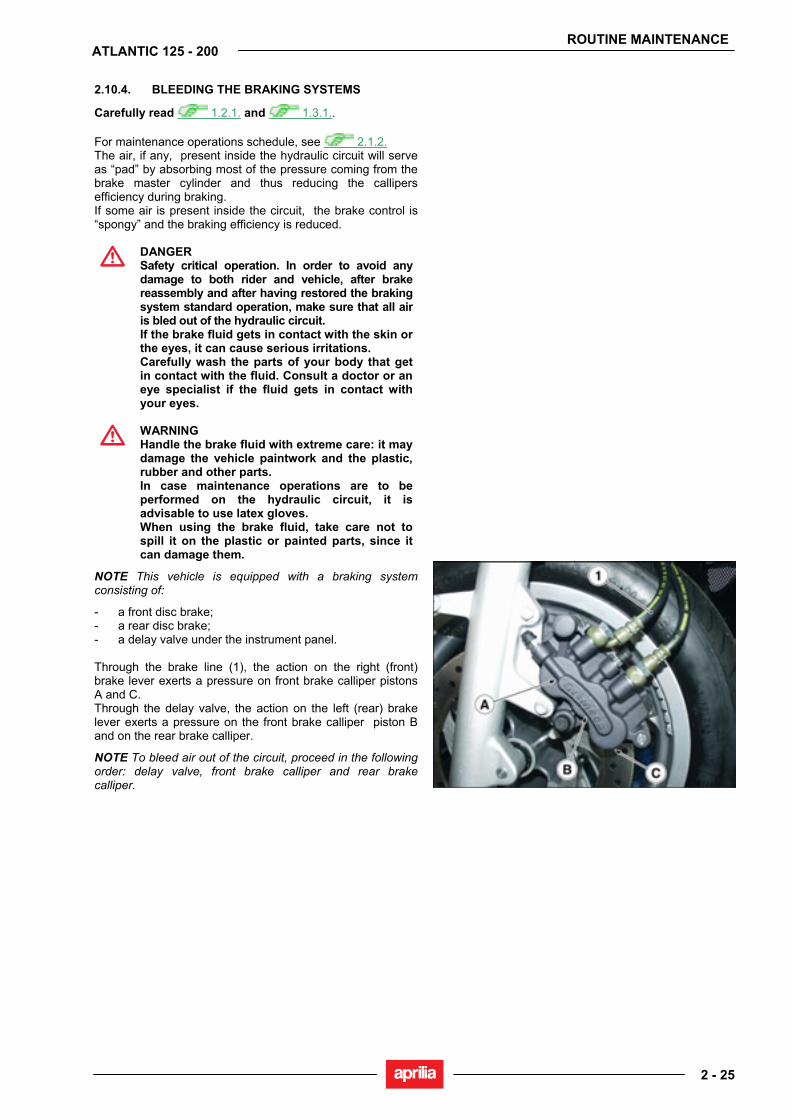
NOTE This vehicle is equipped with a braking system consisting of:
- a front disc brake; - a rear disc brake; - a delay valve under the instrument panel. Through the brake line (1), the action on the right (front) brake lever exerts a pressure on front brake calliper pistons A and C. Through the delay valve, the action on the left (rear) brake lever exerts a pressure on the front brake calliper piston B and on the rear brake calliper.
NOTE To bleed air out of the circuit, proceed in the following order: delay valve, front brake calliper and rear brake calliper.
ROUTINE MAINTENANCE
2 - 26
ATLANTIC 125 - 200
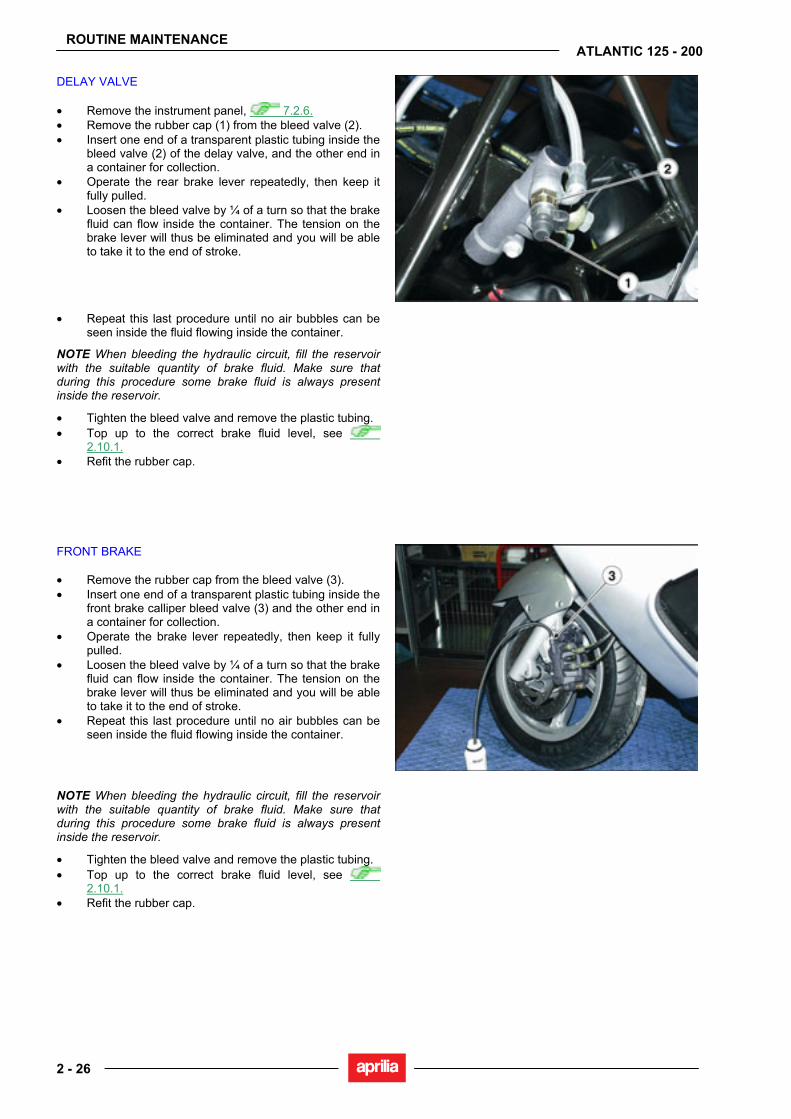
DELAY VALVE • Remove the instrument panel, 7.2.6. • Remove the rubber cap (1) from the bleed valve (2). • Insert one end of a transparent plastic tubing inside the
bleed valve (2) of the delay valve, and the other end in a container for collection.
• Operate the rear brake lever repeatedly, then keep it fully pulled.
• Loosen the bleed valve by ¼ of a turn so that the brake fluid can flow inside the container. The tension on the brake lever will thus be eliminated and you will be able to take it to the end of stroke.
• Repeat this last procedure until no air bubbles can be seen inside the fluid flowing inside the container.
NOTE When bleeding the hydraulic circuit, fill the reservoir with the suitable quantity of brake fluid. Make sure that during this procedure some brake fluid is always present inside the reservoir.
• Tighten the bleed valve and remove the plastic tubing. • Top up to the correct brake fluid level, see
2.10.1. • Refit the rubber cap.
FRONT BRAKE • Remove the rubber cap from the bleed valve (3). • Insert one end of a transparent plastic tubing inside the
front brake calliper bleed valve (3) and the other end in a container for collection.
• Operate the brake lever repeatedly, then keep it fully pulled.
• Loosen the bleed valve by ¼ of a turn so that the brake fluid can flow inside the container. The tension on the brake lever will thus be eliminated and you will be able to take it to the end of stroke.
• Repeat this last procedure until no air bubbles can be seen inside the fluid flowing inside the container.
NOTE When bleeding the hydraulic circuit, fill the reservoir with the suitable quantity of brake fluid. Make sure that during this procedure some brake fluid is always present inside the reservoir.
• Tighten the bleed valve and remove the plastic tubing. • Top up to the correct brake fluid level, see
2.10.1. • Refit the rubber cap.
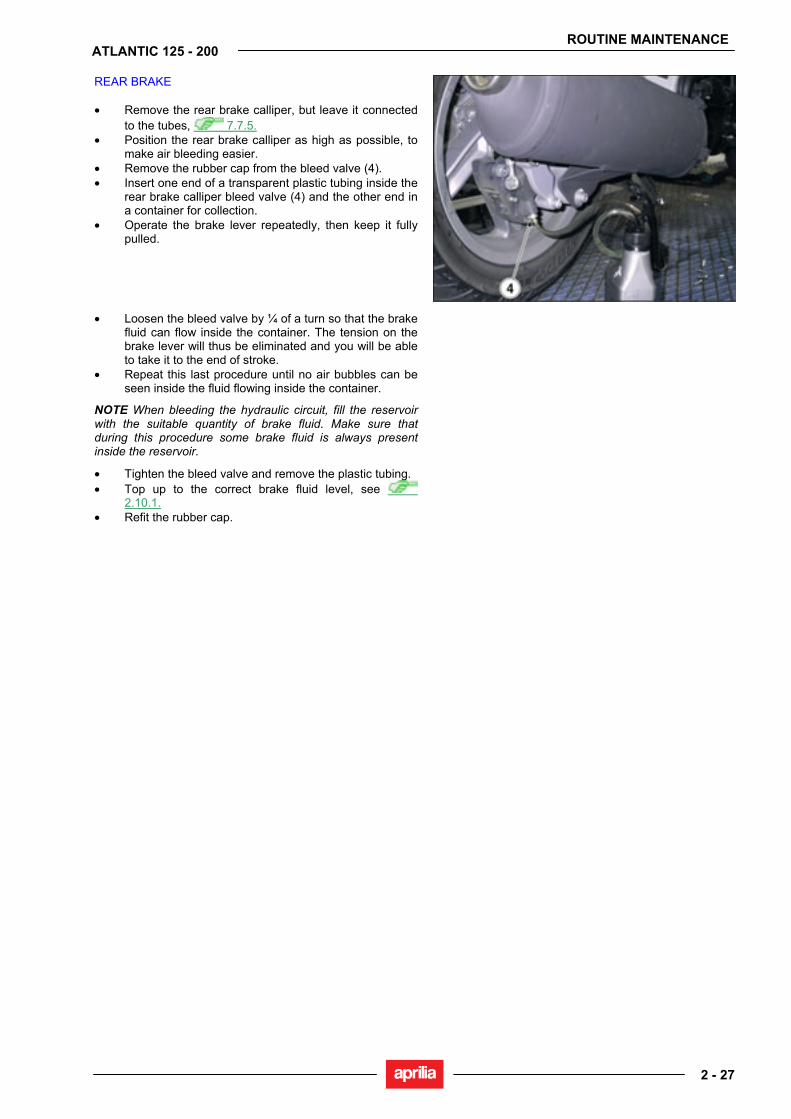
ROUTINE MAINTENANCE
2 - 27
ATLANTIC 125 - 200
REAR BRAKE • Remove the rear brake calliper, but leave it connected
to the tubes, 7.7.5. • Position the rear brake calliper as high as possible, to
make air bleeding easier. • Remove the rubber cap from the bleed valve (4). • Insert one end of a transparent plastic tubing inside the
rear brake calliper bleed valve (4) and the other end in a container for collection.
• Operate the brake lever repeatedly, then keep it fully pulled.
• Loosen the bleed valve by ¼ of a turn so that the brake fluid can flow inside the container. The tension on the brake lever will thus be eliminated and you will be able to take it to the end of stroke.
• Repeat this last procedure until no air bubbles can be seen inside the fluid flowing inside the container.
NOTE When bleeding the hydraulic circuit, fill the reservoir with the suitable quantity of brake fluid. Make sure that during this procedure some brake fluid is always present inside the reservoir.
• Tighten the bleed valve and remove the plastic tubing. • Top up to the correct brake fluid level, see
2.10.1. • Refit the rubber cap.
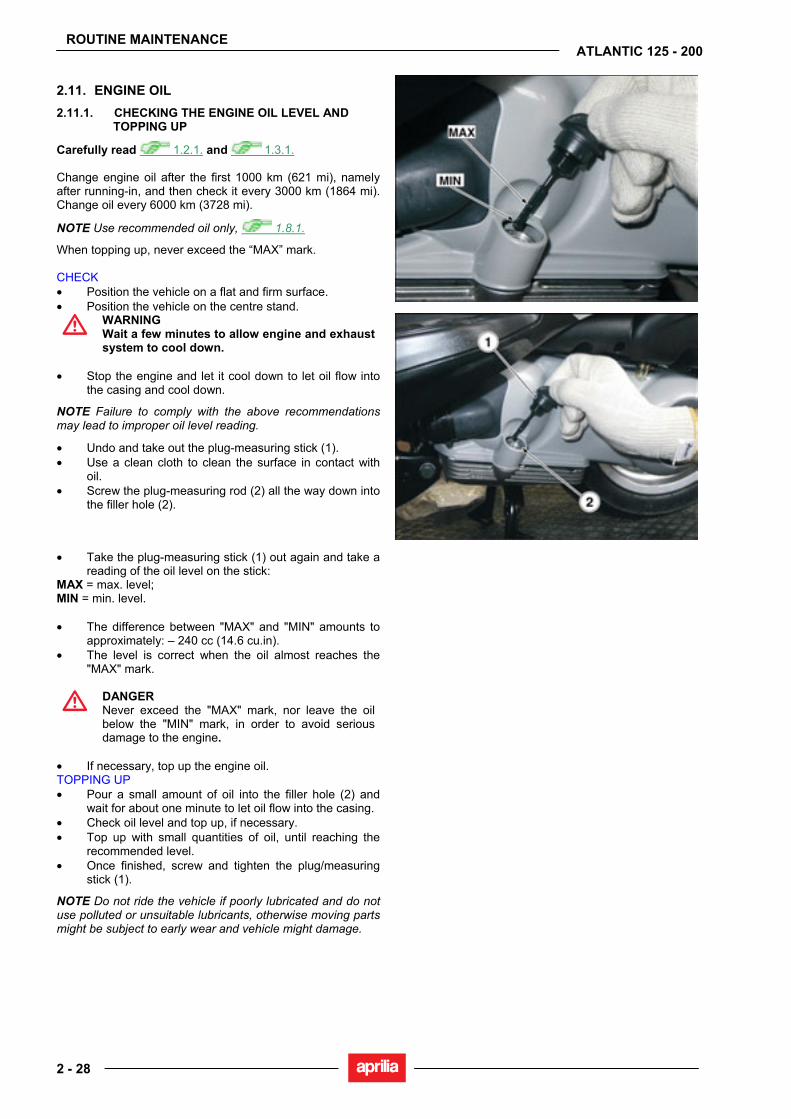
ROUTINE MAINTENANCE
2 - 28
ATLANTIC 125 - 200
2.11. ENGINE OIL 2.11.1. CHECKING THE ENGINE OIL LEVEL AND
TOPPING UP
Carefully read 1.2.1. and 1.3.1. Change engine oil after the first 1000 km (621 mi), namely after running-in, and then check it every 3000 km (1864 mi). Change oil every 6000 km (3728 mi).
NOTE Use recommended oil only, 1.8.1.
When topping up, never exceed the “MAX” mark. CHECK • Position the vehicle on a flat and firm surface. • Position the vehicle on the centre stand.
WARNING Wait a few minutes to allow engine and exhaust system to cool down.
• Stop the engine and let it cool down to let oil flow into
the casing and cool down.
NOTE Failure to comply with the above recommendations may lead to improper oil level reading.
• Undo and take out the plug-measuring stick (1). • Use a clean cloth to clean the surface in contact with
oil. • Screw the plug-measuring rod (2) all the way down into
the filler hole (2).
• Take the plug-measuring stick (1) out again and take a reading of the oil level on the stick:
MAX = max. level; MIN = min. level. • The difference between "MAX" and "MIN" amounts to
approximately: – 240 cc (14.6 cu.in). • The level is correct when the oil almost reaches the
"MAX" mark.
DANGER Never exceed the "MAX" mark, nor leave the oil below the "MIN" mark, in order to avoid serious damage to the engine.
• If necessary, top up the engine oil.
TOPPING UP • Pour a small amount of oil into the filler hole (2) and
wait for about one minute to let oil flow into the casing. • Check oil level and top up, if necessary. • Top up with small quantities of oil, until reaching the
recommended level. • Once finished, screw and tighten the plug/measuring
stick (1).
NOTE Do not ride the vehicle if poorly lubricated and do not use polluted or unsuitable lubricants, otherwise moving parts might be subject to early wear and vehicle might damage.
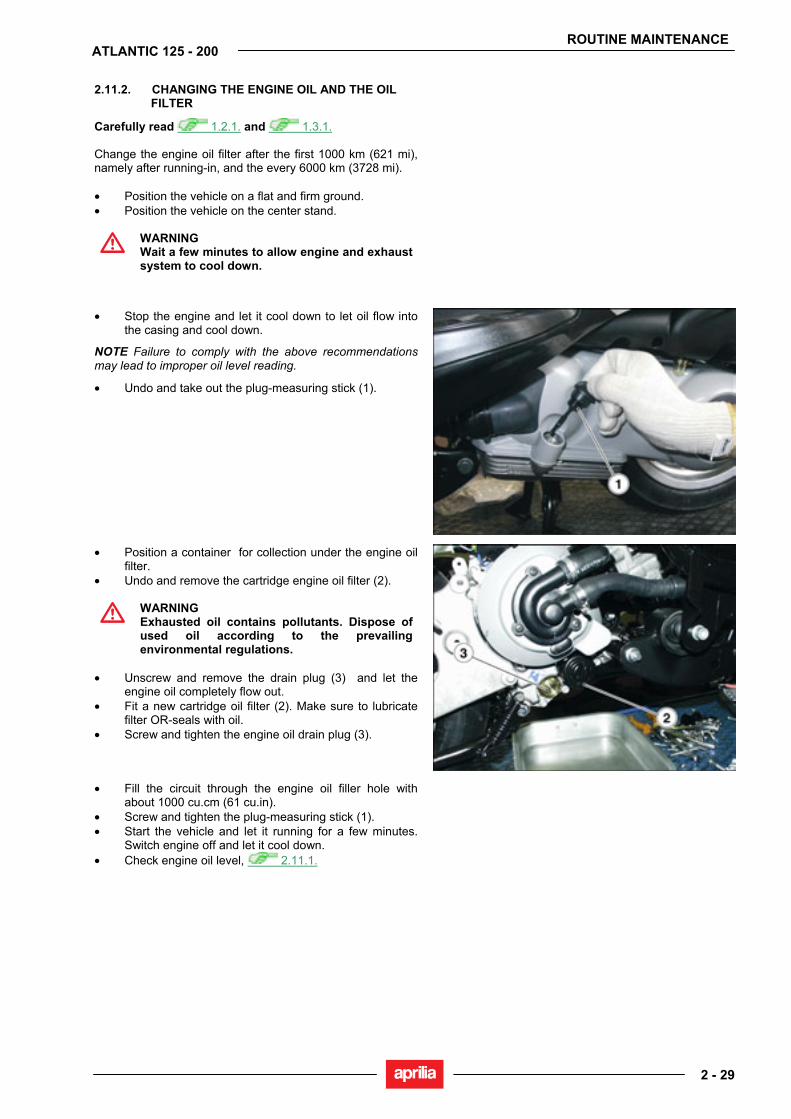
ROUTINE MAINTENANCE
2 - 29
ATLANTIC 125 - 200
2.11.2. CHANGING THE ENGINE OIL AND THE OIL FILTER
Carefully read 1.2.1. and 1.3.1. Change the engine oil filter after the first 1000 km (621 mi), namely after running-in, and the every 6000 km (3728 mi). • Position the vehicle on a flat and firm ground. • Position the vehicle on the center stand.
WARNING Wait a few minutes to allow engine and exhaust system to cool down.
• Stop the engine and let it cool down to let oil flow into the casing and cool down.
NOTE Failure to comply with the above recommendations may lead to improper oil level reading.
• Undo and take out the plug-measuring stick (1).
• Position a container for collection under the engine oil filter.
• Undo and remove the cartridge engine oil filter (2).
WARNING Exhausted oil contains pollutants. Dispose of used oil according to the prevailing environmental regulations.
• Unscrew and remove the drain plug (3) and let the
engine oil completely flow out. • Fit a new cartridge oil filter (2). Make sure to lubricate
filter OR-seals with oil. • Screw and tighten the engine oil drain plug (3).
• Fill the circuit through the engine oil filler hole with about 1000 cu.cm (61 cu.in).
• Screw and tighten the plug-measuring stick (1). • Start the vehicle and let it running for a few minutes.
Switch engine off and let it cool down. • Check engine oil level, 2.11.1.
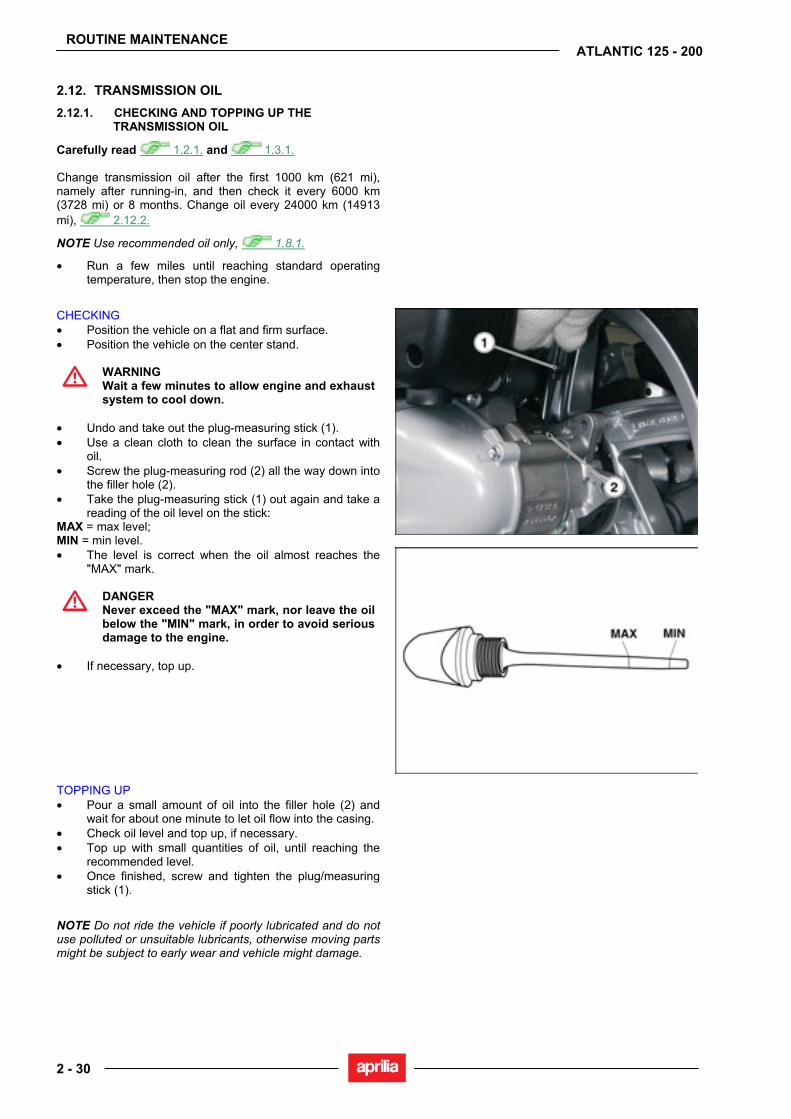
ROUTINE MAINTENANCE
2 - 30
ATLANTIC 125 - 200
2.12. TRANSMISSION OIL 2.12.1. CHECKING AND TOPPING UP THE
TRANSMISSION OIL
Carefully read 1.2.1. and 1.3.1. Change transmission oil after the first 1000 km (621 mi), namely after running-in, and then check it every 6000 km (3728 mi) or 8 months. Change oil every 24000 km (14913 mi), 2.12.2.
NOTE Use recommended oil only, 1.8.1.
• Run a few miles until reaching standard operating temperature, then stop the engine.
CHECKING • Position the vehicle on a flat and firm surface. • Position the vehicle on the center stand.
WARNING Wait a few minutes to allow engine and exhaust system to cool down.
• Undo and take out the plug-measuring stick (1). • Use a clean cloth to clean the surface in contact with
oil. • Screw the plug-measuring rod (2) all the way down into
the filler hole (2). • Take the plug-measuring stick (1) out again and take a
reading of the oil level on the stick: MAX = max level; MIN = min level.
• The level is correct when the oil almost reaches the "MAX" mark.
DANGER Never exceed the "MAX" mark, nor leave the oil below the "MIN" mark, in order to avoid serious damage to the engine.
• If necessary, top up.
TOPPING UP • Pour a small amount of oil into the filler hole (2) and
wait for about one minute to let oil flow into the casing. • Check oil level and top up, if necessary. • Top up with small quantities of oil, until reaching the
recommended level. • Once finished, screw and tighten the plug/measuring
stick (1).
NOTE Do not ride the vehicle if poorly lubricated and do not use polluted or unsuitable lubricants, otherwise moving parts might be subject to early wear and vehicle might damage.

ROUTINE MAINTENANCE
2 - 31
ATLANTIC 125 - 200
2.12.2. CHANGING THE TRANSMISSION OIL
Carefully read 1.2.1. and 1.3.1. Change transmission oil after the first 1000 km (621 mi), namely after running-in, and then check it every 6000 km (3728 mi) or 8 months. Change oil every 24000 km (14913 mi). • Position the vehicle on a flat and firm surface. • Position the vehicle on the center stand.
WARNING Wait a few minutes to allow engine and exhaust system to cool down.
• Stop the engine and let it cool down to let oil flow into the casing and cool down.
NOTE Failure to comply with the above recommendations may lead to improper oil level reading.
• Undo and take out the plug-measuring stick (1).
• Put a container for collection with a capacity above 300 cu.cm (18.3 cu.in) under the drain screw (2).
• Undo and remove the drain screw (2).
WARNING Exhausted oil contains pollutants. Dispose of used oil according to the prevailing environmental regulations
• Screw and tighten drain screw (2).
• Fill the circuit through the transmission oil filler hole with about 250 cu.cm (15.2 cu.in).
• Screw and tighten the plug-measuring stick (1). • Start the vehicle and let it running for a few minutes.
Switch engine off and let it cool down. • Check transmission oil level, 2.12.1.
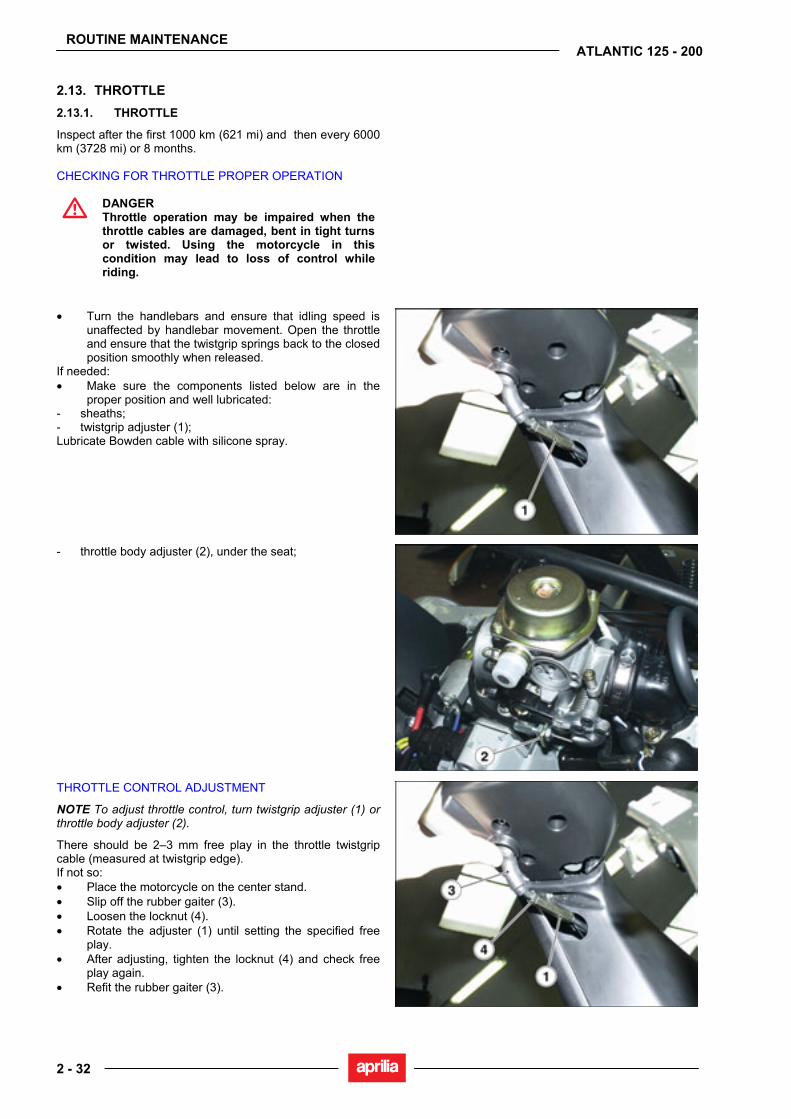
ROUTINE MAINTENANCE
2 - 32
ATLANTIC 125 - 200
2.13. THROTTLE 2.13.1. THROTTLE
Inspect after the first 1000 km (621 mi) and then every 6000 km (3728 mi) or 8 months. CHECKING FOR THROTTLE PROPER OPERATION
DANGER Throttle operation may be impaired when the throttle cables are damaged, bent in tight turns or twisted. Using the motorcycle in this condition may lead to loss of control while riding.
• Turn the handlebars and ensure that idling speed is unaffected by handlebar movement. Open the throttle and ensure that the twistgrip springs back to the closed position smoothly when released.
If needed: • Make sure the components listed below are in the
proper position and well lubricated: - sheaths; - twistgrip adjuster (1); Lubricate Bowden cable with silicone spray.
- throttle body adjuster (2), under the seat;
THROTTLE CONTROL ADJUSTMENT
NOTE To adjust throttle control, turn twistgrip adjuster (1) or throttle body adjuster (2).
There should be 2–3 mm free play in the throttle twistgrip cable (measured at twistgrip edge). If not so: • Place the motorcycle on the center stand. • Slip off the rubber gaiter (3). • Loosen the locknut (4). • Rotate the adjuster (1) until setting the specified free
play. • After adjusting, tighten the locknut (4) and check free
play again. • Refit the rubber gaiter (3).

ROUTINE MAINTENANCE
2 - 33
ATLANTIC 125 - 200
WARNING Turn the handlebars and ensure that idling speed is unaffected by handlebar movement. Open the throttle and ensure that the twistgrip springs back to the closed position smoothly when released.
If twistgrip adjuster is fully tightened, loose or in case correct free play is not reached, proceed as follows: • Raise the seat. • Undo and remove screw (5). • Remove protection.
• Loosen locknut (6). • Turn throttle adjuster (2) to restore recommended
value. • Once finished, tighten locknut (6) and check free play
again.
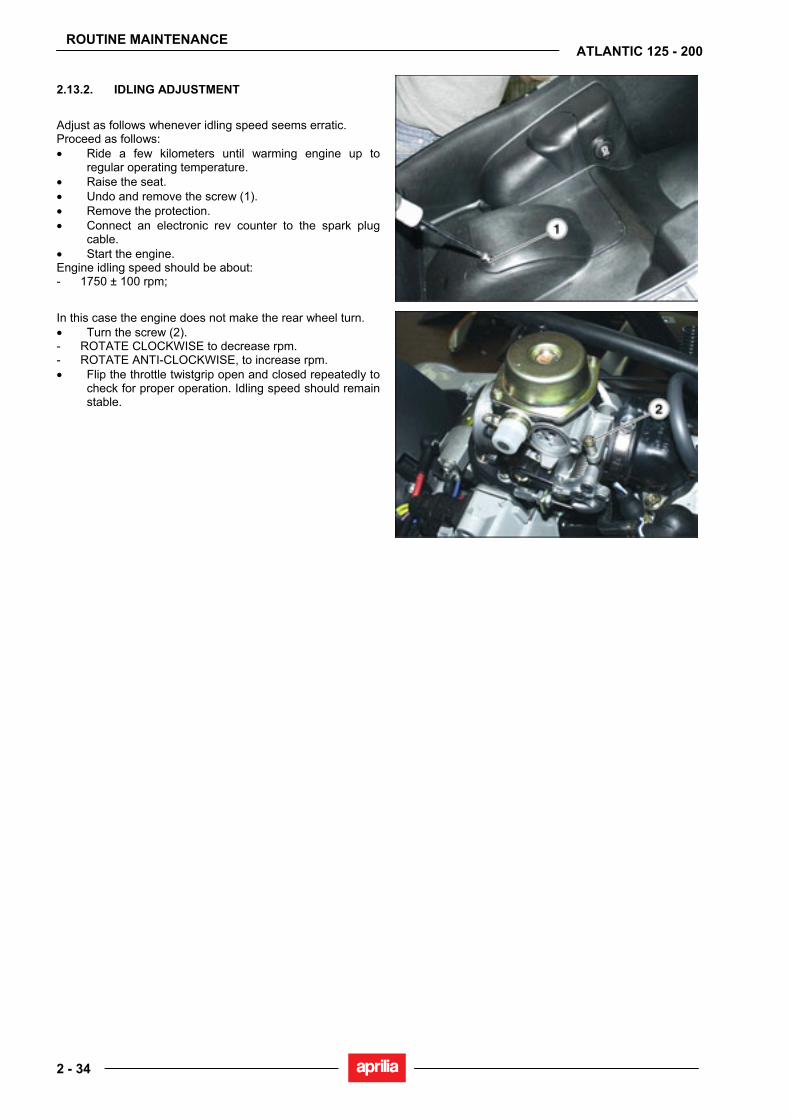
ROUTINE MAINTENANCE
2 - 34
ATLANTIC 125 - 200
2.13.2. IDLING ADJUSTMENT
Adjust as follows whenever idling speed seems erratic. Proceed as follows: • Ride a few kilometers until warming engine up to
regular operating temperature. • Raise the seat. • Undo and remove the screw (1). • Remove the protection. • Connect an electronic rev counter to the spark plug
cable. • Start the engine. Engine idling speed should be about: - 1750 ± 100 rpm;
In this case the engine does not make the rear wheel turn. • Turn the screw (2). - ROTATE CLOCKWISE to decrease rpm. - ROTATE ANTI-CLOCKWISE, to increase rpm. • Flip the throttle twistgrip open and closed repeatedly to
check for proper operation. Idling speed should remain stable.
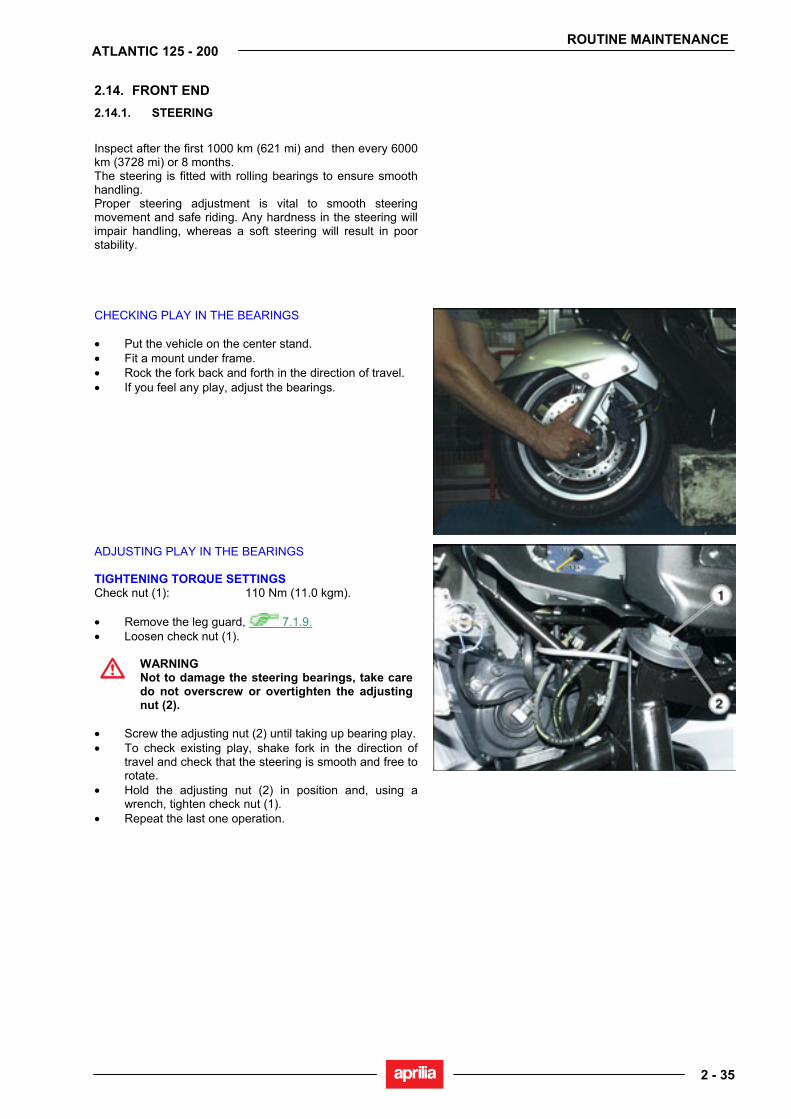
ROUTINE MAINTENANCE
2 - 35
ATLANTIC 125 - 200
2.14. FRONT END 2.14.1. STEERING
Inspect after the first 1000 km (621 mi) and then every 6000 km (3728 mi) or 8 months. The steering is fitted with rolling bearings to ensure smooth handling. Proper steering adjustment is vital to smooth steering movement and safe riding. Any hardness in the steering will impair handling, whereas a soft steering will result in poor stability.
CHECKING PLAY IN THE BEARINGS • Put the vehicle on the center stand. • Fit a mount under frame. • Rock the fork back and forth in the direction of travel. • If you feel any play, adjust the bearings.
ADJUSTING PLAY IN THE BEARINGS TIGHTENING TORQUE SETTINGS Check nut (1): 110 Nm (11.0 kgm). • Remove the leg guard, 7.1.9. • Loosen check nut (1).
WARNING Not to damage the steering bearings, take care do not overscrew or overtighten the adjusting nut (2).
• Screw the adjusting nut (2) until taking up bearing play. • To check existing play, shake fork in the direction of
travel and check that the steering is smooth and free to rotate.
• Hold the adjusting nut (2) in position and, using a wrench, tighten check nut (1).
• Repeat the last one operation.
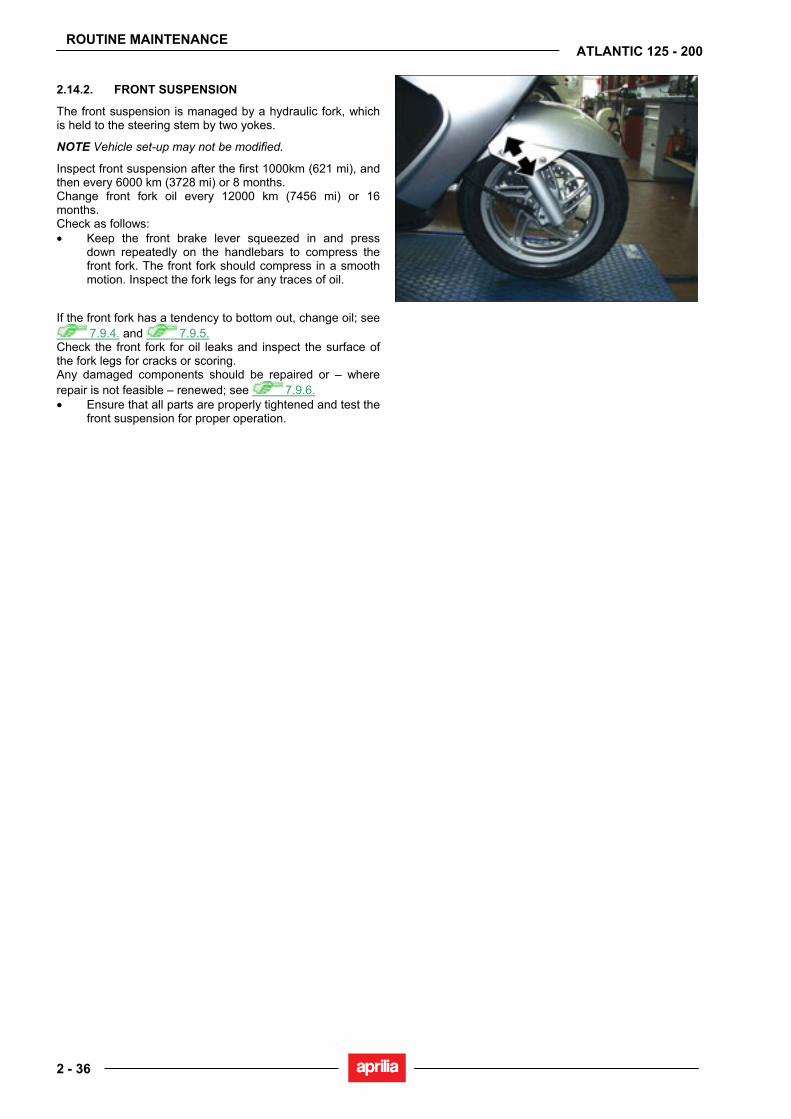
ROUTINE MAINTENANCE
2 - 36
ATLANTIC 125 - 200
2.14.2. FRONT SUSPENSION
The front suspension is managed by a hydraulic fork, which is held to the steering stem by two yokes.
NOTE Vehicle set-up may not be modified.
Inspect front suspension after the first 1000km (621 mi), and then every 6000 km (3728 mi) or 8 months. Change front fork oil every 12000 km (7456 mi) or 16 months. Check as follows: • Keep the front brake lever squeezed in and press
down repeatedly on the handlebars to compress the front fork. The front fork should compress in a smooth motion. Inspect the fork legs for any traces of oil.
If the front fork has a tendency to bottom out, change oil; see 7.9.4. and 7.9.5.
Check the front fork for oil leaks and inspect the surface of the fork legs for cracks or scoring. Any damaged components should be repaired or – where repair is not feasible – renewed; see 7.9.6. • Ensure that all parts are properly tightened and test the
front suspension for proper operation.
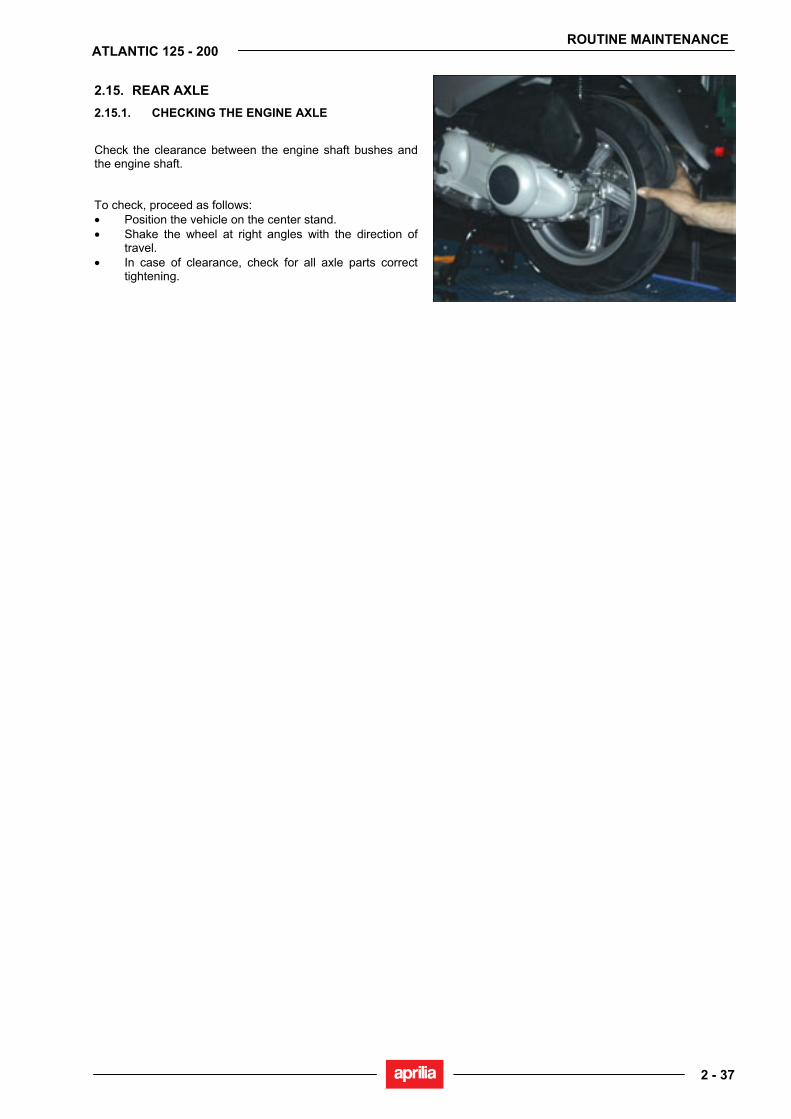
ROUTINE MAINTENANCE
2 - 37
ATLANTIC 125 - 200
2.15. REAR AXLE 2.15.1. CHECKING THE ENGINE AXLE
Check the clearance between the engine shaft bushes and the engine shaft. To check, proceed as follows: • Position the vehicle on the center stand. • Shake the wheel at right angles with the direction of
travel. • In case of clearance, check for all axle parts correct
tightening.
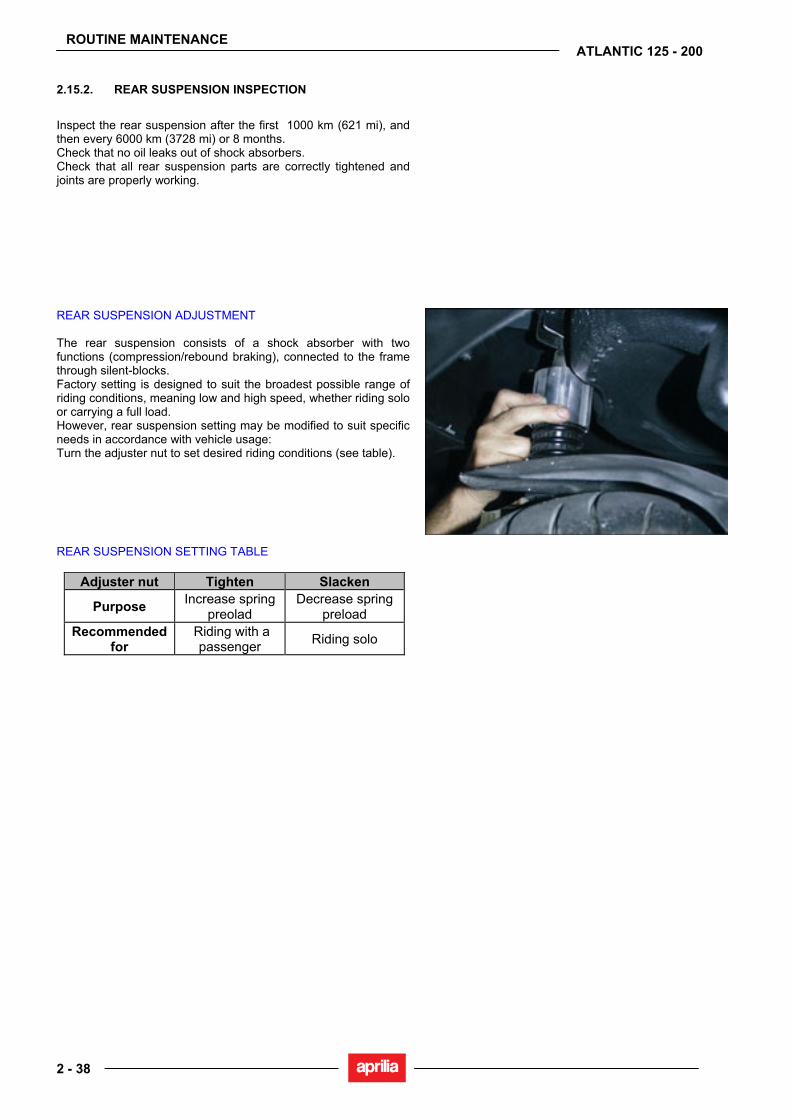
ROUTINE MAINTENANCE
2 - 38
ATLANTIC 125 - 200
2.15.2. REAR SUSPENSION INSPECTION
Inspect the rear suspension after the first 1000 km (621 mi), and then every 6000 km (3728 mi) or 8 months. Check that no oil leaks out of shock absorbers. Check that all rear suspension parts are correctly tightened and joints are properly working.
REAR SUSPENSION ADJUSTMENT The rear suspension consists of a shock absorber with two functions (compression/rebound braking), connected to the frame through silent-blocks. Factory setting is designed to suit the broadest possible range of riding conditions, meaning low and high speed, whether riding solo or carrying a full load. However, rear suspension setting may be modified to suit specific needs in accordance with vehicle usage: Turn the adjuster nut to set desired riding conditions (see table).
REAR SUSPENSION SETTING TABLE
Adjuster nut Tighten Slacken
Purpose Increase spring preolad
Decrease spring preload
Recommended for
Riding with a passenger Riding solo

ROUTINE MAINTENANCE
2 - 39
ATLANTIC 125 - 200
2.16. WHEELS 2.16.1. WHEELS
Carefully read 1.2.1. FRONT WHEEL Check every 6000 km (3728 mi). • Place the vehicle on the center stand. • Place a mount under frame. • Rotate the wheel manually in both directions. • The wheel should be spinning smoothly, with no
hardness or unusual noise. If not so, change the bearings; see 7.5.3.
• If you detect any wobble, inspect wheel and affected components; see 7.5.4.
• A spinning wheel that always stops in exactly the same position needs balancing.
REAR WHEEL Check every 6000 km (3728 mi). • Place the vehicle on the center stand. • Rotate the wheel manually in both directions. • The wheel should be spinning smoothly, with no
hardness or unusual noise. If not so, change the bearings. 7.6.3.
• If you detect any wobble, inspect wheel and affected components. 7.6.5.
• A spinning wheel that always stops in exactly the same position needs balancing.
robebart
unusual noise. 7.6.3. any wobble,
robebart
any wobble, inspect 7.6.5.
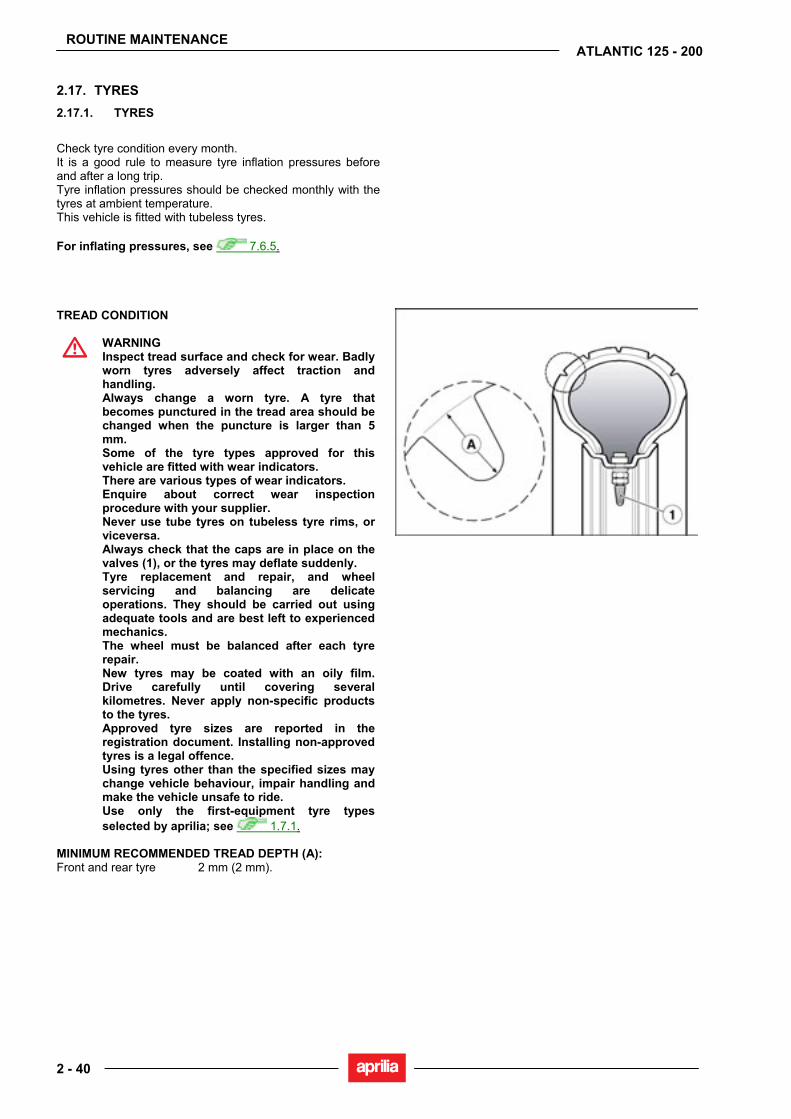
ROUTINE MAINTENANCE
2 - 40
ATLANTIC 125 - 200
2.17. TYRES 2.17.1. TYRES
Check tyre condition every month. It is a good rule to measure tyre inflation pressures before and after a long trip. Tyre inflation pressures should be checked monthly with the tyres at ambient temperature. This vehicle is fitted with tubeless tyres. For inflating pressures, see 7.6.5.
TREAD CONDITION
WARNING Inspect tread surface and check for wear. Badly worn tyres adversely affect traction and handling. Always change a worn tyre. A tyre that becomes punctured in the tread area should be changed when the puncture is larger than 5 mm. Some of the tyre types approved for this vehicle are fitted with wear indicators. There are various types of wear indicators. Enquire about correct wear inspection procedure with your supplier. Never use tube tyres on tubeless tyre rims, or viceversa. Always check that the caps are in place on the valves (1), or the tyres may deflate suddenly. Tyre replacement and repair, and wheel servicing and balancing are delicate operations. They should be carried out using adequate tools and are best left to experienced mechanics. The wheel must be balanced after each tyre repair. New tyres may be coated with an oily film. Drive carefully until covering several kilometres. Never apply non-specific products to the tyres. Approved tyre sizes are reported in the registration document. Installing non-approved tyres is a legal offence. Using tyres other than the specified sizes may change vehicle behaviour, impair handling and make the vehicle unsafe to ride. Use only the first-equipment tyre types selected by aprilia; see 1.7.1.
MINIMUM RECOMMENDED TREAD DEPTH (A): Front and rear tyre 2 mm (2 mm).
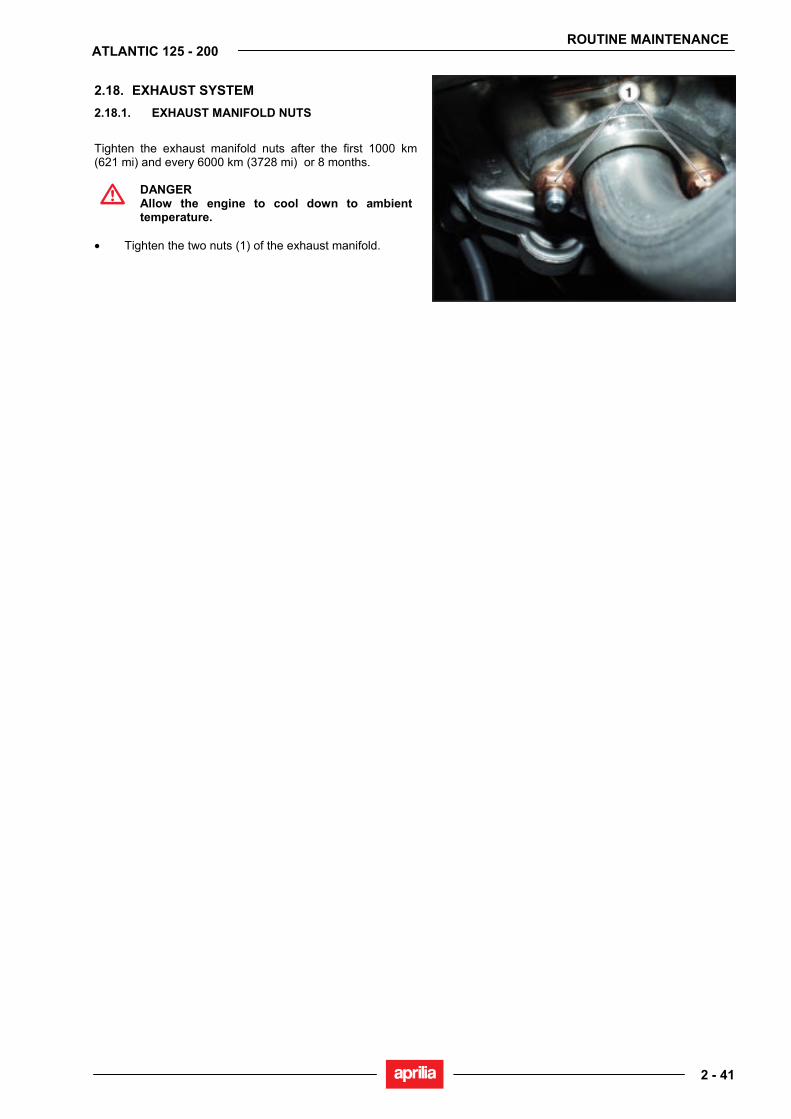
ROUTINE MAINTENANCE
2 - 41
ATLANTIC 125 - 200
2.18. EXHAUST SYSTEM 2.18.1. EXHAUST MANIFOLD NUTS
Tighten the exhaust manifold nuts after the first 1000 km (621 mi) and every 6000 km (3728 mi) or 8 months.
DANGER Allow the engine to cool down to ambient temperature.
• Tighten the two nuts (1) of the exhaust manifold.

LUBRICATION
3 - 1
ATLANTIC 125 - 200
LUBRICATION 3
LUBRICATION
3 - 2
ATLANTIC 125 - 200
SUMMARY 3.1. LUBRICATION ................................................................................................................................. 3
3.1.1. LUBRICATION......................................................................................................................... 3

LUBRICATION
3 - 3
ATLANTIC 125 - 200
3.1. LUBRICATION 3.1.1. LUBRICATION
The lubrication system is described in the engine workshop manual, 0.1.2.

FUEL SYSTEM
4 - 1
ATLANTIC 125 - 200
FUEL SYSTEM 4
FUEL SYSTEM
4 - 2
ATLANTIC 125 - 200
SUMMARY 4.1. FUEL SUPPLY ................................................................................................................................................ 3
4.1.1. FUEL SUPPLY DIAGRAM.......................................................................................................................... 3 4.1.2. CHANGING THE FUEL FILTER ................................................................................................................. 4 4.1.3. REMOVING THE FUEL TANK.................................................................................................................... 5 4.1.4. REMOVING THE FUEL SENSOR .............................................................................................................. 6
4.2. AIR FILTER ..................................................................................................................................................... 7 4.2.1. REMOVING THE AIR BOX......................................................................................................................... 7 4.2.2. REMOVING THE AIR CLEANER ............................................................................................................... 8
4.3. CARBURETOR................................................................................................................................................ 9 4.3.1. REMOVING THE CARBURETOR .............................................................................................................. 9 4.3.2. CARBURETOR DISASSEMBLY............................................................................................................... 11 4.3.3. ASSEMBLING THE CARBURETOR ........................................................................................................ 14 4.3.4. CHECKING THE AUTOMATIC STARTER ............................................................................................... 19 4.3.5. ADJUSTING THE IDLING MIXTURE........................................................................................................ 20
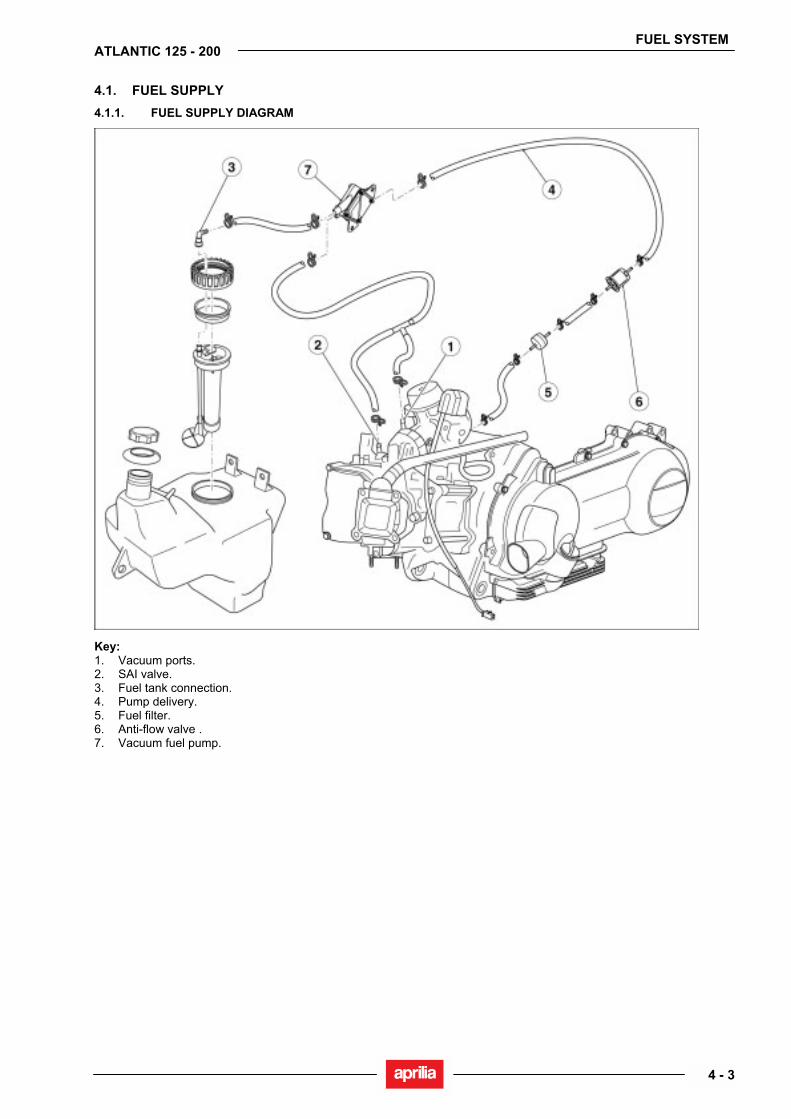
FUEL SYSTEM
4 - 3
ATLANTIC 125 - 200
4.1. FUEL SUPPLY 4.1.1. FUEL SUPPLY DIAGRAM
Key: 1. Vacuum ports. 2. SAI valve. 3. Fuel tank connection. 4. Pump delivery. 5. Fuel filter. 6. Anti-flow valve . 7. Vacuum fuel pump.
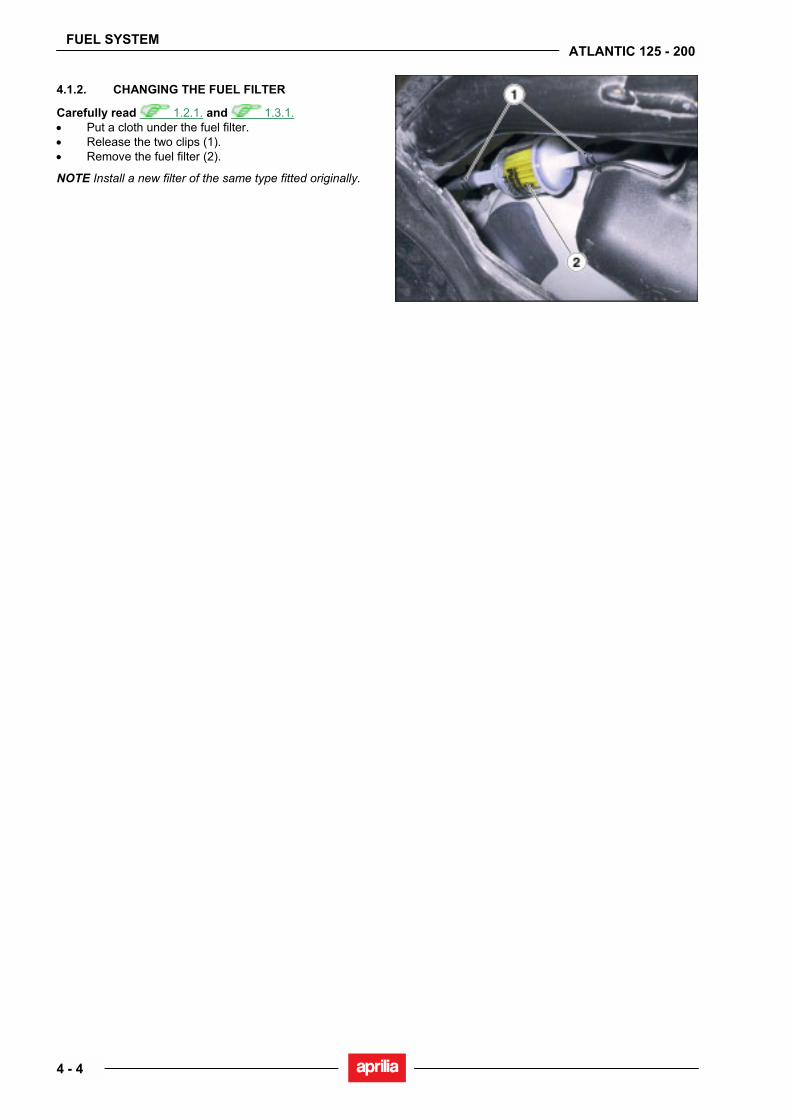
FUEL SYSTEM
4 - 4
ATLANTIC 125 - 200
4.1.2. CHANGING THE FUEL FILTER
Carefully read 1.2.1. and 1.3.1. • Put a cloth under the fuel filter. • Release the two clips (1). • Remove the fuel filter (2).
NOTE Install a new filter of the same type fitted originally.
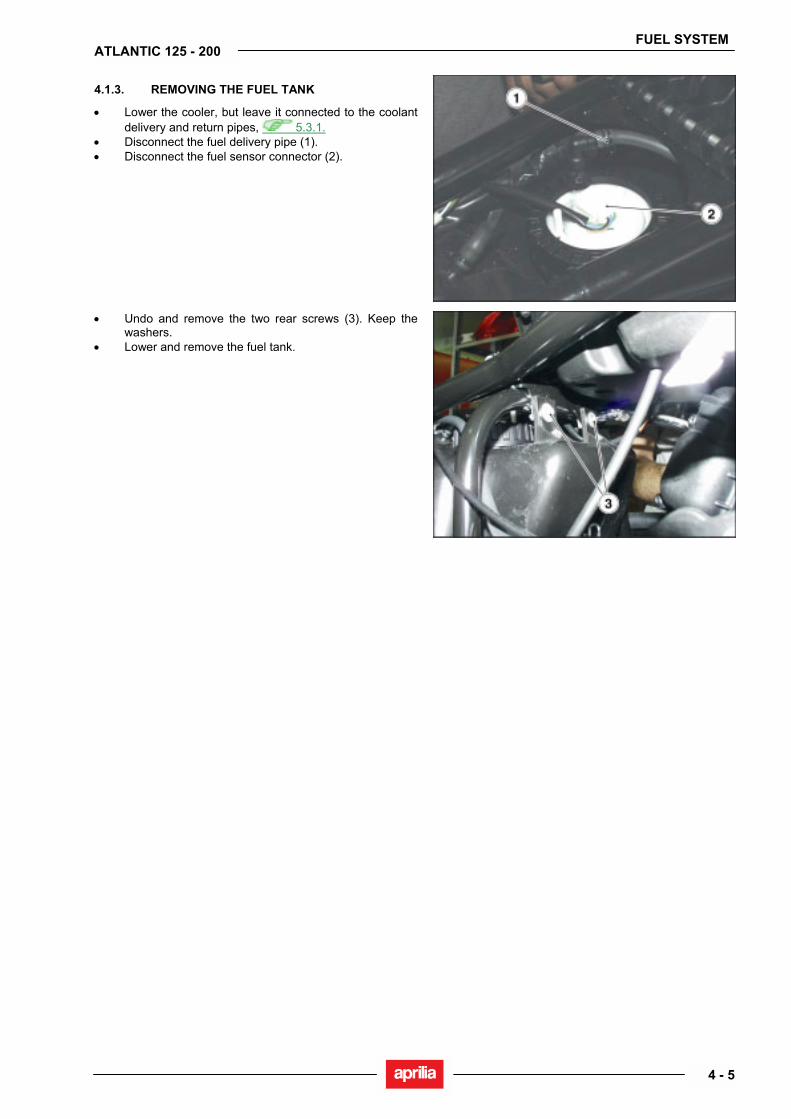
FUEL SYSTEM
4 - 5
ATLANTIC 125 - 200
4.1.3. REMOVING THE FUEL TANK
• Lower the cooler, but leave it connected to the coolant delivery and return pipes, 5.3.1.
• Disconnect the fuel delivery pipe (1). • Disconnect the fuel sensor connector (2).
• Undo and remove the two rear screws (3). Keep the washers.
• Lower and remove the fuel tank.

FUEL SYSTEM
4 - 6
ATLANTIC 125 - 200
4.1.4. REMOVING THE FUEL SENSOR
• Remove the central tunnel, 7.1.7. • Disconnect the fuel delivery pipe (1). • Disconnect the fuel sensor connector (2).
• Undo and remove ring nut (3).
• To remove fuel sensor, turn and lift it.
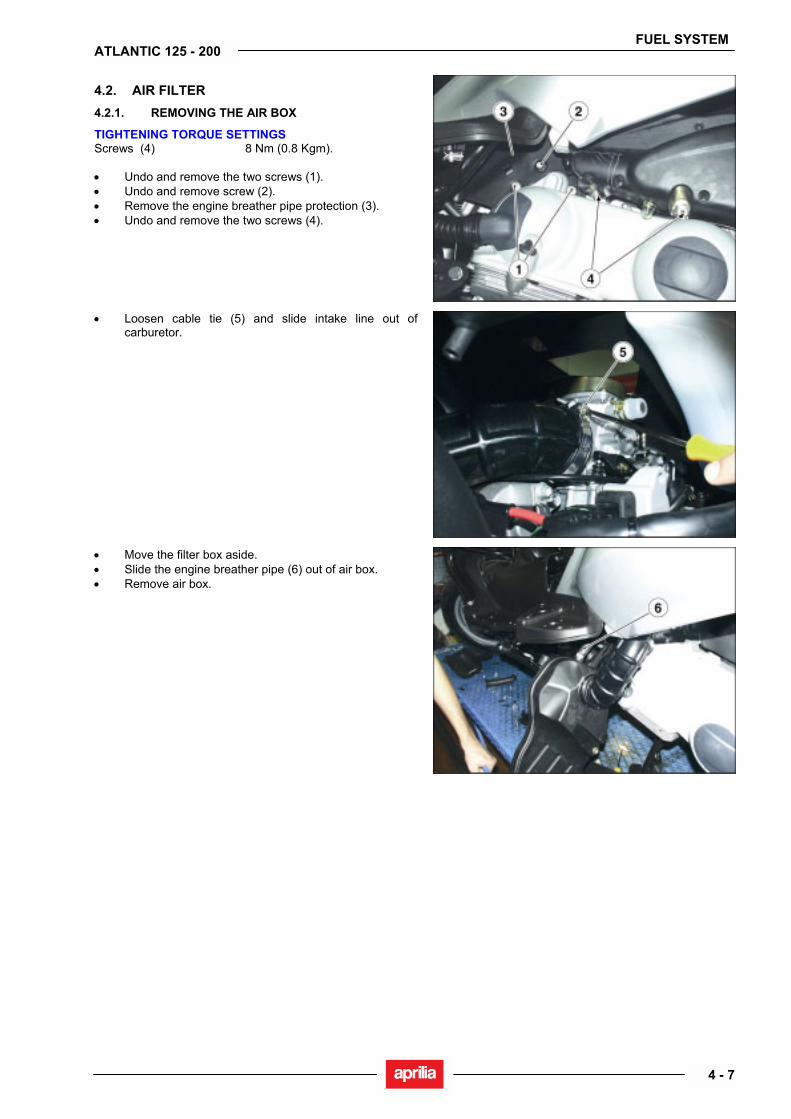
FUEL SYSTEM
4 - 7
ATLANTIC 125 - 200
4.2. AIR FILTER 4.2.1. REMOVING THE AIR BOX
TIGHTENING TORQUE SETTINGS Screws (4) 8 Nm (0.8 Kgm). • Undo and remove the two screws (1). • Undo and remove screw (2). • Remove the engine breather pipe protection (3). • Undo and remove the two screws (4).
• Loosen cable tie (5) and slide intake line out of carburetor.
• Move the filter box aside. • Slide the engine breather pipe (6) out of air box. • Remove air box.
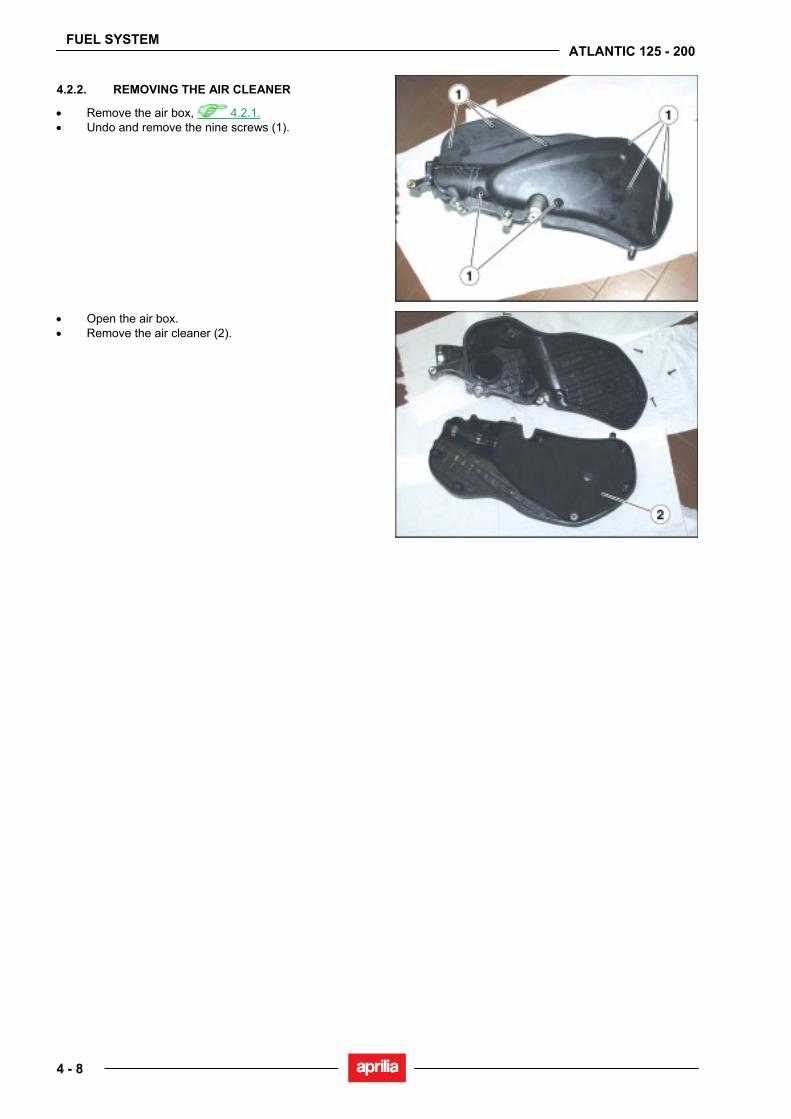
FUEL SYSTEM
4 - 8
ATLANTIC 125 - 200
4.2.2. REMOVING THE AIR CLEANER
• Remove the air box, 4.2.1. • Undo and remove the nine screws (1).
• Open the air box. • Remove the air cleaner (2).
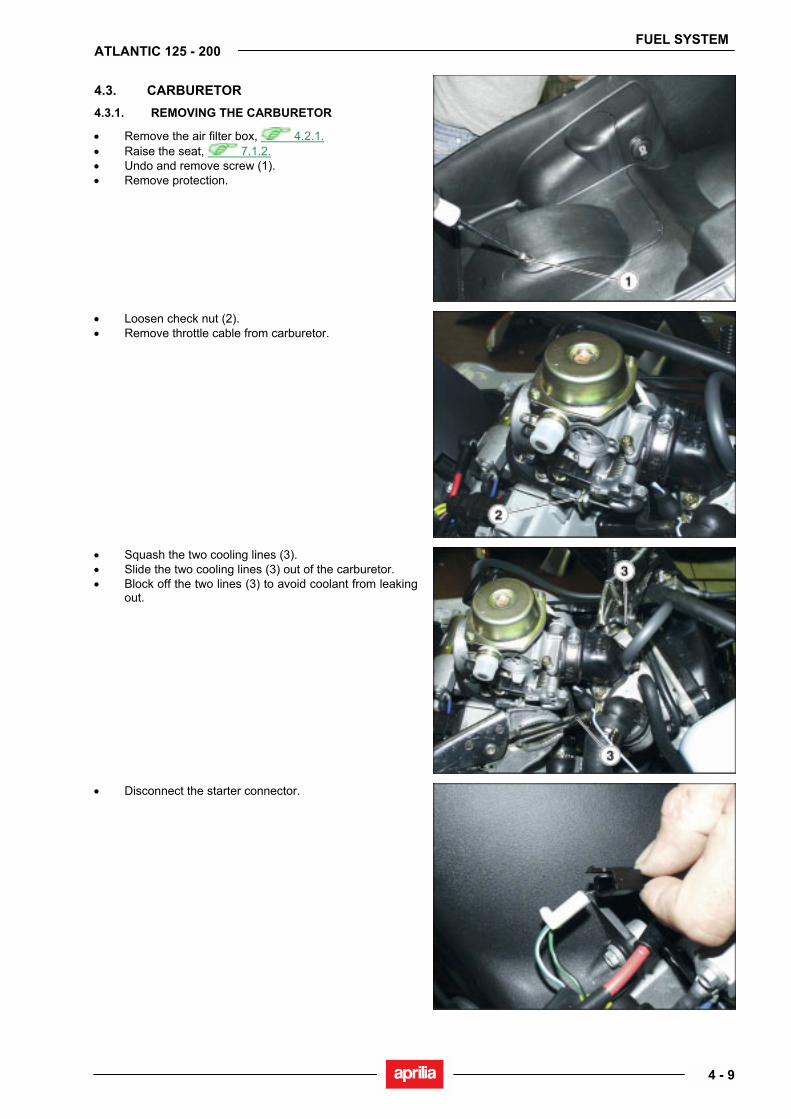
FUEL SYSTEM
4 - 9
ATLANTIC 125 - 200
4.3. CARBURETOR 4.3.1. REMOVING THE CARBURETOR
• Remove the air filter box, 4.2.1. • Raise the seat, 7.1.2. • Undo and remove screw (1). • Remove protection.
• Loosen check nut (2). • Remove throttle cable from carburetor.
• Squash the two cooling lines (3). • Slide the two cooling lines (3) out of the carburetor. • Block off the two lines (3) to avoid coolant from leaking
out.
• Disconnect the starter connector.
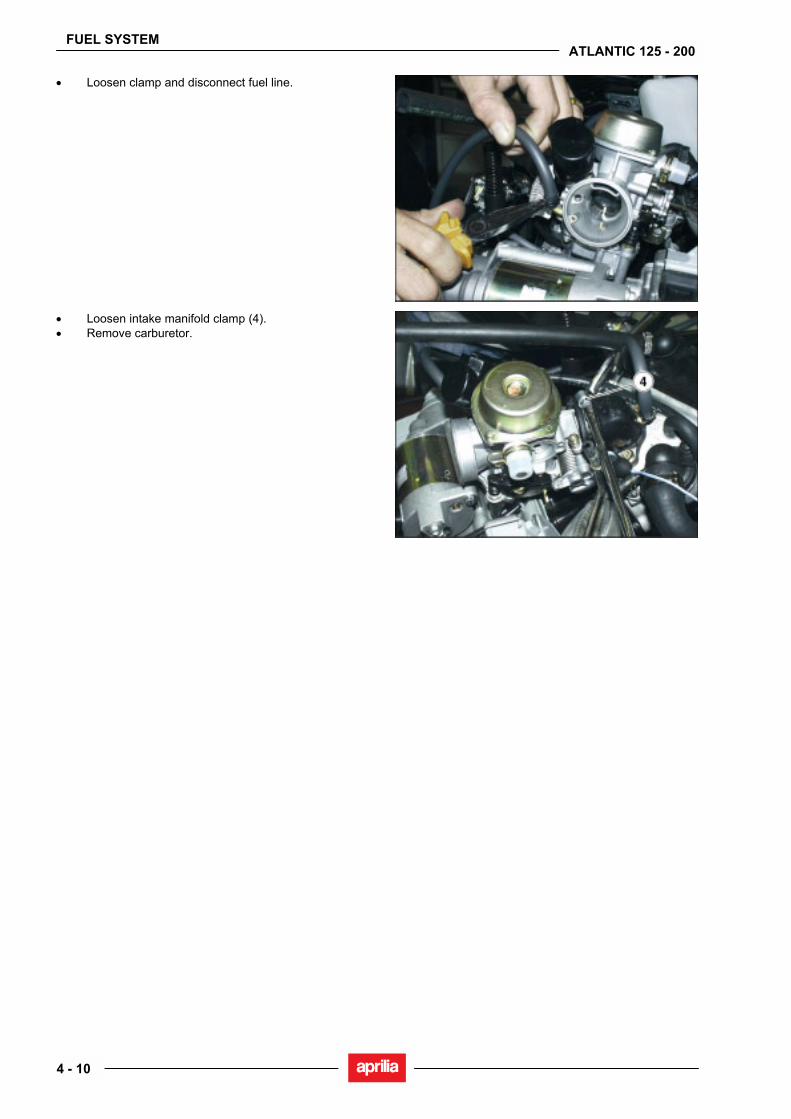
FUEL SYSTEM
4 - 10
ATLANTIC 125 - 200
• Loosen clamp and disconnect fuel line.
• Loosen intake manifold clamp (4). • Remove carburetor.
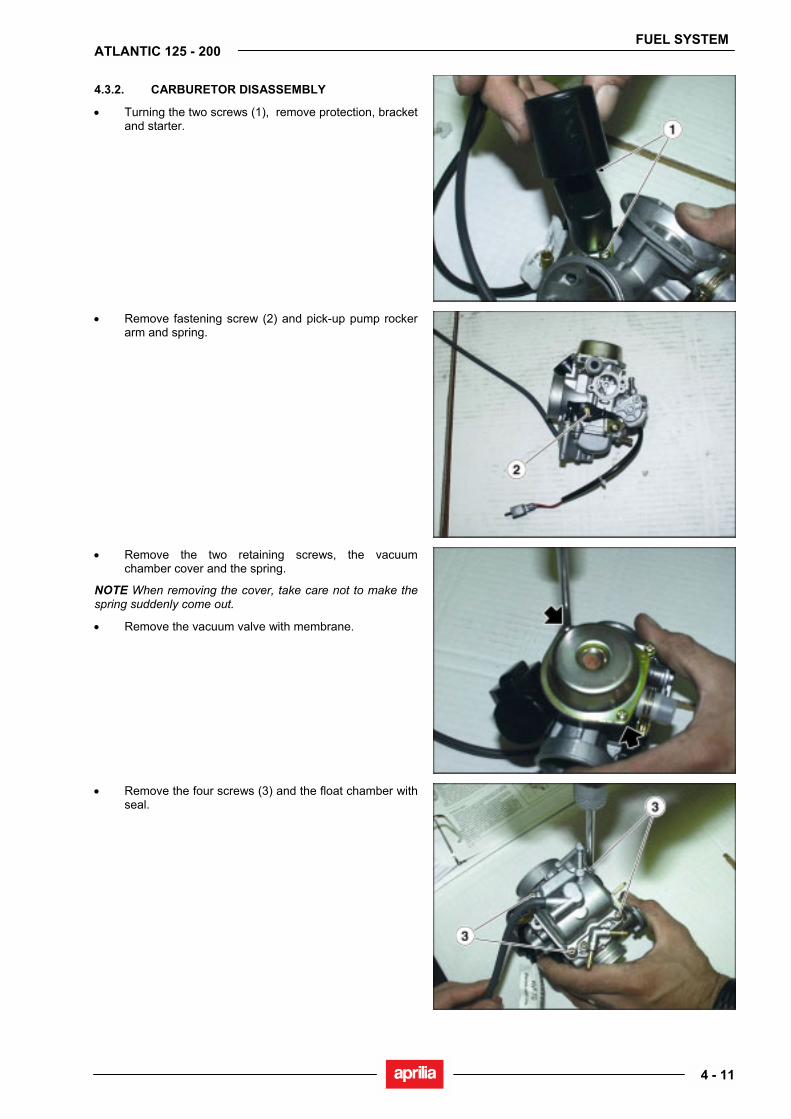
FUEL SYSTEM
4 - 11
ATLANTIC 125 - 200
4.3.2. CARBURETOR DISASSEMBLY
• Turning the two screws (1), remove protection, bracket and starter.
• Remove fastening screw (2) and pick-up pump rocker arm and spring.
• Remove the two retaining screws, the vacuum chamber cover and the spring.
NOTE When removing the cover, take care not to make the spring suddenly come out.
• Remove the vacuum valve with membrane.
• Remove the four screws (3) and the float chamber with seal.
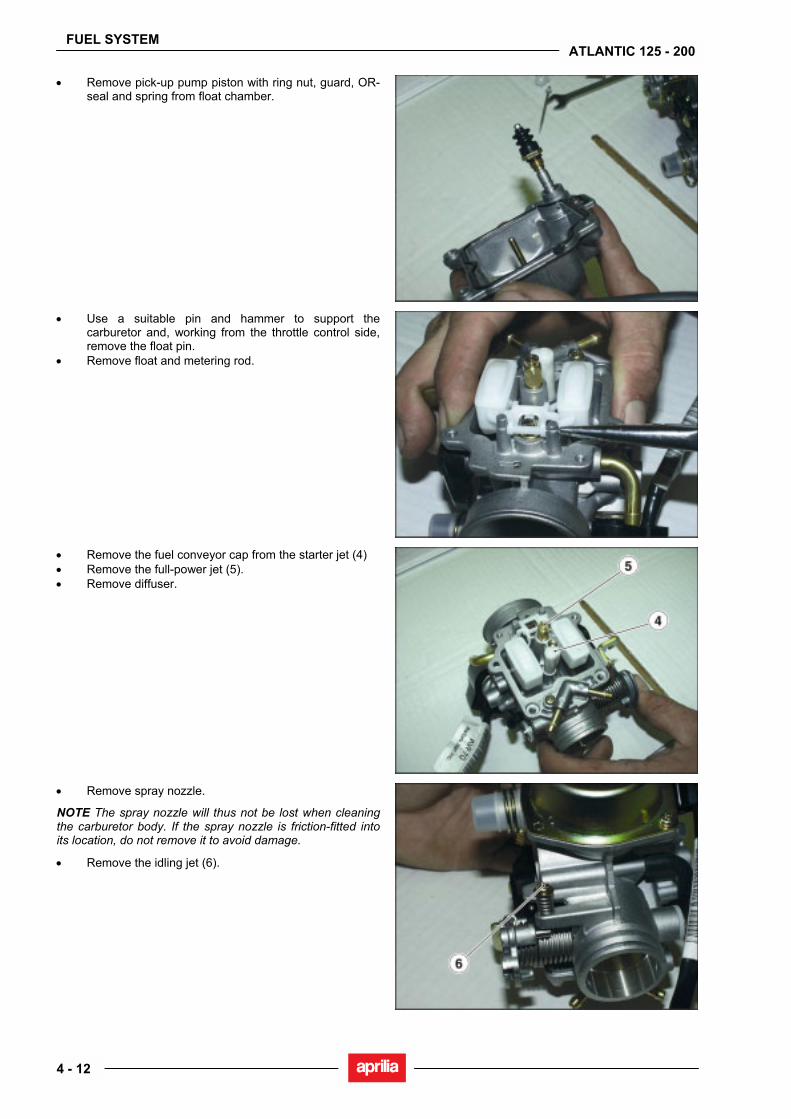
FUEL SYSTEM
4 - 12
ATLANTIC 125 - 200
• Remove pick-up pump piston with ring nut, guard, OR-seal and spring from float chamber.
• Use a suitable pin and hammer to support the carburetor and, working from the throttle control side, remove the float pin.
• Remove float and metering rod.
• Remove the fuel conveyor cap from the starter jet (4) • Remove the full-power jet (5). • Remove diffuser.
• Remove spray nozzle.
NOTE The spray nozzle will thus not be lost when cleaning the carburetor body. If the spray nozzle is friction-fitted into its location, do not remove it to avoid damage.
• Remove the idling jet (6).
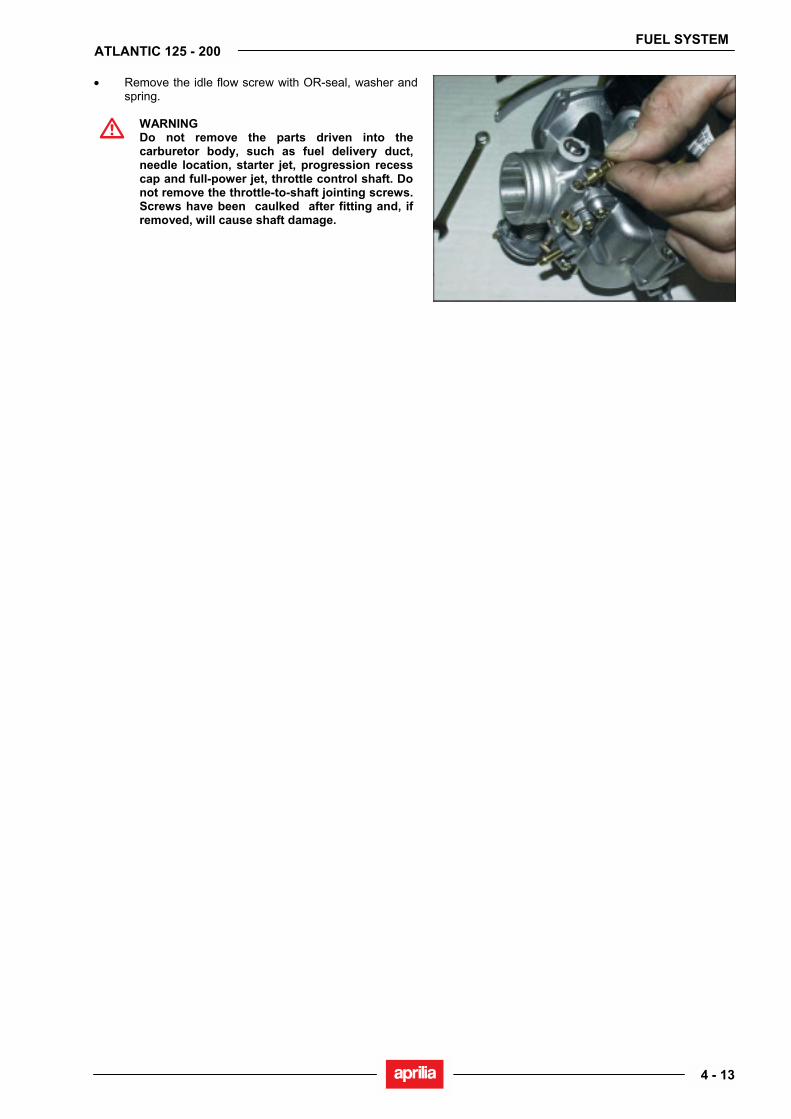
FUEL SYSTEM
4 - 13
ATLANTIC 125 - 200
• Remove the idle flow screw with OR-seal, washer and spring.
WARNING Do not remove the parts driven into the carburetor body, such as fuel delivery duct, needle location, starter jet, progression recess cap and full-power jet, throttle control shaft. Do not remove the throttle-to-shaft jointing screws. Screws have been caulked after fitting and, if removed, will cause shaft damage.
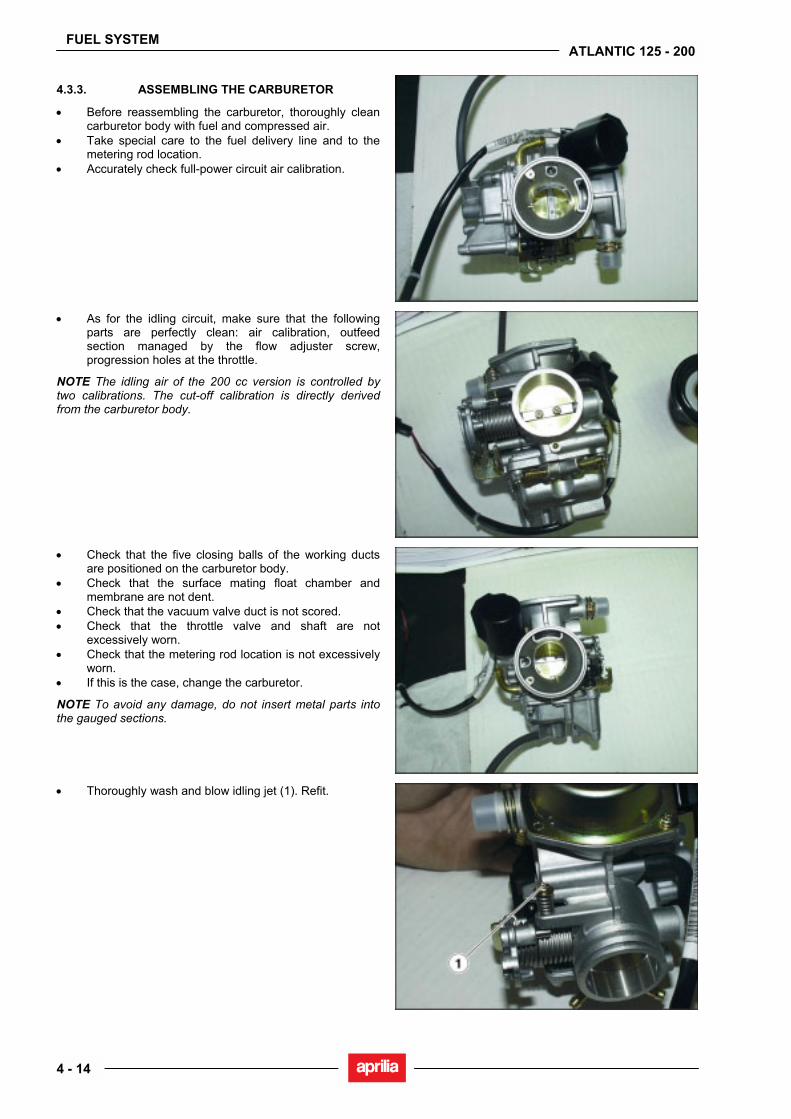
FUEL SYSTEM
4 - 14
ATLANTIC 125 - 200
4.3.3. ASSEMBLING THE CARBURETOR
• Before reassembling the carburetor, thoroughly clean carburetor body with fuel and compressed air.
• Take special care to the fuel delivery line and to the metering rod location.
• Accurately check full-power circuit air calibration.
• As for the idling circuit, make sure that the following parts are perfectly clean: air calibration, outfeed section managed by the flow adjuster screw, progression holes at the throttle.
NOTE The idling air of the 200 cc version is controlled by two calibrations. The cut-off calibration is directly derived from the carburetor body.
• Check that the five closing balls of the working ducts are positioned on the carburetor body.
• Check that the surface mating float chamber and membrane are not dent.
• Check that the vacuum valve duct is not scored. • Check that the throttle valve and shaft are not
excessively worn. • Check that the metering rod location is not excessively
worn. • If this is the case, change the carburetor.
NOTE To avoid any damage, do not insert metal parts into the gauged sections.
• Thoroughly wash and blow idling jet (1). Refit.
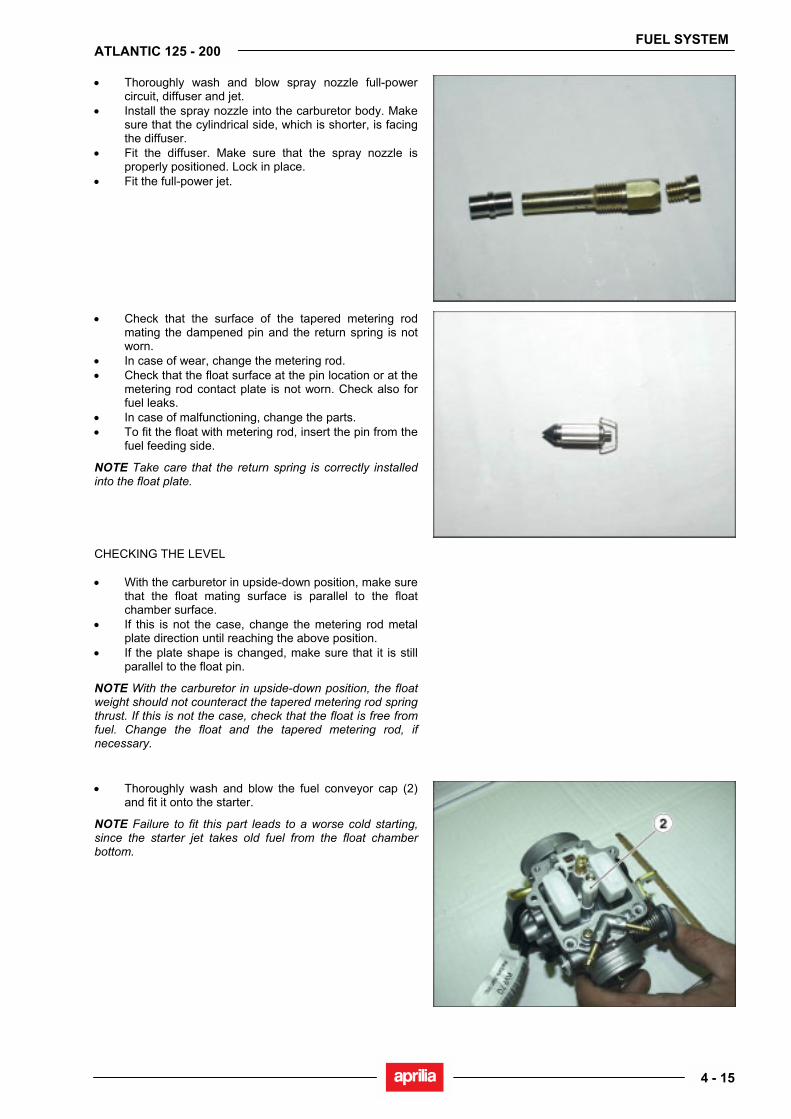
FUEL SYSTEM
4 - 15
ATLANTIC 125 - 200
• Thoroughly wash and blow spray nozzle full-power circuit, diffuser and jet.
• Install the spray nozzle into the carburetor body. Make sure that the cylindrical side, which is shorter, is facing the diffuser.
• Fit the diffuser. Make sure that the spray nozzle is properly positioned. Lock in place.
• Fit the full-power jet.
• Check that the surface of the tapered metering rod mating the dampened pin and the return spring is not worn.
• In case of wear, change the metering rod. • Check that the float surface at the pin location or at the
metering rod contact plate is not worn. Check also for fuel leaks.
• In case of malfunctioning, change the parts. • To fit the float with metering rod, insert the pin from the
fuel feeding side.
NOTE Take care that the return spring is correctly installed into the float plate.
CHECKING THE LEVEL • With the carburetor in upside-down position, make sure
that the float mating surface is parallel to the float chamber surface.
• If this is not the case, change the metering rod metal plate direction until reaching the above position.
• If the plate shape is changed, make sure that it is still parallel to the float pin.
NOTE With the carburetor in upside-down position, the float weight should not counteract the tapered metering rod spring thrust. If this is not the case, check that the float is free from fuel. Change the float and the tapered metering rod, if necessary.
• Thoroughly wash and blow the fuel conveyor cap (2) and fit it onto the starter.
NOTE Failure to fit this part leads to a worse cold starting, since the starter jet takes old fuel from the float chamber bottom.

FUEL SYSTEM
4 - 16
ATLANTIC 125 - 200
• Remove the float chamber exhaust screw (3), thoroughly wash and blow the float chamber. Make sure to perfectly clean the pick-up pump intake and delivery valve.
• As these are one-way valves, gently blow with compressed air into the intake valve working from the float chamber inner side and into the exhaust valve working from the pump piston seat.
• Check the pick-up pump piston and its seat into the float chamber for wear.
• If this is the case, change the worn parts. • Check the pick-up pump piston return spring for wear. • Fit a new OR-seal and a new bellows seal. Refit the
piston unit onto the float chamber. • Fit a new OR-seal in the float chamber exhaust screw.
Tighten the screw.
• To check screw proper sealing, pour a small quantity of fuel into the float chamber.
• Fit a new seal on the float chamber. • Fit the float chamber to the carburetor body. Tighten
the four screws.
• Thoroughly wash and blow the flow adjuster screw. Fit a new OR-seal.
• Pre-assemble the following parts on the screw in the following order: spring, washer and OR-seal.
• Screw the flow screw on the carburetor body. • Screw final position will have to be defined according
to the exhaust gases analysis. • Prepare carburetor for adjustment by loosening the
screw by three turns starting from the closed position.
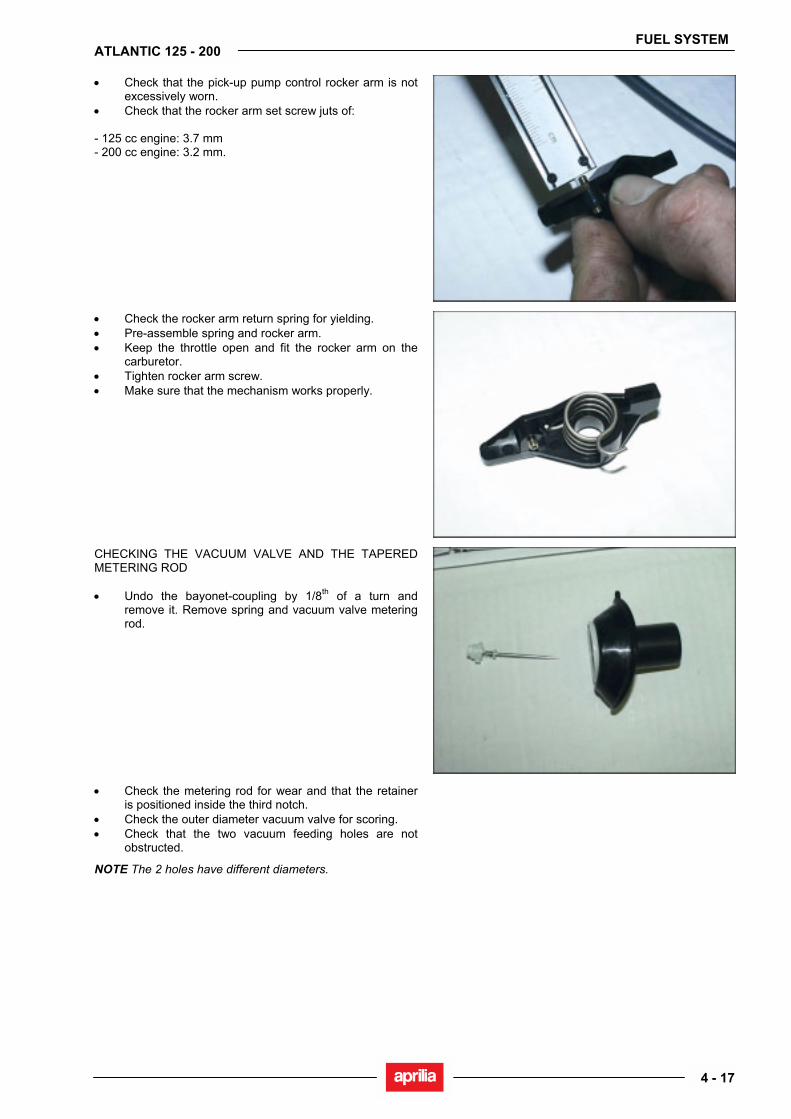
FUEL SYSTEM
4 - 17
ATLANTIC 125 - 200
• Check that the pick-up pump control rocker arm is not excessively worn.
• Check that the rocker arm set screw juts of: - 125 cc engine: 3.7 mm - 200 cc engine: 3.2 mm.
• Check the rocker arm return spring for yielding. • Pre-assemble spring and rocker arm. • Keep the throttle open and fit the rocker arm on the
carburetor. • Tighten rocker arm screw. • Make sure that the mechanism works properly.
CHECKING THE VACUUM VALVE AND THE TAPERED METERING ROD • Undo the bayonet-coupling by 1/8th of a turn and
remove it. Remove spring and vacuum valve metering rod.
• Check the metering rod for wear and that the retainer is positioned inside the third notch.
• Check the outer diameter vacuum valve for scoring. • Check that the two vacuum feeding holes are not
obstructed.
NOTE The 2 holes have different diameters.

FUEL SYSTEM
4 - 18
ATLANTIC 125 - 200
• Make sure that the membrane is not broken or hardened. If this is the case, change it.
• Refit the tapered metering rod on the vacuum valve. • Make sure that the spring is correctly positioned on the
metering rod and that coupling is perfectly seated. • To fit the coupling, turn it by 1/8th of a turn.
• Refit the vacuum valve on the carburetor. Make sure that the tapered metering rod seats into the spray nozzle.
• To time vacuum valve rotation, insert membrane end into its location. The membrane is correctly fitted to the valve when vacuum main feeding hole is in axial position with the choke tube, on the throttle side (see figure).
• Refit spring onto valve. • To refit vacuum chamber cover, make sure that the
reference on cover matches with that on the membrane.
• Tighten screws to the specified torque. • Check for cut-off valve proper positioning, for 200 cc
version only. Check that the membrane is not broken or hardened. Check spring free length.
Standard length: 24 mm • Refit membrane with the metal pin on valve. Refit
spring and cover. Make sure that cover vacuum port is facing upwards.
• Wash and blow starter mount. • Refit a new seal on carburetor body and tighten the
two fastening screws.
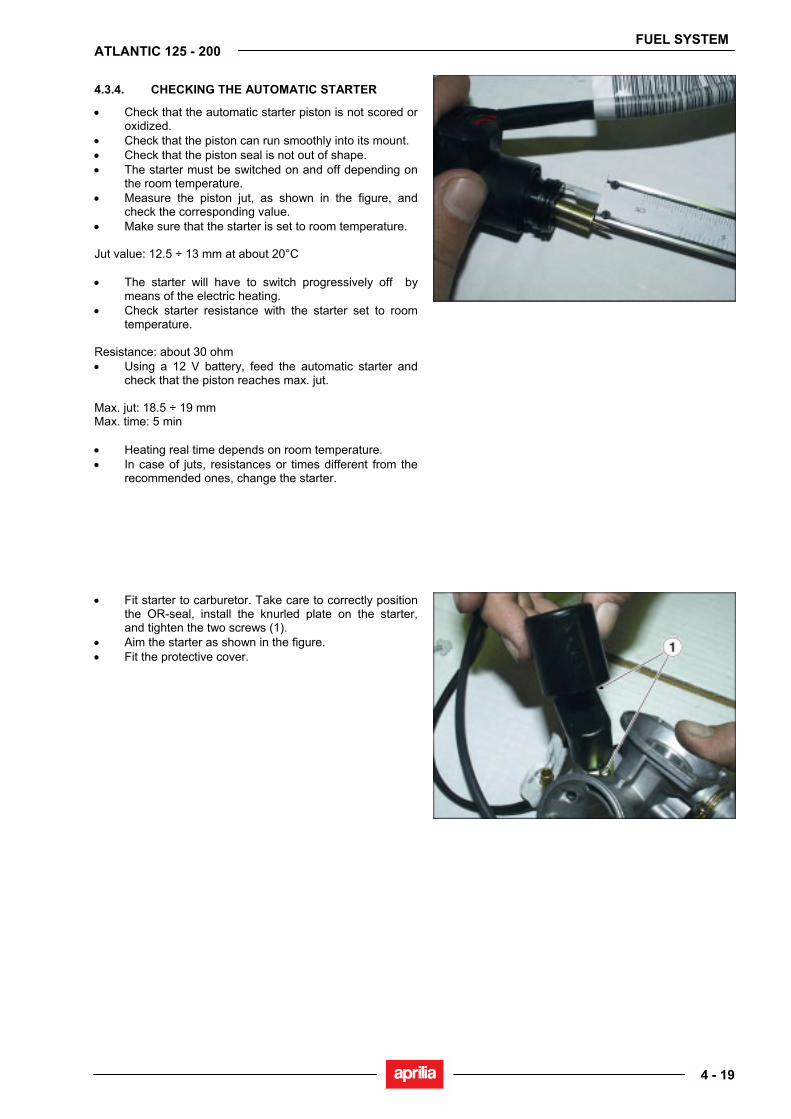
FUEL SYSTEM
4 - 19
ATLANTIC 125 - 200
4.3.4. CHECKING THE AUTOMATIC STARTER
• Check that the automatic starter piston is not scored or oxidized.
• Check that the piston can run smoothly into its mount. • Check that the piston seal is not out of shape. • The starter must be switched on and off depending on
the room temperature. • Measure the piston jut, as shown in the figure, and
check the corresponding value. • Make sure that the starter is set to room temperature. Jut value: 12.5 ÷ 13 mm at about 20°C • The starter will have to switch progressively off by
means of the electric heating. • Check starter resistance with the starter set to room
temperature. Resistance: about 30 ohm
• Using a 12 V battery, feed the automatic starter and check that the piston reaches max. jut.
Max. jut: 18.5 ÷ 19 mm Max. time: 5 min • Heating real time depends on room temperature. • In case of juts, resistances or times different from the
recommended ones, change the starter.
• Fit starter to carburetor. Take care to correctly position the OR-seal, install the knurled plate on the starter, and tighten the two screws (1).
• Aim the starter as shown in the figure. • Fit the protective cover.
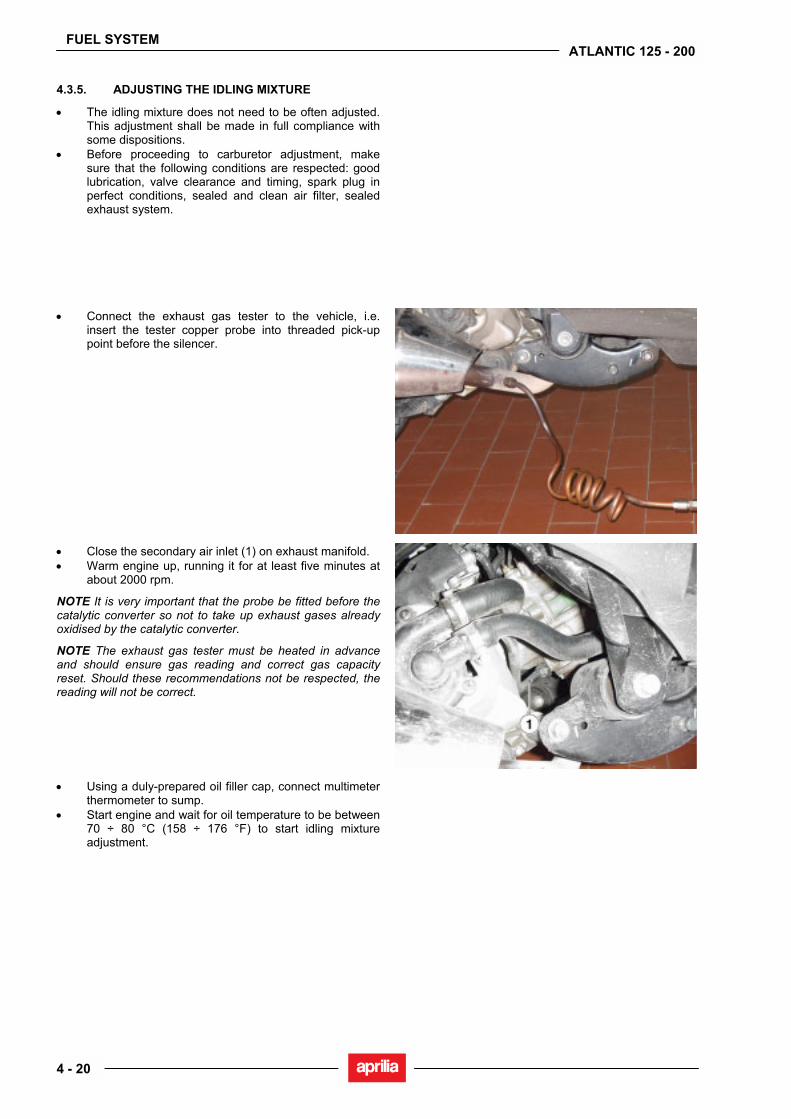
FUEL SYSTEM
4 - 20
ATLANTIC 125 - 200
4.3.5. ADJUSTING THE IDLING MIXTURE
• The idling mixture does not need to be often adjusted. This adjustment shall be made in full compliance with some dispositions.
• Before proceeding to carburetor adjustment, make sure that the following conditions are respected: good lubrication, valve clearance and timing, spark plug in perfect conditions, sealed and clean air filter, sealed exhaust system.
• Connect the exhaust gas tester to the vehicle, i.e. insert the tester copper probe into threaded pick-up point before the silencer.
• Close the secondary air inlet (1) on exhaust manifold. • Warm engine up, running it for at least five minutes at
about 2000 rpm.
NOTE It is very important that the probe be fitted before the catalytic converter so not to take up exhaust gases already oxidised by the catalytic converter.
NOTE The exhaust gas tester must be heated in advance and should ensure gas reading and correct gas capacity reset. Should these recommendations not be respected, the reading will not be correct.
• Using a duly-prepared oil filler cap, connect multimeter thermometer to sump.
• Start engine and wait for oil temperature to be between 70 ÷ 80 °C (158 ÷ 176 °F) to start idling mixture adjustment.
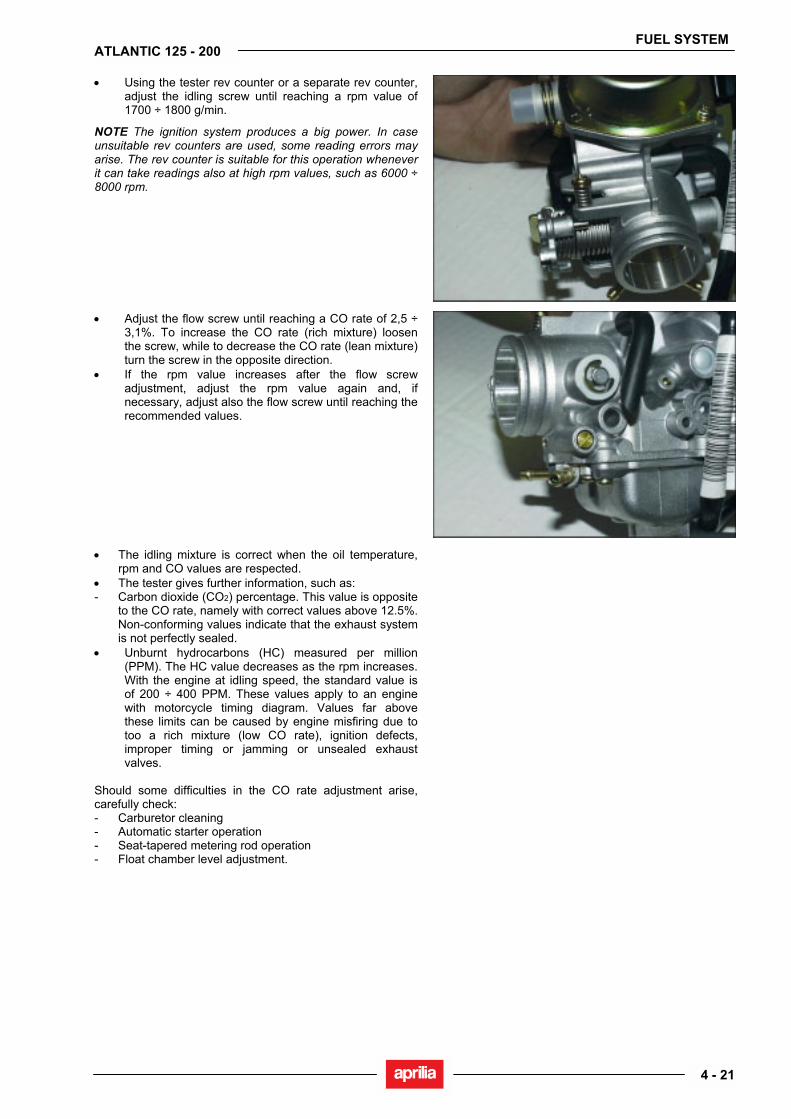
FUEL SYSTEM
4 - 21
ATLANTIC 125 - 200
• Using the tester rev counter or a separate rev counter, adjust the idling screw until reaching a rpm value of 1700 ÷ 1800 g/min.
NOTE The ignition system produces a big power. In case unsuitable rev counters are used, some reading errors may arise. The rev counter is suitable for this operation whenever it can take readings also at high rpm values, such as 6000 ÷ 8000 rpm.
• Adjust the flow screw until reaching a CO rate of 2,5 ÷ 3,1%. To increase the CO rate (rich mixture) loosen the screw, while to decrease the CO rate (lean mixture) turn the screw in the opposite direction.
• If the rpm value increases after the flow screw adjustment, adjust the rpm value again and, if necessary, adjust also the flow screw until reaching the recommended values.
• The idling mixture is correct when the oil temperature, rpm and CO values are respected.
• The tester gives further information, such as: - Carbon dioxide (CO2) percentage. This value is opposite
to the CO rate, namely with correct values above 12.5%. Non-conforming values indicate that the exhaust system is not perfectly sealed.
• Unburnt hydrocarbons (HC) measured per million (PPM). The HC value decreases as the rpm increases. With the engine at idling speed, the standard value is of 200 ÷ 400 PPM. These values apply to an engine with motorcycle timing diagram. Values far above these limits can be caused by engine misfiring due to too a rich mixture (low CO rate), ignition defects, improper timing or jamming or unsealed exhaust valves.
Should some difficulties in the CO rate adjustment arise, carefully check: - Carburetor cleaning - Automatic starter operation - Seat-tapered metering rod operation - Float chamber level adjustment.
COOLING SYSTEM
5 - 1
ATLANTIC 125 - 200
COOLING SYSTEM 5
COOLING SYSTEM
5 - 2
ATLANTIC 125 - 200
SUMMARY 5.1. COOLING SYSTEM DIAGRAM ....................................................................................................... 3
5.1.1. COOLING SYSTEM DIAGRAM .............................................................................................. 3 5.2. COOLANT ........................................................................................................................................ 4
5.2.1. CHANGING COOLANT........................................................................................................... 4 5.3. RADIATOR....................................................................................................................................... 5
5.3.1. REMOVING THE RADIATOR ................................................................................................. 5 5.3.2. REMOVING THE ELECTRIC FAN.......................................................................................... 7
5.4. WATER TEMPERATURE SENSOR................................................................................................ 9 5.4.1. REMOVING THE WATER TEMPERATURE SENSOR .......................................................... 9
5.5. REMOVING THE EXPANSION RESERVOIR ............................................................................... 10 5.5.1. REMOVING THE EXPANSION RESERVOIR....................................................................... 10
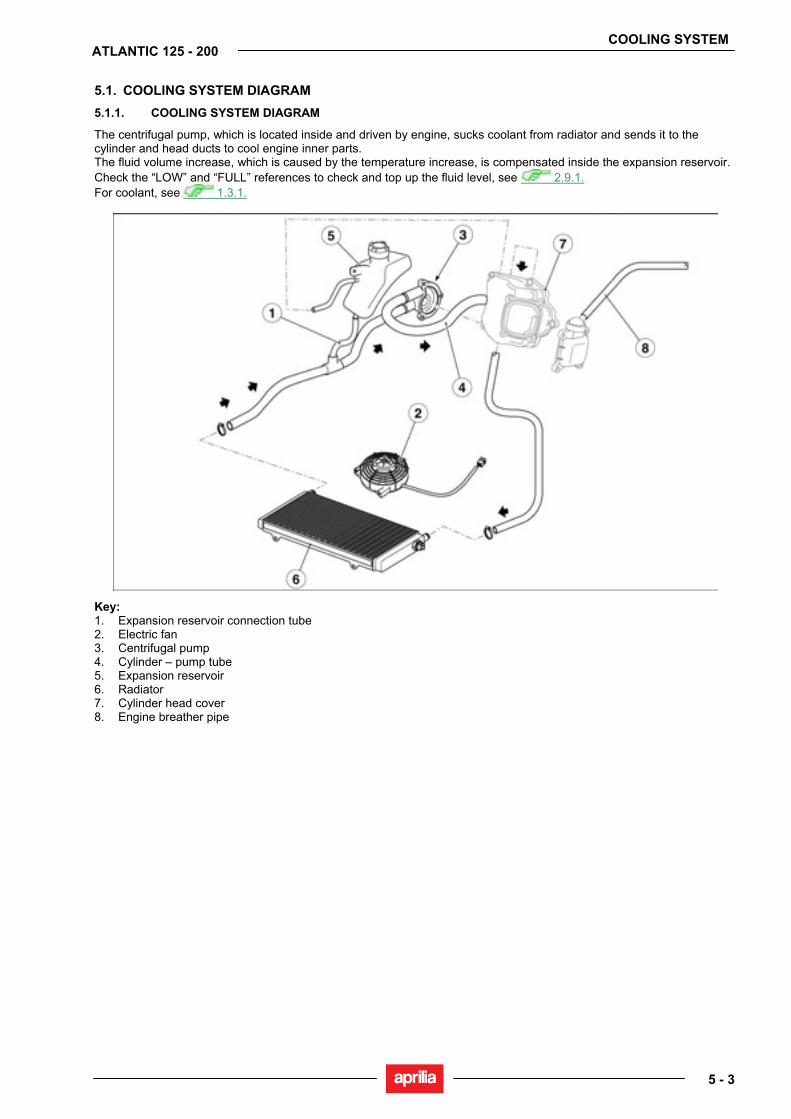
COOLING SYSTEM
5 - 3
ATLANTIC 125 - 200
5.1. COOLING SYSTEM DIAGRAM 5.1.1. COOLING SYSTEM DIAGRAM
The centrifugal pump, which is located inside and driven by engine, sucks coolant from radiator and sends it to the cylinder and head ducts to cool engine inner parts. The fluid volume increase, which is caused by the temperature increase, is compensated inside the expansion reservoir. Check the “LOW” and “FULL” references to check and top up the fluid level, see 2.9.1. For coolant, see 1.3.1.
Key: 1. Expansion reservoir connection tube 2. Electric fan 3. Centrifugal pump 4. Cylinder – pump tube 5. Expansion reservoir 6. Radiator 7. Cylinder head cover 8. Engine breather pipe
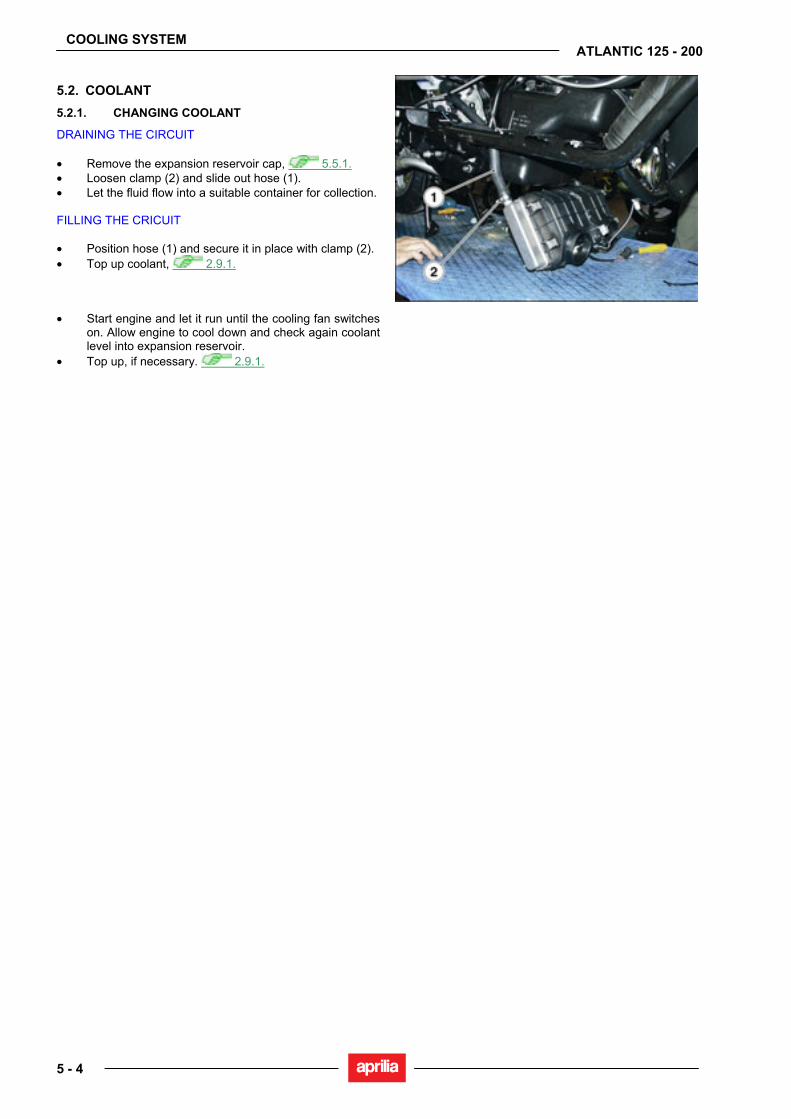
COOLING SYSTEM
5 - 4
ATLANTIC 125 - 200
5.2. COOLANT 5.2.1. CHANGING COOLANT
DRAINING THE CIRCUIT • Remove the expansion reservoir cap, 5.5.1. • Loosen clamp (2) and slide out hose (1). • Let the fluid flow into a suitable container for collection. FILLING THE CRICUIT • Position hose (1) and secure it in place with clamp (2). • Top up coolant, 2.9.1.
• Start engine and let it run until the cooling fan switches on. Allow engine to cool down and check again coolant level into expansion reservoir.
• Top up, if necessary. 2.9.1.

COOLING SYSTEM
5 - 5
ATLANTIC 125 - 200
5.3. RADIATOR 5.3.1. REMOVING THE RADIATOR
• Drain the circuit, 2.12.2. • Remove lower protection, 7.1.8. • Disconnect electric fan connector.
• Disconnect the two connectors on temperature switch.
• Working from both sides, cut clamp (1). • Slide both air intake manifolds out of radiator. • Working from both sides, loosen and remove the two
screws (2).
• Undo and remove central screw (3). • Remove clamps.
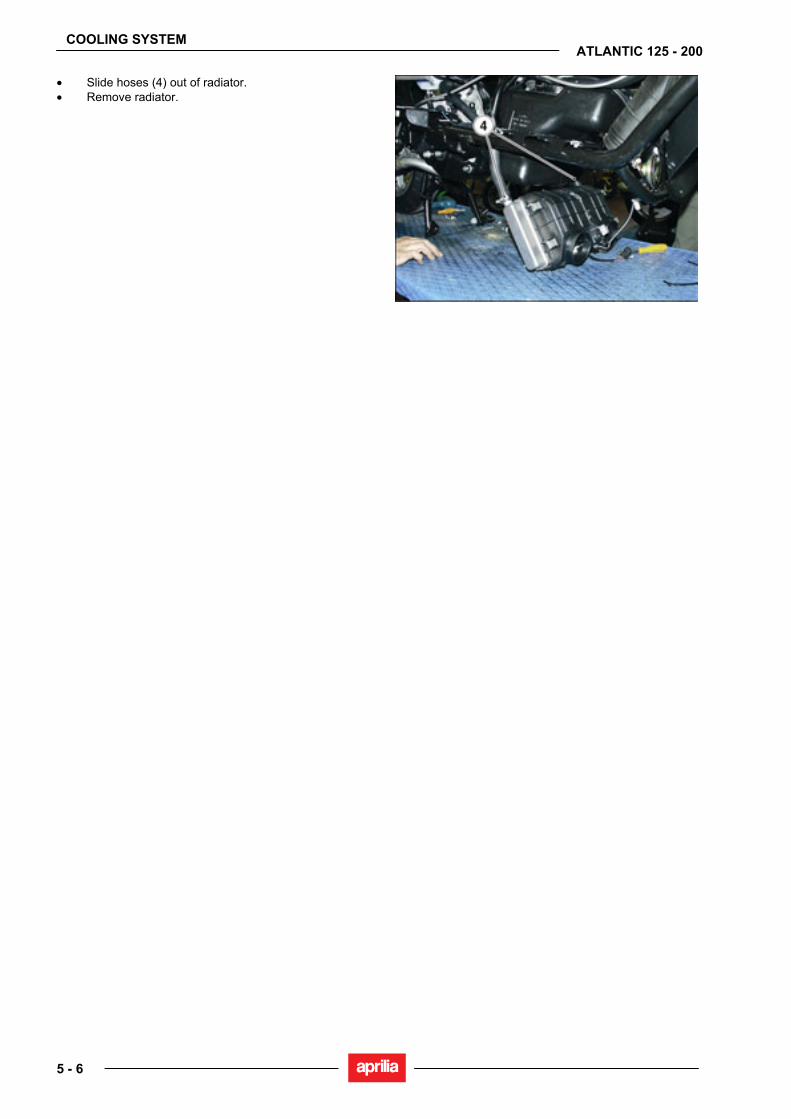
COOLING SYSTEM
5 - 6
ATLANTIC 125 - 200
• Slide hoses (4) out of radiator. • Remove radiator.
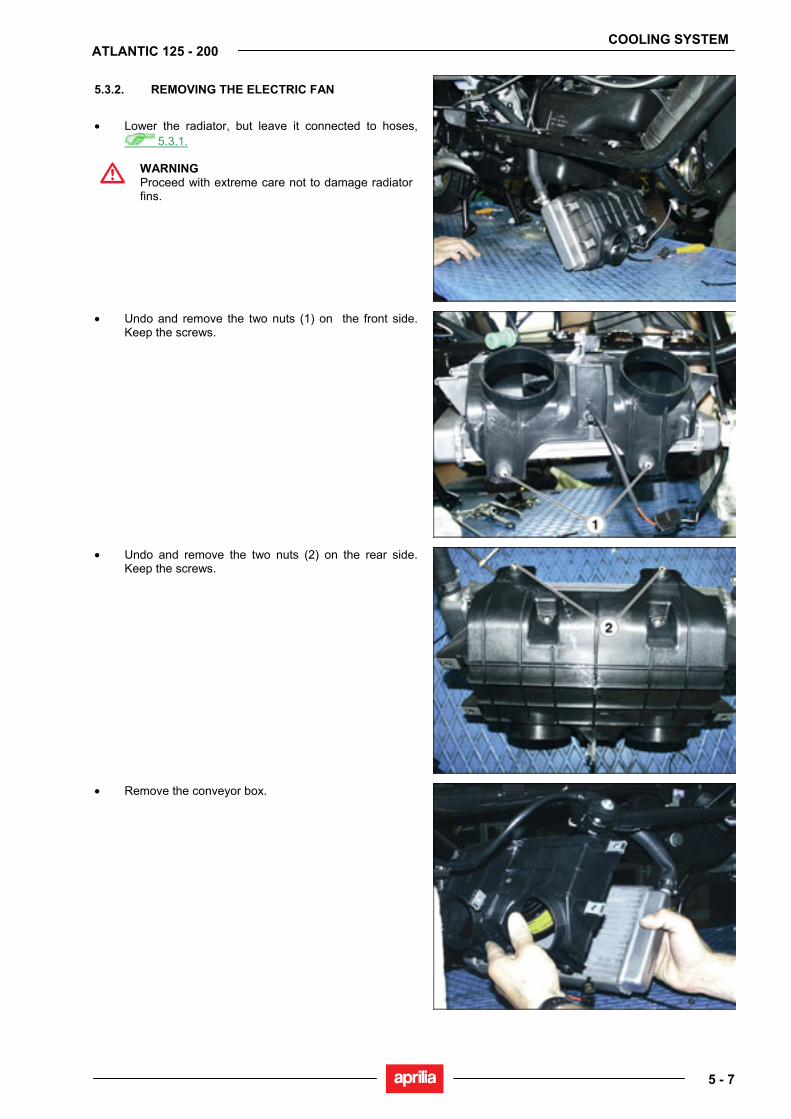
COOLING SYSTEM
5 - 7
ATLANTIC 125 - 200
5.3.2. REMOVING THE ELECTRIC FAN
• Lower the radiator, but leave it connected to hoses,
5.3.1.
WARNING Proceed with extreme care not to damage radiator fins.
• Undo and remove the two nuts (1) on the front side. Keep the screws.
• Undo and remove the two nuts (2) on the rear side. Keep the screws.
• Remove the conveyor box.
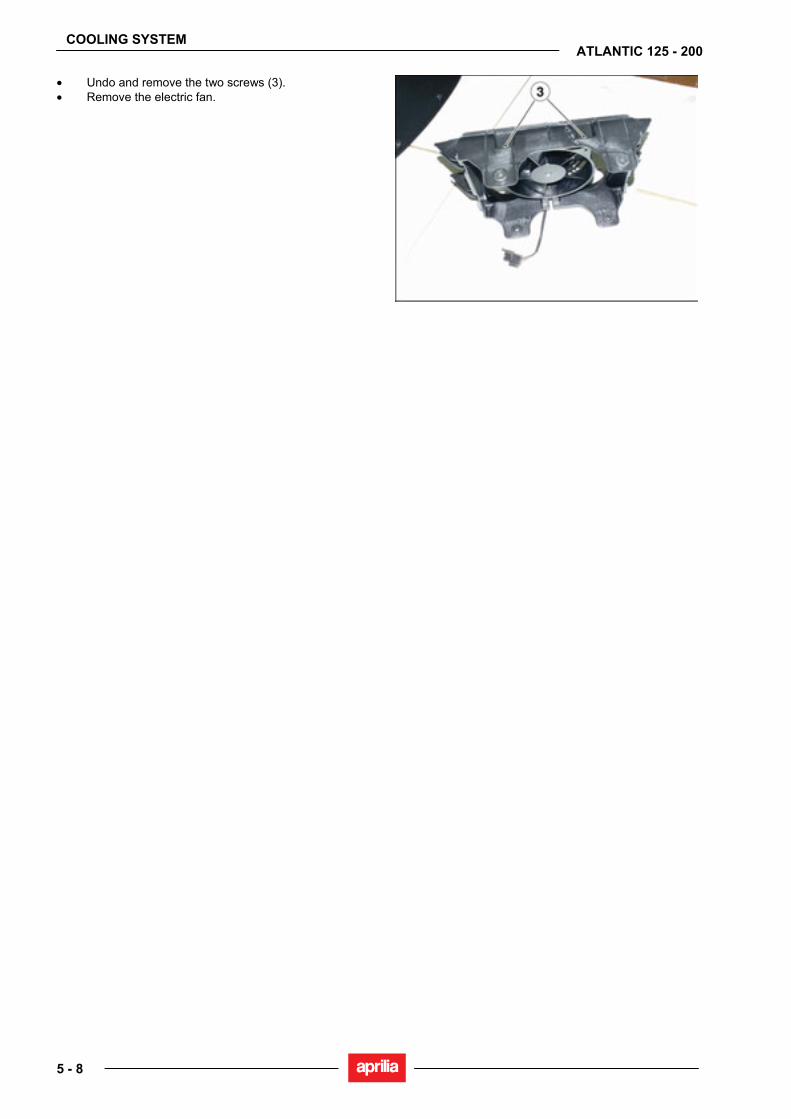
COOLING SYSTEM
5 - 8
ATLANTIC 125 - 200
• Undo and remove the two screws (3). • Remove the electric fan.

COOLING SYSTEM
5 - 9
ATLANTIC 125 - 200
5.4. WATER TEMPERATURE SENSOR 5.4.1. REMOVING THE WATER TEMPERATURE
SENSOR
• Raise the seat, 7.1.2. • Undo and remove screw (1). • Remove protection.
• Disconnect the water temperature sensor.
• Undo and remove the water temperature sensor.
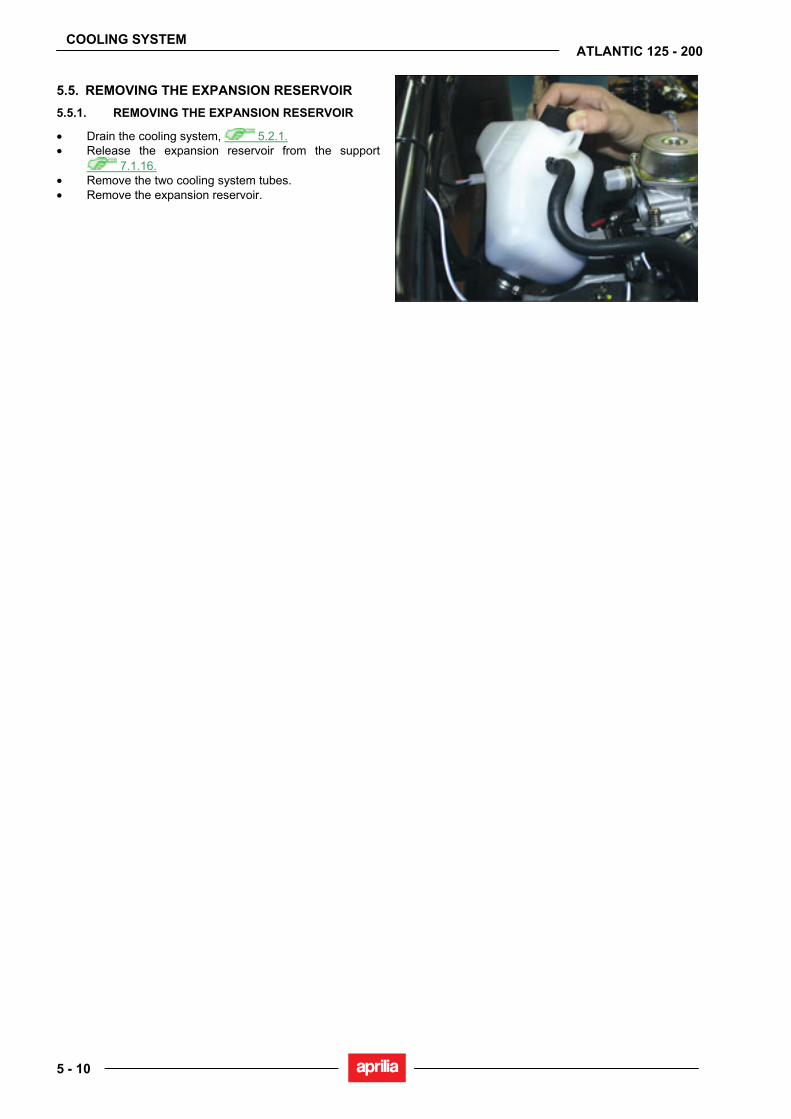
COOLING SYSTEM
5 - 10
ATLANTIC 125 - 200
5.5. REMOVING THE EXPANSION RESERVOIR 5.5.1. REMOVING THE EXPANSION RESERVOIR
• Drain the cooling system, 5.2.1. • Release the expansion reservoir from the support
7.1.16. • Remove the two cooling system tubes. • Remove the expansion reservoir.

ENGINE
6 - 1
ATLANTIC 125 - 200
ENGINE 6
ENGINE
6 - 2
ATLANTIC 125 - 200
SUMMARY 6.1. EXHAUST SYSTEM......................................................................................................................... 3
6.1.1. EXHAUST SILENCER REMOVAL .......................................................................................... 3 6.1.2. EXHAUST SYSTEM REMOVAL ............................................................................................. 4 6.1.3. ENGINE COMPONENTS THAT CAN BE REMOVED LEAVING THE ENGINE IN THE
FRAME .................................................................................................................................... 5 6.2. ENGINE............................................................................................................................................ 6
6.2.1. ENGINE REMOVAL ................................................................................................................ 6 6.2.2. INSTALLING THE ENGINE INTO THE FRAME ..................................................................... 9
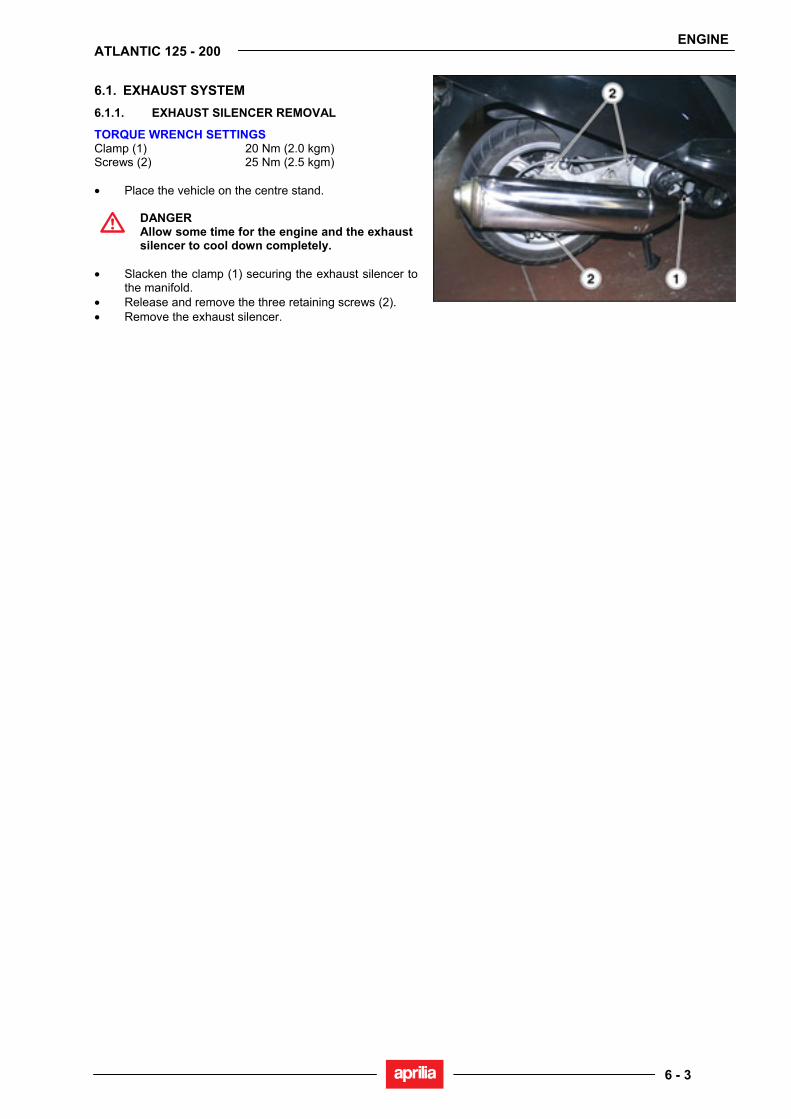
ENGINE
6 - 3
ATLANTIC 125 - 200
6.1. EXHAUST SYSTEM 6.1.1. EXHAUST SILENCER REMOVAL
TORQUE WRENCH SETTINGS Clamp (1) 20 Nm (2.0 kgm) Screws (2) 25 Nm (2.5 kgm) • Place the vehicle on the centre stand.
DANGER Allow some time for the engine and the exhaust silencer to cool down completely.
• Slacken the clamp (1) securing the exhaust silencer to
the manifold. • Release and remove the three retaining screws (2). • Remove the exhaust silencer.
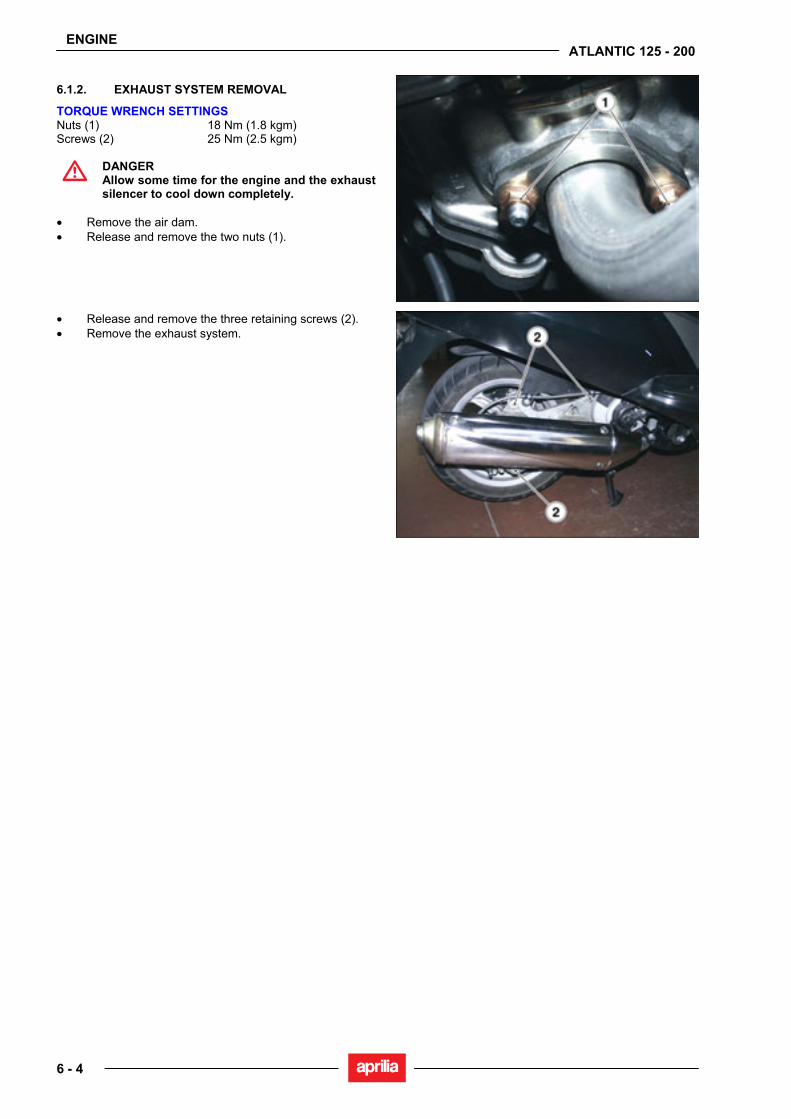
ENGINE
6 - 4
ATLANTIC 125 - 200
6.1.2. EXHAUST SYSTEM REMOVAL
TORQUE WRENCH SETTINGS Nuts (1) 18 Nm (1.8 kgm) Screws (2) 25 Nm (2.5 kgm)
DANGER Allow some time for the engine and the exhaust silencer to cool down completely.
• Remove the air dam. • Release and remove the two nuts (1).
• Release and remove the three retaining screws (2). • Remove the exhaust system.
ENGINE
6 - 5
ATLANTIC 125 - 200
6.1.3. ENGINE COMPONENTS THAT CAN BE REMOVED LEAVING THE ENGINE IN THE FRAME
The components listed below can be removed and refitted with no need to take the engine out of the frame. LEFT SIDE OF ENGINE • Transmission casing cover • Automatic converter • Clutch assembly • Drive belt RIGHT SIDE OF ENGINE • Spark plug • Flywheel • Ignition casing • Stator coil • Pick-up • Coolant pump • Secondary air system TOP END OF ENGINE • Carburetor • Intake manifold hose • Starter motor • Coolant thermistor • Thermal expansion valve • Timing chain tensioner FRONT END OF ENGINE • Valve tappet cover • Camshaft • Cylinder head • Cylinder • Piston BOTTOM END OF ENGINE • Exhaust silencer • Engine oil filter
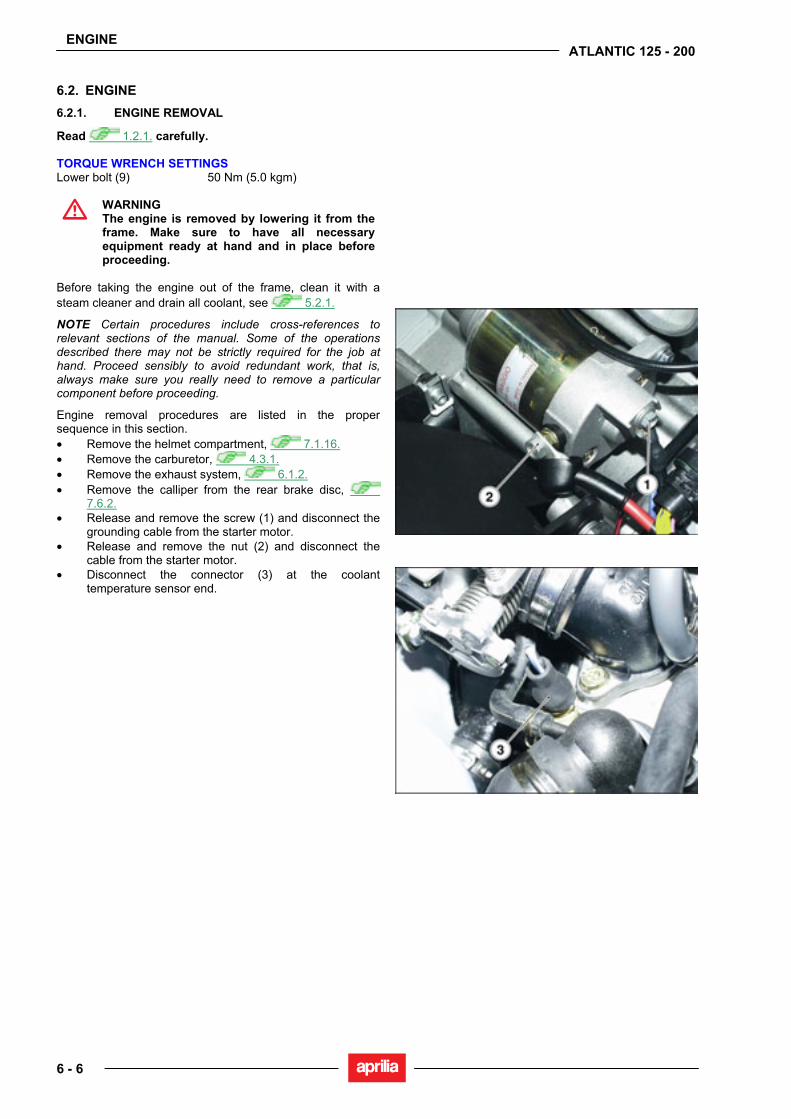
ENGINE
6 - 6
ATLANTIC 125 - 200
6.2. ENGINE 6.2.1. ENGINE REMOVAL
Read 1.2.1. carefully. TORQUE WRENCH SETTINGS Lower bolt (9) 50 Nm (5.0 kgm)
WARNING The engine is removed by lowering it from the frame. Make sure to have all necessary equipment ready at hand and in place before proceeding.
Before taking the engine out of the frame, clean it with a steam cleaner and drain all coolant, see 5.2.1.
NOTE Certain procedures include cross-references to relevant sections of the manual. Some of the operations described there may not be strictly required for the job at hand. Proceed sensibly to avoid redundant work, that is, always make sure you really need to remove a particular component before proceeding.
Engine removal procedures are listed in the proper sequence in this section. • Remove the helmet compartment, 7.1.16. • Remove the carburetor, 4.3.1. • Remove the exhaust system, 6.1.2. • Remove the calliper from the rear brake disc,
7.6.2. • Release and remove the screw (1) and disconnect the
grounding cable from the starter motor. • Release and remove the nut (2) and disconnect the
cable from the starter motor.
• Disconnect the connector (3) at the coolant temperature sensor end.
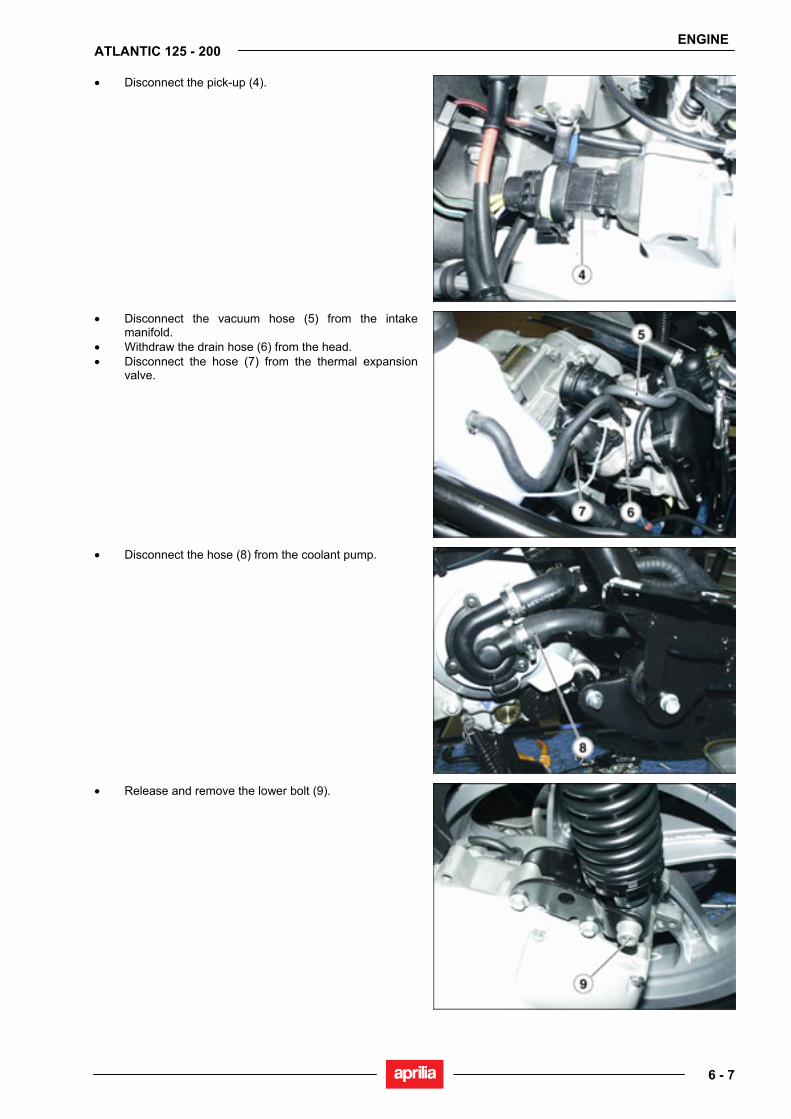
ENGINE
6 - 7
ATLANTIC 125 - 200
• Disconnect the pick-up (4).
• Disconnect the vacuum hose (5) from the intake manifold.
• Withdraw the drain hose (6) from the head. • Disconnect the hose (7) from the thermal expansion
valve.
• Disconnect the hose (8) from the coolant pump.
• Release and remove the lower bolt (9).
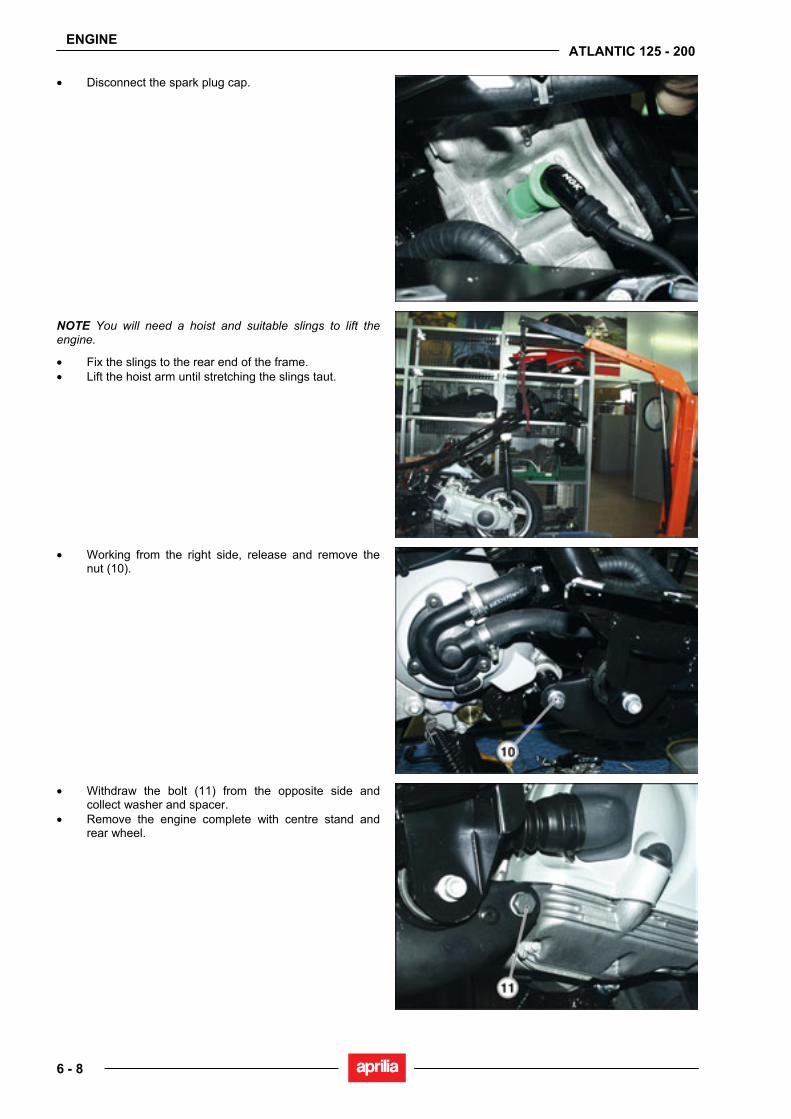
ENGINE
6 - 8
ATLANTIC 125 - 200
• Disconnect the spark plug cap.
NOTE You will need a hoist and suitable slings to lift the engine.
• Fix the slings to the rear end of the frame. • Lift the hoist arm until stretching the slings taut.
• Working from the right side, release and remove the nut (10).
• Withdraw the bolt (11) from the opposite side and collect washer and spacer.
• Remove the engine complete with centre stand and rear wheel.
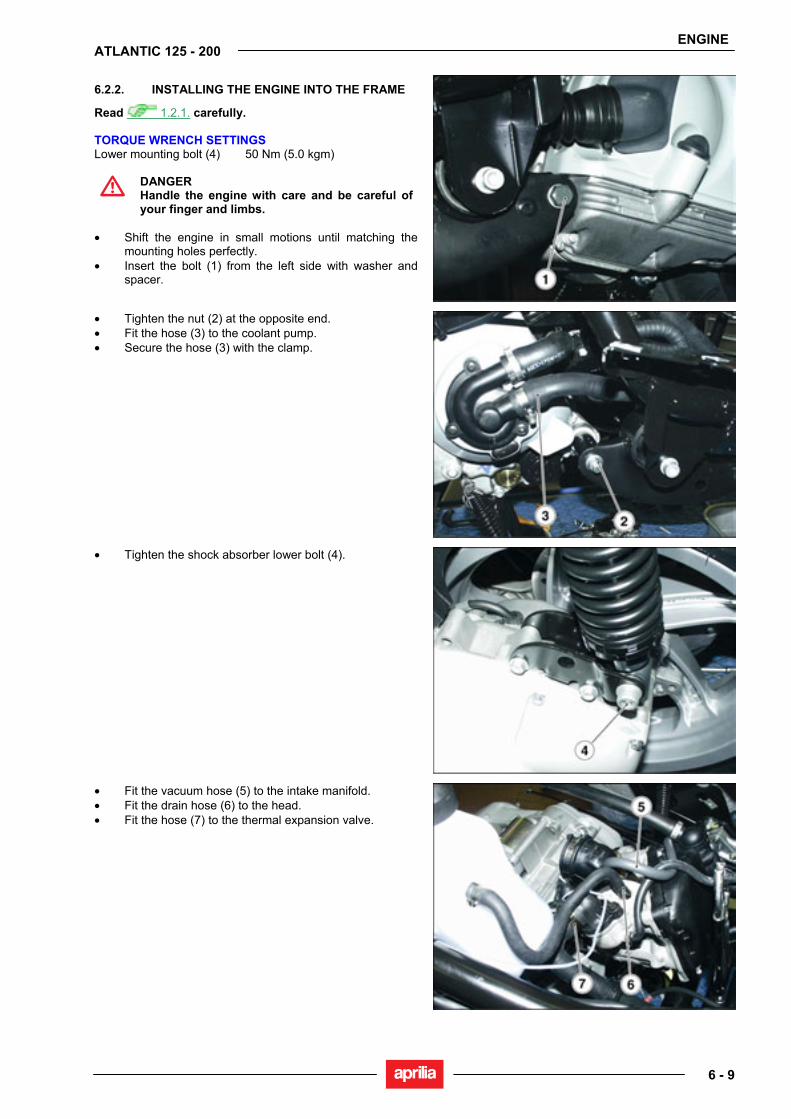
ENGINE
6 - 9
ATLANTIC 125 - 200
6.2.2. INSTALLING THE ENGINE INTO THE FRAME
Read 1.2.1. carefully. TORQUE WRENCH SETTINGS Lower mounting bolt (4) 50 Nm (5.0 kgm)
DANGER Handle the engine with care and be careful of your finger and limbs.
• Shift the engine in small motions until matching the
mounting holes perfectly. • Insert the bolt (1) from the left side with washer and
spacer.
• Tighten the nut (2) at the opposite end. • Fit the hose (3) to the coolant pump. • Secure the hose (3) with the clamp.
• Tighten the shock absorber lower bolt (4).
• Fit the vacuum hose (5) to the intake manifold. • Fit the drain hose (6) to the head. • Fit the hose (7) to the thermal expansion valve.

ENGINE
6 - 10
ATLANTIC 125 - 200
• Connect the spark plug cap correctly.
• Connect the following electric connectors in the order: - Pick-up (8).
• Coolant temperature sensor (9).
• Position the grounding cable of the starter motor. • Tighten the screw (10). • Position the power supply cable of the starter motor. • Tighten the nut (11). • Fit the calliper to the rear brake disc, 7.6.2. • Install the exhaust system, see 6.1.2. • Install the carburetor, see 4.3.1. • Install the helmet compartment, 7.1.16. • Top up coolant level, see 2.9.1.

ENGINE
6 - 11
ATLANTIC 125 - 200
NOTE Inspect any components you have disturbed and check that:
- electric leads are secured correctly with the suitable ties;
WARNING The leads should not be twisted or trapped under any components.
- electric connectors are connected to the matching
connectors; - hoses and hose couplings are inserted correctly and
fixed with suitable clips; - throttle and cold-start cables slide freely and do not bind
when you turn the handlebar.

CHASSIS
7 - 1
ATLANTIC 125 - 200
CHASSIS 7
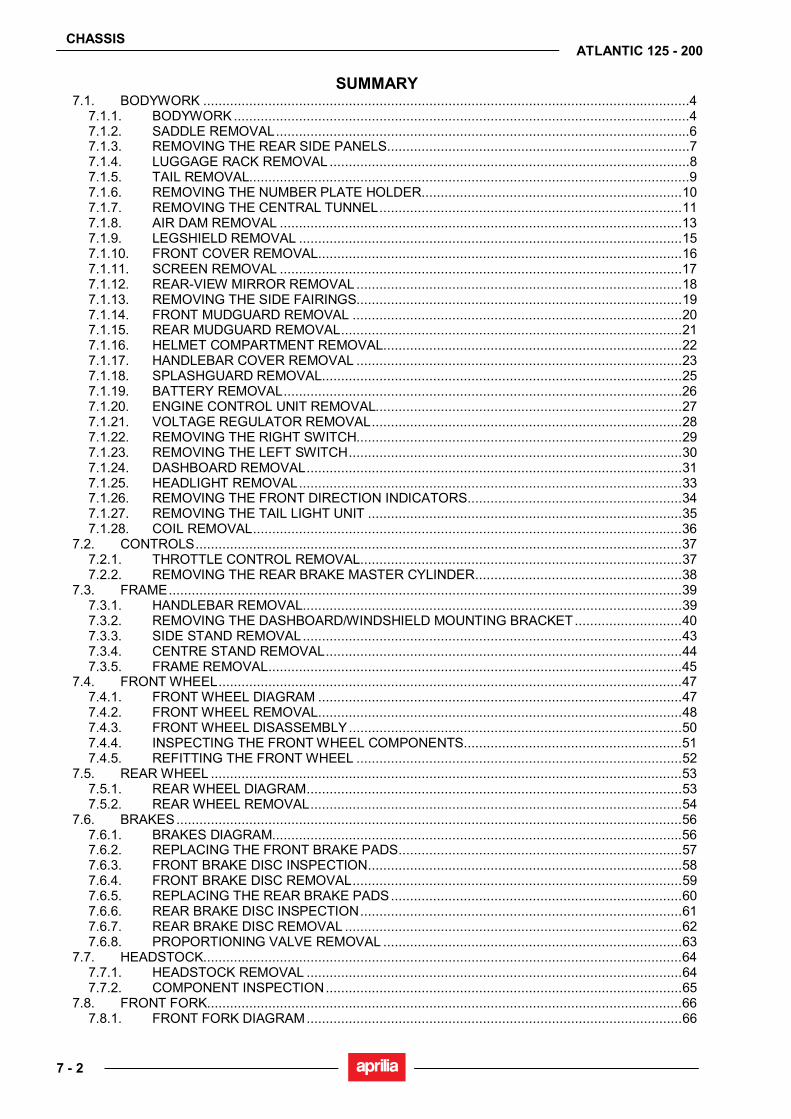
CHASSIS
7 - 2
ATLANTIC 125 - 200
SUMMARY 7.1. BODYWORK ...............................................................................................................................4
7.1.1. BODYWORK .......................................................................................................................4 7.1.2. SADDLE REMOVAL............................................................................................................6 7.1.3. REMOVING THE REAR SIDE PANELS...............................................................................7 7.1.4. LUGGAGE RACK REMOVAL..............................................................................................8 7.1.5. TAIL REMOVAL...................................................................................................................9 7.1.6. REMOVING THE NUMBER PLATE HOLDER....................................................................10 7.1.7. REMOVING THE CENTRAL TUNNEL...............................................................................11 7.1.8. AIR DAM REMOVAL .........................................................................................................13 7.1.9. LEGSHIELD REMOVAL ....................................................................................................15 7.1.10. FRONT COVER REMOVAL...............................................................................................16 7.1.11. SCREEN REMOVAL .........................................................................................................17 7.1.12. REAR-VIEW MIRROR REMOVAL.....................................................................................18 7.1.13. REMOVING THE SIDE FAIRINGS.....................................................................................19 7.1.14. FRONT MUDGUARD REMOVAL ......................................................................................20 7.1.15. REAR MUDGUARD REMOVAL.........................................................................................21 7.1.16. HELMET COMPARTMENT REMOVAL..............................................................................22 7.1.17. HANDLEBAR COVER REMOVAL .....................................................................................23 7.1.18. SPLASHGUARD REMOVAL..............................................................................................25 7.1.19. BATTERY REMOVAL........................................................................................................26 7.1.20. ENGINE CONTROL UNIT REMOVAL................................................................................27 7.1.21. VOLTAGE REGULATOR REMOVAL.................................................................................28 7.1.22. REMOVING THE RIGHT SWITCH.....................................................................................29 7.1.23. REMOVING THE LEFT SWITCH.......................................................................................30 7.1.24. DASHBOARD REMOVAL..................................................................................................31 7.1.25. HEADLIGHT REMOVAL....................................................................................................33 7.1.26. REMOVING THE FRONT DIRECTION INDICATORS........................................................34 7.1.27. REMOVING THE TAIL LIGHT UNIT ..................................................................................35 7.1.28. COIL REMOVAL................................................................................................................36
7.2. CONTROLS...............................................................................................................................37 7.2.1. THROTTLE CONTROL REMOVAL....................................................................................37 7.2.2. REMOVING THE REAR BRAKE MASTER CYLINDER......................................................38
7.3. FRAME......................................................................................................................................39 7.3.1. HANDLEBAR REMOVAL...................................................................................................39 7.3.2. REMOVING THE DASHBOARD/WINDSHIELD MOUNTING BRACKET............................40 7.3.3. SIDE STAND REMOVAL...................................................................................................43 7.3.4. CENTRE STAND REMOVAL.............................................................................................44 7.3.5. FRAME REMOVAL............................................................................................................45
7.4. FRONT WHEEL.........................................................................................................................47 7.4.1. FRONT WHEEL DIAGRAM ...............................................................................................47 7.4.2. FRONT WHEEL REMOVAL...............................................................................................48 7.4.3. FRONT WHEEL DISASSEMBLY.......................................................................................50 7.4.4. INSPECTING THE FRONT WHEEL COMPONENTS.........................................................51 7.4.5. REFITTING THE FRONT WHEEL .....................................................................................52
7.5. REAR WHEEL ...........................................................................................................................53 7.5.1. REAR WHEEL DIAGRAM..................................................................................................53 7.5.2. REAR WHEEL REMOVAL.................................................................................................54
7.6. BRAKES....................................................................................................................................56 7.6.1. BRAKES DIAGRAM...........................................................................................................56 7.6.2. REPLACING THE FRONT BRAKE PADS..........................................................................57 7.6.3. FRONT BRAKE DISC INSPECTION..................................................................................58 7.6.4. FRONT BRAKE DISC REMOVAL......................................................................................59 7.6.5. REPLACING THE REAR BRAKE PADS............................................................................60 7.6.6. REAR BRAKE DISC INSPECTION....................................................................................61 7.6.7. REAR BRAKE DISC REMOVAL ........................................................................................62 7.6.8. PROPORTIONING VALVE REMOVAL ..............................................................................63
7.7. HEADSTOCK.............................................................................................................................64 7.7.1. HEADSTOCK REMOVAL ..................................................................................................64 7.7.2. COMPONENT INSPECTION.............................................................................................65
7.8. FRONT FORK............................................................................................................................66 7.8.1. FRONT FORK DIAGRAM..................................................................................................66

CHASSIS
7 - 3
ATLANTIC 125 - 200
7.8.2. REMOVING THE STANCHION TUBES AND SLIDERS .................................................... 67 7.8.3. DISASSEMBLING THE STANCHION TUBES AND SLIDERS........................................... 68 7.8.4. DRAINING THE FRONT FORK......................................................................................... 71 7.8.5. FILLING THE FORK ......................................................................................................... 73 7.8.6. COMPONENT INSPECTION ............................................................................................ 75 7.8.7. REFITTING THE STANCHION TUBES AND SLIDERS..................................................... 76
7.9. REAR SUSPENSION................................................................................................................ 78 7.9.1. SHOCK ABSORBER REMOVAL ...................................................................................... 78 7.9.2. REMOVING THE LINKAGES............................................................................................ 79

CHASSIS
7 - 4
ATLANTIC 125-200
7.1. BODYWORK 7.1.1. BODYWORK
1. Light unit 2. Front cover 3. Left mirror 4. Rear brake lever 5. Rear brake master cylinder 6. Left switch 7. Glove compartment 8. Legshield 9. Central tunnel 10. Saddle lock 11. Luggage rack 12. Tail 13. Tail light 14. Number plate holder 15. Mudguard 16. Air filter 17. Transmission oil level 18. Engine oil level 19. Centre stand 20. Passenger footrests 21. Side stand 22. Rider footrests 23. Warning horn 24. Front brake calliper 25. Front brake disc 26. Front fork 27. Front mudguard 28. Left side fairing
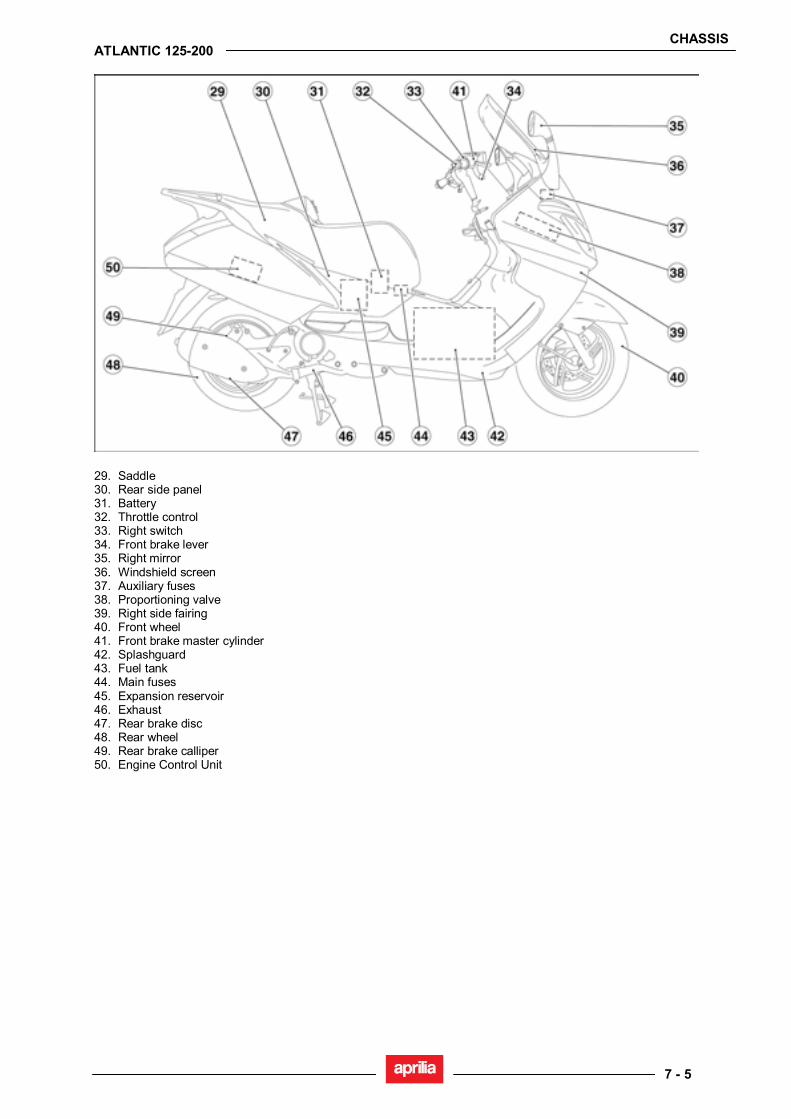
CHASSIS
7 - 5
ATLANTIC 125-200
29. Saddle 30. Rear side panel 31. Battery 32. Throttle control 33. Right switch 34. Front brake lever 35. Right mirror 36. Windshield screen 37. Auxiliary fuses 38. Proportioning valve 39. Right side fairing 40. Front wheel 41. Front brake master cylinder 42. Splashguard 43. Fuel tank 44. Main fuses 45. Expansion reservoir 46. Exhaust 47. Rear brake disc 48. Rear wheel 49. Rear brake calliper 50. Engine Control Unit
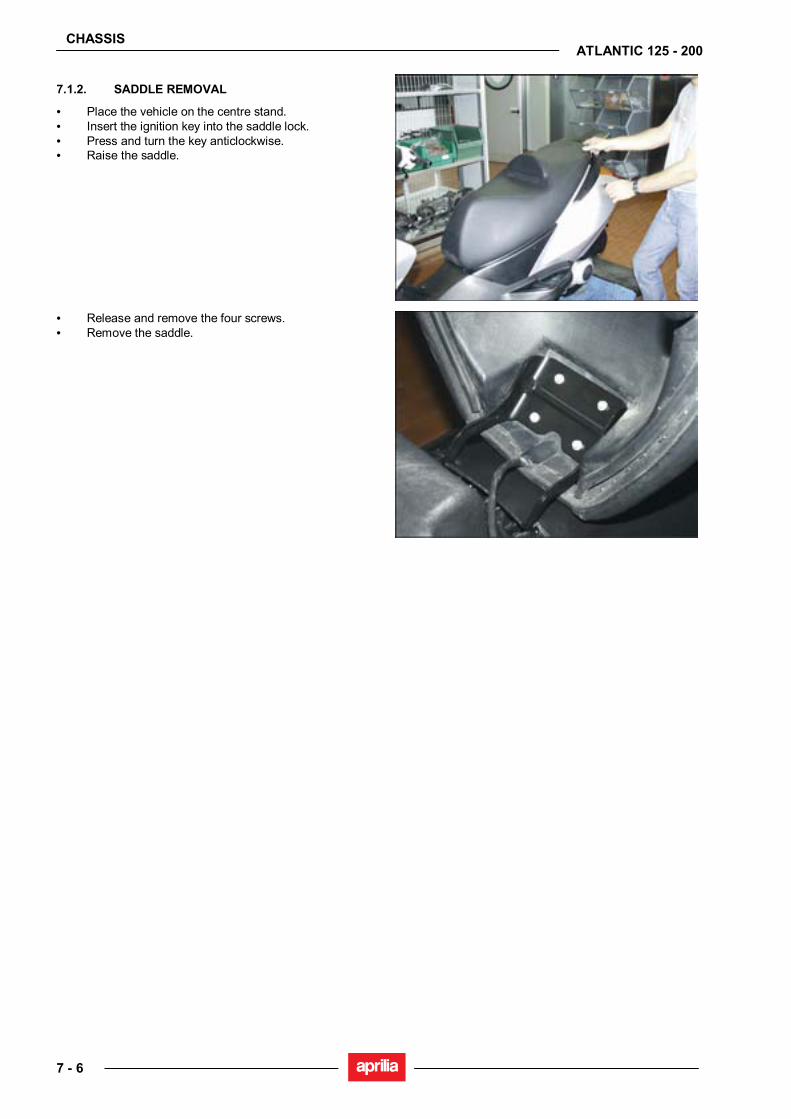
CHASSIS
7 - 6
ATLANTIC 125 - 200
7.1.2. SADDLE REMOVAL
• Place the vehicle on the centre stand. • Insert the ignition key into the saddle lock. • Press and turn the key anticlockwise. • Raise the saddle.
• Release and remove the four screws. • Remove the saddle.
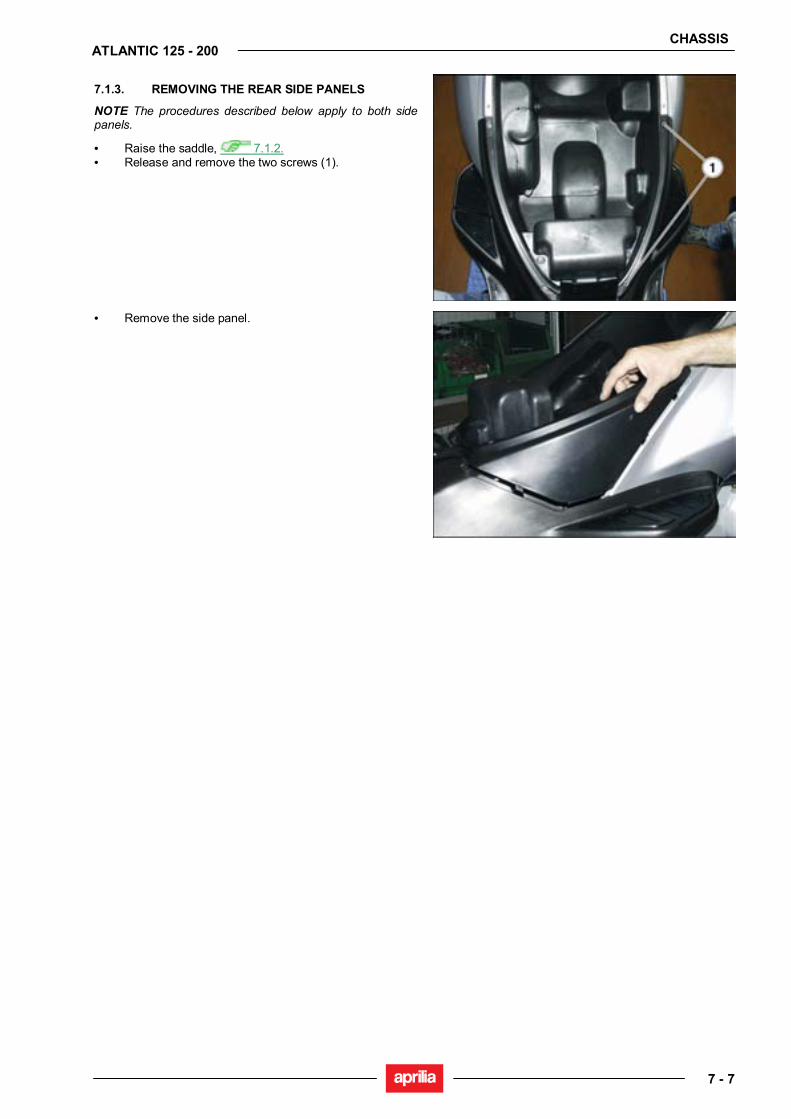
CHASSIS
7 - 7
ATLANTIC 125 - 200
7.1.3. REMOVING THE REAR SIDE PANELS
NOTE The procedures described below apply to both side panels.
• Raise the saddle, 7.1.2. • Release and remove the two screws (1).
• Remove the side panel.
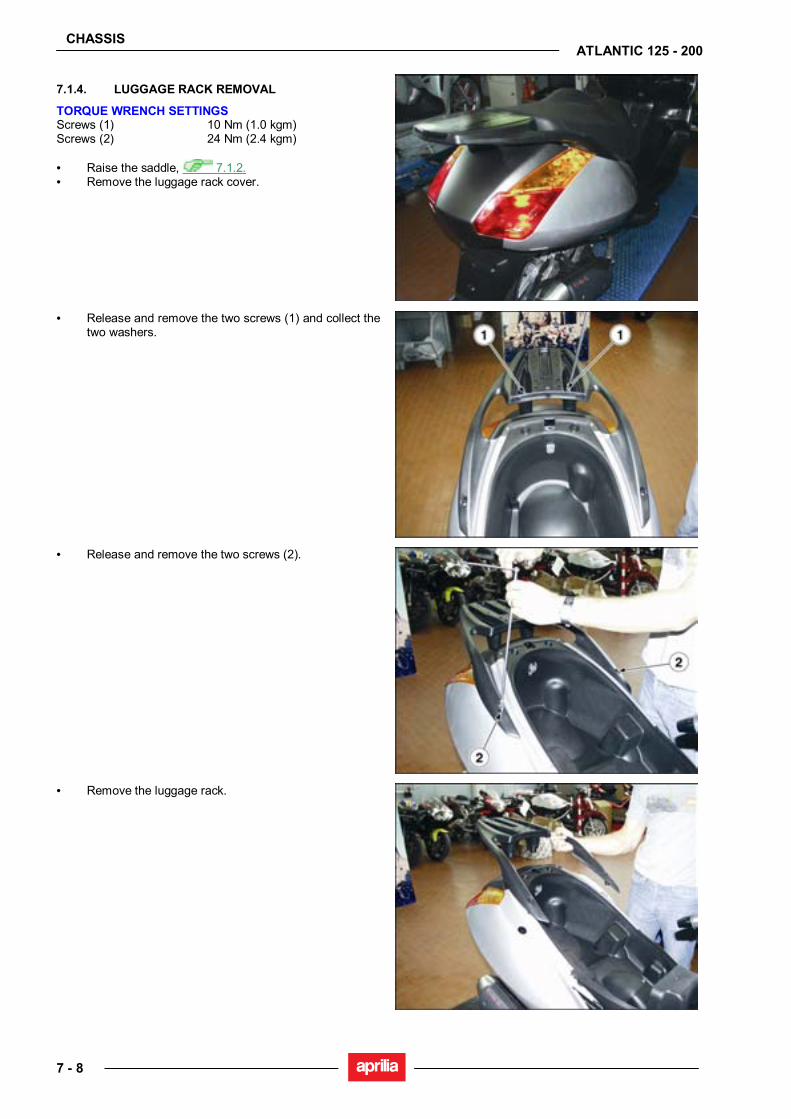
CHASSIS
7 - 8
ATLANTIC 125 - 200
7.1.4. LUGGAGE RACK REMOVAL
TORQUE WRENCH SETTINGS Screws (1) 10 Nm (1.0 kgm) Screws (2) 24 Nm (2.4 kgm) • Raise the saddle, 7.1.2. • Remove the luggage rack cover.
• Release and remove the two screws (1) and collect the two washers.
• Release and remove the two screws (2).
• Remove the luggage rack.
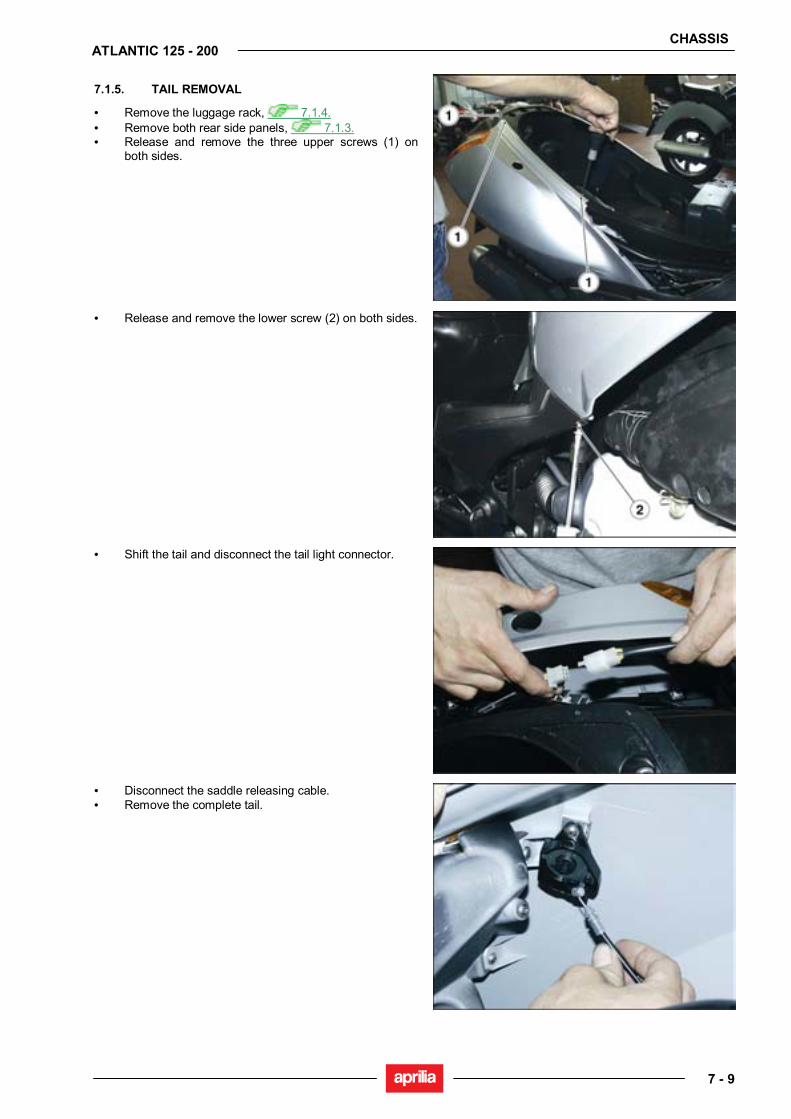
CHASSIS
7 - 9
ATLANTIC 125 - 200
7.1.5. TAIL REMOVAL
• Remove the luggage rack, 7.1.4. • Remove both rear side panels, 7.1.3. • Release and remove the three upper screws (1) on
both sides.
• Release and remove the lower screw (2) on both sides.
• Shift the tail and disconnect the tail light connector.
• Disconnect the saddle releasing cable. • Remove the complete tail.
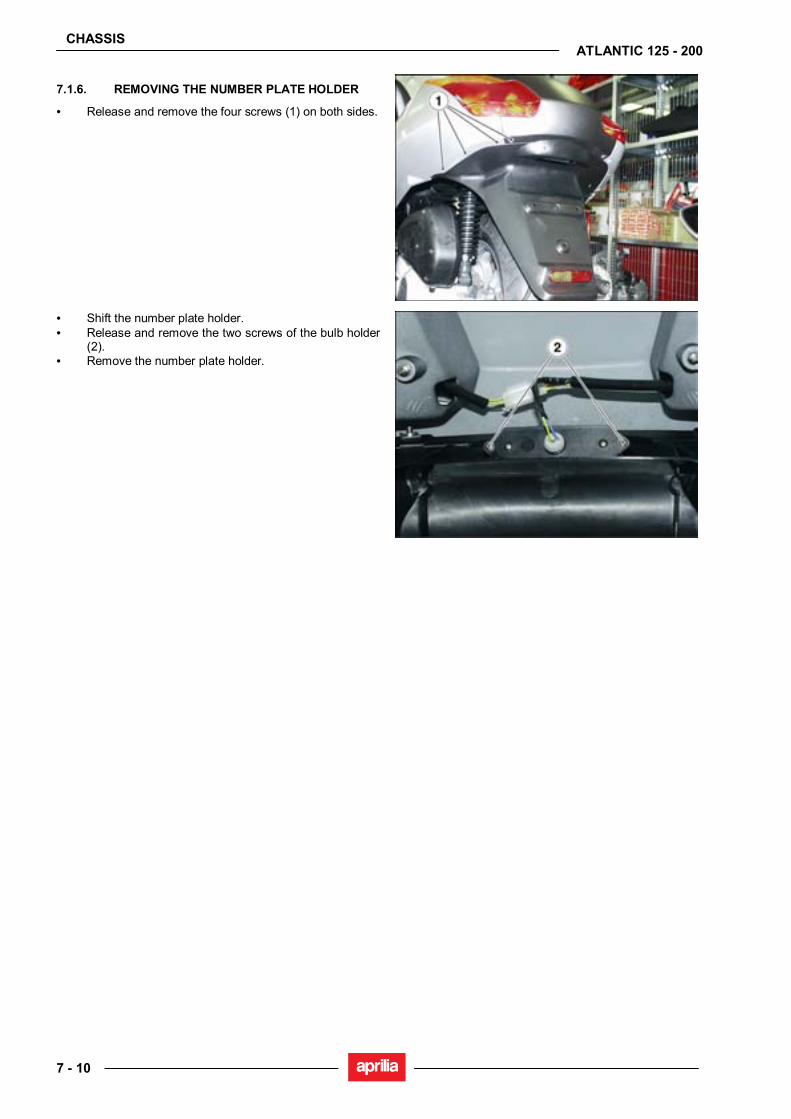
CHASSIS
7 - 10
ATLANTIC 125 - 200
7.1.6. REMOVING THE NUMBER PLATE HOLDER
• Release and remove the four screws (1) on both sides.
• Shift the number plate holder. • Release and remove the two screws of the bulb holder
(2). • Remove the number plate holder.
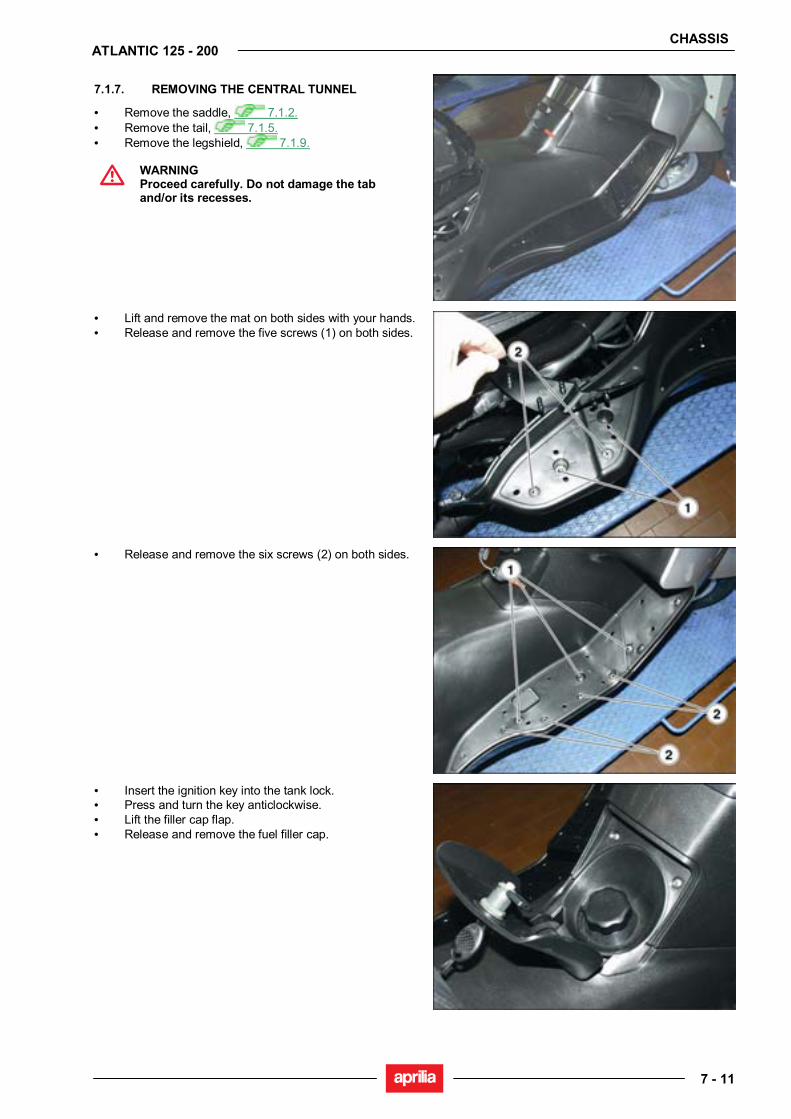
CHASSIS
7 - 11
ATLANTIC 125 - 200
7.1.7. REMOVING THE CENTRAL TUNNEL
• Remove the saddle, 7.1.2. • Remove the tail, 7.1.5. • Remove the legshield, 7.1.9.
WARNING Proceed carefully. Do not damage the tab and/or its recesses.
• Lift and remove the mat on both sides with your hands. • Release and remove the five screws (1) on both sides.
• Release and remove the six screws (2) on both sides.
• Insert the ignition key into the tank lock. • Press and turn the key anticlockwise. • Lift the filler cap flap. • Release and remove the fuel filler cap.
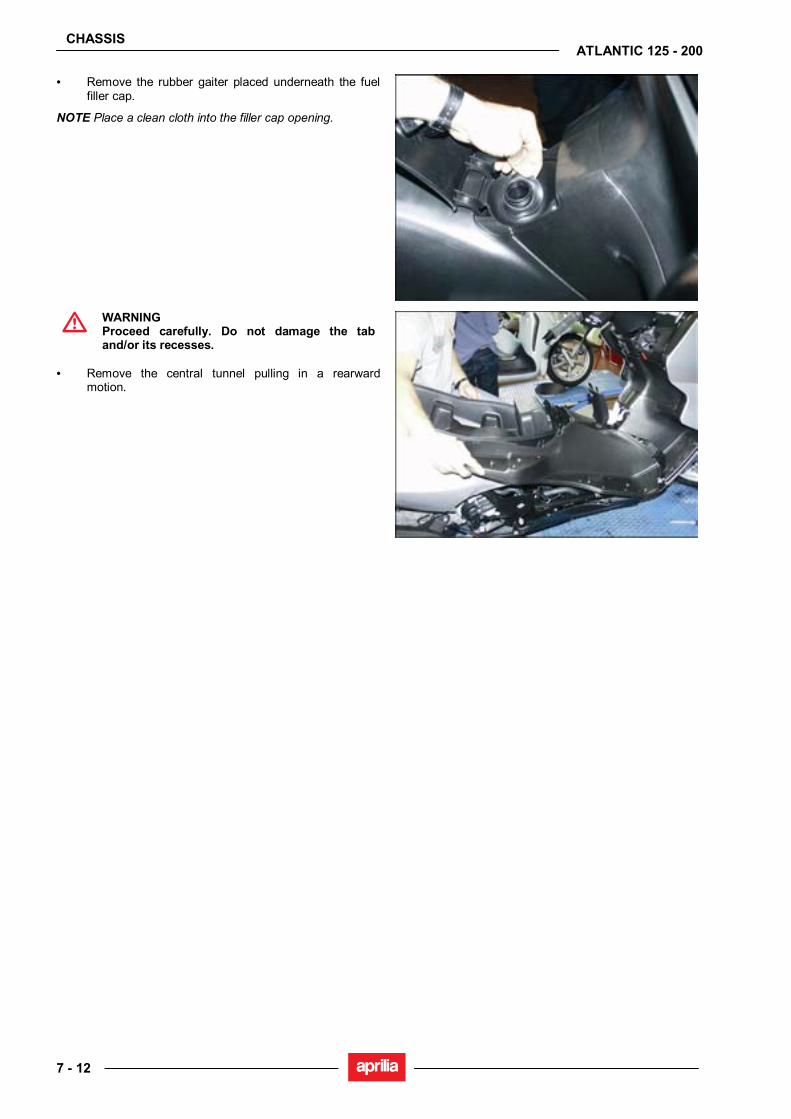
CHASSIS
7 - 12
ATLANTIC 125 - 200
• Remove the rubber gaiter placed underneath the fuel filler cap.
NOTE Place a clean cloth into the filler cap opening.
WARNING Proceed carefully. Do not damage the tab and/or its recesses.
• Remove the central tunnel pulling in a rearward
motion.
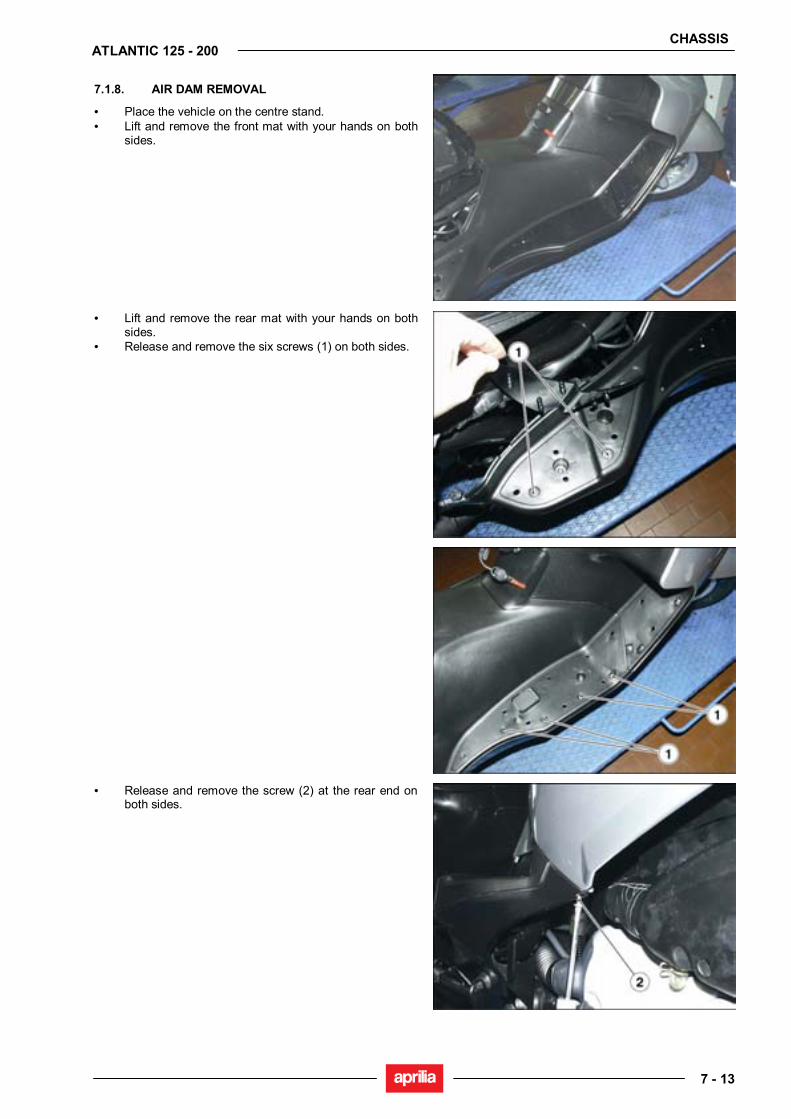
CHASSIS
7 - 13
ATLANTIC 125 - 200
7.1.8. AIR DAM REMOVAL
• Place the vehicle on the centre stand. • Lift and remove the front mat with your hands on both
sides.
• Lift and remove the rear mat with your hands on both sides.
• Release and remove the six screws (1) on both sides.
• Release and remove the screw (2) at the rear end on both sides.
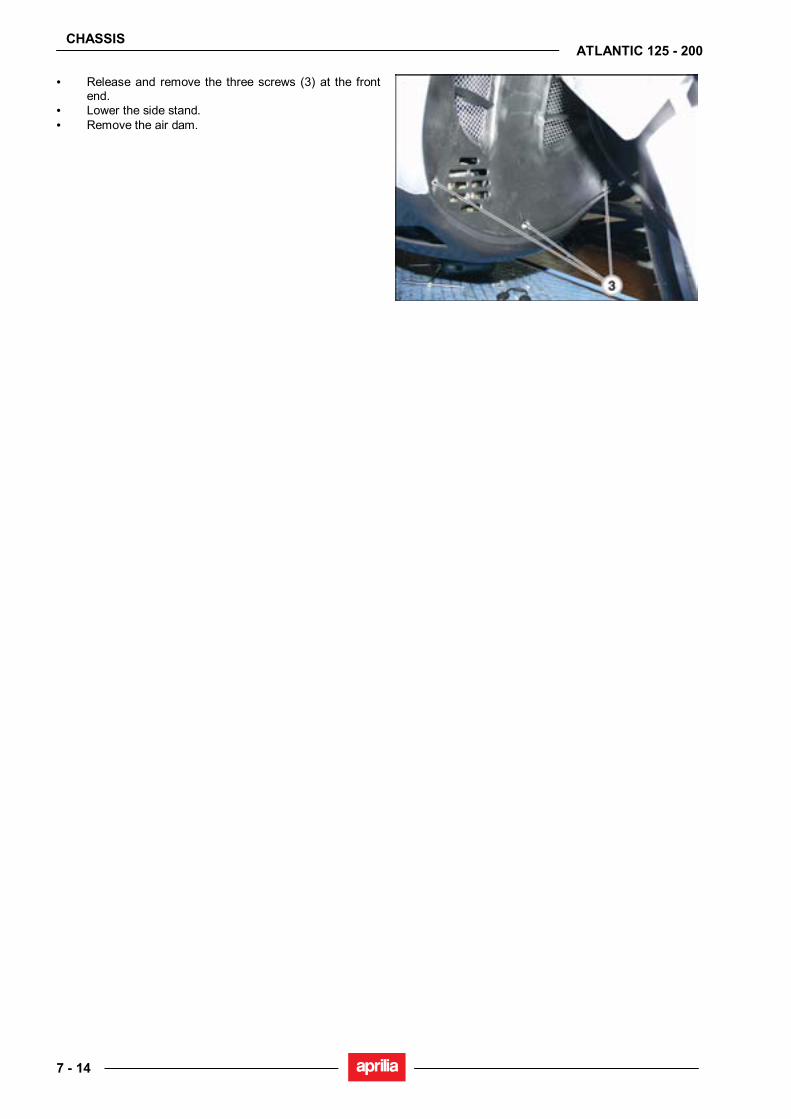
CHASSIS
7 - 14
ATLANTIC 125 - 200
• Release and remove the three screws (3) at the front end.
• Lower the side stand. • Remove the air dam.
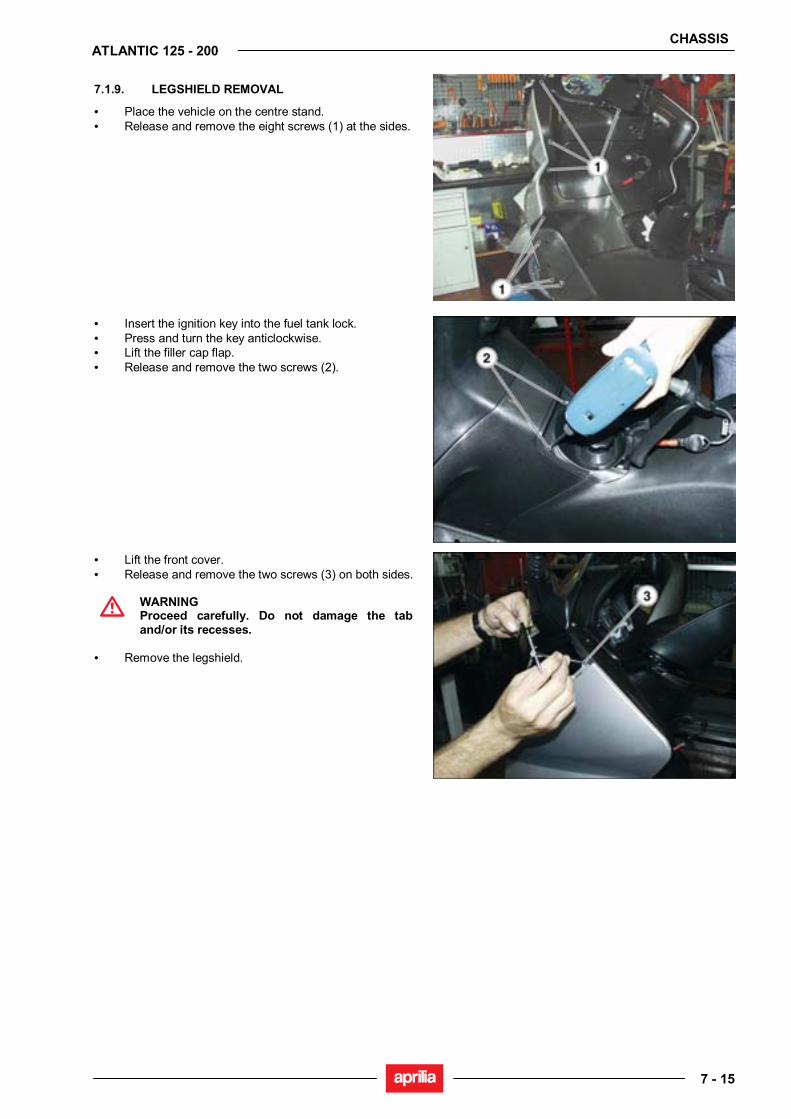
CHASSIS
7 - 15
ATLANTIC 125 - 200
7.1.9. LEGSHIELD REMOVAL
• Place the vehicle on the centre stand. • Release and remove the eight screws (1) at the sides.
• Insert the ignition key into the fuel tank lock. • Press and turn the key anticlockwise. • Lift the filler cap flap. • Release and remove the two screws (2).
• Lift the front cover. • Release and remove the two screws (3) on both sides.
WARNING Proceed carefully. Do not damage the tab and/or its recesses.
• Remove the legshield.
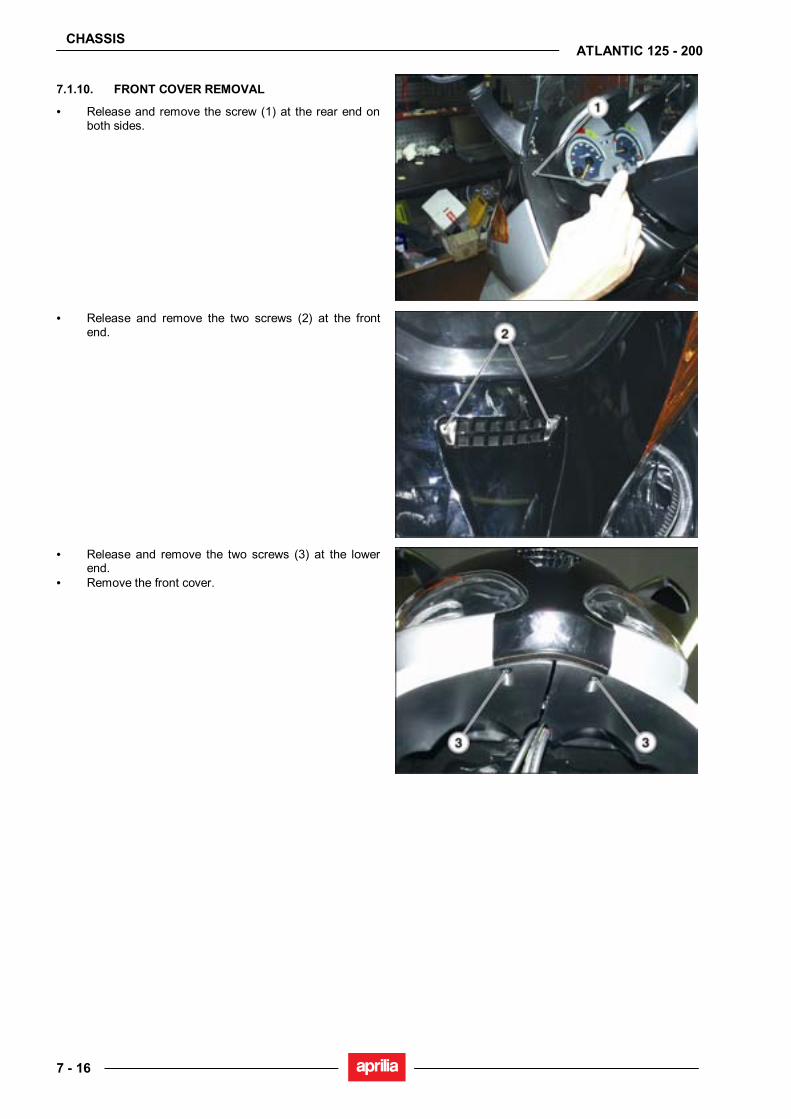
CHASSIS
7 - 16
ATLANTIC 125 - 200
7.1.10. FRONT COVER REMOVAL
• Release and remove the screw (1) at the rear end on both sides.
• Release and remove the two screws (2) at the front end.
• Release and remove the two screws (3) at the lower end.
• Remove the front cover.
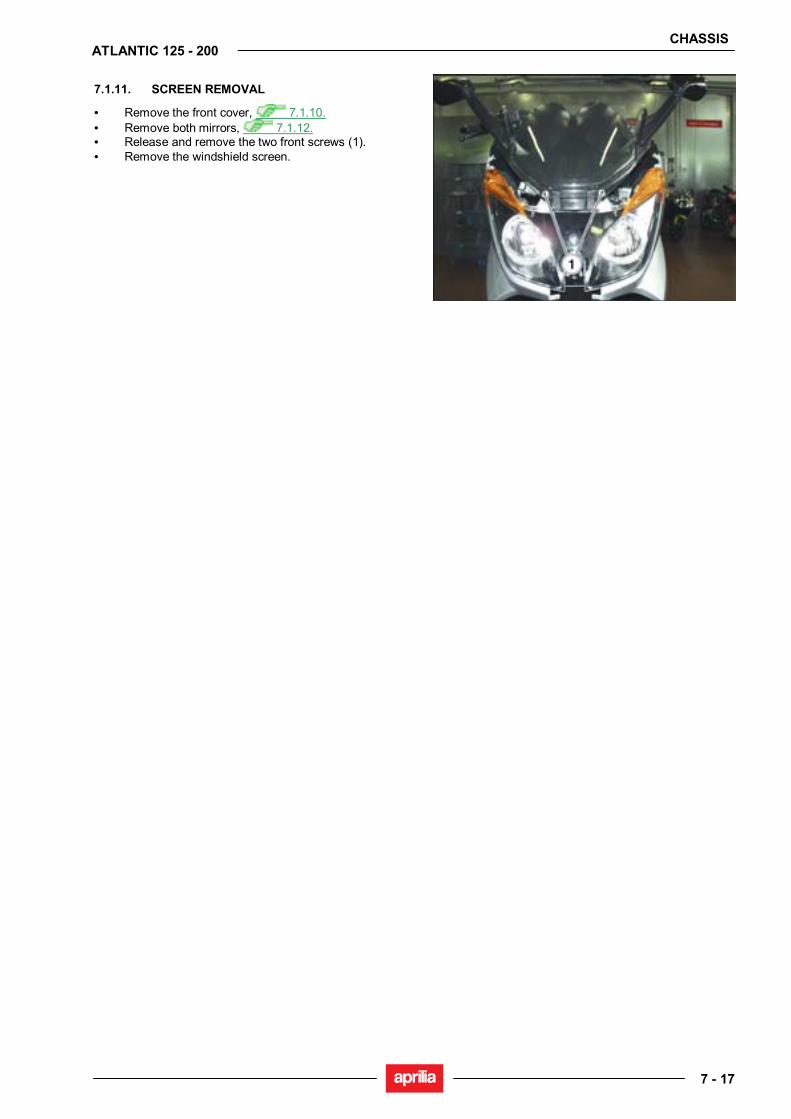
CHASSIS
7 - 17
ATLANTIC 125 - 200
7.1.11. SCREEN REMOVAL
• Remove the front cover, 7.1.10. • Remove both mirrors, 7.1.12. • Release and remove the two front screws (1). • Remove the windshield screen.
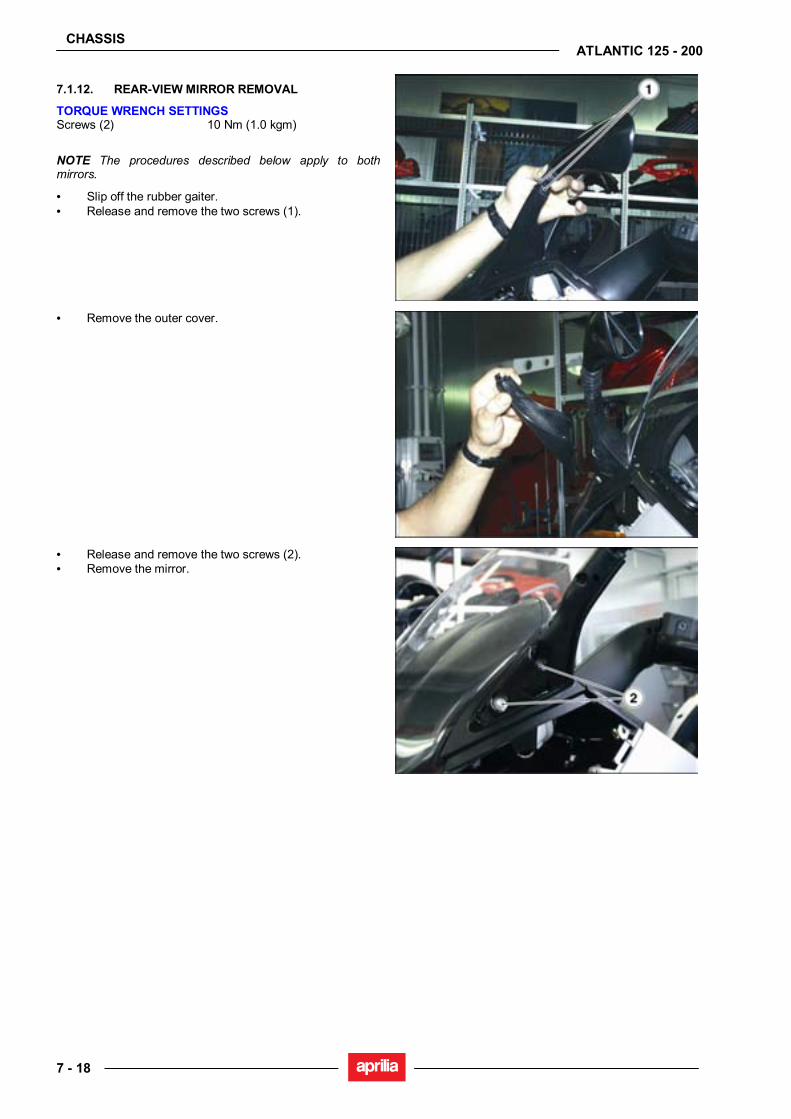
CHASSIS
7 - 18
ATLANTIC 125 - 200
7.1.12. REAR-VIEW MIRROR REMOVAL
TORQUE WRENCH SETTINGS Screws (2) 10 Nm (1.0 kgm)
NOTE The procedures described below apply to both mirrors.
• Slip off the rubber gaiter. • Release and remove the two screws (1).
• Remove the outer cover.
• Release and remove the two screws (2). • Remove the mirror.
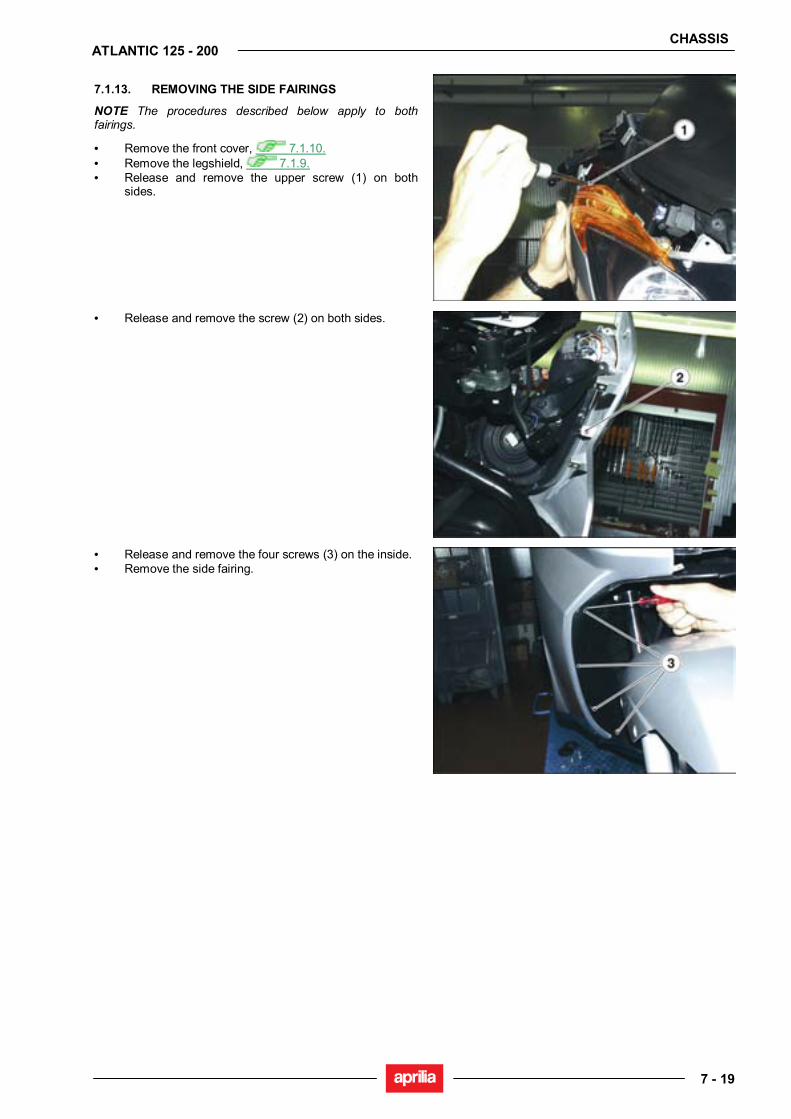
CHASSIS
7 - 19
ATLANTIC 125 - 200
7.1.13. REMOVING THE SIDE FAIRINGS
NOTE The procedures described below apply to both fairings.
• Remove the front cover, 7.1.10. • Remove the legshield, 7.1.9. • Release and remove the upper screw (1) on both
sides.
• Release and remove the screw (2) on both sides.
• Release and remove the four screws (3) on the inside. • Remove the side fairing.
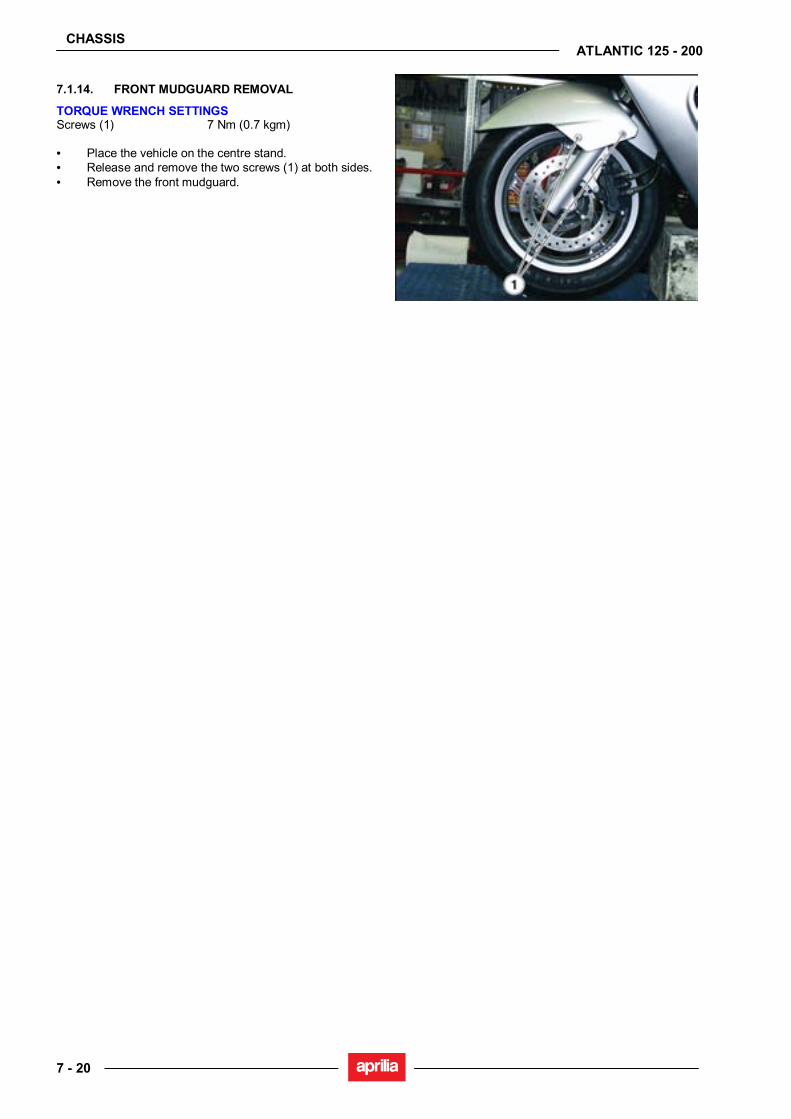
CHASSIS
7 - 20
ATLANTIC 125 - 200
7.1.14. FRONT MUDGUARD REMOVAL
TORQUE WRENCH SETTINGS Screws (1) 7 Nm (0.7 kgm) • Place the vehicle on the centre stand. • Release and remove the two screws (1) at both sides. • Remove the front mudguard.

CHASSIS
7 - 21
ATLANTIC 125 - 200
7.1.15. REAR MUDGUARD REMOVAL
TORQUE WRENCH SETTINGS Airbox screws (1) 8 Nm (0.8 kgm) Screws (2) 12 Nm (1.2 kgm) • Unscrew the two retaining screws (1) of the airbox.
• Unscrew the three retaining screws (2) and collect the cable retainer.
• Remove the rear mudguard.
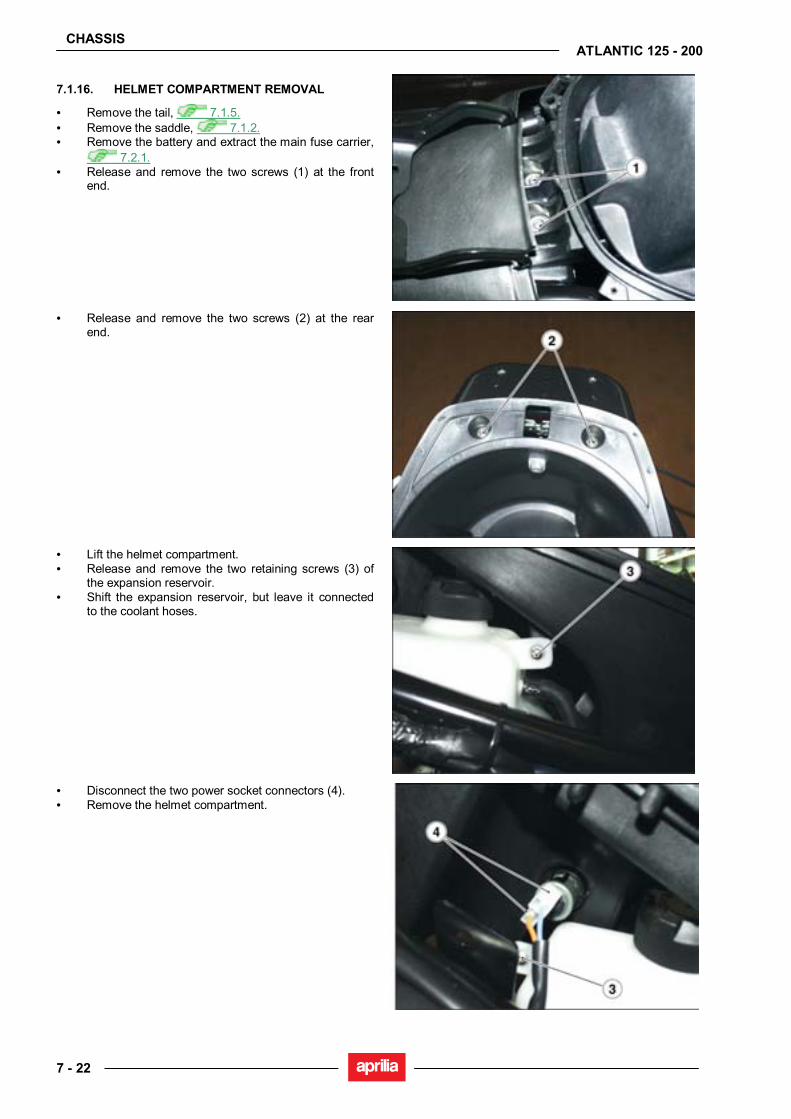
CHASSIS
7 - 22
ATLANTIC 125 - 200
7.1.16. HELMET COMPARTMENT REMOVAL
• Remove the tail, 7.1.5. • Remove the saddle, 7.1.2. • Remove the battery and extract the main fuse carrier,
7.2.1. • Release and remove the two screws (1) at the front
end.
• Release and remove the two screws (2) at the rear end.
• Lift the helmet compartment. • Release and remove the two retaining screws (3) of
the expansion reservoir. • Shift the expansion reservoir, but leave it connected
to the coolant hoses.
• Disconnect the two power socket connectors (4). • Remove the helmet compartment.
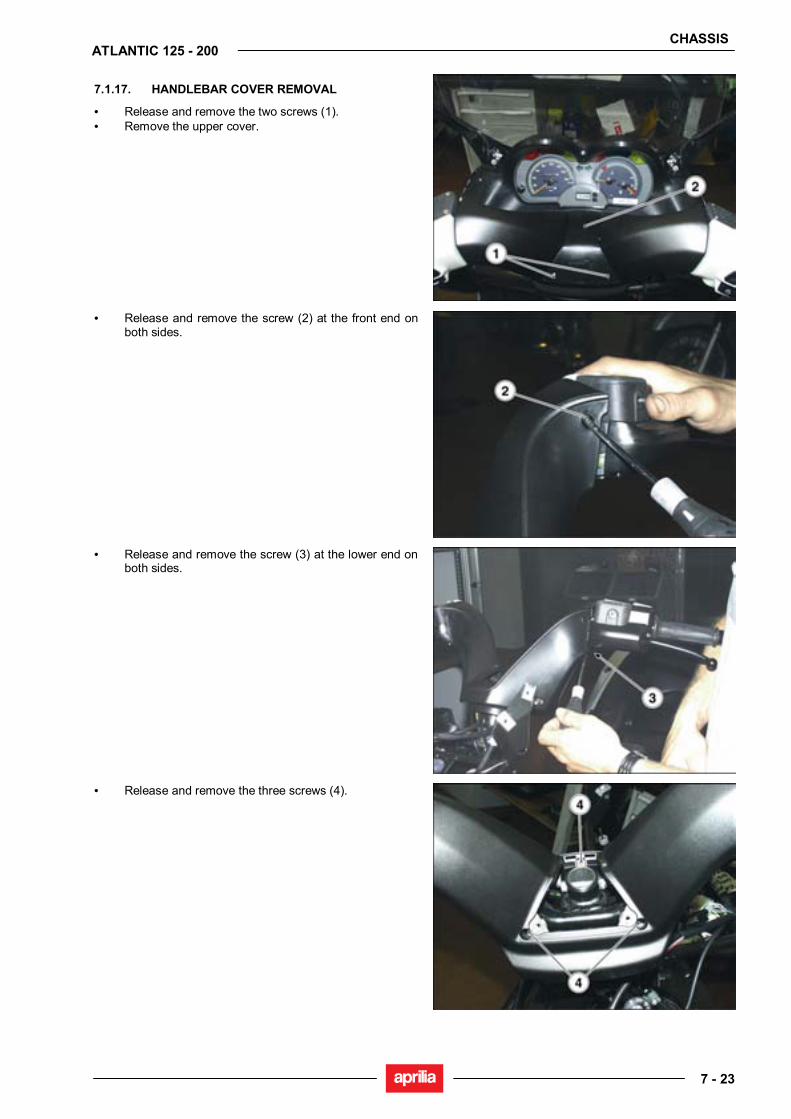
CHASSIS
7 - 23
ATLANTIC 125 - 200
7.1.17. HANDLEBAR COVER REMOVAL
• Release and remove the two screws (1). • Remove the upper cover.
• Release and remove the screw (2) at the front end on both sides.
• Release and remove the screw (3) at the lower end on both sides.
• Release and remove the three screws (4).
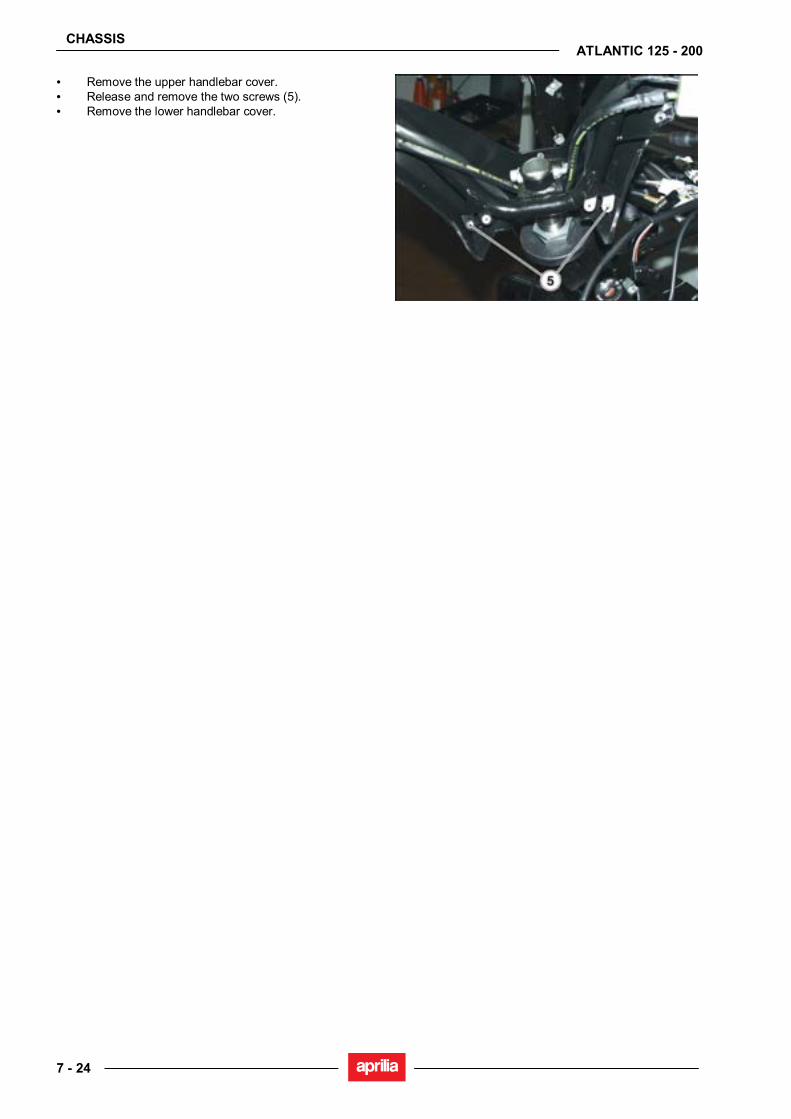
CHASSIS
7 - 24
ATLANTIC 125 - 200
• Remove the upper handlebar cover. • Release and remove the two screws (5). • Remove the lower handlebar cover.

CHASSIS
7 - 25
ATLANTIC 125 - 200
7.1.18. SPLASHGUARD REMOVAL
• Remove the complete headstock, 7.8.1. • Remove the central tunnel, 7.1.7. • Shear the tie (1) on both sides. • Withdraw both air scoops from the radiator.
• Release and remove the four screws (2) at both sides.
• Release and remove the centre screw (3). • Remove the splashguard.
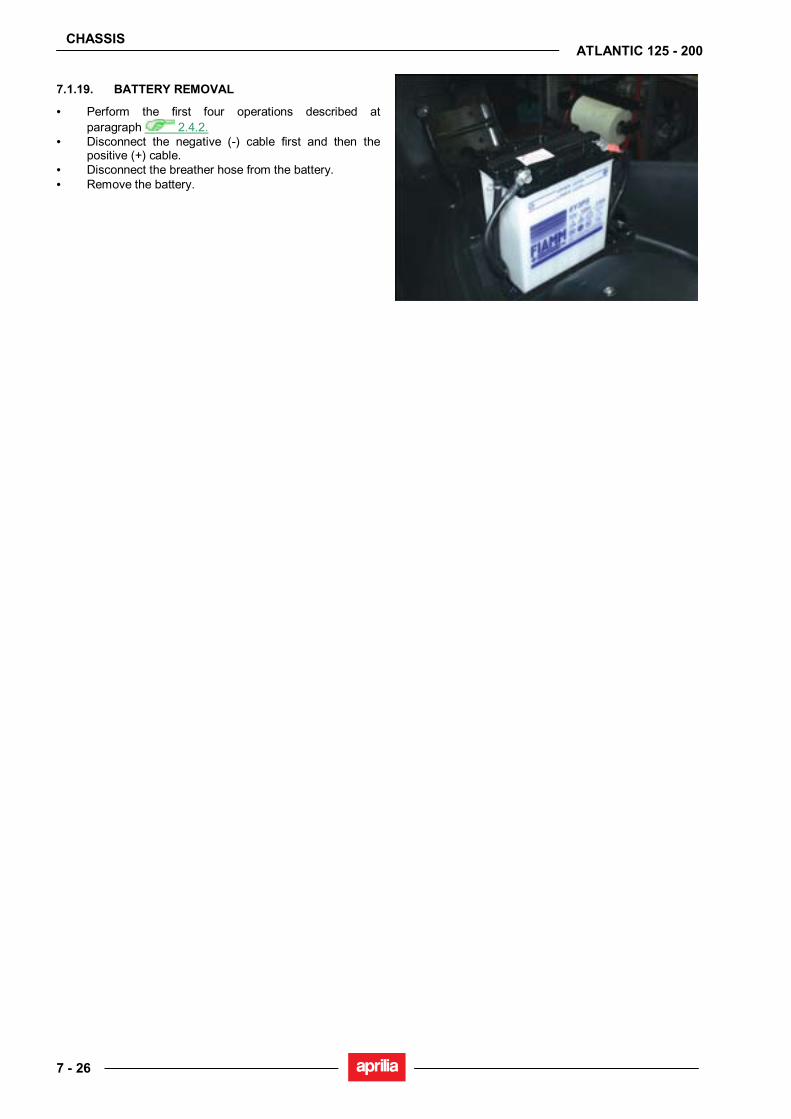
CHASSIS
7 - 26
ATLANTIC 125 - 200
7.1.19. BATTERY REMOVAL
• Perform the first four operations described at paragraph 2.4.2.
• Disconnect the negative (-) cable first and then the positive (+) cable.
• Disconnect the breather hose from the battery. • Remove the battery.
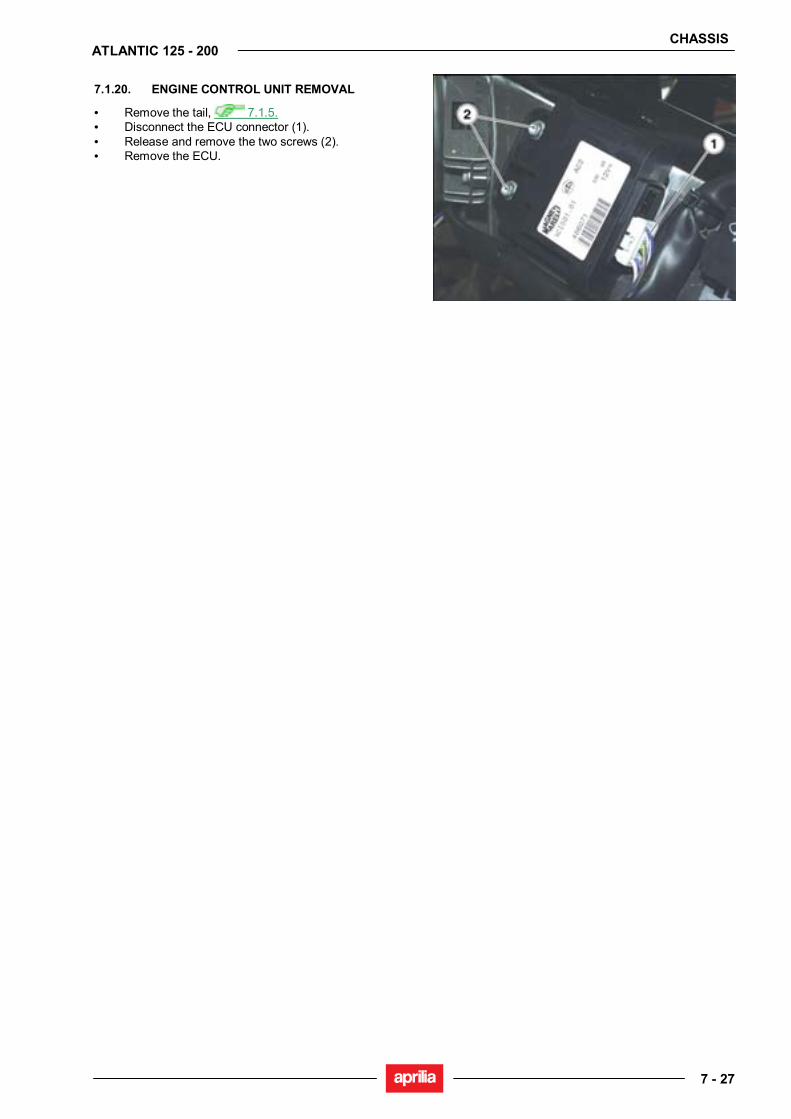
CHASSIS
7 - 27
ATLANTIC 125 - 200
7.1.20. ENGINE CONTROL UNIT REMOVAL
• Remove the tail, 7.1.5. • Disconnect the ECU connector (1). • Release and remove the two screws (2). • Remove the ECU.

CHASSIS
7 - 28
ATLANTIC 125 - 200
7.1.21. VOLTAGE REGULATOR REMOVAL
• Remove the tail, 7.1.5. • Disconnect the voltage regulator connector (1). • Release and remove the two screws (2). • Remove the voltage regulator.

CHASSIS
7 - 29
ATLANTIC 125 - 200
7.1.22. REMOVING THE RIGHT SWITCH
• Release and remove the three screws (1) at the lower end.
• Release and remove the screw (2). • Remove the switch lower cover.
• Disconnect the engine kill switch connector.
• Disconnect the starter connector. • Remove the switch upper cover.
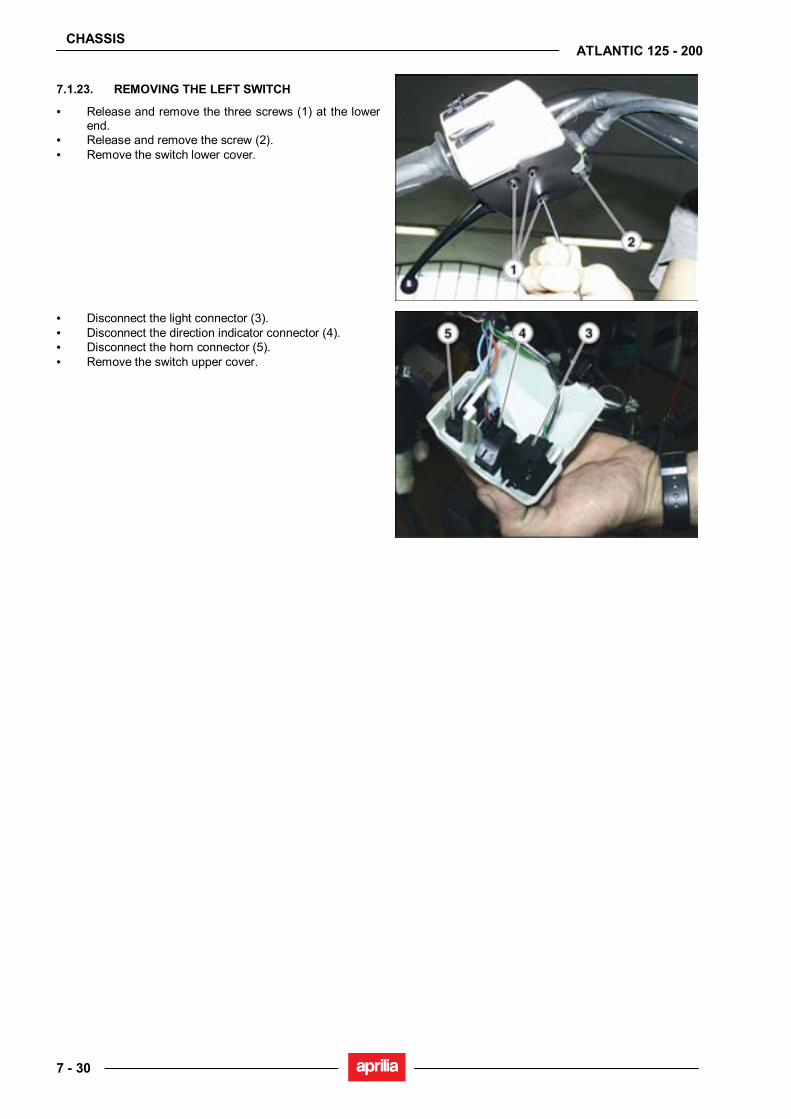
CHASSIS
7 - 30
ATLANTIC 125 - 200
7.1.23. REMOVING THE LEFT SWITCH
• Release and remove the three screws (1) at the lower end.
• Release and remove the screw (2). • Remove the switch lower cover.
• Disconnect the light connector (3). • Disconnect the direction indicator connector (4). • Disconnect the horn connector (5). • Remove the switch upper cover.
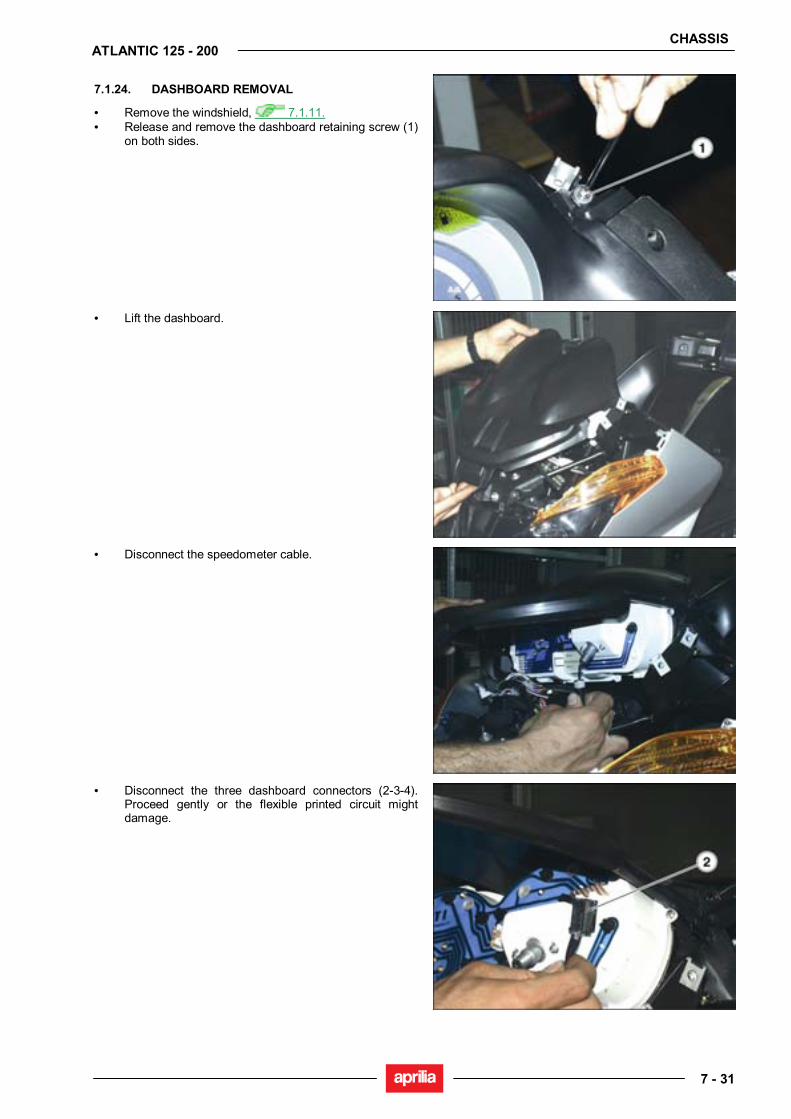
CHASSIS
7 - 31
ATLANTIC 125 - 200
7.1.24. DASHBOARD REMOVAL
• Remove the windshield, 7.1.11. • Release and remove the dashboard retaining screw (1)
on both sides.
• Lift the dashboard.
• Disconnect the speedometer cable.
• Disconnect the three dashboard connectors (2-3-4). Proceed gently or the flexible printed circuit might damage.

CHASSIS
7 - 32
ATLANTIC 125 - 200
• Remove the dashboard.
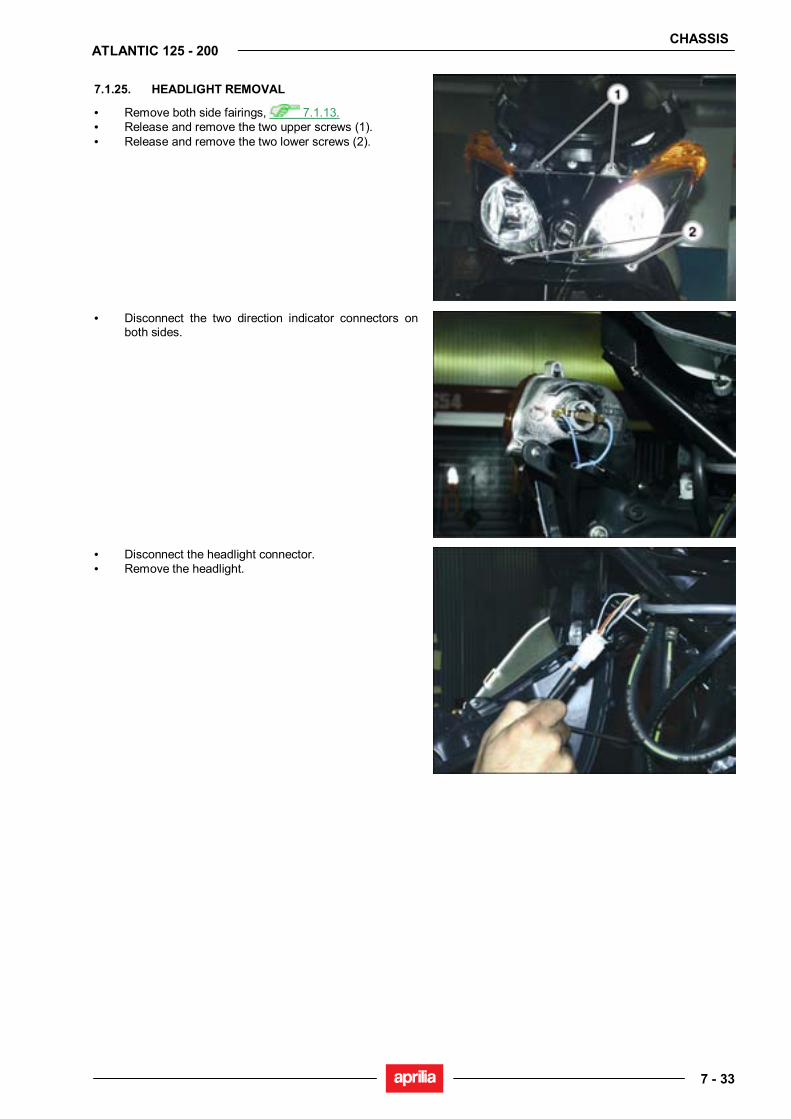
CHASSIS
7 - 33
ATLANTIC 125 - 200
7.1.25. HEADLIGHT REMOVAL
• Remove both side fairings, 7.1.13. • Release and remove the two upper screws (1). • Release and remove the two lower screws (2).
• Disconnect the two direction indicator connectors on both sides.
• Disconnect the headlight connector. • Remove the headlight.

CHASSIS
7 - 34
ATLANTIC 125 - 200
7.1.26. REMOVING THE FRONT DIRECTION INDICATORS
NOTE The procedures described below apply to both direction indicators.
• Remove both side fairings, 7.1.13. • Disconnect the two direction indicator connectors.
• Release and remove the two screws (1).
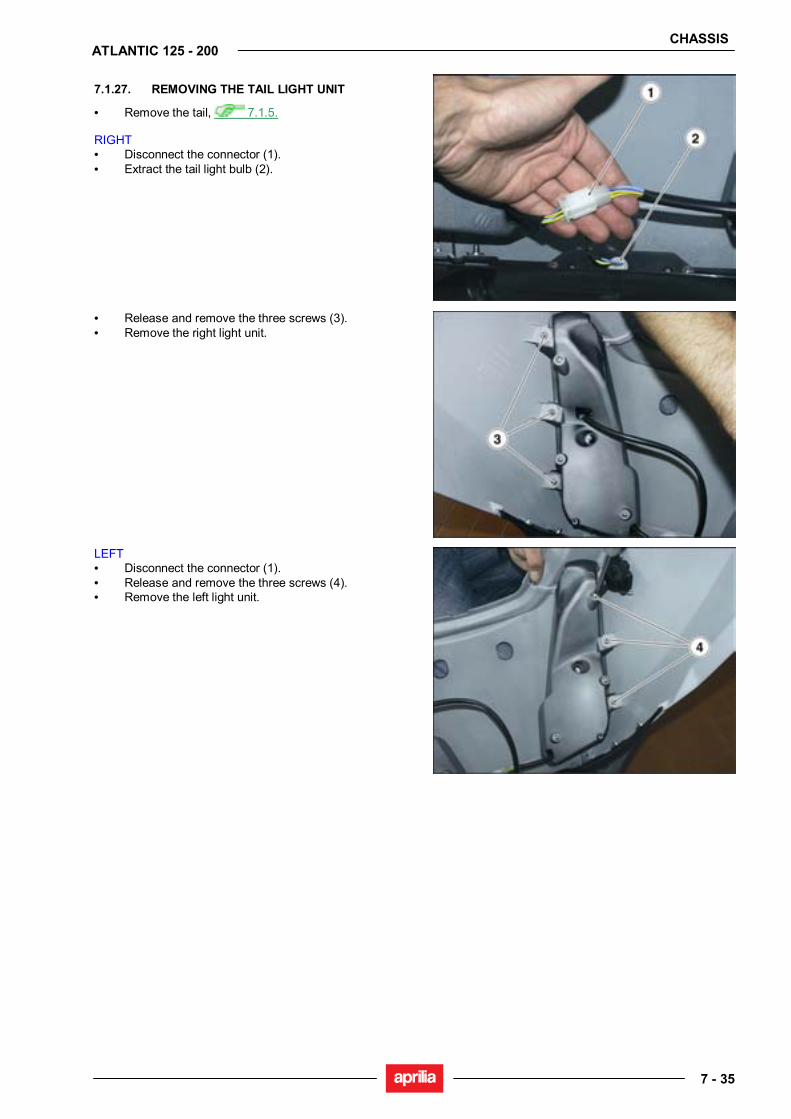
CHASSIS
7 - 35
ATLANTIC 125 - 200
7.1.27. REMOVING THE TAIL LIGHT UNIT
• Remove the tail, 7.1.5. RIGHT • Disconnect the connector (1). • Extract the tail light bulb (2).
• Release and remove the three screws (3). • Remove the right light unit.
LEFT • Disconnect the connector (1). • Release and remove the three screws (4). • Remove the left light unit.

CHASSIS
7 - 36
ATLANTIC 125 - 200
7.1.28. COIL REMOVAL
• Remove the air dam, 7.1.8. • Disconnect the spark plug cap.
• Disconnect the two coil connectors (1). • Release and remove the bolt (2) and collect the nut.
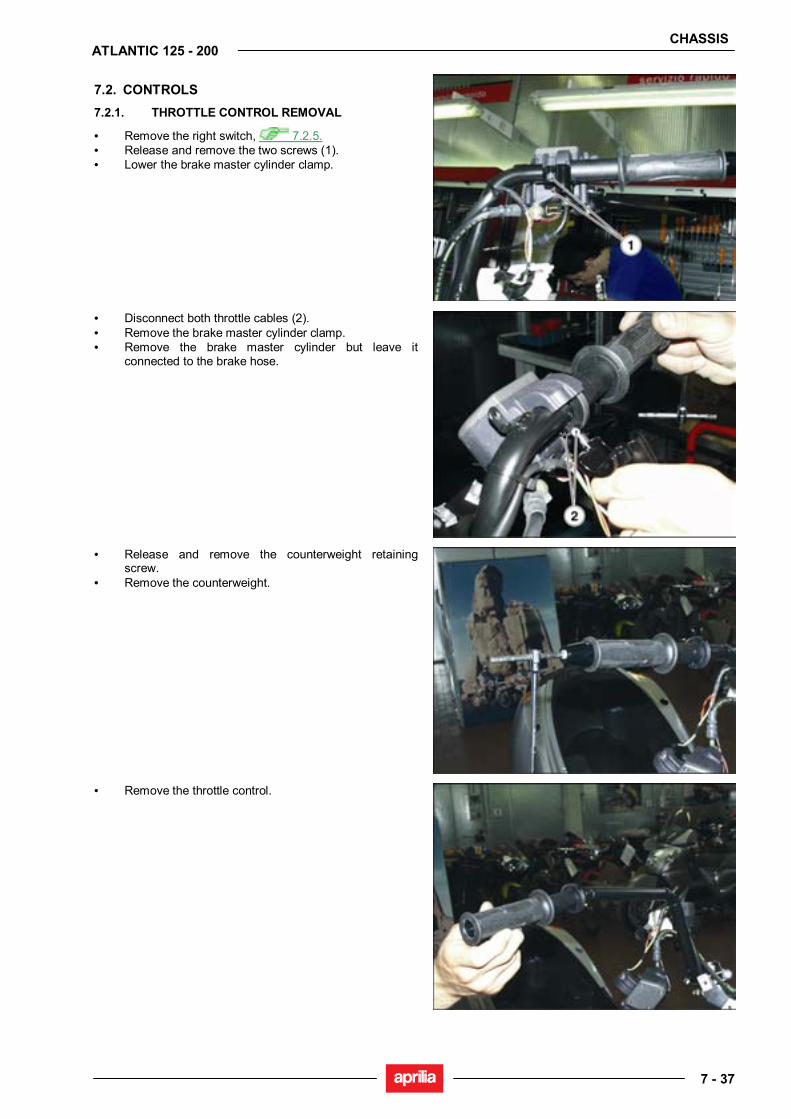
CHASSIS
7 - 37
ATLANTIC 125 - 200
7.2. CONTROLS 7.2.1. THROTTLE CONTROL REMOVAL
• Remove the right switch, 7.2.5. • Release and remove the two screws (1). • Lower the brake master cylinder clamp.
• Disconnect both throttle cables (2). • Remove the brake master cylinder clamp. • Remove the brake master cylinder but leave it
connected to the brake hose.
• Release and remove the counterweight retaining screw.
• Remove the counterweight.
• Remove the throttle control.
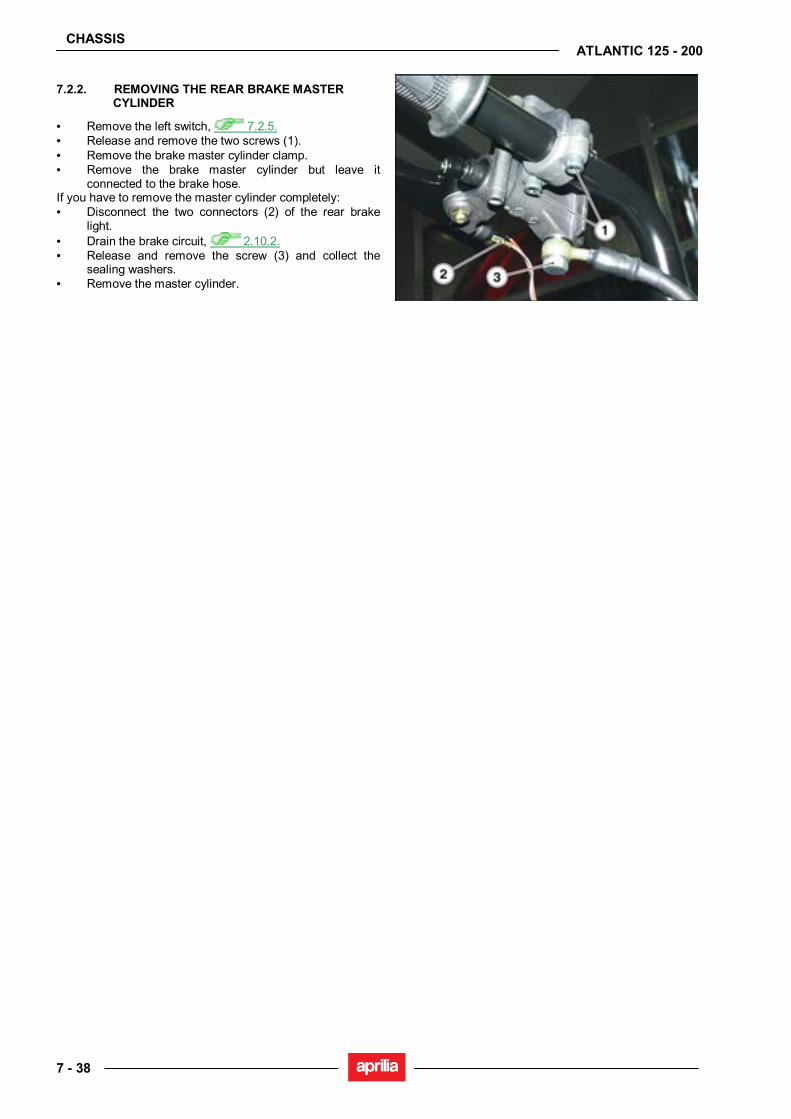
CHASSIS
7 - 38
ATLANTIC 125 - 200
7.2.2. REMOVING THE REAR BRAKE MASTER CYLINDER
• Remove the left switch, 7.2.5. • Release and remove the two screws (1). • Remove the brake master cylinder clamp. • Remove the brake master cylinder but leave it
connected to the brake hose. If you have to remove the master cylinder completely: • Disconnect the two connectors (2) of the rear brake
light. • Drain the brake circuit, 2.10.2. • Release and remove the screw (3) and collect the
sealing washers. • Remove the master cylinder.
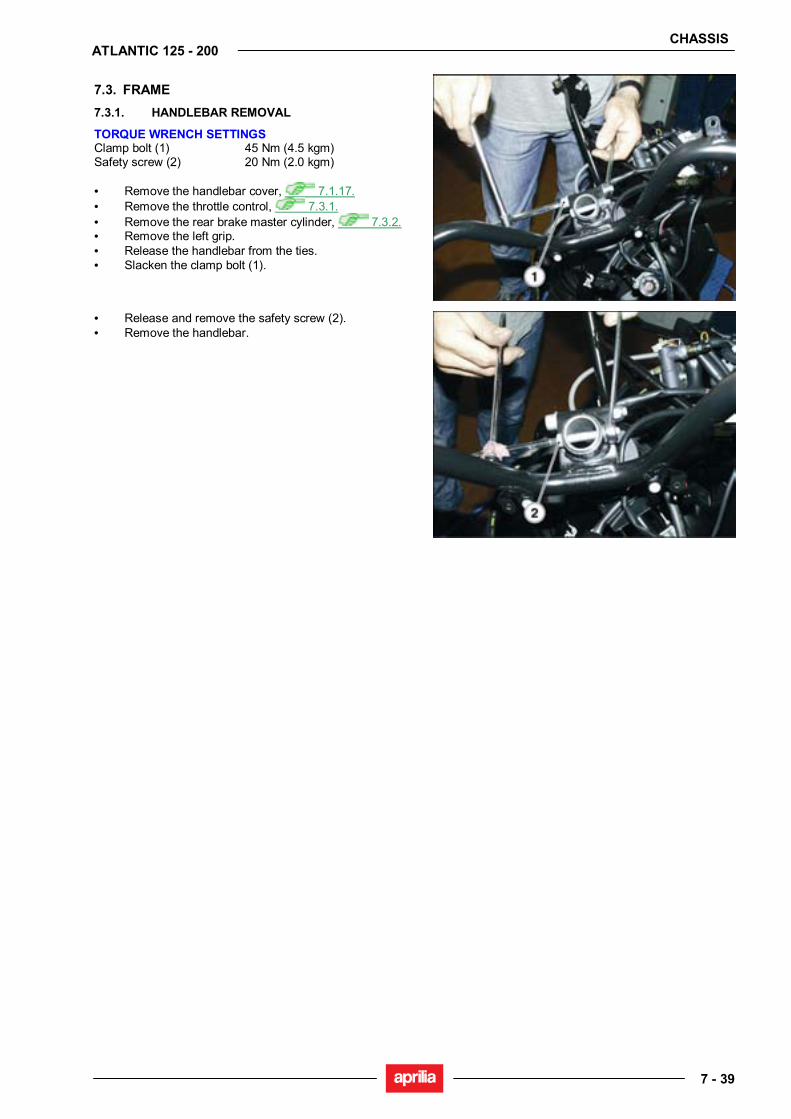
CHASSIS
7 - 39
ATLANTIC 125 - 200
7.3. FRAME 7.3.1. HANDLEBAR REMOVAL
TORQUE WRENCH SETTINGS Clamp bolt (1) 45 Nm (4.5 kgm) Safety screw (2) 20 Nm (2.0 kgm) • Remove the handlebar cover, 7.1.17. • Remove the throttle control, 7.3.1. • Remove the rear brake master cylinder, 7.3.2. • Remove the left grip. • Release the handlebar from the ties. • Slacken the clamp bolt (1).
• Release and remove the safety screw (2). • Remove the handlebar.
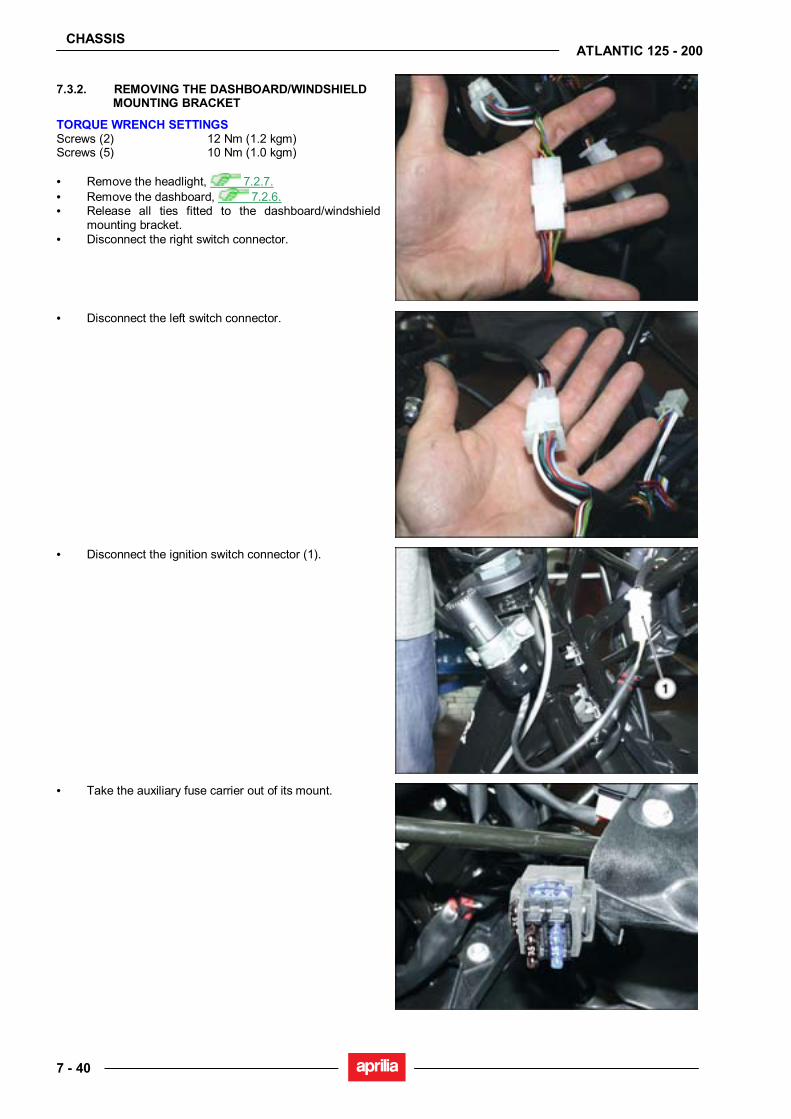
CHASSIS
7 - 40
ATLANTIC 125 - 200
7.3.2. REMOVING THE DASHBOARD/WINDSHIELD MOUNTING BRACKET
TORQUE WRENCH SETTINGS Screws (2) 12 Nm (1.2 kgm) Screws (5) 10 Nm (1.0 kgm) • Remove the headlight, 7.2.7. • Remove the dashboard, 7.2.6. • Release all ties fitted to the dashboard/windshield
mounting bracket. • Disconnect the right switch connector.
• Disconnect the left switch connector.
• Disconnect the ignition switch connector (1).
• Take the auxiliary fuse carrier out of its mount.
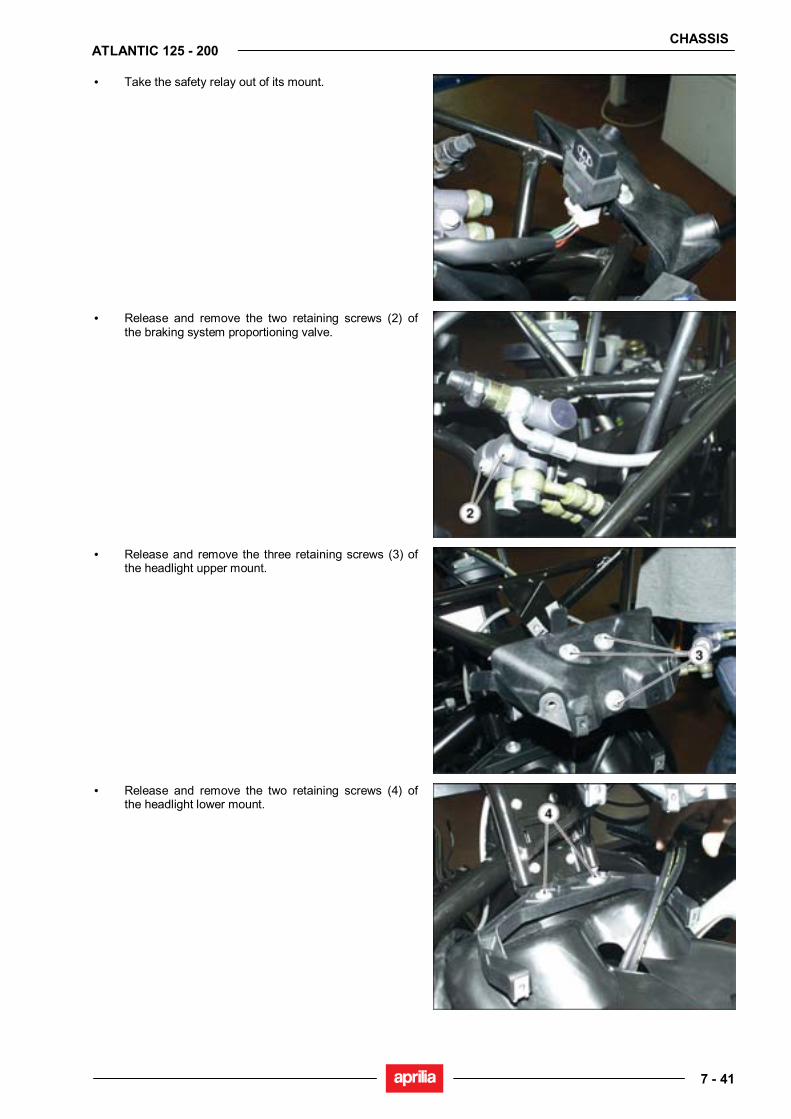
CHASSIS
7 - 41
ATLANTIC 125 - 200
• Take the safety relay out of its mount.
• Release and remove the two retaining screws (2) of the braking system proportioning valve.
• Release and remove the three retaining screws (3) of the headlight upper mount.
• Release and remove the two retaining screws (4) of the headlight lower mount.

CHASSIS
7 - 42
ATLANTIC 125 - 200
• Release and remove the four screws (5) securing the dashboard/windshield mounting bracket to the frame.
• Remove the dashboard/windshield mounting bracket.

CHASSIS
7 - 43
ATLANTIC 125 - 200
7.3.3. SIDE STAND REMOVAL
TORQUE WRENCH SETTINGS Screws (1) 20 Nm (2.0 kgm) • Remove the central tunnel, 7.1.7. • Disconnect the side stand switch connector.
• Unhook the two springs from the stand. • Release and remove the nut (1).
• Working from the opposite end, remove in the order: bolt, washer, stand switch and stand.

CHASSIS
7 - 44
ATLANTIC 125 - 200
7.3.4. CENTRE STAND REMOVAL
TORQUE WRENCH SETTINGS Nut (1) 27 Nm (2.7 kgm) • Place the vehicle on the side stand. • Unhook the two springs.
• Release and remove the nut (1). • Withdraw the bolt from the opposite end. • Remove the centre stand.
WARNING Grease the sliding areas on refitting and avoid damage to the seals. Tighten the nut and make sure the stand folds up smoothly in the correct position.
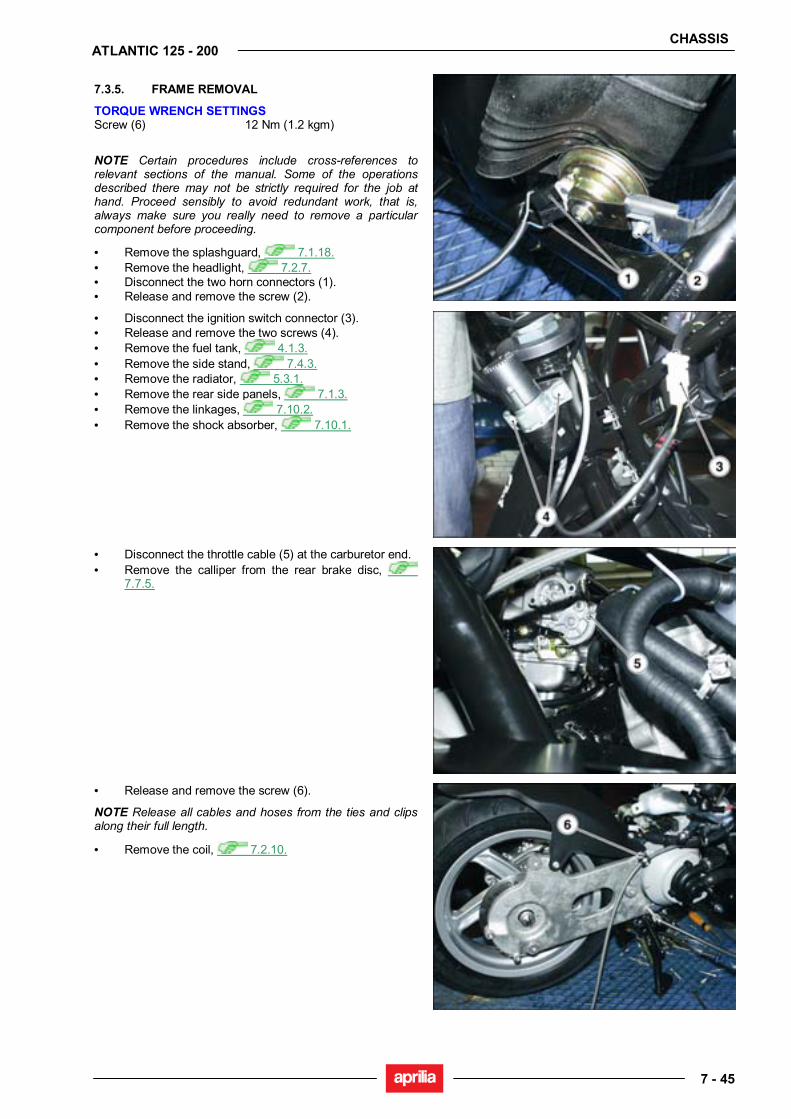
CHASSIS
7 - 45
ATLANTIC 125 - 200
7.3.5. FRAME REMOVAL
TORQUE WRENCH SETTINGS Screw (6) 12 Nm (1.2 kgm)
NOTE Certain procedures include cross-references to relevant sections of the manual. Some of the operations described there may not be strictly required for the job at hand. Proceed sensibly to avoid redundant work, that is, always make sure you really need to remove a particular component before proceeding.
• Remove the splashguard, 7.1.18. • Remove the headlight, 7.2.7. • Disconnect the two horn connectors (1). • Release and remove the screw (2).
• Disconnect the ignition switch connector (3). • Release and remove the two screws (4). • Remove the fuel tank, 4.1.3. • Remove the side stand, 7.4.3. • Remove the radiator, 5.3.1. • Remove the rear side panels, 7.1.3. • Remove the linkages, 7.10.2. • Remove the shock absorber, 7.10.1.
• Disconnect the throttle cable (5) at the carburetor end. • Remove the calliper from the rear brake disc,
7.7.5.
• Release and remove the screw (6).
NOTE Release all cables and hoses from the ties and clips along their full length.
• Remove the coil, 7.2.10.

CHASSIS
7 - 46
ATLANTIC 125 - 200
• Disconnect the following connectors: - voltage regulator;
- Engine Control Unit;
- starter motor connector (7); - disconnect the two connectors (8) at the starter relay
end.
• Release and remove the two screws (9). • Remove the ECU bracket. • Lift the frame to remove.

CHASSIS
7 - 47
ATLANTIC 125 - 200
7.4. FRONT WHEEL 7.4.1. FRONT WHEEL DIAGRAM
Key: 1. Wheel spindle 2. Speedometer drive 3. Right oil seal 4. Right bearing 5. Wheel 6. Inner spacer 7. Left bearing 8. Left oil seal 9. Brake disc 10. Spacer NOTE Grease the wheel spindle (1).
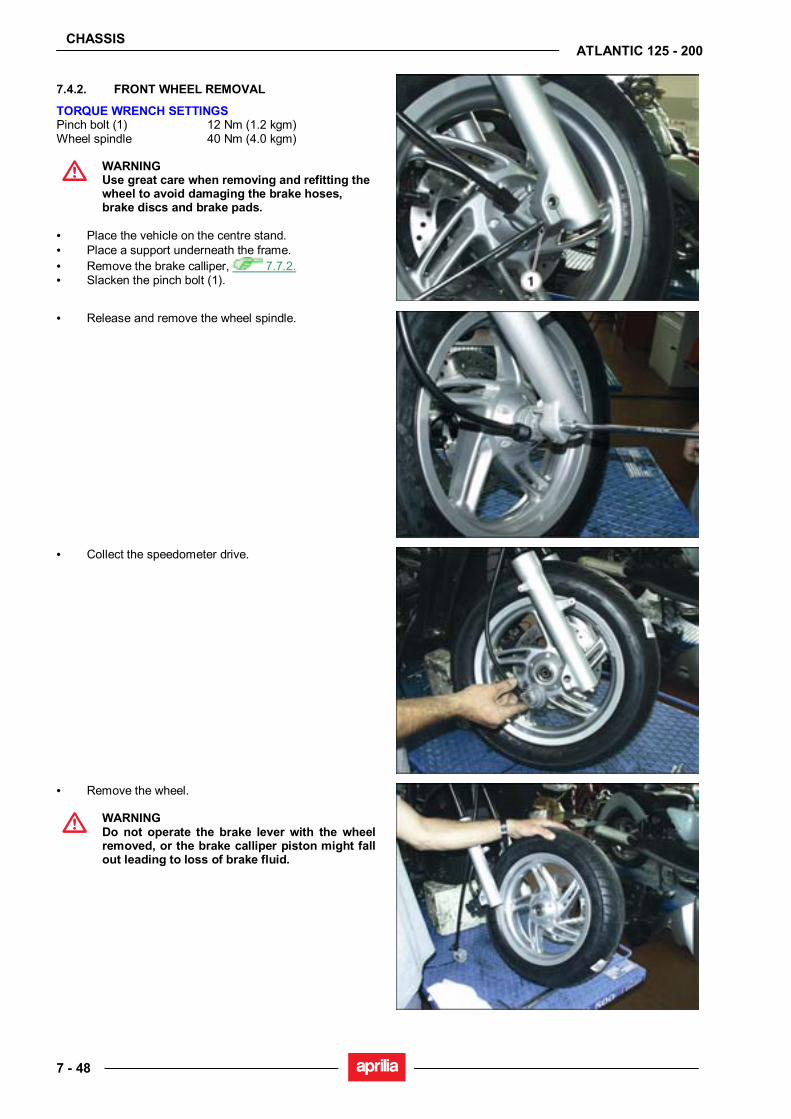
CHASSIS
7 - 48
ATLANTIC 125 - 200
7.4.2. FRONT WHEEL REMOVAL
TORQUE WRENCH SETTINGS Pinch bolt (1) 12 Nm (1.2 kgm) Wheel spindle 40 Nm (4.0 kgm)
WARNING Use great care when removing and refitting the wheel to avoid damaging the brake hoses, brake discs and brake pads.
• Place the vehicle on the centre stand. • Place a support underneath the frame. • Remove the brake calliper, 7.7.2. • Slacken the pinch bolt (1).
• Release and remove the wheel spindle.
• Collect the speedometer drive.
• Remove the wheel.
WARNING Do not operate the brake lever with the wheel removed, or the brake calliper piston might fall out leading to loss of brake fluid.
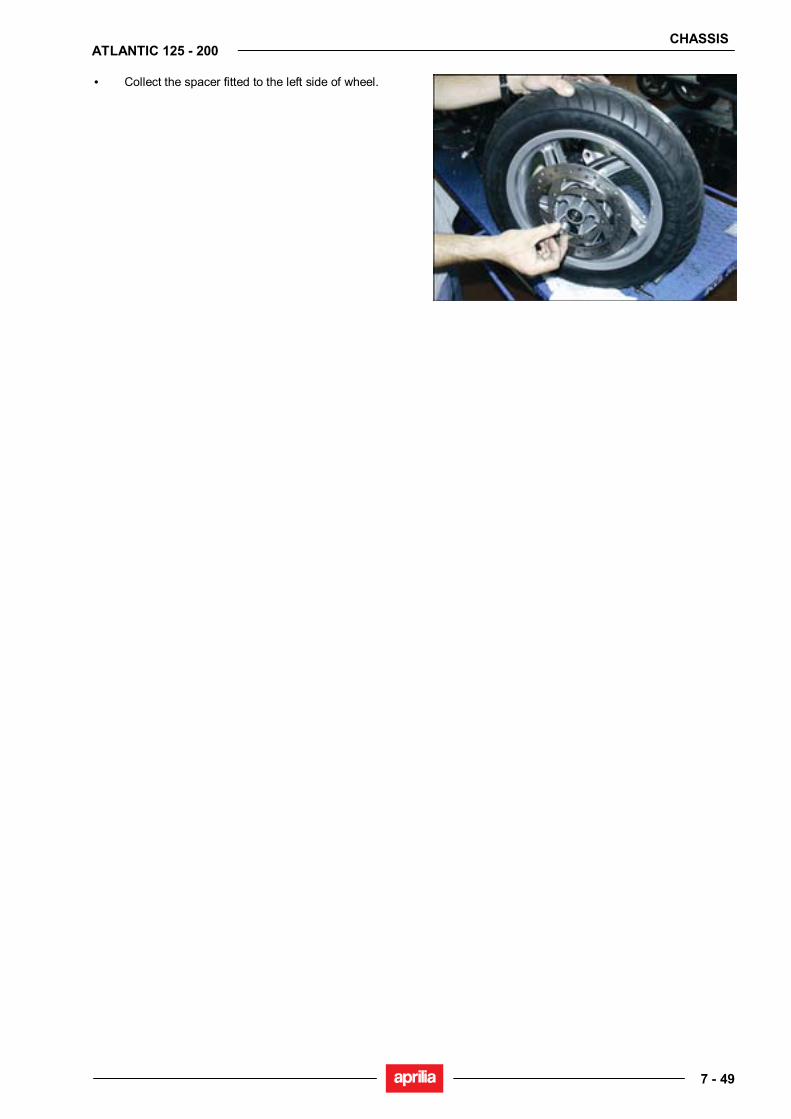
CHASSIS
7 - 49
ATLANTIC 125 - 200
• Collect the spacer fitted to the left side of wheel.
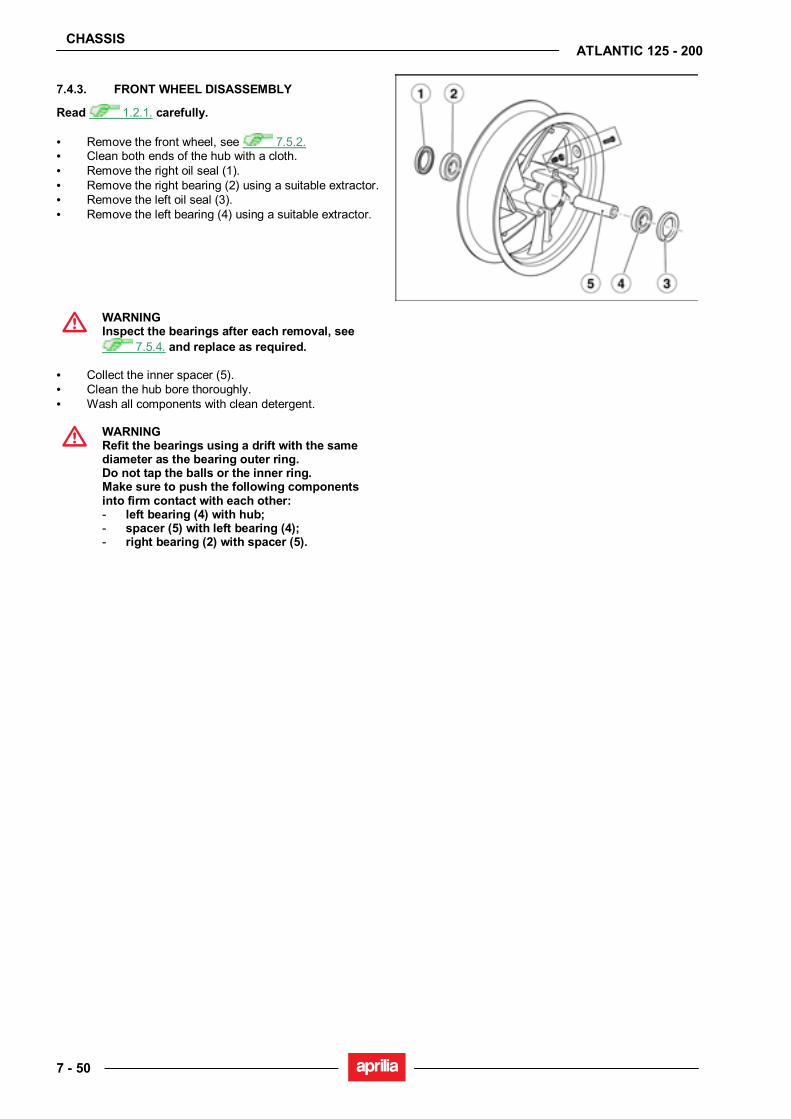
CHASSIS
7 - 50
ATLANTIC 125 - 200
7.4.3. FRONT WHEEL DISASSEMBLY
Read 1.2.1. carefully. • Remove the front wheel, see 7.5.2. • Clean both ends of the hub with a cloth. • Remove the right oil seal (1). • Remove the right bearing (2) using a suitable extractor. • Remove the left oil seal (3). • Remove the left bearing (4) using a suitable extractor.
WARNING Inspect the bearings after each removal, see
7.5.4. and replace as required. • Collect the inner spacer (5). • Clean the hub bore thoroughly. • Wash all components with clean detergent.
WARNING Refit the bearings using a drift with the same diameter as the bearing outer ring. Do not tap the balls or the inner ring. Make sure to push the following components into firm contact with each other: - left bearing (4) with hub; - spacer (5) with left bearing (4); - right bearing (2) with spacer (5).
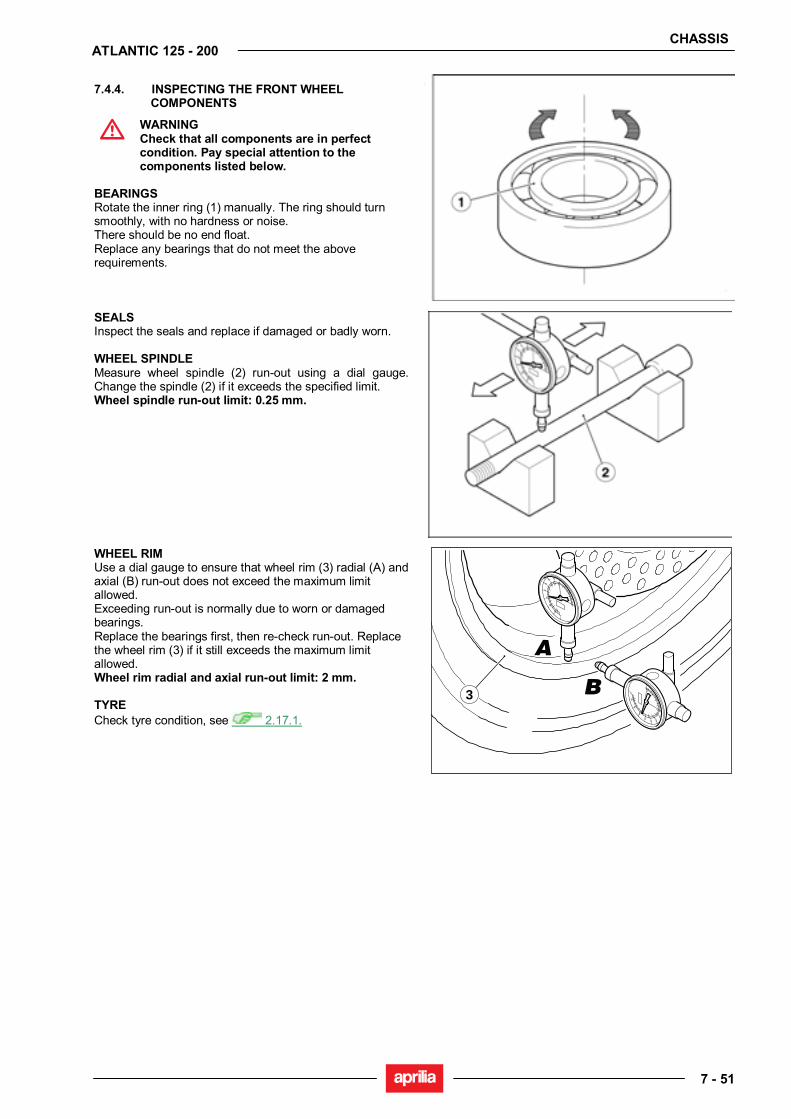
CHASSIS
7 - 51
ATLANTIC 125 - 200
7.4.4. INSPECTING THE FRONT WHEEL COMPONENTS
WARNING Check that all components are in perfect condition. Pay special attention to the components listed below.
BEARINGS Rotate the inner ring (1) manually. The ring should turn smoothly, with no hardness or noise. There should be no end float. Replace any bearings that do not meet the above requirements.
SEALS Inspect the seals and replace if damaged or badly worn. WHEEL SPINDLE Measure wheel spindle (2) run-out using a dial gauge. Change the spindle (2) if it exceeds the specified limit. Wheel spindle run-out limit: 0.25 mm.
WHEEL RIM Use a dial gauge to ensure that wheel rim (3) radial (A) and axial (B) run-out does not exceed the maximum limit allowed. Exceeding run-out is normally due to worn or damaged bearings. Replace the bearings first, then re-check run-out. Replace the wheel rim (3) if it still exceeds the maximum limit allowed. Wheel rim radial and axial run-out limit: 2 mm. TYRE Check tyre condition, see 2.17.1.
0
120
10
30
40
50
6070 80
90
100
110
20
0
120
10
30
40
50 6070
80
90
100
110
20
3
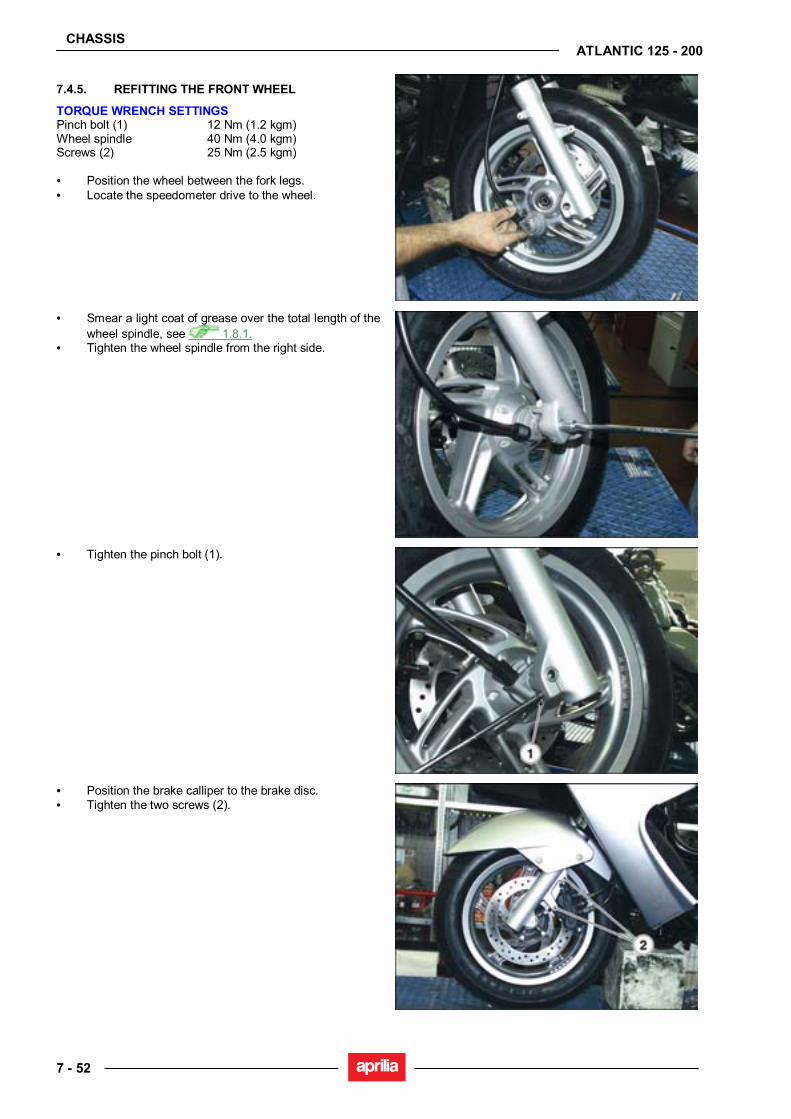
CHASSIS
7 - 52
ATLANTIC 125 - 200
7.4.5. REFITTING THE FRONT WHEEL
TORQUE WRENCH SETTINGS Pinch bolt (1) 12 Nm (1.2 kgm) Wheel spindle 40 Nm (4.0 kgm) Screws (2) 25 Nm (2.5 kgm) • Position the wheel between the fork legs. • Locate the speedometer drive to the wheel.
• Smear a light coat of grease over the total length of the wheel spindle, see 1.8.1.
• Tighten the wheel spindle from the right side.
• Tighten the pinch bolt (1).
• Position the brake calliper to the brake disc. • Tighten the two screws (2).
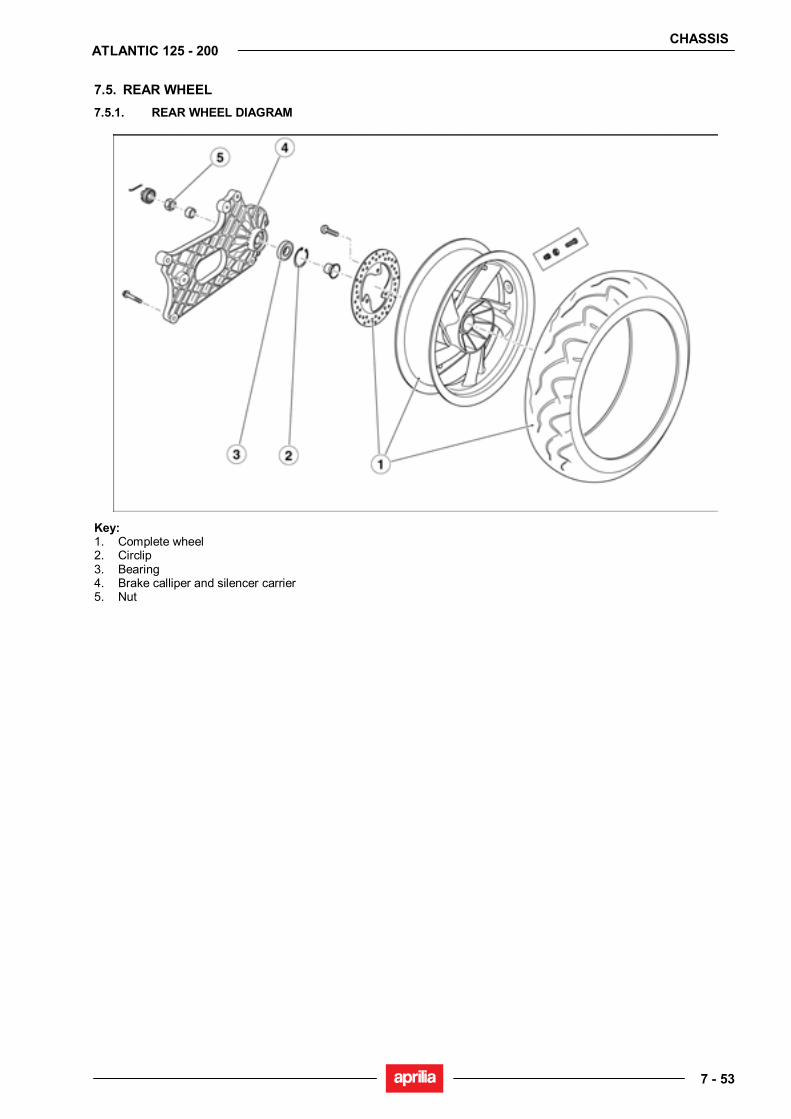
CHASSIS
7 - 53
ATLANTIC 125 - 200
7.5. REAR WHEEL 7.5.1. REAR WHEEL DIAGRAM
Key: 1. Complete wheel 2. Circlip 3. Bearing 4. Brake calliper and silencer carrier 5. Nut

CHASSIS
7 - 54
ATLANTIC 125 - 200
7.5.2. REAR WHEEL REMOVAL
TORQUE WRENCH SETTINGS Screw (1) 25 Nm (2.5 kgm) Wheel spindle nut 110 Nm (11.0 kgm) • Remove the exhaust, 1.8.1. • Remove the rear mudguard, 7.1.15. • Remove the rear brake calliper but leave it connected
to the hose, 7.7.5. • Release and remove the screw (1).
• Remove the split pin from the wheel spindle.
• Remove the nut cap.
• Release and remove the wheel spindle nut. • Remove the silencer carrier.
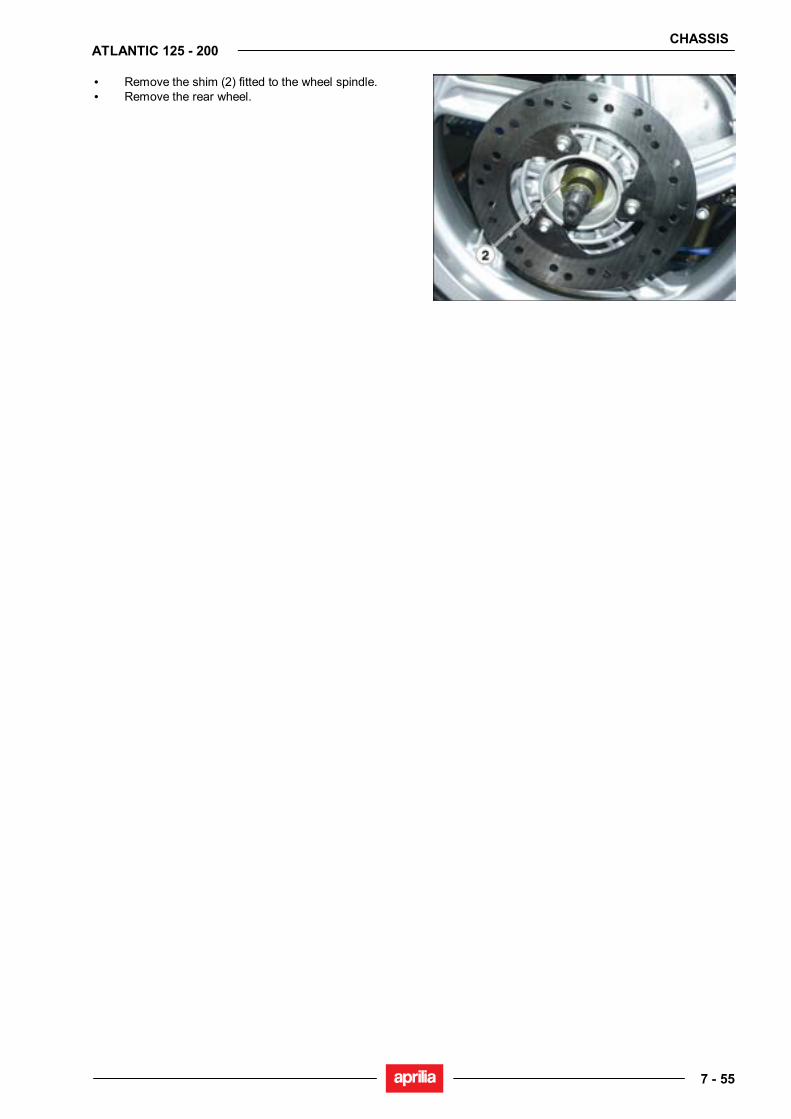
CHASSIS
7 - 55
ATLANTIC 125 - 200
• Remove the shim (2) fitted to the wheel spindle. • Remove the rear wheel.
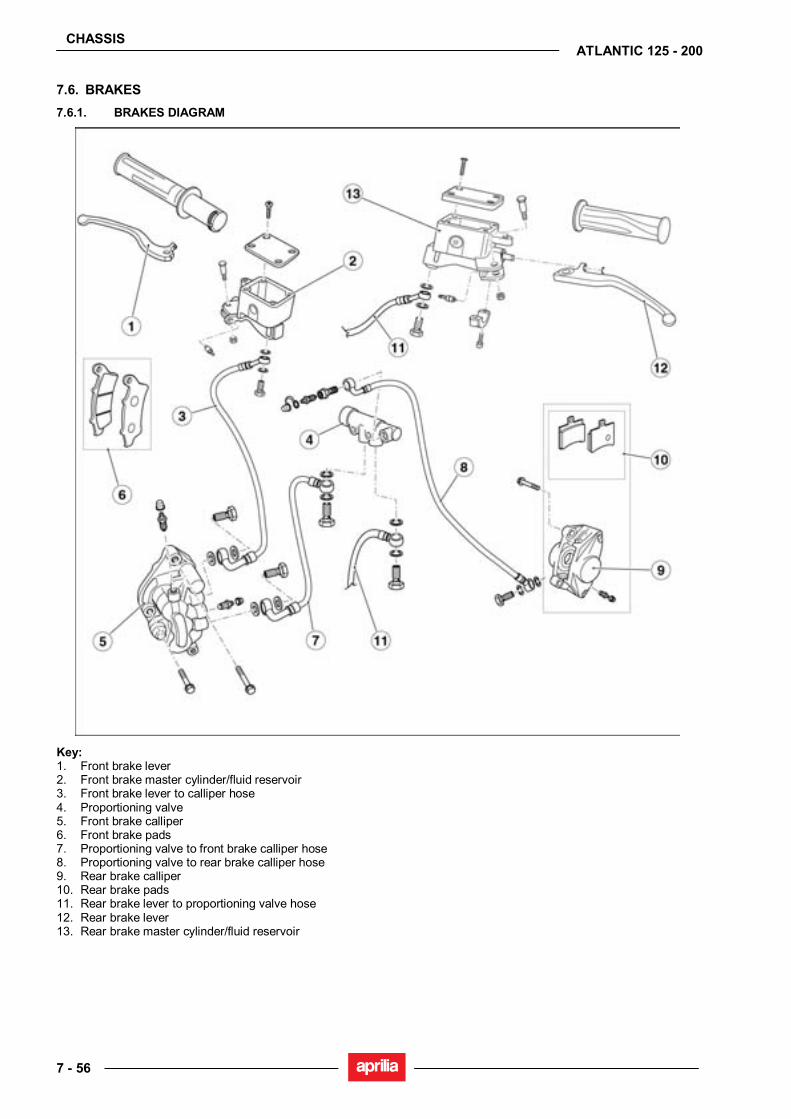
CHASSIS
7 - 56
ATLANTIC 125 - 200
7.6. BRAKES 7.6.1. BRAKES DIAGRAM
Key: 1. Front brake lever 2. Front brake master cylinder/fluid reservoir 3. Front brake lever to calliper hose 4. Proportioning valve 5. Front brake calliper 6. Front brake pads 7. Proportioning valve to front brake calliper hose 8. Proportioning valve to rear brake calliper hose 9. Rear brake calliper 10. Rear brake pads 11. Rear brake lever to proportioning valve hose 12. Rear brake lever 13. Rear brake master cylinder/fluid reservoir
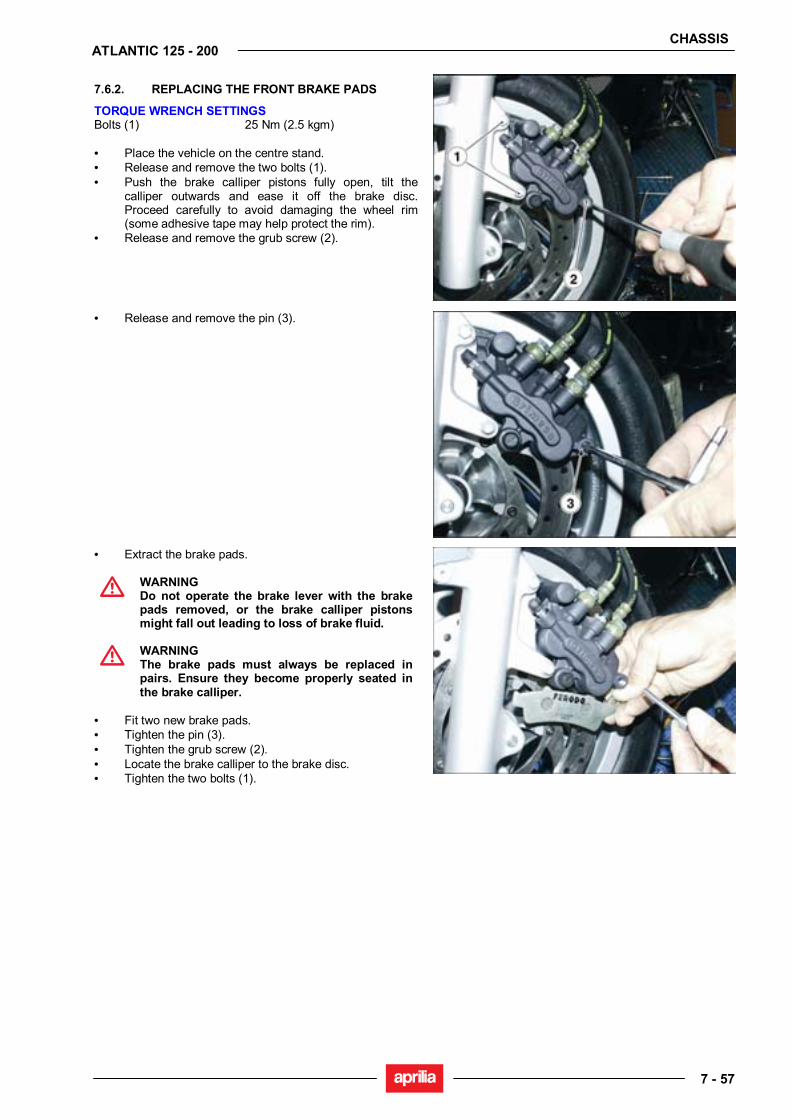
CHASSIS
7 - 57
ATLANTIC 125 - 200
7.6.2. REPLACING THE FRONT BRAKE PADS
TORQUE WRENCH SETTINGS Bolts (1) 25 Nm (2.5 kgm) • Place the vehicle on the centre stand. • Release and remove the two bolts (1). • Push the brake calliper pistons fully open, tilt the
calliper outwards and ease it off the brake disc. Proceed carefully to avoid damaging the wheel rim (some adhesive tape may help protect the rim).
• Release and remove the grub screw (2).
• Release and remove the pin (3).
• Extract the brake pads.
WARNING Do not operate the brake lever with the brake pads removed, or the brake calliper pistons might fall out leading to loss of brake fluid.
WARNING The brake pads must always be replaced in pairs. Ensure they become properly seated in the brake calliper.
• Fit two new brake pads. • Tighten the pin (3). • Tighten the grub screw (2). • Locate the brake calliper to the brake disc. • Tighten the two bolts (1).
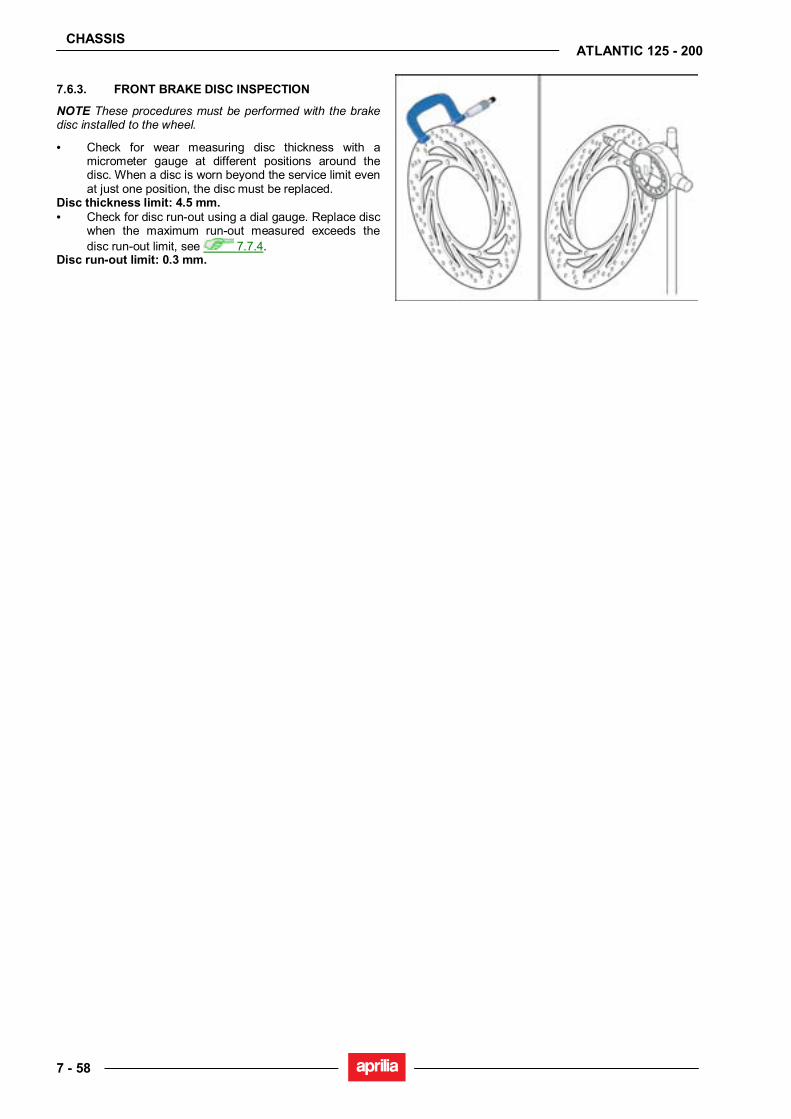
CHASSIS
7 - 58
ATLANTIC 125 - 200
7.6.3. FRONT BRAKE DISC INSPECTION
NOTE These procedures must be performed with the brake disc installed to the wheel.
• Check for wear measuring disc thickness with a micrometer gauge at different positions around the disc. When a disc is worn beyond the service limit even at just one position, the disc must be replaced.
Disc thickness limit: 4.5 mm. • Check for disc run-out using a dial gauge. Replace disc
when the maximum run-out measured exceeds the disc run-out limit, see 7.7.4.
Disc run-out limit: 0.3 mm.
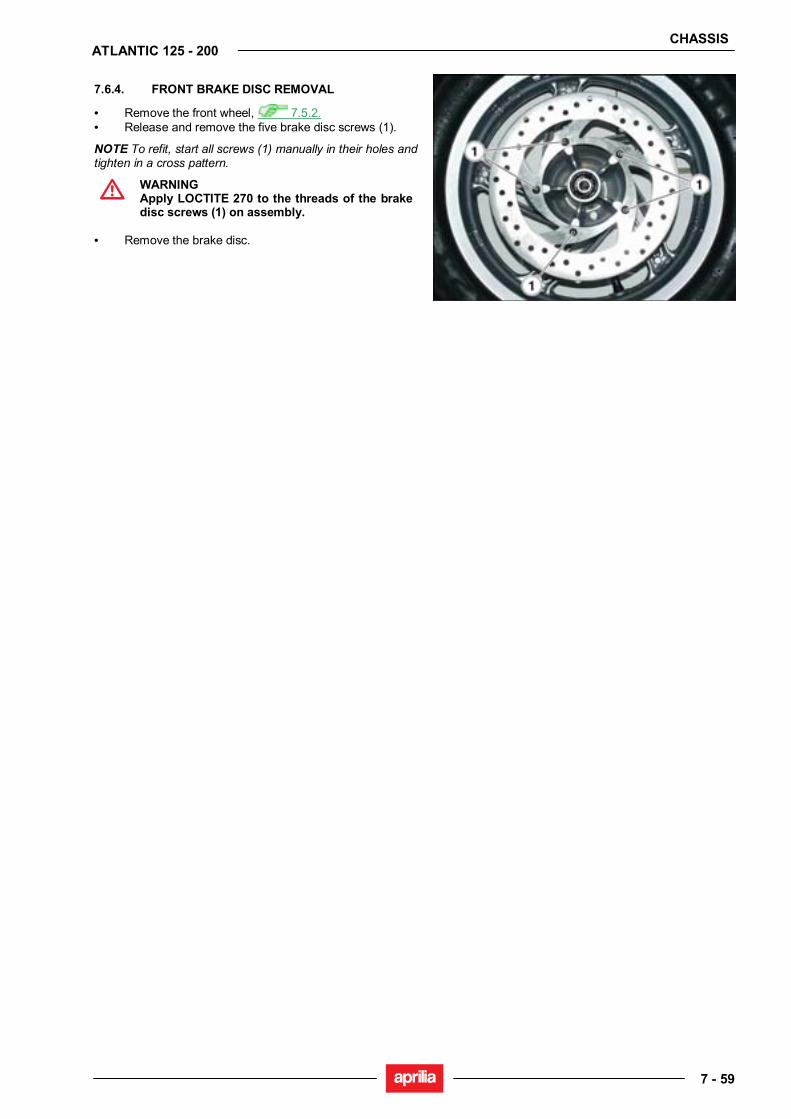
CHASSIS
7 - 59
ATLANTIC 125 - 200
7.6.4. FRONT BRAKE DISC REMOVAL
• Remove the front wheel, 7.5.2. • Release and remove the five brake disc screws (1).
NOTE To refit, start all screws (1) manually in their holes and tighten in a cross pattern.
WARNING Apply LOCTITE 270 to the threads of the brake disc screws (1) on assembly.
• Remove the brake disc.
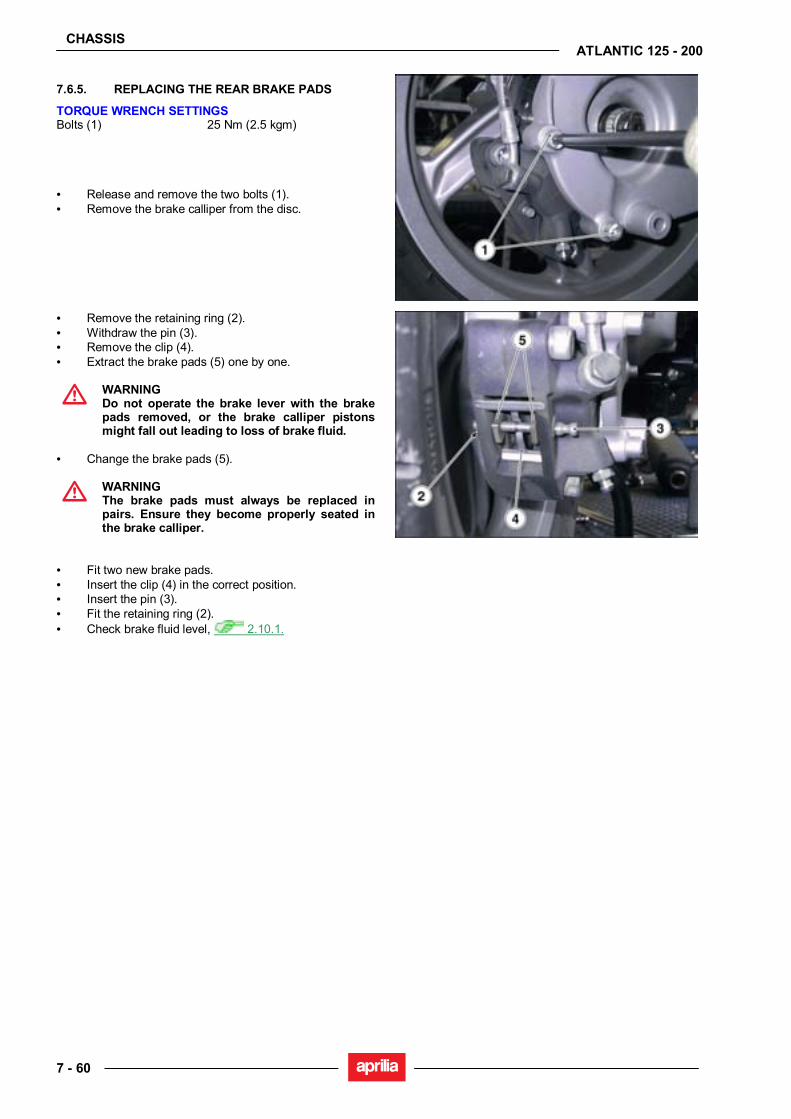
CHASSIS
7 - 60
ATLANTIC 125 - 200
7.6.5. REPLACING THE REAR BRAKE PADS
TORQUE WRENCH SETTINGS Bolts (1) 25 Nm (2.5 kgm)
• Release and remove the two bolts (1). • Remove the brake calliper from the disc.
• Remove the retaining ring (2). • Withdraw the pin (3). • Remove the clip (4). • Extract the brake pads (5) one by one.
WARNING Do not operate the brake lever with the brake pads removed, or the brake calliper pistons might fall out leading to loss of brake fluid.
• Change the brake pads (5).
WARNING The brake pads must always be replaced in pairs. Ensure they become properly seated in the brake calliper.
• Fit two new brake pads. • Insert the clip (4) in the correct position. • Insert the pin (3). • Fit the retaining ring (2). • Check brake fluid level, 2.10.1.
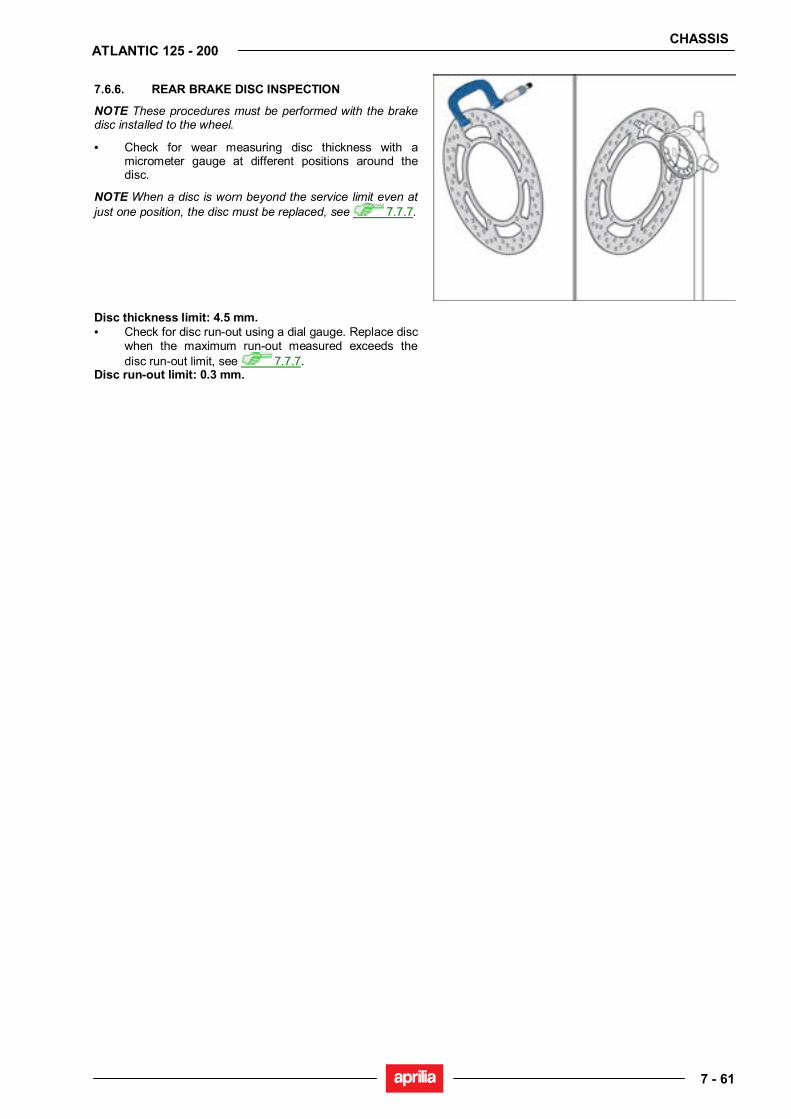
CHASSIS
7 - 61
ATLANTIC 125 - 200
7.6.6. REAR BRAKE DISC INSPECTION
NOTE These procedures must be performed with the brake disc installed to the wheel.
• Check for wear measuring disc thickness with a micrometer gauge at different positions around the disc.
NOTE When a disc is worn beyond the service limit even at just one position, the disc must be replaced, see 7.7.7.
Disc thickness limit: 4.5 mm. • Check for disc run-out using a dial gauge. Replace disc
when the maximum run-out measured exceeds the disc run-out limit, see 7.7.7.
Disc run-out limit: 0.3 mm.

CHASSIS
7 - 62
ATLANTIC 125 - 200
7.6.7. REAR BRAKE DISC REMOVAL
• Remove the rear wheel, 7.5.2. • Release and remove the three brake disc screws (1).
NOTE To refit, start all screws (1) manually in their holes and tighten in a cross pattern.
WARNING Apply LOCTITE 270 to the threads of the brake disc screws (1) on assembly.
• Remove the brake disc.
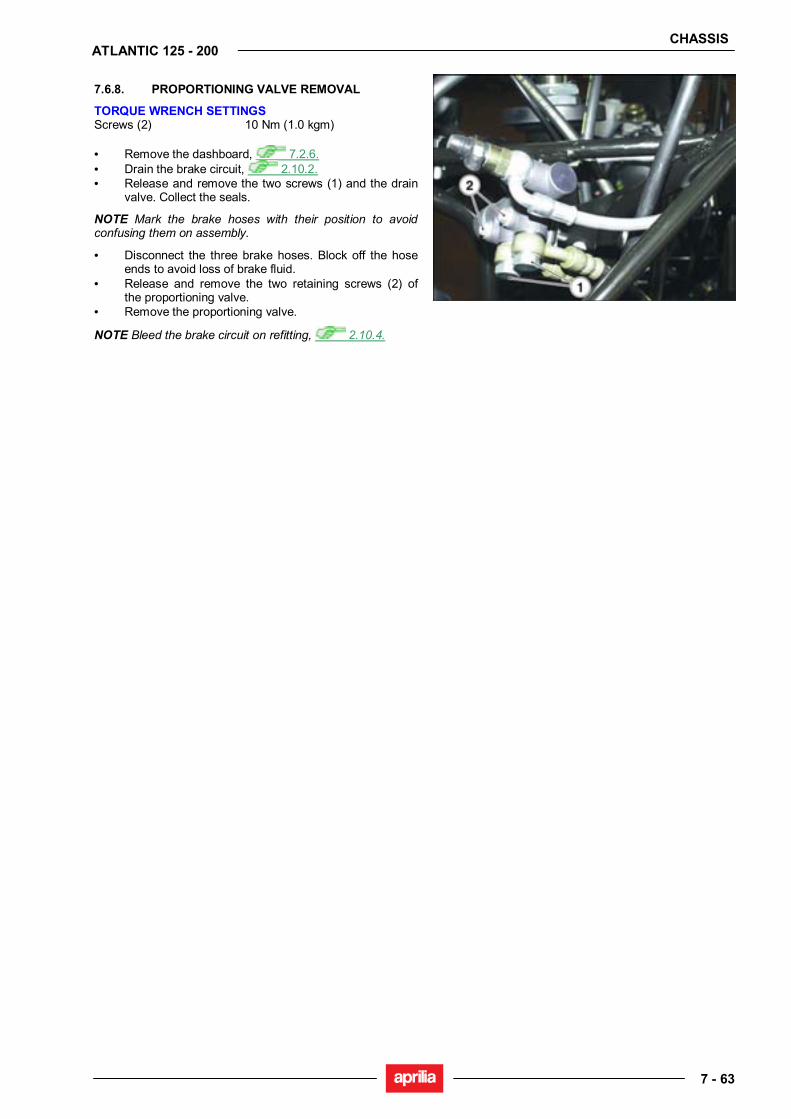
CHASSIS
7 - 63
ATLANTIC 125 - 200
7.6.8. PROPORTIONING VALVE REMOVAL
TORQUE WRENCH SETTINGS Screws (2) 10 Nm (1.0 kgm) • Remove the dashboard, 7.2.6. • Drain the brake circuit, 2.10.2. • Release and remove the two screws (1) and the drain
valve. Collect the seals.
NOTE Mark the brake hoses with their position to avoid confusing them on assembly.
• Disconnect the three brake hoses. Block off the hose ends to avoid loss of brake fluid.
• Release and remove the two retaining screws (2) of the proportioning valve.
• Remove the proportioning valve.
NOTE Bleed the brake circuit on refitting, 2.10.4.
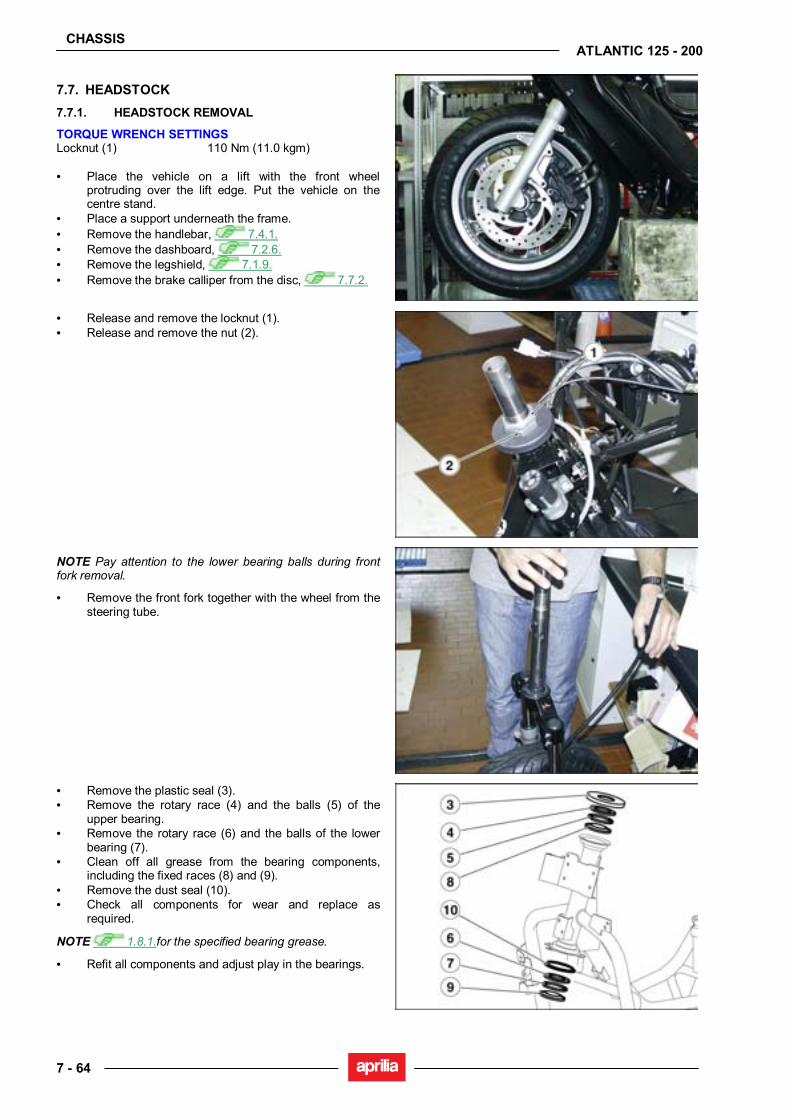
CHASSIS
7 - 64
ATLANTIC 125 - 200
7.7. HEADSTOCK 7.7.1. HEADSTOCK REMOVAL
TORQUE WRENCH SETTINGS Locknut (1) 110 Nm (11.0 kgm) • Place the vehicle on a lift with the front wheel
protruding over the lift edge. Put the vehicle on the centre stand.
• Place a support underneath the frame. • Remove the handlebar, 7.4.1. • Remove the dashboard, 7.2.6. • Remove the legshield, 7.1.9. • Remove the brake calliper from the disc, 7.7.2.
• Release and remove the locknut (1). • Release and remove the nut (2).
NOTE Pay attention to the lower bearing balls during front fork removal.
• Remove the front fork together with the wheel from the steering tube.
• Remove the plastic seal (3). • Remove the rotary race (4) and the balls (5) of the
upper bearing. • Remove the rotary race (6) and the balls of the lower
bearing (7). • Clean off all grease from the bearing components,
including the fixed races (8) and (9). • Remove the dust seal (10). • Check all components for wear and replace as
required.
NOTE 1.8.1.for the specified bearing grease.
• Refit all components and adjust play in the bearings.
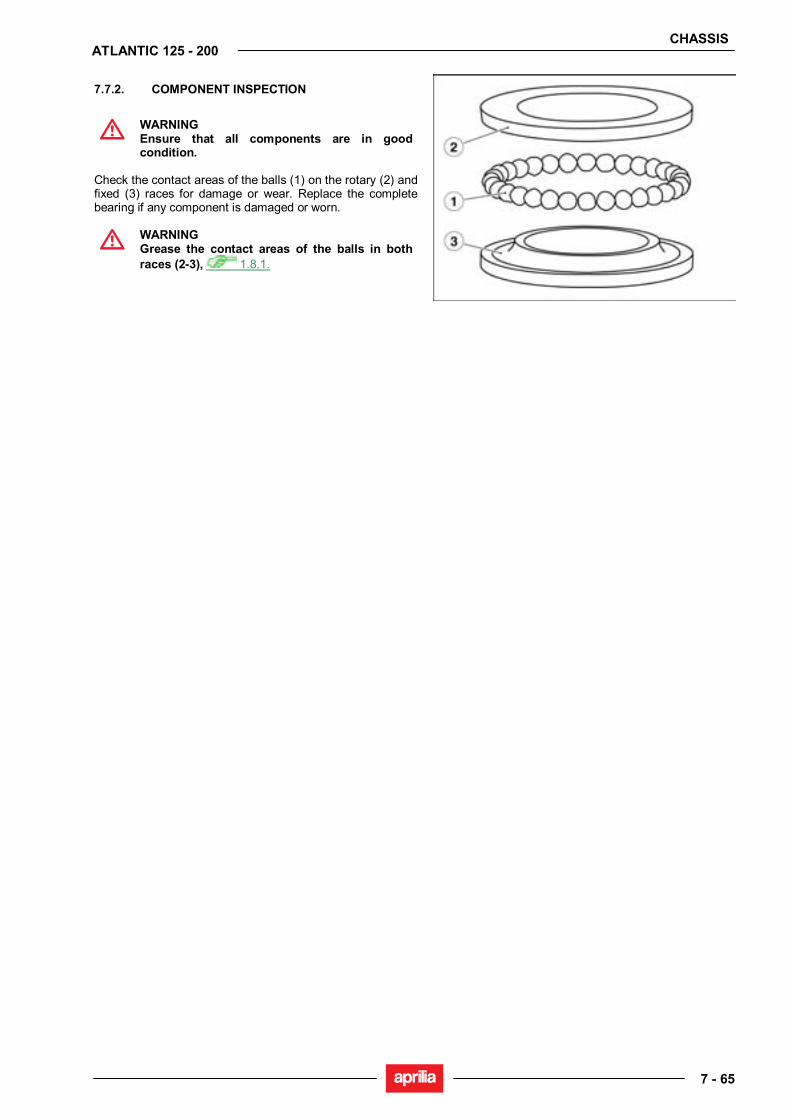
CHASSIS
7 - 65
ATLANTIC 125 - 200
7.7.2. COMPONENT INSPECTION
WARNING Ensure that all components are in good condition.
Check the contact areas of the balls (1) on the rotary (2) and fixed (3) races for damage or wear. Replace the complete bearing if any component is damaged or worn.
WARNING Grease the contact areas of the balls in both races (2-3), 1.8.1.
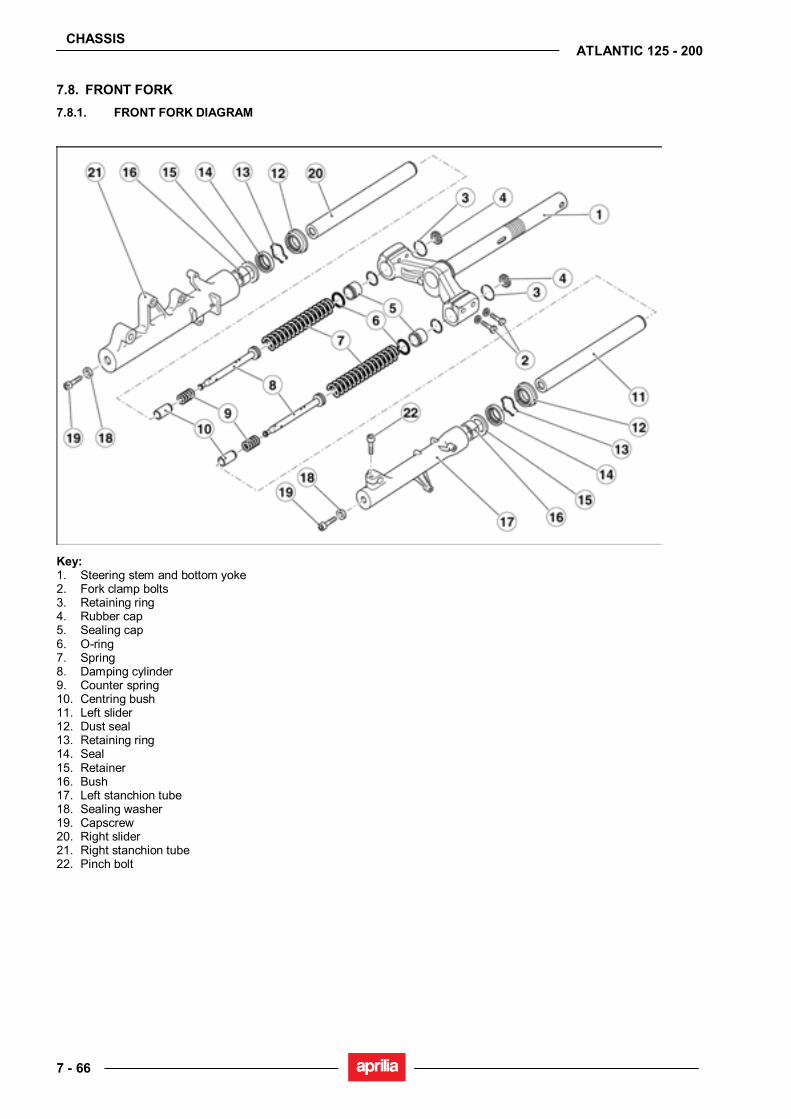
CHASSIS
7 - 66
ATLANTIC 125 - 200
7.8. FRONT FORK 7.8.1. FRONT FORK DIAGRAM
Key: 1. Steering stem and bottom yoke 2. Fork clamp bolts 3. Retaining ring 4. Rubber cap 5. Sealing cap 6. O-ring 7. Spring 8. Damping cylinder 9. Counter spring 10. Centring bush 11. Left slider 12. Dust seal 13. Retaining ring 14. Seal 15. Retainer 16. Bush 17. Left stanchion tube 18. Sealing washer 19. Capscrew 20. Right slider 21. Right stanchion tube 22. Pinch bolt
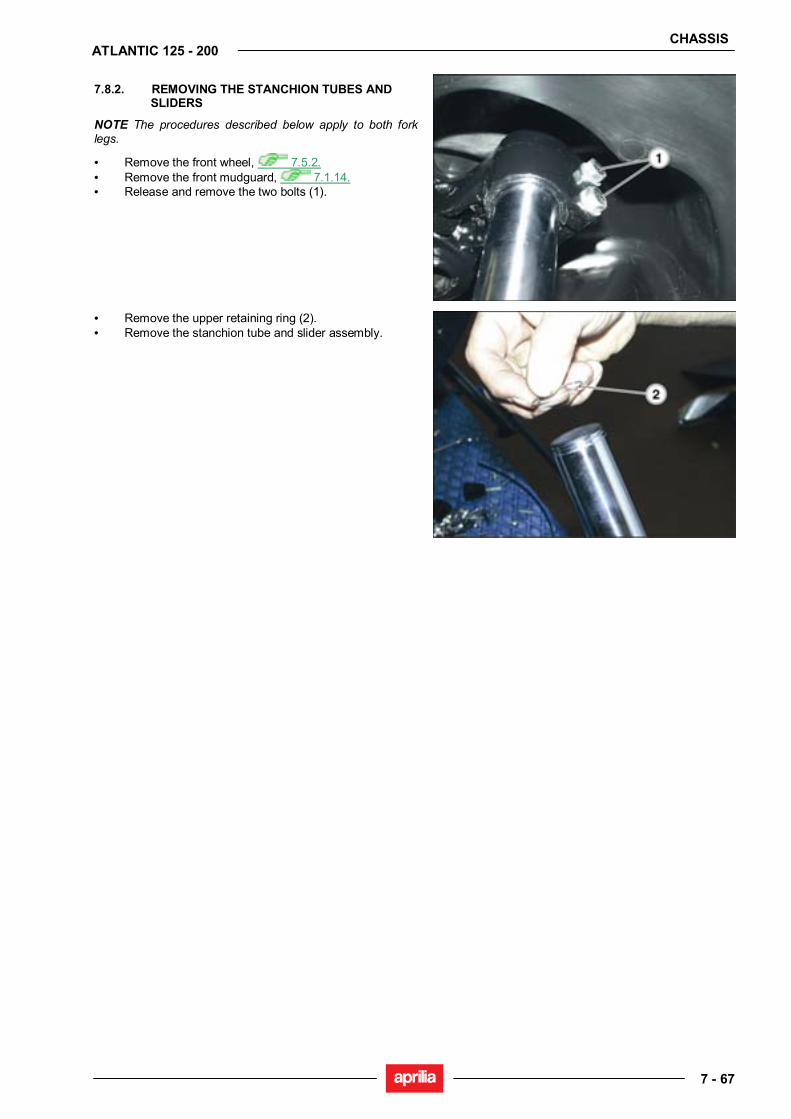
CHASSIS
7 - 67
ATLANTIC 125 - 200
7.8.2. REMOVING THE STANCHION TUBES AND SLIDERS
NOTE The procedures described below apply to both fork legs.
• Remove the front wheel, 7.5.2. • Remove the front mudguard, 7.1.14. • Release and remove the two bolts (1).
• Remove the upper retaining ring (2). • Remove the stanchion tube and slider assembly.

CHASSIS
7 - 68
ATLANTIC 125 - 200
7.8.3. DISASSEMBLING THE STANCHION TUBES AND SLIDERS
• Drain all oil, 7.9.4. • Place the fork leg in a vice with soft (aluminium) jaws.
• Release and remove the capscrew (1).
• Remove the slider and collect the centring bush.
NOTE Proceed carefully when removing the different components, or you might damage the inner seating surface of the slider.
• Remove damping cylinder (2) and spring (3) from the slider.
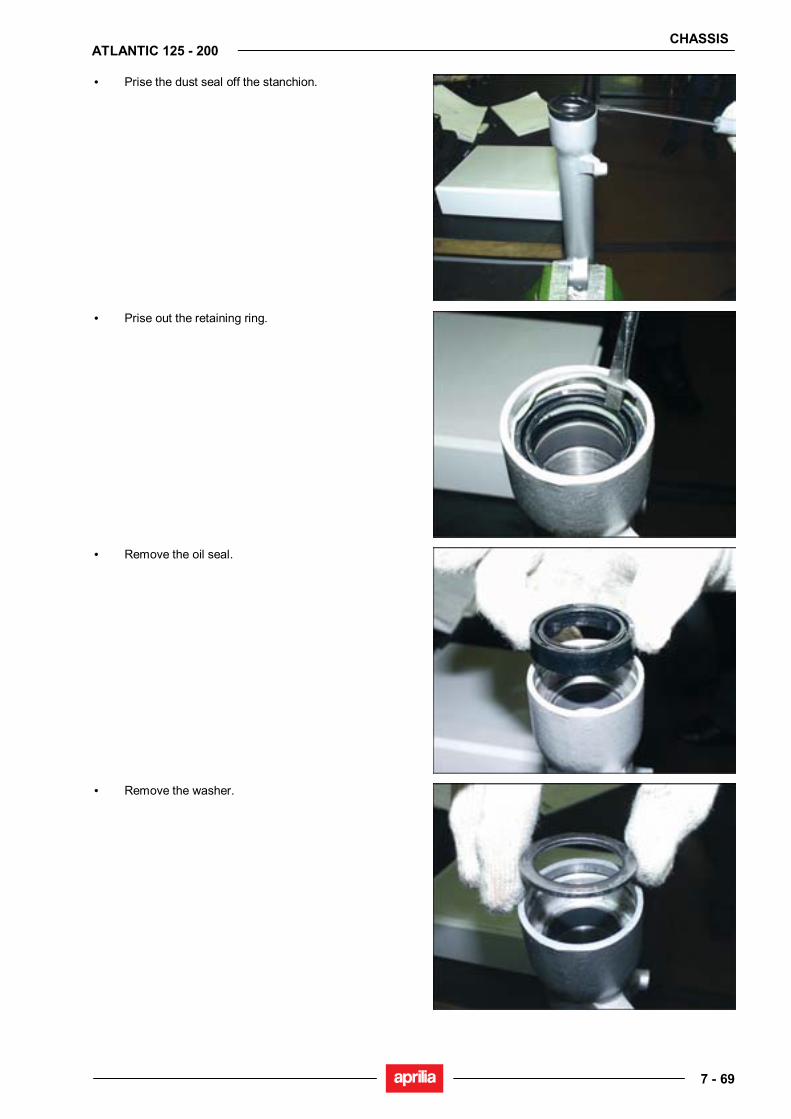
CHASSIS
7 - 69
ATLANTIC 125 - 200
• Prise the dust seal off the stanchion.
• Prise out the retaining ring.
• Remove the oil seal.
• Remove the washer.
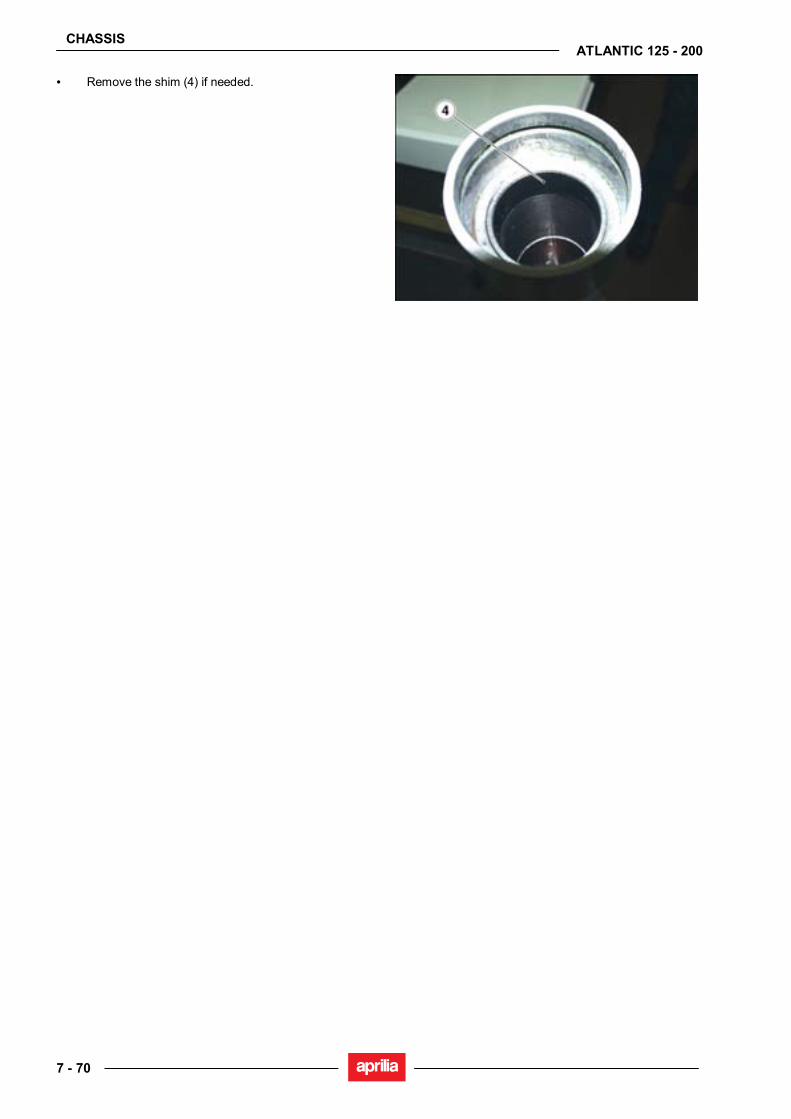
CHASSIS
7 - 70
ATLANTIC 125 - 200
• Remove the shim (4) if needed.
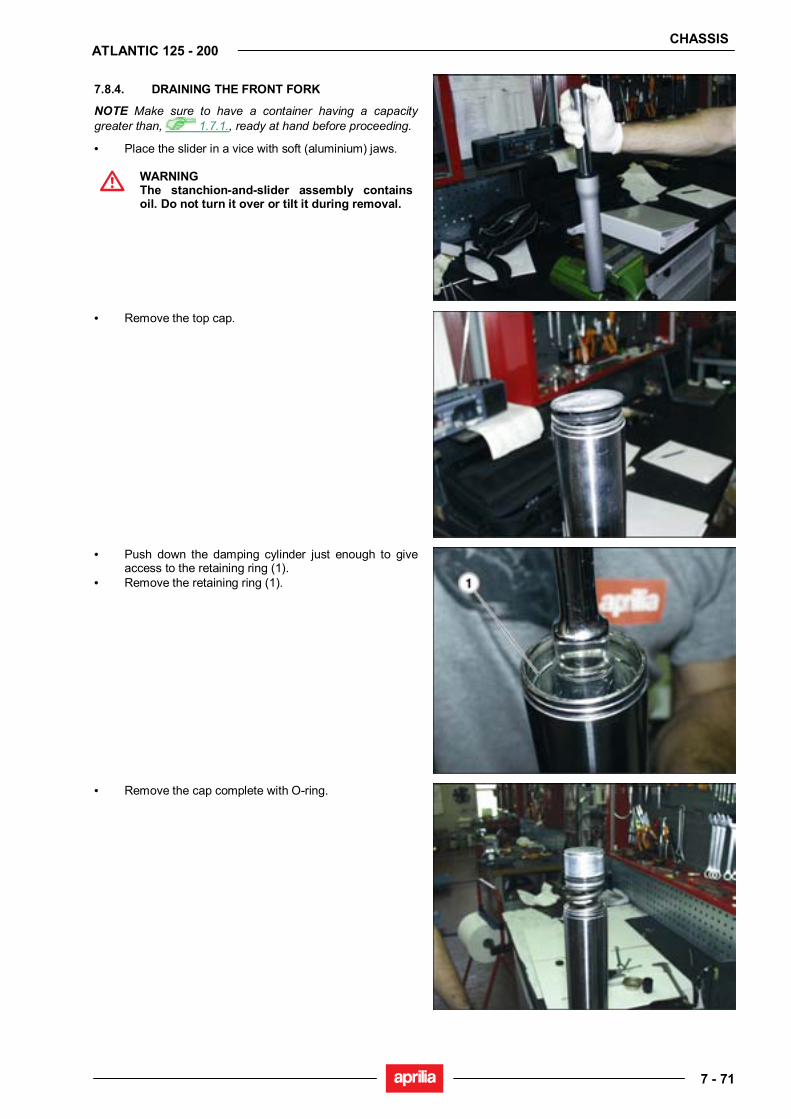
CHASSIS
7 - 71
ATLANTIC 125 - 200
7.8.4. DRAINING THE FRONT FORK
NOTE Make sure to have a container having a capacity greater than, 1.7.1., ready at hand before proceeding.
• Place the slider in a vice with soft (aluminium) jaws.
WARNING The stanchion-and-slider assembly contains oil. Do not turn it over or tilt it during removal.
• Remove the top cap.
• Push down the damping cylinder just enough to give access to the retaining ring (1).
• Remove the retaining ring (1).
• Remove the cap complete with O-ring.
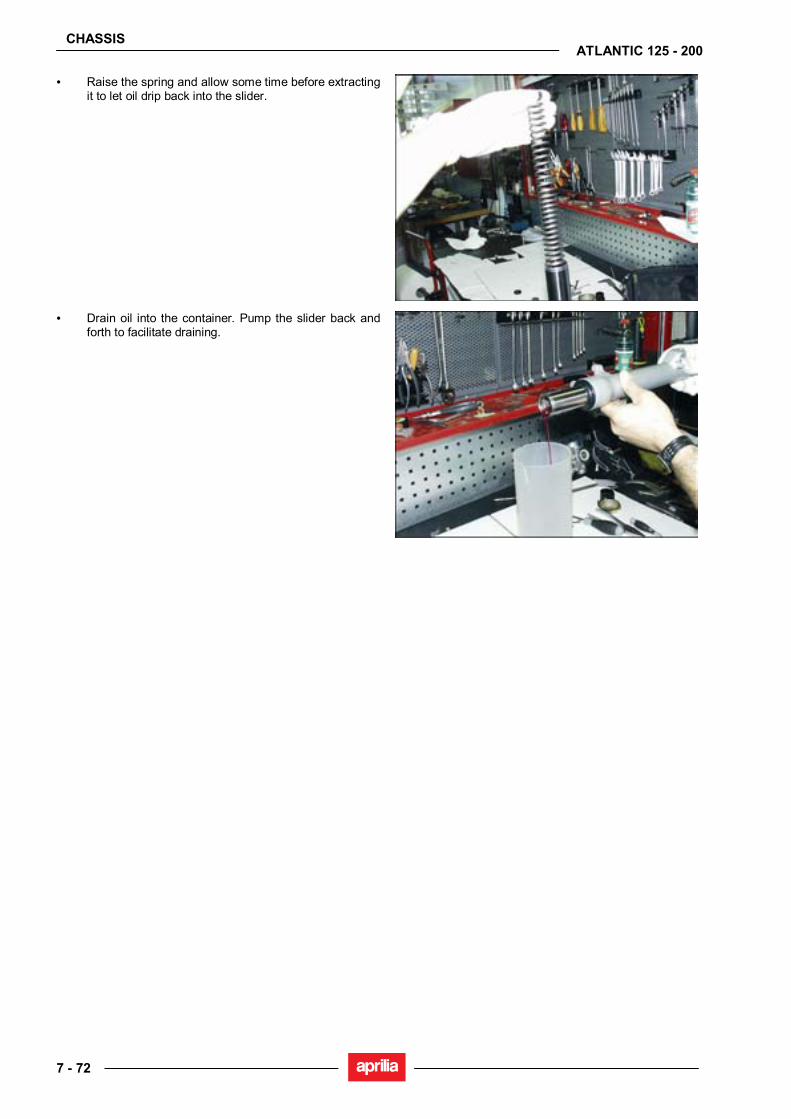
CHASSIS
7 - 72
ATLANTIC 125 - 200
• Raise the spring and allow some time before extracting it to let oil drip back into the slider.
• Drain oil into the container. Pump the slider back and forth to facilitate draining.
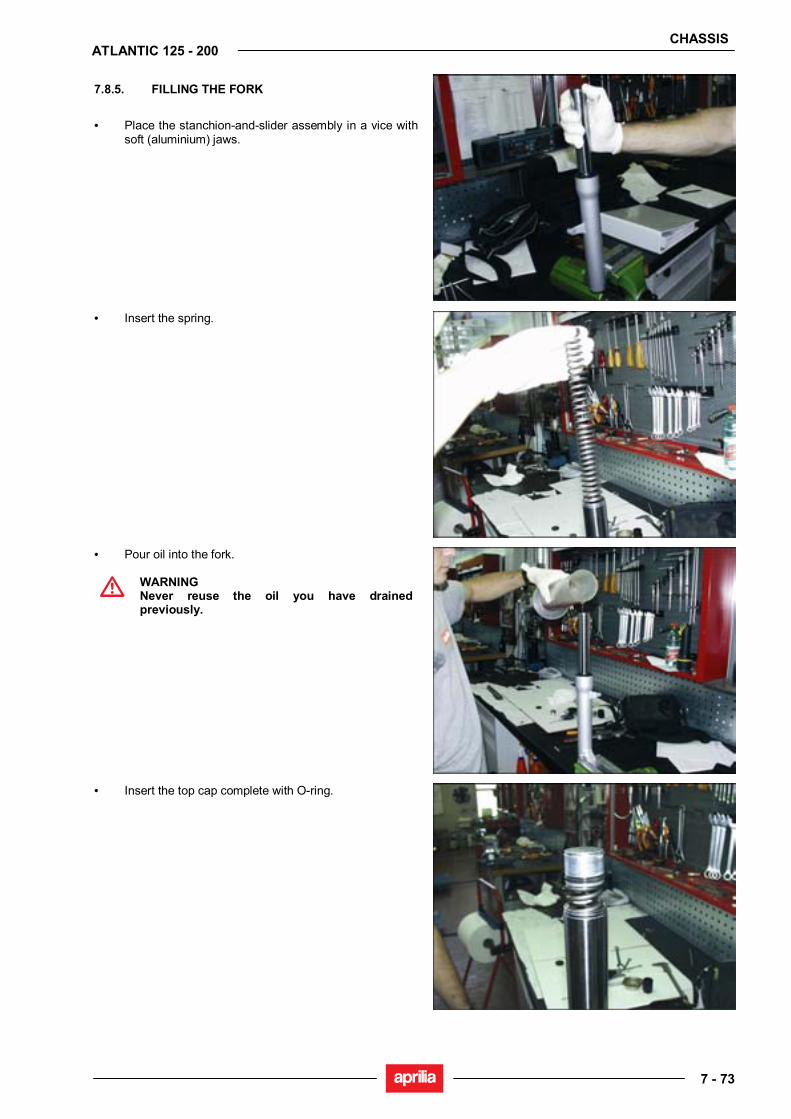
CHASSIS
7 - 73
ATLANTIC 125 - 200
7.8.5. FILLING THE FORK
• Place the stanchion-and-slider assembly in a vice with
soft (aluminium) jaws.
• Insert the spring.
• Pour oil into the fork.
WARNING Never reuse the oil you have drained previously.
• Insert the top cap complete with O-ring.

CHASSIS
7 - 74
ATLANTIC 125 - 200
• Insert the damping cylinder (1).
• Push down the damping cylinder until exposing the retaining ring (2) groove.
• Insert the retaining ring (2).
• Fit the top cap.

CHASSIS
7 - 75
ATLANTIC 125 - 200
7.8.6. COMPONENT INSPECTION
Read 1.2.1. carefully. STANCHION TUBE • Inspect the sliding surface for scoring and/or
scratching. Eliminate minor scoring with wet sand paper (grain size 1).
• Replace the stanchion if badly scored. • Check for stanchion buckling using a dial gauge. • Replace the stanchion if buckled beyond the service
limit. Service limit: 0.2 mm.
DANGER NEVER attempt to straighten a buckled stanchion as this would weaken the overall structure leading to a dangerous riding condition.
SLIDER • Inspect for damage and/or cracking. Replace if
damaged. • Change any component which is badly worn or
damaged. Renew the following components on assembly: - top cap O-ring (1);
- oil seal (2); - dust seal (3);
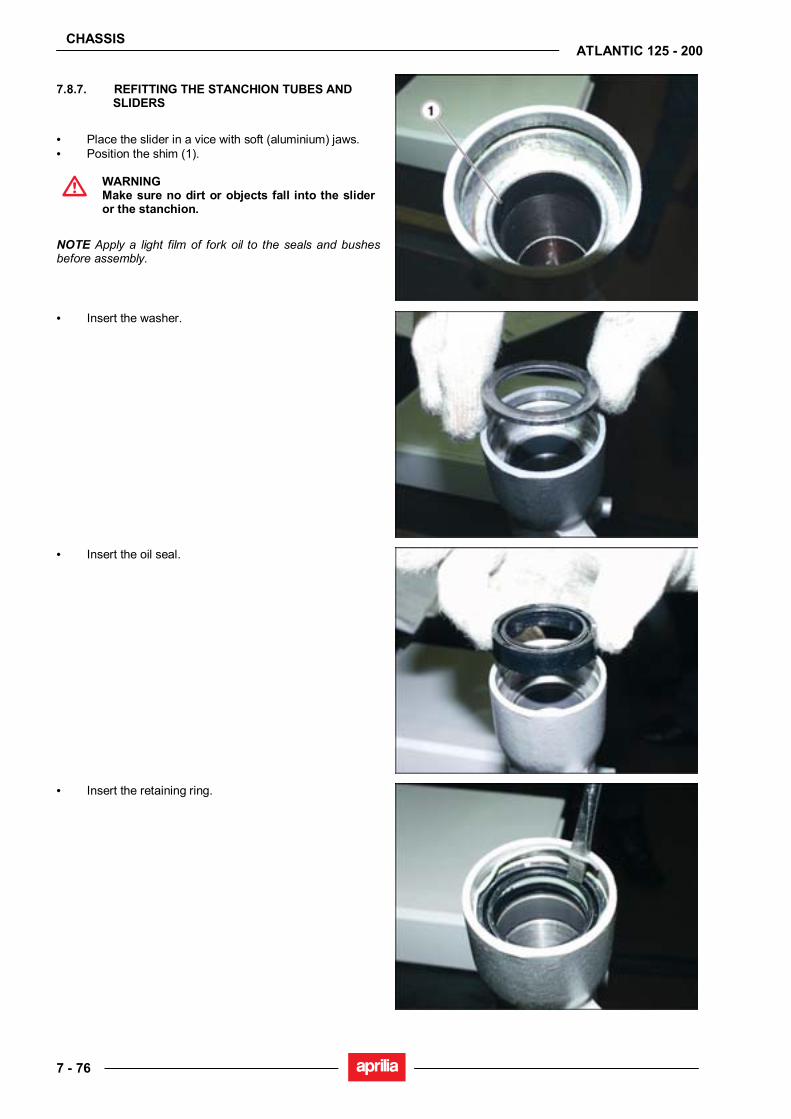
CHASSIS
7 - 76
ATLANTIC 125 - 200
7.8.7. REFITTING THE STANCHION TUBES AND SLIDERS
• Place the slider in a vice with soft (aluminium) jaws. • Position the shim (1).
WARNING Make sure no dirt or objects fall into the slider or the stanchion.
NOTE Apply a light film of fork oil to the seals and bushes before assembly.
• Insert the washer.
• Insert the oil seal.
• Insert the retaining ring.
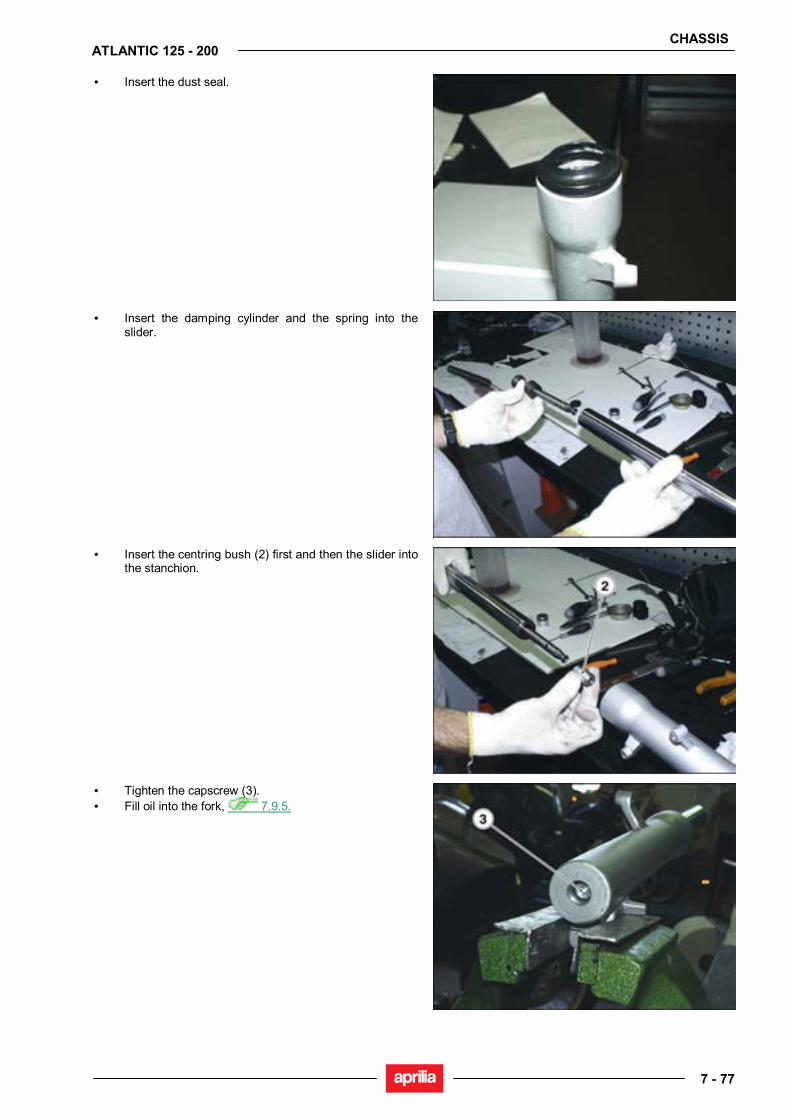
CHASSIS
7 - 77
ATLANTIC 125 - 200
• Insert the dust seal.
• Insert the damping cylinder and the spring into the slider.
• Insert the centring bush (2) first and then the slider into the stanchion.
• Tighten the capscrew (3). • Fill oil into the fork, 7.9.5.
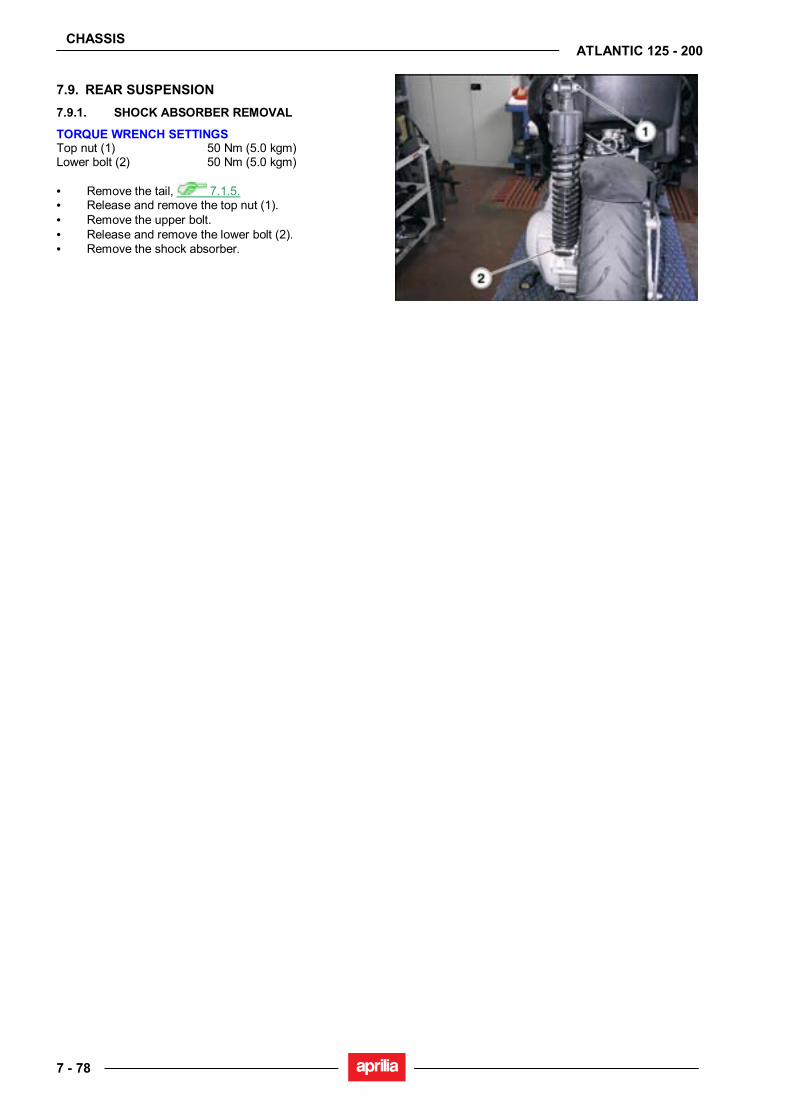
CHASSIS
7 - 78
ATLANTIC 125 - 200
7.9. REAR SUSPENSION 7.9.1. SHOCK ABSORBER REMOVAL
TORQUE WRENCH SETTINGS Top nut (1) 50 Nm (5.0 kgm) Lower bolt (2) 50 Nm (5.0 kgm) • Remove the tail, 7.1.5. • Release and remove the top nut (1). • Remove the upper bolt. • Release and remove the lower bolt (2). • Remove the shock absorber.
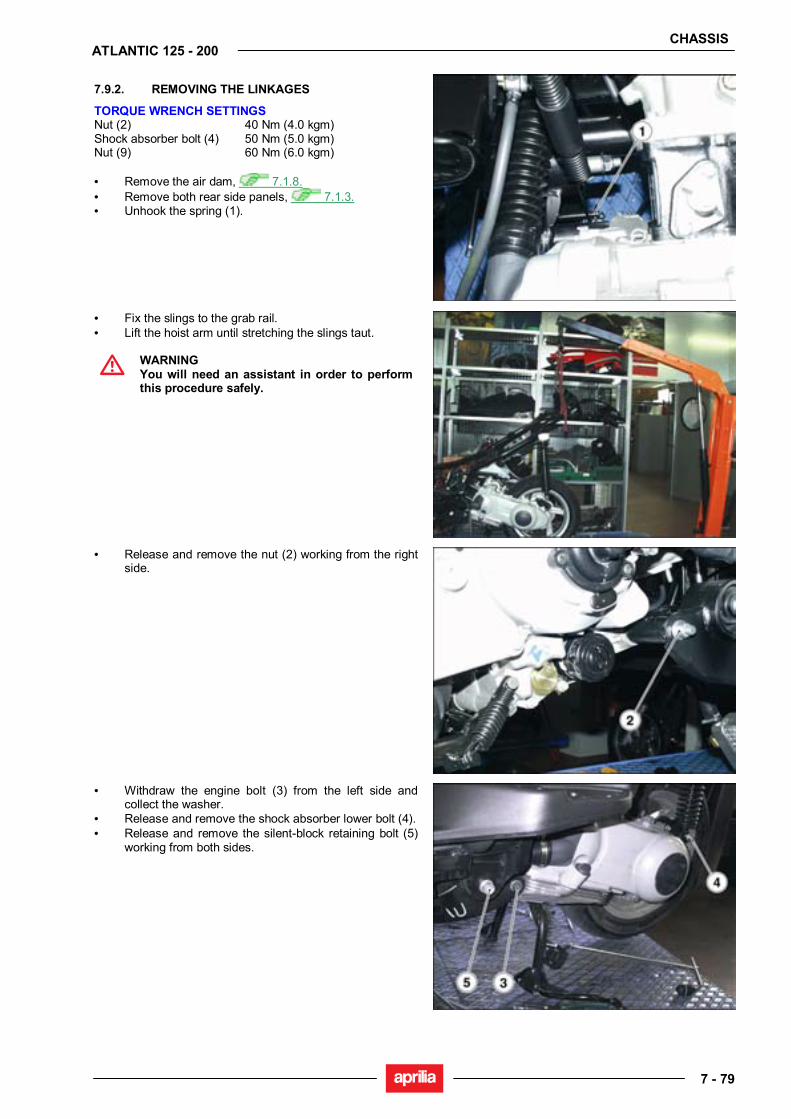
CHASSIS
7 - 79
ATLANTIC 125 - 200
7.9.2. REMOVING THE LINKAGES
TORQUE WRENCH SETTINGS Nut (2) 40 Nm (4.0 kgm) Shock absorber bolt (4) 50 Nm (5.0 kgm) Nut (9) 60 Nm (6.0 kgm) • Remove the air dam, 7.1.8. • Remove both rear side panels, 7.1.3. • Unhook the spring (1).
• Fix the slings to the grab rail. • Lift the hoist arm until stretching the slings taut.
WARNING You will need an assistant in order to perform this procedure safely.
• Release and remove the nut (2) working from the right side.
• Withdraw the engine bolt (3) from the left side and collect the washer.
• Release and remove the shock absorber lower bolt (4). • Release and remove the silent-block retaining bolt (5)
working from both sides.
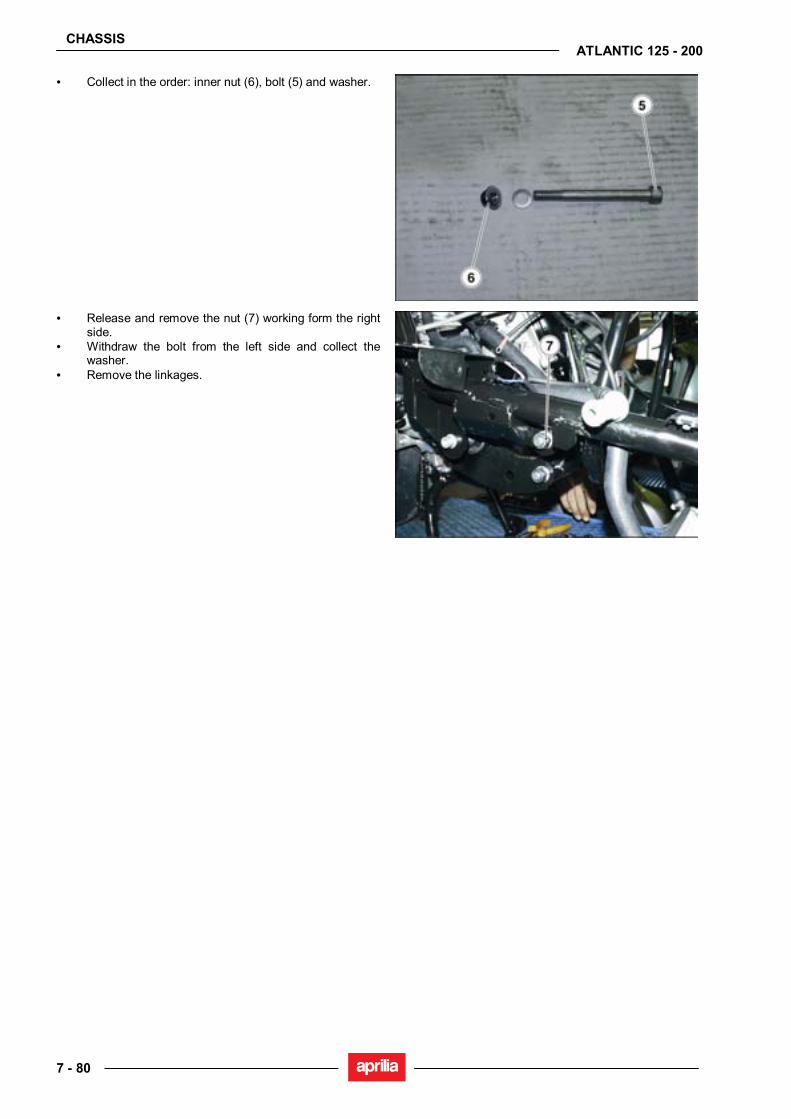
CHASSIS
7 - 80
ATLANTIC 125 - 200
• Collect in the order: inner nut (6), bolt (5) and washer.
• Release and remove the nut (7) working form the right side.
• Withdraw the bolt from the left side and collect the washer.
• Remove the linkages.

ELECTRICAL SYSTEM
8 - 1
ATLANTIC 125 - 200
ELECTRICAL SYSTEM 8
ELECTRICAL SYSTEM
8 - 2
ATLANTIC 125 - 200
SUMMARY 8.1. LAYOUT OF COMPONENTS.......................................................................................................3
8.1.1. LAYOUT OF ELECTRICAL COMPONENTS........................................................................3 8.2. FOREWORD ...............................................................................................................................4
8.2.1. FOREWORD.......................................................................................................................4 8.3. BATTERY ....................................................................................................................................5
8.3.1. BATTERY............................................................................................................................5 8.4. IGNITION SYSTEM AND STAND LOGIC.....................................................................................7
8.4.1. IGNITION SYSTEM AND STAND LOGIC ................................................................................7 8.5. CHARGE SYSTEM....................................................................................................................10
8.5.1. CHARGE SYSTEM AND POWER SUPPLY.......................................................................10 8.6. STARTER CIRCUIT...................................................................................................................12
8.6.1. STARTER CIRCUIT...........................................................................................................12 8.7. SENSORS .................................................................................................................................15
8.7.1. SENSOR CIRCUIT ............................................................................................................15 8.8. FAN AND REAR TOP BOX LIGHT.............................................................................................18
8.8.1. FAN AND REAR TOP BOX LIGHT SYSTEM .....................................................................18 8.9. LIGHT CIRCUIT.........................................................................................................................20
8.9.1. LIGHT CIRCUIT.................................................................................................................20 8.10. VISUAL AND ACOUSTIC SIGNALS ......................................................................................22
8.10.1. VISUAL AND ACOUSTIC SIGNALLING SYSTEM .............................................................22 8.11. BULB REPLACEMENT..........................................................................................................24
8.11.1. BULB REPLACEMENT......................................................................................................24 8.12. REPLACING THE FUSES .....................................................................................................27
8.12.1. REPLACING THE FUSES .................................................................................................27 8.13. BEAM SETTING ....................................................................................................................28
8.13.1. BEAM HEIGHT SETTING..................................................................................................28 8.13.2. BEAM HORIZONTAL SETTING.........................................................................................29
8.14. WIRING DIAGRAM................................................................................................................30 8.14.1. WIRING DIAGRAM............................................................................................................30
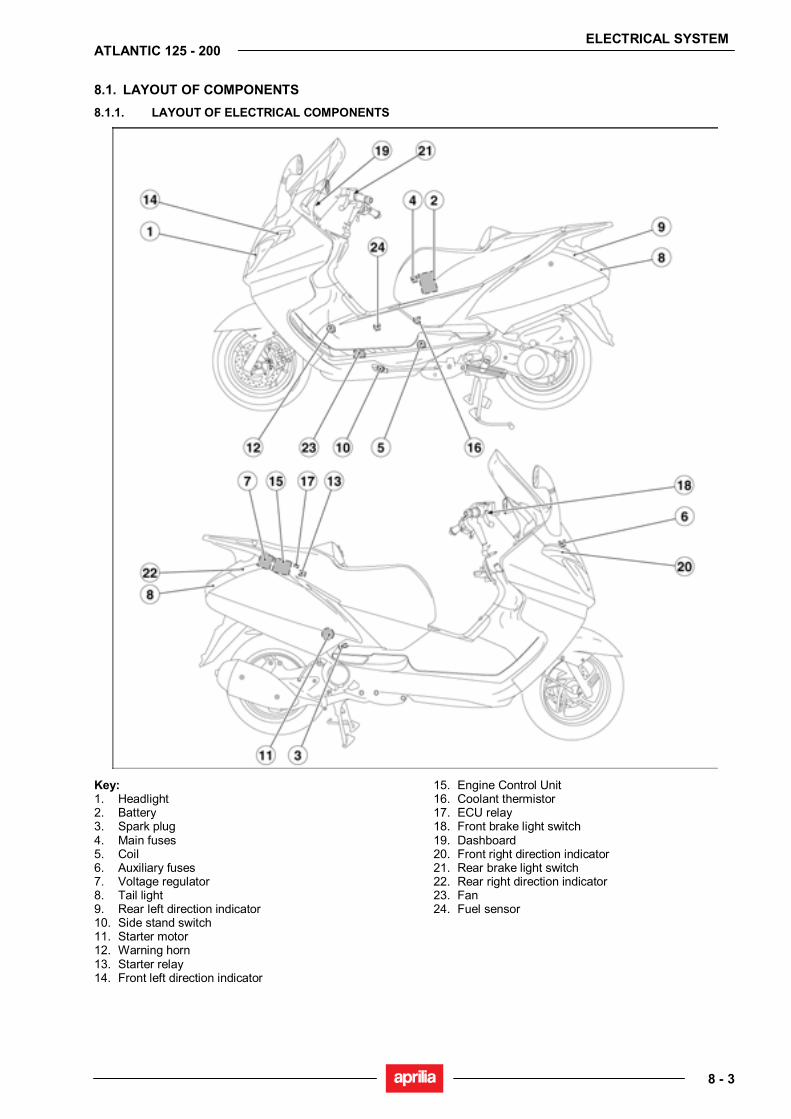
ELECTRICAL SYSTEM
8 - 3
ATLANTIC 125 - 200
8.1. LAYOUT OF COMPONENTS 8.1.1. LAYOUT OF ELECTRICAL COMPONENTS
Key: 1. Headlight 2. Battery 3. Spark plug 4. Main fuses 5. Coil 6. Auxiliary fuses 7. Voltage regulator 8. Tail light 9. Rear left direction indicator 10. Side stand switch 11. Starter motor 12. Warning horn 13. Starter relay 14. Front left direction indicator
15. Engine Control Unit 16. Coolant thermistor 17. ECU relay 18. Front brake light switch 19. Dashboard 20. Front right direction indicator 21. Rear brake light switch 22. Rear right direction indicator 23. Fan 24. Fuel sensor
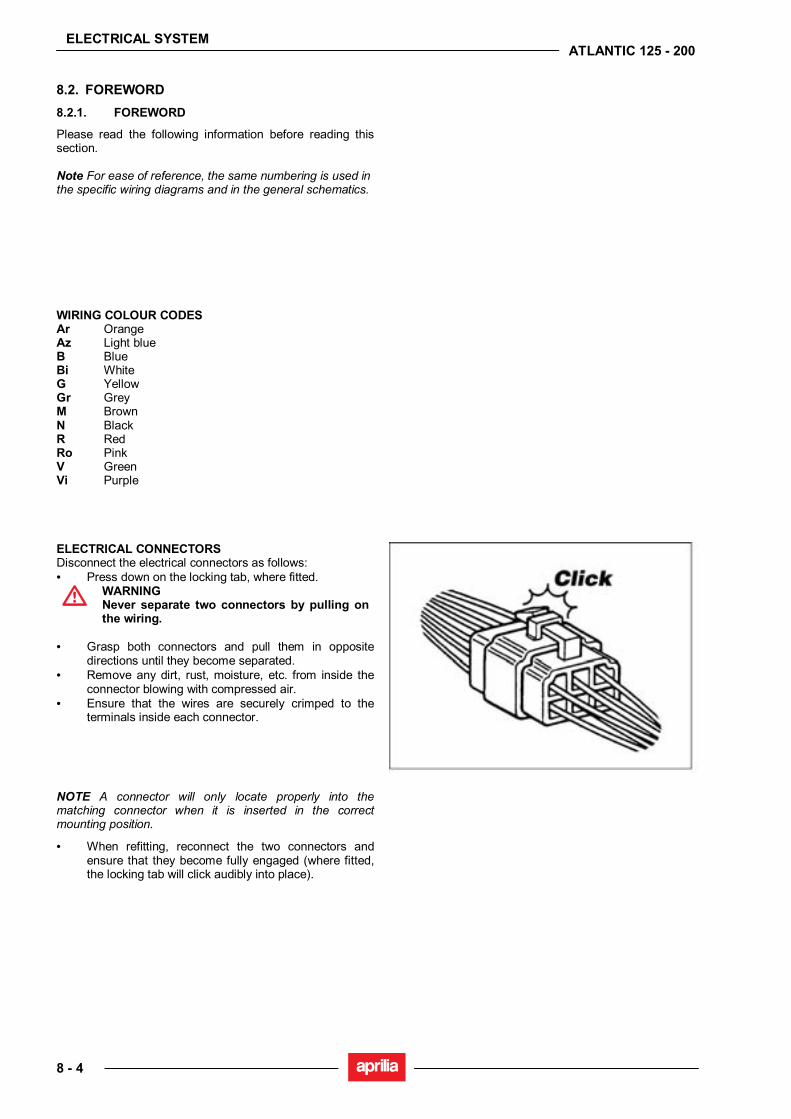
ELECTRICAL SYSTEM
8 - 4
ATLANTIC 125 - 200
8.2. FOREWORD 8.2.1. FOREWORD
Please read the following information before reading this section. Note For ease of reference, the same numbering is used in the specific wiring diagrams and in the general schematics.
WIRING COLOUR CODES Ar Orange Az Light blue B Blue Bi White G Yellow Gr Grey M Brown N Black R Red Ro Pink V Green Vi Purple
ELECTRICAL CONNECTORS Disconnect the electrical connectors as follows: • Press down on the locking tab, where fitted.
WARNING Never separate two connectors by pulling on the wiring.
• Grasp both connectors and pull them in opposite
directions until they become separated. • Remove any dirt, rust, moisture, etc. from inside the
connector blowing with compressed air. • Ensure that the wires are securely crimped to the
terminals inside each connector.
NOTE A connector will only locate properly into the matching connector when it is inserted in the correct mounting position.
• When refitting, reconnect the two connectors and ensure that they become fully engaged (where fitted, the locking tab will click audibly into place).
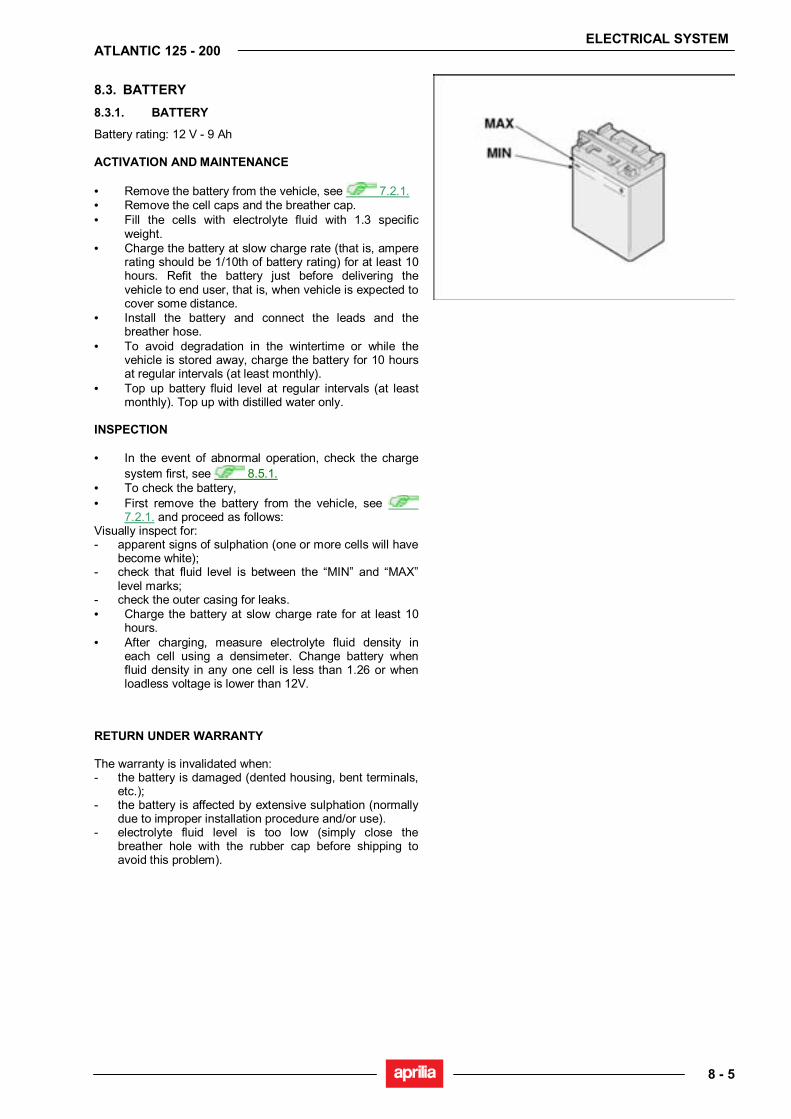
ELECTRICAL SYSTEM
8 - 5
ATLANTIC 125 - 200
8.3. BATTERY 8.3.1. BATTERY
Battery rating: 12 V - 9 Ah ACTIVATION AND MAINTENANCE • Remove the battery from the vehicle, see 7.2.1. • Remove the cell caps and the breather cap. • Fill the cells with electrolyte fluid with 1.3 specific
weight. • Charge the battery at slow charge rate (that is, ampere
rating should be 1/10th of battery rating) for at least 10 hours. Refit the battery just before delivering the vehicle to end user, that is, when vehicle is expected to cover some distance.
• Install the battery and connect the leads and the breather hose.
• To avoid degradation in the wintertime or while the vehicle is stored away, charge the battery for 10 hours at regular intervals (at least monthly).
• Top up battery fluid level at regular intervals (at least monthly). Top up with distilled water only.
INSPECTION • In the event of abnormal operation, check the charge
system first, see 8.5.1. • To check the battery, • First remove the battery from the vehicle, see
7.2.1. and proceed as follows: Visually inspect for: - apparent signs of sulphation (one or more cells will have
become white); - check that fluid level is between the “MIN” and “MAX”
level marks; - check the outer casing for leaks. • Charge the battery at slow charge rate for at least 10
hours. • After charging, measure electrolyte fluid density in
each cell using a densimeter. Change battery when fluid density in any one cell is less than 1.26 or when loadless voltage is lower than 12V.
RETURN UNDER WARRANTY The warranty is invalidated when: - the battery is damaged (dented housing, bent terminals,
etc.); - the battery is affected by extensive sulphation (normally
due to improper installation procedure and/or use). - electrolyte fluid level is too low (simply close the
breather hole with the rubber cap before shipping to avoid this problem).
ELECTRICAL SYSTEM
8 - 6
ATLANTIC 125 - 200
SAFETY RULES
WARNING Battery fluid contains sulphuric acid. Avoid contact with skin and do not spill on your clothing. Keep the battery away from sources of heat or ignition (such as sparks). This is especially important when the battery is under charging, as it releases hydrogen which may cause a fire or explosion.

ELECTRICAL SYSTEM
8 - 7
ATLANTIC 125 - 200
8.4. IGNITION SYSTEM AND STAND LOGIC 8.4.1. IGNITION SYSTEM AND STAND LOGIC
Key: 21. Key-operated switch 25. Engine kill switch 38. Main fuses 40. Battery 41. Auxiliary fuses 42. HT coil 43. Spark plug 44. Automatic starter 45. CDI control unit 46. Side stand switch 47. Pick up 61. Ignition relay
TROUBLESHOOTING • Ensure that the 7.5 A and 15 A fuses are in good
condition. • Check the spark plug and replace as required. • Check the high voltage lead and the spark plug cap. • Check the coil. • Check the pick-up. • Connect the green-brown lead to ground. If the ignition
operates, check the stand logic system. • Fit a substitute CDI control unit known to be in good
working order.

ELECTRICAL SYSTEM
8 - 8
ATLANTIC 125 - 200
TEST READINGS Ignition coil test Test the coil using a portable multimeter. Check for continuity of the primary and secondary windings. The resistance readings found need not match standard values exactly. If the windings are in good working order, resistance readings should approximate the standard values. Coil winding resistance
Primary 0.2 ohm ± 10%
Secondary 2.9 Kohm ± 10% Warning: Disconnect the spark plug cap before measuring.
Pick-up test • Disconnect the pick-up connector. • Measure resistance across the terminals of the
yellow/blue and yellow/green wires using a multimeter set to the 1000 Ohm range. Correct reading is 105 Ohm ± 10% (at 20 °C).
• Replace the pick-up when detected reading indicates infinite resistance or is below the specified range.
CDI CONTROL UNIT test This is a capacitive discharge control unit with digital spark advance control based on engine rpm. The control unit is fitted with two connectors. The eight-pin connector is in use. Pin-out 1. Direction indicator control 2. Not connected 3. Ignition coil control 4. Not connected 5. +15 input 6. Pick-up input 7. Starter control 8. Ground
TEST READINGS Starter relay test To test relay operation: • Feed 12 Volts to the two male terminals (85 - 86). • Check for continuity between the other two terminals
(87 – 30) using a multimeter set to the Ohm range. Correct reading when relay is fed: 0 ohm Correct reading when relay is not fed: ∞ ohm Replace the relay if the readings obtained deviate from those specified.

ELECTRICAL SYSTEM
8 - 9
ATLANTIC 125 - 200
SIDE STAND SWITCH TEST Ensure that there is no obstruction to side stand (1) rotation. Check for the following: • Inspect the springs (2) for any sign of damage, wear,
rust or weakening. • The side stand should rotate freely. Grease the joint if
needed, see 2.2.1. The side stand (1) is fitted with a safety switch (3) that inhibits ignition or shuts down engine operation whenever the side stand (1) is down. To test safety switch (3) operation: • Sit astride the vehicle. • Raise the side stand (1). • Start the engine.
• With the throttle twistgrip released and the engine idling, lower the side stand (1). This should cause the safety switch (3) to cut in.
This is what should happen next: - the engine should stop; - the side stand light “ “ on the dashboard should light
up. NOTE When this is not the case, replace the switch (3).
Wires Stand position
M v N
Up Down
SWITCH TEST Check switch continuity using a multimeter. Change any switch that operates other than as specified in the relevant diagram.
Wires Starter switch
V R
ON
OFF
LOCK
Wires Engine kill switch
Bi/B M/V
OFF
ON

ELECTRICAL SYSTEM
8 - 10
ATLANTIC 125 - 200
8.5. CHARGE SYSTEM 8.5.1. CHARGE SYSTEM AND POWER SUPPLY
Key: 38. Main fuses 39. Power socket 40. Battery 48. Generator 49. Voltage regulator
CHECKING CHARGE VOLTAGE • Check battery fluid level, 2.4.3. • Check battery voltage, 2.4.1. • Start the engine and rev it up to 5000 rpm (rotate
throttle twistgrip up to 1/4th of travel). • Set the light switch to “ ”. • Measure DC voltage across the positive (+) and
negative (–) battery terminals using a multimeter. • If the reading found is less than 13 V or more than 15
V: • Test alternator operation under no-load conditions and
check continuity of alternator and voltage regulator. Correct charge voltage: 13-15 V(DC) at 5000 rpm.
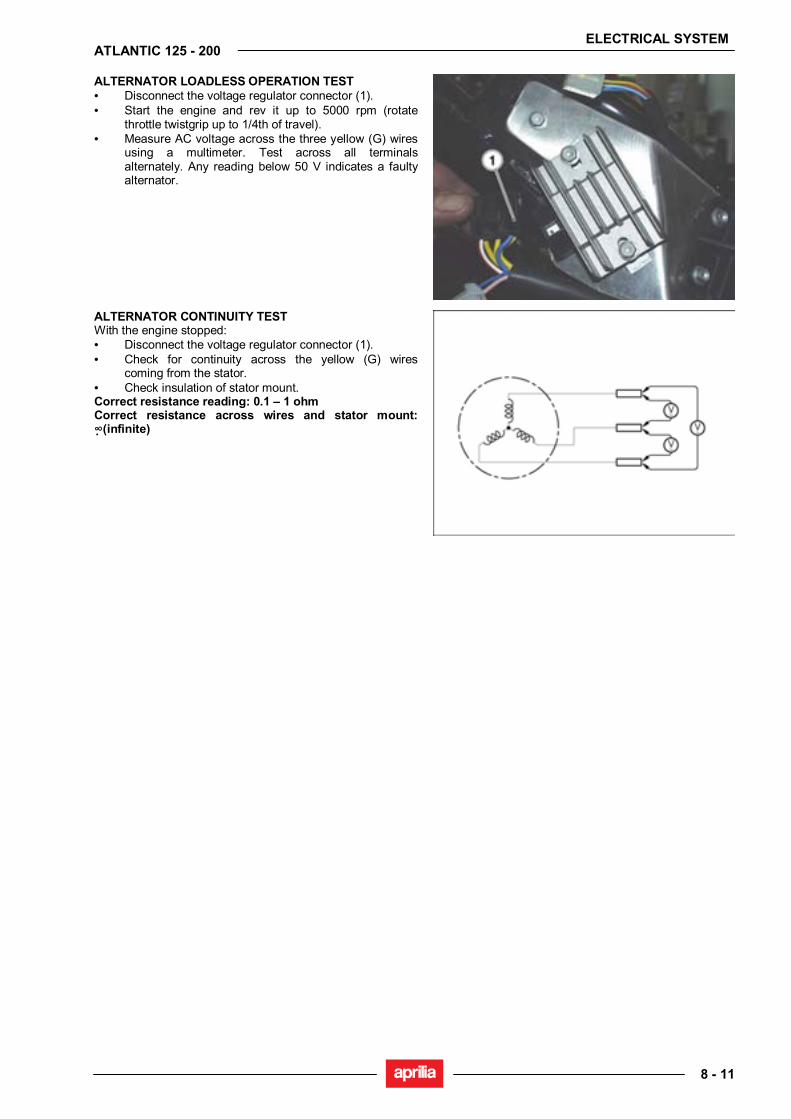
ELECTRICAL SYSTEM
8 - 11
ATLANTIC 125 - 200
ALTERNATOR LOADLESS OPERATION TEST • Disconnect the voltage regulator connector (1). • Start the engine and rev it up to 5000 rpm (rotate
throttle twistgrip up to 1/4th of travel). • Measure AC voltage across the three yellow (G) wires
using a multimeter. Test across all terminals alternately. Any reading below 50 V indicates a faulty alternator.
ALTERNATOR CONTINUITY TEST With the engine stopped: • Disconnect the voltage regulator connector (1). • Check for continuity across the yellow (G) wires
coming from the stator. • Check insulation of stator mount. Correct resistance reading: 0.1 – 1 ohm Correct resistance across wires and stator mount: ∞(infinite)
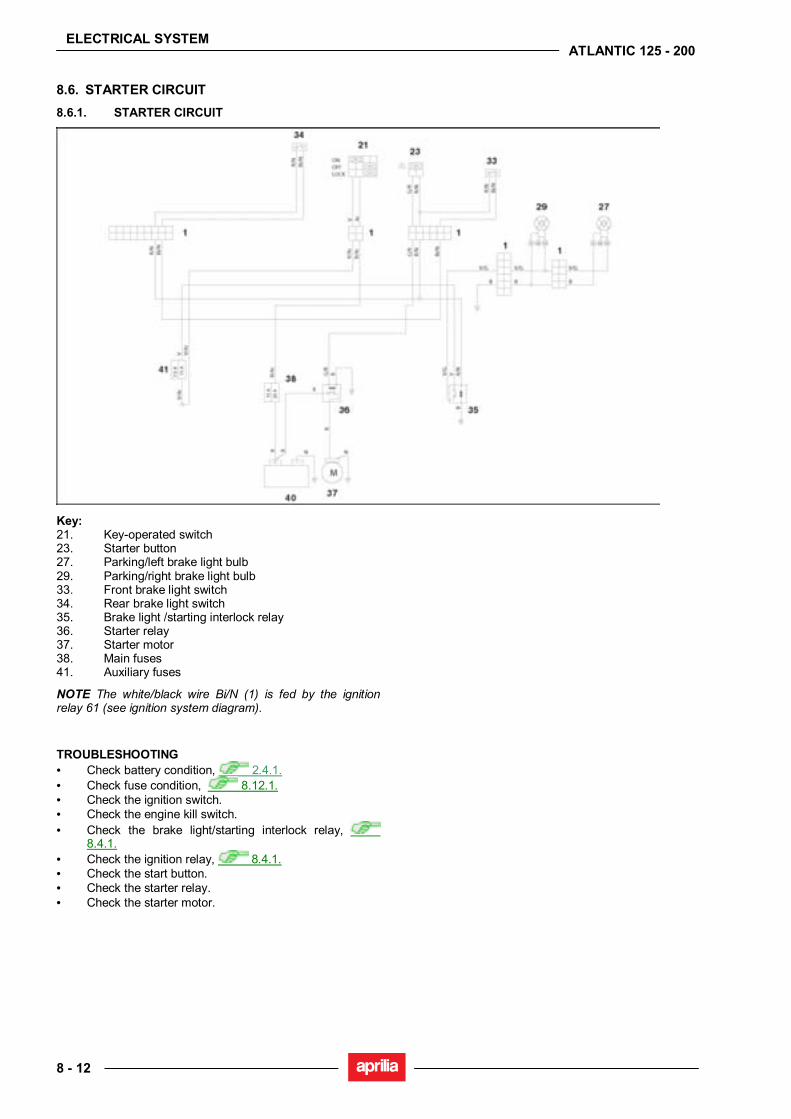
ELECTRICAL SYSTEM
8 - 12
ATLANTIC 125 - 200
8.6. STARTER CIRCUIT 8.6.1. STARTER CIRCUIT
Key: 21. Key-operated switch 23. Starter button 27. Parking/left brake light bulb 29. Parking/right brake light bulb 33. Front brake light switch 34. Rear brake light switch 35. Brake light /starting interlock relay 36. Starter relay 37. Starter motor 38. Main fuses 41. Auxiliary fuses
NOTE The white/black wire Bi/N (1) is fed by the ignition relay 61 (see ignition system diagram).
TROUBLESHOOTING • Check battery condition, 2.4.1. • Check fuse condition, 8.12.1. • Check the ignition switch. • Check the engine kill switch. • Check the brake light/starting interlock relay,
8.4.1. • Check the ignition relay, 8.4.1. • Check the start button. • Check the starter relay. • Check the starter motor.

ELECTRICAL SYSTEM
8 - 13
ATLANTIC 125 - 200
STARTER RELAY TEST • Disconnect the two-way connector (1) (coloured white). • Release the relay (2) from its mount.
• Slip off the two rubber gaiters (3-4). • Disconnect the wires from their respective terminals on
the relay (2).
• Feed 12 V to the two terminals inside the connector (1) at the relay end.
• Check for continuity across the two contact screws on the relay (2) using the multimeter set to the Ohm range.
Correct reading when relay is fed: 0 ohm Correct reading when relay is not fed: ∞ ohm • Change the relay (2) when the readings found deviate
from the specified values.
STARTER MOTOR TEST • Remove the starter motor and connect it to a 12 V
battery in good working order. • If the motor is not operating properly, check for brush
wear and inspect slip ring.
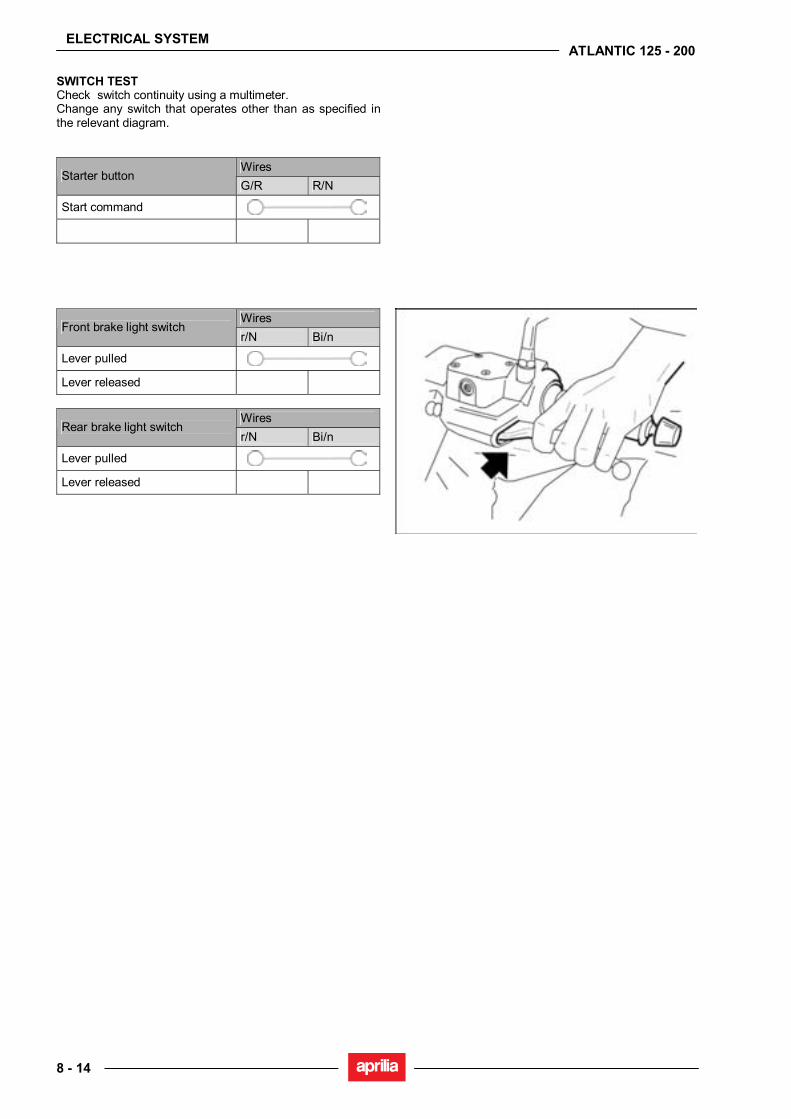
ELECTRICAL SYSTEM
8 - 14
ATLANTIC 125 - 200
SWITCH TEST Check switch continuity using a multimeter. Change any switch that operates other than as specified in the relevant diagram.
Wires Starter button
G/R R/N
Start command
Wires Front brake light switch
r/N Bi/n
Lever pulled Lever released
Wires
Rear brake light switch r/N Bi/n
Lever pulled Lever released
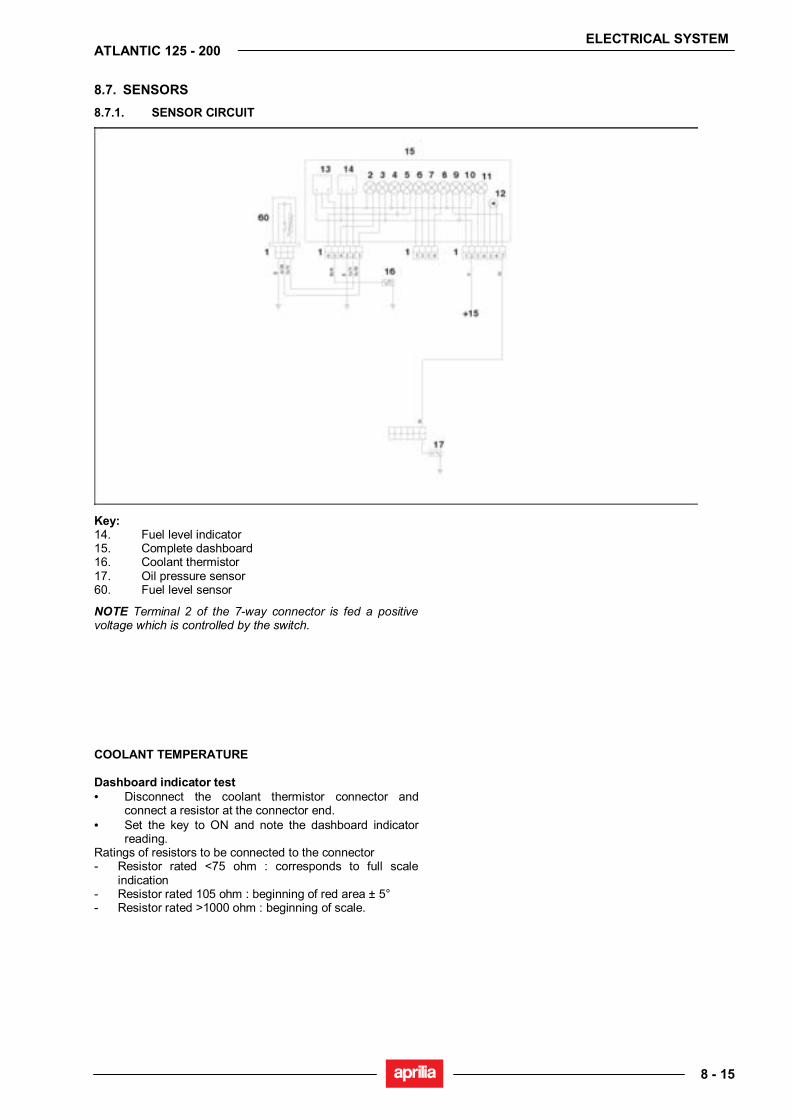
ELECTRICAL SYSTEM
8 - 15
ATLANTIC 125 - 200
8.7. SENSORS 8.7.1. SENSOR CIRCUIT
Key: 14. Fuel level indicator 15. Complete dashboard 16. Coolant thermistor 17. Oil pressure sensor 60. Fuel level sensor
NOTE Terminal 2 of the 7-way connector is fed a positive voltage which is controlled by the switch.
COOLANT TEMPERATURE Dashboard indicator test • Disconnect the coolant thermistor connector and
connect a resistor at the connector end. • Set the key to ON and note the dashboard indicator
reading. Ratings of resistors to be connected to the connector - Resistor rated <75 ohm : corresponds to full scale
indication - Resistor rated 105 ohm : beginning of red area ± 5° - Resistor rated >1000 ohm : beginning of scale.

ELECTRICAL SYSTEM
8 - 16
ATLANTIC 125 - 200
Coolant thermistor test • Remove the thermistor (1), 5.4.1. • Set a multimeter (2) to the Ohm range and attach the
multimeter leads to the thermistor (3) as shown in the figure.
• Suspend the thermistor (1) in a container (3) filled with coolant.
• Suspend a thermometer (4) with a 0 -150°C (32 -302°F) range in the container.
• Place the container on a gas burner (5) and heat up the coolant gradually.
• Check the temperature reading of the thermometer (4) and the thermistor (1) output indicated by the multimeter.
Thermistor output should vary with temperature as indicated in the table below.
Coolant temperature
Correct reading (Ω)
100 (°C) 212 (°F) 144 80 (°C) 176 (°F) 262 60 (°C) 140 (°F) 512 40 (°C) 104 (°F) 1090
NOTE Change the thermistor (1) when meter reading does not vary with temperature, or when the readings found deviate too much from the values indicated in the table.
FUEL LEVEL Dashboard indicator test • Disconnect the sensor connector and connect a
resistor across the yellow-green and blue wires at the connector end.
• Set the key to ON and note the dashboard indicator reading.
Ratings of resistors to be connected to the connector - Resistor rated 10 ohm : full tank indication - Resistor rated 38 ohm : half scale +-5° - Resistor rated 90 ohm : empty tank and light on
Fuel sensor test • Disconnect the sensor connector, 4.1.3. • Connect an ohmmeter to the yellow-green and blue
wire terminals. Measure resistance output at different fuel levels.
- Correct reading with a full tank: less than 10 ohm - Correct reading with 8 litres of fuel: 38 ohm ± 10% - Correct reading with empty tank: greater than 90 ohm
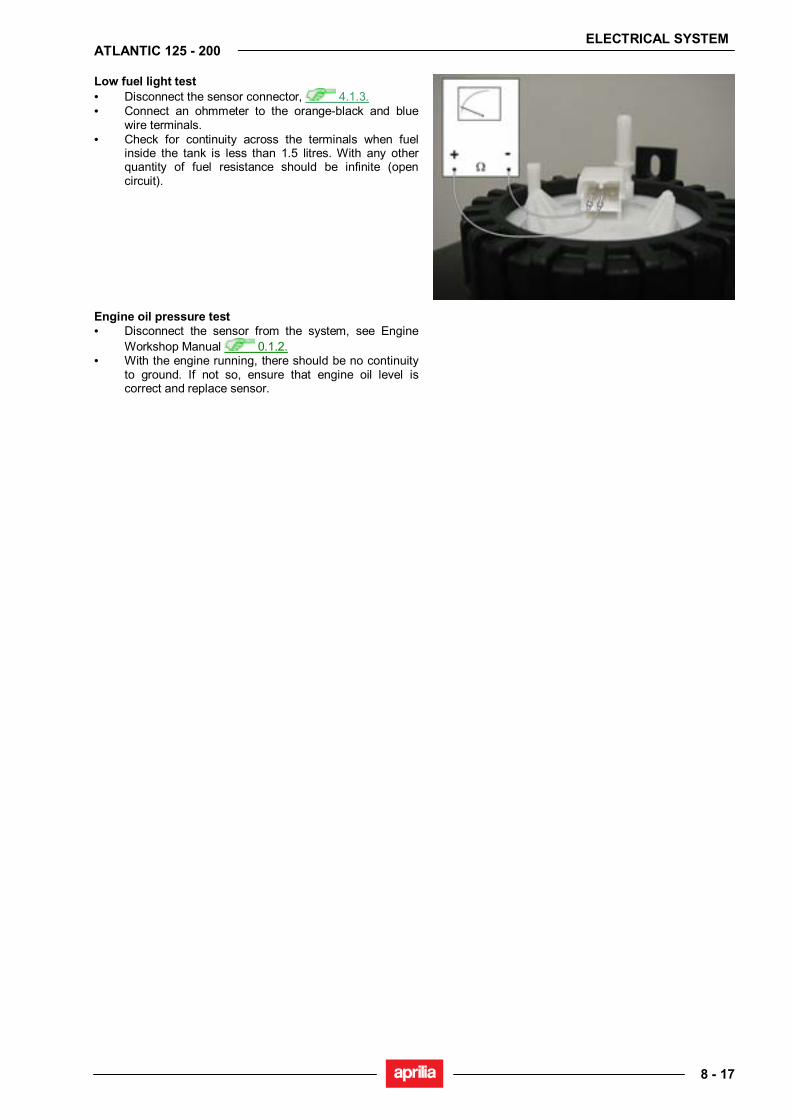
ELECTRICAL SYSTEM
8 - 17
ATLANTIC 125 - 200
Low fuel light test • Disconnect the sensor connector, 4.1.3. • Connect an ohmmeter to the orange-black and blue
wire terminals. • Check for continuity across the terminals when fuel
inside the tank is less than 1.5 litres. With any other quantity of fuel resistance should be infinite (open circuit).
Engine oil pressure test • Disconnect the sensor from the system, see Engine
Workshop Manual 0.1.2. • With the engine running, there should be no continuity
to ground. If not so, ensure that engine oil level is correct and replace sensor.
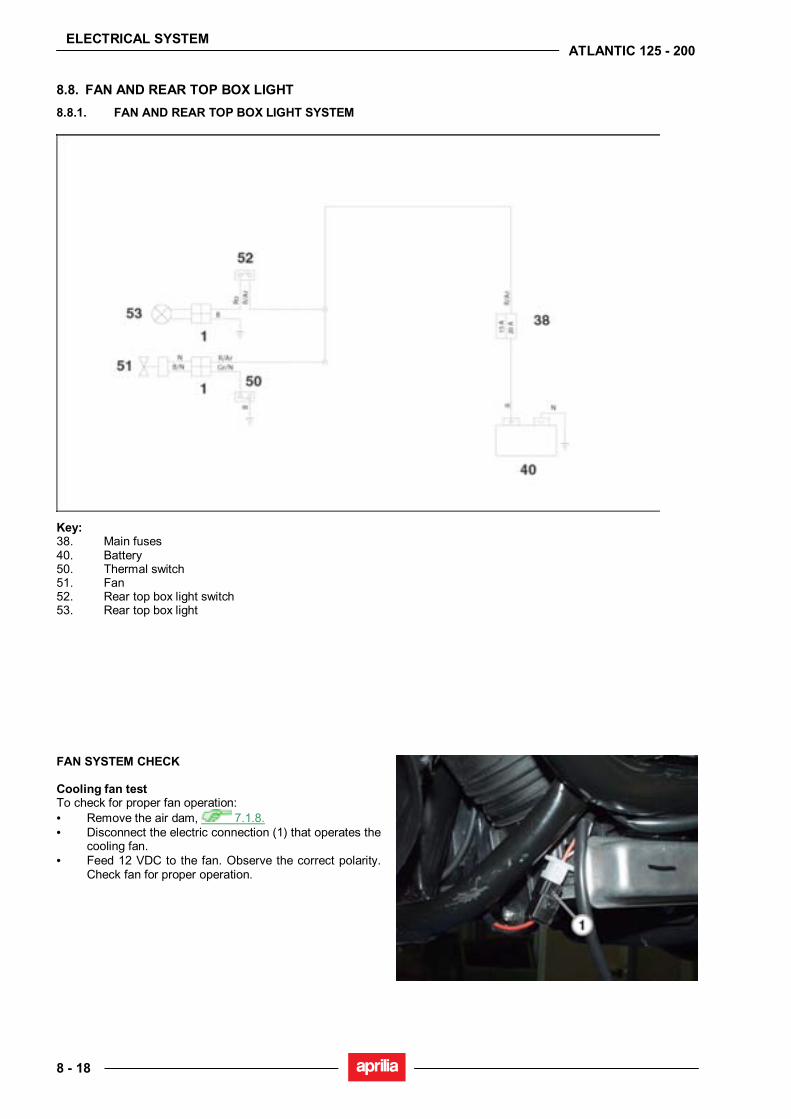
ELECTRICAL SYSTEM
8 - 18
ATLANTIC 125 - 200
8.8. FAN AND REAR TOP BOX LIGHT 8.8.1. FAN AND REAR TOP BOX LIGHT SYSTEM
Key: 38. Main fuses 40. Battery 50. Thermal switch 51. Fan 52. Rear top box light switch 53. Rear top box light
FAN SYSTEM CHECK Cooling fan test To check for proper fan operation: • Remove the air dam, 7.1.8. • Disconnect the electric connection (1) that operates the
cooling fan. • Feed 12 VDC to the fan. Observe the correct polarity.
Check fan for proper operation.

ELECTRICAL SYSTEM
8 - 19
ATLANTIC 125 - 200
Thermal switch test • Remove the air dam, 7.1.8. • Disconnect the two connectors. • Release and remove the thermal switch (2).
• Set a multimeter (3) to the Ohm range to the thermal switch (2) as shown in the figure.
• Suspend the thermal switch (2) in a container filled with coolant (4).
• Suspend a thermometer (5) with a 0-150°C (32 -302°F) range in the container.
• Place the container on a gas burner (6) and heat up the coolant gradually.
• Check the temperature reading of the thermometer (4) and the resistance reading indicated by the multimeter.
• The switch operating threshold is between 90 and 100°C (194 - 212°F). When this threshold is exceeded, tester reading should change from ∞ to 0 ohm.
REAR TOP BOX LIGHT SWITCH TEST • Raise the saddle and check continuity across the two
terminals with a multimeter set to the Ohm range. Correct reading when switch is released (saddle raised) : 0 ohm Correct reading with switch pressed (saddle closed): ∞ ohm
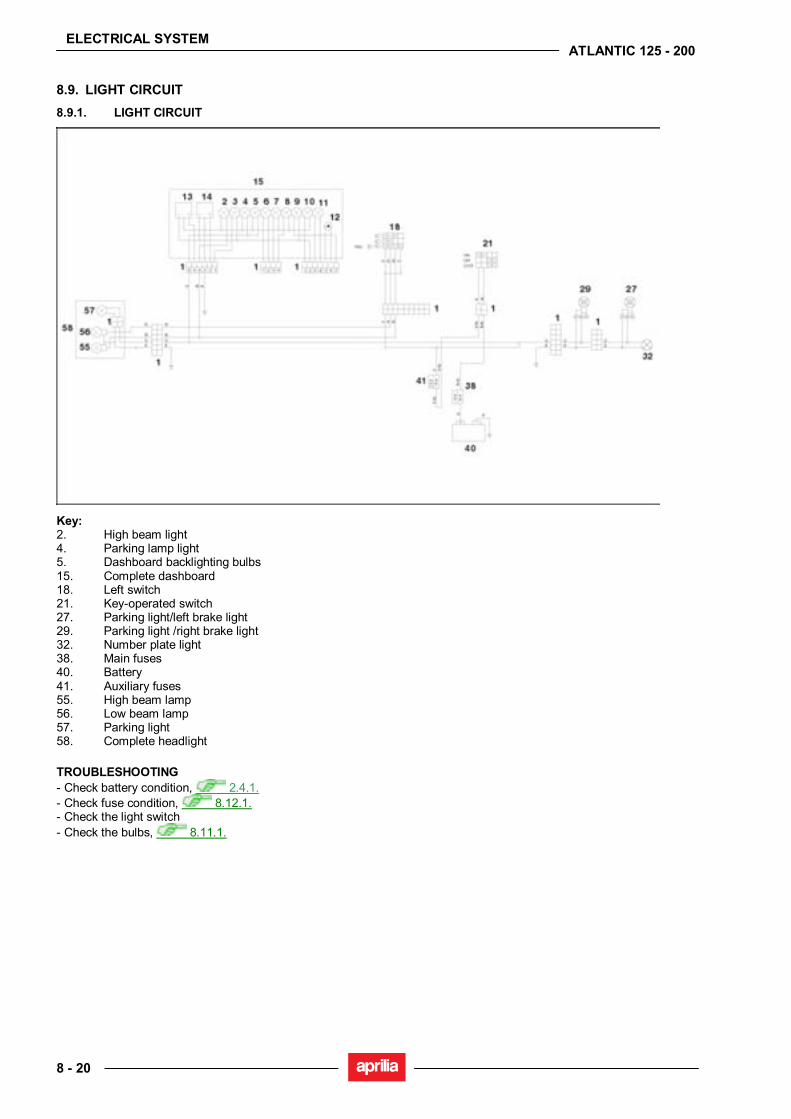
ELECTRICAL SYSTEM
8 - 20
ATLANTIC 125 - 200
8.9. LIGHT CIRCUIT 8.9.1. LIGHT CIRCUIT
Key: 2. High beam light 4. Parking lamp light 5. Dashboard backlighting bulbs 15. Complete dashboard 18. Left switch 21. Key-operated switch 27. Parking light/left brake light 29. Parking light /right brake light 32. Number plate light 38. Main fuses 40. Battery 41. Auxiliary fuses 55. High beam lamp 56. Low beam lamp 57. Parking light 58. Complete headlight
TROUBLESHOOTING - Check battery condition, 2.4.1. - Check fuse condition, 8.12.1. - Check the light switch - Check the bulbs, 8.11.1.
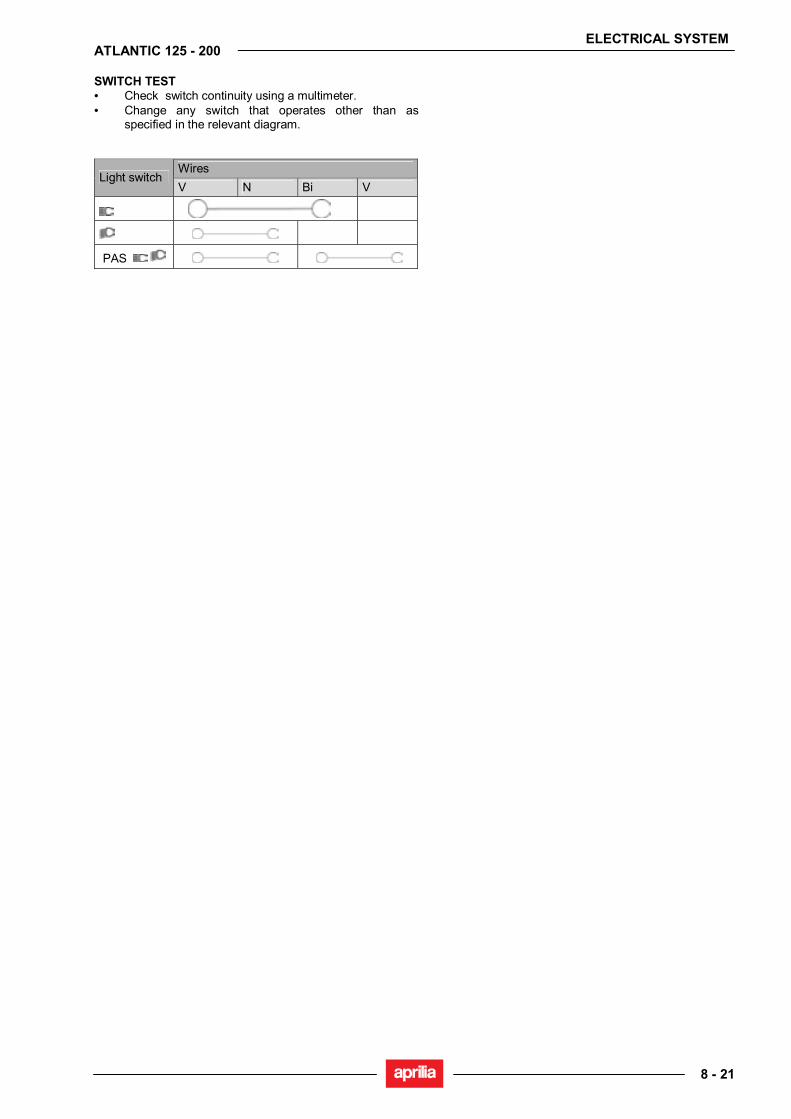
ELECTRICAL SYSTEM
8 - 21
ATLANTIC 125 - 200
SWITCH TEST • Check switch continuity using a multimeter. • Change any switch that operates other than as
specified in the relevant diagram.
Wires Light switch
V N Bi V
PAS

ELECTRICAL SYSTEM
8 - 22
ATLANTIC 125 - 200
8.10. VISUAL AND ACOUSTIC SIGNALS 8.10.1. VISUAL AND ACOUSTIC SIGNALLING
SYSTEM
Key: 7. Right indicator light 8. Left indicator light 15. Complete dashboard 19. Warning horn 20. Horn button 21. Key-operated switch 22. Direction indicator switch 26. Rear left direction indicator 30. Rear right direction indicator 38. Main fuses 40. Battery 41. Auxiliary fuses 45. CDI control unit 54. Front right direction indicator
DIRECTION INDICATOR TROUBLESHOOTING • Check that the bulbs are in good condition,
8.11.1. • When one bulb is burnt out, the other bulb will flash at
doubled frequency. • Check the direction indicator switch. • Check the CDI control unit and replace if needed,
7.2.2. The flasher is incorporated into the CDI control unit.
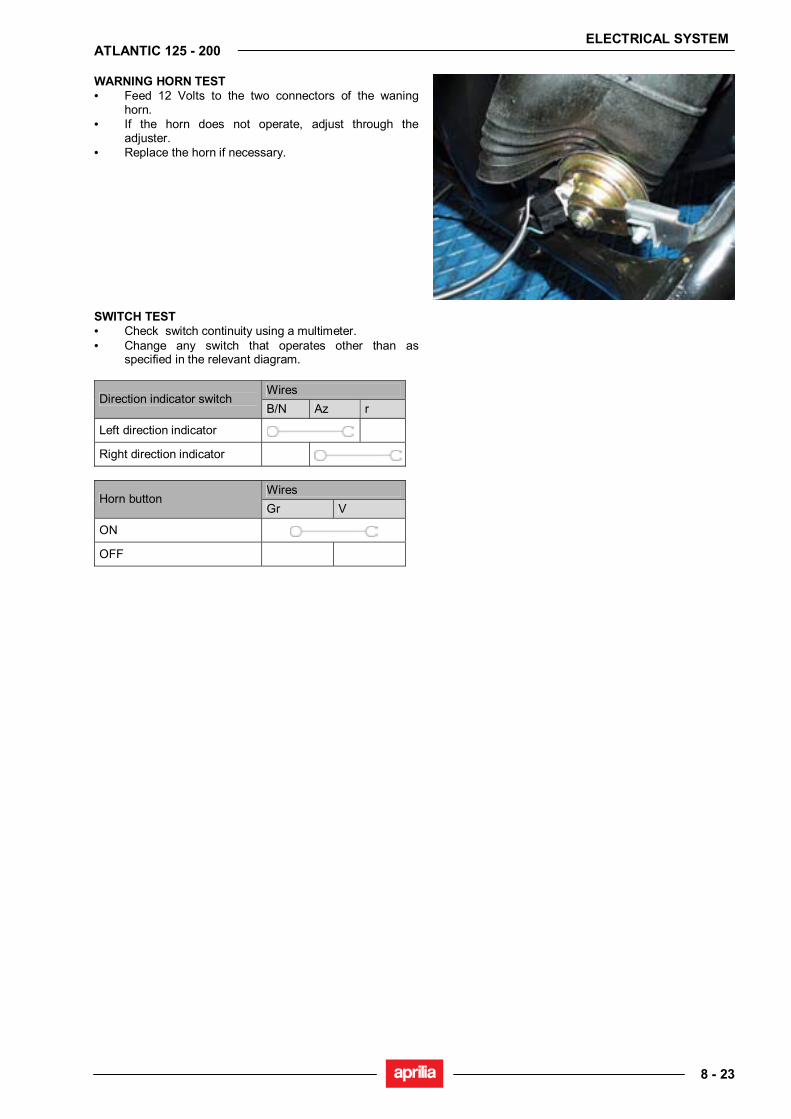
ELECTRICAL SYSTEM
8 - 23
ATLANTIC 125 - 200
WARNING HORN TEST • Feed 12 Volts to the two connectors of the waning
horn. • If the horn does not operate, adjust through the
adjuster. • Replace the horn if necessary.
SWITCH TEST • Check switch continuity using a multimeter. • Change any switch that operates other than as
specified in the relevant diagram.
Wires Direction indicator switch
B/N Az r
Left direction indicator
Right direction indicator
Wires Horn button
Gr V
ON
OFF
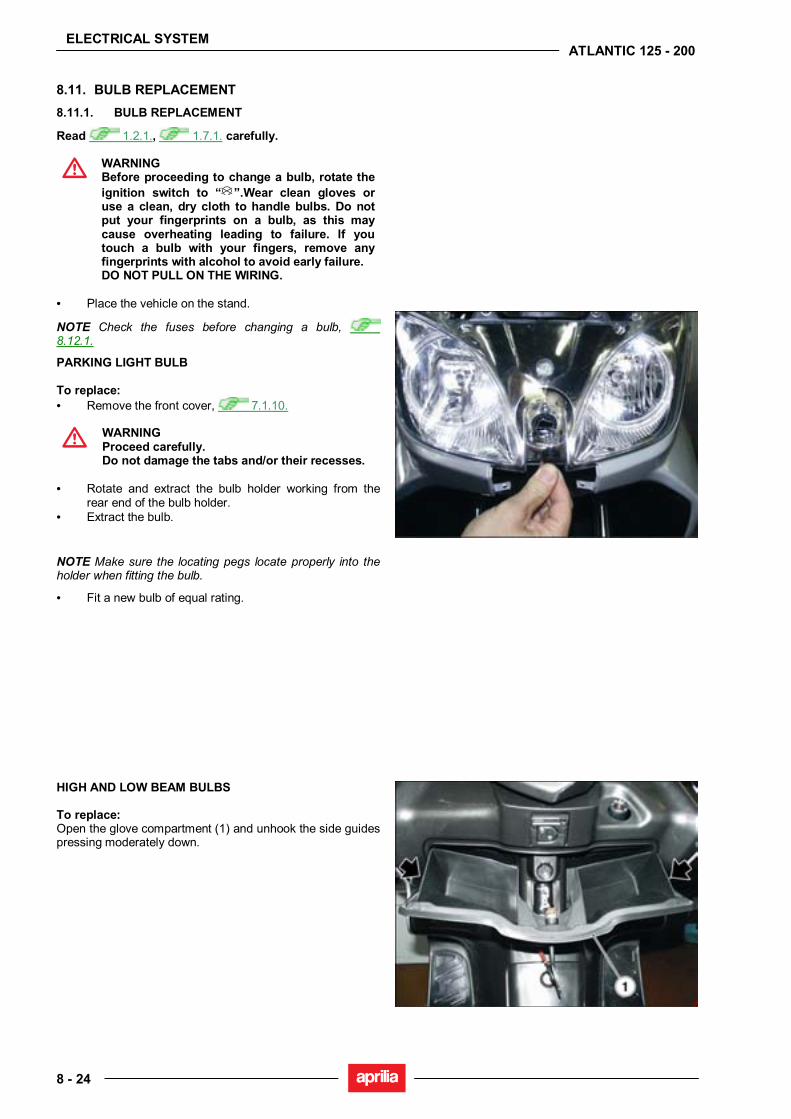
ELECTRICAL SYSTEM
8 - 24
ATLANTIC 125 - 200
8.11. BULB REPLACEMENT 8.11.1. BULB REPLACEMENT
Read 1.2.1., 1.7.1. carefully.
WARNING Before proceeding to change a bulb, rotate the ignition switch to “ ”.Wear clean gloves or use a clean, dry cloth to handle bulbs. Do not put your fingerprints on a bulb, as this may cause overheating leading to failure. If you touch a bulb with your fingers, remove any fingerprints with alcohol to avoid early failure. DO NOT PULL ON THE WIRING.
• Place the vehicle on the stand.
NOTE Check the fuses before changing a bulb, 8.12.1.
PARKING LIGHT BULB To replace: • Remove the front cover, 7.1.10.
WARNING Proceed carefully. Do not damage the tabs and/or their recesses.
• Rotate and extract the bulb holder working from the
rear end of the bulb holder. • Extract the bulb.
NOTE Make sure the locating pegs locate properly into the holder when fitting the bulb.
• Fit a new bulb of equal rating.
HIGH AND LOW BEAM BULBS To replace: Open the glove compartment (1) and unhook the side guides pressing moderately down.
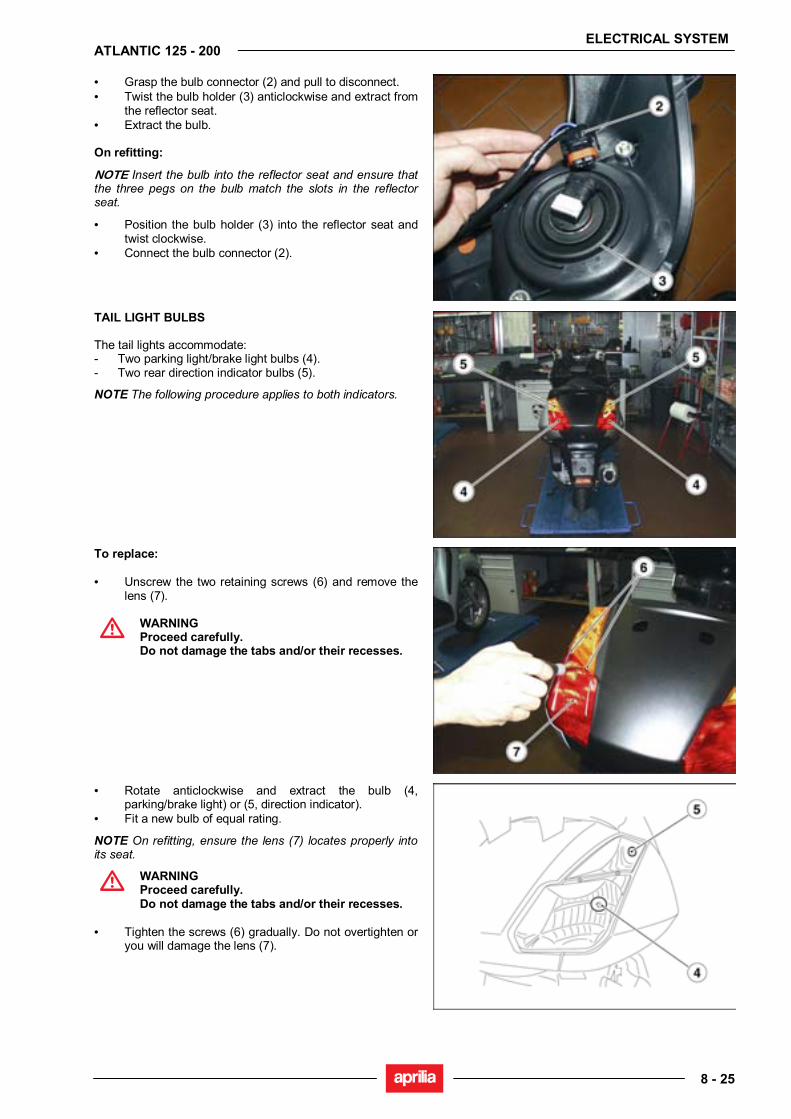
ELECTRICAL SYSTEM
8 - 25
ATLANTIC 125 - 200
• Grasp the bulb connector (2) and pull to disconnect. • Twist the bulb holder (3) anticlockwise and extract from
the reflector seat. • Extract the bulb. On refitting:
NOTE Insert the bulb into the reflector seat and ensure that the three pegs on the bulb match the slots in the reflector seat.
• Position the bulb holder (3) into the reflector seat and twist clockwise.
• Connect the bulb connector (2).
TAIL LIGHT BULBS The tail lights accommodate: - Two parking light/brake light bulbs (4). - Two rear direction indicator bulbs (5).
NOTE The following procedure applies to both indicators.
To replace: • Unscrew the two retaining screws (6) and remove the
lens (7).
WARNING Proceed carefully. Do not damage the tabs and/or their recesses.
• Rotate anticlockwise and extract the bulb (4, parking/brake light) or (5, direction indicator).
• Fit a new bulb of equal rating.
NOTE On refitting, ensure the lens (7) locates properly into its seat.
WARNING Proceed carefully. Do not damage the tabs and/or their recesses.
• Tighten the screws (6) gradually. Do not overtighten or
you will damage the lens (7).
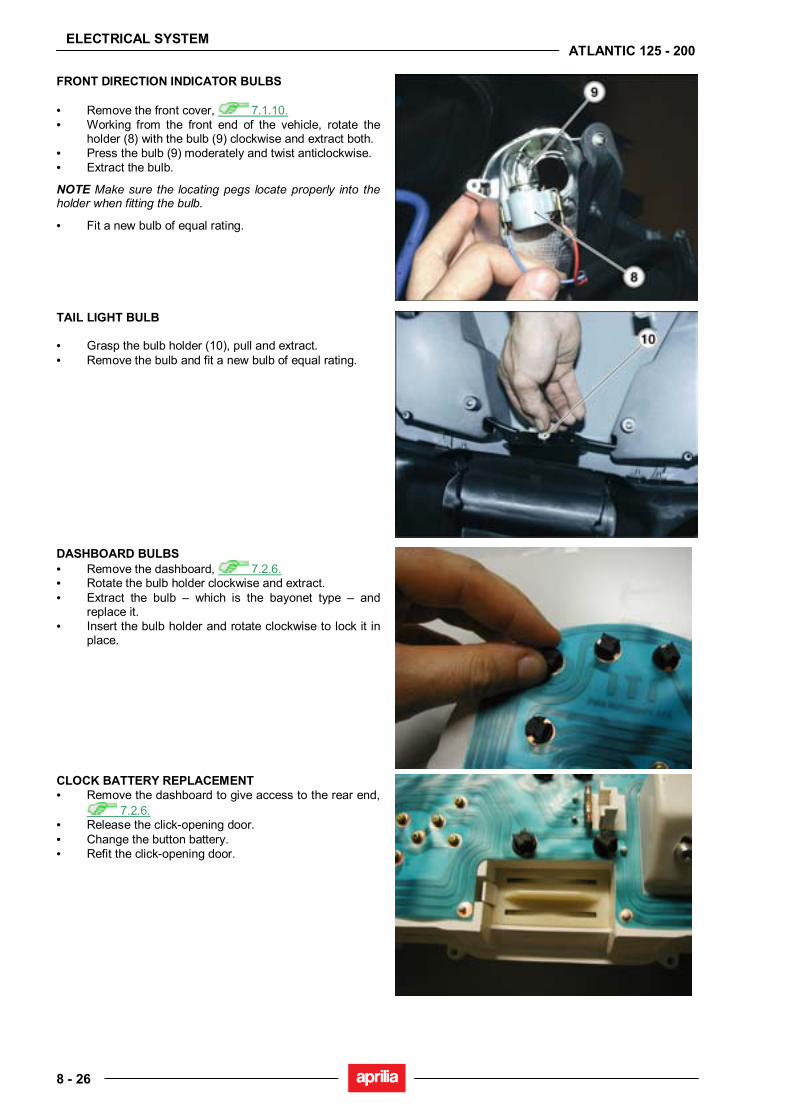
ELECTRICAL SYSTEM
8 - 26
ATLANTIC 125 - 200
FRONT DIRECTION INDICATOR BULBS • Remove the front cover, 7.1.10. • Working from the front end of the vehicle, rotate the
holder (8) with the bulb (9) clockwise and extract both. • Press the bulb (9) moderately and twist anticlockwise. • Extract the bulb.
NOTE Make sure the locating pegs locate properly into the holder when fitting the bulb.
• Fit a new bulb of equal rating.
TAIL LIGHT BULB • Grasp the bulb holder (10), pull and extract. • Remove the bulb and fit a new bulb of equal rating.
DASHBOARD BULBS • Remove the dashboard, 7.2.6. • Rotate the bulb holder clockwise and extract. • Extract the bulb – which is the bayonet type – and
replace it. • Insert the bulb holder and rotate clockwise to lock it in
place.
CLOCK BATTERY REPLACEMENT • Remove the dashboard to give access to the rear end,
7.2.6. • Release the click-opening door. • Change the button battery. • Refit the click-opening door.

ELECTRICAL SYSTEM
8 - 27
ATLANTIC 125 - 200
8.12. REPLACING THE FUSES 8.12.1. REPLACING THE FUSES
WARNING Never attempt to repair a defective fuse. Never use a fuse of a rating other than specified. This could damage the electrical system or cause a short circuit, with the risk of fire.
NOTE When the fuses fitted in a particular position keep blowing frequently, there might be a short circuit or overloading.
Checking the fuses is recommended whenever an electrical component fails to operate or is malfunctioning, or when the engine does not start.
Check the 3-A and 15-A fuses first and then the 30-A fuses. • Set the ignition switch to “ ”. This will prevent
accidental short circuits. Main fuses: • Perform the first four steps described at paragraph
2.4.3. Auxiliary fuses: • Remove the front cover, 7.1.10. Inspection: • Extract all fuses one by one and check for blown fuses.
A blown fuse is identified by the link bar in the centre being divided.
• When you find a blown fuse, determine and rectify the cause (if possible) before fitting a new fuse.
• Replace any failed fuse with a fuse of equal current rating.
NOTE When you use one of the spare fuses, remember to add a new fuse of equal rating to the fuse box.
Layout of auxiliary fuses (front cover): - 15-A fuse (1) From ignition switch to: lights, horn, brake lights. - 7.5-A fuse (2) From ignition switch to: starting interlock relay, automatic starter. - 7.5-A fuse (3) Spare. - 15-A fuse (4) Spare.
Layout of main fuses (battery compartment): - 20-A fuse (5) From battery to: ignition switch, helmet compartment light. - 15-A fuse (6) From battery to: power socket. - 15-A fuse (7) Spare.

ELECTRICAL SYSTEM
8 - 28
ATLANTIC 125 - 200
8.13. BEAM SETTING 8.13.1. BEAM HEIGHT SETTING
This is a quick beam inspection procedure. Place the vehicle ten metres away from a vertical wall. It is important that the motorcycle be on level ground. Switch on the low beam and sit astride the vehicle. The light spot on the wall should be just below the horizontal line of the headlight (about nine/tenths of overall height).
9/1
0 H
10 m
H
To set beam height: • Open the glove compartment (1) and unhook the side
guides by pressing moderately downwards.
• Use a screwdriver and rotate the lower adjuster screws (2) of both beams:
TIGHTEN (turn clockwise) to lower the beam. SLACKEN (turn anticlockwise) to raise the beam.
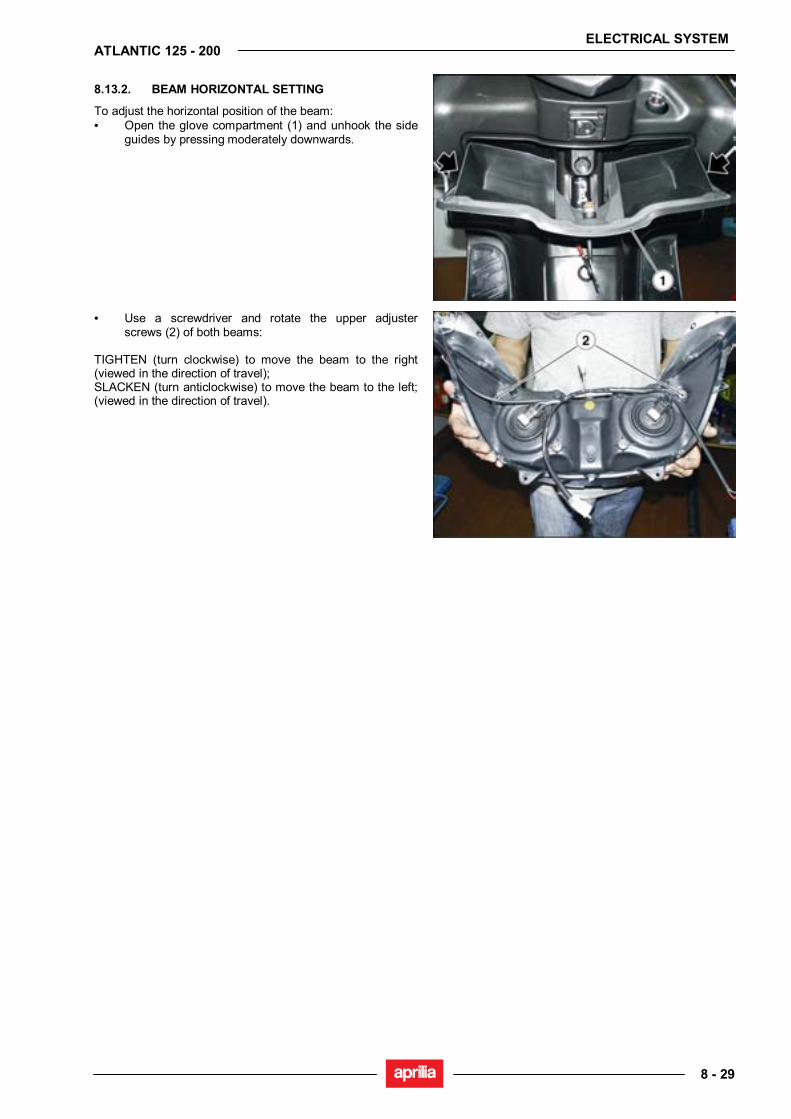
ELECTRICAL SYSTEM
8 - 29
ATLANTIC 125 - 200
8.13.2. BEAM HORIZONTAL SETTING
To adjust the horizontal position of the beam: • Open the glove compartment (1) and unhook the side
guides by pressing moderately downwards.
• Use a screwdriver and rotate the upper adjuster screws (2) of both beams:
TIGHTEN (turn clockwise) to move the beam to the right (viewed in the direction of travel); SLACKEN (turn anticlockwise) to move the beam to the left; (viewed in the direction of travel).
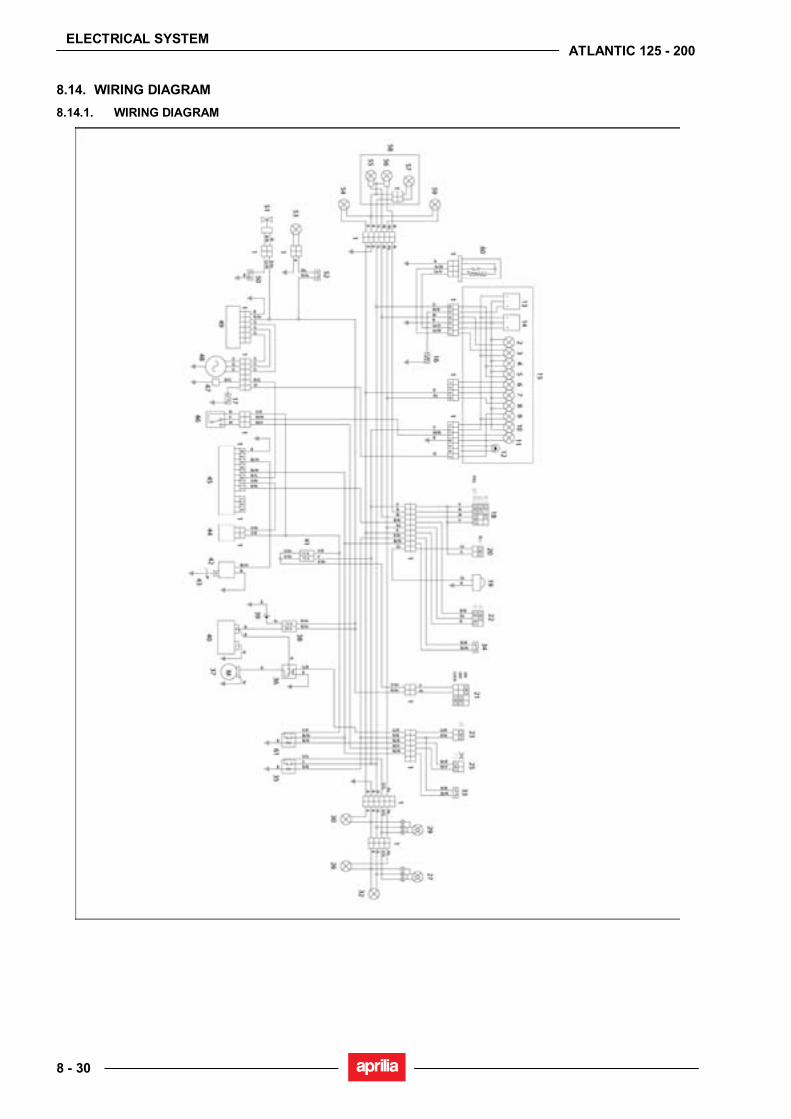
ELECTRICAL SYSTEM
8 - 30
ATLANTIC 125 - 200
8.14. WIRING DIAGRAM 8.14.1. WIRING DIAGRAM
ELECTRICAL SYSTEM
8 - 31
ATLANTIC 125 - 200
Key: 1. Multi-pin connectors 2. High beam warning light 3. Low fuel light 4. Parking light warning light 5. Dashboard backlighting bulbs 6. Check light (not in use) 7. Right direction indicator repeater light 8. Left direction indicator repeater light 9. Oil pressure light 10. ABS light (not in use) 11. Side stand light 12. Anti-theft system LED (not in use) 13. Coolant temperature indicator 14. Fuel level indicator 15. Complete dashboard 16. Coolant thermistor 17. Oil pressure sensor 18. Left light switch 19. Warning horn 20. Horn button 21. Key-operated switch 22. Direction indicator switch 23. Starter button 24. - 25. Engine kill switch 26. Rear left direction indicator 27. Parking light/left brake light bulb 28. - 29. Parking light/right brake light bulb 30. Rear right direction indicator 31. - 32. Number plate light 33. Front brake light switch 34. Rear brake light switch 35. Brake light/starting interlock relay 36. Starter relay 37. Starter motor 38. Main fuses 39. Power socket 40. Battery 41. Auxiliary fuses 42. HT coil 43. Spark plug 44. Automatic starter 45. CDI control unit 46. Side stand switch 47. Pick-up 48. Generator 49. Voltage regulator 50. Thermal switch 51. Fan 52. Rear top box light switch 53. Rear top box light 54. Front right direction indicator 55. High beam bulb 56. Low beam bulb 57. Parking light 58. Complete headlight 59. Front left direction indicator 60. Fuel sensor 61. Ignition relay
WIRE COLOUR CODING Ar Orange Az Light blue B Blue Bi White G Yellow Gr Grey M Brown N Black R Red Ro Pink V Green Vi Purple

aprilia s.p.a.via G.Galilei, 130033 Noale (VE) Italytel. +39 041.5829111fax +39 041.5829190
www.serviceaprilia.comwww.aprilia.com


