Application Testing with Hyper-Vaz12722.vo.msecnd.net/windowsserver2008r2trainingcourse1... · Web...
35
Windows Server 2008 R2 Developer Lab Series Application Testing With Hyper-V Lab version: 1.0.0 Last updated: 3/6/2022
Transcript of Application Testing with Hyper-Vaz12722.vo.msecnd.net/windowsserver2008r2trainingcourse1... · Web...
Windows Server 2008 R2 Developer Lab SeriesApplication Testing With Hyper-VLab version: 1.0.0Last updated: 5/8/2023
Windows Server 2008 R2 Developer Readiness Application Testing using Hyper-V
Contents
Introduction.............................................................................................................................................................3
Windows Hyper-V Automation.............................................................................................................................4
PowerShell Management Library for Hyper-V......................................................................................................5
The Automation Scenario.........................................................................................................................................7
Step 1: Create the VM...........................................................................................................................................8
Step 2: Modify the VHD........................................................................................................................................9
Step 3: Start the VM...........................................................................................................................................10
Step 4: Evaluate Results......................................................................................................................................11
Exercise 1: Automating Software Testing with Windows Hyper-V.........................................................................12
Part 1:Creating the Virtual Machine................................................................................................................13
Part 2: Modifying the VHD..............................................................................................................................18
Part 3: Starting the Virtual Machine................................................................................................................21
Part 4: Verify the Results.................................................................................................................................23
Part 5: Running the Script...............................................................................................................................25
Extra................................................................................................................................................................28
Lab Summary..........................................................................................................................................................29
Page 2 of 30

Windows Server 2008 R2 Developer Readiness Application Testing using Hyper-V
Introduction
Figure 1
The introduction of virtual machines has made software testing a much more simpler task. In the past, numerous machines had to be configured via image restoring tools such as Norton Ghost in order to restore a machine to a clean state. This process was error-prone, difficult to automate, and most importantly, was very time consuming.
Virtual machines changed the rules of the game as a single system could be brought back to a clean state in a matter of second. Not only the process much faster but it could also be easily automated.
In this lab you will learn how to automate all the aspects you might need when creating virtual machines for software testing purposes.
Page 3 of 30
Windows Server 2008 R2 Developer Readiness Application Testing using Hyper-V
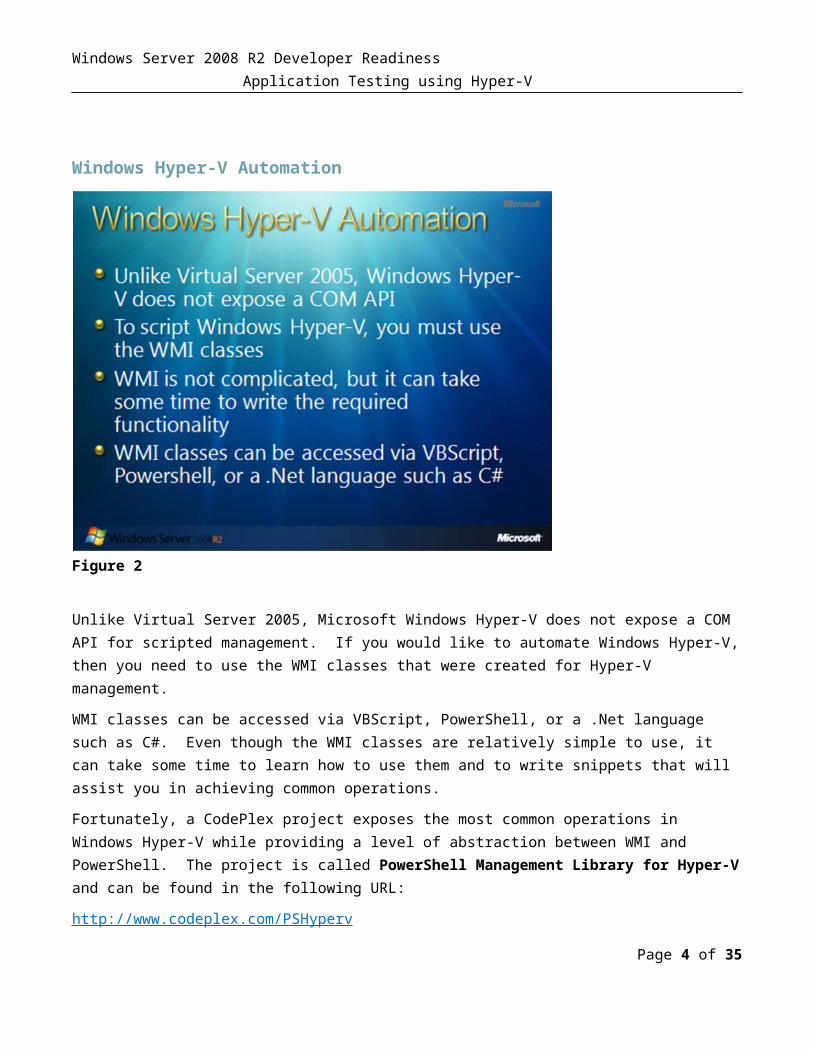
Windows Hyper-V Automation
Figure 2
Unlike Virtual Server 2005, Microsoft Windows Hyper-V does not expose a COM API for scripted management. If you would like to automate Windows Hyper-V, then you need to use the WMI classes that were created for Hyper-V management.
WMI classes can be accessed via VBScript, PowerShell, or a .Net language such as C#. Even though the WMI classes are relatively simple to use, it can take some time to learn how to use them and to write snippets that will assist you in achieving common operations.
Fortunately, a CodePlex project exposes the most common operations in Windows Hyper-V while providing a level of abstraction between WMI and PowerShell. The project is called PowerShell Management Library for Hyper-V and can be found in the following URL:
http://www.codeplex.com/PSHyperv
Page 4 of 30
Windows Server 2008 R2 Developer Readiness Application Testing using Hyper-V
PowerShell Management Library for Hyper-V
Figure 3
The PowerShell Management Library's main purpose is to expose the scripting functionality of Windows Hyper-V without having to worry about the WMI implementation. The library is written entirely in PowerShell and you all you need to do is import the script in order to have a vast array of commands at your fingertips.
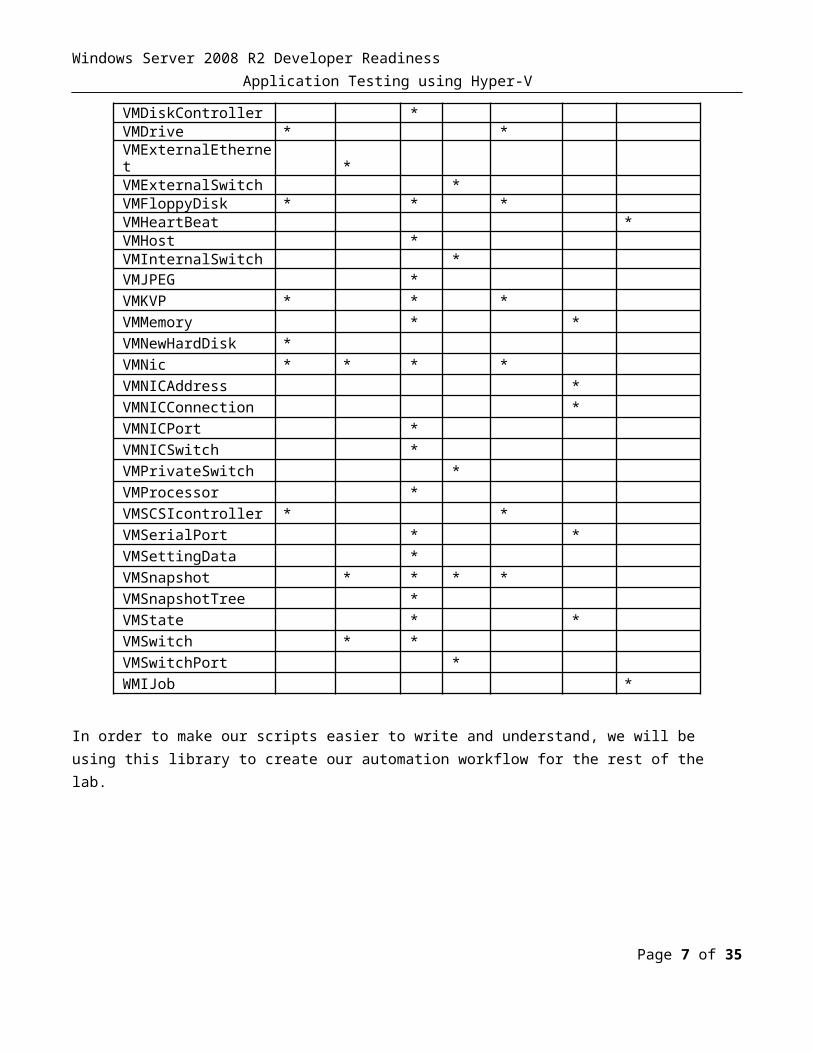
The following matrix shows the combination of commands that can be invoked with the library:
Noun \ Verb Add Choose Get New Remove Set TestVFD *VHD * *VHDDefaultPath *VHDInfo *VM * * * * *VMBackupScript *VMConnectSession *VMCPUCount * *VMDisk * * *VMDiskController *VMDrive * *VMExternalEthernet *VMExternalSwitch *VMFloppyDisk * * *
Page 5 of 30

Windows Server 2008 R2 Developer Readiness Application Testing using Hyper-V
VMHeartBeat *VMHost *VMInternalSwitch *VMJPEG *VMKVP * * *VMMemory * *VMNewHardDisk *VMNic * * * *VMNICAddress *VMNICConnection *VMNICPort *VMNICSwitch *VMPrivateSwitch *VMProcessor *VMSCSIcontroller * *VMSerialPort * *VMSettingData *VMSnapshot * * * *VMSnapshotTree *VMState * *VMSwitch * *VMSwitchPort *WMIJob *
In order to make our scripts easier to write and understand, we will be using this library to create our automation workflow for the rest of the lab.
Page 6 of 30
Windows Server 2008 R2 Developer Readiness Application Testing using Hyper-V
The Automation Scenario
Figure 4
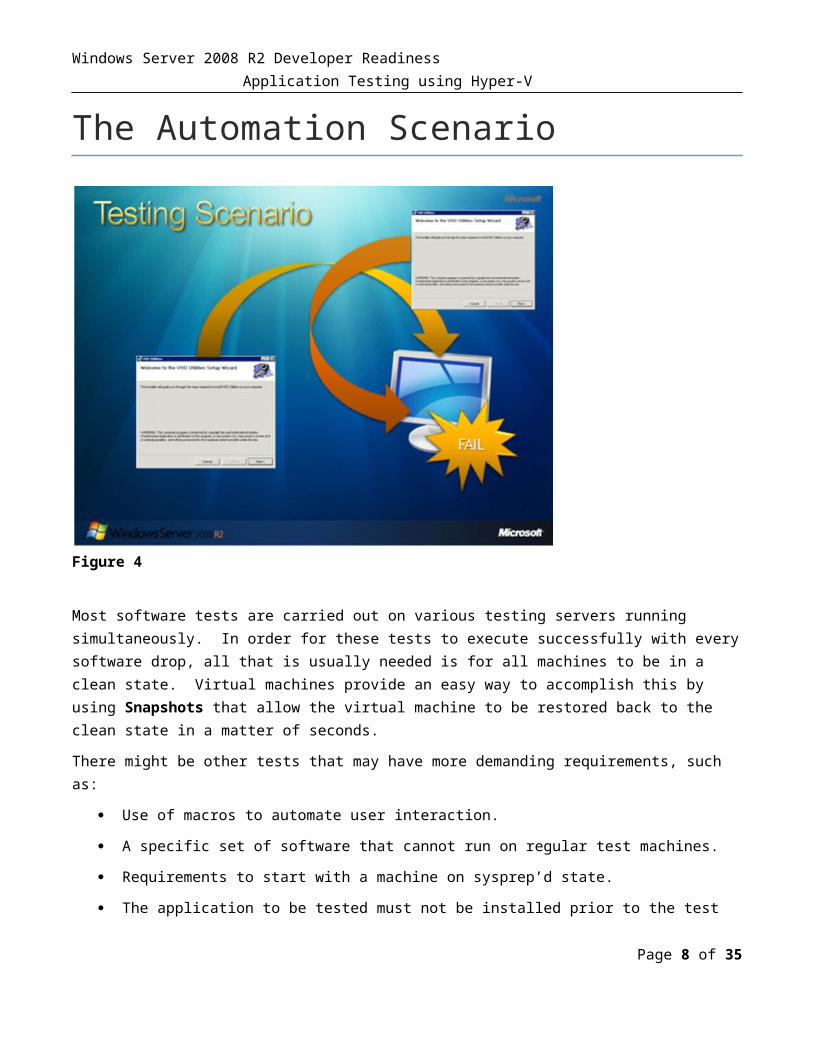
Most software tests are carried out on various testing servers running simultaneously. In order for these tests to execute successfully with every software drop, all that is usually needed is for all machines to be in a clean state. Virtual machines provide an easy way to accomplish this by using Snapshots that allow the virtual machine to be restored back to the clean state in a matter of seconds.
There might be other tests that may have more demanding requirements, such as:
Use of macros to automate user interaction.
A specific set of software that cannot run on regular test machines.
Requirements to start with a machine on sysprep’d state.
The application to be tested must not be installed prior to the test
In this lab, we will simulate the testing of an installer application. This particular scenario requires that the application to be tested (installed) should not be already installed by another test. For this reason, this test will create a clean VM from scratch for the test to run to ensure that no extraneous factors will affect the test run.
The following pages will explain in detail the workflow of the execution and the required tasks that the script must execute.
Page 7 of 30
Windows Server 2008 R2 Developer Readiness Application Testing using Hyper-V
Step 1: Create the VM
Figure 5
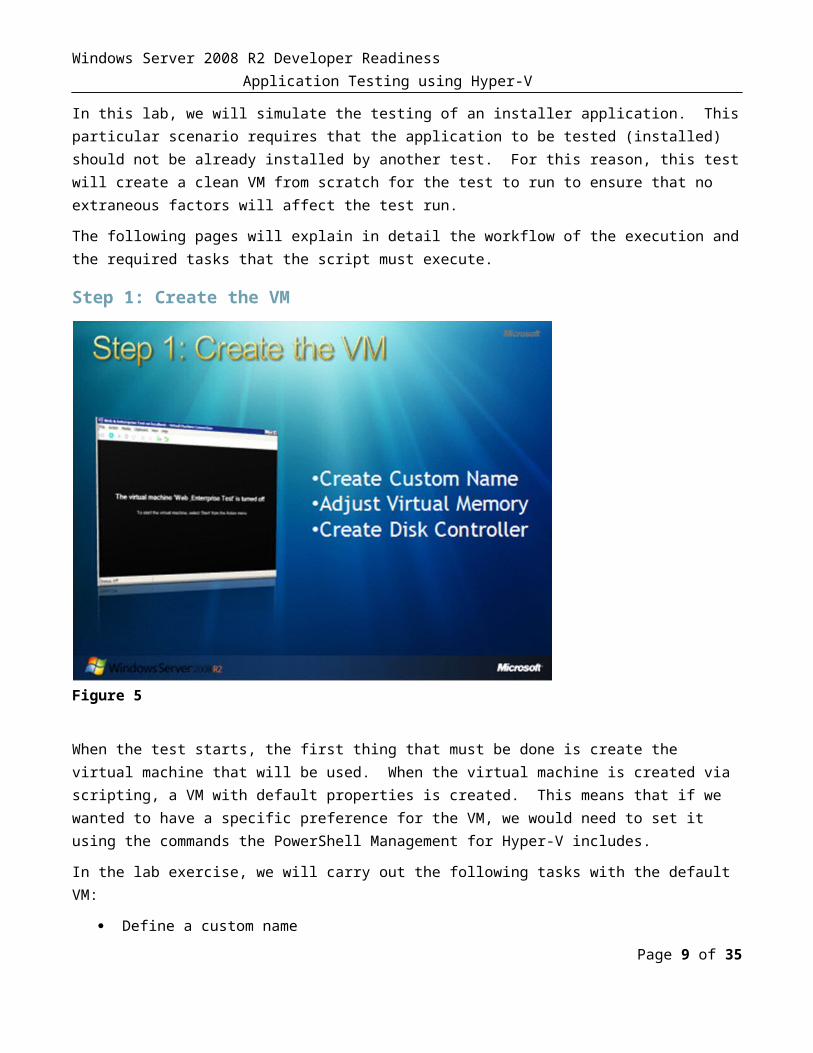
When the test starts, the first thing that must be done is create the virtual machine that will be used. When the virtual machine is created via scripting, a VM with default properties is created. This means that if we wanted to have a specific preference for the VM, we would need to set it using the commands the PowerShell Management for Hyper-V includes.
In the lab exercise, we will carry out the following tasks with the default VM:
Define a custom name
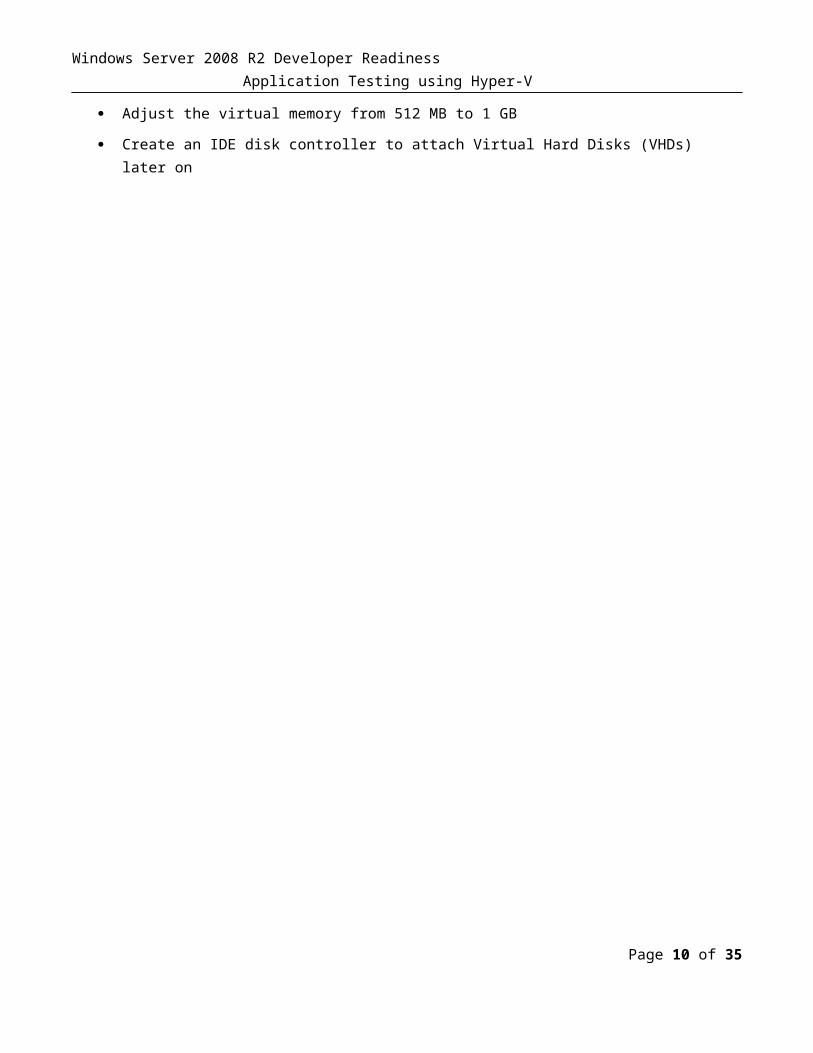
Adjust the virtual memory from 512 MB to 1 GB
Create an IDE disk controller to attach Virtual Hard Disks (VHDs) later on
Page 8 of 30
Windows Server 2008 R2 Developer Readiness Application Testing using Hyper-V
Step 2: Modify the VHD
Figure 6
Once the VM has been created, we must prepare the VHD that it will use. Ideally, we would have a VHD that contains a clean state for the test to run. However, if we run our test on this VHD, then it would no longer be a clean environment for further tests. This could be avoided by copying a new VHD on every run, but using Differencing Disks is a more efficient approach.
Differencing disks are based on the information stored on other disks. A differencing disk has a parent, which is used as the base. All the differences from the parent and the child are written to a differencing disk. Since the parent disk is never changed, it can serve as the parent to many differencing disks, which makes more efficient use of space.
The script will create the differencing disk, and this disk will then be mounted (this is a new feature included in Windows Server 2008 R2). When the VHD mounts, it can be treated just like a regular hard drive would. The script will then copy the installer file we want to test along with a script file that will be responsible for carrying out the installation.
Once the files are copied, the VHD is un-mounted and attached to the VM. At this point, both the VM and the VHD are ready for the test.
Page 9 of 30
Windows Server 2008 R2 Developer Readiness Application Testing using Hyper-V
Step 3: Start the VM
Figure 7
When the VM starts, it will automatically log-in (this step was taken care of when creating the parent VHD). As soon as the VM starts, the script that was copied to the startup items of the computer will begin execution. The script is responsible for the following steps:
1. Launching the installer
2. Sending the keystrokes to the installer to install the application
3. Shutting down the virtual machine
The last step is critical because as soon as the script starts the VM, it will enter a loop and wait until the VM is turned OFF. When the VM is OFF, then the script interprets this as signal that the test has finished and it can now interpret the results.
Page 10 of 30

Windows Server 2008 R2 Developer Readiness Application Testing using Hyper-V
Step 4: Evaluate Results
Figure 8
When the test-run has finished, the VM will mount the VHD and obtain a directory listing on the directory where the installer files should be. This listing will be written to a text file and will then be compared to another text file that holds the expected output. If there is no difference between the two files, then it is safe to assume that the application installed successfully.
Note: The way in which the application installation is tested is probably not the best, but it's simple enough for the purpose of this lab.
Page 11 of 30
Windows Server 2008 R2 Developer Readiness Application Testing using Hyper-V
Exercise 1: Automating Software Testing with Windows Hyper-V
Figure 9
This exercise will show you how to use the PowerShell Management Library in order to completely automate the process of creating a VM to test the correct installation of an application. In this scenario we suppose that the installer needs to run in an environment where no other test has run. This will allow the installer to execute in a clean environment to guarantee the validity of the test results.
Page 12 of 30

Windows Server 2008 R2 Developer Readiness Application Testing using Hyper-V
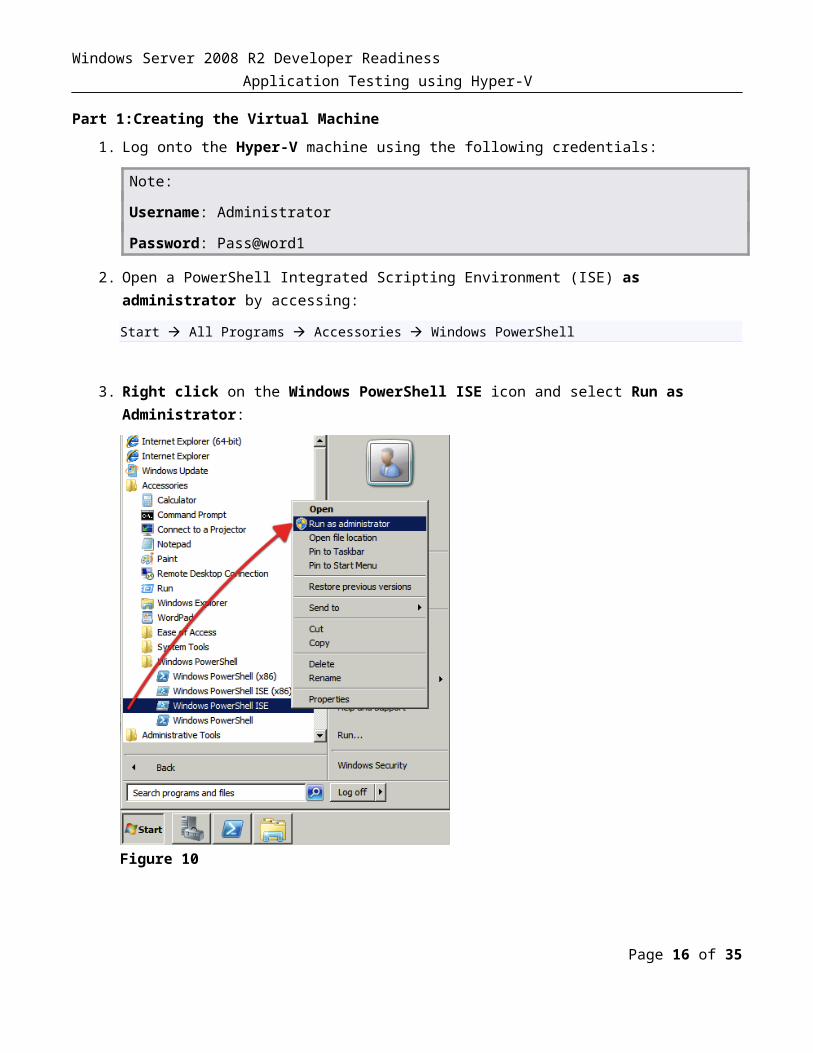
Part 1:Creating the Virtual Machine
1. Log onto the Hyper-V machine using the following credentials:
Note:
Username: Administrator
Password: Pass@word1
2. Open a PowerShell Integrated Scripting Environment (ISE) as administrator by accessing:
Start All Programs Accessories Windows PowerShell
3. Right click on the Windows PowerShell ISE icon and select Run as Administrator:
Figure 10
Note: FYI: PowerShell’s IDE is not installed by default when you install Windows Server 2008 R2. If you would like to use it, you must install it using Server Manager under Features.
Page 13 of 30

Windows Server 2008 R2 Developer Readiness Application Testing using Hyper-V
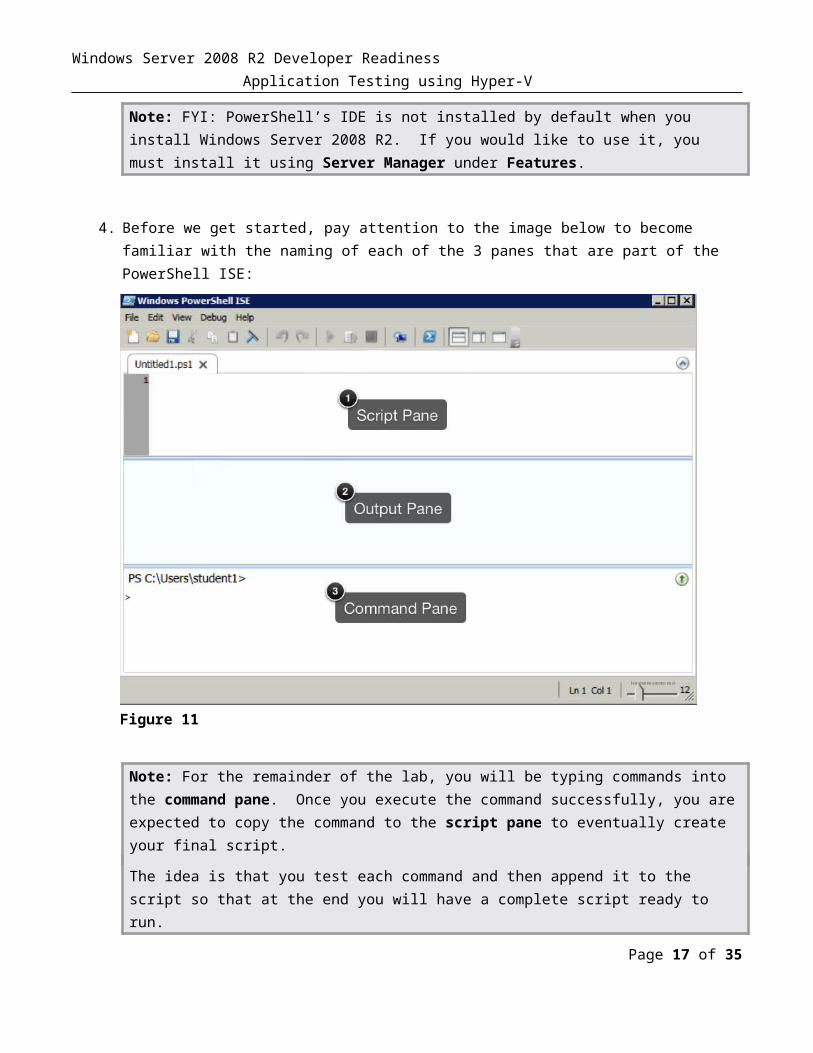
4. Before we get started, pay attention to the image below to become familiar with the naming of each of the 3 panes that are part of the PowerShell ISE:
Figure 11
Note: For the remainder of the lab, you will be typing commands into the command pane. Once you execute the command successfully, you are expected to copy the command to the script pane to eventually create your final script.
The idea is that you test each command and then append it to the script so that at the end you will have a complete script ready to run.
5. In order to make the script more concise, the first thing we’ll do is create a variable that holds the path to our working folder:
$LabPath = "C:\Server 2008 R2 Labs\Application Testing using Hyper-V\"
6. On the command pane, change directories to the folder that contains the files used for this lab:
cd $LabPath
Page 14 of 30

Windows Server 2008 R2 Developer Readiness Application Testing using Hyper-V
Note: Remember to copy each of the commands that you execute successfully to the Untitled.ps1 script in the script pane.
7. In order to simplify the process of scripting Hyper-V, we’ll be using the PowerShell Management Library for Hyper-V. To import all the functions needed you must import the script:
PowerShell
. $LabPath"hyperv.ps1"
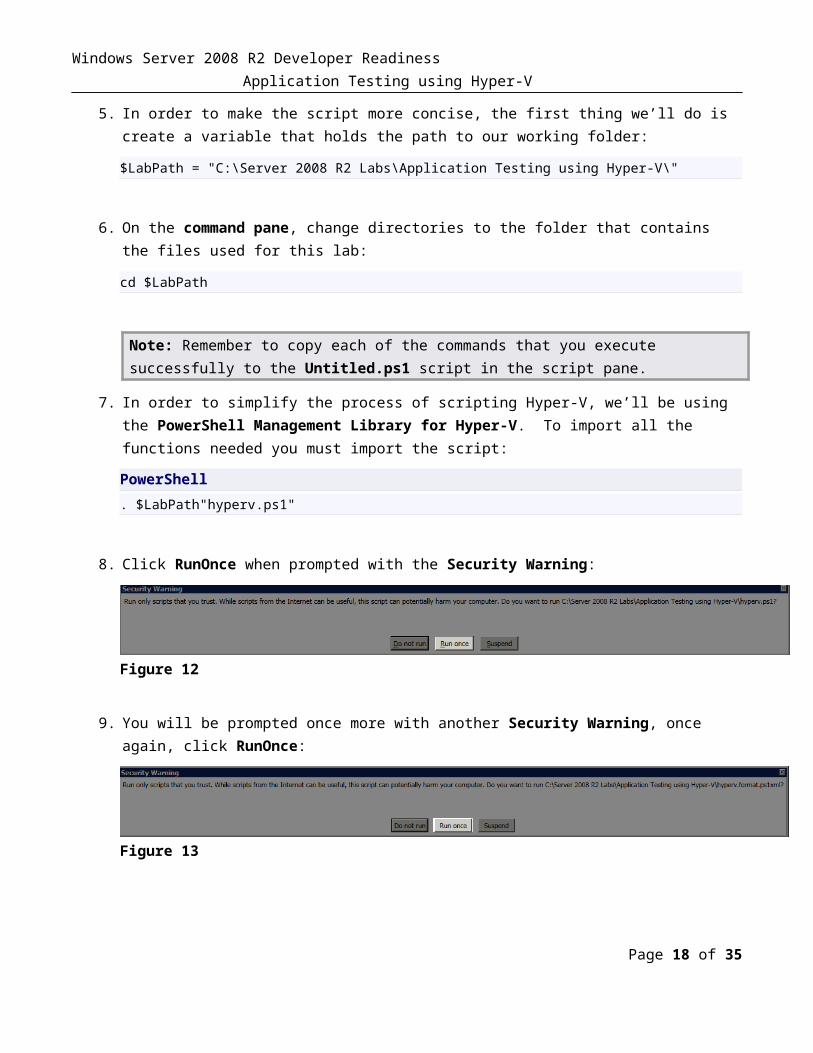
8. Click RunOnce when prompted with the Security Warning:
Figure 12
9. You will be prompted once more with another Security Warning, once again, click RunOnce:
Figure 13
Note: For more information on the PowerShell Management Library for Hyper-V, access the project’s site on Codeplex: http://www.codeplex.com/PSHyperv
The documentation for this library has been included in the lab folder and is named: PowerShell Management Library for Hyper-V Documentation.pdf. Feel free to browse it to see what the library allows you to accomplish.
10. By importing the Management Library for PowerShell we can now easily enter management commands for Windows Hyper-V. Let’s start by creating the virtual machine that will be used in our tests (type this, and all future commands into the command pane and then paste the command the script pane):
PowerShell
$testVM = New-VM -Name ("Test Machine " + $(Get-Date))
Page 15 of 30
Windows Server 2008 R2 Developer Readiness Application Testing using Hyper-V
Note: With the above command, we are creating a new virtual machine with default properties. We are appending the date to the name in order to tell them apart in the future (Hyper-V allows you to create virtual machines with the same name).
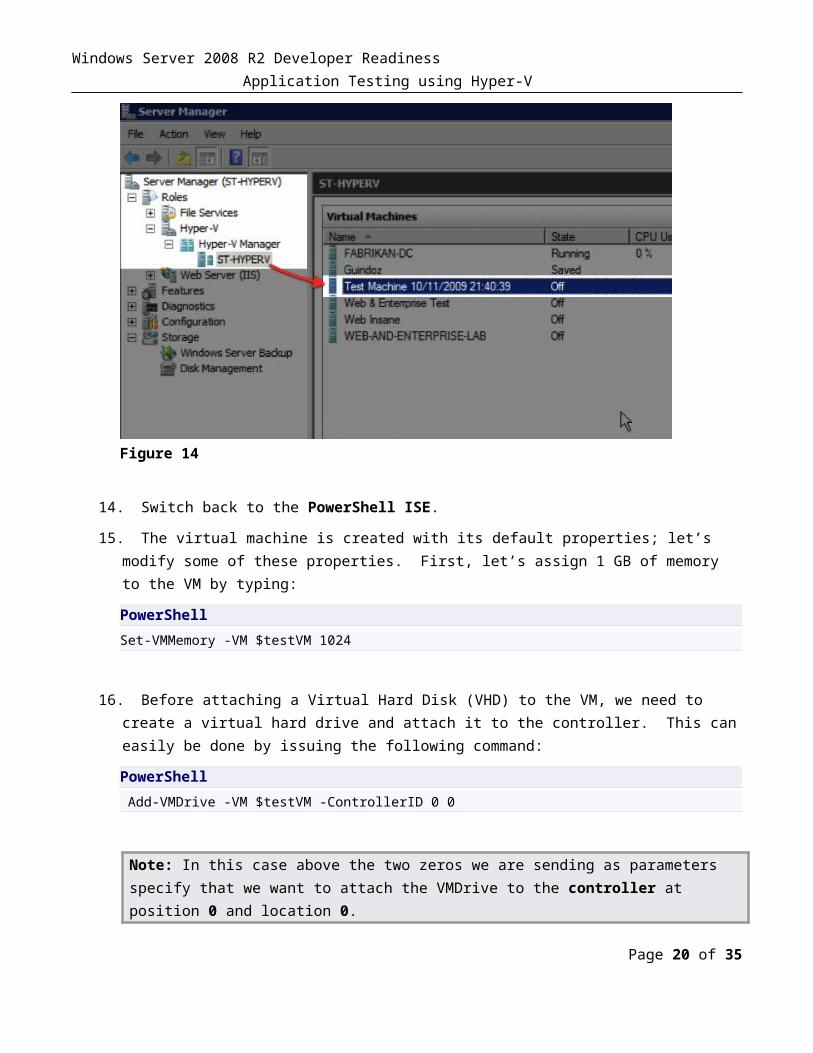
11. Open your machine’s Server Manager by accessing:
All Programs Administrative Tools Server Manager
12. From Server Manager, navigate to:
Roles Hyper-V Hyper-V Manager [Server-Name]
13. Verify that the machine was indeed created:
Figure 14
14. Switch back to the PowerShell ISE.
15. The virtual machine is created with its default properties; let’s modify some of these properties. First, let’s assign 1 GB of memory to the VM by typing:
PowerShell
Set-VMMemory -VM $testVM 1024
Page 16 of 30
Windows Server 2008 R2 Developer Readiness Application Testing using Hyper-V
16. Before attaching a Virtual Hard Disk (VHD) to the VM, we need to create a virtual hard drive and attach it to the controller. This can easily be done by issuing the following command:
PowerShell
Add-VMDrive -VM $testVM -ControllerID 0 0
Note: In this case above the two zeros we are sending as parameters specify that we want to attach the VMDrive to the controller at position 0 and location 0.
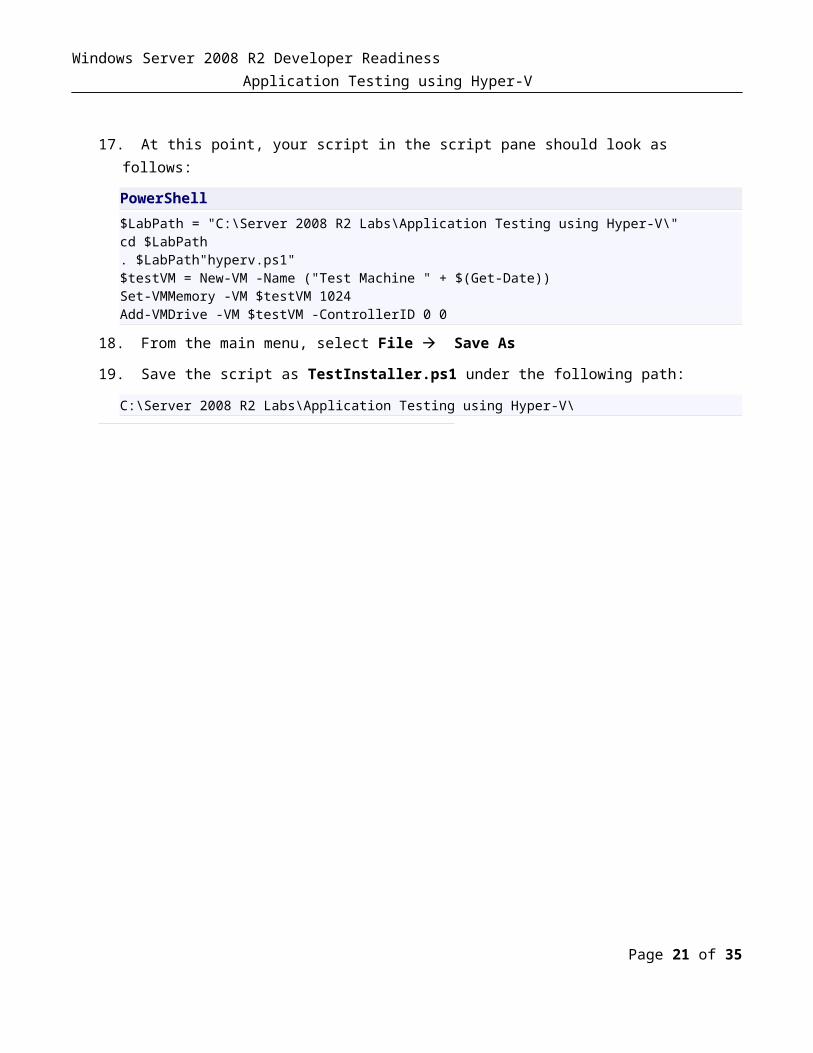
17. At this point, your script in the script pane should look as follows:
PowerShell
$LabPath = "C:\Server 2008 R2 Labs\Application Testing using Hyper-V\"cd $LabPath. $LabPath"hyperv.ps1"$testVM = New-VM -Name ("Test Machine " + $(Get-Date))Set-VMMemory -VM $testVM 1024Add-VMDrive -VM $testVM -ControllerID 0 0
18. From the main menu, select File Save As
19. Save the script as TestInstaller.ps1 under the following path:
C:\Server 2008 R2 Labs\Application Testing using Hyper-V\
Page 17 of 30
Windows Server 2008 R2 Developer Readiness Application Testing using Hyper-V
Part 2: Modifying the VHD
Note: Our script will create a differencing disk every time it runs with the name TestVHD.vhd. The next step involves finding out if the VHD exists in the current path and erasing it if it does.
1. To test for the existence of the TestVHD.vhd, type the following code snippet:
PowerShell
#Clean up if the VHD from a previous run existsIf ((Test-Path ($LabPath + "TestVHD.vhd")) -eq "True") { UnMount-VHD -vhdPath ($LabPath + "TestVHD.vhd") del ($LabPath + "TestVHD.vhd")}
Note: We have provided a VHD that represents a clean state for the installer to be tested. If we modify this VHD on every run, then we no longer have a clean environment. A way to avoid this is to work with a differencing disk from the clean VHD.
2. To create a differencing disk, we use the same command that is used to create fixed or dynamic disks, except that the –parent switch is specified. The command is New-VHD, and below is the line that you need to type:
PowerShell
New-VHD ($LabPath + "TestVHD.vhd") -parent ($LabPath + "Windows Server 2008 R2 Enterprise Evaluation (Full Edition).vhd") –wait
Note: In the case above, we are spawning a disposable differencing disk from the Windows Server 2008 R2 Enterprise Evaluation (Full Edition).vhd VHD. Any changes made to the TestVHD.vhd will not affect its parent.
You may have noticed that the -wait command was used when creating the VHD. This makes the operation synchronous and the script won’t be able to proceed any further until the VHD is created, which is the behavior we need.
3. At this point we need to copy the installation executable into the VHD. Instead of booting the VM and copying the file over the network, we will place the binary into the VHD by mounting it. This can be done by invoking the Mount-VHD command:
Page 18 of 30

Windows Server 2008 R2 Developer Readiness Application Testing using Hyper-V
PowerShell
Mount-VHD -vhdPath ($LabPath + "TestVHD.vhd") -Partition 2 -Letter TSleep 5
Note: We have added a sleep command after the mount to allow the system to update its info once the VHD is mounted.
The Mount-VHD is a very handy command that will mount VHDs regardless on whether they are fixed, dynamic, or differencing. In this case we are mounting the second partition (the first partition is system reserved) and we are specifying to assign the letter T:\ so we know where to access it.
4. We can now copy the application’s executable to the mounted VHD:
PowerShell
#The directry where the bits will residemkdir "T:\test\"#Copy the installercopy ($LabPath + "VHD Utilities.msi") T:\test\
Note: So far, we have copied the installer to the VHD, but we need a way to automatically start it and test it. In order to carry these tasks, we will use AutoHotKey (http://www.autohotkey.com/), a very versatile and convenient keyboard macro program.
For this lab, we have already created the script that will start the installer and will carry out the keyboard combination to install it. The script is called Install VHD Utilities.ahk and resides in the folder for this lab in case you would like to inspect it.
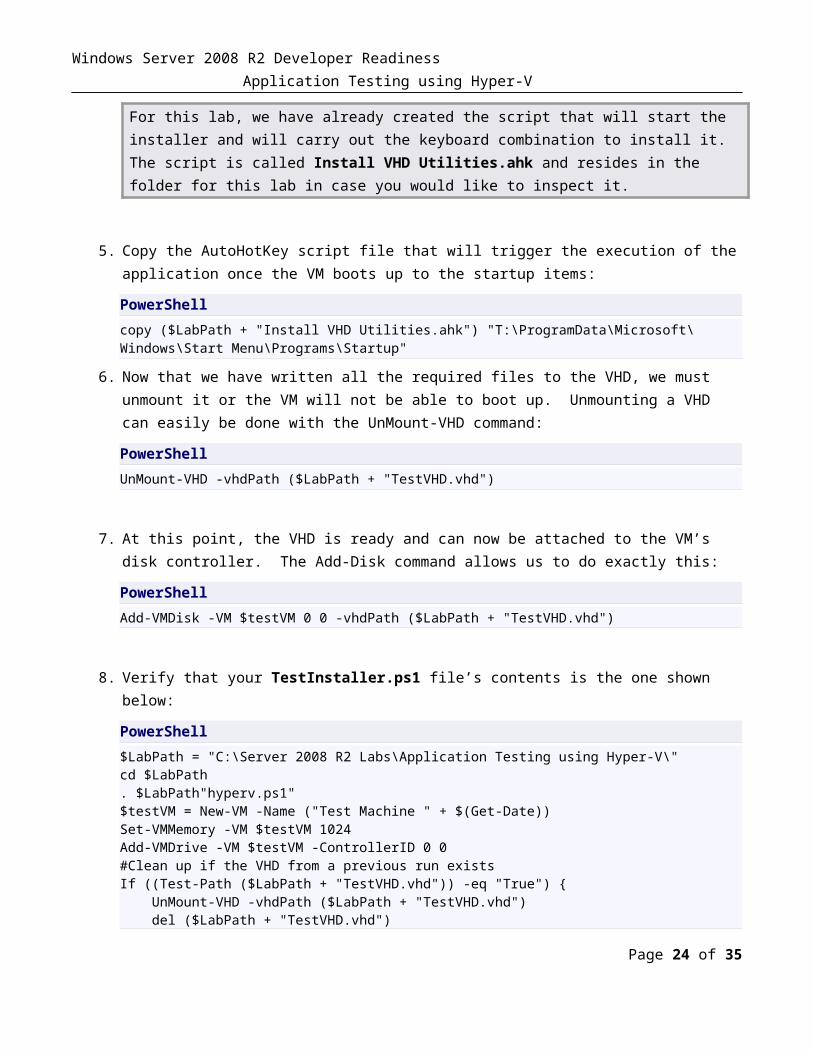
5. Copy the AutoHotKey script file that will trigger the execution of the application once the VM boots up to the startup items:
PowerShell
copy ($LabPath + "Install VHD Utilities.ahk") "T:\ProgramData\Microsoft\Windows\Start Menu\Programs\Startup"
6. Now that we have written all the required files to the VHD, we must unmount it or the VM will not be able to boot up. Unmounting a VHD can easily be done with the UnMount-VHD command:
PowerShell
UnMount-VHD -vhdPath ($LabPath + "TestVHD.vhd")
Page 19 of 30
Windows Server 2008 R2 Developer Readiness Application Testing using Hyper-V
7. At this point, the VHD is ready and can now be attached to the VM’s disk controller. The Add-Disk command allows us to do exactly this:
PowerShell
Add-VMDisk -VM $testVM 0 0 -vhdPath ($LabPath + "TestVHD.vhd")
8. Verify that your TestInstaller.ps1 file’s contents is the one shown below:
PowerShell
$LabPath = "C:\Server 2008 R2 Labs\Application Testing using Hyper-V\"cd $LabPath. $LabPath"hyperv.ps1"$testVM = New-VM -Name ("Test Machine " + $(Get-Date))Set-VMMemory -VM $testVM 1024Add-VMDrive -VM $testVM -ControllerID 0 0#Clean up if the VHD from a previous run existsIf ((Test-Path ($LabPath + "TestVHD.vhd")) -eq "True") { UnMount-VHD -vhdPath ($LabPath + "TestVHD.vhd") del ($LabPath + "TestVHD.vhd")}New-VHD ($LabPath + "TestVHD.vhd") -parent ($LabPath + "Windows Server 2008 R2 Enterprise Evaluation (Full Edition).vhd") –waitMount-VHD -vhdPath ($LabPath + "TestVHD.vhd") -Partition 2 -Letter TSleep 5#The directry where the bits will residemkdir "T:\test\"#Copy the installercopy ($LabPath + "VHD Utilities.msi") T:\test\copy ($LabPath + "Install VHD Utilities.ahk") "T:\ProgramData\Microsoft\Windows\Start Menu\Programs\Startup"UnMount-VHD -vhdPath ($LabPath + "TestVHD.vhd") Add-VMDisk -VM $testVM 0 0 -vhdPath ($LabPath + "TestVHD.vhd")
Page 20 of 30
Windows Server 2008 R2 Developer Readiness Application Testing using Hyper-V
Part 3: Starting the Virtual Machine
Note: In this part we must implement the code that will start the virtual machine and wait for the test to finish.
1. To start the virtual machine we can use the Set-VMState command, which allows us to change the state of the VM to Running with the $vmstate.running parameter. The command to start our VM is the following:
PowerShell
Set-VMState -VM $testVM $vmstate.running
Note: At this point the VM will start running and will carry out an installation. You can can safely ignore what the VM is doing at this point.
2. As an optional step, we want to open a connection to the VM to see that is happening underneath. In a testing environment you would not need this step as the script can run unattended. The command to connect to the VM follows:
PowerShell
New-VMConnectSession -VM $testVM
Note: How do we know when our test is done? If you examined the AutoHotKey script you might have noticed that the last command shuts down our machine; therefore, when the machine changes state from Running to Stopped, the application’s installation has finished.
3. The code to wait for the change of VM state from running to stopped is the following:
PowerShell
#Query the state of the VM, we want to know when it's OFF$testVMState = Get-VMState $testVM#While the machine is starting up or running, wait 15 seconds and then check its state againwhile (($testVMState.EnabledState -eq 2) -or ($testVMState.EnabledState -eq 32770)) { $testVMState = Get-VMState $testVM Write-Host (Get-Date): "Test machine's state is"($testVMState.EnabledState)", sleeping for 15 seconds" sleep(15)}
Page 21 of 30

Windows Server 2008 R2 Developer Readiness Application Testing using Hyper-V
Note: The state of the VM is obtained and stored on the $testVMState variable. The while loop checks to see if the machine is either running or starting, which in case of holding true will cause the loop to continue. Once the state of the VM changes, then the loop will break and the execution of the script will resume.
Page 22 of 30

Windows Server 2008 R2 Developer Readiness Application Testing using Hyper-V
Part 4: Verify the Results
Note: When the script eventually runs, at this point the installer already ran and we need to verify that the application got installed. A quick (not the best) way to find this out is to obtain the directory listing where the application was installed and comparing that to what the expected listing should be. In this part of the lab we will implement this functionality.
1. In order to obtain the directory listing we need for comparison, it is necessary to mount the VHD once more:
PowerShell
Mount-VHD -vhdPath ($LabPath + "TestVHD.vhd") -Partition 2 -Letter TSleep 5
2. Next, we want to obtain the directory listing and output this information to a text file:
PowerShell
dir "T:\Program Files (x86)\Fabrikan\VHD Utilities\" | format-table Name -hideTableHeaders | Out-file actual.txt
Note: The format-table Name -hideTableHeaders command is analogous to dir /b. It will only output the names of the files in the directory.
3. Next, we’ll store the information written to the file to a variable:
PowerShell
$actual = Get-Content .\actual.txt
4. The expected.txt file contains the information of what the output should be, so we need to obtain the file’s contents and store it in variable as well:
PowerShell
$expected = Get-Content .\expected.txt
5. We can now compare the results using the Compare-Object command:
PowerShell
Compare-Object $actual $expected | out-file results.txt
Page 23 of 30
Windows Server 2008 R2 Developer Readiness Application Testing using Hyper-V
Note: The output of this command is written to the results.txt file, which should be blank every time the application got successfully installed. Whenever this file contains any text, it is a clear sign that something went astray.
6. We can now close the VHD since it’s no longer needed:
PowerShell
UnMount-VHD -vhdPath ($LabPath + "TestVHD.vhd")
7. And we can finally remove the VM since it is no longer necessary (note that this does not delete any VHD attached to it):
PowerShell
Remove-VM $testVM
Page 24 of 30

Windows Server 2008 R2 Developer Readiness Application Testing using Hyper-V
Part 5: Running the Script
Note: It is now time to run the script and see if it works correctly.
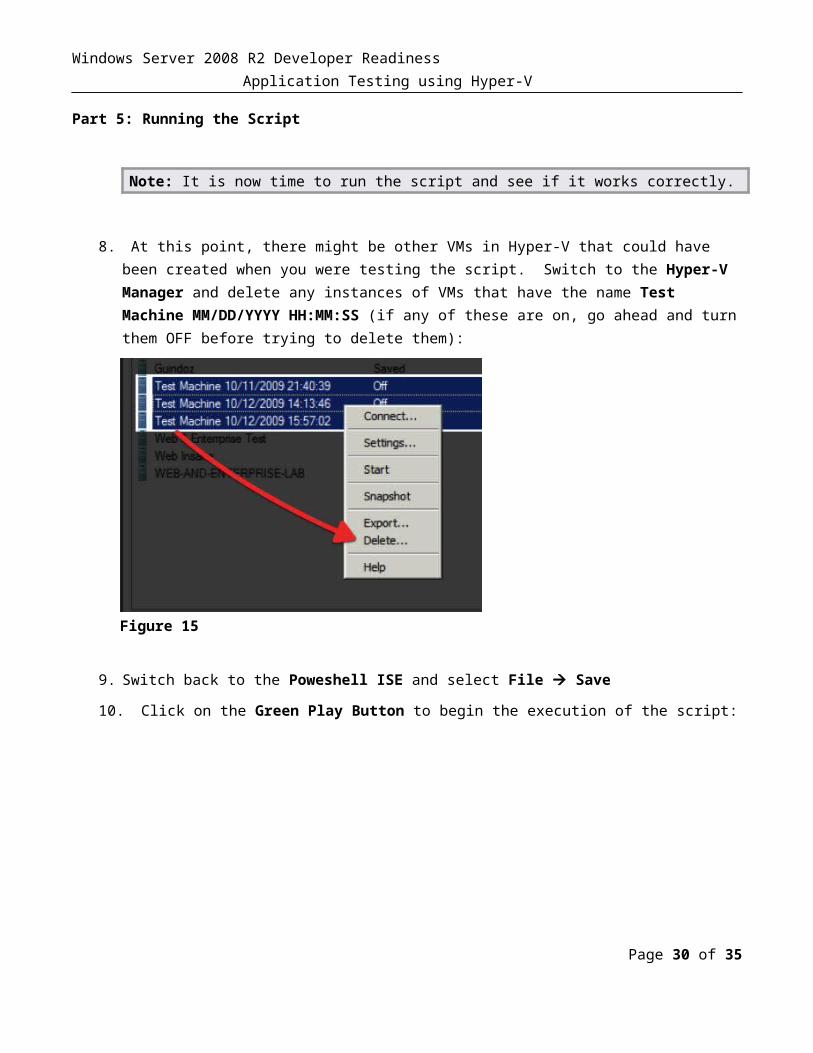
8. At this point, there might be other VMs in Hyper-V that could have been created when you were testing the script. Switch to the Hyper-V Manager and delete any instances of VMs that have the name Test Machine MM/DD/YYYY HH:MM:SS (if any of these are on, go ahead and turn them OFF before trying to delete them):
Figure 15
9. Switch back to the Poweshell ISE and select File Save
10. Click on the Green Play Button to begin the execution of the script:
Page 25 of 30
Windows Server 2008 R2 Developer Readiness Application Testing using Hyper-V
Figure 16
11. Dismiss the 2 security warnings by clicking on Run Once on the two dialogs that will show up.
12. At this point, you should see the following things happening:
a. A PowerShell Window displaying the progress of mounting the VHD
b. A Virtual Machine Connection loading up
c. The Windows Server 2008 R2 VM starting up
d. The machine will auto-logon
e. The installer will be launched
f. The app will be automatically installed
g. The machine will shut itself off
h. The machine will be delete from Hyper-V
13. The following is PowerShell’s output is displayed before for the run of our application:
Created VM 'Test Machine 10/12/2009 17:49:58'Set memory for 'Test Machine 10/12/2009 17:49:58' to 1024 MB.Added drive to 'Test Machine 10/12/2009 17:49:58'.Failed to Unmount C:\Server 2008 R2 Labs\Application Testing using Hyper-V\TestVHD.vhd, return code: 32773VHD Creation of C:\Server 2008 R2 Labs\Application Testing using Hyper-V\TestVHD.vhd : CompletedOKDisk mount: CompletedT:V:Disk ID... 7
Page 26 of 30
Windows Server 2008 R2 Developer Readiness Application Testing using Hyper-V
test Unmounted C:\Server 2008 R2 Labs\Application Testing using Hyper-V\TestVHD.vhdAdded disk to 'Test Machine 10/12/2009 17:49:58'.Changing state of Test Machine 10/12/2009 17:49:58: Job Started.\\ST-HYPERV\root\virtualization:Msvm_ConcreteJob.InstanceID="E8999453-6A23-43F5-A9D5-38EF6226E58E"10/12/2009 5:50:27 PM : Test machine's state is 32770 , sleeping for 15 seconds10/12/2009 5:50:42 PM : Test machine's state is 2 , sleeping for 15 seconds10/12/2009 5:50:58 PM : Test machine's state is 2 , sleeping for 15 seconds10/12/2009 5:51:13 PM : Test machine's state is 2 , sleeping for 15 seconds10/12/2009 5:51:28 PM : Test machine's state is 2 , sleeping for 15 seconds10/12/2009 5:51:43 PM : Test machine's state is 2 , sleeping for 15 seconds10/12/2009 5:51:59 PM : Test machine's state is 3 , sleeping for 15 secondsDisk mount: CompletedT:V:Disk ID... 7Unmounted C:\Server 2008 R2 Labs\Application Testing using Hyper-V\TestVHD.vhdJob Started to delete VM 'Test Machine 10/12/2009 17:49:58'.\\ST-HYPERV\root\virtualization:Msvm_ConcreteJob.InstanceID="37A399F1-A660-4F09-9B26-E2C704AFD5A1"
Page 27 of 30
Windows Server 2008 R2 Developer Readiness Application Testing using Hyper-V
Extra
If you feel like experimenting with the Hyper-V PowerShell Libraries, try carrying out the following tasks:
1. Modify the script so that the line that writes to the console the state of the VM uses the actual name of the state and not the number. For instance:
10/19/2009 9:48:30 PM : Test machine's state is running , sleeping for 15 seconds
2. Read the following blog entry:
http://www.hanselman.com/blog/RemovingSecurityFromDownloadedPowerShellScriptsWithAlternativeDataStreams.aspx
And find a way so that the script will not show the security warnings every time it runs.
In case you do not have an Internet connection, a PDF version of the entry can be found at the following path:
C:\Server 2008 R2 Labs\Application Testing using Hyper-V\Removing Security from Downloaded PowerShell Scripts with Alternative Data Streams.pdf
Page 28 of 30
Windows Server 2008 R2 Developer Readiness Application Testing using Hyper-V
Lab Summary
Just like its predecessor, Virtual Server 2005, Windows Hyper-V can be fully scripted in order to perform any operation you might need. Windows Hyper-V can be automated by using WMI classes from any managed language, VBScript, or PowerShell.
In this lab we used the PowerShell Management Library to automate all of our tasks. The final outcome was easier to write and was more comprehensible than if we had use WMI and PowerShell. The different commands used in this lab should give you a broader idea on how to accomplish any VM related task in the future. Remember to always check the documentation and to visit the PowerShell Management Library to check for any updates.
Page 29 of 30
Windows Server 2008 R2 Developer Readiness Application Testing using Hyper-V
Page 30 of 30