Apple Pro Training Series -...
55
Transcript of Apple Pro Training Series -...


Apple Pro Training Series
Logic Pro 9 and Logic Express 9David Nahmani
deuxmina
0321684451: aptsLogicEx9

Apple Pro Training Series: Logic Pro 9 and Logic Express 9David NahmaniCopyright © 2010 by David Nahmani
Published by Peachpit Press. For information on Peachpit Press books, contact:
Peachpit Press1249 Eighth StreetBerkeley, CA 94710(510) 524-2178Fax: (510) 524-2221www.peachpit.comTo report errors, please send a note to [email protected] Press is a division of Pearson Education.
Apple Series Editor: Serena HerrEditor: Bob LindstromProduction Coordinator: Kim Wimpsett, Happenstance Type-O-RamaTechnical Editor: Robert BrockCopy Editor: Elissa RabellinoTechnical Reviewers: Josh Hinden, Chris ColatosCompositor: Craig Johnson, Happenstance Type-O-RamaIndexer: Jack LewisMedia Producer: Eric GeoffroyCover Illustration: Kent OberheuCover Production: Happenstance Type-O-Rama
Notice of RightsAll rights reserved. No part of this book may be reproduced or transmitted in any form by any means, electronic, mechan-ical, photocopying, recording, or otherwise, without the prior written permission of the publisher. For information on getting permission for reprints and excerpts, contact [email protected].
Darkside © 2007 written by M. Davis (MDouble Music, BMI), J. Honigstock (Jomilla Music, BMI); produced by Myron and Josh Honigstock for MoJa Music; all vocals and instruments performed by Myron. All rights reserved. Home (Klayton Revision) © 2007 courtesy GHOLA Music (ASCAP). Remix, additional production and instrumentation by Klayton (Celldweller); www.celldwellercom. Written by Dan Levler for LVL Production; www.lvlproduction.com. All rights reserved. Mitro Valve Prolapse © 2007 courtesy Machines & Dreams / blumpco. Written and performed by Joe Hedges; produced by Blumpy. All rights reserved. We Shared Everything © 2007; written, performed, and produced by David Nahmani; drums performed by Matt Olofsson and engineered by Gregg Sartiano. All rights reserved. New Day © 2007; produced and performed by David Nahmani. All rights reserved. Sunday Morning © 2007 written by Cortini/Hillstrom, performed by Modwheelmood, www.modwheelmood.com. Produced by Alessandro Cortini. All rights reserved.The music and footage supplied with this book can be used only in association with the lessons included. Any other use, including but not limited to incorporating the media in another project, duplicating, or distributing, requires explicit per-mission from the copyright holders listed above.
Notice of LiabilityThe information in this book is distributed on an “As Is” basis, without warranty. While every precaution has been taken in the preparation of the book, neither the author nor Peachpit Press shall have any liability to any person or entity with respect to any loss or damage caused or alleged to be caused directly or indirectly by the instructions contained in this book or by the computer software and hardware products described in it.
TrademarksMany of the designations used by manufacturers and sellers to distinguish their products are claimed as trademarks. Where those designations appear in this book, and Peachpit was aware of a trademark claim, the designations appear as requested by the owner of the trademark. All other product names and services identified throughout this book are used in editorial fashion only and for the benefit of such companies with no intention of infringement of the trademark. No such use, or the use of any trade name, is intended to convey endorsement or other affiliation with this book.
ISBN 13: 978-0-321-63680-5ISBN 10: 0-321-63680-59 8 7 6 5 4 3 2 1Printed and bound in the United States of America
deuxmina
0321684451: aptsLogicEx9

Acknowledgments My deepest gratitude to the artists and producers
who agreed to provide their Logic sessions for this book: Blumpy and Joe
Hedges for the song “Mitral Valve Prolapse,” Klayton from Celldweller for his
remix “LVL-Home,” Myron for his song “Darkside,” and Alessandro Cortini
from Modwheelmood for their song “Sunday Morning.”

This page intentionally left blank

v
Contents at a Glance
Getting Started . . . . . . . . . . . . . . . . . . . . . . . . . . . . . . . . . . . . . . . . 1
Building a SongLesson 1 Make Music with Logic Now! . . . . . . . . . . . . . . . . . . . . . . . . . . . 11
Lesson 2 Recording Audio . . . . . . . . . . . . . . . . . . . . . . . . . . . . . . . . . . . . . . 59
Lesson 3 Editing Audio . . . . . . . . . . . . . . . . . . . . . . . . . . . . . . . . . . . . . . . 101
Lesson 4 Recording MIDI . . . . . . . . . . . . . . . . . . . . . . . . . . . . . . . . . . . . . 141
Lesson 5 Programming and Editing MIDI . . . . . . . . . . . . . . . . . . . . . . . 169
Lesson 6 Programming Drums . . . . . . . . . . . . . . . . . . . . . . . . . . . . . . . . 213
Lesson 7 Manipulating Tempo and Time Stretching . . . . . . . . . . . . . . . 253
Arranging and MixingLesson 8 Arranging and Preparing for the Mix . . . . . . . . . . . . . . . . . . . 285
Lesson 9 Mixing . . . . . . . . . . . . . . . . . . . . . . . . . . . . . . . . . . . . . . . . . . . . . 329
Lesson 10 Automating the Mix and Using Control Surfaces . . . . . . . . . 379
Lesson 11 Troubleshooting and Optimization . . . . . . . . . . . . . . . . . . . . . 409
Appendix A Using External MIDI Devices . . . . . . . . . . . . . . . . . . . . . . . . . . 449
Appendix B Keyboard Shortcuts (U.S. Preset) . . . . . . . . . . . . . . . . . . . . . . . 461
Index . . . . . . . . . . . . . . . . . . . . . . . . . . . . . . . . . . . . . . . . . . . . . . 485
deuxmina
0321684451: aptsLogicEx9

vi
Table of Contents
Getting Started . . . . . . . . . . . . . . . . . . . . . . . . . . . . . 1
Building a Song
Lesson 1 Make Music with Logic Now! . . . . . . . . . . . . . . . . 11Opening Logic . . . . . . . . . . . . . . . . . . . . . . . . . . . . . . . . . . . . . . . 12
Exploring the Interface . . . . . . . . . . . . . . . . . . . . . . . . . . . . . . . . . 15
Starting a Project with Apple Loops . . . . . . . . . . . . . . . . . . . . . . 18
Navigating the Project . . . . . . . . . . . . . . . . . . . . . . . . . . . . . . . . . 23
Building an Arrangement . . . . . . . . . . . . . . . . . . . . . . . . . . . . . . . 29
Mixing the Song . . . . . . . . . . . . . . . . . . . . . . . . . . . . . . . . . . . . . . 44
Exporting the Mix . . . . . . . . . . . . . . . . . . . . . . . . . . . . . . . . . . . . . 53
Lesson Review . . . . . . . . . . . . . . . . . . . . . . . . . . . . . . . . . . . . . . . . 56
Lesson 2 Recording Audio . . . . . . . . . . . . . . . . . . . . . . . . . . . 59Setting Up Digital Audio Recording . . . . . . . . . . . . . . . . . . . . . 60
Recording a Single Track . . . . . . . . . . . . . . . . . . . . . . . . . . . . . . . 64
Recording Additional Takes . . . . . . . . . . . . . . . . . . . . . . . . . . . . . 75
Recording Multiple Tracks . . . . . . . . . . . . . . . . . . . . . . . . . . . . . . 79
Punching In and Out . . . . . . . . . . . . . . . . . . . . . . . . . . . . . . . . . . 85
Changing Recording and Metronome Settings . . . . . . . . . . . . . 93
Lesson Review . . . . . . . . . . . . . . . . . . . . . . . . . . . . . . . . . . . . . . . . 98
Lesson 3 Editing Audio . . . . . . . . . . . . . . . . . . . . . . . . . . . . . 101Comping Takes . . . . . . . . . . . . . . . . . . . . . . . . . . . . . . . . . . . . . . 102
Assigning Mouse Tools . . . . . . . . . . . . . . . . . . . . . . . . . . . . . . . . 110
Editing Audio Regions in the Arrange Area . . . . . . . . . . . . . . . 113
Contents vii
Deleting Unused Audio Files . . . . . . . . . . . . . . . . . . . . . . . . . . . 121
Quantizing an Audio Drum Recording . . . . . . . . . . . . . . . . . . 124
Manipulating the Waveform with the Flex Tool . . . . . . . . . . . 128
Editing Audio Destructively in the Sample Editor . . . . . . . . . 131
Lesson Review . . . . . . . . . . . . . . . . . . . . . . . . . . . . . . . . . . . . . . . 138
Lesson 4 Recording MIDI . . . . . . . . . . . . . . . . . . . . . . . . . . . 141Recording MIDI . . . . . . . . . . . . . . . . . . . . . . . . . . . . . . . . . . . . . 142
Quantizing MIDI Recordings . . . . . . . . . . . . . . . . . . . . . . . . . . 146
Merging Recordings into a MIDI Region . . . . . . . . . . . . . . . . . 148
Recording MIDI Takes . . . . . . . . . . . . . . . . . . . . . . . . . . . . . . . . 156
Using Punch Recording . . . . . . . . . . . . . . . . . . . . . . . . . . . . . . . 158
Using Step Input Recording . . . . . . . . . . . . . . . . . . . . . . . . . . . . 160
Filtering Incoming MIDI Events . . . . . . . . . . . . . . . . . . . . . . . . 165
Lesson Review . . . . . . . . . . . . . . . . . . . . . . . . . . . . . . . . . . . . . . . 167
Lesson 5 Programming and Editing MIDI . . . . . . . . . . . . . 169Programming in the Piano Roll Editor . . . . . . . . . . . . . . . . . . . 170
Editing a MIDI Recording . . . . . . . . . . . . . . . . . . . . . . . . . . . . . 178
Using the Score Editor . . . . . . . . . . . . . . . . . . . . . . . . . . . . . . . . 181
Editing Notes with a MIDI Keyboard . . . . . . . . . . . . . . . . . . . . 187
Editing Note Velocity Using Hyper Draw . . . . . . . . . . . . . . . . . 190
Editing MIDI Continuous Controller Events . . . . . . . . . . . . . 193
Editing in the Event List . . . . . . . . . . . . . . . . . . . . . . . . . . . . . . . 205
Lesson Review . . . . . . . . . . . . . . . . . . . . . . . . . . . . . . . . . . . . . . . 210
Lesson 6 Programming Drums . . . . . . . . . . . . . . . . . . . . . . 213Programming a Drum Pattern in Ultrabeat . . . . . . . . . . . . . . . 214
Changing the Groove in the MIDI Editors . . . . . . . . . . . . . . . 229
Creating a Snare Roll Using the Hyper Editor . . . . . . . . . . . . . 237
Converting a MIDI Sequence into an Audio Region. . . . . . . . 246
Converting an Audio Region into a
Sampler Instrument Track . . . . . . . . . . . . . . . . . . . . . . . . . . . 248
Lesson Review . . . . . . . . . . . . . . . . . . . . . . . . . . . . . . . . . . . . . . . 251
viii Contents
Lesson 7 Manipulating Tempo and Time Stretching . . . . 253Matching the Project Tempo to an Audio Region’s Tempo . . 254
Working with Apple Loops . . . . . . . . . . . . . . . . . . . . . . . . . . . . 257
Inserting Tempo Changes and Curves . . . . . . . . . . . . . . . . . . . 262
Creating Apple Loops . . . . . . . . . . . . . . . . . . . . . . . . . . . . . . . . . 266
Change the Playback Pitch and Speed with Varispeed . . . . . . 269
Time Stretching and Tempo Matching
with Flex Time Editing . . . . . . . . . . . . . . . . . . . . . . . . . . . . . . 272
Creating a Turntable or Tape Slowdown Effect . . . . . . . . . . . . 279
Lesson Review . . . . . . . . . . . . . . . . . . . . . . . . . . . . . . . . . . . . . . . 282
Arranging and Mixing
Lesson 8 Arranging and Preparing for the Mix . . . . . . . . . 285Previewing the Song . . . . . . . . . . . . . . . . . . . . . . . . . . . . . . . . . . 286
Using Existing Material to Fill In Parts . . . . . . . . . . . . . . . . . . . 289
Adding and Deleting Sections . . . . . . . . . . . . . . . . . . . . . . . . . . 308
Muting Elements . . . . . . . . . . . . . . . . . . . . . . . . . . . . . . . . . . . . . 312
Cleaning Up Noisy Recordings . . . . . . . . . . . . . . . . . . . . . . . . . 315
Lesson Review . . . . . . . . . . . . . . . . . . . . . . . . . . . . . . . . . . . . . . . 326
Lesson 9 Mixing . . . . . . . . . . . . . . . . . . . . . . . . . . . . . . . . . . 329Previewing the Final Mix . . . . . . . . . . . . . . . . . . . . . . . . . . . . . . 330
Using the Amp Designer . . . . . . . . . . . . . . . . . . . . . . . . . . . . . . 330
Using the Pedalboard . . . . . . . . . . . . . . . . . . . . . . . . . . . . . . . . . 339
Adjusting Levels . . . . . . . . . . . . . . . . . . . . . . . . . . . . . . . . . . . . . 344
Choosing Pan Positions . . . . . . . . . . . . . . . . . . . . . . . . . . . . . . . 351
Choosing EQ Settings . . . . . . . . . . . . . . . . . . . . . . . . . . . . . . . . . 355
Using Delay and Reverberation . . . . . . . . . . . . . . . . . . . . . . . . . 361
Using Dynamic Processing Plug-ins . . . . . . . . . . . . . . . . . . . . . 367
A Few Tips and Tricks . . . . . . . . . . . . . . . . . . . . . . . . . . . . . . . . 375
Lesson Review . . . . . . . . . . . . . . . . . . . . . . . . . . . . . . . . . . . . . . . 376

Contents ix
Lesson 10 Automating the Mix and Using Control Surfaces . 379Creating and Editing Offline Automation . . . . . . . . . . . . . . . . 380
Recording Live Automation . . . . . . . . . . . . . . . . . . . . . . . . . . . . 392
Using Control Surfaces . . . . . . . . . . . . . . . . . . . . . . . . . . . . . . . . 401
Exporting the Mix . . . . . . . . . . . . . . . . . . . . . . . . . . . . . . . . . . . . 405
Lesson Review . . . . . . . . . . . . . . . . . . . . . . . . . . . . . . . . . . . . . . . 407
Lesson 11 Troubleshooting and Optimization . . . . . . . . . . . 409Making Backups . . . . . . . . . . . . . . . . . . . . . . . . . . . . . . . . . . . . . 410
Solving Audio and MIDI Routing Problems . . . . . . . . . . . . . . 422
Optimizing Hardware Performance . . . . . . . . . . . . . . . . . . . . . 433
Addressing Unexpected Behaviors . . . . . . . . . . . . . . . . . . . . . . 440
Lesson Review . . . . . . . . . . . . . . . . . . . . . . . . . . . . . . . . . . . . . . . 443
Appendix A Using External MIDI Devices . . . . . . . . . . . . . . . 449Configuring MIDI Hardware . . . . . . . . . . . . . . . . . . . . . . . . . . . 450
Appendix B Keyboard Shortcuts (U.S. Preset) . . . . . . . . . . . . . 461Transport Controls . . . . . . . . . . . . . . . . . . . . . . . . . . . . . . . . . . . 461
Zooming . . . . . . . . . . . . . . . . . . . . . . . . . . . . . . . . . . . . . . . . . . . 462
Tools . . . . . . . . . . . . . . . . . . . . . . . . . . . . . . . . . . . . . . . . . . . . . . . 462
Channel Strip, Track, and Region Operations . . . . . . . . . . . . . 463
Views . . . . . . . . . . . . . . . . . . . . . . . . . . . . . . . . . . . . . . . . . . . . . . 465
Automation . . . . . . . . . . . . . . . . . . . . . . . . . . . . . . . . . . . . . . . . . 466
Finder . . . . . . . . . . . . . . . . . . . . . . . . . . . . . . . . . . . . . . . . . . . . . . 467
Glossary . . . . . . . . . . . . . . . . . . . . . . . . . . . . . . . . . 469 Index . . . . . . . . . . . . . . . . . . . . . . . . . . . . . . . . . . . . 485

This page intentionally left blank

1
Welcome to the official Apple Pro Training Series course for Logic Pro 9
and Logic Express 9. This book is a comprehensive introduction to pro-
fessional audio production with Logic Studio. It uses real-world music
and hands-on exercises to teach you how to record, arrange, mix, produce,
and polish audio and MIDI files in a professional workflow. So let’s get
started!
Getting Started

2 Getting Started
The MethodologyThis book takes a hands-on approach to learning the software, so you’ll be working through
the project files and media on the accompanying DVD. It’s divided into projects that
methodically introduce the interface elements and ways of working with them, building pro-
gressively until you can comfortably grasp the entire application and its standard workflows.
Each lesson in this book is self-contained, so you can jump to any lesson at any time.
However, each lesson is designed to support the concepts learned in the preceding lesson,
and newcomers to audio production should go through the book from start to finish. The
first seven lessons, in particular, teach basic concepts and are best completed in order.
Course StructureThe book is designed to guide you through the music production process as it teaches
Logic. The lessons are organized into two sections:
Building a Song: Lessons 1–7
In this section, you’ll learn the fundamentals of building a song. Lesson 1 starts you out
with an overview of the entire process. You’ll get familiar with the interface and the various
ways to navigate a project while building a song from scratch using Apple Loops, and then
arranging, mixing, and exporting the song to an MP3 file.
In each of the following lessons, you’ll focus on a single topic in detail. You’ll start by learn-
ing how to come up with the building blocks of your musical project: recording, editing,
and programming both audio and MIDI files. Finally, you’ll manipulate the project tempo,
stretch audio files, and apply time and pitch effects.
Arranging and Mixing: Lessons 8–11
In Lessons 8–10, you’ll arrange and mix audio and MIDI files into a final project: add-
ing and deleting sections, muting elements, eliminating noise, adjusting levels, panning,
EQing, adding reverb, and automating the mix. You’ll also learn how to use hardware con-
trol surfaces to manipulate various parameters.
Lesson 11 concludes your exploration of Logic by describing useful troubleshooting
techniques that can improve your Logic system’s reliability and efficiency. You’ll learn

Using the DVD Book Files 3
effective backup procedures, how to resolve audio and MIDI routing problems, and ways
to optimize your hardware. Appendix A covers how to use external MIDI devices, and
Appendix B lists a wealth of useful keyboard shortcuts.
Using the DVD Book FilesThe Apple Pro Training Series: Logic Pro 9 and Logic Express 9 DVD (included with the book)
contains the project files you will use for each lesson, as well as media files that contain the
audio and video content you will need for each exercise. After you transfer the files to your
hard disk, each lesson will instruct you in the use of the project and media files.
Installing LogicThe exercises in this book require that you install Logic Studio or Logic Express along
with the default content pre-selected in the installer. To install Logic Studio or Logic
Express, insert the first installation DVD in your computer, double-click the installer, and
follow the installer’s instructions to complete the installation.
NOTE P If you have already installed Logic Studio but did not install some of the con-
tent, you can run the installer again and choose to install only the Logic Studio Content.
Using Default Preferences and the U.S. Key Command PresetAll the instructions and descriptions in this book assume that you are using the default
set of preferences (unless instructed to change them) and the U.S. key command preset. If
you have changed some of your preferences or have not selected the factory U.S. key com-
mand preset, you may not get the same results described in the exercises. To make sure
you can follow along with this book, it’s best to revert to the initial set of Logic preferences
and choose the U.S. shortcut preset before you start the lessons. Keep in mind that when
you initialize your preferences, you will lose your custom settings, and later you may want
to reset your favorite preferences manually.
1 From the main menu bar, choose Logic Pro > Preferences > Initialize All Except Key
Commands.
A confirmation message pops up.

4 Getting Started
LOgIC ExPrESS P When instructed to choose an item from the Logic Pro menu,
choose the same item from the Logic Express menu.
2 Click Initialize.
Your preferences are initialized. To choose your key commands preset, you need to
open the Key Commands window.
3 In the main menu bar, choose Logic Pro > Preferences > Key Commands.
The Key Commands window opens.
4 Click the Options pop-up menu and choose Presets > U.S.
5 Close the Key Commands window.
Screen resolutionIf you are using a small screen resolution, some of the project files may appear different
on your screen than they do in the book. When you open a project, if you can’t see the
whole Arrange window, move the window until you can see the three window controls at
the left of the title bar, and click the zoom button (the third button from the left) to make
the window fit the screen.
When using a small screen resolution, you may also have to zoom or scroll more often than
instructed in the book to perform some of the exercise steps. In some cases, you may have to
temporarily resize or close an area of the Arrange window to perform an action in another area.
Installing the Logic Lesson FilesOn the DVD, you’ll find a folder titled Logic 9 Files, which contains three subfolders: Lessons,
Media, and Apple Loops for Logic Express Users. The first two folders contain the lessons
and media files for this course. (See the section “Instruction for Logic Express Users” for
an explanation of the third folder.) Make sure you keep these two folders together in the
Logic 9 Files folder on your hard disk. If you do so, Logic should be able to maintain
the original links between the lessons and media files.
1 Insert the Logic Pro 9 and Logic Express 9 DVD into your DVD drive.
Using the DVD Book Files 5
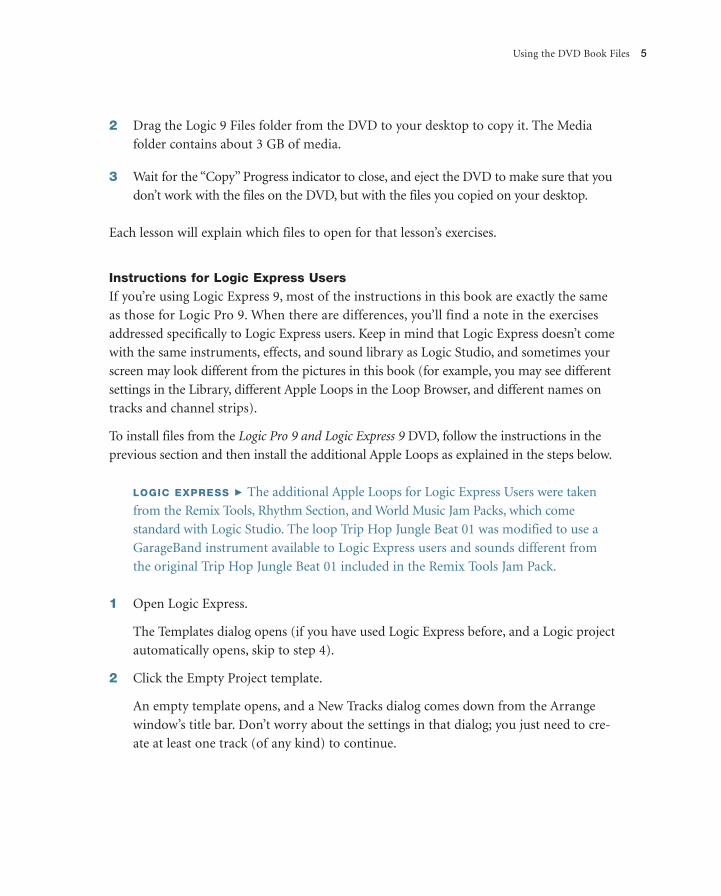
2 Drag the Logic 9 Files folder from the DVD to your desktop to copy it. The Media
folder contains about 3 GB of media.
3 Wait for the “Copy” Progress indicator to close, and eject the DVD to make sure that you
don’t work with the files on the DVD, but with the files you copied on your desktop.
Each lesson will explain which files to open for that lesson’s exercises.
Instructions for Logic Express UsersIf you’re using Logic Express 9, most of the instructions in this book are exactly the same
as those for Logic Pro 9. When there are differences, you’ll find a note in the exercises
addressed specifically to Logic Express users. Keep in mind that Logic Express doesn’t come
with the same instruments, effects, and sound library as Logic Studio, and sometimes your
screen may look different from the pictures in this book (for example, you may see different
settings in the Library, different Apple Loops in the Loop Browser, and different names on
tracks and channel strips).
To install files from the Logic Pro 9 and Logic Express 9 DVD, follow the instructions in the
previous section and then install the additional Apple Loops as explained in the steps below.
LOgIC ExPrESS P The additional Apple Loops for Logic Express Users were taken
from the Remix Tools, Rhythm Section, and World Music Jam Packs, which come
standard with Logic Studio. The loop Trip Hop Jungle Beat 01 was modified to use a
GarageBand instrument available to Logic Express users and sounds different from
the original Trip Hop Jungle Beat 01 included in the Remix Tools Jam Pack.
1 Open Logic Express.
The Templates dialog opens (if you have used Logic Express before, and a Logic project
automatically opens, skip to step 4).
2 Click the Empty Project template.
An empty template opens, and a New Tracks dialog comes down from the Arrange
window’s title bar. Don’t worry about the settings in that dialog; you just need to cre-
ate at least one track (of any kind) to continue.

6 Getting Started
3 In the New Tracks dialog, click Create.
The dialog disappears and a track is created.
4 From the main menu bar, choose Window > Loop Browser.
The Loop Browser opens.
5 Close the main Arrange window underneath, and keep only the Loop Browser open
so that you can see your desktop.
You may need to move the Loop Browser aside to see the Logic 9 Files folder on your
desktop.
6 Double-click the Logic 9 Files folder on your desktop, and double-click Apple Loops
for Logic Express Users.
You should see a folder named “Drag to Loop Browser.”
7 Drag the folder “Drag to Loop Browser” onto the Loop Browser window.
t
A green + (plus) sign appears at the mouse pointer, indicating that you can release the
mouse button to install the Apple Loops.

About the Apple Pro Training Series 7
8 In the “Adding Loops to the Loop Browser” dialog, click “Move to Loops Folder” to
install the Apple Loops.
System requirementsBefore using Apple Pro Training Series: Logic Pro 8 and Logic Express 9, you should have a
working knowledge of your Macintosh and the Mac OS X operating system. Make sure
that you know how to use the mouse and standard menus and commands, and also how
to open, save, and close files. If you need to review these techniques, see the printed or
online documentation included with your system.
Mac computer with an Intel processor P
1 GB of RAM (2 GB or more highly recommended)
Display with 1280 x 800 or higher resolution
Mac OS X v10.5.7 or later
QuickTime 7.6 or later
DVD drive for installation
USB musical keyboard (or suitable MIDI keyboard and interface) to play software P
instruments
Low-latency multi-I/O audio interface highly recommended for audio recording P
About the Apple Pro Training SeriesApple Pro Training Series: Logic Pro 9 and Logic Express 9 is both a self-paced learning
tool and the official curriculum of the Apple Pro Training and Certification Program.
Developed by experts in the field and certified by Apple, the series is used by Apple
Authorized Training Centers worldwide and offers complete training in all Apple Pro
products. The lessons are designed to let you learn at your own pace. Each lesson concludes
with review questions and answers summarizing what you’ve learned, which can be used to
help you prepare for the Apple Pro Certification Exam.
For a complete list of Apple Pro Training Series books, see the ad at the back of this book
or visit www.peachpit.com/apts.

8 Getting Started
Apple Pro Certification ProgramThe Apple Pro Training and Certification Program is designed to keep you at the forefront
of Apple’s digital media technology while giving you a competitive edge in today’s ever-
changing job market. Whether you’re an editor, graphic designer, sound designer, special-
effects artist, or teacher, these training tools are meant to help you expand your skills.
Upon completing the course material in this book, you can become a certified Apple Pro
by taking the certification exam at an Apple Authorized Training Center. Successful certi-
fication as an Apple Pro gives you official recognition of your knowledge of Apple’s pro-
fessional applications while allowing you to market yourself to employers and clients as a
skilled, pro-level user of Apple products.
For those who prefer to learn in an instructor-led setting, Apple offers training courses
at Apple Authorized Training Centers worldwide. These courses, which use the Apple Pro
Training Series books as their curriculum, are taught by Apple Certified Trainers and balance
concepts and lectures with hands-on labs and exercises. Apple Authorized Training Centers
have been carefully selected and have met Apple’s highest standards in all areas, including
facilities, instructors, course delivery, and infrastructure. The goal of the program is to offer
Apple customers, from beginners to the most seasoned professionals, the highest-quality
training experience.
For more information, please see the ad at the back of this book, or to find an Authorized
Training Center near you, go to training.apple.com.
resourcesApple Pro Training Series: Logic Pro 9 and Logic Express 9 is not intended as a comprehensive
reference manual, nor does it replace the documentation that comes with the application.
For comprehensive information about program features, refer to these resources:
The P Logic Pro 9 User Manual and the Logic Express 9 User Manual. Accessed through the
Logic Help menu, the User Manual contains a complete description of all features. The
other documents available in the Logic Help menu can be valuable resources as well.
Apple’s website: www.apple.com. P
Logic Pro Help’s website, an online community of Logic users moderated by the author P
of this book, David Nahmani: www.logicprohelp.com.
Lesson Files Logic 9 Files > Lessons > 04 Rock Song
Time This lesson takes approximately 60 minutes to complete.
Goals Record MIDI performances
Quantize MIDI recordings
Merge a MIDI recording with an existing MIDI region
Record MIDI in take folders
Punch record a MIDI recording
Capture a performance as a recording
Record MIDI using Step Input mode
Filter incoming MIDI events
4

141
MIDI (the Musical Instrument Digital Interface) was created in 1983
to standardize the way electronic musical instruments communicate.
Today, MIDI is extensively used in the music industry, from cell phone
ringtones to major-label albums. Most TV and film orchestra compos-
ers use MIDI to sequence large software sound libraries, getting ever
closer to productions that sound like a real orchestra.
MIDI sequences can be compared to piano rolls, the perforated paper
rolls once used by mechanical player pianos. Like the punched holes in
piano rolls, MIDI events do not contain audio. They contain note infor-
mation such as pitch and velocity. To produce sound, MIDI events need
to be routed to a software instrument or to an external MIDI instrument.
There are two basic types of MIDI events: MIDI note events that trigger
musical notes, and MIDI continuous controller (MIDI CC) events that
control parameters such as volume, pan, or pitch bend.
For example, when you hit C3 on a MIDI controller keyboard, the key-
board sends a Note On MIDI event. The Note On event contains the pitch
of the note (C3) and the velocity of the note (which indicates how fast the
key was struck, measuring how hard the musician played the note).
Lesson 4
Recording MIDI

142 Recording MIDI
By connecting the MIDI controller keyboard to Logic, you can use Logic to route the
MIDI events to a virtual software instrument or to an external MIDI instrument. The
instrument reacts to the Note On event by producing a C3 note, and the velocity typi-
cally determines how loud the note sounds.
MORE INFO P To learn more about the MIDI standard specification, visit the MIDI
Manufacturers Association website at http://www.midi.org/.
Recording MIDIIn Logic, the techniques used to record MIDI are very similar to the techniques you used
to record audio in Lesson 2. When a MIDI controller keyboard is connected to your
computer, and its driver is properly installed (some devices are class-compliant and
don’t require a driver installation), you can use that keyboard to record MIDI in Logic.
Logic automatically routes all incoming MIDI events to the record-enabled software
instrument or external MIDI track.
If you don’t have a MIDI controller keyboard, press the Caps Lock key on
your computer keyboard to turn your Mac keyboard into a polyphonic MIDI control-
ler keyboard. A representation of your computer keyboard is displayed, showing the
letter keys assigned to musical notes. The number keys allow you to choose the octave
range, and the lower row of keys lets you choose the note velocities. Keep in mind
that you may need to disable the Caps Lock keyboard to access some of Logic’s key
commands. Press the Caps Lock key again to disable the Caps Lock keyboard.
Octave range
Note velocities
Musical notes

Recording MIDI 143
To record a MIDI performance triggering a software instrument, you need to create a soft-
ware instrument track, insert an instrument plug-in or choose a channel strip setting
from the Library, and click Record.
1 Go to Logic 9 Files > Lessons and open the 04 Rock Song project.
That project has a single audio track with a drum loop, which will provide a timing
reference to record your new instrument.
2 At the top of the track list, click the New Tracks button (+) (or press Command-
Option-N).
The New Tracks dialog appears.
3 Make sure that Number is set to 1, Type is set to Software Instrument, and Open
Library is selected. Then, click Create.
A software instrument track is created, and it is automatically record-enabled. The
Library opens, displaying software instrument channel strip settings.
By default, audio tracks have a blue icon and audio regions are blue. Software instru-
ments have a green icon and MIDI regions are green.
4 Choose a channel strip setting from the Library.
For this exercise, choose 05 Keyboards > 01 Electric Piano > Suitcase V2.
LOgIc ExpRESS P For this exercise, choose 05 Keyboards > 01 Electric Pianos >
Tines Electric Piano, and in the following exercises, substitute Tines Electric Piano
when you see Suitcase V2.

144 Recording MIDI
In the Inspector, the software instrument channel strip loads the necessary plug-ins. In
the Arrange area, the name Suitcase V2 is displayed on the Inst 1 track header.
Software instrument plug-in
Processing plug-ins
While audio channel strip settings contain only processing plug-ins, software instru-
ment channel strip settings also contain the software instrument plug-in. On the
channel strip, the software instrument plug-in is loaded in the Instrument slot of the
I/O section.
5 Play some notes on your MIDI controller keyboard.
You should hear the electric piano. In the Transport bar’s MIDI In display, the incom-
ing MIDI note events are displayed as notes are played. If you play a chord, the display
shows the chord name.
You are now ready to record, but first open the Piano Roll Editor so that you can see
the MIDI notes appear as you record them.
6 At the bottom of the Arrange area, click the Piano Roll button (or press P).
The Piano Roll Editor opens in the editing area.
7 Go to the beginning of the project.
8 In the Transport bar, click the Record button (or press R).
The playhead jumps back one bar, giving you a four-beat count-in with an audible
metronome click before recording starts. The Bar ruler turns red to indicate that
Logic is recording.

Recording MIDI 145
9 When you can see the playhead, play some notes.
Play a simple bass line in an eighth-note pattern. You will record more notes in that
region later in this lesson.
When you play the first MIDI note, a new MIDI region with a red halo is created
on the record-enabled Suitcase V2 track. The region’s length constantly updates to
include the most recent MIDI event played.
The MIDI notes appear in the Piano Roll Editor as you record them.
10 Stop recording.
MIDI notes
In the MIDI region, the notes are displayed as small beams.
11 Go back to the beginning and listen to your MIDI recording.
If you are not happy with your performance, you can undo it (Command-Z) and
try again.

146 Recording MIDI
If you record-enable several software instrument tracks, incoming MIDI
events will be routed to all record-enabled tracks, allowing you to layer the sounds
of several instruments.
Quantizing MIDI RecordingsIf you are not happy with the timing of your MIDI performance, you can correct the tim-
ing of the notes. The time-correction process is called quantization. To quantize a MIDI
region, you choose a grid resolution from the Quantize menu in the Region Parameter
box. Each note inside the region will snap to the nearest position on the chosen grid.
Quantizing MIDI RegionsIn the following exercise, you will quantize the recording you made in the previous exer-
cise to correct its timing, so that the piano notes are in sync with the drums.
1 Make sure the new #default MIDI region is selected.
First, you’ll rename the region so that you can easily identify it later.
2 In the Inspector’s Region Parameter box, double-click the name of the region and
enter Piano.
The region is renamed Piano.
Now choose the Quantize value, which determines the resolution of the grid used to
quantize the notes.
3 Set the Quantize parameter to 1/8-Note while looking at the notes in the Piano Roll Editor.
All the MIDI notes snap to the nearest eighth note.

Quantizing MIDI Recordings 147
4 Go to the beginning and start playback.
You can hear your performance, perfectly in time with the drums. Unless of course
the performance timing was really poor, in which case some of the notes may not
snap to the desired 1/8 note.
In Logic, quantizing is a nondestructive operation. You can always go back to the way
the performance was originally recorded.
5 With the Piano region selected, open the Quantize parameter menu and choose
“off (3840). ”
The MIDI notes return to their original recording positions.
MORE INFO P The (3840) indicator identifies the shortest resolution of Logic’s MIDI
sequencer, the tick. When the time signature is 4/4, there are 3840 ticks in a bar (or
240 ticks in a sixteenth note). When Quantize is set to “off (3840),” the notes snap to
the closest tick.
6 From the Quantize parameter menu, choose 1/8-Note again.
The notes snap back to the grid.
MORE INFO P The Quantize menu also offers Swing settings. The Swing settings
delay the position of every other note in the grid to obtain a swing, or shuffle groove,
common in many music genres such as blues, jazz, hip-hop, and house music. The
amount of delay goes from no delay (A = no swing) to a lot of delay (F = hard swing).
For example, 8B Swing will subtly delay the second eighth note of each beat.
Setting a Default Quantization gridYou can set a default quantization value so that any new recording will automatically be
quantized to that grid resolution. This is very useful if you are not confident of your tim-
ing chops. Since the Quantize setting is nondestructive, you can always adjust it or turn it
off for that region after the recording is done.
1 Click in the background of the Arrange area.
All regions are deselected, and the Region Parameter box now displays the MIDI
Thru settings. The MIDI Thru parameter settings are automatically applied to any
new MIDI region that you record.
148 Recording MIDI
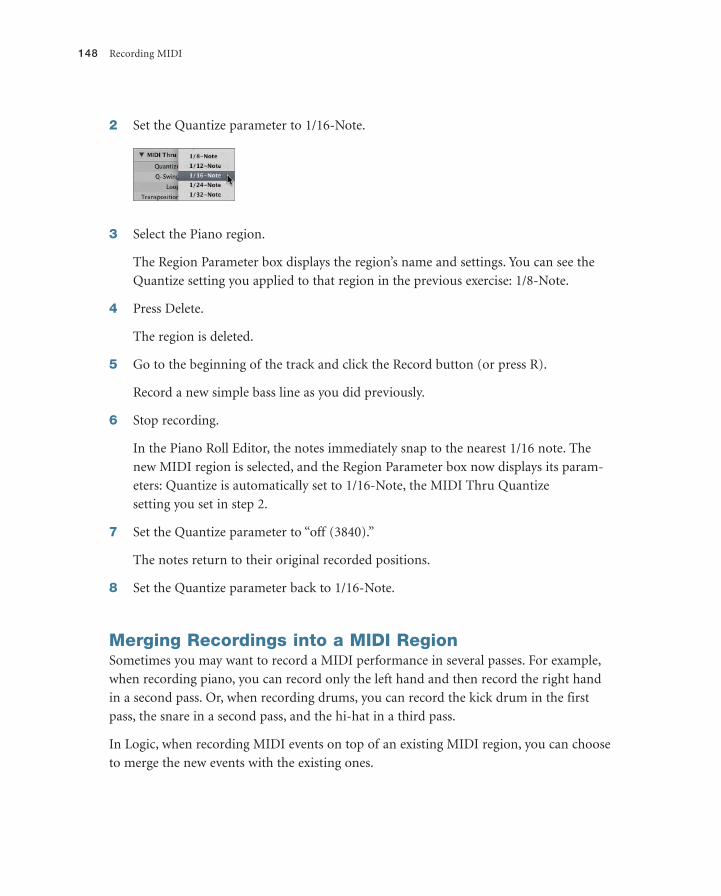
2 Set the Quantize parameter to 1/16-Note.
3 Select the Piano region.
The Region Parameter box displays the region’s name and settings. You can see the
Quantize setting you applied to that region in the previous exercise: 1/8-Note.
4 Press Delete.
The region is deleted.
5 Go to the beginning of the track and click the Record button (or press R).
Record a new simple bass line as you did previously.
6 Stop recording.
In the Piano Roll Editor, the notes immediately snap to the nearest 1/16 note. The
new MIDI region is selected, and the Region Parameter box now displays its param-
eters: Quantize is automatically set to 1/16-Note, the MIDI Thru Quantize
setting you set in step 2.
7 Set the Quantize parameter to “off (3840).”
The notes return to their original recorded positions.
8 Set the Quantize parameter back to 1/16-Note.
Merging Recordings into a MIDI RegionSometimes you may want to record a MIDI performance in several passes. For example,
when recording piano, you can record only the left hand and then record the right hand
in a second pass. Or, when recording drums, you can record the kick drum in the first
pass, the snare in a second pass, and the hi-hat in a third pass.
In Logic, when recording MIDI events on top of an existing MIDI region, you can choose
to merge the new events with the existing ones.

Merging Recordings into a MIDI Region 149
Recording into a Selected MIDI RegionIn the previous exercise, you recorded a simple bass line onto a piano track. Now you will
play chords as you listen to the bass line and record the new chords inside the same MIDI
region. First, you will choose the correct recording setting to merge your new recording
with the selected region.
1 In the Toolbar, click the Settings button and choose Recording.
2 Under MIDI, set Overlapping Recordings to “Merge with selected regions.”
Now you only have to select the existing MIDI region before recording, and the new
notes will be recorded inside the selected region.
3 Make sure the Piano region is still selected.
4 Go to the beginning and start recording.
Try to play some chords that complement the bass line you recorded previously.
NOTE P While you are recording, you are temporarily recording a new region on top
of the existing one. The new region will be merged with the existing one as soon as
you stop recording. The Piano Roll Editor displays the contents of the new region you
are recording, and although the contents of the existing region are not displayed while
you are recording, you can still hear the existing notes played back.

150 Recording MIDI
5 Stop recording.
The new recording is merged with the existing region and you can see all the notes in
the Piano Roll Editor. (You might have to scroll or resize the Piano Roll Editor window
to see all the notes.) Note that the notes you just recorded snap to the nearest 1/16 note,
the default quantize resolution you chose in the previous exercise.
You can also use this technique to add MIDI Controller events such as pitch
bend or modulation to a region after you have recorded the MIDI notes.
Merging Recordings in cycle ModeRecording in Cycle mode allows you to continuously repeat the same section and only
record new events when you are ready. This can be very useful when recording a drum
pattern, for example. When repeating a one-bar or two-bar section, you can add new ele-
ments to the pattern during each pass of the cycle, while listening to everything that you
have recorded.
When you are recording in Cycle mode, notes recorded in all consecutive passes of the
cycle are merged into a single MIDI region. In this exercise, you will use Cycle mode to
record drums—first recording the kick, then the snare, then the hi-hat.
1 In the Arrange area, mute both existing tracks.
Merging Recordings into a MIDI Region 151
Remember that you can click the Mute button on the first track header and drag
down the mouse to mute both tracks.
2 At the top of the track list, click the New Tracks button (+) (or press Command-
Option-N).
The New Tracks dialog appears.
3 Make sure that Number is set to 1, Type is set to Software Instrument, and Open
Library is selected. Then, click Create.
This time, you will insert the software instrument in the Inspector, on the Arrange
channel strip.
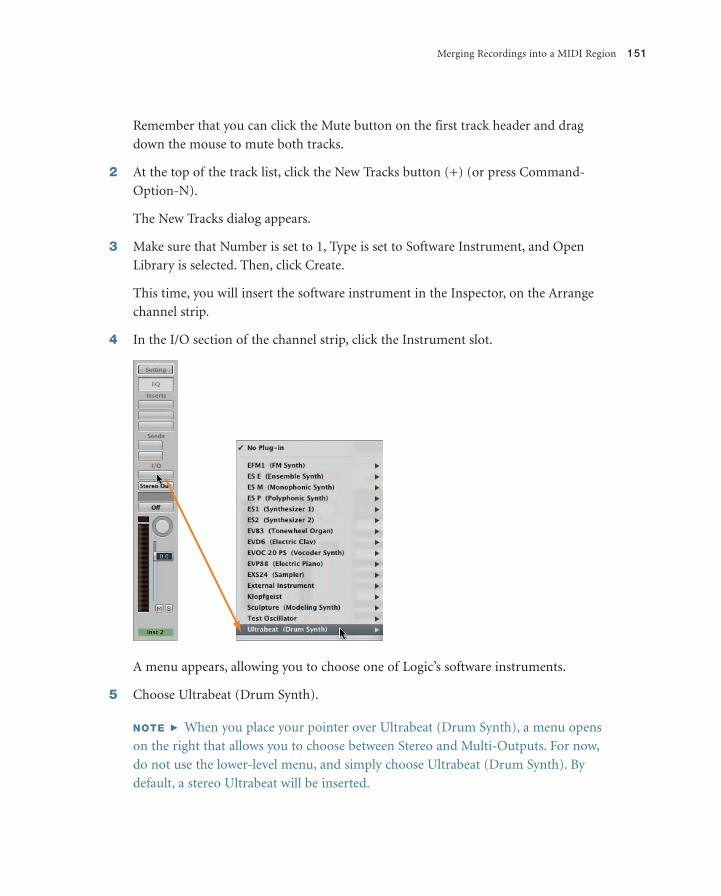
4 In the I/O section of the channel strip, click the Instrument slot.
A menu appears, allowing you to choose one of Logic’s software instruments.
5 Choose Ultrabeat (Drum Synth).
NOTE P When you place your pointer over Ultrabeat (Drum Synth), a menu opens
on the right that allows you to choose between Stereo and Multi-Outputs. For now,
do not use the lower-level menu, and simply choose Ultrabeat (Drum Synth). By
default, a stereo Ultrabeat will be inserted.

152 Recording MIDI
The Ultrabeat plug-in is inserted in the Instrument slot of the channel strip, and the
Ultrabeat plug-in window opens.
6 Close the Ultrabeat window.
MORE INFO P For now, you will use Ultrabeat to produce drum sounds as you
record MIDI in Cycle mode. In Lesson 6, “Programming Drums,” you will use the
Ultrabeat interface to program a drum pattern.
Notice the white frame around the Ultrabeat plug-in on the channel strip. A white
frame indicates the selected section of the channel strip, whose settings are automati-
cally displayed in the Library. The Library now displays Ultrabeat settings.
7 In the Library, choose 01 Drum Kits > Funk Boogie Kit.
Wait a few seconds while Ultrabeat loads the kit. When the kit is fully loaded, the
drum kit name is displayed on the track 3 track header in the Arrange area.
Selecting a software instrument track automatically record-enables it, but the instru-
ment is not always in live mode. (An instrument in live mode requires more CPU
resources) When an instrument is not in live mode, the first note you play will
take about 100 ms (milliseconds) to trigger the instrument, which is then placed
in live mode.
You can put an instrument in live mode by sending any MIDI event to it (playing a
dummy note, moving the modulation wheel, and so on) or by clicking the Record
Enable button in its track header.
Record-enabledinstrument not in live mode
Record-enabledinstrument in live mode

Merging Recordings into a MIDI Region 153
First, locate the notes on your controller keyboard that trigger the kick, the snare, and
the hi-hat. In Ultrabeat, you will use the following:
C1: kick�P
E1: snare�P
F�P #1: hi-hat
8 Play the lowest C note on your MIDI controller while watching the MIDI Activity dis-
play in the Transport bar.
If the MIDI In display doesn’t show a C1, press your MIDI controller keyboard
Octave Up and Down buttons until the lowest C plays a C1.
NOTE P If your MIDI keyboard has a C lower than C1, locate the C1 on a higher
octave.
MORE INFO P If you are using the Caps Lock keyboard, press 4 to set the right
octave, and press A to trigger a C1 MIDI note.
When you can trigger a kick with C1, locate E1 (two white notes to the right) to play
the snare and F#1 (the next black note to the right) to play the hi-hat.
9 In the Bar ruler, click the cycle area.
Cycle mode turns on, and the cycle area is shown as green.
10 Resize the cycle area so that it spans one bar starting at the beginning of the song.
You will now record the drums, one at a time.
154 Recording MIDI
11 Click in the background of the Arrange area.
The Region Parameter box displays the MIDI Thru parameters.
12 Set the Quantize parameter to 1/8-Note.
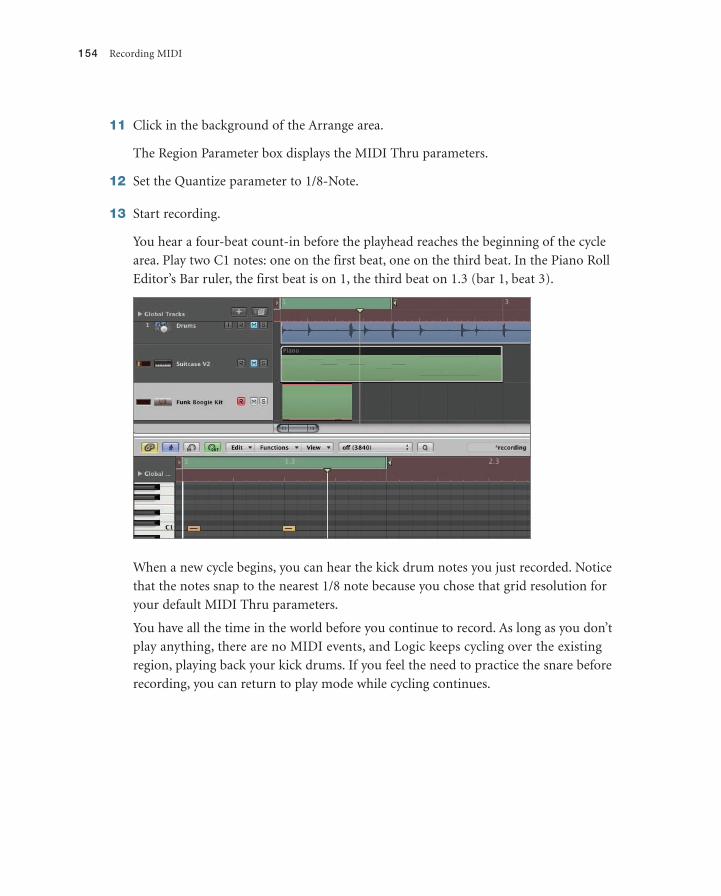
13 Start recording.
You hear a four-beat count-in before the playhead reaches the beginning of the cycle
area. Play two C1 notes: one on the first beat, one on the third beat. In the Piano Roll
Editor’s Bar ruler, the first beat is on 1, the third beat on 1.3 (bar 1, beat 3).
When a new cycle begins, you can hear the kick drum notes you just recorded. Notice
that the notes snap to the nearest 1/8 note because you chose that grid resolution for
your default MIDI Thru parameters.
You have all the time in the world before you continue to record. As long as you don’t
play anything, there are no MIDI events, and Logic keeps cycling over the existing
region, playing back your kick drums. If you feel the need to practice the snare before
recording, you can return to play mode while cycling continues.

Merging Recordings into a MIDI Region 155
14 Click the Play button (or press Shift-Return).
Logic is no longer in record mode (and the metronome stops clicking), but playback
continues as Logic repeats the cycle area without interruption. Notice that the two C1
notes are now quantized to the grid.
On your MIDI keyboard, locate the snare (E1) and practice a snare pattern. Try to hit
the snare on beats 2 and 4.
15 Click the Record button.
Playback continues without interruption, but Logic reenters record mode.
16 Click your drum region on track 3 to select it. When you feel ready, record the snare.
When the playhead jumps to the beginning of the cycle, you can see the two kick
notes and the two snare notes in the Piano Roll Editor.
Use the same techniques to record your hi-hat (F#1) on every eighth note in the same
MIDI region.
17 Stop recording.
The merge MIDI-recording techniques you used in the two previous exercises provide a
lot of flexibility and allow you to take your time, recording a single part of a performance.
These techniques will work in many situations. For example, consider recording a violin
or cello on a software instrument track; then, on a second pass, record the movements of
the pitch bend wheel to add vibrato to some of the notes.

156 Recording MIDI
Recording MIDI TakesWhen you want to nail a performance or experiment with various musical ideas, you can
record different takes and later choose the best one. The techniques to record MIDI takes
are similar to the techniques you used to record audio takes in Lesson 2. You can record
over an existing MIDI region, or you can use cycle recording to record one take for each
pass of the cycle.
Cycle mode should still be turned on from the previous exercise. Let’s record takes in Cycle
mode and experiment using different melodies for a bass line.
1 In the Transport bar, hold down the Record button and choose Recording Settings
from the pop-up menu.
The Recording Project Settings window opens.
2 In the MIDI area, from the Overlapping Recordings pop-up menu, choose “Create
take folders.”
3 Close the Project Settings window.
4 In the Arrange area, unmute track 1 (Drums/Audio 1) and mute track 3 (Funk
Boogie Kit/Inst 2).
5 Create a new software instrument track and open the Library.
6 In the Library, choose 03 Bass > 02 Electric Bass > Aggressive Fretless.
LOgIc ExpRESS P Choose 03 Bass > 02 Electric Bass > Rock Fretless, and in the
following steps, use Rock Fretless instead of Attitude Bass.
7 Start recording and play a different melody for each pass of the cycle until you have
three or four takes.

Recording MIDI Takes 157
A MIDI take is recorded for each pass of the cycle where you play MIDI notes. If you
don’t play anything for a whole cycle, no take is recorded. The takes are packed into a
take folder.
When a new cycle begins, the take you just recorded is automatically muted. You can
listen to it by switching to play mode.
8 Click the Play button (or press Shift-Return).
You are now in play mode, and you can hear the last take you recorded.
9 Open the take folder menu and choose the take you want to hear.
You can also double-click the take folder to open it and click the take you want to
hear. Double-click the take folder to close it.
MORE INFO P Unlike audio take folders, you cannot comp the takes in a MIDI take folder.
10 Stop playback and turn off Cycle mode.

158 Recording MIDI
Using punch RecordingYou can use the punch-on-the-fly and autopunch techniques you learned for audio record-
ing to punch on MIDI recordings. The only difference is that you’ll have to turn on the
Replace mode.
In the next exercise, you will record a piano performance, and then use both the Replace
and Autopunch modes to rerecord a section of the performance.
1 Mute the Aggressive Fretless track.
2 Select and unmute the Suitcase V2 track.
The track is record-enabled, and the MIDI region on the track is selected. If you have
several MIDI regions on that track, all the regions are selected.
NOTE P Make sure that Cycle mode is turned off. If Cycle mode is turned on, select-
ing a track selects only those regions within the cycle area (and the regions that over-
lap the cycle area).
3 Press Delete.
All the selected MIDI regions are deleted.
4 Press Record, play your keyboard for four or five bars, and stop the recording.
You will now correct a bar of your performance.
5 Click both the Autopunch and Replace buttons.
Replace
Autopunch
In order to merge the new events you are going to record over the Autopunch area
with the existing region on the track, you need to change your recording settings
back to the default settings.

Using Punch Recording 159
6 In the Transport bar, hold down the Record button and choose Recording Settings
from the pop-up menu.
The Recording Project Settings window opens.
7 In the MIDI area, from the Overlapping Recordings pop-up menu, choose “Merge
only in Cycle record.”
8 In the Bar ruler, adjust the Autopunch area around a section of the Piano that you
want to record over.
Make sure the Autopunch area is placed over a section of the piano performance you
captured in the previous exercise.
9 Go to the beginning of the project and make sure the Suitcase V2 track is still record-
enabled.
10 Click the Record button and start playing right away.
On the Piano track, the section below the Autopunch area is deleted.
Notes are deleted.

160 Recording MIDI
You can hear the notes you are playing over the previous recording, but only the notes
played within the Autopunch area are recorded inside the MIDI region.
11 Turn off the Autopunch and Replace modes.
Using Step Input RecordingInstead of recording a real-time performance, you can record notes one at a time. In Step
Input mode, you position the playhead and play a note or chord on your MIDI keyboard.
The note(s) are recorded, and the playhead moves one step ahead, waiting for the next
note(s).
This mode is very useful for recording complex musical phrases that you can’t perform in
real time, such as complicated chord patterns or really fast arpeggios (a great technique
for dance music).
1 Select the Suitcase V2 track and press Delete.
All the regions on the track are deleted.
If you don’t want to select the regions on a track when selecting the track,
hold down Option as you select the track.
You start by creating an empty MIDI region using the Pencil tool (as the Command-
click tool). You will step-record notes inside that new region.
2 Press Esc and Command-click the Pencil tool.
3 Command-click the Suitcase V2 track between bars 1 and 2.

Using Step Input Recording 161
The Pencil tool creates an empty one-bar MIDI region.
4 Resize the region so that it is four bars long.
5 At the upper left of the Piano Roll Editor, click the MIDI In button.
The button turns red and MIDI Step Input Recording is turned on.
MORE INFO P You can also enable Step Input Recording in the Score Editor or the
Event List.
6 Go to the beginning of the project.
7 Play a single note on your MIDI keyboard.

162 Recording MIDI
A 1/16 note is recorded at the playhead position, and the playhead moves forward one
1/16 note. The recorded note has the pitch and velocity of the note you played.
The length of a step is identified by the division setting in the Transport bar, below
the time signature.
8 In the Transport bar, click the division setting and drag down until it reads /8.
In the Piano Roll Editor, the grid resolution is the same as the division setting. The
vertical grid lines are now placed at eighth-note intervals.
9 Play a chord.
An eighth-note chord is recorded at the playhead position, and the playhead moves
forward one eighth note.
You can also use the Step Input Keyboard to exercise more control over your step
input recordings.
10 From the main menu bar, choose Options > Step Input Keyboard.
Note-length buttons

Using Step Input Recording 163
The floating Step Input Keyboard appears. The selected note-length button overrides
the division setting in the Transport bar.
11 On the Step Input Keyboard, click the quarter-note button.
12 Play a note.
A quarter note is recorded at the playhead position, and the playhead moves forward
one quarter note.
If you were recording a quarter-note pattern and wanted to record a single half note,
you could click the half-note button, record your half note, and click the quarter-note
button again to record the next quarter note.
An easier way is to use the Sustain Insert Note button.
13 Play a note and hold down the key on your MIDI keyboard.
A quarter note is recorded. You need to hold down the MIDI key for the next step, so
that the note you are recording remains selected in the Piano Roll Editor.
You can also release the key on your MIDI keyboard and click the inserted
note to select it.

164 Recording MIDI
14 On the Step Input Keyboard, click the Sustain Inserted Notes button.
The selected note is lengthened by a quarter note, so it is now a half note. You can
click the Sustain Inserted Notes button several times to lengthen the selected notes
by the current step length. You can now release the key on your MIDI keyboard.
Now let’s record quarter notes starting on bar 2.
15 With the pointer positioned over the lower half of the Piano Roll Bar ruler on bar 2,
hold down the mouse button.
The playhead snaps to bar 2.
16 Play three notes, one at a time.
Now you want to insert a quarter-note rest.
17 On the Step Input Keyboard, click the Sustain Inserted Notes button.

Filtering Incoming MIDI Events 165
The playhead jumps forward one quarter note. When no notes are selected, the Sustain
Inserted Notes button makes the playhead move one step ahead, and you can resume
step input recording.
Try using step input recording techniques to record fast 1/16-note arpeggios or even
crazy chord patterns. With a little experimentation, you will quickly end up with cool
musical phrases that couldn’t possibly be performed live.
18 Click the MIDI In button to turn off Step Input recording, and close the Step Input
keyboard window.
Filtering Incoming MIDI EventsSometimes your MIDI controller keyboard sends MIDI events that you may not want to
record in Logic. Maybe you are using a faulty MIDI keyboard that generates random pitch
bend events, or your keyboard is sending aftertouch MIDI events when you apply pressure
to the keys, but the instrument you are recording does not react to aftertouch.
Logic allows you to filter out undesired incoming MIDI events so that they are not recorded.
Since input filter settings are project settings, you can adjust them to filter various types of
events in different projects.
1 In the Toolbar, click the Settings button and choose MIDI from the pop-up menu.
166 Recording MIDI
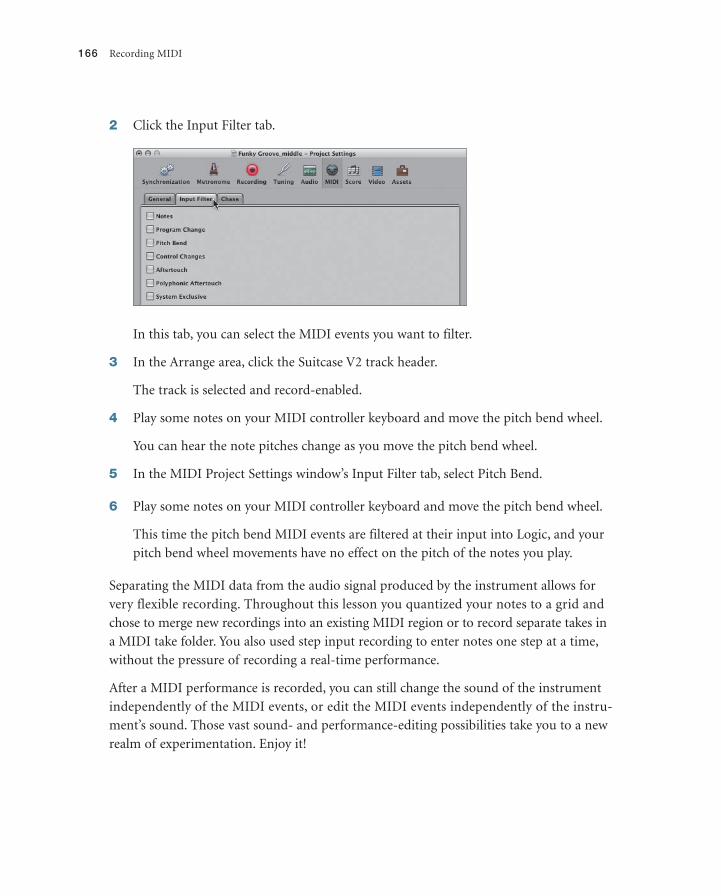
2 Click the Input Filter tab.
In this tab, you can select the MIDI events you want to filter.
3 In the Arrange area, click the Suitcase V2 track header.
The track is selected and record-enabled.
4 Play some notes on your MIDI controller keyboard and move the pitch bend wheel.
You can hear the note pitches change as you move the pitch bend wheel.
5 In the MIDI Project Settings window’s Input Filter tab, select Pitch Bend.
6 Play some notes on your MIDI controller keyboard and move the pitch bend wheel.
This time the pitch bend MIDI events are filtered at their input into Logic, and your
pitch bend wheel movements have no effect on the pitch of the notes you play.
Separating the MIDI data from the audio signal produced by the instrument allows for
very flexible recording. Throughout this lesson you quantized your notes to a grid and
chose to merge new recordings into an existing MIDI region or to record separate takes in
a MIDI take folder. You also used step input recording to enter notes one step at a time,
without the pressure of recording a real-time performance.
After a MIDI performance is recorded, you can still change the sound of the instrument
independently of the MIDI events, or edit the MIDI events independently of the instru-
ment’s sound. Those vast sound- and performance-editing possibilities take you to a new
realm of experimentation. Enjoy it!
Lesson Review 167
MORE INFO P To learn how to use external MIDI instruments with Logic, read the
Appendix, “Using External MIDI Devices.”
Lesson Review1. How does Logic route incoming MIDI events?
2. How can you time-correct a MIDI region?
3. How do you choose the default quantize settings for new MIDI recordings?
4. How do you record MIDI takes?
5. What do you need to do before you can punch in on a MIDI track to replace a portion
of a MIDI region?
6. How do you turn on Step Input mode?
7. When recording in Step Input mode, identify two ways you can adjust the step length.
Answers
1. All incoming MIDI events are routed to the record-enabled track(s).
2. In the Inspector’s Region Parameter box, choose a grid resolution value from the
Quantize menu. The MIDI notes in the region will snap to the nearest position on
the chosen grid.
3. Deselect all regions to choose the MIDI Thru parameters in the Region Parameter box.
4. Open the Recording project settings and choose Overlapping Recordings > Create
take folders, and then record on top of an existing record, or record in Cycle mode.
5. You need to turn on the Replace mode.
6. Click the MIDI In button in the Piano Roll Editor, Score Editor, or Event List.
7. In the Transport bar, adjust the division setting; or open the Step Input Keyboard and
use the note-length buttons.

Aaccents, 226–229AD (analog-to-digital) converter, 60Adaptive Limiter plug-in, 372–375Add Device button, 449Add Every Downbeat command, 224Add Every Upbeat command, 224aftertouch, 206–207AIFF format, 95All Drums button, Loop Browser, 19, 267Alternative tempo maps, 262–266Amp Designer
choosing amp model, 331–333customizing amp model, 334–339overview of, 330
analog signal, to digital data stream, 60analog-to-digital (A/D) converter, 60Analyzer button, Channel EQ plug-in, 357Apple Loops
browsing and previewing loops, 18–22creating, 266–269defined, 257–258overview of, 18setting key signature using, 261–262troubleshooting audio output,
422–424using Loop Browser, 258–261
Arrange area, Arrange windowcontinuously repeating section, 26–29cutting and copying audio regions,
117–121cutting section, 310–312defined, 17deselecting all regions in, 25dragging loop onto, 21looping and positioning regions in,
29–32zooming whole arrangement, 39–40
Arrange channel strip, 370–371Arrange window, 15–18arrangements, building
adjusting loop repetitions, 36–37arranging middle section, 37–39copying and resizing regions, 32–36ending song, 39–44looping and positioning regions,
29–32saving work and undoing actions, 29
arranging and mixingadding introduction, 308–310cutting section, 310–312experimenting with order of regions,
294–296filling in Bass track, 290–294humanizing percussion part, 304–308muting elements, 313–315packing regions into folders, 297–300
previewing song, 286–289reducing noise using Soundtrack Pro,
322–326reducing wah noise from Guitar track,
319–321removing snare leakage from Kick
track, 315–319review Q & A, 326–327slicing and doubling percussion,
300–304Assignment section, Ultrabeat, 215–216,
219–222Attitude Bass track, 170, 176, 189, 190, 196Audio Bin
adding introduction, 310deleting unused audio files from,
121–123using, 72–73viewing takes recorded in Cycle
mode, 79audio drivers, disabling at startup, 444audio files
creating digital, 60–61deleting unused, 121–123, 138–139detecting tempo of, 254–255matching project tempo to, 278–279previewing for quantizing drum
recording, 124–127saving selection as new, 131–133
Audio Files folder, 412–413Audio MIDI Setup, 448–452Audio Preferences. see Preferences, Audioaudio routing problems, solving
bypassing audio interface, 424–426checking audio input, 427–430restoring audio output, 422–424
audio, recording. see recording audioAuto Set Locators, 348Auto Zoom (Control-Z), 382automatic backups, 410–414automating mix
adjusting volume of section, 380–387creating decrescendo, 387–390creating pan automation, 390–392exporting mix, 405–407recording live automation. see
recording live automationreview Q & A, 407using control surfaces, 401–405using offline automation. see offline
automationAutomation button, 381–382Automation Parameter menu, 381, 383,
390, 398, 404–405Automation Preferences, 403automation tracks, Arrange area,
381–387, 397–399
automation, keyboard shortcuts for, 464–465
Autopunch mode, 88–92, 158–160aux sends, adding reverb using, 363–367
BB key (Media button), 122, 178, 248, 310background noises. see noisy recordings,
cleaning upbackups
importance of, 410preferences files, 442–443project files, 414–417project folders to external devices,
420–421rebuilding project files using, 417–420saving project and automatic, 410–414
Balance control. see Pan/Balance controlBand On/Off button, Channel EQ
plug-in, 357Bar ruler
adding introduction using, 308–310automating volume using Hyper
Draw, 199ending song using, 39exporting mix using, 53filling in Bass track using, 290Piano Roll Editor’s, 164, 170previewing song using markers, 286previewing takes for comping, 103red, indicating that Logic is
recording, 71toggling Autopunch mode in, 85,
90, 92toggling Cycle mode in, 79, 84, 114,
153, 310yellow, indicating Solo mode, 288
Bass button, 27Bass track, 290–296. see also Attitude
Bass trackbit depth
Audio Bin, 73digital recording and, 61–62setting, 62–64
blue loops, Loop Browsercontinuously repeating section, 27, 29creating, 266–269defined, 21
bouncingexporting automated mix, 405–406exporting mix, 53–55region in place, 246–247
Broadcast Wave File (BWF, or WAVE), 95Browser tab, 124–127buffer size, setting I/O, 93–94Built-in Audio (or Output), 424
Index

Index 483
busadding reverb using aux sends,
364–367using compressor and limiter on
master channel strip, 370–375BWF (Broadcast Wave File), 95Bypass button, 69
CCabinet label, Pedalboard, 342CAF (Core Audio Format), 95Caps Lock key, Mac, 142Catch mode, 306–307Channel EQ plug-in, 355–361channel pressure (C-Press) events,
206–207channel strips
adjusting levels, 47–49, 345–351adjusting recording level, 69checking audio input on, 427–430choosing pan positions, 352–355choosing Ultrabeat, 214–215creating MIDI recording, 143external MIDI, 454keyboard shortcuts for, 461–462preparing song for mixing, 45–46previewing loops, 21–22using compressor and limiter on
master, 370–375using processing plug-ins, 49–51white frame indicating selected section
of, 152Claps track
humanizing percussion part, 304–308slicing and doubling percussion part,
300–304Click & Ports layer, Environment window,
434–435clip detector, 68–70Clipboard, copying automation to, 199color
customizing in Piano Roll Editor, 172regions or takes, 92
Column view, Loop Browser, 258Command-8 (open Environment
window), 434Command-A (select all), 30, 418Command-B (bounce), 53Command-click (mute/unmute all tracks
Track Mute button), 110–113, 118Command-D (Desktop), 15, 54, 302, 411Command-Down Arrow (opening
selected application), 12Command-H (hide application with key
focus), 411Command-Option-Control-A
(Automation Quick Access), 402–405Command-Option-N (create new tracks),
65, 143, 151Command-R (repeat regions/events), 35,
38–39, 303Command-S (save), 14–15, 29, 34–35, 413Command-Shift-F (pack folder), 297–299,
304–305Command-Shift-S (save as), 315–316
Command-Shift-U (unpack regions from folder), 448
Command-Shift-Z (redo), 235–236Command-Tab (switch between
applications), 411Command-Z (Undo), 29, 123, 235–236comp tracks, 75comping takes
overview of, 105–110previewing, 102–105
compressorusing, 368–370using with limiter on master channel
strip, 370–375Compressor Threshold slider, 369control surfaces
for MIDI keyboards, 402supported by Logic, 401troubleshooting, 402using Automation Quick Access,
402–405Control-click (open shortcut menu), 224Controller button, 207Control-Z (Auto Zoom), 382Convert Regions to New Sampler Track,
249–250converters, 60–61copying
audio regions in Arrange area, 117–121notes with Pencil tool, 174–178plug-ins, 52–53regions, 32–33
Core Audio enginedisabling audio drivers at startup, 444reinitialized after choosing new I/O
device, 64, 94troubleshooting audio output, 423
Core Audio Format (CAF), 95count-in, setting audio recording, 95–96CPU, 94, 437–438crescendo, creating, 244–245, 393–397Crop button, 291crossfades, 115–117, 120–121curves
creating decrescendo with volume automation, 389
inserting tempo, 265–266using Hyper Draw, 195, 198
cuttingaudio regions in Arrange area, 117–121section from song, 310–312
Cycle modeadding introduction, 308–310continuously repeating section, 26–29dragging Ultrabeat pattern to Arrange
area, 231–232merging MIDI recordings in, 150–155preparing song for mixing, 44, 46–47previewing takes for comping in, 104recording MIDI takes, 156–157recording takes, 77–79turned off for punching on MIDI
recordings, 158turned off when bouncing entire
song, 53
Ddecrescendo, creating, 190–192, 387–390delay, during mixing, 361–367Delete Unused (tracks), 300, 305deleting
additional takes on multiple tracks, 83–84
audio, 72notes with Pencil tool, 174–178unused audio files, 123
Denoiser plug-in, 319–321destructive audio editing. see Sample Editordigital recording, 60–61Direction Mixer plug-in, 354distortion, avoiding, 344Dock, 12–13doubling, percussion part, 300–304Down Arrow key, 20downbeat, inserting notes on, 224dragging, 32–33drivers
bypassing audio interface, 426configuring MIDI hardware, 449getting MIDI out, 432restoring audio output, 423–424using MIDI controller keyboard, 142
drum kit, 214–218, 351–355drum recording, quantizing, 124–128Drum Synth. see Ultrabeat (Drum Synth)drum tracks, adjusting levels, 345–351drums, programming
adding snare roll. see snare roll, in Hyper Editor
changing groove in MIDI editors, 229–237
converting audio region into sampler instrument track, 248–250
converting MIDI sequence into audio region, 246–247
review Q & A, 251in Ultrabeat. see Ultrabeat (Drum Synth)
Dry slider, Tape Delay window, 363dynamic processing plug-ins. see
processing plug-ins, dynamic
EEditing area, Arrange window, 16editing audio
assigning mouse tools, 110–113comping takes, 105–110deleting unused files, 121–123destructively in Sample Editor, 131–137manipulating waveforms with Flex
tool, 128–131MIDI. see MIDI, editingMIDI CC events. see MIDI CC
(continuous controller) events, editingoverview of, 101–102previewing takes for comping, 102–105quantizing audio drum recording,
124–128regions in Arrange area, adding fades,
114–117regions in Arrange area, cutting and
copying regions, 117–121review Q & A, 138–139

484 Index
Effects section, Amp Designer, 337–338Empty Project template, 13–14, 417–420ending, arranging song, 39–44EQ settings
choosing, 355–361customizing amp model, 334–337processing plug-ins, 49–51
Esc (Escape) key, 111event definitions, 201–202, 239–241Event List
cleaning up MIDI region, 205–207dragging Ultrabeat pattern to Arrange
area, 232enabling Step Input mode in, 161hiding type of event in, 206–207quantizing note lengths, 208–210
events, Arrange window listing, 17–18events, MIDI
editing in Event List, 205–210filtering incoming, 165–167putting record-enabled instrument
into live mode, 152types of, 141–142
exporting mixesautomated, 405–407overview of, 53–55
external devices, backing up project folders to, 420–421
external MIDI deviceschoosing program remotely, 454–457configuring MIDI hardware, 448–452routing external MIDI tracks, 452–454
Ffades
adding to edit point between two regions, 120–121
adding to region, 114–117speed, 280–282
Fast Forward button, 24, 287Fast Rewind button, 24, 287feedback, avoiding when recording, 64File Browser, 124–127, 418–419File size, Audio Bin, 73files. see also project files
deleting unused audio, 121–123recording formats for, 95
Filter button, Event List Editor, 206filtering incoming MIDI events, 165–167Finder
copying project folder to new location, 420
keyboard shortcuts, 465opening, 12previewing audio files in, 124saving project, 411–414switching to, 55
Finger tool, 67, 79Flatten, 109–110Flex Mode parameter, 128, 264, 273–274,
278–279Flex tool, 128–131, 272–277folders
backing up to external devices, 420–421closing, 307–308
opening, 297packing regions into, 297–300, 304–305saving project, 412
Format button, 365–366format, recording file, 95–96Forward button, 24–25, 70–71, 287freeze process, 439–441, 444frequency analyzer, Channel EQ plug-in,
357–360
GG key. see Global Tracks (G key)Gain knob, Adaptive Limiter, 373–374Gain knob, Amp Designer, 333Gain Reduction meter, Compressor,
369–370gate time, adjusting note, 225–226General MIDI (GM) device
choosing program remotely, 454–457creating custom hyper set for snare
roll, 238–239routing external MIDI, 453
General tab, Audio Preferences, 95Global Tracks (G key)
global Marker track, 286–289global Signature track, 261–262global Tempo track, 262–266rebuilding project file, 418toggling, 286
GM device. see General MIDI (GM) deviceGo to Beginning command (return key),
24–25, 77, 81GoldVerb plug-in, 366green loops, Loop Browser, 21, 267, 269grid, setting default quantization, 147–148grooves
applying laid-back feel to snare, 232–234
changing in MIDI editors. see MIDI, changing groove in editors
quantized vs. laid-back patterns for, 234–237
grouping tracks, adjusting levels by, 349–351
Guitar track, reducing wah noise, 319–321
HH key (Hide View), 89–90, 92handclaps
humanizing percussion part, 304–308slicing and doubling percussion part,
300–304hard disks
backing up project folders to external, 420–421
deleting unused audio files from, 121–123
optimizing hardware performance, 437–438
hardwareconfiguring MIDI, 448–452performance optimization, 436–441
HD meter, monitoring usage, 94Hierarchy button, 205–206, 307
Home button, 124, 178, 254, 417horizontal zoom in (Option-Control-
Right Arrow), 43, 77horizontal zoom out (Option-Control-
Left Arrow), 39–40, 43horn line, creating, 184–187humanizing project
applying laid-back feel to snare, 232–234
changing groove in MIDI editors, 229–237
editing velocities and accents, 225–229percussion part, 304–308using hi-hat notes, 236using quantized vs. laid-back patterns,
234–237Hyper Draw
editing note velocity, 190–193Hyper Editor vs., 200pitch bend automation, 193–196track automation vs. automation of, 380volume automation, 196–200
Hyper Editorcreating custom hyper set for snare
roll, 237–241drawing snare roll, 241–246pan automation, 200–204
hyper sets, 201, 237–241
II/O buffer size, 93–94, 444I/O Labels window, 428–429IAC (Inter-Application Communication)
buses, 449Import button, 418Import Project Settings, 419Include Assets, 411–412, 420initializing preferences, 441–442input
checking audio, 427–430creating new track for recording, 65filtering incoming MIDI events,
165–167reassigning track, 81recording multiple tracks, 80–81
Input Device, setting bit depth, 63–64Input Scale, Adaptive Limiter, 373Insert Silence Between Locators, 308Inspector, Arrange window
channel strip settings, 21defined, 17Region Parameter box. see Region
Parameter boxTrack Parameter box, 127, 263
instruments, live mode, 152Inter-Application Communication (IAC)
buses, 449interface
bypassing audio, 424–426checking audio input, 427–430Logic, 15–18Ultrabeat, 215
introduction, creating, 308–310
Index 485
JJunction pointer, 119–120
Kkey signature, setting project’s, 261–262keyboard shortcuts (U.S. Preset)
automation, 464–465channel strip operations, 461–462Finder, 465Mac OS X, 55navigation, 23–26region operations, 461–462tools, 460–461track operations, 461–462transport controls, 459–460views, 463–464zooming, 460
Kick trackadjusting levels by grouping tracks,
349–351adjusting levels of drum tracks,
345–346previewing song, 287–289removing snare leakage from, 315–319
LL (Loop checkbox), 30, 33, 38labels, checking audio input, 428–429laid-back patterns
applying to snare, 232–234quantized patterns vs., 234–237
Latch mode, live automation in, 397–399latency, 68, 93–94Left-Click tool, assigning, 110–113, 118level fader, 47–49, 394–397levels, choosing during mixing, 344–351Library, routing external MIDI events
using, 452–454limiter, 370–375Line tool
crescendo for snare roll, 244editing note velocities in Hyper Draw,
191–192pan automation in Hyper Editor,
203–204Link modes, Score Editor, 182–184lists of events, Arrange window, 17–18live automation. see recording live
automationlive mode, putting instrument into, 152Logic, introduction to
building arrangement. see arrangements, building
exporting mix, 53–55interface, 15–18mixing song. see mixingnavigation of project, 23–29opening, 12–15review Q & A, 56starting project with Apple Loops,
18–22Loop Browser. see also Apple Loops
blue vs. green loops in, 21browsing and previewing loops, 18–22
continuously repeating section, 26–29creating Apple Loops, 267–269troubleshooting audio output, 422–424using, 258–261
Loop checkbox (L), 30, 33, 38Loop tool
filling in Bass track, 294packing regions into folders, 298, 300using on multiple regions, 40–42working with, 36
loopsbenefits of, 18browsing and previewing, 18–22cutting, 256–257looping and positioning regions, 29–32
MM key. see Mute tool (M)Mac OS X
accessing sound preferences, 425–426adjusting recording level, 68exporting mix with key commands, 55internal microphones, 61turning keyboard into MIDI controller
keyboard, 142markers, 286–289Marquee tool
adjusting levels of drum tracks, 347–348
adjusting volume of section, 386cutting loop, 256–257filling in Bass track, 290–292indicating playback position, 352muting sections of instrument,
313–315removing snare leakage from Kick
track, 316selecting portion of audio region,
117–119master channel strips, 370–375Master volume, Amp Designer, 333Media button (B), 122, 178, 248, 310Media, Lists, or Notes area of Arrange
window, 18menus, Loop Browser, 258merging recordings, 149–155metronome
detecting tempo of audio file, 255–256MIDI, 98quantized patterns vs. laid-back
patterns, 236setting, 96–98turned on when recording audio, 71
microphone preamps, 60–61, 68–70microphones
adjusting levels of drum tracks, 347creating digital audio files, 60–61customizing amp model, 336, 339
middle section, arranging, 37–39MIDI (Musical Instrument Digital
Interface)displaying notes on regions, 42programming in Piano Roll Editor,
170–178
setting metronome, 98solving routing problems, 430–436troubleshooting MIDI In display,
432–436troubleshooting MIDI Out routing,
430–432MIDI CC (continuous controller) events
adding to MIDI region, 150MIDI Controls, 201overview of, 141–142
MIDI CC (continuous controller) events, editingautomating pan in Hyper Editor,
200–204automating pitch bend using Hyper
Draw, 193–196automating volume using Hyper Draw,
196–200overview of, 193
MIDI controller keyboardscontrol surfaces for, 402editing notes, 187–189filtering incoming MIDI events,
165–167previewing drum kit, 216–218recording MIDI, 142–146recording MIDI in Cycle mode,
150–155Step Input mode, 161–165using Ultrabeat Pattern mode, 221
MIDI Monitor, 432MIDI Through parameters, Region
Parameter box, 147–148, 154MIDI, changing groove in editors
applying laid-back feel to snare, 232–234comparing quantized and laid-back
patterns, 234–235dragging pattern to Arrange area,
229–232MIDI, editing
in Event List, 205–210MIDI CC events. see MIDI CC
(continuous controller) events, editing
note velocity using Hyper Draw, 190–193
notes with MIDI keyboard, 187–189recorded MIDI sequence, 178–181review Q & A, 210–211using Score Editor, 181–187
MIDI, recording, 140–167merging into MIDI region, 148–155overview of, 141–142quantizing, 146–148review Q & A, 167standard specification, 142takes, 156–157techniques for, 142–146using punch recording, 158–160using Step Input mode, 160–165
Mix switch, Pedalboard, 343mix, exporting, 53–55
486 Index
Mixeradjusting levels, 47–49adjusting levels of drum tracks,
345–349choosing pan positions, 352–355closing to increase workspace, 20–21panning instruments and copying
plug-ins, 51–53preparing for mixing, 44–47using processing plug-ins, 49–51
Mixer button (X key), 44Mixer pedal, Pedalboard, 342–343mixing. see also arranging and mixing
adding delay, 361–363adding reverberation, 363–367adjusting levels, 47–49, 345–351automated. see automating mixchoosing EQ settings, 355–361choosing pan positions, 351–355overview of, 328–330panning instruments and copying
plug-ins, 51–53preparing for, 44–47previewing final mix, 330review Q & A, 376–377tips and tricks for, 375–376using Amp Designer, 330–339using Pedalboard, 339–344using processing plug-ins, 49–51. see
also processing plug-ins, dynamicmodifier keys, dragging using, 33modulation effect, PedalBoard, 340mono channel strips, 354, 365Moog keyboard track, 313–315mouse tools, assigning, 110–113multiple tracks
recording, 79–82recording additional takes, 82–85
multi-timbral instrument, 453Music view, Loop Browser, 258–259Musical Instrument Digital Interface. see
MIDI (Musical Instrument Digital Interface)
Mute button, 47, 430Mute tool (M)
editing recorded MIDI sequence, 180getting MIDI out, 431–432muting sections of instrument,
313–315
Nnaming track, before recording it, 67navigation
continuously repeating section, 26–29Transport buttons and key commands,
23–26network MIDI ports, configuring, 449New Tracks dialog
creating software instrument track, 14merging recordings in Cycle mode, 151preparing track for recording, 65recording MIDI, 143recording multiple tracks, 80routing external MIDI tracks, 452
No Overlap Drag mode, 117nodes
creating in Hyper Draw, 195, 197–199Tempo track displaying changes as,
264–265Noise Print, 323–324noisy recordings, cleaning up
reducing wah sound from Guitar track, 319–321
removing snare leakage from Kick track, 315–319
using Soundtrack Pro, 322–326nondestructive editing, 113–115note events, MIDI, 141–142Note-length buttons, Step Input
keyboard, 162–165note-on MIDI event, 176, 190–193notes
applying laid-back feel to snare, 232–234
correctly placing or stretching with Flex tool, 272–277
deselecting single, 234displaying Project or Track, 17–18editing velocities and accents, 225–229hiding note events in Event List,
206–207inserting on every downbeat or
upbeat, 224randomizing positions of, 236
notes, MIDIcopying and deleting with Pencil tool,
174–178creating with Pencil tool, 170–174editing velocity using Hyper Draw,
190–193editing velocity using Velocity tool,
176–178editing with MIDI keyboard, 187–189editing with Score Editor, 181–187quantizing lengths of, 208–210
Ooffline automation
adjusting volume of section, 380–387creating decrescendo, 387–390creating pan automation, 390–392defined, 380
1/8 Note, 147one-shot sounds, quantizing note lengths,
208–210Open Library command, 14opening
File Browser, 124folders, 297Logic, 12–15Loop Browser, 18Mixer, 44selected application, 12take folder, 102Templates dialog, 13Tool menu, 111
Option-click (delete crossfade), 115Option-Control-click (zoom out), 43,
107–108Option-Control-Down Arrow (vertical
zoom in), 39, 43, 202Option-Control-drag (zoom in), 43,
107–108Option-Control-Left Arrow (horizontal
zoom out), 39–40, 43Option-Control-Right Arrow (horizontal
zoom in), 43, 77Option-Control-Up Arrow (vertical zoom
out), 43Option-drag, 32–33Output Device, setting bit depth, 63–64Output sliders, Tape Delay window, 363Output volume slider, Sound
preferences, 426output, restoring audio, 422–424Overhead fader, 347Overlapping Recordings, MIDI takes, 167
PP (Piano Roll button), 144pan automation
creating, 390–392recording live automation in Latch
mode, 397–399using Automation Quick Access, 404using Hyper Draw, 200–204
Pan control, choosing pan positions, 352–355
Pan/Balance controladjusting levels, 47panning instruments, 51–52slicing and doubling percussion
part, 302panning instruments
automating in Hyper Editor, 200–204choosing positions, 351–355mixing songs, 51
parametersautomation. see Automation Parameter
menuFlex Mode. see Flex Mode parameterRegion Parameter box. see Region
Parameter boxTrack Parameter box, 127, 263
patterns, Ultrabeat, 221–225, 229–232Peak button, 369peak detector, channel strips, 47–48Pedalboard, 339–344Pencil tool
copying/deleting notes, 174–176creating empty-one bar MIDI region,
160–161creating markers, 286creating notes, 170–174drawing freehand automation, 198drawing pan automation, 202drawing snare roll, 241–246
percussion parthumanizing, 304–308slicing and doubling, 300–304

Index 487
performance, optimizing hardware, 436–441
Piano Roll button (P key), 144Piano Roll Editor
changing groove in. see MIDI, changing groove in editors
copying/deleting notes with Pencil tool, 174–178
creating notes with Pencil tool, 170–174
defined, 170editing MIDI CC events in. see MIDI
CC (continuous controller) events, editing
editing notes with MIDI keyboard, 188–189
importing MIDI file, 179merging recordings in Cycle mode,
154–155opening, 144quantizing MIDI regions, 146–147quantizing note lengths, 208–209recording into selected MIDI region,
149–150recording MIDI, 144–146Score Editor display vs., 169, 182, 188setting default quantization grid,
147–148using step input recording, 161–165working with Hyper Draw. see Hyper
Drawworking with Hyper Editor. see Hyper
Editorpitch
changing with Varispeed, 269–272dropping notes in Score Editor at
desired, 185editing notes with MIDI keyboard,
187–189MIDI keyboards measuring, 176programming in Piano Roll Editor,
171–172, 175pitch bend automation, 193–196playback position, indicating, 352plug-in bypass automation, 400–401plug-ins. see processing plug-insPointer tool
applying fade, 116, 120–121assigning mouse tools, 113copying and deleting notes, 174–176cutting and copying regions, 118–120removing snare leakage from Kick
track, 316resizing audio tracks, 79resizing new audio track, 67
polyphonic pressure (P-Press) events, 232ports, configuring network MIDI, 449Power Cycle, 433Pre/Post EQ button, Channel EQ plug-in,
357preferences
initializing, 441–442restoring, 442–443
Preferences, Audiobit depth, 62–64bypassing audio interface, 424checking audio input, 427defined, 62I/O buffer size, 93–94recording file type, 95turn off Software Monitoring, 67
Preferences, Automation, 403Preferences, General
assigning third tool to right mouse button, 113
Limit Dragging to One Direction, 175project files in backup folder, 414
Presence knob, Amp Designer, 334–335Preview Bypass Effect, Reduce Noise
window, 324previewing
audio files for quantizing drum recording, 124–127
drum sounds in Ultrabeat, 214–218final mix, 330loops, 18–22, 26–29song before arranging, 286–289takes for comping, 102–105
processing plug-insautomating bypass, 400–401copying, 52–53creating MIDI recording, 143–144mixing songs using, 49–51
processing plug-ins, dynamicoverview of, 367–368using compressor, 368–370using compressor and limiter on
master channel strip, 370–375program, remotely choosing, 454–457programming
drums. see drums, programmingin Piano Roll Editor, 170–178
progress window, 71Project End, exporting mix, 53Project File Backups folder, 414project files
backing up, 414–417rebuilding, 417–420saving, 410–414troubleshooting corrupted, 443–444troubleshooting MIDI In, 433–436
project folders, backing up to external devices, 420–421
project settingscount-in, 95–96defined, 62metronome, 96–98preference settings vs., 97punching on MIDI recordings, 159recording MIDI takes, 156
punchingautomatic, 88–92on the fly, 86–88on MIDI recordings, 158–160overview of, 85
QQuantize parameter, 146–148, 154,
234–237quantizing
audio regions, 124–128individual notes, 181laid-back patterns vs., 234–237MIDI regions, 146–147note lengths, 208–210recording MIDI in Cycle mode
using, 154setting default quantization grid,
147–148Quick Swipe Comping, 105–110QuickTime, 330
RR key (record), 24, 70–71, 75–77RAM, 410, 437–438randomizing
grooves, 236percussion part, 305–308regions, 294–296velocities, 225–229
Read automation mode, 392, 397, 399record command (R), 24, 70–71, 75–77Record Enable button, 152, 429recording audio
additional takes on multiple tracks, 82–85
creating additional takes, 75–79editing recorded MIDI sequence,
178–181MIDI. see MIDI, recordingmultiple tracks, 79–82overview of, 59punching in and out, 85–92review Q & A, 98–99setting count-in, 95–96setting file type, 95setting I/O buffer size, 93–94setting metronome, 96–98setting up, 60–64single tracks. see tracks, recording
singletakes. see takes, recording
recording live automationin Latch mode, 397–399plug-in bypass automation, 400–401in Touch mode, 392–397
Reduce Noise window, 324Region Parameter box
copying and resizing regions, 33looping and positioning regions, 30quantized patterns vs. laid-back
patterns, 234–235quantizing audio regions, 127–128quantizing MIDI regions, 146–148recording MIDI in Cycle mode, 154
region-based automation, 193, 196
488 Index
regions, audioadding fade-in or fade-out to, 115–117applying speed fades to, 279–282arranging middle section of, 37–39changing color of, 92converting into sampler instrument
track, 248–250converting MIDI sequence into,
246–247copying and resizing, 32–36creating blue Apple Loops with,
266–269crossfading between two, 120–121editing in Arrange area, 113–121ending song, 39–44experimenting with order of, 294–296keyboard shortcuts for, 461–462looping and positioning, 29–32matching project tempo to tempo of,
254–257moving individual note with Flex tool,
128–131packing into folders, 297–300previewing multiple, in Solo mode,
287–289quantizing, 124–128selecting, 38selecting portion of, 117–119swapping positions of, 294–296using Resize tool adjust start or end
of, 34viewing result of comp as, 109–110
regions, MIDIcleaning up, 205–207converting sequence to audio region,
246–247creating green Apple Loops with,
267, 269dragging pattern to Arrange area,
230–232emptying with Pencil tool, 160how notes are displayed on, 42merging recordings in Cycle mode,
150–155quantizing, 146–148recording into selected, 149–150
remotely choosing program, 454–457repetitions
adjusting loop, 36–37preparing song for mixing in Cycle
mode, 44previewing loops in section with
continuous, 26–29Replace mode, punching on MIDI
recordings, 158–160Resize tool, 34, 172resizing
Editing Area of Arrange window, 16–17
regions, 33–36resolution, 64Reverb Level, Amp Designer, 336–337reverberation, 361–367Revert to Saved command, 88–89Rewind button, 24–26, 70–71, 287
Right-click tool menu, 113Room fader, 347routing external MIDI tracks, 452–454
SSample Editor
defined, 131positioning audio region in Arrange
area, 135–137reversing sample, 133–135saving selection as new audio file,
131–133sample rate, 61–62, 73sampler instrument, converting audio
region into, 248–250saving project
backups, 414–417every couple of steps, 29for first time, 14–15Logic’s behavior when, 410–414
Scale menu, Loop Browser, 258Scissors tool, 295, 300–301Score Editor
creating horn line in, 184–187editing MIDI, 181editing MIDI CC automation, 200editing notes with MIDI keyboard,
187–188enabling Step Input mode, 161Link modes, 182–184
Search Results list, Loop Browser, 19Set Locators button, 26, 231, 348Setting button, 49–51Shift key, key commands with, 175–176Shift-click, 79, 234Shift-Command-A (Applications folder), 12Shift-Control (disabling snapping), 115Shift-Control-click (applying fades with
Pointer tool), 116Shift-Control-drag (applying fades), 121Shift-Enter (Play from Selection), 24–25Shift-R (Record Toggle), 86–88Shift-Return (Play button), 24Shift-Tab (Arrange window areas), 16Shift-W (open in Soundtrack Pro), 322shortcut menus, accessing, 224shuffle mode, 294–296, 305–308Signature menu, Loop Browser, 258Signature track, setting project’s key,
261–262single tracks, recording
adjusting level, 68–70preparing track, 64–67recording audio, 70–72using Audio Bin, 72–74
16-bit resolution, bit depth, 64skip cycle area, 310–312slicing Flex mode, 127–128, 264slicing regions, Scissors tool, 295, 300–301SMPTE timecode, 31snapping, temporarily disabling, 115snare
adjusting levels of drum tracks, 346–347
applying EQ plug-in to, 361
applying laid-back feel to notes, 232–234quantized vs. laid-back patterns,
234–237removing leakage from Kick track,
315–319snare roll, in Hyper Editor
creating custom hyper set, 237–241drawing with Pencil tool, 241–246
software instrument tracksconverting audio regions into sampler,
248–250creating, 14–15creating MIDI recording, 143–146inserting Ultrabeat on, 214merging MIDI recordings in Cycle
mode, 151–253recording MIDI takes, 156–157using green loops as MIDI regions
on, 21–22Software Monitoring, 67, 427Solo button
adjusting levels, 47–49adjusting levels of drum tracks, 346Autopunch recording process, 92previewing drum sounds, 216previewing song, 287, 289solo only one channel strip from
group, 356taking all tracks out of Solo mode, 430unsolo all channel strips in project, 355
Solo tool, 112–113Sound Effects view, Loop Browser,
258–259Soundtrack Pro, reducing noise using,
322–326Space Designer plug-in, 366–367Spacebar (Stop button), 24–25Speaker button, Audio Bin, 122speaker cabinet, 334–335, 339, 342speed
applying speed fade-ins and fade-outs, 280–282
changing with Varispeed, 269–272customizing amp model, Amp
Designer, 338Spinbox effect, PedalBoard, 340–341Status icon, Audio Bin, 73Step Input keyboard, 162–165Step Input recording, 160–165, 166step sequencer, Ultrabeat
defined, 215dragging pattern to Arrange area,
229–230programming or editing patterns,
218–222turning off to stop flange sound, 234
stereo channel strips, 354Stereo Out channel strip, 371–372, 424, 429Stop button (Spacebar), 24–25Strip Silence, 317–319Sustain Inserted Notes button, Step Input
mode, 163–165Swing settings, Quantize menu, 147Synthesizer section, Ultrabeat, 215System Preferences, 425

Index 489
TTab key, 16Take Folder Editing Mode button, 109take folders
autopunching using, 91–92comping takes using, 105–110editing takes inside, 109opening, 102previewing takes for comping takes
using, 102–105recording additional takes using, 75–77recording MIDI takes using, 157recording takes in Cycle mode using, 78
takes, changing color of, 92takes, comping. see comping takestakes, recording
additional, 75–77in Cycle mode, 77–79defined, 75MIDI, 156–157on multiple tracks, 82–85
Tape Delay plug-in, 362–367tape slowdown effect, 279–282tempo, 252–282
adjusting loop settings, 20with Apple Loops, 257–262audio file matching project, 278–279browsing and previewing loops, 20changing with Varispeed, 269–272creating Apple Loops, 266–269creating turntable of tape slowdown
effect, 279–282inserting curves and changes, 262–266matching project tempo to audio
region’s, 254–257review Q & A, 282–282time stretching with Flex tool, 272–277Ultrabeat’s step sequencer
programmed to, 219tempo maps, 262–266Tempo track, global, 261, 262–266Text tool, 110–111, 298(3840) indicator, 147time stretching
creating turntable of tape slowdown effect, 279–282
with Flex tool, 272–277matching project and audio file tempo,
278–279quantizing audio region, 124–128quantizing MIDI recordings, 146–148review Q & A, 282–282
Toggle Zoom to fit Selection or All Content command (Z), 33–34, 127, 405
toms, adjusting volume of, 347–349Tonality slider, 97Tool menus, Arrange area, 110–113Toolbar, Arrange window, 17, 61–62tools, keyboard shortcuts for, 460–461Touch mode, recording live automation
in, 392–397Track Parameter box, 127, 263
track-based automationadjusting volume of section, 380–387creating decrescendo, 387–390creating pan automation, 390–392defined, 380editing, 383–387
tracksadjusting levels of grouped, 349–351keyboard shortcuts, 461–462recording additional takes on multiple,
82–85recording multiple, 79–82resetting all to same height, 79routing external MIDI, 452–454
tracks, recording singleadjusting level, 68–70preparing track, 64–67recording audio, 70–72using Audio Bin, 72–74
transitions, 114–117Transport bar, Arrange window
adjusting settings in display fields, 19–20
adjusting step length in Step Input mode, 162–163
browsing and previewing loops, 19–20comparing quantized with laid-back
patterns, 236defined, 17detecting tempo of audio file, 255–256Transport buttons and key commands
on, 23–26using Solo mode in, 287–289using Varispeed, 270–272
Transport buttons, 23–26, 33transport controls, keyboard shortcuts,
459–460Trash, 123troubleshooting and optimization
addressing unexpected behaviors, 441–444
backing up project files, 414–417backing up project folders to external
devices, 420–421optimizing hardware performance,
436–441overview of, 409rebuilding project file, 417–420restoring audio output, 422–424review Q & A, 445saving project and making automatic
backups, 410–414Tuner plug-in, 69–70turntable effect, applying, 279–28224-Bit Recording, bit depth, 64
UU.S. Preset. see keyboard shortcuts (U.S.
Preset)Ultrabeat (Drum Synth)
choosing drum kit/previewing drum sounds, 214–218
editing velocities/accents, 225–229
programming pattern, 222–225quantized vs. laid-back patterns,
235–237recording MIDI in Cycle mode, 151–155regions of interface, 215using step sequencer, 218–222viewing pattern as MIDI region,
230–232Up Arrow key, 20upbeat, inserting notes on, 224USB, troubleshooting MIDI In, 433
VVarispeed, 269–272velocity
adjusting notes with MIDI keyboard, 187–189
editing note, 225–229snare roll, 242–246using Hyper Draw to edit note,
190–193using Velocity tool to edit note,
176–178Velocity tool, 171, 176–178, 193vertical zoom in (Option-Control-Down
Arrow), 39, 43, 202vertical zoom out (Option-Control-Up
Arrow), 43View menu, Loop Browser, 258views, 258, 463–464vocals, with delay and reverb, 362–367volume
adding accents to notes, 225–229adjusting levels of drum tracks, 345–349setting metronome, 97
volume automationadjusting section, 380–387creating decrescendo, 387–390in Hyper Draw, 196–200
Wwah noise, reducing Guitar track, 319–321WAVE file, 95waveforms, manipulating with Flex tool,
128–131Write automation mode, 399
XX key (Mixer button), 44
ZZ key (Toggle Zoom to fit Selection or All
Content), 33–34, 127, 405zooming
Auto Zoom (Control-Z), 382basic commands, 39–40, 43keyboard shortcuts for, 460


![1249 SEJ_Kertas 1 [Www.mystudyguide.net]](https://static.fdocuments.net/doc/165x107/55cf9a24550346d033a09cef/1249-sejkertas-1-wwwmystudyguidenet.jpg)