Appendix T: Curatorial Care of Biological Collections · Appendix T: Curatorial Care of Biological...
138
Appendix T: Curatorial Care of Biological Collections Page Section I: The Nature of Biological Collections ................................................................................... T:1 A. Overview..................................................................................................................................... T:1 What information will I find in this appendix? ................................................................................... T:1 What are biological collections? ..................................................................................................... T:1 B. Introduction to Biological Collections ........................................................................................ T:1 What types of specimens are included in biological collections?....................................................... T:1 What is the value of biological collections? ..................................................................................... T:4 What is the basis for collecting appropriate specimens? .................................................................. T:5 How are biological collections used................................................................................................ T:5 Does preservation method affect use? ........................................................................................... T:6 How should I manage biological collections? .................................................................................. T:6 What is involved with the proper care of biological collections? ........................................................ T:7 What are the agents of deterioration that affect biological collections?.............................................. T:7 What should I know about preventive conservation of biological collections? .................................... T:8 How should I handle biological specimens? .................................................................................... T:8 Are there any other handling issues that I should be aware of? ........................................................ T:10 Are there any health and safety concerns related to biological collections? ....................................... T:10 Section II: Preservation of Biological Collections In General .............................................................. T:13 A. Overview..................................................................................................................................... T:13 B. Stabilization of Biological Specimens ......................................................................................... T:13 What is stabilization? .................................................................................................................... T:13 What issues should I consider prior to stabilization? ........................................................................ T:13 What issues should I consider once we decide to initiate stabilization of specimens? ........................ T:14 What information should I document during stabilization of biological specimens? ............................ T:14 Are there any other issues related to stabilization that I should consider? ......................................... T:16 What protection concerns and practices are involved with stabilization of biological specimens?........ T:16 What health and safety concerns should I be aware of during stabilization?...................................... T:16 C. Processing of Biological Specimens .......................................................................................... T:17 What is processing? ...................................................................................................................... T:17 What are the NPS requirements for processing of project-generated specimens?............................. T:17 What is involved in preparation of specimens?................................................................................ T:18 What is involved in accessioning biological specimens? .................................................................. T:18 What is involved in cataloging biological specimens? ...................................................................... T:19 How should I label specimens?...................................................................................................... T:19 What materials should I use to label specimens? ............................................................................ T:20 How should I handle biological specimens during processing? ......................................................... T:22 What should I know about preparation materials? ........................................................................... T:23 How should I document a specimen’s condition during processing? ................................................. T:23 Are the any special health and safety concerns during processing? ................................................. T:23 What do I need to know about loans of specimens?........................................................................ T:23 What techniques should I use when packing and shipping specimens for loans? .............................. T:25 What are the regulations pertaining to shipments of hazardous specimens? ..................................... T:25
Transcript of Appendix T: Curatorial Care of Biological Collections · Appendix T: Curatorial Care of Biological...
Appendix T: Curatorial Care of Biological Collections
Page
Section I: The Nature of Biological Collections ................................................................................... T:1
A. Overview..................................................................................................................................... T:1 What information will I find in this appendix?................................................................................... T:1 What are biological collections?..................................................................................................... T:1
B. Introduction to Biological Collections ........................................................................................ T:1 What types of specimens are included in biological collections?....................................................... T:1 What is the value of biological collections? ..................................................................................... T:4 What is the basis for collecting appropriate specimens? .................................................................. T:5 How are biological collections used................................................................................................ T:5 Does preservation method affect use? ........................................................................................... T:6 How should I manage biological collections? .................................................................................. T:6 What is involved with the proper care of biological collections? ........................................................ T:7 What are the agents of deterioration that affect biological collections?.............................................. T:7 What should I know about preventive conservation of biological collections? .................................... T:8 How should I handle biological specimens?.................................................................................... T:8 Are there any other handling issues that I should be aware of? ........................................................ T:10 Are there any health and safety concerns related to biological collections?....................................... T:10
Section II: Preservation of Biological Collections In General .............................................................. T:13
A. Overview..................................................................................................................................... T:13
B. Stabilization of Biological Specimens......................................................................................... T:13 What is stabilization? .................................................................................................................... T:13 What issues should I consider prior to stabilization? ........................................................................ T:13 What issues should I consider once we decide to initiate stabilization of specimens? ........................ T:14 What information should I document during stabilization of biological specimens? ............................ T:14 Are there any other issues related to stabilization that I should consider? ......................................... T:16 What protection concerns and practices are involved with stabilization of biological specimens?........ T:16 What health and safety concerns should I be aware of during stabilization?...................................... T:16
C. Processing of Biological Specimens .......................................................................................... T:17 What is processing?...................................................................................................................... T:17 What are the NPS requirements for processing of project-generated specimens?............................. T:17 What is involved in preparation of specimens?................................................................................ T:18 What is involved in accessioning biological specimens? .................................................................. T:18 What is involved in cataloging biological specimens? ...................................................................... T:19 How should I label specimens?...................................................................................................... T:19 What materials should I use to label specimens? ............................................................................ T:20 How should I handle biological specimens during processing?......................................................... T:22 What should I know about preparation materials? ........................................................................... T:23 How should I document a specimen’s condition during processing? ................................................. T:23 Are the any special health and safety concerns during processing? ................................................. T:23 What do I need to know about loans of specimens?........................................................................ T:23 What techniques should I use when packing and shipping specimens for loans? .............................. T:25 What are the regulations pertaining to shipments of hazardous specimens?..................................... T:25
D. Storage of Biological Collections ............................................................................................... T:26 How should I store biological collections?....................................................................................... T:26 Where should I locate storage? ..................................................................................................... T:27 How can I ensure the security of biological collections in storage? ................................................... T:27 How should I organize my park’s biological collection?.................................................................... T:28 What about other methods of arrangement?................................................................................... T:28 Are there any other issues related to collection arrangement that I should consider?......................... T:29 What issues should I consider when planning a new or upgraded storage facility for
biological specimens?............................................................................................................. T:29 What storage systems will best protect my park’s biological collections? .......................................... T:32 What types of storage equipment should I use for biological collections?.......................................... T:35 What special concerns should I consider when installing new storage equipment?............................ T:37 What types of storage materials are appropriate for use with biological collections? .......................... T:38 Are there any cautions to using the above materials with biological specimens? ............................... T:39 What materials should not be used for storage of biological specimens? .......................................... T:39
E. Maintenance of Biological Collections........................................................................................ T:40 What is maintenance?................................................................................................................... T:40 What information management issues are related to maintenance of biological collections? .............. T:41 How important is housekeeping for biological collections? ............................................................... T:41 What housekeeping strategies should I use for long-term preservation of biological specimens? ....... T:41 What should I know about emergency management, response and recovery?.................................. T:42 What do I need to know about salvaging biological specimens following an emergency?................... T:42 What about cleaning biological specimens?.................................................................................... T:43 Are there any other concerns regarding treatments of biological specimens?.................................... T:44 Are there any health and safety concerns related to maintenance of biological collections? ............... T:44 Should I document cleaning, treatment, and salvage activities? ....................................................... T:44 How can I protect biological specimens from pests?........................................................................ T:44
Section III: Dry Biological Collections.................................................................................................. T:46
A. Overview..................................................................................................................................... T:46 What are dry biological collections? ............................................................................................... T:46 Why are some biological specimens preserved in a dry state?......................................................... T:46 What types of biological specimens are usually included in dry collections?...................................... T:46 What are the primary agents of deterioration that affect dry collections?........................................... T:47 How does neglect affect dry collections? ........................................................................................ T:47 How do pests threaten dry collections? .......................................................................................... T:47 How can contaminants adversely affect dry collections?.................................................................. T:47 How does visible and ultraviolet light affect dry collections?............................................................. T:49 How does temperature and relative humidity affect dry collections? ................................................. T:49 Are there any special rules for handling dry collections?.................................................................. T:50 What security issues are related to dry collections?......................................................................... T:53 Are there any health and safety concerns associated with dry collections? ....................................... T:54
B. Special Concerns for the Stabilization of Dry Specimens........................................................... T:55 How are dry specimens stabilized? ................................................................................................ T:55 What protection concerns and practices are involved with stabilization of dry specimens?................. T:55
C. Special Concerns for the Processing of Dry Biological Specimens ........................................... T:56 Are there any general observations about processing of dry specimens? ......................................... T:56 What are the agents of deterioration that affect dry collections during processing?............................ T:57
D. Special Maintenance Concerns for Dry Collections.................................................................... T:57 What should I do about migrating lipids that are staining the specimen or surrounding materials?...... T:57 How should I protect dry specimens from pests? ............................................................................ T:58 What passive IPM measures should I take to protect the collection? ................................................ T:58 What active IPM measures should I take to protect the collection? ................................................... T:59 What should I do if eradication is necessary? ................................................................................. T:60 What kind of traps can I use? ........................................................................................................ T:61 Are there any cautions related to traps that I should consider?......................................................... T:62 How can I use freezing temperatures to eliminate a pest problem? .................................................. T:62 How can I use heat to eliminate a pest problem? ............................................................................ T:63 How can I use a low-oxygen environment to treat a pest problem? .................................................. T:63 If necessary, can I still use chemical treatments to eliminate a pest problem?................................... T:63 Where can I find additional information concerning IPM and pest control? ........................................ T:63
Section IV: Wet Biological Collections................................................................................................. T:64
A. Overview..................................................................................................................................... T:64 What are wet collections?.............................................................................................................. T:64 Why are these specimens preserved in a wet form?........................................................................ T:64 What is fixation? ........................................................................................................................... T:64 Are all wet specimens treated with a fixative? ................................................................................. T:64 What types of preservative fluids are used for wet collections?........................................................ T:64 What types of specimens are usually included in wet collections?.................................................... T:64 What are the primary agents of deterioration for wet collections? ..................................................... T:65 How can inappropriate temperature and temperature fluctuations adversely
affect wet collections? ............................................................................................................. T:66 Can relative humidity adversely affect wet collections?.................................................................... T:66 How can wet collections become contaminated? ............................................................................ T:66 Are there any special health and safety concerns related to wet collections? .................................... T:67
B. Stabilization of Wet Biological Specimens ................................................................................. T:68 What specimen characteristics should I document prior to stabilizing a wet specimen? ..................... T:68 What should I know about the stabilization process for wet specimens? ........................................... T:68 Is formalin used with all wet biological specimens? ......................................................................... T:69 How do I protect specimens during stabilization? ............................................................................ T:69 What are the health and safety issues concerning stabilization of wet specimens?............................ T:70
C. Processing of Wet Biological Specimens ................................................................................... T:71 What general information about processing should I be aware of? ................................................... T:71 How should I label wet specimens?................................................................................................ T:72 What materials should I use to label wet specimens?...................................................................... T:72 What agents of deterioration affect wet biological specimens during processing?.............................. T:73 How should I handle wet biological specimens during processing? .................................................. T:74 Can I keep some wet biological specimens in formalin? .................................................................. T:75 How do I transfer wet specimens from formalin to an alcohol solution?............................................. T:75 Can I transfer wet biological specimens from ethanol to isopropanol? .............................................. T:77 What about clearing and staining specimens? ................................................................................ T:77 Can I keep different wet biological specimens together in the same container? ................................. T:77 How should I document a wet specimen’s condition during processing? ........................................... T:77 What health and safety concerns should I be aware of during processing?....................................... T:78 What do I need to know about loans of wet specimens?.................................................................. T:78
D. Storage of Wet Biological Collections ........................................................................................ T:79 Where should I locate storage? ..................................................................................................... T:79
What agents of deterioration pose the greatest threat to wet collections in storage? .......................... T:79 Are there any special considerations for storing wet specimens? ..................................................... T:80 What types of storage containers should I use? .............................................................................. T:82 Are there any other storage requirements that I should consider? .................................................... T:84 What about arranging wet specimens?........................................................................................... T:84 Are there any special health and safety concerns related to storage of wet collections? .................... T:85
E. Maintenance of Wet Biological Collections................................................................................. T:85 What does maintenance of wet collections include?........................................................................ T:85 How do I maintain fluid quality for wet specimens?.......................................................................... T:85 How are fluids lost or compromised?.............................................................................................. T:86 How do I replace or replenish the fluid preservative?....................................................................... T:87 Are there any other ways to adjust fluid concentrations?.................................................................. T:88 When should I replace the fluid?.................................................................................................... T:88 Should I be concerned if some fluids are discolored? ...................................................................... T:88 When should I consult a conservator? ............................................................................................ T:89 Are there any health and safety concerns related to maintenance of wet collections?........................ T:89 What should I know about emergency preparedness, response, salvage,
and long-term recovery? ......................................................................................................... T:89 Do I need to document maintenance activities such as replacing fluids?........................................... T:90
Section V: Biological Low-Temperature Collections............................................................................ T:91
A. Overview........................................................................................................................................ T:91 Why are specimens preserved at low temperatures?.......................................................................... T:91 What low temperatures are used?..................................................................................................... T:91 What specimens are preserved at low temperatures? ........................................................................ T:91 What agents of deterioration affect low-temperature collections? ........................................................ T:93 What health and safety concerns are related to low-temperature collections? ...................................... T:94
B. Stabilization and Processing of Low-Temperature Collections ..................................................... T:95 How should I label low-temperature collections?................................................................................ T:96 What should I know about loans of low-temperature collections? ........................................................ T:97 What agents of deterioration affect low-temperature collections during processing? ............................. T:97 How should I handle specimens during processing? .......................................................................... T:98 How should I pack and ship specimens for loans? ............................................................................. T:99 How should I document a specimen’s condition during processing? .................................................... T:99 What health and safety concerns should I be aware of during processing?.......................................... T:100
C. Storage of Low-temperature Collections ....................................................................................... T:100 Are there any special storage considerations concerning low-temperature collections? ........................ T:100 How should I organize low-temperature collections? .......................................................................... T:100 What are the primary agents of deterioration that affect specimens in storage?.................................... T:101 What special features should I include in low-temperature storage areas?........................................... T:102 What types of supplies and equipment are used for storage of low-temperature collections? ................ T:103 What else should I know about mechanical freezers?......................................................................... T:105 How should I store specimens inside a freezer?................................................................................. T:105 What about storage of DNA samples?............................................................................................... T:106 Are there any special health and safety concerns related to storage
of low-temperature collections? .................................................................................................. T:106
D. Maintenance of Low -temperature Collections ............................................................................... T:107 Are there any special maintenance issues concerning storage of low-temperature collections?............. T:107 What is involved in salvage of low-temperature collections? ............................................................... T:108
What is the “best method” of salvage? .............................................................................................. T:108 Where can I get salvage advice and assistance? ............................................................................... T:110 How should I document emergency salvage efforts?.......................................................................... T:110
Section VI: Biological Microscopy Collections .................................................................................... T:111
A. Overview..................................................................................................................................... T:111 Why are some specimens preserved as microscope preparations?.................................................. T:111 How are specimens preserved as microscope preparations?........................................................... T:111 What agents of deterioration affect microscopy collections?............................................................. T:112 Are there any health and safety concerns related to microscopy collections?.................................... T:114
B. Stabilization and Processing of Microscopy Collections............................................................ T:116 What are the primary agents of deterioration that affect microscopy collections?............................... T:116 How should I handle specimens during processing? ....................................................................... T:117 How should I label microscope slides? ........................................................................................... T:117 What types of specimen containers should I use for microscopy preparations?................................. T:117 How should I pack and ship microscopy specimens for loans?......................................................... T:117 How should I document a specimen’s condition during processing? ................................................. T:118
C. Storage of Microscopy Collections............................................................................................. T:118 How should I organize the collection? ............................................................................................ T:118 What are the primary agents of deterioration for microscopy collections in storage? .......................... T:119 What are the appropriate environmental conditions for storage of microscopy collections? ................ T:120 What types of storage equipment should I use?.............................................................................. T:120 Are there any common problems with microscopy collections?........................................................ T:121 What should I do if specimens need to be cleaned, remounted, or treated? ...................................... T:121 What should I know about salvaging microscopy collections? .......................................................... T:121 Are there any health and safety issues that I should consider? ........................................................ T:122
Section VII: Glossary ........................................................................................................................... T:123
Section VIII: References....................................................................................................................... T:124
Section IX: Non-NPS Repositories with Servicewide or Multi-Regional Agreements to House Park Biological Collections....................................................................................................... T:134
List of Figures Figure T.1 Use extra care when transporting specimens with delicate parts. ................................... T:9 Figure T.2 Microscope slides stored horizontally in a slide cabinet ................................................. T:121

APPENDIX T: CURATORIAL CARE OF BIOLOGICAL COLLECTIONS
SECTION I: THE NATURE OF BIOLOGICAL COLLECTIONS
A. Overview
1. What information will I find in this appendix?
2. What are biological collections?
This appendix discusses the nature of biological collections and outlines strategies for their long-term care and preservation.
Most biological collections are either dry collections or wet collections. They also may include collections preserved at low temperatures or microscopy collections. This appendix discusses all four types of biological collections. It also includes the four basic stages of preservation: stabilization, processing, storage, and maintenance.
Biological collections are typically:
· preserved plant or animal specimens
· specimen documentation, such as labels and notations (Note: associated project data, reports, notes, etc. should be accessioned into the park’s archives and cross-referenced to the related specimens)
Normally biological materials are maintained as separate collections based on:
· the types of specimens
· the type of preservation
· differences related to management, care, and use
Plants would be a part of a plant collection, but depending on the size and diversity of the collection, it might be appropriate to differentiate types of plants, and include a vascular plant collection and a non-vascular plant collection.
B. Introduction to Biological Collections
1. What types of specimens are included in biological collections?
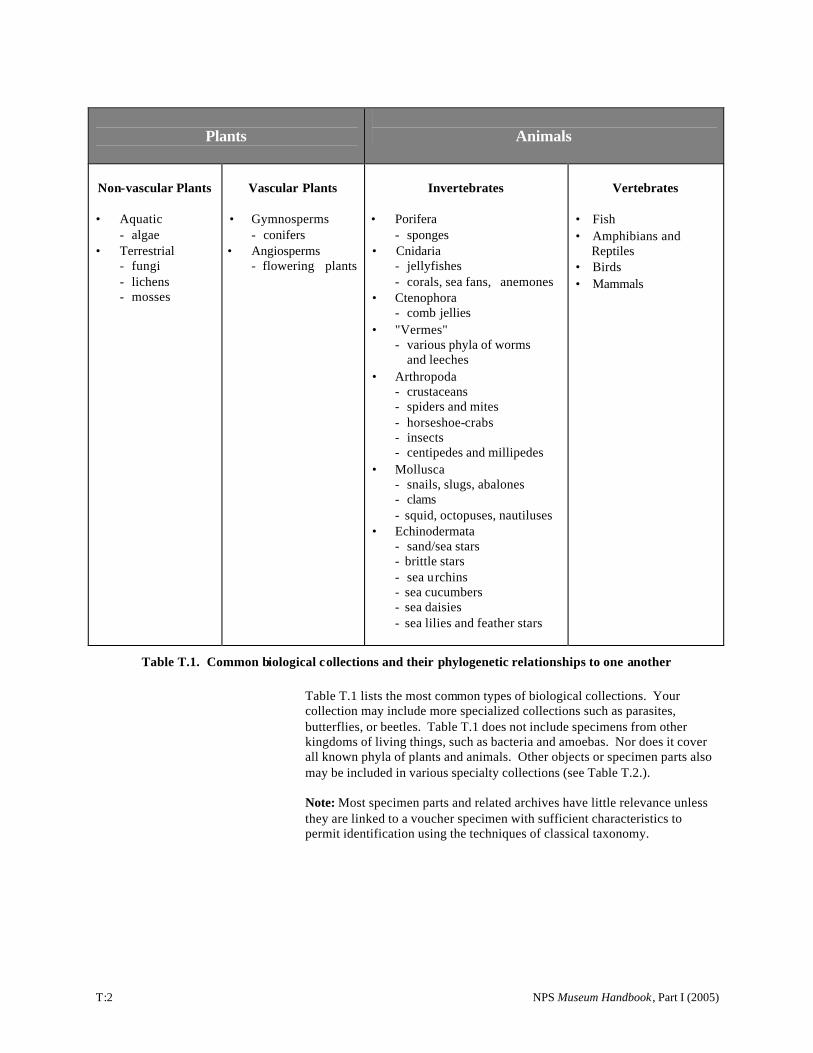
Common biological collections include non-vascular and vascular plants, and animals, both vertebrate and invertebrate. See Table T.1 for a listing of common biological collections and their phylogenetic relationships to one another.
NPS Museum Handbook , Part I (2005) T:1
Plants Animals
Non-vascular Plants Vascular Plants Invertebrates Vertebrates
· Aquatic - algae
· Terrestrial - fungi - lichens - mosses
· Gymnosperms - conifers
· Angiosperms - flowering plants
·
·
·
·
·
·
·
Porifera - sponges Cnidaria - jellyfishes - corals, sea fans, anemones Ctenophora - comb jellies "Vermes" - various phyla of worms
and leeches Arthropoda - crustaceans - spiders and mites - horseshoe-crabs - insects - centipedes and millipedes Mollusca - snails, slugs, abalones - clams - squid, octopuses, nautiluses Echinodermata - sand/sea stars - brittle stars - sea urchins - sea cucumbers - sea daisies - sea lilies and feather stars
· ·
· ·
Fish Amphibians and Reptiles Birds Mammals
Table T.1. Common biological collections and their phylogenetic relationships to one another
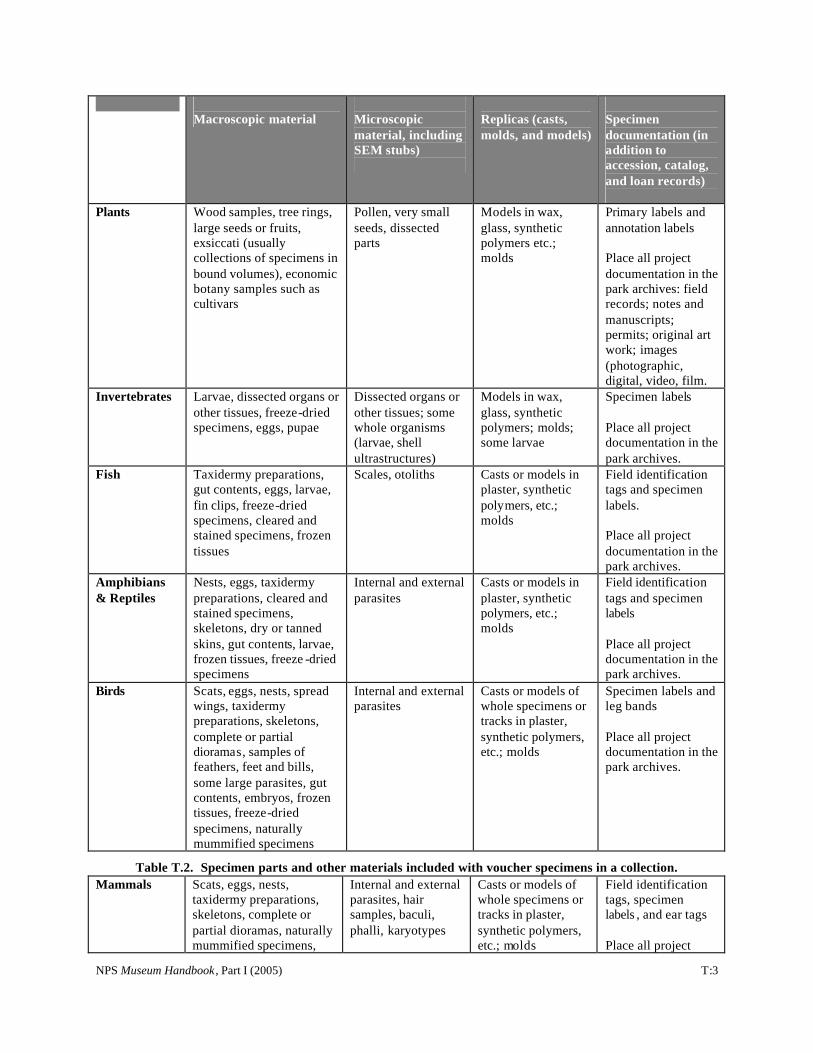
Table T.1 lists the most common types of biological collections. Your collection may include more specialized collections such as parasites, butterflies, or beetles. Table T.1 does not include specimens from other kingdoms of living things, such as bacteria and amoebas. Nor does it cover all known phyla of plants and animals. Other objects or specimen parts also may be included in various specialty collections (see Table T.2.).
Note: Most specimen parts and related archives have little relevance unless they are linked to a voucher specimen with sufficient characteristics to permit identification using the techniques of classical taxonomy.
T:2 NPS Museum Handbook , Part I (2005)
Macroscopic material Microscopic material, including SEM stubs)
Replicas (casts, molds, and models)
Specimen documentation (in addition to accession, catalog, and loan records)
Plants Wood samples, tree rings, large seeds or fruits, exsiccati (usually collections of specimens in bound volumes), economic botany samples such as cultivars
Pollen, very small seeds, dissected parts
Models in wax, glass, synthetic polymers etc.; molds
Primary labels and annotation labels
Place all project documentation in the park archives: field records; notes and manuscripts; permits; original art work; images (photographic, digital, video, film.
Invertebrates Larvae, dissected organs or other tissues, freeze-dried specimens, eggs, pupae
Dissected organs or other tissues; some whole organisms (larvae, shell ultrastructures)
Models in wax, glass, synthetic polymers; molds; some larvae
Specimen labels
Place all project documentation in the park archives.
Fish Taxidermy preparations, gut contents, eggs, larvae, fin clips, freeze-dried specimens, cleared and stained specimens, frozen tissues
Scales, otoliths Casts or models in plaster, synthetic polymers, etc.; molds
Field identification tags and specimen labels.
Place all project documentation in the park archives.
Amphibians Nests, eggs, taxidermy Internal and external Casts or models in Field identification & Reptiles preparations, cleared and
stained specimens, skeletons, dry or tanned skins, gut contents, larvae, frozen tissues, freeze -dried specimens
parasites plaster, synthetic polymers, etc.; molds
tags and specimen labels
Place all project documentation in the park archives.
Birds Scats, eggs, nests, spread wings, taxidermy preparations, skeletons, complete or partial dioramas, samples of feathers, feet and bills, some large parasites, gut contents, embryos, frozen tissues, freeze-dried specimens, naturally mummified specimens
Internal and external parasites
Casts or models of whole specimens or tracks in plaster, synthetic polymers, etc.; molds
Specimen labels and leg bands
Place all project documentation in the park archives.
Table T.2. Specimen parts and other materials included with voucher specimens in a collection. Mammals Scats, eggs, nests,
taxidermy preparations, skeletons, complete or partial dioramas, naturally mummified specimens,
Internal and external parasites, hair samples, baculi, phalli, karyotypes
Casts or models of whole specimens or tracks in plaster, synthetic polymers, etc.; molds
Field identification tags, specimen labels , and ear tags
Place all project
NPS Museum Handbook , Part I (2005) T:3
tanned skins, horns and antlers, gut contents, dissected organs, embryos, frozen tissues, freeze-dried specimens or specimen parts, sectioned teeth, some dissected baculi; some large parasites
documentation in the park archives.
Table T.2. Specimen parts and other materials included with voucher specimens in a collection (continued)
Biological collections may be grouped within broad taxonomic categories according to the nature of preservation. Biological specimens normally are preserved by drying, preservative fluids (either as macroscopic or microscopic preparations), or storage at low temperatures.
2. What is the value of Biological collections are valuable (in order of rank) as: biological collections?
· types (specimens referred to in the first published account of a new taxonomic group)
· rare, endangered or extinct species
· vouchers for specific research studies or specimens of special historical value
· specimens rarely found in any collections or those that are rare in the particular collection in question
· specimens that fully document the existence of a species at a given place and time (most properly collected and maintained biological specimens will fit this category)
· specimens collected specifically for destructive sampling or for interpretive programs
Some specimens fall into more than one of these categories.
3. What is the basis for collecting appropriate specimens?
The most common uses of biological collections are to resolve issues related to taxonomic identification and provide physical evidence of the presence of a particular taxon at a specific place and point in time.
Before you can understand if a particular specimen is appropriate in a collection, you first must understand its value. You also need to know how the specimen might be handled and used. Cultural value, usually for historical or scientific purposes, is the basis for responsibly selecting material for biological collections.
Note: Many historical specimens were not necessarily collected to answer a
T:4 NPS Museum Handbook , Part I (2005)
specific research question, as specimens collected for scientific purposes today are. However, if historic specimen collections do include adequate documentation, (detailing the existence of a taxon at a place and point in time), they are scientific collections too.
Collecting based on emotional values can result in collection biases and inappropriate commitments for the collection. Examples of collecting for emotional value may include:
· the acquisition of particularly attractive or unusual specimens
· some salvage operations
Collecting for use often assumes eventual destruction or transfer of the specimen in question. For responsible resource management, you must evaluate:
· the level of initial preparation that a specimen needs for placement in the collection
· the amount of long-term management and care required for such specimens once placed in the collection
For instance, a taxidermy mount of a commonly occurring animal, which lacks collecting, preparation, and provenience data, has little purpose other than exhibition or teaching. It may not be appropriate to allocate resources for long-term management and care of such a specimen.
4. How are biological Collection use is dependent on many factors, such as the specimens or parts collections used? available, expertise available, preservation methods, and preservation
quality. The use of most collections falls into specific categories, which vary according to the number of specimens involved. For instance, a single specimen can be used for:
· a voucher of research
· a synoptic reference sample
· documentation of the occurrence of a species at a given place and time
· interpretation
As the number of specimens of a given species increases, the types of use expand substantially. Besides the uses noted above, the collection can document:
· variations - among individuals
- among age groups
- between sexes
· seasonal variation
· geographical variation
NPS Museum Handbook , Part I (2005) T:5
· geographical distribution
· ecological relationships and associations
5. Does preservation method affect use?
6. How should I manage biological collections?
Remember: The basic reason for maintaining biological collections is to promote their use in both science and education.
Yes, the method of specimen preservation has an impact on collection use.
Dry preservation is useful for visual examination of characteristics, particularly where a degree of color and some delicate parts are important.
Fluid preservation may sacrifice color, but is useful for preserving internal organs that might be exposed by dissection.
Because there is no single preservation method that will accommodate all possible uses of a specimen, a collection often includes specimens preserved by different methods.
Many of the modern research uses for biological collections involve very specialized preservation methods and materials. These include:
· histology
· parasitology
· chemical or biochemical analyses
· molecular genetics
· analyses of environmental pollutants
These uses require appropriate research personnel, facilities, and equipment. Many institutions with collections lack the expertise to carry out or even to properly evaluate requests for these kinds of fairly sophisticated research. Such institutions also can rarely provide appropriate care for the materials generated by the research.
Manage collections to ensure that they are available for use. When you decide to preserve a specimen, you should:
· utilize appropriate processing methods. Such methods must comply with standard practices appropriate to the type of biological materials. This will ensure the quality and integrity of:
- the specimen
- associated information
· organize the specimens (with hundreds, perhaps thousands, of others) in an established order
T:6 NPS Museum Handbook , Part I (2005)
- this facilitates retrieval of specimens
· use storage equipment and supplies that best serve the goals of preservation and access
Your management responsibilities also include:
· updating the organization of the collection
· directing collection growth as scientific research changes
To provide proper care, document and use the best:7. What is involved with the proper care of biological collections? · preservation methods
· preservation materials
· collection environments
· handling practices
· storage designs
· emergency salvage and response procedures
· condition reporting
· collection treatments
When you practice proper collections management and care, your collections will be accessible, useful, and stable. Remember to incorporate management and care concerns in the development of all recommended policies and procedures.
8. What are the agents of Biological materials are designed to decompose. They can be damaged by deterioration that affect any of the following processes: biological collections?
· Mechanical
· Biological
· Chemical
Remember: Damage from one process can sometimes cause another. The specific agents of deterioration that affect biological collections are:
· visible and ultraviolet (UV) light
· inappropriate temperature
· inappropriate relative humidity levels and fluctuations (especially at extreme levels)
· contaminants or pollutants
NPS Museum Handbook , Part I (2005) T:7
· pests
· fire
· water
· physical forces
· criminal activity
· neglect
All of these agents may act on biological specimens. The risk of one agent over another may vary considerably, depending on the type of preservation or collection.
9. What should I know about preventive conservation of biological collections?
Biological collections have research potential. New and innovative technological approaches to research are common. Avoid any action that might compromise the research integrity of the specimens. For this reason, your response to threats of mechanical, biological, or chemical damage should emphasize stabilization before interventive treatments .
10. How should I handle biological specimens?
Some specimens may have special handling requirements. Discuss these issues with the researcher who collected and/or prepared the specimens. Contact your regional/SO curator or the Senior Curator of Natural History if you have any questions.
In general, handle specimens as you would other museum objects:
· Handle specimens as infrequently as possible.
· Handle each specimen as though it’s irreplaceable and the most specimen valuable in the collection.
· Never smoke, eat, or drink while handling specimens.
· Don’t wear anything that may damage the specimen. To avoid scratching and snagging surfaces, be careful of breast pocket contents, jewelry, watches, and belt buckles.
· Use only a pencil when examin ing specimens.
· Save all information that is associated with the specimen, such as tags and labels.
· Know the condition of a specimen before moving it.
· Lift and/or move the specimen by supporting its strongest structural component. Do not lift it by protruding parts, small bones, wings, or attachments. These areas are weak. They also can be easily separated from the rest of the specimen (and lost!).
· Use a utility cart with padded shelves and raised sides to transport specimens from one room, area, or building to another. See Tools of the Trade for additional information.
T:8 NPS Museum Handbook , Part I (2005)

· Handle only one specimen at a time and use both hands. Use one hand for support and the other hand for balance.
· If you transport a specimen via a specimen tray, be sure that it cannot shift or fall out. Use cavity packing (see Appendix I, Figure I.6., page I:11) to keep specimens from shifting.
· If you need to temporarily place a specimen in an unstable position for examination, be sure to support it. Exercise extreme caution in these situations. Return the specimen to a stable base or surface as soon as possible.
· Never hurry when handling specimens. Move slowly.
Figure T.1. Use extra care when transporting specimens with delicate parts, such as this pinned butterfly specimen. Photograph courtesy of the Bohart Museum of Entomology, University of California, Davis.
If part of a specimen is broken, reattach it as soon as possible to prevent it from becoming separated or lost. At a minimum, place the broken part in a labeled polyethylene bag or acid-free (not buffered) envelope to ensure that it doesn’t become lost. Consult with your regional/SO curator, the Senior Curator of Natural History, or a natural history conservator for advice.
11. Are there any other handling issues that I should be aware of?
Researchers will need to handle specimens in order to study them. But don’t assume that everyone who requests collections access (including scientists) is aware of all the proper handling procedures.
NPS Museum Handbook , Part I (2005) T:9
Be sure that you:
· know how to appropriately handle all of the specimens in your collection.
· thoroughly brief all collections users on proper specimen handling techniques. A good way to do this is to provide all researchers with a copy of your park’s “Collections Handling Guidelines.”
· require all collections users to sign a statement agreeing to abide by these and any other applicable rules, as a condition of access.
For additional information, refer to Chapter 6: Handling, Packing, and Shipping. You also may find the following example standard operating procedures to be useful:
· Figure 6.14, “Example of Written Handling Rules for NPS Collections” on page 6:30
· Figure G.6., “Sample Visitor Log” on page G:32
· Figure G.7., “Conditions for Access to Museum Collections” on page G:33
12. Are there any health and The collection, preparation, and handling of biological specimens can pose safety concerns related to various risks to human health and safety. One of the most familiar concerns biological collections? is the historic use of toxic chemicals, such as arsenic, for preservation and
pest control. These collections may involve other risks as well.
Collecting living organisms can be dangerous because of:
· the organisms’ natural defense systems, such as:
- marine organisms that sting (jellyfish, stingrays, sea urchins, octopuses, and others)
- venom in snakes
· non-target species in the same habitat.
Even after collection, be sure to handle all organisms with care. Natural toxins in the plant or animal and diseases can be transferred to humans from an animal or its parasites. Health hazards include:
Bacterial Diseases
· Anthrax (hoofed animals)
· Bucellosis (cattle, goats, hares, pigs)
· Erysipelas (pigs, marine mammals, possibly birds)
· Leptospirosis (rodents, hares, hedgehogs, possibly others)
· Plague (rodents)
T:10 NPS Museum Handbook , Part I (2005)
· Pseudotuberculosis (birds, some rodents and possibly other small animals)
· Psittacosis/ornithosis (birds)
· Rickettsial diseases such as Rocky Mountain spotted fever, rickettsialpox, recrudescent typhus, murine typhus, Q fever, and momcytic erlichiosis (small mammals, carnivores, deer)
· Salmonellosis (primarily rodents, reptiles, some birds)
· Tetanus (most animals)
· Tick-borne spirochetal diseases such as Lyme disease, and other relapsing fevers (rodents)
· Tuberculosis, avian (birds)
· Tuberculosis, mammalian (relatively uncommon in wild animals)
· Tularemia (burrowing rodents, ground squirrels, rabbits and hares)
Fungal Diseases
· Aspergillosis (birds, occasionally mammals)
· Histoplasmosis (colonial birds or mammals where excrement accumulates)
· Ringworm (mammals, occasionally birds)
Viral Diseases
· Hantavirus (rodents)
· Rabies (coyotes, foxes, raccoons, skunks, some bats)
· West Nile virus (birds)
Often, only someone with expertise in a particular species may recognize an animal’s symptoms indicating a potential human health hazard. Eliminating the hazards can be complicated. Each one is resistant to different factors. For example, freezing specimens prior to preparation will not destroy some bacteria and viruses, such as some rickettsial diseases and rabies. Freeze-drying will preserve many pathogens for prolonged periods.
Taking material from the wild into collections also can involve hazardous materials used to tranquilize, kill, clean, or otherwise prepare specimens. These hazards vary with the type of specimen and preservation method (dry, wet, low temperature, microscopy).
Provide safe conditions; ensure that:
NPS Museum Handbook , Part I (2005) T:11
· human health and safety is paramount; superseding all other concerns
· all health and safety risks are taken seriously and eliminated to the degree possible
· unnecessary risks are avoided
· warnings about health and safety risks are provided verbally and in writing to staff and collection users
· compliance with governmental health and safety regulations is standard practice, including:
- monitoring for hazards
- using engineering controls to mitigate hazards
- worker training, including training in the use of personal protective equipment where engineering controls are not feasible
· collection personnel work in pairs when safety is a concern (for example, handling heavy equipment or toxic chemicals)
· staff properly dispose of all parts discarded during the preservation process (such as internal organs of vertebrates preserved as dried skins)
For additional information related to curatorial health and safety, see Chapter 11. You can also obtain information concerning methods to mitigate biohazards without compromising the utility of specimens from:
· The Centers for Disease Control and Prevention (CDC) (800) 311-3435 www.cdc.gov
· The American Society of Mammalogists www.mammalsociety.org
SECTION II: PRESERVATION OF BIOLOGICAL COLLECTIONS IN GENERAL
A. Overview
For purposes of organization and discussion, preservation is subdivided into the following stages:
· Stabilization: preservation activities associated with halting active deterioration and minimizing the risk of loss, damage, or disorder as it relates to the specimen and its associated information
· Processing: preservation activities beyond stabilization that are related to making the specimen available for use
· Storage: preservation activities associated with housing of the
T:12 NPS Museum Handbook , Part I (2005)

specimens for the sake of access, organization, and protection
· Maintenance: preservation activities associated with corrective actions in response to a real or perceived problem
By definition, both emergency management and pest management are “maintenance” activities.
Note: Most specimens you receive will already be stabilized. They probably will have undergone some degree of processing too. Park biologists or outside researchers working under contract usually carry out this work. These scientists are familiar with the standard protocols for specimen stabilization and processing in their fields. Curatorial staff should be involved only in some aspects of processing, and in the storage and maintenance of the collections.
Make sure you have documentation as to what processes were used by the researcher.
B. Stabilization of Biological Specimens
Stabilization includes:1. What is stabilization?
· halting active deterioration of a specimen
· minimizing the risk of loss, damage, or disorder of the specimen and its associated information
Carefully evaluate all incoming material:2. What issues should I consider prior to
· Does the quality of the specimen(s) and associated information complystabilization? with standards for the collection?
· Does the acquisition of the specimen(s) comply with the park’s Scope of Collection Statement and:
- serve institutional mission and goals?
- contribute to the utility of the collection?
- pose any health and safety ris ks?
- pose any legal, ethical, or social problems?
- require special resources for collection or salvage, preparation, or long-term care?
3. What issues should I · What is the condition of the specimen? Keep in mind that it may be: consider once we decide
- aliveto initiate stabilization of specimens?
- recently dead
NPS Museum Handbook , Part I (2005) T:13
4. What information should I document during stabilization of biological specimens?
- in some state of decomposition (as a result of necropsy, freezing, or delay between collection and initial stabilization)
· What parts of the specimen are to be preserved?
· What kind of stabilization (dry, wet, low temperature) is appropriate?
· Does stabilization require additional materials for support of the specimen and/or specialized equipment for the process?
· What professional standards (for example, positioning) apply to the stabilization technique?
· What special methods (for example, exposing diagnostic features) must be applied to insure maximum use of the specimen?
· Does completion of the stabilization of choice make the specimen available for use? Will subsequent processing treatments be required? For example, a vascular plant specimen may be stable after pressing to remove moisture. However, it won’t be useful until it has been mounted.
Because so much information is lost when a specimen is removed from its natural setting and collected, the collector documents:
· ecological information
· field conditions
· observations about the specimen and its habitat
· accurate locality data
Such documentation usually includes: · field notes
· field tags applied to the specimen
· photographs
· digital images
· original artwork
· sound or video recordings.
Remember: At a minimum, researchers working in NPS areas are required to provide the park with:
· an Investigator’s Annual Report for each year of the permit
· copies of field notes, data, reports, publications and/or other materials resulting from the studies
Be sure that these data are included in the collection and are cross-
T:14 NPS Museum Handbook , Part I (2005)
referenced with the specimen/s, including all catalog information in ANCS+.
Note information about the individual specimen. Often this involves recognizing the species and assigning a field or preparation number (especially in the case of tissues and/or parasites removed from the specimen). This allows the specimen to be cross-referenced to other related information. Some disciplines may not assign these numbers because all of the pertinent information is maintained with the dry specimen (this is sometimes the case in botany).
The collector also should have provided provenience information. This is especially important for ensuring specimen value and use within the collection. Such data include:
· the species
· the field or preparation number
· the methods used for stabilization from the time of collecting until received at the park
· where the specimen was collected
· when the specimen was
- collected (including the method, as well as any drug and/or chemical used during the collection of animal specimens)
- prepared
· who collected the specimen · who stabilized the specimen
Hopefully, the collector also included:
· any special handling procedures
· information related to parasites or tissues collected from the specimen
You also need to be sure to document the natural conditions and features of the specimen, particularly those that may be changed by stabilization. Examples include color, markings, weight, dimensions, sex, reproductive condition, age, and physical condition.
Any documentation about specimen history, such as condition of the specimen, environmental conditions, and stabilization methods and materials, may prove useful in determining the integrity of the specimen for various uses.
Yes. Be sure to bear in mind that:5. Are there any other issues related to stabilization that
NPS Museum Handbook , Part I (2005) T:15
I should consider? · Various stabilization methods are used but can vary significantly between disciplines. Refer to the specific stabilization methods in subsequent sections for more information.
· The intended use of the specimen can significantly influence how it will be preserved.
· Stabilization should be the first step in preservation. Take care to ensure that stabilization practices comply with disciplinary standards.
6. What protection concerns and practices are involved with stabilization of biological specimens?
During stabilization, you should:
· ensure the relationship of the specimens and their data
· protect the specimens from all agents of deterioration
The agents of deterioration that most often damage specimens during stabilization depend greatly on the nature of stabilization. Refer to the specific stabilization methods in subsequent sections for more information.
7. What health and safety concerns should I be aware of during stabilization?
Specimens may contain animal-borne pathogens and/or toxic chemicals that are part of the plants or animals themselves. If chemicals are used as part of the stabilization process there may be additional risks. These hazards depend upon the specific chemicals. Protect yourself with good personal hygiene. Use appropriate engineering controls (such as biohazards hoods and chemical vapor hoods), and properly chosen gloves. If engineering controls are unavailable (as is often the case during field stabilization), you may need to use additional personal protective equipment.
C. Processing of Biological Specimens
1. What is processing? Processing involves those activities beyond stabilization that are related to making the specimen available for use. These activities depend on standard practices established by individual disciplines. Processing typically includes a sequence of steps that includes:
· preparation
· accessioning
· cataloging
· labeling
· loans or other collection access
2. What are the NPS requirements for processing of project-generated specimens?
Specimens that you acquire should already have been accessioned, cataloged, and labeled. This is required of researchers (NPS and non-NPS) who have NPS collection permits.
Director’s Order #24: NPS Museum Collections Management, requires all project budgets to include funding for the basic management of project-generated collections. Collections management includes:
T:16 NPS Museum Handbook , Part I (2005)

You also must ultimately decide whether to preserve the entire specimen or This will lead to decisions about incorporating
To best address these issues, consult appropriate subject matter experts and/or literature.
Processing can require special expertise, time, and facilities. sure that you have all of the necessary resources before accepting
If you do not, your collection will have a backlog of unprocessed or partially processed specimens that are of
T:17
Be
3. What is involved in preparation of specimens?
· cataloging
· labeling
· conservation examination and treatment (including preparation)
· initial storage of objects and specimens
· organization and storage of project documentation (field data, reports, and other associated archival materials)
Do not accept project-generated collections that lack such basic documentation and means for protection. As noted above, DO #24 requires project budgets to include funding for basic collections management. It is not the responsibility of the park’s museum program to fund cataloging and initial storage and organization of project-generated specimens and archives. You can contact your regional/SO curator or the Senior Curator of Natural History for advice.
All resource management projects that generate collections must provide funding for accessioning, cataloging, and labeling of specimens, as well as initial conservation and storage of both specimens and related archives. Budgets should include sufficient funding for NPS or contract cataloging or specimens and archives, storage materials, and equipment, such as cabinetry.
The initial step in processing is the preparation of the specimen (although it can be part of the stabilization process). If you lack critical data about the specimen (such as measurements), it is important to obtain the information at this time.
Anticipate specimen use, so that you can make correct decisions about:
· applying appropriate preparation techniques
· conforming to disciplinary standards
· positioning and exposing diagnostic features
· possibly exposing additional features commonly used for descriptive and comparative research
only part(s) of it. supplemental support systems.
processing obligations.
little or no utility.
NPS Museum Handbook , Part I (2005)
4. What is involved in accessioning biological specimens?
For information concerning accessioning of museum collections, see Museum Handbook , Part II (MH-II), Chapter 2. Additional accession information relevant to biological acquisitions that you should document includes:
· What taxonomic groups of specimens are represented by the acquisition?
· What methods of preservation are represented by the acquisition?
· Where was the acquisition collected?
· When was the material collected?
You should also include the following materials in the accession folder:
· a copy of the research proposal
· a copy of the research/collecting permit(s)
It’s also helpful for researchers if you also provide a cross-reference to these documents’ physical locations in the park archives in the ANCS+ catalog record(s).
Do not assume responsibility for specimens that have not been appropriately stabilized and prepared (such as a backlog of unprepared specimens maintained in freezers).
5. What is involved in cataloging biological specimens?
6. How should I label specimens?
For information concerning cataloging biological specimens, see MH-II, Chapter 3 and the ANCS User Manual, Chapter 2, Section V. You also should include the following:
· When was the specimen collected?
· When was the specimen stabilized and prepared?
· Who stabilized and prepared the specimen?
Depending on the specimen and preservation method, you can label:
· the specimen itself (some invertebrates and bones)
· support materia ls for the specimen, such as:
- labels attached to herbarium sheets
- microscope slides
- insect pins
· tags tied to these specimens
T:18 NPS Museum Handbook , Part I (2005)
7. What materials should I use to label specimens?
- birds
- mammal skins
- fluid-preserved specimens
· labels attached to the outside or placed inside of containers
- bags
- boxes
- vials
- jars
In many instances, the park acronym and a catalog number may be the only label data. Additional information can be valuable for facilitating collection use and organization. See MH-II, Appendix J, Section K, “Natural His tory Specimens” for information concerning labeling biological collections.
Always use stable materials and in an appropriate manner. Most specimens that you acquire will already have been accessioned, cataloged, and labeled. This is required of researchers who have NPS collection permits. Sometimes park staff may undertake these activities for material they have collected.
Paper Labels
Paper products can vary in quality and appropriateness for the preservation of biological specimens. Paper labels that you use should:
· be white
· have a neutral to slightly alkaline pH (pH 6.0-8.0);
· have a lignin content of less than 0.3%
· be of long-fibered cotton stock, although alpha-cellulose, ground-wood papers are also acceptable
Alkaline-buffered papers, which have a pH of 8.5 or higher, are not acceptable unless they are labels applied to herbarium sheets or packets, insect pins, microscope slides, or the exterior of boxes or other containers where they are not in direct contact with the specimens.
You can obtain acceptable archival-quality paper from various vendors. These include firms listed in Tools of the Trade or from some full-line office supply stores (although you may have to place a special order).
Plastic Labels
Do not use plastic labels. Most of the plastic labels that have been used with specimens in the past have not been stable. The exception to this general rule is Tyvek®, a stable non-woven polyester.
NPS Museum Handbook , Part I (2005) T:19

Metal Labels
Metal labels are sometimes part of a specimen in the form of leg bands or ear tags. Always retain these with the specimen. Do not use metal for other labels or label attachments , as:
· most metals will oxidize and corrode when in contact with the specimens
· sharp edges and corners of the metal can cause physical damage to the specimen
Note: If a metal leg band or ear tag attached to a specimen is actively corroding, you may need to remove it from the specimen. Be sure to consult with a conservator and/or you regional/SO curator for guidance.
Inks
Inks must be resistant to light, fluids, and abrasion. Only use carbon-based, permanent, black ink to label specimens. Carbon inks do not fade. Commercial, black printing inks are usually carbon-based. Most laser printer and photocopier toner is also carbon-based. Laser and photocopiers apply toner with a certain amount of heat. This helps fuse the toner particles to the paper. Some inkjet printers now use pigment-based inks. Keep in mind though that only black, carbon-based pigments are acceptable for labeling biological specimens.
Liquid inks vary in quality. Black inks suitable for labeling should be drafting inks designed for writing on drafting film, using technical pens. These inks tend to be carbon-based with a neutral pH. They adhere well to almost any surface.
You also can use some fiber-tipped pens for labeling specimens. Once again, be sure to choose pens with carbon-based, black, liquid ink.
To test an ink, see how:
· long it takes for the ink to dry so that it will not smear
· well the dry ink resists abrasion
· well it resists water, alcohol, or other fluids that may be used in specimen preservation
For information concerning acceptable permanent inks, refer to Tools of the Trade.
Label Attachments
Attach tags to specimens with cotton thread of a thickness appropriate to the size of the specimen. The attachment should be:
· long enough to permit the tag to be read on both sides without stress on the specimen
· short enough that it does not become entangled with the specimen or
T:20 NPS Museum Handbook , Part I (2005)
8. How should I handle biological specimens during processing?
adjacent specimens
Do not use plastic or metal ties when labeling specimens. These can deteriorate from contact with the specimens. They also can cause mechanical and/or chemical damage to the specimens.
Herbarium Sheet Labels
Attach labels to herbarium sheets and specimen packets in botany collections using methylcellulose paste. Other types of adhesives may break down over time and cause:
· labels to separate from sheets
· deposits of deterioration products on labels and sheets
Methylcellulose paste is compatible with the sheets, packets, and labels. To make this adhesive, follow these steps:
1. Choose a very pure, high-viscosity methylcellulose powder (such as Methocel A4M, a grade A, 4,000 viscosity methylcellulose made by Dow Chemical).
2. Mix the methylcellulose powder with distilled or deionized water.
3. Form a thick gel (following the manufacturer’s directions).
4. Dilute the mixture with ethanol or an ethanol and water solution.
5. This creates a quick drying adhesive for paper materials.
Methylcellulose may not work well to attach paper labels to all surfaces. To adhere a label to a glass vial you may need to use an acrylic adhesive. Self-adhesive, foil-backed, paper labels with an acrylic adhesive are available from various conservation suppliers.
Labeling Directly On Specimens
You can directly label bone, shell, and other fairly smooth-surfaced specimens. Use a stable acrylic resin (such as Acryloid® B-72) to seal the surface below the number. If you don’t seal the surface, the ink can penetrate and disperse through cracks. This can cause permanent alteration or requiring aggressive scraping to remove labeling errors. See Conserve O Gram (COG) 1/4 for additional information.
To protect specimens during processing:
· provide dedicated, open workspace
· use stable work surfaces
· provide ultraviolet-filtered lighting with good color rendering capacity (a Color Rendering Index of 90 or higher)
· maintain clean surfaces
· remove clutter
NPS Museum Handbook , Part I (2005) T:21
9. What should I know about preparation materials?
10. How should I document a specimen’s condition during processing?
· wear nitrile gloves
· maintain sufficient space for each specimen
· handle only one specimen at a time
· use trays or carts to move specimens to and from work areas
· keep food, fluids, and other contaminants away from work and storage areas
· avoid working with specimens in areas where environmental conditions are outside an acceptable range
· don’t handle or move specimens more than necessary (use a padded turntable for examination to reduce handling)
· request assistance if needed to safely handle or transport a specimen
Most specimens have been fully stabilized and prepared prior to receipt. The materials used in these processes can affect the preservation and utility of the specimens. It is impossible at this time to state the best preparation techniques with certainty. Therefore, it’s always important to carefully document all methods and materials to help determine appropriate use of the specimens over time and to aid future conservation efforts.
Prepare condition reports to document a specimen’s condition. Collections care routinely involves condition reporting. It’s impossible for you to prepare a condition report for each specimen. Therefore, you’ll need to prioritize specimen condition reporting. At a minimum, prepare condition reports for:
· type specimens
· endangered or rare species
· unique and historically important specimens
· specimens that are removed from the collection to be sent on loan, or to be used for interpretation or exhibition
· specimens that need treatment
ANCS+ contains a condition report module that you can use to document the condition of specimens in your collection. See the ANCS User Manual, Chapter 3, Section IV: Condition Reports Supplemental Record, for additional information.
Your collection may require a more detailed condition examination. You also may require additional information concerning appropriate care for certain specimens. Discuss these needs with your regional/SO curator. He or she can assist you to hire a natural history conservator to conduct a Collection Condition Survey (CCS) of your collection. For additional information concerning a CCS, see Chapter 3, Section D.
If the specimens were not fully prepared when received at the park, the11. Are there any special health and safety issues may be similar to those for stabilization. If the
T:22 NPS Museum Handbook , Part I (2005)
health and safety concerns during processing?
12. What do I need to know about loans of specimens?
specimens have been fully prepared, the risks will be primarily physical or chemical. If you know about all stabilization and preparation materials, it’s possible for you to mitigate or eliminate chemical threats through the use of engineering controls and personal protective equipment (PPE). You can reduce the physical risks by paying careful attention to proper handling and storage techniques.
For information concerning incoming loans, see MH-II, Chapter 2, Section P. For information concerning outgoing loans, see MH-II, Chapter 5. The following additional standards pertain to loans of biological specimens:
Type Specimens
· are never loaned in some disciplines (e.g., mammalogy)
· are routinely loaned in some disciplines (e.g., invertebrate zoology and botany)
· are usually subject to more stringent loan conditions than non-type material
Important Notes Concerning Transport of Type Specimens:
· The best method of transport to ensure a type specimen’s security is hand delivery.
· Specimens shipped by air or mail may be subjected to various types of electronic, chemical, or radiological examination and treatment. Such procedures may damage the specimen; either physically and/or render it useless for certain types of research.
· Some commercial carriers do not accept animals, either alive or dead, for transport. Consult with your carrier in advance concerning their policies.
· If you must send a type specimen by post or commercial carrier, be sure that you can track the package.
Other Important Points Concerning Loans
· rare species or unique specimens are almost never loaned
· entire holdings of a series of specimens are not sent in a single loan
· normal loan duration is six months with provisions for extensions upon request
· shipping containers for outgoing loans are used to return the loans
· loans are not shipped during the end-of-year holiday season due to the risk of delays or losses due to the increased volume of holiday mail
· loan shipments (and indeed, any shipment of specimens for any reason) must fully comply with all applicable State and Federal regulations regarding:
- shipping documentation
NPS Museum Handbook , Part I (2005) T:23
13. What techniques should I use when packing and shipping specimens for loans?
14. What are the regulations pertaining to shipments of hazardous specimens?
- the shipment of endangered species
- transporting hazardous materials
Be sure that the borrowing institution uses the NPS annotation label (Form 10-510) to note any annotations. The NPS annotation label is available in ANCS+. It’s a good idea to send several blank NPS annotation labels with the loan paperwork for the borrower to use, if needed. Upon the loan’s return to the park, be sure to note label annotations on the specimen’s catalog record in ANCS+. For information concerning proper packing and shipping techniques, see Chapter 6, “Handling, Packing, and Shipping Museum Objects.” To ensure proper handling of specimens, you also should:
· use a rigid container (ideally a watertight container) for shipping to protect from external physical forces and environmental risks
· include appropriate invoices, permit information, and other shipping documentation to avoid unnecessary opening of the container
· provide instructions on how to properly open and remove the contents of the shipment
· provide appropriate support and cushioning in the container to protect the specimens from mechanical damage
· provide reasonably stable materials in contact with specimens
· wrap each specimen individually for protection and to contain specimen parts in the event of damage
· be sure address information is correct and legible, and that copies of the shipper and recipient addresses are inside the package
· follow all applicable laws and regulations regarding the packaging of any hazardous materials for any shipping method
There is no guarantee that the same care will be provided when the loan is returned, but hopefully your demonstration of proper methods and materials will serve as a positive example for loan recipients.
If you ship any hazardous materials (HAZMAT), including some specimens (such as radioactive, toxic, flammable, or otherwise dangerous specimens) via a commercial carrier (Federal Express, UPS, or similar firms) you must comply with all State and Federal regulations, especially Title 49, Code of Federal Regulations (49CFR).
YOU CANNOT SHIP HAZARDOUS MATERIALS USING THE U.S. POSTAL SERVICE. IT’S ILLEGAL.
In the United States, the U.S. Department of Transportation (DOT) administers the Federal regulations pertaining to transportation of HAZMAT, known internationally as dangerous goods. 49CFR, Parts 100 through 185, govern the transportation of hazardous materials in the U.S. As noted above, all commercial shipments of hazardous material must be in accordance with the Hazardous Materials Regulations (HMR) found in
T:24 NPS Museum Handbook , Part I (2005)
Parts 171 through 180 of Title 49, CFR.
According to 49CFR, you CANNOToffer a HAZMAT shipment to a commercial carrier for transportation unless it has been packaged, labeled, and prepared for shipment in accordance with the Hazardous Materials Regulations (HMR) (see Parts 171 through 180 of 49CFR). The regulations also require that:
· All packages and containers that you use for shipping by commercial carrier must meet the requirements of the HMR
· Individuals who package, label, and/or prepare shipping papers for hazardous shipments must take a HAZMAT shipping training course. The training must include general awareness and familiarization, function-specific, and safety training.
If your park needs to transport a specimen that is considered HAZMAT, you have three options:
· Use a U.S. Government vehicle driven by a properly trained park employee who is knowledgeable of any risks posed by the specimen(s). Such shipments are not regulated by the requirements of the HMR noted above.
· Hire a Commercial Carrier and a hazardous materials packaging contractor. The contractor (who has been trained and certified in all DOT HAZMAT regulations) will prepare your package for shipment according to the HMR. The contractor will then forward your shipment to the commercial carrier. Companies that offer these services are usually located near large international airports or port facilities.
· Complete a HAZMAT shipping training course that meets DOT requirements . Several firms and organizations offer such courses , which are classroom-based, distance-learning/Internet, or via a CD-ROM or other method. The DOT has a CD-ROM based training program. Once you have completed the training you can legally pack such shipments for commercial transport.
For additional information concerning transportation of hazardous specimens and training requirements, consult the DOT:
U.S. Department of Transportation Research and Special Programs Administration Office of Hazardous Materials Safety 400 7th Street, SW Washington, DC 20590 (800) 467-4922; (202) 366-8553 http://hazmat.dot.gov
D. Storage of Biological Collections
1. How should I store To ensure proper storage, consider:
biological collections? · location
NPS Museum Handbook , Part I (2005) T:25
· security
· organization
· housings
--
storage designs storage systems
- storage materials
2. Where should I locate storage?
Locate biological collection storage in an area:
· where there are minimal natural or human-caused hazards
· where you can control access
· where you can organize the collection in a logical manner
· that staff can easily monitor and control the environment
Off-site facilities, basements, attics, and irregular or fragmented spaces do not serve the interests of good collection management, care, or use. Storage should meet the standards of the NPS Checklist for Preservation and protection of Museum Collections (“Museum Checklist”). For additional information concerning the Museum Checklist, see Appendix F: NPS Museum Collections Management Checklists.
3. How can I ensure the security of biological collections in storage?
Provide appropriate security for the specimens through:
· control of access and use
- policies
- procedures and other standard operations
- key control
- restrictions
· physical security
- door and cabinet locks
- staff supervision of all collection access
- electronic detection and surveillance systems (alarm systems, coded keycards, closed circuit television surveillance, etc.)
For further information concerning the security of collections, see:
· Chapter 9, “Museum Collections Security and Fire Protection.”
· ASIS Standing Committee on Museum, Library and Archive Security. Suggested Guidelines in Museum Security. Alexandria: ASIS International, 1997. Available at on the web at:
T:26 NPS Museum Handbook , Part I (2005)
4. How should I organize my park’s biological collection?
5. What about other methods of arrangement?
<www.stevekeller.com/steve/pdf_files/SecurityStandards/GuidelinesRe v97.pdf>.
· Layne, Stevan P. The Cultural Property Protection Manual. Denver: Layne Consultants International, 2002.
You can organize your collection:
· following disciplinary standards that comply with the most recently accepted classification system for the taxonomic group in question
· based on a progression from primitive to complex forms, often reflecting a described classification system
- begin subdivisions within the broadest pertinent taxonomic division (phyla or class)
- continue the phylogenetic arrangement at least to the family or subfamily level
Below these levels it is common to use an alphabetic arrangement:
· genera are organized alphabetically within a given family
· species are organized alphabetically within a given genus
· such organization may continue to sub-specific levels as well
Organization beyond the classification system may vary among disciplines and/or parks:
· Parks with large collections of specimens of the same genus or species (or subspecies, if applicable) may want to arrange specimens alphabetically by geographical designations for the collecting locality (such as state, park district, or county).
· Beyond classification and geographical arrangement, arrange specimens numerically by catalog number.
If you organize your park’s biological collection this way, every specimen has a designated and predictable location. You can then easily retrieve and replace specimens and conduct periodic inventories without difficulty.
Sometimes you may need to adapt your arrangement patterns to provide effective use of space for:
· over-sized specimens
· specimens with multiple parts that are not best accommodated in the same storage unit (dry study skins with parts preserved in fluids)
· collections from more than one park
Remember: Be sure that your method of arrangement:
· provides appropriate protection for the specimens
NPS Museum Handbook , Part I (2005) T:27

6. Are there any other issues related to collection arrangement that I should consider?
7. What issues should I consider when planning a new or upgraded storage facility for biological specimens?
· enables the specimens to be accessed with ease for research use
For additional assistance deciding on a suitable arrangement system, consult:
· Your regional and network-level contacts:
- regional /SO curator
- regional chief scientist
- network inventory and monitoring coordinator
· NPS Senior Curator of Natural History
· Park scientists/natural resource management staff
· Major research users of your park’s natural science collection
After you organize your biological collection based on an acceptable classification system, and arrange it in a simple and logical pattern, be sure that you can easily locate specimens. You can facilitate this by:
· signage
- label each aisle of storage units to indicate the beginning and ending groups housed within the aisle
- label each cabinet, drawer, and shelf to indicate the beginning and ending groups in the unit
· floor plans that detail where the various specimen groups are located
The ultimate goal is to allow ease of access to a specimen with minimal handling of other specimens.
Discuss your storage needs with your regional/SO curator, park and regional/SO natural resource management staff, network inventory and monitoring coordinator, park maintenance staff, park partners such as local universities, other agencies, and museums, and other subject matter experts. Refer to Chapter 7, “Museum Collections Storage” for NPS standards and requirements for collections storage. Also refer to:
· Rose, C., C. Hawks, and H. Genoways (eds.). Storage of Natural History Collections: A Preventive Conservation Approach. Washington, D.C.: Society for the Preservation of Natural History Collections, 1995.
· Rose, C. L., and A. R. de Torres (eds.). Storage of Natural History Collections: Ideas and Practical Solutions. Washington, D.C.: Society for the Preservation of Natural History Collections, 1992.
For ordering information concerning either volume, visit the Society for the Preservation of Natural History Collections’ (SPNHC) website at: <http://www.spnhc.org/>.
Things to consider for biological collections storage facilities include:
· Have a dedicated storage area. Do not co-locate offices, collections processing, supply storage, or any other functions within collections
T:28 NPS Museum Handbook , Part I (2005)

·
·
·
·
·
·
·
·
storage areas.
Provide 350 lbs. per square foot floor-loading capacity for storage areas that will house compact or mobile storage systems.
- This will also permit you to safely move cabinets, collections on pallets, or objects in crates using lift equipment such as power lift stackers and pallet trucks.
- Make sure that access corridors between freight elevators, storerooms, and exhibit areas have similar floor loading capacities.
Ensure that the entrance to any storage area is large enough in both dimensions to accommodate full-unit cabinets and large objects.
Avoid dropped ceilings in all storage areas, and, to the extent possible, elsewhere in the building. Dropped ceilings:
- provide a habitat for pests
- disguise the source of leaks
- contain materials that can generate dust and debris that foul particulate filtration systems
Avoid raised decks or other raised flooring for compact storage systems. These provide a habitat for pests. Install compactor tracks into properly leveled and coated concrete floors (see below).
Install a sanitary perimeter around any building that houses collections. This is a 3’ wide pea gravel border, 4” deep, along the outside of the exterior walls.
- The trench should slope away from the building and be lined with a polyethylene membrane to inhibit plant growth.
- Use non-flowering plants for landscaping outside the sanitary perimeter. Flowering plants attract dermestid beetles.
- Avoid attaching mercury vapor or tungsten lighting to buildings as these attract insects.
Equip all storerooms with fire detection and water-based, automatic fire suppression systems.
- Program for, and ensure regular testing, inspection, and maintenance of the systems.
- For assistance, contact your regional structural fire management officer (SFMO) and regional/SO curator.
Label all pipes and ductwork so that staff can adequately protect collections that may have to be stored below them. Do not locate any pipes (other than sprinkler lines and minimal ductwork) inside storage areas. Install seals around all duct and pipe chases where they pass through walls, floors, or ceilings. You can block these passages with “Stuf-it”
NPS Museum Handbook , Part I (2005) T:29
·
·
·
·
·
·
·
copper wool gauze to keep insect pests and rodents out of storage areas. “Stuf-it” copper wool gauze is available from:
Allen Special Products, Inc. 1610 Bethlehem Pike #B3
Hatfield, PA 19440 (800) 848-6805
Avoid interior duct linings. Where needed for noise control or to reduce condensation, use external duct linings.
Install climate control equipment outside the storage room. This eliminates the need to access the room to maintain the equipment. This will also help protect the collections from equipment leaks.
Filter all incoming and recirculated air to the American Society of Heating, Refrigerating and Air-Conditioning Engineers (ASHRAE) 90-95% level.
Plan for a moderately dry environment.
- The relative humidity (RH) range that is most suited to the majority of natural history collections is 40-60%. This assumes that the building fabric is designed for this range.
- Specimens and objects inside well-sealed cabinets can withstand external environments from 30-65% RH over the course of a year. In a temperate climate, the collections inside the cabinets will enjoy a very stable RH somewhere between 45% and 55%.
- Most natural history materials will preserve very well at a RH of 40-50%.
- Some materials are very sensitive to mechanical damage at a RH below 40%, (teeth, bone, and shell). Fluctuations in RH below 40% can cause these materials to crack and spall, even without the impetus of mechanical damage.
The optimum temperature for storage of biological collections depends upon the type of preservation (dry, wet, low temperature). Consult the appropriate sections of the text for information.
Avoid all natural light, and use indirect lighting or filtered fluorescent lighting to reduce the potential for damage to collections from ultraviolet radiation.
Paint walls and ceilings white or a very light color. White reflects much of the visible-light spectrum. You can then reduce the intensity of the light from various light sources in work or storage areas.
- White or light walls and ceilings permit easy monitoring for dust, and cobwebs and other indications that insects may be present.
- Most white paints contain titanium dioxide, which absorbs part of the ultraviolet radiation from fluorescent lighting, reducing the UV
T:30 NPS Museum Handbook , Part I (2005)

in any reflected light.
- Avoid oil-based paints, single-component epoxies, alkyd paints, or oil-modified polyurethane coatings.
- Select an acrylic emulsion latex (interior or exterior), vinyl acrylic, or acrylic urethane coating for walls and ceilings.
· Coat concrete floors (after appropriate curing) with a solvent-borne epoxy sealer, topped with a moisture-cure epoxy sealer.
- Avoid all other floor coverings. Anything else will require wet cleaning or will be a source of particulate or gaseous pollutants.
- When worn, you can replace the topcoat without having to evacuate the collections from the area.
- Use a clear or pigmented epoxy. Do not use white, it will always appear scuffed.
8. What storage systems will best protect my park’s biological collections?
The agents of deterioration that pose the greatest risks in storage of collections vary according to the level of containment for the specimens. Collections in open storage are far more vulnerable than those stored in closed storage, as shown in Tables T.3 and T.4., below:
Threat Floor Racks/Screens Shelving
Neglect Poor Poor Poor-Fair
NPS Museum Handbook , Part I (2005) T:31
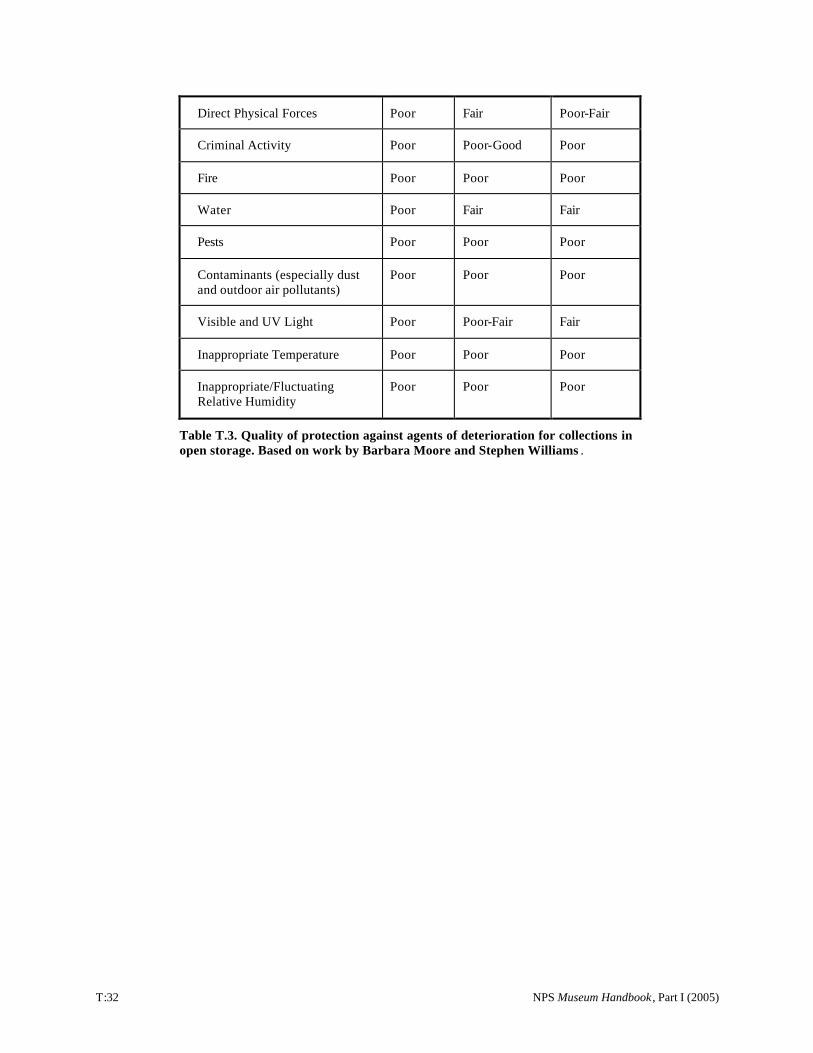
Direct Physical Forces Poor Fair Poor-Fair
Criminal Activity Poor Poor-Good Poor
Fire Poor Poor Poor
Water Poor Fair Fair
Pests Poor Poor Poor
Contaminants (especially dust and outdoor air pollutants)
Poor Poor Poor
Visible and UV Light Poor Poor-Fair Fair
Inappropriate Temperature Poor Poor Poor
Inappropriate/Fluctuating Relative Humidity
Poor Poor Poor
Table T.3. Quality of protection against agents of deterioration for collections in open storage. Based on work by Barbara Moore and Stephen Williams .
T:32 NPS Museum Handbook , Part I (2005)
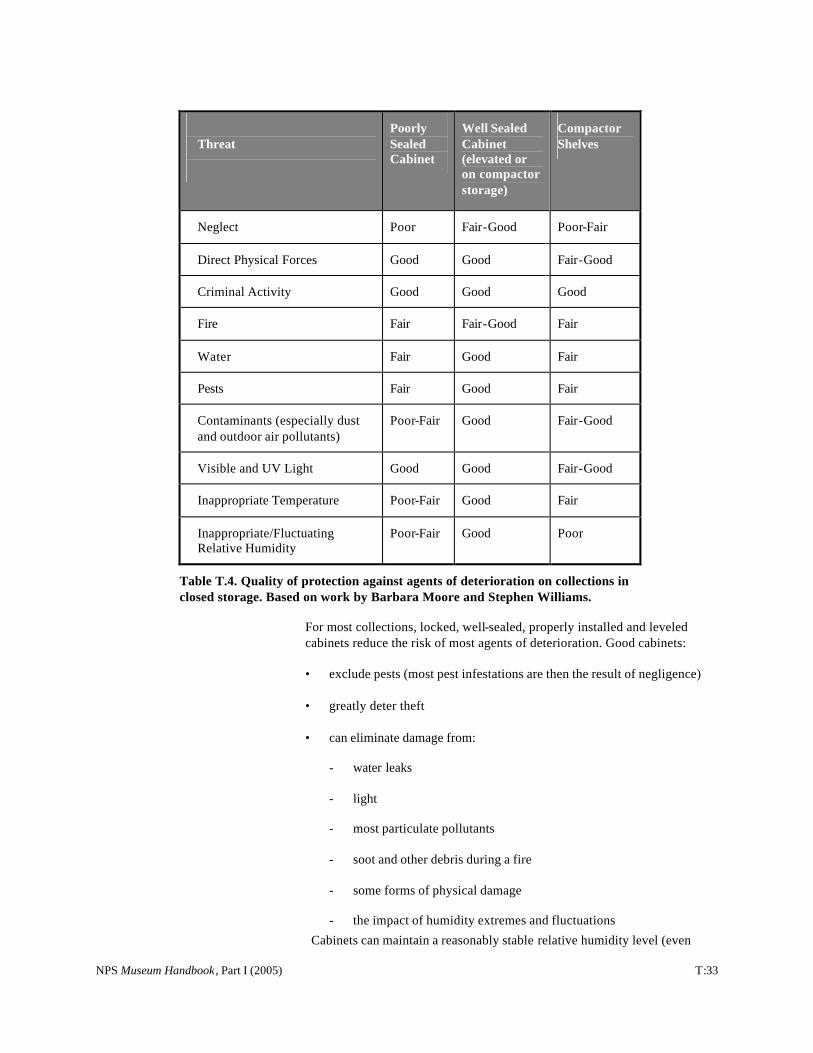
Threat Poorly Sealed Cabinet
Well Sealed Cabinet (elevated or on compactor storage)
Compactor Shelves
Neglect Poor Fair-Good Poor-Fair
Direct Physical Forces Good Good Fair-Good
Criminal Activity Good Good Good
Fire Fair Fair-Good Fair
Water Fair Good Fair
Pests Fair Good Fair
Contaminants (especially dust and outdoor air pollutants)
Poor-Fair Good Fair-Good
Visible and UV Light Good Good Fair-Good
Inappropriate Temperature Poor-Fair Good Fair
Inappropriate/Fluctuating Relative Humidity
Poor-Fair Good Poor
Table T.4. Quality of protection against agents of deterioration on collections in closed storage. Based on work by Barbara Moore and Stephen Williams.
For most collections, locked, well-sealed, properly installed and leveled cabinets reduce the risk of most agents of deterioration. Good cabinets:
· exclude pests (most pest infestations are then the result of negligence)
· greatly deter theft
· can eliminate damage from:
- water leaks
- light
- most particulate pollutants
- soot and other debris during a fire
- some forms of physical damage
- the impact of humidity extremes and fluctuations
Cabinets can maintain a reasonably stable relative humidity level (even
NPS Museum Handbook , Part I (2005) T:33
when you open doors periodically for access). If you keep doors closed, the cabinets will provide acceptable environments through short-term failure of building systems.
9. What types of storage equipment should I use for biological collections?
Remember: Cabinets do not provide protection against neglect. Lack of appropriate organization, cushioning, and support will still expose specimens to mechanical damage from physical forces. Well-sealed cabinets also will contain any vapor off-gassed by poor quality storage materials. This will increase the potential for chemical damage to collections stored with these materials.
The storage equipment of choice may depend on the type of biological collection (dry, wet, low temperature, etc.). Refer to subsequent sections for more information.
One of the best ways to provide proper long-term care for your collections at minimal cost is to use appropriate storage equipment. Good quality cabinets and other storage equipment will last for several decades if properly maintained. Purchase and use standardized storage equipment. This permits:
· bulk purchases, which can result in substantial cost savings
· drawers and other interior fittings to be traded among cabinets to suit specific needs
When purchasing new storage equipment, include the following specifications:
· steel construction (some lightweight aluminum or molded high-density polyethylene shelving may be useful in certain instances)
· high gloss, epoxy powder coatings
· exterior surfaces that are flush (no indentations or recesses other than at door latches)
· no interior spaces of any kind that cannot be reached with a vacuum cleaner - this includes hollow doors unless they are completely sealed
· hinged, lift-off doors, or doors that open completely and fold back flat against adjacent cabinets to facilitate
- cleaning of the cabinet interiors
- rearrangement of drawers and shelves
- installation and removal of specimens
· door locks, generally keyed alike to prevent a proliferation of keys or a tendency to avoid locking the doors
· d-style tubular neoprene or silicone door gaskets
T:34 NPS Museum Handbook , Part I (2005)
- these “rubberized” materials will off-gas minor amounts of sulfur (herbarium materials are sensitive to sulfur gases)
- you can use either neoprene or silicone foam gaskets for sulfur-sensitive collections, but the d-style gaskets provide a better seal against pests and pollutants and for most biological collections are probably worth the comparatively minor risk from the sulfur
· alcohol-cure silicone sealants (no acetic acid should be present in any sealants used in cabinets)
· powder-coated steel interior fittings
· light-tight construction for all cabinets (where light can enter, so can insect pests and dust)
· leveling feet
· 4” or higher legs
Note: The GSA contractors that manufacture NPS standard museum storage cabinets also sell cabinet platforms that you can use to elevate the cabinets 6” above the floor. See Tools of the Trade for more information.
· casters, or dollies with locking casters for deep shelving units, these
- allow the units to be easily moved, even when fully loaded
- help maximize the use of space in a storage area (they are an inexpensive compact storage design)
· removable restraining bars to keep items from toppling from shelving units during an earthquake
· suspension (roller-bearing) or Permaslide® or equivalent systems for pull-out drawers. Avoid friction systems as these rapidly abrade and can deposit fine particulates from the paint on collection objects.
When you acquire new storage cabinets, purchase only white or off-white equipment and containers. This facilitates housekeeping, pest monitoring, and "crumb" monitoring. "Crumb" monitoring refers to examining stored collections for signs of decrepitation (small particles dislodged from specimens as a result of biological, chemical, or physical deterioration). It’s virtually impossible to inspect for pests against anything other than a white or very light background.
For additional information concerning proper storage equipment for biological collections, see MH-I, Chapter 7, “Museum Collections Storage” and Tools of the Trade. Refer to Tools of the Trade for equipment product descriptions and illustrations, vendor contact information, and current Federal government contracts.
NPS Museum Handbook , Part I (2005) T:35
10. What special concerns should I consider when installing new storage equipment?
Use the following steps when installing new storage equipment. This will help ensure that the equipment will protect the collections and be durable over time. You should use similar steps if you must move storage equipment after the initial installation.
· If possible, arrange for the manufacturer to install the equipment.
· If park staff are moving or installing cabinets:
- Use mechanized equipment such as a stacker.
- Move cabinets with a nearly complete complement of shelves or drawers (but without the collections). This helps reduce distortion of the cabinet during the move.
- Remember that a good quality, steel museum storage cabinet with drawers can weigh as much as 600 lbs.
- If you move cabinets improperly, this will reduce their capacity to provide protection for collections.
· Test all incoming storage cabinets for off-gassing.
- This includes any powder-coated cabinets.
- Coatings may off-gas.
- Cabinets may contain many other materials besides the coating.
- Air out all storage cabinets (with doors open) for as long as possible before installation of any collection objects.
Note: Information on test methods is given below.
· Level all cabinets (front-to-back and side-to-side) whenever they are newly installed or moved. Cabinets that are not level will not close properly and:
- provide limited microclimate control
- allow dust and insect pests to enter
· After leveling, test all incoming storage cabinets to insure that they are light tight:
- Place a battery-powered lantern or 9-volt flashlights inside a leveled cabinet, then close and lock the door.
- Turn off all room lights.
- Carefully examine the cabinet for several minutes for signs of light from within.
- If light can be seen, mark the area with a post-it note and examine it under normal lighting.
- If the light leak is a result of a flaw in the cabinet from anything
T:36 NPS Museum Handbook , Part I (2005)
other than a minor problem around the door gasket, contact the manufacturer for repairs or replacement.
- You can fill minor leaks around the door gasket. Use 3M® self-adhesive neoprene foam gasket material (or equivalent), which is available in various widths at hardware stores.
- Refer all major problems with door gaskets to the cabinet’s manufacturer.
The storage materials of choice may depend on the type of biological 11. What types of storage collection (dry, wet, low temperature, etc.). Refer to subsequent sectionsmaterials are appropriate for more information about storage materials. In general, storage materials for use with biological that are appropriate for use with biological collections include: collections?
· closed-cell polyethylene foam (VolaraÒ Type A or PlastazoteÒ)
· opaque non-woven (spun-bond) polyethylene fabric (Tyvek®)
· polyester film
· high density molded polypropylene or polyethylene
· pH-neutral, alpha-cellulose, lignin-free, unbuffered papers & boards
· pH-neutral, unbuffered, 100% cotton paper products
· pure cotton fabrics (thoroughly washed)
· polyester fiber (non-bonded, high loft, resin-free polyester fiberfill)
· medium or high density, phenol-formaldehyde-impregnated, exterior grade plywood that is surface laminated with melamine, or with vapor barrier foil/plastic laminates. Note: See the Safety Note concerning the use of aluminum foil laminates with certain treated specimens, in #13, below)
· glassware
12. Are there any cautions to using the above materials with biological specimens?
Contact with alkaline-buffered (“buffered”) paper can damage pigments and proteins in bird and mammal specimens. It can also interfere with herbarium chemical taxonomy studies. Always use unbuffered, acid-free materials with natural history specimens, or line buffered trays with unbuffered blotting paper to eliminate direct contact with alkalis.
For additional information concerning proper storage materials for biological collections, see MH-I, Chapter 7, “Museum Collections Storage” and Tools of the Trade.
Polyethylene melts at about 250oF. This temperature is far below that at which many bird and mammal study skins, untanned skins, feathered or haired specimens, plant specimens, and paper are damaged by heat alone. If the foam is in direct contact, it will melt and damage the specimens before they would ordinarily be damaged by the heat of a fire. Separate from
NPS Museum Handbook , Part I (2005) T:37
direct contact with specimens by using pH-neutral, 100% cotton rag blotting paper or pH- neutral, smooth-surfaced tissue.
Polyethylene foams and films develop a static charge in low humidity conditions and can damage:
· friable surfaces, such as the periostracum on many shells
· fragile parts such as those on some plant specimens
· hair or feathers
Other cautions concerning polyethylene foam include:
· Polyethylene foam will readily adhere to some small specimens and objects, such as those with fur or with sharp protrusions (a specimen or object can be easily be torn in lifting it from the foam surface).
· Some expanded polyethylene foams have open pores along cut edges that are an appropriate size for some insects to deposit eggs or for insect larvae to pupate. Using appropriate ventilation, seal edges with a hot air gun, or cut the foam with a hot knife to seal the openings.
Considerations for other materials include:
· Polyester film (Mylar D®, Melinex 516®) has a very high melting point, but develops a static charge at humidity levels of about 40% or less.
· Polypropylene may have the same problems as those noted above for polyethylene foams.
· Polyester fiber should always be separated from direct contact with any collection item that has small protrusions or a friable surface.
Don’t use any of the following materials , they can damage specimens: 13. What materials should not be used for storage of biological specimens? · polystyrene
· polyvinyl chloride (PVC) plastics
· polyurethane foams and oil-based polyurethane varnishes
· synthetic polymers containing unstable plasticizers or other additives
· alkyd enamel paints · bakelite (a hard, black plastic), which decomposes when
exposed to alcohol and/or formaldehyde vapor
· acidic paper products
· alkaline-buffered paper products (in collections containing proteins, animal pigments, or intended for use in some biochemical or chemical taxonomy studies)
· wood and most wood products, although you can use wood to construct
T:38 NPS Museum Handbook , Part I (2005)
pallets for large specimens if:
- you use a well ventilated room
- you properly seal the wood
- the collection materials are not in direct contact with the wood
· most uncoated metals (see safety note below)
· most commercial grade textiles
· cotton batting (is extremely hygroscopic and will attract and hold moisture on specimens)
· natural rubber
IMPORTANT SAFETY NOTE: Aluminum metal, and vapor barrier materials made with aluminum foil can be a hazard if used with collections that have been treated for pest control using mercury salts or chlorinated compounds. These chemicals react with aluminum.
E. Maintenance of Biological Collections
Maintenance includes all of the corrective actions in response to a real or 1. What is maintenance? perceived problem. It can include a variety of issues, but the most common maintenance concerns include:
· updating information
· housekeeping in storage and exhibit areas
· emergency preparedness, response, and salvage
· specimen cleaning
· specimen treatment
· pest management
Maintenance includes the following information management issues:2. What information management issues are related to maintenance of · the need to update information (to reflect ongoing changes in the biological collections? classification system as researchers develop a better understanding of
taxonomic relationships) to:
- specimens
- drawer labels
- catalog records
NPS Museum Handbook , Part I (2005) T:39
- databases
3. How important is housekeeping for biological collections?
4. What housekeeping strategies should I use for long-term preservation of biological specimens?
Be sure to document information related to any associated collections of tissue or parasites. You also should obtain reports of further analysis of these collections.
· detailed documentation and analyses of environmental conditions in collection areas
· condition reporting
· recording images of specimens
· deaccessioning specimens (see MH-II, Chapter 6, “Deaccessioning”)
Maintenance activities may depend on the type of biological collection (dry, wet, low temperature, etc.) in question. Refer to subsequent sections for more information about specific maintenance issues.
Include all pertinent information in ANCS+, especially loan, exhibit, and treatment histories. Also, note all publications in which a specimen has been cited. If this information is available, the value of individual specimens and the collection as a whole is enhanced.
As with all other collections, good housekeeping provides for the long-term preservation of biological specimens. Proper housekeeping minimizes particulate pollutants and eliminates habitats and materials attractive to insect and rodent pests.
For NPS housekeeping and storage requirements, see the “NPS Checklist for Preservation and Protection of Museum Collections” in Appendix F: NPS Museum Collections Management Checklists, as well as Chapter 7: Museum Collection Storage and Chapter 13: Museum Housekeeping.
Other steps that you should take include:
· Place polypropylene fiber mats outside the doors to the storage rooms to reduce dust and dirt entering the collection area.
· Use High Efficiency Particulate Air (HEPA)-filtered vacuums as your primary cleaning tool. Unlike conventional vacuums, HEPA vacuums do not redistribute fine particulates into the area being cleaned. See Tools of the Trade for product information.
· Avoid wet cleaning in collection areas. If necessary, use spot cleaning to remove stains.
- There is no need for regular wet cleaning in storage areas.
- Large areas of damp carpet or floors can raise humidity levels.
· Do not use spray cleaners or aerosol cleaners in collection areas.
- Do not use these in any space that shares a ventilation system with
T:40 NPS Museum Handbook , Part I (2005)
5. What should I know about emergency management, response and recovery?
6. What do I need to know about salvaging biological specimens following an emergency?
collection areas.
- Spray on cleaning rags outside collection areas, only.
· Do not use chlorinated cleaners anywhere in collection areas. For safer cleaning alternatives, see COG 2/21 “Safer Cleaning Alternatives for the Museum and Visitor Center.”
· Use specialized cleaners (such as BrillianizeÒ) for many plastics, such as exhibit cases. Never spray directly onto the case surfaces, or on rags while in collection areas.
Emergency planning and management is vital. Be sure that you are prepared to deal with all emergencies and potential disasters. Have an up-to-date Emergency Operations Plan (EOP), conduct drills, and ensure that all staff are aware of their responsibilities in event of an emergency. This will reduce damage to, or loss of, life or property.
For additional information, refer to MH-I, Chapter 10, and your park’s EOP. For questions about your park’s EOP, consult your chief ranger, safety officer, and regional/SO curator.
Salvaging specimens after an emergency or a disaster is usually geared towards stabilization. It normally occurs within the first 48-hours after the collection and/or area is secured. Initial stabilization may involve some treatments. However, these treatments are not designed for restoration or repair, but to eliminate further damage.
There are a number of salvage techniques for many kinds of specimens. A very useful reference is:
Ball, C. and A. Yardley-Jones. Help! A Survivor’s Guide to Emergency Preparedness. Museum Excellence Series: Book 3. Edmonton: Museums Alberta, 2003. Ordering information at: <www.museumsalberta.ab.ca>.
There are conservators who have extensive experience in salvage of biological materials. Be sure to include their names and contact information in your park’s EOP response call list. Information about appropriate conservators is available on the web at <http://www.aic-faic.org/guide/form.html>.
Following an emergency, many specimens and/or collections may require treatment. These treatments can be extremely complex. Refer such work to a professional conservator.
7. What about cleaning biological specimens?
Cleaning of specimens poses a variety of problems:
· Removing particulate matter on most specimens can risk mechanical damage.
· Vacuuming some specimens, such as study skins, will remove ectoparasites that may be useful in verifying the identity of the host organism.
- Before you vacuum or otherwise clean any research specimens, be sure that the “pest” is indeed a “recent” infestation rather than an
NPS Museum Handbook , Part I (2005) T:41
8. Are there any other concerns regarding treatments of biological specimens?
ectoparasite.
To ensure that specimens are not damaged during cleaning, follow these general guidelines:
· Carefully vacuum specimens using a HEPA-filtered vacuum and small tools.
- Do not dust wipe specimens or use forced air.
- For some hard -surfaced specimens, you can use a soft brush to brush surface dust into the nozzle of a HEPA-filtered vacuum.
· Restrict your cleaning to specimens that are otherwise in good condition.
· Do not attempt to vacuum specimens with:
- flaking skin, scales, periostraca, or paint
- loose feathers or hair
- fragile parts or appendages
· Avoid cleaning botanical specimens, herbarium sheets, and insects.
· Consult a conservator for advice before cleaning any group of specimens for the first time.
Consult with a conservator before attempting any cleaning that may require water or organic solvents. This applies to all types of specimens and whatever sort of material is to be removed from them.
When specimens have suffered mechanical, biological, or chemical damage, you should stabilize the material by non-interventive means rather than to try to repair the damage:
· If there are detached parts, contain them so that they will not be lost. Don’t attempt to reattach them.
· You can stabilize a cracked or broken specimen with an appropriate support.
Specimens with historic or interpretive value can be treated, but only by a conservator. Even in these instances, all repair materials must be easily distinguished from original specimen materials.
NOTE: Avoid any action that might compromise the integrity of research specimens.
Many of the health and safety concerns can be mitigated by the use of9. Are there any health and proper personal protective equipment (PPE). This includes gloves and the
T:42 NPS Museum Handbook , Part I (2005)
43
T:
safety concerns related to use of other appropriate equipment, such as HEPA-filtered vacuums. maintenance of biological collections? Activities beyond routine maintenance may require you to:
· have full knowledge of potential material interactions
· use properly ventilated laboratory facilities
· use respirators and additional PPE
10. Should I document cleaning, treatment, and salvage activities?
11. How can I protect biological specimens from pests?
NPS Museum Handbook , Part I (2005)
The use of some personal protective equipment (PPE), such as respirators, requires a medical evaluation, formal training, and fit testing. For additional information concerning respirator use, see COG 2/13.
Yes. All cleaning is essentially an irreversible treatment. Always document all cleaning activities (whether done by collection staff or a conservator). Provide written documentation and photographs or other images as well. You also should document any treatment (however simple it may appear to be) in writing, and in photographs or images taken before, during, and after the treatment.
During emergency salvage operations, it’s acceptable for you to eliminate individual specimen reports. However, you’ll need to document all steps in the overall immediate salvage (in writing and in some imaging system). Record specific damage to particularly valuable specimens and specimens on loan from other museums. Note the specific salvage methods used. Such information may be important for insurance purposes as well as for the future preservation and utility of the specimens.
In the past, pest management incorporated repeated application of pesticides. This often involved multiple types over time. There are numerous problems with this approach, including:
· laws and regulations
· health and safety
· environmental quality
· questionable effectiveness
· materials interactions
Practice the principles of Integrated Pest Management (IPM). IPM is the best approach to dealing with pests in museum collections. It is a holistic, environmentally-friendly, and sustainable means of pest control. IPM does not exclude the use of pesticides. It does however, offer many alternatives for achieving the same goal. Because dry collections are at greater risk from pests than other types of collections, refer to Section III for more information about IPM and pest management.
The National Park Service implemented an IPM program in the early 1980s. Since then, the NPS has reduced pesticide use by over 60 percent, while also improving the effectiveness of Servicewide pest management efforts.

T:44 NPS Museum Handbook , Part I (2005)
SECTION III: DRY BIOLOGICAL COLLECTIONS
A. Overview
1. What are dry biological collections?
2. Why are some biological specimens preserved in a dry state?
3. What types of biological specimens are usually included in dry collections?
4. What are the primary agents of deterioration that affect dry collections?
Dry collections consist of those specimens that are preserved in a dry state.
Two factors influence decisions about preserving specimens this way:
· Rigidity. Some specimens can be preserved naturally (starfish) or artificially (vascular plants) with sufficient rigidity to accommodate normal handling. Such specimens often are suitable for dry preservation.
· Specific characteristics. Drying may provide the best available means to preserve natural colors (for example, butterflies) or distinguishing features (such as skeletal parts or surface details). Such specimens in a dry state may have great potential for interpretation and research.
Plants
· Non-vascular (selected forms of lower plants such as lichens and many fungi)
· Vascular (flowering and coniferous plants)
Animals
· Invertebrates (selected forms such as many insects, corals and some crustacea, mollusks and echinoderms)
· Vertebrates
- fish (skeletal parts, mounted specimens)
- reptiles (skeletal parts, scutes or shells, large skins, mounted specimens)
- birds (skeletal parts, skins, mounted specimens)
- mammals (skeletal parts, skins, antlers, horns, mounted specimens)
Ancillary Collections
In addition to the specimens, ancillary or support collections are commonly preserved in a dry state. Examples include nests, eggs, replicas, scats, wood samples, labels, and specimen or collection records.
Note: Some biological collections may include photographs used to represent the voucher specimen, especially for some threatened and endangered species. An example of this is a photograph attached to a labeled herbarium sheet. Under certain conditions, dry collections can be damaged by all of the agents of deterioration. They are particularly susceptible to neglect, pests, contaminants, visible and UV light, inappropriate levels of temperature and humidity, and improper handling.
NPS Museum Handbook , Part I (2005) T:45
5. How does neglect affect dry collections?
6. How do pests threaten dry collections?
7. How can contaminants adversely affect dry collections?
Neglect can cause collections to become:
· damaged
· lost
· disordered (a lack of organization that impedes collection access)
Major causes of neglect include:
· insufficient knowledge and skills
· failure to provide adequate documentation
· apathy
· lack of administrative support
· an imbalance of resources
Dry biological collections contain organic material that is attractive to many insect pests. Fresh material that is not thoroughly dry is highly at risk. However, even dry material is attractive to some pests. The species of insect pest varies according to the type of collection. Some insect pests prefer dried plant materials, while others feed on animal materials .
Vertebrate pests (such as mice) can damage any material either through nesting or feeding. They can also cause soiling with body fluids or excrement.
Contaminants may occur in particulate or gaseous forms. Specimens can be contaminated due to:
· particulates such as dust and soot from atmospheric pollutants
· emergencies
· poor storage and exhibit designs
Particulates can:
· be abrasive
· soil surfaces
· obscure fine details
· attract and hold gas -phase pollutants on the surface of specimens, promoting chemical damage
· necessitate repeated cleaning of collections that:
- is a drain on a museum’s resources
- causes wear and tear on the collections
T:46 NPS Museum Handbook , Part I (2005)
- has the potential for severe damage during the cleaning process.
Specimens may acquire other particulate contaminants such as:
· asbestos from deterioration of building materials
· polychlorinated biphenyls (PCBs), lead, and cadmium as a result of the deterioration of paints used in buildings or on storage furniture
· other chemicals used for preparation treatments or pest control
Not all of these cause chemical or physical deterioration of the specimens, but they may have an impact on use of the specimens for interpretation or research.
Other points to rememb er include:
· Gaseous pollutants are generally inorganic or organic vapors that form acids when they react with moisture in the air.
· Inorganic acid gases, primarily sulfur and nitrogen oxides, are present in very high concentrations near urban centers. They may be high in some rural areas as well. In a museum, they contribute to deterioration of many materials. However, they will have the greatest effect on cellulosic materials stored or exhibited outside of cabinets.
· Organic acid vapors cause deterioration to most dry specimens and their documentation at varying rates, according to:
- the type and concentration of pollutant
- the nature of the materials in the collection
Organic acids can:
- cause chemical disintegration of organic materials
- attack calcareous materials (materials containing calcium such as shell, eggshell, and coral)
- damage to calcareous materials can range from unsightly surface alteration to complete conversion to a powder
The major sources of organic acid pollutants are:
- wood and wood products (including wood pulp paper and cardboard)
- additives in some plastics and fabrics - certain adhesives and coatings, especially alkyd enamel paints,
including the baked enamel paints used on some storage furniture
Most dry specimen materials are either very sensitive or moderately8. How does visible and sensitive to visible light. Visible light causes fading of biological pigments.ultraviolet light affect dry Fortunately, “structural colors” in animals are not greatly affected by visual collections? light. These include multiple iridescent colors and some blues and greens
NPS Museum Handbook , Part I (2005) T:47
that are found in feathers. Others include colors in the exoskeletons and wings of many insects.
As with visible light, most dry specimen materials are also either very sensitive or moderately sensitive to ultraviolet radiation. Ultraviolet radiation causes:
· alteration of biological pigments (fading or shifts in color).
· damage to chemical bonds in plant and animal materials
- UV breaks down the structure of the materials to leave them weakened or embrittled
- this loss of structural integrity can alter the appearance of structural colors
9. How does temperature and relative humidity affect dry collections?
High temperatures contribute to:
· desiccation
· denaturation of proteins
· lipid and resin migration
In general, the rate of any chemical reaction that damages specimens will double with each 10°C/50° F rise in temperature.
Temperatures below freezing:
· cause expansion of free water, which can result in cell rupture in fresh plant and animal specimens
· permit lipid migration (via ruptured cells) in fresh animal specimens
· will not stop the growth of microorganisms unless the temperatures are below -20°C/-4ºF
· will not stop enzymatic activity
· increase the rate at which lipids oxidize, which can cause damage to pigments and proteins
· may cause migration of salts in tanned skins. This can lead to collapse of capillaries in the skin
Temperature fluctuations can result in expansion and contraction of some materials, such as teeth. This can cause cracking.
Excessive moisture in the air (above about 65% relative humidity) encourages:
· mold
T:48 NPS Museum Handbook , Part I (2005)
10. Are there any special rules for handling dry collections?
· pest infestations
· chemical reactions that can be damaging to organic material
· deformation of material such as tanned or untanned skins and wood samples (deformation is also caused by fluctuating relative humidity)
· softening of some adhesives
Relative humidity below 40% may contribute to embrittlement of rigid materials such as:
· teeth
· ivory
· bone
· mollusk shell
· the outer covering on some mollusk shells (the periostracum)
· wood samples
Embrittlement will leave these specimens very susceptible to mechanical damage.
Fluctuations in relative humidity can cause cracking or splitting of these materials. This is especially true at humidity levels below 40%.
Maintain relative humidity levels below 40% to promote the preservation of freeze-dried specimens that are prone to deteriorate rapidly at higher levels of RH.
Yes. You can easily damage dry collections by improper handling, inadequate support, carelessness, and poor storage techniques. In addition to the recommendations in Chapter 6 and those previously noted in this appendix, use the following handling guidelines to prevent damage to your dry collections:
· Ensure that everyone who uses the collection knows how to properly handle herbarium specimens. Develop written guidelines for use.
· Use large storage trays to move specimens housed in envelopes and small specimen trays.
· Used a padded cart to move material from room to room.
· Avoid handling specimens with your bare hands. Wear unpowdered nitrile gloves. As with other collection items, gloves will protect the specimen from oils in the hands, but they’ll also protect you from specimens that may cause you to have an allergic reaction.
NPS Museum Handbook , Part I (2005) T:49
· Use a light colored work area, so that any material that breaks off can easily be seen and retrieved.
· If you require extra light, use it sparingly.
· Use forceps or gloved hands to carefully move loose material.
Herbarium Specimens
· Do not overcrowd specimens:
- Don’t place too many specimens on one cabinet shelf.
- Leave enough space on each shelf to allow for easy expansion of the collection in the future.
· When you access a specimen, always remove the entire genus folder.
- Never attempt to remove just one herbarium sheet from a stack of folders. This can damage the specimens.
- Support the bottom of the genus folder with both hands when moving it.
· Move herbarium sheets by providing complete support from the bottom.
· Don’t shuffle sheets as if they were cards or pages of a book.
· Do not turn sheets upside-down.
- Stack sheets neatly to the side if specimens on the bottom of the stack are needed.
- Be sure that the edges of sheets never hit or scrape specimens below.
· Whenever you remove a folder from storage, place a marker in the location to ensure that the folder is returned to its proper place.
· Do not bend sheets to force them under a microscope. Use a hand lens or long-armed microscope.
· Have fragment folders close at hand for attachment to herbarium sheets if needed. If a portion comes loose, place it in a fragment folder attached to the specimen’s sheet immediately.
· Equip the research area with work surfaces that are large enough to accommodate a number of herbarium sheets, as well as additional space to ensure that the individual sheets will not strike each other, which may damage a specimen.
The most common cause of damage to herbarium specimens is through improper handling of herbarium sheets.
T:50 NPS Museum Handbook , Part I (2005)
Insect Specimens
· Have empty pinning boxes close by in case they are needed for temporary placement of specimens.
· Do not leave drawers or specimens out of storage cabinets overnight, as they are more likely to be infested when outside cabinets.
· Remove boxes or the entire cabinet drawer; do not remove just single specimens from a cabinet for use.
· Leave specimens in the pinning box when viewing under the microscope.
· Use extreme care when removing an individual specimen from a storage box for such purposes as examining the ventral side of the specimen. Do not hit other specimens in the box.
· If there is not enough room on the pin above the specimen to safely grab it with your fingers use pinning forceps:
- Use pinning forceps with the smaller size pins that flex easily.
- Carefully pull the pin straight up from the pinning bottom of the box with an easy, smooth motion.
· Avoid unnecessary shaking of the specimen on the pin; do not jerk or quickly pull at the pin. Rough handling can cause sections of the specimen to fall off.
· If the underside of the pinned specimen must be viewed:
- Pin the specimen into a large eraser or a piece of cork for easier handling.
- Other possible pinning surfaces include a pinning box with all but one side removed, or an “L-cork” (two pieces of cork joined in an L-shape). Hold the “L” on either the backside or bottom, as needed to view the specimen.
Bird and Mammal Collections
Important Note:Be very careful if you don’t know a specimen’s complete treatment history. In such cases, assume that it’s been treated with pesticides. For additional information concerning contaminated collections, see Question 12, below.
· Wear a white lab coat or lab apron. Animal hair, feather fragments, and insect frass are most likely to be seen against a white background.
· Handle/examine specimens on clean, cushioned, white or light-colored work surfaces. You can use a covering of 1/8” polyethylene foam to cushion a table or desktop effectively.
NPS Museum Handbook , Part I (2005) T:51
11. What security issues are related to dry collections?
12. Are there any health and safety concerns associated with dry collections?
· Don’t remove taxidermy mounts from their original supports.
- The specimen armatures are under tension.
- If you remove the rods extending from the feet from their original support, the armatures can move and damage the specimen.
· Handle freeze-dried specimens as little as possible and with great care. Freeze-dried specimens are extremely fragile.
Theft is an increasing concern. This is because these collections are often subject to less stringent security measures than many cultural collections. Specimens at risk of theft include:
· ivory
· rhinoceros horn
· horn sheaths and antlers
· some claws and talons
· tanned skins
· skulls
· mollusk and egg shells
· insects
· seeds
· hallucinogenic plants
· specimens of rare, endangered, and extinct animals and plants
Supplementary archival materials, such as original scientific artwork, photographs, and field journals kept by well-known scientists are also vulnerable to theft. Toxic materials may be present in various forms. This is usually a result of previous treatments. This includes chemicals that may have been used in specimen preparation or processing, such as:
· tanning with chromium salts
· use of asbestos in some taxidermy preparations
· residues from pesticide treatments such as arsenic, DDT, and mercury salts
Other potential hazards include:
· residues from inadvertent contamination of specimens by asbestos from deteriorating building materials
T:52 NPS Museum Handbook , Part I (2005)
· lead paint dust from old cabinets
· mold spores from past exposure to liquid water or prolonged high relative humidity
Some park staff and collection users may have allergic reactions to hair, feathers, dander, insect debris, and certain specimens (such as poison ivy). Specimens with thorns, spines, or quills, claws, talons, antlers, horns, and long beaks, can cause physical injury during handling. At the same time, handling biological material during stabilization and preparation can pose the risk of numerous biohazards, varying with the specimen.
For additional information concerning handling of contaminated collections, refer to the following Conserve O Grams:
· 2/2 “Ethylene Oxide Health and Safety Update”
· 2/3 “Arsenic Health and Safety Update”
· 2/4 “Diclorvos (Vapona) Update”
· 2/10 “Hazardous Materials in Your Collection”
· 2/11 “Health and Safety Risks of Asbestos”
· 2/14 “DDT Health and Safety Update”
· 2/16 “Chronology of Pesticides Used on National Park Service Collections”
· 2/17 “Physical Properties and Health Effects of Pesticides Used on National Park Service Collections”
· 2/19 “Guidelines for the Handling of Pesticide Contaminated Collections”
B. Special Concerns for the Stabilization of Dry Specimens
Dry stabilization is used for many biological collections. However, the1. How are dry specimens activities can vary significantly between disciplines. For example:stabilized?
· some non-vascular plant specimens (such as lichens) and some types of invertebrate specimens involve simple desiccation, such that the specimen does not need further physical alteration before it is ready for use
· for some non-vascular plants and most vascular plants, researchers use plant presses for positioning, compressing, and drying (with or without heat) individual specimens
· some invertebrates are treated with chemicals to either control bacterial decomposition of soft body parts by removing fats or oils, to degrade
NPS Museum Handbook , Part I (2005) T:53

soft body parts to facilitate removal or to relax the specimen
· insects are typically pinned and carefully positioned before being dried
- some insects (for example, butterflies) are occasionally dried without positioning
- these specimens are rehydrated and positioned as part of the processing stage or because they will be used for analysis of nucleic acids (rehydration will damage or destroy DNA)
· skins of various vertebrates, particularly oversized specimens, are flattened and dried (or tanned)
· whole skins and wings, or detached wings of some birds are shaped and dried
· skins of smaller birds and mammals are positioned and dried after being stuffed with a fibrous material (for example, cotton or polyester fiber) and supported with rigid materials (for example, wire, wood, or paper board)
· the flesh is normally removed from skeletal parts of vertebrate specimens to facilitate drying
Stabilization should be the first step in preservation. Take care to ensure that stabilization practices comply with disciplinary standards.
2. What protection concerns and practices are involved with stabilization of dry specimens?
During stabilization, you should:
· ensure the relationship of the specimens and their data
· protect the specimens from pests
· maintain the specimens in a dry condition The agents of deterioration that most often damage specimens during stabilization are neglect, pests, and high relative humidity. (See Table T.5 below.)
PRIORITY 1 PRIORITY 2 PRIORITY 3
Neglect Visible light and UV radiation Criminal Activity
Pests Contaminants Fire
Inappropriate RH Physical Forces Inappropriate T
Water
T:54 NPS Museum Handbook , Part I (2005)
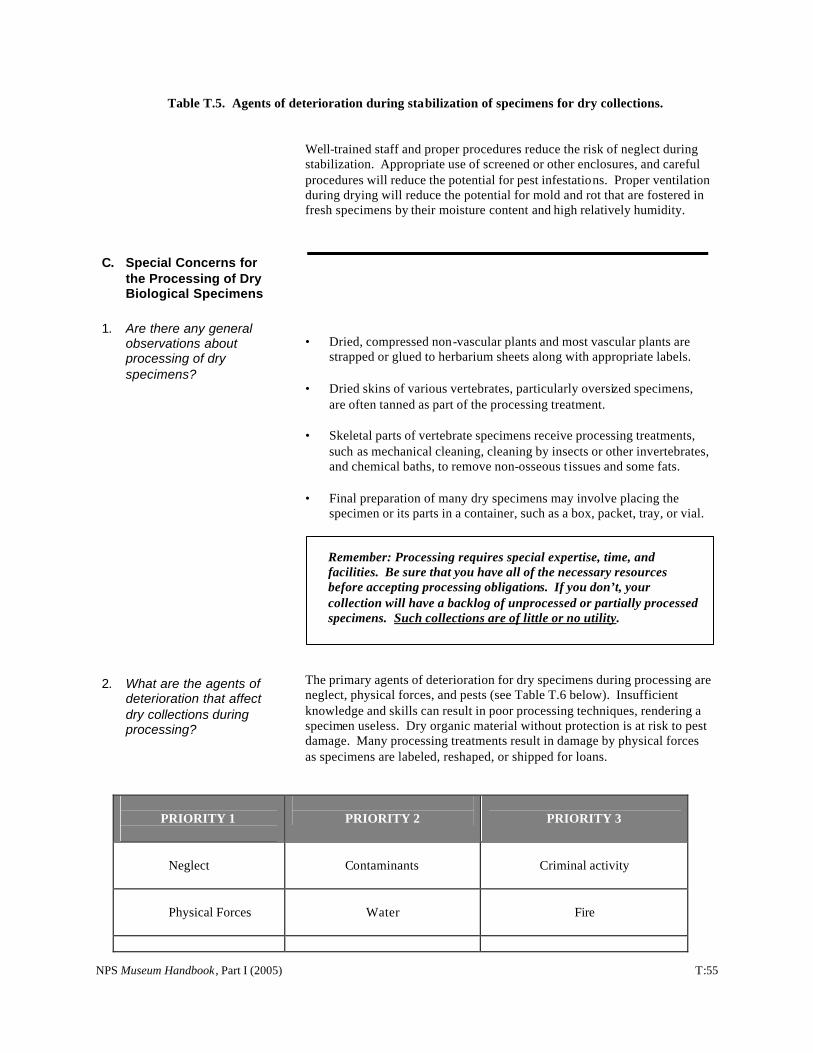
Table T.5. Agents of deterioration during stabilization of specimens for dry collections.
Well-trained staff and proper procedures reduce the risk of neglect during stabilization. Appropriate use of screened or other enclosures, and careful procedures will reduce the potential for pest infestations. Proper ventilation during drying will reduce the potential for mold and rot that are fostered in fresh specimens by their moisture content and high relatively humidity.
C. Special Concerns for the Processing of Dry Biological Specimens
1. Are there any general observations about processing of dry specimens?
·
·
Dried, compressed non-vascular plants and most vascular plants are strapped or glued to herbarium sheets along with appropriate labels.
Dried skins of various vertebrates, particularly oversized specimens, are often tanned as part of the processing treatment.
· Skeletal parts of vertebrate specimens receive processing treatments, such as mechanical cleaning, cleaning by insects or other invertebrates, and chemical baths, to remove non-osseous t issues and some fats.
· Final preparation of many dry specimens may involve placing the specimen or its parts in a container, such as a box, packet, tray, or vial.
2. What are the agents of deterioration that affect dry collections during processing?
Remember: Processing requires special expertise, time, and facilities. Be sure that you have all of the necessary resources before accepting processing obligations. If you don’t, your collection will have a backlog of unprocessed or partially processed specimens. Such collections are of little or no utility.
The primary agents of deterioration for dry specimens during processing are neglect, physical forces, and pests (see Table T.6 below). Insufficient knowledge and skills can result in poor processing techniques, rendering a specimen useless. Dry organic material without protection is at risk to pest damage. Many processing treatments result in damage by physical forces as specimens are labeled, reshaped, or shipped for loans.
PRIORITY 1 PRIORITY 2 PRIORITY 3
Neglect Contaminants Criminal activity
Physical Forces Water Fire
NPS Museum Handbook , Part I (2005) T:55
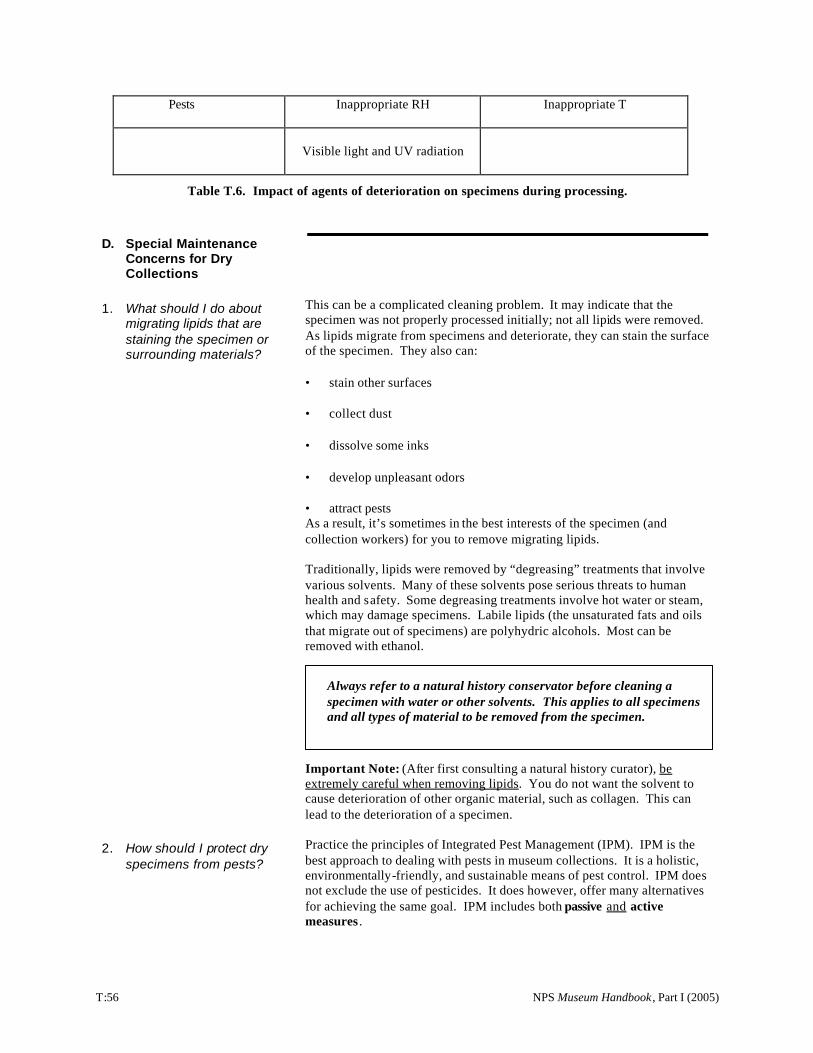
Pests Inappropriate RH Inappropriate T
Visible light and UV radiation
Table T.6. Impact of agents of deterioration on specimens during processing.
D. Special Maintenance Concerns for Dry Collections
1. What should I do about migrating lipids that are staining the specimen or surrounding materials?
This can be a complicated cleaning problem. It may indicate that the specimen was not properly processed initially; not all lipids were removed. As lipids migrate from specimens and deteriorate, they can stain the surface of the specimen. They also can:
· stain other surfaces
· collect dust
· dissolve some inks
· develop unpleasant odors
· attract pests As a result, it’s sometimes in the best interests of the specimen (and collection workers) for you to remove migrating lipids.
Traditionally, lipids were removed by “degreasing” treatments that involve various solvents. Many of these solvents pose serious threats to human health and safety. Some degreasing treatments involve hot water or steam, which may damage specimens. Labile lipids (the unsaturated fats and oils that migrate out of specimens) are polyhydric alcohols. Most can be removed with ethanol.
Always refer to a natural history conservator before cleaning a specimen with water or other solvents. This applies to all specimens and all types of material to be removed from the specimen.
2. How should I protect dry specimens from pests?
Important Note: (After first consulting a natural history curator), be extremely careful when removing lipids. You do not want the solvent to cause deterioration of other organic material, such as collagen. This can lead to the deterioration of a specimen.
Practice the principles of Integrated Pest Management (IPM). IPM is the best approach to dealing with pests in museum collections. It is a holistic, environmentally-friendly, and sustainable means of pest control. IPM does not exclude the use of pesticides. It does however, offer many alternatives for achieving the same goal. IPM includes both passive and active measures .
T:56 NPS Museum Handbook , Part I (2005)
3. What passive IPM measures should I take to protect the collection?
NPS Management Policies (2001) requires that “The Service, and each park unit, will use an IPM approach to address pest issues. Proposed pest management activities must be conducted according to the IPM process prescribed in Director’s Order #77-7: Integrated Pest Management.”
For additional information, policies, and procedures, see MH-I, Chapter 5, “Biological Infestations,” Director’s Order #77-7, Integrated Pest Management (forthcoming) and the Integrated Pest Management Manual. You can also consult with your park’s IPM coordinator and your regional/SO curator.
Passive measures are proactive ongoing daily activities that can significantly reduce the risks of pest infestations. Examples include:
· appropriate housekeeping procedures
· ensuring that food, drink, smoking, and live plants are never allowed in or near collections areas
- Never locate break rooms or other areas were food is stored, prepared, and/or consumed near collections areas.
- Be sure that garbage and other debris (including recycling materials) for disposal are never stored nor allowed to accumulate near collections areas.
· good work habits, such as replacing specimens in cabinets or other containers after use
· proper storage (using closed storage units)
· basic preventive practices, such as the quarantine of incoming specimens
· not storing curatorial supplies in collections storage areas
- packing materials can contain pests; store these and all other supplies away from collections areas
· eliminating or reducing one or more of the four requirements for pest survival
- nourishment
- water
- shelter
- proper climatic conditions
· surveillance
- periodic inspections, especially of materials particularly prone to pests (freeze-dried specimens) and natural traps (windows and spider webs)
NPS Museum Handbook , Part I (2005) T:57

- use of sticky traps (with or without pheromones)
· documentation
- inspection dates
- cleaning activities (what and when)
· proper design of facilities
· proper storage equipment
Remember: Passive measures do NOT include ongoing or scheduled application of toxic chemicals on specimens.
4. What active IPM measures should I take to protect the collection?
Active IPM measures are your responses to the discovery of possible pest problems, such as:
· pest damage
· ·
pest excrement pest remains
· live pests
Always keep good collection records. They can help you determine if the evidence of pests represents a new problem or a pre-existing problem that has been addressed in the past.
When you discover a pest problem, the active measures that you can take range from surveillance to eradication procedures.
The first steps that you should take are to:
· Identify the problem:
- What evidence is there?
- What species of pest is it?
- What life stages of pests are involved?
- Are there active pests present or is it possible that the evidence is from an old infestation that is no longer active?
· Isolate the problem
- Bag potentially infested specimens in polyethylene sheeting. Monitor them for evidence of pest activity to verify that there is an active infestation.
T:58 NPS Museum Handbook , Part I (2005)
5. What should I do if eradication is necessary?
6. What kind of traps can I use?
- Determine the magnitude of the problem. Find out how much of the collection is infested.
- If possible, move affected material away from the rest of the collection.
· Thoroughly inspect and clean the infested areas and materials.
· Replace storage supplies that may have been associated with the infestation.
Maintain close surveillance of the infested area and materials. A good option is to use pest “sticky” traps.
If active measures require eradication procedures, you have several options before you should use hazardous chemical pesticides:
· various kinds of traps
· freezing temperatures
· temperatures of 60°C/140°F · low-oxygen or anoxic (without oxygen) environments
See COG 3/8 “Controlling Insect Pests: Alternatives to Pesticides.”
Various kinds of traps can help eradicate pests, but their success will depend on the pest species and circumstances.
· Sticky traps involve a variety of forms (boxes, fly-paper, boards) having surfaces with a sticky adhesive to trap pests. Place sticky traps in high-risk areas throughout the facility and inside specimen cases.
- Check the traps frequently. Use an established schedule
- Identify and record any pests that you discover.
- Replace traps as necessary.
See COG 3/7 “Monitoring Insect Pests with Sticky Traps.”
· Pheromone traps may involve sticky traps, but with the addition of species-specific pheromones.
- Pheromones are natural scents insect species use to communicate with each other.
- Pheromone traps tend to be sex-specific in effectiveness.
- Certain pests can be strongly attracted to the traps from the surrounding area. This provides an extremely effective early warning system of pest presence.
- Pheromone traps are only available for certain insects such as
NPS Museum Handbook , Part I (2005) T:59

cigarette beetles (Lasioderma), drug store beetles (Stegobium), Indian meal moths (Plodia), and warehouse beetles (Trogoderma).
- Other types are being developed and may be available soon.
· Snap traps (mouse traps) can be used for rats and mice, although they are sometimes messy.
· Glue boards are similar to sticky traps but larger.
- They are often used against rats and mice.
- Although glue boards are cleaner to use than snap traps, they will not kill the animal. Use snap traps to ensure the pest’s quick and painless end.
· Small electronic devices that emit high frequency sound waves are sometimes used as a deterrent, in place of traps.
--
They are usually targeted against mice, rats, and other rodents. The effectiveness of such devices is questioned. According to Health Canada’s Pest Management Regulatory Agency, “Rodents may adapt to the devices over time and return to areas within the device’s range” (Health Canada, 2001).
7. Are there any cautions related to traps that I should consider?
Yes. Be sure to bear in mind the following:
· Don’t allow traps to become a food source for other problem pests.
- Conduct regular monitoring of all pest traps.
- Dispose of traps when they are no longer useful (if they contain a large quantity of trapped pests or loose their “stickiness”).
· Avoid the use of pheromone traps or baited traps inside collection storage areas or cabinets if there is a risk of attracting pests into the collection area from an outside location.
8. How can I use freezing temperatures to eliminate a pest problem?
You can use freezing temperatures to kill pests in specimens or storage materials. Be sure to properly encapsulate the materials and follow these procedures:
· Encapsulate the items in two layers of well-sealed polyethylene bags or sheeting.
· Freeze the specimen as rapidly as possible. Slow cooling allows some insects to produce a “natural antifreeze.”
· Freeze the materials for at least fourteen days at -20°C/-4°F.
- Shorter periods may be effective with some species or if colder temperatures are used.
- For temperatures above -20°C/-4°F, much longer periods are required for complete insect pest eradication.
T:60 NPS Museum Handbook , Part I (2005)
- Do not use shorter periods interrupted by thawing. This will produce freeze-hardy insects. Insect eggs will not be completely eradicated during the shorter freezing periods.
9. How can I use heat to eliminate a pest problem?
10. How can I use a low-oxygen environment to treat a pest problem?
11. If necessary, can I still use chemical treatments to eliminate a pest problem?
Be sure that the specimens and other materials have thawed completely before you remove the polyethylene wrapping. This will prevent condensation of moisture on the specimens. During thawing, moisture should condense on the polyethylene.
For additional information concerning freezing for pest control, see:
· COG 3/6 “An Insect Pest Control Procedure: The Freezing Process.”
· CCI Notes 3/3 “Controlling Insect Pests with Low Temperature.” By Tom Strang. Canadian Conservation Institute, Ottawa (1997). Available for $2.00 USD (+shipping) from the CCI website at: <http://www.cci-icc.gc.ca>.
All life stages of insects can be eradicated by subjecting the affected materials to a temperature of 60°C/140°F. Use this method for infested storage materials that have high melting points, and for stacks of dry herbarium specimens. Do not use this process for animal specimens.
For an inexpensive and rapid heat treatment:
1) Encapsulate the items to be treated in 6mil black plastic.
2) Then place the encapsulated materials in a clear plastic “greenhouse” and use solar energy to create the heat.
This system was developed by Tom Strang of the Canadian Conservation Institute (CCI), and is fully described in:
WAAC Newsletter, 23:2 “Solar Bagging: Putting Sunlight to Work to Eliminate Insect Infestations in Mere Hours.” By B. Baskin. Western Association for Art Conservation (2001). Ordering information available at: <http://palimpsest.stanford.edu/waac>.
Another method to eradicate pests in dry specimens and storage materials is to create a low-oxygen or no-oxygen (anoxic) environment. You can create a low-oxygen or anoxic environment by using carbon dioxide or nitrogen gas in a commercially available chamber. Or you can use an oxygen scavenger in special made-to-order enclosures. These methods require specialized training or assistance for effective use. See COG 3/9 “Anoxic Microenvironments: A Treatment for Pest Control.”
If all of the non-chemical methods listed above fail to eradicate the pests affecting your collection, you may need to utilize certain chemical treatments. Discuss the matter with your park’s IPM coordinator, safety officer, and regional/SO IPM coordinator if necessary. There may be a least-toxic alternative that will work.
Do not attempt to apply any chemical insecticides yourself. NPS policy and local and state laws require that only individuals with formal training and certification can apply most chemical pesticides.
NPS Museum Handbook , Part I (2005) T:61
12. Where can I find additional information concerning IPM and pest control?
Only use chemical insecticides on non-collection materials. Such applications include around baseboards in a storage room or possibly to disinfest curatorial supplies.
For additional information, see the NPS Integrated Pest Management Manual , available on the web at <http://www1.nature.nps.gov/biology/ipm/manual/ipmmanual.htm>. The manual includes a module on museum pests.
Your park’s IPM coordinator, safety officer, and natural resource management staff can assist you to develop an appropriate program to protect your collection. You also may wish to consult your regional/SO IPM coordinator, local university entomology faculty, county extension agent, local university natural history museum staff, or other specialists.
T:62 NPS Museum Handbook , Part I (2005)
SECTION IV: WET BIOLOGICAL COLLECTIONS
A. Overview
Wet collections are specimens kept in a liquid preservative to prevent their 1. What are wet collections? deterioration.
The best available resource on the nature and care of wet biological collections is:
Simmon, J. 2002. Herpetological Collecting and Collections Management. Rev. ed. Herpetological Circulars No. 31. Society for the Study of Amphibians and Reptiles. For ordering information, visit the “Bibliomania! Herpetological Literature” website at: <http://herplit.com/SSAR/circulars/HC31/simmons.html>.
Certain biological specimens are preserved in a wet form due to:2. Why are these specimens preserved in a wet form?
· convenience
· an intent to preserve body form and soft parts for a variety of uses
When color preservation is not critical and dry preservation sacrifices qualities needed for other intended uses, fluid preservation is beneficial.
Note: The size and flexibility of the specimen (or its parts) must allow effective chemical fixation, chemical preservation, and possible storage inside rigid containers (for example, glass jars, or metal or plastic tanks).
Fixation is a stabilization process in which the fixative chemically bonds to3. What is fixation? the specimen to impede deterioration by enzymatic digestion or autolysis. Formalin, a solution of 40% formaldehyde gas in water that is then further diluted, is a common fixative. Usually the final solution contains about 4% formaldehyde in water and is referred to as 10% formalin.
No. Some specimens are not treated with a fixative, but instead are placed 4. Are all wet specimens immediately in an alcohol. Alcohols replace water in the tissues to reduce treated with a fixative? the potential for deterioration. Alcohols are considered to be denaturants, rather than fixatives.
Preservative fluids are those in which the specimen is housed for long-term 5. What types of storage, usually during the processing stage of specimen preparation.preservative fluids are Alcohols, primarily 70-90% ethanol and 50-60% isopropanol, are common used for wet collections? storage fluids for specimens that have been fixed or denatured.
The following biological specimens are commonly subjected to wet6. What types of specimens preservation:are usually included in wet
collections? · Plants
- non-vascular (some forms)
- vascular (particularly fleshy parts such as fruit or succulent vegetative parts)
· Animals
NPS Museum Handbook , Part I (2005) T:63
7. What are the primary agents of deterioration for wet collections?
8. How can inappropriate temperature and temperature fluctuations adversely affect wet collections?
- invertebrates (most forms)
- vertebrates (especially fish, reptiles, amphibians, soft eggs, larvae, many small specimens of birds and mammals, and viscera of birds and mammals)
Most agents of deterioration might cause damage to wet collections under certain conditions, but the primary causes of deterioration are usually related to fluid and container quality. Other agents of deterioration that can affect wet collections include:
· Neglect (primarily the failure to monitor and maintain fluid levels and concentrations in containers)
· Visible and UV light
- most natural pigments are very sensitive to the effects of visible light and ultraviolet radiation
- visible and UV light will trigger photochemically induced reactions that may increase the rate of deterioration in the fluids around specimens
- light, particularly UV, will also contribute to the deterioration of glass and plastic containers
· Inappropriate temperature (especially temperature fluctuations)
· Inappropriate relative humidity and fluctuations
· Fire (a special concern for collections stored in alcohols)
- alcohol vapor from poorly sealed containers creates an explosion hazard
- alcohols may serve as fuel for a fire
· Physical forces
- earthquakes or other natural emergencies
- explosions
- dropping a glass container housing a wet specimen
Note: Fluids provide excellent cushioning against most vibration and minor shock, as long as the containers are not tightly packed with specimens.
· Contaminants resulting from improper mixing of fluids
· High temperatures will accelerate the drying of specimens removed from fluid.
· Low temperatures (below about 12.7°C/55°F):
T:64 NPS Museum Handbook , Part I (2005)

- Will cause polymerization of unfixed formaldehyde. This results in milky strands that cannot maintain the equilibrium reaction that is the basis of fixation.
- Prolonged exposure to low temperatures may cause loss of fixation in formalin-fixed specimens.
- Low temperatures can improve the preservation of material that is denatured and stored in alcohol and has never been fixed in formalin.
9. Can relative humidity adversely affect wet collections?
Relative humidity has little importance for specimens in fluid. However:
· Excessively low relative humidity will accelerate drying of specimens removed from fluid.
· Excessively high relative humidity will contribute to corrosion of metal and glass containers.
10. How can wet collections become contaminated?
· Fixatives may have been improperly mixed using:
- tap water, which is often very alkaline
- saltwater, which can impede fixation
This results in poorly fixed specimens that may contain contaminants from water treatments or seawater components.
· Alcohols , the main storage fluids, can be contaminated if the initial quality of the alcohol is poor.
- Low-grade ethanol may be contaminated by acetone.
- Any chemical used in the collection should be laboratory grade, or higher.
- Any ethanol that is used in a collection should be undenatured.
·
- Denatured ethanol (ethanol that is not potable) will incorporate any of a number of deliberate contaminants, including, aviation fuel, acetone, fluorescent dyes, methanol, and purgatives. Such contaminants make the alcohol unsuitable for human consumption.
Containers with decomposing seals or corroding metal lids have the potential to contaminate fluid preservatives.
- They can discolor specimens as the decomposition/corrosion products leach into the fluid.
- Also, any time fluid types are changed (for example, changing between isopropanol and ethanol) one fluid becomes the
NPS Museum Handbook , Part I (2005) T:65
11. Are there any special health and safety concerns related to wet collections?
contaminant of the other.
· Labels may react with fluid environments, depending on the materials involved.
- The dissolution of label inks and colorants are common examples.
- Metal labels and wires used to attach labels often corrode in fluids.
- Corroding metals will deposit corrosion products on the speci-mens and can serve as catalysts for other reactions in the fluids.
Fortunately, the fluid environment is dynamic. It provides an optimum medium for chemical reactions and transfer of products; lipids, pigments, proteins, and other specimen components will leach into the fluids.
· If there are no outside energy sources, such as light, to drive the process, these reactions will eventually reach equilibrium.
· This results in both specimens and their fluid achieving a reasonably stable state, unless someone changes the fluids.
Many types of toxic chemicals are used for stabilization treatments and fluid storage media. To reduce your risk, have well-designed preparation, storage, and research facilities. Also, always use appropriate procedures.
Proper ventilation is extremely important. So is personal protective equipment (PPE). Use goggles designed to protect against spills and vapor, and aprons and gloves appropriate for each chemical.
Most chemicals used in fluid -preserved collections pose risks through inhalation or skin absorption. Some, like alcohols and picric acid, also pose fire and explosion hazards . The most common chemical hazards are:
· ethanol - flammable
· isopropanol - flammable
· formalin solutions - formaldehyde is considered to be a carcinogen
· fixatives containing metal salts (arsenic, chromium, copper, mercury)
· acids (acetic, boric, carbolic, glacial acetic, nitric, osmic, picric, pyroligneous, sulfuric, sulfurous, trichloroacetic)
· other chemicals that may be toxic (camphor, chloral hydrate, various glycols, phenoxetol, methanol, thymol)
· dyes and stains (used in clearing and staining specimens)
· unknown fluids - fixatives and storage fluids of unknown composition that may contain toxic substances
Other hazards include:
T:66 NPS Museum Handbook , Part I (2005)
B. Stabilization of Wet Biological Specimens
1. What specimen characteristics should I document prior to stabilizing a wet specimen?
Be sure to document the natural conditions and features of the specimen. Note anything that may be changed by stabilization. The details of such documentation typically follow standard practices of individual disciplines. Examples include color, markings, weight dimensions, sex, reproductive condition, age, and physical condition. It ’s a good idea to take dimensional measurements when the specimen is still fresh. Fixation or denaturation may cause it to distort, shrink, or swell.
Documentation about specimen history can be useful in determining the integrity of the specimen for research or its safety for use in interpretation. Such information may include the condition of the specimen, environmental conditions, and stabilization methods and materials, to name but a few.
2. What should I know about the stabilization process for wet specimens?
3. Is formalin used with all wet biological specimens?
· cuts from broken glassware
· injuries from attempting to lift heavy jars or tanks
· biohazards that were not eliminated in processing
Note: Many infectious agents are killed by formalin but not all are killed by ethanol. For specimens that have been denatured rather than fixed, handle them with special care.
A variety of chemicals can be used for collecting, fixing, and preserving specimens. The choice may be based on the kind of organism involved, disciplinary standards, intended use, and legal possession.
Formalin is a common fixative for soft tissues. Some specimens, such as fish larvae and eggs, are usually fixed and stored in formalin solutions.
Because formalin fixation yields acidic solutions that are harmful to calcium-based materials (shell, bone, and the calcium present in many tissues), formalin solutions may be: · buffered
· subsequently replaced with an alcohol solution
To avoid potential deterioration in the fixative, some specimen parts may be removed prior to fixation (for example, skulls of vertebrates) then preserved by other means.
No. Some specimens are denatured using alcohol, rather than treated with a fixative. This:
· facilitates extracting nucleic acids from specimens for biochemical
NPS Museum Handbook , Part I (2005) T:67

analyses
· avoids the safety hazards associated with formalin
· averts potential decalcification
The technique works especially well for small specimens, such as insects.
Note: You still may find it necessary to transfer the specimens to a fresh alcohol solution during the processing stage. This depends upon the degree to which displacement of water from the specimens has altered the concentration of the alcohol.
4. How do I protect specimens during stabilization?
During stabilization you should:
· Ensure the relationship of the specimens to their data.
· Perform the stabilization treatment in a timely manner to min imize the decomposition of the specimen.
· Use trained people to perform the work.
· Use deionized or distilled water to mix fixatives.
- Tap water, water from local ponds and streams, or saltwater can be sources of fluid contamination.
- Contaminants may jeopardize preservation by changing the pH of the solution (this can impede fixation or denaturation).
- Soaking specimens in certain salt solutions has been used as a method to reverse formalin fixation.
· Use fixative or alcohol solutions for specimens for the same taxa collected at the same place and time.
- This will ensure uncompromised utility of the specimens for biochemical analyses.
- Components leached from one set of specimens can contaminate the next set.
· Do not crowd specimens in fixative or alcohol solutions. - The amount of water that leaches into the fluid from the specimens
will weaken the concentration of the solutions.
- Crowding also may lead to mechanical damage to the specimens.
Other things to remember include:
· Alcohols are flammable. Take special precautions to protect the specimens from fire.
· Fixation with formalin may not work well at low temperatures . This is because of the potential for polymerization of formaldehyde.
T:68 NPS Museum Handbook , Part I (2005)
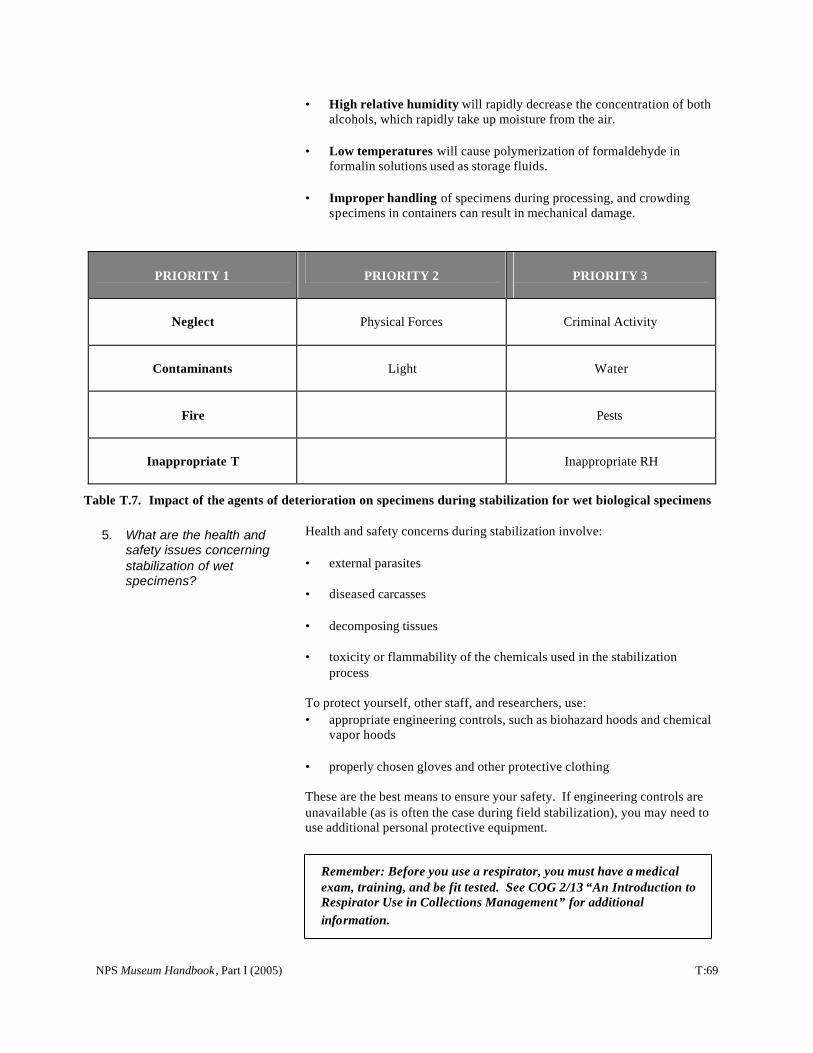
· High relative humidity will rapidly decrease the concentration of both alcohols, which rapidly take up moisture from the air.
· Low temperatures will cause polymerization of formaldehyde in formalin solutions used as storage fluids.
· Improper handling of specimens during processing, and crowding specimens in containers can result in mechanical damage.
PRIORITY 1 PRIORITY 2 PRIORITY 3
Neglect Physical Forces Criminal Activity
Contaminants Light Water
Fire Pests
Inappropriate T Inappropriate RH
Table T.7. Impact of the agents of deterioration on specimens during stabilization for wet biological specimens
Health and safety concerns during stabilization involve:5. What are the health and safety issues concerning stabilization of wet · external parasites specimens?
· diseased carcasses
· decomposing tissues
· toxicity or flammability of the chemicals used in the stabilization process
To protect yourself, other staff, and researchers, use: · appropriate engineering controls, such as biohazard hoods and chemical
vapor hoods
· properly chosen gloves and other protective clothing
These are the best means to ensure your safety. If engineering controls are unavailable (as is often the case during field stabilization), you may need to use additional personal protective equipment.
Remember: Before you use a respirator, you must have a medical exam, training, and be fit tested. See COG 2/13 “An Introduction to Respirator Use in Collections Management” for additional information.
NPS Museum Handbook , Part I (2005) T:69
C. Processing of Wet Biological Specimens
1. What general information about processing should I be aware of?
· In the past, specimens removed from formalin solutions for transfer to alcohol solutions were first soaked in water for prolonged periods to remove the excess fixative. Today, prudent practice involves briefly soaking the specimens in various concentrations of the final storage fluid (for example, 20%, then 40%, then 60%, then 70% ethanol for specimens that will eventually be stored in 70-75% ethanol).
· Many institutions select 70-75% ethanol as the storage fluid of choice. Institutions that lack a Federal permit for undenatured (potable) ethanol can use a 45-55% isopropanol solution. However, ethanol is the best storage fluid because it preserves the utility of the specimens for many biochemical and other analyses. Isopropanol use can also be problematic, as it:
- has been shown to change the measurements of some specimens (via shrinkage)
- renders some specimens transparent
- may soften bone
- is difficult to mix thoroughly with water
Note: To apply for a Federal permit for undenatured ethanol, contact the U.S. Department of the Treasury’s Tax and Trade Bureau, National Revenue Center at:
·
U.S. Department of the Treasury Tax and Trade Bureau National Revenue Center 550 Main Street Suite 8002 Cincinnati, Ohio 45202 (877) 882-3277 www.ttb.gov/nrc/index.htm
Some vertebrate material will be subjected to clearing and staining techniques to expose the position of skeletal elements within the body of the specimen.
· Some specimens with delicate or soft parts may be secured to a support system (for example, glass plate). This will protect the specimen and make it easy to handle during examination.
· Final preparation of wet specimens involves placing the specimen or its parts in a container, such as a glass vial or jar, or a stainless steel or plastic tank.
Processing requires special expertise, time, & facilities. You must possess ALL of these resources before accepting collections that may require processing. If you don’t, you’ll have a backlog of unprocessed or partially processed specimens of limited use.
T:70 NPS Museum Handbook , Part I (2005)
2. How should I label wet specimens?
3. What materials should I use to label wet specimens?
Depending on the specimen(s), you can label specimens with:
· tags tied to the specimen
· labels attached to the outside of the container
· labels placed inside the container, but facing out for visibility
If you place multiple, individually cataloged specimens within the same container, be sure that each specimen has a tag with at least its catalog number.
Remember: Any labels that you place inside the container must be resistant to fluid damage (both label and ink).
Label Materials
· Use good quality, long-fibered, cotton rag labels. These hold up remarkably well in fluid collections.
· The only synthetic polymer that seems to withstand the fluid environment is non-woven polyester, such as Tyvek®.
· Don’t use:
- Paper treated with formaldehyde to make it fluid-resistant. This can cause slight acidification of storage fluids.
- Metal labels can corrode and may also cause mechanical damage to specimens. Keep in mind that leg bands and ear tags should remain with specimens, even when stored in fluids.
Inks and Other Media
· Carbon inks do not fade over time. Use only carbon-based, black inks on specimen labels, including barcode labels.
- Commercial, black printing inks are usually carbon-based, as are most laser and photocopier toners.
- Laser and photocopiers also apply the toner with a certain amount of heat, which helps fuse the toner particles to the paper.
· Liquid inks vary greatly in quality. Black inks for labeling wet collections should be drafting inks designed for writing on drafting film, using technical pens.
- These tend to be carbon-based inks with a neutral pH that adhere well to almost any surface.
- Such inks do not dissolve in water, alcohol, or formalin solutions.
- Note: They do not have to be used in technical pens or on drafting
NPS Museum Handbook , Part I (2005) T:71
film during specimen labeling.
· Black liquid inks in some fiber-tipped pens are acceptable for use in labeling wet specimens. Be sure to choose pens with carbon-based inks, and test:
- how long it takes for the ink to dry so that it will not smear
- how well the ink resists water, alcohol, and formalin
- how well it resists smearing or loss from abrasion when wet with any of these fluids
Attachments for Labels
· Cotton thread or string will work well to attach labels to fluid-preserved specimens.
· Don’t use:
- wire or any other metal fasteners
- plastics
4. What agents of deterioration affect wet biological specimens during processing?
The primary agents of deterioration for wet specimens during processing are:
· Neglect, including staff with insufficient knowledge and skills to fulfill processing techniques. This can render a specimen useless.
· Contaminants can result from:
-
-
diluting storage fluids with tap water (which often contains a variety of treatment chemicals) using denatured alcohol or low-grade alcohols that contain impurities
· Light and ultraviolet radiation can damage wet specimens during processing while out of their fluid medium or while in transparent containers.
· Fire is a hazard with both ethanol and isopropanol.
Other agents of deterioration affecting wet biological specimens include:
· High relative humidity will rapidly decrease the concentration of both alcohols, which rapidly take up moisture from the air.
· Low temperatures will cause polymerization of formaldehyde in formalin solutions used as storage fluids.
· Improper handling of specimens during processing, and crowding specimens in containers can result in mechanical damage.
T:72 NPS Museum Handbook , Part I (2005)
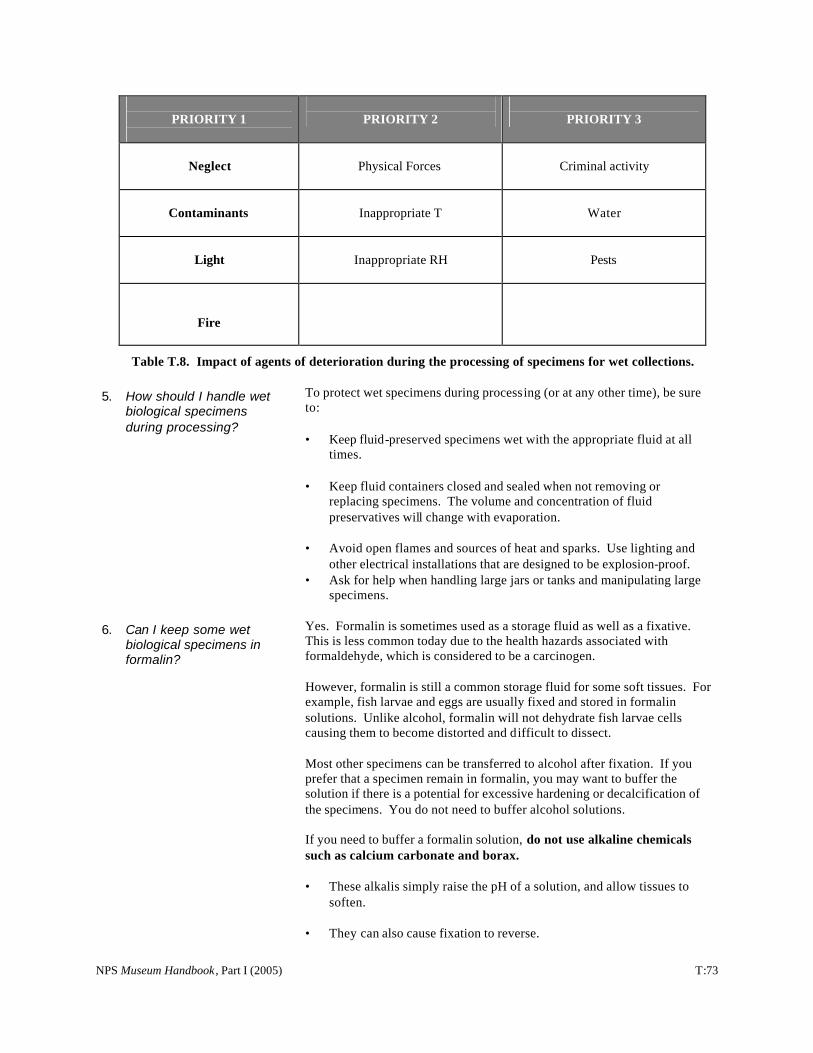
PRIORITY 1 PRIORITY 2 PRIORITY 3
Neglect Physical Forces Criminal activity
Contaminants Inappropriate T Water
Light Inappropriate RH Pests
Fire
Table T.8. Impact of agents of deterioration during the processing of specimens for wet collections.
5. How should I handle wet biological specimens during processing?
6. Can I keep some wet biological specimens in formalin?
To protect wet specimens during processing (or at any other time), be sure to:
· Keep fluid-preserved specimens wet with the appropriate fluid at all times.
· Keep fluid containers closed and sealed when not removing or replacing specimens. The volume and concentration of fluid preservatives will change with evaporation.
·
·
Avoid open flames and sources of heat and sparks. Use lighting and other electrical installations that are designed to be explosion-proof. Ask for help when handling large jars or tanks and manipulating large specimens.
Yes. Formalin is sometimes used as a storage fluid as well as a fixative. This is less common today due to the health hazards associated with formaldehyde, which is considered to be a carcinogen.
However, formalin is still a common storage fluid for some soft tissues. For example, fish larvae and eggs are usually fixed and stored in formalin solutions. Unlike alcohol, formalin will not dehydrate fish larvae cells causing them to become distorted and difficult to dissect.
Most other specimens can be transferred to alcohol after fixation. If you prefer that a specimen remain in formalin, you may want to buffer the solution if there is a potential for excessive hardening or decalcification of the specimens. You do not need to buffer alcohol solutions.
If you need to buffer a formalin solution, do not use alkaline chemicals such as calcium carbonate and borax.
· These alkalis simply raise the pH of a solution, and allow tissues to soften.
· They can also cause fixation to reverse.
NPS Museum Handbook , Part I (2005) T:73
· Their impact on the pH of the solution may be short-lived.
· True chemical buffers act continuously to stabilize the pH of the solution to a pH determined by the choice of buffering agent.
7. How do I transfer wet specimens from formalin to an alcohol solution?
An acceptable buffer for formalin is composed of monobasic sodium phosphate monohydrate and dibasic sodium phosphate anhydrate.
Remember: The rationale for keeping a particular specimen in formalin or transferring it into an alcohol solution might be related to its intended research use.
If you transfer specimens from formalin to alcohol, be sure to soak them in increasing concentrations of the storage fluid. This prevents damage from osmotic pressures in the tissues. Osmotic pressures result when you move specimens directly into the final concentration of the storage fluid (alcohol) from a formalin solution, which is mostly water. Prolonged soaking in water, rather than graded alcohols, causes two problems:
· fixation may be reversed, allowing the specimens to begin to rot
· specimens may swell as they become hydrated
Note: You can determine alcohol concentrations by using an alcohol hydrometer. Test Strips
· During the transfer process, you can use formaldehyde test strips to determine approximately how much fixative remains in the solutions.
· There should be some residual fixative in the final storage solution (even though this has potential to acidity the alcohol) because fixation involves an equilibrium reaction.
· If trace amounts of the fixative are not detected, it may mean that specimens were not originally fixed properly or that fixation was reversed during the transfer process.
Water
· Alcohols are usually diluted with water when used as a transfer or a storage medium.
· Tap water is not acceptable for mixing these solutions : it contains water treatment chemicals that may have an impact on specimen preservation and utility.
· Distilled water exposed to carbon dioxide in air tends to be acidic.
· The best choice is deionized water, which is pH neutral and should contain no harmful impurities.
T:74 NPS Museum Handbook , Part I (2005)
8. Can I transfer wet biological specimens from ethanol to isopropanol?
9. What about clearing and staining specimens?
10. Can I keep different wet biological specimens together in the same container?
11. How should I document a wet specimen’s condition during processing?
NPS Museum Handbook , Part I (2005)
Mi xing
· Don’t mix an alcohol/water solution simply by using fixed volumes, such as 70 parts alcohol to 30 parts water. The result will rarely be 70% alcohol because the concentration is temperature dependent.
· Determine the volume percent concentration of the alcohol.
- You can use an alcohol hydrometer (available from most laboratory supply companies). Ambient and fluid temperatures must be at about 20°C/68°F.
- Ideally, measure concentrations using a density meter (also available from laboratory suppliers).
Concentrations
· Check the concentration of alcohols used for specimens that are not treated with a fixative.
· You might have to correct the concentration of the alcohol to create an appropriate storage fluid.
- If the concentration of the alcohol solution is very low, it may be prudent to replace the fluid entirely, even though this will result in loss of the materials already leached from the specimen.
- See COG 11/5 for methods to correct the alcohol concentration.
No. Do not transfer specimens in ethanol to isopropanol. This change will damage the specimens. Researchers have experimented with transferring specimens from isopropanol to ethanol after conditioning the specimens in increasing concentrations of ethanol. However, this process requires additional research before it can be endorsed as a practice.
Some specimens are cleared and stained before being placed in storage fluids, and vice versa. The use of clearing and staining chemicals requires specialized knowledge. The choice of final storage fluid will be determined in part by the solubility of the stains used in the process.
Often the final storage fluid is glycerol. Glycerol supports mold growth, so collection staff sometimes have to mix various chemicals, such as thymol, as anti-fungal agents. These chemicals add to the complexity of preservation problems. When the stains used are not alcohol soluble, a simple way to prevent mold growth is to store the specimens in a mixture of glycerin and ethanol.
No. Various specimen components leach into the fluid. If you mix specimens you ris k cross contamination. This will damage the utility of the specimens for biochemical studies .
Don’t store specimens together in the same container unless they are of the same species or lot and were collected in the same place and at the same time.
As previously discussed, utilize a condition report. In addition to documenting standard conditions, you may want to also note:
T:75
12. What health and safety concerns should I be aware of during processing?
13. What do I need to know about loans of wet specimens?
· condition of labels and the label attachments to the specimen
· fluid characteristics
- color
- transparency
- pH
- formalin concentration
- alcohol concentration
- fluid-to-specimen ratio
· condition of the container and closure (corroded, poorly sealed, etc.)
Your collection may require a more detailed condition examination. You also may require additional information concerning appropriate care for certain specimens. Discuss these needs with your regional/SO curator. He or she can assist you to hire a natural history conservator to conduct a Collection Condition Survey (CCS) of your collection. For additional information concerning a CCS, see Chapter 3, Section D.
You might find it helpful to include the name of the individual who prepared the specimen in your condition report as well.
Special health and safety concerns during processing are the:
· toxicity or flammability of the chemicals
· potential for ergonomic injuries when handling large containers
Engineering controls, such as chemical vapor hoods, along with proper gloves and other protective clothing are the best means to ensure your safety when handling hazardous chemicals. If engineering controls are unavailable, use additional personal protective equipment. Note:The use of respirators requires a medical evaluation, training, and regular fit testing. See COG 2/13.
To protect yourself, other staff, and researchers, you should also:
· keep spill cleanup kits on hand for all chemicals used in collection processing
· place large tanks on dollies
· use carts to move large glass jars and smaller tanks
For loan shipments, collections staff usually prepare wet specimens by:
· individually wrapping specimens with cotton gauze that has been saturated with the appropriate fluid preservative
T:76 NPS Museum Handbook , Part I (2005)
· sealing them in multiple plastic bags, so there’s minimal risk of fluids affecting the shipping container
D. Storage of Wet Biological Collections
1. Where should I locate storage?
Because wet specimens may not have any information other than the catalog number, you may be required to provide additional information about the specimen for the user. Such information typically includes at least the collecting locality and date, and the fluid in which the specimen should be housed while on loan.
In addition, when packing and shipping specimens preserved in fluids you must:
· include instructions about the type of fluid preservative to be used with the specimens
· insert and seal the bagged specimen in at least one additional polyethylene bag, along with an address label that is visible through the second bag
· place the bags in a sturdy, well-sealed shipping container that has been cushioned on the interior to help protect the specimens during shipment
· comply with all laws and regulations regarding the shipment/transport of biological specimens, rare or endangered species, and hazardous chemicals
Notes:
· As long as you use the shipping method described above (specimens wrapped in cotton gauze saturated with solution and inside plastic bags), your shipment should not contain fluid in an amount to be considered HAZMAT by the DOT. As a result, unless the specimen itself was hazardous, your shipment shouldn’t be subject to the Hazardous Materials Regulations, noted previously in this appendix.
· Some commercial shippers (such as Federal Express) do not accept dead animals of any type, including scientific specimens, for transport. Consult with your shipper in advance about any special provisions or requirements of this nature.
You may find it necessary to situate wet collection storage along an exterior wall. Such a location can help mitigate the impact of an explosion on the rest of the building. Note that placement and structural features may be controlled by local building codes. As with all collection storage areas, wet collections should be located where you can:
· control access
· organize the collection in a logical manner
NPS Museum Handbook , Part I (2005) T:77
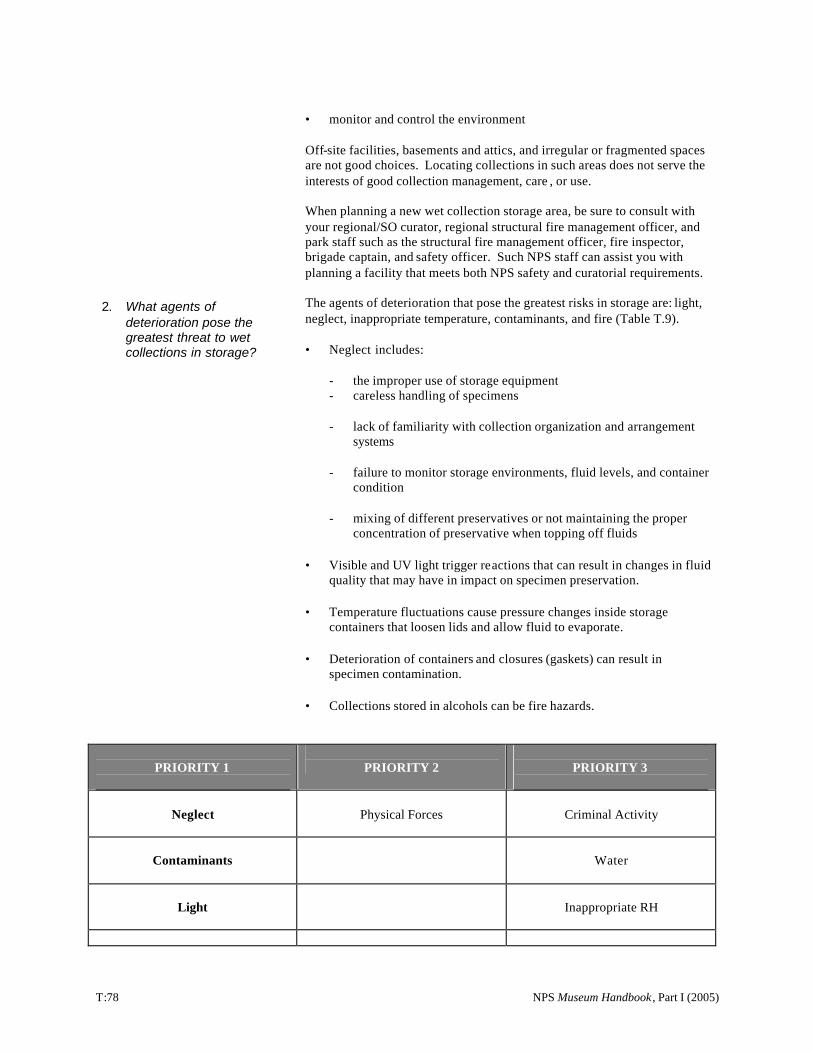
· monitor and control the environment
Off-site facilities, basements and attics, and irregular or fragmented spaces are not good choices. Locating collections in such areas does not serve the interests of good collection management, care , or use.
When planning a new wet collection storage area, be sure to consult with your regional/SO curator, regional structural fire management officer, and park staff such as the structural fire management officer, fire inspector, brigade captain, and safety officer. Such NPS staff can assist you with planning a facility that meets both NPS safety and curatorial requirements.
2. What agents of deterioration pose the greatest threat to wet collections in storage?
The agents of deterioration that pose the greatest risks in storage are: light, neglect, inappropriate temperature, contaminants, and fire (Table T.9).
· Neglect includes:
--
the improper use of storage equipment careless handling of specimens
- lack of familiarity with collection organization and arrangement systems
- failure to monitor storage environments, fluid levels, and container condition
- mixing of different preservatives or not maintaining the proper concentration of preservative when topping off fluids
· Visible and UV light trigger reactions that can result in changes in fluid quality that may have in impact on specimen preservation.
· Temperature fluctuations cause pressure changes inside storage containers that loosen lids and allow fluid to evaporate.
· Deterioration of containers and closures (gaskets) can result in specimen contamination.
· Collections stored in alcohols can be fire hazards.
PRIORITY 1 PRIORITY 2 PRIORITY 3
Neglect Physical Forces Criminal Activity
Contaminants Water
Light Inappropriate RH
T:78 NPS Museum Handbook , Part I (2005)
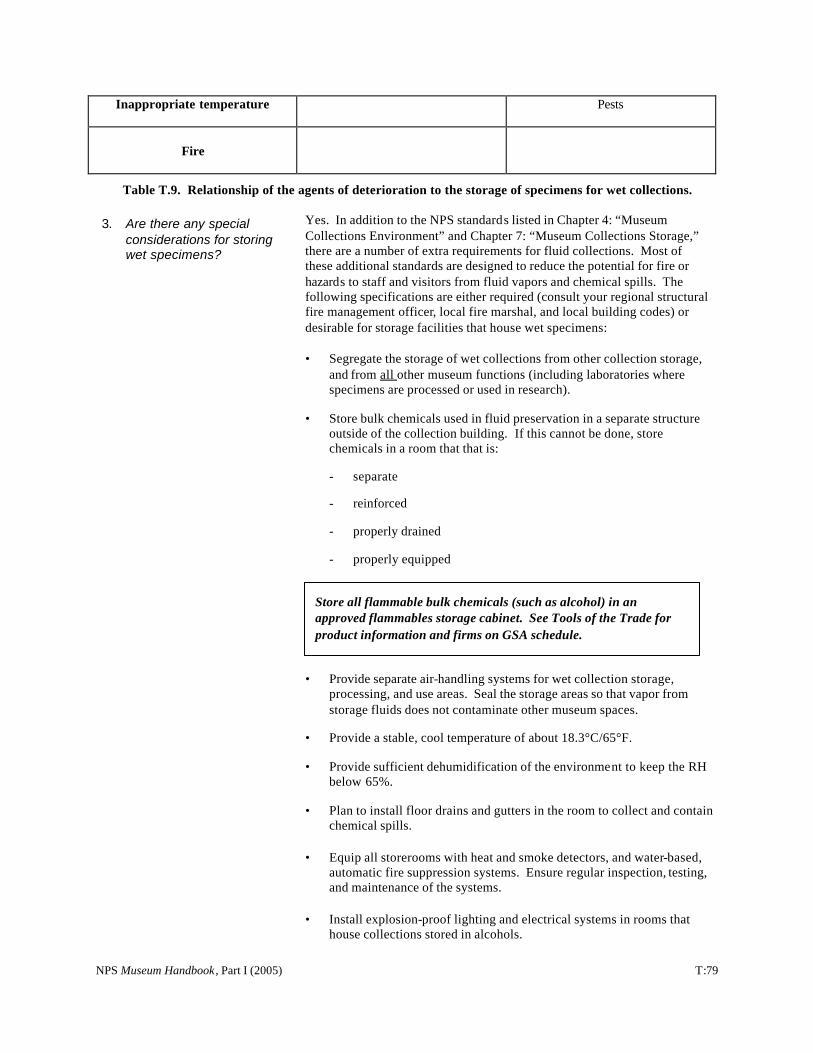
Inappropriate temperature Pests
Fire
Table T.9. Relationship of the agents of deterioration to the storage of specimens for wet collections.
3. Are there any special considerations for storing wet specimens?
Yes. In addition to the NPS standards listed in Chapter 4: “Museum Collections Environment” and Chapter 7: “Museum Collections Storage,” there are a number of extra requirements for fluid collections. Most of these additional standards are designed to reduce the potential for fire or hazards to staff and visitors from fluid vapors and chemical spills. The following specifications are either required (consult your regional structural fire management officer, local fire marshal, and local building codes) or desirable for storage facilities that house wet specimens:
· Segregate the storage of wet collections from other collection storage, and from all other museum functions (including laboratories where specimens are processed or used in research).
· Store bulk chemicals used in fluid preservation in a separate structure outside of the collection building. If this cannot be done, store chemicals in a room that that is:
- separate
- reinforced
- properly drained
- properly equipped
Store all flammable bulk chemicals (such as alcohol) in an approved flammables storage cabinet. See Tools of the Trade for product information and firms on GSA schedule.
· Provide separate air-handling systems for wet collection storage, processing, and use areas. Seal the storage areas so that vapor from storage fluids does not contaminate other museum spaces.
· Provide a stable, cool temperature of about 18.3°C/65°F.
· Provide sufficient dehumidification of the environment to keep the RH below 65%.
· Plan to install floor drains and gutters in the room to collect and contain chemical spills.
· Equip all storerooms with heat and smoke detectors, and water-based, automatic fire suppression systems. Ensure regular inspection, testing, and maintenance of the systems.
· Install explosion-proof lighting and electrical systems in rooms that house collections stored in alcohols.
NPS Museum Handbook , Part I (2005) T:79
· Filter all incoming and recirculated air to the American Society of Heating, Refrigerating and Air-Conditioning Engineers (ASHRAE) 90-95% level.
· Use UV filters on all fluorescent lighting. Keep specimens in a dark environment when not in use for research.
· If wet collection storage rooms are along exterior walls, you may need to design these as breakout walls. You also may need to reinforce interior walls to help contain potential explosions.
· Provide equipment to properly dispose of chemicals and solutions.
Discuss storage requirements with your regional/SO curator, regional and park structural fire management officers, local fire department, park maintenance staff, park safety officer, park and regional/SO natural resource management staff, and other subject matter experts. Refer to Chapter 4: “Museum Collections Environment” and Chapter 7, “Museum Collections Storage,” COG 2/18 “Safe Storage and Handling of Natural History Specimens Preserved in Fluid,” and COG 11/3 “Storage Concerns for Fluid -Preserved Collections” for NPS standards and requirements for fluid-preserved collections storage.
Note: Consult your regional structural fire management officer, park structural fire management officer, local fire marshal, and building codes to see if your jurisdiction has any special requirements for structures that house collections preserved in alcohol or formalin.
4. What types of storage containers should I use?
Containers for long-term storage of specimens preserved in fluid must:
· be durable
· be non-reactive towards the specimens and the storage fluids
· seal well enough to prohibit evaporation of the storage fluid
· comfortably accommodate the specimen so that removal and replacement can be done without causing damage (for example, no shoulders on jars or other containers)
· not degrade from environmental agents of deterioration
· be impermeable to oxygen
You can use these containers to store specimens:
· Glassware
- Borosilicate Glassware is the best container material for small to mid-sized specimens. It’s very resistant to chemical corrosion. Unfortunately, appropriate sizes of borosilicate jars are difficult to find in the United States. As a consequence, most U.S. collections
T:80 NPS Museum Handbook , Part I (2005)
·
·
house wet specimens in soda-lime glass (glass composed of silica, calcium oxide, and sodium oxide).
- Soda -Lime Glass is cheap, readily available glass. It has only fair corrosion resistance. This glass will begin to leach its alkaline constituents into distilled water in a matter of minutes. Since most storage fluids have pHs ranging from neutral to moderately acidic, the glass will probably react with the fluids over time.
- Flint Glass Containers are also used to store specimens in fluid. Flint glass is made of much the same ingredients as soda-lime glass. It may also contain other components, including lead oxide. Flint Glass is not particularly resistant to acids.
Tanks
- Large specimens are usually housed in tanks made of stainless steel, molded polyethylene, or molded polypropylene.
- Stainless steel tanks will corrode in the presence of the fluids
- Steel tanks may also corrode along the welds at the seams. Most do not seal well enough to stop fluid evaporation.
- Plastic tanks can deteriorate from long exposure to acids, alkalis, UV radiation, and the stress caused by large volumes of fluid.
Lids, Gaskets, and Seals
Lids, gaskets, and seals on containers are often a source of contaminants in the storage fluid. As with the containers noted above, stoppers of borosilicate glass are superior, while other types are not as effective:
- Borosilicate glass stoppers that are manufactured to very fine tolerances seal borosilicate jars very well. These have been used in the United Kingdom for many years.
- Stoppers for commercial grade glassware are not as carefully manufactured, and usually will fit only the container for which each stopper was produced originally. As a consequence, mixing stoppers and containers results in poorly sealed jars.
- Metal caps will corrode. Avoid using them.
- Some plastic lids, such as those made of Bakelite, become brittle in the presence of the vapor from the fluids.
- Polypropylene lids with polyethylene liners work reasonably well on most soda-lime and flint glass jars. They constitute one of the least expensive, but fairly effective closure systems.
- Avoid rubber and synthetic rubber gaskets. They will discolor and deteriorate with age. These gaskets also break down when in contact with the fluid preservative (Simmons, 1995). Gaskets of acrylonitrilebutadiene may be an adequate option (Suzumoto, 1992).
NPS Museum Handbook , Part I (2005) T:81
5. Are there any other storage requirements that I should consider?
6. What about arranging wet specimens?
When closures are ineffective, your first option should always be to replace the closure, the container, or both. If that is not feasible, you can use 3M® brand #5086 clear polypropylene sealing tape with alcohol-resistant acrylic adhesive as a temporary means to reduce fluid loss. The tape is available at stores that sell building supplies.
· Vials in a Larger Container
Follow the steps below to store small fluid -preserved specimens: - Place the specimens in vials filled with the appropriate fluid
preservative.
- Close the vials with a permeable material (such as high-loft, non-bonded polyester fiber).
- Place the vials in a larger container filled with the same fluid preservative.
- Seal the outer container with a lid and liner to prevent evaporation.
This storage method protects individual specimens from mechanical damage and unnecessary handling. It also helps insure that any fluid loss around the specimens will be minimal.
IMPORTANT: Be sure that the ratio of specimens to fluid in a container does not exceed 30%. Fluid quality is jeopardized (the concentration drops, as does the pH) if specimen ratios are higher than 30%.
Yes. The best way to store small wet collections is inside a flammable storage cabinet. Larger collections can be housed on shelves, including mechanically operated mobile storage (although these may not be acceptable to some fire protection authorities). Be sure that the finish on the shelving will resist the collection fluids.
Use bins or trays within cabinets or on shelves to organize specimen containers. This will protect the specimen containers from excess handling and disorder.
Equip all shelving units with removable restraining bars to help keep the containers in place in the event of an emergency. Such rails will also provide protection against someone accidentally knocking a jar off the shelf. Vibration and compactor movement pose little threat to these collections, as long as jars do not topple from the shelves as a result of shifts in position.
See Tools of the Trade and COG 11/3 “Storage Concerns for Fluid -Preserved Collections” for additional information concerning storage equipment.
Sometimes you may need to adapt your arrangement patterns. Most fluid-preserved specimens are stored on shelves. You might want to use an arrangement that accommodates a mo re effective use of available space (such as storing the same size containers on a shelf).
T:82 NPS Museum Handbook , Part I (2005)
7. Are there any special health and safety concerns related to storage of wet collections?
Over-sized specimens are often housed in large, sometimes very heavy containers. Normally, these are stored at or near floor level. Do not store them above head level.
Yes. In addition to threats of fire and explosion, there are the risks of:
· inhalation of vapor
· skin absorption of chemicals
These risks can occur when removing specimens from large containers. Always open containers under local exhaust ventilation, or use appropriate personal protective equipment. You can minimize these risks and ensure that there is little alcohol or formaldehyde vapor in the ambient air if you:
· Design, maintain and use proper general ventilation systems.
· Use specimen containers that seal well.
To reduce the potential for injuries:
· Keep large containers on dollies or casters.
· Do not store heavy jars or other heavy containers on high shelves.
E. Maintenance of Wet Biological Collections
1. What does maintenance of wet collections include?
Proper maintenance includes:
· updating information (including deaccessioning [See MH-II, Chapter 6: Deaccessioning, for additional information.])
· ensuring fluid quality and levels
· emergency preparedness and response
2. How do I maintain fluid quality for wet specimens?
Monitoring
Conduct frequent monitoring of the wet specimens. This includes:
· The visual inspection of fluid levels.
· The use of a digital density meter and temperature correction tables.
- These tools allow you to determine alcohol concentrations if fluids have evaporated or become exceptionally discolored.
- Note: You can use an alcohol hydrometer to approximate the concentration, but both the fluid and the ambient air temperatures must be 20°C/68°F to achieve accurate results.
Maintaining Fluid Levels
NPS Museum Handbook , Part I (2005) T:83
· If room temperatures do not change over time, you can maintain fluid levels by completely filling containers.
· If temperatures change, pressures within containers will cause the lids to loosen
- This will eventually compromise fluid levels and concentrations.
- If this occurs, it’s best if you maintain fluid levels at a standard distance (at least one inch) below the lip of the closed lid.
- This allows for the available space to better accommodate changing internal pressures.
Other monitoring considerations include:
· Avoid excessive air. This promotes oxidation of the fluids (acidification of the alcohol).
· Keep all containers filled to the same level. This facilitates inspections for containers that do not seal properly.
· If a container permits fluid loss, replace the appropriate parts (jar, lid, or gasket).
· If the loss of fluid results from use, you’ll need to replenish the preservative.
It’s vital that you ensure proper fluid levels and concentrations in each individual container housing wet specimens. This requires constant monitoring of fluid conditions and occasional maintenance.
3. How are fluids lost or compromised?
Fluids may be lost or altered by:
· defective lids or seals
· changing temperatures that cause closures to loosen
· leaving lids off of the containers for prolonged periods
· removal and replacement of specimens
· spills
In addition, fluid preservatives may become discolored due to:
· unstable gaskets
· corrosion of metal (such as bails, lids, labels, ear tags, leg bands)
· seepage of body fluids (water in the cells, blood, digestive fluids)
T:84 NPS Museum Handbook , Part I (2005)
4. How do I replace or replenish the fluid preservative?
· dissolution of specimen pigments
· breakdown of lipids
· polymerization of formaldehyde into milky strings, due to:
- exposure to low temperatures
- a change in the pH of the fluid
· contaminants originally present in the fluids (such as minerals from tap water)
The most common problem related to wet collections maintenance is lack of training. Do not attempt to replenish fluids in a collection if you do not have a proper understanding of how to adjust the overall concentration.
Because the primary environments for wet specimens are the storage fluids, the quality of those fluids are your main concern . If fluids evaporate from containers for any reason, the concentration of the remaining fluid is altered. Alcohols evaporate more quickly than the water with which they are mixed. Evaporation results in solutions with low alcohol concentrations and low fluid volumes that no longer fill the jars. The space once filled with fluids is now filled with air. The air fosters oxidation of the alcohol, further changing the chemistry of the solution.
First, fix the problem, even if it means replacing the container. When containers are maintaining fluid levels, the only reason for fluid replacement should be to replenish fluids lost because of specimen use.
Use the following procedures to replenish fluid:
· Determine the concentration of the alcohol in the container.
- Use a digital density meter and temperature correction tables to determine the concentration of the alcohol in the container. OR
- Use an alcohol hydrometer to approximate the concentration, but both the fluid and the ambient air temperatures must be 20°C/68°F to achieve accurate results. This requires you to:
a. take several measurements to determine the true concentration of the reduced fluid in the container
b. carefully mix the fluid to ensure that there is no possibility of measuring pockets of especially high or low concentration
c. use sufficient amounts of fluid for measurement
· To determine the appropriate concentration of the make-up fluid, use the formula developed by Kelly Sendall and Grant Hughes: z(x+y) = ax + by
z = desired concentration x = height of the fluid in a straight sided container
NPS Museum Handbook , Part I (2005) T:85
5. Are there any other ways to adjust fluid concentrations?
6. When should I replace the fluid?
y = amount of fluid to add (in inches or centimeters) a = measure concentration of the fluid (percent) b = the concentration of the fluid being added (percent)
Yes. You also can adjust the concentration by simply adding 95% alcohol to the appropriate level in the container and then checking the concentration with the density meter. If the new concentration reaches the target range (70-75% ethanol) or is higher, that is acceptable. Higher concentrations are not likely to damage the specimens, but concentrations below the optimum range will permit deterioration.
You may need to replace the fluid if any of the following circumstances occur:
· If the alcohol concentration in a container is 20% or less and there is still a fairly large amount of fluid in the container, it may not be possible to bring the concentration back to the appropriate level. If that is the case, you may need to replace at least some portion of the fluid.
· If the addition of 95% alcohol to the fluid in the container does not bring the concentration to the appropriate range or higher, you may need to replace the fluid.
· If the fluid contains sediment or other particulate residue that is shown by analysis to be damaging to the specimen, you can filter the fluid to remove the sediment and then return the fluid to the container. If the sediment is an indication of an ongoing deterioration of the fluid or specimen, then you may need to replace the fluid.
· If specimen containers are crowded with specimens the result will be poor fluid quality. To fix this:
- Separate the specimens into additional containers.
- Correct the concentration of the fluid in the initial container.
- Use new storage fluids in the additional containers.
7. Should I be concerned if some fluids are discolored?
The fluid surrounding a specimen contains components leached from the specimen. Therefore, loss of specimen material results if you completely replace fluids. You can expect additional leaching as the specimen(s) and replacement fluid reach equilibrium. Replace fluids only under very special circumstances.
Note: Specimens that have become deformed when fluids have evaporated completely may no longer be useful for morphological studies. They are often of limited use after rehydration. However, in the dry state, they may be very stable. They also may be useful for biochemical studies, depending upon the type of fluids that were used originally.
No. Fluids are often discolored; this is not normally a cause for alarm. However, consult a conservator if:
· a fluid has developed a very dark color, and · there is any evidence that a lid, gasket, or label is undergoing
T:86 NPS Museum Handbook , Part I (2005)
deterioration and may be leaching components into the fluid
8. When should I consult a conservator?
9. Are there any health and safety concerns related to maintenance of wet collections?
10. What should I know about emergency preparedness, response, salvage, and long-term recovery?
The conservator or a conservation scientist should determine the appropriate treatment. Do not replace the fluid before you have researched the nature of the deterioration.
Never take any action that might compromise the integrity of research specimens. If specimens are damaged, stabilize the material by non-interventive means. This approach is usually preferable to treatment to repair the damage. For example, you can leave detached parts separate as long as they are kept in the same container with the original specimen. Be sure to separately label the parts to indicate their source.
If a condition indicates active deterioration, the specimen may need treatment to halt further decay. An example might be a metal label that has corroded and become attached directly to a specimen by the corrosion products. Because the corrosion and the specimen damage will continue in a fluid environment, it may be best to remove the label and the corrosion salts, then stabilize the label separately. Do not attempt this type of interventive treatment. Call a professional conservator for assistance.
In general, the safety concerns are the same as those for stabilization and processing of wet collections. Remember to utilize proper waste disposal of any fluids that are replaced during maintenance activities. Use proper engineering controls and personal protective equipment. Always move large tanks and other containers on dollies. Move smaller containers on carts.
Potential emergencies include chemical spills and leaks, fire, and explosions. Fluid collections can also be damaged by floods and earthquakes, especially if shelves are not properly secured and specimen containers are not protected by restraining bars on the shelving units.
Be sure that your park’s structural fire brigade, law enforcement staff, local fire department, emergency medical technicians, and all other emergency response personnel know of all potential hazards and their locations.
The safety concerns that arise during emergency salvage are noted in Chapter 10: Emergency Planning and Help! A Survivor’s Guide to Emergency Preparedness, available from the Alberta Museums Association. Ordering information is available on the association’s website at <www.museumsalberta.ab.ca>.
If specimen containers have broken and fluids have been lost, the most important salvage step is to keep the specimens damp. Ideally, you should keep them damp using the same kind of fluid in which they were stored prior to the emergency. If that’s not possible, at least bag (double bag if you can) the specimens in polyethylene with a small amount of deionized or distilled water. Add a little alcohol to help limit the potential for biodeterioration.
NPS Museum Handbook , Part I (2005) T:87
11. Do I need to document maintenance activities such as replacing fluids?
Note: Following an emergency, be sure to consult a conservation professional. Complex, extensive treatments may be needed as part of the long-term recovery process. If containers have been broken or were poorly sealed the contents may no longer have utility for some scientific research.
Yes. All adjustments of fluid concentration and fluid replacements are essentially specimen treatments that you should fully document in writing. If you discover that containers or labels have contaminated a specimen, note this as well. Any contamination is likely to affect the long-term preservation and the utility of the specimens for research.
During emergency salvage operations, it’s acceptable for you to eliminate individual specimen reports, as long as you document all steps in the overall immediate salvage (in writing and in some imaging system). You should record specific damage to particularly valuable specimens and specimens on loan from other museums, and note the specific salvage methods used, as they may be important for insurance purposes.
T:88 NPS Museum Handbook , Part I (2005)
SECTION V: BIOLOGICAL LOW-TEMPERATURE COLLECTIONS
A. Overview
1. Why are specimens preserved at low temperatures?
2. What low temperatures are used?
Specimens are maintained at low temperatures to preserve:
· soft parts for various biochemical analyses
· whole organisms in a viable (able to live and grow) state
Cold Storage includes temperatures above the freezing point of water (0°C/32°F), but not above about 8°C/46.4°F (a range of 2°-8°C/35.6-46.4°F is recommended). Cold storage is used to extend the shelf life of microorganisms prepared by specialized lyophilization (freeze-drying) techniques.
Freezer Storage includes temperatures between 0°C/32°F and -80°C/ -112°F. Although such temperatures are often used for temporary storage, expansion of water in cells, ice crystal formation, and dehydration can damage biological materials stored at these temperatures.
Ultracold Storage at about -80°C/ -112°F is used for short-term preservation of non-viable samples, such as animal tissue samples.
True Cryogenic Storage includes temperatures that are usually below -130°C/-202°F (the exact temperature is usually determined by the sensitivity of the specimens). -130°C/-202°F is the maximum temperature for long-term stability of plant and animal cells and -150°C/-238°F or lower is considered to be optimum for preservation.
You cannot achieve true preservation of fresh biological material at temperatures between 0°C/32°F and -130°C/-202°F, as:
· fresh material will undergo cellular disruption because of expansion of water in the tissues
· dry biological material will be degraded by an increase in the rate of deterioration of lipids and damage from residual moisture
Note: Increased rate of deterioration of lipids, and increased potential for biodeterioration are hazards for many materials stored at temperatures between 8°C/46.4°F and 16°C/60.8°F.
Lyophilization and cryogenic storage options generally require pre-treatment of the specimens using a cryoprotectant chemical.
3. What specimens are preserved at low temperatures?
• Plants
- Non-vascular (strains of fungi, including yeasts)
- Vascular (cell lines, seeds, cloned probes, other samples)
NPS Museum Handbook , Part I (2005) T:89
· Protists
- Some algae
- Protozoa (especially parasitic strains)
· Viruses
- Plant, human, and animal viruses
- Cloned viral genomes
· Bacteria
- Bacterial strains
- Bacteriophages
- Plasmids
· Animals
- Tissues (dissected organs, muscles)
- Cell lines
- Blood and blood components (whole blood, serum, plasma, antisera)
- Semen
- Venom
- Other samples (cloned probes, isolated proteins and nucleic acids, cell suspensions)
Note: The largest organisms that can be preserved in a viable state are some insects.
Cryogenic collections are often samples specifically set aside for destructive analyses, using tissues from voucher specimens in traditional collections. Such cryogenic samples are ancillary or supportive to the voucher specimens. However, ancillary collections may include one or more tissue samples from individual specimens, or include samples from more than one collection or institution. Sometimes there is no voucher specimen. Because of these issues and the fact that various tissues may be indistinguishable without biochemical analyses, you need to ensure that your records are extremely accurate.
4. What agents of Inappropriate temperature (including temperature fluctuations) is the deterioration affect low- primary agent of deterioration for low temperatures collections.
T:90 NPS Museum Handbook , Part I (2005)
temperature collections? · Cold Storage at temperatures of 2-8°C/35.6-46.4°F will extend the life of some freeze-dried cultures that are reasonably resistant to temperature changes, but may be damaged by temperatures outside this range.
· Ultracold Storage at temperatures around -80°C/-112°F:
- will slow the rate of deterioration of tissue samples preserved for DNA analysis but will not stop the deterioration
- the rate of deterioration increases when samples are repeatedly removed from storage for use at higher temperatures
· Cryogenic Storage at temperatures below -130°C/-202°F will preserve specimens well, but is expensive to install and maintain.
Cryogenic Specimens cannot be stored at temperatures above about -130°C/-202°F and below 0°C/32°F, as this will destroy their utility. To prevent such damage, make sure that you have backup systems in place so that cryogenic units can maintain the appropriate temperatures at all times.
The other agents of deterioration in addition to inappropriate temperature include:
· Neglect includes a lack of knowledge and skills, failure to follow standards or provide adequate documentation, apathy, lack of administrative support and resources. Common instances of neglect are:
- marking ampoules illegibly or inaccurately
- failing to link tissues, cell lines, etc. to identifiable voucher specimens
- failing to monitor storage environments to ensure that appropriate temperatures are maintained constantly
- failing to provide adequate backup systems to prevent temperature increases
- the lack of temperature control during sample use
· Contaminants can damage low-temperature collections. Do not allow specimens to come into contact with:
- other specimens, directly or indirectly (for example, transfer through handling)
- any non-sterile surface Contaminants can destroy a specimen’s utility for many types of research. Maintain pristine work areas and utilize appropriate biofilters, proper storage containers, and appropriate handling methods to eliminate specimen contamination.
· Physical Forces can damage or destroy low-temperature collections.
NPS Museum Handbook , Part I (2005) T:91
- Inappropriate ampoules or ampoules containing excessive specimen tissues can burst when removed from liquid nitrogen. (Liquid nitrogen is used to both transport and store some materials preserved at low temperatures.) This will destroy the specimens and pose chemical, physical, and biological hazards to human safety.
- Freezing at temperatures above cryogenic levels will permit moisture in tissue samples to form ice crystals that will damage tissue structures .
· Criminal Activity is usually not a major threat to collections stored at low temperatures. However, some low-temperature collections may require additional security measures if they include:
- viable organisms that are pathogenic to humans or human resources (for example, to agricultural plants and animals, or water supplies)
- tissues that may contain pathogenic organisms in a viable state
Institutions that maintain such material must possess permits and sufficient security to ensure that their holdings cannot become a danger to public health.
5. What health and safety concerns are related to low-temperature collections?
As with fresh or semi-fresh biological material, there is the possibility of that human pathogens are present in low-temperature materials . These may include either the specimens themselves or as infectious agents in the specimens. Other potential hazards include:
· Liquid nitrogen, which is the best storage medium for cryogenic preservation. If you use liquid nitrogen, you need:
- special personal protective equipment (PPE)
- special building ventilation systems
- appropriate ampoules that are resistant to breakage resulting from thermal changes
- possible replenishment of liquid nitrogen, depending on the system used
·
You also may need to equip your building with special piping for delivery of the liquid nitrogen to cryogenic units. Dry ice (solid carbon dioxide) is sometimes used to protect material removed from cryogenic storage. If you use dry ice:
- utilize special containers and personal protective equipment
- do not use dry ice in confined closed areas because of respiratory concerns involving excessively high atmospheric quantities of carbon dioxide
T:92 NPS Museum Handbook , Part I (2005)
Don’t store dry ice in sealed rigid containers. This can cause an explosion when the containers are opened. Use vented containers.
B. Stabilization and Processing of Low-Temperature Collections
· Ethylene oxide is used in some preparation procedures to sterilize the preparation chambers. This chemical requires:
- special exhaust ventilation
- personal protective equipment
- specialized training
To reduce risks to you, other staff, and researchers, be sure to utilize:
· proper procedures
· well-designed preparation, storage, and research facilities
· biohazards hoods for any work with specimens preserved at low temperature
· personal protective equipment, including long insulated gloves and face shields when working with material stored at cryogenic temperatures
· properly fitted respiratory protection, and proper gloves and other protective clothing when
- handling microorganisms
- working with liquid nitrogen and ethylene oxide
IMPORTANT NOTES CONCERNING LOW-TEMPERATURE COLLECTIONS:
Stabilization of low-temperature collections should not be the responsibility of the park’s collection staff. Researchers, research designs, and material utilization will control the conditions of biological specimens and specimen parts intended for low-temperature preservation. Stabilization of such material is beyond the control or operations of the park.
Low-temperature collections can pose serious health and safety risks. They can also involve significant resource commitments (time, money, personnel, space, facilities, and equipment) for operating specialized low-temperature equipment.
No individual should be involved with stabilization of biological materials for low-temperature collections without first receiving specialized training. Such training far surpasses any guidance provided in this appendix. Therefore, the following information attempts to focus on the processing, storage, and maintenance of low-temperature collections. Be aware that serious health and safety risks are still present with these stages of preservation.
NPS Museum Handbook , Part I (2005) T:93
Finally, considering evolving issues of national security as they relate to the legality of some preserved biological materials (viruses, spores, toxins, etc.), special permits and security clearance may be required for any possession, handling, or transport of hazardous biological materials. The information contained in this appendix does not address any stage of preservation of such materials.
1. How should I label low-temperature collections?
Refer to the previous general discussions of labeling specimens, as well as those noted in MH-II, Appendix J, Section K, Natural History Specimens. Other considerations specific to low temperature include:
· Condensation on cold surfaces, water solubility of some inks, and impervious surfaces (like plastic ampoules) can create the problems for using inks in low-temperature collections. Staff sometime use alternative methods such as soft pencils or mechanical inscription.
· Carbon-based, black inks are the only type of inks that you should use on specimen labels. Carbon inks do not fade over time.
- Commercial, black printing inks are usually carbon-based.
- Most laser and photocopier toners are usually carbon-based.
- Laser and photocopiers apply the toner with a certain amount of heat, which helps fuse the toner particles to the paper.
Liquid inks vary in quality. A good choice is black ink designed for writing on drafting film, using technical pens. These tend to be carbon-based inks with a neutral pH that adhere well to almost any surface.
· Fiber-tipped pens. Black liquid inks in some fiber-tipped pens are acceptable for labeling specimen containers.
- Be sure to choose pens with carbon-based inks.
- Fiber-tipped pens that contain colored or black dye inks are also available.
- Many of these products may not function well if water from condensation is present.
- Cold temperatures will slow the fading of the dyes in these inks, but rate of fading will depend upon both the temperature and the humidity level in storage.
- Time spent out of the low-temperature environment will permit the inks to fade quite rapidly.
· Testing of Inks. Test inks to see:
- How long does it takes for any ink to dry so that it won’t smear?
- How well does it resist smearing when wet?
- What’s the resistance of the ink to various fluids, minimal abrasive
T:94 NPS Museum Handbook , Part I (2005)

2. What should I know about loans of low-temperature collections?
3. What agents of deterioration affect low-temperature collections during processing?
forces, and to prolonged exposure to UV radiation?
Avoid any ink that fails such tests.
· Bar Coding is often used for the specimen and sample vials used in low-temperature preservation. Bar coding facilitates rapid inventory and reduced risk of mismatching specimens with data.
For information concerning incoming loans, see MH-II, Chapter 2, Section P. For information concerning outgoing loans, see MH-II, Chapter 5. You should also be aware of the following additional standards that pertain to loans of specimens preserved at low temperature:
· The use of hazardous biological materials may be restricted.
· Do not loan entire holdings of a taxon for use at a single time (it may be necessary to culture a new colony before allowing specimens to be sent).
· Commercial shipments of hazardous biological materials must be in compliance with all Federal and State regulations, including the Hazardous Materials Regulations (49CFR, Parts 171 through 180).
The primary agents of deterioration during processing are:
· Insufficient knowledge and skills (neglect) that can render a specimen useless.
· Contaminants can result from poor handling techniques. Both physical damage and contamination can result from removing improperly sealed ampoules from some types of cryogenic storage.
· If liquid nitrogen has leaked into specimen containers, the containers may burst when exposed to warmer temperatures.
· Inappropriate temperatures can rapidly destroy the utility of specimens preserved at low temperatures.
These agents of deterioration are shown in Table T.10., below.
PRIO RITY 1 PRIORITY 2 PRIORITY 3
Neglect Criminal activity Light
Contaminants Water
Physical Forces Fire
Inappropriate T Pests
NPS Museum Handbook , Part I (2005) T:95
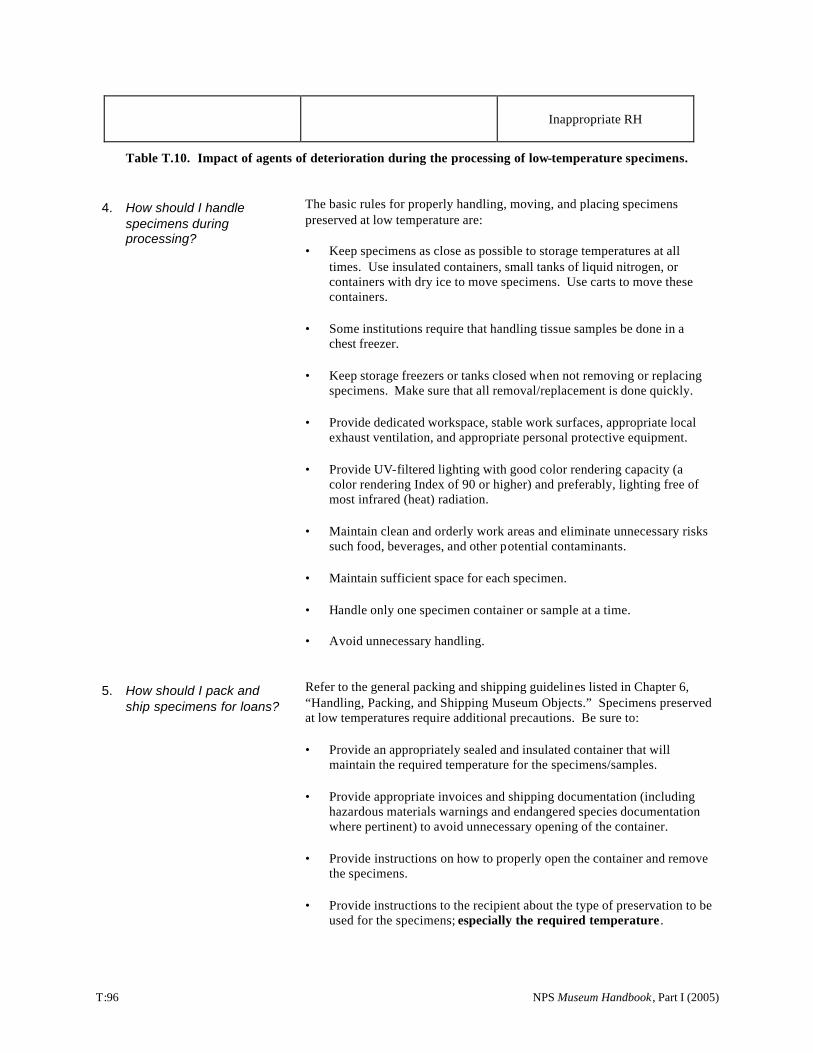
Inappropriate RH
Table T.10. Impact of agents of deterioration during the processing of low-temperature specimens.
The basic rules for properly handling, moving, and placing specimens4. How should I handle preserved at low temperature are:specimens during
processing? · Keep specimens as close as possible to storage temperatures at all
times. Use insulated containers, small tanks of liquid nitrogen, or containers with dry ice to move specimens. Use carts to move these containers.
· Some institutions require that handling tissue samples be done in a chest freezer.
· Keep storage freezers or tanks closed when not removing or replacing specimens. Make sure that all removal/replacement is done quickly.
· Provide dedicated workspace, stable work surfaces, appropriate local exhaust ventilation, and appropriate personal protective equipment.
· Provide UV-filtered lighting with good color rendering capacity (a color rendering Index of 90 or higher) and preferably, lighting free of most infrared (heat) radiation.
· Maintain clean and orderly work areas and eliminate unnecessary risks such food, beverages, and other potential contaminants.
· Maintain sufficient space for each specimen.
· Handle only one specimen container or sample at a time.
· Avoid unnecessary handling.
Refer to the general packing and shipping guidelines listed in Chapter 6, 5. How should I pack and “Handling, Packing, and Shipping Museum Objects.” Specimens preservedship specimens for loans? at low temperatures require additional precautions. Be sure to:
· Provide an appropriately sealed and insulated container that will maintain the required temperature for the specimens/samples.
· Provide appropriate invoices and shipping documentation (including hazardous materials warnings and endangered species documentation where pertinent) to avoid unnecessary opening of the container.
· Provide instructions on how to properly open the container and remove the specimens.
· Provide instructions to the recipient about the type of preservation to be used for the specimens; especially the required temperature .
T:96 NPS Museum Handbook , Part I (2005)
97
T:
6. How should I document a specimen’s condition during processing?
7. What health and safety concerns should I be aware of during processing?
· Send loans by overnight express at the beginning of the week to ensure better control and to minimize risks of thawing prior to delivery.
· Send frozen materials in heavily insulated containers with “ice-packs.”
Note: Dry ice is considered to be a dangerous good. Do not use dry ice in a commercial shipment unless you have received DOT-approved training in packing, labeling, and shipping dangerous goods OR hire a certified HAZMAT shipping contractor to properly pack, prepare, and label the shipment for transport.
· Be sure that all shipments fully comply with Federal regulations regarding:
- shipping documentation
- the shipment of endangered species
- the shipment of hazardous materials.
· Ensure that the specimens are properly packaged, to protect both the specimens and anyone handling the shipment.
· Mark outside of shipments as “FROZEN MATERIALS - KEEP FROZEN” or “TEMPERATURE SENSITIVE MATERIAL - KEEP REFRIGERATED.”
Condition reporting of most cryogenic materials is not performed in the traditional manner. Be sure to report any adverse conditions. For example, document samples that have experienced thawing, freezer-burn, and potentially compromised data.
If the cryogenic materials are more consistent to traditional collections (where whole identifiable organisms are maintained), you may be able to use a traditional natural history condition report, as previously noted. Health and safety concerns during processing are primarily associated with human pathogens. However, there also are concerns associated with storage in liquid nitrogen. To prevent injury, be sure to:
· Wear long, insulated gloves to protect the hands and arms against the cold.
· Wear a face shield when accessing material that may have been in the liquid phase of liquid nitrogen.
· Protect all skin against contact with dry ice.
Other hazards that you should be aware of include:
Dry Ice
Do not use dry ice in well-sealed rigid containers. Sublimation of the dry ice can increase internal pressure to the point that the container may explode. Use ventedcontainers only.
NPS Museum Handbook , Part I (2005) Don’t store containers of dry ice in enclosed areas. As dry ice “melts,” carbon dioxide is released. Within enclosed areas, carbon dioxide can build to levels dangerous to people.
C. Storage of Low-temperature Collections
1. Are there any special storage considerations concerning low-temperature collections?
2. How should I organize low-temperature collections?
Freeze-Dried Specimens
Anyone handling specimens that are being freeze-dried must wear both respiratory protection and gloves for safety. If freeze-dryers are sterilized using ethylene oxide, the staff members who apply the chemical must have special training. They also may be required to have a general license or certification for application of a pesticide and a special license or certification for application of a fumigant. Additional requirements include:
· medical monitoring of personnel
· environmental monitoring for residual ethylene oxide levels
· full compliance with all applicable OSHA regulations
If there are biological toxins or pathogens involved, you MUST possess specialized training, permits, and sufficient security to ensure that the holdings cannot become a danger to public health.
For detailed information concerning the security of collections, see Chapter 9, “Museum Collections Security and Fire Protection.”
Organize the collection to enable rapid retrieval and replacement of specimens. Don’t let access risk temperature control for other specimens or samples. Place specimens that are frequently used within easy reach. There are two primary methods of organizing cryogenic materials. Both have advantages and disadvantages. Your choice should depend on how your collection is used.
Sequential or chronological organization groups material from a common time and source. Every sample has a definite and predictable location in the storage unit. If a sample has been consumed through prior research, an empty space is left.
· The advantage to this type of organization is the maximization of space.
· The disadvantage is that some research is based on multiple samples of common taxa. This would require the researcher to go through the entire cryogenic collection to obtain the needed samples.
Identification and classification systems organization is another method of arrangement. This involves maintaining samples in groups based on various identification and classification systems.
· The primary advantage is that most material needed for research purposes will be located in one area of the collection. This is less disruptive to the collection as whole.
T:98 NPS Museum Handbook , Part I (2005)

· The disadvantages are:
- As new material is added to specific taxa, more space within expensive storage units is required to accommodate expansion
- The location of individual samples is less definite and predictable than the sequential or chronological organization.
Remember that organization can vary among disciplines and institutions. It may be more practical to simply arrange specimens according to catalog number. Whichever method you choose, be sure that every specimen has a designated and predictable location.
After you have organized your collection, don’t forget cabinet signage, labels, and floor plans. Label each low-temperature storage unit with a sign indicating the beginning and ending taxa and catalog numbers. This avoids unnecessary opening of the unit. Use the same method for individual shelves, trays, or other equipment used to hold samples or specimen vials.
The ultimate goal is to allow rapid and easy access to a specimen with minimal handling of other specimen containers.
3. What are the primary agents of deterioration that affect specimens in storage?
The agents of deterioration that pose the greatest risks to low-temperature collections in storage are:
· Neglect, such as:
- the improper use of storage equipment
- failure to monitor environmental conditions
- careless handling of specimens
- lack of familiarity with collection organization and arrangement systems
- disassociation of specimens from data
· Inappropriate Temperature, especially:
- temperature increases
- repeated exposure to freezing and warming temperatures
Such circumstances will cause specimens to deteriorate.
PRIORITY 1 PRIORITY 2 PRIORITY 3
Neglect Contaminants Inappropriate RH
NPS Museum Handbook , Part I (2005) T:99
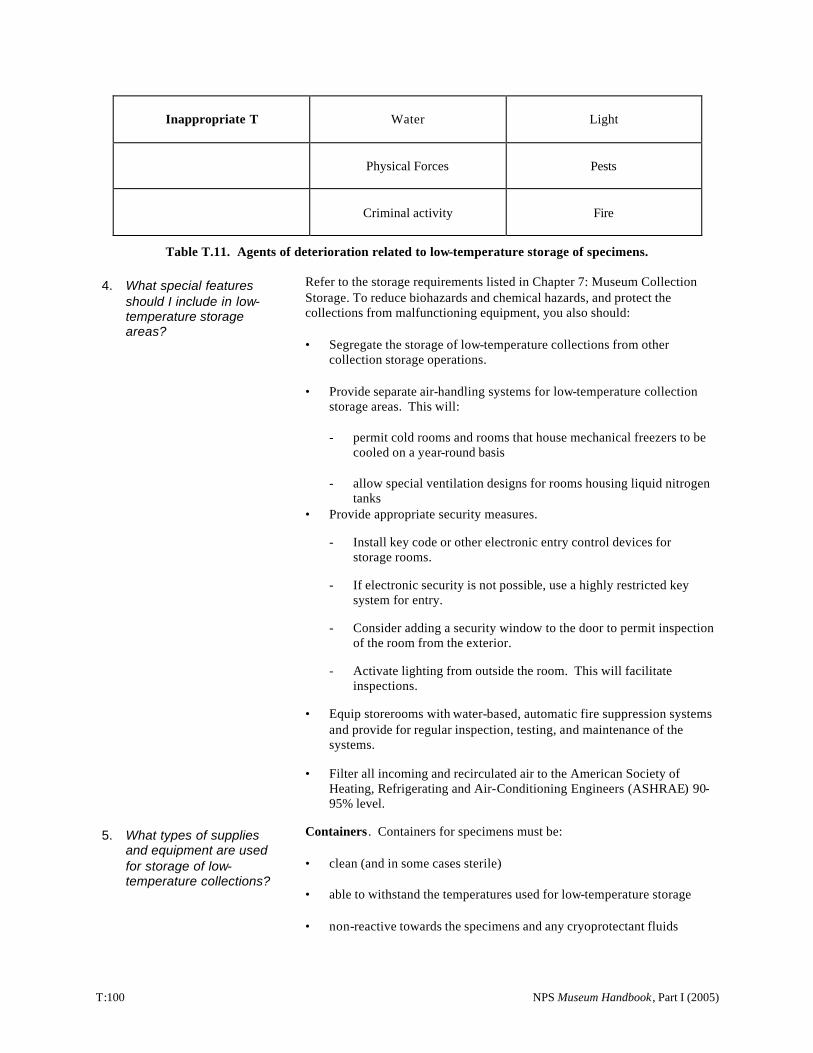
Inappropriate T Water Light
Physical Forces Pests
Criminal activity Fire
Table T.11. Agents of deterioration related to low-temperature storage of specimens.
Refer to the storage requirements listed in Chapter 7: Museum Collection4. What special features Storage. To reduce biohazards and chemical hazards, and protect theshould I include in low-collections from malfunctioning equipment, you also should:temperature storage
areas? · Segregate the storage of low-temperature collections from other
collection storage operations.
· Provide separate air-handling systems for low-temperature collection storage areas. This will:
- permit cold rooms and rooms that house mechanical freezers to be cooled on a year-round basis
- allow special ventilation designs for rooms housing liquid nitrogen tanks
· Provide appropriate security measures.
- Install key code or other electronic entry control devices for storage rooms.
- If electronic security is not possible, use a highly restricted key system for entry.
- Consider adding a security window to the door to permit inspection of the room from the exterior.
- Activate lighting from outside the room. This will facilitate inspections.
· Equip storerooms with water-based, automatic fire suppression systems and provide for regular inspection, testing, and maintenance of the systems.
· Filter all incoming and recirculated air to the American Society of Heating, Refrigerating and Air-Conditioning Engineers (ASHRAE) 90-95% level.
Containers . Containers for specimens must be:5. What types of supplies and equipment are used for storage of low- · clean (and in some cases sterile) temperature collections?
· able to withstand the temperatures used for low-temperature storage
· non-reactive towards the specimens and any cryoprotectant fluids
T:100 NPS Museum Handbook , Part I (2005)
· sealed well enough to prohibit ingress of contaminants or release of material from the specimens
· impermeable to oxygen
Glass or polypropylene containers are usually used for many cryogenic or other low-temperature storage methods. Be aware that:
· Polypropylene is rapidly becoming the most popular type of container material.
· Only some polypropylene or glass vials can be used in the liquid phase of liquid nitrogen. Most must be kept in the nitrogen vapor over the liquid to avoid the potential for rupture unless they are further sealed in polyethylene tubing.
· Some polypropylene vial and closure systems have been designed especially for use in tanks containing liquid nitrogen. These are the best choice for shipping samples collected in the field.
Container closures . The closures for containers vary with the temperature at which the container will be stored. There are some vial and cap systems that are designed to withstand liquid nitrogen temperatures, but it’s important to carefully consult the manufacturer’s recommendations when choosing a system. Do not use rubber-stoppered vials for storage at liquid nitrogen temperatures.
Rack and Trays. A good technique for storing specimens inside mechanical freezers is to use stainless steel racks to hold divided cardboard or polypropylene trays containing the sample vials.
· This allows you to easily label the freezer contents and reduces the number of samples exposed to ambient air during retrieval and replacement.
· There are stainless steel racks suitable for use in either upright or chest freezers.
· Stainless steel racks for use with divided polypropylene trays and aluminum canes have also been developed to hold specimen vials for storage in the vapor over liquid nitrogen. These systems permit retrieval of selected vials without exposing large numbers of specimens to temperature changes.
· You can also use divided tray systems for freeze-dried specimens stored in sealed vials in cold storage rooms or in refrigerators capable of maintaining 2-8°C/35.6-46.4°F or less.
Cold Rooms used to store freeze-dried material are maintained at temperatures just above freezing (2-8°C/35.6-46.4°F).
· Cold Rooms require dehumidification of incoming air to ensure that there is not a problem with condensation that could lead to mold growth.
NPS Museum Handbook , Part I (2005) T:101

· They require backup power supplies to ensure that the temperatures are maintained in the event of a power failure.
· Cold Rooms will prolong the shelf life of viable specimens that are preserved by freeze-drying, but do not guarantee long -term preservation. You may need to periodically grow new colonies and create new specimens to ensure that stocks are maintained.
Mechanical Freezers (standard freezers and ultracold freezers) are also used to store low-temperature collections.
· Freezers can meet virtually any temperature requirement, but initial costs and operating costs increase as the desired temperature goes down.
· Many institutions maintain tissue samples in mechanical freezers at -80°C/-112°F.
- Long-term preservation that would be achieved at true cryogenic temperatures is sacrificed to economics.
6. What else should I know about mechanical freezers?
- Most institutions can afford to maintain temperatures of -80°C/ -112°F but cannot afford the cost of lower temperatures.
Freezers use a lot of energy to obtain temperatures of -80°C/ -112°F. They also produce a great deal of heat. Because of this, only use freezers in rooms that have constant (24 hours/day, year-round) air conditioning or appropriate heat exhaust systems . You also need to equip the freezers with back-up generators in case of a power failure.
There are two main kinds of mechanical freezers:
· Upright freezers are easy for staff to use. However, there is a tendency for temperature gradients to form when the door is opened. This can compromise temperature control.
· Chest freezers are less prone to the problem of temperature gradients forming. As noted above, both types become increasingly expensive to purchase and operate as the target temperature drops.
Liquid nitrogen freezers provide an excellent storage medium. They can maintain specimens at temperatures below -130°C/-202°F (usually at least -150°C/-238°F).
· Rooms that contain liquid nitrogen freezers must be properly ventilated:
- when the freezers are refilled with liquid nitrogen
- when oxygen levels in the room become too low for human safety
· If a number of liquid nitrogen freezers are housed in the same room, it’s best to deliver the nitrogen through pipes from a bulk tank. Don’t try to refill the freezers manually.
· Piping for liquid nitrogen has special design requirements, including:
- insulation
T:102 NPS Museum Handbook , Part I (2005)
7. How should I store specimens inside a freezer?
8. What about storage of DNA samples?
- safety valves
· Use low-pressure tanks to supply the liquid nitrogen. High-pressure tanks can be hazardous to staff during manual refilling. They also can damage the automatic supply units.
· Within the tanks, specimens are usually stored in the vapor over the liquid, but can be stored in the liquid itself.
Use stainless steel racks to hold divided cardboard or polypropylene trays containing the sample vials. This is a good technique, which:
· allows you to easily label the freezer contents
· reduces the number of samples exposed to ambient air during retrieval and replacement
Stainless steel racks are available for use in either upright or chest freezers.
To hold specimen vials for storage in the vapor over liquid nitrogen, you can use specialized:
· stainless steel racks and divided polypropylene trays
· aluminum canes
These systems permit retrieval of selected vials without exposing large numbers of specimens to temperature changes.
You can also use divided tray systems for freeze-dried specimens stored in sealed vials in cold storage rooms or in refrigerators capable of maintaining 2-8°C/35.6-46.4°F or less.
Low-temperature storage is not a prerequisite for successful extraction of DNA from specimens. In some cases, it is possible that simply freeze-drying some organ tissues, and then maintaining them in dry conditions might work as well as storing fresh samples at very low temperatures.
The main reason for low-temperature storage for samples preserved for nucleic acids analyses seems to be the ease of extraction when specimens have not been treated by any other methods, rather than the quality of preservation.
DNA can now be removed from highly degraded materials using the polymerase chain reaction (PCR) technique. This method allows DNA to be successfully extracted from increasingly smaller samples of old museum materials. This practice has improved steadily as a result of interest by forensic scientists. As a result, sample size and environmental conditions are not as important as they were when the techniques for DNA extraction were initially developed.
As long as biological tissues have not been contaminated in some adverse fashion, or chemically treated in a way that destroys the nucleic acids, most dry biological specimens can be used for DNA analyses.
NPS Museum Handbook , Part I (2005) T:103
9. Are there any special health and safety concerns related to storage of low-temperature collections?
The primary health and safety concerns include:
· protection against biohazards
· exposure to high concentrations of carbon dioxide from dry ice
· skin lacerations from exploding ampoules or vials
· injuries resulting from exposure to very low temperatures
· displacement of oxygen caused by evaporation of liquid nitrogen in confined spaces
Consult your regional curator, an industrial hygienist, the Centers for Disease Control and Prevention (CDC), and the National Research Council of the National Academy of Sciences for information concerning the control of specific biohazards. Use face shields and long, insulated gloves when retrieving or replacing samples from the liquid phase of liquid nitrogen. Use long, insulated gloves when working with material in the vapor phase over liquid nitrogen. To protect against low oxygen environments when dealing with liquid nitrogen, equip all storage areas with oxygen monitors, and audible and visible alarms that alert staff to problems before they enter.
D. Maintenance of Low -temperature Collections
1. Are there any special maintenance issues concerning storage of low-temperature collections?
Low-Temperature Equipment
Specific maintenance concerns depend on the type of low-temperature equipment that you use. Be sure to discuss these issues with the equipment manufacturer and/or distributor.
Alarm systems are vital! Alarm systems that can warn of power or equipment failures at any time of the day or night are an important part of emergency preparedness for collections preserved at low temperatures. Many “freezer alarms ” are designed to be audible or visible only to someone who is nearby when the alarm is triggered. Such alarms are useless 16 hours every weekday and on weekends. Install alarm systems that are monitored 24 hours a day by a UL-listed central station that will immediately notify staff in the event of a power or equipment failure.
Be sure that your park has emergency generators, backup freezers, and/or transportation and storage arrangements in place to move collections in the event of an emergency. This information should be included in your park’s Emergency Operations Plan. Make sure that all staff are aware of these procedures and their individual responsibilities.
Staff Training
Be sure that all collection staff have been properly trained. The most common problem with the maintenance of low-temperature collections is
T:104 NPS Museum Handbook , Part I (2005)
2. What is involved in salvage of low-temperature collections?
lack of training. Without proper training, uninformed “good intentions” easily can cause specimen damage. For example, tissue samples and other frozen material may deteriorate if:
· freezers are left open
· specimens are transported from freezers to work areas without temperature protection
· specimens are used at room temperature
· you allow repeated cycles of freezing and warming, which will:
- cause physical damage to the specimens
- destroy the viability of cell suspensions when their cryoprotective fluids are allowed to warm to room temperature and then are re-frozen
· mishandled, causing:
- breakage of vials or ampoules
- contamination by contact with non-sterile surfaces
Any of these instances can destroy the utility of the material. For this reason, full documentation is required for every sample that has been compromised.
Don’t underestimate staff training needs, equipment needs, and operational costs for low-temperature storage. All of these requirements can be quite expensive. As with all other types of museum collections, if you cannot provide an appropriate level of care for them, you shouldn’t attempt to maintain low-temperature collections at your park. Such collections would be better housed at an institution that specializes in research and care of such collections.
Salvaging specimens after an emergency or a disaster:
· is usually concerned with stabilizing the specimens
· normally occurs within the first 48-hours after the collection or area is secured from the situation
This initial stabilization may involve some treatments. However, such treatments are not designed for restoration or repair, but to keep further damage at bay. The primary concern for salvage of low-temperature collections is maintaining the proper preservation temperatures .
Once most collections preserved at -80°C/-112°F or lower have been defrosted and allowed to remain at room temperatures for more than a few hours, they can be damaged by bacteriological and enzymatic processes. Tissue samples are especially susceptible to this type of damage. Freeze-
NPS Museum Handbook , Part I (2005) T:105
dried materials may last much longer if kept in well-sealed containers and not exposed to moisture.
3. What is the “best method” of salvage?
Preplanning
As with all potential disasters and emergencies, preplanning is vital. An appropriate and effective emergency and salvage plan can spell the difference between an inconvenience and a major disaster. Be sure that your park’s Emergency Operations Plan (EOP) includes relevant information concerning low-temperature collections if your park maintains such materials, especially information related to any biohazards.
· Ensure that all staff:
- are aware of their emergency responsibilities
--
possess appropriate training have full knowledge of all potential hazards (including biohazards)
- possess proper personal protective equipment
· Conduct periodic reviews of the potential for b iohazards for all low-temperature collections.
· Ensure that you implement adequate control measures for any type of emergency situation involving biohazards.
· To prevent release of hazardous organisms during salvage efforts, request assistance from the Centers for Disease Control and Prevention (CDC) and your state health department.
- Don’t wait until an emergency to contact these organizations and agencies; by then it could be too late .
- Include the CDC and your state health department in emergency pre-planning efforts.
- Be sure that your park’s EOP contains all such relevant information.
Emergency Response
HUMAN SAFETY IS PARAMOUNT! Address all potential life safety issues before you attempt any collection salvage. Ensure that:
· All staff possess full knowledge of potential biohazards.
· Facilities are properly ventilated.
· All staff possess appropriate training and personal protective equipment (PPE).
· The park has procedures for the proper disposal of any biohazards, if portions of some samples are not salvageable.
Once it is safe to enter the area, you can start the salvage operation:
T:106 NPS Museum Handbook , Part I (2005)
4. Where can I get salvage advice and assistance?
5. How should I document emergency salvage efforts?
· Transfer frozen specimens to backup freezers or to temporary storage in containers with dry ice or liquid nitrogen. Store the specimen over the liquid, not in it, if possible.
· It may be possible to salvage some tissue samples by freeze-drying. This requires that you maintain sterile conditions throughout the freeze-drying process.
Notes:
· If samples from the same voucher specimens are available at other repositories, heroic salvage efforts may not be worthwhile.
· To be effective, all salvage operations should be targeted toward specimens whose importance has been determined in advance. These must be well marked and placed in storage so as to facilitate salvage activities.
IMPORTANT: Be sure that your museum standard operating procedures include information pertaining to the proper disposal of any biohazards, if portions of some samples are not returned to storage after salvage or research use.
Contact your regional/SO curator, the Senior Curator of Natural History, a natural history conservator, or staff from a nearby large natural history museum or university repository. You can also contact organizations such as:
The American Type Culture Collection PO Box 1549 Manassas, Virginia 20108 (703) 365-2700 www.atcc.org
The American Type Culture Collection’s staff have specialized expertise in dealing with collections preserved at low temperatures. It’s a good idea to include this organization on your park’s emergency salvage call list.
Tissue samples are unlikely to survive for more than a few years at the storage temperatures commonly used for their preservation. As a result, management and care issues tend to overlap for documentation, as with emergency salvage. The primary concerns for collections care documentation are:
· How long has the specimen been in storage?
· How often and under what circumstances has the specimen been used?
Tracking this information will provide a reasonable schedule for disposal of specimens that have outlived their utility and therefore are no longer worth the costs of preservation.
During emergency salvage it is acceptable to simply document all
NPS Museum Handbook , Part I (2005) T:107

immediate salvage steps, both in writing and in some type of imaging system. Record specific damage to particularly valuable specimens and specimens from other institutions, and note specific salvage methods that are used. Such data may be important for insurance purposes or essential in resolving liability issues.
T:108 NPS Museum Handbook , Part I (2005)
SECTION VI: BIOLOGICAL MICROSCOPY COLLECTIONS
A. Overview
1. Why are some specimens preserved as microscope preparations?
Scientists preserve certain specimens as microscope preparations to preserve whole or partial organisms for:
· various kinds of microscopic examination
· some kinds of biochemical analyses, including extraction of DNA
Specimens prepared for microscopy may be found in all biological collections, but are most common in these collections:
· entomology
· mycology
· palynology
· parasitology
It’s also common for microscopy collections to be ancillary to more traditional collections. Examples of such ancillary collections include:
· histology
· karyology
· hair samples
· scales
· some gentalia
Be sure that microscope slides of parts tied to another specimen are given the same catalog number as the specimen. Link or otherwise cross-reference all data too.
2. How are specimens preserved as microscope preparations?
There are several basic types of microscope preparations for biological specimens or specimen parts:
· mounted on flat, glass microscope slides of various sizes, usually with round, square, or oblong cover slips
· in micromounts (paperboard, aluminum, or glass slides that have one or more cavities for the specimen(s), usually with a polyester film or glass cover slip on one side or possibly on both sides
· mounted on stubs for scanning electron microscopy (SEM)
· removed from SEM stubs
NPS Museum Handbook , Part I (2005) T:109

3. What agents of deterioration affect microscopy collections?
· prepared as thin sections (cut into very thin slices) for subsequent examination under various levels of magnification
They can also include casts or other replicas of specimens or specimen parts (often used for SEM).
The specimens or specimen parts for microscopy may be:
· immersed in a natural or synthetic liquid or resinous mounting medium, often with a ringing medium (a material used around the margin of the cover slip to protect the specimen and the mounting medium)
· embedded in a solid or semi-solid wax or resin (often used for thin sections)
· dry-mounted without a mounting medium or coating, but often attached to the slide or stub with a small amount of an adhesive
· coated with various metallic (e.g., aluminum, gold, gold-palladium alloy) or non-metallic substances (such as carbon) to improve the image of the specimen/specimen part for SEM, and attached to a stub with a small amount of adhesive
Specimens prepared for microscope slides or for thin sections are often:
· cleared (treated with a enzymes or alkaline chemicals that render parts of the specimen transparent to light)
· stained (treated with dyes that differentially color various tissues to make them easily visible)
The impact of various agents of deterioration on microscopy collections is largely unknown. This topic has not yet been adequately examined in scientific studies. As a result, what little that is known comes from observations by collections staff. As with other biological collections, inappropriate temperature, contaminants, neglect, and inappropriate relative humidity levels undoubtedly pose risks to specimens preserved for microscopy. Be aware of the following risks:
Physical Forces
· Glass breakage: specimens mounted on glass substrates are prone to damage from breakage of the glass.
· Specimens mounted on scanning electron microscope stubs are small and usually very fragile.
· Gravity can damage many specimens in mounting media. This is because the media can flow over time and move specimens out from under protective cover slips.
Inappropriate Temperature
The precise temperatures that pose risks vary with the particular medium.
T:110 NPS Museum Handbook , Part I (2005)
· The mounting, ringing, and sometimes the embedding media used in preparing specimens for microscopy can flow under the force of gravity at room temperatures.
· Elevated temperatures can increase the tendency for mounting media to flow.
· Temperatures at or below freezing may cause the mounting media to fracture.
Contaminants
In general, any gas phase material that can promote the oxidation of an organic substance is likely to cause damage to the synthetic and natural resins used in many mounting and ringing media. This includes peroxides emitted by wood and wood by-products, including many poor quality paper products.
Particulates may also damage specimens prepared for microscopy. This is because they can become absorbed into the surface of some resins, and obscure fine details in the specimens.
Inappropriate Relative Humidity
· Inappropriate relative humidity levels, whether very high or very low are thought to damage some ringing and mounting media.
· It is possible that very high relative humidity could cause some resins to become cloudy or moldy. This would obscure the specimen.
· Very low relative humidity might cause desiccation of mounting, ringing or embedding media. This can lead to physical damage to specimens.
Neglect
Neglect can result in damage to all collections, including microscopy preparations, and is characterized by:
· insufficient knowledge and skills
· failure to follow standards and/or provide adequate documentation
· apathy
· lack of adequate administrative support and funding
Common instances of neglect in microscopy collections include the failure to: link specimen parts to identifiable voucher specimens; provide backup systems to ensure appropriate environmental conditions; provide adequate storage to protect against contaminants.
NPS Museum Handbook , Part I (2005) T:111
4. Are there any health and safety concerns related to microscopy collections?
Visible and UV Light
Microscopy preparations are generally kept in cabinets or boxes that protect them from light. However, during examination, they are apt to be exposed to very intense light. Prolonged exposure will fade the color in some stains. Light sources rich in ultraviolet radiation will not only increase this rate of fading, but may also promote the oxidation (aging, usually accompanied by yellowing) of many media used for embedding, mounting, or ringing.
Pests
Other than insects attracted to the adhesive on paper slide labels, insect and rodent pests are rarely, if ever, a threat to microscopy preparations.
Water
Prolonged immersion in water from a flood or leak will soften some natural and synthetic resins used as various media. Immersion might soften the adhesives used to mount specimens on SEM stubs. It also may damage the ink, paper, or adhesives used in labeling slides, resulting in loss of essential data.
Fire
Fire can cause slides to break, soften media, and may deposit soot on slides and specimens mounted on SEM stubs.
Yes. Be aware of the following safety issues:
· Any risk from human pathogens that may be present in the specimens is usually greatly reduced if the specimens are mounted in some type of medium.
· The greatest human safety risk is the preparation of the media, due to the toxic nature of some of the chemicals used.
· Once the specimens have been prepared, the risks in subsequent handling of microscope preparations should be minimal. Even so, always wear nitrile gloves when handling these preparations .
· Any effort to remount slides or to remove the coatings from SEM specimens can pose significant risks.
There are hundreds of different chemicals and chemical mixtures that have been used in creating microscope preparations in the biological sciences. Some of these include: · polychlorinated biphenyls (PCBs)
· cyanide solutions (used to remove SEM coatings)
· naphthalene resins or polymers mixed with toluene or other solvents
· organic stains and dyes, many of which are toxic
· chloral hydrate, the common component of most formulations of Hoyer’s mounting media, and also an ingredient in many other
T:112 NPS Museum Handbook , Part I (2005)
mounting media
· phenol
· thymol
· phenolic resins
· Eurparal, a commercial product containing paraldehyde
· cellulose nitrate (flammable)
· formaldehyde
· inorganic and organic acids
· natural plant resin (Canada balsam), which while not a threat in itself, is often thinned with phenol alcohol or xylene
· epoxy resins
· polystyrene resins
· phthalate plasticizers
· metal salts
Refer any interventive treatment of microscope preparations to a conservator or to a specialist in the preparation of the organisms. To ensure human safety and preservation of the specimen, be sure to acquire information on the preparation methods used for any specimens prepared for microscopy.
Of particular concern are:
· the use of toxic chemicals during preparation work
· the impact of toxic chemicals during subsequent handling of the specimens
Be sure to use appropriate engineering controls and personal protective equipment when examining microscope preparations.
B. Stabilization and Processing of IMPORTANT NOTE: For purposes of these guidelines, it is assumed Microscopy Collections that the conditions of biological specimens and specimen parts intended
for a microscopy collection will be under the control of research designs and material utilization. Therefore, the stabilization stage of
NPS Museum Handbook , Part I (2005) T:113
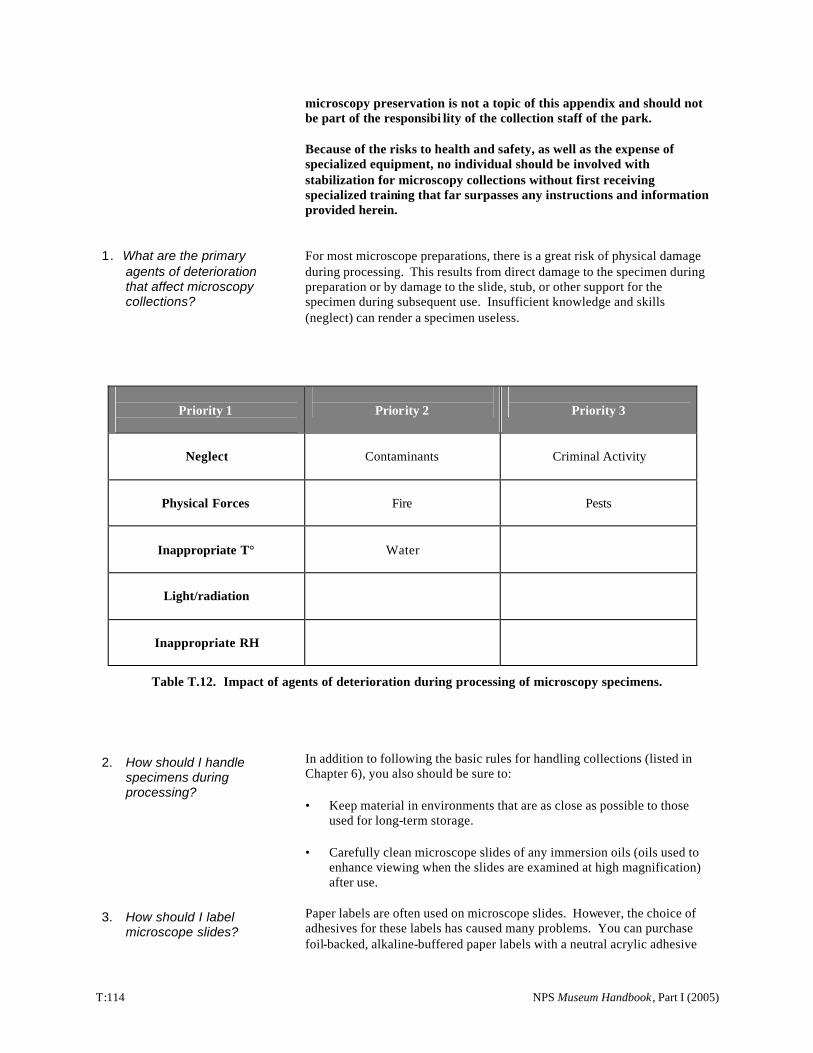
1. What are the primary agents of deterioration that affect microscopy collections?
microscopy preservation is not a topic of this appendix and should not be part of the responsibi lity of the collection staff of the park.
Because of the risks to health and safety, as well as the expense of specialized equipment, no individual should be involved with stabilization for microscopy collections without first receiving specialized training that far surpasses any instructions and information provided herein.
For most microscope preparations, there is a great risk of physical damage during processing. This results from direct damage to the specimen during preparation or by damage to the slide, stub, or other support for the specimen during subsequent use. Insufficient knowledge and skills (neglect) can render a specimen useless.
Priority 1 Priority 2 Priority 3
Neglect Contaminants Criminal Activity
Physical Forces Fire Pests
Inappropriate T° Water
Light/radiation
Inappropriate RH
Table T.12. Impact of agents of deterioration during processing of microscopy specimens.
In addition to following the basic rules for handling collections (listed in2. How should I handle Chapter 6), you also should be sure to:specimens during
processing? · Keep material in environments that are as close as possible to those
used for long-term storage.
· Carefully clean microscope slides of any immersion oils (oils used to enhance viewing when the slides are examined at high magnification) after use.
Paper labels are often used on microscope slides. However, the choice of 3. How should I label adhesives for these labels has caused many problems. You can purchasemicroscope slides? foil-backed, alkaline-buffered paper labels with a neutral acrylic adhesive
T:114 NPS Museum Handbook , Part I (2005)
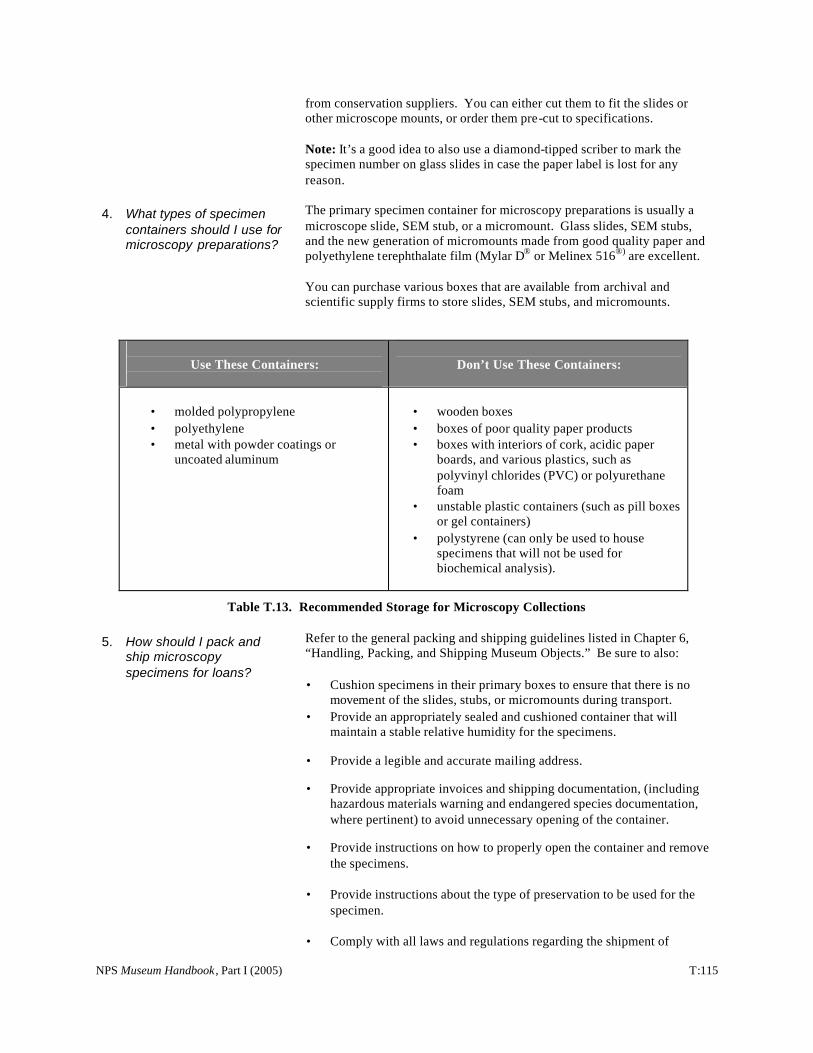
4. What types of specimen containers should I use for microscopy preparations?
from conservation suppliers. You can either cut them to fit the slides or other microscope mounts, or order them pre-cut to specifications.
Note: It’s a good idea to also use a diamond-tipped scriber to mark the specimen number on glass slides in case the paper label is lost for any reason.
The primary specimen container for microscopy preparations is usually a microscope slide, SEM stub, or a micromount. Glass slides, SEM stubs, and the new generation of micromounts made from good quality paper and polyethylene terephthalate film (Mylar D® or Melinex 516®) are excellent.
You can purchase various boxes that are available from archival and scientific supply firms to store slides, SEM stubs, and micromounts.
Use These Containers: Don’t Use These Containers:
· · ·
molded polypropylene polyethylene metal with powder coatings or uncoated aluminum
· · ·
·
·
wooden boxes boxes of poor quality paper products boxes with interiors of cork, acidic paper boards, and various plastics, such as polyvinyl chlorides (PVC) or polyurethane foam unstable plastic containers (such as pill boxes or gel containers) polystyrene (can only be used to house specimens that will not be used for biochemical analysis).
Table T.13. Recommended Storage for Microscopy Collections
5. How should I pack and ship microscopy specimens for loans?
Refer to the general packing and shipping guidelines listed in Chapter 6, “Handling, Packing, and Shipping Museum Objects.” Be sure to also:
· Cushion specimens in their primary boxes to ensure that there is no movement of the slides, stubs, or micromounts during transport.
· Provide an appropriately sealed and cushioned container that will maintain a stable relative humidity for the specimens.
· Provide a legible and accurate mailing address.
· Provide appropriate invoices and shipping documentation, (including hazardous materials warning and endangered species documentation, where pertinent) to avoid unnecessary opening of the container.
· Provide instructions on how to properly open the container and remove the specimens.
· Provide instructions about the type of preservation to be used for the specimen.
· Comply with all laws and regulations regarding the shipment of
NPS Museum Handbook , Part I (2005) T:115

endangered species or hazardous materials.
6. How should I document a specimen’s condition during processing?
For condition reports for microscope preparations, be sure to include information about the support as well as the specimen. For example, be sure to note:
· chipped, cracked, or broken slides or cover slips (slides with these conditions should not be shipped on loans until the specimens can be remounted properly)
· “infingering” of air into mounting media (usually evidenced by bubbles or voids in the media that extend from the edge of the cover slip inwards)
· flow of mounting media (usually indicated by a less-than-centered position of the specimen)
· cloudiness, discoloration, or crazing of mounting media
· voids or cracks in ringing media
· torn or distorted specimens
· faded stains or dyes
· discolored specimens
· dirt or debris on slides, stubs, or specimens
· mold
C. Storage of Microscopy Collections
1. How should I organize the collection?
The most important organization concern is to be sure that the arrangement allows access to selected specimens without jeopardizing other specimens. Organization may vary among disciplines and institutions. In most instances, the organization will be first by nature of preservation (slide or SEM stub), then by taxonomic group, and then catalog number, or simply by catalog number. This type of organization ensures that every specimen has a more-or-less designated and predictable location.
Once the collection is organized, be sure to:
· post adequate informational signage and floor plans throughout the area
· label all storage units with beginning & ending taxa and catalog numbers
· label each slide box or SEM stub box with beginning and ending catalog numbers
Ease of access to a specimen with minimal handling of other specimen containers is the ultimate goal .
T:116 NPS Museum Handbook , Part I (2005)
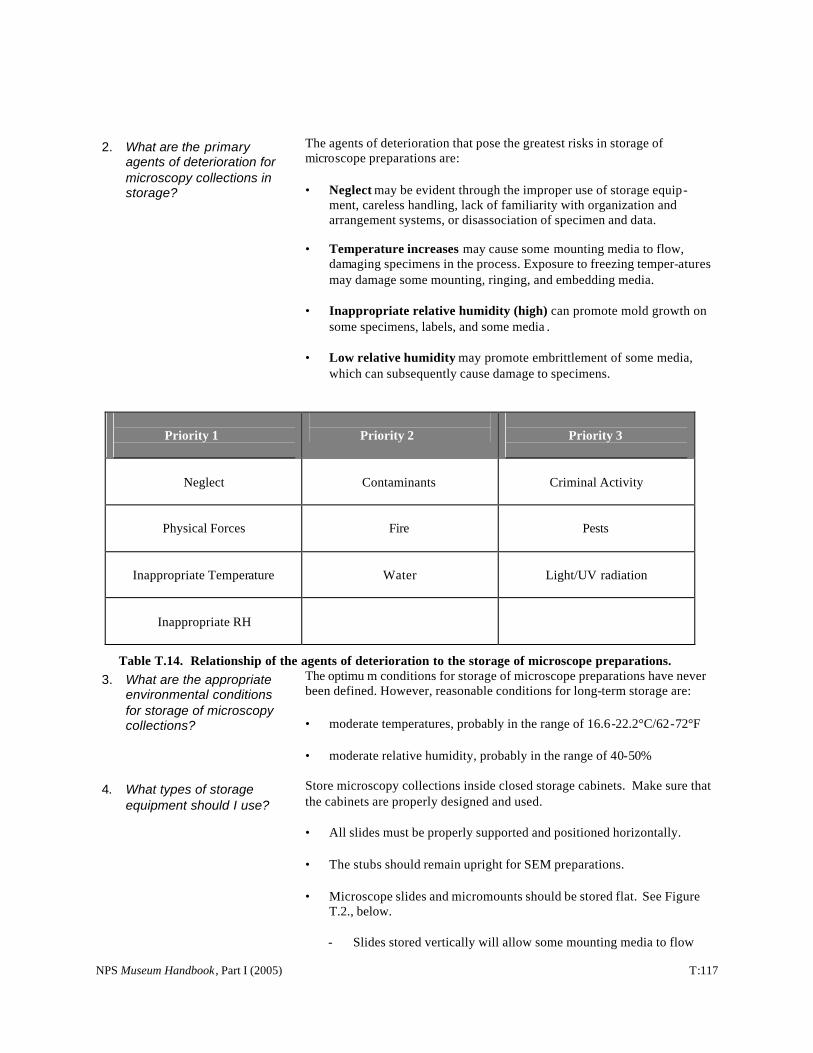
2. What are the primary agents of deterioration for microscopy collections in storage?
The agents of deterioration that pose the greatest risks in storage of microscope preparations are:
· Neglect may be evident through the improper use of storage equip-ment, careless handling, lack of familiarity with organization and arrangement systems, or disassociation of specimen and data.
· Temperature increases may cause some mounting media to flow, damaging specimens in the process. Exposure to freezing temper-atures may damage some mounting, ringing, and embedding media.
· Inappropriate relative humidity (high) can promote mold growth on some specimens, labels, and some media .
· Low relative humidity may promote embrittlement of some media, which can subsequently cause damage to specimens.
Priority 1 Priority 2 Priority 3
Neglect Contaminants Criminal Activity
Physical Forces Fire Pests
Inappropriate Temperature Water Light/UV radiation
Inappropriate RH
Table T.14. Relationship of the agents of deterioration to the storage of microscope preparations. 3. What are the appropriate
environmental conditions for storage of microscopy collections?
4. What types of storage equipment should I use?
The optimu m conditions for storage of microscope preparations have never been defined. However, reasonable conditions for long-term storage are:
· moderate temperatures, probably in the range of 16.6-22.2°C/62-72°F
· moderate relative humidity, probably in the range of 40-50%
Store microscopy collections inside closed storage cabinets. Make sure that the cabinets are properly designed and used.
· All slides must be properly supported and positioned horizontally.
· The stubs should remain upright for SEM preparations.
· Microscope slides and micromounts should be stored flat. See Figure T.2., below.
- Slides stored vertically will allow some mounting media to flow
NPS Museum Handbook , Part I (2005) T:117
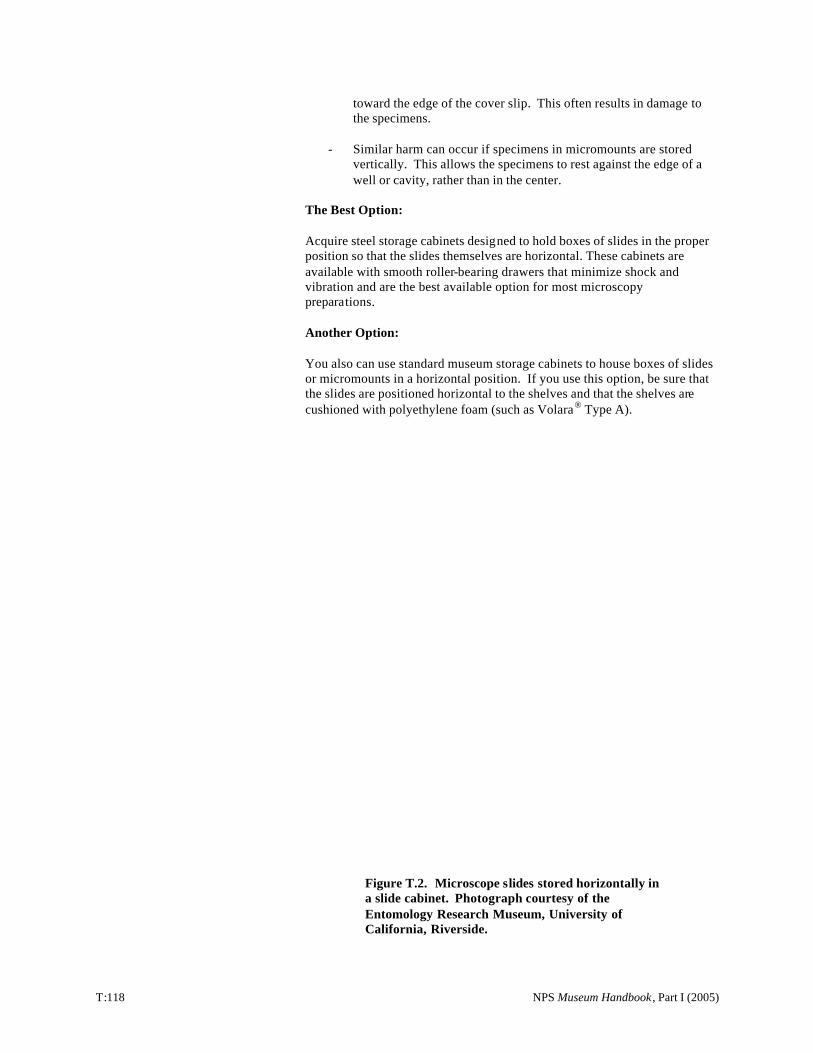
toward the edge of the cover slip. This often results in damage to the specimens.
- Similar harm can occur if specimens in micromounts are stored vertically. This allows the specimens to rest against the edge of a well or cavity, rather than in the center.
The Best Option:
Acquire steel storage cabinets designed to hold boxes of slides in the proper position so that the slides themselves are horizontal. These cabinets are available with smooth roller-bearing drawers that minimize shock and vibration and are the best available option for most microscopy preparations.
Another Option:
You also can use standard museum storage cabinets to house boxes of slides or micromounts in a horizontal position. If you use this option, be sure that the slides are positioned horizontal to the shelves and that the shelves are cushioned with polyethylene foam (such as Volara® Type A).
Figure T.2. Microscope slides stored horizontally in a slide cabinet. Photograph courtesy of the Entomology Research Museum, University of California, Riverside.
T:118 NPS Museum Handbook , Part I (2005)
5. Are there any common problems with microscopy collections?
6. What should I do if specimens need to be cleaned, remounted, or treated?
7. What should I know about salvaging microscopy collections?
8. Are there any health and safety issues that I should consider?
Yes. They include:
· deteriorating mounting, ringing, or embedding media
· researchers, who may:
- wish to have an SEM coating removed from a specimen
- leave a coating of immersion oils on a microscope slide
· a lack of training among staff and/or researchers
Aside from gently wiping off immersion oil residues, leave any other cleaning of specimens prepared for microscopy to experts. The removal of SEM coatings can involve the use of extremely dangerous chemicals and is generally not recommended for any biological specimens.
Always refer to an experienced conservator concerning remounting specimens that exhibit deteriorating mounting or ringing media. Most of the common mounting, ringing, and embedding media in collections are not stable. They were chosen for their ability to enhance microscopic examinations, not for longevity. As a result, it is not unusual to see many thousands of deteriorating preparations in a single collection.
Some unpublished studies have been conducted, especially in parasitology collections, to replace deteriorating mounting media. Although there are some successes with certain mounting media, this remains a topic requiring additional research.
Unfortunately, there are no data on the salvage of microscope preparations following disasters. Because most emergencies will result in water damage and subsequent high humidity, the most useful steps probably will involve achieving control over the environment, such as:
· exhausting moisture-laden air from the storage room and replacing it with conditioned (drier) air using specialized dehumidification equipment and fans (leaving specimens in containers and inside closed cabinets)
· air-drying, by removing specimens from containers and cabinets to an area with good ventilation and dehumidification
· arranging to transfer the collection to an environmentally controlled location for examination and possible treatment by experts
As noted above, during any cleaning or remounting process, anyone handling specimens prepared for microscopy can be exposed repeatedly to small quantities of highly toxic materials. When working with such chemicals be sure that:
· all staff have received appropriate training
· all staff possess a full knowledge of the potential chemical hazards
· proper engineering controls are in place
NPS Museum Handbook , Part I (2005) T:119

· all staff have appropriate personal protective equipment
· all hazardous waste is properly disposed of
Remember: Human safety is paramount. Address all human safety issues prior to attempting collection salvage. Do not put staff at risk during emergency salvage efforts.
T:120 NPS Museum Handbook , Part I (2005)
SECTION VII: GLOSSARY
Autolysis:
Denaturant:
Ectoparasites:
Exsiccati:
Fixation:
Karyotypes:
Larvae:
Lipid:
Lyophilization:
Maintenance:
Periostracum:
Processing:
Pupae:
Stabilization:
Storage:
Type Specimen:
Ultrastructure:
deterioration of a specimen’s cells or tissues due to enzymatic digestion
chemicals added to ethanol to make it unsuitable for human consumption
a parasite that lives on the exterior of its “host” organism; examples include ticks, lice, and fleas
dried fungi specimens that have been identified and labeled
applying a substance that chemically bonds to a specimen to impede deterioration of the specimen by enzymatic digestion
a photograph or “map” of a cell’s chromosomes
young of any insects that undergo a complete metamorphosis in the course of development into adults
organic fats, oils, and waxes contained in all life forms, which serve as cellular building blocks and provide energy
the process of freeze-drying a specimen
preservation activities associated with corrective actions in response to a real or perceived problem
the hard outer covering of a mollusk’s shell
preservation activities beyond stabilization that are related to making the specimen available for use
the metamorphic stage of an insect’s life between larvae and adult
preservation activities associated with halting active deterioration and minimizing the risk of loss, damage, or disorder as it relates to the specimen and its associated information
preservation activities associated with housing of the specimens for the sake of access, organization, and protection
the specimen used to describe a new species for the first time; type specimens have extremely high scientific value; they are managed as NPS controlled museum property and must be afforded appropriate storage and security
a detailed, complete view of a cell or tissue; visible only through electron microscopy
SECTION VIII: REFERENCES
NPS Museum Handbook , Part I (2005) T:121
A. References for Section I: The Nature Of Biological Collections
Baker, R. “Some Thoughts on Conservation, Biodiversity, Museums, Molecular Characters, Systematics, and Basic Research.” Journal of Mammalogy 75, no. 2 (1994): 277-287.
B. References for Section II: Preservation of Biological Collections in General
ASIS Standing Committee on Museum, Library and Archive Security. Suggested Guidelines in Museum Security. Rev. ed. Alexandria: ASIS International, 1997. Available on the web at: <www.stevekeller.com/steve/pdf_files/SecurityStandards/GuidelinesRev97.pdf>.
Baker, R. “Some Thoughts on Conservation, Biodiversity, Museums, Molecular Characters, Systematics, and Basic Research.” Journal of Mammalogy 75, no. 2 (1994): 277-287.
Ball, C. and A. Yardley-Jones. Help! A Survivor’s Guide to Emergency Preparedness. Museum Excellence Series: Book 3. Edmonton: Museum Alberta, 2003.
Canadian Conservation Institute. Publications and Special Products Catalog. Ottawa: Canadian Conservation Institute, 2003. Available at: <http://www.cci-icc.gc.ca>.
Cato, P. Guidelines for Managing Bird Collections. Museology No. 7. Lubbock: Texas Tech University Press, 1986.
Cato, P. and C. Jones (eds.). Natural History Museums: Directions for Growth. Lubbock: Texas Tech University Press, 1991.
Cato, P., R. Waller, L. Sharp, J. Simmons, S. Williams. Developing Staff Resources for Managing Collections. Martinsville, Va.: Virginia Museum of Natural History and Canadian Museum of Nature, 1996.
Childs, J., J. Mills, and G. Glass. “Rodent-Borne Hemorrhagic Fever Viruses: A Special Risk for Mammalogists?” Journal of Mammalogy 76, no. 3 (1995): 664-680.
Cohen, D. and R. Cressey (eds.). Natural History Collections: Past, Present, and Future. Special issue of the Proceedings of the Biological Society of Washington, Volume 82, pp. 559-762. Washington, D.C.: Biological Society of Washington, 1969.
Cosgrove, J., D. Donaldson, G. Hughes, and W. Maloff. “Plague at the Museum: Disease Transmission Potential and Biosafety Precautions.” Collection Forum 8, no. 1 (1992): 1-8.
Down, J., M. MacDonald, J. Tétreault, and S. Williams. “Adhesive Testing at the Canadian Conservation Institute– An Evalulation of Selected Poly(vinyl acetate) and Acrylic Adhesives.” Studies in Conservation 41 (1996): 19-44.
Duckworth, D., H. Genoways, and C. Rose. Preserving Natural Science Collections: Chronicle of our Environmental Heritage. Washington, D.C.: National Institute for the Conservation of Cultural Property, 1993.
Feller, R. and M. Wilt. Evaluation of Cellulose Ethers for Conservation. Research in Conservation 3. Los Angeles: Getty Conservation Institute, 1990.
Floray, S. “Safer Cleaning Alternatives for the Museum and Visitor Center.” Conserve O Gram 2/21. Washington, D.C.: National Park Service, 2003.
T:122 NPS Museum Handbook , Part I (2005)
Gage, K., R. Ostfeld, and J. Olson. “Nonviral Vector-Borne Zoonoses Associated with Mammals in the United States.” Journal of Mamma logy 76, no. 3 (1995): 695-715.
Garrett, K. “Documentation Guidelines for the Preparation of Biological Specimens.” Collection Forum 5, no. 2 (1989): 47-51.
Genoways, H., C. Jones, and O Rossolimo (eds.). Mammal Collection Management . Lubbock: Texas Tech Un iversity Press, 1987.
Gorton, P., F. Schieppati, and M. Conquino. Health and Safety for Archaeologists and CRM Professionals. Buffalo: Panmerican Environmental, Inc. and Panamerican Consultants, Inc., 1999.
Hawks, C. “An Introduction to Respirator Use in Collections Management.” Conserve O Gram 2/13. Washington, D.C.: National Park Service, 2000.
Hawks, C., and K. Makos. “Inherent and Acquired Hazards in Museum Objects: Implications for Care and Use of Collections.” CRM 23, no. 5 (2000): 31-37.
Heyer, W., M. Donnelly, R. MacDiarmid, L-A Hayek, and M. Foster (eds.). Measuring and Monitoring Biological Diversity: Standard Methods for Amphibians. Washington, D.C.: Smithsonian Institution Press, 1994.
Hoagland, K. (ed.). Guidelines for Institutional Policies and Planning in Natural History Collections. Washington, D.C.: Association of Systematics Collections, 1994.
Irvin, A., J. Cooper, and S. Hedges. “Possible Health Hazards Associated with the Collection and Handling of Post-Mortem Zoological Material.” Mammal Review 2, no. 2 (1972): 43-54.
Krebs, J., M. Wilson, and J. Childs. “Rabies–Epidemiology, Prevention, and Future Research.” Journal of Mammalogy 76, no. 3 (1995): 681-694.
Layne, S. The Cultural Property Protection Manual . Denver: Layne Consultants International, 2002.
McLaren, S., P. August, L. Carraway, P. Cato, W. Gannon, M. Lawrence, N. Slade, P. Sudman, R. Thorington, S. Williams, and S. Woodward. Documentation Standards for Automatic Data Processing in Mammalogy: Version 2.0. American Society of Mammalogists, Committee on Information Retrieval, 1996.
McLaren, S. and J. Braun (eds.). GIS Applications in Mammalogy. Norman: Oklahoma Museum of Natural History and The Carnegie Museum of Natural History, 1993.
Merritt, E. “Conditions on Outgoing Research Loans.” Collection Forum 8, no. 2 (1992): 78-82.
Metzger, D. and S. Byers. Managing the Modern Herbarium: An Interdisciplinary Approach. Washington, D.C.: Society for the Preservation of Natural History Collections and The Royal Ontario Museum, Centre for Biodiversity and Conservation Biology, 1999.
Michalski, S, M. MacDonald, T. Strang, J. Tétreault, and R. Williams. 1992. A Systematic Approach to the Conservation (Care) of Museum Collections, with Technical Appendices. Ottawa: Canadian Conservation Institute.
Miller, E. (ed.). Museum Collections: Their Roles and Future in Biological Research. Occasional Papers Series No. 25. Victoria: British Columbia Provincial Museum, 1985.
Mills, J., T. Yates, J. Childs, R. Parmenter, T. Ksiazek, P. Rollin, and C. Peters. “Guidelines For Working With Rodents Potentially Infected with Hantavirus.” Journal of Mammalogy, 76, no 3 (1995): 716-722.
Monk, R. Bar Code Use in the Mammal Collection at the Museum of Texas Tech University. Museology 8. Lubbock: Texas Tech University Press, 1998 .
NPS Museum Handbook , Part I (2005) T:123
National Park Service. Conserve O Gram series. Washington, D.C.: National Park Service. Available at <http://www.cr.nps.gov/museum/publications/conserveogram/conserv.html >.
Nudds, J. and C. Pettitt (eds.). The Value and Valuation of Natural Science Collections. Proceedings of the International Conference, Manchester, 1995. London: The Geological Society, 1997.
Rose, C., C. Hawks, and H. Genoways (eds.). Storage of Natural History Collections: A Preventive Conservation Approach. Washington, D.C.: Society for the Preservation of Natural History Collections, 1995.
Rose, C., and A. R. de Torres (eds.). Storage of Natural History Collections: Ideas and Practical Solutions. Washington, D.C.: Society for the Preservation of Natural History Collections, 1992.
Rose, C., S. Williams, and J. Gisbert. (eds.). Current Issues, Initiatives, and Future Directions for the Preservation and Conservation of Natural History Collections. Vol. 3 in Proceedings of the International Symposium and First World Congress on the Preservation and Conservation of Natural History Collections, Madrid, 10-15 May 1992. Madrid: Consejería de Educación y Cultura, Comunidad de Madrid, y Dirección General de Bellas Artes y Archivos, Ministerior de Cultura, 1993.
Simmons, J. Herpetological Collecting and Collections Management. Rev. ed. Herpetological Circular No. 31. Society for the Study of Amphibians and Reptiles, 2002.
Society for the Preservation of Natural History Collections. “Guidelines for the Care of Natural History Collections.” Collection Forum 10, no. 1 (1994): 32-40.
Stansfield, G., J. Mathias, and G. Reid. Manual of Natural History Curatorship. London: HMSO, 1994.
Waddington, J. and D. Rudkin (eds.). Proceedings of the 1985 Workshop on the Care and Maintenance of Natural History Collections. Life Sciences Miscellaneous Publications. Toronto: Royal Ontario Museum, 1986.
Williams, S. Destructive Preservation: A Review of the Effect of Standard Preservation Practices on the Future Use of Natural History Collections. Göteborg Studies in Conservation 6. Göteborg, Sweden: Acta Universitatis Gothoburgensis, 1999.
Williams, S. and L. Brandstetter-Wolansky. “Examination of Macroscopic Particles from Dust Accumulations in Collection Storage Areas.” Collection Forum 18, nos. 1-2 (2003): 90-97.
Williams, S. and P. Cato. “Interaction of Research, Management, and Conservation for Serving the Long-Term Interests of Natural History Collections.” Collection Forum 11, no. 1 (1995): 16-27.
Williams, S. and C. Hawks. “Inks for Documentation in Vertebrate Research Collections.” Curator 29, no. 2 (1986): 93-08.
Wilson, D., F. Cole, J. Nichols, R. Rudran, and M. Foster (eds.). Measuring and Monitoring Biological Diversity: Standard Methods for Mammals. Washington, D.C.: Smithsonian Institution Press, 1996.
Wood, R. and S. Williams. “An Evaluation of Disposable Pens for Permanent Museum Records.” Curator 36, no. 3 (1993): 189-200.
C. References for Section III: Dry Biological Collections
Agnew, N. “The Corrosion of Egg Shells by Acetic Acid Vapour.” ICCM Bulletin 7, no. 4 (1981): 3-9.
Baskin, B. “Solar Bagging: Putting Sunlight to Work to Eliminate Insect Infestations in Mere Hours.” WAAC (Western Area for Art Conservation) Newsletter 23, no. 1 (2001): 20-22.
T:124 NPS Museum Handbook , Part I (2005)
Briggs, D, P. Sell, M. Block and R. I’Ons. “Mercury Vapour: A Health Hazard in Herbaria. New Phytologist, 94 (1983): 453-457.
Burke, J. “Anoxic Microenvironments: A Treatment for Pest Control.” Conserve O Gram 3/9. Washington, D.C.: National Park Service, 1999.
Cato, P. Guidelines for Managing Bird Collections. Museology No. 7. Lubbock: Texas Tech University Press, 1986.
Child, R. (ed.). Conservation and the Herbarium. Leigh, Worcestershire, U.K.: Institute of Paper Conservation, 1994.
______. “Monitoring Insect Pests with Sticky Traps.” Conserve O Gram3/7. Washington, D.C.: National Park Service, 1998.
Espinoza, E. and M-J. Mann. Identification Guide for Ivory and Ivory Substitutes. 2d rev ed. Washington, DC: World Wildlife Fund, 1991.
Florian, M -L. “The Effects of Freezing and Freeze-Drying on Natural History Specimens.” Collection Forum 6, no. 2 (1990): 45-52.
Hawks, C. and S. Williams. “Care of Specimen Labels in Vertebrate Research Collections.” In Proceeding of the 1985 Workshop on Care and Maintenance of Natural History Collections, edited by J. Waddington and D. Rudkin, 105-108. Life Sciences Miscellaneous Publications. Toronto: Royal Ontario Museum, 1986.
Hawks, C., S. Williams, and J. Gardner. The Care of Tanned Skins in Recent Mammal Collections. Museology No. 6. Lubbock: Texas Tech University Press, 1974.
Hawks, C. and D. Von Endt. “Mercury and Mercury Compounds in Natural History Collections: An Annotated Bibliography.” Natural History Conservation 5 (1990): 4-19.
Health Canada, Pest Management Regulatory Agency. Effective Control of Rats and Mice. Ottawa: Health Canada, Pest Management Regulatory Agency, 2001. On the web at: http://www.pmra-arla.gc.ca/english/consum/ratsandmice-e.html#5.
Horie, C. “Fading of Feathers by Light.” Pp. 431-435 in Preprints of the ICOM Committee for Conservation 9th Triennial Meeting, Dresden, Germany, 26-31 August 1990. Paris: ICOM Committee for Conservation.
Kigawa, R., H. Nochide, H. Kimura, and S. Miura. “Effects of Various Fumigants, Thermal Methods, and Carbon Dioxide Treatment on DNA Extraction and Amplification: A Case Study on Freeze-Dried Mushroom and Freeze-Dried Muscle Specimens. Collection Forum 18, nos. 1-2 (2003): 74-89.
Linnie, M. “Use of a Low-Oxygen Atmosphere for the Control of Insect Pests.” Collection Forum 14, no. 1 (2000): 57-65.
Metzger, D. and S. Byers. Managing the Modern Herbarium: An Interdisciplinary Approach. Washington, D.C.: Society for the Preservation of Natural History Collections and The Royal Ontario Museum, Centre for Biodiversity and Conservation Biology, 1999.
Monk, R. Bar Code Use in the Mammal Collection at the Museum of Texas Tech University. Museology 8. Lubbock: Texas Tech University Press, 1998.
Peigler, R. “Shipping of Pinned Insects .” Collection Forum 8, no. 2 (1992): 73-77.
Pinniger, D. “Controlling Insect Pests: Alternatives to Pesticides.” Conserve O Gram 3/8. Washington, D.C.: National Park Service, 1998.
Poole, M. “Preliminary Analysis of the Effects of Cold Storage on Fur Garments and Mammal Skins.” Collection Forum 13, no. 1 (1997): 25-39.
NPS Museum Handbook , Part I (2005) T:125
Purewal, V. “An Investigation into the Composition of Botanical Wax Models with a View to Their Conservation.” Collection Forum 13, no. 1 (1997): 11-19.
Purewal, V. “The Identification of Hazardous Pesticide and Fungicide Residues on Herbarium Material.” SSCR Journal 10, no. 4 (1999): 5-9.
Raphael, Toby. “An Insect Pest Control Procedure: The Freezing Process.” Conserve O Gram 3/6. Washington, D.C.: National Park Service, 1994.
Rogers, S., M. Schmidt, and T Gütebier. An Annotated Bibliography on Preparation, Taxidermy and Collection Management of Vertebrates with Emphasis on Birds. Special Publication No. 15. Pittsburgh: Carnegie Museum of Natural History, 1989.
Rose, C., C. Hawks, and H. Genoways (eds.). Storage of Natural History Collections: A Preventive Conservation Approach. Washington, D.C.: Society for the Preservation of Natural History Collections. 1995.
Rose, C. L., and A. R. de Torres (eds.). Storage of Natural History Collections: Ideas and Practical Solutions. Washington, D.C.: Society for the Preservation of Natural History Collections, 1992.
Shchepanek, M. “Observations of Temperature and Relative Humidity During the Cooling and Warming of Botanical Specimens for Insect Pest Control.” Collection Forum 12, no. 1 (1996): 1-7.
Simmons, J. Herpetological Collecting and Collections Management. Rev. ed. Herpetological Circular No. 31. Society for the Study of Amphibians and Reptiles, 2002.
Strang, T. “A Review of Published Temperatures for the Control of Pest Insects in Museums.” Collection Forum 8, no. 2 (1992): 41-67.
______. “Detecting Infestations: Facility Inspection Procedure and Checklist.” CCI Notes 3/2. Ottawa: Canadian Conservation Institute, 1996.
______. “Controlling Insect Pests with Low temperature.” CCI Notes 3/3. Ottawa: Canadian Conservation Institute, 1997.
______. “The Effect of Thermal Methods of Pest Control on Museum Collections.” In Biodeterioration of Cultural Property 3 . Edited by C. Aranyanak and C. Shinghasiri, 334-353. Proceedings of the 3rd International Conference on Biodeterioration of Cultural Property, 4-7 July 1995, Bangkok, Thailand. Bangkok: Thammasat University Press.
Tennent, N. and T. Baird. “The Deterioration of Mollusca Collections: Identification of Shell Efflorescence.” Studies in Conservation 30 (1985): 73-85.
Waddington, J. and J. Fenn. “Preventive Conservation of Amber: Some Preliminary Investigations.” Collection Forum 4, no. 2 (1988): 25-31.
Williams, S. “Investigation of the Causes of Structural Damage to Teeth in Natural History Collections.” Collection Forum 7, no. 1 (1991): 13-25.
Williams, S. and C. Hawks. “Arsenic in Natural History Collections.” Leather Conservation News 2, no. 2 (1986): 1-4.
______. “Inks for Documentation in Vertebrate Research Collections.” Curator 29, no. 2 (1986): 93-08.
______. “History of Preparation Materials Used for Recent Mammal Specimens. In Mammal Collection Management, edited by H. Genoways, C. Jones, and O. Rossolimo , 21-48. Lubbock: Texas Tech University Press, 1987.
______. “Deterioration of Bone and Ivory: An Annotated Bibliography.” Natural History Conservation 5 (1990): 25-27.
T:126 NPS Museum Handbook , Part I (2005)
Williams, S. L., R. Laubach, and H. H. Genoways. 1977. A Guide to the Management of Recent Mammal Collections. Special Publication 4. Carnegie Museum of Natural History, Pittsburgh. 105 pp.
Williams, S. and S. McLaren. “Modification of Storage Design to Mitigate Insect Problems.” Collection Forum 6, no. 1 (1990): 27-32.
Williams, R., J. Waddington, and J. Fenn. “Infrared Spectroscopic Analysis of Central and South American Amber Exposed to Air Pollutants, Biocides, Light, and Moisture.” Collection Forum 6, no. 2 (1990): 65-75.
Wood, R. and S. Williams. “An Evaluation of Disposable Pens for Permanent Museum Records.” Curator 36, no. 3 (1993): 189-200.
Yu, D. S. Klein, and D Reindl. “An Evaluation of Silica Gel for Humidity Control in Display Cases.” WAAC (Western Area for Art Conservation) Newsletter 23, no 1 (2001): 14-19.
Zycherman, L. and J. Schrock (eds.). A Guide to Museum Pest Control. Washington, D.C.: Foundation of the American Institute for Conservation and the Association of Systematics Collections, 1988.
D. References for Section IV: Wet Biological Collections
Andrei, M. and H. Genoways. “Changes in pH in Museum Storage Fluids, I–Effects of Resistal Paper Labels.” Collection Forum 12, no. 2 (1991): 63-75.
Bayer, J. and T. Counihan. “Length Changes in White Sturgeon Larvae Preserved in Ethanol or Formaldehyde.” Collection Forum 15, nos. 1-2 (2001): 57-64.
Billy, A. “The Effects of Formalin and Isopropyl Alcohol on Length and Weight Measurements of Sarotherodon mossambicus Trewavas.” Journal of Fish Biology 21 (1982): 107-112.
Boase, N. and R. Waller. “The Effect of Propylene Glycol on Ethanol Concentrations Determined by Density Measurement.” Collection Forum 10, no 2 (1994): 41-49.
Camacho, A. and J. Bedoya. “Evaluation of the Effects of Different Preservative and Fixative Fluids on Aquatic Invertebrates from Interstitial Waters.” Collection Forum 10, no. 1 (1994): 20-31.
Carter, J. “An Investigation of pH Changes in a Selection of Formaldehyde Buffering Agents Used on a Fish Parasitology Research Collection.” Collection Forum 13, no 1 (1997): 1-10.
Clark, P. “Ground Glass Stoppered Jars for Fluid Collections.” In Storage of Natural History Collections: Ideas and Practical Solutions, edited by C. Rose and A. de Torres, 221-223. Washington, D.C.: Society for the Preservation of Natural History Collections, 1992.
Clark, P., O. Crimmen, F. Naggs, A. Wahl, and M. Mansfield. “Transportation of Fluid -Preserved Natural History Specimens Stored in Glass Containers: New Solutions to an Old Problem.” Collection Forum 10, no. 1 (1994): 1-9.
Fery, J., T. Yates, D. Duszynski, W. Gannon, and S. Gardner. “Designation and Curatorial Management of Type Host Specimens for New Parasite Species.” Journal of Parasitology 78, no. 5 (1992): 930-932.
Gisbert, J. and R. Garcia-Perea. “Double-jar system for types in fluid collections.” In Storage of Natural History Collections: Ideas and Practical Solutions, edited by C. Rose and A. de Torres, 225-226. Washington, D.C.: Society for the Preservation of Natural History Collections, 1992.
NPS Museum Handbook , Part I (2005) T:127
Gisbert, J., F. Palacios, and R. Garcia -Perea. “Labeling Vertebrate Collections with Tyvek® Synthetic Paper.” Collection Forum 6, no. 1 (1990): 35-37.
Lohrer, F. “Magnetic Label Holders for Metal Storage Equipment – System No. 1. and System No. 2.” In Storage of Natural History Collections: Ideas and Practical Solutions, edited by C. Rose and A. de Torres, 261-264. Washington, D.C.: Society for the Preservation of Natural History Collections, 1992.
Hochberg, E. “Colored Dots for Coding Fluid Collections.” In Storage of Natural History Collections: Ideas and Practical Solutions, edited by C. Rose and A. de Torres, 267-268. Washington, D.C.: Society for the Preservation of Natural History Collections, 1992.
Hughes, G. and J. Cosgrove. “pH Change in a Formalin Borax Solution with Inferences about Uses of Neutralized Formalin in Vertebrate Collections.” Collection Forum 6, no. 1 (1990): 21-26.
McCoy, C. “Packing Fluid-Preserved Herpetological Specimens for Shipment.” Collection Forum 9, no. 2 (1993): 70-75.
Ratcliffe, B. and C. Messenger. “Vial Support System for Fluid Collections.” In Storage of Natural History Collections: Ideas and Practical Solutions, edited by C. Rose and A. de Torres, 21-214. Washington, D.C.: Society for the Preservation of Natural History Collections, 1992.
Scott, N. and A. Aquino-Shuster. “The Effects of Freezing on Formalin Preservation of Specimens of Frogs and Snakes.” Collection Forum 5, no. 2 (1989): 41-46.
Sendall, K. and G. Hughes. “Correcting Alcohol Concentrations.” SPNHC Newsletter 11, no. 1 (1997): 6-7.
Simmons, J. Herpetological Collecting and Collections Management. Herpetological Circular No. 16. Tyler, Texas: Society for the Study of Amphibians and Reptiles, 1987.
______. “Storage in Fluid Preservatives.” In Storage of Natural History Collections: Ideas and Practical Solutions, edited by C. Rose and A. de Torres, 161-186. Washington, D.C.: Society for the Preservation of Natural History Collections, 1992.
______. “Vial Supports for Cleared and Stained Specimens.” In Storage of Natural History Collections: Ideas and Practical Solutions, edited by C. Rose and A. de Torres, 215-216. Washington, D.C.: Society for the Preservation of Natural History Collections, 1992.
______. Herpetological Collecting and Collections Management. Herpetological Circulars No. 31. Rev. ed. Marceline, MO: Society for the Study of Amphibians and Reptiles, 2002.
Snyder, A. (comp.). Proceedings of the 1992 ASIH Workshop on Collections Care and Management Issues in Herpetology and Ichthyology. American Society of Ichthyologists and Herpetologists, 1993.
Snyder, A. (comp.). 1994. Proceedings of the 1993 ASIH Workshop on Collections Care and Management Issues in Herpetology and Ichthyology. American Society of Ichthyologists and Herpetologists. 51 pp. [2] + 20 pp.
Steedman, H. (ed.). Zooplankton Preservation and Fixation. Monographs on Oceanographic Methodology 4. Paris: The UNESCO Press, 1976.
Steigerwald, M. and S. Laframboise. “Tape Applications: A Jar Sealing Method for Reducing Ethanol Evaporation in Fluid-Preserved Collections.” Collection Forum 12, no. 2 (1996): 45-54.
Stoddard, D. “Fixatives and Preservatives: Their Effects on Tissue.” In Conservation of Natural History Specimens: Spirit Collections, 1-25. Manchester: Manchester Museum and Department of Environmental Biology, University of Manchester, 1989.
Stuart, J. “Observations on Formalin-Induced Darkening of Herpetological Specimens.” Collection Forum 11, no. 2 (1995): 39-45.
T:128 NPS Museum Handbook , Part I (2005)
Suzumoto, A. “Storage Containers for Fluid-Preserved Specimens.” In Storage of Natural History Collections: Ideas and Practical Solutions, edited by C. Rose and A. de Torres, 217-220. Washington, D.C.: Society for the Preservation of Natural History Collections, 1992.
van Dam, A. “DMDN-Hydantoin: The Promising Result of a Search for an Alternative in Fluid Preservation of Biological Specimens.” Collection Forum 18, nos. 1-2 (2003): 104-115.
______. “The Interactions of Preservative Fluid, Specimen Container, and Sealant in a Fluid Collection.” Collection Forum 14, no 1 (2000): 78-92.
Von Endt, D. “Spirit Collections: A Preliminary Analysis of Some Organic Materials Found in the Storage Fluid of Mammals.” Collection Forum 10, no. 1 (1994): 10-19.
Von Endt, D., E Yourd, and P. Hare. “Spirit Collections: Accelerated Aging Studies Concerning the Stability of Keratin in Ethanol and Formalin.” Collection Forum 14, no. 1 (2000): 66-77.
Waller, R. and D. McAllister. “A Spot Test for Distinguishing Formalin from Alcohol Solutions.” In Proceedings of the 1985 Workshop on the Care and Maintenance of Natural History Collections, edited by J. Waddington and D. Rudkin, 93-99. Life Sciences Miscellaneous Publications. Toronto: Royal Ontario Museum, 1986.
Waller, R. and J. Simmons. “An Exploratory Assessment of the State of a Fluid-Preserved Herpetological Collection.” Collection Forum 18, nos. 1-2 (2003): 1-37.
Waller, R. and T. Strang. “Physical Chemical Properties of Preservative Solutions–I. Ethanol-Water Solutions.” Collection Forum 12, no. 2 (1996): 70-85.
E. References for Section V: Biological Low-Temperature Collections
American Society for Testing and Materials. Standard Practice for Preservation by Freezing, Freeze-Drying, and Low-temperature Maintenance of Bacteria, Fungi, Protista, Viruses, Genetic Elements, and Animal and Plant Tissues. Guide E1342-97. Philadelphia: American Society for Testing and Materials, 1997.
______. Standard Guide for Handling Hazardous Biological Materials in Liquid Nitrogen. Guide E1556-00. Philadelphia: American Society for Testing and Materials, 2000.
Baker, R. “Some Thoughts on Conservation, Biodiversity, Museums, Molecular Characters, Systematics, and Basic Research.” Journal of Mammalogy 75, no. 2 (1994): 277-287.
Baker, R. and M. Hafner. “Curation of Collections of Frozen Tissues: Curatorial Problems Unique to Frozen Tissue Collections.” In Collections of Frozen Tissues: Value, Management, Field and Laboratory Procedures, and Directory of Existing Collections, edited by H. Dessauer and M. Hafner, 35-40. Lawrence: Association of Systematics Collections, 1984.
Baker, R. and M. Haiduk. “Collections of Tissue Cultured Cell Lines Suspended by Freezing.” Acta Zoologica Fennica 170: 91-92.
Cato. P. “Racks and Dividers to Organize Small Frozen Samples.” In Storage of Natural History Collections: Ideas and Practical Solutions, edited by C. Rose and A. de Torres, 201-202. Washington, D.C.: Society for the Preservation of Natural History Collections, 1992.
Cato, P. and D. Schmidly. “Policies concerning the use and management of ancillary preparations in vertebrate systematic collections.” In Natural History Museums: Directions for Growth, edited by P. Cato and C. Jones, 91-104. Lubbock: Texas Tech University Press, 1991.
NPS Museum Handbook , Part I (2005) T:129
Cosgrove, J. 1992. “Tub and Divider System for Fluid Collections.” In Storage of Natural History Collections: Ideas and Practical Solutions, edited by C. Rose and A. de Torres, 205-206. Washington, D.C.: Society for the Preservation of Natural History Collections, 1992.
Dessauer, H. and M Hafner (eds.). Collections of Frozen Tissues: Value, Management, Field and Laboratory Procedures, and Directory of Existing Collections. Lawrence, Ks.: Association of Systematics Collections.
Gareis, P., C. Cowley, and H. Gallisdorfer. “Operating Characteristics of Biological Storage Vessels Maintained with Liquid Nitrogen.” Cyrobiology 6, no. 1 (1969): 45-56.
Hawksworth, D., I. Sastramihardja, R. Kokke, and R. Stevenson. Guidelines for the Establishment and Operation of Collections of Cultures and Microorganisms. World Federation for Culture Collections, 1990.
Malik, K. (ed.). Technical Information for Culture Collections Curators in Developing Countries. Paris: UNESCO and World Federation of Culture Collections-Education Committee, 1992.
Merryman, H. Cryobiology. London: Academic Press, 1966.
Monk, R. Bar Code Use in the Mammal Collection at the Museum of Texas Tech University. Museology 8. Lubbock: Texas Tech University Press, 1998.
National Research Council Committee on Hazardous Biological Substances in the Laboratory. Biosafety in the Laboratory: Prudent Practices for Handling and Disposal of Infectious Materials. Washington, D.C.: National Academy of Sciences, 1989.
Richmond, J., and R. McKinney (eds.). Biosafety in Microbiological and Biomedical Laboratories. 4th rev. ed. U.S. Department of Health and Human Services, Public Health Service, Centers for Disease Control and Prevention, and National Institutes of Health, 1999. Available on the web at: <http://www.cdc.gov/od/ohs/biosfty/biosfty.htm>.
Simione, F. “Storage of Living Cells in Culture.” In Storage of Natural History Collections: Ideas and Practical Solutions, edited by C. Rose and A. de Torres, 273-274. Washington, D.C.: Society for the Preservation of Natural History Collections, 1992.
______. “Storage in Standards and Ultra-Cold Freezers: Living Biological Specimens.” In Storage of Natural History Collections: A Preventive Conservation Approach, edited by C. Rose, C. Hawks, and H. Genoways, 157-186. Washington, D.C.: Society for the Preservation of Natural History Collections, 1995.
Woodward, S. and W. Hlywka. “A Database for Frozen Tissues and Karyotype Slides.” Collection Forum 9. no. 2 (1993): 76-83.
F. References for Section VI: Biological Microscopy Collections
Brown, P. “A Review of Techniques Used in the Preparation, Curation and Conservation of Microscope Slides at the Natural History Museum, London.” The Biology Curator Issue 10 Supplement. Biology Curators’ Group, 1997.
Fery, J., T. Yates, D. Duszynski, W. Gannon, and S. Gardner. “Designation and Curatorial Management of Type Host Specimens for New Parasite Species.” Journal of Parasitology 78, no. 5 (1992): 930-932.
Garner, R. and C. Horie. “The Conservation and Restoration of Slides of Mosses.” Studies in Conservation 29 (1984): 93-99.
T:130 NPS Museum Handbook , Part I (2005)
Golden, J. “Golden Oldies: Curating SEM Specimens.” Collection Forum 5, no. 1 (1989): 17-26.
______. “Storage for SEM stubs.” In Storage of Natural History Collections: Ideas and Practical Solutions, edited by C. Rose and A. de Torres, 271-272. Washington, D.C.: Society for the Preservation of Natural History Collections, 1992.
Goodway, M. “Storage System for Microscopical Preparations.” In Storage of Natural History Collections: Ideas and Practical Solutions, edited by C. Rose and A. de Torres, 269. Washington, D.C.: Society for the Preservation of Natural History Collections, 1992.
Harris, R. A Selective Bibliography on Preservation, Macro and Micro-anatomical Techniques in Zoology. Report No. 3. Biology Curators’ Group, 1984.
Pritchard, M. and G. Kruse (comps.). The Collection and Preservation of Animal Parasites. Lincoln: University of Nebraska Press, 1982.
Upton, M. “Aqueous Gum-Chloral Slide Mounting Media: An Historical Review.” Bulletin of Entomological Research 83 (1993): 267-274.
NPS Museum Handbook , Part I (2005) T:131
SECTION IX: NON-NPS REPOSITORIES WITH SERVICEWIDE OR MULTI-REGIONAL AGREEMENTS TO HOUSE PARK BIOLOGICAL COLLECTIONS
The National Park Service seeks and maintains long-term agreements with qualified institutions to assist in managing park collections. These umbrella agreements establish terms and conditions under which park collections will be preserved, housed, managed, and accessed, as well as the responsibilities of all parties to the agreement.
The Chief Curator and the Associate Director, Natural Resources negotiate the agreements. Parks that place specimens with a cooperating repository must prepare a loan form documenting all specimens.
The contact information for institutions with Servicewide agreements to curate NPS natural science collections are as follows:
A. Low-Temperature Collections
The American Type Culture Collection PO Box 1549 Manassas, Virginia 20108 (703) 365-2700 http://www.atcc.org/SpecialCollection/NPS.cfm
The American Type Culture Collection (ATCC) makes available for research microorganisms collected in parks. Park collections are on loan to ATCC under the terms of this agreement. Copies of the agreement, which includes related NPS procedures, are available from the Chief Curator at [email protected].
B. Other Specimens At this time, the National Park Service has no Servicewide agreements with any non-NPS repositories for curation of NPS botanical, animal, fluid-preserved, or microscopy collections. Several parks, regions, and/or networks have agreements at that level; contact your regional/SO curator for additional information.
T:132 NPS Museum Handbook , Part I (2005)