API PRO Job Request Portal - API Maintenance · PDF fileAPI PRO Job Request Portal ... Getting...
32
API PRO Job Request Portal API Maintenance Systems A/S Roskildevej 342 B, st. DK-2630 Taastrup Denmark Tel. +45 4348 9900 Fax. +45 4348 9901 Web: www.apipro.com Manual Revision: 19 th June, 2009 Product Version: V5 Xa SP04/FP01 Language: English
Transcript of API PRO Job Request Portal - API Maintenance · PDF fileAPI PRO Job Request Portal ... Getting...

API PRO Job Request Portal
API Maintenance Systems A/S
Roskildevej 342 B, st.
DK-2630 Taastrup
Denmark
Tel. +45 4348 9900
Fax. +45 4348 9901
Web: www.apipro.com
Manual Revision: 19th
June, 2009
Product Version: V5 Xa SP04/FP01
Language: English

API PRO Maintenance Systems A/S Job Request Portal Page 2
Contents
OVERVIEW ...................................................................................................................... 3
USER’S GUIDE ................................................................................................................ 3
USE OF JOB REQUEST PORTAL .......................................................................................... 3
My job requests ............................................................................................................ 4
View job request ........................................................................................................... 6
Create job request ........................................................................................................ 7
Timeout ......................................................................................................................... 8
SUPERVISOR’S GUIDE ................................................................................................. 9
API PRO USER SETUP ...................................................................................................... 9 Screen design for Job Request Portal ................................................................................................................... 9 Getting started – initial screen design for Job Request Portal .............................................................................. 9
Web portal group configuration ................................................................................... 9
Web user setup ........................................................................................................... 12
INSTALLATION ON SERVER .................................................................................... 14
PREREQUISITES ............................................................................................................... 14
Microsoft .NET Framework 3.5 SP1 .......................................................................... 14
SET UP THE OPENEDGE APPSERVER ............................................................................... 17
INSTALL THE JOB REQUEST PORTAL PROGRAM PACKAGE ............................................... 19
Customizing the Job Portal help page ....................................................................... 19
CONFIGURATION OF INTERNET INFORMATION SERVICES (IIS) ....................................... 19
Create the “API PRO Job Request Web Service” site in IIS ..................................... 20 The apipro-service.web.config file .................................................................................................................... 24
Create the “API PRO Job Request Portal” site in IIS ............................................... 25 The apipro.web.config file ................................................................................................................................. 29
How to check the security settings for a web site ....................................................... 30
API PRO Maintenance Systems A/S Job Request Portal Page 3
Overview
API PRO Job Request Portal provides users with easy access to job ordering functionality
via an internet browser without a need for the installation of API PRO on each client.
This can be particularly useful for the users whose work in API PRO should be limited to
request of jobs, or when a job must be requested remotely from a department or a site
where the network is accessible, but no API PRO installation is available.
The required version of API PRO is API PRO Xa SP04 plus the Web Job Request
Feature Pack (Xa FP01). The OpenEdge version on the server must be at least 10.1C03.
The Job request module (module 3.31) must be installed.
This document describes three different things. First the daily use of the Job Request
Portal, as seen from the user‟s point of view, secondly the API PRO setup as seen from
the API PRO supervisor‟s point of view, and lastly, the installation and setup of the web
portal programs.
User’s Guide
Use of Job Request Portal
Your system administrator will provide you with the web address for the Job Request
portal.
Job Request Portal is password protected. Having loaded the start page of Job Request
Portal, you will be asked to identify yourself in the login page:

API PRO Maintenance Systems A/S Job Request Portal Page 4
Job Request Portal login
The User ID and password for the Job Request Portal are the same as for normal API
PRO login. The API PRO Supervisor decides which users are granted the right to log in.
It is possible to set up access for users that are not registered as separate users in API
PRO. For this, the button <Anonymous access> is used.
If several different users are using anonymous login, it can be useful to distinguish
between them by using a name for each. This is possible to do in the Job Request Portal.
When logging in, the user can enter a name in the User ID field before pressing the
<Anonymous access> button. This name will be used as default for “ordered by” when
new jobs are requested, and will be used in selection of which jobs will be displayed.
My job requests
Once you have logged in to the Job Request Portal, you will see the “My job requests”
page.

API PRO Maintenance Systems A/S Job Request Portal Page 5
My job requests
Here your job requests are represented in a list. Named users (users that log in with User
ID and password) will see jobs that are created by this User ID.
Anonymous users will, by default see all jobs created by anonymous users. But if a name
was entered in the Login page, only work orders where “Ordered by” is the same as the
entered name will be seen.
The legend of colour marking used in Status column:
Initial status
In progress
Stopped or waiting
Technically finished or Job History
In the bottom right hand corner of the list, there is an area which shows the current page
number and has the buttons to get to the next/previous page.
The > character means that more data is available.
To sort the list by a specific column ascending or descending, click on the header of the
column.
It is also possible to search for specific job orders.

API PRO Maintenance Systems A/S Job Request Portal Page 6
Type a search string in the Search field and press <Enter> or click the button. Use
the button to define the search fields – all the searchable columns or a particular
column from the list.
Each time you click on the <My job requests> tab in the top of the page the list of
your job requests is refreshed. If the job ordering page shows job orders fulfilling filter
criteria, you will be reset to the full list of your job requests.
View job request
The list of your job requests contains only the main fields of job ordering data. The
detailed description of a job is available by clicking on the work order key of the job you
are interested in.
View job request
API PRO Maintenance Systems A/S Job Request Portal Page 7
In API PRO, the Work orders have a special note type – Web Request note - which the
API PRO users can use for comments about the job and messages for the web user. This
note text is by default included in the View Job Request screen.
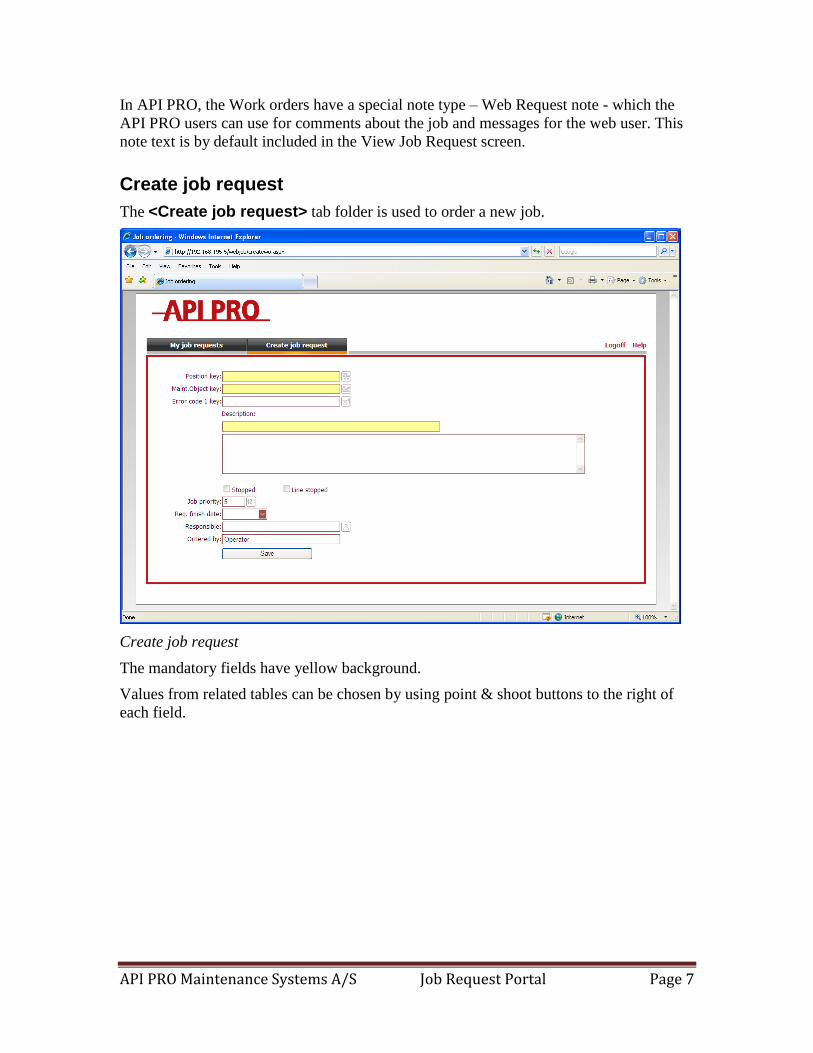
Create job request
The <Create job request> tab folder is used to order a new job.
Create job request
The mandatory fields have yellow background.
Values from related tables can be chosen by using point & shoot buttons to the right of
each field.

API PRO Maintenance Systems A/S Job Request Portal Page 8
Selection of values from related table
For date fields, a calendar is available for date selection.
The <Save> button will create the new job request in the database. The job will be
created immediately and a message will be shown to confirm that the job is created.
If the data is not valid, and the job can not be created, a message will be shown
explaining the problem, and the data will stay on the screen. Correct the problem and
press <Save> again to create the job.
Timeout
Like so many other web pages, we expect that users will sometimes forget to log off. If
the Job Request Portal is not used for 20 minutes, the page will expire and the user will
have to log in again.
API PRO Maintenance Systems A/S Job Request Portal Page 9
Supervisor’s Guide
API PRO User setup The access to Job Request Portal is granted by the supervisor in the two steps – user
group setup and user setup.
The reason for using groups for web access is to re-use settings for design, language and
other defaults for several users. It is convenient to use one or more API PRO user groups
for this purpose. Please note that the web settings do not in any way influence the way
the user groups is used in API PRO itself. The web settings are simply extra information
stored, and the information is only used by the Job Request Portal.
Screen design for Job Request Portal
The Job Request portal reads its screen designs from API PRO. The Job Request Portal
has a standard design, which must be loaded with a fix program before the Job Request
portal can be used (see below). As a minimum, the default web portal configuration
group must have a design attached.
Getting started – initial screen design for Job Request Portal
To load the standard design, please use the fix program fix-db/web-02-1.p. The program
will create a group, WEB GROUP, set this group as the default web portal configuration
group, and attach the standard screen design to this group. If designs already exist for this
group, they will be overwritten.
Web portal group configuration
To access the web user group setup, choose System, User, Web portal group
configuration .

API PRO Maintenance Systems A/S Job Request Portal Page 10
Web portal group configuration
The groups shown here are the normal API PRO user groups. The Web portal status
column shows which groups can be configured for web access. The text “Default configuration” in the Web portal status column shows that the web setup for this group
will be used by web portal users who do not have a specific web portal group attached.
The simplest possible setup is to have only one group enabled and also set this group as
the default configuration. This is sufficient in many cases. It is only necessary to have
more groups enabled if there is a need to have different settings, for example a different
language or different default values for some users. The users that are allowed to use the
Job Request Portal do not have to be members of the group that stores the setup. The
name of the group to use for web configuration is a separate setting in User setup.
Use the <Enable> button to activate the web portal settings for the current group.
Use the <Disable> button to deactivate web portal settings for the group.
With the <Edit config> option, it is possible to change the settings of the group web
access. The <Edit config> option is enabled if the group has active web portal settings

API PRO Maintenance Systems A/S Job Request Portal Page 11
Web portal group edit window
<Web portal configuration attached> has the same function as the Disable/Enable
buttons in the Web portal groups browser – if selected, the group has an active web setup.
<Default web portal configuration> means the web setup for this group will be
used by web portal users who do not have a specific web portal group attached. There is
always one – and only one – default web portal configuration group. It is not possible to
remove the checkmark when it is set, but it is possible to set it on another group‟s
configuration, and thereby change the default web configuration group.
The values of <Job priority>, <Job type>, <Job code key> and <Maint. Object key> fields will be used by default when creating a new job request in Job Request
Portal.
The <Language> field determines which language the web user will see when he is
logged in. Please note that translations must exist and the programs must be compiled
with the chosen language. Default language is “English <default>”.
With the <Imp. Design> and <Exp. Design> buttons in the Web Portal Groups browser,
it is possible to import and export screen designs for the Job Request Portal. The Import
and Export functions are intended for use when an API PRO consultant has modified the
standard design. It can of course also be used if you wish to copy the standard design to
another user group.
It is only possible to export design if there is actually a design attached to the group.

API PRO Maintenance Systems A/S Job Request Portal Page 12
Web user setup
User settings of the access to Job Request Portal are available in the new section of API
PRO User program, folder Extra Info.
Web portal group section in User program
The user can sign on to Job Request Portal if the <Web portal enabled> field is set to
„Yes‟.
The web properties are taken from the user group specified in the <Web portal group>
field. If the field is left blank, the default web portal group will be used.
If the <Use for anonymous access> field is set to „Yes‟ for a user, this API PRO
user will be used for signing on anonymously. Only one user can be set up for
anonymous access. The User ID of the “anonymous” user will be used whenever an
anonymous user creates a work order from the Job Request Portal. If anonymous users
must identity themselves on the work orders they create, the “Ordered by” field is the
place to do it.
If the “anonymous” user logs in to the Job Request Portal as a normal user, he will see all
the work orders created by anonymous access, because his User ID was used in the
creation of the work orders. If you change the anonymous user to another User ID, then
the work orders created before the change will no longer be visible in the Job Request
Portal for anonymous users. They will still be visible if the original “anonymous” user
logs in to the Job Request Portal as a normal user.
API PRO Maintenance Systems A/S Job Request Portal Page 13
Please note that the language for the “anonymous access” user is also the default
language of the job portal. This is the language is used in the Login page in the Job
Request Portal. If there is no “anonymous access” user, the default English texts will be
used.
If you want to set the default language but do not want to allow anonymous access, you
must define the anonymous user as described and then simply remove the check mark in
the <Web portal enabled> field for the anonymous user.
API PRO Maintenance Systems A/S Job Request Portal Page 14
Installation on server
Prerequisites The API PRO Job Request Portal requires a Microsoft Windows 2003 Server or later,
with Microsoft .NET Framework 3.5 SP1 installed and an available Internet Information
Service (IIS).
The default setup is described for a 2003 server. The described setup should only be
altered if you specifically require another set-up.
The required version of OpenEdge is 10.1C or later, and AppServer is required.
The recommended client browser is Internet Explorer 7. Other browsers may display
differences in behaviour and/or the pages may look different.
Microsoft .NET Framework 3.5 SP1
The first step is to verify if the Framework is installed. If it is installed, it can be found in
the C:\Windows\Microsoft.NET\Framework directory.
Open a command prompt and run the following command:
dir C:\Windows\Microsoft.NET\Framework /A:D
API PRO Maintenance Systems A/S Job Request Portal Page 15
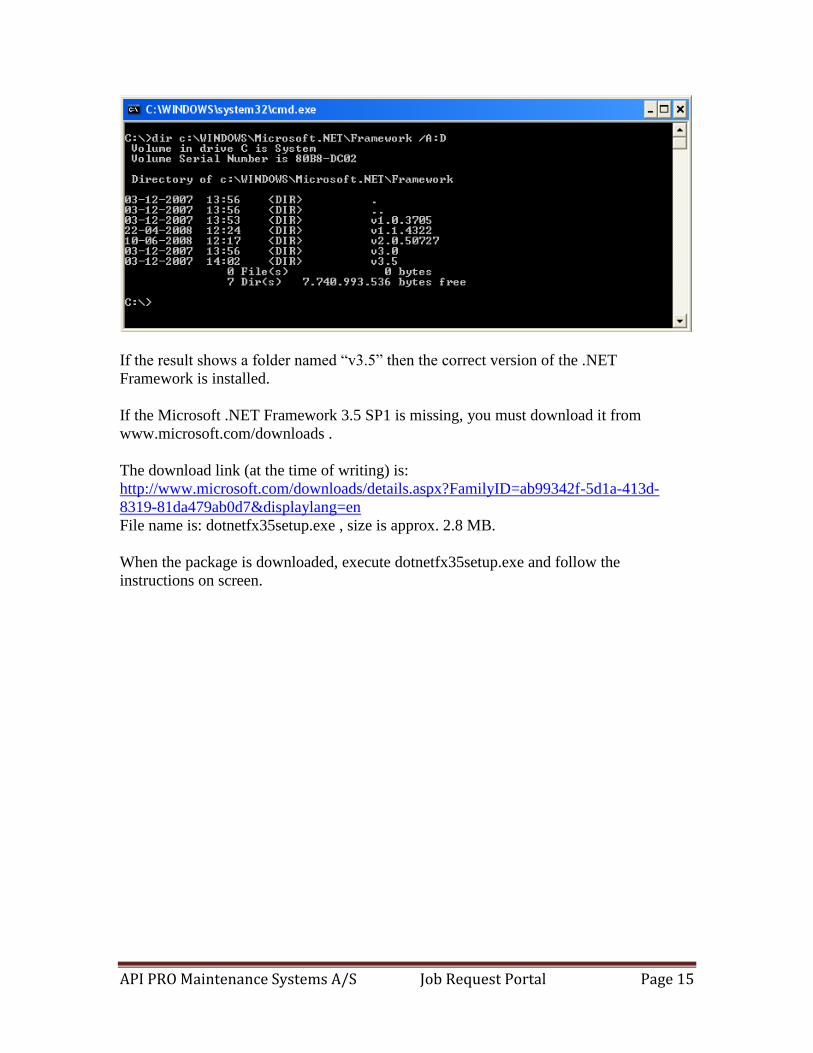
If the result shows a folder named “v3.5” then the correct version of the .NET
Framework is installed.
If the Microsoft .NET Framework 3.5 SP1 is missing, you must download it from
www.microsoft.com/downloads .
The download link (at the time of writing) is:
http://www.microsoft.com/downloads/details.aspx?FamilyID=ab99342f-5d1a-413d-
8319-81da479ab0d7&displaylang=en
File name is: dotnetfx35setup.exe , size is approx. 2.8 MB.
When the package is downloaded, execute dotnetfx35setup.exe and follow the
instructions on screen.

API PRO Maintenance Systems A/S Job Request Portal Page 16
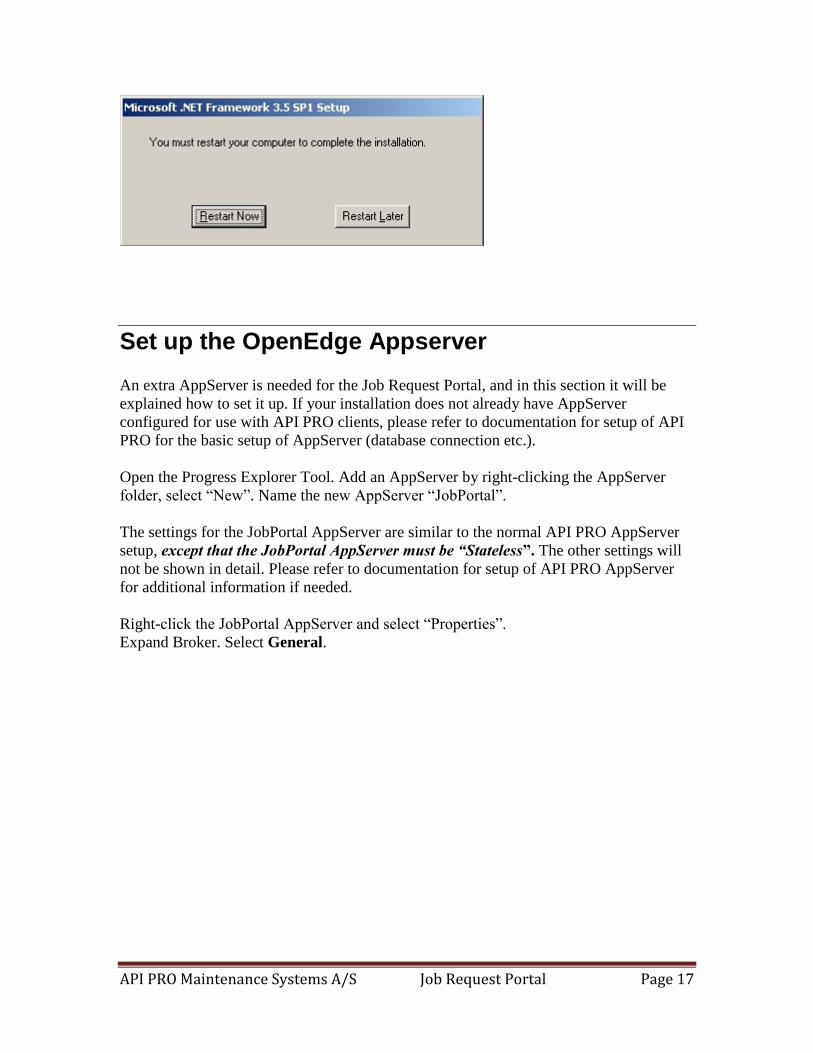
Follow the directions in the installation until it is complete.
The installation may require a reboot of the server which must be done.
API PRO Maintenance Systems A/S Job Request Portal Page 17
Set up the OpenEdge Appserver
An extra AppServer is needed for the Job Request Portal, and in this section it will be
explained how to set it up. If your installation does not already have AppServer
configured for use with API PRO clients, please refer to documentation for setup of API
PRO for the basic setup of AppServer (database connection etc.).
Open the Progress Explorer Tool. Add an AppServer by right-clicking the AppServer
folder, select “New”. Name the new AppServer “JobPortal”.
The settings for the JobPortal AppServer are similar to the normal API PRO AppServer
setup, except that the JobPortal AppServer must be “Stateless”. The other settings will
not be shown in detail. Please refer to documentation for setup of API PRO AppServer
for additional information if needed.
Right-click the JobPortal AppServer and select “Properties”.
Expand Broker. Select General.

API PRO Maintenance Systems A/S Job Request Portal Page 18
Operating mode must be “Stateless”. This is important!
If you need to run the AppServer on another port please edit the “Port number”. A grayed
port number means that the port number is already in use.
Owner Information must be left blank (default) Controlling NameServer should be NS1 (default) AppService Name List should show “JobPortal” (default)
Logging Setting : use default settings (shown below). Settings should only be changed in
case it is necessary for troubleshooting, and always set back to defaults afterwards.

API PRO Maintenance Systems A/S Job Request Portal Page 19
Advanced Features : use default settings.
Install the Job Request portal program package
The necessary ASP.NET files for the Job Request Portal are provided as a zip file, and
can be found in the SETUP directory.
To install, you must simply unpack the XaFP01-JobPortal.zip file. The recommended
location is C:\WebJob.
The zip package will unpack to two directories. The Service directory contains the files
for the web service. The Portal directory contains the files for the Job portal web site.
These directories will be referenced by the Internet Information Services setup.
Customizing the Job Portal help page
The Job portal help page is a simple html page. The default page is a very simple help
text in English. The page can be easily modified to suit the need of the individual
company.
In the directory C:\WebJob\Portal you will find a file called help.htm. This is the help
page. It can be modified with any html editor. (Make a backup copy before you start.)
You have full control over this file. You can add graphics, you can create link to other
pages, perhaps pages in different languages, or you can add links to other web sites. It
could also be used for more detailed instructions about the company policies for
requesting jobs – explanations of what must be included in the description, etc.
Configuration of Internet Information Services (IIS)
You must make sure that the ASP.NET extension is allowed in the Internet Information
Service (IIS).
Expand “[server name](local computer)”, select “Web Service Extensions”.
If the Web Service Extension “ASP.NET v2.0.50727” is “prohibited” then select it and
click the “Allow” button.

API PRO Maintenance Systems A/S Job Request Portal Page 20
Create the “API PRO Job Request Web Service” site in IIS
Right-click on the “Web sites” folder and select New -> Web Site.
API PRO Maintenance Systems A/S Job Request Portal Page 21
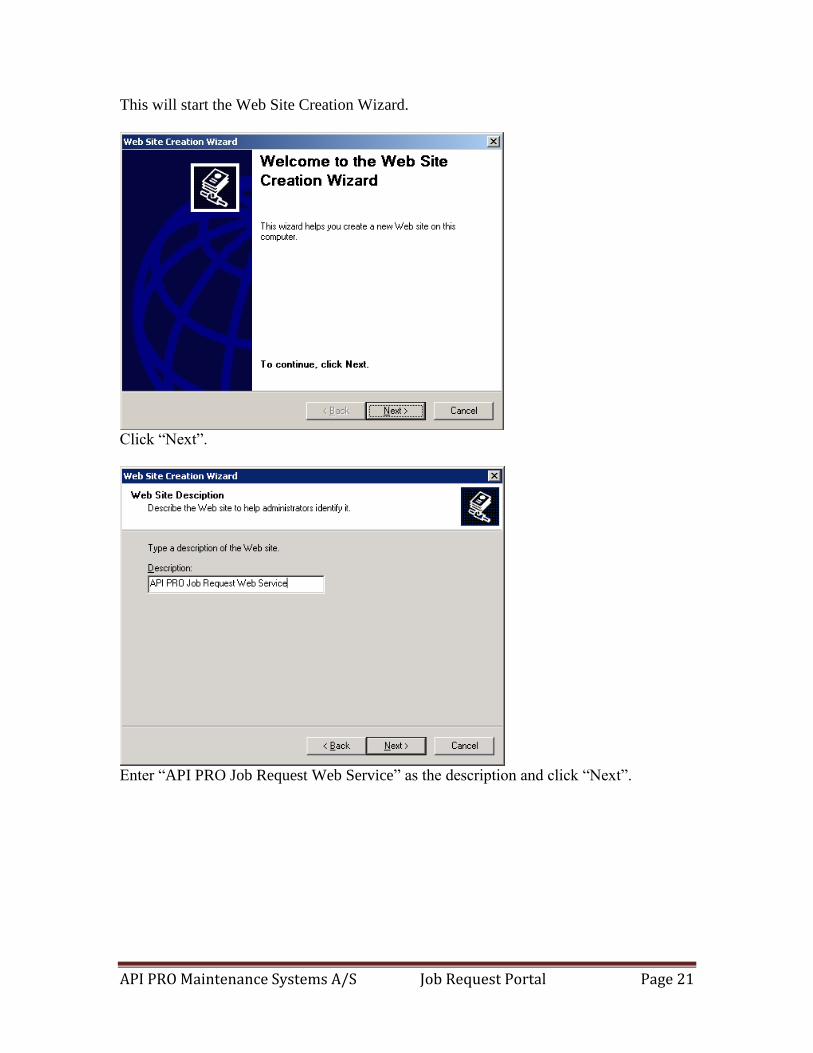
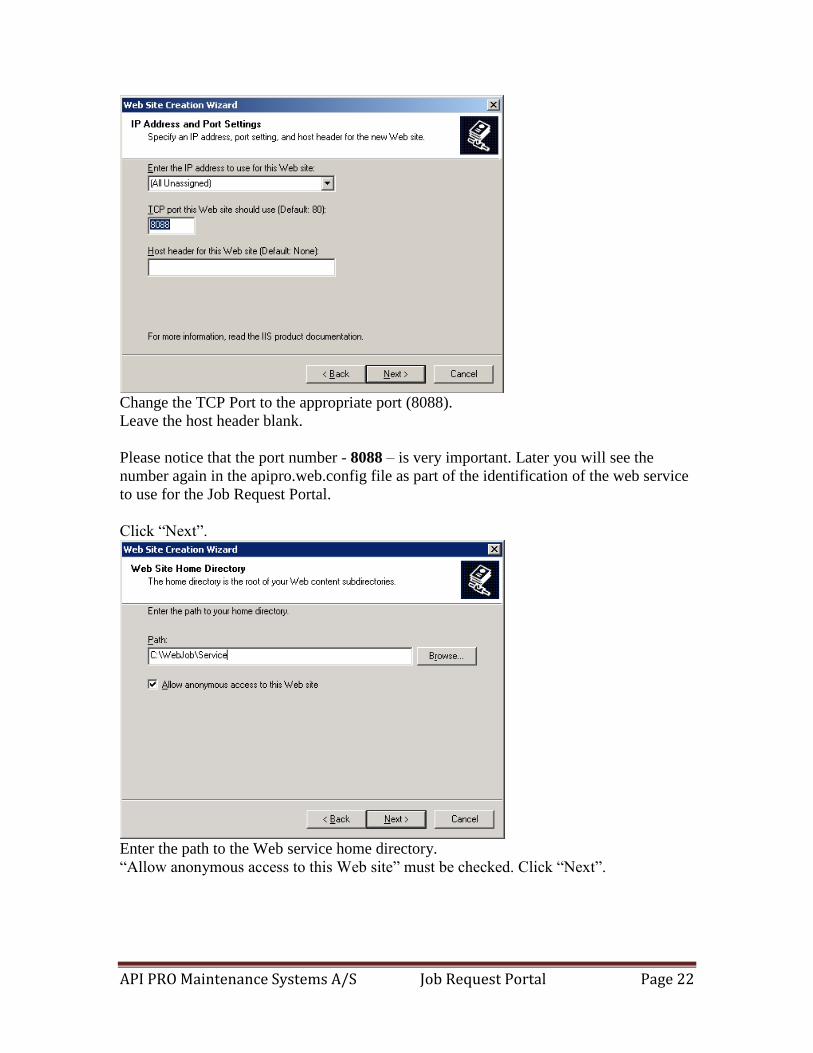
This will start the Web Site Creation Wizard.
Click “Next”.
Enter “API PRO Job Request Web Service” as the description and click “Next”.
API PRO Maintenance Systems A/S Job Request Portal Page 22
Change the TCP Port to the appropriate port (8088).
Leave the host header blank.
Please notice that the port number - 8088 – is very important. Later you will see the
number again in the apipro.web.config file as part of the identification of the web service
to use for the Job Request Portal.
Click “Next”.
Enter the path to the Web service home directory.
“Allow anonymous access to this Web site” must be checked. Click “Next”.
API PRO Maintenance Systems A/S Job Request Portal Page 23
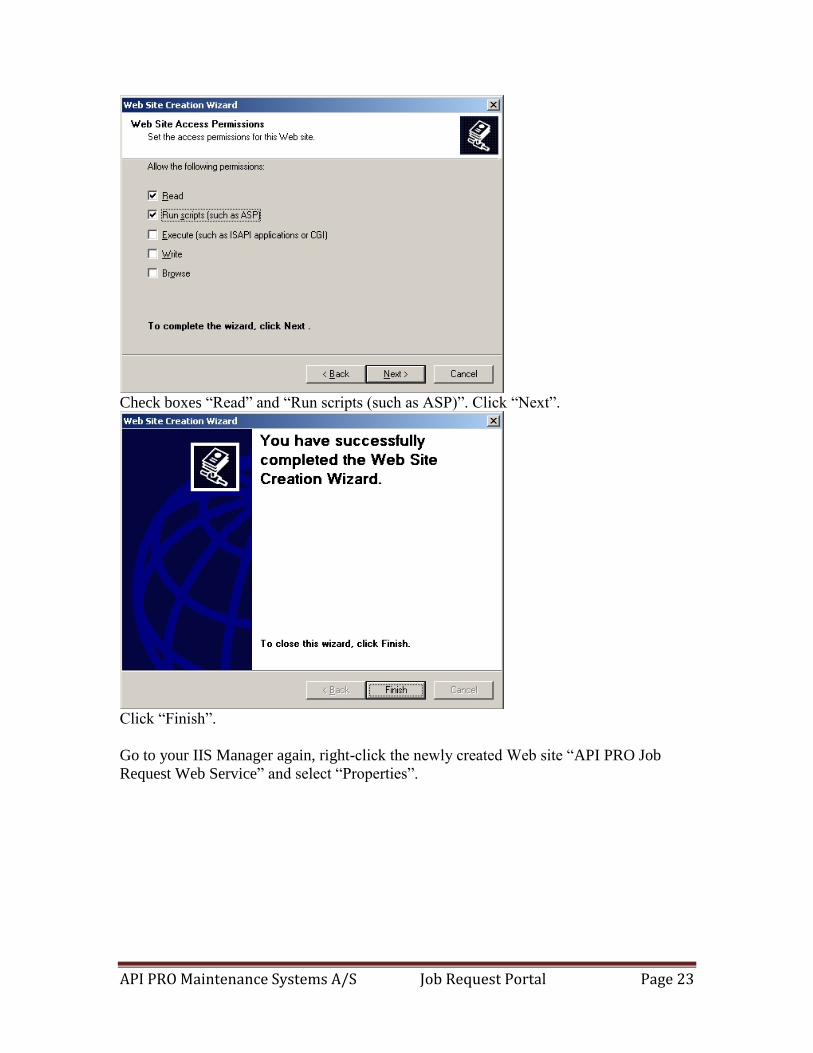
Check boxes “Read” and “Run scripts (such as ASP)”. Click “Next”.
Click “Finish”.
Go to your IIS Manager again, right-click the newly created Web site “API PRO Job
Request Web Service” and select “Properties”.
API PRO Maintenance Systems A/S Job Request Portal Page 24
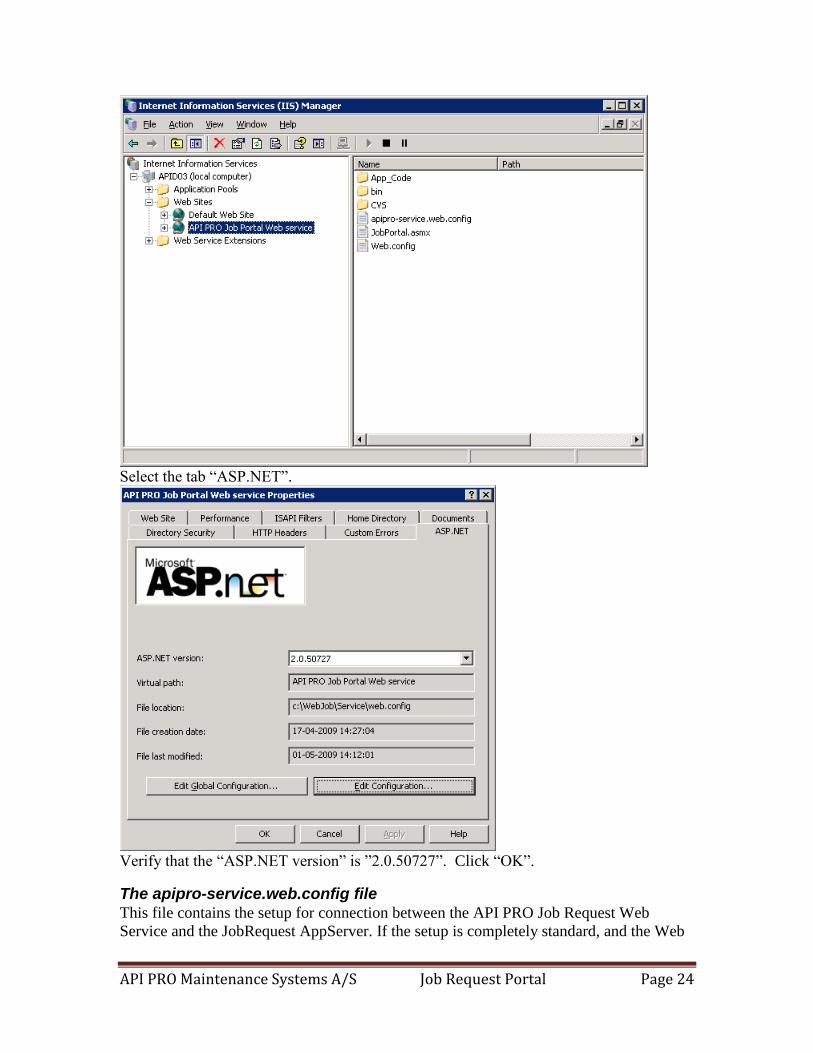
Select the tab “ASP.NET”.
Verify that the “ASP.NET version” is ”2.0.50727”. Click “OK”.
The apipro-service.web.config file
This file contains the setup for connection between the API PRO Job Request Web
Service and the JobRequest AppServer. If the setup is completely standard, and the Web
API PRO Maintenance Systems A/S Job Request Portal Page 25
Service and the AppServer is running on the same physical server, it should not be
necessary to change the file.
This is the contents of the file as shipped: <?xml version="1.0"?>
<!--
Connection settings for API PRO Job Request web service
The http address is localhost when web service and AppServer runs
on the same server.
Otherwise you must use the IP address of the server where the
AppServer runs.
-->
<appSettings>
<add key="AppServerIP" value="localhost"/>
<add key="NameServerPort" value="5162"/>
<add key="AppServerName" value="JobPortal"/>
</appSettings>
The settings in the file are:
AppServerIP: the IP address of the server where the JobPortal AppServer agent
will be running.
NameServerPort: The port number of the Name server as set up in Progress
Explorer tool
AppServerName: The name of the AppServer agent ( “JobPortal”)
Create the “API PRO Job Request Portal” site in IIS
The “Default Web Site” is often used by any other web sites (ex. PC-Web or LAN-
Terminal updates). For that reason, we recommend creating a “sub-“ site (virtual
directory) for the API PRO Job Request Portal. The recommended name is WEBJOB.
For the users, the API PRO Job Request web site address will be <server>/WEBJOB
Server name can be either IP address or web site. For example:
192.168.117.65/webjob
or
http://www.apipro.com/webjob
or
http://apid08/webjob (if apid08 is the name of your local server)
Go to your IIS Manager.

API PRO Maintenance Systems A/S Job Request Portal Page 26
Right-click on the “Default web site” folder and select New -> Virtual Directory.
Click “Next”.

API PRO Maintenance Systems A/S Job Request Portal Page 27
Enter the name of the virtual directory (WEBJOB). Click “Next”.
Enter the name where the files for the API PRO Job Request Portal are placed
(C:\WebJob\Portal). Click “Next”.

API PRO Maintenance Systems A/S Job Request Portal Page 28
Check boxes “Read” and “Run scripts (such as ASP)”. Click “Next”.
Click “Finish”.
Go to your IIS Manager again and right-click the newly created virtual directory
“WEBJOB”. Select the tab “ASP.NET”
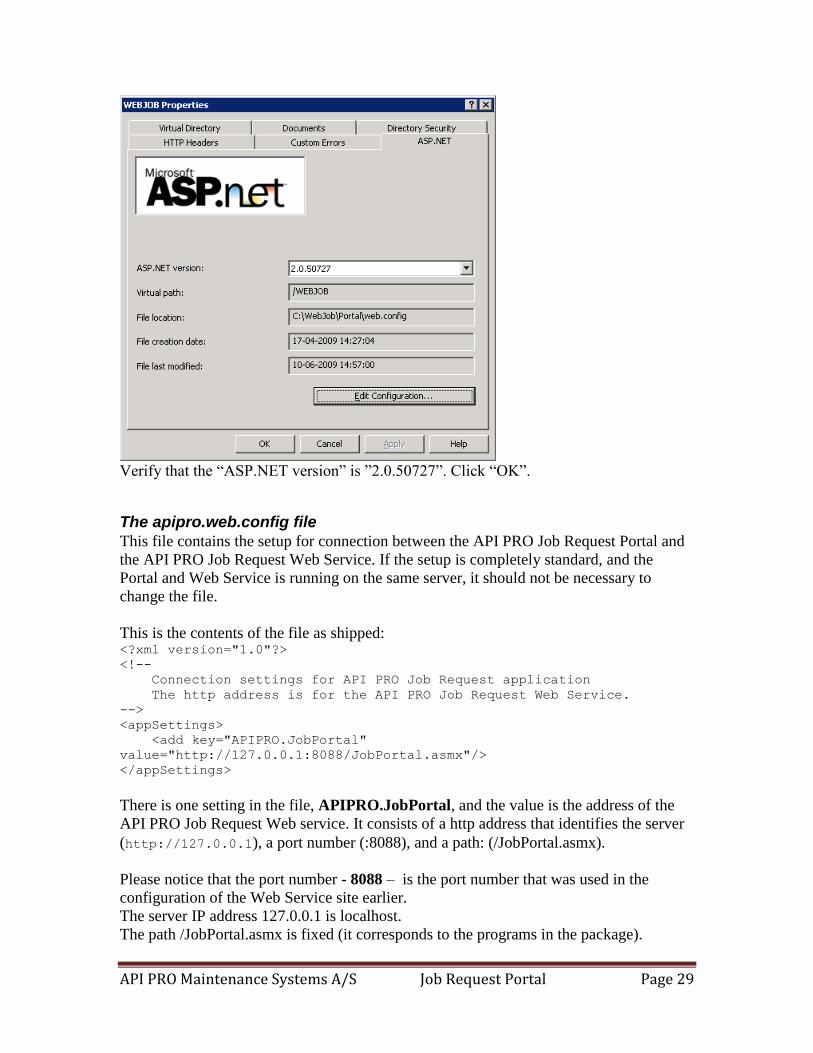
API PRO Maintenance Systems A/S Job Request Portal Page 29
Verify that the “ASP.NET version” is ”2.0.50727”. Click “OK”.
The apipro.web.config file
This file contains the setup for connection between the API PRO Job Request Portal and
the API PRO Job Request Web Service. If the setup is completely standard, and the
Portal and Web Service is running on the same server, it should not be necessary to
change the file.
This is the contents of the file as shipped: <?xml version="1.0"?>
<!--
Connection settings for API PRO Job Request application
The http address is for the API PRO Job Request Web Service.
-->
<appSettings>
<add key="APIPRO.JobPortal"
value="http://127.0.0.1:8088/JobPortal.asmx"/>
</appSettings>
There is one setting in the file, APIPRO.JobPortal, and the value is the address of the
API PRO Job Request Web service. It consists of a http address that identifies the server
(http://127.0.0.1), a port number (:8088), and a path: (/JobPortal.asmx).
Please notice that the port number - 8088 – is the port number that was used in the
configuration of the Web Service site earlier.
The server IP address 127.0.0.1 is localhost.
The path /JobPortal.asmx is fixed (it corresponds to the programs in the package).
API PRO Maintenance Systems A/S Job Request Portal Page 30
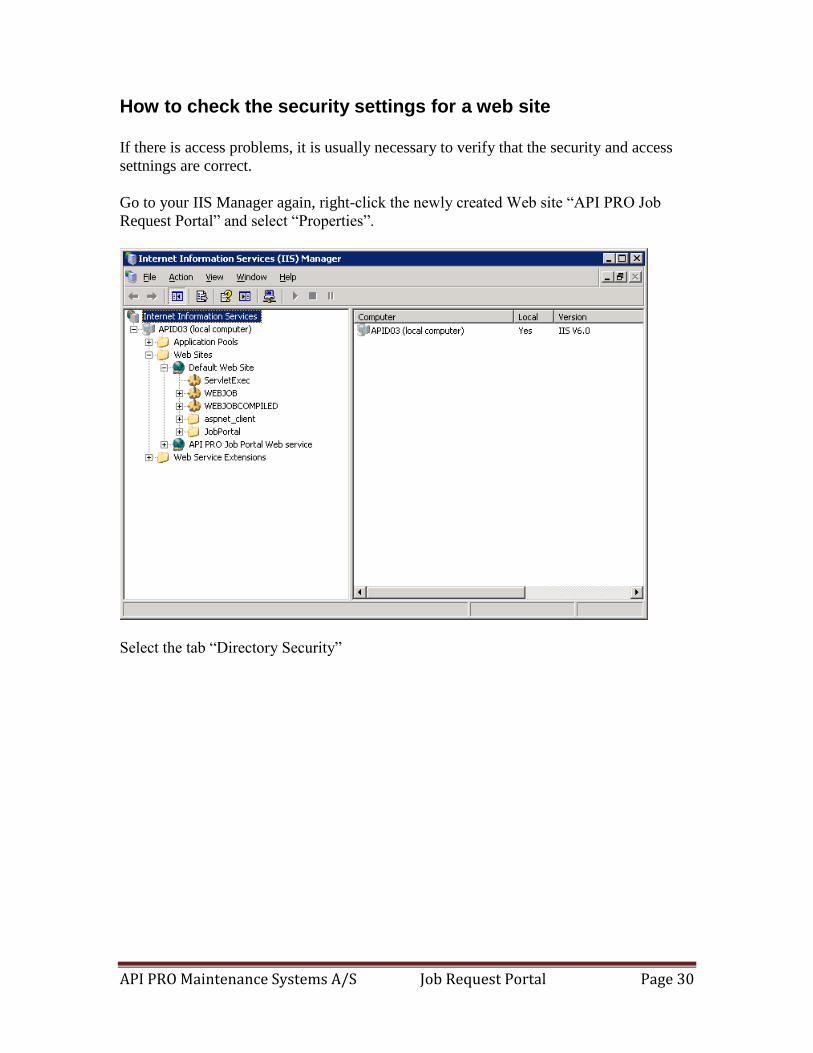
How to check the security settings for a web site
If there is access problems, it is usually necessary to verify that the security and access
settnings are correct.
Go to your IIS Manager again, right-click the newly created Web site “API PRO Job
Request Portal” and select “Properties”.
Select the tab “Directory Security”
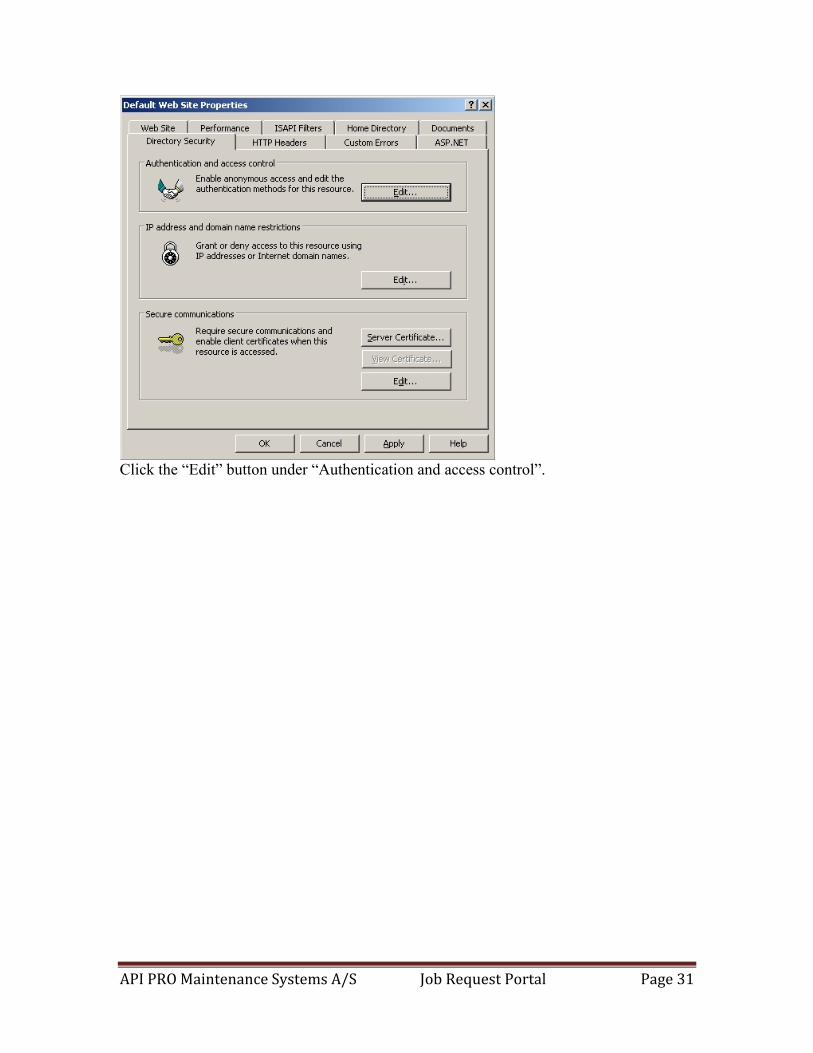
API PRO Maintenance Systems A/S Job Request Portal Page 31
Click the “Edit” button under “Authentication and access control”.

API PRO Maintenance Systems A/S Job Request Portal Page 32
Make sure that “Enable anonymous access” is checked.
The user account that handles the anonumous access must have the necessary access
rights to the directory where the web site files are located.