Apache HTTP Server Cookbook - index-of.co.ukindex-of.co.uk/Networking/Apache Http Server...
46
Transcript of Apache HTTP Server Cookbook - index-of.co.ukindex-of.co.uk/Networking/Apache Http Server...

Apache HTTP Server Cookbook i
Apache HTTP Server Cookbook
Apache HTTP Server Cookbook ii
Contents
1 How to install the Apache web server 1
1.1 Installing Apache and utilities . . . . . . . . . . . . . . . . . . . . . . . . . . . . . . . . . . . . . . . . . . . . 1
1.2 Checking running status of Apache . . . . . . . . . . . . . . . . . . . . . . . . . . . . . . . . . . . . . . . . . . 1
1.3 Serving your first website with Apache . . . . . . . . . . . . . . . . . . . . . . . . . . . . . . . . . . . . . . . . 3
1.4 Wrapping up . . . . . . . . . . . . . . . . . . . . . . . . . . . . . . . . . . . . . . . . . . . . . . . . . . . . . 6
2 Apache Configuration Tutorial 7
2.1 Inspecting the Apache configuration file . . . . . . . . . . . . . . . . . . . . . . . . . . . . . . . . . . . . . . . 8
2.2 Apache modules . . . . . . . . . . . . . . . . . . . . . . . . . . . . . . . . . . . . . . . . . . . . . . . . . . . . 8
2.3 Configuration directives . . . . . . . . . . . . . . . . . . . . . . . . . . . . . . . . . . . . . . . . . . . . . . . . 8
2.4 Basic authentication . . . . . . . . . . . . . . . . . . . . . . . . . . . . . . . . . . . . . . . . . . . . . . . . . . 10
2.5 Directives in action . . . . . . . . . . . . . . . . . . . . . . . . . . . . . . . . . . . . . . . . . . . . . . . . . . 11
2.6 Basic security considerations . . . . . . . . . . . . . . . . . . . . . . . . . . . . . . . . . . . . . . . . . . . . . 14
2.7 Conclusion . . . . . . . . . . . . . . . . . . . . . . . . . . . . . . . . . . . . . . . . . . . . . . . . . . . . . . 14
3 Name-based Virtual Host Configuration 15
3.1 Reviewing the Apache configuration file . . . . . . . . . . . . . . . . . . . . . . . . . . . . . . . . . . . . . . . 15
3.2 Defining virtual hosts . . . . . . . . . . . . . . . . . . . . . . . . . . . . . . . . . . . . . . . . . . . . . . . . . 15
3.3 Troubleshooting . . . . . . . . . . . . . . . . . . . . . . . . . . . . . . . . . . . . . . . . . . . . . . . . . . . . 18
3.4 Limiting bandwidth . . . . . . . . . . . . . . . . . . . . . . . . . . . . . . . . . . . . . . . . . . . . . . . . . . 19
3.5 Summary . . . . . . . . . . . . . . . . . . . . . . . . . . . . . . . . . . . . . . . . . . . . . . . . . . . . . . . 20
4 mod_rewrite: Redirecting and rewriting URLs 21
4.1 Introducing regular expressions (regexs) . . . . . . . . . . . . . . . . . . . . . . . . . . . . . . . . . . . . . . . 21
4.2 Introducing RewriteRule and RewriteCond . . . . . . . . . . . . . . . . . . . . . . . . . . . . . . . . . . . . . . 22
4.3 Examples . . . . . . . . . . . . . . . . . . . . . . . . . . . . . . . . . . . . . . . . . . . . . . . . . . . . . . . 22
4.4 Summary . . . . . . . . . . . . . . . . . . . . . . . . . . . . . . . . . . . . . . . . . . . . . . . . . . . . . . . 28
5 Apache SSL / TLS Support 29
5.1 Introducing SSL and TLS . . . . . . . . . . . . . . . . . . . . . . . . . . . . . . . . . . . . . . . . . . . . . . . 29
5.2 Apache and TLS . . . . . . . . . . . . . . . . . . . . . . . . . . . . . . . . . . . . . . . . . . . . . . . . . . . 29
5.3 Summary . . . . . . . . . . . . . . . . . . . . . . . . . . . . . . . . . . . . . . . . . . . . . . . . . . . . . . . 33
Apache HTTP Server Cookbook iii
6 Apache URL rewrite example 35
6.1 Redirecting to a new resource in the same server . . . . . . . . . . . . . . . . . . . . . . . . . . . . . . . . . . . 35
6.2 Redirecting to a resource moved to another server . . . . . . . . . . . . . . . . . . . . . . . . . . . . . . . . . . 36
6.3 Serve browser-dependent content . . . . . . . . . . . . . . . . . . . . . . . . . . . . . . . . . . . . . . . . . . . 37
6.4 Summary . . . . . . . . . . . . . . . . . . . . . . . . . . . . . . . . . . . . . . . . . . . . . . . . . . . . . . . 39
Apache HTTP Server Cookbook iv
Copyright (c) Exelixis Media P.C., 2016
All rights reserved. Without limiting the rights undercopyright reserved above, no part of this publicationmay be reproduced, stored or introduced into a retrieval system, ortransmitted, in any form or by any means (electronic, mechanical,photocopying, recording or otherwise), without the prior writtenpermission of the copyright owner.
Apache HTTP Server Cookbook v
Preface
The Apache HTTP Server, colloquially called Apache, is the world’s most used web server software. Originally based on theNCSA HTTPd server, development of Apache began in early 1995 after work on the NCSA code stalled. Apache played akey role in the initial growth of the World Wide Web, quickly overtaking NCSA HTTPd as the dominant HTTP server, andhas remained most popular since April 1996. In 2009, it became the first web server software to serve more than 100 millionwebsites.
Apache is developed and maintained by an open community of developers under the auspices of the Apache Software Foundation.Most commonly used on a Unix-like system (usually Linux), the software is available for a wide variety of operating systemsbesides Unix, including eComStation, Microsoft Windows, NetWare, OpenVMS, OS/2, and TPF. Released under the ApacheLicense, Apache is free and open-source software.
As of November 2015, Apache was estimated to serve 50% of all active websites and 37% of the top servers across all domains.(Source: https://en.wikipedia.org/wiki/Apache_HTTP_Server/)
In this ebook, we provide a compilation of Apache HTTP Server tutorials that will help you get started with this web server. Wecover a wide range of topics, from installing the server and performing a basic configuration, to configuring Virtual Hosts andSSL support. With our straightforward tutorials, you will be able to get your own projects up and running in minimum time.

Apache HTTP Server Cookbook vi
About the Author
Gabriel Canepa is a Linux Foundation Certified System Administrator (LFCS-1500-0576-0100) and web developer from VillaMercedes, San Luis, Argentina.
He works for a worldwide leading consumer product company and takes great pleasure in using FOSS tools to increase produc-tivity in all areas of his daily work.
When he’s not typing commands or writing code or articles, he enjoys telling bedtime stories with his wife to his two littledaughters and playing with them, the great pleasure of his life.
Apache HTTP Server Cookbook 1 / 39
Chapter 1
How to install the Apache web server
In this example we will show how to install the Apache web server in CentOS 7.2 and Ubuntu 14.04.3 using the command line.According to recent reports, Apache continues to keep the lead in the number of websites and Internet-facing machines whencompared to other web servers, such as Microsoft’s IIS or Nginx. Such has been the case for a long time, and that is why the skillof knowing how to install, configure, and leverage Apache is on the rise everywhere.
In other words, by acquiring Apache skills you will learn how to use the number one server on the Internet.
1.1 Installing Apache and utilities
Perhaps the first thing that we need to note is that the package that includes Apache has different names in CentOS (httpd) andUbuntu (apache2). The good news is that in both cases, the package is included in the repositories that are configured whenthe operating system is installed. For that reason, you do not need to make any modifications to the repositories in order to installApache.
In addition, we will install an extra package named apache2-utils and httpd-tools in Ubuntu and CentOS, respectively.This package includes tools that will be useful to benchmark Apache, manage basic and digest authentication to web pages, andresolve IP addresses to host names in the logs, among other things.
However, before you proceed please keep in mind that installing packages require administrative privileges, so you will need torun the following commands either as root (in CentOS) or using sudo (in Ubuntu). With that in mind, let us proceed with theinstallation.
In CentOS, type
yum update && yum install httpd httpd-tools -y
and press Enter.
In Ubuntu, do
sudo apt-get update && apt-get install apache2 apache2-utils -y
The package management system (yum or apt-get) will take care of installing all necessary dependencies required by the webserver.
1.2 Checking running status of Apache
Once the installation completes, we need to check whether the web server has been automatically started. Typically, that is thecase in Ubuntu but not in CentOS.
To check the running status of Apache in Ubuntu, type

Apache HTTP Server Cookbook 2 / 39
service apache2 status
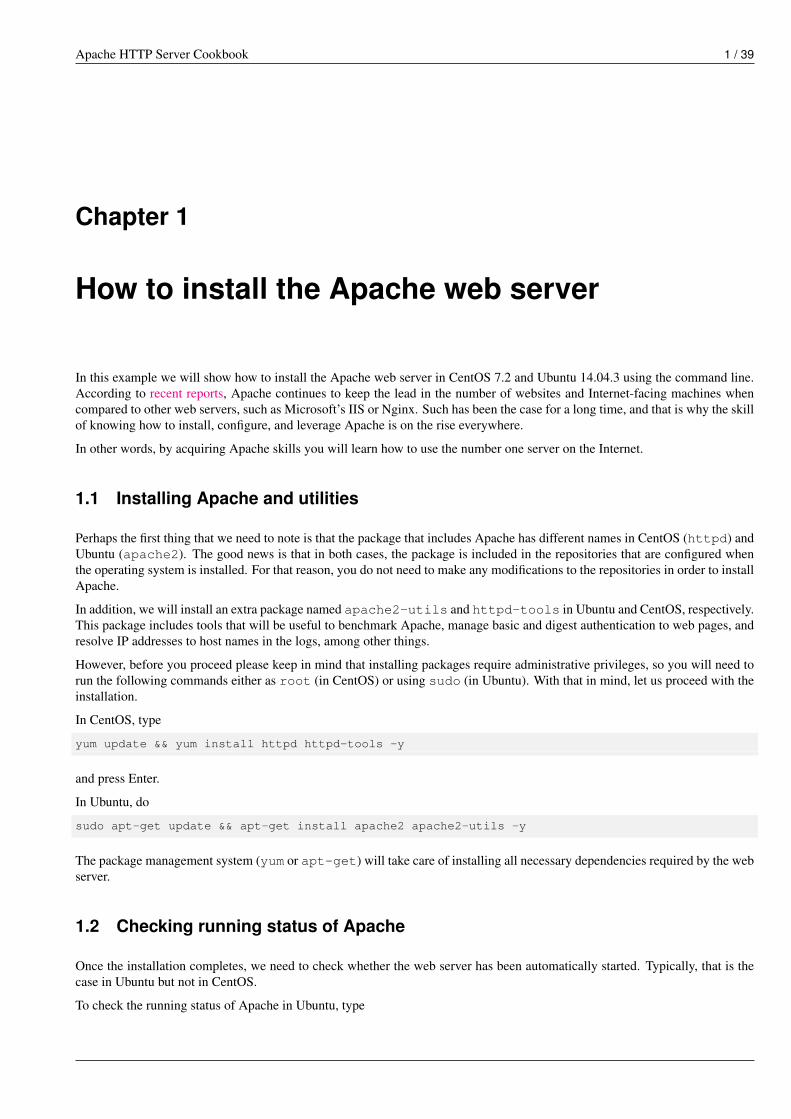
In Fig. 1.1 you can see the expected output when the web server is running. Otherwise, if it is stopped (as we forced it to using
sudo service apache2 stop
which is also shown in the image) you will need to run
sudo service apache2 start
to restart it. By now, you can safely ignore the AH00558 error message as it refers to an aspect of the web server configurationthat we will cover in the next tutorial of the Apache series.
Figure 1.1: Checking the running status of Apache in Ubuntu
In CentOS, you will use systemctl (the system and service manager tool) to verify the status of Apache:
systemctl status httpd
Fig. 1.2 shows the expected output when the web server is running and when it is not.
Apache HTTP Server Cookbook 3 / 39
Figure 1.2: Using systemctl to check Apache’s status in CentOS
Last but not least, we need to ensure that the web server is started automatically the next time the system boots. In Ubuntu, theinstallation process by default will configure it to start after a reboot whereas in CentOS, you will need to start it by hand:
systemctl start httpd
and enable it for future reboots:
systemctl enable httpd
This ensures that Apache will be started by systemd each time the machine boots.
In Ubuntu, you can also get more information about Apache (web traffic statistics, server load and uptime, percentage of CPUusage, number of requests currently being processed, to name a few examples) using
apachectl status
In CentOS this command is aliased to
systemctl status httpd
so you will not get more details than those shown in Fig. 1.2).
1.3 Serving your first website with Apache
After you have successfully installed Apache and got it running, it is time to look into serving web pages. Although we willdiscuss this further in later articles, you need to know that Apache not only is used as a standalone server (that is, to store a singlewebsite or application), but also to run several sites (also known as virtual hosts) at the same time.
For the time being, it is sufficient to indicate the place where the web server stores pages and see how it returns them upon arequest performed by a client - all in the context of a standalone server. To see Apache in action for the first time, launch a web
Apache HTTP Server Cookbook 4 / 39
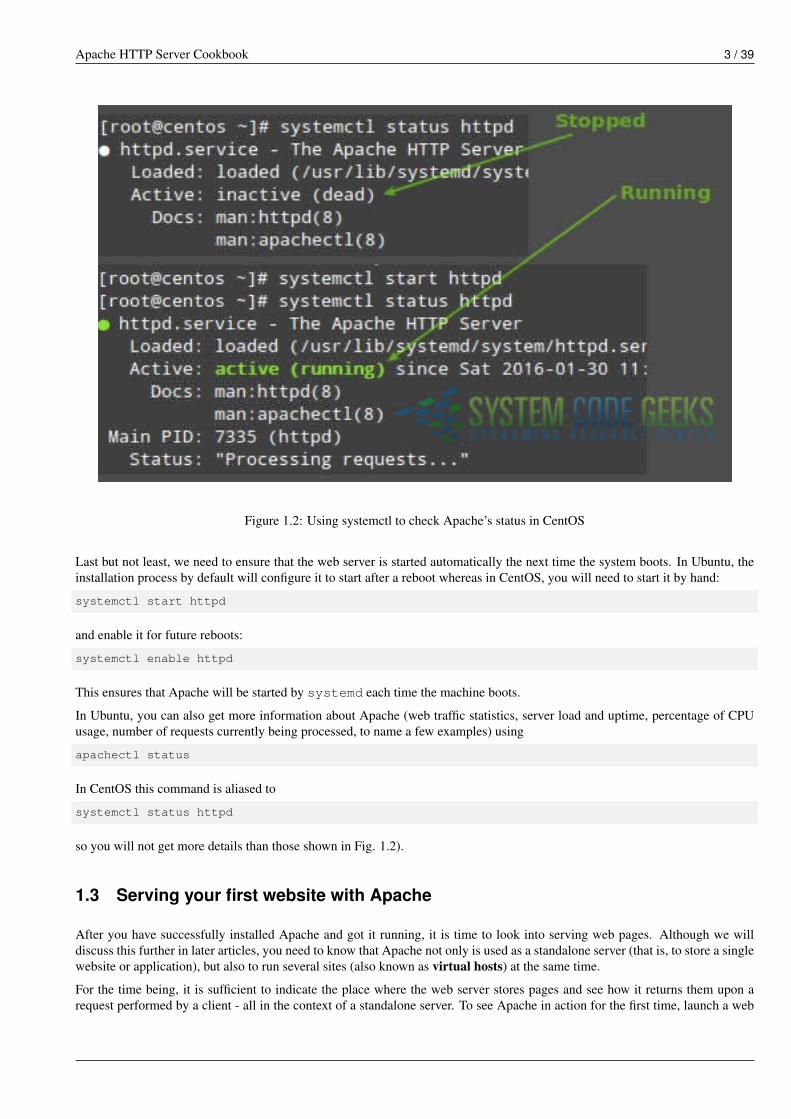
browser and point it to the IP address of the machine where Apache is running, as shown in Fig. 1.3 (192.168.0.29 is a CentOSand 192.168.0.30 is Ubuntu).
Figure 1.3: Apache test page in CentOS and Ubuntu
If you cannot see the test page after starting Apache in CentOS and your web browser says it can’t establish a connection to theweb server, please check the following:
• Did you misspell the IP address in the browser’s URL bar?
• Is firewalld, the default firewall in CentOS 7 allowing http traffic?
You can check #2 as follows:
Type
firewall-cmd --add-services=http
then
Apache HTTP Server Cookbook 5 / 39
firewall-cmd --add-services=http --permanent
and hit Enter. Then try to access the web server by IP as explained earlier.
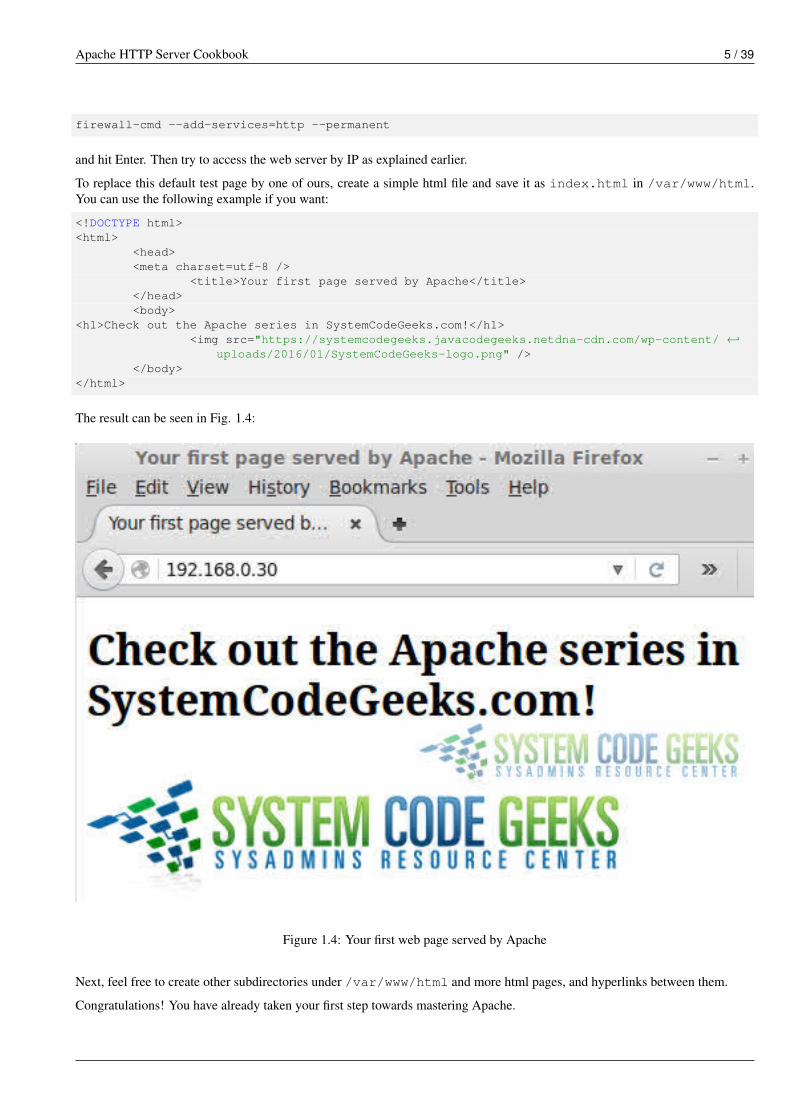
To replace this default test page by one of ours, create a simple html file and save it as index.html in /var/www/html.You can use the following example if you want:
<!DOCTYPE html><html>
<head><meta charset=utf-8 />
<title>Your first page served by Apache</title></head><body>
<h1>Check out the Apache series in SystemCodeGeeks.com!</h1><img src="https://systemcodegeeks.javacodegeeks.netdna-cdn.com/wp-content/ ←↩
uploads/2016/01/SystemCodeGeeks-logo.png" /></body>
</html>
The result can be seen in Fig. 1.4:
Figure 1.4: Your first web page served by Apache
Next, feel free to create other subdirectories under /var/www/html and more html pages, and hyperlinks between them.
Congratulations! You have already taken your first step towards mastering Apache.
Apache HTTP Server Cookbook 6 / 39
1.4 Wrapping up
In this tutorial we have explained how to install Apache, the most used server used by websites and Internet-facing computers,in CentOS 7 and Ubuntu 14.04. In addition, we showed you how to replace the default test page with a custom one.
In the next articles of this series, we will discuss in greater depth the capabilities of Apache. Stay tuned.
Apache HTTP Server Cookbook 7 / 39
Chapter 2
Apache Configuration Tutorial
In the first article of this series we introduced you to Apache. If you took the time to read the introduction, you will have noticedthat it is the number one server powering websites and Internet-facing computers - and there are plenty of good reasons for that.
In this guide we will discuss one of those reasons: its easiness of configuration and seamless integration with server-side scriptinglanguages such as PHP in the context of a standalone web server. In this type of setup, Apache is used to serve a single domain orapplication, as opposed to running several sites off a single system (also known as virtual hosting, the topic of our next tutorial).
Note: The configuration syntax and directives of Apache have changed a bit from version 2.2 to 2.4. In addition, some well-known directives in version 2.2 have been deprecated in 2.4. If you followed the steps in the previous tutorial, you should haveinstalled the latest version of the web server (2.4 at the time of this writing).
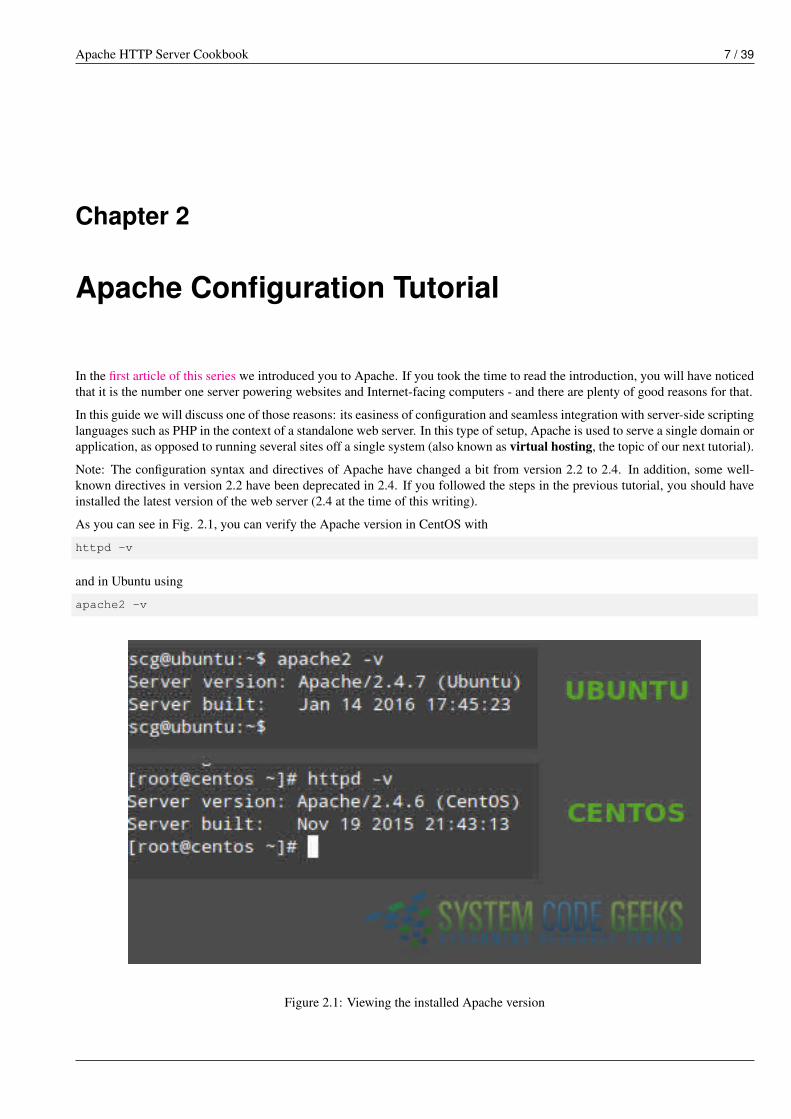
As you can see in Fig. 2.1, you can verify the Apache version in CentOS with
httpd -v
and in Ubuntu using
apache2 -v
Figure 2.1: Viewing the installed Apache version
Apache HTTP Server Cookbook 8 / 39
2.1 Inspecting the Apache configuration file
As you can already tell based on the first article, the only difference between the Apache installations in CentOS and Ubuntu isthe package name. Thus, it is to be expected that the main configuration file be named differently (httpd.conf in CentOSand apache2.conf in Ubuntu) and located in a different place in each distribution (/etc/httpd/conf/ and /etc/apache2/, respectively).
Regardless of the distribution, the main configuration file contains the configuration directives that give the server its instructions.You will use this file to configure system-wide settings for the web server, and additional files to set up virtual hosts (but again,we will expand more on that last topic in the next guide).
It is important to note that you should understand and familiarize yourself with the directives in the configuration file beforemaking changes that can potentially affect the operation of the web server.
2.2 Apache modules
You can easily extend the web server’s operation by using independent, separate pieces of software called modules that providespecific functionality. Some modules come built-in with Apache, while others can be installed using your distribution’s packagemanagement system and enabled to integrate with the web server. Although we will discuss modules in later guides of this series,it is important to have this definition in mind before we dive into the configuration directives. You will see the reason in a minute.
2.3 Configuration directives
The following directives are listed in the main configuration file. All of them (and many, many more!) are explained thoroughlyin the Apache 2.4 configuration docs online at https://httpd.apache.org/docs/current/.
If you want or need to read the Apache documentation offline, you can install the package httpd-manual in CentOS:
yum install httpd-manual
and apache2-doc in Ubuntu:
sudo apt-get install apache2-doc
You can then access the docs through a web browser (https://server/manual, where server must be replaced with thehostname or the IP address of the machine). This tool can come in handy if at a given time you cannot access the Internet tocheck the same resource online.
Directive Description ExampleServerRoot The directory tree where the server’s
configuration, error, and log files arekept.
Example
Listen The IP and port where Apache isbound. The default is listening on port80 of all network interfaces, althoughit is more secure to specify a single IPaddress.
Listen 192.168.0.100:80
User Group The name of the user/group to run theweb server as. It is usually goodpractice to create a dedicated user andgroup for running Apache, as it is thecase with most system services. Youcan also use the UID and the GIDinstead of the username andgroupname, although it is not commonto do so.
User apache Group apache
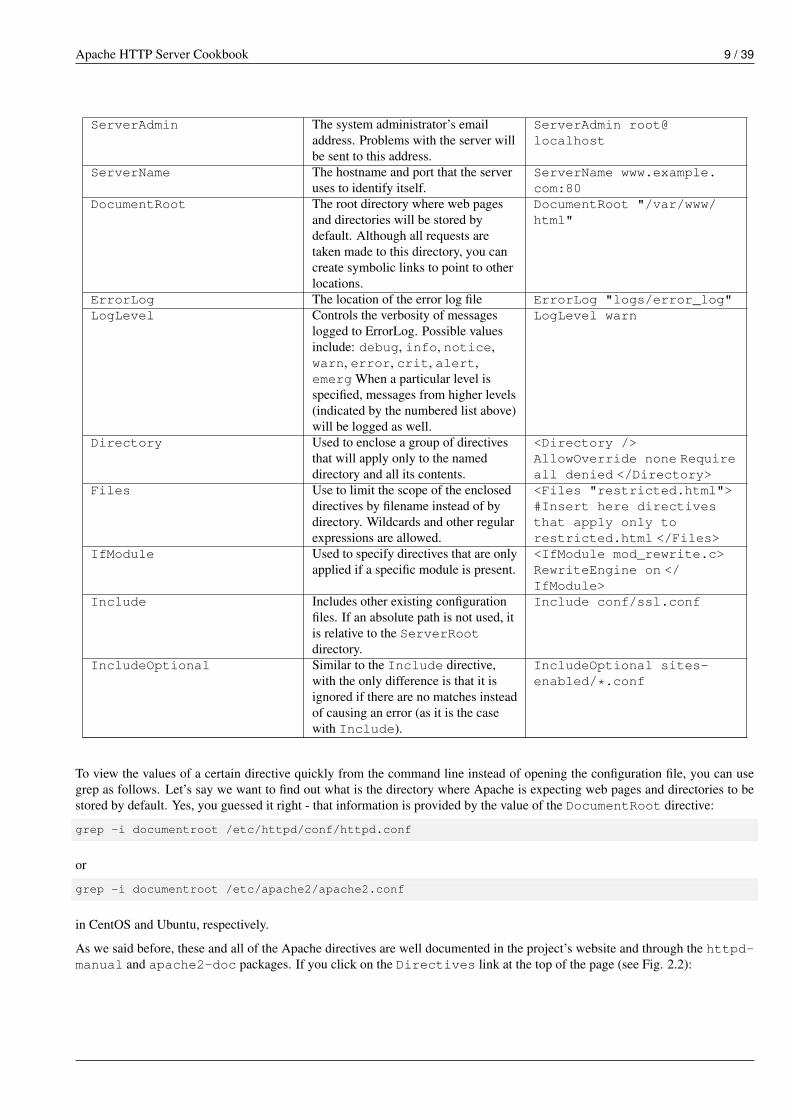
Apache HTTP Server Cookbook 9 / 39
ServerAdmin The system administrator’s emailaddress. Problems with the server willbe sent to this address.
ServerAdmin root@localhost
ServerName The hostname and port that the serveruses to identify itself.
ServerName www.example.com:80
DocumentRoot The root directory where web pagesand directories will be stored bydefault. Although all requests aretaken made to this directory, you cancreate symbolic links to point to otherlocations.
DocumentRoot "/var/www/html"
ErrorLog The location of the error log file ErrorLog "logs/error_log"LogLevel Controls the verbosity of messages
logged to ErrorLog. Possible valuesinclude: debug, info, notice,warn, error, crit, alert,emerg When a particular level isspecified, messages from higher levels(indicated by the numbered list above)will be logged as well.
LogLevel warn
Directory Used to enclose a group of directivesthat will apply only to the nameddirectory and all its contents.
<Directory />AllowOverride none Requireall denied </Directory>
Files Use to limit the scope of the encloseddirectives by filename instead of bydirectory. Wildcards and other regularexpressions are allowed.
<Files "restricted.html">#Insert here directivesthat apply only torestricted.html </Files>
IfModule Used to specify directives that are onlyapplied if a specific module is present.
<IfModule mod_rewrite.c>RewriteEngine on </IfModule>
Include Includes other existing configurationfiles. If an absolute path is not used, itis relative to the ServerRootdirectory.
Include conf/ssl.conf
IncludeOptional Similar to the Include directive,with the only difference is that it isignored if there are no matches insteadof causing an error (as it is the casewith Include).
IncludeOptional sites-enabled/*.conf
To view the values of a certain directive quickly from the command line instead of opening the configuration file, you can usegrep as follows. Let’s say we want to find out what is the directory where Apache is expecting web pages and directories to bestored by default. Yes, you guessed it right - that information is provided by the value of the DocumentRoot directive:
grep -i documentroot /etc/httpd/conf/httpd.conf
or
grep -i documentroot /etc/apache2/apache2.conf
in CentOS and Ubuntu, respectively.
As we said before, these and all of the Apache directives are well documented in the project’s website and through the httpd-manual and apache2-doc packages. If you click on the Directives link at the top of the page (see Fig. 2.2):
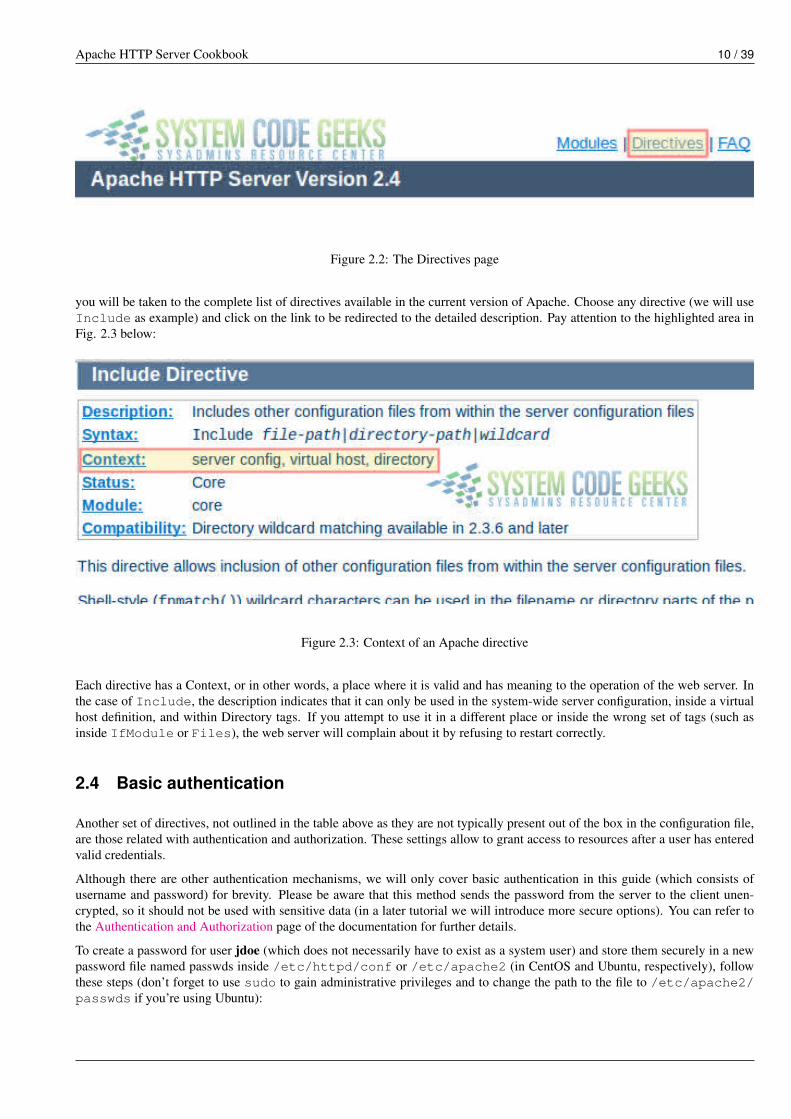
Apache HTTP Server Cookbook 10 / 39
Figure 2.2: The Directives page
you will be taken to the complete list of directives available in the current version of Apache. Choose any directive (we will useInclude as example) and click on the link to be redirected to the detailed description. Pay attention to the highlighted area inFig. 2.3 below:
Figure 2.3: Context of an Apache directive
Each directive has a Context, or in other words, a place where it is valid and has meaning to the operation of the web server. Inthe case of Include, the description indicates that it can only be used in the system-wide server configuration, inside a virtualhost definition, and within Directory tags. If you attempt to use it in a different place or inside the wrong set of tags (such asinside IfModule or Files), the web server will complain about it by refusing to restart correctly.
2.4 Basic authentication
Another set of directives, not outlined in the table above as they are not typically present out of the box in the configuration file,are those related with authentication and authorization. These settings allow to grant access to resources after a user has enteredvalid credentials.
Although there are other authentication mechanisms, we will only cover basic authentication in this guide (which consists ofusername and password) for brevity. Please be aware that this method sends the password from the server to the client unen-crypted, so it should not be used with sensitive data (in a later tutorial we will introduce more secure options). You can refer tothe Authentication and Authorization page of the documentation for further details.
To create a password for user jdoe (which does not necessarily have to exist as a system user) and store them securely in a newpassword file named passwds inside /etc/httpd/conf or /etc/apache2 (in CentOS and Ubuntu, respectively), followthese steps (don’t forget to use sudo to gain administrative privileges and to change the path to the file to /etc/apache2/passwds if you’re using Ubuntu):
Apache HTTP Server Cookbook 11 / 39
Step 1 - Create the file with htpasswd, the tool that is used to manage basic authentication credentials. Use the -c option toindicate that we are creating a non-existent file:
htpasswd -c /etc/httpd/conf/passwds jdoe
Step 2 - Choose a new password for jdoe and enter it twice when you are prompted to do so.
Step 3 - Change ownership of the file to the user Apache is running as and set its permissions to 600:
In CentOS:
chown apache:apache /etc/httpd/conf/passwdschmod 600 /etc/httpd/conf/passwds
In Ubuntu:
chown www-data:www-data /etc/apache2/passwdschmod 600 /etc/apache2/passwds
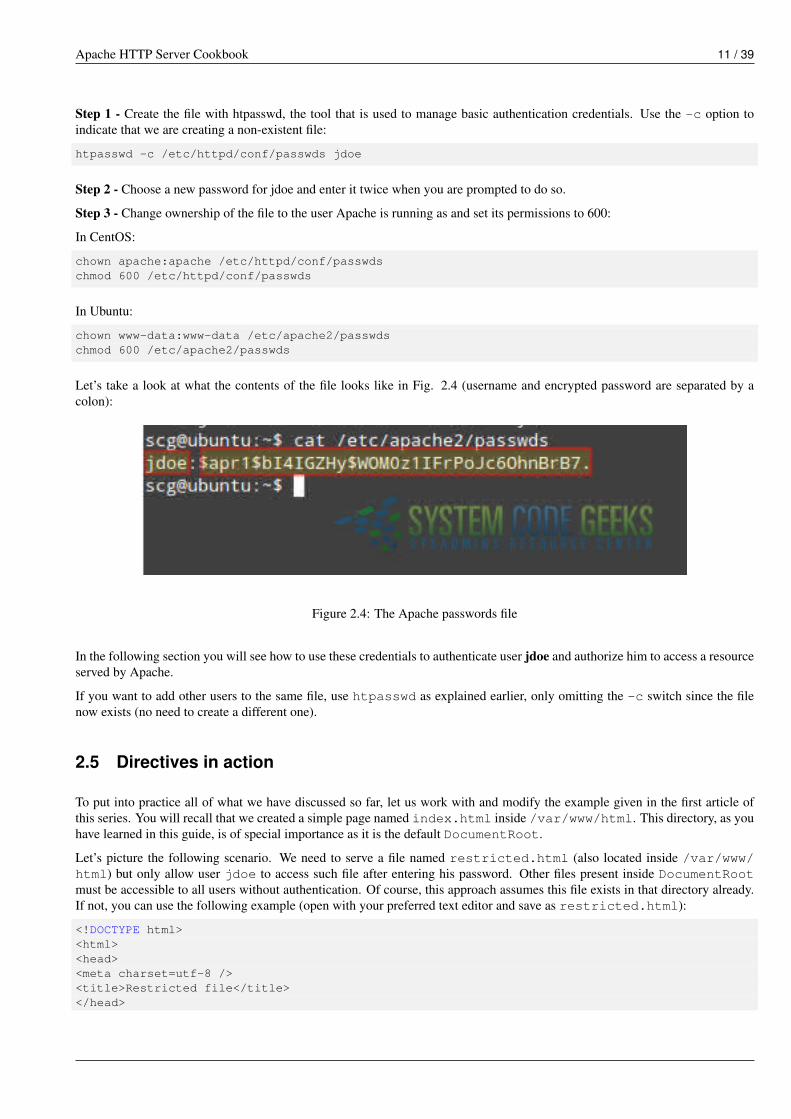
Let’s take a look at what the contents of the file looks like in Fig. 2.4 (username and encrypted password are separated by acolon):
Figure 2.4: The Apache passwords file
In the following section you will see how to use these credentials to authenticate user jdoe and authorize him to access a resourceserved by Apache.
If you want to add other users to the same file, use htpasswd as explained earlier, only omitting the -c switch since the filenow exists (no need to create a different one).
2.5 Directives in action
To put into practice all of what we have discussed so far, let us work with and modify the example given in the first article ofthis series. You will recall that we created a simple page named index.html inside /var/www/html. This directory, as youhave learned in this guide, is of special importance as it is the default DocumentRoot.
Let’s picture the following scenario. We need to serve a file named restricted.html (also located inside /var/www/html) but only allow user jdoe to access such file after entering his password. Other files present inside DocumentRootmust be accessible to all users without authentication. Of course, this approach assumes this file exists in that directory already.If not, you can use the following example (open with your preferred text editor and save as restricted.html):
<!DOCTYPE html><html><head><meta charset=utf-8 /><title>Restricted file</title></head>
Apache HTTP Server Cookbook 12 / 39
<body><h1>Restricted file</h1><img src="https://files.softicons.com/download/folder-icons/dellios-system-icons-by- ←↩
dellustrations/png/128/restricted.png" /></body></html>
To accomplish our goal, let’s open the Apache configuration file and add the following Directory block:
<Directory /var/www/html><Files restricted.html>AuthType BasicAuthName "SystemCodeGeeks - Restricted file"AuthBasicProvider fileAuthUserFile /etc/apache2/passwdsRequire user jdoe</Files></Directory>
Now restart Apache:
In CentOS:
systemctl restart httpd
In Ubuntu:
service apache2 restart
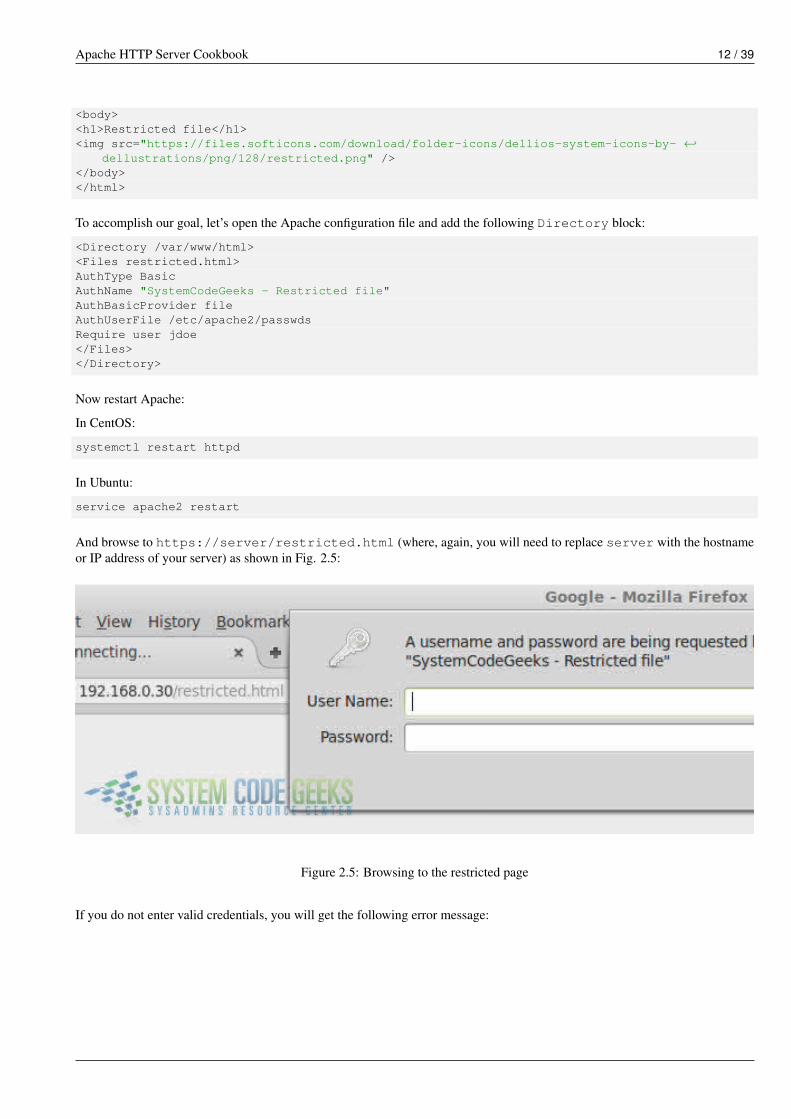
And browse to https://server/restricted.html (where, again, you will need to replace server with the hostnameor IP address of your server) as shown in Fig. 2.5:
Figure 2.5: Browsing to the restricted page
If you do not enter valid credentials, you will get the following error message:
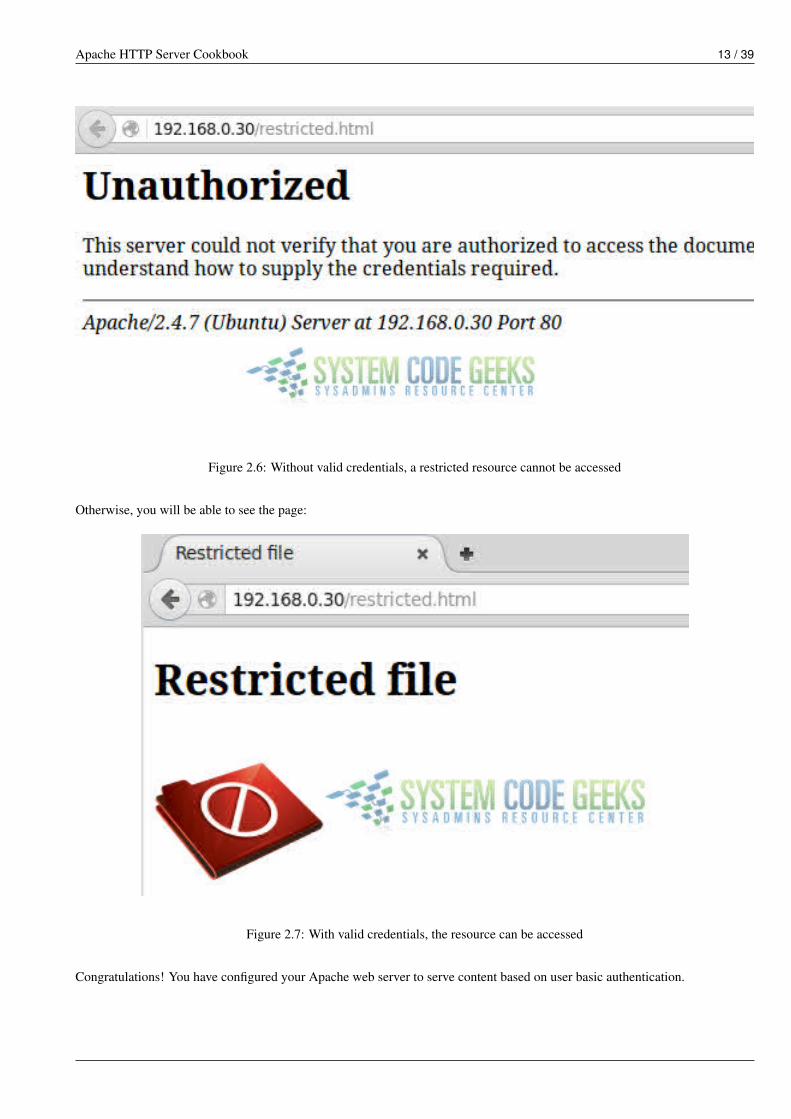
Apache HTTP Server Cookbook 13 / 39
Figure 2.6: Without valid credentials, a restricted resource cannot be accessed
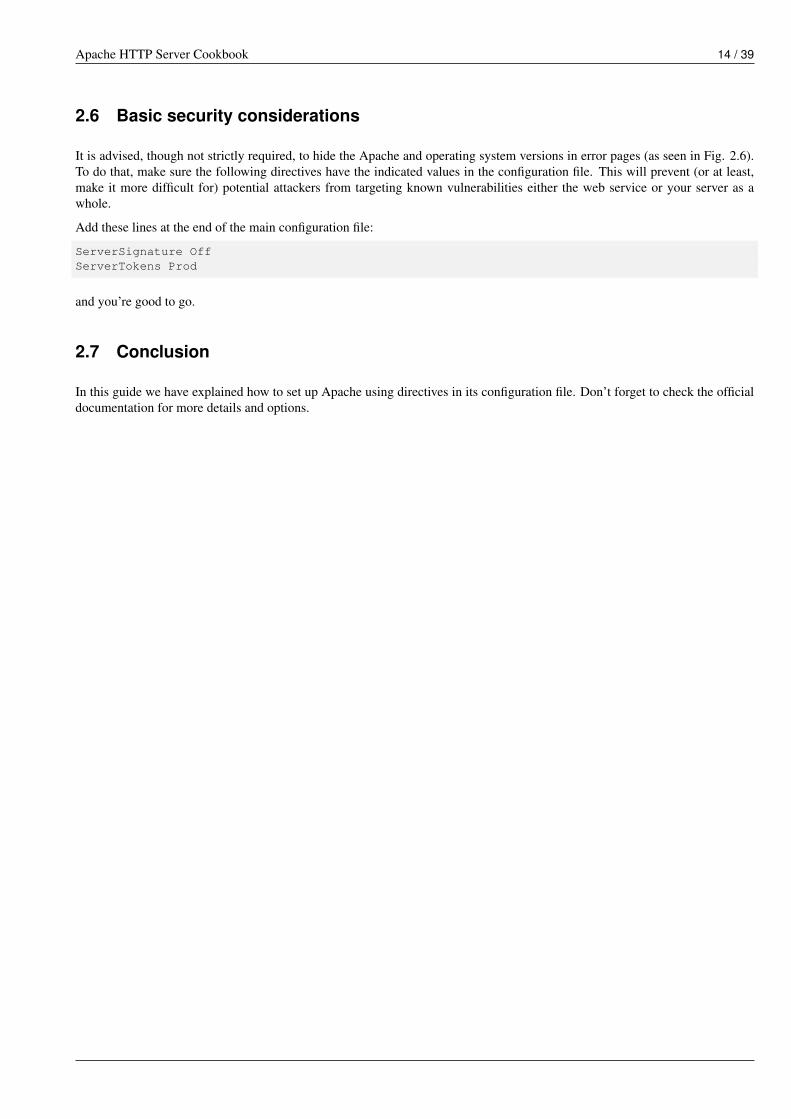
Otherwise, you will be able to see the page:
Figure 2.7: With valid credentials, the resource can be accessed
Congratulations! You have configured your Apache web server to serve content based on user basic authentication.
Apache HTTP Server Cookbook 14 / 39
2.6 Basic security considerations
It is advised, though not strictly required, to hide the Apache and operating system versions in error pages (as seen in Fig. 2.6).To do that, make sure the following directives have the indicated values in the configuration file. This will prevent (or at least,make it more difficult for) potential attackers from targeting known vulnerabilities either the web service or your server as awhole.
Add these lines at the end of the main configuration file:
ServerSignature OffServerTokens Prod
and you’re good to go.
2.7 Conclusion
In this guide we have explained how to set up Apache using directives in its configuration file. Don’t forget to check the officialdocumentation for more details and options.

Apache HTTP Server Cookbook 15 / 39
Chapter 3
Name-based Virtual Host Configuration
In our previous tutorial we discussed how to configure Apache as a standalone web server (hosting a single site) and how toconfigure it. In addition, we outlined the most frequent directives and explained the concept of context, which indicates the placewhere a directive is valid. If you have not read the Apache configuration tutorial yet, you are highly encouraged to do so beforeproceeding.
In this guide we will show you how to use Apache to run multiple sites using a single machine. This practice is known as name-based virtual hosting, and is key to our understanding of how a web server works. Using one machine to run several domainsclearly has its advantages (low maintenance costs, for example) and a few disadvantages as well (without a bandwidth balancerin place, a single site can end up consuming the entire bandwidth allocated for the server, thus impacting negatively the operationand performance of the rest).
3.1 Reviewing the Apache configuration file
As you will recall from the previous guide, the main configuration file for Apache (where system-wide settings are found) islocated in /etc/httpd/conf/httpd.conf in CentOS or /etc/apache2/apache.conf in Ubuntu. Note how wenow refer to such file as the “main configuration file” and not only as “the configuration file” because we will see in a momenthow you will use other files to define the directives for each virtual host. Although you can define virtual hosts inside the mainconfiguration file, such practice is often discouraged. Instead, the preferred method for defining virtual hosts consists of usingseparate .conf files as it allows for scalability and easier maintenance.
Near the bottom of the main configuration file you will see the following lines:
In CentOS:
# Load config files in the "/etc/httpd/conf.d" directory, if any.IncludeOptional conf.d/*.conf
In Ubuntu:
# Include the virtual host configurations:IncludeOptional sites-enabled/*.conf
As the comment indicates, and as the IncludeOptional directive suggests, Apache will look for .conf files in the /etc/httpd/conf.d (in CentOS) or /etc/apache2/sites-enabled (Ubuntu) which, if present, are used to indicate thevarious directives that define a virtual host.
3.2 Defining virtual hosts
To begin, we will need to either
Apache HTTP Server Cookbook 16 / 39
a) use 2 dummy domains (such as www.example1.com and www.example2.com, as in this guide, or others of your choosing), or
b) use 2 “real” domains that you have registered. This last option also requires that you have set up DNS entries for those domainswith your cloud hosting provider, but such procedure is out of the scope of this tutorial as it is specific for each provider. If youwant to implement name-based virtual hosting in your cloud VPS using domains you have previously registered, consult with yourprovider to set up the necessary DNS entries for each domain, or use a free service such as FreeDNS (https://freedns.afraid.org/).Note that each virtual host will need a directory structure to store files and logs. In addition, the user Apache runs as (apache inCentOS or www-data in Ubuntu) needs to be able to read the web content. To do it, create the following directories and assignthe indicated permissions:
mkdir -p /var/www/example1.com/public_htmlmkdir -p /var/www/example2.com/public_htmlchmod -R 0755 /var/www/
Let’s start by defining www.example1.com. To do it, insert the following block in /etc/httpd/conf.d/example1.com.conf (CentOS) or /etc/apache2/sites-available/example1.com.conf (Ubuntu):
<VirtualHost *:80>DocumentRoot "/var/www/example1.com/public_html/"ServerName www.example1.comServerAlias example1.comErrorLog /var/www/example1.com/error.logLogLevel infoCustomLog /var/www/example1.com/access.log combined</VirtualHost>
Then repeat for the other domain:
<VirtualHost *:80>DocumentRoot "/var/www/example2.com/public_html/"ServerName www.example2.comServerAlias example2.comErrorLog /var/www/example2.com/error.logLogLevel infoCustomLog /var/www/example2.com/access.log combined</VirtualHost>
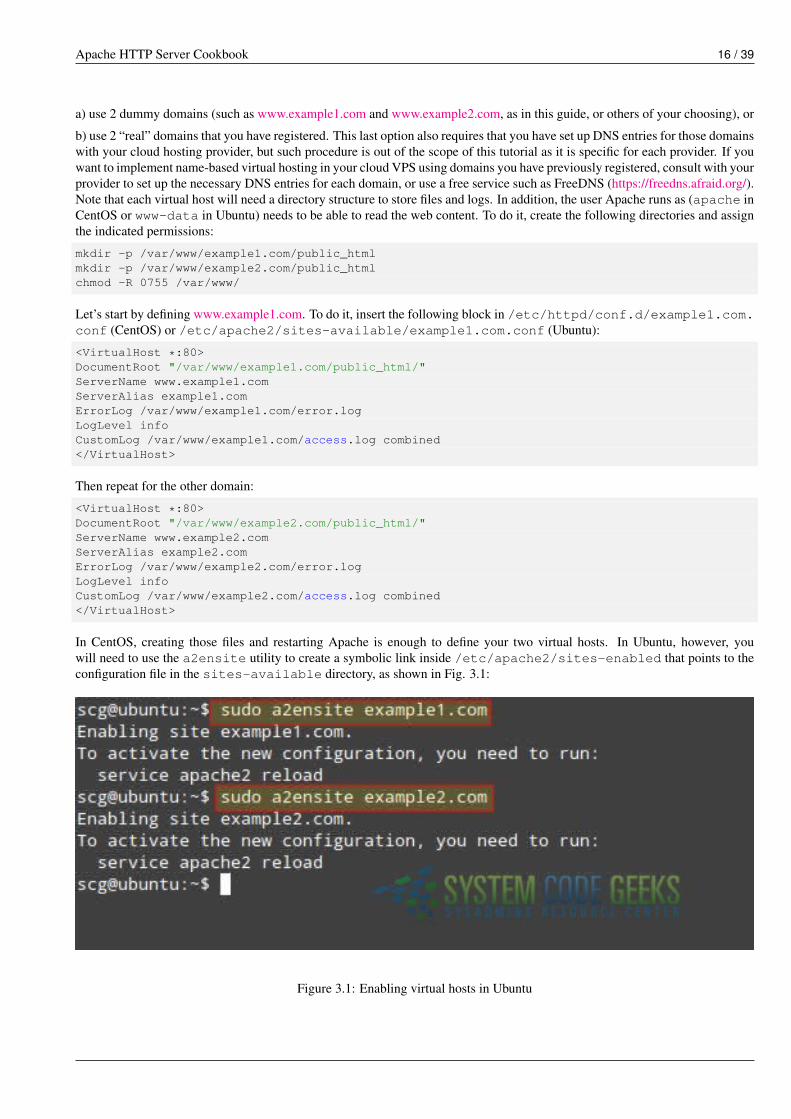
In CentOS, creating those files and restarting Apache is enough to define your two virtual hosts. In Ubuntu, however, youwill need to use the a2ensite utility to create a symbolic link inside /etc/apache2/sites-enabled that points to theconfiguration file in the sites-available directory, as shown in Fig. 3.1:
Figure 3.1: Enabling virtual hosts in Ubuntu
Apache HTTP Server Cookbook 17 / 39
sudo a2ensite example1.comsudo a2ensite example2.com
Then restart Apache:
In CentOS:
systemctl restart httpd
In Ubuntu:
service apache2 restart
Finally, let’s create a sample index.html inside /var/www/example1.com/public_html. By indicating the presenceof the jQuery library as a resource in this simple page, we will be able to recognize success and failures in the logs later:
<!DOCTYPE html><html><head><meta charset="utf-8"><title>Example1.com</title><script src="jquery-1.12.0.min.js"></script></head><body><h1>Welcome!</h1><h3>This is Example1.com</h3></body></html>
and another one inside /var/www/example2.com/public_html:
<!DOCTYPE html><html><head><meta charset="utf-8"><title>Example2.com</title><script src="jquery-1.12.0.min.js"></script></head><body><h1>Welcome!</h1><h3>This is Example2.com</h3></body></html>
Since both www.example1.com and www.example2.com are dummy domains, we need to tell our client computer how to findthem. The most basic name resolution method is using the /etc/hosts file in our computer to map the IP address of our webserver to those domains.
Using the Ubuntu server’s address (192.168.0.30, change to fit your environment) as example, add the following lines to the /etc/hosts file in each client computer that you want to access the virtual hosts:
192.168.0.30 example1.com www.example1.com192.168.0.30 example2.com https://www.example2.com[www.example2.com]
Save the changes and launch your web browser. When you enter www.example1.com and www.example2.com in the URL barand press Enter, the result should be similar to that shown in Fig. 3.2:
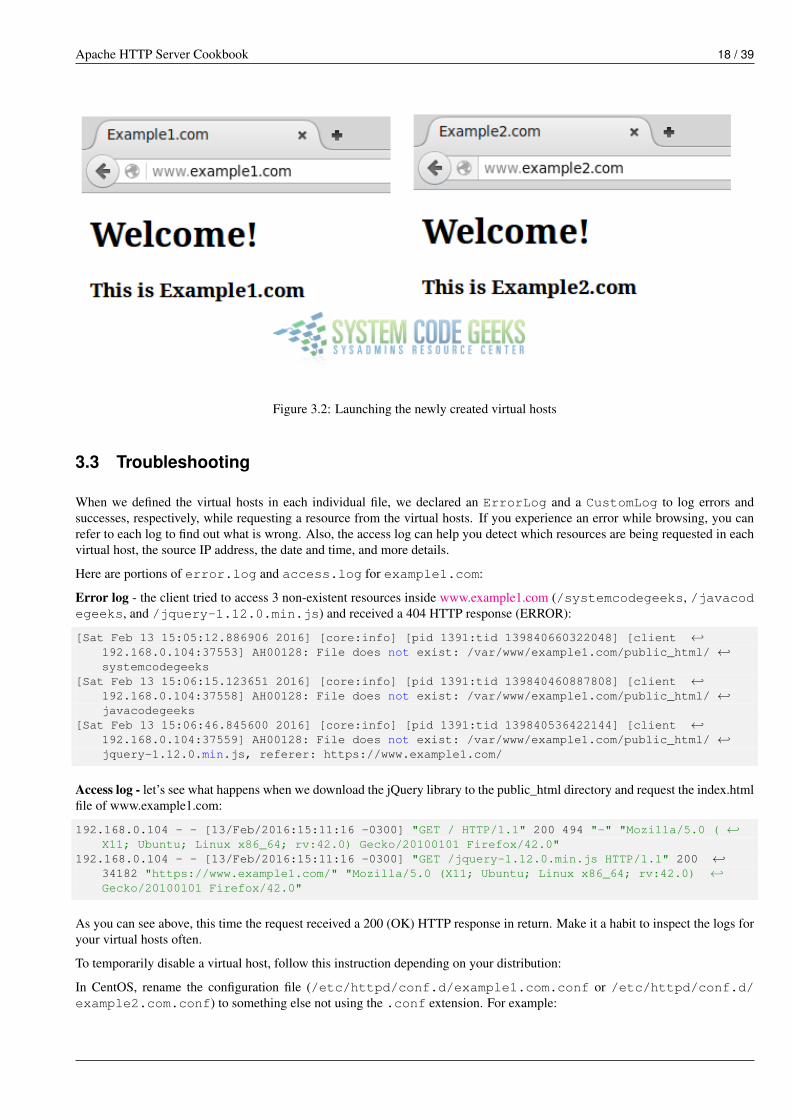
Apache HTTP Server Cookbook 18 / 39
Figure 3.2: Launching the newly created virtual hosts
3.3 Troubleshooting
When we defined the virtual hosts in each individual file, we declared an ErrorLog and a CustomLog to log errors andsuccesses, respectively, while requesting a resource from the virtual hosts. If you experience an error while browsing, you canrefer to each log to find out what is wrong. Also, the access log can help you detect which resources are being requested in eachvirtual host, the source IP address, the date and time, and more details.
Here are portions of error.log and access.log for example1.com:
Error log - the client tried to access 3 non-existent resources inside www.example1.com (/systemcodegeeks, /javacodegeeks, and /jquery-1.12.0.min.js) and received a 404 HTTP response (ERROR):
[Sat Feb 13 15:05:12.886906 2016] [core:info] [pid 1391:tid 139840660322048] [client ←↩192.168.0.104:37553] AH00128: File does not exist: /var/www/example1.com/public_html/ ←↩systemcodegeeks
[Sat Feb 13 15:06:15.123651 2016] [core:info] [pid 1391:tid 139840460887808] [client ←↩192.168.0.104:37558] AH00128: File does not exist: /var/www/example1.com/public_html/ ←↩javacodegeeks
[Sat Feb 13 15:06:46.845600 2016] [core:info] [pid 1391:tid 139840536422144] [client ←↩192.168.0.104:37559] AH00128: File does not exist: /var/www/example1.com/public_html/ ←↩jquery-1.12.0.min.js, referer: https://www.example1.com/
Access log - let’s see what happens when we download the jQuery library to the public_html directory and request the index.htmlfile of www.example1.com:
192.168.0.104 - - [13/Feb/2016:15:11:16 -0300] "GET / HTTP/1.1" 200 494 "-" "Mozilla/5.0 ( ←↩X11; Ubuntu; Linux x86_64; rv:42.0) Gecko/20100101 Firefox/42.0"
192.168.0.104 - - [13/Feb/2016:15:11:16 -0300] "GET /jquery-1.12.0.min.js HTTP/1.1" 200 ←↩34182 "https://www.example1.com/" "Mozilla/5.0 (X11; Ubuntu; Linux x86_64; rv:42.0) ←↩Gecko/20100101 Firefox/42.0"
As you can see above, this time the request received a 200 (OK) HTTP response in return. Make it a habit to inspect the logs foryour virtual hosts often.
To temporarily disable a virtual host, follow this instruction depending on your distribution:
In CentOS, rename the configuration file (/etc/httpd/conf.d/example1.com.conf or /etc/httpd/conf.d/example2.com.conf) to something else not using the .conf extension. For example:
Apache HTTP Server Cookbook 19 / 39
mv /etc/httpd/conf.d/example1.com.conf /etc/httpd/conf.d/example1.com
In Ubuntu, you can use the a2dissite utility as follows:
sudo a2dissite example1
In either case, this will prevent the IncludeOptional directive at the bottom of the main configuration file to load thedefinition of that specific virtual host.
3.4 Limiting bandwidth
As we explained in the introduction, you do not want a virtual host to consume all the bandwidth that is available in your server.To avoid this situation, we will make use of mod_bw, an Apache module that will allow us to limit the allocated bandwidth pervirtual host.
Since mod_bw is not made available by default along with Apache, we will need to install it and make sure it is loaded beforeproceeding.
In CentOS 7, mod_bw is not available in an official repository. For that reason we will use an unofficial repo to install thepackage:
yum install https://repo.unmanarc.com/CentOS/7/RPMS/x86_64/mod_bw-0.92-2.el7.centos.x86_64. ←↩rpm[https://repo.unmanarc.com/CentOS/7/RPMS/x86_64/mod_bw-0.92-2.el7.centos.x86_64.rpm]
Once installed, we need to replace the path to the installed module in /etc/httpd/conf.d/mod_bw.conf:
sed -i ’s@extramodules/mod_bw.so@modules/mod_bw.so@g’ /etc/httpd/conf.d/mod_bw.conf
Then restart Apache.
In Ubuntu, the installation is more straightforward as mod_bw is provided by the libapache2-mod-bw package:
sudo apt-get install libapache2-mod-bw
Apache will then be restarted following the installation of libapache2-mod-bw.
As a totally silly test, let’s modify the total bandwidth allocated for www.example1.com to only 256 bytes for all clients (Band-width all 256 and MinBandwidth all -1) and limiting the number of connections from all sources to 5:
<VirtualHost *:80>DocumentRoot "/var/www/example1.com/public_html/"ServerName www.example1.comServerAlias example1.comErrorLog /var/www/example1.com/error.logLogLevel infoCustomLog /var/www/example1.com/access.log combinedBandwidthModule OnForceBandWidthModule OnBandwidth all 256MinBandwidth all -1MaxConnection all 5</VirtualHost>
If you now restart Apache and try to browse to www.example1.com, you will notice a significant delay to load the page, whilewww.example2.com can be loaded just as fast as before.
You will agree with us that the 256-byte bandwidth limit is an over-exaggeration, but it is helpful to view the results quickly. Feelfree to check out the man page of mod_bw online for further examples on how to limit bandwidth per IP, network, file types, andother criteria. Then you will be able to come up with a bandwidth usage limit that applies accurately to your needs per virtualhost.
Apache HTTP Server Cookbook 20 / 39
Let’s take a look at another example. Perhaps you need to store big files (high resolution images, music, or videos, to name a fewexamples) in a separate directory of your virtual host for people to download - separate from the site pages. As we mentioned inthe above paragraph, we can limit the bandwidth available by file type, and we can do so on a specific directory or on the virtualhost definition.
That said, let’s create a directory named media inside the DocumentRoot of www.example1.com. Note that this will notinterfere with the operation of the rest of the site:
mkdir /var/www/example1.com/public_html/media
and add a Directory block inside the virtual host definition (/etc/httpd/conf.d/example1.com.conf in CentOSor /etc/apache2/sites-available/example1.com.conf in Ubuntu):
<VirtualHost *:80>DocumentRoot "/var/www/example1.com/public_html/"ServerName www.example1.comServerAlias example1.comErrorLog /var/www/example1.com/error.logLogLevel infoCustomLog /var/www/example1.com/access.log combinedBandwidthModule OnForceBandWidthModule OnBandwidth all 20480MinBandwidth all -1MaxConnection all 5<Directory "/var/www/example1.com/public_html/media">LargeFileLimit * 1024 10240</Directory></VirtualHost>
The LargeFileLimit directive above will limit the bandwidth available for all files in the media directory, greater than orequal to 1 MB (1024 KB) to 10 KB/s.
If you want to limit by extension, replace the star (*) with the file extension (such as .avi or .mp3 for example). If you want tolimit more than one file extension, use separate LargeFileLimit directives for each.
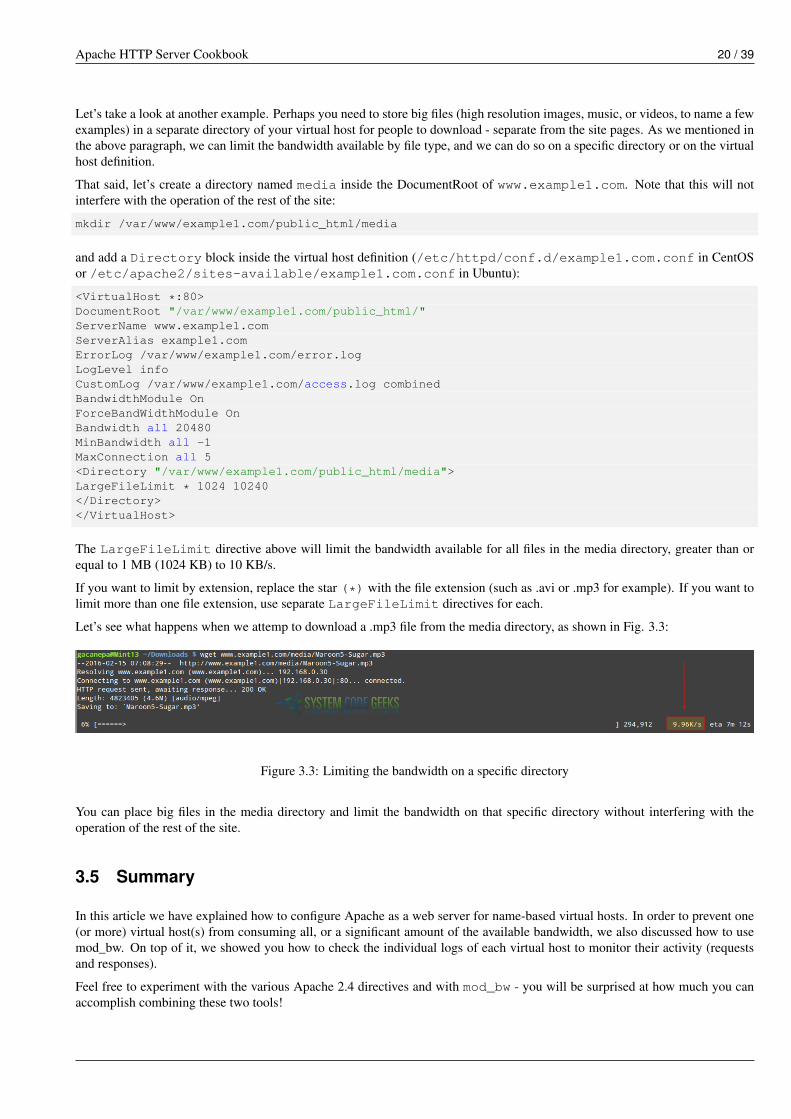
Let’s see what happens when we attemp to download a .mp3 file from the media directory, as shown in Fig. 3.3:
Figure 3.3: Limiting the bandwidth on a specific directory
You can place big files in the media directory and limit the bandwidth on that specific directory without interfering with theoperation of the rest of the site.
3.5 Summary
In this article we have explained how to configure Apache as a web server for name-based virtual hosts. In order to prevent one(or more) virtual host(s) from consuming all, or a significant amount of the available bandwidth, we also discussed how to usemod_bw. On top of it, we showed you how to check the individual logs of each virtual host to monitor their activity (requestsand responses).
Feel free to experiment with the various Apache 2.4 directives and with mod_bw - you will be surprised at how much you canaccomplish combining these two tools!
Apache HTTP Server Cookbook 21 / 39
Chapter 4
mod_rewrite: Redirecting and rewriting URLs
In a previous article we mentioned that one of Apache’s most distinguishing features is its extensibility via modules, which wedefined as "independent, separate pieces of software that provide specific functionality".
Some modules are built-in into Apache as part of the core functionality and are present when the web server is installed as weexplained in “How to install the Apache web server”.
Others, such as mod_bw (which we covered in “Apache name-based Virtual Host Configuration Example”), can be installedusing your distribution’s package management system.
The current list of all of the modules that come as part of the Apache HTTP Server can be found at https://httpd.apache.org/-docs/current/mod/.
In this article we will explain how to use mod_rewrite (a well-known and widely used module) to dynamically map incomingHTTP requests targeting arbitrary URLs to specific documents in your web server’s or virtual host internal structure, or to anotherexternal URL.
In other words, this module will allow you to redirect (as the rewrite in the name suggests) an URL (https://www.example.com/-scg/results.php?country=Argentina&province=Cordoba) to a more user or SEO friendly URL (https://www.example.com/scg/-Argentina/Cordoba) in order to get a higher position in search engines rankings, which ultimately leads to more visitors.
To accomplish this purpose, mod_rewrite realies heavily on PCRE (Perl Compatible Regular Expressions) vocabulary, whichwe will introduce next. Please be advised, however, that this topic can be a little burdensome until you start reaping the benefitsout of it.
4.1 Introducing regular expressions (regexs)
In simple words, a regular expression is a text string that represents a search pattern. The following list, adapted from the Apachedocumentation on PCRE, shows the most common characters used in regular expressions, their meaning, and an example:
. (a dot) matches any single character. Thus, b.t will match b*a*t, b*e*t, b*i*t, b*o*t, and b*u*t.
+ (the plus sign) repeats the previous characters one or more times. For example, o+ matches oo, ooo, etc.
* (star) repeats the previous match zero or more times. Additionally, * is also used to match an empty string. In other words, thematches returned by a+ are a subset of the matches of a*.
? (question sign) makes the match of the previous characters optional, so colou?r will match both color and colour.
ˆ (caret) matches the beginning of the string. For example ˆa matches a string that begins with a.
$ (dollar sign) matches the end of the string, so a$ matches a string that ends with a.
In addition, you can also group characters into groups of classes:
• A set of parentheses ( ) is used to group several characters into a single unit. You can then apply the above regex characters tothe group as it was a single character. Thus, (ab)+ matches abab, ababab, etc. Keep in mind that the + here applies to the groupof characters surrounded by parentheses.
Apache HTTP Server Cookbook 22 / 39
• A character class [ ] matches at least one of the characters in the set inside square brackets. For example, [alnum] matches anyletter of the alphabet or numerical digit. Character classes are well explained in the PCRE regex syntax for PHP.
• On the opposite, a negative character class [ˆ ] matches any character not specified. Thus, c[ˆ/]t matches cat or c2t but notc/t.
Finally, you can use the exclamation sign (!) to negate it.
Now we are ready to discuss the RewriteRule and RewriteCond directives, which are essential to the operation ofmod_rewrite.
4.2 Introducing RewriteRule and RewriteCond
The RewriteRule directive, as its name implies, substitutes a given pattern with either one of three things:
• An absolute path to a local resource found inside the system
• A path to a local web resource
• An absolute URL
Its basic syntax is:
RewriteRule [Pattern] [Substitution] [Optional --> Flags]
Since the [Flags] parameters is optional, we will not cover it in detail, but only mention it when we use it in an example. Youcan find the full [Flags] documentation here. Last, but not least, we need to mention that you can place this directive inside themain configuration file, inside a Virtual host definition or Directory block. You can use multiple RewriteRule directives inthe same context, each one with its own [Pattern], [Substitution] and (optionally) [Flags]. Alternatively, you caninsert RewriteRule directives in .htaccess files. Although this is a widely used but not very secure method, we have chosen tonot cover it during this series. However, you can learn more about it in the Apache documentation here. The RewriteConddirective introduces a condition that must be met before the RewriteRule rules are “activated”.
To better understand this topic, let’s illustrate with a few examples.
4.3 Examples
Before we proceed with some examples, there are some considerations that we must take into account. In order to actually usemod_rewrite, we need to add the directives listed below in the context where we will use this module. Additionally, we needto make sure the module is loaded. We do this by running (in Ubuntu)
sudo a2enmod rewrite
In CentOS, it is enabled by default, which you can confirm with
httpd -M | grep rewrite
You should get the following output:
rewrite_module (shared)
If not, you will need to check the presence of the module file (mod_rewrite.so) in /etc/httpd/modules and make sureApache is loading the modules in that directory. Look for the following line in the main configuration file:
Include conf.modules.d/*.conf
Apache HTTP Server Cookbook 23 / 39
(By the way, /etc/httpd/modules is actually a symbolic link to /etc/httpd/conf.modules.d)
If it is not there, add it before proceeding.
Suppose we want to enable mod_rewrite in the context of www.example1.com. We need to modify its configuration fileand add RewriteEngine (to enable the rewriting engine). Additionally, you need to set the Options directive to allowFollowSymlinks:
<VirtualHost *:80>DocumentRoot "/var/www/example1.com/public_html/"ServerName www.example1.comServerAlias example1.comErrorLog /var/www/example1.com/error.logLogLevel infoCustomLog /var/www/example1.com/access.log combinedBandwidthModule OnForceBandWidthModule OnBandwidth all 20480MinBandwidth all -1MaxConnection all 5<Directory "/var/www/example1.com/public_html/media">LargeFileLimit * 1024 10240</Directory>RewriteEngine onOptions FollowSymLinks</VirtualHost>
With that in place, also add the following lines inside the virtual host definition given above:
RewriteCond "%{REMOTE_ADDR}" "^192\.168\.0\.104"RewriteRule "^/vhosterrors" "/var/www/example1.com/error.log"RewriteRule "^/default\.aspx$" "index.html" [R]RewriteRule "^/go/to/example2$" "https://example2.com" [R]RewriteRule "^/writer/(.*)/view$" "/var/www/example1.com/$1"
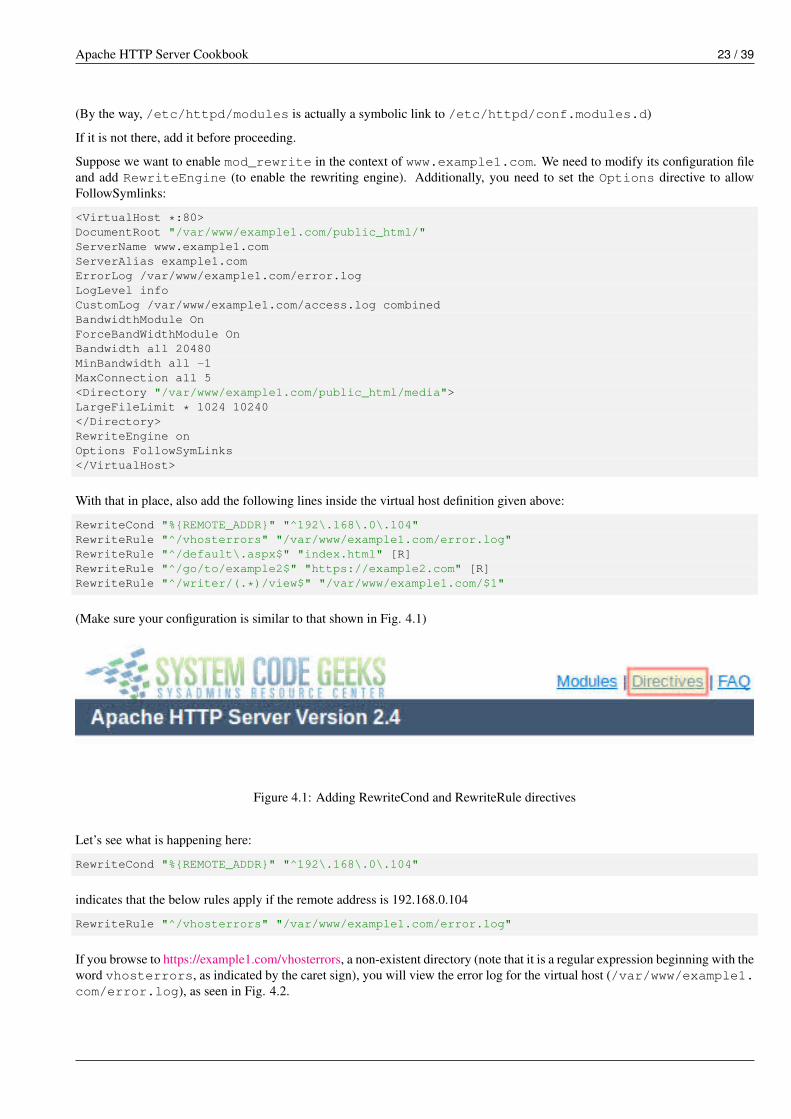
(Make sure your configuration is similar to that shown in Fig. 4.1)
Figure 4.1: Adding RewriteCond and RewriteRule directives
Let’s see what is happening here:
RewriteCond "%{REMOTE_ADDR}" "^192\.168\.0\.104"
indicates that the below rules apply if the remote address is 192.168.0.104
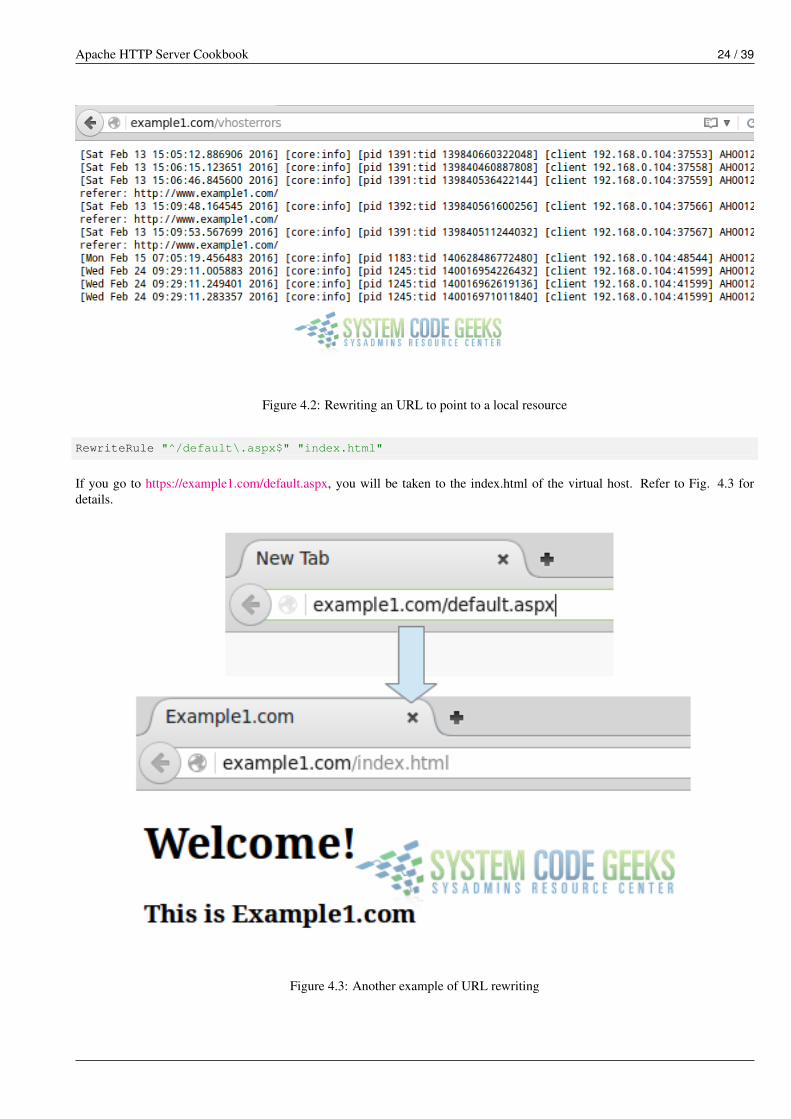
RewriteRule "^/vhosterrors" "/var/www/example1.com/error.log"
If you browse to https://example1.com/vhosterrors, a non-existent directory (note that it is a regular expression beginning with theword vhosterrors, as indicated by the caret sign), you will view the error log for the virtual host (/var/www/example1.com/error.log), as seen in Fig. 4.2.
Apache HTTP Server Cookbook 24 / 39
Figure 4.2: Rewriting an URL to point to a local resource
RewriteRule "^/default\.aspx$" "index.html"
If you go to https://example1.com/default.aspx, you will be taken to the index.html of the virtual host. Refer to Fig. 4.3 fordetails.
Figure 4.3: Another example of URL rewriting

Apache HTTP Server Cookbook 25 / 39
RewriteRule "^/go/to/example2$" "https://example2.com" [R]
Browse to https://example1.com/go/to/example2 and you will be redirected to https://example2.com. By the way, the R insidesquare brackets stands for Redirect. This rule, as opposed to the previous one (which does a URL rewrite in the full sense ofthe word), performs a redirect to an external site. You may want to keep in mind that example1.com and example2.comare two different, separate sites even though they are hosted in the same machine.
Finally,
RewriteRule "^/writer/(.*)/view$" "/var/www/example1.com/$1"
says that if you go to https://example1.com/writer/gabriel/view, you will be taken to /var/www/example1.com/public_html/gabriel. Here the $1 is a placeholder for whatever matches the regular expression (.*). As explained earlier, thedot stands for any character, and the star sign represents zero or more occurrences of such character. In other words, that is theregular expression for match everything. Since this file does not exist, in Fig. 4.4 we can see a portion of the error log that saysso:
Figure 4.4: Using a regular expression match to rewrite an URL
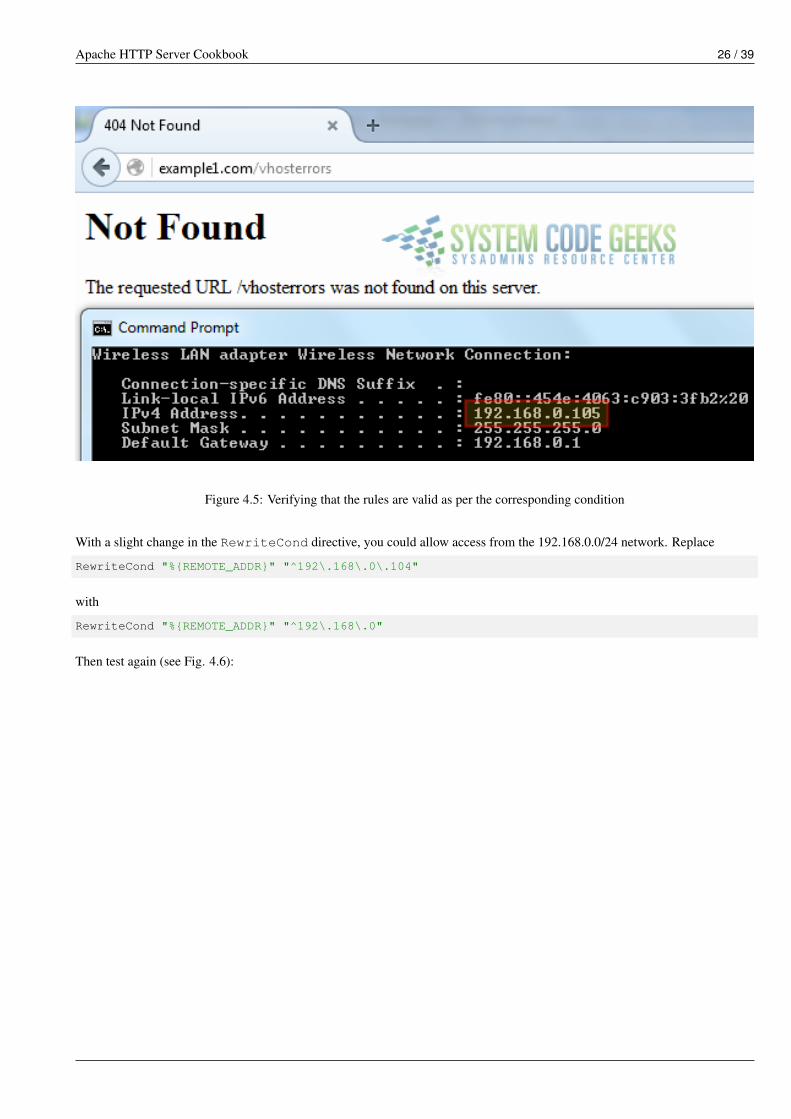
If you try any of the above rewrite rules from a machine other than 192.168.0.104, you will see they don’t work as the rewriterules are only put into effect when the remote address is 192.168.0.104, as you can see in Fig. 4.5:
Apache HTTP Server Cookbook 26 / 39
Figure 4.5: Verifying that the rules are valid as per the corresponding condition
With a slight change in the RewriteCond directive, you could allow access from the 192.168.0.0/24 network. Replace
RewriteCond "%{REMOTE_ADDR}" "^192\.168\.0\.104"
with
RewriteCond "%{REMOTE_ADDR}" "^192\.168\.0"
Then test again (see Fig. 4.6):
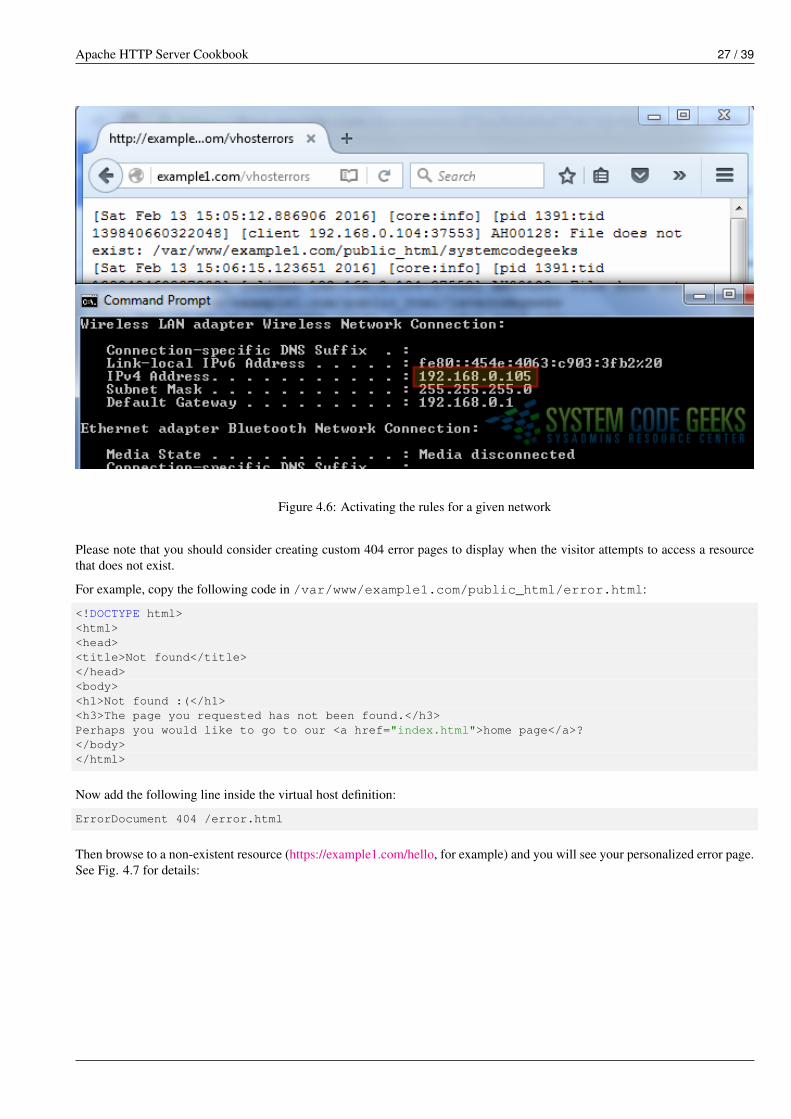
Apache HTTP Server Cookbook 27 / 39
Figure 4.6: Activating the rules for a given network
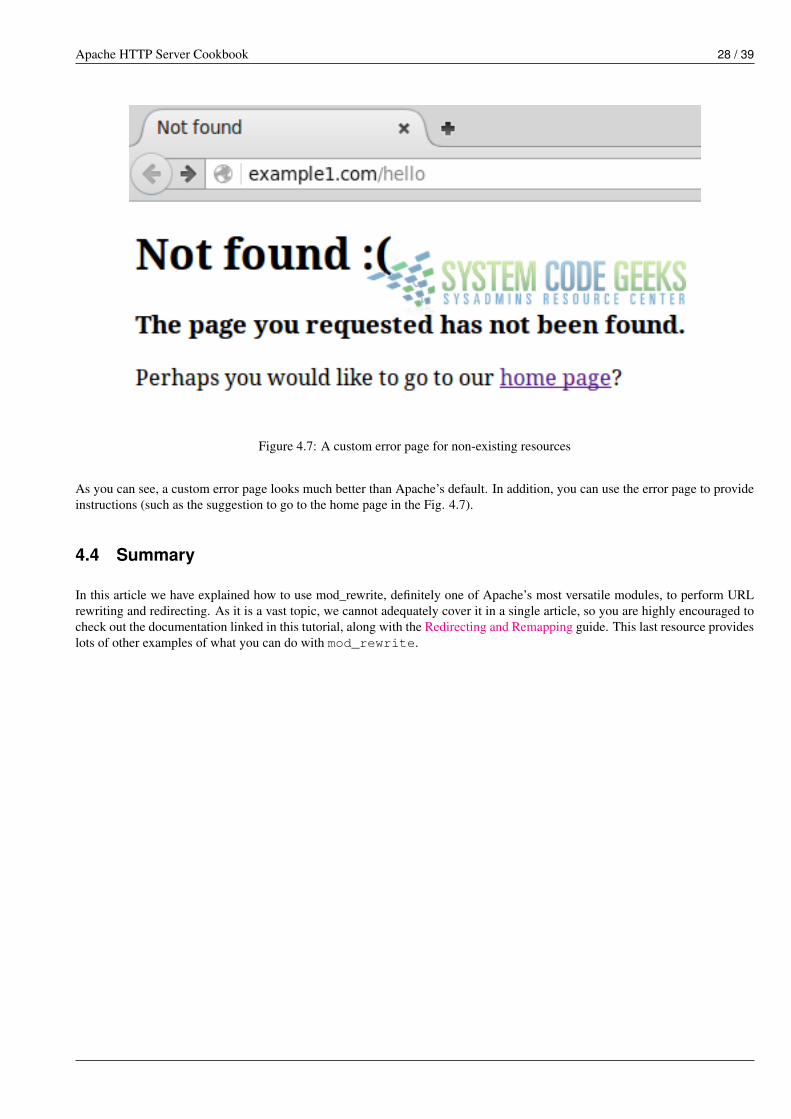
Please note that you should consider creating custom 404 error pages to display when the visitor attempts to access a resourcethat does not exist.
For example, copy the following code in /var/www/example1.com/public_html/error.html:
<!DOCTYPE html><html><head><title>Not found</title></head><body><h1>Not found :(</h1><h3>The page you requested has not been found.</h3>Perhaps you would like to go to our <a href="index.html">home page</a>?</body></html>
Now add the following line inside the virtual host definition:
ErrorDocument 404 /error.html
Then browse to a non-existent resource (https://example1.com/hello, for example) and you will see your personalized error page.See Fig. 4.7 for details:
Apache HTTP Server Cookbook 28 / 39
Figure 4.7: A custom error page for non-existing resources
As you can see, a custom error page looks much better than Apache’s default. In addition, you can use the error page to provideinstructions (such as the suggestion to go to the home page in the Fig. 4.7).
4.4 Summary
In this article we have explained how to use mod_rewrite, definitely one of Apache’s most versatile modules, to perform URLrewriting and redirecting. As it is a vast topic, we cannot adequately cover it in a single article, so you are highly encouraged tocheck out the documentation linked in this tutorial, along with the Redirecting and Remapping guide. This last resource provideslots of other examples of what you can do with mod_rewrite.
Apache HTTP Server Cookbook 29 / 39
Chapter 5
Apache SSL / TLS Support
In the previous articles of this series, we discussed how to install Apache, configure virtual hosts, rewrite and redirect URLs, andadd basic authentication to access resources, among other things.
Although all those things are necessary in order to have a functional web server, any serious discussion about Apache must takesecurity into account. In other words, you need to ensure that sensitive and other private data that is sent from a client to yourweb server is protected along its way.
5.1 Introducing SSL and TLS
Originally designed by Netscape to secure transactions between web servers and browsers, the Secure Sockets Layer (bestknown as SSL) protocol served well its purpose for a long time. This was the case until critical vulnerabilities (such as Heartbleedand Poodle) were found in some of its most-used implementations. This eventually led to the recommendation of avoiding SSLand using the Transport Layer Security, or TLS for short. Version 1.2 of the TLS protocol is well documented in RFC 5246.When you request a page over HTTPS (https://www.facebook.com/ for example), the server responds with a valid certificate thathas been signed by a common trusted party, along with its public key. The client then returns an encrypted key (signed with theserver’s public key), which is then decrypted using the server’s private key.
From this point on, a secure session is initiated between server and client, and both use the session key to encrypt and decryptexchanged data. In more technical terms, asymmetric cryptography (public / private key pair) is used while the session key isbeing exchanged, and then symmetric encryption (shared key) is utilized while the client and the server communicate with eachother.
5.2 Apache and TLS
In this guide we will again use example2.com, one of the virtual hosts that we previously set up. To begin, we need to makesure that the mod_ssl package is installed if we are using CentOS:
yum install mod_ssl
or that the ssl module is loaded in Ubuntu:
sudo service apache2 restart
To illustrate, we will use a self-signed certificate, which is easy to create and use. A self-signed certificate is perfectly valid fora private application (as you can generate it on your own at no cost to you), but not for a production application. For a web siteor application that other people will use, you may want to consider getting a certificate signed by a trusted Certificate Authority.Note, however, that this option is not free. Let’s begin by creating a special directory to store the certificate and the key.
In CentOS:
Apache HTTP Server Cookbook 30 / 39
mkdir /etc/httpd/certs
In Ubuntu:
sudo mkdir /etc/apache2/certs
Important: The following example is based in Ubuntu, so if you are using CentOS make sure you change the path to the certsdirectory. The rest of the set up is identical for both distributions.
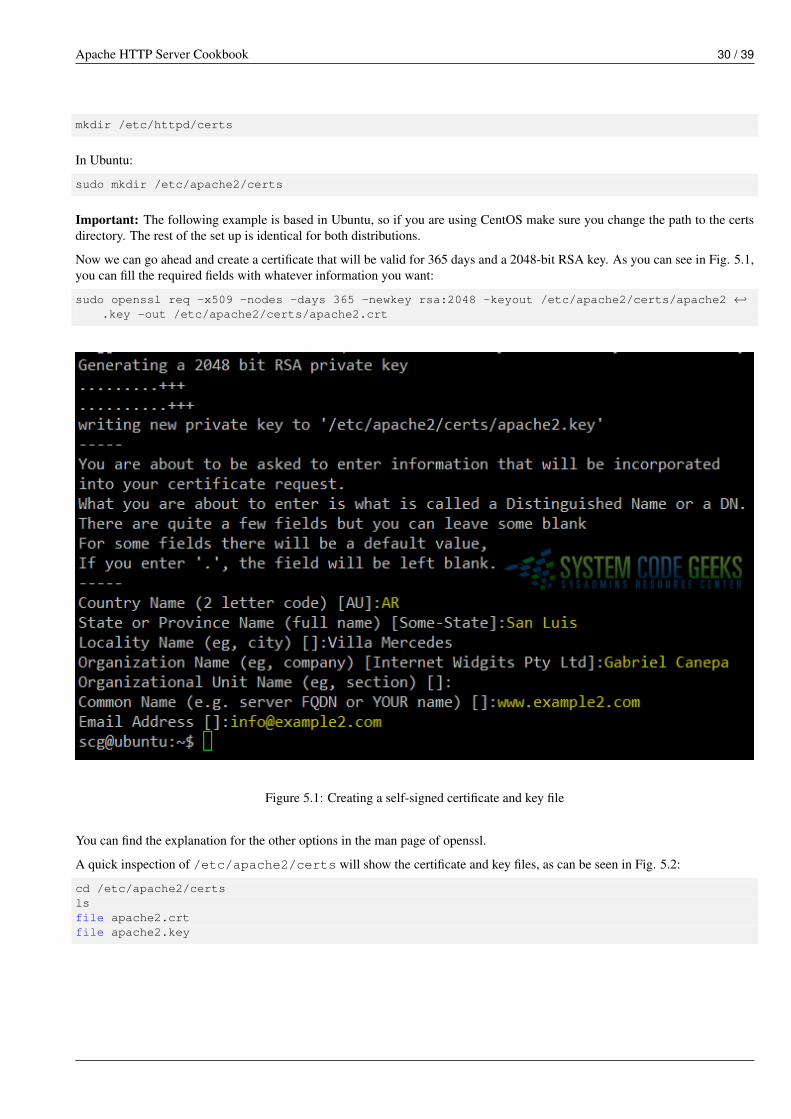
Now we can go ahead and create a certificate that will be valid for 365 days and a 2048-bit RSA key. As you can see in Fig. 5.1,you can fill the required fields with whatever information you want:
sudo openssl req -x509 -nodes -days 365 -newkey rsa:2048 -keyout /etc/apache2/certs/apache2 ←↩.key -out /etc/apache2/certs/apache2.crt
Figure 5.1: Creating a self-signed certificate and key file
You can find the explanation for the other options in the man page of openssl.
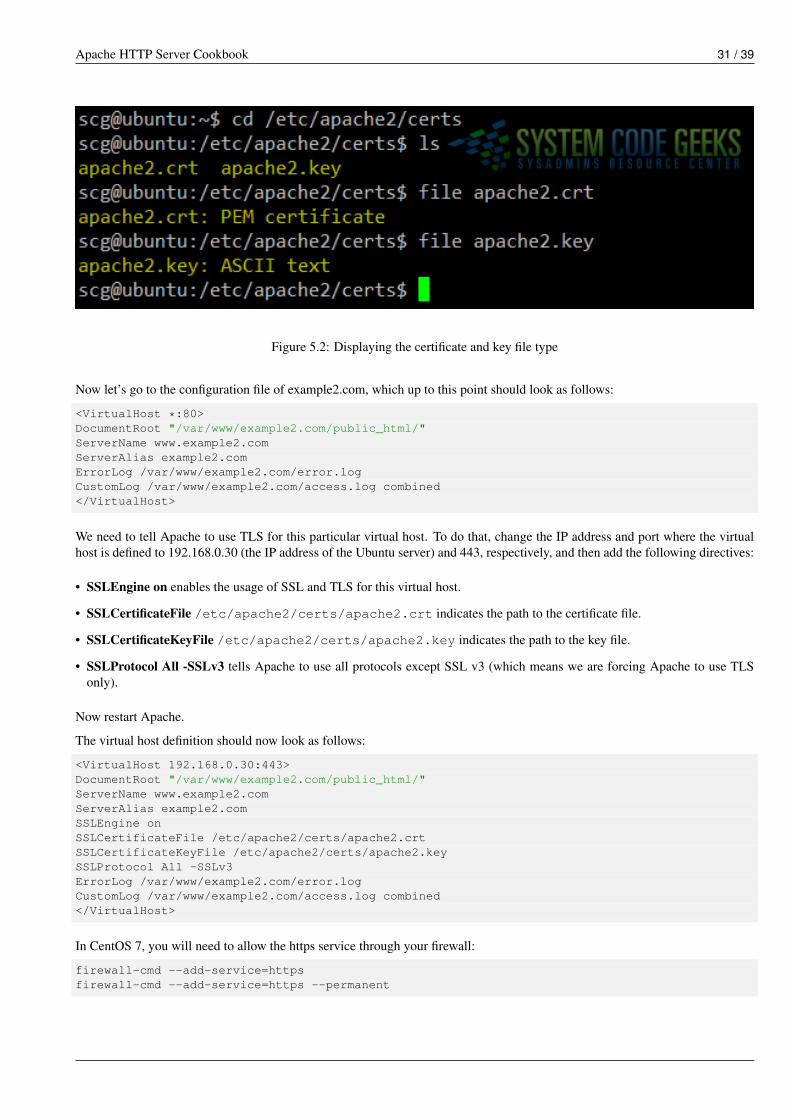
A quick inspection of /etc/apache2/certs will show the certificate and key files, as can be seen in Fig. 5.2:
cd /etc/apache2/certslsfile apache2.crtfile apache2.key
Apache HTTP Server Cookbook 31 / 39
Figure 5.2: Displaying the certificate and key file type
Now let’s go to the configuration file of example2.com, which up to this point should look as follows:
<VirtualHost *:80>DocumentRoot "/var/www/example2.com/public_html/"ServerName www.example2.comServerAlias example2.comErrorLog /var/www/example2.com/error.logCustomLog /var/www/example2.com/access.log combined</VirtualHost>
We need to tell Apache to use TLS for this particular virtual host. To do that, change the IP address and port where the virtualhost is defined to 192.168.0.30 (the IP address of the Ubuntu server) and 443, respectively, and then add the following directives:
• SSLEngine on enables the usage of SSL and TLS for this virtual host.
• SSLCertificateFile /etc/apache2/certs/apache2.crt indicates the path to the certificate file.
• SSLCertificateKeyFile /etc/apache2/certs/apache2.key indicates the path to the key file.
• SSLProtocol All -SSLv3 tells Apache to use all protocols except SSL v3 (which means we are forcing Apache to use TLSonly).
Now restart Apache.
The virtual host definition should now look as follows:
<VirtualHost 192.168.0.30:443>DocumentRoot "/var/www/example2.com/public_html/"ServerName www.example2.comServerAlias example2.comSSLEngine onSSLCertificateFile /etc/apache2/certs/apache2.crtSSLCertificateKeyFile /etc/apache2/certs/apache2.keySSLProtocol All -SSLv3ErrorLog /var/www/example2.com/error.logCustomLog /var/www/example2.com/access.log combined</VirtualHost>
In CentOS 7, you will need to allow the https service through your firewall:
firewall-cmd --add-service=httpsfirewall-cmd --add-service=https --permanent
Apache HTTP Server Cookbook 32 / 39
To test, you can now either open a browser and go to https://example2.com (you will be asked to confirm a security exceptionthat indicates that the server is presenting a self-signed certificate) or add the following line to the /etc/hosts file:
192.168.0.30 example2 example2.com
and use the openssl tool as follows.
First, test a non-supported protocol (SSLv3 for example):
openssl s_client -connect example2.com:443 -ssl3
Then repeat the test using TLS:
openssl s_client -connect example2.com:443 -tls1
You should see a significant difference between the output of these two tests.
If you decided to use a browser to perform the test instead, you should see the certificate information after opening the developertools (in Firefox, right click and choose Inspect element). Refer to Fig. 5.3 for details.
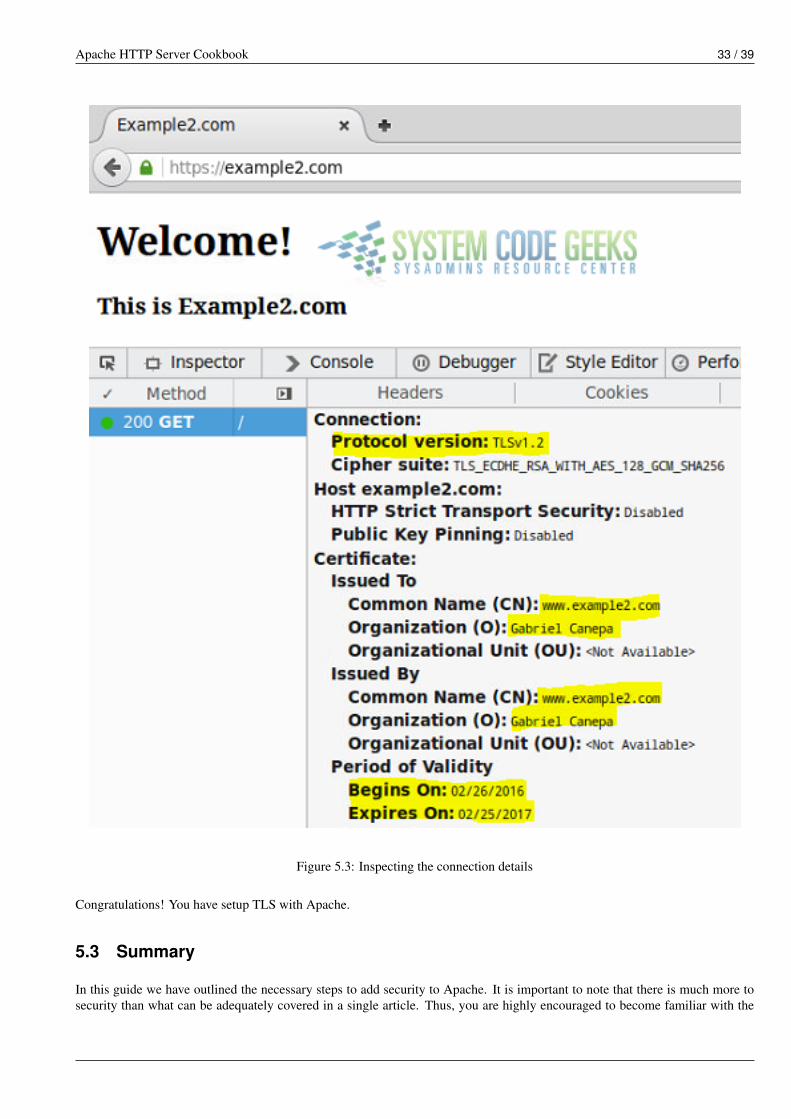
Apache HTTP Server Cookbook 33 / 39
Figure 5.3: Inspecting the connection details
Congratulations! You have setup TLS with Apache.
5.3 Summary
In this guide we have outlined the necessary steps to add security to Apache. It is important to note that there is much more tosecurity than what can be adequately covered in a single article. Thus, you are highly encouraged to become familiar with the

Apache HTTP Server Cookbook 34 / 39
mod_ssl documentation before taking your web server to a production stage.
Apache HTTP Server Cookbook 35 / 39
Chapter 6
Apache URL rewrite example
In Apache mod_rewrite example: Redirecting and rewriting URLs, we introduced you to Perl Compatible Regular Expressions(PCRE) and explained how to integrate them with the mod_rewrite Apache module. These tools allow us to perform URLrewriting and redirecting for a variety of purposes at our convenience.
In this tutorial we will build on these concepts and share other examples of URL rewriting you should have handy as a systemadministrator.
6.1 Redirecting to a new resource in the same server
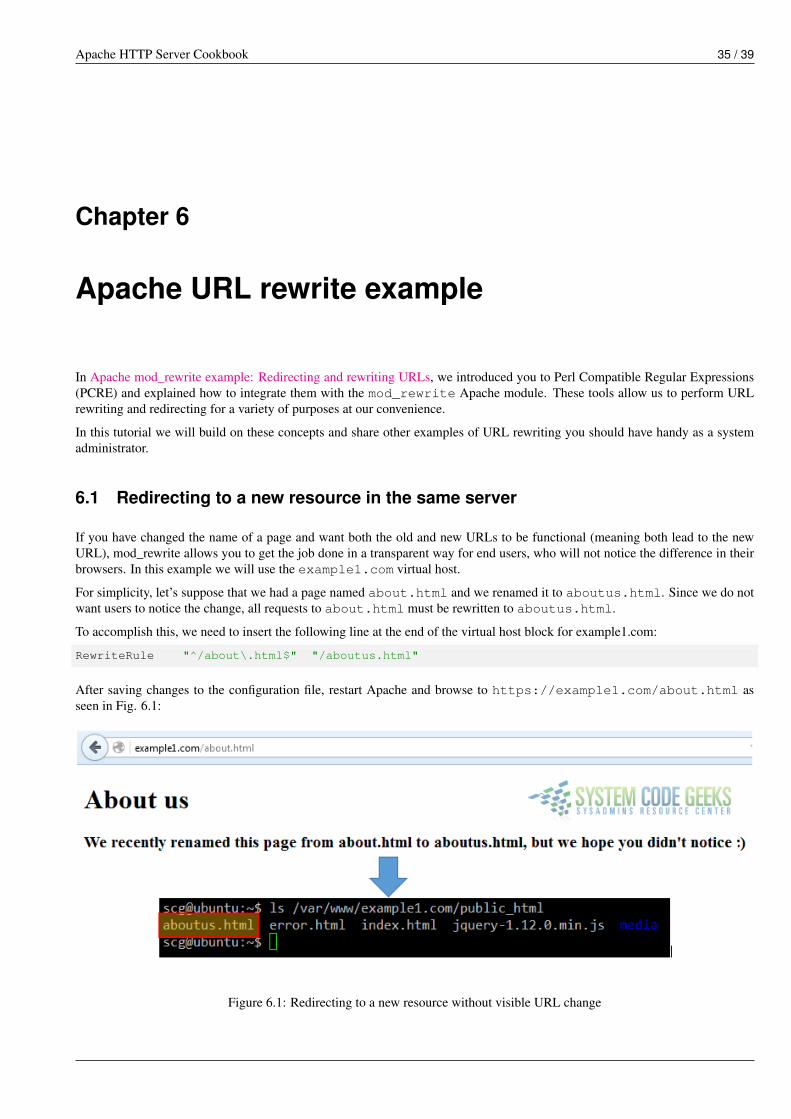
If you have changed the name of a page and want both the old and new URLs to be functional (meaning both lead to the newURL), mod_rewrite allows you to get the job done in a transparent way for end users, who will not notice the difference in theirbrowsers. In this example we will use the example1.com virtual host.
For simplicity, let’s suppose that we had a page named about.html and we renamed it to aboutus.html. Since we do notwant users to notice the change, all requests to about.html must be rewritten to aboutus.html.
To accomplish this, we need to insert the following line at the end of the virtual host block for example1.com:
RewriteRule "^/about\.html$" "/aboutus.html"
After saving changes to the configuration file, restart Apache and browse to https://example1.com/about.html asseen in Fig. 6.1:
Figure 6.1: Redirecting to a new resource without visible URL change
Apache HTTP Server Cookbook 36 / 39
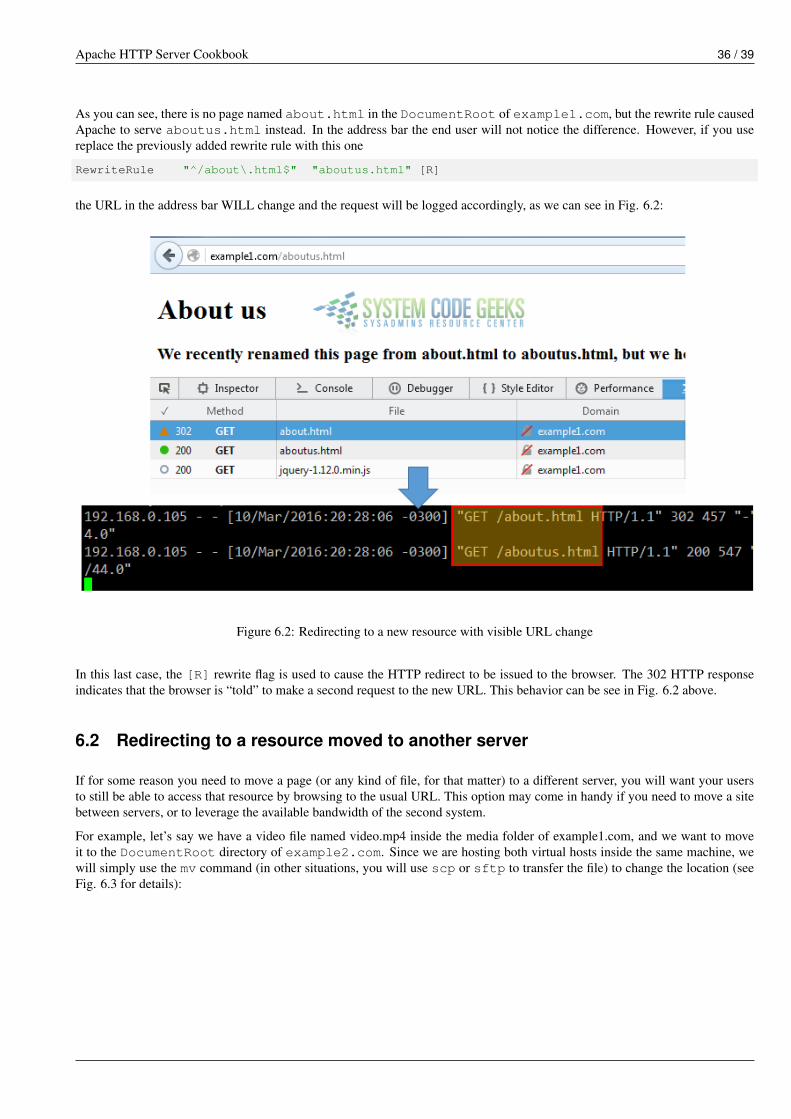
As you can see, there is no page named about.html in the DocumentRoot of example1.com, but the rewrite rule causedApache to serve aboutus.html instead. In the address bar the end user will not notice the difference. However, if you usereplace the previously added rewrite rule with this one
RewriteRule "^/about\.html$" "aboutus.html" [R]
the URL in the address bar WILL change and the request will be logged accordingly, as we can see in Fig. 6.2:
Figure 6.2: Redirecting to a new resource with visible URL change
In this last case, the [R] rewrite flag is used to cause the HTTP redirect to be issued to the browser. The 302 HTTP responseindicates that the browser is “told” to make a second request to the new URL. This behavior can be see in Fig. 6.2 above.
6.2 Redirecting to a resource moved to another server
If for some reason you need to move a page (or any kind of file, for that matter) to a different server, you will want your usersto still be able to access that resource by browsing to the usual URL. This option may come in handy if you need to move a sitebetween servers, or to leverage the available bandwidth of the second system.
For example, let’s say we have a video file named video.mp4 inside the media folder of example1.com, and we want to moveit to the DocumentRoot directory of example2.com. Since we are hosting both virtual hosts inside the same machine, wewill simply use the mv command (in other situations, you will use scp or sftp to transfer the file) to change the location (seeFig. 6.3 for details):

Apache HTTP Server Cookbook 37 / 39
Figure 6.3: Moving a video file to a different virtual host
To allow users to access video.mp4 when they type https://example1.com/video.mp4, use the following rewrite rulein the virtual host block:
RewriteRule "^/video\.mp4" "https://example2.com/$1" [R,L]
Now save changes, don’t forget to restart Apache, and let’s see what happens in Fig. 6.4:
Figure 6.4: Serving a resource that has been moved to a new server
In Fig. 6.4 we can see that the request to https://example1.com/video.mp4 was actually handled by example2.com.The combination of the R and L flags in the rewrite rule tells Apache to 1) perform a redirect, and 2) disregard further rules,respectively.
6.3 Serve browser-dependent content
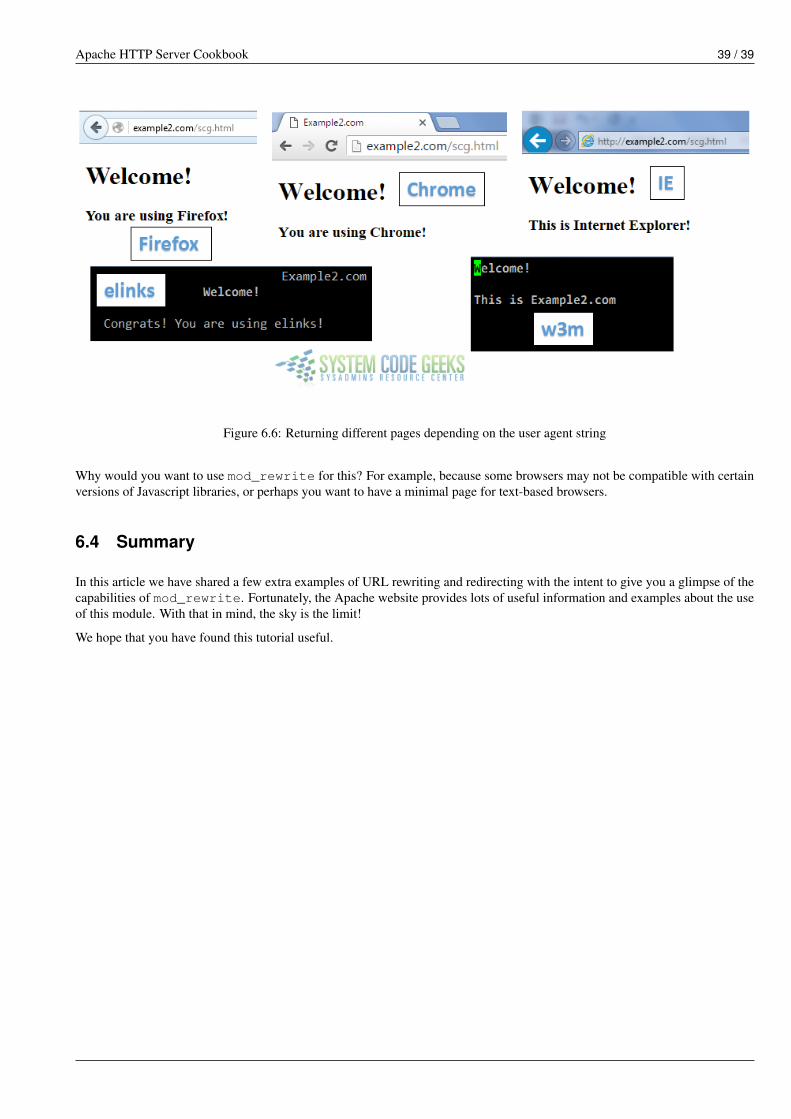
You can also use mod_rewrite to present a different file as home page based on the end user’s browser. We will use four dif-ferent files (firefox.html, chrome.html, ie.html, and elinks.html for Mozilla Firefox, Google Chrome, InternetExplorer, and the text-based elinks browsers, respectively) for this. Refer to Fig. 6.5 for details:

Apache HTTP Server Cookbook 38 / 39
Figure 6.5: Different pages to present depending on the user’s browser
Add the following lines to the configuration file of example2.com inside the virtual host block. Note that this relies on theHTTP_USER_AGENT environment variable, which stores the user-agent string identifying the browser:
RewriteCond "%{HTTP_USER_AGENT}" ".*Firefox.*"RewriteRule "^/foo\.html$" "/firefox.html" [L]RewriteCond "%{HTTP_USER_AGENT}" ".*ELinks.*"RewriteRule "^/scg\.html$" "/elinks.html" [L]RewriteCond "%{HTTP_USER_AGENT}" ".*Chrome.*"RewriteRule "^/scg\.html$" "/chrome.html" [L]RewriteCond "%{HTTP_USER_AGENT}" ".*Trident.*"RewriteRule "^/scg\.html$" "/ie.html" [L]RewriteRule "^/scg\.html$" "/index.html" [L]
You will notice that the regular expressions used in the above rewrite rules look for a match inside the user agent string (whichcan be rather large, such as Mozilla/5.0 (Windows NT 6.1; rv:44.0) Gecko/20100101 Firefox/44.0).
Depending on the browser, a different page will be displayed when the user requests https://example2.com/scg.html(note that this file does not exist in the DocumentRoot of this virtual host). If the browser is neither Firefox, Chrome, IE(identified by the string Trident) or elinks, the request will be redirected to index.html.
In Fig. 6.6 we see how Apache has returned different pages for each of the four browsers mentioned earlier. We also used w3m(another text-based browser) to illustrate the default action when the user agent string does not match the rewrite conditions (inthis case, the usual index.html page is served):
Apache HTTP Server Cookbook 39 / 39
Figure 6.6: Returning different pages depending on the user agent string
Why would you want to use mod_rewrite for this? For example, because some browsers may not be compatible with certainversions of Javascript libraries, or perhaps you want to have a minimal page for text-based browsers.
6.4 Summary
In this article we have shared a few extra examples of URL rewriting and redirecting with the intent to give you a glimpse of thecapabilities of mod_rewrite. Fortunately, the Apache website provides lots of useful information and examples about the useof this module. With that in mind, the sky is the limit!
We hope that you have found this tutorial useful.
![Raymond Feng [email protected] - Apache HTTP Server](https://static.fdocuments.net/doc/165x107/61fb55402e268c58cd5ced4b/raymond-feng-emailprotected-apache-http-server.jpg)