
AOE IED Integrated Unit: Reverse Engineering Lesson 1 ... · Unit 2 Reverse Engineering Lesson 1...
157
AOE IED Integrated Unit: Reverse Engineering Lesson 1 Introduction to Engineering Design Introduction to Reverse Engineering In this lesson, students are introduced to the concept of reverse engineering and the associated integrated unit. After this introduction, students begin IED Unit 3, starting with the lesson on visual analysis. Some of that lesson is reproduced here as a reference for the other teachers on the team. In that lesson, students are introduced to the terminology associated with design and the expectations of speaking the language of design clearly and concisely. Students will learn the definitions of basic terminology essential to their understanding of the visual language of design in order to communicate what they see. Next, they will learn how to identify the elements of design, or the components that form the structure of a product or an object, by studying products or objects common to their environment. They will also be introduced to the principles of design, the concepts used to organize the structural elements of a product or object. This lesson is expected to take six class periods. Lesson Framework Learning Objectives Each student will: • Define reverse engineering. • Identify visual design elements within a given object. • Explain how visual design principles were used to manipulate design elements within a given object. • Explain what aesthetics is and how it contributes to a design’s commercial success. Academic Standards • Students will develop an understanding of the role of society in the development and use of technology. (ITEA Standards for Technological Literacy, Standard 6) • Students will develop an understanding of the attributes of design. (ITEA Standards for Technological Literacy, Standard 8) • Students will develop an understanding of the role of troubleshooting, research and development, invention and innovation, and experimentation in problem solving. (ITEA Standards for Technological Literacy, Standard 10) • Students will develop abilities to apply the design process. (ITEA Standards for Technological Literacy, Standard 11)
Transcript of AOE IED Integrated Unit: Reverse Engineering Lesson 1 ... · Unit 2 Reverse Engineering Lesson 1...

AOE IED Integrated Unit: Reverse Engineering
Lesson 1 Introduction to Engineering Design
Introduction to Reverse Engineering
In this lesson, students are introduced to the concept of reverse engineering and the associated integrated unit. After this introduction, students begin IED Unit 3, starting with the lesson on visual analysis. Some of that lesson is reproduced here as a reference for the other teachers on the team. In that lesson, students are introduced to the terminology associated with design and the expectations of speaking the language of design clearly and concisely. Students will learn the definitions of basic terminology essential to their understanding of the visual language of design in order to communicate what they see. Next, they will learn how to identify the elements of design, or the components that form the structure of a product or an object, by studying products or objects common to their environment. They will also be introduced to the principles of design, the concepts used to organize the structural elements of a product or object.
This lesson is expected to take six class periods.
Lesson Framework
Learning Objectives Each student will:
• Define reverse engineering. • Identify visual design elements within a given object. • Explain how visual design principles were used to manipulate design elements within a given
object. • Explain what aesthetics is and how it contributes to a design’s commercial success.
Academic Standards • Students will develop an understanding of the role of society in the development and use of
technology. (ITEA Standards for Technological Literacy, Standard 6) • Students will develop an understanding of the attributes of design. (ITEA Standards for
Technological Literacy, Standard 8) • Students will develop an understanding of the role of troubleshooting, research and development,
invention and innovation, and experimentation in problem solving. (ITEA Standards for Technological Literacy, Standard 10)
• Students will develop abilities to apply the design process. (ITEA Standards for Technological Literacy, Standard 11)

Unit 2 Reverse Engineering Lesson 1 Introduction to Reverse Engineering
Assessment Assessment Product Assessment Criteria
Presentations of design principles and elements of common household objects
Study of the visual design principles and elements of a mechanical household object with many components
Teacher Resource 1.2—Rubric: Visual Design Principles and Elements Study
Prerequisites • Working knowledge of the PLTW engineering notebook • Working knowledge of the PLTW design process • Working knowledge of sketching techniques, including different views
Instructional Materials
Teacher Resources • Teacher Resource 1.1—Presentation: Visual Design Principles and Elements • Teacher Resource 1.2—Rubric: Visual Design Principles and Elements Study
Student Resources • Student Resource 1.1—Worksheet: Visual Design Principles and Elements Identification
(IED 3.1.1) • Student Resource 1.2—Worksheet: Visual Design Principles and Elements Study (IED 3.1.2)
Equipment and Supplies • Various household products • 3 x 5 inch index cards • Computer with printer access • Digital camera • Engineer’s notebook • Color or black and white laser printer • Clear tape or glue stick • Scissors

Unit 2 Reverse Engineering Lesson 1 Introduction to Reverse Engineering
Lesson Steps Step Min. Activity
CLASS PERIOD 1
1 20 Class Discussion: Reverse Engineering
Write the term reverse engineering on the board and give students a minute or two to come up with their own definitions and examples of where they have heard the term used, if they have any.
Select several students to share their definitions. Write their definitions on the board and discuss with students any common elements within the definitions they have created.
Once students have refined the definition to their satisfaction, you can provide the following definition: Reverse engineering is the process of taking something apart and analyzing its workings in detail, usually with the intention to understand its function, prepare documentation and electronic data, or construct a new or improved device or program, without actually copying from the original.
Tell students that reverse engineering is an important process that takes place in the redesign of products. Designers get an opportunity to break down and analyze each part of the product to see how it operates. The information gathered during this process can help the designer or team determine what they can do to make the product better and optimize the manufacturing potential to increase company profits.
The process of reverse engineering involves analyzing the product’s function, structure, and visual elements. In this unit, students will get an opportunity to examine all three aspects of this process. They will use the information they learn during these procedures and suggest possible changes to improve a product.
In their other classes, students will also learn how examples of reverse engineering have affected the course of history, and how reverse engineering is used in scientific research today.

Unit 2 Reverse Engineering Lesson 1 Introduction to Reverse Engineering
Step Min. Activity
2 30 Direct Instruction: Visual Design Principles and Elements
Explain to students that visual design principles and elements constitute a language that can be used to dissect and describe any object without reference to its function or formal title. Artists, graphic designers, architects, and industrial designers all have a deep understanding of these principles and elements, which they use to create objects and spaces that people want to be around, look at, and use. Engineers, too, in other fields of engineering must also apply the same principles and elements.
Following IED Lesson 3.1, introduce the main concepts that underlie the visual analysis of objects:
1. Visual design principles and elements constitute an aesthetic vocabulary that is used to describe any object independent of its formal title and structural and functional qualities.
2. Tangible design elements are manipulated according to conceptual design principles.
3. Aesthetic appeal results from the interplay between design principles and elements.
4. Though distinctly different, a design’s visual characteristics are influenced by its structural and functional requirements.
5. Visual appeal influences a design’s commercial success.
Use the Visual Design Principles and Elements PowerPoint presentation (Teacher Resource 1.1) as a guide to introduce students to the key vocabulary and the essential questions of the lesson.
Pass out the Visual Design Principles and Elements Identification worksheet (Student Resource 1.1). For homework, have students identify and bring in five objects as described on the worksheet.
CLASS PERIOD 2
3 50 Product Analysis: Visual Design Principles and Elements Identification
Give students time in class to work on the Visual Design Principles and Elements Identification worksheet. Circulate among the class while students are working and provide additional information to clarify their understanding or correct misconceptions as needed.

Unit 2 Reverse Engineering Lesson 1 Introduction to Reverse Engineering
Step Min. Activity
CLASS PERIOD 3
4 50 Presentations: Visual Design Analysis
Have each student present their five products from home to the class and describe the visual design principles and elements embodied in each artifact.
For homework, each student should find and bring in one mechanical artifact consisting of no more than 12 component parts (e.g., nail clippers, stapler).
CLASS PERIODS 4 AND 5
5 100 Product Analysis: Visual Design Principles and Elements Study
Pass out the Visual Design Principles and Elements Study worksheet (Student Resource 1.2). Group students into teams of two or three. Have the groups choose one of the mechanical objects they brought to class and follow the analysis procedures on the worksheet. Each student must complete drawings in their own engineering notebook. When students are finished with their drawings, collect their notebooks and assess their work using the Visual Design Principles and Elements Study rubric (Teacher Resource 1.2).
CLASS PERIOD 6
6 30 Assessment: Visual Design Principles and Elements Quiz
Administer the assessment provided in the IED curriculum and complete the assessment using the answer key.

AOE IED Integrated Unit: Reverse Engineering
Lesson 1 Introduction to Reverse Engineering
Student Resources
Resource Description
Student Resource 1.1 Worksheet: Visual Design Principles and Elements Identification (IED 3.1.1)
Student Resource 1.2 Worksheet: Visual Design Principles and Elements Study (IED 3.1.2)

Unit 2 Reverse Engineering Lesson 1 Introduction to Reverse Engineering
Student Resource 1.1
Worksheet: Visual Design Principles and Elements Identification (IED 3.1.1)
Purpose Following the steps in the design process and applying the visual design principles and elements are key to the overall effectiveness and “tastefulness” of a design.
As you have learned in previous lessons, the design process is a very important step-by-step framework that needs to be followed and revisited during product development. Following this process by itself does not guarantee an awe-inspiring solution. Using the right blend of visual design principles and elements, however, can greatly enhance your product’s functionality, appearance, feel, and overall effectiveness. Selecting this proper combination is a difficult skill to develop, but it can be achieved by immersing yourself in the design process throughout the year, tackling problem after problem, and letting your imagination run wild.
When you look at a product that you really like, ask yourself, what, besides its function, do you like? Is it the color? Is it the form or shape of the case? Maybe it’s the product’s proportion. Then again, maybe it’s the formal balance of the product’s design that grabs your attention. With some insight into these and other visual design principles and elements, you will be able to create products that capture the attention and imagination of the viewer. Artists, graphic designers, architects, and industrial designers make up only a handful of the professions that use the vocabulary of visual design principles and elements on a daily basis.
Equipment • Various household products
• 3 x 5 inch index cards
Procedure The purpose of this activity is to identify the visual design elements that appear in household products and the visual design principles by which they were arranged.
Locate five items at home that utilize the principles and elements of design and bring them to class. Each object should fit within a 12-inch cubical volume.
For each product, create a neatly written index card that includes your name, the name of the product, and the visual design principles and elements that are evident in that product.
Sue Smith
Hand Soap Container
Elements: bright red and green colors, curved and straight lines, rectangular and circular shapes, geometric forms, smooth texture
Principles: formal balance, patterned shapes, contrasting colors

Unit 2 Reverse Engineering Lesson 1 Introduction to Reverse Engineering
Organize your thoughts so that you can deliver a short oral presentation to the class, in which you present the visual design principles and elements that are evident in your five products.
Rehearse your presentation. Each object should require no more than one minute to describe.
Bring the five objects into class for display purposes and make your short presentation to the class.
Conclusion 1. Do you have a better understanding of how visual design principles and elements are used in a
design?
2. Can you identify a product that you feel is aesthetically pleasing? What is it about the product that you find appealing?
3. Can you look at a product whose appearance you don’t like and identify the visual design principles and elements that contribute to this feeling?
4. Were any of the visual design principles and elements not used appropriately in some of the products shown?

Unit 2 Reverse Engineering Lesson 1 Introduction to Reverse Engineering
Student Resource 1.2
Worksheet: Visual Design Principles and Elements Study (IED 3.1.2)
Purpose What is it about an object that captures a person’s attention? Is it the color of an object that emphasizes its presence? That might explain why a kindergarten classroom is full of reds, yellows, and blues. Is it the organic curves of an object’s form, like the body of a sports car? Could it be a repeating series of shapes, such as a tile pattern in a bathroom? Is it the visual appearance of the wood grain that makes a person purchase a fine piece of furniture? Perhaps, it’s a matter of symmetry, or the lack of it. Sometimes the shear scale of an object or a space within it demands attention. Could that be another reason why people are attracted to cities? After developing some insight into these and other visual design principles and elements, students will develop the ability to create designs that not only work but also look good.
Equipment Computer with printer access
Digital camera
Engineer’s notebook
Laser printer that prints color or black-and-white images
Clear tape or glue stick
Scissors
Optional: Collection of products or objects to be used for reverse engineering
Procedure In this activity, working in a team of two or three, you will choose a relatively simple mechanical (non-electrical) product to “reverse engineer,” such as a hose nozzle. You will use a digital camera to aid you in your visual analysis of the object and will describe it using the language of visual design principles and elements.
1. Select the product or object for your study.
2. Perform a visual analysis of the object using the following procedure:
a. In your engineer’s notebook, identify the product of your study, for example: Hose Nozzle.
b. Using a digital camera, take at least three pictures of the product from different angles.
c. Print out the images on a color or laser printer and neatly secure the images in your engineer’s notebook.
d. Create a caption under each image that identifies the particular object view.

Unit 2 Reverse Engineering Lesson 1 Introduction to Reverse Engineering
e. Next to each image, write a description of the visual design principles and elements that are evident from that particular view.
f. Submit your engineer’s notebook to your teacher for evaluation.
Conclusion 1. How has this study affected your understanding of visual design principles and elements?
2. Based on your understanding of visual design principles and elements, how will you look at products differently from now on?
3. How do visual design principles and elements relate to the natural world?

AOE IED Integrated Unit: Reverse Engineering
Lesson 1 Introduction to Reverse Engineering
Teacher Resources
Resource Description
Teacher Resource 1.1 Presentation: Visual Design Principles and Elements
Teacher Resource 1.2 Rubric: Visual Design Principles and Elements Study
Unit 2 Reverse Engineering Lesson 1 Introduction to Reverse Engineering
Teacher Resource 1.1
Presentation: Visual Design Principles and Elements
Directions Right click on the slide below and select Presentation Object/Open to open the PowerPoint presentation.
®
Forging new generations of engineers

Unit 2 Reverse Engineering Lesson 1 Introduction to Reverse Engineering
Teacher Resource 1.2
Rubric: Visual Design Principles and Elements Study
Student Name(s): _____________________________________________ Date: _______________
Topics 4 points 3 points 2 points 1 point
Images All images used are excellent representations of the selected principle or element.
All images used represent the selected principle or element.
Most images used represent the selected principle or element.
Few of the images used represent the selected principle or element.
Captions All captions are excellent explanations of the images presented.
Most captions are excellent explanations of the images presented.
All captions are fair explanations of the images presented.
Uses poor captions.
Organization Excellent organization of images; well thought out.
Good organization of images.
Fair organization of images.
Poor organization of images; not well thought out.
Breadth Selected images cover an excellent range of uses of the selected principle or element.
Selected images cover most uses of the selected principle or element.
Selected images cover just a few uses of the selected principle or element.
Poor selection of images. A very narrow range of uses are shown.


AOE IED Integrated Unit: Reverse Engineering
Lesson 2 English Language Arts
Precision Communication
In this lesson, students learn to use precise, technical language in order to give instructions to a reader. Students will learn characteristics of good technical writing and then critique a piece of technical writing based on those characteristics. Students will then apply that knowledge when writing their own technical document concerning the assembly of a multipart object they create. Students will exchange instructions and attempt to build each other’s object based only on the written instructions.
This lesson is expected to take two class periods.
Lesson Framework
Learning Objectives Each student will:
• Compose instructions for the assembly of multipart object using only text. • Assemble a multipart object from instructions written by a classmate.
Academic Standards • Students apply a wide range of strategies to comprehend, interpret, evaluate, and appreciate
texts. They draw on their prior experience, their interactions with other readers and writers, their knowledge of word meaning and of other texts, their word identification strategies, and their understanding of textual features (e.g., sound-letter correspondence, sentence structure, context, graphics). (NCTE Standards for the English Language Arts)
• Students adjust their use of spoken, written, and visual language (e.g., conventions, style, vocabulary) to communicate effectively with a variety of audiences and for different purposes. (NCTE Standards for the English Language Arts)
• Students employ a wide range of strategies as they write and use different writing process elements appropriately to communicate with different audiences for a variety of purposes. (NCTE Standards for the English Language Arts)
Unit 2 Reverse Engineering Lesson 2 Precision Communication
Assessment Assessment Product Assessment Criteria
Written instructions for the assembly of a multipart object
Check to see if assembly by other students was successful
Multipart object assembled based on written instructions
Check to see if assembled object matches original
Written instructions critique worksheet None
Written instructions rewrite Check to see if rewrite has incorporated changes based on the critique
Prerequisites • Working knowledge of the engineering design process
Instructional Materials
Teacher Resources • Teacher Resource 2.1—Presentation: Don’t Be That Writer • Teacher Resource 2.2—Example: Excessive Documentation • Teacher Resource 2.3—Bad Writing
Student Resources • Student Resource 2.1—Handout: Instruction Manual Example • Student Resource 2.2—Handout: What is Good Writing? • Student Resource 2.3—Reading: Technical Documentation • Student Resource 2.4—Worksheet: Instructions Critique
Equipment and Supplies • LEGO™ blocks or other building materials (twice as many as needed for one class) • Lined paper • Highlighters
Unit 2 Reverse Engineering Lesson 2 Precision Communication
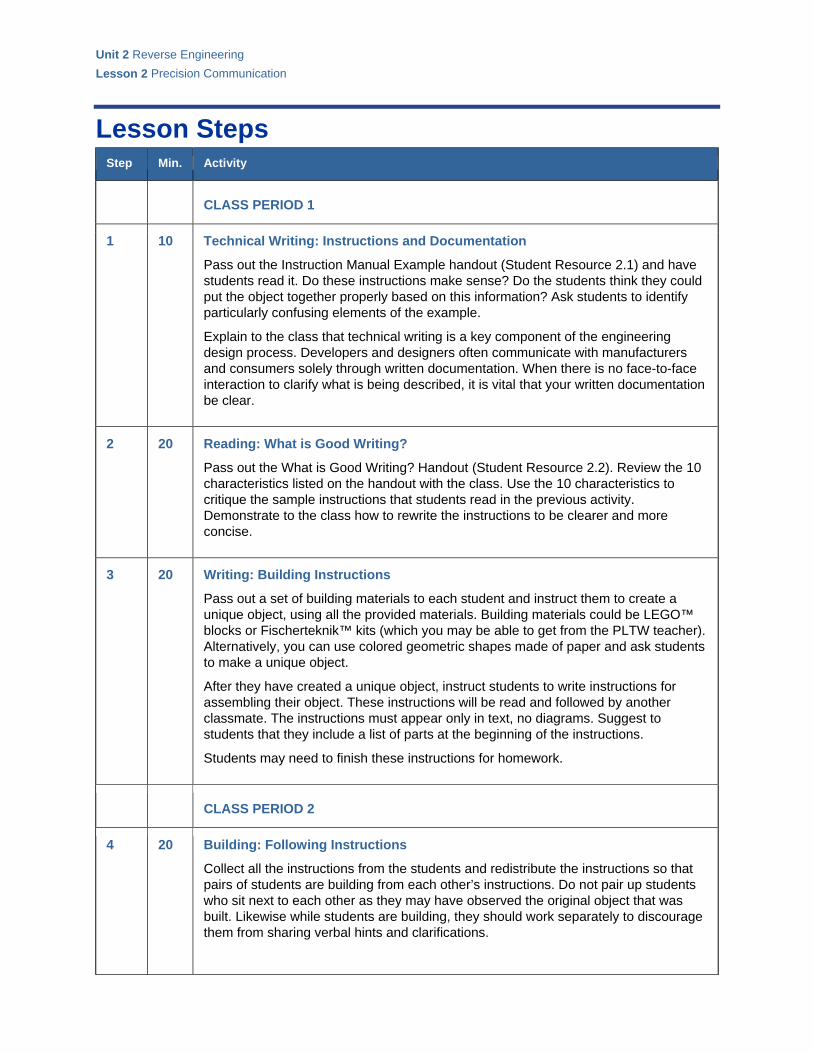
Lesson Steps Step Min. Activity
CLASS PERIOD 1
1 10 Technical Writing: Instructions and Documentation
Pass out the Instruction Manual Example handout (Student Resource 2.1) and have students read it. Do these instructions make sense? Do the students think they could put the object together properly based on this information? Ask students to identify particularly confusing elements of the example.
Explain to the class that technical writing is a key component of the engineering design process. Developers and designers often communicate with manufacturers and consumers solely through written documentation. When there is no face-to-face interaction to clarify what is being described, it is vital that your written documentation be clear.
2 20 Reading: What is Good Writing?
Pass out the What is Good Writing? Handout (Student Resource 2.2). Review the 10 characteristics listed on the handout with the class. Use the 10 characteristics to critique the sample instructions that students read in the previous activity. Demonstrate to the class how to rewrite the instructions to be clearer and more concise.
3 20 Writing: Building Instructions
Pass out a set of building materials to each student and instruct them to create a unique object, using all the provided materials. Building materials could be LEGO™ blocks or Fischerteknik™ kits (which you may be able to get from the PLTW teacher). Alternatively, you can use colored geometric shapes made of paper and ask students to make a unique object.
After they have created a unique object, instruct students to write instructions for assembling their object. These instructions will be read and followed by another classmate. The instructions must appear only in text, no diagrams. Suggest to students that they include a list of parts at the beginning of the instructions.
Students may need to finish these instructions for homework.
CLASS PERIOD 2
4 20 Building: Following Instructions
Collect all the instructions from the students and redistribute the instructions so that pairs of students are building from each other’s instructions. Do not pair up students who sit next to each other as they may have observed the original object that was built. Likewise while students are building, they should work separately to discourage them from sharing verbal hints and clarifications.

Unit 2 Reverse Engineering Lesson 2 Precision Communication
Step Min. Activity
Give each student a new set of building materials and have them attempt to reassemble the objects based on the written instructions. While they are building, have them highlight the particular instructions about which they are unsure.
5 30 Pair Debrief: Instructions Critique
Have the pairs of students sit together and compare their objects to the original. Instruct students to use this opportunity to critique each other’s instructions. Builders should identify for the writers where their instructions were clear (and what made them easy to understand) and where their instructions were confusing (including what could have been done to improve the clarity).
For homework, have students rewrite their instructions to improve any highlighted passages and any passages that resulted in errors in building. Collect the original instructions, the associated critique, and the rewritten instructions for comparison.
Wrap up the lesson with some humorous examples of bad writing/documentation found in the teacher resources.
Extensions • Have students find and critique an example of technical writing that they bring from home (e.g.,
instructions for assembly or use of toys, appliances, or electronics).

AOE IED Integrated Unit: Reverse Engineering
Lesson 2 Precision Communication
Student Resources
Resource Description
Student Resource 2.1 Handout: Instruction Manual Example
Student Resource 2.2 Handout: What Is Good Writing?
Student Resource 2.3 Reading: Technical Documentation
Student Resource 2.4 Worksheet: Instructions Critique

Unit 2 Reverse Engineering Lesson 2 Precision Communication
Student Resource 2.1
Handout: Instruction Manual Example
Unit 2 Reverse Engineering Lesson 2 Precision Communication
Student Resource 2.2
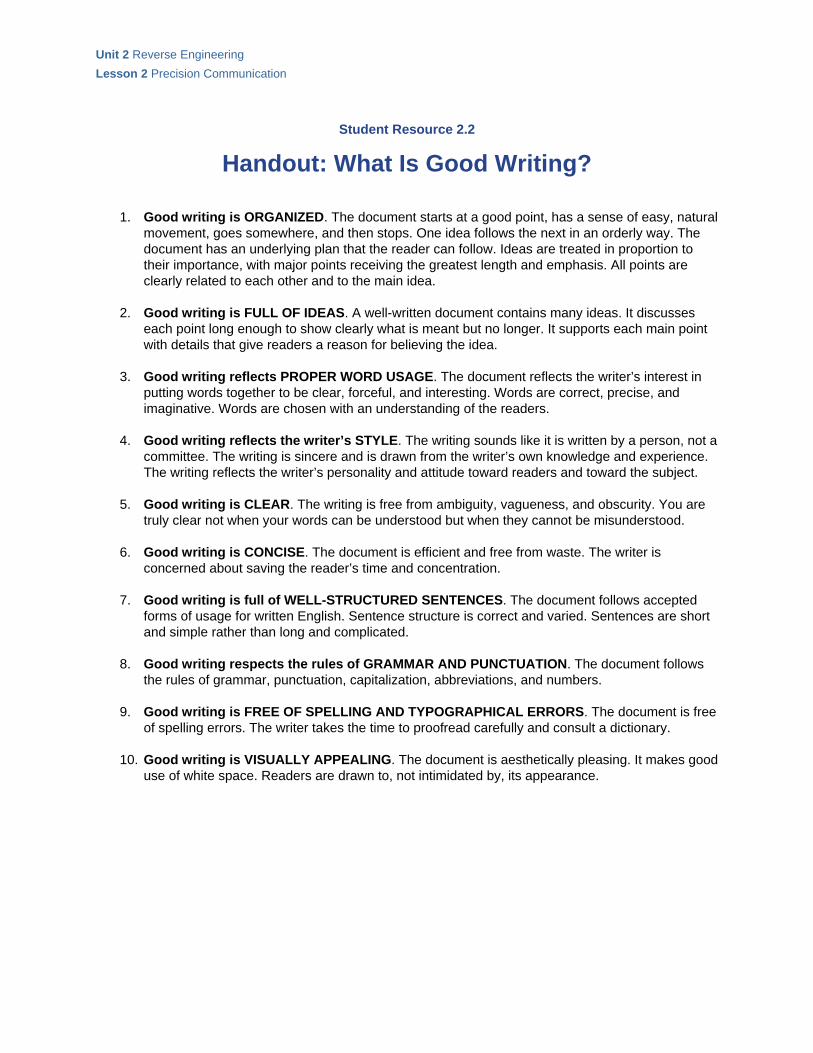
Handout: What Is Good Writing?
1. Good writing is ORGANIZED. The document starts at a good point, has a sense of easy, natural movement, goes somewhere, and then stops. One idea follows the next in an orderly way. The document has an underlying plan that the reader can follow. Ideas are treated in proportion to their importance, with major points receiving the greatest length and emphasis. All points are clearly related to each other and to the main idea.
2. Good writing is FULL OF IDEAS. A well-written document contains many ideas. It discusses each point long enough to show clearly what is meant but no longer. It supports each main point with details that give readers a reason for believing the idea.
3. Good writing reflects PROPER WORD USAGE. The document reflects the writer’s interest in putting words together to be clear, forceful, and interesting. Words are correct, precise, and imaginative. Words are chosen with an understanding of the readers.
4. Good writing reflects the writer’s STYLE. The writing sounds like it is written by a person, not a committee. The writing is sincere and is drawn from the writer’s own knowledge and experience. The writing reflects the writer’s personality and attitude toward readers and toward the subject.
5. Good writing is CLEAR. The writing is free from ambiguity, vagueness, and obscurity. You are truly clear not when your words can be understood but when they cannot be misunderstood.
6. Good writing is CONCISE. The document is efficient and free from waste. The writer is concerned about saving the reader’s time and concentration.
7. Good writing is full of WELL-STRUCTURED SENTENCES. The document follows accepted forms of usage for written English. Sentence structure is correct and varied. Sentences are short and simple rather than long and complicated.
8. Good writing respects the rules of GRAMMAR AND PUNCTUATION. The document follows the rules of grammar, punctuation, capitalization, abbreviations, and numbers.
9. Good writing is FREE OF SPELLING AND TYPOGRAPHICAL ERRORS. The document is free of spelling errors. The writer takes the time to proofread carefully and consult a dictionary.
10. Good writing is VISUALLY APPEALING. The document is aesthetically pleasing. It makes good use of white space. Readers are drawn to, not intimidated by, its appearance.

Unit 2 Reverse Engineering Lesson 2 Precision Communication
Student Resource 2.3
Reading: Technical Documentation The purpose of documentation is to transmit information explicitly and accurately to help others understand and use a product.
Documents are important because knowledge is useless unless it is effectively transmitted and acquired. Products such as software are based on complex technology. Understandably, customers often find it difficult to understand and use such products. Documentation makes products usable. If a document about a product is well written, that document can and often does improve customer satisfaction with that product.
A product is useless to users unless they can understand how to use it to get a job done. And the faster that knowledge can be communicated, the better the product performs. A product truly exists only to the degree to which users perceive how and why it is useful. Further, a product truly exists only to the degree to which users find it easy to use.
Documents transmit important information about products to users. As such, writers need to focus on human factors such as ease of use, clear instructions, and effective training for their readers. Good documents take a human factors approach and often must compensate for the lack of such an approach in the product itself.
Good Documents Are Usable
A product is a tool, something that can satisfy a need or a want. A product can be a thing, a service, a procedure or process, an organization, a place, information, or an idea. The key feature of a product is the service (benefit) it gives to your customers. Customers tend to assess the benefits of a product in order to determine its value to them.
Without a document, a product is merely a potential product. When complemented by a good document, however, a document becomes a true product—a tool for solving your customers’ problems.
Good Documentation:
• Introduces functions and benefits
• Demonstrates installation and setup
• Warns against errors and bugs
• Describes features and benefits
• Teaches more productive methods
• Explains shortcuts
• Clarifies problems and solutions
• Identifies problems that require expert help
• Enables user independence from developers
Costs of Bad Documentation:
• Endless searches for information
• Ongoing one-on-one training and training workshops
• Continual self-teaching with no sense of learning
• Frustration
• Downtime caused by lengthy installations and adjustments
• High learning curves
• Lower productivity
• The end result: the job does not get done on time

Unit 2 Reverse Engineering Lesson 2 Precision Communication
Student Resource 2.4
Worksheet: Instructions Critique
Directions: Sit with the author of the instructions you used to assemble your object. Compare the object you built with the original and then answer the following questions:
1. Was the object you built the same as the original? If not, how many differences were there?
2. Draw a picture of the original in the space below. Draw another picture of the object you built if it was different from the original. Be sure to use a view that shows the differences.
3. Take a look at all the correct parts of the object you built. Write down three examples of instructions that were particularly helpful or clear and explain why they were good instructions.
a.
b.
c.
4. If there were mistakes, did they occur due to the instructions you highlighted during building?
5. If there were mistakes on your object, describe why you found the instructions confusing. On the instruction sheets, suggest a rewrite of any instructions that caused you to make a mistake.


AOE IED Integrated Unit: Reverse Engineering
Lesson 2 Precision Communication
Teacher Resources
Resource Description
Teacher Resource 2.1 Presentation: Don’t Be That Writer
Teacher Resource 2.2 Example: Excessive Documentation
Teacher Resource 2.3 Example: Bad Writing

Unit 2 Reverse Engineering Lesson 2 Precision Communication
Teacher Resource 2.1
Presentation: Don’t Be That Writer
Directions Right click on the slide below and select Presentation Object/Open to open the PowerPoint presentation.
Don’t Be That WriterGerald B. Moulds

Unit 2 Reverse Engineering Lesson 2 Precision Communication
Teacher Resource 2.2
Example: Excessive Documentation

Unit 2 Reverse Engineering Lesson 2 Precision Communication
Teacher Resource 2.3
Example: Bad Writing Burying the Lead
The project we are proposing is based on an excellent idea developed in Australia during the 1990’s. The first person to realize that this was a good idea died some time ago. In the event we are funded we hope to continue the project until it is no longer needed. The way we look at it is, “nothing ventured, nothing gained.” That is why we are proposing to conduct an advanced algebra workshop for high school Math teachers using hand held puppets so they can use this art form to introduce math concepts to their students.
Verbosity (from Scott Adams, The Dilbert Principle)*
"I utilized a multitined tool to process a starch resource."
TRANSLATION: "I used my fork to eat a potato."
Density
Existing is being unique. Existence, reality, essence, cause, or truth is uniqueness. The geometric point in the center of the sphere is nature’s symbol of the immeasurable uniqueness within its measurable effect. A center is always unique; otherwise it would not be a center. Because uniqueness is reality, or that which makes a thing what it is, everything that is real is based on a centralization.*
Empty Words
This change will allow us to better leverage our talent base in an area where developmental roles are under way and strategically focuses us toward the upcoming transition where systems literacy and accuracy will be essential to maintain and to further improve service levels to our customer base going forward.*
Lack of Specificity
My research plan is to go to one of the many research libraries that exist in the United States and read poetry. I will analyze the poetry I like and keep notes on what I read. This process could take anywhere from one month to a year. I hope to develop a play or a novel or a cook book based on my readings at a later date. I am requesting $10,000 for travel, lodging, and meals during this time. I may want to take a research assistant with me so an extra $5000 would help.
Jargon
LD students have more problems in school than BD students because it is difficult to write an IEP based on WISC results. Usually the pedagogical interventions focus on process skills rather than content, and this makes mainstreaming and inclusion goals less achievable.

Unit 2 Reverse Engineering Lesson 2 Precision Communication
False Humility
The Woebegone University proposes to establish a writing center for first generation college students. This will be the first creative thing the University has done in decades. Most of the faculty and staff at WU have had little experience providing this type of assistance, although everyone is very enthusiastic about the idea. The Project Director has sufficient qualifications to administer the project. We therefore are hopeful that the project will not fail.
Extra Baggage
The innovative curriculum program we have developed is based on the Gluckenstein Math Program (GMP). Please see page 53 of the GMP curriculum guide in Appendix A for our specific project objectives. This program will be implemented in the 28 school districts which exist in four rural counties in southeastern Illinois. See Figures 1-28 for maps showing the location of each district. A list of the names of the 78 teachers involved in the program is presented in Table #10. Letters of support from each of the 28 school district superintendents can be found in Appendix G.
Technical Errors
The amount of grammer and usage error’s today is astounding. Not to mention spelling. If I was a teacher, I’d feel badly that less and less students seem to understand the basic principals of good writing. Neither the oldest high school students nor the youngest kindergartner know proper usage. A student often thinks they can depend on word processing programs to correct they’re errors. Know way!
from “Examples of Bad Writing” by Sandra LaFave, Chair of the West Valley College Philosophy Department: http://instruct.westvalley.edu/lafave/writsamp0.htm

AOE IED Integrated Unit: Reverse Engineering
Lesson 3 Introduction to Engineering Design
Functional Analysis
This lesson is the placeholder IED Lesson 3.2. Some of that lesson is reproduced here for the reference of the other team teachers. In this lesson, students are guided through the functional analysis phase of the reverse engineering process. Functional analysis in this lesson will be conducted through non-destructive methods of observation. Their products will remain intact throughout this lesson. Students will learn about simple machines and use that knowledge to identify how the various components within their products function. Students will then generate summaries of the sequential operations of their products and identify the inputs and outputs that are indicative of those systems.
This lesson is expected to take five class periods.
Lesson Framework
Learning Objectives Each student will:
• Identify the six simple machines that make up mechanical systems. • Explain the purpose of simple machines. • Explain the difference between a simple and compound machine. • Identify the reasons why engineers perform reverse engineering on products. • Describe the function of a given manufactured object as a sequence of operations through visual
analysis and inspection (prior to dissection).
Academic Standards • Students will develop an understanding of the core concepts of technology. (ICTE Standards for
Technological Literacy, Standard 2) • Students will develop an understanding of the influence of technology on history. (ICTE
Standards for Technological Literacy, Standard 7) • Students will develop an understanding of the attributes of design. (ICTE Standards for
Technological Literacy, Standard 8) • Students will develop abilities to apply the design process. (ICTE Standards for Technological
Literacy, Standard 11)

Unit 2 Reverse Engineering Lesson 3 Functional Analysis
Assessment Assessment Product Assessment Criteria
Analysis of household mechanical object for simple machines
See IED curriculum
Functional analysis of household mechanical object
See IED curriculum
Prerequisites • Basic familiarity with simple machines • Isometric sketching skills • Introduction to visual analysis (Lesson 1)
Instructional Materials
Teacher Resources • Teacher Resource 3.1—Presentation: Simple Machines • Teacher Resource 3.2—Presentation: Reverse Engineering and Functional Analysis • Teacher Resource 3.3—Handout: Example Product Observation (IED 3.2.2a)
Student Resources • Student Resource 3.1—Worksheet: Simple Machines (IED 3.2.1) • Student Resource 3.2—Worksheet: Product Observation (IED 3.2.2)
Equipment and Supplies • Digital cameras • Graphics software (Microsoft Paint is acceptable) • Students’ engineer’s notebooks • DVD: The Films of Charles and Ray Eames, Volume 4 • TV/DVD player or computer with LCD projector

Unit 2 Reverse Engineering Lesson 3 Functional Analysis
Lesson Steps Step Min. Activity
CLASS PERIOD 1
1 15 Direct Instruction: Functional Analysis
Introduce the main concepts of functional analysis to the class:
1. Mechanisms use simple machines to move loads through the input of applied effort forces.
2. Engineers perform reverse engineering on products to study their visual, functional, and structural qualities.
3. Through observation and analysis, a product’s function can be divided into a sequence of operations.
4. Products operate as systems, with identifiable inputs and outputs.
Tell students that in this lesson they will be exploring the following questions:
• What is the difference between a simple and compound machine? • What is the purpose of reverse engineering? • What is the difference between a product’s visual and functional qualities?
2 20 Concept Review: Simple Machines
Students should be familiar with simple machines from their courses in elementary and middle school science. However, because simple machines serve as the basis for mechanical objects with moving parts, take some time to review simple machines in class using the Simple Machines presentation (Teacher Resource 3.1) as a guide. Have students take notes in their engineer’s notebook for reference.
3 15 Object Analysis: Simple Machines
Assemble students into their groups from the visual analysis activity. Tell students that they will be re-examining their object, but this time they will be trying to identify any simple machines that are being used in the object’s mechanism.
Pass out the Simple Machines worksheet (Student Resource 3.1) and have students follow the procedures listed to complete their observations.
CLASS PERIODS 2 AND 3
4 Varies Object Analysis: Simple Machines (continued)
Give students time to finish their object observation as needed. Collect their Simple Machines worksheets and check them for accuracy.

Unit 2 Reverse Engineering Lesson 3 Functional Analysis
Step Min. Activity
5 30 Video: SX–70
Show students the SX–70 video from volume 4 of “The Films of Charles and Ray Eames.” After watching the video, discuss with the class how design objects may be described as a sequence of operations, using the SX–70 camera as an example.
CLASS PERIODS 4 AND 5
6 30 Direct Instruction: Reverse Engineering and Functional Analysis
Remind students that reverse engineering is a process that involves looking at an object’s visual, functional, and structural qualities through detailed analysis.
Why do engineers “reverse” engineer products? An engineer might need to create technical drawings for parts that have none on record. CAD models may be needed to generate computer numerical control data that will automate manufacturing equipment. Engineers also use reverse engineering to discover how unique parts are constructed to optimize their manufacturing potential and increase a company’s profit margin. Though reverse engineering does not imply redesign, it is a process that may precede the redesign of an object in order to improve its performance or to reduce its impact on the environment.
Review the components of reverse engineering and the process of a functional (as opposed to visual) analysis of an object using the Reverse Engineering and Functional Analysis presentation (Teacher Resource 3.2) as a guide.
7 Varies Object Analysis: Functional Analysis Observation
Demonstrate a functional object analysis using a stapler and the Example Product Observation handout (Teacher Resource 3.3).
Have students complete a similar functional analysis on their own object using the Product Observation worksheet (Student Resource 3.2). Time allotted for the activity may vary. Circulate among the class while students are working to check on their progress. Collect students’ product observations after they complete them and assess their observations for accuracy.

AOE IED Integrated Unit: Reverse Engineering
Lesson 3 Functional Analysis
Student Resources
Resource Description
Student Resource 3.1 Worksheet: Simple Machines (IED 3.2.1)
Student Resource 3.2 Worksheet: Product Observation (IED 3.2.2)

Unit 2 Reverse Engineering Lesson 3 Functional Analysis
Student Resource 3.1
Worksheet: Simple Machines
Purpose How many simple machines have you come into contact with since you woke up this morning? If you were to list all of the common objects that you interact with on a daily basis, you would be astonished at how many of them are mechanisms that use simple machines.
A simple machine is any of several elementary mechanisms that are used to transmit or modify force or motion. There are six simple machines: lever, wheel and axle, pulley, inclined plane, wedge, and screw. If you had to climb a set of stairs or walk up a ramp to get from one level to another, then you have used an inclined plane. If you used a knife to cut a piece of bread, then you have used a wedge. If you had to pull on a string to open or close a set of window blinds, then you have used a pulley. When you turn a door handle, you are interacting with a wheel and axle. When you use a hole punch to cut holes through a stack of papers for placement in a 3-ring binder, the handle that you push down on is a 2nd class lever. When you flip a light switch, you are using a 1st class lever.
A mechanical device, like the product that you have selected for the focus of your reverse engineering project, is a system that is often made up of several simple machines working together to make an object perform a desired task. When a mechanism uses more than one simple machine to perform work, the device is called a compound machine. An example of a compound machine is a nail clipper, which uses wedges and two different types of levers to transfer a person’s effort force to the resistance; in this case, the person’s nail.
The functional analysis of your mechanical device will reveal the simple machines that it uses to perform its intended function.
Equipment • Object from visual analysis activity
• Digital Camera
• Computer

Unit 2 Reverse Engineering Lesson 3 Functional Analysis
• Microsoft Paint or other graphic manipulation software
• Printer
• Engineer’s notebook
• Number 2 pencil
Procedure In this activity, you will perform a pre-dissection functional analysis of your selected product to identify any simple machines that are used in its function.
Perform a visual inspection of the exterior of your reverse engineering product. Use the table below to identify the number of simple machines that you see. Briefly describe the parts that make up the simple machine (you may invent names for the parts), and what their functions are. This task may also include providing details about the simple machine, such as the class of lever that is present. If the table is too small to accommodate the necessary amount of information, you may recreate the table in your engineer’s notebook and use that instead. Not all mechanical objects are made up of all six simple machines. Therefore, it is understood that some parts of the table may have to be left blank.
Simple Machine # of
Occurrences Description
Lever
Pulley
Wheel and Axle
Inclined Plane
Wedge
Screw
Use a digital camera to take photographs of the parts of the object that function as simple machines. Clean up the images on the computer using a graphic manipulation program. Place the photographs in your engineer’s notebook. Next to each image, explain what type of simple machine is present, and how it is used to make the mechanical device function.

Unit 2 Reverse Engineering Lesson 3 Functional Analysis
Conclusion
1. What are the six simple machines that make up mechanical systems?
2. Generally speaking, what is the purpose of a simple machine?
3. What is the difference between a simple and a compound machine?

Unit 2 Reverse Engineering Lesson 3 Functional Analysis
Student Resource 3.2
Worksheet: Product Observation (IED 3.2.2)
Purpose Have you ever noticed how children are fascinated with how objects work? Many engineers have stated that they can trace back their interest in their chosen field to their childhood, when they would tear apart broken objects to figure out what caused them to move and function.
Reverse engineering is a process that relies on this childhood fascination with objects and how they work. The process involves the study of an object’s visual, functional, and structural qualities. Though it does not imply redesign, reverse engineering is often a tool that is used to aid in the redesign of an object so that its performance may be improved. Other reasons for performing reverse engineering include reducing an object’s negative environmental impacts, maximizing manufacturing techniques through the substitution of more appropriate materials, discovering how a competitor’s product works, and increasing a company’s profit margin.
You have performed a visual analysis of your selected product to identify the visual design principles and elements that give the object its visual appeal, or lack thereof. The next step in the reverse engineering process involves the study of the object’s function. This is done through careful observation of the object’s sequential operation before it is disassembled. By first observing the product, you can hypothesize how a product operates and then compare your predictions to your actual findings after the part is dissected.
Equipment • IED Activity 3.2.2a Example Product Observation
• Object for visual analysis activity
• Engineer’s notebook
• Number 2 pencil
Procedure In this activity, you will analyze the function of your consumer product.
Before you measure and dissect it, you must theorize how the product functions through non-destructive observation. Identify your product’s name and the company that produced it and answer the following questions.
Product Name:
Company Name:

Unit 2 Reverse Engineering Lesson 3 Functional Analysis
1. What is the purpose or primary function of the object?
2. Sketch an isometric pictorial of the product in your engineer’s notebook and label the individual components. If you are not sure what a particular component is called, then make an educated guess.
3. Make an educated guess as to how this product operates. Use the terminology presented in the Simples Machines worksheet (Student Resource 3.1) to explain the object’s sequential operation.

Unit 2 Reverse Engineering Lesson 3 Functional Analysis
4. Identify the system inputs, intended product function, and outputs in the table below.
Inputs Product Function Output
5. What mechanical components are visible?
6. What aspects of the device’s function cannot be identified because the mechanical components are hidden from plain view?

Unit 2 Reverse Engineering Lesson 3 Functional Analysis
Conclusion 1. Why do engineers perform reverse engineering on products?
2. What does a black box represent in the system input/output model?

AOE IED Integrated Unit: Reverse Engineering
Lesson 3 Functional Analysis
Teacher Resources
Resource Description
Teacher Resource 3.1 Presentation: Simple Machines
Teacher Resource 3.2 Presentation: Reverse Engineering and Functional Analysis
Teacher Resource 3.3 Handout: Example Product Observation (IED 3.2.2a)

Unit 2 Reverse Engineering Lesson 3 Functional Analysis
Teacher Resource 3.1
Presentation: Simple Machines
Directions Right click on the slide below and select Presentation Object/Open to open the PowerPoint presentation.
®
Forging new generations of engineers

Unit 2 Reverse Engineering Lesson 3 Functional Analysis
Teacher Resource 3.2
Presentation: Reverse Engineering and Functional Analysis
Directions Right click on the slide below and select Presentation Object/Open to open the PowerPoint presentation.
®
Forging new generations of engineers

Unit 2 Reverse Engineering Lesson 3 Functional Analysis
Teacher Resource 3.3
Handout: Example Product Observation (IED 3.2.2a)
Product Name: Stapler
Company Name: Bates Model 640 Custom
1. What is the purpose or primary function of the object?
This device is designed to perforate and mechanically bind sheets of paper together using metal wire.
2. Sketch an isometric pictorial of the product and label the individual components. If you are not sure what a particular component is called, then make an educated guess.
Sketch from Engineer’s Notebook

Unit 2 Reverse Engineering Lesson 3 Functional Analysis
3. Make an educated guess as to how this product operates. Use the terminology from the Simple Machines presentation (Teacher Resource 3.1) to explain the operation.
The top portion of the stapler serves as a lever arm and rotates about a pivot pin. The pivot pin functions as a fulcrum. An effort force is applied downward on the end of the lever arm, which moves the top assembly down toward a small metal plate, called the anvil. The top assembly consists of the top portion of the stapler and the magazine.
The magazine, which is located on the underside of the lever arm assembly, is compressed against the corner of a stack of papers that rests on top of the anvil. The top portion of the stapler continues to move downward, which causes a single piece of metal wire, bent in an upside down U-shape, to be ejected from the magazine. The ends of the wire are small enough in diameter to puncture several sheets of stacked paper. The wire is pushed through the paper until it contacts the anvil.
The anvil has two indentations that function as inclined planes. These inclined planes cause the wire ends to deform and to hook inward toward each other as the wires continue to make their way through the paper sheets. The hooked ends form a mechanical connection that binds the papers together. When the U-shaped wire bottoms out on the top sheet of paper, the stapling action in complete.
Force is removed from the top portion of the stapler, and the lever returns to its original position as if it were being pushed by some internal force. This action seems to automatically reset the magazine to eject another metal wire staple when the process is repeated.
4. Identify the system inputs, intended product function, and outputs in the table below.
Staples Loose Paper
Applied Force Fasten Paper
Noise Heat
Bent Staple
5. What mechanical components are visible?
Base plate, riser, pivot pin, magazine, anvil, upper stapler lever arm
6. What aspects of the device’s function cannot be identified because the mechanical components are hidden from plain view?
It is not obvious what is causing the magazine to advance another staple after each cycle.
It is also not obvious what is causing the lever arm assembly to return to its original position.


AOE IED Integrated Unit: Reverse Engineering
Lesson 4 English Language Arts
The Design of Everyday Things
In this lesson, students will learn about the function that the illustrative story can serve in informational writing. Students will read excerpts from The Design of Everyday Things and identify how the stories the author intersperses in the text help to engage his audience and illustrate his points. Students will then write illustrative stories of their own based on experiences with poor design.
This lesson is expected to take one class period.
Lesson Framework
Learning Objectives Each student will:
• Read excerpts from a non-fiction text and identify how anecdotes are used to illustrate the author’s main points.
• Write an essay that uses an illustrative story to emphasize an observation about poor design.
Academic Standards • Students adjust their use of spoken, written, and visual language to communicate effectively with
a variety of audiences and for different purposes. (NCTE Standards for the English Language Arts, Standard 4)
• Students employ a wide range of strategies as they write and use different writing process elements appropriately to communicate with different audiences for a variety of purposes. (NCTE Standards for the English Language Arts, Standard 5)
• Students apply knowledge of language structure, language conventions, media techniques, figurative language, and genre to create, critique, and discuss print and nonprint texts. (NCTE Standards for the English Language Arts, Standard 6)
• Students use spoken, written, and visual language to accomplish their own purpose. (NCTE Standards for the English Language Arts, Standard 12)

Unit 2 Reverse Engineering Lesson 4 The Design of Everyday Things
Assessment Assessment Product Assessment Criteria
Anecdote worksheet comparing anecdotes to similar literary genres
None provided
One-page illustrative anecdote on bad design Teacher Resource 4.2—Rubric: Illustrative Anecdote
Prerequisites • Working knowledge of the characteristics of classic literary genres such as the short story, the
parable, and the fable • Working knowledge of elements and principles of good design (from Introduction to Engineering
Design class)
Instructional Materials
Teacher Resources • Teacher Resource 4.1—Reading: The Design of Everyday Things Excerpt • Teacher Resource 4.2—Rubric: Illustrative Anecdote
Student Resources • Student Resource 4.1—Worksheet: Anecdotes • Student Resource 4.2—Writing Assignment: Illustrative Anecdote
Equipment and Supplies • The Design of Everyday Things, by Donald Norman

Unit 2 Reverse Engineering Lesson 4 The Design of Everyday Things
Lesson Steps Step Min. Activity
CLASS PERIOD 1
1 25 Reading: The Design of Everyday Things
Pass out the excerpt from The Design of Everyday Things. Tell the class that this excerpt addresses a problem. Ask them to try to identify the problem the author is talking about while they listen or read. Have the passage read aloud (by yourself or students) or have students read it silently.
Based on what they’ve read, ask students what they think the rest of the book is going to be about. What are the author’s main points in these beginning paragraphs? Have they ever had or observed a similar experience of someone being unable to open a door? Why has the author included the story that appears at the end of excerpt?
2 20 Direct Instruction: Anecdotes
Define the term anecdote for students as a brief narrative of a particular incident. An anecdote differs from a short story in that it is taken from real life, is uncomplicated, and deals with a single episode. The literal Greek meaning of the word is “not published,” and it still retains some such sense of confidentiality. Wikipedia (an Internet encyclopedia) provides a good description of how anecdotes are similar and different to other common literary forms:
An anecdote is a short tale narrating an interesting or amusing biographical incident. It may be as brief as the setting and provocation of a bon mot. An anecdote is always based on real life, an incident involving actual persons, whether famous or not, in real places. However, over time, modification in reuse may convert a particular anecdote to a fictional piece, one that is retold but is "too good to be true." Sometimes humorous, anecdotes are not jokes, because their primary purpose is not simply to evoke laughter, but to reveal a truth more general than the brief tale itself, or to delineate a character trait or the workings of an institution in such a light that it strikes in a flash of insight to their very essence. A brief monologue beginning "A man walks into a bar…" will be a joke. A brief monologue beginning "Once J. Edgar Hoover walked into a bar…” will be an anecdote. An anecdote thus is closer to the tradition of the parable than the patently invented fable with its animal characters and generic human figures—but it is distinct from the parable in the historical specificity which it claims. An anecdote is not a metaphor nor does it bear a moral, a necessity in both parable and fable, merely an illustrative incident that is in some way an epitome.
Pass out the Anecdotes worksheet (Student Resource 4.1) and have students compare and contrast anecdotes to other similar literary genres.
The book The Design of Everyday Things is filled with interesting design anecdotes. If time allows, go through the book and have students read other anecdotes and identify what point is being illustrated. Keep in mind that the book was originally published in 1988, so some of the technology being described may be unfamiliar to students (e.g., VCRs, cassette players, typewriters, and so on).

Unit 2 Reverse Engineering Lesson 4 The Design of Everyday Things
Step Min. Activity
3 5 Writing Assignment: Illustrative Anecdote
Ask students to recall elements and principles of good and bad design from the IED unit and perhaps from the book excerpts, and to think about an experience they’ve had with bad design. Ask them to write an anecdote that illustrates an element or principle of bad design. If they can’t think of a personal experience, tell them they can use the experience of a family member or friend.
AOE IED Integrated Unit: Reverse Engineering
Lesson 4 The Design of Everyday Things
Student Resources
Resource Description
Student Resource 4.1 Worksheet: Anecdotes
Student Resource 4.2 Writing Assignment: Illustrative Anecdote

Unit 2 Reverse Engineering Lesson 4 The Design of Everyday Things
Student Resource 4.1
Worksheet: Anecdotes
What is an Anecdote? An anecdote is a short and interesting story taken from your past experience or the experience of someone you know or have heard about.
Anecdotes are often funny, but their main purpose isn’t to make the audience laugh. Anecdotes are typically intended to serve as an example of a more general point being made by the author.
Why Are Anecdotes Useful? It is a simple fact of life that we enjoy hearing interesting stories. No one knows why, but we do. Certainly, we enjoy relating to and learning from stories, and we often can identify with the characters in them.
Using anecdotes in writing can engage, involve, and interest your reader in ways little else can; it will add a human and personal dimension that can be irresistible and fascinating.
But anecdotes need to be believable and lively, and they can also be very emotional. In addition, because anecdotes are “true” stories, they can be very convincing indeed, adding authority to what you write.
A well-chosen, well-told anecdote is a sure way to involve and persuade your reader.
Compare and Contrast Similarities Differences
Anecdote vs. Parable
Anecdote vs. Fable
Anecdote vs. Short Story
Anecdote vs. Historical Fiction

Unit 2 Reverse Engineering Lesson 4 The Design of Everyday Things
Student Resource 4.2
Writing Assignment: Illustrative Anecdote
Directions There are examples of bad design everywhere. Think of an experience you’ve had with an object that was poorly designed—something that was hard to use or looked totally wrong and out of place. This experience was probably an example of how a designer has made a bad decision regarding a specific element and principle of design.
Write an anecdote of that experience as an illustration of why that particular design element or principle is important to consider.
Be sure your anecdote includes the following elements:
• An introduction that catches the audience’s interest
• A vivid description of the setting
• A logically sequenced account of the events that occurred
• Creative details that bring the anecdote to life
• Appropriate spelling, grammar, capitalization, and punctuation


AOE IED Integrated Unit: Reverse Engineering
Lesson 4 The Design of Everyday Things
Teacher Resources
Resource Description
Teacher Resource 4.1 Reading: The Design of Everyday Things Excerpt
Teacher Resource 4.2 Rubric: Illustrative Anecdote

Unit 2 Reverse Engineering Lesson 4 The Design of Everyday Things
Teacher Resource 4.1
Reading: The Design of Everyday Things Excerpt
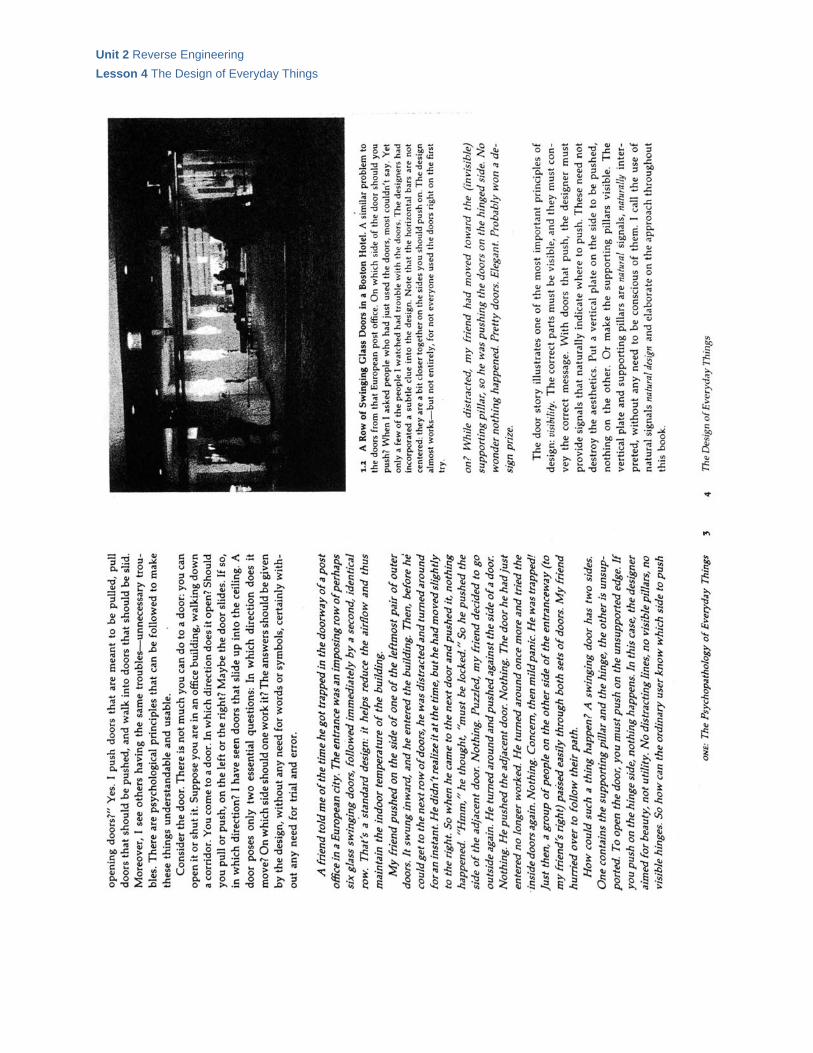
On the next page find a copy of the reading excerpt. The excerpt ends after the italicized anecdote on page 4.
Making your own copy of the book will probably result in better photograph reproduction. If possible, obtain copies of the original book for students to read. This was a very popular book when it was first published in 1988, and you can easily find inexpensive, used copies online at Amazon.com and other book resellers.
You can do an Internet image search for “frameless glass doors” for other image examples.

Unit 2 Reverse Engineering Lesson 4 The Design of Everyday Things
Unit 2 Reverse Engineering Lesson 4 The Design of Everyday Things
Unit 2 Reverse Engineering Lesson 4 The Design of Everyday Things
Teacher Resource 4.2
Rubric: Illustrative Anecdote
Student Name(s): _____________________________________________ Date: _______________
Exemplary Solid Developing Needs Attention
Introduction First paragraph has a "grabber" or catchy beginning.
First paragraph has a weak "grabber."
A catchy beginning was attempted but was confusing rather than catchy.
No attempt was made to catch the reader's attention in the first paragraph.
Organization The story is very well organized. One idea or scene follows another in a logical sequence with clear transitions.
The story is pretty well organized. One idea or scene may seem out of place. Clear transitions are used.
The story is a little hard to follow. The transitions are sometimes not clear.
Ideas and scenes seem to be randomly arranged.
Setting Many vivid, descriptive words are used to tell when and where the story took place.
Some vivid, descriptive words are used to tell the audience when and where the story took place.
The reader can figure out when and where the story took place, but the author didn't supply much detail.
The reader has trouble figuring out when and where the story took place.
Creativity The story contains many creative details and/or descriptions that contribute to the reader's enjoyment. The author has really used his/her imagination.
The story contains a few creative details and/or descriptions that contribute to the reader's enjoyment. The author has used his/her imagination.
The story contains a few creative details and/or descriptions, but they distract from the story. The author has tried to use his/her imagination.
There is little evidence of creativity in the story. The author does not seem to have used much imagination.
Spelling and Punctuation
There are no spelling or punctuation errors in the final draft. Character and place names that the author invented are spelled out consistently throughout.
There is one spelling or punctuation error in the final draft.
There are 2–3 spelling or punctuation errors in the final draft.
The final draft has more than 3 spelling or punctuation errors.


AOE IED Integrated Unit: Reverse Engineering
Lesson 5 World History
Cracking the Enigma
In this lesson, students will analyze the necessity for and outcomes of technological innovations on the course of World War II.
The introductory section should give the teacher a clear, concise understanding of the lesson. A brief paragraph will state the key concepts of the lesson (the organizing themes and big ideas), as well as the activities used to address the concepts and topics.
This lesson is expected to take six class periods.
Lesson Framework
Learning Objectives Each student will:
• Compare and contrast the importance of technological developments on the outcome of World War II.
• Describe the importance of codebreaking during World War II. • Explain how the Enigma code was broken and describe the importance of codebreaking during
World War II. • Simulate the use of the Enigma machine.
Academic Standards • Describe the major turning points of the war and the principal theaters of conflict in Europe, the
Middle East, Sub-Saharan Africa, East Asia, and the South Pacific. (NCHS National World History Standards, Era 8)
• Explain how massive industrial production and innovations in military technology affected strategy, tactics, and the scale and duration of the war. (NCHS National World History Standards, Era 8)

Unit 2 Reverse Engineering Lesson 5 Cracking the Enigma
Assessment
Assessment Product Assessment Criteria
Technological innovation research report Teacher Resource 5.6—Rubric: Key Technological Innovation Report
Prerequisites • Introduction to World War II and the main Axis and Allied powers
Instructional Materials
Teacher Resources • Teacher Resource 5.1—Template: Cipher Rotors • Teacher Resource 5.2—Answer Key: Intercepted Message A • Teacher Resource 5.3—Answer Key: Intercepted Message B • Teacher Resource 5.4—Answer Key: Intercepted Message C • Teacher Resource 5.5—Rubric: Key Technological Innovation Report
Student Resources • Student Resource 5.1—Handout: Intercepted Message A • Student Resource 5.2—Handout: Intercepted Message B • Student Resource 5.3—Handout: Intercepted Message C • Student Resource 5.4—Worksheet: Technological Innovations • Student Resource 5.5—Handout: Research Report
Equipment and Supplies • Scissors • Paper brads • TV/VCR • NOVA Video: Decoding Nazi Secrets
http://shop.wgbh.org/product/search?terms=decoding+nazi+secrets • Computer lab with Internet access

Unit 2 Reverse Engineering Lesson 5 Cracking the Enigma
Lesson Steps Step Min. Activity
PRIOR TO CLASS
Materials Construction: Cipher Rotors
Assemble a class set of cipher rotors. One for every four students is sufficient, but you may choose to have one per pair or one per student. Laminating the rotors will allow them to be reused.
CLASS PERIOD 1
1 40 Role Play: Codebreaking
Tell students that during a war, each side needs to send and receive secret messages. These messages often contain important information such as when and where attacks are to be made. The messages have to be put into code so that if they are intercepted by the enemy, the secret message will not be revealed. By breaking a code it is possible to find out the enemy's secret plans.
Divide the class into groups of four (or two). Pass out one of the Intercepted Messages handouts (Student Resources 5.1–5.3, see note below). Tell students that these messages have been intercepted from the enemy. Their side doesn’t know how the code works, but luckily they have recently captured the cipher machine used by the enemy to code and decode secret messages. Instruct students to attempt to break the code.
Note: There are three different Intercepted Message handouts. The message is the same, but their ciphers vary in difficulty. Message A is a straight substitution cipher; Message B is a substitution cipher with word spacing broken up; and Message C is an advancing substitution cipher (after each letter is coded, the cipher rotor advances).
Student groups who have broken the code should compose a fake message to send to the enemy.
2 10 Mini-Lecture: Codes vs. Ciphers
Define the following terms for students:
The use of codes and ciphers is known as cryptography (from the Greek, kryptos, meaning secret or hidden, and graphos, meaning writing). Explain to the class that the terms code and cipher have specific meanings when used in the military.
A code is a set of symbols (letters, shapes, numbers) that represent a whole word or concept. The code always means the same thing. For example, apple might mean attack. If you need to send a lot of information in codes, will probably need a codebook.
Generally speaking, a cipher refers to an instance when individual letters or numbers or symbols are used to replace the original letters, numbers, or symbols. A specific set

Unit 2 Reverse Engineering Lesson 5 Cracking the Enigma
Step Min. Activity
of rules governs how the letters are replaced. As long as you know the rule, you can encrypt or decrypt any message. However, the simpler the rule, the easier it is for someone to figure it out.
Even though these two terms technically mean different things, code is a more familiar word and is often used when cipher is meant. Similarly, using codes and ciphers to hide your message is often referred to interchangeably as encoding/decoding, enciphering/deciphering, or encrypting/decrypting.
A little bit of background information:
Codes and ciphers have been used since ancient times. Some classic examples of historic cryptography include Greeks and Spartans using messages written on strips of paper that could only be read when wrapped around a stick of a specific diameter.
The Greeks also invented a code that changed letters into numbers. A is written as 11; B is 12; and so on. So WAR would read 52 11 42. A form of this code was still being used 2,000 years later during World War I.
Julius Caesar is said to have used a simple cipher that replaced each letter with the letter that was three places down in the alphabet: that is, A becomes D; B becomes E; and so on.
CLASS PERIODS 2—4
3 120 Video: Decoding Nazi Secrets
Have students discuss the kinds of people they would choose if they were recruiting codebreakers. As they watch, have students record the kind of members asked to join the Station X team and the characteristics they possessed.
Show all or part of the NOVA video Decoding Nazi Secrets, a 120-minute account of the work done by British and American codebreakers at Bletchley Park during World War II.
This video can be purchased at http://shop.wgbh.org/product/search?terms=decoding+nazi+secrets

Unit 2 Reverse Engineering Lesson 5 Cracking the Enigma
Step Min. Activity
4 10 Class Discussion: Codebreakers
After watching the video, discuss with students the kind of qualities necessary for a team to work as effectively as the one at Station X. Did students see any of the characteristics they chose before watching? Did the codebreakers include any characteristics that students had not considered?
5 20 Simulation: Paper Enigma Machine
Download the “Paper Enigma Machine” from http://mckoss.com/crypto/enigma.htm
CLASS PERIOD 5
6 50 Research: Technological Innovations
Tell that class that the Enigma machine (and how it was broken) was only one of many technological innovations that were worked on in secret. If students worked on the Ship Shape unit, they might remember that several specialized tanks were engineered to overcome defenses at the Normandy beachhead. There were a number of other well-known technologies that were invented, improved, or widely distributed during World War II, including radar, sonar, the atomic bomb, proximity fuze, Norden bombsight, napalm, and penicillin. Have students research each of these innovations using the Technological Innovations worksheet (Student Resource 5.4).
After they have researched each innovation, ask students to rank the innovations based on their importance to the war effort. There is no correct ranking, but students should be prepared to justify their rankings to others.
CLASS PERIOD 6
7 20 Class Discussion: Technological Innovations
Have students share their rankings of eight innovations with the class. Discuss the differences in the rankings that students have selected. When students disagree, they should provide justification for their position.
8 30 Research Report: Key Technological Innovation of World War II
Ask students to write a three-page research report on the innovation they have selected as the most important to the war effort. Some additional research may be required. The report should include a description of the innovation, brief history of its development, an analysis of the impact of the innovation on the war, and a justification for why they selected it as the most important to the war effort. Students can begin writing an outline in class, but the majority of the report should be done as homework.

Unit 2 Reverse Engineering Lesson 5 Cracking the Enigma
Extensions
Enrichment • Have students acquire experience with the Enigma machine using one of many online or
downloadable simulators. An excellent example can be found at http://users.telenet.be/d.rijmenants/en/enigmasim.htm

AOE IED Integrated Unit: Reverse Engineering
Lesson 5 Cracking the Enigma
Student Resources
Resource Description
Student Resource 5.1 Handout: Intercepted Message A
Student Resource 5.2 Handout: Intercepted Message B
Student Resource 5.3 Handout: Intercepted Message C
Student Resource 5.4 Worksheet: Technological Innovations
Student Resource 5.5 Handout: Research Report

Unit 2 Reverse Engineering Lesson 5 Cracking the Enigma
Student Resource 5.1
Handout: Intercepted Message A
Directions You have intercepted the following messages from the enemy. You don’t know what they say, but you have also managed to capture the cipher device you think is being used to encode and decode the secret transmissions. Can you figure out how they work?
3 XY CKGFAKT XL YGXT LKUJ NBONKTL FB RBUJBU GF JGCU BU OBUJGE

Unit 2 Reverse Engineering Lesson 5 Cracking the Enigma
Student Resource 5.2
Handout: Intercepted Message B
Directions You have intercepted the following messages from the enemy. You don’t know what they say, but you have also managed to capture the cipher device you think is being used to encode and decode the secret transmissions. Can you figure out how they work?
3 XYCKG FAKTX LYGXT LKUJN BONKT LFBRB UJBUG FJGCU BUOBU JGE

Unit 2 Reverse Engineering Lesson 5 Cracking the Enigma
Student Resource 5.3
Handout: Intercepted Message C
Directions You have intercepted the following messages from the enemy. You don’t know what they say, but you have also managed to capture the cipher device you think is being used to encode and decode the secret transmissions. Can you figure out how they work?
3/1 XMEAK EURST VPOHY AWKHW XAQNI
TFIUT TXWWX VURXG VVVYY CWF

Unit 2 Reverse Engineering Lesson 5 Cracking the Enigma
Student Resource 5.4
Worksheet: Technological Innovations
Directions Research each of the following technological innovations and their impact on World War II using the Internet or print resources. After you have found the function and impact of each innovation, rank its importance based on your own opinion. Be prepared to justify your choices in class.
Name of Innovation Function Impact on World War II
Ex: Enigma machine
Machine used by German forces to encipher and decipher messages being passed so that they couldn’t be read by the Allies.
Enigma cipher was broken by the Allies, which allowed them to decode the secret messages being passed between the German forces without their knowledge.
___ Radar
___ Sonar
___ Proximity fuze (fuse)
___ Norden bombsight
___ Atomic bomb
___ Napalm
___ Penicillin

Unit 2 Reverse Engineering Lesson 5 Cracking the Enigma
Student Resource 5.5
Handout: Research Report
Directions Write a report on what you consider to be the most important technological innovation of World War II. Your report should include the following components:
• A title.
• A description of the innovation, including what it does, how it works, and a brief history of its development.
• A summary of the impact of the innovation on the war effort. For example, what was made possible or what was prevented by the use of the innovation? How did it help the war effort?
• A discussion of what might have occurred if the innovation had not been developed. How might the war have turned out differently?
• An opinion on why this innovation is the most important of the many innovations that were developed during this time period. Include your reasons for making this choice.
You must consult and cite a minimum of three sources of varying types (Internet, books, magazines, and so on) to prepare your report.
The report should be two to three pages long, and it should be prepared using word processing software.

AOE IED Intepgrated Unit: Reverse Engineering
Lesson 5 Cracking the Enigma
Teacher Resources
Resource Description
Teacher Resource 5.1 Template: Cipher Rotors
Teacher Resource 5.2 Answer Key: Intercepted Message A
Teacher Resource 5.3 Answer Key: Intercepted Message B
Teacher Resource 5.4 Answer Key: Intercepted Message C
Teacher Resource 5.5 Rubric: Key Technological Innovation Report

Unit 2 Reverse Engineering Lesson 5 Cracking the Enigma
Teacher Resource 5.1
Template: Cipher Rotors
Directions Cut out the two circles and the initial setting window along the dotted lines. Place the top rotor over the bottom rotor so that the center holes line up and attach with a paper brad. A number should be visible through the initial setting window.

Unit 2 Reverse Engineering Lesson 5 Cracking the Enigma
Teacher Resource 5.2
Answer Key: Intercepted Message A
Directions You have intercepted the following messages from the enemy. You don’t know what they say, but you have also managed to capture the cipher device you think is being used to encode and decode the secret transmissions. Can you figure out how they work?
This is the easiest to solve, a straight substitution cipher with rotors positioned so that the number 3 shows through the initial setting window.
3 XY CKGFAKT XL YGXT LKUJ NBONKTL IF WEATHER IS FAIR SEND BOMBERS
FB RBUJBU GF JGCU BU OBUJGE
TO LONDON AT DAWN ON MONDAY

Unit 2 Reverse Engineering Lesson 5 Cracking the Enigma
Teacher Resource 5.3
Answer Key: Intercepted Message B
Directions You have intercepted the following messages from the enemy. You don’t know what they say, but you have also managed to capture the cipher device you think is being used to encode and decode the secret transmissions. Can you figure out how they work?
This is the second easiest to solve. Like message A, this uses a straight substitution cipher with rotors positioned so that the number 3 shows through the initial setting window, but the words are broken up into 5-letter chunks.
3 XYCKG FAKTX LYGXT LKUJN BONKT IFWEA THERI SFAIR SENDB OMBER
LFBRB UJBUG FJGCU BUOBU JGE
STOLO NDONA TDAWN ONMON DAY

Unit 2 Reverse Engineering Lesson 5 Cracking the Enigma
Teacher Resource 5.4
Answer Key: Intercepted Message C
Directions You have intercepted the following messages from the enemy. You don’t know what they say, but you have also managed to capture the cipher device you think is being used to encode and decode the secret transmissions. Can you figure out how they work?
This is the hardest to solve. This is substitution cipher that begins with rotors positioned so that the number 3 shows through the initial setting window. However, after each letter is deciphering, rotate the top rotor one space clockwise before deciphering the next letter.
3/1 XMEAK EURST VPOHY AWKHW XAQNI IFWEA THERI SFAIR SENDB OMBER TFIUT TXWWX VURXG VVVYY CWF STOLO NDONA TDAWN ONMON DAY

Unit 2 Reverse Engineering Lesson 5 Cracking the Enigma
Teacher Resource 5.5
Rubric: Key Technological Innovation Report
Student Name(s): _____________________________________________ Date: _______________
Exemplary Solid Developing Needs Attention
Contributions The student routinely provides useful ideas when participating in a group or in a class discussion.
The student usually provides useful ideas when participating in a group or in a class discussion.
The student sometimes provides useful ideas when participating in a group or in a class discussion.
The student rarely provides useful ideas when participating in a group or in a class discussion.
Attitude The student is never publicly critical of others’ work and always has a positive attitude.
The student is rarely publicly critical of others’ work and often has a positive attitude.
The student is sometimes publicly critical of others’ work and sometimes has a negative attitude.
The student is often publicly critical of others’ work and often has a negative attitude.
Sharing Work Responsibility
Group members can always count on this person to do his or her share.
Group members can usually count on this person to do his or her share.
Group members must sometimes prompt this person to do his or her share.
Group members can rarely count on this person to do his or her share.
Worksheet Content
The worksheet is finished. All sentences are complete with no grammatical or spelling errors.
The worksheet is finished. Most sentences are complete, but there are one to two grammatical or spelling errors.
The worksheet is only partially finished. There are some incomplete sentences and/or three to four grammatical or spelling errors.
The worksheet is only partially finished. There are many incomplete sentences and/or five or more grammatical or spelling errors.

AOE IED Integrated Unit: Reverse Engineering
Lesson 6 Algebra I
The Function of Codes
This lesson introduces students to functions as a subset of mathematical relations. In this lesson, students learn the characteristics of functions and how to read function notation. They then learn how to calculate inverse functions in the context of decoding messages.
This lesson is expected to take two class periods.
Lesson Framework
Learning Objectives Each student will:
• Demonstrate knowledge of the characteristics of functions by identifying relations that are functions.
• Calculate the correct output for given inputs to a function. • Demonstrate understanding of inverse functions by determining a function’s inverse and
checking that the composite of a function and its inverse results in the identity.
Academic Standards • Represent, analyze, and generalize a variety of patterns with tables, graphs, words, and,
when possible, symbolic rules. (NCTM Principles and Standards for School Mathematics, Algebra)
• Identify functions as linear or nonlinear and contrast their properties from tables, graphs, or equations. (NCTM Principles and Standards for School Mathematics, Algebra)
• Understand and perform transformations such as arithmetically combining, composing, and inverting commonly used functions, using technology to perform such operations on more complicated symbolic expressions. (NCTM Principles and Standards for School Mathematics, Algebra)

Unit 2 Reverse Engineering Lesson 6 The Function of Codes
Assessment
Assessment Product Assessment Criteria
Is It a Function? Worksheet Check worksheet for completion and accuracy.
The Function of Codes Worksheet Check worksheet for completion and accuracy.
Prerequisites Students should be able to do the following:
• Substitute numbers into an expression and evaluate the results. • Read and identify specific points on a coordinate graph. • Have some familiarity with the concept of encoding messages.
Instructional Materials
Teacher Resources There are no teacher resources for this lesson.
Student Resources • Student Resource 6.1—Worksheet: Is It a Function? • Student Resource 6.2—Worksheet: The Function of Codes
Equipment and Supplies • Calculators, Scientific or Graphing

Unit 2 Reverse Engineering Lesson 6 The Function of Codes
Lesson Steps Step Min. Activity
CLASS PERIOD 1
1 5 Lesson Springboard
Write an encoded message on the board that uses a coding system that replaces letters with numbers by a constant function. An example might be as follows:
Plain text message: No homework tonight.
Coding System: Replace each letter with its corresponding number, such that A = 1, B = 2, …, Z = 26. Then add 2 to each number.
Coded message: 16,17,10,17,15,7,25,17,20,13,22,17,16,11,9,10,20
Ask students what they think the message might say and how it might have been encoded. Tell students that the class will be exploring simple coding systems in this lesson.
2 30 Introduction to Functions
Tell students that before they decode the message on the board, the class needs to think about how codes work. This lesson deals with straightforward codes with which most people are familiar: each number stands for one and only one letter, and the numbers and letters correspond to each other by a set rule. If you know the rule, then decoding the message is simple. Without the rule, a person must check each possible letter-number correspondence to figure out the message.
Ask the class to consider what types of mathematical rules create a one-to-one correspondence of numbers, and which types of rules give more than one possible output for each input. They might realize that most of the relations they have been working with so far in their mathematics courses have a one-to-one correspondence. These relations are called functions.
Provide several examples of functions, including equations, data tables, sets of points, and graphs. This is an appropriate time to mention the vertical line test as a way to check for one-to-one correspondence. Show students how most functions are appropriate to use when encoding messages, because each letter in the plain text will correspond to one number, making the coded message unambiguous when it is decoded. (Technically, although functions must produce only one output for each input, they can have more than one input that results in the same output. In other words, relations can fail the horizontal line test and still be a function. Coding systems should also avoid this type of function.
Give an example of how a function can be used to encode a message, much like the example given in the lesson springboard.
Provide the class with several examples of relations that are not functions. Again, include equations, data tables, sets of points, and graphs. Point out the areas on a graph that would show that the relation is not a function and make the connection between the degree of a polynomial equation and the possibilities for more than one output for each input.

Unit 2 Reverse Engineering Lesson 6 The Function of Codes
Step Min. Activity
Try to encode a message with a rule that is not a function. Point out the confusion that might be created in a message when there is more than one output for each input.
When students are familiar with the characteristics of a function and what functions look like in a graph, an equation, and a data table, the class can move on to the next activity.
3 20 Is It a Function? Worksheet
Distribute the Is It a Function? Worksheet (Student Resource 6.1) and have students complete the problems in pairs. If graphing calculators are available, students can graph the first three equations to check whether they are functions. Otherwise, students may need to guess and check with different inputs and look for patterns to see whether the equations are functions.
Allow students time to complete the worksheet problems. If there is time, have students compare their answers and discuss any disagreements as a class until there is consensus on all of the correct answers. Otherwise, students can discuss the problems at the beginning of the next class session.
CLASS PERIOD 2
4 10 Review: Is It a Function? Worksheet
Have students share their answers to the Is It a Function? worksheet and discuss any disagreements that may have come up if this was not done during the previous class session. Review the definition of function and have students provide examples of relations that are functions and those that are non-functions to check for their understanding of these concepts.
5 20 Introduction to Inverse Functions
On the board, write a short message and ask students to encode it by converting all of the letters into their corresponding numbers, and then transforming the numbers using the function y = x + 5, where y is the output and x is the input.
Ask students how they would decode the message. It is apparent that 5 should be subtracted from each number in the code, which will then correspond to the correct letter. Explain that performing operations to “undo” a function can also be called performing the inverse function. In other words, performing the inverse function on the output of a function will result in the original input to that function.
Introduce the function notation f(x), and the inverse function notation f-1(x). If appropriate, discuss situations where the inverse of a function is not a function. Rules that are best for coding systems are those whose inverses are also functions and have a one-to-one correspondence.
Review several more examples of finding the inverse of a function with the class, including quadratic functions and functions that include division. Have students check their answers by plugging in an output from the original function into its inverse and by making sure that the original input is the result.

Unit 2 Reverse Engineering Lesson 6 The Function of Codes
Step Min. Activity
6 25 The Function of Codes worksheet
Distribute The Function of Codes worksheet (Student Resource 6.2) to the class and allow students to complete the problems in pairs. As you circulate among the class to clarify any questions, be sure to emphasize the relationship between a function and its inverse, and how to check whether a relation actually is the inverse of a given function. If there is time, ask advanced students to consider whether functions are commutative or associative and if they can provide examples of each.
Students can complete the worksheet for homework if necessary. Otherwise, have students share and discuss their answers at the end of the class period.
Groups that finish early can also attempt to decode the message on the board that was used as the lesson springboard.
Extensions
Enrichment • This lesson can easily be extended to include the concept of composite functions. Students can
encode letters by sending its corresponding number through two or more functions and then calculate the single function that is the equivalent of the composite. They can then explore whether different functions, their inverses, and combinations of their composites are commutative or associative.


AOE IED Integrated Unit: Reverse Engineering
Lesson 6 The Function of Codes
Student Resources
Resource Description
Student Resource 6.1 Worksheet: Is It a Function?
Student Resource 6.2 Worksheet: The Function of Codes

Unit 2 Reverse Engineering Lesson 6 The Function of Codes
Student Resource 6.1
Worksheet: Is It a Function?
Directions In mathematics, a function maps an input on to only one output. In other words, for every number x that is plugged into a function, only one corresponding number y comes out. When encoding messages, it is important that each letter only correspond with one other letter so that the message can be decoded and read correctly.
Decide whether each of the following relations is a function. If it is not a function, provide inputs and corresponding outputs for the relation that proves it.
1. y = 9x – 8 6.
2. y = 4x2
3. y2 = x + 4
4. (1, 0), (3, 10), (12, 2), (1, 3), (3, 1) 7.
5. (-3, 7), (1, 9), (5, 8), (7, 7), (12, 19)
y = 3x + 1 Input
x = 4 Output
y = 13
This relationship is a function. There is only one output for each input.
This relationship is NOT a function. There is more than one output for each input.
y2 = x - 1 Input
x = 5
Output
y = 2
y = -2
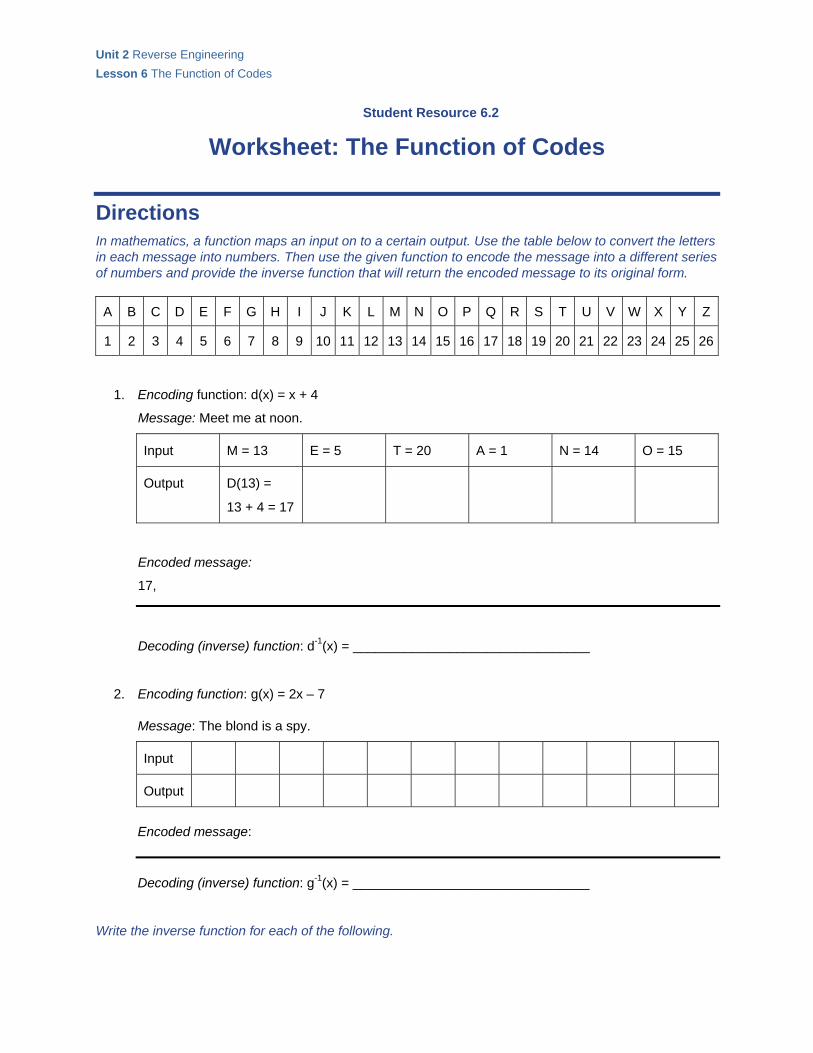
Unit 2 Reverse Engineering Lesson 6 The Function of Codes
Student Resource 6.2
Worksheet: The Function of Codes
Directions In mathematics, a function maps an input on to a certain output. Use the table below to convert the letters in each message into numbers. Then use the given function to encode the message into a different series of numbers and provide the inverse function that will return the encoded message to its original form.
A B C D E F G H I J K L M N O P Q R S T U V W X Y Z
1 2 3 4 5 6 7 8 9 10 11 12 13 14 15 16 17 18 19 20 21 22 23 24 25 26
1. Encoding function: d(x) = x + 4
Message: Meet me at noon.
Input M = 13 E = 5 T = 20 A = 1 N = 14 O = 15
Output D(13) =
13 + 4 = 17
Encoded message:
17,
Decoding (inverse) function: d-1(x) = ________________________________
2. Encoding function: g(x) = 2x – 7 Message: The blond is a spy.
Input
Output
Encoded message: Decoding (inverse) function: g-1(x) = ________________________________
Write the inverse function for each of the following.

Unit 2 Reverse Engineering Lesson 6 The Function of Codes
3. w(x) = 4x + 1
w-1(x) = ____________________
4. p(x) = 5 + 9x
p-1(x) = ____________________
5. k(x) = –7 – 2x k-1(x) = ____________________

AOE IED Integrated Unit: Reverse Engineering
Lesson 6 The Function of Codes
Teacher Resources This lesson has no teacher resources.


AOE IED Integrated Unit: Reverse Engineering
Lesson 7 Algebra
Let Me Count the Ways
In this lesson, students will review the mathematical differences between permutations and combinations and learn how the two concepts are related. The different calculations that are necessary when repeats are allowed in a permutation or combination are also discussed. The class will then calculate the number of possible configurations for the actual Enigma machine.
This lesson is expected to take three class periods.
Lesson Framework
Learning Objectives Each student will:
• Demonstrate knowledge of the difference between permutations and combinations by solving related problems in context.
• Calculate permutations and combinations in situations when repeats are allowed and when they are not allowed.
• Calculate the total number of possible configurations for the Enigma machine to practice working with large numbers and using counting methods in context.
Academic Standards • Develop an understanding of permutations and combinations as counting techniques. (NCTM
Principles and Standards of School Mathematics) • Judge the reasonableness of numerical computations and their results. (NCTM Principles and
Standards of School Mathematics)

Unit 2 Reverse Engineering Lesson 7 Let Me Count the Ways
Assessment Assessment Product Assessment Criteria
Student Resource 7.1—Worksheet: Permutations and Combinations
Teacher Resource 7.1—Answer Key: Permutations and Combinations
Student Resource 7.2—Worksheet: Enigma Permutations
Teacher Resource 7.2—Answer Key: Enigma Permutations
Student Resource 7.3—Worksheet: Enigma Combinations
Teacher Resource 7.3—Answer Key: Enigma Combinations
Prerequisites Students should
• Have an elementary understanding of probability as a calculation involving possible outcomes. • Be familiar with the counting principles of permutations and combinations and be able to list
possible outcomes in an organized way such as creating tree diagrams. It would be helpful if students were also aware that the number of possible outcomes could also be calculated through multiplication.
• Students should be comfortable with the calculation and concept of multiplication.
Instructional Materials
Teacher Resources • Teacher Resource 7.1—Answer Key: Permutations and Combinations • Teacher Resource 7.2—Answer Key: Enigma Permutations • Teacher Resource 7.3—Answer Key: Enigma Combinations
Student Resources • Student Resource 7.1—Worksheet: Permutations and Combinations • Student Resource 7.2—Worksheet: Enigma Permutations • Student Resource 7.3—Worksheet: Enigma Combinations

Unit 2 Reverse Engineering Lesson 7 Let Me Count the Ways
Equipment and Supplies • Calculators
Lesson Steps Step Min. Activity
CLASS PERIOD 1
1 5 Lesson Introduction
Introduce or remind students about the codebreakers at Bletchley Park during World War II. The Allied forces had intercepted a German Enigma machine and knew that it was used to code German military communications. Of course, the Allies needed to figure out how to break the codes the Enigma produced as soon as possible.
How difficult was the task that Allied codebreakers were asked to accomplish? How many possible codes can the Enigma machine produce?
Tell students that in this lesson they will be reviewing the concepts of permutations and combinations and will eventually calculate how many possible code configurations the Enigma could have.
2 35 Direct Instruction/Class Discussion: Permutations and Combinations
Before the class performs an analysis of the Enigma machine itself, it will review the concepts of permutations and combinations using more manageable numbers.
First, review the concept of permutations; showing students examples of permutations is likely to be the clearest way to communicate the concept. Here is a suggested exercise that you can ask students to do at their desks:
There are 4 numbered cards in a pile: 1, 2, 3, and 4. How many different ways can 3 cards get chosen from the pile in order?
Ask students to share their answer and the method they used to solve the problem with the class. The correct answer is that there are 24 different ways:
(1,2,3) (1,3,2) (2,1,3) (2,3,1) (3,1,2) (3,2,1)
(1,2,4) (1,4,2) (2,1,4) (2,4,1) (4,1,2) (4,2,1)
(1,3,4) (1,4,3) (3,1,4) (3,4,1) (4,1,3) (4,3,1)
(2,3,4) (2,4,3) (3,2,4) (3,4,2) (4,2,3) (4,3,2)
Students might choose to list the possible permutations in an organized list or tree diagram. If no one volunteers to use the multiplication method, discuss this method with the class. For the 1st card, there are 4 choices. After the 1st card is chosen, there are only 3 choices left for the 2nd card. When those 2 cards are determined, there are 2 choices left for the 3rd card: 4 x 3 x 2 = 24. This method can be illustrated with a tree

Unit 2 Reverse Engineering Lesson 7 Let Me Count the Ways
Step Min. Activity
diagram or other graphic organizer to highlight the multiplication process used. If appropriate, introduce factorial notation and the formula for calculating the number of permutations given n number of elements to choose from, and r number of things being chosen:
P(n,r) = n!/(n-r)!
From exercises like this one and others that you might choose to do with the class, emphasize that permutations are different ways to reorder elements in a set. This is very different from combinations, where order does not matter.
Give an example of a situation that would call for a combination to review the difference between combinations and permutations. Using the same example of pulling cards from a pile, a combination problem would look like this one:
There are 4 numbered cards in a deck: 1, 2, 3, and 4. How many different hands of 3 cards can be dealt?
Because this problem is dealing with hands of cards instead a specific order of pulling cards, it is a combination. The order in which the cards are chosen doesn’t matter to the overall hand that is dealt: having (1,2,3) in your hand is the same as having (2,1,3). If you look at the table of possible permutations above, each row lists permutations that result in the same combination. It shows that 6 permutations account for one combination in this situation: 24 ÷ 6 = 4 (there are only 4 different combinations possible).
Why are there 6 permutations for every 1 combination in this situation? The number of elements being chosen for each hand, r, is 3. The number of permutations for 3 elements is 3 x 2 x 1 = 6. Therefore, every combination of 3 elements correlates to 6 permutations. This phenomenon is reflected in the general formula for counting combinations. The formula is the same as the one for permutations, except there is an extra division by r! to account for the number of permutations that correspond to the same combination:
C(n,r) = n!/r!(n-r)!
The examples above assume that there are no repeats in the combination or permutation: (1,1,1) isn’t a valid combination, for example. In the worksheets, students will be asked to consider situations where repeats are acceptable. Repeats in permutations are very straightforward, but repeats in combinations are somewhat more complicated. It is suggested that students make a list of possible combinations when repeats are acceptable for now and that the formula for those situations be discussed only if there is time.
3 15 Worksheet: Permutations and Combinations
Distribute the Permutations and Combinations worksheet (Student Resource 7.1) and allow the class time to work on the problems in groups or pairs. The worksheet can be completed for homework if it is not finished in class.
Remind students to pay attention to instances when repeats are acceptable and to be ready to explain their reasoning for each problem in class during next period.
Unit 2 Reverse Engineering Lesson 7 Let Me Count the Ways
Step Min. Activity
CLASS PERIOD 2
4 30 Worksheet Presentations: Permutations and Combinations
Divide the class into groups of four students and assign each group one problem from the Permutations and Combinations worksheet to present to the class. Each presentation should review what the problem is asking, clearly demonstrate the answer to the problem, and justify the reasoning behind the process used to calculate the answer.
If there are any disagreements about the answers to the problems, discuss the problem until students are convinced of the correct answer. An answer key is provided as Teacher Resource 7.1. Highlight the fact that the number of combinations is equal to the number of permutations possible in the same situation, divided by r!, as discussed in the direct instruction session during the previous class period.
5 25 Worksheet: Enigma Permutations
Now that students have reviewed the counting principles of permutations and combinations, they are ready to tackle the problem of figuring out the number of possible configurations for the Enigma machine. This process will be divided into two steps. The first step, which will be done this period, is to calculate the different ways to set up the rotor system on the Enigma. This calculation involves permutations.
Distribute the Enigma Permutations worksheet (Student Resource 7.2). Allow students to work on the problems in groups or pairs for the rest of the period. The worksheet can be completed for homework if not done in class. Tell the students that they might be asked to justify their answers in class during the next period, so they should pay attention to their work.
CLASS PERIOD 3
6 15 Worksheet Answers: Enigma Permutations
Review the answers to the Enigma Permutations worksheet. An answer key is provided as Teacher Resource 7.2. Go over any questions or have students volunteer to explain answers to the problems that others in the class had trouble with. Have the class agree on the correct answers, as they will be used at the end of the next worksheet activity.
6 25 Worksheet: Enigma Combinations
Distribute the Enigma Combinations worksheet (Student Resource 7.3) and tell the class that this is the second step in their calculations to figure out how many configurations are possible for the Enigma machine. Though these calculations are combinations, tell the students that it may be easier for them to figure out the number of combinations indirectly by first solving the problem as a permutation. Then they can determine the number of combinations by dividing by r!, as discussed in the previous two class periods.
Unit 2 Reverse Engineering Lesson 7 Let Me Count the Ways
Step Min. Activity
Allow the students to finish the worksheet in groups or pairs. Circulate around the classroom to answer any questions.
7 15 Lesson Closure
Review the answers to the Enigma Combinations worksheet either through class discussion or by having groups quickly share their answers with the rest of the class. Resolve any disagreements that may arise about the answers. An answer key is provided as Teacher Resource 7.3.
Spend the remainder of the period discussing just how difficult it must have been to crack the Enigma code. Using the calculations in the worksheet, it would have taken millions of years to go through each of the possible configurations of the Enigma to decode one message if it took an average of 1 minute per reconfiguration. A modern day computer would take 4 full days to go through that number of possibilities. The German military changed the Enigma machine configurations every day, which made the process of decoding German communications even harder.
The codebreakers at Bletchley Park did manage to break the Enigma code through tireless mathematical reasoning, brute force, and using patterns in German communications to narrow down the field of possibilities each day. The process of breaking the code led to advancements that helped to develop the computer and is credited by some historians as hastening the end of World War II by up to 2 years.
Extensions • If there is time, the class can discuss the formula for calculating the number of possible
combinations if repeats are acceptable. The formula is: (n+r-1)!/r!(n-1)!
• This is a difficult formula to derive, but students can gain knowledge about the situation by looking at the worksheet problems that address repeats.

AOE IED Integrated Unit: Reverse Engineering
Lesson 7 Let Me Count the Ways
Student Resources
Resource Description
Student Resource 7.1 Worksheet: Permutations and Combinations
Student Resource 7.2 Worksheet: Enigma Permutations
Student Resource 7.3 Worksheet: Enigma Combinations

Unit 2 Reverse Engineering Lesson 7 Let Me Count the Ways
Student Resource 7.1
Worksheet: Permutations and Combinations
Directions In mathematics, there are important differences between permutations and combinations. Solve the following problems. Show all of your work and be prepared to explain your answers to the class.
1. There are 3 positions to be filled in this year’s student council and 4 candidates in the election. The ballot allows students to vote for their 3 favorite candidates. The candidate with the most votes will be president, the candidate with the second greatest number of votes will be vice-president, and the candidate with the third highest number of votes will be secretary.
a. How many different ways can the student council positions get filled? Write out a list of the different possibilities.
b. Is this situation a combination or a permutation? Explain how you know.
2. The school decides that instead of having 3 different positions, the student council would consist of a 3-person committee. Each committee member would have the same responsibilities and title.
a. If there are still 4 candidates for the student council, how many ways can the committee get filled? List the possibilities.
b. Is this situation a combination or a permutation? Explain how you know.
3. Explain how the number of permutations is mathematically related to the number of combinations in the previous two problems. (Hint: It may be helpful to look at the two lists you made.)
4. An ice cream parlor has 15 different flavors of ice cream. The largest serving cup they offer can contain 3 scoops of ice cream.
a. If each of the scoops can be any flavor, but scoops do not have to be different flavors, how many different cups of ice cream are possible? (You might need to write a list.)
b. If each of the scoops must be a different flavor, how many different cups of ice cream are possible?
c. Are the situations in problems #4a and 4b combinations or permutations? Explain how you know.

Unit 2 Reverse Engineering Lesson 7 Let Me Count the Ways
5. The same ice cream parlor also sells cones that carry 3 scoops of ice cream. The servers always ask which ice cream flavor should be on the bottom, the middle, and the top of the pile of scoops.
a. If repeated flavors of ice cream are allowed, how many different possible ways can a 3-scoop ice cream cone get served?
b. If repeated flavors are not allowed, how many different possibilities are there for 3-scoop ice cream cones?
c. Are the situations in problems #5a and 5b combinations or permutations? Explain how you know.
6. How is the number of permutations mathematically related to the number of combinations in the previous two problems?

Unit 2 Reverse Engineering Lesson 7 Let Me Count the Ways
Student Resource 7.2
Worksheet: Enigma Permutations
Directions In order to understand how difficult it was to crack the Enigma code, it is important to understand how many different possible codes could be created by the machine. Solve the following problems. Show all of your work and be prepared to explain your answers to the class.
1. The Enigma comes with five different rotors that can be placed inside the machine.
a. Imagine that only one rotor could be inserted into the Enigma machine. How many different ways can the five rotors change the code setting of the machine?
b. Imagine that there were two places where a rotor could be inserted. How many different ways can the five rotors be inserted into those two places?
c. The actual Enigma machine allows three different rotors to be inserted. How many different ways can the five rotors be inserted into those three places?
2. Once the three rotors are placed in the Enigma machine, each of them is turned to a particular setting.
a. If there were only 2 different settings available on each rotor, how many different possible ways could the machine be set in a starting position?
b. If there were 2 settings on the first rotor, and 10 settings on the second rotor, how many different possible ways could the machine be set?
c. The actual Enigma machine had 26 settings for each of its rotors (one for each letter of the alphabet). How many different possible ways could the machine be set?
The actual Enigma machine has three places to insert rotors and 26 settings on each rotor.

Unit 2 Reverse Engineering Lesson 7 Let Me Count the Ways
3. Each time a letter key was pressed on the Enigma, the first rotor would move one notch (to the next of the 26 different positions). One full rotation by the first rotor causes the second rotor to turn one notch. One full rotation by the second rotor causes the third rotor to turn one notch.
Where the first and second rotors start counting full rotations can be set to any of the 26 possible positions. These positions are called “ring settings.”
How many different possible ring settings are there for the Enigma?
4. How many different ways can the Enigma rotor system (placing the rotors in the machine, setting the start positions, and choosing the ring settings) be set up?
5. If it takes 30 seconds to rearrange the settings of an Enigma rotor system, how long would it take to get through all of the possible arrangements?
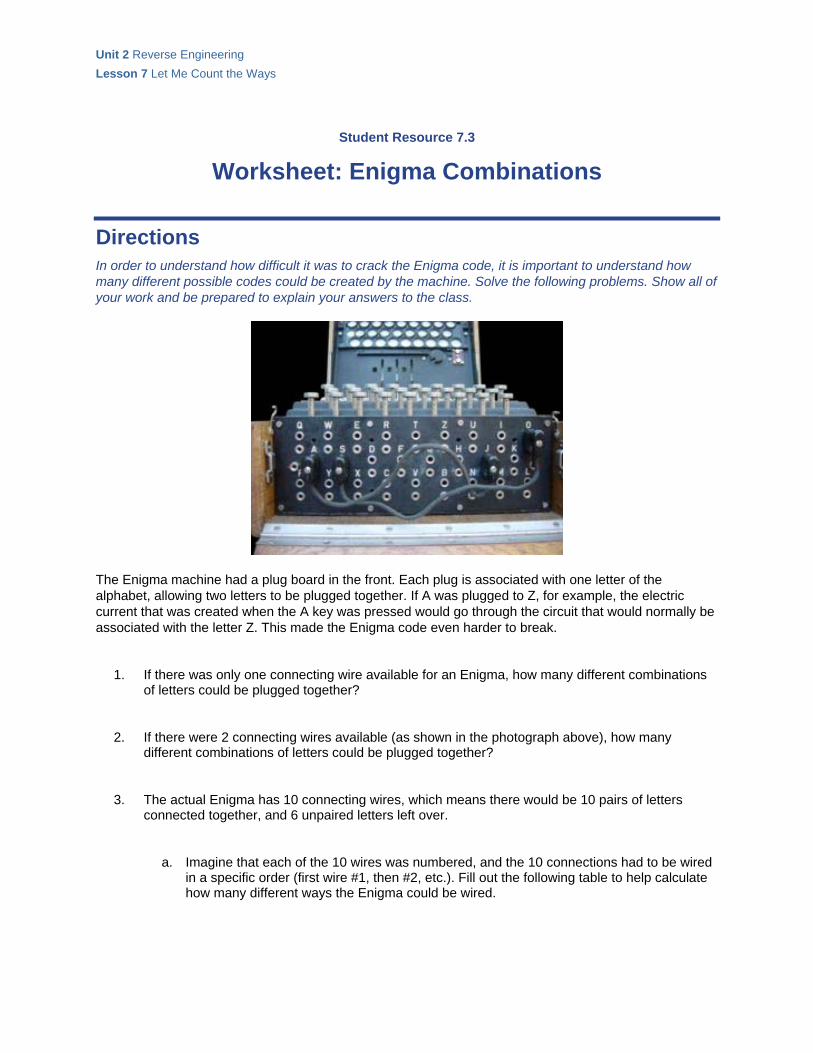
Unit 2 Reverse Engineering Lesson 7 Let Me Count the Ways
Student Resource 7.3
Worksheet: Enigma Combinations
Directions In order to understand how difficult it was to crack the Enigma code, it is important to understand how many different possible codes could be created by the machine. Solve the following problems. Show all of your work and be prepared to explain your answers to the class.
The Enigma machine had a plug board in the front. Each plug is associated with one letter of the alphabet, allowing two letters to be plugged together. If A was plugged to Z, for example, the electric current that was created when the A key was pressed would go through the circuit that would normally be associated with the letter Z. This made the Enigma code even harder to break.
1. If there was only one connecting wire available for an Enigma, how many different combinations of letters could be plugged together?
2. If there were 2 connecting wires available (as shown in the photograph above), how many different combinations of letters could be plugged together?
3. The actual Enigma has 10 connecting wires, which means there would be 10 pairs of letters connected together, and 6 unpaired letters left over.
a. Imagine that each of the 10 wires was numbered, and the 10 connections had to be wired in a specific order (first wire #1, then #2, etc.). Fill out the following table to help calculate how many different ways the Enigma could be wired.

Unit 2 Reverse Engineering Lesson 7 Let Me Count the Ways
Wire Work/Calculations Number of possibilities for that wire
#1
#2
#3
#4
#5
#6
#7
#8
#9
#10
b. Using the information in the table you just filled out, calculate the number of different ways the Enigma could be wired.
4. The actual Enigma did not have numbered wires, and the letters could be paired in any order. How does this change the number of possible ways that the Enigma could have been wired? What is the real number of possible combinations?
5. Think about the number of possibilities for the Enigma plug board and the number of possibilities for the Enigma rotor system (calculated on the previous worksheet). How many different possible configurations could the Enigma machine have had?
6. If it takes 60 seconds to set up an Enigma machine (rotor system and plug board), how long would it take to go through all of the possible configurations?


AOE IED Integrated Unit: Reverse Engineering
Lesson 7 Let Me Count the Ways
Teacher Resources
Resource Description
Teacher Resource 7.1 Answer Key: Permutations and Combinations
Teacher Resource 7.2 Answer Key: Enigma Permutations
Teacher Resource 7.3 Answer Key: Enigma Combinations

Unit 2 Reverse Engineering Lesson 7 Let Me Count the Ways
Teacher Resource 7.1
Answer Key: Permutations and Combinations
1. There are 3 positions to be filled in this year’s student council and 4 candidates in the election. The ballot allows students to vote for their 3 favorite candidates. The candidate with the most votes will be president, the candidate with the second greatest number of votes will be vice-president, and the candidate with the third highest number of votes will be secretary.
a. How many different ways can the student council positions get filled? Write out a list of the different possibilities. 4 x 3 x 2 = 24 different ways
b. Is this situation a combination or a permutation? Explain how you know. This is a permutation because order matters.
2. The school decides that instead of having 3 different positions, the student council would consist of a 3-person committee. Each committee member would have the same responsibilities and title.
a. If there are still 4 candidates for the student council, how many ways can the committee get filled? List the possibilities. If the candidates are numbered 1–4, the possible committees are (1,2,3); (1,2,4); (1,3,4); (2,3,4). There are 4 possible combinations.
b. Is this situation a combination or a permutation? Explain how you know. This is a combination because order does not matter.
3. Explain how the number of permutations is mathematically related to the number of combinations in the previous two problems. (Hint: It may be helpful to look at the two lists you made. How many permutations result in the same combination?) The number of combinations is equal to the number of permutations divided by 6. This is equivalent to dividing by r!, where r is the size of the group.
4. An ice cream parlor has 5 different flavors of ice cream. The largest serving cup they offer can contain 3 scoops of ice cream.
a. If each of the scoops can be any flavor, but scoops do not have to be different flavors, how many different cups of ice cream are possible? 35 different combinations
b. If each of the scoops must be a different flavor, how many different cups of ice cream are possible? 10 different combinations
c. Are the situations in problems #4a and 4b combinations or permutations? Explain how you know. These are combinations because it doesn’t matter in what order the scoops are placed in the cup.

Unit 2 Reverse Engineering Lesson 7 Let Me Count the Ways
5. The same ice cream parlor also sells cones that have 3 scoops of ice cream. The servers always ask which ice cream flavor should be on the bottom, the middle, and the top of the pile of scoops. In other words, the order of the scoops does matter.
a. If repeated flavors of ice cream are allowed, how many different possible ways can a 3-scoop ice cream cone get served? 5 x 5 x 5 = 125 different ways
b. If repeated flavors are not allowed, how many different possibilities are there for 3-scoop ice cream cones? 5 x 4 x 3 = 60 different cones
c. Are the situations in problems #5a and 5b combinations or permutations? Explain how you know. These are permutations because the order in which the scoops are placed in the cones does matter.
6. How is the number of permutations mathematically related to the number of combinations in problems #4b and 5b? The number of combinations is equal to the number of permutations divided by 6. This is equivalent to dividing by r!, where r is the number of scoops being considered at a time.

Unit 2 Reverse Engineering Lesson 7 Let Me Count the Ways
Teacher Resource 7.2
Answer Key: Enigma Permutations
1. The Enigma comes with five different rotors that can be placed inside the machine.
a. Imagine that only one rotor could be inserted into the Enigma machine. How many different ways can the five rotors change the code setting of the machine? 5 ways
b. Imagine that there were two places where a rotor could be inserted. How many different ways can the five rotors be inserted into those two places? 5 x 4 = 20 ways
c. The actual Enigma machine allows three different rotors to be inserted. How many different ways can the five rotors be inserted into those three places? 5 x 4 x 3 = 60 ways
2. Once the three rotors are placed in the Enigma machine, each of them is turned to a particular setting.
a. If there were only 2 different settings available on each rotor, how many different possible ways could the rotor system be set in a starting position? 2 x 2 x 2 = 8 different ways
b. If there were 2 settings on the first rotor, and 10 settings on the second and third rotors, how many different possible ways could the rotor system be set? 2 x 10 x 10 = 200 ways
c. The actual Enigma machine had 26 settings for each of its rotors (one for each letter of the alphabet). How many different possible ways could the rotor system be set? 26 x 26 x 26 = 17,576 different ways
3. Each time a letter key was pressed on the Enigma, the first rotor would move one notch (to the next of the 26 different positions). One full rotation by the first rotor causes the second rotor to turn one notch. One full rotation by the second rotor causes the third rotor to turn one notch. Where the first and second rotors start counting full rotations can be set to any of the 26 possible positions. These positions are called “ring settings.” How many different possible ring settings are there for the Enigma? 26 x 26 = 676 different settings
a. How many different ways can the Enigma rotor system (placing the rotors in the machine, setting the start positions, and choosing the ring settings) be set up? 60 x 17,576 x 676 = 712,882,560
b. If it takes 30 seconds to rearrange the settings of an Enigma rotor system, how long would it take to get through all of the possible arrangements?
712,882,560 possible settings x 30 seconds/setting = 21,386,476,800 seconds 21,386,476,800 seconds x 1 minute/60 seconds = 356,441,280 minutes 356,441,280 minutes x 1 hour/60 minutes = 5,940,688 hours 5,940,688 hours x 1 day/24 hours = 247528.67 days 247528.67 days x 1 year/365 days = 678.16 years

Unit 2 Reverse Engineering Lesson 7 Let Me Count the Ways
Teacher Resource 7.3
Answer Key: Enigma Combinations
1. If there was only 1 connecting wire available for an Enigma, how many different combinations of letters could be plugged together? C(26,2) = 325 different ways
2. If there were 2 connecting wires available (as shown in the photograph above), how many different combinations of letters could be plugged together? C(26,2) x C(24,2) = 89,700 different ways
3. The actual Enigma has 10 connecting wires, which means there would be 10 pairs of letters connected together, and 6 unpaired letters left over.
a. Imagine that each of the 10 wires was numbered, and the 10 connections had to be wired in a specific order (first wire #1, then #2, etc.). Fill out the following table to help calculate how many different ways the Enigma could be wired.
Wire Work/Calculations Number of possibilities for that wire
#1 C(26,2) 325
#2 C(24,2) 276
#3 C(22,2) 231
#4 C(20,2) 190
#5 C(18,2) 153
#6 C(16,2) 120
#7 C(14,2) 91
#8 C(12,2) 66
#9 C(10,2) 45
#10 C(8,2) 28
b. Using the information in the table you just filled out, calculate the number of different ways the Enigma could get wired: 325 x 276 x 231 x 190 x 153 x 120 x 91 x 66 x 45 x 28 = 5.46990521 x 10²⁰ possible configurations

Unit 2 Reverse Engineering Lesson 7 Let Me Count the Ways
4. The actual Enigma did not have numbered wires, and the letters could be paired in any order. How does this change the number of possible ways that the Enigma could have been wired? What is the real number of possible combinations? Because it doesn’t matter in what order the letters are paired, the situation changes from a permutation to a combination. The number of possible permutations must be divided by r!, where r is the size of the group being chosen. In this case, r = 10. 5.46990521 x 10²⁰ ÷ 10! = 150,738,274,937,250 possible combinations.
5. Think about the number of possibilities for the Enigma plug board and the number of possibilities for the Enigma rotor system (calculated on the previous worksheet). How many different possible configurations could the Enigma machine have had? 150,738,274,937,250 x 712,882,560 = ~1.0746 x 10²³ different configurations
6. If it takes 60 seconds to set up an Enigma machine (rotor system and plug board), how long would it take to go through all of the possible configurations?
(1.0746 x 10²³) configurations x 60 seconds/1 configuration = 6.4475 x 1024 seconds
(6.4475 x 1024) seconds x 1 hour/3600 seconds = 1.790978 x 10²¹ hours
(1.790978 x 10²¹) hours x 1 year/8760 hours = 2.044496 x 10¹⁷ years
AOE IED Integrated Unit: Reverse Engineering
Lesson 8 Biology
Science as Reverse Engineering
In this lesson, students learn how reverse engineering and scientific investigation often use similar methodologies to understand and characterize how things work. This lesson uses natural selection and adaptations as an example, but it would work just as well with almost any biological phenomenon.
This lesson is expected to take one class period.
Lesson Framework
Learning Objectives Each student will:
• Compare and contrast scientific investigation to reverse engineering. • Use reverse engineering principles to characterize physical adaptation.
Academic Standards • Biological evolution accounts for the diversity of species developed through gradual processes
over many generations. Species acquire many of their unique characteristics through biological adaptation, which involves the selection of naturally occurring variations in populations. Biological adaptations include changes in structures, behaviors, or physiology that enhance survival and reproductive success in a particular environment. (NRC National Science Education Standards, Life Science)
• Scientists formulate and test their explanations of nature using observation, experiments, and theoretical and mathematical models. Although all scientific ideas are tentative and subject to change and improvement in principle, for most major ideas in science, there is much experimental and observational confirmation. Those ideas are not likely to change greatly in the future. Scientists do and have changed their ideas about nature when they encounter new experimental evidence that does not match their existing explanations. (NRC National Science Education Standards, History and Nature of Science)

Unit 2 Reverse Engineering Lesson 8 Science as Reverse Engineering
Assessment
Assessment Product Assessment Criteria
Functional analysis of octopus camouflage None provided
Reverse engineering report on another adaptation
None provided
Prerequisites • Students should have working knowledge of the scientific method and of natural selection and
adaptation.
Instructional Materials
Teacher Resources • Teacher Resource 8.1—Background Reading: Reverse Engineering vs. Science
Student Resources • Student Resource 8.1—Worksheet: Functional Analysis
Equipment and Supplies • Computer with LCD projector and Internet access
Lesson Steps Step Min. Activity
1 25 Video: Amazing Camouflage
Write the following question on the board:
How are science and reverse engineering similar?
Remind the class that in their Introduction to Engineering Design class, they learned that careful observation of the parts of an object and the processes involved in its

Unit 2 Reverse Engineering Lesson 8 Science as Reverse Engineering
Step Min. Activity
operation are key to understanding how that object works. Similarly, in science, the first stage of students’ understanding natural phenomena is careful observation and recording of what they have observed.
Show the first half of the following video to the class and tell the students to watch it closely:
http://www.youtube.com/watch?v=SCgtYWUybIE
The video shows a well-camouflaged octopus undergoing a startling color change after being approached by a diver and swimming away in an ink cloud.
Pass out the Functional Analysis worksheet (Student Resource 8.1). Give students a few minutes to consider how they would fill out this worksheet if the octopus were a product.
Guide the entire class through the individual steps:
1. What is the purpose or primary function of the octopus in the video? Obviously, octopodes do not have a function in the way products do, but what is the octopus doing in the video? Either hiding or escaping is acceptable.
2. What parts of the octopus would you make special note of in a drawing given the phenomenon on display? Take note of the dark spots that can appear and disappear on the surface of the octopus. You would probably also include the ink cloud in the drawing.
3. The octopus is not a mechanical object, so simple machines aren’t relevant. How do students think the octopus changes its color? You may want to show the second half of the video, which displays the color change in reverse and in slow motion.
4. Students can fill in the input/output table using either hiding or escaping as the intending function.
5. What parts that help in hiding or escaping are visible on the octopus?
6. What can you not tell about how the camouflage works just by looking at the octopus? You cannot tell how the octopus is causing its surface to change color.
Ask students what their next step would be. Help students to recognize that a closer investigation of the skin would be the most likely next step.
Explain to students that further investigation of the octopus reveals that the octopode’s color change capability is due to special skin cells called chromatophores. Each chromatophore consists of three bags of pigment. By squeezing or expanding the bags, octopodes can change the color displayed by each cell, allowing millions of subtle combinations. Each cell is controlled separately, and together they can create remarkably sharp displays.
Return to the original question of how reverse engineering and science are similar. Ask students who are new to the reverse engineering process to describe some other classic scientific discoveries they have learned about during class.

Unit 2 Reverse Engineering Lesson 8 Science as Reverse Engineering
Step Min. Activity
2 20 Class Discussion: Reverse Engineering vs. Scientific Investigation
Analogies to reverse engineering can be drawn for almost any concept during the year. Much of biology can be presented as problems that have been solved and thus you can have students apply the principles of reverse engineering to investigate and characterize a natural phenomenon. For example, students can investigate the endocrine system and signaling pathways through an analysis of the fight-or-flight response, or students could investigate cell division through an investigation of cancer.
Watson and Crick’s discovery of DNA is often referred to as an example of biological reverse engineering. Many geneticists used the term reverse engineering when discussing the study and manipulation of a genome. In many ways, scientific investigation is much like reverse engineering that takes place in the natural world. However, there is an important distinction to make:
Reverse engineering is just what the term implies: the interpretation of an already existing artifact by an analysis of the design considerations that must have governed its creation. Nature, however, does not design systems. In the evolutionary processes of natural selection, desired outcomes are not set in advance, problems to be overcome are not formulated and chosen to be overcome, and selection does not guarantee an optimal “solution” anyway. Even though the principles of reverse engineering can be used to analyze the function of natural phenomena, do not lead students to believe that those phenomena were intentionally engineered.
3 5 Writing: Redesign
Have students “reverse engineer” another adaptation of their choice for homework. Remind them that because adaptations in nature are not actually designed, they are not necessarily optimal to their task. Tell students to include a hypothetical redesign of the adaptation and an application for human use if possible.
AOE IED Integrated Unit: Reverse Engineering
Lesson 8 Reverse Engineering vs. Science
Student Resources
Resource Description
Student Resource 8.1 Worksheet: Functional Analysis

Unit 2 Reverse Engineering Lesson 8 Science as Reverse Engineering
Student Resource 8.1
Worksheet: Functional Analysis
Purpose Can you do a functional analysis on a biological organism? What kind of information would you get?
Procedure In this activity, you will analyze the function of your consumer product.
Before measuring and dissecting it, you must theorize how the product functions through non-destructive observation. Identify your product’s name and the company that produced it and answer the following questions.
“Product” Name:
1. What is the purpose or primary function of the object?
2. Sketch a diagram of the “product” and label the individual components. If you are not sure what a particular component is called, then make an educated guess.
3. Make an educated guess as to how this product operates. Try to explain the object’s sequential operation.

Unit 2 Reverse Engineering Lesson 8 Science as Reverse Engineering
4. Identify the system inputs, intended product function, and outputs in the table below.
Inputs Product Function Output
5. What components are visible?
6. What is it about this “product’s” function that you cannot identify because the components are hidden from plain view?


AOE IED Integrated Unit: Reverse Engineering
Lesson 8 Science as Reverse Engineering
Teacher Resources
Resource Description
Teacher Resource 8.1 Background Reading: Reverse Engineering vs. Science
Unit 2 Reverse Engineering Lesson 8 Science as Reverse Engineering
Teacher Resource 8.1
Background Reading: Reverse Engineering vs. Science
Cognitive scientist Daniel Dennett makes the following observation in the Proceedings of the 9th International Congress of Logic, Methodology and Philosophy:
“If we can identify a goal that has been optimally or suboptimally achieved by the evolutionary process, this is something of a misrepresentation of history. This observation, often expressed by Richard Lewontin in his criticism of adaptationism, must be carefully put if it is to be anything but an attack on a straw man. Marr and others (including all but the silliest adaptationists) know perfectly well that the historical design process of evolution doesn’t proceed by an exact analogue of the top-down engineering process, and in their interpretations of design they are not committing that simple fallacy of misimputing history. They have presupposed, however—and this is the target of a more interesting and defensible objection—that in spite of the difference in the design processes, reverse engineering is just as applicable a methodology to systems designed by Nature, as to systems designed by engineers. Their presupposition, in other words, has been that even though the forward processes have been different, the products are of the same sort, so that the reverse process of functional analysis should work as well on both sorts of product.
There is a phenomenon analogous to convergent evolution in engineering: entirely independent design teams come up with virtually the same solution to a design problem. This is not surprising, and is even highly predictable, the more constraints there are, the better specified the task is. Ask five different design teams to design a wooden bridge to span a particular gorge and capable of bearing a particular maximum load, and it is to be expected that the independently conceived designs will be very similar: the efficient ways of exploiting the strengths and weaknesses of wood are well-known and limited.
But when different engineering teams must design the same sort of thing a more usual tactic is to borrow from each other. When Raytheon wants to make an electronic widget to compete with General Electric’s widget, they buy several of GE’s widget, and proceed to analyze them: that’s reverse engineering. They run them, benchmark them, x-ray them, take them apart, and subject every part of them to interpretive analysis: why did GE make these wires so heavy? What are these extra ROM registers for? Is this a double layer of insulation, and if so, why did they bother with it? Notice that the reigning assumption is that all these ‘why’ questions have answers. Everything has a raison d’être; GE did nothing in vain.
Of course if the wisdom of the reverse engineers includes healthy helping of self-knowledge, they will recognize that this default assumption of optimality is too strong: sometimes engineers put stupid, pointless things in their designs, sometimes they forget to remove things that no longer have a function, sometimes they overlook retrospectively obvious shortcuts. But still, optimality must be the default assumption; if the reverse engineers can’t assume that there is a good rationale for the features they observe, they can’t even begin their analysis.
A cautious version of this assumption would be to note that the judicious application of reverse engineering to artifacts already invokes the appreciation of historical accident, suboptimal jury-rigs, and the like, so there is no reason why the same techniques, applied to organisms and their subsystems, shouldn’t yield a sound understanding of their design. And literally thousands of examples of successful application of the techniques of reverse engineering to biology could be cited. Some would go so far (I am one of them) as to state that what biology is, is the reverse engineering of natural systems.”

AOE IED Integrated Unit: Reverse Engineering
Lesson 9 Introduction to Engineering Design
Product Redesign
Product teardown is an important step in the redesign process because it allows one to take an in-depth look at the characteristics of products. Teardown involves the taking apart or disassembly of a product to help a person understand, study, and analyze the product’s properties and function. This process is often the first step in the evolution of a product. In this lesson, students will teardown a sample product and then identify specific visual, structural, or functional issues with their “reverse-engineered” products; initiate product improvements by writing design briefs; participate in group brainstorming sessions to develop creative ideas; use matrices to make design decisions; develop innovative solutions; and communicate their designs through technical reports.
This lesson is a placeholder for IED Lessons 3.3 and 3.4.
This lesson is expected to take up to 30 class periods.
Lesson Framework
Learning Objectives Each student will:
• Identify the types of structural connections that exist in a given object. • Use dial calipers to precisely measure outside and inside diameter, hole depth, and object
thickness. • Identify a given object’s material type. • Identify material processing methods that are used to manufacture the components of a given
commercial product. • Assign a density value to a material and apply it to a given solid CAD model. • Perform computer analysis to determine mass, volume, and surface area of a given object. • Perform finite element analysis on a given object to predict its behavior under specified load
conditions. • Write design briefs that focus on product innovation. • Identify group brainstorming techniques and the rules associated with brainstorming. • Use decision matrices to make design decisions. • Explain the difference between invention and innovation.

Unit 2 Reverse Engineering Lesson 9 Product Redesign
Academic Standards ITEA Standards for Technological Literacy
• Students will develop an understanding of the characteristics and scope of technology. • Students will develop an understanding of the core concepts of technology. • Students will develop an understanding of the relationships among technologies and the
connections between technology and other fields of study. • Students will develop an understanding of the cultural, social, economic, and political effects of
technology. • Students will develop an understanding of the effects of technology on the environment. • Students will develop an understanding of the influence of technology on history. • Students will develop an understanding of the attributes of design. • Students will develop an understanding of engineering design. • Students will develop an understanding of the role of troubleshooting, research and development,
invention and innovation, and experimentation in problem solving. • Students will develop abilities to apply the design process. • Students will develop the abilities to use and maintain technological products and systems. • Students will develop the abilities to assess the impacts of products and systems. • Students will develop an understanding of and be able to select and use information and
communication technologies.
Assessment Assessment Product Assessment Criteria
Product Teardown None provided
Product Design Brief None provided
Deep Dive Questions None provided
Product Redesign Technical Report None provided
Prerequisites • Sketching skills • Working knowledge of the decision matrix from IED Unit 2

Unit 2 Reverse Engineering Lesson 9 Product Redesign
Instructional Materials
Teacher Resources • Teacher Resource 9.1—Presentation: Writing a Design Brief • Teacher Resource 9.2—Answer Key: The Deep Dive (IED 3.4.2) • Teacher Resource 9.3—Presentation: Technical Report Writing
Student Resources • Student Resource 9.1—Worksheet: Product Disassembly (IED 3.3.2) • Student Resource 9.2—Project: Product Disassembly Display (IED 3.3.6) • Student Resource 9.3—Design Brief: Child Toy (IED 3.4.1a) • Student Resource 9.4—Worksheet: Writing a Design Brief (IED 3.4.1) • Student Resource 9.5—Template: Design Brief (IED 3.4.1b) • Student Resource 9.6—Worksheet: The Deep Dive (IED 3.4.2) • Student Resource 9.7—Project: Product Improvement (IED 3.4.3)
Equipment and Supplies • See equipment lists in the IED curriculum
Lesson Steps Step Min. Activity
CLASS PERIODS 1–15
1 n/a IED Lesson 3.3: Structural Analysis
This IED lesson is too extensive to be reproduced here. For reference, the lesson is an introduction to product teardown and stress analysis.
Product teardown is an important step in the redesign process because it allows one to take an in-depth look at product characteristics. Teardown involves the taking apart or disassembly of a product to help a person understand, study, and analyze the product’s properties and function. The study of a product should result in a better understanding of its strengths, weaknesses, and the manufacturing process used. Often product teardown gives a manufacturer an opportunity to look at a competitor’s product to determine such information as material, application, manufacturing process, new technology, costs, and trends. This process is often the first step in the evolution

Unit 2 Reverse Engineering Lesson 9 Product Redesign
Step Min. Activity
of a product. One of the main reasons to perform a product teardown is to gain an understanding of how things work.
The analysis of product parts in the design phase can help a company bring a better product to market in less time. One aspect of the analysis cycle would be determining a part’s weight, surface area, and volume. These mass properties will help a manufacturer to determine quantities of production and finishing materials needed, as well as to assess product packaging and shipping costs. Controlling costs by minimizing the total mass of a product without compromising safety, structural integrity, and expected product life lead us to another aspect of analysis and design considerations: stress analysis.
Stress analysis is a process used to better understand how a design will perform under certain conditions. By performing a basic stress analysis early in the design phase, one can improve the overall engineering process. This process helps companies analyze a part to determine if it is strong enough to withstand expected loads or vibrations without breaking or becoming deformed. In this way, they can gain valuable insights at an early stage when the cost of redesign is small and can determine if a part can be redesigned in a more cost-effective manner and still perform well under expected use.
In this part of the lesson, students teardown and identify the various materials that exist in the products they have been analyzing for this unit following the procedures on the Product Disassembly worksheet (Student Resource 9.1). Students will also model each part using 3D-modeling software and make a presentation on the product teardown following the Product Disassembly Display project assignment (Student Resource 9.2). Final projects should look something like this:

Unit 2 Reverse Engineering Lesson 9 Product Redesign
Step Min. Activity
CLASS PERIODS 16–30
2 n/a IED Lesson 3.4: Product Improvement by Design
This IED lesson is also too extensive to be reproduced here for reference. However, the main concepts covered in this lesson are the following:
1. Engineers analyze designs to identify shortcomings and opportunities for innovation.
2. Design teams use brainstorming techniques to generate large numbers of ideas in short time periods.
3. Engineers use decision matrices to help make design decisions that are based on analysis and logic.
4. Engineers spend a great deal of time writing technical reports to explain project information to various audiences.
Begin the lesson by introducing the concept of the design brief using the Writing a Design Brief presentation (Teacher Resource 9.1) as a guide and have students look at the sample Child Toy design brief (Student Resource 9.3) as a reference. Have students create a hypothetical design brief that would have resulted in the design and production of their reverse engineering product.
After students have completed their design briefs, explain to them that product redesign is an innovative experience that requires creative thinking, particularly when the object being redesigned is a familiar one.
Show The Deep Dive video and have students follow along using The Deep Dive worksheet (Student Resource 9.6). Use the questions at the end of the worksheet to discuss how the video illustrated the various key aspects of product redesign.
Have students brainstorm about product improvement, considering the identified problem and its constraints. Ask students to evaluate their ideas using a decision matrix and then to write up their work from the unit in a technical report. If necessary, review the elements of technical report writing using the Technical Report Writing PowerPoint presentation (Teacher Resource 9.3) as a guide (or have students review them in English).


AOE IED Integrated Unit: Reverse Engineering
Lesson 9 Product Redesign
Student Resources
Resource Description
Student Resource 9.1 Worksheet: Product Disassembly (IED 3.3.2)
Student Resource 9.2 Project: Product Disassembly Display (IED 3.3.6)
Student Resource 9.3 Design Brief: Child Toy (IED 3.4.1a)
Student Resource 9.4 Worksheet: Writing a Design Brief (IED 3.4.1)
Student Resource 9.5 Template: Design Brief (IED 3.4.1b)
Student Resource 9.6 Worksheet: The Deep Dive (IED 3.4.2)
Student Resource 9.7 Project: Product Improvement (IED 3.4.3)

Unit 2 Reverse Engineering Lesson 9 Product Redesign
Student Resource 9.1
Worksheet: Product Disassembly (IED 3.3.2)
Purpose Have you ever wondered how a product functions or what causes it to fail? Why can some products withstand extreme conditions and others cannot? Understanding how a product is made is not easy to do by simply looking at it. A technique used by many engineers is to disassemble a product to learn more about how it works and why it does not work in some situations.
During this activity, you will investigate vital product characteristics to learn more about the structural composition of the product you first began to investigate in this unit. You have already made a prediction about how the product works. Now you will carefully disassemble the product to see how it actually functions.
Equipment: • Storage container for parts • Hand tools necessary to disassemble product • Graph and isometric grid paper • Pencil • Computer and the Internet for research • Textbook • IED Activity 3.3.2a—Product Disassembly chart • IED Activity 3.3.2b—Materials Usages chart
Procedure In this activity, you will use the disassembly process. Disassembly is a main step in the reverse engineering process. During the disassembly process you will research and document your findings using careful measurements and notes. You must record all of your findings. The information you record will help you in the next activity that will include 3D-modeling, analysis, and redesign of your chosen product. To aid you in your work, you will use the Product Disassembly Chart to record the information you and your team gather.
Carefully disassemble your product and identify each part by name, quantity, size, function, material, finish, interaction of parts, and general notes using the Product Disassembly Chart (Activity 3.3.2a) to record your work.
Use resources available to you, such as the Internet and textbooks, to help explain how your product operates.
The How Stuff Works website: www.HowStuffWorks.com
Macaulay, D. (1998). New way things work. Boston: Walter Lorraine Books.

Unit 2 Reverse Engineering Lesson 9 Product Redesign
Compare your hypothesis about how the product should function to what you actually discovered when you disassembled the product and determined its actual operation.
Sample Annotated Sketch of Part Documentation
The following is an example of a part documentation using an isometric sketch with annotated notes of fillet, hole location, materials, finish part location, and interactive parts.
Reference Sources
Material usage charts may be found in your textbook:
Hutchinson, J., & Karsnitz, J. R. (1997). Design and problem solving in technology. NY: Glencoe McGraw-Hill.
Conclusion 1. How did the process of disassembling the product aid you in understanding how the product
works?
2. What is the intended consumer use of this product?
3. How does your product function?
4. Was your prediction as to how the product operates accurate?
5. What parts would you redesign? Why?

Unit 2 Reverse Engineering Lesson 9 Product Redesign
Student Resource 9.2
Project: Product Disassembly Display (IED 3.3.6)
Purpose Displaying your work is key to many different fields of engineering. It is important to communicate how you arrive at your ideas, solutions, and conclusions. Many engineering firms make presentations of their work to assess if the team has worked together successfully and if all team members have contributed to the work.
In this project, you will complete several pre-activities that will enable you to collect the information needed in order to make your display. It is imperative that you keep good notes and check-in with your team to make sure everyone has the same information. Having team members who share the same knowledge and who communicate with each other are both important parts of the learning process to become an engineer.
You and your partner will be expected to make a poster presentation of your findings. You will create a tri-fold poster of your product along with your three-minute presentation about what you learned about disassembling your product.
Equipment • Engineer’s notebook • Product Disassembly Chart • Product part drawings • Product part 3D-model printouts • Results of mass property analysis • Results of finite property analysis • Paper • Computer with 3D-CAD modeling software • Product that your team disassembled with all parts labeled • Tri-fold poster board at least ¾ in. thick that is sturdy and thick enough to hold product parts • Scissors • Felt-tip pens or color markers • Optional: Hot-glue gun • Optional: Hot-glue sticks • Optional: Wire ties used to hold parts of the product on a board • Optional: 1-hole punch to create holes for wire ties

Unit 2 Reverse Engineering Lesson 9 Product Redesign
Procedure In the IED 3.3.2 Product Disassembly worksheet (Student Resource 9.1), you and your partner disassembled a product that your teacher gave you. You created a chart that identified the parts and measurements and you gathered other important information, such as isometric sketches that were rendered for each part, results of mass property analysis, and results of finite element analysis.
In this project, discuss with your partner who will model various parts. Also, determine to what degree of accuracy you will measure the parts, what names you will use to save the models, where the models will be saved, and what part modeling procedures you will use.
If you have not already done so, follow these steps:
1. Create a sketch of each part; measure and label each part; annotate the parts of the product you selected to do; and create a solid model of the parts of your product.
2. Communicate with your partner throughout this assignment so that both of you follow the required standards.
3. Have your teacher check your progress and the modeling of your parts as you work. 4. Create drawing sheets of each part with a multi-view representation and an isometric projection.
Prepare your poster for the poster session using the following criteria:
Create a tri-fold display that includes the following:
1. Rendered isometric drawing with a title bar displaying the following information for each part of the product:
o Name of part
o Dimensions of part
o Material of part
o Density of material
o Volume
o Surface area
o Mass
2. Parts mounted on the board with the drawing of each part labeled appropriately 3. Product Display Chart
Prepare a three-minute presentation that answers the following questions:
1. What is your product and its function? 2. What did you learn about the product’s mass property analysis? 3. Could you complete a finite analysis? If not, why not? 4. If you were able to complete a finite analysis, what was the result?

Unit 2 Reverse Engineering Lesson 9 Product Redesign
Conclusion 1. Is there another reason for product disassembly besides the modeling and electronic
documentation of parts?
2. Explain the process used to complete a mass property analysis and explain why this process is commonly used in industry.
3. Explain the process used to complete a finite property analysis and explain why this process is commonly used in designing a product.
4. Describe the importance of having good interpersonal communication skills in a technically related field, such as engineering and design.

Unit 2 Reverse Engineering Lesson 9 Product Redesign
Student Resource 9.3
Design Brief: Child Toy (IED 3.4.1a)
Client: Playskool™
Target Consumer: Parents (purchasers) and Infants or Toddlers (end users) Problem Statement: Most parents expect their children to be able to walk, talk, sing, count, and
recite their ABC’s before they enter elementary school. A growing demand is being placed on infants and toddlers to develop their cognitive abilities and fine motor skills during the first three years of life.
Design Statement: Design, market, test, and mass-produce a multi-use educational toy that
serves as an infant activity center and a toddler’s walking aid. Constraints: • Easy to assemble
• Visually stimulating to a child • Contains multiple shapes, numbers, and letters • Plays music • Meets all health and safety codes • Easy to clean • Easy to transform between infant and toddler mode • Weighs less than 4 lbs. • Retail cost under $20 • Parts made primarily from injection molding

Unit 2 Reverse Engineering Lesson 9 Product Redesign
Student Resource 9.4
Worksheet: Writing a Design Brief (IED 3.4.1)
Purpose What problem does a toaster solve? What was the need that drove the design of the first plastic bottle? Did these objects begin with a design brief, or was the creation the byproduct of less formal circumstances?
Engineers use design briefs to clearly define a problem, provide solution expectations, and identify project constraints. Writing a design brief occurs early in a design process, and well before a product is actually fabricated.
Equipment • Reverse engineering study product • Computer • Microsoft Word • Printer • Digital camera • Student Resource 9.3—Design Brief: Child Toy (IED 3.4.1a) • Student Resource 9.5—Template: Design Brief (IED 3.4.1b)
Procedure In this activity, you and your partner will work backwards by analyzing an existing object to create a design brief that an engineer could have used to start your reverse engineering study product. Use the IED 3.4.1a Child Toy design brief (Student Resource 9.3) as your guide to completing this activity. Answer the following questions and use the information to craft the design brief.
1. List at least five of the product’s physical features.
a.
b.
c.
d.
e.

Unit 2 Reverse Engineering Lesson 9 Product Redesign
What purpose does the product serve?
2. List at least five issues or problems that the product appears to address.
a.
b.
c.
d.
e.
3. What company marketed the product?
4. Who was the target consumer?
5. Write an example Problem Statement for your product.
6. Write an example Design Statement for your product.
7. List at least five constraints that the designer could have had to work within.
a.
b.
c.
d.
e.

Unit 2 Reverse Engineering Lesson 9 Product Redesign
Take a digital photograph of your product and use it as the main graphic for your report title page. The title page must be created in Microsoft Word and will include the class title, class period, date, your name, and your instructor’s name.
Fill in the IED 3.4.1b Design Brief template (Student Resource 9.5) using the information from the activity questions. When you have finished the design brief, place it behind the title page and add the documents to your design portfolio.
Submit your updated design portfolio to your instructor for evaluation.
Conclusion 1. Why is a design brief used in a design process?
2. What is the difference between a design statement and a problem statement?
3. Identify at least five constraints that are common to most design problems.

Unit 2 Reverse Engineering Lesson 9 Product Redesign
Student Resource 9.5
Template: Design Brief (IED 3.4.1b)
Client Company:
Target Consumer:
Problem Statement:
Design Statement:
Constraints:
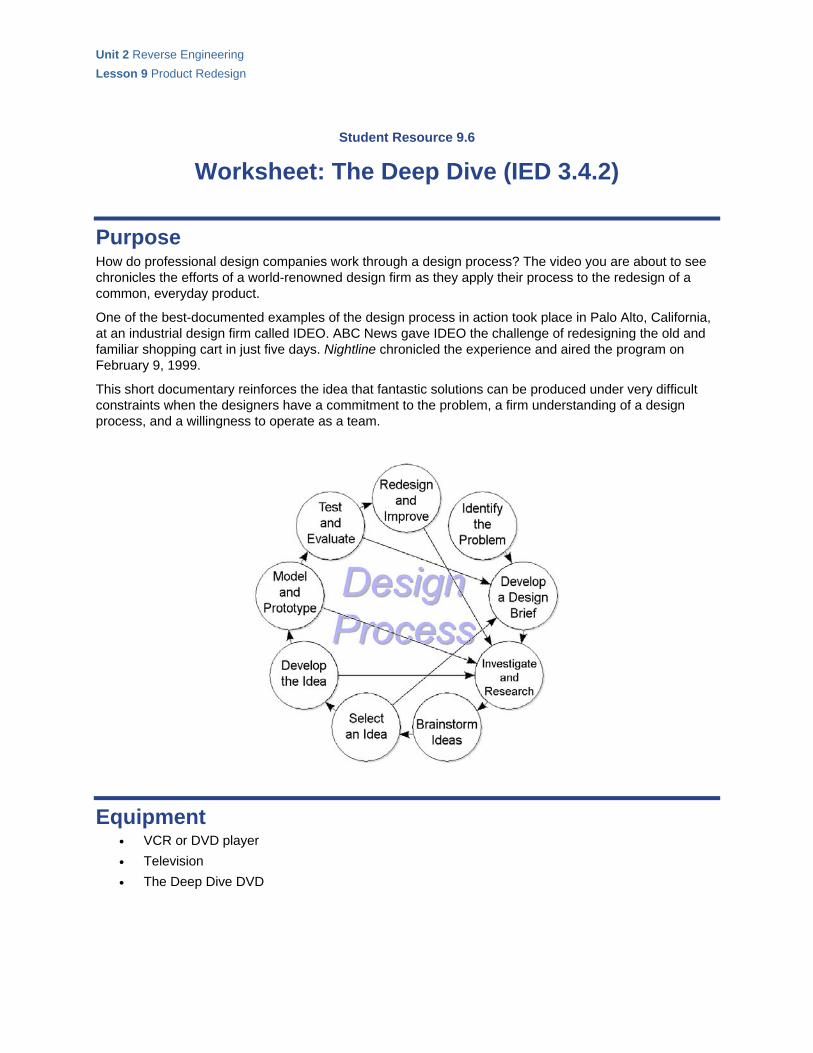
Unit 2 Reverse Engineering Lesson 9 Product Redesign
Student Resource 9.6
Worksheet: The Deep Dive (IED 3.4.2)
Purpose How do professional design companies work through a design process? The video you are about to see chronicles the efforts of a world-renowned design firm as they apply their process to the redesign of a common, everyday product.
One of the best-documented examples of the design process in action took place in Palo Alto, California, at an industrial design firm called IDEO. ABC News gave IDEO the challenge of redesigning the old and familiar shopping cart in just five days. Nightline chronicled the experience and aired the program on February 9, 1999.
This short documentary reinforces the idea that fantastic solutions can be produced under very difficult constraints when the designers have a commitment to the problem, a firm understanding of a design process, and a willingness to operate as a team.
Equipment • VCR or DVD player • Television • The Deep Dive DVD

Unit 2 Reverse Engineering Lesson 9 Product Redesign
Procedure In this activity, you will watch a group of professionals work to solve a design problem in just five days. Answer the following questions as you watch the video The Deep Dive. A class discussion will take place following the broadcast.
1. “From the buildings in which we live and work, to the cars we drive, or the knives and forks with which we eat, everything we use was designed to create some sort of marriage between _________________ and _________________.”
2. The folks at IDEO state that they are not experts on any given area. But, they do claim to be experts on the ____________________, which they apply to the innovation of consumer products.
3. After the team of designers is brought together, told the problem, and informed they have five days to “pull it off,” what phase of the design process do they immediately engage in?
4. Give two examples of what the team members did during this phase.
a.
b.
5. List five “rules-of-thumb” that IDEO employees follow when they share ideas during the brainstorming phase:
a.
b.
c.
d.
e.
6. Why should wild (and sometimes crazy) ideas be entertained during the brainstorming phase?
7. After the brainstorming phase was over, the team narrowed down the hundreds of ideas by _____________ for those ideas that were not only “cool” but also _________________ in a short period of time. What phase of the design process is this called?

Unit 2 Reverse Engineering Lesson 9 Product Redesign
8. IDEO believes that the ideas and efforts of a ______________ will always be more successful than the planning of a lone genius.
9. Once the ideas were narrowed down and divided into categories, the group was split into four smaller teams. What phase(s) of the design process was each of these groups responsible for?
10. The leaders at IDEO believe that ________________ behavior and a ______________ environment are two important reasons why their employees are able to think quickly and creatively to produce innovative results.
11. Sometimes, people come up with great solutions that work by trying their ideas first and asking for _________________ later.
12. Design is often a process of going too far and having to take a few steps back. What phase of the design process would the critique of the four mock-ups come under?
13. Upon critique of the four teams’ models, it was obvious that none of the teams had developed an optimum solution. However, the people at IDEO believe that it is important to _____________ often in order to _____________ sooner.
14. What percentage of the entire week’s time did it take to fabricate the final prototype?
15. Instead of showering his design team with a tremendous amount of praise, what did the boss require his employees to do with their new design?
16. Of all the things that we are surrounded by every day, what has not gone through the design process?
Conclusion 1. What did you find to be the most impressive part of the team’s effort?
2. What advantages are there to having a design team with members who have non-engineering backgrounds?

Unit 2 Reverse Engineering Lesson 9 Product Redesign
3. There was a point in the process where a self-appointed group of adults stepped up, stopped the ideas, and redirected the group to break up into teams. Why was this done?
4. At the end of the video, Dave Kelly states, “Look around. The only things that are not designed are the things we find in nature.” Can you think of anything that would contradict this statement?

Unit 2 Reverse Engineering Lesson 9 Product Redesign
Student Resource 9.7
Project: Product Improvement (IED 3.4.3)
Purpose When a customer shops for an automobile, what is he/she looking for? Most customers will pay a great deal of money for a vehicle that they believe is visually appealing, structurally sound, and functioning well within a myriad of acceptable parameters. These same qualities that customers look for in their automobiles are extended to other designs as well, such as houses, furniture, computers, sporting equipment, and clothing. The list is endless.
Having studied the history of a consumer product, you may have noticed that the innovations that took place throughout that product’s history could be categorized as visual, structural, or functional improvements. Now that you have “reverse engineered” a product, and are aware of these qualities, you must ask the question: “Which of these qualities could be better?” Once you have answered this question, you will have taken your first step in the product improvement process.
Equipment • Engineer’s notebook • Digital camera • Graph paper • # 2 pencil • All related CAD models from your reverse engineered product • Computer • CAD solid modeling software • Internet access • Library access • Printer • Microsoft Word • Design Brief Template • Decision Matrix
Procedure In this activity, you and your partner will identify a need for a visual, structural, or functional improvement to the object that you have reverse engineered. Begin the process by recording any visual, structural, or functional design issues in your engineer’s notebook.

Unit 2 Reverse Engineering Lesson 9 Product Redesign
As a team, you will write a design brief that explains the problem, identifies the solution expectations and the degree to which that solution will be realized, and lists any appropriate project constraints. You and your partner will then present this design brief to the class.

Unit 2 Reverse Engineering Lesson 9 Product Redesign
Once all teams’ design briefs have been presented, the class will work together as one design team to brainstorm ideas on graph paper that address each team’s problem. This will generate a critical mass of ideas that each team can use to aid them in their design process. You and your partner will then conduct whatever research may be necessary and expand upon the ideas of the class by brainstorming with each other. Narrow down the number of plausible ideas to a handful.
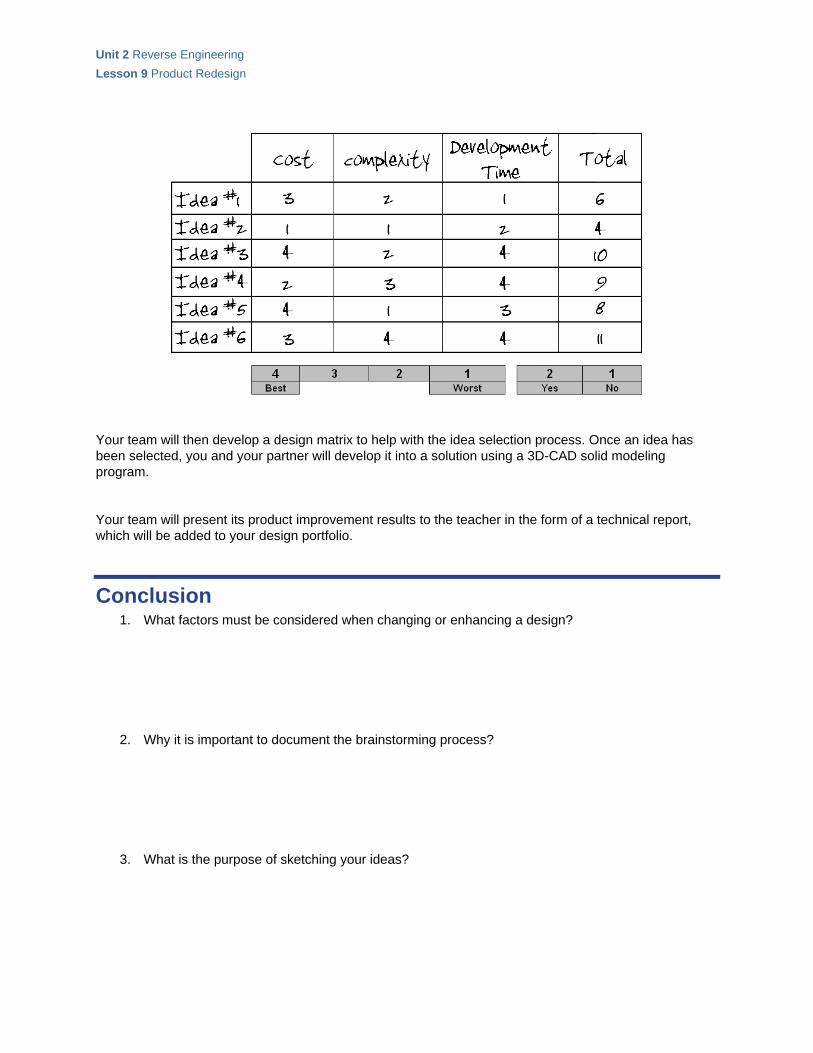
Unit 2 Reverse Engineering Lesson 9 Product Redesign
Your team will then develop a design matrix to help with the idea selection process. Once an idea has been selected, you and your partner will develop it into a solution using a 3D-CAD solid modeling program.
Your team will present its product improvement results to the teacher in the form of a technical report, which will be added to your design portfolio.
Conclusion 1. What factors must be considered when changing or enhancing a design?
2. Why it is important to document the brainstorming process?
3. What is the purpose of sketching your ideas?

AOE IED Integrated Unit: Reverse Engineering
Lesson 9 Product Redesign
Teacher Resources
Resource Description
Teacher Resource 9.1 Presentation: Writing a Design Brief
Teacher Resource 9.2 Answer Key: The Deep Dive (IED 3.4.2)
Teacher Resource 9.3 Presentation: Technical Report Writing

Unit 2 Reverse Engineering Lesson 9 Product Redesign
Teacher Resource 9.1
Presentation: Writing a Design Brief
Directions Right click on the slide below and select Presentation Object/Open to open the PowerPoint presentation.
®
Forging new generations of engineers

Unit 2 Reverse Engineering Lesson 9 Product Redesign
Teacher Resource 9.2
Answer Key: The Deep Dive (IED 3.4.2)
Purpose How do professional design companies work through a design process? The video you are about to see chronicles the efforts of a world-renowned design firm as they apply their process to the redesign of a common, everyday product.
One of the best-documented examples of the design process in action took place in Palo Alto, California, at an industrial design firm called IDEO. ABC News gave IDEO the challenge of redesigning the old and familiar shopping cart in just five days. Nightline chronicled the experience and aired the program on February 9, 1999.
This short documentary reinforces the idea that fantastic solutions can be produced under very difficult constraints when the designers have a commitment to the problem, a firm understanding of a design process, and a willingness to operate as a team.
Equipment • VCR or DVD player • Television • The Deep Dive DVD

Unit 2 Reverse Engineering Lesson 9 Product Redesign
Procedure In this activity, you will watch a group of professionals work to solve a design problem in just five days. Answer the following questions as you watch the video The Deep Dive. A class discussion will take place following the broadcast.
1. “From the buildings in which we live and work, to the cars we drive, or the knives and forks with which we eat, everything we use was designed to create some sort of marriage between ______form__________ and _____function____________.”
2. The folks at IDEO state that they are not experts in any given area. But, they do claim to be experts on the _____design process_______, which they apply to the innovation of consumer products.
3. After the team of designers is brought together, told the problem, and informed they have five days to “pull it off,” what phase of the design process do they immediately engage in?
The Investigate and Research Phase
4. Give two examples of what the team members did during this phase.
a. Some went to the local grocery store and observed its patrons.
b. Some talked to shopping cart maintenance personnel.
5. List five “rules-of-thumb” that IDEO employees follow when they share ideas during the brainstorming phase:
a. Have one conversation at a time
b. Stay focused
c. Encourage wild ideas
d. Defer judgment
e. Build on the ideas of others
6. Why should wild (and sometimes crazy) ideas be entertained during the brainstorming phase?
Wild ideas can be built upon and may end up being better, more innovative ideas.
7. After the brainstorming phase was over, the team narrowed down the hundreds of ideas by ___voting___ for those ideas that were not only “cool” but also __buildable____ in a short period of time. What phase of the design process is this called?
Select an Idea

Unit 2 Reverse Engineering Lesson 9 Product Redesign
8. IDEO believes that the ideas and efforts of a ___team___ will always be more successful than the planning of a lone genius.
9. Once the ideas were narrowed down and divided into categories, the group was split into four smaller teams. What phase(s) of the design process was each of these groups responsible for?
Develop the Idea Model and Prototype
10. The leaders at IDEO believe that __playful__ behavior and a ____fun______ environment are two important reasons why their employees are able to think quickly and creatively to produce innovative results.
11. Sometimes, people come up with great solutions that work by trying their ideas first and asking for ___forgiveness____ later.
12. Design is often a process of going too far and having to take a few steps back. What phase of the design process would the critique of the four mock-ups come under?
Test and Evaluate
13. Upon critique of the four teams’ models, it was obvious that none of the teams had developed an optimum solution. However, the people at IDEO believe that it is important to ___fail_____ often in order to ___succeed__ sooner.
14. What percentage of the entire week’s time did it take to fabricate the final prototype?
It took one day, or 20 percent of the total week’s time.
15. Instead of showering his design team with a tremendous amount of praise, what did the boss require his employees to do with their new design?
Dave Kelly told his design team to take the new design to the local grocery store and test it out in its intended environment.
16. Of all the things that we are surrounded by every day, what has not been placed through the design process?
Only things that occur naturally (such as trees, rocks, etc.) did not go through the design process.
Conclusion 1. What did you find to be the most impressive part of the team’s effort?

Unit 2 Reverse Engineering Lesson 9 Product Redesign
2. What advantages are there to having a design team with members who have non-engineering backgrounds?
3. There was a point in the process where a self-appointed group of adults stepped up, stopped the ideas, and redirected the group to break up into teams. Why was this done?
4. At the end of the video, Dave Kelly states, “Look around. The only things that are not designed are the things we find in nature.” Can you think of anything that would contradict this statement?

Unit 2 Reverse Engineering Lesson 9 Product Redesign
Teacher Resource 9.3
Presentation: Technical Report Writing
Directions for the Class Right click on the slide below and select Presentation Object/Open to open the PowerPoint.
Forging new generations of engineers