Anorak Pattern
22
Product: Swedish surplus anorak (AKA snow smock, snow parka, vindblus, pull-over) MFR stamp: Textil-Söm Size: FV 50 (so-called XXL) measurement length from to width 28.5"/72 cm armpit armpit center back 34.5"/87 cm base of hood hem sleeve 37"/94 cm center back cuff Body: Arm:
description
Pattern for anorak
Transcript of Anorak Pattern

Product: Swedish surplus anorak (AKA snow smock, snow parka, vindblus, pull-over) MFR stamp: Textil-Söm Size: FV 50 (so-called XXL) measurement length from to width 28.5"/72 cm armpit armpit center back 34.5"/87 cm base of hood hem sleeve 37"/94 cm center back cuff Body:
Arm:

Hood:


Pocket:
As you may have guessed, I haven't actually constructed one of these (rather destructed), but here is an outline of the construction process based on seam order noticed while ripping seams, filled in with what I would suggest after my making a wool pull-‐over from another pattern. First, seams. Seam allowances on this pattern (the above pattern includes seam allowances) greatly varied but were usually around 1 cm. These should probably be adjusted as you go (the allowance, not the pattern size) to make each piece fit how you want. Nearly all the seams on this were a kind of flat-‐felled seam. This is the seam used on jeans, and is stronger than top-‐stitched but (I find) more putsy to sew correctly. Also note that there are no exposed edges on the flat-‐felled seam, whereas the edges are exposed on the inside of the garment with top-‐stitched seams. If I were making one, I would just use top-‐stitching for all of them because I think that's good enough and certainly easier. At any rate, here are the two seams used:

I can't think of a way to break up the formation of the flat-‐felled seam and still get the result they had, so just pin or press in place and make the two lines of stitching. Or, there are other kinds of flat-‐felled seams that can be done in two steps similar to the top-‐stitch: sew wrong sides together, then fold over the seam allowances (which are on the right side of the garment) and stitch them down. Looking at the diagram, just imagine taking the seam allowance of the top-‐stitch and folding the very edges back to the right, into the second stitch before sewing it. One last note on the flat-‐felled seam is that it is suited to straight seams (think jean legs) and is very rarely used on curved lines. 1. Assembling arms, hood, and body Our main goal is sewing up the sides and underarms last, allowing us to work with a flat garment for as long as possible (and also making top-‐stitching easier on the machine).


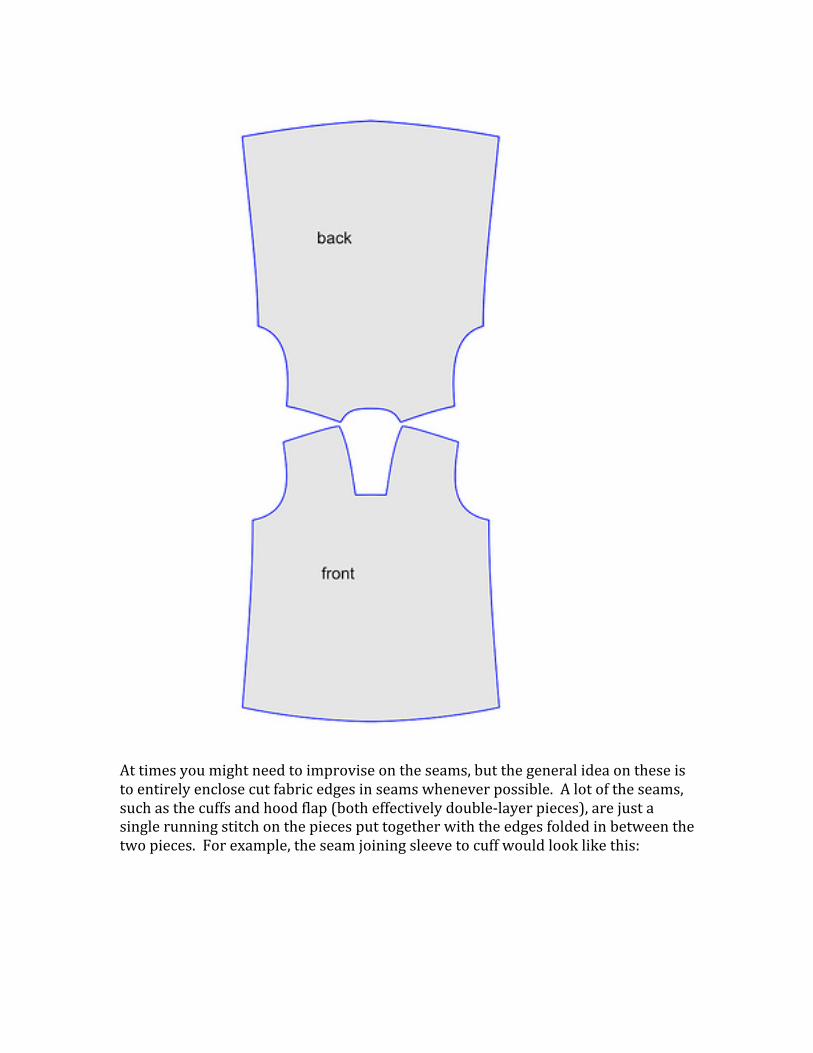
At times you might need to improvise on the seams, but the general idea on these is to entirely enclose cut fabric edges in seams whenever possible. A lot of the seams, such as the cuffs and hood flap (both effectively double-‐layer pieces), are just a single running stitch on the pieces put together with the edges folded in between the two pieces. For example, the seam joining sleeve to cuff would look like this:

If you want a hood cinch tie, it will go between the hood and the hood trim. You may care to pin it there before (and while) sewing on the hood trim, and then sew across the tunnel and through the tie at the top of the hood. This was done on the original smocks, and keeps the ties from migrating to one side. 2. Attaching assembled hood to body Before attaching the hood, you'll want to figure out the pleats. Make them such that the bottom length of the pleated hood fits perfectly around the neck hole of your body, which is already sewn together at the shoulders. My smocks had eight pleats on the hood, placed about like this:
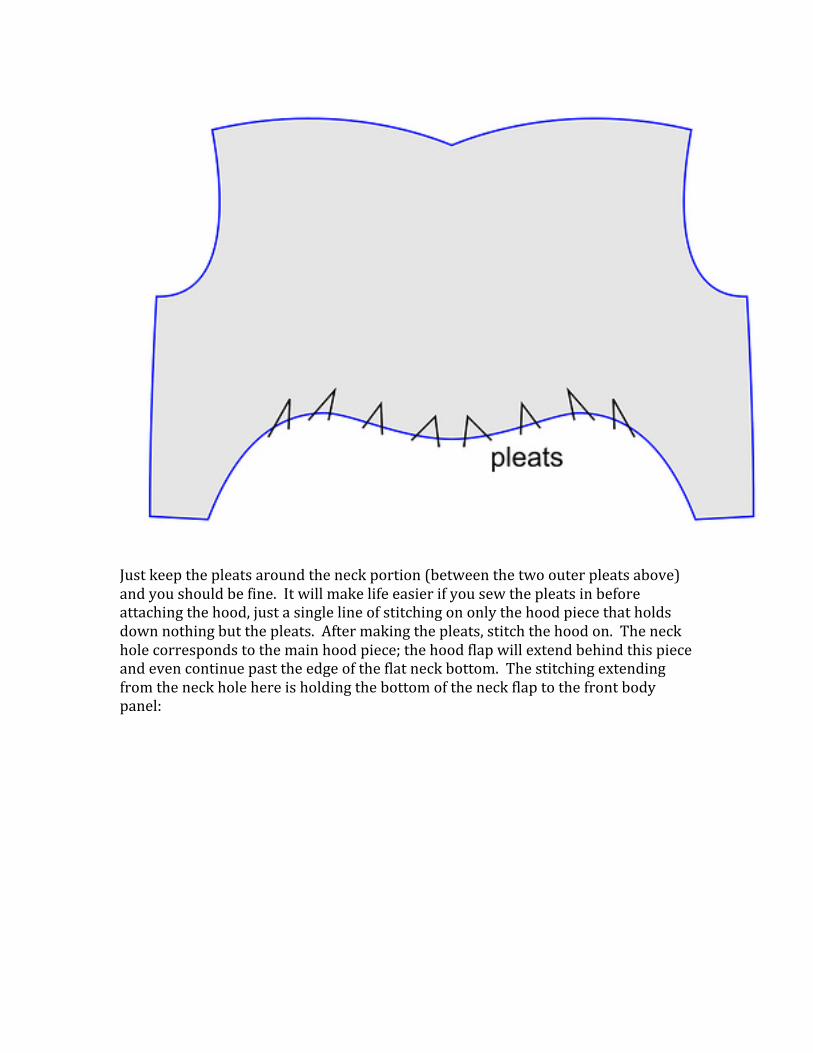
Just keep the pleats around the neck portion (between the two outer pleats above) and you should be fine. It will make life easier if you sew the pleats in before attaching the hood, just a single line of stitching on only the hood piece that holds down nothing but the pleats. After making the pleats, stitch the hood on. The neck hole corresponds to the main hood piece; the hood flap will extend behind this piece and even continue past the edge of the flat neck bottom. The stitching extending from the neck hole here is holding the bottom of the neck flap to the front body panel:

3. Attaching assembled arms to body This should be fairly straight-‐forward. The edges of the gussets should line up with the edges of the armholes on each side of the body panels.

4. Attaching cuffs Just like pleating the hood to fit the neck hole, you'll want to pleat your arm ends to match your cuff length. My smocks had five pleats of a little over 1 cm each. Again, sew in the pleats before joining the seam. 5. Pockets Here is how our pocket flaps will line up with the pocket body:

Note the overlap, which is unique to this pocket design. Again, see my review for some related pictures. To make the pocket flap from two pieces, just hide the edges inside and sew together (this may require some pressing and/or pinning). We will leave a bit of the pocket flap edge when sewing them to the pockets. This will allow us to sew the top of the pocket flap to the anorak without sewing our pocket shut. A front view, then a side view:

http://www.flickr.com/photos/49483099@N02/4656589490/sizes/l/in/set-‐72157624172871714/%5B/img
If you are unsure of how the pocket part should look, just cut out one flat side of a

brown paper grocery bag, cutting about an inch from the edge. (If you cut along the bottom corners now, you would end up with our pocket pattern.) The pocket will be sewn to the anorak through the inch of the flat side that you left. You can kind of see this edge here on the upside-‐down pocket:
As far as placement goes, the pockets on these are about an inch from the bottom (after hemming), but you can obviously put them wherever you want. These pockets are right on my thighs, and some people complain about this being annoying when they have things in their pockets. Consider my next post, "What I would do differently," or my modification thread. 6. Final step The final step is to sew up the sides and underarms. The stitching on my smocks stops a few inches from the cuff to leave a little breathing room there (which is good because the cuffs are pretty tight). Then fold up and sew the hem, and you're done! If anything in this scattered account is unclear, feel free to ask. Later on I'll be making a third post on this thread with modifications to the pattern that I would suggest, but I'm tentatively waiting on that until I do more work on my own modifications. Eric The hood flaps are really only one hood flap (I made up the name but don't know what else to call it); there are two pieces stitched together so that (1) the area is more stiff and (2) the edges can be nice. It's the same with the cuffs (which get folded lengthwise), only there isn't a convenient place for a fold on the hood flap, so it's made from two pieces.

The front edges of the main hood piece just touch in the front and don't overlap, so the hood flap holds the buttons and blocks the wind. Of the two front sides of the main hood piece, one has buttonholes and the other has the hood flap. First, pictures:
Inside out, flap buttoned. There is a buttonhole on the tip of the hood flap, and a corresponding button around my left shoulder. It holds the hood flap in place, making the neck very windproof.

Inside out, flap unbuttoned.

Inside out, flap pulled back. The flap is only sewn to the body panel along the bottom of the flap. The light/dark line on the raised fabric is the difference between the double-layer hood flap and the single-layer main hood. Also note that the bottom of the hood flap extends past the edge of the neck hole, into the front body panel.

Rightside out, neck closed. The buttons button in this position. Only a sliver of the hood flap is visible in the center, sewn to the left side and behind the buttonhole/right side.

Rightside out, hood flap exposed. Here I have pulled down the buttonhole side of the hood front, revealing the hood flap behind.
Now diagrams: Here is how I would imagine doing it. The process is suggested by the fact that the stitching along the top of the hood flap does not intersect the main hood piece material, rather being just above it. Addition of the following steps would result in the construction order (only steps regarding the hood): hood top, hood trim, hood flap, hood pleats, hood-to-body. (The hood flap hides the edge of the hood trim; the hood trim hides the edge of the hood top.) And I realize now that I've neglected to ever mention there is a second layer of fabric sewn on behind the main buttonholes, on the inside of the hood - you should be able to see its lines of stitching in the pictures.

Step 3 just shows the result of steps 1 and 2.

If you haven't cut the pieces already, I might suggest just cutting a triangle to sew to both hood ends, making kind of a "stovepipe gusset" neck like the ECW anoraks. I'm thinking I will try to modify mine in that way. But glad to hear someone is using the pattern. Did you make any modifications? (Pictures?) Do say if any of the steps didn't work right and so forth.