Anna’s Adventures - History is Fun, Jamestown …€™s Adventures Exploring Food Preservation...
4
HISTORY Food preservaon is preparing fresh food for long-term storage by using techniques that prevent the food from spoiling. The natural moisture in many foods can become a breeding ground for organisms like bacteria and fungi, which can be harmful if eaten. Some of the ways of preserving food include drying, removing the natural moisture from the food, adding a preservave that prevents organisms like bacteria from living in the food, and sealing the food in an airght container. Today refrigeraon allows for us to keep fresh food longer, but we sll depend on many preserved foods like jars of spaghe sauce and boxes of cereal. For centuries people needed to preserve food at home, so their families would have enough to eat year round. In the video Anna visited a small farm from the late 18th century where they commonly used food preservaon techniques like drying, salng, pickling, and jellying. In the video Anna dried green beans by simply stringing them together on a thread. In this recipe we’ll first blanch the beans to preserve their color and to help break down their enzymes, so they soſten and can dry more quickly. To blanch we’ll use boiling water to parally cook the beans, then we’ll use ice water to immediately stop the process. Fill a large stockpot 2/3 full of water. Put a lid on the pot and bring the water to a boil over high heat on the stovetop. While waing for the water to boil, set up the rest of your equipment. Fill a large bowl 2/3 full of ice water and set it on the counter next to the sink. Place the colander inside the sink. Once the water comes to a boil, carefully place the green beans inside the pot. Make sure all the beans are covered by the water, and allow the water to return to a boil. Boil for 2 minutes or unl the beans turn a vibrant green, but no longer. Ingredients 1/2 pound of green beans, washed water, liquid and ice Equipment large stockpot colander large bowl clean, kitchen twine sterilized kitchen (trussing) needle clean, kitchen towel Anna’s Adventures Exploring Food Preservaon Techniques 1. 2. 3. PART ONE AIR DRIED GREEN BEANS DRYING & PICKLING Ask an adult for permission and help with the following food preservaon acvies. Read through the ingredients and equipment lists, as well as the direcons before starng, to make sure you have everything needed.
Transcript of Anna’s Adventures - History is Fun, Jamestown …€™s Adventures Exploring Food Preservation...

HISTORY Food preservation is preparing fresh food for long-term storage by using techniques that prevent the food from spoiling. The natural moisture in many foods can become a breeding ground for organisms like bacteria and fungi, which can be harmful if eaten. Some of the ways of preserving food include drying, removing the natural moisture from the food, adding a preservative that prevents organisms like bacteria from living in the food, and sealing the food in an airtight container.
Today refrigeration allows for us to keep fresh food longer, but we still depend on many preserved foods like jars of spaghetti sauce and boxes of cereal. For centuries people needed to preserve food at home, so their families would have enough to eat year round. In the video Anna visited a small farm from the late 18th century where they commonly used food preservation techniques like drying, salting, pickling, and jellying.
In the video Anna dried green beans by simply stringing them together on a thread. In this recipe we’ll first blanch the beans to preserve their color and to help break down their enzymes, so they soften and can dry more quickly. To blanch we’ll use boiling water to partially cook the beans, then we’ll use ice water to immediately stop the process.
Fill a large stockpot 2/3 full of water. Put a lid on the pot and bring the water to a boil over high heat on the stovetop.
While waiting for the water to boil, set up the rest of your equipment. Fill a large bowl 2/3 full of ice water and set it on the counter next to the sink. Place the colander inside the sink.
Once the water comes to a boil, carefully place the green beans inside the pot. Make sure all the beans are covered by the water, and allow the water to return to a boil. Boil for 2 minutes or until the beans turn a vibrant green, but no longer.
Ingre dien ts
1/2 pound of green beans, washed
water, liquid and ice
Equ ipment
large stockpot
colander
large bowl
clean, kitchen twine
sterilized kitchen (trussing) needle
clean, kitchen towel
Anna’s AdventuresExploring Food Preservation Techniques
1.
2.
3.
PARTONE
AIR DR IED GREEN BEANS
DRYING & PICKLING Ask an adult for permission and help with the following food preservation activities. Read through the ingredients and equipment lists, as well as the directions before starting, to make sure you have everything needed.

Cut the cucumbers into 1/2-inch-thick rounds, and transfer to a colander set in a bowl. Toss well with salt. Refrigerate the salted cucumber rounds for 1 hour.
Rinse cucumber rounds well with water and allow to drain. Pat the rounds dry between paper towels. Transfer cucumber slices to a large bowl.
Bring the water, vinegar, dill seed, and garlic to a boil in a medium saucepan, stirring occasionally. Reduce heat, and allow to simmer for 4 minutes. Remove mixture from heat and cool slightly, about 10 minutes.
Meanwhile, sterilize airtight containers (ex: mason jars) by running them through a sterilization cycle in the dishwasher, or boiling the jars and lids in water for 10-15 minutes and letting them cool.
Add chopped dill to cucumber slices, and toss to combine. Pour in the boiled vinegar mixture. Let cool completely, about 30 minutes.
Transfer pickle mixture to the sterilized airtight containers, and refrigerate for at least 1 week (pickles will keep 3 weeks more).
Ingre dien ts
2 pounds pickling cucumbers, washed
3 tablespoons coarse salt (ex: kosher salt)
3 cups water
2 cups distilled white vinegar
1 tablespoon dried dill seed
4 cloves of garlic, peeled
2 bunches fresh dill, coarsely chopped
Equ ipment
cutting knife
colander and bowl
medium saucepan
airtight (mason) jars
1.
2.
3.
4.
5.
6.
EASY REFR IGERATOR P ICKLES (makes 2 quarts)
Immediately drain the beans into the colander, then shake the excess water from the beans and pour them into the bowl of ice water.
After the beans are cool to the touch and the ice has mostly melted, drain the beans again in the colander. Shake off the excess water. Thoroughly dry the beans with the kitchen towel.
Thread the needle with the kitchen twine, then begin to string the beans onto the twine. Try to pierce the beans in the center, and leave some space between each of the beans so they have enough room to allow the air to completely circulate around them. Create 1-2 foot long strings of beans.
Hang the strings in a warm, dry place, out of the sunlight. Drying times will vary. Once the beans are dry they will last up to 3 months. To eat the beans, rehydrate them by soaking in liquid until soft then season as desired, or simply add the dry beans to boiling soups.
4.
5.
6.
7.
AIR DR IED GREEN BEANS. . . CONTINUED
‘Pickling cucumbers’ are about 5 inches long. They should be firm to the touch, dark green in color, and have lots of ridges and bumps on their surface. These characteristics will give you a crisp, crunchy pickle!
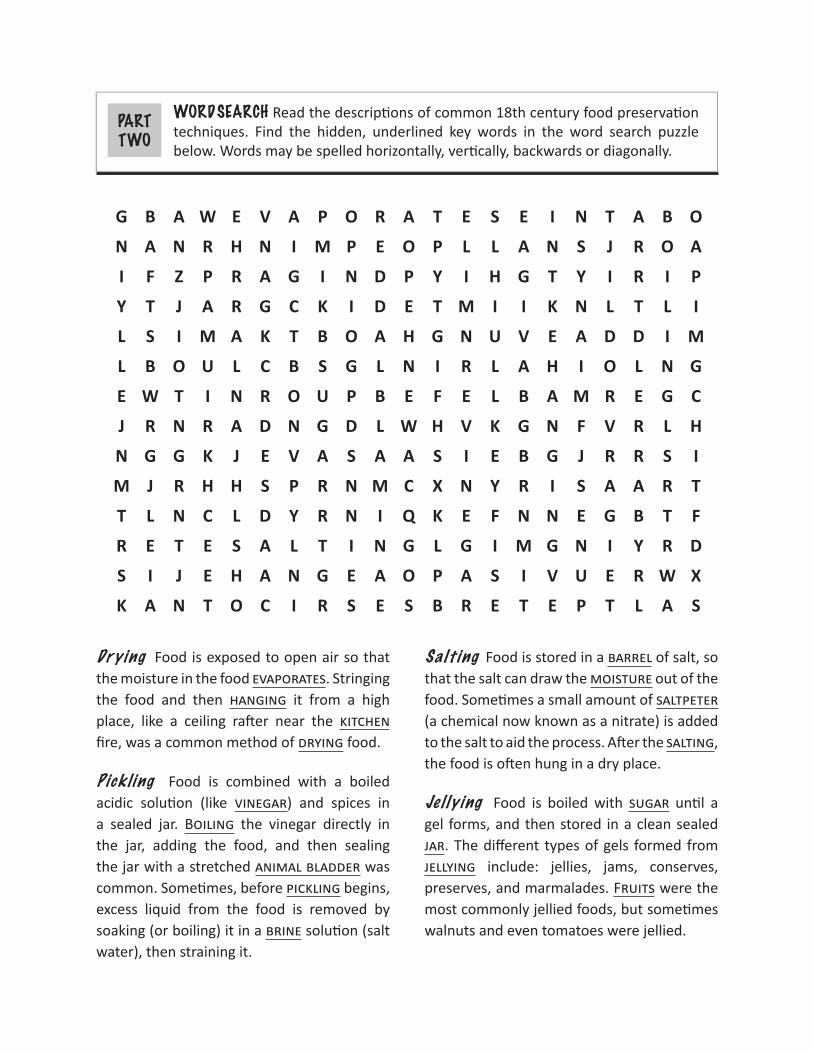
WORD SEARCH Read the descriptions of common 18th century food preservation techniques. Find the hidden, underlined key words in the word search puzzle below. Words may be spelled horizontally, vertically, backwards or diagonally.
Dr y ing Food is exposed to open air so that the moisture in the food evaporates. Stringing the food and then hanging it from a high place, like a ceiling rafter near the kitchen fire, was a common method of drying food.
P ick l ing Food is combined with a boiled acidic solution (like vinegar) and spices in a sealed jar. Boiling the vinegar directly in the jar, adding the food, and then sealing the jar with a stretched animal bladder was common. Sometimes, before pickling begins, excess liquid from the food is removed by soaking (or boiling) it in a brine solution (salt water), then straining it.
PARTTWO
G B A W E V A P O R A T E S E I N T A B O
N A N R H N I M P E O P L L A N S J R O A
I F Z P R A G I N D P Y I H G T Y I R I P
Y T J A R G C K I D E T M I I K N L T L I
L S I M A K T B O A H G N U V E A D D I M
L B O U L C B S G L N I R L A H I O L N G
E W T I N R O U P B E F E L B A M R E G C
J R N R A D N G D L W H V K G N F V R L H
N G G K J E V A S A A S I E B G J R R S I
M J R H H S P R N M C X N Y R I S A A R T
T L N C L D Y R N I Q K E F N N E G B T F
R E T E S A L T I N G L G I M G N I Y R D
S I J E H A N G E A O P A S I V U E R W X
K A N T O C I R S E S B R E T E P T L A S
Sa l t ing Food is stored in a barrel of salt, so that the salt can draw the moisture out of the food. Sometimes a small amount of saltpeter (a chemical now known as a nitrate) is added to the salt to aid the process. After the salting, the food is often hung in a dry place.
Je l l y ing Food is boiled with sugar until a gel forms, and then stored in a clean sealed jar. The different types of gels formed from jellying include: jellies, jams, conserves, preserves, and marmalades. Fruits were the most commonly jellied foods, but sometimes walnuts and even tomatoes were jellied.

pickledeggs
pickledcabbage
saltedpig feetdried
apple slices
dried beans
barrels of salted pork
salted�sh
jelliedstrawberries
jelliedapples
jelliedwalnuts
pickledcucumbers
driedmushrooms
© Jamestown-Yorktown Foundation • P.O. Box 1607, Williamsburg, VA 23187 August 2011
IDENTIFICATION Identify each of the four commonly used food preservation techniques by coloring the picture below. Use the color GREEN for dried foods, BLUE for salted foods, YELLOW for pickled foods, and ORANGE for jellied foods.
PARTTHREE