Angular, REST and U2 - The Rocket Software Blog REST and U2 Page 5 Blog Post 3 Brian Leach...
33
Brian Leach Consulting Limited http://www.brianleach.co.uk Angular, REST and U2 Part 3
Transcript of Angular, REST and U2 - The Rocket Software Blog REST and U2 Page 5 Blog Post 3 Brian Leach...

Brian Leach Consulting Limited
http://www.brianleach.co.uk
Angular, REST and U2
Part 3

Angular, REST and U2 Page 2 Blog Post 3
Brian Leach Consulting Limited Version 1.0
Contents
Introduction ....................................................................................................................... 3
The U2 Object Model ......................................................................................................... 4
Installing the U2 Toolkit for .NET ..................................................................................... 4
Creating a new WebAPI Project .......................................................................................... 5
Adding a Reference ......................................................................................................... 6
Connecting to the Server .................................................................................................... 7
WebAPI Controllers .......................................................................................................... 10
Injecting the Settings .................................................................................................... 13
Reading Data.................................................................................................................... 15
Creating a Model .......................................................................................................... 15
Adding a Factory ........................................................................................................... 17
Requesting a Single Record ........................................................................................... 20
Returning a Collection ...................................................................................................... 22
Selecting Records .......................................................................................................... 22
Custom Serialization ..................................................................................................... 23
Hooking it Up ................................................................................................................... 26
Dealing with CORS ........................................................................................................ 26
Hooking up the Summary Listing ................................................................................... 27
Using the QueryString ...................................................................................................... 29
Running a Command ..................................................................................................... 29
Fetching the QueryString .............................................................................................. 30
Getting the Detail.......................................................................................................... 31
Next Steps ........................................................................................................................ 32
A Final Word .................................................................................................................... 33

Angular, REST and U2 Page 3 Blog Post 3
Brian Leach Consulting Limited Version 1.0
Introduction
This is the third post in the series, Angular, REST and U2.
In the first post, we looked at the architecture behind Angular, the favourite library for
creating scalable single page applications. We worked with TypeScript, the enhanced meta-
language over JavaScript, and handling simple RESTful calls.
In the second post, we linked our angular application to a U2 database through the Rocket U2
RESTful Web Services. This is a built-in feature that exposes your application to REST through
either file/query based data sources or subroutine calls.
In this final post, we will consider another option for surfacing your application end points.
Whilst the U2 RESTful services are powerful and, with the ability to call subroutines, both
flexible and easy to use, it is the nature of any tool they make some assumptions about the
way in which your data should be presented. They are not the only game in town, and there
are plenty more ways in which you can interface with UniVerse or UniData.
For this post, I will be guiding you through the Microsoft Web API, using the native UniObjects
protocol to provide the middleware glue between .NET and the U2 application platform.
Angular, REST and U2 Page 4 Blog Post 3
Brian Leach Consulting Limited Version 1.0
The U2 Object Model
One of the most powerful features of U2, and the thing that sets these two platforms apart
from other MultiValue solutions, is the Object Model. This first appeared with UniVerse back
in the early 1990s when VMARK released UniVerse Objects, and turned the MultiValue model
on its head. Where before MultiValue had appeared as a single, sprawling and intersecting set
of features, this organized the most salient aspects of the MultiValue architecture into a small
number of simple-to-use classes. I still use the Object Model when training new developers
on U2 today as the best way into understanding what is going on behind the scenes.
Installing the U2 Toolkit for .NET
The original UniVerse Objects protocol was replaced with UniObjects and with UO.NET. Today
this has been similarly displaced by the Rocket U2 Toolkit for .NET, which extends the
functionality to bind together the native object model, ADO.NET and Entity Data. You can still
use the older UO.NET library if you prefer: this continues to use the IBMU2 namespace but is
functionally equivalent to using the native protocol in the Rocket toolkit.
The U2 Toolkit for .NET is provided as a separate download outside the usual U2 tools and
APIs. There are two parts to this: the Provider, which is free, and the Developer which is now
also free but only for registered copies of UniVerse and is not available for Personal Edition.
We will therefore have to restrict our use to the features of the Provider.
Navigate to http://www.rocketsoftware.com/u2 and select the Try it Now button as you did
for the previous post. Here you can download the Rocket U2 Toolkit for .NET. Once
downloaded, please install the providers for 32 and 64 bit.
Angular, REST and U2 Page 5 Blog Post 3
Brian Leach Consulting Limited Version 1.0
Creating a new WebAPI Project
The sample project we have working with for the first two posts runs using .NET Core, the
cross-platform implementation of the .NET framework that is setting the direction that
Microsoft is now following. At time of writing, Rocket provides no support for this, so we need
to create a new WebAPI project that runs the full .NET framework.
Start Visual Studio 2017 (or above) and create a new solution. This will keep it segregated
whilst we concentrate on the server: with the move to a modular project style Visual Studio
sometimes attempts to be helpful and load in resources as it finds them and that causes
confusion if we add this directly to the existing solution.
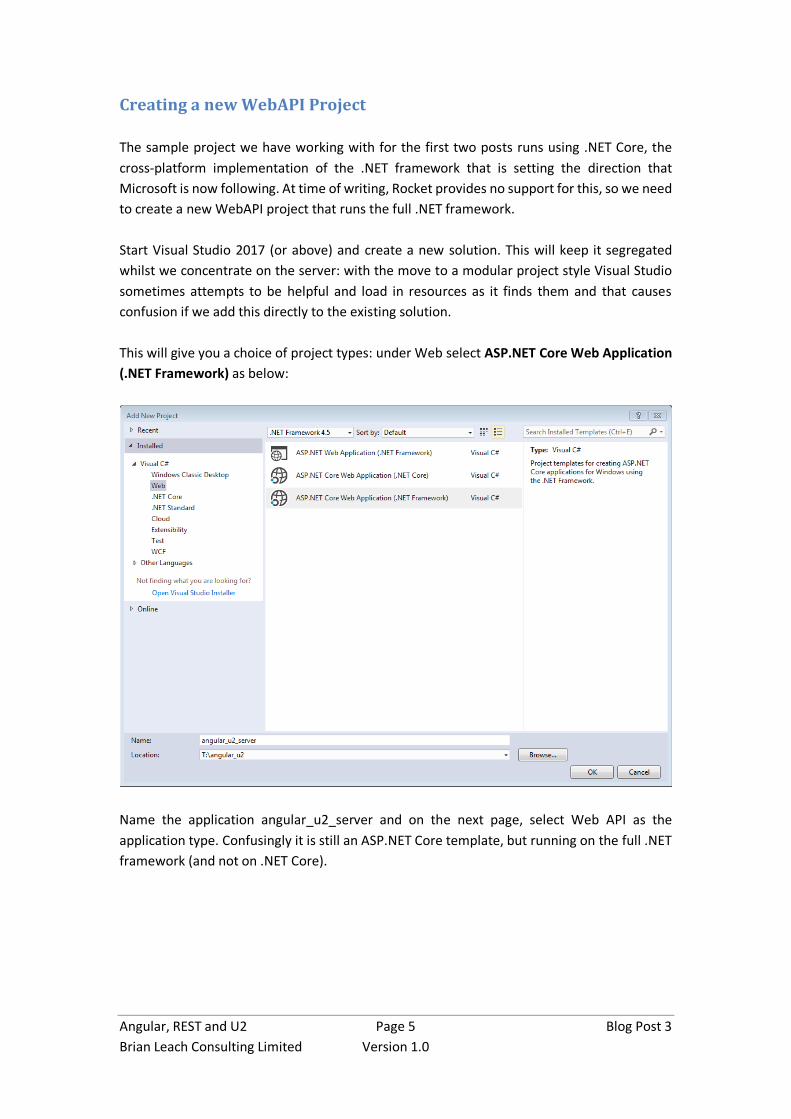
This will give you a choice of project types: under Web select ASP.NET Core Web Application
(.NET Framework) as below:
Name the application angular_u2_server and on the next page, select Web API as the
application type. Confusingly it is still an ASP.NET Core template, but running on the full .NET
framework (and not on .NET Core).

Angular, REST and U2 Page 6 Blog Post 3
Brian Leach Consulting Limited Version 1.0
Adding a Reference
Before you can make use of the Rocket U2 Toolkit for .NET in your application you must add
a reference to its assembly. From the Solution Explorer, right click the project name and
select Add -> New Reference from the context menu.
Use the Browse button to navigate to C:\Program Files\Rocket Software\U2 Toolkit for
.NET\U2 Database Provider\bin\.NETFramework\v4.5 and add the U2.Data.Client.dll:
Note that this must match the version of the .NET framework you are targeting.

Angular, REST and U2 Page 7 Blog Post 3
Brian Leach Consulting Limited Version 1.0
Connecting to the Server
The UniObjects protocol uses a regular, stateful connection to the database. The Rocket U2
RESTful Services, that you used in the last post, also makes use of UniObjects, but in the java
implementation and hidden behind the tools. Here we will be connecting and making the calls
directly which gives us more flexibility.
Connections are wrapped in and handled by the UniSession object. This represents a user
session connected to a UniVerse account, and is the parent for all the other objects you can
create that in turn represent or expose the content of that account, such as files and cataloged
subroutines.
Rather than spread the data access throughout the code, it is neater to coordinate this into a
suitable class that will handle all the interactions with the database - it makes managing the
connections easier and provides a single place for debugging and logging if required.
Right click on your project and add a new folder you did in the previous post. Call it DAL (Data
Access Layer), and then right click that new folder and add a new Class named Connection.cs.
The connection will need to use the U2 Toolkit for .NET, so first we should add a using clause
to the code to import the U2 namespaces. This works similarly to the imports clause that we
have used throughout the previous post for our TypeScript modules.
Here we import the U2.Data.Client namespace and the System.Data namespace on which it
depends, as below:
using System; using System.Collections.Generic; using System.Linq; using System.Threading.Tasks; using System.Data; using U2.Data.Client; using U2.Data.Client.UO; namespace angular_u2_server { public class Connection { } }
We are going to use the Connection class to log into to your U2 demonstration database. Let’s
add a Connect() method that will use a UOConnection to instantiate a UniSession. We will
also add a disconnect method to release our session when we are finished with it. For a real
application we would look to some form of pooling.

Angular, REST and U2 Page 8 Blog Post 3
Brian Leach Consulting Limited Version 1.0
public class Connection { protected U2Connection _conn = null; protected UniSession sess = null; public bool Connect(string hostName, string userName, string accountPath, string pass, string service, ref string errText) { try { U2ConnectionStringBuilder s = new U2ConnectionStringBuilder(); s.UserID = userName; s.Password = pass; s.Server = hostName; s.Database = accountPath; s.ServerType = "UniVerse"; s.AccessMode = "Native"; s.RpcServiceType = service; s.Pooling = false; _conn = new U2Connection(); _conn.ConnectionString = s.ToString(); _conn.Open(); sess = _conn.UniSession; } catch (Exception ex) { errText = ex.Message; return false; } return true; } public void disconnect() { _conn.Close(); } }
The session logs in using details provided in the ConnectionString: most of this should be
obvious except possibly for the service name. This is the entry in the unirpcservices file that
defines the specific listener it will be connect to and additional details such as the timeout
period and any additional security constraints. On a vanilla UniVerse installation, the service
name will be uvcs (for UniData, it is udcs, allowing UniVerse and UniData to coexist on the
same machine).
A UniObjects connection is similar to a regular TELNET connection in that it will need your
credentials. For Personal Edition it will take the same credentials that you use to log into your
PC or laptop, although you may need to experiment with whether or not it requires a domain
prefix. If you managed to log in using the Rocket U2 RESTful Web Services Designer in the
previous post, it will be the same credentials that you used there.
Unlike a desktop application it cannot prompt for these, so we will simply store them in the
application settings. Please note that this is not secure and you should encrypt this were you
to do this for a live implementation.
Microsoft has offered various models for configuration over the different versions of .NET. For
an ASP.NET Core application, settings are stored in the appsettings.json file which you will find

Angular, REST and U2 Page 9 Blog Post 3
Brian Leach Consulting Limited Version 1.0
in your Solution Explorer. Open this and add a new section, substituting an appropriate user
name and password. Make sure to add the comma before the Connection section:
{ "Logging": { "IncludeScopes": false, "LogLevel": { "Default": "Warning" } }, "Connection": { "Host": "localhost", "User": "demo", "Pass": "demo", "Account": "u2_books", "Service": "uvcs" } }
Remember how Angular likes to use dependency injection for settings and services? Well,
Microsoft has chosen to do the same with configuration settings. It makes it typically more
verbose than using settings in previous versions of .NET, but there you go.
First, we need to define a simple class to hold these settings, using the same names for the
properties as the keys in the appsettings.json file above, so that the framework can populate
these automatically. Add a new Class to the root of the project (not in the DAL folder) called
ConnectionSettings and set out the properties as below:
public class ConnectionSettings { public string Host { get; set; } public string User { get; set; } public string Pass { get; set; } public string Account { get; set; } public string Service { get; set; } }
To have this class created for us automatically, we must register it with the ASP.NET
framework services, similar again to the way that Angular required us to register things of
interest with its AppModules. The framework services are configured in the Startup.cs file
which is already loaded into your project.
Open this and add a line to the ConfigureServices method as below:
public void ConfigureServices(IServiceCollection services) { // Add framework services. services.AddMvc(); services.Configure<ConnectionSettings>( Configuration.GetSection("Connection")); }

Angular, REST and U2 Page 10 Blog Post 3
Brian Leach Consulting Limited Version 1.0
WebAPI Controllers
Before we do anything more spectacular, it would be a good idea to check that we can simply
connect to the database using this new Connection class, and can return something in
response to a web service call.
The UniSession class comes with a useful GetAtVariable() method that returns one of the
regular UniVerse environment variables such as @WHO and @USERNO, identified by number.
We will use that to prove we have connected successfully, by adding a new property to the
Connection class:
public string Who { get { return sess.GetAtVariable(1).StringValue; } }
When we access the Who property of the Connection, it will return the @LOGNAME variable
from the server.
You have a Connection class with a Connect() method and a Who property, and a settings class
that will hold the connection details. All you need now is a way to call it in response to a REST
style request1.
The WebAPI model has massively simplified working with RESTful services. Where before
developers had to wrestle with a complex MVC model, WebAPI has pared that back to the
minimum. As with our Angular project on the client, it uses convention over coding and a
routing model that maps URI end points to calls to methods in classes.
Those classes live in the Controllers folder and have a specific naming convention:
ActionController. The scaffolding for a WebAPI project creates an example controller called
ValuesController: let’s take a look.
1 For a real project we would, of course, have set up a Unit Test project and tested all the data access calls and connectivity from that before messing about with controllers and web requests. But this is a tutorial and we don’t have space.

Angular, REST and U2 Page 11 Blog Post 3
Brian Leach Consulting Limited Version 1.0
namespace angular_u2_server.Controllers { [Route("api/[controller]")] public class ValuesController : Controller { // GET api/values [HttpGet] public IEnumerable<string> Get() { return new string[] { "value1", "value2" }; } // GET api/values/5 [HttpGet("{id}")] public string Get(int id) { return "value"; } // POST api/values [HttpPost] public void Post([FromBody]string value) { } // PUT api/values/5 [HttpPut("{id}")] public void Put(int id, [FromBody]string value) { } // DELETE api/values/5 [HttpDelete("{id}")] public void Delete(int id) { } } }
Here is a complete implementation of a simple RESTful service endpoint. The link-up between
the HTTP verbs and routing is handled through attributes.
The first is the Route attribute attached to the class, which sets the routing for this action to
the default (api/[controller]). We learned about routing and instantiation when looking at
Angular on the client, and the same principles apply here: this means the ASP.NET Core will
automatically instantiate this class in response to any call made to /api/Values (or /api/values,
it will be mapped case insensitively).
Each of the main RESTful HTTP verbs (GET, PUT, POST, DELETE) can be handled by one or more
methods, decorated with the HttpXXX attribute. Again, the routing is managed automatically
by the ASP.NET framework.
Here we can see that the first method will be called in response to an HTTP GET request:

Angular, REST and U2 Page 12 Blog Post 3
Brian Leach Consulting Limited Version 1.0
// GET api/values [HttpGet] public IEnumerable<string> Get() { return new string[] { "value1", "value2" }; }
This will return an array of two string values in response to the call. You can test this out by
running this project: right click on the angular_u2_server project and select Debug->Start New
Instance to run it and launch a browser to show the results.
To create new service endpoints, we just need to create new controllers and set the routing
and verb handlers. We will add a new controller to handle a Who request to test our
connection.
Stop the project debugging, and right click in the Controllers folder and select Add->Controller.
The first time you do this you will be prompted to add some more scaffolding to the project.
Choose only the minimal dependencies: we won’t be needing the rest.
After this has completed, right click in the Controllers folder (again) and Add ->Controller (yes
it forgets the first time). Wait for Visual Studio to ask you for the necessary scaffolding it should
create.

Angular, REST and U2 Page 13 Blog Post 3
Brian Leach Consulting Limited Version 1.0
Select API Controller with Read/Write actions to create a regular RESTful WebAPI controller
similar to the ValuesController above and when prompted, name it WhoController.
At the end, you will have an identical controller to the ValueController we have just seen: in
fact, it even has the same examples. The only differences are the name and a Route attribute
that maps this class to an “api/Who” endpoint - meaning that we can point our browser at
http://localhost:port_number/api/Who to automatically instantiate the class.
We will use the Get() method to log into the server and return the @LOGNAME through the
Who property on our Connection class. There is only one thing missing: we need to get our
paws on those connection settings to authenticate the connection.
Injecting the Settings
When the .NET Core framework instantiates the controller, we have the option to tell it to
automatically pass in our configuration settings using dependency injection. You should be
accustomed to this by now.
The syntax for this is slightly different than for the dependency injection in Angular of course:
for this we need to add a constructor to the class that will receive an
IOptions<ConnectionSettings> value. IOptions<T> is a generic interface that can be attached
to any class and returns an instance of that class through a Value property.

Angular, REST and U2 Page 14 Blog Post 3
Brian Leach Consulting Limited Version 1.0
Here’s how it all looks when put together. Note that you need to add the using clause to
reference the Microsoft.Extensions.Options namespace:
using System; using System.Collections.Generic; using System.Linq; using System.Threading.Tasks; using Microsoft.AspNetCore.Http; using Microsoft.AspNetCore.Mvc; using Microsoft.Extensions.Options; namespace angular_u2_server.Controllers { [Produces("application/json")] [Route("api/Who")] public class WhoController : Controller { protected ConnectionSettings _settings = null; public WhoController(IOptions<ConnectionSettings> config) { _settings = config.Value; } // GET: api/Who [HttpGet] public IEnumerable<string> Get() { Connection connection = new Connection(); string errText = string.Empty; if (connection.Connect(_settings.Host, _settings.User, _settings.Account, _settings.Pass, _settings.Service, ref errText)) { return new string[] { connection.Who }; } else { return new string[] { errText }; } } (other methods excluded) } }
If the connection succeeds it will return the Who property. If not it will return a reason for the
connection failure given in errText.
That’s all - you can now run the project again and point your browser at /api/Who to see the
result: it should display your user name. If not, please check your connection settings are
correct.

Angular, REST and U2 Page 15 Blog Post 3
Brian Leach Consulting Limited Version 1.0
Reading Data
It’s all very exciting being able to get a session property, but we want to see some data. The
U2 Data Provider for .NET Toolkit gives us a convenient way to read data using a UniFile object:
as the name suggests this represents a UniVerse data file.
We cannot simply open a file without connecting, and without knowing what account the file
belongs to. A UniFile object is therefore created from the UniSession that represents a
connection to an account. Just as for a regular UniVerse session, once the UniSession closes
so do any UniFile instances that belong to that session.
The session is owned by our Connection class, so open this and add a simple, generic Read
method to the class:
public UniDynArray Read(string fileName, string itemName) { using (var uniFile = sess.CreateUniFile(fileName)) { return uniFile.Read(itemName); } }
The Read() method returns a dynamic array. The .NET framework does not have an equivalent
data type that can manipulate the various fields, values and subvalues of a record, and so the
UniObjects model gives us another class to offer this functionality: a UniDynArray. This
encapsulates a dynamic array and offers Extract, Replace, Insert and Delete methods similar
to those found on the server in the business language and in Interpreted Descriptors.
The Read method returns the record it has read as a UniDynArray, which is useful for accessing
fields but won’t be too helpful to us in returning data from a web service call until we tell .NET
how this should be serialized into something we can understand rather than a plain dynamic
array. We want to split out the fields we care about into a nicely formatted JSON package with
sensible names.
Creating a Model
When, in the previous blog, we needed a representation of a book for the Angular side to
receive the details from a RESTful call, we created a TypeScript model of a book containing
the fields that interested us called BookDetail:

Angular, REST and U2 Page 16 Blog Post 3
Brian Leach Consulting Limited Version 1.0
export class BookDetail { public id: number; public title: string; public author_id: string; public author_name: string; public isbn: string; public dept: string; public genre: string; public media: string; public publisher_id: string; public publisher_name: string; public sale_price: number; public stock_level: number; public on_order: number; public tax_code: string; public tax_rate: number; public supplier_id: string; public supplier_name: string; public purch_price: number; public u2version: string; }
Angular automatically deserialized the web service message that contained the book details
from JSON to create an instance of this class.
Here in the middle tier, WebAPI will do exactly the same, but in reverse. If we give it a model
of the book details, it will serialize it into JSON on our behalf. Yes, this would be a nice easy
utility to write as a UniVerse program to generate both of these off a dictionary.
Add a Models folder to your angular_u2_server project and create the following simple class
to represent a book. You may be presented with a bunch of Naming rule violation errors but
those are just hints and we want the names to match our TypeScript model on the client.
public class BookDetail{ public int id { get; set; } public string title { get; set; } public string author_id { get; set; } public string author_name { get; set; } public string isbn { get; set; } public string dept { get; set; } public string genre { get; set; } public string media { get; set; } public string publisher_id { get; set; } public string publisher_name { get; set; } public string sale_price { get; set; } public int stock_level { get; set; } public int on_order { get; set; } public string tax_code { get; set; } public double tax_rate { get; set; } public string supplier_id { get; set; } public string supplier_name { get; set; } public double purch_price { get; set; } }

Angular, REST and U2 Page 17 Blog Post 3
Brian Leach Consulting Limited Version 1.0
Adding a Factory
We could add methods to read and write the book here, but let’s split this out further and add
a little factory class to handle that interaction: it makes things neater. The factory will read
the chosen book and populate a BookDetails object.
You would not, I hope, ever write server side code that used field numbers: you would always
use EQUATEs for your field names. If that is not the case, stand in the corner in shame. A
UniDynArray represents a record in a file, and it too is addressed by field (and value, and
subvalue) number, though with a different syntax than used in the business language. The
same rule applies here: for safety and legibility we should always name the field positions.
There are two structures we can use in C# for this, an enumeration or a set of constants. For
various reasons, I prefer to use constants: so we will create the equivalent or a set of EQUATEs
for our U2_BOOKS file. Yes, another thing that could easily be generated from a dictionary
using a utility program.
Add a new folder called Maps to the project and in there, add the following U2_BOOKS class
to define the record layout:
namespace angular_u2_server.Maps { public class U2_BOOKS { public const int TITLE = 1; public const int AUTHOR_ID = 2; public const int ISBN = 3; public const int DEPT = 4; public const int GENRE = 5; public const int MEDIA = 6; public const int PUBLISHER_ID = 7; public const int SALE_PRICE = 8; public const int STOCK_LEVEL = 9; public const int MIN_ORDER = 10; public const int ON_ORDER = 11; public const int TAX_CODE = 12; public const int SUPPLIER_ID = 13; public const int PURCH_PRICE = 14; public const int SUPPLIER_CODE = 15; public const int LONG_DESCRIPTION = 20; } }
Now we have the plumbing in place, we can read a book and fill out the details. Add a new
class called BookFactory to the DAL folder to take on this responsibility and read a single book
identified by its ID. We will split out the read from the parsing to promote reuse and testability.

Angular, REST and U2 Page 18 Blog Post 3
Brian Leach Consulting Limited Version 1.0
It is a little bit verbose and for now, we will only deal with the fields in the U2_BOOK file itself:
using angular_u2_server.Models; using angular_u2_server.Maps; namespace angular_u2_server.DAL{
public class BookFactory{ protected Connection _connection = null; public BookFactory(Connection connection) { _connection = connection; } public BookDetail fetch(int id) { var bookRec = _connection.Read("U2_BOOKS", id.ToString()); return parseDetail(id, bookRec); } public BookDetail parseDetail(int id, UniDynArray bookRec) { BookDetail bookDetail = new BookDetail(); bookDetail.id = id; bookDetail.isbn = bookRec.Extract(U2_BOOKS.ISBN).StringValue; bookDetail.author_id = bookRec.Extract(U2_BOOKS.AUTHOR_ID).StringValue; bookDetail.dept = bookRec.Extract(U2_BOOKS.DEPT).StringValue; bookDetail.genre = bookRec.Extract(U2_BOOKS.GENRE).StringValue; bookDetail.media = bookRec.Extract(U2_BOOKS.MEDIA).StringValue; bookDetail.on_order = int.Parse( bookRec.Extract(U2_BOOKS.ON_ORDER).StringValue); bookDetail.publisher_id = bookRec.Extract(U2_BOOKS.PUBLISHER_ID).StringValue; bookDetail.purch_price = int.Parse( bookRec.Extract(U2_BOOKS.PURCH_PRICE).StringValue) / 100; bookDetail.sale_price = int.Parse( bookRec.Extract(U2_BOOKS.SALE_PRICE).StringValue) / 100; bookDetail.stock_level = int.Parse( bookRec.Extract(U2_BOOKS.STOCK_LEVEL).StringValue); bookDetail.supplier_id = bookRec.Extract(U2_BOOKS.SUPPLIER_ID).StringValue; bookDetail.tax_code = bookRec.Extract(U2_BOOKS.TAX_CODE).StringValue; bookDetail.title = bookRec.Extract(U2_BOOKS.TITLE).StringValue; return bookDetail; } }
}
That was a lot of typing. Why so verbose?
First, the UniDynArray supports an Extract method similar to the EXTRACT() function on the
server, but it returns a UniDynArray not a string since the result of the EXTRACT() could itself
be multivalued or subvalued. So we need to either cast it to string using ToString() or use the
StringValue property.
Second, we need to cast that to an integer for the stock_level and on_order members, and to
externalize prices. On the server we apply an MD2 conversion, so the best equivalent is to
simply divide by 100 - the UniSession gives us an OCONV() method but that does a round trip

Angular, REST and U2 Page 19 Blog Post 3
Brian Leach Consulting Limited Version 1.0
to the server (think about it and you will work out why) but that makes it very inefficient for
repeated operations.
I’m lazy when it comes to typing and that method looks ugly. We can make our lives easier by
adding a couple of extension methods to UniDynArray class and use that syntactic sugar to
make the code neater and shorter.
Here is an alternative implementation: add a new folder to your solution called Extensions
and create a UniDynArrayExtensions class as below:
using U2.Data.Client.UO; namespace angular_u2_server.Extensions { public static class UniDynArrayExtensions { public static string AsString(this UniDynArray dynArray, int fieldNo) { return dynArray.Extract(fieldNo).StringValue; } public static int AsInt(this UniDynArray dynArray, int fieldNo) { try { return int.Parse(dynArray.Extract(fieldNo).StringValue); } catch { return 0; // non-numeric data where numeric required .. } } public static double AsDouble(this UniDynArray dynArray, int fieldNo) { try { return double.Parse(dynArray.Extract(fieldNo).StringValue); } catch { return 0.0; // non-numeric data where numeric required .. } } public static double AsPrice(this UniDynArray dynArray, int fieldNo) { try { return (double)( double.Parse(dynArray.Extract(fieldNo).StringValue) / 100); } catch { return 0.0; // non-numeric data where numeric required .. } } } }
This adds a new set of extension methods to a UniDynArray that gives us a potentially much
neater and more legible way to rewrite our BookFactory method:

Angular, REST and U2 Page 20 Blog Post 3
Brian Leach Consulting Limited Version 1.0
public BookDetail parseDetail(int id , UniDynArray bookRec) { BookDetail bookDetail = new BookDetail(); bookDetail.id = id; bookDetail.isbn = bookRec.AsString(U2_BOOKS.ISBN); bookDetail.author_id = bookRec.AsString(U2_BOOKS.AUTHOR_ID); bookDetail.dept = bookRec.AsString(U2_BOOKS.DEPT); bookDetail.genre = bookRec.AsString(U2_BOOKS.GENRE); bookDetail.media = bookRec.AsString(U2_BOOKS.MEDIA); bookDetail.on_order = bookRec.AsInt(U2_BOOKS.ON_ORDER); bookDetail.publisher_id = bookRec.AsString(U2_BOOKS.PUBLISHER_ID); bookDetail.purch_price = bookRec.AsPrice(U2_BOOKS.PURCH_PRICE); bookDetail.sale_price = bookRec.AsPrice(U2_BOOKS.SALE_PRICE); bookDetail.stock_level = bookRec.AsInt(U2_BOOKS.STOCK_LEVEL); bookDetail.supplier_id = bookRec.AsString(U2_BOOKS.SUPPLIER_ID); bookDetail.tax_code = bookRec.AsString(U2_BOOKS.TAX_CODE); bookDetail.title = bookRec.AsString(U2_BOOKS.TITLE); return bookDetail; }
Requesting a Single Record
The only step remaining is to call this from a controller. Right click on the Controllers folder
and add a new controller called BookController as you did for the WhoController above.
The fetch method above reads a single book identified by its record id, and the RESTful
convention for this is to simply add the id to the end of the GET URI:
http://myserver/api/u2_books/id
If you look at the BookController scaffolding, you will see that this is automatically handled by
the routing which provides an override to the Get method that expects an id, created
specifically for this purpose.
Fill that out to call the fetch method on our BookFactory. You will need to use the same pattern
of dependency injection to create the connection settings and to log in to the server.

Angular, REST and U2 Page 21 Blog Post 3
Brian Leach Consulting Limited Version 1.0
using Microsoft.Extensions.Options; using angular_u2_server.Models; using angular_u2_server.DAL; namespace angular_u2_server.Controllers{ [Produces("application/json")] [Route("api/Books")] public class BooksController : Controller { protected ConnectionSettings _connectionSettings = null; public BooksController(IOptions<ConnectionSettings> config) { _connectionSettings = config.Value; } // GET: api/Books/5 [HttpGet("{id}", Name = "GetBook")] public BookDetail Get(int id) { var connection = new Connection(); BookDetail detail = null; string errText = string.Empty; if (connection.Connect(_connectionSettings.Host, _connectionSettings.User, _connectionSettings.Account, _connectionSettings.Pass, _connectionSettings.Service, ref errText)){ detail = new BookFactory(connection).fetch(id); connection.disconnect(); } return detail; }
Phew, now we can launch the project in IIS Express and navigate in our browser to
http://localhost:port/api/Books/10 and retrieve details on a Harry Potter title:
As an exercise, I will leave you to add the missing author_name, publisher_name and
supplier_name to the book details. Remember to create maps for the U2_AUTHORS,
U2_PUBLISHERS and U2_SUPPLIERS records.

Angular, REST and U2 Page 22 Blog Post 3
Brian Leach Consulting Limited Version 1.0
Returning a Collection
That was a single item returned in response to a RESTful request that included the title id. For
a regular GET we should return a collection. Fortunately, we can now add that easily.
The UniFile class allows us to read a whole batch of records in a single call by calling a
ReadRecords() methods and passing an array of item ids that we want to return. These are
combined together in a UniDataSet, which is nothing more than a set of UniRecords each
consisting of a record id and a record body.
We have a Read method on our Connection class for a single record, so this can be followed
by a ReadAll method as below:
public UniDataSet ReadAll( string fileName, string[] itemNames) { using(var uniFile = sess.CreateUniFile(fileName)) { return uniFile.ReadRecords(itemNames); } }
How are we going to get this list of item names? By convention, with no additional parameters
a RESTful call should return all records in the collection, but of course for live data since you
now control this you can decide just what we want to return. You would not, for example,
want a rogue client being able to return your entire 100 million-strong transaction file.
The U2_BOOKS file contains only about 350 records so that is small enough not to make any
kind of impact: we can simply select the whole file as we did using the U2 RESTful Web Services
data source in the previous post.
Selecting Records
For this we will need a selection, and just as a UniFile encapsulates file access, so selection
operations are encapsulated by a UniSelectList.
A UniSelectList surfaces one of the numbered select lists in the UniVerse server environment.
Each session can have 10 active select lists, each identified by a number from 0 to 9. The
default select list is number 0, as you should know from the familiar message:
354 record(s) selected to SELECT list #0.
When you create an instance of a UniFile, you tell it the name of the file to access. For a
UniSelectList you similarly tell it which of the numbered select lists it is accessing.

Angular, REST and U2 Page 23 Blog Post 3
Brian Leach Consulting Limited Version 1.0
The UniSelectList has various methods for returning the select list to the client. A Next method
pops the next entry from the active select list in exactly the same way as ReadNext in the
business language: a LastRecordRead property can be examined to see whether the list has
been exhausted. A ReadList method returns the whole list as a dynamic array, exactly the
same as ReadList on the server. And finally, the ReadListAsStringArray method returns the list
as an array of strings, which will prove very useful here.
On the server, the business language gives us three ways in which we can generate a select
list from a file. The simples of these, sometimes known as a Basic Selection, is the Select or
SSelect statement run against a file variable, which simply selects all the keys to that file. If
the file has indices, this can be used to fuel an alternative index selection using the SelectIndex
statement, or of course you can generate a selection using either of the enquiry languages,
RetrieVe or SQL. All of these have equivalents in using a UniSelectList.
The simplest of these, the equivalent to the Basic Selection using a file variable on the server,
is to pass an open UniFile object to a Select() method on the UniSelectList. This will give us all
the record keys in an unsorted order.
To use this, add an override ReadAll() method to the Connection that accepts only the file
name as an argument:
public UniDataSet ReadAll(string fileName) { var selectList = sess.CreateUniSelectList(0); using (var uniFile = sess.CreateUniFile(fileName)) { selectList.Select(uniFile); return uniFile.ReadRecords(selectList.ReadListAsStringArray()); } }
When we performed this in the previous post, we returned a cut-down version of the book as
a summary view to save on bandwidth. We should really do the same here for consistency,
especially as we would like to hook this up to the same Angular client before we finish.
Custom Serialization
First we add a new map for the book summary. This needs to match the names for the
BookSummary template in our Angular project, but there is slight catch (of course!). The
WebAPI will mess with the ISBN property and rename it as isbn, which means it won’t be
deserialized correctly on the client.
If we want to preserve the original naming, or otherwise customize the serialization process,
we can tell WebAPI to force which properties to publish, and how, by adding a Data Contract
to our class.

Angular, REST and U2 Page 24 Blog Post 3
Brian Leach Consulting Limited Version 1.0
using System; using System.Collections.Generic; using System.Linq; using System.Runtime.Serialization; using System.Threading.Tasks; namespace angular_u2_server.Models { [DataContract] public class BookSummary { [DataMember] public string id { get; set; } [DataMember] public string title { get; set; } [DataMember] public string authorName { get; set; } [DataMember(Name = "ISBN")] public string ISBN { get; set; } [DataMember] public double salePrice { get; set; } [DataMember] public string media { get; set; } } }
Now we can add a shorter parseSummary to our BookFactory and an override to the fetch()
method to select the file and return a list of BookSummary objects:
public List<BookSummary> fetch() { var list = new List<BookSummary>(); UniDataSet bookArray = _connection.ReadAll("U2_BOOKS"); foreach(UniRecord record in bookArray) { list.Add(parseSummary(record.RecordID, record.Record)); } return list; }
public BookSummary parseSummary(string id, UniDynArray bookRec) { BookSummary bookSummary = new BookSummary(); bookSummary.id = id; bookSummary.ISBN = bookRec.AsString(U2_BOOKS.ISBN); bookSummary.media = bookRec.AsString(U2_BOOKS.MEDIA); bookSummary.salePrice = bookRec.AsPrice(U2_BOOKS.SALE_PRICE); bookSummary.title = bookRec.AsString(U2_BOOKS.TITLE); var authorRec = _connection.Read("U2_AUTHORS", bookRec.AsString(U2_BOOKS.AUTHOR_ID)); bookSummary.authorName = authorRec.AsString(U2_AUTHORS.FULLNAME); return bookSummary; }
Finally hook this up to the simple Get() method on the BookController and change the return
type to an IEnumerable<BookDetail>.

Angular, REST and U2 Page 25 Blog Post 3
Brian Leach Consulting Limited Version 1.0
[HttpGet] public IEnumerable<BookSummary> Get() { var connection = new Connection(); string errText = string.Empty; if (connection.Connect(_connectionSettings.Host, _connectionSettings.User, _connectionSettings.Account, _connectionSettings.Pass, _connectionSettings.Service, ref errText)) { return new BookFactory(connection).fetch(); } else { return new List<BookSummary>(); } }
Navigate in your browser to localhost:port_number/api/Books and see the whole of the
U2_BOOKS file returned as a series of BookSummary items, complete with the forced ISBN
key as below.

Angular, REST and U2 Page 26 Blog Post 3
Brian Leach Consulting Limited Version 1.0
Hooking it Up
We now have a working WebAPI service returning a collection of books and an individual book.
It has taken us some work to get there, and we are now in a similar position to where we were
when we created services using the U2 RESTful Web Service Designer in the previous post. To
complete the sequence, we should hook this up to our Angular client.
It should not surprize you by now, that there is one more piece of unnecessary complexity to
add just to make our lives miserable. Since these are now separate projects, calling one from
the other will cause our famous Cross Origin Resource Sharing (CORS) errors once again since
they will be running on different ports. That is a common enough situation that it is worth
handling here.
Dealing with CORS
Microsoft has added support to WebAPI 2 and above to resolve CORS errors, but it is not
provided by the templates out of the box which would have been useful. We need to install
another package.
Package management, on the plus side, is an area of strength for Visual Studio. Select Tools -
> NuGet Package Manager -> Package Manager Console from Visual Studio to open the
Package Manager Console window.
Type the following command in the Package Manager Console window and let Visual Studio
do the rest:
Install-Package Microsoft.AspNet.WebApi.Cors
To enable cross-origin requests, CORS support is added to the application configuration in the
Startup.cs file, where previously you configured the services. Add the following to globally
enable access to our server: for a live situation you can, of course, be more specific in locking
down requests.

Angular, REST and U2 Page 27 Blog Post 3
Brian Leach Consulting Limited Version 1.0
public void Configure(IApplicationBuilder app, IHostingEnvironment env, ILoggerFactory loggerFactory) { loggerFactory.AddConsole(Configuration.GetSection("Logging")); loggerFactory.AddDebug(); if (env.IsDevelopment()) { app.UseDeveloperExceptionPage(); } else { app.UseExceptionHandler("/Home/Error"); } app.UseStaticFiles(); app.UseCors(builder => AllowAnyOrigin().AllowAnyHeader().AllowAnyMethod()); app.UseMvc(routes => { routes.MapRoute( name: "default", template: "{controller=Home}/{action=Index}/{id?}"); }); }
Start the project and leave it running whilst we attend to the client.
Hooking up the Summary Listing
Open up a second copy of Visual Studio and load the angular_u2 solution from the previous
posts.
If you recall, we consolidated all of the operations for reading and writing books in the
BookListService class, held in the booklist.service.ts file under ClientApp\app\services. We
added a getBooksFromREST method to return the list of books from the U2 RESTful Web
Services like this:
getBooksFromREST(searchTerm: string) { var uri = this.restUrl + "/U2_book_summary?sort=BY ID"; if (searchTerm) { uri = uri + '&select=TITLE LIKE "...' + searchTerm + '..." OR AUTHOR_NAME LIKE "...' + searchTerm + '..."'; } this._http.get(uri).subscribe( result => { this.books = result.json().U2_book_summary as BookSummary[]; this.getPage(1); }); }
Now we can add a similar method to return the books from WebAPI, although at this stage
we are not yet supporting the selection clause. Substitute the port number for your WebAPI
project and note that the selection clause begins the query string with a question mark.

Angular, REST and U2 Page 28 Blog Post 3
Brian Leach Consulting Limited Version 1.0
getBooksFromWebAPI(searchTerm: string) { var uri = "http://localhost:40016/api/Books"; if (searchTerm) { uri = uri + '?select=TITLE LIKE "...' + searchTerm + '..." OR AUTHOR_NAME LIKE "...' + searchTerm + '..."'; } this._http.get(uri) .subscribe( result => { this.books = result.json() as BookSummary[]; this.getPage(1); }); }
The getBooksFromREST method is called from your BookListComponent, held in the file
ClientApp\app\ components\booklist.component.ts. Change that to call the new method on
the constructor and the onSearch method:
constructor(public bookListService: BookListService) { //bookListService.getBooksFromREST(''); bookListService.getBooksFromWebAPI(''); }
onSearch() { //this.bookListService.getBooksFromREST(this.searchText); this.bookListService.getBooksFromWebAPI(this.searchText); }
Start the project and check that it returns the same list of books, without the sort ordering,
to populate the summary listing.

Angular, REST and U2 Page 29 Blog Post 3
Brian Leach Consulting Limited Version 1.0
Using the QueryString
The U2 RESTful Web Services makes use of the QueryString to qualify the RESTful actions. As
we have already seen, the selection clause is passed verbatim in the format:
path/to/resource?select=clause
For simplicity sake, we will do exactly the same using your WebAPI project, to discover how
to handle the query string. The Get method on the BookController will take an optional select
clause that will be used to limit the list of books selected.
Running a Command
To fetch the list of books, we took the simplest route of passing an open UniFile to the Select
method of the UniSelectList. That was all very well but it did not let us set the sort order or
any filtering. To allow for these we should really execute a SELECT or SSELECT statement.
To execute a command on the server, UniObjects predictably provides a UniCommand class.
This sets the Command and offers an Execute() method to run it. If the command generates
an active select list, it can be picked up by a UniSelectList targeting that list number.
To add this, create a second override for the ReadAll method on the Connection:
public UniDataSet ReadAll(string fileName, string selection) { var selectList = sess.CreateUniSelectList(0); var command = sess.CreateUniCommand(); command.Command = selection; command.Execute(); using (var uniFile = sess.CreateUniFile(fileName)) { return uniFile.ReadRecords(selectList.ReadListAsStringArray()); } }
Then a matching override for the fetch() method on the BookFactory:
public List<BookSummary> fetch(string selectClause) { var list = new List<BookSummary>(); string selection = "SSELECT U2_BOOKS WITH " + selectClause; UniDataSet bookArray = _connection.ReadAll("U2_BOOKS", selection); foreach (UniRecord record in bookArray) { list.Add(parseSummary(record.RecordID, record.Record)); } return list; }

Angular, REST and U2 Page 30 Blog Post 3
Brian Leach Consulting Limited Version 1.0
Fetching the QueryString
If we want to get to the QueryString portion of the URI, we can examine that within the
Controller methods by accessing the controller context, which gives access to details of the
request and much more.
To get to the query is typically tortuous, but can return either the string as a whole in the
QueryString property of the request, or parsed for our convenience into a set of query
elements each consisting of the key and value:
var allKeys = ControllerContext.HttpContext.Request.Query;
If we pass a selection clause we can gather that here as below using a lambda query
expression:
string selectClause = allKeys.LastOrDefault(x => x.Key == "select").Value;
That is all you need to add the selection into your BookController:
[HttpGet] public IEnumerable<BookSummary> Get(){ var allKeys = ControllerContext.HttpContext.Request.Query; string selectClause = allKeys.LastOrDefault(x => x.Key == "select").Value; var list = new List<BookSummary>(); var connection = new Connection(); string errText = string.Empty; if (connection.Connect(_connectionSettings.Host, _connectionSettings.User, _connectionSettings.Account, _connectionSettings.Pass, _connectionSettings.Service, ref errText)) { if (string.IsNullOrEmpty(selectClause)) { list = new BookFactory(connection).fetch(); } else { list = new BookFactory(connection).fetch(selectClause); } connection.disconnect(); } return list; }
Start your Angular client once again and check that now you can use the search box to limit
the books returned.

Angular, REST and U2 Page 31 Blog Post 3
Brian Leach Consulting Limited Version 1.0
Getting the Detail
As the final act in this post, you can use the fetch of a single BookDetail to populate the
editor view. Change the onEdit() action to run a new GetBookFromWebAPI method similar
to the GetBookFromREST. There is no envelope added for the book, so you do not need the
u2_book_detail added to the result.json() path.
getBookFromWebAPI(id: any) { var book: BookDetail = null; this.selectedBook = new BookDetail(); // ensure no nulls for template var uri = "http://localhost:40016/api/Books/" + id; this._http.get(uri) .subscribe( result => { this.selectedBook = result.json() as BookDetail; }); }

Angular, REST and U2 Page 32 Blog Post 3
Brian Leach Consulting Limited Version 1.0
That’s it! You have a working WebAPI project that can read and display collections and
individual records using RESTful conventions, and leveraging the UniObjects protocol behind
the scenes.
Next Steps
This post has only scratched the surface of using WebAPI with the UniObjects model. There
are more objects to play with: UniSelectList to run stored procedures, UniXML for fetching
data sets to name but two. WebAPI involves more work than using tools like the Rocket U2
RESTful Web Services, but the payback is in the flexibility and power you can harness. It is also
constantly evolving and changing, so by the time you read this there will already be a new
version around the corner.
In this example, limited by Personal Edition, we have used a simple connection model with a
new connection being instantiated and destroyed for each action. This is obviously not
scalable for real world applications, and so a production quality service would look to employ
connection pooling and better security.
I encourage you to play with WebAPI and all the new features of the ASP.NET Core platform.
These things have come a long way and are opening up new opportunities, especially when
combined with the power of a MultiValue platform like UniVerse behind the scenes.

Angular, REST and U2 Page 33 Blog Post 3
Brian Leach Consulting Limited Version 1.0
A Final Word
This series has been a helter-skelter journey through a number of exciting technologies:
Angular, TypeScript, U2 RESTful Services, ASP.NET and WebAPI, and of course, Rocket U2 and
its object model. I hope you have found this enjoyable as well as educational.
The U2 Platforms are perfectly positioned to take advantage of new technologies, and always
have been. If you wish to learn more, please visit my website at http://www.brianleach.co.uk
and continue to subscribe to the Rocket MultiValue Blog.