ANGEL Training Uploading content to your class Plainview High School presents: Created by: Lori K....
28
ANGEL Training Uploading content to your class Plainview High School presents: Created by: Lori K. Klooz
Transcript of ANGEL Training Uploading content to your class Plainview High School presents: Created by: Lori K....

ANGEL Training
Uploading content to your class
Plainview High School presents:
Created by: Lori K. Klooz

Adding content to your class
Course contents
• Overview: Uploading Content
• Lesson 1: Create a syllabus
• Lesson 2: Add a folder
• Lesson 3: Add a file
• Lesson 4: Create a drop box
• Lesson 5: Add a link

You know how to login to your ANGEL class, but now you need to be able to add content to it.
Overview: Uploading Content
You will be learning how to add files, drop boxes, and links to your class content, as well as creating a syllabus and folders to organize your material.
Adding content to your class

Adding content to your class
Course goals
• Create a syllabus.
• Create folders for content.
• Upload files.
• Create a drop box.
• Add a link to an external website.

Lesson 1
Create a syllabus

Create a syllabus
Lesson 1
One of the first things you will want to add to your class is a syllabus. This can be done two ways.
First, you can use the provided form and simply fill out the appropriate information.
Second, if you already have a syllabus for your class, you can simply upload it to ANGEL.
What is my first step?
Create a syllabus
Lesson 1
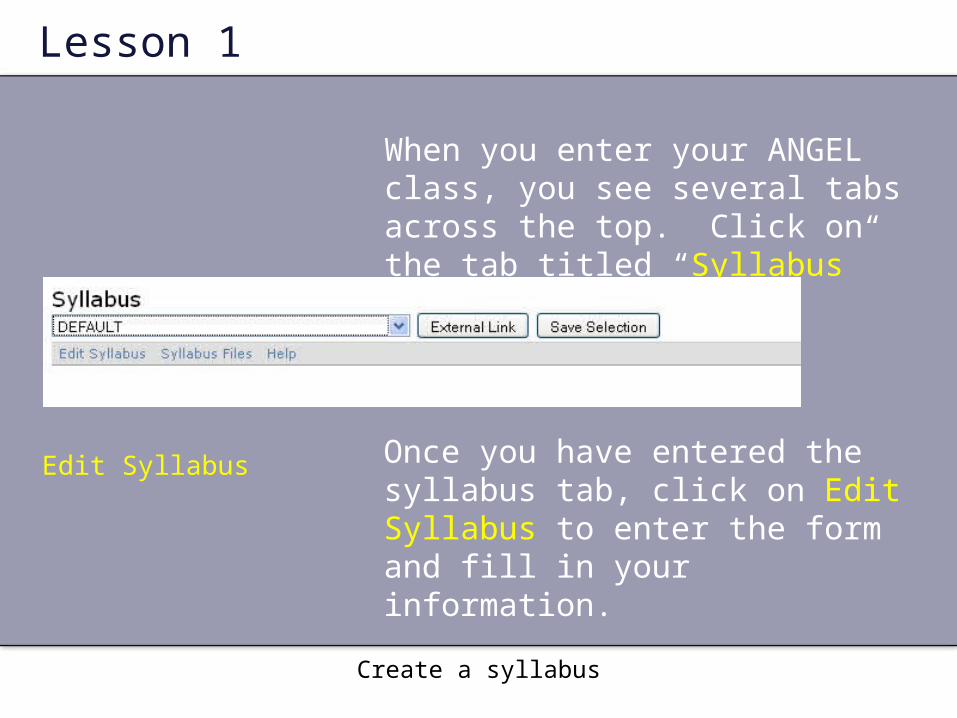
When you enter your ANGEL class, you see several tabs across the top. Click on the tab titled “Syllabus”
Edit Syllabus Once you have entered the syllabus tab, click on Edit Syllabus to enter the form and fill in your information.

Create a syllabus
Lesson 1
Uploading a previously created syllabus
Under the syllabus tab, click on Syllabus Files then Add Content. At that point you can choose Upload Files and browse to find your file.
You might also choose to upload your own syllabus that you have already created. You will need to know where that syllabus is located so that you can easily find it to add to your ANGEL class.

Create a syllabus
Lesson 1
Make sure your syllabus includes:
•Grading policy
•Contact information
•Topics covered
•Expectations regarding the online component of your class
A syllabus will be an important piece for students to refer to throughout the class.

Create a syllabus
Suggestions for practice
1. Click on the syllabus tab.
2. Choose to either fill out the Edit Syllabus form or upload your own syllabus.
3. Save your syllabus.

Lesson 2
Create a folder

Add a folder
Lesson 2
Refer again to the several tabs across the top. Click on the tab titled “Lessons”
This is the tab that will house all your course material.

Add a folder
Lesson 2
Under the Lessons tab, choose Add Content and then click on Folder
You will be asked to title your folder and also give a description.
This is where you want to give some thought to organization. Do you want a folder for each chapter or topic? Then we will add more content inside those folders.

Add a Folder
Suggestions for practice
1. Click on the Lessons tab.
2. Choose Add Content
3. Click on Folder
4. Give your Folder a title and a description.
5. Save your folder.

Lesson 3
Add a file

Add a file
Lesson 3
Open the appropriate folder, then choose Add Content. Choose File to upload a Word document, Excel spreadsheet, PDF, or other type of file.
You can upload worksheets, reading material, quizzes – anything that you want your students to be able to see.

Add a file
Lesson 3
Once you click on File, you will need to Browse to find the file you want to upload and also title the file.
Before you begin this step, make sure you know where your files are saved!

Add a file
Suggestions for practice
1. Click on the Lessons tab.
2. Choose the folder you want to add content to.
3. Choose Add Content.
4. Choose File.
5. Browse to find the file you want to upload.
6. Title the file.
7. Upload File. Don’t reinvent the wheel!
Use material you already have!

Lesson 4
Add a drop box

Add a drop box
Lesson 4
Open the appropriate folder, then choose Add Content. Choose Drop Box to create a place where students can electronically submit class assignments.
You can choose to create a separate drop box for each assignment or create just one for all assignments.

Add a drop box
Lesson 4
Once you click on Drop Box, you will need a title and directions for submitting assignments.
Be specific about giving directions.
You might want to consider including how the students title their submission so that you can easily know what they are.

Add a Drop Box
Suggestions for practice
1. Click on the Lessons tab.
2. Choose the folder you want to add content to.
3. Choose Add Content.
4. Choose Drop Box.
5. Title the Drop Box.
6. Add directions for the Drop Box.
7. Save the Drop Box.
Lesson 5
Add a link

Add a link
Lesson 5
Open the appropriate folder, then choose Add Content. Choose Link to make a link for students to follow to an external website.

Add a link
Lesson 5
Once you click on Link, you will need a title and description. You will also copy and paste the link URL. (You can browse for it, but it may be easier to just copy and paste.)
Link Target
Another thing to think about. Do you want the link to open in the same window or in a new window?

Add a link.
Suggestions for practice
1. Click on the Lessons tab.
2. Choose the folder you want to add content to.
3. Choose Add Content.
4. Choose Link.
5. Title and describe the link.
6. Copy and paste the URL.
7. Save the Link.

ANGEL training
Adding content
To sum things up. . .
You can add just about any kind of content you want to your class on ANGEL. The steps are very similar for folders, files, drop boxes, and links.
While this may seem overwhelming at first, keep in mind that once the materials are there, you will be able to use them over and over again.
Once you have some content added, we will take a look at how to make different material available to students at different times.

ANGEL training
Adding content
EVALUATION 1.Complete the self-checklist on the rubric after you have added at least one of each kind of content.
2.Have someone near you look at what you have added and complete the second column of the rubric.
3.Have an instructor look at what you have added and complete the rubric.