Android GPS Navigation HD Car Recorder User Manual · will be recover to normal working. Main menu...
37
Android GPS Navigation HD Car Recorder User Manual
Transcript of Android GPS Navigation HD Car Recorder User Manual · will be recover to normal working. Main menu...
Android GPS Navigation
HD Car Recorder
User Manual

To Customer
Dear Customer,
Thanks for buying our car camera, it is our honor and pleasure to serve you to
using our product.
Before using this product, please read this manual very carefully and keep it
properly. As production date and batch difference,the instruction maybe have
difference with the actural object.If any discrepancy in future, please adhere to
the actural product instead.
Hope you will like this product and then we can build long term business
relationship in the near future. Your kindly feedback and support will prompt us
to do the better. Thank you.

Key button

1. Power
(1)Turn ON/OFF Car Camera
When DVR is OFF status, keep press 【Power】3 seconds, will turn on car dvr;
When DVR is ON status, keep press 【Power】3 seconds, will turn off car dvr;
(2)Turn ON/OFF Screen background light
Press【Power】shortly, will turn on/off the screen display background light.
2. Photo
When DVR under main menu, press【Photo】will enter car video recording
interface.
3. Speaker Mute
Press 【Speaker Mute】shortly, will turn on/off the DVR speaker.
4. Volume +
Press 【Volume +】shortly, will turn up the dvr speaker volume .
5. Volume -
Press 【Volume +】shortly, will turn down the dvr speaker volume .

6. USB port
Mini USB port is to be connected with car charger and USB cable.
7. AV IN port
The rear camera will be plugged into this AV IN port
8. TF card slot
Micro sd card will be inserted into this TF card slot. It support maximum 32GB
micro sd card (not include in standard package).
9. GPS port
It is for connecting with the extra GPS antenna.
10. Reset
Reset hole is on the backside of dvr, if dvr works unnormally, click Reset, dvr
will be recover to normal working.

Main menu
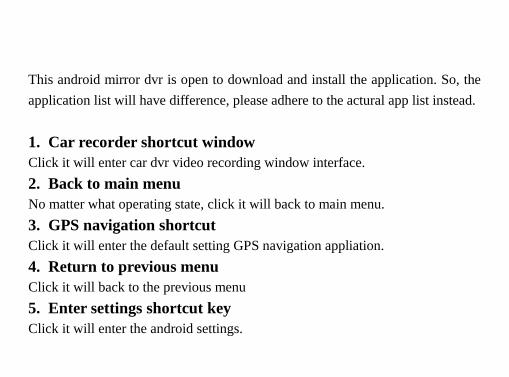
This android mirror dvr is open to download and install the application. So, the
application list will have difference, please adhere to the actural app list instead.
1. Car recorder shortcut window
Click it will enter car dvr video recording window interface.
2. Back to main menu
No matter what operating state, click it will back to main menu.
3. GPS navigation shortcut
Click it will enter the default setting GPS navigation appliation.
4. Return to previous menu
Click it will back to the previous menu
5. Enter settings shortcut key
Click it will enter the android settings.

6. Navigation
1) Press it one second, will enter the default GPS navigation directly;
2) Press it 2-3 seconds, will enter the default navigation settings up window:
For example, if you want to set up the “Navitel” as the dvr default GPS
navigation, click “Navitel”, then “Navitel” will become the default Navigation.

7. Video

Click it will enter video and photo playback.
1) Normal Video
“Fr” is front camera video file; “Ba” is back caemera video file.
2) Locked Video
Locked video files will not by automatically deleted by dvr loop recording.
3) Picture
You could find the dvr photo here and playback it.
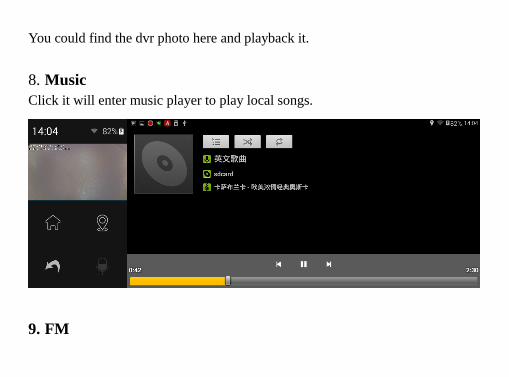
8. Music
Click it will enter music player to play local songs.
9. FM

This DVR support FM transmit function, not FM radio function.
Thanks to the dvr FM transmission function, you can synchronize the dvr music
to your car audio speaker to play out .
1) Click to power on the dvr FM, and please use USB cable or Car Charger as
FM antenna.
2) Set up one FM frequency, eg. 87.5 frequency.

About Frequency choosing, it is better to choose the FM frequency which could
not receive your local FM radio signal, because it will weaken the interferene.
3) Go to your car radio and set up the same frequency as DVR’s, eg.87.9
frequency.
4) Play the music song on the DVR music player, and then DVR speaker will be
closed , but you will hear the song from the car speaker.
Remarks: “Open FM, Close device Sound”, it means, as long as you turn on
DVR CarFM function, then DVR will not have any sound out from DVR
speaker. So, when you found the DVR has no sound, please kindly check
whether the CarFM open or not.
10. DVR

Click it will enter car dvr video recording menu
1) REC
When dvr insert the memory card and start video record, it will have REC
flashing indicated the dvr is video recording.
2) PIP
After plug the rear camera into dvr, you could choose the Picture in Picture
mode or not.
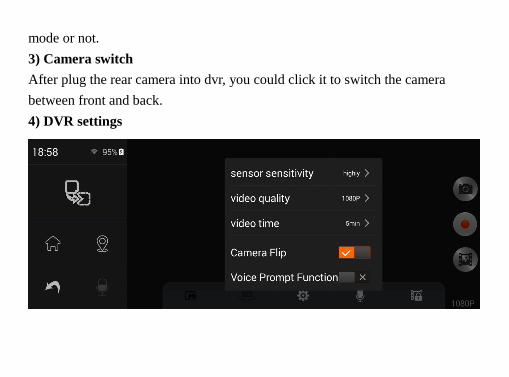
3) Camera switch
After plug the rear camera into dvr, you could click it to switch the camera
between front and back.
4) DVR settings

·Sensor sensitivity
Here you could set up the G-Sensor sensitivity “low/common/highly/close”.
·Video quality
Set up the video resolution at 1080p/720p.
·Video time
Set up the loop video recording clip time at “1min/2mins/5mins”.and then dvr

will record at 1min , or 2 mins , or 5mins one video segment. Because this dvr
support loop recording function, when memory card almost full, dvr will
automatically delete the first previous video segment, and then keep video
recording.
·Camera Flip
Turn on camera flip, the rear camera image display will be mirrored image;
Turn off camera flip, the rear camera image display will be adverse direction
image.
·Voice Prompt Function
Turn on voice prompt, when you operate the dvr, there is one lady voice to say
your operation;
Turn off voice prompt, will close the lady voice when you operating the dvr.
·sdcard format
Click it will remind you “format sd card or not? Ok or cancel”
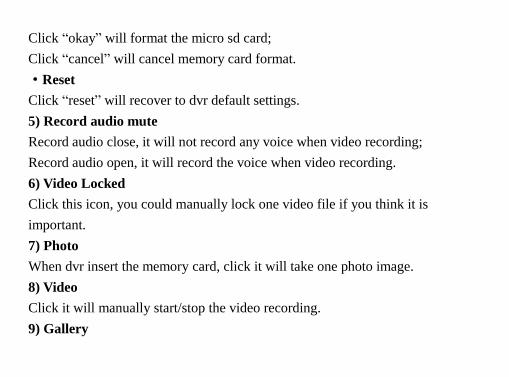
Click “okay” will format the micro sd card;
Click “cancel” will cancel memory card format.
·Reset
Click “reset” will recover to dvr default settings.
5) Record audio mute
Record audio close, it will not record any voice when video recording;
Record audio open, it will record the voice when video recording.
6) Video Locked
Click this icon, you could manually lock one video file if you think it is
important.
7) Photo
When dvr insert the memory card, click it will take one photo image.
8) Video
Click it will manually start/stop the video recording.
9) Gallery

Click it will find the video and photo files in the memory card, too. You could
choose the playback the video files in dvr. If no memory card inside dvr, then
will “Not found any files”.
10) Rear camera window
After connect the rear camera, it will show Picture in Picture window.
【Reverse View Function】
If you need dvr rear camera for reversing, please connect the rear camera’s Red
Wire with your car reverse lamp power’s postive pole (+);
When you get your car in reverse gear, the DVR will automatically switch to rear lens view image with parking line.
11. Google Play
Enter the google play account, you could download other android applications.
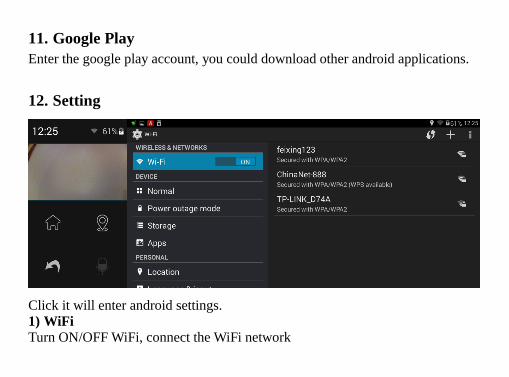
12. Setting
Click it will enter android settings.
1) WiFi
Turn ON/OFF WiFi, connect the WiFi network

2) Normal
Here you could adjust the mirror dvr “Volumes/ Brightness/Sleep/Factory data
reset”. And the “Sleep”, you could adjust when the dvr screen display
background light will be automatically turned off.
3) Power outage mode
·Power off
If you choose “Power off” mode, after you disconnect the power supply, the dvr
will pop up one window, remind you “the device will automatically go to power
off after 10 seconds”.
·Sleep
If you choose “Sleep” mode, after you disconnect the power supply, the dvr will
pop up one window, remind you “the device will automatically go to sleep after
10 seconds”.
4) Storage
Here will indicate the mirror dvr internal used & available storage , and the
external used & available storage.
5) Apps
Here you could uninstall the application you don’t want.Also will show the
application running information.
6) Location
7) Language & input
You could set up the android menu language and default input method.
8) Date & time

You could set up the android dvr date & time here.
9) System information
Here you could check the android dvr systems information “Systems
update/Satues/Model number/Processor type/ Version/Build number”.
13. Clean
Click it will clear and stop all android appliations running but the dvr.
14. Browse
After connect wifi, you could enter browse to surfing internet.
15. File Manager
Click it will enter android dvr all files information.
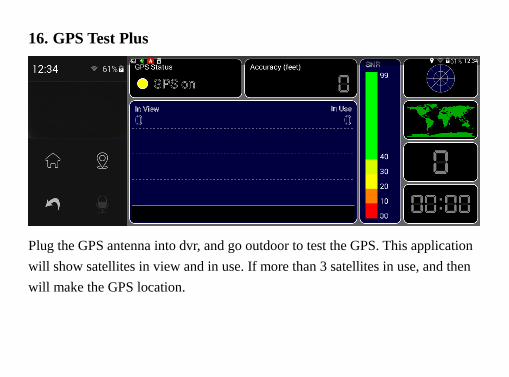
16. GPS Test Plus
Plug the GPS antenna into dvr, and go outdoor to test the GPS. This application
will show satellites in view and in use. If more than 3 satellites in use, and then
will make the GPS location.

17. GPS navigation (adjustable)
If install the GPS navigation into android dvr, the gps application will also show
on the app list. For example, if you install Navitel map, it will show the Navitel
application here.
How to install one GPS navigation application?
1)Please download the navigation apk into dvr.
2)Download the offline GPS map data into dvr, and then the navigation will
work.
18. SwiftKey Keyboard (adjustable) This application support multiple language input.
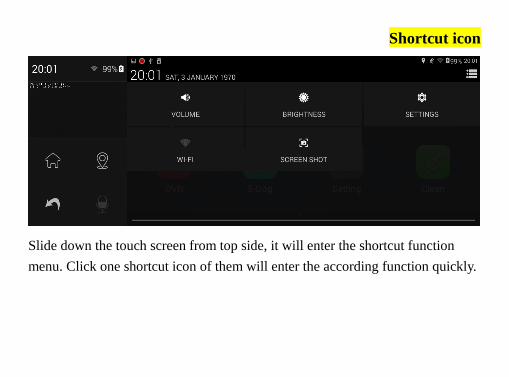
Shortcut icon
Slide down the touch screen from top side, it will enter the shortcut function
menu. Click one shortcut icon of them will enter the according function quickly.

Connect PC
How to connect the mirror dvr with computer?
1) When you connect the dvr with computer via usb cable, please click
icon, and then it will pop up below list:

2) Choose “USB connected”, it will pop up below window:
3) Choose “Turn on USB storage”, the USB storage will be in use, and then you
will find the android dvr disk in your computer.

Car dvr installation guide
1. Close automobile engine:
2. Insert the Micro SD card into TF card slot 【Notice】Please use high speed memory card (Class 6 above), capacity could not less than 512MB, micro sd card maximum support 32GB.
3. Fix the car camera onto the car’s original rearview mirror with rubble rings.
4. Plug the car charger into car cigarette lighter. 5. Connect the car charger with car camera USB port. 【Notice】Arrange the car charger cable to be laid along the edge of windshield. 6. Install the rear camera on the backside of car, please notice the install direction. Arrange the rear camera cable to be laid along the vehicle roof. After rear camera cable arrangement, please plug into the car camera’s AV-IN port. 7. Adjust the camera lens position, ensure the lens level with ground.

8. Start automobile engine, check whether the car camera installation is correct.
【Notice】If install correctly, system working indicator lights; car camera will
enter recording status, video recording indicator flash. Please check whether the
screen display image is normal, if it is inverted image, please don’t hesitate to
contact us.
Specifications
Specifications
Processor Allwinner A33
Smart systems Android 4.4.2 OS
RAM 1GB
ROM 16GB (about 12GB avilable for data storage)
Screen 6.86”Capacitive touchscreen

Display resolution 1280*480px
External sd card Support Maximum 32GB TF card (not included)
Image Sensor 5.0 million pixel HD camera
Lens angle view Front 140 degree
Video Resolution Front: 1920*1080(30f/s)/HD1280x720(30f/s); Rear: 640*480p
Video format MP4
Picture resolution Support 5M
Picture format JPEG
Compression H.264
Speaker Built in
MIC Built in

External I/O port
1*USB 2.0
1*TF card port
1* GPS port
1*AV IN (support auto reverse function)
Functions:
Dual lens Optional,support PIP
AV IN Support
WIFI Support
GPS Navi Support
FM transmit Support
Photo shoot Support
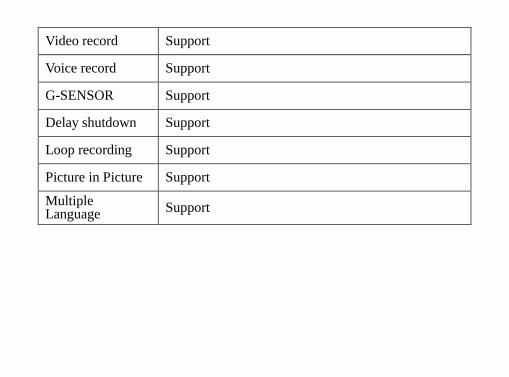
Video record Support
Voice record Support
G-SENSOR Support
Delay shutdown Support
Loop recording Support
Picture in Picture Support
Multiple Language
Support

FAQ
Q1: What's the dvr DC INPUT?
A: The car dvr only support DC 5V IN, please don’t connect with 12/24V Power
directly, otherwise will burn the dvr’s mainboard. So, Please use car charger to
plug into cigar lighter to power supply the car dvr. If you want to connect with
12/24V car battery directly, please buy the 5V convert adapter. Thank you.
Q2: What type of Micro SD card use for car dvr?
A: Please use the High Speed Class 10 micro sd card. Before dvr recording
recording, please format the new memory card firstly in dvr.
Q3: After disconnect with Power, the dvr will automatically turn off?
A: Yes, dvr will automatically Turn ON / OFF accordingly when Power
ON/OFF. And dvr main power supply is from car charger, not from built in
battery, so dvr battery ‘s standby time is short. Please understand.

Q4: Does the dvr support Parking reverse function?
A: Yes, if your car dvr support dual lens, when get your car in reverse gear, the
dvr will automatically switch to the rear camera image with parking line.
Q5: How to connect the Rear Camera?
A: Please connect the rear camera’s Red Wire with your car Reverse Lamp
Power’s Positive Pole (+). And other side connector , please plug into DVR AV
IN port.
Q6: Why the rear camera image direction is opposite side?
A:When car in reverse gear, if the rear camera image is opposite, please enter
dvr’s settings to turn on the “Camera Flip” function, and then the rear camera
image will be mirrored and correct.
Q7: The GPS Navigation no need network support?
A: Yes, the car dvr is with external GPS antenna, support OFF-LINE GPS
navigation, no need any network support.
Q8: Why sometimes GPS satellites search slowly?
A: Weather, High building, outdoor or not will influence the GPS satellites
searching, please go outdoor and open space to search satellites. And the first
time , GPS searching will take a bit long time than the second time, please
kindly wait. Thank you.
Q9: If want to turn off the Screen background light, how to do?
A: If you want manually turn off screen background light, please press “Power”
button one second, you could turn on/off the screen background light;
If you want dvr screen will automatically turn off the light, please enter android
settings to set up the dvr sleep time.
Q10: Why the Android DVR don’t have sound out?
A: Please kindly check whether you turn on the FM transmit function, if FM
transmit turn on, then Car DVR speaker will be closed.
If you have any other questions, please feel free to contact us.