
Android Device Management - VMware
107
Android Device Management VMware Workspace ONE UEM
Transcript of Android Device Management - VMware
Android DeviceManagementVMware Workspace ONE UEM
You can find the most up-to-date technical documentation on the VMware website at:
https://docs.vmware.com/
VMware, Inc.3401 Hillview Ave.Palo Alto, CA 94304www.vmware.com
Copyright ©
2021 VMware, Inc. All rights reserved. Copyright and trademark information.
Android Device Management
VMware, Inc. 2
Contents
1 Integrating Workspace ONE UEM with Android 7Requirements for Using Android With Workspace ONE UEM 8
Supported Operating Systems 8
Network Requirements for Android 9
Firewall Rules for Consoles 10
Enrollment Requirements 10
Enrollment Restrictions for Android 11
Understanding Android Device Modes 12
Work Profile Mode Functionality 12
Work Managed Device Mode Functionality 13
Work Managed Device Without Google Play Services 13
Corporate Owned Personally Enabled (COPE) Mode 14
2 Legacy Android Migration 16Best Practices for Legacy Android Migration 16
How to Migrate Between Device Modes 17
Work Managed Mode Migration 17
Work Profile Migration 18
Corporate Owned Devices Migration 18
Android Without Google Services Migration 18
Fully Managed Mode Migration Using Zero Touch Enrollment 19
Impact on APIs 19
Frequently Asked Questions for Android (Legacy) Migration 20
Prerequisities for Android Migration 20
Device Eligibility 21
Create Smart Group to Migrate from Android (Legacy) 21
Recreate Profiles for Android 21
Configure Application Management 22
Verify Network Settings 23
Migrating from Android (Legacy) Using Migration Tool 23
Migration Details Page 24
Legacy Android Migration Details Page 24
3 Registering Android with Workspace ONE UEM 25Register Android EMM with Managed Google Play Account 26
Register Android EMM with Managed Google Domain (G-Suite Customers) 27
Setup Google Service Account 27
Setup Google Admin Console 28
VMware, Inc. 3

Generate EMM Token 29
Generate EMM Token for Existing Domain 30
Upload EMM Token 30
Setup Users 31
Creating Android Enrollment Users 31
Creating Users Automatically 32
Creating Users Manually 32
Unbind Domain from Workspace ONE UEM 33
4 Android Device Enrollment Overview 34Devices & Users / Android / Android EMM Registration 34
Enrollment Settings 35
Enrollment Restrictions 35
Device Protection for Android Devices 36
Enable Unmanaged Enrollment for Android Devices 36
Autodiscovery Enrollment 37
Registration for Autodiscovery Enrollment 37
Configure Autodiscovery Enrollment from a Parent Organization Group 37
Configuring Work Managed Device Enrollment 38
Enrolling with AirWatch Relay 38
Enrolling with Workspace ONE Intelligent Hub Identifier 39
Enrolling with QR Code 39
Enrolling with Zero Touch Portal 40
Enrolling Devices Using Workspace ONE Access 40
Enroll Work Managed Device with AirWatch Relay 40
Enroll Android Devices Using VMware Workspace ONE Intelligent Hub Identifier 44
Enroll Work Managed Device Using a QR Code 45
Enroll Android Device Using Zero Touch Portal 47
Configuring Corporate Owned Personally-Enabled Enrollment 48
Enroll with AirWatch Relay 49
Enroll with Workspace ONE Intelligent Hub Identifier 49
Enroll with QR Code 49
Enroll with Zero Touch 50
Additional Supported Enrollment Flags for Android Enrollment 50
Formatting 50
Unpin Hub in case of Autodiscovery Enrollment Error 51
Disable Safeboot 51
Disable USB Debugging 51
Disable Unknown Sources 52
Use UEM Authentication 52
Local Auto Discover URL 52
Android Device Management
VMware, Inc. 4
Discovery Retry Count 52
Discovery Interval in Seconds 52
AOSP Enrollment 52
Retry Count 53
Allow Unpinning 53
Enroll Android Device into Work Profile Mode 53
Zebra Stage Now 54
5 How to Configure Android Profiles 57Configure Profile 59
Passcode 60
Chrome Browser Settings 64
Chrome Browser Settings Matrix (Android) 65
Restrictions 67
Specific Restrictions for Android 68
Exchange Active Sync 74
Public App Auto Update 75
Credentials 75
Manage Certificates With Custom XML 76
Custom Messages 76
Application Control 76
Proxy Settings 77
System Updates 78
Wi-Fi 78
VPN 80
Configure Per-App VPN Rules 81
Permissions 82
Lock Task Mode 82
Date/Time for Android Devices 83
Date/Time for Samsung Devices 84
Workspace ONE Launcher 84
Firewall 85
APN 86
Enterprise Factory Reset Protection 87
Configure Enterprise Factory Reset Protection Profile for Android 88
Zebra MX 88
Custom Settings 90
Custom XML for Android Devices 91
Specific Profiles Features for Android 91
6 Android Device Management with Workspace ONE UEM 95
Android Device Management
VMware, Inc. 5

Using the Device Details Page 95
Enrollment Status in Device Details 95
If Devices are in Power Saving Mode 96
Direct Boot for Android Devices** 96
Supported Android Device Commands By Enrollment Mode 96
Device Management Commands for Android Devices 99
Details Apps Tab 101
Request Device Log 102
SafetyNet Attestation 103
7 Android System Updates with Workspace ONE UEM 104Publish Firmware Updates (Android) 104
Samsung Enterprise Firmware Over The Air (EFOTA) Updates 105
Register Samsung Enterprise Firmware Over The Air Updates 105
Configure Restrictions Profile (Samsung EFOTA) 106
Android OS Update for Work Managed Device 106
Procedure 106
Android Device Management
VMware, Inc. 6

Integrating Workspace ONE UEMwith Android 1Workspace ONE UEM powered by AirWatch provides you with a robust set of mobilitymanagement solutions for enrolling, securing, configuring, and managing your Android devicedeployment. Through the Workspace ONE UEM console, you have several tools and features atyour disposal for managing the entire life cycle of corporate and employee owned devices.
The guide explains how to integrate Workspace ONE UEM as your Enterprise Mobility Manager(EMM) with Android devices.
##Key Terms for Android
These key terms associated with Android will help you in understanding how to configure anddeploy settings to your users.
n Work Profile– Work Profile mode, also known as Profile Owner, creates a dedicatedcontainer on your device for only business applications and content. Work Profile modeallows organizations to manage the business data and applications but not have access tothe user's personal data and apps. The Android apps are denoted with a briefcase icon sothey are distinguishable from the personal apps.
n Work Managed Device– Work Managed Device mode, also referred to as Device Owner orFully Managed Mode, is scoped to the whole device. There is no personal side to the deviceand policies are pushed from the Workspace ONE Intelligent Hub to apply to the entiredevice. Work Managed Device mode applies to a device which starts in an unprovisionedstate and, through a separate provisioning process, installs and grants the Workspace ONEIntelligent Hub full control of the entire device.
n Corporate Owned Personally Enabled – Corporate Owned Personally (COPE) refers tocompany-owned devices, similar to Work Managed Device, but is provisioned with a WorkProfile which leverages both personal and corporate use.
n Managed Google Account – Refers to the Google account registered to the device used forAndroid and provides Android app management through Google Play. This account ismanaged by the domain that manages your Android configuration.
n Managed Google Play Account - For organizations that want to set up Android but do nothave G Suite Accounts or Managed Google Accounts.
n Google Service Account – The Google Service Account is a special Google account that isused by applications to access Google APIs recommended for G Suite customers.
VMware, Inc. 7

n EMM Token – Unique ID that Workspace ONE UEM uses to connect the Workspace ONEUEM console to the Managed Google Account.
n Managed Google Domain – Domain claimed for enabling Android associated with yourenterprise.
n Google Domain Setup – Google process for claiming a managed Google domain.
n AirWatch Relay – The Workspace ONE UEM application admins use to bulk enroll AndroidDevices into Workspace ONE UEM.
n NFC Bump – A communication technology that allows devices to exchange information byplacing them next to each other - known as a 'bump'. This is done while using the AirWatchRelay app to pass information from the parent device to the child device.
n AOSP/Closed Network – Android Open Source Project or Closed Network refers to Androiddevices without Google Mobile Services (GMS) and Console environments with no access toGoogle.
n User-based and Device-based enrollment - Select whether Google account on the devicewould be tied to each enrollment session (device-based) or each enrollment user account(user-based)
n Cap and Grow - Cap and Grow allows you to continue using your current device deploymentas you make the transition from Android (Legacy) to Android Enterprise. Any new devicerollouts can be enrolled into Android Enterprise and be managed with older devices.
This chapter includes the following topics:
n Requirements for Using Android With Workspace ONE UEM
n Understanding Android Device Modes
Requirements for Using Android With Workspace ONE UEM
Before deploying Android devices, consider the following pre-requisites, requirements forenrollment, supporting materials, and helpful suggestions from the Workspace ONE UEM team.
Supported Operating Systems
Android 5.X.X (Lollipop)
Android 6.X.X
Android 7.X.X
Android 8.X.X
Android 9.X.X
Note: LG Service Application is no longer supported on LG devices running Android 9 and laterwith Android (Legacy) deployments. If you are using LG devices on Android 9 or later using theAndroid Legacy enrollment method, consider migrating to Android Enterprise.
Android Device Management
VMware, Inc. 8

Android 10.X.X
Android 11.X.X
Note: Customers will experience an updated privacy conscious feature set when a COPE enrolleddevice is upgraded from Android 10 to Android 11. A summary of the key features andfunctionality of COPE devices can be found in Understanding Android Device Modes.
Note: If your organization requires more time to complete testing, there are two options to delayyour devices upgrading to Android 11. See Manage System Updates for Android Devices.
If your devices do not support Google Play EMM Integration, refer to Android (Legacy)deployment or use AOSP/Closed Network configuration.
For more information on AOSP/Closed Network, see Understanding Android Device Modes.
Android Go is not supported with Workspace ONE UEM.
Network Requirements for Android
End-user devices must be able to reach certain endpoints for access to apps and services. TheNetwork Requirements for Android is a list of known endpoints for current and past versions ofenterprise management APIs.
To reach all the endpoints successfully, a direct connection is required. If the devices areconnected behind a proxy, the direct communication is not possible and certain functions fail.
Destination Host Ports Purpose
play.google.com,android.com,google-analytics.com,*.googleusercontent.com,*gstatic.com,*gvt1.com*,*ggpht.com,dl.google.com,dl-ssl.google.com,android.clients.google.com,*gvt2.com,*gvt3.com
TCP/443TCP,UDP/5228-5230
Google Play and updatesgstatic.com,*googleusercontent.com - contains UserGenerated Content (e.g. appicons in thestore)*gvt1.com, *.ggpht, dl.google.com,dl-ssl.google.com,android.clients.google.com -Download apps and updates, PlayStore APIs,gvt2.com and gvt3.com are usedfor Playconnectivity monitoring fordiagnostics.
*.googleapis.com TCP/443 EMM/Google APIs/PlayStore APIs
accounts.google.com, accounts.google.[country] TCP/443 Authentication For accounts.google., use yourlocal top-level domain for . For example, forAustralia use accounts.google.com.au, and forUnited Kingdom use accounts.google.co.uk.
fcm.googleapis.com, fcm-xmpp.googleapis.com TCP/443,5228-5230
Firebase Cloud Messaging (e.g. Find MyDevice, EMM Console <-> DPC communication,like pushing configs)
pki.google.com, clients1.google.com TCP/443 Certificate Revocation list checks for Google-issued certificates
clients2.google.com, clients3.google.com.clients4.google.com, clients5.google.com,clients6.google.com
TCP/443 Domains shared by various Google backendservices such as crash reporting, ChromeBookmark Sync, time sync (tlsdate), and manyothers
Android Device Management
VMware, Inc. 9
Destination Host Ports Purpose
omahaproxy.appspot.com TCP/443 Chrome updates
android.clients.google.com TCP/443 CloudDPC download URL used in NFCprovisioning
connectivitycheck.android.com www.google.com TCP/443 Connectivity check prior to CloudDPC v470Android connectivity check starting with N MR1requires https://www.google.com/generate_204 to be reachable, or for the given WiFinetwork to point to a reachable PAC file. Alsorequired for AOSP devices running Android 7.0or later.
| |www.google.com, www.google.com/generate_204| |AOSP devices runnning Android 7.0 orlater|
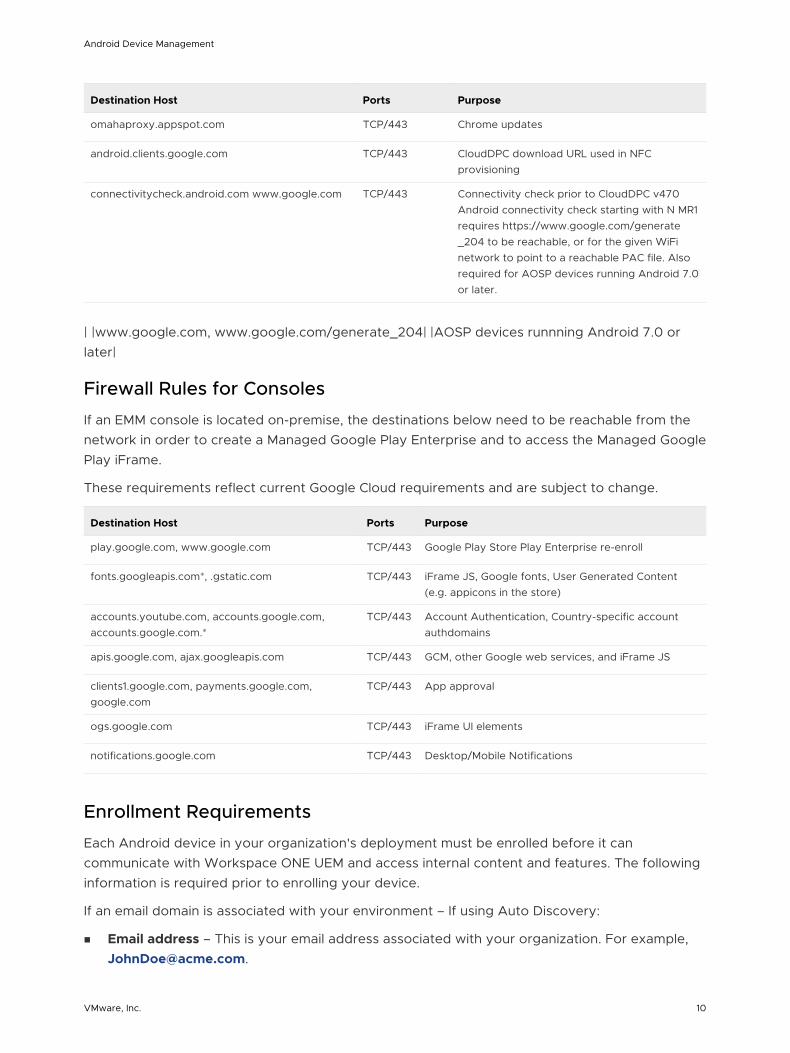
Firewall Rules for Consoles
If an EMM console is located on-premise, the destinations below need to be reachable from thenetwork in order to create a Managed Google Play Enterprise and to access the Managed GooglePlay iFrame.
These requirements reflect current Google Cloud requirements and are subject to change.
Destination Host Ports Purpose
play.google.com, www.google.com TCP/443 Google Play Store Play Enterprise re-enroll
fonts.googleapis.com*, .gstatic.com TCP/443 iFrame JS, Google fonts, User Generated Content(e.g. appicons in the store)
accounts.youtube.com, accounts.google.com,accounts.google.com.*
TCP/443 Account Authentication, Country-specific accountauthdomains
apis.google.com, ajax.googleapis.com TCP/443 GCM, other Google web services, and iFrame JS
clients1.google.com, payments.google.com,google.com
TCP/443 App approval
ogs.google.com TCP/443 iFrame UI elements
notifications.google.com TCP/443 Desktop/Mobile Notifications
Enrollment Requirements
Each Android device in your organization's deployment must be enrolled before it cancommunicate with Workspace ONE UEM and access internal content and features. The followinginformation is required prior to enrolling your device.
If an email domain is associated with your environment – If using Auto Discovery:
n Email address – This is your email address associated with your organization. For example,[email protected].
Android Device Management
VMware, Inc. 10
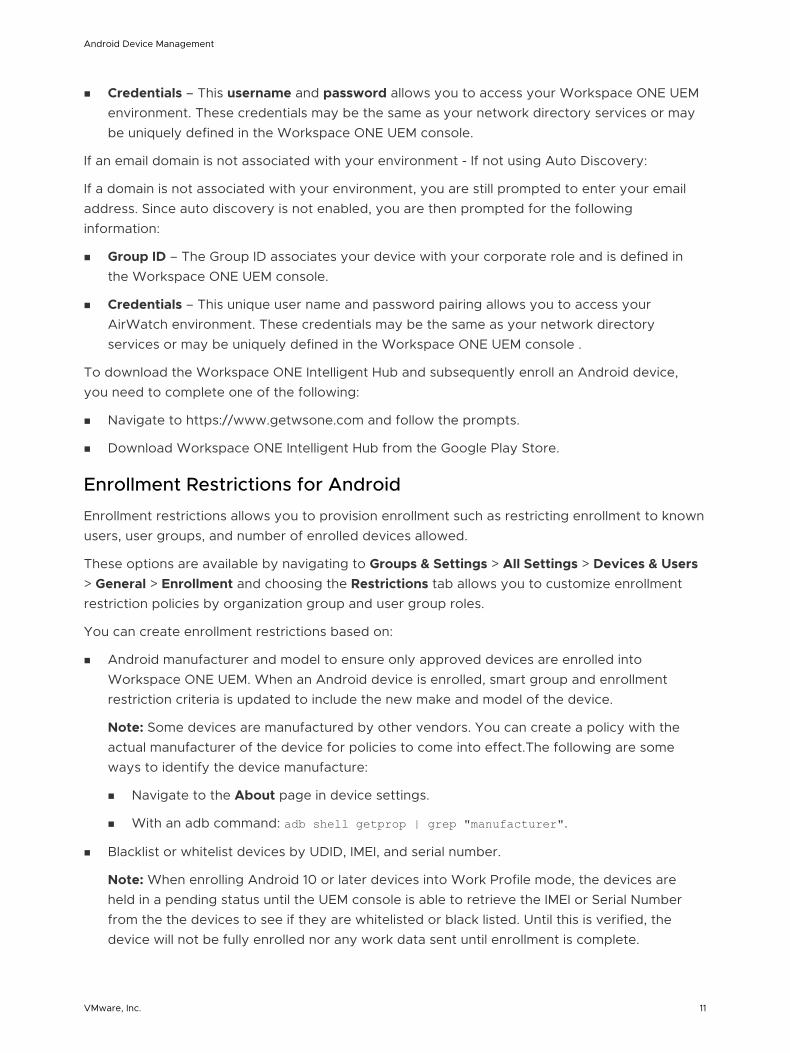
n Credentials – This username and password allows you to access your Workspace ONE UEMenvironment. These credentials may be the same as your network directory services or maybe uniquely defined in the Workspace ONE UEM console.
If an email domain is not associated with your environment - If not using Auto Discovery:
If a domain is not associated with your environment, you are still prompted to enter your emailaddress. Since auto discovery is not enabled, you are then prompted for the followinginformation:
n Group ID – The Group ID associates your device with your corporate role and is defined inthe Workspace ONE UEM console.
n Credentials – This unique user name and password pairing allows you to access yourAirWatch environment. These credentials may be the same as your network directoryservices or may be uniquely defined in the Workspace ONE UEM console .
To download the Workspace ONE Intelligent Hub and subsequently enroll an Android device,you need to complete one of the following:
n Navigate to https://www.getwsone.com and follow the prompts.
n Download Workspace ONE Intelligent Hub from the Google Play Store.
Enrollment Restrictions for Android
Enrollment restrictions allows you to provision enrollment such as restricting enrollment to knownusers, user groups, and number of enrolled devices allowed.
These options are available by navigating to Groups & Settings > All Settings > Devices & Users> General > Enrollment and choosing the Restrictions tab allows you to customize enrollmentrestriction policies by organization group and user group roles.
You can create enrollment restrictions based on:
n Android manufacturer and model to ensure only approved devices are enrolled intoWorkspace ONE UEM. When an Android device is enrolled, smart group and enrollmentrestriction criteria is updated to include the new make and model of the device.
Note: Some devices are manufactured by other vendors. You can create a policy with theactual manufacturer of the device for policies to come into effect.The following are someways to identify the device manufacture:
n Navigate to the About page in device settings.
n With an adb command: adb shell getprop | grep "manufacturer".
n Blacklist or whitelist devices by UDID, IMEI, and serial number.
Note: When enrolling Android 10 or later devices into Work Profile mode, the devices areheld in a pending status until the UEM console is able to retrieve the IMEI or Serial Numberfrom the the devices to see if they are whitelisted or black listed. Until this is verified, thedevice will not be fully enrolled nor any work data sent until enrollment is complete.
Android Device Management
VMware, Inc. 11
Understanding Android Device Modes
Android’s built-in management features enable IT admins to fully manage devices usedexclusively for work.
Android offers several modes depending on the ownership of the device being used within yourorganization:
n Work Profile: Creates a dedicated space on the device for only work applications and data.This is the ideal deployment for Bring Your Own Device (BYOD) applications.
n Work Managed Device: Allows Workspace ONE UEM and IT admin to control the entiredevice and enforce an extended range of policy controls unavailable to work profiles, butrestricts the device to only corporate use
n Corporate Owned Personally Enabled: Refers to company-owned devices, similar toWork Managed Device, but is provisioned with a Work Profile which uses both personaland corporate use.
n Work Managed Device Without Google Play Services: If you are using Workspace ONEUEM on Android Open Source Project (AOSP) devices, non- GMS devices, or using closednetworks within your organization, you can enroll your Android devices using the WorkManaged Device enrollment flow without Google Play Services
Work Profile Mode Functionality
Applications in the Work Profile are differentiated by a red briefcase icon, called badgedapplications, and are shown in a unified launcher with the user's personal applications. Forexample, your device shows both a personal icon for Google Chrome and a separate icon forWork Chrome denoted by the badge. From an end-user perspective, it looks like two differentapplications, but the application is only installed once with business data stored separately frompersonal data.
The Workspace ONE Intelligent Hub is badged and exists only within the Work Profile dataspace. There is no control over personal applications and the Workspace ONE Intelligent Hubdoes not have access to personal information.
There are a handful of system applications that are included with the Work Profile by defaultsuch as Work Chrome, Google Play, Google settings, Contacts, and Camera – which can behidden using a restrictions profile.
Certain settings show the separation between personal and work configurations. Users seeseparate configurations for the following settings:
n Credentials – View corporate certificates for user authentication to managed devices.
n Accounts – View the Managed Google Account tied to the Work Profile.
n Applications – Lists all applications installed on the device.
n Security – Shows device encryption status.
Android Device Management
VMware, Inc. 12
Work Managed Device Mode Functionality
When devices are enrolled in Work Managed Device mode, a true corporate ownership mode iscreated. Workspace ONE UEM controls the entire device and there is no separation of work andpersonal data.
Important things to note for the Work Managed mode are:
n The homescreen does not show badged applications like Work Profile mode.
n Users have access to various pre-loaded applications upon activation of the device.Additional applications can only be approved and added through the Workspace ONE UEMconsole.
n The Workspace ONE Intelligent Hub is set as the device administrator in the security settingsand cannot be disabled.
n Unenrolling the device from Work Managed mode prompts device factory reset.
Work Managed Device Without Google Play Services
If you are using Workspace ONE UEM on Android Open Source Project (AOSP) devices, non-GMS devices, or using closed networks within your organization, you can enroll your Androiddevices using the Work Managed Device enrollment flow without Google Play Services. You canhost apps on your organization's intranet and use OEM specific enrollment methods fordeployment.
You will need to specify in the UEM console that you are using AOSP/Closed Network duringAndroid EMM Registration.
Things to consider when using Work Managed Device Without Google Play Services on AOSP/Closed Network deployments:
n If you have already setup Android at a top Organization Group and want to deploy AOSP/Closed network at a specific child Organization Group only, the UEM console admin has anoption to specify that out of box enrollments at the child Organization Group will not have amanaged Google account. For more information, see Enrollment Settings in the Android EMMRegistration.
n If you are deploying devices using Workspace ONE UEM 1907 and below, there is no UEMconsole configuration required.
n If you are deploying devices using Workspace ONE UEM 1908 and higher, you must configurethe settings in the Android EMM Registration page.
n The supported enrollment methods are:
n QR Code
n StageNow for Zebra devices
n Honeywell Enterprise Provisioner for Honeywell devices
Android Device Management
VMware, Inc. 13
n Enrollment through Workspace ONE Intelligent Hub identifier is not supportet on AOSPdevices.
n Public Auto Update profile is not supported. This profile is specifically for public apps and willnot function on devices on AOSP or closed networks
n Factory Reset Protection profile is not supported.
n Internal apps (hosted in the Workspace ONE UEM console) will deploy silently to the AOSP/Closed network devices.
n Work Managed devices enrolled without a managed Google account should not be assignedany public apps and should not be considered in public app assignment device counts.
n OS Version & OEM requirements for Work Managed Device without Google Play Services:
n AOSP (non-GMS)
n Zebra and Honeywell - Must be on an OS version that supports StageNow orHoneywell Enterprise Provisioner enrollment.
n Other OEMs - Not supported unless OEM develops support for it via a client likeStageNow or by allowing users to access QR Code enrollment.
n Closed Network
n Zebra and Honeywell - Android 7.0 and higher or must be on an OS version thatsupports StageNow (also 7.0 or higher) or Honeywell Enterprise Provisionerenrollment.
n Other OEMs - Android 7.0 or higher since QR Code enrollment is the only supportedmethod.
n When a Work Managed device is configured without Google Play Services, Workspace ONEIntelligent Hub needs to be configured to use AWCM instead Firebase Cloud messaging.Without this update, devices will not receive push notifications from the console.
Corporate Owned Personally Enabled (COPE) Mode
When devices are enrolled using COPE mode, you still control the entire device. The uniquecapability with COPE mode is that it allows you to enforce two separate sets of policies, such asrestrictions, for the device and inside a Work profile.
COPE mode is only available on Android 8.0+ devices. If you enroll Android devices belowAndroid 8.0, the device automatically enrolls as Fully Managed Device.
There are some caveats to consider when enrolling devices into COPE mode:
n For new enrollments, using Android 11 must use Workspace ONE Intelligent Hub 20.08 forAndroid and Workspace ONE UEM console 2008. For specific information, see Changes toCorporate Owned Personally Enabled (COPE) in Android 11.
Android Device Management
VMware, Inc. 14
n Pin Based encryption and Workspace ONE UEM Single Sign On by using SDK is notsupported for Corporate Owned Personally Enabled devices. A work passcode can beenforced to ensure that the use of work applications requires the use of a passcode.
n Single user staging and Multi-user staging are not supported for COPE enrollments.
n Internal applications (hosted in Workspace ONE UEM) and public applications deployed toCOPE devices are shown in the application Catalog within the Work Profile.
n Similar to Work Profile only enrollments, Corporate Owned Personally Enabled devicesprovide users the option to disable the Work Profile (for example, if the user is on vacation).When the Work Profile is disabled, the work applications no longer present notifications andcannot be launched. The status (Enabled or Disabled) of the Work Profile is presented to theadmin on the Device Details page. When the Work Profile is disabled, the latest applicationand profile information cannot be retrieved from the Work Profile.
n The Workspace ONE Intelligent Hub exists in the Fully Managed and the Work Profilesections of the Corporate Owned Personally Enabled device. By existing both inside andoutside the Work Profile, management policies can be applied within the Work Profile and theentire device. However, the Workspace ONE Intelligent Hub is only visible within the WorkProfile.
n When push notifications are sent to the device, the Workspace ONE Intelligent Hub outsidethe Work Profile is temporarily available for the user to view messages, ensuring that criticalmessages reach the user even if the Work Profile is temporarily disabled.
n Assigned profiles can be viewed through the Workspace ONE Intelligent Hub in the WorkProfile.
n Compliance policies for application management (such as block/ remove applications) areonly supported for applications within the Work Profile. Applications can be blacklisted on thedevice (outside the Work Profile) by using Application Control profiles.
n An enterprise wipe will factory reset Corporate Owned Personally Enabled devices.
n Product Provisioning is not supported on COPE enrollments.
n Android 11 Specific Changes:
n Internal applications (hosted by Workspace ONE UEM) can no longer be pushed on thepersonal side of the device. Both internal apps (as private apps) and public apps must bedeployed to the Work profile only.
n Any other functionality such as Compliance Rules that rely on Internal applications willalso no longer be supported.
n The enrollment method afw#hub will no longer be supported.
n Consider using QR code or Zero Touch enrollment instead.
n If your organization requires more time to complete testing, there are two options todelay your devices upgrading to Android 11. For specific information, see Changes toCorporate Owned Personally Enabled (COPE) in Android 11.
Android Device Management
VMware, Inc. 15

Legacy Android Migration 2Android (Legacy), also known as Device administrator, is the legacy method of enrolling Androiddevices with the Workspace ONE UEM console after Android’s Work Managed and Work Profilemodes were introduced in Android 5.0. Customers who are enrolled into Workspace ONE UEMusing Android (Legacy) deployment can migrate to Android Enterprise to take advantage ofdevice functionality for the enterprise.
This section gives you information and best practices on how to move from the Android (Legacy)deployment to Android Enterprise.
Google deprecated certain device administrator APIs in favor or more up-to-date devicefunctionality because device administrator is not well suited to support current enterpriserequirements. Workspace ONE UEM customers can adopt Work Managed (ideal for corporateowned devices), Work Profile (ideal for BYOD deployments), and Corporate Owned PersonallyEnabled (COPE) modes to manage their Android devices by migrating from Android (Legacy) toAndroid Enterprise.
This chapter includes the following topics:
n Best Practices for Legacy Android Migration
n How to Migrate Between Device Modes
n Impact on APIs
n Frequently Asked Questions for Android (Legacy) Migration
n Prerequisities for Android Migration
n Migrating from Android (Legacy) Using Migration Tool
Best Practices for Legacy Android Migration
When to migrate to Android Enterprise is at the discretion of your business needs and timing ofthe actual migration depends on you organization's use cases. Here are a few considerations:
n If your current devices are unlikely to receive Android 10, or the OS updates are controlled byyour organization, it is not necessary to migrate these devices. You can deploy Androidenterprise for newly purchased devices.
VMware, Inc. 16
n BYOD devices are the most vulnerable as end users are likely to update their devices to thelatest operating system. A migration from device administrator to work profile can beachieved using the Android Legacy Migration feature in the Workspace ONE UEM console.
How to Migrate Between Device Modes
Work Managed Mode Migration
Zebra devices running Android 7 and higher and MXMF 7 and higher support a migration fromAndroid (Legacy) to Android Enterprise Work Managed mode. Contact Zebra support to retrievea certificate for your company, which is required from a security perspective to ensure theintegrity of the migration. Certificates typically have a short lifespan (30-90 days). The certificateshould be a .pem format.
Zebra may request the following information for the certificate generation:
n App performing the migration:Zebra MX Service
n App being migrated to Work Managed: Workspace ONE Intelligent Hub for Android
n Customer Name
The migration requirements and features from this flow include:
n VMware Workspace ONE UEM 2006 or later
n Workspace ONE Intelligent Hub 20.05 for Android and Zebra MX Service 4.8 for Android.
n If using APF files for enrollment or Hub Upgrade, the Device Administrator (Android (Legacy)), listed as DA, version of the APF file should be used for enrollment, and the Work Managed (Android Enterprise), listed as DO, version should be used for upgrade.
n The migration is done remotely and silently.
n Google accounts cannot be present on the device, as it will cause migration to fail. Removeany Google accounts before migrating.
n Devices do not power off, reboot, or reset during the migration ensuring app data to remainsintact.
n Wi-Fi connectivity is maintained during the migration.
n Products which do not contain profiles remain installed.
n Migration to AOSP/Closed Network mode is fully supported.
n Prior to migration, review your Play Store restriction policy. If the Play Store is blocked priorto migration, your devices will be treated as AOSP Work Managed devices, and will notsupport public app management. If you'd like to deploy apps from the Play Store aftermigrating to Work Managed, ensure the Play Store is not blocked on your legacy enrolleddevices prior to migration.
Android EMM Registration
Android Device Management
VMware, Inc. 17
Set up Android EMM Registration in your environment to enable enrollment and migration ofdevices into Android Enterprise.
Migration Eligibility
Two new custom attributes, migration.do.eligible and migration.do.ineligibilityReason, are
reported to the console. If migration.do.eligible has a value of 'true' then the device is capable
of migration. The console will automatically check this attribute prior to sending a migrationcommand to the device. If the value is 'false' then please checkmigration.do.ineligibilityReason for further guidance.
Work Profile Migration
The Workspace ONE UEM console provides a seamless process that helps you migrate alldevices from Android (Legacy) to a Work Profile for Android Enterprise. The migration featuresin the UEM console help you to make sure that:
n Your legacy administration remains intact until migration is complete.
n Devices not being migrated are never affected.
n Monitor which devices are complete, in progress, and assigned.
n Create staging or test Smart Groups to make sure that all user devices successfully migratebefore migrating your entire device fleet.
Corporate Owned Devices Migration
You can migrate from Android (Legacy) to Android Enterprise with your corporate owneddevices into Work Managed Mode or Corporate Owned Personally Enabled (COPE). Theenrollment and migration options vary depending on Android OS, device type, and whether thedevices have access to Google Services. This scenario is best for migrating non- Zebra Androiddevices.
The migration and enrollment options are:
n Use Fully Managed enrollment for Android 8.0+ devices.
n Use Knox Mobile Enrollment for Samsung Android 8.0+ devices.
n Follow the Cap and Grow strategy and continue to use your current Android devices enrolledthrough Android (Legacy). A Cap and Grow strategy means that any new device rollouts areautomatically enrolled into Android Enterprise and managed simultaneously with olderdeployments (Android (Legacy) until your organization is ready to move all devices toAndroid Enterprise.
Android Without Google Services Migration
If you are currently enrolled into Workspace ONE UEM with Android devices deployed throughAndroid (Legacy) and want to switch to Android Enterprise without Google Services, we offerClosed Network support for corporated owned devices and unmanaged enrollment for BYODdevices.
Android Device Management
VMware, Inc. 18

If you have a device that has no network connectivity or the device can connect to a network buthas no Google services (a non-GMS certified device), you can enroll these devices into AndroidEnterprise into Work Managed Mode and push internal applications and apply policies withAndroid profiles.
If you have a device that has network connectivity but has restrictions on Google Services, forexample devices being in China, you can use Closed Network support for corporate devices. ForBYOD devices, you can use SDK-based MAM only mode called Registered Mode to enableunmanaged enrollment for Android devices.
Fully Managed Mode Migration Using Zero Touch Enrollment
Zero-touch enrollment allows Android devices to be configured in bulk with Workspace ONEUEM as your EMM provider right out of the box without having to manually setup each device.Using Zero-touch enrollment with your Android (Legacy) migration allows you to move yourdevices to Fully Managed mode with ease and ensuring the migration is completed securely.
1 Setup the Workspace ONE UEM console by completing the prerequisites for Android(Legacy) Migration.
2 Complete Zero-Touch enrollment to get your devices added into the Zero-Touch portal.
3 Test and make sure the migration flow works for your test devices. Remember a Wi-Fi profilehas to be created for the migration to be successful.
4 Send a "Device Wipe" command to the devices previously managed under Android(Legacy).
Impact on APIs
Google deprecated certain device administrator APIs in favor of more up-to-date devicefunctionality because device administrator is not well suited to support current enterpriserequirements. The following APIs available with device administrator no longer function ondevices running Android 10 and above. Devices remaining on Android 9.0 and below are notimpacted:
n USES_POLICY_DISABLE_CAMERA
n USES_POLICY_DISABLE_KEYGUARD_FEATURES
n USES_POLICY_EXPIRE_PASSWORD
n USES_POLICY_LIMIT_PASSWORD
Android Device Management
VMware, Inc. 19
Frequently Asked Questions for Android (Legacy) Migration
To help you better understand the Android (Legacy) migration, here are some commonly askedquestions and best practices to make for a successful migation.
n When I enable Android enterprise in an organization group, does it affect my existingdevice administrator enrollments?
n Current device administrator enrollments will remain enrolled and will receive all assignedprofiles and apps. Enabling Android enterprise will affect new enrollments only; when anew Android enterprise-capable device enrolls it will use Android enterprise. If a device isnot Android enterprise capable, it will enroll using device administrator.
n Can device administrator and Android enterprise co-exist in the same UEM console?
n Device administrator enrollments and Android enterprise enrollments can co-exist in thesame organization group. Profile management is separated as Android and Android(Legacy) for Android enterprise and device administrator enrollments respectively.
Additionally, with UEM console v9.2.0+ it is possible to override Android enterpriseenrollments at specific organization groups, or even limit it to specific smart groups.
n Can I use Product Provisioning with Android enterprise?
n Product Provisioning is supported on Fully Managed devices.
n Are OEM-specific management capabilities available on devices enrolled through Androidenterprise?
n OEM-specific management capabilities are possible through OEMConfig. OEMs such asSamsung and Zebra have created public apps that can be added to the Workspace ONEUEM console. These apps provide app configuration key-value pairs that can alter devicecapabilities.
n Does Workspace ONE Assist work with Android Enterprise?
n Workspace ONE Assist is compatible with all Android Enterprise enrollment options.
n Can new customers use Android (Legacy)?
n New Workspace ONE UEM customers must setup Android Enterprise to deploy Androiddevices.
n Existing customers can disable and re-enable Android (Legacy) as desired.
Now that you understand Android (Legacy) migration, you can proceed to complete theprerequisites to being migration.
Prerequisities for Android Migration
To provide an intuitive end user experience for the migration, this page will guide you through asuccessful migration. Not completing these steps could result in a failed migration or users notbeing able to access all apps they need.
Android Device Management
VMware, Inc. 20
Device Eligibility
Device needs to be eligible for migration. For example. Samsung devices with Knox Containerenabled cannot be migrated.
Check eligibility for migration by navigating to Device Details > Custom Attributes and makesure migration.eligible attribute has a value of True.
Create Smart Group to Migrate from Android (Legacy)
Before you migrate, you will need to create Smart Groups for all devices that are being migrated.You can create separate groups for staging a small number of devices for testing purposesbefore you deploy to all your devices.
The Workspace ONE UEM console provides a seamless process that helps you create SmartGroups to migrate all devices from Android (Legacy) to Android Work Profile deployment.
1 Select the applicable **Organization Group (OG)**to which your new smart group applies andfrom which it can be managed. Selecting an OG is optional.
2 Navigate to Groups & Settings > Groups > Assignment Groups and then select Add SmartGroup
3 Enter a Name for the smart group.
4 Configure the Smart Group type:
n Criteria: This option works best for groups with large numbers of devices (more than500) that receive general updates. This method works best because the inherent detailsof these groups can reach all endpoints of your mobile fleet.
n Devices or Users: This option works best for groups with smaller numbers of devices(500 or fewer) that receive sporadic, although important, updates. This method worksbest because of the granular level at which you can select group members. Note:Switching between the two smart group types will erase any entries and selections youmight have made.
At least one device deployed as Android (legacy) needs to be selected as eligible formigration or you will get errors while setting up the migration.
5 Select Save.
Recreate Profiles for Android
Android Enterprise profiles are separate from device administrator, or Android (Legacy) profiles.You must re-create profiles for Android enterprise. These profiles are available for configurationafter completing the Android enterprise registration.
On UEM consoles lower than 9.4.0, Android enterprise profiles are available under Devices >Profiles & Resources > Profiles > Add > Add Profile > Android > Android for Work.
On UEM consoles 9.4.0 and higher, Android enterprise profiles are available under Devices >Profiles & Resources > Profiles > Add > Add Profile > Android.
Android Device Management
VMware, Inc. 21
Note: If the Wi-Fi profile was configured for your Android (Legacy) deployment, you must createand assign an Android Wi-Fi profile to the devices selected for migration before you can create amigration.
Android device profiles ensure proper use of devices, protection of sensitive data, and workplacefunctionality. Profiles serve many different purposes, from letting you enforce corporate rulesand procedures to tailoring and preparing Android devices for how they are used.
Configure Application Management
Once an application is added to the Workspace ONE UEM console, it can be distributed to deviceadministrator, also known as Android (Legacy), and Android enterprise enrollments. If a publicapplication has been added to the UEM console prior to Android enterprise registration, theapplication management section of this guide will help you configure settings so there will be nodisruption to existing app assignments.
Internal applications cannot be managed for Work Profile management mode under AndroidEnterprise. In order to make sure internal applications are available for devices that havemigrated to Work Profile, you must upload the application to the Managed Google console as aprivate application prior to migration.
Use Workspace ONE UEM to manage the deployment and maintenance of publicly availablemobile applications from Google Play Store. Make sure every public app is approved for yourorganization to ensure seamless migration.
Note: If you are migrating to Work Managed devices, review your Play Store restriction policyprior to migration. If the Play Store is blocked prior to migration, your devices will be treated asAOSP Work Managed devices, and will not support public app management. If you'd like todeploy apps from the Play Store after migrating to Work Managed, ensure the Play Store is notblocked on your legacy enrolled devices prior to migration to Work Managed.
Manage Public Apps for Android (Legacy) Migration
If a public app has been added to the UEM console prior to the Android (Legacy) migration andAndroid Enterprise registration, this task will help you make sure all apps are imported after themigration.
These steps simply ensure the UEM console is aware the app has been approved on managedGoogle Play. It is now possible to assign this app to Android enterprise enrollments after themigration has completed.
1 Navigate to https://play.google.com/work (log in with the same Gmail account used toconfigure Android enterprise), search for the app(s) and approve it for your organization.
2 In the UEM console, navigate to Apps & Books > Native > Public > Add Application > Android> Import from Play .
3 Select Import once the list of approved apps displays
After migration, the app cache is cleared and users will have to re-enter there credentials.
Android Device Management
VMware, Inc. 22
Verify Network Settings
The Network Requirements for Android is a list of known endpoints for current and past versionsof enterprise management APIs. Check your network settings to ensure a connection betweenWorkspace ONE, the Google Play Store, and Android devices.
Once you've walked through the prerequisites, you are ready to proceed with the migration withyour desired device mode.
Migrating from Android (Legacy) Using Migration Tool
The Workspace ONE UEM console provides a migration tool that allows you to complete allprerequisites, select smart groups, configure a custom message for your users, and a dashboardto view a summary page of the migrated devices including eligilibity status and reason for failureor success.
Be sure to have completed the prerequisites to avoid failed migration or users not being able toaccess all apps they need.
1 Navigate to Devices > Lifeycle > Legacy Android Migration and select New Migration.
2 Select desired mode from the Select Migration Type window.
3 Complete the prerequisites and select Next to move to the Details tab.
Details The details tab allows you to select the Smart Groups you want to migrate
Name Enter a friendly name for the migration group.
Description Enter detailed description of the migration group.
Smart Groups Specify which smart groups to receive the migration. Smart Groups must include Android(Legacy) deployments. You will receive an error message if a Smart Group is not eligible to beincluded in the migration.
Message After users have chosen to upgrade to Android Enterprise, this message will inform them aboutthe migration and prompt them to take action to proceed.
4 Select Validate. Selecting validate retrieves the number of devices eligible for migration.
5 Select Continue once all devices are validated for migration. You cannot continue until a validSmart Group is selected.
A Summary page displays showing details such as list of devices, migration eligibility, andreason the device is not eligible, when applied
6 Select Create to create the migration.
A notification is sent to eligible devices in the selected Smart Groups informing users aboutmigration and prompting them to perform necessary actions to proceed. You can monitorprogress on the Legacy Android Migration page. From this page you can select migrationsfrom the list view to display the Migration Details page.
Android Device Management
VMware, Inc. 23

Note: During Android (Legacy) migration to Android Enterprise, based on the setting in theScheduler the migration command is automatically sent for the first batch size (300) ofdevices instantly. After the first 300 devices, the remaining devices will receive the commandat the determined intervals. You can view the settings in the UEM console under Admin >Scheduler.
See the Migration Details Page for more information
Migration Details Page
The Migration Details pages allow you to track the migration by migration group, details, status,and list view of devices included in migration.
Legacy Android Migration List View
The Legacy Android Migration List View automatically displays after you create a new migrationpage. The list view helps you to view all the real-time updates of your end user devices that youare migrating with the Workspace ONE UEM console. The list view allows you to:
n Edit specific migrations by selecting the radio button on the desired migration friendly name.You can update the migration for new devices added to the Smart Group by selecting Edit.
n Delete migration groups which prevents devices in queue from migrating from LegacyAndroid by withdrawing the persistent notification. Android Work Profile is not removed fromdevices that have already migrated.
n Search and narrow down a device using the Search option.
Legacy Android Migration Details Page
The Migration Details page is accessed by selecting a migration Friendly Name from the LegacyAndroid Migration List View with the Workspace ONE UEM console to review the status of themigration. You can view a graphical overview, status, and reason for the migration failing orsucceeding.
Use the Migration Details page to push the migration command to the device with the Retrybutton if the migration fails.
Customize a message to the devices in the migration batch with the Notify button. Configure thefield as followed:
n Message Type: Select the message type (email, SMS, or push) that Workspace ONE UEMuses for this template.
n Subject: Enter the message subject.
n Message Body: Enter the message Workspace ONE UEM displays on the end-user devicesfor each message type.
Android Device Management
VMware, Inc. 24

Registering Android withWorkspace ONE UEM 3To start managing Android devices, you’ll need to register Workspace ONE UEM as yourEnterprise Mobility Management (EMM) provider with Google. The Getting Started page in theWorkspace ONE UEM console provides a step by step solution to help configure the enterprisemanagement tools needed to secure and manage your device fleet.
There are two ways to configure Android: by using a Managed Google Play account (preferred)or using a managed Google domain (recommended by Google for G Suite customers). AManaged Google Play account is used when your business does not use G Suite and allows formultiple configurations of Android within your organization using a personal Google account.Workspace ONE UEM manages this account and requires no Active Directory sync or Googleverification.
Setting up Android using managed Google domain (G Suite) requires your enterprise to set up aGoogle domain and must follow a verification process to prove that you own the domain. Thisdomain can only be linked to one verified EMM account. The setup includes creating a GoogleService Account and configuring Workspace ONE UEM as your EMM provider. Consider creatinga Google account specifically for Android for your organization to use so as not to conflict withany existing Google accounts.
Important: When you create a Google account for the managed Google domain it is consideredthe administrator account for your domain. Consider adding additional users (Google accounts)to help you manage tasks in managed Google Play. Adding more Google accounts is useful in theevent the primary Google account expires. If this happens, you can still access the managedGoogle domain and avoid unwanted behaviors. Furthermore, do not delete the Google AdminAccount or EnterpriseID associated to your Android EMM Registration. Deleting may result inAndroid EMM Registration errors or failure.
You can create and assign roles for your managed Google domain. See Assign Roles inEnterprises.
The Google Service Account is a special Google account that is used by applications to accessGoogle APIs and is required when setting up Android using the managed Google domain methodfor your business. The Google Service Account credentials are automatically populated whenconfiguring Android Accounts when registering using managed Google play account. If youencounter an error while setting Android Accounts, clear your settings in the Workspace ONEUEM console and try again or create the account manually. For Google Accounts, considercreating your Google Service Account before either setup method.
VMware, Inc. 25
To change the Google account or make changes to your admin settings, you have to unbind theaccount from the Workspace ONE UEM console.
Important: The setup of Android includes the integration of third-party tools that is not managedby VMware. The information in this guide for the Google Admin Console and Google DeveloperConsole has been documented with the available version as of January 2018. Integration with athird-party product is not guaranteed and is dependent upon the proper functioning of the third-party solutions.
This chapter includes the following topics:
n Register Android EMM with Managed Google Play Account
n Register Android EMM with Managed Google Domain (G-Suite Customers)
n Creating Android Enrollment Users
n Unbind Domain from Workspace ONE UEM
Register Android EMM with Managed Google Play Account
The Workspace ONE UEM console allows you to complete a simplified setup process to bind theUEM console to Google as your EMM provider.
Prerequisites
If the Android EMM Registration page is blocked, make sure you enable the Google URLs in yournetwork architecture to communicate with internal and external endpoints.
Procedure
1 Navigate to Getting Started > Workspace ONE > Android EMM Registration.
2 Select Configure and you are redirected to the Android EMM Registration page.
3 SelectRegister with Google. If you are already signed in with your Google credentials, youare directed to the Google "Get Started" page.
If your organization uses more than one domain, you will need to register separate domains.
4 Select Sign In if you are not already, and enter your Google credentials and then select GetStarted.
5 Enter your Organization Name. The Enterprise Mobility Manager (EMM) provider fieldpopulates automatically as VMware Workspace ONE UEM.
6 Select Confirm > Complete Registration. You are redirected to the Workspace ONE Console,and your Google Service Account credentials are automatically populated.
7 Select Save > Test Connection to ensure the service account is set up and connectedsuccessfully.
If your settings in the UEM console have been cleared, when you navigate to register withGoogle, you will see a message that prompts you to complete setup. You are redirected back tothe Workspace ONE UEM console to finish setup.
Android Device Management
VMware, Inc. 26

Register Android EMM with Managed Google Domain (G-Suite Customers)
Setting up your account with managed Google domain requires the organization to set up aGoogle domain if they do not already use one. You will also complete several manual tasks, suchas verifying domain ownership with Google, obtaining an EMM token, and creating an enterpriseservice account to use this type of setup.
1 Navigate to Getting Started > Workspace ONE > Android EMM Registration.
2 Select Register to be redirected to the Android Setup Wizard to complete three steps:
a Generate Token: Obtain your enterprise token by registering your enterprise domain withGoogle.
b Upload Token: Enter the EMM Token into the Android setup wizard.
c Setup Users: Configure how users will be created for your entire enterprise.
3 Select Go To Google. You are redirected to the G Suite site.
4 Register your enterprise and verify your domain.
Setup Google Service Account
The Google Service Account is a special Google account that is used by applications to accessGoogle APIs. You should create this account after you generate your EMM token so you canupload all information at one time.
1 Navigate to the Google Cloud Platform- Google Developers Console.
2 Sign in with your Google credentials.
The Google Admin credentials do not have to be associated with your business domain.Consider creating a Google account specifically for Android for your organization to use so asnot to conflict with any existing Google accounts.
Note: Consider adding additional accounts so that if one account expires becaue of inactivity,you will have additional accounts to log in and access your Google Service Account.
3 Use the drop-down menu from the Select a project menu and select New project.
4 Enter a Project Name to create your API project in the New project window. Consider usingAndroid EMM-CompanyName as the naming convention.
5 Agree to the terms and conditions and select Create.
Your project generates and the Google Developer Console redirects you to the API Managerpage.
6 Select Enable APIS and Services for Android from the APIs & Services Dashboard.
7 Search and enable the following APIs: Google Play EMM API and Admin SDK.
Android Device Management
VMware, Inc. 27
After creating your project and enabling APIs, create your service account in the GoogleDeveloper's Console.
8 Navigate to APIs & Services > Credentials > Create Credentials > Service Account Key >New Service Account.
9 Define the Service Account name for your service account. Consider following the Androidnaming convention and be sure to note the name you choose as you will need it in furthersteps.
10 Use the drop-down menu to select the Role > Project as Owner.
11 Select the Key Type as P12.
12 Select Create. The identity certificate gets automatically created and downloaded to yourlocal drive. Be sure to save your identity certificate and password for when you upload thecertificate into the Workspace ONE UEM console.
13 Select Manage service accounts from the Service Account Keys list which opens the ServiceAccounts page.
14 Select the menu button (three vertical dots) beside your service account and select Edit.
15 Select Enable G Suite Domain-wide Delegation.
16 Enter a Product name in order change settings for G Suite Domain. Consider usingAndroidEMM-CompanyName as the naming convention.
17 Select Save.
18 Select View Client ID under the Domain Wide Delegation field. The details of your serviceaccount displays. From here, you will leave the Developer Console and input your credentialsinto the Google Admin Console.
Be sure to save your client ID before navigating away from the Developer's Console. You willalso use these credentials in the Workspace ONE UEM console when you upload yourEMM token.
Setup Google Admin Console
The Google Admin Console is where administrators manage Google services for users in anorganization. Workspace ONE UEM uses the Google Admin Console for integration with Androidand Chrome OS.
The Manage API client access page allows you to control custom internal application and third-party application access to supported Google APIs (scopes).
1 Login to the Google Admin Console and navigate to Security > Advanced Settings > ManageAPI Client Access.
Android Device Management
VMware, Inc. 28

2 Fill in the following details:
Setting Description
Client Name Enter the Client ID generated when creating your Google Service Account
One or More API Scopes Copy and paste the following Google API scopes for Android: Android: https://www.googleapis.com/auth/admin.directory.user
3 Select Authorize.
Generate EMM Token
Your unique EMM token binds your domain for Android management to the Workspace ONEUEM powered by AirWatch. You are directed to the G Suite setup site after selecting Go toGoogle from the previous task to begin.
The steps in outlined in task are for generating an EMM token for a new domain. The task togenerate the EMM token is different depending on if you are registering with a new or existingdomain.
If you are generating a token for an existing domain, simple navigate to Security > ManagedEMM Provider for Androidand select Generate EMM Token and proceed to step 5.
1 Complete the following fields:
a About You – Enter your admin contact information.
b About Your Business – Fill out your company information.
c Your Google Admin Account – Create a Google admin account.
d Finishing Up – Enter the security verification data.
2 Select Accept & create your account after reading and agreeing to terms set by Google.
3 Follow the remaining prompts to Verify domain ownership and Connect with your provider.Once verified, this becomes your managed Google domain.
To verify domain ownership, the following options are available: add a meta tag to yourhomepage, add a domain host record, or upload HTML file to your domain site. Configuresettings for the available options.
4 Select Verify to proceed. If this process is successful, the Connect with your provider sectiondisplays your EMM token. This token is valid for 30 days. If you encounter problems duringthis step, refer to Google support using the number and unique PIN listed.
5 Copy the generated EMM token and select Finish.
Workspace ONE UEMrecommends that you create your Google Service Account before youreturn to the Workspace ONE UEM console to upload the EMM token, so that you can upload allcredentials at one time.
Android Device Management
VMware, Inc. 29
Generate EMM Token for Existing Domain
Your unique EMM token binds your domain for Android management to the Workspace ONEUEM powered by AirWatchWorkspace ONE UEM powered by AirWatch. For existing domain,you are directed to the Google Admin Console to generate the EMM token. The steps in outlinedin task are for generating an EMM token for an existing domain. The task to generate the EMMtoken is different depending on if you are registering with a new or existing domain. Forinformation on generating an EMM token for a new domain, see . Log into the Google AdminConsole using your Google Admin credentials.Navigate to Security > Managed EMM Provider forAndroid and select Generate EMM Token.Copy and paste the token into the Workspace ONEUEM console.
The steps in outlined in task are for generating an EMM token for an existing domain. The task togenerate the EMM token is different depending on if you are registering with a new or existingdomain.
1 Log into the Google Admin Console using your Google Admin credentials.
2 Navigate to Security > Managed EMM Provider for Androidand select Generate EMM Token.
3 Copy and paste the token into the Workspace ONE UEM console.
Upload EMM Token
Enter the information you obtained from Google during registration. This includes the registereddomain, Enterprise Token, and the Google Admin Email Address you created.
You can also get your enterprise token by logging into https://admin.google.com with yourGoogle Admin Email Address under Security→Manage EMM Provider for Android.
1 Navigate to Getting Started > Workspace ONE > Android EMM Registration. If you haveclosed the window or are not automatically redirected back to Workspace ONE UEM.
2 Select Register to be redirected to the Android Setup Wizard.
3 Select Upload Token from the Android Setup wizard.
This is also referred to as the Enterprise Token.
4 Complete the following fields:
Setting Description
Domain Domain claimed for enabling Android associated with your enterprise.Important: If yourdomain has already been registered with another EMM provider, you will not be allowedto upload a new EMM token.
Enterprise EMMToken
Token generated in Google Admin Console.
Google Admin EmailAddress
This is the admin account used for domain registration, Google Developers Console, andthe Google Admin Console.
Client ID Client ID generated when creating your Google Service Account. This ID is retrievedfrom the Google Developer Console Settings.
Android Device Management
VMware, Inc. 30
Setting Description
Google ServiceAccount EmailAddress
Email generated from Google Service Account creation. This ID is retrieved from theGoogle Developer Console Settings.
Certificate ID Upload the P12 certificate created when generating Google Service Account. Requires apassword. This ID is retrieved from the Google Developer Console Settings.
5 Select Next to set users.
Setup Users
All users in your enterprise using Android need Google accounts created to connect with theirdevices. This final step in the Android EMM Registration wizard allows you to determine whichsetup method you prefer for creating users.
You have two options for creating users under Android:
n Allow Workspace ONE UEM to automatically create Google accounts during enrollment.
n Create users manually by logging into the Google Admin Console or using the Google ActiveDirectory Sync Tool (GADS).
The format for the user name is username@<your_enterprise_domain>.com.
1 Enable one of the following options to determine how users are set up:
n Create Google account during enrollment based on enrolled user's email address.
n Use SAML for Authentication - Enable SAML for the enrollment process.
n Use SAML for Google Account Authentication - To use this method, configure single sign-on by navigating to Security > Single sign on in the Google Admin Console. If auto createusers is not enabled with one of the above methods, the Workspace ONE UEM consoledirects you to the alternative method of creating Google accounts by the Google ActiveDirectory Sync Tool or the Google Admin Console.
2 Use the Test Connection option which checks for proper communication with Google.
n Play API Access: Validates Google EMM API is enabled and applications can be installed.
n Directory API Access: Validates Admin SDK API is enabled and https://www.googleapis.com/auth/admin.directory.user scope is authorized on Google AdminConsole.
3 Select Save.
Creating Android Enrollment Users
VMware suggests that you create users for Android automatically during enrollment. TheAndroid setup wizard allows you to specify if you want to automatically create user accountsduring enrollment, and if so, to use SAML to authenticate the accounts. If you have not set upSAML previously, the wizard will display a link that directs you to configure your settings.
Android Device Management
VMware, Inc. 31

Creating Users Automatically
1 Select Yes to Create Google accounts during enrollment based on enrolled user's email.
2 Select Yes to Use SAML endpoint to authenticate accounts.
If you have not setup SAML, the wizard will prompt you to configure SAML authenticationsettings.
3 Select Yes to Use SAML for Google Account Authentication which requires you to configuresingle sign-on in the Google Admin Console.
4 Select Save to complete Android setup.
Creating Users Manually
You can manually create user accounts for your entire enterprise outside of the Workspace ONEUEM console by either using either the Google Cloud Directory Sync (GCDS) tool or the GoogleAdmin Console. To access the Google Admin Console , you can click the link provided in thesetup wizard. You will need to contact Google for further instructions on how to use the console.
The GCDS method requires you to use similar settings as the AirWatch Directory Services.Access the Directory Services settings by navigating to Groups & Settings ► All Settings ►System ► Enterprise Integration ► Directory Services.
You can access the GCDS tool by clicking the link posted in the setup wizard or by downloadingthe tool directly to your computer from the Google Support page.
The GDCS tool allows you to manually create Google accounts for every employee in yourenterprise in one bulk creation. The accounts are created by synchronizing with the informationstored from your VMware Workspace ONE Directory Services.
Note: The information discussed here is up to date as of latest version of GCDS v4.4.0 for March2017.
1 Select the link from the setup wizard or download the GDCS tool directly from Google.
2 Open the tool from your desktop and select User Accounts and Groups to synchronize.
3 Select the Google Domain Configuration tab and enter the following:
a Enter Primary Domain Name.
b Select to Replace domain names in LDAP email address (of users and groups) with thisdomain name. This will ensure that all user email addresses match the domain name.
4 Select the Authorize Now button.
5 Follow the steps to continue the authorization process when the Authorize Google AppsDirectory Sync dialog displays.
a Sign-in to your Android admin account.
b Enter the verification received in email.
c Select Validate to confirm these settings.
Android Device Management
VMware, Inc. 32
6 Select the LDAP Configuration tab to enter the connection settings to sync the AirWatchDirectory Services with Google. From here, you can enter the same settings saved in theAirWatch Directory Services to sync with this tool. To access these settings, navigate toGroups & Settings ► All Settings ► System ► Enterprise Integration ► Directory Services.
7 Select Test Connection. If the sync is successful, this will auto create the linked ActiveDirectory accounts and corporate Google accounts in Google.
You will be directed back to the setup wizard to finish setup.
Unbind Domain from Workspace ONE UEM
You can unbind the Android admin account in the Workspace ONE UEM console in the event youneed to make a change or change Google accounts.
1 Navigate to Devices > Device Settings > Devices & Users > Android > AndroidEMM Registration
2 Select Clear Settings from the Android EMM Registration page.
Android Device Management
VMware, Inc. 33
Android Device EnrollmentOverview 4Each Android device in your organization's deployment must be enrolled before it cancommunicate with the Workspace ONE UEM console and access internal content and features.
The Workspace ONE Intelligent Hub provides a single resource to enroll a device and providesdevice and connection details. Hub-based enrollment allows you to:
n Authenticate users using basic or directory services, such as AD/LDAP/Domino, SAML,tokens, or proxies.
n Register devices in bulk or allow users to self-register.
n Define approved OS versions, models, and maximum number of devices per user.
n Authenticate enrollment using Workspace ONE Access during auto enrollment.
This chapter includes the following topics:
n Devices & Users / Android / Android EMM Registration
n Device Protection for Android Devices
n Enable Unmanaged Enrollment for Android Devices
n Autodiscovery Enrollment
n Configuring Work Managed Device Enrollment
n Configuring Corporate Owned Personally-Enabled Enrollment
n Additional Supported Enrollment Flags for Android Enrollment
n Enroll Android Device into Work Profile Mode
n Zebra Stage Now
Devices & Users / Android / Android EMM Registration
Android EMM Registration lets you configure the various options for enrolling with Android. Thispage uses a wizard to help you set up the integration for devices. Enable these settings beforebeginning enrollment.
VMware, Inc. 34
Enrollment Settings
Setting Description
Work ManagedEnrollment Type(Non-G suiteonly)
Choose if devices should be associated with the enrollment user or device. When using paid apps,User Based is preferred for optimal license allocation and most BYOD use cases. For scenarioswhere a single user will not be associated with the device (such as Kiosks), Device Based ispreferred.
If you are operating on a closed network or cannot communicate with Google Play, select AOSP/Closed Network. A Google account is not created on these devices. Public app managementthrough managed Google Play is not available using AOSP/Closed Network Enrollment. Thissetting will only apply to the devices enrolled with that organization group. The ParentOrganization can still have devices on Work Managed enrollment using a Google account.
In some instances, you might want to enroll GMS and non-GMS devices in the same organizationgroup without having to create multiple organization groups for device management. If you areusing QR code enrollment for these devices, you can configure the Enrollment Configurationwizard to force AOSP/ Closed Network enrollment regardless of the enrollment type set in thisfield.
If Device-Based is selected, only Device based accounts should be used which applies to COPEon Android 8.0. Android 10, and Android 11 devices. This is useful for staging and single usescenarios such as kiosk devices.
Fully-ManagedDeviceEnrollments
Choose whether enrolled devices will use Work Managed Device or Corporate OwnedPersonally Enabled mode.
Work ProfileEnterprise WipeUser Message
Customize a toast message to display on user devices when you have performed an enterprisewipe from the UEM console. When you perform and enterprise wipe from the Device Detailspage, this message is also generated. The user does not need to take any action on their device.The message displays after the enterprise wipe is complete.
Enrollment Restrictions
Setting Description
Define the enrollmentmethod for thisOrganization Group
Select whether to Always use Android, or Always Use Android (Legacy), Defineassignment group that use Android.
If you select Define Assignment Group that use Android, all unassigned devices defaultto use Android (Legacy).
Assignment Groups Select a smart group from the drop-down menu.
When a smart group(s) is selected, devices or users that do not belong to that group(s)will go through Android legacy enrollment (device administrator). Devices that belong tosmart group will enroll in Work Profile or Work Managed assuming they support theseenrollment modes.
Allow Work ProfileEnrollment
Use this setting to block employee-owned devices from enrolling in Work Profile mode.
Android Device Management
VMware, Inc. 35

Device Protection for Android Devices
Android OS 5.1 and above have a feature called Device Protection which requires Googlecredentials to be entered before and after a device can be reset. When a device is ready to beenrolled as a Work Managed device for Android, the device must be factory reset.
Any existing Google account has to be removed from the device and the secure lock screendisabled to avoid triggering Device Protection so that the Workspace ONE Intelligent Hub can beinstalled during enrollment. Using the device from the factory reset state also prevents the newuser from being locked out of the device.
In the event the previous owner changed the Google account password, you must wait threedays before factory resetting any of your Android 5.1+ devices for enrollment unless you haveexplicitly disabled Android Device Protection on them. If you factory reset one of your Androiddevices before those three days are up and then attempt to sign into that device with yourGoogle account, you will be met with an error message and not allowed to log into the devicewith any account until 72 hours after the password reset occurred.
Enable Unmanaged Enrollment for Android Devices
To allow some Android devices to enroll into Workspace ONE UEM without Google services, youmust enable Registered Mode
Devices enrolled through the Intelligent Hub app are MDM managed by default. To allow someAndroid devices to enroll without MDM management you must enable the unmanaged mode fora smart group.
The selection criteria available is OS version, ownership type, and user group.
In the unmanaged enrollment, users can access applications that require a basic level of security.When users try to access an app that requires management, users are guided through the MDMenrollment process. You use the adaptive management app policies to control devicemanagement levels for Android devices enrolled without management.
1 In the Workspace ONE UEM console, select the organization group to be enabled withunmanaged enrollment and navigate to the Devices > Devices Settings > Devices & Users >General > Enrollment > Management Mode page.
2 In Current Settings, click Override.
3 For Android, select Enabled.
4 In Smart Groups, add the smart group that is enabled for unmanaged enrollments.
5 Click Save.
Users with Android devices from the configured smart group are entitled unmanaged access toapps. Users can use the Workspace ONE Intelligent Hub app to access applications that require abasic level of security without the device being enrolled into Workspace ONE UEM Mobile DeviceManagement.
Android Device Management
VMware, Inc. 36
Autodiscovery Enrollment
Workspace ONE UEM powered by AirWatch makes the enrollment process simple, using anemail-based autodiscovery system to enroll devices to environments and organization groups(OG). Autodiscovery can also be used to allow end users to authenticate into the Self-ServicePortal (SSP).
Note: To enable an autodiscovery for on-premises environments, ensure that your environmentcan communicate with the Workspace ONE UEM Autodiscovery servers.
Registration for Autodiscovery Enrollment
The server checks for an email domain uniqueness, only allowing a domain to be registered atone organization group in one environment. Because of this server check, register your domainat your highest-level organization group.
Autodiscovery is configured automatically for new Software as a Service (SaaS) customers.
Configure Autodiscovery Enrollment from a Parent OrganizationGroup
Autodiscovery Enrollment simplifies the enrollment process enrolling devices to intendedenvironments and organization groups (OG) using end-user email addresses.
Configure an autodiscovery enrollment from a parent OG by taking the following steps.
1 Navigate to Groups & Settings > All Settings > Admin > Cloud Services and enable the AutoDiscovery setting. Enter your login email address in Auto Discovery AirWatch ID and selectSet Identity.
a If necessary, navigate to https://my.workspaceone.com/set-discovery-password to setthe password for Auto Discovery service. Once you have registered and selected SetIdentity, the HMAC Token auto-populates. Click Test Connection to ensure that theconnection is functional.
2 Enable the Auto Discovery Certificate Pinning option to upload your own certificate and pinit to the auto discovery function. You can review the validity dates and other information forexisting certificates, and also can Replace and Clear these existing certificates.
3 Select Add a certificate and the settings Name and Certificate display. Enter the name of thecertificate you want to upload, select the Upload button, and select the cert on your device.
4 Select Save to complete an autodiscovery setup.
Instruct end users who enroll themselves to select the email address option for authentication,instead of entering an environment URL and Group ID. When users enroll devices with an emailaddress, they enroll into the same group listed in the Enrollment Organization Group of theassociated user account.
Android Device Management
VMware, Inc. 37
Configure Autodiscovery Enrollment from a Child Organization Group
You can configure Autodiscovery Enrollment from a child organization group below theenrollment organization group. To enable an autodiscovery enrollment in this way, you mustrequire users to select a Group ID during enrollment.
Force users to select a Group ID during enrollments.
1 Navigate to Devices > Device Settings > General > Enrollment and select the Grouping tab.
2 Select Prompt User to Select Group ID.
3 Select Save.
Configuring Work Managed Device Enrollment
Android Work Managed Device mode gives Workspace ONE UEM control of the entire device.Using a factory reset device helps ensure that devices are not set up for personal use.
There are several ways to enroll Work Managed devices:
n Using AirWatch Relay to perform an NFC bump
n Using a unique identifier or token code
n Scanning a QR code
n Using Zero Touch enrollment
Your business requirements determine which enrollment methods you want to use. You cannotenroll devices until you have completed Android EMM Registration.
If the Android devices you are using are on a closed network, unable to communicate withGoogle Play, or are running Android 5.0 or earlier versions, then you can enroll using WorkManaged Device enrollment for AOSP/Closed Network support. Public app management throughmanaged Google Play will not be available.
Enrolling with AirWatch Relay
AirWatch Relay is an application that passes information from parent devices to all child devicesbeing enrolled into Workspace ONE UEM with Android.
Note: AirWatch Relay is not supported in Android 10.
This process is done through an NFC bump and provisions child devices to:
n Copy the parent device Wi-Fi network and region settings including the device date, time,and location.
n Download the latest production version of Workspace ONE Intelligent Hub for Android.
n Silently set the Workspace ONE Intelligent Hub as device administrator.
n Automatically enroll into Workspace ONE UEM.
Android Device Management
VMware, Inc. 38

AirWatch Relay allows you to bulk enroll all child devices before deploying them to end users andeliminates end users from having to enroll their own devices. All child devices must be in factoryreset mode and have NFC enabled by default to be enrolled as Work Managed Device forAndroid.
The NFC bump process depends on the Android OS. Devices running Android 6.0+ perform onebump to connect and enroll child devices in one step. Devices running Android OS versionsbetween v5.0 and v6.0 perform two NFC bumps. The first bump is to connect the child device toWi-Fi network and region settings including the device date, time, and location and download theWorkspace ONE Intelligent Hub. The second NFC bump is to enroll all child devices beforedeploying them to end users.
Enrolling with Workspace ONE Intelligent Hub Identifier
The Workspace ONE Intelligent Hub Identifier enrollment method is a simplified approach toenrolling Work Managed devices for Android 6.0+ devices. Enter a simple identifier, or hashvalue, on a factory reset device. After the identifier is entered, the enrollment is automatedpushing down the Workspace ONE Intelligent Hub. The user only has to enter server details, username, and password.
With the identifier, you can also enroll on behalf of the end user by doing Single-User DeviceStaging. This method is useful for administrators who set up multiple devices for an entire teamor single members of a team. Such a method saves the end users the time and effort of enrollingtheir own devices.
For more information on Single-User Device Staging, see Stage a Single-User Device in theMobile Device Management (MDM) documentation.
Enrolling with QR Code
QR code provisioning is an easy way to enroll a fleet of devices that do not support NFC and theNFC bump. The QR code contains a payload of key-value pairs with all the information that isneeded for the device to be enrolled. Create the QR code before starting enrollment. You canuse any online QR Code generator, such as Web Toolkit Online, to create your unique QR code.The QR code includes the Server URL and Group ID information. You can also include the username and password or the user has to enter their credentials.
Here is the format of the text to paste into the generator:
{"android.app.extra.PROVISIONING_DEVICE_ADMIN_COMPONENT_NAME":"com.airwatch.androidagent/com.airwatch.agent.DeviceAdministratorReceiver","android.app.extra.PROVISIONING_DEVICE_ADMIN_SIGNATURE_CHECKSUM":"6kyqxDOjgS30jvQuzh4uvHPk-0bmAD-1QU7vtW7i_o8=\n","android.app.extra.PROVISIONING_DEVICE_ADMIN_PACKAGE_DOWNLOAD_LOCATION":"https://getwsone.com/mobileenrollment/airwatchagent.apk","android.app.extra.PROVISIONING_SKIP_ENCRYPTION": false,"android.app.extra.PROVISIONING_WIFI_SSID": "Your_SSID","android.app.extra.PROVISIONING_WIFI_PASSWORD": "Password","android.app.extra.PROVISIONING_ADMIN_EXTRAS_BUNDLE":
Android Device Management
VMware, Inc. 39
{"serverurl": "Server URL","gid": "Group ID","un":"Username","pw":"Password"}
Enrolling with Zero Touch Portal
Zero Touch enrollment allows for Android 9.0+ devices to be configured with Workspace ONEUEM as the enterprise mobility management provider out the box.
When the device is connected to the Internet during the device setup, the Workspace ONEIntelligent Hub is automatically downloaded and enrollment details are automatically passed toenroll the device with no user interaction. You manage zero-touch enrollment for yourorganization from an online portal in your web browser. We call this the zero-touch enrollmentportal
Zero Touch enrollment is supported by a limited number of mobile carriers and OEMs. Customerswork with their carrier to ensure that zero touch provisioning is supported. Learn more aboutsupported carriers and devices on the Google website.
For additional information on zero-touch enrollment, see the Android Support Article.
Note: Zero Touch enrollment is only supported on Android 8.0 (Oreo) devices.
Enrolling Devices Using Workspace ONE Access
Workspace ONE Access provides multi-factor authentication, conditional access and single sign-on to SaaS, web and native mobile apps. You can use Workspace ONE Access to authenticatedevices instead of Workspace ONE Intelligent Hub. When you have enabled Workspace ONEAccess as the authentication method, you can use auto enrollment methods such as NFC, QRcode, Zero-Touch, and Samsung Knox Mobile Enrollment.
Enroll Work Managed Device with AirWatch Relay
Enrolling the Work Managed Device mode using AirWatch Relay varies depending on theAndroid OS version.
Note: AirWatch Relay is not supported in Android 10 or later.
Enroll Android Device with AirWatch Relay for Android 6.0+
For Android 6.0+, the AirWatch Relay app provides a single bump option which configuresregion, Wi-Fi, provisioning settings, and enrollment settings in the single bump.
Procedure
1 Download the AirWatch Relay app from the Google Play Store to the parent device andlaunch the app once complete.
2 Review the 'For AirWatch Admins' screen and select Next to proceed to the wizard. Thisscreen will allow you to view or skip to a setup wizard which provides a descriptions of thepurpose of the app and a tutorial of the NFC bump.
Android Device Management
VMware, Inc. 40
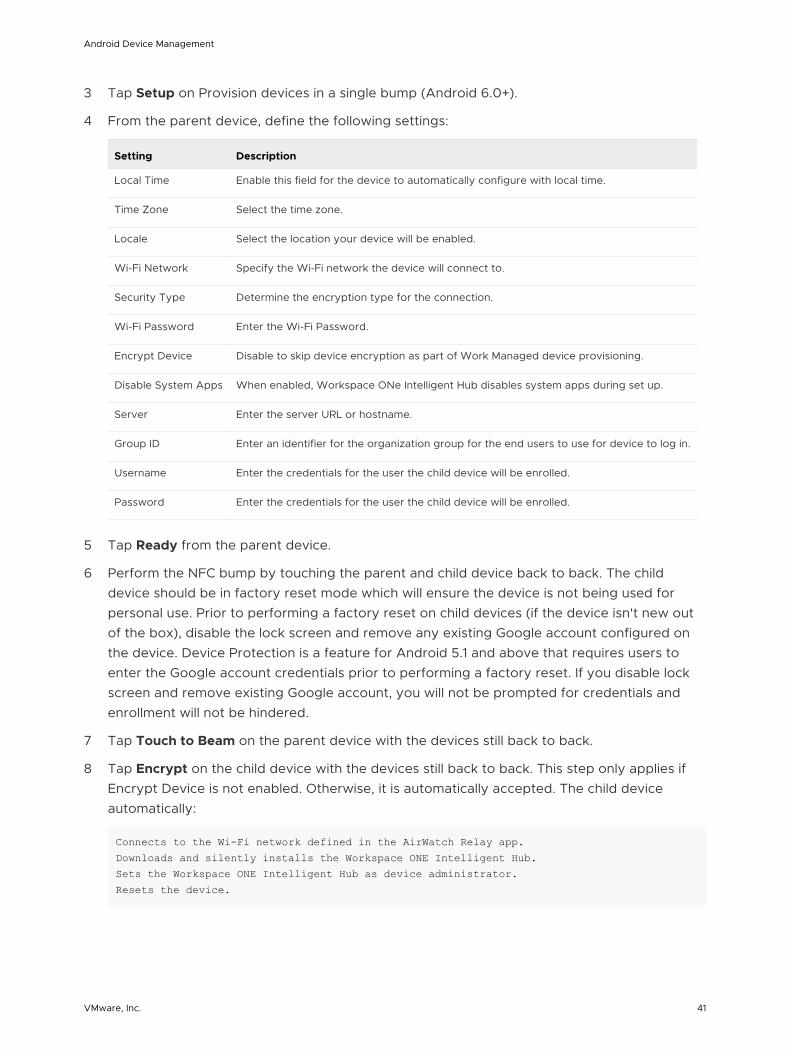
3 Tap Setup on Provision devices in a single bump (Android 6.0+).
4 From the parent device, define the following settings:
Setting Description
Local Time Enable this field for the device to automatically configure with local time.
Time Zone Select the time zone.
Locale Select the location your device will be enabled.
Wi-Fi Network Specify the Wi-Fi network the device will connect to.
Security Type Determine the encryption type for the connection.
Wi-Fi Password Enter the Wi-Fi Password.
Encrypt Device Disable to skip device encryption as part of Work Managed device provisioning.
Disable System Apps When enabled, Workspace ONe Intelligent Hub disables system apps during set up.
Server Enter the server URL or hostname.
Group ID Enter an identifier for the organization group for the end users to use for device to log in.
Username Enter the credentials for the user the child device will be enrolled.
Password Enter the credentials for the user the child device will be enrolled.
5 Tap Ready from the parent device.
6 Perform the NFC bump by touching the parent and child device back to back. The childdevice should be in factory reset mode which will ensure the device is not being used forpersonal use. Prior to performing a factory reset on child devices (if the device isn't new outof the box), disable the lock screen and remove any existing Google account configured onthe device. Device Protection is a feature for Android 5.1 and above that requires users toenter the Google account credentials prior to performing a factory reset. If you disable lockscreen and remove existing Google account, you will not be prompted for credentials andenrollment will not be hindered.
7 Tap Touch to Beam on the parent device with the devices still back to back.
8 Tap Encrypt on the child device with the devices still back to back. This step only applies ifEncrypt Device is not enabled. Otherwise, it is automatically accepted. The child deviceautomatically:
Connects to the Wi-Fi network defined in the AirWatch Relay app.Downloads and silently installs the Workspace ONE Intelligent Hub.Sets the Workspace ONE Intelligent Hub as device administrator.Resets the device.
Android Device Management
VMware, Inc. 41
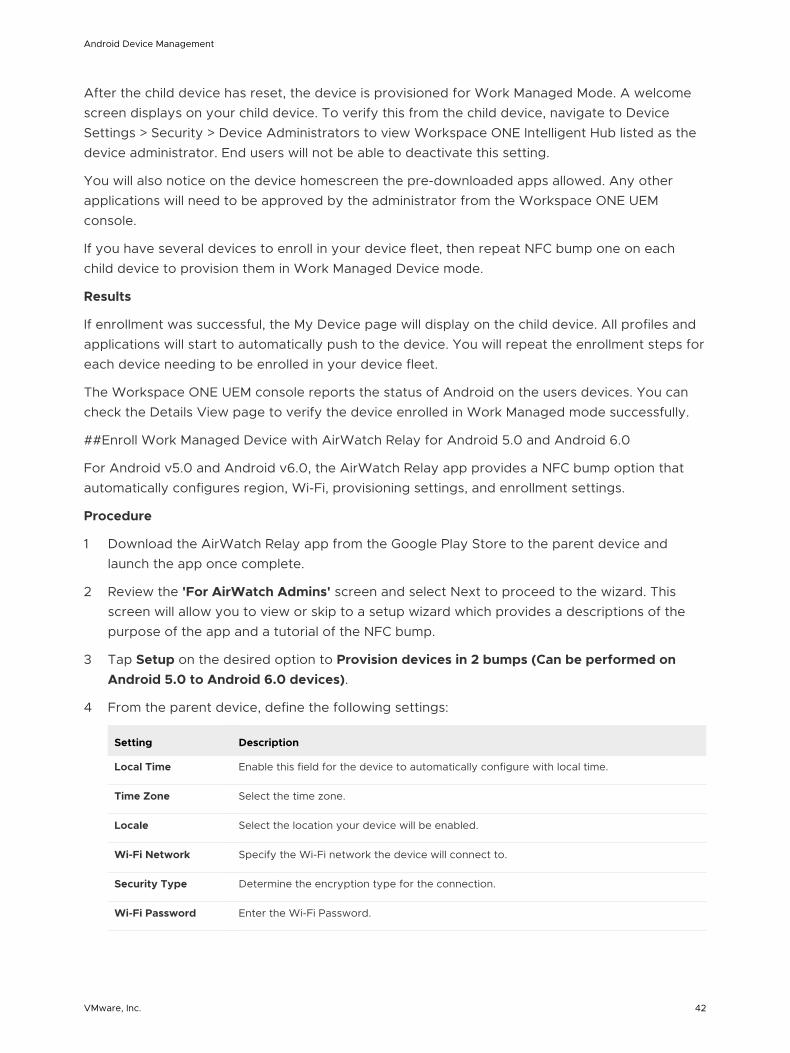
After the child device has reset, the device is provisioned for Work Managed Mode. A welcomescreen displays on your child device. To verify this from the child device, navigate to DeviceSettings > Security > Device Administrators to view Workspace ONE Intelligent Hub listed as thedevice administrator. End users will not be able to deactivate this setting.
You will also notice on the device homescreen the pre-downloaded apps allowed. Any otherapplications will need to be approved by the administrator from the Workspace ONE UEMconsole.
If you have several devices to enroll in your device fleet, then repeat NFC bump one on eachchild device to provision them in Work Managed Device mode.
Results
If enrollment was successful, the My Device page will display on the child device. All profiles andapplications will start to automatically push to the device. You will repeat the enrollment steps foreach device needing to be enrolled in your device fleet.
The Workspace ONE UEM console reports the status of Android on the users devices. You cancheck the Details View page to verify the device enrolled in Work Managed mode successfully.
##Enroll Work Managed Device with AirWatch Relay for Android 5.0 and Android 6.0
For Android v5.0 and Android v6.0, the AirWatch Relay app provides a NFC bump option thatautomatically configures region, Wi-Fi, provisioning settings, and enrollment settings.
Procedure
1 Download the AirWatch Relay app from the Google Play Store to the parent device andlaunch the app once complete.
2 Review the 'For AirWatch Admins' screen and select Next to proceed to the wizard. Thisscreen will allow you to view or skip to a setup wizard which provides a descriptions of thepurpose of the app and a tutorial of the NFC bump.
3 Tap Setup on the desired option to Provision devices in 2 bumps (Can be performed onAndroid 5.0 to Android 6.0 devices).
4 From the parent device, define the following settings:
Setting Description
Local Time Enable this field for the device to automatically configure with local time.
Time Zone Select the time zone.
Locale Select the location your device will be enabled.
Wi-Fi Network Specify the Wi-Fi network the device will connect to.
Security Type Determine the encryption type for the connection.
Wi-Fi Password Enter the Wi-Fi Password.
Android Device Management
VMware, Inc. 42
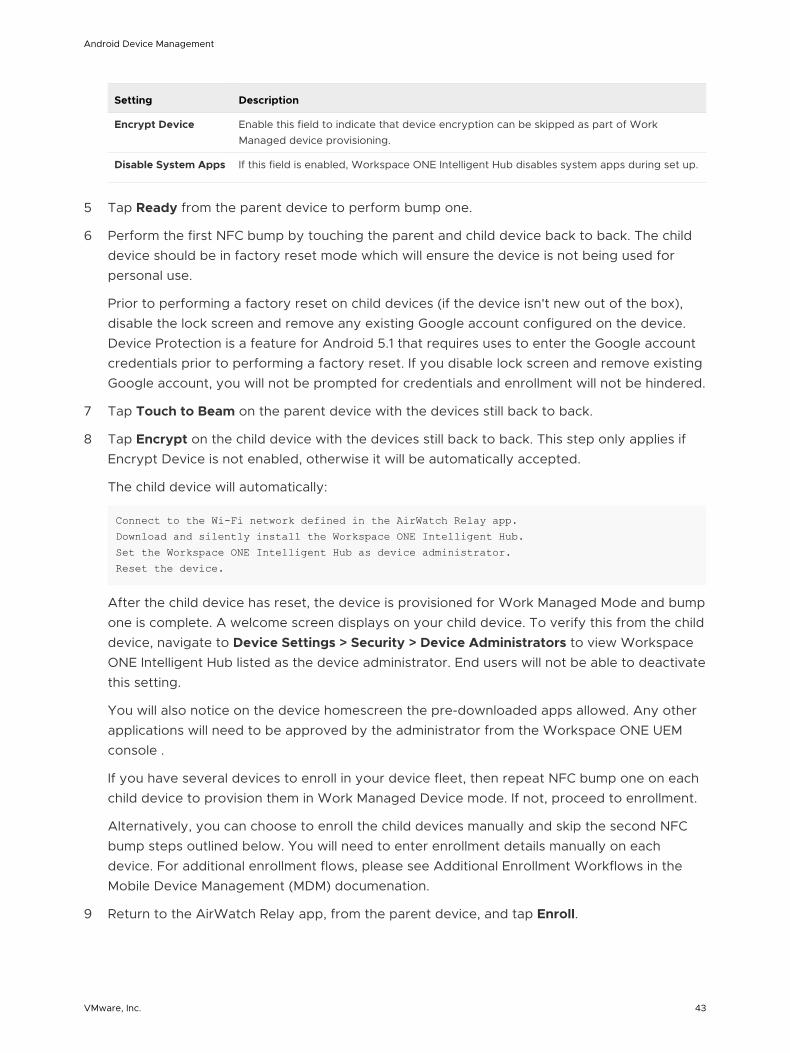
Setting Description
Encrypt Device Enable this field to indicate that device encryption can be skipped as part of WorkManaged device provisioning.
Disable System Apps If this field is enabled, Workspace ONE Intelligent Hub disables system apps during set up.
5 Tap Ready from the parent device to perform bump one.
6 Perform the first NFC bump by touching the parent and child device back to back. The childdevice should be in factory reset mode which will ensure the device is not being used forpersonal use.
Prior to performing a factory reset on child devices (if the device isn't new out of the box),disable the lock screen and remove any existing Google account configured on the device.Device Protection is a feature for Android 5.1 that requires uses to enter the Google accountcredentials prior to performing a factory reset. If you disable lock screen and remove existingGoogle account, you will not be prompted for credentials and enrollment will not be hindered.
7 Tap Touch to Beam on the parent device with the devices still back to back.
8 Tap Encrypt on the child device with the devices still back to back. This step only applies ifEncrypt Device is not enabled, otherwise it will be automatically accepted.
The child device will automatically:
Connect to the Wi-Fi network defined in the AirWatch Relay app.Download and silently install the Workspace ONE Intelligent Hub.Set the Workspace ONE Intelligent Hub as device administrator.Reset the device.
After the child device has reset, the device is provisioned for Work Managed Mode and bumpone is complete. A welcome screen displays on your child device. To verify this from the childdevice, navigate to Device Settings > Security > Device Administrators to view WorkspaceONE Intelligent Hub listed as the device administrator. End users will not be able to deactivatethis setting.
You will also notice on the device homescreen the pre-downloaded apps allowed. Any otherapplications will need to be approved by the administrator from the Workspace ONE UEMconsole .
If you have several devices to enroll in your device fleet, then repeat NFC bump one on eachchild device to provision them in Work Managed Device mode. If not, proceed to enrollment.
Alternatively, you can choose to enroll the child devices manually and skip the second NFCbump steps outlined below. You will need to enter enrollment details manually on eachdevice. For additional enrollment flows, please see Additional Enrollment Workflows in theMobile Device Management (MDM) documenation.
9 Return to the AirWatch Relay app, from the parent device, and tap Enroll.
Android Device Management
VMware, Inc. 43
10 Define the enrollment settings. These setting will be used to automate enrollment of childdevices.
Setting Description
Server Enter the server URL or hostname.
Group ID Enter an identifier for the organization group for the end users to use for device to log in.
11 Tap Ready.
12 Perform the second NFC bump by bringing the parent and child device back to back and tapTouch to Beam on the child device to begin enrollment. The second NFC bump must beperformed after the Setup Wizard has been completed. Wait until the Setup Wizardcompletes and directs you to the device home page before performing the second NFCbump to configure the Workspace ONE Intelligent Hub.
13 Enter the credentials for the corporate Google account tied to the user. You will be promptedwith the Google account password screen. If you are enrolled as a Managed Google Playaccount, this screen does not display.
14 Tap Next to proceed to the My Device page.
What to do next If enrollment was successful, the My Device page will display on the child device(shown above). All profiles and applications will start to automatically push to the device. You willrepeat the enrollment steps for each device needing to be enrolled in your device fleet.
Enroll Android Devices Using VMware Workspace ONE IntelligentHub Identifier
During Work Managed Device and Corporate Owned Personally enabled (COPE) enrollment, theuser enters a special DPC-specific identifier token when they are prompted to add anaccount.The token for Workspace ONE UEM is “afw#hub” which automatically identifiesWorkspace ONE UEM as your EMM provider.
Important: This enrollment flow is only supported for Android 6.0 Marshmallow or later devices.
1 Tap Get Started on your factory reset device.
2 Select your Wi-Fi network and login with your credentials to connect the device.
3 Enter the identifier “afw#hub” when prompted to add a Google account. The setup wizardadds a temporary Google Account to the device. This account is only used to download theDPC from Google Play and is removed upon completion.
If the identifier is entered incorrectly, you are prompted to re-enter it.
4 Tap Install to begin configuration of the Workspace ONE Intelligent Hub to the device. TheHub will automatically open after install is complete.
Android Device Management
VMware, Inc. 44

5 Choose the Authentication Method to continue enrollment:
a Enter Email Address if you have configured Autodiscovery. In addition, you may beprompted to select your Group ID from a list or choose Server Details and enter Server,Group ID, and user credentials.
b Choose QR Code if you have created a QR Code in the UEM console.
6 Follow the remaining prompts to complete enrollment.
Note: You can check the Details View page to verify that the device enrolled in WorkManaged Mode successfully.
Enroll Work Managed Device Using a QR Code
The QR code enrollment method sets up and configures Work Managed Device and CorporateOwned Personally Enabled (COPE) modes by scanning a QR code generated with the EnrollmentConfiguration Wizard or from any QR code generator, such as Web Toolkit Online.
To use the UEM console to create the QR code, see the Enrollment Configuration Wizard(Devices > Lifecycle > Staging > List View > Configure Enrollment).
Important: This enrollment flow is available for Managed Google Play and Managed GoogleDomain users. This enrollment flow is supported on Android 7.0+ devices.
1 Power on the factory reset or out of the box device. The setup wizard prompts the user totap the Welcome screen six times.The taps have to be done in the same place on the screen.
a For Android 8.0+ devices, proceed to step 2 in order to download the QR code reader.
b For Android 9.0+ devices, the camera will open automatically after you complete the sixtaps.
2 Connect to Wi-Fi and the setup wizard automatically downloads a QR code reader. The QRcode reader app automatically starts once complete. On Android 8.0 and 9.0 devices, youcan use mobile connectivity. On Android 10 or later, Wi-Fi is required.
3 Scan your QR code. For Android 9.0+ devices, use the QR code option on the camera toscan. You can use any online QR code generator, such as Web Toolkit Online, to create yourunique QR code.
|QR Code Text Format| ```{"android.app.extra.PROVISIONING_DEVICE_ADMIN_COMPONENT_NAME":"com.airwatch.androidagent/com.airwatch.agent.DeviceAdministratorReceiver","android.app.extra.PROVISIONING_DEVICE_ADMIN_SIGNATURE_CHECKSUM": "6kyqxDOjgS30jvQuzh4uvHPk-0bmAD-1QU7vtW7i_o8=\n","android.app.extra.PROVISIONING_DEVICE_ADMIN_PACKAGE_DOWNLOAD_LOCATION":"https://getwsone.com/mobileenrollment/airwatchagent.apk","android.app.extra.PROVISIONING_SKIP_ENCRYPTION":
Android Device Management
VMware, Inc. 45

false,"android.app.extra.PROVISIONING_WIFI_SSID":"Your_SSID","android.app.extra.PROVISIONING_WIFI_PASSWORD": "Password","android.app.extra.PROVISIONING_ADMIN_EXTRAS_BUNDLE": {"serverurl": "Server URL","gid": "Group ID", "un":"Username", "pw":"Password"}}
4 The setup wizard automatically downloads the Workspace ONE Intelligent Hub andautomatically configures the Server URL, Group ID, Username, and Password as specified inthe generated QR code.
Note: When Server, Group ID, Username, and Password are all included in the configuration,any additional enrollment prompts are skipped by the Hub
5 Enter the user credentials of not previously configured in the QR code.
If enrollment was successful, the My Device page displays on the device. All profiles andapplications start to push automatically to the device.
The Workspace ONE UEM console reports the status of Android on the users devices. Youcan check the Details View page to verify the device enrolled in Work Managed Modesuccessfully.
Generate a QR Code Using the Enrollment Configuration Wizard
Create a QR Code to scan with your Android 7.0 or later devices to stage the device quickly. Thewizard simplifies the staging configuration process.
1 Navigate to Devices > Lifecycle > Staging > List View > Configure Enrollment > Android >QR Code in the Workspace ONE UEM console.
2 Connect the device to Wi-Fi prior to enrollment by enabling the Wi-Fi toggle. The followingoptions display:
Setting Description
SSID Enter the Service Set Identifier, more commonly known as the name of the Wi-Fi Network.
Password Enter the Wi-Fi password for the entered SSID.
3 Select Next.
4 Select the Workspace ONE Intelligent Hub to push to devices during staging. The defaultselection is Use latest Workspace ONE Intelligent Hub.
If you do not have the Workspace ONE Intelligent Hub added, select Hosted on an externalURL and enter the address in the URL text box to point to an externally-hosted WorkspaceONE Intelligent Hub Package.
5 Select Next.
Android Device Management
VMware, Inc. 46

6 Set the Enrollment Details settings. To use token-based authentication, leave both optionsdisabled.
Setting Description
Organization Group Enable and select the organization group the QR Code staging package uses.
User name Configure login credentials. Enter the Workspace ONE UEM account user name.
Password Enter the corresponding password.
System Apps Applies to Work Managed devices only. You can Enable to keep non-critical systemapplications installed on your Work Managed device. Select Disable which remove theseapplications.
Force AOSP/Closed NetworkEnrollment
When this field is enabled, you can enroll GMS and non-GMS devices in the sameorganization group regardless of the Work Managed device enrollment type set duringAndroid EMM registration. - If the flag is set to use GMS and the UEM console is set toAOSP in the Android EMM registration page, the device will use the UEM console flag andenroll without Google account.
If the flag is set to use GMS and the UEM console is set to User-Based or Device-Basedaccounts, the Intelligent Hub will attempt a GMS enrollment flow. If the device is non-GMS,enrollment fails.
7 Select Next.
8 The Summary page allows you to Download File of the PDF. Select View PDF to see apreview of your QR Code Format selections.
Enroll Android Device Using Zero Touch Portal
In the Zero Touch Portal, add enrollment configurations that should be applied on the device assoon as the Workspace ONE Intelligent Hub is downloaded.
Note: Zero Touch enrollment is only supported on Android 9.0 or later devices. For Samsungdevices, use Knox Mobile Enrollment
1 Navigate to the Configurations tab and click the +.
2 Enter the following details for enrollment:
Setting Description
Configuration Name Enter a name for this configuration.
EMM DPC Select 'Workspace ONE Intelligent Hub'. This will ensure that the Workspace ONEIntelligent Hub is downloaded as part of factory setup.
DPC Extras Enter the enrollment credentials that will be configured in the Workspace ONEIntelligent Hub. You can include the Workspace ONE UEM console Server URL, GroupID, enrollment username, and password. Copy the JSON-formatted text from your EMMconsole.
Company Name Enter your organization name.
Support E-mail Address Enter the email that end users should contact if they run into issues.
Android Device Management
VMware, Inc. 47
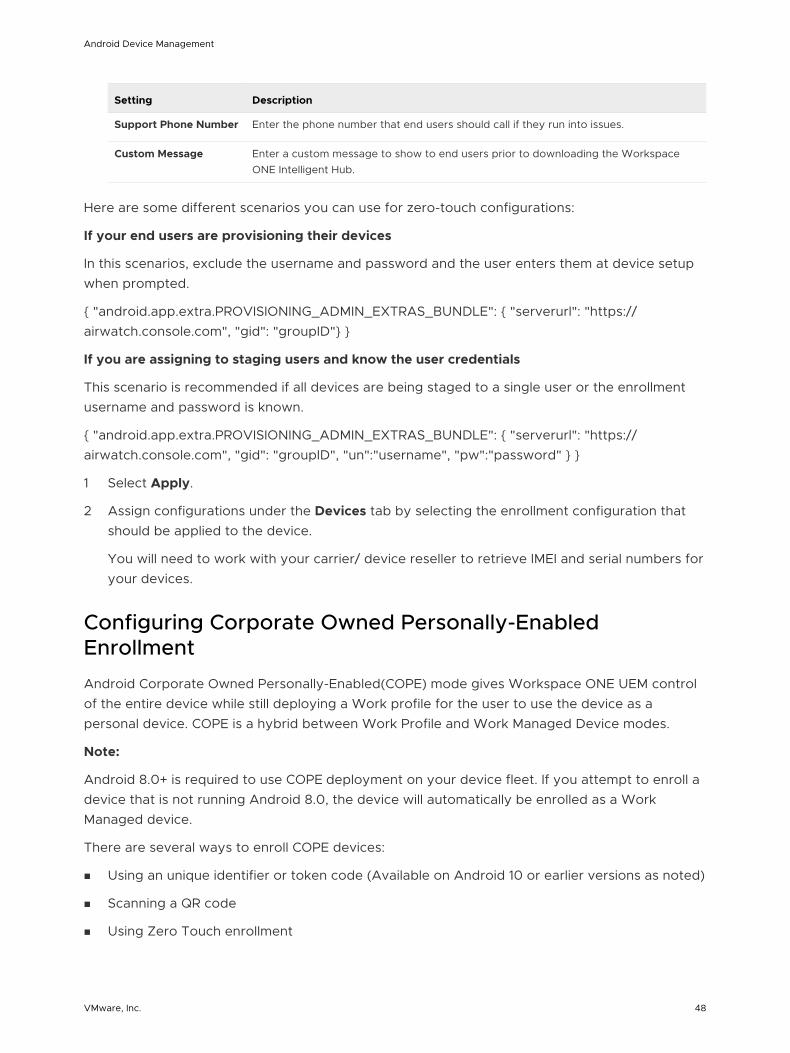
Setting Description
Support Phone Number Enter the phone number that end users should call if they run into issues.
Custom Message Enter a custom message to show to end users prior to downloading the WorkspaceONE Intelligent Hub.
Here are some different scenarios you can use for zero-touch configurations:
If your end users are provisioning their devices
In this scenarios, exclude the username and password and the user enters them at device setupwhen prompted.
{ "android.app.extra.PROVISIONING_ADMIN_EXTRAS_BUNDLE": { "serverurl": "https://airwatch.console.com", "gid": "groupID"} }
If you are assigning to staging users and know the user credentials
This scenario is recommended if all devices are being staged to a single user or the enrollmentusername and password is known.
{ "android.app.extra.PROVISIONING_ADMIN_EXTRAS_BUNDLE": { "serverurl": "https://airwatch.console.com", "gid": "groupID", "un":"username", "pw":"password" } }
1 Select Apply.
2 Assign configurations under the Devices tab by selecting the enrollment configuration thatshould be applied to the device.
You will need to work with your carrier/ device reseller to retrieve IMEI and serial numbers foryour devices.
Configuring Corporate Owned Personally-EnabledEnrollment
Android Corporate Owned Personally-Enabled(COPE) mode gives Workspace ONE UEM controlof the entire device while still deploying a Work profile for the user to use the device as apersonal device. COPE is a hybrid between Work Profile and Work Managed Device modes.
Note:
Android 8.0+ is required to use COPE deployment on your device fleet. If you attempt to enroll adevice that is not running Android 8.0, the device will automatically be enrolled as a WorkManaged device.
There are several ways to enroll COPE devices:
n Using an unique identifier or token code (Available on Android 10 or earlier versions as noted)
n Scanning a QR code
n Using Zero Touch enrollment
Android Device Management
VMware, Inc. 48

n Using Knox Mobile Enrollment for Samsung devices. You can find information in the KnoxMobile Enrollment documentation.
Your business requirements determine which enrollment methods you want to use. You cannotenroll devices until you have completed Android EMM Registration.
Enroll with AirWatch Relay
AirWatch Relay is an application that passes information from parent devices to all child devicesbeing enrolled into Workspace ONE UEM with Android. This process is done through and NFCbump and provisions child devices to:
n Connect to the parent device to copy Wi-Fi network and region settings including the devicedate, time, and location.
n Download the latest production version of Workspace ONE Intelligent Hub for Android.
n Silently set the Workspace ONE Intelligent Hub as device administrator.
n Automatically enroll into Workspace ONE UEM.
AirWatch Relay allows you to bulk enroll all child devices before deploying them to end users andeliminates end users from having to enroll their own devices. All child devices must be in factoryreset mode and have NFC enabled by default to be enrolled as a COPE device.
The NFC bump process depends on the Android OS version . Since COPE is only supported onAndroid 8.0+ only, enrollment with AirWatch Relay will perform a single bump to connect andenroll child devices in one step.
Note Android 11 does not support AirWatch Relay NFC Bump for COPE. If attempting to enrollAndroid 11 devices using NFC Bump, enrollment is blocked as Google deprecated the capability.
Enroll with Workspace ONE Intelligent Hub Identifier
The Workspace ONE Intelligent Hub Identifier enrollment method is a simplified approach toenrolling COPE enabled devices. Enter a simple identifier, or hash value, on a factory resetdevice. After the identifier is entered, the enrollment is automated pushing down the WorkspaceONE Intelligent Hub. The user only has to enter server details, user name, and password.
Note: This enrollment method is not available on Android 11 for COPE. If attempting to enrollAndroid 11 devices, enrollment is blocked as Google deprecated the capability.
Enroll with QR Code
QR code provisioning is an easy way to enroll a fleet of devices that do not support NFC and theNFC bump. The QR code contains a payload of key-value pairs with all the information that isneeded for the device to be enrolled. Create the QR code before starting enrollment. You cangenerate the QR Code using the Enrollment Configuration Wizard in the WorkspaceONE UEM console.
The QR code includes the Server URL and Group ID information. You can also include the username and password or the user has to enter their credentials.
Android Device Management
VMware, Inc. 49
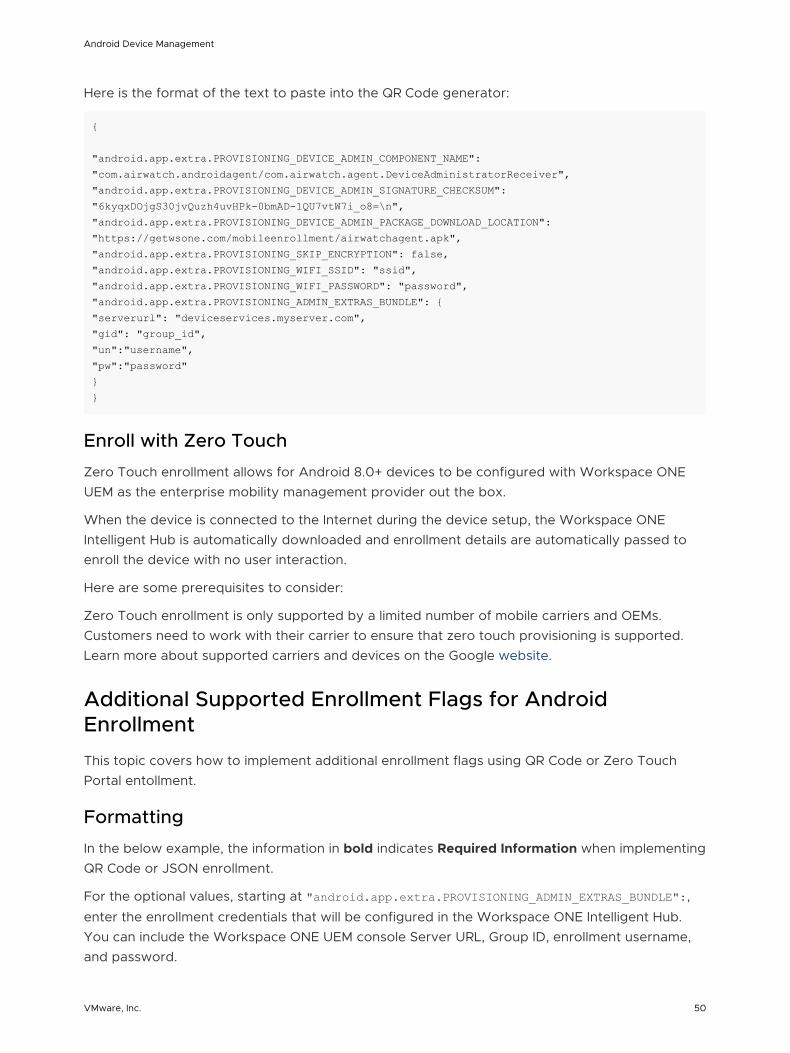
Here is the format of the text to paste into the QR Code generator:
{
"android.app.extra.PROVISIONING_DEVICE_ADMIN_COMPONENT_NAME":"com.airwatch.androidagent/com.airwatch.agent.DeviceAdministratorReceiver","android.app.extra.PROVISIONING_DEVICE_ADMIN_SIGNATURE_CHECKSUM":"6kyqxDOjgS30jvQuzh4uvHPk-0bmAD-1QU7vtW7i_o8=\n","android.app.extra.PROVISIONING_DEVICE_ADMIN_PACKAGE_DOWNLOAD_LOCATION":"https://getwsone.com/mobileenrollment/airwatchagent.apk","android.app.extra.PROVISIONING_SKIP_ENCRYPTION": false,"android.app.extra.PROVISIONING_WIFI_SSID": "ssid","android.app.extra.PROVISIONING_WIFI_PASSWORD": "password","android.app.extra.PROVISIONING_ADMIN_EXTRAS_BUNDLE": {"serverurl": "deviceservices.myserver.com","gid": "group_id","un":"username","pw":"password"}}
Enroll with Zero Touch
Zero Touch enrollment allows for Android 8.0+ devices to be configured with Workspace ONEUEM as the enterprise mobility management provider out the box.
When the device is connected to the Internet during the device setup, the Workspace ONEIntelligent Hub is automatically downloaded and enrollment details are automatically passed toenroll the device with no user interaction.
Here are some prerequisites to consider:
Zero Touch enrollment is only supported by a limited number of mobile carriers and OEMs.Customers need to work with their carrier to ensure that zero touch provisioning is supported.Learn more about supported carriers and devices on the Google website.
Additional Supported Enrollment Flags for AndroidEnrollment
This topic covers how to implement additional enrollment flags using QR Code or Zero TouchPortal entollment.
Formatting
In the below example, the information in bold indicates Required Information when implementingQR Code or JSON enrollment.
For the optional values, starting at "android.app.extra.PROVISIONING_ADMIN_EXTRAS_BUNDLE":,
enter the enrollment credentials that will be configured in the Workspace ONE Intelligent Hub.You can include the Workspace ONE UEM console Server URL, Group ID, enrollment username,and password.
Android Device Management
VMware, Inc. 50
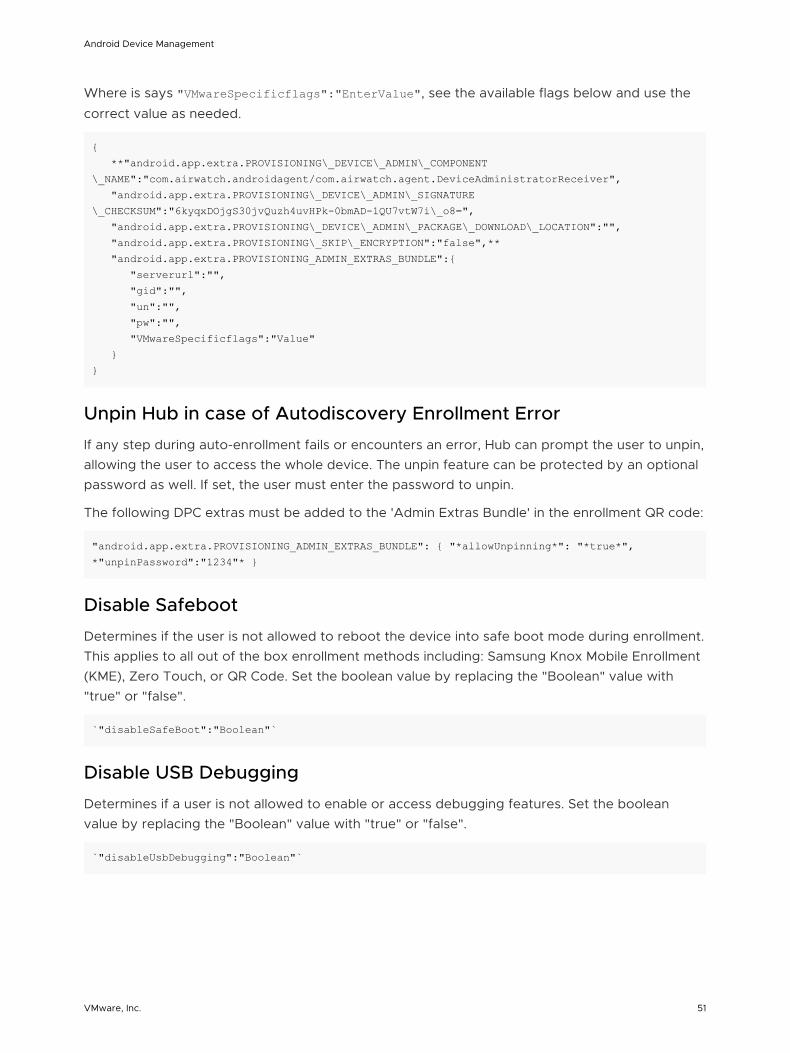
Where is says "VMwareSpecificflags":"EnterValue", see the available flags below and use the
correct value as needed.
{ **"android.app.extra.PROVISIONING\_DEVICE\_ADMIN\_COMPONENT\_NAME":"com.airwatch.androidagent/com.airwatch.agent.DeviceAdministratorReceiver", "android.app.extra.PROVISIONING\_DEVICE\_ADMIN\_SIGNATURE\_CHECKSUM":"6kyqxDOjgS30jvQuzh4uvHPk-0bmAD-1QU7vtW7i\_o8=", "android.app.extra.PROVISIONING\_DEVICE\_ADMIN\_PACKAGE\_DOWNLOAD\_LOCATION":"", "android.app.extra.PROVISIONING\_SKIP\_ENCRYPTION":"false",** "android.app.extra.PROVISIONING_ADMIN_EXTRAS_BUNDLE":{ "serverurl":"", "gid":"", "un":"", "pw":"", "VMwareSpecificflags":"Value" }}
Unpin Hub in case of Autodiscovery Enrollment Error
If any step during auto-enrollment fails or encounters an error, Hub can prompt the user to unpin,allowing the user to access the whole device. The unpin feature can be protected by an optionalpassword as well. If set, the user must enter the password to unpin.
The following DPC extras must be added to the 'Admin Extras Bundle' in the enrollment QR code:
"android.app.extra.PROVISIONING_ADMIN_EXTRAS_BUNDLE": { "*allowUnpinning*": "*true*", *"unpinPassword":"1234"* }
Disable Safeboot
Determines if the user is not allowed to reboot the device into safe boot mode during enrollment.This applies to all out of the box enrollment methods including: Samsung Knox Mobile Enrollment(KME), Zero Touch, or QR Code. Set the boolean value by replacing the "Boolean" value with"true" or "false".
`"disableSafeBoot":"Boolean"`
Disable USB Debugging
Determines if a user is not allowed to enable or access debugging features. Set the booleanvalue by replacing the "Boolean" value with "true" or "false".
`"disableUsbDebugging":"Boolean"`
Android Device Management
VMware, Inc. 51
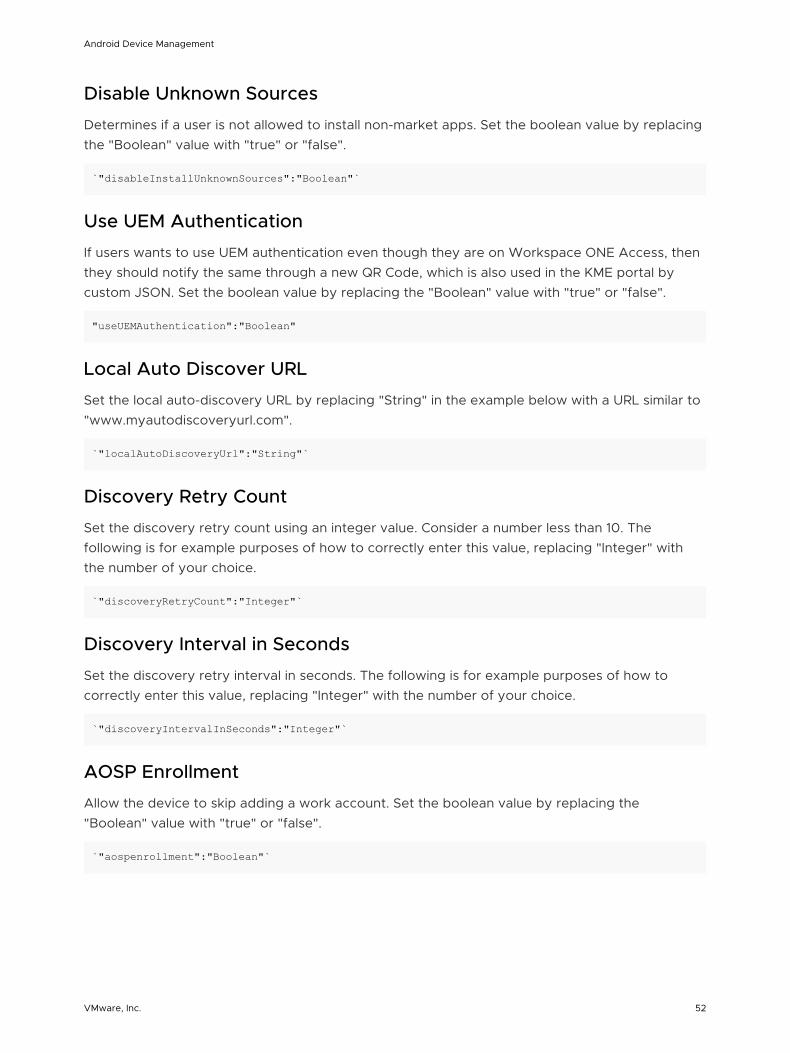
Disable Unknown Sources
Determines if a user is not allowed to install non-market apps. Set the boolean value by replacingthe "Boolean" value with "true" or "false".
`"disableInstallUnknownSources":"Boolean"`
Use UEM Authentication
If users wants to use UEM authentication even though they are on Workspace ONE Access, thenthey should notify the same through a new QR Code, which is also used in the KME portal bycustom JSON. Set the boolean value by replacing the "Boolean" value with "true" or "false".
"useUEMAuthentication":"Boolean"
Local Auto Discover URL
Set the local auto-discovery URL by replacing "String" in the example below with a URL similar to"www.myautodiscoveryurl.com".
`"localAutoDiscoveryUrl":"String"`
Discovery Retry Count
Set the discovery retry count using an integer value. Consider a number less than 10. Thefollowing is for example purposes of how to correctly enter this value, replacing "Integer" withthe number of your choice.
`"discoveryRetryCount":"Integer"`
Discovery Interval in Seconds
Set the discovery retry interval in seconds. The following is for example purposes of how tocorrectly enter this value, replacing "Integer" with the number of your choice.
`"discoveryIntervalInSeconds":"Integer"`
AOSP Enrollment
Allow the device to skip adding a work account. Set the boolean value by replacing the"Boolean" value with "true" or "false".
`"aospenrollment":"Boolean"`
Android Device Management
VMware, Inc. 52
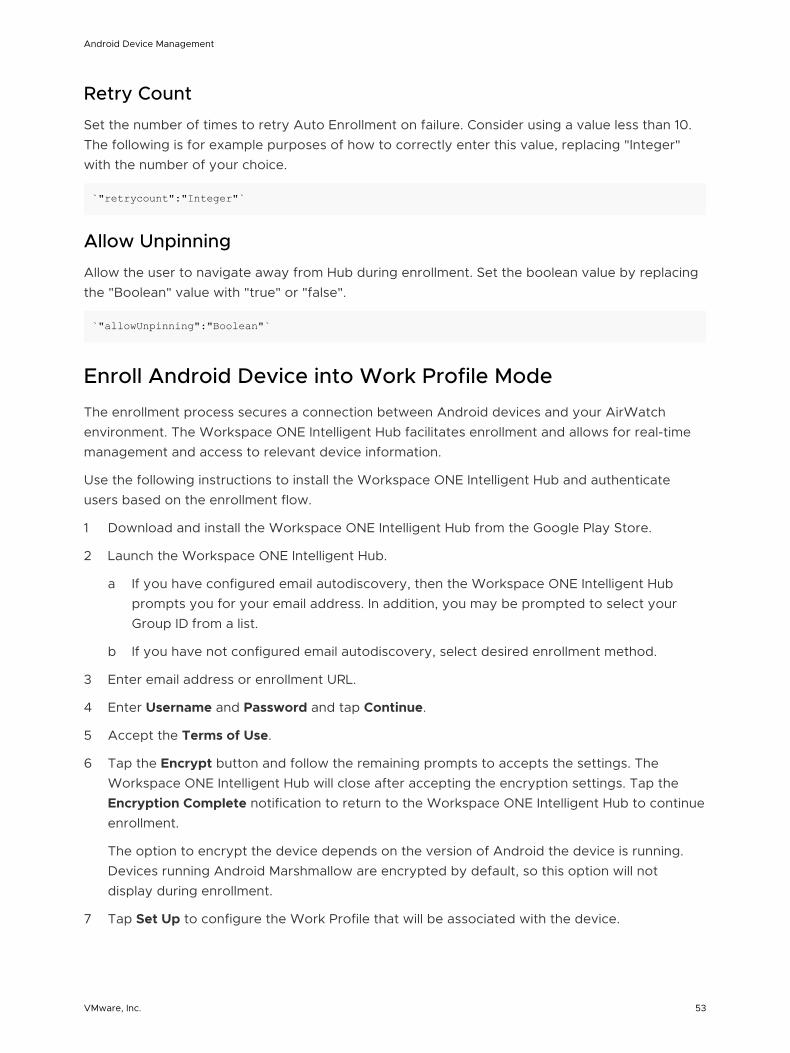
Retry Count
Set the number of times to retry Auto Enrollment on failure. Consider using a value less than 10.The following is for example purposes of how to correctly enter this value, replacing "Integer"with the number of your choice.
`"retrycount":"Integer"`
Allow Unpinning
Allow the user to navigate away from Hub during enrollment. Set the boolean value by replacingthe "Boolean" value with "true" or "false".
`"allowUnpinning":"Boolean"`
Enroll Android Device into Work Profile Mode
The enrollment process secures a connection between Android devices and your AirWatchenvironment. The Workspace ONE Intelligent Hub facilitates enrollment and allows for real-timemanagement and access to relevant device information.
Use the following instructions to install the Workspace ONE Intelligent Hub and authenticateusers based on the enrollment flow.
1 Download and install the Workspace ONE Intelligent Hub from the Google Play Store.
2 Launch the Workspace ONE Intelligent Hub.
a If you have configured email autodiscovery, then the Workspace ONE Intelligent Hubprompts you for your email address. In addition, you may be prompted to select yourGroup ID from a list.
b If you have not configured email autodiscovery, select desired enrollment method.
3 Enter email address or enrollment URL.
4 Enter Username and Password and tap Continue.
5 Accept the Terms of Use.
6 Tap the Encrypt button and follow the remaining prompts to accepts the settings. TheWorkspace ONE Intelligent Hub will close after accepting the encryption settings. Tap theEncryption Complete notification to return to the Workspace ONE Intelligent Hub to continueenrollment.
The option to encrypt the device depends on the version of Android the device is running.Devices running Android Marshmallow are encrypted by default, so this option will notdisplay during enrollment.
7 Tap Set Up to configure the Work Profile that will be associated with the device.
Android Device Management
VMware, Inc. 53
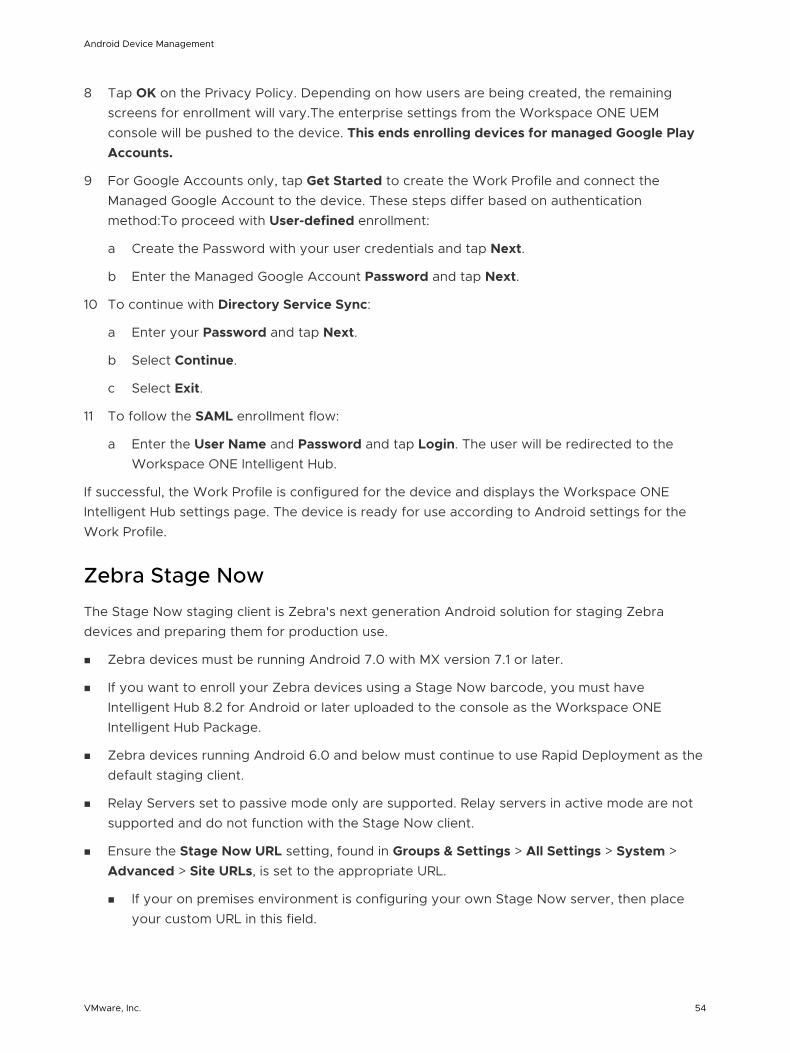
8 Tap OK on the Privacy Policy. Depending on how users are being created, the remainingscreens for enrollment will vary.The enterprise settings from the Workspace ONE UEMconsole will be pushed to the device. This ends enrolling devices for managed Google PlayAccounts.
9 For Google Accounts only, tap Get Started to create the Work Profile and connect theManaged Google Account to the device. These steps differ based on authenticationmethod:To proceed with User-defined enrollment:
a Create the Password with your user credentials and tap Next.
b Enter the Managed Google Account Password and tap Next.
10 To continue with Directory Service Sync:
a Enter your Password and tap Next.
b Select Continue.
c Select Exit.
11 To follow the SAML enrollment flow:
a Enter the User Name and Password and tap Login. The user will be redirected to theWorkspace ONE Intelligent Hub.
If successful, the Work Profile is configured for the device and displays the Workspace ONEIntelligent Hub settings page. The device is ready for use according to Android settings for theWork Profile.
Zebra Stage Now
The Stage Now staging client is Zebra's next generation Android solution for staging Zebradevices and preparing them for production use.
n Zebra devices must be running Android 7.0 with MX version 7.1 or later.
n If you want to enroll your Zebra devices using a Stage Now barcode, you must haveIntelligent Hub 8.2 for Android or later uploaded to the console as the Workspace ONEIntelligent Hub Package.
n Zebra devices running Android 6.0 and below must continue to use Rapid Deployment as thedefault staging client.
n Relay Servers set to passive mode only are supported. Relay servers in active mode are notsupported and do not function with the Stage Now client.
n Ensure the Stage Now URL setting, found in Groups & Settings > All Settings > System >Advanced > Site URLs, is set to the appropriate URL.
n If your on premises environment is configuring your own Stage Now server, then placeyour custom URL in this field.
Android Device Management
VMware, Inc. 54

n If your on premises environment is not configuring your own Stage Now server, then yousimply must open your networks to allow access to the URL listed here.
n SaaS environments do not need to change this text box.
n There must be no Google account present on the device while attempting Stage Nowenrollment in Work Managed Mode.
Workspace ONE UEM supports Stage Now given the following conditions and limitations.
For more information on Zebra Mobility, see Zebra Mobility Extensions and Full MX FeatureMatrix.
If you plan to enroll Zebra devices in Work Managed Device Mode with a Stage Now barcode,take the following steps.
1 Use the Organization Group selector to select the OG you want to configure for your Androiddevices.
2 Navigate to Groups & Settings > All Settings > Devices & Users > Android > Android EMMRegistration and select the Enrollment Restrictions tab.
3 Complete the following settings.
Setting Description
Current Setting Select Override to affect changes to the OG you selected in step 1.
Define theenrollmentmethod for thisorganizationgroup
This setting determines how this OG treats Android devices.
Select from among the following settings:
Always use Android– This setting enables the Device Owner Mode slider on the GenerateStage Now Barcode screen and makes it uneditable. This forces all Android devices thatenroll in this OG to be in Device Owner Mode (or Work Managed Device Mode).
Always use Android (Legacy) – This setting disables the Device Owner Mode slider fromthe Generate Stage Now Barcode screen and makes it uneditable. This forces all Androiddevices that enroll in this OG to be in Device Admin Mode.
Define Assignment Groups that use Android – This setting enables the Device Owner Modeslider on the Generate Stage Now Barcode screen and makes it editable, allowing you thechoice of enrolling Android devices in Device Owner Mode (Work Managed Device Mode)or enrolling them in Device Admin Mode according to selected Assignment Groups.
4 Direct your end-user to take the following steps to enroll their device:
a Start the device from a "factory settings" state.
b Ensure there is no Google account on the device.
c Proceed through the Setup Wizard or scan the "skip setup wizard" barcode provided byZebra.
Android Device Management
VMware, Inc. 55

d Open the Stage Now app.
e Scan the barcode.
The device is automatically enrolled into Work Managed mode.
Android Device Management
VMware, Inc. 56
How to Configure Android Profiles 5Android profiles ensure proper use of devices and protection of sensitive data. Profiles servemany different purposes, from letting you enforce corporate rules and procedures to tailoringand preparing Android devices for how they are used.
Android Versus Android Legacy Profiles
When deploying profiles there are two Android profile types: Android and Android (Legacy).Select the Android profile option if you have completed the Android EMM Registration. If youhave opted out of the EMM registration, then the Android (Legacy) profiles are available. Whenyou select Android but have not walked through the Android EMM Registration, an errormessage displays prompting you to go to the settings page to complete EMM registration orproceed to Android (Legacy) profile deployment.
Work Profile vs. Work Managed Device Mode
A Work Profile is a special type of administrator tailored primarily for a BYOD use case. When theuser already has a personal device configured with their own Google account, Workspace ONEUEM enrollment creates a Work Profile, where it installs the Workspace ONE IntelligentHub.Workspace ONE UEM only controls the Work Profile. Managed apps install inside the WorkProfile and display an orange briefcase badge to differentiate them from personal apps.
Work Managed device applies to devices enrolled from an unprovisioned state (factory reset),recommended for corporate owned devices. Workspace ONE Intelligent Hub is installed duringthe setup process and set as the device owner, meaning Workspace ONE UEM will have fullcontrol of the entire device.
Android profiles will display the following tags: Work Profile and Work Managed Device.
Profile options with the Work Profile tag only apply to the Work Profile settings and apps, and donot affect the user's personal apps or settings. For example, certain restrictions disable access tothe Camera or taking screen capture. These restrictions only affect the Android badged appsinside the Work Profile and will not impact personal apps. Profile options configured for WorkManaged Device apply to the entire device. Each profile discussed in this section indicates whichdevice type the profile affects.
Profiles Behavior
VMware, Inc. 57
There are times when more than one profile needs to be implemented for various reasons. Whenduplicate profiles are deployed, the most restrictive policy takes priority. Therefore, if twoprofiles are installed, and one says to block camera and another says to allow camera, IntelligentHub for Android combines the profiles and blocks the camera to choose the more secure option.
This chapter includes the following topics:
n Configure Profile
n Passcode
n Chrome Browser Settings
n Chrome Browser Settings Matrix (Android)
n Restrictions
n Specific Restrictions for Android
n Exchange Active Sync
n Public App Auto Update
n Credentials
n Custom Messages
n Application Control
n Proxy Settings
n System Updates
n Wi-Fi
n VPN
n Configure Per-App VPN Rules
n Permissions
n Lock Task Mode
n Date/Time for Android Devices
n Date/Time for Samsung Devices
n Workspace ONE Launcher
n Firewall
n APN
n Enterprise Factory Reset Protection
n Configure Enterprise Factory Reset Protection Profile for Android
n Zebra MX
n Custom Settings
Android Device Management
VMware, Inc. 58
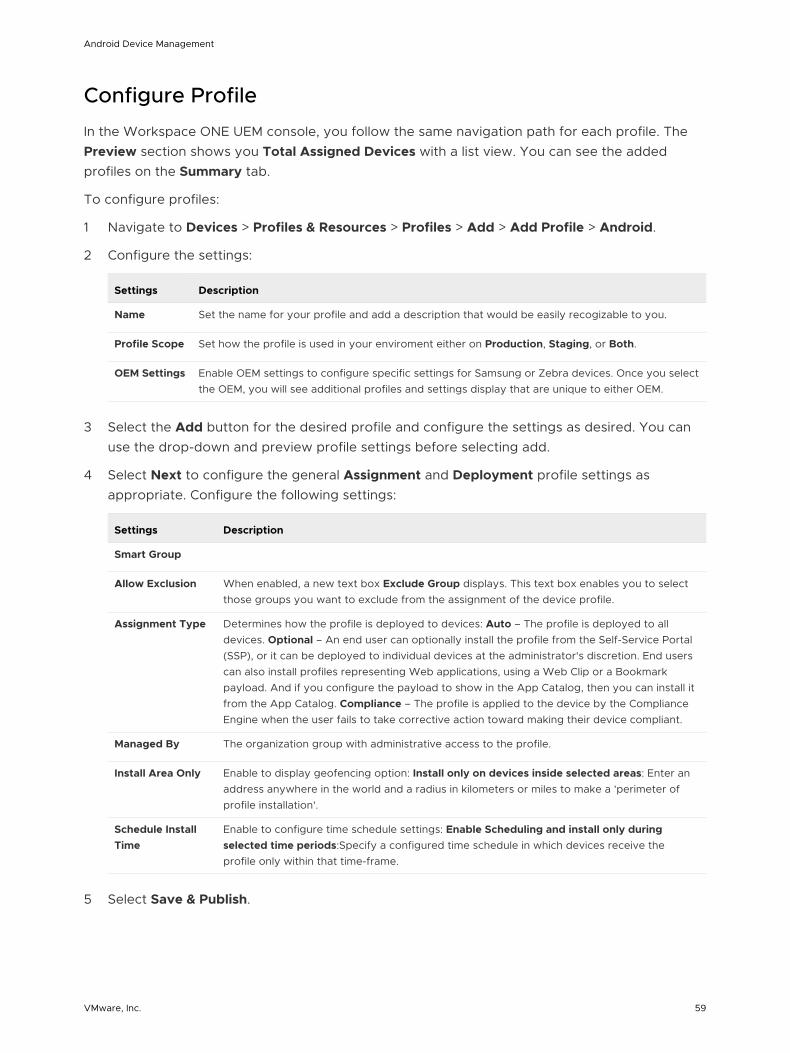
Configure Profile
In the Workspace ONE UEM console, you follow the same navigation path for each profile. ThePreview section shows you Total Assigned Devices with a list view. You can see the addedprofiles on the Summary tab.
To configure profiles:
1 Navigate to Devices > Profiles & Resources > Profiles > Add > Add Profile > Android.
2 Configure the settings:
Settings Description
Name Set the name for your profile and add a description that would be easily recogizable to you.
Profile Scope Set how the profile is used in your enviroment either on Production, Staging, or Both.
OEM Settings Enable OEM settings to configure specific settings for Samsung or Zebra devices. Once you selectthe OEM, you will see additional profiles and settings display that are unique to either OEM.
3 Select the Add button for the desired profile and configure the settings as desired. You canuse the drop-down and preview profile settings before selecting add.
4 Select Next to configure the general Assignment and Deployment profile settings asappropriate. Configure the following settings:
Settings Description
Smart Group
Allow Exclusion When enabled, a new text box Exclude Group displays. This text box enables you to selectthose groups you want to exclude from the assignment of the device profile.
Assignment Type Determines how the profile is deployed to devices: Auto – The profile is deployed to alldevices. Optional – An end user can optionally install the profile from the Self-Service Portal(SSP), or it can be deployed to individual devices at the administrator's discretion. End userscan also install profiles representing Web applications, using a Web Clip or a Bookmarkpayload. And if you configure the payload to show in the App Catalog, then you can install itfrom the App Catalog. Compliance – The profile is applied to the device by the ComplianceEngine when the user fails to take corrective action toward making their device compliant.
Managed By The organization group with administrative access to the profile.
Install Area Only Enable to display geofencing option: Install only on devices inside selected areas: Enter anaddress anywhere in the world and a radius in kilometers or miles to make a 'perimeter ofprofile installation'.
Schedule InstallTime
Enable to configure time schedule settings: Enable Scheduling and install only duringselected time periods:Specify a configured time schedule in which devices receive theprofile only within that time-frame.
5 Select Save & Publish.
Android Device Management
VMware, Inc. 59
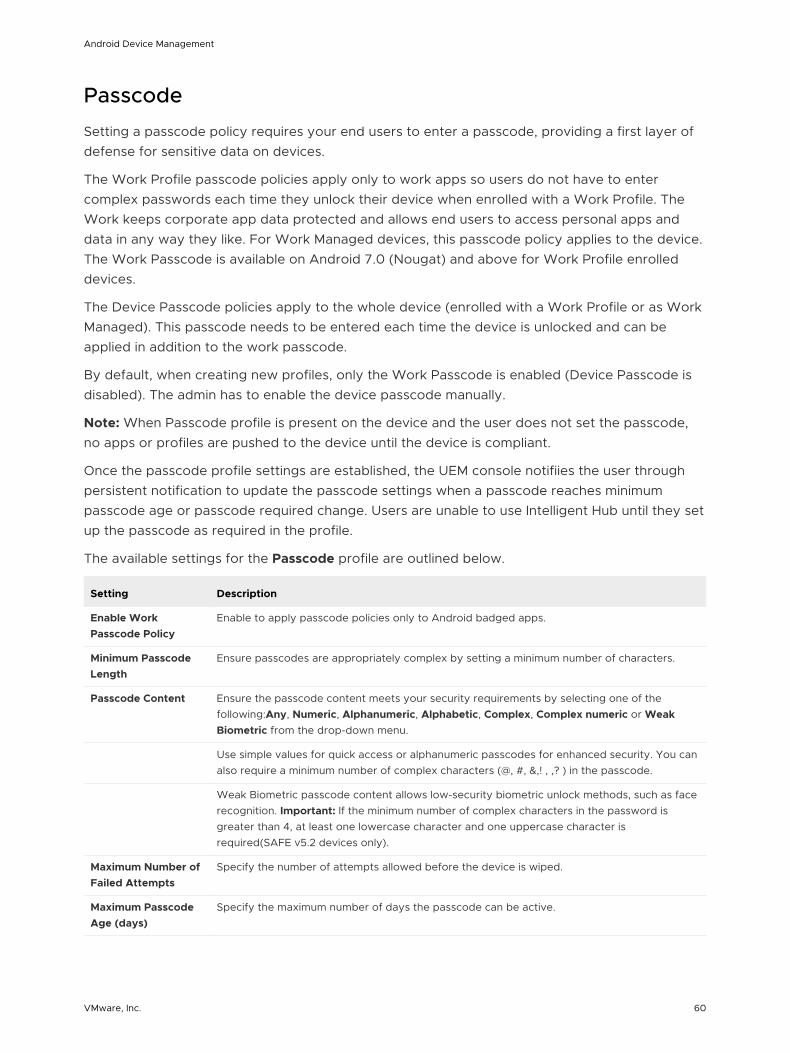
Passcode
Setting a passcode policy requires your end users to enter a passcode, providing a first layer ofdefense for sensitive data on devices.
The Work Profile passcode policies apply only to work apps so users do not have to entercomplex passwords each time they unlock their device when enrolled with a Work Profile. TheWork keeps corporate app data protected and allows end users to access personal apps anddata in any way they like. For Work Managed devices, this passcode policy applies to the device.The Work Passcode is available on Android 7.0 (Nougat) and above for Work Profile enrolleddevices.
The Device Passcode policies apply to the whole device (enrolled with a Work Profile or as WorkManaged). This passcode needs to be entered each time the device is unlocked and can beapplied in addition to the work passcode.
By default, when creating new profiles, only the Work Passcode is enabled (Device Passcode isdisabled). The admin has to enable the device passcode manually.
Note: When Passcode profile is present on the device and the user does not set the passcode,no apps or profiles are pushed to the device until the device is compliant.
Once the passcode profile settings are established, the UEM console notifiies the user throughpersistent notification to update the passcode settings when a passcode reaches minimumpasscode age or passcode required change. Users are unable to use Intelligent Hub until they setup the passcode as required in the profile.
The available settings for the Passcode profile are outlined below.
Setting Description
Enable WorkPasscode Policy
Enable to apply passcode policies only to Android badged apps.
Minimum PasscodeLength
Ensure passcodes are appropriately complex by setting a minimum number of characters.
Passcode Content Ensure the passcode content meets your security requirements by selecting one of thefollowing:Any, Numeric, Alphanumeric, Alphabetic, Complex, Complex numeric or WeakBiometric from the drop-down menu.
Use simple values for quick access or alphanumeric passcodes for enhanced security. You canalso require a minimum number of complex characters (@, #, &,! , ,? ) in the passcode.
Weak Biometric passcode content allows low-security biometric unlock methods, such as facerecognition. Important: If the minimum number of complex characters in the password isgreater than 4, at least one lowercase character and one uppercase character isrequired(SAFE v5.2 devices only).
Maximum Number ofFailed Attempts
Specify the number of attempts allowed before the device is wiped.
Maximum PasscodeAge (days)
Specify the maximum number of days the passcode can be active.
Android Device Management
VMware, Inc. 60
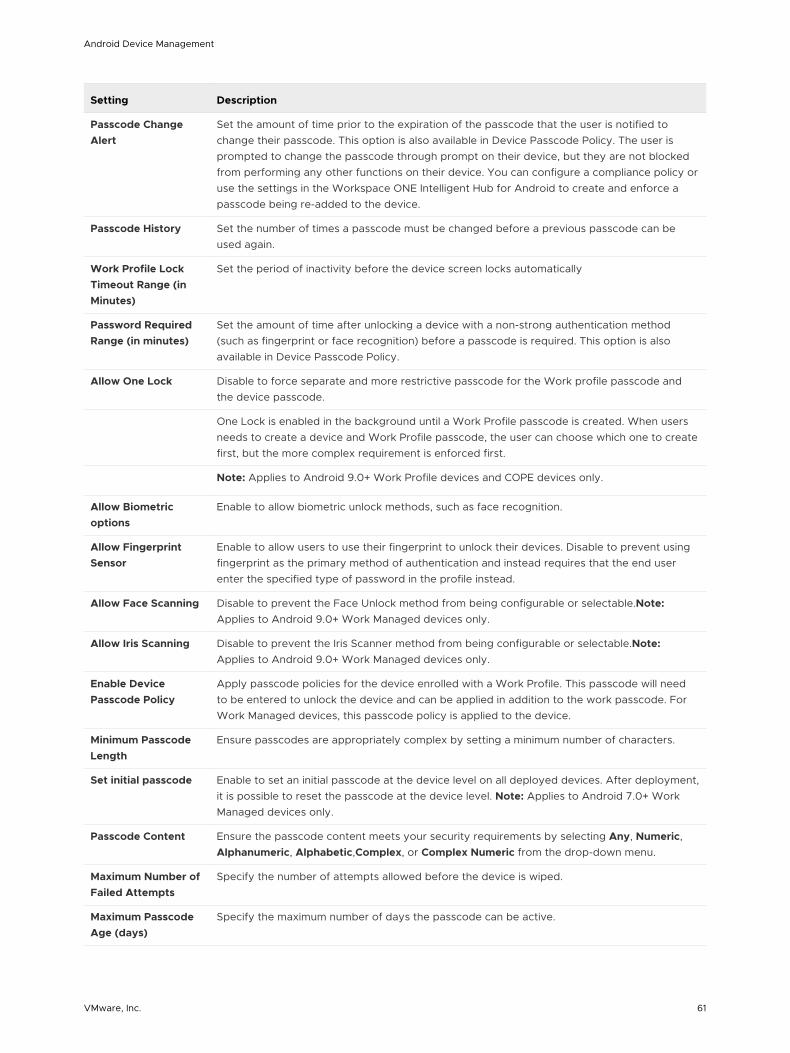
Setting Description
Passcode ChangeAlert
Set the amount of time prior to the expiration of the passcode that the user is notified tochange their passcode. This option is also available in Device Passcode Policy. The user isprompted to change the passcode through prompt on their device, but they are not blockedfrom performing any other functions on their device. You can configure a compliance policy oruse the settings in the Workspace ONE Intelligent Hub for Android to create and enforce apasscode being re-added to the device.
Passcode History Set the number of times a passcode must be changed before a previous passcode can beused again.
Work Profile LockTimeout Range (inMinutes)
Set the period of inactivity before the device screen locks automatically
Password RequiredRange (in minutes)
Set the amount of time after unlocking a device with a non-strong authentication method(such as fingerprint or face recognition) before a passcode is required. This option is alsoavailable in Device Passcode Policy.
Allow One Lock Disable to force separate and more restrictive passcode for the Work profile passcode andthe device passcode.
One Lock is enabled in the background until a Work Profile passcode is created. When usersneeds to create a device and Work Profile passcode, the user can choose which one to createfirst, but the more complex requirement is enforced first.
Note: Applies to Android 9.0+ Work Profile devices and COPE devices only.
Allow Biometricoptions
Enable to allow biometric unlock methods, such as face recognition.
Allow FingerprintSensor
Enable to allow users to use their fingerprint to unlock their devices. Disable to prevent usingfingerprint as the primary method of authentication and instead requires that the end userenter the specified type of password in the profile instead.
Allow Face Scanning Disable to prevent the Face Unlock method from being configurable or selectable.Note:Applies to Android 9.0+ Work Managed devices only.
Allow Iris Scanning Disable to prevent the Iris Scanner method from being configurable or selectable.Note:Applies to Android 9.0+ Work Managed devices only.
Enable DevicePasscode Policy
Apply passcode policies for the device enrolled with a Work Profile. This passcode will needto be entered to unlock the device and can be applied in addition to the work passcode. ForWork Managed devices, this passcode policy is applied to the device.
Minimum PasscodeLength
Ensure passcodes are appropriately complex by setting a minimum number of characters.
Set initial passcode Enable to set an initial passcode at the device level on all deployed devices. After deployment,it is possible to reset the passcode at the device level. Note: Applies to Android 7.0+ WorkManaged devices only.
Passcode Content Ensure the passcode content meets your security requirements by selecting Any, Numeric,Alphanumeric, Alphabetic,Complex, or Complex Numeric from the drop-down menu.
Maximum Number ofFailed Attempts
Specify the number of attempts allowed before the device is wiped.
Maximum PasscodeAge (days)
Specify the maximum number of days the passcode can be active.
Android Device Management
VMware, Inc. 61
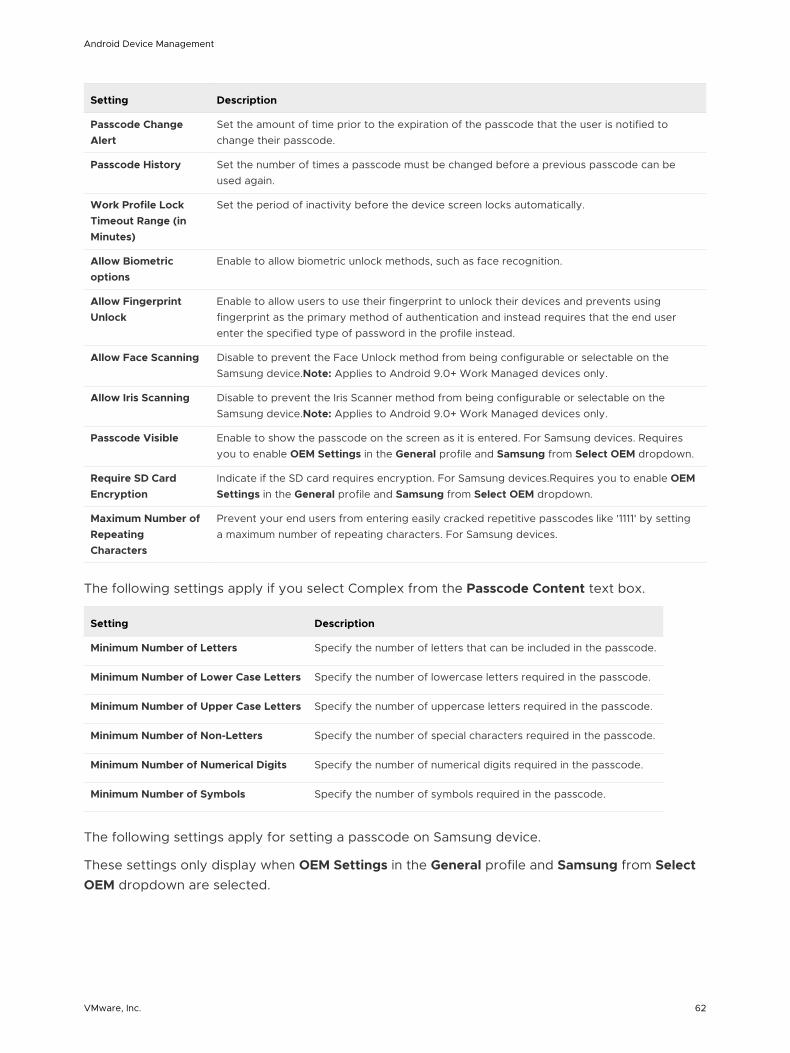
Setting Description
Passcode ChangeAlert
Set the amount of time prior to the expiration of the passcode that the user is notified tochange their passcode.
Passcode History Set the number of times a passcode must be changed before a previous passcode can beused again.
Work Profile LockTimeout Range (inMinutes)
Set the period of inactivity before the device screen locks automatically.
Allow Biometricoptions
Enable to allow biometric unlock methods, such as face recognition.
Allow FingerprintUnlock
Enable to allow users to use their fingerprint to unlock their devices and prevents usingfingerprint as the primary method of authentication and instead requires that the end userenter the specified type of password in the profile instead.
Allow Face Scanning Disable to prevent the Face Unlock method from being configurable or selectable on theSamsung device.Note: Applies to Android 9.0+ Work Managed devices only.
Allow Iris Scanning Disable to prevent the Iris Scanner method from being configurable or selectable on theSamsung device.Note: Applies to Android 9.0+ Work Managed devices only.
Passcode Visible Enable to show the passcode on the screen as it is entered. For Samsung devices. Requiresyou to enable OEM Settings in the General profile and Samsung from Select OEM dropdown.
Require SD CardEncryption
Indicate if the SD card requires encryption. For Samsung devices.Requires you to enable OEMSettings in the General profile and Samsung from Select OEM dropdown.
Maximum Number ofRepeatingCharacters
Prevent your end users from entering easily cracked repetitive passcodes like '1111' by settinga maximum number of repeating characters. For Samsung devices.
The following settings apply if you select Complex from the Passcode Content text box.
Setting Description
Minimum Number of Letters Specify the number of letters that can be included in the passcode.
Minimum Number of Lower Case Letters Specify the number of lowercase letters required in the passcode.
Minimum Number of Upper Case Letters Specify the number of uppercase letters required in the passcode.
Minimum Number of Non-Letters Specify the number of special characters required in the passcode.
Minimum Number of Numerical Digits Specify the number of numerical digits required in the passcode.
Minimum Number of Symbols Specify the number of symbols required in the passcode.
The following settings apply for setting a passcode on Samsung device.
These settings only display when OEM Settings in the General profile and Samsung from SelectOEM dropdown are selected.
Android Device Management
VMware, Inc. 62
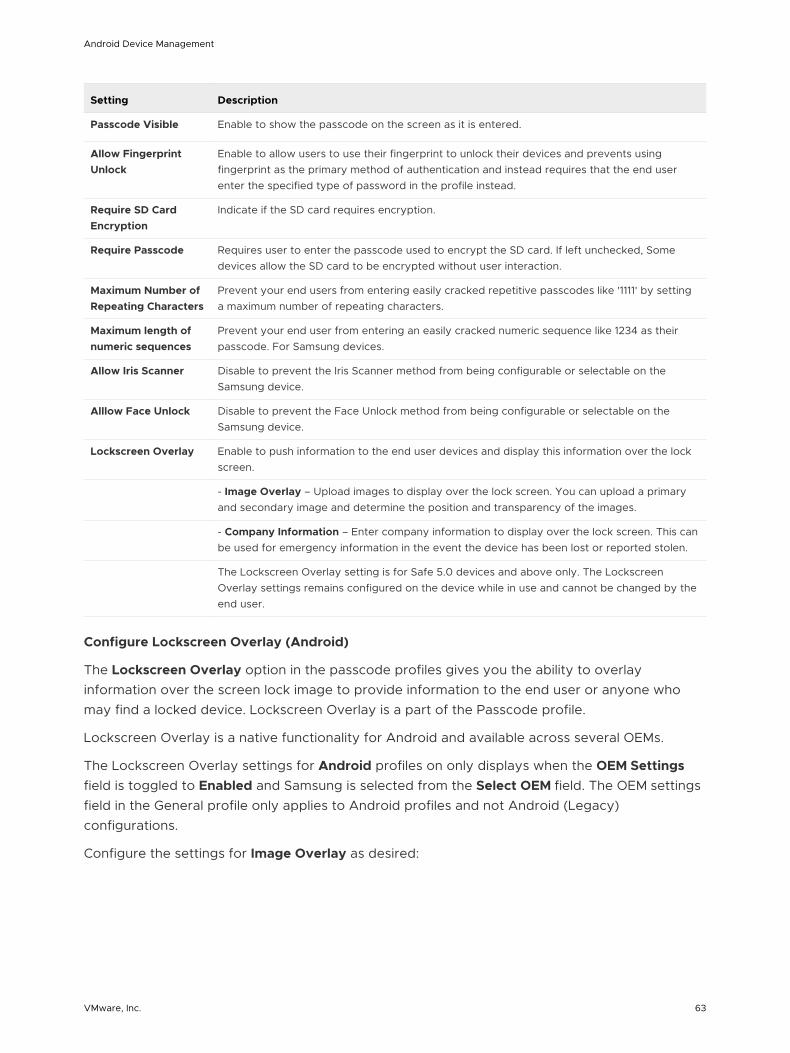
Setting Description
Passcode Visible Enable to show the passcode on the screen as it is entered.
Allow FingerprintUnlock
Enable to allow users to use their fingerprint to unlock their devices and prevents usingfingerprint as the primary method of authentication and instead requires that the end userenter the specified type of password in the profile instead.
Require SD CardEncryption
Indicate if the SD card requires encryption.
Require Passcode Requires user to enter the passcode used to encrypt the SD card. If left unchecked, Somedevices allow the SD card to be encrypted without user interaction.
Maximum Number ofRepeating Characters
Prevent your end users from entering easily cracked repetitive passcodes like '1111' by settinga maximum number of repeating characters.
Maximum length ofnumeric sequences
Prevent your end user from entering an easily cracked numeric sequence like 1234 as theirpasscode. For Samsung devices.
Allow Iris Scanner Disable to prevent the Iris Scanner method from being configurable or selectable on theSamsung device.
Alllow Face Unlock Disable to prevent the Face Unlock method from being configurable or selectable on theSamsung device.
Lockscreen Overlay Enable to push information to the end user devices and display this information over the lockscreen.
- Image Overlay – Upload images to display over the lock screen. You can upload a primaryand secondary image and determine the position and transparency of the images.
- Company Information – Enter company information to display over the lock screen. This canbe used for emergency information in the event the device has been lost or reported stolen.
The Lockscreen Overlay setting is for Safe 5.0 devices and above only. The LockscreenOverlay settings remains configured on the device while in use and cannot be changed by theend user.
Configure Lockscreen Overlay (Android)
The Lockscreen Overlay option in the passcode profiles gives you the ability to overlayinformation over the screen lock image to provide information to the end user or anyone whomay find a locked device. Lockscreen Overlay is a part of the Passcode profile.
Lockscreen Overlay is a native functionality for Android and available across several OEMs.
The Lockscreen Overlay settings for Android profiles on only displays when the OEM Settingsfield is toggled to Enabled and Samsung is selected from the Select OEM field. The OEM settingsfield in the General profile only applies to Android profiles and not Android (Legacy)configurations.
Configure the settings for Image Overlay as desired:
Android Device Management
VMware, Inc. 63

Setting Description
Image Overlay Type Select Single Image or Multi Image to determine the number of overlay imagesrequired.
Primary Image Upload an image file.
Primary Image Top Position inPercent
Determine the position of the top image from 0-90 percent.
Primary Image Bottom Positionin Percent
Determine the position of the bottom image from 0-90 percent.
Secondary Image Upload a second image if desired. This field only displays if Multi Image is selectedfrom the Image Overlay Type field.
Secondary Image Position inPercent
Determine the position of the top image from 0-90 percent. Only application if MultiImage is selected from the Image Overlay Type field.
Secondary Image BottomPosition in Percent
Determine the position of the bottom image from 0-90 percent. Only applicable ifMulti Image is selected from the Image Overlay Type field.
Overlay Image Determine the transparency of your image as Transparent or Opaque.
Configure the settings for Company Information as desired.
Setting Description
Company Name Enter your company name for display.
Company Logo Upload the company logo with an image file.
Company Address Enter the company office address.
Company Phone Number Enter the company phone number.
Overlay Image Determine the transparency of your image as Transparent or Opaque.
Chrome Browser Settings
The Chrome Browser Settings profile helps you to manage settings for the Work Chrome app.
Chrome is Google's web browser. Chrome offers a number of features such as search, theomnibox (one box to search and navigate), auto-fill, saved passwords, and Google account sign-in to instantly access recent tabs and searches across all your devices. The work Chrome appfunctions the same as the personal version of Chrome. Configuring this profile will not affect theuser's personal Chrome app. You can push this profile in conjunction with a separate VPN orCredentials+Wi-Fi payload to ensure end-users can authenticate and log in to your internal sitesand systems. This will ensure that users must use the Work Chrome app for business purposes.
Android Device Management
VMware, Inc. 64
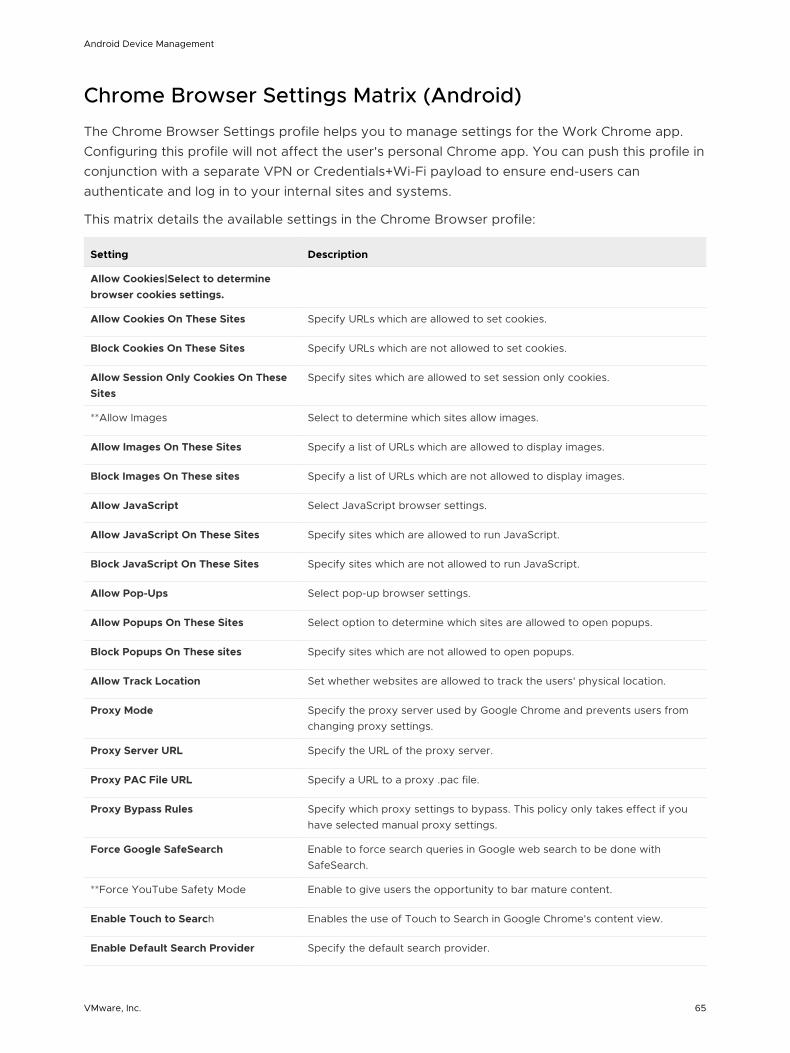
Chrome Browser Settings Matrix (Android)
The Chrome Browser Settings profile helps you to manage settings for the Work Chrome app.Configuring this profile will not affect the user's personal Chrome app. You can push this profile inconjunction with a separate VPN or Credentials+Wi-Fi payload to ensure end-users canauthenticate and log in to your internal sites and systems.
This matrix details the available settings in the Chrome Browser profile:
Setting Description
Allow Cookies|Select to determinebrowser cookies settings.
Allow Cookies On These Sites Specify URLs which are allowed to set cookies.
Block Cookies On These Sites Specify URLs which are not allowed to set cookies.
Allow Session Only Cookies On TheseSites
Specify sites which are allowed to set session only cookies.
**Allow Images Select to determine which sites allow images.
Allow Images On These Sites Specify a list of URLs which are allowed to display images.
Block Images On These sites Specify a list of URLs which are not allowed to display images.
Allow JavaScript Select JavaScript browser settings.
Allow JavaScript On These Sites Specify sites which are allowed to run JavaScript.
Block JavaScript On These Sites Specify sites which are not allowed to run JavaScript.
Allow Pop-Ups Select pop-up browser settings.
Allow Popups On These Sites Select option to determine which sites are allowed to open popups.
Block Popups On These sites Specify sites which are not allowed to open popups.
Allow Track Location Set whether websites are allowed to track the users' physical location.
Proxy Mode Specify the proxy server used by Google Chrome and prevents users fromchanging proxy settings.
Proxy Server URL Specify the URL of the proxy server.
Proxy PAC File URL Specify a URL to a proxy .pac file.
Proxy Bypass Rules Specify which proxy settings to bypass. This policy only takes effect if youhave selected manual proxy settings.
Force Google SafeSearch Enable to force search queries in Google web search to be done withSafeSearch.
**Force YouTube Safety Mode Enable to give users the opportunity to bar mature content.
Enable Touch to Search Enables the use of Touch to Search in Google Chrome's content view.
Enable Default Search Provider Specify the default search provider.
Android Device Management
VMware, Inc. 65
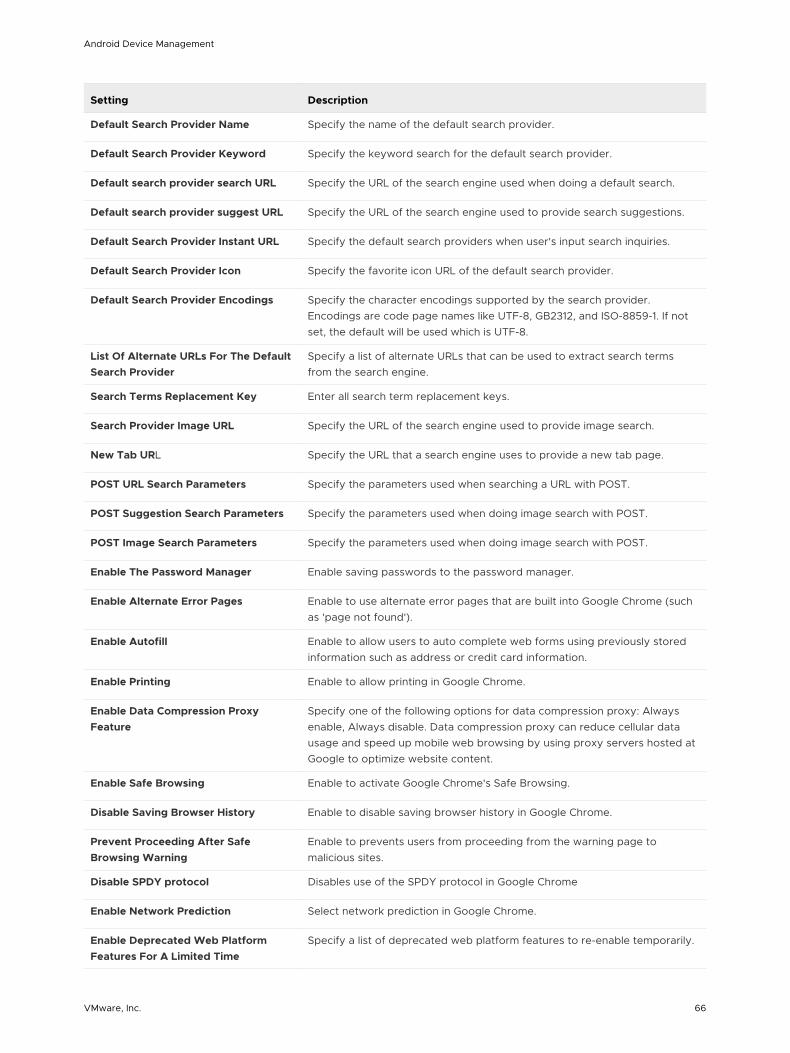
Setting Description
Default Search Provider Name Specify the name of the default search provider.
Default Search Provider Keyword Specify the keyword search for the default search provider.
Default search provider search URL Specify the URL of the search engine used when doing a default search.
Default search provider suggest URL Specify the URL of the search engine used to provide search suggestions.
Default Search Provider Instant URL Specify the default search providers when user's input search inquiries.
Default Search Provider Icon Specify the favorite icon URL of the default search provider.
Default Search Provider Encodings Specify the character encodings supported by the search provider.Encodings are code page names like UTF-8, GB2312, and ISO-8859-1. If notset, the default will be used which is UTF-8.
List Of Alternate URLs For The DefaultSearch Provider
Specify a list of alternate URLs that can be used to extract search termsfrom the search engine.
Search Terms Replacement Key Enter all search term replacement keys.
Search Provider Image URL Specify the URL of the search engine used to provide image search.
New Tab URL Specify the URL that a search engine uses to provide a new tab page.
POST URL Search Parameters Specify the parameters used when searching a URL with POST.
POST Suggestion Search Parameters Specify the parameters used when doing image search with POST.
POST Image Search Parameters Specify the parameters used when doing image search with POST.
Enable The Password Manager Enable saving passwords to the password manager.
Enable Alternate Error Pages Enable to use alternate error pages that are built into Google Chrome (suchas 'page not found').
Enable Autofill Enable to allow users to auto complete web forms using previously storedinformation such as address or credit card information.
Enable Printing Enable to allow printing in Google Chrome.
Enable Data Compression ProxyFeature
Specify one of the following options for data compression proxy: Alwaysenable, Always disable. Data compression proxy can reduce cellular datausage and speed up mobile web browsing by using proxy servers hosted atGoogle to optimize website content.
Enable Safe Browsing Enable to activate Google Chrome's Safe Browsing.
Disable Saving Browser History Enable to disable saving browser history in Google Chrome.
Prevent Proceeding After SafeBrowsing Warning
Enable to prevents users from proceeding from the warning page tomalicious sites.
Disable SPDY protocol Disables use of the SPDY protocol in Google Chrome
Enable Network Prediction Select network prediction in Google Chrome.
Enable Deprecated Web PlatformFeatures For A Limited Time
Specify a list of deprecated web platform features to re-enable temporarily.
Android Device Management
VMware, Inc. 66
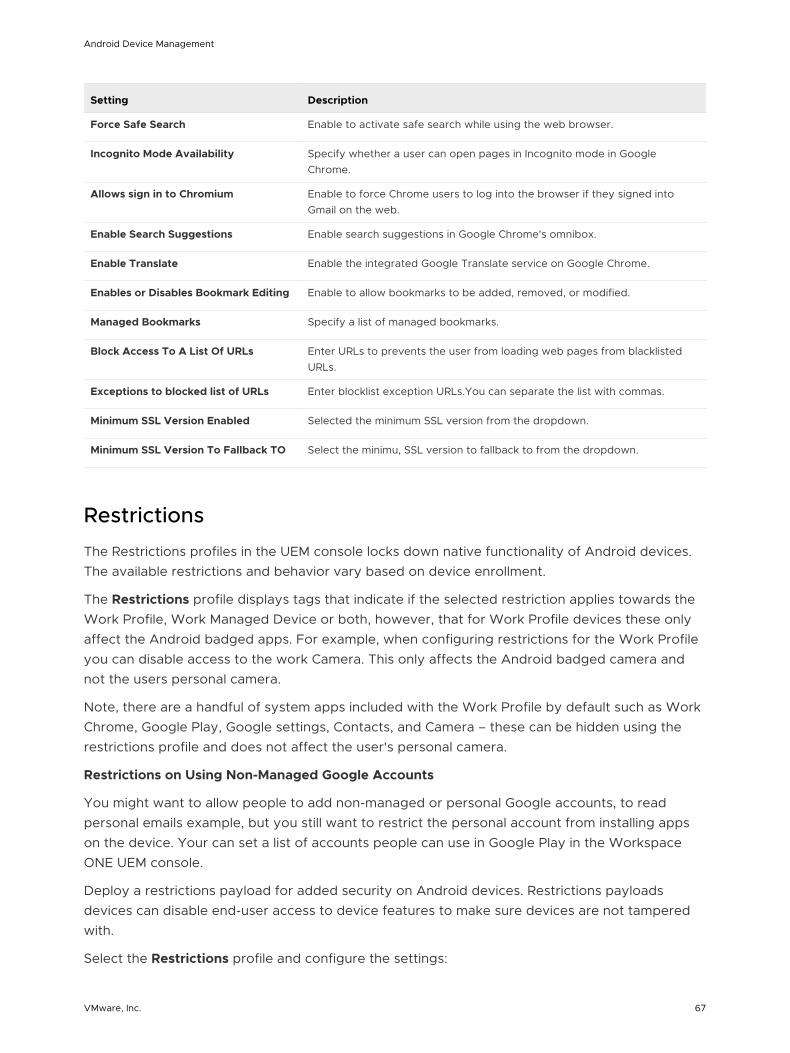
Setting Description
Force Safe Search Enable to activate safe search while using the web browser.
Incognito Mode Availability Specify whether a user can open pages in Incognito mode in GoogleChrome.
Allows sign in to Chromium Enable to force Chrome users to log into the browser if they signed intoGmail on the web.
Enable Search Suggestions Enable search suggestions in Google Chrome's omnibox.
Enable Translate Enable the integrated Google Translate service on Google Chrome.
Enables or Disables Bookmark Editing Enable to allow bookmarks to be added, removed, or modified.
Managed Bookmarks Specify a list of managed bookmarks.
Block Access To A List Of URLs Enter URLs to prevents the user from loading web pages from blacklistedURLs.
Exceptions to blocked list of URLs Enter blocklist exception URLs.You can separate the list with commas.
Minimum SSL Version Enabled Selected the minimum SSL version from the dropdown.
Minimum SSL Version To Fallback TO Select the minimu, SSL version to fallback to from the dropdown.
Restrictions
The Restrictions profiles in the UEM console locks down native functionality of Android devices.The available restrictions and behavior vary based on device enrollment.
The Restrictions profile displays tags that indicate if the selected restriction applies towards theWork Profile, Work Managed Device or both, however, that for Work Profile devices these onlyaffect the Android badged apps. For example, when configuring restrictions for the Work Profileyou can disable access to the work Camera. This only affects the Android badged camera andnot the users personal camera.
Note, there are a handful of system apps included with the Work Profile by default such as WorkChrome, Google Play, Google settings, Contacts, and Camera – these can be hidden using therestrictions profile and does not affect the user's personal camera.
Restrictions on Using Non-Managed Google Accounts
You might want to allow people to add non-managed or personal Google accounts, to readpersonal emails example, but you still want to restrict the personal account from installing appson the device. Your can set a list of accounts people can use in Google Play in the WorkspaceONE UEM console.
Deploy a restrictions payload for added security on Android devices. Restrictions payloadsdevices can disable end-user access to device features to make sure devices are not tamperedwith.
Select the Restrictions profile and configure the settings:
Android Device Management
VMware, Inc. 67
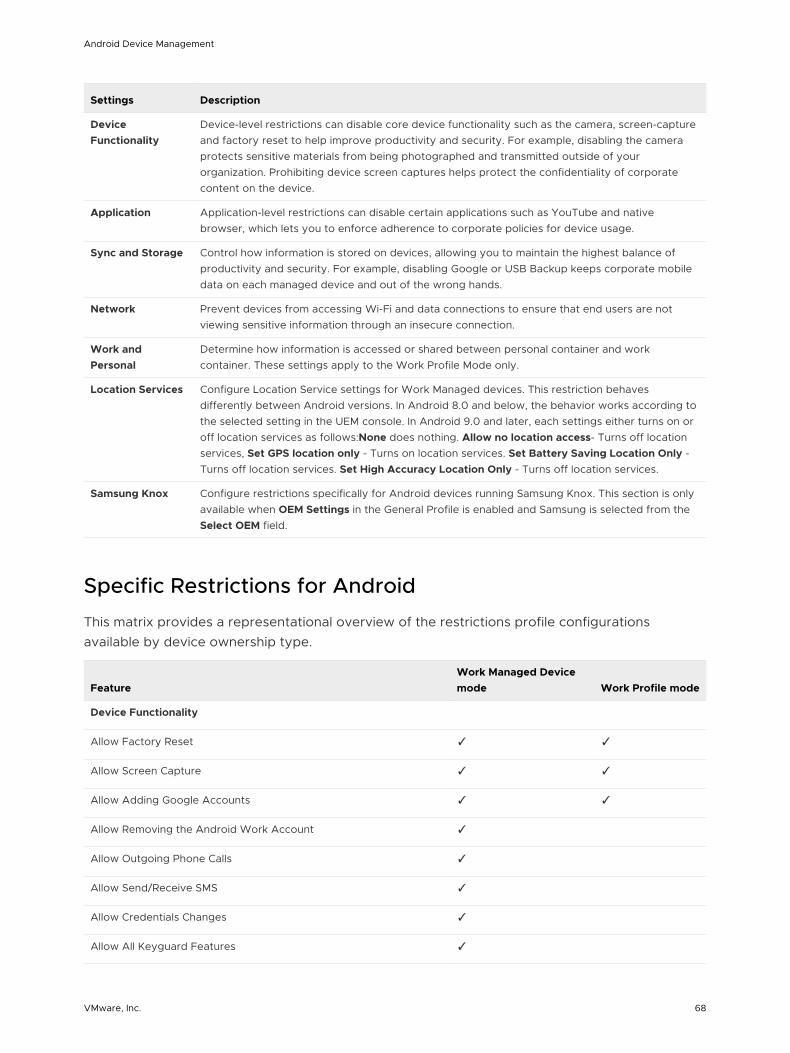
Settings Description
DeviceFunctionality
Device-level restrictions can disable core device functionality such as the camera, screen-captureand factory reset to help improve productivity and security. For example, disabling the cameraprotects sensitive materials from being photographed and transmitted outside of yourorganization. Prohibiting device screen captures helps protect the confidentiality of corporatecontent on the device.
Application Application-level restrictions can disable certain applications such as YouTube and nativebrowser, which lets you to enforce adherence to corporate policies for device usage.
Sync and Storage Control how information is stored on devices, allowing you to maintain the highest balance ofproductivity and security. For example, disabling Google or USB Backup keeps corporate mobiledata on each managed device and out of the wrong hands.
Network Prevent devices from accessing Wi-Fi and data connections to ensure that end users are notviewing sensitive information through an insecure connection.
Work andPersonal
Determine how information is accessed or shared between personal container and workcontainer. These settings apply to the Work Profile Mode only.
Location Services Configure Location Service settings for Work Managed devices. This restriction behavesdifferently between Android versions. In Android 8.0 and below, the behavior works according tothe selected setting in the UEM console. In Android 9.0 and later, each settings either turns on oroff location services as follows:None does nothing. Allow no location access- Turns off locationservices, Set GPS location only - Turns on location services. Set Battery Saving Location Only -Turns off location services. Set High Accuracy Location Only - Turns off location services.
Samsung Knox Configure restrictions specifically for Android devices running Samsung Knox. This section is onlyavailable when OEM Settings in the General Profile is enabled and Samsung is selected from theSelect OEM field.
Specific Restrictions for Android
This matrix provides a representational overview of the restrictions profile configurationsavailable by device ownership type.
FeatureWork Managed Devicemode Work Profile mode
Device Functionality
Allow Factory Reset ✓ ✓
Allow Screen Capture ✓ ✓
Allow Adding Google Accounts ✓ ✓
Allow Removing the Android Work Account ✓
Allow Outgoing Phone Calls ✓
Allow Send/Receive SMS ✓
Allow Credentials Changes ✓
Allow All Keyguard Features ✓
Android Device Management
VMware, Inc. 68
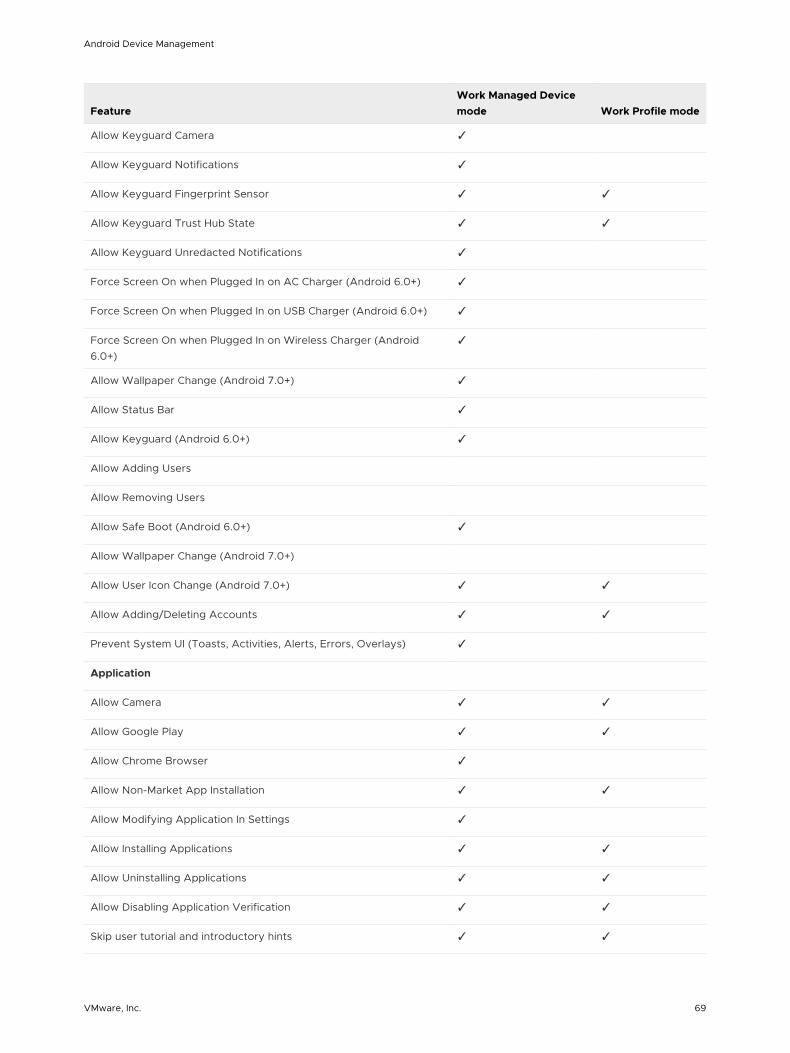
FeatureWork Managed Devicemode Work Profile mode
Allow Keyguard Camera ✓
Allow Keyguard Notifications ✓
Allow Keyguard Fingerprint Sensor ✓ ✓
Allow Keyguard Trust Hub State ✓ ✓
Allow Keyguard Unredacted Notifications ✓
Force Screen On when Plugged In on AC Charger (Android 6.0+) ✓
Force Screen On when Plugged In on USB Charger (Android 6.0+) ✓
Force Screen On when Plugged In on Wireless Charger (Android6.0+)
✓
Allow Wallpaper Change (Android 7.0+) ✓
Allow Status Bar ✓
Allow Keyguard (Android 6.0+) ✓
Allow Adding Users
Allow Removing Users
Allow Safe Boot (Android 6.0+) ✓
Allow Wallpaper Change (Android 7.0+)
Allow User Icon Change (Android 7.0+) ✓ ✓
Allow Adding/Deleting Accounts ✓ ✓
Prevent System UI (Toasts, Activities, Alerts, Errors, Overlays) ✓
Application
Allow Camera ✓ ✓
Allow Google Play ✓ ✓
Allow Chrome Browser ✓
Allow Non-Market App Installation ✓ ✓
Allow Modifying Application In Settings ✓
Allow Installing Applications ✓ ✓
Allow Uninstalling Applications ✓ ✓
Allow Disabling Application Verification ✓ ✓
Skip user tutorial and introductory hints ✓ ✓
Android Device Management
VMware, Inc. 69

FeatureWork Managed Devicemode Work Profile mode
Allow Whitelist Accessibility Services ✓
Restrict Input Methods ✓ ✓
Sync and Storage
Allow USB Debugging ✓
Allow USB Mass Storage✓
Allow Mounting Physical Storage Media ✓
Allow USB File Transfer ✓
Allow Backup Service (Android 8.0+)
Network
Allow Wi-Fi changes ✓
Allow Bluetooth Pairing ✓
Allow Bluetooth (Android 8.0+) ✓
Allow Bluetooth Contact Sharing (Android 8.0+)* ✓
Allow Outgoing Bluetooth Connections* ✓ ✓
Allow All Tethering ✓
Allow VPN Changes ✓
Allow Mobile Network Changes ✓
Allow NFC ✓
Allow Managed Wi-Fi Profile Changes (Android 6.0+) ✓
Work and Personal
Allow Pasting Clipboard Between Work and Personal Apps ✓
Allow Works Apps To Access Documents From Personal Apps ✓
Allow Personal Apps to Access Documents From Work Apps ✓
Allow Personal Apps to Share Documents With Work Apps ✓
Allow Work Apps to Share Documents With Personal Apps
Allow Work Contact's Caller ID Info to Show in Phone Dialer ✓
Allow Work Widgets To Be Added To Personal Home Screen ✓
Allow Work Contacts in Personal Contacts App (Android 7.0+)
Android Device Management
VMware, Inc. 70
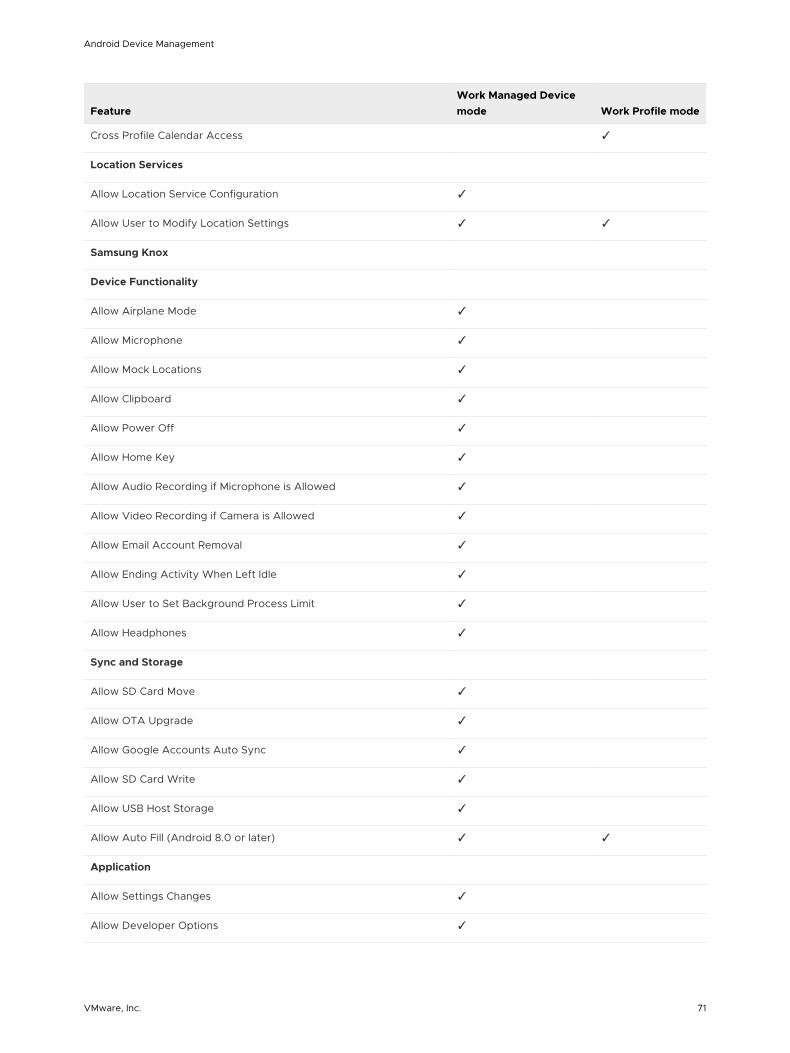
FeatureWork Managed Devicemode Work Profile mode
Cross Profile Calendar Access ✓
Location Services
Allow Location Service Configuration ✓
Allow User to Modify Location Settings ✓ ✓
Samsung Knox
Device Functionality
Allow Airplane Mode ✓
Allow Microphone ✓
Allow Mock Locations ✓
Allow Clipboard ✓
Allow Power Off ✓
Allow Home Key ✓
Allow Audio Recording if Microphone is Allowed ✓
Allow Video Recording if Camera is Allowed ✓
Allow Email Account Removal ✓
Allow Ending Activity When Left Idle ✓
Allow User to Set Background Process Limit ✓
Allow Headphones ✓
Sync and Storage
Allow SD Card Move ✓
Allow OTA Upgrade ✓
Allow Google Accounts Auto Sync ✓
Allow SD Card Write ✓
Allow USB Host Storage ✓
Allow Auto Fill (Android 8.0 or later) ✓ ✓
Application
Allow Settings Changes ✓
Allow Developer Options ✓
Android Device Management
VMware, Inc. 71
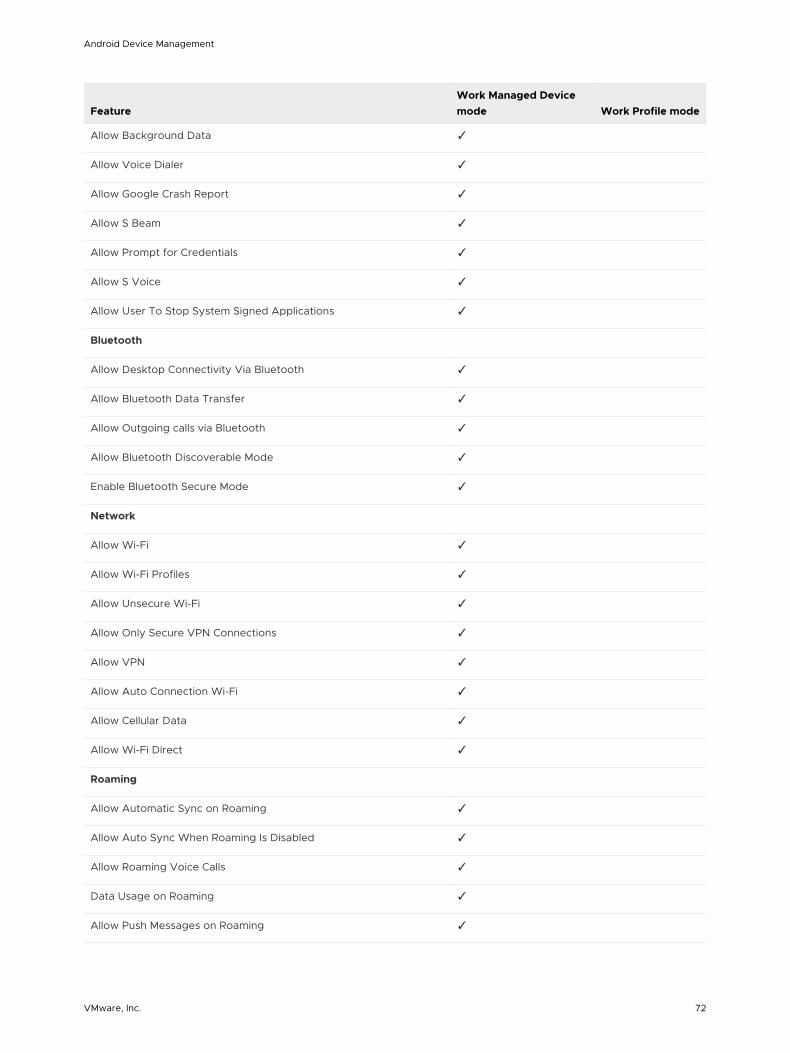
FeatureWork Managed Devicemode Work Profile mode
Allow Background Data ✓
Allow Voice Dialer ✓
Allow Google Crash Report ✓
Allow S Beam ✓
Allow Prompt for Credentials ✓
Allow S Voice ✓
Allow User To Stop System Signed Applications ✓
Bluetooth
Allow Desktop Connectivity Via Bluetooth ✓
Allow Bluetooth Data Transfer ✓
Allow Outgoing calls via Bluetooth ✓
Allow Bluetooth Discoverable Mode ✓
Enable Bluetooth Secure Mode ✓
Network
Allow Wi-Fi ✓
Allow Wi-Fi Profiles ✓
Allow Unsecure Wi-Fi ✓
Allow Only Secure VPN Connections ✓
Allow VPN ✓
Allow Auto Connection Wi-Fi ✓
Allow Cellular Data ✓
Allow Wi-Fi Direct ✓
Roaming
Allow Automatic Sync on Roaming ✓
Allow Auto Sync When Roaming Is Disabled ✓
Allow Roaming Voice Calls ✓
Data Usage on Roaming ✓
Allow Push Messages on Roaming ✓
Android Device Management
VMware, Inc. 72

FeatureWork Managed Devicemode Work Profile mode
Phone & Data
Allow Non-Emergency Calls ✓
Allow User to Set Mobile Data Limit ✓
Allow WAP Push ✓
Hardware Restrictions
Allow Menu Key ✓
Allow Back Key ✓
Allow Search Key ✓
Allow Task Manager ✓
Allow System Bar ✓
Allow Volume Key ✓
Security
Allow Lock Screen Settings ✓
Allow Firmware Recovery ✓
Tethering
Allow USB Tethering ✓
MMS Restrictions
Allow Incoming MMS ✓
Allow Outgoing MMS ✓
Miscellaneous
Set Device Font ✓
Set Device Font Size ✓
Allow User to Stop System Signed Applications ✓
Allow Only Secure VPN Connections ✓
Android Device Management
VMware, Inc. 73
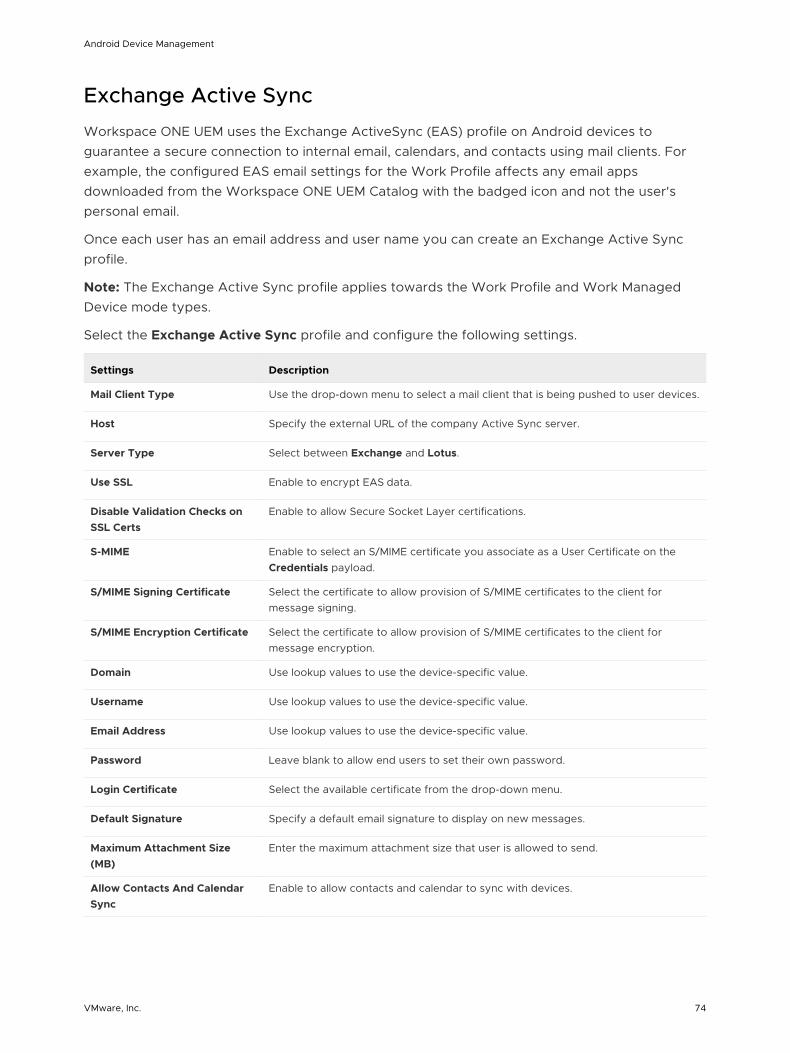
Exchange Active Sync
Workspace ONE UEM uses the Exchange ActiveSync (EAS) profile on Android devices toguarantee a secure connection to internal email, calendars, and contacts using mail clients. Forexample, the configured EAS email settings for the Work Profile affects any email appsdownloaded from the Workspace ONE UEM Catalog with the badged icon and not the user'spersonal email.
Once each user has an email address and user name you can create an Exchange Active Syncprofile.
Note: The Exchange Active Sync profile applies towards the Work Profile and Work ManagedDevice mode types.
Select the Exchange Active Sync profile and configure the following settings.
Settings Description
Mail Client Type Use the drop-down menu to select a mail client that is being pushed to user devices.
Host Specify the external URL of the company Active Sync server.
Server Type Select between Exchange and Lotus.
Use SSL Enable to encrypt EAS data.
Disable Validation Checks onSSL Certs
Enable to allow Secure Socket Layer certifications.
S-MIME Enable to select an S/MIME certificate you associate as a User Certificate on theCredentials payload.
S/MIME Signing Certificate Select the certificate to allow provision of S/MIME certificates to the client formessage signing.
S/MIME Encryption Certificate Select the certificate to allow provision of S/MIME certificates to the client formessage encryption.
Domain Use lookup values to use the device-specific value.
Username Use lookup values to use the device-specific value.
Email Address Use lookup values to use the device-specific value.
Password Leave blank to allow end users to set their own password.
Login Certificate Select the available certificate from the drop-down menu.
Default Signature Specify a default email signature to display on new messages.
Maximum Attachment Size(MB)
Enter the maximum attachment size that user is allowed to send.
Allow Contacts And CalendarSync
Enable to allow contacts and calendar to sync with devices.
Android Device Management
VMware, Inc. 74

Public App Auto Update
The Public App Auto update profile allows you to configure auto updates and schedulingmaintenance windows for public Android applications.
The Public app auto update profile uses Google API's to send profile data directly to devices. Thisprofile will not be displayed in the Workspace ONE Intelligent Hub.
To configure the Public App Auto Update profile:
Note: If a profile contains a Public App Update payload, it cannot contain any other payloads.
Select Public App Auto Update from the payload list and configure the update settings:
n Public Apps Auto Update Policy: Specify when Google Play allows auto-date. Select Allowuser to configure, Always auto update, Update on Wi-Fi only, or Never auto upate.
The default selection is Allow user to configure.
n Start Time: Configure what the local time applications in the foreground should be allowed toauto update each day. Select a time between 00:30 to 23:30.
Note: Only applies if Update on Wi-Fi Only and Always auto update are selected.
n End Time: Configure what the local time applications in the foreground should be allowed toauto update each day. Select a time between 30 minutes to 24 hours.
Note: Only applies if Update on Wi-Fi Only and Always auto update are selected.
Based on time set, the applications only auto updates during the specified start and end times.For example, you would set kiosk devices to only update outside of business hours to notinterrupt kiosk usage.
Credentials
For greater security, you can implement digital certificates to protect corporate assets. To dothis, you must first define a certificate authority, then configure a Credentials payload alongsideyour Exchange ActiveSync (EAS), Wi-Fi or VPN payload.
Each payload has settings for associating the certificate authority defined in the Credentialspayload. Credentials profiles deploy corporate certificates for user authentication to manageddevices. The settings in this profile vary depending on the device ownership type. TheCredentials profile applies towards the Work Profile and Work Managed Device mode types.
Devices must have a device pin code configured before Workspace ONE UEM can install identitycertificates with a private key.
Credentials profiles deploy corporate certificates for user authentication to managed devices.The settings in this profile will vary depending on the device ownership type. The Credentialsprofile will apply towards the Work Profile and Work Managed Device mode types.
Select the Credentials profile and select Configure.
Android Device Management
VMware, Inc. 75

Use the drop-down menu to select either Upload or Defined Certificate Authority for theCredential Source. The remaining profile options are source-dependent. If you select Upload,you must enter a Credential Name and upload a new certificate. If you select Defined CertificateAuthority, you must choose a predefined Certificate Authority and Template.
Manage Certificates With Custom XML
Certificates can be managed through the Workspace ONE Intelligent Hub for Android and byusing custom XML in the UEM console. You can specify package names that allow you to manageyour certificates on Android devices. You can add the package names through custom settings.
To push these packages:
1 Navigate to Groups & Settings > All Settings > Apps > Settings & Policies > Settings >Custom Settings.
2 Configure the custom XML accordingly:
Setting Description
Custom Settings Paste the following custom XML: { "AuthorizedCertInstaller" : "packagename" } and replacethe placeholder package name with the actual package name of the app (usually in format:com.company.appname).
3 Save the Custom XML.
Custom Messages
The Custom Messages profile allows you configure messages that display on the devicehomescreen when important information needs to be relayed to the user.
The Custom messages profile allows you to set a lockscreen message, a message to displaywhen users attempt to perform a blocked setting, or device user settings.
Select the Custom Messages profile and configure the messages settings:
|Set a Lockscreen Message|Enter a message to display on the device homescreen when thedevice is locked. This is useful for a device that has been lost or stolen to display contactinformation of the user.| |Set a short message for blocked settings|Enter a message to bedisplayed when a user tries to perform actions on a device that is blocked. Use the custommessage to explain why the feature is blocked.| |Set a long message for users to view insettings|Users can view this message on their device under Settings > Security > Device admins> Intelligent Hub.|
Application Control
The Application Control profile allows you to control approved applications and preventuninstalling important apps. While the compliance engine can send alerts and takesadministrative actions when a user installs or uninstalls certain applications, Application Controlprevents users from even making those changes.
Android Device Management
VMware, Inc. 76

Only apps approved by the admin will display in the Play Store when the application controlprofile is configured. For example, you can automatically push the browser of your choice to thedevice as a managed app and add it to the required apps Application Group. This setupcombined with enabling the Prevent Un-Installation of Required Apps option in the ApplicationControl profile prevents uninstalling the browser and any other required apps configured in theApplication Group.
Warning: Enabling/ disabling critical system apps results in devices becomingunusable.
For more information on Application Groups, see the Mobile Application ManagementDocumentation.
To control application access to your Android devices, create a profile to allow, prevent, uninstall,or enable system applications with the Application Control profile.
Select the Application Control payload and configure the following settings to set the level ofcontrol for your application deployments:
Setting Description
Disable Access toBlacklisted Apps
Select to disable access to applications that are considered blacklisted which is definedin Application Groups. If enabled, this option does not uninstall the application from thedevice.
Prevent Un-Installation ofRequired Apps
Turn on to prevent the uninstallation of required applications defined in ApplicationGroups.
Enable System Apps Turn on to unhide pre-installed applications as defined in whitelisted applications inApplication Groups. For COPE, the 'Work Managed' checkbox applies to the personalside and 'Work profile' applies to the corporate side.
Proxy Settings
Proxy settings are configured to ensure that all the HTTP and HTTPS network traffic is passedonly through it. This ensures data security since all the personal and corporate data will befiltered through the Proxy Settings profile.
Configure the Proxy settings as such:
Setting Description
Proxy Mode Select the desired proxy type.
Proxy PAC URL Specify a URL to a proxy .pac file.
Proxy Server Enter the host name of IP address for the proxy server.
Exclusion List Add hostnames to prevent them from routing through the proxy.
Android Device Management
VMware, Inc. 77

System Updates
Use this profile to manage how Android device updates are handled when the device is enrolledinto Workspace ONE UEM.
Select the System Updates profile.
Use the drop-down menu from the Automatic Updates field to select the update policy.
Setting Description
Automatic Updates(Android 6.0 andhigher Work Managedand COPE devices)
Install Updates Automatically: Automatically install updates when they become available.
Defer Update Notifications: Defer all updates. Send a policy that blocks OS updates for amaximum period of 30 days.
Set Update Window: Set a daily time window in which to update the device.
Annual SystemUpdate Freeze Periods(Android 9.0 andhigher Work Managedand COPE devices)
Device owners can postpone OTA system updates to devices for up to 90 days to freezethe OS version running on these devices over critical periods (such as holidays). The systemenforces a mandatory 60-day buffer after any defined freeze period to prevent freezing thedevice indefinitely.
During a freeze period:
Devices do not receive any notifications about pending OTA updates.
Devices do not install any OTA updates to the OS.
Device users are not able to manually check for OTA updates.
Freeze Period Use this field to set freeze periods, in month and day, when updates cannot be installed.When the time of the device is within any of the freeze periods, all incoming system updates,including security patches, are blocked and cannot be installed. Each individual freeze periodis allowed to be at most 90 days long and adjacent freeze periods need to be at least 60days a part.
Wi-Fi
Configuring a Wi-Fi profile lets devices connect to corporate networks, even if they are hidden,encrypted, or protected.
The Wi-Fi profile can be useful for end users who travel to various office locations that have theirown unique wireless networks or for automatically configuring devices to connect to theappropriate wireless network while in an office.
Android Device Management
VMware, Inc. 78

When pushing a Wi-Fi profile to devices running Android 6.0+, if a user already has their deviceconnected to a Wi-Fi network through a manual setup; the Wi-Fi configuration cannot bechanged by Workspace ONE UEM. For example, if the Wi-Fi password has been changed andyou push the updated profile to enrolled devices, some users have to update their device withthe new password manually.
To configure the profile:
Configure Wi-Fi settings, including:
Setting> Description
Service SetIdentifier
Provide the name of the network the device connects to.
Hidden Network Indicate if the Wi-Fi network is hidden.
Set as ActiveNetwork
Indicate if the device will connect to the network with no end-user interaction.
Security Type Specify the access protocol used and whether certificates are required.Depending on theselected security type, this will change the required fields. If None, WEP, WPA/WPA 2, or Any(Personal) are selected; the Password field will display. If WPA/WPA 2 Enterprise is selected,the Protocols and Authentication fields display.
Protocols
- Use Two Factor Authentication
- SFA Type
Authentication
- Identity
- Anonymous Identity
- Username
- Password
- Identity Certificate
- Root Certificate
Password Provide the required credentials for the device to connect to the network. The password fielddisplays when WEP, WPA/WPA 2, Any (Personal), WPA/WPA2 Enterprise are selected fromthe Security Type field.
Include FusionSettings
Enable to expand Fusion options for use with Fusion Adapters for Motorola devices. FusionSettings apply only to Motorola Rugged devices. For more information about VMware Supportfor Android Rugged devices, see the Rugged Android Platform Guide.
Set Fusion 802.11d Enable to use the Fusion 802.11d to set the Fusion 802.11d settings.
Enable 802.11d Enable to use 802.11d wireless specification for operation in additional regulatory domains.
Set Country Code Enable to set the Country Code for use in the 802.11d specifications.
Android Device Management
VMware, Inc. 79

Setting> Description
Set RF Band Enable to choose 2.4 GHz, 5 Ghz, or both bands and any channel masks applicable.
Proxy Type Enable to configure the Wi-Fi proxy settings.Note: Wi-Fi Proxy Auto Configuration is notsupported using Per-App VPN.
Proxy Server Enter the hostname or IP address for the proxy server.
Proxy Server Port Enter the port for the proxy server.
Exclusion List Enter the hostnames to exclude from the proxy.Hostnames entered here will not be routedthrough the proxy. Use the * as a wild card for the domain. For example: *.air-watch.com or*air-watch.com.
VPN
A Virtual Private Network (VPN) provides devices with a secure and encrypted tunnel to accessinternal resources such as email, files, and content. VPN profiles enable each device to functionas if it were connected through the on-site network.
Depending on the connection type and authentication method, use look-up values to auto-filluser name info to streamline the login process.
Note: The VPN profile applies for both the Work Profile and Work Managed Device mode types.
Configure VPN settings. The table below defines all settings that can be configured based on theVPN client.
Setting Description
Connection Type Choose the protocol used to facilitate VPN sessions. Each Connection Type requires therespective VPN Client to be installed on the device to deploy the VPN profile. Theseapplications should be assigned to users and published as public apps.
Connection Name Enter the assigned to the connection created by the profile.
Server Enter the name or address of the used for VPN connections.
Account Enter the user account for authenticating the connection.
Always On VPN Enable to force all traffic from work apps to be tunneled through VPN.
Lockdown Forces apps to only connect through the VPN. If the VPN is disconnected or notavailable, apps will not have any internet access.
Allow Apps to BypassLockdown
Enable to specify apps to continue to access the internet even when the VPN isdisconnected or not available.
Lockdown Allow List If Lockdown Allow List is enabled with packages added, then the listed apps will be ableto connect straight to the internet if VPN has been disconnected
Set Active Enable to turn VPN on after the profile applies to the device.
Per-App VPN Rules Enable Per App VPN which allows you to configure VPN traffic rules based on specificapplications. This text box only displays for supported VPN vendors. Note: Wi-Fi ProxyAuto Configuration is not supported using Per-App VPN.
Android Device Management
VMware, Inc. 80

Setting Description
Protocol Select the authentication protocol for the VPN. Available when Cisco AnyConnect isselected from the Connection Type.
Username Enter the username. Available when Cisco AnyConnect is selected from the ConnectionType.
User Authentication Choose the method required to authenticate the VPN session.
Password Provide the credentials required for end-user VPN access.
Client Certificate Use the drop-down to select the client certificate. These are configured in theCredentials profiles.
Certificate Revocation Enable to turn on certificate revocation.
AnyConnect Profile Enter the AnyConnect profile name.
FIPS Mode Enable to turn on FIPS Mode.
Strict Mode Enable to turn on Strict Mode.
Vendor Keys Create custom keys to go into the vendor config dictionary.
Key Enter the specific key provided by the vendor.
Value Enter the VPN value for each key.
Identity Certificate Select the identity certificate to be used for the VPN connection. Available whenWorkspace ONE Tunnel is selected from the Connection Type.
Configure Per-App VPN Rules
You can force selected applications to connect through your corporate VPN. Your VPN providermust support this feature, and you must publish the apps as managed applications.
Note: Wi-Fi Proxy Auto Configuration is not supported using Per-App VPN.
1 Select the VPN payload from the list.
2 Select your VPN vendor from the Connection Type field.
3 Configure your VPN profile.
4 Select Per-App VPN Rules to enable the ability to associate the VPN profile to the desiredapplications. For Workspace ONE Tunnel client, this selection is enabled by default. After thecheckbox is enabled, this profile is available for selection under the App Tunneling profilesdropdown in the application assignment page.
5 Select Save & Publish.
If Per-App VPN rules are enabled as an update to an existing VPN profile, the devices/applications that were previously using the VPN connection are affected. The VPNconnection that was previously routing all apps traffic are disconnected and VPN only appliesto applications associated with the updated profile.
Android Device Management
VMware, Inc. 81
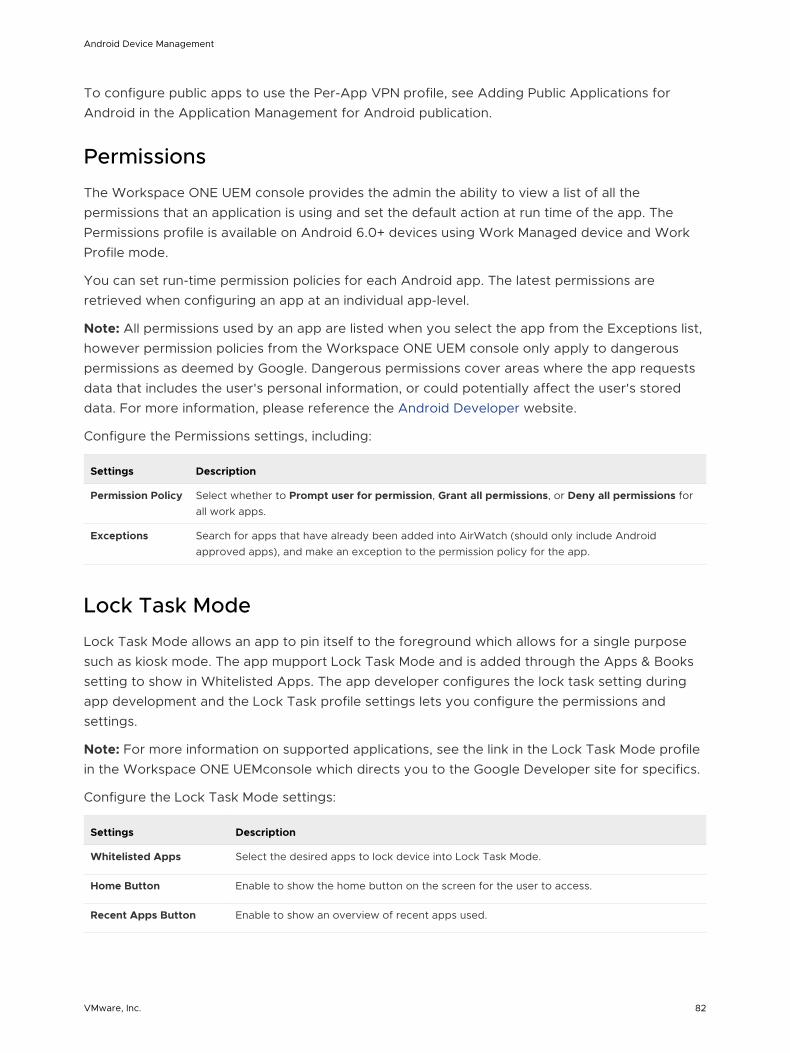
To configure public apps to use the Per-App VPN profile, see Adding Public Applications forAndroid in the Application Management for Android publication.
Permissions
The Workspace ONE UEM console provides the admin the ability to view a list of all thepermissions that an application is using and set the default action at run time of the app. ThePermissions profile is available on Android 6.0+ devices using Work Managed device and WorkProfile mode.
You can set run-time permission policies for each Android app. The latest permissions areretrieved when configuring an app at an individual app-level.
Note: All permissions used by an app are listed when you select the app from the Exceptions list,however permission policies from the Workspace ONE UEM console only apply to dangerouspermissions as deemed by Google. Dangerous permissions cover areas where the app requestsdata that includes the user's personal information, or could potentially affect the user's storeddata. For more information, please reference the Android Developer website.
Configure the Permissions settings, including:
Settings Description
Permission Policy Select whether to Prompt user for permission, Grant all permissions, or Deny all permissions forall work apps.
Exceptions Search for apps that have already been added into AirWatch (should only include Androidapproved apps), and make an exception to the permission policy for the app.
Lock Task Mode
Lock Task Mode allows an app to pin itself to the foreground which allows for a single purposesuch as kiosk mode. The app mupport Lock Task Mode and is added through the Apps & Bookssetting to show in Whitelisted Apps. The app developer configures the lock task setting duringapp development and the Lock Task profile settings lets you configure the permissions andsettings.
Note: For more information on supported applications, see the link in the Lock Task Mode profilein the Workspace ONE UEMconsole which directs you to the Google Developer site for specifics.
Configure the Lock Task Mode settings:
Settings Description
Whitelisted Apps Select the desired apps to lock device into Lock Task Mode.
Home Button Enable to show the home button on the screen for the user to access.
Recent Apps Button Enable to show an overview of recent apps used.
Android Device Management
VMware, Inc. 82
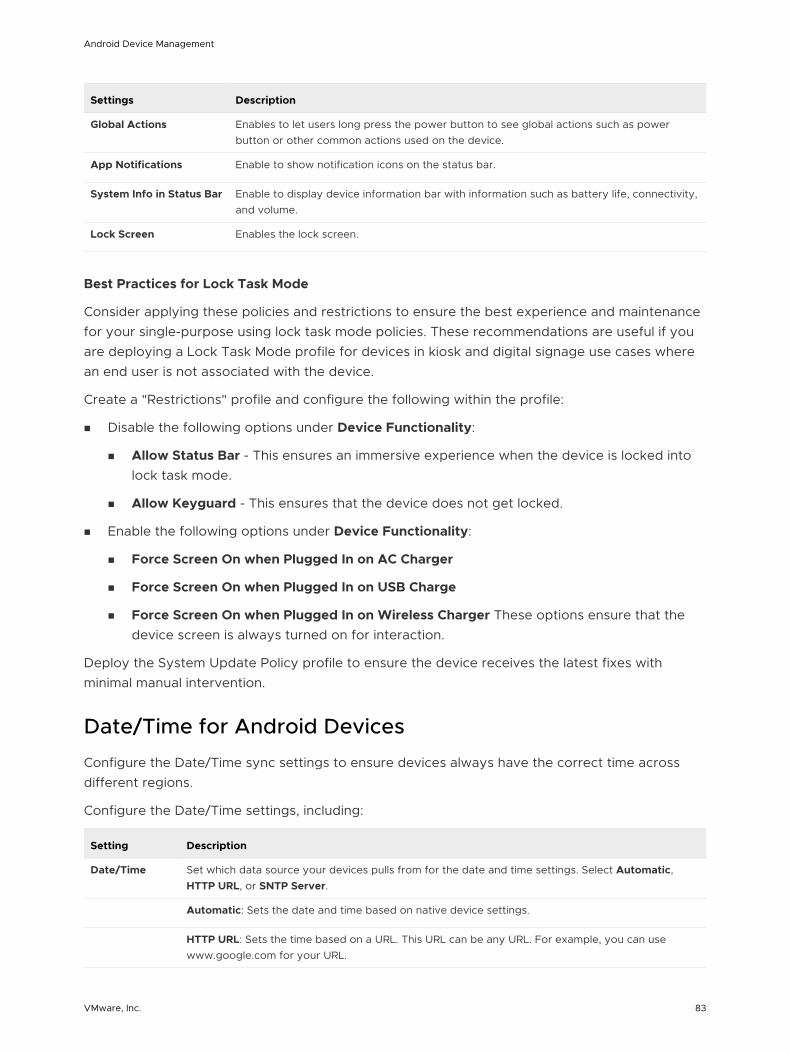
Settings Description
Global Actions Enables to let users long press the power button to see global actions such as powerbutton or other common actions used on the device.
App Notifications Enable to show notification icons on the status bar.
System Info in Status Bar Enable to display device information bar with information such as battery life, connectivity,and volume.
Lock Screen Enables the lock screen.
Best Practices for Lock Task Mode
Consider applying these policies and restrictions to ensure the best experience and maintenancefor your single-purpose using lock task mode policies. These recommendations are useful if youare deploying a Lock Task Mode profile for devices in kiosk and digital signage use cases wherean end user is not associated with the device.
Create a "Restrictions" profile and configure the following within the profile:
n Disable the following options under Device Functionality:
n Allow Status Bar - This ensures an immersive experience when the device is locked intolock task mode.
n Allow Keyguard - This ensures that the device does not get locked.
n Enable the following options under Device Functionality:
n Force Screen On when Plugged In on AC Charger
n Force Screen On when Plugged In on USB Charge
n Force Screen On when Plugged In on Wireless Charger These options ensure that thedevice screen is always turned on for interaction.
Deploy the System Update Policy profile to ensure the device receives the latest fixes withminimal manual intervention.
Date/Time for Android Devices
Configure the Date/Time sync settings to ensure devices always have the correct time acrossdifferent regions.
Configure the Date/Time settings, including:
Setting Description
Date/Time Set which data source your devices pulls from for the date and time settings. Select Automatic,HTTP URL, or SNTP Server.
Automatic: Sets the date and time based on native device settings.
HTTP URL: Sets the time based on a URL. This URL can be any URL. For example, you can usewww.google.com for your URL.
Android Device Management
VMware, Inc. 83

Setting Description
SNTP Server: Enter the server address. For example, you could enter time.nist.gov for your use.
For HTTP URL and SNTP Server, configure the additional settings: Enable Periodic Sync – Enable toset the device to sync date/time periodically in days. Set Time Zone – Specify the time zone fromthe available options.
Allow User toto changedate/time
Enable to allow users to manually change the date/time from the device.
Date/Time for Samsung Devices
Configure the Date/Time sync settings to ensure devices always have the correct time acrossdifferent regions.
This profile is available when OEM Settings is enabled and the Select OEM field is set toSamsung in the General profile settings.
Note: The Date/Time profile only displays when the OEM Settings field is toggled to Enabled
Configure the Date/Time settings for Samsung, including:
Setting Description
Date Format Change the order of the Month, Day, and Year display.
Time Format Choose 12 or 24 Hours format.
Date/Time Set which data source your devices pulls from for the date and time settings:
Automatic: Sets the date and time based on native device settings.
Server Time: Sets the time based on the server time of the Workspace ONE UEM console at the timethat the profile is created. Note this may cause device time to be late due to latency with pushingprofiles.
HTTP URL: Sets the time based on a URL. This URL can be any URL. For example, you can usewww.google.com for your URL.
SNTP Server: Enter the server.
For HTTP URL and SNTP Server, configure the additional settings: Enable Periodic Sync – Enable to setthe device to sync date/time periodically in days. Set Time Zone – Specify the time zone from theavailable options.
Workspace ONE Launcher
Workspace ONE Launcher is an application launcher that lets you to lock down Android devicesfor individual use cases and customize the look and behavior of managed Android devices. TheWorkspace ONE Launcher application replaces your device interface with one that is custom-tailored to your business needs.
Android Device Management
VMware, Inc. 84
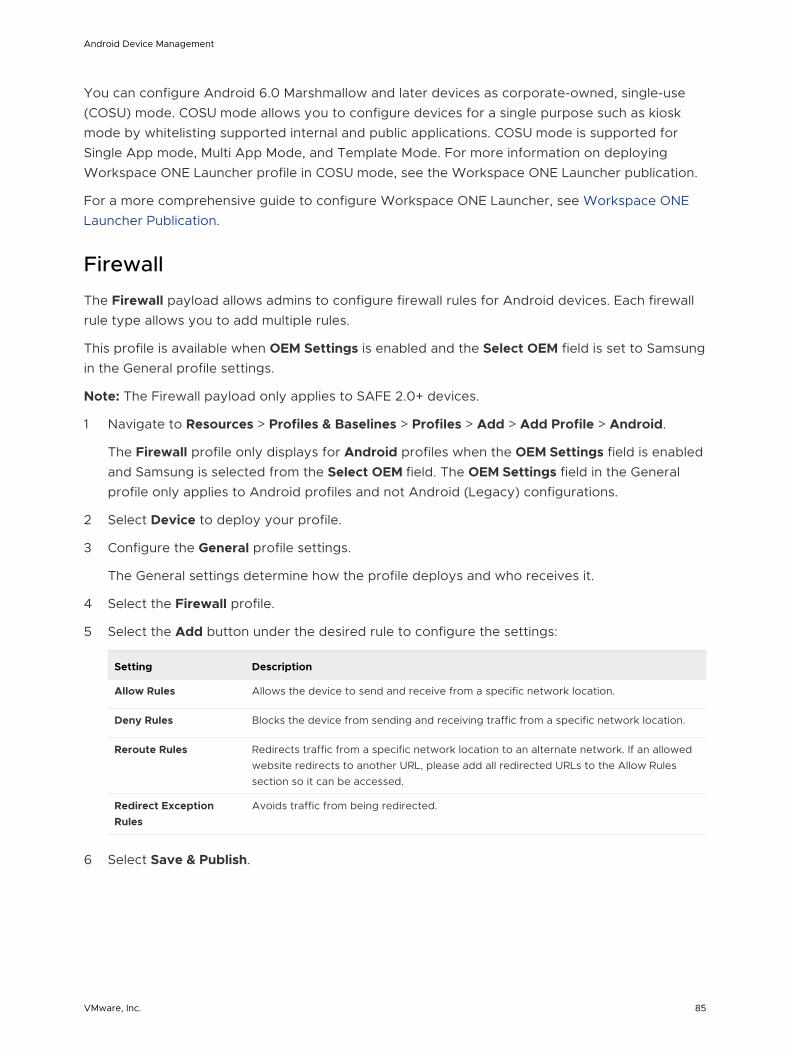
You can configure Android 6.0 Marshmallow and later devices as corporate-owned, single-use(COSU) mode. COSU mode allows you to configure devices for a single purpose such as kioskmode by whitelisting supported internal and public applications. COSU mode is supported forSingle App mode, Multi App Mode, and Template Mode. For more information on deployingWorkspace ONE Launcher profile in COSU mode, see the Workspace ONE Launcher publication.
For a more comprehensive guide to configure Workspace ONE Launcher, see Workspace ONELauncher Publication.
Firewall
The Firewall payload allows admins to configure firewall rules for Android devices. Each firewallrule type allows you to add multiple rules.
This profile is available when OEM Settings is enabled and the Select OEM field is set to Samsungin the General profile settings.
Note: The Firewall payload only applies to SAFE 2.0+ devices.
1 Navigate to Resources > Profiles & Baselines > Profiles > Add > Add Profile > Android.
The Firewall profile only displays for Android profiles when the OEM Settings field is enabledand Samsung is selected from the Select OEM field. The OEM Settings field in the Generalprofile only applies to Android profiles and not Android (Legacy) configurations.
2 Select Device to deploy your profile.
3 Configure the General profile settings.
The General settings determine how the profile deploys and who receives it.
4 Select the Firewall profile.
5 Select the Add button under the desired rule to configure the settings:
Setting Description
Allow Rules Allows the device to send and receive from a specific network location.
Deny Rules Blocks the device from sending and receiving traffic from a specific network location.
Reroute Rules Redirects traffic from a specific network location to an alternate network. If an allowedwebsite redirects to another URL, please add all redirected URLs to the Allow Rulessection so it can be accessed.
Redirect ExceptionRules
Avoids traffic from being redirected.
6 Select Save & Publish.
Android Device Management
VMware, Inc. 85

APN
Configure Android devices Access Point Name (APN) settings to unify device fleet carriersettings and correct misconfigurations.
1 Navigate to Resources > Profiles & Baselines > Profiles > Add > Add Profile > Android.
2 Select Device to deploy your profile to a device.
3 Configure the profile's General settings. The APN profile only displays when theOEM Settings field is toggled to Enabled and Samsung is selected from the Select OEM field.
The General profile settings determine how the profile deploys and who receives it.
4 Select the APN payload.
5 Configure the APN settings, including:
Setting Description
Display Name Provide a user friendly name of the access name.
Access Point Name (APN) Enter the APN provided by your carrier (For example: come.moto.cellular).
Access Point Type Specifies which types of data communication should use this APN configuration.
Mobile Country Code (MCC) Enter the 3-digit country code. This values checks whether devices are roaming ona different carrier than entered here. This is used in combination with a mobilenetwork code (MNC) to uniquely identify a mobile network operator (carrier) usingthe GSM (including GSM-R), UMTS, and LTE mobile networks.
Mobile Network Code (MNC) Enter the 3-digit network code. This values checks whether devices are roamingon a different carrier than entered here. This is used in combination with a mobilecountry code (MCC) to uniquely identify a mobile network operator (carrier) usingthe GSM (including GSM-R), UMTS, and LTE mobile networks.
MMS Server (MMSC) Specify the server address.
MMS Proxy Server Enter the MMS port number.
MMS Proxy Server Port Enter the target port for the proxy server.
Server Enter the name or address used for the connection.
Proxy Server Enter the proxy server details.
Proxy Server Port Enter the proxy server port for all traffic.
Access Point User Name Specify the username that connects to the access point.
Access Point Password Specify the password that authenticates the access point.
Authentication Type Select the authentication protocol.
Set as Preferred APN Enable to ensure all end user devices have the same APN settings and to preventany changes being made from the device or carrier.
6 Select Save & Publish.
Android Device Management
VMware, Inc. 86
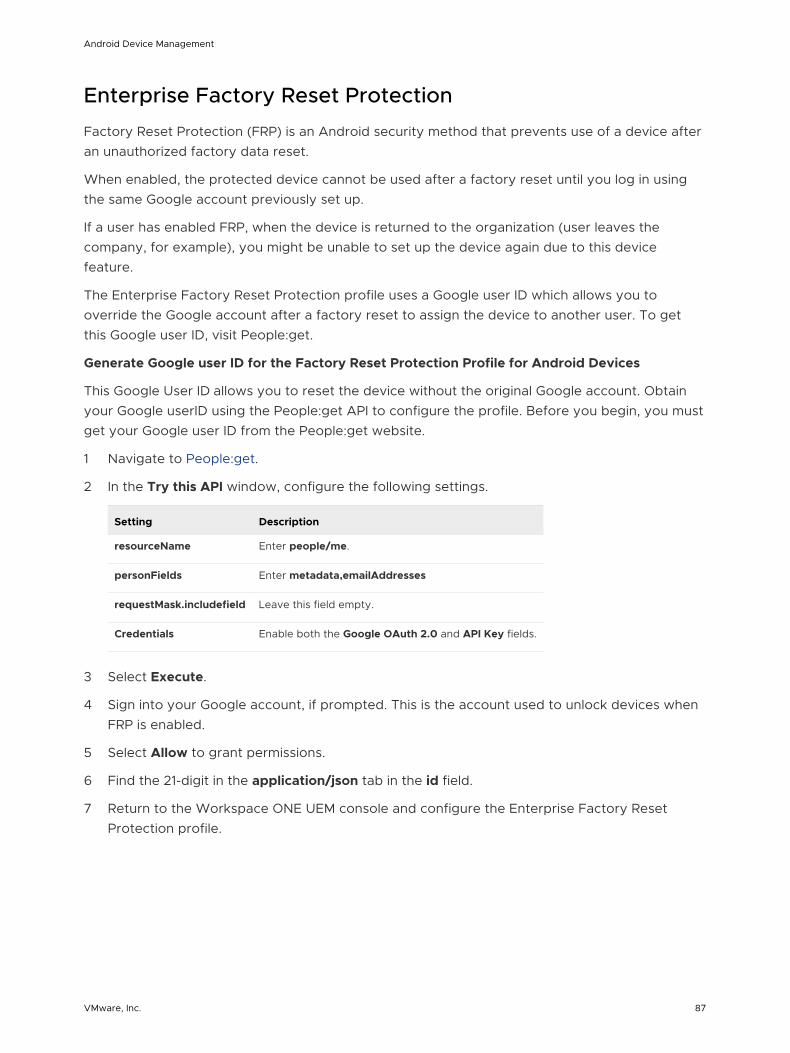
Enterprise Factory Reset Protection
Factory Reset Protection (FRP) is an Android security method that prevents use of a device afteran unauthorized factory data reset.
When enabled, the protected device cannot be used after a factory reset until you log in usingthe same Google account previously set up.
If a user has enabled FRP, when the device is returned to the organization (user leaves thecompany, for example), you might be unable to set up the device again due to this devicefeature.
The Enterprise Factory Reset Protection profile uses a Google user ID which allows you tooverride the Google account after a factory reset to assign the device to another user. To getthis Google user ID, visit People:get.
Generate Google user ID for the Factory Reset Protection Profile for Android Devices
This Google User ID allows you to reset the device without the original Google account. Obtainyour Google userID using the People:get API to configure the profile. Before you begin, you mustget your Google user ID from the People:get website.
1 Navigate to People:get.
2 In the Try this API window, configure the following settings.
Setting Description
resourceName Enter people/me.
personFields Enter metadata,emailAddresses
requestMask.includefield Leave this field empty.
Credentials Enable both the Google OAuth 2.0 and API Key fields.
3 Select Execute.
4 Sign into your Google account, if prompted. This is the account used to unlock devices whenFRP is enabled.
5 Select Allow to grant permissions.
6 Find the 21-digit in the application/json tab in the id field.
7 Return to the Workspace ONE UEM console and configure the Enterprise Factory ResetProtection profile.
Android Device Management
VMware, Inc. 87
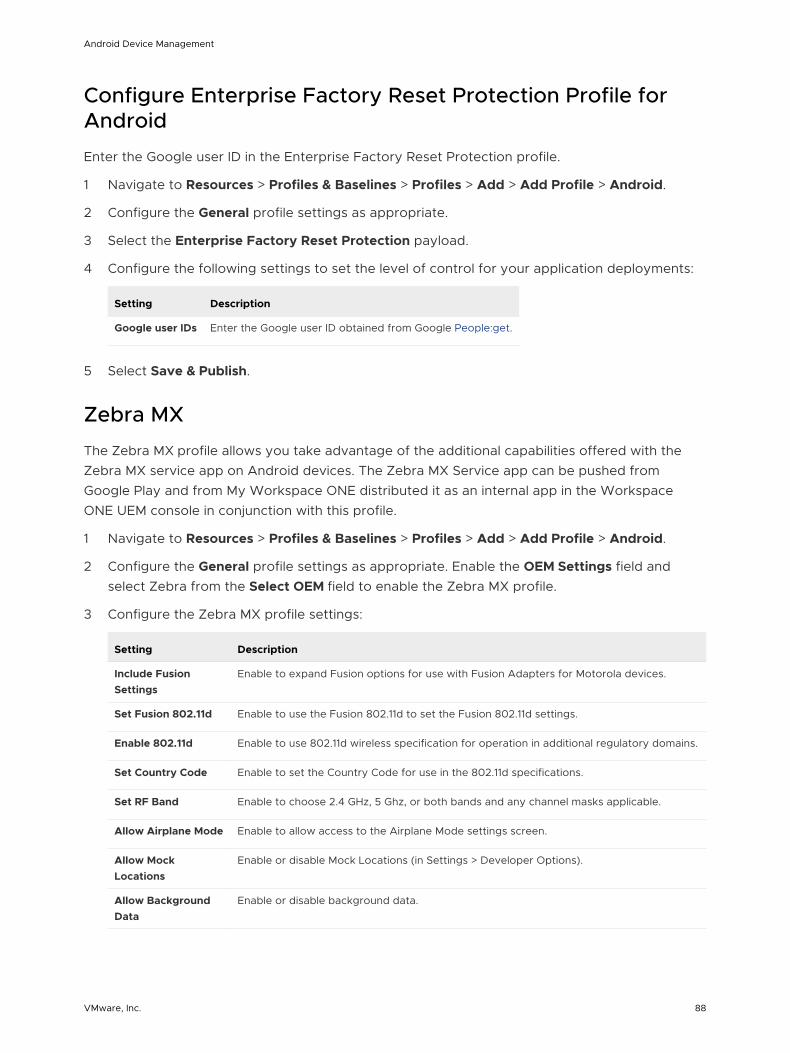
Configure Enterprise Factory Reset Protection Profile forAndroid
Enter the Google user ID in the Enterprise Factory Reset Protection profile.
1 Navigate to Resources > Profiles & Baselines > Profiles > Add > Add Profile > Android.
2 Configure the General profile settings as appropriate.
3 Select the Enterprise Factory Reset Protection payload.
4 Configure the following settings to set the level of control for your application deployments:
Setting Description
Google user IDs Enter the Google user ID obtained from Google People:get.
5 Select Save & Publish.
Zebra MX
The Zebra MX profile allows you take advantage of the additional capabilities offered with theZebra MX service app on Android devices. The Zebra MX Service app can be pushed fromGoogle Play and from My Workspace ONE distributed it as an internal app in the WorkspaceONE UEM console in conjunction with this profile.
1 Navigate to Resources > Profiles & Baselines > Profiles > Add > Add Profile > Android.
2 Configure the General profile settings as appropriate. Enable the OEM Settings field andselect Zebra from the Select OEM field to enable the Zebra MX profile.
3 Configure the Zebra MX profile settings:
Setting Description
Include FusionSettings
Enable to expand Fusion options for use with Fusion Adapters for Motorola devices.
Set Fusion 802.11d Enable to use the Fusion 802.11d to set the Fusion 802.11d settings.
Enable 802.11d Enable to use 802.11d wireless specification for operation in additional regulatory domains.
Set Country Code Enable to set the Country Code for use in the 802.11d specifications.
Set RF Band Enable to choose 2.4 GHz, 5 Ghz, or both bands and any channel masks applicable.
Allow Airplane Mode Enable to allow access to the Airplane Mode settings screen.
Allow MockLocations
Enable or disable Mock Locations (in Settings > Developer Options).
Allow BackgroundData
Enable or disable background data.
Android Device Management
VMware, Inc. 88
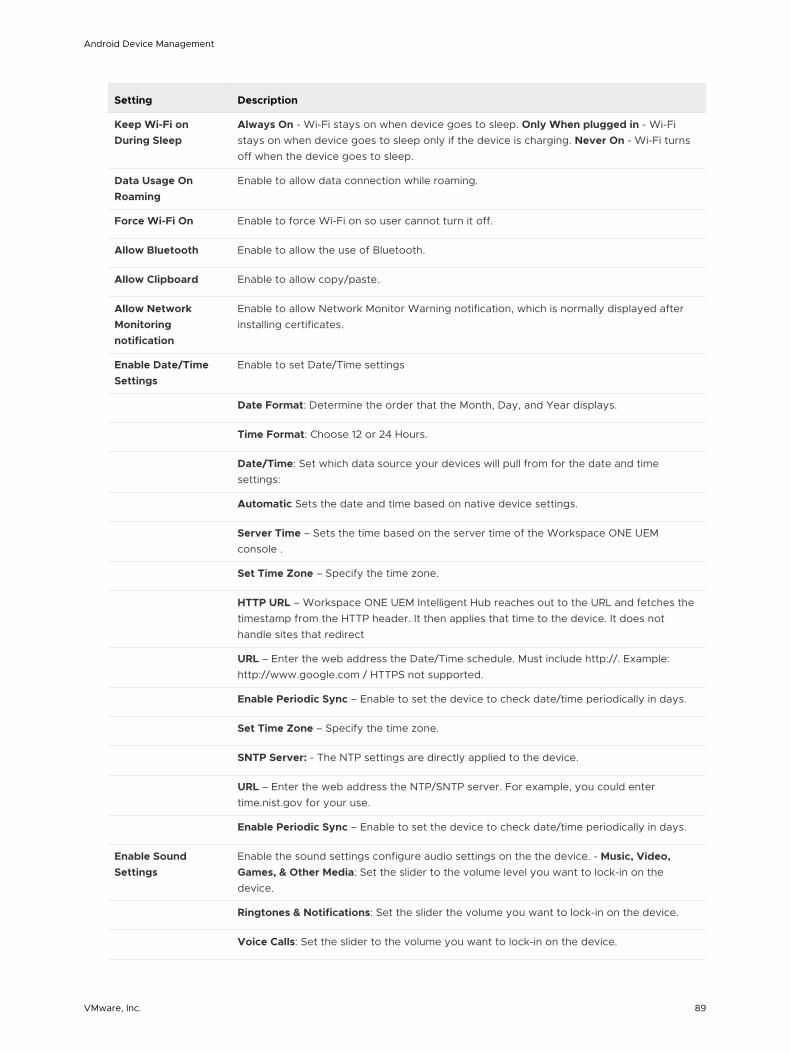
Setting Description
Keep Wi-Fi onDuring Sleep
Always On - Wi-Fi stays on when device goes to sleep. Only When plugged in - Wi-Fistays on when device goes to sleep only if the device is charging. Never On - Wi-Fi turnsoff when the device goes to sleep.
Data Usage OnRoaming
Enable to allow data connection while roaming.
Force Wi-Fi On Enable to force Wi-Fi on so user cannot turn it off.
Allow Bluetooth Enable to allow the use of Bluetooth.
Allow Clipboard Enable to allow copy/paste.
Allow NetworkMonitoringnotification
Enable to allow Network Monitor Warning notification, which is normally displayed afterinstalling certificates.
Enable Date/TimeSettings
Enable to set Date/Time settings
Date Format: Determine the order that the Month, Day, and Year displays.
Time Format: Choose 12 or 24 Hours.
Date/Time: Set which data source your devices will pull from for the date and timesettings:
Automatic Sets the date and time based on native device settings.
Server Time – Sets the time based on the server time of the Workspace ONE UEMconsole .
Set Time Zone – Specify the time zone.
HTTP URL – Workspace ONE UEM Intelligent Hub reaches out to the URL and fetches thetimestamp from the HTTP header. It then applies that time to the device. It does nothandle sites that redirect
URL – Enter the web address the Date/Time schedule. Must include http://. Example:http://www.google.com / HTTPS not supported.
Enable Periodic Sync – Enable to set the device to check date/time periodically in days.
Set Time Zone – Specify the time zone.
SNTP Server: - The NTP settings are directly applied to the device.
URL – Enter the web address the NTP/SNTP server. For example, you could entertime.nist.gov for your use.
Enable Periodic Sync – Enable to set the device to check date/time periodically in days.
Enable SoundSettings
Enable the sound settings configure audio settings on the the device. - Music, Video,Games, & Other Media: Set the slider to the volume level you want to lock-in on thedevice.
Ringtones & Notifications: Set the slider the volume you want to lock-in on the device.
Voice Calls: Set the slider to the volume you want to lock-in on the device.
Android Device Management
VMware, Inc. 89

Setting Description
Enable Default Notifications: Allows default notifications on the device to sound.
Enable Dial Pad Touch Tones: Allows dial pad touch tones on the device to sound.
Enable Touch Tones: Allows touch tones on the device to sound.
Enable Screen Lock Sounds: Allows the device to play a sound when locked.
Enable Vibrate on Touch**: Allows the vibrate settings to be activated.-
Enable DisplaySettings
Enable to set display settings: - Display Brightness: Set the slider to the brightness levelyou want to lock-in on the device.
Enable Auto-Rotate Screen: Set the slider to the brightness level you want to lock-in onthe device.
Set Sleep: Choose the amount of time before the screen will set to sleep mode.
4 Select Save & Publish.
Custom Settings
The Custom Settings payload can be used when new Android functionality releases or featuresthat Workspace ONE UEM console does not currently support through its native payloads. Usethe Custom Settings payload and XML code to manually enable or disable certain settings.
Be sure you are using the right characteristic type for your profile type:
n For Android profiles, use characteristic type = "com.airwatch.android.androidwork.launcher".
n For Android (Legacy) profiles, use characteristic type = "com.airwatch.android.kiosk.settings".
1 Navigate to Resources > Profiles & Baselines > Profiles > Add > Add Profile > Android.
2 Configure the profile's General settings.
3 Configure the applicable payload (for example, Restrictions or Passcode).
You can work on a copy of your profile, saved under a "test" organization group, to avoidaffecting other users before you are ready to Save and Publish.
4 Save, but do not publish, your profile.
5 Select the radio button from the Profiles List View for the row of the profile you want tocustomize.
6 Select the XML button at the top to view the profile XML.
7 Find the section of text starting with ... that you configured previously, for example,Restrictions or Passcode. The section contains a configuration type identifying its purpose,for example, restrictions.
Copy this section of text and close the XML View. Open your profile.
Android Device Management
VMware, Inc. 90
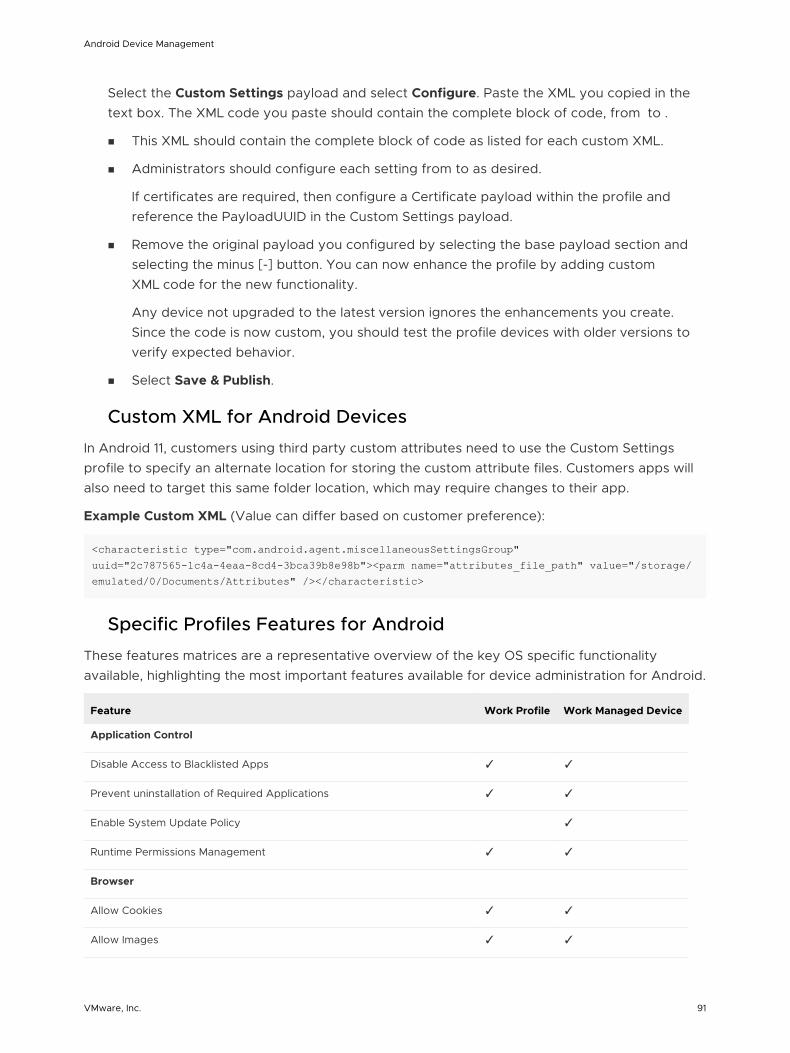
Select the Custom Settings payload and select Configure. Paste the XML you copied in thetext box. The XML code you paste should contain the complete block of code, from to .
n This XML should contain the complete block of code as listed for each custom XML.
n Administrators should configure each setting from to as desired.
If certificates are required, then configure a Certificate payload within the profile andreference the PayloadUUID in the Custom Settings payload.
n Remove the original payload you configured by selecting the base payload section andselecting the minus [-] button. You can now enhance the profile by adding customXML code for the new functionality.
Any device not upgraded to the latest version ignores the enhancements you create.Since the code is now custom, you should test the profile devices with older versions toverify expected behavior.
n Select Save & Publish.
Custom XML for Android Devices
In Android 11, customers using third party custom attributes need to use the Custom Settingsprofile to specify an alternate location for storing the custom attribute files. Customers apps willalso need to target this same folder location, which may require changes to their app.
Example Custom XML (Value can differ based on customer preference):
<characteristic type="com.android.agent.miscellaneousSettingsGroup" uuid="2c787565-1c4a-4eaa-8cd4-3bca39b8e98b"><parm name="attributes_file_path" value="/storage/emulated/0/Documents/Attributes" /></characteristic>
Specific Profiles Features for Android
These features matrices are a representative overview of the key OS specific functionalityavailable, highlighting the most important features available for device administration for Android.
Feature Work Profile Work Managed Device
Application Control
Disable Access to Blacklisted Apps ✓ ✓
Prevent uninstallation of Required Applications ✓ ✓
Enable System Update Policy ✓
Runtime Permissions Management ✓ ✓
Browser
Allow Cookies ✓ ✓
Allow Images ✓ ✓
Android Device Management
VMware, Inc. 91

Feature Work Profile Work Managed Device
Enable Javascript ✓ ✓
Allow Pop-Ups ✓ ✓
Allow Track Location ✓ ✓
Configure Proxy Settings ✓ ✓
Force Google SafeSearch ✓ ✓
Force YouTube Safety Mode ✓ ✓
Enable Touch to Search ✓ ✓
Enable Default Search Provider ✓ ✓
Enable Password Manager ✓ ✓
Enable alternate error pages ✓ ✓
Enable Autofill ✓ ✓
Enable Printing ✓ ✓
Enable Data Compression Proxy Feature ✓ ✓
Enable Safe Browsing ✓ ✓
Disable saving browser history ✓ ✓
Prevent Proceeding After Safe Browsing Warning ✓ ✓
Disable SPDY protocol ✓ ✓
Enable network prediction ✓ ✓
Enable Deprecated Web Platform Features For a Limited Time ✓ ✓
Force Safe Search ✓ ✓
Incognito Mode Availability ✓ ✓
Allows sign in to Chromium ✓ ✓
Enable Search Suggestion ✓ ✓
Enable Translate ✓ ✓
Allow Bookmarks ✓ ✓
Allow Access to Certain URLs ✓ ✓
Block Access to Certain URLs ✓ ✓
Set Minimum SSL Version ✓ ✓
Passcode Policy
Android Device Management
VMware, Inc. 92
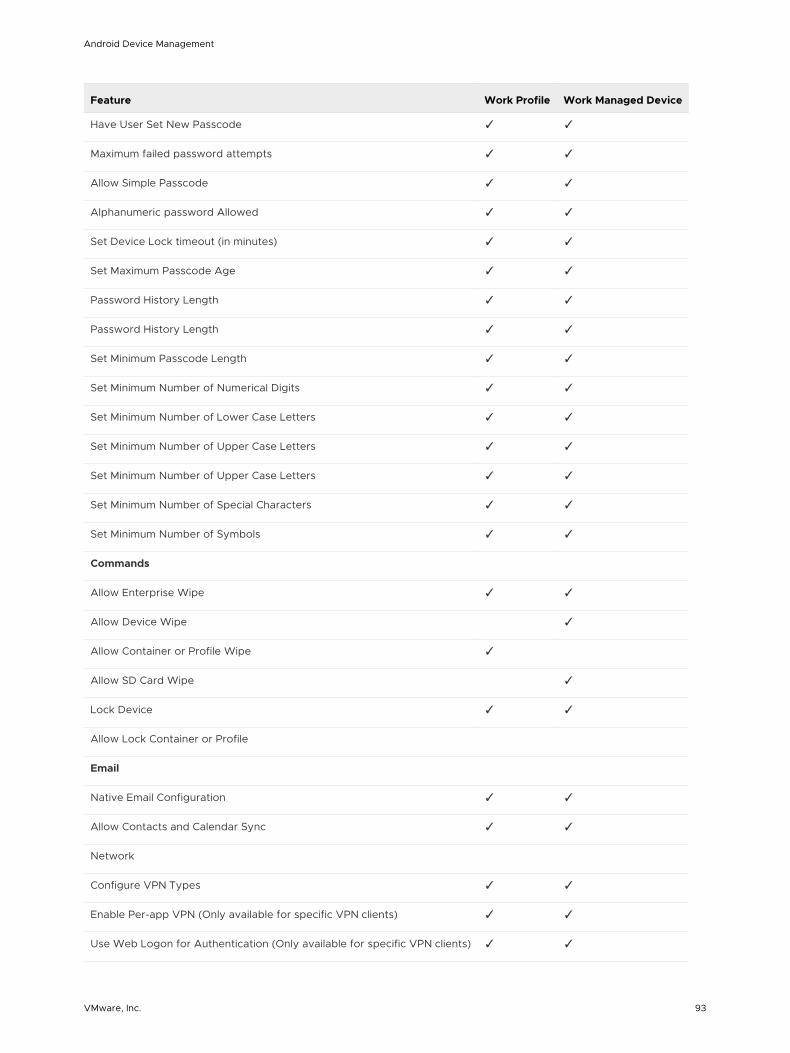
Feature Work Profile Work Managed Device
Have User Set New Passcode ✓ ✓
Maximum failed password attempts ✓ ✓
Allow Simple Passcode ✓ ✓
Alphanumeric password Allowed ✓ ✓
Set Device Lock timeout (in minutes) ✓ ✓
Set Maximum Passcode Age ✓ ✓
Password History Length ✓ ✓
Password History Length ✓ ✓
Set Minimum Passcode Length ✓ ✓
Set Minimum Number of Numerical Digits ✓ ✓
Set Minimum Number of Lower Case Letters ✓ ✓
Set Minimum Number of Upper Case Letters ✓ ✓
Set Minimum Number of Upper Case Letters ✓ ✓
Set Minimum Number of Special Characters ✓ ✓
Set Minimum Number of Symbols ✓ ✓
Commands
Allow Enterprise Wipe ✓ ✓
Allow Device Wipe ✓
Allow Container or Profile Wipe ✓
Allow SD Card Wipe ✓
Lock Device ✓ ✓
Allow Lock Container or Profile
Native Email Configuration ✓ ✓
Allow Contacts and Calendar Sync ✓ ✓
Network
Configure VPN Types ✓ ✓
Enable Per-app VPN (Only available for specific VPN clients) ✓ ✓
Use Web Logon for Authentication (Only available for specific VPN clients) ✓ ✓
Android Device Management
VMware, Inc. 93

Feature Work Profile Work Managed Device
Set HTTP Global Proxy ✓ ✓
Allow Data Connection to Wi-Fi ✓ ✓
Always on VPN ✓ ✓
Encryption
Require Full Device Encryption ✓ ✓
Report Encryption Status
Android Device Management
VMware, Inc. 94
Android Device Management withWorkspace ONE UEM 6After your devices are enrolled and configured, manage the devices using the Workspace ONEUEM console. The management tools and functions enable you to keep an eye on your devicesand remotely perform administrative functions.
You can manage all your devices from the UEM console. The Dashboard is a searchable,customizable view that you can use to filter and find specific devices. This feature makes it easierto perform administrative functions on a particular set of devices. The Device List View displaysall the devices currently enrolled in your Workspace ONE UEM environment and their status. Youcan filter the list view specific to Android and see how devices are being managed in a a glance.
This chapter includes the following topics:
n Using the Device Details Page
n Device Management Commands for Android Devices
n Details Apps Tab
n Request Device Log
n SafetyNet Attestation
Using the Device Details Page
The Device Details page provides device-specific information such as profiles, apps, WorkspaceONE Intelligent Hub version and which version of any applicable OEM service currently installedon the device. You can also perform remote actions on the device from the Device Details pagethat are platform-specific.
You can access the Device Details page by either selecting a device's Friendly Name from theDevice Search page, from one of the available Dashboards or by using any of the availablesearch tools with the Workspace ONE UEM console.
Enrollment Status in Device Details
There are some cases when the Device Details page does not update the enrollment status dueto actions performed locally on the device.
VMware, Inc. 95
Here are some scenarios:
n When a user performs a factory reset from the Settings app on their device, the enrollmentstatus is not updated in the UEM console.
n If a user removes the work profile from the Settings app on their device, the enrollment statusis not updated in the UEM console.
n The enrollment status is not updated after the limit of failed work profile or device passcodeis reached which triggers a work profile or device wipe depending on the enrollment mode:
n On Work profile, the work profile is wiped.
n On COPE and Fully Managed devices, the whole device is wiped.
If Devices are in Power Saving Mode
Android devices running Android M use power saving options for idle apps and devices. If a userunplugs a device and leaves it stationary, with its screen off, for a period of time, the device goesinto Doze mode, where it attempts to keep the device in a sleep state. There will be no networkactivity during this time.
Additionally, App Standby mode allows the device to determine that an app is idle when the useris not actively using it. When devices are in either state, the Workspace ONE UEM console willnot receive reports on device details. When the user plugs a device in to charge or opens an app,the device will resume normal operations and reporting from AirWatch apps installed on thedevice to the Workspace ONE UEM console resumes.
Direct Boot for Android Devices**
Direct Boot mode is when the device has been powered on but the user has not unlocked thedevice. When in this state, apps cannot run normally. Apps, such as Workspace ONE IntelligentHub for Android, are not able to send samples to the UEM console or perform supportedfunctionality when the device is in this state.
Direct Boot affects devices enrolled in Work Profile Mode differently. The Work Profile is stilllocked in Direct Boot mode until the Work Profile is unlocked by entering the Work Profilepasscode, if one exists. In this way, apps outside the Work Profile may be able to functionnormally if the device is unlocked, but apps within the Work Profile may still be locked in DirectBoot mode until the Work Profile is unlocked by the user.
Supported Android Device Commands By Enrollment Mode
This matrix shows you the available device commands by enrollment mode.
The asterisk denotes which commands are supported while devices are in Direct boot.
Note: The Clear Passcode command while in direct boot is only supported with FCM (FirebaseCloud Messaging). AWCM is not supported.
Android Device Management
VMware, Inc. 96

Device CommandWork Managed DeviceMode Work Profile
COPE (Android 8.0-Android 10) COPE Android 11+
Device Query ✓ ✓ ✓ ✓
Send ✓ ✓ ✓ ✓
Lock ✓ ✓ ✓ ✓
Clear Passcode
Clear Device Passcode ✓* ✓*
Clear Work Profile Passcode ✓ ✓ ✓
Generate App Token ✓ ✓ ✓ ✓
Management
Change Device Passcode ✓ ✓
Change Work Passcode ✓ ✓ ✓
Lock SSO ✓ ✓ ✓ ✓
Reboot Device ✓
Enterprise Wipe ✓*
Device Wipe ✓* ✓* ✓*
Support
Find Device ✓ ✓ ✓ ✓
Sync Device ✓ ✓ ✓ ✓
Admin
Change Organization Group ✓ ✓ ✓ ✓
Manage Tags ✓ ✓ ✓ ✓
Edit Device ✓ ✓ ✓ ✓
Delete Device ✓* ✓ ✓* ✓*
Request Device Log ✓ ✓ ✓ ✓
Override Job Log Level ✓
Advanced
Start/Stop AWCM ✓ ✓ ✓ ✓
Sync Device ✓ ✓ ✓ ✓
Android Device Management
VMware, Inc. 97

Use the Device Details menu tabs to access specific device information, including:
n Summary – View general statistics such as enrollment status, compliance, last seen, platform/model/OS, organization group, contact information, serial number, power status includingbattery health, storage capacity, physical memory and virtual memory. Zebra devices featurea panel displaying detailed battery information. You can also view the Workspace ONEIntelligent Hub and which version of any applicable OEM is currently installed on the device.
n Compliance – Display the status, policy name, date of the previous and forthcomingcompliance check and the actions already taken on the device.
n Profiles – View all MDM profiles currently installed on a device.
n Apps – View all apps currently installed or pending installation on the device. For internalapps, we sample the install status of all Apps. For public apps, we sample only for apps thathave a launchable icon on the device. Non-managed apps without a launchable icon are notsampled.
n Content – View status, type, name, priority, deployment, last update, and date and time ofviews, and provide a toolbar for administrative action (install or delete content). Android(Legacy) Platform VMware, Inc. 77
n Location – View current location or location history of a device. If your device is in powersaving mode, the location data might not be updated during Doze Mode. You will need to usethe Restrictions profile in the UEM console and add Allow Location Service Configuration tothe allow list or use OEM Config to disable Doze mode entirely.
n User – Access details about the user of a device as well as the status of the other devicesenrolled to this user. The menu tabs below are accessed by selecting More from the mainDevice Details tab.
n Network – View current network (Cellular, Wi-Fi, Bluetooth) status of a device.
n Telecom – View all amounts of calls, data and messages sent and received involving thedevice.
n Notes – View and add notes regarding the device. For example, note the shipping status or ifthe device is in repair and out of commission.
n Certificates – Identify device certificates by name and issuant. This tab also providesinformation about certificate expiration.
n Products –View complete history and status of all packages provisioned to the device andany provisioning errors.
n Custom Attributes – Enable you to use advanced product provisioning functionality.
n Files/Actions – View the files and other actions associated with the device.
n Event Actions – Allows you to take action on a device when predetermined conditions aremet
n Shared Device Log – View history of device in terms of Shared Device, including pastcheckins and check-outs and current status.
Android Device Management
VMware, Inc. 98
n Troubleshooting – View Event Log and Commands logging information. This page featuresexport and search functions, enabling you to perform targets searches and analysis.
n Event Log – View detailed debug information and server check-ins, including a Filter by EventGroup Type, Date Range, Severity, Module, and Category. In the Event Log listing, the EventData column may display hypertext links that open a separate screen with even more detailsurrounding the specific event. This information enables you to perform advancedtroubleshooting such as determining why a profile fails to install.
n Commands – View detailed listing of pending, queued, and completed commands sent to thedevice. Includes a Filter enabling you to filter commands by Category, Status, and specificCommand.
n Compromised Detection – View details about the compromised status of the deviceincluding the specific Reason for the status and how Severe the status is.
n Status History – View history of device in relation to enrollment status.
n Targeted Logging - View the logs for the Console, Catalog, Device Services, DeviceManagement, and Self Service Portal. You must enable Targeted Logging in settings and alink is provided for this purpose. You must then select the Create New Log button and selecta length of time the log is collected.
n Attachments – Use this storage space on the server for screenshots, documents, and linksfor troubleshooting and other purposes without taking up space on the device itself.
MAC Address Behavior for Android
On devices that run Android 10 or higher, the system transmits randomized MAC addresses bydefault. This is different from previous versions of Android.
The Android OS version and the enrollment type determines how we collect the Wi-Fi MACaddress:
n Fully managed devices can collect the actual hardware WiFi MAC address on all OS versions.
n COPE devices can collect the actual hardware WiFi MAC address on all OS.
n Work Profile devices can collect the actual hardware Wi-Fi MAC address on Android 9 andbelow.
n Work Profile devices can collect the randomized WiFi MAC address for the active SSID onAndroid 10 or later.
You can find the MAC Address listed in the Network tab of Device Details.
Device Management Commands for Android Devices
The More drop-down on the Device Details page enables you to perform remote actions over-the-air to the selected device. The actions listed below vary depending on factors such as deviceplatform, Workspace ONE UEM console settings, and enrollment status.
Android Device Management
VMware, Inc. 99

Clear Passcode
n Clear Passcode (Device) – Clear the device passcode. To be used in situations where theuser has forgotten their device's passcode.
n Generate App Token - Generate app token for users who forget their login information forWorkspace ONE SDK-built applications.
n Clear Work Passcode - Clear the work or container passcode. To be used in situations wherethe user has forgotten their device's passcode.
Management
n Change Device Passcode – Replace any existing device passcode used to access theselected device with a new passcode.
n Change Work Passcode - Select to remove the work security challenge on the device. ForAndroid 8.0 or later.
n Lock SSO – Lock the device user out of Workspace ONE UEM Container and all participatingapplications.
n Reboot Device – Reboot a device remotely, reproducing the effect of powering it off and onagain.
n Device Wipe – Send an MDM command to wipe a device clear of all data and operatingsystem. This action cannot be undone.
n Lock SSO – Lock the device user out of Workspace ONE UEM Container and all participatingapplications.
n Enterprise Wipe – Removes enterprise data from the device without impacting any personaldata.
Support
n Find Device – Send a text message to the applicable Workspace ONE UEM applicationtogether with an audible sound designed to help the user locate a misplaced device. Theaudible sound options include playing the sound a configurable number of times and thelength of the gap, in seconds, between sounds.
n Sync Device – Synchronize the selected device with the UEM console, aligning its Last Seenstatus.
Admin
n Change Organization Group – Change the device's home organization group to anotherexisting OG. Includes an option to select a static or dynamic OG. If you want to change theorganization group for multiple devices at a time, you must select devices for the bulk actionusing the Block selection method (using the shift-key) instead of the Global check box (nextto the Last Seen column heading in the device list view).
n Manage Tags -
Android Device Management
VMware, Inc. 100
n Edit Device – Edit device information such as Friendly Name, Asset Number, DeviceOwnership, Device Group Device Category.
n Delete Device – Delete and unenroll a device from the console. Sends the enterprise wipecommand to the device that gets wiped on the next check-in and marks the device as DeleteIn Progress on the console. If the wipe protection is turned off on the device, the issuedcommand immediately performs an enterprise wipe and removes the device representationin the console.
n Request Device Log – Request the debug log for the selected device, after which you canview the log by selecting the More tab and selecting Attachments > Documents. You cannotview the log within the Workspace ONE UEM console. The log is delivered as a ZIP file thatcan be used to troubleshoot and provide support. When you request a log, you can select toreceive the logs from the System or the Hub. System provides system-level logs. Hubprovides logs from the multiple agents running on the device.
Android Only: you can retrieve detailed logs from corporate-owned Android devices andview them in the console to resolve issues on the device quickly.
n Override Job Log Level – Override the currently specified level of job event logging on theselected device. This action sets the logging verbosity of Jobs pushed through ProductProvisioning and overrides the current log level configured in Android Hub Settings. Job LogLevel Override can be cleared by selecting the drop-down menu item Reset to Default on theaction screen. You can also change the Job Log Level under the Product Provisioningcategory in Android Hub Settings.
Advanced
n Start/Stop AWCM – Start/Stop the Cloud Messaging service for the selected device. VMwareAirWatch Cloud Messaging (AWCM) streamlines the delivery of messages and commandsfrom the Admin Console. The AWCM eliminates the need for end users to access the publicInternet or use consumer accounts such as Google IDs.
n Sync Device – Synchronize the selected device with the UEM console, aligning its Last Seenstatus.
Details Apps Tab
The Devices Details Apps Tab in the Workspace ONE UEM console contains options to controlpublic applications by device. You can view apps that have been assigned in the UEM consoleand personal apps based on the enrollment type and privacy configurations.
Admins can view information about the application including the installation status, theapplication type, the application version, and the application identifier.
The Install option from the actions menu lets you select the assigned apps from the list view anddirectly push to the device. The Remove option from the actions menu to uninstall the applicationsilently off the device.
Android Device Management
VMware, Inc. 101
Work Profile enrollments only display apps assigned by the admin and will not display personalapplications installed by the user. Work Managed enrollments display all applications becauseWorkspace ONE UEM has full control of the device, and there is no concept of personalapplications. For a COPE enrollment, the device details apps tab display managed applications,which include internal applications that are install on the personal side by default.
The Workspace ONE UEM console will not show apps that cannot be launched by users. TheUEM console reports the status of apps that have a Launcher icon that the user can click on andopen. Therefore, background apps or service applications are not shown in device details.
The Request Device Log command allows you to retrieve Workspace ONE Intelligent Hub ordetailed system logs from corporate-owned devices and view them in the console to quicklyresolve any issues on the device. The Request Device Log dialog box allows you to customizeyour logging request for Android devices. See more details below.
Request Device Log
The Request Device Log command allows you to retrieve Workspace ONE Intelligent Hub ordetailed system logs from corporate-owned devices and view them in the console to quicklyresolve any issues on the device. The Request Device Log dialog box allows you to customizeyour logging request for Android devices.
1 Navigate to Groups & Settings > All Settings > Devices and Users > General > Privacy andenable Request Device Log in the privacy settings.
Employee- owned devices are not allowed to be selected due to privacy concerns
2 Navigate to Devices > List View > Select device from list > More Actions > Request DeviceLog.
3 Customize the log settings:
Setting Description
Source Select Hub to collect logs generated by Workspace ONE Intelligent Hub.
Select System to include all applications and events on the device. System is available based on yourprivacy settings and is limited to device manufacturers with specific platform service applications.Note: Available on devices running Platform OEM Service v3.3+, MSI Service v1.3+, and HonewellService v3.0+.
Select Network to record DNS requests and network connections from apps to a log file for thespecified duration. Note: Available on Work Managed devices running Android 8 or higher. Note:Collect Public IP Address must be enabled in Privacy Settings.
Select Security to collect security logs that detail possible security breaches such as pre and post bootactivities, authentication attempts, credential storage modification, attempted adb connections, andmore. Note: Requires Work Managed Android 7.0 or later devices and Workspace ONE Intelligent Hub21.05 for Android. The Security option is greyed out if devices do not meet these requirements.
Type Select Snapshot to retrieve the latest log records available from devices. Select Timed to collect arolling log over a specified period. Multiple log files may be sent to UEM console.The 'Level' option willnot be available when Network is selected
Android Device Management
VMware, Inc. 102
Setting Description
Duration Specify the duration of time for the device to collect and report logs to the console.
Level Determine the level of detail included in the log (Error, Warning, Info, Debug, Verbose).
4 Select Save.
5 To review the log files, navigate to Device Details > More > Attachments > Documents.
6 Cancel the device log request after the logs have been received and there is no further needfor log collection. Navigate to Devices > List View > Select device from list > More Actions >Cancel Device Log to cancel the device log request.
SafetyNet Attestation
SafetyNet Attestation is a Google API used to validate the integrity of the device ensuring thedevice is not compromised.
SafetyNet validates software and hardware information on the device and creates a profile ofthat device. This attestation helps determine if a particular device has been tampered ormodified. When the Workspace ONE UEM console runs the SafetyNet Attestation API andreports the device has been compromised, the UEM console Device Details page reports thedevice as compromised. If SafetyNet Attestation detects the device as compromised, the onlyway to revert a device compromised state is to re-enroll the affected device.
It is important to note that SafetyNet Attestation does not re-evaluate compromised status afterit is initially reported.
SafetyNet Attestation is only supported with Workspace ONE Intelligent Hub.
Enable SafetyNet Attestation Enable the SafetyNet Attestation API in the UEM console tovalidate the integrity of a device and determine if a device has been compromised.
1 Navigate to Groups & Settings > All Settings > Apps > Settings & Policies > Settings > CustomSettings
2 Paste the following custom XML into the Custom Settings field: { "SafetyNetEnabled":true }
3 Save the Custom XML.
4 Verify SafetyNet from the Summary tab in the Device Details page in the UEM console. If youdo not see the status of the SafetyNet Attestation, you can send a remote command torestart the device.
Android Device Management
VMware, Inc. 103

Android System Updates withWorkspace ONE UEM 7The Android Updates console page lists all firmware updates available for Android devices. Onthis page, you can review and push updates for Android devices. This is helpful in allowing you toperform testing to resolve any compability issues and monitor available upates across devicesbefore pushing firmware updates to your device fleet.
The updates are listed by release dates and details including information about specific OEMs,model, and carriers. Each model/carrier combination is a different firmware update.
For example, you might see Samsung Galaxy S7 for T-mobile and a separate update for SamsungGalaxy S7 on Sprint. The list can be sorted by OEM and carrier.
This chapter includes the following topics:
n Publish Firmware Updates (Android)
n Samsung Enterprise Firmware Over The Air (EFOTA) Updates
n Android OS Update for Work Managed Device
Publish Firmware Updates (Android)
The Android Updates console page lists all firmware updates available for Android devices andallows you to view specific firmware versions and select to prompt the user to install the update.
1 Navigate to Devices Device Updates.
2 View and select the radio button beside the desired update.
3 Select Manage Update.
4 Configure the settings:
Settings Description
Install Method Select Auto Installto select the timeframe to schedule updates. Select Install on Demand andusers are prompted to accept firmware updates before it is installed on their device.
Deployment Start Schedule the start date and time for update.Updates can be scheduled no more than 30 daysin advance with a maximum update window of 7 days. Updates within this window will bepublished to devices every 4 hours in the server time zone.
Deployment End Schedule the end date and time for update.
VMware, Inc. 104
Settings Description
Server Time Zone This field is read only as it generates from the server.
Network Select whether to deploy the updates when the devices are connected to Wi-Fi Only or Anynetwork connection.
5 Select Publish. The Manage Updates window closes and the UEM console returns to theUpdates page.
Note: If for some reason you need to cancel or change the update, select the desired updateand select Cancel Schedule from the Manage Update window.
Since the updates are batched into device groups, previous updated devices cannot be revoked.
Samsung Enterprise Firmware Over The Air (EFOTA)Updates
Samsung Enterprise Firmware Over the Air (EFOTA) allows you to manage and restrict firmwareupdates on Samsung devices running Android 7.0 Nougat or later.
For Samsung devices, you must register for a Samsung E-FOTA license in order to get updates.Features are not available until registered.
The Samsung EFOTA flow involves registering your EFOTA settings provided by your licensedreseller, enabling "Register Enterprise FOTA" in the Android restrictions profile, and viewing andselecting applicable updates to push to devices.
Samsung EFOTA can only be configured at customer level Organization Group, so all devicesregistered under that Organization Group receive updates. Consider creating a separateOrganization Group for testing before pushing to all devices.
Register Samsung Enterprise Firmware Over The Air Updates
Use the Devices & Users System Settings page to enter your EFOTA settings provided bySamsung or your licensed reseller.
1 Navigate to Devices > Device Settings > Devices & Users > Android > Samsung EnterpriseFOTA.
2 Enter the settings:
Setting Description
Customer ID Enter the ID provided by your licensed reseller.
License Enter the license provided by your licensed reseller.
Client ID Enter the Client ID provided by your licensed reseller.
Client Secret Enter the Client Secret provided by your licensed reseller.
Android Device Management
VMware, Inc. 105

3 Select Save.
Configure Restrictions Profile (Samsung EFOTA)
Restriction profiles lock down native functionality of Android devices and vary based on OEM.Enabling the "Register Enterprise FOTA" restriction locks down assigned devices to their currentfirmware versionsrsion.
This field in the Restrictions profile only becomes available when you select Samsung from theOEM Settings field.
1 Navigate to Devices > Profile & Resources > Profiles > Add > Add Profile > Android >Restrictions.
2 Select Configure
3 Enable Register Enterprise FOTA.
Allow OTA Upgrade must be enabled or firmware updates are blocked.
4 Select Save & Publish.
Android OS Update for Work Managed Device
Upgrade Android Work Managed devices remotely with a local zip file through the OS UpgradeFile-Action.
This OS Upgrade task applies specifically to Work Managed devices running Android 10.0 orlater. If you want to OS Upgrade on Zebra devices, then see Create an OS Upgrade for ZebraDevices, Android 8.0+.
Procedure
1 Retrieve the OS update zip file/package from the OEM
2 Navigate to File/Action under Devices > Provisioning > Components > Files/Actions to uploadthe zip file. Install manifest should contain OS Upgrade action with the uploaded zip fileselected
n The zip file needs to be downloaded to Hub's internal storage directory. Use the wildcard$osupdate$ in the file download location, which will find the correct file path regardless ofOEM.
n Example: $osupdate$/update.zip
1 Add the File/Action to a Product manifest. Configure any other criteria, such as assignmentand deployment conditions.
2 Hub downloads zip and calls OS upgrade API
3 Device reboots into recovery and installs the update (or in case of A/B update, device simplyreboots into new version when ready)
4 Hub performs post-update validation to ensure the new build got installed
Android Device Management
VMware, Inc. 106
5 Hub will also update the build number Custom Attribute that gets reported to the console
Results
After successful validation, product goes to complete/compliant state, and the build numbercustom attribute for the device is updated to the new version.
Android Device Management
VMware, Inc. 107