Welding Procedure Qualification Certificate (EN ISO 15614-1)

Andrew+
Qualification Procedure

2/18
Contents About this manual .................................................................................................................................................. 3
1. Installation Qualification (IQ) .......................................................................................................................... 3
1.1. IQ procedure ......................................................................................................................................... 3
A) User manuals and documents ............................................................................................................... 4
B) Installation of Andrew+ robot ............................................................................................................... 4
C) Placement of pipettes on Andrew+ tool rack ....................................................................................... 6
D) Power On the device ............................................................................................................................. 7
E) Pairing of Andrew+ to OneLab .............................................................................................................. 8
1.2. IQ test report ....................................................................................................................................... 10
2. Operational Qualification (OQ) ..................................................................................................................... 11
2.1. OQ test plan ........................................................................................................................................ 11
2.2. Getting started .................................................................................................................................... 12
A) Experiment execution and verification correct execution .................................................................. 12
B) Test of additional components and verification of correct execution (optional) ............................... 15
C) Collection of Logfiles ........................................................................................................................... 16
2.3. OQ test report ..................................................................................................................................... 17
3. Contact ......................................................................................................................................................... 18

3/18
About this manual The procedure defines the general steps that should be performed to ensure that Andrew+ is installed and
functioning properly
1. Installation Qualification (IQ) Document #: IQ-01 Revision: 8
Function Name Date
Author
Global Service & Support Sr Manager
N. Vamvoukas 22 July 2021
Approved by
Global Technologies Director
G. Horak 22 July 2021
The Installation Qualification (IQ) is documented proof that equipment has been delivered and installed
in accordance with the requirements and statutory safety regulations stipulated in the design qualification. The documentation for an Installation Qualification consists of:
• IQ test plan
• IQ report
1.1. IQ procedure The IQ procedure contains detailed information of the tests to be performed on the respective equipment
in the context of the Installation Qualification. The IQ procedure is composed of the following series of basic
checks:
• Verification that all documents required for the correct use of Andrew and its software are given
to the customer.
• Verification that the environmental conditions where Andrew+ is installed fulfills the requirements
present in the “User Manual”.
• Verification of the correct installation of Andrew+.
After completion of the Installation Qualification, the results are summarized, evaluated and compiled in an
IQ report.
The Installation Qualification template for Andrew+ is reported in the next page.

4/18
INSTALLATION QUALIFICATION
System name: Andrew+
Serial number: 718._____________________
Document # IQ-01 Revision 8
A) User manuals and documents Verification that all the documentations and manuals are correctly delivered
Andrew+ Quick Start Guide OK ☐
NOK ☐
Comment (if none, check this
checkbox ☐ )
Andrew+ User manual OK ☐
NOK ☐
Comment (if none, check this
checkbox ☐ )
B) Installation of Andrew+ robot Andrew+ Installation
Verify that the bench on which Andrew+ is placed is stable and flat enough.
OK ☐
NOK ☐
Comment (if none, check this
checkbox ☐ )
Verify that the bench on which Andrew+ will be placed is preferably not shiny and completely black. Note: placing Andrew+ on a shiny or black bench could create some difficulties in the image acquisition processes, depending the light conditions. That said, a shiny or black bench does not create an non conformity for the installation.
OK ☐
NOK ☐
Comment (if none, check this
checkbox ☐ )
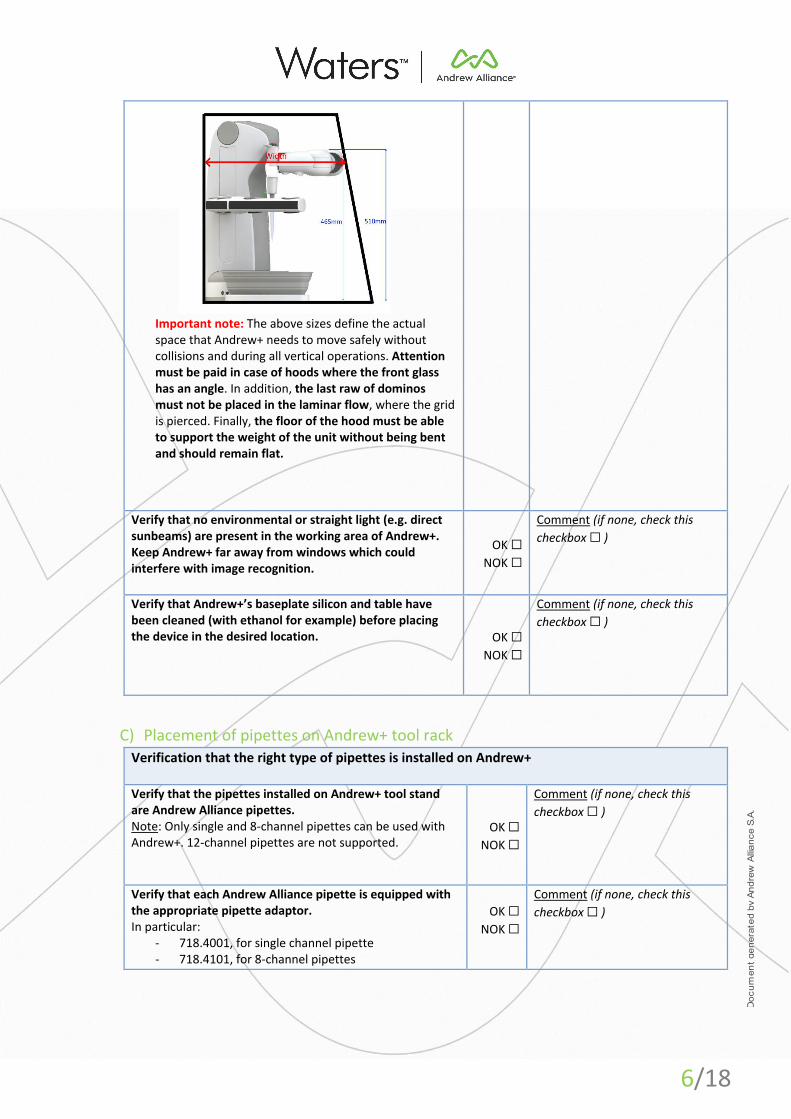
Verify that the working area of Andrew+ is bigger than 108cm large and 72cm deep and 61cm tall without any obstacles. (See images in next page)
OK ☐
NOK ☐
Comment (if none, check this
checkbox ☐ )

5/18
Note: a smaller deepness is allowed depending on the number of Dominos will be used during a single protocol execution.
If Andrew+ is placed inside a hood, verify that the below conditions are fulfilled depending on the number of Domino rows to be used in a single protocol execution:
• Single row of Dominos: Minimum width (deepness) 495mm available at height 465 mm from the bottom of the hood.
• Two rows of Dominos: Minimum width (deepness): 545mm available at height 465 mm from the bottom of the hood.
• Three rows of Dominos: minimum width (deepness): 711mm available at height 465 mm from the bottom of the hood.
(See image and note in next page)
OK ☐
NOK ☐
N/A☐
Comment (if none, check this
checkbox ☐ )
6/18
Important note: The above sizes define the actual space that Andrew+ needs to move safely without collisions and during all vertical operations. Attention must be paid in case of hoods where the front glass has an angle. In addition, the last raw of dominos must not be placed in the laminar flow, where the grid is pierced. Finally, the floor of the hood must be able to support the weight of the unit without being bent and should remain flat.
Verify that no environmental or straight light (e.g. direct sunbeams) are present in the working area of Andrew+. Keep Andrew+ far away from windows which could interfere with image recognition.
OK ☐
NOK ☐
Comment (if none, check this
checkbox ☐ )
Verify that Andrew+’s baseplate silicon and table have been cleaned (with ethanol for example) before placing the device in the desired location. OK ☐
NOK ☐
Comment (if none, check this
checkbox ☐ )
C) Placement of pipettes on Andrew+ tool rack Verification that the right type of pipettes is installed on Andrew+
Verify that the pipettes installed on Andrew+ tool stand are Andrew Alliance pipettes. Note: Only single and 8-channel pipettes can be used with Andrew+. 12-channel pipettes are not supported.
OK ☐
NOK ☐
Comment (if none, check this
checkbox ☐ )
Verify that each Andrew Alliance pipette is equipped with the appropriate pipette adaptor. In particular:
- 718.4001, for single channel pipette - 718.4101, for 8-channel pipettes
OK ☐
NOK ☐
Comment (if none, check this
checkbox ☐ )

7/18
Verify that the pipette adaptor is correctly installed on
each pipette.
Of more information, please see the User Manual of Andrew+.
OK ☐
NOK ☐
Comment (if none, check this
checkbox ☐ )
Verify that the pipette display is oriented towards the user, as shown below.
OK ☐
NOK ☐
Comment (if none, check this
checkbox ☐ )
D) Power On the device
Installation of the power line.
Verify that the power supply provided by Andrew Alliance is used with Andrew+.
OK ☐
NOK ☐
Comment (if none, check this
checkbox ☐ )
Connect the power cord of the power supply to a compatible socket. Afterwards, plug the cable of the power supply into the back of Andrew+.
OK ☐
NOK ☐
Comment (if none, check this
checkbox ☐ )

8/18
Verify that the “Plus” LED indication present on the front body of Andrew+ is blinking white. After few minutes, its color will turn blue or green. For additional information, see the User Manual of Andrew+.
OK ☐
NOK ☐
Comment (if none, check this
checkbox ☐ )
Verify that the display color of each pipette placed in the tool rack of Andrew+, matches the color of the main button of the pipette (ex. Orange, blue, purple etc.) Note: This indicates that the pipette is properly connected and charging.
OK ☐
NOK ☐
Comment (if none, check this
checkbox ☐ )
E) Pairing of Andrew+ to OneLab
Association of Andrew+ to OneLab. This procedure is necessary only if Andrew+ hasn’t been already paired to OneLab. If the Cloud version of OneLab is used, verify that the network, which Andrew+ will be connected to has Internet access and the webpage https://onelab.andrewalliance.com can be reached.
OK ☐
NOK ☐
N/A ☐
Comment (if none, check this
checkbox ☐ )
If the Cloud configuration of OneLab is used, make sure you have an OneLab account for the admin user that this device will be associated with. Visit https://onelab.andrewalliance.com to create a new free account.
OK ☐
NOK ☐
Comment (if none, check this
checkbox ☐ )
In case of a local server (Standalone) verify that the server hosting OneLab is placed preferably on the right side of Andrew+ and at least 3 meters away from the Andrew+ device (if used on Wifi) or as far as the Ethernet cable allows in case of wired connection. Note: placing the server closer could create interference with the pipettes placed on the Andrew+
OK ☐
NOK ☐
N/A ☐
Comment (if none, check this
checkbox ☐ )
In case of a local server (Standalone) or Edge configuration, verify that the server hosting OneLab is turned ON and the network is available.
OK ☐
NOK ☐
N/A ☐
Comment (if none, check this
checkbox ☐ )
Follow the procedure of “Pairing Andrew+ to OneLab” as explained in Andrew+ Quick Start Guide. After the pairing procedure is successful, Andrew+ should be visible in the Device page of OneLab having the status “Ready”.
OK ☐
NOK ☐
Comment (if none, check this
checkbox ☐ )

9/18
If Ethernet connection will be used with Andrew+ instead of Wi-fi, make sure you use the Ethernet cable provided by Andrew Alliance. Note: If a longer cable is required, the Customer IT who provided the cable must make sure the cable is properly functional.
OK ☐
NOK ☐
N/A ☐
Comment (if none, check
this checkbox ☐ )
After the pairing is successfully completed, access your OneLab. In that moment, select the Lab you would like to link Andrew+, as well as add the list of Dominos that should be associated with the device by entering their serial numbers in the appropriated field, as shown in OneLab. Note: additional Dominos can be also linked at a later time from the Device Tab.
OK ☐
NOK ☐
N/A ☐
Comment (if none, check
this checkbox ☐ )
Activate the license for Andrew+ following the instructions shown in OneLab. Note: a license key should have been delivered either electronically (by email) or as a physical product.
OK ☐
NOK ☐
N/A ☐
Comment (if none, check
this checkbox ☐ )
Select the current Andrew+ in the list of available devices present in OneLab Device Tab. Click on “Locate Me” to verify that the communication between OneLab and Andrew+ is successful. Andrew+ should make a sound and its “Plus” LED should temporarily blink violet.
OK ☐
NOK ☐
Comment (if none, check
this checkbox ☐ )
Click on the button “Refresh tools” and verify that the pipettes present on Andrew+ tool stand are visible in OneLab.
OK ☐
NOK ☐
Comment (if none, check
this checkbox ☐ )

10/18
1.2. IQ test report Below Installation Qualification Report is show. The Installation Qualification is successful if the instrument
passed ALL the tests. The report should be signed by both the person who executed the IQ process, as well
as the owner of the device.
INSTALLATION QUALIFICATION REPORT
IQ test
DESCRIPTION RESULT COMMENT (if none, bar the cell) Evaluation
A User Manual and Documents OK ☐
NOK ☐
PASS ☐
FAIL ☐
B Installation of Andrew+ robot OK ☐
NOK ☐
PASS ☐
FAIL ☐
C Placement of pipettes on Andrew+ tool rack OK ☐
NOK ☐
PASS ☐
FAIL ☐
D Power On the device OK ☐
NOK ☐
PASS ☐
FAIL ☐
E Pairing of Andrew+ to OneLab OK ☐
NOK ☐
PASS ☐
FAIL ☐
Function Name Date Signature
Performed by
Approved by

11/18
2. Operational Qualification (OQ) Document #: OQ-01 Revision: 8
Function Name Date
Author
Global Service & Support Sr Manager
N. Vamvoukas 22 July 2021
Approved by
Global Technologies Director
G. Horak 22 July 2021
The Operational Qualification (OQ) is a test process that evaluates the proper functioning of a facility or an
appliance. The Operational Qualification (OQ) may only be performed after a successfully completed Installation
Qualification (IQ). The documentation for an Operational Qualification consists of:
• OQ test plan
• OQ report
2.1. OQ test plan The OQ test plan contains detailed information of the tests to be performed on the respective equipment in the
context of the Operation Qualification (OQ). This test plan contains detailed specifications on the course of the
test itself.
After completion of the OQ test plan, the results are summarized, evaluated and combined in an OQ report. All
deviations, as well as measures taken to eliminate these, are documented. After the deviations have been
eliminated, they must be tested again, documented, and evaluated in a new OQ report.
The Operational Qualification template for Andrew+ is reported in the next page.

12/18
OPERATION QUALIFICATION
System name: Andrew+
Serial number: 718._____________________
Document # OQ-01 Revision 8
2.2. Getting started This Operational Qualification procedure is based on the execution of a set of protocols to test the correct
functionality of different modules of the system. It is suggested to use distilled water and a solution of Ponceau
S with a concentration of 0.5 g/l. The use of dye is suggested to have a better visibility of the correctly filled wells
and consumables.
As Andrew+ handles electronic pipettes, there is no need to test the fluidic performances of the system at the
time of the installation. The latter have been tested during the manufacturing process of the pipettes. A
performance qualification document is delivered along with the pipettes.
A) Experiment execution and verification correct execution Select one of the options below depending on your Domino/Pipette setup.
OPTION 1 Starter Kit configuration
SELECTED☐
N/A ☐
Verify that the following Andrew Alliance pipettes have the compatible pipette adaptor and they are installed on Andrew+ tool stand:
- Single channel AA pipette 100-5000 µL - Single channel AA pipette 10-300 µL - 8-channel AA pipette 50-1200 µL
OK ☐
NOK ☐
Comment (if none,
check this checkbox ☐ )
Verify the availability of the following Andrew Alliance Dominos:
- 1x [218.1252] Domino for 5mL tips - 2x [218.1101] TIS Domino - [218.2002] Microplate Domino - [218.2032] 50mL tube Domino - [218.2182] 8-channel reservoir Domino - [218.2152] Microtube Domino
OK ☐
NOK ☐
Comment (if none,
check this checkbox ☐ )
Verify that the 50mL conical tube is compatible with Corning #352070. OK ☐
NOK ☐
Comment (if none,
check this checkbox ☐ )
Verify that the flat bottom 96-well plate is comparable to Greiner™ #655101 . OK ☐
NOK ☐
Comment (if none,
check this checkbox ☐ )
Verify that the 8-channel reservoir is Integra #4332.
OK ☐
NOK ☐
Comment (if none,
check this checkbox ☐ )
13/18
Verify that the 1.5mL centrifuge conical microtube is comparable to Fisher Scientific #11926955. OK ☐
NOK ☐
Comment (if none,
check this checkbox ☐ )
Verify that the following pipette tips by Sartorius are used for the experiment:
- 300uL:790350, 790351, 790352, 790353, LH-L790350, LH-L790352, 790301F or LH-LF790301
- 1200uL: 791210, 791211, 791212, 791213, LH-L791210, 791211F or LH-LF7991211
- 5mL: 780304, 780305, 780300, 780308
OK ☐
NOK ☐
Comment (if none,
check this checkbox ☐ )
Execute the protocol “Starter kit protocol” with Andrew+”
OK ☐
NOK ☐
Comment (if none,
check this checkbox ☐ )
During the experiment execution observe the ability of Andrew+ to:
• Grab the pipettes.
• Insert the different type of tips.
• Alignment in the various labware/Dominos
OK ☐ NOK ☐
OK ☐ NOK ☐
OK ☐ NOK ☐
Comment (if none,
check this checkbox ☐ )
The protocol was executed without errors.
OK ☐
NOK ☐
Comment (if none,
check this checkbox ☐ )
OPTION 2 Glycoworks configuration
SELECTED☐
N/A ☐
Verify that the following Andrew Alliance pipettes have the compatible pipette adaptor and they are installed on Andrew+ tool stand:
- Single channel AA pipette 10-300 µL - 8- channel AA pipette 10-300 µL - 8-channel AA pipette 50-1200 µL
OK ☐
NOK ☐
Comment (if none,
check this checkbox ☐ )
Verify the availability of the following Andrew Alliance Dominos:
- 2x [218.1101] TIS Domino - [218.2301] Deepwell plate - [218.2901] Storage plate - [518.4600] 96-pcr plate Peltier+ - [518.6000] Microelution plate (GlycoWorks™
RapiFluor-MS™ by Waters™)
OK ☐
NOK ☐
Comment (if none,
check this checkbox ☐ )
Verify that the [518.4600] 96-pcr plate Peltier+ and [518.6000] Microelution plate Connected Devices have been properly paired with OneLab and their license has been activated.
OK ☐
NOK ☐
Comment (if none,
check this checkbox ☐ )
Verify that the reservoir is Axygen® 12-well reservoir with 12-channel trough #RES-MW12-HP
OK ☐
NOK ☐
Comment (if none,
check this checkbox ☐ )

14/18
Verify that the collection plate is Waters® 1 mL 96 round well collection plate #186002481 OK ☐
NOK ☐
Comment (if none,
check this checkbox ☐ )
Verify that the reaction plate is compatible with Eppendorf twin.tec® 96-well skirted LoBind PCR plate #0030129555 OK ☐
NOK ☐
Comment (if none,
check this checkbox ☐ )
Verify that the μElution plate is the Waters GlycoWorks™ HILIC μElution plate #186002780 OK ☐
NOK ☐
Comment (if none,
check this checkbox ☐ )
Verify that the following pipette tips by Sartorius are used for the experiment:
- 300uL:790350, 790351, 790352, 790353, LH-L790350, LH-L790352, 790301F or LH-LF790301
- 1200uL: 791210, 791211, 791212, 791213, LH-L791210, 791211F or LH-LF7991211
OK ☐
NOK ☐
Comment (if none,
check this checkbox ☐ )
Execute the protocol “GlycoWorks OQ protocol.onp” with Andrew+”
OK ☐
NOK ☐
Comment (if none,
check this checkbox ☐ )
During the experiment execution observe the ability of Andrew+ to:
• Grab the pipettes.
• Insert the different type of tips.
• Alignment in the various labware/Dominos
• Dead volume in the reaction pate is <=5uL
• Control of Devices+ (heating, cooling, vacuum) Note: Make sure to follow the instructions shown in OneLab during the protocol execution as User Actions or Notifications.
OK ☐ NOK ☐
OK ☐ NOK ☐
OK ☐ NOK ☐
OK ☐ NOK ☐
OK ☐ NOK ☐
Comment (if none,
check this checkbox ☐ )
The protocol was executed without errors OK ☐
NOK ☐
Comment (if none,
check this checkbox ☐ )
Option 3 Custom configuration
SELECTED☐
N/A ☐
Select one of the below configurations:
• Option 1: Andrew+ can handle volumes from 0.5uL up to 1200uL with single and/or multi-channel pipettes.
• Option 2: Andrew+ can handle volumes from 10uL to 5mL with single ONLY or single/ multi-channel pipettes.
• Option 3: Andrew+ can handle volumes from 10uL to 1200uL with multi-channel ONLY pipettes.
• Option 4: Andrew+ can handle big volumes only (5mL and/or 10mL pipettes)
Option 1 ☐
Option 2 ☐
Option 3 ☐
Option 4 ☐
Comment (if none,
check this checkbox ☐ )
15/18
Execute the relevant operation test protocol depending on the option selected in the previous step:
• Option 1: “OQ custom from 0.5uL up to 1200uL Single and_or Multi.onp”
• Option 2: ” OQ custom 10uL to 5mL with single ONLY or Single Multichannel.onp ”
• Option 3: “OQ custom from 10uL to 1200uL multi-channel ONLY.onp “
• Option 4: “ OQ custom big volumes only 5mL and_or 10mL pipettes. onp”
Note: It might be required to replace the labware used in the OQ test protocol with a labware of similar properties that you have available and is compatible with your Domino setup.
OK ☐
NOK ☐
Comment (if none,
check this checkbox ☐ )
During the experiment execution observe the ability of Andrew+ to:
• Grab the pipettes.
• Insert the different type of tips.
• Alignment in the various labware/Dominos
OK ☐ NOK ☐
OK ☐ NOK ☐
OK ☐ NOK ☐
Comment (if none,
check this checkbox ☐ )
The protocol was executed without errors.
OK ☐
NOK ☐
Comment (if none,
check this checkbox ☐ )
B) Test of additional components and verification of correct execution (optional) The below steps should be followed in case it is required to test additional components that were not used
during the tests of section A. This set of tests is optional.
Custom configuration SELECTED☐
N/A ☐
Design a protocol in OneLab that fulfills the below requirements:
• All pipettes must be used at least once
• Select one of the available multi-channel (and/or a single channel) to perform multiple aspirations/dispenses with multiple tip insertions (at least the half tip box per type should be used). ex. Fill a microplate with 300uL by using the 8-ch 1200uL and some microtubes with 300uL by using the 1-ch 300uL pipette etc.
• Add a protocol step in which Andrew+ grabs an already used pipette for a second time to perform a single pipetting step.
• Try to include/use as many dominos as possible depending on what you have available.
OK ☐
NOK ☐
Comment (if none,
check this checkbox ☐ )
16/18
Reminder: Andrew+ can use up to 11 Dominos at once.
• If your Andrew+ should be used with a connected device (ex. Shaker) add a protocol step to test its functionality.
The purpose of this protocol should be to test the:
• Pipette grabbing abilities of Andrew+.
• Tip insertion ability of Andrew+ with single and/or multi-channel pipettes.
• Alignment in different labware/Dominos
• Communication and proper functionality of a connected device (if present).
Execute the custom protocol with Andrew+.
OK ☐
NOK ☐
Comment (if none,
check this checkbox ☐ )
During the experiment execution observe the ability of Andrew+ to:
• Grab the pipettes.
• Insert the different type of tips.
• Alignment in the various labware/Dominos
• Control of Devices+ (shaker, heating etc)
OK ☐ NOK ☐
OK ☐ NOK ☐
OK ☐ NOK ☐
OK ☐ NOK ☐
Comment (if none,
check this checkbox ☐ )
The protocol was executed without errors.
OK ☐
NOK ☐
Comment (if none,
check this checkbox ☐ )
C) Collection of Logfiles Following the completion of the OQ protocol(s), collect the logfiles. Important note: The collection of logfiles must be performed right after the protocols have been completed and without power cycling the device. If for any reason the unit had to be power cycled, the OQ process and protocol execution must be restarted from the beginning.
OK ☐
NOK ☐
Comment (if none,
check this checkbox ☐ )

17/18
2.3. OQ test report Below Operation Qualification Report is shown. The Operation Qualification is successful if the instrument
passed ALL the tests. The report must be signed by both the person who executed the OQ process, as well as
the owner of the device.
OPERATION QUALIFICATION REPORT
OQ test
DESCRIPTION RESULT COMMENT (if none, bar the cell)
Evaluation (Pass/Fail)
A Experiment execution and verification of correct operation
OK ☐
NOK ☐
PASS ☐
FAIL ☐
B Test of additional components and verification of correct execution (optional)
OK ☐
NOK ☐
N/A ☐
PASS ☐
FAIL ☐
C Collection of Logfiles OK ☐
NOK ☐
PASS ☐
FAIL ☐
Function Name Date Signature
Performed by
Approved by

18/18
3. Contact For any questions or information, do not hesitate to:
• Visit our website www.andrewalliance.com
• Contact us through our Intercom messenger.
• Send us an email to [email protected]
• Call us:
o +41 (0)22 54 93 49