Europäische Aktiengesellschaft (SE) Svenja Andresen (KRvFG Moosburg)
Upload
kristen-andresenCategory
view
147download
0
AC JointsKristen Andresen// Rads 216-C // April 28, 2016

AC Joints w/o Weights (Neutral Position)
Image Source:http://velonews.competitor.com/2010/11/training-center/shoulder-separations-explained_150447

HIPAA COMPLIANCE● This image is HIPAA compliant. The
patient and imaging facility’s information is absent from the image. No identifiable information is present.

Is a correct anatomical side marker visible in the image?
● Yes, Both sides have been marked with the correct side markers and “Neutral” was post-processed in, but explains the patient’s position (w/o weights).
Is the side marker placed correctly in the image?
● Yes. The side markers are placed correctly on the image.
Are any markers superimposed on pertinent anatomy?
● No anatomy is being superimposed by any of the markers.
Marker & Patient ID

Are additional markers needed? Were they used?
● Arrow markers could have been used to mark the site of the patient’s pain/ trauma, and a “Neutral”(Without weights) marker could have been used prior to exposure.
Is the image displayed correctly, based on marker placement?
● These are done AP, and both sides of the patient were marked correctly.
Marker & Patient ID

Radiation HygieneAssess the accuracy/presence of acceptable
beam restriction on the image. (state rule)
● The state rule says that three sides of collimation should be visualized on the image.There is visualization of beam restriction on all sides. No required anatomy has been clipped due to collimation.
Does “evidence” exist to indicate appropriate use of shielding? (state rule)
● There appears to be at least three sides of collimation and there is collimation seen on the side closest to the gonads. Collimation is the best form of shielding, so the patient’s gonads were “shielded” from the primary beam.

List the positions/projections required as part of the “routine procedure” for this body part.
● AP Bilateral WITH weights
● AP Bilateral WITHOUT weights
Special/ Alternate Positions/Projection:
● AP Axial (Alexander Method)- 15° cephalad
● Supine Position: Patient is recumbent on table with long strips of gauze on PT’s extremities to pull shoulders down. This should only be done is necessary and by experienced personnel to prevent further injury.
Completeness of Position/Projection

Completeness of Position/Projection
Does the image comply with routine position(s)/projection(s)?
● Yes, this image is the bilateral AP projection which is part of the required routine imaging.
Are all anatomical parts correctly visualized in the image?
● Part of the left shoulder is clipped, but all the necessary anatomy required on this image is visualized.

Are preventable physical artifacts visible in the image?
● There is a wire included on the image out of the anatomy of interest. This could have been moved further out of the way. No other physical artifacts are present.
Are body parts superimposed that should not be?
● There is no major body superimposition that shouldn’t be present, but the clavicles should be straighter, in an even plane, and there should be no rotation of the clavicles like in this image.
Is hospital paraphernalia present &/or visible in the image?
● There is a wire present on the image towards the left side. This is pointed out with the green arrow above.
Artifact Identification

Artifact Identification
Are patient clothing/belongings visible in the image?
● No articles of clothing are visible in the image.
Are any indwelling artifacts/foreign bodies visible in the image?
● No indwelling/ foreign objects are visualized.

Is excess fog visible &/or degrading overall image quality?
● No gridlines or excessive fogging is visible.
Are any CR/DR artifacts visible in the image
● No CR/DR artifacts are present in the image.
Assessment of Image Integrity

Image Sharpness
Is “gross” voluntary motion visible in the image?
● No, the image appears clear with minimal patient motion.
Is excessive quantum mottle (or image noise) visible in the image?
● There is some quantum mottle specifically in the soft tissue/ neck area, but not in excess.
Is evidence of double (or previous/ghosted) exposure present?
● There is no evidence of double exposure present.

● No grid lines, grid artifact or grid cut-off is visible in the image.
● Size distortion appears minimal in this image.
● The CR/IR appear to be properly aligned. No noticeable shape distortion is caused.
Image Sharpness

Is the part adequately aligned to the image media?
● Yes. It’s not perfectly aligned, but it’s not off-center enough to cause any major changes in the image.
Is the part accurately centered to the image media?
● It is slightly off-center, but not enough to cause any major differences in the image.
Is the CR centered to within 1 cm of anatomical part?
● The CR is centered within 1 cm of the anatomical part.
Radiography of the Anatomical Part

● Assuming the black border around the image is the area of the IR, then the CR appears to be properly aligned.
● The CR’s alignment conforms to an acceptable IR exposure recognition field. There is also good use of collimation.
Radiography of the Anatomical Part

Radiography of the Anatomical Part Positioning Criteria: (Martensen, p. 268)
● Center the AC Joint to the upright IR in an AP Projection
● Position the shoulder’s at equal distances from the IR.
● Place shoulders on the same transverse plane
● Position the MCP vertically, aligning it parallel with the IR
● Center a perpendicular CR to the AC joint of interest
● Center the IR to the CR
● Open the longitudinally and transversely collimated field to include one half of the clavicle and the coracoid process
● Obtain an AP projection without weights and one with the patient holding 5-8 lb weights
● Place a word or arrow marker on the IR to indicate the projection that was obtained with the PT holding weights.

Correct Patient Positioning

Evaluation Criteria: (Martensen, p.268)
● Lateral clavicle is horizontal
● About 0.125” (0.3 cm) of space is present between the lateral clavicle and the acromial apex
● Lateral clavicle demonstrates minimal acromion process superimposition
● Clavicle & the superior scapula angle are demonstrated at the same transverse level.
● AC Joint is at the center of the exposure field for both the non-weight bearing and the weight bearing exposures.
● Lateral clavicle, acromion process & superior scapular angle are included within the exposure field.
● A word or arrow marker, point downward, is present on projection that was obtained with the patient holding weights.
Radiography of the Anatomical Part
Radiography of the Anatomical Part
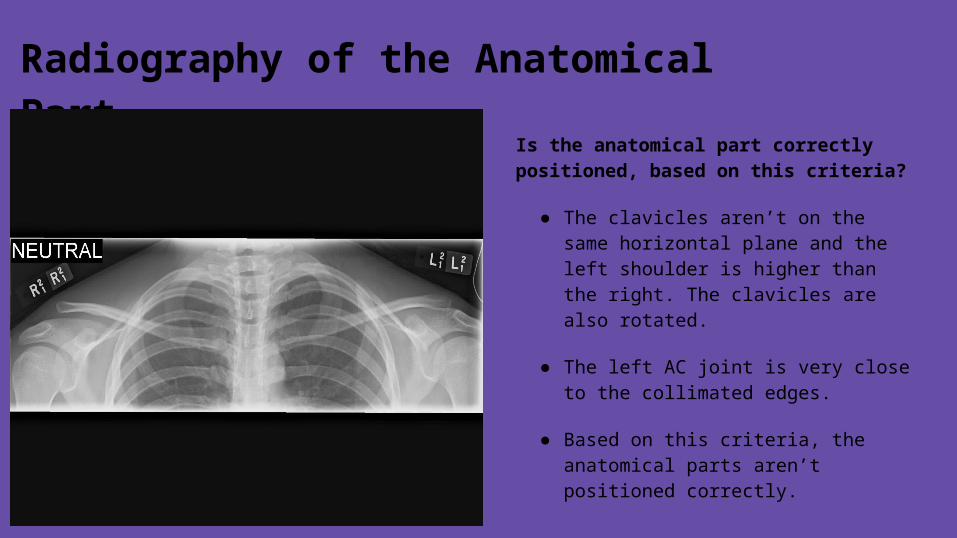
Is the anatomical part correctly positioned, based on this criteria?
● The clavicles aren’t on the same horizontal plane and the left shoulder is higher than the right. The clavicles are also rotated.
● The left AC joint is very close to the collimated edges.
● Based on this criteria, the anatomical parts aren’t positioned correctly.

● The most radiolucent structure is the air surrounding the patient and air in the PT’s lungs. This area appears the most “black”.
● The Bony cortex and anatomy is definitely the most radiopaque part of this image.This area appears the most “white”.
Judicious Exposure Technique

Judicious Exposure TechniqueWhat is your assessment of the image’s
contrast (window width)?
● The contrast for the upper extremities should be relatively short-scale, with more black and white as opposed to more greys. This image appears to be on the longer side of short-scale contrast which allows for better visualization of bony anatomy.
What is your assessment of the image’s brightness (window level) &/or exposure indicator (EI) value?
● There appears to be adequate brightness on the image but I feel like the EI value would be on the lower scale of an acceptable EI value.
Does this image meet (or exceed) minimum established standards for acceptance criteria?
I would Reject this image. There is rotation of the shoulders and the left AC joint was almost clipped. The technique could also be adjusted to provide more detail of the bony anatomy.
Accept/Reject Image(s)

● I would make sure the clavicles are on the same horizontal plane
● Make sure there’s no rotation of the patient
● Have both shoulders at equal lengths of each other
● Have a “without weights” marker on the image before exposure.
● Move the wire out of the exposure field
● Collimate more vertically
● Ensure both AC joints are fully in the exposure field
● Adjust the exposure technique for better visualization of bony anatomy.
Corrections

Bontrager, K. (2014). Textbook of Radiographic Positioning and Related Anatomy. (8th edition). St. Louis, MO: Elsevier
Frank, E. (2012). Merrill’s Atlas of Radiographic Positioning and Procedures. (12th Edition). St.Louis, MO: Elsevier
McQuillen-Martensen, K. (2015). Radiographic Image Analysis. (4th edition). St.Louis, MO: Elsevier
Sources List