Analysis Features with OLAP€¦ · OLAP or Tabular model name in case of Tabular OLAP model) OLAP...
75
Using OLAP/Analytic Model analysis features of Kyubit Business Intelligence www.kyubit.com Analysis Features with OLAP & ‘Analytic Models’ Using OLAP/Analytic Model analysis features of Kyubit Business Intelligence © 2020, All rights reserved www.kyubit.com
Transcript of Analysis Features with OLAP€¦ · OLAP or Tabular model name in case of Tabular OLAP model) OLAP...

Using OLAP/Analytic Model analysis features of Kyubit Business Intelligence
www.kyubit.com
Analysis Features with OLAP &
‘Analytic Models’
Using OLAP/Analytic Model analysis features of Kyubit Business Intelligence
© 2020, All rights reserved
www.kyubit.com

2
Analysis features using OLAP and Analytic Models with Kyubit Business Intelligence - User manual
Kyubit Business Intelligence, Analysis features with OLAP and ‘Analytic Models’ - User manual
Contents Contents ........................................................................................................................................................................... 2
OLAP/Analytic Model data sources ....................................................................................................................... 5
Folders..................................................................................................................................................................... 7
2.1. My Analysis .................................................................................................................................................... 7
Analytic Grid Analysis ............................................................................................................................................. 8
3.1. New Analysis .................................................................................................................................................. 8
3.2. Grid Analysis concepts .................................................................................................................................. 9
3.2.1. OLAP/Analytic Model Tree Structure ................................................................................................ 10
3.2.2. Categories and series ......................................................................................................................... 10
3.3. Expand member, single dimension hierarchy ........................................................................................... 11
3.4. Expand member, different dimension hierarchy ...................................................................................... 11
3.5. Expand all/Collapse all members ............................................................................................................... 12
3.6. Drill-down member ..................................................................................................................................... 12
3.7. User analysis settings .................................................................................................................................. 13
3.7.1. Analysis Aggregates ........................................................................................................................... 14
3.7.2. Aggregate operation defined for each measure individually .......................................................... 14
3.7.3. Show/Hide Empty rows ..................................................................................................................... 14
3.7.4. Toggle Level Aggregates (OLAP Analysis) ......................................................................................... 15
3.7.5. Set column width ............................................................................................................................... 15
3.8. Filtering grid analysis data .......................................................................................................................... 16
3.8.1. Search members ................................................................................................................................ 16
3.8.2. Isolating .............................................................................................................................................. 17
3.8.3. Dimension level value filtering .......................................................................................................... 18
3.8.4. User Properties as analysis filters ..................................................................................................... 19
3.8.5. Time Intelligence Slicers (OLAP) ........................................................................................................ 21
3.8.6. Configure Time Slicers ....................................................................................................................... 23
3.9. Sorting all members on the grid axis .......................................................................................................... 26
3.10. Sorting members on a particular dimension level .................................................................................... 28
3.11. Pivot ............................................................................................................................................................. 29
3.12. Create and manage ad-hoc User Named sets (OLAP) ............................................................................... 29
3.12.1. Create Named Set by picking members ............................................................................................ 30
3.12.2. Create Named Set by expression ...................................................................................................... 31
3.12.3. Edit existing User Named Sets ........................................................................................................... 31
3.13. Create and manage ad-hoc User Calculated Measures (OLAP) ................................................................ 32
3.13.1. Edit existing User Calculated Measures ............................................................................................ 34
3.14. Member Properties (OLAP) ........................................................................................................................ 35
3.15. Save analysis state ....................................................................................................................................... 36
3.16. Sharing an analysis ...................................................................................................................................... 36
3.17. Analysis history, move back and forward .................................................................................................. 37

3
Analysis features using OLAP and Analytic Models with Kyubit Business Intelligence - User manual
Kyubit Business Intelligence, Analysis features with OLAP and ‘Analytic Models’ - User manual
3.18. Show/Hide Grid Analysis Panels ................................................................................................................. 38
4. Chart analysis features ......................................................................................................................................... 39
4.1. Categories .................................................................................................................................................... 39
4.2. Series ............................................................................................................................................................ 39
4.3. Change or add the measure ....................................................................................................................... 40
4.4. Pivot chart .................................................................................................................................................... 40
4.5. Isolating........................................................................................................................................................ 40
4.6. Drill category member values (Slice) .......................................................................................................... 40
4.7. Drill-down .................................................................................................................................................... 42
4.8. Chart visuals ................................................................................................................................................ 43
4.8.1. Chart Types ......................................................................................................................................... 43
4.8.2. Palette ................................................................................................................................................. 44
4.8.3. Theme ................................................................................................................................................. 44
4.8.4. Enable 3D view ................................................................................................................................... 44
4.8.5. Semi-transparent option ................................................................................................................... 44
4.8.6. Show values option ............................................................................................................................ 44
4.8.7. Pie/Doughnut details ......................................................................................................................... 44
5. Calculations ........................................................................................................................................................... 45
5.1. No calculations (Default view) .................................................................................................................... 45
5.1. % of Columns total ...................................................................................................................................... 45
5.2. % of Rows Total ........................................................................................................................................... 45
5.3. % of Grand Total .......................................................................................................................................... 46
5.4. Running totals for categories ..................................................................................................................... 46
5.5. Running totals for series ............................................................................................................................. 46
5.6. % of value .................................................................................................................................................... 47
5.6.1. % of the category ............................................................................................................................... 47
5.6.2. % of the series .................................................................................................................................... 47
5.6.3. % of the cell values ................................................................................................................................. 48
5.7. The Difference from … ................................................................................................................................ 48
5.7.1. The Difference from the selected row .............................................................................................. 48
5.7.2. The Difference from the selected column ........................................................................................ 49
5.7.3. The Difference from the selected cell ............................................................................................... 49
5.8. % Difference from ....................................................................................................................................... 49
6. Report view ........................................................................................................................................................... 50
6.1. Report ‘Value Bars’ ...................................................................................................................................... 51
7. Exporting options ................................................................................................................................................. 52
7.1. Exporting to an Excel file ............................................................................................................................. 52
7.2. Exporting to a PDF file ................................................................................................................................. 54
7.3 Exporting to a CSV file ................................................................................................................................. 55
8. Drill-through features........................................................................................................................................... 56
8.1. Custom drill-through ................................................................................................................................... 57

4
Analysis features using OLAP and Analytic Models with Kyubit Business Intelligence - User manual
Kyubit Business Intelligence, Analysis features with OLAP and ‘Analytic Models’ - User manual
8.2. Drill-through results links ............................................................................................................................ 58
8.3. Saving drill-through columns and reuse .................................................................................................... 58
9. Grid KPI functionalities ......................................................................................................................................... 59
9.1. Define KPI .................................................................................................................................................... 59
9.2. Using KPI ...................................................................................................................................................... 60
10. Grid cell formatting options ............................................................................................................................ 61
10.1. Cell formatting based on grid KPI status .................................................................................................... 62
11. Expand All – Analysis Mode ............................................................................................................................. 64
12. Cell writeback ................................................................................................................................................... 65
13. Publishing Features .......................................................................................................................................... 67
13.1. Publish Analysis ........................................................................................................................................... 67
13.1.1. Publishing URL and EMBED string ..................................................................................................... 67
13.1.2. Report Alias ........................................................................................................................................ 67
13.1.3. Caching ............................................................................................................................................... 67
13.1.4. Impersonate ....................................................................................................................................... 68
13.1.5. Visuals ................................................................................................................................................. 68
14. ‘Peek Analysis’ .................................................................................................................................................. 69
15. Decomposition Analysis ................................................................................................................................... 70
15.1. OLAP/Analytic Model analysis in multiple decomposition steps .............................................................. 70
15.2. Decomposition Options .............................................................................................................................. 70
15.3. Sample Decomposition Steps ..................................................................................................................... 70
16. Subscriptions .................................................................................................................................................... 73
16.1. My subscriptions ......................................................................................................................................... 73
16.2. Subscriptions within analysis ...................................................................................................................... 73
16.3. Subscription details ..................................................................................................................................... 74

5
Analysis features using OLAP and Analytic Models with Kyubit Business Intelligence - User manual
Kyubit Business Intelligence, Analysis features with OLAP and ‘Analytic Models’ - User manual
OLAP/Analytic Model data sources Kyubit BI application has features to analyze and visualize data from your existing OLAP databases or from
created Analytic Models inside Kyubit application. Analytic Model is multidimensional data source (similar to
OLAP), quickly created based on your SQL or CSV data. To start analyzing data using your existing OLAP database,
an OLAP database cube has to be created as a new data source in the Kyubit Business Intelligence application or
in the case of analyzing data from Analytic Models, Analytic Models will appear under Data Sources once it is
created (for more details on creating an Analytic Model, please refer to Kyubit-Self-Service-BI.pdf document).
Once OLAP/Analytic Model data source is created, it can be reused in a different analysis, reports, KPIs,
Dashboards, and used by any users of the Kyubit Business Intelligence which has access permissions for the
same data source. To define OLAP cube data source for certain OLAP cube, MS SQL Analysis Services
2005/2008/2012/2014 has to be installed on the intranet in the same intranet to which Kyubit Business
Intelligence server belongs to. While creating OLAP data source user has to provide the following data:
▪ Server name (address) with MS SQL Analysis Services
▪ OLAP Database name
▪ Cube name or Tabular Model (in this field provide the name of OLAP cube in case of multidimensional
OLAP or Tabular model name in case of Tabular OLAP model)
▪ OLAP reference name (custom name for your OLAP data source)
OLAP cube connection could be defined by server/database elements or could defined as custom connection
string, so advanced users could add some extra parameters. To assign permissions for other users, select
“Permissions” link.

6
Analysis features using OLAP and Analytic Models with Kyubit Business Intelligence - User manual
Kyubit Business Intelligence, Analysis features with OLAP and ‘Analytic Models’ - User manual
Sample Analytic Model data source quickly created using SQL query in the Kyubit application. (for more details
on creating an Analytic Model, please refer to Kyubit-Self-Service-BI.pdf document)
Data Sources list in Kyubit BI …

7
Analysis features using OLAP and Analytic Models with Kyubit Business Intelligence - User manual
Kyubit Business Intelligence, Analysis features with OLAP and ‘Analytic Models’ - User manual
Folders To give permissions to other users to see or edit created analysis, analysis has to be connected (shared) with a
previously created folder. The Folder is an object that groups all analyses (or dashboards) with the same
permissions. Folders could be used to share analysis/dashboard with a common subject or belong to a certain
business unit or process. Administrator or user with a read/write permission on a folder could manage
permissions for other users or groups.
If analysis/report is based on the OLAP data, to see actual data from OLAP data source, user needs permission on
OLAP database level (OLAP Role-based security), but to see that certain analysis exists in Kyubit Business
Intelligence application, user needs permission also in Kyubit Business Intelligence folder that contains that same
analysis/report.
To create a new folder and define folder permissions, follow these steps:
▪ On Main menu select Create Folder button on the right side of the screen.
▪ Set folder name and click Save
▪ To define permissions on the folder, select permissions and choose required users and groups, and
finally select which access level should be given Read Access or Read/Write Access.
2.1. My Analysis By default, all users have “My Analysis” folder. When saving an analysis, it is automatically saved in users “My
Analysis” folder, which is visible only to the current user. “My Analysis” folder cannot be deleted or renamed. To
move certain analysis to another folder, the analysis/report has to be shared (connected) to that particular
folder. Once shared to the folder, the analysis/report is available to the group of users, which have access
permissions to view the content of the folder.

8
Analysis features using OLAP and Analytic Models with Kyubit Business Intelligence - User manual
Kyubit Business Intelligence, Analysis features with OLAP and ‘Analytic Models’ - User manual
Analytic Grid Analysis 3.1. New Analysis To start a new analysis, click on the New Analysis button on the Home or Analysis application section (page).
Note, that if you have only one OLAP/Analytic Model data source, Grid Analysis screen will immediately become
visible and ready for analysis. If there are more OLAP/Analytic Model data sources, the user will be asked for
which OLAP/Analytic Model data source to start the analysis. If required OLAP/Analytic Model data source is not
on the data source list, select “New Data Source” to create new OLAP data source or select ‘New Analytic Model’
to create a new analytic model using your SQL/CSV data.

9
Analysis features using OLAP and Analytic Models with Kyubit Business Intelligence - User manual
Kyubit Business Intelligence, Analysis features with OLAP and ‘Analytic Models’ - User manual
3.2. Grid Analysis concepts The most common approach of OLAP/Analytic Model data analysis in Kyubit Business Intelligence application is
Grid Analysis. Simply drag-and-drop measures, hierarchies/levels from OLAP/Analytic Model cube tree structure
to grid areas on the right side to analyze the data. Following areas exist for grid analysis:
▪ OLAP/Analytic Model structure Tree (Measures and Dimensions)
▪ Categories area (Axis)
▪ Series area (Axis)
▪ Measures area
▪ Filters area
▪ Values area

10
Analysis features using OLAP and Analytic Models with Kyubit Business Intelligence - User manual
Kyubit Business Intelligence, Analysis features with OLAP and ‘Analytic Models’ - User manual
3.2.1. OLAP/Analytic Model Tree Structure Every OLAP/Analytic Model data source consists of measures, dimensions and hierarchies. The structure is
defined in the OLAP database or an Analytic Model and within Kyubit Business Intelligence is displayed using the
tree view. The Analysis is performed by dragging required elements from the structure tree to the designated
area on the right. Drag-and-drop tree items (Measures, dimension hierarchies) to the appropriate areas on the
right.
3.2.2. Categories and series To see some measure values over some entity structure (dimension), drag OLAP/Analytic Model dimension
hierarchies from the OLAP/Analytic Model tree structure, visualized with the tree-view on the left side of the
screen, to the Categories and/or Series area. For example, ‘Countries’ dimension hierarchy could be placed on
the category axis and ‘Product’ dimension hierarchy on the series axis. Corresponding values from OLAP/Analytic
Model data source will appear on the values area in the center of the screen.
To remove dimension hierarchy from the analysis, drag dimension hierarchy from categories or series area to
dimension tree area or select dimension hierarchy (one click) and press ‘Delete’ key.

11
Analysis features using OLAP and Analytic Models with Kyubit Business Intelligence - User manual
Kyubit Business Intelligence, Analysis features with OLAP and ‘Analytic Models’ - User manual
3.3. Expand member, single dimension hierarchy If we drag dimension hierarchy that consists of several levels (For example, Geography [Country - State - City -
Customer] or Calendar [Year - Semester - Quarter - Month - Week - Day]), with each member on the categories
or series area will be displayed collapse/expand option, which would expand values to show values for the next
hierarchy level members. For example, with a few clicks, we would see the analysis for all countries, drill-down
‘USA’ to states, drill-down ‘California’ to cities and finally find values for ‘San Francisco’. At the same analysis, it is
possible to drill-down categories and series dimension hierarchies.
3.4. Expand member, different dimension hierarchy To expand values and show members of other dimension hierarchy, drag all dimension hierarchies to the same
axis (Categories or Series) and click/expand desired members. It is possible to drag multiple dimension
hierarchies to the same axis and on that way expand values from one hierarchy to another. For example, we
could first drag ‘Countries’ hierarchy and then ‘Product’ hierarchy. On that way first we would see values for all
countries, and then by expanding ‘USA’, we would see ‘Product’ categories sold in ‘USA’.
Expanding members with single or different dimension hierarchies could be combined and performed on both
axes separately within the same analysis, giving a powerful and fast option to analyze data from OLAP/Analytic
Model data sources.

12
Analysis features using OLAP and Analytic Models with Kyubit Business Intelligence - User manual
Kyubit Business Intelligence, Analysis features with OLAP and ‘Analytic Models’ - User manual
3.5. Expand all/Collapse all members To expand all sibling members of a particular hierarchy, right-click any of sibling members and select “Expand
all”. On the same way select “Collapse all members” to collapse all sibling members. Expand all/Collapse all
members is available only on categories axis.
3.6. Drill-down member On a category axis it is possible to drill-down certain member if it is a root category level member. Right-click the
member and select “Drill-down Bikes”. “Bikes” member will be automatically added to filters and level bellow
will show members related to selected “Bikes” member.

13
Analysis features using OLAP and Analytic Models with Kyubit Business Intelligence - User manual
Kyubit Business Intelligence, Analysis features with OLAP and ‘Analytic Models’ - User manual
3.7. User analysis settings Every user could define his own preference while analyzing OLAP/Analytic Model data with Kyubit Business
Intelligence application. Every time the user starts a new analysis, the user settings will be applied. Select “User
Settings” available in the top-right corner of the application screen.

14
Analysis features using OLAP and Analytic Models with Kyubit Business Intelligence - User manual
Kyubit Business Intelligence, Analysis features with OLAP and ‘Analytic Models’ - User manual
3.7.1. Analysis Aggregates By default, the aggregate operation defined in ‘User Settings’ will be used to calculate analysis aggregates. The
user can choose which aggregate function to apply and show at any time in the analysis view. To select the
aggregate function, click the “Options” (or right-click on empty area) -> “Set Aggregates...”
3.7.2. Aggregate operation defined for each measure individually The aggregate operation can also be defined for each measure individually. After the measure is added to the
analysis, right-click on the measure and set the appropriate aggregate function.
3.7.3. Show/Hide Empty rows If analysis displays empty rows (empty cells), the user can decide to show them or not for each individual
analysis. Option to Show/Hide Empty rows could be defined in the ‘User Settings’ as a default option when
starting a new analysis.

15
Analysis features using OLAP and Analytic Models with Kyubit Business Intelligence - User manual
Kyubit Business Intelligence, Analysis features with OLAP and ‘Analytic Models’ - User manual
3.7.4. Toggle Level Aggregates (OLAP Analysis) While creating OLAP grid analysis, for each level added on the category or series axis, toggle the display of
aggregate Row/Column for that level and compose analysis with aggregations on the levels you prefer.
3.7.5. Set column width In some situations, while in grid analysis, it will be convenient to customize the grid column width for best grid
visual perception. The user can select from 6 different column width option, from “Small” to “XXXL”. Column
width will be saved together with analysis. Column width could be set specifically for category items and value
items.

16
Analysis features using OLAP and Analytic Models with Kyubit Business Intelligence - User manual
Kyubit Business Intelligence, Analysis features with OLAP and ‘Analytic Models’ - User manual
3.8. Filtering grid analysis data Drag-and-drop dimension hierarchy to filters area and narrow analysis to a particular point of interest. Multiple
filters could be selected to existing analysis. By dragging dimension hierarchies to Filters area, we prepare a grid
to accept filter values (slicers). Finally, to set filters, browse through dimension hierarchy or search for dimension
hierarchy members to isolate analysis data.
Dimension hierarchies could be dragged to filters area from the cube tree or, if exists, from the dimension
hierarchies that are already placed to categories or series area.
For example, we could add Calendar dimension hierarchy to filters area and select ‘CY2003’ which would narrow
analysis and show values only for Calendar Year of ‘2003’ for the given dimension hierarchies on the Categories
and Series area.
To remove the filter from the analysis, drag filter from Filters area to cube tree or select filter (one click) and
press ‘Delete’ key.
3.8.1. Search members To find the particular member to add to analysis filters, add dimension hierarchy to the filters area and select the
Search tab. Combine hierarchy members by browsing and member search features to find exact members for
the analysis filter. Type-in part of the member name, select appropriate selector (contains, starts with, ends
with, etc.) and select the dimension hierarchy level and narrow scope that will be searched to find required
members.

17
Analysis features using OLAP and Analytic Models with Kyubit Business Intelligence - User manual
Kyubit Business Intelligence, Analysis features with OLAP and ‘Analytic Models’ - User manual
3.8.2. Isolating When narrowing our analysis to the particular point of interest, we could drag dimension hierarchies to the
filters area, but even more practical and faster way to narrow the analysis and reduce the number of values
shown in the analysis is Isolating feature.
While analyzing the data, it is possible to select certain members on categories or series axis (Column or Row).
The member and all of its children will be selected and highlighted in the yellow color. In that moment, it is
possible to click on the Isolate option in the analysis toolbar and instantly selected member and all of its children
will be isolated for further analysis. This means members not isolated on that axis will be removed from the
further analysis. It is possible to select multiple members on categories or series axis (Columns or Rows) at the
same time by holding the left shift button.
After isolating, the filters area will be refreshed with actual filter members as a result of the isolating. The
isolating is just another way of setting up analysis filters and can be used together in the same analysis.

18
Analysis features using OLAP and Analytic Models with Kyubit Business Intelligence - User manual
Kyubit Business Intelligence, Analysis features with OLAP and ‘Analytic Models’ - User manual
3.8.3. Dimension level value filtering For every added dimension level on the grid analysis, it is possible to define level filtering that would narrow a
number of level members to show in the grid. Click the level arrow and select Level value filtering from the level
context menu. Level value filters could be applied using any data source defined measure, using required query
selector (Top, Top Percent, Bottom, Bottom Percent, Is Higher, Is Between, etc.) and specified filter value. Levels
with defined Level value filtering will show a different blue arrow on the grid axis.

19
Analysis features using OLAP and Analytic Models with Kyubit Business Intelligence - User manual
Kyubit Business Intelligence, Analysis features with OLAP and ‘Analytic Models’ - User manual
3.8.4. User Properties as analysis filters The analysis could be filtered using current user properties to show data of interest for the current user. User
properties are Login Name, Real Name of current user or custom created user properties that could be assigned
and changed by the Kyubit administrator role.
To create and manage user properties, Kyubit Administrator should navigate to the Administration -> ‘Users and
Admins’, create a new custom user property and click on each user to assign his custom property values.

20
Analysis features using OLAP and Analytic Models with Kyubit Business Intelligence - User manual
Kyubit Business Intelligence, Analysis features with OLAP and ‘Analytic Models’ - User manual
The User Properties could be used to filter Analyses, Queries and Dashboards.
To add a ‘User Property’ within an analysis, while in filter dialog form, click on the ‘User Property’ icon on the
upper right and choose one of existing ‘User Property’. More values under the same property should be
delimited with the semicolon (;).
Every time user opens the analysis, ‘User Property’ value will be resolved and used to filter the analysis data
using the current user property value.

21
Analysis features using OLAP and Analytic Models with Kyubit Business Intelligence - User manual
Kyubit Business Intelligence, Analysis features with OLAP and ‘Analytic Models’ - User manual
3.8.5. Time Intelligence Slicers (OLAP) Common OLAP reporting scenario includes filtering of data based on the date period relative to the current time,
such is 'Last Week', 'Last 3 Months', 'Parallel Period', etc. There are different approaches to this filtering
requirement and Kyubit BI tools now include an additional option to make it easy for any analyst to filter any
data based on the relative time periods from the current date.
The Time Intelligence filters could be used within OLAP analysis, OLAP report or in Dashboard. Prior to being
used as time intelligence filter, the OLAP dimension hierarchy needs to be configured (only once) in the Kyubit
application (explained below). After initial configuration, the same OLAP dimension hierarchy could be used for
relative time period filtering anywhere in Kyubit application by any user.
1) Add Time dimension hierarchy that is configured for the Time Intelligence filtering.

22
Analysis features using OLAP and Analytic Models with Kyubit Business Intelligence - User manual
Kyubit Business Intelligence, Analysis features with OLAP and ‘Analytic Models’ - User manual
2) Select available levels of dimension hierarchy to be used as time intelligence slicer.
3) Select 'Time Function' ('Last Periods', 'Parallel Period', ‘YTD’, ‘QTD’, ‘MTD’ or ‘WTD’) and 'Periods'
number.

23
Analysis features using OLAP and Analytic Models with Kyubit Business Intelligence - User manual
Kyubit Business Intelligence, Analysis features with OLAP and ‘Analytic Models’ - User manual
3.8.6. Configure Time Slicers Time Dimension hierarchy could be used as Time Intelligence Slicer once we have defined its level member
unique name format. This action of configuration has to be done only once, after which all users can benefit
from this configuration. The base for this feature is on application to find appropriate dimension member based
on current date, after which is no problem to use 'Last Periods' or 'Parallel Period' functions to find any scope of
periods relative to current date/time. For that reason, we have to define member unique name formatting for
each of dimension levels we want to use as Time Intelligence Slicer.
1) Open OLAP data source dialog form and click on the Time Intelligence button. List of all Time dimension
levels in the OLAP cube will be listed.
2) On the right side of listed dimension levels, already resolved formats are displayed. Click on the levels
to resolve its member unique name formatting.

24
Analysis features using OLAP and Analytic Models with Kyubit Business Intelligence - User manual
Kyubit Business Intelligence, Analysis features with OLAP and ‘Analytic Models’ - User manual
3) List of sample members for selected dimension level is displayed to show member unique name
samples. Numbers in the member unique name should be replaced by certain date parts (Year,
Semester, Quarter, Month, Week, Day). We could resolve definition manually or with help of 'Auto
Resolve' button, which should work in majority cases.
4) After Member Unique Name Format is resolved (Manually or Auto Resolved), click on the 'Test' button which
should validate provided definition. Please, refer below samples for manual definition. If validation is successful,
click 'OK' and 'Save' on the list of dimension levels. That time dimension level is ready to use on any analysis or
dashboard.

25
Analysis features using OLAP and Analytic Models with Kyubit Business Intelligence - User manual
Kyubit Business Intelligence, Analysis features with OLAP and ‘Analytic Models’ - User manual
Numbers in the member unique name should be replaced by certain date parts (Year, Semester, Quarter,
Month, Week, Day), that would define for the application which date parts are needed to construct member
unique name. It is easy to manually interpret member unique name format and replace by appropriate date part
Placeholders. Placeholders are not case-sensitive.
Available date part Placeholders
<Year> Current year. Sample: 2017 <Semester> Current semester. Sample: 2
<<Semester>> Current semester with leading zero. Sample: 02 <Quarter> Current quarter. Sample: 4 <<Quarter>> Current quarter with leading zero. Sample: 04 <Month> Current month. Sample: 9 <<Month>> Current month with leading zero. Sample: 09

26
Analysis features using OLAP and Analytic Models with Kyubit Business Intelligence - User manual
Kyubit Business Intelligence, Analysis features with OLAP and ‘Analytic Models’ - User manual
<Week> Current week. Sample: 2 <<Week>> Current week with leading zero. Sample: 02
<Day> Current day within a month. Sample: 5 <<Day>> Current day within a month with leading zero. Sample: 05 Examples… Member Unique Name: [Date].[Calendar].[Month].&[2017]&[10] Resolves as ... Member Unique Name Format: [Date].[Calendar].[Month].&[<Year>]&[<Month>] Member Unique Name: [Date].[Calendar].[Date].&[20141112] Resolves as ... Member Unique Name Format: [Date].[Calendar].[Date].&[<Year><<Month>><<Day>>]
Member Unique Name: [Date].[Fiscal Weeks].[Fiscal Week].&[32]&[2013] Resolves as ... Member Unique Name Format: [Date].[Fiscal Weeks].[Fiscal Week].&[<Week>]&[<Year>]
3.9. Sorting all members on the grid axis Grid analysis data could be sorted on the axis level and on the particular dimension level added to the grid
analysis. To sort all members on an axis, right-click on the grid analysis and select Set Row Sorting or Set Column
Sorting. Choose to sort by one of the added measures or alphabetically. If you wish to sort data using the
measure values, optionally it is possible to select a member on the opposite axis upon which values sorting will
be done. If the opposite member is not selected, sorting will be done by measure total on the opposite axis.

27
Analysis features using OLAP and Analytic Models with Kyubit Business Intelligence - User manual
Kyubit Business Intelligence, Analysis features with OLAP and ‘Analytic Models’ - User manual
(Sorting with the selected member on the opposite axis)

28
Analysis features using OLAP and Analytic Models with Kyubit Business Intelligence - User manual
Kyubit Business Intelligence, Analysis features with OLAP and ‘Analytic Models’ - User manual
3.10. Sorting members on a particular dimension level The analysis grid has options to set sorting for each added dimension level individually. For example, one level
could be sorted using one measure values, while other for different measure values and third could be sorted
alphabetically, for example. Click the arrow beside added dimension level, level context menu will appear and
select Level sorting.
On a picture below, we see ‘Country’ level members are sorted by ‘Accessories’ ascending, but members of
‘State-Province’ are sorted by ‘Bikes’ in descending order. It is possible to create sorting for every added
dimension level on both axes.

29
Analysis features using OLAP and Analytic Models with Kyubit Business Intelligence - User manual
Kyubit Business Intelligence, Analysis features with OLAP and ‘Analytic Models’ - User manual
3.11. Pivot Anytime while analyzing data in Kyubit BI application, a user has the possibility to switch dimension hierarchies
on the categories and series axis. For many reasons, switching axes could be very practical while analyzing and
visualizing data, especially when working with the chart analysis and switching back and forth to the grid
analysis.
To select the Pivot action, right click on the empty grid area. After the menu pops up, click on the Pivot.
3.12. Create and manage ad-hoc User Named sets (OLAP) While analyzing data with the grid analysis, any user could use OLAP database defined Named set or create ad-
hoc User Named Set that will be stored in Kyubit BI application and could be reused in a different analysis and
shared with other users. To create ad-hoc ‘User Named Set’ drag dimension hierarchy to any of the grid axes,
click dimension hierarchy arrow and from the hierarchy context menu select “Create Named Set”. After saving
the User Named Set, OLAP Cube structure (metadata) tree will be refreshed to include the new User Named set.

30
Analysis features using OLAP and Analytic Models with Kyubit Business Intelligence - User manual
Kyubit Business Intelligence, Analysis features with OLAP and ‘Analytic Models’ - User manual
3.12.1. Create Named Set by picking members To create a named set with static members of certain dimension hierarchy, select ‘Select named set members’,
click ‘Pick members’ and browse through dimension hierarchy or use the search members feature to find
required members for the named set.

31
Analysis features using OLAP and Analytic Models with Kyubit Business Intelligence - User manual
Kyubit Business Intelligence, Analysis features with OLAP and ‘Analytic Models’ - User manual
3.12.2. Create Named Set by expression To create expression-based Named set, select ‘Set named set expression’ and enter an MDX expression that will
be used to dynamically return members evaluated by the expression. Select ‘Test expression’ to validate MDX
expression input. After saving the named set, every time named set is used, the expression will be executed in
the analysis scope to return members and be used within the analysis.
3.12.3. Edit existing User Named Sets While in the grid analysis, authorized users could edit existing User Named Sets by right-click on the User
Named set in the OLAP Cube structure tree or in Main Menu -> Shared Items -> User Named Sets. Gray named
sets are those defined in the OLAP database, blue Named sets are those defined in the Kyubit BI application.

32
Analysis features using OLAP and Analytic Models with Kyubit Business Intelligence - User manual
Kyubit Business Intelligence, Analysis features with OLAP and ‘Analytic Models’ - User manual
3.13. Create and manage ad-hoc User Calculated Measures (OLAP) While analyzing the data with the grid analysis, any user could use OLAP database defined calculated measures
or create ad-hoc User Calculated Measures that will be stored in the Kyubit Business Intelligence application and
could be reused in a different analysis and shared with other users. To create ad-hoc “User Calculated Measure”,
right-click the grid analysis area (or Options) and select ‘Create User Calculated Measure’.
Enter the MDX expression that will be used for the User Calculated Measure. Select measures and click “Add
Measure” to add measure unique name to the expression. After you form complete expression, validate the
expression by selecting “Test MDX expression”. Enter appropriate MDX value for “Format values”, for example,

33
Analysis features using OLAP and Analytic Models with Kyubit Business Intelligence - User manual
Kyubit Business Intelligence, Analysis features with OLAP and ‘Analytic Models’ - User manual
“Standard”, “Currency”, “Percent” or any other valid MDX format values expressions. (Check official MDX
documentation for available “Format values” parameters).
After you create the User Calculated Measure, OLAP cube structure tree will be refreshed to show new User
Calculated Measure, which then could be used in the analysis or shared to be available for other users.

34
Analysis features using OLAP and Analytic Models with Kyubit Business Intelligence - User manual
Kyubit Business Intelligence, Analysis features with OLAP and ‘Analytic Models’ - User manual
3.13.1. Edit existing User Calculated Measures To edit an existing User Calculated Measure, right-click User Calculate Measure in OLAP cube structure tree
while in the grid analysis and select “Edit User Calculated Measure” or go to the Main Menu -> Share Items ->
User Calculated Measures.

35
Analysis features using OLAP and Analytic Models with Kyubit Business Intelligence - User manual
Kyubit Business Intelligence, Analysis features with OLAP and ‘Analytic Models’ - User manual
3.14. Member Properties (OLAP) Display ‘Member Properties’ for a single OLAP dimension member or add ‘Member Properties’ to your OLAP
analysis/report as columns with member property values for multiple OLAP dimensions.
To show ‘Member Properties’ for a single member, right-click on the member on the category axis while in the
analysis ‘Grid View’ and select ‘Show Member Properties’. Member properties form will open displaying
‘Member Property’ values for a single member.
To add/remove ‘Member Properties’ to OLAP grid/report columns, select individual ‘Member Properties’ from
Member properties form clicking on the ‘Add’ or ’Remove’ button.
At any time, edit displayed ‘Member Properties’ order of appearance by right-click on member property columns
on the grid and choose appropriate action. If you hide ‘Member Properties’ titles, properties column width will
be more narrow, saving space area on the screen.

36
Analysis features using OLAP and Analytic Models with Kyubit Business Intelligence - User manual
Kyubit Business Intelligence, Analysis features with OLAP and ‘Analytic Models’ - User manual
3.15. Save analysis state In Grid or Chart view, after every analysis action, it is possible to save the current state of analysis and run it
again from the Analysis application section. By default, when saved, the analysis will be located in “My analysis”
folder, visible only to the user who created analysis. An existing analysis could be saved under a different name,
using “Save As” option. To open (analyze) again the same analysis, open Folders, then My Analysis folder and
click on the analysis icon.
3.16. Sharing an analysis To make analysis visible to other users, open an existing analysis and select “Share” option available on the top-
right corner. Select one of the available folders and click the Share button. From now on current analysis will be
located in the designated folder and will not be visible in “My analysis”. Sharing with the folder does not mean
that this analysis could be visible to everyone, but only to the users with permission on a particular folder.
Furthermore, users with given permissions on the folder will see that analysis with the given name exists, but
when they try to execute one, same users additionally must have permissions in OLAP database itself to
successfully run analysis and see actual values from the OLAP database (OLAP role-based security).
Typically, folders would be created to separate analysis for different business units, sectors or teams, to separate
points of interest and appropriately assign the permissions.
Option to share analysis is available in the grid and charts view, if the analysis is previously saved.

37
Analysis features using OLAP and Analytic Models with Kyubit Business Intelligence - User manual
Kyubit Business Intelligence, Analysis features with OLAP and ‘Analytic Models’ - User manual
3.17. Analysis history, move back and forward After every analysis action in the grid or charts view, analysis state is saved in the memory and could be used to
move Back or Forward through the analysis history, which would reproduce particular analysis states from the
memory.
Additionally, the user can select “History” option and see all available analysis states (up to 10), that exists in
memory and could be run again, either by “Back” and “Forward” options or by explicitly clicking on the green
arrow beside each analysis state in the history panel. The history panel additionally shows basic elements of a
certain analysis state: measures, filters, category and series dimension hierarchies and time of the execution.
Analysis history is resetting with each new analysis (or ‘Clear’ action).

38
Analysis features using OLAP and Analytic Models with Kyubit Business Intelligence - User manual
Kyubit Business Intelligence, Analysis features with OLAP and ‘Analytic Models’ - User manual
3.18. Show/Hide Grid Analysis Panels Toggle (show/hide) filters, measures and cube structure panels within the grid Analysis to have more space for
data values, while analyzing data on smaller screens. The analysis with many filters and measures lacks screen
space when used on laptops or smaller monitors. The cube structure on the left side also is taking a lot of screen
space that could be alternatively used for analyzing data instead. Toggle buttons available aside tree structure,
filters and measures panel could be used at any time to show or hide the same panels leaving more space for
analysis data cells in the main screen section.
After minimizing the panels …

39
Analysis features using OLAP and Analytic Models with Kyubit Business Intelligence - User manual
Kyubit Business Intelligence, Analysis features with OLAP and ‘Analytic Models’ - User manual
4. Chart analysis features To analyze data visually, switch analysis view to the Chart view. Chart view and grid view show same analysis
data following the concept that first dimension hierarchy on the category axis in the grid view will be displayed
on the category (X-axis) in the chart view, values for each measure will be shown on the Y-axis and finally first
dimension hierarchy on the series axis in the grid view will be displayed as series in the charts view.
In the grid analysis, it is possible to select more dimension hierarchies for each axis. Chart view will accept
(display) only the first dimension hierarchy for both axes.
While doing chart analysis, Grid analysis is also refreshed in the background, so a user could combine both views
to execute the required analysis and to apply required actions. It is the same set of analysis data. If you switch to
the grid view, you will see that analysis values for your actions are automatically reflected in both analysis views.
Chart analysis could display up to 3 measures. Each measure will be shown on the separate chart, one above
other. Unlike the grid analysis, chart analysis uses right-click-context menu that pops up and show available
actions to select elements from the OLAP/Analytic Model structure and to perform particular analysis actions.
4.1. Categories To start chart analysis, at the minimum, dimension level for the category has to be selected. To select particular
dimension level for Categories, Series or Filters, first, the menu will show available dimensions, and after click on
certain dimension, other menu pops up with all available dimension levels for previously selected dimension.
Category dimension hierarchy members will be displayed on the X-axis (horizontal).
To change the category, right-click on an empty chart area and select “Change Category” action from the menu.
Select dimension and dimension levels for the category axis.
4.2. Series To set series dimension level, right-click on empty chart area and select “Set Series” action from the menu.
Select dimension and dimension level for the series axis. Series dimension level members will be displayed above
chart with a different color for each Series member.
40
Analysis features using OLAP and Analytic Models with Kyubit Business Intelligence - User manual
Kyubit Business Intelligence, Analysis features with OLAP and ‘Analytic Models’ - User manual
4.3. Change or add the measure It is possible to change the current measure in chart view or add new measures (Up to 3). To remove certain
measure, use the grid view, removing measure is not supported in the chart view.
To change or add the measure, right-click on an empty chart area and select “Change Measure” or “Add
Measure” action from the menu. Select measure group and then the particular measure.
While working with multiple measures, the chart will be displayed one above other, so that category members
vertically line up for a measure value comparison.
4.4. Pivot chart To switch members from the categories to series and vice-versa, right-click on an empty chart area and select
the Pivot action from the menu.
4.5. Isolating To isolate certain member values right-click on the member values (Column, Bar, Line, etc.) and select the Isolate
action. Note, that it is possible to isolate category members or if exists, a series member within the category
member.
To isolate series member, right-click on the series legend (above chart) member and select the isolate action.
The isolate action will set addition filter for the analysis.
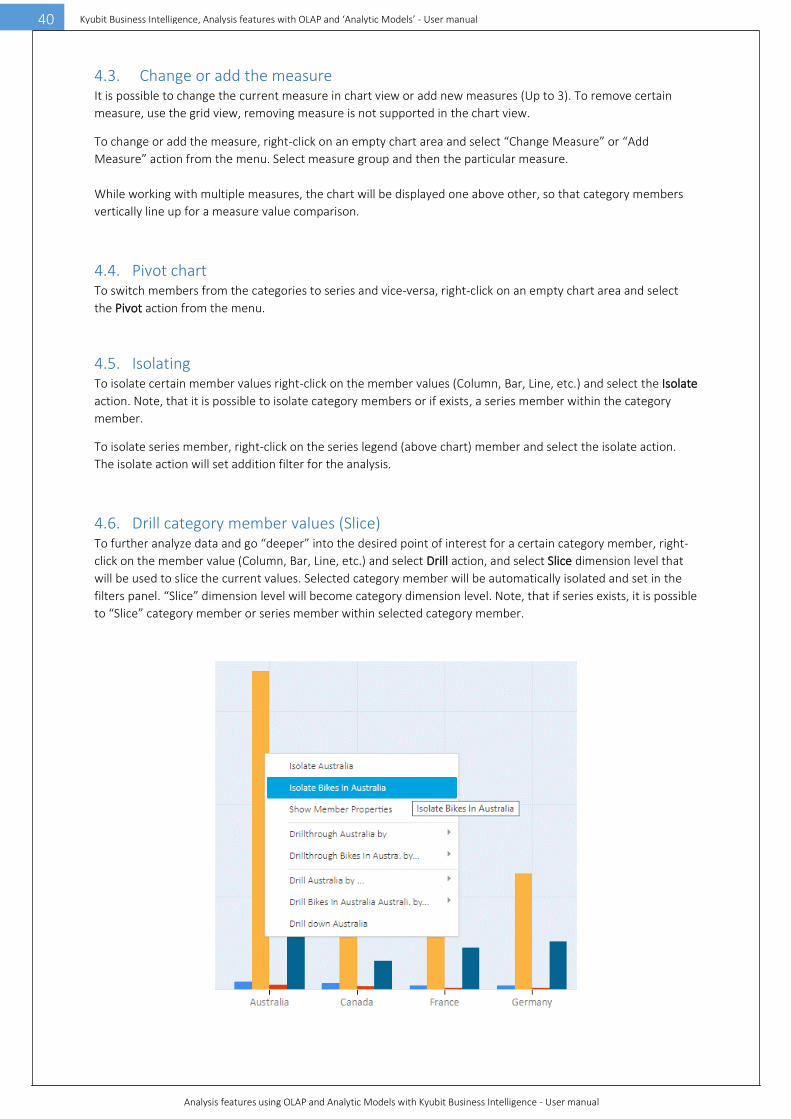
4.6. Drill category member values (Slice) To further analyze data and go “deeper” into the desired point of interest for a certain category member, right-
click on the member value (Column, Bar, Line, etc.) and select Drill action, and select Slice dimension level that
will be used to slice the current values. Selected category member will be automatically isolated and set in the
filters panel. “Slice” dimension level will become category dimension level. Note, that if series exists, it is possible
to “Slice” category member or series member within selected category member.

41
Analysis features using OLAP and Analytic Models with Kyubit Business Intelligence - User manual
Kyubit Business Intelligence, Analysis features with OLAP and ‘Analytic Models’ - User manual
“Slicing” category member values could be repeated as many times it is required.

42
Analysis features using OLAP and Analytic Models with Kyubit Business Intelligence - User manual
Kyubit Business Intelligence, Analysis features with OLAP and ‘Analytic Models’ - User manual
4.7. Drill-down If the category dimension hierarchy consists of more levels, Drill-down option will be available in the action
menu. Drilling-down will replace dimension hierarchy with its child level. For example, Country to State or State
to City. Right-click on the member value (Column, Bar, Line, etc.) and select the “Drill-Down” action.

43
Analysis features using OLAP and Analytic Models with Kyubit Business Intelligence - User manual
Kyubit Business Intelligence, Analysis features with OLAP and ‘Analytic Models’ - User manual
4.8. Chart visuals There are 6 different and independent visual elements, which could be set up to optimize visualization and
perception of chart analysis data. The user should try several combinations to find the most appropriate visual
elements, which best suits for a given analysis. Changing chart visuals does not impact analysis data/values in
any way.
4.8.1. Chart Types There are 14 different chart types that could be selected for any chart analysis.
▪ Lines ▪ Splines ▪ Bars ▪ Stacked Bars ▪ Stacked Bars 100 ▪ Columns ▪ Stacked Columns ▪ Stacked Columns 100 ▪ Areas ▪ Stacked Areas ▪ Stacked Areas 100 ▪ Pie ▪ Doughnut ▪ Radar

44
Analysis features using OLAP and Analytic Models with Kyubit Business Intelligence - User manual
Kyubit Business Intelligence, Analysis features with OLAP and ‘Analytic Models’ - User manual
4.8.2. Palette Defines color sets that could be used to display chart values.
▪ Brigth
▪ Grayscale
▪ Excel
▪ Light
▪ Pastel
▪ EarthTones
▪ Semitransparent
▪ Berry
▪ Chocolate
▪ Fire
▪ SeaGreen
▪ BrightPastel
4.8.3. Theme Defines background color for the chart area.
▪ Blue
▪ White
▪ Warm
4.8.4. Enable 3D view Apply 3D view for given chart analysis and defined chart visuals.
4.8.5. Semi-transparent option Value elements (Lines, Columns, Bars, etc.) could be visually semitransparent above the chart area.
4.8.6. Show values option Values could be presented with numbers beside each member value element
4.8.7. Pie/Doughnut details For pie and doughnut chart types, a special setting is provided to support different value presentation options,
due to these chart type specifics.

45
Analysis features using OLAP and Analytic Models with Kyubit Business Intelligence - User manual
Kyubit Business Intelligence, Analysis features with OLAP and ‘Analytic Models’ - User manual
5. Calculations Default analysis view is a display of values as they are in the data sources. In many occasions, it is practical to see
how values relate to each other in the same view. Calculations view on the analysis data answers additional
questions on how certain values correspond with the same value for other member or measures. It is used for
comparison or better insights into the impact of a certain value in overall presented data.
5.1. No calculations (Default view)
The values are rendered as they are, with no mutual comparison.
5.1. % of Columns total
The same values (cells) are represented as percent of the column total.
5.2. % of Rows Total
The same values (cells) are represented as percent of the row total.

46
Analysis features using OLAP and Analytic Models with Kyubit Business Intelligence - User manual
Kyubit Business Intelligence, Analysis features with OLAP and ‘Analytic Models’ - User manual
5.3. % of Grand Total
The same values (cells) are represented as percent of the grand total.
5.4. Running totals for categories
The cell values are represented as running totals, cumulating the values of category members.
5.5. Running totals for series
The cell values are represented as running totals, cumulating the values of series members.

47
Analysis features using OLAP and Analytic Models with Kyubit Business Intelligence - User manual
Kyubit Business Intelligence, Analysis features with OLAP and ‘Analytic Models’ - User manual
5.6. % of value Shows how other values are related to chosen cell, column or row on the analysis grid.
5.6.1. % of the category
Other cells are represented as % of the selected category (row) = Australia.
5.6.2. % of the series
Other cells are represented as % of the selected series (column) = FY 2011.

48
Analysis features using OLAP and Analytic Models with Kyubit Business Intelligence - User manual
Kyubit Business Intelligence, Analysis features with OLAP and ‘Analytic Models’ - User manual
5.6.3. % of the cell values
Other cells are represented as % of the selected cell, defined as category = ‘Canada’ and series = ‘FY 2012’.
5.7. The Difference from … Same as above calculation view ‘% of the value’, ‘Difference from’ displays the pure difference between column,
rows or cells in the analysis grid.
5.7.1. The Difference from the selected row
The difference view from the selected row = ‘United Kingdom’.

49
Analysis features using OLAP and Analytic Models with Kyubit Business Intelligence - User manual
Kyubit Business Intelligence, Analysis features with OLAP and ‘Analytic Models’ - User manual
5.7.2. The Difference from the selected column
The difference view from the selected column = ‘FY 2011.
5.7.3. The Difference from the selected cell
The difference view of the selected cell, defined as a category (row) = ‘United States’ and series (column) = ‘FY
2013’.
5.8. % Difference from This calculation view works the same as above explained (Difference from), except that the difference between
values is displayed as a percentage.
The percentage difference view of the selected cell, defined as a category (row) = ‘United States’ and series
(column) = ‘FY 2013’.

50
Analysis features using OLAP and Analytic Models with Kyubit Business Intelligence - User manual
Kyubit Business Intelligence, Analysis features with OLAP and ‘Analytic Models’ - User manual
6. Report view After analysis gets shape and data we want, we often want to show it to the other people. Many users we would
like to show analysis are not familiar with OLAP/Analytic Model and analysis technology concepts. To get the
analysis view that would be as simple and straightforward as possible, showing only business valuable data
without all possible actions, OLAP cube/Analytic Model structure etc., we switch to “Report view” that would
show only final analysis data. Report view hides almost all Kyubit Business Intelligence interface (header, menu,
etc.) and show plain analysis data values, which are ready to present to other users or send directly to the
printer.
In Report view, following actions are available:
▪ Switch to full analysis view (if users wants to open analysis with full feature)
▪ Update Filters
▪ Toggle display of chart/grid
▪ Toggle display of value bars (next section explains)
▪ Send to print
▪ Export to Excel/PDF
▪ Email as a link to a colleague
▪ Subscribe to receive same report on the email at the scheduled time
▪ Participate in discussions related to this report and add your comments

51
Analysis features using OLAP and Analytic Models with Kyubit Business Intelligence - User manual
Kyubit Business Intelligence, Analysis features with OLAP and ‘Analytic Models’ - User manual
6.1. Report ‘Value Bars’ Report view can show ‘Value Bars’, which are visual indicators that visually present the impact of the value for
each cell compared to column totals or to a grand total of the analysis. The ‘Value bars’ can be configured to
display at analysis design-time (Grid Analysis), but also while using by the end users (Report). Select ‘Visuals’
button in the report view to display ‘Value Bars’.

52
Analysis features using OLAP and Analytic Models with Kyubit Business Intelligence - User manual
Kyubit Business Intelligence, Analysis features with OLAP and ‘Analytic Models’ - User manual
7. Exporting options While analyzing the data, there are two exporting options always available:
▪ Export to Excel file (.xlsx format) or CSV file
The grid data and chart image will be exported to Excel cells with the related analysis elements or as simple
(comma delimited) CSV file.
▪ Export to a PDF file
The grid data and chart image will be exported to PDF file with the related analysis elements.
7.1. Exporting to an Excel file Complete analysis based on OLAP/Analytic Model data could be exported into the Excel file, which would include
analysis title, description, including filters, grid analysis and optionally chart image.
Select Excel exporting options …

53
Analysis features using OLAP and Analytic Models with Kyubit Business Intelligence - User manual
Kyubit Business Intelligence, Analysis features with OLAP and ‘Analytic Models’ - User manual
Exported values in Excel file …
Values could be exported as numeric values, in which case it would be formatted as numeric within the Excel file
or as non-numeric, in which case they would be of a textual character in the Excel file. Both approaches have
advantages and disadvantages depending on the requirements.
Expanded category items could be displayed) the same way as in analysis grid (expanded-collapsed) or category
items could be displayed inline, in which case expanded items will be repeated one above the other, so it would
be clear to which parent each category items belongs looking at each row of data.
Inline categories export …

54
Analysis features using OLAP and Analytic Models with Kyubit Business Intelligence - User manual
Kyubit Business Intelligence, Analysis features with OLAP and ‘Analytic Models’ - User manual
7.2. Exporting to a PDF file PDF export has additional dialog to setup some PDF export preferences, such page margins and orientation,
font-size, option to show/hide filters and to selected export of grid and/or chart report elements.
Exported analysis to the PDF file …

55
Analysis features using OLAP and Analytic Models with Kyubit Business Intelligence - User manual
Kyubit Business Intelligence, Analysis features with OLAP and ‘Analytic Models’ - User manual
7.3 Exporting to a CSV file CSV file export will simply export all analysis data into a flat CSV file (comma delimited). It will include analysis
details, applied filters and grid analysis data. Each information of the grid analysis is simply divided into rows and
(comma separate) columns.

56
Analysis features using OLAP and Analytic Models with Kyubit Business Intelligence - User manual
Kyubit Business Intelligence, Analysis features with OLAP and ‘Analytic Models’ - User manual
8. Drill-through features Usually, analysis means exploring aggregated values for some business topics. Drilling and slicing functionalities
will narrow analysis to a particular point of interest. But, at the certain moment we all want to see exact
information, who, when and what, for an aggregated piece of the data. For example, with the analysis we found
that certain product is best-selling product in some city in the last quarter of the year, but now we are very
interesting to see details: names, dates and other purchasing details available in the OLAP/Analytic Model
structure. The drill-through action gives us the possibility to see details for the given analysis values. The drill-
through action is available in the grid and chart view and can be executed over any values already existing in our
analysis. In the grid view, right-click on the cell will give us Drill-through options or right-click on the chart value
elements (Lines, Columns, Bars, etc.) in the chart view. Drill-through action could be defined in the OLAP
database or created in the Kyubit BI application for OLAP or Analytic Models data sources. Note, that drill-
through actions for certain users could be restricted by the OLAP database permissions (OLAP role-based
security).

57
Analysis features using OLAP and Analytic Models with Kyubit Business Intelligence - User manual
Kyubit Business Intelligence, Analysis features with OLAP and ‘Analytic Models’ - User manual
8.1. Custom drill-through Custom drill-through action, which can be selected anytime in the grid and chart view. Right-click on some value,
select Drill-through and then Custom drill-through action. New ‘Drill-through results’ window will open, showing
elements of this drill-through: OLAP cube/Analytic Model, measures, filters, total. Total presents value for a
given measure that we want to drill-through. Filters present all OLAP cube/Analytic Model dimension levels that
were set to filters to get this result.
Now, we have to set which drill-through columns we want to include by selecting the ‘Set drill-through columns’
button. A new window will open ‘Drill-through columns definition’ in which we select drill-through columns from
all available dimensions that are associated with measure group to which drill-through measure belongs to.
Which dimensions are associated with which measure group is implicitly set inside OLAP cube structure (in the
case of OLAP data source).
In the ‘Drill-through columns definition’, browse for interesting dimension levels (columns) on the left side of the
screen (Tree view) and click on interesting to include in the drill-through. After we click on it, it will be displayed
in the list of selected columns on the right side of the screen. We can add, remove or change the order of the
selected columns.
After required columns are selected, Run drill-through button should be clicked to test the results. The
‘Drillthrough columns definition’ window will close, and in the window ‘Drillthrough results’ drill-through will be
executed and results will be displayed. Depending on the number of result items, drill-through could take a while
before it is finished and displays all the results.
Drill-through result table could be sorted by clicking on the column header and could be exported to the Excel
file. The user can redefine drill-through columns to return, as many times it is required.

58
Analysis features using OLAP and Analytic Models with Kyubit Business Intelligence - User manual
Kyubit Business Intelligence, Analysis features with OLAP and ‘Analytic Models’ - User manual
8.2. Drill-through results links Drill-through results could contain links that would lead us to some site/application, which would show us
anything related to drill-through data. For example, we could see for each work order its details in a time
tracking application, which exists on the intranet.
To set up links in drill-through results, in ‘Drill-through columns definition’ while defining which columns to
return in the drill-through action, click on the required column (to highlight it) and then click Define link button.
A new window will open, ‘Drill-through column link’ which allows us to define the link for the selected column. In
the field Link (HREF), it is expected to provide URL to some external resource. For the variable query string
element click on some dimension level on the left.
For example, define the following link URL:
http://timetracking/Workorder.aspx?Workorder={[WorkOrder].[WorkOrderId]}
Part of this URL is static and another part (between brackets) is dynamic in the drill-through results. Finally,
when we get the drill-through results we could click on each work order and open web application that shows us
full details about the given work order object. Of course, such application should exist, but this is just a tip on
how and why we could use links with the drill-through feature.
8.3. Saving drill-through columns and reuse Typically, for certain business situations, we would like to get a certain set of drill-through columns. Set of drill-
through columns could contain dozens of columns and, of course, we do not like to pick them again every time
we run drill-through for the given situation. Once picked and defined, we could save them in Kyubit Business
Intelligence application for later use.
Saved set of drill-through columns is associated with measure group and anytime in any analysis we could run
drill-through with a saved set of drill-through columns if the value we would like to drill-through is from a
measure that belongs to the same associated measure group. (This applies only to OLAP data sources)
To reuse saved set of drill-through columns, right-click in the analysis on some value and within Drill-through
options, all available sets of drill-through columns will be shown.
Outside of analysis, saved set of drill-through columns could be viewed and edited in the Main Menu under
menu tab OLAP Shared Items -> User Drillthrough columns.
59
Analysis features using OLAP and Analytic Models with Kyubit Business Intelligence - User manual
Kyubit Business Intelligence, Analysis features with OLAP and ‘Analytic Models’ - User manual
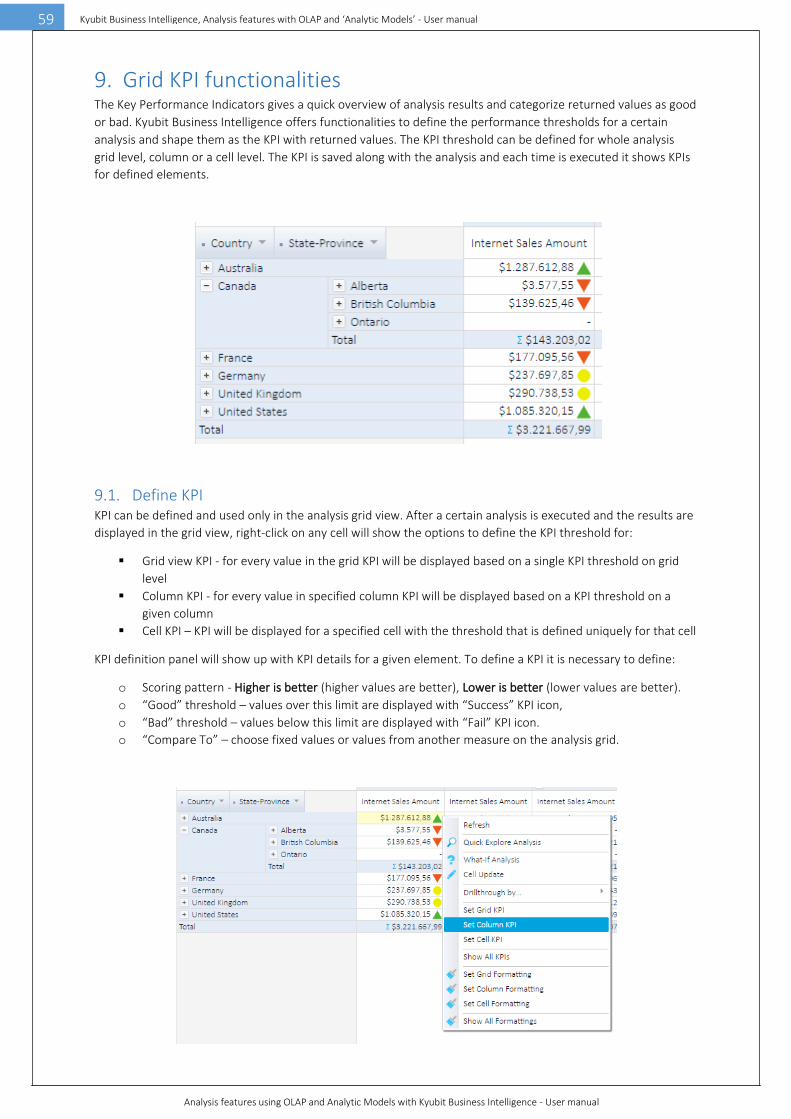
9. Grid KPI functionalities The Key Performance Indicators gives a quick overview of analysis results and categorize returned values as good
or bad. Kyubit Business Intelligence offers functionalities to define the performance thresholds for a certain
analysis and shape them as the KPI with returned values. The KPI threshold can be defined for whole analysis
grid level, column or a cell level. The KPI is saved along with the analysis and each time is executed it shows KPIs
for defined elements.
9.1. Define KPI KPI can be defined and used only in the analysis grid view. After a certain analysis is executed and the results are
displayed in the grid view, right-click on any cell will show the options to define the KPI threshold for:
▪ Grid view KPI - for every value in the grid KPI will be displayed based on a single KPI threshold on grid
level
▪ Column KPI - for every value in specified column KPI will be displayed based on a KPI threshold on a
given column
▪ Cell KPI – KPI will be displayed for a specified cell with the threshold that is defined uniquely for that cell
KPI definition panel will show up with KPI details for a given element. To define a KPI it is necessary to define:
o Scoring pattern - Higher is better (higher values are better), Lower is better (lower values are better).
o “Good” threshold – values over this limit are displayed with “Success” KPI icon,
o “Bad” threshold – values below this limit are displayed with “Fail” KPI icon.
o “Compare To” – choose fixed values or values from another measure on the analysis grid.

60
Analysis features using OLAP and Analytic Models with Kyubit Business Intelligence - User manual
Kyubit Business Intelligence, Analysis features with OLAP and ‘Analytic Models’ - User manual
Analysis Grid KPI definition could be based on the fixed values or values from another measure on the same
analysis.
9.2. Using KPI To see all defined KPIs for a certain analysis, open the analysis, right-click on the empty area and select “Show all
KPI’s” from the context menu. A list with all defined KPI thresholds will be displayed with the indicator for which
grid element this KPI is associated with. To view or change KPI details, open the KPI definition panel from the list.

61
Analysis features using OLAP and Analytic Models with Kyubit Business Intelligence - User manual
Kyubit Business Intelligence, Analysis features with OLAP and ‘Analytic Models’ - User manual
10. Grid cell formatting options To emphasize certain cells or columns on the grid analysis, the user can define certain formatting/visualization
options for the cells. At any time, right-click on a cell and choose to format: single cell, a single column or whole
grid and define formatting options that could include: Text style, Text alignment, Fore Color and Background
Color for the cell.
Formatting is immediately rendered in the analysis and report view.

62
Analysis features using OLAP and Analytic Models with Kyubit Business Intelligence - User manual
Kyubit Business Intelligence, Analysis features with OLAP and ‘Analytic Models’ - User manual
10.1. Cell formatting based on grid KPI status More useful usage of cell formatting is to display formatting conditionally based on the selected grid KPI status.
This way color and formatting will be applied only on those cells that meet defined criteria.

63
Analysis features using OLAP and Analytic Models with Kyubit Business Intelligence - User manual
Kyubit Business Intelligence, Analysis features with OLAP and ‘Analytic Models’ - User manual

64
Analysis features using OLAP and Analytic Models with Kyubit Business Intelligence - User manual
Kyubit Business Intelligence, Analysis features with OLAP and ‘Analytic Models’ - User manual
11. Expand All – Analysis Mode Default analysis mode is ‘Step-by-step’ which allows a user to expand, collapse, drill-down particular members.
Each time the user performs analytic action Kyubit sends an MDX query to the OLAP cube and renders the
results. If analysis has a lot of members and expanding operations, to expand all members on the category axis
will take more time and resource. ‘Expand all’ analysis mode will simply take added category levels and display
all expanded category items at once (with a single MDX query). If you have a lot of category items you wish to
display all expanded this analysis mode will give better performance. The disadvantage is that series levels
cannot be expanded in this mode and category levels cannot of the same dimension category.
Expanded all category items …
At any time, switch from ‘Step-by-step’ analysis to ‘Expand all’ and back.
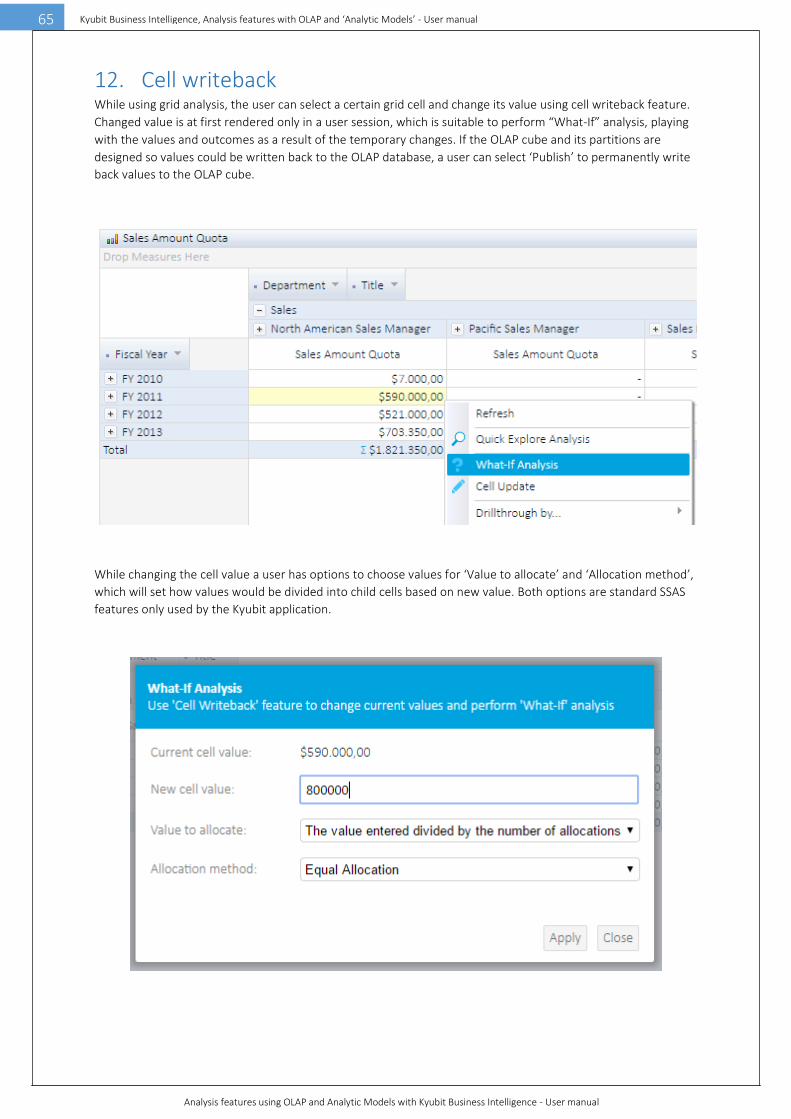
65
Analysis features using OLAP and Analytic Models with Kyubit Business Intelligence - User manual
Kyubit Business Intelligence, Analysis features with OLAP and ‘Analytic Models’ - User manual
12. Cell writeback While using grid analysis, the user can select a certain grid cell and change its value using cell writeback feature.
Changed value is at first rendered only in a user session, which is suitable to perform “What-If” analysis, playing
with the values and outcomes as a result of the temporary changes. If the OLAP cube and its partitions are
designed so values could be written back to the OLAP database, a user can select ‘Publish’ to permanently write
back values to the OLAP cube.
While changing the cell value a user has options to choose values for ‘Value to allocate’ and ‘Allocation method’,
which will set how values would be divided into child cells based on new value. Both options are standard SSAS
features only used by the Kyubit application.

66
Analysis features using OLAP and Analytic Models with Kyubit Business Intelligence - User manual
Kyubit Business Intelligence, Analysis features with OLAP and ‘Analytic Models’ - User manual
Grid automatically renders new cell value with the option to analyze all implications of the changed cell value.
If your OLAP structure and permissions allow, ‘Publish’ push changes into the OLAP database directly from the
Kyubit application.
Fast way to use the cell writeback feature is to double click the cell and enter value directly in the grid and press
enter to publish value back to the OLAP cube.

67
Analysis features using OLAP and Analytic Models with Kyubit Business Intelligence - User manual
Kyubit Business Intelligence, Analysis features with OLAP and ‘Analytic Models’ - User manual
13. Publishing Features Publishing Features provides functionalities to publish certain analysis and make it available on a designated URL
for integration purposes with other web applications and services. This way it is possible to merge your analyses
grids, charts and KPIs in other sites and apps, with additional analysis appearance, caching and security
configuration for optimal visual and data integration.
13.1. Publish Analysis In any moment of data analyzing, it is possible to publish the current state of analysis. On “Report” tab of
analysis, select the Publish option and the new window will appear with all publishing details. Publishing details
give a lot of options and parameters that help us to fine tune the analysis outlook and set caching, security and
other options.
13.1.1. Publishing URL and EMBED string While we are configuring publishing options, we can see the URL and EMBED string that we can use later to see
the published analysis from other HTML pages.
13.1.2. Report Alias This is a unique identifier for the published analysis. When we set “Report Alias” we know on which URL our
published analysis will be available. For example, for “Report Alias” with a value of “Alias1” URL will be
http://KyubitBI/report.aspx?Analysis=Alias1
13.1.3. Caching It is possible to set up the caching time of published analysis in minutes. This way users on some external
website will see the analysis from the memory without the need to directly connect to the OLAP data source
every time someone opens the page with the same analysis, and thus, speeds up the whole experience with the
published analyses.

68
Analysis features using OLAP and Analytic Models with Kyubit Business Intelligence - User manual
Kyubit Business Intelligence, Analysis features with OLAP and ‘Analytic Models’ - User manual
13.1.4. Impersonate If many people would request the published analysis, and we are not sure if all of them have necessary OLAP
permissions to see all analysis elements, it is possible to impersonate the request for the published analysis. In
this way, we will use one windows user name and the password that we are sure has all required OLAP
permissions (OLAP role-based security) to connect and provide published analysis.
13.1.5. Visuals “Visual elements”, “Grid Visuals” and “Chart Visuals” panels provide a lot of visual elements we can customize
while publishing the analysis. We will configure which elements to show or hide, fonts, colors, alignments and
other elements to fine tune the published analysis appearance.

69
Analysis features using OLAP and Analytic Models with Kyubit Business Intelligence - User manual
Kyubit Business Intelligence, Analysis features with OLAP and ‘Analytic Models’ - User manual
14. ‘Peek Analysis’ While analyzing OLAP data in the grid analysis view, ‘Peek Analysis’ feature comes handy for many situations
where a user would like to get quick further insight to the cell data, without leaving or changing the main
analysis in the grid view.
In the following example, we see that ‘Accessories’ sold in the ‘California’ sum is $144,910.19 in the main
analysis grid. If we right-click the same cell and choose ‘Peek Analysis’ a new window will be opened that will
show sub-analysis of the cell data. By default, Time dimension will be used to show drill of the analysis, but the
user can select any of existing dimensions for the sub-analysis category and series. This way the user has
explored cell value using other dimensions without losing analysis in the grid view. Furthermore, the user can
quickly go from cell to cell to display ‘Peek analysis’ and at any time choose to transform ‘Peek analysis’ to the
main grid analysis.
Different type of ‘Peek Analysis’ chart visualizations can be selected that best matches the ‘Peek analysis’ nature.
Selected Category dimension for the ‘Peek analysis’ is saved with the analysis for future use.
70
Analysis features using OLAP and Analytic Models with Kyubit Business Intelligence - User manual
Kyubit Business Intelligence, Analysis features with OLAP and ‘Analytic Models’ - User manual
15. Decomposition Analysis Unlike standard Grid/Chart analysis, Decomposition analysis enables data analysis in multiple steps, while the
user can see all the steps at the same time and has the ability to change each step definition at any time.
15.1. OLAP/Analytic Model analysis in multiple decomposition steps The decomposition Analysis consists of analysis levels (steps) added with the option to select level members that
we would like to explore in the subsequent levels we are about to add to see details of analysis interest. This is
data drill-down in multiple steps, with great possibility to change selected members of any level, at any time.
After you click any level member, it will be included in the level selection and complete decomposition tree will
be recalculated and visualized with the new selection. The decomposition analysis can be saved and shared with
other authorized users, collaborate by adding comments and decomposition leaf (last) level can be used to
visualize data on the dashboards. Saved decomposition analysis are displayed in the 'Analysis' section of the
application with its characteristic icon.
15.2. Decomposition Options At each decomposition level, the user can select visualization type that best fit with current data and nature of
the analysis (Column Chart, Line Chart, Pie Chart, Doughnut Chart, Table Chart). Level members can be sorted
and members can be isolated by TOP n items to narrow level members display of dimensions hierarchies with
lots of members. Each Level can be opened in the enlarged view with options to visualize and explore
decomposition level using the whole screen, export decomposition level data in Excel file (with or without chart
visualization) or perform Drill-Through actions built-in OLAP cube or created ad-hoc in Kyubit Business
Intelligence application. If appropriate at a certain point, continue particular decomposition level analysis with
the standard Grid/Chart analysis in a separate window tab. All decomposition levels can be isolated with
additional filters that are added on the top of the analysis and are applied to all visible data on the
decomposition tree.
15.3. Sample Decomposition Steps To create a decomposition analysis, select ‘New Decomposition Analysis’ option in ‘Home’ or ‘Analysis’ view of
Kyubit BI application.
• Select the appropriate OLAP/Analytic Model data source
• Select Measure for analysis. The single measure could be selected and changed at any time.
• Select ‘Add Decomposition Level’ button on the bottom to choose the dimension level that will be used
for the first decomposition level. The level chart will immediately appear.
• Select ‘Add Decomposition Level’ for each additional dimension level you wish to analyze in subsequent
analysis steps.
• Selecting members on a certain decomposition level will automatically filter all subsequent (child) levels
with the current selection. At any time, change the selection for each added decomposition level.
• If complete decomposition level should be filtered (sliced) with additional data, select ‘Add Filters’ to
add appropriate slicers.
• On each decomposition Level, select ‘Sorting’, isolate top N members, change the chart type, open
chart in large view or continue analysis in Grid/Chart analysis.
• On each decomposition Level, export data to the Excel file.

71
Analysis features using OLAP and Analytic Models with Kyubit Business Intelligence - User manual
Kyubit Business Intelligence, Analysis features with OLAP and ‘Analytic Models’ - User manual

72
Analysis features using OLAP and Analytic Models with Kyubit Business Intelligence - User manual
Kyubit Business Intelligence, Analysis features with OLAP and ‘Analytic Models’ - User manual
New Decomposition analysis UI and options are available in the Kyubit BI version 5.0 as well as support for
Decomposition analysis on Analytic Models.

73
Analysis features using OLAP and Analytic Models with Kyubit Business Intelligence - User manual
Kyubit Business Intelligence, Analysis features with OLAP and ‘Analytic Models’ - User manual
16. Subscriptions An Important aspect of Kyubit Business Intelligence analysis usage is to deliver analysis reports to users using the
email subscriptions, which contain OLAP/Analytic Model analysis data in the form of HTML with embedded
analysis images or attached PDF/Excel file. Every user of Kyubit Business Intelligence with at least ‘Read’
permission has the privilege to make a subscription to OLAP/Analytic Model analysis and receive an analysis
report on the email within the scheduled time of the delivery. To create the subscription, the user needs to
update his ‘email address’ and ‘credentials’ in the user settings form (upper left icon in the ‘Home’ page).
16.1. My subscriptions Every user can see all his own subscriptions (Analysis and Dashboards) in the Kyubit Business Intelligence - >
Schedule section, where all his subscriptions could be managed.
16.2. Subscriptions within analysis When user opens a certain OLAP/Analytic Model analysis, he can immediately see if he already has some
subscriptions created to the analysis.
By click on “Subscribe” link, form with existing subscriptions of the current user will be displayed with an option
to create the new subscription, edit or delete the existing.

74
Analysis features using OLAP and Analytic Models with Kyubit Business Intelligence - User manual
Kyubit Business Intelligence, Analysis features with OLAP and ‘Analytic Models’ - User manual
16.3. Subscription details There are several subscription settings that could impact the way users are receiving subscriptions.

75
Analysis features using OLAP and Analytic Models with Kyubit Business Intelligence - User manual
Kyubit Business Intelligence, Analysis features with OLAP and ‘Analytic Models’ - User manual
• Subscription title, sets the name that will appear when delivering dashboard/analysis inside the email
message.
• Subscription item, selects Kyubit Business Intelligence content (Analysis or Dashboard) to deliver within
the subscription. The user can subscribe to all content with at least ‘Read’ permissions.
• Occurs, defines scheduled time to deliver subscription. There are three different time scheduling
categories:
o Weekly, set the weekdays to deliver subscription
o Monthly, set the month days to deliver subscription
o Once, set a single the day to deliver subscription
• Time, sets time within day to deliver subscription
• CC Recipients, an optional list of email addresses to deliver subscription (separated by semicolon)
• Include, type of delivered content
o Only link to Kyubit Business Intelligence analysis
o Link + embedded analysis image (user immediately sees analysis image when opens email
message)
o Link + Analysis as PDF attachment
o Link + Analysis as Excel attachment
• Disable, all subscriptions marked disable will not be delivered at the scheduled time.