AN1246, How to Create Widgets in Microchip Graphics Library
30
2011 Microchip Technology Inc. DS01246B-page 1 AN1246 INTRODUCTION The Microchip Graphics Library consists of various, readily usable Widgets which include the functions required in various applications. The Widgets can be customized for size, colors and the type of fonts used to adapt to the overall appearance and functions of the application. In some cases, the standard Widgets might not func- tion in a manner as desired by the application designer. Customized attributes (or even new Widgets) may be needed for the application designer to achieve the opti- mal GUI design. For example, a designer could use a slider to indicate fluid levels; however, the user may not fully understand what the slider is for unless an icon or label is added to the screen. In another example, one could implement a security keypad console using the library’s standard Widgets. This is done by using a set of buttons along with an edit box for text entry. If this same application requires the keypad configuration to change on-the-fly, using the standard Widgets might be more difficult. In such situa- tions, it becomes necessary to design specific Widgets which can perform functions to make the application more efficient. This application note serves as a useful guide in creating customized Widgets. The essential components of a Widget are enumerated and described in this document. This application note also outlines the process of integrating the new Widget into the Graphics Library in order to utilize the already implemented routines for processing messages and rendering Widgets. This application note is an advanced topic for the users of the Microchip Graphics Library. Most of the applica- tions can be created using the standard Widgets that come along with the installation of the library. For users who intend to create their own Widgets, it is assumed that they are familiar with the structure and operation of the Microchip Graphics Library and C programming syntax. For more information on the Microchip Graphics Library, refer to the Graphics Library Help File that is included in the most current version of the library and the other relevant application notes on the library. The library can be downloaded from www.microchip.com/graphics. AN EXAMPLE WIDGET To aid in the discussion of the Widgets, consider the example of a key entry user interface, commonly used in security systems. The function of this interface is to receive inputs from the user using the available alpha- numeric keys. Since this is used for security systems, the important application specifications are as follows: • Provide a versatile interface where the number of keys and the characters assigned to each key can be dynamically changed. • Provide an option to display the * character in the display screen instead of the actual keyed in characters. One mode is shown on the left keypad of Figure 1 and the other is shown on the right keypad, where the char- acters entered are replaced with the * character, and the locations of the numbers are randomized. The user interface can be created with all the important features using the standard Button and Edit Box Wid- gets of the Graphics Library. The drawback of using the standard Widgets is slower rendering, larger code and more RAM space usage. On the other hand, the newly implemented Widget can take advantage of the already existing rendering and messaging infrastructure in the Graphics Library, resulting in a faster rendering with less code. Authors: Paolo Tamayo Harold Serrano Microchip Technology Inc. Note: The users of standard Widgets can skip reading this document. How to Create Widgets in Microchip Graphics Library
Transcript of AN1246, How to Create Widgets in Microchip Graphics Library

AN1246How to Create Widgets in Microchip Graphics Library
INTRODUCTION
The Microchip Graphics Library consists of various,readily usable Widgets which include the functionsrequired in various applications. The Widgets can becustomized for size, colors and the type of fonts usedto adapt to the overall appearance and functions of theapplication.
In some cases, the standard Widgets might not func-tion in a manner as desired by the application designer.Customized attributes (or even new Widgets) may beneeded for the application designer to achieve the opti-mal GUI design. For example, a designer could use aslider to indicate fluid levels; however, the user may notfully understand what the slider is for unless an icon orlabel is added to the screen.
In another example, one could implement a securitykeypad console using the library’s standard Widgets.This is done by using a set of buttons along with an editbox for text entry. If this same application requires thekeypad configuration to change on-the-fly, using thestandard Widgets might be more difficult. In such situa-tions, it becomes necessary to design specific Widgetswhich can perform functions to make the applicationmore efficient.
This application note serves as a useful guide in creatingcustomized Widgets. The essential components of aWidget are enumerated and described in this document.This application note also outlines the process ofintegrating the new Widget into the Graphics Library inorder to utilize the already implemented routines forprocessing messages and rendering Widgets.
This application note is an advanced topic for the usersof the Microchip Graphics Library. Most of the applica-tions can be created using the standard Widgets thatcome along with the installation of the library.
For users who intend to create their own Widgets, it isassumed that they are familiar with the structure andoperation of the Microchip Graphics Library and Cprogramming syntax. For more information on theMicrochip Graphics Library, refer to the GraphicsLibrary Help File that is included in the mostcurrent version of the library and the other relevantapplication notes on the library. The library can bedownloaded from www.microchip.com/graphics.
AN EXAMPLE WIDGET
To aid in the discussion of the Widgets, consider theexample of a key entry user interface, commonly usedin security systems. The function of this interface is toreceive inputs from the user using the available alpha-numeric keys. Since this is used for security systems,the important application specifications are as follows:
• Provide a versatile interface where the number of keys and the characters assigned to each key can be dynamically changed.
• Provide an option to display the * character in the display screen instead of the actual keyed in characters.
One mode is shown on the left keypad of Figure 1 andthe other is shown on the right keypad, where the char-acters entered are replaced with the * character, andthe locations of the numbers are randomized.
The user interface can be created with all the importantfeatures using the standard Button and Edit Box Wid-gets of the Graphics Library. The drawback of using thestandard Widgets is slower rendering, larger code andmore RAM space usage. On the other hand, the newlyimplemented Widget can take advantage of the alreadyexisting rendering and messaging infrastructure in theGraphics Library, resulting in a faster rendering withless code.
Authors: Paolo TamayoHarold SerranoMicrochip Technology Inc.
Note: The users of standard Widgets can skipreading this document.
2011 Microchip Technology Inc. DS01246B-page 1

FIGURE 1: SECURITY KEYPAD APPLICATION
Before examining the details of the requirements,download the latest version of the Microchip GraphicsLibrary from www.microchip.com/graphics. Installingthe library with the default installation directory willplace the library files and demos under the ”MicrochipSolutions” directory. The files, Graphics.h, GOL.h,TextEntry.c and TextEntry.h, found in the direc-tory, are the code files referred to in this document.Refer to these files and use them as a guide while read-ing the steps described in this application note. Theapplication’s directory, named AN1246, contains theapplication-specific code for implementing the Widgetdescribed in the example.
The remaining sections of the document describe:
• Components of a Widget
• Files that need to be edited in the Graphics Library
• Application Programming Interfaces (APIs) that are implemented to fully integrate the Widget into the Graphics Library
Figure 2 displays the files that are to be created and/ormodified if you wish to integrate the new Widget intothe Graphics Library.
FIGURE 2: FILES TO BE CREATED AND MODIFIED
1 2 3
4 5 6
7 8 9
* 0 #
1 2 3 4 5 6
d e l
s p c
e n t e r
3 2 5
8 6 1
4 7 0
* 9 #
* * * * * *
d e l
s p c
e n t e r
DS01246B-page 2 2011 Microchip Technology Inc.
COMPONENTS OF A WIDGET
To create a new Widget for use in the MicrochipGraphics Library, the following steps are performed:
• A new C file and a header file are created for the Widget.
• Modifications are made to the GOL.h and Graphics.h files of the library.
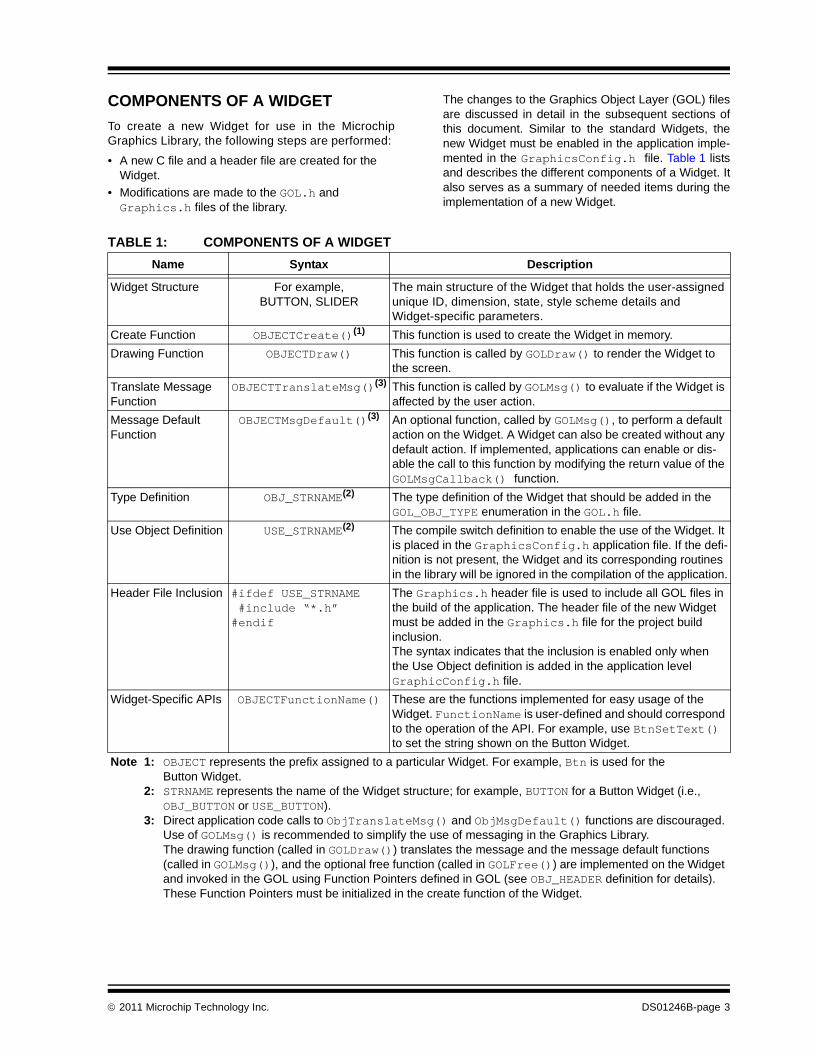
The changes to the Graphics Object Layer (GOL) filesare discussed in detail in the subsequent sections ofthis document. Similar to the standard Widgets, thenew Widget must be enabled in the application imple-mented in the GraphicsConfig.h file. Table 1 listsand describes the different components of a Widget. Italso serves as a summary of needed items during theimplementation of a new Widget.
TABLE 1: COMPONENTS OF A WIDGET
Name Syntax Description
Widget Structure For example, BUTTON, SLIDER
The main structure of the Widget that holds the user-assigned unique ID, dimension, state, style scheme details and Widget-specific parameters.
Create Function OBJECTCreate()(1) This function is used to create the Widget in memory.
Drawing Function OBJECTDraw() This function is called by GOLDraw() to render the Widget to the screen.
Translate Message Function
OBJECTTranslateMsg()(3) This function is called by GOLMsg() to evaluate if the Widget is affected by the user action.
Message Default Function
OBJECTMsgDefault()(3) An optional function, called by GOLMsg(), to perform a default action on the Widget. A Widget can also be created without any default action. If implemented, applications can enable or dis-able the call to this function by modifying the return value of the GOLMsgCallback() function.
Type Definition OBJ_STRNAME(2) The type definition of the Widget that should be added in the GOL_OBJ_TYPE enumeration in the GOL.h file.
Use Object Definition USE_STRNAME(2) The compile switch definition to enable the use of the Widget. It is placed in the GraphicsConfig.h application file. If the defi-nition is not present, the Widget and its corresponding routines in the library will be ignored in the compilation of the application.
Header File Inclusion #ifdef USE_STRNAME #include “*.h”#endif
The Graphics.h header file is used to include all GOL files in the build of the application. The header file of the new Widget must be added in the Graphics.h file for the project build inclusion. The syntax indicates that the inclusion is enabled only when the Use Object definition is added in the application level GraphicConfig.h file.
Widget-Specific APIs OBJECTFunctionName() These are the functions implemented for easy usage of the Widget. FunctionName is user-defined and should correspond to the operation of the API. For example, use BtnSetText() to set the string shown on the Button Widget.
Note 1: OBJECT represents the prefix assigned to a particular Widget. For example, Btn is used for the Button Widget.
2: STRNAME represents the name of the Widget structure; for example, BUTTON for a Button Widget (i.e., OBJ_BUTTON or USE_BUTTON).
3: Direct application code calls to ObjTranslateMsg() and ObjMsgDefault() functions are discouraged. Use of GOLMsg() is recommended to simplify the use of messaging in the Graphics Library. The drawing function (called in GOLDraw()) translates the message and the message default functions (called in GOLMsg()), and the optional free function (called in GOLFree()) are implemented on the Widget and invoked in the GOL using Function Pointers defined in GOL (see OBJ_HEADER definition for details). These Function Pointers must be initialized in the create function of the Widget.
2011 Microchip Technology Inc. DS01246B-page 3

This document explains how a Widget is implementedto support the text entry interface application men-tioned earlier. Since the functionality of the Widgetexpects inputs from the user through the displayedkeys on the screen, the Widget is named the Text EntryWidget. The ‘Te’ is used as the abbreviation to prefixthe standard function names, and TEXTENTRY is usedfor macros that need the name spelled out.
For your own purpose, you can name your new Widgetwhatever is the most applicable for your application.
The summary of the generalized prefixes and names forthe Text Entry Widget components is shown in Table 2.
Note: The completed version of the Widget isalready included in the installation of theGraphics Library with Version Number 1.60or later. The code shown here is for yourreference and guidance.
TABLE 2: TEXT ENTRY WIDGET COMPONENTS
Name Syntax
Widget Structure TEXTENTRY
Create Function TeCreate()
Drawing Function TeDraw()
Translate Message Function TeTranslateMsg()
Message Default Function TeMsgDefault()
Type Definition OBJ_TEXTENTRY
Use Object Definition USE_TEXTENTRY
Widget Specific APIs TeFunctionName()
DS01246B-page 4 2011 Microchip Technology Inc.

WIDGET STRUCTURE
The TEXTENTRY is the structure name we have chosenfor the new Text Entry Widget. For use within theGraphics Library, the new Widget’s structure must bedefined in the TextEntry. h file.
EXAMPLE 1: TEXTENTRY STRUCTURE
The number of user-defined Widget parametersdepends on the desired functionality of the new widget.The parameters are selected to make the operation ofthe Widget optimized and efficient. The selection ofparameters can be done by identifying the supportAPIs that will be used with the Widget.
For example, the Text Entry Widget expects a versatileinterface, where the number of keys and the charactersassigned to each key can be dynamically changed. Wecould assign a parameter to define the number of keys.However, since the arrangement of the keys can bedynamically changed, we can further simplify the codeif we assign the number of horizontal and vertical keys.Thus, in the example, we will see the verticalkeysand horizontalkeys declared in the structure.
The data types for these user-defined parameters canbe of any type and depend on their usefulness to theWidget. For example, one parameter can be a pointer,while the rest can be characters, or signed or unsignedintegers.
The OBJ_HEADER structure is already defined in thelibrary. This structure, which is the first member of theWidget structure, defines:
• Unique ID set by the user
• State variable that helps in rendering the Widget
• Dimensions (left, right, top and bottom) that define the position and size of the Widget
• Pointer to the next Widget
• Style scheme used in the Widget
DrawObj, FreeObj, MsgObj and MsgDefaultObjare Function Pointers to the draw, free, translatemessage and default message functions of the Widget.All are required to be initialized in the Widget's createfunction. In some cases, a Widget can be implementedwith no default message function. If this is the case,MsgDefaultObj must be initialized to NULL.
EXAMPLE 2: OBJECT_HEADER STRUCTURE
typedef struct {
OBJ_HEADER hdr; // Generic header for all Objects.WORD UsrDefMember1; // Optional User defined Widget parameter.WORD UsrDefMember2; // Optional User defined Widget parameter.…SHORT UsrDefMemberN; // Optional User defined Widget parameter.
} TEXTENTRY;
typedef struct {
WORD ID; // Unique id assigned for referencing.void *pNxtObj; // Pointer to the next object.GOL_OBJ_TYPE type; // Identifies the type of GOL object.WORD state; // State of object.SHORT left; // Left position of the Object.SHORT top; // Top position of the Object.SHORT right; // Right position of the Object.SHORT bottom; // Bottom position of the Object.GOL_SCHEME *pGolScheme; // Pointer to the scheme used.DRAW_FUNC DrawObj; // Function pointer to the object draw function.FREE_FUNC FreeObj; // Function pointer to the object free function.MSG_FUNC MsgObj; // Function pointer to the object message function.MSG_DEFAULT_FUNC MsgDefaultObj; // Function pointer to the object default message function.
} OBJ_HEADER;
2011 Microchip Technology Inc. DS01246B-page 5

The type parameter must be added to theGOL_OBJ_TYPE enumeration in the GOL.h file, asshown in Example 3. The format used isOBJ_WIDGETNAME; therefore, for the Text EntryWidget, the parameter is OBJ_TEXTENTRY.
EXAMPLE 3: OBJECT TYPE ENUMERATION
Example 4 defines the Text Entry Widget structure. Asexplained earlier, the OBJ_HEADER is required and isused to define the dimensions, states and style of theWidget. Additional structure members are added tosupport the different features of the Widget. Thehorizontal and vertical keys are added to define thenumber of keys. Having these two key parametersallows the Widget to have variable vertical and horizon-
tal key counts. The string displayed on the Widget willbe defined with the maximum characters that it canhold and an option to change the font used to displaythe inputs. The limit on the string length simplifies themanagement of the String Buffer Pointer, pTeOutput,and the addition of a separate font for the display allowsthe versatility of having different character sizes for thekey characters and the display.
EXAMPLE 4: TEXT ENTRY WIDGET STRUCTURE
typedef enum {
OBJ_BUTTON, // Type defined for Button Object.OBJ_WINDOW, // Type defined for Window Object.OBJ_CHECKBOX, // Type defined for Check Box Object.OBJ_RADIOBUTTON, // Type defined for Radio Button Object.OBJ_EDITBOX, // Type defined for Edit Box Object.…OBJ_GRID, // Type defined for Grid Object.OBJ_CHART, // Type defined for Chart Object.OBJ_TEXTENTRY, // ADD your widget object in the list of object typesOBJ_UNKNOWN
} GOL_OBJ_TYPE;
typedef struct {
OBJ_HEADER hdr; // Generic header for all objectsSHORT horizontalkeys; // Number of Horizontal keysSHORT verticalkeys; // Number of Vertical KeysXCHAR *pTeOutput; // pointer to the buffer assigned by the user
// which holds the text shown in the editboxWORD CurrentLength; // length of array, keeps track if length<MaxSizeWORD outputLenMax; // Maximum length of the buffer pTeOutputKEYMEMBER *pActiveKey; // pointer to the currently active key in the KEYMEMBER listKEYMEMBER *pHeadOfList; // pointer to the list of KEYMEMBERvoid *pDisplayFont; // pointer to the font used in displaying text
}TEXTENTRY;
DS01246B-page 6 2011 Microchip Technology Inc.
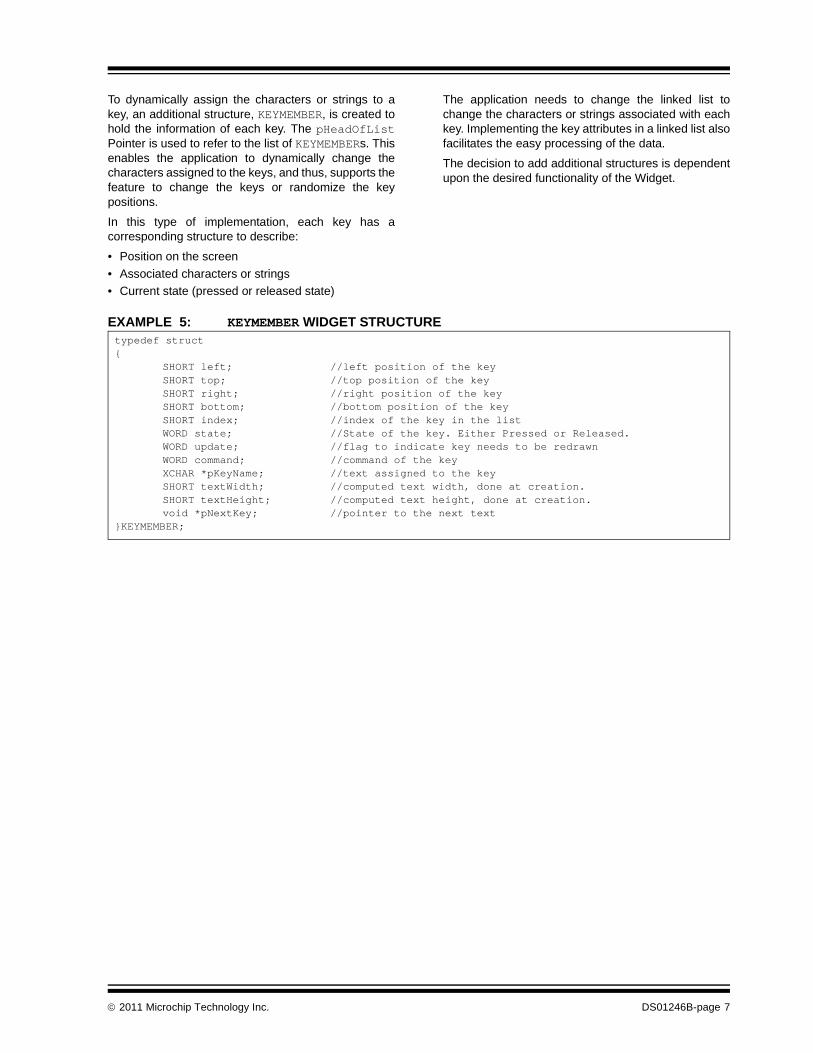
To dynamically assign the characters or strings to akey, an additional structure, KEYMEMBER, is created tohold the information of each key. The pHeadOfListPointer is used to refer to the list of KEYMEMBERs. Thisenables the application to dynamically change thecharacters assigned to the keys, and thus, supports thefeature to change the keys or randomize the keypositions.
In this type of implementation, each key has acorresponding structure to describe:
• Position on the screen
• Associated characters or strings
• Current state (pressed or released state)
The application needs to change the linked list tochange the characters or strings associated with eachkey. Implementing the key attributes in a linked list alsofacilitates the easy processing of the data.
The decision to add additional structures is dependentupon the desired functionality of the Widget.
EXAMPLE 5: KEYMEMBER WIDGET STRUCTURE typedef struct {
SHORT left; //left position of the keySHORT top; //top position of the keySHORT right; //right position of the keySHORT bottom; //bottom position of the keySHORT index; //index of the key in the listWORD state; //State of the key. Either Pressed or Released.WORD update; //flag to indicate key needs to be redrawnWORD command; //command of the keyXCHAR *pKeyName; //text assigned to the keySHORT textWidth; //computed text width, done at creation.SHORT textHeight; //computed text height, done at creation.void *pNextKey; //pointer to the next text
}KEYMEMBER;
2011 Microchip Technology Inc. DS01246B-page 7

ASSIGNING STATE BITS
The Widgets in the Graphics Library are rendered andcontrolled directly by the state variable. Each bit of thestate variable is interpreted as a state bit, where eachbit can be assigned to a specific state. Apart from therequired state bits, you will also need to define statebits specific to your Widget. The state variable iscomposed of two main components:
• Drawing State Bits – Indicates if the object needs to be hidden, partially redrawn or fully redrawn in the display.
• Property State Bits – Defines action and appearance of the objects.
The six Most Significant bits (MSbs) are allocated fordrawing states and the remaining bits are allocated forthe property states. Some common property and draw-ing state bits are given in Table 3. Apart from theoptional focus feature controlled by OBJ_FOCUS andOBJ_DRAW_FOCUS, the rest of the bits must be imple-mented. Focus is an optional feature of a Widget wherea dashed rectangle is drawn over the face of the Widgetto indicate that the Widget is currently focused. Thisfeature provides feedback to users in systems wheretouch screen is not supported and Widget selection isdone through other means, such as a physical buttonor a switch. The bit mask locations of the state bits arealso reserved to these states. The new Widgets mustnot use these mask bits for other purposes aside fromthe indicated usage given in Table 3.
TABLE 3: COMMON WIDGET STATE BITS
State Name Type Bit Mask Location Description
OBJ_FOCUSED Property 0x0001 The Widget is in the focused state. This is usually used to show the selection of the object. Not all objects have this feature.
OBJ_DISABLED(1) Property 0x0002 The Widget is disabled and will ignore all messages. The Widget is redrawn using the dis-abled colors defined in the style scheme of the Widget.
OBJ_DRAW_FOCUS Drawing 0x2000 The focus for the object is redrawn.
OBJ_DRAW(1) Drawing 0x4000 The Widget is redrawn completely.
OBJ_HIDE(1) Drawing 0x8000 The Widget is hidden by filling the area occupied by the Widget with the common background color. This has the highest priority over all draw-ing states. When a Widget is set to be hidden, all other drawing states are overridden.
Note 1: These state bits are required for all of the Widgets.
DS01246B-page 8 2011 Microchip Technology Inc.

Drawing State Bits
Apart from the common drawing state bits, three moredrawing state bits are available for use. They are bit 10,bit 11 and bit 12 of the state variable (0x0400, 0x0800and 0x1000). These bits can be used depending on thecharacteristics of the new Widget.
The required drawing state bits for the Text EntryWidget are defined in Table 4.
TABLE 4: DRAWING STATE BITS FOR TEXT ENTRY WIDGET
State Name Bit Mask Location
TE_HIDE 0x8000
TE_DRAW 0x4000
TE_UPDATE_KEY 0x2000
TE_UPDATE_TEXT 0x1000
2011 Microchip Technology Inc. DS01246B-page 9

The drawing state bits are used by the drawing functionof the Widget to render or hide the Widget in thedisplay. For our example Widget, TeDraw() will be thedrawing function.
Applications can directly call the Widget specific drawfunction (i.e., TeDraw()) to render or hide the widget;however, it is recommended that the more genericGOLDraw() function be used instead. This function isimplemented in the GOL.c file. The application can setor reset the drawing state bits of the Widgets by callingthe SetState() and ClrState() functions, andthen calling GOLDraw() to automatically render or hide
the Widgets from the screen. GOLDraw() checks eachdrawing state of all the created Widgets and performsthe rendering or hiding of the Widgets from the screenby calling their respective drawing functions.
Since GOLDraw() calls the Widget's drawing functionwhen its state bits requires redrawing (through theDRAW_FUNC Function Pointer), any new Widget will beautomatically included in the GOLDraw() processing.Example 6 shows how GOLDraw() implements thecalls to the Widget's drawing function.
EXAMPLE 6: GOLDRAW() IMPLEMENTATION
In Example 6, GOLDraw() automatically resets thedrawing state bits once the Widget's draw function isfinished (returns a '1'). The Reset of the drawing statebits is performed by the GOLDrawComplete()function.
WORD GOLDraw(void){
static OBJ_HEADER *pCurrentObj = NULL; SHORT done;
if(pCurrentObj == NULL) {
if(GOLDrawCallback()){
// It's last object jump to headpCurrentObj = _pGolObjects;
} else {
return (0); // drawing is not done}
}done = 0;
while(pCurrentObj != NULL){
if(IsObjUpdated(pCurrentObj)){
// call Widget drawing functiondone = pCurrentObj->DrawObj(pCurrentObj); if(done){
GOLDrawComplete(pCurrentObj);}else{
return (0); // drawing is not done}
}pCurrentObj = (OBJ_HEADER *)pCurrentObj->pNxtObj;
}return (1); // drawing is completed
}
DS01246B-page 10 2011 Microchip Technology Inc.

Property State Bits
The property state bits are used to define the appear-ance and action of the Widget. For example, in SliderWidget, the SLD_VERTICAL state bit defines how theslider is drawn. If the bit is set, the slider is drawn verti-cally, and if not set, the slider is drawn horizontally. Forthe Button Widget, the BTN_PRESSED state bit indicatesthat the Button will be drawn with the light and darkemboss colors interchanged, emulating the pressedeffect. When the bit is reset, it returns to the defaultassignment of the light and dark emboss colors,emulating the unpressed effect. Refer to the Slider.hand Button.h files for details and examples onproperty state bits.
As mentioned earlier, state bits can be set and resetusing the corresponding APIs. For setting the state,use the SetState() API, and for resetting or clearingthe state bits, use the ClrState() API. State bitstatus can be queried using the GetState() API. For
consistency, these APIs are used to set, reset andquery a state bit when implementing the drawingfunction of the Widget.
In the Text Entry Widget, the property state bits (lower10 bits) are appended to the already identified drawingstate bits (upper 6 bits) and are listed and described inTable 5.
The choice of the state bits is based primarily on theoptimized operation of the Widget. For example, thedrawing state bit, TE_UPDATE_KEY, will indicate that akey will be drawn as pressed or released. Similarly, thedrawing state bit, TE_UPDATE_TEXT, will require anupdate on the text area only. If both of these state bitsare set, then the key and the text area will be updated.
The property state bit, TE_KEY_PRESSED, on the otherhand, will indicate that at least one of the keys is cur-rently pressed. This will serve as a flag in the Widget’sdrawing function to check for the current status of thekeys.
TABLE 5: STATE BITS OF TEXT ENTRY WIDGET(1)
State Name Type Bit Mask Location Description
TE_DISABLED Property 0x0002 The Widget is disabled and will ignore all messages. The Widget is redrawn using the disabled colors defined in the style scheme of the Widget.
TE_KEY_PRESSED Property 0x0004 A key is pressed; this can refer to any key.
TE_ECHO_HIDE Property 0x0008 Text entries echoed into the edit box are replaced by the * character.
TE_HIDE Drawing 0x8000 The Widget is hidden by drawing the common background color over the object.
TE_DRAW Drawing 0x4000 The Widget is redrawn completely.
TE_UPDATE_KEY Drawing 0x2000 The Widget is partially redrawn. Only the key that is active is redrawn.
TE_UPDATE_TEXT Drawing 0x1000 The Widget is partially redrawn. Only the text area is redrawn.
Note 1: The definitions of the state bits of the Text Entry Widget should be placed in the TextEntry.h file.
2011 Microchip Technology Inc. DS01246B-page 11
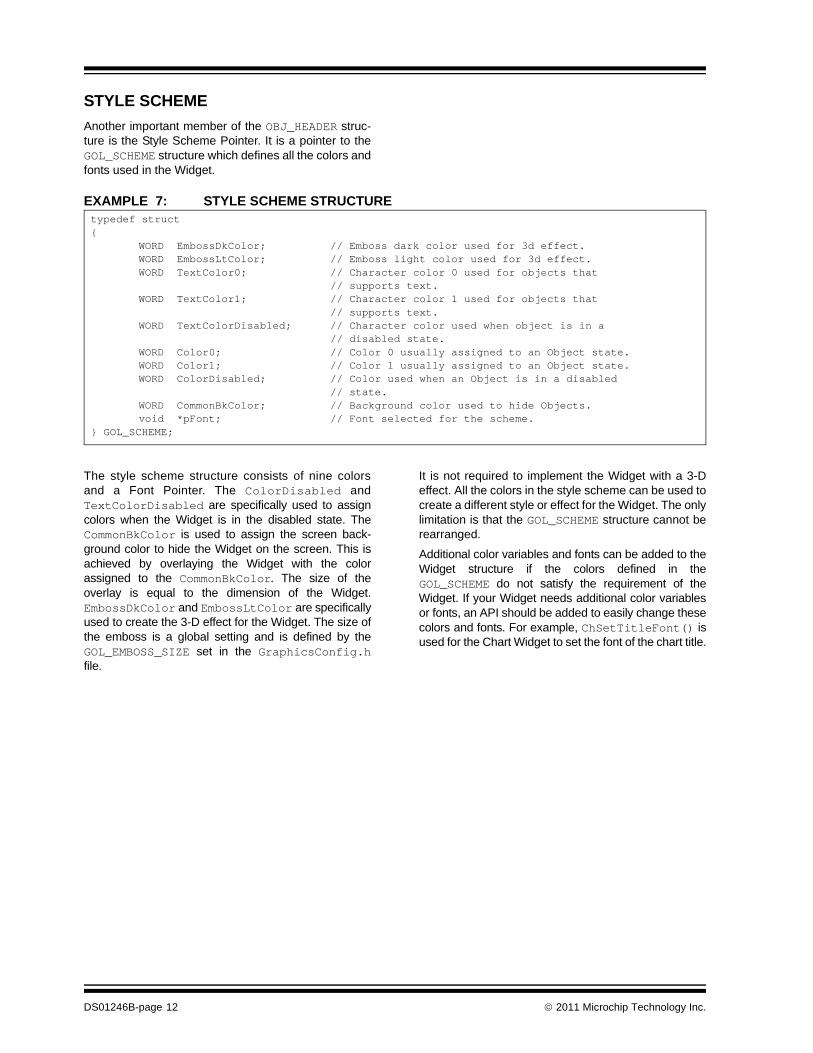
STYLE SCHEME
Another important member of the OBJ_HEADER struc-ture is the Style Scheme Pointer. It is a pointer to theGOL_SCHEME structure which defines all the colors andfonts used in the Widget.
EXAMPLE 7: STYLE SCHEME STRUCTURE
The style scheme structure consists of nine colorsand a Font Pointer. The ColorDisabled andTextColorDisabled are specifically used to assigncolors when the Widget is in the disabled state. TheCommonBkColor is used to assign the screen back-ground color to hide the Widget on the screen. This isachieved by overlaying the Widget with the colorassigned to the CommonBkColor. The size of theoverlay is equal to the dimension of the Widget.EmbossDkColor and EmbossLtColor are specificallyused to create the 3-D effect for the Widget. The size ofthe emboss is a global setting and is defined by theGOL_EMBOSS_SIZE set in the GraphicsConfig.hfile.
It is not required to implement the Widget with a 3-Deffect. All the colors in the style scheme can be used tocreate a different style or effect for the Widget. The onlylimitation is that the GOL_SCHEME structure cannot berearranged.
Additional color variables and fonts can be added to theWidget structure if the colors defined in theGOL_SCHEME do not satisfy the requirement of theWidget. If your Widget needs additional color variablesor fonts, an API should be added to easily change thesecolors and fonts. For example, ChSetTitleFont() isused for the Chart Widget to set the font of the chart title.
typedef struct {
WORD EmbossDkColor; // Emboss dark color used for 3d effect.WORD EmbossLtColor; // Emboss light color used for 3d effect.WORD TextColor0; // Character color 0 used for objects that
// supports text.WORD TextColor1; // Character color 1 used for objects that
// supports text.WORD TextColorDisabled; // Character color used when object is in a
// disabled state.WORD Color0; // Color 0 usually assigned to an Object state.WORD Color1; // Color 1 usually assigned to an Object state.WORD ColorDisabled; // Color used when an Object is in a disabled
// state.WORD CommonBkColor; // Background color used to hide Objects.void *pFont; // Font selected for the scheme.
} GOL_SCHEME;
DS01246B-page 12 2011 Microchip Technology Inc.

CODING THE WIDGETNow that the Widget structure components have beenidentified, it is time to code the different functions thatwill create, manage and delete the Widget.
Create Function
The “create function” allocates memory and initializesthe structure members of the Widget. Allocation is thefirst task in the “create function”. This is done by usingthe malloc function.
If, for some reason, the system cannot allocatememory for the Widget, the “create function” mustreturn a NULL. This gives the application layer achance to perform a recovery operation if the Widgetcreation fails.
The next task in the “create function” is the initializationof the first nine and other user-defined parameters ofthe Widget structure.
EXAMPLE 8: INITIALIZING WIDGET MEMORY
EXAMPLE 9: INITIALIZING PARAMETERS
Note that the Style Scheme Pointer, pGolScheme, isassigned to _pDefaultGolScheme. This is thedefault style scheme assigned to any Widget if no stylescheme is assigned to the Widget at creation(i.e., pScheme = NULL).
Aside from the standard Widget structure members,the parameters of the “create function” are expanded toinitialize the additional structure members that have
been added earlier to implement the Widget’s specifi-cations. Example 9 shows the additional parametersthat are passed to the function. The sequence ofparameters is not mandatory, but the sequence in theexample is a typical sequence of parameters in thealready implemented Widgets of the library. For detailson usage of the parameters, refer to the TextEntry.cfile downloaded with the Graphics Library.
TEXTENTRY *TeCreate(…) {TEXTENTRY *pTe = NULL;
pTe = (TEXTENTRY*)malloc(sizeof(TEXTENTRY));if (pTe = NULL)
return NULL;…}
TEXTENTRY *TeCreate( WORD ID,
SHORT left, top, right, bottom,WORD state,SHORT horizontalKeys,SHORT verticalKeys,XCHAR *pText[],void *pBuffer,WORD bufferLength,void *pDisplayFont,GOL_SCHEME *pScheme)
{pTe->hdr.ID = ID; // unique id for referencingpTe ->hdr.pNxtObj = NULL; // initialize pointer to NULLpTe ->hdr.type = OBJ_TEXTENTRY; // set object typepTe ->hdr.left = left; // left positionpTe ->hdr.top = top; // top positionpTe ->hdr.right = right; // right positionpTe ->hdr.bottom = bottom; // bottom positionpTe ->hdr.state = state; // state...pTe->hdr.DrawObj = TeDraw; // draw functionpTe->hdr.MsgObj = TeTranslateMsg; // message functionpTe->hdr.MsgDefaultObj = TeMsgDefault; // default message functionpTe->hdr.FreeObj = TeDelKeyMembers; // free function
// Set the style scheme to be usedif(pScheme == NULL)
pTe->hdr.pGolScheme = _pDefaultGolScheme;else
pTe->hdr.pGolScheme = (GOL_SCHEME *)pScheme;
// add parameter initializations here...
}
2011 Microchip Technology Inc. DS01246B-page 13

After initializing the Widget parameters, the Widgetmust be added to the global active list of Widgets. Thisis done by calling the GOLAddObject() API.
EXAMPLE 10: ADDING THE TEXT ENTRY WIDGET TO THE ACTIVE LIST OF WIDGETS
Note that the Object Pointer is casted to OBJ_HEADER.This is because all Widget management APIs operateon OBJ_HEADER pointers. Finally, the “create function”must return a pointer to the newly created Widget. If thepointer is not NULL, the Widget was successfullycreated.
Draw Function
The drawing function should perform state-based ren-dering, which allows the Widget to support both blockingand non-blocking configurations. State-based renderingalso helps with dividing the drawing function into thefollowing tasks:
• Full and partial redraw of the Widget
• Drawing of focus if supported
• Hiding the Widget
Blocking and non-blocking configurations provide theGraphics Library with the ability to take advantage ofhardware implemented rendering primitives. In block-ing configuration, the drawing function will not exit untilthe Widget is drawn. It can be a complete rendering ofthe Widget or an update of a portion of the Widget. In a
non-blocking configuration, the drawing function of theWidget can check the status of the primitive renderingfunctions implemented in the hardware, such asLine(), Bar() and Rectangle(). If the hardware isstill busy executing the last called primitive renderingfunction, the drawing function exits and returns the pro-cessor control to the application. The drawing functionsof the Widgets retain the state of the drawing flow. Thenext call to the draw function returns to the last primitivecommand to continue the rendering of the Widget.Non-blocking configuration will be used whenUSE_NONBLOCKING_CONFIG is defined in theGraphicsConfig.h file. If it is not defined, the librarydefaults to the blocking configuration.
The non-blocking configuration takes advantage of theprimitive functions implemented in the hardware of thedisplay controller. Depending on the display controller,the hardware will be able to implement one, two or allof the primitive rendering functions. Since the librarycan be used with any display controller, the drawingfunction of the Widget must check to see if the hard-ware is busy after every primitive rendering functioncall. This is done by calling the IsDeviceBusy()API. TRUE is returned if the display controller hardwareis busy. This API is actually a macro that may be mod-ified to suit the hardware being used. It can also bemodified to add system level control on the drawingfunctions of the Widgets.
For example, in applications using scheduled tasks, thescheduler can force the hardware to be busy to makesure that other tasks in the system get the neededprocessor time. Note that this is only possible in displaycontrollers which have primitive rendering functionsimplemented in the hardware. The use of theIsDeviceBusy() API is shown in Example 11.
EXAMPLE 11: HARDWARE BUSY CHECK IN DRAWING FUNCTIONS OF THE WIDGETS
TEXTENTRY *TeCreate(…){…GOLAddObject((OBJ_HEADER*) pTe);return pTe;
}
// this example code is just for illustration purposes onlyWORD ExDraw( ){
…case DRAW_STATE1:
if(IsDeviceBusy())return 0;
SetColor(BLACK);Bar( left, top,right,bottom);state = DRAW_STATE2;break;
case DRAW_STATE2:if(IsDeviceBusy())
return 0;// change left, top, right, bottom variables hereBar( left, top, right, bottom);state = DRAW_STATE3;break;
…}
DS01246B-page 14 2011 Microchip Technology Inc.

In the DRAW_STATE1 case, IsDeviceBusy() returnsa TRUE or ‘1’ if the hardware is still busy with the lastprimitive rendering function call. In the case ofDRAW_STATE2, the same hardware test is performedbefore the call to the next Bar() function. This can beany primitive function implemented in the hardware. Ifthe hardware is indeed busy, the Widget drawingfunction should exit with a return value of ‘0’. IfIsDeviceBusy() returns a FALSE or a ‘0’, then theDraw() function of the widget can proceed inexecuting the next primitive function.
If the drawing function exits with ‘0’, how can it recoverand go back to the last unsuccessful primitive call? Asmentioned earlier, the drawing function of the Widget
must be implemented in a state-based manner.Example 12 shows one possible implementation. Eachprimitive rendering function can be assigned a state. Astatic rendering variable, “state”, is used to keep trackof the current state of the drawing flow. When the func-tion exits, the variable maintains that state and whenthe drawing function of the Widget is called again, it canreturn to the last state and execute the next primitivefunction. Take note that the “state” variable mentionedhere is referring to the static rendering state variablethat controls the rendering flow of the Widget. This isnot to be confused with the OBJ_STATE structuremember “state” that refers to the state bits of theWidget.
EXAMPLE 12: STATE-BASED RENDERING CODE STRUCTURE
// this example code is just for illustration purposes onlyWORD ExDraw( ){typedef enum {
DRAW_STATE0,DRAW_STATE1,DRAW_STATE2,DRAW_STATE3,
} MYW_DRAW_STATES;static MYW_DRAW_STATES state = DRAW_STATE0;static SHORT left, top, right, bottom;
switch(state){
case DRAW_STATE0:if(IsDeviceBusy())
return 0; ….
state = DRAW_STATE1;case DRAW_STATE1:
if(IsDeviceBusy())return 0;
SetColor(BLACK);Bar(left, top,right,bottom);// change left, top, right, bottom variables herestate = DRAW_STATE2;break;
case DRAW_STATE2:if(IsDeviceBusy())
return 0;Bar(left, top, right, bottom);state = DRAW_STATE3;break;
…}
2011 Microchip Technology Inc. DS01246B-page 15

Example 12 also shows where left, top, right andbottom variables, that define the area where the Bar()is drawn, can be modified. If the calculation is done inDRAW_STATE2 and the rendering state variable is atDRAW_STATE2, each time the Draw() function iscalled, more time is consumed if the hardware isalways busy in that state. Having the location inDRAW_STATE1 (before the state is changed toDRAW_STATE2) optimizes the rendering flow. The fourvariables will maintain their values since they aredeclared as static variables inside the Widget’s drawfunction.
The full redraw, partial redraw, drawing of the focus (ifthe Widget supports focus) and hiding of the Widgetare all decided based on the drawing state bits of theWidget. Along with the property state bits, the overall
look of the Widget is decided and drawn. To accommo-date the additional rendering requirements of theWidgets, additional states must be implemented. Anexample of such requirements is the redrawing of thecurrent pressed key to its unpressed state, and at thesame time, redrawing of another unpressed key to itspressed state. This is a very common scenario for theexample Widget, where the user drags the touchacross the keys without releasing the press on thescreen. The additional drawing sequence can be justone state, as in the case of hiding the Widget, or aseries of states to fully implement a multiple keypress/release redrawing sequence. The final numberof needed states in the rendering of the Widget willdepend on the features and behavior of the Widgetbeing implemented.
EXAMPLE 13: ADDITION OF HIDE AND FOCUS DRAWING STATES
// this example code is just for illustration purposes onlyWORD ExDraw ( ){typedef enum {
DRAW_HIDE,DRAW_STATE1,DRAW_STATE2,DRAW_STATE3,…DRAW_FOCUS,
} MYW_DRAW_STATES;static MYW_DRAW_STATES state = DRAW_HIDE;static SHORT left, top, right, bottom;
switch(state){
case DRAW_HIDE:if(IsDeviceBusy())
return 0; if (GetState(pB, HIDE)) {
// Hide the Widget SetColor(pB->hdr.pGolScheme->CommonBkColor);Bar(pB->hdr.left, pB->hdr.top,
pB->hdr.right, pB->hdr.bottom);return 1;
}
DS01246B-page 16 2011 Microchip Technology Inc.

In Example 12, rendering of the focus rectangle andthe hiding of the Widget are added. The renderingstate, DRAW_STATE0, is now changed to DRAW_HIDE.The Widget is hidden by always drawing a bar on top ofthe Widget using the common background color, asdefined in the Widget’s current style scheme. Note thatwhen the hide drawing bit state is set, there is no needto change the state; instead, the drawing must exit witha ‘1’ to signify that the Widget drawing is complete.
For consistency, always use the GetState() API tocheck a particular bit state of the Widget and useFOCUS_LINE when drawing the focus line.
Rendering a Widget is made possible by calling primi-tive drawing functions in a predefined sequence thatwill render the Widget to the specified form determinedby the designer of the Widget. For example, if thedesign of the Widget specifies that the Widget will havea red filled circle inscribed in a blue filled square, thenthe rendering of the blue filled square must first beperformed before the filled circle is drawn. If therequirement also states that the square edges must bedrawn with a dashed line, then the line type must be setbefore the square is drawn and changed before thecircle is drawn. Therefore, the sequencing of primitivesalso means that the primitive drawing settings, such asline type, line thickness, font and color, must also besequenced properly. These settings can be set by thefollowing APIs:
• SetLineType()
• SetLineThickness()
• SetFont()
• SetColor()
In some cases, the Widget may enable the clippingregion using the SetClip() and SetClipRgn()APIs to set the boundaries of the clipping region. All ofthese primitive drawing settings and primitive renderingfunctions are sequenced in the Widget’s draw functionusing the rendering states. Since GOLDraw() rendersthe Widgets in sequence, there will be no changes tothe primitive drawing settings by another Widget’s drawfunction until the current Widget drawing is done. Theway the library is designed assures that the drawingsequences will be consistent.
The application code only needs to set the drawingstate bits of a Widget and the next call to GOLDraw()will automatically render the Widget. WithinGOLDraw(), a call to the GOLDrawCallback() func-tion is provided for application-specific customizeddrawing. This callback function is performed only afterall the Widgets have been rendered. Any modificationto the primitive drawing settings by theapplication-specific customized drawing will not affectthe Widget drawing functions.
The Text Entry Widget gives an opportunity to showhow a loop that draws the same shape can be codedand adapted to the state-based rendering. Since thereare n-number of keys in the Widget at any given time,the loop that draws the keys can be divided into states.The static variables can keep track of the keys that aredrawn and not drawn.
Looking back at the structure of the Widget, theuser-defined vertical and horizontal keys determine thenumber of keys drawn on the Widget. To draw the keys(drawn by the panel function from GOL.c), a loop canbe implemented to draw the panels one by one. Eachpanel will represent one key. Since the drawingfunction must be able to recover the last unexecutedprimitive and restart from there, the implementation ofthe loop becomes different. Example 14 describes theloop in a state-based rendering.
Note: Do not clear any drawing state bits in theWidget drawing function. The drawingstate bits are cleared automatically by theGOLDraw() function that calls the Widgetdraw functions.
2011 Microchip Technology Inc. DS01246B-page 17

EXAMPLE 14: IMPLEMENTING LOOPS IN STATE-BASED RENDERING
WORD TeDraw(TEXTENTRY *pTe){SHORT NumberOfKeys;…typedef enum {
TE_REMOVE,TE_DRAW_PANEL,TE_INIT_DRAW_EDITBOX,TE_DRAW_EDITBOX,TE_DRAW_KEY_INIT,TE_DRAW_KEY_SET_PANEL,TE_DRAW_KEY_DRAW_PANEL,TE_DRAW_KEY_TEXT,TE_DRAW_KEY_UPDATE,TE_UPDATE_STRING_INIT,TE_UPDATE_STRING,
} TE_DRAW_STATES;static TE_DRAW_STATES state = TE_REMOVE;
…switch(state) { case TE_REMOVE:
…/* ************************************************************** *//* Update the keys/* ************************************************************** */ case TE_DRAW_KEY_INIT:te_draw_key_init_st:
embossLtClr=pTe->hdr.pGolScheme->EmbossLtColor;embossDkClr=pTe->hdr.pGolScheme->EmbossDkColor;faceClr=pTe->hdr.pGolScheme->Color0;// if the active key update flag is set, only one needs to be redrawnif ((GetState(pTe, TE_DRAW) != TE_DRAW) &&(pTe->pActiveKey->update == TRUE)) {CountOfKeys = (pTe->horizontalKeys*pTe->verticalKeys)-1;pKeyTemp = pTe->pActiveKey;} else {
CountOfKeys = 0;pKeyTemp = pTe->pHeadOfList;
} state = TE_DRAW_KEY_SET_PANEL;
case TE_DRAW_KEY_SET_PANEL:te_draw_key_set_panel_st:
if (CountOfKeys < (pTe->horizontalKeys*pTe->verticalKeys)){// check if we need to draw the panelif (GetState(pTe, TE_DRAW) != TE_DRAW) {
if (pKeyTemp->update == TRUE) {// set the colors neededif (GetState(pTe, TE_KEY_PRESSED)) {
embossLtClr=pTe->hdr.pGolScheme->EmbossDkColor;embossDkClr=pTe->hdr.pGolScheme->EmbossLtColor;faceClr=pTe->hdr.pGolScheme->Color1;
} else {embossLtClr=pTe->hdr.pGolScheme->EmbossLtColor;embossDkClr=pTe->hdr.pGolScheme->EmbossDkColor;faceClr=pTe->hdr.pGolScheme->Color0;
} } else { state = TE_DRAW_KEY_UPDATE; goto te_draw_key_update_st; } }
DS01246B-page 18 2011 Microchip Technology Inc.

EXAMPLE 14: IMPLEMENTING LOOPS IN STATE-BASED RENDERING (CONTINUED)
// set up the panelGOLPanelDraw(pKeyTemp->left,pKeyTemp->top,pKeyTemp->right,pKeyTemp->bottom,0, faceClr,
embossLtClr, embossDkClr, NULL, GOL_EMBOSS_SIZE);state = TE_DRAW_KEY_DRAW_PANEL;
} else {state = TE_UPDATE_STRING_INIT;goto te_update_string_init_st;
}case TE_DRAW_KEY_DRAW_PANEL:
if (!GOLPanelDrawTsk())return 0;
// reset the update flag since the key panel is already redrawn pKeyTemp->update = FALSE;//set the text coordinates of the drawn keyxText = ((pKeyTemp->left)+(pKeyTemp->right)-(pKeyTemp->textWidth))>>1;yText = ((pKeyTemp->bottom)+(pKeyTemp->top)-(pKeyTemp->textHeight))>>1;//set color of text// if the object is disabled, draw the disabled colorsif (GetState(pTe, TE_DISABLED) == TE_DISABLED) {
SetColor(pTe->hdr.pGolScheme->TextColorDisabled);} else {
if ((GetState(pTe, TE_DRAW) != TE_DRAW) &&(GetState(pTe, TE_KEY_PRESSED)) == TE_KEY_PRESSED) { SetColor(pTe->hdr.pGolScheme->TextColor1);} else {
SetColor(pTe->hdr.pGolScheme->TextColor0);}
}//output the textMoveTo(xText, yText);// set the font to be usedSetFont(pTe->hdr.pGolScheme->pFont); state = TE_DRAW_KEY_TEXT;
case TE_DRAW_KEY_TEXT:if(!OutText(pKeyTemp->pKeyName))
return 0;state = TE_DRAW_KEY_UPDATE;
case TE_DRAW_KEY_UPDATE:te_draw_key_update_st:
// update loop variablesCountOfKeys++;pKeyTemp=pKeyTemp->pNextKey;state = TE_DRAW_KEY_SET_PANEL;goto te_draw_key_set_panel_st;
…}
}
2011 Microchip Technology Inc. DS01246B-page 19

The loop is controlled by the static variable,CountOfKeys, and the pointer to a member of the listof keys, pKeyTemp. Rendering a single panel or key isdecided if the active key parameter update is enabled.Only one key can be processed by the Widget at a time.When the TE_DRAW state bit of the Widget is set, theWidget is redrawn fully. The entire rendering process iscontrolled by using states. The flow of the states isshown in Figure 3.
While testing the message processing of the Widget,pay attention to the combination of states and mes-sages that the Widget might be receiving. A lot of thesecases are best checked by creating a short applicationthat will test scenarios of the different combination ofmessages and states.
For example, moving your touch from a key pressshould cancel the ‘Press’.
FIGURE 3: STATE-BASED LOOP
NO
Check if all keys or one key will be rendered;If (all): CountOfKeys = keysElse: CountOfKeys = keys – 1
YES
If (CountOfKeys = keys): go to next render state Else: If set colors used and panel parameters
Execute panel drawing and set cursor for text rendering
Draw the text associated with the key
Next State in the Draw Function
TE_DRAW_KEY_INIT
TE_DRAW_KEY_SET_PANEL
TE_DRAW_KEY_DRAW_PANEL
TE_DRAW_KEY_TEXT
TE_DRAW_KEY_UPDATE
From Previous State in the Draw
Function
Update variables
DS01246B-page 20 2011 Microchip Technology Inc.

Disabling the Widget
One of the important features of a Widget is its ability toenter a disabled state. In this state, the Widget will notaccept any message. Implementation of the disabledstate is enforced in the translate message function,which is described in detail in the next section.
Translate Message Function
The messages from the user are processed by theGOLMsg() function. This function is responsible fordetermining which of the created Widgets in an applica-tion was affected by the message. It determines theaffected Widget by calling each of the translatemessage functions of the Widgets. The Widget'stranslate message function is called by GOLMsg()through the MsgObj Function Pointer initialized inExample 9. The Widget, which replies with a translatedmessage not equal to OBJ_MSG_INVALID, is the
affected Widget. A disabled Widget will also reply withOBJ_MSG_INVALID. It is not mandatory for all Widgetsto process messages. These types of Widgets willimplement their translate message function thatautomatically returns OBJ_MSG_INVALID whencalled.
Translated messages for the Widget are defined basedon the characteristics of the Widget. The definitions areusually specific to the Widgets. The definition must beadded to the TRANS_MSG type enumeration found inthe GOL.h file (see Example 13).
The translate message function implementation shouldcover all the defined translated messages that areadded in the TRANS_MSG enumeration, specific for thenew Widget. For the Text Entry Widget, one possibleimplementation is shown in Figure 4 as a flowchart.
EXAMPLE 15: TRANSLATED MESSAGES ENUMERATION typedef enum {
OBJ_MSG_INVALID = 0, // Invalid message response.CB_MSG_CHECKED, // Check Box check action ID.CB_MSG_UNCHECKED, // Check Box un-check action ID.…BTN_MSG_PRESSED, // Button pressed action ID.BTN_MSG_RELEASED, // Button released action ID.…TE_MSG_RELEASED, // Text Entry key released ID.TE_MSG_PRESSED, // Text Entry key pressed ID.TE_MSG_ADD_CHAR, // Text Entry Add character ID.TE_MSG_DELETE, // Text Entry Delete character ID.TE_MSG_SPACE, // Text Entry Insert Space character ID.TE_MSG_ENTER, // Text Entry Enter Action ID.
} TRANS_MSG;
2011 Microchip Technology Inc. DS01246B-page 21
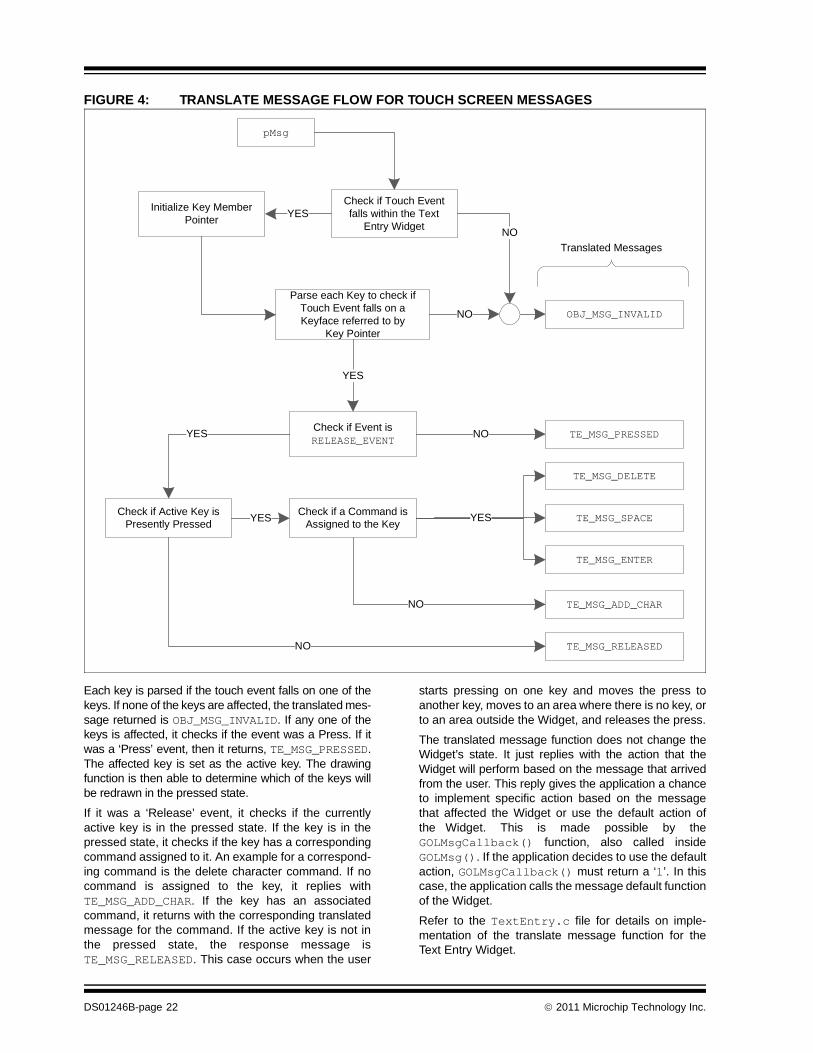
FIGURE 4: TRANSLATE MESSAGE FLOW FOR TOUCH SCREEN MESSAGES
Each key is parsed if the touch event falls on one of thekeys. If none of the keys are affected, the translated mes-sage returned is OBJ_MSG_INVALID. If any one of thekeys is affected, it checks if the event was a Press. If itwas a ‘Press’ event, then it returns, TE_MSG_PRESSED.The affected key is set as the active key. The drawingfunction is then able to determine which of the keys willbe redrawn in the pressed state.
If it was a ‘Release’ event, it checks if the currentlyactive key is in the pressed state. If the key is in thepressed state, it checks if the key has a correspondingcommand assigned to it. An example for a correspond-ing command is the delete character command. If nocommand is assigned to the key, it replies withTE_MSG_ADD_CHAR. If the key has an associatedcommand, it returns with the corresponding translatedmessage for the command. If the active key is not inthe pressed state, the response message isTE_MSG_RELEASED. This case occurs when the user
starts pressing on one key and moves the press toanother key, moves to an area where there is no key, orto an area outside the Widget, and releases the press.
The translated message function does not change theWidget’s state. It just replies with the action that theWidget will perform based on the message that arrivedfrom the user. This reply gives the application a chanceto implement specific action based on the messagethat affected the Widget or use the default action ofthe Widget. This is made possible by theGOLMsgCallback() function, also called insideGOLMsg(). If the application decides to use the defaultaction, GOLMsgCallback() must return a ‘1’. In thiscase, the application calls the message default functionof the Widget.
Refer to the TextEntry.c file for details on imple-mentation of the translate message function for theText Entry Widget.
YES
NO
pMsg
OBJ_MSG_INVALID
TE_MSG_ADD_CHAR
TE_MSG_PRESSED
NO
YES
YES
NO
NO
TE_MSG_DELETE
TE_MSG_SPACE
TE_MSG_ENTER
Translated Messages
Check if Touch Event falls within the Text
Entry Widget
Parse each Key to check if Touch Event falls on a Keyface referred to by
Key Pointer
Check if Event is RELEASE_EVENT
Initialize Key Member Pointer
Check if Active Key is Presently Pressed
Check if a Command is Assigned to the Key
NO
YES
TE_MSG_RELEASED
YES
DS01246B-page 22 2011 Microchip Technology Inc.

Message Default Function
The message default function performs the defaultaction of the Widget based on the translated message.This is where the property and draw state bits are mod-ified to perform the default action. Example 16 showsthe message default function for the Text Entry Widget.
The code shows that each of the translated messagesis processed to perform the action on the Widget.States are cleared or set, and the Widget is partially
redrawn to save the time in rendering. Since all theWidget components do not change for each of thetranslated messages, a partial redraw is performed.Redrawing will be performed by the Widget’sGOLDraw() drawing function.
The Widget's message default function is called byGOLMsg() through the MsgDefaultObj FunctionPointer, initialized in Example 9.
EXAMPLE 16: MESSAGE DEFAULT FUNCTION
void TeMsgDefault(WORD translatedMsg, void *pObj, GOL_MSG *pMsg)
TEXTENTRY *pTe (TEXTENTRY *)pObj;
switch(translatedMsg) {case TE_MSG_DELETE:
SetState(pTe,TE_UPDATE_KEY|TE_UPDATE_TEXT);break;
case TE_MSG_SPACE:TeSpaceChar(pTe);SetState(pTe,TE_UPDATE_KEY|TE_UPDATE_TEXT);break;
case TE_MSG_ENTER:SetState(pTe,TE_UPDATE_KEY); break;
case TE_MSG_ADD_CHAR:TeAddChar(pTe);SetState(pTe,TE_UPDATE_KEY|TE_UPDATE_TEXT);break;
case TE_MSG_PRESSED:(pTe->pActiveKey)->state = TE_KEY_PRESSED;SetState(pTe,TE_KEY_PRESSED|TE_UPDATE_KEY);return;
case TE_MSG_RELEASED:(pTe->pActiveKey)->state=0;ClrState(pTe, TE_KEY_PRESSED);SetState(pTe, TE_UPDATE_KEY); return;
}if(pTe->pActiveKey != NULL)
(pTe->pActiveKey)->state = 0;ClrState(pTe, TE_KEY_PRESSED);
}
2011 Microchip Technology Inc. DS01246B-page 23

Widget Run-Time Deallocation
The Widgets are removed from memory using theGOLFree() function found in the GOL.c file. This func-tion deletes all the Widgets in the active list. The activelist of Widgets is the list that is parsed by GOLDraw()and GOLMsg() to render and process the messages,respectively. If the Widget itself creates and referencesanother object in the memory, then a correspondingfunction must be created for the Widget to removethese additional objects. Failure to do this will result ina memory leak. If the application continuously createsand frees the Widget, the memory allocated by theWidget for these additional objects will eventually con-sume all the memory space allocated for dynamicallycreated objects.
The Text Entry Widget requires an additional list ofstructures that is also created dynamically when theWidget is used and allocated space in memory. This listdefines the characters and commands associated withthe keys. Since this is a dynamically created space,GOLFree() must free the memory used by the list andthe Widget. Example 17 shows the implementation ofthe GOLFree() function found in the GOL.c file.GOLFree() calls the TeDelKeyMembers(), initial-ized in TeDraw() (see Example 9) through theFreeObj Function Pointer. This is performed beforethe actual Widget is removed from memory. Pleaserefer to the TextEntry.c file for details of theTeDelKeyMembers() implementation.
EXAMPLE 17: GOLFREE() IMPLEMENTATION
void GOLFree( ) {OBJ_HEADER * pNextObj;OBJ_HEADER * pCurrentObj;
pCurrentObj = _pGolObjects;while(pCurrentObj != NULL){
pNextObj = (OBJ_HEADER *)pCurrentObj->pNxtObj;
// check if there are additional items to free if(pCurrentObj->FreeObj)pCurrentObj->FreeObj(pCurrentObj);
// free the Widget GFX_free(pCurrentObj);pCurrentObj = pNextObj;
}GOLNewList();
}
DS01246B-page 24 2011 Microchip Technology Inc.

Supporting Functions
Now that the Widget is fully integrated into the GraphicsLibrary, the supporting functions can be added for easyusage of the Widget. Such supporting functions arelisted and described in Table 6.
For a complete list of functions, refer to theTextEntry.c and TextEntry.h files.
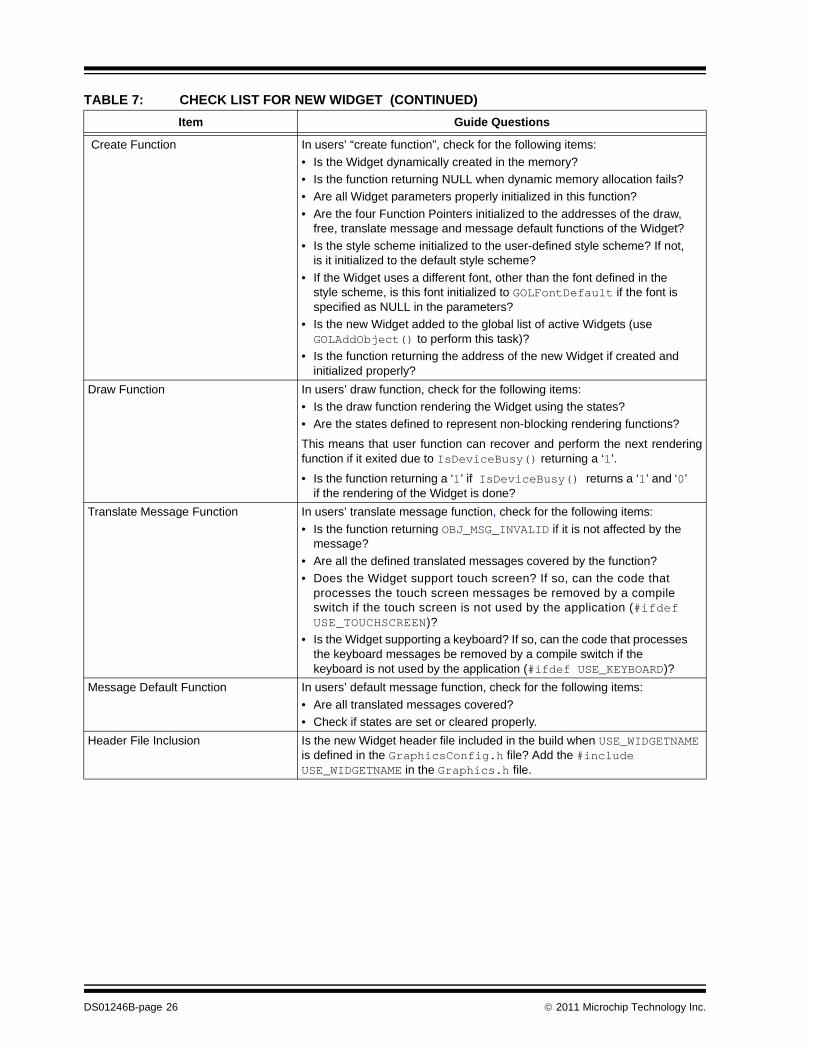
Checklist for Creating a New Widget
Table 7 lists the items that need to be checked to makesure that the new Widget is integrated properly into theGraphics Library.
TABLE 6: SUPPORTING FUNCTIONS(1)
Function Description
TeSetBuffer(pTe, pText, MaxSize) Function to set the string on the edit box of the Text Entry Widget. pText is the buffer address.
TeGetBuffer(pTe) Function to get the buffer address of the string displayed in the edit box.
TeClearBuffer(pTe) Function to clear the contents of the edit box.
TeIsKeyPressed(pTe, index) Function to test if the particular key referenced by the index is currently pressed.
TeSetKeyCommand(pTe, index, command) This function assigns a command to a particular key referenced by the index. On assigning the command, the key will not echo the assigned string or character to the key, but rather perform the command.
TeGetKeyCommand(pTe, index) This function returns the current command assigned to a particular key referenced by the index.
TeCreateKeyMembers(pTe, pText[]) This function creates the list of keys and assigns each entry in thepText array to each created key.
TeDelKeyMembers(pTe) This function removes the list of keys associated with the Key Entry Widget. It deletes the memory space used by the list of keys. This is thesame function called in GOLFree() when the Widget is being deletedfrom memory.
Note 1: pTe is the pointer to the Text Entry Widget.
TABLE 7: CHECK LIST FOR NEW WIDGET
Item Guide Questions
USE_WIDGETNAME In users’ Widget C code, is the compile switch that is specific for the Widget and defined in the GraphicsConfig.h file implemented? Compiler includes the Widget code in the build only if it is defined in the GraphicsConfig.h file. (Ex: USE_TEXTENTRY for Text Entry Widget.)
Widget State Bits Double-check if all the state bits defined are using the standard drawing and property state bits for hiding, drawing and enabling. Check that all additional state bits are not using the standard states, including optional states of standard Widgets. (Optional state example is for focus.)
GOL_OBJ_TYPE Is the new Widget type included in the GOL_OBJ_TYPE enumeration found in GOL.h? (Ex: Add GOL_TEXTENTRY for type Text Entry Widget.)
TRANS_MSG Are the new translated messages specific to users’ Widget included in the TRANS_MSG enumeration found in the GOL.h file? Users may reuse the existing translated messages.
OBJ_HEADER Are the first member(s) of the Widget structure the same data type or size as the OBJ_HEADER?If the user has used OBJ_HEADER as the first structure member, then there is no need for a check.
2011 Microchip Technology Inc. DS01246B-page 25
Create Function In users’ “create function”, check for the following items:
• Is the Widget dynamically created in the memory?
• Is the function returning NULL when dynamic memory allocation fails?
• Are all Widget parameters properly initialized in this function?
• Are the four Function Pointers initialized to the addresses of the draw, free, translate message and message default functions of the Widget?
• Is the style scheme initialized to the user-defined style scheme? If not, is it initialized to the default style scheme?
• If the Widget uses a different font, other than the font defined in the style scheme, is this font initialized to GOLFontDefault if the font is specified as NULL in the parameters?
• Is the new Widget added to the global list of active Widgets (use GOLAddObject() to perform this task)?
• Is the function returning the address of the new Widget if created and initialized properly?
Draw Function In users’ draw function, check for the following items:
• Is the draw function rendering the Widget using the states?
• Are the states defined to represent non-blocking rendering functions?
This means that user function can recover and perform the next renderingfunction if it exited due to IsDeviceBusy() returning a ‘1’.
• Is the function returning a ‘1’ if IsDeviceBusy() returns a ‘1’ and ‘0’ if the rendering of the Widget is done?
Translate Message Function In users’ translate message function, check for the following items:
• Is the function returning OBJ_MSG_INVALID if it is not affected by the message?
• Are all the defined translated messages covered by the function?
• Does the Widget support touch screen? If so, can the code that processes the touch screen messages be removed by a compile switch if the touch screen is not used by the application (#ifdef USE_TOUCHSCREEN)?
• Is the Widget supporting a keyboard? If so, can the code that processes the keyboard messages be removed by a compile switch if the keyboard is not used by the application (#ifdef USE_KEYBOARD)?
Message Default Function In users’ default message function, check for the following items:
• Are all translated messages covered?
• Check if states are set or cleared properly.
Header File Inclusion Is the new Widget header file included in the build when USE_WIDGETNAME is defined in the GraphicsConfig.h file? Add the #include USE_WIDGETNAME in the Graphics.h file.
TABLE 7: CHECK LIST FOR NEW WIDGET (CONTINUED)
Item Guide Questions
DS01246B-page 26 2011 Microchip Technology Inc.

CONCLUSION
In certain applications, creating new Widgets fromscratch is necessary to save code and to simplify theusage of the Widgets. The different functions and filesin the Graphics Library, that require modification toimplement the new Widget, have been discussed inthis document. Code examples are provided to showthe possible ways of implementing the required func-tions and macros. A checklist is also provided to checkthe items that will be implemented and modified tofacilitate easy integration of the new Widget into theGraphics Library.
For details on the implementation of the GraphicsLibrary, refer to the source code included in the instal-lation of the library. The installer can be downloadedfrom www.microchip.com/graphics. The code for theText Entry Widget example comes with the installationof the library.
REFERENCES
• Microchip Application Note AN1136, “How to Use Widgets in Microchip Graphics Library” (DS01136), Microchip Technology Incorporated.
• Microchip Application Note AN1182, “Fonts in the Microchip Graphics Library” (DS01182), Microchip Technology Incorporated.
• Microchip Graphics Library, Microchip Graphics Library Help.chm, Microchip Technology Incorporated (www.microchip.com/graphics).
• HIF 2131 – Designing with Microchip Graphics Library, Microchip Regional Training Centerweb site (www.microchip.com/rtc).
2011 Microchip Technology Inc. DS01246B-page 27

NOTES:
DS01246B-page 28 2011 Microchip Technology Inc.
Note the following details of the code protection feature on Microchip devices:
• Microchip products meet the specification contained in their particular Microchip Data Sheet.
• Microchip believes that its family of products is one of the most secure families of its kind on the market today, when used in the intended manner and under normal conditions.
• There are dishonest and possibly illegal methods used to breach the code protection feature. All of these methods, to our knowledge, require using the Microchip products in a manner outside the operating specifications contained in Microchip’s Data Sheets. Most likely, the person doing so is engaged in theft of intellectual property.
• Microchip is willing to work with the customer who is concerned about the integrity of their code.
• Neither Microchip nor any other semiconductor manufacturer can guarantee the security of their code. Code protection does not mean that we are guaranteeing the product as “unbreakable.”
Code protection is constantly evolving. We at Microchip are committed to continuously improving the code protection features of ourproducts. Attempts to break Microchip’s code protection feature may be a violation of the Digital Millennium Copyright Act. If such actsallow unauthorized access to your software or other copyrighted work, you may have a right to sue for relief under that Act.
Information contained in this publication regarding deviceapplications and the like is provided only for your convenienceand may be superseded by updates. It is your responsibility toensure that your application meets with your specifications.MICROCHIP MAKES NO REPRESENTATIONS ORWARRANTIES OF ANY KIND WHETHER EXPRESS ORIMPLIED, WRITTEN OR ORAL, STATUTORY OROTHERWISE, RELATED TO THE INFORMATION,INCLUDING BUT NOT LIMITED TO ITS CONDITION,QUALITY, PERFORMANCE, MERCHANTABILITY ORFITNESS FOR PURPOSE. Microchip disclaims all liabilityarising from this information and its use. Use of Microchipdevices in life support and/or safety applications is entirely atthe buyer’s risk, and the buyer agrees to defend, indemnify andhold harmless Microchip from any and all damages, claims,suits, or expenses resulting from such use. No licenses areconveyed, implicitly or otherwise, under any Microchipintellectual property rights.
2010 Microchip Technology Inc.
Trademarks
The Microchip name and logo, the Microchip logo, dsPIC, KEELOQ, KEELOQ logo, MPLAB, PIC, PICmicro, PICSTART, PIC32 logo, rfPIC and UNI/O are registered trademarks of Microchip Technology Incorporated in the U.S.A. and other countries.
FilterLab, Hampshire, HI-TECH C, Linear Active Thermistor, MXDEV, MXLAB, SEEVAL and The Embedded Control Solutions Company are registered trademarks of Microchip Technology Incorporated in the U.S.A.
Analog-for-the-Digital Age, Application Maestro, CodeGuard, dsPICDEM, dsPICDEM.net, dsPICworks, dsSPEAK, ECAN, ECONOMONITOR, FanSense, HI-TIDE, In-Circuit Serial Programming, ICSP, Mindi, MiWi, MPASM, MPLAB Certified logo, MPLIB, MPLINK, mTouch, Omniscient Code Generation, PICC, PICC-18, PICDEM, PICDEM.net, PICkit, PICtail, REAL ICE, rfLAB, Select Mode, Total Endurance, TSHARC, UniWinDriver, WiperLock and ZENA are trademarks of Microchip Technology Incorporated in the U.S.A. and other countries.
SQTP is a service mark of Microchip Technology Incorporated in the U.S.A.
All other trademarks mentioned herein are property of their respective companies.
© 2010, Microchip Technology Incorporated, Printed in the U.S.A., All Rights Reserved.
Printed on recycled paper.
ISBN: 978-1-60932-920-4
DS01246B-page 29
Microchip received ISO/TS-16949:2002 certification for its worldwide headquarters, design and wafer fabrication facilities in Chandler and Tempe, Arizona; Gresham, Oregon and design centers in California and India. The Company’s quality system processes and procedures are for its PIC® MCUs and dsPIC® DSCs, KEELOQ® code hopping devices, Serial EEPROMs, microperipherals, nonvolatile memory and analog products. In addition, Microchip’s quality system for the design and manufacture of development systems is ISO 9001:2000 certified.

DS01246B-page 30 2011 Microchip Technology Inc.
AMERICASCorporate Office2355 West Chandler Blvd.Chandler, AZ 85224-6199Tel: 480-792-7200 Fax: 480-792-7277Technical Support: http://www.microchip.com/supportWeb Address: www.microchip.com
AtlantaDuluth, GA Tel: 678-957-9614 Fax: 678-957-1455
BostonWestborough, MA Tel: 774-760-0087 Fax: 774-760-0088
ChicagoItasca, IL Tel: 630-285-0071 Fax: 630-285-0075
ClevelandIndependence, OH Tel: 216-447-0464 Fax: 216-447-0643
DallasAddison, TX Tel: 972-818-7423 Fax: 972-818-2924
DetroitFarmington Hills, MI Tel: 248-538-2250Fax: 248-538-2260
IndianapolisNoblesville, IN Tel: 317-773-8323Fax: 317-773-5453
Los AngelesMission Viejo, CA Tel: 949-462-9523 Fax: 949-462-9608
Santa ClaraSanta Clara, CA Tel: 408-961-6444Fax: 408-961-6445
TorontoMississauga, Ontario, CanadaTel: 905-673-0699 Fax: 905-673-6509
ASIA/PACIFICAsia Pacific OfficeSuites 3707-14, 37th FloorTower 6, The GatewayHarbour City, KowloonHong KongTel: 852-2401-1200Fax: 852-2401-3431
Australia - SydneyTel: 61-2-9868-6733Fax: 61-2-9868-6755
China - BeijingTel: 86-10-8528-2100 Fax: 86-10-8528-2104
China - ChengduTel: 86-28-8665-5511Fax: 86-28-8665-7889
China - ChongqingTel: 86-23-8980-9588Fax: 86-23-8980-9500
China - Hong Kong SARTel: 852-2401-1200 Fax: 852-2401-3431
China - NanjingTel: 86-25-8473-2460Fax: 86-25-8473-2470
China - QingdaoTel: 86-532-8502-7355Fax: 86-532-8502-7205
China - ShanghaiTel: 86-21-5407-5533 Fax: 86-21-5407-5066
China - ShenyangTel: 86-24-2334-2829Fax: 86-24-2334-2393
China - ShenzhenTel: 86-755-8203-2660 Fax: 86-755-8203-1760
China - WuhanTel: 86-27-5980-5300Fax: 86-27-5980-5118
China - XianTel: 86-29-8833-7252Fax: 86-29-8833-7256
China - XiamenTel: 86-592-2388138 Fax: 86-592-2388130
China - ZhuhaiTel: 86-756-3210040 Fax: 86-756-3210049
ASIA/PACIFICIndia - BangaloreTel: 91-80-3090-4444 Fax: 91-80-3090-4123
India - New DelhiTel: 91-11-4160-8631Fax: 91-11-4160-8632
India - PuneTel: 91-20-2566-1512Fax: 91-20-2566-1513
Japan - YokohamaTel: 81-45-471- 6166 Fax: 81-45-471-6122
Korea - DaeguTel: 82-53-744-4301Fax: 82-53-744-4302
Korea - SeoulTel: 82-2-554-7200Fax: 82-2-558-5932 or 82-2-558-5934
Malaysia - Kuala LumpurTel: 60-3-6201-9857Fax: 60-3-6201-9859
Malaysia - PenangTel: 60-4-227-8870Fax: 60-4-227-4068
Philippines - ManilaTel: 63-2-634-9065Fax: 63-2-634-9069
SingaporeTel: 65-6334-8870Fax: 65-6334-8850
Taiwan - Hsin ChuTel: 886-3-6578-300Fax: 886-3-6578-370
Taiwan - KaohsiungTel: 886-7-213-7830Fax: 886-7-330-9305
Taiwan - TaipeiTel: 886-2-2500-6610 Fax: 886-2-2508-0102
Thailand - BangkokTel: 66-2-694-1351Fax: 66-2-694-1350
EUROPEAustria - WelsTel: 43-7242-2244-39Fax: 43-7242-2244-393Denmark - CopenhagenTel: 45-4450-2828 Fax: 45-4485-2829
France - ParisTel: 33-1-69-53-63-20 Fax: 33-1-69-30-90-79
Germany - MunichTel: 49-89-627-144-0 Fax: 49-89-627-144-44
Italy - Milan Tel: 39-0331-742611 Fax: 39-0331-466781
Netherlands - DrunenTel: 31-416-690399 Fax: 31-416-690340
Spain - MadridTel: 34-91-708-08-90Fax: 34-91-708-08-91
UK - WokinghamTel: 44-118-921-5869Fax: 44-118-921-5820
Worldwide Sales and Service
02/18/11