An Introduction to Strawberry Plasticulture · The beneficial effect of these beds on root growth...
20
An Introductory Guide to Strawberry Plasticulture E. Barclay Poling Professor and Extension Specialist (Small Fruits) Department of Horticultural Science, NC State Written 2002; revised 2011 Section 1. Introduction Strawberries are one of the most economically important fruit crops in North Carolina and throughout the Southeast. In 2010, North Carolina led the Mid-South region with an estimated 1600 acres with a production value of $24.3 million. North Carolina is fourth in strawberry production in the United States (following CA, FL and OR). The strawberry industry in North Carolina and the Mid-South is highly de-centralized and almost entirely based on small family farm units producing several acres of berry production for direct marketing (U-pick, ready-pick, roadside stands, and farmers markets). The main harvest months for this region are April and May, but coastal regions in Georgia and South Carolina have production beginning in early to mid-March in most years, and the season typically lasts from four to six weeks in a given production area. A positive factor in our region is the increasing demand for locally grown, farm fresh strawberries. The real challenge for the strawberry producer is to try to be consistent in his/her production from one year to the next. Strawberry growers in the mid-South may not grow large acreages in comparison to growers in Florida or California, but profit per acre can be reasonable if the grower carefully manages the crop from start to finish. The primary purpose of this guide to give an overview of the “Strawberry Plasticulture Production System” that is now the main commercial growing system for North Carolina and other states in the Mid-South. Section 2 – Strawberry Plasticulture “Strawberry Plasticulture” is technically the annual hill training system in which “green” strawberry transplants (fresh dug plants or plugs) are planted in early fall in double rows at densities of approximately 15,000 to 17,500 plants/acre on fumigated, raised beds that are covered with black plastic mulch Strawberry plasticulture is technically the annual hill training system. The term hill culture refers to a type of strawberry training system where the runners are either manually or mechanically removed (in summer), or don’t develop at all (fall-winter season). It is a training system that allows only for the growth and development of the mother plant. Hill system transplants are normally set in double rows with plants spaced 12-14 inches in-the-row by 12-14 inches between the row – this is variety-dependent as some varieties like Sweet Charlie benefit from closer spacing than more vigorous varieties like Chandler. Plants are normally set in a staggered pattern (alternate) with the adjacent row as indicated by the illustration in Fig. 1-H. The training systems shown in Figs. 1-D and 1-E are modifications of the older matted row system where mother plants are set in the early spring and allowed to “runner”. In contrast, any runners that form in the hill system are removed. In actuality, by the time growers in the southeastern Coastal Plain plant in mid- October, there is no runnering at all.
Transcript of An Introduction to Strawberry Plasticulture · The beneficial effect of these beds on root growth...

An Introductory Guide to Strawberry Plasticulture E. Barclay Poling
Professor and Extension Specialist (Small Fruits) Department of Horticultural Science, NC State
Written 2002; revised 2011
Section 1. Introduction Strawberries are one of the most economically important fruit crops in North Carolina and throughout the Southeast. In 2010, North Carolina led the Mid-South region with an estimated 1600 acres with a production value of $24.3 million. North Carolina is fourth in strawberry production in the United States (following CA, FL and OR).
The strawberry industry in North Carolina and the Mid-South is highly de-centralized and almost entirely based on small family farm units producing several acres of berry production for direct marketing (U-pick, ready-pick, roadside stands, and farmers markets). The main harvest months for this region are April and May, but coastal regions in Georgia and South Carolina have production beginning in early to mid-March in most years, and the season typically lasts from four to six weeks in a given production area. A positive factor in our region is the increasing demand for locally grown, farm fresh strawberries. The real challenge for the strawberry producer is to try to be consistent in his/her production from one year to the next.
Strawberry growers in the mid-South may not grow large acreages in comparison to growers in Florida or California, but profit per acre can be reasonable if the grower carefully manages the crop from start to finish. The primary purpose of this guide to give an overview of the “Strawberry Plasticulture Production System” that is now the main commercial growing system for North Carolina and other states in the Mid-South. Section 2 – Strawberry Plasticulture
“Strawberry Plasticulture” is technically the annual hill training system in which “green” strawberry transplants (fresh dug plants or plugs) are planted in early fall in double rows at densities of approximately 15,000 to 17,500 plants/acre on fumigated, raised beds that are covered with black plastic mulch Strawberry plasticulture is technically the annual hill training system. The term hill culture refers to a type of strawberry training system where the runners are either manually or mechanically removed (in summer), or don’t develop at all (fall-winter season). It is a training system that allows only for the growth and development of the mother plant. Hill system transplants are normally set in double rows with plants spaced 12-14 inches in-the-row by 12-14 inches between the row – this is variety-dependent as some varieties like Sweet Charlie benefit from closer spacing than more vigorous varieties like Chandler. Plants are normally set in a staggered pattern (alternate) with the adjacent row as indicated by the illustration in Fig. 1-H. The training systems shown in Figs. 1-D and 1-E are modifications of the older matted row system where mother plants are set in the early spring and allowed to “runner”. In contrast, any runners that form in the hill system are removed. In actuality, by the time growers in the southeastern Coastal Plain plant in mid-October, there is no runnering at all.

2
Fig. 1. Systems of training strawberries: D. Spaced Row (allows daughter plant development with mother plants set in center); E. Spaced Row (mother plants set near edge of raised bed); F. Single Row Hills; G. Double-Row Hills (opposite); H. Double-Row Hills (alternate); I. Stool Hills (Older European System). We attach the word annual to hill culture to describe a training system where new strawberry plants are set out each year for fruit production as opposed to training systems that take advantage of the perennial growth habit of the strawberry (e.g. matted row, spaced row, and ribbon row). The first and perhaps most important principle of annual hill can simply be stated as follows: Achieving large fruit size and excellent quality on a regular basis can only be achieved with first-year plants. If you carry over a first-year planting, be prepared for smaller berries that are much more time-consuming to harvest. The best “grower control” for optimizing fruit quality and size is to stick with the younger first-year plants. Don’t carry-over to a second year! In the strawberry plasticulture system berries can be harvested in just 7 to 8 months after planting in the early fall. Following harvest (early to mid-June), the strawberry plants should be destroyed due to the high risk of infection in the mid-South with anthracnose fruit rot (Colletotrichum acutatum) as well as anthracnose crown rot (Colletotrichum gloeosporioides) in second-year beds. Although anthracnose crown rot can be observed in fruit production fields during the fall and spring it is most severe in nurseries in the southeastern United States and is one of the primary reasons that production of transplants has moved to the mountains of Western North Carolina and Canada's Maritime Provinces, including Nova Scotia and Prince Edward Island. The plastic beds may be re-utilized for summer/fall vegetable crops, and these crops also would benefit from pre-plant fumigation for strawberries.
Raised beds are another crucial ingredient to success with the strawberry plasticulture system. In reality, most of the strawberry beds in North Carolina are 10-inch high “super

3
beds” (not 12-inch as shown in Fig. 2), and the 10-inch high beds are typically 32 inches wide at the base and 30 inches wide on the top. The beds are slightly crowned so water will run off and not rest on the plastic (a bed with a 30-inch top should slope from the center to the edge with a drop of 1.25 inches). Beds are on 5-ft centers in North Carolina (not 52-inch as shown in Fig. 3). There are 8,712 linear ft of row per acre with the 5 ft center. Most growers use a 60-inch wide plastic film roll (not 54-inch).
Fig. 2. Schematic of older two-row ridged bed used in California.
The "super-beds" provide a nearly ideal air-soil-water environment for vigorous strawberry root development. The beneficial effect of these beds on root growth is easily observed by excavating the soil beneath the plastic mulch film at the end of the season. George Darrow (1966) also identified the importance of raised beds for healthy root development:
“Roots of the strawberry grow chiefly downward in well-drained sandy soils and a few roots may be found as deep as 24 inches. In clay soils they spread more horizontally. In late fall when the water table rises and the oxygen in the deeper layers becomes low, root growth is shallow. The oxygen content of the air in the soil where root growth is active is nearly that of the air above the soil, but where soil is water, it may be as little as 1/10,000 the normal.”
Black plastic. Late fall and early winter field conditions in North Carolina and the mid-South are actually too cold for the strawberry annual hill, raised bed system to be economical without the addition of black plastic mulch. The black plastic film must be in direct contact with the soil beneath to achieve the desired soil-warming effect needed for rapid plant establishment in the fall. With the plastic mulch, heat does not radiate so rapidly off the soil under the plastic, so that with several degrees warmer soil for several months, more extensive root and crown development occurs. Fig. 3. A North Carolina raised bed covered with embossed black plastic mulch – 5 ft centers.

4
With the addition of raised beds and black plastic mulch, the total package becomes the “annual hill, raised bed, black plastic mulch system”-- you can see why the name “strawberry plasticulture” is preferred! Section 3 – Regional adaptation
The annual plasticulture strawberry system is recommended for all regions of North Carolina and the Mid-South, including the mountains; however climatic differences across different growing regions may result in varied yields. Yields for mountain production are typically in the range of 1 to 1.2 pounds per plant, though ideal conditions have occasionally produced yields as high as 1.5 pounds per plant. Due to the shorter growing season in the fall and colder winters, this region of the state sees lower yields compared to the Piedmont and coastal plains where yields of 1.5 pounds per plant are regularly achieved with good management.
Weather risks. In very good weather years it may be possible to achieve another half pound per plant above the average yield for a given growing region, but in erratic weather years, like the 2009-2010 season, growers may see their average yields plummet to less than one pound of berries per plant. Based on research completed at N.C. State University, strawberry growers need to achieve yields of at least one pound of berries per plant, or 15,000 pounds per acre (7 ½ tons), to make a profit using plasticulture (Safley and Poling, 2004). Another seasonal risk with strawberry plasticulture production is the potential for having a harvest season in which the crop is very concentrated. In the spring of 2011, the North Carolina crop was very concentrated in ripening, and instead of picking for 4 to 5 weeks, the season only lasted about 2½ to 3 weeks on many farms (for reasons that are still not well understood). There is the added problem in years of concentrated crops that growers will likely experience great difficulty in locating enough pickers and markets during the peak production period.
Section 4. Preliminary Considerations A number of strawberry plasticulture production recommendations have changed over the last decade. The balance of this Introduction to Strawberry Plasticulture is intended to provide current information on a full range of production-related topics, from variety selection to plant tissue testing and the latest recommendations on row cover management.
Before setting the first strawberry plant, there are several preliminary considerations to address, including site, soil, equipment, plant material, nursery plant health and varieties. Site • Windbreaks. The most reliably productive strawberry plasticulture sites are almost
always those with a wooded area or a windbreak on the north or northwest side of the field. Wind not only has a drying affect on plant foliage, it can also impede frost protection efforts. New leaves in the early spring are especially susceptible to mechanical wind injury on exposed sites.
• Crop rotation. It is best to rotate strawberry field sites as often as possible, but the

5
general practice in most areas is to crop strawberries continuously on the same land because of existing irrigation lines and market location. Avoid rotations with crops treated with herbicides or plant growth regulators (or a combination of these) that could be residual in the soil and cause crop losses in strawberries. Read all pesticide labels carefully for rotational restrictions.
• Row orientation. A north-to-south row orientation is recommended for more uniform plant stands and ripening. However, if the field is almost flat, facilitating soil drainage is the most important factor.
• Wildlife. Most strawberry plasticulture sites require protection from deer within a month or two of planting. In areas with intense deer pressure, appropriate fencing should be erected no later than two weeks after planting. If deer are allowed to graze once, the likelihood of their return for another meal drastically increases. Fences provide the most effective control for prohibiting deer. Several configurations of electric fences are available. The most effective fence utilizes two fences spaced one and a half feet apart (an inner fence and an outer fence) using white electric tape instead of wire. The two layers of tape alter the deer’s depth perception deterring its effort to cross the first fence line. Many growers also manage deer pressure by practicing population reduction. Hunting deer outside of the regulated season requires a special permit from the N.C. Wildlife Resources Commission. Soil Soil structure is important for bed formation. Beds are made five feet apart, center-to-center. • Soil content. Strawberries grow and produce satisfactorily in a wide range of soil types,
but sandy loam and sandy clay-loam soils are ideal for building and shaping the 8-inch-deep raised beds that are critical to the success of the strawberry plasticulture system. Soils with high clay content or those that are rocky or very stony are more difficult for bedding, fumigation and plastic-mulch equipment. As a general rule, growers should consider using plug plants on soils with a high clay content for semi-mechanical transplanting (with a water wheel) rather than bare-root, fresh dug plants (which require hand transplanting). Sandy soils will require more careful irrigation and nutrient management. Research is ongoing to identify useful soil amendments, such as chicken compost, and testing of summer cover crops to improve soil structure.
• Soil pH. Optimal strawberry production requires a favorable root environment and the availability of essential nutrients. Soil pH is a key factor in maintaining a favorable root environment. Soils with a pH between 6.0 to 6.2 promote the best growth. A soil test can indicate what amendments need to be added to correct the pH. Soil testing services are available from NCDA&CS regional agronomists. Low pH is one of the most frequent problems identified on soil samples. Because the problem cannot be corrected after planting and low calcium (Ca) usually accompanies a low soil pH, testing and liming the soil as needed is especially important. Incorporate the lime based on the soil test recommendation at least two months before transplanting.
• Soil moisture. Strawberry plants require a continuous supply of water during periods of active growth, and drip irrigation is the most efficient method for slowly applying small

6
amounts of water directly to the strawberry plant’ s root zone in the pre-bloom, bloom and harvest period. It is important for growers to keep in mind that a standard 8- to 10-inch strawberry plasticulture bed has very poor capillary water movement and a drip irrigation system is going to be required to meet most of the moisture requirements of the crop. But, with good management of a drip irrigation system, strawberry root zone moisture content can be maintained close to optimum for plant growth, or near what is called “field capacity. In North Carolina, it is common practice to use the drip system to establish plug transplants in the late summer, but some overhead sprinkler irrigation should still be applied for the first two to three days after transplanting. It is also recommended that growers hook up their drip systems soon after planting for a post-plant chemical injection of Ridomil Gold if transplants are suspected to be infected with crown rot (Phytophthora cactorumi), or when a field has a history of this disease. To aid transplant establishment in October and November, it may be necessary to run the drip system for a few hours every few days during weeks of little or no rainfall. Drip systems are “winterized” in the late fall and are not re-connected until early March (around the time of new leaf development). Water loss from plants is much less during the dormant season (December to early February), and winter rains generally furnish adequate soil moisture through early March. However, in warm periods during mid-March (pre-bloom) it is not unusual for the crop’s water requirement to approach 1 inch/acre/week. On a daily basis this is about 3,880 gallons (1 acre-inch of water = 27,154 gallons). During the bloom, fruit set and harvest period, crop water usage will climb to 1.5 inches/acre/week (0.2 inches/acre/day), and in warm/hot weather it becomes necessary to apply as much as 1.75 inches/acre/week (0.25 inch/acre/day).
• Soil erosion and surface water management. Although raised beds encourage water drainage within the soil, plasticulture growers frequently encounter problems with getting rid of excess surface water. Because 50 percent of a plasticulture strawberry field is covered with an impermeable plastic film, the field should have enough slope that surface water drains uniformly and gently from the field after periods of heavy precipitation without causing erosion or leaving puddles. On fields with more than a two percent slope (a two-foot drop over 100 feet), continuous overhead sprinkling for establishment of fresh dug plants may cause severe soil erosion. It is often a good idea to broadcast annual ryegrass at a rate of approximately 50 pounds per acre over the entire field the same day you finish fumigating (before planting holes are punched). Ryegrass will reduce soil washing in the aisles after heavy rains or establishment irrigation on sloping terrain. The ryegrass should be killed or stunted by an application of post-emergence grass herbicide when it is about six inches tall or prior to applying the winter row cover.
Equipment
A specialized tractor implement is used to lay the drip tape and the plastic mulch at the same time.
• Field preparation. Once the soil as been properly amended for pH and nutrient availability, fields must be prepared for transplanting. Since the premise of plasticulture is a raised bed covered with plastic mulch, growers have come to rely on a multi-function tractor implement that reduces the number of passes through the field. Equipment for shaping the beds, fumigating the soil and laying plastic and drip tape, costs

7
approximately $5,500. New growers may consider hiring a contractor who has the necessary equipment. Custom applicators can form beds, inject fumigant, apply plastic and lay drip tape in one operation. As the fumigant is injected, the beds are immediately “tarped” with an embossed black plastic mulch film that can be “stretched” by the mulch laying/fumigation unit to give an extra tight fit over the bed. The black plastic film needs to be in direct contact with the soil (for maximum soil warming to occur in the late fall and winter months). If there are “air pockets” between the film and the soil, the black plastic will actually serve to cool the soil, and plant top-growth and root development will be significantly reduced.
Figure 4. Sandy loam and clay loam soils are ideal for building and shaping the 8 – to 10- inch raised beds that are a critical component to success in the strawberry plasticulture system. The raised beds are 8-10 in high, and 28 – 30 in wide at the base. These beds are fumigated 3-4 weeks prior to transplanting with a fumigant that is typically shank-injected (the label for some fumigants may also permit injection through the drip system).
• Overhead sprinkler irrigation. Strawberry plasticulture requires overhead sprinkler irrigation for establishing transplants, protecting blossoms from cold injury and for evaporative cooling in the event of a spring heat wave that could cause open blossoms to abort. Total cost for overhead sprinkler irrigation would be approximately $2,900 per acre. It is prudent to plan for at least 12 frost and freeze episodes per season. The water requirement for an overhead sprinkler irrigation system is usually estimated on the basis of three consecutive frost or freeze nights. For example, 5.4 acre-inches of water (27,152 gallons equal 1 acre-inch) would be needed for sprinkling at the rate of 0.18 inches per hour (for control down to 24 degrees Fahrenheit), for 10 continuous hours each night over three nights. Furthermore, 1.8 inches per night (10 hours times 0.18 inch) for three nights equals 5.4 acre-inches of water. An irrigation pond would need to hold about 150,000 gallons of water for each acre of plasticulture production under these conditions (5.4 acre-inches times 27,152 gallons per acre-inch equals 146,620 gallons). Several factors should be considered before installing an irrigation system:
• Water supply. Water may come from wells, ponds, lakes and municipal lines. An irrigation pond would need to hold about 150,000 gallons of water for each acre of plasticulture production to provide protection for three consecutive frost or freeze nights.
• Pumping capacity. A pumping capacity of as much as 90 gallons per minute (gpm) or 0.2 inches per hour is recommended for severe frost and freeze conditions.
• Pump. An electric pump is recommended for reliability so long as a reliable electric power service is available.

8
• Sprinkler type. Low-impact sprinklers are preferred. • Sprinkler spacing. A 40-foot by 40-foot triangular spacing will greatly improve the
sprinkling distribution pattern under higher winds as compared to matted-row spacing of 60-foot by 60-foot.
• Drip irrigation. The deep 8- and 10-inch beds require drip irrigation because capillary movement of water is poor. Drip irrigation provides the most efficient use of water and fertilizer. Many deep wells are fairly clean and require only a screen filter to remove particles. However, the presence of precipitates or other contaminants in the water should be determined by a water-quality test before considering the well for a drip system. Any surface water source, such as a stream, pond, pit or river, will contain bacteria, algae or other aquatic life, making sand filters or other special filters a necessity. For strawberries, drip tape is used to wet a continuous strip along the center of the row. A 12-inch emitter spacing is recommended for sandy loam and clay soils. For coarse sands, 8-inch emitter spacing is recommended. Drip emitter discharge rates are generally expressed in gallons per minute (gpm) per 100 feet of length for the selected emitter spacing. A common tape selection for plasticulture strawberries on sandy loam or clay soils uses 0.40 gpm emitters: 24 gallons per hour (gph) per 100 feet. To determine field water requirements in gpm per acre, simply multiply 24 gph times 87.12 (the number of 100-foot row units per acre on five-foot bed spacing) and divide by 60, which yields 35 gpm. The cost to install a drip irrigation system to these specifications is approximately $1,000 per acre. An additional cost of approximately $170 per acre will be required annually for the drip tape used in the rows. Because strawberries grown on plastic mulch are considered annuals and are grown for only one season, thin, disposable drip tape (8 mils thick) is commonly used. Once a drip irrigation system is installed, the crop can be fertilized via the drip system (fertigation).
Plant Material Strawberry plant material is utilized in three forms in North Carolina depending on the strawberry producing region. Plants may be acquired as plugs, fresh dugs and cutoffs. Approximately 55 percent of the strawberries grown in North Carolina are grown from plugs, while 35 percent start as fresh dugs with the remaining 10 percent grown from cutoffs. The mountains, foothills and Piedmont primarily use plugs. In fact, the mountains are restricted to using plugs since the fresh dugs are not available until after their last acceptable planting date. Growers in the coastal plains primarily use fresh dugs. A most southeastern region of the coastal plains can also use cutoffs. These types of plant material are all “fresh” as opposed to dormant. Fresh dugs and cutoffs are bare-root plants, while plugs are runner tips that have been rooted in a peat-based media and feature an intact root-ball. The distinction between fresh dugs and cutoffs is that fresh dugs retain the vegetative foliage while the foliage of cutoffs has been mowed prior to digging from the propagation bed. Plugs are the most expensive type of plant material, while cutoffs are the least expensive.

9
Figure. 5. From left to right: plug plant, cutoff and freshly dug bare-root plant (far right).
Strawberry plants (runners) are asexually propagated through tissue-culture in a micropropagation lab. The plants are grown out for up to four generations in the nursery. Runners harvested after two years of growth in the field nursery are considered “registered,” while those grown for three years in the field are referred to as “certified.” The most vigorous plants are the first year nursery plants, called foundation or white tag plants; however these are cost prohibitive to producers and serve only as nursery stock. Each year thereafter, there is reduced vigor.
The plugs are rooted in North Carolina from runner tips grown in Canada or western North Carolina. Fresh dugs are grown in Canada and western North Carolina. The Canadian fresh dugs primarily come from two provinces: Prince Edward Island and Ontario. The cutoff plants are all propagated in northern California.
Plugs. Strawberry plugs are nearly twice the cost of fresh dug or cutoff strawberry plants, but they have the advantage of being suitable for mechanical transplanting with a water-wheel or disposable pot mulch planter. Part-time growers, who do not have the time to oversee the continuous overhead watering of fresh dugs during the first week following field transplanting, should use plugs. Also, less experienced growers are encouraged to consider planting plugs because they are more “mistake-proof” than highly perishable, fresh dug plants. Transplanting dates for plugs can also be slightly later than for fresh dugs without as great a yield reduction. This is because plugs establish more quickly than fresh dugs after transplanting. Commercial grower experiences in North Carolina suggests using overhead sprinklings for the first, second and possibly third day following plug transplanting for approximately five hours, three hours and two hours per day, respectively. Drip irrigation has proven to be very important during the fall season to meet the plants water requirement during dry periods in the late fall. Growers should be aware that plug orders need to be placed by early to mid-June to ensure availability.
10
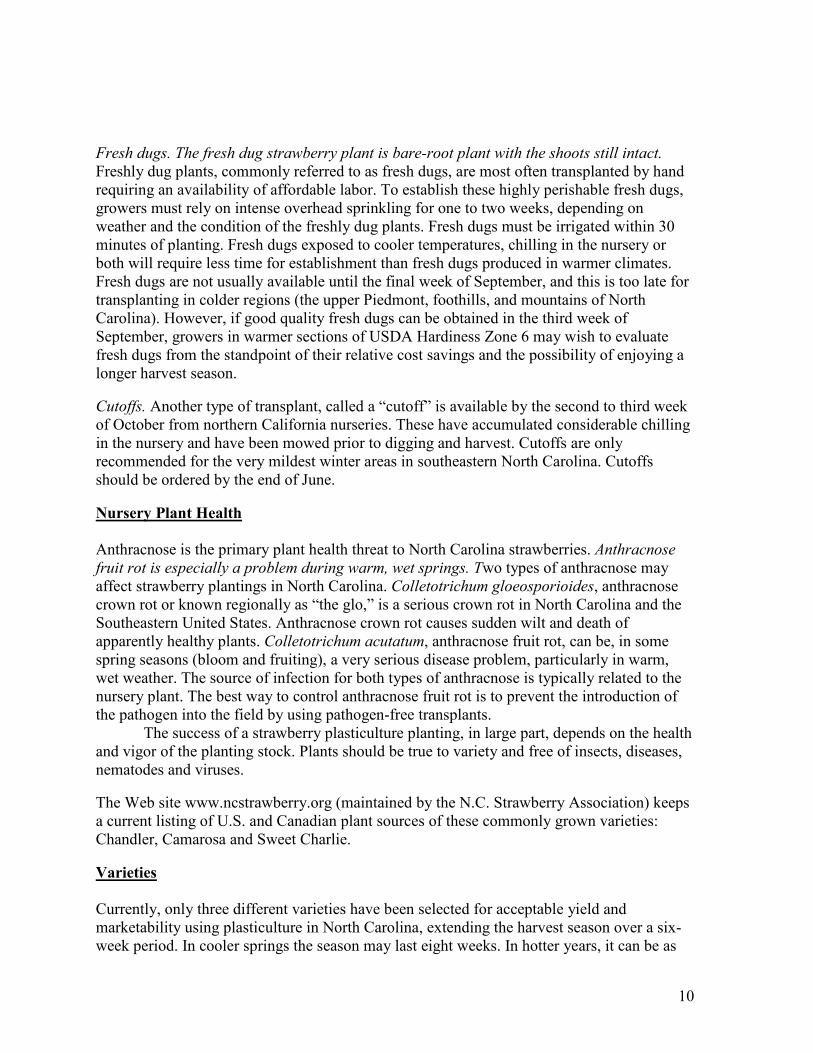
Fresh dugs. The fresh dug strawberry plant is bare-root plant with the shoots still intact. Freshly dug plants, commonly referred to as fresh dugs, are most often transplanted by hand requiring an availability of affordable labor. To establish these highly perishable fresh dugs, growers must rely on intense overhead sprinkling for one to two weeks, depending on weather and the condition of the freshly dug plants. Fresh dugs must be irrigated within 30 minutes of planting. Fresh dugs exposed to cooler temperatures, chilling in the nursery or both will require less time for establishment than fresh dugs produced in warmer climates. Fresh dugs are not usually available until the final week of September, and this is too late for transplanting in colder regions (the upper Piedmont, foothills, and mountains of North Carolina). However, if good quality fresh dugs can be obtained in the third week of September, growers in warmer sections of USDA Hardiness Zone 6 may wish to evaluate fresh dugs from the standpoint of their relative cost savings and the possibility of enjoying a longer harvest season.
Cutoffs. Another type of transplant, called a “cutoff” is available by the second to third week of October from northern California nurseries. These have accumulated considerable chilling in the nursery and have been mowed prior to digging and harvest. Cutoffs are only recommended for the very mildest winter areas in southeastern North Carolina. Cutoffs should be ordered by the end of June.
Nursery Plant Health Anthracnose is the primary plant health threat to North Carolina strawberries. Anthracnose fruit rot is especially a problem during warm, wet springs. Two types of anthracnose may affect strawberry plantings in North Carolina. Colletotrichum gloeosporioides, anthracnose crown rot or known regionally as “the glo,” is a serious crown rot in North Carolina and the Southeastern United States. Anthracnose crown rot causes sudden wilt and death of apparently healthy plants. Colletotrichum acutatum, anthracnose fruit rot, can be, in some spring seasons (bloom and fruiting), a very serious disease problem, particularly in warm, wet weather. The source of infection for both types of anthracnose is typically related to the nursery plant. The best way to control anthracnose fruit rot is to prevent the introduction of the pathogen into the field by using pathogen-free transplants.
The success of a strawberry plasticulture planting, in large part, depends on the health and vigor of the planting stock. Plants should be true to variety and free of insects, diseases, nematodes and viruses.
The Web site www.ncstrawberry.org (maintained by the N.C. Strawberry Association) keeps a current listing of U.S. and Canadian plant sources of these commonly grown varieties: Chandler, Camarosa and Sweet Charlie.
Varieties Currently, only three different varieties have been selected for acceptable yield and marketability using plasticulture in North Carolina, extending the harvest season over a six-week period. In cooler springs the season may last eight weeks. In hotter years, it can be as

11
short as four weeks. These varieties are: Sweet Charlie, Chandler and Camarosa.
Both Sweet Charlie (early variety) and Chandler (early midseason variety) are widely adapted throughout North Carolina. Camarosa (a midseason variety) is limited to the growing areas with a milder winter, such as the coastal plains of North Carolina. Camarosa is also being grown throughout the Piedmont with the provision that over-winter row covers are used from late December through early March. Sweet Charlie is used in limited numbers to start the harvest season. Chandler is the most reliable variety for the upper Piedmont, foothills and mountain regions. In addition to regional climate variations, market purpose may also determine which variety a grower chooses. Chandler is an excellent U-pick berry, but its shelf life is limited as a pre-pick berry compared to Camarosa.
While strawberry varieties are classified as June bearing, everbearing and day neutral depending on their response to photoperiod (flowering relative to daylength), the commercially grown varieties in North Carolina are all June bearers. Home gardeners may choose everbearing or day neutral berry varieties, but they are not currently considered viable options for large scale production.
Considerable research is now underway testing day neutral strawberries that are best adapted to summer and fall fruiting in high elevations (2,500 ft or more). Two California cultivars, Albion and Seascape, have proven to be high yielding with dessert quality fruit. Both varieties are worthy of trial in the summer and fall fruiting system at high elevations.
Sweet Charlie. For an early market niche, Sweet Charlie is the variety of choice. It ripens about five to seven days ahead of Chandler, and possibly two weeks ahead if a row cover is applied in mid-winter. Growers do not generally plant more than 10 percent of their acreage with Sweet Charlie, but in some years that 10 percent will account for 20 to 25 percent of the operation’s profits. The ripening season for Sweet Charlie is rather interesting; it has two weeks of very good quality early production, but then size falls off rather drastically and it does not compete well with Chandler, an early-midseason variety. In some years, growers experience a second crop of very large Sweet Charlie berries in the final week of the strawberry season. Many consumers actually show a preference for Sweet Charlie berries, which have a high sugar to acid ratio. Sweet Charlie should be planted at 12-inch in-row plant spacing (for a double-row bed on a five-foot center, 12-inch in-row spacing will require 17,500 plants per acre).
Optimum planting dates for Sweet Charlie will vary with region. But, as a general rule, this variety must be transplanted at least seven days ahead of Chandler. Plugs are usually preferred for Sweet Charlie over fresh dug, bare-root transplants. Field observations suggest that Sweet Charlie may be more susceptible to Phythophthora cactorum (crown rot) than Chandler or Camarosa. Sweet Charlie is generally recognized as being resistant to anthracnose fruit rot.
Chandler. This is the standard cultivar for the U-pick producers in North Carolina because of its high yield compared to other plasticulture varieties and because it is well liked by consumers for its good flavor, size and attractive red color. Given its widespread use for U-pick, it should be planted at 14-inch in-row plant spacing for easier customer harvest (for a double-row bed on five-foot center, 14-inch in-row spacing will require 15,000 plants per

12
acre). Plugs and fresh dug, bare-root plants are usually comparable in yield performance for Chandler, but fresh dugs may have an advantage from the standpoint that they do not concentrate the ripening of the crop as much as plugs in some spring seasons. Optimum plug planting dates for Chandler vary with region (fresh dugs should be set three to five days earlier than plugs):
Mountains, high elevation: first week of September Mountains, lower elevation: second week of September Foothills: third week of September Upper Piedmont and tidewater: fourth week of September Piedmont transition to coastal plain: first week of October Sandhills: first week of October, but the last week of September is also fine
for colder locations, especially for fresh dugs Lower coastal plain: second of week of October or third week for warmer
sites. For southeastern counties like Brunswick, it is fine to go as late as the fourth week of October.
Chandler is quite cold hardy and does not generally require winter protection (straw or row covers) for most growing areas in North Carolina. However, winter temperatures below 10 degrees Fahrenheit will cause extensive flower and crown injury in this variety. For this reason, row covers are strongly recommended for areas where there is a potential for periods of extreme cold in winter (less than 10 degrees Fahrenheit). Based on recent research with row covers in upper mountain areas (elevations higher than 2,500 feet), it has been determined that row covers (1.5 oz per sq yd) applied in late November to early December for additional winter protection and then removed in early March (before new blossoms reach the “popcorn” stage) can significantly improve Chandler yields compared to unprotected plantings. The row covers will also assist with deer protection, and they can be reapplied for cold protection of flower buds and blossoms in late winter to early spring.
Camarosa. Camarosa is primarily grown for pre-pick and is gaining popularity as a U-pick variety. Camarosa has superior shelf-life and handling characteristics compared to Chandler. In the warmer winter areas of North Carolina, Camarosa production now surpasses Chandler in acreage. The fruit is very large and firm and holds up well in rainy weather. To achieve the best Camarosa flavor, it is important to delay picking past the glossy bright red stage and to train pickers to harvest Camarosa when it takes on a darker color. However, when it becomes wine-red in color, it is becoming overripe. It is currently believed that the optimum planting dates for Camarosa are about the same time as Chandler, but most growers prefer to set this variety at least three days ahead of Chandler. Camarosa is typically planted at 14-inch in-row plant spacing (for a double-row bed on a five-foot center, 14-inch in-row spacing will require 15,000 plants per acre). Camarosa can really strengthen mid-to-late season sales when Chandler quantity and quality declines as the temperatures increase. This variety is receiving increased attention for its season extending potential.
Section 5. Production Schedule Decisions made throughout the entire 12-month production cycle can make a big impact on the success of each strawberry season, however, very close attention to detail is required

13
during the pre-plant and planting stages. The pre-plant and planting periods are times when growers should anticipate at least $5,000 per acre in operating expenses for pre-plant fertilizers, fumigants, plastic mulch, drip tape and plants. Plants will be the principal cash outlay and costing as little as $1,350 per acre for bare-root fresh dugs to as much as $3,750 per acre for plug transplants (assuming a planting density of 15,000 plants per acre, based on average prices from 2009).
Pre-planting Ensure fertility. Complete a soil test several months before planting to determine how much dolomitic lime is needed to raise the soil pH and how much potash (K2O) fertilizer to apply before bedding. If a soil test was not taken prior to shaping the beds, use these standard recommendations: Apply 60 pounds nitrogen (N) per acre, 60 pounds phosphate (P2O5) per acre and 120 pounds potassium (K2O) per acre. Broadcast these fertilizers and lightly incorporate before bedding and fumigation. Ammonium nitrate is recommended for the pre-planting nitrogen application. A broadcast application of 175 pounds per acre of ammonium nitrate will deliver 60 pounds of nitrogen per acre. In general, a P2O5 application of 60 pounds per acre should be incorporated, even on soil with a high phosphorus index. However, on soils that have ultra high levels of phosphorus (typically areas where large amounts of poultry manure have been applied), this application can be deleted. A pre-bedding broadcast application of 120 pounds triple superphosphate (50 percent) can supply 60 pounds of P2O5 per acre. Soil testing also determines the need for potash (K2O). Potassium sulfate is a very good source of K2O for strawberries (50 to 53 percent), and it provides some sulfur as well (18 percent). If the soil test recommends 60 pounds K2O per acre, then a broadcast application of 120 pounds of potassium sulfate fertilizer (50 percent K2O) can be applied to meet the crop’s potash requirement. Other nutrients can be injected as called for (preferably as the result of tissue testing) through the drip irrigation system.
Shape the beds. Avoid using a vegetable bed-maker. Instead, stick with the bed-making equipment that is specifically designed for deep strawberry plasticulture beds. Reddick and Kennco are two of the leading suppliers. A deep bed will produce higher yields and fruit with less soil splash. The 10-inch deep beds mulched in plastic are typically 30- to 32-inches wide at the base and 28- to 30-inches wide on top. Beds are slightly crowned so water will run off and not rest on the plastic. For example, a bed with a 28- to 30-inch top should slope from the center to the edge with a drop of 1.25 inches. Applying straw mulch to the aisles to keep the berries clean is not necessary with 10-inch deep beds. Bed centers are usually 5 feet. Most machines have some specific advantages, and it is worthwhile to investigate these differences. Almost all of the machines sold will form the bed, fumigate, lay plastic mulch and install drip tape in one operation. In general, the single-row bed-making and plastic-laying machines are appropriate for most strawberry operations. Be sure that enough soil is pulled up so that the bed has good, sharp corners and no depression in the center (it is not usually possible to get these sharp corners on clay soils). You may find it beneficial to pre-bed the rows to make sure that enough soil will be pulled up for the bed-shaper-the same disk hillers used for making tobacco beds work nicely for strawberry pre-bedding. The extra pains involved in getting your land “just right” for forming beds, such as laying plastic and fumigating, will pay off in better plant growth in the fall and winter seasons.

14
Install plastic mulch. Ideally, strawberry beds have the plastic mulch in direct contact with the soil beneath. If there are air pockets beneath the plastic, plant growth will be slow in the fall and winter. Heat from the black plastic will not be conducted into the soil if there are air pockets. In fact, the black plastic will have a cooling effect if it is not in good contact with the soil beneath. In very recent years most of the N.C. strawberry industry has transitioned to higher barrier plastic films such as virtually impermeable films (VIF) or mulches that allow very little methyl bromide and other fumigant gases to pass through it. These nearly impermeable films make it possible to significantly reduce fumigant application rates by helping to contain the fumigant within the soil and reduce overall emissions into the atmosphere. Use black plastic 1-mil to 1.25-mil VIF for strawberry plasticulture production. On 5-foot row centers there are 8,712 linear feet of row per acre, so you will need about 3.5 rolls (2,400 feet) of plastic mulch per acre. For 6-foot centers, 3 rolls of plastic mulch will be required per acre. It is important that the plastic fit tightly on the bed and that the edge of the plastic, or the tuck, be held firmly in the soil. These measures reduce the chance of wind getting under the plastic and causing it to blow off or float up and down, which injures plants.
Install drip tubing. Install drip tubing with the orifices facing upwards. The tubing is typically buried 1 or 2 inches deep in the bed center. During installation several workers should be watching to insure that the tubing maintains its orifice-upwards orientation. The workers are responsible for assisting if the tubing becomes tangled in the injector and signal when the drip tape reel is empty. Tubing ends should be closed off by kinking or knotting until the tubes are hooked up to the system. Growers have the option of using only overhead sprinklers in the fall, but the drip system should be functional by late winter.
Fumigate. Fumigants have been used in combination with plastic mulch row covers since the early 1980′s for broad spectrum soilborne pest and disease control in strawberry plasticulture. New land that has been subject to good crop rotations and best management practices (such as cover cropping and good drainage strategies) can, under optimum conditions, generate yields that are 85 to 95 percent of the yields in fumigated soil. Weed control, however, can be a serious problem. Strawberry plasticulture production on the same site year after year is not advisable without pre-plant fumigation because of potential weed and disease problems.
With rising cost and scarcity of methyl bromide, which is being phased- out nationally and internationally under provisions of the Montreal Protocol (effective January 1, 2005), there has been an intensive search underway for a broad spectrum replacement fumigant for methyl bromide over the last decade. Methyl bromide is a stratospheric ozone depleting compound. A newly registered broad spectrum fumigant that has potential to replace methyl bromide is methyl iodide:chloropicrin (Midas 50:50). Similar to methyl bromide, Midas 50:50 has a two-week plant-back period. This product has performed well in comparison to methyl bromide in university research trials. Other registered fumigants for strawberries have plant-back intervals of 21 days or more. As a general rule, you should begin land preparation for bedding and fumigation at least six weeks ahead of planting with the use of methyl bromide:chloropicrin (50:50), and seven weeks ahead of planting for Telone C-35.
Schedule fumigation far enough in advance to allow for plant-back restrictions for the particular chemical used as well as unexpected setbacks that can occur with weather. If

15
adverse weather prevents fumigation, it may be better to plant on time and not fumigate than to fumigate and plant extremely late; if the site is fairly free of noxious diseases and weeds, such as nutsedge.
Stay on schedule. Here is a sample schedule for a grower in Zone 6 who wants to set out Chandler plugs in the second week of September, and where the producer has decided to use methyl bromide. For growers using a fumigant requiring a 21-day plant-back, plan on starting at least one week earlier.
July, week 4. Whenever there is adequate soil moisture, begin preparing the soil so you can shape the beds and fumigate in early August. In an unusually dry July, you may be forced to irrigate overhead to get the land ready for chisel plowing and sub-soiling. Sub-soiling is needed every few years on heavy soils. This should be done in two directions, north-south and east-west, and it needs to be done deeply to loosen the soil and break up the plow layer (at 10 to 12 inches deep). Breaking up this layer will require setting the draft control so the V-ripper doesn’t come up easily when it hits the hard spots. This operation requires extra horsepower. Be sure to incorporate your lime at this stage if you haven’t done so already. Ideally, the lime should be spread in June, just after the plastic is pulled and the beds are knocked down.
August, week 1. Have fumigant cylinders delivered to the farm and complete fumigation rig safety checks. Check with your fumigant supplier to be sure the cylinders are delivered on time and to ensure that the proper safety checks are used.
August, week 2. Broadcast N-P-K fertilizers and disk them into the soil to prevent nitrogen loss. Disk to a depth of 6 inches, breaking up clods until the soil has a “fluffy” texture. Don’t use equipment that will compact the soil (a rotary hoe or rototiller may cause compaction).
August, week 3. Shape the beds and fumigate with methyl bromide + chloropicrin. Lay plastic mulch and drip tape. As the fumigant is injected, the beds should be immediately “tarped” with an embossed 1-mil black plastic mulch film that can be “stretched” by the mulch-laying and fumigation unit to give an extra tight fit over the bed. Also, if rooting your own plugs, now it the time to stick tips. It is time to sow annual ryegrass if you want to ensure erosion control in the field aisles.
September, week 2. Transplant plugs. Always try to allow three weeks between fumigation and planting, even though methyl bromide: chloropicrin (50:50) is a two-week plant-back material. This extra week will provide a “cushion” for possible weather delays that may occur. Likewise, for a 21-day plant-back fumigant, you really need to allow a four-week waiting period between fumigation and planting. Thus, fumigation with Telone C-35 should be done in the third week of August for an area that will be planted in the third week of September.
Fall season growth Runner removal in the fall is recommended. Avoid removing runners until about three to four weeks following transplant. Complete a follow-up runner removal operation at six weeks following transplant if necessary. Plug transplants that are established in September
16
are particularly susceptible to a fall runnering problem. There is generally less problem with fresh dug plants than plugs.
Plant canopy and runners. Plants should have three or more fully green leaves remaining at the end of the initial three- to four-week establishment period, regardless of whether they are fresh dugs or plugs. If the “original” leaves on a fresh dug or plug are lost to drought stress, plant establishment will be significantly delayed or “set back” and spring yields will be significantly reduced. The number of leaves and total plant leaf area in the late fall/early winter can be correlated with fruit production the following spring.
Runners that develop in the fall can be removed to prevent competition with branch crown formation and overall growth of the main plant that was transplanted in September/October. Runners that develop in the fall can be removed to prevent competition with crown formation and floral bud development:
• Avoid removing runners until about three to four weeks following transplanting. • Complete a follow-up runner removal operation at six weeks following transplanting
if necessary.
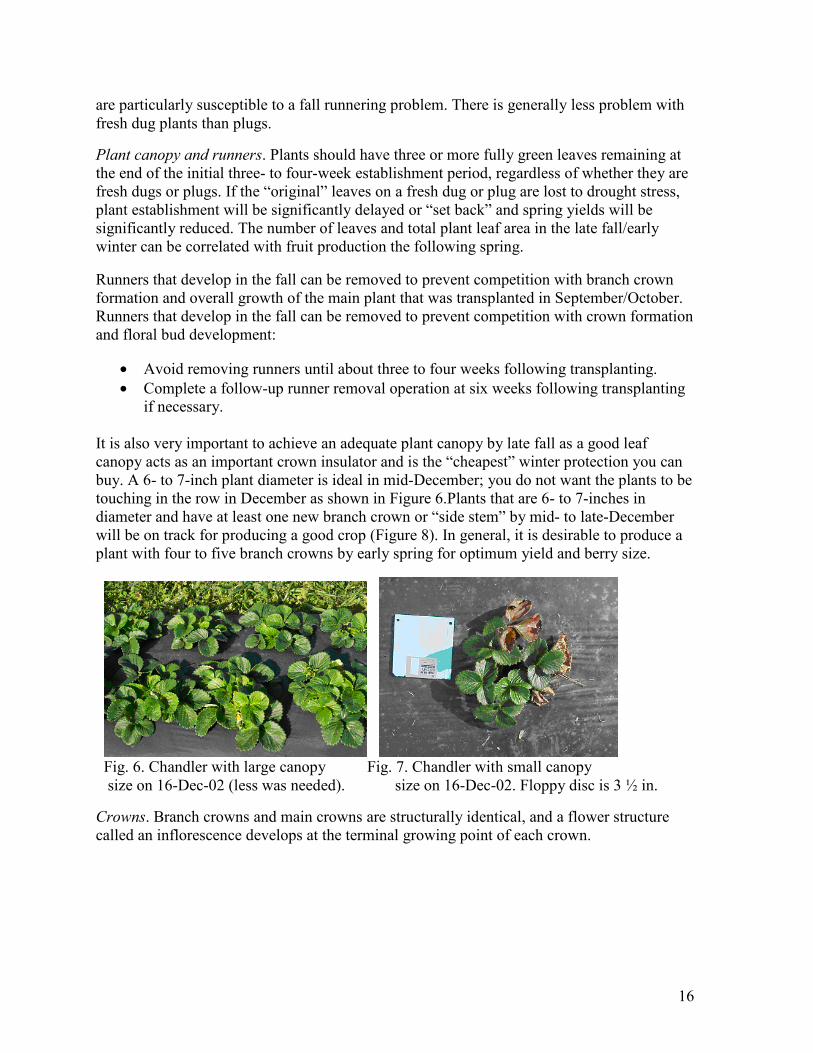
It is also very important to achieve an adequate plant canopy by late fall as a good leaf canopy acts as an important crown insulator and is the “cheapest” winter protection you can buy. A 6- to 7-inch plant diameter is ideal in mid-December; you do not want the plants to be touching in the row in December as shown in Figure 6.Plants that are 6- to 7-inches in diameter and have at least one new branch crown or “side stem” by mid- to late-December will be on track for producing a good crop (Figure 8). In general, it is desirable to produce a plant with four to five branch crowns by early spring for optimum yield and berry size.
Fig. 6. Chandler with large canopy Fig. 7. Chandler with small canopy
size on 16-Dec-02 (less was needed). size on 16-Dec-02. Floppy disc is 3 ½ in.
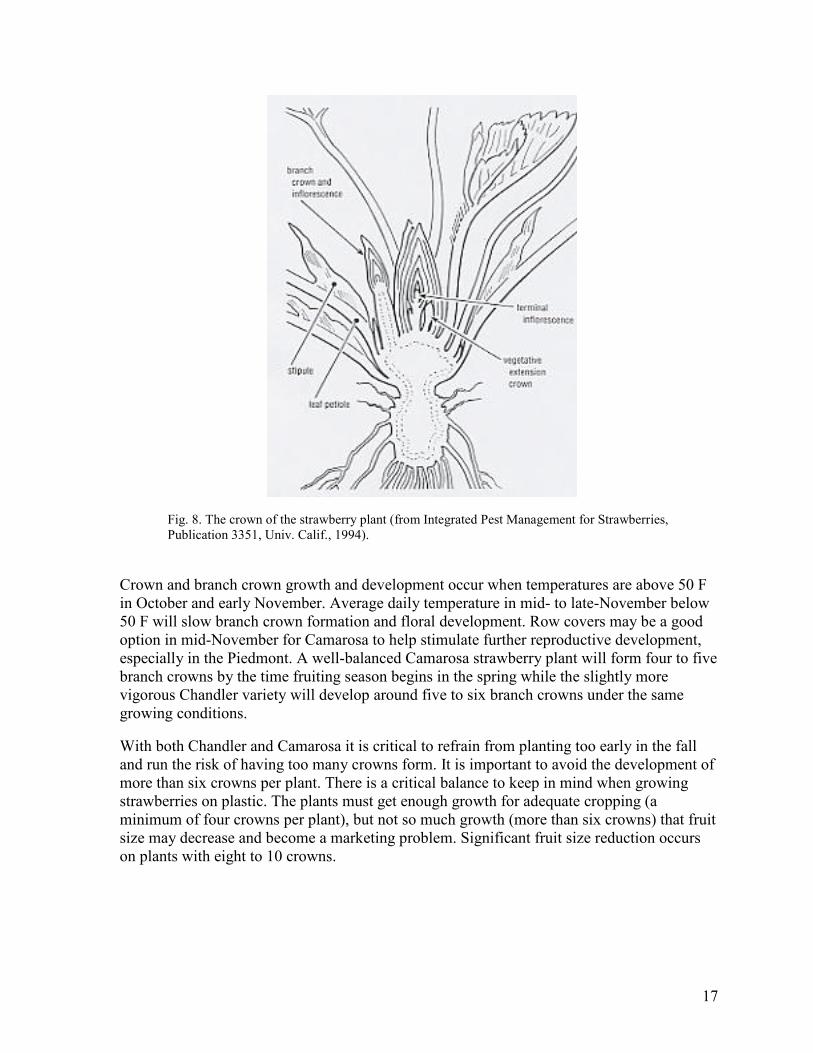
Crowns. Branch crowns and main crowns are structurally identical, and a flower structure called an inflorescence develops at the terminal growing point of each crown.
17
Fig. 8. The crown of the strawberry plant (from Integrated Pest Management for Strawberries, Publication 3351, Univ. Calif., 1994).
Crown and branch crown growth and development occur when temperatures are above 50 F in October and early November. Average daily temperature in mid- to late-November below 50 F will slow branch crown formation and floral development. Row covers may be a good option in mid-November for Camarosa to help stimulate further reproductive development, especially in the Piedmont. A well-balanced Camarosa strawberry plant will form four to five branch crowns by the time fruiting season begins in the spring while the slightly more vigorous Chandler variety will develop around five to six branch crowns under the same growing conditions.
With both Chandler and Camarosa it is critical to refrain from planting too early in the fall and run the risk of having too many crowns form. It is important to avoid the development of more than six crowns per plant. There is a critical balance to keep in mind when growing strawberries on plastic. The plants must get enough growth for adequate cropping (a minimum of four crowns per plant), but not so much growth (more than six crowns) that fruit size may decrease and become a marketing problem. Significant fruit size reduction occurs on plants with eight to 10 crowns.

18
Fig. 9. The “growing point” of the strawberry is in the center. Note the formation of a new side stem, or branch crown, that has begun to form in late December. There is excellent potential for a yield in excess of 2 lbs. per plant (> 15 tons per acre) when you can see the formation of 1 to 2 side crowns in addition to the main crown (center) in late fall/early winter. Plants should have three or more fully green leaves remaining at the end of the initial three- to four-week establishment period, regardless of whether they are fresh dugs or plugs. If the original leaves on a fresh dug or plug are lost to drought stress, plant establishment will be significantly delayed and spring yields will be significantly reduced. The number of leaves and total plant leaf area in the late fall and early winter can be correlated with fruit production the following spring.
It is also very important to achieve an adequate plant canopy by early winter as a good leaf canopy acts as an important crown insulator in winter. An 8-inch plant diameter is ideal in mid-December. For good berry production, each plant should form one or two side stems (the branch crowns) and eight to 10 leaves by mid-December.
Roots. Rooting is active throughout the fall and early winter as long as soil temperature is above 45 F and roots remain healthy. It is important in the fall season to maintain adequate moisture in the beds for active root development. To aid transplant establishment in October and November, it may be necessary to run the drip system for a few hours every few days during weeks of little or no rainfall.
The roots also serve as storage sites for starch reserves during winter. Growers who “push” fall top-growth with extra nitrogen feeding may be doing so at the expense of starch accumulation in the roots. The stored starch is needed for vigorous growth and flowering in the spring, which will enhance berry size.
Fig. 10. Strawberry plugs that have been planted for 5 days (left) and 12 days (right). You can see the formation of primary roots in the photo (long and stringy appearance). Small white secondary roots (rootlets) make up the bulk of the strawberry root system.

19
5.3 Fall and Early Winter Fertility
If beds were prepared as described under Pre-planting, no fertilizer should be needed after transplanting. It takes strawberry plants (especially fresh dugs) two to three weeks to establish a new root system, and you should not expect the plant’s top-growth to look that healthy and vigorous during this initial period. Thus, growers should not be alarmed if fresh dugs do not appear to have adequate nitrogen in the first two to three weeks following transplanting – it takes this much time for the plants to establish a new root system that is able to take-up the nitrogen, phosphate and potassium fertilizers that were applied prior to bedding. After three weeks, you should see the plants “color up” and begin to produce healthy new leaves. If pre-plant fertilizers were not applied, then it will be necessary to begin a fertigation program starting in the third week following transplanting. However, pre-plant fertility should never be omitted in favor of a drip fertigation program. In addition, if plant growth is over-stimulated with excess nitrogen in the fall the resulting larger plant size and heavy leaf canopy the following spring will:
1. Hinder picking – it becomes difficult to find the fruit with large “bushes”;
2. There will be increased disease incidence (mainly botrytis); and,
3. Fruit quality and flavor will be negatively influenced by extra thick plant canopies – if the leaves nearest the berries are well-exposed to light (not shaded by other leaves), you can anticipate higher fruit sugars and more favorable remarks from your customers.
Managing Wildlife, Diseases and Pests
Wildlife. Electric fences should be put up no later than the third or fourth week in October to protect succulent new strawberry plants from deer. Yield loss associated with deer depredation can be 50 percent or more in unprotected fields.
Anthracnose. If anthracnose is positively identified in newly established plants, apply a strobulurin (such as Quadris or Cabrio), before colder temperatures in late fall to protect the plants from colonization. This treatment can potentially prevent the establishment of an epidemic in anthracnose susceptible varieties including Chandler and Camarosa. See the Disease section of this notebook for more information.
Root-pathogenic fungi. Fungi such as Phytophthora cactorum (crown rot) can severely limit root development. If your site has a prior history with this disease or plants have a P. cactorum infection, take recommended preventive measures:
Mites. A miticide application may be needed in the early fall to prevent two-spotted spider mites from reaching damaging levels in the late winter.
• Check plugs carefully for mites three to four weeks after transplanting. • Make the miticide application before the late fall or early winter application of row
covers if row covers are being used for winter protection.

20
Botrytis crown rot. This disease becomes a concern in unusually warm falls when there can be significant blooming. Botrytis crown rot colonizes the dead flower tissues and moves into the crown.
Literature citations: Darrow, George M. The Strawberry, History, Breeding and Physiology, Holt, Rinehart and Winston, Chicago (1966). Charles D. Safley, E. Barclay Poling, Michael K. Wohlgenant, Olga Sydorovych, and Ross F. Williams. 2004. Producing and marketing strawberries for direct market operations. HortTechnology, 14(1)16-27.