Amigurumi Parent and Baby Animals Ebook3000
120
includes basic crochet instructions AMIGURUMIPATTERNS.NET Crochet soft and snuggly moms and dads with the cutest babies!
description
amigurumi
Transcript of Amigurumi Parent and Baby Animals Ebook3000

includes
basic crochet
instructions
AMIGURUMIPATTERNS.NET
Crochet soft and snuggly moms and dads with the cutest babies!

Amigurumi Parent and Baby Animals
First published September 2015
© 2015 - Amigurumipatterns.net / Meteoor bvba
Mutsaardstraat 18, 2000 Antwerpen, Belgium
www.amigurumipatterns.net
Have you made amigurumi with patterns from this book?
Share a picture on facebook.com/AmigurumiPatterns.net
or on instagram with #parentandbabyanimals
PLEASE NOTE:
All rights reserved.
No part of this publication may be reproduced, stored in a
retrieval system or transmitted in any form or by any means
without the prior written permission of the publisher and
copyright owner.
The book is sold subject to the condition that all designs are
copyright and are not for commercial reproduction or educa-
tional purposes without the permission in writing of the publish-
er and copyright owner.
It is the buyer’s sole responsibility to ensure his original copy is
not distributed illegally online or ofline. Any illegal sharing (by you or a third party using your copy) may be tracked back to
the original buyer who may be held responsible for lost sales.

AMIGURUMIPATTERNS.NET
Crochet soft and snuggly moms and dads with the cutest babies!

Hi!
Each year we organize a design competition for crochet lovers on
our website www.amigurumipatterns.net. It's the loveliest time of
the year, as it's amazing to see all these creative designs pour in.
The theme of our latest contest, elaborated upon in this book,
reached new heights in terms of cuteness. You'll find the sweetest
baby animals accompanied by their proud parents. A baby penguin
is driven around in his eggshell buggy, baby sloth spends all day on
mom's belly and baby bear celebrates his first birthday ... They will
all steal your heart away.
Occasionally you'll see an adult amigurumi with tired eyes, because
these mommies and daddies are not afraid to admit that parenting
sometimes has its downsides. Those sweet amigurumi babies need
constant attention after all, and a good night's sleep can be hard to
come by. But it takes just one smile or a mischievous look from their
little ones and they are completely in love again.
This new book contains twelve of the participating patterns –
25 characters in total. They all make great gifts for new parents or
playmates for your children.
Maybe you are making your very first amigurumi? Then don’t worry
– it's easy as pie! The book begins with a number of pages dedicated to
explaining all the basics. If you make characters from the patterns in
the book and would like to share the results, your photos are wel-
come at facebook.com/AmigurumiPatterns.net or on instagram with
#parentandbabyanimals. We look forward to seeing your amigurumi!
Happy crocheting!
Joke Vermeiren
www.amigurumipatterns.net

Basic materials | page 6
What you should know before you start | page 7
Stitches | page 8
Mom Tilda & baby Earl armadillo (Patchwork Moose) | page 16
Little Tim the fawn & his mommy (Stuff The Body) | page 28
Maisy mouse & baby Charly (Erinna Lee) | page 37
July the kangaroo & her baby Jumpy (Kamlin Patterns) | page 42
Mama Lulu & baby Bea the sloths (Mevvsan) | page 50
5
16
28
37
42
50
56
66
79
85
98
104
11
0
page 56 | Rosy the T-rex & her baby boys (Lia Arjono)
page 66 | Dashy the beagle & his baby boy (Enna Design)
page 79 | Butterfly Bree & baby caterpillar Calin (Zabbez)
page 85 | Mama bear, papa bear & baby bear (Tales of Twisted Fibers)
page 98 | Mama Octa & her baby octopi (Diceberry Designs)
page 104 | Papa penguin & baby Pierre (Moji-Moji Design)
page 110 | Mama Frida monkey & baby Lila (Jamaica Y Tamarindo)
page 116 | Designers
CONTENTS

Colorful yarn
With every pattern in this book we list the materials used
to create that amigurumi. Any type of cotton, acrylic or
wool can be used. Yarn comes in different weights. The
yarn weight used in the original design is specified in
each pattern, you can however change this to suit your
preference provided you match it with the right crochet
hook. Much of what you need to know is on the yarn
label, but it might take a little bit of decoding. We have
added a chart below to help you make the right choice.
The amounts of yarn you need are rather small and will
vary according to how loosely or tightly you crochet, we
have added an estimate of the amount needed for each
pattern. You could use some of the remnants from other
projects or start with a new ball of yarn.
Crochet hooks
Not only yarn, but hooks as well come in different sorts
and sizes. Bigger hooks make bigger stitches than smaller
ones. It is important to match the right hook with the
right weight of yarn. The size of hook used for the original
design is indicated with each pattern. The crochetwork
should be quite tight, without any gaps through which
stuffing can escape. It is best to use a smaller hook than
stated on the yarn label to achieve this. Hooks are usually
made from aluminium, steel or plastic. Metal hooks tend
to slip between the stitches more easily.
Stitch marker
A stitch marker is a small clip made of metal or plastic.
It’s a simple tool to mark your starting point and give
you the assurance that you’ve made the right number of
stitches in each round. With my stitch marker I always
mark the last stitch of the previous round.
Stuffing and facial features
For the filling polyester fiberfill is advised. You can buy
this at any craft shop. It is inexpensive, washable and non-
allergenic. Be careful not to overstuff your character as
the stuffing might stretch the fabric and show through.
For some patterns safety eyes are used. These are widely
available. Be alert when you apply safety eyes: once you
put the washer on you won’t be able to pull it off again.
So be careful to make sure the post is where you want
it to be before attaching the washer. Alternatively, the
features can be embroidered, which is recommended if
you’re crocheting for children under the age of three. For
embroidery a tapestry needle with a rounded tip is used.
HOOK IN METRIC SIZE
NUMBER
CATEGORY
UK YARN
US YARN
HOOK IN US SIZE
1 2 3 4
super fine fine light medium
2,25 to 3,5mm
3,5 to 4,5mm
4,5 to 5,5mm 5,5 to 6,5mm
B-1 to E-4 E-4 to 7 7 to I-9I-9
to K-10 1/2
Fingering Sport LightWorsted
Worsted
3 ply 4 plydouble
knitting (DK)aran
6
BASIC MATERIALS
* For amigurumi you generally use a hook 2 or 3 sizes smaller than what is recommended on your yarn label and in this table.
*
*

Skill level
Every pattern is marked with a skill level to indicate how
easy they are to make. If this is your first time making
amigurumi it's best to start with an easy pattern and
work up to the intermediate and experienced ones.
Pattern structure
All patterns in this book are worked in continuous
spirals, not in joined rounds. Crocheting in spirals can
be confusing since there’s no clear indication of where
a new round begins and the previous one ends. To keep
track of the rounds, you can mark the end of a round
with a stitch marker or safety pin. After crocheting the
next round, you should end up right above your stitch
marker. Move your stitch marker at the end of each
round to keep track of where you are.
At the beginning of each line of the pattern you will
find ‘Rnd’ + a number to indicate which round you are
in. Although we usually crochet in rounds, occasionally
it happens that we switch to rows. When we switch to
rows, it will be indicated with ‘Row’ + a number.
At the end of each line you will find the number of stitch-
es you should have in brackets, for example [9]. When in
doubt take a moment to count your stitch count.
Abbreviations are used throughout the book. You can
find their explanations on the next pages.
When part of the instructions repeat throughout
the round, we place it between brackets and add the
number of times it should be repeated. We do this to
shorten the pattern and make it less cluttered.
Sometimes we use a more condensed way of writing.
When reading “inc in st 5, 7, 13”, you make a single
crochet in all stitches except for stitch 5, 7 and 13 where
you increase.
When working in rows, you make a turning chain and
turn your piece at the end of each row. Start the next
row in the second chain from your hook.
beginner
easy
intermediate
experienced
a challenge
7
In some patterns we use a diagram
to better explain a difficult part.
In these diagrams each stitch is
represented by a symbol.
WHAT YOU SHOULD KNOW BEFORE YOU START
chain
slip stitch
single crochet
double crochet
treble crochet
treble crochet 2 in one stitch
treble crochet 2 stitches together

BASIC STITCHES
With the stitches explained in the next pages you can
make all of the amigurumi in this book. It's a good idea to
practice all the basic stitches before you start making one
of the characters, as this will help you to read the patterns
and abbreviations more comfortably without having to
browse back to these pages too often.
Chain (abbreviation: ch)
This stitch is the basis for many crochet patterns. If
you’re working in rows, your first row will be a series of
chain stitches. Use the hook to draw the yarn through
the loop (1) and pull the loop until tight (2). Wrap the
yarn over the hook from back to front. Pull the hook,
carrying the yarn, through the loop already on your
hook (3). You have now completed one chain stitch.
Repeat these steps as indicated in the pattern to create a
foundation chain (4).
Single crochet (abbreviation: sc)
Single crochet is the stitch that will be most frequently
used in this book. Insert the hook into the next chain
stitch (1) and wrap the yarn over the hook. Pull the yarn
through the stitch (2). You will see that there are now two
loops on the hook. Wrap the yarn over the hook again
and draw it through both loops at once (3). You have now
completed one single crochet (4). Insert the hook into the
next chain stitch to continue the row (5). At the end of the
row (6) you need to bring the yarn up to the correct height
to work the first stitch. Make one chain stitch (7) and
turn the work (8). Start the next single crochet in the first
stitch (don’t count the turning chain as a stitch). To work
into a previous row of crochet, insert your hook under
both loops of the first stitch, as shown in the figure (9).
Slip stitch (abbreviation: slst)
A slip stitch is used to move across one or more stitches
at once or finish a piece. Insert your hook into the next
stitch (1). Wrap the yarn over the hook, pull it through
the stitch and the loop on your hook (2). You have now
completed one slip stitch.
1 2
3 4
1
2
3
4
5
6
7
8
9
1
2
Chain
Single crochet
Slip stitch
8

Double crochet (abbreviation: dc)
Bring your yarn over the hook from back to front before
placing the hook in the stitch. Now insert your hook in
the fourth chain – without counting the loop on the
hook (1). Wrap the yarn over the hook and draw the yarn
through the chain stitch. You now have three loops on the
hook (2). Wrap the yarn over the hook again and pull it
through the first two loops on the hook (3). You now have
2 loops on the hook. Wrap the yarn over the hook one last
time and draw it through both loops on the hook (4). You
have now completed one double crochet. To continue
bring your yarn over the hook and insert it in the next
chain stitch (5). Work the first stitch. To raise the yarn,
make three chain stitches. Start the next double crochet
in the second stitch. Be sure to insert your hook under
both loops of this stitch (7).
Triple or treble crochet (abbreviation: tr)
Bring your yarn over the hook twice before you insert
it in the fifth chain from the hook (1). Wrap the yarn
over the hook and draw the yarn through the chain
stitch (2). Wrap the yarn over the hook again and pull
it through the first two loops on the hook (3). Repeat
this last step twice (4 & 5). You have now completed
one triple crochet stitch. To start a second row, bring
your thread to the correct height by making four chain
stitches. Start the next triple crochet in the second
stitch. To start a second row, bring your thread to the
correct height by making four chain stitches.
1
2
3
12
3 4
5 6
7
Double crochet
4
9
5
12
3 4
Triple crochet
5
6

Half double crochet (abbreviation: hdc)
Bring your yarn over the hook from back to front before
placing the hook in the stitch. Now insert your hook
in the third chain – without counting the loop on the
hook (1). Wrap the yarn over the hook and draw the yarn
through the chain stitch. You now have three loops on
the hook (2). Wrap the yarn over the hook again and pull
it through all three loops on the hook (3). You have com-
pleted your first half double crochet. To continue bring
your yarn over the hook and insert it in the next chain
stitch (4). To start a second row, bring your thread to the
correct height by making two chain stitches.
Increase (abbreviation: inc)
To increase you make two single crochet stitches in the
next stitch.
Invisible decrease (abbreviation: dec)
The standard method of decreasing can leave a small
bump or gap. The invisible decrease is an alternative
method of decreasing which will make your decrease-
stitch look much like the other stitches in the row,
resulting in a smoother and more even crochet fabric.
Insert the hook in the front loop of your first stitch.
Now immediately insert your hook in the front loop of
the second stitch (1). You now have three loops on your
hook. Wrap the yarn over the hook and draw it through
the first two loops on your hook (2). Wrap the yarn over
again and draw it through the two loops remaining on
your hook (4). You have now completed one invisible
decrease.
Invisibly decrease 3 stitches at once
(abbreviation: sc3tog)
Insert the hook under the front loop only of the next
three stitches (1). This gives you four loops on the
hook (2). Wrap the yarn over the hook and draw it
through the first three loops on your hook. Wrap
the yarn over the hook again and pull through the
remaining two loops on the hook (3). You have now
completed one sc3tog.
3
12
3 4
Half double crochet
12
Increase
1 2
12
3
Invisible decrease
Invisibly decrease 3 stitches at once
3
10

Front loops only (abbreviation: FLO)
and Back loops only (abbreviation: BLO)
When making a crochet stitch, you end up with two loops
at the top of the stitch, a front loop towards you (1) and
a back loop (2). When asked to crochet FLO or BLO you
make the same stitch but leave one loop untouched.
Magic ring
A magic ring is the ideal way to start crocheting in the
round. You start by crocheting over an adjustable loop
then you pull the loop tight when you have finished
the required number of stitches. The advantage of this
method is that there’s no hole left in the middle of your
starting round.
Start with the yarn crossed to form a circle (1). Draw up
a loop with your hook but don’t pull it tight (2). Hold the
circle with your middle finger and thumb, and wrap the
working yarn over your index finger (3). Make one chain
stitch by wrapping the yarn over the hook and pulling
it through the loop on your hook (4, 5). Now insert your
hook into the loop and underneath the tail. Wrap the
yarn over the hook and draw up a loop (6). Wrap the yarn
over the hook again and draw it through both loops on
your hook (7). You have now completed your first single
crochet (8). Continue to crochet until you have the re-
quired number of stitches as mentioned in the pattern.
Now grab the yarn tail and pull to draw the centre of the
ring tightly closed (9).
You can now begin your second round by crocheting
into the first stitch of the first round. You can use a
stitch marker to remember where you started.
If you do not prefer this technique, you can start each
piece using the following technique: ch 2, x sc into the
second chain from the hook – where x is the number of
sc stitches you would make in your magic ring.
1 2
Front loops or Back loops only
11
tail
working yarn
tailworking yarn
12
3 4
Magic ring
5
6
78
9
10

SPECIAL STITCHES
These stitches are less commonly used and may not necessarily
be known by heart. When you bump into a stitch that’s new to
you, browse back to these pages to find a tutorial.
Bobble stitch
The bobble stitch creates a soft dimensional bobble in
your crochetwork. Think of it as a cluster of dc stitches
worked in the same stitch.
Bring your yarn over the hook from back to front before
placing the hook in the stitch (1). Wrap the yarn over the
hook and draw the yarn through the stitch. You now have
three loops on the hook. Wrap the yarn over the hook
again and pull it through the first two loops on the hook.
One half-closed double crochet is complete, and two
loops remain on the hook (2). In the same stitch, repeat
the preceding steps twice. You should have four loops on
your hook. Wrap the yarn over your hook and draw the
yarn through all four loops on the hook (3). One 3-dc-
bobble-stitch is complete. Create a bobble stitch with as
many dc stitches as indicated in the pattern.
Spike stitch
Instead of working into the two loops of the next stitch,
work into the corresponding stitch in the row below the
next stitch (1). Wrap the yarn over the hook and draw
it through the stitch. You now have two loops on your
hook. Wrap the yarn over the hook once more and pull
it through both loops on your hook (2). You have now
completed one spike stitch.
Crab stitch or Reverse single crochet
Crab stitch is also known as reverse single crochet. At the
end of your row of single crochet, do not turn your work –
you will be working from left to right. Insert your hook in
the first stitch to the right (1). Wrap the yarn around the
hook and pull up a loop (2). The new stitch is to the left of
the loop originally on the hook. Pull up a loop and pull it
through both loops on your hook (3).
12
1 2
3
Bobble stitch
1 2
Spike stitch
Crab stitch or Reverse single crochet
1 2
3
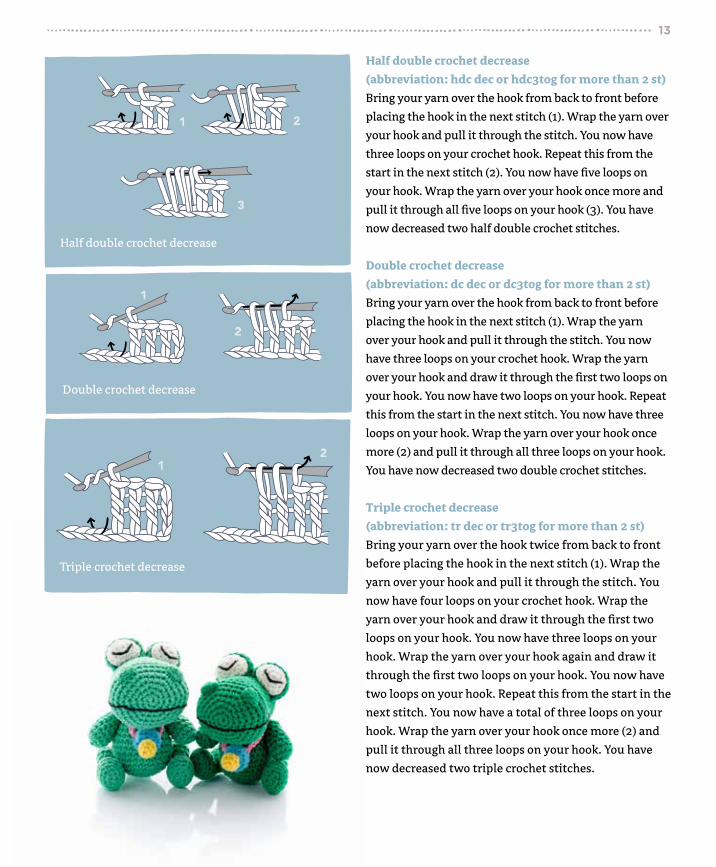
Half double crochet decrease
(abbreviation: hdc dec or hdc3tog for more than 2 st)
Bring your yarn over the hook from back to front before
placing the hook in the next stitch (1). Wrap the yarn over
your hook and pull it through the stitch. You now have
three loops on your crochet hook. Repeat this from the
start in the next stitch (2). You now have five loops on
your hook. Wrap the yarn over your hook once more and
pull it through all five loops on your hook (3). You have
now decreased two half double crochet stitches.
Double crochet decrease
(abbreviation: dc dec or dc3tog for more than 2 st)
Bring your yarn over the hook from back to front before
placing the hook in the next stitch (1). Wrap the yarn
over your hook and pull it through the stitch. You now
have three loops on your crochet hook. Wrap the yarn
over your hook and draw it through the first two loops on
your hook. You now have two loops on your hook. Repeat
this from the start in the next stitch. You now have three
loops on your hook. Wrap the yarn over your hook once
more (2) and pull it through all three loops on your hook.
You have now decreased two double crochet stitches.
Triple crochet decrease
(abbreviation: tr dec or tr3tog for more than 2 st)
Bring your yarn over the hook twice from back to front
before placing the hook in the next stitch (1). Wrap the
yarn over your hook and pull it through the stitch. You
now have four loops on your crochet hook. Wrap the
yarn over your hook and draw it through the first two
loops on your hook. You now have three loops on your
hook. Wrap the yarn over your hook again and draw it
through the first two loops on your hook. You now have
two loops on your hook. Repeat this from the start in the
next stitch. You now have a total of three loops on your
hook. Wrap the yarn over your hook once more (2) and
pull it through all three loops on your hook. You have
now decreased two triple crochet stitches.
13
1 2
Half double crochet decrease
3
1
2
Double crochet decrease
12
Triple crochet decrease

Back post or Front post single crochet
To make a back post or front post single crochet, insert the
hook from right to left around the vertical post of the next
stitch according to the picture. Wrap the yarn over the hook
and draw up a loop. Finish the single crochet stitch as usual.
OTHER TECHNIQUES
Crocheting around a foundation chain
Some pieces start with an oval instead of a circle. In
these instances, instead of working the first round into
a magic ring, you start with a foundation chain and
crochet around it.
Crochet a foundation chain with as many chains as
instructed in the pattern. Work a sc stitch under the back
loop only of the second chain from hook (1, 2) and under
the back loop only of each remaining chain across as
instructed in the pattern (3). The last stitch before turning
is usually an increase stitch. Now, turn your work upside
down (4) and work into the leftover loops of the chain
stitches on the other side (5). When you've finished this
first round, your last stitch should be next to the first stitch
you made (6). You can now continue working in spirals.
Crocheting into a ring
When you want a center ring that is open, instead of
closed like a magic ring, you start out with a ring of chain
stitches, after which your first round is worked over the
ring. Make a series of chain stitches as instructed in the
pattern, close with a slip stitch in the first chain to make
a ring (1). Now insert your hook into the center of the
ring, instead of into the chain stitch (2). Complete the
stitch in the usual way. Follow the pattern instructions to
determine how many stitches to work into the ring.
Crocheting into the back of a chain
Usually you crochet in the front side of the chain, which
looks like a series of interlocking V's (1). When you turn
your chain, you'll see a small 'bump' on the back side of
each stitch (2). Insert your hook under this bump and
continue as usual.
14
back post front post
Back post or Front post single crochet
Crocheting into a ring
12
Crocheting around a foundation chain
12
34
5
6
Crocheting into the back of a chain
1
2

Invisible color change
When you want to switch from one color to the next,
you work to within two stitches before a color change.
Make the next stitch as usual, but don’t pull the final
loop through (1). Instead, wrap the new color of yarn
around your hook and pull it through the remaining
loops (2). To make a neat color change, you can make
the first stitch in the new color a slip stitch instead of a
single crochet. Don’t pull the slip stitch too tight or it
will be difficult to crochet into in the next round. Tie the
loose tails in a knot and leave them on the inside.
Fastening off
When you've finished crocheting, cut the yarn a couple
of inches / cm from your last stitch. Pull the yarn
through the last loop until it is all the way through (1).
You now have a finished knot.
Thread the long tail through a tapestry needle and
15
1
2
Invisible color change
1
2
Fastening off
insert your tapestry needle through the back loop of the
next stitch (2). This way the finishing knot will remain
invisible in your finished piece. You can use this piece of
yarn to continue sewing the body pieces together.
Joining all parts
First, pin the parts that you want to sew to one another,
so you can evaluate the results and adjust if necessary.
Where possible, use the leftover yarn tail from one of
the pieces to sew the work together, or use a new length
of the same thread colour as one of the pieces you want
to join. Some designers leave the extremities open for
sewing onto the body, others sew them closed.
When open: position the piece on the body and sew all
around it, going through the front stitches of both the
extremity and the body.
When the opening of the extremities is sewn closed be-
fore attaching it to the body, you line up the stitches of
one side with the other side and sew through the front
loop of one side and the back loop of the other side. Use
the same color of yarn as one of the pieces you want to
join together.
Always make sure pieces are securely attached so that
they can’t be pulled off. Make small, neat stitches and
try to make them show as little as possible.
Blocking your crochet items
Blocking refers to the process of stretching and evening
out stitches of a finished crochet item to ensure it is
the proper size and shape. There are different ways to
achieve this, depending upon the yarn used.
– Moisten your fabric. Lay it on a clean towel and put
a second one on top, pressing out as much water as
possible. Pull your item into the desired shape and
pin it to the towel. Let the garment air dry.
– Lay your item on a dry towel on your ironing board.
Place a wet washcloth over your item. Press the hot
iron on your washcloth for a few seconds. Repeat as
necessary. Pull your item into the proper shape and
allow it to air dry. Because acrylics are sensitive to
heat, they should not be steam blocked.

Tilda and Earl are nine banded armadillos. They spend their days curled up and snoozing in
their burrow and their evenings slurping up the bugs like noodles. Their favourite pastimes
include hide and seek in the undergrowth and making mud pies.
skill level
8” / 20.5 cm long 6” / 15.5 cm long
mom baby
16

17
NOTE: This pattern involves a color change in the bobble
stitches. You will need to change to white yarn for every
3-dc-bobble / 5-dc-bobble stitch in the pattern. Switch
back to the main color stated for all other stitches. To
change color smoothly start your bobble in white yarn
but when you have your 4/6 loops left on the hook, yarn
over with the main yarn and pull through all 4/6 loops
on the hook to complete the stitch. When making color
changes, drop the yarn you are not using to the back of
your work and pick it up again when you need it, being
careful not to pull it too loose or too tight when starting
with it again.
TILDA – MOM ARMADILLO
HEAD (in beige yarn)
Rnd 1: start 5 sc in a magic ring [5]
Rnd 2 – 3: sc in all 5 st [5]
Fasten off the first nostril.
Repeat rounds 1 to 3 so that you have two nostrils.
Do not fasten off the second nostril. We continue to
work around both nostrils to join them together.
Rnd 4: working into the current nostril, inc in next 3 st,
sc in next st, working back into the first nostril, sc, inc
in next 3 st, sc in next st and sc back into the remaining
st in the second nostril [16]
Push each nostril in. (picture 1)
Rnd 5 – 10: sc in all 16 st [16]
Rnd 11: sc in next 5 st, inc in next 6 st, sc in next 5 st [22]
Rnd 12: sc in all 22 st [22]
Rnd 13: sc in next 5 st, (inc in next st, sc in next st)
repeat 6 times, sc in next 5 st [28]
Rnd 14: sc in all 28 st [28]
Rnd 15: sc in next 7 st, inc in next 3 st, sc in next 12 st,
inc in next 3 st, sc in next 3 st [34]
Mark st 13 and 26 on the next round with a stitch marker.
This will indicate where to affix the eyes later.
Rnd 16: sc in all 34 st [34]
Rnd 17: sc in next 7 st, (inc in next st, sc in next st)
repeat 3 times, sc in next 12 st, (sc in next st, inc in next st)
repeat 3 times, sc in next 3 st [40]
Rnd 18: sc in all 40 st [40]
Rnd 19: (inc in next st, sc in next 4 st) repeat 8 times [48]
Rnd 20 – 24: sc in all 48 st [48]
Attach the eyes in the stitches marked earlier. Stuff the
head with fiberfill and continue stuffing as you go.
Rnd 25: (sc in next 6 st, dec) repeat 6 times [42]
Rnd 26: (sc in next 5 st, dec) repeat 6 times [36]
Rnd 27: (sc in next 4 st, dec) repeat 6 times [30]
Rnd 28: (sc in next 3 st, dec) repeat 6 times [24]
Rnd 29: (sc in next 2 st, dec) repeat 6 times [18]
Rnd 30: (sc in next st, dec) repeat 6 times [12]
materials – mom
– DK / light worsted weight yarn in
beige (90 g / 180 m), gray (50 g / 100 m),
white (30 g / 60 m)
– Safety eyes (20 mm)
materials – baby
– DK / light worsted weight yarn in
beige (60 g / 120 m), gray (25 g / 50 m)
white (20 g / 40 m)
– Safety eyes (20 mm)
both
– Size 3.5 mm / E-4 crochet hook
– Fiberfill for stuffing
– 3 Stitch markers
– Yarn needle
– Pins
1

Rnd 31: dec 6 times [6]
Fasten off, leaving a long tail for sewing. Using your
yarn needle, weave the yarn tail through the front
loop of each remaining stitch and pull it tight to close.
Weave in the yarn ends. Stitch up the hole between
the nostrils.
LEFT EYELID (in beige yarn)
We crochet in rows. Ch 7.
Row 1: start in second chain from hook. Sc, hdc, dc,
hdc, sc, slst [6]
Fasten off, leaving a long tail for sewing.
RIGHT EYELID (in beige yarn)
We crochet in rows. Ch 7.
Row 1: start in second chain from hook. Slst, sc, hdc,
dc, hdc, sc [6]
Fasten off, leaving a long tail for sewing.
EAR (make 2, in beige yarn)
Rnd 1: start 4 sc in a magic ring [4]
Rnd 2: sc in all 4 st [4]
Rnd 3: inc 4 times [8]
Rnd 4: sc in all 8 st [8]
Rnd 5: (sc, inc in next st) repeat 4 times [12]
Rnd 6: sc in all 12 st [12]
Rnd 7: (sc in next 2 st, inc in next st) repeat 4 times [16]
Rnd 8 – 9: sc in all 16 st [16]
Rnd 10: (sc in next 3 st, inc in next st) repeat 4 times [20]
Rnd 11 – 13: sc in all 20 st [20]
Rnd 14: (sc in next 3 st, dec) repeat 4 times [16]
Rnd 15: (sc in next 2 st, dec) repeat 4 times [12]
Fasten off, leaving a long tail for sewing.
BODY (in beige yarn)
Rnd 1: start 6 sc in a magic ring [6]
Rnd 2: inc 6 times [12]
Rnd 3: (sc, inc in next st) repeat 6 times [18]
Rnd 4: (sc in next 2 st, inc in next st) repeat 6 times [24]
Rnd 5: (sc in next 3 st, inc in next st) repeat 6 times [30]
Rnd 6: (sc in next 4 st, inc in next st) repeat 6 times [36]
Rnd 7: (sc in next 5 st, inc in next st) repeat 6 times [42]
Rnd 8: (sc in next 6 st, inc in next st) repeat 6 times [48]
Rnd 9: (sc in next 7 st, inc in next st) repeat 6 times [54]
Rnd 10: (sc in next 8 st, inc in next st) repeat 6 times [60]
Rnd 11 – 24: sc in all 60 st [60]
Rnd 25: (sc in next 8 st, dec) repeat 6 times [54]
Rnd 26: (sc in next 7 st, dec) repeat 6 times [48]
Rnd 27: (sc in next 6 st, dec) repeat 6 times [42]
Rnd 28: (sc in next 5 st, dec) repeat 6 times [36]
18

Rnd 29: (sc in next 4 st, dec) repeat 6 times [30]
Rnd 30: (sc in next 3 st, dec) repeat 6 times [24]
Rnd 31: (sc in next 2 st, dec) repeat 6 times [18]
Fasten off, leaving a tail for sewing. Stuff the body.
LEFT LEG (make 2, start in beige yarn)
NOTE: You will need to change to white yarn for every
5-dc-bobble stitch. Switch back to beige for all other stitches.
Rnd 1: start 6 sc in a magic ring [6]
Rnd 2: inc 6 times [12]
Rnd 3: (inc, sc in next st) repeat 6 times [18]
Rnd 4: (inc, sc in next 2 st) repeat 6 times [24]
Rnd 5: (5-dc-bobble, sc in next 2 st) repeat 4 times, sc in
next 12 st [24]
Rnd 6 – 10: sc in all 24 st [24]
Rnd 11: (dec, sc in next 2 st) repeat 6 times [18]
Rnd 12: (dec, sc in next 7 st) repeat 2 times [16]
We continue working in rows.
Row 13: sc in next 12 st, ch 1, turn [12]
Row 14: sc in next 8 st, ch 1, turn [8]
Row 15: dec, sc in next 4 st, dec [6]
Finishing round: sc in next 2 st down the row edge, slst in
next 8 st, sc in next 2 st up the row edge, sc in next 6 st [18]
Slst in the next st and fasten off, leaving a tail for sewing.
Stuff the leg.
RIGHT LEG (make 2, start in beige yarn)
NOTE: You will need to change to white yarn for every
5-dc-bobble stitch. Switch back to beige for all other stitches.
Rnd 1: start 6 sc in a magic ring [6]
Rnd 2: inc 6 times [12]
Rnd 3: (inc, sc in next st) repeat 6 times [18]
Rnd 4: (inc, sc in next 2 st) repeat 6 times [24]
Rnd 5: (5-dc-bobble, sc in next 2 st) repeat 4 times,
sc in next 12 st [24]
Rnd 6 – 10: sc in all 24 st [24]
Rnd 11: (dec, sc in next 2 st) repeat 6 times [18]
Rnd 12: (dec, sc in next 7 st) repeat 2 times [16]
We continue working in rows.
Row 13: sc in next 4 st, ch 1, turn [4]
Row 14: sc in next 8 st, ch 1, turn [8]
Row 15: dec, sc in next 4 st, dec [6]
Finishing rnd: sc in next 2 st down the row edge, sc in
next 8 st, sc in next 2 st up the row edge, sc in next 6 st [18]
Slst in the next st and fasten off, leaving a tail for
sewing. Stuff the leg.
HEAD PLATE (start in gray yarn) (picture 2)
NOTE: You will need to change to white yarn for every
5-dc-bobble stitch. Switch back to gray for all other stitches.
Crochet in rows. Ch 2.
19

Row 1: start 3 sc in second chain from hook, ch 1, turn [3]
Row 2: inc in next st, 5-dc-bobble, inc in next st, ch 1,
turn [5]
Row 3: sc in all 5 st, ch 1, turn [5]
Row 4: inc in next st, 5-dc-bobble, sc, 5-dc-bobble, inc
in next st, ch 1, turn [7]
Row 5: sc in all 7 st, ch 1, turn [7]
Row 6: inc in next st, (5-dc-bobble, sc in next st) repeat
2 times, 5-dc-bobble, inc in next st, ch 1, turn [9]
Row 7: sc in all 9 st, ch 1, turn [9]
Row 8: inc in next st, (5-dc-bobble, sc in next st) repeat
3 times, 5-dc-bobble, inc in next st, ch 1, turn [11]
Row 9: sc in all 11 st, ch 1, turn [11]
Row 10: inc in next st, (5-dc-bobble, sc in next st) repeat
4 times, 5-dc-bobble, inc in next st, ch 1, turn [13]
Row 11: dec, sc in next 9 st, dec, ch 1, turn [11]
Row 12: dec, (5-dc-bobble, sc in next st) repeat 3 times,
5-dc-bobble, dec, ch 1, turn [9]
Row 13: sc in all 9 st, ch 1, turn [9]
Row 14: dec, sc in next 5 st, dec [7]
Finishing rnd: sc 12 st along the edge of the plate toward
the beginning ch, inc in the base of the ch, sc 12 st back up
the edge of the plate toward the first st made [26]
Slst in the next st and fasten off, leaving a tail for sewing.
BODY ARMOUR (start in gray yarn)
NOTE: You will need to change to white yarn for every
5-dc-bobble stitch. Switch back to gray for all other stitches.
We crochet in rows. Ch 2.
Row 1: start 5 sc in second chain from hook, ch 1, turn [5]
Row 2: inc 5 times, ch 1, turn [10]
Row 3: (inc in next st, sc in next st) repeat 5 times, ch 1,
turn [15]
Row 4: (inc in next st, 5-dc-bobble, sc in next st) repeat
5 times, ch 1, turn [20]
Row 5: (inc in next st, sc in next 3 st) repeat 5 times, ch 1,
turn [25]
Row 6: (inc in next st, 5-dc-bobble, sc in next 2 st,
5-dc-bobble) repeat 4 times, inc in next st, 5-dc-bobble,
sc in next 3 st, ch 1, turn [30]
Row 7: (inc in next st, sc in next 5 st) repeat 5 times,
ch 1, turn [35]
Row 8: inc in next st, sc in next 3 st, 5-dc-bobble, sc in
next 2 st, (sc + 5-dc-bobble in same st, sc in next 3 st,
5-dc-bobble, sc in next 2 st) repeat 4 times, ch 1, turn [40]
Row 9: (inc in next st, sc in next 7 st) repeat 5 times,
ch 1, turn [45]
Row 10: (inc in next st, sc in next 2 st, 5-dc-bobble, sc in
next 4 st, 5-dc-bobble) repeat 4 times, inc in next st, sc
in next 2 st, 5-dc-bobble, sc in next 5 st, ch 1, turn [50]
Row 11: sc in all 50 st, ch 1, turn [50]
Row 12: (sc in next 2 st, 5-dc-bobble, sc in next 4 st,
5-dc-bobble, sc in next 2 st) repeat 5 times, ch 1, turn [50]
Row 13: sc in all 50 st, ch 1, turn [50]
Row 14: BLO sc in all 50 st, ch 1, turn [50]
Row 15: FLO sc in all 50 st, ch 1, turn [50]
Row 16: BLO sc in all 50 st, ch 1, turn [50]
Row 17: FLO sc in all 50 st, ch 1, turn [50]
Row 18: BLO sc in all 50 st, ch 1, turn [50]
Row 19: FLO sc in all 50 st, ch 1, turn [50]
Row 20: BLO sc in all 50 st, ch 1, turn [50]
Fasten off. Join yarn again at the first sc stitch of row 20
20
2 3 4 5
and continue to work the armour in rows.
Row 21: (sc in next 2 st, 5-dc-bobble, sc in next 4 st,
5-dc-bobble, sc in next 2 st) repeat 5 times, ch 1, turn [50]
Row 22: sc in all 50 st, ch 1, turn [50]
Row 23: dec, sc in next 3 st, (5-dc-bobble, sc in next
4 st, 5-dc-bobble, dec, sc in next 2 st) repeat 4 times,
5-dc-bobble, sc in next 4 st, ch 1, turn [45]
Row 24: (dec, sc in next 7 st) repeat 5 times, ch 1, turn [40]
Row 25: (dec, 5-dc-bobble, sc in next 3 st, 5-dc-bobble,
sc in next st) repeat 5 times, ch 1, turn [35]
Row 26: (dec, sc in next 5 st) repeat 5 times, ch 1, turn [30]
Row 27: (dec, sc in next 4 st) repeat 5 times [25]
Finishing rnd: sc 26 st along the row edge toward the
beginning ch, sc into the ch and sc 26 st back up to the
start [53]
Slst in the next st and fasten off, leaving a tail for sewing.
ARMOUR BANDS (in white yarn)
We will now be working 7 rows of sc into the loops left open
earlier on. Work with the right side facing you. (picture 3)
Band 1 (In the open loops of row 13): sc in all 50 st,
fasten off [50]
Band 2 (In the open loops of row 14): sc in all 50 st,
fasten off [50]
Band 3 (In the open loops of row 15): sc in all 50 st,
fasten off [50]
Band 4 (In the open loops of row 16): sc in all 50 st,
fasten off [50]
Band 5 (In the open loops of row 17): sc in all 50 st,
fasten off [50]
Band 6 (In the open loops of row 18): sc in all 50 st,
fasten off [50]
Band 7 (In the open loops of row 19): sc in all 50 st,
fasten off [50]
Weave in the yarn ends. (picture 4, 5)
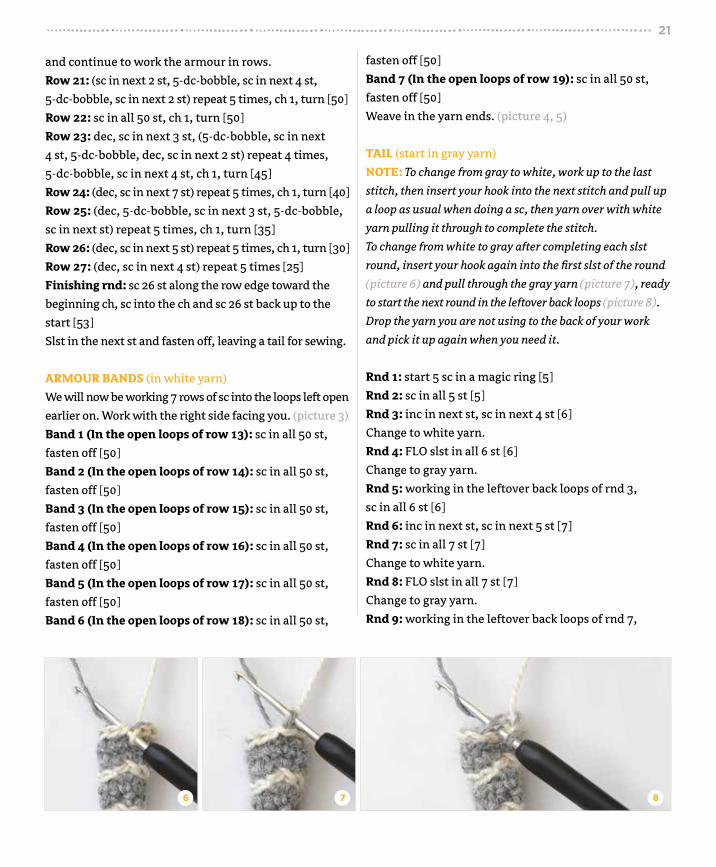
TAIL (start in gray yarn)
NOTE: To change from gray to white, work up to the last
stitch, then insert your hook into the next stitch and pull up
a loop as usual when doing a sc, then yarn over with white
yarn pulling it through to complete the stitch.
To change from white to gray after completing each slst
round, insert your hook again into the first slst of the round
(picture 6) and pull through the gray yarn (picture 7), ready
to start the next round in the leftover back loops (picture 8).
Drop the yarn you are not using to the back of your work
and pick it up again when you need it.
Rnd 1: start 5 sc in a magic ring [5]
Rnd 2: sc in all 5 st [5]
Rnd 3: inc in next st, sc in next 4 st [6]
Change to white yarn.
Rnd 4: FLO slst in all 6 st [6]
Change to gray yarn.
Rnd 5: working in the leftover back loops of rnd 3,
sc in all 6 st [6]
Rnd 6: inc in next st, sc in next 5 st [7]
Rnd 7: sc in all 7 st [7]
Change to white yarn.
Rnd 8: FLO slst in all 7 st [7]
Change to gray yarn.
Rnd 9: working in the leftover back loops of rnd 7,
6 7 8
21

sc in all 7 st [7]
Rnd 10: inc in next st, sc in next 6 st [8]
Rnd 11: sc in all 8 st [8]
Change to white yarn.
Rnd 12: FLO slst in all 8 st [8]
Change to gray yarn.
Rnd 13: working in the leftover back loops of rnd 11,
sc in all 8 st [8]
Rnd 14: inc in next st, sc in next 7 st [9]
Rnd 15: sc in all 9 st [9]
Change to white yarn.
Rnd 16: FLO slst in all 9 st [9]
Change to gray yarn.
Rnd 17: working in the leftover back loops of rnd 15,
sc in all 9 st [9]
Rnd 18: inc in next st, sc in next 8 st [10]
Rnd 19: sc in all 10 st [10]
Stuff the end of the tail lightly. Change to white yarn.
Rnd 20: FLO slst in all 10 st [10]
Change to gray yarn.
Rnd 21: working in the leftover back loops of rnd 19,
sc in all 10 st [10]
Rnd 22: (inc in next st, sc in next 4 st) repeat 2 times [12]
Rnd 23: sc in all 12 st [12]
Change to white yarn.
Rnd 24: FLO slst in all 12 st [12]
Change to gray yarn.
Rnd 25: working in the leftover back loops of rnd 23,
sc in all 12 st [12]
Rnd 26: (inc in next st, sc in next 5 st) repeat 2 times [14]
Rnd 27: sc in all 14 st [14]
Change to white yarn.
Rnd 28: FLO slst in all 14 st [14]
Change to gray yarn.
Rnd 29: working in the leftover back loops of rnd 27,
sc in all 14 st [14]
Rnd 30: (inc in next st, sc in next 6 st) repeat 2 times [16]
Rnd 31: sc in all 16 st [16]
Change to white yarn.
Rnd 32: FLO slst in all 16 st [16]
Change to gray yarn.
Rnd 33: working in the leftover back loops of rnd 31,
sc in all 16 st [16]
Rnd 34: (inc in next st, sc in next 7 st) repeat 2 times [18]
Rnd 35: sc in all 18 st [18]
Fasten off, leaving a tail for sewing. Stuff the tail.
ASSEMBLY
– Stitch the eyelids on making sure to curve them
around the eyes.
– Place the head plate on top of the head between the
eyes, with the back edge resting along round 27 of the
head. Stitch on firmly.
– Flatten the ears and stitch closed. The ears do not need
to be stuffed. Place the ears on the head so that the sewn
edge lies horizontally, directly below the diagonal edge
of the head plate. Sew the ears to the head firmly.
– Starting along round 25 of the body (where the
decreases begin), pin a pair of legs to the body with
a gap of 4 stitches between them and the claws facing
toward the neck edge. Pin the last pair of legs 3 rounds
22

behind the front legs, with the back edges resting
along round 8 of the body. Make sure they are both in
line with the front legs and that the claws point
toward the neck edge. Don’t stitch the legs on just yet.
– Place the head on the neck edge of the body, with the
head closure meeting the top of the neck edge. Adjust
the head to tilt to the side a little and pin in place.
– Rest your armadillo on a flat surface to make sure she
can balance and adjust the legs slightly if she falls over.
When she can balance stitch the legs and head on firmly.
– Drape the armour over the body with the starting chain
of the armour resting on the starting magic ring on the
body. Stitch the armour to the body along the rear and
neck edge, leaving the sides unattached to fall along
side the legs.
– Stitch the tail just under the edge of the armour.
EARL THE BABY ARMADILLO
HEAD (in beige yarn)
Ch 4. Stitches are worked around both sides of the
foundation chain.
Rnd 1: start in second ch from hook, 3 sc in first st, sc in
next st, 3 sc in last st. Continue on the other side of the
foundation chain, sc in next st [8]
Rnd 2: (inc in next st, sc in next st) repeat 4 times [12]
Rnd 3 – 7: sc in all 12 st [12]
Rnd 8: sc in next 5 st, inc in next 3 st, sc in next 4 st [15]
Rnd 9: sc in next 5 st (sc in next st, inc in next st) repeat
3 times, sc in next 4 st [18]
Rnd 10 – 12: sc in all 18 st [18]
Mark stitch 9 and 20 on the next round with a stitch
marker. This will indicate where to affix the eyes later.
Rnd 13: sc in next 5 st, inc in next 3 st, sc in next 6 st,
inc in next 3 st, sc in next st [24]
Rnd 14: sc in next 5 st (sc in next st, inc in next st)
repeat 3 times, sc in next 6 st (inc in next st, sc in
next st) repeat 3 times, sc in next st [30]
Rnd 15 – 20: sc in all 30 st [30]
Attach the eyes in the stitches marked earlier.
Stuff the head and continue stuffing as you go.
Rnd 21: (sc in next 3 st, dec) repeat 6 times [24]
Rnd 22: (sc in next 2 st, dec) repeat 6 times [18]
Rnd 23: (sc in next st, dec) repeat 6 times [12]
Rnd 24: dec 6 times [6]
Fasten off, leaving a long tail for sewing. Using your
yarn needle, weave the yarn tail through the front
loop of each remaining stitch and pull it tight to close.
Weave in the yarn end.
LEFT EYELID (in beige yarn)
We crochet in rows. Ch 7.
Row 1: start in second ch from hook. Sc, hdc, dc, hdc,
sc, slst [6]
Fasten off, leaving a long tail for sewing.
RIGHT EYELID (in beige yarn)
We crochet in rows. Ch 7.
Row 1: start in second chain from hook. Slst, sc, hdc,
dc, hdc, sc [6]
Fasten off, leaving a long tail for sewing.
23

EAR (make 2, in beige yarn)
Rnd 1: start 4 sc in a magic ring [4]
Rnd 2: sc in all 4 st [4]
Rnd 3: inc 4 times [8]
Rnd 4: sc in all 8 st [8]
Rnd 5: (sc, inc in next st) repeat 4 times [12]
Rnd 6 – 7: sc in all 12 st [12]
Rnd 8: (sc in next 2 st, inc in next st) repeat 4 times [16]
Rnd 9 – 10: sc in all 16 st [16]
Rnd 11: (sc in next 2 st, dec) repeat 4 times [12]
Fasten off, leaving a tail for sewing.
BODY (in beige yarn)
Rnd 1: start 6 sc in a magic ring [6]
Rnd 2: inc 6 times [12]
Rnd 3: (sc, inc in next st) repeat 6 times [18]
Rnd 4: (sc in next 2 st, inc in next st) repeat 6 times [24]
Rnd 5: (sc in next 3 st, inc in next st) repeat 6 times [30]
Rnd 6: (sc in next 4 st, inc in next st) repeat 6 times [36]
Rnd 7: (sc in next 5 st, inc in next st) repeat 6 times [42]
Rnd 8 – 19: sc in all 42 st [42]
Rnd 20: (sc in next 5 st, dec) repeat 6 times [36]
Rnd 21: (sc in next 4 st, dec) repeat 6 times [30]
Rnd 22: (sc in next 3 st, dec) repeat 6 times [24]
Rnd 23: (sc in next 2 st, dec) repeat 6 times [18]
Stuff the body.
Rnd 24: (sc in next st, dec) repeat 6 times [12]
Rnd 25: dec 6 times [6]
Fasten off, leaving a long tail for sewing. Using your
yarn needle, weave the yarn tail through the front loop
of each remaining stitch and pull it tight to close. Weave
in the yarn end.
ARM (make 2, in beige yarn)
Ch 5. Stitches are worked around both sides of the
foundation chain.
Rnd 1: start in second ch from hook, 3 sc in first st,
sc in next 2 st, 3 sc in last st. Continue on the other side
of the foundation chain, sc in next 2 st [10]
Rnd 2: (inc in next st, sc in next st, inc in next st, sc in
next 2 st) repeat 2 times [14]
Rnd 3 – 7: sc in all 14 st [14]
We continue working in rows.
Row 8: sc in next 4 st, ch 1, turn [4]
Row 9: sc in next 8 st, ch 1, turn [8]
Row 10: dec, sc in next 4 st, dec [6]
Finishing rnd: sc 2 st down the row edge, sc in next
6 st, sc 2 st up the row edge [10]
Slst in next st and fasten off, leaving a tail for sewing.
Stuff the arm with fiberfill.
CLAW (make 2, in white yarn)
The claws are made in one continuous piece, do not
fasten off between claws. Ch 4.
Claw 1: start in second chain from hook, sc in all 3 st [3]
Claw 2: ch 6, start in second chain from hook, sc in all 5 st [5]
Claw 3: ch 6, start in second chain from hook, sc in all 5 st [5]
Claw 4: ch 4, start in second chain from hook, sc in all 3 st [3]
Top Row: ch 1, sc 4 st across the edge of the claws, so you
end up back at the first claw [4]
Slst in next st and fasten off, leaving a tail for sewing.
Stitch the claws firmly to the foundation chain of the arms.
FOOT (make 2, start in beige yarn)
NOTE: You will need to change to white yarn for every
5-dc-bobble stitch. Switch back to beige for all other stitches.
Ch 5. Stitches are worked around both sides of the
foundation chain.
Rnd 1: start in second ch from hook, 3 sc in first st, sc in
next 2 st, 3 sc in last st. Continue on the other side of the
foundation chain, sc in next 2 st [10]
Rnd 2: (inc in next st, sc in next st, inc in next st, sc in
next 2 st) repeat 2 times [14]
Rnd 3: sc in next 4 st, 5-dc-bobble, sc in next 2 st,
5-dc-bobble, sc in next 6 st [14]
Rnd 4: sc in next 2 st, 3 sc in next st, sc in next 6 st,
3 sc in next st, sc in next 4 st [18]
Rnd 5: sc in all 18 st [18]
Rnd 6: sc in next 4 st, 5-dc-bobble, sc in next 7 st,
5-dc-bobble, sc in next 5 st [18]
Rnd 7: (dec, sc in next st) repeat 6 times [12]
Rnd 8 – 10: sc in all 12 st [12]
24

25
Stuff lightly with fiberfill.
Rnd 11: dec 6 times [6]
Fasten off, leaving a long tail for sewing. Using your
yarn needle, weave the yarn tail through the front loop
of each remaining stitch and pull it tight to close. Weave
in the yarn end.
FOOT SHAPING (with beige yarn) (picture 9, 10)
To shape the toes you will be making three stitches in
between the bobble stitches on the feet. With a needle,
stitch between the first two bobble stitches, into round
5 of the foot, and make a long stitch exiting horizontally
at the other side. Then stitch again in the same place,
looping the yarn around the foot and pulling it tightly.
Repeat this stitch a few times and fasten off securely.
Repeat these stitches twice more between the other
bobble stitches.
HEAD PLATE (start in gray yarn)
NOTE: You will need to change to white yarn for every
3-dc-bobble stitch. Switch back to gray for all other stitches.
We crochet in rows. Ch 2.
Row 1: start 3 sc in second ch from hook, ch 1, turn [3]
Row 2: inc in next st, 3-dc-bobble, inc in next st, ch 1,
turn [5]
Row 3: sc in all 5 st, ch 1, turn [5]
Row 4: inc in next st, 3-dc-bobble, sc, 3-dc-bobble, inc
in next st, ch 1, turn [7]
Row 5: sc in all 7 st, ch 1, turn [7]
Row 6: inc in next st, (3-dc-bobble, sc in next st) repeat
2 times, 3-dc-bobble, inc in next st, ch 1, turn [9]
Row 7: sc in all 9 st, ch 1, turn [9]
Row 8: inc in next st, (3-dc-bobble, sc in next st) repeat
3 times, 3-dc-bobble, inc in next st, ch 1, turn [11]
Row 9: dec, sc in next 7 st, dec, ch 1, turn [9]
Row 10: dec, (3-dc-bobble, sc in next st) repeat 2 times,
3-dc-bobble, dec, ch 1, turn [7]
Row 11: sc in all 7 st, ch 1, turn [7]
Row 12: dec, sc in next 3 st, dec [5]
Finishing rnd: sc 11 st along the edge of the plate toward
the beginning ch, inc in the base of the ch, sc 11 st back up
the edge of the plate toward the first st made [24]
Slst in next st and fasten off, leaving a long tail for sewing.
BODY ARMOUR (start in gray yarn) (picture 11)
NOTE: You will need to change to white yarn for every
3-dc-bobble stitch. Switch back to gray for all other stitches.
We crochet in rows. Ch 2.
Row 1: start 4 sc in second ch from hook, ch 1, turn [4]
Row 2: inc 4 times [8]
Row 3: (inc in next st, sc in next st) repeat 4 times, ch 1,
turn [12]
Row 4: (inc in next st, 3-dc-bobble, sc in next st) repeat
4 times, ch 1, turn [16]
Row 5: (inc in next st, sc in next 3 st) repeat 4 times, ch 1,
turn [20]
Row 6: (inc in next st, 3-dc-bobble, sc in next 2 st,
3-dc-bobble) repeat 4 times, sc into the same st as the
last 3-dc-bobble, ch 1, turn [25]
Row 7: sc in next 7 st, (inc in next st, sc in next 5 st)
repeat 3 times, ch 1, turn [28]
Row 8: (sc in next st, 3-dc-bobble, sc in next 2 st,
9 10 11

26
3-dc-bobble, sc in next 2 st) repeat 4 times, ch 1, turn [28]
Row 9: sc in all 28 st, ch 1, turn [28]
Row 10: BLO sc in all 28 st, ch 1, turn [28]
Row 11: FLO sc in all 28 st, ch 1, turn [28]
Row 12: BLO sc in all 28 st, ch 1, turn [28]
Row 13: FLO sc in all 28 st, ch 1, turn [28]
Row 14: BLO sc in all 28 st, ch 1, turn [28]
Row 15: FLO sc in all 28 st, ch 1, turn [28]
Row 16: sc in all 28 st, ch 1, turn [28]
Fasten off. Join yarn again in the first sc stitch of row
16 and continue to work the armour in rows.
Row 17: (sc in next st, 3-dc-bobble, sc in next 2 st,
3-dc-bobble, sc in next 2 st) repeat 4 times, ch 1, turn [28]
Row 18: (dec, sc in next 5 st) repeat 4 times, ch 1, turn [24]
Row 19: dec, sc in next st, (3-dc-bobble, sc in next 2 st,
3-dc-bobble, dec) repeat 3 times, 3-dc-bobble, sc in next
2 st, ch 1, turn [20]
Row 20: (dec, sc in next 3 st) repeat 4 times, ch 1, turn [16]
Row 21: (dec, sc in next st, 3-dc-bobble) repeat 3 times,
dec, 3-dc-bobble, sc in next st, ch 1, turn [12]
Row 22: (dec, sc in next st) repeat 4 times, ch 1, turn [8]
Row 23: dec 4 times, ch 1, turn [4]
Row 24: dec 2 times, ch 1, turn [2]
Row 25: dec [1]
Finishing rnd: sc 24 along the row edge toward
the beginning ch, sc in the ch and sc 24 back up
to the start [49]
Slst in the next st and fasten off, leaving a
tail for sewing.
ARMOUR BANDS (in white yarn)
We will now be working 6 rows of sc
into the loops left open earlier on.
Work with the right side facing you.
Band 1 (In the open loops of row 9):
sc in all 28 st, fasten off [28]
Band 2 (In the open loops of row 10):
sc in all 28 st, fasten off [28]
Band 3 (In the open loops of row 11):
sc in all 28 st, fasten off [28]
Band 4 (In the open loops of row 12): sc in all 28 st,
fasten off [28]
Band 5 (In the open loops of row 13): sc in all 28 st,
fasten off [28]
Band 6 (In the open loops of row 14): sc in all 28 st,
fasten off [28]
Weave in the yarn ends.
TAIL (start in gray yarn)
NOTE: To change from gray to white work up to the last
stitch, then insert your hook into the next stitch and pull up
a loop as usual when doing a sc, then yarn over with white
yarn pulling it through to complete the stitch.
To change from white to gray after completing each slst
round, insert your hook again into the first slst of the round
and pull through the gray yarn, ready to start the next round.
Drop the yarn you are not using to the back of your work
and pick it up again when you need it.

27
Rnd 1: start 5 sc in a magic ring [5]
Rnd 2: sc in all 5 st [5]
Rnd 3: inc in next st, sc in next 4 st [6]
Change to white yarn.
Rnd 4: FLO slst in all 6 st [6]
Change to gray yarn.
Rnd 5: working in the leftover back loops of rnd 3,
sc in all 6 st [6]
Rnd 6: inc in next st, sc in next 5 st [7]
Rnd 7: sc in all 7 st [7]
Change to white yarn.
Rnd 8: FLO slst in all 7 st [7]
Change to gray yarn.
Rnd 9: working in the leftover back loops of rnd 7,
sc in all 7 st [7]
Rnd 10: inc in next st, sc in next 6 st [8]
Stuff the tail.
Rnd 11: sc in all 8 st [8]
Change to white yarn.
Rnd 12: FLO slst in all 8 st [8]
Change to gray yarn.
Rnd 13: working in the leftover back loops of rnd 11,
sc in all 8 st [8]
Rnd 14: inc in next st, sc in next 7 st [9]
Rnd 15: sc in all 9 st [9]
Change to white yarn.
Rnd 16: FLO slst in all 9 st [9]
Change to gray yarn.
Rnd 17: working in the leftover back loops of rnd 15,
sc in all 9 st [9]
Rnd 18: inc in next st, sc in next 8 st [10]
Rnd 19: sc in all 10 st [10]
Fasten off, leaving a tail for sewing. Stuff the tail lightly.
ASSEMBLY
– Stitch the eyelids on, making sure to curve them
around the eyes.
– Place the head plate on top of the head between the
eyes, with the back edge resting along round 21 of the
head. Stitch on firmly.
– Flatten the ears and sew them closed. The ears do not
need to be stuffed. Place the ears on the head so that
the sewn edge lies horizontally, directly below the
diagonal edge of the head plate. Sew to the head firmly.
– Fit the armour over the body so that the top and bottom
edge meet the starting magic ring and closure of the
body. Sew the armour on firmly along the edges.
– Align the back of the head at round 18, with round
5 on the body and adjust the head to tilt to the side
a little. Make sure the head rests in the middle of the
body, half way between the armour edges, then stitch
on firmly.
– Stitch the tail in front of the armour, so it rests against
the starting chain of the armour and is in line with the
head.
– Pin the feet either side of the tail. Pin the arms either
side of the head, in line with the eyes. When you are
happy with the arm and feet placement, stitch them
both on firmly.

When Tim was a very little fawn, his brothers told him the Bambi story. He's been a bit panicky ever since.
But his mommy loves him and would never leave him alone – not even for a little while.
She encourages him and teaches him to be brave.
skill level
8” / 20.5 cm tall 5” / 13 cm tall
mom baby
28

Earfan: tr 5 in next sc, ch 3, slst in first ch,
tr 5 in the same sc [14]
The next stitch after the earfan can be hidden underneath
the earfan. Make sure you continue in the right stitch.
materials – mom
– Sport weight yarn in white (10 g / 35 m),
black (10 g / 35 m), orange (50 g / 160 m)
– Safety eyes (6 mm)
materials – baby
– Sport weight yarn in white (10 g / 35 m),
black (10 g / 35 m), orange (30 g / 100 m)
– Safety eyes (5 mm)
both
– Size 1.75 mm crochet hook
– Fiberfill for stuffing
– Yarn needle
MOM FAWN
HEAD & BODY (start with orange yarn)
The color is indicated throughout the pattern.
NOTE: This pattern is for a deer looking to the right. If you
want to make a deer looking to the left, use this alteration:
After you finish round 16 of the head, crochet an additional
9 sc along the edge. The next stitch you will do is the new
beginning of the round. If you use a stitch marker, move it
9 stitches forward. Then continue following the pattern.
Rnd 1: start 8 sc in a magic ring [8]
Rnd 2: inc 8 times [16]
Rnd 3: inc in next 2 st, sc in next 4 st, inc in next 4 st,
sc in next 4 st, inc in next 2 st [24]
Rnd 4: inc in next 2 st, sc in next 8 st, inc in next 4 st,
sc in next 8 st, inc in next 2 st [32]
Rnd 5: sc in next 5 st, earfan, sc in next 8 st, inc in next
4 st, sc in next 7 st, earfan, sc in next 6 st [62] (picture 1)
Rnd 6: sc in next 5 st, (white) earcluster, (orange) sc in
next 5 st, dec, sc in next 10 st, dec, sc in next 4 st, (white)
earcluster, (orange) sc in next 6 st [34] (picture 2, 3, 4, 5)
Rnd 7: sc in all 34 st [34]
ADDITIONAL TERMINOLOGY IN THIS PATTERN:
Earcluster (made on earfan): Yarn over the hook 2
times, then insert the hook into the back loop of the
next stitch. Yarn over the hook and draw yarn through
the back loop (4 loops on hook). Yarn over the hook and
draw through two loops (3 loops on hook). Yarn over the
hook and draw through two loops (2 loops on hook).
Repeat 4 times on next 4 tr until you have 6 loops on
the hook. Skip the picot (you can fold it to the front so
it doesn't bother you), yarn over 2 times and make 5
more unfinished triple stitches into the back loops of
next 5 tr (11 loops on hook). Yarn over and draw the yarn
through all 11 loops on the hook. Make sure the picot
stitch (ch 3, slst in first ch) is on the right side of the
shape.
29
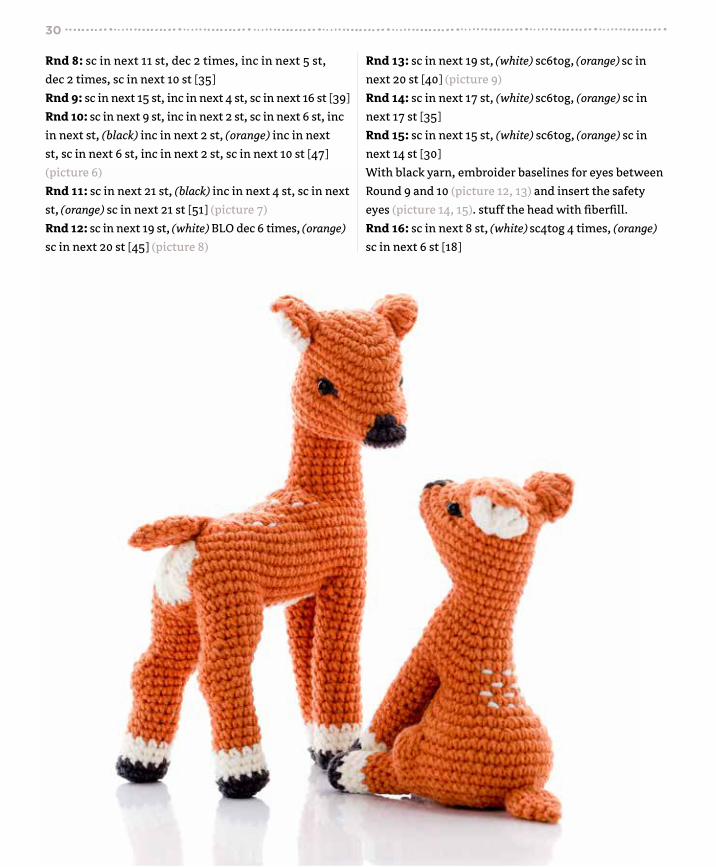
Rnd 8: sc in next 11 st, dec 2 times, inc in next 5 st,
dec 2 times, sc in next 10 st [35]
Rnd 9: sc in next 15 st, inc in next 4 st, sc in next 16 st [39]
Rnd 10: sc in next 9 st, inc in next 2 st, sc in next 6 st, inc
in next st, (black) inc in next 2 st, (orange) inc in next
st, sc in next 6 st, inc in next 2 st, sc in next 10 st [47]
(picture 6)
Rnd 11: sc in next 21 st, (black) inc in next 4 st, sc in next
st, (orange) sc in next 21 st [51] (picture 7)
Rnd 12: sc in next 19 st, (white) BLO dec 6 times, (orange)
sc in next 20 st [45] (picture 8)
Rnd 13: sc in next 19 st, (white) sc6tog, (orange) sc in
next 20 st [40] (picture 9)
Rnd 14: sc in next 17 st, (white) sc6tog, (orange) sc in
next 17 st [35]
Rnd 15: sc in next 15 st, (white) sc6tog, (orange) sc in
next 14 st [30]
With black yarn, embroider baselines for eyes between
Round 9 and 10 (picture 12, 13) and insert the safety
eyes (picture 14, 15). stuff the head with fiberfill.
Rnd 16: sc in next 8 st, (white) sc4tog 4 times, (orange)
sc in next 6 st [18]
30

1 2 3 4
5 6 7 8
9 10 11
12 13 14 15
Rnd 17 – 21: sc in all 18 st [18]
Rnd 22: sc in next 6 st, inc in next st, sc in next 11 st [19]
Rnd 23: sc in next 7 st, inc in next st, sc in next 11 st [20]
Rnd 24: sc in next 8 st, inc in next st, sc in next 11 st [21]
Rnd 25: sc in next 8 st, 5 dc in next 2 st, sc in next 11 st [29]
Rnd 26: sc in next 12 st, 5 dc in next 2 st, sc in next 15 st [37]
Rnd 27: sc in next 15 st, 3 dc in next st, 5 dc in next 2 st,
3 dc in next st, sc in next 18 st [49]
Rnd 28: sc in next 21 st, 3 dc in next st, 5 dc in next 2 st,
3 dc in next st, sc in next 24 st [61]
31
Beginning of Rnd 17
End ofRnd 16additional 9 sc
In case you'd like to make a deer looking to the left.

Rnd 29: sc in next 27 st, skip next 4 st for the tail,
sc in next 30 st [57]
Rnd 30: sc in next 26 st, (white) 5 dc in next 2 st, (orange)
sc in next 29 st [65] (picture 16)
Rnd 31: sc in next 27 st, (white) sc3tog, 5 dc in next 2 st,
sc3tog, (orange) sc in next 30 st [69] (picture 17)
Rnd 32 – 34: sc in all 69 st [69]
Rnd 35: sc in next 60 st, skip next 8 st, sc in next st [61]
Stuff the neck with fiberfill.
Rnd 36: sc in next st, skip next 8 st, sc in next 11 st, skip
next 14 st, sc in next st, skip next 14 st, sc in next st,
(white) sc in next 7 st, sc4tog [22]
Stuff the body with fiberfill.
Rnd 37: sc4tog, sc in next 4 st, sc4tog 2 times, sc in next
6 st [13]
Fasten off, leaving a long white tail for sewing. Do not
close the hole yet.
TAIL (in orange yarn)
Attach orange yarn to the first skipped stitch of the tail
hole as shown in picture 18.
Rnd 1: crochet a round of 8 sc along the hole [8]
Rnd 2: (sc in next 2 st, inc in next 2 st) repeat 2 times [12]
Rnd 3: sc in all 12 st [12]
Rnd 4: (sc in next 4 st, dec) repeat 2 times [10]
Rnd 5: (sc in next 3 st, dec) repeat 2 times [8]
Rnd 6: (sc in next 2 st, dec) repeat 2 times [6]
Rnd 7: (sc in next st, dec) repeat 2 times [4]
The tail does not need to be stuffed. Fasten off, leaving a
long tail for sewing. Using your yarn needle, weave the
yarn tail through the front loop of each remaining stitch
and pull it tight to close. Weave in the yarn end.
BACK LEFT LEG (start in orange yarn)
Attach orange yarn to the first skipped stitch of the back
left leg hole as shown in picture 19.
Rnd 1: crochet a round of 18 sc along the hole [18]
Rnd 2: sc in all 18 st [18]
Rnd 3: sc in all 16 st, dec [17]
Rnd 4 – 6: dec, sc in next 6 st, inc in next 2 st, sc in next
5 st, dec [17]
Rnd 7: dec, sc in next 13 st, dec [15]
Rnd 8: dec, sc in next 13 st [14]
Stuff the leg with fiberfill and continue stuffing as you go.
16 17
1918
32
For the tail attach yarn here
Front legs attach yarn
here
For left leg attach yarn
here
For right leg attach yarn
here

Rnd 9: sc in next 6 st, dec 2 times, sc in next 4 st [12]
Rnd 10 – 14: sc in all 12 st [12]
Rnd 15 – 17: (white) sc in all 12 st [12]
Rnd 18 – 19: (black) sc in all 12 st [12]
Rnd 20: BLO dec 6 times [6]
Fasten off leaving a long tail for sewing. Using your yarn
needle, weave the yarn tail through the front loop of
each remaining stitch and pull it tight to close. Weave in
the yarn end.
BACK RIGHT LEG (start in orange yarn)
Attach orange yarn to the first skipped stitch of the back
right leg hole as shown in picture 19.
Rnd 1: crochet a round of 18 sc along the hole [18]
Rnd 2: sc in all 18 st [18]
Rnd 3: sc in next 14 st, dec 2 times [16]
Rnd 4: sc in next 5 st, inc in next 2 st, sc in next 5 st,
dec 2 times [16]
Rnd 5: sc in next 6 st, inc in next 2 st, sc in next 6 st, dec [17]
Rnd 6: dec, sc in next 5 st, inc in next 2 st, sc in next
6 st, dec [17]
Rnd 7: dec, sc in next 13 st, dec [15]
Rnd 8: dec, sc in next 13 st [14]
Stuff the leg with fiberfill and continue stuffing as you go.
Rnd 9: sc in next 5 st, dec 2 times, sc in next 5 st [12]
Rnd 10 – 14: sc in all 12 st [12]
Rnd 15 – 17: (white) sc in all 12 st [12]
Rnd 18 – 19: (black) sc in all 12 st [12]
Rnd 20: BLO dec 6 times [6]
Fasten off, leaving a long tail for sewing. Using your
yarn needle, weave the yarn tail through the front loop
of each remaining stitch and pull it tight to close. Weave
in the yarn end.
20 21 22
33

FRONT LEG (make 2, start in orange yarn)
Attach orange yarn to the first skipped stitch of either
front leg hole as shown in picture 19.
Rnd 1: crochet a round of 12 sc along the hole [12]
Rnd 2 – 14: sc in all 12 st [12]
Rnd 15 – 17: (white) sc in all 12 st [12]
Rnd 18 – 19: (black) sc in all 12 st [12]
Stuff the leg with fiberfill.
Rnd 20: BLO dec 6 times [6]
Fasten off, leaving a long tail for sewing. Using your yarn
needle, weave the yarn tail through the front loop of each
remaining stitch and pull it tight to close. Weave in the
yarn end. Crochet the other front leg in the same way.
SPOTS (in white yarn)
Embroider white spots along the '5 dc in next st' sequences
from rounds 25–27 of the body pattern. Use the picture
on page 36 as a reference.
CLOSING
If necessary, add more stuffing through the hole in the
belly. Using the long white yarn tail, sew the hole shut. Sew
on stitch by stitch, through front loops only. (picture 22)
TIM THE BABY FAWN
HEAD AND BODY (start in orange yarn)
Rnd 1: start 8 sc in a magic ring [8]
Rnd 2: inc 8 times [16]
Rnd 3: inc in next 2 st, sc in next 4 st, inc in next 4 st,
sc in next 4 st, inc in next 2 st [24]
Rnd 4: sc in next 4 st, earfan, sc in next 5 st, inc in next
4 st, sc in next 5 st, earfan, sc in next 4 st [54]
Rnd 5: sc in next 4 st, (white) earcluster, (orange) sc in
next 3 st, dec, sc in next 8 st, dec, sc in next 3 st, (white)
earcluster, (orange) sc in next 4 st [26]
Rnd 6: sc in next 8 st, dec, inc in next 5 st, dec, sc in
next 9 st [29]
Rnd 7: sc in next 12 st, inc in next 4 st, sc in next 13 st [33]
Rnd 8: sc in next 8 st, inc in next 2 st, sc in next 5 st,
(black) inc in next 2 st, (orange) sc in next 5 st, inc in next
2 st, sc in next 9 st [39]
Rnd 9: sc in next 17 st, (black) inc in next st, sc in next
2 st, inc in next st, (orange) sc in next 18 st [41]
Rnd 10: sc in next 17 st, (white) BLO sc6tog, (orange)
sc in next 18 st [36]
Rnd 11: sc in next 15 st, (white) sc6tog, (orange) sc in
next 15 st [31]
With black yarn, embroider baselines for eyes (between
round 6 and 7) and insert the safety eyes. (picture 24)
Rnd 12: sc in next 13 st, (white) sc5tog, (orange) sc in
next 13 st [27]
Rnd 13: sc in next 11 st, (white) sc5tog, (orange) sc in
next 11 st [23]
Rnd 14: sc in next 8 st, (white) dec, sc3tog, dec, (orange)
sc in next 8 st [19]
Rnd 15: sc in all 19 st [19]
Stuff with fiberfill.
Rnd 16: sc in next 17 st, inc in next st, sc in next st [20]
Rnd 17: sc in next 2 st, inc in next st, (sc in next 7 st, inc)
repeat 2 times, sc in last st [23]
Rnd 18: sc in next 3 st, inc in next st, sc in next 17 st,
inc in next st, sc in next st [25]
34

Rnd 19: sc in next 4 st, inc in next st, sc in next 17 st,
inc in next st, sc in next 2 st [27]
Rnd 20: sc in next 4 st, inc in next st, sc in next 19 st,
inc in next st, sc in next 2 st [29]
Rnd 21: sc in next 5 st, inc in next st, sc in next 20 st,
inc in next st, sc in next 2 st [31]
Rnd 22: sc in next 6 st, inc in next st, sc in next 20 st,
(inc in next st, sc in next st) repeat 2 times [34]
Rnd 23: (inc in next st, sc in next st) repeat 2 times,
inc in next st, sc in next 7 st, skip next 6 st, sc in next st,
skip next 6 st, sc in next 4 st, inc in next st, sc in next
2 st, inc in next st, sc in next st [27]
Rnd 24: sc in next st, inc in next st, (sc in next 2 st, inc)
repeat 2 times, sc in next 13 st, inc in next st, sc in next
3 st, inc in next st, sc in next st [32]
Rnd 25: sc in next 2 st, inc in next st, (sc in next 3 st,
inc) repeat 2 times, sc in next 7 st, dec, (sc in next 4 st,
inc) repeat 2 times, sc in next 2 st [36]
Rnd 26: sc in next 2 st, inc in next st, (sc in next 4 st,
inc) repeat 2 times, sc in next 23 st [39]
Rnd 27: sc in next 18 st, 8 dc in next st, sc in next 5 st,
dec, sc in next 5 st, 8 dc in next st, sc in next 7 st [52]
Rnd 28: sc in all 52 st [52]
Rnd 29: sc in next 24 st, dec, sc in next 5 st, dec, sc in
next 4 st, dec, sc in next 13 st [49]
Rnd 30: sc in next 24 st, dec, sc in next 4 st, dec, sc in
next 2 st, dec, sc in next 13 st [46]
Rnd 31: sc in next 5 st, ch 2, skip next 2 st, sc in next 15
st, ch 3, skip next 3 st, sc in next 3 st, dec, sc in next 3 st,
ch 3, skip next 3 st, sc in next 10 st [45]
Rnd 32: (dec, sc in next 3 st) repeat 9 times [36]
Stuff with fiberfill.
Rnd 33: (dec, sc in next 2 st) repeat 9 times [27]
Rnd 34: (dec, sc in next st) repeat 9 times [18]
Rnd 35: dec 9 times [9]
Fasten off, leaving a long tail for sewing. Using your yarn
needle, weave the yarn tail through the front loop of each
remaining stitch and pull it tight to close. Weave in the
yarn end.
TAIL (in orange yarn)
Attach orange yarn to the first skipped stitch of the tail
hole as shown in picture 27. Continue following the
same pattern that was used for mom's tail.
23 24 25 26
27 28 29 30
35
For the tail attach yarn
here
For the right front leg attach yarn here
For the left front leg attach yarn here
For the right back leg
attach yarn here
For the left back leg attach yarn here Sew legs
together

FRONT LEG (make 2, start in orange yarn)
Attach orange yarn to the first skipped stitch of either
front leg hole as shown in picture 28.
Rnd 1: crochet a round of 10 sc along the hole [10]
Rnd 2 - 10: sc in next 10 st [10]
Rnd 11 - 13: (white) sc in next 10 st [10]
Rnd 14 - 15: (black) sc in next 10 st [10]
Stuff the leg with fiberfill.
Rnd 16: BLO dec 5 times [5]
Fasten off, leaving a long tail for sewing. Using your yarn
needle, weave the yarn tail through the front loop of each
remaining stitch and pull it tight to close. Weave in the
yarn end. Crochet the other front leg in the same way.
BACK LEG (make 2, start in orange yarn)
Attach orange yarn to the first skipped stitch of either
back leg hole as shown in picture 28.
Rnd 1: crochet a round of 10 sc along the hole [10]
Rnd 2 - 5: sc in next 10 st [10]
Rnd 6: (white) sc in next 10 st [10]
Rnd 7 - 8: sc in next 10 st [10]
Rnd 9: (black) sc in next 10 st [10]
Rnd 10: sc in next 10 st [10]
Stuff the leg with fiberfill.
Rnd 11: BLO dec 5 times [5]
Fasten off, leaving a long tail for sewing. Using your yarn
needle, weave the yarn tail through the front loop of each
remaining stitch and pull it tight to close. Weave in the
yarn end. Crochet the other back leg in the same way.
Optional: Sew all legs together as shown in picture 29.
SPOTS (in white yarn)
Embroider white spots as shown in picture 30.
36

Cheeky little Charly is always up to mischief. This morning she woke up, put on her
kitty onesie and hid in a bucket. As her mommy Maisy walked past, little Charly jumped out and
roared 'MEEEOOWW!!' as loudly as her squeaky voice would allow.
skill level
6” / 15 cm tall 4.25” / 11 cm tall
mom baby
design by LittleAquaGirl (Erinna Lee)
37

materials – mom
– Light worsted weight yarn in beige (30 g / 60 m),
light blue (30 g / 60 m) and pink (10 g / 20 m)
– Light Fingering weight yarn in black (leftover)
and pink (leftover)
– 2.5 mm crochet hook
– Pink felt
materials – baby
– Light fingering weight yarn in orange (25 g /
110 m), light blue (leftover), pink (10 g / 45 m),
Ecru (10 g / 45 m), black (leftover)
– 2.0 mm crochet hook
– Black metal brads
both
– Fiberfill for stuffing
– Yarn needle
– Sewing pins
– Stitch markers
– Yarn glue
MOMMY MOUSE MAISY
NOTE: Use a 2.5 mm hook and light worsted weight yarn.
HEAD (in beige yarn)
Rnd 1: start 6 sc in a magic ring [6]
Rnd 2: (sc, inc in next st) repeat 3 times [9]
Rnd 3: (sc in next 2 st, inc in next st) repeat 3 times [12]
Rnd 4: (sc in next 3 st, inc in next st) repeat 3 times [15]
Rnd 5: (sc in next 4 st, inc in next st) repeat 3 times [18]
Rnd 6: (sc in next 5 st, inc in next st) repeat 3 times [21]
Rnd 7: (sc in next 6 st, inc in next st) repeat 3 times [24]
Rnd 8: (sc in next 7 st, inc in next st) repeat 3 times [27]
Rnd 9: (sc in next 8 st, inc in next st) repeat 3 times [30]
Rnd 10: (sc in next 9 st, inc in next st) repeat 3 times [33]
Rnd 11: (sc in next 10 st, inc in next st) repeat 3 times [36]
Rnd 12 – 16: sc in all 36 st [36]
Rnd 17: (sc in next 4 st, dec) repeat 6 times [30]
Rnd 18: (sc in next 3 st, dec) repeat 6 times [24]
Rnd 19: (sc in next 2 st, dec) repeat 6 times [18]
Rnd 20: sc in all 18 st [18]
Stuff the head with fiberfill.
Rnd 21: (sc in next st, dec) repeat 6 times [12]
Rnd 22: dec 6 times [6]
Fasten off, leaving a long tail for sewing. Using your yarn
needle, weave the yarn tail through the front loop of each
remaining stitch and pull it tight to close. Weave in the yarn
end. With pink yarn, embroider the nose across round 1
and 2 with the widest part of the nose 3 st apart. With black
yarn, embroider the eyes. Each eye should start between
round 8 and 9 and end between round 11 and 12. The start
point of the two eyes should be 9 stitches apart. (picture 1)
LEG (make 2, start with beige yarn)
Ch 5. Stitches are worked around both sides of the foun-
dation chain.
Rnd 1: start in the second ch from the hook, sc in next
3 st, 3 sc in next st. Continue on the other side of the
foundation chain, sc in next 2 st, inc in next st [10]
Rnd 2: inc in next st, sc in next 2 st, inc in next 3 st,
sc in next 2 st, inc in next 2 st [16]
Rnd 3: BLO sc in all 16 st [16]
Rnd 4: sc in next 5 st, dec 3 times, sc in next 5 st [13]
Rnd 5: sc in next 3 st, dec 3 times, sc in next 4 st [10]
Rnd 6: sc in next 4 st, dec, sc in next 4 st [9]
Rnd 7 – 11: sc in all 9 st [9]
Change to light blue yarn.
Rnd 12: sc in all 9 st [9]
Slst in next st. Fasten off and weave in the yarn end.
Mark the second stitch counting back from the slst.
(indicated blue in picture 2) Repeat rounds 1 to 12 for the
second leg. Crochet another 3 sc at the end of round 12.
Do not fasten off.
BODY (in light blue yarn)
Continuing from the second (right) leg.
Rnd 1: ch 1, sc in the first st after the marked st on the
first leg. Mark this new st you just made (indicated green
38

in picture 2), this will be the starting stitch of the rounds
to follow. Sc in next 8 st. Work a sc into the chain st, sc in
next 9 st on the second leg, sc into the chain st [20]
Rnd 2: sc in all 20 st [20]
Stuff the legs with fiberfill.
Rnd 3: (sc in next 4 st, inc in next st) repeat 4 times [24]
Rnd 4: (sc in next 3 st, inc in next st) repeat 6 times [30]
Rnd 5: (sc in next 4 st, inc in next st) repeat 6 times [36]
Rnd 6 – 7: sc in all 36 st [36]
Rnd 8: BLO (sc in next 10 st, dec) repeat 3 times [33]
Rnd 9: sc in all 33 st [33]
Rnd 10: (sc in next 9 st, dec) repeat 3 times [30]
Rnd 11: sc in all 30 st [30]
Rnd 12: (sc in next 8 st, dec) repeat 3 times [27]
Rnd 13: sc in all 27 st [27]
Rnd 14: (sc in next 7 st, dec) repeat 3 times [24]
Rnd 15: sc in all 24 st [24]
Rnd 16: (sc in next 6 st, dec) repeat 3 times [21]
Rnd 17: sc in all 21 st [21]
Rnd 18: (sc in next 5 st, dec) repeat 3 times [18]
Rnd 19: sc in all 18 st [18]
Stuff the body with fiberfill.
Rnd 20: (sc in next 4 st, dec) repeat 3 times [15]
Rnd 21: sc in all 15 st [15]
Slst in next st. Fasten off, leaving a long tail for sewing.
Sew the body between round 10 and 14 of the head.
(picture 3) Cut out two triangular pieces of pink felt and
glue them on as a collar for mommy Maisy’s dress.
SKIRT (start in light blue yarn)
Keep the legs directed away from you while you crochet
the skirt, so the pretty side of your crochetwork will
face outward. Join light blue yarn in the first front loop
stitch of round 8 of the body.
Rnd 1: FLO dc inc in all 36 st [72]
Rnd 2: (dc inc in next st, dc in next st) repeat 36 times [108]
Change to pink yarn.
Rnd 3: sc in all 108 st [108]
Slst in next st. Fasten off, weave in the loose yarn ends.
1
39
Rnd 11
Rnd 8
2 3
Rnd 10
Rnd 14
last slst of first leg
last sc of second leg
FRONT
BACK
19201
23
4
5
6
7 8
910 11
12 13
14
15
16
1718
Start of Rnd 1 of
bodych
2nd (right) leg1st (left) leg

5 6
ARM (make 2, start in beige yarn)
Rnd 1: start 6 sc in a magic ring [6]
Rnd 2: (sc in next 2 st, inc in next st) repeat 2 times [8]
Rnd 3 – 14: sc in all 8 st [8]
Change to light blue yarn.
Rnd 15: sc in all 8 st [8]
Rnd 16: ch 2, (3 dc in next st, 2 dc in next st) repeat
4 times [20]
Rnd 17: dec 10 times [10]
Rnd 18: (sc in next 3 st, dec) repeat 2 times [8]
Stuff the arm with fiberfill. Flatten the piece.
Sc across both sides of the piece to close the opening.
Rnd 19: sc in all 4 st [4]
Fasten off, leaving a long tail for sewing. Sew the arms
to each side of the body between round 20 and 21.
INNER EAR (make 2, in pink yarn)
Rnd 1: start 6 sc in a magic ring [6]
Rnd 2: inc 6 times [12]
Rnd 3: (sc, inc in next st) repeat 6 times [18]
Slst in next st. Fasten off and weave in the yarn ends.
OUTER EAR (make 2, in beige yarn)
Rnd 1: start 6 sc in a magic ring [6]
Rnd 2: inc 6 times [12]
Rnd 3: (sc, inc in next st) repeat 6 times [18]
Align one inner ear with an outer ear, the backs facing
each other.
Rnd 4: With the outer ear facing you, ch 1, sc in next
18 st through both pieces at once [18] (picture 4)
Slst in next st. Fasten off, leaving a long tail for sewing
Pin the ears to the head between round 16 and 17, about
7 st apart. Sew the ears to the head with 4 stitches only.
BABY CHARLY MOUSE
NOTE: Unless otherwise specified, all parts of baby
Charly are identical to those of mommy Maisy, though
crocheted with light fingering weight yarn and a 2 mm
crochet hook.
HEAD (in beige yarn)
Follow the pattern for mommy Maisy’s head. Embroi-
der the nose and eyes as mentioned below.
– Using pink yarn, stitch the nose over rounds 1 and 2
with the widest part of the nose 2 stitches apart.
– Embroider the eyes with black yarn. Each eye should
start between rounds 7 and 8 and end between
rounds 10 and 11. The starting point of the two eyes
should be 8 stitches apart. (picture 5)
– Sew rounds 11 to 16 of the head to the body.
SKIRT (start in orange yarn)
Keep the legs directed away from you while you crochet
the skirt, so the pretty side of your crochetwork will face
outward. Join orange yarn in the first front loop stitch of
round 8 of the body.
Rnd 1: FLO dc inc in all 36 st [72]
Change to light blue yarn.
Rnd 2: (inc in next st, sc in next st) repeat 36 times [108]
Slst in next st and fasten off. Weave in the loose yarn
ends.
4
40
Rnd 10
Rnd 7
Rnd 10
7

ARM (make two, start in beige yarn)
Rnd 1: start 6 sc in a magic ring [6]
Rnd 2: (sc in next 2 st, inc in next st) repeat 2 times [8]
Rnd 3 – 5: sc in all 8 st [8]
Change to orange yarn.
Rnd 6 – 18: sc in all 8 st [8]
Stuff the arm with fiberfill. Flatten the piece. Sc across
both sides of the piece to close the opening.
Rnd 19: sc in all 4 st [4]
Fasten off, leaving a long tail for sewing. Sew the arms
to each side of the body between rounds 20 and 21.
KITTY HOODIE (in orange yarn)
Rnd 1: start 6 sc in a magic ring [6]
Rnd 2: inc 6 times [12]
Rnd 3: (sc, inc in next st) repeat 6 times [18]
Rnd 4: (sc in next 2 st, inc in next st) repeat 6 times [24]
Rnd 5: (sc in next 3 st, inc in next st) repeat 6 times [30]
Rnd 6: (sc in next 4 st, inc in next st) repeat 6 times [36]
Rnd 7: (sc in next 10 st, dec] repeat 3 times [33]
Rnd 8: sc in next 6 st, ch 5 and skip next 5 st, sc in next
7 st, ch 5 and skip next 5 st, sc in next 6 st [29]
We continue crocheting in rows.
Row 9 – 13: ch 1, turn, start in second ch from hook,
sc in next 29 st [29]
Finish with ch 30 to create one tie for the hoodie. To create
the second tie, pull up a loop of orange yarn on the other
side of the hoodie and ch 30. Weave in the yarn ends.
KITTY EARS FOR HOODIE (in orange yarn)
Rnd 1: start 6 sc in a magic ring [6]
Rnd 2: (sc in next 2 st, inc in next st) repeat 2 times [8]
Rnd 3: (sc in next 3 st, inc in next st) repeat 2 times [10]
Rnd 4: (sc in next 4 st, inc in next st) repeat 2 times [12]
Rnd 5: sc in all 12 st [12]
Flatten the piece. Sc across both sides of the piece to
close the opening.
Rnd 6: sc in all 6 st [6]
Fasten off, leaving a long tail for sewing.
FACE OF KITTY HOODIE
Sew the face of the kitty hoodie before attaching baby
Charly’s ears (picture 6, 7)
– Insert black metal brads between rounds 10 and 11,
5 stitches apart.
– With black yarn, sew eyebrows 1 round above each eye.
– Sew two parallel whiskers with black yarn, each 2
stitches in length, between rounds 11 and 12, and
rounds 12 and 13.
– Embroider nose with pink yarn across round 11.
– Sew on the orange ears between rounds 9 and 10,
12 stitches apart.
– Put the kitty hoodie onto baby Charly’s head and tie
it on with a bow.
– Sew baby Charly’s ears on through the gaps in her
hoodie. Sew 3 stitches of each ear to the head.
41

July is the sweetest mom any baby kangaroo could ever wish for. She is always joyful, energetic
and she loves her baby daughter. Anytime little Jumpy craves a warm hug from mom,
she takes her in her arms and squeezes her tight.
skill level
12” / 30 cm tall 4.5” / 12 cm tall
mom baby
42
design by Kamlin Patterns

materials – mom
– Fingering weight yarn in brown (80 g / 230 m)
beige (10 g / 30 m), black (leftover)
– Safety eyes (10 mm)
– Bow for decoration
materials – baby
– Fingering weight yarn in brown (20 g / 60 m)
beige (5 g / 15 m), black (leftover)
– Safety eyes (4.5 mm)
– Button for decoration
both
– Size 1.75 mm crochet hook
– Embroidery thread in black
– Yarn needle
– Stitch marker
– Fiberfill for stuffing
MOM KANGAROO
HEAD (in brown yarn)
Rnd 1: start 6 sc in a magic ring [6]
Rnd 2: inc 6 times [12]
Rnd 3: (sc, inc in next st) repeat 6 times [18]
Rnd 4: (sc in next 2 st, inc in next st) repeat 6 times [24]
Rnd 5: (sc in next 3 st, inc in next st) repeat 6 times [30]
Rnd 6: (sc in next 4 st, inc in next st) repeat 6 times [36]
Rnd 7 – 12: sc in all 36 st [36]
Rnd 13: (sc in next 5 st, inc in next st) repeat 6 times [42]
Rnd 14: (sc in next 6 st, inc in next st) repeat 6 times [48]
Rnd 15: (sc in next 7 st, inc in next st) repeat 6 times [54]
Rnd 16 – 17: sc in all 54 st [54]
Rnd 18: (sc in next 8 st, inc in next st) repeat 6 times [60]
Rnd 19 – 20: sc in all 60 st [60]
Rnd 21: (sc in next 9 st, inc in next st) repeat 6 times [66]
Rnd 22 – 28: sc in all 66 st [66]
Insert 10 mm safety eyes between rounds 15 and 16,
with an interspace of 5 stitches. Using black embroidery
thread, embroider an eyebrow above each eye.
Rnd 29: (sc in next 9 st, dec) repeat 6 times [60]
Rnd 30: (sc in next 8 st, dec) repeat 6 times [54]
Rnd 31: (sc in next 7 st, dec) repeat 6 times [48]
Rnd 32: (sc in next 6 st, dec) repeat 6 times [42]
Rnd 33: (sc in next 5 st, dec) repeat 6 times [36]
Stuff with fiberfill and continue stuffing as you go.
Rnd 34: (sc in next 4 st, dec) repeat 6 times [30]
Rnd 35: (sc in next 3 st, dec) repeat 6 times [24]
Rnd 36: (sc in next 2 st, dec) repeat 6 times [18]
Rnd 37: (sc in next st, dec) repeat 6 times [12]
Rnd 38: dec 6 times [6]
Fasten off, leaving a long tail for sewing. Using your
yarn needle, weave the yarn tail through the front loop
of each remaining stitch and pull it tight, closing off the
back of the head. Weave in the yarn end. (picture 1)
NOSE (in black yarn)
Ch 6. Stitches are worked around both sides of the foun-
dation chain.
Rnd 1: start in second ch from hook, sc in next 4 st, 3 sc
in last st. Continue on the other side of the foundation
chain, sc in next 3 st, inc in last st [12]
Rnd 2: (sc in next 5 st, 3 sc in next st) repeat 2 times [16]
Rnd 3 – 5: sc in all 16 st [16]
Fasten off, leaving a tail for sewing. Stuff the nose with
fiberfill. Sew the nose to the head between rounds 6 and
8 (count 6 rounds down from the eyes). Using black em-
broidery thread, sew a vertical line starting at the nose,
down over the magic ring to round 11. Sew a smiling
mouth over round 11. (picture 2)
EAR (make 2, in brown yarn)
Rnd 1: start 6 sc in a magic ring [6]
Rnd 2: (sc, inc in next st) repeat 3 times [9]
Rnd 3: (sc in next 2 st, inc in next st) repeat 3 times [12]
Rnd 4: (sc in next 3 st, inc in next st) repeat 3 times [15]
Rnd 5: (sc in next 4 st, inc in next st) repeat 3 times [18]
Rnd 6: (sc in next 5 st, inc in next st) repeat 3 times [21]
Rnd 7: (sc in next 6 st, inc in next st) repeat 3 times [24]
Rnd 8 – 12: sc in all 24 st [24]
43

Rnd 13: (sc in next 6 st, dec) repeat 3 times [21]
Rnd 14: (sc in next 5 st, dec) repeat 3 times [18]
Rnd 15: (sc in next 4 st, dec) repeat 3 times [15]
Rnd 16: sc in all 15 st [15]
Fasten off, leaving a long tail for sewing. Flatten the
ears, they do not need to be stuffed (picture 3). Pinch
the ears together at the bottom end sew them together
with one stitch. Now sew the ears to the head over
rounds 25 to 27 with an interspace of about 18 stitches.
Sew a small bow to one ear.
BODY (in brown yarn)
Starting at the bottom.
Rnd 1: start 6 sc in a magic ring [6]
Rnd 2: inc 6 times [12]
Rnd 3: (sc, inc in next st) repeat 6 times [18]
Rnd 4: (sc in next 2 st, inc in next st) repeat 6 times [24]
Rnd 5: (sc in next 3 st, inc in next st) repeat 6 times [30]
Rnd 6: (sc in next 4 st, inc in next st) repeat 6 times [36]
Rnd 7: (sc in next 5 st, inc in next st) repeat 6 times [42]
Rnd 8: (sc in next 6 st, inc in next st) repeat 6 times [48]
Rnd 9: (sc in next 7 st, inc in next st) repeat 6 times [54]
Rnd 10: (sc in next 8 st, inc in next st) repeat 6 times [60]
Rnd 11: (sc in next 9 st, inc in next st) repeat 6 times [66]
Rnd 12: (sc in next 10 st, inc in next st) repeat 6 times [72]
Rnd 13: (sc in next 11 st, inc in next st) repeat 6 times [78]
Rnd 14: (sc in next 12 st, inc in next st) repeat 6 times [84]
Rnd 15: (sc in next 13 st, inc in next st) repeat 6 times [90]
Rnd 16 – 25: sc in all 90 st [90]
Rnd 26: (sc in next 13 st, dec) repeat 6 times [84]
Rnd 27: sc in all 84 st [84]
Rnd 28: (sc in next 12 st, dec) repeat 6 times [78]
Rnd 29: sc in all 78 st [78]
Rnd 30: (sc in next 11 st, dec) repeat 6 times [72]
Rnd 31: sc in all 72 st [72]
Rnd 32: (sc in next 10 st, dec) repeat 6 times [66]
Rnd 33: sc in all 66 st [66]
Rnd 34: (sc in next 9 st, dec) repeat 6 times [60]
Rnd 35: (sc in next 8 st, dec) repeat 6 times [54]
Rnd 36: (sc in next 7 st, dec) repeat 6 times [48]
Rnd 37 – 38: sc in all 48 st [48]
Rnd 39: (sc in next 6 st, dec) repeat 6 times [42]
Rnd 40 – 41: sc in all 42 st [42]
Rnd 42: (sc in next 5 st, dec) repeat 6 times [36]
Stuff the body with fiberfill and continue stuffing as
you go. Don't overstuff. If you do, the baby might not
fit in the pouch.
Rnd 43 – 44: sc in all 36 st [36]
Rnd 45: (sc in next 4 st, dec) repeat 6 times [30]
Rnd 46 – 47: sc in all 30 st [30]
Rnd 48: (sc in next 3 st, dec) repeat 6 times [24]
Rnd 49 – 50: sc in all 24 st [24]
Rnd 51: (sc in next 2 st, dec) repeat 6 times [18]
Rnd 52 – 55: sc in all 18 st [18]
Rnd 56: (sc in next st, dec) repeat 6 times [12]
Rnd 57: dec 6 times [6]
Fasten off, weave in the yarn ends. Sew rounds 20 to 27
of the head to the body.
BELLY PATCH (in beige yarn)
Ch 21. Stitches are worked around both sides of the
foundation chain.
1 2 4
44
3

Rnd 1: start in second ch from hook, sc in next 19 st,
3 sc in last st. Continue on the other side of the foun-
dation chain, sc in next 18 st, inc in last st [42]
Rnd 2: (sc in next 20 st, 3 sc in next st) repeat 2 times [46]
Rnd 3: inc, sc in next 18 st, inc in next 5 st, sc in next
18 st, inc in next 4 st [56]
Rnd 4: sc in all 56 st [56]
Rnd 5: sc in next 12 st, dc in next 9 st, dc inc in next 10
st, dc in next 9 st, sc in next 16 st [66]
Fasten off, leaving a long tail for sewing. Sew the patch
to the body starting 6 rounds below the neck.
POUCH (in brown yarn)
Ch 19. We crochet in rows.
Row 1: start in the second chain from hook, sc in all
18 st, ch 1, turn [18]
Row 2: inc, sc in next 16 st, inc in the last st, ch 1, turn [20]
Row 3: inc, sc in next 18 st, inc in the last st, ch 1, turn [22]
Row 4: inc, sc in next 20 st, inc in the last st, ch 1, turn [24]
Row 5: inc, sc in next 22 st, inc in the last st, ch 1, turn [26]
Row 6: inc, sc in next 24 st, inc in the last st, ch 1, turn [28]
Row 7: inc, sc in next 26 st, inc in the last st, ch 1, turn [30]
Row 8: inc, sc in next 28 st, inc in the last st, ch 1, turn [32]
Row 9: inc, sc in next 30 st, inc in the last st, ch 1, turn [34]
Row 10: inc, sc in next 32 st, inc in the last st, ch 1, turn [36]
Row 11: inc, sc in next 34 st, inc in the last st, ch 1, turn [38]
Row 12: inc, sc in next 36 st, inc in the last st, ch 1, turn [40]
Row 13 – 18: sc in all 40 st, ch 1, turn [40]
Row 19: sc in all 40 st [40]
Crochet a finishing round of sc, one sc stitch in each
row end, 3 sc in the corners. (picture 4)
Slst in next st. Fasten off, leaving a long tail for sewing.
Pin the pouch to the body starting 5 rounds below the
belly patch. Make sure you make it roomy enough for
baby kangaroo to fit in. Sew the pouch to the body with
the leftover yarn tail.
ARM (make 2, in brown yarn)
Rnd 1: start 6 sc in a magic ring [6]
Rnd 2: inc 6 times [12]
Rnd 3: (sc, inc in next st) repeat 6 times [18]
Rnd 4 – 34: sc in all 18 st [18]
Rnd 35: (sc in next st, dec) repeat 6 times [12]
Stuff the arm with fiberfill.
Rnd 36: dec 6 times [6]
Fasten off, leaving a long tail for sewing. Using your
yarn needle, weave the yarn tail through the front loop
of each remaining stitch and pull it tight, closing off the
top of the arm. Weave in the yarn end.
We now attach the arms, about 4 rounds below the neck
edge. Thread your yarn needle with a long piece of brown
yarn. Insert it into the first arm, through the body and
out through the second arm. Return through the second
arm and through the body, back to the starting point.
Repeat if necessary. Pull the yarn tight and fasten off.
45

FOOT (make 2, in brown yarn)
Ch 16. Stitches are worked around both sides of the
foundation chain.
Rnd 1: start in second ch from hook, sc in next 14 st,
3 sc in last st. Continue on the other side of the foun-
dation chain, sc in next 13 st, inc in last st [32]
Rnd 2: (sc in next 15 st, 3 sc in next st) repeat 2 times [36]
Rnd 3 – 13: sc in all 36 st [36]
Rnd 14: (sc in next 7, dec) repeat 4 times [32]
Rnd 15 – 17: sc in all 32 st [32]
Rnd 18: (sc in next 6, dec) repeat 4 times [28]
Rnd 19 – 21: sc in all 28 st [28]
46

Rnd 22: (sc in next 5, dec) repeat 4 times [24]
Stuff with fiberfill and continue stuffing as you go.
Rnd 23 – 25: sc in all 24 st [24]
Rnd 26: (sc in next 4, dec) repeat 4 times [20]
Rnd 27 – 29: sc in all 20 st [20]
Rnd 30: (sc in next 3, dec) repeat 4 times [16]
Rnd 31: (sc in next 2, dec) repeat 4 times [12]
Rnd 32: (sc in next st, dec) repeat 4 times [8]
Fasten off, leaving a long tail for sewing. Using your
yarn needle, weave the yarn tail through the front loop
of each remaining stitch and pull it tight, closing off the
back of the foot. Weave in the yarn end.
Using black embroidery thread, sew 2 long stitches
through each foot to make toes. Sew rounds 14 to 25
of the top side of the feet to the body.
TAIL (in brown yarn)
Rnd 1: start 6 sc in a magic ring [6]
Rnd 2: (sc, inc in next st) repeat 3 times [9]
Rnd 3 – 15: sc in all 9 st [9]
Rnd 16: (sc in next 2 st, inc in next st) repeat 3 times [12]
Rnd 17 – 31: sc in all 12 st [12]
Stuff with fiberfill and continue stuffing as you go.
Rnd 32: (sc in next 3 st, inc in next st) repeat 3 times [15]
Rnd 33: sc in all 15 st [15]
Rnd 34: (sc in next 4 st, inc in next st) repeat 3 times [18]
Rnd 35: sc in all 18 st [18]
Rnd 36: (sc in next 5 st, inc in next st) repeat 3 times [21]
Rnd 37: (sc in next 6 st, inc in next st) repeat 3 times [24]
Rnd 38: (sc in next 7 st, inc in next st) repeat 3 times [27]
Rnd 39: (sc in next 8 st, inc in next st) repeat 3 times [30]
Rnd 40: (sc in next 9 st, inc in next st) repeat 3 times [33]
Rnd 41: (sc in next 10 st, inc in next st) repeat 3 times [36]
Rnd 42: (sc in next 11 st, inc in next st) repeat 3 times [39]
Fasten off, leaving a long tail for sewing. Sew on the
kangaroo's tail after completing the baby to ensure
the mom kangaroo can balance properly and won't tip
forwards with the baby in her pouch.
JUMPY THE BABY KANGAROO
HEAD (in brown yarn)
Rnd 1: start 6 sc in a magic ring [6]
Rnd 2: inc 6 times [12]
Rnd 3: (sc, inc in next st) repeat 6 times [18]
Rnd 4 – 6: sc in all 18 st [18]
Rnd 7: (sc in next 2 st, inc in next st) repeat 6 times [24]
Rnd 8: (sc in next 3 st, inc in next st) repeat 6 times [30]
Rnd 9: (sc in next 4 st, inc in next st) repeat 6 times [36]
Rnd 10 – 12: sc in all 36 st [36]
Rnd 13: (sc in next 4 st, dec) repeat 6 times [30]
Rnd 14: (sc in next 3 st, dec) repeat 6 times [24]
Insert the 4.5 mm safety eyes between rounds 7 and 8,
with an interspace of 3 stitches.
Stuff with fiberfill and continue stuffing as you go.
Rnd 15: (sc in next 2 st, dec) repeat 6 times [18]
Rnd 16: (sc in next st, dec) repeat 6 times [12]
Rnd 17: dec 6 times [6]
Fasten off, leaving a long tail for sewing. Using your
yarn needle, weave the yarn tail through the front loop
of each remaining stitch and pull it tight, closing off the
back of the head. Weave in the yarn end. (picture 5)
47

Using black embroidery thread, sew a nose over
rounds 2 to 4. Sew a vertical line starting at the tip of
the nose downward to round 2. Sew a smiling mouth
over round 2. (picture 6)
EAR (make 2, in brown yarn)
Ch 2. We crochet in rows.
Row 1: start in second ch from hook, sc in the first st,
ch 1, turn [1]
Row 2: 3 sc in the first st, ch 1, turn [3]
Row 3: inc, sc, inc in the last st, ch 1, turn [5]
Row 4: inc, sc in next 3 st, inc in the last st, ch 1, turn [7]
Row 5: inc, sc in next 5 st, inc in the last st [9]
Crochet a finishing round of sc around the ear; one sc
stitch in each row end, 3 sc in the corners (picture 7).
Fasten off, leaving a long tail for sewing. Pinch the ears
together at the bottom and sew them together with
one stitch. Sew the ears to the head over rounds 12 to
14 with an interspace of about 5 stitches (picture 8).
Sew a small button to one ear.
BODY (in brown yarn)
Starting at the bottom.
Rnd 1: start 6 sc in a magic ring [6]
Rnd 2: inc 6 times [12]
Rnd 3: (sc, inc in next st) repeat 6 times [18]
Rnd 4: (sc in next 2 st, inc in next st) repeat 6 times [24]
Rnd 5: (sc in next 3 st, inc in next st) repeat 6 times [30]
Rnd 6: (sc in next 4 st, inc in next st) repeat 6 times [36]
Rnd 7: (sc in next 5 st, inc in next st) repeat 6 times [42]
Rnd 8 – 10: sc in all 42 st [42]
Rnd 11: (sc in next 5 st, dec) repeat 6 times [36]
Rnd 12: sc in all 36 st [36]
Rnd 13: (sc in next 4 st, dec) repeat 6 times [30]
Rnd 14 – 15: sc in all 30 st [30]
Rnd 16: (sc in next 3 st, dec) repeat 6 times [24]
Rnd 17 – 18: sc in all 24 st [24]
Rnd 19: (sc in next 2 st, dec) repeat 6 times [18]
Rnd 20 – 21: sc in all 18 st [18]
Stuff with fiberfill and continue stuffing as you go.
Rnd 22: (sc in next st, dec) repeat 6 times [12]
Rnd 23: sc in all 12 st [12]
Rnd 24: dec 6 times [6]
Fasten off, weave in the yarn ends. Sew rounds 9 to 12 of
the head to the body.
BELLY PATCH (in beige yarn)
Ch 9. Stitches are worked around both sides of the foun-
dation chain.
Rnd 1: start in second ch from hook, sc in next 7 st, 3 sc
in last st. Continue on the other side of the foundation
chain, sc in next 6 st, inc in last st [18]
Rnd 2: (sc in next 8 st, 3 sc in next st) repeat 2 times [22]
48

49
Slst in next st. Fasten off, leaving a long tail for sewing.
Sew the belly patch to the body.
POUCH (in brown yarn)
Ch 7. We crochet in rows.
Row 1: start in the second ch from hook, sc in all 6 st,
ch 1, turn [6]
Row 2: inc, sc in next 4 st, inc in last st, ch 1, turn [8]
Row 3: inc, sc in next 6 st, inc in last st, ch 1, turn [10]
Row 4: inc, sc in next 8 st, inc in last st, ch 1, turn [12]
Row 5: sc in all 12 st, ch 1, turn [12]
Row 6: sc in all 12 st [12]
Crochet a finishing round of sc around the pouch;
one sc stitch in each row end, 3 sc in the corners.
Fasten off, leaving a long tail for sewing. Sew the pouch
to the kangaroo’s body, starting about one row under
the belly patch.
ARM (make 2, in brown yarn)
Rnd 1: start 5 sc in a magic ring [5]
Rnd 2: inc 5 times [10]
Rnd 3 – 5: sc in all 10 st [10]
Rnd 6: (sc in next st, dec) repeat 3 times, sc in last st [7]
Rnd 7 – 13: sc in all 7 st [7]
Fasten off, leaving a long tail for sewing. Stuffing the
arms is optional, in the example they are not stuffed. Sew
the arms to the body 1 round below the base of the head.
FOOT (make 2, in brown yarn)
Rnd 1: start 5 sc in a magic ring [5]
Rnd 2: inc 5 times [10]
5 6
Rnd 3 – 5: sc in all 10 st [10]
Rnd 6: (sc in next st, dec) repeat 3 times, sc in last st [7]
Rnd 7: sc in all 7 st [7]
Fasten off, leaving a long tail for sewing. The feet do not
need to be stuffed. Sew the feet to the body between
rounds 4 and 5.
TAIL (in brown yarn)
Rnd 1: start 6 sc in a magic ring [6]
Rnd 2 – 8: sc in all 6 st [6]
Rnd 9: (sc, inc in next st) repeat 3 times [9]
Rnd 10: (sc in next 2 st, inc in next st) repeat 3 times [12]
Slst in next st. Fasten off, leaving a long tail for sewing.
Stuff the tail lightly with fiberfill. Sew the tail to the
kangaroo’s bottom.
7 8
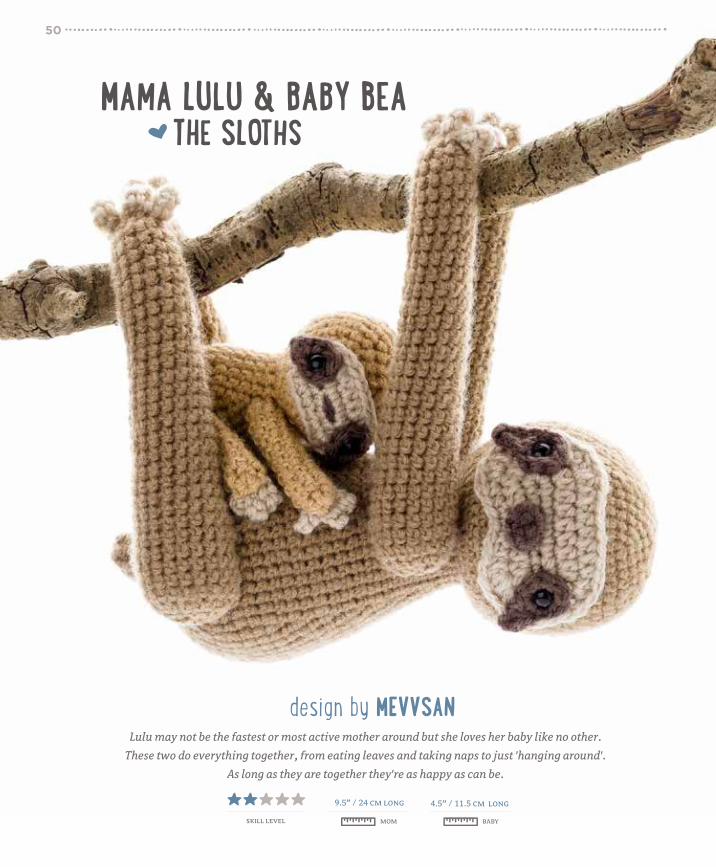
Lulu may not be the fastest or most active mother around but she loves her baby like no other.
These two do everything together, from eating leaves and taking naps to just 'hanging around'.
As long as they are together they're as happy as can be.
skill level
9.5” / 24 cm long 4.5” / 11.5 cm long
mom baby
50
design by MEVVSAN

materials – mom
– Worsted weight yarn in light brown (90 g / 180 m),
dark brown (a leftover) and beige (5 g / 10 m)
– Safety eyes (9 mm)
– Two buttons (6 mm)
materials – baby
– Worsted weight yarn in light brown (25 g / 45 m),
dark brown (a leftover) and beige (5 g / 5 m)
– Safety eyes (9 mm)
both
– Size 2.75 mm / C-2 crochet hook
– Fiberfill for stuffing
– Brown sewing thread
– Yarn needle
51
MAMA SLOTH LULU
HEAD (in light brown yarn)
Rnd 1: start 8 sc in a magic ring [8]
Rnd 2: inc 8 times [16]
Rnd 3: (inc in next st, sc in next st) repeat 8 times [24]
Rnd 4: (inc in next st, sc in next 2 st) repeat 8 times [32]
Rnd 5: (inc in next st, sc in next 3 st) repeat 8 times [40]
Rnd 6: (inc in next st, sc in next 4 st) repeat 8 times [48]
Rnd 7 – 16: sc in all 48 st [48]
Rnd 17: (dec, sc in next 4 st) repeat 8 times [40]
Rnd 18: (dec, sc in next 3 st) repeat 8 times [32]
Stuff with fiberfill and continue stuffing as you go.
Rnd 19: (dec, sc in next 2 st) repeat 8 times [24]
Rnd 20: (dec, sc in next st) repeat 8 times [16]
Rnd 21: dec 8 times [8]
Fasten off, leaving a long tail for sewing. Using your yarn
needle, weave the yarn tail through the front loop of each
remaining stitch and pull it tight to close. (picture 1)
FACE PATCH (in beige yarn)
Ch 8. Stitches are worked around both sides of the foun-
dation chain.
Rnd 1: start in second ch from hook, inc in first st, sc in
next 5 st, 4 sc in last st. Continue on the other side of the
foundation ch, sc in next 5 st, inc in last st [18]
Rnd 2: hdc inc in next 2 st, hdc in next st, sc in next 3 st,
hdc in next st, hdc inc in next 4 st, hdc in next 5 st, hdc
inc in last 2 st [26]
Rnd 3: dc inc in next 3 st, hdc in next 2 st, sc in next 3
st, hdc in next 2 st, dc inc in next 6 st, hdc in next 7 st,
dc inc in next 3 st [38]
Slst in next st. Fasten off, leaving a long tail for sewing.
(picture 2)
EYE MARKING (make 2, in dark brown yarn)
Rnd 1: start 4 sc in a magic ring [4]
Before closing the magic ring, place the safety eye
inside and tighten the magic ring around it. Do not affix
the backings yet.
Rnd 2: inc 4 times [8]
Ch 4 (picture 3), hdc in second ch from hook, hdc in next
2 ch, slst back in first st of round 2. (picture 4)
1 2 3 4

Fasten off, leaving a long tail for sewing. Insert the safety
eyes between rounds 2 and 3 on the face patch. Affix the
backs of the safety eyes and sew the face patch to the head.
The curved part of the patch should be placed at the chin
area of the head (picture 5). Once attached use the leftover
yarn tails from the eye markings to sew them to the head.
NOSE (in dark brown yarn)
Rnd 1: start 4 sc in a magic ring [4]
Rnd 2: (inc, sc in next st) repeat 2 times [6]
Fasten off, leaving a long tail for sewing. Do not stuff
the nose with fiberfill. Sew the nose to the face in be-
tween the eyes. (picture 5)
BODY (in light brown yarn)
Rnd 1: start 8 sc in a magic ring [8]
Rnd 2: inc 8 times [16]
Rnd 3: (inc in next st, sc in next st) repeat 8 times [24]
Rnd 4: (inc in next st, sc in next 2 st) repeat 8 times [32]
Rnd 5: (inc in next st, sc in next 3 st) repeat 8 times [40]
Rnd 6: (inc in next st, sc in next 4 st) repeat 8 times [48]
Rnd 7: sc in all 48 st [48]
Rnd 8: (inc in next st, sc in next 5 st) repeat 8 times [56]
Rnd 9 – 13: sc in all 56 st [56]
Rnd 14: (dec, sc in next 12 st) repeat 4 times [52]
Rnd 15: sc in all 52 st [52]
Rnd 16: (dec, sc in next 11 st) repeat 4 times [48]
Rnd 17: sc in all 48 st [48]
Rnd 18: (dec, sc in next 10 st) repeat 4 times [44]
Rnd 19: sc in all 44 st [44]
Rnd 20: (dec, sc in next 9 st) repeat 4 times [40]
Rnd 21: sc in all 40 st [40]
Rnd 22: (dec, sc in next 8 st) repeat 4 times [36]
Rnd 23: sc in all 36 st [36]
Stuff with fiberfill and continue stuffing as you go.
Rnd 24: (dec, sc in next 7 st) repeat 4 times [32]
Rnd 25: sc in all 32 st [32]
Rnd 26: (dec, sc in next 6 st) repeat 4 times [28]
Rnd 27 – 28: sc in all 28 st [28] (Fig. 6)
Fasten off, leaving a long tail for sewing. Sew the body
to the head. (picture 6)
ARM (make 2, in light brown yarn)
Rnd 1: start 6 sc in a magic ring [6]
Rnd 2: inc 6 times [12]
Rnd 3: (inc, sc in next 5 st) repeat 2 times [14]
Rnd 4 – 7: sc in all 14 st [14]
Stuff lightly with fiberfill and continue stuffing as you go.
Rnd 8: inc in next st, sc in next 13 st [15]
Rnd 9 – 12: sc in all 15 st [15]
Rnd 13: inc in next st, sc in next 14 st [16]
Rnd 14 – 16: sc in all 16 st [16]
Rnd 17: inc in next st, sc in next 15 st [17]
Rnd 18 – 20: sc in all 17 st [17]
Rnd 21: inc in next st, sc in next 16 st [18]
Rnd 22 – 28: sc in all 18 st [18]
Rnd 29: (dec, sc in next st) repeat 6 times [12]
Rnd 30: dec 6 times [6]
Fasten off, leaving a long tail for sewing. Using your
yarn needle, weave the yarn tail through the front loop
of each remaining st and pull it tight to close. Sew the
arms to the body. (picture 7, 8)
52
5 6 7 8

LEG (make 2, in light brown yarn)
Rnd 1: start 6 sc in a magic ring [6]
Rnd 2: inc 6 times [12]
Rnd 3: (inc in next st, sc in next 5 st) repeat 2 times [14]
Rnd 4 – 7: sc in all 14 st [14]
Rnd 8: inc in next st, sc in next 13 st [15]
Stuff lightly with fiberfill and continue stuffing as
you go.
Rnd 9 – 12: sc in all 15 st [15]
Rnd 13: inc in next st, sc in next 14 st [16]
Rnd 14 – 16: sc in all 16 st [16]
Rnd 17: inc in next st, sc in next 15 st [17]
Rnd 18 – 19: sc in all 17 st [17]
Rnd 20: inc in next st, sc in next 16 st [18]
Rnd 21 – 22: sc in all 18 st [18]
Rnd 23: inc in next st, sc in next 17 st [19]
Rnd 24: sc in all 19 st [19]
Rnd 25: inc in next st, sc in next 18 st [20]
Rnd 26: sc in all 20 st [20]
Rnd 27: inc in next st, sc in next 19 st [21]
Rnd 28: inc in next st, sc in next 20 st [22]
53

Rnd 29: (inc in next st, sc in next 10 st) repeat 2 times [24]
Rnd 30: (dec, sc in next st) repeat 8 times [16]
Rnd 31: dec 8 times [8]
Fasten off, leaving a long tail for sewing. Using your
yarn needle, weave the yarn tail through the front loop
of each remaining stitch and pull it tight to close. Sew
the legs to the body.
TAIL (in light brown yarn)
Rnd 1: start 4 sc in a magic ring [4]
Rnd 2: inc 4 times [8]
Rnd 3: (inc in next st, sc in next 3 st) repeat 2 times [10]
Rnd 4: (inc in next st, sc in next 4 st) repeat 2 times [12]
Rnd 5: (inc in next st, sc in next 3 st) repeat 3 times [15]
Fasten off, leaving a long tail for sewing. Lightly stuff the
tail and sew it directly over the magic ring of the body.
CLAW (make 4, in beige yarn)
(Ch 5, start in second ch from hook, sc in next 4 st)
repeat 3 times for a total of 3 toes. (picture 9, 10)
Fasten off, leaving a long tail for sewing. Sew the claws
to the top of the arms and feet. (picture 11)
54
BABY SLOTH
HEAD (in light brown yarn)
Rnd 1: start 6 sc in a magic ring [6]
Rnd 2: inc 6 times [12]
Rnd 3: (inc in next st, sc in next st) repeat 6 times [18]
Rnd 4: (inc in next st, sc in next 2 st) repeat 6 times [24]
Rnd 5: (inc in next st, sc in next 3 st) repeat 6 times [30]
Rnd 6 – 10: sc in all 30 st [30]
Rnd 11: (dec, sc in next 3 st) repeat 6 times [24]
Stuff with fiberfill and continue stuffing as you go.
Rnd 12: (dec, sc in next 2 st) repeat 6 times [18]
Rnd 13: (dec, sc in next st) repeat 6 times [12]
Rnd 14: dec 6 times [6]
Fasten off, leaving a tail for sewing. Using your yarn needle,
weave the yarn tail through the front loop of each remaining
stitch and pull it tight to close. Weave in the yarn end.
FACE PATCH (in beige yarn)
Ch 6. Stitches are worked around both sides of the
foundation chain.
Rnd 1: start in second ch from hook, inc in the first st,
9 10 11 12
13 14 15 16

55
sc in next 3 st, 4 sc in last st. Continue on the other side
of the foundation ch, sc in next 3 st, inc in last st [14]
Rnd 2: hdc inc in first 2 st, sc in next 3 st, hdc inc in next
4 st, hdc in next 3 st, hdc inc in last 2 st [22]
Slst in next st. Fasten off, leaving a tail for sewing.
(picture 12)
EYE MARKING (make 2, in dark brown)
Rnd 1: start 5 sc in a magic ring [5]
Before closing the magic ring, place the safety eye
inside and tighten the magic ring around it. Do not affix
the backings yet.
Rnd 2: ch 3, sc in second ch from hook, sc in next st,
slst in the first sc in the magic ring.
Fasten off, leaving a long tail for sewing. Insert the eyes
in round 2 of the face patch. Affix the backings to the
safety eyes and embroider a small brown nose between
the eyes.
Use the face patch’s leftover yarn tail to sew it to the
head, making sure the curved part is facing downwards
where the chin area will be. (picture 13)
Use the yarn ends from the eye markings to sew them to
the face.
BODY (in light brown yarn)
Rnd 1: start 6 sc in a magic ring [6]
Rnd 2: inc 6 times [12]
Rnd 3: (inc in next st, sc in next st) repeat 6 times [18]
Rnd 4: (inc in next st, sc in next 2 st) repeat 6 times [24]
Rnd 5 – 7: sc in all 24 st [24]
Rnd 8: (dec, sc in next 10 st) repeat 2 times [22]
Stuff with fiberfill and continue stuffing as you go.
Rnd 9: (dec, sc in next 9 st) repeat 2 times [20]
Rnd 10: (dec, sc in next 8 st) repeat 2 times [18]
Rnd 11: (dec, sc in next 7 st) repeat 2 times [16]
Fasten off, leaving a long tail for sewing. Sew the body
to the head. (picture 14)
ARM AND LEG (make 4, in light brown yarn)
Rnd 1: start 6 sc in a magic ring [6]
Rnd 2: (inc in next st, sc in next 2 st) repeat 2 times [8]
Rnd 3 – 10: sc in all 8 st [8]
Fasten off, leaving a long tail for sewing. Do not stuff
the arms and legs. Sew them to the body. Make sure the
head is facing the side. (picture 15)
CLAW (make 4, in beige yarn)
(Ch 3, slst in second ch from hook, slst in next st) repeat
3 times for a total of 3 fingers.
Fasten off, leaving a long tail for sewing. Sew the claws
to the top of each arm and leg. (picture 16)
TAIL (in light brown yarn)
Ch 3.
Row 1: start in second ch from hoook, hdc in next 2 st [2]
Fasten off, leaving a long tail for sewing. Sew the tail to
the body where the magic ring is.
BUTTONS
If you would like mother sloth to hang from objects you
can sew a button to one of the front and back legs. On
the opposite legs, pull up a loop of light brown yarn,
ch 4 and slst back into the same spot on the foot. Fasten
off and weave in the yarn ends. Button up the legs.

Rosy never misses a chance to read a bedtime story to her sons since she knows they always sleep
easier when dreaming of the adventures of brave dino knights and dino princesses. No matter
how busy she is, she always finds the time to read at least one tale to them every night.
skill level
7” / 18 cm tall 3” / 8 cm tall
mom baby
56
design by LIA ARJONO

materials – mom
– Sport weight yarn in light green (40 g / 100 m),
yellow (5 g / 10 m), orange (leftover), white
(5 g / 10 m), black (leftover), blue (leftover)
and pink (leftover)
– Safety eyes (10 mm)
– Craft felt in yellow
– Yarn glue
materials – baby
– Sport weight yarn in dark green (15 g / 35 m),
yellow (leftover), blue (leftover), pink (leftover),
white (leftover), black (leftover)
both
– Size 2.25 mm / B-1 crochet hook
– Fiberfill for stuffing
– Yarn needle
– Sewing thread in black
– Sewing pins
57
ROSY, MAMA T-REX
HEAD (in light green yarn)
Start at the muzzle.
Rnd 1: start 6 sc in a magic ring [6]
Rnd 2: inc 6 times [12]
Rnd 3: (sc in next st, inc in next st) repeat 6 times [18]
Rnd 4: (sc in next 2 st, inc in next st) repeat 6 times [24]
Rnd 5: (sc in next 3 st, inc in next st) repeat 6 times [30]
Rnd 6: (sc in next 4 st, inc in next st) repeat 6 times [36]
Rnd 7: (sc in next 5 st, inc in next st) repeat 6 times [42]
Rnd 8: (sc in next 6 st, inc in next st) repeat 6 times [48]
Rnd 9: (sc in next 7 st, inc in next st) repeat 6 times [54]
Rnd 10: (sc in next 8 st, inc in next st) repeat 6 times [60]
Rnd 11: (sc in next 9 st, inc in next st) repeat 6 times [66]
Rnd 12: sc in all 66 st [66]
Rnd 13: (sc in next 20 st, dec) repeat 3 times [63]
Rnd 14: FLO dec 10 times, sc in next 11 st through both
loops, FLO dec 10 times, sc in next 12 st through both
loops [43]
Rnd 15 – 20: sc in all 43 st [43]
Rnd 21: (sc in next 6 st, dec) repeat 5 times, sc in next
3 st [38]
Rnd 22: (sc in next 5 st, dec) repeat 5 times, sc in next
3 st [33]
Rnd 23: (sc in next 4 st, dec) repeat 5 times, sc in next
3 st [28]
Rnd 24: sc in next 8 st, inc in next 6 st, sc in next 14 st [34]
Rnd 25 – 26: sc in all 34 st [34]
Rnd 27: hdc in next 5 st, sc in next 18 st, hdc in next
11 st [34]
Stuff the head firmly and continue stuffing as you go.
Rnd 28: (sc in next st, dec) repeat 11 times, sc in next st [23]
Rnd 29: sc in all 23 st [23]
Rnd 30: (sc in next st, dec) repeat 7 times, sc in next
2 st [16]
Rnd 31: dec 8 times [8]
Rnd 32: (sc in next 2 st, dec) repeat 2 times [6]
Fasten off, leaving a long tail for sewing. Using your yarn
needle, weave the yarn tail through the front loop of
each remaining stitch and pull it tight, closing off the
back of the head. Weave in the yarn end. From round 24
onwards you will have gradually created a little lump. This
lump should be facing downwards - you will insert it into
the body when you attach the body to the head.
EYEBALL (make 2, in white yarn)
Rnd 1: start 8 sc in a magic ring [8]
Rnd 2: inc 8 times [16]
Rnd 3: (sc in next st, inc in next st) repeat 8 times [24]
Rnd 4: sc in all 24 st [24]
Rnd 5: (sc in next 2 st, dec) repeat 6 times [18]
Rnd 6: (sc in next st, dec) repeat 3 times, sc in next 9 st [15]
Insert the safety eyes into the center of the eyeball.
Stuff the eyeball lightly.
Ch 1, press both sides of the eyeball together so that the
second stitch of round 6 lines up with the last stitch of
round 6 (skip the first stitch of round 6), slst through
both layers to the end. Fasten off, leaving a long tail for

sewing. With the curved side facing upwards, sew the
eyeball to the head between round 23 and round 27
with an interspace of 4 stitches.
EYELID (make 2, in light green yarn)
Rnd 1: start 6 sc in a magic ring [6]
Rnd 2: inc 6 times [12]
Rnd 3: (sc in next st, inc in next st) repeat 6 times [18]
Rnd 4: (sc in next 2 st, inc in next st) repeat 6 times [24]
Rnd 5: (sc in next 3 st, inc in next st) repeat 6 times [30]
Rnd 6: sc in all 30 st [30]
Flatten the eyelid. Do not stuff. Ch 1.
Rnd 7: sc through both layers in all 15 st [15]
Fasten off, leaving a long tail for sewing. With the curved
side facing upwards, sew the eyelid to the head right
behind the eyeball.
NOSTRIL (make 2, in light green yarn)
Rnd 1: start 6 sc in a magic ring [6]
Rnd 2: inc 6 times [12]
Fasten off, leaving a tail for sewing. Flatten the nostrils,
but do not sew them together. The nostrils do not need
to be stuffed. Sew the nostrils to the head between
round 12 and 13 with an interspace of 12 stitches. Make
sure the open side faces forward. (picture 1)
MOUTH
Using black yarn, embroider the mouth crossing round
18 from one side to the other. Count 4 rounds below the
starting magic ring of the head; this is the middle lower
point of the mouth.
TOOTH (make 2, in white yarn)
We crochet in rows. Ch 2.
Row 1: start in second ch from hook, inc, ch 1, turn [2]
Row 2: sc in next st, inc in next st, ch 1, turn [3]
Row 3: sc in next 2 st, inc in next st [4]
Fasten off, leaving a long tail for sewing. Sew the teeth
to the head right above the black line of the mouth
between rounds 7 and 10.
BIGGER TOOTH (make 2, in white yarn)
We crochet in rows. Ch 2.
Row 1: start in second ch from hook, inc, ch 1, turn [2]
Row 2: sc in next st, inc in next st, ch 1, turn [3]
Row 3: sc in next 2 st, inc in next st, ch 1, turn [4]
Row 4: sc in next 3 st, inc in next st [5]
Fasten off, leaving a long tail for sewing. Sew the teeth
to the head right above the black line of the mouth
between rounds 10 and 14.
BODY (in light green yarn)
Rnd 1: start 6 sc in a magic ring [6]
Rnd 2: inc 6 times [12]
Rnd 3: (sc in next st, inc in next st) repeat 6 times [18]
Rnd 4: (sc in next 2 st, inc in next st) repeat 6 times [24]
Rnd 5: (sc in next 3 st, inc in next st) repeat 6 times [30]
Rnd 6: (sc in next 4 st, inc in next st) repeat 6 times [36]
Rnd 7: (sc in next 5 st, inc in next st) repeat 6 times [42]
Rnd 8: (sc in next 6 st, inc in next st) repeat 6 times [48]
Rnd 9 – 20: sc in all 48 st [48]
Rnd 21: (sc in next 6 st, dec) repeat 6 times [42]
Rnd 22: sc in all 42 st [42]
Rnd 23: (sc in next 5 st, dec) repeat 6 times [36]
Rnd 24: sc in all 36 st [36]
Rnd 25: (sc in next 4 st, dec) repeat 6 times [30]
Rnd 26: sc in all 30 st [30]
Rnd 27: (sc in next 8 st, dec) repeat 2 times, sc in next
10 st [28]
Rnd 28: sc in next 9 st, dec, sc in next 5 st, dec, sc in
next 10 st [26]
Rnd 29: sc in next 10 st, dec 2 times, sc in next 12 st [24]
Stuff the body firmly and continue stuffing as you go.
58
1

Rnd 30 – 41: sc in all 24 st [24]
Rnd 42: sc in next 9 st, turn [9] Do not finish this round.
We continue crocheting in rows.
Row 43: skip first st, sc in next 6 st, dec 2 times, sc in
next 6 st, turn [14]
Row 44: skip first st, sc in next 11 st, dec [12]
Fasten off, leaving a long tail for sewing. Sew the body
to the head between rounds 23 and 30. Make sure the
rounded side (belly) faces front.
TUMMY PATCH (in yellow yarn)
We crochet in rows. Ch 11.
Row 1: start in second ch from hook, sc in next 10 st,
ch 1, turn [10]
Row 2: inc in next st, sc in next 8 st, inc in next st,
ch 1, turn [12]
Row 3: inc in next st, sc in next 10 st, inc in next st,
ch 1, turn [14]
Row 4: inc in next st, sc in next 12 st, inc in next st,
ch 1, turn [16]
Row 5: inc in next st, sc in next 14 st, inc in next st,
ch 1, turn [18]
Row 6 – 8: sc in all 18 st, ch 1, turn [18]
Row 9: dec, sc in next 14 st, dec, ch 1, turn [16]
Row 10: sc in all 16 st, ch 1, turn [16]
Row 11: dec, sc in next 12 st, dec, ch 1, turn [14]
Row 12: sc in all 14 st, ch 1, turn [14]
Row 13: dec, sc in next 10 st, dec, ch 1, turn [12]
Row 14: sc in all 12 st, ch 1, turn [12]
Row 15: dec, sc in next 8 st, dec, ch 1, turn [10]
Row 16: sc in all 10 st, ch 1, turn [10]
Row 17: dec, sc in next 6 st, dec, ch 1, turn [8]
Row 18: sc in all 8 st, ch 1, turn [8]
Row 19: dec, sc in next 4 st, dec, ch 1, turn [6]
Row 20 – 29: sc in all 6 st, ch 1, turn [6]
Row 30: sc in all 6 st [6]
Crochet a finishing round around the tummy patch, one
slst in each row end. Fasten off, leaving a long tail for
sewing. Sew the edges of the patch to the belly with the
straight edge at the neck and the curved edge at the bottom.
59

SECOND FINGER (make 1 for each hand,
2 pieces in total, in light green yarn)
Rnd 1: start 6 sc in a magic ring [6]
Rnd 2: (sc in next 2 st, inc in next st) repeat 2 times [8]
Rnd 3: sc in all 8 st [8]
Rnd 4: (sc in next 2 st, dec) repeat 2 times [6]
Rnd 5: sc in all 6 st [6]
Fasten off, weave in the yarn end. Stuff the finger firmly.
FIRST & THIRD FINGER (make 2 for each hand,
4 pieces in total, in light green yarn)
Rnd 1: start 6 sc in a magic ring [6]
Rnd 2: (sc in next 2 st, inc in next st) repeat 2 times [8]
Rnd 3: sc in all 8 st [8]
Rnd 4: (sc in next 2 st, dec) repeat 2 times [6]
Fasten off and weave in the yarn ends on 2 fingers. These
are the 'third fingers'. Do not fasten off on the other 2
fingers. These are the 'first fingers'. Continue working on
these first fingers to make a hand. Stuff the fingers firmly.
HAND AND ARM (make 2, in light green yarn)
Continue from first finger.
Rnd 1: sc in next 3 st of the first finger, sc in next 3 st of
the second finger, sc in all 6 st of the third finger, sc in
next 3 st of the second finger, sc in the last 3 remaining
st of the first finger [18]
Rnd 2 – 3: sc in all 18 st [18]
Rnd 4: (sc in next st, dec) repeat 6 times [12]
Rnd 5: (sc in next 4 st, dec) repeat 2 times [10]
Rnd 6 – 7: sc in all 10 st [10]
Stuff the hand firmly and continue stuffing as you go.
Rnd 8: (sc in next 4 st, inc in next st) repeat 2 times [12]
Rnd 9: sc in all 12 st [12]
Rnd 10: (sc in next 5 st, inc in next st) repeat 2 times [14]
Rnd 11: (sc in next 6 st, inc in next st) repeat 2 times [16]
Rnd 12 – 13: sc in all 16 st [16]
Rnd 14: (sc in next 6 st, dec) repeat 2 times [14]
Rnd 15: (sc in next 5 st, dec) repeat 2 times [12]
Rnd 16: (sc in next 4 st, dec) repeat 2 times [10]
Rnd 17: dec 5 times [5]
Fasten off, leaving a long tail for sewing. Using your yarn
needle, weave the yarn tail through the front loop of each
remaining stitch and pull it tight, closing off the top of the
arm. Weave in the yarn tail on the first arm. On the second
arm, weave this yarn tail through the arm to the spot
where you would like the arm to be attached to the body.
Count 5 rounds down from the top of the arm; this is the
spot where the yarn goes through (a). Sew the arms to
the sides of the body following the diagram (picture 2).
Start at position (a), insert your needle in the body 14
rounds below the neck. Go through the body, coming out
on the other side, 14 rounds below the neck, go through
the left arm, 5 rounds down from the top of the arm,
coming out on the other side, insert your needle back
into the arm and go through the body once more. When
back at the starting position (a) go through the right
arm, out on the other side and back into the arm. Make a
knot at position (a) and weave in the yarn end. To avoid
flattening the tops of the arms, make sure the yarn goes
in between stitches at point (b) and (c).
LEG (make 2, start in orange yarn)
Rnd 1: start 6 sc in a magic ring [6]
Rnd 2: inc 6 times [12]
Rnd 3: (sc in next st, inc in next st) repeat 6 times [18]
Rnd 4: inc 18 times [36]
Rnd 5: (skip 1 st, 2 dc + tc + 2 dc in next st, skip 1 st,
sc in next st) repeat 3 times, change to light green yarn,
sc in next 24 st [42]
Rnd 6: BLO sc in next 42 st [42]
Rnd 7 – 8: sc in all 42 st [42]
Rnd 9: (dc5tog, sc in next st) repeat 2 times, dc5tog,
(sc in next 4 st, dec) repeat 2 times, sc in next st, (dec,
60
acb
2

sc in next 4 st) repeat 2 times [26]
Rnd 10: sc in all 26 st [26]
Rnd 11: (sc in next st, dec) repeat 2 times, sc in next st,
(sc in next 5 st, dec) repeat 2 times, sc in next 5 st [22]
Rnd 12 – 14: sc in all 22 st [22]
Rnd 15: dec, sc in next st, dec, sc in next 17 st [20]
Rnd 16: dec 3 times, sc in next 6 st, dec, sc in next 6 st [16]
Rnd 17: inc 3 times, sc in next 13 st [19]
Stuff the leg firmly and continue stuffing as you go.
Rnd 18: (sc in next st, inc in next st) repeat 3 times,
sc in next 13 st [22]
Rnd 19 – 20: sc in all 22 st [22]
Rnd 21: (dec, sc in next 2 st) repeat 5 times, dec [16]
Rnd 22: sc in all 16 st [16]
Rnd 23: (dec, sc in next st) repeat 5 times, sc in next st [11]
Rnd 24: sc in all 11 st [11]
Rnd 25: dec 5 times, sc in last st [6]
Fasten off, leaving a long tail for sewing. Using your
yarn needle, weave the yarn tail through the front loop of
each remaining stitch and pull it tight, closing off the top
of the leg. Weave in the yarn end on the first leg. On the
second leg you weave this yarn tail through the leg to the
spot where you would like the leg to be attached to the
body. Count 4 rounds down from the top of the leg; this is
the spot where the yarn will go through. Sew the legs to
the sides of the body between rounds 14 and 15 follow-
ing the same method for attaching the arms (picture 2).
TAIL (in light green yarn)
Rnd 1: start 3 sc in a magic ring [3]
Rnd 2: inc 3 times [6]
Rnd 3: sc in all 6 st [6]
Rnd 4: (sc in next st, inc in next st) repeat 3 times [9]
Rnd 5: sc in all 9 st [9]
Rnd 6: (sc in next 2 st, inc in next st) repeat 3 times [12]
Rnd 7: sc in all 12 st [12]
Rnd 8: (sc in next 3 st, inc in next st) repeat 3 times [15]
Rnd 9: sc in all 15 st [15]
Rnd 10: (sc in next 4 st, inc in next st) repeat 3 times [18]
Rnd 11: sc in all 18 st [18]
Rnd 12: sc in next 8 st, inc 3 times, sc in next 7 st [21]
Rnd 13: sc in all 21 st [21]
Rnd 14: sc in next 9 st, inc 3 times, sc in next 9 st [24]
Rnd 15: sc in all 24 st [24]
Rnd 16: sc in next 11 st, inc 3 times, sc in next 10 st [27]
Rnd 17: sc in all 27 st [27]
Rnd 18: sc in next 12 st, inc 3 times, sc in next 12 st [30]
Rnd 19: sc in all 30 st [30]
Rnd 20: sc in next 14 st, inc 3 times, sc in next 13 st [33]
Rnd 21: sc in all 33 st [33]
Rnd 22: sc in next 15 st, inc 3 times, sc in next 15 st [36]
Rnd 23: sc in all 36 st [36]
Rnd 24: sc in next 17 st, inc 3 times, sc in next 16 st [39]
Fasten off, leaving a long tail for sewing. Stuff the end of
the tail with a bit of fiberfill and gradually stuff the entire
61

piece firmly. Shape the end of the tail to make it pointy.
Sew the tail to the body between rounds 7 and 22.
BOOK COVER (make 2, in blue yarn)
We crochet in rows. Ch 9.
Row 1: Start in second ch from hook, sc in next 8 st,
ch 1, turn [8]
Row 2 – 8: sc in all 8 st, ch 1, turn [8]
Row 9: sc in all 8 st [8]
Fasten off, weave in the yarn end. Block before assembling.
BOOK PAPER (in white yarn)
We crochet in rows. Ch 9.
Row 1: start in second ch from hook, sc in next 8 st,
ch 1, turn [8]
Row 2 – 11: sc in all 8 st, ch 1, turn [8]
Row 12: sc in all 8 st [8]
Fasten off, weave in the yarn end. Block before assembling.
ASSEMBLING THE BOOK
– Hold the two pieces of the book cover together with the
chain edge from the last round on the top and facing
outwards (picture 3). Pull up a loop of pink yarn at the
end of row 9 through both layers (picture 4). Making
sure all stitches go through both layers, ch 1, sc in
same st as join, sc in each of next 7 row ends.
– Using black sewing thread, embroider a word on the
cover. Weave in the yarn ends. (picture 5)
– Draw a small half moon on paper that would fit on the
front cover of the book. Cut out the pattern when you are
satisfied with the sizing then pin the template and a
piece of felt together. Carefully cut the felt along the
template’s edge then attach the felt with yarn glue.
– Using white yarn, sew the middle of the book paper
at row 6 to the middle of the inside of the book cover.
Weave in the yarn end. (picture 6)
Sew the finished book to the hand. Make a stitch through
the right and left hand sides of the book to the hands.
BABY T-REX
HEAD (in dark green yarn)
Start at the muzzle.
Rnd 1: start 6 sc in a magic ring [6]
Rnd 2: inc 6 times [12]
Rnd 3: (sc in next st, inc in next st) repeat 6 times [18]
Rnd 4: (sc in next 2 st, inc in next st) repeat 6 times [24]
Rnd 5: (sc in next 3 st, inc in next st) repeat 6 times [30]
Rnd 6: (sc in next 4 st, inc in next st) repeat 6 times [36]
Rnd 7: (sc in next 5 st, inc in next st) repeat 6 times [42]
Rnd 8: sc in all 42 st [42]
Rnd 9: (sc in next 12 st, dec) repeat 3 times [39]
Rnd 10: FLO dec 6 times, sc in next 7 st through both loops,
FLO dec 6 times, sc in next 8 st through both loops [27]
Rnd 11 – 13: sc in all 27 st [27]
Rnd 14: sc in next 4 st, dec, (sc in next 5 st, dec) repeat
3 times [23]
Rnd 15: sc in next 8 st, inc 4 times, sc in next 11 st [27]
Rnd 16 – 17: sc in all 27 st [27]
Rnd 18: hdc in next 5 st, sc in next 14 st, hdc in next 8 st [27]
Rnd 19: (sc in next st, dec) repeat 9 times [18]
62
3 4 65

Stuff the head firmly and continue stuffing as you go.
Rnd 20: sc in all 18 st [18]
Rnd 21: (sc in next st, dec) repeat 6 times [12]
Rnd 22: dec 6 times [6]
Fasten off, leaving a long tail for sewing. Using your
yarn needle, weave the yarn tail through the front loop
of each remaining stitch and pull it tight, closing off the
back of the head. Weave in the yarn end.
EYEBALL (make 2, in white yarn)
Rnd 1: start 5 sc in a magic ring [5]
Rnd 2: inc 5 times [10]
Rnd 3: (sc in next st, inc in next st) repeat 5 times [15]
Rnd 4: sc in all 15 st [15]
Rnd 5: (sc in next st, dec) repeat 5 times [10]
Rnd 6: sc in next st, dec, sc in next 7 st [9]
Using black yarn, embroider the eye crossing round 2
from one side to the other. Count 1 round below the
magic ring of the eyeball; this is the middle lower point
of the eye. (picture 7, 8) Stuff the eyeball lightly.
Ch 1, press both sides of the eyeball together so that the
second stitch of round 6 lines up with the last stitch of
round 6 (we skip the first stitch of round 6) (picture 9),
slst through both layers to the end (picture 10). Fasten
off, leaving a long tail for sewing. With the curved side
facing upwards, sew the eyeballs to the head between
rounds 15 and 18 with an interspace of 2 stitches.
63
7 8 109
last stitch
second stitch
skip first stitch

EYELID (make 2, in dark green yarn)
We crochet in rows. Ch 2.
Row 1: start in second ch from hook, 4 sc in next st,
ch 1, turn [4]
Row 2: inc 4 times, ch 1, turn [8]
Row 3: (sc in next st, inc) repeat 4 times, ch 1, turn [12]
Row 4: sc in all 12 st, ch 1, turn [12]
Row 5: sc in all 12 st [12]
Fasten off, leaving a long tail for sewing. With the
curved side facing upwards, sew the eyelid to the head
right behind the eyeball.
NOSTRIL (make 2, in dark green yarn)
Rnd 1: start 4 sc in a magic ring [4]
Rnd 2: inc 4 times [8]
Fasten off, leaving a long tail for sewing. Do not stuff.
Flatten the nostrils. Sew the nostrils to the head be-
tween rounds 6 and 7 with an interspace of 6 stitches.
MOUTH
Using black yarn, embroider the mouth crossing round
12 from one side to the other. Count 2 rounds below the
starting magic ring of the head; this is the middle lower
point of the mouth.
BODY (in dark green yarn)
Rnd 1: start 6 sc in a magic ring [6]
Rnd 2: inc 6 times [12]
Rnd 3: (sc in next st, inc in next st) repeat 6 times [18]
Rnd 4: (sc in next 2 st, inc in next st) repeat 6 times [24]
Rnd 5: (sc in next 3 st, inc in next st) repeat 6 times [30]
Rnd 6 – 10: sc in all 30 st [30]
Rnd 11: (sc in next 3 st, dec) repeat 6 times [24]
Rnd 12: sc in all 24 st [24]
Rnd 13: (sc in next 2 st, dec) repeat 6 times [18]
Rnd 14: sc in next 7 st, dec 2 times, sc in next 7 st [16]
Rnd 15: sc in all 16 st [16]
Fasten off, leaving a long tail for sewing. Stuff the body
firmly. Sew the body to the head between rounds 14
and 20. Make sure the rounded side (belly) is facing
the front.
ARM (make 2, in dark green yarn)
Rnd 1: start 6 sc in a magic ring [6]
Rnd 2: inc 6 times [12]
Rnd 3 – 4: sc in all 12 st [12]
Rnd 5: (sc in next 2 st, dec) repeat 3 times [9]
Rnd 6 – 7: sc in all 9 st [9]
Stuff the arm lightly and continue stuffing as you go.
Rnd 8: (sc in next st, dec) repeat 3 times [6]
Rnd 9: sc in all 6 st [6]
Fasten off, leaving a long tail for sewing. Using your yarn
needle, weave the yarn tail through the front loop of each
remaining stitch and pull it tight, closing off the top of the
arm. Weave in the yarn tail on the first arm. On the second
arm, weave the yarn tail through the arm to the spot
where you would like the arm to be attached to the body.
Count 2 rounds down from the top of the arm; this is the
spot where the yarn goes through. Sew the arms to the
sides of the body, about 2 rounds below the neck, follow-
ing the same method for attaching the arms. (picture 2)
LEG (make 2, in dark green yarn)
Ch 4. Stitches are worked around both sides of the foun-
dation chain.
Rnd 1: start in second ch from hook, sc in next 2 st, inc in
next st. We continue on the other side of the foundation
chain, sc in next 2 st, inc in next st [8]
Rnd 2: inc in next st, sc in next st, inc 3 times, sc in next
st, inc 2 times [14]
Rnd 3: BLO sc in all 14 st [14]
64

Rnd 4: sc in all 14 st [14]
Rnd 5: dec, sc in next 3 st, dec 2 times, sc in next 3 st,
dec [10]
Rnd 6: sc in next 4 st, sc3tog, sc in next 3 st [8]
Rnd 7: sc in all 8 st [8]
Stuff the leg lightly and continue stuffing as you go.
Rnd 8: sc in next 5 st, inc in next st, sc in next 2 st [9]
Rnd 9: sc in next 4 st, inc in next st, sc in next st, inc in
next st, sc in next 2 st [11]
Rnd 10: sc in all 11 st [11]
Rnd 11: sc in next st, dec 5 times [6]
Rnd 12: sc in all 6 st [6]
Fasten off, leaving a long tail for sewing. Using your
yarn needle, weave the yarn tail through the front loop
of each remaining stitch and pull it tight, closing off the
top of the leg. Weave in the yarn end on the first leg. On
the second leg, weave this yarn tail through the leg to the
spot where you would like the leg to be attached to the
body: count 3 rounds down from the top of the leg, this is
the spot where the yarn goes through. Sew the legs to the
sides of the body between rounds 5 and 6 following the
same method for attaching the arms. (picture 2)
TAIL (in dark green yarn)
Rnd 1: start 3 sc in a magic ring [3]
Rnd 2: inc 3 times [6]
Rnd 3: sc in all 6 st [6]
Rnd 4: (sc in next st, inc in next st) repeat 3 times [9]
Rnd 5: sc in all 9 st [9]
Rnd 6: (sc in next 2 st, inc in next st) repeat 3 times [12]
Rnd 7: sc in all 12 st [12]
Rnd 8: sc in next 5 st, inc 3 times, sc in next 4 st [15]
Rnd 9: sc in all 15 st [15]
Fasten off, leaving a long tail for sewing. Stuff the end of
the tail with a small amount of fiberfill and gradually stuff
the entire piece firmly. Shape the end of the tail to make it
pointy. Sew the tail to the body between rounds 5 and 10.
PACIFIER PART 1 (in yellow yarn)
Rnd 1: start 4 sc in a magic ring [4]
Rnd 2: inc 4 times [8]
Rnd 3: sc in all 8 st [8]
Stuff firmly and continue stuffing as you go.
Rnd 4: dec 4 times [4]
Fasten off, leaving a long tail for sewing.
PACIFIER PART 2 (make 2, in blue yarn)
Rnd 1: start 6 sc in a magic ring [6]
Rnd 2: inc 6 times [12]
Fasten off and weave in the yarn end on the first piece.
Sew the yellow piece to the center of this piece (picture 11).
Do not fasten off the yarn tail on the second piece. Con-
tinue working on this piece to join the two blue pieces
together.
– Hold the two blue pieces together. Continue from the
last stitch, sc in all 12 st through both layers (picture 12).
Fasten off and weave in the yarn end.
– Pull up a loop of pink yarn in any stitch on the edge of the
blue piece, ch 28 (picture 13). Put the chains around the
neck, then sc to the blue piece with an interspace of 4
stitches from the first loop (picture 14). Make sure the
yellow piece faces front. Weave in the yarn ends.
11 12 1413
65

Dashy, the beagle dog, is a new dad. He used to struggle with his crying puppy, but now
he's an expert at soothing him. Whenever he hears his little boy starting to whine he puts him
in his carrier and walks a few blocks until he falls asleep.
skill level
12” / 30 cm tall 3” / 8 cm tall
dad baby
66
design by ENNA DESIGN (EMI KANESADA)

materials – dad
– Worsted weight yarn in white (35 g / 70 m),
black (60 g / 120 m), brown (15 g / 30 m) and
pink (leftover)
– Size 4 mm / G-6 crochet hook
– Safety eyes (15 mm)
– Triangular safety nose (28 mm)
materials – baby + carrier
– Fingering weight yarn in white (5 g / 15 m),
black (10 g / 40 m), brown (5 g / 15 m), blue
(5 g / 15 m) and yellow (leftover)
– Size 2.25 mm / B-1 crochet hook
– Safety eyes (5 mm)
– Triangular safety nose (15 mm)
both
– Fiberfill for stuffing
– Yarn needle
– Stitch marker
– Yarn glue
67
NOTE: HANDLING YARN WHEN CHANGING COLOR:
In this project, because you continually switch between
two or more colors of yarn, handling of the yarns may be a
little complicated. Therefore we recommend the following
two methods for color change
– Carry the unused yarn back along the top of the round you're
going to work unless otherwise noted; For example, the
black yarn not in use is carried back along the top of the
round and brought back to the beginning of the next color
change you are going to work (picture 1). Then, crochet over
the yarn you carried back to hide it in the fabric. (picture 2 - 4)
– When you use the same color twice in different places in the
same round, use a different thread for each color change
(picture 5). However, you do not need to have two separate
balls of yarn. You can use the second end of the same ball of
yarn. Every ball of yarn has two ends; the end from the center
and the other end from the outside. (picture 6)
– When you work on the first rounds of the head with black
yarn, you drop the black yarn to the back of the brown part
(picture 7). Picture 8 shows the yarn crossing on the wrong
side. It is important to maintain the correct yarn tension so
that the carried yarn stays smoothly along the inner surface
of the work. If you pull the carried yarn too tight, the work
1 2 3 4
5 6 7 8

will pucker up. If you leave it too loose, the stitches will be
loosened and you will get an uneven finish.
PAPA BEAGLE DASHY
NOTE: Use a 4 mm hook and worsted weight yarn.
HEAD (start in black yarn)
Rnd 1: start 6 sc in a magic ring [6]
Rnd 2: inc 6 times [12]
Rnd 3: (sc in next st, inc in next st) repeat 6 times [18]
Rnd 4: (sc in next 2 st, inc in next st) repeat 6 times [24]
Rnd 5: (sc in next 3 st, inc in next st) repeat 6 times [30]
Rnd 6: (sc in next 4 st, inc in next st) repeat 6 times [36]
Rnd 7: (sc in next 5 st, inc in next st) repeat 6 times [42]
Rnd 8: (sc in next 6 st, inc in next st) repeat 6 times [48]
Starting at the next round, we will crochet the head
with alternating yarns. The color you work with is
indicated before each line. Please note the instructions
for color changes on page 67.
Rnd 9: (black) (sc in next 7 st, inc in next st) repeat 2 times,
(brown) sc in next 2 st,
(black) sc in next 5 st, inc in next st, sc in next 4 st,
(brown) sc in next 2 st, (picture 5)
(black) (inc in next st, sc in next 7 st) repeat 2 times,
inc in next st, sc in next st [54]
Rnd 10: (black) sc in next 4 st, inc in next st, sc in next 8 st,
inc in next st, sc in next 3 st,
(brown) sc in next 4 st,
(black) inc in next st, sc in next 7 st, inc in next st,
(brown) sc in next 5 st,
(black) sc in next 4 st, inc in next st, sc in next 8 st,
inc in next st, sc in next 5 st [60]
Rnd 11: (black) sc in next 18 st,
(brown) sc in next 6 st,
(black) sc in next 10 st,
(brown) sc in next 6 st,
(black) sc in next 20 st [60]
Rnd 12: (black) sc in next 17 st,
(brown) sc in next 7 st,
(black) sc in next 10 st,
(brown) sc in next 7 st,
(black) sc in next 19 st [60]
Rnd 13: (black) sc in next 17 st,
(brown) sc in next 25 st,
Drop the second brown yarn, and fasten off, weave in
the yarn end securely. The black yarn is carried along
the round you're going to work. (picture 1)
(black) sc in next 18 st [60]
Rnd 14: (black) sc in next 16 st,
(brown) sc in next 27 st,
(black) sc in next 17 st [60]
Rnd 15: (black) sc in next 16 st,
(brown) sc in next 28 st,
(black) sc in next 16 st [60]
Rnd 16: (black) sc in next 15 st,
(brown) sc in next 30 st,
(black) sc in next 15 st [60]
Rnd 17: (black) sc in next 15 st,
(brown) sc in next 30 st,
(black) sc in next 15 st [60]
Rnd 18: (black) sc in next 8 st, dec, sc in next 5 st,
(brown) sc in next 3 st, dec, (sc in next 8 st, dec) repeat
2 times, sc in next 5 st,
(black) sc in next 3 st, dec, sc in next 8 st, dec [54]
Rnd 19: (black) sc in next 3 st, dec, sc in next 7 st, dec,
sc in next st,
(brown) sc in next 6 st, dec, (sc in next 7 st, dec) repeat
2 times,
(black) sc in next 7 st, dec, sc in next 4 st [48]
Rnd 20: (black) sc in next 6 st, dec, sc in next 6 st,
(brown) (dec, sc in next 6 st) repeat 2 times, dec,
68
9 10

sc in next 3 st,
(black) sc in next 3 st, dec, sc in next 6 st, dec [42]
Rnd 21: (black) sc in next 3 st, dec, sc in next 5 st, dec,
sc in next 2 st,
(brown) sc in next 3 st, dec, sc in next 5 st, dec,
sc in next 4 st,
(black) sc in next st, dec, sc in next 5 st, dec, sc in
next 2 st [36]
Rnd 22: (black) (sc in next 4 st, dec) repeat 2 times,
sc in next 3 st,
(brown) sc in next st, dec, sc in next 4 st, dec,
(black) (sc in next 4 st, dec) repeat 2 times [30]
Rnd 23: (black) (sc in next 3 st, dec) repeat 6 times [24]
Fasten off, weave in the yarn end.
EYELID (make 2, start in white yarn)
Ch 6, join with a slst in the first ch to make a ring.
Rnd 1: Work 10 sc into the ring [10] (picture 9 + tutorial
on page 14)
Change to brown yarn. We work on the first 5 stitches only.
Rnd 2: ch 1, sc in next st, (hdc, dc) in the next st, dc in
next st, (dc, hdc) in the next st, sc in next st [7]
Fasten off, weave in the yarn end. Insert the safety eye
in the center of the starting ring (picture 10). Don't close
the washers yet. Secure the eyelid to the eye with yarn
glue. Insert the eyes between rounds 12 and 13 with an
interspace of 13 stitches. Make sure the eyes are slightly
angled to make the eyes look sleepy. Now close the
washers. Stuff the head with fiberfill.
MUZZLE (in white yarn)
Ch 10. Stitches are worked around both sides of the
foundation chain.
Rnd 1: start in second ch from hook, sc in next 8 st, 4 sc
in last st. Continue on the other side of the foundation
chain, sc in next 7 st, 3 sc in last st [22]
Rnd 2: sc in next 3 st, sc3tog, sc in next 3 st, inc in next
2 st, sc in next 9 st, inc in next 2 st [24]
Rnd 3: sc in next 7 st, inc in next 4 st, sc in next 4 st, inc
in next st, sc in next 4 st, inc in next 4 st [33]
Rnd 4: sc in all 33 st [33]
Rnd 5: sc in next 17 st, dec, sc in next 2 st, dec, sc in
next 10 st [31]
Rnd 6 – 7: sc in all 31 st [31]
Do not fasten off, drop the yarn for later use. Pull out
your crochet hook and put a safety pin or a stitch mark-
er in the loop to keep it from unraveling (picture 11). We
continue crocheting the blaze.
Using the second end of the yarn from the same ball, join
the yarn with a slst in the 18th st of round 7 (picture 12).
We crochet in rows.
Row 1: sc in the same st as where you joined the yarn,
sc in next 5 st, ch 1, turn [6]
Row 2: dec, sc in next 2 st, dec, ch 1, turn [4]
Row 3: dec, sc in next 2 st, ch 1, turn [3]
Row 4 – 11: sc in all 3 st, ch 1, turn [3]
Row 12: dec, sc in next st [2] (picture 13)
Fasten off, weave in the yarn end. Re-insert your
hook in the stitch where the safety pin was placed
(picture 14). We continue working around both the
muzzle and blaze. (picture 15)
69
11 12 13 14

Rnd 8: sc in next 17 st, sc in next 11 row ends of the
blaze, inc in 2 st across row 12 of the blaze, sc in next 11
row ends at the other side of the blaze, sc in remaining 8
st across the muzzle.
Fasten off, leaving a long tail for sewing. Insert the safety
nose between rounds 2 and 3 in the center of the muzzle.
Sew the muzzle to the head. Stuff the muzzle as you
sew, do not over stuff.
EAR (make 2, in black yarn)
Ch 7. Stitches are worked around both sides of the
foundation chain.
Rnd 1: start in second ch from hook, sc in next 5 st,
3 sc in last st. Continue on the other side of the foun-
dation chain, sc in next 4 st, inc in next st [14]
Rnd 2: inc in next st, sc in next 11 st, inc in next 2 st [17]
Rnd 3: sc in next st, inc in next st, sc in next 12 st, inc in
next st, sc in next st, inc in next st [20]
Rnd 4: inc in next st, sc in next st, inc in next st, sc in
next 13 st, (inc in next st, sc in next st) repeat 2 times [24]
Rnd 5: sc in next st, inc in next st, sc in next 19 st,
inc in next st, sc in next st, inc in next st [27]
Rnd 6: inc in next st, sc in next 23 st, inc in next st,
sc in next 2 st [29]
Rnd 7: sc in next 28 st, inc in last st [30]
Rnd 8 – 10: sc in all 30 st [30]
Rnd 11: dec, sc in next 26 st, dec [28]
Rnd 12: sc in all 28 st [28]
Rnd 13: dec, sc in next 24 st, dec [26]
Rnd 14: dec, sc in next 22 st, dec [24]
Rnd 15: sc in all 24 st [24]
Rnd 16: dec 2 times, sc in next 20 st [22]
Rnd 17: dec 2 times, sc in next 18 st [20]
Rnd 18: sc in all 20 st [20]
Rnd 19: dec 2 times, sc in next 16 st [18]
Rnd 20: dec 2 times, sc in next 14 st [16]
Rnd 21: sc in all 16 st [16]
Flatten the ears. Do not stuff the ears.
Row 1: work through both layers in each st across.
Sc in next 8 st [8] (picture 16)
Fasten off, leaving a long tail for sewing. Sew the ears to
the head in between rounds 7 and 8.
ARM (make 2, start in white yarn)
Ch 6. Stitches are worked around both sides of the
foundation chain.
Rnd 1: start in second ch from hook, sc in next 4 st,
3 sc in next st. Continue on the other side of the
foundation chain, 5-dc-bobble in next st, sc in next st,
5-dc-bobble in next st, 2 sc in next st [12]
NOTE: When you insert your hook in the next st after the
5-dc-bobble st, push the bobble with your middle finger so
that the bobble comes out in front. Make sure the bobble
stays in front when you yarn over and draw up a loop. If the
bobble appears on the wrong side when you work the next
stitch, you can push the bobble out with your middle finger
after you made your next single crochet.
Rnd 2: (sc in next 5 st, 5-dc-bobble) repeat 2 times [12]
Rnd 3: (sc in next st, inc in next st) repeat 6 times [18]
Rnd 4: sc in all 18 st [18]
Rnd 5: (sc in next 4 st, dec) repeat 3 times [15]
Rnd 6: (sc in next 3 st, dec) repeat 3 times [12]
Rnd 7: (sc in next 2 st, dec) repeat 3 times [9]
Stuff the hand with fiberfill.
Rnd 8 – 12: sc in all 9 st [9]
Change to black yarn.
Rnd 13 – 21: sc in all 9 st [9]
Rnd 22: (sc in next st, dec) repeat 3 times [6]
Fasten off, leaving a long tail for sewing. Stuff the arms
with fiberfill.
15 16
70

LEG (make 2, start in brown yarn)
Ch 13, join with a slst in the first ch to form a ring. Work
round 1 in the back ridge of the chain. (The back ridge is
the small 'bump' on the back of the chain, the opposite
side of which you usually crochet in.)
Rnd 1 – 6: sc in all 13 st [13]
Change to white yarn.
Rnd 7 – 12: sc in all 13 st [13]
Rnd 13: sc in next 5 st, 3 sc in next st, sc in next st,
3 sc in next st, sc in next 5 st [17]
Rnd 14: sc in next 6 st, inc in next st, sc in next 3 st,
inc in next st, sc in next 6 st [19]
Rnd 15: sc in next 7 st, 3 hdc in next st, hdc in next 3 st,
3 hdc in next st, sc in next 7 st [23]
Right foot:
Rnd 16: sc in first 8 st, (3-dc-bobble in next st, sc in next
st) repeat 2 times, 4-dc-bobble in next st, sc in next st,
5-dc-bobble in next st, sc in next 8 st [23]
Fasten off, weave in the yarn end.
Left foot:
Rnd 16: sc in first 8 st, 5-dc-bobble in next st, sc in next
st, 4-dc-bobble in next st, sc in next st, (3-dc-bobble in
71

next st, sc in next st) repeat 2 times, sc in next 8 st [23]
Fasten off, weave in the yarn end. (picture 17)
BODY (start in brown yarn)
Now we continue crocheting the body working around
both legs. As you have crocheted round 1 of the legs in the
back ridge of the foundation chain, the front and back loop
of the stitch will be visible at the beginning of your work.
Flatten the leg, ensuring that the toes face forward, and
place a stitch marker in a stitch at the big toe side edge
of each leg (picture 18). We start with the left leg.
Rnd 17: Insert your hook in the marked stitch of the left
leg and draw up a loop (picture 19). Leave a tail at the
beginning; you will use it later to sew the space between
the two legs closed. Sc in all 13 st of the left leg. Continue
on the right leg. Insert your hook in the marked st of the
right leg (picture 20) and sc in all 13 st [26]
Rnd 18: (sc in next 5 st, inc in next st) repeat 4 times,
sc in next 2 st [30]
Starting at the next round, we will crochet the body
with alternating yarns. The color you work with is indi-
cated before each line. Please note the instructions for
color changes on page 67.
Rnd 19: (black) sc in next 2 st, inc in next st, sc in next st,
(brown) sc in next 7 st,
(white) sc in next st, inc in next st, sc in next 4 st, inc in
next st, sc in next st,
(brown) sc in next 7 st,
(black) sc in next st, inc in next st, sc in next 2 st [34]
Rnd 20: (black) sc in next 6 st,
(brown) sc in next 6 st,
(white) sc in next 11 st,
(brown) sc in next 6 st,
(black) sc in next 5 st [34]
Rnd 21: (black) sc in next 7 st,
(brown) sc in next 4 st,
(white) sc in next 13 st,
(brown) sc in next 4 st,
(black) sc in next 6 st [34]
Rnd 22: (black) sc in next 8 st,
(brown) sc in next 3 st,
(white) sc in next 14 st,
(brown) sc in next 3 st,
(black) sc in next 6 st [34]
Rnd 23: (black) sc in next 9 st,
(brown) sc in next 2 st,
(white) sc in next 15 st,
(brown) sc in next st,
(black) sc in next 7 st [34]
Drop the brown yarn and fasten off, weave in the yarn
end securely.
Rnd 24: (black) sc in next 11 st,
(white) sc in next 15 st,
(black) sc in next 8 st [34]
Rnd 25: (black) sc in next 8 st, dec, sc in next st,
(white) sc in next 15 st,
(black) sc in next st, dec, sc in next 5 st [32]
Rnd 26: (black) sc in next 11 st,
(white) sc in next 14 st,
(black) sc in next 7 st [32]
Rnd 27: (black) sc in next 2 st, dec, sc in next 7 st,
(white) sc in next 6 st, dec, sc in next 6 st,
72
17 18 19 20

(black) sc in next 7 st [30]
Rnd 28: (black) sc in next 11 st,
(white) sc in next 12 st,
(black) sc in next 7 st [30]
Rnd 29: (black) sc in next 7 st, dec, sc in next 2 st,
(white) sc in next 12 st,
(black) sc in next 2 st, dec, sc in next 3 st [28]
Rnd 30: (black) sc in next 11 st,
(white) sc in next 11 st,
(black) sc in next 6 st [28]
Rnd 31: (black) sc in next 3 st, dec, sc in next 6 st,
(white) sc in next 5 st, dec, sc in next 4 st,
(black) sc in next 6 st [26]
Rnd 32: (black) sc in next 11 st,
(white) sc in next 9 st,
(black) sc in next 6 st [26]
Rnd 33: (black) sc in next 11 st,
(white) sc in next st, dec, sc in next 2 st, dec, sc in next 2 st,
(black) sc in next 6 st [24]
Drop the white yarn. Fasten off, weave in the yarn end
securely.
Rnd 34 – 35: (black) sc in all 24 st [24]
Fasten off, leaving a long tail for sewing. Stuff the body
with fiberfill. Sew the head to the body, add extra stuffing
as you sew to make the head stable. Sew the arms to the
sides of the body on the second round down from the neck.
SOLE OF FOOT (make 2, start in pink yarn)
Rnd 1: start 6 sc in a magic ring [6]
Rnd 2: inc 6 times [12]
Change to white yarn.
Rnd 3: inc in next 4 st, (sc in 2 next st, inc in next st)
repeat 2 times, sc in next 2 st [18]
Now we will make the paw with alternating colors.
Rnd 4: (sc in white, inc in next st in pink) repeat 4
times, slst in next 10 st in white [22]
Fasten off. Weave in the pink yarn. Leave a long tail of
white yarn for sewing. Stuff the legs with fiberfill.
To sew the sole to the bottom of the foot, find the
seventh stitch of the sole, and the stitch between the
second and third toe (picture 21). Then pinch the sole
and the bottom of the foot so that these 2 stitches are
facing each other. Place a stitch marker in the 2 stitch-
es (picture 22). Using the leftover yarn tail of the sole,
sew the stitches facing each other one by one. Make
sure to insert your yarn needle through both loops of
the white stitches and through the back loops only of
the pink stitches. (picture 23, 24)
TAIL (start in white yarn)
Rnd 1: start 6 sc in a magic ring [6]
Rnd 2 – 3: sc in all 6 st [6]
Rnd 4: (sc in next 2 st, inc in next st) repeat 2 times [8]
Rnd 5 – 8: sc in all 8 st [8]
Change to black yarn.
Rnd 9 – 18: sc in all 8 st [8]
Fasten off, leaving a long tail for sewing. Do not stuff
the tail. Sew the tail the body over rounds 3 to 5
counting up from the top of the leg.
73
21 22 23 24

BABY BEAGLE
NOTE: Use a 2.25 mm hook and Fingering weight yarn.
HEAD (start in black yarn)
Rnd 1: start 6 sc in a magic ring [6]
Rnd 2: inc 6 times [12]
Rnd 3: (sc in next st, inc in next st) repeat 6 times [18]
Rnd 4: (sc in next 2 st, inc in next st) repeat 6 times [24]
Starting at the next round, we will crochet the head
with alternating yarns. The color you work with is indi-
cated before each line. Please note the instructions for
color changes on page 67.
Rnd 5: (black) sc in next st, inc in next st, sc in next 3 st,
inc in next st, sc in next 2 st,
(brown) sc in next st,
(black) inc in next st, sc in next 3 st, inc in next st,
(brown) sc in next st,
(black) sc in next 2 st, inc in next st, sc in next 3 st,
inc in next st, sc in next 2 st [30]
Rnd 6: (black) (sc in next 4 st, inc in next st) repeat 2 times,
(brown) sc in next 2 st,
(black) sc in next 2 st, inc in next st, sc in next 3 st,
(brown) sc in next st, inc in next st,
(black) (sc in next 4 st, inc in next st) repeat 2 times [36]
Rnd 7: (black) sc in next 4 st, inc in next st, sc in next
5 st, inc in next st,
(brown) sc in next 4 st,
(black) sc in next st, inc in next st, sc in next 4 st,
(brown) sc in next st, inc in next st, sc in next 2 st,
(black) sc in next 3 st, inc in next st, sc in next 5 st,
inc in next st, sc in next st [42]
Rnd 8: (black) sc in next 12 st,
(brown) sc in next 6 st,
(black) sc in next 6 st,
(brown) sc in next 6 st,
(black) sc in next 12 st [42]
Rnd 9: (black) sc in next 12 st
(brown) sc in next 19 st,
(black) sc in next 11 st [42]
Rnd 10 – 11: (black) sc in next 12 st,
(brown) sc in next 20 st,
(black) sc in next 10 st [42]
Rnd 12: (black) sc in next 13 st,
(brown) sc in next 18 st,
(black) sc in next 11 st [42]
Rnd 13: (black) sc in next 14 st,
(brown) sc in next 17 st,
(black) sc in next 11 st [42]
Rnd 14: (black) (sc in next 5 st, dec) repeat 2 times,
sc in next st,
(brown) sc in next 4 st, dec, sc in next 5 st, dec, sc in
next 2 st,
(black) sc in next 3 st, dec, sc in next 5 st, dec [36]
Rnd 15: (black) sc in next 2 st, (dec, sc in next 4 st) repeat
2 times,
(brown) dec, sc in next 4 st, dec, sc in next 3 st,
(black) sc in next st, dec, sc in next 4 st, dec, sc in next
2 st [30]
Rnd 16: (black) (sc in next 3 st, dec) repeat 2 times,
sc in next 3 st,
(brown) dec, sc in next 3 st, dec, sc in next st,
(black) sc in next 2 st, dec, sc in next 3 st, dec [24]
Drop the brown yarn and fasten off. Weave in the
yarn end securely. Insert the safety eyes between
74

rounds 9 and 10 with an interspace of 8 stitches. Stuff
the head and add extra stuffing as you go.
Rnd 17: (black) (sc in next 2 st, dec) repeat 6 times [18]
Rnd 18: (black) (sc in next st, dec) repeat 6 times [12]
Fasten off, weave in the yarn end.
MUZZLE (in white yarn)
Ch 8. Stitches are worked around both sides of the
foundation chain.
Rnd 1: start in second ch from hook, sc in next 6 st,
4 sc in last st. Continue on the other side of the foun-
dation chain, sc in next 5 st, 3 sc in next st [18]
Rnd 2: sc in next 2 st, sc3tog, sc in next 2 st, inc in next
2 st, sc in next 3 st, ch 2 and skip the next stitch for a
space for the safety nose, sc in next 3 st, inc in next 2 st [21]
Rnd 3: sc in next 12 st, 2 sc into the 2 ch, sc in next 7 st [21]
Rnd 4: sc in all 21 st [21]
Rnd 5: sc in next 13 st, next we will crochet the blaze.
Ch 7 (picture 25) and work along the length of the
ch, starting in second ch from hook, sc in next
6 ch, skip next st, sc in next 7 st (picture 26)
[21 + blaze]
Fasten off, leaving a long tail for sewing. Insert
the safety nose in the hole on round 2 of the
muzzle. Sew the muzzle to the head, stuff
the muzzle as you sew. Do not over stuff.
NOTE: If your safety nose has a longer stem,
cut it short to fit into the muzzle so it doesn't poke
through the head. If the washer is too big to fit
inside the muzzle, cut the stem of the nose off and
glue the nose to the muzzle.
EAR (make 2, in black yarn)
Ch 4. Stitches are worked around both sides of the foun-
dation chain.
Rnd 1: start in second ch from hook, sc in next 2 st, 3 sc
in last st. Continue on the other side of the foundation
chain, sc in next st, inc in next st [8]
Rnd 2: inc in next st, sc in next 5 st, inc in next 2 st [11]
Rnd 3: sc in next st, inc in next st, sc in next 6 st, inc in
next st, sc in next st, inc in next st [14]
Rnd 4: Inc in next st, sc in next st, inc in next st, sc in
next 7 st, (inc in next st, sc in next st) repeat 2 times [18]
Rnd 5 – 6: sc in all 18 st [18]
Rnd 7: dec, sc in next 14 st, dec [16]
Rnd 8: dec, sc in next 12 st, dec [14]
Rnd 9: dec, sc in next 10 st, dec [12]
Rnd 10: dec, sc in next 8 st, dec [10]
Flatten the ear. Do not stuff the ear. We continue
crocheting in rows.
Row 1: work through both layers in each st across.
sc in next 5 st, ch 1, turn [5]
75

Row 2: sc in next 3 st, dec, ch 1, turn [4]
Row 3: dec, sc in next 2 st [3]
Fasten off, leaving a long tail for sewing. Sew the ears
to the head over rounds 6 and 7.
ARM (make 2, start in white yarn)
Rnd 1: start 6 sc in a magic ring [6]
Rnd 2 – 5: sc in all 6 st [6]
Change to black yarn.
Rnd 6: sc in all 6 st [6]
Rnd 7: (sc in next st, dec) repeat 2 times [4]
Fasten off, leaving a long tail for sewing. Do not stuff
the arms.
LEG (make 2, start in white yarn)
Rnd 1: start 6 sc in a magic ring [6]
Rnd 2 – 5: sc in all 6 st [6]
Change to brown yarn.
Rnd 6: sc in all 6 st [6]
Fasten off the first leg. Create a second leg just like the
first one. Do not fasten off the second leg, we will con-
tinue working on this leg.
BODY (start in brown yarn)
Continue on the second leg, ch 3 (picture 27), join to the
first leg with a slst (picture 28), and continue crocheting
the body working around both legs.
Rnd 7: ch 1 and sc in the same stitch as you made slst, sc
in next 5 st, sc in each half side of ch-3 (picture 29), sc in
next 6 st on the second leg (picture 30), sc in next 3 st at
the opposite side of the ch-3 [18] (picture 31)
Rnd 8: (brown) sc in next 6 st,
(white) sc in next 3 st,
(brown) sc in next 6 st,
(black) sc in next 3 st [18]
Rnd 9: (black) sc in next st,
(brown) sc in next 4 st,
(white) sc in next 6 st,
(brown) sc in next 3 st,
(black) sc in next 4 st [18]
Rnd 10: (black) sc in next 2 st,
(brown) sc in next 2 st,
(white) sc in next 8 st,
(brown) sc in next 2 st,
(black) sc in next 4 st [18]
76
25 26 27 28
29 30 31 32

77
to black yarn, sc in next 5 ch in black.
Fasten off, leaving a long tail for sewing. Weave in the
white yarn end. Sew the tail to the body between rounds
2 and 3 counting up from the top of the leg. (picture 32)
BABY CARRIER (start in blue yarn)
Rnd 1: start 6 sc in a magic ring [6]
Rnd 2: (inc in next st, ch 10, skip next 2 st) repeat
2 times [20] (picture 33)
Rnd 3: (sc in next st, inc in next st, 10 sc into ch 10-
space) repeat 2 times [26] (picture 34)
Rnd 4: sc in next 6 st, next we’ll crochet the strap,
work ch 32 (picture 35) and, starting in third ch from
hook, hdc in each 30 ch along the length of the chain
(picture 36), sc in next 2 st, inc in next st, sc in next 9 st,
inc in next st, sc in next 4 st, next you will crochet the
second strap, work ch 32 and, starting in third ch from
hook, hdc in each 30 ch along the length of the chain,
sc in next 3 st [30 and 2 straps] (picture 37)
Rnd 5: sc in next 6 st, keep both straps directed down
towards you, work ch 1, jump to the other side of the
strap, sc in next 19 st, ch 1 (picture 38), jump to the
other side of the strap, sc in next 3 st [30]
Drop the brown yarn and fasten off, weave in the
yarn end.
Rnd 11: (black) sc in next 4 st,
(white) sc in next 8 st,
(black) sc in next 6 st [18]
Rnd 12: (black) sc in next 2 st, dec,
(white) sc in next 8 st,
(black) dec, sc in next 4 st [16]
Rnd 13: (black) sc in next 4 st,
(white) sc in next 7 st,
(black) sc in next 5 st [16]
Rnd 14: (black) sc in next 2 st, dec, sc in next st,
(white) sc in next st, dec, sc in next 2 st,
(black) dec, sc in next 2 st, dec [12]
Rnd 15: (black) sc in all 12 st [12]
Fasten off, leaving a long tail for sewing. Stuff the body
with fiberfill. Sew the head to the body, add extra stuffing
as you sew to make the head stable. Sew the arms to the
sides of the body on the second round down from the neck.
TAIL (start in black yarn)
Ch 5 in black, continue with ch 4 in white. Starting in
second ch from hook, slst in next 3 ch in white, change
33 34 35 36
37 38 39 40

Rnd 6: (white) sc in all 30 st [30]
Rnd 7: (blue) sc in all 30 st [30]
Rnd 8: (white) sc in all 30 st [30]
Rnd 9: (blue) sc in all 30 st [30]
Rnd 10: (white) sc in all 30 st [30]
Change to blue yarn. Drop the white yarn and
78
fasten off, weave in the yarn end.
Rnd 11: sc in all 30 st [30]
Rnd 12: sc in next 28 st, bring the top of the strap to the
edge of this round and work through both layers, sc in
next 2 st [30]
Rnd 13: sc in next 6 st, bring the top of the second strap to
the edge of this round and work through both layers,
sc in next 2 st (picture 39), sc in next 22 st [30] (picture 40)
Fasten off, weave in the yarn end.
BABY SOOTHER (start in blue yarn)
The soother is made of 3 parts; the base, the center
ball and the ring. (picture 41)
BASE (in blue yarn)
Rnd 1: start 3 sc, 3 hdc, 3 sc, 3 hdc in a magic ring [12]
Fasten off, weave in the yarn end.
CENTER BALL (in white yarn)
Rnd 1: start 6 hdc in a magic ring [6]
Draw the yarn through the back loops of all 6 stitches
and pull tightly. Fasten off, leaving a long tail for sew-
ing. Put the center ball aside.
RING (in yellow yarn)
Rnd 1: ch 8, join with slst in the first ch to form a ring [8]
Tie the yarn ends together and secure it with a little bit
of yarn glue. Pull the ring through the center of the ball
and secure it with a little bit of yarn glue (picture 42).
Sew the center ball to the base (picture 43) and sew or
glue it to the muzzle of baby beagle. (picture 44)
41 42 43 44

Butterfly Bree has one great love, her baby Caterpillar Calin. With her majestic wings
she flutters from flower to flower. While flying around, mama Bree comforts Calin and rocks him,
gently singing a sweet lullaby. Calin will soon become a beautiful butterfly just like his mother.
skill level
7” / 18 cm tall 3” / 8 cm long
mom baby
79
design by ZABBEZ

materials – mom
– Sport weight yarn in apricot (10 g / 25 m),
white (20 g / 50 m), light blue (15 g /40 m),
dark blue (17 g / 45 m)
– Brown safety eyes (6 mm)
– Florist wire (optional)
materials – baby
– Sport weight yarn in apricot (10 g / 25 m),
green (10 g /25 m) and dark brown (leftover).
both
– Size 2.5 mm / B-1 crochet hook
– Yarn needle
– Fiberfill for stuffing
MAMA BUTTERFLY
HEAD AND BODY (start in apricot yarn)
Rnd 1: start 6 sc in a magic ring [6]
Rnd 2: inc 6 times [12]
Rnd 3: (sc, inc in next st) repeat 6 times [18]
Rnd 4: (sc in next 2 st, inc in next st) repeat 6 times [24]
Rnd 5: (sc in next 3 st, inc in next st) repeat 6 times [30]
Rnd 6: (sc in next 4 st, inc in next st) repeat 6 times [36]
Rnd 7 – 11: sc in all 36 st [36]
Rnd 12: (sc in next 4 st, dec) repeat 6 times [30]
Rnd 13: (sc in next 3 st, dec) repeat 6 times [24]
Rnd 14: (sc in next 2 st, dec) repeat 6 times [18]
Insert the safety eyes between rounds 10 and 11 with an
interspace of 8 stitches. Stuff with fiberfill and continue
stuffing as you go.
Rnd 15: (sc in next st, dec) repeat 6 times [12]
Rnd 16: dec 6 times [6]
Change to light blue yarn.
Rnd 17: inc 6 times [12]
Rnd 18: (sc, inc in next st) repeat 6 times [18]
Rnd 19: (sc in next 2 st, inc in next st) repeat 6 times [24]
Rnd 20: (sc in next 3 st, inc in next st) repeat 6 times [30]
80
Rnd 21 – 23: sc in all 30 st [30]
Rnd 24: (sc in next 3 st, dec) repeat 6 times [24]
Rnd 25: (sc in next 2 st, dec) repeat 6 times [18]
Stuff with fiberfill and continue stuffing as you go.
Rnd 26: (sc in next st, dec) repeat 6 times [12]
Rnd 27: (sc in next st, inc in next st) repeat 6 times [18]
Rnd 28: (sc in next 2 st, inc in next st) repeat 6 times [24]
Rnd 29: (sc in next 3 st, inc in next st) repeat 6 times [30]
Rnd 30: (sc in next 4 st, inc in next st) repeat 6 times [36]
Rnd 31 – 35: sc in all 36 st [36]
Rnd 36: (sc in next 4 st, dec) repeat 6 times [30]
Rnd 37 – 38: sc in all 30 st [30]
Rnd 39: (sc in next 3 st, dec) repeat 6 times [24]
Rnd 40 – 41: sc in all 24 st [24]
Rnd 42: (sc in next 2 st, dec) repeat 6 times [18]
Rnd 43 – 44: sc in all 18 st [18]
Stuff with fiberfill and continue stuffing as you go.
Rnd 45: (sc in next st, dec) repeat 6 times [12]
Rnd 46 – 47: sc in all 12 st [12]
Rnd 48: dec 6 times [6]
Rnd 49: sc in all 6 st [6]
Fasten off, leaving a long tail for sewing. Using your
yarn needle, weave the yarn tail through the front loop
of each remaining stitch and pull it tight, closing off the
bottom of the body. Weave in the yarn end.
ANTENNA (make 2, in light blue yarn)
Rnd 1: start 5 sc in a magic ring [5]
Rnd 2 – 9: sc in all 5 st [5]
Fasten off, leaving a long tail for sewing. Position the
antennas to round 4 of the head, slightly towards the
front. Using your yarn needle, sew them on with the
leftover yarn tail and weave in the yarn end.
ARM (make 2, start in apricot yarn)
Rnd 1: start 8 sc in a magic ring [8]
Rnd 2 – 4: sc in all 8 st [8]
Change to light blue yarn.
Rnd 5 – 7: sc in all 8 st [8]
Rnd 8: (sc in next 2 st, dec) repeat 2 times [6]
Rnd 9 – 14: sc in all 6 st [6]

Flatten the arm. The arms do not need to be stuffed.
Rnd 15: crochet through both sides at once, sc in all 3 st [3]
Fasten off, leaving a long tail for sewing. Sew the arms to
the body between rounds 20 and 21. Weave in the yarn end.
UPPER WING (make 2 in white yarn and 2 in
dark blue yarn)
Make sure you crochet fairly tightly so the wings are
firm and keep their shape. We crochet in rows. Ch 4.
Row 1: start in second ch from hook, sc in next 3 st,
ch 1, turn [3]
Row 2: inc in next st, sc, inc in next st, ch 1, turn [5]
Row 3: inc in next st, sc in next 3 st, inc in next st,
ch 1, turn [7]
Row 4: inc in next st, sc in next 6 st, ch 1, turn [8]
Row 5: sc in next 7 st, inc in next st, ch 1, turn [9]
Row 6: inc in next st, sc in next 7 st, inc in next st,
ch 1, turn [11]
Row 7: sc in next 10 st, inc in next st, ch 1, turn [12]
Row 8: sc in all 12 st, ch 1, turn [12]
Row 9: sc in next 11 st, inc in next st, ch 1, turn [13]
Row 10: inc in next st, sc in next 12 st, ch 1, turn [14]
Row 11: sc in next 13 st, inc in next st, ch 1, turn [15]
Row 12: inc in next st, sc in next 14 st, ch 1, turn [16]
Row 13: sc in next 15 st, inc in next st, ch 1, turn [17]
Row 14: inc in next st, sc in next 16 st, ch 1, turn [18]
Row 15 – 18: sc in all 18 st, ch 1, turn [18]
Row 19: sc in next 16 st, dec, ch 1, turn [17]
Row 20: sc in all 17 st, ch 1, turn [17]
Row 21: sc in next 15 st, dec, ch 1, turn [16]
Row 22: dec, sc in next 12 st, dec, ch 1, turn [14]
Row 23: sc in next 12 st, dec, ch 1, turn [13]
Row 24: dec, sc in next 11 st, ch 1, turn [12]
Row 25: sc in all 12 st, ch 1, turn [12]
Row 26: dec, sc in next 10 st, ch 1, turn [11]
Row 27: sc in next 9 st, dec, ch 1, turn [10]
Row 28: dec, sc in next 6 st, dec, ch 1, turn [8]
Row 29: sc in next 6 st, dec, ch 1, turn [7]
Row 30: dec, sc in next 5 st, ch 1, turn [6]
Row 31: sc in next 4 st, dec, ch 1, turn [5]
Row 32: dec, sc in next 3 st, ch 1, turn [4]
Row 33: dec 2 times, ch 1, turn [2]
81

Row 34: dec [1]
Fasten off, weave in the yarn ends.
LOWER WING (make 2 in white yarn and 2 in
dark blue yarn)
Make sure you crochet fairly tightly so the wings are
firm and keep their shape. We crochet in rows. Ch 3.
Row 1: start in second ch from hook, sc in next 2 st,
ch 1, turn [2]
Row 2 – 4: sc in next 2 st, ch 1, turn [2]
Row 5: inc 2 times, ch 1, turn [4]
Row 6: inc in next st, sc in next 2 st, inc in next st,
ch 1, turn [6]
Row 7: inc in next st, sc in next 4 st, inc in next st,
ch 1, turn [8]
Row 8: inc in next st, sc in next 6 st, inc in next st,
ch 1, turn [10]
Row 9: inc in next st, sc in next 8 st, inc in next st,
ch 1, turn [12]
Row 10: inc in next st, sc in next 10 st, inc in next st,
ch 1, turn [14]
Row 11: inc in next st, sc in next 12 st, inc in next st,
ch 1, turn [16]
Row 12: inc in next st, sc in next 14 st, inc in next st,
ch 1, turn [18]
Row 13 – 15: sc in all 18 st, ch 1, turn [18]
Row 16: dec, sc in next 16 st, ch 1, turn [17]
Row 17: sc in all 17 st, ch 1, turn [17]
Row 18: dec, sc in next 15 st, ch 1, turn [16]
Row 19: sc in all 16 st, ch 1, turn [16]
Row 20: dec, sc in next 12 st, dec, ch 1, turn [14]
Row 21: sc in next 12 st, dec, ch 1, turn [13]
Row 22: dec, sc in next 11 st, ch 1, turn [12]
Row 23: sc in all 12 st, ch 1, turn [12]
Row 24: dec, sc in next 8 st, dec, ch 1, turn [10]
Row 25: sc in all 10 st, ch 1, turn [10]
Row 26: dec, sc in next 6 st, dec, ch 1, turn [8]
Row 27: sc in all 8 st, ch 1, turn [8]
Row 28: dec, sc in next 4 st, dec, ch 1, turn [6]
Row 29: dec, sc in next 2 st, dec, ch 1, turn [4]
Row 30: dec 2 times, ch 1, turn [2]
Row 31: dec [1]
Fasten off, weave in the yarn ends.
ASSEMBLY OF THE WINGS
Lay down the 4 blue wings according to the butterfly’s
wings lay-out (picture 1). Put the 4 white wings on top. For
each wing, crochet the blue and white layers together start-
ing at the narrow end of each wing (picture 2, red dots).
NOTE: When you crochet tightly, after you have crocheted
the wings together, they should be firm enough to hold their
shape. However, if you want the wings to be even firmer,
you can crochet a length of wire in the rim.
82
1 2 3 4
5 6
A B
C D
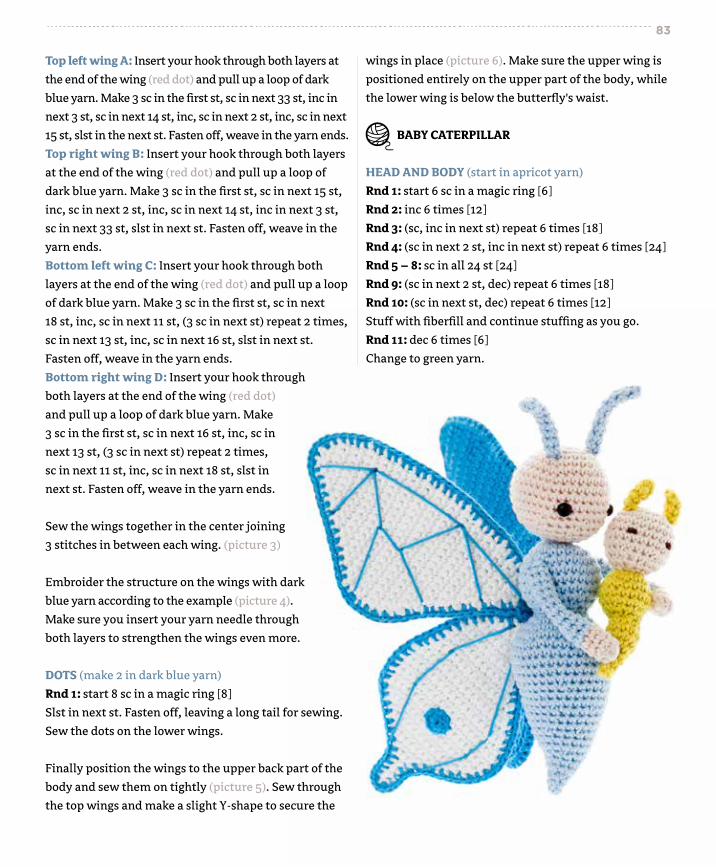
Top left wing A: Insert your hook through both layers at
the end of the wing (red dot) and pull up a loop of dark
blue yarn. Make 3 sc in the first st, sc in next 33 st, inc in
next 3 st, sc in next 14 st, inc, sc in next 2 st, inc, sc in next
15 st, slst in the next st. Fasten off, weave in the yarn ends.
Top right wing B: Insert your hook through both layers
at the end of the wing (red dot) and pull up a loop of
dark blue yarn. Make 3 sc in the first st, sc in next 15 st,
inc, sc in next 2 st, inc, sc in next 14 st, inc in next 3 st,
sc in next 33 st, slst in next st. Fasten off, weave in the
yarn ends.
Bottom left wing C: Insert your hook through both
layers at the end of the wing (red dot) and pull up a loop
of dark blue yarn. Make 3 sc in the first st, sc in next
18 st, inc, sc in next 11 st, (3 sc in next st) repeat 2 times,
sc in next 13 st, inc, sc in next 16 st, slst in next st.
Fasten off, weave in the yarn ends.
Bottom right wing D: Insert your hook through
both layers at the end of the wing (red dot)
and pull up a loop of dark blue yarn. Make
3 sc in the first st, sc in next 16 st, inc, sc in
next 13 st, (3 sc in next st) repeat 2 times,
sc in next 11 st, inc, sc in next 18 st, slst in
next st. Fasten off, weave in the yarn ends.
Sew the wings together in the center joining
3 stitches in between each wing. (picture 3)
Embroider the structure on the wings with dark
blue yarn according to the example (picture 4).
Make sure you insert your yarn needle through
both layers to strengthen the wings even more.
DOTS (make 2 in dark blue yarn)
Rnd 1: start 8 sc in a magic ring [8]
Slst in next st. Fasten off, leaving a long tail for sewing.
Sew the dots on the lower wings.
Finally position the wings to the upper back part of the
body and sew them on tightly (picture 5). Sew through
the top wings and make a slight Y-shape to secure the
wings in place (picture 6). Make sure the upper wing is
positioned entirely on the upper part of the body, while
the lower wing is below the butterfly's waist.
BABY CATERPILLAR
HEAD AND BODY (start in apricot yarn)
Rnd 1: start 6 sc in a magic ring [6]
Rnd 2: inc 6 times [12]
Rnd 3: (sc, inc in next st) repeat 6 times [18]
Rnd 4: (sc in next 2 st, inc in next st) repeat 6 times [24]
Rnd 5 – 8: sc in all 24 st [24]
Rnd 9: (sc in next 2 st, dec) repeat 6 times [18]
Rnd 10: (sc in next st, dec) repeat 6 times [12]
Stuff with fiberfill and continue stuffing as you go.
Rnd 11: dec 6 times [6]
Change to green yarn.
83

Rnd 12: inc 6 times [12]
Rnd 13: (sc, inc in next st) repeat 6 times [18]
Rnd 14 – 16: sc in all 18 st [18]
Rnd 17: (sc in next st, dec) repeat 6 times [12]
Stuff with fiberfill and continue stuffing as you go.
Rnd 18: dec 6 times [6]
Rnd 19: inc 6 times [12]
Rnd 20 – 21: sc in all 12 st [12]
Rnd 22: dec 6 times [6]
Rnd 23: dec, sc in next 4 st [5]
Rnd 24 – 25: sc in all 5 st [5]
Fasten off, leaving a long tail for sewing. Using your
yarn needle, weave the yarn tail through the front loop
of each remaining stitch and pull it tight, closing off the
bottom of the body. Weave in the yarn end.
84
ANTENNA (make 2, in green yarn)
Rnd 1: start 5 sc in a magic ring [5]
Rnd 2 – 4: sc in all 5 st [5]
Fasten off, leaving a long tail for sewing. Position the
antennas to round 3 of the head, slightly towards the
front. Using your yarn needle, sew them on with the
leftover yarn tail and weave in the yarn end.
With dark brown yarn, embroider the eyes between
rounds 6 and 7 with an interspace of 4 stitches.
Optional: you can sew the caterpillar baby in mama
butterfly's arms.

Baby Bear is having his first birthday party today and all his friends are coming. Look at that cake!
Doesn’t it look yummy? Papa and Mama Bear stayed up all night to bake it. Now Baby Bear can’t
wait to eat it. Oh, why won’t his friends hurry up and come over already!
skill level
8.5” / 21 cm tall 5.5” / 14 cm tall
mom / dad baby
85
design by TALES OF TWISTED FIBERS (SERAH BASNET)

materials – mom
– Fingering weight yarn in light brown (60 g /
240 m), dark brown (10 g / 40 m), light pink (15 g /
60 m), dark pink (15 g / 60 m)
– Safety eyes (12 mm)
– Triangular safety nose (20 mm)
– 2 pink buttons (11 mm)
materials – dad
– Fingering weight yarn in light brown (60 g /
240 m), dark brown (10 g / 40 m), dark blue
(20 g / 80 m)
– Safety eyes (12 mm)
– Triangular safety nose (20 mm)
– 2 brown buttons (11 mm)
materials – baby
– Fingering weight yarn in light brown (40 g /
160 m), dark brown (10 g / 40 m), light blue
(10 g / 40 m), red (10 g / 40 m)
– Safety eyes (10 mm)
– Triangular safety nose (15 mm)
– 2 blue (heart-shaped) buttons (10 mm)
– 3 star shaped buttons in yellow, green,
light blue (10 mm)
materials – cake
– Fingering weight yarn in light yellow (30 g / 120 m),
white (10 g / 40 m), brown (15 g / 60 m), red (10 g /
40 m), light blue (10 g / 40 m), orange (5 g / 20 m)
all
– Size 2.5 mm / B-1 crochet hook
– A small piece of plastic sheet
– A pair of scissors
– Yarn needle
– Pearl headed pins
– Stitch markers
– Small lengths of dark brown, pink, blue,
yellow and green sewing thread
MAMA & PAPA BEAR
LEG (make 2, start in dark brown yarn)
Ch 6. Stitches are worked around both sides of the foun-
dation chain.
Rnd 1: start in second ch from hook, sc in next 4 st, 3 sc
in last st. Continue on the other side of the foundation
chain, sc in next 3 st, inc in the last st [12]
Rnd 2: inc in next st, sc in next 3 st, inc in next 3 st, sc in
next 3 st, inc in last 2 st [18]
Rnd 3: inc in next st, sc in next 5 st, inc in next 5 st, sc in
next 5 st, inc in last 2 st [26]
Make the sole: On a small plastic sheet, lay the sole flat,
trace an outline around it and cut out the base. Check
if it stays within the dark brown area. Trim further if
required. Make 2 holes in the center, a few centimeters
apart. Make a second sole following the same instruc-
tions and set them aside.
Change to light brown yarn.
Rnd 4: BLO sc in all 26 st [26]
Rnd 5 – 7: sc in all 26 st [26]
Insert sole: Place the plastic sole on the inside of the foot
(picture 1), thread a yarn needle with dark brown yarn, and
holding both pieces together, insert the needle from the
inside to the outside through the first hole (picture 2) and
from the outside to the inside through the second hole (pic-
ture 3). Knot the yarn ends together to secure. (picture 4)
Rnd 8: sc in next 7 st, dec 5 times, sc in last 9 st [21]
Rnd 9: sc in next 6 st, dec 4 times, sc in last 7 st [17]
86
optional materials for poseable arms
– 16 gauge wire
– Masking tape
– Wire cutter

Rnd 10: sc in next 4 st, dec 4 times, sc in last 5 st [13]
Rnd 11 – 12: sc in all 13 st [13]
Stuff the foot with fiberfill.
Rnd 13: (sc in next st, inc) repeat 3 times, inc in next st,
(sc in next st, inc) repeat 3 times [20]
Rnd 14 – 17: sc in all 20 st [20]
Rnd 18: (sc in next 4 st, inc) repeat 4 times [24]
Rnd 19: sc in next 20 st. Mark the last worked stitch;
this is where the leg will be joined later. sc in remaining
4 st [24]
Fasten off, weave in the yarn end. Stuff with fiberfill.
Make the second leg following instructions for round
1 – 18.
Rnd 19: sc in all 24 st [24]
Rnd 20: slst in the next 5 st. Mark the last st worked as
the end of the round. Do not finish the round. Do not
fasten off. Stuff with fiberfill.
BODY (in light brown yarn)
In the next round, we will join the legs. Hold both legs
together, the leg with the ‘live’ stitch should be on the
right and the first leg on the left. Make sure the toes are
facing away from you.
Rnd 1: With the live stitch on your hook, insert your hook
in the marked stitch of the left leg, pull up a loop and
make a sc, this is the first st of the round, you can mark it
with a stitch marker for your convenience, sc in next
22 st, inc in the last st of the first leg. Continue on the
second leg, inc in first st, sc in next 23 st [50]
Rnd 2 – 7: sc in all 50 st [50]
Rnd 8: (sc in next 8 st, dec) repeat 5 times [45]
Rnd 9: sc in all 45 st [45]
Rnd 10: (sc in next 7 st, dec) repeat 5 times [40]
Rnd 11 – 12: sc in all 40 st [40]
Stuff with fiberfill and continue stuffing as you go.
Rnd 13: (sc in next 6 st, dec) repeat 5 times [35]
Rnd 14 – 15: sc in all 35 st [35]
Rnd 16: (sc in next 5 st, dec) repeat 5 times [30]
Rnd 17 – 18: sc in all 30 st [30]
Rnd 19: (sc in next 4 st, dec) repeat 5 times [25]
Rnd 20 – 21: sc in all 25 st [25]
Rnd 22: (sc in next 3 st, dec) repeat 5 times [20]
Rnd 23 – 24: sc in all 20 st [20]
Rnd 25: (sc in next 3 st, dec) repeat 4 times [16]
Rnd 26: sc in all 16 st [16]
Rnd 27: (sc in next 2 st, dec) repeat 4 times [12]
Rnd 28 – 31: sc in all 12 st [12]
It is very important to stuff the neck as firmly as possible
at this point so it can support the weight of the head.
Rnd 32: dec 6 times [6]
Fasten off, leaving a long tail for sewing. Using your yarn
needle, weave the yarn tail through the front loop of each
remaining stitch and pull it tight, closing off the neck.
Weave in the yarn end.
ARM (make 2, in light brown yarn)
Rnd 1: start 6 sc in a magic ring [6]
Rnd 2: inc 6 times [12]
Rnd 3: (sc in next st, inc) repeat 6 times [18]
Rnd 4 – 6: sc in all 18 st [18]
Rnd 7: [left arm] 4-dc bobble stitch in next st, sc in next
st, dec 4 times, sc in last 8 st [14] [right arm] sc in next 8 st,
dec 4 times, sc in next st, 4-dc bobble stitch in last st [14]
87
1 2 3 4

Rnd 8: sc in all 14 st [14]
Rnd 9: (sc in next 5 st, dec) repeat 2 times [12]
Rnd 10 – 25: sc in all 12 st [12]
If you’d like to make poseable arms, follow Poseable arm
instructions. If you’d prefer to make stationary arms, stuff
the arms with fiberfill and skip immediately to round 26,
then sew the arms to the body.
Poseable arm instructions:
– Cut the yarn, leaving a tail long enough to work one
more round and sew. Do not fasten off, instead put a
stitch marker in your loop to prevent your crochet work
from unraveling.
– We now insert wire and stuffing into the arm. Measure
the length of the arm first, then the area above the chest
where the wire will go through the body and then the
second arm; add an additional inch /2.5 cm. This is the
total length of wire needed.
– With a wire cutter, bend one end to make an eyelet
(picture 5). Wrap some masking tape around the eyelet to
prevent it from poking through the stitches (picture 6).
Insert this end into the first arm and stuff around it
lightly. (picture 7)
Rnd 26: dec 6 times [6] (picture 8)
Sew the gap closed (picture 9). Do not clip off excess yarn.
– Insert the other end of the wire into the area where the
arm will be placed. This will be between round 7 and 8
counting down from the top of the neck. Push the wire
all the way through to the other side where the second
arm will be placed (picture 10). Bend the tip into an
eyelet, secure with masking tape.
– Do not clip off excess yarn. Instead, push the yarn needle
back inside the body (from the point where you inserted
the wire) and bring it out from the tip of the neck.
(picture 11)
– Follow round 1 – 25 to make the second arm. Insert wire
and stuffing (picture 12). Work round 26 and sew the
gap closed. Repeat the previous step with the leftover
yarn of the second arm. Using these two strands,
tie a couple of knots to secure the arms to the body.
Clip off excess yarn ends.
HEAD (in light brown yarn)
Rnd 1: start 8 sc in a magic ring [8]
Rnd 2: inc 8 times [16]
Rnd 3: (sc in next st, inc in next st) repeat 8 times [24]
88
5 6 7 8
9 10 11 12

Rnd 4: (sc in next 2 st, inc in next st) repeat 8 times [32]
Rnd 5: (sc in next 3 st, inc in next st) repeat 8 times [40]
Rnd 6: (sc in next 4 st, inc in next st) repeat 8 times [48]
Rnd 7: (sc in next 5 st, inc in next st) repeat 8 times [56]
Rnd 8: (sc in next 6 st, inc in next st) repeat 8 times [64]
Rnd 9 – 19: sc in all 64 st [64]
Rnd 20: (sc in next 6 st, dec) repeat 8 times [56]
Rnd 21: (sc in next 5 st, dec) repeat 8 times [48]
Rnd 22: (sc in next 4 st, dec) repeat 8 times [40]
Rnd 23: (sc in next 3 st, dec) repeat 8 times [32]
Rnd 24: (sc in next 2 st, dec) repeat 8 times [24]
Rnd 25: (sc in next st, dec) repeat 8 times [16]
Rnd 26: (sc in next 2 st, dec) repeat 4 times [12]
Fasten off, weave in the yarn end. Stuff firmly while
leaving some space in the center for the neck that will
be inserted later.
MUZZLE (in light brown yarn)
Rnd 1: start 8 sc in a magic ring [8]
Rnd 2: inc 8 times [16]
Rnd 3: (sc in next st, inc) repeat 8 times [24]
Rnd 4 – 5: sc in all 24 st [24]
slst in the next st. Fasten off, leaving a long tail for sew-
ing. Insert the 20 mm safety nose through the magic ring
and stuff the muzzle. Pin the muzzle between rounds 12
and 20 of the head and sew it in place.
EYES
Indent eye area: Following this step will define the
face. With pearl headed pins, mark the points for the
eyes to be sewn on, between rounds 15 and 16 on either
side of the muzzle (this would be the second stitch on
89
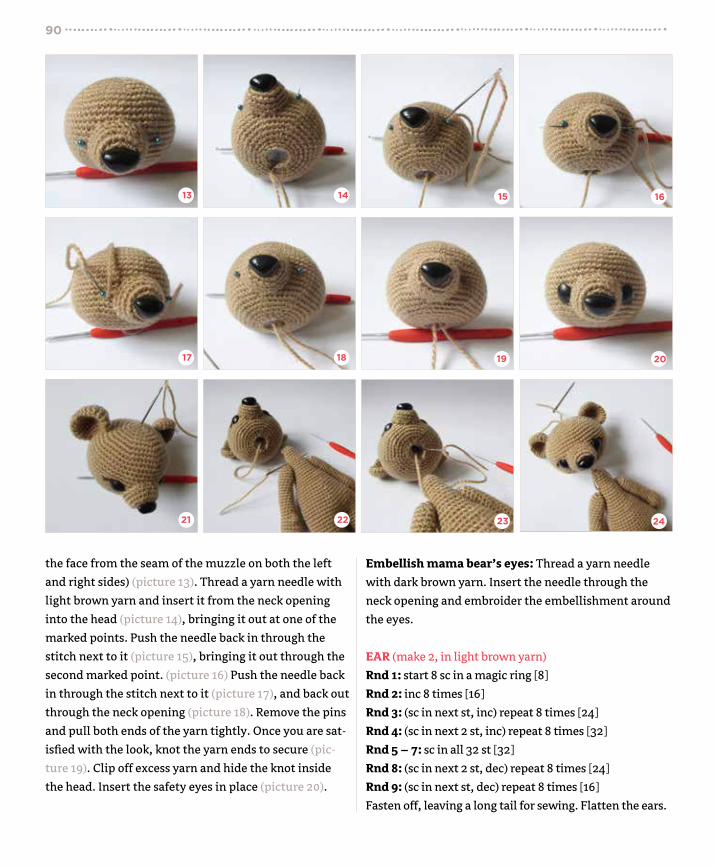
the face from the seam of the muzzle on both the left
and right sides) (picture 13). Thread a yarn needle with
light brown yarn and insert it from the neck opening
into the head (picture 14), bringing it out at one of the
marked points. Push the needle back in through the
stitch next to it (picture 15), bringing it out through the
second marked point. (picture 16) Push the needle back
in through the stitch next to it (picture 17), and back out
through the neck opening (picture 18). Remove the pins
and pull both ends of the yarn tightly. Once you are sat-
isfied with the look, knot the yarn ends to secure (pic-
ture 19). Clip off excess yarn and hide the knot inside
the head. Insert the safety eyes in place (picture 20).
Embellish mama bear’s eyes: Thread a yarn needle
with dark brown yarn. Insert the needle through the
neck opening and embroider the embellishment around
the eyes.
EAR (make 2, in light brown yarn)
Rnd 1: start 8 sc in a magic ring [8]
Rnd 2: inc 8 times [16]
Rnd 3: (sc in next st, inc) repeat 8 times [24]
Rnd 4: (sc in next 2 st, inc) repeat 8 times [32]
Rnd 5 – 7: sc in all 32 st [32]
Rnd 8: (sc in next 2 st, dec) repeat 8 times [24]
Rnd 9: (sc in next st, dec) repeat 8 times [16]
Fasten off, leaving a long tail for sewing. Flatten the ears.
90
13 14 15 16
17 18 19 20
21 22 23 24

The ears do not need to be stuffed. Sew them on either
side of the head between rounds 6 and 12.
Make movable head: To make the head movable, thread
light brown yarn and insert the needle through the center
of the magic ring on the head and out through the neck
opening (picture 21). Count down 7 rounds from the top
of the neck. Now insert your needle through the neck
at this point (picture 22), then back through the neck
opening on the head (picture 23), bringing it out through
the magic ring again (picture 24). Slide the head down
the two strands of yarn until it sits perfectly on the neck.
Knot the yarn ends together a few times to secure. Clip off
excess yarn and push remaining yarn back into the head.
DRESS FOR MAMA BEAR (start in dark pink yarn)
NOTE: When the pattern calls for making a 'dc in the ch 1
space of one of the previously worked rounds', work as fol-
lows: yarn over, insert hook in the ch-1 space on the indicated
round, pull up a long loop to the height of a dc, yarn over and
pull through the first two loops, yarn over and pull through
the remaining two loops. (pictures 25 – 30)
The dress changes color several times. You don't need to
cut your yarn for each color change, carry the yarn on the
inside of your crochetwork and pick it up when it's needed.
We start with the waistband. Ch 45, join with a slst to the
first ch to form a ring.
Rnd 1: start in 3rd ch from hook, hdc in all 43 st [43]
Change to light pink yarn.
Rnd 2: work this round in BLO. dc in next 2 st, ch 1, skip
the next st, (dc in next 3 st, ch 1, skip the next st) repeat
10 times [43]
Rnd 3: dc in next 2 st, ch 1, skip the next st, (dc in next
3 st, ch 1, skip the next st) repeat 10 times [43]
Change to dark pink yarn.
Rnd 4: dc in next 2 st, dc in the ch-1 space on round 2,
(dc in next 3 st, dc in the ch-1 space on round 2) repeat 10
times [43]
Change to light pink yarn.
Rnd 5 – 6: repeat rounds 2 and 3.
Fasten off this color. Change to dark pink yarn.
Rnd 7: dc in next 2 st, dc in the ch-1 space on round 5,
(dc in next 3 st, dc in the ch-1 space on round 5) repeat 10
times [43]
Fasten off, weave in the yarn ends.
Bib (start in light pink yarn)
Join light pink in one of the stitches on the waistband of
the dress (this is the ch 45 at the start). We work in rows.
Row 1 – 2: sc in next 12 st, ch 1, turn [12]
Change to dark pink yarn.
Row 3: dec, sc in next 8 st, dec, ch 1, turn [10]
Change to light pink yarn.
91
25 26 27 28
29 30

Row 4: FLO sc in all 10 st, ch 1, turn [10]
Row 5: sc in all 10 st, ch 1, turn [10]
Change to dark pink yarn.
Row 6: sc in all 10 st, ch 1, turn [10]
Fasten off this color. Change to light pink yarn.
Row 7: BLO sc in all 10 st, ch 1, turn [10]
Row 8: sc in all 10 st [10]
Fasten off, weave in yarn ends. With dark pink yarn,
sc all around the bib to neaten the row ends.
Shoulder straps
Find the center of the back of the dress. Count 6 st to the
right and mark this stitch. Count 6 st from the center to
the left and mark this stitch.
Join dark pink yarn on the marked st on the right and ch
22. Starting in seventh ch from the hook, sc in the next 16
ch. Join with a slst to the next st on the waistband, slst in
the next 10 st on the waistband, ch 22, starting in seventh
ch from the hook, sc in the next 16 ch. Join with a slst to
the next st on the waistband. Fasten off and, weave in the
yarn ends.
Sew the 11 mm pink buttons on the bib, slip the dress up
the legs and button the straps.
OVERALLS FOR PAPA BEAR (in dark blue yarn)
Trouser leg (make 2)
Ch 24, join with a slst to the first ch to form a ring.
Rnd 1 – 5: hdc in all 24 st [24]
Fasten off, weave in the yarn ends.
Make the second trouser leg. Do not fasten off. In the
next round, we join the trouser legs.
Rnd 6: Hold the first trouser leg on the left of the work-
ing piece. Insert your hook in any one of the stitches of
the first trouser leg and slst to join. We continue on the
second trouser leg. hdc inc in the first st, hdc in next 22 st,
hdc inc in next st, jump to the first leg, hdc inc in next st,
hdc in next 22 st, hdc inc in the last st [52]
Rnd 7 – 10: hdc in all 52 st [52]
Rnd 11: (hdc in next 11 st, dec) repeat 4 times [48]
Rnd 12: (hdc in next 22 st, dec) repeat 2 times [46]
Rnd 13: (hdc in next 21 st, dec) repeat 2 times [44]
Fasten off.
92

Bib (in dark blue yarn)
Lay the trousers flat and find the center. Count 6 st to
the right and mark this stitch. Count 6 st from the center
to the left and mark this stitch. We will work in rows on
these 13 st only. Join dark blue yarn to the first marked
stitch on the right.
Row 1: ch 2, hdc in the next 13 st, ch 2, turn [13]
Row 2 – 3: hdc in all 13 st, ch 2, turn [13]
Row 4: dec, hdc in next 9 st, dec, ch 2, turn [11]
Row 5: hdc in all 11 st, ch 2, turn [11]
Row 6: dec, hdc in next 7 st, dec [9]
Fasten off. Join dark blue yarn to the base of the bib on
the right and sc along the row ends, slst along the top
9 st, sc along the left row ends. Fasten off, weave in the
yarn ends.
Shoulder straps
On the back of the trousers, find the center of the waist.
Count 6 st to the right and mark this st. Count 6 st from
the center to the left and mark this stitch. Join dark blue
yarn to the marked st on the right and ch 26. Starting in
seventh ch from the hook, sc in the next 20 ch. Join with
a slst to the next st on the waistband, slst in next 10 st
on the waistband, ch 26, starting in seventh ch from the
hook, sc in the next 20 ch. Join with a slst to the next st on
the waistband.
Fasten off, weave in the yarn ends. Sew 11 mm brown
buttons on either side of the bib. Slip the overalls up the
legs and button the straps.
BABY BEAR
LEG (make 2, start in dark brown yarn)
Ch 6. Stitches are worked around both sides of the foun-
dation chain.
Rnd 1: start in second ch from the hook, sc in next 4 st,
3 sc in last st. Continue on the other side of the founda-
tion ch, sc in next 3 st, inc in last st [12]
Rnd 2: inc 12 times [24]
Change to light brown yarn.
Rnd 3: BLO sc in all 24 st [24]
Rnd 4: sc in next 7 st, dec 5 times, sc in next 7 st [19]
Rnd 5: sc in next 7 st, dec 3 times, sc in next 6 st [16]
Rnd 6: sc in next 6 st, dec 2 times, sc in next 6 st [14]
Rnd 7: sc in next 5 st, dec 2 times, sc in next 5 st [12]
Stuff the foot with fiberfill.
Rnd 8 – 10: sc in all 12 st [12]
Rnd 11: (sc in next 3 st, inc in next st) repeat 3 times [15]
Counting anti-clockwise, mark the third st from the ‘live’
stitch with a stitch marker. This is where we will join the
other leg later. Fasten off and stuff the leg with fiberfill.
Repeat rounds 1 to 11 for the second leg. Do not fasten off.
Slst in the next 4 st. Mark the last st as the end of the round.
BODY (in light brown yarn)
In the next round, we will join the legs. Hold both legs to-
gether, with the working leg on the right and the first leg
on the left. Make sure the toes are facing away from you.
Rnd 1: Insert your hook in the marked stitch of the left
leg and make a sc, this is the first st of the round, you can
mark it with a stitch marker for your convenience, sc in
the next 14 st. Continue working on the second leg and
sc in all 15 st [30]
Rnd 2 – 4: sc in all 30 st [30]
Rnd 5: (sc in next 3 st, dec) repeat 6 times [24]
Rnd 6 – 12: sc in all 24 st [24]
Stuff the body with fiberfill.
Rnd 13: dec 12 times [12]
Rnd 14 – 18: sc in all 12 st [12]
Stuff the neck firmly.
Rnd 19: dec 6 times [6]
Fasten off, leaving a long tail for sewing. Using your yarn
needle, weave the yarn tail through the front loop of each
remaining stitch and pull it tight, closing off the body.
ARM (make 2, in light brown yarn)
Rnd 1: start 6 sc in a magic ring [6]
Rnd 2: (sc in next st, inc) repeat 3 times [9]
Rnd 3 – 4: sc in all 9 st [9]
Rnd 5: (sc in next st, dec) repeat 2 times, sc in last 3 st [7]
Rnd 6 – 12: sc in all 7 st [7]
Fasten off. Do not stuff. Insert wire following Poseable
93

arm instructions for Mama and Papa Bear and attach the
arms between rounds 9 and 10 of the body, counting
down from the top of the neck.
HEAD (in light brown yarn)
Rnd 1: start 8 sc in a magic ring [8]
Rnd 2: inc 8 times [16]
Rnd 3: (sc in next st, inc in next st) repeat 8 times [24]
Rnd 4: (sc in next 2 st, inc in next st) repeat 8 times [32]
Rnd 5: (sc in next 3 st, inc in next st) repeat 8 times [40]
Rnd 6: (sc in next 4 st, inc in next st) repeat 8 times [48]
Rnd 7 – 15: sc in all 48 st [48]
Rnd 16: (sc in next 4 st, dec) repeat 8 times [40]
Rnd 17: (sc in next 3 st, dec) repeat 8 times [32]
Rnd 18: (sc in next 2 st, dec) repeat 8 times [24]
Rnd 19: dec 12 times [12]
Slst in the next st. Fasten off, weave in the yarn end. Stuff
firmly while leaving some space in the center for the neck
that will be inserted later.
MUZZLE (in light brown yarn)
Rnd 1: start 6 sc in a magic ring [6]
Rnd 2: inc 6 times [12]
Rnd 3: (sc in next st, inc in next st) repeat 6 times [18]
Rnd 4: sc in all 18 st [18]
Rnd 5: (sc in next 2 st, inc in next st) repeat 6 times [24]
Slst in the next st. Fasten off, leaving a long tail for sewing.
Insert the 15 mm triangular safety nose through the
magic ring. Stuff the muzzle lightly and sew it in place
between rounds 8 and 17 of the head. Next, indent the
eye area following instructions given for mama and papa
bear and place the 12 mm eyes between rounds 12 and 13
on either side of the muzzle.
EAR (make 2, in light brown yarn)
Rnd 1: start 6 sc in a magic ring [6]
Rnd 2: inc 6 times [12]
Rnd 3: (sc in next st, inc in next st) repeat 6 times [18]
Rnd 4: (sc in next 2 st, inc in next st) repeat 6 times [24]
Rnd 5 – 7: sc in all 24 st [24]
Rnd 8: (sc in next 2 st, dec) repeat 6 times [18]
Slst in the next st. Fasten off, leaving a long tail for
sewing. Flatten the ears and sew them on either side
of the head between rounds 4 and 11.
Embroider a line above the eyes with brown yarn following
Embellish mama bear’s eyes instructions. Next, following
94

Make movable head instructions, attach the head to the
body between round 7 and 8 counting down from the top
of the neck.
OVERALLS (in light blue yarn)
Ch 20, join with a slst to the first ch to form a ring.
Rnd 1 – 2: hdc in all 20 ch [20]
Fasten off. Make the second trouser leg but do not
fasten off. In the next round, we join the trouser legs.
Rnd 3: hold the first trouser leg on the left of the
working piece. Insert your hook in any one of the
stitches and join with a slst. Hdc in all 40 st around
both trouser legs [40]
Rnd 4: (hdc in next 3 st, dec) repeat 8 times [32]
Rnd 5: (hdc in next 6 st, dec) repeat 4 times [28]
Next, we will work on the bib. We crochet in rows.
Row 1: slst in next 4 st. ch 2, turn, hdc in next 7 st [7]
Row 2 – 4: ch 2, turn, hdc in next 7 st [7]
Fasten off. Join blue yarn to the base of the bib on the right
and sc along the row end, slst along the top 7 st, sc along
the left row end. Fasten off, weave in the yarn ends.
Shoulder straps
On the back of the trousers, find the center of the waist.
Count 3 st to the right and mark this stitch. Count 3 st
from the center to the left and mark this stitch. Join light
blue yarn to the marked stitch on the right and ch 22.
Starting in the seventh ch from the hook, sc in the next
16 ch. Join with a slst to the next st on the waistband,
slst in the next 5 st on the waistband, ch 22, starting in
the seventh ch from the hook, sc in the next 16 ch. Join
with a slst to the next st on the waistband.
Fasten off, weave in the yarn ends. Sew the 10 mm blue
buttons on either side of the bib. Slip the overalls up the
legs and button the straps.
PARTY HAT (in red yarn)
Rnd 1: start 5 sc in a magic ring [5]
Rnd 2: inc 5 times [10]
Rnd 3 – 4: sc in all 10 st [10]
Rnd 5: (sc in next st, inc in next st) repeat 5 times [15]
Rnd 6 – 7: sc in all 15 st [15]
Rnd 8: (sc in next 2 st, inc in next st) repeat 5 times [20]
Rnd 9: sc in all 20 st [20]
Rnd 10: (sc in next 3 st, inc in next st) repeat 5 times [25]
Rnd 11: sc in all 25 st [25]
Rnd 12: reverse sc in all 25 st [25]
Fasten off, weave in the yarn end. Embellish the hat by
sewing 10 mm plastic star shaped buttons on it.
You can either tie two strings on the hat and fasten it on
baby bear’s head or sew it on the head permanently.
BIRTHDAY CAKE
CAKE (in light yellow yarn)
Rnd 1: start 8 sc in a magic ring [8]
Rnd 2: inc 8 times [16]
Rnd 3: (sc in next st, inc in next st) repeat 8 times [24]
Rnd 4: (sc in next 2 st, inc in next st) repeat 8 times [32]
Rnd 5: (sc in next 3 st, inc in next st) repeat 8 times [40]
Rnd 6: (sc in next 4 st, inc in next st) repeat 8 times [48]
Rnd 7: (sc in next 5 st, inc in next st) repeat 8 times [56]
Rnd 8: bpsc in all 56 st [56]
Rnd 9 – 11: sc in all 56 st [56]
Change to white yarn.
Rnd 12: hdc in all 56 st [56]
Change to light yellow yarn.
Rnd 13: BLO sc in all 56 st [56]
Rnd 14 – 15: sc in all 56 st [56]
Rnd 16: bpsc in all 56 st [56]
Rnd 17: (sc in next 5 st, dec) repeat 8 times [48]
Rnd 18: (sc in next 4 st, dec) repeat 8 times [40]
Rnd 19: (sc in next 3 st, dec) repeat 8 times [32]
Rnd 20: (sc in next 2 st, dec) repeat 8 times [24]
Rnd 21: (sc in next st, dec) repeat 8 times [16]
Stuff with fiberfill.
Rnd 22: dec 8 times [8]
Fasten off and sew the gap closed.
CHOCOLATE ICING (in brown yarn)
Rnd 1 – 7: Follow rnd 1 to 7 of the cake instructions [56]
Rnd 8: (sc in next 6 st, inc) repeat 8 times [64]
95

slst in the next st. Next we will work on the chocolate drips.
Drip 1: ch 5 (picture 31), start in second ch from hook,
sc in next 4 ch (picture 32), slst in the next 3 st on the
spiral. (picture 33, 34)
Drip 2: ch 8, start in third ch from hook, hdc in next 6 ch,
slst in the next 5 st on the spiral.
Drip 3: ch 4 (picture 35), start in third ch from hook, hdc
in next 2 ch, slst in the next 4 st on the spiral.
Drip 4: ch 8, start in third ch from hook, dc in next 6 ch,
skip next st on the spiral and slst in the next 3 st.
Drip 5: ch 6, start in third ch from hook, hdc in next 4 ch,
slst in the next 3 st on the spiral.
Drip 6: ch 3, start in second ch from hook, sc in next 2 ch,
slst in the next 4 st on the spiral.
Drip 7: skip the next st on the spiral, 5 dc in next st,
skip 1 st, slst in the next 3 st on the spiral.
Drip 8: ch 5, start in third ch from hook, hdc in next 3 ch,
slst in the next 4 st on the spiral.
Drip 9: ch 7, start in third ch from hook, dc in next 5 ch,
skip 1 st on the spiral and slst in the next 4 st.
Drip 10: skip the next st on the spiral, 5 dc in the next st,
skip 1 st on the spiral and slst in the next 4 st.
Drip 11: ch 4, start in third ch from hook, hdc in next
2 ch, slst in the next 5 st on the spiral.
Drip 12: ch 7, start in third ch from hook, hdc in next
5 ch, slst in the next 4 st on the spiral.
Drip 13: skip the next st, 5 dc in the next st, skip 1 st on
the spiral and slst in the next 3 st.
31 32 33 34
35 36 37 38
39 40 41 42
96

97
Drip 14: ch 4, start in second st from hook, sc in next
3 ch, slst in the next 3 st on the spiral.
Fasten off, leaving a long tail for sewing. Pin this layer
on top of the cake and sew in place, making sure all the
chocolate dribbles are also sewn to the cake.
CREAM AND CHERRY (make 6, start in red yarn)
Rnd 1: start 5 sc in a magic ring [5]
Rnd 2: sc in all 5 st [5]
Change to white yarn.
Rnd 3: inc 5 times [10]
Slst in the first st. Fasten off, leaving a long tail for sewing.
Arrange all six pieces in a circle on top of the chocolate
icing and sew in place.
CANDLE (start in blue yarn)
Rnd 1: start 5 sc in a magic ring [5]
Rnd 2: BLO sc in all 5 st [5]
Rnd 3: sc in all 5 st [5]
Do not fasten off. We will work on the remaining length
of the candle later.
Making the flame: Cut a short length of orange yarn
(about 4 inches / 10 cm) and fold it in half. Insert your
hook from the inside of the magic ring and pull the loop
in from the center (picture 36). Take another strand of
orange yarn that is slightly longer than the first one.
Insert one end of the yarn through the loop (picture 37,
38) and make multiple knots to secure the ‘flame’ inside
the body of the candle (picture 39). Pull the two strands
of the yarn sticking out from the magic ring (this is to be
the flame) until the knots sit securely against the inside
of the magic ring. Next, we go back to working on the
body of the candle.
Rnd 4 – 6: sc in all 5 st [5]
Fasten off, leaving a long tail for sewing (picture 40).
Snip off the excess yarn that is visible outside the lower
body of the candle. Carefully loosen the fiber of the or-
ange strands. Once it is loose and fuzzy, hold your scis-
sors vertically and trim into shape (picture 42). Finally,
hold the yarn between your thumb and index finger and
gently twist to give it a flame-like shape. Sew the candle
on the center of the cake.
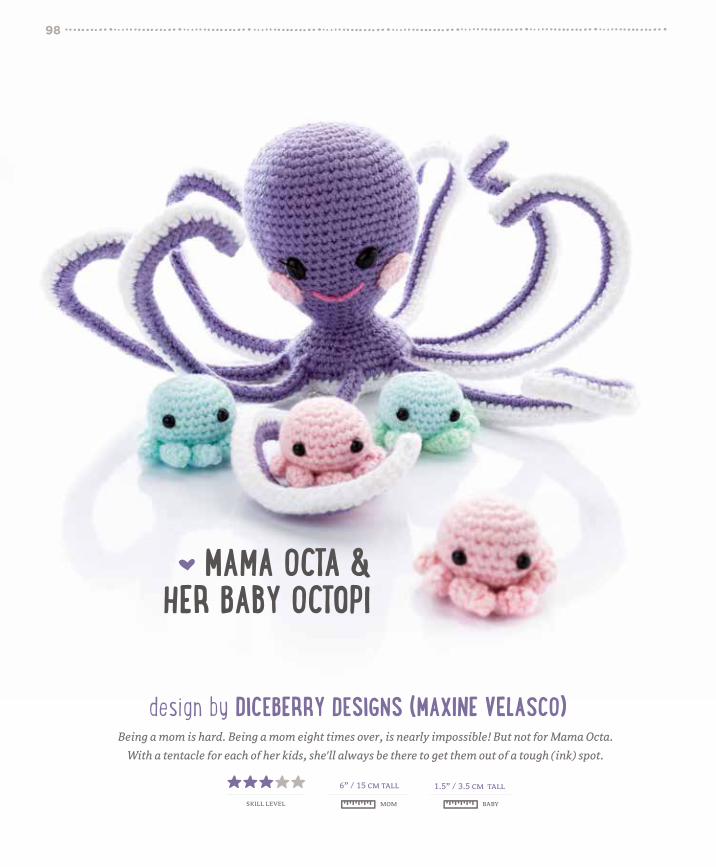
Being a mom is hard. Being a mom eight times over, is nearly impossible! But not for Mama Octa.
With a tentacle for each of her kids, she'll always be there to get them out of a tough (ink) spot.
skill level
6” / 15 cm tall 1.5” / 3.5 cm tall
mom baby
98
design by DICEBERRY DESIGNS (MAXINE VELASCO)

materials – mom
– Worsted weight yarn in white (15 g / 7 m),
purple (25 g / 10 m), light pink (leftover) and
dark pink (leftover)
– Oval safety eyes (12 mm x 9 mm)
– A roll of steel wire or pipe cleaners (8 pcs)
materials for 8 babies
– Worsted weight yarn in light pink (10 g / 5 m)
and light green (10 g / 5 m)
– 16 round safety eyes (4 mm)
both
– Size 3 mm / C-2 hook
– Size 2.5 mm / B-1 hook
– Polyester fiberfill
– Super glue
– Black embroidery floss
– Yarn and thread needles
– Scissors
99
NOTE: It is not recommended to use steel wire in a toy for
young children.
NOTE: Use a 3 mm hook unless otherwise specified.
MAMA OCTA
BLUSH CHEEKS (make 2, in light pink yarn
with a 2.5 mm hook)
Rnd 1: start 6 sc in a magic ring [6]
Rnd 2: inc 6 times [12]
Fasten off, leaving a long tail for sewing.
HEAD AND BODY (in purple yarn)
Rnd 1: start 6 sc in a magic ring [6]
Rnd 2: inc 6 times [12]
Rnd 3: (inc in next st, sc in next st) repeat 6 times [18]
Rnd 4: (inc in next st, sc in next 2 st) repeat 6 times [24]
Rnd 5: (inc in next st, sc in next 3 st) repeat 6 times [30]
Rnd 6: (inc in next st, sc in next 4 st) repeat 6 times [36]
Rnd 7: (inc in next st, sc in next 5 st) repeat 6 times [42]
Rnd 8: (inc in next st, sc in next 6 st) repeat 6 times [48]
Rnd 9: (inc in next st, sc in next 7 st) repeat 6 times [54]
Rnd 10 – 11: sc in all 54 st [54]
Rnd 12: (inc in next st, sc in next 8 st) repeat 6 times [60]
Rnd 13 – 16: sc in all 60 st [60]
Rnd 17: (dec, sc in next 8 st) repeat 6 times [54]
Rnd 18 – 19: sc in all 54 st [54]
Rnd 20: (dec, sc in next 7 st) repeat 6 times [48]
Rnd 21: sc in all 48 st [48]
Rnd 22: (dec, sc in next 6 st) repeat 6 times [42]
Rnd 23: sc in all 42 st [42]
Rnd 24: (dec, sc in next 5 st) repeat 6 times [36]
Rnd 25: sc in all 36 st [36]
Rnd 26: (dec, sc in next 4 st) repeat 6 times [30]
Rnd 27: sc in all 30 st [30]
Rnd 28: (dec, sc in next 3 st) repeat 6 times [24]
Rnd 29: (dec, sc in next 2 st) repeat 6 times [18]
Rnd 30 – 31: sc in all 18 st [18]
Insert the oval safety eyes between rounds 19 and 20 with
an interspace of 7 or 8 stitches. Do not fasten the backings
yet. Embroider a slanting line on the edge of the plastic
eyes to create lashes for Mama Octa. Then fasten the eyes.
Begin stuffing the head with fiberfill.
Rnd 32: (inc in next st, sc in next 2 st) repeat 6 times [24]
Rnd 33: (inc in next st, sc in next 2 st) repeat 8 times [32]
Rnd 34: (inc in next st, sc in next 3 st) repeat 8 times [40]
Rnd 35: (inc in next st, sc in next 4 st) repeat 8 times [48]
Continue to stuff the body up to the neck, and then give
it a good squeeze to make sure the stuffing fills the head
nicely, as well as to stretch the fabric to an oblong-like
shape. Add extra stuffing if needed. (picture 1)
Next we continue crocheting the tentacles.
WORKING THE TENTACLES
Rnd 36: sc in the next 3 st, (ch 51, start in second ch from
hook, sc in all 50 remaining ch, sc in next 6 st on the body)
repeat 7 times. Make the last tentacle by ch 51, start in
second ch from hook, sc in all 50 remaining ch, sc in next

3 st on the body [448] (picture 2)
Rnd 37: sc in next 3 st, (sc in next 100 st on the tentacle,
skip 1 st, sc in next 5 st on the body) repeat 7 times, sc in
next 100 st on the tentacle, skip 1 st, sc in next 2 st on the
body, skip 1 st, BLO slst in the last 2 st [840]
Skip 1 st and BLO slst in the next two stitches. Fasten off
the purple yarn, leaving a tail for sewing. (picture 3)
Rnd 38: Pull up a loop of white yarn, slst in the same st,
slst in next 4 st, (sc in all 100 st on the tentacle, slst in next
5 st on the body) repeat 7 times, sc in all 100 st, slst in next
1 2 3 4
5 6 7
8 9 10
11 12 13
100

st on the body [840] (picture 4 – 7)
Fasten off, leaving a tail for sewing.
CLOSING THE TENTACLES
Wiring:
Hold the octopus with its wrong side facing you. Measure
the length of a tentacle, which should roughly be 9 or 10
inches (23 to 25 cm). If using steel wire, follow Step A. If
using pipe cleaners, follow Step B.
A – Steel wire: Take the steel wire roll and cut double
the length of one of the tentacles (20 inches / 50 cm)
plus 2 – 3 inches / 8 – 9 cm for allowance. Repeat 7
times more for the other tentacles. Take one piece of
wire and insert the end into the topmost end of the
tentacle's wrong side. Continue threading it in until
half of its total length is through. Fold it in two at the
halfway point so that the tentacle is lined with a double
up length of wire. Keep the extra length in place with a
pin at the base of the tentacle and bury the ends of the
wire into the stuffing to prevent it from poking you as
you work (picture 8, 9). Proceed to row 1 afterwards.
B – Pipe cleaner: Line the center part of the tentacle
with a pipe cleaner. Loop the top end into the topmost
st to secure and to keep it from poking through the
fabric. Then with the main color yarn, sew the wire in
place at three sections starting from top, middle and
bottom of the tentacle (picture 10, 11). Proceed to row 1
afterwards.
Finishing (in white yarn) (picture 12, 13)
Row 1: Fold the tentacle in half lengthways, making sure
the stitches are aligned evenly. Then with the working
yarn slst the two topmost sc stitches together. Continue
to slst the stitches together for the next 48 st. Fasten off,
weave in the yarn ends. Repeat row 1 for the rest of the
seven tentacles. (picture 14, 15)
To finish the wiring, divide the wire lot in two, then care-
fully bundle and twist four tails together (picture 16). Next,
bend and bury the twisted tails into the stuffing to
finish (picture 17). Stuff the space under the wire
with fiberfill to secure it in place.
14 15 16 17
101
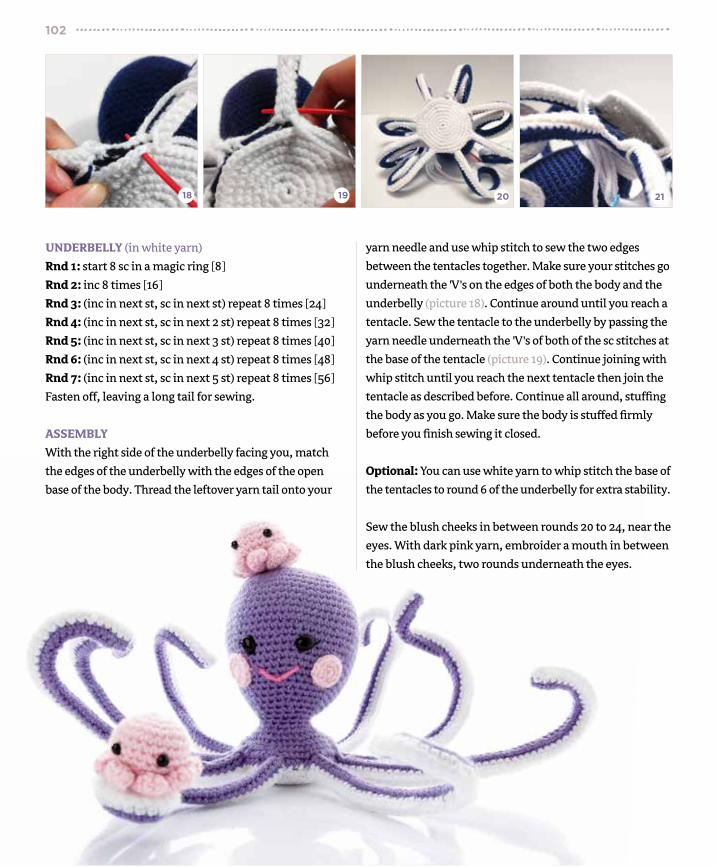
UNDERBELLY (in white yarn)
Rnd 1: start 8 sc in a magic ring [8]
Rnd 2: inc 8 times [16]
Rnd 3: (inc in next st, sc in next st) repeat 8 times [24]
Rnd 4: (inc in next st, sc in next 2 st) repeat 8 times [32]
Rnd 5: (inc in next st, sc in next 3 st) repeat 8 times [40]
Rnd 6: (inc in next st, sc in next 4 st) repeat 8 times [48]
Rnd 7: (inc in next st, sc in next 5 st) repeat 8 times [56]
Fasten off, leaving a long tail for sewing.
ASSEMBLY
With the right side of the underbelly facing you, match
the edges of the underbelly with the edges of the open
base of the body. Thread the leftover yarn tail onto your
yarn needle and use whip stitch to sew the two edges
between the tentacles together. Make sure your stitches go
underneath the 'V's on the edges of both the body and the
underbelly (picture 18). Continue around until you reach a
tentacle. Sew the tentacle to the underbelly by passing the
yarn needle underneath the 'V's of both of the sc stitches at
the base of the tentacle (picture 19). Continue joining with
whip stitch until you reach the next tentacle then join the
tentacle as described before. Continue all around, stuffing
the body as you go. Make sure the body is stuffed firmly
before you finish sewing it closed.
Optional: You can use white yarn to whip stitch the base of
the tentacles to round 6 of the underbelly for extra stability.
Sew the blush cheeks in between rounds 20 to 24, near the
eyes. With dark pink yarn, embroider a mouth in between
the blush cheeks, two rounds underneath the eyes.
18 19 20 21
102

103
BABY OCTOPUS
NOTE: Use a 2,5 mm hook.
HEAD (in light pink or light green yarn)
Rnd 1: start 6 sc in a magic ring [6]
Rnd 2: inc 6 times [12]
Rnd 3: (inc in next st, sc in next st) repeat 6 times [18]
Rnd 4: (inc in next st, sc in next 2 st) repeat 6 times [24]
Rnd 5 – 8: sc in all 24 st [24]
Rnd 9: (dec, sc in next 2 st) repeat 6 times [18]
Stuff the head with fiberfill. Insert the safety eyes in round
6 with an interspace of 4 to 5 stitches.
Rnd 10: (dec, sc in next st) repeat 6 times [12]
Rnd 11: dec 6 times [6]
Fasten off, weave in the yarn ends.
22 23 24 25
TENTACLES (in light pink or light green yarn)
Ch 8, join with a slst in the first ch to make a circle.
Rnd 1: sc in all 8 st, join with a slst in first st [8]
Rnd 2: (ch 10, start in 3rd ch from hook, dc in next 7 ch,
dc + slst in last ch, slst in next st on the starting ch) repeat
8 times.
Ch 1 and fasten off, leaving a long tail for sewing. Use this
leftover yarn tail to sew the tentacle piece to the bottom
of the octopus over round 11. (picture 22 – 25)

104
Papa Penguin is such a loving and conscientious father who will do anything to protect his new son.
Mama Penguin happily goes off for a few weeks to feed on fish and build her strength back up. She knows that
Papa will make a great success of hatching and looking after their precious baby until she returns.
skill level
9” / 23 cm tall 3” /6 cm tall
dad baby
design by MOJI-MOJI DESIGN (JANINE HOLMES)

materials – dad
– Light worsted weight yarn in black (35 g / 100 m),
white (25 g / 70 m), dark orange (15 g / 40 m),
light orange (10 g / 30 m), dark yellow (5 g / 15 m),
light yellow (5 g / 15 m), gray (5 g / 15 m)
– Clear safety eyes with black center (12 mm)
materials – baby + carriage
– Light worsted weight yarn in black (10 g / 30 m),
white (20 g / 55 m), dark orange (5 g / 15 m), light
orange (leftover), gray (10 g / 30 m)
– Safety eyes (6 mm)
– 2 pipe cleaners
– Plastic drinking straw
– Decorative button, approx 1 cm diameter
– 4 x 0,5 cm buttons for center of wheels
both
– Size 3.25 mm / D-3 crochet hook
– Polyester fiberfill
– Yarn needle
– Sewing needle
105
NOTE: To make the eyes shine brighter paint the backs with a
coat of silver nail polish.
PAPA PENGUIN
HEAD AND BODY (start in dark orange yarn)
Rnd 1: start 6 sc in a magic ring [6]
Rnd 2: inc 6 times [12]
Rnd 3: (sc in next st, inc in next st) repeat 6 times [18]
Rnd 4: (sc in next 2 st, inc in next st) repeat 6 times [24]
Rnd 5: (sc in next 3 st, inc in next st) repeat 6 times [30]
Rnd 6 – 15: sc in all 30 st [30]
Change to light orange yarn.
Rnd 16 – 18: sc in all 30 st [30]
Change to dark yellow yarn.
Rnd 19: (sc in next 4 st, inc in next st) repeat 6 times [36]
Rnd 20 – 21: sc in all 36 st [36]
Change to light yellow yarn.
Rnd 22: sc in all 36 st [36]
Rnd 23: (sc in next 5 st, inc in next st) repeat 6 times [42]
Rnd 24: sc in all 42 st [42]
Change to white yarn.
Rnd 25 – 47: sc in all 42 st [42]
Stuff the head and body. Do not cut the yarn.
First leg
We continue crocheting with the attached yarn.
Rnd 1: sc in next 21 st, skip next 21 st [21]
Now we continue working in the 21 st from round 1 only.
Rnd 2: sc in all 21 st [21]
Rnd 3: (sc in next 5 st, dec) repeat 3 times [18]
Rnd 4: (sc in next 4 st, dec) repeat 3 times [15]
Rnd 5: (sc in next 3 st, dec) repeat 3 times [12]
Stuff the leg.
Rnd 6: dec 6 times [6]
Fasten off, leaving a long tail for sewing. Using your
yarn needle, weave the yarn tail through the front loop
of each remaining stitch and pull it tight to close. Fasten
off, weave in the yarn end.
Second leg
Rnd 1: Leaving a long yarn tail at the beginning, pull
up a loop of white yarn in the stitch immediately to
the left of the first leg. Ch 1 (does not count as a st),
sc in same st as joined yarn, sc in each remaining st
around [21]
Rnd 2 – 6: follow the pattern and instructions for rounds
2 – 6 of the first leg.
Use the yarn tail you left at the beginning of the second
leg to sew closed the gap between the legs.
FOOT (make 2, in gray yarn)
Rnd 1: start 6 sc in a magic ring [6]
Rnd 2: sc in all 6 st [6]
Rnd 3: (sc in next st, inc in next st) repeat 3 times [9]
Rnd 4 – 5: sc in all 9 st [9]
Rnd 6: (sc in next 2 st, inc in next st) repeat 3 times [12]
Rnd 7: sc in all 12 st [12]
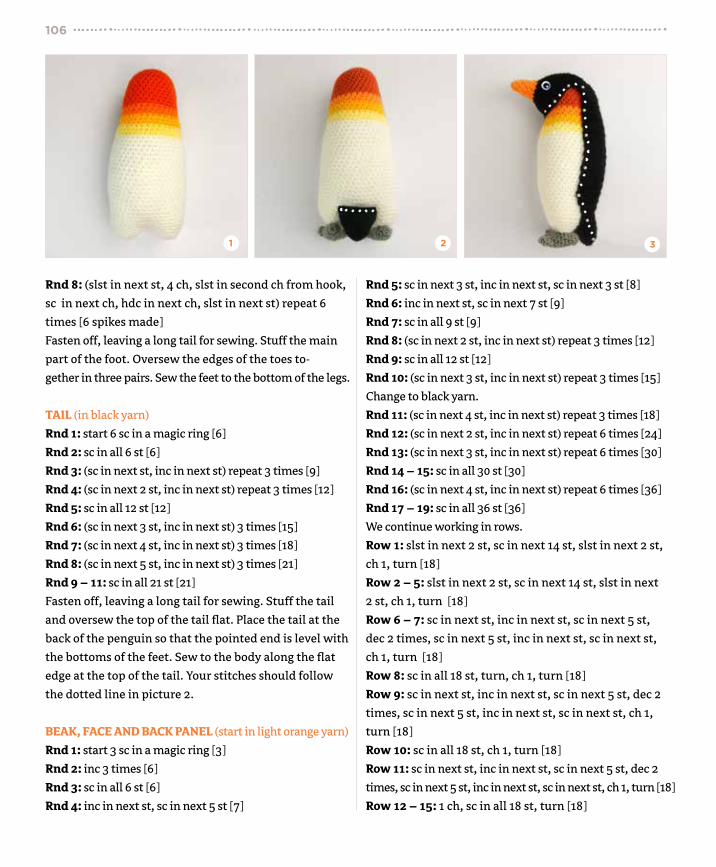
Rnd 8: (slst in next st, 4 ch, slst in second ch from hook,
sc in next ch, hdc in next ch, slst in next st) repeat 6
times [6 spikes made]
Fasten off, leaving a long tail for sewing. Stuff the main
part of the foot. Oversew the edges of the toes to-
gether in three pairs. Sew the feet to the bottom of the legs.
TAIL (in black yarn)
Rnd 1: start 6 sc in a magic ring [6]
Rnd 2: sc in all 6 st [6]
Rnd 3: (sc in next st, inc in next st) repeat 3 times [9]
Rnd 4: (sc in next 2 st, inc in next st) repeat 3 times [12]
Rnd 5: sc in all 12 st [12]
Rnd 6: (sc in next 3 st, inc in next st) 3 times [15]
Rnd 7: (sc in next 4 st, inc in next st) 3 times [18]
Rnd 8: (sc in next 5 st, inc in next st) 3 times [21]
Rnd 9 – 11: sc in all 21 st [21]
Fasten off, leaving a long tail for sewing. Stuff the tail
and oversew the top of the tail flat. Place the tail at the
back of the penguin so that the pointed end is level with
the bottoms of the feet. Sew to the body along the flat
edge at the top of the tail. Your stitches should follow
the dotted line in picture 2.
BEAK, FACE AND BACK PANEL (start in light orange yarn)
Rnd 1: start 3 sc in a magic ring [3]
Rnd 2: inc 3 times [6]
Rnd 3: sc in all 6 st [6]
Rnd 4: inc in next st, sc in next 5 st [7]
Rnd 5: sc in next 3 st, inc in next st, sc in next 3 st [8]
Rnd 6: inc in next st, sc in next 7 st [9]
Rnd 7: sc in all 9 st [9]
Rnd 8: (sc in next 2 st, inc in next st) repeat 3 times [12]
Rnd 9: sc in all 12 st [12]
Rnd 10: (sc in next 3 st, inc in next st) repeat 3 times [15]
Change to black yarn.
Rnd 11: (sc in next 4 st, inc in next st) repeat 3 times [18]
Rnd 12: (sc in next 2 st, inc in next st) repeat 6 times [24]
Rnd 13: (sc in next 3 st, inc in next st) repeat 6 times [30]
Rnd 14 – 15: sc in all 30 st [30]
Rnd 16: (sc in next 4 st, inc in next st) repeat 6 times [36]
Rnd 17 – 19: sc in all 36 st [36]
We continue working in rows.
Row 1: slst in next 2 st, sc in next 14 st, slst in next 2 st,
ch 1, turn [18]
Row 2 – 5: slst in next 2 st, sc in next 14 st, slst in next
2 st, ch 1, turn [18]
Row 6 – 7: sc in next st, inc in next st, sc in next 5 st,
dec 2 times, sc in next 5 st, inc in next st, sc in next st,
ch 1, turn [18]
Row 8: sc in all 18 st, turn, ch 1, turn [18]
Row 9: sc in next st, inc in next st, sc in next 5 st, dec 2
times, sc in next 5 st, inc in next st, sc in next st, ch 1,
turn [18]
Row 10: sc in all 18 st, ch 1, turn [18]
Row 11: sc in next st, inc in next st, sc in next 5 st, dec 2
times, sc in next 5 st, inc in next st, sc in next st, ch 1, turn [18]
Row 12 – 15: 1 ch, sc in all 18 st, turn [18]
106
1 2 3
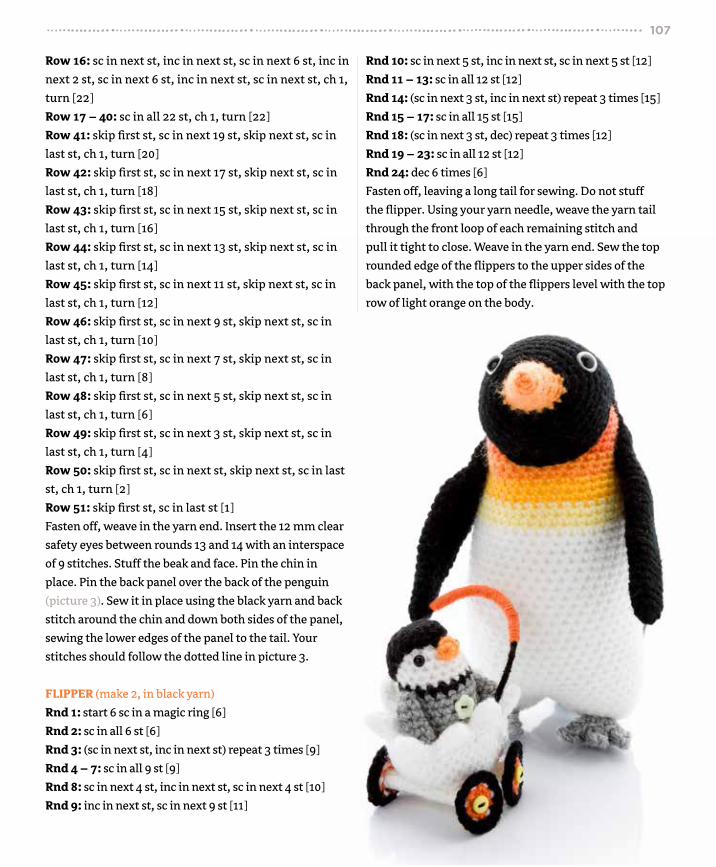
Row 16: sc in next st, inc in next st, sc in next 6 st, inc in
next 2 st, sc in next 6 st, inc in next st, sc in next st, ch 1,
turn [22]
Row 17 – 40: sc in all 22 st, ch 1, turn [22]
Row 41: skip first st, sc in next 19 st, skip next st, sc in
last st, ch 1, turn [20]
Row 42: skip first st, sc in next 17 st, skip next st, sc in
last st, ch 1, turn [18]
Row 43: skip first st, sc in next 15 st, skip next st, sc in
last st, ch 1, turn [16]
Row 44: skip first st, sc in next 13 st, skip next st, sc in
last st, ch 1, turn [14]
Row 45: skip first st, sc in next 11 st, skip next st, sc in
last st, ch 1, turn [12]
Row 46: skip first st, sc in next 9 st, skip next st, sc in
last st, ch 1, turn [10]
Row 47: skip first st, sc in next 7 st, skip next st, sc in
last st, ch 1, turn [8]
Row 48: skip first st, sc in next 5 st, skip next st, sc in
last st, ch 1, turn [6]
Row 49: skip first st, sc in next 3 st, skip next st, sc in
last st, ch 1, turn [4]
Row 50: skip first st, sc in next st, skip next st, sc in last
st, ch 1, turn [2]
Row 51: skip first st, sc in last st [1]
Fasten off, weave in the yarn end. Insert the 12 mm clear
safety eyes between rounds 13 and 14 with an interspace
of 9 stitches. Stuff the beak and face. Pin the chin in
place. Pin the back panel over the back of the penguin
(picture 3). Sew it in place using the black yarn and back
stitch around the chin and down both sides of the panel,
sewing the lower edges of the panel to the tail. Your
stitches should follow the dotted line in picture 3.
FLIPPER (make 2, in black yarn)
Rnd 1: start 6 sc in a magic ring [6]
Rnd 2: sc in all 6 st [6]
Rnd 3: (sc in next st, inc in next st) repeat 3 times [9]
Rnd 4 – 7: sc in all 9 st [9]
Rnd 8: sc in next 4 st, inc in next st, sc in next 4 st [10]
Rnd 9: inc in next st, sc in next 9 st [11]
Rnd 10: sc in next 5 st, inc in next st, sc in next 5 st [12]
Rnd 11 – 13: sc in all 12 st [12]
Rnd 14: (sc in next 3 st, inc in next st) repeat 3 times [15]
Rnd 15 – 17: sc in all 15 st [15]
Rnd 18: (sc in next 3 st, dec) repeat 3 times [12]
Rnd 19 – 23: sc in all 12 st [12]
Rnd 24: dec 6 times [6]
Fasten off, leaving a long tail for sewing. Do not stuff
the flipper. Using your yarn needle, weave the yarn tail
through the front loop of each remaining stitch and
pull it tight to close. Weave in the yarn end. Sew the top
rounded edge of the flippers to the upper sides of the
back panel, with the top of the flippers level with the top
row of light orange on the body.
107

BABY PIERRE
HEAD AND BODY (start in white yarn)
Rnd 1: start 6 sc in a magic ring [6]
Rnd 2: inc 6 times [12]
Rnd 3: (sc in next st, inc in next st) repeat 6 times [18]
Rnd 4 – 7: sc in all 18 st [18]
Change to black yarn.
Rnd 8: sc in all 18 st [18]
Change to gray yarn.
Rnd 9: (sc in next 5 st, inc in next st) repeat 3 times [21]
Insert 6 mm black safety eyes in between rounds 4 and 5
with an interspace of 5 stitches.
Rnd 10 – 14: sc in all 21 st [21]
Rnd 15: (sc in next 5 st, dec) repeat 3 times [18]
Rnd 16 – 17: sc in all 18 st [18]
Rnd 18: (sc in next st, dec) repeat 6 times [12]
Stuff the head and body.
Rnd 19: dec 6 times [6]
Fasten off, leaving a long tail for sewing. Using your yarn
needle, weave the yarn tail through the front loop of each
remaining stitch and pull it tight to close. Weave in the yarn
end. Sew a decorative button to Pierre's tummy.
CAP (in black yarn)
Rnd 1: start 6 sc in a magic ring [6]
Rnd 2: inc 6 times [12]
Rnd 3: (sc in next st, inc in next st) repeat 6 times [18]
Rnd 4 – 5: sc in all 18 st [18]
Rnd 6: hdc + dc in next st, 2 tr in next st, dc + hdc in next
st, sc in next st, slst in next st [8] Do not finish the round.
Fasten off, leaving a long tail for sewing. Position cap on
top of penguin's head and sew in place with the pointed
part of the cap at the center front and the back of the
cap touching the single black stripe on the neck.
BEAK (in light orange yarn)
Rnd 1: start 3 sc in a magic ring [3]
Rnd 2: inc 3 times [6]
Fasten off, leaving a long tail for sewing. Do not stuff.
Using your yarn needle, weave the yarn tail through the
front loop of each remaining stitch and pull it tight to
close. Weave in the yarn end. Sew the beak to the center
of the face just below the pointed part of the cap.
FLIPPER (make 2, in gray yarn)
Rnd 1: start 6 sc in a magic ring [6]
Rnd 2 – 6: sc in all 6 st [6]
Fasten off, leaving a long yarn tail for sewing. Do not
stuff. Oversew the tops of the flippers closed. Sew to the
sides of the body just below the single black stripe on
the neck.
108

FOOT (make 2, in black yarn)
Rnd 1: start 6 sc in a magic ring [6]
Rnd 2: sc in all 6 st [6]
We continue working in rows.
Row 1: Fold work in half and placing all stitches through
both sides to join. Ch 1 (does not count as a st), sc in next
3 st, turn [3]
Row 2: (3 ch, slst in st at base of 3 ch, slst in next st) repeat
2 times, 3 ch, slst in st at base of 3 ch [3 toes made]
Fasten off, leaving a long tail for sewing. Sew the feet to
the base of the penguin.
EGG SHELL BUGGY
HANDLE
Cut two 18 cm lengths of pipe cleaner. Holding the
lengths together, bind a doubled up strand of black yarn
tightly around the pipe cleaners, securing both ends with
a knot. Bind a doubled up strand of orange yarn tightly
around the middle 2.5" /6 cm of the pipe cleaner, over
the black yarn. Sew the ends of the orange yarn inside the
black binding for a neat finish.
INNER SHELL (in white yarn)
Rnd 1: start 6 sc in a magic ring [6]
Rnd 2: inc 6 times [12]
Rnd 3: (sc, inc in next st) repeat 6 times [18]
Rnd 4: (sc in next 2 st, inc in next st) repeat 6 times [24]
Rnd 5: (sc in next 2 st, inc in next st) repeat 8 times [32]
Rnd 6 – 10: sc in all 32 st [32]
Rnd 11: (slst in next st, 5 ch, slst in second ch from hook,
hdc in next ch, dc in next 2 ch, skip next 2 st, slst in next st)
repeat 8 times [8 spikes made]
Fasten off, weave in the yarn end.
OUTER SHELL (in white yarn)
Rnd 1 – 10: follow rounds 1 – 10 of the inner shell pattern.
Rnd 11: sc in all 32 st [32]
Rnd 12: follow pattern for round 11 of inner shell.
Fasten off, leaving a long tail for sewing.
With the wrong sides facing, place the inner shell inside
the outer shell, lining up the points. Place the ends of
the handle in between the two layers of the shell on
either side of the carriage. Three of the points on the
rim of the shell should be behind the handles and five
points should be in front. Pin in place and oversew the
shell edges together all the way around, putting an
extra stitch or two through the place where the handles
emerge from the shell.
WHEEL (make 4, start in dark orange yarn)
Rnd 1: start 6 sc in a magic ring [6]
Rnd 2: inc 6 times [12]
Change to black yarn.
Rnd 3: (sc in next st, inc in next st) repeat 6 times [18]
Fasten off, weave in the yarn ends.
With a strand of white yarn, embroider a line of running
stitches in between rounds 2 and 3. Weave in the ends on
the back of the wheel. Sew a small button to the center of
each wheel.
CHASSIS POLE (make 2, in white yarn)
Rnd 1: leaving a long tail at the beginning, start 6 sc in a
magic ring [6]
Rnd 2 – 9: BLO sc in all 6 st [6]
Fasten off, leaving a long tail for sewing. Insert the plas-
tic drinking straw into the tube. Using your yarn needle,
weave the yarn tail through the front loop of each
remaining stitch and pull it tight to close. Use the yarn
tails to sew the center back of each wheel to the ends of
the chassis poles. Sew the chassis poles to the underside
of the eggshell carriage. (picture 4, 5)
109
4 5

110
Frida made a nice little sling for her baby girl, so she can carry her at any time. Little monkeys are very
lively and fast – Frida must be careful, because if she doesn't hold her firmly, little Lila wriggles out of her
cocoon and crawls into her mom's hair!
skill level
11” / 28 cm tall 3” /8 cm tall
mom baby
design by JAMAICA Y TAMARINDO

materials – mom
– Light worsted weight yarn in beige (10 g / 30 m),
light brown (35 g / 100 m), red (10 g / 30 m), white
(leftover), yellow (leftover), pink (leftover),
fuchsia (leftover) and violet (leftover)
– Size 4 mm / G-6 crochet hook
– Safety eyes (8 mm)
materials – baby + sling
– Fingering weight yarn in beige (5 g / 15 m),
light brown (15 g / 45 m) and some colorful bits
for the tiny flowers
– Size 2.5 mm / B-1 crochet hook
– 2 tiny black plastic beads
– Stretch fabric
– Sewing needle and thread
both
– Fiberfill for stuffing
– Yarn needle
– Stitch markers
– Optional: Felting needle
– Optional: Yarn glue
111
MOM FRIDA
NOTE: Use worsted weight yarn and a 4 mm crochet hook.
SNOUT (in beige yarn)
Rnd 1: start 7 sc in a magic ring [7]
Rnd 2: inc 7 times [14]
Rnd 3: (sc in next st, inc in next st) repeat 7 times [21]
Rnd 4: sc in next st, inc in next st, (sc in next 2 st, inc in
next st) repeat 6 times, sc in last st [28]
Rnd 5: (sc in next 3 st, inc in next st) repeat 7 times [35]
Rnd 6: sc in next 2 st, inc next st, (sc in next 4 st, inc in
next st) repeat 6 times, sc in next 2 st [42]
Rnd 7 – 10: sc in all 42 st [42]
Rnd 11: (sc in next 4 st, dec) repeat 7 times [35]
Fasten off, leaving a long tail for sewing.
LEG (make 2, in light brown yarn)
Start with the first leg.
Rnd 1: start 6 sc in a magic ring [6]
Rnd 2: inc 6 times [12]
Rnd 3 – 24: sc in all 12 st [12]
Fasten off and weave in the yarn ends.
Create a second leg just like the first. Don't fasten off the
second leg, we will continue working on this leg. Stuff
the legs firmly with fiberfill to support the weight of the
body and head.
Optional: To achieve firmer legs you can use a felting
needle and felt the fiberfill as you stuff the piece.
BODY AND HEAD (in light brown yarn)
Hold both legs together, making sure the leftover loop at
the end of the second leg is where the legs meet (picture 1).
Using your yarn needle join the legs through their center
by making a small, firm stitch using the same color yarn
(picture 2). Now continue crocheting all around the
joined legs.
Rnd 1: sc in all 24 st [24]
Rnd 2: sc in next 10 st, inc 4 times, sc in the next 10 st [28]
Rnd 3: (sc in next 3 st, inc in next st) repeat 7 times [35]
Rnd 4 – 5: sc in all 35 st [35]
Rnd 6: BLO sc in all 35 st [35]
Rnd 7 – 9: sc in all 35 st [35]
Rnd 10: (sc in next 3 st, dec) repeat 7 times [28]
Rnd 11 – 12: sc in all 28 st [28]
Rnd 13: (sc in next 2 st, dec) repeat 7 times [21]
Rnd 14: sc in all 21 st [21]
Rnd 15: (sc in next 2 st, dec) repeat 5 times, sc in last st [16]
Stuff the body firmly with fiberfill and continue stuffing
as you go.
Rnd 16 – 25: sc in all 16 st [16]
Stuff the neck firmly with fiberfill to support the weight
of the head.
Optional: To achieve firmer parts you can use a felting
needle and felt the fiberfill as you stuff the piece.
In the next round we will attach the snout to the body.
Rnd 26: sc in next 4 st. Count 8 st and mark the next
stitch using a stitch marker. You now have 8 central st

from your last stitch to your marker (picture 3). Take
the beige snout and count 8 st from the last st. Mark
the next stitch with a stitch marker (picture 4). Now
hold both pieces together, matching the 8 stitches
between the markers. Sew them together using your
yarn needle. (picture 5)
Take the leftover loop from the neck on your hook,
BLO sc in next 27 st on the snout, sc in last 4 st on the
neck [35] (picture 6)
Sew the snout to the neck with a stitch in the center and
tighten with a knot. (picture 7, 8)
Rnd 27: (sc in next 3 st, dec) repeat 5 times, sc in next
10 st [30]
Rnd 28: sc in next 22 st, (sc in next st, inc in next st)
repeat 4 times [34]
Rnd 29 – 30: sc in all 34 st [34]
Rnd 31: sc in next 22 st, (sc in next 4 st, inc in next st)
repeat 2 times, sc in next 2 st [36]
Stuff the snout. Insert the safety eyes between rounds
27 and 28 with an interspace of 2 stitches.
Rnd 32 – 34: sc in all 36 st [36]
Stuff the head with fiberfill and continue stuffing as you go.
Rnd 35: (sc in next 4 st, dec) repeat 6 times [30]
Rnd 36: sc in next 2 st, dec, (sc in next 3 st, dec) repeat
5 times, sc in the last st [24]
Rnd 37: (sc in next 2 st, dec) repeat 6 times [18]
Rnd 38: (sc in next st, dec) repeat 6 times [12]
Rnd 39: dec 6 times [6]
Fasten off. Using your yarn needle, weave the yarn tail
through the front loop of each remaining stitch and pull
it tight, closing off the top of the head.
ARM (make 2, in light brown yarn)
Rnd 1: start 5 sc in a magic ring [5]
Rnd 2: inc 5 times [10]
Rnd 3 – 17: sc in all 10 st [10]
Fasten off, leaving a long tail for sewing. Stuff only until
round 4. Sew the arms between rounds 13 and 14 of the
body.
TAIL (in light brown yarn)
Rnd 1: start 8 sc in a magic ring [8]
Rnd 2 – 20: sc in all 8 st [8]
Fasten off, leaving a long tail for sewing. Stuff firmly.
1 2 3 4
5 6 7 8
112

Sew the tail to the back of the body, between rounds
5 and 6.
EAR (make 2, in light brown yarn)
Rnd 1: start 6 sc in a magic ring [6]
Rnd 2: inc 6 times [12]
Rnd 3: (sc in next st, inc in next st) repeat 6 times [18]
Rnd 4: sc in all 18 st [18]
Rnd 5: (sc in next st, dec) repeat 6 times [12]
Rnd 6: dec 6 times [6]
Fasten off. Using your yarn needle, weave the yarn tail
through the front loop of each remaining stitch and pull
it tight, closing off the ear, leaving a long tail for sewing.
Flatten the ears, the ears do not need to be stuffed.
Sew them to either side of the head over rounds 27
to 30.
SKIRT (start in red yarn)
We continue in the leftover front loops of round 6 of the
body. Keep the legs directed away from you while you
crochet the skirt, so the pretty side of your crochetwork
will face outward. Join with red yarn in the first front
loop stitch of round 6 of the body.
Rnd 1: (sc in next 4 st, inc in next st) repeat 7 times [42]
Rnd 2: (sc in next 5 st, inc in next st) repeat 7 times [49]
Rnd 3: (sc in next 6 st, inc in next st) repeat 7 times [56]
Rnd 4: sc in all 56 st [56]
Change to white yarn.
Rnd 5: BLO sc in all 56 [56]
Slst in next st and fasten off. Weave in the yarn ends.
FLOWER (in red, yellow, pink, fuchsia and violet yarn)
Ch 16. We crochet in rows.
Row 1: start in second ch from hook, sc in all 15 st [15]
Roll the piece to create the flower and sew together with
a small stitch at the back of the flower. Sew or glue the
flowers to the head, making a crown. (picture 9 – 12)
WRAP SLING (made of stretch fabric with a color of
your choice)
Cut 2 pieces of fabric measuring 8" / 20 cm long and
2.5" / 6 cm wide. Sew both pieces together (picture 13)
and turn them inside out (picture 14, 15). Turn one of
the ends to twist the shape (picture 16). Match the ends
and sew them together.
113
13 14 15 16
9 10 11 12

BABY LILA
NOTE: Use Fingering weight yarn and 2.5 mm crochet hook.
SNOUT (in beige yarn)
Rnd 1: start 5 sc in a magic ring [5]
Rnd 2: inc 5 times [10]
Rnd 3: (sc in next st, inc in next st) repeat 5 times [15]
Rnd 4: sc in next st, inc in next st, (sc in next 2 st, inc in
next st) repeat 4 times, sc in the last st [20]
Rnd 5: (sc in next 3 st, inc in next st) repeat 5 times [25]
Rnd 6: sc in next 2 st, inc next st, (sc in next 4 st, inc in
next st) repeat 4 times, sc in next 2 st [30]
Rnd 7 – 8: sc in all 30 st [30]
Rnd 9: (sc in next 4 st, dec) repeat 5 times [25]
Fasten off, leaving a long tail for sewing.
LEG (make 2, in light brown yarn)
Start with the first leg.
Rnd 1: start 7 sc in a magic ring [7]
Rnd 2 – 8: sc in all 7 st [7]
Fasten off, weave in the yarn ends.
Create a second leg just like the first. Don't fasten off the
second leg, we will continue working on this leg. Stuff
the legs with fiberfill.
BODY AND HEAD (in light brown yarn)
Hold both legs together and join with a slst.
Rnd 1: sc in the 14 st around both legs [14]
Rnd 2: sc in next 6 st, inc 2 times, sc in the next 6 st [16]
Rnd 3: (sc in next 3 st,inc in next st) repeat 4 times [20]
Rnd 4 – 5: sc in all 20 st [20]
Rnd 6: (sc in next 3 st, dec) repeat 4 times [16]
Rnd 7: (sc in next 2 st, dec) repeat 4 times [12]
Stuff the body with fiberfill and continue stuffing as you go.
Rnd 8 – 15: sc in all 12 st [12]
Stuff the neck firmly with fiberfill to support the weight
of the head. In the next round we will attach the snout
to the body. Take the snout and line it up with the body.
Match the 6 central stitches and sew them together using
your yarn needle.
Rnd 16: Take the leftover loop from the neck on your
hook, sc in next 25 st. Crochet in BLO over the snout to
achieve a neat finish [25]
Rnd 17: (sc in next 3 st, dec) repeat 4 times, sc in next
6 st [22]
Rnd 18: sc in next 18 st, (sc in next st, inc in next st)
repeat 2 times [24]
Stuff the snout. Sew the black plastic beads between
rounds 16 and 17 in the center of the face with an inter-
space of 1 stitch.
Rnd 19 – 22: sc in all 24 st [24]
114

Stuff the head with fiberfill and continue stuffing as you go.
Rnd 23: (sc in next 3 st, dec) repeat 4 times, sc in next
4 st [20]
Rnd 24: (sc in next 2 st, dec) repeat 5 times [15]
Rnd 25: (sc in next st, dec) repeat 5 times [10]
Rnd 26: dec 5 times [5]
Fasten off. Using your yarn needle, weave the yarn tail
through the front loop of each remaining stitch and pull
it tight, closing off the top of the head. Weave in the yarn
end. With dark brown yarn, embroider a horizontal nose
underneath the eyes over 2 stitches. Embroider a straight
line from the center of the nose, one round down.
ARM (make 2, in light brown yarn)
Rnd 1: start 7 sc in a magic ring [7]
Rnd 2 – 7: sc in all 7 st [7]
Fasten off, leaving a long tail for sewing. Flatten the
arm. The arms do not need to be stuffed. Sew the arms
between rounds 7 and 8 of the body.
TAIL (in light brown yarn)
We crochet in rows. Ch 13.
Row 1: start in second ch from hook, 4 sc in the next st,
2 sc in the next st, sc in next st, slst in next 9 st [18]
Fasten off, leaving a long tail for sewing. Sew the tail to
the back of the body.
EAR (make 2, in light brown yarn)
Rnd 1: start 6 sc in a magic ring [6]
115
Rnd 2: inc 6 times [12]
Rnd 3: slst in all 12 st [12]
Fasten off, leaving a long tail for sewing. Sew the ears on
either side of the head over rounds 16 to 18.
FLOWER (in red, yellow, pink, and violet yarn)
We crochet in rows. Ch 9.
Row 1: start in second ch from hook, sc in all 8 st [8]
Roll the piece to create a flower and sew it together with
a small stitch at the back of the flower. Sew or glue the
flowers to the head, making a crown.

Patchwork Moose (Kate E Hancock)
United Kingdom
Kate makes the cutest little crochet
creatures to brighten up your day.
Amigurumi has drawn her into crochet. She saw
these adorable little creatures and knew she had
to learn to make them for herself.
Mevvsan (Mevlinn Gusick) Portugal
Mevlinn is a college graduate with a BFA in Fine Arts
Painting. Her interest in knitting and crochet begin when
her aunt showed her how to knit. It peaked her curiosity
and here she is today, crocheting amigurumi whenever
she gets the chance. Every day she makes something special
with her own hands and gives it to those she loves.
LittleAquaGirl (Erinna Lee) Australia
Erinna is a scientist by day and a crochet
lover by night. Until a year ago she had never
designed her own amigurumi. The competition
inspired her to try it the first time and with
great success! Her cute design made it to an
incredible third place in the contest.
Zabbez The Netherlands
Bas is always busy creating beautiful things that
make him and others happy. He is inspired by
nature, plants and flowers. Making amigurumi
puts him in a good mood. Each time he crochets
another round or changes to a new color, his
designs become more vivid and playful.
116

Diceberry Designs (Maxine Velasco) United States
Maxine is a lover of all arts and crafts but she once
by passed crochet when it was taught in a
mandatory elementary class. Years later she was
thrilled to discover how this craft could bring her
sketches to life and knew this would be the start of a
lifelong passion for making her own stuffed toys.
Lia Arjono Indonesia
Lia loves crafting as much as she loves
cute things. When her mom intro
duced her to crochet, she immediately
fell in love with amigurumi and soon
began designing her own cute and
colorful characters.
Moji-Moji Design (Janine Holmes) United Kingdom
Janine has always loved working with yarns and fibers
and has a professional background in both woven
and printed textiles. Crochet is the most recent
addition to her list of skills and since discovering
the endless creative possibilities of amigurumi
it looks set to remain a definite favorite!
Enna Design (Emi Kanesada) United States
Emi is an Amigurumi artist with a background
in interior design and jewelry design. Her
creations are inspired by the Japanese 'Kawaii'
culture in her DNA. Her brain is always full of
fun imaginings and her hands are always busy
trying to keep up with them!
117

Tales of Twisted Fibers (Serah Basnet) Nepal
Serah decided she needed to learn to crochet after
discovering amigurumi three years ago. She has been
doodling character sketches and bringing them to life
with a hook ever since. Her mission is to spread
amigurumi love in her hometown Gangtok (India) and
in Kathmandu (Nepal) where she currently resides.
Stuff The Body Poland
Natalia loves crocheting but she does not like
assembling limbs, making parts fit to each
other, or sewing them together. That it why she
invented seamless crocheting. Every time she
finds a new way to seamlessly shape crochet
creatures, she feels like a winner!
Jamaica Y Tamarindo (Eugenia Arancibia)
Argentina
Eugenia loves all of the amigurumi she creates.
With just a ball of yarn, she can bring a character
to life. Seeing them grow and having people
react to her designs, makes her the happiest
designer in the world!
Kamlin Patterns Czech Republic
Katka can create almost anything
using her crochet hook and a ball
of yarn. She's inspired hundreds
of people to pick up a crochet hook
and create handmade toys for their
children.
118

Joke Vermeiren Belgium
Joke started collecting patterns on amigurumipatterns.net
and compiled this book with care. She’s an enthusiast with a
heart for the creative and loves showing their work, helping
them get the word out about their new designs. She enjoys
picking up a crochet hook on a quiet winter evening. Ask her
anything through [email protected].
A special thank you goes out to everyone who participated in this contest and all amigurumi fans
around the world who voted for their favorite characters, to the 12 designers who participated
in this book and who were a joy to work with, to Bruno for helping me climb high mountains,
to Riet for being my 'chief assistant', to Joost for making the most amazing pictures, to Janine
for reading through the book with care, to everyone who volunteered as a proofreader to test
one of the English patterns (Ashton Kirkham, Jeana Clark, Alisha Lingle, Katie Courtney,
Kirsteen Stewart, Kristi Randmaa, Maria Marta Albala, Noah McLeroy, Serena Chew, Jill Con
stantine, Shelley Jones, Shir Reichert, Susan Mackie, Terry Rios, Melissa Campbell, Amanda
French, Iris Dongo, Roni Swiderski, Katie Strange, Michelle Donnelly, Lucy Fyles, Barbara
Roman), to printing house Graphius for their care, and to all my amazing Facebook fans for
their support and enthusiasm!
119
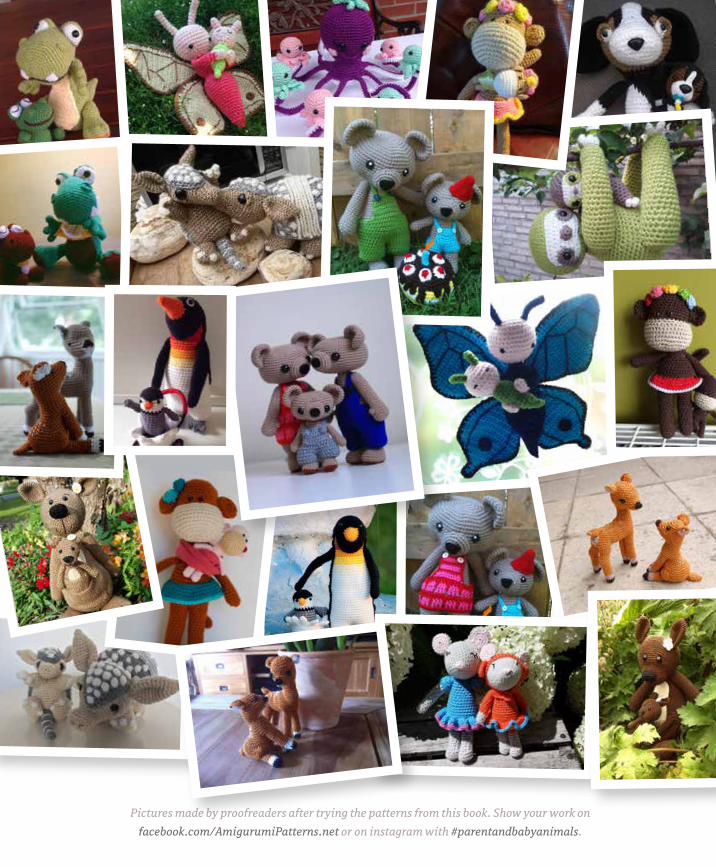
Pictures made by proofreaders after trying the patterns from this book. Show your work on
facebook.com/AmigurumiPatterns.net or on instagram with #parentandbabyanimals.