
QUICK START QUICK START TRAINING Updated – September 15, 2011.
AMBE Server ver. 0.3 - Quick Start Guide
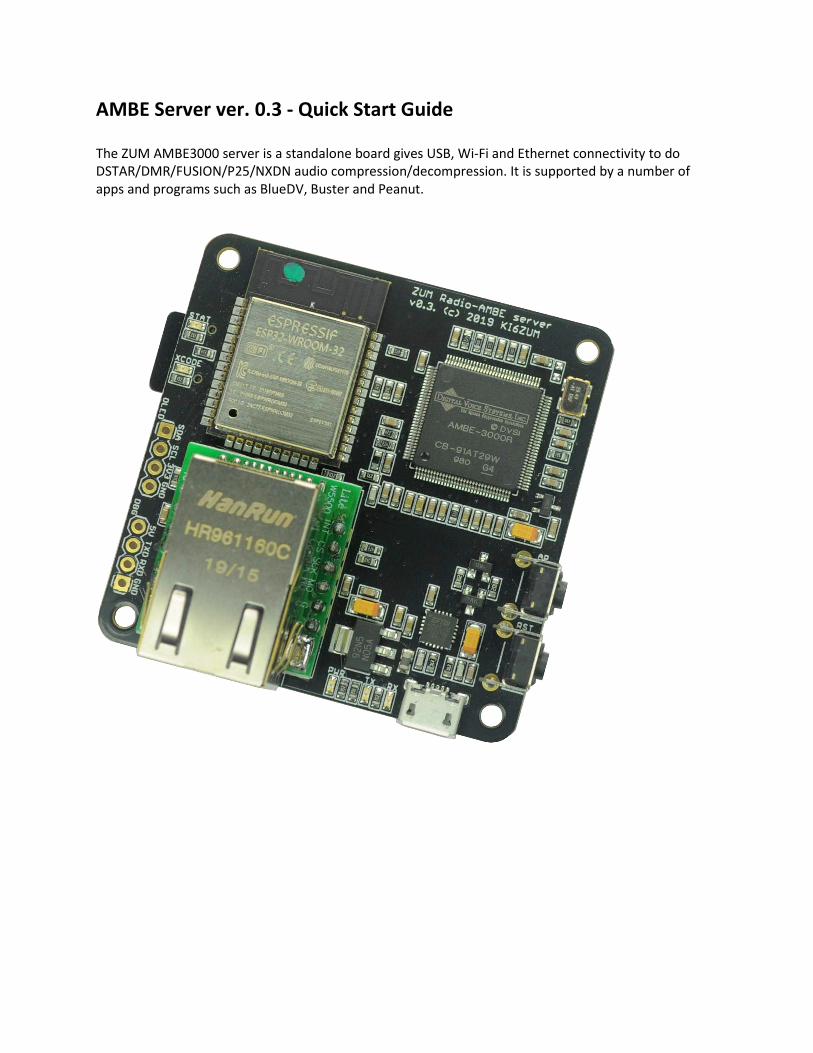
The ZUM AMBE3000 server is a standalone board gives USB, Wi-Fi and Ethernet connectivity to do
DSTAR/DMR/FUSION/P25/NXDN audio compression/decompression. It is supported by a number of
apps and programs such as BlueDV, Buster and Peanut.

Board specifications 3
Board power 4
Board configuration 5
Ethernet (DHCP): 5
Ethernet (Static IP): 6
Wi-Fi (DHCP): 7
Wi-Fi (Static IP): 8
USB UART 9
Software configuration 11
Blue DV for Windows 11
Peanut 14
Buster 16
MMDVM (DummyRepeater) 18
XLX Reflector 19
OLED Screen 19
Support 20

Board specifications
The ZUM AMBE board uses an authentic AMBE3000R chip sourced directly from DVSI. This chip allows
for audio transcoding for DSTAR, DMR, Fusion, P25 and NXDN.
Connection types
• WiFi (2.4Ghz B/G/N)
• Serial (460800 baud)
• Ethernet (100Mbit/full duplex)
The board can be used with the following software.
• BlueDV - http://www.pa7lim.nl/bluedv-windows/
• MMDVM (DummyRepeater) - https://github.com/g4klx/DummyRepeater
• Peanut - http://www.pa7lim.nl/peanut/
• Buster - https://apps.apple.com/us/app/buster/id1060175273?mt=12
Configuration
• The configuration is stored on an SD card
Screen
• A 1.3” OLED screen can be attached to the board

Board power
The AMBE server board is powered by the micro USB port.
When using Wi-Fi or Ethernet mode, it is recommended to use a 5V USB power supply with at least 1A
current rating. When using USB UART mode, it is recommended to use a powered USB hub.

Board configuration
All the configuration information for the board is contained in the root folder of the micro SD card in the
file named zum.ini. The card must be formatted with a FAT32 partition.
To make setup easy there is an online tool which has a GUI to create the zum.ini file. The tool can be
access at:
http://ambeboard.zumradio.com/configurator/
Ethernet (DHCP):
To use the Ethernet port, select ETHERNET for “WiFi/Ethernet”. Also select Network for
“Serial/Network”. In this example the “Network/IP” is set for DHCP and the “AMBE port” is 2460.
Finally click on “Download ini file” and save the file on the micro SD card and put it into the AMBE Server
board.
In the zum.ini file, those settings are specified as follows:
• wifi=0 (0=Ethernet, 1=wifi)
• dhcp=1 (0=static IP, 1=dhcp)
• ambeserver=1 (0=usb serial, 1=network)
• ambeport=2460 (number is the IP port used)

Ethernet (Static IP):
To use the Ethernet port, select ETHERNET for “WiFi/Ethernet”. Also select Network for
“Serial/Network”. In this example the “Network/IP” is set for STATIC and the “AMBE port” is 2460.
Finally click on “Download ini file” and save the file on the micro SD card and put it into the AMBE Server
board.
In the zum.ini file, those settings are specified as follows:
• wifi=0 (0=Ethernet, 1=wifi)
• dhcp=1 (0=static IP, 1=dhcp)
• ambeserver=1 (0=usb serial, 1=network)
• ambeport=2460 (number is the IP port used)
• ip=192.168.1.10
• subnet=255.255.255.0
• gateway=192.168.1.1

Wi-Fi (DHCP):
To use the Ethernet port, select WIFI for “WiFi/Ethernet”. Also select Network for “Serial/Network”. In
this example the “Network/IP” is set for DHCP and the “AMBE port” is 2460. Also enter the SSID of your
network router as well as the password for your router.
Finally click on “Download ini file” and save the file on the micro SD card and put it into the AMBE
Server.
In the zum.ini file, those settings are specified as follows:
• wifi=1 (0=Ethernet, 1=wifi)
• dhcp=1 (0=static IP, 1=dhcp)
• ssid=myWiFi
• ssidpassword=mypassword
• ambeserver=1 (0=usb serial, 1=network)
• ambeport=2460 (number is the IP port used)

Wi-Fi (Static IP):
To use the Ethernet port, select ETHERNET for “WiFi/Ethernet”. Also select Network for
“Serial/Network”. In this example the “Network/IP” is set for STATIC and the “AMBE port” is 2460.
Finally click on “Download ini file” and save the file on the micro SD card and put it into the AMBE
Server.
In the zum.ini file, those settings are specified as follows:
• wifi=0 (0=Ethernet, 1=wifi)
• dhcp=1 (0=static IP, 1=dhcp)
• ssid=myWiFi / ssidpassword=mypassword
• ambeserver=1 (0=usb serial, 1=network)
• ambeport=2460 (number is the IP port used)
• ip=192.168.1.10
• subnet=255.255.255.0
• gateway=192.168.1.1

USB UART
To use the USB UART port, select Serial for “Serial/Network”. In this example the network related
settings are not used.
Click on “Download ini file” and save the file on the micro SD card and put it into the AMBE Server
board.
In the zum.ini file, those settings are specified as follows:
• ambeserver=0 (0=usb serial, 1=network)


Software configuration
The ZUM AMBE board is supported by a number of software products. Below are some quick start
instructions to getting the software configured for use.
Blue DV for Windows
BlueDV is a Windows application that can be used to access to DStar, DMR and Fusion networks without
needing a radio.
Download and install the app from:
http://www.pa7lim.nl/bluedv-windows/
Make sure that “Serial” is not turned on. Next, select “Menu”, then “Setup”. Enter “Your Call”, select
“Use AMBE” and select “Use AMBE Server”. Next enter the “Host/IP” address and “Port” number of the
ZUM AMBE board. Finally select “Save”.

Now click on “AMBE” and select the preferred Microphone and Speakers for your machine.
To start using BlueDV, select “Serial”. This will connect to the AMBE Server. Now select “DSTAR” which
will enable DStar mode. Now you can select the reflector and module. You use the “Link” and “Unlink”
buttons to connect to the reflector.

Once you are connected to your Reflector or Talk Group, you can transmit by clicking on the
“AMBE3000” button. To stop transmitting, click on the button again.

Peanut
On the Peanut you can talk with HAM amateurs around the world via an Android device or network
radio. Some of the ROOMS are connected to DSTAR reflectors (XRF076B, XRF076F, XRF070C etc.) or
DMR reflectors/talkgroups. You only need the Windows app or an Android device to use DSTAR or DMR.
The software for Windows is available for download from: http://www.pa7lim.nl/peanut/
If you don’t already have a “Peanut ID”, request one from: http://www.pa7lim.nl/peanut-request/
Install then launch the app and click on “Setup”.
Enter your call sign in the “Call” field. Next, click on “Query” so the app can determine your DMR ID.
Next, enter in the “Code” field the “Peanut ID” you were given from the link above. Next, select your
preferred Speaker and Microphone. Lastly click on “Save”.

Select the host “Country” of the talk room or reflector you want to connect. Next select the “Room”.
Clicking on the “Off/On” switch will connect and disconnect from the “Room. Clicking on the slider will
turn on transmit – speak clearly into your microphone. Clicking again on the slider will turn off transmit.
Once you are connected, you can also look at the Peanut Dashboard to see who else is connected to the
system.
http://peanut.pa7lim.nl/
To set up your own XLX DStar reflector or DMR plus reflector, follow these instructions:
http://www.pa7lim.nl/ambeserver/
Once the server has been setup, you can have it added to the Peanut network by sending the details to
David PA7LIM.

Buster
Buster is a Mac OSX application that allows you to connect to DStar reflectors, then listen and talk to
people on the reflector. The application connects to the ZUM AMBE server over the local network to do
the audio compression and decompression.
The app can be downloaded from the Apple App Store:
https://apps.apple.com/us/app/buster/id1060175273?mt=12
Once installed, several settings need to be configured.
Click on the “General” button to get to the user settings. Here, enter your call sign and 4 character
message. The “BSTR” message shows you are connecting with Buster.
Click on the “Audio” button to get to the microphone and speaker/headphone settings. Here, set the
“Output” and “Input” values to the preferred microphone and speaker/headphone devices on your
computer.

Click on the “Vocoder” button to get to the AMBE device configuration. Select “Network DV3000” from
the pulldown menu. Next enter the IP “Address” and “Port” number for the ZUM AMBE3000 board.
Finally press “Test”. The software should display the “Product ID AMBE3000R and the “Version” number
of the board.
Click on the “+” sign in the bottom right corner to add a reflector. Next, enter the name of the reflector
and set the module letter of the reflector. For example “REF030” and “C” specifies Reflector 30C. Finally
click “Add”.

To link to a reflector, select the preferred one from the “Reflector” list and click on the “Link” button.
You will hear the audio when there is traffic on the reflector. To unlink, click on the “Unlink” button.
To talk on the reflector, wait and listen until you hear a gap between people talking. Next click on the
“PTT” button and speak clearly into your selected microphone. When done talking, press the “PTT”
button again.
MMDVM (DummyRepeater)
Instructions coming soon

XLX Reflector
Modify the [DV3000] section of the DMR Analog Bridge configuration file to use the network connected
AMBE board, as opposed to the USB device. Comment out the USB device and un-comment the AMBE
server section and setting the IP address and rxPort as shown below:
[DV3000]
address = 192.168.1.243 ; IP address of AMBEServer
rxPort = 2460 ; Port of AMBEServer
;;address = /dev/ttyUSB0 ; Device of DV3000U on this machine, DMR is on /dev/ttyUSB0
;;baud = 460800 ; Baud rate of the dongle
;;serial = true ; Use serial (DV3000U) or IP
OLED Screen
The ZUM AMBE board supports the 1.3” OLED screen. There are 4 wires that need to be connected
from the board to the screen. The software on the board automatically uses the display when it is
connected.
The most common displays look like this. There are 4 pins (GND, VCC, SCL and SDA).
The ZUM AMBE3000 board has an OLED port with 4 pins (GND, 3V3, SCL and SDA). A 4 pin header
should be soldered to the board. The 4 pins should be connected together:
• GND to GND
• VCC to 3V3
• SCK to SCK
• SDA to SDA

Support
MMDVM Yahoo group:
https://groups.yahoo.com/neo/groups/mmdvm/conversations/messages
Pi-Star support forum:
https://forum.pistar.uk/
Pi-Star Facebook support group:
https://www.facebook.com/groups/pistar/
Pi-Star Wiki:
http://wiki.pistar.uk
ZUM Radio Facebook group:
https://www.facebook.com/groups/249802742395450/
ZUM Radio email:


