Amazon Redshift - Getting Started Guide Service Highlights and Pricing – This product detail...
25
Amazon Redshift Getting Started Guide API Version 2012-12-01
Transcript of Amazon Redshift - Getting Started Guide Service Highlights and Pricing – This product detail...

Amazon RedshiftGetting Started Guide
API Version 2012-12-01
Amazon Redshift Getting Started Guide
Amazon Redshift: Getting Started GuideCopyright © 2018 Amazon Web Services, Inc. and/or its affiliates. All rights reserved.
Amazon's trademarks and trade dress may not be used in connection with any product or service that is not Amazon's, in any mannerthat is likely to cause confusion among customers, or in any manner that disparages or discredits Amazon. All other trademarks notowned by Amazon are the property of their respective owners, who may or may not be affiliated with, connected to, or sponsored byAmazon.

Amazon Redshift Getting Started Guide
Table of ContentsGetting Started .... . . . . . . . . . . . . . . . . . . . . . . . . . . . . . . . . . . . . . . . . . . . . . . . . . . . . . . . . . . . . . . . . . . . . . . . . . . . . . . . . . . . . . . . . . . . . . . . . . . . . . . . . . . . . . . . . . . . . . . . . . . . . . . 1
Step 1: Set Up Prerequisites ... . . . . . . . . . . . . . . . . . . . . . . . . . . . . . . . . . . . . . . . . . . . . . . . . . . . . . . . . . . . . . . . . . . . . . . . . . . . . . . . . . . . . . . . . . . . . . . . . . . . . . 1Sign Up for AWS .... . . . . . . . . . . . . . . . . . . . . . . . . . . . . . . . . . . . . . . . . . . . . . . . . . . . . . . . . . . . . . . . . . . . . . . . . . . . . . . . . . . . . . . . . . . . . . . . . . . . . . . . . . . . . 2Install SQL Client Drivers and Tools ... . . . . . . . . . . . . . . . . . . . . . . . . . . . . . . . . . . . . . . . . . . . . . . . . . . . . . . . . . . . . . . . . . . . . . . . . . . . . . . . . . . . 2Determine Firewall Rules .... . . . . . . . . . . . . . . . . . . . . . . . . . . . . . . . . . . . . . . . . . . . . . . . . . . . . . . . . . . . . . . . . . . . . . . . . . . . . . . . . . . . . . . . . . . . . . . . . . 2
Step 2: Create an IAM Role .... . . . . . . . . . . . . . . . . . . . . . . . . . . . . . . . . . . . . . . . . . . . . . . . . . . . . . . . . . . . . . . . . . . . . . . . . . . . . . . . . . . . . . . . . . . . . . . . . . . . . . 3To Create an IAM Role for Amazon Redshift ... . . . . . . . . . . . . . . . . . . . . . . . . . . . . . . . . . . . . . . . . . . . . . . . . . . . . . . . . . . . . . . . . . . . . 3
Step 3: Launch a Cluster ... . . . . . . . . . . . . . . . . . . . . . . . . . . . . . . . . . . . . . . . . . . . . . . . . . . . . . . . . . . . . . . . . . . . . . . . . . . . . . . . . . . . . . . . . . . . . . . . . . . . . . . . . . . 3To Launch an Amazon Redshift Cluster ... . . . . . . . . . . . . . . . . . . . . . . . . . . . . . . . . . . . . . . . . . . . . . . . . . . . . . . . . . . . . . . . . . . . . . . . . . . . . . . 4
Step 4: Authorize Cluster Access .... . . . . . . . . . . . . . . . . . . . . . . . . . . . . . . . . . . . . . . . . . . . . . . . . . . . . . . . . . . . . . . . . . . . . . . . . . . . . . . . . . . . . . . . . . . . . . . 9To Configure the VPC Security Group (EC2-VPC Platform) .... . . . . . . . . . . . . . . . . . . . . . . . . . . . . . . . . . . . . . . . . . . . . . . . . . . 10To Configure the Amazon Redshift Security Group .... . . . . . . . . . . . . . . . . . . . . . . . . . . . . . . . . . . . . . . . . . . . . . . . . . . . . . . . . . . . . 11
Step 5: Connect to the Cluster ... . . . . . . . . . . . . . . . . . . . . . . . . . . . . . . . . . . . . . . . . . . . . . . . . . . . . . . . . . . . . . . . . . . . . . . . . . . . . . . . . . . . . . . . . . . . . . . . . 11To Get Your Connection String .... . . . . . . . . . . . . . . . . . . . . . . . . . . . . . . . . . . . . . . . . . . . . . . . . . . . . . . . . . . . . . . . . . . . . . . . . . . . . . . . . . . . . . . . 12To Connect from SQL Workbench/J to Your Cluster ... . . . . . . . . . . . . . . . . . . . . . . . . . . . . . . . . . . . . . . . . . . . . . . . . . . . . . . . . . . . 12
Step 6: Load Sample Data .... . . . . . . . . . . . . . . . . . . . . . . . . . . . . . . . . . . . . . . . . . . . . . . . . . . . . . . . . . . . . . . . . . . . . . . . . . . . . . . . . . . . . . . . . . . . . . . . . . . . . . 14Step 7: Find Additional Resources and Reset Your Environment .... . . . . . . . . . . . . . . . . . . . . . . . . . . . . . . . . . . . . . . . . . . . . . . . . . . 18
Where Do I Go From Here? .... . . . . . . . . . . . . . . . . . . . . . . . . . . . . . . . . . . . . . . . . . . . . . . . . . . . . . . . . . . . . . . . . . . . . . . . . . . . . . . . . . . . . . . . . . . . . 19Document History .... . . . . . . . . . . . . . . . . . . . . . . . . . . . . . . . . . . . . . . . . . . . . . . . . . . . . . . . . . . . . . . . . . . . . . . . . . . . . . . . . . . . . . . . . . . . . . . . . . . . . . . . . . . . . . . . . . . . . . . . . 22
API Version 2012-12-01iii

Amazon Redshift Getting Started GuideStep 1: Set Up Prerequisites
Getting Started with AmazonRedshift
Welcome to the Amazon Redshift Getting Started Guide. Amazon Redshift is a fully managed, petabyte-scale data warehouse service in the cloud. An Amazon Redshift data warehouse is a collection ofcomputing resources called nodes, which are organized into a group called a cluster. Each cluster runs anAmazon Redshift engine and contains one or more databases.
If you are a first-time user of Amazon Redshift, we recommend that you begin by reading the followingsections:
• Amazon Redshift Management Overview – This topic provides an overview of Amazon Redshift.• Service Highlights and Pricing – This product detail page provides the Amazon Redshift value
proposition, service highlights, and pricing.• Amazon Redshift Getting Started (this guide) – This guide provides a tutorial of using Amazon Redshift
to create a sample cluster and work with sample data.
This guide is a tutorial designed to walk you through the process of creating a sample Amazon Redshiftcluster. You can use this sample cluster to evaluate the Amazon Redshift service. In this tutorial, you’llperform the following steps:
• Step 1: Set Up Prerequisites (p. 1)• Step 2: Create an IAM Role (p. 3)• Step 3: Launch a Sample Amazon Redshift Cluster (p. 3)• Step 4: Authorize Access to the Cluster (p. 9)• Step 5: Connect to the Sample Cluster (p. 11)• Step 6: Load Sample Data from Amazon S3 (p. 14)• Step 7: Find Additional Resources and Reset Your Environment (p. 18)
After you complete this tutorial, you can find more information about Amazon Redshift and next steps inWhere Do I Go From Here? (p. 19)
ImportantThe sample cluster that you create will be running in a live environment. The on-demand rateis $0.25 per hour for using the sample cluster that is designed in this tutorial until you delete it.For more pricing information, go to the Amazon Redshift pricing page. If you have questions orget stuck, you can reach out to the Amazon Redshift team by posting on our Discussion Forum.
This tutorial is not meant for production environments, and does not discuss options in depth. After youcomplete the steps in this tutorial, you can use the Additional Resources (p. 19) section to locate morein-depth information to plan, deploy, and maintain your clusters, and to work with the data in your datawarehouse.
Step 1: Set Up PrerequisitesBefore you begin setting up an Amazon Redshift cluster, make sure that you complete the followingprerequisites in this section:
• Sign Up for AWS (p. 2)
API Version 2012-12-011

Amazon Redshift Getting Started GuideSign Up for AWS
• Install SQL Client Drivers and Tools (p. 2)• Determine Firewall Rules (p. 2)
Sign Up for AWSIf you don’t already have an AWS account, you must sign up for one. If you already have an account, youcan skip this prerequisite and use your existing account.
1. Open https://aws.amazon.com/, and then choose Create an AWS Account.
NoteThis might be unavailable in your browser if you previously signed into the AWSManagement Console. In that case, choose Sign in to a different account, and then chooseCreate a new AWS account.
2. Follow the online instructions.
Part of the sign-up procedure involves receiving a phone call and entering a PIN using the phonekeypad.
Install SQL Client Drivers and ToolsYou can use most SQL client tools with Amazon Redshift JDBC or ODBC drivers to connect to an AmazonRedshift cluster. In this tutorial, we show you how to connect using SQL Workbench/J, a free, DBMS-independent, cross-platform SQL query tool. If you plan to use SQL Workbench/J to complete thistutorial, follow the steps below to get set up with the Amazon Redshift JDBC driver and SQL Workbench/J. For more complete instructions for installing SQL Workbench/J, go to Setting Up the SQL Workbench/J Client in the Amazon Redshift Cluster Management Guide. If you use an Amazon EC2 instance as yourclient computer, you will need to install SQL Workbench/J and the required drivers on the instance.
NoteYou must install any third-party database tools that you want to use with your clusters; AmazonRedshift does not provide or install any third-party tools or libraries.
To Install SQL Workbench/J on Your Client Computer1. Review the SQL Workbench/J software license.2. Go to the SQL Workbench/J website and download the appropriate package for your operating
system.3. Go to the Installing and starting SQL Workbench/J page and install SQL Workbench/J.
ImportantNote the Java runtime version prerequisites for SQL Workbench/J and ensure you are usingthat version, otherwise, this client application will not run.
4. Go to Configure a JDBC Connection and download an Amazon Redshift JDBC driver to enable SQLWorkbench/J to connect to your cluster.
For more information about using the Amazon Redshift JDBC or ODBC drivers, see ConfiguringConnections in Amazon Redshift.
Determine Firewall RulesAs part of this tutorial, you will specify a port when you launch your Amazon Redshift cluster. You willalso create an inbound ingress rule in a security group to allow access through the port to your cluster.
API Version 2012-12-012
Amazon Redshift Getting Started GuideStep 2: Create an IAM Role
If your client computer is behind a firewall, you need to know an open port that you can use so you canconnect to the cluster from a SQL client tool and run queries. If you do not know this, you should workwith someone who understands your network firewall rules to determine an open port in your firewall.Though Amazon Redshift uses port 5439 by default, the connection will not work if that port is not openin your firewall. Because you cannot change the port number for your Amazon Redshift cluster after it iscreated, make sure that you specify an open port that will work in your environment during the launchprocess.
Step 2: Create an IAM RoleFor any operation that accesses data on another AWS resource, such as using a COPY command to loaddata from Amazon S3, your cluster needs permission to access the resource and the data on the resourceon your behalf. You provide those permissions by using AWS Identity and Access Management, eitherthrough an IAM role that is attached to your cluster or by providing the AWS access key for an IAM userthat has the necessary permissions.
To best protect your sensitive data and safeguard your AWS access credentials, we recommend creatingan IAM role and attaching it to your cluster. For more information about providing access permissions,see Permissions to Access Other AWS Resources.
In this step, you will create a new IAM role that enables Amazon Redshift to load data from Amazon S3buckets. In the next step, you will attach the role to your cluster.
To Create an IAM Role for Amazon Redshift1. Sign in to the AWS Management Console and open the IAM console at https://
console.aws.amazon.com/iam/.2. In the left navigation pane, choose Roles.3. Choose Create role4. In the AWS Service group, choose Redshift.5. Under Select your use case, choose Redshift - Customizable then choose Next: Permissions.6. On the Attach permissions policies page, choose AmazonS3ReadOnlyAccess, and then choose
Next: Review.7. For Role name, type a name for your role. For this tutorial, type myRedshiftRole.8. Review the information, and then choose Create Role.9. Choose the role name for new role.10. Copy the Role ARN to your clipboard—this value is the Amazon Resource Name (ARN) for the role
that you just created. You will use that value when you use the COPY command to load data in Step6: Load Sample Data from Amazon S3 (p. 14).
Now that you have created the new role, your next step is to attach it to your cluster. You can attachthe role when you launch a new cluster or you can attach it to an existing cluster. In the next step, you'llattach the role to a new cluster.
Step 3: Launch a Sample Amazon Redshift ClusterNow that you have the prerequisites completed, you can launch your Amazon Redshift cluster.
ImportantThe cluster that you are about to launch will be live (and not running in a sandbox). Youwill incur the standard Amazon Redshift usage fees for the cluster until you delete it. If you
API Version 2012-12-013

Amazon Redshift Getting Started GuideTo Launch an Amazon Redshift Cluster
complete the tutorial described here in one sitting and delete the cluster when you are finished,the total charges will be minimal.
To Launch an Amazon Redshift Cluster1. Sign in to the AWS Management Console and open the Amazon Redshift console at https://
console.aws.amazon.com/redshift/.
ImportantIf you use IAM user credentials, ensure that the user has the necessary permissions toperform the cluster operations. For more information, go to Controlling Access to IAM Usersin the Amazon Redshift Cluster Management Guide.
2. In the main menu, select the region in which you want to create the cluster. For the purposes of thistutorial, select US West (Oregon).
3. On the Amazon Redshift Dashboard, choose Launch Cluster.
The Amazon Redshift Dashboard looks similar to the following:
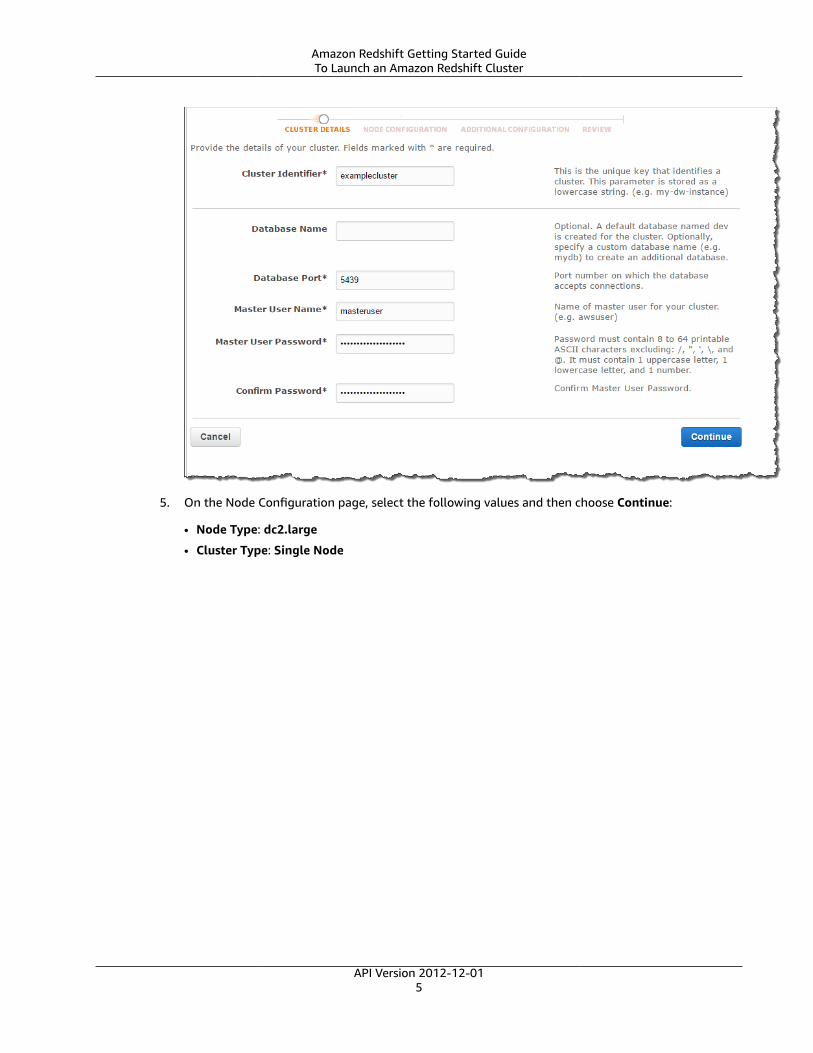
4. On the Cluster Details page, enter the following values and then choose Continue:
• Cluster Identifier: type examplecluster.
• Database Name: leave this box blank. Amazon Redshift will create a default database named dev.
• Database Port: type the port number on which the database will accept connections. You shouldhave determined the port number in the prerequisite step of this tutorial. You cannot change theport after launching the cluster, so make sure that you have an open port number in your firewallso that you can connect from SQL client tools to the database in the cluster.
• Master User Name: type masteruser. You will use this username and password to connect toyour database after the cluster is available.
• Master User Password and Confirm Password: type a password for the master user account.
API Version 2012-12-014
Amazon Redshift Getting Started GuideTo Launch an Amazon Redshift Cluster
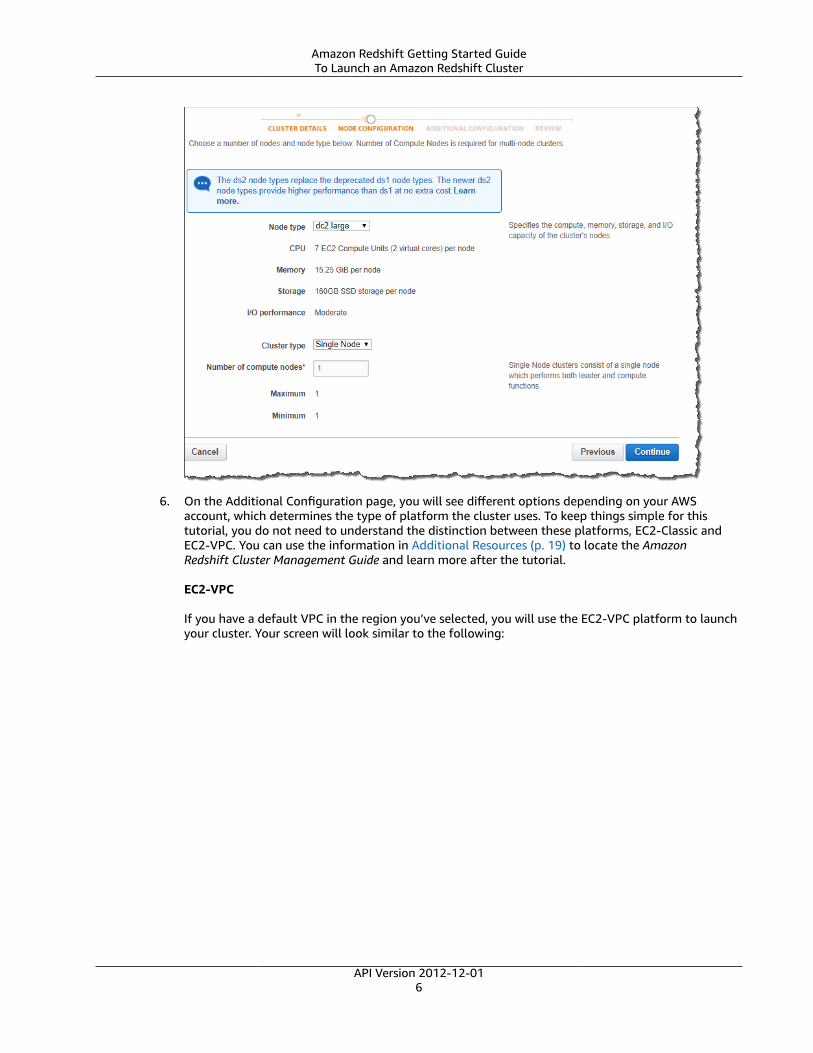
5. On the Node Configuration page, select the following values and then choose Continue:
• Node Type: dc2.large
• Cluster Type: Single Node
API Version 2012-12-015
Amazon Redshift Getting Started GuideTo Launch an Amazon Redshift Cluster
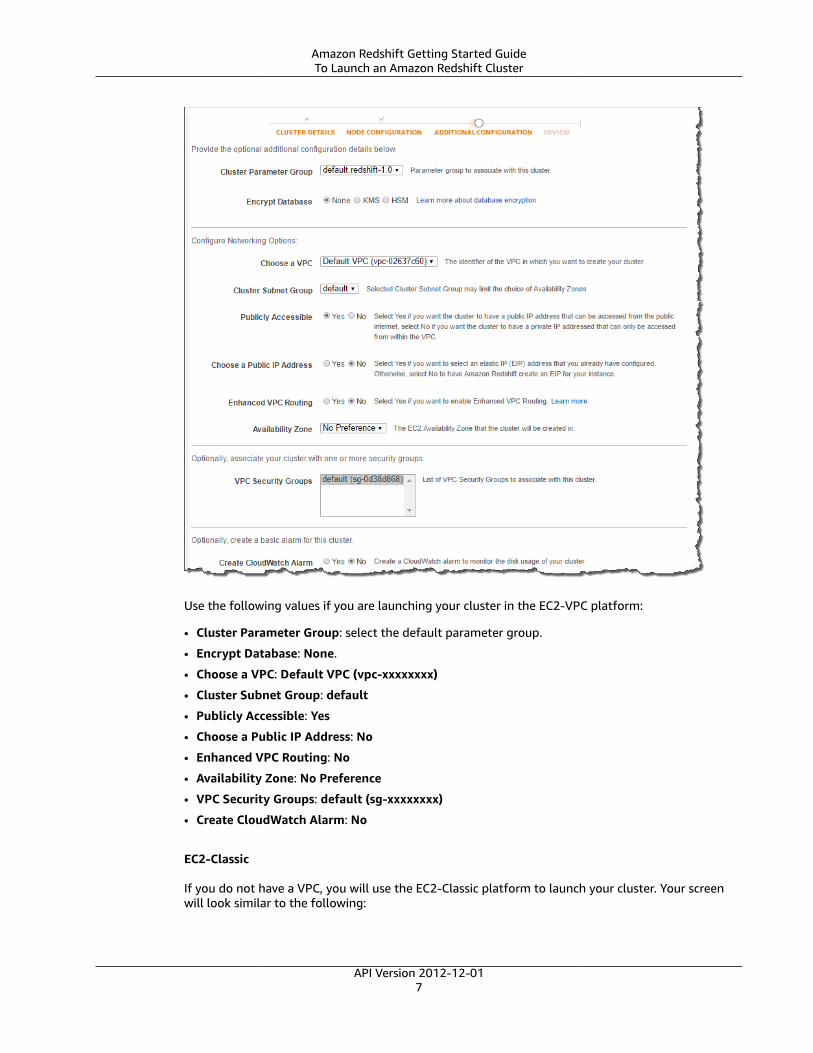
6. On the Additional Configuration page, you will see different options depending on your AWSaccount, which determines the type of platform the cluster uses. To keep things simple for thistutorial, you do not need to understand the distinction between these platforms, EC2-Classic andEC2-VPC. You can use the information in Additional Resources (p. 19) to locate the AmazonRedshift Cluster Management Guide and learn more after the tutorial.
EC2-VPC
If you have a default VPC in the region you’ve selected, you will use the EC2-VPC platform to launchyour cluster. Your screen will look similar to the following:
API Version 2012-12-016
Amazon Redshift Getting Started GuideTo Launch an Amazon Redshift Cluster
Use the following values if you are launching your cluster in the EC2-VPC platform:
• Cluster Parameter Group: select the default parameter group.
• Encrypt Database: None.
• Choose a VPC: Default VPC (vpc-xxxxxxxx)
• Cluster Subnet Group: default
• Publicly Accessible: Yes
• Choose a Public IP Address: No
• Enhanced VPC Routing: No
• Availability Zone: No Preference
• VPC Security Groups: default (sg-xxxxxxxx)
• Create CloudWatch Alarm: No
EC2-Classic
If you do not have a VPC, you will use the EC2-Classic platform to launch your cluster. Your screenwill look similar to the following:
API Version 2012-12-017
Amazon Redshift Getting Started GuideTo Launch an Amazon Redshift Cluster
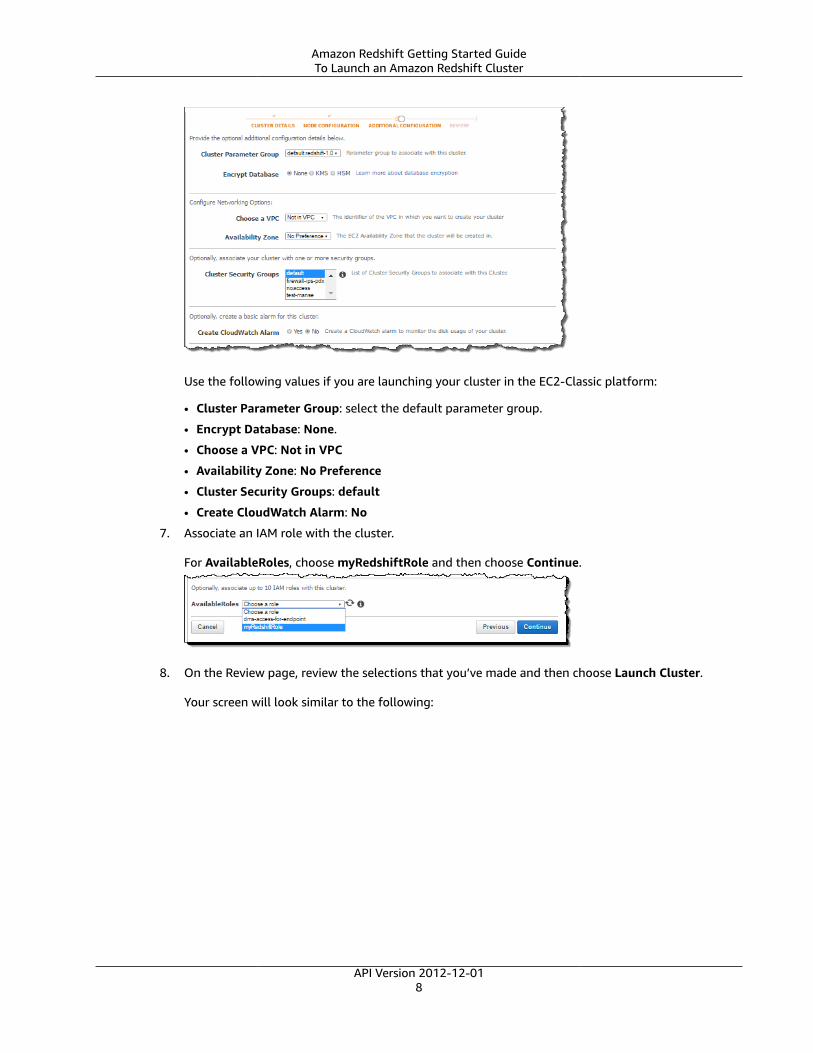
Use the following values if you are launching your cluster in the EC2-Classic platform:
• Cluster Parameter Group: select the default parameter group.
• Encrypt Database: None.
• Choose a VPC: Not in VPC
• Availability Zone: No Preference
• Cluster Security Groups: default
• Create CloudWatch Alarm: No
7. Associate an IAM role with the cluster.
For AvailableRoles, choose myRedshiftRole and then choose Continue.
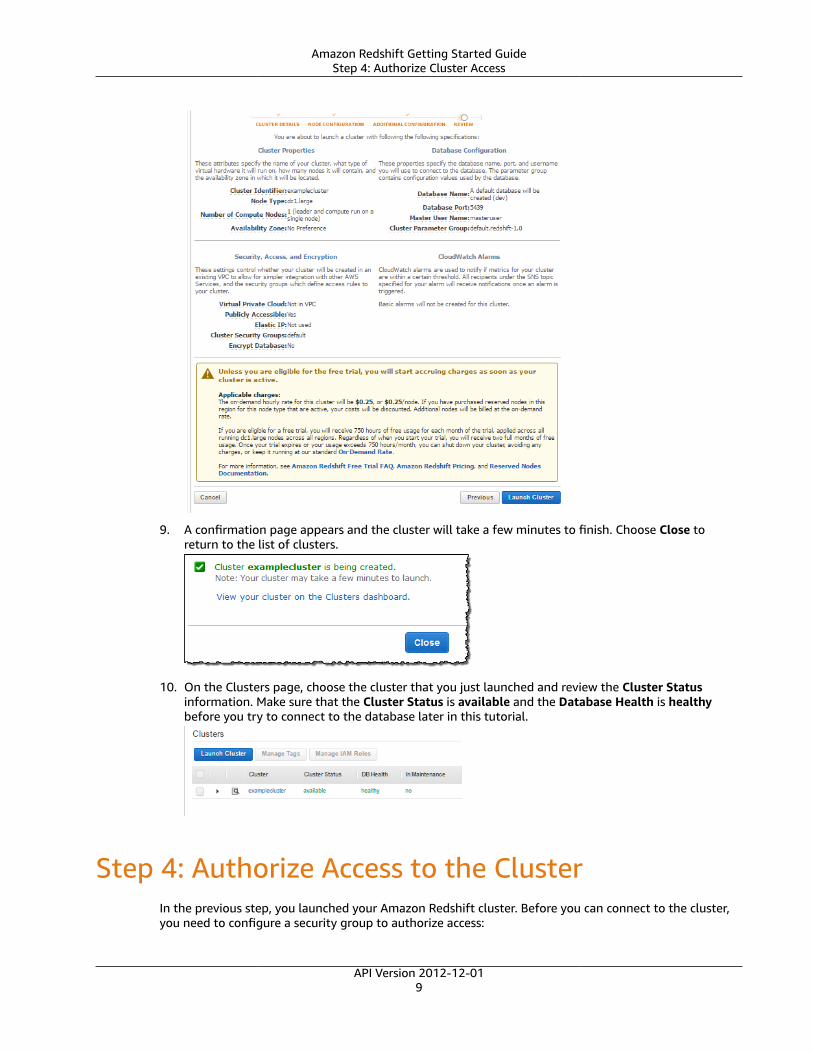
8. On the Review page, review the selections that you’ve made and then choose Launch Cluster.
Your screen will look similar to the following:
API Version 2012-12-018
Amazon Redshift Getting Started GuideStep 4: Authorize Cluster Access
9. A confirmation page appears and the cluster will take a few minutes to finish. Choose Close toreturn to the list of clusters.
10. On the Clusters page, choose the cluster that you just launched and review the Cluster Statusinformation. Make sure that the Cluster Status is available and the Database Health is healthybefore you try to connect to the database later in this tutorial.
Step 4: Authorize Access to the ClusterIn the previous step, you launched your Amazon Redshift cluster. Before you can connect to the cluster,you need to configure a security group to authorize access:
API Version 2012-12-019

Amazon Redshift Getting Started GuideTo Configure the VPC Security Group (EC2-VPC Platform)
• If you launched your cluster in the EC2-VPC platform, follow the steps in To Configure the VPCSecurity Group (EC2-VPC Platform) (p. 10).
• If you launched your cluster in the EC2-Classic platform, follow the steps in To Configure the AmazonRedshift Security Group (p. 11).
NoteYou only need to configure one of these two types of security groups. Follow the steps thatcorrespond to the platform in which you launched your cluster.
To Configure the VPC Security Group (EC2-VPCPlatform)1. In the Amazon Redshift console, in the navigation pane, choose Clusters.
2. Choose examplecluster to open it, and make sure you are on the Configuration tab.
3. Under Cluster Properties, for VPC Security Groups, choose your security group.
4. After your security group opens in the Amazon EC2 console, choose the Inbound tab.
5. Choose Edit, and enter the following, then choose Save:
• Type: Custom TCP Rule.
• Protocol: TCP.
• Port Range: type the same port number that you used when you launched the cluster. The defaultport for Amazon Redshift is 5439, but your port might be different.
• Source: select Custom IP, then type 0.0.0.0/0.
ImportantUsing 0.0.0.0/0 is not recommended for anything other than demonstration purposesbecause it allows access from any computer on the internet. In a real environment, youwould create inbound rules based on your own network settings.
API Version 2012-12-0110
Amazon Redshift Getting Started GuideTo Configure the Amazon Redshift Security Group
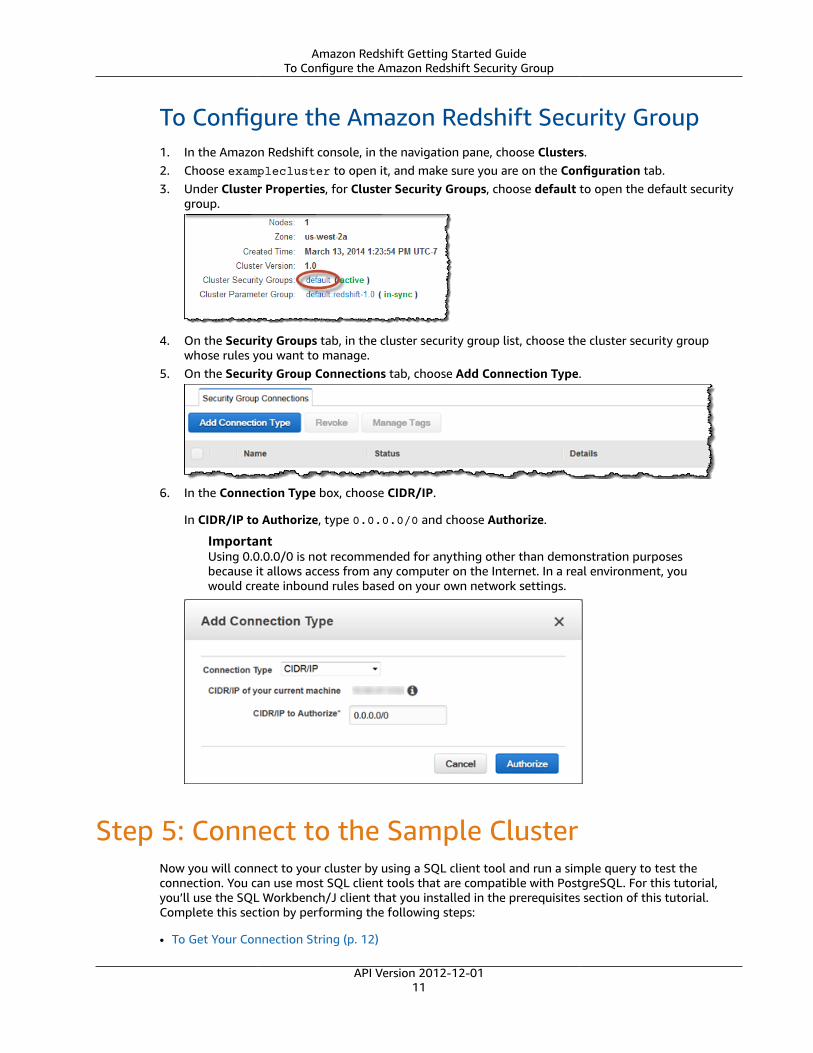
To Configure the Amazon Redshift Security Group1. In the Amazon Redshift console, in the navigation pane, choose Clusters.2. Choose examplecluster to open it, and make sure you are on the Configuration tab.3. Under Cluster Properties, for Cluster Security Groups, choose default to open the default security
group.
4. On the Security Groups tab, in the cluster security group list, choose the cluster security groupwhose rules you want to manage.
5. On the Security Group Connections tab, choose Add Connection Type.
6. In the Connection Type box, choose CIDR/IP.
In CIDR/IP to Authorize, type 0.0.0.0/0 and choose Authorize.
ImportantUsing 0.0.0.0/0 is not recommended for anything other than demonstration purposesbecause it allows access from any computer on the Internet. In a real environment, youwould create inbound rules based on your own network settings.
Step 5: Connect to the Sample ClusterNow you will connect to your cluster by using a SQL client tool and run a simple query to test theconnection. You can use most SQL client tools that are compatible with PostgreSQL. For this tutorial,you’ll use the SQL Workbench/J client that you installed in the prerequisites section of this tutorial.Complete this section by performing the following steps:
• To Get Your Connection String (p. 12)
API Version 2012-12-0111
Amazon Redshift Getting Started GuideTo Get Your Connection String
• To Connect from SQL Workbench/J to Your Cluster (p. 12)
After you complete this step, you can determine whether you want to load sample data from AmazonS3 in Step 6: Load Sample Data from Amazon S3 (p. 14) or find more information about AmazonRedshift and reset your environment at Where Do I Go From Here? (p. 19).
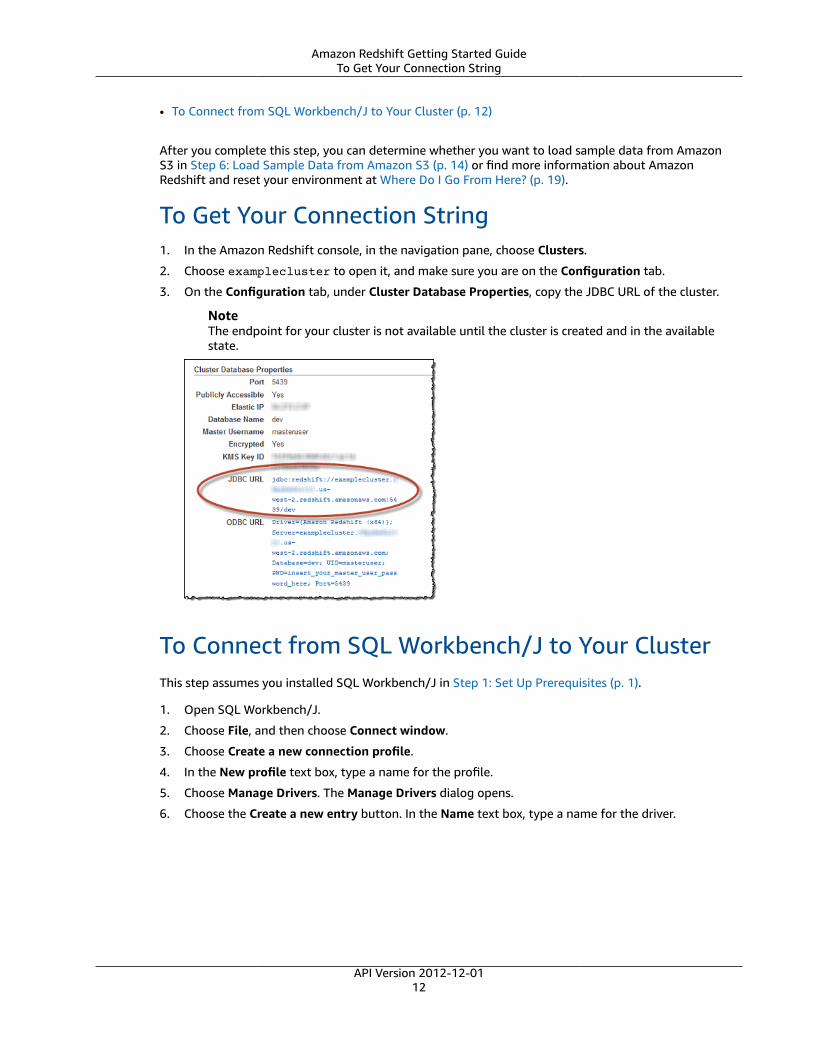
To Get Your Connection String1. In the Amazon Redshift console, in the navigation pane, choose Clusters.
2. Choose examplecluster to open it, and make sure you are on the Configuration tab.
3. On the Configuration tab, under Cluster Database Properties, copy the JDBC URL of the cluster.
NoteThe endpoint for your cluster is not available until the cluster is created and in the availablestate.
To Connect from SQL Workbench/J to Your ClusterThis step assumes you installed SQL Workbench/J in Step 1: Set Up Prerequisites (p. 1).
1. Open SQL Workbench/J.
2. Choose File, and then choose Connect window.
3. Choose Create a new connection profile.
4. In the New profile text box, type a name for the profile.
5. Choose Manage Drivers. The Manage Drivers dialog opens.
6. Choose the Create a new entry button. In the Name text box, type a name for the driver.
API Version 2012-12-0112

Amazon Redshift Getting Started GuideTo Connect from SQL Workbench/J to Your Cluster
Choose the folder icon next to the Library box, navigate to the location of the driver, select it, andthen choose Open.
If the Please select one driver dialog box displays, select com.amazon.redshift.jdbc4.Driver orcom.amazon.redshift.jdbc41.Driver and choose OK. SQL Workbench/J automatically completes theClassname box. Leave the Sample URL box blank, and then choose OK.
7. In the Driver box, choose the driver you just added.
8. In URL, copy the JDBC URL from the Amazon Redshift console and paste it here.
9. In Username, type masteruser.
10. In Password, type the password associated with the master user account.
11. Choose the Autocommit box.
12. Choose the Save profile list icon, as shown below:
API Version 2012-12-0113

Amazon Redshift Getting Started GuideStep 6: Load Sample Data
13. Choose OK.
Step 6: Load Sample Data from Amazon S3At this point you have a database called dev and you are connected to it. Now you will create sometables in the database, upload data to the tables, and try a query. For your convenience, the sample datayou will load is available in an Amazon S3 bucket.
NoteBefore you proceed, ensure that your SQL Workbench/J client is connected to the cluster.
After you complete this step, you can find more information about Amazon Redshift and reset yourenvironment at Where Do I Go From Here? (p. 19).
1. Create tables.
Copy and execute the following create table statements to create tables in the dev database. Formore information about the syntax, go to CREATE TABLE in the Amazon Redshift Database DeveloperGuide.
create table users( userid integer not null distkey sortkey, username char(8), firstname varchar(30), lastname varchar(30), city varchar(30), state char(2), email varchar(100), phone char(14), likesports boolean, liketheatre boolean,
API Version 2012-12-0114
Amazon Redshift Getting Started GuideStep 6: Load Sample Data
likeconcerts boolean, likejazz boolean, likeclassical boolean, likeopera boolean, likerock boolean, likevegas boolean, likebroadway boolean, likemusicals boolean);
create table venue( venueid smallint not null distkey sortkey, venuename varchar(100), venuecity varchar(30), venuestate char(2), venueseats integer);
create table category( catid smallint not null distkey sortkey, catgroup varchar(10), catname varchar(10), catdesc varchar(50));
create table date( dateid smallint not null distkey sortkey, caldate date not null, day character(3) not null, week smallint not null, month character(5) not null, qtr character(5) not null, year smallint not null, holiday boolean default('N'));
create table event( eventid integer not null distkey, venueid smallint not null, catid smallint not null, dateid smallint not null sortkey, eventname varchar(200), starttime timestamp);
create table listing( listid integer not null distkey, sellerid integer not null, eventid integer not null, dateid smallint not null sortkey, numtickets smallint not null, priceperticket decimal(8,2), totalprice decimal(8,2), listtime timestamp);
create table sales( salesid integer not null, listid integer not null distkey, sellerid integer not null, buyerid integer not null, eventid integer not null, dateid smallint not null sortkey, qtysold smallint not null, pricepaid decimal(8,2), commission decimal(8,2), saletime timestamp);
2. Load sample data from Amazon S3 by using the COPY command.
API Version 2012-12-0115
Amazon Redshift Getting Started GuideStep 6: Load Sample Data
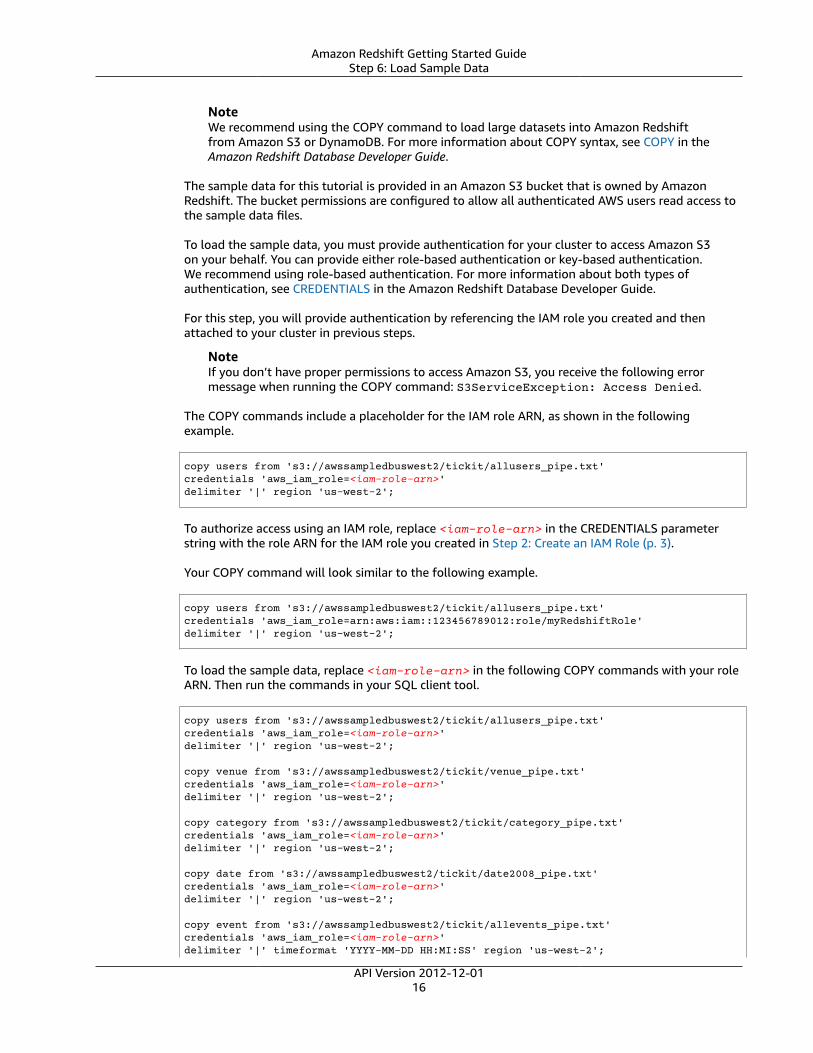
NoteWe recommend using the COPY command to load large datasets into Amazon Redshiftfrom Amazon S3 or DynamoDB. For more information about COPY syntax, see COPY in theAmazon Redshift Database Developer Guide.
The sample data for this tutorial is provided in an Amazon S3 bucket that is owned by AmazonRedshift. The bucket permissions are configured to allow all authenticated AWS users read access tothe sample data files.
To load the sample data, you must provide authentication for your cluster to access Amazon S3on your behalf. You can provide either role-based authentication or key-based authentication.We recommend using role-based authentication. For more information about both types ofauthentication, see CREDENTIALS in the Amazon Redshift Database Developer Guide.
For this step, you will provide authentication by referencing the IAM role you created and thenattached to your cluster in previous steps.
NoteIf you don’t have proper permissions to access Amazon S3, you receive the following errormessage when running the COPY command: S3ServiceException: Access Denied.
The COPY commands include a placeholder for the IAM role ARN, as shown in the followingexample.
copy users from 's3://awssampledbuswest2/tickit/allusers_pipe.txt' credentials 'aws_iam_role=<iam-role-arn>' delimiter '|' region 'us-west-2';
To authorize access using an IAM role, replace <iam-role-arn> in the CREDENTIALS parameterstring with the role ARN for the IAM role you created in Step 2: Create an IAM Role (p. 3).
Your COPY command will look similar to the following example.
copy users from 's3://awssampledbuswest2/tickit/allusers_pipe.txt' credentials 'aws_iam_role=arn:aws:iam::123456789012:role/myRedshiftRole' delimiter '|' region 'us-west-2';
To load the sample data, replace <iam-role-arn> in the following COPY commands with your roleARN. Then run the commands in your SQL client tool.
copy users from 's3://awssampledbuswest2/tickit/allusers_pipe.txt' credentials 'aws_iam_role=<iam-role-arn>' delimiter '|' region 'us-west-2';
copy venue from 's3://awssampledbuswest2/tickit/venue_pipe.txt' credentials 'aws_iam_role=<iam-role-arn>' delimiter '|' region 'us-west-2';
copy category from 's3://awssampledbuswest2/tickit/category_pipe.txt' credentials 'aws_iam_role=<iam-role-arn>' delimiter '|' region 'us-west-2';
copy date from 's3://awssampledbuswest2/tickit/date2008_pipe.txt' credentials 'aws_iam_role=<iam-role-arn>' delimiter '|' region 'us-west-2';
copy event from 's3://awssampledbuswest2/tickit/allevents_pipe.txt' credentials 'aws_iam_role=<iam-role-arn>' delimiter '|' timeformat 'YYYY-MM-DD HH:MI:SS' region 'us-west-2';
API Version 2012-12-0116

Amazon Redshift Getting Started GuideStep 6: Load Sample Data
copy listing from 's3://awssampledbuswest2/tickit/listings_pipe.txt' credentials 'aws_iam_role=<iam-role-arn>' delimiter '|' region 'us-west-2';
copy sales from 's3://awssampledbuswest2/tickit/sales_tab.txt'credentials 'aws_iam_role=<iam-role-arn>'delimiter '\t' timeformat 'MM/DD/YYYY HH:MI:SS' region 'us-west-2';
3. Now try the example queries. For more information, go to SELECT in the Amazon Redshift DeveloperGuide.
-- Get definition for the sales table.SELECT * FROM pg_table_def WHERE tablename = 'sales';
-- Find total sales on a given calendar date.SELECT sum(qtysold) FROM sales, date WHERE sales.dateid = date.dateid AND caldate = '2008-01-05';
-- Find top 10 buyers by quantity.SELECT firstname, lastname, total_quantity FROM (SELECT buyerid, sum(qtysold) total_quantity FROM sales GROUP BY buyerid ORDER BY total_quantity desc limit 10) Q, usersWHERE Q.buyerid = useridORDER BY Q.total_quantity desc;
-- Find events in the 99.9 percentile in terms of all time gross sales.SELECT eventname, total_price FROM (SELECT eventid, total_price, ntile(1000) over(order by total_price desc) as percentile FROM (SELECT eventid, sum(pricepaid) total_price FROM sales GROUP BY eventid)) Q, event E WHERE Q.eventid = E.eventid AND percentile = 1ORDER BY total_price desc;
4. You can optionally go the Amazon Redshift console to review the queries you executed. The Queriestab shows a list of queries that you executed over a time period you specify. By default, the consoledisplays queries that have executed in the last 24 hours, including currently executing queries.
• Sign in to the AWS Management Console and open the Amazon Redshift console at https://console.aws.amazon.com/redshift/.
• In the cluster list in the right pane, choose examplecluster.
• Choose the Queries tab.
The console displays list of queries you executed as shown in the example below.
API Version 2012-12-0117

Amazon Redshift Getting Started GuideStep 7: Find Additional Resources
and Reset Your Environment
• To view more information about a query, choose the query ID link in the Query column or choosethe magnifying glass icon.
The following example shows the details of a query you ran in a previous step.
Step 7: Find Additional Resources and Reset YourEnvironment
When you have completed this tutorial, you can go to other Amazon Redshift resources to learn moreabout the concepts introduced in this guide or you can reset your environment to the previous state.You might want to keep the sample cluster running if you intend to try tasks in other Amazon Redshiftguides. However, remember that you will continue to be charged for your cluster as long as it isrunning. You should revoke access to the cluster and delete it when you no longer need it so that youstop incurring charges.
API Version 2012-12-0118
Amazon Redshift Getting Started GuideWhere Do I Go From Here?
Where Do I Go From Here?
Additional Resources
We recommend that you continue to learn more about the concepts introduced in this guide with thefollowing resources:
• Amazon Redshift Management Overview: This topic provides an overview of Amazon Redshift.
• Amazon Redshift Cluster Management Guide: This guide builds upon this Amazon Redshift GettingStarted and provides in-depth information about the concepts and tasks for creating, managing, andmonitoring clusters.
• Amazon Redshift Database Developer Guide: This guide builds upon this Amazon Redshift GettingStarted by providing in-depth information for database developers about designing, building,querying, and maintaining the databases that make up your data warehouse.
Resetting Your Environment
When you have completed this tutorial, you should reset your environment to the previous state bydoing the following:
• Revoke access to the port and CIDR/IP address for which you authorized access:
If you used the EC2-VPC platform to launch your cluster, perform the steps in To Revoke Access fromthe VPC Security Group (p. 19).
If you used the EC2-Classic platform to launch your cluster, perform the steps in To Revoke Accessfrom the Cluster Security Group (p. 20).
• Delete your sample cluster. You will continue to incur charges for the Amazon Redshift service untilyou delete the cluster. Perform the steps in To Delete the Sample Cluster (p. 21).
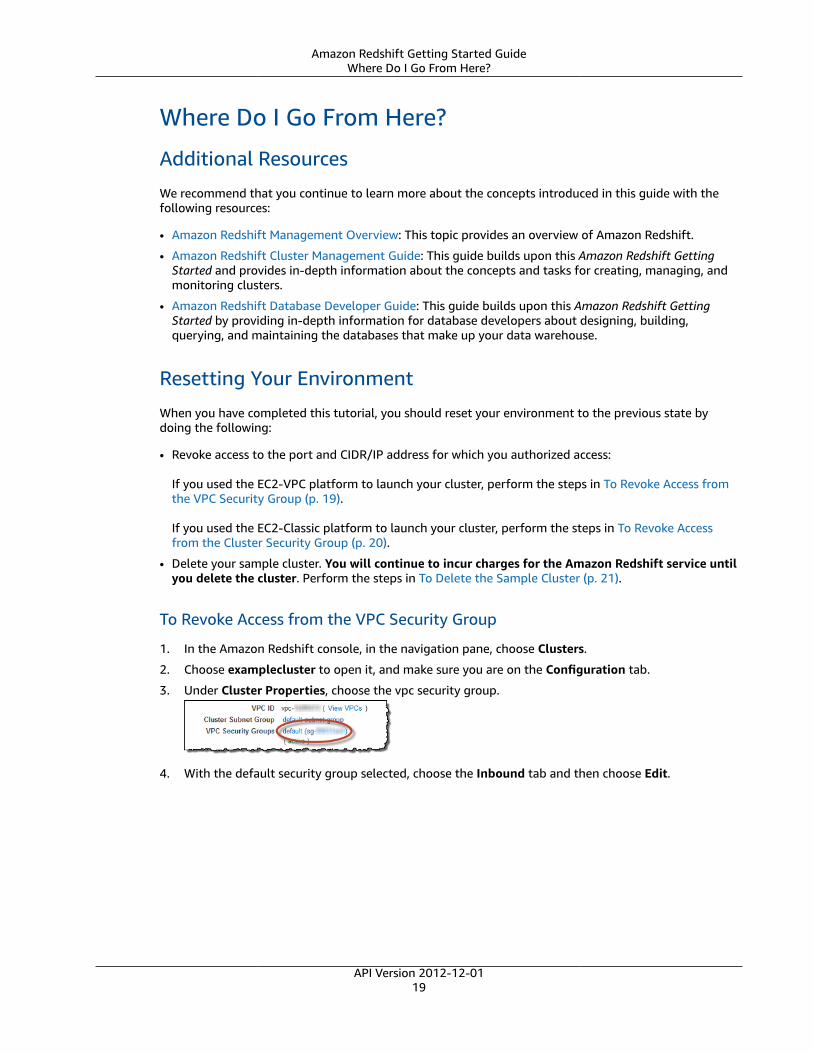
To Revoke Access from the VPC Security Group
1. In the Amazon Redshift console, in the navigation pane, choose Clusters.
2. Choose examplecluster to open it, and make sure you are on the Configuration tab.
3. Under Cluster Properties, choose the vpc security group.
4. With the default security group selected, choose the Inbound tab and then choose Edit.
API Version 2012-12-0119
Amazon Redshift Getting Started GuideWhere Do I Go From Here?
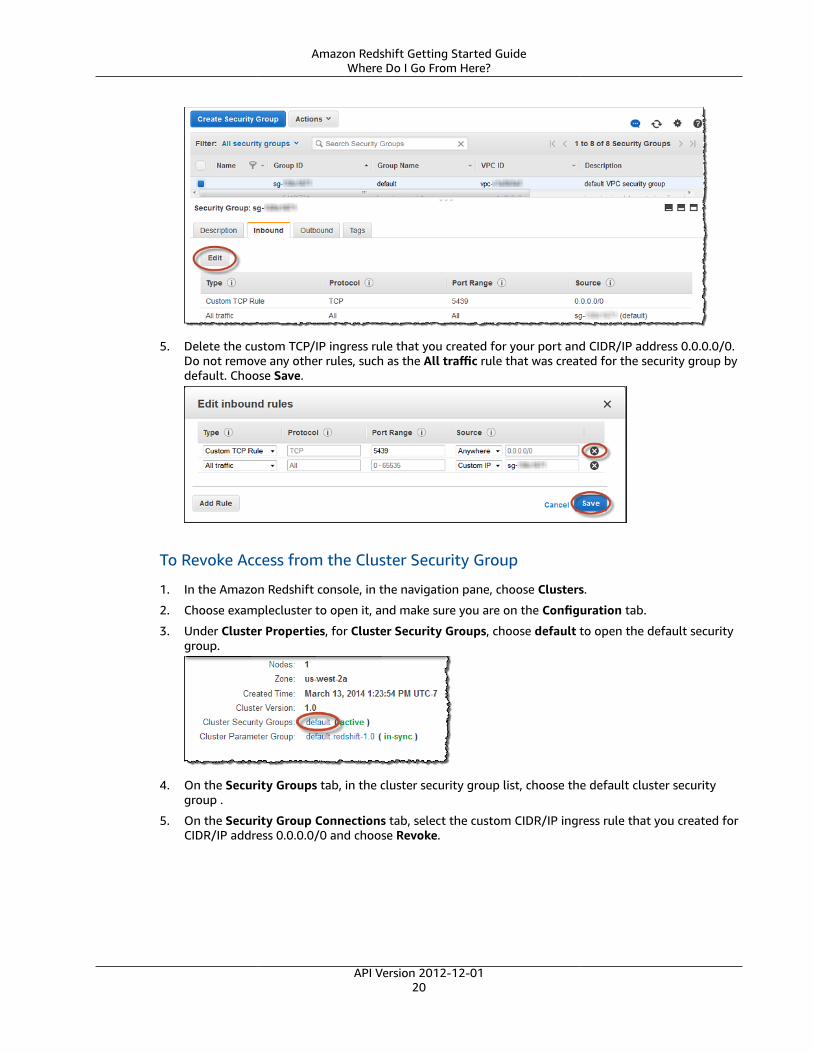
5. Delete the custom TCP/IP ingress rule that you created for your port and CIDR/IP address 0.0.0.0/0.Do not remove any other rules, such as the All traffic rule that was created for the security group bydefault. Choose Save.
To Revoke Access from the Cluster Security Group
1. In the Amazon Redshift console, in the navigation pane, choose Clusters.
2. Choose examplecluster to open it, and make sure you are on the Configuration tab.
3. Under Cluster Properties, for Cluster Security Groups, choose default to open the default securitygroup.
4. On the Security Groups tab, in the cluster security group list, choose the default cluster securitygroup .
5. On the Security Group Connections tab, select the custom CIDR/IP ingress rule that you created forCIDR/IP address 0.0.0.0/0 and choose Revoke.
API Version 2012-12-0120
Amazon Redshift Getting Started GuideWhere Do I Go From Here?
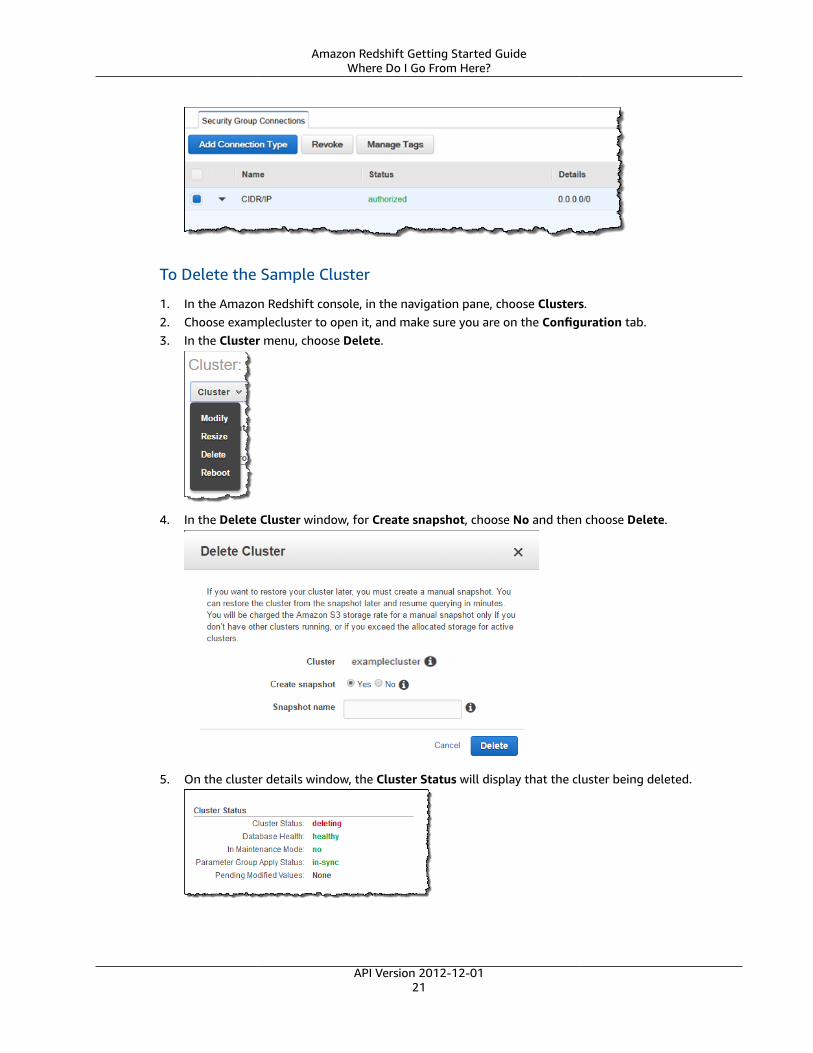
To Delete the Sample Cluster
1. In the Amazon Redshift console, in the navigation pane, choose Clusters.2. Choose examplecluster to open it, and make sure you are on the Configuration tab.3. In the Cluster menu, choose Delete.
4. In the Delete Cluster window, for Create snapshot, choose No and then choose Delete.
5. On the cluster details window, the Cluster Status will display that the cluster being deleted.
API Version 2012-12-0121

Amazon Redshift Getting Started Guide
Document HistoryThe following table describes the important changes since the last release of the Amazon RedshiftGetting Started Guide.
Latest documentation update: July 28, 2015
Change Description Release Date
New Feature Updated the guide to launch clusters from the AmazonRedshift Dashboard.
July 28, 2015
New Feature Updated the guide to use new node type names. June 9, 2015
DocumentationUpdate
Updated screenshots and procedure for configuring VPCsecurity groups.
April 30, 2015
DocumentationUpdate
Updated screenshots and procedures to match thecurrent console.
November 12, 2014
DocumentationUpdate
Moved loading data from Amazon S3 information into itsown section and moved next steps section into the finalstep for better discoverability.
May 13, 2014
DocumentationUpdate
Removed the Welcome page and incorporated thecontent into the main Getting Started page.
March 14, 2014
DocumentationUpdate
This is a new release of the Amazon Redshift GettingStarted Guide that addresses customer feedback andservice updates.
March 14, 2014
New Guide This is the first release of the Amazon Redshift GettingStarted Guide.
February 14, 2013
API Version 2012-12-0122