Amazon AWS © Copyright 2020 Rubicon Communications LLC · Security Gateway Manual Amazon AWS There...
65
Security Gateway Manual Amazon AWS © Copyright 2020 Rubicon Communications LLC May 19, 2020
Transcript of Amazon AWS © Copyright 2020 Rubicon Communications LLC · Security Gateway Manual Amazon AWS There...

Security Gateway ManualAmazon AWS
copy Copyright 2020 Rubicon Communications LLC
May 19 2020
CONTENTS
1 Getting Started 2
2 Instance Usage 10
3 Virtual Private Cloud (VPC) 28
4 References 62
i
Security Gateway Manual Amazon AWS
The pfSensereg FirewallVPNRouter for Amazon AWS is a stateful firewall and VPN appliance It is suitable for useas a VPN endpoint for mobile devices laptops and desktop computers to ensure that data sent over unsecured wirelessnetworks or untrusted wired networks is encrypted using industry standard encryption algorithms It can also be usedto establish a connection between one or many sites with the internet or each other
This AMI can be run in any region where EC2 offers service on various sizes of instance pfSense for AWS is availablein the AWS Marketplace
copy Copyright 2020 Rubicon Communications LLC 1
CHAPTER
ONE
GETTING STARTED
11 Prerequisites and Requirements
In order to use a Netgate appliance instance to protect your VPC subnets you will need the following
bull A VPC
bull One internet facing public subnet which the Netgate appliance instance will have its primaryWAN interfaceconnected to
bull One or more private subnets which the Netgate appliance instance will have its secondaryLAN interface (andpossibly additional optional interfaces) connected to
bull Separate routing tables for the internet-facing subnet and the private subnet(s)
bull Separate security groups for the internet-facing subnet and the private subnet(s)
bull An elastic IP or Public IP for the WAN interface of the appliance
For the purposes of this guide your VPC will contain two subnets (public and private) as well as an Internet GatewayThe end result should look like the following diagram
If you already have all of these in place with an existing VPC feel free to skip ahead to Launching an Instance
12 Choosing Instance Type and Sizing
There are a range of specifications to choose from and this page will help guide you through those choices
121 Supported EC2 Instance Types
Your instance type will depend on your expected network throughput as well as the types of services you will providewith your pfSensereg appliance
For general firewall appliances that do not require high throughput T2 instances are General Purpose Burstable Per-formance Instances that provide a baseline level of CPU performance with the ability to burst above the baseline
If you are planning to provide advanced services like web proxying IDSIPS or Server Load Balancing you mayconsider an instance that provides more CPU andor faster storage resources such as m4large or m4xlarge
The following EC2 instance types are supported by Netgate
bull t2nano
bull t2micro
bull t2small
2
Security Gateway Manual Amazon AWS
Fig 1 Architecture Diagram
bull t2medium
bull t2large
bull m3medium
bull m3large
bull m3xlarge
bull m4large
bull m4xlarge
bull c3large
bull c3xlarge
bull c4large
bull c4xlarge
bull r4large
bull r4xlarge
122 Sizing Your EBS Volume
The pfSense appliance is only supported with EBS storage For general purpose firewalls your storage requirementswill typically be small and the default 8GB general purpose SSD volume should be more than enough
copy Copyright 2020 Rubicon Communications LLC 3
Security Gateway Manual Amazon AWS
In situations where you may provide web proxying or caching to your users or other advanced features you shouldconsider increasing the volume size to something more appropriate for example 64GB
13 AWS Service Limits
New services provisioned in a VPC may be assigned IP addresses or other resources but Amazon puts limits on VPCresources per Region Before provisioning a new resource make sure to check these limits
The following tables list the limits for Amazon VPC resources per Region Unless indicated otherwise requests canbe made to increase these limits using the Amazon VPC limits form For some of these limits the current limit appliedcan be viewed using the Limits page of the Amazon EC2 console
Note If a limit increase is requested that applies per resource we increase the limit for all resources in the RegionFor example the limit for security groups per VPC applies to all VPCs in the Region
131 VPC and Subnets
Resource Default limit CommentsVPCs per Region 5
The limit forInternet gateways perRegion is directlycorrelated to thisone Increasing thislimit increases thelimit on internetgateways per Regionby the same amount
Subnets per VPC 200ndash
IPv4 CIDR blocks per VPC 5
This limit is made upof your primary CIDRblock plus 4secondary CIDRblocks
IPv6 CIDR blocks per VPC 1
This limit cannot beincreased
copy Copyright 2020 Rubicon Communications LLC 4
Security Gateway Manual Amazon AWS
132 DNS
For more information see DNS Limits
133 Elastic IP Addresses (IPv4)
Resource Default limit CommentsElastic IP addresses per Region 5
This is the limit forthe number of ElasticIP addresses for usein EC2-VPC ForElastic IP addressesfor use inEC2-Classic seeAmazon EC2 Limitsin the Amazon WebServices GeneralReference
134 Flow Logs
Resource Default limit Comments
Flow logs per singlenetwork interfacesingle subnet orsingle VPC in aRegion
2
This limit cannot beincreased You caneffectively have 6flow logs per networkinterface if youcreate 2 flow logsfor the subnet and 2flow logs for the VPCin which your networkinterface resides
copy Copyright 2020 Rubicon Communications LLC 5
Security Gateway Manual Amazon AWS
135 Gateways
Resource Default limit CommentsCustomer gateways per Region 50
ndash
Egress-only internet gateways perRegion
5
This limit isdirectly correlatedwith the limit onVPCs per Region Toincrease this limitincrease the limit onVPCs per Region Youcan attach only oneegress-only internetgateway to a VPC at atime
Internet gateways per Region 5
This limit isdirectly correlatedwith the limit onVPCs per Region Toincrease this limitincrease the limit onVPCs per Region Onlyone internet gatewaycan be attached to aVPC at a time
NAT gateways per Availability Zone 5
A NAT gateway in thepending active ordeleting state countsagainst your
14 Creating an IAM User in Your AWS Account
pfSensereg uses AWS Identity and Access Management (IAM) accounts for administration Every AWS account in-cludes at least one user For security reasons the root account should not be used for day-to-day administration Thissection describes the process of creating and using an IAM user account for administering pfSense
See also
To find out more about AWS security and credentials read Understanding and Getting Your Security Credentials
copy Copyright 2020 Rubicon Communications LLC 6
Security Gateway Manual Amazon AWS
There are multiple methods for creating users in IAM The recommended method is to use the AWS ManagementConsole The process of creating a user and enabling that user to perform work tasks consists of the following steps
1 Create the user
2 Create credentials for the user
3 As a best practice create only the credentials that the user needs For example for a user who requires accessonly through the AWS Management Console do not create access keys
Note For cloud security it is considered best practice to limit access for the root user so root is locked bydefault
4 Grant the appropriate permissions to the user to administer pfSense
5 Provide the user with the necessary sign-in information
6 (Optional) Configure multi-factor authentication (MFA) for the user
141 Creating IAM Users (Console)
You can use the AWS Management Console to create IAM users To create one or more IAM users (console)
1 Sign in to the AWS Management Console and open the IAM console at httpsconsoleawsamazoncomiam
2 In the navigation pane choose Users and then choose Add user
3 Type the user name for the new user This is the name they will use to sign in to AWS To add up to 10 users atonce choose Add another user for each additional user and type their user names
4 User names can be a combination of up to 64 letters digits and these characters +=-
5 Names must be unique within an account and are not case sensitive
6 Select AWS Management Console access This creates a password for each new user
bull For Console password choose one of the following
ndash Autogenerated password Each user gets a randomly generated password that meets the accountpassword policy in effect (if any) You can view or download the passwords when you get to theFinal page
ndash Custom password Each user is assigned the password that you type in the box
bull We recommend that you select Require password reset to ensure that users are forced to change theirpassword the first time they sign in
7 Click Next On the Set permissions page specify how you want to assign permissions to this new user(s)Choose one of the following three options
bull Add user to group Choose this option if you want to assign the user(s) to one or more groups thatalready have permissions policies IAM displays a list of the groups in your account along with theirattached policies You can select one or more existing groups or choose Create group to create a newgroup
bull Copy permissions from existing user Choose this option to copy all access rights from an existing userto the new user(s)
bull Attach existing policies to user directly Choose this option to see a list of the managed policies in youraccount Select the policies that you want to attach to the new users or choose Create policy to open anew browser tab and create a new policy
copy Copyright 2020 Rubicon Communications LLC 7
Security Gateway Manual Amazon AWS
8 Choose Next Review to see all of the choices you made up to this point When you are ready to proceedchoose Create user
9 To view the usersrsquo access keys (access key IDs and secret access keys) choose Show next to each password andaccess key that you want to see To save the access keys choose Download csv and then save the file to a safelocation
Important This is your only opportunity to view or download the secret access keys and you must providethis information to your users before they can use the AWS API Save the userrsquos new access key ID and secretaccess key in a safe and secure place You will not have access to the secret keys again after this step
10 On the final page you can choose Send email next to each user Your local mail client opens with a draft thatyou can customize and send The email template includes the following details to each user
bull User name
bull URL to the account sign-in page Use the following example substituting the correct account ID numberor account alias
bull httpsAWS-account-ID or aliassigninawsamazoncomconsole
Important The userrsquos password is not included in the generated email You must provide them to the customerin a way that complies with your organizationrsquos security guidelines
15 Using IAM Roles
AWS IAM Roles are used to delegate access to users applications or services that require controlled access to AWSresources IAM Roles should be used to manage all pfSensereg instances This unique role can be specified whenlaunching a new instance or attached to an existing instance
The AWS Management Console is the recommended method for creating roles for use with pfSense It is also recom-mended to create these roles based on the principle of least privilege also known as the principle of least authoritywhich is the assignment of lowest needed privileges based on necessity The below instructions attempt to follow thisprinciple
151 Create Policy for pfSense Management IAM Role
Create a custom policy that will be associated with an IAM role allowing access to the pfSense Management GUIrunning on an EC2 Instance
1 Sign in to the AWS Management Console and open the IAM console at httpsconsoleawsamazoncomiam
2 In the navigation pane of the console select Policies then choose Create Policy
3 Drop down the Service menu and select EC2
4 In the Actions dropdown check the box next to All EC2 actions (ec2)
Note If stricter policies are required for the actions that can be performed on the pfSense EC2 Instance thesecan be set here
5 Select the Resources dropdown arrow and review resulting warnings
copy Copyright 2020 Rubicon Communications LLC 8
Security Gateway Manual Amazon AWS
6 Click the All resources bubble
7 Select Review policy
8 Populate the Name field (eg pfSense_EC2_Access) and Description if desired
Note Policy names must be unique within the AWS account and the name of the policy cannot be changedonce created
9 Select Create Policy
152 Create IAM Role for pfSense Management
Create a role that an IAM user or users within an IAM Group can assume and use to connect to and manage pfSenserunning on an EC2 Instance
Note The administrator of the specified account can grant permission to assume this role to any IAM user inthat account To do this the administrator attaches a policy to the user or a group that grants permission for thestsAssumeRole action That policy must specify the rolersquos ARN as the Resource
1 Sign in to the AWS Management Console and open the IAM console at httpsconsoleawsamazoncomiam
2 In the navigation pane of the console select Roles then choose Create Role
3 Select the Another AWS account role type
4 In the Account ID field type the AWS account ID that will be allowed to access the destination resource
5 The Require external ID checkbox should remain cleared unless granting permissions to users from an accountthat you do not control Reference AWS Documentation for External ID Roles in the event this is required
6 It is recommended to restrict the role to users who sign in with multi-factor authentication (MFA) Select Re-quire MFA to add a condition to the rolersquos trust policy to require MFA sign-in
7 Select Next Permissions
8 Type the name of the previously created Custom policy in the search field Check the box next to the correctPolicy name
9 Select NextTags
Note IAM tags are key-value pairs that can be used to organize track or control access for this role This isan optional step More information can be found within AWS Documentation for Tagging IAM Entities
10 Select Next Review
11 Populate the Role name field (eg pfSense_Admin) and Role description if desired
Note Role names must be unique within the AWS account and the name of the role cannot be changed oncecreated
12 Review remaining configured settings then select Create role
This role can now be assigned to an IAM User or all users in an IAM group allowing secure administrative access tothe EC2 Instance(s) containing pfSense
copy Copyright 2020 Rubicon Communications LLC 9
CHAPTER
TWO
INSTANCE USAGE
21 Launching an Instance
Here are instructions on how to launch a new instance of the pfSensereg firewallVPN appliance from the Amazon EC2Management Console
1 Select the region for the instance to run in using the region tab at the upper right corner of the page
2 Navigate to the AWS Management Console Main Page and select EC2 under the Compute section in the Allservices dropdown
10
Security Gateway Manual Amazon AWS
3 Launch a new instance by clicking on the Launch Instance button under the Create Instance section of theEC2 dashboard
4 Select AWS Marketplace in the left-hand Navigation Menu Type Netgate pfSense in the search box andpress enter
copy Copyright 2020 Rubicon Communications LLC 11
Security Gateway Manual Amazon AWS
5 Click the Select button for the Netgate pfSense FirewallVPNRouter listing in the search result
6 Review pricing and other helpful information then click Continue
copy Copyright 2020 Rubicon Communications LLC 12
Security Gateway Manual Amazon AWS
7 Choose the instance type to run by clicking the checkbox next to the desired type Click Next ConfigureInstance Details
8 Choose the desired Network and Subnet that the instance will be deployed in Choose any other instance-specificsettings that may be required in your environment Optionally expand the Advanced Details section and setparameters as text in the User Data field The available options are
bull password - setting a value via a directive like password=abcdefg will set the password for the admin-istrative account to the value you specify - abcdefg in this example If no value is set here a randompassword will be assigned in order to keep administrative access from being exposed to the Internet with adefault password
bull mgmtnet - setting a value via a directive like mgmtnet=1001024 will restrict management access(http https ssh) to the network you specify - 1001024 in this example This will cause the firewallrules on the instance (not on Amazonrsquos access lists but on the Netgate pfSense appliancersquos own firewall)to restrict management traffic for the instance to the specified source network The default behavior is toallow management from any host
copy Copyright 2020 Rubicon Communications LLC 13
Security Gateway Manual Amazon AWS
These directives can be set by placing them on a single line in the User Data field and separating them withcolons To specify both parameters type a statement similar to this one
password=abcdefgmgmtnet=1001024
Note If a password is set using the password parameter listed above the password is retrieved by the instancevia an unencrypted HTTP request when the system is configured the first time it boots The request is made toan Amazon Web Services-operated server on the local LAN that stores metadata about each instance runningThe data for an instance is only made available to that instance but is available to be queried from the instancewithout providing any authentication credentials
It is advised to change the admin password via the pfSense web GUI after the instance comes up to avoid anysecurity risks associated with the unencrypted request Otherwise it is possible to choose not to set the passwordat all and let a random password be set
9 Choose the desired Network and Subnet to which the Instance will be deployed Scroll down to configure thenetwork interface(s) with a Static or DHCP-assigned IP address
Once the Network Interface(s) are configured select Next Add Storage
10 Click Next Add Tags to accept the Storage Device Configuration
copy Copyright 2020 Rubicon Communications LLC 14
Security Gateway Manual Amazon AWS
11 It is recommended to set a tag that can be used to differentiate this instance from other instances by entering avalue for the Name tag Click Next Configure Security Group after setting any desired tags
Press the Add Tag button Input Name under the Key field and the desired Instance Tag Name under the Valuefield (eg Netgate FirewallRouter)
12 Select a security group to launch the instance with The Security group name and Description can be left at thedefault or replaced with the desired values The recommended settings for a security group should allow at leastthe following traffic
bull TCP port 443 from 00000
ndash HTTPS - This is the port that the management web GUI listens on
bull TCP port 22 from 00000
ndash SSH - This port can be used to connect to a command prompt with an ssh client
bull UDP port 1194 from 00000
copy Copyright 2020 Rubicon Communications LLC 15
Security Gateway Manual Amazon AWS
ndash OpenVPN - The OpenVPN server that is configured by default is bound to this port
bull UDP port 500 from 00000
ndash IKE for IPsec VPN
bull UDP port 4500 from 00000
ndash IPsecNAT-T for IPsec VPN
Note If there is an existing security group that includes this access click Select an existing security groupthen select the desired group(s) to use and click Continue Otherwise select Create a new security group andadd rules for this access by filling in the form for each rule and clicking the Add Rule button When all of therules have been added click Review and Launch
13 Review any AWS warnings and make note of recommendations Scroll down to review the remaining instancedetails and click Launch after making any needed adjustments
copy Copyright 2020 Rubicon Communications LLC 16
Security Gateway Manual Amazon AWS
14 Select an existing key pair or create a new key pair to connect to the instance with Click the checkbox thatindicates acknowledgment of access to the selected private key file and then click Launch Instances
Important Do NOT select the Proceed Without a Key Pair option
22 Managing the Configuration of the Instance
Once the instance is launched monitor its status using the Instances page of the EC2 Management Console The EC2Management Console will display whether the instance is up and reachable and will also display its current public IPaddress and the hostname that resolves to the public IP address Find the hostname and public IP address in the EC2console by clicking on the Instances heading on the left finding the instance and checking the checkbox next to it andlooking at the details at the bottom of the page
In the example above the hostname of the instance is ec2-23-20-204-54compute-1amazonawscom
copy Copyright 2020 Rubicon Communications LLC 17
Security Gateway Manual Amazon AWS
The public IP address is available by putting together the 4 numbers included in the hostname - 233020454 Itis also possbile to obtain the IP address by using a popular DNS lookup tool such as host dig or nslookup toresolve the hostname to its IP address
Note The hostname and IP address used in this and other examples in this guide are associated at the time of writingwith a test instance This addresshostname will not be the same values used to access the instance and they will noteven be associated with the same test instance by the time this guide is available to the public
In order to manage the configuration of the instance connect to it via https or ssh To connect via ssh use the key pairchosen while creating the instance to connect to the admin account From the command line on a UnixLinux hostuse a command similar to ssh -i my_key_file adminpublic_IP where the appropriate private key fileand public IP or hostname are substituted In the example below the key file my_ec2_key is used to connect to the IPaddress 232020454
Note The first time logging into the instance the ssh key of the instance will not be cached locally type yes whenasked whether to continue connecting This should not be necessary on subsequent sessions
A limited set of configurations is possible through the ssh interface The preferred method for managing most of theconfigurations or viewing data on the status of the pfSensereg instance is through the https web GUI To connect viahttps enter an https URL containing the public IP address or hostname of the instance into a web browser Forexample https232020454
Itrsquos very likely there is a browser warning indicating that the security certificate of the site is not trusted because theinstance uses a self-signed certificate for https communication Click on the option to proceed to the site anyway and
copy Copyright 2020 Rubicon Communications LLC 18
Security Gateway Manual Amazon AWS
a login screen with the Netgate logo should appear
The username to log in with is admin The password to use is either a value set in the User Data during the creationof the instance or a random password If a specific password wasnrsquot set find out that value that the random passwordwas set to through one of two different means
1 The first is to log in over ssh with the key pair that was selected when the instance was created and examine thecontents of the file located at etcmotd Select option 8 (Shell) from the console menu that is presented afterlog in and execute cat etcmotd from the shell
2 Alternatively view the System Log for the instance in the EC2 Management Console After the messagesthat are displayed that show the status of the boot process a message should appear that indicates what theadministrative password was changed to
The message using either of the methods mentioned will look like this
Admin password changed to abcdefg
In this example the password was changed to abcdefg
Note Be aware that the System Log output in the EC2 Management Console is not updated in real time and maytake a few minutes to show up It is preferable to explicitly set a password by passing a value in with the User Datafield so the password will be known in advance To allow a random password to be set connect via ssh and find outwhat the password was changed to after the instance is up without any delay
Once the password has been determined and entered into the login form the pfSense Web GUI should be available
23 Using the remote access IPsec VPN
An IPsec VPN for remote users is preconfigured on the instance when it comes up In order to use it you will need toconfigure the IPsec VPN client on your device
See also
A guide for manually configuring Android or iOS (iPhoneiPodiPad) mobile clients to establish an IPsec VPN islocated in the pfSensereg Documentation
For iOS clients a profile can be downloaded and installed that will automatically configure an IPsec VPN to theinstance The profile can be downloaded by visiting the page at iphone_ipsec_profilephp on the instance If theinstance IP address were 232020454 the correct URL to visit would be https232020454iphone_ipsec_profilephp You will need to authenticate to the web interface by typing the username (admin) and password prior to beingable to download the profile
The profile should be downloaded and saved automatically upon opening the page If the page is visited in a webbrowser on an iOS device the device should automatically launch the Settings app and attempt to install the newprofile If the profile is downloaded to another non-iOS device it can be sent via email as an attachment If theattachment is opened in the iOS email client the Settings app new profile installation will also open
The name and description of the profile being installed will be displayed Tap the Install button A warning messagewill be displayed that indicates that the profile is unsigned Tap on Install Now to continue
copy Copyright 2020 Rubicon Communications LLC 19
Security Gateway Manual Amazon AWS
copy Copyright 2020 Rubicon Communications LLC 20
Security Gateway Manual Amazon AWS
Enter your passcode for the iOS device (the one you enter when you wake the device from sleep) and the passwordto access the IPsec VPN (the one you entered to get access to the Web GUI) when prompted and the profile will beinstalled When the screen shows that the profile was installed tap Done
When the profile has been installed the VPN can be enabled in the Settings app There will be a heading named VPNunder the main Settings page If there are more than one VPN configured on the device tap the VPN heading Thenewly installed profile should be selected It will have a check mark next to it There will be an onoff switch at thetop of the page to enable the VPN If this is the only VPN configured the switch to enable the VPN will be next to theVPN heading on the main Settings page Tap the switch to enable the VPN You should be prompted for a usernameand password The username (admin) should already be filled in Enter the password and tap OK A welcome messageshould be displayed Tap OK and you are ready to use the VPN
24 Using the remote access OpenVPN VPN
An OpenVPN VPN for remote users is automatically configured the first time the instance is booted In order to useit you will need an OpenVPN client app installed on your device and you will need to import a configuration thatspecifies how to connect to the instance
An OpenVPN configuration can be downloaded by visiting the page openvpn_connect_profilephp on your instanceIf the instance IP address were 233020454 the correct URL to visit would be https232020454iphone_ipsec_profilephp You will need to authenticate to the web interface by typing the username (admin) and password prior tobeing allowed to download the configuration
The profile should be downloaded and saved automatically upon opening the page The file that it was saved in shouldbe imported into the OpenVPN client on the device that you wish to connect with
copy Copyright 2020 Rubicon Communications LLC 21
Security Gateway Manual Amazon AWS
241 Tips for configuring OpenVPN based on platformclient
OpenVPN Connect App on iOS (iPhoneiPadiPod)
The iOS version of the OpenVPN Connect App allows you to import an OpenVPN profile by opening an attachmentto an email message Save the config to a file named remote-access-vpnovpn and send it to an email account thatthe iOS device is configured to retrieve mail for Open the email message and touch the attachment to open it Youwill be presented with Open in OpenVPN as one of the available options Touch the OpenVPN icon to select thatoption The OpenVPN Connect App should then open and list the profile under a heading that says New profiles areavailable Click on the green ball with the + sign in it to import the profile Type in the username admin andpassword then change the OnOff switch to On
OpenVPN Connect App on Android
The Android version of the OpenVPN Connect App allows you to import an OpenVPN profile from an SD card Savethe configuration file to the SD card Launch the OpenVPN Connect App From the menu select Import then ImportProfile from SD card Browse to the location of the configuration file and select it Enter the username admin andpassword to connect to the VPN Press Connect
TunnelBlick on MacOS X
The TunnelBlick App for MacOS allows you to import an OpenVPN configuration file Save the configuration to afile on your system Click on VPN Details Click on the + symbol underneath the existing configurations to add anew configuration Click on the I have configuration files button Click on the OpenVPN Configuration(s) buttonFollow the instructions presented by TunnelBlick (copy the config into an empty folder TunnelBlick creates on theDesktop rename the folder click on the folder) When the profile is imported successfully click on itrsquos name and thenclick on Connect Enter the username admin and password to connect to the VPN
OpenVPN Connect Client on Windows
The OpenVPN Connect Client on Windows allows you to import an OpenVPN configuration file from the local diskSave the file on your system Click the + symbol to the right of Connection Profiles Select Local File and click onthe Import button Find the profile you wish to import in the file browser window and click Open A box with thename of the new profile should appear under Connection Profiles now Click on that box and enter the usernameadmin and password to connect to the VPN
25 Enabling Enhanced Networking with the Elastic Network Adapter(ENA)
To enable enhanced networking on AWS pfSensereg FirewallVPNRouter must be version 241 or above Use theupdate wizard in the pfSense console to perform the update if necessary and then ENA can be enabled Enabling ENAis outlined in the steps below
Warning Updating the pfSense FirewallVPNRouter will force it to reboot and cause a disruption in service Besure to perform the update during a maintenance cycle
1 Install AWS CLI Documentation on the installation and use of AWS CLI can be found at httpsawsamazoncomcli
copy Copyright 2020 Rubicon Communications LLC 22
Security Gateway Manual Amazon AWS
2 Determine the Instance ID for the pfSense Instance from the EC2 Console
Fig 1 The selected pfSense Instance ID is i-042c16b65423b7dac
3 Stop the instance using Amazon EC2 console
4 Enable the enhanced networking attribute by executing the following AWS CLI command
aws ec2 modify-instance-attribute --instance-id i-042c16b65423b7dac --ena-support
5 Use the EC2 Console to start the pfSense Instance Once the pfSense Instance has started confirm that EnaSup-port is enabled by executing the following AWS CLI command
aws ec2 describe-instances --instance-ids i-042c16b65423b7dac --queryReservations[]Instances[]EnaSupport[true
]
6 Change the pfSense Instance Type to one that supports Enhanced Networking using the EC2 console Afterselecting an Instance Type that supports Enhanced Networking use the EC2 console to stop the pfSense Instance
copy Copyright 2020 Rubicon Communications LLC 23
Security Gateway Manual Amazon AWS
Note To review the Instance Types please see httpsawsamazoncomec2instance-types
7 Once the pfSense Instance has stopped use the EC2 Console to select the pfSense Instance and then under theActions button select Instance Settings gt Change Instance Type and select a new Instance Type
Fig 2 In this case m4xlarge was selected as the new Instance Type and then Apply was selected
8 In the EC2 Console the pfSense Instance should now show an Instance Type of m4xlarge
9 Using the EC2 console select the pfSense Instance and then under the Actions button select Instance State gtStart
26 Advanced Usage
261 Protecting a private network in VPC
An instance of the Netgate appliance can be used as a firewall for a VPC subnet This will generally require moremanual configuration than using an instance to host a remote access VPN does See the VPC User Guide for a moredetailed explanation of how to configure your VPC and your Netgate appliance instance to support this
262 Connecting a local pfSensereg device
In addition to connecting remote devices as clients a device running pfSensereg as a firewallrouter can be connectedas a peer to a pfSense appliance
See also
Read Configuring a Site-to-Site Static Key OpenVPN Instance in the pfSense documention to see the process ofconfiguring this setup
copy Copyright 2020 Rubicon Communications LLC 24
Security Gateway Manual Amazon AWS
When implementing the configuration changes detailed in the document you should use the Netgate appliance instanceon AWS as the ldquoserverrdquo end of the connection and your local pfSense device as the client ldquoendrdquo You will also needto make sure that you are using a unique port The default remote access OpenVPN server is configured to use UDPport 1194 It is suggested that if you are adding a site-to-site tunnel you should use a port between 1195 and 2000Whichever port you decide to use you will need to make sure that the port is open both in the firewall rules on theNetgate appliance instance and in the Security Group in the EC2 Management Console
If you wish to route all traffic from your homeoffice network through the OpenVPN tunnel to your Netgate applianceinstance you will need to add this statement to the advanced options for the OpenVPN Client on the homeofficepfSense device
redirect-gateway def1
This will cause a default route to be set that sends all locally originated traffic on your homeoffice network overthe OpenVPN tunnel when it is established If you use this configuration to send all traffic from your local networkthrough the OpenVPN tunnel you will also need to establish a NAT on the Netgate appliance instance on AWS fortraffic from the homeoffice network to the internet This can be accomplished by adding the CIDR block for yourhomeoffice network to the preconfigured Alias called Networks_to_NAT This is done by navigating to Aliases underthe Firewall heading on the web GUI then clicking on the edit icon to the right of Networks_to_NAT Add the newnetwork address and mask to the list of Networks and click the Save button Then click the Apply Changes buttonYou will also need to add the network used for the tunnel endpoints (IPv4 Tunnel Network) to the Networks_to_NATalias as well using the same procedure that was used to add the homeoffice network
Connecting multiple pfSense gateways to a Netgate appliance
Multiple homeoffice networks can be connected to a single Netgate appliance instance This could be used to allowclients at different office locations to communicate without requiring tunnels between each individual location Itcould also be used as a way to apply policies on traffic tofrom the internet in one place and have them take effectacross multiple locations
Each site would need to have the instructions above for connecting an individual device repeated to add an OpenVPNserver on the Netgate appliance instance and an OpenVPN client on the local pfSense device Each OpenVPN Serverthat is configured must use a unique port and a unique network for IPv4 Tunnel Network It is recommended touse a name that uniquely identifies each location connected in this manner in the Description field when adding anOpenVPN Server for a site in the Netgate appliance
263 Detect and Recover EC2 Instance Failure
You can create an Amazon CloudWatch alarm that monitors an Amazon EC2 instance and automatically recovers theinstance if it becomes impaired due to an underlying issue
For more information about instance recovery see Recover Your Instance
27 Frequently Asked Questions
271 1 I donrsquot know the password to the web GUI How do I find out what it is
The first time the instance boots it looks for a user-defined password set in the User Data box when the instance wascreated If you didnrsquot set one it chooses one randomly so that the instance is not accessible via a default password tomalicious users You can find out the random password that was set by choosing Get System Log from the ActionsMenu for the instance in the EC2 Management Console A message should appear after the system boot messages thatlooks like the following
copy Copyright 2020 Rubicon Communications LLC 25
Security Gateway Manual Amazon AWS
Admin password changed to abcdefg
It may take 5-10 minutes after the instance boots for this message to appear in the system log If you would like to findout the password sooner you can log in via SSH using the SSH key that was selected when the instance was createdThe same message that will be written to the system log will be written to the file etcmotd Running the commandcat etcmotd will show you what the password is
272 2 I donrsquot like the random password that was selected How can I change it
The password can be changed via the web GUI Log in with the username admin and the existing password Underthe System category click on User Manager The admin account should appear in a list of accounts Unless yoursquoveadded other accounts it should be the only account present Click on the Edit button (the icon with the e in it) to theright of the account listing Type your choice for a new password into the two boxes labeled Password Click theSave button at the bottom of the screen
273 3 How do I access my instance
There are several ways that you can manage or use your instance You should be able to connect via SSH or HTTPS inorder to manage the configuration of your instance If you connect via SSH you will either need to know the passwordof the admin account and login with that account or use the SSH key that was selected when the instance was createdHere is a sample command line to log in with an SSH key from a Unix or Linux host
ssh -i ~sshmy-ec2-key adminec2-A-B-C-Dcompute-1amazonawscom
You would substitute the actual location of your SSH private key for ~sshmy-ec2-key and the real hostnamewhich you can retrieve from the EC2 Management Console by looking at the data for the instance for example ec2-A-B-C-Dcompute-1amazonawscom If you know the password for the admin account you could use a commandsimilar to the one above but omit the -i ~sshmy-ec2-key
To connect via HTTPS you need to know the password to the instance either by setting it explicitly in the User Datawhen the instance is created or by retrieving it from the instance Once you know the password you should be able toconnect to the instance with any web browser by typing in the hostname of the instance to the URL field
274 4 How do I connect a VPN client to my instance
See the section in the user guide on Using the remote access IPsec or OpenVPN VPN
275 5 Why does the pfSensereg Dashboard say my WAN address is 10XYZ
Amazon AWS instances use DHCP to assign private addresses to the public-facing interfaces of an instance Thepublicly routable IP address that you use to acces the instance is NATed by Amazon to the private address that you seeconfigured on the WAN interface of your instance
copy Copyright 2020 Rubicon Communications LLC 26
Security Gateway Manual Amazon AWS
276 6 I added custom firewall rules to allow some traffic to my instance why I amnot seeing the packets arrive
Amazon AWS provides packet filtering in addition to the Netgate Appliance itself being a stateful firewall If youallowed traffic on the Netgate Appliance but have a security group configuration in the settings for the instance that isrestricting traffic you will need to also add your rules to the security group in the EC2 Management Console
Given that the Netgate Appliance is a fully functional firewall you may assign an AWS security group that allows alltraffic and perform whatever filtering you desire with rules on the Netgate Appliance
277 7 How do I route all the traffic from my entire home network over a VPN
If your home gatewayrouter has support for OpenVPN you can connect a site to site tunnel from your home networkto the Netgate VPN Appliance and configure your routing so that all Internet traffic is sent over the encrypted tunnelSee the user guide section on Connecting a local pfSensereg device
This may provide for simpler administration at home but your mobile devices and laptops that get used outside thehome should have an OpenVPN client installed and configured anyway so that you are always receiving the benefitsof sending your traffic through a VPN
copy Copyright 2020 Rubicon Communications LLC 27
CHAPTER
THREE
VIRTUAL PRIVATE CLOUD (VPC)
31 AWS VPC User Guide
The pfSensereg Certified firewall and VPN appliance from Netgate for Amazon EC2 is a stateful firewall and VPNappliance In addition to itrsquos capabilities as a VPN gateway and firewall for users and offices it is capable of actingas a firewall to protect instances providing services in Amazonrsquos Virtual Private Cloud or VPC service This servicediffers from the classic EC2 service in that it allows for management of instances on private subnets
This guide will explain how to launch manage and use an instance of the appliance to act as a gateway for otherinstances in a VPC subnet
311 Preparing your VPC
In order to use a Netgate appliance instance to protect your VPC subnets you will need the following
bull One internet-facing subnet which the Netgate appliance instance will have itrsquos primaryWAN interface con-nected to
bull One or more private subnets which the Netgate appliance instance will have itrsquos secondaryLAN interface (andpossibly additional optional interfaces) connected to
bull Separate routing tables for the internet-facing subnet and the private subnet(s)
bull If you already have all of these in place with an existing VPC feel free to skip ahead to Launching an Instance
These instructions will demonstrate how to create a single private subnet and set it up behind an instance of thepfSensereg Certified firewall and VPN appliance from Netgate In the Amazon VPC Management Console create anew VPC subnets and routing table(s)
1 Go to Your VPCs view in the menu on the left side of the VPC Management Console under the Virtual PrivateClouds grouping Click the Create VPC button
28
Security Gateway Manual Amazon AWS
2 Enter a CIDR block to use in the box that pops up If you will connect to hosts in your VPC using a VPNfrom hosts at other sites in your infrastructure be sure to select address space that does not conflict with theprivate address space used elsewhere by your organization Make sure the block you choose is large enoughto contain all subnets you may want to include within it Eg if you plan to use a 24 for your internet-facingsubnet and a 24 for your private network the CIDR block you select here will need to be at least a 23 to holdthose 2 subnets The maximum size block you can select is a 16 For the purposes of this example we will use1020016 Leave the value of Tenancy set to Default Click on the Yes Create button
3 To create the subnets required go to the Subnets view in the menu on the left side of the VPC ManagementConsole Click the Create Subnet button Select the VPC you just created and choose the availability zone youdesire Enter the subnet you wish to use for the internet-facing hosts in the CIDR Block field This subnet willbe the one that the WAN interface of the Netgate appliance instance is attached to and could include any otherhosts or appliances that you wish to be available directly from the Internet and not protected behind the Netgate
copy Copyright 2020 Rubicon Communications LLC 29
Security Gateway Manual Amazon AWS
appliance The subnet you select here must be a block that is within the address space you assigned to the VPCFor this example we will use 1020024 Click on the Yes Create button
4 Create the private subnet Still in the Subnets view of the VPC Management Console click the Create Subnetbutton In the box that pops up select the appropriate VPC and the same Availability Zone that you assignedto your public subnet Enter the subnet you wish to use for your private network in the CIDR Block field Thisnetwork should be a subnet of the address space you assigned to the VPC and should be distinct from the subnetyou assigned to the public subnet For this example we will use 1021024 Click on the Yes Create button
5 Both subnets that you created will have been created to use a default route table that was created for the VPCThe private subnet can continue to use that default table A new route table will need to be created for the publicsubnet Go to the Route Tables view in the menu on the left side of the VPC Management Console The singleexisting route table should be displayed Click on the Create Route Table button Select the VPC and click on
copy Copyright 2020 Rubicon Communications LLC 30
Security Gateway Manual Amazon AWS
the Yes Create button
6 Associate the public subnet (1020024 in our examples) with the routing table that was just created Go to theSubnets view on the left hand side of the VPC Management Console Check the checkbox next to the publicsubnet and scroll down to look at the Details tab for that subnet At the top of the Details tab will be listed theCIDR block VPC and Availability Zone Under those items the Route Table will be listed and will have a linklabeled replace next to it Click on the link Select the route table in the box that pops up and click on the YesReplace button
7 In order to send traffic from the public subnet to the Internet we will need to add a default route to an InternetGateway We must first create one Go to the Internet Gateways view in the menu on the left hand side of theVPC Management Console Click on the Create Internet Gateway button Click the Yes Create button onthe box that pops up Click the checkbox next to the new Internet Gateway and then click the Attach to VPC
copy Copyright 2020 Rubicon Communications LLC 31
Security Gateway Manual Amazon AWS
button Select the VPC and click on the Yes Attach button
8 The route table for the public subnet will need to be updated so that it has a default route to the Internet GatewayGo to the Route Tables view on the left hand side of the VPC Management Console Check the checkbox nextto the route table for the public subnet Under the Routes tab for that route table there should only be listed asingle route for the CIDR block of the VPC (1020016 in our example) that has a target of local There is arow underneath this route with a text box in the Destination field and a pop up menu for the Target field Enter00000 for the Destination and select the Internet Gateway (should be formatted like igw-XXXXXXXX)for the target Click on the Add button that appears at the right side of the row Click the Yes Add button onthe box that pops up
There are a few more VPC configuration changes that will be required later but next you must launch a Netgateappliance instance
copy Copyright 2020 Rubicon Communications LLC 32
Security Gateway Manual Amazon AWS
312 Launching an Instance in a VPC
In the Amazon EC2 Management Console launch a new instance of the pfSensereg firewall and VPN appliance Thisprocess is the same as the one for launching an EC2 (non-VPC) instance up until step 11 which details the values toenter for the Configure Instance Details screen in order to specify the instance should be created in your VPC
1 Select the region to run the instance in using the tab at the upper right corner of the page
2 Launch a new instance by clicking on the Launch Instance button under the Create Instance section of theEC2 dashboard
copy Copyright 2020 Rubicon Communications LLC 33
Security Gateway Manual Amazon AWS
3 Select AWS Marketplace on the Create a New Instance menu Type Netgate pfSense FirewallVPNRouter in the search box and press enter (or click on the Search button next to the text box)
4 Click on the link for the Netgate pfSense FirewallVPNRouter appliance in the search results
5 Click on the Continue button on the info page for the Netgate pfSense FirewallVPNRouter
copy Copyright 2020 Rubicon Communications LLC 34
Security Gateway Manual Amazon AWS
6 Click on the Launch with EC2 Console tab
7 If the license terms havenrsquot been accepted click on the Accept Terms button
8 A message should be displayed indicating that the subscription is being processed
copy Copyright 2020 Rubicon Communications LLC 35
Security Gateway Manual Amazon AWS
9 Select the version of the image to run under the popup menu labeled Select a Version Generally the mostrecently issued version should be selected Identify which region to launch the instances in and click on theLaunch in EC2 Console button to the right of that region
10 Choose the instance type to run on Click Next Configure Instance Details
copy Copyright 2020 Rubicon Communications LLC 36
Security Gateway Manual Amazon AWS
11 On the Configure Instance Details page under the Network field select the VPC that was created For theSubnet field that appears right below the Network field select the public subnet that was created earlier In ourexamples this is 1020024
12 Scroll down to the Network Interfaces heading A single interface named eth0 should be displayed by defaultClick on the Add Device button underneath eth0 Select the private subnet that was created (1021024 in ourexample) Pick an IP address within the range of the private subnet and enter it in the Private IP field Keep inmind that the first 3 or 4 IP addresses are reserved For this example we will use 10215
copy Copyright 2020 Rubicon Communications LLC 37
Security Gateway Manual Amazon AWS
Optionally expand the Advanced Details section and set parameters as text in the User Data field The availableoptions are
password Setting a value via a directive like password=abcdefg will set the password for theadministrative account to the specified value - abcdefg in this example If no value is set here arandom password will be assigned in order to keep administrative access from being exposed tothe internet with a default password
mgmtnet Setting a value via a directive like mgmtnet=1001024 will restrict managementaccess (http https ssh) to the specified network - 1001024 in this example This will causethe firewall rule on the instance (not on Amazons access lists but on the Netgate appliancersquosown firewall) to restrict management traffic for the instance to the specified source network Thedefault behavior is to allow management from any host
These directives can be set by placing them on a single line in the User Data field and separating them withcolons Specify both parameters by typing a statement similar to
password=abcdefgmgmtnet=1001024
Click Next Add Storage after optionally setting these parameters
Note If setting a password using the password parameter listed above the password is retrieved by the instancevia an unencrypted HTTP request when the system is configured the first time it boots The request is made toan Amazon Web Services-operated server on the local LAN that stores metadata about each instance runningThe data for an instance is only made available to that instance but is available to be queried from the instancewithout providing any authentication credentials
It is advised to change the admin password via the pfSense webGUI after the instance comes up or choose notto set the password at all and let a random password be set
copy Copyright 2020 Rubicon Communications LLC 38
Security Gateway Manual Amazon AWS
13 Click Next Tag Instance to accept the Storage Device Configuration
14 Optionally a tag can be set on the instance to differentiate this instance from other VMrsquos that were started byentering a value for the Name tag Click Next Configure Security Group after setting any desired tags
copy Copyright 2020 Rubicon Communications LLC 39
Security Gateway Manual Amazon AWS
15 Select a security group to launch the instance with The recommended settings for a security group should allowat least the following traffic
bull TCP port 443 from 00000 - HTTPS - This is the port that the management web GUI listens on
bull TCP port 22 from 00000 - SSH - This port can be used to connect to a command prompt with an sshclient
bull UDP port 1194 from 00000 - OpenVPN - The OpenVPN server that is configured by default is boundto this port
bull UDP port 500 from 00000 - IKE for IPsec VPN
bull UDP port 4500 from 00000 - IPsecNAT-T for IPsec VPN
copy Copyright 2020 Rubicon Communications LLC 40
Security Gateway Manual Amazon AWS
If you have an existing security group that includes this access select Select an existing security group thenselect the group(s) to use and click Continue Otherwise select Create a new security group and add rulesfor this access by filling in the form for each rule and clicking the Add Rule button When all of the rules havebeen added click Review and Launch
16 Verify the details for the instance and click Launch
17 Select an existing key pair or create a new key pair to connect to the instance with Do not select Proceed
copy Copyright 2020 Rubicon Communications LLC 41
Security Gateway Manual Amazon AWS
Without a Key Pair Click the checkbox that indicates you acknowledge having access to the selected privatekey file and then click Launch Instance
18 In order to reach the instance from the Internet associate an Elastic IP with the WAN interface of the instanceIn the VPC Management Console go to the Elastic IPs view by clicking on Elastic IPs on the left side of thepage Click on the Allocate New Address button Select that you want the EIP used in VPC and click on theYes Allocate button in the box that pops up After the Elastic IP address is allocated associate the address withthe WAN interface of the Netgate appliance by clicking on the Associate Address button
A box will pop up that will either let you specify the instance and Private IP address of the interface or theNetwork Interface and the Private IP Address of the interface Use one of these methods to select the correctinterface and click on the Yes Associate button The instance should now be reachable via ssh or https
copy Copyright 2020 Rubicon Communications LLC 42
Security Gateway Manual Amazon AWS
19 In order for traffic to be allowed to be routed from the private subnet through the public interface of the instancethe SourceDest AddressCheck on the private interfaces needs to be disabled In the EC2 Management Con-sole go to the ldquoNetwork Interfacesrdquo view by clicking on Network Interfaces in the menu on the lefthand sideof the page
Click the checkbox to the left of the privateLAN interface on the Netgate appliance instance Click on theActions button at the top of the page and select Change SourceDesk Check on the popup menu Select theradio button labeled Disabled on the box that pops up and click on the Save button
Non-local traffic from the private subnet should now be sent through the privateLAN interface on the Netgateappliance instance
copy Copyright 2020 Rubicon Communications LLC 43
Security Gateway Manual Amazon AWS
313 Managing a VPC Instance
Once the instance is launched you can connect to it via the Elastic IP that was attached to the primary interface duringthe provisioning phase
In order to manage the configuration of the instance you can connect to it via https or ssh A limited set of configura-tions is possible through the SSH interface the preferred method for managing most of the configurations or viewingdata on the status of the pfSensereg instance is through the https webGUI
Connecting via SSH
To connect via SSH you would use the key pair you chose while creating the instance to connect to the admin accountFrom the command line on a UnixLinux host you would use a command similar to
ssh -i my_ec2_key admin232020454
Where the appropriate private key file and public IP or hostname are substituted
Note The first time you log into your instance the SSH key of the instance will not be cached on your computerand you will need to type yes when asked whether you want continue connecting This should not be necessary onsubsequent sessions
Once logged in you should see the console menu similar to the one below
copy Copyright 2020 Rubicon Communications LLC 44
Security Gateway Manual Amazon AWS
Connecting via HTTPS
To connect via https you would enter a URL containing the public IP address or hostname of your instance intoa web browser For example https232020454 Itrsquos very likely that you will receive a browser warningindicating that the security certificate of the site is not trusted This is because the instance uses a self-signed certificatefor https communication You should click on the option to proceed to the site anyway The pfSense login screen withthe Netgate logo should appear
The username to log in with is admin The password to use is either a value that you set in the User Data during thecreation of the instance or a random password
Tip It is preferable to explicitly set a password by passing a value in with the User Data field so the password willbe known in advance
If you did not set a specific password you can find out that value that the random password was set to through one of2 different methods
1 The first method is to log in over SSH with the key pair that you selected when the instance was created andexamine the contents of the file located at etcmotd You would do this by selecting option 8) Shell in theconsole menu that is presented when you SSH in then run this command in the shell
cat etcmotd
2 The second method is to view the System Log for the instance in the EC2 Management Console After themessages that are displayed that show the status of the boot process a message should appear that indicates what
copy Copyright 2020 Rubicon Communications LLC 45
Security Gateway Manual Amazon AWS
the administrative password was changed to Be aware that the System Log output in the EC2 ManagementConsole is not updated in real time and may take a few minutes to show up
The message you should look for using either of the methods mentioned about will look like this
Admin password changed to abcdefg
Once yoursquove determined your password and entered it into the login form the pfSense WebGUI should be availableto you
314 Forwarding traffic from VPC subnets through the instance
Some additional configuration is required within the VPC instancersquos pfSensereg webGUI before you are able to managetraffic from the private subnet
1 Log into the pfSense WebGUI for the instance
2 Click on the Interfaces heading on the left and then click the Assign link
3 Click on the + icon to add a new Interface under the Interface assignments tab A LAN interface shouldautomatically be added with the next available network interface (xn1)
4 Click on the Interfaces heading on the left again and then click on LAN Click the checkbox to enable the LANinterface Set the IPv4 Configuration Type to Static IPv4 and enter the IP address you assigned to the 2ndinterface during the provisioning phase Click the Save button
Now you can create other instances attached to your private subnet and protect them with the firewall on the pfSenseinstance
Common ways to manage private hosts
Allowing private hosts to connect to the Internet
To allow private hosts to be able to connect to the Internet you can allow any traffic from the LAN in your firewallrules there should be a rule like this in place by default
Next set up NAT rules to cause addresses in the private subnet to be NATed to the IP address of the WAN interface
1 Under the Firewall heading on the left click on the NAT link
2 On the Outbound tab click the radio button for Manual Outbound NAT rule generation (AON - AdvancedOutbound NAT)
3 Click the Save button
4 Click on the Aliases link under the Firewall heading on the left
5 Add your private subnet to the Networks_to_NAT alias
Note There is an existing NAT rule configured by default that uses the alias Networks_to_NAT
copy Copyright 2020 Rubicon Communications LLC 46
Security Gateway Manual Amazon AWS
Allow private hosts to connect to each other
If your hosts should only contact each other and a private network segment elsewhere you can configure an IPsecor OpenVPN tunnel from your remote networks to the Netgate appliance instance and set up the appropriate firewallrules routes and security policies to allow access to your private subnet through a VPN tunnel
Allow direct inbound access from the internet to hosts
If you wish to enable direct inbound access from the internet to hosts on the private subnet you can set up portforwarding on the WAN interface to direct traffic to particular hosts in the private subnet
315 Establishing a VPN connection to a VPC in another region
To establish a VPN that allows instances on the VPC subnet(s) that sit behind a Netgate appliance to communicate withinstances that reside in a VPC in another region the Netgate appliance has a VPC configuration wizard that assists byconfiguring both the Netgate appliance as well as the VPC configuration elements that would normally have to be setmanually through the AWS Management Console
For detailed instructions see the AWS VPC User Guide
316 Upgrading a VPC Instance
Periodically new releases of the AMI are issued to track new releases of pfSensereg that may provide new functionalitybug fixes and security updates
The lower risk approach to upgrading is to bring up a new instance alongside the existing one and executing a cutoverThese instructions detail the procedure for moving your existing instance to one running the latest version
1 Back up the configuration of your exsting instance by navigating to BackupRestore under the Diagnosticsmenu in the Web GUI Click the Download configuration button under the Backup Configuration headingand save your config file to your local system
2 Bring up a new instance of the pfSense Certified RouterFirewallVPN running the latest version
3 When creating the instance make sure the interfaces match the interfaces on the existing instance Make surethat the new instance is in the same VPC as the existing instance and that it has the same number of interfacesattached and that the interfaces are connected to the same Subnets
4 Make sure any interfaces on the new instance that will communicate with private Subnets have theSourceDestination check disabled
5 Allocate a new Elastic IP and associate it to the WAN interface of the new instance to allow yourself managementaccess
6 Restore the backed up configuration file to the new instance Navigate to BackupRestore under the Diagnosticsmenu in the Web GUI Under the Restore Configuration heading click the Choose File button and browsefor the configuration file you backed up from the existing instance earlier Once you have selected that fileclick the Restore configuration button The configuration file will be uploaded and the instance will rebootautomatically
7 If you had packages installed on the old instance navigate to Packages under the System menu in the pfSenseweb GUI and install the same packages
8 If there was any external dependency on the public IP address of the existing instance you can remove theElastic IP Address from the upgraded instance and move the Elastic IP Address from the existing instance tothe upgraded instance External dependencies that might cause you to want to do this include things like VPNrsquos
copy Copyright 2020 Rubicon Communications LLC 47
Security Gateway Manual Amazon AWS
configured to external devices that rely on the existing instancersquos Elastic IP address or access lists on externaldevices that allow access to traffic from the existing instancersquos IP address There may be other reasons why youwould wish to keep the existing address as well (to preserve existing bookmarks to the Web GUI reduce theneed for updates to existing internal documentation etc) The process for moving the old Elastic IP address tothe new instance is as follows
bull Disassociate the Elastic IP address from the new instance In the EC2 Management Console click onElastic IPs under the Network amp Security heading Check the box next to the Elastic IP address assignedto the new instance and click on the Disassociate Address button
bull Disassociate the Elastic IP address from the old instance The procedure is the same as in the previousstep just repeated for the Eastic IP address of the old instance this time
bull Associate the Elastic IP address that was previously associated to the old instance to public interface of thenew instance In the EC2 Management Console click on Elastic IPs Check the box next to the Elastic IPaddress you are moving and click the Associate Address button Fill in the correct value for the Instanceor Network Interface and select the Private IP Address of the public interface on the new instance Clickthe Associate button The management interface of the new instance should now be accessible
9 Move any default routes that pointed to an interface on the old instance to point to the equivalent interface onthe new instance In the VPC Management Console click on Route Tables under the Virtual Private Cloudheading Check the box next to a Route Table associated with the VPC that the instances is located in
bull In the detail pane that appears at the bottom of the screen click on the Routes tab
bull If a route exists for 00000 with a Target that is an interface ID of an interface on the old instnace clickthe Edit button above the table displaying the routes
bull Click the red X next to the row for 00000 to remove the existing route
bull There should be a blank row with empty fields for a new route Enter 00000 in the Destinationfield and the Network Interface ID of the interface on the new instance in the Target field Click on theSave button
bull If there were multiple private subnets in the VPC which were pointed to interfaces on the pfSense instancerepeat this process for the other Route Tables associated with the VPC
bull The new instance should now be functioning as the old one did
32 AWS VPC Wizard User Guide
This guide will explain how to use the AWS VPC Wizard to simplify the configuration of a VPN to a remote VPC Theadministrator is asked for the minimum amount of basic information required to establish the VPN The configurationsboth on the AWS VPC side and on the pfSense side are then automatically created When the wizard is finishedexecuting a functioning VPN connection to a VPC should be established
321 AWS Access Keys
In order to connect to the AWS API to make certain required configuration changes the AWS VPC Wizard requiresAccess Keys to retrieve and modify VPC configurations
See also
Find more information about AWS Security Credential including Access Keys by reading AWS Security Credentials
Access keys consist of two parts
1 An access key ID
copy Copyright 2020 Rubicon Communications LLC 48
Security Gateway Manual Amazon AWS
bull For example AKIAIOSFODNN7EXAMPLE
2 A secret access key
bull For example wJalrXUtnFEMIK7MDENGbPxRfiCYEXAMPLEKEY
Access keys are like a usernamepassword and needed for programmatic requests to AWS including the AWS VPCWizard Use both the access key ID and secret access key together to authenticate requests
Important Manage access keys as securely as a user name and password
Managing Access Keys
To create modify or delete IAM user access keys do the following
1 Sign in to the IAM console
2 In the navigation bar on the upper right choose a user name and then choose My Security Credentials
3 On the AWS IAM Credentials tab in the Access keys for CLI SDK and API access section choose Createaccess key
4 Choose Download csv file to save the access key ID and secret access key to a csv file on your computerStore the file in a secure location There is no access to the secret access key again after this dialog box closesAfter the csv file has been downloaded choose Close When an access key is created the key pair is active bydefault and the pair can be used right away
bull To disable an active access key choose Make inactive
bull To reenable an inactive access key choose Make active
bull To delete an access key choose its X button at the far right of the row Then choose Delete to confirmWhen an access key is deleted itrsquos gone forever and cannot be retrieved However new keys can alwaysbe created
To create modify or delete another IAM userrsquos access keys do the following
1 Sign in to the IAM console
2 In the navigation pane choose Users
3 Choose the name of the user whose access keys to manage and then choose the Security credentials tab
4 In the Access keys section choose Create access key
5 Choose Download csv file to save the access key ID and secret access key to a CSV file on your computer
Rotating Access Keys
As a security best practice we recommend to regularly rotate (change) IAM user access keys Rotating access keyscan be done from the AWS Management Console
To rotate access keys for an IAM user without interrupting the applications (console) create a second access key whilethe first access key is still active
1 Sign in to the IAM console
2 In the navigation pane choose Users
3 Choose the name of the user whose access keys to manage and then choose the Security credentials tab
4 In the Access keys section choose Create access key
copy Copyright 2020 Rubicon Communications LLC 49
Security Gateway Manual Amazon AWS
5 Choose Download csv file to save the access key ID and secret access key to a CSV file on your computer
6 The new access key is active by default At this point the user has two active access keys
After waiting some period of time to ensure that all applications and tools have been updated delete the first accesskey
1 Sign in to the IAM console
2 In the navigation pane choose Users
3 Choose the name of the user whose access keys to manage and then choose the Security credentials tab
4 Locate the access key to delete and choose its X button at the far right of the row Then choose Delete to confirm
Determining When Access Keys Need Rotating
To determine when access keys need rotating (console) do the following
1 Sign in to the IAM console
2 In the navigation pane choose Users
3 If necessary add the Access key age column to the users table by completing the following steps
1 Above the table on the far right click the settings icon
2 In Manage columns select Access key age
3 Choose Close to return to the list of users
4 The Access key age column shows the number of days since the oldest active access key was created Usethis information to find users with access keys that need rotating The column displays None for users with noaccess key
322 Using the Wizard
1 Gather your AWS Access Key ID and Secret Key
2 Navigate to VPN gt AWS VPC Wizard in the main menu in the pfSensereg webGUI
copy Copyright 2020 Rubicon Communications LLC 50
Security Gateway Manual Amazon AWS
3 The first screen of the wizard prompts for the AWS Credentials Enter the Access Key ID and Secret AccessKey in the appropriate text fields and select the Region to connect to in the dropdown menu then click Next
The wizard will then query the AWS API using those credentials to find which VPCrsquos exist in the selectedregion If the credentials were rejected an error message will be displayed and return to the first screen
4 The next screen will prompt to select from the available VPCrsquos in the selected region Select the one to connectto from the dropdown menu The wizard will not create a new VPC it will only connect to an existing VPC
Click Next after selecting the desired VPC
copy Copyright 2020 Rubicon Communications LLC 51
Security Gateway Manual Amazon AWS
Note If the desired VPCrsquos to connect to isnrsquot available create one via the AWS Management Console and tryagain
The wizard will then query the AWS API to check whether there is a VPN Gateway attached to the selectedVPC If none exists one will be created via the API Then the next screen will be displayed
5 On the next screen specify routing and network data
A description of what should be entered for each of these fields follows
copy Copyright 2020 Rubicon Communications LLC 52
Security Gateway Manual Amazon AWS
Routing Type AWS offers either static routing or BGP routing Select the appropriate type fromthe dropdown menu If unsure static routing is likely to be adequate
BGP AS Number If static routing was choosen leave this field blank Otherwise it is possible tospecify an AS number to use If left blank the value will default to 65000
Local Public IP Address On an AWS Netgate appliance instance this should be the public IP ad-dress of the Elastic IP associated with the instance If configuring a hardware device runningpfSense this could be the public address assigned to the WAN (or other) interface of the device
Local subnets The subnets connected to the pfSense instance that should be routed over the tunnelfrom hosts in the remote VPC As an example if connecting a pfSense instance to a remote VPCin the AWS us-east-1 region enter the subnets (or a single subnet) that are local to the pfSenseinstance and when hosts in your VPC in us-east-1 attempted to reach addresses within thosesubnets the traffic will be sent through the VPN tunnel that is being configured
Note When selecting static routing as the routing type there will be a delay that is typically between 2-5minutes before the next screen is displayed This is because static routes must be added to the VPN Connectionvia the AWS API This operation fails until the VPN Connection reaches the ldquoavailablerdquo state This can take afew minutes to occur
Click Next when done
The wizard will then query the AWS API to find whether a Customer Gateway is configured with the selectedPublic IP Address If none exists one will be created If one already exists the ID will be retrieved and it willbe used
The wizard will then query the AWS API to see if a VPC Connection already exists that matches the dataentered If one exists it will be used Otherwise one will be created
If static routing was selected static routes will be added to the VPN Connection for the Local subnets entered
Route propagation will be enabled for the VPN Gateway in each of the Route Tables that are associated withthe VPC All of these configurations are carried out in the AWS API nothing has been changed in the pfSenseVPN configurations yet
Warning Important Note on Billing Once this step is carried out and the VPN Connection is createdAWS will start billing your AWS account the hourly rate for a VPN Connection This is $005 as of thiswriting and that is a charge that goes entirely to AWS itself They will do this until the VPN Connection isdeleted via the VPC Management Console
Nothing in pfSense will ever cause AWS to stop billing for this VPN Connection Whether it works or notwhether the pfSense instance is up or down whether the IPsec tunnels have been deleted or reconfiguredAWS will continue to bill the hourly fee for a VPN Connection if the creation of it succeeds until it is deletedthrough their web interface
The wizard helps establish an initial configuration that works and configures the appropriate elements inAWSrsquos API to facilitate this You are responsible for making sure you understand what yoursquore being billedfor and disabling any functions including VPN Connections that are no longer necessary
6 If the operations of the previous step succeeded the next screen will appear
copy Copyright 2020 Rubicon Communications LLC 53
Security Gateway Manual Amazon AWS
Select an Interface to act as the local endpoint of the VPN tunnels that will be created In most cases thisshould be the WAN interface It should generally be whatever interface is associated with the Local Public IPAddress entered in the previous step
On an AWS Netgate pfSense instance this will be whatever interface the Elastic IP is associated with On ahardware device running pfSense that has the Local Public IP Address directly configured on an interface thiswill be the interface that the Local Public IP Address is configured on
After clicking Next the wizard will configure the VPN and associated settings within pfSense itself using datareturned by the AWS API in the previous step
It will configure 2 IPsec tunnels a firewall rule 2 Aliases (referenced by the firewall rule) and 2 Virtual IPAddresses If BGP was selected as the Routing Type in the previous step it will install the OpenBGPDpackage automatically and configure it appropriately
7 The next screen will appear and prompt to apply the configuration changes that have been made
copy Copyright 2020 Rubicon Communications LLC 54
Security Gateway Manual Amazon AWS
After clicking Next all the configuration changes that were made will be applied
8 The wizard will be completed and the browser will be redirected to the IPsec status page The VPN to the VPCshould now be fully configured
Note Sometimes there is a delay of 5-10 minutes before the tunnels are fully functional and passing trafficThis has been observed particularly often during the setup of tunnels using BGP routing
copy Copyright 2020 Rubicon Communications LLC 55
Security Gateway Manual Amazon AWS
323 Testing Connectivity
Verify that the IPsec tunnels are functioning by attempting to ping the ldquoinside tunnel addressesrdquo of the VPC side ofthe tunnel by navigating to Firewall -gt Virtual IP There should be two virtual IP addresses configured that haveDescriptions like ldquoInside address for tunnel to ltremote IP addressgtrdquo
Amazon provides inside addresses for each end of the tunnel in a 30 subnet in IPv4 link local address space(169254xy) Typically the first usable address in the 30 is the inside address for the VPC end of the tunnel andthe other usable address is the inside address for your end of the tunnel So if you ping from one of the virtual IPaddresses configured on the pfSensereg instance to the IP address that is one less (for example if the virtual IP addresswere 16925425322 ping from 16925425322 to 16925425321) that checks whether the other end of the tunnelis responding and whether the tunnel is functioning properly
Note It sometimes takes a few minutes for the tunnels to begin working after the configuration wizard completes
To ping log into the pfSense instance via SSH and execute ping from a shell prompt For the previous example of16925425322 the proper syntax is
ping -S 16925425322 16925425321
When pinging from a shell prompt it is possible leave the command running indefinitely and interrupt it there is aresponse
copy Copyright 2020 Rubicon Communications LLC 56
Security Gateway Manual Amazon AWS
It is also possible to ping via the Diagnostics -gt Ping page by selecting the appropriate source address and enteringthe remote tunnel inside address in the Host field This will only send a limited number of ping packets so it may benecessary to repeat this a few times
324 VPC Configuration Details
The AWS documentation for connecting a hardware device to a VPC provides a great amount of detail on configuringVPN Connections to VPC
The main configuration elements that exist in Amazonrsquos data model are the Virtual Private Gateway the CustomerGateway and the VPN Connection In order to configure a VPN connection to a VPC all 3 of these need to exist TheVirtual Private Gateway is the VPN endpoint on Amazonrsquos side The customer gateway is the VPN endpoint on thepfSensereg instancedevice being configured The VPN Connection is the IPsec VPN between Amazon and the pfSenseinstancedevice
A Virtual Private Gateway needs to exist and be associated to the VPC A particular VPN Gateway can only beassociated to one VPC at a time Once the VPC to connect to has been selected the wizard invokes the AWS API callDescribeVpnGateways to determine if a VPN Gateway already exists that is attached to the VPC If none exists itcreates one with the CreateVpnGateway API call and attaches it to the VPC with the AttachVpnGateway call
A Customer Gateway needs to be created for the public IP address of the device or virtual machine that will be used toconnect to the VPC The wizard invokes the AWS API call DescribeCustomerGateways to determine if a CustomerGateway already exists If none exists one is created with the CreateCustomerGateway API call
The VPN Connection connects the Virtual Private Gateway and Customer Gateway The wizard checks to see if thereis an existing VPN Connection configured that connects those endpoints by invoking the AWS API call DescribeVp-nConnections If none exists one is created using the CreateVpnConnection call One of the fields returned by thiscall is a block of XML configuration data that contains configuration data assigned by AWS for use with configuringthe VPN Connection This data is stored and used in subsequent steps to make the required configuration changeswithin pfSense
copy Copyright 2020 Rubicon Communications LLC 57
Security Gateway Manual Amazon AWS
Any objects created through API calls by the wizard will be tagged with names like auto-created by pfSenseVPC ltyour_VPC_IDgt This is accomplished by calling the AWS API call CreateTags and using Name as the keyfor the tag
In addition to creation of the items mentioned above required adjustments are made to Security Groups and RouteTables to facilitate communication over the VPN The Security Groups associated with the VPC are updated to allowinbound access from the local subnets on the pfSense end of the VPN They are checked first via the DescribeSecuri-tyGroups AWS API call to determine if the access is already allowed Any of the subnets that is not already allowedhas inbound access added via the AuthorizeSecurityGroupIngress AWS API call
Route Tables associated with the VPC are updated to receive routes from the VPN Gateway used by the VPN Con-nection They are checked first via the DescribeRouteTables AWS API call If the VPN Gateway ID is not includedin the list of VPN Gateways propagating routes route propagation for the VPN Gateway is enabled on that table usingthe EnableVgwRoutePropagation AWS API call
For VPN Connections using static routing static routes for the specified subnets are added to the VPN ConnectionThis is done via the CreateVpnConnectionRoute AWS API call
325 pfSense Configuration Details
On the pfSensereg side there are numerous configurations added to support the VPN to the VPC
Aliases
First aliases are created for use in a firewall rule These aliases are intended to contain the subnets that traffic shouldbe allowed to ingress over the IPsec tunnel One alias represents the local subnets on the pfSense side and is givena name like VPC_Local_vpc_12345678 and the other represents the remote subnets on the VPC side and is given aname like VPC_Remote_vpc_12345678
Virtual IP addresses
Next virtual IP addresses are added on the lo0 (loopback) interface These virtual IP addresses are the local ldquoinsideaddressesrdquo of the IPsec tunnels These addresses are used as the local address for BGP communication when BGProuting is selected These addresses are IPv4 link local addresses (see RFC 3297) AWS assigns 30rsquos out of thenetwork 1692540016 for this purpose
Note These addresses are also useful as a ping target to execute a basic test of whether the tunnel is functioningproperly Executing a ping from a source address of one of these IP addresses to the corresponding inside address ofthe other end of the tunnel helps determine whether the tunnel negotiation is completing properly
Firewall rules
Next a firewall rule is added on the IPsec interface that allows traffic from the VPC networks to the local subnetsThis rule uses the previously created Aliases as sourcedestination targets
IPsec
Then IPsec phase 1 and phase 2 associations are set up Most of the settings required are extracted from a blockof XML data that was returned by the CreateVpnConnection call made during the AWS configuration step Thisincludes parameters like endpoint IP addresses encryption ciphers timer values etc
copy Copyright 2020 Rubicon Communications LLC 58
Security Gateway Manual Amazon AWS
If BGP routing was selected the configurations for the OpenBGPD BGP daemon are established The required settingsare determined using the AS number entered into the wizard and the parameters returned by the CreateVpnConnec-tion call made during the AWS configuration step
326 Tested Configurations
Various topologies may be possible to establish using the AWS VPC Configuration Wizard This section enumeratessome of the configurations that were successfully tested
Platforms
bull Various hardware platforms
bull 64-bit virtual machines in VMware vSphereESX
bull Amazon EC2 instances (Xen virtual machines) of the Netgate pfSensereg RouterFirewallVPN AWS AMI
Local networkrouting configurations
bull pfSense with a public address configured on the WAN interface
bull pfSense with a private address configured on the WAN interface behind a 11 NAT
bull pfSense with a private address configured on the WAN interface behind a PAT (1many NAT)
VPC Topologies
bull pfSense connected to a single VPC
bull pfSense connected to multiple VPCrsquos in different regions
bull Amazon EC2 instance of the pfSense RouterFirewallVPN AWS AMI connected to a VPC belonging to thesame AWS account in a different region
bull Amazon EC2 instance of the pfSense RouterFirewallVPN AWS AMI connected to a VPC belonging to adifferent AWS account in the same region
The configuration recommended for the greatest amount of stability is to have a public IPv4 address directly configuredon the WAN interface of your pfSense firewall but VPNs have been successfully established under all of the conditionslisted above
Whether any of these solutions is appropriate should be evaluated in the context of personal needs and existing infras-tructure Other configurations not listed above may be possible as well
327 AWS VPC Wizard FAQ
1 What level of redundancy is provided by the two tunnels
Amazon provides two tunnel endpoints that will allow traffic to be sent between your networks and the remote VPCyou are connected to The racoon daemon in pfSensereg is only capable of establishing an active phase 2 associationfor a particular sourcedestination pair on a single tunnel
Phase 2 associations between the local subnets and the remote VPC subnet are configured in the pfSense GUI for bothtunnels but racoon will only actually establish an association for the first tunnel This means that racoon will onlyever try to send traffic destined for the remote VPC subnet over the first tunnel
copy Copyright 2020 Rubicon Communications LLC 59
Security Gateway Manual Amazon AWS
If that tunnel goes down the second tunnel may be up and inbound traffic from the remote VPC may be sent to yourlocal networks over that tunnel automatically But outbound traffic to your remote VPC would not automatically failover to the second tunnel In order for you to send your outbound traffic over the second tunnel you would need todisable the phase 2 associations for the first tunnel and apply the changes
2 I quit the wizard before finishing Now what
To finish setting up the VPN go back to the wizard and run through it again It should reuse any partial configurationsthat were generated before it was stopped and create the new elements that are required
3 What are the AWS charges for this
AWS determines their own pricing and provides details for EC2 pricing and VPC pricing There are many types ofcharges that may be incurred for operating instances on AWS (eg charges related to running an instance bandwidthstorage elastic IPs etc)
The charge of specific interest in this case is the hourly charge for a VPN Connection As of this writing it costs $005(USD) per hour in most regions to have a VPN Connection configured and available AWS will charge whether theVPN Connection is being used or not as long as it is configured This will be configured by the third step of the wizardand will never be removed by pfSense
If the VPN Connection is no longer needed and billing for it needs to be stopped visit AWSrsquos VPC ManagementConsole and delete the VPN Connection manually
4 Can I use the wizard to connect to the GovCloud region
This hasnrsquot been officially tested but at least one user has reported that they were able to successfully connect to theGovCloud region They manually added the region us-gov-west-1 to the list of regions in the first step of the wizardand were able to successfully connect to their VPC in that region This may be supported in a future build but to trywithout official support do the following
1 Under the System gt Advanced menu make sure the Enable Secure Shell box is checked This is already doneby default on AWS instances but is off by default on pfSense hardware devices
2 Log into the instance via SSH
3 Make sure the root filesystem is mounted as readwrite On an AWS instance or a hardware device running on anSSD this should be true On a hardware device using Compact Flash or an SD card for storage it will probablybe necessary to remount the root filesystem in readwrite mode by running
mount -uw
4 Edit the file usrlocalwwwwizardsvpc_vpn_wizardxml using vi Look for a section of the file that lookslike this
ltoptiongtltnamegtsa-east-1ltnamegtltvaluegtsa-east-1ltvaluegt
ltoptiongt
That should appear directly after several similar ltoptiongt specifications containing all of the other availableregions Right underneath that section add the following
copy Copyright 2020 Rubicon Communications LLC 60
Security Gateway Manual Amazon AWS
ltoptiongtltnamegtus-gov-west-1ltnamegtltvaluegtus-gov-west-1ltvaluegt
ltoptiongt
Then save the file and exit vi
5 If the filesystem had to be remounted in readwrite mode earlier remount it in read-only mode by running
The GovCloud region should now appear as a choice in the first step of the wizard
copy Copyright 2020 Rubicon Communications LLC 61
CHAPTER
FOUR
REFERENCES
41 Support Resources
411 Commercial Support
In order to keep prices low the software is not bundled with a support subscription For users who need commercialsupport Netgate Gloabal Support can be purchased at httpswwwnetgatecomsupport
412 Community Support
Community support for pfSensereg software is available through the Netgate Forum
42 Additional Resources
421 Netgate Training
Netgate training offers training courses for increasing your knowledge of pfSensereg products and services Whetheryou need to maintain or improve the security skills of your staff or offer highly specialized support and improve yourcustomer satisfaction Netgate training has got you covered
httpswwwnetgatecomtraining
422 Resource Library
To learn more about how to use your pfSense appliance and for other helpful resources make sure to browse ourResource Library
httpswwwnetgatecomresources
423 Professional Services
Support does not cover more complex tasks such as CARP configuration for redundancy on multiple firewalls orcircuits network design and conversion from other firewalls to pfSensereg These items are offered as professionalservices and can be purchased and scheduled accordingly
httpswwwnetgatecomour-servicesprofessional-serviceshtml
62
Security Gateway Manual Amazon AWS
424 Community Options
If you elected not to get a paid support plan you can find help from the active and knowledgeable pfSense communityon our forums
httpsforumnetgatecom
copy Copyright 2020 Rubicon Communications LLC 63
- Getting Started
- Instance Usage
- Virtual Private Cloud (VPC)
- References
-
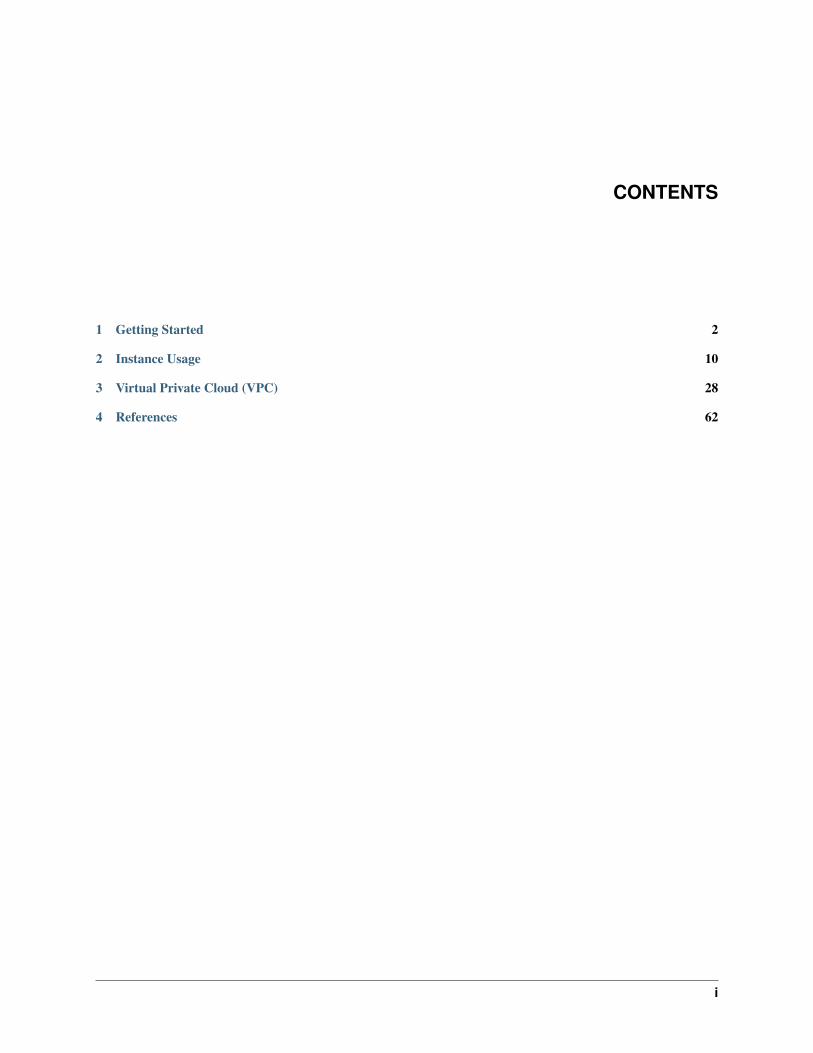

Security Gateway Manual Amazon AWS
The pfSensereg FirewallVPNRouter for Amazon AWS is a stateful firewall and VPN appliance It is suitable for useas a VPN endpoint for mobile devices laptops and desktop computers to ensure that data sent over unsecured wirelessnetworks or untrusted wired networks is encrypted using industry standard encryption algorithms It can also be usedto establish a connection between one or many sites with the internet or each other
This AMI can be run in any region where EC2 offers service on various sizes of instance pfSense for AWS is availablein the AWS Marketplace
copy Copyright 2020 Rubicon Communications LLC 1
CHAPTER
ONE
GETTING STARTED
11 Prerequisites and Requirements
In order to use a Netgate appliance instance to protect your VPC subnets you will need the following
bull A VPC
bull One internet facing public subnet which the Netgate appliance instance will have its primaryWAN interfaceconnected to
bull One or more private subnets which the Netgate appliance instance will have its secondaryLAN interface (andpossibly additional optional interfaces) connected to
bull Separate routing tables for the internet-facing subnet and the private subnet(s)
bull Separate security groups for the internet-facing subnet and the private subnet(s)
bull An elastic IP or Public IP for the WAN interface of the appliance
For the purposes of this guide your VPC will contain two subnets (public and private) as well as an Internet GatewayThe end result should look like the following diagram
If you already have all of these in place with an existing VPC feel free to skip ahead to Launching an Instance
12 Choosing Instance Type and Sizing
There are a range of specifications to choose from and this page will help guide you through those choices
121 Supported EC2 Instance Types
Your instance type will depend on your expected network throughput as well as the types of services you will providewith your pfSensereg appliance
For general firewall appliances that do not require high throughput T2 instances are General Purpose Burstable Per-formance Instances that provide a baseline level of CPU performance with the ability to burst above the baseline
If you are planning to provide advanced services like web proxying IDSIPS or Server Load Balancing you mayconsider an instance that provides more CPU andor faster storage resources such as m4large or m4xlarge
The following EC2 instance types are supported by Netgate
bull t2nano
bull t2micro
bull t2small
2
Security Gateway Manual Amazon AWS
Fig 1 Architecture Diagram
bull t2medium
bull t2large
bull m3medium
bull m3large
bull m3xlarge
bull m4large
bull m4xlarge
bull c3large
bull c3xlarge
bull c4large
bull c4xlarge
bull r4large
bull r4xlarge
122 Sizing Your EBS Volume
The pfSense appliance is only supported with EBS storage For general purpose firewalls your storage requirementswill typically be small and the default 8GB general purpose SSD volume should be more than enough
copy Copyright 2020 Rubicon Communications LLC 3
Security Gateway Manual Amazon AWS
In situations where you may provide web proxying or caching to your users or other advanced features you shouldconsider increasing the volume size to something more appropriate for example 64GB
13 AWS Service Limits
New services provisioned in a VPC may be assigned IP addresses or other resources but Amazon puts limits on VPCresources per Region Before provisioning a new resource make sure to check these limits
The following tables list the limits for Amazon VPC resources per Region Unless indicated otherwise requests canbe made to increase these limits using the Amazon VPC limits form For some of these limits the current limit appliedcan be viewed using the Limits page of the Amazon EC2 console
Note If a limit increase is requested that applies per resource we increase the limit for all resources in the RegionFor example the limit for security groups per VPC applies to all VPCs in the Region
131 VPC and Subnets
Resource Default limit CommentsVPCs per Region 5
The limit forInternet gateways perRegion is directlycorrelated to thisone Increasing thislimit increases thelimit on internetgateways per Regionby the same amount
Subnets per VPC 200ndash
IPv4 CIDR blocks per VPC 5
This limit is made upof your primary CIDRblock plus 4secondary CIDRblocks
IPv6 CIDR blocks per VPC 1
This limit cannot beincreased
copy Copyright 2020 Rubicon Communications LLC 4
Security Gateway Manual Amazon AWS
132 DNS
For more information see DNS Limits
133 Elastic IP Addresses (IPv4)
Resource Default limit CommentsElastic IP addresses per Region 5
This is the limit forthe number of ElasticIP addresses for usein EC2-VPC ForElastic IP addressesfor use inEC2-Classic seeAmazon EC2 Limitsin the Amazon WebServices GeneralReference
134 Flow Logs
Resource Default limit Comments
Flow logs per singlenetwork interfacesingle subnet orsingle VPC in aRegion
2
This limit cannot beincreased You caneffectively have 6flow logs per networkinterface if youcreate 2 flow logsfor the subnet and 2flow logs for the VPCin which your networkinterface resides
copy Copyright 2020 Rubicon Communications LLC 5
Security Gateway Manual Amazon AWS
135 Gateways
Resource Default limit CommentsCustomer gateways per Region 50
ndash
Egress-only internet gateways perRegion
5
This limit isdirectly correlatedwith the limit onVPCs per Region Toincrease this limitincrease the limit onVPCs per Region Youcan attach only oneegress-only internetgateway to a VPC at atime
Internet gateways per Region 5
This limit isdirectly correlatedwith the limit onVPCs per Region Toincrease this limitincrease the limit onVPCs per Region Onlyone internet gatewaycan be attached to aVPC at a time
NAT gateways per Availability Zone 5
A NAT gateway in thepending active ordeleting state countsagainst your
14 Creating an IAM User in Your AWS Account
pfSensereg uses AWS Identity and Access Management (IAM) accounts for administration Every AWS account in-cludes at least one user For security reasons the root account should not be used for day-to-day administration Thissection describes the process of creating and using an IAM user account for administering pfSense
See also
To find out more about AWS security and credentials read Understanding and Getting Your Security Credentials
copy Copyright 2020 Rubicon Communications LLC 6
Security Gateway Manual Amazon AWS
There are multiple methods for creating users in IAM The recommended method is to use the AWS ManagementConsole The process of creating a user and enabling that user to perform work tasks consists of the following steps
1 Create the user
2 Create credentials for the user
3 As a best practice create only the credentials that the user needs For example for a user who requires accessonly through the AWS Management Console do not create access keys
Note For cloud security it is considered best practice to limit access for the root user so root is locked bydefault
4 Grant the appropriate permissions to the user to administer pfSense
5 Provide the user with the necessary sign-in information
6 (Optional) Configure multi-factor authentication (MFA) for the user
141 Creating IAM Users (Console)
You can use the AWS Management Console to create IAM users To create one or more IAM users (console)
1 Sign in to the AWS Management Console and open the IAM console at httpsconsoleawsamazoncomiam
2 In the navigation pane choose Users and then choose Add user
3 Type the user name for the new user This is the name they will use to sign in to AWS To add up to 10 users atonce choose Add another user for each additional user and type their user names
4 User names can be a combination of up to 64 letters digits and these characters +=-
5 Names must be unique within an account and are not case sensitive
6 Select AWS Management Console access This creates a password for each new user
bull For Console password choose one of the following
ndash Autogenerated password Each user gets a randomly generated password that meets the accountpassword policy in effect (if any) You can view or download the passwords when you get to theFinal page
ndash Custom password Each user is assigned the password that you type in the box
bull We recommend that you select Require password reset to ensure that users are forced to change theirpassword the first time they sign in
7 Click Next On the Set permissions page specify how you want to assign permissions to this new user(s)Choose one of the following three options
bull Add user to group Choose this option if you want to assign the user(s) to one or more groups thatalready have permissions policies IAM displays a list of the groups in your account along with theirattached policies You can select one or more existing groups or choose Create group to create a newgroup
bull Copy permissions from existing user Choose this option to copy all access rights from an existing userto the new user(s)
bull Attach existing policies to user directly Choose this option to see a list of the managed policies in youraccount Select the policies that you want to attach to the new users or choose Create policy to open anew browser tab and create a new policy
copy Copyright 2020 Rubicon Communications LLC 7
Security Gateway Manual Amazon AWS
8 Choose Next Review to see all of the choices you made up to this point When you are ready to proceedchoose Create user
9 To view the usersrsquo access keys (access key IDs and secret access keys) choose Show next to each password andaccess key that you want to see To save the access keys choose Download csv and then save the file to a safelocation
Important This is your only opportunity to view or download the secret access keys and you must providethis information to your users before they can use the AWS API Save the userrsquos new access key ID and secretaccess key in a safe and secure place You will not have access to the secret keys again after this step
10 On the final page you can choose Send email next to each user Your local mail client opens with a draft thatyou can customize and send The email template includes the following details to each user
bull User name
bull URL to the account sign-in page Use the following example substituting the correct account ID numberor account alias
bull httpsAWS-account-ID or aliassigninawsamazoncomconsole
Important The userrsquos password is not included in the generated email You must provide them to the customerin a way that complies with your organizationrsquos security guidelines
15 Using IAM Roles
AWS IAM Roles are used to delegate access to users applications or services that require controlled access to AWSresources IAM Roles should be used to manage all pfSensereg instances This unique role can be specified whenlaunching a new instance or attached to an existing instance
The AWS Management Console is the recommended method for creating roles for use with pfSense It is also recom-mended to create these roles based on the principle of least privilege also known as the principle of least authoritywhich is the assignment of lowest needed privileges based on necessity The below instructions attempt to follow thisprinciple
151 Create Policy for pfSense Management IAM Role
Create a custom policy that will be associated with an IAM role allowing access to the pfSense Management GUIrunning on an EC2 Instance
1 Sign in to the AWS Management Console and open the IAM console at httpsconsoleawsamazoncomiam
2 In the navigation pane of the console select Policies then choose Create Policy
3 Drop down the Service menu and select EC2
4 In the Actions dropdown check the box next to All EC2 actions (ec2)
Note If stricter policies are required for the actions that can be performed on the pfSense EC2 Instance thesecan be set here
5 Select the Resources dropdown arrow and review resulting warnings
copy Copyright 2020 Rubicon Communications LLC 8
Security Gateway Manual Amazon AWS
6 Click the All resources bubble
7 Select Review policy
8 Populate the Name field (eg pfSense_EC2_Access) and Description if desired
Note Policy names must be unique within the AWS account and the name of the policy cannot be changedonce created
9 Select Create Policy
152 Create IAM Role for pfSense Management
Create a role that an IAM user or users within an IAM Group can assume and use to connect to and manage pfSenserunning on an EC2 Instance
Note The administrator of the specified account can grant permission to assume this role to any IAM user inthat account To do this the administrator attaches a policy to the user or a group that grants permission for thestsAssumeRole action That policy must specify the rolersquos ARN as the Resource
1 Sign in to the AWS Management Console and open the IAM console at httpsconsoleawsamazoncomiam
2 In the navigation pane of the console select Roles then choose Create Role
3 Select the Another AWS account role type
4 In the Account ID field type the AWS account ID that will be allowed to access the destination resource
5 The Require external ID checkbox should remain cleared unless granting permissions to users from an accountthat you do not control Reference AWS Documentation for External ID Roles in the event this is required
6 It is recommended to restrict the role to users who sign in with multi-factor authentication (MFA) Select Re-quire MFA to add a condition to the rolersquos trust policy to require MFA sign-in
7 Select Next Permissions
8 Type the name of the previously created Custom policy in the search field Check the box next to the correctPolicy name
9 Select NextTags
Note IAM tags are key-value pairs that can be used to organize track or control access for this role This isan optional step More information can be found within AWS Documentation for Tagging IAM Entities
10 Select Next Review
11 Populate the Role name field (eg pfSense_Admin) and Role description if desired
Note Role names must be unique within the AWS account and the name of the role cannot be changed oncecreated
12 Review remaining configured settings then select Create role
This role can now be assigned to an IAM User or all users in an IAM group allowing secure administrative access tothe EC2 Instance(s) containing pfSense
copy Copyright 2020 Rubicon Communications LLC 9
CHAPTER
TWO
INSTANCE USAGE
21 Launching an Instance
Here are instructions on how to launch a new instance of the pfSensereg firewallVPN appliance from the Amazon EC2Management Console
1 Select the region for the instance to run in using the region tab at the upper right corner of the page
2 Navigate to the AWS Management Console Main Page and select EC2 under the Compute section in the Allservices dropdown
10
Security Gateway Manual Amazon AWS
3 Launch a new instance by clicking on the Launch Instance button under the Create Instance section of theEC2 dashboard
4 Select AWS Marketplace in the left-hand Navigation Menu Type Netgate pfSense in the search box andpress enter
copy Copyright 2020 Rubicon Communications LLC 11
Security Gateway Manual Amazon AWS
5 Click the Select button for the Netgate pfSense FirewallVPNRouter listing in the search result
6 Review pricing and other helpful information then click Continue
copy Copyright 2020 Rubicon Communications LLC 12
Security Gateway Manual Amazon AWS
7 Choose the instance type to run by clicking the checkbox next to the desired type Click Next ConfigureInstance Details
8 Choose the desired Network and Subnet that the instance will be deployed in Choose any other instance-specificsettings that may be required in your environment Optionally expand the Advanced Details section and setparameters as text in the User Data field The available options are
bull password - setting a value via a directive like password=abcdefg will set the password for the admin-istrative account to the value you specify - abcdefg in this example If no value is set here a randompassword will be assigned in order to keep administrative access from being exposed to the Internet with adefault password
bull mgmtnet - setting a value via a directive like mgmtnet=1001024 will restrict management access(http https ssh) to the network you specify - 1001024 in this example This will cause the firewallrules on the instance (not on Amazonrsquos access lists but on the Netgate pfSense appliancersquos own firewall)to restrict management traffic for the instance to the specified source network The default behavior is toallow management from any host
copy Copyright 2020 Rubicon Communications LLC 13
Security Gateway Manual Amazon AWS
These directives can be set by placing them on a single line in the User Data field and separating them withcolons To specify both parameters type a statement similar to this one
password=abcdefgmgmtnet=1001024
Note If a password is set using the password parameter listed above the password is retrieved by the instancevia an unencrypted HTTP request when the system is configured the first time it boots The request is made toan Amazon Web Services-operated server on the local LAN that stores metadata about each instance runningThe data for an instance is only made available to that instance but is available to be queried from the instancewithout providing any authentication credentials
It is advised to change the admin password via the pfSense web GUI after the instance comes up to avoid anysecurity risks associated with the unencrypted request Otherwise it is possible to choose not to set the passwordat all and let a random password be set
9 Choose the desired Network and Subnet to which the Instance will be deployed Scroll down to configure thenetwork interface(s) with a Static or DHCP-assigned IP address
Once the Network Interface(s) are configured select Next Add Storage
10 Click Next Add Tags to accept the Storage Device Configuration
copy Copyright 2020 Rubicon Communications LLC 14
Security Gateway Manual Amazon AWS
11 It is recommended to set a tag that can be used to differentiate this instance from other instances by entering avalue for the Name tag Click Next Configure Security Group after setting any desired tags
Press the Add Tag button Input Name under the Key field and the desired Instance Tag Name under the Valuefield (eg Netgate FirewallRouter)
12 Select a security group to launch the instance with The Security group name and Description can be left at thedefault or replaced with the desired values The recommended settings for a security group should allow at leastthe following traffic
bull TCP port 443 from 00000
ndash HTTPS - This is the port that the management web GUI listens on
bull TCP port 22 from 00000
ndash SSH - This port can be used to connect to a command prompt with an ssh client
bull UDP port 1194 from 00000
copy Copyright 2020 Rubicon Communications LLC 15
Security Gateway Manual Amazon AWS
ndash OpenVPN - The OpenVPN server that is configured by default is bound to this port
bull UDP port 500 from 00000
ndash IKE for IPsec VPN
bull UDP port 4500 from 00000
ndash IPsecNAT-T for IPsec VPN
Note If there is an existing security group that includes this access click Select an existing security groupthen select the desired group(s) to use and click Continue Otherwise select Create a new security group andadd rules for this access by filling in the form for each rule and clicking the Add Rule button When all of therules have been added click Review and Launch
13 Review any AWS warnings and make note of recommendations Scroll down to review the remaining instancedetails and click Launch after making any needed adjustments
copy Copyright 2020 Rubicon Communications LLC 16
Security Gateway Manual Amazon AWS
14 Select an existing key pair or create a new key pair to connect to the instance with Click the checkbox thatindicates acknowledgment of access to the selected private key file and then click Launch Instances
Important Do NOT select the Proceed Without a Key Pair option
22 Managing the Configuration of the Instance
Once the instance is launched monitor its status using the Instances page of the EC2 Management Console The EC2Management Console will display whether the instance is up and reachable and will also display its current public IPaddress and the hostname that resolves to the public IP address Find the hostname and public IP address in the EC2console by clicking on the Instances heading on the left finding the instance and checking the checkbox next to it andlooking at the details at the bottom of the page
In the example above the hostname of the instance is ec2-23-20-204-54compute-1amazonawscom
copy Copyright 2020 Rubicon Communications LLC 17
Security Gateway Manual Amazon AWS
The public IP address is available by putting together the 4 numbers included in the hostname - 233020454 Itis also possbile to obtain the IP address by using a popular DNS lookup tool such as host dig or nslookup toresolve the hostname to its IP address
Note The hostname and IP address used in this and other examples in this guide are associated at the time of writingwith a test instance This addresshostname will not be the same values used to access the instance and they will noteven be associated with the same test instance by the time this guide is available to the public
In order to manage the configuration of the instance connect to it via https or ssh To connect via ssh use the key pairchosen while creating the instance to connect to the admin account From the command line on a UnixLinux hostuse a command similar to ssh -i my_key_file adminpublic_IP where the appropriate private key fileand public IP or hostname are substituted In the example below the key file my_ec2_key is used to connect to the IPaddress 232020454
Note The first time logging into the instance the ssh key of the instance will not be cached locally type yes whenasked whether to continue connecting This should not be necessary on subsequent sessions
A limited set of configurations is possible through the ssh interface The preferred method for managing most of theconfigurations or viewing data on the status of the pfSensereg instance is through the https web GUI To connect viahttps enter an https URL containing the public IP address or hostname of the instance into a web browser Forexample https232020454
Itrsquos very likely there is a browser warning indicating that the security certificate of the site is not trusted because theinstance uses a self-signed certificate for https communication Click on the option to proceed to the site anyway and
copy Copyright 2020 Rubicon Communications LLC 18
Security Gateway Manual Amazon AWS
a login screen with the Netgate logo should appear
The username to log in with is admin The password to use is either a value set in the User Data during the creationof the instance or a random password If a specific password wasnrsquot set find out that value that the random passwordwas set to through one of two different means
1 The first is to log in over ssh with the key pair that was selected when the instance was created and examine thecontents of the file located at etcmotd Select option 8 (Shell) from the console menu that is presented afterlog in and execute cat etcmotd from the shell
2 Alternatively view the System Log for the instance in the EC2 Management Console After the messagesthat are displayed that show the status of the boot process a message should appear that indicates what theadministrative password was changed to
The message using either of the methods mentioned will look like this
Admin password changed to abcdefg
In this example the password was changed to abcdefg
Note Be aware that the System Log output in the EC2 Management Console is not updated in real time and maytake a few minutes to show up It is preferable to explicitly set a password by passing a value in with the User Datafield so the password will be known in advance To allow a random password to be set connect via ssh and find outwhat the password was changed to after the instance is up without any delay
Once the password has been determined and entered into the login form the pfSense Web GUI should be available
23 Using the remote access IPsec VPN
An IPsec VPN for remote users is preconfigured on the instance when it comes up In order to use it you will need toconfigure the IPsec VPN client on your device
See also
A guide for manually configuring Android or iOS (iPhoneiPodiPad) mobile clients to establish an IPsec VPN islocated in the pfSensereg Documentation
For iOS clients a profile can be downloaded and installed that will automatically configure an IPsec VPN to theinstance The profile can be downloaded by visiting the page at iphone_ipsec_profilephp on the instance If theinstance IP address were 232020454 the correct URL to visit would be https232020454iphone_ipsec_profilephp You will need to authenticate to the web interface by typing the username (admin) and password prior to beingable to download the profile
The profile should be downloaded and saved automatically upon opening the page If the page is visited in a webbrowser on an iOS device the device should automatically launch the Settings app and attempt to install the newprofile If the profile is downloaded to another non-iOS device it can be sent via email as an attachment If theattachment is opened in the iOS email client the Settings app new profile installation will also open
The name and description of the profile being installed will be displayed Tap the Install button A warning messagewill be displayed that indicates that the profile is unsigned Tap on Install Now to continue
copy Copyright 2020 Rubicon Communications LLC 19
Security Gateway Manual Amazon AWS
copy Copyright 2020 Rubicon Communications LLC 20
Security Gateway Manual Amazon AWS
Enter your passcode for the iOS device (the one you enter when you wake the device from sleep) and the passwordto access the IPsec VPN (the one you entered to get access to the Web GUI) when prompted and the profile will beinstalled When the screen shows that the profile was installed tap Done
When the profile has been installed the VPN can be enabled in the Settings app There will be a heading named VPNunder the main Settings page If there are more than one VPN configured on the device tap the VPN heading Thenewly installed profile should be selected It will have a check mark next to it There will be an onoff switch at thetop of the page to enable the VPN If this is the only VPN configured the switch to enable the VPN will be next to theVPN heading on the main Settings page Tap the switch to enable the VPN You should be prompted for a usernameand password The username (admin) should already be filled in Enter the password and tap OK A welcome messageshould be displayed Tap OK and you are ready to use the VPN
24 Using the remote access OpenVPN VPN
An OpenVPN VPN for remote users is automatically configured the first time the instance is booted In order to useit you will need an OpenVPN client app installed on your device and you will need to import a configuration thatspecifies how to connect to the instance
An OpenVPN configuration can be downloaded by visiting the page openvpn_connect_profilephp on your instanceIf the instance IP address were 233020454 the correct URL to visit would be https232020454iphone_ipsec_profilephp You will need to authenticate to the web interface by typing the username (admin) and password prior tobeing allowed to download the configuration
The profile should be downloaded and saved automatically upon opening the page The file that it was saved in shouldbe imported into the OpenVPN client on the device that you wish to connect with
copy Copyright 2020 Rubicon Communications LLC 21
Security Gateway Manual Amazon AWS
241 Tips for configuring OpenVPN based on platformclient
OpenVPN Connect App on iOS (iPhoneiPadiPod)
The iOS version of the OpenVPN Connect App allows you to import an OpenVPN profile by opening an attachmentto an email message Save the config to a file named remote-access-vpnovpn and send it to an email account thatthe iOS device is configured to retrieve mail for Open the email message and touch the attachment to open it Youwill be presented with Open in OpenVPN as one of the available options Touch the OpenVPN icon to select thatoption The OpenVPN Connect App should then open and list the profile under a heading that says New profiles areavailable Click on the green ball with the + sign in it to import the profile Type in the username admin andpassword then change the OnOff switch to On
OpenVPN Connect App on Android
The Android version of the OpenVPN Connect App allows you to import an OpenVPN profile from an SD card Savethe configuration file to the SD card Launch the OpenVPN Connect App From the menu select Import then ImportProfile from SD card Browse to the location of the configuration file and select it Enter the username admin andpassword to connect to the VPN Press Connect
TunnelBlick on MacOS X
The TunnelBlick App for MacOS allows you to import an OpenVPN configuration file Save the configuration to afile on your system Click on VPN Details Click on the + symbol underneath the existing configurations to add anew configuration Click on the I have configuration files button Click on the OpenVPN Configuration(s) buttonFollow the instructions presented by TunnelBlick (copy the config into an empty folder TunnelBlick creates on theDesktop rename the folder click on the folder) When the profile is imported successfully click on itrsquos name and thenclick on Connect Enter the username admin and password to connect to the VPN
OpenVPN Connect Client on Windows
The OpenVPN Connect Client on Windows allows you to import an OpenVPN configuration file from the local diskSave the file on your system Click the + symbol to the right of Connection Profiles Select Local File and click onthe Import button Find the profile you wish to import in the file browser window and click Open A box with thename of the new profile should appear under Connection Profiles now Click on that box and enter the usernameadmin and password to connect to the VPN
25 Enabling Enhanced Networking with the Elastic Network Adapter(ENA)
To enable enhanced networking on AWS pfSensereg FirewallVPNRouter must be version 241 or above Use theupdate wizard in the pfSense console to perform the update if necessary and then ENA can be enabled Enabling ENAis outlined in the steps below
Warning Updating the pfSense FirewallVPNRouter will force it to reboot and cause a disruption in service Besure to perform the update during a maintenance cycle
1 Install AWS CLI Documentation on the installation and use of AWS CLI can be found at httpsawsamazoncomcli
copy Copyright 2020 Rubicon Communications LLC 22
Security Gateway Manual Amazon AWS
2 Determine the Instance ID for the pfSense Instance from the EC2 Console
Fig 1 The selected pfSense Instance ID is i-042c16b65423b7dac
3 Stop the instance using Amazon EC2 console
4 Enable the enhanced networking attribute by executing the following AWS CLI command
aws ec2 modify-instance-attribute --instance-id i-042c16b65423b7dac --ena-support
5 Use the EC2 Console to start the pfSense Instance Once the pfSense Instance has started confirm that EnaSup-port is enabled by executing the following AWS CLI command
aws ec2 describe-instances --instance-ids i-042c16b65423b7dac --queryReservations[]Instances[]EnaSupport[true
]
6 Change the pfSense Instance Type to one that supports Enhanced Networking using the EC2 console Afterselecting an Instance Type that supports Enhanced Networking use the EC2 console to stop the pfSense Instance
copy Copyright 2020 Rubicon Communications LLC 23
Security Gateway Manual Amazon AWS
Note To review the Instance Types please see httpsawsamazoncomec2instance-types
7 Once the pfSense Instance has stopped use the EC2 Console to select the pfSense Instance and then under theActions button select Instance Settings gt Change Instance Type and select a new Instance Type
Fig 2 In this case m4xlarge was selected as the new Instance Type and then Apply was selected
8 In the EC2 Console the pfSense Instance should now show an Instance Type of m4xlarge
9 Using the EC2 console select the pfSense Instance and then under the Actions button select Instance State gtStart
26 Advanced Usage
261 Protecting a private network in VPC
An instance of the Netgate appliance can be used as a firewall for a VPC subnet This will generally require moremanual configuration than using an instance to host a remote access VPN does See the VPC User Guide for a moredetailed explanation of how to configure your VPC and your Netgate appliance instance to support this
262 Connecting a local pfSensereg device
In addition to connecting remote devices as clients a device running pfSensereg as a firewallrouter can be connectedas a peer to a pfSense appliance
See also
Read Configuring a Site-to-Site Static Key OpenVPN Instance in the pfSense documention to see the process ofconfiguring this setup
copy Copyright 2020 Rubicon Communications LLC 24
Security Gateway Manual Amazon AWS
When implementing the configuration changes detailed in the document you should use the Netgate appliance instanceon AWS as the ldquoserverrdquo end of the connection and your local pfSense device as the client ldquoendrdquo You will also needto make sure that you are using a unique port The default remote access OpenVPN server is configured to use UDPport 1194 It is suggested that if you are adding a site-to-site tunnel you should use a port between 1195 and 2000Whichever port you decide to use you will need to make sure that the port is open both in the firewall rules on theNetgate appliance instance and in the Security Group in the EC2 Management Console
If you wish to route all traffic from your homeoffice network through the OpenVPN tunnel to your Netgate applianceinstance you will need to add this statement to the advanced options for the OpenVPN Client on the homeofficepfSense device
redirect-gateway def1
This will cause a default route to be set that sends all locally originated traffic on your homeoffice network overthe OpenVPN tunnel when it is established If you use this configuration to send all traffic from your local networkthrough the OpenVPN tunnel you will also need to establish a NAT on the Netgate appliance instance on AWS fortraffic from the homeoffice network to the internet This can be accomplished by adding the CIDR block for yourhomeoffice network to the preconfigured Alias called Networks_to_NAT This is done by navigating to Aliases underthe Firewall heading on the web GUI then clicking on the edit icon to the right of Networks_to_NAT Add the newnetwork address and mask to the list of Networks and click the Save button Then click the Apply Changes buttonYou will also need to add the network used for the tunnel endpoints (IPv4 Tunnel Network) to the Networks_to_NATalias as well using the same procedure that was used to add the homeoffice network
Connecting multiple pfSense gateways to a Netgate appliance
Multiple homeoffice networks can be connected to a single Netgate appliance instance This could be used to allowclients at different office locations to communicate without requiring tunnels between each individual location Itcould also be used as a way to apply policies on traffic tofrom the internet in one place and have them take effectacross multiple locations
Each site would need to have the instructions above for connecting an individual device repeated to add an OpenVPNserver on the Netgate appliance instance and an OpenVPN client on the local pfSense device Each OpenVPN Serverthat is configured must use a unique port and a unique network for IPv4 Tunnel Network It is recommended touse a name that uniquely identifies each location connected in this manner in the Description field when adding anOpenVPN Server for a site in the Netgate appliance
263 Detect and Recover EC2 Instance Failure
You can create an Amazon CloudWatch alarm that monitors an Amazon EC2 instance and automatically recovers theinstance if it becomes impaired due to an underlying issue
For more information about instance recovery see Recover Your Instance
27 Frequently Asked Questions
271 1 I donrsquot know the password to the web GUI How do I find out what it is
The first time the instance boots it looks for a user-defined password set in the User Data box when the instance wascreated If you didnrsquot set one it chooses one randomly so that the instance is not accessible via a default password tomalicious users You can find out the random password that was set by choosing Get System Log from the ActionsMenu for the instance in the EC2 Management Console A message should appear after the system boot messages thatlooks like the following
copy Copyright 2020 Rubicon Communications LLC 25
Security Gateway Manual Amazon AWS
Admin password changed to abcdefg
It may take 5-10 minutes after the instance boots for this message to appear in the system log If you would like to findout the password sooner you can log in via SSH using the SSH key that was selected when the instance was createdThe same message that will be written to the system log will be written to the file etcmotd Running the commandcat etcmotd will show you what the password is
272 2 I donrsquot like the random password that was selected How can I change it
The password can be changed via the web GUI Log in with the username admin and the existing password Underthe System category click on User Manager The admin account should appear in a list of accounts Unless yoursquoveadded other accounts it should be the only account present Click on the Edit button (the icon with the e in it) to theright of the account listing Type your choice for a new password into the two boxes labeled Password Click theSave button at the bottom of the screen
273 3 How do I access my instance
There are several ways that you can manage or use your instance You should be able to connect via SSH or HTTPS inorder to manage the configuration of your instance If you connect via SSH you will either need to know the passwordof the admin account and login with that account or use the SSH key that was selected when the instance was createdHere is a sample command line to log in with an SSH key from a Unix or Linux host
ssh -i ~sshmy-ec2-key adminec2-A-B-C-Dcompute-1amazonawscom
You would substitute the actual location of your SSH private key for ~sshmy-ec2-key and the real hostnamewhich you can retrieve from the EC2 Management Console by looking at the data for the instance for example ec2-A-B-C-Dcompute-1amazonawscom If you know the password for the admin account you could use a commandsimilar to the one above but omit the -i ~sshmy-ec2-key
To connect via HTTPS you need to know the password to the instance either by setting it explicitly in the User Datawhen the instance is created or by retrieving it from the instance Once you know the password you should be able toconnect to the instance with any web browser by typing in the hostname of the instance to the URL field
274 4 How do I connect a VPN client to my instance
See the section in the user guide on Using the remote access IPsec or OpenVPN VPN
275 5 Why does the pfSensereg Dashboard say my WAN address is 10XYZ
Amazon AWS instances use DHCP to assign private addresses to the public-facing interfaces of an instance Thepublicly routable IP address that you use to acces the instance is NATed by Amazon to the private address that you seeconfigured on the WAN interface of your instance
copy Copyright 2020 Rubicon Communications LLC 26
Security Gateway Manual Amazon AWS
276 6 I added custom firewall rules to allow some traffic to my instance why I amnot seeing the packets arrive
Amazon AWS provides packet filtering in addition to the Netgate Appliance itself being a stateful firewall If youallowed traffic on the Netgate Appliance but have a security group configuration in the settings for the instance that isrestricting traffic you will need to also add your rules to the security group in the EC2 Management Console
Given that the Netgate Appliance is a fully functional firewall you may assign an AWS security group that allows alltraffic and perform whatever filtering you desire with rules on the Netgate Appliance
277 7 How do I route all the traffic from my entire home network over a VPN
If your home gatewayrouter has support for OpenVPN you can connect a site to site tunnel from your home networkto the Netgate VPN Appliance and configure your routing so that all Internet traffic is sent over the encrypted tunnelSee the user guide section on Connecting a local pfSensereg device
This may provide for simpler administration at home but your mobile devices and laptops that get used outside thehome should have an OpenVPN client installed and configured anyway so that you are always receiving the benefitsof sending your traffic through a VPN
copy Copyright 2020 Rubicon Communications LLC 27
CHAPTER
THREE
VIRTUAL PRIVATE CLOUD (VPC)
31 AWS VPC User Guide
The pfSensereg Certified firewall and VPN appliance from Netgate for Amazon EC2 is a stateful firewall and VPNappliance In addition to itrsquos capabilities as a VPN gateway and firewall for users and offices it is capable of actingas a firewall to protect instances providing services in Amazonrsquos Virtual Private Cloud or VPC service This servicediffers from the classic EC2 service in that it allows for management of instances on private subnets
This guide will explain how to launch manage and use an instance of the appliance to act as a gateway for otherinstances in a VPC subnet
311 Preparing your VPC
In order to use a Netgate appliance instance to protect your VPC subnets you will need the following
bull One internet-facing subnet which the Netgate appliance instance will have itrsquos primaryWAN interface con-nected to
bull One or more private subnets which the Netgate appliance instance will have itrsquos secondaryLAN interface (andpossibly additional optional interfaces) connected to
bull Separate routing tables for the internet-facing subnet and the private subnet(s)
bull If you already have all of these in place with an existing VPC feel free to skip ahead to Launching an Instance
These instructions will demonstrate how to create a single private subnet and set it up behind an instance of thepfSensereg Certified firewall and VPN appliance from Netgate In the Amazon VPC Management Console create anew VPC subnets and routing table(s)
1 Go to Your VPCs view in the menu on the left side of the VPC Management Console under the Virtual PrivateClouds grouping Click the Create VPC button
28
Security Gateway Manual Amazon AWS
2 Enter a CIDR block to use in the box that pops up If you will connect to hosts in your VPC using a VPNfrom hosts at other sites in your infrastructure be sure to select address space that does not conflict with theprivate address space used elsewhere by your organization Make sure the block you choose is large enoughto contain all subnets you may want to include within it Eg if you plan to use a 24 for your internet-facingsubnet and a 24 for your private network the CIDR block you select here will need to be at least a 23 to holdthose 2 subnets The maximum size block you can select is a 16 For the purposes of this example we will use1020016 Leave the value of Tenancy set to Default Click on the Yes Create button
3 To create the subnets required go to the Subnets view in the menu on the left side of the VPC ManagementConsole Click the Create Subnet button Select the VPC you just created and choose the availability zone youdesire Enter the subnet you wish to use for the internet-facing hosts in the CIDR Block field This subnet willbe the one that the WAN interface of the Netgate appliance instance is attached to and could include any otherhosts or appliances that you wish to be available directly from the Internet and not protected behind the Netgate
copy Copyright 2020 Rubicon Communications LLC 29
Security Gateway Manual Amazon AWS
appliance The subnet you select here must be a block that is within the address space you assigned to the VPCFor this example we will use 1020024 Click on the Yes Create button
4 Create the private subnet Still in the Subnets view of the VPC Management Console click the Create Subnetbutton In the box that pops up select the appropriate VPC and the same Availability Zone that you assignedto your public subnet Enter the subnet you wish to use for your private network in the CIDR Block field Thisnetwork should be a subnet of the address space you assigned to the VPC and should be distinct from the subnetyou assigned to the public subnet For this example we will use 1021024 Click on the Yes Create button
5 Both subnets that you created will have been created to use a default route table that was created for the VPCThe private subnet can continue to use that default table A new route table will need to be created for the publicsubnet Go to the Route Tables view in the menu on the left side of the VPC Management Console The singleexisting route table should be displayed Click on the Create Route Table button Select the VPC and click on
copy Copyright 2020 Rubicon Communications LLC 30
Security Gateway Manual Amazon AWS
the Yes Create button
6 Associate the public subnet (1020024 in our examples) with the routing table that was just created Go to theSubnets view on the left hand side of the VPC Management Console Check the checkbox next to the publicsubnet and scroll down to look at the Details tab for that subnet At the top of the Details tab will be listed theCIDR block VPC and Availability Zone Under those items the Route Table will be listed and will have a linklabeled replace next to it Click on the link Select the route table in the box that pops up and click on the YesReplace button
7 In order to send traffic from the public subnet to the Internet we will need to add a default route to an InternetGateway We must first create one Go to the Internet Gateways view in the menu on the left hand side of theVPC Management Console Click on the Create Internet Gateway button Click the Yes Create button onthe box that pops up Click the checkbox next to the new Internet Gateway and then click the Attach to VPC
copy Copyright 2020 Rubicon Communications LLC 31
Security Gateway Manual Amazon AWS
button Select the VPC and click on the Yes Attach button
8 The route table for the public subnet will need to be updated so that it has a default route to the Internet GatewayGo to the Route Tables view on the left hand side of the VPC Management Console Check the checkbox nextto the route table for the public subnet Under the Routes tab for that route table there should only be listed asingle route for the CIDR block of the VPC (1020016 in our example) that has a target of local There is arow underneath this route with a text box in the Destination field and a pop up menu for the Target field Enter00000 for the Destination and select the Internet Gateway (should be formatted like igw-XXXXXXXX)for the target Click on the Add button that appears at the right side of the row Click the Yes Add button onthe box that pops up
There are a few more VPC configuration changes that will be required later but next you must launch a Netgateappliance instance
copy Copyright 2020 Rubicon Communications LLC 32
Security Gateway Manual Amazon AWS
312 Launching an Instance in a VPC
In the Amazon EC2 Management Console launch a new instance of the pfSensereg firewall and VPN appliance Thisprocess is the same as the one for launching an EC2 (non-VPC) instance up until step 11 which details the values toenter for the Configure Instance Details screen in order to specify the instance should be created in your VPC
1 Select the region to run the instance in using the tab at the upper right corner of the page
2 Launch a new instance by clicking on the Launch Instance button under the Create Instance section of theEC2 dashboard
copy Copyright 2020 Rubicon Communications LLC 33
Security Gateway Manual Amazon AWS
3 Select AWS Marketplace on the Create a New Instance menu Type Netgate pfSense FirewallVPNRouter in the search box and press enter (or click on the Search button next to the text box)
4 Click on the link for the Netgate pfSense FirewallVPNRouter appliance in the search results
5 Click on the Continue button on the info page for the Netgate pfSense FirewallVPNRouter
copy Copyright 2020 Rubicon Communications LLC 34
Security Gateway Manual Amazon AWS
6 Click on the Launch with EC2 Console tab
7 If the license terms havenrsquot been accepted click on the Accept Terms button
8 A message should be displayed indicating that the subscription is being processed
copy Copyright 2020 Rubicon Communications LLC 35
Security Gateway Manual Amazon AWS
9 Select the version of the image to run under the popup menu labeled Select a Version Generally the mostrecently issued version should be selected Identify which region to launch the instances in and click on theLaunch in EC2 Console button to the right of that region
10 Choose the instance type to run on Click Next Configure Instance Details
copy Copyright 2020 Rubicon Communications LLC 36
Security Gateway Manual Amazon AWS
11 On the Configure Instance Details page under the Network field select the VPC that was created For theSubnet field that appears right below the Network field select the public subnet that was created earlier In ourexamples this is 1020024
12 Scroll down to the Network Interfaces heading A single interface named eth0 should be displayed by defaultClick on the Add Device button underneath eth0 Select the private subnet that was created (1021024 in ourexample) Pick an IP address within the range of the private subnet and enter it in the Private IP field Keep inmind that the first 3 or 4 IP addresses are reserved For this example we will use 10215
copy Copyright 2020 Rubicon Communications LLC 37
Security Gateway Manual Amazon AWS
Optionally expand the Advanced Details section and set parameters as text in the User Data field The availableoptions are
password Setting a value via a directive like password=abcdefg will set the password for theadministrative account to the specified value - abcdefg in this example If no value is set here arandom password will be assigned in order to keep administrative access from being exposed tothe internet with a default password
mgmtnet Setting a value via a directive like mgmtnet=1001024 will restrict managementaccess (http https ssh) to the specified network - 1001024 in this example This will causethe firewall rule on the instance (not on Amazons access lists but on the Netgate appliancersquosown firewall) to restrict management traffic for the instance to the specified source network Thedefault behavior is to allow management from any host
These directives can be set by placing them on a single line in the User Data field and separating them withcolons Specify both parameters by typing a statement similar to
password=abcdefgmgmtnet=1001024
Click Next Add Storage after optionally setting these parameters
Note If setting a password using the password parameter listed above the password is retrieved by the instancevia an unencrypted HTTP request when the system is configured the first time it boots The request is made toan Amazon Web Services-operated server on the local LAN that stores metadata about each instance runningThe data for an instance is only made available to that instance but is available to be queried from the instancewithout providing any authentication credentials
It is advised to change the admin password via the pfSense webGUI after the instance comes up or choose notto set the password at all and let a random password be set
copy Copyright 2020 Rubicon Communications LLC 38
Security Gateway Manual Amazon AWS
13 Click Next Tag Instance to accept the Storage Device Configuration
14 Optionally a tag can be set on the instance to differentiate this instance from other VMrsquos that were started byentering a value for the Name tag Click Next Configure Security Group after setting any desired tags
copy Copyright 2020 Rubicon Communications LLC 39
Security Gateway Manual Amazon AWS
15 Select a security group to launch the instance with The recommended settings for a security group should allowat least the following traffic
bull TCP port 443 from 00000 - HTTPS - This is the port that the management web GUI listens on
bull TCP port 22 from 00000 - SSH - This port can be used to connect to a command prompt with an sshclient
bull UDP port 1194 from 00000 - OpenVPN - The OpenVPN server that is configured by default is boundto this port
bull UDP port 500 from 00000 - IKE for IPsec VPN
bull UDP port 4500 from 00000 - IPsecNAT-T for IPsec VPN
copy Copyright 2020 Rubicon Communications LLC 40
Security Gateway Manual Amazon AWS
If you have an existing security group that includes this access select Select an existing security group thenselect the group(s) to use and click Continue Otherwise select Create a new security group and add rulesfor this access by filling in the form for each rule and clicking the Add Rule button When all of the rules havebeen added click Review and Launch
16 Verify the details for the instance and click Launch
17 Select an existing key pair or create a new key pair to connect to the instance with Do not select Proceed
copy Copyright 2020 Rubicon Communications LLC 41
Security Gateway Manual Amazon AWS
Without a Key Pair Click the checkbox that indicates you acknowledge having access to the selected privatekey file and then click Launch Instance
18 In order to reach the instance from the Internet associate an Elastic IP with the WAN interface of the instanceIn the VPC Management Console go to the Elastic IPs view by clicking on Elastic IPs on the left side of thepage Click on the Allocate New Address button Select that you want the EIP used in VPC and click on theYes Allocate button in the box that pops up After the Elastic IP address is allocated associate the address withthe WAN interface of the Netgate appliance by clicking on the Associate Address button
A box will pop up that will either let you specify the instance and Private IP address of the interface or theNetwork Interface and the Private IP Address of the interface Use one of these methods to select the correctinterface and click on the Yes Associate button The instance should now be reachable via ssh or https
copy Copyright 2020 Rubicon Communications LLC 42
Security Gateway Manual Amazon AWS
19 In order for traffic to be allowed to be routed from the private subnet through the public interface of the instancethe SourceDest AddressCheck on the private interfaces needs to be disabled In the EC2 Management Con-sole go to the ldquoNetwork Interfacesrdquo view by clicking on Network Interfaces in the menu on the lefthand sideof the page
Click the checkbox to the left of the privateLAN interface on the Netgate appliance instance Click on theActions button at the top of the page and select Change SourceDesk Check on the popup menu Select theradio button labeled Disabled on the box that pops up and click on the Save button
Non-local traffic from the private subnet should now be sent through the privateLAN interface on the Netgateappliance instance
copy Copyright 2020 Rubicon Communications LLC 43
Security Gateway Manual Amazon AWS
313 Managing a VPC Instance
Once the instance is launched you can connect to it via the Elastic IP that was attached to the primary interface duringthe provisioning phase
In order to manage the configuration of the instance you can connect to it via https or ssh A limited set of configura-tions is possible through the SSH interface the preferred method for managing most of the configurations or viewingdata on the status of the pfSensereg instance is through the https webGUI
Connecting via SSH
To connect via SSH you would use the key pair you chose while creating the instance to connect to the admin accountFrom the command line on a UnixLinux host you would use a command similar to
ssh -i my_ec2_key admin232020454
Where the appropriate private key file and public IP or hostname are substituted
Note The first time you log into your instance the SSH key of the instance will not be cached on your computerand you will need to type yes when asked whether you want continue connecting This should not be necessary onsubsequent sessions
Once logged in you should see the console menu similar to the one below
copy Copyright 2020 Rubicon Communications LLC 44
Security Gateway Manual Amazon AWS
Connecting via HTTPS
To connect via https you would enter a URL containing the public IP address or hostname of your instance intoa web browser For example https232020454 Itrsquos very likely that you will receive a browser warningindicating that the security certificate of the site is not trusted This is because the instance uses a self-signed certificatefor https communication You should click on the option to proceed to the site anyway The pfSense login screen withthe Netgate logo should appear
The username to log in with is admin The password to use is either a value that you set in the User Data during thecreation of the instance or a random password
Tip It is preferable to explicitly set a password by passing a value in with the User Data field so the password willbe known in advance
If you did not set a specific password you can find out that value that the random password was set to through one of2 different methods
1 The first method is to log in over SSH with the key pair that you selected when the instance was created andexamine the contents of the file located at etcmotd You would do this by selecting option 8) Shell in theconsole menu that is presented when you SSH in then run this command in the shell
cat etcmotd
2 The second method is to view the System Log for the instance in the EC2 Management Console After themessages that are displayed that show the status of the boot process a message should appear that indicates what
copy Copyright 2020 Rubicon Communications LLC 45
Security Gateway Manual Amazon AWS
the administrative password was changed to Be aware that the System Log output in the EC2 ManagementConsole is not updated in real time and may take a few minutes to show up
The message you should look for using either of the methods mentioned about will look like this
Admin password changed to abcdefg
Once yoursquove determined your password and entered it into the login form the pfSense WebGUI should be availableto you
314 Forwarding traffic from VPC subnets through the instance
Some additional configuration is required within the VPC instancersquos pfSensereg webGUI before you are able to managetraffic from the private subnet
1 Log into the pfSense WebGUI for the instance
2 Click on the Interfaces heading on the left and then click the Assign link
3 Click on the + icon to add a new Interface under the Interface assignments tab A LAN interface shouldautomatically be added with the next available network interface (xn1)
4 Click on the Interfaces heading on the left again and then click on LAN Click the checkbox to enable the LANinterface Set the IPv4 Configuration Type to Static IPv4 and enter the IP address you assigned to the 2ndinterface during the provisioning phase Click the Save button
Now you can create other instances attached to your private subnet and protect them with the firewall on the pfSenseinstance
Common ways to manage private hosts
Allowing private hosts to connect to the Internet
To allow private hosts to be able to connect to the Internet you can allow any traffic from the LAN in your firewallrules there should be a rule like this in place by default
Next set up NAT rules to cause addresses in the private subnet to be NATed to the IP address of the WAN interface
1 Under the Firewall heading on the left click on the NAT link
2 On the Outbound tab click the radio button for Manual Outbound NAT rule generation (AON - AdvancedOutbound NAT)
3 Click the Save button
4 Click on the Aliases link under the Firewall heading on the left
5 Add your private subnet to the Networks_to_NAT alias
Note There is an existing NAT rule configured by default that uses the alias Networks_to_NAT
copy Copyright 2020 Rubicon Communications LLC 46
Security Gateway Manual Amazon AWS
Allow private hosts to connect to each other
If your hosts should only contact each other and a private network segment elsewhere you can configure an IPsecor OpenVPN tunnel from your remote networks to the Netgate appliance instance and set up the appropriate firewallrules routes and security policies to allow access to your private subnet through a VPN tunnel
Allow direct inbound access from the internet to hosts
If you wish to enable direct inbound access from the internet to hosts on the private subnet you can set up portforwarding on the WAN interface to direct traffic to particular hosts in the private subnet
315 Establishing a VPN connection to a VPC in another region
To establish a VPN that allows instances on the VPC subnet(s) that sit behind a Netgate appliance to communicate withinstances that reside in a VPC in another region the Netgate appliance has a VPC configuration wizard that assists byconfiguring both the Netgate appliance as well as the VPC configuration elements that would normally have to be setmanually through the AWS Management Console
For detailed instructions see the AWS VPC User Guide
316 Upgrading a VPC Instance
Periodically new releases of the AMI are issued to track new releases of pfSensereg that may provide new functionalitybug fixes and security updates
The lower risk approach to upgrading is to bring up a new instance alongside the existing one and executing a cutoverThese instructions detail the procedure for moving your existing instance to one running the latest version
1 Back up the configuration of your exsting instance by navigating to BackupRestore under the Diagnosticsmenu in the Web GUI Click the Download configuration button under the Backup Configuration headingand save your config file to your local system
2 Bring up a new instance of the pfSense Certified RouterFirewallVPN running the latest version
3 When creating the instance make sure the interfaces match the interfaces on the existing instance Make surethat the new instance is in the same VPC as the existing instance and that it has the same number of interfacesattached and that the interfaces are connected to the same Subnets
4 Make sure any interfaces on the new instance that will communicate with private Subnets have theSourceDestination check disabled
5 Allocate a new Elastic IP and associate it to the WAN interface of the new instance to allow yourself managementaccess
6 Restore the backed up configuration file to the new instance Navigate to BackupRestore under the Diagnosticsmenu in the Web GUI Under the Restore Configuration heading click the Choose File button and browsefor the configuration file you backed up from the existing instance earlier Once you have selected that fileclick the Restore configuration button The configuration file will be uploaded and the instance will rebootautomatically
7 If you had packages installed on the old instance navigate to Packages under the System menu in the pfSenseweb GUI and install the same packages
8 If there was any external dependency on the public IP address of the existing instance you can remove theElastic IP Address from the upgraded instance and move the Elastic IP Address from the existing instance tothe upgraded instance External dependencies that might cause you to want to do this include things like VPNrsquos
copy Copyright 2020 Rubicon Communications LLC 47
Security Gateway Manual Amazon AWS
configured to external devices that rely on the existing instancersquos Elastic IP address or access lists on externaldevices that allow access to traffic from the existing instancersquos IP address There may be other reasons why youwould wish to keep the existing address as well (to preserve existing bookmarks to the Web GUI reduce theneed for updates to existing internal documentation etc) The process for moving the old Elastic IP address tothe new instance is as follows
bull Disassociate the Elastic IP address from the new instance In the EC2 Management Console click onElastic IPs under the Network amp Security heading Check the box next to the Elastic IP address assignedto the new instance and click on the Disassociate Address button
bull Disassociate the Elastic IP address from the old instance The procedure is the same as in the previousstep just repeated for the Eastic IP address of the old instance this time
bull Associate the Elastic IP address that was previously associated to the old instance to public interface of thenew instance In the EC2 Management Console click on Elastic IPs Check the box next to the Elastic IPaddress you are moving and click the Associate Address button Fill in the correct value for the Instanceor Network Interface and select the Private IP Address of the public interface on the new instance Clickthe Associate button The management interface of the new instance should now be accessible
9 Move any default routes that pointed to an interface on the old instance to point to the equivalent interface onthe new instance In the VPC Management Console click on Route Tables under the Virtual Private Cloudheading Check the box next to a Route Table associated with the VPC that the instances is located in
bull In the detail pane that appears at the bottom of the screen click on the Routes tab
bull If a route exists for 00000 with a Target that is an interface ID of an interface on the old instnace clickthe Edit button above the table displaying the routes
bull Click the red X next to the row for 00000 to remove the existing route
bull There should be a blank row with empty fields for a new route Enter 00000 in the Destinationfield and the Network Interface ID of the interface on the new instance in the Target field Click on theSave button
bull If there were multiple private subnets in the VPC which were pointed to interfaces on the pfSense instancerepeat this process for the other Route Tables associated with the VPC
bull The new instance should now be functioning as the old one did
32 AWS VPC Wizard User Guide
This guide will explain how to use the AWS VPC Wizard to simplify the configuration of a VPN to a remote VPC Theadministrator is asked for the minimum amount of basic information required to establish the VPN The configurationsboth on the AWS VPC side and on the pfSense side are then automatically created When the wizard is finishedexecuting a functioning VPN connection to a VPC should be established
321 AWS Access Keys
In order to connect to the AWS API to make certain required configuration changes the AWS VPC Wizard requiresAccess Keys to retrieve and modify VPC configurations
See also
Find more information about AWS Security Credential including Access Keys by reading AWS Security Credentials
Access keys consist of two parts
1 An access key ID
copy Copyright 2020 Rubicon Communications LLC 48
Security Gateway Manual Amazon AWS
bull For example AKIAIOSFODNN7EXAMPLE
2 A secret access key
bull For example wJalrXUtnFEMIK7MDENGbPxRfiCYEXAMPLEKEY
Access keys are like a usernamepassword and needed for programmatic requests to AWS including the AWS VPCWizard Use both the access key ID and secret access key together to authenticate requests
Important Manage access keys as securely as a user name and password
Managing Access Keys
To create modify or delete IAM user access keys do the following
1 Sign in to the IAM console
2 In the navigation bar on the upper right choose a user name and then choose My Security Credentials
3 On the AWS IAM Credentials tab in the Access keys for CLI SDK and API access section choose Createaccess key
4 Choose Download csv file to save the access key ID and secret access key to a csv file on your computerStore the file in a secure location There is no access to the secret access key again after this dialog box closesAfter the csv file has been downloaded choose Close When an access key is created the key pair is active bydefault and the pair can be used right away
bull To disable an active access key choose Make inactive
bull To reenable an inactive access key choose Make active
bull To delete an access key choose its X button at the far right of the row Then choose Delete to confirmWhen an access key is deleted itrsquos gone forever and cannot be retrieved However new keys can alwaysbe created
To create modify or delete another IAM userrsquos access keys do the following
1 Sign in to the IAM console
2 In the navigation pane choose Users
3 Choose the name of the user whose access keys to manage and then choose the Security credentials tab
4 In the Access keys section choose Create access key
5 Choose Download csv file to save the access key ID and secret access key to a CSV file on your computer
Rotating Access Keys
As a security best practice we recommend to regularly rotate (change) IAM user access keys Rotating access keyscan be done from the AWS Management Console
To rotate access keys for an IAM user without interrupting the applications (console) create a second access key whilethe first access key is still active
1 Sign in to the IAM console
2 In the navigation pane choose Users
3 Choose the name of the user whose access keys to manage and then choose the Security credentials tab
4 In the Access keys section choose Create access key
copy Copyright 2020 Rubicon Communications LLC 49
Security Gateway Manual Amazon AWS
5 Choose Download csv file to save the access key ID and secret access key to a CSV file on your computer
6 The new access key is active by default At this point the user has two active access keys
After waiting some period of time to ensure that all applications and tools have been updated delete the first accesskey
1 Sign in to the IAM console
2 In the navigation pane choose Users
3 Choose the name of the user whose access keys to manage and then choose the Security credentials tab
4 Locate the access key to delete and choose its X button at the far right of the row Then choose Delete to confirm
Determining When Access Keys Need Rotating
To determine when access keys need rotating (console) do the following
1 Sign in to the IAM console
2 In the navigation pane choose Users
3 If necessary add the Access key age column to the users table by completing the following steps
1 Above the table on the far right click the settings icon
2 In Manage columns select Access key age
3 Choose Close to return to the list of users
4 The Access key age column shows the number of days since the oldest active access key was created Usethis information to find users with access keys that need rotating The column displays None for users with noaccess key
322 Using the Wizard
1 Gather your AWS Access Key ID and Secret Key
2 Navigate to VPN gt AWS VPC Wizard in the main menu in the pfSensereg webGUI
copy Copyright 2020 Rubicon Communications LLC 50
Security Gateway Manual Amazon AWS
3 The first screen of the wizard prompts for the AWS Credentials Enter the Access Key ID and Secret AccessKey in the appropriate text fields and select the Region to connect to in the dropdown menu then click Next
The wizard will then query the AWS API using those credentials to find which VPCrsquos exist in the selectedregion If the credentials were rejected an error message will be displayed and return to the first screen
4 The next screen will prompt to select from the available VPCrsquos in the selected region Select the one to connectto from the dropdown menu The wizard will not create a new VPC it will only connect to an existing VPC
Click Next after selecting the desired VPC
copy Copyright 2020 Rubicon Communications LLC 51
Security Gateway Manual Amazon AWS
Note If the desired VPCrsquos to connect to isnrsquot available create one via the AWS Management Console and tryagain
The wizard will then query the AWS API to check whether there is a VPN Gateway attached to the selectedVPC If none exists one will be created via the API Then the next screen will be displayed
5 On the next screen specify routing and network data
A description of what should be entered for each of these fields follows
copy Copyright 2020 Rubicon Communications LLC 52
Security Gateway Manual Amazon AWS
Routing Type AWS offers either static routing or BGP routing Select the appropriate type fromthe dropdown menu If unsure static routing is likely to be adequate
BGP AS Number If static routing was choosen leave this field blank Otherwise it is possible tospecify an AS number to use If left blank the value will default to 65000
Local Public IP Address On an AWS Netgate appliance instance this should be the public IP ad-dress of the Elastic IP associated with the instance If configuring a hardware device runningpfSense this could be the public address assigned to the WAN (or other) interface of the device
Local subnets The subnets connected to the pfSense instance that should be routed over the tunnelfrom hosts in the remote VPC As an example if connecting a pfSense instance to a remote VPCin the AWS us-east-1 region enter the subnets (or a single subnet) that are local to the pfSenseinstance and when hosts in your VPC in us-east-1 attempted to reach addresses within thosesubnets the traffic will be sent through the VPN tunnel that is being configured
Note When selecting static routing as the routing type there will be a delay that is typically between 2-5minutes before the next screen is displayed This is because static routes must be added to the VPN Connectionvia the AWS API This operation fails until the VPN Connection reaches the ldquoavailablerdquo state This can take afew minutes to occur
Click Next when done
The wizard will then query the AWS API to find whether a Customer Gateway is configured with the selectedPublic IP Address If none exists one will be created If one already exists the ID will be retrieved and it willbe used
The wizard will then query the AWS API to see if a VPC Connection already exists that matches the dataentered If one exists it will be used Otherwise one will be created
If static routing was selected static routes will be added to the VPN Connection for the Local subnets entered
Route propagation will be enabled for the VPN Gateway in each of the Route Tables that are associated withthe VPC All of these configurations are carried out in the AWS API nothing has been changed in the pfSenseVPN configurations yet
Warning Important Note on Billing Once this step is carried out and the VPN Connection is createdAWS will start billing your AWS account the hourly rate for a VPN Connection This is $005 as of thiswriting and that is a charge that goes entirely to AWS itself They will do this until the VPN Connection isdeleted via the VPC Management Console
Nothing in pfSense will ever cause AWS to stop billing for this VPN Connection Whether it works or notwhether the pfSense instance is up or down whether the IPsec tunnels have been deleted or reconfiguredAWS will continue to bill the hourly fee for a VPN Connection if the creation of it succeeds until it is deletedthrough their web interface
The wizard helps establish an initial configuration that works and configures the appropriate elements inAWSrsquos API to facilitate this You are responsible for making sure you understand what yoursquore being billedfor and disabling any functions including VPN Connections that are no longer necessary
6 If the operations of the previous step succeeded the next screen will appear
copy Copyright 2020 Rubicon Communications LLC 53
Security Gateway Manual Amazon AWS
Select an Interface to act as the local endpoint of the VPN tunnels that will be created In most cases thisshould be the WAN interface It should generally be whatever interface is associated with the Local Public IPAddress entered in the previous step
On an AWS Netgate pfSense instance this will be whatever interface the Elastic IP is associated with On ahardware device running pfSense that has the Local Public IP Address directly configured on an interface thiswill be the interface that the Local Public IP Address is configured on
After clicking Next the wizard will configure the VPN and associated settings within pfSense itself using datareturned by the AWS API in the previous step
It will configure 2 IPsec tunnels a firewall rule 2 Aliases (referenced by the firewall rule) and 2 Virtual IPAddresses If BGP was selected as the Routing Type in the previous step it will install the OpenBGPDpackage automatically and configure it appropriately
7 The next screen will appear and prompt to apply the configuration changes that have been made
copy Copyright 2020 Rubicon Communications LLC 54
Security Gateway Manual Amazon AWS
After clicking Next all the configuration changes that were made will be applied
8 The wizard will be completed and the browser will be redirected to the IPsec status page The VPN to the VPCshould now be fully configured
Note Sometimes there is a delay of 5-10 minutes before the tunnels are fully functional and passing trafficThis has been observed particularly often during the setup of tunnels using BGP routing
copy Copyright 2020 Rubicon Communications LLC 55
Security Gateway Manual Amazon AWS
323 Testing Connectivity
Verify that the IPsec tunnels are functioning by attempting to ping the ldquoinside tunnel addressesrdquo of the VPC side ofthe tunnel by navigating to Firewall -gt Virtual IP There should be two virtual IP addresses configured that haveDescriptions like ldquoInside address for tunnel to ltremote IP addressgtrdquo
Amazon provides inside addresses for each end of the tunnel in a 30 subnet in IPv4 link local address space(169254xy) Typically the first usable address in the 30 is the inside address for the VPC end of the tunnel andthe other usable address is the inside address for your end of the tunnel So if you ping from one of the virtual IPaddresses configured on the pfSensereg instance to the IP address that is one less (for example if the virtual IP addresswere 16925425322 ping from 16925425322 to 16925425321) that checks whether the other end of the tunnelis responding and whether the tunnel is functioning properly
Note It sometimes takes a few minutes for the tunnels to begin working after the configuration wizard completes
To ping log into the pfSense instance via SSH and execute ping from a shell prompt For the previous example of16925425322 the proper syntax is
ping -S 16925425322 16925425321
When pinging from a shell prompt it is possible leave the command running indefinitely and interrupt it there is aresponse
copy Copyright 2020 Rubicon Communications LLC 56
Security Gateway Manual Amazon AWS
It is also possible to ping via the Diagnostics -gt Ping page by selecting the appropriate source address and enteringthe remote tunnel inside address in the Host field This will only send a limited number of ping packets so it may benecessary to repeat this a few times
324 VPC Configuration Details
The AWS documentation for connecting a hardware device to a VPC provides a great amount of detail on configuringVPN Connections to VPC
The main configuration elements that exist in Amazonrsquos data model are the Virtual Private Gateway the CustomerGateway and the VPN Connection In order to configure a VPN connection to a VPC all 3 of these need to exist TheVirtual Private Gateway is the VPN endpoint on Amazonrsquos side The customer gateway is the VPN endpoint on thepfSensereg instancedevice being configured The VPN Connection is the IPsec VPN between Amazon and the pfSenseinstancedevice
A Virtual Private Gateway needs to exist and be associated to the VPC A particular VPN Gateway can only beassociated to one VPC at a time Once the VPC to connect to has been selected the wizard invokes the AWS API callDescribeVpnGateways to determine if a VPN Gateway already exists that is attached to the VPC If none exists itcreates one with the CreateVpnGateway API call and attaches it to the VPC with the AttachVpnGateway call
A Customer Gateway needs to be created for the public IP address of the device or virtual machine that will be used toconnect to the VPC The wizard invokes the AWS API call DescribeCustomerGateways to determine if a CustomerGateway already exists If none exists one is created with the CreateCustomerGateway API call
The VPN Connection connects the Virtual Private Gateway and Customer Gateway The wizard checks to see if thereis an existing VPN Connection configured that connects those endpoints by invoking the AWS API call DescribeVp-nConnections If none exists one is created using the CreateVpnConnection call One of the fields returned by thiscall is a block of XML configuration data that contains configuration data assigned by AWS for use with configuringthe VPN Connection This data is stored and used in subsequent steps to make the required configuration changeswithin pfSense
copy Copyright 2020 Rubicon Communications LLC 57
Security Gateway Manual Amazon AWS
Any objects created through API calls by the wizard will be tagged with names like auto-created by pfSenseVPC ltyour_VPC_IDgt This is accomplished by calling the AWS API call CreateTags and using Name as the keyfor the tag
In addition to creation of the items mentioned above required adjustments are made to Security Groups and RouteTables to facilitate communication over the VPN The Security Groups associated with the VPC are updated to allowinbound access from the local subnets on the pfSense end of the VPN They are checked first via the DescribeSecuri-tyGroups AWS API call to determine if the access is already allowed Any of the subnets that is not already allowedhas inbound access added via the AuthorizeSecurityGroupIngress AWS API call
Route Tables associated with the VPC are updated to receive routes from the VPN Gateway used by the VPN Con-nection They are checked first via the DescribeRouteTables AWS API call If the VPN Gateway ID is not includedin the list of VPN Gateways propagating routes route propagation for the VPN Gateway is enabled on that table usingthe EnableVgwRoutePropagation AWS API call
For VPN Connections using static routing static routes for the specified subnets are added to the VPN ConnectionThis is done via the CreateVpnConnectionRoute AWS API call
325 pfSense Configuration Details
On the pfSensereg side there are numerous configurations added to support the VPN to the VPC
Aliases
First aliases are created for use in a firewall rule These aliases are intended to contain the subnets that traffic shouldbe allowed to ingress over the IPsec tunnel One alias represents the local subnets on the pfSense side and is givena name like VPC_Local_vpc_12345678 and the other represents the remote subnets on the VPC side and is given aname like VPC_Remote_vpc_12345678
Virtual IP addresses
Next virtual IP addresses are added on the lo0 (loopback) interface These virtual IP addresses are the local ldquoinsideaddressesrdquo of the IPsec tunnels These addresses are used as the local address for BGP communication when BGProuting is selected These addresses are IPv4 link local addresses (see RFC 3297) AWS assigns 30rsquos out of thenetwork 1692540016 for this purpose
Note These addresses are also useful as a ping target to execute a basic test of whether the tunnel is functioningproperly Executing a ping from a source address of one of these IP addresses to the corresponding inside address ofthe other end of the tunnel helps determine whether the tunnel negotiation is completing properly
Firewall rules
Next a firewall rule is added on the IPsec interface that allows traffic from the VPC networks to the local subnetsThis rule uses the previously created Aliases as sourcedestination targets
IPsec
Then IPsec phase 1 and phase 2 associations are set up Most of the settings required are extracted from a blockof XML data that was returned by the CreateVpnConnection call made during the AWS configuration step Thisincludes parameters like endpoint IP addresses encryption ciphers timer values etc
copy Copyright 2020 Rubicon Communications LLC 58
Security Gateway Manual Amazon AWS
If BGP routing was selected the configurations for the OpenBGPD BGP daemon are established The required settingsare determined using the AS number entered into the wizard and the parameters returned by the CreateVpnConnec-tion call made during the AWS configuration step
326 Tested Configurations
Various topologies may be possible to establish using the AWS VPC Configuration Wizard This section enumeratessome of the configurations that were successfully tested
Platforms
bull Various hardware platforms
bull 64-bit virtual machines in VMware vSphereESX
bull Amazon EC2 instances (Xen virtual machines) of the Netgate pfSensereg RouterFirewallVPN AWS AMI
Local networkrouting configurations
bull pfSense with a public address configured on the WAN interface
bull pfSense with a private address configured on the WAN interface behind a 11 NAT
bull pfSense with a private address configured on the WAN interface behind a PAT (1many NAT)
VPC Topologies
bull pfSense connected to a single VPC
bull pfSense connected to multiple VPCrsquos in different regions
bull Amazon EC2 instance of the pfSense RouterFirewallVPN AWS AMI connected to a VPC belonging to thesame AWS account in a different region
bull Amazon EC2 instance of the pfSense RouterFirewallVPN AWS AMI connected to a VPC belonging to adifferent AWS account in the same region
The configuration recommended for the greatest amount of stability is to have a public IPv4 address directly configuredon the WAN interface of your pfSense firewall but VPNs have been successfully established under all of the conditionslisted above
Whether any of these solutions is appropriate should be evaluated in the context of personal needs and existing infras-tructure Other configurations not listed above may be possible as well
327 AWS VPC Wizard FAQ
1 What level of redundancy is provided by the two tunnels
Amazon provides two tunnel endpoints that will allow traffic to be sent between your networks and the remote VPCyou are connected to The racoon daemon in pfSensereg is only capable of establishing an active phase 2 associationfor a particular sourcedestination pair on a single tunnel
Phase 2 associations between the local subnets and the remote VPC subnet are configured in the pfSense GUI for bothtunnels but racoon will only actually establish an association for the first tunnel This means that racoon will onlyever try to send traffic destined for the remote VPC subnet over the first tunnel
copy Copyright 2020 Rubicon Communications LLC 59
Security Gateway Manual Amazon AWS
If that tunnel goes down the second tunnel may be up and inbound traffic from the remote VPC may be sent to yourlocal networks over that tunnel automatically But outbound traffic to your remote VPC would not automatically failover to the second tunnel In order for you to send your outbound traffic over the second tunnel you would need todisable the phase 2 associations for the first tunnel and apply the changes
2 I quit the wizard before finishing Now what
To finish setting up the VPN go back to the wizard and run through it again It should reuse any partial configurationsthat were generated before it was stopped and create the new elements that are required
3 What are the AWS charges for this
AWS determines their own pricing and provides details for EC2 pricing and VPC pricing There are many types ofcharges that may be incurred for operating instances on AWS (eg charges related to running an instance bandwidthstorage elastic IPs etc)
The charge of specific interest in this case is the hourly charge for a VPN Connection As of this writing it costs $005(USD) per hour in most regions to have a VPN Connection configured and available AWS will charge whether theVPN Connection is being used or not as long as it is configured This will be configured by the third step of the wizardand will never be removed by pfSense
If the VPN Connection is no longer needed and billing for it needs to be stopped visit AWSrsquos VPC ManagementConsole and delete the VPN Connection manually
4 Can I use the wizard to connect to the GovCloud region
This hasnrsquot been officially tested but at least one user has reported that they were able to successfully connect to theGovCloud region They manually added the region us-gov-west-1 to the list of regions in the first step of the wizardand were able to successfully connect to their VPC in that region This may be supported in a future build but to trywithout official support do the following
1 Under the System gt Advanced menu make sure the Enable Secure Shell box is checked This is already doneby default on AWS instances but is off by default on pfSense hardware devices
2 Log into the instance via SSH
3 Make sure the root filesystem is mounted as readwrite On an AWS instance or a hardware device running on anSSD this should be true On a hardware device using Compact Flash or an SD card for storage it will probablybe necessary to remount the root filesystem in readwrite mode by running
mount -uw
4 Edit the file usrlocalwwwwizardsvpc_vpn_wizardxml using vi Look for a section of the file that lookslike this
ltoptiongtltnamegtsa-east-1ltnamegtltvaluegtsa-east-1ltvaluegt
ltoptiongt
That should appear directly after several similar ltoptiongt specifications containing all of the other availableregions Right underneath that section add the following
copy Copyright 2020 Rubicon Communications LLC 60
Security Gateway Manual Amazon AWS
ltoptiongtltnamegtus-gov-west-1ltnamegtltvaluegtus-gov-west-1ltvaluegt
ltoptiongt
Then save the file and exit vi
5 If the filesystem had to be remounted in readwrite mode earlier remount it in read-only mode by running
The GovCloud region should now appear as a choice in the first step of the wizard
copy Copyright 2020 Rubicon Communications LLC 61
CHAPTER
FOUR
REFERENCES
41 Support Resources
411 Commercial Support
In order to keep prices low the software is not bundled with a support subscription For users who need commercialsupport Netgate Gloabal Support can be purchased at httpswwwnetgatecomsupport
412 Community Support
Community support for pfSensereg software is available through the Netgate Forum
42 Additional Resources
421 Netgate Training
Netgate training offers training courses for increasing your knowledge of pfSensereg products and services Whetheryou need to maintain or improve the security skills of your staff or offer highly specialized support and improve yourcustomer satisfaction Netgate training has got you covered
httpswwwnetgatecomtraining
422 Resource Library
To learn more about how to use your pfSense appliance and for other helpful resources make sure to browse ourResource Library
httpswwwnetgatecomresources
423 Professional Services
Support does not cover more complex tasks such as CARP configuration for redundancy on multiple firewalls orcircuits network design and conversion from other firewalls to pfSensereg These items are offered as professionalservices and can be purchased and scheduled accordingly
httpswwwnetgatecomour-servicesprofessional-serviceshtml
62
Security Gateway Manual Amazon AWS
424 Community Options
If you elected not to get a paid support plan you can find help from the active and knowledgeable pfSense communityon our forums
httpsforumnetgatecom
copy Copyright 2020 Rubicon Communications LLC 63
- Getting Started
- Instance Usage
- Virtual Private Cloud (VPC)
- References
-

CHAPTER
ONE
GETTING STARTED
11 Prerequisites and Requirements
In order to use a Netgate appliance instance to protect your VPC subnets you will need the following
bull A VPC
bull One internet facing public subnet which the Netgate appliance instance will have its primaryWAN interfaceconnected to
bull One or more private subnets which the Netgate appliance instance will have its secondaryLAN interface (andpossibly additional optional interfaces) connected to
bull Separate routing tables for the internet-facing subnet and the private subnet(s)
bull Separate security groups for the internet-facing subnet and the private subnet(s)
bull An elastic IP or Public IP for the WAN interface of the appliance
For the purposes of this guide your VPC will contain two subnets (public and private) as well as an Internet GatewayThe end result should look like the following diagram
If you already have all of these in place with an existing VPC feel free to skip ahead to Launching an Instance
12 Choosing Instance Type and Sizing
There are a range of specifications to choose from and this page will help guide you through those choices
121 Supported EC2 Instance Types
Your instance type will depend on your expected network throughput as well as the types of services you will providewith your pfSensereg appliance
For general firewall appliances that do not require high throughput T2 instances are General Purpose Burstable Per-formance Instances that provide a baseline level of CPU performance with the ability to burst above the baseline
If you are planning to provide advanced services like web proxying IDSIPS or Server Load Balancing you mayconsider an instance that provides more CPU andor faster storage resources such as m4large or m4xlarge
The following EC2 instance types are supported by Netgate
bull t2nano
bull t2micro
bull t2small
2
Security Gateway Manual Amazon AWS
Fig 1 Architecture Diagram
bull t2medium
bull t2large
bull m3medium
bull m3large
bull m3xlarge
bull m4large
bull m4xlarge
bull c3large
bull c3xlarge
bull c4large
bull c4xlarge
bull r4large
bull r4xlarge
122 Sizing Your EBS Volume
The pfSense appliance is only supported with EBS storage For general purpose firewalls your storage requirementswill typically be small and the default 8GB general purpose SSD volume should be more than enough
copy Copyright 2020 Rubicon Communications LLC 3
Security Gateway Manual Amazon AWS
In situations where you may provide web proxying or caching to your users or other advanced features you shouldconsider increasing the volume size to something more appropriate for example 64GB
13 AWS Service Limits
New services provisioned in a VPC may be assigned IP addresses or other resources but Amazon puts limits on VPCresources per Region Before provisioning a new resource make sure to check these limits
The following tables list the limits for Amazon VPC resources per Region Unless indicated otherwise requests canbe made to increase these limits using the Amazon VPC limits form For some of these limits the current limit appliedcan be viewed using the Limits page of the Amazon EC2 console
Note If a limit increase is requested that applies per resource we increase the limit for all resources in the RegionFor example the limit for security groups per VPC applies to all VPCs in the Region
131 VPC and Subnets
Resource Default limit CommentsVPCs per Region 5
The limit forInternet gateways perRegion is directlycorrelated to thisone Increasing thislimit increases thelimit on internetgateways per Regionby the same amount
Subnets per VPC 200ndash
IPv4 CIDR blocks per VPC 5
This limit is made upof your primary CIDRblock plus 4secondary CIDRblocks
IPv6 CIDR blocks per VPC 1
This limit cannot beincreased
copy Copyright 2020 Rubicon Communications LLC 4
Security Gateway Manual Amazon AWS
132 DNS
For more information see DNS Limits
133 Elastic IP Addresses (IPv4)
Resource Default limit CommentsElastic IP addresses per Region 5
This is the limit forthe number of ElasticIP addresses for usein EC2-VPC ForElastic IP addressesfor use inEC2-Classic seeAmazon EC2 Limitsin the Amazon WebServices GeneralReference
134 Flow Logs
Resource Default limit Comments
Flow logs per singlenetwork interfacesingle subnet orsingle VPC in aRegion
2
This limit cannot beincreased You caneffectively have 6flow logs per networkinterface if youcreate 2 flow logsfor the subnet and 2flow logs for the VPCin which your networkinterface resides
copy Copyright 2020 Rubicon Communications LLC 5
Security Gateway Manual Amazon AWS
135 Gateways
Resource Default limit CommentsCustomer gateways per Region 50
ndash
Egress-only internet gateways perRegion
5
This limit isdirectly correlatedwith the limit onVPCs per Region Toincrease this limitincrease the limit onVPCs per Region Youcan attach only oneegress-only internetgateway to a VPC at atime
Internet gateways per Region 5
This limit isdirectly correlatedwith the limit onVPCs per Region Toincrease this limitincrease the limit onVPCs per Region Onlyone internet gatewaycan be attached to aVPC at a time
NAT gateways per Availability Zone 5
A NAT gateway in thepending active ordeleting state countsagainst your
14 Creating an IAM User in Your AWS Account
pfSensereg uses AWS Identity and Access Management (IAM) accounts for administration Every AWS account in-cludes at least one user For security reasons the root account should not be used for day-to-day administration Thissection describes the process of creating and using an IAM user account for administering pfSense
See also
To find out more about AWS security and credentials read Understanding and Getting Your Security Credentials
copy Copyright 2020 Rubicon Communications LLC 6
Security Gateway Manual Amazon AWS
There are multiple methods for creating users in IAM The recommended method is to use the AWS ManagementConsole The process of creating a user and enabling that user to perform work tasks consists of the following steps
1 Create the user
2 Create credentials for the user
3 As a best practice create only the credentials that the user needs For example for a user who requires accessonly through the AWS Management Console do not create access keys
Note For cloud security it is considered best practice to limit access for the root user so root is locked bydefault
4 Grant the appropriate permissions to the user to administer pfSense
5 Provide the user with the necessary sign-in information
6 (Optional) Configure multi-factor authentication (MFA) for the user
141 Creating IAM Users (Console)
You can use the AWS Management Console to create IAM users To create one or more IAM users (console)
1 Sign in to the AWS Management Console and open the IAM console at httpsconsoleawsamazoncomiam
2 In the navigation pane choose Users and then choose Add user
3 Type the user name for the new user This is the name they will use to sign in to AWS To add up to 10 users atonce choose Add another user for each additional user and type their user names
4 User names can be a combination of up to 64 letters digits and these characters +=-
5 Names must be unique within an account and are not case sensitive
6 Select AWS Management Console access This creates a password for each new user
bull For Console password choose one of the following
ndash Autogenerated password Each user gets a randomly generated password that meets the accountpassword policy in effect (if any) You can view or download the passwords when you get to theFinal page
ndash Custom password Each user is assigned the password that you type in the box
bull We recommend that you select Require password reset to ensure that users are forced to change theirpassword the first time they sign in
7 Click Next On the Set permissions page specify how you want to assign permissions to this new user(s)Choose one of the following three options
bull Add user to group Choose this option if you want to assign the user(s) to one or more groups thatalready have permissions policies IAM displays a list of the groups in your account along with theirattached policies You can select one or more existing groups or choose Create group to create a newgroup
bull Copy permissions from existing user Choose this option to copy all access rights from an existing userto the new user(s)
bull Attach existing policies to user directly Choose this option to see a list of the managed policies in youraccount Select the policies that you want to attach to the new users or choose Create policy to open anew browser tab and create a new policy
copy Copyright 2020 Rubicon Communications LLC 7
Security Gateway Manual Amazon AWS
8 Choose Next Review to see all of the choices you made up to this point When you are ready to proceedchoose Create user
9 To view the usersrsquo access keys (access key IDs and secret access keys) choose Show next to each password andaccess key that you want to see To save the access keys choose Download csv and then save the file to a safelocation
Important This is your only opportunity to view or download the secret access keys and you must providethis information to your users before they can use the AWS API Save the userrsquos new access key ID and secretaccess key in a safe and secure place You will not have access to the secret keys again after this step
10 On the final page you can choose Send email next to each user Your local mail client opens with a draft thatyou can customize and send The email template includes the following details to each user
bull User name
bull URL to the account sign-in page Use the following example substituting the correct account ID numberor account alias
bull httpsAWS-account-ID or aliassigninawsamazoncomconsole
Important The userrsquos password is not included in the generated email You must provide them to the customerin a way that complies with your organizationrsquos security guidelines
15 Using IAM Roles
AWS IAM Roles are used to delegate access to users applications or services that require controlled access to AWSresources IAM Roles should be used to manage all pfSensereg instances This unique role can be specified whenlaunching a new instance or attached to an existing instance
The AWS Management Console is the recommended method for creating roles for use with pfSense It is also recom-mended to create these roles based on the principle of least privilege also known as the principle of least authoritywhich is the assignment of lowest needed privileges based on necessity The below instructions attempt to follow thisprinciple
151 Create Policy for pfSense Management IAM Role
Create a custom policy that will be associated with an IAM role allowing access to the pfSense Management GUIrunning on an EC2 Instance
1 Sign in to the AWS Management Console and open the IAM console at httpsconsoleawsamazoncomiam
2 In the navigation pane of the console select Policies then choose Create Policy
3 Drop down the Service menu and select EC2
4 In the Actions dropdown check the box next to All EC2 actions (ec2)
Note If stricter policies are required for the actions that can be performed on the pfSense EC2 Instance thesecan be set here
5 Select the Resources dropdown arrow and review resulting warnings
copy Copyright 2020 Rubicon Communications LLC 8
Security Gateway Manual Amazon AWS
6 Click the All resources bubble
7 Select Review policy
8 Populate the Name field (eg pfSense_EC2_Access) and Description if desired
Note Policy names must be unique within the AWS account and the name of the policy cannot be changedonce created
9 Select Create Policy
152 Create IAM Role for pfSense Management
Create a role that an IAM user or users within an IAM Group can assume and use to connect to and manage pfSenserunning on an EC2 Instance
Note The administrator of the specified account can grant permission to assume this role to any IAM user inthat account To do this the administrator attaches a policy to the user or a group that grants permission for thestsAssumeRole action That policy must specify the rolersquos ARN as the Resource
1 Sign in to the AWS Management Console and open the IAM console at httpsconsoleawsamazoncomiam
2 In the navigation pane of the console select Roles then choose Create Role
3 Select the Another AWS account role type
4 In the Account ID field type the AWS account ID that will be allowed to access the destination resource
5 The Require external ID checkbox should remain cleared unless granting permissions to users from an accountthat you do not control Reference AWS Documentation for External ID Roles in the event this is required
6 It is recommended to restrict the role to users who sign in with multi-factor authentication (MFA) Select Re-quire MFA to add a condition to the rolersquos trust policy to require MFA sign-in
7 Select Next Permissions
8 Type the name of the previously created Custom policy in the search field Check the box next to the correctPolicy name
9 Select NextTags
Note IAM tags are key-value pairs that can be used to organize track or control access for this role This isan optional step More information can be found within AWS Documentation for Tagging IAM Entities
10 Select Next Review
11 Populate the Role name field (eg pfSense_Admin) and Role description if desired
Note Role names must be unique within the AWS account and the name of the role cannot be changed oncecreated
12 Review remaining configured settings then select Create role
This role can now be assigned to an IAM User or all users in an IAM group allowing secure administrative access tothe EC2 Instance(s) containing pfSense
copy Copyright 2020 Rubicon Communications LLC 9
CHAPTER
TWO
INSTANCE USAGE
21 Launching an Instance
Here are instructions on how to launch a new instance of the pfSensereg firewallVPN appliance from the Amazon EC2Management Console
1 Select the region for the instance to run in using the region tab at the upper right corner of the page
2 Navigate to the AWS Management Console Main Page and select EC2 under the Compute section in the Allservices dropdown
10
Security Gateway Manual Amazon AWS
3 Launch a new instance by clicking on the Launch Instance button under the Create Instance section of theEC2 dashboard
4 Select AWS Marketplace in the left-hand Navigation Menu Type Netgate pfSense in the search box andpress enter
copy Copyright 2020 Rubicon Communications LLC 11
Security Gateway Manual Amazon AWS
5 Click the Select button for the Netgate pfSense FirewallVPNRouter listing in the search result
6 Review pricing and other helpful information then click Continue
copy Copyright 2020 Rubicon Communications LLC 12
Security Gateway Manual Amazon AWS
7 Choose the instance type to run by clicking the checkbox next to the desired type Click Next ConfigureInstance Details
8 Choose the desired Network and Subnet that the instance will be deployed in Choose any other instance-specificsettings that may be required in your environment Optionally expand the Advanced Details section and setparameters as text in the User Data field The available options are
bull password - setting a value via a directive like password=abcdefg will set the password for the admin-istrative account to the value you specify - abcdefg in this example If no value is set here a randompassword will be assigned in order to keep administrative access from being exposed to the Internet with adefault password
bull mgmtnet - setting a value via a directive like mgmtnet=1001024 will restrict management access(http https ssh) to the network you specify - 1001024 in this example This will cause the firewallrules on the instance (not on Amazonrsquos access lists but on the Netgate pfSense appliancersquos own firewall)to restrict management traffic for the instance to the specified source network The default behavior is toallow management from any host
copy Copyright 2020 Rubicon Communications LLC 13
Security Gateway Manual Amazon AWS
These directives can be set by placing them on a single line in the User Data field and separating them withcolons To specify both parameters type a statement similar to this one
password=abcdefgmgmtnet=1001024
Note If a password is set using the password parameter listed above the password is retrieved by the instancevia an unencrypted HTTP request when the system is configured the first time it boots The request is made toan Amazon Web Services-operated server on the local LAN that stores metadata about each instance runningThe data for an instance is only made available to that instance but is available to be queried from the instancewithout providing any authentication credentials
It is advised to change the admin password via the pfSense web GUI after the instance comes up to avoid anysecurity risks associated with the unencrypted request Otherwise it is possible to choose not to set the passwordat all and let a random password be set
9 Choose the desired Network and Subnet to which the Instance will be deployed Scroll down to configure thenetwork interface(s) with a Static or DHCP-assigned IP address
Once the Network Interface(s) are configured select Next Add Storage
10 Click Next Add Tags to accept the Storage Device Configuration
copy Copyright 2020 Rubicon Communications LLC 14
Security Gateway Manual Amazon AWS
11 It is recommended to set a tag that can be used to differentiate this instance from other instances by entering avalue for the Name tag Click Next Configure Security Group after setting any desired tags
Press the Add Tag button Input Name under the Key field and the desired Instance Tag Name under the Valuefield (eg Netgate FirewallRouter)
12 Select a security group to launch the instance with The Security group name and Description can be left at thedefault or replaced with the desired values The recommended settings for a security group should allow at leastthe following traffic
bull TCP port 443 from 00000
ndash HTTPS - This is the port that the management web GUI listens on
bull TCP port 22 from 00000
ndash SSH - This port can be used to connect to a command prompt with an ssh client
bull UDP port 1194 from 00000
copy Copyright 2020 Rubicon Communications LLC 15
Security Gateway Manual Amazon AWS
ndash OpenVPN - The OpenVPN server that is configured by default is bound to this port
bull UDP port 500 from 00000
ndash IKE for IPsec VPN
bull UDP port 4500 from 00000
ndash IPsecNAT-T for IPsec VPN
Note If there is an existing security group that includes this access click Select an existing security groupthen select the desired group(s) to use and click Continue Otherwise select Create a new security group andadd rules for this access by filling in the form for each rule and clicking the Add Rule button When all of therules have been added click Review and Launch
13 Review any AWS warnings and make note of recommendations Scroll down to review the remaining instancedetails and click Launch after making any needed adjustments
copy Copyright 2020 Rubicon Communications LLC 16
Security Gateway Manual Amazon AWS
14 Select an existing key pair or create a new key pair to connect to the instance with Click the checkbox thatindicates acknowledgment of access to the selected private key file and then click Launch Instances
Important Do NOT select the Proceed Without a Key Pair option
22 Managing the Configuration of the Instance
Once the instance is launched monitor its status using the Instances page of the EC2 Management Console The EC2Management Console will display whether the instance is up and reachable and will also display its current public IPaddress and the hostname that resolves to the public IP address Find the hostname and public IP address in the EC2console by clicking on the Instances heading on the left finding the instance and checking the checkbox next to it andlooking at the details at the bottom of the page
In the example above the hostname of the instance is ec2-23-20-204-54compute-1amazonawscom
copy Copyright 2020 Rubicon Communications LLC 17
Security Gateway Manual Amazon AWS
The public IP address is available by putting together the 4 numbers included in the hostname - 233020454 Itis also possbile to obtain the IP address by using a popular DNS lookup tool such as host dig or nslookup toresolve the hostname to its IP address
Note The hostname and IP address used in this and other examples in this guide are associated at the time of writingwith a test instance This addresshostname will not be the same values used to access the instance and they will noteven be associated with the same test instance by the time this guide is available to the public
In order to manage the configuration of the instance connect to it via https or ssh To connect via ssh use the key pairchosen while creating the instance to connect to the admin account From the command line on a UnixLinux hostuse a command similar to ssh -i my_key_file adminpublic_IP where the appropriate private key fileand public IP or hostname are substituted In the example below the key file my_ec2_key is used to connect to the IPaddress 232020454
Note The first time logging into the instance the ssh key of the instance will not be cached locally type yes whenasked whether to continue connecting This should not be necessary on subsequent sessions
A limited set of configurations is possible through the ssh interface The preferred method for managing most of theconfigurations or viewing data on the status of the pfSensereg instance is through the https web GUI To connect viahttps enter an https URL containing the public IP address or hostname of the instance into a web browser Forexample https232020454
Itrsquos very likely there is a browser warning indicating that the security certificate of the site is not trusted because theinstance uses a self-signed certificate for https communication Click on the option to proceed to the site anyway and
copy Copyright 2020 Rubicon Communications LLC 18
Security Gateway Manual Amazon AWS
a login screen with the Netgate logo should appear
The username to log in with is admin The password to use is either a value set in the User Data during the creationof the instance or a random password If a specific password wasnrsquot set find out that value that the random passwordwas set to through one of two different means
1 The first is to log in over ssh with the key pair that was selected when the instance was created and examine thecontents of the file located at etcmotd Select option 8 (Shell) from the console menu that is presented afterlog in and execute cat etcmotd from the shell
2 Alternatively view the System Log for the instance in the EC2 Management Console After the messagesthat are displayed that show the status of the boot process a message should appear that indicates what theadministrative password was changed to
The message using either of the methods mentioned will look like this
Admin password changed to abcdefg
In this example the password was changed to abcdefg
Note Be aware that the System Log output in the EC2 Management Console is not updated in real time and maytake a few minutes to show up It is preferable to explicitly set a password by passing a value in with the User Datafield so the password will be known in advance To allow a random password to be set connect via ssh and find outwhat the password was changed to after the instance is up without any delay
Once the password has been determined and entered into the login form the pfSense Web GUI should be available
23 Using the remote access IPsec VPN
An IPsec VPN for remote users is preconfigured on the instance when it comes up In order to use it you will need toconfigure the IPsec VPN client on your device
See also
A guide for manually configuring Android or iOS (iPhoneiPodiPad) mobile clients to establish an IPsec VPN islocated in the pfSensereg Documentation
For iOS clients a profile can be downloaded and installed that will automatically configure an IPsec VPN to theinstance The profile can be downloaded by visiting the page at iphone_ipsec_profilephp on the instance If theinstance IP address were 232020454 the correct URL to visit would be https232020454iphone_ipsec_profilephp You will need to authenticate to the web interface by typing the username (admin) and password prior to beingable to download the profile
The profile should be downloaded and saved automatically upon opening the page If the page is visited in a webbrowser on an iOS device the device should automatically launch the Settings app and attempt to install the newprofile If the profile is downloaded to another non-iOS device it can be sent via email as an attachment If theattachment is opened in the iOS email client the Settings app new profile installation will also open
The name and description of the profile being installed will be displayed Tap the Install button A warning messagewill be displayed that indicates that the profile is unsigned Tap on Install Now to continue
copy Copyright 2020 Rubicon Communications LLC 19
Security Gateway Manual Amazon AWS
copy Copyright 2020 Rubicon Communications LLC 20
Security Gateway Manual Amazon AWS
Enter your passcode for the iOS device (the one you enter when you wake the device from sleep) and the passwordto access the IPsec VPN (the one you entered to get access to the Web GUI) when prompted and the profile will beinstalled When the screen shows that the profile was installed tap Done
When the profile has been installed the VPN can be enabled in the Settings app There will be a heading named VPNunder the main Settings page If there are more than one VPN configured on the device tap the VPN heading Thenewly installed profile should be selected It will have a check mark next to it There will be an onoff switch at thetop of the page to enable the VPN If this is the only VPN configured the switch to enable the VPN will be next to theVPN heading on the main Settings page Tap the switch to enable the VPN You should be prompted for a usernameand password The username (admin) should already be filled in Enter the password and tap OK A welcome messageshould be displayed Tap OK and you are ready to use the VPN
24 Using the remote access OpenVPN VPN
An OpenVPN VPN for remote users is automatically configured the first time the instance is booted In order to useit you will need an OpenVPN client app installed on your device and you will need to import a configuration thatspecifies how to connect to the instance
An OpenVPN configuration can be downloaded by visiting the page openvpn_connect_profilephp on your instanceIf the instance IP address were 233020454 the correct URL to visit would be https232020454iphone_ipsec_profilephp You will need to authenticate to the web interface by typing the username (admin) and password prior tobeing allowed to download the configuration
The profile should be downloaded and saved automatically upon opening the page The file that it was saved in shouldbe imported into the OpenVPN client on the device that you wish to connect with
copy Copyright 2020 Rubicon Communications LLC 21
Security Gateway Manual Amazon AWS
241 Tips for configuring OpenVPN based on platformclient
OpenVPN Connect App on iOS (iPhoneiPadiPod)
The iOS version of the OpenVPN Connect App allows you to import an OpenVPN profile by opening an attachmentto an email message Save the config to a file named remote-access-vpnovpn and send it to an email account thatthe iOS device is configured to retrieve mail for Open the email message and touch the attachment to open it Youwill be presented with Open in OpenVPN as one of the available options Touch the OpenVPN icon to select thatoption The OpenVPN Connect App should then open and list the profile under a heading that says New profiles areavailable Click on the green ball with the + sign in it to import the profile Type in the username admin andpassword then change the OnOff switch to On
OpenVPN Connect App on Android
The Android version of the OpenVPN Connect App allows you to import an OpenVPN profile from an SD card Savethe configuration file to the SD card Launch the OpenVPN Connect App From the menu select Import then ImportProfile from SD card Browse to the location of the configuration file and select it Enter the username admin andpassword to connect to the VPN Press Connect
TunnelBlick on MacOS X
The TunnelBlick App for MacOS allows you to import an OpenVPN configuration file Save the configuration to afile on your system Click on VPN Details Click on the + symbol underneath the existing configurations to add anew configuration Click on the I have configuration files button Click on the OpenVPN Configuration(s) buttonFollow the instructions presented by TunnelBlick (copy the config into an empty folder TunnelBlick creates on theDesktop rename the folder click on the folder) When the profile is imported successfully click on itrsquos name and thenclick on Connect Enter the username admin and password to connect to the VPN
OpenVPN Connect Client on Windows
The OpenVPN Connect Client on Windows allows you to import an OpenVPN configuration file from the local diskSave the file on your system Click the + symbol to the right of Connection Profiles Select Local File and click onthe Import button Find the profile you wish to import in the file browser window and click Open A box with thename of the new profile should appear under Connection Profiles now Click on that box and enter the usernameadmin and password to connect to the VPN
25 Enabling Enhanced Networking with the Elastic Network Adapter(ENA)
To enable enhanced networking on AWS pfSensereg FirewallVPNRouter must be version 241 or above Use theupdate wizard in the pfSense console to perform the update if necessary and then ENA can be enabled Enabling ENAis outlined in the steps below
Warning Updating the pfSense FirewallVPNRouter will force it to reboot and cause a disruption in service Besure to perform the update during a maintenance cycle
1 Install AWS CLI Documentation on the installation and use of AWS CLI can be found at httpsawsamazoncomcli
copy Copyright 2020 Rubicon Communications LLC 22
Security Gateway Manual Amazon AWS
2 Determine the Instance ID for the pfSense Instance from the EC2 Console
Fig 1 The selected pfSense Instance ID is i-042c16b65423b7dac
3 Stop the instance using Amazon EC2 console
4 Enable the enhanced networking attribute by executing the following AWS CLI command
aws ec2 modify-instance-attribute --instance-id i-042c16b65423b7dac --ena-support
5 Use the EC2 Console to start the pfSense Instance Once the pfSense Instance has started confirm that EnaSup-port is enabled by executing the following AWS CLI command
aws ec2 describe-instances --instance-ids i-042c16b65423b7dac --queryReservations[]Instances[]EnaSupport[true
]
6 Change the pfSense Instance Type to one that supports Enhanced Networking using the EC2 console Afterselecting an Instance Type that supports Enhanced Networking use the EC2 console to stop the pfSense Instance
copy Copyright 2020 Rubicon Communications LLC 23
Security Gateway Manual Amazon AWS
Note To review the Instance Types please see httpsawsamazoncomec2instance-types
7 Once the pfSense Instance has stopped use the EC2 Console to select the pfSense Instance and then under theActions button select Instance Settings gt Change Instance Type and select a new Instance Type
Fig 2 In this case m4xlarge was selected as the new Instance Type and then Apply was selected
8 In the EC2 Console the pfSense Instance should now show an Instance Type of m4xlarge
9 Using the EC2 console select the pfSense Instance and then under the Actions button select Instance State gtStart
26 Advanced Usage
261 Protecting a private network in VPC
An instance of the Netgate appliance can be used as a firewall for a VPC subnet This will generally require moremanual configuration than using an instance to host a remote access VPN does See the VPC User Guide for a moredetailed explanation of how to configure your VPC and your Netgate appliance instance to support this
262 Connecting a local pfSensereg device
In addition to connecting remote devices as clients a device running pfSensereg as a firewallrouter can be connectedas a peer to a pfSense appliance
See also
Read Configuring a Site-to-Site Static Key OpenVPN Instance in the pfSense documention to see the process ofconfiguring this setup
copy Copyright 2020 Rubicon Communications LLC 24
Security Gateway Manual Amazon AWS
When implementing the configuration changes detailed in the document you should use the Netgate appliance instanceon AWS as the ldquoserverrdquo end of the connection and your local pfSense device as the client ldquoendrdquo You will also needto make sure that you are using a unique port The default remote access OpenVPN server is configured to use UDPport 1194 It is suggested that if you are adding a site-to-site tunnel you should use a port between 1195 and 2000Whichever port you decide to use you will need to make sure that the port is open both in the firewall rules on theNetgate appliance instance and in the Security Group in the EC2 Management Console
If you wish to route all traffic from your homeoffice network through the OpenVPN tunnel to your Netgate applianceinstance you will need to add this statement to the advanced options for the OpenVPN Client on the homeofficepfSense device
redirect-gateway def1
This will cause a default route to be set that sends all locally originated traffic on your homeoffice network overthe OpenVPN tunnel when it is established If you use this configuration to send all traffic from your local networkthrough the OpenVPN tunnel you will also need to establish a NAT on the Netgate appliance instance on AWS fortraffic from the homeoffice network to the internet This can be accomplished by adding the CIDR block for yourhomeoffice network to the preconfigured Alias called Networks_to_NAT This is done by navigating to Aliases underthe Firewall heading on the web GUI then clicking on the edit icon to the right of Networks_to_NAT Add the newnetwork address and mask to the list of Networks and click the Save button Then click the Apply Changes buttonYou will also need to add the network used for the tunnel endpoints (IPv4 Tunnel Network) to the Networks_to_NATalias as well using the same procedure that was used to add the homeoffice network
Connecting multiple pfSense gateways to a Netgate appliance
Multiple homeoffice networks can be connected to a single Netgate appliance instance This could be used to allowclients at different office locations to communicate without requiring tunnels between each individual location Itcould also be used as a way to apply policies on traffic tofrom the internet in one place and have them take effectacross multiple locations
Each site would need to have the instructions above for connecting an individual device repeated to add an OpenVPNserver on the Netgate appliance instance and an OpenVPN client on the local pfSense device Each OpenVPN Serverthat is configured must use a unique port and a unique network for IPv4 Tunnel Network It is recommended touse a name that uniquely identifies each location connected in this manner in the Description field when adding anOpenVPN Server for a site in the Netgate appliance
263 Detect and Recover EC2 Instance Failure
You can create an Amazon CloudWatch alarm that monitors an Amazon EC2 instance and automatically recovers theinstance if it becomes impaired due to an underlying issue
For more information about instance recovery see Recover Your Instance
27 Frequently Asked Questions
271 1 I donrsquot know the password to the web GUI How do I find out what it is
The first time the instance boots it looks for a user-defined password set in the User Data box when the instance wascreated If you didnrsquot set one it chooses one randomly so that the instance is not accessible via a default password tomalicious users You can find out the random password that was set by choosing Get System Log from the ActionsMenu for the instance in the EC2 Management Console A message should appear after the system boot messages thatlooks like the following
copy Copyright 2020 Rubicon Communications LLC 25
Security Gateway Manual Amazon AWS
Admin password changed to abcdefg
It may take 5-10 minutes after the instance boots for this message to appear in the system log If you would like to findout the password sooner you can log in via SSH using the SSH key that was selected when the instance was createdThe same message that will be written to the system log will be written to the file etcmotd Running the commandcat etcmotd will show you what the password is
272 2 I donrsquot like the random password that was selected How can I change it
The password can be changed via the web GUI Log in with the username admin and the existing password Underthe System category click on User Manager The admin account should appear in a list of accounts Unless yoursquoveadded other accounts it should be the only account present Click on the Edit button (the icon with the e in it) to theright of the account listing Type your choice for a new password into the two boxes labeled Password Click theSave button at the bottom of the screen
273 3 How do I access my instance
There are several ways that you can manage or use your instance You should be able to connect via SSH or HTTPS inorder to manage the configuration of your instance If you connect via SSH you will either need to know the passwordof the admin account and login with that account or use the SSH key that was selected when the instance was createdHere is a sample command line to log in with an SSH key from a Unix or Linux host
ssh -i ~sshmy-ec2-key adminec2-A-B-C-Dcompute-1amazonawscom
You would substitute the actual location of your SSH private key for ~sshmy-ec2-key and the real hostnamewhich you can retrieve from the EC2 Management Console by looking at the data for the instance for example ec2-A-B-C-Dcompute-1amazonawscom If you know the password for the admin account you could use a commandsimilar to the one above but omit the -i ~sshmy-ec2-key
To connect via HTTPS you need to know the password to the instance either by setting it explicitly in the User Datawhen the instance is created or by retrieving it from the instance Once you know the password you should be able toconnect to the instance with any web browser by typing in the hostname of the instance to the URL field
274 4 How do I connect a VPN client to my instance
See the section in the user guide on Using the remote access IPsec or OpenVPN VPN
275 5 Why does the pfSensereg Dashboard say my WAN address is 10XYZ
Amazon AWS instances use DHCP to assign private addresses to the public-facing interfaces of an instance Thepublicly routable IP address that you use to acces the instance is NATed by Amazon to the private address that you seeconfigured on the WAN interface of your instance
copy Copyright 2020 Rubicon Communications LLC 26
Security Gateway Manual Amazon AWS
276 6 I added custom firewall rules to allow some traffic to my instance why I amnot seeing the packets arrive
Amazon AWS provides packet filtering in addition to the Netgate Appliance itself being a stateful firewall If youallowed traffic on the Netgate Appliance but have a security group configuration in the settings for the instance that isrestricting traffic you will need to also add your rules to the security group in the EC2 Management Console
Given that the Netgate Appliance is a fully functional firewall you may assign an AWS security group that allows alltraffic and perform whatever filtering you desire with rules on the Netgate Appliance
277 7 How do I route all the traffic from my entire home network over a VPN
If your home gatewayrouter has support for OpenVPN you can connect a site to site tunnel from your home networkto the Netgate VPN Appliance and configure your routing so that all Internet traffic is sent over the encrypted tunnelSee the user guide section on Connecting a local pfSensereg device
This may provide for simpler administration at home but your mobile devices and laptops that get used outside thehome should have an OpenVPN client installed and configured anyway so that you are always receiving the benefitsof sending your traffic through a VPN
copy Copyright 2020 Rubicon Communications LLC 27
CHAPTER
THREE
VIRTUAL PRIVATE CLOUD (VPC)
31 AWS VPC User Guide
The pfSensereg Certified firewall and VPN appliance from Netgate for Amazon EC2 is a stateful firewall and VPNappliance In addition to itrsquos capabilities as a VPN gateway and firewall for users and offices it is capable of actingas a firewall to protect instances providing services in Amazonrsquos Virtual Private Cloud or VPC service This servicediffers from the classic EC2 service in that it allows for management of instances on private subnets
This guide will explain how to launch manage and use an instance of the appliance to act as a gateway for otherinstances in a VPC subnet
311 Preparing your VPC
In order to use a Netgate appliance instance to protect your VPC subnets you will need the following
bull One internet-facing subnet which the Netgate appliance instance will have itrsquos primaryWAN interface con-nected to
bull One or more private subnets which the Netgate appliance instance will have itrsquos secondaryLAN interface (andpossibly additional optional interfaces) connected to
bull Separate routing tables for the internet-facing subnet and the private subnet(s)
bull If you already have all of these in place with an existing VPC feel free to skip ahead to Launching an Instance
These instructions will demonstrate how to create a single private subnet and set it up behind an instance of thepfSensereg Certified firewall and VPN appliance from Netgate In the Amazon VPC Management Console create anew VPC subnets and routing table(s)
1 Go to Your VPCs view in the menu on the left side of the VPC Management Console under the Virtual PrivateClouds grouping Click the Create VPC button
28
Security Gateway Manual Amazon AWS
2 Enter a CIDR block to use in the box that pops up If you will connect to hosts in your VPC using a VPNfrom hosts at other sites in your infrastructure be sure to select address space that does not conflict with theprivate address space used elsewhere by your organization Make sure the block you choose is large enoughto contain all subnets you may want to include within it Eg if you plan to use a 24 for your internet-facingsubnet and a 24 for your private network the CIDR block you select here will need to be at least a 23 to holdthose 2 subnets The maximum size block you can select is a 16 For the purposes of this example we will use1020016 Leave the value of Tenancy set to Default Click on the Yes Create button
3 To create the subnets required go to the Subnets view in the menu on the left side of the VPC ManagementConsole Click the Create Subnet button Select the VPC you just created and choose the availability zone youdesire Enter the subnet you wish to use for the internet-facing hosts in the CIDR Block field This subnet willbe the one that the WAN interface of the Netgate appliance instance is attached to and could include any otherhosts or appliances that you wish to be available directly from the Internet and not protected behind the Netgate
copy Copyright 2020 Rubicon Communications LLC 29
Security Gateway Manual Amazon AWS
appliance The subnet you select here must be a block that is within the address space you assigned to the VPCFor this example we will use 1020024 Click on the Yes Create button
4 Create the private subnet Still in the Subnets view of the VPC Management Console click the Create Subnetbutton In the box that pops up select the appropriate VPC and the same Availability Zone that you assignedto your public subnet Enter the subnet you wish to use for your private network in the CIDR Block field Thisnetwork should be a subnet of the address space you assigned to the VPC and should be distinct from the subnetyou assigned to the public subnet For this example we will use 1021024 Click on the Yes Create button
5 Both subnets that you created will have been created to use a default route table that was created for the VPCThe private subnet can continue to use that default table A new route table will need to be created for the publicsubnet Go to the Route Tables view in the menu on the left side of the VPC Management Console The singleexisting route table should be displayed Click on the Create Route Table button Select the VPC and click on
copy Copyright 2020 Rubicon Communications LLC 30
Security Gateway Manual Amazon AWS
the Yes Create button
6 Associate the public subnet (1020024 in our examples) with the routing table that was just created Go to theSubnets view on the left hand side of the VPC Management Console Check the checkbox next to the publicsubnet and scroll down to look at the Details tab for that subnet At the top of the Details tab will be listed theCIDR block VPC and Availability Zone Under those items the Route Table will be listed and will have a linklabeled replace next to it Click on the link Select the route table in the box that pops up and click on the YesReplace button
7 In order to send traffic from the public subnet to the Internet we will need to add a default route to an InternetGateway We must first create one Go to the Internet Gateways view in the menu on the left hand side of theVPC Management Console Click on the Create Internet Gateway button Click the Yes Create button onthe box that pops up Click the checkbox next to the new Internet Gateway and then click the Attach to VPC
copy Copyright 2020 Rubicon Communications LLC 31
Security Gateway Manual Amazon AWS
button Select the VPC and click on the Yes Attach button
8 The route table for the public subnet will need to be updated so that it has a default route to the Internet GatewayGo to the Route Tables view on the left hand side of the VPC Management Console Check the checkbox nextto the route table for the public subnet Under the Routes tab for that route table there should only be listed asingle route for the CIDR block of the VPC (1020016 in our example) that has a target of local There is arow underneath this route with a text box in the Destination field and a pop up menu for the Target field Enter00000 for the Destination and select the Internet Gateway (should be formatted like igw-XXXXXXXX)for the target Click on the Add button that appears at the right side of the row Click the Yes Add button onthe box that pops up
There are a few more VPC configuration changes that will be required later but next you must launch a Netgateappliance instance
copy Copyright 2020 Rubicon Communications LLC 32
Security Gateway Manual Amazon AWS
312 Launching an Instance in a VPC
In the Amazon EC2 Management Console launch a new instance of the pfSensereg firewall and VPN appliance Thisprocess is the same as the one for launching an EC2 (non-VPC) instance up until step 11 which details the values toenter for the Configure Instance Details screen in order to specify the instance should be created in your VPC
1 Select the region to run the instance in using the tab at the upper right corner of the page
2 Launch a new instance by clicking on the Launch Instance button under the Create Instance section of theEC2 dashboard
copy Copyright 2020 Rubicon Communications LLC 33
Security Gateway Manual Amazon AWS
3 Select AWS Marketplace on the Create a New Instance menu Type Netgate pfSense FirewallVPNRouter in the search box and press enter (or click on the Search button next to the text box)
4 Click on the link for the Netgate pfSense FirewallVPNRouter appliance in the search results
5 Click on the Continue button on the info page for the Netgate pfSense FirewallVPNRouter
copy Copyright 2020 Rubicon Communications LLC 34
Security Gateway Manual Amazon AWS
6 Click on the Launch with EC2 Console tab
7 If the license terms havenrsquot been accepted click on the Accept Terms button
8 A message should be displayed indicating that the subscription is being processed
copy Copyright 2020 Rubicon Communications LLC 35
Security Gateway Manual Amazon AWS
9 Select the version of the image to run under the popup menu labeled Select a Version Generally the mostrecently issued version should be selected Identify which region to launch the instances in and click on theLaunch in EC2 Console button to the right of that region
10 Choose the instance type to run on Click Next Configure Instance Details
copy Copyright 2020 Rubicon Communications LLC 36
Security Gateway Manual Amazon AWS
11 On the Configure Instance Details page under the Network field select the VPC that was created For theSubnet field that appears right below the Network field select the public subnet that was created earlier In ourexamples this is 1020024
12 Scroll down to the Network Interfaces heading A single interface named eth0 should be displayed by defaultClick on the Add Device button underneath eth0 Select the private subnet that was created (1021024 in ourexample) Pick an IP address within the range of the private subnet and enter it in the Private IP field Keep inmind that the first 3 or 4 IP addresses are reserved For this example we will use 10215
copy Copyright 2020 Rubicon Communications LLC 37
Security Gateway Manual Amazon AWS
Optionally expand the Advanced Details section and set parameters as text in the User Data field The availableoptions are
password Setting a value via a directive like password=abcdefg will set the password for theadministrative account to the specified value - abcdefg in this example If no value is set here arandom password will be assigned in order to keep administrative access from being exposed tothe internet with a default password
mgmtnet Setting a value via a directive like mgmtnet=1001024 will restrict managementaccess (http https ssh) to the specified network - 1001024 in this example This will causethe firewall rule on the instance (not on Amazons access lists but on the Netgate appliancersquosown firewall) to restrict management traffic for the instance to the specified source network Thedefault behavior is to allow management from any host
These directives can be set by placing them on a single line in the User Data field and separating them withcolons Specify both parameters by typing a statement similar to
password=abcdefgmgmtnet=1001024
Click Next Add Storage after optionally setting these parameters
Note If setting a password using the password parameter listed above the password is retrieved by the instancevia an unencrypted HTTP request when the system is configured the first time it boots The request is made toan Amazon Web Services-operated server on the local LAN that stores metadata about each instance runningThe data for an instance is only made available to that instance but is available to be queried from the instancewithout providing any authentication credentials
It is advised to change the admin password via the pfSense webGUI after the instance comes up or choose notto set the password at all and let a random password be set
copy Copyright 2020 Rubicon Communications LLC 38
Security Gateway Manual Amazon AWS
13 Click Next Tag Instance to accept the Storage Device Configuration
14 Optionally a tag can be set on the instance to differentiate this instance from other VMrsquos that were started byentering a value for the Name tag Click Next Configure Security Group after setting any desired tags
copy Copyright 2020 Rubicon Communications LLC 39
Security Gateway Manual Amazon AWS
15 Select a security group to launch the instance with The recommended settings for a security group should allowat least the following traffic
bull TCP port 443 from 00000 - HTTPS - This is the port that the management web GUI listens on
bull TCP port 22 from 00000 - SSH - This port can be used to connect to a command prompt with an sshclient
bull UDP port 1194 from 00000 - OpenVPN - The OpenVPN server that is configured by default is boundto this port
bull UDP port 500 from 00000 - IKE for IPsec VPN
bull UDP port 4500 from 00000 - IPsecNAT-T for IPsec VPN
copy Copyright 2020 Rubicon Communications LLC 40
Security Gateway Manual Amazon AWS
If you have an existing security group that includes this access select Select an existing security group thenselect the group(s) to use and click Continue Otherwise select Create a new security group and add rulesfor this access by filling in the form for each rule and clicking the Add Rule button When all of the rules havebeen added click Review and Launch
16 Verify the details for the instance and click Launch
17 Select an existing key pair or create a new key pair to connect to the instance with Do not select Proceed
copy Copyright 2020 Rubicon Communications LLC 41
Security Gateway Manual Amazon AWS
Without a Key Pair Click the checkbox that indicates you acknowledge having access to the selected privatekey file and then click Launch Instance
18 In order to reach the instance from the Internet associate an Elastic IP with the WAN interface of the instanceIn the VPC Management Console go to the Elastic IPs view by clicking on Elastic IPs on the left side of thepage Click on the Allocate New Address button Select that you want the EIP used in VPC and click on theYes Allocate button in the box that pops up After the Elastic IP address is allocated associate the address withthe WAN interface of the Netgate appliance by clicking on the Associate Address button
A box will pop up that will either let you specify the instance and Private IP address of the interface or theNetwork Interface and the Private IP Address of the interface Use one of these methods to select the correctinterface and click on the Yes Associate button The instance should now be reachable via ssh or https
copy Copyright 2020 Rubicon Communications LLC 42
Security Gateway Manual Amazon AWS
19 In order for traffic to be allowed to be routed from the private subnet through the public interface of the instancethe SourceDest AddressCheck on the private interfaces needs to be disabled In the EC2 Management Con-sole go to the ldquoNetwork Interfacesrdquo view by clicking on Network Interfaces in the menu on the lefthand sideof the page
Click the checkbox to the left of the privateLAN interface on the Netgate appliance instance Click on theActions button at the top of the page and select Change SourceDesk Check on the popup menu Select theradio button labeled Disabled on the box that pops up and click on the Save button
Non-local traffic from the private subnet should now be sent through the privateLAN interface on the Netgateappliance instance
copy Copyright 2020 Rubicon Communications LLC 43
Security Gateway Manual Amazon AWS
313 Managing a VPC Instance
Once the instance is launched you can connect to it via the Elastic IP that was attached to the primary interface duringthe provisioning phase
In order to manage the configuration of the instance you can connect to it via https or ssh A limited set of configura-tions is possible through the SSH interface the preferred method for managing most of the configurations or viewingdata on the status of the pfSensereg instance is through the https webGUI
Connecting via SSH
To connect via SSH you would use the key pair you chose while creating the instance to connect to the admin accountFrom the command line on a UnixLinux host you would use a command similar to
ssh -i my_ec2_key admin232020454
Where the appropriate private key file and public IP or hostname are substituted
Note The first time you log into your instance the SSH key of the instance will not be cached on your computerand you will need to type yes when asked whether you want continue connecting This should not be necessary onsubsequent sessions
Once logged in you should see the console menu similar to the one below
copy Copyright 2020 Rubicon Communications LLC 44
Security Gateway Manual Amazon AWS
Connecting via HTTPS
To connect via https you would enter a URL containing the public IP address or hostname of your instance intoa web browser For example https232020454 Itrsquos very likely that you will receive a browser warningindicating that the security certificate of the site is not trusted This is because the instance uses a self-signed certificatefor https communication You should click on the option to proceed to the site anyway The pfSense login screen withthe Netgate logo should appear
The username to log in with is admin The password to use is either a value that you set in the User Data during thecreation of the instance or a random password
Tip It is preferable to explicitly set a password by passing a value in with the User Data field so the password willbe known in advance
If you did not set a specific password you can find out that value that the random password was set to through one of2 different methods
1 The first method is to log in over SSH with the key pair that you selected when the instance was created andexamine the contents of the file located at etcmotd You would do this by selecting option 8) Shell in theconsole menu that is presented when you SSH in then run this command in the shell
cat etcmotd
2 The second method is to view the System Log for the instance in the EC2 Management Console After themessages that are displayed that show the status of the boot process a message should appear that indicates what
copy Copyright 2020 Rubicon Communications LLC 45
Security Gateway Manual Amazon AWS
the administrative password was changed to Be aware that the System Log output in the EC2 ManagementConsole is not updated in real time and may take a few minutes to show up
The message you should look for using either of the methods mentioned about will look like this
Admin password changed to abcdefg
Once yoursquove determined your password and entered it into the login form the pfSense WebGUI should be availableto you
314 Forwarding traffic from VPC subnets through the instance
Some additional configuration is required within the VPC instancersquos pfSensereg webGUI before you are able to managetraffic from the private subnet
1 Log into the pfSense WebGUI for the instance
2 Click on the Interfaces heading on the left and then click the Assign link
3 Click on the + icon to add a new Interface under the Interface assignments tab A LAN interface shouldautomatically be added with the next available network interface (xn1)
4 Click on the Interfaces heading on the left again and then click on LAN Click the checkbox to enable the LANinterface Set the IPv4 Configuration Type to Static IPv4 and enter the IP address you assigned to the 2ndinterface during the provisioning phase Click the Save button
Now you can create other instances attached to your private subnet and protect them with the firewall on the pfSenseinstance
Common ways to manage private hosts
Allowing private hosts to connect to the Internet
To allow private hosts to be able to connect to the Internet you can allow any traffic from the LAN in your firewallrules there should be a rule like this in place by default
Next set up NAT rules to cause addresses in the private subnet to be NATed to the IP address of the WAN interface
1 Under the Firewall heading on the left click on the NAT link
2 On the Outbound tab click the radio button for Manual Outbound NAT rule generation (AON - AdvancedOutbound NAT)
3 Click the Save button
4 Click on the Aliases link under the Firewall heading on the left
5 Add your private subnet to the Networks_to_NAT alias
Note There is an existing NAT rule configured by default that uses the alias Networks_to_NAT
copy Copyright 2020 Rubicon Communications LLC 46
Security Gateway Manual Amazon AWS
Allow private hosts to connect to each other
If your hosts should only contact each other and a private network segment elsewhere you can configure an IPsecor OpenVPN tunnel from your remote networks to the Netgate appliance instance and set up the appropriate firewallrules routes and security policies to allow access to your private subnet through a VPN tunnel
Allow direct inbound access from the internet to hosts
If you wish to enable direct inbound access from the internet to hosts on the private subnet you can set up portforwarding on the WAN interface to direct traffic to particular hosts in the private subnet
315 Establishing a VPN connection to a VPC in another region
To establish a VPN that allows instances on the VPC subnet(s) that sit behind a Netgate appliance to communicate withinstances that reside in a VPC in another region the Netgate appliance has a VPC configuration wizard that assists byconfiguring both the Netgate appliance as well as the VPC configuration elements that would normally have to be setmanually through the AWS Management Console
For detailed instructions see the AWS VPC User Guide
316 Upgrading a VPC Instance
Periodically new releases of the AMI are issued to track new releases of pfSensereg that may provide new functionalitybug fixes and security updates
The lower risk approach to upgrading is to bring up a new instance alongside the existing one and executing a cutoverThese instructions detail the procedure for moving your existing instance to one running the latest version
1 Back up the configuration of your exsting instance by navigating to BackupRestore under the Diagnosticsmenu in the Web GUI Click the Download configuration button under the Backup Configuration headingand save your config file to your local system
2 Bring up a new instance of the pfSense Certified RouterFirewallVPN running the latest version
3 When creating the instance make sure the interfaces match the interfaces on the existing instance Make surethat the new instance is in the same VPC as the existing instance and that it has the same number of interfacesattached and that the interfaces are connected to the same Subnets
4 Make sure any interfaces on the new instance that will communicate with private Subnets have theSourceDestination check disabled
5 Allocate a new Elastic IP and associate it to the WAN interface of the new instance to allow yourself managementaccess
6 Restore the backed up configuration file to the new instance Navigate to BackupRestore under the Diagnosticsmenu in the Web GUI Under the Restore Configuration heading click the Choose File button and browsefor the configuration file you backed up from the existing instance earlier Once you have selected that fileclick the Restore configuration button The configuration file will be uploaded and the instance will rebootautomatically
7 If you had packages installed on the old instance navigate to Packages under the System menu in the pfSenseweb GUI and install the same packages
8 If there was any external dependency on the public IP address of the existing instance you can remove theElastic IP Address from the upgraded instance and move the Elastic IP Address from the existing instance tothe upgraded instance External dependencies that might cause you to want to do this include things like VPNrsquos
copy Copyright 2020 Rubicon Communications LLC 47
Security Gateway Manual Amazon AWS
configured to external devices that rely on the existing instancersquos Elastic IP address or access lists on externaldevices that allow access to traffic from the existing instancersquos IP address There may be other reasons why youwould wish to keep the existing address as well (to preserve existing bookmarks to the Web GUI reduce theneed for updates to existing internal documentation etc) The process for moving the old Elastic IP address tothe new instance is as follows
bull Disassociate the Elastic IP address from the new instance In the EC2 Management Console click onElastic IPs under the Network amp Security heading Check the box next to the Elastic IP address assignedto the new instance and click on the Disassociate Address button
bull Disassociate the Elastic IP address from the old instance The procedure is the same as in the previousstep just repeated for the Eastic IP address of the old instance this time
bull Associate the Elastic IP address that was previously associated to the old instance to public interface of thenew instance In the EC2 Management Console click on Elastic IPs Check the box next to the Elastic IPaddress you are moving and click the Associate Address button Fill in the correct value for the Instanceor Network Interface and select the Private IP Address of the public interface on the new instance Clickthe Associate button The management interface of the new instance should now be accessible
9 Move any default routes that pointed to an interface on the old instance to point to the equivalent interface onthe new instance In the VPC Management Console click on Route Tables under the Virtual Private Cloudheading Check the box next to a Route Table associated with the VPC that the instances is located in
bull In the detail pane that appears at the bottom of the screen click on the Routes tab
bull If a route exists for 00000 with a Target that is an interface ID of an interface on the old instnace clickthe Edit button above the table displaying the routes
bull Click the red X next to the row for 00000 to remove the existing route
bull There should be a blank row with empty fields for a new route Enter 00000 in the Destinationfield and the Network Interface ID of the interface on the new instance in the Target field Click on theSave button
bull If there were multiple private subnets in the VPC which were pointed to interfaces on the pfSense instancerepeat this process for the other Route Tables associated with the VPC
bull The new instance should now be functioning as the old one did
32 AWS VPC Wizard User Guide
This guide will explain how to use the AWS VPC Wizard to simplify the configuration of a VPN to a remote VPC Theadministrator is asked for the minimum amount of basic information required to establish the VPN The configurationsboth on the AWS VPC side and on the pfSense side are then automatically created When the wizard is finishedexecuting a functioning VPN connection to a VPC should be established
321 AWS Access Keys
In order to connect to the AWS API to make certain required configuration changes the AWS VPC Wizard requiresAccess Keys to retrieve and modify VPC configurations
See also
Find more information about AWS Security Credential including Access Keys by reading AWS Security Credentials
Access keys consist of two parts
1 An access key ID
copy Copyright 2020 Rubicon Communications LLC 48
Security Gateway Manual Amazon AWS
bull For example AKIAIOSFODNN7EXAMPLE
2 A secret access key
bull For example wJalrXUtnFEMIK7MDENGbPxRfiCYEXAMPLEKEY
Access keys are like a usernamepassword and needed for programmatic requests to AWS including the AWS VPCWizard Use both the access key ID and secret access key together to authenticate requests
Important Manage access keys as securely as a user name and password
Managing Access Keys
To create modify or delete IAM user access keys do the following
1 Sign in to the IAM console
2 In the navigation bar on the upper right choose a user name and then choose My Security Credentials
3 On the AWS IAM Credentials tab in the Access keys for CLI SDK and API access section choose Createaccess key
4 Choose Download csv file to save the access key ID and secret access key to a csv file on your computerStore the file in a secure location There is no access to the secret access key again after this dialog box closesAfter the csv file has been downloaded choose Close When an access key is created the key pair is active bydefault and the pair can be used right away
bull To disable an active access key choose Make inactive
bull To reenable an inactive access key choose Make active
bull To delete an access key choose its X button at the far right of the row Then choose Delete to confirmWhen an access key is deleted itrsquos gone forever and cannot be retrieved However new keys can alwaysbe created
To create modify or delete another IAM userrsquos access keys do the following
1 Sign in to the IAM console
2 In the navigation pane choose Users
3 Choose the name of the user whose access keys to manage and then choose the Security credentials tab
4 In the Access keys section choose Create access key
5 Choose Download csv file to save the access key ID and secret access key to a CSV file on your computer
Rotating Access Keys
As a security best practice we recommend to regularly rotate (change) IAM user access keys Rotating access keyscan be done from the AWS Management Console
To rotate access keys for an IAM user without interrupting the applications (console) create a second access key whilethe first access key is still active
1 Sign in to the IAM console
2 In the navigation pane choose Users
3 Choose the name of the user whose access keys to manage and then choose the Security credentials tab
4 In the Access keys section choose Create access key
copy Copyright 2020 Rubicon Communications LLC 49
Security Gateway Manual Amazon AWS
5 Choose Download csv file to save the access key ID and secret access key to a CSV file on your computer
6 The new access key is active by default At this point the user has two active access keys
After waiting some period of time to ensure that all applications and tools have been updated delete the first accesskey
1 Sign in to the IAM console
2 In the navigation pane choose Users
3 Choose the name of the user whose access keys to manage and then choose the Security credentials tab
4 Locate the access key to delete and choose its X button at the far right of the row Then choose Delete to confirm
Determining When Access Keys Need Rotating
To determine when access keys need rotating (console) do the following
1 Sign in to the IAM console
2 In the navigation pane choose Users
3 If necessary add the Access key age column to the users table by completing the following steps
1 Above the table on the far right click the settings icon
2 In Manage columns select Access key age
3 Choose Close to return to the list of users
4 The Access key age column shows the number of days since the oldest active access key was created Usethis information to find users with access keys that need rotating The column displays None for users with noaccess key
322 Using the Wizard
1 Gather your AWS Access Key ID and Secret Key
2 Navigate to VPN gt AWS VPC Wizard in the main menu in the pfSensereg webGUI
copy Copyright 2020 Rubicon Communications LLC 50
Security Gateway Manual Amazon AWS
3 The first screen of the wizard prompts for the AWS Credentials Enter the Access Key ID and Secret AccessKey in the appropriate text fields and select the Region to connect to in the dropdown menu then click Next
The wizard will then query the AWS API using those credentials to find which VPCrsquos exist in the selectedregion If the credentials were rejected an error message will be displayed and return to the first screen
4 The next screen will prompt to select from the available VPCrsquos in the selected region Select the one to connectto from the dropdown menu The wizard will not create a new VPC it will only connect to an existing VPC
Click Next after selecting the desired VPC
copy Copyright 2020 Rubicon Communications LLC 51
Security Gateway Manual Amazon AWS
Note If the desired VPCrsquos to connect to isnrsquot available create one via the AWS Management Console and tryagain
The wizard will then query the AWS API to check whether there is a VPN Gateway attached to the selectedVPC If none exists one will be created via the API Then the next screen will be displayed
5 On the next screen specify routing and network data
A description of what should be entered for each of these fields follows
copy Copyright 2020 Rubicon Communications LLC 52
Security Gateway Manual Amazon AWS
Routing Type AWS offers either static routing or BGP routing Select the appropriate type fromthe dropdown menu If unsure static routing is likely to be adequate
BGP AS Number If static routing was choosen leave this field blank Otherwise it is possible tospecify an AS number to use If left blank the value will default to 65000
Local Public IP Address On an AWS Netgate appliance instance this should be the public IP ad-dress of the Elastic IP associated with the instance If configuring a hardware device runningpfSense this could be the public address assigned to the WAN (or other) interface of the device
Local subnets The subnets connected to the pfSense instance that should be routed over the tunnelfrom hosts in the remote VPC As an example if connecting a pfSense instance to a remote VPCin the AWS us-east-1 region enter the subnets (or a single subnet) that are local to the pfSenseinstance and when hosts in your VPC in us-east-1 attempted to reach addresses within thosesubnets the traffic will be sent through the VPN tunnel that is being configured
Note When selecting static routing as the routing type there will be a delay that is typically between 2-5minutes before the next screen is displayed This is because static routes must be added to the VPN Connectionvia the AWS API This operation fails until the VPN Connection reaches the ldquoavailablerdquo state This can take afew minutes to occur
Click Next when done
The wizard will then query the AWS API to find whether a Customer Gateway is configured with the selectedPublic IP Address If none exists one will be created If one already exists the ID will be retrieved and it willbe used
The wizard will then query the AWS API to see if a VPC Connection already exists that matches the dataentered If one exists it will be used Otherwise one will be created
If static routing was selected static routes will be added to the VPN Connection for the Local subnets entered
Route propagation will be enabled for the VPN Gateway in each of the Route Tables that are associated withthe VPC All of these configurations are carried out in the AWS API nothing has been changed in the pfSenseVPN configurations yet
Warning Important Note on Billing Once this step is carried out and the VPN Connection is createdAWS will start billing your AWS account the hourly rate for a VPN Connection This is $005 as of thiswriting and that is a charge that goes entirely to AWS itself They will do this until the VPN Connection isdeleted via the VPC Management Console
Nothing in pfSense will ever cause AWS to stop billing for this VPN Connection Whether it works or notwhether the pfSense instance is up or down whether the IPsec tunnels have been deleted or reconfiguredAWS will continue to bill the hourly fee for a VPN Connection if the creation of it succeeds until it is deletedthrough their web interface
The wizard helps establish an initial configuration that works and configures the appropriate elements inAWSrsquos API to facilitate this You are responsible for making sure you understand what yoursquore being billedfor and disabling any functions including VPN Connections that are no longer necessary
6 If the operations of the previous step succeeded the next screen will appear
copy Copyright 2020 Rubicon Communications LLC 53
Security Gateway Manual Amazon AWS
Select an Interface to act as the local endpoint of the VPN tunnels that will be created In most cases thisshould be the WAN interface It should generally be whatever interface is associated with the Local Public IPAddress entered in the previous step
On an AWS Netgate pfSense instance this will be whatever interface the Elastic IP is associated with On ahardware device running pfSense that has the Local Public IP Address directly configured on an interface thiswill be the interface that the Local Public IP Address is configured on
After clicking Next the wizard will configure the VPN and associated settings within pfSense itself using datareturned by the AWS API in the previous step
It will configure 2 IPsec tunnels a firewall rule 2 Aliases (referenced by the firewall rule) and 2 Virtual IPAddresses If BGP was selected as the Routing Type in the previous step it will install the OpenBGPDpackage automatically and configure it appropriately
7 The next screen will appear and prompt to apply the configuration changes that have been made
copy Copyright 2020 Rubicon Communications LLC 54
Security Gateway Manual Amazon AWS
After clicking Next all the configuration changes that were made will be applied
8 The wizard will be completed and the browser will be redirected to the IPsec status page The VPN to the VPCshould now be fully configured
Note Sometimes there is a delay of 5-10 minutes before the tunnels are fully functional and passing trafficThis has been observed particularly often during the setup of tunnels using BGP routing
copy Copyright 2020 Rubicon Communications LLC 55
Security Gateway Manual Amazon AWS
323 Testing Connectivity
Verify that the IPsec tunnels are functioning by attempting to ping the ldquoinside tunnel addressesrdquo of the VPC side ofthe tunnel by navigating to Firewall -gt Virtual IP There should be two virtual IP addresses configured that haveDescriptions like ldquoInside address for tunnel to ltremote IP addressgtrdquo
Amazon provides inside addresses for each end of the tunnel in a 30 subnet in IPv4 link local address space(169254xy) Typically the first usable address in the 30 is the inside address for the VPC end of the tunnel andthe other usable address is the inside address for your end of the tunnel So if you ping from one of the virtual IPaddresses configured on the pfSensereg instance to the IP address that is one less (for example if the virtual IP addresswere 16925425322 ping from 16925425322 to 16925425321) that checks whether the other end of the tunnelis responding and whether the tunnel is functioning properly
Note It sometimes takes a few minutes for the tunnels to begin working after the configuration wizard completes
To ping log into the pfSense instance via SSH and execute ping from a shell prompt For the previous example of16925425322 the proper syntax is
ping -S 16925425322 16925425321
When pinging from a shell prompt it is possible leave the command running indefinitely and interrupt it there is aresponse
copy Copyright 2020 Rubicon Communications LLC 56
Security Gateway Manual Amazon AWS
It is also possible to ping via the Diagnostics -gt Ping page by selecting the appropriate source address and enteringthe remote tunnel inside address in the Host field This will only send a limited number of ping packets so it may benecessary to repeat this a few times
324 VPC Configuration Details
The AWS documentation for connecting a hardware device to a VPC provides a great amount of detail on configuringVPN Connections to VPC
The main configuration elements that exist in Amazonrsquos data model are the Virtual Private Gateway the CustomerGateway and the VPN Connection In order to configure a VPN connection to a VPC all 3 of these need to exist TheVirtual Private Gateway is the VPN endpoint on Amazonrsquos side The customer gateway is the VPN endpoint on thepfSensereg instancedevice being configured The VPN Connection is the IPsec VPN between Amazon and the pfSenseinstancedevice
A Virtual Private Gateway needs to exist and be associated to the VPC A particular VPN Gateway can only beassociated to one VPC at a time Once the VPC to connect to has been selected the wizard invokes the AWS API callDescribeVpnGateways to determine if a VPN Gateway already exists that is attached to the VPC If none exists itcreates one with the CreateVpnGateway API call and attaches it to the VPC with the AttachVpnGateway call
A Customer Gateway needs to be created for the public IP address of the device or virtual machine that will be used toconnect to the VPC The wizard invokes the AWS API call DescribeCustomerGateways to determine if a CustomerGateway already exists If none exists one is created with the CreateCustomerGateway API call
The VPN Connection connects the Virtual Private Gateway and Customer Gateway The wizard checks to see if thereis an existing VPN Connection configured that connects those endpoints by invoking the AWS API call DescribeVp-nConnections If none exists one is created using the CreateVpnConnection call One of the fields returned by thiscall is a block of XML configuration data that contains configuration data assigned by AWS for use with configuringthe VPN Connection This data is stored and used in subsequent steps to make the required configuration changeswithin pfSense
copy Copyright 2020 Rubicon Communications LLC 57
Security Gateway Manual Amazon AWS
Any objects created through API calls by the wizard will be tagged with names like auto-created by pfSenseVPC ltyour_VPC_IDgt This is accomplished by calling the AWS API call CreateTags and using Name as the keyfor the tag
In addition to creation of the items mentioned above required adjustments are made to Security Groups and RouteTables to facilitate communication over the VPN The Security Groups associated with the VPC are updated to allowinbound access from the local subnets on the pfSense end of the VPN They are checked first via the DescribeSecuri-tyGroups AWS API call to determine if the access is already allowed Any of the subnets that is not already allowedhas inbound access added via the AuthorizeSecurityGroupIngress AWS API call
Route Tables associated with the VPC are updated to receive routes from the VPN Gateway used by the VPN Con-nection They are checked first via the DescribeRouteTables AWS API call If the VPN Gateway ID is not includedin the list of VPN Gateways propagating routes route propagation for the VPN Gateway is enabled on that table usingthe EnableVgwRoutePropagation AWS API call
For VPN Connections using static routing static routes for the specified subnets are added to the VPN ConnectionThis is done via the CreateVpnConnectionRoute AWS API call
325 pfSense Configuration Details
On the pfSensereg side there are numerous configurations added to support the VPN to the VPC
Aliases
First aliases are created for use in a firewall rule These aliases are intended to contain the subnets that traffic shouldbe allowed to ingress over the IPsec tunnel One alias represents the local subnets on the pfSense side and is givena name like VPC_Local_vpc_12345678 and the other represents the remote subnets on the VPC side and is given aname like VPC_Remote_vpc_12345678
Virtual IP addresses
Next virtual IP addresses are added on the lo0 (loopback) interface These virtual IP addresses are the local ldquoinsideaddressesrdquo of the IPsec tunnels These addresses are used as the local address for BGP communication when BGProuting is selected These addresses are IPv4 link local addresses (see RFC 3297) AWS assigns 30rsquos out of thenetwork 1692540016 for this purpose
Note These addresses are also useful as a ping target to execute a basic test of whether the tunnel is functioningproperly Executing a ping from a source address of one of these IP addresses to the corresponding inside address ofthe other end of the tunnel helps determine whether the tunnel negotiation is completing properly
Firewall rules
Next a firewall rule is added on the IPsec interface that allows traffic from the VPC networks to the local subnetsThis rule uses the previously created Aliases as sourcedestination targets
IPsec
Then IPsec phase 1 and phase 2 associations are set up Most of the settings required are extracted from a blockof XML data that was returned by the CreateVpnConnection call made during the AWS configuration step Thisincludes parameters like endpoint IP addresses encryption ciphers timer values etc
copy Copyright 2020 Rubicon Communications LLC 58
Security Gateway Manual Amazon AWS
If BGP routing was selected the configurations for the OpenBGPD BGP daemon are established The required settingsare determined using the AS number entered into the wizard and the parameters returned by the CreateVpnConnec-tion call made during the AWS configuration step
326 Tested Configurations
Various topologies may be possible to establish using the AWS VPC Configuration Wizard This section enumeratessome of the configurations that were successfully tested
Platforms
bull Various hardware platforms
bull 64-bit virtual machines in VMware vSphereESX
bull Amazon EC2 instances (Xen virtual machines) of the Netgate pfSensereg RouterFirewallVPN AWS AMI
Local networkrouting configurations
bull pfSense with a public address configured on the WAN interface
bull pfSense with a private address configured on the WAN interface behind a 11 NAT
bull pfSense with a private address configured on the WAN interface behind a PAT (1many NAT)
VPC Topologies
bull pfSense connected to a single VPC
bull pfSense connected to multiple VPCrsquos in different regions
bull Amazon EC2 instance of the pfSense RouterFirewallVPN AWS AMI connected to a VPC belonging to thesame AWS account in a different region
bull Amazon EC2 instance of the pfSense RouterFirewallVPN AWS AMI connected to a VPC belonging to adifferent AWS account in the same region
The configuration recommended for the greatest amount of stability is to have a public IPv4 address directly configuredon the WAN interface of your pfSense firewall but VPNs have been successfully established under all of the conditionslisted above
Whether any of these solutions is appropriate should be evaluated in the context of personal needs and existing infras-tructure Other configurations not listed above may be possible as well
327 AWS VPC Wizard FAQ
1 What level of redundancy is provided by the two tunnels
Amazon provides two tunnel endpoints that will allow traffic to be sent between your networks and the remote VPCyou are connected to The racoon daemon in pfSensereg is only capable of establishing an active phase 2 associationfor a particular sourcedestination pair on a single tunnel
Phase 2 associations between the local subnets and the remote VPC subnet are configured in the pfSense GUI for bothtunnels but racoon will only actually establish an association for the first tunnel This means that racoon will onlyever try to send traffic destined for the remote VPC subnet over the first tunnel
copy Copyright 2020 Rubicon Communications LLC 59
Security Gateway Manual Amazon AWS
If that tunnel goes down the second tunnel may be up and inbound traffic from the remote VPC may be sent to yourlocal networks over that tunnel automatically But outbound traffic to your remote VPC would not automatically failover to the second tunnel In order for you to send your outbound traffic over the second tunnel you would need todisable the phase 2 associations for the first tunnel and apply the changes
2 I quit the wizard before finishing Now what
To finish setting up the VPN go back to the wizard and run through it again It should reuse any partial configurationsthat were generated before it was stopped and create the new elements that are required
3 What are the AWS charges for this
AWS determines their own pricing and provides details for EC2 pricing and VPC pricing There are many types ofcharges that may be incurred for operating instances on AWS (eg charges related to running an instance bandwidthstorage elastic IPs etc)
The charge of specific interest in this case is the hourly charge for a VPN Connection As of this writing it costs $005(USD) per hour in most regions to have a VPN Connection configured and available AWS will charge whether theVPN Connection is being used or not as long as it is configured This will be configured by the third step of the wizardand will never be removed by pfSense
If the VPN Connection is no longer needed and billing for it needs to be stopped visit AWSrsquos VPC ManagementConsole and delete the VPN Connection manually
4 Can I use the wizard to connect to the GovCloud region
This hasnrsquot been officially tested but at least one user has reported that they were able to successfully connect to theGovCloud region They manually added the region us-gov-west-1 to the list of regions in the first step of the wizardand were able to successfully connect to their VPC in that region This may be supported in a future build but to trywithout official support do the following
1 Under the System gt Advanced menu make sure the Enable Secure Shell box is checked This is already doneby default on AWS instances but is off by default on pfSense hardware devices
2 Log into the instance via SSH
3 Make sure the root filesystem is mounted as readwrite On an AWS instance or a hardware device running on anSSD this should be true On a hardware device using Compact Flash or an SD card for storage it will probablybe necessary to remount the root filesystem in readwrite mode by running
mount -uw
4 Edit the file usrlocalwwwwizardsvpc_vpn_wizardxml using vi Look for a section of the file that lookslike this
ltoptiongtltnamegtsa-east-1ltnamegtltvaluegtsa-east-1ltvaluegt
ltoptiongt
That should appear directly after several similar ltoptiongt specifications containing all of the other availableregions Right underneath that section add the following
copy Copyright 2020 Rubicon Communications LLC 60
Security Gateway Manual Amazon AWS
ltoptiongtltnamegtus-gov-west-1ltnamegtltvaluegtus-gov-west-1ltvaluegt
ltoptiongt
Then save the file and exit vi
5 If the filesystem had to be remounted in readwrite mode earlier remount it in read-only mode by running
The GovCloud region should now appear as a choice in the first step of the wizard
copy Copyright 2020 Rubicon Communications LLC 61
CHAPTER
FOUR
REFERENCES
41 Support Resources
411 Commercial Support
In order to keep prices low the software is not bundled with a support subscription For users who need commercialsupport Netgate Gloabal Support can be purchased at httpswwwnetgatecomsupport
412 Community Support
Community support for pfSensereg software is available through the Netgate Forum
42 Additional Resources
421 Netgate Training
Netgate training offers training courses for increasing your knowledge of pfSensereg products and services Whetheryou need to maintain or improve the security skills of your staff or offer highly specialized support and improve yourcustomer satisfaction Netgate training has got you covered
httpswwwnetgatecomtraining
422 Resource Library
To learn more about how to use your pfSense appliance and for other helpful resources make sure to browse ourResource Library
httpswwwnetgatecomresources
423 Professional Services
Support does not cover more complex tasks such as CARP configuration for redundancy on multiple firewalls orcircuits network design and conversion from other firewalls to pfSensereg These items are offered as professionalservices and can be purchased and scheduled accordingly
httpswwwnetgatecomour-servicesprofessional-serviceshtml
62
Security Gateway Manual Amazon AWS
424 Community Options
If you elected not to get a paid support plan you can find help from the active and knowledgeable pfSense communityon our forums
httpsforumnetgatecom
copy Copyright 2020 Rubicon Communications LLC 63
- Getting Started
- Instance Usage
- Virtual Private Cloud (VPC)
- References
-

Security Gateway Manual Amazon AWS
Fig 1 Architecture Diagram
bull t2medium
bull t2large
bull m3medium
bull m3large
bull m3xlarge
bull m4large
bull m4xlarge
bull c3large
bull c3xlarge
bull c4large
bull c4xlarge
bull r4large
bull r4xlarge
122 Sizing Your EBS Volume
The pfSense appliance is only supported with EBS storage For general purpose firewalls your storage requirementswill typically be small and the default 8GB general purpose SSD volume should be more than enough
copy Copyright 2020 Rubicon Communications LLC 3
Security Gateway Manual Amazon AWS
In situations where you may provide web proxying or caching to your users or other advanced features you shouldconsider increasing the volume size to something more appropriate for example 64GB
13 AWS Service Limits
New services provisioned in a VPC may be assigned IP addresses or other resources but Amazon puts limits on VPCresources per Region Before provisioning a new resource make sure to check these limits
The following tables list the limits for Amazon VPC resources per Region Unless indicated otherwise requests canbe made to increase these limits using the Amazon VPC limits form For some of these limits the current limit appliedcan be viewed using the Limits page of the Amazon EC2 console
Note If a limit increase is requested that applies per resource we increase the limit for all resources in the RegionFor example the limit for security groups per VPC applies to all VPCs in the Region
131 VPC and Subnets
Resource Default limit CommentsVPCs per Region 5
The limit forInternet gateways perRegion is directlycorrelated to thisone Increasing thislimit increases thelimit on internetgateways per Regionby the same amount
Subnets per VPC 200ndash
IPv4 CIDR blocks per VPC 5
This limit is made upof your primary CIDRblock plus 4secondary CIDRblocks
IPv6 CIDR blocks per VPC 1
This limit cannot beincreased
copy Copyright 2020 Rubicon Communications LLC 4
Security Gateway Manual Amazon AWS
132 DNS
For more information see DNS Limits
133 Elastic IP Addresses (IPv4)
Resource Default limit CommentsElastic IP addresses per Region 5
This is the limit forthe number of ElasticIP addresses for usein EC2-VPC ForElastic IP addressesfor use inEC2-Classic seeAmazon EC2 Limitsin the Amazon WebServices GeneralReference
134 Flow Logs
Resource Default limit Comments
Flow logs per singlenetwork interfacesingle subnet orsingle VPC in aRegion
2
This limit cannot beincreased You caneffectively have 6flow logs per networkinterface if youcreate 2 flow logsfor the subnet and 2flow logs for the VPCin which your networkinterface resides
copy Copyright 2020 Rubicon Communications LLC 5
Security Gateway Manual Amazon AWS
135 Gateways
Resource Default limit CommentsCustomer gateways per Region 50
ndash
Egress-only internet gateways perRegion
5
This limit isdirectly correlatedwith the limit onVPCs per Region Toincrease this limitincrease the limit onVPCs per Region Youcan attach only oneegress-only internetgateway to a VPC at atime
Internet gateways per Region 5
This limit isdirectly correlatedwith the limit onVPCs per Region Toincrease this limitincrease the limit onVPCs per Region Onlyone internet gatewaycan be attached to aVPC at a time
NAT gateways per Availability Zone 5
A NAT gateway in thepending active ordeleting state countsagainst your
14 Creating an IAM User in Your AWS Account
pfSensereg uses AWS Identity and Access Management (IAM) accounts for administration Every AWS account in-cludes at least one user For security reasons the root account should not be used for day-to-day administration Thissection describes the process of creating and using an IAM user account for administering pfSense
See also
To find out more about AWS security and credentials read Understanding and Getting Your Security Credentials
copy Copyright 2020 Rubicon Communications LLC 6
Security Gateway Manual Amazon AWS
There are multiple methods for creating users in IAM The recommended method is to use the AWS ManagementConsole The process of creating a user and enabling that user to perform work tasks consists of the following steps
1 Create the user
2 Create credentials for the user
3 As a best practice create only the credentials that the user needs For example for a user who requires accessonly through the AWS Management Console do not create access keys
Note For cloud security it is considered best practice to limit access for the root user so root is locked bydefault
4 Grant the appropriate permissions to the user to administer pfSense
5 Provide the user with the necessary sign-in information
6 (Optional) Configure multi-factor authentication (MFA) for the user
141 Creating IAM Users (Console)
You can use the AWS Management Console to create IAM users To create one or more IAM users (console)
1 Sign in to the AWS Management Console and open the IAM console at httpsconsoleawsamazoncomiam
2 In the navigation pane choose Users and then choose Add user
3 Type the user name for the new user This is the name they will use to sign in to AWS To add up to 10 users atonce choose Add another user for each additional user and type their user names
4 User names can be a combination of up to 64 letters digits and these characters +=-
5 Names must be unique within an account and are not case sensitive
6 Select AWS Management Console access This creates a password for each new user
bull For Console password choose one of the following
ndash Autogenerated password Each user gets a randomly generated password that meets the accountpassword policy in effect (if any) You can view or download the passwords when you get to theFinal page
ndash Custom password Each user is assigned the password that you type in the box
bull We recommend that you select Require password reset to ensure that users are forced to change theirpassword the first time they sign in
7 Click Next On the Set permissions page specify how you want to assign permissions to this new user(s)Choose one of the following three options
bull Add user to group Choose this option if you want to assign the user(s) to one or more groups thatalready have permissions policies IAM displays a list of the groups in your account along with theirattached policies You can select one or more existing groups or choose Create group to create a newgroup
bull Copy permissions from existing user Choose this option to copy all access rights from an existing userto the new user(s)
bull Attach existing policies to user directly Choose this option to see a list of the managed policies in youraccount Select the policies that you want to attach to the new users or choose Create policy to open anew browser tab and create a new policy
copy Copyright 2020 Rubicon Communications LLC 7
Security Gateway Manual Amazon AWS
8 Choose Next Review to see all of the choices you made up to this point When you are ready to proceedchoose Create user
9 To view the usersrsquo access keys (access key IDs and secret access keys) choose Show next to each password andaccess key that you want to see To save the access keys choose Download csv and then save the file to a safelocation
Important This is your only opportunity to view or download the secret access keys and you must providethis information to your users before they can use the AWS API Save the userrsquos new access key ID and secretaccess key in a safe and secure place You will not have access to the secret keys again after this step
10 On the final page you can choose Send email next to each user Your local mail client opens with a draft thatyou can customize and send The email template includes the following details to each user
bull User name
bull URL to the account sign-in page Use the following example substituting the correct account ID numberor account alias
bull httpsAWS-account-ID or aliassigninawsamazoncomconsole
Important The userrsquos password is not included in the generated email You must provide them to the customerin a way that complies with your organizationrsquos security guidelines
15 Using IAM Roles
AWS IAM Roles are used to delegate access to users applications or services that require controlled access to AWSresources IAM Roles should be used to manage all pfSensereg instances This unique role can be specified whenlaunching a new instance or attached to an existing instance
The AWS Management Console is the recommended method for creating roles for use with pfSense It is also recom-mended to create these roles based on the principle of least privilege also known as the principle of least authoritywhich is the assignment of lowest needed privileges based on necessity The below instructions attempt to follow thisprinciple
151 Create Policy for pfSense Management IAM Role
Create a custom policy that will be associated with an IAM role allowing access to the pfSense Management GUIrunning on an EC2 Instance
1 Sign in to the AWS Management Console and open the IAM console at httpsconsoleawsamazoncomiam
2 In the navigation pane of the console select Policies then choose Create Policy
3 Drop down the Service menu and select EC2
4 In the Actions dropdown check the box next to All EC2 actions (ec2)
Note If stricter policies are required for the actions that can be performed on the pfSense EC2 Instance thesecan be set here
5 Select the Resources dropdown arrow and review resulting warnings
copy Copyright 2020 Rubicon Communications LLC 8
Security Gateway Manual Amazon AWS
6 Click the All resources bubble
7 Select Review policy
8 Populate the Name field (eg pfSense_EC2_Access) and Description if desired
Note Policy names must be unique within the AWS account and the name of the policy cannot be changedonce created
9 Select Create Policy
152 Create IAM Role for pfSense Management
Create a role that an IAM user or users within an IAM Group can assume and use to connect to and manage pfSenserunning on an EC2 Instance
Note The administrator of the specified account can grant permission to assume this role to any IAM user inthat account To do this the administrator attaches a policy to the user or a group that grants permission for thestsAssumeRole action That policy must specify the rolersquos ARN as the Resource
1 Sign in to the AWS Management Console and open the IAM console at httpsconsoleawsamazoncomiam
2 In the navigation pane of the console select Roles then choose Create Role
3 Select the Another AWS account role type
4 In the Account ID field type the AWS account ID that will be allowed to access the destination resource
5 The Require external ID checkbox should remain cleared unless granting permissions to users from an accountthat you do not control Reference AWS Documentation for External ID Roles in the event this is required
6 It is recommended to restrict the role to users who sign in with multi-factor authentication (MFA) Select Re-quire MFA to add a condition to the rolersquos trust policy to require MFA sign-in
7 Select Next Permissions
8 Type the name of the previously created Custom policy in the search field Check the box next to the correctPolicy name
9 Select NextTags
Note IAM tags are key-value pairs that can be used to organize track or control access for this role This isan optional step More information can be found within AWS Documentation for Tagging IAM Entities
10 Select Next Review
11 Populate the Role name field (eg pfSense_Admin) and Role description if desired
Note Role names must be unique within the AWS account and the name of the role cannot be changed oncecreated
12 Review remaining configured settings then select Create role
This role can now be assigned to an IAM User or all users in an IAM group allowing secure administrative access tothe EC2 Instance(s) containing pfSense
copy Copyright 2020 Rubicon Communications LLC 9
CHAPTER
TWO
INSTANCE USAGE
21 Launching an Instance
Here are instructions on how to launch a new instance of the pfSensereg firewallVPN appliance from the Amazon EC2Management Console
1 Select the region for the instance to run in using the region tab at the upper right corner of the page
2 Navigate to the AWS Management Console Main Page and select EC2 under the Compute section in the Allservices dropdown
10
Security Gateway Manual Amazon AWS
3 Launch a new instance by clicking on the Launch Instance button under the Create Instance section of theEC2 dashboard
4 Select AWS Marketplace in the left-hand Navigation Menu Type Netgate pfSense in the search box andpress enter
copy Copyright 2020 Rubicon Communications LLC 11
Security Gateway Manual Amazon AWS
5 Click the Select button for the Netgate pfSense FirewallVPNRouter listing in the search result
6 Review pricing and other helpful information then click Continue
copy Copyright 2020 Rubicon Communications LLC 12
Security Gateway Manual Amazon AWS
7 Choose the instance type to run by clicking the checkbox next to the desired type Click Next ConfigureInstance Details
8 Choose the desired Network and Subnet that the instance will be deployed in Choose any other instance-specificsettings that may be required in your environment Optionally expand the Advanced Details section and setparameters as text in the User Data field The available options are
bull password - setting a value via a directive like password=abcdefg will set the password for the admin-istrative account to the value you specify - abcdefg in this example If no value is set here a randompassword will be assigned in order to keep administrative access from being exposed to the Internet with adefault password
bull mgmtnet - setting a value via a directive like mgmtnet=1001024 will restrict management access(http https ssh) to the network you specify - 1001024 in this example This will cause the firewallrules on the instance (not on Amazonrsquos access lists but on the Netgate pfSense appliancersquos own firewall)to restrict management traffic for the instance to the specified source network The default behavior is toallow management from any host
copy Copyright 2020 Rubicon Communications LLC 13
Security Gateway Manual Amazon AWS
These directives can be set by placing them on a single line in the User Data field and separating them withcolons To specify both parameters type a statement similar to this one
password=abcdefgmgmtnet=1001024
Note If a password is set using the password parameter listed above the password is retrieved by the instancevia an unencrypted HTTP request when the system is configured the first time it boots The request is made toan Amazon Web Services-operated server on the local LAN that stores metadata about each instance runningThe data for an instance is only made available to that instance but is available to be queried from the instancewithout providing any authentication credentials
It is advised to change the admin password via the pfSense web GUI after the instance comes up to avoid anysecurity risks associated with the unencrypted request Otherwise it is possible to choose not to set the passwordat all and let a random password be set
9 Choose the desired Network and Subnet to which the Instance will be deployed Scroll down to configure thenetwork interface(s) with a Static or DHCP-assigned IP address
Once the Network Interface(s) are configured select Next Add Storage
10 Click Next Add Tags to accept the Storage Device Configuration
copy Copyright 2020 Rubicon Communications LLC 14
Security Gateway Manual Amazon AWS
11 It is recommended to set a tag that can be used to differentiate this instance from other instances by entering avalue for the Name tag Click Next Configure Security Group after setting any desired tags
Press the Add Tag button Input Name under the Key field and the desired Instance Tag Name under the Valuefield (eg Netgate FirewallRouter)
12 Select a security group to launch the instance with The Security group name and Description can be left at thedefault or replaced with the desired values The recommended settings for a security group should allow at leastthe following traffic
bull TCP port 443 from 00000
ndash HTTPS - This is the port that the management web GUI listens on
bull TCP port 22 from 00000
ndash SSH - This port can be used to connect to a command prompt with an ssh client
bull UDP port 1194 from 00000
copy Copyright 2020 Rubicon Communications LLC 15
Security Gateway Manual Amazon AWS
ndash OpenVPN - The OpenVPN server that is configured by default is bound to this port
bull UDP port 500 from 00000
ndash IKE for IPsec VPN
bull UDP port 4500 from 00000
ndash IPsecNAT-T for IPsec VPN
Note If there is an existing security group that includes this access click Select an existing security groupthen select the desired group(s) to use and click Continue Otherwise select Create a new security group andadd rules for this access by filling in the form for each rule and clicking the Add Rule button When all of therules have been added click Review and Launch
13 Review any AWS warnings and make note of recommendations Scroll down to review the remaining instancedetails and click Launch after making any needed adjustments
copy Copyright 2020 Rubicon Communications LLC 16
Security Gateway Manual Amazon AWS
14 Select an existing key pair or create a new key pair to connect to the instance with Click the checkbox thatindicates acknowledgment of access to the selected private key file and then click Launch Instances
Important Do NOT select the Proceed Without a Key Pair option
22 Managing the Configuration of the Instance
Once the instance is launched monitor its status using the Instances page of the EC2 Management Console The EC2Management Console will display whether the instance is up and reachable and will also display its current public IPaddress and the hostname that resolves to the public IP address Find the hostname and public IP address in the EC2console by clicking on the Instances heading on the left finding the instance and checking the checkbox next to it andlooking at the details at the bottom of the page
In the example above the hostname of the instance is ec2-23-20-204-54compute-1amazonawscom
copy Copyright 2020 Rubicon Communications LLC 17
Security Gateway Manual Amazon AWS
The public IP address is available by putting together the 4 numbers included in the hostname - 233020454 Itis also possbile to obtain the IP address by using a popular DNS lookup tool such as host dig or nslookup toresolve the hostname to its IP address
Note The hostname and IP address used in this and other examples in this guide are associated at the time of writingwith a test instance This addresshostname will not be the same values used to access the instance and they will noteven be associated with the same test instance by the time this guide is available to the public
In order to manage the configuration of the instance connect to it via https or ssh To connect via ssh use the key pairchosen while creating the instance to connect to the admin account From the command line on a UnixLinux hostuse a command similar to ssh -i my_key_file adminpublic_IP where the appropriate private key fileand public IP or hostname are substituted In the example below the key file my_ec2_key is used to connect to the IPaddress 232020454
Note The first time logging into the instance the ssh key of the instance will not be cached locally type yes whenasked whether to continue connecting This should not be necessary on subsequent sessions
A limited set of configurations is possible through the ssh interface The preferred method for managing most of theconfigurations or viewing data on the status of the pfSensereg instance is through the https web GUI To connect viahttps enter an https URL containing the public IP address or hostname of the instance into a web browser Forexample https232020454
Itrsquos very likely there is a browser warning indicating that the security certificate of the site is not trusted because theinstance uses a self-signed certificate for https communication Click on the option to proceed to the site anyway and
copy Copyright 2020 Rubicon Communications LLC 18
Security Gateway Manual Amazon AWS
a login screen with the Netgate logo should appear
The username to log in with is admin The password to use is either a value set in the User Data during the creationof the instance or a random password If a specific password wasnrsquot set find out that value that the random passwordwas set to through one of two different means
1 The first is to log in over ssh with the key pair that was selected when the instance was created and examine thecontents of the file located at etcmotd Select option 8 (Shell) from the console menu that is presented afterlog in and execute cat etcmotd from the shell
2 Alternatively view the System Log for the instance in the EC2 Management Console After the messagesthat are displayed that show the status of the boot process a message should appear that indicates what theadministrative password was changed to
The message using either of the methods mentioned will look like this
Admin password changed to abcdefg
In this example the password was changed to abcdefg
Note Be aware that the System Log output in the EC2 Management Console is not updated in real time and maytake a few minutes to show up It is preferable to explicitly set a password by passing a value in with the User Datafield so the password will be known in advance To allow a random password to be set connect via ssh and find outwhat the password was changed to after the instance is up without any delay
Once the password has been determined and entered into the login form the pfSense Web GUI should be available
23 Using the remote access IPsec VPN
An IPsec VPN for remote users is preconfigured on the instance when it comes up In order to use it you will need toconfigure the IPsec VPN client on your device
See also
A guide for manually configuring Android or iOS (iPhoneiPodiPad) mobile clients to establish an IPsec VPN islocated in the pfSensereg Documentation
For iOS clients a profile can be downloaded and installed that will automatically configure an IPsec VPN to theinstance The profile can be downloaded by visiting the page at iphone_ipsec_profilephp on the instance If theinstance IP address were 232020454 the correct URL to visit would be https232020454iphone_ipsec_profilephp You will need to authenticate to the web interface by typing the username (admin) and password prior to beingable to download the profile
The profile should be downloaded and saved automatically upon opening the page If the page is visited in a webbrowser on an iOS device the device should automatically launch the Settings app and attempt to install the newprofile If the profile is downloaded to another non-iOS device it can be sent via email as an attachment If theattachment is opened in the iOS email client the Settings app new profile installation will also open
The name and description of the profile being installed will be displayed Tap the Install button A warning messagewill be displayed that indicates that the profile is unsigned Tap on Install Now to continue
copy Copyright 2020 Rubicon Communications LLC 19
Security Gateway Manual Amazon AWS
copy Copyright 2020 Rubicon Communications LLC 20
Security Gateway Manual Amazon AWS
Enter your passcode for the iOS device (the one you enter when you wake the device from sleep) and the passwordto access the IPsec VPN (the one you entered to get access to the Web GUI) when prompted and the profile will beinstalled When the screen shows that the profile was installed tap Done
When the profile has been installed the VPN can be enabled in the Settings app There will be a heading named VPNunder the main Settings page If there are more than one VPN configured on the device tap the VPN heading Thenewly installed profile should be selected It will have a check mark next to it There will be an onoff switch at thetop of the page to enable the VPN If this is the only VPN configured the switch to enable the VPN will be next to theVPN heading on the main Settings page Tap the switch to enable the VPN You should be prompted for a usernameand password The username (admin) should already be filled in Enter the password and tap OK A welcome messageshould be displayed Tap OK and you are ready to use the VPN
24 Using the remote access OpenVPN VPN
An OpenVPN VPN for remote users is automatically configured the first time the instance is booted In order to useit you will need an OpenVPN client app installed on your device and you will need to import a configuration thatspecifies how to connect to the instance
An OpenVPN configuration can be downloaded by visiting the page openvpn_connect_profilephp on your instanceIf the instance IP address were 233020454 the correct URL to visit would be https232020454iphone_ipsec_profilephp You will need to authenticate to the web interface by typing the username (admin) and password prior tobeing allowed to download the configuration
The profile should be downloaded and saved automatically upon opening the page The file that it was saved in shouldbe imported into the OpenVPN client on the device that you wish to connect with
copy Copyright 2020 Rubicon Communications LLC 21
Security Gateway Manual Amazon AWS
241 Tips for configuring OpenVPN based on platformclient
OpenVPN Connect App on iOS (iPhoneiPadiPod)
The iOS version of the OpenVPN Connect App allows you to import an OpenVPN profile by opening an attachmentto an email message Save the config to a file named remote-access-vpnovpn and send it to an email account thatthe iOS device is configured to retrieve mail for Open the email message and touch the attachment to open it Youwill be presented with Open in OpenVPN as one of the available options Touch the OpenVPN icon to select thatoption The OpenVPN Connect App should then open and list the profile under a heading that says New profiles areavailable Click on the green ball with the + sign in it to import the profile Type in the username admin andpassword then change the OnOff switch to On
OpenVPN Connect App on Android
The Android version of the OpenVPN Connect App allows you to import an OpenVPN profile from an SD card Savethe configuration file to the SD card Launch the OpenVPN Connect App From the menu select Import then ImportProfile from SD card Browse to the location of the configuration file and select it Enter the username admin andpassword to connect to the VPN Press Connect
TunnelBlick on MacOS X
The TunnelBlick App for MacOS allows you to import an OpenVPN configuration file Save the configuration to afile on your system Click on VPN Details Click on the + symbol underneath the existing configurations to add anew configuration Click on the I have configuration files button Click on the OpenVPN Configuration(s) buttonFollow the instructions presented by TunnelBlick (copy the config into an empty folder TunnelBlick creates on theDesktop rename the folder click on the folder) When the profile is imported successfully click on itrsquos name and thenclick on Connect Enter the username admin and password to connect to the VPN
OpenVPN Connect Client on Windows
The OpenVPN Connect Client on Windows allows you to import an OpenVPN configuration file from the local diskSave the file on your system Click the + symbol to the right of Connection Profiles Select Local File and click onthe Import button Find the profile you wish to import in the file browser window and click Open A box with thename of the new profile should appear under Connection Profiles now Click on that box and enter the usernameadmin and password to connect to the VPN
25 Enabling Enhanced Networking with the Elastic Network Adapter(ENA)
To enable enhanced networking on AWS pfSensereg FirewallVPNRouter must be version 241 or above Use theupdate wizard in the pfSense console to perform the update if necessary and then ENA can be enabled Enabling ENAis outlined in the steps below
Warning Updating the pfSense FirewallVPNRouter will force it to reboot and cause a disruption in service Besure to perform the update during a maintenance cycle
1 Install AWS CLI Documentation on the installation and use of AWS CLI can be found at httpsawsamazoncomcli
copy Copyright 2020 Rubicon Communications LLC 22
Security Gateway Manual Amazon AWS
2 Determine the Instance ID for the pfSense Instance from the EC2 Console
Fig 1 The selected pfSense Instance ID is i-042c16b65423b7dac
3 Stop the instance using Amazon EC2 console
4 Enable the enhanced networking attribute by executing the following AWS CLI command
aws ec2 modify-instance-attribute --instance-id i-042c16b65423b7dac --ena-support
5 Use the EC2 Console to start the pfSense Instance Once the pfSense Instance has started confirm that EnaSup-port is enabled by executing the following AWS CLI command
aws ec2 describe-instances --instance-ids i-042c16b65423b7dac --queryReservations[]Instances[]EnaSupport[true
]
6 Change the pfSense Instance Type to one that supports Enhanced Networking using the EC2 console Afterselecting an Instance Type that supports Enhanced Networking use the EC2 console to stop the pfSense Instance
copy Copyright 2020 Rubicon Communications LLC 23
Security Gateway Manual Amazon AWS
Note To review the Instance Types please see httpsawsamazoncomec2instance-types
7 Once the pfSense Instance has stopped use the EC2 Console to select the pfSense Instance and then under theActions button select Instance Settings gt Change Instance Type and select a new Instance Type
Fig 2 In this case m4xlarge was selected as the new Instance Type and then Apply was selected
8 In the EC2 Console the pfSense Instance should now show an Instance Type of m4xlarge
9 Using the EC2 console select the pfSense Instance and then under the Actions button select Instance State gtStart
26 Advanced Usage
261 Protecting a private network in VPC
An instance of the Netgate appliance can be used as a firewall for a VPC subnet This will generally require moremanual configuration than using an instance to host a remote access VPN does See the VPC User Guide for a moredetailed explanation of how to configure your VPC and your Netgate appliance instance to support this
262 Connecting a local pfSensereg device
In addition to connecting remote devices as clients a device running pfSensereg as a firewallrouter can be connectedas a peer to a pfSense appliance
See also
Read Configuring a Site-to-Site Static Key OpenVPN Instance in the pfSense documention to see the process ofconfiguring this setup
copy Copyright 2020 Rubicon Communications LLC 24
Security Gateway Manual Amazon AWS
When implementing the configuration changes detailed in the document you should use the Netgate appliance instanceon AWS as the ldquoserverrdquo end of the connection and your local pfSense device as the client ldquoendrdquo You will also needto make sure that you are using a unique port The default remote access OpenVPN server is configured to use UDPport 1194 It is suggested that if you are adding a site-to-site tunnel you should use a port between 1195 and 2000Whichever port you decide to use you will need to make sure that the port is open both in the firewall rules on theNetgate appliance instance and in the Security Group in the EC2 Management Console
If you wish to route all traffic from your homeoffice network through the OpenVPN tunnel to your Netgate applianceinstance you will need to add this statement to the advanced options for the OpenVPN Client on the homeofficepfSense device
redirect-gateway def1
This will cause a default route to be set that sends all locally originated traffic on your homeoffice network overthe OpenVPN tunnel when it is established If you use this configuration to send all traffic from your local networkthrough the OpenVPN tunnel you will also need to establish a NAT on the Netgate appliance instance on AWS fortraffic from the homeoffice network to the internet This can be accomplished by adding the CIDR block for yourhomeoffice network to the preconfigured Alias called Networks_to_NAT This is done by navigating to Aliases underthe Firewall heading on the web GUI then clicking on the edit icon to the right of Networks_to_NAT Add the newnetwork address and mask to the list of Networks and click the Save button Then click the Apply Changes buttonYou will also need to add the network used for the tunnel endpoints (IPv4 Tunnel Network) to the Networks_to_NATalias as well using the same procedure that was used to add the homeoffice network
Connecting multiple pfSense gateways to a Netgate appliance
Multiple homeoffice networks can be connected to a single Netgate appliance instance This could be used to allowclients at different office locations to communicate without requiring tunnels between each individual location Itcould also be used as a way to apply policies on traffic tofrom the internet in one place and have them take effectacross multiple locations
Each site would need to have the instructions above for connecting an individual device repeated to add an OpenVPNserver on the Netgate appliance instance and an OpenVPN client on the local pfSense device Each OpenVPN Serverthat is configured must use a unique port and a unique network for IPv4 Tunnel Network It is recommended touse a name that uniquely identifies each location connected in this manner in the Description field when adding anOpenVPN Server for a site in the Netgate appliance
263 Detect and Recover EC2 Instance Failure
You can create an Amazon CloudWatch alarm that monitors an Amazon EC2 instance and automatically recovers theinstance if it becomes impaired due to an underlying issue
For more information about instance recovery see Recover Your Instance
27 Frequently Asked Questions
271 1 I donrsquot know the password to the web GUI How do I find out what it is
The first time the instance boots it looks for a user-defined password set in the User Data box when the instance wascreated If you didnrsquot set one it chooses one randomly so that the instance is not accessible via a default password tomalicious users You can find out the random password that was set by choosing Get System Log from the ActionsMenu for the instance in the EC2 Management Console A message should appear after the system boot messages thatlooks like the following
copy Copyright 2020 Rubicon Communications LLC 25
Security Gateway Manual Amazon AWS
Admin password changed to abcdefg
It may take 5-10 minutes after the instance boots for this message to appear in the system log If you would like to findout the password sooner you can log in via SSH using the SSH key that was selected when the instance was createdThe same message that will be written to the system log will be written to the file etcmotd Running the commandcat etcmotd will show you what the password is
272 2 I donrsquot like the random password that was selected How can I change it
The password can be changed via the web GUI Log in with the username admin and the existing password Underthe System category click on User Manager The admin account should appear in a list of accounts Unless yoursquoveadded other accounts it should be the only account present Click on the Edit button (the icon with the e in it) to theright of the account listing Type your choice for a new password into the two boxes labeled Password Click theSave button at the bottom of the screen
273 3 How do I access my instance
There are several ways that you can manage or use your instance You should be able to connect via SSH or HTTPS inorder to manage the configuration of your instance If you connect via SSH you will either need to know the passwordof the admin account and login with that account or use the SSH key that was selected when the instance was createdHere is a sample command line to log in with an SSH key from a Unix or Linux host
ssh -i ~sshmy-ec2-key adminec2-A-B-C-Dcompute-1amazonawscom
You would substitute the actual location of your SSH private key for ~sshmy-ec2-key and the real hostnamewhich you can retrieve from the EC2 Management Console by looking at the data for the instance for example ec2-A-B-C-Dcompute-1amazonawscom If you know the password for the admin account you could use a commandsimilar to the one above but omit the -i ~sshmy-ec2-key
To connect via HTTPS you need to know the password to the instance either by setting it explicitly in the User Datawhen the instance is created or by retrieving it from the instance Once you know the password you should be able toconnect to the instance with any web browser by typing in the hostname of the instance to the URL field
274 4 How do I connect a VPN client to my instance
See the section in the user guide on Using the remote access IPsec or OpenVPN VPN
275 5 Why does the pfSensereg Dashboard say my WAN address is 10XYZ
Amazon AWS instances use DHCP to assign private addresses to the public-facing interfaces of an instance Thepublicly routable IP address that you use to acces the instance is NATed by Amazon to the private address that you seeconfigured on the WAN interface of your instance
copy Copyright 2020 Rubicon Communications LLC 26
Security Gateway Manual Amazon AWS
276 6 I added custom firewall rules to allow some traffic to my instance why I amnot seeing the packets arrive
Amazon AWS provides packet filtering in addition to the Netgate Appliance itself being a stateful firewall If youallowed traffic on the Netgate Appliance but have a security group configuration in the settings for the instance that isrestricting traffic you will need to also add your rules to the security group in the EC2 Management Console
Given that the Netgate Appliance is a fully functional firewall you may assign an AWS security group that allows alltraffic and perform whatever filtering you desire with rules on the Netgate Appliance
277 7 How do I route all the traffic from my entire home network over a VPN
If your home gatewayrouter has support for OpenVPN you can connect a site to site tunnel from your home networkto the Netgate VPN Appliance and configure your routing so that all Internet traffic is sent over the encrypted tunnelSee the user guide section on Connecting a local pfSensereg device
This may provide for simpler administration at home but your mobile devices and laptops that get used outside thehome should have an OpenVPN client installed and configured anyway so that you are always receiving the benefitsof sending your traffic through a VPN
copy Copyright 2020 Rubicon Communications LLC 27
CHAPTER
THREE
VIRTUAL PRIVATE CLOUD (VPC)
31 AWS VPC User Guide
The pfSensereg Certified firewall and VPN appliance from Netgate for Amazon EC2 is a stateful firewall and VPNappliance In addition to itrsquos capabilities as a VPN gateway and firewall for users and offices it is capable of actingas a firewall to protect instances providing services in Amazonrsquos Virtual Private Cloud or VPC service This servicediffers from the classic EC2 service in that it allows for management of instances on private subnets
This guide will explain how to launch manage and use an instance of the appliance to act as a gateway for otherinstances in a VPC subnet
311 Preparing your VPC
In order to use a Netgate appliance instance to protect your VPC subnets you will need the following
bull One internet-facing subnet which the Netgate appliance instance will have itrsquos primaryWAN interface con-nected to
bull One or more private subnets which the Netgate appliance instance will have itrsquos secondaryLAN interface (andpossibly additional optional interfaces) connected to
bull Separate routing tables for the internet-facing subnet and the private subnet(s)
bull If you already have all of these in place with an existing VPC feel free to skip ahead to Launching an Instance
These instructions will demonstrate how to create a single private subnet and set it up behind an instance of thepfSensereg Certified firewall and VPN appliance from Netgate In the Amazon VPC Management Console create anew VPC subnets and routing table(s)
1 Go to Your VPCs view in the menu on the left side of the VPC Management Console under the Virtual PrivateClouds grouping Click the Create VPC button
28
Security Gateway Manual Amazon AWS
2 Enter a CIDR block to use in the box that pops up If you will connect to hosts in your VPC using a VPNfrom hosts at other sites in your infrastructure be sure to select address space that does not conflict with theprivate address space used elsewhere by your organization Make sure the block you choose is large enoughto contain all subnets you may want to include within it Eg if you plan to use a 24 for your internet-facingsubnet and a 24 for your private network the CIDR block you select here will need to be at least a 23 to holdthose 2 subnets The maximum size block you can select is a 16 For the purposes of this example we will use1020016 Leave the value of Tenancy set to Default Click on the Yes Create button
3 To create the subnets required go to the Subnets view in the menu on the left side of the VPC ManagementConsole Click the Create Subnet button Select the VPC you just created and choose the availability zone youdesire Enter the subnet you wish to use for the internet-facing hosts in the CIDR Block field This subnet willbe the one that the WAN interface of the Netgate appliance instance is attached to and could include any otherhosts or appliances that you wish to be available directly from the Internet and not protected behind the Netgate
copy Copyright 2020 Rubicon Communications LLC 29
Security Gateway Manual Amazon AWS
appliance The subnet you select here must be a block that is within the address space you assigned to the VPCFor this example we will use 1020024 Click on the Yes Create button
4 Create the private subnet Still in the Subnets view of the VPC Management Console click the Create Subnetbutton In the box that pops up select the appropriate VPC and the same Availability Zone that you assignedto your public subnet Enter the subnet you wish to use for your private network in the CIDR Block field Thisnetwork should be a subnet of the address space you assigned to the VPC and should be distinct from the subnetyou assigned to the public subnet For this example we will use 1021024 Click on the Yes Create button
5 Both subnets that you created will have been created to use a default route table that was created for the VPCThe private subnet can continue to use that default table A new route table will need to be created for the publicsubnet Go to the Route Tables view in the menu on the left side of the VPC Management Console The singleexisting route table should be displayed Click on the Create Route Table button Select the VPC and click on
copy Copyright 2020 Rubicon Communications LLC 30
Security Gateway Manual Amazon AWS
the Yes Create button
6 Associate the public subnet (1020024 in our examples) with the routing table that was just created Go to theSubnets view on the left hand side of the VPC Management Console Check the checkbox next to the publicsubnet and scroll down to look at the Details tab for that subnet At the top of the Details tab will be listed theCIDR block VPC and Availability Zone Under those items the Route Table will be listed and will have a linklabeled replace next to it Click on the link Select the route table in the box that pops up and click on the YesReplace button
7 In order to send traffic from the public subnet to the Internet we will need to add a default route to an InternetGateway We must first create one Go to the Internet Gateways view in the menu on the left hand side of theVPC Management Console Click on the Create Internet Gateway button Click the Yes Create button onthe box that pops up Click the checkbox next to the new Internet Gateway and then click the Attach to VPC
copy Copyright 2020 Rubicon Communications LLC 31
Security Gateway Manual Amazon AWS
button Select the VPC and click on the Yes Attach button
8 The route table for the public subnet will need to be updated so that it has a default route to the Internet GatewayGo to the Route Tables view on the left hand side of the VPC Management Console Check the checkbox nextto the route table for the public subnet Under the Routes tab for that route table there should only be listed asingle route for the CIDR block of the VPC (1020016 in our example) that has a target of local There is arow underneath this route with a text box in the Destination field and a pop up menu for the Target field Enter00000 for the Destination and select the Internet Gateway (should be formatted like igw-XXXXXXXX)for the target Click on the Add button that appears at the right side of the row Click the Yes Add button onthe box that pops up
There are a few more VPC configuration changes that will be required later but next you must launch a Netgateappliance instance
copy Copyright 2020 Rubicon Communications LLC 32
Security Gateway Manual Amazon AWS
312 Launching an Instance in a VPC
In the Amazon EC2 Management Console launch a new instance of the pfSensereg firewall and VPN appliance Thisprocess is the same as the one for launching an EC2 (non-VPC) instance up until step 11 which details the values toenter for the Configure Instance Details screen in order to specify the instance should be created in your VPC
1 Select the region to run the instance in using the tab at the upper right corner of the page
2 Launch a new instance by clicking on the Launch Instance button under the Create Instance section of theEC2 dashboard
copy Copyright 2020 Rubicon Communications LLC 33
Security Gateway Manual Amazon AWS
3 Select AWS Marketplace on the Create a New Instance menu Type Netgate pfSense FirewallVPNRouter in the search box and press enter (or click on the Search button next to the text box)
4 Click on the link for the Netgate pfSense FirewallVPNRouter appliance in the search results
5 Click on the Continue button on the info page for the Netgate pfSense FirewallVPNRouter
copy Copyright 2020 Rubicon Communications LLC 34
Security Gateway Manual Amazon AWS
6 Click on the Launch with EC2 Console tab
7 If the license terms havenrsquot been accepted click on the Accept Terms button
8 A message should be displayed indicating that the subscription is being processed
copy Copyright 2020 Rubicon Communications LLC 35
Security Gateway Manual Amazon AWS
9 Select the version of the image to run under the popup menu labeled Select a Version Generally the mostrecently issued version should be selected Identify which region to launch the instances in and click on theLaunch in EC2 Console button to the right of that region
10 Choose the instance type to run on Click Next Configure Instance Details
copy Copyright 2020 Rubicon Communications LLC 36
Security Gateway Manual Amazon AWS
11 On the Configure Instance Details page under the Network field select the VPC that was created For theSubnet field that appears right below the Network field select the public subnet that was created earlier In ourexamples this is 1020024
12 Scroll down to the Network Interfaces heading A single interface named eth0 should be displayed by defaultClick on the Add Device button underneath eth0 Select the private subnet that was created (1021024 in ourexample) Pick an IP address within the range of the private subnet and enter it in the Private IP field Keep inmind that the first 3 or 4 IP addresses are reserved For this example we will use 10215
copy Copyright 2020 Rubicon Communications LLC 37
Security Gateway Manual Amazon AWS
Optionally expand the Advanced Details section and set parameters as text in the User Data field The availableoptions are
password Setting a value via a directive like password=abcdefg will set the password for theadministrative account to the specified value - abcdefg in this example If no value is set here arandom password will be assigned in order to keep administrative access from being exposed tothe internet with a default password
mgmtnet Setting a value via a directive like mgmtnet=1001024 will restrict managementaccess (http https ssh) to the specified network - 1001024 in this example This will causethe firewall rule on the instance (not on Amazons access lists but on the Netgate appliancersquosown firewall) to restrict management traffic for the instance to the specified source network Thedefault behavior is to allow management from any host
These directives can be set by placing them on a single line in the User Data field and separating them withcolons Specify both parameters by typing a statement similar to
password=abcdefgmgmtnet=1001024
Click Next Add Storage after optionally setting these parameters
Note If setting a password using the password parameter listed above the password is retrieved by the instancevia an unencrypted HTTP request when the system is configured the first time it boots The request is made toan Amazon Web Services-operated server on the local LAN that stores metadata about each instance runningThe data for an instance is only made available to that instance but is available to be queried from the instancewithout providing any authentication credentials
It is advised to change the admin password via the pfSense webGUI after the instance comes up or choose notto set the password at all and let a random password be set
copy Copyright 2020 Rubicon Communications LLC 38
Security Gateway Manual Amazon AWS
13 Click Next Tag Instance to accept the Storage Device Configuration
14 Optionally a tag can be set on the instance to differentiate this instance from other VMrsquos that were started byentering a value for the Name tag Click Next Configure Security Group after setting any desired tags
copy Copyright 2020 Rubicon Communications LLC 39
Security Gateway Manual Amazon AWS
15 Select a security group to launch the instance with The recommended settings for a security group should allowat least the following traffic
bull TCP port 443 from 00000 - HTTPS - This is the port that the management web GUI listens on
bull TCP port 22 from 00000 - SSH - This port can be used to connect to a command prompt with an sshclient
bull UDP port 1194 from 00000 - OpenVPN - The OpenVPN server that is configured by default is boundto this port
bull UDP port 500 from 00000 - IKE for IPsec VPN
bull UDP port 4500 from 00000 - IPsecNAT-T for IPsec VPN
copy Copyright 2020 Rubicon Communications LLC 40
Security Gateway Manual Amazon AWS
If you have an existing security group that includes this access select Select an existing security group thenselect the group(s) to use and click Continue Otherwise select Create a new security group and add rulesfor this access by filling in the form for each rule and clicking the Add Rule button When all of the rules havebeen added click Review and Launch
16 Verify the details for the instance and click Launch
17 Select an existing key pair or create a new key pair to connect to the instance with Do not select Proceed
copy Copyright 2020 Rubicon Communications LLC 41
Security Gateway Manual Amazon AWS
Without a Key Pair Click the checkbox that indicates you acknowledge having access to the selected privatekey file and then click Launch Instance
18 In order to reach the instance from the Internet associate an Elastic IP with the WAN interface of the instanceIn the VPC Management Console go to the Elastic IPs view by clicking on Elastic IPs on the left side of thepage Click on the Allocate New Address button Select that you want the EIP used in VPC and click on theYes Allocate button in the box that pops up After the Elastic IP address is allocated associate the address withthe WAN interface of the Netgate appliance by clicking on the Associate Address button
A box will pop up that will either let you specify the instance and Private IP address of the interface or theNetwork Interface and the Private IP Address of the interface Use one of these methods to select the correctinterface and click on the Yes Associate button The instance should now be reachable via ssh or https
copy Copyright 2020 Rubicon Communications LLC 42
Security Gateway Manual Amazon AWS
19 In order for traffic to be allowed to be routed from the private subnet through the public interface of the instancethe SourceDest AddressCheck on the private interfaces needs to be disabled In the EC2 Management Con-sole go to the ldquoNetwork Interfacesrdquo view by clicking on Network Interfaces in the menu on the lefthand sideof the page
Click the checkbox to the left of the privateLAN interface on the Netgate appliance instance Click on theActions button at the top of the page and select Change SourceDesk Check on the popup menu Select theradio button labeled Disabled on the box that pops up and click on the Save button
Non-local traffic from the private subnet should now be sent through the privateLAN interface on the Netgateappliance instance
copy Copyright 2020 Rubicon Communications LLC 43
Security Gateway Manual Amazon AWS
313 Managing a VPC Instance
Once the instance is launched you can connect to it via the Elastic IP that was attached to the primary interface duringthe provisioning phase
In order to manage the configuration of the instance you can connect to it via https or ssh A limited set of configura-tions is possible through the SSH interface the preferred method for managing most of the configurations or viewingdata on the status of the pfSensereg instance is through the https webGUI
Connecting via SSH
To connect via SSH you would use the key pair you chose while creating the instance to connect to the admin accountFrom the command line on a UnixLinux host you would use a command similar to
ssh -i my_ec2_key admin232020454
Where the appropriate private key file and public IP or hostname are substituted
Note The first time you log into your instance the SSH key of the instance will not be cached on your computerand you will need to type yes when asked whether you want continue connecting This should not be necessary onsubsequent sessions
Once logged in you should see the console menu similar to the one below
copy Copyright 2020 Rubicon Communications LLC 44
Security Gateway Manual Amazon AWS
Connecting via HTTPS
To connect via https you would enter a URL containing the public IP address or hostname of your instance intoa web browser For example https232020454 Itrsquos very likely that you will receive a browser warningindicating that the security certificate of the site is not trusted This is because the instance uses a self-signed certificatefor https communication You should click on the option to proceed to the site anyway The pfSense login screen withthe Netgate logo should appear
The username to log in with is admin The password to use is either a value that you set in the User Data during thecreation of the instance or a random password
Tip It is preferable to explicitly set a password by passing a value in with the User Data field so the password willbe known in advance
If you did not set a specific password you can find out that value that the random password was set to through one of2 different methods
1 The first method is to log in over SSH with the key pair that you selected when the instance was created andexamine the contents of the file located at etcmotd You would do this by selecting option 8) Shell in theconsole menu that is presented when you SSH in then run this command in the shell
cat etcmotd
2 The second method is to view the System Log for the instance in the EC2 Management Console After themessages that are displayed that show the status of the boot process a message should appear that indicates what
copy Copyright 2020 Rubicon Communications LLC 45
Security Gateway Manual Amazon AWS
the administrative password was changed to Be aware that the System Log output in the EC2 ManagementConsole is not updated in real time and may take a few minutes to show up
The message you should look for using either of the methods mentioned about will look like this
Admin password changed to abcdefg
Once yoursquove determined your password and entered it into the login form the pfSense WebGUI should be availableto you
314 Forwarding traffic from VPC subnets through the instance
Some additional configuration is required within the VPC instancersquos pfSensereg webGUI before you are able to managetraffic from the private subnet
1 Log into the pfSense WebGUI for the instance
2 Click on the Interfaces heading on the left and then click the Assign link
3 Click on the + icon to add a new Interface under the Interface assignments tab A LAN interface shouldautomatically be added with the next available network interface (xn1)
4 Click on the Interfaces heading on the left again and then click on LAN Click the checkbox to enable the LANinterface Set the IPv4 Configuration Type to Static IPv4 and enter the IP address you assigned to the 2ndinterface during the provisioning phase Click the Save button
Now you can create other instances attached to your private subnet and protect them with the firewall on the pfSenseinstance
Common ways to manage private hosts
Allowing private hosts to connect to the Internet
To allow private hosts to be able to connect to the Internet you can allow any traffic from the LAN in your firewallrules there should be a rule like this in place by default
Next set up NAT rules to cause addresses in the private subnet to be NATed to the IP address of the WAN interface
1 Under the Firewall heading on the left click on the NAT link
2 On the Outbound tab click the radio button for Manual Outbound NAT rule generation (AON - AdvancedOutbound NAT)
3 Click the Save button
4 Click on the Aliases link under the Firewall heading on the left
5 Add your private subnet to the Networks_to_NAT alias
Note There is an existing NAT rule configured by default that uses the alias Networks_to_NAT
copy Copyright 2020 Rubicon Communications LLC 46
Security Gateway Manual Amazon AWS
Allow private hosts to connect to each other
If your hosts should only contact each other and a private network segment elsewhere you can configure an IPsecor OpenVPN tunnel from your remote networks to the Netgate appliance instance and set up the appropriate firewallrules routes and security policies to allow access to your private subnet through a VPN tunnel
Allow direct inbound access from the internet to hosts
If you wish to enable direct inbound access from the internet to hosts on the private subnet you can set up portforwarding on the WAN interface to direct traffic to particular hosts in the private subnet
315 Establishing a VPN connection to a VPC in another region
To establish a VPN that allows instances on the VPC subnet(s) that sit behind a Netgate appliance to communicate withinstances that reside in a VPC in another region the Netgate appliance has a VPC configuration wizard that assists byconfiguring both the Netgate appliance as well as the VPC configuration elements that would normally have to be setmanually through the AWS Management Console
For detailed instructions see the AWS VPC User Guide
316 Upgrading a VPC Instance
Periodically new releases of the AMI are issued to track new releases of pfSensereg that may provide new functionalitybug fixes and security updates
The lower risk approach to upgrading is to bring up a new instance alongside the existing one and executing a cutoverThese instructions detail the procedure for moving your existing instance to one running the latest version
1 Back up the configuration of your exsting instance by navigating to BackupRestore under the Diagnosticsmenu in the Web GUI Click the Download configuration button under the Backup Configuration headingand save your config file to your local system
2 Bring up a new instance of the pfSense Certified RouterFirewallVPN running the latest version
3 When creating the instance make sure the interfaces match the interfaces on the existing instance Make surethat the new instance is in the same VPC as the existing instance and that it has the same number of interfacesattached and that the interfaces are connected to the same Subnets
4 Make sure any interfaces on the new instance that will communicate with private Subnets have theSourceDestination check disabled
5 Allocate a new Elastic IP and associate it to the WAN interface of the new instance to allow yourself managementaccess
6 Restore the backed up configuration file to the new instance Navigate to BackupRestore under the Diagnosticsmenu in the Web GUI Under the Restore Configuration heading click the Choose File button and browsefor the configuration file you backed up from the existing instance earlier Once you have selected that fileclick the Restore configuration button The configuration file will be uploaded and the instance will rebootautomatically
7 If you had packages installed on the old instance navigate to Packages under the System menu in the pfSenseweb GUI and install the same packages
8 If there was any external dependency on the public IP address of the existing instance you can remove theElastic IP Address from the upgraded instance and move the Elastic IP Address from the existing instance tothe upgraded instance External dependencies that might cause you to want to do this include things like VPNrsquos
copy Copyright 2020 Rubicon Communications LLC 47
Security Gateway Manual Amazon AWS
configured to external devices that rely on the existing instancersquos Elastic IP address or access lists on externaldevices that allow access to traffic from the existing instancersquos IP address There may be other reasons why youwould wish to keep the existing address as well (to preserve existing bookmarks to the Web GUI reduce theneed for updates to existing internal documentation etc) The process for moving the old Elastic IP address tothe new instance is as follows
bull Disassociate the Elastic IP address from the new instance In the EC2 Management Console click onElastic IPs under the Network amp Security heading Check the box next to the Elastic IP address assignedto the new instance and click on the Disassociate Address button
bull Disassociate the Elastic IP address from the old instance The procedure is the same as in the previousstep just repeated for the Eastic IP address of the old instance this time
bull Associate the Elastic IP address that was previously associated to the old instance to public interface of thenew instance In the EC2 Management Console click on Elastic IPs Check the box next to the Elastic IPaddress you are moving and click the Associate Address button Fill in the correct value for the Instanceor Network Interface and select the Private IP Address of the public interface on the new instance Clickthe Associate button The management interface of the new instance should now be accessible
9 Move any default routes that pointed to an interface on the old instance to point to the equivalent interface onthe new instance In the VPC Management Console click on Route Tables under the Virtual Private Cloudheading Check the box next to a Route Table associated with the VPC that the instances is located in
bull In the detail pane that appears at the bottom of the screen click on the Routes tab
bull If a route exists for 00000 with a Target that is an interface ID of an interface on the old instnace clickthe Edit button above the table displaying the routes
bull Click the red X next to the row for 00000 to remove the existing route
bull There should be a blank row with empty fields for a new route Enter 00000 in the Destinationfield and the Network Interface ID of the interface on the new instance in the Target field Click on theSave button
bull If there were multiple private subnets in the VPC which were pointed to interfaces on the pfSense instancerepeat this process for the other Route Tables associated with the VPC
bull The new instance should now be functioning as the old one did
32 AWS VPC Wizard User Guide
This guide will explain how to use the AWS VPC Wizard to simplify the configuration of a VPN to a remote VPC Theadministrator is asked for the minimum amount of basic information required to establish the VPN The configurationsboth on the AWS VPC side and on the pfSense side are then automatically created When the wizard is finishedexecuting a functioning VPN connection to a VPC should be established
321 AWS Access Keys
In order to connect to the AWS API to make certain required configuration changes the AWS VPC Wizard requiresAccess Keys to retrieve and modify VPC configurations
See also
Find more information about AWS Security Credential including Access Keys by reading AWS Security Credentials
Access keys consist of two parts
1 An access key ID
copy Copyright 2020 Rubicon Communications LLC 48
Security Gateway Manual Amazon AWS
bull For example AKIAIOSFODNN7EXAMPLE
2 A secret access key
bull For example wJalrXUtnFEMIK7MDENGbPxRfiCYEXAMPLEKEY
Access keys are like a usernamepassword and needed for programmatic requests to AWS including the AWS VPCWizard Use both the access key ID and secret access key together to authenticate requests
Important Manage access keys as securely as a user name and password
Managing Access Keys
To create modify or delete IAM user access keys do the following
1 Sign in to the IAM console
2 In the navigation bar on the upper right choose a user name and then choose My Security Credentials
3 On the AWS IAM Credentials tab in the Access keys for CLI SDK and API access section choose Createaccess key
4 Choose Download csv file to save the access key ID and secret access key to a csv file on your computerStore the file in a secure location There is no access to the secret access key again after this dialog box closesAfter the csv file has been downloaded choose Close When an access key is created the key pair is active bydefault and the pair can be used right away
bull To disable an active access key choose Make inactive
bull To reenable an inactive access key choose Make active
bull To delete an access key choose its X button at the far right of the row Then choose Delete to confirmWhen an access key is deleted itrsquos gone forever and cannot be retrieved However new keys can alwaysbe created
To create modify or delete another IAM userrsquos access keys do the following
1 Sign in to the IAM console
2 In the navigation pane choose Users
3 Choose the name of the user whose access keys to manage and then choose the Security credentials tab
4 In the Access keys section choose Create access key
5 Choose Download csv file to save the access key ID and secret access key to a CSV file on your computer
Rotating Access Keys
As a security best practice we recommend to regularly rotate (change) IAM user access keys Rotating access keyscan be done from the AWS Management Console
To rotate access keys for an IAM user without interrupting the applications (console) create a second access key whilethe first access key is still active
1 Sign in to the IAM console
2 In the navigation pane choose Users
3 Choose the name of the user whose access keys to manage and then choose the Security credentials tab
4 In the Access keys section choose Create access key
copy Copyright 2020 Rubicon Communications LLC 49
Security Gateway Manual Amazon AWS
5 Choose Download csv file to save the access key ID and secret access key to a CSV file on your computer
6 The new access key is active by default At this point the user has two active access keys
After waiting some period of time to ensure that all applications and tools have been updated delete the first accesskey
1 Sign in to the IAM console
2 In the navigation pane choose Users
3 Choose the name of the user whose access keys to manage and then choose the Security credentials tab
4 Locate the access key to delete and choose its X button at the far right of the row Then choose Delete to confirm
Determining When Access Keys Need Rotating
To determine when access keys need rotating (console) do the following
1 Sign in to the IAM console
2 In the navigation pane choose Users
3 If necessary add the Access key age column to the users table by completing the following steps
1 Above the table on the far right click the settings icon
2 In Manage columns select Access key age
3 Choose Close to return to the list of users
4 The Access key age column shows the number of days since the oldest active access key was created Usethis information to find users with access keys that need rotating The column displays None for users with noaccess key
322 Using the Wizard
1 Gather your AWS Access Key ID and Secret Key
2 Navigate to VPN gt AWS VPC Wizard in the main menu in the pfSensereg webGUI
copy Copyright 2020 Rubicon Communications LLC 50
Security Gateway Manual Amazon AWS
3 The first screen of the wizard prompts for the AWS Credentials Enter the Access Key ID and Secret AccessKey in the appropriate text fields and select the Region to connect to in the dropdown menu then click Next
The wizard will then query the AWS API using those credentials to find which VPCrsquos exist in the selectedregion If the credentials were rejected an error message will be displayed and return to the first screen
4 The next screen will prompt to select from the available VPCrsquos in the selected region Select the one to connectto from the dropdown menu The wizard will not create a new VPC it will only connect to an existing VPC
Click Next after selecting the desired VPC
copy Copyright 2020 Rubicon Communications LLC 51
Security Gateway Manual Amazon AWS
Note If the desired VPCrsquos to connect to isnrsquot available create one via the AWS Management Console and tryagain
The wizard will then query the AWS API to check whether there is a VPN Gateway attached to the selectedVPC If none exists one will be created via the API Then the next screen will be displayed
5 On the next screen specify routing and network data
A description of what should be entered for each of these fields follows
copy Copyright 2020 Rubicon Communications LLC 52
Security Gateway Manual Amazon AWS
Routing Type AWS offers either static routing or BGP routing Select the appropriate type fromthe dropdown menu If unsure static routing is likely to be adequate
BGP AS Number If static routing was choosen leave this field blank Otherwise it is possible tospecify an AS number to use If left blank the value will default to 65000
Local Public IP Address On an AWS Netgate appliance instance this should be the public IP ad-dress of the Elastic IP associated with the instance If configuring a hardware device runningpfSense this could be the public address assigned to the WAN (or other) interface of the device
Local subnets The subnets connected to the pfSense instance that should be routed over the tunnelfrom hosts in the remote VPC As an example if connecting a pfSense instance to a remote VPCin the AWS us-east-1 region enter the subnets (or a single subnet) that are local to the pfSenseinstance and when hosts in your VPC in us-east-1 attempted to reach addresses within thosesubnets the traffic will be sent through the VPN tunnel that is being configured
Note When selecting static routing as the routing type there will be a delay that is typically between 2-5minutes before the next screen is displayed This is because static routes must be added to the VPN Connectionvia the AWS API This operation fails until the VPN Connection reaches the ldquoavailablerdquo state This can take afew minutes to occur
Click Next when done
The wizard will then query the AWS API to find whether a Customer Gateway is configured with the selectedPublic IP Address If none exists one will be created If one already exists the ID will be retrieved and it willbe used
The wizard will then query the AWS API to see if a VPC Connection already exists that matches the dataentered If one exists it will be used Otherwise one will be created
If static routing was selected static routes will be added to the VPN Connection for the Local subnets entered
Route propagation will be enabled for the VPN Gateway in each of the Route Tables that are associated withthe VPC All of these configurations are carried out in the AWS API nothing has been changed in the pfSenseVPN configurations yet
Warning Important Note on Billing Once this step is carried out and the VPN Connection is createdAWS will start billing your AWS account the hourly rate for a VPN Connection This is $005 as of thiswriting and that is a charge that goes entirely to AWS itself They will do this until the VPN Connection isdeleted via the VPC Management Console
Nothing in pfSense will ever cause AWS to stop billing for this VPN Connection Whether it works or notwhether the pfSense instance is up or down whether the IPsec tunnels have been deleted or reconfiguredAWS will continue to bill the hourly fee for a VPN Connection if the creation of it succeeds until it is deletedthrough their web interface
The wizard helps establish an initial configuration that works and configures the appropriate elements inAWSrsquos API to facilitate this You are responsible for making sure you understand what yoursquore being billedfor and disabling any functions including VPN Connections that are no longer necessary
6 If the operations of the previous step succeeded the next screen will appear
copy Copyright 2020 Rubicon Communications LLC 53
Security Gateway Manual Amazon AWS
Select an Interface to act as the local endpoint of the VPN tunnels that will be created In most cases thisshould be the WAN interface It should generally be whatever interface is associated with the Local Public IPAddress entered in the previous step
On an AWS Netgate pfSense instance this will be whatever interface the Elastic IP is associated with On ahardware device running pfSense that has the Local Public IP Address directly configured on an interface thiswill be the interface that the Local Public IP Address is configured on
After clicking Next the wizard will configure the VPN and associated settings within pfSense itself using datareturned by the AWS API in the previous step
It will configure 2 IPsec tunnels a firewall rule 2 Aliases (referenced by the firewall rule) and 2 Virtual IPAddresses If BGP was selected as the Routing Type in the previous step it will install the OpenBGPDpackage automatically and configure it appropriately
7 The next screen will appear and prompt to apply the configuration changes that have been made
copy Copyright 2020 Rubicon Communications LLC 54
Security Gateway Manual Amazon AWS
After clicking Next all the configuration changes that were made will be applied
8 The wizard will be completed and the browser will be redirected to the IPsec status page The VPN to the VPCshould now be fully configured
Note Sometimes there is a delay of 5-10 minutes before the tunnels are fully functional and passing trafficThis has been observed particularly often during the setup of tunnels using BGP routing
copy Copyright 2020 Rubicon Communications LLC 55
Security Gateway Manual Amazon AWS
323 Testing Connectivity
Verify that the IPsec tunnels are functioning by attempting to ping the ldquoinside tunnel addressesrdquo of the VPC side ofthe tunnel by navigating to Firewall -gt Virtual IP There should be two virtual IP addresses configured that haveDescriptions like ldquoInside address for tunnel to ltremote IP addressgtrdquo
Amazon provides inside addresses for each end of the tunnel in a 30 subnet in IPv4 link local address space(169254xy) Typically the first usable address in the 30 is the inside address for the VPC end of the tunnel andthe other usable address is the inside address for your end of the tunnel So if you ping from one of the virtual IPaddresses configured on the pfSensereg instance to the IP address that is one less (for example if the virtual IP addresswere 16925425322 ping from 16925425322 to 16925425321) that checks whether the other end of the tunnelis responding and whether the tunnel is functioning properly
Note It sometimes takes a few minutes for the tunnels to begin working after the configuration wizard completes
To ping log into the pfSense instance via SSH and execute ping from a shell prompt For the previous example of16925425322 the proper syntax is
ping -S 16925425322 16925425321
When pinging from a shell prompt it is possible leave the command running indefinitely and interrupt it there is aresponse
copy Copyright 2020 Rubicon Communications LLC 56
Security Gateway Manual Amazon AWS
It is also possible to ping via the Diagnostics -gt Ping page by selecting the appropriate source address and enteringthe remote tunnel inside address in the Host field This will only send a limited number of ping packets so it may benecessary to repeat this a few times
324 VPC Configuration Details
The AWS documentation for connecting a hardware device to a VPC provides a great amount of detail on configuringVPN Connections to VPC
The main configuration elements that exist in Amazonrsquos data model are the Virtual Private Gateway the CustomerGateway and the VPN Connection In order to configure a VPN connection to a VPC all 3 of these need to exist TheVirtual Private Gateway is the VPN endpoint on Amazonrsquos side The customer gateway is the VPN endpoint on thepfSensereg instancedevice being configured The VPN Connection is the IPsec VPN between Amazon and the pfSenseinstancedevice
A Virtual Private Gateway needs to exist and be associated to the VPC A particular VPN Gateway can only beassociated to one VPC at a time Once the VPC to connect to has been selected the wizard invokes the AWS API callDescribeVpnGateways to determine if a VPN Gateway already exists that is attached to the VPC If none exists itcreates one with the CreateVpnGateway API call and attaches it to the VPC with the AttachVpnGateway call
A Customer Gateway needs to be created for the public IP address of the device or virtual machine that will be used toconnect to the VPC The wizard invokes the AWS API call DescribeCustomerGateways to determine if a CustomerGateway already exists If none exists one is created with the CreateCustomerGateway API call
The VPN Connection connects the Virtual Private Gateway and Customer Gateway The wizard checks to see if thereis an existing VPN Connection configured that connects those endpoints by invoking the AWS API call DescribeVp-nConnections If none exists one is created using the CreateVpnConnection call One of the fields returned by thiscall is a block of XML configuration data that contains configuration data assigned by AWS for use with configuringthe VPN Connection This data is stored and used in subsequent steps to make the required configuration changeswithin pfSense
copy Copyright 2020 Rubicon Communications LLC 57
Security Gateway Manual Amazon AWS
Any objects created through API calls by the wizard will be tagged with names like auto-created by pfSenseVPC ltyour_VPC_IDgt This is accomplished by calling the AWS API call CreateTags and using Name as the keyfor the tag
In addition to creation of the items mentioned above required adjustments are made to Security Groups and RouteTables to facilitate communication over the VPN The Security Groups associated with the VPC are updated to allowinbound access from the local subnets on the pfSense end of the VPN They are checked first via the DescribeSecuri-tyGroups AWS API call to determine if the access is already allowed Any of the subnets that is not already allowedhas inbound access added via the AuthorizeSecurityGroupIngress AWS API call
Route Tables associated with the VPC are updated to receive routes from the VPN Gateway used by the VPN Con-nection They are checked first via the DescribeRouteTables AWS API call If the VPN Gateway ID is not includedin the list of VPN Gateways propagating routes route propagation for the VPN Gateway is enabled on that table usingthe EnableVgwRoutePropagation AWS API call
For VPN Connections using static routing static routes for the specified subnets are added to the VPN ConnectionThis is done via the CreateVpnConnectionRoute AWS API call
325 pfSense Configuration Details
On the pfSensereg side there are numerous configurations added to support the VPN to the VPC
Aliases
First aliases are created for use in a firewall rule These aliases are intended to contain the subnets that traffic shouldbe allowed to ingress over the IPsec tunnel One alias represents the local subnets on the pfSense side and is givena name like VPC_Local_vpc_12345678 and the other represents the remote subnets on the VPC side and is given aname like VPC_Remote_vpc_12345678
Virtual IP addresses
Next virtual IP addresses are added on the lo0 (loopback) interface These virtual IP addresses are the local ldquoinsideaddressesrdquo of the IPsec tunnels These addresses are used as the local address for BGP communication when BGProuting is selected These addresses are IPv4 link local addresses (see RFC 3297) AWS assigns 30rsquos out of thenetwork 1692540016 for this purpose
Note These addresses are also useful as a ping target to execute a basic test of whether the tunnel is functioningproperly Executing a ping from a source address of one of these IP addresses to the corresponding inside address ofthe other end of the tunnel helps determine whether the tunnel negotiation is completing properly
Firewall rules
Next a firewall rule is added on the IPsec interface that allows traffic from the VPC networks to the local subnetsThis rule uses the previously created Aliases as sourcedestination targets
IPsec
Then IPsec phase 1 and phase 2 associations are set up Most of the settings required are extracted from a blockof XML data that was returned by the CreateVpnConnection call made during the AWS configuration step Thisincludes parameters like endpoint IP addresses encryption ciphers timer values etc
copy Copyright 2020 Rubicon Communications LLC 58
Security Gateway Manual Amazon AWS
If BGP routing was selected the configurations for the OpenBGPD BGP daemon are established The required settingsare determined using the AS number entered into the wizard and the parameters returned by the CreateVpnConnec-tion call made during the AWS configuration step
326 Tested Configurations
Various topologies may be possible to establish using the AWS VPC Configuration Wizard This section enumeratessome of the configurations that were successfully tested
Platforms
bull Various hardware platforms
bull 64-bit virtual machines in VMware vSphereESX
bull Amazon EC2 instances (Xen virtual machines) of the Netgate pfSensereg RouterFirewallVPN AWS AMI
Local networkrouting configurations
bull pfSense with a public address configured on the WAN interface
bull pfSense with a private address configured on the WAN interface behind a 11 NAT
bull pfSense with a private address configured on the WAN interface behind a PAT (1many NAT)
VPC Topologies
bull pfSense connected to a single VPC
bull pfSense connected to multiple VPCrsquos in different regions
bull Amazon EC2 instance of the pfSense RouterFirewallVPN AWS AMI connected to a VPC belonging to thesame AWS account in a different region
bull Amazon EC2 instance of the pfSense RouterFirewallVPN AWS AMI connected to a VPC belonging to adifferent AWS account in the same region
The configuration recommended for the greatest amount of stability is to have a public IPv4 address directly configuredon the WAN interface of your pfSense firewall but VPNs have been successfully established under all of the conditionslisted above
Whether any of these solutions is appropriate should be evaluated in the context of personal needs and existing infras-tructure Other configurations not listed above may be possible as well
327 AWS VPC Wizard FAQ
1 What level of redundancy is provided by the two tunnels
Amazon provides two tunnel endpoints that will allow traffic to be sent between your networks and the remote VPCyou are connected to The racoon daemon in pfSensereg is only capable of establishing an active phase 2 associationfor a particular sourcedestination pair on a single tunnel
Phase 2 associations between the local subnets and the remote VPC subnet are configured in the pfSense GUI for bothtunnels but racoon will only actually establish an association for the first tunnel This means that racoon will onlyever try to send traffic destined for the remote VPC subnet over the first tunnel
copy Copyright 2020 Rubicon Communications LLC 59
Security Gateway Manual Amazon AWS
If that tunnel goes down the second tunnel may be up and inbound traffic from the remote VPC may be sent to yourlocal networks over that tunnel automatically But outbound traffic to your remote VPC would not automatically failover to the second tunnel In order for you to send your outbound traffic over the second tunnel you would need todisable the phase 2 associations for the first tunnel and apply the changes
2 I quit the wizard before finishing Now what
To finish setting up the VPN go back to the wizard and run through it again It should reuse any partial configurationsthat were generated before it was stopped and create the new elements that are required
3 What are the AWS charges for this
AWS determines their own pricing and provides details for EC2 pricing and VPC pricing There are many types ofcharges that may be incurred for operating instances on AWS (eg charges related to running an instance bandwidthstorage elastic IPs etc)
The charge of specific interest in this case is the hourly charge for a VPN Connection As of this writing it costs $005(USD) per hour in most regions to have a VPN Connection configured and available AWS will charge whether theVPN Connection is being used or not as long as it is configured This will be configured by the third step of the wizardand will never be removed by pfSense
If the VPN Connection is no longer needed and billing for it needs to be stopped visit AWSrsquos VPC ManagementConsole and delete the VPN Connection manually
4 Can I use the wizard to connect to the GovCloud region
This hasnrsquot been officially tested but at least one user has reported that they were able to successfully connect to theGovCloud region They manually added the region us-gov-west-1 to the list of regions in the first step of the wizardand were able to successfully connect to their VPC in that region This may be supported in a future build but to trywithout official support do the following
1 Under the System gt Advanced menu make sure the Enable Secure Shell box is checked This is already doneby default on AWS instances but is off by default on pfSense hardware devices
2 Log into the instance via SSH
3 Make sure the root filesystem is mounted as readwrite On an AWS instance or a hardware device running on anSSD this should be true On a hardware device using Compact Flash or an SD card for storage it will probablybe necessary to remount the root filesystem in readwrite mode by running
mount -uw
4 Edit the file usrlocalwwwwizardsvpc_vpn_wizardxml using vi Look for a section of the file that lookslike this
ltoptiongtltnamegtsa-east-1ltnamegtltvaluegtsa-east-1ltvaluegt
ltoptiongt
That should appear directly after several similar ltoptiongt specifications containing all of the other availableregions Right underneath that section add the following
copy Copyright 2020 Rubicon Communications LLC 60
Security Gateway Manual Amazon AWS
ltoptiongtltnamegtus-gov-west-1ltnamegtltvaluegtus-gov-west-1ltvaluegt
ltoptiongt
Then save the file and exit vi
5 If the filesystem had to be remounted in readwrite mode earlier remount it in read-only mode by running
The GovCloud region should now appear as a choice in the first step of the wizard
copy Copyright 2020 Rubicon Communications LLC 61
CHAPTER
FOUR
REFERENCES
41 Support Resources
411 Commercial Support
In order to keep prices low the software is not bundled with a support subscription For users who need commercialsupport Netgate Gloabal Support can be purchased at httpswwwnetgatecomsupport
412 Community Support
Community support for pfSensereg software is available through the Netgate Forum
42 Additional Resources
421 Netgate Training
Netgate training offers training courses for increasing your knowledge of pfSensereg products and services Whetheryou need to maintain or improve the security skills of your staff or offer highly specialized support and improve yourcustomer satisfaction Netgate training has got you covered
httpswwwnetgatecomtraining
422 Resource Library
To learn more about how to use your pfSense appliance and for other helpful resources make sure to browse ourResource Library
httpswwwnetgatecomresources
423 Professional Services
Support does not cover more complex tasks such as CARP configuration for redundancy on multiple firewalls orcircuits network design and conversion from other firewalls to pfSensereg These items are offered as professionalservices and can be purchased and scheduled accordingly
httpswwwnetgatecomour-servicesprofessional-serviceshtml
62
Security Gateway Manual Amazon AWS
424 Community Options
If you elected not to get a paid support plan you can find help from the active and knowledgeable pfSense communityon our forums
httpsforumnetgatecom
copy Copyright 2020 Rubicon Communications LLC 63
- Getting Started
- Instance Usage
- Virtual Private Cloud (VPC)
- References
-
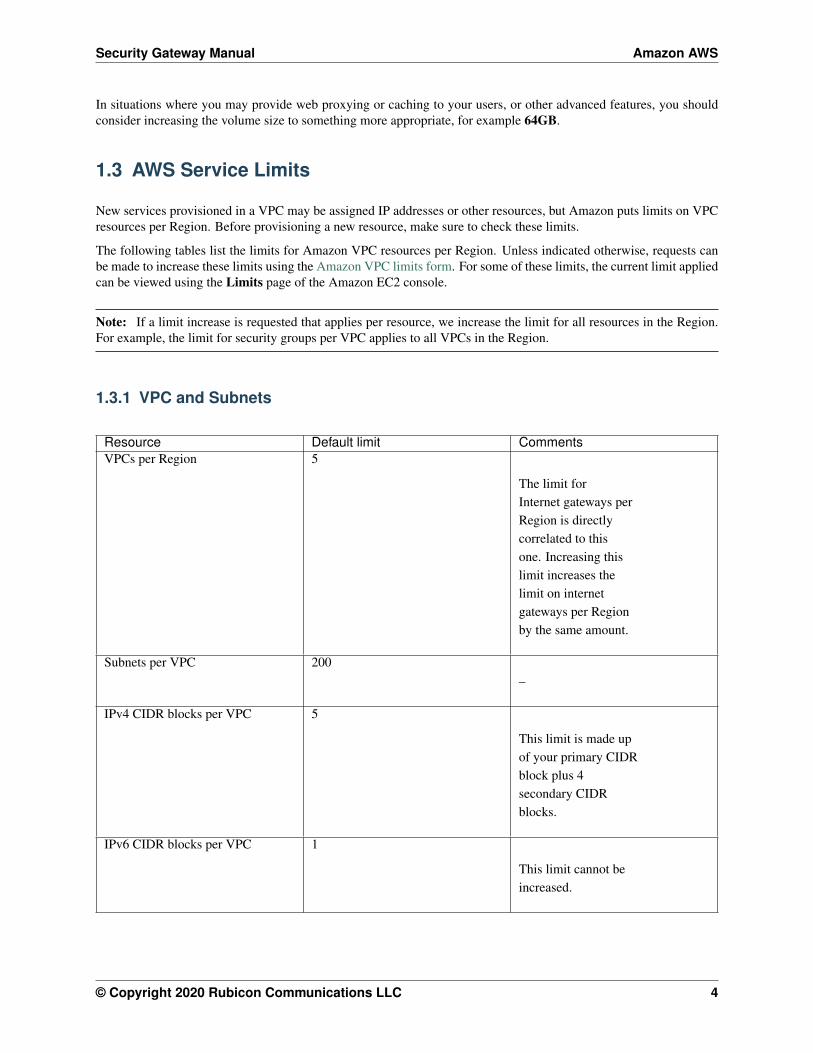
Security Gateway Manual Amazon AWS
132 DNS
For more information see DNS Limits
133 Elastic IP Addresses (IPv4)
Resource Default limit CommentsElastic IP addresses per Region 5
This is the limit forthe number of ElasticIP addresses for usein EC2-VPC ForElastic IP addressesfor use inEC2-Classic seeAmazon EC2 Limitsin the Amazon WebServices GeneralReference
134 Flow Logs
Resource Default limit Comments
Flow logs per singlenetwork interfacesingle subnet orsingle VPC in aRegion
2
This limit cannot beincreased You caneffectively have 6flow logs per networkinterface if youcreate 2 flow logsfor the subnet and 2flow logs for the VPCin which your networkinterface resides
copy Copyright 2020 Rubicon Communications LLC 5
Security Gateway Manual Amazon AWS
135 Gateways
Resource Default limit CommentsCustomer gateways per Region 50
ndash
Egress-only internet gateways perRegion
5
This limit isdirectly correlatedwith the limit onVPCs per Region Toincrease this limitincrease the limit onVPCs per Region Youcan attach only oneegress-only internetgateway to a VPC at atime
Internet gateways per Region 5
This limit isdirectly correlatedwith the limit onVPCs per Region Toincrease this limitincrease the limit onVPCs per Region Onlyone internet gatewaycan be attached to aVPC at a time
NAT gateways per Availability Zone 5
A NAT gateway in thepending active ordeleting state countsagainst your
14 Creating an IAM User in Your AWS Account
pfSensereg uses AWS Identity and Access Management (IAM) accounts for administration Every AWS account in-cludes at least one user For security reasons the root account should not be used for day-to-day administration Thissection describes the process of creating and using an IAM user account for administering pfSense
See also
To find out more about AWS security and credentials read Understanding and Getting Your Security Credentials
copy Copyright 2020 Rubicon Communications LLC 6
Security Gateway Manual Amazon AWS
There are multiple methods for creating users in IAM The recommended method is to use the AWS ManagementConsole The process of creating a user and enabling that user to perform work tasks consists of the following steps
1 Create the user
2 Create credentials for the user
3 As a best practice create only the credentials that the user needs For example for a user who requires accessonly through the AWS Management Console do not create access keys
Note For cloud security it is considered best practice to limit access for the root user so root is locked bydefault
4 Grant the appropriate permissions to the user to administer pfSense
5 Provide the user with the necessary sign-in information
6 (Optional) Configure multi-factor authentication (MFA) for the user
141 Creating IAM Users (Console)
You can use the AWS Management Console to create IAM users To create one or more IAM users (console)
1 Sign in to the AWS Management Console and open the IAM console at httpsconsoleawsamazoncomiam
2 In the navigation pane choose Users and then choose Add user
3 Type the user name for the new user This is the name they will use to sign in to AWS To add up to 10 users atonce choose Add another user for each additional user and type their user names
4 User names can be a combination of up to 64 letters digits and these characters +=-
5 Names must be unique within an account and are not case sensitive
6 Select AWS Management Console access This creates a password for each new user
bull For Console password choose one of the following
ndash Autogenerated password Each user gets a randomly generated password that meets the accountpassword policy in effect (if any) You can view or download the passwords when you get to theFinal page
ndash Custom password Each user is assigned the password that you type in the box
bull We recommend that you select Require password reset to ensure that users are forced to change theirpassword the first time they sign in
7 Click Next On the Set permissions page specify how you want to assign permissions to this new user(s)Choose one of the following three options
bull Add user to group Choose this option if you want to assign the user(s) to one or more groups thatalready have permissions policies IAM displays a list of the groups in your account along with theirattached policies You can select one or more existing groups or choose Create group to create a newgroup
bull Copy permissions from existing user Choose this option to copy all access rights from an existing userto the new user(s)
bull Attach existing policies to user directly Choose this option to see a list of the managed policies in youraccount Select the policies that you want to attach to the new users or choose Create policy to open anew browser tab and create a new policy
copy Copyright 2020 Rubicon Communications LLC 7
Security Gateway Manual Amazon AWS
8 Choose Next Review to see all of the choices you made up to this point When you are ready to proceedchoose Create user
9 To view the usersrsquo access keys (access key IDs and secret access keys) choose Show next to each password andaccess key that you want to see To save the access keys choose Download csv and then save the file to a safelocation
Important This is your only opportunity to view or download the secret access keys and you must providethis information to your users before they can use the AWS API Save the userrsquos new access key ID and secretaccess key in a safe and secure place You will not have access to the secret keys again after this step
10 On the final page you can choose Send email next to each user Your local mail client opens with a draft thatyou can customize and send The email template includes the following details to each user
bull User name
bull URL to the account sign-in page Use the following example substituting the correct account ID numberor account alias
bull httpsAWS-account-ID or aliassigninawsamazoncomconsole
Important The userrsquos password is not included in the generated email You must provide them to the customerin a way that complies with your organizationrsquos security guidelines
15 Using IAM Roles
AWS IAM Roles are used to delegate access to users applications or services that require controlled access to AWSresources IAM Roles should be used to manage all pfSensereg instances This unique role can be specified whenlaunching a new instance or attached to an existing instance
The AWS Management Console is the recommended method for creating roles for use with pfSense It is also recom-mended to create these roles based on the principle of least privilege also known as the principle of least authoritywhich is the assignment of lowest needed privileges based on necessity The below instructions attempt to follow thisprinciple
151 Create Policy for pfSense Management IAM Role
Create a custom policy that will be associated with an IAM role allowing access to the pfSense Management GUIrunning on an EC2 Instance
1 Sign in to the AWS Management Console and open the IAM console at httpsconsoleawsamazoncomiam
2 In the navigation pane of the console select Policies then choose Create Policy
3 Drop down the Service menu and select EC2
4 In the Actions dropdown check the box next to All EC2 actions (ec2)
Note If stricter policies are required for the actions that can be performed on the pfSense EC2 Instance thesecan be set here
5 Select the Resources dropdown arrow and review resulting warnings
copy Copyright 2020 Rubicon Communications LLC 8
Security Gateway Manual Amazon AWS
6 Click the All resources bubble
7 Select Review policy
8 Populate the Name field (eg pfSense_EC2_Access) and Description if desired
Note Policy names must be unique within the AWS account and the name of the policy cannot be changedonce created
9 Select Create Policy
152 Create IAM Role for pfSense Management
Create a role that an IAM user or users within an IAM Group can assume and use to connect to and manage pfSenserunning on an EC2 Instance
Note The administrator of the specified account can grant permission to assume this role to any IAM user inthat account To do this the administrator attaches a policy to the user or a group that grants permission for thestsAssumeRole action That policy must specify the rolersquos ARN as the Resource
1 Sign in to the AWS Management Console and open the IAM console at httpsconsoleawsamazoncomiam
2 In the navigation pane of the console select Roles then choose Create Role
3 Select the Another AWS account role type
4 In the Account ID field type the AWS account ID that will be allowed to access the destination resource
5 The Require external ID checkbox should remain cleared unless granting permissions to users from an accountthat you do not control Reference AWS Documentation for External ID Roles in the event this is required
6 It is recommended to restrict the role to users who sign in with multi-factor authentication (MFA) Select Re-quire MFA to add a condition to the rolersquos trust policy to require MFA sign-in
7 Select Next Permissions
8 Type the name of the previously created Custom policy in the search field Check the box next to the correctPolicy name
9 Select NextTags
Note IAM tags are key-value pairs that can be used to organize track or control access for this role This isan optional step More information can be found within AWS Documentation for Tagging IAM Entities
10 Select Next Review
11 Populate the Role name field (eg pfSense_Admin) and Role description if desired
Note Role names must be unique within the AWS account and the name of the role cannot be changed oncecreated
12 Review remaining configured settings then select Create role
This role can now be assigned to an IAM User or all users in an IAM group allowing secure administrative access tothe EC2 Instance(s) containing pfSense
copy Copyright 2020 Rubicon Communications LLC 9
CHAPTER
TWO
INSTANCE USAGE
21 Launching an Instance
Here are instructions on how to launch a new instance of the pfSensereg firewallVPN appliance from the Amazon EC2Management Console
1 Select the region for the instance to run in using the region tab at the upper right corner of the page
2 Navigate to the AWS Management Console Main Page and select EC2 under the Compute section in the Allservices dropdown
10
Security Gateway Manual Amazon AWS
3 Launch a new instance by clicking on the Launch Instance button under the Create Instance section of theEC2 dashboard
4 Select AWS Marketplace in the left-hand Navigation Menu Type Netgate pfSense in the search box andpress enter
copy Copyright 2020 Rubicon Communications LLC 11
Security Gateway Manual Amazon AWS
5 Click the Select button for the Netgate pfSense FirewallVPNRouter listing in the search result
6 Review pricing and other helpful information then click Continue
copy Copyright 2020 Rubicon Communications LLC 12
Security Gateway Manual Amazon AWS
7 Choose the instance type to run by clicking the checkbox next to the desired type Click Next ConfigureInstance Details
8 Choose the desired Network and Subnet that the instance will be deployed in Choose any other instance-specificsettings that may be required in your environment Optionally expand the Advanced Details section and setparameters as text in the User Data field The available options are
bull password - setting a value via a directive like password=abcdefg will set the password for the admin-istrative account to the value you specify - abcdefg in this example If no value is set here a randompassword will be assigned in order to keep administrative access from being exposed to the Internet with adefault password
bull mgmtnet - setting a value via a directive like mgmtnet=1001024 will restrict management access(http https ssh) to the network you specify - 1001024 in this example This will cause the firewallrules on the instance (not on Amazonrsquos access lists but on the Netgate pfSense appliancersquos own firewall)to restrict management traffic for the instance to the specified source network The default behavior is toallow management from any host
copy Copyright 2020 Rubicon Communications LLC 13
Security Gateway Manual Amazon AWS
These directives can be set by placing them on a single line in the User Data field and separating them withcolons To specify both parameters type a statement similar to this one
password=abcdefgmgmtnet=1001024
Note If a password is set using the password parameter listed above the password is retrieved by the instancevia an unencrypted HTTP request when the system is configured the first time it boots The request is made toan Amazon Web Services-operated server on the local LAN that stores metadata about each instance runningThe data for an instance is only made available to that instance but is available to be queried from the instancewithout providing any authentication credentials
It is advised to change the admin password via the pfSense web GUI after the instance comes up to avoid anysecurity risks associated with the unencrypted request Otherwise it is possible to choose not to set the passwordat all and let a random password be set
9 Choose the desired Network and Subnet to which the Instance will be deployed Scroll down to configure thenetwork interface(s) with a Static or DHCP-assigned IP address
Once the Network Interface(s) are configured select Next Add Storage
10 Click Next Add Tags to accept the Storage Device Configuration
copy Copyright 2020 Rubicon Communications LLC 14
Security Gateway Manual Amazon AWS
11 It is recommended to set a tag that can be used to differentiate this instance from other instances by entering avalue for the Name tag Click Next Configure Security Group after setting any desired tags
Press the Add Tag button Input Name under the Key field and the desired Instance Tag Name under the Valuefield (eg Netgate FirewallRouter)
12 Select a security group to launch the instance with The Security group name and Description can be left at thedefault or replaced with the desired values The recommended settings for a security group should allow at leastthe following traffic
bull TCP port 443 from 00000
ndash HTTPS - This is the port that the management web GUI listens on
bull TCP port 22 from 00000
ndash SSH - This port can be used to connect to a command prompt with an ssh client
bull UDP port 1194 from 00000
copy Copyright 2020 Rubicon Communications LLC 15
Security Gateway Manual Amazon AWS
ndash OpenVPN - The OpenVPN server that is configured by default is bound to this port
bull UDP port 500 from 00000
ndash IKE for IPsec VPN
bull UDP port 4500 from 00000
ndash IPsecNAT-T for IPsec VPN
Note If there is an existing security group that includes this access click Select an existing security groupthen select the desired group(s) to use and click Continue Otherwise select Create a new security group andadd rules for this access by filling in the form for each rule and clicking the Add Rule button When all of therules have been added click Review and Launch
13 Review any AWS warnings and make note of recommendations Scroll down to review the remaining instancedetails and click Launch after making any needed adjustments
copy Copyright 2020 Rubicon Communications LLC 16
Security Gateway Manual Amazon AWS
14 Select an existing key pair or create a new key pair to connect to the instance with Click the checkbox thatindicates acknowledgment of access to the selected private key file and then click Launch Instances
Important Do NOT select the Proceed Without a Key Pair option
22 Managing the Configuration of the Instance
Once the instance is launched monitor its status using the Instances page of the EC2 Management Console The EC2Management Console will display whether the instance is up and reachable and will also display its current public IPaddress and the hostname that resolves to the public IP address Find the hostname and public IP address in the EC2console by clicking on the Instances heading on the left finding the instance and checking the checkbox next to it andlooking at the details at the bottom of the page
In the example above the hostname of the instance is ec2-23-20-204-54compute-1amazonawscom
copy Copyright 2020 Rubicon Communications LLC 17
Security Gateway Manual Amazon AWS
The public IP address is available by putting together the 4 numbers included in the hostname - 233020454 Itis also possbile to obtain the IP address by using a popular DNS lookup tool such as host dig or nslookup toresolve the hostname to its IP address
Note The hostname and IP address used in this and other examples in this guide are associated at the time of writingwith a test instance This addresshostname will not be the same values used to access the instance and they will noteven be associated with the same test instance by the time this guide is available to the public
In order to manage the configuration of the instance connect to it via https or ssh To connect via ssh use the key pairchosen while creating the instance to connect to the admin account From the command line on a UnixLinux hostuse a command similar to ssh -i my_key_file adminpublic_IP where the appropriate private key fileand public IP or hostname are substituted In the example below the key file my_ec2_key is used to connect to the IPaddress 232020454
Note The first time logging into the instance the ssh key of the instance will not be cached locally type yes whenasked whether to continue connecting This should not be necessary on subsequent sessions
A limited set of configurations is possible through the ssh interface The preferred method for managing most of theconfigurations or viewing data on the status of the pfSensereg instance is through the https web GUI To connect viahttps enter an https URL containing the public IP address or hostname of the instance into a web browser Forexample https232020454
Itrsquos very likely there is a browser warning indicating that the security certificate of the site is not trusted because theinstance uses a self-signed certificate for https communication Click on the option to proceed to the site anyway and
copy Copyright 2020 Rubicon Communications LLC 18
Security Gateway Manual Amazon AWS
a login screen with the Netgate logo should appear
The username to log in with is admin The password to use is either a value set in the User Data during the creationof the instance or a random password If a specific password wasnrsquot set find out that value that the random passwordwas set to through one of two different means
1 The first is to log in over ssh with the key pair that was selected when the instance was created and examine thecontents of the file located at etcmotd Select option 8 (Shell) from the console menu that is presented afterlog in and execute cat etcmotd from the shell
2 Alternatively view the System Log for the instance in the EC2 Management Console After the messagesthat are displayed that show the status of the boot process a message should appear that indicates what theadministrative password was changed to
The message using either of the methods mentioned will look like this
Admin password changed to abcdefg
In this example the password was changed to abcdefg
Note Be aware that the System Log output in the EC2 Management Console is not updated in real time and maytake a few minutes to show up It is preferable to explicitly set a password by passing a value in with the User Datafield so the password will be known in advance To allow a random password to be set connect via ssh and find outwhat the password was changed to after the instance is up without any delay
Once the password has been determined and entered into the login form the pfSense Web GUI should be available
23 Using the remote access IPsec VPN
An IPsec VPN for remote users is preconfigured on the instance when it comes up In order to use it you will need toconfigure the IPsec VPN client on your device
See also
A guide for manually configuring Android or iOS (iPhoneiPodiPad) mobile clients to establish an IPsec VPN islocated in the pfSensereg Documentation
For iOS clients a profile can be downloaded and installed that will automatically configure an IPsec VPN to theinstance The profile can be downloaded by visiting the page at iphone_ipsec_profilephp on the instance If theinstance IP address were 232020454 the correct URL to visit would be https232020454iphone_ipsec_profilephp You will need to authenticate to the web interface by typing the username (admin) and password prior to beingable to download the profile
The profile should be downloaded and saved automatically upon opening the page If the page is visited in a webbrowser on an iOS device the device should automatically launch the Settings app and attempt to install the newprofile If the profile is downloaded to another non-iOS device it can be sent via email as an attachment If theattachment is opened in the iOS email client the Settings app new profile installation will also open
The name and description of the profile being installed will be displayed Tap the Install button A warning messagewill be displayed that indicates that the profile is unsigned Tap on Install Now to continue
copy Copyright 2020 Rubicon Communications LLC 19
Security Gateway Manual Amazon AWS
copy Copyright 2020 Rubicon Communications LLC 20
Security Gateway Manual Amazon AWS
Enter your passcode for the iOS device (the one you enter when you wake the device from sleep) and the passwordto access the IPsec VPN (the one you entered to get access to the Web GUI) when prompted and the profile will beinstalled When the screen shows that the profile was installed tap Done
When the profile has been installed the VPN can be enabled in the Settings app There will be a heading named VPNunder the main Settings page If there are more than one VPN configured on the device tap the VPN heading Thenewly installed profile should be selected It will have a check mark next to it There will be an onoff switch at thetop of the page to enable the VPN If this is the only VPN configured the switch to enable the VPN will be next to theVPN heading on the main Settings page Tap the switch to enable the VPN You should be prompted for a usernameand password The username (admin) should already be filled in Enter the password and tap OK A welcome messageshould be displayed Tap OK and you are ready to use the VPN
24 Using the remote access OpenVPN VPN
An OpenVPN VPN for remote users is automatically configured the first time the instance is booted In order to useit you will need an OpenVPN client app installed on your device and you will need to import a configuration thatspecifies how to connect to the instance
An OpenVPN configuration can be downloaded by visiting the page openvpn_connect_profilephp on your instanceIf the instance IP address were 233020454 the correct URL to visit would be https232020454iphone_ipsec_profilephp You will need to authenticate to the web interface by typing the username (admin) and password prior tobeing allowed to download the configuration
The profile should be downloaded and saved automatically upon opening the page The file that it was saved in shouldbe imported into the OpenVPN client on the device that you wish to connect with
copy Copyright 2020 Rubicon Communications LLC 21
Security Gateway Manual Amazon AWS
241 Tips for configuring OpenVPN based on platformclient
OpenVPN Connect App on iOS (iPhoneiPadiPod)
The iOS version of the OpenVPN Connect App allows you to import an OpenVPN profile by opening an attachmentto an email message Save the config to a file named remote-access-vpnovpn and send it to an email account thatthe iOS device is configured to retrieve mail for Open the email message and touch the attachment to open it Youwill be presented with Open in OpenVPN as one of the available options Touch the OpenVPN icon to select thatoption The OpenVPN Connect App should then open and list the profile under a heading that says New profiles areavailable Click on the green ball with the + sign in it to import the profile Type in the username admin andpassword then change the OnOff switch to On
OpenVPN Connect App on Android
The Android version of the OpenVPN Connect App allows you to import an OpenVPN profile from an SD card Savethe configuration file to the SD card Launch the OpenVPN Connect App From the menu select Import then ImportProfile from SD card Browse to the location of the configuration file and select it Enter the username admin andpassword to connect to the VPN Press Connect
TunnelBlick on MacOS X
The TunnelBlick App for MacOS allows you to import an OpenVPN configuration file Save the configuration to afile on your system Click on VPN Details Click on the + symbol underneath the existing configurations to add anew configuration Click on the I have configuration files button Click on the OpenVPN Configuration(s) buttonFollow the instructions presented by TunnelBlick (copy the config into an empty folder TunnelBlick creates on theDesktop rename the folder click on the folder) When the profile is imported successfully click on itrsquos name and thenclick on Connect Enter the username admin and password to connect to the VPN
OpenVPN Connect Client on Windows
The OpenVPN Connect Client on Windows allows you to import an OpenVPN configuration file from the local diskSave the file on your system Click the + symbol to the right of Connection Profiles Select Local File and click onthe Import button Find the profile you wish to import in the file browser window and click Open A box with thename of the new profile should appear under Connection Profiles now Click on that box and enter the usernameadmin and password to connect to the VPN
25 Enabling Enhanced Networking with the Elastic Network Adapter(ENA)
To enable enhanced networking on AWS pfSensereg FirewallVPNRouter must be version 241 or above Use theupdate wizard in the pfSense console to perform the update if necessary and then ENA can be enabled Enabling ENAis outlined in the steps below
Warning Updating the pfSense FirewallVPNRouter will force it to reboot and cause a disruption in service Besure to perform the update during a maintenance cycle
1 Install AWS CLI Documentation on the installation and use of AWS CLI can be found at httpsawsamazoncomcli
copy Copyright 2020 Rubicon Communications LLC 22
Security Gateway Manual Amazon AWS
2 Determine the Instance ID for the pfSense Instance from the EC2 Console
Fig 1 The selected pfSense Instance ID is i-042c16b65423b7dac
3 Stop the instance using Amazon EC2 console
4 Enable the enhanced networking attribute by executing the following AWS CLI command
aws ec2 modify-instance-attribute --instance-id i-042c16b65423b7dac --ena-support
5 Use the EC2 Console to start the pfSense Instance Once the pfSense Instance has started confirm that EnaSup-port is enabled by executing the following AWS CLI command
aws ec2 describe-instances --instance-ids i-042c16b65423b7dac --queryReservations[]Instances[]EnaSupport[true
]
6 Change the pfSense Instance Type to one that supports Enhanced Networking using the EC2 console Afterselecting an Instance Type that supports Enhanced Networking use the EC2 console to stop the pfSense Instance
copy Copyright 2020 Rubicon Communications LLC 23
Security Gateway Manual Amazon AWS
Note To review the Instance Types please see httpsawsamazoncomec2instance-types
7 Once the pfSense Instance has stopped use the EC2 Console to select the pfSense Instance and then under theActions button select Instance Settings gt Change Instance Type and select a new Instance Type
Fig 2 In this case m4xlarge was selected as the new Instance Type and then Apply was selected
8 In the EC2 Console the pfSense Instance should now show an Instance Type of m4xlarge
9 Using the EC2 console select the pfSense Instance and then under the Actions button select Instance State gtStart
26 Advanced Usage
261 Protecting a private network in VPC
An instance of the Netgate appliance can be used as a firewall for a VPC subnet This will generally require moremanual configuration than using an instance to host a remote access VPN does See the VPC User Guide for a moredetailed explanation of how to configure your VPC and your Netgate appliance instance to support this
262 Connecting a local pfSensereg device
In addition to connecting remote devices as clients a device running pfSensereg as a firewallrouter can be connectedas a peer to a pfSense appliance
See also
Read Configuring a Site-to-Site Static Key OpenVPN Instance in the pfSense documention to see the process ofconfiguring this setup
copy Copyright 2020 Rubicon Communications LLC 24
Security Gateway Manual Amazon AWS
When implementing the configuration changes detailed in the document you should use the Netgate appliance instanceon AWS as the ldquoserverrdquo end of the connection and your local pfSense device as the client ldquoendrdquo You will also needto make sure that you are using a unique port The default remote access OpenVPN server is configured to use UDPport 1194 It is suggested that if you are adding a site-to-site tunnel you should use a port between 1195 and 2000Whichever port you decide to use you will need to make sure that the port is open both in the firewall rules on theNetgate appliance instance and in the Security Group in the EC2 Management Console
If you wish to route all traffic from your homeoffice network through the OpenVPN tunnel to your Netgate applianceinstance you will need to add this statement to the advanced options for the OpenVPN Client on the homeofficepfSense device
redirect-gateway def1
This will cause a default route to be set that sends all locally originated traffic on your homeoffice network overthe OpenVPN tunnel when it is established If you use this configuration to send all traffic from your local networkthrough the OpenVPN tunnel you will also need to establish a NAT on the Netgate appliance instance on AWS fortraffic from the homeoffice network to the internet This can be accomplished by adding the CIDR block for yourhomeoffice network to the preconfigured Alias called Networks_to_NAT This is done by navigating to Aliases underthe Firewall heading on the web GUI then clicking on the edit icon to the right of Networks_to_NAT Add the newnetwork address and mask to the list of Networks and click the Save button Then click the Apply Changes buttonYou will also need to add the network used for the tunnel endpoints (IPv4 Tunnel Network) to the Networks_to_NATalias as well using the same procedure that was used to add the homeoffice network
Connecting multiple pfSense gateways to a Netgate appliance
Multiple homeoffice networks can be connected to a single Netgate appliance instance This could be used to allowclients at different office locations to communicate without requiring tunnels between each individual location Itcould also be used as a way to apply policies on traffic tofrom the internet in one place and have them take effectacross multiple locations
Each site would need to have the instructions above for connecting an individual device repeated to add an OpenVPNserver on the Netgate appliance instance and an OpenVPN client on the local pfSense device Each OpenVPN Serverthat is configured must use a unique port and a unique network for IPv4 Tunnel Network It is recommended touse a name that uniquely identifies each location connected in this manner in the Description field when adding anOpenVPN Server for a site in the Netgate appliance
263 Detect and Recover EC2 Instance Failure
You can create an Amazon CloudWatch alarm that monitors an Amazon EC2 instance and automatically recovers theinstance if it becomes impaired due to an underlying issue
For more information about instance recovery see Recover Your Instance
27 Frequently Asked Questions
271 1 I donrsquot know the password to the web GUI How do I find out what it is
The first time the instance boots it looks for a user-defined password set in the User Data box when the instance wascreated If you didnrsquot set one it chooses one randomly so that the instance is not accessible via a default password tomalicious users You can find out the random password that was set by choosing Get System Log from the ActionsMenu for the instance in the EC2 Management Console A message should appear after the system boot messages thatlooks like the following
copy Copyright 2020 Rubicon Communications LLC 25
Security Gateway Manual Amazon AWS
Admin password changed to abcdefg
It may take 5-10 minutes after the instance boots for this message to appear in the system log If you would like to findout the password sooner you can log in via SSH using the SSH key that was selected when the instance was createdThe same message that will be written to the system log will be written to the file etcmotd Running the commandcat etcmotd will show you what the password is
272 2 I donrsquot like the random password that was selected How can I change it
The password can be changed via the web GUI Log in with the username admin and the existing password Underthe System category click on User Manager The admin account should appear in a list of accounts Unless yoursquoveadded other accounts it should be the only account present Click on the Edit button (the icon with the e in it) to theright of the account listing Type your choice for a new password into the two boxes labeled Password Click theSave button at the bottom of the screen
273 3 How do I access my instance
There are several ways that you can manage or use your instance You should be able to connect via SSH or HTTPS inorder to manage the configuration of your instance If you connect via SSH you will either need to know the passwordof the admin account and login with that account or use the SSH key that was selected when the instance was createdHere is a sample command line to log in with an SSH key from a Unix or Linux host
ssh -i ~sshmy-ec2-key adminec2-A-B-C-Dcompute-1amazonawscom
You would substitute the actual location of your SSH private key for ~sshmy-ec2-key and the real hostnamewhich you can retrieve from the EC2 Management Console by looking at the data for the instance for example ec2-A-B-C-Dcompute-1amazonawscom If you know the password for the admin account you could use a commandsimilar to the one above but omit the -i ~sshmy-ec2-key
To connect via HTTPS you need to know the password to the instance either by setting it explicitly in the User Datawhen the instance is created or by retrieving it from the instance Once you know the password you should be able toconnect to the instance with any web browser by typing in the hostname of the instance to the URL field
274 4 How do I connect a VPN client to my instance
See the section in the user guide on Using the remote access IPsec or OpenVPN VPN
275 5 Why does the pfSensereg Dashboard say my WAN address is 10XYZ
Amazon AWS instances use DHCP to assign private addresses to the public-facing interfaces of an instance Thepublicly routable IP address that you use to acces the instance is NATed by Amazon to the private address that you seeconfigured on the WAN interface of your instance
copy Copyright 2020 Rubicon Communications LLC 26
Security Gateway Manual Amazon AWS
276 6 I added custom firewall rules to allow some traffic to my instance why I amnot seeing the packets arrive
Amazon AWS provides packet filtering in addition to the Netgate Appliance itself being a stateful firewall If youallowed traffic on the Netgate Appliance but have a security group configuration in the settings for the instance that isrestricting traffic you will need to also add your rules to the security group in the EC2 Management Console
Given that the Netgate Appliance is a fully functional firewall you may assign an AWS security group that allows alltraffic and perform whatever filtering you desire with rules on the Netgate Appliance
277 7 How do I route all the traffic from my entire home network over a VPN
If your home gatewayrouter has support for OpenVPN you can connect a site to site tunnel from your home networkto the Netgate VPN Appliance and configure your routing so that all Internet traffic is sent over the encrypted tunnelSee the user guide section on Connecting a local pfSensereg device
This may provide for simpler administration at home but your mobile devices and laptops that get used outside thehome should have an OpenVPN client installed and configured anyway so that you are always receiving the benefitsof sending your traffic through a VPN
copy Copyright 2020 Rubicon Communications LLC 27
CHAPTER
THREE
VIRTUAL PRIVATE CLOUD (VPC)
31 AWS VPC User Guide
The pfSensereg Certified firewall and VPN appliance from Netgate for Amazon EC2 is a stateful firewall and VPNappliance In addition to itrsquos capabilities as a VPN gateway and firewall for users and offices it is capable of actingas a firewall to protect instances providing services in Amazonrsquos Virtual Private Cloud or VPC service This servicediffers from the classic EC2 service in that it allows for management of instances on private subnets
This guide will explain how to launch manage and use an instance of the appliance to act as a gateway for otherinstances in a VPC subnet
311 Preparing your VPC
In order to use a Netgate appliance instance to protect your VPC subnets you will need the following
bull One internet-facing subnet which the Netgate appliance instance will have itrsquos primaryWAN interface con-nected to
bull One or more private subnets which the Netgate appliance instance will have itrsquos secondaryLAN interface (andpossibly additional optional interfaces) connected to
bull Separate routing tables for the internet-facing subnet and the private subnet(s)
bull If you already have all of these in place with an existing VPC feel free to skip ahead to Launching an Instance
These instructions will demonstrate how to create a single private subnet and set it up behind an instance of thepfSensereg Certified firewall and VPN appliance from Netgate In the Amazon VPC Management Console create anew VPC subnets and routing table(s)
1 Go to Your VPCs view in the menu on the left side of the VPC Management Console under the Virtual PrivateClouds grouping Click the Create VPC button
28
Security Gateway Manual Amazon AWS
2 Enter a CIDR block to use in the box that pops up If you will connect to hosts in your VPC using a VPNfrom hosts at other sites in your infrastructure be sure to select address space that does not conflict with theprivate address space used elsewhere by your organization Make sure the block you choose is large enoughto contain all subnets you may want to include within it Eg if you plan to use a 24 for your internet-facingsubnet and a 24 for your private network the CIDR block you select here will need to be at least a 23 to holdthose 2 subnets The maximum size block you can select is a 16 For the purposes of this example we will use1020016 Leave the value of Tenancy set to Default Click on the Yes Create button
3 To create the subnets required go to the Subnets view in the menu on the left side of the VPC ManagementConsole Click the Create Subnet button Select the VPC you just created and choose the availability zone youdesire Enter the subnet you wish to use for the internet-facing hosts in the CIDR Block field This subnet willbe the one that the WAN interface of the Netgate appliance instance is attached to and could include any otherhosts or appliances that you wish to be available directly from the Internet and not protected behind the Netgate
copy Copyright 2020 Rubicon Communications LLC 29
Security Gateway Manual Amazon AWS
appliance The subnet you select here must be a block that is within the address space you assigned to the VPCFor this example we will use 1020024 Click on the Yes Create button
4 Create the private subnet Still in the Subnets view of the VPC Management Console click the Create Subnetbutton In the box that pops up select the appropriate VPC and the same Availability Zone that you assignedto your public subnet Enter the subnet you wish to use for your private network in the CIDR Block field Thisnetwork should be a subnet of the address space you assigned to the VPC and should be distinct from the subnetyou assigned to the public subnet For this example we will use 1021024 Click on the Yes Create button
5 Both subnets that you created will have been created to use a default route table that was created for the VPCThe private subnet can continue to use that default table A new route table will need to be created for the publicsubnet Go to the Route Tables view in the menu on the left side of the VPC Management Console The singleexisting route table should be displayed Click on the Create Route Table button Select the VPC and click on
copy Copyright 2020 Rubicon Communications LLC 30
Security Gateway Manual Amazon AWS
the Yes Create button
6 Associate the public subnet (1020024 in our examples) with the routing table that was just created Go to theSubnets view on the left hand side of the VPC Management Console Check the checkbox next to the publicsubnet and scroll down to look at the Details tab for that subnet At the top of the Details tab will be listed theCIDR block VPC and Availability Zone Under those items the Route Table will be listed and will have a linklabeled replace next to it Click on the link Select the route table in the box that pops up and click on the YesReplace button
7 In order to send traffic from the public subnet to the Internet we will need to add a default route to an InternetGateway We must first create one Go to the Internet Gateways view in the menu on the left hand side of theVPC Management Console Click on the Create Internet Gateway button Click the Yes Create button onthe box that pops up Click the checkbox next to the new Internet Gateway and then click the Attach to VPC
copy Copyright 2020 Rubicon Communications LLC 31
Security Gateway Manual Amazon AWS
button Select the VPC and click on the Yes Attach button
8 The route table for the public subnet will need to be updated so that it has a default route to the Internet GatewayGo to the Route Tables view on the left hand side of the VPC Management Console Check the checkbox nextto the route table for the public subnet Under the Routes tab for that route table there should only be listed asingle route for the CIDR block of the VPC (1020016 in our example) that has a target of local There is arow underneath this route with a text box in the Destination field and a pop up menu for the Target field Enter00000 for the Destination and select the Internet Gateway (should be formatted like igw-XXXXXXXX)for the target Click on the Add button that appears at the right side of the row Click the Yes Add button onthe box that pops up
There are a few more VPC configuration changes that will be required later but next you must launch a Netgateappliance instance
copy Copyright 2020 Rubicon Communications LLC 32
Security Gateway Manual Amazon AWS
312 Launching an Instance in a VPC
In the Amazon EC2 Management Console launch a new instance of the pfSensereg firewall and VPN appliance Thisprocess is the same as the one for launching an EC2 (non-VPC) instance up until step 11 which details the values toenter for the Configure Instance Details screen in order to specify the instance should be created in your VPC
1 Select the region to run the instance in using the tab at the upper right corner of the page
2 Launch a new instance by clicking on the Launch Instance button under the Create Instance section of theEC2 dashboard
copy Copyright 2020 Rubicon Communications LLC 33
Security Gateway Manual Amazon AWS
3 Select AWS Marketplace on the Create a New Instance menu Type Netgate pfSense FirewallVPNRouter in the search box and press enter (or click on the Search button next to the text box)
4 Click on the link for the Netgate pfSense FirewallVPNRouter appliance in the search results
5 Click on the Continue button on the info page for the Netgate pfSense FirewallVPNRouter
copy Copyright 2020 Rubicon Communications LLC 34
Security Gateway Manual Amazon AWS
6 Click on the Launch with EC2 Console tab
7 If the license terms havenrsquot been accepted click on the Accept Terms button
8 A message should be displayed indicating that the subscription is being processed
copy Copyright 2020 Rubicon Communications LLC 35
Security Gateway Manual Amazon AWS
9 Select the version of the image to run under the popup menu labeled Select a Version Generally the mostrecently issued version should be selected Identify which region to launch the instances in and click on theLaunch in EC2 Console button to the right of that region
10 Choose the instance type to run on Click Next Configure Instance Details
copy Copyright 2020 Rubicon Communications LLC 36
Security Gateway Manual Amazon AWS
11 On the Configure Instance Details page under the Network field select the VPC that was created For theSubnet field that appears right below the Network field select the public subnet that was created earlier In ourexamples this is 1020024
12 Scroll down to the Network Interfaces heading A single interface named eth0 should be displayed by defaultClick on the Add Device button underneath eth0 Select the private subnet that was created (1021024 in ourexample) Pick an IP address within the range of the private subnet and enter it in the Private IP field Keep inmind that the first 3 or 4 IP addresses are reserved For this example we will use 10215
copy Copyright 2020 Rubicon Communications LLC 37
Security Gateway Manual Amazon AWS
Optionally expand the Advanced Details section and set parameters as text in the User Data field The availableoptions are
password Setting a value via a directive like password=abcdefg will set the password for theadministrative account to the specified value - abcdefg in this example If no value is set here arandom password will be assigned in order to keep administrative access from being exposed tothe internet with a default password
mgmtnet Setting a value via a directive like mgmtnet=1001024 will restrict managementaccess (http https ssh) to the specified network - 1001024 in this example This will causethe firewall rule on the instance (not on Amazons access lists but on the Netgate appliancersquosown firewall) to restrict management traffic for the instance to the specified source network Thedefault behavior is to allow management from any host
These directives can be set by placing them on a single line in the User Data field and separating them withcolons Specify both parameters by typing a statement similar to
password=abcdefgmgmtnet=1001024
Click Next Add Storage after optionally setting these parameters
Note If setting a password using the password parameter listed above the password is retrieved by the instancevia an unencrypted HTTP request when the system is configured the first time it boots The request is made toan Amazon Web Services-operated server on the local LAN that stores metadata about each instance runningThe data for an instance is only made available to that instance but is available to be queried from the instancewithout providing any authentication credentials
It is advised to change the admin password via the pfSense webGUI after the instance comes up or choose notto set the password at all and let a random password be set
copy Copyright 2020 Rubicon Communications LLC 38
Security Gateway Manual Amazon AWS
13 Click Next Tag Instance to accept the Storage Device Configuration
14 Optionally a tag can be set on the instance to differentiate this instance from other VMrsquos that were started byentering a value for the Name tag Click Next Configure Security Group after setting any desired tags
copy Copyright 2020 Rubicon Communications LLC 39
Security Gateway Manual Amazon AWS
15 Select a security group to launch the instance with The recommended settings for a security group should allowat least the following traffic
bull TCP port 443 from 00000 - HTTPS - This is the port that the management web GUI listens on
bull TCP port 22 from 00000 - SSH - This port can be used to connect to a command prompt with an sshclient
bull UDP port 1194 from 00000 - OpenVPN - The OpenVPN server that is configured by default is boundto this port
bull UDP port 500 from 00000 - IKE for IPsec VPN
bull UDP port 4500 from 00000 - IPsecNAT-T for IPsec VPN
copy Copyright 2020 Rubicon Communications LLC 40
Security Gateway Manual Amazon AWS
If you have an existing security group that includes this access select Select an existing security group thenselect the group(s) to use and click Continue Otherwise select Create a new security group and add rulesfor this access by filling in the form for each rule and clicking the Add Rule button When all of the rules havebeen added click Review and Launch
16 Verify the details for the instance and click Launch
17 Select an existing key pair or create a new key pair to connect to the instance with Do not select Proceed
copy Copyright 2020 Rubicon Communications LLC 41
Security Gateway Manual Amazon AWS
Without a Key Pair Click the checkbox that indicates you acknowledge having access to the selected privatekey file and then click Launch Instance
18 In order to reach the instance from the Internet associate an Elastic IP with the WAN interface of the instanceIn the VPC Management Console go to the Elastic IPs view by clicking on Elastic IPs on the left side of thepage Click on the Allocate New Address button Select that you want the EIP used in VPC and click on theYes Allocate button in the box that pops up After the Elastic IP address is allocated associate the address withthe WAN interface of the Netgate appliance by clicking on the Associate Address button
A box will pop up that will either let you specify the instance and Private IP address of the interface or theNetwork Interface and the Private IP Address of the interface Use one of these methods to select the correctinterface and click on the Yes Associate button The instance should now be reachable via ssh or https
copy Copyright 2020 Rubicon Communications LLC 42
Security Gateway Manual Amazon AWS
19 In order for traffic to be allowed to be routed from the private subnet through the public interface of the instancethe SourceDest AddressCheck on the private interfaces needs to be disabled In the EC2 Management Con-sole go to the ldquoNetwork Interfacesrdquo view by clicking on Network Interfaces in the menu on the lefthand sideof the page
Click the checkbox to the left of the privateLAN interface on the Netgate appliance instance Click on theActions button at the top of the page and select Change SourceDesk Check on the popup menu Select theradio button labeled Disabled on the box that pops up and click on the Save button
Non-local traffic from the private subnet should now be sent through the privateLAN interface on the Netgateappliance instance
copy Copyright 2020 Rubicon Communications LLC 43
Security Gateway Manual Amazon AWS
313 Managing a VPC Instance
Once the instance is launched you can connect to it via the Elastic IP that was attached to the primary interface duringthe provisioning phase
In order to manage the configuration of the instance you can connect to it via https or ssh A limited set of configura-tions is possible through the SSH interface the preferred method for managing most of the configurations or viewingdata on the status of the pfSensereg instance is through the https webGUI
Connecting via SSH
To connect via SSH you would use the key pair you chose while creating the instance to connect to the admin accountFrom the command line on a UnixLinux host you would use a command similar to
ssh -i my_ec2_key admin232020454
Where the appropriate private key file and public IP or hostname are substituted
Note The first time you log into your instance the SSH key of the instance will not be cached on your computerand you will need to type yes when asked whether you want continue connecting This should not be necessary onsubsequent sessions
Once logged in you should see the console menu similar to the one below
copy Copyright 2020 Rubicon Communications LLC 44
Security Gateway Manual Amazon AWS
Connecting via HTTPS
To connect via https you would enter a URL containing the public IP address or hostname of your instance intoa web browser For example https232020454 Itrsquos very likely that you will receive a browser warningindicating that the security certificate of the site is not trusted This is because the instance uses a self-signed certificatefor https communication You should click on the option to proceed to the site anyway The pfSense login screen withthe Netgate logo should appear
The username to log in with is admin The password to use is either a value that you set in the User Data during thecreation of the instance or a random password
Tip It is preferable to explicitly set a password by passing a value in with the User Data field so the password willbe known in advance
If you did not set a specific password you can find out that value that the random password was set to through one of2 different methods
1 The first method is to log in over SSH with the key pair that you selected when the instance was created andexamine the contents of the file located at etcmotd You would do this by selecting option 8) Shell in theconsole menu that is presented when you SSH in then run this command in the shell
cat etcmotd
2 The second method is to view the System Log for the instance in the EC2 Management Console After themessages that are displayed that show the status of the boot process a message should appear that indicates what
copy Copyright 2020 Rubicon Communications LLC 45
Security Gateway Manual Amazon AWS
the administrative password was changed to Be aware that the System Log output in the EC2 ManagementConsole is not updated in real time and may take a few minutes to show up
The message you should look for using either of the methods mentioned about will look like this
Admin password changed to abcdefg
Once yoursquove determined your password and entered it into the login form the pfSense WebGUI should be availableto you
314 Forwarding traffic from VPC subnets through the instance
Some additional configuration is required within the VPC instancersquos pfSensereg webGUI before you are able to managetraffic from the private subnet
1 Log into the pfSense WebGUI for the instance
2 Click on the Interfaces heading on the left and then click the Assign link
3 Click on the + icon to add a new Interface under the Interface assignments tab A LAN interface shouldautomatically be added with the next available network interface (xn1)
4 Click on the Interfaces heading on the left again and then click on LAN Click the checkbox to enable the LANinterface Set the IPv4 Configuration Type to Static IPv4 and enter the IP address you assigned to the 2ndinterface during the provisioning phase Click the Save button
Now you can create other instances attached to your private subnet and protect them with the firewall on the pfSenseinstance
Common ways to manage private hosts
Allowing private hosts to connect to the Internet
To allow private hosts to be able to connect to the Internet you can allow any traffic from the LAN in your firewallrules there should be a rule like this in place by default
Next set up NAT rules to cause addresses in the private subnet to be NATed to the IP address of the WAN interface
1 Under the Firewall heading on the left click on the NAT link
2 On the Outbound tab click the radio button for Manual Outbound NAT rule generation (AON - AdvancedOutbound NAT)
3 Click the Save button
4 Click on the Aliases link under the Firewall heading on the left
5 Add your private subnet to the Networks_to_NAT alias
Note There is an existing NAT rule configured by default that uses the alias Networks_to_NAT
copy Copyright 2020 Rubicon Communications LLC 46
Security Gateway Manual Amazon AWS
Allow private hosts to connect to each other
If your hosts should only contact each other and a private network segment elsewhere you can configure an IPsecor OpenVPN tunnel from your remote networks to the Netgate appliance instance and set up the appropriate firewallrules routes and security policies to allow access to your private subnet through a VPN tunnel
Allow direct inbound access from the internet to hosts
If you wish to enable direct inbound access from the internet to hosts on the private subnet you can set up portforwarding on the WAN interface to direct traffic to particular hosts in the private subnet
315 Establishing a VPN connection to a VPC in another region
To establish a VPN that allows instances on the VPC subnet(s) that sit behind a Netgate appliance to communicate withinstances that reside in a VPC in another region the Netgate appliance has a VPC configuration wizard that assists byconfiguring both the Netgate appliance as well as the VPC configuration elements that would normally have to be setmanually through the AWS Management Console
For detailed instructions see the AWS VPC User Guide
316 Upgrading a VPC Instance
Periodically new releases of the AMI are issued to track new releases of pfSensereg that may provide new functionalitybug fixes and security updates
The lower risk approach to upgrading is to bring up a new instance alongside the existing one and executing a cutoverThese instructions detail the procedure for moving your existing instance to one running the latest version
1 Back up the configuration of your exsting instance by navigating to BackupRestore under the Diagnosticsmenu in the Web GUI Click the Download configuration button under the Backup Configuration headingand save your config file to your local system
2 Bring up a new instance of the pfSense Certified RouterFirewallVPN running the latest version
3 When creating the instance make sure the interfaces match the interfaces on the existing instance Make surethat the new instance is in the same VPC as the existing instance and that it has the same number of interfacesattached and that the interfaces are connected to the same Subnets
4 Make sure any interfaces on the new instance that will communicate with private Subnets have theSourceDestination check disabled
5 Allocate a new Elastic IP and associate it to the WAN interface of the new instance to allow yourself managementaccess
6 Restore the backed up configuration file to the new instance Navigate to BackupRestore under the Diagnosticsmenu in the Web GUI Under the Restore Configuration heading click the Choose File button and browsefor the configuration file you backed up from the existing instance earlier Once you have selected that fileclick the Restore configuration button The configuration file will be uploaded and the instance will rebootautomatically
7 If you had packages installed on the old instance navigate to Packages under the System menu in the pfSenseweb GUI and install the same packages
8 If there was any external dependency on the public IP address of the existing instance you can remove theElastic IP Address from the upgraded instance and move the Elastic IP Address from the existing instance tothe upgraded instance External dependencies that might cause you to want to do this include things like VPNrsquos
copy Copyright 2020 Rubicon Communications LLC 47
Security Gateway Manual Amazon AWS
configured to external devices that rely on the existing instancersquos Elastic IP address or access lists on externaldevices that allow access to traffic from the existing instancersquos IP address There may be other reasons why youwould wish to keep the existing address as well (to preserve existing bookmarks to the Web GUI reduce theneed for updates to existing internal documentation etc) The process for moving the old Elastic IP address tothe new instance is as follows
bull Disassociate the Elastic IP address from the new instance In the EC2 Management Console click onElastic IPs under the Network amp Security heading Check the box next to the Elastic IP address assignedto the new instance and click on the Disassociate Address button
bull Disassociate the Elastic IP address from the old instance The procedure is the same as in the previousstep just repeated for the Eastic IP address of the old instance this time
bull Associate the Elastic IP address that was previously associated to the old instance to public interface of thenew instance In the EC2 Management Console click on Elastic IPs Check the box next to the Elastic IPaddress you are moving and click the Associate Address button Fill in the correct value for the Instanceor Network Interface and select the Private IP Address of the public interface on the new instance Clickthe Associate button The management interface of the new instance should now be accessible
9 Move any default routes that pointed to an interface on the old instance to point to the equivalent interface onthe new instance In the VPC Management Console click on Route Tables under the Virtual Private Cloudheading Check the box next to a Route Table associated with the VPC that the instances is located in
bull In the detail pane that appears at the bottom of the screen click on the Routes tab
bull If a route exists for 00000 with a Target that is an interface ID of an interface on the old instnace clickthe Edit button above the table displaying the routes
bull Click the red X next to the row for 00000 to remove the existing route
bull There should be a blank row with empty fields for a new route Enter 00000 in the Destinationfield and the Network Interface ID of the interface on the new instance in the Target field Click on theSave button
bull If there were multiple private subnets in the VPC which were pointed to interfaces on the pfSense instancerepeat this process for the other Route Tables associated with the VPC
bull The new instance should now be functioning as the old one did
32 AWS VPC Wizard User Guide
This guide will explain how to use the AWS VPC Wizard to simplify the configuration of a VPN to a remote VPC Theadministrator is asked for the minimum amount of basic information required to establish the VPN The configurationsboth on the AWS VPC side and on the pfSense side are then automatically created When the wizard is finishedexecuting a functioning VPN connection to a VPC should be established
321 AWS Access Keys
In order to connect to the AWS API to make certain required configuration changes the AWS VPC Wizard requiresAccess Keys to retrieve and modify VPC configurations
See also
Find more information about AWS Security Credential including Access Keys by reading AWS Security Credentials
Access keys consist of two parts
1 An access key ID
copy Copyright 2020 Rubicon Communications LLC 48
Security Gateway Manual Amazon AWS
bull For example AKIAIOSFODNN7EXAMPLE
2 A secret access key
bull For example wJalrXUtnFEMIK7MDENGbPxRfiCYEXAMPLEKEY
Access keys are like a usernamepassword and needed for programmatic requests to AWS including the AWS VPCWizard Use both the access key ID and secret access key together to authenticate requests
Important Manage access keys as securely as a user name and password
Managing Access Keys
To create modify or delete IAM user access keys do the following
1 Sign in to the IAM console
2 In the navigation bar on the upper right choose a user name and then choose My Security Credentials
3 On the AWS IAM Credentials tab in the Access keys for CLI SDK and API access section choose Createaccess key
4 Choose Download csv file to save the access key ID and secret access key to a csv file on your computerStore the file in a secure location There is no access to the secret access key again after this dialog box closesAfter the csv file has been downloaded choose Close When an access key is created the key pair is active bydefault and the pair can be used right away
bull To disable an active access key choose Make inactive
bull To reenable an inactive access key choose Make active
bull To delete an access key choose its X button at the far right of the row Then choose Delete to confirmWhen an access key is deleted itrsquos gone forever and cannot be retrieved However new keys can alwaysbe created
To create modify or delete another IAM userrsquos access keys do the following
1 Sign in to the IAM console
2 In the navigation pane choose Users
3 Choose the name of the user whose access keys to manage and then choose the Security credentials tab
4 In the Access keys section choose Create access key
5 Choose Download csv file to save the access key ID and secret access key to a CSV file on your computer
Rotating Access Keys
As a security best practice we recommend to regularly rotate (change) IAM user access keys Rotating access keyscan be done from the AWS Management Console
To rotate access keys for an IAM user without interrupting the applications (console) create a second access key whilethe first access key is still active
1 Sign in to the IAM console
2 In the navigation pane choose Users
3 Choose the name of the user whose access keys to manage and then choose the Security credentials tab
4 In the Access keys section choose Create access key
copy Copyright 2020 Rubicon Communications LLC 49
Security Gateway Manual Amazon AWS
5 Choose Download csv file to save the access key ID and secret access key to a CSV file on your computer
6 The new access key is active by default At this point the user has two active access keys
After waiting some period of time to ensure that all applications and tools have been updated delete the first accesskey
1 Sign in to the IAM console
2 In the navigation pane choose Users
3 Choose the name of the user whose access keys to manage and then choose the Security credentials tab
4 Locate the access key to delete and choose its X button at the far right of the row Then choose Delete to confirm
Determining When Access Keys Need Rotating
To determine when access keys need rotating (console) do the following
1 Sign in to the IAM console
2 In the navigation pane choose Users
3 If necessary add the Access key age column to the users table by completing the following steps
1 Above the table on the far right click the settings icon
2 In Manage columns select Access key age
3 Choose Close to return to the list of users
4 The Access key age column shows the number of days since the oldest active access key was created Usethis information to find users with access keys that need rotating The column displays None for users with noaccess key
322 Using the Wizard
1 Gather your AWS Access Key ID and Secret Key
2 Navigate to VPN gt AWS VPC Wizard in the main menu in the pfSensereg webGUI
copy Copyright 2020 Rubicon Communications LLC 50
Security Gateway Manual Amazon AWS
3 The first screen of the wizard prompts for the AWS Credentials Enter the Access Key ID and Secret AccessKey in the appropriate text fields and select the Region to connect to in the dropdown menu then click Next
The wizard will then query the AWS API using those credentials to find which VPCrsquos exist in the selectedregion If the credentials were rejected an error message will be displayed and return to the first screen
4 The next screen will prompt to select from the available VPCrsquos in the selected region Select the one to connectto from the dropdown menu The wizard will not create a new VPC it will only connect to an existing VPC
Click Next after selecting the desired VPC
copy Copyright 2020 Rubicon Communications LLC 51
Security Gateway Manual Amazon AWS
Note If the desired VPCrsquos to connect to isnrsquot available create one via the AWS Management Console and tryagain
The wizard will then query the AWS API to check whether there is a VPN Gateway attached to the selectedVPC If none exists one will be created via the API Then the next screen will be displayed
5 On the next screen specify routing and network data
A description of what should be entered for each of these fields follows
copy Copyright 2020 Rubicon Communications LLC 52
Security Gateway Manual Amazon AWS
Routing Type AWS offers either static routing or BGP routing Select the appropriate type fromthe dropdown menu If unsure static routing is likely to be adequate
BGP AS Number If static routing was choosen leave this field blank Otherwise it is possible tospecify an AS number to use If left blank the value will default to 65000
Local Public IP Address On an AWS Netgate appliance instance this should be the public IP ad-dress of the Elastic IP associated with the instance If configuring a hardware device runningpfSense this could be the public address assigned to the WAN (or other) interface of the device
Local subnets The subnets connected to the pfSense instance that should be routed over the tunnelfrom hosts in the remote VPC As an example if connecting a pfSense instance to a remote VPCin the AWS us-east-1 region enter the subnets (or a single subnet) that are local to the pfSenseinstance and when hosts in your VPC in us-east-1 attempted to reach addresses within thosesubnets the traffic will be sent through the VPN tunnel that is being configured
Note When selecting static routing as the routing type there will be a delay that is typically between 2-5minutes before the next screen is displayed This is because static routes must be added to the VPN Connectionvia the AWS API This operation fails until the VPN Connection reaches the ldquoavailablerdquo state This can take afew minutes to occur
Click Next when done
The wizard will then query the AWS API to find whether a Customer Gateway is configured with the selectedPublic IP Address If none exists one will be created If one already exists the ID will be retrieved and it willbe used
The wizard will then query the AWS API to see if a VPC Connection already exists that matches the dataentered If one exists it will be used Otherwise one will be created
If static routing was selected static routes will be added to the VPN Connection for the Local subnets entered
Route propagation will be enabled for the VPN Gateway in each of the Route Tables that are associated withthe VPC All of these configurations are carried out in the AWS API nothing has been changed in the pfSenseVPN configurations yet
Warning Important Note on Billing Once this step is carried out and the VPN Connection is createdAWS will start billing your AWS account the hourly rate for a VPN Connection This is $005 as of thiswriting and that is a charge that goes entirely to AWS itself They will do this until the VPN Connection isdeleted via the VPC Management Console
Nothing in pfSense will ever cause AWS to stop billing for this VPN Connection Whether it works or notwhether the pfSense instance is up or down whether the IPsec tunnels have been deleted or reconfiguredAWS will continue to bill the hourly fee for a VPN Connection if the creation of it succeeds until it is deletedthrough their web interface
The wizard helps establish an initial configuration that works and configures the appropriate elements inAWSrsquos API to facilitate this You are responsible for making sure you understand what yoursquore being billedfor and disabling any functions including VPN Connections that are no longer necessary
6 If the operations of the previous step succeeded the next screen will appear
copy Copyright 2020 Rubicon Communications LLC 53
Security Gateway Manual Amazon AWS
Select an Interface to act as the local endpoint of the VPN tunnels that will be created In most cases thisshould be the WAN interface It should generally be whatever interface is associated with the Local Public IPAddress entered in the previous step
On an AWS Netgate pfSense instance this will be whatever interface the Elastic IP is associated with On ahardware device running pfSense that has the Local Public IP Address directly configured on an interface thiswill be the interface that the Local Public IP Address is configured on
After clicking Next the wizard will configure the VPN and associated settings within pfSense itself using datareturned by the AWS API in the previous step
It will configure 2 IPsec tunnels a firewall rule 2 Aliases (referenced by the firewall rule) and 2 Virtual IPAddresses If BGP was selected as the Routing Type in the previous step it will install the OpenBGPDpackage automatically and configure it appropriately
7 The next screen will appear and prompt to apply the configuration changes that have been made
copy Copyright 2020 Rubicon Communications LLC 54
Security Gateway Manual Amazon AWS
After clicking Next all the configuration changes that were made will be applied
8 The wizard will be completed and the browser will be redirected to the IPsec status page The VPN to the VPCshould now be fully configured
Note Sometimes there is a delay of 5-10 minutes before the tunnels are fully functional and passing trafficThis has been observed particularly often during the setup of tunnels using BGP routing
copy Copyright 2020 Rubicon Communications LLC 55
Security Gateway Manual Amazon AWS
323 Testing Connectivity
Verify that the IPsec tunnels are functioning by attempting to ping the ldquoinside tunnel addressesrdquo of the VPC side ofthe tunnel by navigating to Firewall -gt Virtual IP There should be two virtual IP addresses configured that haveDescriptions like ldquoInside address for tunnel to ltremote IP addressgtrdquo
Amazon provides inside addresses for each end of the tunnel in a 30 subnet in IPv4 link local address space(169254xy) Typically the first usable address in the 30 is the inside address for the VPC end of the tunnel andthe other usable address is the inside address for your end of the tunnel So if you ping from one of the virtual IPaddresses configured on the pfSensereg instance to the IP address that is one less (for example if the virtual IP addresswere 16925425322 ping from 16925425322 to 16925425321) that checks whether the other end of the tunnelis responding and whether the tunnel is functioning properly
Note It sometimes takes a few minutes for the tunnels to begin working after the configuration wizard completes
To ping log into the pfSense instance via SSH and execute ping from a shell prompt For the previous example of16925425322 the proper syntax is
ping -S 16925425322 16925425321
When pinging from a shell prompt it is possible leave the command running indefinitely and interrupt it there is aresponse
copy Copyright 2020 Rubicon Communications LLC 56
Security Gateway Manual Amazon AWS
It is also possible to ping via the Diagnostics -gt Ping page by selecting the appropriate source address and enteringthe remote tunnel inside address in the Host field This will only send a limited number of ping packets so it may benecessary to repeat this a few times
324 VPC Configuration Details
The AWS documentation for connecting a hardware device to a VPC provides a great amount of detail on configuringVPN Connections to VPC
The main configuration elements that exist in Amazonrsquos data model are the Virtual Private Gateway the CustomerGateway and the VPN Connection In order to configure a VPN connection to a VPC all 3 of these need to exist TheVirtual Private Gateway is the VPN endpoint on Amazonrsquos side The customer gateway is the VPN endpoint on thepfSensereg instancedevice being configured The VPN Connection is the IPsec VPN between Amazon and the pfSenseinstancedevice
A Virtual Private Gateway needs to exist and be associated to the VPC A particular VPN Gateway can only beassociated to one VPC at a time Once the VPC to connect to has been selected the wizard invokes the AWS API callDescribeVpnGateways to determine if a VPN Gateway already exists that is attached to the VPC If none exists itcreates one with the CreateVpnGateway API call and attaches it to the VPC with the AttachVpnGateway call
A Customer Gateway needs to be created for the public IP address of the device or virtual machine that will be used toconnect to the VPC The wizard invokes the AWS API call DescribeCustomerGateways to determine if a CustomerGateway already exists If none exists one is created with the CreateCustomerGateway API call
The VPN Connection connects the Virtual Private Gateway and Customer Gateway The wizard checks to see if thereis an existing VPN Connection configured that connects those endpoints by invoking the AWS API call DescribeVp-nConnections If none exists one is created using the CreateVpnConnection call One of the fields returned by thiscall is a block of XML configuration data that contains configuration data assigned by AWS for use with configuringthe VPN Connection This data is stored and used in subsequent steps to make the required configuration changeswithin pfSense
copy Copyright 2020 Rubicon Communications LLC 57
Security Gateway Manual Amazon AWS
Any objects created through API calls by the wizard will be tagged with names like auto-created by pfSenseVPC ltyour_VPC_IDgt This is accomplished by calling the AWS API call CreateTags and using Name as the keyfor the tag
In addition to creation of the items mentioned above required adjustments are made to Security Groups and RouteTables to facilitate communication over the VPN The Security Groups associated with the VPC are updated to allowinbound access from the local subnets on the pfSense end of the VPN They are checked first via the DescribeSecuri-tyGroups AWS API call to determine if the access is already allowed Any of the subnets that is not already allowedhas inbound access added via the AuthorizeSecurityGroupIngress AWS API call
Route Tables associated with the VPC are updated to receive routes from the VPN Gateway used by the VPN Con-nection They are checked first via the DescribeRouteTables AWS API call If the VPN Gateway ID is not includedin the list of VPN Gateways propagating routes route propagation for the VPN Gateway is enabled on that table usingthe EnableVgwRoutePropagation AWS API call
For VPN Connections using static routing static routes for the specified subnets are added to the VPN ConnectionThis is done via the CreateVpnConnectionRoute AWS API call
325 pfSense Configuration Details
On the pfSensereg side there are numerous configurations added to support the VPN to the VPC
Aliases
First aliases are created for use in a firewall rule These aliases are intended to contain the subnets that traffic shouldbe allowed to ingress over the IPsec tunnel One alias represents the local subnets on the pfSense side and is givena name like VPC_Local_vpc_12345678 and the other represents the remote subnets on the VPC side and is given aname like VPC_Remote_vpc_12345678
Virtual IP addresses
Next virtual IP addresses are added on the lo0 (loopback) interface These virtual IP addresses are the local ldquoinsideaddressesrdquo of the IPsec tunnels These addresses are used as the local address for BGP communication when BGProuting is selected These addresses are IPv4 link local addresses (see RFC 3297) AWS assigns 30rsquos out of thenetwork 1692540016 for this purpose
Note These addresses are also useful as a ping target to execute a basic test of whether the tunnel is functioningproperly Executing a ping from a source address of one of these IP addresses to the corresponding inside address ofthe other end of the tunnel helps determine whether the tunnel negotiation is completing properly
Firewall rules
Next a firewall rule is added on the IPsec interface that allows traffic from the VPC networks to the local subnetsThis rule uses the previously created Aliases as sourcedestination targets
IPsec
Then IPsec phase 1 and phase 2 associations are set up Most of the settings required are extracted from a blockof XML data that was returned by the CreateVpnConnection call made during the AWS configuration step Thisincludes parameters like endpoint IP addresses encryption ciphers timer values etc
copy Copyright 2020 Rubicon Communications LLC 58
Security Gateway Manual Amazon AWS
If BGP routing was selected the configurations for the OpenBGPD BGP daemon are established The required settingsare determined using the AS number entered into the wizard and the parameters returned by the CreateVpnConnec-tion call made during the AWS configuration step
326 Tested Configurations
Various topologies may be possible to establish using the AWS VPC Configuration Wizard This section enumeratessome of the configurations that were successfully tested
Platforms
bull Various hardware platforms
bull 64-bit virtual machines in VMware vSphereESX
bull Amazon EC2 instances (Xen virtual machines) of the Netgate pfSensereg RouterFirewallVPN AWS AMI
Local networkrouting configurations
bull pfSense with a public address configured on the WAN interface
bull pfSense with a private address configured on the WAN interface behind a 11 NAT
bull pfSense with a private address configured on the WAN interface behind a PAT (1many NAT)
VPC Topologies
bull pfSense connected to a single VPC
bull pfSense connected to multiple VPCrsquos in different regions
bull Amazon EC2 instance of the pfSense RouterFirewallVPN AWS AMI connected to a VPC belonging to thesame AWS account in a different region
bull Amazon EC2 instance of the pfSense RouterFirewallVPN AWS AMI connected to a VPC belonging to adifferent AWS account in the same region
The configuration recommended for the greatest amount of stability is to have a public IPv4 address directly configuredon the WAN interface of your pfSense firewall but VPNs have been successfully established under all of the conditionslisted above
Whether any of these solutions is appropriate should be evaluated in the context of personal needs and existing infras-tructure Other configurations not listed above may be possible as well
327 AWS VPC Wizard FAQ
1 What level of redundancy is provided by the two tunnels
Amazon provides two tunnel endpoints that will allow traffic to be sent between your networks and the remote VPCyou are connected to The racoon daemon in pfSensereg is only capable of establishing an active phase 2 associationfor a particular sourcedestination pair on a single tunnel
Phase 2 associations between the local subnets and the remote VPC subnet are configured in the pfSense GUI for bothtunnels but racoon will only actually establish an association for the first tunnel This means that racoon will onlyever try to send traffic destined for the remote VPC subnet over the first tunnel
copy Copyright 2020 Rubicon Communications LLC 59
Security Gateway Manual Amazon AWS
If that tunnel goes down the second tunnel may be up and inbound traffic from the remote VPC may be sent to yourlocal networks over that tunnel automatically But outbound traffic to your remote VPC would not automatically failover to the second tunnel In order for you to send your outbound traffic over the second tunnel you would need todisable the phase 2 associations for the first tunnel and apply the changes
2 I quit the wizard before finishing Now what
To finish setting up the VPN go back to the wizard and run through it again It should reuse any partial configurationsthat were generated before it was stopped and create the new elements that are required
3 What are the AWS charges for this
AWS determines their own pricing and provides details for EC2 pricing and VPC pricing There are many types ofcharges that may be incurred for operating instances on AWS (eg charges related to running an instance bandwidthstorage elastic IPs etc)
The charge of specific interest in this case is the hourly charge for a VPN Connection As of this writing it costs $005(USD) per hour in most regions to have a VPN Connection configured and available AWS will charge whether theVPN Connection is being used or not as long as it is configured This will be configured by the third step of the wizardand will never be removed by pfSense
If the VPN Connection is no longer needed and billing for it needs to be stopped visit AWSrsquos VPC ManagementConsole and delete the VPN Connection manually
4 Can I use the wizard to connect to the GovCloud region
This hasnrsquot been officially tested but at least one user has reported that they were able to successfully connect to theGovCloud region They manually added the region us-gov-west-1 to the list of regions in the first step of the wizardand were able to successfully connect to their VPC in that region This may be supported in a future build but to trywithout official support do the following
1 Under the System gt Advanced menu make sure the Enable Secure Shell box is checked This is already doneby default on AWS instances but is off by default on pfSense hardware devices
2 Log into the instance via SSH
3 Make sure the root filesystem is mounted as readwrite On an AWS instance or a hardware device running on anSSD this should be true On a hardware device using Compact Flash or an SD card for storage it will probablybe necessary to remount the root filesystem in readwrite mode by running
mount -uw
4 Edit the file usrlocalwwwwizardsvpc_vpn_wizardxml using vi Look for a section of the file that lookslike this
ltoptiongtltnamegtsa-east-1ltnamegtltvaluegtsa-east-1ltvaluegt
ltoptiongt
That should appear directly after several similar ltoptiongt specifications containing all of the other availableregions Right underneath that section add the following
copy Copyright 2020 Rubicon Communications LLC 60
Security Gateway Manual Amazon AWS
ltoptiongtltnamegtus-gov-west-1ltnamegtltvaluegtus-gov-west-1ltvaluegt
ltoptiongt
Then save the file and exit vi
5 If the filesystem had to be remounted in readwrite mode earlier remount it in read-only mode by running
The GovCloud region should now appear as a choice in the first step of the wizard
copy Copyright 2020 Rubicon Communications LLC 61
CHAPTER
FOUR
REFERENCES
41 Support Resources
411 Commercial Support
In order to keep prices low the software is not bundled with a support subscription For users who need commercialsupport Netgate Gloabal Support can be purchased at httpswwwnetgatecomsupport
412 Community Support
Community support for pfSensereg software is available through the Netgate Forum
42 Additional Resources
421 Netgate Training
Netgate training offers training courses for increasing your knowledge of pfSensereg products and services Whetheryou need to maintain or improve the security skills of your staff or offer highly specialized support and improve yourcustomer satisfaction Netgate training has got you covered
httpswwwnetgatecomtraining
422 Resource Library
To learn more about how to use your pfSense appliance and for other helpful resources make sure to browse ourResource Library
httpswwwnetgatecomresources
423 Professional Services
Support does not cover more complex tasks such as CARP configuration for redundancy on multiple firewalls orcircuits network design and conversion from other firewalls to pfSensereg These items are offered as professionalservices and can be purchased and scheduled accordingly
httpswwwnetgatecomour-servicesprofessional-serviceshtml
62
Security Gateway Manual Amazon AWS
424 Community Options
If you elected not to get a paid support plan you can find help from the active and knowledgeable pfSense communityon our forums
httpsforumnetgatecom
copy Copyright 2020 Rubicon Communications LLC 63
- Getting Started
- Instance Usage
- Virtual Private Cloud (VPC)
- References
-
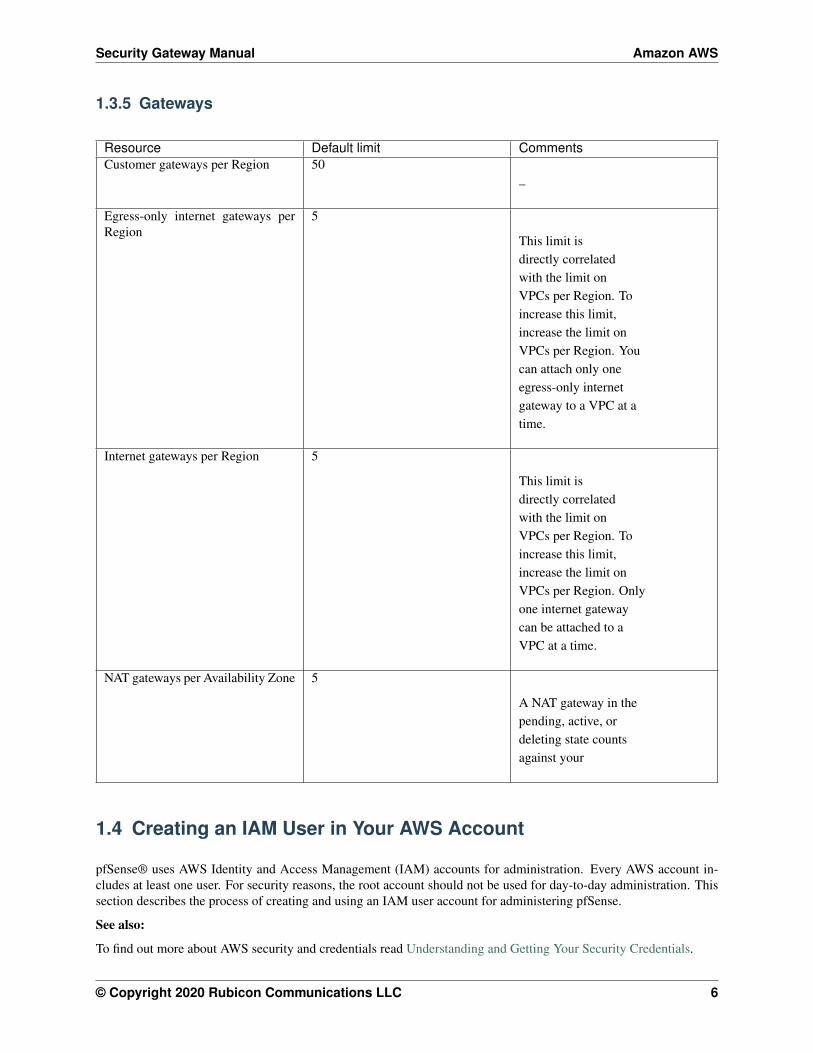
Security Gateway Manual Amazon AWS
6 Click the All resources bubble
7 Select Review policy
8 Populate the Name field (eg pfSense_EC2_Access) and Description if desired
Note Policy names must be unique within the AWS account and the name of the policy cannot be changedonce created
9 Select Create Policy
152 Create IAM Role for pfSense Management
Create a role that an IAM user or users within an IAM Group can assume and use to connect to and manage pfSenserunning on an EC2 Instance
Note The administrator of the specified account can grant permission to assume this role to any IAM user inthat account To do this the administrator attaches a policy to the user or a group that grants permission for thestsAssumeRole action That policy must specify the rolersquos ARN as the Resource
1 Sign in to the AWS Management Console and open the IAM console at httpsconsoleawsamazoncomiam
2 In the navigation pane of the console select Roles then choose Create Role
3 Select the Another AWS account role type
4 In the Account ID field type the AWS account ID that will be allowed to access the destination resource
5 The Require external ID checkbox should remain cleared unless granting permissions to users from an accountthat you do not control Reference AWS Documentation for External ID Roles in the event this is required
6 It is recommended to restrict the role to users who sign in with multi-factor authentication (MFA) Select Re-quire MFA to add a condition to the rolersquos trust policy to require MFA sign-in
7 Select Next Permissions
8 Type the name of the previously created Custom policy in the search field Check the box next to the correctPolicy name
9 Select NextTags
Note IAM tags are key-value pairs that can be used to organize track or control access for this role This isan optional step More information can be found within AWS Documentation for Tagging IAM Entities
10 Select Next Review
11 Populate the Role name field (eg pfSense_Admin) and Role description if desired
Note Role names must be unique within the AWS account and the name of the role cannot be changed oncecreated
12 Review remaining configured settings then select Create role
This role can now be assigned to an IAM User or all users in an IAM group allowing secure administrative access tothe EC2 Instance(s) containing pfSense
copy Copyright 2020 Rubicon Communications LLC 9
CHAPTER
TWO
INSTANCE USAGE
21 Launching an Instance
Here are instructions on how to launch a new instance of the pfSensereg firewallVPN appliance from the Amazon EC2Management Console
1 Select the region for the instance to run in using the region tab at the upper right corner of the page
2 Navigate to the AWS Management Console Main Page and select EC2 under the Compute section in the Allservices dropdown
10
Security Gateway Manual Amazon AWS
3 Launch a new instance by clicking on the Launch Instance button under the Create Instance section of theEC2 dashboard
4 Select AWS Marketplace in the left-hand Navigation Menu Type Netgate pfSense in the search box andpress enter
copy Copyright 2020 Rubicon Communications LLC 11
Security Gateway Manual Amazon AWS
5 Click the Select button for the Netgate pfSense FirewallVPNRouter listing in the search result
6 Review pricing and other helpful information then click Continue
copy Copyright 2020 Rubicon Communications LLC 12
Security Gateway Manual Amazon AWS
7 Choose the instance type to run by clicking the checkbox next to the desired type Click Next ConfigureInstance Details
8 Choose the desired Network and Subnet that the instance will be deployed in Choose any other instance-specificsettings that may be required in your environment Optionally expand the Advanced Details section and setparameters as text in the User Data field The available options are
bull password - setting a value via a directive like password=abcdefg will set the password for the admin-istrative account to the value you specify - abcdefg in this example If no value is set here a randompassword will be assigned in order to keep administrative access from being exposed to the Internet with adefault password
bull mgmtnet - setting a value via a directive like mgmtnet=1001024 will restrict management access(http https ssh) to the network you specify - 1001024 in this example This will cause the firewallrules on the instance (not on Amazonrsquos access lists but on the Netgate pfSense appliancersquos own firewall)to restrict management traffic for the instance to the specified source network The default behavior is toallow management from any host
copy Copyright 2020 Rubicon Communications LLC 13
Security Gateway Manual Amazon AWS
These directives can be set by placing them on a single line in the User Data field and separating them withcolons To specify both parameters type a statement similar to this one
password=abcdefgmgmtnet=1001024
Note If a password is set using the password parameter listed above the password is retrieved by the instancevia an unencrypted HTTP request when the system is configured the first time it boots The request is made toan Amazon Web Services-operated server on the local LAN that stores metadata about each instance runningThe data for an instance is only made available to that instance but is available to be queried from the instancewithout providing any authentication credentials
It is advised to change the admin password via the pfSense web GUI after the instance comes up to avoid anysecurity risks associated with the unencrypted request Otherwise it is possible to choose not to set the passwordat all and let a random password be set
9 Choose the desired Network and Subnet to which the Instance will be deployed Scroll down to configure thenetwork interface(s) with a Static or DHCP-assigned IP address
Once the Network Interface(s) are configured select Next Add Storage
10 Click Next Add Tags to accept the Storage Device Configuration
copy Copyright 2020 Rubicon Communications LLC 14
Security Gateway Manual Amazon AWS
11 It is recommended to set a tag that can be used to differentiate this instance from other instances by entering avalue for the Name tag Click Next Configure Security Group after setting any desired tags
Press the Add Tag button Input Name under the Key field and the desired Instance Tag Name under the Valuefield (eg Netgate FirewallRouter)
12 Select a security group to launch the instance with The Security group name and Description can be left at thedefault or replaced with the desired values The recommended settings for a security group should allow at leastthe following traffic
bull TCP port 443 from 00000
ndash HTTPS - This is the port that the management web GUI listens on
bull TCP port 22 from 00000
ndash SSH - This port can be used to connect to a command prompt with an ssh client
bull UDP port 1194 from 00000
copy Copyright 2020 Rubicon Communications LLC 15
Security Gateway Manual Amazon AWS
ndash OpenVPN - The OpenVPN server that is configured by default is bound to this port
bull UDP port 500 from 00000
ndash IKE for IPsec VPN
bull UDP port 4500 from 00000
ndash IPsecNAT-T for IPsec VPN
Note If there is an existing security group that includes this access click Select an existing security groupthen select the desired group(s) to use and click Continue Otherwise select Create a new security group andadd rules for this access by filling in the form for each rule and clicking the Add Rule button When all of therules have been added click Review and Launch
13 Review any AWS warnings and make note of recommendations Scroll down to review the remaining instancedetails and click Launch after making any needed adjustments
copy Copyright 2020 Rubicon Communications LLC 16
Security Gateway Manual Amazon AWS
14 Select an existing key pair or create a new key pair to connect to the instance with Click the checkbox thatindicates acknowledgment of access to the selected private key file and then click Launch Instances
Important Do NOT select the Proceed Without a Key Pair option
22 Managing the Configuration of the Instance
Once the instance is launched monitor its status using the Instances page of the EC2 Management Console The EC2Management Console will display whether the instance is up and reachable and will also display its current public IPaddress and the hostname that resolves to the public IP address Find the hostname and public IP address in the EC2console by clicking on the Instances heading on the left finding the instance and checking the checkbox next to it andlooking at the details at the bottom of the page
In the example above the hostname of the instance is ec2-23-20-204-54compute-1amazonawscom
copy Copyright 2020 Rubicon Communications LLC 17
Security Gateway Manual Amazon AWS
The public IP address is available by putting together the 4 numbers included in the hostname - 233020454 Itis also possbile to obtain the IP address by using a popular DNS lookup tool such as host dig or nslookup toresolve the hostname to its IP address
Note The hostname and IP address used in this and other examples in this guide are associated at the time of writingwith a test instance This addresshostname will not be the same values used to access the instance and they will noteven be associated with the same test instance by the time this guide is available to the public
In order to manage the configuration of the instance connect to it via https or ssh To connect via ssh use the key pairchosen while creating the instance to connect to the admin account From the command line on a UnixLinux hostuse a command similar to ssh -i my_key_file adminpublic_IP where the appropriate private key fileand public IP or hostname are substituted In the example below the key file my_ec2_key is used to connect to the IPaddress 232020454
Note The first time logging into the instance the ssh key of the instance will not be cached locally type yes whenasked whether to continue connecting This should not be necessary on subsequent sessions
A limited set of configurations is possible through the ssh interface The preferred method for managing most of theconfigurations or viewing data on the status of the pfSensereg instance is through the https web GUI To connect viahttps enter an https URL containing the public IP address or hostname of the instance into a web browser Forexample https232020454
Itrsquos very likely there is a browser warning indicating that the security certificate of the site is not trusted because theinstance uses a self-signed certificate for https communication Click on the option to proceed to the site anyway and
copy Copyright 2020 Rubicon Communications LLC 18
Security Gateway Manual Amazon AWS
a login screen with the Netgate logo should appear
The username to log in with is admin The password to use is either a value set in the User Data during the creationof the instance or a random password If a specific password wasnrsquot set find out that value that the random passwordwas set to through one of two different means
1 The first is to log in over ssh with the key pair that was selected when the instance was created and examine thecontents of the file located at etcmotd Select option 8 (Shell) from the console menu that is presented afterlog in and execute cat etcmotd from the shell
2 Alternatively view the System Log for the instance in the EC2 Management Console After the messagesthat are displayed that show the status of the boot process a message should appear that indicates what theadministrative password was changed to
The message using either of the methods mentioned will look like this
Admin password changed to abcdefg
In this example the password was changed to abcdefg
Note Be aware that the System Log output in the EC2 Management Console is not updated in real time and maytake a few minutes to show up It is preferable to explicitly set a password by passing a value in with the User Datafield so the password will be known in advance To allow a random password to be set connect via ssh and find outwhat the password was changed to after the instance is up without any delay
Once the password has been determined and entered into the login form the pfSense Web GUI should be available
23 Using the remote access IPsec VPN
An IPsec VPN for remote users is preconfigured on the instance when it comes up In order to use it you will need toconfigure the IPsec VPN client on your device
See also
A guide for manually configuring Android or iOS (iPhoneiPodiPad) mobile clients to establish an IPsec VPN islocated in the pfSensereg Documentation
For iOS clients a profile can be downloaded and installed that will automatically configure an IPsec VPN to theinstance The profile can be downloaded by visiting the page at iphone_ipsec_profilephp on the instance If theinstance IP address were 232020454 the correct URL to visit would be https232020454iphone_ipsec_profilephp You will need to authenticate to the web interface by typing the username (admin) and password prior to beingable to download the profile
The profile should be downloaded and saved automatically upon opening the page If the page is visited in a webbrowser on an iOS device the device should automatically launch the Settings app and attempt to install the newprofile If the profile is downloaded to another non-iOS device it can be sent via email as an attachment If theattachment is opened in the iOS email client the Settings app new profile installation will also open
The name and description of the profile being installed will be displayed Tap the Install button A warning messagewill be displayed that indicates that the profile is unsigned Tap on Install Now to continue
copy Copyright 2020 Rubicon Communications LLC 19
Security Gateway Manual Amazon AWS
copy Copyright 2020 Rubicon Communications LLC 20
Security Gateway Manual Amazon AWS
Enter your passcode for the iOS device (the one you enter when you wake the device from sleep) and the passwordto access the IPsec VPN (the one you entered to get access to the Web GUI) when prompted and the profile will beinstalled When the screen shows that the profile was installed tap Done
When the profile has been installed the VPN can be enabled in the Settings app There will be a heading named VPNunder the main Settings page If there are more than one VPN configured on the device tap the VPN heading Thenewly installed profile should be selected It will have a check mark next to it There will be an onoff switch at thetop of the page to enable the VPN If this is the only VPN configured the switch to enable the VPN will be next to theVPN heading on the main Settings page Tap the switch to enable the VPN You should be prompted for a usernameand password The username (admin) should already be filled in Enter the password and tap OK A welcome messageshould be displayed Tap OK and you are ready to use the VPN
24 Using the remote access OpenVPN VPN
An OpenVPN VPN for remote users is automatically configured the first time the instance is booted In order to useit you will need an OpenVPN client app installed on your device and you will need to import a configuration thatspecifies how to connect to the instance
An OpenVPN configuration can be downloaded by visiting the page openvpn_connect_profilephp on your instanceIf the instance IP address were 233020454 the correct URL to visit would be https232020454iphone_ipsec_profilephp You will need to authenticate to the web interface by typing the username (admin) and password prior tobeing allowed to download the configuration
The profile should be downloaded and saved automatically upon opening the page The file that it was saved in shouldbe imported into the OpenVPN client on the device that you wish to connect with
copy Copyright 2020 Rubicon Communications LLC 21
Security Gateway Manual Amazon AWS
241 Tips for configuring OpenVPN based on platformclient
OpenVPN Connect App on iOS (iPhoneiPadiPod)
The iOS version of the OpenVPN Connect App allows you to import an OpenVPN profile by opening an attachmentto an email message Save the config to a file named remote-access-vpnovpn and send it to an email account thatthe iOS device is configured to retrieve mail for Open the email message and touch the attachment to open it Youwill be presented with Open in OpenVPN as one of the available options Touch the OpenVPN icon to select thatoption The OpenVPN Connect App should then open and list the profile under a heading that says New profiles areavailable Click on the green ball with the + sign in it to import the profile Type in the username admin andpassword then change the OnOff switch to On
OpenVPN Connect App on Android
The Android version of the OpenVPN Connect App allows you to import an OpenVPN profile from an SD card Savethe configuration file to the SD card Launch the OpenVPN Connect App From the menu select Import then ImportProfile from SD card Browse to the location of the configuration file and select it Enter the username admin andpassword to connect to the VPN Press Connect
TunnelBlick on MacOS X
The TunnelBlick App for MacOS allows you to import an OpenVPN configuration file Save the configuration to afile on your system Click on VPN Details Click on the + symbol underneath the existing configurations to add anew configuration Click on the I have configuration files button Click on the OpenVPN Configuration(s) buttonFollow the instructions presented by TunnelBlick (copy the config into an empty folder TunnelBlick creates on theDesktop rename the folder click on the folder) When the profile is imported successfully click on itrsquos name and thenclick on Connect Enter the username admin and password to connect to the VPN
OpenVPN Connect Client on Windows
The OpenVPN Connect Client on Windows allows you to import an OpenVPN configuration file from the local diskSave the file on your system Click the + symbol to the right of Connection Profiles Select Local File and click onthe Import button Find the profile you wish to import in the file browser window and click Open A box with thename of the new profile should appear under Connection Profiles now Click on that box and enter the usernameadmin and password to connect to the VPN
25 Enabling Enhanced Networking with the Elastic Network Adapter(ENA)
To enable enhanced networking on AWS pfSensereg FirewallVPNRouter must be version 241 or above Use theupdate wizard in the pfSense console to perform the update if necessary and then ENA can be enabled Enabling ENAis outlined in the steps below
Warning Updating the pfSense FirewallVPNRouter will force it to reboot and cause a disruption in service Besure to perform the update during a maintenance cycle
1 Install AWS CLI Documentation on the installation and use of AWS CLI can be found at httpsawsamazoncomcli
copy Copyright 2020 Rubicon Communications LLC 22
Security Gateway Manual Amazon AWS
2 Determine the Instance ID for the pfSense Instance from the EC2 Console
Fig 1 The selected pfSense Instance ID is i-042c16b65423b7dac
3 Stop the instance using Amazon EC2 console
4 Enable the enhanced networking attribute by executing the following AWS CLI command
aws ec2 modify-instance-attribute --instance-id i-042c16b65423b7dac --ena-support
5 Use the EC2 Console to start the pfSense Instance Once the pfSense Instance has started confirm that EnaSup-port is enabled by executing the following AWS CLI command
aws ec2 describe-instances --instance-ids i-042c16b65423b7dac --queryReservations[]Instances[]EnaSupport[true
]
6 Change the pfSense Instance Type to one that supports Enhanced Networking using the EC2 console Afterselecting an Instance Type that supports Enhanced Networking use the EC2 console to stop the pfSense Instance
copy Copyright 2020 Rubicon Communications LLC 23
Security Gateway Manual Amazon AWS
Note To review the Instance Types please see httpsawsamazoncomec2instance-types
7 Once the pfSense Instance has stopped use the EC2 Console to select the pfSense Instance and then under theActions button select Instance Settings gt Change Instance Type and select a new Instance Type
Fig 2 In this case m4xlarge was selected as the new Instance Type and then Apply was selected
8 In the EC2 Console the pfSense Instance should now show an Instance Type of m4xlarge
9 Using the EC2 console select the pfSense Instance and then under the Actions button select Instance State gtStart
26 Advanced Usage
261 Protecting a private network in VPC
An instance of the Netgate appliance can be used as a firewall for a VPC subnet This will generally require moremanual configuration than using an instance to host a remote access VPN does See the VPC User Guide for a moredetailed explanation of how to configure your VPC and your Netgate appliance instance to support this
262 Connecting a local pfSensereg device
In addition to connecting remote devices as clients a device running pfSensereg as a firewallrouter can be connectedas a peer to a pfSense appliance
See also
Read Configuring a Site-to-Site Static Key OpenVPN Instance in the pfSense documention to see the process ofconfiguring this setup
copy Copyright 2020 Rubicon Communications LLC 24
Security Gateway Manual Amazon AWS
When implementing the configuration changes detailed in the document you should use the Netgate appliance instanceon AWS as the ldquoserverrdquo end of the connection and your local pfSense device as the client ldquoendrdquo You will also needto make sure that you are using a unique port The default remote access OpenVPN server is configured to use UDPport 1194 It is suggested that if you are adding a site-to-site tunnel you should use a port between 1195 and 2000Whichever port you decide to use you will need to make sure that the port is open both in the firewall rules on theNetgate appliance instance and in the Security Group in the EC2 Management Console
If you wish to route all traffic from your homeoffice network through the OpenVPN tunnel to your Netgate applianceinstance you will need to add this statement to the advanced options for the OpenVPN Client on the homeofficepfSense device
redirect-gateway def1
This will cause a default route to be set that sends all locally originated traffic on your homeoffice network overthe OpenVPN tunnel when it is established If you use this configuration to send all traffic from your local networkthrough the OpenVPN tunnel you will also need to establish a NAT on the Netgate appliance instance on AWS fortraffic from the homeoffice network to the internet This can be accomplished by adding the CIDR block for yourhomeoffice network to the preconfigured Alias called Networks_to_NAT This is done by navigating to Aliases underthe Firewall heading on the web GUI then clicking on the edit icon to the right of Networks_to_NAT Add the newnetwork address and mask to the list of Networks and click the Save button Then click the Apply Changes buttonYou will also need to add the network used for the tunnel endpoints (IPv4 Tunnel Network) to the Networks_to_NATalias as well using the same procedure that was used to add the homeoffice network
Connecting multiple pfSense gateways to a Netgate appliance
Multiple homeoffice networks can be connected to a single Netgate appliance instance This could be used to allowclients at different office locations to communicate without requiring tunnels between each individual location Itcould also be used as a way to apply policies on traffic tofrom the internet in one place and have them take effectacross multiple locations
Each site would need to have the instructions above for connecting an individual device repeated to add an OpenVPNserver on the Netgate appliance instance and an OpenVPN client on the local pfSense device Each OpenVPN Serverthat is configured must use a unique port and a unique network for IPv4 Tunnel Network It is recommended touse a name that uniquely identifies each location connected in this manner in the Description field when adding anOpenVPN Server for a site in the Netgate appliance
263 Detect and Recover EC2 Instance Failure
You can create an Amazon CloudWatch alarm that monitors an Amazon EC2 instance and automatically recovers theinstance if it becomes impaired due to an underlying issue
For more information about instance recovery see Recover Your Instance
27 Frequently Asked Questions
271 1 I donrsquot know the password to the web GUI How do I find out what it is
The first time the instance boots it looks for a user-defined password set in the User Data box when the instance wascreated If you didnrsquot set one it chooses one randomly so that the instance is not accessible via a default password tomalicious users You can find out the random password that was set by choosing Get System Log from the ActionsMenu for the instance in the EC2 Management Console A message should appear after the system boot messages thatlooks like the following
copy Copyright 2020 Rubicon Communications LLC 25
Security Gateway Manual Amazon AWS
Admin password changed to abcdefg
It may take 5-10 minutes after the instance boots for this message to appear in the system log If you would like to findout the password sooner you can log in via SSH using the SSH key that was selected when the instance was createdThe same message that will be written to the system log will be written to the file etcmotd Running the commandcat etcmotd will show you what the password is
272 2 I donrsquot like the random password that was selected How can I change it
The password can be changed via the web GUI Log in with the username admin and the existing password Underthe System category click on User Manager The admin account should appear in a list of accounts Unless yoursquoveadded other accounts it should be the only account present Click on the Edit button (the icon with the e in it) to theright of the account listing Type your choice for a new password into the two boxes labeled Password Click theSave button at the bottom of the screen
273 3 How do I access my instance
There are several ways that you can manage or use your instance You should be able to connect via SSH or HTTPS inorder to manage the configuration of your instance If you connect via SSH you will either need to know the passwordof the admin account and login with that account or use the SSH key that was selected when the instance was createdHere is a sample command line to log in with an SSH key from a Unix or Linux host
ssh -i ~sshmy-ec2-key adminec2-A-B-C-Dcompute-1amazonawscom
You would substitute the actual location of your SSH private key for ~sshmy-ec2-key and the real hostnamewhich you can retrieve from the EC2 Management Console by looking at the data for the instance for example ec2-A-B-C-Dcompute-1amazonawscom If you know the password for the admin account you could use a commandsimilar to the one above but omit the -i ~sshmy-ec2-key
To connect via HTTPS you need to know the password to the instance either by setting it explicitly in the User Datawhen the instance is created or by retrieving it from the instance Once you know the password you should be able toconnect to the instance with any web browser by typing in the hostname of the instance to the URL field
274 4 How do I connect a VPN client to my instance
See the section in the user guide on Using the remote access IPsec or OpenVPN VPN
275 5 Why does the pfSensereg Dashboard say my WAN address is 10XYZ
Amazon AWS instances use DHCP to assign private addresses to the public-facing interfaces of an instance Thepublicly routable IP address that you use to acces the instance is NATed by Amazon to the private address that you seeconfigured on the WAN interface of your instance
copy Copyright 2020 Rubicon Communications LLC 26
Security Gateway Manual Amazon AWS
276 6 I added custom firewall rules to allow some traffic to my instance why I amnot seeing the packets arrive
Amazon AWS provides packet filtering in addition to the Netgate Appliance itself being a stateful firewall If youallowed traffic on the Netgate Appliance but have a security group configuration in the settings for the instance that isrestricting traffic you will need to also add your rules to the security group in the EC2 Management Console
Given that the Netgate Appliance is a fully functional firewall you may assign an AWS security group that allows alltraffic and perform whatever filtering you desire with rules on the Netgate Appliance
277 7 How do I route all the traffic from my entire home network over a VPN
If your home gatewayrouter has support for OpenVPN you can connect a site to site tunnel from your home networkto the Netgate VPN Appliance and configure your routing so that all Internet traffic is sent over the encrypted tunnelSee the user guide section on Connecting a local pfSensereg device
This may provide for simpler administration at home but your mobile devices and laptops that get used outside thehome should have an OpenVPN client installed and configured anyway so that you are always receiving the benefitsof sending your traffic through a VPN
copy Copyright 2020 Rubicon Communications LLC 27
CHAPTER
THREE
VIRTUAL PRIVATE CLOUD (VPC)
31 AWS VPC User Guide
The pfSensereg Certified firewall and VPN appliance from Netgate for Amazon EC2 is a stateful firewall and VPNappliance In addition to itrsquos capabilities as a VPN gateway and firewall for users and offices it is capable of actingas a firewall to protect instances providing services in Amazonrsquos Virtual Private Cloud or VPC service This servicediffers from the classic EC2 service in that it allows for management of instances on private subnets
This guide will explain how to launch manage and use an instance of the appliance to act as a gateway for otherinstances in a VPC subnet
311 Preparing your VPC
In order to use a Netgate appliance instance to protect your VPC subnets you will need the following
bull One internet-facing subnet which the Netgate appliance instance will have itrsquos primaryWAN interface con-nected to
bull One or more private subnets which the Netgate appliance instance will have itrsquos secondaryLAN interface (andpossibly additional optional interfaces) connected to
bull Separate routing tables for the internet-facing subnet and the private subnet(s)
bull If you already have all of these in place with an existing VPC feel free to skip ahead to Launching an Instance
These instructions will demonstrate how to create a single private subnet and set it up behind an instance of thepfSensereg Certified firewall and VPN appliance from Netgate In the Amazon VPC Management Console create anew VPC subnets and routing table(s)
1 Go to Your VPCs view in the menu on the left side of the VPC Management Console under the Virtual PrivateClouds grouping Click the Create VPC button
28
Security Gateway Manual Amazon AWS
2 Enter a CIDR block to use in the box that pops up If you will connect to hosts in your VPC using a VPNfrom hosts at other sites in your infrastructure be sure to select address space that does not conflict with theprivate address space used elsewhere by your organization Make sure the block you choose is large enoughto contain all subnets you may want to include within it Eg if you plan to use a 24 for your internet-facingsubnet and a 24 for your private network the CIDR block you select here will need to be at least a 23 to holdthose 2 subnets The maximum size block you can select is a 16 For the purposes of this example we will use1020016 Leave the value of Tenancy set to Default Click on the Yes Create button
3 To create the subnets required go to the Subnets view in the menu on the left side of the VPC ManagementConsole Click the Create Subnet button Select the VPC you just created and choose the availability zone youdesire Enter the subnet you wish to use for the internet-facing hosts in the CIDR Block field This subnet willbe the one that the WAN interface of the Netgate appliance instance is attached to and could include any otherhosts or appliances that you wish to be available directly from the Internet and not protected behind the Netgate
copy Copyright 2020 Rubicon Communications LLC 29
Security Gateway Manual Amazon AWS
appliance The subnet you select here must be a block that is within the address space you assigned to the VPCFor this example we will use 1020024 Click on the Yes Create button
4 Create the private subnet Still in the Subnets view of the VPC Management Console click the Create Subnetbutton In the box that pops up select the appropriate VPC and the same Availability Zone that you assignedto your public subnet Enter the subnet you wish to use for your private network in the CIDR Block field Thisnetwork should be a subnet of the address space you assigned to the VPC and should be distinct from the subnetyou assigned to the public subnet For this example we will use 1021024 Click on the Yes Create button
5 Both subnets that you created will have been created to use a default route table that was created for the VPCThe private subnet can continue to use that default table A new route table will need to be created for the publicsubnet Go to the Route Tables view in the menu on the left side of the VPC Management Console The singleexisting route table should be displayed Click on the Create Route Table button Select the VPC and click on
copy Copyright 2020 Rubicon Communications LLC 30
Security Gateway Manual Amazon AWS
the Yes Create button
6 Associate the public subnet (1020024 in our examples) with the routing table that was just created Go to theSubnets view on the left hand side of the VPC Management Console Check the checkbox next to the publicsubnet and scroll down to look at the Details tab for that subnet At the top of the Details tab will be listed theCIDR block VPC and Availability Zone Under those items the Route Table will be listed and will have a linklabeled replace next to it Click on the link Select the route table in the box that pops up and click on the YesReplace button
7 In order to send traffic from the public subnet to the Internet we will need to add a default route to an InternetGateway We must first create one Go to the Internet Gateways view in the menu on the left hand side of theVPC Management Console Click on the Create Internet Gateway button Click the Yes Create button onthe box that pops up Click the checkbox next to the new Internet Gateway and then click the Attach to VPC
copy Copyright 2020 Rubicon Communications LLC 31
Security Gateway Manual Amazon AWS
button Select the VPC and click on the Yes Attach button
8 The route table for the public subnet will need to be updated so that it has a default route to the Internet GatewayGo to the Route Tables view on the left hand side of the VPC Management Console Check the checkbox nextto the route table for the public subnet Under the Routes tab for that route table there should only be listed asingle route for the CIDR block of the VPC (1020016 in our example) that has a target of local There is arow underneath this route with a text box in the Destination field and a pop up menu for the Target field Enter00000 for the Destination and select the Internet Gateway (should be formatted like igw-XXXXXXXX)for the target Click on the Add button that appears at the right side of the row Click the Yes Add button onthe box that pops up
There are a few more VPC configuration changes that will be required later but next you must launch a Netgateappliance instance
copy Copyright 2020 Rubicon Communications LLC 32
Security Gateway Manual Amazon AWS
312 Launching an Instance in a VPC
In the Amazon EC2 Management Console launch a new instance of the pfSensereg firewall and VPN appliance Thisprocess is the same as the one for launching an EC2 (non-VPC) instance up until step 11 which details the values toenter for the Configure Instance Details screen in order to specify the instance should be created in your VPC
1 Select the region to run the instance in using the tab at the upper right corner of the page
2 Launch a new instance by clicking on the Launch Instance button under the Create Instance section of theEC2 dashboard
copy Copyright 2020 Rubicon Communications LLC 33
Security Gateway Manual Amazon AWS
3 Select AWS Marketplace on the Create a New Instance menu Type Netgate pfSense FirewallVPNRouter in the search box and press enter (or click on the Search button next to the text box)
4 Click on the link for the Netgate pfSense FirewallVPNRouter appliance in the search results
5 Click on the Continue button on the info page for the Netgate pfSense FirewallVPNRouter
copy Copyright 2020 Rubicon Communications LLC 34
Security Gateway Manual Amazon AWS
6 Click on the Launch with EC2 Console tab
7 If the license terms havenrsquot been accepted click on the Accept Terms button
8 A message should be displayed indicating that the subscription is being processed
copy Copyright 2020 Rubicon Communications LLC 35
Security Gateway Manual Amazon AWS
9 Select the version of the image to run under the popup menu labeled Select a Version Generally the mostrecently issued version should be selected Identify which region to launch the instances in and click on theLaunch in EC2 Console button to the right of that region
10 Choose the instance type to run on Click Next Configure Instance Details
copy Copyright 2020 Rubicon Communications LLC 36
Security Gateway Manual Amazon AWS
11 On the Configure Instance Details page under the Network field select the VPC that was created For theSubnet field that appears right below the Network field select the public subnet that was created earlier In ourexamples this is 1020024
12 Scroll down to the Network Interfaces heading A single interface named eth0 should be displayed by defaultClick on the Add Device button underneath eth0 Select the private subnet that was created (1021024 in ourexample) Pick an IP address within the range of the private subnet and enter it in the Private IP field Keep inmind that the first 3 or 4 IP addresses are reserved For this example we will use 10215
copy Copyright 2020 Rubicon Communications LLC 37
Security Gateway Manual Amazon AWS
Optionally expand the Advanced Details section and set parameters as text in the User Data field The availableoptions are
password Setting a value via a directive like password=abcdefg will set the password for theadministrative account to the specified value - abcdefg in this example If no value is set here arandom password will be assigned in order to keep administrative access from being exposed tothe internet with a default password
mgmtnet Setting a value via a directive like mgmtnet=1001024 will restrict managementaccess (http https ssh) to the specified network - 1001024 in this example This will causethe firewall rule on the instance (not on Amazons access lists but on the Netgate appliancersquosown firewall) to restrict management traffic for the instance to the specified source network Thedefault behavior is to allow management from any host
These directives can be set by placing them on a single line in the User Data field and separating them withcolons Specify both parameters by typing a statement similar to
password=abcdefgmgmtnet=1001024
Click Next Add Storage after optionally setting these parameters
Note If setting a password using the password parameter listed above the password is retrieved by the instancevia an unencrypted HTTP request when the system is configured the first time it boots The request is made toan Amazon Web Services-operated server on the local LAN that stores metadata about each instance runningThe data for an instance is only made available to that instance but is available to be queried from the instancewithout providing any authentication credentials
It is advised to change the admin password via the pfSense webGUI after the instance comes up or choose notto set the password at all and let a random password be set
copy Copyright 2020 Rubicon Communications LLC 38
Security Gateway Manual Amazon AWS
13 Click Next Tag Instance to accept the Storage Device Configuration
14 Optionally a tag can be set on the instance to differentiate this instance from other VMrsquos that were started byentering a value for the Name tag Click Next Configure Security Group after setting any desired tags
copy Copyright 2020 Rubicon Communications LLC 39
Security Gateway Manual Amazon AWS
15 Select a security group to launch the instance with The recommended settings for a security group should allowat least the following traffic
bull TCP port 443 from 00000 - HTTPS - This is the port that the management web GUI listens on
bull TCP port 22 from 00000 - SSH - This port can be used to connect to a command prompt with an sshclient
bull UDP port 1194 from 00000 - OpenVPN - The OpenVPN server that is configured by default is boundto this port
bull UDP port 500 from 00000 - IKE for IPsec VPN
bull UDP port 4500 from 00000 - IPsecNAT-T for IPsec VPN
copy Copyright 2020 Rubicon Communications LLC 40
Security Gateway Manual Amazon AWS
If you have an existing security group that includes this access select Select an existing security group thenselect the group(s) to use and click Continue Otherwise select Create a new security group and add rulesfor this access by filling in the form for each rule and clicking the Add Rule button When all of the rules havebeen added click Review and Launch
16 Verify the details for the instance and click Launch
17 Select an existing key pair or create a new key pair to connect to the instance with Do not select Proceed
copy Copyright 2020 Rubicon Communications LLC 41
Security Gateway Manual Amazon AWS
Without a Key Pair Click the checkbox that indicates you acknowledge having access to the selected privatekey file and then click Launch Instance
18 In order to reach the instance from the Internet associate an Elastic IP with the WAN interface of the instanceIn the VPC Management Console go to the Elastic IPs view by clicking on Elastic IPs on the left side of thepage Click on the Allocate New Address button Select that you want the EIP used in VPC and click on theYes Allocate button in the box that pops up After the Elastic IP address is allocated associate the address withthe WAN interface of the Netgate appliance by clicking on the Associate Address button
A box will pop up that will either let you specify the instance and Private IP address of the interface or theNetwork Interface and the Private IP Address of the interface Use one of these methods to select the correctinterface and click on the Yes Associate button The instance should now be reachable via ssh or https
copy Copyright 2020 Rubicon Communications LLC 42
Security Gateway Manual Amazon AWS
19 In order for traffic to be allowed to be routed from the private subnet through the public interface of the instancethe SourceDest AddressCheck on the private interfaces needs to be disabled In the EC2 Management Con-sole go to the ldquoNetwork Interfacesrdquo view by clicking on Network Interfaces in the menu on the lefthand sideof the page
Click the checkbox to the left of the privateLAN interface on the Netgate appliance instance Click on theActions button at the top of the page and select Change SourceDesk Check on the popup menu Select theradio button labeled Disabled on the box that pops up and click on the Save button
Non-local traffic from the private subnet should now be sent through the privateLAN interface on the Netgateappliance instance
copy Copyright 2020 Rubicon Communications LLC 43
Security Gateway Manual Amazon AWS
313 Managing a VPC Instance
Once the instance is launched you can connect to it via the Elastic IP that was attached to the primary interface duringthe provisioning phase
In order to manage the configuration of the instance you can connect to it via https or ssh A limited set of configura-tions is possible through the SSH interface the preferred method for managing most of the configurations or viewingdata on the status of the pfSensereg instance is through the https webGUI
Connecting via SSH
To connect via SSH you would use the key pair you chose while creating the instance to connect to the admin accountFrom the command line on a UnixLinux host you would use a command similar to
ssh -i my_ec2_key admin232020454
Where the appropriate private key file and public IP or hostname are substituted
Note The first time you log into your instance the SSH key of the instance will not be cached on your computerand you will need to type yes when asked whether you want continue connecting This should not be necessary onsubsequent sessions
Once logged in you should see the console menu similar to the one below
copy Copyright 2020 Rubicon Communications LLC 44
Security Gateway Manual Amazon AWS
Connecting via HTTPS
To connect via https you would enter a URL containing the public IP address or hostname of your instance intoa web browser For example https232020454 Itrsquos very likely that you will receive a browser warningindicating that the security certificate of the site is not trusted This is because the instance uses a self-signed certificatefor https communication You should click on the option to proceed to the site anyway The pfSense login screen withthe Netgate logo should appear
The username to log in with is admin The password to use is either a value that you set in the User Data during thecreation of the instance or a random password
Tip It is preferable to explicitly set a password by passing a value in with the User Data field so the password willbe known in advance
If you did not set a specific password you can find out that value that the random password was set to through one of2 different methods
1 The first method is to log in over SSH with the key pair that you selected when the instance was created andexamine the contents of the file located at etcmotd You would do this by selecting option 8) Shell in theconsole menu that is presented when you SSH in then run this command in the shell
cat etcmotd
2 The second method is to view the System Log for the instance in the EC2 Management Console After themessages that are displayed that show the status of the boot process a message should appear that indicates what
copy Copyright 2020 Rubicon Communications LLC 45
Security Gateway Manual Amazon AWS
the administrative password was changed to Be aware that the System Log output in the EC2 ManagementConsole is not updated in real time and may take a few minutes to show up
The message you should look for using either of the methods mentioned about will look like this
Admin password changed to abcdefg
Once yoursquove determined your password and entered it into the login form the pfSense WebGUI should be availableto you
314 Forwarding traffic from VPC subnets through the instance
Some additional configuration is required within the VPC instancersquos pfSensereg webGUI before you are able to managetraffic from the private subnet
1 Log into the pfSense WebGUI for the instance
2 Click on the Interfaces heading on the left and then click the Assign link
3 Click on the + icon to add a new Interface under the Interface assignments tab A LAN interface shouldautomatically be added with the next available network interface (xn1)
4 Click on the Interfaces heading on the left again and then click on LAN Click the checkbox to enable the LANinterface Set the IPv4 Configuration Type to Static IPv4 and enter the IP address you assigned to the 2ndinterface during the provisioning phase Click the Save button
Now you can create other instances attached to your private subnet and protect them with the firewall on the pfSenseinstance
Common ways to manage private hosts
Allowing private hosts to connect to the Internet
To allow private hosts to be able to connect to the Internet you can allow any traffic from the LAN in your firewallrules there should be a rule like this in place by default
Next set up NAT rules to cause addresses in the private subnet to be NATed to the IP address of the WAN interface
1 Under the Firewall heading on the left click on the NAT link
2 On the Outbound tab click the radio button for Manual Outbound NAT rule generation (AON - AdvancedOutbound NAT)
3 Click the Save button
4 Click on the Aliases link under the Firewall heading on the left
5 Add your private subnet to the Networks_to_NAT alias
Note There is an existing NAT rule configured by default that uses the alias Networks_to_NAT
copy Copyright 2020 Rubicon Communications LLC 46
Security Gateway Manual Amazon AWS
Allow private hosts to connect to each other
If your hosts should only contact each other and a private network segment elsewhere you can configure an IPsecor OpenVPN tunnel from your remote networks to the Netgate appliance instance and set up the appropriate firewallrules routes and security policies to allow access to your private subnet through a VPN tunnel
Allow direct inbound access from the internet to hosts
If you wish to enable direct inbound access from the internet to hosts on the private subnet you can set up portforwarding on the WAN interface to direct traffic to particular hosts in the private subnet
315 Establishing a VPN connection to a VPC in another region
To establish a VPN that allows instances on the VPC subnet(s) that sit behind a Netgate appliance to communicate withinstances that reside in a VPC in another region the Netgate appliance has a VPC configuration wizard that assists byconfiguring both the Netgate appliance as well as the VPC configuration elements that would normally have to be setmanually through the AWS Management Console
For detailed instructions see the AWS VPC User Guide
316 Upgrading a VPC Instance
Periodically new releases of the AMI are issued to track new releases of pfSensereg that may provide new functionalitybug fixes and security updates
The lower risk approach to upgrading is to bring up a new instance alongside the existing one and executing a cutoverThese instructions detail the procedure for moving your existing instance to one running the latest version
1 Back up the configuration of your exsting instance by navigating to BackupRestore under the Diagnosticsmenu in the Web GUI Click the Download configuration button under the Backup Configuration headingand save your config file to your local system
2 Bring up a new instance of the pfSense Certified RouterFirewallVPN running the latest version
3 When creating the instance make sure the interfaces match the interfaces on the existing instance Make surethat the new instance is in the same VPC as the existing instance and that it has the same number of interfacesattached and that the interfaces are connected to the same Subnets
4 Make sure any interfaces on the new instance that will communicate with private Subnets have theSourceDestination check disabled
5 Allocate a new Elastic IP and associate it to the WAN interface of the new instance to allow yourself managementaccess
6 Restore the backed up configuration file to the new instance Navigate to BackupRestore under the Diagnosticsmenu in the Web GUI Under the Restore Configuration heading click the Choose File button and browsefor the configuration file you backed up from the existing instance earlier Once you have selected that fileclick the Restore configuration button The configuration file will be uploaded and the instance will rebootautomatically
7 If you had packages installed on the old instance navigate to Packages under the System menu in the pfSenseweb GUI and install the same packages
8 If there was any external dependency on the public IP address of the existing instance you can remove theElastic IP Address from the upgraded instance and move the Elastic IP Address from the existing instance tothe upgraded instance External dependencies that might cause you to want to do this include things like VPNrsquos
copy Copyright 2020 Rubicon Communications LLC 47
Security Gateway Manual Amazon AWS
configured to external devices that rely on the existing instancersquos Elastic IP address or access lists on externaldevices that allow access to traffic from the existing instancersquos IP address There may be other reasons why youwould wish to keep the existing address as well (to preserve existing bookmarks to the Web GUI reduce theneed for updates to existing internal documentation etc) The process for moving the old Elastic IP address tothe new instance is as follows
bull Disassociate the Elastic IP address from the new instance In the EC2 Management Console click onElastic IPs under the Network amp Security heading Check the box next to the Elastic IP address assignedto the new instance and click on the Disassociate Address button
bull Disassociate the Elastic IP address from the old instance The procedure is the same as in the previousstep just repeated for the Eastic IP address of the old instance this time
bull Associate the Elastic IP address that was previously associated to the old instance to public interface of thenew instance In the EC2 Management Console click on Elastic IPs Check the box next to the Elastic IPaddress you are moving and click the Associate Address button Fill in the correct value for the Instanceor Network Interface and select the Private IP Address of the public interface on the new instance Clickthe Associate button The management interface of the new instance should now be accessible
9 Move any default routes that pointed to an interface on the old instance to point to the equivalent interface onthe new instance In the VPC Management Console click on Route Tables under the Virtual Private Cloudheading Check the box next to a Route Table associated with the VPC that the instances is located in
bull In the detail pane that appears at the bottom of the screen click on the Routes tab
bull If a route exists for 00000 with a Target that is an interface ID of an interface on the old instnace clickthe Edit button above the table displaying the routes
bull Click the red X next to the row for 00000 to remove the existing route
bull There should be a blank row with empty fields for a new route Enter 00000 in the Destinationfield and the Network Interface ID of the interface on the new instance in the Target field Click on theSave button
bull If there were multiple private subnets in the VPC which were pointed to interfaces on the pfSense instancerepeat this process for the other Route Tables associated with the VPC
bull The new instance should now be functioning as the old one did
32 AWS VPC Wizard User Guide
This guide will explain how to use the AWS VPC Wizard to simplify the configuration of a VPN to a remote VPC Theadministrator is asked for the minimum amount of basic information required to establish the VPN The configurationsboth on the AWS VPC side and on the pfSense side are then automatically created When the wizard is finishedexecuting a functioning VPN connection to a VPC should be established
321 AWS Access Keys
In order to connect to the AWS API to make certain required configuration changes the AWS VPC Wizard requiresAccess Keys to retrieve and modify VPC configurations
See also
Find more information about AWS Security Credential including Access Keys by reading AWS Security Credentials
Access keys consist of two parts
1 An access key ID
copy Copyright 2020 Rubicon Communications LLC 48
Security Gateway Manual Amazon AWS
bull For example AKIAIOSFODNN7EXAMPLE
2 A secret access key
bull For example wJalrXUtnFEMIK7MDENGbPxRfiCYEXAMPLEKEY
Access keys are like a usernamepassword and needed for programmatic requests to AWS including the AWS VPCWizard Use both the access key ID and secret access key together to authenticate requests
Important Manage access keys as securely as a user name and password
Managing Access Keys
To create modify or delete IAM user access keys do the following
1 Sign in to the IAM console
2 In the navigation bar on the upper right choose a user name and then choose My Security Credentials
3 On the AWS IAM Credentials tab in the Access keys for CLI SDK and API access section choose Createaccess key
4 Choose Download csv file to save the access key ID and secret access key to a csv file on your computerStore the file in a secure location There is no access to the secret access key again after this dialog box closesAfter the csv file has been downloaded choose Close When an access key is created the key pair is active bydefault and the pair can be used right away
bull To disable an active access key choose Make inactive
bull To reenable an inactive access key choose Make active
bull To delete an access key choose its X button at the far right of the row Then choose Delete to confirmWhen an access key is deleted itrsquos gone forever and cannot be retrieved However new keys can alwaysbe created
To create modify or delete another IAM userrsquos access keys do the following
1 Sign in to the IAM console
2 In the navigation pane choose Users
3 Choose the name of the user whose access keys to manage and then choose the Security credentials tab
4 In the Access keys section choose Create access key
5 Choose Download csv file to save the access key ID and secret access key to a CSV file on your computer
Rotating Access Keys
As a security best practice we recommend to regularly rotate (change) IAM user access keys Rotating access keyscan be done from the AWS Management Console
To rotate access keys for an IAM user without interrupting the applications (console) create a second access key whilethe first access key is still active
1 Sign in to the IAM console
2 In the navigation pane choose Users
3 Choose the name of the user whose access keys to manage and then choose the Security credentials tab
4 In the Access keys section choose Create access key
copy Copyright 2020 Rubicon Communications LLC 49
Security Gateway Manual Amazon AWS
5 Choose Download csv file to save the access key ID and secret access key to a CSV file on your computer
6 The new access key is active by default At this point the user has two active access keys
After waiting some period of time to ensure that all applications and tools have been updated delete the first accesskey
1 Sign in to the IAM console
2 In the navigation pane choose Users
3 Choose the name of the user whose access keys to manage and then choose the Security credentials tab
4 Locate the access key to delete and choose its X button at the far right of the row Then choose Delete to confirm
Determining When Access Keys Need Rotating
To determine when access keys need rotating (console) do the following
1 Sign in to the IAM console
2 In the navigation pane choose Users
3 If necessary add the Access key age column to the users table by completing the following steps
1 Above the table on the far right click the settings icon
2 In Manage columns select Access key age
3 Choose Close to return to the list of users
4 The Access key age column shows the number of days since the oldest active access key was created Usethis information to find users with access keys that need rotating The column displays None for users with noaccess key
322 Using the Wizard
1 Gather your AWS Access Key ID and Secret Key
2 Navigate to VPN gt AWS VPC Wizard in the main menu in the pfSensereg webGUI
copy Copyright 2020 Rubicon Communications LLC 50
Security Gateway Manual Amazon AWS
3 The first screen of the wizard prompts for the AWS Credentials Enter the Access Key ID and Secret AccessKey in the appropriate text fields and select the Region to connect to in the dropdown menu then click Next
The wizard will then query the AWS API using those credentials to find which VPCrsquos exist in the selectedregion If the credentials were rejected an error message will be displayed and return to the first screen
4 The next screen will prompt to select from the available VPCrsquos in the selected region Select the one to connectto from the dropdown menu The wizard will not create a new VPC it will only connect to an existing VPC
Click Next after selecting the desired VPC
copy Copyright 2020 Rubicon Communications LLC 51
Security Gateway Manual Amazon AWS
Note If the desired VPCrsquos to connect to isnrsquot available create one via the AWS Management Console and tryagain
The wizard will then query the AWS API to check whether there is a VPN Gateway attached to the selectedVPC If none exists one will be created via the API Then the next screen will be displayed
5 On the next screen specify routing and network data
A description of what should be entered for each of these fields follows
copy Copyright 2020 Rubicon Communications LLC 52
Security Gateway Manual Amazon AWS
Routing Type AWS offers either static routing or BGP routing Select the appropriate type fromthe dropdown menu If unsure static routing is likely to be adequate
BGP AS Number If static routing was choosen leave this field blank Otherwise it is possible tospecify an AS number to use If left blank the value will default to 65000
Local Public IP Address On an AWS Netgate appliance instance this should be the public IP ad-dress of the Elastic IP associated with the instance If configuring a hardware device runningpfSense this could be the public address assigned to the WAN (or other) interface of the device
Local subnets The subnets connected to the pfSense instance that should be routed over the tunnelfrom hosts in the remote VPC As an example if connecting a pfSense instance to a remote VPCin the AWS us-east-1 region enter the subnets (or a single subnet) that are local to the pfSenseinstance and when hosts in your VPC in us-east-1 attempted to reach addresses within thosesubnets the traffic will be sent through the VPN tunnel that is being configured
Note When selecting static routing as the routing type there will be a delay that is typically between 2-5minutes before the next screen is displayed This is because static routes must be added to the VPN Connectionvia the AWS API This operation fails until the VPN Connection reaches the ldquoavailablerdquo state This can take afew minutes to occur
Click Next when done
The wizard will then query the AWS API to find whether a Customer Gateway is configured with the selectedPublic IP Address If none exists one will be created If one already exists the ID will be retrieved and it willbe used
The wizard will then query the AWS API to see if a VPC Connection already exists that matches the dataentered If one exists it will be used Otherwise one will be created
If static routing was selected static routes will be added to the VPN Connection for the Local subnets entered
Route propagation will be enabled for the VPN Gateway in each of the Route Tables that are associated withthe VPC All of these configurations are carried out in the AWS API nothing has been changed in the pfSenseVPN configurations yet
Warning Important Note on Billing Once this step is carried out and the VPN Connection is createdAWS will start billing your AWS account the hourly rate for a VPN Connection This is $005 as of thiswriting and that is a charge that goes entirely to AWS itself They will do this until the VPN Connection isdeleted via the VPC Management Console
Nothing in pfSense will ever cause AWS to stop billing for this VPN Connection Whether it works or notwhether the pfSense instance is up or down whether the IPsec tunnels have been deleted or reconfiguredAWS will continue to bill the hourly fee for a VPN Connection if the creation of it succeeds until it is deletedthrough their web interface
The wizard helps establish an initial configuration that works and configures the appropriate elements inAWSrsquos API to facilitate this You are responsible for making sure you understand what yoursquore being billedfor and disabling any functions including VPN Connections that are no longer necessary
6 If the operations of the previous step succeeded the next screen will appear
copy Copyright 2020 Rubicon Communications LLC 53
Security Gateway Manual Amazon AWS
Select an Interface to act as the local endpoint of the VPN tunnels that will be created In most cases thisshould be the WAN interface It should generally be whatever interface is associated with the Local Public IPAddress entered in the previous step
On an AWS Netgate pfSense instance this will be whatever interface the Elastic IP is associated with On ahardware device running pfSense that has the Local Public IP Address directly configured on an interface thiswill be the interface that the Local Public IP Address is configured on
After clicking Next the wizard will configure the VPN and associated settings within pfSense itself using datareturned by the AWS API in the previous step
It will configure 2 IPsec tunnels a firewall rule 2 Aliases (referenced by the firewall rule) and 2 Virtual IPAddresses If BGP was selected as the Routing Type in the previous step it will install the OpenBGPDpackage automatically and configure it appropriately
7 The next screen will appear and prompt to apply the configuration changes that have been made
copy Copyright 2020 Rubicon Communications LLC 54
Security Gateway Manual Amazon AWS
After clicking Next all the configuration changes that were made will be applied
8 The wizard will be completed and the browser will be redirected to the IPsec status page The VPN to the VPCshould now be fully configured
Note Sometimes there is a delay of 5-10 minutes before the tunnels are fully functional and passing trafficThis has been observed particularly often during the setup of tunnels using BGP routing
copy Copyright 2020 Rubicon Communications LLC 55
Security Gateway Manual Amazon AWS
323 Testing Connectivity
Verify that the IPsec tunnels are functioning by attempting to ping the ldquoinside tunnel addressesrdquo of the VPC side ofthe tunnel by navigating to Firewall -gt Virtual IP There should be two virtual IP addresses configured that haveDescriptions like ldquoInside address for tunnel to ltremote IP addressgtrdquo
Amazon provides inside addresses for each end of the tunnel in a 30 subnet in IPv4 link local address space(169254xy) Typically the first usable address in the 30 is the inside address for the VPC end of the tunnel andthe other usable address is the inside address for your end of the tunnel So if you ping from one of the virtual IPaddresses configured on the pfSensereg instance to the IP address that is one less (for example if the virtual IP addresswere 16925425322 ping from 16925425322 to 16925425321) that checks whether the other end of the tunnelis responding and whether the tunnel is functioning properly
Note It sometimes takes a few minutes for the tunnels to begin working after the configuration wizard completes
To ping log into the pfSense instance via SSH and execute ping from a shell prompt For the previous example of16925425322 the proper syntax is
ping -S 16925425322 16925425321
When pinging from a shell prompt it is possible leave the command running indefinitely and interrupt it there is aresponse
copy Copyright 2020 Rubicon Communications LLC 56
Security Gateway Manual Amazon AWS
It is also possible to ping via the Diagnostics -gt Ping page by selecting the appropriate source address and enteringthe remote tunnel inside address in the Host field This will only send a limited number of ping packets so it may benecessary to repeat this a few times
324 VPC Configuration Details
The AWS documentation for connecting a hardware device to a VPC provides a great amount of detail on configuringVPN Connections to VPC
The main configuration elements that exist in Amazonrsquos data model are the Virtual Private Gateway the CustomerGateway and the VPN Connection In order to configure a VPN connection to a VPC all 3 of these need to exist TheVirtual Private Gateway is the VPN endpoint on Amazonrsquos side The customer gateway is the VPN endpoint on thepfSensereg instancedevice being configured The VPN Connection is the IPsec VPN between Amazon and the pfSenseinstancedevice
A Virtual Private Gateway needs to exist and be associated to the VPC A particular VPN Gateway can only beassociated to one VPC at a time Once the VPC to connect to has been selected the wizard invokes the AWS API callDescribeVpnGateways to determine if a VPN Gateway already exists that is attached to the VPC If none exists itcreates one with the CreateVpnGateway API call and attaches it to the VPC with the AttachVpnGateway call
A Customer Gateway needs to be created for the public IP address of the device or virtual machine that will be used toconnect to the VPC The wizard invokes the AWS API call DescribeCustomerGateways to determine if a CustomerGateway already exists If none exists one is created with the CreateCustomerGateway API call
The VPN Connection connects the Virtual Private Gateway and Customer Gateway The wizard checks to see if thereis an existing VPN Connection configured that connects those endpoints by invoking the AWS API call DescribeVp-nConnections If none exists one is created using the CreateVpnConnection call One of the fields returned by thiscall is a block of XML configuration data that contains configuration data assigned by AWS for use with configuringthe VPN Connection This data is stored and used in subsequent steps to make the required configuration changeswithin pfSense
copy Copyright 2020 Rubicon Communications LLC 57
Security Gateway Manual Amazon AWS
Any objects created through API calls by the wizard will be tagged with names like auto-created by pfSenseVPC ltyour_VPC_IDgt This is accomplished by calling the AWS API call CreateTags and using Name as the keyfor the tag
In addition to creation of the items mentioned above required adjustments are made to Security Groups and RouteTables to facilitate communication over the VPN The Security Groups associated with the VPC are updated to allowinbound access from the local subnets on the pfSense end of the VPN They are checked first via the DescribeSecuri-tyGroups AWS API call to determine if the access is already allowed Any of the subnets that is not already allowedhas inbound access added via the AuthorizeSecurityGroupIngress AWS API call
Route Tables associated with the VPC are updated to receive routes from the VPN Gateway used by the VPN Con-nection They are checked first via the DescribeRouteTables AWS API call If the VPN Gateway ID is not includedin the list of VPN Gateways propagating routes route propagation for the VPN Gateway is enabled on that table usingthe EnableVgwRoutePropagation AWS API call
For VPN Connections using static routing static routes for the specified subnets are added to the VPN ConnectionThis is done via the CreateVpnConnectionRoute AWS API call
325 pfSense Configuration Details
On the pfSensereg side there are numerous configurations added to support the VPN to the VPC
Aliases
First aliases are created for use in a firewall rule These aliases are intended to contain the subnets that traffic shouldbe allowed to ingress over the IPsec tunnel One alias represents the local subnets on the pfSense side and is givena name like VPC_Local_vpc_12345678 and the other represents the remote subnets on the VPC side and is given aname like VPC_Remote_vpc_12345678
Virtual IP addresses
Next virtual IP addresses are added on the lo0 (loopback) interface These virtual IP addresses are the local ldquoinsideaddressesrdquo of the IPsec tunnels These addresses are used as the local address for BGP communication when BGProuting is selected These addresses are IPv4 link local addresses (see RFC 3297) AWS assigns 30rsquos out of thenetwork 1692540016 for this purpose
Note These addresses are also useful as a ping target to execute a basic test of whether the tunnel is functioningproperly Executing a ping from a source address of one of these IP addresses to the corresponding inside address ofthe other end of the tunnel helps determine whether the tunnel negotiation is completing properly
Firewall rules
Next a firewall rule is added on the IPsec interface that allows traffic from the VPC networks to the local subnetsThis rule uses the previously created Aliases as sourcedestination targets
IPsec
Then IPsec phase 1 and phase 2 associations are set up Most of the settings required are extracted from a blockof XML data that was returned by the CreateVpnConnection call made during the AWS configuration step Thisincludes parameters like endpoint IP addresses encryption ciphers timer values etc
copy Copyright 2020 Rubicon Communications LLC 58
Security Gateway Manual Amazon AWS
If BGP routing was selected the configurations for the OpenBGPD BGP daemon are established The required settingsare determined using the AS number entered into the wizard and the parameters returned by the CreateVpnConnec-tion call made during the AWS configuration step
326 Tested Configurations
Various topologies may be possible to establish using the AWS VPC Configuration Wizard This section enumeratessome of the configurations that were successfully tested
Platforms
bull Various hardware platforms
bull 64-bit virtual machines in VMware vSphereESX
bull Amazon EC2 instances (Xen virtual machines) of the Netgate pfSensereg RouterFirewallVPN AWS AMI
Local networkrouting configurations
bull pfSense with a public address configured on the WAN interface
bull pfSense with a private address configured on the WAN interface behind a 11 NAT
bull pfSense with a private address configured on the WAN interface behind a PAT (1many NAT)
VPC Topologies
bull pfSense connected to a single VPC
bull pfSense connected to multiple VPCrsquos in different regions
bull Amazon EC2 instance of the pfSense RouterFirewallVPN AWS AMI connected to a VPC belonging to thesame AWS account in a different region
bull Amazon EC2 instance of the pfSense RouterFirewallVPN AWS AMI connected to a VPC belonging to adifferent AWS account in the same region
The configuration recommended for the greatest amount of stability is to have a public IPv4 address directly configuredon the WAN interface of your pfSense firewall but VPNs have been successfully established under all of the conditionslisted above
Whether any of these solutions is appropriate should be evaluated in the context of personal needs and existing infras-tructure Other configurations not listed above may be possible as well
327 AWS VPC Wizard FAQ
1 What level of redundancy is provided by the two tunnels
Amazon provides two tunnel endpoints that will allow traffic to be sent between your networks and the remote VPCyou are connected to The racoon daemon in pfSensereg is only capable of establishing an active phase 2 associationfor a particular sourcedestination pair on a single tunnel
Phase 2 associations between the local subnets and the remote VPC subnet are configured in the pfSense GUI for bothtunnels but racoon will only actually establish an association for the first tunnel This means that racoon will onlyever try to send traffic destined for the remote VPC subnet over the first tunnel
copy Copyright 2020 Rubicon Communications LLC 59
Security Gateway Manual Amazon AWS
If that tunnel goes down the second tunnel may be up and inbound traffic from the remote VPC may be sent to yourlocal networks over that tunnel automatically But outbound traffic to your remote VPC would not automatically failover to the second tunnel In order for you to send your outbound traffic over the second tunnel you would need todisable the phase 2 associations for the first tunnel and apply the changes
2 I quit the wizard before finishing Now what
To finish setting up the VPN go back to the wizard and run through it again It should reuse any partial configurationsthat were generated before it was stopped and create the new elements that are required
3 What are the AWS charges for this
AWS determines their own pricing and provides details for EC2 pricing and VPC pricing There are many types ofcharges that may be incurred for operating instances on AWS (eg charges related to running an instance bandwidthstorage elastic IPs etc)
The charge of specific interest in this case is the hourly charge for a VPN Connection As of this writing it costs $005(USD) per hour in most regions to have a VPN Connection configured and available AWS will charge whether theVPN Connection is being used or not as long as it is configured This will be configured by the third step of the wizardand will never be removed by pfSense
If the VPN Connection is no longer needed and billing for it needs to be stopped visit AWSrsquos VPC ManagementConsole and delete the VPN Connection manually
4 Can I use the wizard to connect to the GovCloud region
This hasnrsquot been officially tested but at least one user has reported that they were able to successfully connect to theGovCloud region They manually added the region us-gov-west-1 to the list of regions in the first step of the wizardand were able to successfully connect to their VPC in that region This may be supported in a future build but to trywithout official support do the following
1 Under the System gt Advanced menu make sure the Enable Secure Shell box is checked This is already doneby default on AWS instances but is off by default on pfSense hardware devices
2 Log into the instance via SSH
3 Make sure the root filesystem is mounted as readwrite On an AWS instance or a hardware device running on anSSD this should be true On a hardware device using Compact Flash or an SD card for storage it will probablybe necessary to remount the root filesystem in readwrite mode by running
mount -uw
4 Edit the file usrlocalwwwwizardsvpc_vpn_wizardxml using vi Look for a section of the file that lookslike this
ltoptiongtltnamegtsa-east-1ltnamegtltvaluegtsa-east-1ltvaluegt
ltoptiongt
That should appear directly after several similar ltoptiongt specifications containing all of the other availableregions Right underneath that section add the following
copy Copyright 2020 Rubicon Communications LLC 60
Security Gateway Manual Amazon AWS
ltoptiongtltnamegtus-gov-west-1ltnamegtltvaluegtus-gov-west-1ltvaluegt
ltoptiongt
Then save the file and exit vi
5 If the filesystem had to be remounted in readwrite mode earlier remount it in read-only mode by running
The GovCloud region should now appear as a choice in the first step of the wizard
copy Copyright 2020 Rubicon Communications LLC 61
CHAPTER
FOUR
REFERENCES
41 Support Resources
411 Commercial Support
In order to keep prices low the software is not bundled with a support subscription For users who need commercialsupport Netgate Gloabal Support can be purchased at httpswwwnetgatecomsupport
412 Community Support
Community support for pfSensereg software is available through the Netgate Forum
42 Additional Resources
421 Netgate Training
Netgate training offers training courses for increasing your knowledge of pfSensereg products and services Whetheryou need to maintain or improve the security skills of your staff or offer highly specialized support and improve yourcustomer satisfaction Netgate training has got you covered
httpswwwnetgatecomtraining
422 Resource Library
To learn more about how to use your pfSense appliance and for other helpful resources make sure to browse ourResource Library
httpswwwnetgatecomresources
423 Professional Services
Support does not cover more complex tasks such as CARP configuration for redundancy on multiple firewalls orcircuits network design and conversion from other firewalls to pfSensereg These items are offered as professionalservices and can be purchased and scheduled accordingly
httpswwwnetgatecomour-servicesprofessional-serviceshtml
62
Security Gateway Manual Amazon AWS
424 Community Options
If you elected not to get a paid support plan you can find help from the active and knowledgeable pfSense communityon our forums
httpsforumnetgatecom
copy Copyright 2020 Rubicon Communications LLC 63
- Getting Started
- Instance Usage
- Virtual Private Cloud (VPC)
- References
-
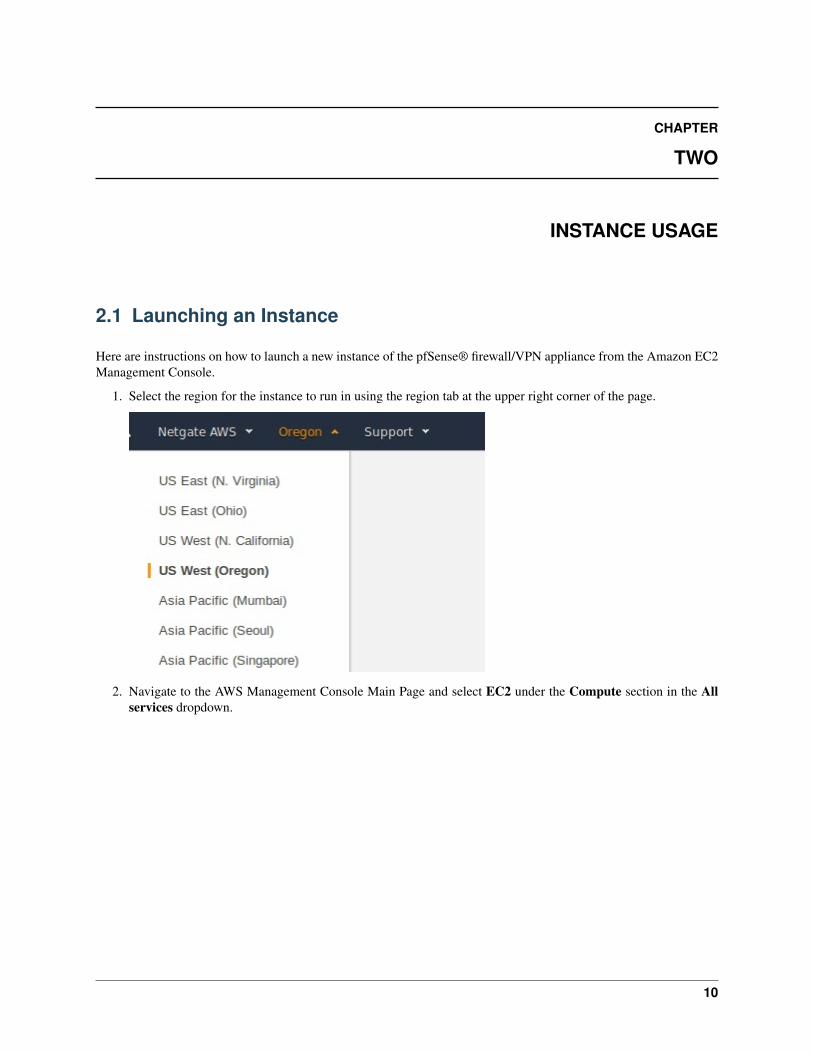
CHAPTER
TWO
INSTANCE USAGE
21 Launching an Instance
Here are instructions on how to launch a new instance of the pfSensereg firewallVPN appliance from the Amazon EC2Management Console
1 Select the region for the instance to run in using the region tab at the upper right corner of the page
2 Navigate to the AWS Management Console Main Page and select EC2 under the Compute section in the Allservices dropdown
10
Security Gateway Manual Amazon AWS
3 Launch a new instance by clicking on the Launch Instance button under the Create Instance section of theEC2 dashboard
4 Select AWS Marketplace in the left-hand Navigation Menu Type Netgate pfSense in the search box andpress enter
copy Copyright 2020 Rubicon Communications LLC 11
Security Gateway Manual Amazon AWS
5 Click the Select button for the Netgate pfSense FirewallVPNRouter listing in the search result
6 Review pricing and other helpful information then click Continue
copy Copyright 2020 Rubicon Communications LLC 12
Security Gateway Manual Amazon AWS
7 Choose the instance type to run by clicking the checkbox next to the desired type Click Next ConfigureInstance Details
8 Choose the desired Network and Subnet that the instance will be deployed in Choose any other instance-specificsettings that may be required in your environment Optionally expand the Advanced Details section and setparameters as text in the User Data field The available options are
bull password - setting a value via a directive like password=abcdefg will set the password for the admin-istrative account to the value you specify - abcdefg in this example If no value is set here a randompassword will be assigned in order to keep administrative access from being exposed to the Internet with adefault password
bull mgmtnet - setting a value via a directive like mgmtnet=1001024 will restrict management access(http https ssh) to the network you specify - 1001024 in this example This will cause the firewallrules on the instance (not on Amazonrsquos access lists but on the Netgate pfSense appliancersquos own firewall)to restrict management traffic for the instance to the specified source network The default behavior is toallow management from any host
copy Copyright 2020 Rubicon Communications LLC 13
Security Gateway Manual Amazon AWS
These directives can be set by placing them on a single line in the User Data field and separating them withcolons To specify both parameters type a statement similar to this one
password=abcdefgmgmtnet=1001024
Note If a password is set using the password parameter listed above the password is retrieved by the instancevia an unencrypted HTTP request when the system is configured the first time it boots The request is made toan Amazon Web Services-operated server on the local LAN that stores metadata about each instance runningThe data for an instance is only made available to that instance but is available to be queried from the instancewithout providing any authentication credentials
It is advised to change the admin password via the pfSense web GUI after the instance comes up to avoid anysecurity risks associated with the unencrypted request Otherwise it is possible to choose not to set the passwordat all and let a random password be set
9 Choose the desired Network and Subnet to which the Instance will be deployed Scroll down to configure thenetwork interface(s) with a Static or DHCP-assigned IP address
Once the Network Interface(s) are configured select Next Add Storage
10 Click Next Add Tags to accept the Storage Device Configuration
copy Copyright 2020 Rubicon Communications LLC 14
Security Gateway Manual Amazon AWS
11 It is recommended to set a tag that can be used to differentiate this instance from other instances by entering avalue for the Name tag Click Next Configure Security Group after setting any desired tags
Press the Add Tag button Input Name under the Key field and the desired Instance Tag Name under the Valuefield (eg Netgate FirewallRouter)
12 Select a security group to launch the instance with The Security group name and Description can be left at thedefault or replaced with the desired values The recommended settings for a security group should allow at leastthe following traffic
bull TCP port 443 from 00000
ndash HTTPS - This is the port that the management web GUI listens on
bull TCP port 22 from 00000
ndash SSH - This port can be used to connect to a command prompt with an ssh client
bull UDP port 1194 from 00000
copy Copyright 2020 Rubicon Communications LLC 15
Security Gateway Manual Amazon AWS
ndash OpenVPN - The OpenVPN server that is configured by default is bound to this port
bull UDP port 500 from 00000
ndash IKE for IPsec VPN
bull UDP port 4500 from 00000
ndash IPsecNAT-T for IPsec VPN
Note If there is an existing security group that includes this access click Select an existing security groupthen select the desired group(s) to use and click Continue Otherwise select Create a new security group andadd rules for this access by filling in the form for each rule and clicking the Add Rule button When all of therules have been added click Review and Launch
13 Review any AWS warnings and make note of recommendations Scroll down to review the remaining instancedetails and click Launch after making any needed adjustments
copy Copyright 2020 Rubicon Communications LLC 16
Security Gateway Manual Amazon AWS
14 Select an existing key pair or create a new key pair to connect to the instance with Click the checkbox thatindicates acknowledgment of access to the selected private key file and then click Launch Instances
Important Do NOT select the Proceed Without a Key Pair option
22 Managing the Configuration of the Instance
Once the instance is launched monitor its status using the Instances page of the EC2 Management Console The EC2Management Console will display whether the instance is up and reachable and will also display its current public IPaddress and the hostname that resolves to the public IP address Find the hostname and public IP address in the EC2console by clicking on the Instances heading on the left finding the instance and checking the checkbox next to it andlooking at the details at the bottom of the page
In the example above the hostname of the instance is ec2-23-20-204-54compute-1amazonawscom
copy Copyright 2020 Rubicon Communications LLC 17
Security Gateway Manual Amazon AWS
The public IP address is available by putting together the 4 numbers included in the hostname - 233020454 Itis also possbile to obtain the IP address by using a popular DNS lookup tool such as host dig or nslookup toresolve the hostname to its IP address
Note The hostname and IP address used in this and other examples in this guide are associated at the time of writingwith a test instance This addresshostname will not be the same values used to access the instance and they will noteven be associated with the same test instance by the time this guide is available to the public
In order to manage the configuration of the instance connect to it via https or ssh To connect via ssh use the key pairchosen while creating the instance to connect to the admin account From the command line on a UnixLinux hostuse a command similar to ssh -i my_key_file adminpublic_IP where the appropriate private key fileand public IP or hostname are substituted In the example below the key file my_ec2_key is used to connect to the IPaddress 232020454
Note The first time logging into the instance the ssh key of the instance will not be cached locally type yes whenasked whether to continue connecting This should not be necessary on subsequent sessions
A limited set of configurations is possible through the ssh interface The preferred method for managing most of theconfigurations or viewing data on the status of the pfSensereg instance is through the https web GUI To connect viahttps enter an https URL containing the public IP address or hostname of the instance into a web browser Forexample https232020454
Itrsquos very likely there is a browser warning indicating that the security certificate of the site is not trusted because theinstance uses a self-signed certificate for https communication Click on the option to proceed to the site anyway and
copy Copyright 2020 Rubicon Communications LLC 18
Security Gateway Manual Amazon AWS
a login screen with the Netgate logo should appear
The username to log in with is admin The password to use is either a value set in the User Data during the creationof the instance or a random password If a specific password wasnrsquot set find out that value that the random passwordwas set to through one of two different means
1 The first is to log in over ssh with the key pair that was selected when the instance was created and examine thecontents of the file located at etcmotd Select option 8 (Shell) from the console menu that is presented afterlog in and execute cat etcmotd from the shell
2 Alternatively view the System Log for the instance in the EC2 Management Console After the messagesthat are displayed that show the status of the boot process a message should appear that indicates what theadministrative password was changed to
The message using either of the methods mentioned will look like this
Admin password changed to abcdefg
In this example the password was changed to abcdefg
Note Be aware that the System Log output in the EC2 Management Console is not updated in real time and maytake a few minutes to show up It is preferable to explicitly set a password by passing a value in with the User Datafield so the password will be known in advance To allow a random password to be set connect via ssh and find outwhat the password was changed to after the instance is up without any delay
Once the password has been determined and entered into the login form the pfSense Web GUI should be available
23 Using the remote access IPsec VPN
An IPsec VPN for remote users is preconfigured on the instance when it comes up In order to use it you will need toconfigure the IPsec VPN client on your device
See also
A guide for manually configuring Android or iOS (iPhoneiPodiPad) mobile clients to establish an IPsec VPN islocated in the pfSensereg Documentation
For iOS clients a profile can be downloaded and installed that will automatically configure an IPsec VPN to theinstance The profile can be downloaded by visiting the page at iphone_ipsec_profilephp on the instance If theinstance IP address were 232020454 the correct URL to visit would be https232020454iphone_ipsec_profilephp You will need to authenticate to the web interface by typing the username (admin) and password prior to beingable to download the profile
The profile should be downloaded and saved automatically upon opening the page If the page is visited in a webbrowser on an iOS device the device should automatically launch the Settings app and attempt to install the newprofile If the profile is downloaded to another non-iOS device it can be sent via email as an attachment If theattachment is opened in the iOS email client the Settings app new profile installation will also open
The name and description of the profile being installed will be displayed Tap the Install button A warning messagewill be displayed that indicates that the profile is unsigned Tap on Install Now to continue
copy Copyright 2020 Rubicon Communications LLC 19
Security Gateway Manual Amazon AWS
copy Copyright 2020 Rubicon Communications LLC 20
Security Gateway Manual Amazon AWS
Enter your passcode for the iOS device (the one you enter when you wake the device from sleep) and the passwordto access the IPsec VPN (the one you entered to get access to the Web GUI) when prompted and the profile will beinstalled When the screen shows that the profile was installed tap Done
When the profile has been installed the VPN can be enabled in the Settings app There will be a heading named VPNunder the main Settings page If there are more than one VPN configured on the device tap the VPN heading Thenewly installed profile should be selected It will have a check mark next to it There will be an onoff switch at thetop of the page to enable the VPN If this is the only VPN configured the switch to enable the VPN will be next to theVPN heading on the main Settings page Tap the switch to enable the VPN You should be prompted for a usernameand password The username (admin) should already be filled in Enter the password and tap OK A welcome messageshould be displayed Tap OK and you are ready to use the VPN
24 Using the remote access OpenVPN VPN
An OpenVPN VPN for remote users is automatically configured the first time the instance is booted In order to useit you will need an OpenVPN client app installed on your device and you will need to import a configuration thatspecifies how to connect to the instance
An OpenVPN configuration can be downloaded by visiting the page openvpn_connect_profilephp on your instanceIf the instance IP address were 233020454 the correct URL to visit would be https232020454iphone_ipsec_profilephp You will need to authenticate to the web interface by typing the username (admin) and password prior tobeing allowed to download the configuration
The profile should be downloaded and saved automatically upon opening the page The file that it was saved in shouldbe imported into the OpenVPN client on the device that you wish to connect with
copy Copyright 2020 Rubicon Communications LLC 21
Security Gateway Manual Amazon AWS
241 Tips for configuring OpenVPN based on platformclient
OpenVPN Connect App on iOS (iPhoneiPadiPod)
The iOS version of the OpenVPN Connect App allows you to import an OpenVPN profile by opening an attachmentto an email message Save the config to a file named remote-access-vpnovpn and send it to an email account thatthe iOS device is configured to retrieve mail for Open the email message and touch the attachment to open it Youwill be presented with Open in OpenVPN as one of the available options Touch the OpenVPN icon to select thatoption The OpenVPN Connect App should then open and list the profile under a heading that says New profiles areavailable Click on the green ball with the + sign in it to import the profile Type in the username admin andpassword then change the OnOff switch to On
OpenVPN Connect App on Android
The Android version of the OpenVPN Connect App allows you to import an OpenVPN profile from an SD card Savethe configuration file to the SD card Launch the OpenVPN Connect App From the menu select Import then ImportProfile from SD card Browse to the location of the configuration file and select it Enter the username admin andpassword to connect to the VPN Press Connect
TunnelBlick on MacOS X
The TunnelBlick App for MacOS allows you to import an OpenVPN configuration file Save the configuration to afile on your system Click on VPN Details Click on the + symbol underneath the existing configurations to add anew configuration Click on the I have configuration files button Click on the OpenVPN Configuration(s) buttonFollow the instructions presented by TunnelBlick (copy the config into an empty folder TunnelBlick creates on theDesktop rename the folder click on the folder) When the profile is imported successfully click on itrsquos name and thenclick on Connect Enter the username admin and password to connect to the VPN
OpenVPN Connect Client on Windows
The OpenVPN Connect Client on Windows allows you to import an OpenVPN configuration file from the local diskSave the file on your system Click the + symbol to the right of Connection Profiles Select Local File and click onthe Import button Find the profile you wish to import in the file browser window and click Open A box with thename of the new profile should appear under Connection Profiles now Click on that box and enter the usernameadmin and password to connect to the VPN
25 Enabling Enhanced Networking with the Elastic Network Adapter(ENA)
To enable enhanced networking on AWS pfSensereg FirewallVPNRouter must be version 241 or above Use theupdate wizard in the pfSense console to perform the update if necessary and then ENA can be enabled Enabling ENAis outlined in the steps below
Warning Updating the pfSense FirewallVPNRouter will force it to reboot and cause a disruption in service Besure to perform the update during a maintenance cycle
1 Install AWS CLI Documentation on the installation and use of AWS CLI can be found at httpsawsamazoncomcli
copy Copyright 2020 Rubicon Communications LLC 22
Security Gateway Manual Amazon AWS
2 Determine the Instance ID for the pfSense Instance from the EC2 Console
Fig 1 The selected pfSense Instance ID is i-042c16b65423b7dac
3 Stop the instance using Amazon EC2 console
4 Enable the enhanced networking attribute by executing the following AWS CLI command
aws ec2 modify-instance-attribute --instance-id i-042c16b65423b7dac --ena-support
5 Use the EC2 Console to start the pfSense Instance Once the pfSense Instance has started confirm that EnaSup-port is enabled by executing the following AWS CLI command
aws ec2 describe-instances --instance-ids i-042c16b65423b7dac --queryReservations[]Instances[]EnaSupport[true
]
6 Change the pfSense Instance Type to one that supports Enhanced Networking using the EC2 console Afterselecting an Instance Type that supports Enhanced Networking use the EC2 console to stop the pfSense Instance
copy Copyright 2020 Rubicon Communications LLC 23
Security Gateway Manual Amazon AWS
Note To review the Instance Types please see httpsawsamazoncomec2instance-types
7 Once the pfSense Instance has stopped use the EC2 Console to select the pfSense Instance and then under theActions button select Instance Settings gt Change Instance Type and select a new Instance Type
Fig 2 In this case m4xlarge was selected as the new Instance Type and then Apply was selected
8 In the EC2 Console the pfSense Instance should now show an Instance Type of m4xlarge
9 Using the EC2 console select the pfSense Instance and then under the Actions button select Instance State gtStart
26 Advanced Usage
261 Protecting a private network in VPC
An instance of the Netgate appliance can be used as a firewall for a VPC subnet This will generally require moremanual configuration than using an instance to host a remote access VPN does See the VPC User Guide for a moredetailed explanation of how to configure your VPC and your Netgate appliance instance to support this
262 Connecting a local pfSensereg device
In addition to connecting remote devices as clients a device running pfSensereg as a firewallrouter can be connectedas a peer to a pfSense appliance
See also
Read Configuring a Site-to-Site Static Key OpenVPN Instance in the pfSense documention to see the process ofconfiguring this setup
copy Copyright 2020 Rubicon Communications LLC 24
Security Gateway Manual Amazon AWS
When implementing the configuration changes detailed in the document you should use the Netgate appliance instanceon AWS as the ldquoserverrdquo end of the connection and your local pfSense device as the client ldquoendrdquo You will also needto make sure that you are using a unique port The default remote access OpenVPN server is configured to use UDPport 1194 It is suggested that if you are adding a site-to-site tunnel you should use a port between 1195 and 2000Whichever port you decide to use you will need to make sure that the port is open both in the firewall rules on theNetgate appliance instance and in the Security Group in the EC2 Management Console
If you wish to route all traffic from your homeoffice network through the OpenVPN tunnel to your Netgate applianceinstance you will need to add this statement to the advanced options for the OpenVPN Client on the homeofficepfSense device
redirect-gateway def1
This will cause a default route to be set that sends all locally originated traffic on your homeoffice network overthe OpenVPN tunnel when it is established If you use this configuration to send all traffic from your local networkthrough the OpenVPN tunnel you will also need to establish a NAT on the Netgate appliance instance on AWS fortraffic from the homeoffice network to the internet This can be accomplished by adding the CIDR block for yourhomeoffice network to the preconfigured Alias called Networks_to_NAT This is done by navigating to Aliases underthe Firewall heading on the web GUI then clicking on the edit icon to the right of Networks_to_NAT Add the newnetwork address and mask to the list of Networks and click the Save button Then click the Apply Changes buttonYou will also need to add the network used for the tunnel endpoints (IPv4 Tunnel Network) to the Networks_to_NATalias as well using the same procedure that was used to add the homeoffice network
Connecting multiple pfSense gateways to a Netgate appliance
Multiple homeoffice networks can be connected to a single Netgate appliance instance This could be used to allowclients at different office locations to communicate without requiring tunnels between each individual location Itcould also be used as a way to apply policies on traffic tofrom the internet in one place and have them take effectacross multiple locations
Each site would need to have the instructions above for connecting an individual device repeated to add an OpenVPNserver on the Netgate appliance instance and an OpenVPN client on the local pfSense device Each OpenVPN Serverthat is configured must use a unique port and a unique network for IPv4 Tunnel Network It is recommended touse a name that uniquely identifies each location connected in this manner in the Description field when adding anOpenVPN Server for a site in the Netgate appliance
263 Detect and Recover EC2 Instance Failure
You can create an Amazon CloudWatch alarm that monitors an Amazon EC2 instance and automatically recovers theinstance if it becomes impaired due to an underlying issue
For more information about instance recovery see Recover Your Instance
27 Frequently Asked Questions
271 1 I donrsquot know the password to the web GUI How do I find out what it is
The first time the instance boots it looks for a user-defined password set in the User Data box when the instance wascreated If you didnrsquot set one it chooses one randomly so that the instance is not accessible via a default password tomalicious users You can find out the random password that was set by choosing Get System Log from the ActionsMenu for the instance in the EC2 Management Console A message should appear after the system boot messages thatlooks like the following
copy Copyright 2020 Rubicon Communications LLC 25
Security Gateway Manual Amazon AWS
Admin password changed to abcdefg
It may take 5-10 minutes after the instance boots for this message to appear in the system log If you would like to findout the password sooner you can log in via SSH using the SSH key that was selected when the instance was createdThe same message that will be written to the system log will be written to the file etcmotd Running the commandcat etcmotd will show you what the password is
272 2 I donrsquot like the random password that was selected How can I change it
The password can be changed via the web GUI Log in with the username admin and the existing password Underthe System category click on User Manager The admin account should appear in a list of accounts Unless yoursquoveadded other accounts it should be the only account present Click on the Edit button (the icon with the e in it) to theright of the account listing Type your choice for a new password into the two boxes labeled Password Click theSave button at the bottom of the screen
273 3 How do I access my instance
There are several ways that you can manage or use your instance You should be able to connect via SSH or HTTPS inorder to manage the configuration of your instance If you connect via SSH you will either need to know the passwordof the admin account and login with that account or use the SSH key that was selected when the instance was createdHere is a sample command line to log in with an SSH key from a Unix or Linux host
ssh -i ~sshmy-ec2-key adminec2-A-B-C-Dcompute-1amazonawscom
You would substitute the actual location of your SSH private key for ~sshmy-ec2-key and the real hostnamewhich you can retrieve from the EC2 Management Console by looking at the data for the instance for example ec2-A-B-C-Dcompute-1amazonawscom If you know the password for the admin account you could use a commandsimilar to the one above but omit the -i ~sshmy-ec2-key
To connect via HTTPS you need to know the password to the instance either by setting it explicitly in the User Datawhen the instance is created or by retrieving it from the instance Once you know the password you should be able toconnect to the instance with any web browser by typing in the hostname of the instance to the URL field
274 4 How do I connect a VPN client to my instance
See the section in the user guide on Using the remote access IPsec or OpenVPN VPN
275 5 Why does the pfSensereg Dashboard say my WAN address is 10XYZ
Amazon AWS instances use DHCP to assign private addresses to the public-facing interfaces of an instance Thepublicly routable IP address that you use to acces the instance is NATed by Amazon to the private address that you seeconfigured on the WAN interface of your instance
copy Copyright 2020 Rubicon Communications LLC 26
Security Gateway Manual Amazon AWS
276 6 I added custom firewall rules to allow some traffic to my instance why I amnot seeing the packets arrive
Amazon AWS provides packet filtering in addition to the Netgate Appliance itself being a stateful firewall If youallowed traffic on the Netgate Appliance but have a security group configuration in the settings for the instance that isrestricting traffic you will need to also add your rules to the security group in the EC2 Management Console
Given that the Netgate Appliance is a fully functional firewall you may assign an AWS security group that allows alltraffic and perform whatever filtering you desire with rules on the Netgate Appliance
277 7 How do I route all the traffic from my entire home network over a VPN
If your home gatewayrouter has support for OpenVPN you can connect a site to site tunnel from your home networkto the Netgate VPN Appliance and configure your routing so that all Internet traffic is sent over the encrypted tunnelSee the user guide section on Connecting a local pfSensereg device
This may provide for simpler administration at home but your mobile devices and laptops that get used outside thehome should have an OpenVPN client installed and configured anyway so that you are always receiving the benefitsof sending your traffic through a VPN
copy Copyright 2020 Rubicon Communications LLC 27
CHAPTER
THREE
VIRTUAL PRIVATE CLOUD (VPC)
31 AWS VPC User Guide
The pfSensereg Certified firewall and VPN appliance from Netgate for Amazon EC2 is a stateful firewall and VPNappliance In addition to itrsquos capabilities as a VPN gateway and firewall for users and offices it is capable of actingas a firewall to protect instances providing services in Amazonrsquos Virtual Private Cloud or VPC service This servicediffers from the classic EC2 service in that it allows for management of instances on private subnets
This guide will explain how to launch manage and use an instance of the appliance to act as a gateway for otherinstances in a VPC subnet
311 Preparing your VPC
In order to use a Netgate appliance instance to protect your VPC subnets you will need the following
bull One internet-facing subnet which the Netgate appliance instance will have itrsquos primaryWAN interface con-nected to
bull One or more private subnets which the Netgate appliance instance will have itrsquos secondaryLAN interface (andpossibly additional optional interfaces) connected to
bull Separate routing tables for the internet-facing subnet and the private subnet(s)
bull If you already have all of these in place with an existing VPC feel free to skip ahead to Launching an Instance
These instructions will demonstrate how to create a single private subnet and set it up behind an instance of thepfSensereg Certified firewall and VPN appliance from Netgate In the Amazon VPC Management Console create anew VPC subnets and routing table(s)
1 Go to Your VPCs view in the menu on the left side of the VPC Management Console under the Virtual PrivateClouds grouping Click the Create VPC button
28
Security Gateway Manual Amazon AWS
2 Enter a CIDR block to use in the box that pops up If you will connect to hosts in your VPC using a VPNfrom hosts at other sites in your infrastructure be sure to select address space that does not conflict with theprivate address space used elsewhere by your organization Make sure the block you choose is large enoughto contain all subnets you may want to include within it Eg if you plan to use a 24 for your internet-facingsubnet and a 24 for your private network the CIDR block you select here will need to be at least a 23 to holdthose 2 subnets The maximum size block you can select is a 16 For the purposes of this example we will use1020016 Leave the value of Tenancy set to Default Click on the Yes Create button
3 To create the subnets required go to the Subnets view in the menu on the left side of the VPC ManagementConsole Click the Create Subnet button Select the VPC you just created and choose the availability zone youdesire Enter the subnet you wish to use for the internet-facing hosts in the CIDR Block field This subnet willbe the one that the WAN interface of the Netgate appliance instance is attached to and could include any otherhosts or appliances that you wish to be available directly from the Internet and not protected behind the Netgate
copy Copyright 2020 Rubicon Communications LLC 29
Security Gateway Manual Amazon AWS
appliance The subnet you select here must be a block that is within the address space you assigned to the VPCFor this example we will use 1020024 Click on the Yes Create button
4 Create the private subnet Still in the Subnets view of the VPC Management Console click the Create Subnetbutton In the box that pops up select the appropriate VPC and the same Availability Zone that you assignedto your public subnet Enter the subnet you wish to use for your private network in the CIDR Block field Thisnetwork should be a subnet of the address space you assigned to the VPC and should be distinct from the subnetyou assigned to the public subnet For this example we will use 1021024 Click on the Yes Create button
5 Both subnets that you created will have been created to use a default route table that was created for the VPCThe private subnet can continue to use that default table A new route table will need to be created for the publicsubnet Go to the Route Tables view in the menu on the left side of the VPC Management Console The singleexisting route table should be displayed Click on the Create Route Table button Select the VPC and click on
copy Copyright 2020 Rubicon Communications LLC 30
Security Gateway Manual Amazon AWS
the Yes Create button
6 Associate the public subnet (1020024 in our examples) with the routing table that was just created Go to theSubnets view on the left hand side of the VPC Management Console Check the checkbox next to the publicsubnet and scroll down to look at the Details tab for that subnet At the top of the Details tab will be listed theCIDR block VPC and Availability Zone Under those items the Route Table will be listed and will have a linklabeled replace next to it Click on the link Select the route table in the box that pops up and click on the YesReplace button
7 In order to send traffic from the public subnet to the Internet we will need to add a default route to an InternetGateway We must first create one Go to the Internet Gateways view in the menu on the left hand side of theVPC Management Console Click on the Create Internet Gateway button Click the Yes Create button onthe box that pops up Click the checkbox next to the new Internet Gateway and then click the Attach to VPC
copy Copyright 2020 Rubicon Communications LLC 31
Security Gateway Manual Amazon AWS
button Select the VPC and click on the Yes Attach button
8 The route table for the public subnet will need to be updated so that it has a default route to the Internet GatewayGo to the Route Tables view on the left hand side of the VPC Management Console Check the checkbox nextto the route table for the public subnet Under the Routes tab for that route table there should only be listed asingle route for the CIDR block of the VPC (1020016 in our example) that has a target of local There is arow underneath this route with a text box in the Destination field and a pop up menu for the Target field Enter00000 for the Destination and select the Internet Gateway (should be formatted like igw-XXXXXXXX)for the target Click on the Add button that appears at the right side of the row Click the Yes Add button onthe box that pops up
There are a few more VPC configuration changes that will be required later but next you must launch a Netgateappliance instance
copy Copyright 2020 Rubicon Communications LLC 32
Security Gateway Manual Amazon AWS
312 Launching an Instance in a VPC
In the Amazon EC2 Management Console launch a new instance of the pfSensereg firewall and VPN appliance Thisprocess is the same as the one for launching an EC2 (non-VPC) instance up until step 11 which details the values toenter for the Configure Instance Details screen in order to specify the instance should be created in your VPC
1 Select the region to run the instance in using the tab at the upper right corner of the page
2 Launch a new instance by clicking on the Launch Instance button under the Create Instance section of theEC2 dashboard
copy Copyright 2020 Rubicon Communications LLC 33
Security Gateway Manual Amazon AWS
3 Select AWS Marketplace on the Create a New Instance menu Type Netgate pfSense FirewallVPNRouter in the search box and press enter (or click on the Search button next to the text box)
4 Click on the link for the Netgate pfSense FirewallVPNRouter appliance in the search results
5 Click on the Continue button on the info page for the Netgate pfSense FirewallVPNRouter
copy Copyright 2020 Rubicon Communications LLC 34
Security Gateway Manual Amazon AWS
6 Click on the Launch with EC2 Console tab
7 If the license terms havenrsquot been accepted click on the Accept Terms button
8 A message should be displayed indicating that the subscription is being processed
copy Copyright 2020 Rubicon Communications LLC 35
Security Gateway Manual Amazon AWS
9 Select the version of the image to run under the popup menu labeled Select a Version Generally the mostrecently issued version should be selected Identify which region to launch the instances in and click on theLaunch in EC2 Console button to the right of that region
10 Choose the instance type to run on Click Next Configure Instance Details
copy Copyright 2020 Rubicon Communications LLC 36
Security Gateway Manual Amazon AWS
11 On the Configure Instance Details page under the Network field select the VPC that was created For theSubnet field that appears right below the Network field select the public subnet that was created earlier In ourexamples this is 1020024
12 Scroll down to the Network Interfaces heading A single interface named eth0 should be displayed by defaultClick on the Add Device button underneath eth0 Select the private subnet that was created (1021024 in ourexample) Pick an IP address within the range of the private subnet and enter it in the Private IP field Keep inmind that the first 3 or 4 IP addresses are reserved For this example we will use 10215
copy Copyright 2020 Rubicon Communications LLC 37
Security Gateway Manual Amazon AWS
Optionally expand the Advanced Details section and set parameters as text in the User Data field The availableoptions are
password Setting a value via a directive like password=abcdefg will set the password for theadministrative account to the specified value - abcdefg in this example If no value is set here arandom password will be assigned in order to keep administrative access from being exposed tothe internet with a default password
mgmtnet Setting a value via a directive like mgmtnet=1001024 will restrict managementaccess (http https ssh) to the specified network - 1001024 in this example This will causethe firewall rule on the instance (not on Amazons access lists but on the Netgate appliancersquosown firewall) to restrict management traffic for the instance to the specified source network Thedefault behavior is to allow management from any host
These directives can be set by placing them on a single line in the User Data field and separating them withcolons Specify both parameters by typing a statement similar to
password=abcdefgmgmtnet=1001024
Click Next Add Storage after optionally setting these parameters
Note If setting a password using the password parameter listed above the password is retrieved by the instancevia an unencrypted HTTP request when the system is configured the first time it boots The request is made toan Amazon Web Services-operated server on the local LAN that stores metadata about each instance runningThe data for an instance is only made available to that instance but is available to be queried from the instancewithout providing any authentication credentials
It is advised to change the admin password via the pfSense webGUI after the instance comes up or choose notto set the password at all and let a random password be set
copy Copyright 2020 Rubicon Communications LLC 38
Security Gateway Manual Amazon AWS
13 Click Next Tag Instance to accept the Storage Device Configuration
14 Optionally a tag can be set on the instance to differentiate this instance from other VMrsquos that were started byentering a value for the Name tag Click Next Configure Security Group after setting any desired tags
copy Copyright 2020 Rubicon Communications LLC 39
Security Gateway Manual Amazon AWS
15 Select a security group to launch the instance with The recommended settings for a security group should allowat least the following traffic
bull TCP port 443 from 00000 - HTTPS - This is the port that the management web GUI listens on
bull TCP port 22 from 00000 - SSH - This port can be used to connect to a command prompt with an sshclient
bull UDP port 1194 from 00000 - OpenVPN - The OpenVPN server that is configured by default is boundto this port
bull UDP port 500 from 00000 - IKE for IPsec VPN
bull UDP port 4500 from 00000 - IPsecNAT-T for IPsec VPN
copy Copyright 2020 Rubicon Communications LLC 40
Security Gateway Manual Amazon AWS
If you have an existing security group that includes this access select Select an existing security group thenselect the group(s) to use and click Continue Otherwise select Create a new security group and add rulesfor this access by filling in the form for each rule and clicking the Add Rule button When all of the rules havebeen added click Review and Launch
16 Verify the details for the instance and click Launch
17 Select an existing key pair or create a new key pair to connect to the instance with Do not select Proceed
copy Copyright 2020 Rubicon Communications LLC 41
Security Gateway Manual Amazon AWS
Without a Key Pair Click the checkbox that indicates you acknowledge having access to the selected privatekey file and then click Launch Instance
18 In order to reach the instance from the Internet associate an Elastic IP with the WAN interface of the instanceIn the VPC Management Console go to the Elastic IPs view by clicking on Elastic IPs on the left side of thepage Click on the Allocate New Address button Select that you want the EIP used in VPC and click on theYes Allocate button in the box that pops up After the Elastic IP address is allocated associate the address withthe WAN interface of the Netgate appliance by clicking on the Associate Address button
A box will pop up that will either let you specify the instance and Private IP address of the interface or theNetwork Interface and the Private IP Address of the interface Use one of these methods to select the correctinterface and click on the Yes Associate button The instance should now be reachable via ssh or https
copy Copyright 2020 Rubicon Communications LLC 42
Security Gateway Manual Amazon AWS
19 In order for traffic to be allowed to be routed from the private subnet through the public interface of the instancethe SourceDest AddressCheck on the private interfaces needs to be disabled In the EC2 Management Con-sole go to the ldquoNetwork Interfacesrdquo view by clicking on Network Interfaces in the menu on the lefthand sideof the page
Click the checkbox to the left of the privateLAN interface on the Netgate appliance instance Click on theActions button at the top of the page and select Change SourceDesk Check on the popup menu Select theradio button labeled Disabled on the box that pops up and click on the Save button
Non-local traffic from the private subnet should now be sent through the privateLAN interface on the Netgateappliance instance
copy Copyright 2020 Rubicon Communications LLC 43
Security Gateway Manual Amazon AWS
313 Managing a VPC Instance
Once the instance is launched you can connect to it via the Elastic IP that was attached to the primary interface duringthe provisioning phase
In order to manage the configuration of the instance you can connect to it via https or ssh A limited set of configura-tions is possible through the SSH interface the preferred method for managing most of the configurations or viewingdata on the status of the pfSensereg instance is through the https webGUI
Connecting via SSH
To connect via SSH you would use the key pair you chose while creating the instance to connect to the admin accountFrom the command line on a UnixLinux host you would use a command similar to
ssh -i my_ec2_key admin232020454
Where the appropriate private key file and public IP or hostname are substituted
Note The first time you log into your instance the SSH key of the instance will not be cached on your computerand you will need to type yes when asked whether you want continue connecting This should not be necessary onsubsequent sessions
Once logged in you should see the console menu similar to the one below
copy Copyright 2020 Rubicon Communications LLC 44
Security Gateway Manual Amazon AWS
Connecting via HTTPS
To connect via https you would enter a URL containing the public IP address or hostname of your instance intoa web browser For example https232020454 Itrsquos very likely that you will receive a browser warningindicating that the security certificate of the site is not trusted This is because the instance uses a self-signed certificatefor https communication You should click on the option to proceed to the site anyway The pfSense login screen withthe Netgate logo should appear
The username to log in with is admin The password to use is either a value that you set in the User Data during thecreation of the instance or a random password
Tip It is preferable to explicitly set a password by passing a value in with the User Data field so the password willbe known in advance
If you did not set a specific password you can find out that value that the random password was set to through one of2 different methods
1 The first method is to log in over SSH with the key pair that you selected when the instance was created andexamine the contents of the file located at etcmotd You would do this by selecting option 8) Shell in theconsole menu that is presented when you SSH in then run this command in the shell
cat etcmotd
2 The second method is to view the System Log for the instance in the EC2 Management Console After themessages that are displayed that show the status of the boot process a message should appear that indicates what
copy Copyright 2020 Rubicon Communications LLC 45
Security Gateway Manual Amazon AWS
the administrative password was changed to Be aware that the System Log output in the EC2 ManagementConsole is not updated in real time and may take a few minutes to show up
The message you should look for using either of the methods mentioned about will look like this
Admin password changed to abcdefg
Once yoursquove determined your password and entered it into the login form the pfSense WebGUI should be availableto you
314 Forwarding traffic from VPC subnets through the instance
Some additional configuration is required within the VPC instancersquos pfSensereg webGUI before you are able to managetraffic from the private subnet
1 Log into the pfSense WebGUI for the instance
2 Click on the Interfaces heading on the left and then click the Assign link
3 Click on the + icon to add a new Interface under the Interface assignments tab A LAN interface shouldautomatically be added with the next available network interface (xn1)
4 Click on the Interfaces heading on the left again and then click on LAN Click the checkbox to enable the LANinterface Set the IPv4 Configuration Type to Static IPv4 and enter the IP address you assigned to the 2ndinterface during the provisioning phase Click the Save button
Now you can create other instances attached to your private subnet and protect them with the firewall on the pfSenseinstance
Common ways to manage private hosts
Allowing private hosts to connect to the Internet
To allow private hosts to be able to connect to the Internet you can allow any traffic from the LAN in your firewallrules there should be a rule like this in place by default
Next set up NAT rules to cause addresses in the private subnet to be NATed to the IP address of the WAN interface
1 Under the Firewall heading on the left click on the NAT link
2 On the Outbound tab click the radio button for Manual Outbound NAT rule generation (AON - AdvancedOutbound NAT)
3 Click the Save button
4 Click on the Aliases link under the Firewall heading on the left
5 Add your private subnet to the Networks_to_NAT alias
Note There is an existing NAT rule configured by default that uses the alias Networks_to_NAT
copy Copyright 2020 Rubicon Communications LLC 46
Security Gateway Manual Amazon AWS
Allow private hosts to connect to each other
If your hosts should only contact each other and a private network segment elsewhere you can configure an IPsecor OpenVPN tunnel from your remote networks to the Netgate appliance instance and set up the appropriate firewallrules routes and security policies to allow access to your private subnet through a VPN tunnel
Allow direct inbound access from the internet to hosts
If you wish to enable direct inbound access from the internet to hosts on the private subnet you can set up portforwarding on the WAN interface to direct traffic to particular hosts in the private subnet
315 Establishing a VPN connection to a VPC in another region
To establish a VPN that allows instances on the VPC subnet(s) that sit behind a Netgate appliance to communicate withinstances that reside in a VPC in another region the Netgate appliance has a VPC configuration wizard that assists byconfiguring both the Netgate appliance as well as the VPC configuration elements that would normally have to be setmanually through the AWS Management Console
For detailed instructions see the AWS VPC User Guide
316 Upgrading a VPC Instance
Periodically new releases of the AMI are issued to track new releases of pfSensereg that may provide new functionalitybug fixes and security updates
The lower risk approach to upgrading is to bring up a new instance alongside the existing one and executing a cutoverThese instructions detail the procedure for moving your existing instance to one running the latest version
1 Back up the configuration of your exsting instance by navigating to BackupRestore under the Diagnosticsmenu in the Web GUI Click the Download configuration button under the Backup Configuration headingand save your config file to your local system
2 Bring up a new instance of the pfSense Certified RouterFirewallVPN running the latest version
3 When creating the instance make sure the interfaces match the interfaces on the existing instance Make surethat the new instance is in the same VPC as the existing instance and that it has the same number of interfacesattached and that the interfaces are connected to the same Subnets
4 Make sure any interfaces on the new instance that will communicate with private Subnets have theSourceDestination check disabled
5 Allocate a new Elastic IP and associate it to the WAN interface of the new instance to allow yourself managementaccess
6 Restore the backed up configuration file to the new instance Navigate to BackupRestore under the Diagnosticsmenu in the Web GUI Under the Restore Configuration heading click the Choose File button and browsefor the configuration file you backed up from the existing instance earlier Once you have selected that fileclick the Restore configuration button The configuration file will be uploaded and the instance will rebootautomatically
7 If you had packages installed on the old instance navigate to Packages under the System menu in the pfSenseweb GUI and install the same packages
8 If there was any external dependency on the public IP address of the existing instance you can remove theElastic IP Address from the upgraded instance and move the Elastic IP Address from the existing instance tothe upgraded instance External dependencies that might cause you to want to do this include things like VPNrsquos
copy Copyright 2020 Rubicon Communications LLC 47
Security Gateway Manual Amazon AWS
configured to external devices that rely on the existing instancersquos Elastic IP address or access lists on externaldevices that allow access to traffic from the existing instancersquos IP address There may be other reasons why youwould wish to keep the existing address as well (to preserve existing bookmarks to the Web GUI reduce theneed for updates to existing internal documentation etc) The process for moving the old Elastic IP address tothe new instance is as follows
bull Disassociate the Elastic IP address from the new instance In the EC2 Management Console click onElastic IPs under the Network amp Security heading Check the box next to the Elastic IP address assignedto the new instance and click on the Disassociate Address button
bull Disassociate the Elastic IP address from the old instance The procedure is the same as in the previousstep just repeated for the Eastic IP address of the old instance this time
bull Associate the Elastic IP address that was previously associated to the old instance to public interface of thenew instance In the EC2 Management Console click on Elastic IPs Check the box next to the Elastic IPaddress you are moving and click the Associate Address button Fill in the correct value for the Instanceor Network Interface and select the Private IP Address of the public interface on the new instance Clickthe Associate button The management interface of the new instance should now be accessible
9 Move any default routes that pointed to an interface on the old instance to point to the equivalent interface onthe new instance In the VPC Management Console click on Route Tables under the Virtual Private Cloudheading Check the box next to a Route Table associated with the VPC that the instances is located in
bull In the detail pane that appears at the bottom of the screen click on the Routes tab
bull If a route exists for 00000 with a Target that is an interface ID of an interface on the old instnace clickthe Edit button above the table displaying the routes
bull Click the red X next to the row for 00000 to remove the existing route
bull There should be a blank row with empty fields for a new route Enter 00000 in the Destinationfield and the Network Interface ID of the interface on the new instance in the Target field Click on theSave button
bull If there were multiple private subnets in the VPC which were pointed to interfaces on the pfSense instancerepeat this process for the other Route Tables associated with the VPC
bull The new instance should now be functioning as the old one did
32 AWS VPC Wizard User Guide
This guide will explain how to use the AWS VPC Wizard to simplify the configuration of a VPN to a remote VPC Theadministrator is asked for the minimum amount of basic information required to establish the VPN The configurationsboth on the AWS VPC side and on the pfSense side are then automatically created When the wizard is finishedexecuting a functioning VPN connection to a VPC should be established
321 AWS Access Keys
In order to connect to the AWS API to make certain required configuration changes the AWS VPC Wizard requiresAccess Keys to retrieve and modify VPC configurations
See also
Find more information about AWS Security Credential including Access Keys by reading AWS Security Credentials
Access keys consist of two parts
1 An access key ID
copy Copyright 2020 Rubicon Communications LLC 48
Security Gateway Manual Amazon AWS
bull For example AKIAIOSFODNN7EXAMPLE
2 A secret access key
bull For example wJalrXUtnFEMIK7MDENGbPxRfiCYEXAMPLEKEY
Access keys are like a usernamepassword and needed for programmatic requests to AWS including the AWS VPCWizard Use both the access key ID and secret access key together to authenticate requests
Important Manage access keys as securely as a user name and password
Managing Access Keys
To create modify or delete IAM user access keys do the following
1 Sign in to the IAM console
2 In the navigation bar on the upper right choose a user name and then choose My Security Credentials
3 On the AWS IAM Credentials tab in the Access keys for CLI SDK and API access section choose Createaccess key
4 Choose Download csv file to save the access key ID and secret access key to a csv file on your computerStore the file in a secure location There is no access to the secret access key again after this dialog box closesAfter the csv file has been downloaded choose Close When an access key is created the key pair is active bydefault and the pair can be used right away
bull To disable an active access key choose Make inactive
bull To reenable an inactive access key choose Make active
bull To delete an access key choose its X button at the far right of the row Then choose Delete to confirmWhen an access key is deleted itrsquos gone forever and cannot be retrieved However new keys can alwaysbe created
To create modify or delete another IAM userrsquos access keys do the following
1 Sign in to the IAM console
2 In the navigation pane choose Users
3 Choose the name of the user whose access keys to manage and then choose the Security credentials tab
4 In the Access keys section choose Create access key
5 Choose Download csv file to save the access key ID and secret access key to a CSV file on your computer
Rotating Access Keys
As a security best practice we recommend to regularly rotate (change) IAM user access keys Rotating access keyscan be done from the AWS Management Console
To rotate access keys for an IAM user without interrupting the applications (console) create a second access key whilethe first access key is still active
1 Sign in to the IAM console
2 In the navigation pane choose Users
3 Choose the name of the user whose access keys to manage and then choose the Security credentials tab
4 In the Access keys section choose Create access key
copy Copyright 2020 Rubicon Communications LLC 49
Security Gateway Manual Amazon AWS
5 Choose Download csv file to save the access key ID and secret access key to a CSV file on your computer
6 The new access key is active by default At this point the user has two active access keys
After waiting some period of time to ensure that all applications and tools have been updated delete the first accesskey
1 Sign in to the IAM console
2 In the navigation pane choose Users
3 Choose the name of the user whose access keys to manage and then choose the Security credentials tab
4 Locate the access key to delete and choose its X button at the far right of the row Then choose Delete to confirm
Determining When Access Keys Need Rotating
To determine when access keys need rotating (console) do the following
1 Sign in to the IAM console
2 In the navigation pane choose Users
3 If necessary add the Access key age column to the users table by completing the following steps
1 Above the table on the far right click the settings icon
2 In Manage columns select Access key age
3 Choose Close to return to the list of users
4 The Access key age column shows the number of days since the oldest active access key was created Usethis information to find users with access keys that need rotating The column displays None for users with noaccess key
322 Using the Wizard
1 Gather your AWS Access Key ID and Secret Key
2 Navigate to VPN gt AWS VPC Wizard in the main menu in the pfSensereg webGUI
copy Copyright 2020 Rubicon Communications LLC 50
Security Gateway Manual Amazon AWS
3 The first screen of the wizard prompts for the AWS Credentials Enter the Access Key ID and Secret AccessKey in the appropriate text fields and select the Region to connect to in the dropdown menu then click Next
The wizard will then query the AWS API using those credentials to find which VPCrsquos exist in the selectedregion If the credentials were rejected an error message will be displayed and return to the first screen
4 The next screen will prompt to select from the available VPCrsquos in the selected region Select the one to connectto from the dropdown menu The wizard will not create a new VPC it will only connect to an existing VPC
Click Next after selecting the desired VPC
copy Copyright 2020 Rubicon Communications LLC 51
Security Gateway Manual Amazon AWS
Note If the desired VPCrsquos to connect to isnrsquot available create one via the AWS Management Console and tryagain
The wizard will then query the AWS API to check whether there is a VPN Gateway attached to the selectedVPC If none exists one will be created via the API Then the next screen will be displayed
5 On the next screen specify routing and network data
A description of what should be entered for each of these fields follows
copy Copyright 2020 Rubicon Communications LLC 52
Security Gateway Manual Amazon AWS
Routing Type AWS offers either static routing or BGP routing Select the appropriate type fromthe dropdown menu If unsure static routing is likely to be adequate
BGP AS Number If static routing was choosen leave this field blank Otherwise it is possible tospecify an AS number to use If left blank the value will default to 65000
Local Public IP Address On an AWS Netgate appliance instance this should be the public IP ad-dress of the Elastic IP associated with the instance If configuring a hardware device runningpfSense this could be the public address assigned to the WAN (or other) interface of the device
Local subnets The subnets connected to the pfSense instance that should be routed over the tunnelfrom hosts in the remote VPC As an example if connecting a pfSense instance to a remote VPCin the AWS us-east-1 region enter the subnets (or a single subnet) that are local to the pfSenseinstance and when hosts in your VPC in us-east-1 attempted to reach addresses within thosesubnets the traffic will be sent through the VPN tunnel that is being configured
Note When selecting static routing as the routing type there will be a delay that is typically between 2-5minutes before the next screen is displayed This is because static routes must be added to the VPN Connectionvia the AWS API This operation fails until the VPN Connection reaches the ldquoavailablerdquo state This can take afew minutes to occur
Click Next when done
The wizard will then query the AWS API to find whether a Customer Gateway is configured with the selectedPublic IP Address If none exists one will be created If one already exists the ID will be retrieved and it willbe used
The wizard will then query the AWS API to see if a VPC Connection already exists that matches the dataentered If one exists it will be used Otherwise one will be created
If static routing was selected static routes will be added to the VPN Connection for the Local subnets entered
Route propagation will be enabled for the VPN Gateway in each of the Route Tables that are associated withthe VPC All of these configurations are carried out in the AWS API nothing has been changed in the pfSenseVPN configurations yet
Warning Important Note on Billing Once this step is carried out and the VPN Connection is createdAWS will start billing your AWS account the hourly rate for a VPN Connection This is $005 as of thiswriting and that is a charge that goes entirely to AWS itself They will do this until the VPN Connection isdeleted via the VPC Management Console
Nothing in pfSense will ever cause AWS to stop billing for this VPN Connection Whether it works or notwhether the pfSense instance is up or down whether the IPsec tunnels have been deleted or reconfiguredAWS will continue to bill the hourly fee for a VPN Connection if the creation of it succeeds until it is deletedthrough their web interface
The wizard helps establish an initial configuration that works and configures the appropriate elements inAWSrsquos API to facilitate this You are responsible for making sure you understand what yoursquore being billedfor and disabling any functions including VPN Connections that are no longer necessary
6 If the operations of the previous step succeeded the next screen will appear
copy Copyright 2020 Rubicon Communications LLC 53
Security Gateway Manual Amazon AWS
Select an Interface to act as the local endpoint of the VPN tunnels that will be created In most cases thisshould be the WAN interface It should generally be whatever interface is associated with the Local Public IPAddress entered in the previous step
On an AWS Netgate pfSense instance this will be whatever interface the Elastic IP is associated with On ahardware device running pfSense that has the Local Public IP Address directly configured on an interface thiswill be the interface that the Local Public IP Address is configured on
After clicking Next the wizard will configure the VPN and associated settings within pfSense itself using datareturned by the AWS API in the previous step
It will configure 2 IPsec tunnels a firewall rule 2 Aliases (referenced by the firewall rule) and 2 Virtual IPAddresses If BGP was selected as the Routing Type in the previous step it will install the OpenBGPDpackage automatically and configure it appropriately
7 The next screen will appear and prompt to apply the configuration changes that have been made
copy Copyright 2020 Rubicon Communications LLC 54
Security Gateway Manual Amazon AWS
After clicking Next all the configuration changes that were made will be applied
8 The wizard will be completed and the browser will be redirected to the IPsec status page The VPN to the VPCshould now be fully configured
Note Sometimes there is a delay of 5-10 minutes before the tunnels are fully functional and passing trafficThis has been observed particularly often during the setup of tunnels using BGP routing
copy Copyright 2020 Rubicon Communications LLC 55
Security Gateway Manual Amazon AWS
323 Testing Connectivity
Verify that the IPsec tunnels are functioning by attempting to ping the ldquoinside tunnel addressesrdquo of the VPC side ofthe tunnel by navigating to Firewall -gt Virtual IP There should be two virtual IP addresses configured that haveDescriptions like ldquoInside address for tunnel to ltremote IP addressgtrdquo
Amazon provides inside addresses for each end of the tunnel in a 30 subnet in IPv4 link local address space(169254xy) Typically the first usable address in the 30 is the inside address for the VPC end of the tunnel andthe other usable address is the inside address for your end of the tunnel So if you ping from one of the virtual IPaddresses configured on the pfSensereg instance to the IP address that is one less (for example if the virtual IP addresswere 16925425322 ping from 16925425322 to 16925425321) that checks whether the other end of the tunnelis responding and whether the tunnel is functioning properly
Note It sometimes takes a few minutes for the tunnels to begin working after the configuration wizard completes
To ping log into the pfSense instance via SSH and execute ping from a shell prompt For the previous example of16925425322 the proper syntax is
ping -S 16925425322 16925425321
When pinging from a shell prompt it is possible leave the command running indefinitely and interrupt it there is aresponse
copy Copyright 2020 Rubicon Communications LLC 56
Security Gateway Manual Amazon AWS
It is also possible to ping via the Diagnostics -gt Ping page by selecting the appropriate source address and enteringthe remote tunnel inside address in the Host field This will only send a limited number of ping packets so it may benecessary to repeat this a few times
324 VPC Configuration Details
The AWS documentation for connecting a hardware device to a VPC provides a great amount of detail on configuringVPN Connections to VPC
The main configuration elements that exist in Amazonrsquos data model are the Virtual Private Gateway the CustomerGateway and the VPN Connection In order to configure a VPN connection to a VPC all 3 of these need to exist TheVirtual Private Gateway is the VPN endpoint on Amazonrsquos side The customer gateway is the VPN endpoint on thepfSensereg instancedevice being configured The VPN Connection is the IPsec VPN between Amazon and the pfSenseinstancedevice
A Virtual Private Gateway needs to exist and be associated to the VPC A particular VPN Gateway can only beassociated to one VPC at a time Once the VPC to connect to has been selected the wizard invokes the AWS API callDescribeVpnGateways to determine if a VPN Gateway already exists that is attached to the VPC If none exists itcreates one with the CreateVpnGateway API call and attaches it to the VPC with the AttachVpnGateway call
A Customer Gateway needs to be created for the public IP address of the device or virtual machine that will be used toconnect to the VPC The wizard invokes the AWS API call DescribeCustomerGateways to determine if a CustomerGateway already exists If none exists one is created with the CreateCustomerGateway API call
The VPN Connection connects the Virtual Private Gateway and Customer Gateway The wizard checks to see if thereis an existing VPN Connection configured that connects those endpoints by invoking the AWS API call DescribeVp-nConnections If none exists one is created using the CreateVpnConnection call One of the fields returned by thiscall is a block of XML configuration data that contains configuration data assigned by AWS for use with configuringthe VPN Connection This data is stored and used in subsequent steps to make the required configuration changeswithin pfSense
copy Copyright 2020 Rubicon Communications LLC 57
Security Gateway Manual Amazon AWS
Any objects created through API calls by the wizard will be tagged with names like auto-created by pfSenseVPC ltyour_VPC_IDgt This is accomplished by calling the AWS API call CreateTags and using Name as the keyfor the tag
In addition to creation of the items mentioned above required adjustments are made to Security Groups and RouteTables to facilitate communication over the VPN The Security Groups associated with the VPC are updated to allowinbound access from the local subnets on the pfSense end of the VPN They are checked first via the DescribeSecuri-tyGroups AWS API call to determine if the access is already allowed Any of the subnets that is not already allowedhas inbound access added via the AuthorizeSecurityGroupIngress AWS API call
Route Tables associated with the VPC are updated to receive routes from the VPN Gateway used by the VPN Con-nection They are checked first via the DescribeRouteTables AWS API call If the VPN Gateway ID is not includedin the list of VPN Gateways propagating routes route propagation for the VPN Gateway is enabled on that table usingthe EnableVgwRoutePropagation AWS API call
For VPN Connections using static routing static routes for the specified subnets are added to the VPN ConnectionThis is done via the CreateVpnConnectionRoute AWS API call
325 pfSense Configuration Details
On the pfSensereg side there are numerous configurations added to support the VPN to the VPC
Aliases
First aliases are created for use in a firewall rule These aliases are intended to contain the subnets that traffic shouldbe allowed to ingress over the IPsec tunnel One alias represents the local subnets on the pfSense side and is givena name like VPC_Local_vpc_12345678 and the other represents the remote subnets on the VPC side and is given aname like VPC_Remote_vpc_12345678
Virtual IP addresses
Next virtual IP addresses are added on the lo0 (loopback) interface These virtual IP addresses are the local ldquoinsideaddressesrdquo of the IPsec tunnels These addresses are used as the local address for BGP communication when BGProuting is selected These addresses are IPv4 link local addresses (see RFC 3297) AWS assigns 30rsquos out of thenetwork 1692540016 for this purpose
Note These addresses are also useful as a ping target to execute a basic test of whether the tunnel is functioningproperly Executing a ping from a source address of one of these IP addresses to the corresponding inside address ofthe other end of the tunnel helps determine whether the tunnel negotiation is completing properly
Firewall rules
Next a firewall rule is added on the IPsec interface that allows traffic from the VPC networks to the local subnetsThis rule uses the previously created Aliases as sourcedestination targets
IPsec
Then IPsec phase 1 and phase 2 associations are set up Most of the settings required are extracted from a blockof XML data that was returned by the CreateVpnConnection call made during the AWS configuration step Thisincludes parameters like endpoint IP addresses encryption ciphers timer values etc
copy Copyright 2020 Rubicon Communications LLC 58
Security Gateway Manual Amazon AWS
If BGP routing was selected the configurations for the OpenBGPD BGP daemon are established The required settingsare determined using the AS number entered into the wizard and the parameters returned by the CreateVpnConnec-tion call made during the AWS configuration step
326 Tested Configurations
Various topologies may be possible to establish using the AWS VPC Configuration Wizard This section enumeratessome of the configurations that were successfully tested
Platforms
bull Various hardware platforms
bull 64-bit virtual machines in VMware vSphereESX
bull Amazon EC2 instances (Xen virtual machines) of the Netgate pfSensereg RouterFirewallVPN AWS AMI
Local networkrouting configurations
bull pfSense with a public address configured on the WAN interface
bull pfSense with a private address configured on the WAN interface behind a 11 NAT
bull pfSense with a private address configured on the WAN interface behind a PAT (1many NAT)
VPC Topologies
bull pfSense connected to a single VPC
bull pfSense connected to multiple VPCrsquos in different regions
bull Amazon EC2 instance of the pfSense RouterFirewallVPN AWS AMI connected to a VPC belonging to thesame AWS account in a different region
bull Amazon EC2 instance of the pfSense RouterFirewallVPN AWS AMI connected to a VPC belonging to adifferent AWS account in the same region
The configuration recommended for the greatest amount of stability is to have a public IPv4 address directly configuredon the WAN interface of your pfSense firewall but VPNs have been successfully established under all of the conditionslisted above
Whether any of these solutions is appropriate should be evaluated in the context of personal needs and existing infras-tructure Other configurations not listed above may be possible as well
327 AWS VPC Wizard FAQ
1 What level of redundancy is provided by the two tunnels
Amazon provides two tunnel endpoints that will allow traffic to be sent between your networks and the remote VPCyou are connected to The racoon daemon in pfSensereg is only capable of establishing an active phase 2 associationfor a particular sourcedestination pair on a single tunnel
Phase 2 associations between the local subnets and the remote VPC subnet are configured in the pfSense GUI for bothtunnels but racoon will only actually establish an association for the first tunnel This means that racoon will onlyever try to send traffic destined for the remote VPC subnet over the first tunnel
copy Copyright 2020 Rubicon Communications LLC 59
Security Gateway Manual Amazon AWS
If that tunnel goes down the second tunnel may be up and inbound traffic from the remote VPC may be sent to yourlocal networks over that tunnel automatically But outbound traffic to your remote VPC would not automatically failover to the second tunnel In order for you to send your outbound traffic over the second tunnel you would need todisable the phase 2 associations for the first tunnel and apply the changes
2 I quit the wizard before finishing Now what
To finish setting up the VPN go back to the wizard and run through it again It should reuse any partial configurationsthat were generated before it was stopped and create the new elements that are required
3 What are the AWS charges for this
AWS determines their own pricing and provides details for EC2 pricing and VPC pricing There are many types ofcharges that may be incurred for operating instances on AWS (eg charges related to running an instance bandwidthstorage elastic IPs etc)
The charge of specific interest in this case is the hourly charge for a VPN Connection As of this writing it costs $005(USD) per hour in most regions to have a VPN Connection configured and available AWS will charge whether theVPN Connection is being used or not as long as it is configured This will be configured by the third step of the wizardand will never be removed by pfSense
If the VPN Connection is no longer needed and billing for it needs to be stopped visit AWSrsquos VPC ManagementConsole and delete the VPN Connection manually
4 Can I use the wizard to connect to the GovCloud region
This hasnrsquot been officially tested but at least one user has reported that they were able to successfully connect to theGovCloud region They manually added the region us-gov-west-1 to the list of regions in the first step of the wizardand were able to successfully connect to their VPC in that region This may be supported in a future build but to trywithout official support do the following
1 Under the System gt Advanced menu make sure the Enable Secure Shell box is checked This is already doneby default on AWS instances but is off by default on pfSense hardware devices
2 Log into the instance via SSH
3 Make sure the root filesystem is mounted as readwrite On an AWS instance or a hardware device running on anSSD this should be true On a hardware device using Compact Flash or an SD card for storage it will probablybe necessary to remount the root filesystem in readwrite mode by running
mount -uw
4 Edit the file usrlocalwwwwizardsvpc_vpn_wizardxml using vi Look for a section of the file that lookslike this
ltoptiongtltnamegtsa-east-1ltnamegtltvaluegtsa-east-1ltvaluegt
ltoptiongt
That should appear directly after several similar ltoptiongt specifications containing all of the other availableregions Right underneath that section add the following
copy Copyright 2020 Rubicon Communications LLC 60
Security Gateway Manual Amazon AWS
ltoptiongtltnamegtus-gov-west-1ltnamegtltvaluegtus-gov-west-1ltvaluegt
ltoptiongt
Then save the file and exit vi
5 If the filesystem had to be remounted in readwrite mode earlier remount it in read-only mode by running
The GovCloud region should now appear as a choice in the first step of the wizard
copy Copyright 2020 Rubicon Communications LLC 61
CHAPTER
FOUR
REFERENCES
41 Support Resources
411 Commercial Support
In order to keep prices low the software is not bundled with a support subscription For users who need commercialsupport Netgate Gloabal Support can be purchased at httpswwwnetgatecomsupport
412 Community Support
Community support for pfSensereg software is available through the Netgate Forum
42 Additional Resources
421 Netgate Training
Netgate training offers training courses for increasing your knowledge of pfSensereg products and services Whetheryou need to maintain or improve the security skills of your staff or offer highly specialized support and improve yourcustomer satisfaction Netgate training has got you covered
httpswwwnetgatecomtraining
422 Resource Library
To learn more about how to use your pfSense appliance and for other helpful resources make sure to browse ourResource Library
httpswwwnetgatecomresources
423 Professional Services
Support does not cover more complex tasks such as CARP configuration for redundancy on multiple firewalls orcircuits network design and conversion from other firewalls to pfSensereg These items are offered as professionalservices and can be purchased and scheduled accordingly
httpswwwnetgatecomour-servicesprofessional-serviceshtml
62
Security Gateway Manual Amazon AWS
424 Community Options
If you elected not to get a paid support plan you can find help from the active and knowledgeable pfSense communityon our forums
httpsforumnetgatecom
copy Copyright 2020 Rubicon Communications LLC 63
- Getting Started
- Instance Usage
- Virtual Private Cloud (VPC)
- References
-
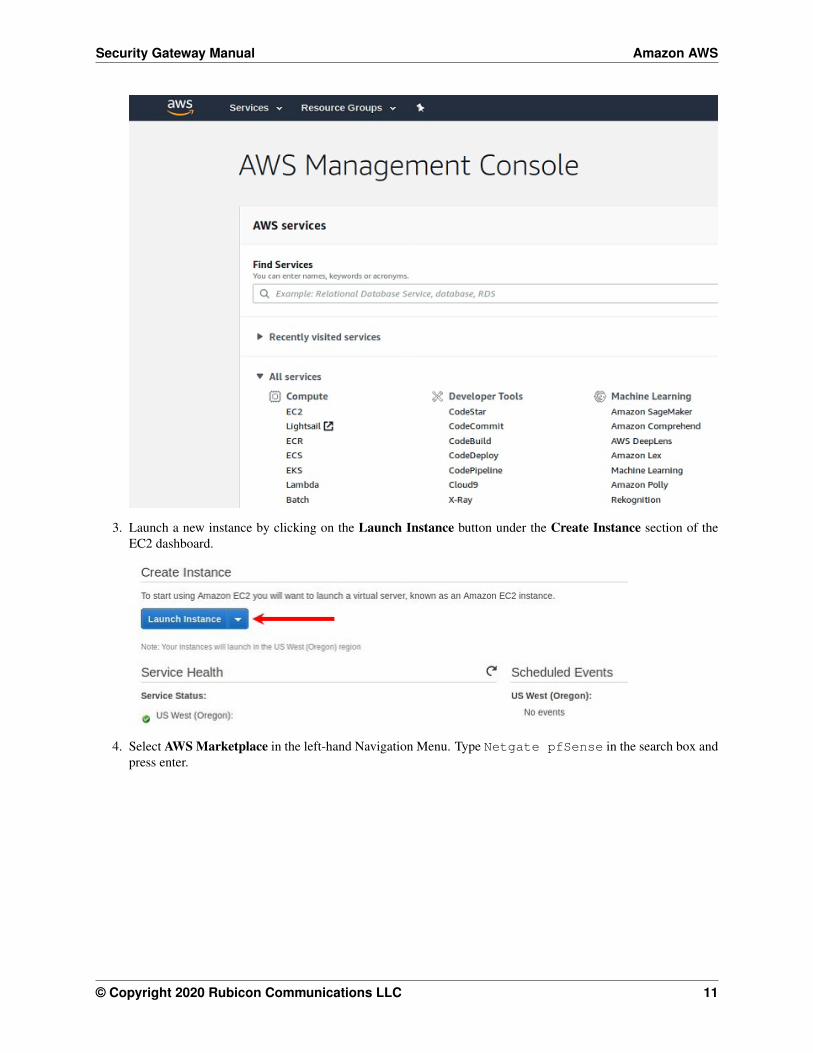
Security Gateway Manual Amazon AWS
These directives can be set by placing them on a single line in the User Data field and separating them withcolons To specify both parameters type a statement similar to this one
password=abcdefgmgmtnet=1001024
Note If a password is set using the password parameter listed above the password is retrieved by the instancevia an unencrypted HTTP request when the system is configured the first time it boots The request is made toan Amazon Web Services-operated server on the local LAN that stores metadata about each instance runningThe data for an instance is only made available to that instance but is available to be queried from the instancewithout providing any authentication credentials
It is advised to change the admin password via the pfSense web GUI after the instance comes up to avoid anysecurity risks associated with the unencrypted request Otherwise it is possible to choose not to set the passwordat all and let a random password be set
9 Choose the desired Network and Subnet to which the Instance will be deployed Scroll down to configure thenetwork interface(s) with a Static or DHCP-assigned IP address
Once the Network Interface(s) are configured select Next Add Storage
10 Click Next Add Tags to accept the Storage Device Configuration
copy Copyright 2020 Rubicon Communications LLC 14
Security Gateway Manual Amazon AWS
11 It is recommended to set a tag that can be used to differentiate this instance from other instances by entering avalue for the Name tag Click Next Configure Security Group after setting any desired tags
Press the Add Tag button Input Name under the Key field and the desired Instance Tag Name under the Valuefield (eg Netgate FirewallRouter)
12 Select a security group to launch the instance with The Security group name and Description can be left at thedefault or replaced with the desired values The recommended settings for a security group should allow at leastthe following traffic
bull TCP port 443 from 00000
ndash HTTPS - This is the port that the management web GUI listens on
bull TCP port 22 from 00000
ndash SSH - This port can be used to connect to a command prompt with an ssh client
bull UDP port 1194 from 00000
copy Copyright 2020 Rubicon Communications LLC 15
Security Gateway Manual Amazon AWS
ndash OpenVPN - The OpenVPN server that is configured by default is bound to this port
bull UDP port 500 from 00000
ndash IKE for IPsec VPN
bull UDP port 4500 from 00000
ndash IPsecNAT-T for IPsec VPN
Note If there is an existing security group that includes this access click Select an existing security groupthen select the desired group(s) to use and click Continue Otherwise select Create a new security group andadd rules for this access by filling in the form for each rule and clicking the Add Rule button When all of therules have been added click Review and Launch
13 Review any AWS warnings and make note of recommendations Scroll down to review the remaining instancedetails and click Launch after making any needed adjustments
copy Copyright 2020 Rubicon Communications LLC 16
Security Gateway Manual Amazon AWS
14 Select an existing key pair or create a new key pair to connect to the instance with Click the checkbox thatindicates acknowledgment of access to the selected private key file and then click Launch Instances
Important Do NOT select the Proceed Without a Key Pair option
22 Managing the Configuration of the Instance
Once the instance is launched monitor its status using the Instances page of the EC2 Management Console The EC2Management Console will display whether the instance is up and reachable and will also display its current public IPaddress and the hostname that resolves to the public IP address Find the hostname and public IP address in the EC2console by clicking on the Instances heading on the left finding the instance and checking the checkbox next to it andlooking at the details at the bottom of the page
In the example above the hostname of the instance is ec2-23-20-204-54compute-1amazonawscom
copy Copyright 2020 Rubicon Communications LLC 17
Security Gateway Manual Amazon AWS
The public IP address is available by putting together the 4 numbers included in the hostname - 233020454 Itis also possbile to obtain the IP address by using a popular DNS lookup tool such as host dig or nslookup toresolve the hostname to its IP address
Note The hostname and IP address used in this and other examples in this guide are associated at the time of writingwith a test instance This addresshostname will not be the same values used to access the instance and they will noteven be associated with the same test instance by the time this guide is available to the public
In order to manage the configuration of the instance connect to it via https or ssh To connect via ssh use the key pairchosen while creating the instance to connect to the admin account From the command line on a UnixLinux hostuse a command similar to ssh -i my_key_file adminpublic_IP where the appropriate private key fileand public IP or hostname are substituted In the example below the key file my_ec2_key is used to connect to the IPaddress 232020454
Note The first time logging into the instance the ssh key of the instance will not be cached locally type yes whenasked whether to continue connecting This should not be necessary on subsequent sessions
A limited set of configurations is possible through the ssh interface The preferred method for managing most of theconfigurations or viewing data on the status of the pfSensereg instance is through the https web GUI To connect viahttps enter an https URL containing the public IP address or hostname of the instance into a web browser Forexample https232020454
Itrsquos very likely there is a browser warning indicating that the security certificate of the site is not trusted because theinstance uses a self-signed certificate for https communication Click on the option to proceed to the site anyway and
copy Copyright 2020 Rubicon Communications LLC 18
Security Gateway Manual Amazon AWS
a login screen with the Netgate logo should appear
The username to log in with is admin The password to use is either a value set in the User Data during the creationof the instance or a random password If a specific password wasnrsquot set find out that value that the random passwordwas set to through one of two different means
1 The first is to log in over ssh with the key pair that was selected when the instance was created and examine thecontents of the file located at etcmotd Select option 8 (Shell) from the console menu that is presented afterlog in and execute cat etcmotd from the shell
2 Alternatively view the System Log for the instance in the EC2 Management Console After the messagesthat are displayed that show the status of the boot process a message should appear that indicates what theadministrative password was changed to
The message using either of the methods mentioned will look like this
Admin password changed to abcdefg
In this example the password was changed to abcdefg
Note Be aware that the System Log output in the EC2 Management Console is not updated in real time and maytake a few minutes to show up It is preferable to explicitly set a password by passing a value in with the User Datafield so the password will be known in advance To allow a random password to be set connect via ssh and find outwhat the password was changed to after the instance is up without any delay
Once the password has been determined and entered into the login form the pfSense Web GUI should be available
23 Using the remote access IPsec VPN
An IPsec VPN for remote users is preconfigured on the instance when it comes up In order to use it you will need toconfigure the IPsec VPN client on your device
See also
A guide for manually configuring Android or iOS (iPhoneiPodiPad) mobile clients to establish an IPsec VPN islocated in the pfSensereg Documentation
For iOS clients a profile can be downloaded and installed that will automatically configure an IPsec VPN to theinstance The profile can be downloaded by visiting the page at iphone_ipsec_profilephp on the instance If theinstance IP address were 232020454 the correct URL to visit would be https232020454iphone_ipsec_profilephp You will need to authenticate to the web interface by typing the username (admin) and password prior to beingable to download the profile
The profile should be downloaded and saved automatically upon opening the page If the page is visited in a webbrowser on an iOS device the device should automatically launch the Settings app and attempt to install the newprofile If the profile is downloaded to another non-iOS device it can be sent via email as an attachment If theattachment is opened in the iOS email client the Settings app new profile installation will also open
The name and description of the profile being installed will be displayed Tap the Install button A warning messagewill be displayed that indicates that the profile is unsigned Tap on Install Now to continue
copy Copyright 2020 Rubicon Communications LLC 19
Security Gateway Manual Amazon AWS
copy Copyright 2020 Rubicon Communications LLC 20
Security Gateway Manual Amazon AWS
Enter your passcode for the iOS device (the one you enter when you wake the device from sleep) and the passwordto access the IPsec VPN (the one you entered to get access to the Web GUI) when prompted and the profile will beinstalled When the screen shows that the profile was installed tap Done
When the profile has been installed the VPN can be enabled in the Settings app There will be a heading named VPNunder the main Settings page If there are more than one VPN configured on the device tap the VPN heading Thenewly installed profile should be selected It will have a check mark next to it There will be an onoff switch at thetop of the page to enable the VPN If this is the only VPN configured the switch to enable the VPN will be next to theVPN heading on the main Settings page Tap the switch to enable the VPN You should be prompted for a usernameand password The username (admin) should already be filled in Enter the password and tap OK A welcome messageshould be displayed Tap OK and you are ready to use the VPN
24 Using the remote access OpenVPN VPN
An OpenVPN VPN for remote users is automatically configured the first time the instance is booted In order to useit you will need an OpenVPN client app installed on your device and you will need to import a configuration thatspecifies how to connect to the instance
An OpenVPN configuration can be downloaded by visiting the page openvpn_connect_profilephp on your instanceIf the instance IP address were 233020454 the correct URL to visit would be https232020454iphone_ipsec_profilephp You will need to authenticate to the web interface by typing the username (admin) and password prior tobeing allowed to download the configuration
The profile should be downloaded and saved automatically upon opening the page The file that it was saved in shouldbe imported into the OpenVPN client on the device that you wish to connect with
copy Copyright 2020 Rubicon Communications LLC 21
Security Gateway Manual Amazon AWS
241 Tips for configuring OpenVPN based on platformclient
OpenVPN Connect App on iOS (iPhoneiPadiPod)
The iOS version of the OpenVPN Connect App allows you to import an OpenVPN profile by opening an attachmentto an email message Save the config to a file named remote-access-vpnovpn and send it to an email account thatthe iOS device is configured to retrieve mail for Open the email message and touch the attachment to open it Youwill be presented with Open in OpenVPN as one of the available options Touch the OpenVPN icon to select thatoption The OpenVPN Connect App should then open and list the profile under a heading that says New profiles areavailable Click on the green ball with the + sign in it to import the profile Type in the username admin andpassword then change the OnOff switch to On
OpenVPN Connect App on Android
The Android version of the OpenVPN Connect App allows you to import an OpenVPN profile from an SD card Savethe configuration file to the SD card Launch the OpenVPN Connect App From the menu select Import then ImportProfile from SD card Browse to the location of the configuration file and select it Enter the username admin andpassword to connect to the VPN Press Connect
TunnelBlick on MacOS X
The TunnelBlick App for MacOS allows you to import an OpenVPN configuration file Save the configuration to afile on your system Click on VPN Details Click on the + symbol underneath the existing configurations to add anew configuration Click on the I have configuration files button Click on the OpenVPN Configuration(s) buttonFollow the instructions presented by TunnelBlick (copy the config into an empty folder TunnelBlick creates on theDesktop rename the folder click on the folder) When the profile is imported successfully click on itrsquos name and thenclick on Connect Enter the username admin and password to connect to the VPN
OpenVPN Connect Client on Windows
The OpenVPN Connect Client on Windows allows you to import an OpenVPN configuration file from the local diskSave the file on your system Click the + symbol to the right of Connection Profiles Select Local File and click onthe Import button Find the profile you wish to import in the file browser window and click Open A box with thename of the new profile should appear under Connection Profiles now Click on that box and enter the usernameadmin and password to connect to the VPN
25 Enabling Enhanced Networking with the Elastic Network Adapter(ENA)
To enable enhanced networking on AWS pfSensereg FirewallVPNRouter must be version 241 or above Use theupdate wizard in the pfSense console to perform the update if necessary and then ENA can be enabled Enabling ENAis outlined in the steps below
Warning Updating the pfSense FirewallVPNRouter will force it to reboot and cause a disruption in service Besure to perform the update during a maintenance cycle
1 Install AWS CLI Documentation on the installation and use of AWS CLI can be found at httpsawsamazoncomcli
copy Copyright 2020 Rubicon Communications LLC 22
Security Gateway Manual Amazon AWS
2 Determine the Instance ID for the pfSense Instance from the EC2 Console
Fig 1 The selected pfSense Instance ID is i-042c16b65423b7dac
3 Stop the instance using Amazon EC2 console
4 Enable the enhanced networking attribute by executing the following AWS CLI command
aws ec2 modify-instance-attribute --instance-id i-042c16b65423b7dac --ena-support
5 Use the EC2 Console to start the pfSense Instance Once the pfSense Instance has started confirm that EnaSup-port is enabled by executing the following AWS CLI command
aws ec2 describe-instances --instance-ids i-042c16b65423b7dac --queryReservations[]Instances[]EnaSupport[true
]
6 Change the pfSense Instance Type to one that supports Enhanced Networking using the EC2 console Afterselecting an Instance Type that supports Enhanced Networking use the EC2 console to stop the pfSense Instance
copy Copyright 2020 Rubicon Communications LLC 23
Security Gateway Manual Amazon AWS
Note To review the Instance Types please see httpsawsamazoncomec2instance-types
7 Once the pfSense Instance has stopped use the EC2 Console to select the pfSense Instance and then under theActions button select Instance Settings gt Change Instance Type and select a new Instance Type
Fig 2 In this case m4xlarge was selected as the new Instance Type and then Apply was selected
8 In the EC2 Console the pfSense Instance should now show an Instance Type of m4xlarge
9 Using the EC2 console select the pfSense Instance and then under the Actions button select Instance State gtStart
26 Advanced Usage
261 Protecting a private network in VPC
An instance of the Netgate appliance can be used as a firewall for a VPC subnet This will generally require moremanual configuration than using an instance to host a remote access VPN does See the VPC User Guide for a moredetailed explanation of how to configure your VPC and your Netgate appliance instance to support this
262 Connecting a local pfSensereg device
In addition to connecting remote devices as clients a device running pfSensereg as a firewallrouter can be connectedas a peer to a pfSense appliance
See also
Read Configuring a Site-to-Site Static Key OpenVPN Instance in the pfSense documention to see the process ofconfiguring this setup
copy Copyright 2020 Rubicon Communications LLC 24
Security Gateway Manual Amazon AWS
When implementing the configuration changes detailed in the document you should use the Netgate appliance instanceon AWS as the ldquoserverrdquo end of the connection and your local pfSense device as the client ldquoendrdquo You will also needto make sure that you are using a unique port The default remote access OpenVPN server is configured to use UDPport 1194 It is suggested that if you are adding a site-to-site tunnel you should use a port between 1195 and 2000Whichever port you decide to use you will need to make sure that the port is open both in the firewall rules on theNetgate appliance instance and in the Security Group in the EC2 Management Console
If you wish to route all traffic from your homeoffice network through the OpenVPN tunnel to your Netgate applianceinstance you will need to add this statement to the advanced options for the OpenVPN Client on the homeofficepfSense device
redirect-gateway def1
This will cause a default route to be set that sends all locally originated traffic on your homeoffice network overthe OpenVPN tunnel when it is established If you use this configuration to send all traffic from your local networkthrough the OpenVPN tunnel you will also need to establish a NAT on the Netgate appliance instance on AWS fortraffic from the homeoffice network to the internet This can be accomplished by adding the CIDR block for yourhomeoffice network to the preconfigured Alias called Networks_to_NAT This is done by navigating to Aliases underthe Firewall heading on the web GUI then clicking on the edit icon to the right of Networks_to_NAT Add the newnetwork address and mask to the list of Networks and click the Save button Then click the Apply Changes buttonYou will also need to add the network used for the tunnel endpoints (IPv4 Tunnel Network) to the Networks_to_NATalias as well using the same procedure that was used to add the homeoffice network
Connecting multiple pfSense gateways to a Netgate appliance
Multiple homeoffice networks can be connected to a single Netgate appliance instance This could be used to allowclients at different office locations to communicate without requiring tunnels between each individual location Itcould also be used as a way to apply policies on traffic tofrom the internet in one place and have them take effectacross multiple locations
Each site would need to have the instructions above for connecting an individual device repeated to add an OpenVPNserver on the Netgate appliance instance and an OpenVPN client on the local pfSense device Each OpenVPN Serverthat is configured must use a unique port and a unique network for IPv4 Tunnel Network It is recommended touse a name that uniquely identifies each location connected in this manner in the Description field when adding anOpenVPN Server for a site in the Netgate appliance
263 Detect and Recover EC2 Instance Failure
You can create an Amazon CloudWatch alarm that monitors an Amazon EC2 instance and automatically recovers theinstance if it becomes impaired due to an underlying issue
For more information about instance recovery see Recover Your Instance
27 Frequently Asked Questions
271 1 I donrsquot know the password to the web GUI How do I find out what it is
The first time the instance boots it looks for a user-defined password set in the User Data box when the instance wascreated If you didnrsquot set one it chooses one randomly so that the instance is not accessible via a default password tomalicious users You can find out the random password that was set by choosing Get System Log from the ActionsMenu for the instance in the EC2 Management Console A message should appear after the system boot messages thatlooks like the following
copy Copyright 2020 Rubicon Communications LLC 25
Security Gateway Manual Amazon AWS
Admin password changed to abcdefg
It may take 5-10 minutes after the instance boots for this message to appear in the system log If you would like to findout the password sooner you can log in via SSH using the SSH key that was selected when the instance was createdThe same message that will be written to the system log will be written to the file etcmotd Running the commandcat etcmotd will show you what the password is
272 2 I donrsquot like the random password that was selected How can I change it
The password can be changed via the web GUI Log in with the username admin and the existing password Underthe System category click on User Manager The admin account should appear in a list of accounts Unless yoursquoveadded other accounts it should be the only account present Click on the Edit button (the icon with the e in it) to theright of the account listing Type your choice for a new password into the two boxes labeled Password Click theSave button at the bottom of the screen
273 3 How do I access my instance
There are several ways that you can manage or use your instance You should be able to connect via SSH or HTTPS inorder to manage the configuration of your instance If you connect via SSH you will either need to know the passwordof the admin account and login with that account or use the SSH key that was selected when the instance was createdHere is a sample command line to log in with an SSH key from a Unix or Linux host
ssh -i ~sshmy-ec2-key adminec2-A-B-C-Dcompute-1amazonawscom
You would substitute the actual location of your SSH private key for ~sshmy-ec2-key and the real hostnamewhich you can retrieve from the EC2 Management Console by looking at the data for the instance for example ec2-A-B-C-Dcompute-1amazonawscom If you know the password for the admin account you could use a commandsimilar to the one above but omit the -i ~sshmy-ec2-key
To connect via HTTPS you need to know the password to the instance either by setting it explicitly in the User Datawhen the instance is created or by retrieving it from the instance Once you know the password you should be able toconnect to the instance with any web browser by typing in the hostname of the instance to the URL field
274 4 How do I connect a VPN client to my instance
See the section in the user guide on Using the remote access IPsec or OpenVPN VPN
275 5 Why does the pfSensereg Dashboard say my WAN address is 10XYZ
Amazon AWS instances use DHCP to assign private addresses to the public-facing interfaces of an instance Thepublicly routable IP address that you use to acces the instance is NATed by Amazon to the private address that you seeconfigured on the WAN interface of your instance
copy Copyright 2020 Rubicon Communications LLC 26
Security Gateway Manual Amazon AWS
276 6 I added custom firewall rules to allow some traffic to my instance why I amnot seeing the packets arrive
Amazon AWS provides packet filtering in addition to the Netgate Appliance itself being a stateful firewall If youallowed traffic on the Netgate Appliance but have a security group configuration in the settings for the instance that isrestricting traffic you will need to also add your rules to the security group in the EC2 Management Console
Given that the Netgate Appliance is a fully functional firewall you may assign an AWS security group that allows alltraffic and perform whatever filtering you desire with rules on the Netgate Appliance
277 7 How do I route all the traffic from my entire home network over a VPN
If your home gatewayrouter has support for OpenVPN you can connect a site to site tunnel from your home networkto the Netgate VPN Appliance and configure your routing so that all Internet traffic is sent over the encrypted tunnelSee the user guide section on Connecting a local pfSensereg device
This may provide for simpler administration at home but your mobile devices and laptops that get used outside thehome should have an OpenVPN client installed and configured anyway so that you are always receiving the benefitsof sending your traffic through a VPN
copy Copyright 2020 Rubicon Communications LLC 27
CHAPTER
THREE
VIRTUAL PRIVATE CLOUD (VPC)
31 AWS VPC User Guide
The pfSensereg Certified firewall and VPN appliance from Netgate for Amazon EC2 is a stateful firewall and VPNappliance In addition to itrsquos capabilities as a VPN gateway and firewall for users and offices it is capable of actingas a firewall to protect instances providing services in Amazonrsquos Virtual Private Cloud or VPC service This servicediffers from the classic EC2 service in that it allows for management of instances on private subnets
This guide will explain how to launch manage and use an instance of the appliance to act as a gateway for otherinstances in a VPC subnet
311 Preparing your VPC
In order to use a Netgate appliance instance to protect your VPC subnets you will need the following
bull One internet-facing subnet which the Netgate appliance instance will have itrsquos primaryWAN interface con-nected to
bull One or more private subnets which the Netgate appliance instance will have itrsquos secondaryLAN interface (andpossibly additional optional interfaces) connected to
bull Separate routing tables for the internet-facing subnet and the private subnet(s)
bull If you already have all of these in place with an existing VPC feel free to skip ahead to Launching an Instance
These instructions will demonstrate how to create a single private subnet and set it up behind an instance of thepfSensereg Certified firewall and VPN appliance from Netgate In the Amazon VPC Management Console create anew VPC subnets and routing table(s)
1 Go to Your VPCs view in the menu on the left side of the VPC Management Console under the Virtual PrivateClouds grouping Click the Create VPC button
28
Security Gateway Manual Amazon AWS
2 Enter a CIDR block to use in the box that pops up If you will connect to hosts in your VPC using a VPNfrom hosts at other sites in your infrastructure be sure to select address space that does not conflict with theprivate address space used elsewhere by your organization Make sure the block you choose is large enoughto contain all subnets you may want to include within it Eg if you plan to use a 24 for your internet-facingsubnet and a 24 for your private network the CIDR block you select here will need to be at least a 23 to holdthose 2 subnets The maximum size block you can select is a 16 For the purposes of this example we will use1020016 Leave the value of Tenancy set to Default Click on the Yes Create button
3 To create the subnets required go to the Subnets view in the menu on the left side of the VPC ManagementConsole Click the Create Subnet button Select the VPC you just created and choose the availability zone youdesire Enter the subnet you wish to use for the internet-facing hosts in the CIDR Block field This subnet willbe the one that the WAN interface of the Netgate appliance instance is attached to and could include any otherhosts or appliances that you wish to be available directly from the Internet and not protected behind the Netgate
copy Copyright 2020 Rubicon Communications LLC 29
Security Gateway Manual Amazon AWS
appliance The subnet you select here must be a block that is within the address space you assigned to the VPCFor this example we will use 1020024 Click on the Yes Create button
4 Create the private subnet Still in the Subnets view of the VPC Management Console click the Create Subnetbutton In the box that pops up select the appropriate VPC and the same Availability Zone that you assignedto your public subnet Enter the subnet you wish to use for your private network in the CIDR Block field Thisnetwork should be a subnet of the address space you assigned to the VPC and should be distinct from the subnetyou assigned to the public subnet For this example we will use 1021024 Click on the Yes Create button
5 Both subnets that you created will have been created to use a default route table that was created for the VPCThe private subnet can continue to use that default table A new route table will need to be created for the publicsubnet Go to the Route Tables view in the menu on the left side of the VPC Management Console The singleexisting route table should be displayed Click on the Create Route Table button Select the VPC and click on
copy Copyright 2020 Rubicon Communications LLC 30
Security Gateway Manual Amazon AWS
the Yes Create button
6 Associate the public subnet (1020024 in our examples) with the routing table that was just created Go to theSubnets view on the left hand side of the VPC Management Console Check the checkbox next to the publicsubnet and scroll down to look at the Details tab for that subnet At the top of the Details tab will be listed theCIDR block VPC and Availability Zone Under those items the Route Table will be listed and will have a linklabeled replace next to it Click on the link Select the route table in the box that pops up and click on the YesReplace button
7 In order to send traffic from the public subnet to the Internet we will need to add a default route to an InternetGateway We must first create one Go to the Internet Gateways view in the menu on the left hand side of theVPC Management Console Click on the Create Internet Gateway button Click the Yes Create button onthe box that pops up Click the checkbox next to the new Internet Gateway and then click the Attach to VPC
copy Copyright 2020 Rubicon Communications LLC 31
Security Gateway Manual Amazon AWS
button Select the VPC and click on the Yes Attach button
8 The route table for the public subnet will need to be updated so that it has a default route to the Internet GatewayGo to the Route Tables view on the left hand side of the VPC Management Console Check the checkbox nextto the route table for the public subnet Under the Routes tab for that route table there should only be listed asingle route for the CIDR block of the VPC (1020016 in our example) that has a target of local There is arow underneath this route with a text box in the Destination field and a pop up menu for the Target field Enter00000 for the Destination and select the Internet Gateway (should be formatted like igw-XXXXXXXX)for the target Click on the Add button that appears at the right side of the row Click the Yes Add button onthe box that pops up
There are a few more VPC configuration changes that will be required later but next you must launch a Netgateappliance instance
copy Copyright 2020 Rubicon Communications LLC 32
Security Gateway Manual Amazon AWS
312 Launching an Instance in a VPC
In the Amazon EC2 Management Console launch a new instance of the pfSensereg firewall and VPN appliance Thisprocess is the same as the one for launching an EC2 (non-VPC) instance up until step 11 which details the values toenter for the Configure Instance Details screen in order to specify the instance should be created in your VPC
1 Select the region to run the instance in using the tab at the upper right corner of the page
2 Launch a new instance by clicking on the Launch Instance button under the Create Instance section of theEC2 dashboard
copy Copyright 2020 Rubicon Communications LLC 33
Security Gateway Manual Amazon AWS
3 Select AWS Marketplace on the Create a New Instance menu Type Netgate pfSense FirewallVPNRouter in the search box and press enter (or click on the Search button next to the text box)
4 Click on the link for the Netgate pfSense FirewallVPNRouter appliance in the search results
5 Click on the Continue button on the info page for the Netgate pfSense FirewallVPNRouter
copy Copyright 2020 Rubicon Communications LLC 34
Security Gateway Manual Amazon AWS
6 Click on the Launch with EC2 Console tab
7 If the license terms havenrsquot been accepted click on the Accept Terms button
8 A message should be displayed indicating that the subscription is being processed
copy Copyright 2020 Rubicon Communications LLC 35
Security Gateway Manual Amazon AWS
9 Select the version of the image to run under the popup menu labeled Select a Version Generally the mostrecently issued version should be selected Identify which region to launch the instances in and click on theLaunch in EC2 Console button to the right of that region
10 Choose the instance type to run on Click Next Configure Instance Details
copy Copyright 2020 Rubicon Communications LLC 36
Security Gateway Manual Amazon AWS
11 On the Configure Instance Details page under the Network field select the VPC that was created For theSubnet field that appears right below the Network field select the public subnet that was created earlier In ourexamples this is 1020024
12 Scroll down to the Network Interfaces heading A single interface named eth0 should be displayed by defaultClick on the Add Device button underneath eth0 Select the private subnet that was created (1021024 in ourexample) Pick an IP address within the range of the private subnet and enter it in the Private IP field Keep inmind that the first 3 or 4 IP addresses are reserved For this example we will use 10215
copy Copyright 2020 Rubicon Communications LLC 37
Security Gateway Manual Amazon AWS
Optionally expand the Advanced Details section and set parameters as text in the User Data field The availableoptions are
password Setting a value via a directive like password=abcdefg will set the password for theadministrative account to the specified value - abcdefg in this example If no value is set here arandom password will be assigned in order to keep administrative access from being exposed tothe internet with a default password
mgmtnet Setting a value via a directive like mgmtnet=1001024 will restrict managementaccess (http https ssh) to the specified network - 1001024 in this example This will causethe firewall rule on the instance (not on Amazons access lists but on the Netgate appliancersquosown firewall) to restrict management traffic for the instance to the specified source network Thedefault behavior is to allow management from any host
These directives can be set by placing them on a single line in the User Data field and separating them withcolons Specify both parameters by typing a statement similar to
password=abcdefgmgmtnet=1001024
Click Next Add Storage after optionally setting these parameters
Note If setting a password using the password parameter listed above the password is retrieved by the instancevia an unencrypted HTTP request when the system is configured the first time it boots The request is made toan Amazon Web Services-operated server on the local LAN that stores metadata about each instance runningThe data for an instance is only made available to that instance but is available to be queried from the instancewithout providing any authentication credentials
It is advised to change the admin password via the pfSense webGUI after the instance comes up or choose notto set the password at all and let a random password be set
copy Copyright 2020 Rubicon Communications LLC 38
Security Gateway Manual Amazon AWS
13 Click Next Tag Instance to accept the Storage Device Configuration
14 Optionally a tag can be set on the instance to differentiate this instance from other VMrsquos that were started byentering a value for the Name tag Click Next Configure Security Group after setting any desired tags
copy Copyright 2020 Rubicon Communications LLC 39
Security Gateway Manual Amazon AWS
15 Select a security group to launch the instance with The recommended settings for a security group should allowat least the following traffic
bull TCP port 443 from 00000 - HTTPS - This is the port that the management web GUI listens on
bull TCP port 22 from 00000 - SSH - This port can be used to connect to a command prompt with an sshclient
bull UDP port 1194 from 00000 - OpenVPN - The OpenVPN server that is configured by default is boundto this port
bull UDP port 500 from 00000 - IKE for IPsec VPN
bull UDP port 4500 from 00000 - IPsecNAT-T for IPsec VPN
copy Copyright 2020 Rubicon Communications LLC 40
Security Gateway Manual Amazon AWS
If you have an existing security group that includes this access select Select an existing security group thenselect the group(s) to use and click Continue Otherwise select Create a new security group and add rulesfor this access by filling in the form for each rule and clicking the Add Rule button When all of the rules havebeen added click Review and Launch
16 Verify the details for the instance and click Launch
17 Select an existing key pair or create a new key pair to connect to the instance with Do not select Proceed
copy Copyright 2020 Rubicon Communications LLC 41
Security Gateway Manual Amazon AWS
Without a Key Pair Click the checkbox that indicates you acknowledge having access to the selected privatekey file and then click Launch Instance
18 In order to reach the instance from the Internet associate an Elastic IP with the WAN interface of the instanceIn the VPC Management Console go to the Elastic IPs view by clicking on Elastic IPs on the left side of thepage Click on the Allocate New Address button Select that you want the EIP used in VPC and click on theYes Allocate button in the box that pops up After the Elastic IP address is allocated associate the address withthe WAN interface of the Netgate appliance by clicking on the Associate Address button
A box will pop up that will either let you specify the instance and Private IP address of the interface or theNetwork Interface and the Private IP Address of the interface Use one of these methods to select the correctinterface and click on the Yes Associate button The instance should now be reachable via ssh or https
copy Copyright 2020 Rubicon Communications LLC 42
Security Gateway Manual Amazon AWS
19 In order for traffic to be allowed to be routed from the private subnet through the public interface of the instancethe SourceDest AddressCheck on the private interfaces needs to be disabled In the EC2 Management Con-sole go to the ldquoNetwork Interfacesrdquo view by clicking on Network Interfaces in the menu on the lefthand sideof the page
Click the checkbox to the left of the privateLAN interface on the Netgate appliance instance Click on theActions button at the top of the page and select Change SourceDesk Check on the popup menu Select theradio button labeled Disabled on the box that pops up and click on the Save button
Non-local traffic from the private subnet should now be sent through the privateLAN interface on the Netgateappliance instance
copy Copyright 2020 Rubicon Communications LLC 43
Security Gateway Manual Amazon AWS
313 Managing a VPC Instance
Once the instance is launched you can connect to it via the Elastic IP that was attached to the primary interface duringthe provisioning phase
In order to manage the configuration of the instance you can connect to it via https or ssh A limited set of configura-tions is possible through the SSH interface the preferred method for managing most of the configurations or viewingdata on the status of the pfSensereg instance is through the https webGUI
Connecting via SSH
To connect via SSH you would use the key pair you chose while creating the instance to connect to the admin accountFrom the command line on a UnixLinux host you would use a command similar to
ssh -i my_ec2_key admin232020454
Where the appropriate private key file and public IP or hostname are substituted
Note The first time you log into your instance the SSH key of the instance will not be cached on your computerand you will need to type yes when asked whether you want continue connecting This should not be necessary onsubsequent sessions
Once logged in you should see the console menu similar to the one below
copy Copyright 2020 Rubicon Communications LLC 44
Security Gateway Manual Amazon AWS
Connecting via HTTPS
To connect via https you would enter a URL containing the public IP address or hostname of your instance intoa web browser For example https232020454 Itrsquos very likely that you will receive a browser warningindicating that the security certificate of the site is not trusted This is because the instance uses a self-signed certificatefor https communication You should click on the option to proceed to the site anyway The pfSense login screen withthe Netgate logo should appear
The username to log in with is admin The password to use is either a value that you set in the User Data during thecreation of the instance or a random password
Tip It is preferable to explicitly set a password by passing a value in with the User Data field so the password willbe known in advance
If you did not set a specific password you can find out that value that the random password was set to through one of2 different methods
1 The first method is to log in over SSH with the key pair that you selected when the instance was created andexamine the contents of the file located at etcmotd You would do this by selecting option 8) Shell in theconsole menu that is presented when you SSH in then run this command in the shell
cat etcmotd
2 The second method is to view the System Log for the instance in the EC2 Management Console After themessages that are displayed that show the status of the boot process a message should appear that indicates what
copy Copyright 2020 Rubicon Communications LLC 45
Security Gateway Manual Amazon AWS
the administrative password was changed to Be aware that the System Log output in the EC2 ManagementConsole is not updated in real time and may take a few minutes to show up
The message you should look for using either of the methods mentioned about will look like this
Admin password changed to abcdefg
Once yoursquove determined your password and entered it into the login form the pfSense WebGUI should be availableto you
314 Forwarding traffic from VPC subnets through the instance
Some additional configuration is required within the VPC instancersquos pfSensereg webGUI before you are able to managetraffic from the private subnet
1 Log into the pfSense WebGUI for the instance
2 Click on the Interfaces heading on the left and then click the Assign link
3 Click on the + icon to add a new Interface under the Interface assignments tab A LAN interface shouldautomatically be added with the next available network interface (xn1)
4 Click on the Interfaces heading on the left again and then click on LAN Click the checkbox to enable the LANinterface Set the IPv4 Configuration Type to Static IPv4 and enter the IP address you assigned to the 2ndinterface during the provisioning phase Click the Save button
Now you can create other instances attached to your private subnet and protect them with the firewall on the pfSenseinstance
Common ways to manage private hosts
Allowing private hosts to connect to the Internet
To allow private hosts to be able to connect to the Internet you can allow any traffic from the LAN in your firewallrules there should be a rule like this in place by default
Next set up NAT rules to cause addresses in the private subnet to be NATed to the IP address of the WAN interface
1 Under the Firewall heading on the left click on the NAT link
2 On the Outbound tab click the radio button for Manual Outbound NAT rule generation (AON - AdvancedOutbound NAT)
3 Click the Save button
4 Click on the Aliases link under the Firewall heading on the left
5 Add your private subnet to the Networks_to_NAT alias
Note There is an existing NAT rule configured by default that uses the alias Networks_to_NAT
copy Copyright 2020 Rubicon Communications LLC 46
Security Gateway Manual Amazon AWS
Allow private hosts to connect to each other
If your hosts should only contact each other and a private network segment elsewhere you can configure an IPsecor OpenVPN tunnel from your remote networks to the Netgate appliance instance and set up the appropriate firewallrules routes and security policies to allow access to your private subnet through a VPN tunnel
Allow direct inbound access from the internet to hosts
If you wish to enable direct inbound access from the internet to hosts on the private subnet you can set up portforwarding on the WAN interface to direct traffic to particular hosts in the private subnet
315 Establishing a VPN connection to a VPC in another region
To establish a VPN that allows instances on the VPC subnet(s) that sit behind a Netgate appliance to communicate withinstances that reside in a VPC in another region the Netgate appliance has a VPC configuration wizard that assists byconfiguring both the Netgate appliance as well as the VPC configuration elements that would normally have to be setmanually through the AWS Management Console
For detailed instructions see the AWS VPC User Guide
316 Upgrading a VPC Instance
Periodically new releases of the AMI are issued to track new releases of pfSensereg that may provide new functionalitybug fixes and security updates
The lower risk approach to upgrading is to bring up a new instance alongside the existing one and executing a cutoverThese instructions detail the procedure for moving your existing instance to one running the latest version
1 Back up the configuration of your exsting instance by navigating to BackupRestore under the Diagnosticsmenu in the Web GUI Click the Download configuration button under the Backup Configuration headingand save your config file to your local system
2 Bring up a new instance of the pfSense Certified RouterFirewallVPN running the latest version
3 When creating the instance make sure the interfaces match the interfaces on the existing instance Make surethat the new instance is in the same VPC as the existing instance and that it has the same number of interfacesattached and that the interfaces are connected to the same Subnets
4 Make sure any interfaces on the new instance that will communicate with private Subnets have theSourceDestination check disabled
5 Allocate a new Elastic IP and associate it to the WAN interface of the new instance to allow yourself managementaccess
6 Restore the backed up configuration file to the new instance Navigate to BackupRestore under the Diagnosticsmenu in the Web GUI Under the Restore Configuration heading click the Choose File button and browsefor the configuration file you backed up from the existing instance earlier Once you have selected that fileclick the Restore configuration button The configuration file will be uploaded and the instance will rebootautomatically
7 If you had packages installed on the old instance navigate to Packages under the System menu in the pfSenseweb GUI and install the same packages
8 If there was any external dependency on the public IP address of the existing instance you can remove theElastic IP Address from the upgraded instance and move the Elastic IP Address from the existing instance tothe upgraded instance External dependencies that might cause you to want to do this include things like VPNrsquos
copy Copyright 2020 Rubicon Communications LLC 47
Security Gateway Manual Amazon AWS
configured to external devices that rely on the existing instancersquos Elastic IP address or access lists on externaldevices that allow access to traffic from the existing instancersquos IP address There may be other reasons why youwould wish to keep the existing address as well (to preserve existing bookmarks to the Web GUI reduce theneed for updates to existing internal documentation etc) The process for moving the old Elastic IP address tothe new instance is as follows
bull Disassociate the Elastic IP address from the new instance In the EC2 Management Console click onElastic IPs under the Network amp Security heading Check the box next to the Elastic IP address assignedto the new instance and click on the Disassociate Address button
bull Disassociate the Elastic IP address from the old instance The procedure is the same as in the previousstep just repeated for the Eastic IP address of the old instance this time
bull Associate the Elastic IP address that was previously associated to the old instance to public interface of thenew instance In the EC2 Management Console click on Elastic IPs Check the box next to the Elastic IPaddress you are moving and click the Associate Address button Fill in the correct value for the Instanceor Network Interface and select the Private IP Address of the public interface on the new instance Clickthe Associate button The management interface of the new instance should now be accessible
9 Move any default routes that pointed to an interface on the old instance to point to the equivalent interface onthe new instance In the VPC Management Console click on Route Tables under the Virtual Private Cloudheading Check the box next to a Route Table associated with the VPC that the instances is located in
bull In the detail pane that appears at the bottom of the screen click on the Routes tab
bull If a route exists for 00000 with a Target that is an interface ID of an interface on the old instnace clickthe Edit button above the table displaying the routes
bull Click the red X next to the row for 00000 to remove the existing route
bull There should be a blank row with empty fields for a new route Enter 00000 in the Destinationfield and the Network Interface ID of the interface on the new instance in the Target field Click on theSave button
bull If there were multiple private subnets in the VPC which were pointed to interfaces on the pfSense instancerepeat this process for the other Route Tables associated with the VPC
bull The new instance should now be functioning as the old one did
32 AWS VPC Wizard User Guide
This guide will explain how to use the AWS VPC Wizard to simplify the configuration of a VPN to a remote VPC Theadministrator is asked for the minimum amount of basic information required to establish the VPN The configurationsboth on the AWS VPC side and on the pfSense side are then automatically created When the wizard is finishedexecuting a functioning VPN connection to a VPC should be established
321 AWS Access Keys
In order to connect to the AWS API to make certain required configuration changes the AWS VPC Wizard requiresAccess Keys to retrieve and modify VPC configurations
See also
Find more information about AWS Security Credential including Access Keys by reading AWS Security Credentials
Access keys consist of two parts
1 An access key ID
copy Copyright 2020 Rubicon Communications LLC 48
Security Gateway Manual Amazon AWS
bull For example AKIAIOSFODNN7EXAMPLE
2 A secret access key
bull For example wJalrXUtnFEMIK7MDENGbPxRfiCYEXAMPLEKEY
Access keys are like a usernamepassword and needed for programmatic requests to AWS including the AWS VPCWizard Use both the access key ID and secret access key together to authenticate requests
Important Manage access keys as securely as a user name and password
Managing Access Keys
To create modify or delete IAM user access keys do the following
1 Sign in to the IAM console
2 In the navigation bar on the upper right choose a user name and then choose My Security Credentials
3 On the AWS IAM Credentials tab in the Access keys for CLI SDK and API access section choose Createaccess key
4 Choose Download csv file to save the access key ID and secret access key to a csv file on your computerStore the file in a secure location There is no access to the secret access key again after this dialog box closesAfter the csv file has been downloaded choose Close When an access key is created the key pair is active bydefault and the pair can be used right away
bull To disable an active access key choose Make inactive
bull To reenable an inactive access key choose Make active
bull To delete an access key choose its X button at the far right of the row Then choose Delete to confirmWhen an access key is deleted itrsquos gone forever and cannot be retrieved However new keys can alwaysbe created
To create modify or delete another IAM userrsquos access keys do the following
1 Sign in to the IAM console
2 In the navigation pane choose Users
3 Choose the name of the user whose access keys to manage and then choose the Security credentials tab
4 In the Access keys section choose Create access key
5 Choose Download csv file to save the access key ID and secret access key to a CSV file on your computer
Rotating Access Keys
As a security best practice we recommend to regularly rotate (change) IAM user access keys Rotating access keyscan be done from the AWS Management Console
To rotate access keys for an IAM user without interrupting the applications (console) create a second access key whilethe first access key is still active
1 Sign in to the IAM console
2 In the navigation pane choose Users
3 Choose the name of the user whose access keys to manage and then choose the Security credentials tab
4 In the Access keys section choose Create access key
copy Copyright 2020 Rubicon Communications LLC 49
Security Gateway Manual Amazon AWS
5 Choose Download csv file to save the access key ID and secret access key to a CSV file on your computer
6 The new access key is active by default At this point the user has two active access keys
After waiting some period of time to ensure that all applications and tools have been updated delete the first accesskey
1 Sign in to the IAM console
2 In the navigation pane choose Users
3 Choose the name of the user whose access keys to manage and then choose the Security credentials tab
4 Locate the access key to delete and choose its X button at the far right of the row Then choose Delete to confirm
Determining When Access Keys Need Rotating
To determine when access keys need rotating (console) do the following
1 Sign in to the IAM console
2 In the navigation pane choose Users
3 If necessary add the Access key age column to the users table by completing the following steps
1 Above the table on the far right click the settings icon
2 In Manage columns select Access key age
3 Choose Close to return to the list of users
4 The Access key age column shows the number of days since the oldest active access key was created Usethis information to find users with access keys that need rotating The column displays None for users with noaccess key
322 Using the Wizard
1 Gather your AWS Access Key ID and Secret Key
2 Navigate to VPN gt AWS VPC Wizard in the main menu in the pfSensereg webGUI
copy Copyright 2020 Rubicon Communications LLC 50
Security Gateway Manual Amazon AWS
3 The first screen of the wizard prompts for the AWS Credentials Enter the Access Key ID and Secret AccessKey in the appropriate text fields and select the Region to connect to in the dropdown menu then click Next
The wizard will then query the AWS API using those credentials to find which VPCrsquos exist in the selectedregion If the credentials were rejected an error message will be displayed and return to the first screen
4 The next screen will prompt to select from the available VPCrsquos in the selected region Select the one to connectto from the dropdown menu The wizard will not create a new VPC it will only connect to an existing VPC
Click Next after selecting the desired VPC
copy Copyright 2020 Rubicon Communications LLC 51
Security Gateway Manual Amazon AWS
Note If the desired VPCrsquos to connect to isnrsquot available create one via the AWS Management Console and tryagain
The wizard will then query the AWS API to check whether there is a VPN Gateway attached to the selectedVPC If none exists one will be created via the API Then the next screen will be displayed
5 On the next screen specify routing and network data
A description of what should be entered for each of these fields follows
copy Copyright 2020 Rubicon Communications LLC 52
Security Gateway Manual Amazon AWS
Routing Type AWS offers either static routing or BGP routing Select the appropriate type fromthe dropdown menu If unsure static routing is likely to be adequate
BGP AS Number If static routing was choosen leave this field blank Otherwise it is possible tospecify an AS number to use If left blank the value will default to 65000
Local Public IP Address On an AWS Netgate appliance instance this should be the public IP ad-dress of the Elastic IP associated with the instance If configuring a hardware device runningpfSense this could be the public address assigned to the WAN (or other) interface of the device
Local subnets The subnets connected to the pfSense instance that should be routed over the tunnelfrom hosts in the remote VPC As an example if connecting a pfSense instance to a remote VPCin the AWS us-east-1 region enter the subnets (or a single subnet) that are local to the pfSenseinstance and when hosts in your VPC in us-east-1 attempted to reach addresses within thosesubnets the traffic will be sent through the VPN tunnel that is being configured
Note When selecting static routing as the routing type there will be a delay that is typically between 2-5minutes before the next screen is displayed This is because static routes must be added to the VPN Connectionvia the AWS API This operation fails until the VPN Connection reaches the ldquoavailablerdquo state This can take afew minutes to occur
Click Next when done
The wizard will then query the AWS API to find whether a Customer Gateway is configured with the selectedPublic IP Address If none exists one will be created If one already exists the ID will be retrieved and it willbe used
The wizard will then query the AWS API to see if a VPC Connection already exists that matches the dataentered If one exists it will be used Otherwise one will be created
If static routing was selected static routes will be added to the VPN Connection for the Local subnets entered
Route propagation will be enabled for the VPN Gateway in each of the Route Tables that are associated withthe VPC All of these configurations are carried out in the AWS API nothing has been changed in the pfSenseVPN configurations yet
Warning Important Note on Billing Once this step is carried out and the VPN Connection is createdAWS will start billing your AWS account the hourly rate for a VPN Connection This is $005 as of thiswriting and that is a charge that goes entirely to AWS itself They will do this until the VPN Connection isdeleted via the VPC Management Console
Nothing in pfSense will ever cause AWS to stop billing for this VPN Connection Whether it works or notwhether the pfSense instance is up or down whether the IPsec tunnels have been deleted or reconfiguredAWS will continue to bill the hourly fee for a VPN Connection if the creation of it succeeds until it is deletedthrough their web interface
The wizard helps establish an initial configuration that works and configures the appropriate elements inAWSrsquos API to facilitate this You are responsible for making sure you understand what yoursquore being billedfor and disabling any functions including VPN Connections that are no longer necessary
6 If the operations of the previous step succeeded the next screen will appear
copy Copyright 2020 Rubicon Communications LLC 53
Security Gateway Manual Amazon AWS
Select an Interface to act as the local endpoint of the VPN tunnels that will be created In most cases thisshould be the WAN interface It should generally be whatever interface is associated with the Local Public IPAddress entered in the previous step
On an AWS Netgate pfSense instance this will be whatever interface the Elastic IP is associated with On ahardware device running pfSense that has the Local Public IP Address directly configured on an interface thiswill be the interface that the Local Public IP Address is configured on
After clicking Next the wizard will configure the VPN and associated settings within pfSense itself using datareturned by the AWS API in the previous step
It will configure 2 IPsec tunnels a firewall rule 2 Aliases (referenced by the firewall rule) and 2 Virtual IPAddresses If BGP was selected as the Routing Type in the previous step it will install the OpenBGPDpackage automatically and configure it appropriately
7 The next screen will appear and prompt to apply the configuration changes that have been made
copy Copyright 2020 Rubicon Communications LLC 54
Security Gateway Manual Amazon AWS
After clicking Next all the configuration changes that were made will be applied
8 The wizard will be completed and the browser will be redirected to the IPsec status page The VPN to the VPCshould now be fully configured
Note Sometimes there is a delay of 5-10 minutes before the tunnels are fully functional and passing trafficThis has been observed particularly often during the setup of tunnels using BGP routing
copy Copyright 2020 Rubicon Communications LLC 55
Security Gateway Manual Amazon AWS
323 Testing Connectivity
Verify that the IPsec tunnels are functioning by attempting to ping the ldquoinside tunnel addressesrdquo of the VPC side ofthe tunnel by navigating to Firewall -gt Virtual IP There should be two virtual IP addresses configured that haveDescriptions like ldquoInside address for tunnel to ltremote IP addressgtrdquo
Amazon provides inside addresses for each end of the tunnel in a 30 subnet in IPv4 link local address space(169254xy) Typically the first usable address in the 30 is the inside address for the VPC end of the tunnel andthe other usable address is the inside address for your end of the tunnel So if you ping from one of the virtual IPaddresses configured on the pfSensereg instance to the IP address that is one less (for example if the virtual IP addresswere 16925425322 ping from 16925425322 to 16925425321) that checks whether the other end of the tunnelis responding and whether the tunnel is functioning properly
Note It sometimes takes a few minutes for the tunnels to begin working after the configuration wizard completes
To ping log into the pfSense instance via SSH and execute ping from a shell prompt For the previous example of16925425322 the proper syntax is
ping -S 16925425322 16925425321
When pinging from a shell prompt it is possible leave the command running indefinitely and interrupt it there is aresponse
copy Copyright 2020 Rubicon Communications LLC 56
Security Gateway Manual Amazon AWS
It is also possible to ping via the Diagnostics -gt Ping page by selecting the appropriate source address and enteringthe remote tunnel inside address in the Host field This will only send a limited number of ping packets so it may benecessary to repeat this a few times
324 VPC Configuration Details
The AWS documentation for connecting a hardware device to a VPC provides a great amount of detail on configuringVPN Connections to VPC
The main configuration elements that exist in Amazonrsquos data model are the Virtual Private Gateway the CustomerGateway and the VPN Connection In order to configure a VPN connection to a VPC all 3 of these need to exist TheVirtual Private Gateway is the VPN endpoint on Amazonrsquos side The customer gateway is the VPN endpoint on thepfSensereg instancedevice being configured The VPN Connection is the IPsec VPN between Amazon and the pfSenseinstancedevice
A Virtual Private Gateway needs to exist and be associated to the VPC A particular VPN Gateway can only beassociated to one VPC at a time Once the VPC to connect to has been selected the wizard invokes the AWS API callDescribeVpnGateways to determine if a VPN Gateway already exists that is attached to the VPC If none exists itcreates one with the CreateVpnGateway API call and attaches it to the VPC with the AttachVpnGateway call
A Customer Gateway needs to be created for the public IP address of the device or virtual machine that will be used toconnect to the VPC The wizard invokes the AWS API call DescribeCustomerGateways to determine if a CustomerGateway already exists If none exists one is created with the CreateCustomerGateway API call
The VPN Connection connects the Virtual Private Gateway and Customer Gateway The wizard checks to see if thereis an existing VPN Connection configured that connects those endpoints by invoking the AWS API call DescribeVp-nConnections If none exists one is created using the CreateVpnConnection call One of the fields returned by thiscall is a block of XML configuration data that contains configuration data assigned by AWS for use with configuringthe VPN Connection This data is stored and used in subsequent steps to make the required configuration changeswithin pfSense
copy Copyright 2020 Rubicon Communications LLC 57
Security Gateway Manual Amazon AWS
Any objects created through API calls by the wizard will be tagged with names like auto-created by pfSenseVPC ltyour_VPC_IDgt This is accomplished by calling the AWS API call CreateTags and using Name as the keyfor the tag
In addition to creation of the items mentioned above required adjustments are made to Security Groups and RouteTables to facilitate communication over the VPN The Security Groups associated with the VPC are updated to allowinbound access from the local subnets on the pfSense end of the VPN They are checked first via the DescribeSecuri-tyGroups AWS API call to determine if the access is already allowed Any of the subnets that is not already allowedhas inbound access added via the AuthorizeSecurityGroupIngress AWS API call
Route Tables associated with the VPC are updated to receive routes from the VPN Gateway used by the VPN Con-nection They are checked first via the DescribeRouteTables AWS API call If the VPN Gateway ID is not includedin the list of VPN Gateways propagating routes route propagation for the VPN Gateway is enabled on that table usingthe EnableVgwRoutePropagation AWS API call
For VPN Connections using static routing static routes for the specified subnets are added to the VPN ConnectionThis is done via the CreateVpnConnectionRoute AWS API call
325 pfSense Configuration Details
On the pfSensereg side there are numerous configurations added to support the VPN to the VPC
Aliases
First aliases are created for use in a firewall rule These aliases are intended to contain the subnets that traffic shouldbe allowed to ingress over the IPsec tunnel One alias represents the local subnets on the pfSense side and is givena name like VPC_Local_vpc_12345678 and the other represents the remote subnets on the VPC side and is given aname like VPC_Remote_vpc_12345678
Virtual IP addresses
Next virtual IP addresses are added on the lo0 (loopback) interface These virtual IP addresses are the local ldquoinsideaddressesrdquo of the IPsec tunnels These addresses are used as the local address for BGP communication when BGProuting is selected These addresses are IPv4 link local addresses (see RFC 3297) AWS assigns 30rsquos out of thenetwork 1692540016 for this purpose
Note These addresses are also useful as a ping target to execute a basic test of whether the tunnel is functioningproperly Executing a ping from a source address of one of these IP addresses to the corresponding inside address ofthe other end of the tunnel helps determine whether the tunnel negotiation is completing properly
Firewall rules
Next a firewall rule is added on the IPsec interface that allows traffic from the VPC networks to the local subnetsThis rule uses the previously created Aliases as sourcedestination targets
IPsec
Then IPsec phase 1 and phase 2 associations are set up Most of the settings required are extracted from a blockof XML data that was returned by the CreateVpnConnection call made during the AWS configuration step Thisincludes parameters like endpoint IP addresses encryption ciphers timer values etc
copy Copyright 2020 Rubicon Communications LLC 58
Security Gateway Manual Amazon AWS
If BGP routing was selected the configurations for the OpenBGPD BGP daemon are established The required settingsare determined using the AS number entered into the wizard and the parameters returned by the CreateVpnConnec-tion call made during the AWS configuration step
326 Tested Configurations
Various topologies may be possible to establish using the AWS VPC Configuration Wizard This section enumeratessome of the configurations that were successfully tested
Platforms
bull Various hardware platforms
bull 64-bit virtual machines in VMware vSphereESX
bull Amazon EC2 instances (Xen virtual machines) of the Netgate pfSensereg RouterFirewallVPN AWS AMI
Local networkrouting configurations
bull pfSense with a public address configured on the WAN interface
bull pfSense with a private address configured on the WAN interface behind a 11 NAT
bull pfSense with a private address configured on the WAN interface behind a PAT (1many NAT)
VPC Topologies
bull pfSense connected to a single VPC
bull pfSense connected to multiple VPCrsquos in different regions
bull Amazon EC2 instance of the pfSense RouterFirewallVPN AWS AMI connected to a VPC belonging to thesame AWS account in a different region
bull Amazon EC2 instance of the pfSense RouterFirewallVPN AWS AMI connected to a VPC belonging to adifferent AWS account in the same region
The configuration recommended for the greatest amount of stability is to have a public IPv4 address directly configuredon the WAN interface of your pfSense firewall but VPNs have been successfully established under all of the conditionslisted above
Whether any of these solutions is appropriate should be evaluated in the context of personal needs and existing infras-tructure Other configurations not listed above may be possible as well
327 AWS VPC Wizard FAQ
1 What level of redundancy is provided by the two tunnels
Amazon provides two tunnel endpoints that will allow traffic to be sent between your networks and the remote VPCyou are connected to The racoon daemon in pfSensereg is only capable of establishing an active phase 2 associationfor a particular sourcedestination pair on a single tunnel
Phase 2 associations between the local subnets and the remote VPC subnet are configured in the pfSense GUI for bothtunnels but racoon will only actually establish an association for the first tunnel This means that racoon will onlyever try to send traffic destined for the remote VPC subnet over the first tunnel
copy Copyright 2020 Rubicon Communications LLC 59
Security Gateway Manual Amazon AWS
If that tunnel goes down the second tunnel may be up and inbound traffic from the remote VPC may be sent to yourlocal networks over that tunnel automatically But outbound traffic to your remote VPC would not automatically failover to the second tunnel In order for you to send your outbound traffic over the second tunnel you would need todisable the phase 2 associations for the first tunnel and apply the changes
2 I quit the wizard before finishing Now what
To finish setting up the VPN go back to the wizard and run through it again It should reuse any partial configurationsthat were generated before it was stopped and create the new elements that are required
3 What are the AWS charges for this
AWS determines their own pricing and provides details for EC2 pricing and VPC pricing There are many types ofcharges that may be incurred for operating instances on AWS (eg charges related to running an instance bandwidthstorage elastic IPs etc)
The charge of specific interest in this case is the hourly charge for a VPN Connection As of this writing it costs $005(USD) per hour in most regions to have a VPN Connection configured and available AWS will charge whether theVPN Connection is being used or not as long as it is configured This will be configured by the third step of the wizardand will never be removed by pfSense
If the VPN Connection is no longer needed and billing for it needs to be stopped visit AWSrsquos VPC ManagementConsole and delete the VPN Connection manually
4 Can I use the wizard to connect to the GovCloud region
This hasnrsquot been officially tested but at least one user has reported that they were able to successfully connect to theGovCloud region They manually added the region us-gov-west-1 to the list of regions in the first step of the wizardand were able to successfully connect to their VPC in that region This may be supported in a future build but to trywithout official support do the following
1 Under the System gt Advanced menu make sure the Enable Secure Shell box is checked This is already doneby default on AWS instances but is off by default on pfSense hardware devices
2 Log into the instance via SSH
3 Make sure the root filesystem is mounted as readwrite On an AWS instance or a hardware device running on anSSD this should be true On a hardware device using Compact Flash or an SD card for storage it will probablybe necessary to remount the root filesystem in readwrite mode by running
mount -uw
4 Edit the file usrlocalwwwwizardsvpc_vpn_wizardxml using vi Look for a section of the file that lookslike this
ltoptiongtltnamegtsa-east-1ltnamegtltvaluegtsa-east-1ltvaluegt
ltoptiongt
That should appear directly after several similar ltoptiongt specifications containing all of the other availableregions Right underneath that section add the following
copy Copyright 2020 Rubicon Communications LLC 60
Security Gateway Manual Amazon AWS
ltoptiongtltnamegtus-gov-west-1ltnamegtltvaluegtus-gov-west-1ltvaluegt
ltoptiongt
Then save the file and exit vi
5 If the filesystem had to be remounted in readwrite mode earlier remount it in read-only mode by running
The GovCloud region should now appear as a choice in the first step of the wizard
copy Copyright 2020 Rubicon Communications LLC 61
CHAPTER
FOUR
REFERENCES
41 Support Resources
411 Commercial Support
In order to keep prices low the software is not bundled with a support subscription For users who need commercialsupport Netgate Gloabal Support can be purchased at httpswwwnetgatecomsupport
412 Community Support
Community support for pfSensereg software is available through the Netgate Forum
42 Additional Resources
421 Netgate Training
Netgate training offers training courses for increasing your knowledge of pfSensereg products and services Whetheryou need to maintain or improve the security skills of your staff or offer highly specialized support and improve yourcustomer satisfaction Netgate training has got you covered
httpswwwnetgatecomtraining
422 Resource Library
To learn more about how to use your pfSense appliance and for other helpful resources make sure to browse ourResource Library
httpswwwnetgatecomresources
423 Professional Services
Support does not cover more complex tasks such as CARP configuration for redundancy on multiple firewalls orcircuits network design and conversion from other firewalls to pfSensereg These items are offered as professionalservices and can be purchased and scheduled accordingly
httpswwwnetgatecomour-servicesprofessional-serviceshtml
62
Security Gateway Manual Amazon AWS
424 Community Options
If you elected not to get a paid support plan you can find help from the active and knowledgeable pfSense communityon our forums
httpsforumnetgatecom
copy Copyright 2020 Rubicon Communications LLC 63
- Getting Started
- Instance Usage
- Virtual Private Cloud (VPC)
- References
-
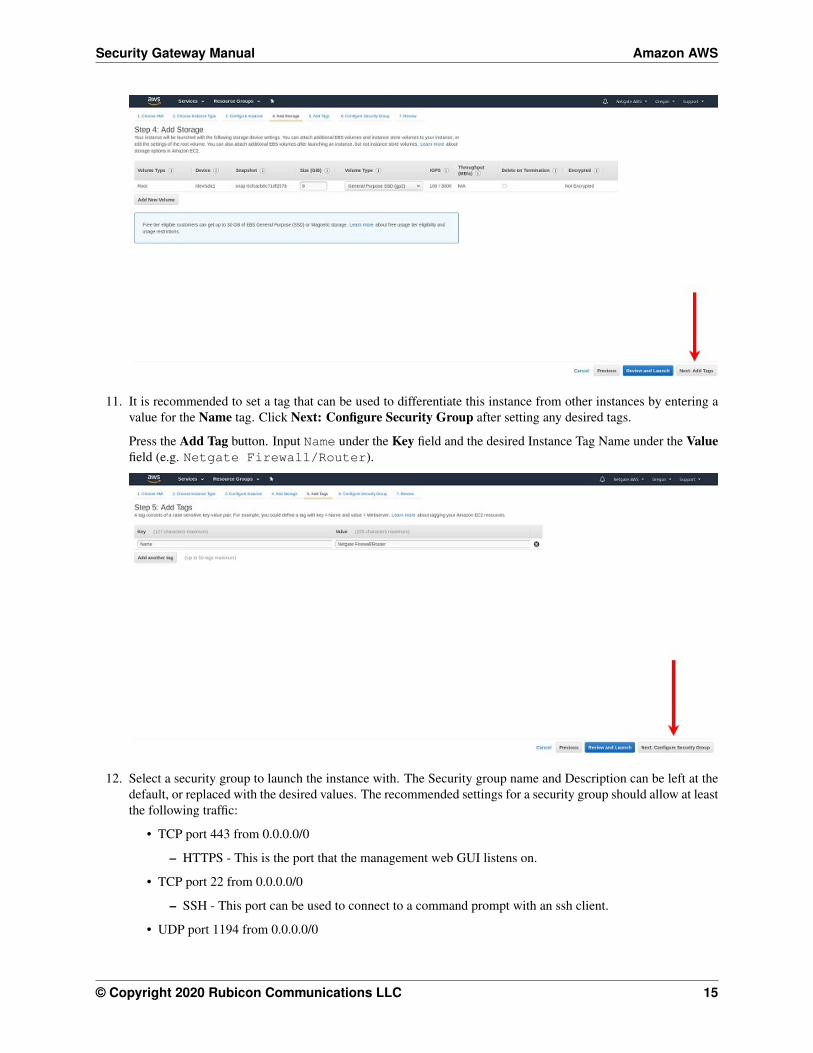
Security Gateway Manual Amazon AWS
a login screen with the Netgate logo should appear
The username to log in with is admin The password to use is either a value set in the User Data during the creationof the instance or a random password If a specific password wasnrsquot set find out that value that the random passwordwas set to through one of two different means
1 The first is to log in over ssh with the key pair that was selected when the instance was created and examine thecontents of the file located at etcmotd Select option 8 (Shell) from the console menu that is presented afterlog in and execute cat etcmotd from the shell
2 Alternatively view the System Log for the instance in the EC2 Management Console After the messagesthat are displayed that show the status of the boot process a message should appear that indicates what theadministrative password was changed to
The message using either of the methods mentioned will look like this
Admin password changed to abcdefg
In this example the password was changed to abcdefg
Note Be aware that the System Log output in the EC2 Management Console is not updated in real time and maytake a few minutes to show up It is preferable to explicitly set a password by passing a value in with the User Datafield so the password will be known in advance To allow a random password to be set connect via ssh and find outwhat the password was changed to after the instance is up without any delay
Once the password has been determined and entered into the login form the pfSense Web GUI should be available
23 Using the remote access IPsec VPN
An IPsec VPN for remote users is preconfigured on the instance when it comes up In order to use it you will need toconfigure the IPsec VPN client on your device
See also
A guide for manually configuring Android or iOS (iPhoneiPodiPad) mobile clients to establish an IPsec VPN islocated in the pfSensereg Documentation
For iOS clients a profile can be downloaded and installed that will automatically configure an IPsec VPN to theinstance The profile can be downloaded by visiting the page at iphone_ipsec_profilephp on the instance If theinstance IP address were 232020454 the correct URL to visit would be https232020454iphone_ipsec_profilephp You will need to authenticate to the web interface by typing the username (admin) and password prior to beingable to download the profile
The profile should be downloaded and saved automatically upon opening the page If the page is visited in a webbrowser on an iOS device the device should automatically launch the Settings app and attempt to install the newprofile If the profile is downloaded to another non-iOS device it can be sent via email as an attachment If theattachment is opened in the iOS email client the Settings app new profile installation will also open
The name and description of the profile being installed will be displayed Tap the Install button A warning messagewill be displayed that indicates that the profile is unsigned Tap on Install Now to continue
copy Copyright 2020 Rubicon Communications LLC 19
Security Gateway Manual Amazon AWS
copy Copyright 2020 Rubicon Communications LLC 20
Security Gateway Manual Amazon AWS
Enter your passcode for the iOS device (the one you enter when you wake the device from sleep) and the passwordto access the IPsec VPN (the one you entered to get access to the Web GUI) when prompted and the profile will beinstalled When the screen shows that the profile was installed tap Done
When the profile has been installed the VPN can be enabled in the Settings app There will be a heading named VPNunder the main Settings page If there are more than one VPN configured on the device tap the VPN heading Thenewly installed profile should be selected It will have a check mark next to it There will be an onoff switch at thetop of the page to enable the VPN If this is the only VPN configured the switch to enable the VPN will be next to theVPN heading on the main Settings page Tap the switch to enable the VPN You should be prompted for a usernameand password The username (admin) should already be filled in Enter the password and tap OK A welcome messageshould be displayed Tap OK and you are ready to use the VPN
24 Using the remote access OpenVPN VPN
An OpenVPN VPN for remote users is automatically configured the first time the instance is booted In order to useit you will need an OpenVPN client app installed on your device and you will need to import a configuration thatspecifies how to connect to the instance
An OpenVPN configuration can be downloaded by visiting the page openvpn_connect_profilephp on your instanceIf the instance IP address were 233020454 the correct URL to visit would be https232020454iphone_ipsec_profilephp You will need to authenticate to the web interface by typing the username (admin) and password prior tobeing allowed to download the configuration
The profile should be downloaded and saved automatically upon opening the page The file that it was saved in shouldbe imported into the OpenVPN client on the device that you wish to connect with
copy Copyright 2020 Rubicon Communications LLC 21
Security Gateway Manual Amazon AWS
241 Tips for configuring OpenVPN based on platformclient
OpenVPN Connect App on iOS (iPhoneiPadiPod)
The iOS version of the OpenVPN Connect App allows you to import an OpenVPN profile by opening an attachmentto an email message Save the config to a file named remote-access-vpnovpn and send it to an email account thatthe iOS device is configured to retrieve mail for Open the email message and touch the attachment to open it Youwill be presented with Open in OpenVPN as one of the available options Touch the OpenVPN icon to select thatoption The OpenVPN Connect App should then open and list the profile under a heading that says New profiles areavailable Click on the green ball with the + sign in it to import the profile Type in the username admin andpassword then change the OnOff switch to On
OpenVPN Connect App on Android
The Android version of the OpenVPN Connect App allows you to import an OpenVPN profile from an SD card Savethe configuration file to the SD card Launch the OpenVPN Connect App From the menu select Import then ImportProfile from SD card Browse to the location of the configuration file and select it Enter the username admin andpassword to connect to the VPN Press Connect
TunnelBlick on MacOS X
The TunnelBlick App for MacOS allows you to import an OpenVPN configuration file Save the configuration to afile on your system Click on VPN Details Click on the + symbol underneath the existing configurations to add anew configuration Click on the I have configuration files button Click on the OpenVPN Configuration(s) buttonFollow the instructions presented by TunnelBlick (copy the config into an empty folder TunnelBlick creates on theDesktop rename the folder click on the folder) When the profile is imported successfully click on itrsquos name and thenclick on Connect Enter the username admin and password to connect to the VPN
OpenVPN Connect Client on Windows
The OpenVPN Connect Client on Windows allows you to import an OpenVPN configuration file from the local diskSave the file on your system Click the + symbol to the right of Connection Profiles Select Local File and click onthe Import button Find the profile you wish to import in the file browser window and click Open A box with thename of the new profile should appear under Connection Profiles now Click on that box and enter the usernameadmin and password to connect to the VPN
25 Enabling Enhanced Networking with the Elastic Network Adapter(ENA)
To enable enhanced networking on AWS pfSensereg FirewallVPNRouter must be version 241 or above Use theupdate wizard in the pfSense console to perform the update if necessary and then ENA can be enabled Enabling ENAis outlined in the steps below
Warning Updating the pfSense FirewallVPNRouter will force it to reboot and cause a disruption in service Besure to perform the update during a maintenance cycle
1 Install AWS CLI Documentation on the installation and use of AWS CLI can be found at httpsawsamazoncomcli
copy Copyright 2020 Rubicon Communications LLC 22
Security Gateway Manual Amazon AWS
2 Determine the Instance ID for the pfSense Instance from the EC2 Console
Fig 1 The selected pfSense Instance ID is i-042c16b65423b7dac
3 Stop the instance using Amazon EC2 console
4 Enable the enhanced networking attribute by executing the following AWS CLI command
aws ec2 modify-instance-attribute --instance-id i-042c16b65423b7dac --ena-support
5 Use the EC2 Console to start the pfSense Instance Once the pfSense Instance has started confirm that EnaSup-port is enabled by executing the following AWS CLI command
aws ec2 describe-instances --instance-ids i-042c16b65423b7dac --queryReservations[]Instances[]EnaSupport[true
]
6 Change the pfSense Instance Type to one that supports Enhanced Networking using the EC2 console Afterselecting an Instance Type that supports Enhanced Networking use the EC2 console to stop the pfSense Instance
copy Copyright 2020 Rubicon Communications LLC 23
Security Gateway Manual Amazon AWS
Note To review the Instance Types please see httpsawsamazoncomec2instance-types
7 Once the pfSense Instance has stopped use the EC2 Console to select the pfSense Instance and then under theActions button select Instance Settings gt Change Instance Type and select a new Instance Type
Fig 2 In this case m4xlarge was selected as the new Instance Type and then Apply was selected
8 In the EC2 Console the pfSense Instance should now show an Instance Type of m4xlarge
9 Using the EC2 console select the pfSense Instance and then under the Actions button select Instance State gtStart
26 Advanced Usage
261 Protecting a private network in VPC
An instance of the Netgate appliance can be used as a firewall for a VPC subnet This will generally require moremanual configuration than using an instance to host a remote access VPN does See the VPC User Guide for a moredetailed explanation of how to configure your VPC and your Netgate appliance instance to support this
262 Connecting a local pfSensereg device
In addition to connecting remote devices as clients a device running pfSensereg as a firewallrouter can be connectedas a peer to a pfSense appliance
See also
Read Configuring a Site-to-Site Static Key OpenVPN Instance in the pfSense documention to see the process ofconfiguring this setup
copy Copyright 2020 Rubicon Communications LLC 24
Security Gateway Manual Amazon AWS
When implementing the configuration changes detailed in the document you should use the Netgate appliance instanceon AWS as the ldquoserverrdquo end of the connection and your local pfSense device as the client ldquoendrdquo You will also needto make sure that you are using a unique port The default remote access OpenVPN server is configured to use UDPport 1194 It is suggested that if you are adding a site-to-site tunnel you should use a port between 1195 and 2000Whichever port you decide to use you will need to make sure that the port is open both in the firewall rules on theNetgate appliance instance and in the Security Group in the EC2 Management Console
If you wish to route all traffic from your homeoffice network through the OpenVPN tunnel to your Netgate applianceinstance you will need to add this statement to the advanced options for the OpenVPN Client on the homeofficepfSense device
redirect-gateway def1
This will cause a default route to be set that sends all locally originated traffic on your homeoffice network overthe OpenVPN tunnel when it is established If you use this configuration to send all traffic from your local networkthrough the OpenVPN tunnel you will also need to establish a NAT on the Netgate appliance instance on AWS fortraffic from the homeoffice network to the internet This can be accomplished by adding the CIDR block for yourhomeoffice network to the preconfigured Alias called Networks_to_NAT This is done by navigating to Aliases underthe Firewall heading on the web GUI then clicking on the edit icon to the right of Networks_to_NAT Add the newnetwork address and mask to the list of Networks and click the Save button Then click the Apply Changes buttonYou will also need to add the network used for the tunnel endpoints (IPv4 Tunnel Network) to the Networks_to_NATalias as well using the same procedure that was used to add the homeoffice network
Connecting multiple pfSense gateways to a Netgate appliance
Multiple homeoffice networks can be connected to a single Netgate appliance instance This could be used to allowclients at different office locations to communicate without requiring tunnels between each individual location Itcould also be used as a way to apply policies on traffic tofrom the internet in one place and have them take effectacross multiple locations
Each site would need to have the instructions above for connecting an individual device repeated to add an OpenVPNserver on the Netgate appliance instance and an OpenVPN client on the local pfSense device Each OpenVPN Serverthat is configured must use a unique port and a unique network for IPv4 Tunnel Network It is recommended touse a name that uniquely identifies each location connected in this manner in the Description field when adding anOpenVPN Server for a site in the Netgate appliance
263 Detect and Recover EC2 Instance Failure
You can create an Amazon CloudWatch alarm that monitors an Amazon EC2 instance and automatically recovers theinstance if it becomes impaired due to an underlying issue
For more information about instance recovery see Recover Your Instance
27 Frequently Asked Questions
271 1 I donrsquot know the password to the web GUI How do I find out what it is
The first time the instance boots it looks for a user-defined password set in the User Data box when the instance wascreated If you didnrsquot set one it chooses one randomly so that the instance is not accessible via a default password tomalicious users You can find out the random password that was set by choosing Get System Log from the ActionsMenu for the instance in the EC2 Management Console A message should appear after the system boot messages thatlooks like the following
copy Copyright 2020 Rubicon Communications LLC 25
Security Gateway Manual Amazon AWS
Admin password changed to abcdefg
It may take 5-10 minutes after the instance boots for this message to appear in the system log If you would like to findout the password sooner you can log in via SSH using the SSH key that was selected when the instance was createdThe same message that will be written to the system log will be written to the file etcmotd Running the commandcat etcmotd will show you what the password is
272 2 I donrsquot like the random password that was selected How can I change it
The password can be changed via the web GUI Log in with the username admin and the existing password Underthe System category click on User Manager The admin account should appear in a list of accounts Unless yoursquoveadded other accounts it should be the only account present Click on the Edit button (the icon with the e in it) to theright of the account listing Type your choice for a new password into the two boxes labeled Password Click theSave button at the bottom of the screen
273 3 How do I access my instance
There are several ways that you can manage or use your instance You should be able to connect via SSH or HTTPS inorder to manage the configuration of your instance If you connect via SSH you will either need to know the passwordof the admin account and login with that account or use the SSH key that was selected when the instance was createdHere is a sample command line to log in with an SSH key from a Unix or Linux host
ssh -i ~sshmy-ec2-key adminec2-A-B-C-Dcompute-1amazonawscom
You would substitute the actual location of your SSH private key for ~sshmy-ec2-key and the real hostnamewhich you can retrieve from the EC2 Management Console by looking at the data for the instance for example ec2-A-B-C-Dcompute-1amazonawscom If you know the password for the admin account you could use a commandsimilar to the one above but omit the -i ~sshmy-ec2-key
To connect via HTTPS you need to know the password to the instance either by setting it explicitly in the User Datawhen the instance is created or by retrieving it from the instance Once you know the password you should be able toconnect to the instance with any web browser by typing in the hostname of the instance to the URL field
274 4 How do I connect a VPN client to my instance
See the section in the user guide on Using the remote access IPsec or OpenVPN VPN
275 5 Why does the pfSensereg Dashboard say my WAN address is 10XYZ
Amazon AWS instances use DHCP to assign private addresses to the public-facing interfaces of an instance Thepublicly routable IP address that you use to acces the instance is NATed by Amazon to the private address that you seeconfigured on the WAN interface of your instance
copy Copyright 2020 Rubicon Communications LLC 26
Security Gateway Manual Amazon AWS
276 6 I added custom firewall rules to allow some traffic to my instance why I amnot seeing the packets arrive
Amazon AWS provides packet filtering in addition to the Netgate Appliance itself being a stateful firewall If youallowed traffic on the Netgate Appliance but have a security group configuration in the settings for the instance that isrestricting traffic you will need to also add your rules to the security group in the EC2 Management Console
Given that the Netgate Appliance is a fully functional firewall you may assign an AWS security group that allows alltraffic and perform whatever filtering you desire with rules on the Netgate Appliance
277 7 How do I route all the traffic from my entire home network over a VPN
If your home gatewayrouter has support for OpenVPN you can connect a site to site tunnel from your home networkto the Netgate VPN Appliance and configure your routing so that all Internet traffic is sent over the encrypted tunnelSee the user guide section on Connecting a local pfSensereg device
This may provide for simpler administration at home but your mobile devices and laptops that get used outside thehome should have an OpenVPN client installed and configured anyway so that you are always receiving the benefitsof sending your traffic through a VPN
copy Copyright 2020 Rubicon Communications LLC 27
CHAPTER
THREE
VIRTUAL PRIVATE CLOUD (VPC)
31 AWS VPC User Guide
The pfSensereg Certified firewall and VPN appliance from Netgate for Amazon EC2 is a stateful firewall and VPNappliance In addition to itrsquos capabilities as a VPN gateway and firewall for users and offices it is capable of actingas a firewall to protect instances providing services in Amazonrsquos Virtual Private Cloud or VPC service This servicediffers from the classic EC2 service in that it allows for management of instances on private subnets
This guide will explain how to launch manage and use an instance of the appliance to act as a gateway for otherinstances in a VPC subnet
311 Preparing your VPC
In order to use a Netgate appliance instance to protect your VPC subnets you will need the following
bull One internet-facing subnet which the Netgate appliance instance will have itrsquos primaryWAN interface con-nected to
bull One or more private subnets which the Netgate appliance instance will have itrsquos secondaryLAN interface (andpossibly additional optional interfaces) connected to
bull Separate routing tables for the internet-facing subnet and the private subnet(s)
bull If you already have all of these in place with an existing VPC feel free to skip ahead to Launching an Instance
These instructions will demonstrate how to create a single private subnet and set it up behind an instance of thepfSensereg Certified firewall and VPN appliance from Netgate In the Amazon VPC Management Console create anew VPC subnets and routing table(s)
1 Go to Your VPCs view in the menu on the left side of the VPC Management Console under the Virtual PrivateClouds grouping Click the Create VPC button
28
Security Gateway Manual Amazon AWS
2 Enter a CIDR block to use in the box that pops up If you will connect to hosts in your VPC using a VPNfrom hosts at other sites in your infrastructure be sure to select address space that does not conflict with theprivate address space used elsewhere by your organization Make sure the block you choose is large enoughto contain all subnets you may want to include within it Eg if you plan to use a 24 for your internet-facingsubnet and a 24 for your private network the CIDR block you select here will need to be at least a 23 to holdthose 2 subnets The maximum size block you can select is a 16 For the purposes of this example we will use1020016 Leave the value of Tenancy set to Default Click on the Yes Create button
3 To create the subnets required go to the Subnets view in the menu on the left side of the VPC ManagementConsole Click the Create Subnet button Select the VPC you just created and choose the availability zone youdesire Enter the subnet you wish to use for the internet-facing hosts in the CIDR Block field This subnet willbe the one that the WAN interface of the Netgate appliance instance is attached to and could include any otherhosts or appliances that you wish to be available directly from the Internet and not protected behind the Netgate
copy Copyright 2020 Rubicon Communications LLC 29
Security Gateway Manual Amazon AWS
appliance The subnet you select here must be a block that is within the address space you assigned to the VPCFor this example we will use 1020024 Click on the Yes Create button
4 Create the private subnet Still in the Subnets view of the VPC Management Console click the Create Subnetbutton In the box that pops up select the appropriate VPC and the same Availability Zone that you assignedto your public subnet Enter the subnet you wish to use for your private network in the CIDR Block field Thisnetwork should be a subnet of the address space you assigned to the VPC and should be distinct from the subnetyou assigned to the public subnet For this example we will use 1021024 Click on the Yes Create button
5 Both subnets that you created will have been created to use a default route table that was created for the VPCThe private subnet can continue to use that default table A new route table will need to be created for the publicsubnet Go to the Route Tables view in the menu on the left side of the VPC Management Console The singleexisting route table should be displayed Click on the Create Route Table button Select the VPC and click on
copy Copyright 2020 Rubicon Communications LLC 30
Security Gateway Manual Amazon AWS
the Yes Create button
6 Associate the public subnet (1020024 in our examples) with the routing table that was just created Go to theSubnets view on the left hand side of the VPC Management Console Check the checkbox next to the publicsubnet and scroll down to look at the Details tab for that subnet At the top of the Details tab will be listed theCIDR block VPC and Availability Zone Under those items the Route Table will be listed and will have a linklabeled replace next to it Click on the link Select the route table in the box that pops up and click on the YesReplace button
7 In order to send traffic from the public subnet to the Internet we will need to add a default route to an InternetGateway We must first create one Go to the Internet Gateways view in the menu on the left hand side of theVPC Management Console Click on the Create Internet Gateway button Click the Yes Create button onthe box that pops up Click the checkbox next to the new Internet Gateway and then click the Attach to VPC
copy Copyright 2020 Rubicon Communications LLC 31
Security Gateway Manual Amazon AWS
button Select the VPC and click on the Yes Attach button
8 The route table for the public subnet will need to be updated so that it has a default route to the Internet GatewayGo to the Route Tables view on the left hand side of the VPC Management Console Check the checkbox nextto the route table for the public subnet Under the Routes tab for that route table there should only be listed asingle route for the CIDR block of the VPC (1020016 in our example) that has a target of local There is arow underneath this route with a text box in the Destination field and a pop up menu for the Target field Enter00000 for the Destination and select the Internet Gateway (should be formatted like igw-XXXXXXXX)for the target Click on the Add button that appears at the right side of the row Click the Yes Add button onthe box that pops up
There are a few more VPC configuration changes that will be required later but next you must launch a Netgateappliance instance
copy Copyright 2020 Rubicon Communications LLC 32
Security Gateway Manual Amazon AWS
312 Launching an Instance in a VPC
In the Amazon EC2 Management Console launch a new instance of the pfSensereg firewall and VPN appliance Thisprocess is the same as the one for launching an EC2 (non-VPC) instance up until step 11 which details the values toenter for the Configure Instance Details screen in order to specify the instance should be created in your VPC
1 Select the region to run the instance in using the tab at the upper right corner of the page
2 Launch a new instance by clicking on the Launch Instance button under the Create Instance section of theEC2 dashboard
copy Copyright 2020 Rubicon Communications LLC 33
Security Gateway Manual Amazon AWS
3 Select AWS Marketplace on the Create a New Instance menu Type Netgate pfSense FirewallVPNRouter in the search box and press enter (or click on the Search button next to the text box)
4 Click on the link for the Netgate pfSense FirewallVPNRouter appliance in the search results
5 Click on the Continue button on the info page for the Netgate pfSense FirewallVPNRouter
copy Copyright 2020 Rubicon Communications LLC 34
Security Gateway Manual Amazon AWS
6 Click on the Launch with EC2 Console tab
7 If the license terms havenrsquot been accepted click on the Accept Terms button
8 A message should be displayed indicating that the subscription is being processed
copy Copyright 2020 Rubicon Communications LLC 35
Security Gateway Manual Amazon AWS
9 Select the version of the image to run under the popup menu labeled Select a Version Generally the mostrecently issued version should be selected Identify which region to launch the instances in and click on theLaunch in EC2 Console button to the right of that region
10 Choose the instance type to run on Click Next Configure Instance Details
copy Copyright 2020 Rubicon Communications LLC 36
Security Gateway Manual Amazon AWS
11 On the Configure Instance Details page under the Network field select the VPC that was created For theSubnet field that appears right below the Network field select the public subnet that was created earlier In ourexamples this is 1020024
12 Scroll down to the Network Interfaces heading A single interface named eth0 should be displayed by defaultClick on the Add Device button underneath eth0 Select the private subnet that was created (1021024 in ourexample) Pick an IP address within the range of the private subnet and enter it in the Private IP field Keep inmind that the first 3 or 4 IP addresses are reserved For this example we will use 10215
copy Copyright 2020 Rubicon Communications LLC 37
Security Gateway Manual Amazon AWS
Optionally expand the Advanced Details section and set parameters as text in the User Data field The availableoptions are
password Setting a value via a directive like password=abcdefg will set the password for theadministrative account to the specified value - abcdefg in this example If no value is set here arandom password will be assigned in order to keep administrative access from being exposed tothe internet with a default password
mgmtnet Setting a value via a directive like mgmtnet=1001024 will restrict managementaccess (http https ssh) to the specified network - 1001024 in this example This will causethe firewall rule on the instance (not on Amazons access lists but on the Netgate appliancersquosown firewall) to restrict management traffic for the instance to the specified source network Thedefault behavior is to allow management from any host
These directives can be set by placing them on a single line in the User Data field and separating them withcolons Specify both parameters by typing a statement similar to
password=abcdefgmgmtnet=1001024
Click Next Add Storage after optionally setting these parameters
Note If setting a password using the password parameter listed above the password is retrieved by the instancevia an unencrypted HTTP request when the system is configured the first time it boots The request is made toan Amazon Web Services-operated server on the local LAN that stores metadata about each instance runningThe data for an instance is only made available to that instance but is available to be queried from the instancewithout providing any authentication credentials
It is advised to change the admin password via the pfSense webGUI after the instance comes up or choose notto set the password at all and let a random password be set
copy Copyright 2020 Rubicon Communications LLC 38
Security Gateway Manual Amazon AWS
13 Click Next Tag Instance to accept the Storage Device Configuration
14 Optionally a tag can be set on the instance to differentiate this instance from other VMrsquos that were started byentering a value for the Name tag Click Next Configure Security Group after setting any desired tags
copy Copyright 2020 Rubicon Communications LLC 39
Security Gateway Manual Amazon AWS
15 Select a security group to launch the instance with The recommended settings for a security group should allowat least the following traffic
bull TCP port 443 from 00000 - HTTPS - This is the port that the management web GUI listens on
bull TCP port 22 from 00000 - SSH - This port can be used to connect to a command prompt with an sshclient
bull UDP port 1194 from 00000 - OpenVPN - The OpenVPN server that is configured by default is boundto this port
bull UDP port 500 from 00000 - IKE for IPsec VPN
bull UDP port 4500 from 00000 - IPsecNAT-T for IPsec VPN
copy Copyright 2020 Rubicon Communications LLC 40
Security Gateway Manual Amazon AWS
If you have an existing security group that includes this access select Select an existing security group thenselect the group(s) to use and click Continue Otherwise select Create a new security group and add rulesfor this access by filling in the form for each rule and clicking the Add Rule button When all of the rules havebeen added click Review and Launch
16 Verify the details for the instance and click Launch
17 Select an existing key pair or create a new key pair to connect to the instance with Do not select Proceed
copy Copyright 2020 Rubicon Communications LLC 41
Security Gateway Manual Amazon AWS
Without a Key Pair Click the checkbox that indicates you acknowledge having access to the selected privatekey file and then click Launch Instance
18 In order to reach the instance from the Internet associate an Elastic IP with the WAN interface of the instanceIn the VPC Management Console go to the Elastic IPs view by clicking on Elastic IPs on the left side of thepage Click on the Allocate New Address button Select that you want the EIP used in VPC and click on theYes Allocate button in the box that pops up After the Elastic IP address is allocated associate the address withthe WAN interface of the Netgate appliance by clicking on the Associate Address button
A box will pop up that will either let you specify the instance and Private IP address of the interface or theNetwork Interface and the Private IP Address of the interface Use one of these methods to select the correctinterface and click on the Yes Associate button The instance should now be reachable via ssh or https
copy Copyright 2020 Rubicon Communications LLC 42
Security Gateway Manual Amazon AWS
19 In order for traffic to be allowed to be routed from the private subnet through the public interface of the instancethe SourceDest AddressCheck on the private interfaces needs to be disabled In the EC2 Management Con-sole go to the ldquoNetwork Interfacesrdquo view by clicking on Network Interfaces in the menu on the lefthand sideof the page
Click the checkbox to the left of the privateLAN interface on the Netgate appliance instance Click on theActions button at the top of the page and select Change SourceDesk Check on the popup menu Select theradio button labeled Disabled on the box that pops up and click on the Save button
Non-local traffic from the private subnet should now be sent through the privateLAN interface on the Netgateappliance instance
copy Copyright 2020 Rubicon Communications LLC 43
Security Gateway Manual Amazon AWS
313 Managing a VPC Instance
Once the instance is launched you can connect to it via the Elastic IP that was attached to the primary interface duringthe provisioning phase
In order to manage the configuration of the instance you can connect to it via https or ssh A limited set of configura-tions is possible through the SSH interface the preferred method for managing most of the configurations or viewingdata on the status of the pfSensereg instance is through the https webGUI
Connecting via SSH
To connect via SSH you would use the key pair you chose while creating the instance to connect to the admin accountFrom the command line on a UnixLinux host you would use a command similar to
ssh -i my_ec2_key admin232020454
Where the appropriate private key file and public IP or hostname are substituted
Note The first time you log into your instance the SSH key of the instance will not be cached on your computerand you will need to type yes when asked whether you want continue connecting This should not be necessary onsubsequent sessions
Once logged in you should see the console menu similar to the one below
copy Copyright 2020 Rubicon Communications LLC 44
Security Gateway Manual Amazon AWS
Connecting via HTTPS
To connect via https you would enter a URL containing the public IP address or hostname of your instance intoa web browser For example https232020454 Itrsquos very likely that you will receive a browser warningindicating that the security certificate of the site is not trusted This is because the instance uses a self-signed certificatefor https communication You should click on the option to proceed to the site anyway The pfSense login screen withthe Netgate logo should appear
The username to log in with is admin The password to use is either a value that you set in the User Data during thecreation of the instance or a random password
Tip It is preferable to explicitly set a password by passing a value in with the User Data field so the password willbe known in advance
If you did not set a specific password you can find out that value that the random password was set to through one of2 different methods
1 The first method is to log in over SSH with the key pair that you selected when the instance was created andexamine the contents of the file located at etcmotd You would do this by selecting option 8) Shell in theconsole menu that is presented when you SSH in then run this command in the shell
cat etcmotd
2 The second method is to view the System Log for the instance in the EC2 Management Console After themessages that are displayed that show the status of the boot process a message should appear that indicates what
copy Copyright 2020 Rubicon Communications LLC 45
Security Gateway Manual Amazon AWS
the administrative password was changed to Be aware that the System Log output in the EC2 ManagementConsole is not updated in real time and may take a few minutes to show up
The message you should look for using either of the methods mentioned about will look like this
Admin password changed to abcdefg
Once yoursquove determined your password and entered it into the login form the pfSense WebGUI should be availableto you
314 Forwarding traffic from VPC subnets through the instance
Some additional configuration is required within the VPC instancersquos pfSensereg webGUI before you are able to managetraffic from the private subnet
1 Log into the pfSense WebGUI for the instance
2 Click on the Interfaces heading on the left and then click the Assign link
3 Click on the + icon to add a new Interface under the Interface assignments tab A LAN interface shouldautomatically be added with the next available network interface (xn1)
4 Click on the Interfaces heading on the left again and then click on LAN Click the checkbox to enable the LANinterface Set the IPv4 Configuration Type to Static IPv4 and enter the IP address you assigned to the 2ndinterface during the provisioning phase Click the Save button
Now you can create other instances attached to your private subnet and protect them with the firewall on the pfSenseinstance
Common ways to manage private hosts
Allowing private hosts to connect to the Internet
To allow private hosts to be able to connect to the Internet you can allow any traffic from the LAN in your firewallrules there should be a rule like this in place by default
Next set up NAT rules to cause addresses in the private subnet to be NATed to the IP address of the WAN interface
1 Under the Firewall heading on the left click on the NAT link
2 On the Outbound tab click the radio button for Manual Outbound NAT rule generation (AON - AdvancedOutbound NAT)
3 Click the Save button
4 Click on the Aliases link under the Firewall heading on the left
5 Add your private subnet to the Networks_to_NAT alias
Note There is an existing NAT rule configured by default that uses the alias Networks_to_NAT
copy Copyright 2020 Rubicon Communications LLC 46
Security Gateway Manual Amazon AWS
Allow private hosts to connect to each other
If your hosts should only contact each other and a private network segment elsewhere you can configure an IPsecor OpenVPN tunnel from your remote networks to the Netgate appliance instance and set up the appropriate firewallrules routes and security policies to allow access to your private subnet through a VPN tunnel
Allow direct inbound access from the internet to hosts
If you wish to enable direct inbound access from the internet to hosts on the private subnet you can set up portforwarding on the WAN interface to direct traffic to particular hosts in the private subnet
315 Establishing a VPN connection to a VPC in another region
To establish a VPN that allows instances on the VPC subnet(s) that sit behind a Netgate appliance to communicate withinstances that reside in a VPC in another region the Netgate appliance has a VPC configuration wizard that assists byconfiguring both the Netgate appliance as well as the VPC configuration elements that would normally have to be setmanually through the AWS Management Console
For detailed instructions see the AWS VPC User Guide
316 Upgrading a VPC Instance
Periodically new releases of the AMI are issued to track new releases of pfSensereg that may provide new functionalitybug fixes and security updates
The lower risk approach to upgrading is to bring up a new instance alongside the existing one and executing a cutoverThese instructions detail the procedure for moving your existing instance to one running the latest version
1 Back up the configuration of your exsting instance by navigating to BackupRestore under the Diagnosticsmenu in the Web GUI Click the Download configuration button under the Backup Configuration headingand save your config file to your local system
2 Bring up a new instance of the pfSense Certified RouterFirewallVPN running the latest version
3 When creating the instance make sure the interfaces match the interfaces on the existing instance Make surethat the new instance is in the same VPC as the existing instance and that it has the same number of interfacesattached and that the interfaces are connected to the same Subnets
4 Make sure any interfaces on the new instance that will communicate with private Subnets have theSourceDestination check disabled
5 Allocate a new Elastic IP and associate it to the WAN interface of the new instance to allow yourself managementaccess
6 Restore the backed up configuration file to the new instance Navigate to BackupRestore under the Diagnosticsmenu in the Web GUI Under the Restore Configuration heading click the Choose File button and browsefor the configuration file you backed up from the existing instance earlier Once you have selected that fileclick the Restore configuration button The configuration file will be uploaded and the instance will rebootautomatically
7 If you had packages installed on the old instance navigate to Packages under the System menu in the pfSenseweb GUI and install the same packages
8 If there was any external dependency on the public IP address of the existing instance you can remove theElastic IP Address from the upgraded instance and move the Elastic IP Address from the existing instance tothe upgraded instance External dependencies that might cause you to want to do this include things like VPNrsquos
copy Copyright 2020 Rubicon Communications LLC 47
Security Gateway Manual Amazon AWS
configured to external devices that rely on the existing instancersquos Elastic IP address or access lists on externaldevices that allow access to traffic from the existing instancersquos IP address There may be other reasons why youwould wish to keep the existing address as well (to preserve existing bookmarks to the Web GUI reduce theneed for updates to existing internal documentation etc) The process for moving the old Elastic IP address tothe new instance is as follows
bull Disassociate the Elastic IP address from the new instance In the EC2 Management Console click onElastic IPs under the Network amp Security heading Check the box next to the Elastic IP address assignedto the new instance and click on the Disassociate Address button
bull Disassociate the Elastic IP address from the old instance The procedure is the same as in the previousstep just repeated for the Eastic IP address of the old instance this time
bull Associate the Elastic IP address that was previously associated to the old instance to public interface of thenew instance In the EC2 Management Console click on Elastic IPs Check the box next to the Elastic IPaddress you are moving and click the Associate Address button Fill in the correct value for the Instanceor Network Interface and select the Private IP Address of the public interface on the new instance Clickthe Associate button The management interface of the new instance should now be accessible
9 Move any default routes that pointed to an interface on the old instance to point to the equivalent interface onthe new instance In the VPC Management Console click on Route Tables under the Virtual Private Cloudheading Check the box next to a Route Table associated with the VPC that the instances is located in
bull In the detail pane that appears at the bottom of the screen click on the Routes tab
bull If a route exists for 00000 with a Target that is an interface ID of an interface on the old instnace clickthe Edit button above the table displaying the routes
bull Click the red X next to the row for 00000 to remove the existing route
bull There should be a blank row with empty fields for a new route Enter 00000 in the Destinationfield and the Network Interface ID of the interface on the new instance in the Target field Click on theSave button
bull If there were multiple private subnets in the VPC which were pointed to interfaces on the pfSense instancerepeat this process for the other Route Tables associated with the VPC
bull The new instance should now be functioning as the old one did
32 AWS VPC Wizard User Guide
This guide will explain how to use the AWS VPC Wizard to simplify the configuration of a VPN to a remote VPC Theadministrator is asked for the minimum amount of basic information required to establish the VPN The configurationsboth on the AWS VPC side and on the pfSense side are then automatically created When the wizard is finishedexecuting a functioning VPN connection to a VPC should be established
321 AWS Access Keys
In order to connect to the AWS API to make certain required configuration changes the AWS VPC Wizard requiresAccess Keys to retrieve and modify VPC configurations
See also
Find more information about AWS Security Credential including Access Keys by reading AWS Security Credentials
Access keys consist of two parts
1 An access key ID
copy Copyright 2020 Rubicon Communications LLC 48
Security Gateway Manual Amazon AWS
bull For example AKIAIOSFODNN7EXAMPLE
2 A secret access key
bull For example wJalrXUtnFEMIK7MDENGbPxRfiCYEXAMPLEKEY
Access keys are like a usernamepassword and needed for programmatic requests to AWS including the AWS VPCWizard Use both the access key ID and secret access key together to authenticate requests
Important Manage access keys as securely as a user name and password
Managing Access Keys
To create modify or delete IAM user access keys do the following
1 Sign in to the IAM console
2 In the navigation bar on the upper right choose a user name and then choose My Security Credentials
3 On the AWS IAM Credentials tab in the Access keys for CLI SDK and API access section choose Createaccess key
4 Choose Download csv file to save the access key ID and secret access key to a csv file on your computerStore the file in a secure location There is no access to the secret access key again after this dialog box closesAfter the csv file has been downloaded choose Close When an access key is created the key pair is active bydefault and the pair can be used right away
bull To disable an active access key choose Make inactive
bull To reenable an inactive access key choose Make active
bull To delete an access key choose its X button at the far right of the row Then choose Delete to confirmWhen an access key is deleted itrsquos gone forever and cannot be retrieved However new keys can alwaysbe created
To create modify or delete another IAM userrsquos access keys do the following
1 Sign in to the IAM console
2 In the navigation pane choose Users
3 Choose the name of the user whose access keys to manage and then choose the Security credentials tab
4 In the Access keys section choose Create access key
5 Choose Download csv file to save the access key ID and secret access key to a CSV file on your computer
Rotating Access Keys
As a security best practice we recommend to regularly rotate (change) IAM user access keys Rotating access keyscan be done from the AWS Management Console
To rotate access keys for an IAM user without interrupting the applications (console) create a second access key whilethe first access key is still active
1 Sign in to the IAM console
2 In the navigation pane choose Users
3 Choose the name of the user whose access keys to manage and then choose the Security credentials tab
4 In the Access keys section choose Create access key
copy Copyright 2020 Rubicon Communications LLC 49
Security Gateway Manual Amazon AWS
5 Choose Download csv file to save the access key ID and secret access key to a CSV file on your computer
6 The new access key is active by default At this point the user has two active access keys
After waiting some period of time to ensure that all applications and tools have been updated delete the first accesskey
1 Sign in to the IAM console
2 In the navigation pane choose Users
3 Choose the name of the user whose access keys to manage and then choose the Security credentials tab
4 Locate the access key to delete and choose its X button at the far right of the row Then choose Delete to confirm
Determining When Access Keys Need Rotating
To determine when access keys need rotating (console) do the following
1 Sign in to the IAM console
2 In the navigation pane choose Users
3 If necessary add the Access key age column to the users table by completing the following steps
1 Above the table on the far right click the settings icon
2 In Manage columns select Access key age
3 Choose Close to return to the list of users
4 The Access key age column shows the number of days since the oldest active access key was created Usethis information to find users with access keys that need rotating The column displays None for users with noaccess key
322 Using the Wizard
1 Gather your AWS Access Key ID and Secret Key
2 Navigate to VPN gt AWS VPC Wizard in the main menu in the pfSensereg webGUI
copy Copyright 2020 Rubicon Communications LLC 50
Security Gateway Manual Amazon AWS
3 The first screen of the wizard prompts for the AWS Credentials Enter the Access Key ID and Secret AccessKey in the appropriate text fields and select the Region to connect to in the dropdown menu then click Next
The wizard will then query the AWS API using those credentials to find which VPCrsquos exist in the selectedregion If the credentials were rejected an error message will be displayed and return to the first screen
4 The next screen will prompt to select from the available VPCrsquos in the selected region Select the one to connectto from the dropdown menu The wizard will not create a new VPC it will only connect to an existing VPC
Click Next after selecting the desired VPC
copy Copyright 2020 Rubicon Communications LLC 51
Security Gateway Manual Amazon AWS
Note If the desired VPCrsquos to connect to isnrsquot available create one via the AWS Management Console and tryagain
The wizard will then query the AWS API to check whether there is a VPN Gateway attached to the selectedVPC If none exists one will be created via the API Then the next screen will be displayed
5 On the next screen specify routing and network data
A description of what should be entered for each of these fields follows
copy Copyright 2020 Rubicon Communications LLC 52
Security Gateway Manual Amazon AWS
Routing Type AWS offers either static routing or BGP routing Select the appropriate type fromthe dropdown menu If unsure static routing is likely to be adequate
BGP AS Number If static routing was choosen leave this field blank Otherwise it is possible tospecify an AS number to use If left blank the value will default to 65000
Local Public IP Address On an AWS Netgate appliance instance this should be the public IP ad-dress of the Elastic IP associated with the instance If configuring a hardware device runningpfSense this could be the public address assigned to the WAN (or other) interface of the device
Local subnets The subnets connected to the pfSense instance that should be routed over the tunnelfrom hosts in the remote VPC As an example if connecting a pfSense instance to a remote VPCin the AWS us-east-1 region enter the subnets (or a single subnet) that are local to the pfSenseinstance and when hosts in your VPC in us-east-1 attempted to reach addresses within thosesubnets the traffic will be sent through the VPN tunnel that is being configured
Note When selecting static routing as the routing type there will be a delay that is typically between 2-5minutes before the next screen is displayed This is because static routes must be added to the VPN Connectionvia the AWS API This operation fails until the VPN Connection reaches the ldquoavailablerdquo state This can take afew minutes to occur
Click Next when done
The wizard will then query the AWS API to find whether a Customer Gateway is configured with the selectedPublic IP Address If none exists one will be created If one already exists the ID will be retrieved and it willbe used
The wizard will then query the AWS API to see if a VPC Connection already exists that matches the dataentered If one exists it will be used Otherwise one will be created
If static routing was selected static routes will be added to the VPN Connection for the Local subnets entered
Route propagation will be enabled for the VPN Gateway in each of the Route Tables that are associated withthe VPC All of these configurations are carried out in the AWS API nothing has been changed in the pfSenseVPN configurations yet
Warning Important Note on Billing Once this step is carried out and the VPN Connection is createdAWS will start billing your AWS account the hourly rate for a VPN Connection This is $005 as of thiswriting and that is a charge that goes entirely to AWS itself They will do this until the VPN Connection isdeleted via the VPC Management Console
Nothing in pfSense will ever cause AWS to stop billing for this VPN Connection Whether it works or notwhether the pfSense instance is up or down whether the IPsec tunnels have been deleted or reconfiguredAWS will continue to bill the hourly fee for a VPN Connection if the creation of it succeeds until it is deletedthrough their web interface
The wizard helps establish an initial configuration that works and configures the appropriate elements inAWSrsquos API to facilitate this You are responsible for making sure you understand what yoursquore being billedfor and disabling any functions including VPN Connections that are no longer necessary
6 If the operations of the previous step succeeded the next screen will appear
copy Copyright 2020 Rubicon Communications LLC 53
Security Gateway Manual Amazon AWS
Select an Interface to act as the local endpoint of the VPN tunnels that will be created In most cases thisshould be the WAN interface It should generally be whatever interface is associated with the Local Public IPAddress entered in the previous step
On an AWS Netgate pfSense instance this will be whatever interface the Elastic IP is associated with On ahardware device running pfSense that has the Local Public IP Address directly configured on an interface thiswill be the interface that the Local Public IP Address is configured on
After clicking Next the wizard will configure the VPN and associated settings within pfSense itself using datareturned by the AWS API in the previous step
It will configure 2 IPsec tunnels a firewall rule 2 Aliases (referenced by the firewall rule) and 2 Virtual IPAddresses If BGP was selected as the Routing Type in the previous step it will install the OpenBGPDpackage automatically and configure it appropriately
7 The next screen will appear and prompt to apply the configuration changes that have been made
copy Copyright 2020 Rubicon Communications LLC 54
Security Gateway Manual Amazon AWS
After clicking Next all the configuration changes that were made will be applied
8 The wizard will be completed and the browser will be redirected to the IPsec status page The VPN to the VPCshould now be fully configured
Note Sometimes there is a delay of 5-10 minutes before the tunnels are fully functional and passing trafficThis has been observed particularly often during the setup of tunnels using BGP routing
copy Copyright 2020 Rubicon Communications LLC 55
Security Gateway Manual Amazon AWS
323 Testing Connectivity
Verify that the IPsec tunnels are functioning by attempting to ping the ldquoinside tunnel addressesrdquo of the VPC side ofthe tunnel by navigating to Firewall -gt Virtual IP There should be two virtual IP addresses configured that haveDescriptions like ldquoInside address for tunnel to ltremote IP addressgtrdquo
Amazon provides inside addresses for each end of the tunnel in a 30 subnet in IPv4 link local address space(169254xy) Typically the first usable address in the 30 is the inside address for the VPC end of the tunnel andthe other usable address is the inside address for your end of the tunnel So if you ping from one of the virtual IPaddresses configured on the pfSensereg instance to the IP address that is one less (for example if the virtual IP addresswere 16925425322 ping from 16925425322 to 16925425321) that checks whether the other end of the tunnelis responding and whether the tunnel is functioning properly
Note It sometimes takes a few minutes for the tunnels to begin working after the configuration wizard completes
To ping log into the pfSense instance via SSH and execute ping from a shell prompt For the previous example of16925425322 the proper syntax is
ping -S 16925425322 16925425321
When pinging from a shell prompt it is possible leave the command running indefinitely and interrupt it there is aresponse
copy Copyright 2020 Rubicon Communications LLC 56
Security Gateway Manual Amazon AWS
It is also possible to ping via the Diagnostics -gt Ping page by selecting the appropriate source address and enteringthe remote tunnel inside address in the Host field This will only send a limited number of ping packets so it may benecessary to repeat this a few times
324 VPC Configuration Details
The AWS documentation for connecting a hardware device to a VPC provides a great amount of detail on configuringVPN Connections to VPC
The main configuration elements that exist in Amazonrsquos data model are the Virtual Private Gateway the CustomerGateway and the VPN Connection In order to configure a VPN connection to a VPC all 3 of these need to exist TheVirtual Private Gateway is the VPN endpoint on Amazonrsquos side The customer gateway is the VPN endpoint on thepfSensereg instancedevice being configured The VPN Connection is the IPsec VPN between Amazon and the pfSenseinstancedevice
A Virtual Private Gateway needs to exist and be associated to the VPC A particular VPN Gateway can only beassociated to one VPC at a time Once the VPC to connect to has been selected the wizard invokes the AWS API callDescribeVpnGateways to determine if a VPN Gateway already exists that is attached to the VPC If none exists itcreates one with the CreateVpnGateway API call and attaches it to the VPC with the AttachVpnGateway call
A Customer Gateway needs to be created for the public IP address of the device or virtual machine that will be used toconnect to the VPC The wizard invokes the AWS API call DescribeCustomerGateways to determine if a CustomerGateway already exists If none exists one is created with the CreateCustomerGateway API call
The VPN Connection connects the Virtual Private Gateway and Customer Gateway The wizard checks to see if thereis an existing VPN Connection configured that connects those endpoints by invoking the AWS API call DescribeVp-nConnections If none exists one is created using the CreateVpnConnection call One of the fields returned by thiscall is a block of XML configuration data that contains configuration data assigned by AWS for use with configuringthe VPN Connection This data is stored and used in subsequent steps to make the required configuration changeswithin pfSense
copy Copyright 2020 Rubicon Communications LLC 57
Security Gateway Manual Amazon AWS
Any objects created through API calls by the wizard will be tagged with names like auto-created by pfSenseVPC ltyour_VPC_IDgt This is accomplished by calling the AWS API call CreateTags and using Name as the keyfor the tag
In addition to creation of the items mentioned above required adjustments are made to Security Groups and RouteTables to facilitate communication over the VPN The Security Groups associated with the VPC are updated to allowinbound access from the local subnets on the pfSense end of the VPN They are checked first via the DescribeSecuri-tyGroups AWS API call to determine if the access is already allowed Any of the subnets that is not already allowedhas inbound access added via the AuthorizeSecurityGroupIngress AWS API call
Route Tables associated with the VPC are updated to receive routes from the VPN Gateway used by the VPN Con-nection They are checked first via the DescribeRouteTables AWS API call If the VPN Gateway ID is not includedin the list of VPN Gateways propagating routes route propagation for the VPN Gateway is enabled on that table usingthe EnableVgwRoutePropagation AWS API call
For VPN Connections using static routing static routes for the specified subnets are added to the VPN ConnectionThis is done via the CreateVpnConnectionRoute AWS API call
325 pfSense Configuration Details
On the pfSensereg side there are numerous configurations added to support the VPN to the VPC
Aliases
First aliases are created for use in a firewall rule These aliases are intended to contain the subnets that traffic shouldbe allowed to ingress over the IPsec tunnel One alias represents the local subnets on the pfSense side and is givena name like VPC_Local_vpc_12345678 and the other represents the remote subnets on the VPC side and is given aname like VPC_Remote_vpc_12345678
Virtual IP addresses
Next virtual IP addresses are added on the lo0 (loopback) interface These virtual IP addresses are the local ldquoinsideaddressesrdquo of the IPsec tunnels These addresses are used as the local address for BGP communication when BGProuting is selected These addresses are IPv4 link local addresses (see RFC 3297) AWS assigns 30rsquos out of thenetwork 1692540016 for this purpose
Note These addresses are also useful as a ping target to execute a basic test of whether the tunnel is functioningproperly Executing a ping from a source address of one of these IP addresses to the corresponding inside address ofthe other end of the tunnel helps determine whether the tunnel negotiation is completing properly
Firewall rules
Next a firewall rule is added on the IPsec interface that allows traffic from the VPC networks to the local subnetsThis rule uses the previously created Aliases as sourcedestination targets
IPsec
Then IPsec phase 1 and phase 2 associations are set up Most of the settings required are extracted from a blockof XML data that was returned by the CreateVpnConnection call made during the AWS configuration step Thisincludes parameters like endpoint IP addresses encryption ciphers timer values etc
copy Copyright 2020 Rubicon Communications LLC 58
Security Gateway Manual Amazon AWS
If BGP routing was selected the configurations for the OpenBGPD BGP daemon are established The required settingsare determined using the AS number entered into the wizard and the parameters returned by the CreateVpnConnec-tion call made during the AWS configuration step
326 Tested Configurations
Various topologies may be possible to establish using the AWS VPC Configuration Wizard This section enumeratessome of the configurations that were successfully tested
Platforms
bull Various hardware platforms
bull 64-bit virtual machines in VMware vSphereESX
bull Amazon EC2 instances (Xen virtual machines) of the Netgate pfSensereg RouterFirewallVPN AWS AMI
Local networkrouting configurations
bull pfSense with a public address configured on the WAN interface
bull pfSense with a private address configured on the WAN interface behind a 11 NAT
bull pfSense with a private address configured on the WAN interface behind a PAT (1many NAT)
VPC Topologies
bull pfSense connected to a single VPC
bull pfSense connected to multiple VPCrsquos in different regions
bull Amazon EC2 instance of the pfSense RouterFirewallVPN AWS AMI connected to a VPC belonging to thesame AWS account in a different region
bull Amazon EC2 instance of the pfSense RouterFirewallVPN AWS AMI connected to a VPC belonging to adifferent AWS account in the same region
The configuration recommended for the greatest amount of stability is to have a public IPv4 address directly configuredon the WAN interface of your pfSense firewall but VPNs have been successfully established under all of the conditionslisted above
Whether any of these solutions is appropriate should be evaluated in the context of personal needs and existing infras-tructure Other configurations not listed above may be possible as well
327 AWS VPC Wizard FAQ
1 What level of redundancy is provided by the two tunnels
Amazon provides two tunnel endpoints that will allow traffic to be sent between your networks and the remote VPCyou are connected to The racoon daemon in pfSensereg is only capable of establishing an active phase 2 associationfor a particular sourcedestination pair on a single tunnel
Phase 2 associations between the local subnets and the remote VPC subnet are configured in the pfSense GUI for bothtunnels but racoon will only actually establish an association for the first tunnel This means that racoon will onlyever try to send traffic destined for the remote VPC subnet over the first tunnel
copy Copyright 2020 Rubicon Communications LLC 59
Security Gateway Manual Amazon AWS
If that tunnel goes down the second tunnel may be up and inbound traffic from the remote VPC may be sent to yourlocal networks over that tunnel automatically But outbound traffic to your remote VPC would not automatically failover to the second tunnel In order for you to send your outbound traffic over the second tunnel you would need todisable the phase 2 associations for the first tunnel and apply the changes
2 I quit the wizard before finishing Now what
To finish setting up the VPN go back to the wizard and run through it again It should reuse any partial configurationsthat were generated before it was stopped and create the new elements that are required
3 What are the AWS charges for this
AWS determines their own pricing and provides details for EC2 pricing and VPC pricing There are many types ofcharges that may be incurred for operating instances on AWS (eg charges related to running an instance bandwidthstorage elastic IPs etc)
The charge of specific interest in this case is the hourly charge for a VPN Connection As of this writing it costs $005(USD) per hour in most regions to have a VPN Connection configured and available AWS will charge whether theVPN Connection is being used or not as long as it is configured This will be configured by the third step of the wizardand will never be removed by pfSense
If the VPN Connection is no longer needed and billing for it needs to be stopped visit AWSrsquos VPC ManagementConsole and delete the VPN Connection manually
4 Can I use the wizard to connect to the GovCloud region
This hasnrsquot been officially tested but at least one user has reported that they were able to successfully connect to theGovCloud region They manually added the region us-gov-west-1 to the list of regions in the first step of the wizardand were able to successfully connect to their VPC in that region This may be supported in a future build but to trywithout official support do the following
1 Under the System gt Advanced menu make sure the Enable Secure Shell box is checked This is already doneby default on AWS instances but is off by default on pfSense hardware devices
2 Log into the instance via SSH
3 Make sure the root filesystem is mounted as readwrite On an AWS instance or a hardware device running on anSSD this should be true On a hardware device using Compact Flash or an SD card for storage it will probablybe necessary to remount the root filesystem in readwrite mode by running
mount -uw
4 Edit the file usrlocalwwwwizardsvpc_vpn_wizardxml using vi Look for a section of the file that lookslike this
ltoptiongtltnamegtsa-east-1ltnamegtltvaluegtsa-east-1ltvaluegt
ltoptiongt
That should appear directly after several similar ltoptiongt specifications containing all of the other availableregions Right underneath that section add the following
copy Copyright 2020 Rubicon Communications LLC 60
Security Gateway Manual Amazon AWS
ltoptiongtltnamegtus-gov-west-1ltnamegtltvaluegtus-gov-west-1ltvaluegt
ltoptiongt
Then save the file and exit vi
5 If the filesystem had to be remounted in readwrite mode earlier remount it in read-only mode by running
The GovCloud region should now appear as a choice in the first step of the wizard
copy Copyright 2020 Rubicon Communications LLC 61
CHAPTER
FOUR
REFERENCES
41 Support Resources
411 Commercial Support
In order to keep prices low the software is not bundled with a support subscription For users who need commercialsupport Netgate Gloabal Support can be purchased at httpswwwnetgatecomsupport
412 Community Support
Community support for pfSensereg software is available through the Netgate Forum
42 Additional Resources
421 Netgate Training
Netgate training offers training courses for increasing your knowledge of pfSensereg products and services Whetheryou need to maintain or improve the security skills of your staff or offer highly specialized support and improve yourcustomer satisfaction Netgate training has got you covered
httpswwwnetgatecomtraining
422 Resource Library
To learn more about how to use your pfSense appliance and for other helpful resources make sure to browse ourResource Library
httpswwwnetgatecomresources
423 Professional Services
Support does not cover more complex tasks such as CARP configuration for redundancy on multiple firewalls orcircuits network design and conversion from other firewalls to pfSensereg These items are offered as professionalservices and can be purchased and scheduled accordingly
httpswwwnetgatecomour-servicesprofessional-serviceshtml
62
Security Gateway Manual Amazon AWS
424 Community Options
If you elected not to get a paid support plan you can find help from the active and knowledgeable pfSense communityon our forums
httpsforumnetgatecom
copy Copyright 2020 Rubicon Communications LLC 63
- Getting Started
- Instance Usage
- Virtual Private Cloud (VPC)
- References
-
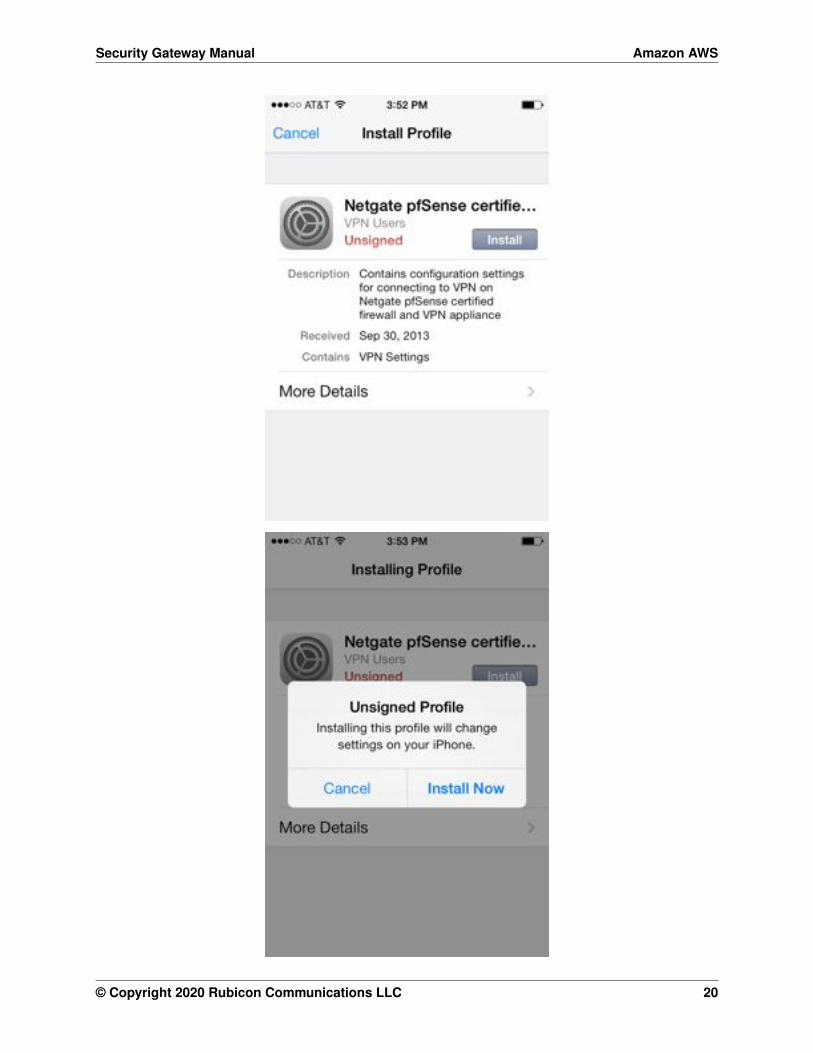
Security Gateway Manual Amazon AWS
241 Tips for configuring OpenVPN based on platformclient
OpenVPN Connect App on iOS (iPhoneiPadiPod)
The iOS version of the OpenVPN Connect App allows you to import an OpenVPN profile by opening an attachmentto an email message Save the config to a file named remote-access-vpnovpn and send it to an email account thatthe iOS device is configured to retrieve mail for Open the email message and touch the attachment to open it Youwill be presented with Open in OpenVPN as one of the available options Touch the OpenVPN icon to select thatoption The OpenVPN Connect App should then open and list the profile under a heading that says New profiles areavailable Click on the green ball with the + sign in it to import the profile Type in the username admin andpassword then change the OnOff switch to On
OpenVPN Connect App on Android
The Android version of the OpenVPN Connect App allows you to import an OpenVPN profile from an SD card Savethe configuration file to the SD card Launch the OpenVPN Connect App From the menu select Import then ImportProfile from SD card Browse to the location of the configuration file and select it Enter the username admin andpassword to connect to the VPN Press Connect
TunnelBlick on MacOS X
The TunnelBlick App for MacOS allows you to import an OpenVPN configuration file Save the configuration to afile on your system Click on VPN Details Click on the + symbol underneath the existing configurations to add anew configuration Click on the I have configuration files button Click on the OpenVPN Configuration(s) buttonFollow the instructions presented by TunnelBlick (copy the config into an empty folder TunnelBlick creates on theDesktop rename the folder click on the folder) When the profile is imported successfully click on itrsquos name and thenclick on Connect Enter the username admin and password to connect to the VPN
OpenVPN Connect Client on Windows
The OpenVPN Connect Client on Windows allows you to import an OpenVPN configuration file from the local diskSave the file on your system Click the + symbol to the right of Connection Profiles Select Local File and click onthe Import button Find the profile you wish to import in the file browser window and click Open A box with thename of the new profile should appear under Connection Profiles now Click on that box and enter the usernameadmin and password to connect to the VPN
25 Enabling Enhanced Networking with the Elastic Network Adapter(ENA)
To enable enhanced networking on AWS pfSensereg FirewallVPNRouter must be version 241 or above Use theupdate wizard in the pfSense console to perform the update if necessary and then ENA can be enabled Enabling ENAis outlined in the steps below
Warning Updating the pfSense FirewallVPNRouter will force it to reboot and cause a disruption in service Besure to perform the update during a maintenance cycle
1 Install AWS CLI Documentation on the installation and use of AWS CLI can be found at httpsawsamazoncomcli
copy Copyright 2020 Rubicon Communications LLC 22
Security Gateway Manual Amazon AWS
2 Determine the Instance ID for the pfSense Instance from the EC2 Console
Fig 1 The selected pfSense Instance ID is i-042c16b65423b7dac
3 Stop the instance using Amazon EC2 console
4 Enable the enhanced networking attribute by executing the following AWS CLI command
aws ec2 modify-instance-attribute --instance-id i-042c16b65423b7dac --ena-support
5 Use the EC2 Console to start the pfSense Instance Once the pfSense Instance has started confirm that EnaSup-port is enabled by executing the following AWS CLI command
aws ec2 describe-instances --instance-ids i-042c16b65423b7dac --queryReservations[]Instances[]EnaSupport[true
]
6 Change the pfSense Instance Type to one that supports Enhanced Networking using the EC2 console Afterselecting an Instance Type that supports Enhanced Networking use the EC2 console to stop the pfSense Instance
copy Copyright 2020 Rubicon Communications LLC 23
Security Gateway Manual Amazon AWS
Note To review the Instance Types please see httpsawsamazoncomec2instance-types
7 Once the pfSense Instance has stopped use the EC2 Console to select the pfSense Instance and then under theActions button select Instance Settings gt Change Instance Type and select a new Instance Type
Fig 2 In this case m4xlarge was selected as the new Instance Type and then Apply was selected
8 In the EC2 Console the pfSense Instance should now show an Instance Type of m4xlarge
9 Using the EC2 console select the pfSense Instance and then under the Actions button select Instance State gtStart
26 Advanced Usage
261 Protecting a private network in VPC
An instance of the Netgate appliance can be used as a firewall for a VPC subnet This will generally require moremanual configuration than using an instance to host a remote access VPN does See the VPC User Guide for a moredetailed explanation of how to configure your VPC and your Netgate appliance instance to support this
262 Connecting a local pfSensereg device
In addition to connecting remote devices as clients a device running pfSensereg as a firewallrouter can be connectedas a peer to a pfSense appliance
See also
Read Configuring a Site-to-Site Static Key OpenVPN Instance in the pfSense documention to see the process ofconfiguring this setup
copy Copyright 2020 Rubicon Communications LLC 24
Security Gateway Manual Amazon AWS
When implementing the configuration changes detailed in the document you should use the Netgate appliance instanceon AWS as the ldquoserverrdquo end of the connection and your local pfSense device as the client ldquoendrdquo You will also needto make sure that you are using a unique port The default remote access OpenVPN server is configured to use UDPport 1194 It is suggested that if you are adding a site-to-site tunnel you should use a port between 1195 and 2000Whichever port you decide to use you will need to make sure that the port is open both in the firewall rules on theNetgate appliance instance and in the Security Group in the EC2 Management Console
If you wish to route all traffic from your homeoffice network through the OpenVPN tunnel to your Netgate applianceinstance you will need to add this statement to the advanced options for the OpenVPN Client on the homeofficepfSense device
redirect-gateway def1
This will cause a default route to be set that sends all locally originated traffic on your homeoffice network overthe OpenVPN tunnel when it is established If you use this configuration to send all traffic from your local networkthrough the OpenVPN tunnel you will also need to establish a NAT on the Netgate appliance instance on AWS fortraffic from the homeoffice network to the internet This can be accomplished by adding the CIDR block for yourhomeoffice network to the preconfigured Alias called Networks_to_NAT This is done by navigating to Aliases underthe Firewall heading on the web GUI then clicking on the edit icon to the right of Networks_to_NAT Add the newnetwork address and mask to the list of Networks and click the Save button Then click the Apply Changes buttonYou will also need to add the network used for the tunnel endpoints (IPv4 Tunnel Network) to the Networks_to_NATalias as well using the same procedure that was used to add the homeoffice network
Connecting multiple pfSense gateways to a Netgate appliance
Multiple homeoffice networks can be connected to a single Netgate appliance instance This could be used to allowclients at different office locations to communicate without requiring tunnels between each individual location Itcould also be used as a way to apply policies on traffic tofrom the internet in one place and have them take effectacross multiple locations
Each site would need to have the instructions above for connecting an individual device repeated to add an OpenVPNserver on the Netgate appliance instance and an OpenVPN client on the local pfSense device Each OpenVPN Serverthat is configured must use a unique port and a unique network for IPv4 Tunnel Network It is recommended touse a name that uniquely identifies each location connected in this manner in the Description field when adding anOpenVPN Server for a site in the Netgate appliance
263 Detect and Recover EC2 Instance Failure
You can create an Amazon CloudWatch alarm that monitors an Amazon EC2 instance and automatically recovers theinstance if it becomes impaired due to an underlying issue
For more information about instance recovery see Recover Your Instance
27 Frequently Asked Questions
271 1 I donrsquot know the password to the web GUI How do I find out what it is
The first time the instance boots it looks for a user-defined password set in the User Data box when the instance wascreated If you didnrsquot set one it chooses one randomly so that the instance is not accessible via a default password tomalicious users You can find out the random password that was set by choosing Get System Log from the ActionsMenu for the instance in the EC2 Management Console A message should appear after the system boot messages thatlooks like the following
copy Copyright 2020 Rubicon Communications LLC 25
Security Gateway Manual Amazon AWS
Admin password changed to abcdefg
It may take 5-10 minutes after the instance boots for this message to appear in the system log If you would like to findout the password sooner you can log in via SSH using the SSH key that was selected when the instance was createdThe same message that will be written to the system log will be written to the file etcmotd Running the commandcat etcmotd will show you what the password is
272 2 I donrsquot like the random password that was selected How can I change it
The password can be changed via the web GUI Log in with the username admin and the existing password Underthe System category click on User Manager The admin account should appear in a list of accounts Unless yoursquoveadded other accounts it should be the only account present Click on the Edit button (the icon with the e in it) to theright of the account listing Type your choice for a new password into the two boxes labeled Password Click theSave button at the bottom of the screen
273 3 How do I access my instance
There are several ways that you can manage or use your instance You should be able to connect via SSH or HTTPS inorder to manage the configuration of your instance If you connect via SSH you will either need to know the passwordof the admin account and login with that account or use the SSH key that was selected when the instance was createdHere is a sample command line to log in with an SSH key from a Unix or Linux host
ssh -i ~sshmy-ec2-key adminec2-A-B-C-Dcompute-1amazonawscom
You would substitute the actual location of your SSH private key for ~sshmy-ec2-key and the real hostnamewhich you can retrieve from the EC2 Management Console by looking at the data for the instance for example ec2-A-B-C-Dcompute-1amazonawscom If you know the password for the admin account you could use a commandsimilar to the one above but omit the -i ~sshmy-ec2-key
To connect via HTTPS you need to know the password to the instance either by setting it explicitly in the User Datawhen the instance is created or by retrieving it from the instance Once you know the password you should be able toconnect to the instance with any web browser by typing in the hostname of the instance to the URL field
274 4 How do I connect a VPN client to my instance
See the section in the user guide on Using the remote access IPsec or OpenVPN VPN
275 5 Why does the pfSensereg Dashboard say my WAN address is 10XYZ
Amazon AWS instances use DHCP to assign private addresses to the public-facing interfaces of an instance Thepublicly routable IP address that you use to acces the instance is NATed by Amazon to the private address that you seeconfigured on the WAN interface of your instance
copy Copyright 2020 Rubicon Communications LLC 26
Security Gateway Manual Amazon AWS
276 6 I added custom firewall rules to allow some traffic to my instance why I amnot seeing the packets arrive
Amazon AWS provides packet filtering in addition to the Netgate Appliance itself being a stateful firewall If youallowed traffic on the Netgate Appliance but have a security group configuration in the settings for the instance that isrestricting traffic you will need to also add your rules to the security group in the EC2 Management Console
Given that the Netgate Appliance is a fully functional firewall you may assign an AWS security group that allows alltraffic and perform whatever filtering you desire with rules on the Netgate Appliance
277 7 How do I route all the traffic from my entire home network over a VPN
If your home gatewayrouter has support for OpenVPN you can connect a site to site tunnel from your home networkto the Netgate VPN Appliance and configure your routing so that all Internet traffic is sent over the encrypted tunnelSee the user guide section on Connecting a local pfSensereg device
This may provide for simpler administration at home but your mobile devices and laptops that get used outside thehome should have an OpenVPN client installed and configured anyway so that you are always receiving the benefitsof sending your traffic through a VPN
copy Copyright 2020 Rubicon Communications LLC 27
CHAPTER
THREE
VIRTUAL PRIVATE CLOUD (VPC)
31 AWS VPC User Guide
The pfSensereg Certified firewall and VPN appliance from Netgate for Amazon EC2 is a stateful firewall and VPNappliance In addition to itrsquos capabilities as a VPN gateway and firewall for users and offices it is capable of actingas a firewall to protect instances providing services in Amazonrsquos Virtual Private Cloud or VPC service This servicediffers from the classic EC2 service in that it allows for management of instances on private subnets
This guide will explain how to launch manage and use an instance of the appliance to act as a gateway for otherinstances in a VPC subnet
311 Preparing your VPC
In order to use a Netgate appliance instance to protect your VPC subnets you will need the following
bull One internet-facing subnet which the Netgate appliance instance will have itrsquos primaryWAN interface con-nected to
bull One or more private subnets which the Netgate appliance instance will have itrsquos secondaryLAN interface (andpossibly additional optional interfaces) connected to
bull Separate routing tables for the internet-facing subnet and the private subnet(s)
bull If you already have all of these in place with an existing VPC feel free to skip ahead to Launching an Instance
These instructions will demonstrate how to create a single private subnet and set it up behind an instance of thepfSensereg Certified firewall and VPN appliance from Netgate In the Amazon VPC Management Console create anew VPC subnets and routing table(s)
1 Go to Your VPCs view in the menu on the left side of the VPC Management Console under the Virtual PrivateClouds grouping Click the Create VPC button
28
Security Gateway Manual Amazon AWS
2 Enter a CIDR block to use in the box that pops up If you will connect to hosts in your VPC using a VPNfrom hosts at other sites in your infrastructure be sure to select address space that does not conflict with theprivate address space used elsewhere by your organization Make sure the block you choose is large enoughto contain all subnets you may want to include within it Eg if you plan to use a 24 for your internet-facingsubnet and a 24 for your private network the CIDR block you select here will need to be at least a 23 to holdthose 2 subnets The maximum size block you can select is a 16 For the purposes of this example we will use1020016 Leave the value of Tenancy set to Default Click on the Yes Create button
3 To create the subnets required go to the Subnets view in the menu on the left side of the VPC ManagementConsole Click the Create Subnet button Select the VPC you just created and choose the availability zone youdesire Enter the subnet you wish to use for the internet-facing hosts in the CIDR Block field This subnet willbe the one that the WAN interface of the Netgate appliance instance is attached to and could include any otherhosts or appliances that you wish to be available directly from the Internet and not protected behind the Netgate
copy Copyright 2020 Rubicon Communications LLC 29
Security Gateway Manual Amazon AWS
appliance The subnet you select here must be a block that is within the address space you assigned to the VPCFor this example we will use 1020024 Click on the Yes Create button
4 Create the private subnet Still in the Subnets view of the VPC Management Console click the Create Subnetbutton In the box that pops up select the appropriate VPC and the same Availability Zone that you assignedto your public subnet Enter the subnet you wish to use for your private network in the CIDR Block field Thisnetwork should be a subnet of the address space you assigned to the VPC and should be distinct from the subnetyou assigned to the public subnet For this example we will use 1021024 Click on the Yes Create button
5 Both subnets that you created will have been created to use a default route table that was created for the VPCThe private subnet can continue to use that default table A new route table will need to be created for the publicsubnet Go to the Route Tables view in the menu on the left side of the VPC Management Console The singleexisting route table should be displayed Click on the Create Route Table button Select the VPC and click on
copy Copyright 2020 Rubicon Communications LLC 30
Security Gateway Manual Amazon AWS
the Yes Create button
6 Associate the public subnet (1020024 in our examples) with the routing table that was just created Go to theSubnets view on the left hand side of the VPC Management Console Check the checkbox next to the publicsubnet and scroll down to look at the Details tab for that subnet At the top of the Details tab will be listed theCIDR block VPC and Availability Zone Under those items the Route Table will be listed and will have a linklabeled replace next to it Click on the link Select the route table in the box that pops up and click on the YesReplace button
7 In order to send traffic from the public subnet to the Internet we will need to add a default route to an InternetGateway We must first create one Go to the Internet Gateways view in the menu on the left hand side of theVPC Management Console Click on the Create Internet Gateway button Click the Yes Create button onthe box that pops up Click the checkbox next to the new Internet Gateway and then click the Attach to VPC
copy Copyright 2020 Rubicon Communications LLC 31
Security Gateway Manual Amazon AWS
button Select the VPC and click on the Yes Attach button
8 The route table for the public subnet will need to be updated so that it has a default route to the Internet GatewayGo to the Route Tables view on the left hand side of the VPC Management Console Check the checkbox nextto the route table for the public subnet Under the Routes tab for that route table there should only be listed asingle route for the CIDR block of the VPC (1020016 in our example) that has a target of local There is arow underneath this route with a text box in the Destination field and a pop up menu for the Target field Enter00000 for the Destination and select the Internet Gateway (should be formatted like igw-XXXXXXXX)for the target Click on the Add button that appears at the right side of the row Click the Yes Add button onthe box that pops up
There are a few more VPC configuration changes that will be required later but next you must launch a Netgateappliance instance
copy Copyright 2020 Rubicon Communications LLC 32
Security Gateway Manual Amazon AWS
312 Launching an Instance in a VPC
In the Amazon EC2 Management Console launch a new instance of the pfSensereg firewall and VPN appliance Thisprocess is the same as the one for launching an EC2 (non-VPC) instance up until step 11 which details the values toenter for the Configure Instance Details screen in order to specify the instance should be created in your VPC
1 Select the region to run the instance in using the tab at the upper right corner of the page
2 Launch a new instance by clicking on the Launch Instance button under the Create Instance section of theEC2 dashboard
copy Copyright 2020 Rubicon Communications LLC 33
Security Gateway Manual Amazon AWS
3 Select AWS Marketplace on the Create a New Instance menu Type Netgate pfSense FirewallVPNRouter in the search box and press enter (or click on the Search button next to the text box)
4 Click on the link for the Netgate pfSense FirewallVPNRouter appliance in the search results
5 Click on the Continue button on the info page for the Netgate pfSense FirewallVPNRouter
copy Copyright 2020 Rubicon Communications LLC 34
Security Gateway Manual Amazon AWS
6 Click on the Launch with EC2 Console tab
7 If the license terms havenrsquot been accepted click on the Accept Terms button
8 A message should be displayed indicating that the subscription is being processed
copy Copyright 2020 Rubicon Communications LLC 35
Security Gateway Manual Amazon AWS
9 Select the version of the image to run under the popup menu labeled Select a Version Generally the mostrecently issued version should be selected Identify which region to launch the instances in and click on theLaunch in EC2 Console button to the right of that region
10 Choose the instance type to run on Click Next Configure Instance Details
copy Copyright 2020 Rubicon Communications LLC 36
Security Gateway Manual Amazon AWS
11 On the Configure Instance Details page under the Network field select the VPC that was created For theSubnet field that appears right below the Network field select the public subnet that was created earlier In ourexamples this is 1020024
12 Scroll down to the Network Interfaces heading A single interface named eth0 should be displayed by defaultClick on the Add Device button underneath eth0 Select the private subnet that was created (1021024 in ourexample) Pick an IP address within the range of the private subnet and enter it in the Private IP field Keep inmind that the first 3 or 4 IP addresses are reserved For this example we will use 10215
copy Copyright 2020 Rubicon Communications LLC 37
Security Gateway Manual Amazon AWS
Optionally expand the Advanced Details section and set parameters as text in the User Data field The availableoptions are
password Setting a value via a directive like password=abcdefg will set the password for theadministrative account to the specified value - abcdefg in this example If no value is set here arandom password will be assigned in order to keep administrative access from being exposed tothe internet with a default password
mgmtnet Setting a value via a directive like mgmtnet=1001024 will restrict managementaccess (http https ssh) to the specified network - 1001024 in this example This will causethe firewall rule on the instance (not on Amazons access lists but on the Netgate appliancersquosown firewall) to restrict management traffic for the instance to the specified source network Thedefault behavior is to allow management from any host
These directives can be set by placing them on a single line in the User Data field and separating them withcolons Specify both parameters by typing a statement similar to
password=abcdefgmgmtnet=1001024
Click Next Add Storage after optionally setting these parameters
Note If setting a password using the password parameter listed above the password is retrieved by the instancevia an unencrypted HTTP request when the system is configured the first time it boots The request is made toan Amazon Web Services-operated server on the local LAN that stores metadata about each instance runningThe data for an instance is only made available to that instance but is available to be queried from the instancewithout providing any authentication credentials
It is advised to change the admin password via the pfSense webGUI after the instance comes up or choose notto set the password at all and let a random password be set
copy Copyright 2020 Rubicon Communications LLC 38
Security Gateway Manual Amazon AWS
13 Click Next Tag Instance to accept the Storage Device Configuration
14 Optionally a tag can be set on the instance to differentiate this instance from other VMrsquos that were started byentering a value for the Name tag Click Next Configure Security Group after setting any desired tags
copy Copyright 2020 Rubicon Communications LLC 39
Security Gateway Manual Amazon AWS
15 Select a security group to launch the instance with The recommended settings for a security group should allowat least the following traffic
bull TCP port 443 from 00000 - HTTPS - This is the port that the management web GUI listens on
bull TCP port 22 from 00000 - SSH - This port can be used to connect to a command prompt with an sshclient
bull UDP port 1194 from 00000 - OpenVPN - The OpenVPN server that is configured by default is boundto this port
bull UDP port 500 from 00000 - IKE for IPsec VPN
bull UDP port 4500 from 00000 - IPsecNAT-T for IPsec VPN
copy Copyright 2020 Rubicon Communications LLC 40
Security Gateway Manual Amazon AWS
If you have an existing security group that includes this access select Select an existing security group thenselect the group(s) to use and click Continue Otherwise select Create a new security group and add rulesfor this access by filling in the form for each rule and clicking the Add Rule button When all of the rules havebeen added click Review and Launch
16 Verify the details for the instance and click Launch
17 Select an existing key pair or create a new key pair to connect to the instance with Do not select Proceed
copy Copyright 2020 Rubicon Communications LLC 41
Security Gateway Manual Amazon AWS
Without a Key Pair Click the checkbox that indicates you acknowledge having access to the selected privatekey file and then click Launch Instance
18 In order to reach the instance from the Internet associate an Elastic IP with the WAN interface of the instanceIn the VPC Management Console go to the Elastic IPs view by clicking on Elastic IPs on the left side of thepage Click on the Allocate New Address button Select that you want the EIP used in VPC and click on theYes Allocate button in the box that pops up After the Elastic IP address is allocated associate the address withthe WAN interface of the Netgate appliance by clicking on the Associate Address button
A box will pop up that will either let you specify the instance and Private IP address of the interface or theNetwork Interface and the Private IP Address of the interface Use one of these methods to select the correctinterface and click on the Yes Associate button The instance should now be reachable via ssh or https
copy Copyright 2020 Rubicon Communications LLC 42
Security Gateway Manual Amazon AWS
19 In order for traffic to be allowed to be routed from the private subnet through the public interface of the instancethe SourceDest AddressCheck on the private interfaces needs to be disabled In the EC2 Management Con-sole go to the ldquoNetwork Interfacesrdquo view by clicking on Network Interfaces in the menu on the lefthand sideof the page
Click the checkbox to the left of the privateLAN interface on the Netgate appliance instance Click on theActions button at the top of the page and select Change SourceDesk Check on the popup menu Select theradio button labeled Disabled on the box that pops up and click on the Save button
Non-local traffic from the private subnet should now be sent through the privateLAN interface on the Netgateappliance instance
copy Copyright 2020 Rubicon Communications LLC 43
Security Gateway Manual Amazon AWS
313 Managing a VPC Instance
Once the instance is launched you can connect to it via the Elastic IP that was attached to the primary interface duringthe provisioning phase
In order to manage the configuration of the instance you can connect to it via https or ssh A limited set of configura-tions is possible through the SSH interface the preferred method for managing most of the configurations or viewingdata on the status of the pfSensereg instance is through the https webGUI
Connecting via SSH
To connect via SSH you would use the key pair you chose while creating the instance to connect to the admin accountFrom the command line on a UnixLinux host you would use a command similar to
ssh -i my_ec2_key admin232020454
Where the appropriate private key file and public IP or hostname are substituted
Note The first time you log into your instance the SSH key of the instance will not be cached on your computerand you will need to type yes when asked whether you want continue connecting This should not be necessary onsubsequent sessions
Once logged in you should see the console menu similar to the one below
copy Copyright 2020 Rubicon Communications LLC 44
Security Gateway Manual Amazon AWS
Connecting via HTTPS
To connect via https you would enter a URL containing the public IP address or hostname of your instance intoa web browser For example https232020454 Itrsquos very likely that you will receive a browser warningindicating that the security certificate of the site is not trusted This is because the instance uses a self-signed certificatefor https communication You should click on the option to proceed to the site anyway The pfSense login screen withthe Netgate logo should appear
The username to log in with is admin The password to use is either a value that you set in the User Data during thecreation of the instance or a random password
Tip It is preferable to explicitly set a password by passing a value in with the User Data field so the password willbe known in advance
If you did not set a specific password you can find out that value that the random password was set to through one of2 different methods
1 The first method is to log in over SSH with the key pair that you selected when the instance was created andexamine the contents of the file located at etcmotd You would do this by selecting option 8) Shell in theconsole menu that is presented when you SSH in then run this command in the shell
cat etcmotd
2 The second method is to view the System Log for the instance in the EC2 Management Console After themessages that are displayed that show the status of the boot process a message should appear that indicates what
copy Copyright 2020 Rubicon Communications LLC 45
Security Gateway Manual Amazon AWS
the administrative password was changed to Be aware that the System Log output in the EC2 ManagementConsole is not updated in real time and may take a few minutes to show up
The message you should look for using either of the methods mentioned about will look like this
Admin password changed to abcdefg
Once yoursquove determined your password and entered it into the login form the pfSense WebGUI should be availableto you
314 Forwarding traffic from VPC subnets through the instance
Some additional configuration is required within the VPC instancersquos pfSensereg webGUI before you are able to managetraffic from the private subnet
1 Log into the pfSense WebGUI for the instance
2 Click on the Interfaces heading on the left and then click the Assign link
3 Click on the + icon to add a new Interface under the Interface assignments tab A LAN interface shouldautomatically be added with the next available network interface (xn1)
4 Click on the Interfaces heading on the left again and then click on LAN Click the checkbox to enable the LANinterface Set the IPv4 Configuration Type to Static IPv4 and enter the IP address you assigned to the 2ndinterface during the provisioning phase Click the Save button
Now you can create other instances attached to your private subnet and protect them with the firewall on the pfSenseinstance
Common ways to manage private hosts
Allowing private hosts to connect to the Internet
To allow private hosts to be able to connect to the Internet you can allow any traffic from the LAN in your firewallrules there should be a rule like this in place by default
Next set up NAT rules to cause addresses in the private subnet to be NATed to the IP address of the WAN interface
1 Under the Firewall heading on the left click on the NAT link
2 On the Outbound tab click the radio button for Manual Outbound NAT rule generation (AON - AdvancedOutbound NAT)
3 Click the Save button
4 Click on the Aliases link under the Firewall heading on the left
5 Add your private subnet to the Networks_to_NAT alias
Note There is an existing NAT rule configured by default that uses the alias Networks_to_NAT
copy Copyright 2020 Rubicon Communications LLC 46
Security Gateway Manual Amazon AWS
Allow private hosts to connect to each other
If your hosts should only contact each other and a private network segment elsewhere you can configure an IPsecor OpenVPN tunnel from your remote networks to the Netgate appliance instance and set up the appropriate firewallrules routes and security policies to allow access to your private subnet through a VPN tunnel
Allow direct inbound access from the internet to hosts
If you wish to enable direct inbound access from the internet to hosts on the private subnet you can set up portforwarding on the WAN interface to direct traffic to particular hosts in the private subnet
315 Establishing a VPN connection to a VPC in another region
To establish a VPN that allows instances on the VPC subnet(s) that sit behind a Netgate appliance to communicate withinstances that reside in a VPC in another region the Netgate appliance has a VPC configuration wizard that assists byconfiguring both the Netgate appliance as well as the VPC configuration elements that would normally have to be setmanually through the AWS Management Console
For detailed instructions see the AWS VPC User Guide
316 Upgrading a VPC Instance
Periodically new releases of the AMI are issued to track new releases of pfSensereg that may provide new functionalitybug fixes and security updates
The lower risk approach to upgrading is to bring up a new instance alongside the existing one and executing a cutoverThese instructions detail the procedure for moving your existing instance to one running the latest version
1 Back up the configuration of your exsting instance by navigating to BackupRestore under the Diagnosticsmenu in the Web GUI Click the Download configuration button under the Backup Configuration headingand save your config file to your local system
2 Bring up a new instance of the pfSense Certified RouterFirewallVPN running the latest version
3 When creating the instance make sure the interfaces match the interfaces on the existing instance Make surethat the new instance is in the same VPC as the existing instance and that it has the same number of interfacesattached and that the interfaces are connected to the same Subnets
4 Make sure any interfaces on the new instance that will communicate with private Subnets have theSourceDestination check disabled
5 Allocate a new Elastic IP and associate it to the WAN interface of the new instance to allow yourself managementaccess
6 Restore the backed up configuration file to the new instance Navigate to BackupRestore under the Diagnosticsmenu in the Web GUI Under the Restore Configuration heading click the Choose File button and browsefor the configuration file you backed up from the existing instance earlier Once you have selected that fileclick the Restore configuration button The configuration file will be uploaded and the instance will rebootautomatically
7 If you had packages installed on the old instance navigate to Packages under the System menu in the pfSenseweb GUI and install the same packages
8 If there was any external dependency on the public IP address of the existing instance you can remove theElastic IP Address from the upgraded instance and move the Elastic IP Address from the existing instance tothe upgraded instance External dependencies that might cause you to want to do this include things like VPNrsquos
copy Copyright 2020 Rubicon Communications LLC 47
Security Gateway Manual Amazon AWS
configured to external devices that rely on the existing instancersquos Elastic IP address or access lists on externaldevices that allow access to traffic from the existing instancersquos IP address There may be other reasons why youwould wish to keep the existing address as well (to preserve existing bookmarks to the Web GUI reduce theneed for updates to existing internal documentation etc) The process for moving the old Elastic IP address tothe new instance is as follows
bull Disassociate the Elastic IP address from the new instance In the EC2 Management Console click onElastic IPs under the Network amp Security heading Check the box next to the Elastic IP address assignedto the new instance and click on the Disassociate Address button
bull Disassociate the Elastic IP address from the old instance The procedure is the same as in the previousstep just repeated for the Eastic IP address of the old instance this time
bull Associate the Elastic IP address that was previously associated to the old instance to public interface of thenew instance In the EC2 Management Console click on Elastic IPs Check the box next to the Elastic IPaddress you are moving and click the Associate Address button Fill in the correct value for the Instanceor Network Interface and select the Private IP Address of the public interface on the new instance Clickthe Associate button The management interface of the new instance should now be accessible
9 Move any default routes that pointed to an interface on the old instance to point to the equivalent interface onthe new instance In the VPC Management Console click on Route Tables under the Virtual Private Cloudheading Check the box next to a Route Table associated with the VPC that the instances is located in
bull In the detail pane that appears at the bottom of the screen click on the Routes tab
bull If a route exists for 00000 with a Target that is an interface ID of an interface on the old instnace clickthe Edit button above the table displaying the routes
bull Click the red X next to the row for 00000 to remove the existing route
bull There should be a blank row with empty fields for a new route Enter 00000 in the Destinationfield and the Network Interface ID of the interface on the new instance in the Target field Click on theSave button
bull If there were multiple private subnets in the VPC which were pointed to interfaces on the pfSense instancerepeat this process for the other Route Tables associated with the VPC
bull The new instance should now be functioning as the old one did
32 AWS VPC Wizard User Guide
This guide will explain how to use the AWS VPC Wizard to simplify the configuration of a VPN to a remote VPC Theadministrator is asked for the minimum amount of basic information required to establish the VPN The configurationsboth on the AWS VPC side and on the pfSense side are then automatically created When the wizard is finishedexecuting a functioning VPN connection to a VPC should be established
321 AWS Access Keys
In order to connect to the AWS API to make certain required configuration changes the AWS VPC Wizard requiresAccess Keys to retrieve and modify VPC configurations
See also
Find more information about AWS Security Credential including Access Keys by reading AWS Security Credentials
Access keys consist of two parts
1 An access key ID
copy Copyright 2020 Rubicon Communications LLC 48
Security Gateway Manual Amazon AWS
bull For example AKIAIOSFODNN7EXAMPLE
2 A secret access key
bull For example wJalrXUtnFEMIK7MDENGbPxRfiCYEXAMPLEKEY
Access keys are like a usernamepassword and needed for programmatic requests to AWS including the AWS VPCWizard Use both the access key ID and secret access key together to authenticate requests
Important Manage access keys as securely as a user name and password
Managing Access Keys
To create modify or delete IAM user access keys do the following
1 Sign in to the IAM console
2 In the navigation bar on the upper right choose a user name and then choose My Security Credentials
3 On the AWS IAM Credentials tab in the Access keys for CLI SDK and API access section choose Createaccess key
4 Choose Download csv file to save the access key ID and secret access key to a csv file on your computerStore the file in a secure location There is no access to the secret access key again after this dialog box closesAfter the csv file has been downloaded choose Close When an access key is created the key pair is active bydefault and the pair can be used right away
bull To disable an active access key choose Make inactive
bull To reenable an inactive access key choose Make active
bull To delete an access key choose its X button at the far right of the row Then choose Delete to confirmWhen an access key is deleted itrsquos gone forever and cannot be retrieved However new keys can alwaysbe created
To create modify or delete another IAM userrsquos access keys do the following
1 Sign in to the IAM console
2 In the navigation pane choose Users
3 Choose the name of the user whose access keys to manage and then choose the Security credentials tab
4 In the Access keys section choose Create access key
5 Choose Download csv file to save the access key ID and secret access key to a CSV file on your computer
Rotating Access Keys
As a security best practice we recommend to regularly rotate (change) IAM user access keys Rotating access keyscan be done from the AWS Management Console
To rotate access keys for an IAM user without interrupting the applications (console) create a second access key whilethe first access key is still active
1 Sign in to the IAM console
2 In the navigation pane choose Users
3 Choose the name of the user whose access keys to manage and then choose the Security credentials tab
4 In the Access keys section choose Create access key
copy Copyright 2020 Rubicon Communications LLC 49
Security Gateway Manual Amazon AWS
5 Choose Download csv file to save the access key ID and secret access key to a CSV file on your computer
6 The new access key is active by default At this point the user has two active access keys
After waiting some period of time to ensure that all applications and tools have been updated delete the first accesskey
1 Sign in to the IAM console
2 In the navigation pane choose Users
3 Choose the name of the user whose access keys to manage and then choose the Security credentials tab
4 Locate the access key to delete and choose its X button at the far right of the row Then choose Delete to confirm
Determining When Access Keys Need Rotating
To determine when access keys need rotating (console) do the following
1 Sign in to the IAM console
2 In the navigation pane choose Users
3 If necessary add the Access key age column to the users table by completing the following steps
1 Above the table on the far right click the settings icon
2 In Manage columns select Access key age
3 Choose Close to return to the list of users
4 The Access key age column shows the number of days since the oldest active access key was created Usethis information to find users with access keys that need rotating The column displays None for users with noaccess key
322 Using the Wizard
1 Gather your AWS Access Key ID and Secret Key
2 Navigate to VPN gt AWS VPC Wizard in the main menu in the pfSensereg webGUI
copy Copyright 2020 Rubicon Communications LLC 50
Security Gateway Manual Amazon AWS
3 The first screen of the wizard prompts for the AWS Credentials Enter the Access Key ID and Secret AccessKey in the appropriate text fields and select the Region to connect to in the dropdown menu then click Next
The wizard will then query the AWS API using those credentials to find which VPCrsquos exist in the selectedregion If the credentials were rejected an error message will be displayed and return to the first screen
4 The next screen will prompt to select from the available VPCrsquos in the selected region Select the one to connectto from the dropdown menu The wizard will not create a new VPC it will only connect to an existing VPC
Click Next after selecting the desired VPC
copy Copyright 2020 Rubicon Communications LLC 51
Security Gateway Manual Amazon AWS
Note If the desired VPCrsquos to connect to isnrsquot available create one via the AWS Management Console and tryagain
The wizard will then query the AWS API to check whether there is a VPN Gateway attached to the selectedVPC If none exists one will be created via the API Then the next screen will be displayed
5 On the next screen specify routing and network data
A description of what should be entered for each of these fields follows
copy Copyright 2020 Rubicon Communications LLC 52
Security Gateway Manual Amazon AWS
Routing Type AWS offers either static routing or BGP routing Select the appropriate type fromthe dropdown menu If unsure static routing is likely to be adequate
BGP AS Number If static routing was choosen leave this field blank Otherwise it is possible tospecify an AS number to use If left blank the value will default to 65000
Local Public IP Address On an AWS Netgate appliance instance this should be the public IP ad-dress of the Elastic IP associated with the instance If configuring a hardware device runningpfSense this could be the public address assigned to the WAN (or other) interface of the device
Local subnets The subnets connected to the pfSense instance that should be routed over the tunnelfrom hosts in the remote VPC As an example if connecting a pfSense instance to a remote VPCin the AWS us-east-1 region enter the subnets (or a single subnet) that are local to the pfSenseinstance and when hosts in your VPC in us-east-1 attempted to reach addresses within thosesubnets the traffic will be sent through the VPN tunnel that is being configured
Note When selecting static routing as the routing type there will be a delay that is typically between 2-5minutes before the next screen is displayed This is because static routes must be added to the VPN Connectionvia the AWS API This operation fails until the VPN Connection reaches the ldquoavailablerdquo state This can take afew minutes to occur
Click Next when done
The wizard will then query the AWS API to find whether a Customer Gateway is configured with the selectedPublic IP Address If none exists one will be created If one already exists the ID will be retrieved and it willbe used
The wizard will then query the AWS API to see if a VPC Connection already exists that matches the dataentered If one exists it will be used Otherwise one will be created
If static routing was selected static routes will be added to the VPN Connection for the Local subnets entered
Route propagation will be enabled for the VPN Gateway in each of the Route Tables that are associated withthe VPC All of these configurations are carried out in the AWS API nothing has been changed in the pfSenseVPN configurations yet
Warning Important Note on Billing Once this step is carried out and the VPN Connection is createdAWS will start billing your AWS account the hourly rate for a VPN Connection This is $005 as of thiswriting and that is a charge that goes entirely to AWS itself They will do this until the VPN Connection isdeleted via the VPC Management Console
Nothing in pfSense will ever cause AWS to stop billing for this VPN Connection Whether it works or notwhether the pfSense instance is up or down whether the IPsec tunnels have been deleted or reconfiguredAWS will continue to bill the hourly fee for a VPN Connection if the creation of it succeeds until it is deletedthrough their web interface
The wizard helps establish an initial configuration that works and configures the appropriate elements inAWSrsquos API to facilitate this You are responsible for making sure you understand what yoursquore being billedfor and disabling any functions including VPN Connections that are no longer necessary
6 If the operations of the previous step succeeded the next screen will appear
copy Copyright 2020 Rubicon Communications LLC 53
Security Gateway Manual Amazon AWS
Select an Interface to act as the local endpoint of the VPN tunnels that will be created In most cases thisshould be the WAN interface It should generally be whatever interface is associated with the Local Public IPAddress entered in the previous step
On an AWS Netgate pfSense instance this will be whatever interface the Elastic IP is associated with On ahardware device running pfSense that has the Local Public IP Address directly configured on an interface thiswill be the interface that the Local Public IP Address is configured on
After clicking Next the wizard will configure the VPN and associated settings within pfSense itself using datareturned by the AWS API in the previous step
It will configure 2 IPsec tunnels a firewall rule 2 Aliases (referenced by the firewall rule) and 2 Virtual IPAddresses If BGP was selected as the Routing Type in the previous step it will install the OpenBGPDpackage automatically and configure it appropriately
7 The next screen will appear and prompt to apply the configuration changes that have been made
copy Copyright 2020 Rubicon Communications LLC 54
Security Gateway Manual Amazon AWS
After clicking Next all the configuration changes that were made will be applied
8 The wizard will be completed and the browser will be redirected to the IPsec status page The VPN to the VPCshould now be fully configured
Note Sometimes there is a delay of 5-10 minutes before the tunnels are fully functional and passing trafficThis has been observed particularly often during the setup of tunnels using BGP routing
copy Copyright 2020 Rubicon Communications LLC 55
Security Gateway Manual Amazon AWS
323 Testing Connectivity
Verify that the IPsec tunnels are functioning by attempting to ping the ldquoinside tunnel addressesrdquo of the VPC side ofthe tunnel by navigating to Firewall -gt Virtual IP There should be two virtual IP addresses configured that haveDescriptions like ldquoInside address for tunnel to ltremote IP addressgtrdquo
Amazon provides inside addresses for each end of the tunnel in a 30 subnet in IPv4 link local address space(169254xy) Typically the first usable address in the 30 is the inside address for the VPC end of the tunnel andthe other usable address is the inside address for your end of the tunnel So if you ping from one of the virtual IPaddresses configured on the pfSensereg instance to the IP address that is one less (for example if the virtual IP addresswere 16925425322 ping from 16925425322 to 16925425321) that checks whether the other end of the tunnelis responding and whether the tunnel is functioning properly
Note It sometimes takes a few minutes for the tunnels to begin working after the configuration wizard completes
To ping log into the pfSense instance via SSH and execute ping from a shell prompt For the previous example of16925425322 the proper syntax is
ping -S 16925425322 16925425321
When pinging from a shell prompt it is possible leave the command running indefinitely and interrupt it there is aresponse
copy Copyright 2020 Rubicon Communications LLC 56
Security Gateway Manual Amazon AWS
It is also possible to ping via the Diagnostics -gt Ping page by selecting the appropriate source address and enteringthe remote tunnel inside address in the Host field This will only send a limited number of ping packets so it may benecessary to repeat this a few times
324 VPC Configuration Details
The AWS documentation for connecting a hardware device to a VPC provides a great amount of detail on configuringVPN Connections to VPC
The main configuration elements that exist in Amazonrsquos data model are the Virtual Private Gateway the CustomerGateway and the VPN Connection In order to configure a VPN connection to a VPC all 3 of these need to exist TheVirtual Private Gateway is the VPN endpoint on Amazonrsquos side The customer gateway is the VPN endpoint on thepfSensereg instancedevice being configured The VPN Connection is the IPsec VPN between Amazon and the pfSenseinstancedevice
A Virtual Private Gateway needs to exist and be associated to the VPC A particular VPN Gateway can only beassociated to one VPC at a time Once the VPC to connect to has been selected the wizard invokes the AWS API callDescribeVpnGateways to determine if a VPN Gateway already exists that is attached to the VPC If none exists itcreates one with the CreateVpnGateway API call and attaches it to the VPC with the AttachVpnGateway call
A Customer Gateway needs to be created for the public IP address of the device or virtual machine that will be used toconnect to the VPC The wizard invokes the AWS API call DescribeCustomerGateways to determine if a CustomerGateway already exists If none exists one is created with the CreateCustomerGateway API call
The VPN Connection connects the Virtual Private Gateway and Customer Gateway The wizard checks to see if thereis an existing VPN Connection configured that connects those endpoints by invoking the AWS API call DescribeVp-nConnections If none exists one is created using the CreateVpnConnection call One of the fields returned by thiscall is a block of XML configuration data that contains configuration data assigned by AWS for use with configuringthe VPN Connection This data is stored and used in subsequent steps to make the required configuration changeswithin pfSense
copy Copyright 2020 Rubicon Communications LLC 57
Security Gateway Manual Amazon AWS
Any objects created through API calls by the wizard will be tagged with names like auto-created by pfSenseVPC ltyour_VPC_IDgt This is accomplished by calling the AWS API call CreateTags and using Name as the keyfor the tag
In addition to creation of the items mentioned above required adjustments are made to Security Groups and RouteTables to facilitate communication over the VPN The Security Groups associated with the VPC are updated to allowinbound access from the local subnets on the pfSense end of the VPN They are checked first via the DescribeSecuri-tyGroups AWS API call to determine if the access is already allowed Any of the subnets that is not already allowedhas inbound access added via the AuthorizeSecurityGroupIngress AWS API call
Route Tables associated with the VPC are updated to receive routes from the VPN Gateway used by the VPN Con-nection They are checked first via the DescribeRouteTables AWS API call If the VPN Gateway ID is not includedin the list of VPN Gateways propagating routes route propagation for the VPN Gateway is enabled on that table usingthe EnableVgwRoutePropagation AWS API call
For VPN Connections using static routing static routes for the specified subnets are added to the VPN ConnectionThis is done via the CreateVpnConnectionRoute AWS API call
325 pfSense Configuration Details
On the pfSensereg side there are numerous configurations added to support the VPN to the VPC
Aliases
First aliases are created for use in a firewall rule These aliases are intended to contain the subnets that traffic shouldbe allowed to ingress over the IPsec tunnel One alias represents the local subnets on the pfSense side and is givena name like VPC_Local_vpc_12345678 and the other represents the remote subnets on the VPC side and is given aname like VPC_Remote_vpc_12345678
Virtual IP addresses
Next virtual IP addresses are added on the lo0 (loopback) interface These virtual IP addresses are the local ldquoinsideaddressesrdquo of the IPsec tunnels These addresses are used as the local address for BGP communication when BGProuting is selected These addresses are IPv4 link local addresses (see RFC 3297) AWS assigns 30rsquos out of thenetwork 1692540016 for this purpose
Note These addresses are also useful as a ping target to execute a basic test of whether the tunnel is functioningproperly Executing a ping from a source address of one of these IP addresses to the corresponding inside address ofthe other end of the tunnel helps determine whether the tunnel negotiation is completing properly
Firewall rules
Next a firewall rule is added on the IPsec interface that allows traffic from the VPC networks to the local subnetsThis rule uses the previously created Aliases as sourcedestination targets
IPsec
Then IPsec phase 1 and phase 2 associations are set up Most of the settings required are extracted from a blockof XML data that was returned by the CreateVpnConnection call made during the AWS configuration step Thisincludes parameters like endpoint IP addresses encryption ciphers timer values etc
copy Copyright 2020 Rubicon Communications LLC 58
Security Gateway Manual Amazon AWS
If BGP routing was selected the configurations for the OpenBGPD BGP daemon are established The required settingsare determined using the AS number entered into the wizard and the parameters returned by the CreateVpnConnec-tion call made during the AWS configuration step
326 Tested Configurations
Various topologies may be possible to establish using the AWS VPC Configuration Wizard This section enumeratessome of the configurations that were successfully tested
Platforms
bull Various hardware platforms
bull 64-bit virtual machines in VMware vSphereESX
bull Amazon EC2 instances (Xen virtual machines) of the Netgate pfSensereg RouterFirewallVPN AWS AMI
Local networkrouting configurations
bull pfSense with a public address configured on the WAN interface
bull pfSense with a private address configured on the WAN interface behind a 11 NAT
bull pfSense with a private address configured on the WAN interface behind a PAT (1many NAT)
VPC Topologies
bull pfSense connected to a single VPC
bull pfSense connected to multiple VPCrsquos in different regions
bull Amazon EC2 instance of the pfSense RouterFirewallVPN AWS AMI connected to a VPC belonging to thesame AWS account in a different region
bull Amazon EC2 instance of the pfSense RouterFirewallVPN AWS AMI connected to a VPC belonging to adifferent AWS account in the same region
The configuration recommended for the greatest amount of stability is to have a public IPv4 address directly configuredon the WAN interface of your pfSense firewall but VPNs have been successfully established under all of the conditionslisted above
Whether any of these solutions is appropriate should be evaluated in the context of personal needs and existing infras-tructure Other configurations not listed above may be possible as well
327 AWS VPC Wizard FAQ
1 What level of redundancy is provided by the two tunnels
Amazon provides two tunnel endpoints that will allow traffic to be sent between your networks and the remote VPCyou are connected to The racoon daemon in pfSensereg is only capable of establishing an active phase 2 associationfor a particular sourcedestination pair on a single tunnel
Phase 2 associations between the local subnets and the remote VPC subnet are configured in the pfSense GUI for bothtunnels but racoon will only actually establish an association for the first tunnel This means that racoon will onlyever try to send traffic destined for the remote VPC subnet over the first tunnel
copy Copyright 2020 Rubicon Communications LLC 59
Security Gateway Manual Amazon AWS
If that tunnel goes down the second tunnel may be up and inbound traffic from the remote VPC may be sent to yourlocal networks over that tunnel automatically But outbound traffic to your remote VPC would not automatically failover to the second tunnel In order for you to send your outbound traffic over the second tunnel you would need todisable the phase 2 associations for the first tunnel and apply the changes
2 I quit the wizard before finishing Now what
To finish setting up the VPN go back to the wizard and run through it again It should reuse any partial configurationsthat were generated before it was stopped and create the new elements that are required
3 What are the AWS charges for this
AWS determines their own pricing and provides details for EC2 pricing and VPC pricing There are many types ofcharges that may be incurred for operating instances on AWS (eg charges related to running an instance bandwidthstorage elastic IPs etc)
The charge of specific interest in this case is the hourly charge for a VPN Connection As of this writing it costs $005(USD) per hour in most regions to have a VPN Connection configured and available AWS will charge whether theVPN Connection is being used or not as long as it is configured This will be configured by the third step of the wizardand will never be removed by pfSense
If the VPN Connection is no longer needed and billing for it needs to be stopped visit AWSrsquos VPC ManagementConsole and delete the VPN Connection manually
4 Can I use the wizard to connect to the GovCloud region
This hasnrsquot been officially tested but at least one user has reported that they were able to successfully connect to theGovCloud region They manually added the region us-gov-west-1 to the list of regions in the first step of the wizardand were able to successfully connect to their VPC in that region This may be supported in a future build but to trywithout official support do the following
1 Under the System gt Advanced menu make sure the Enable Secure Shell box is checked This is already doneby default on AWS instances but is off by default on pfSense hardware devices
2 Log into the instance via SSH
3 Make sure the root filesystem is mounted as readwrite On an AWS instance or a hardware device running on anSSD this should be true On a hardware device using Compact Flash or an SD card for storage it will probablybe necessary to remount the root filesystem in readwrite mode by running
mount -uw
4 Edit the file usrlocalwwwwizardsvpc_vpn_wizardxml using vi Look for a section of the file that lookslike this
ltoptiongtltnamegtsa-east-1ltnamegtltvaluegtsa-east-1ltvaluegt
ltoptiongt
That should appear directly after several similar ltoptiongt specifications containing all of the other availableregions Right underneath that section add the following
copy Copyright 2020 Rubicon Communications LLC 60
Security Gateway Manual Amazon AWS
ltoptiongtltnamegtus-gov-west-1ltnamegtltvaluegtus-gov-west-1ltvaluegt
ltoptiongt
Then save the file and exit vi
5 If the filesystem had to be remounted in readwrite mode earlier remount it in read-only mode by running
The GovCloud region should now appear as a choice in the first step of the wizard
copy Copyright 2020 Rubicon Communications LLC 61
CHAPTER
FOUR
REFERENCES
41 Support Resources
411 Commercial Support
In order to keep prices low the software is not bundled with a support subscription For users who need commercialsupport Netgate Gloabal Support can be purchased at httpswwwnetgatecomsupport
412 Community Support
Community support for pfSensereg software is available through the Netgate Forum
42 Additional Resources
421 Netgate Training
Netgate training offers training courses for increasing your knowledge of pfSensereg products and services Whetheryou need to maintain or improve the security skills of your staff or offer highly specialized support and improve yourcustomer satisfaction Netgate training has got you covered
httpswwwnetgatecomtraining
422 Resource Library
To learn more about how to use your pfSense appliance and for other helpful resources make sure to browse ourResource Library
httpswwwnetgatecomresources
423 Professional Services
Support does not cover more complex tasks such as CARP configuration for redundancy on multiple firewalls orcircuits network design and conversion from other firewalls to pfSensereg These items are offered as professionalservices and can be purchased and scheduled accordingly
httpswwwnetgatecomour-servicesprofessional-serviceshtml
62
Security Gateway Manual Amazon AWS
424 Community Options
If you elected not to get a paid support plan you can find help from the active and knowledgeable pfSense communityon our forums
httpsforumnetgatecom
copy Copyright 2020 Rubicon Communications LLC 63
- Getting Started
- Instance Usage
- Virtual Private Cloud (VPC)
- References
-
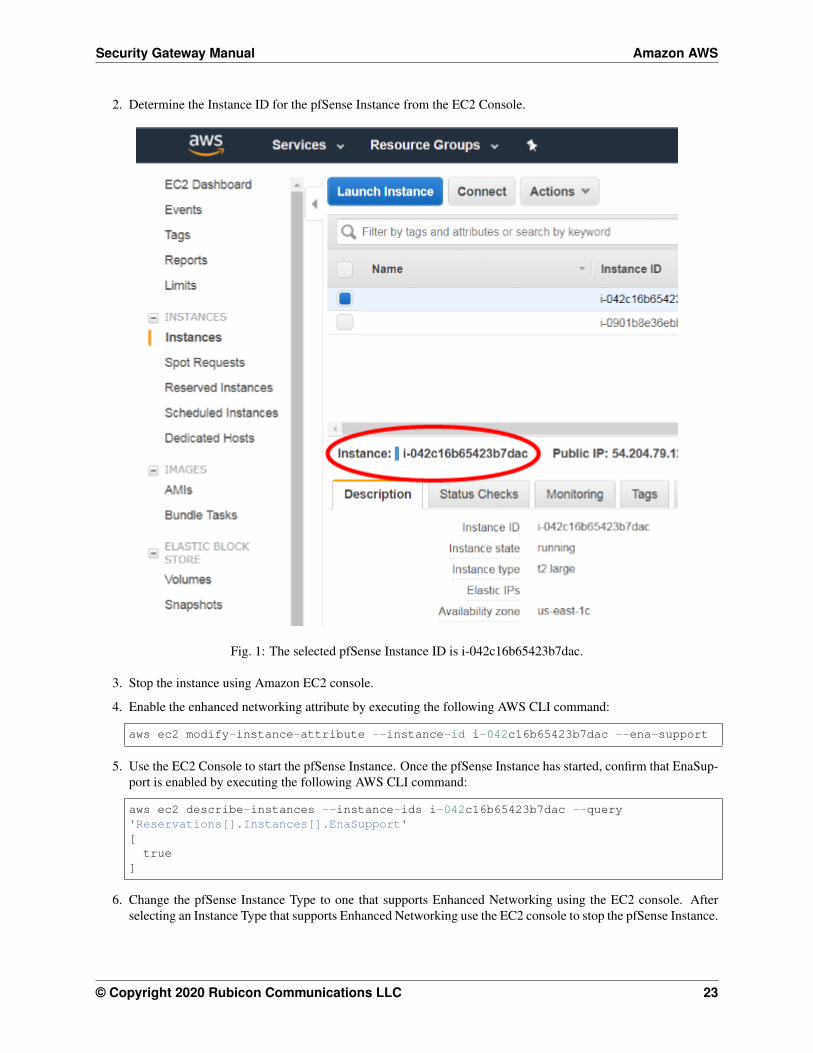
Security Gateway Manual Amazon AWS
Admin password changed to abcdefg
It may take 5-10 minutes after the instance boots for this message to appear in the system log If you would like to findout the password sooner you can log in via SSH using the SSH key that was selected when the instance was createdThe same message that will be written to the system log will be written to the file etcmotd Running the commandcat etcmotd will show you what the password is
272 2 I donrsquot like the random password that was selected How can I change it
The password can be changed via the web GUI Log in with the username admin and the existing password Underthe System category click on User Manager The admin account should appear in a list of accounts Unless yoursquoveadded other accounts it should be the only account present Click on the Edit button (the icon with the e in it) to theright of the account listing Type your choice for a new password into the two boxes labeled Password Click theSave button at the bottom of the screen
273 3 How do I access my instance
There are several ways that you can manage or use your instance You should be able to connect via SSH or HTTPS inorder to manage the configuration of your instance If you connect via SSH you will either need to know the passwordof the admin account and login with that account or use the SSH key that was selected when the instance was createdHere is a sample command line to log in with an SSH key from a Unix or Linux host
ssh -i ~sshmy-ec2-key adminec2-A-B-C-Dcompute-1amazonawscom
You would substitute the actual location of your SSH private key for ~sshmy-ec2-key and the real hostnamewhich you can retrieve from the EC2 Management Console by looking at the data for the instance for example ec2-A-B-C-Dcompute-1amazonawscom If you know the password for the admin account you could use a commandsimilar to the one above but omit the -i ~sshmy-ec2-key
To connect via HTTPS you need to know the password to the instance either by setting it explicitly in the User Datawhen the instance is created or by retrieving it from the instance Once you know the password you should be able toconnect to the instance with any web browser by typing in the hostname of the instance to the URL field
274 4 How do I connect a VPN client to my instance
See the section in the user guide on Using the remote access IPsec or OpenVPN VPN
275 5 Why does the pfSensereg Dashboard say my WAN address is 10XYZ
Amazon AWS instances use DHCP to assign private addresses to the public-facing interfaces of an instance Thepublicly routable IP address that you use to acces the instance is NATed by Amazon to the private address that you seeconfigured on the WAN interface of your instance
copy Copyright 2020 Rubicon Communications LLC 26
Security Gateway Manual Amazon AWS
276 6 I added custom firewall rules to allow some traffic to my instance why I amnot seeing the packets arrive
Amazon AWS provides packet filtering in addition to the Netgate Appliance itself being a stateful firewall If youallowed traffic on the Netgate Appliance but have a security group configuration in the settings for the instance that isrestricting traffic you will need to also add your rules to the security group in the EC2 Management Console
Given that the Netgate Appliance is a fully functional firewall you may assign an AWS security group that allows alltraffic and perform whatever filtering you desire with rules on the Netgate Appliance
277 7 How do I route all the traffic from my entire home network over a VPN
If your home gatewayrouter has support for OpenVPN you can connect a site to site tunnel from your home networkto the Netgate VPN Appliance and configure your routing so that all Internet traffic is sent over the encrypted tunnelSee the user guide section on Connecting a local pfSensereg device
This may provide for simpler administration at home but your mobile devices and laptops that get used outside thehome should have an OpenVPN client installed and configured anyway so that you are always receiving the benefitsof sending your traffic through a VPN
copy Copyright 2020 Rubicon Communications LLC 27
CHAPTER
THREE
VIRTUAL PRIVATE CLOUD (VPC)
31 AWS VPC User Guide
The pfSensereg Certified firewall and VPN appliance from Netgate for Amazon EC2 is a stateful firewall and VPNappliance In addition to itrsquos capabilities as a VPN gateway and firewall for users and offices it is capable of actingas a firewall to protect instances providing services in Amazonrsquos Virtual Private Cloud or VPC service This servicediffers from the classic EC2 service in that it allows for management of instances on private subnets
This guide will explain how to launch manage and use an instance of the appliance to act as a gateway for otherinstances in a VPC subnet
311 Preparing your VPC
In order to use a Netgate appliance instance to protect your VPC subnets you will need the following
bull One internet-facing subnet which the Netgate appliance instance will have itrsquos primaryWAN interface con-nected to
bull One or more private subnets which the Netgate appliance instance will have itrsquos secondaryLAN interface (andpossibly additional optional interfaces) connected to
bull Separate routing tables for the internet-facing subnet and the private subnet(s)
bull If you already have all of these in place with an existing VPC feel free to skip ahead to Launching an Instance
These instructions will demonstrate how to create a single private subnet and set it up behind an instance of thepfSensereg Certified firewall and VPN appliance from Netgate In the Amazon VPC Management Console create anew VPC subnets and routing table(s)
1 Go to Your VPCs view in the menu on the left side of the VPC Management Console under the Virtual PrivateClouds grouping Click the Create VPC button
28
Security Gateway Manual Amazon AWS
2 Enter a CIDR block to use in the box that pops up If you will connect to hosts in your VPC using a VPNfrom hosts at other sites in your infrastructure be sure to select address space that does not conflict with theprivate address space used elsewhere by your organization Make sure the block you choose is large enoughto contain all subnets you may want to include within it Eg if you plan to use a 24 for your internet-facingsubnet and a 24 for your private network the CIDR block you select here will need to be at least a 23 to holdthose 2 subnets The maximum size block you can select is a 16 For the purposes of this example we will use1020016 Leave the value of Tenancy set to Default Click on the Yes Create button
3 To create the subnets required go to the Subnets view in the menu on the left side of the VPC ManagementConsole Click the Create Subnet button Select the VPC you just created and choose the availability zone youdesire Enter the subnet you wish to use for the internet-facing hosts in the CIDR Block field This subnet willbe the one that the WAN interface of the Netgate appliance instance is attached to and could include any otherhosts or appliances that you wish to be available directly from the Internet and not protected behind the Netgate
copy Copyright 2020 Rubicon Communications LLC 29
Security Gateway Manual Amazon AWS
appliance The subnet you select here must be a block that is within the address space you assigned to the VPCFor this example we will use 1020024 Click on the Yes Create button
4 Create the private subnet Still in the Subnets view of the VPC Management Console click the Create Subnetbutton In the box that pops up select the appropriate VPC and the same Availability Zone that you assignedto your public subnet Enter the subnet you wish to use for your private network in the CIDR Block field Thisnetwork should be a subnet of the address space you assigned to the VPC and should be distinct from the subnetyou assigned to the public subnet For this example we will use 1021024 Click on the Yes Create button
5 Both subnets that you created will have been created to use a default route table that was created for the VPCThe private subnet can continue to use that default table A new route table will need to be created for the publicsubnet Go to the Route Tables view in the menu on the left side of the VPC Management Console The singleexisting route table should be displayed Click on the Create Route Table button Select the VPC and click on
copy Copyright 2020 Rubicon Communications LLC 30
Security Gateway Manual Amazon AWS
the Yes Create button
6 Associate the public subnet (1020024 in our examples) with the routing table that was just created Go to theSubnets view on the left hand side of the VPC Management Console Check the checkbox next to the publicsubnet and scroll down to look at the Details tab for that subnet At the top of the Details tab will be listed theCIDR block VPC and Availability Zone Under those items the Route Table will be listed and will have a linklabeled replace next to it Click on the link Select the route table in the box that pops up and click on the YesReplace button
7 In order to send traffic from the public subnet to the Internet we will need to add a default route to an InternetGateway We must first create one Go to the Internet Gateways view in the menu on the left hand side of theVPC Management Console Click on the Create Internet Gateway button Click the Yes Create button onthe box that pops up Click the checkbox next to the new Internet Gateway and then click the Attach to VPC
copy Copyright 2020 Rubicon Communications LLC 31
Security Gateway Manual Amazon AWS
button Select the VPC and click on the Yes Attach button
8 The route table for the public subnet will need to be updated so that it has a default route to the Internet GatewayGo to the Route Tables view on the left hand side of the VPC Management Console Check the checkbox nextto the route table for the public subnet Under the Routes tab for that route table there should only be listed asingle route for the CIDR block of the VPC (1020016 in our example) that has a target of local There is arow underneath this route with a text box in the Destination field and a pop up menu for the Target field Enter00000 for the Destination and select the Internet Gateway (should be formatted like igw-XXXXXXXX)for the target Click on the Add button that appears at the right side of the row Click the Yes Add button onthe box that pops up
There are a few more VPC configuration changes that will be required later but next you must launch a Netgateappliance instance
copy Copyright 2020 Rubicon Communications LLC 32
Security Gateway Manual Amazon AWS
312 Launching an Instance in a VPC
In the Amazon EC2 Management Console launch a new instance of the pfSensereg firewall and VPN appliance Thisprocess is the same as the one for launching an EC2 (non-VPC) instance up until step 11 which details the values toenter for the Configure Instance Details screen in order to specify the instance should be created in your VPC
1 Select the region to run the instance in using the tab at the upper right corner of the page
2 Launch a new instance by clicking on the Launch Instance button under the Create Instance section of theEC2 dashboard
copy Copyright 2020 Rubicon Communications LLC 33
Security Gateway Manual Amazon AWS
3 Select AWS Marketplace on the Create a New Instance menu Type Netgate pfSense FirewallVPNRouter in the search box and press enter (or click on the Search button next to the text box)
4 Click on the link for the Netgate pfSense FirewallVPNRouter appliance in the search results
5 Click on the Continue button on the info page for the Netgate pfSense FirewallVPNRouter
copy Copyright 2020 Rubicon Communications LLC 34
Security Gateway Manual Amazon AWS
6 Click on the Launch with EC2 Console tab
7 If the license terms havenrsquot been accepted click on the Accept Terms button
8 A message should be displayed indicating that the subscription is being processed
copy Copyright 2020 Rubicon Communications LLC 35
Security Gateway Manual Amazon AWS
9 Select the version of the image to run under the popup menu labeled Select a Version Generally the mostrecently issued version should be selected Identify which region to launch the instances in and click on theLaunch in EC2 Console button to the right of that region
10 Choose the instance type to run on Click Next Configure Instance Details
copy Copyright 2020 Rubicon Communications LLC 36
Security Gateway Manual Amazon AWS
11 On the Configure Instance Details page under the Network field select the VPC that was created For theSubnet field that appears right below the Network field select the public subnet that was created earlier In ourexamples this is 1020024
12 Scroll down to the Network Interfaces heading A single interface named eth0 should be displayed by defaultClick on the Add Device button underneath eth0 Select the private subnet that was created (1021024 in ourexample) Pick an IP address within the range of the private subnet and enter it in the Private IP field Keep inmind that the first 3 or 4 IP addresses are reserved For this example we will use 10215
copy Copyright 2020 Rubicon Communications LLC 37
Security Gateway Manual Amazon AWS
Optionally expand the Advanced Details section and set parameters as text in the User Data field The availableoptions are
password Setting a value via a directive like password=abcdefg will set the password for theadministrative account to the specified value - abcdefg in this example If no value is set here arandom password will be assigned in order to keep administrative access from being exposed tothe internet with a default password
mgmtnet Setting a value via a directive like mgmtnet=1001024 will restrict managementaccess (http https ssh) to the specified network - 1001024 in this example This will causethe firewall rule on the instance (not on Amazons access lists but on the Netgate appliancersquosown firewall) to restrict management traffic for the instance to the specified source network Thedefault behavior is to allow management from any host
These directives can be set by placing them on a single line in the User Data field and separating them withcolons Specify both parameters by typing a statement similar to
password=abcdefgmgmtnet=1001024
Click Next Add Storage after optionally setting these parameters
Note If setting a password using the password parameter listed above the password is retrieved by the instancevia an unencrypted HTTP request when the system is configured the first time it boots The request is made toan Amazon Web Services-operated server on the local LAN that stores metadata about each instance runningThe data for an instance is only made available to that instance but is available to be queried from the instancewithout providing any authentication credentials
It is advised to change the admin password via the pfSense webGUI after the instance comes up or choose notto set the password at all and let a random password be set
copy Copyright 2020 Rubicon Communications LLC 38
Security Gateway Manual Amazon AWS
13 Click Next Tag Instance to accept the Storage Device Configuration
14 Optionally a tag can be set on the instance to differentiate this instance from other VMrsquos that were started byentering a value for the Name tag Click Next Configure Security Group after setting any desired tags
copy Copyright 2020 Rubicon Communications LLC 39
Security Gateway Manual Amazon AWS
15 Select a security group to launch the instance with The recommended settings for a security group should allowat least the following traffic
bull TCP port 443 from 00000 - HTTPS - This is the port that the management web GUI listens on
bull TCP port 22 from 00000 - SSH - This port can be used to connect to a command prompt with an sshclient
bull UDP port 1194 from 00000 - OpenVPN - The OpenVPN server that is configured by default is boundto this port
bull UDP port 500 from 00000 - IKE for IPsec VPN
bull UDP port 4500 from 00000 - IPsecNAT-T for IPsec VPN
copy Copyright 2020 Rubicon Communications LLC 40
Security Gateway Manual Amazon AWS
If you have an existing security group that includes this access select Select an existing security group thenselect the group(s) to use and click Continue Otherwise select Create a new security group and add rulesfor this access by filling in the form for each rule and clicking the Add Rule button When all of the rules havebeen added click Review and Launch
16 Verify the details for the instance and click Launch
17 Select an existing key pair or create a new key pair to connect to the instance with Do not select Proceed
copy Copyright 2020 Rubicon Communications LLC 41
Security Gateway Manual Amazon AWS
Without a Key Pair Click the checkbox that indicates you acknowledge having access to the selected privatekey file and then click Launch Instance
18 In order to reach the instance from the Internet associate an Elastic IP with the WAN interface of the instanceIn the VPC Management Console go to the Elastic IPs view by clicking on Elastic IPs on the left side of thepage Click on the Allocate New Address button Select that you want the EIP used in VPC and click on theYes Allocate button in the box that pops up After the Elastic IP address is allocated associate the address withthe WAN interface of the Netgate appliance by clicking on the Associate Address button
A box will pop up that will either let you specify the instance and Private IP address of the interface or theNetwork Interface and the Private IP Address of the interface Use one of these methods to select the correctinterface and click on the Yes Associate button The instance should now be reachable via ssh or https
copy Copyright 2020 Rubicon Communications LLC 42
Security Gateway Manual Amazon AWS
19 In order for traffic to be allowed to be routed from the private subnet through the public interface of the instancethe SourceDest AddressCheck on the private interfaces needs to be disabled In the EC2 Management Con-sole go to the ldquoNetwork Interfacesrdquo view by clicking on Network Interfaces in the menu on the lefthand sideof the page
Click the checkbox to the left of the privateLAN interface on the Netgate appliance instance Click on theActions button at the top of the page and select Change SourceDesk Check on the popup menu Select theradio button labeled Disabled on the box that pops up and click on the Save button
Non-local traffic from the private subnet should now be sent through the privateLAN interface on the Netgateappliance instance
copy Copyright 2020 Rubicon Communications LLC 43
Security Gateway Manual Amazon AWS
313 Managing a VPC Instance
Once the instance is launched you can connect to it via the Elastic IP that was attached to the primary interface duringthe provisioning phase
In order to manage the configuration of the instance you can connect to it via https or ssh A limited set of configura-tions is possible through the SSH interface the preferred method for managing most of the configurations or viewingdata on the status of the pfSensereg instance is through the https webGUI
Connecting via SSH
To connect via SSH you would use the key pair you chose while creating the instance to connect to the admin accountFrom the command line on a UnixLinux host you would use a command similar to
ssh -i my_ec2_key admin232020454
Where the appropriate private key file and public IP or hostname are substituted
Note The first time you log into your instance the SSH key of the instance will not be cached on your computerand you will need to type yes when asked whether you want continue connecting This should not be necessary onsubsequent sessions
Once logged in you should see the console menu similar to the one below
copy Copyright 2020 Rubicon Communications LLC 44
Security Gateway Manual Amazon AWS
Connecting via HTTPS
To connect via https you would enter a URL containing the public IP address or hostname of your instance intoa web browser For example https232020454 Itrsquos very likely that you will receive a browser warningindicating that the security certificate of the site is not trusted This is because the instance uses a self-signed certificatefor https communication You should click on the option to proceed to the site anyway The pfSense login screen withthe Netgate logo should appear
The username to log in with is admin The password to use is either a value that you set in the User Data during thecreation of the instance or a random password
Tip It is preferable to explicitly set a password by passing a value in with the User Data field so the password willbe known in advance
If you did not set a specific password you can find out that value that the random password was set to through one of2 different methods
1 The first method is to log in over SSH with the key pair that you selected when the instance was created andexamine the contents of the file located at etcmotd You would do this by selecting option 8) Shell in theconsole menu that is presented when you SSH in then run this command in the shell
cat etcmotd
2 The second method is to view the System Log for the instance in the EC2 Management Console After themessages that are displayed that show the status of the boot process a message should appear that indicates what
copy Copyright 2020 Rubicon Communications LLC 45
Security Gateway Manual Amazon AWS
the administrative password was changed to Be aware that the System Log output in the EC2 ManagementConsole is not updated in real time and may take a few minutes to show up
The message you should look for using either of the methods mentioned about will look like this
Admin password changed to abcdefg
Once yoursquove determined your password and entered it into the login form the pfSense WebGUI should be availableto you
314 Forwarding traffic from VPC subnets through the instance
Some additional configuration is required within the VPC instancersquos pfSensereg webGUI before you are able to managetraffic from the private subnet
1 Log into the pfSense WebGUI for the instance
2 Click on the Interfaces heading on the left and then click the Assign link
3 Click on the + icon to add a new Interface under the Interface assignments tab A LAN interface shouldautomatically be added with the next available network interface (xn1)
4 Click on the Interfaces heading on the left again and then click on LAN Click the checkbox to enable the LANinterface Set the IPv4 Configuration Type to Static IPv4 and enter the IP address you assigned to the 2ndinterface during the provisioning phase Click the Save button
Now you can create other instances attached to your private subnet and protect them with the firewall on the pfSenseinstance
Common ways to manage private hosts
Allowing private hosts to connect to the Internet
To allow private hosts to be able to connect to the Internet you can allow any traffic from the LAN in your firewallrules there should be a rule like this in place by default
Next set up NAT rules to cause addresses in the private subnet to be NATed to the IP address of the WAN interface
1 Under the Firewall heading on the left click on the NAT link
2 On the Outbound tab click the radio button for Manual Outbound NAT rule generation (AON - AdvancedOutbound NAT)
3 Click the Save button
4 Click on the Aliases link under the Firewall heading on the left
5 Add your private subnet to the Networks_to_NAT alias
Note There is an existing NAT rule configured by default that uses the alias Networks_to_NAT
copy Copyright 2020 Rubicon Communications LLC 46
Security Gateway Manual Amazon AWS
Allow private hosts to connect to each other
If your hosts should only contact each other and a private network segment elsewhere you can configure an IPsecor OpenVPN tunnel from your remote networks to the Netgate appliance instance and set up the appropriate firewallrules routes and security policies to allow access to your private subnet through a VPN tunnel
Allow direct inbound access from the internet to hosts
If you wish to enable direct inbound access from the internet to hosts on the private subnet you can set up portforwarding on the WAN interface to direct traffic to particular hosts in the private subnet
315 Establishing a VPN connection to a VPC in another region
To establish a VPN that allows instances on the VPC subnet(s) that sit behind a Netgate appliance to communicate withinstances that reside in a VPC in another region the Netgate appliance has a VPC configuration wizard that assists byconfiguring both the Netgate appliance as well as the VPC configuration elements that would normally have to be setmanually through the AWS Management Console
For detailed instructions see the AWS VPC User Guide
316 Upgrading a VPC Instance
Periodically new releases of the AMI are issued to track new releases of pfSensereg that may provide new functionalitybug fixes and security updates
The lower risk approach to upgrading is to bring up a new instance alongside the existing one and executing a cutoverThese instructions detail the procedure for moving your existing instance to one running the latest version
1 Back up the configuration of your exsting instance by navigating to BackupRestore under the Diagnosticsmenu in the Web GUI Click the Download configuration button under the Backup Configuration headingand save your config file to your local system
2 Bring up a new instance of the pfSense Certified RouterFirewallVPN running the latest version
3 When creating the instance make sure the interfaces match the interfaces on the existing instance Make surethat the new instance is in the same VPC as the existing instance and that it has the same number of interfacesattached and that the interfaces are connected to the same Subnets
4 Make sure any interfaces on the new instance that will communicate with private Subnets have theSourceDestination check disabled
5 Allocate a new Elastic IP and associate it to the WAN interface of the new instance to allow yourself managementaccess
6 Restore the backed up configuration file to the new instance Navigate to BackupRestore under the Diagnosticsmenu in the Web GUI Under the Restore Configuration heading click the Choose File button and browsefor the configuration file you backed up from the existing instance earlier Once you have selected that fileclick the Restore configuration button The configuration file will be uploaded and the instance will rebootautomatically
7 If you had packages installed on the old instance navigate to Packages under the System menu in the pfSenseweb GUI and install the same packages
8 If there was any external dependency on the public IP address of the existing instance you can remove theElastic IP Address from the upgraded instance and move the Elastic IP Address from the existing instance tothe upgraded instance External dependencies that might cause you to want to do this include things like VPNrsquos
copy Copyright 2020 Rubicon Communications LLC 47
Security Gateway Manual Amazon AWS
configured to external devices that rely on the existing instancersquos Elastic IP address or access lists on externaldevices that allow access to traffic from the existing instancersquos IP address There may be other reasons why youwould wish to keep the existing address as well (to preserve existing bookmarks to the Web GUI reduce theneed for updates to existing internal documentation etc) The process for moving the old Elastic IP address tothe new instance is as follows
bull Disassociate the Elastic IP address from the new instance In the EC2 Management Console click onElastic IPs under the Network amp Security heading Check the box next to the Elastic IP address assignedto the new instance and click on the Disassociate Address button
bull Disassociate the Elastic IP address from the old instance The procedure is the same as in the previousstep just repeated for the Eastic IP address of the old instance this time
bull Associate the Elastic IP address that was previously associated to the old instance to public interface of thenew instance In the EC2 Management Console click on Elastic IPs Check the box next to the Elastic IPaddress you are moving and click the Associate Address button Fill in the correct value for the Instanceor Network Interface and select the Private IP Address of the public interface on the new instance Clickthe Associate button The management interface of the new instance should now be accessible
9 Move any default routes that pointed to an interface on the old instance to point to the equivalent interface onthe new instance In the VPC Management Console click on Route Tables under the Virtual Private Cloudheading Check the box next to a Route Table associated with the VPC that the instances is located in
bull In the detail pane that appears at the bottom of the screen click on the Routes tab
bull If a route exists for 00000 with a Target that is an interface ID of an interface on the old instnace clickthe Edit button above the table displaying the routes
bull Click the red X next to the row for 00000 to remove the existing route
bull There should be a blank row with empty fields for a new route Enter 00000 in the Destinationfield and the Network Interface ID of the interface on the new instance in the Target field Click on theSave button
bull If there were multiple private subnets in the VPC which were pointed to interfaces on the pfSense instancerepeat this process for the other Route Tables associated with the VPC
bull The new instance should now be functioning as the old one did
32 AWS VPC Wizard User Guide
This guide will explain how to use the AWS VPC Wizard to simplify the configuration of a VPN to a remote VPC Theadministrator is asked for the minimum amount of basic information required to establish the VPN The configurationsboth on the AWS VPC side and on the pfSense side are then automatically created When the wizard is finishedexecuting a functioning VPN connection to a VPC should be established
321 AWS Access Keys
In order to connect to the AWS API to make certain required configuration changes the AWS VPC Wizard requiresAccess Keys to retrieve and modify VPC configurations
See also
Find more information about AWS Security Credential including Access Keys by reading AWS Security Credentials
Access keys consist of two parts
1 An access key ID
copy Copyright 2020 Rubicon Communications LLC 48
Security Gateway Manual Amazon AWS
bull For example AKIAIOSFODNN7EXAMPLE
2 A secret access key
bull For example wJalrXUtnFEMIK7MDENGbPxRfiCYEXAMPLEKEY
Access keys are like a usernamepassword and needed for programmatic requests to AWS including the AWS VPCWizard Use both the access key ID and secret access key together to authenticate requests
Important Manage access keys as securely as a user name and password
Managing Access Keys
To create modify or delete IAM user access keys do the following
1 Sign in to the IAM console
2 In the navigation bar on the upper right choose a user name and then choose My Security Credentials
3 On the AWS IAM Credentials tab in the Access keys for CLI SDK and API access section choose Createaccess key
4 Choose Download csv file to save the access key ID and secret access key to a csv file on your computerStore the file in a secure location There is no access to the secret access key again after this dialog box closesAfter the csv file has been downloaded choose Close When an access key is created the key pair is active bydefault and the pair can be used right away
bull To disable an active access key choose Make inactive
bull To reenable an inactive access key choose Make active
bull To delete an access key choose its X button at the far right of the row Then choose Delete to confirmWhen an access key is deleted itrsquos gone forever and cannot be retrieved However new keys can alwaysbe created
To create modify or delete another IAM userrsquos access keys do the following
1 Sign in to the IAM console
2 In the navigation pane choose Users
3 Choose the name of the user whose access keys to manage and then choose the Security credentials tab
4 In the Access keys section choose Create access key
5 Choose Download csv file to save the access key ID and secret access key to a CSV file on your computer
Rotating Access Keys
As a security best practice we recommend to regularly rotate (change) IAM user access keys Rotating access keyscan be done from the AWS Management Console
To rotate access keys for an IAM user without interrupting the applications (console) create a second access key whilethe first access key is still active
1 Sign in to the IAM console
2 In the navigation pane choose Users
3 Choose the name of the user whose access keys to manage and then choose the Security credentials tab
4 In the Access keys section choose Create access key
copy Copyright 2020 Rubicon Communications LLC 49
Security Gateway Manual Amazon AWS
5 Choose Download csv file to save the access key ID and secret access key to a CSV file on your computer
6 The new access key is active by default At this point the user has two active access keys
After waiting some period of time to ensure that all applications and tools have been updated delete the first accesskey
1 Sign in to the IAM console
2 In the navigation pane choose Users
3 Choose the name of the user whose access keys to manage and then choose the Security credentials tab
4 Locate the access key to delete and choose its X button at the far right of the row Then choose Delete to confirm
Determining When Access Keys Need Rotating
To determine when access keys need rotating (console) do the following
1 Sign in to the IAM console
2 In the navigation pane choose Users
3 If necessary add the Access key age column to the users table by completing the following steps
1 Above the table on the far right click the settings icon
2 In Manage columns select Access key age
3 Choose Close to return to the list of users
4 The Access key age column shows the number of days since the oldest active access key was created Usethis information to find users with access keys that need rotating The column displays None for users with noaccess key
322 Using the Wizard
1 Gather your AWS Access Key ID and Secret Key
2 Navigate to VPN gt AWS VPC Wizard in the main menu in the pfSensereg webGUI
copy Copyright 2020 Rubicon Communications LLC 50
Security Gateway Manual Amazon AWS
3 The first screen of the wizard prompts for the AWS Credentials Enter the Access Key ID and Secret AccessKey in the appropriate text fields and select the Region to connect to in the dropdown menu then click Next
The wizard will then query the AWS API using those credentials to find which VPCrsquos exist in the selectedregion If the credentials were rejected an error message will be displayed and return to the first screen
4 The next screen will prompt to select from the available VPCrsquos in the selected region Select the one to connectto from the dropdown menu The wizard will not create a new VPC it will only connect to an existing VPC
Click Next after selecting the desired VPC
copy Copyright 2020 Rubicon Communications LLC 51
Security Gateway Manual Amazon AWS
Note If the desired VPCrsquos to connect to isnrsquot available create one via the AWS Management Console and tryagain
The wizard will then query the AWS API to check whether there is a VPN Gateway attached to the selectedVPC If none exists one will be created via the API Then the next screen will be displayed
5 On the next screen specify routing and network data
A description of what should be entered for each of these fields follows
copy Copyright 2020 Rubicon Communications LLC 52
Security Gateway Manual Amazon AWS
Routing Type AWS offers either static routing or BGP routing Select the appropriate type fromthe dropdown menu If unsure static routing is likely to be adequate
BGP AS Number If static routing was choosen leave this field blank Otherwise it is possible tospecify an AS number to use If left blank the value will default to 65000
Local Public IP Address On an AWS Netgate appliance instance this should be the public IP ad-dress of the Elastic IP associated with the instance If configuring a hardware device runningpfSense this could be the public address assigned to the WAN (or other) interface of the device
Local subnets The subnets connected to the pfSense instance that should be routed over the tunnelfrom hosts in the remote VPC As an example if connecting a pfSense instance to a remote VPCin the AWS us-east-1 region enter the subnets (or a single subnet) that are local to the pfSenseinstance and when hosts in your VPC in us-east-1 attempted to reach addresses within thosesubnets the traffic will be sent through the VPN tunnel that is being configured
Note When selecting static routing as the routing type there will be a delay that is typically between 2-5minutes before the next screen is displayed This is because static routes must be added to the VPN Connectionvia the AWS API This operation fails until the VPN Connection reaches the ldquoavailablerdquo state This can take afew minutes to occur
Click Next when done
The wizard will then query the AWS API to find whether a Customer Gateway is configured with the selectedPublic IP Address If none exists one will be created If one already exists the ID will be retrieved and it willbe used
The wizard will then query the AWS API to see if a VPC Connection already exists that matches the dataentered If one exists it will be used Otherwise one will be created
If static routing was selected static routes will be added to the VPN Connection for the Local subnets entered
Route propagation will be enabled for the VPN Gateway in each of the Route Tables that are associated withthe VPC All of these configurations are carried out in the AWS API nothing has been changed in the pfSenseVPN configurations yet
Warning Important Note on Billing Once this step is carried out and the VPN Connection is createdAWS will start billing your AWS account the hourly rate for a VPN Connection This is $005 as of thiswriting and that is a charge that goes entirely to AWS itself They will do this until the VPN Connection isdeleted via the VPC Management Console
Nothing in pfSense will ever cause AWS to stop billing for this VPN Connection Whether it works or notwhether the pfSense instance is up or down whether the IPsec tunnels have been deleted or reconfiguredAWS will continue to bill the hourly fee for a VPN Connection if the creation of it succeeds until it is deletedthrough their web interface
The wizard helps establish an initial configuration that works and configures the appropriate elements inAWSrsquos API to facilitate this You are responsible for making sure you understand what yoursquore being billedfor and disabling any functions including VPN Connections that are no longer necessary
6 If the operations of the previous step succeeded the next screen will appear
copy Copyright 2020 Rubicon Communications LLC 53
Security Gateway Manual Amazon AWS
Select an Interface to act as the local endpoint of the VPN tunnels that will be created In most cases thisshould be the WAN interface It should generally be whatever interface is associated with the Local Public IPAddress entered in the previous step
On an AWS Netgate pfSense instance this will be whatever interface the Elastic IP is associated with On ahardware device running pfSense that has the Local Public IP Address directly configured on an interface thiswill be the interface that the Local Public IP Address is configured on
After clicking Next the wizard will configure the VPN and associated settings within pfSense itself using datareturned by the AWS API in the previous step
It will configure 2 IPsec tunnels a firewall rule 2 Aliases (referenced by the firewall rule) and 2 Virtual IPAddresses If BGP was selected as the Routing Type in the previous step it will install the OpenBGPDpackage automatically and configure it appropriately
7 The next screen will appear and prompt to apply the configuration changes that have been made
copy Copyright 2020 Rubicon Communications LLC 54
Security Gateway Manual Amazon AWS
After clicking Next all the configuration changes that were made will be applied
8 The wizard will be completed and the browser will be redirected to the IPsec status page The VPN to the VPCshould now be fully configured
Note Sometimes there is a delay of 5-10 minutes before the tunnels are fully functional and passing trafficThis has been observed particularly often during the setup of tunnels using BGP routing
copy Copyright 2020 Rubicon Communications LLC 55
Security Gateway Manual Amazon AWS
323 Testing Connectivity
Verify that the IPsec tunnels are functioning by attempting to ping the ldquoinside tunnel addressesrdquo of the VPC side ofthe tunnel by navigating to Firewall -gt Virtual IP There should be two virtual IP addresses configured that haveDescriptions like ldquoInside address for tunnel to ltremote IP addressgtrdquo
Amazon provides inside addresses for each end of the tunnel in a 30 subnet in IPv4 link local address space(169254xy) Typically the first usable address in the 30 is the inside address for the VPC end of the tunnel andthe other usable address is the inside address for your end of the tunnel So if you ping from one of the virtual IPaddresses configured on the pfSensereg instance to the IP address that is one less (for example if the virtual IP addresswere 16925425322 ping from 16925425322 to 16925425321) that checks whether the other end of the tunnelis responding and whether the tunnel is functioning properly
Note It sometimes takes a few minutes for the tunnels to begin working after the configuration wizard completes
To ping log into the pfSense instance via SSH and execute ping from a shell prompt For the previous example of16925425322 the proper syntax is
ping -S 16925425322 16925425321
When pinging from a shell prompt it is possible leave the command running indefinitely and interrupt it there is aresponse
copy Copyright 2020 Rubicon Communications LLC 56
Security Gateway Manual Amazon AWS
It is also possible to ping via the Diagnostics -gt Ping page by selecting the appropriate source address and enteringthe remote tunnel inside address in the Host field This will only send a limited number of ping packets so it may benecessary to repeat this a few times
324 VPC Configuration Details
The AWS documentation for connecting a hardware device to a VPC provides a great amount of detail on configuringVPN Connections to VPC
The main configuration elements that exist in Amazonrsquos data model are the Virtual Private Gateway the CustomerGateway and the VPN Connection In order to configure a VPN connection to a VPC all 3 of these need to exist TheVirtual Private Gateway is the VPN endpoint on Amazonrsquos side The customer gateway is the VPN endpoint on thepfSensereg instancedevice being configured The VPN Connection is the IPsec VPN between Amazon and the pfSenseinstancedevice
A Virtual Private Gateway needs to exist and be associated to the VPC A particular VPN Gateway can only beassociated to one VPC at a time Once the VPC to connect to has been selected the wizard invokes the AWS API callDescribeVpnGateways to determine if a VPN Gateway already exists that is attached to the VPC If none exists itcreates one with the CreateVpnGateway API call and attaches it to the VPC with the AttachVpnGateway call
A Customer Gateway needs to be created for the public IP address of the device or virtual machine that will be used toconnect to the VPC The wizard invokes the AWS API call DescribeCustomerGateways to determine if a CustomerGateway already exists If none exists one is created with the CreateCustomerGateway API call
The VPN Connection connects the Virtual Private Gateway and Customer Gateway The wizard checks to see if thereis an existing VPN Connection configured that connects those endpoints by invoking the AWS API call DescribeVp-nConnections If none exists one is created using the CreateVpnConnection call One of the fields returned by thiscall is a block of XML configuration data that contains configuration data assigned by AWS for use with configuringthe VPN Connection This data is stored and used in subsequent steps to make the required configuration changeswithin pfSense
copy Copyright 2020 Rubicon Communications LLC 57
Security Gateway Manual Amazon AWS
Any objects created through API calls by the wizard will be tagged with names like auto-created by pfSenseVPC ltyour_VPC_IDgt This is accomplished by calling the AWS API call CreateTags and using Name as the keyfor the tag
In addition to creation of the items mentioned above required adjustments are made to Security Groups and RouteTables to facilitate communication over the VPN The Security Groups associated with the VPC are updated to allowinbound access from the local subnets on the pfSense end of the VPN They are checked first via the DescribeSecuri-tyGroups AWS API call to determine if the access is already allowed Any of the subnets that is not already allowedhas inbound access added via the AuthorizeSecurityGroupIngress AWS API call
Route Tables associated with the VPC are updated to receive routes from the VPN Gateway used by the VPN Con-nection They are checked first via the DescribeRouteTables AWS API call If the VPN Gateway ID is not includedin the list of VPN Gateways propagating routes route propagation for the VPN Gateway is enabled on that table usingthe EnableVgwRoutePropagation AWS API call
For VPN Connections using static routing static routes for the specified subnets are added to the VPN ConnectionThis is done via the CreateVpnConnectionRoute AWS API call
325 pfSense Configuration Details
On the pfSensereg side there are numerous configurations added to support the VPN to the VPC
Aliases
First aliases are created for use in a firewall rule These aliases are intended to contain the subnets that traffic shouldbe allowed to ingress over the IPsec tunnel One alias represents the local subnets on the pfSense side and is givena name like VPC_Local_vpc_12345678 and the other represents the remote subnets on the VPC side and is given aname like VPC_Remote_vpc_12345678
Virtual IP addresses
Next virtual IP addresses are added on the lo0 (loopback) interface These virtual IP addresses are the local ldquoinsideaddressesrdquo of the IPsec tunnels These addresses are used as the local address for BGP communication when BGProuting is selected These addresses are IPv4 link local addresses (see RFC 3297) AWS assigns 30rsquos out of thenetwork 1692540016 for this purpose
Note These addresses are also useful as a ping target to execute a basic test of whether the tunnel is functioningproperly Executing a ping from a source address of one of these IP addresses to the corresponding inside address ofthe other end of the tunnel helps determine whether the tunnel negotiation is completing properly
Firewall rules
Next a firewall rule is added on the IPsec interface that allows traffic from the VPC networks to the local subnetsThis rule uses the previously created Aliases as sourcedestination targets
IPsec
Then IPsec phase 1 and phase 2 associations are set up Most of the settings required are extracted from a blockof XML data that was returned by the CreateVpnConnection call made during the AWS configuration step Thisincludes parameters like endpoint IP addresses encryption ciphers timer values etc
copy Copyright 2020 Rubicon Communications LLC 58
Security Gateway Manual Amazon AWS
If BGP routing was selected the configurations for the OpenBGPD BGP daemon are established The required settingsare determined using the AS number entered into the wizard and the parameters returned by the CreateVpnConnec-tion call made during the AWS configuration step
326 Tested Configurations
Various topologies may be possible to establish using the AWS VPC Configuration Wizard This section enumeratessome of the configurations that were successfully tested
Platforms
bull Various hardware platforms
bull 64-bit virtual machines in VMware vSphereESX
bull Amazon EC2 instances (Xen virtual machines) of the Netgate pfSensereg RouterFirewallVPN AWS AMI
Local networkrouting configurations
bull pfSense with a public address configured on the WAN interface
bull pfSense with a private address configured on the WAN interface behind a 11 NAT
bull pfSense with a private address configured on the WAN interface behind a PAT (1many NAT)
VPC Topologies
bull pfSense connected to a single VPC
bull pfSense connected to multiple VPCrsquos in different regions
bull Amazon EC2 instance of the pfSense RouterFirewallVPN AWS AMI connected to a VPC belonging to thesame AWS account in a different region
bull Amazon EC2 instance of the pfSense RouterFirewallVPN AWS AMI connected to a VPC belonging to adifferent AWS account in the same region
The configuration recommended for the greatest amount of stability is to have a public IPv4 address directly configuredon the WAN interface of your pfSense firewall but VPNs have been successfully established under all of the conditionslisted above
Whether any of these solutions is appropriate should be evaluated in the context of personal needs and existing infras-tructure Other configurations not listed above may be possible as well
327 AWS VPC Wizard FAQ
1 What level of redundancy is provided by the two tunnels
Amazon provides two tunnel endpoints that will allow traffic to be sent between your networks and the remote VPCyou are connected to The racoon daemon in pfSensereg is only capable of establishing an active phase 2 associationfor a particular sourcedestination pair on a single tunnel
Phase 2 associations between the local subnets and the remote VPC subnet are configured in the pfSense GUI for bothtunnels but racoon will only actually establish an association for the first tunnel This means that racoon will onlyever try to send traffic destined for the remote VPC subnet over the first tunnel
copy Copyright 2020 Rubicon Communications LLC 59
Security Gateway Manual Amazon AWS
If that tunnel goes down the second tunnel may be up and inbound traffic from the remote VPC may be sent to yourlocal networks over that tunnel automatically But outbound traffic to your remote VPC would not automatically failover to the second tunnel In order for you to send your outbound traffic over the second tunnel you would need todisable the phase 2 associations for the first tunnel and apply the changes
2 I quit the wizard before finishing Now what
To finish setting up the VPN go back to the wizard and run through it again It should reuse any partial configurationsthat were generated before it was stopped and create the new elements that are required
3 What are the AWS charges for this
AWS determines their own pricing and provides details for EC2 pricing and VPC pricing There are many types ofcharges that may be incurred for operating instances on AWS (eg charges related to running an instance bandwidthstorage elastic IPs etc)
The charge of specific interest in this case is the hourly charge for a VPN Connection As of this writing it costs $005(USD) per hour in most regions to have a VPN Connection configured and available AWS will charge whether theVPN Connection is being used or not as long as it is configured This will be configured by the third step of the wizardand will never be removed by pfSense
If the VPN Connection is no longer needed and billing for it needs to be stopped visit AWSrsquos VPC ManagementConsole and delete the VPN Connection manually
4 Can I use the wizard to connect to the GovCloud region
This hasnrsquot been officially tested but at least one user has reported that they were able to successfully connect to theGovCloud region They manually added the region us-gov-west-1 to the list of regions in the first step of the wizardand were able to successfully connect to their VPC in that region This may be supported in a future build but to trywithout official support do the following
1 Under the System gt Advanced menu make sure the Enable Secure Shell box is checked This is already doneby default on AWS instances but is off by default on pfSense hardware devices
2 Log into the instance via SSH
3 Make sure the root filesystem is mounted as readwrite On an AWS instance or a hardware device running on anSSD this should be true On a hardware device using Compact Flash or an SD card for storage it will probablybe necessary to remount the root filesystem in readwrite mode by running
mount -uw
4 Edit the file usrlocalwwwwizardsvpc_vpn_wizardxml using vi Look for a section of the file that lookslike this
ltoptiongtltnamegtsa-east-1ltnamegtltvaluegtsa-east-1ltvaluegt
ltoptiongt
That should appear directly after several similar ltoptiongt specifications containing all of the other availableregions Right underneath that section add the following
copy Copyright 2020 Rubicon Communications LLC 60
Security Gateway Manual Amazon AWS
ltoptiongtltnamegtus-gov-west-1ltnamegtltvaluegtus-gov-west-1ltvaluegt
ltoptiongt
Then save the file and exit vi
5 If the filesystem had to be remounted in readwrite mode earlier remount it in read-only mode by running
The GovCloud region should now appear as a choice in the first step of the wizard
copy Copyright 2020 Rubicon Communications LLC 61
CHAPTER
FOUR
REFERENCES
41 Support Resources
411 Commercial Support
In order to keep prices low the software is not bundled with a support subscription For users who need commercialsupport Netgate Gloabal Support can be purchased at httpswwwnetgatecomsupport
412 Community Support
Community support for pfSensereg software is available through the Netgate Forum
42 Additional Resources
421 Netgate Training
Netgate training offers training courses for increasing your knowledge of pfSensereg products and services Whetheryou need to maintain or improve the security skills of your staff or offer highly specialized support and improve yourcustomer satisfaction Netgate training has got you covered
httpswwwnetgatecomtraining
422 Resource Library
To learn more about how to use your pfSense appliance and for other helpful resources make sure to browse ourResource Library
httpswwwnetgatecomresources
423 Professional Services
Support does not cover more complex tasks such as CARP configuration for redundancy on multiple firewalls orcircuits network design and conversion from other firewalls to pfSensereg These items are offered as professionalservices and can be purchased and scheduled accordingly
httpswwwnetgatecomour-servicesprofessional-serviceshtml
62
Security Gateway Manual Amazon AWS
424 Community Options
If you elected not to get a paid support plan you can find help from the active and knowledgeable pfSense communityon our forums
httpsforumnetgatecom
copy Copyright 2020 Rubicon Communications LLC 63
- Getting Started
- Instance Usage
- Virtual Private Cloud (VPC)
- References
-

Security Gateway Manual Amazon AWS
276 6 I added custom firewall rules to allow some traffic to my instance why I amnot seeing the packets arrive
Amazon AWS provides packet filtering in addition to the Netgate Appliance itself being a stateful firewall If youallowed traffic on the Netgate Appliance but have a security group configuration in the settings for the instance that isrestricting traffic you will need to also add your rules to the security group in the EC2 Management Console
Given that the Netgate Appliance is a fully functional firewall you may assign an AWS security group that allows alltraffic and perform whatever filtering you desire with rules on the Netgate Appliance
277 7 How do I route all the traffic from my entire home network over a VPN
If your home gatewayrouter has support for OpenVPN you can connect a site to site tunnel from your home networkto the Netgate VPN Appliance and configure your routing so that all Internet traffic is sent over the encrypted tunnelSee the user guide section on Connecting a local pfSensereg device
This may provide for simpler administration at home but your mobile devices and laptops that get used outside thehome should have an OpenVPN client installed and configured anyway so that you are always receiving the benefitsof sending your traffic through a VPN
copy Copyright 2020 Rubicon Communications LLC 27
CHAPTER
THREE
VIRTUAL PRIVATE CLOUD (VPC)
31 AWS VPC User Guide
The pfSensereg Certified firewall and VPN appliance from Netgate for Amazon EC2 is a stateful firewall and VPNappliance In addition to itrsquos capabilities as a VPN gateway and firewall for users and offices it is capable of actingas a firewall to protect instances providing services in Amazonrsquos Virtual Private Cloud or VPC service This servicediffers from the classic EC2 service in that it allows for management of instances on private subnets
This guide will explain how to launch manage and use an instance of the appliance to act as a gateway for otherinstances in a VPC subnet
311 Preparing your VPC
In order to use a Netgate appliance instance to protect your VPC subnets you will need the following
bull One internet-facing subnet which the Netgate appliance instance will have itrsquos primaryWAN interface con-nected to
bull One or more private subnets which the Netgate appliance instance will have itrsquos secondaryLAN interface (andpossibly additional optional interfaces) connected to
bull Separate routing tables for the internet-facing subnet and the private subnet(s)
bull If you already have all of these in place with an existing VPC feel free to skip ahead to Launching an Instance
These instructions will demonstrate how to create a single private subnet and set it up behind an instance of thepfSensereg Certified firewall and VPN appliance from Netgate In the Amazon VPC Management Console create anew VPC subnets and routing table(s)
1 Go to Your VPCs view in the menu on the left side of the VPC Management Console under the Virtual PrivateClouds grouping Click the Create VPC button
28
Security Gateway Manual Amazon AWS
2 Enter a CIDR block to use in the box that pops up If you will connect to hosts in your VPC using a VPNfrom hosts at other sites in your infrastructure be sure to select address space that does not conflict with theprivate address space used elsewhere by your organization Make sure the block you choose is large enoughto contain all subnets you may want to include within it Eg if you plan to use a 24 for your internet-facingsubnet and a 24 for your private network the CIDR block you select here will need to be at least a 23 to holdthose 2 subnets The maximum size block you can select is a 16 For the purposes of this example we will use1020016 Leave the value of Tenancy set to Default Click on the Yes Create button
3 To create the subnets required go to the Subnets view in the menu on the left side of the VPC ManagementConsole Click the Create Subnet button Select the VPC you just created and choose the availability zone youdesire Enter the subnet you wish to use for the internet-facing hosts in the CIDR Block field This subnet willbe the one that the WAN interface of the Netgate appliance instance is attached to and could include any otherhosts or appliances that you wish to be available directly from the Internet and not protected behind the Netgate
copy Copyright 2020 Rubicon Communications LLC 29
Security Gateway Manual Amazon AWS
appliance The subnet you select here must be a block that is within the address space you assigned to the VPCFor this example we will use 1020024 Click on the Yes Create button
4 Create the private subnet Still in the Subnets view of the VPC Management Console click the Create Subnetbutton In the box that pops up select the appropriate VPC and the same Availability Zone that you assignedto your public subnet Enter the subnet you wish to use for your private network in the CIDR Block field Thisnetwork should be a subnet of the address space you assigned to the VPC and should be distinct from the subnetyou assigned to the public subnet For this example we will use 1021024 Click on the Yes Create button
5 Both subnets that you created will have been created to use a default route table that was created for the VPCThe private subnet can continue to use that default table A new route table will need to be created for the publicsubnet Go to the Route Tables view in the menu on the left side of the VPC Management Console The singleexisting route table should be displayed Click on the Create Route Table button Select the VPC and click on
copy Copyright 2020 Rubicon Communications LLC 30
Security Gateway Manual Amazon AWS
the Yes Create button
6 Associate the public subnet (1020024 in our examples) with the routing table that was just created Go to theSubnets view on the left hand side of the VPC Management Console Check the checkbox next to the publicsubnet and scroll down to look at the Details tab for that subnet At the top of the Details tab will be listed theCIDR block VPC and Availability Zone Under those items the Route Table will be listed and will have a linklabeled replace next to it Click on the link Select the route table in the box that pops up and click on the YesReplace button
7 In order to send traffic from the public subnet to the Internet we will need to add a default route to an InternetGateway We must first create one Go to the Internet Gateways view in the menu on the left hand side of theVPC Management Console Click on the Create Internet Gateway button Click the Yes Create button onthe box that pops up Click the checkbox next to the new Internet Gateway and then click the Attach to VPC
copy Copyright 2020 Rubicon Communications LLC 31
Security Gateway Manual Amazon AWS
button Select the VPC and click on the Yes Attach button
8 The route table for the public subnet will need to be updated so that it has a default route to the Internet GatewayGo to the Route Tables view on the left hand side of the VPC Management Console Check the checkbox nextto the route table for the public subnet Under the Routes tab for that route table there should only be listed asingle route for the CIDR block of the VPC (1020016 in our example) that has a target of local There is arow underneath this route with a text box in the Destination field and a pop up menu for the Target field Enter00000 for the Destination and select the Internet Gateway (should be formatted like igw-XXXXXXXX)for the target Click on the Add button that appears at the right side of the row Click the Yes Add button onthe box that pops up
There are a few more VPC configuration changes that will be required later but next you must launch a Netgateappliance instance
copy Copyright 2020 Rubicon Communications LLC 32
Security Gateway Manual Amazon AWS
312 Launching an Instance in a VPC
In the Amazon EC2 Management Console launch a new instance of the pfSensereg firewall and VPN appliance Thisprocess is the same as the one for launching an EC2 (non-VPC) instance up until step 11 which details the values toenter for the Configure Instance Details screen in order to specify the instance should be created in your VPC
1 Select the region to run the instance in using the tab at the upper right corner of the page
2 Launch a new instance by clicking on the Launch Instance button under the Create Instance section of theEC2 dashboard
copy Copyright 2020 Rubicon Communications LLC 33
Security Gateway Manual Amazon AWS
3 Select AWS Marketplace on the Create a New Instance menu Type Netgate pfSense FirewallVPNRouter in the search box and press enter (or click on the Search button next to the text box)
4 Click on the link for the Netgate pfSense FirewallVPNRouter appliance in the search results
5 Click on the Continue button on the info page for the Netgate pfSense FirewallVPNRouter
copy Copyright 2020 Rubicon Communications LLC 34
Security Gateway Manual Amazon AWS
6 Click on the Launch with EC2 Console tab
7 If the license terms havenrsquot been accepted click on the Accept Terms button
8 A message should be displayed indicating that the subscription is being processed
copy Copyright 2020 Rubicon Communications LLC 35
Security Gateway Manual Amazon AWS
9 Select the version of the image to run under the popup menu labeled Select a Version Generally the mostrecently issued version should be selected Identify which region to launch the instances in and click on theLaunch in EC2 Console button to the right of that region
10 Choose the instance type to run on Click Next Configure Instance Details
copy Copyright 2020 Rubicon Communications LLC 36
Security Gateway Manual Amazon AWS
11 On the Configure Instance Details page under the Network field select the VPC that was created For theSubnet field that appears right below the Network field select the public subnet that was created earlier In ourexamples this is 1020024
12 Scroll down to the Network Interfaces heading A single interface named eth0 should be displayed by defaultClick on the Add Device button underneath eth0 Select the private subnet that was created (1021024 in ourexample) Pick an IP address within the range of the private subnet and enter it in the Private IP field Keep inmind that the first 3 or 4 IP addresses are reserved For this example we will use 10215
copy Copyright 2020 Rubicon Communications LLC 37
Security Gateway Manual Amazon AWS
Optionally expand the Advanced Details section and set parameters as text in the User Data field The availableoptions are
password Setting a value via a directive like password=abcdefg will set the password for theadministrative account to the specified value - abcdefg in this example If no value is set here arandom password will be assigned in order to keep administrative access from being exposed tothe internet with a default password
mgmtnet Setting a value via a directive like mgmtnet=1001024 will restrict managementaccess (http https ssh) to the specified network - 1001024 in this example This will causethe firewall rule on the instance (not on Amazons access lists but on the Netgate appliancersquosown firewall) to restrict management traffic for the instance to the specified source network Thedefault behavior is to allow management from any host
These directives can be set by placing them on a single line in the User Data field and separating them withcolons Specify both parameters by typing a statement similar to
password=abcdefgmgmtnet=1001024
Click Next Add Storage after optionally setting these parameters
Note If setting a password using the password parameter listed above the password is retrieved by the instancevia an unencrypted HTTP request when the system is configured the first time it boots The request is made toan Amazon Web Services-operated server on the local LAN that stores metadata about each instance runningThe data for an instance is only made available to that instance but is available to be queried from the instancewithout providing any authentication credentials
It is advised to change the admin password via the pfSense webGUI after the instance comes up or choose notto set the password at all and let a random password be set
copy Copyright 2020 Rubicon Communications LLC 38
Security Gateway Manual Amazon AWS
13 Click Next Tag Instance to accept the Storage Device Configuration
14 Optionally a tag can be set on the instance to differentiate this instance from other VMrsquos that were started byentering a value for the Name tag Click Next Configure Security Group after setting any desired tags
copy Copyright 2020 Rubicon Communications LLC 39
Security Gateway Manual Amazon AWS
15 Select a security group to launch the instance with The recommended settings for a security group should allowat least the following traffic
bull TCP port 443 from 00000 - HTTPS - This is the port that the management web GUI listens on
bull TCP port 22 from 00000 - SSH - This port can be used to connect to a command prompt with an sshclient
bull UDP port 1194 from 00000 - OpenVPN - The OpenVPN server that is configured by default is boundto this port
bull UDP port 500 from 00000 - IKE for IPsec VPN
bull UDP port 4500 from 00000 - IPsecNAT-T for IPsec VPN
copy Copyright 2020 Rubicon Communications LLC 40
Security Gateway Manual Amazon AWS
If you have an existing security group that includes this access select Select an existing security group thenselect the group(s) to use and click Continue Otherwise select Create a new security group and add rulesfor this access by filling in the form for each rule and clicking the Add Rule button When all of the rules havebeen added click Review and Launch
16 Verify the details for the instance and click Launch
17 Select an existing key pair or create a new key pair to connect to the instance with Do not select Proceed
copy Copyright 2020 Rubicon Communications LLC 41
Security Gateway Manual Amazon AWS
Without a Key Pair Click the checkbox that indicates you acknowledge having access to the selected privatekey file and then click Launch Instance
18 In order to reach the instance from the Internet associate an Elastic IP with the WAN interface of the instanceIn the VPC Management Console go to the Elastic IPs view by clicking on Elastic IPs on the left side of thepage Click on the Allocate New Address button Select that you want the EIP used in VPC and click on theYes Allocate button in the box that pops up After the Elastic IP address is allocated associate the address withthe WAN interface of the Netgate appliance by clicking on the Associate Address button
A box will pop up that will either let you specify the instance and Private IP address of the interface or theNetwork Interface and the Private IP Address of the interface Use one of these methods to select the correctinterface and click on the Yes Associate button The instance should now be reachable via ssh or https
copy Copyright 2020 Rubicon Communications LLC 42
Security Gateway Manual Amazon AWS
19 In order for traffic to be allowed to be routed from the private subnet through the public interface of the instancethe SourceDest AddressCheck on the private interfaces needs to be disabled In the EC2 Management Con-sole go to the ldquoNetwork Interfacesrdquo view by clicking on Network Interfaces in the menu on the lefthand sideof the page
Click the checkbox to the left of the privateLAN interface on the Netgate appliance instance Click on theActions button at the top of the page and select Change SourceDesk Check on the popup menu Select theradio button labeled Disabled on the box that pops up and click on the Save button
Non-local traffic from the private subnet should now be sent through the privateLAN interface on the Netgateappliance instance
copy Copyright 2020 Rubicon Communications LLC 43
Security Gateway Manual Amazon AWS
313 Managing a VPC Instance
Once the instance is launched you can connect to it via the Elastic IP that was attached to the primary interface duringthe provisioning phase
In order to manage the configuration of the instance you can connect to it via https or ssh A limited set of configura-tions is possible through the SSH interface the preferred method for managing most of the configurations or viewingdata on the status of the pfSensereg instance is through the https webGUI
Connecting via SSH
To connect via SSH you would use the key pair you chose while creating the instance to connect to the admin accountFrom the command line on a UnixLinux host you would use a command similar to
ssh -i my_ec2_key admin232020454
Where the appropriate private key file and public IP or hostname are substituted
Note The first time you log into your instance the SSH key of the instance will not be cached on your computerand you will need to type yes when asked whether you want continue connecting This should not be necessary onsubsequent sessions
Once logged in you should see the console menu similar to the one below
copy Copyright 2020 Rubicon Communications LLC 44
Security Gateway Manual Amazon AWS
Connecting via HTTPS
To connect via https you would enter a URL containing the public IP address or hostname of your instance intoa web browser For example https232020454 Itrsquos very likely that you will receive a browser warningindicating that the security certificate of the site is not trusted This is because the instance uses a self-signed certificatefor https communication You should click on the option to proceed to the site anyway The pfSense login screen withthe Netgate logo should appear
The username to log in with is admin The password to use is either a value that you set in the User Data during thecreation of the instance or a random password
Tip It is preferable to explicitly set a password by passing a value in with the User Data field so the password willbe known in advance
If you did not set a specific password you can find out that value that the random password was set to through one of2 different methods
1 The first method is to log in over SSH with the key pair that you selected when the instance was created andexamine the contents of the file located at etcmotd You would do this by selecting option 8) Shell in theconsole menu that is presented when you SSH in then run this command in the shell
cat etcmotd
2 The second method is to view the System Log for the instance in the EC2 Management Console After themessages that are displayed that show the status of the boot process a message should appear that indicates what
copy Copyright 2020 Rubicon Communications LLC 45
Security Gateway Manual Amazon AWS
the administrative password was changed to Be aware that the System Log output in the EC2 ManagementConsole is not updated in real time and may take a few minutes to show up
The message you should look for using either of the methods mentioned about will look like this
Admin password changed to abcdefg
Once yoursquove determined your password and entered it into the login form the pfSense WebGUI should be availableto you
314 Forwarding traffic from VPC subnets through the instance
Some additional configuration is required within the VPC instancersquos pfSensereg webGUI before you are able to managetraffic from the private subnet
1 Log into the pfSense WebGUI for the instance
2 Click on the Interfaces heading on the left and then click the Assign link
3 Click on the + icon to add a new Interface under the Interface assignments tab A LAN interface shouldautomatically be added with the next available network interface (xn1)
4 Click on the Interfaces heading on the left again and then click on LAN Click the checkbox to enable the LANinterface Set the IPv4 Configuration Type to Static IPv4 and enter the IP address you assigned to the 2ndinterface during the provisioning phase Click the Save button
Now you can create other instances attached to your private subnet and protect them with the firewall on the pfSenseinstance
Common ways to manage private hosts
Allowing private hosts to connect to the Internet
To allow private hosts to be able to connect to the Internet you can allow any traffic from the LAN in your firewallrules there should be a rule like this in place by default
Next set up NAT rules to cause addresses in the private subnet to be NATed to the IP address of the WAN interface
1 Under the Firewall heading on the left click on the NAT link
2 On the Outbound tab click the radio button for Manual Outbound NAT rule generation (AON - AdvancedOutbound NAT)
3 Click the Save button
4 Click on the Aliases link under the Firewall heading on the left
5 Add your private subnet to the Networks_to_NAT alias
Note There is an existing NAT rule configured by default that uses the alias Networks_to_NAT
copy Copyright 2020 Rubicon Communications LLC 46
Security Gateway Manual Amazon AWS
Allow private hosts to connect to each other
If your hosts should only contact each other and a private network segment elsewhere you can configure an IPsecor OpenVPN tunnel from your remote networks to the Netgate appliance instance and set up the appropriate firewallrules routes and security policies to allow access to your private subnet through a VPN tunnel
Allow direct inbound access from the internet to hosts
If you wish to enable direct inbound access from the internet to hosts on the private subnet you can set up portforwarding on the WAN interface to direct traffic to particular hosts in the private subnet
315 Establishing a VPN connection to a VPC in another region
To establish a VPN that allows instances on the VPC subnet(s) that sit behind a Netgate appliance to communicate withinstances that reside in a VPC in another region the Netgate appliance has a VPC configuration wizard that assists byconfiguring both the Netgate appliance as well as the VPC configuration elements that would normally have to be setmanually through the AWS Management Console
For detailed instructions see the AWS VPC User Guide
316 Upgrading a VPC Instance
Periodically new releases of the AMI are issued to track new releases of pfSensereg that may provide new functionalitybug fixes and security updates
The lower risk approach to upgrading is to bring up a new instance alongside the existing one and executing a cutoverThese instructions detail the procedure for moving your existing instance to one running the latest version
1 Back up the configuration of your exsting instance by navigating to BackupRestore under the Diagnosticsmenu in the Web GUI Click the Download configuration button under the Backup Configuration headingand save your config file to your local system
2 Bring up a new instance of the pfSense Certified RouterFirewallVPN running the latest version
3 When creating the instance make sure the interfaces match the interfaces on the existing instance Make surethat the new instance is in the same VPC as the existing instance and that it has the same number of interfacesattached and that the interfaces are connected to the same Subnets
4 Make sure any interfaces on the new instance that will communicate with private Subnets have theSourceDestination check disabled
5 Allocate a new Elastic IP and associate it to the WAN interface of the new instance to allow yourself managementaccess
6 Restore the backed up configuration file to the new instance Navigate to BackupRestore under the Diagnosticsmenu in the Web GUI Under the Restore Configuration heading click the Choose File button and browsefor the configuration file you backed up from the existing instance earlier Once you have selected that fileclick the Restore configuration button The configuration file will be uploaded and the instance will rebootautomatically
7 If you had packages installed on the old instance navigate to Packages under the System menu in the pfSenseweb GUI and install the same packages
8 If there was any external dependency on the public IP address of the existing instance you can remove theElastic IP Address from the upgraded instance and move the Elastic IP Address from the existing instance tothe upgraded instance External dependencies that might cause you to want to do this include things like VPNrsquos
copy Copyright 2020 Rubicon Communications LLC 47
Security Gateway Manual Amazon AWS
configured to external devices that rely on the existing instancersquos Elastic IP address or access lists on externaldevices that allow access to traffic from the existing instancersquos IP address There may be other reasons why youwould wish to keep the existing address as well (to preserve existing bookmarks to the Web GUI reduce theneed for updates to existing internal documentation etc) The process for moving the old Elastic IP address tothe new instance is as follows
bull Disassociate the Elastic IP address from the new instance In the EC2 Management Console click onElastic IPs under the Network amp Security heading Check the box next to the Elastic IP address assignedto the new instance and click on the Disassociate Address button
bull Disassociate the Elastic IP address from the old instance The procedure is the same as in the previousstep just repeated for the Eastic IP address of the old instance this time
bull Associate the Elastic IP address that was previously associated to the old instance to public interface of thenew instance In the EC2 Management Console click on Elastic IPs Check the box next to the Elastic IPaddress you are moving and click the Associate Address button Fill in the correct value for the Instanceor Network Interface and select the Private IP Address of the public interface on the new instance Clickthe Associate button The management interface of the new instance should now be accessible
9 Move any default routes that pointed to an interface on the old instance to point to the equivalent interface onthe new instance In the VPC Management Console click on Route Tables under the Virtual Private Cloudheading Check the box next to a Route Table associated with the VPC that the instances is located in
bull In the detail pane that appears at the bottom of the screen click on the Routes tab
bull If a route exists for 00000 with a Target that is an interface ID of an interface on the old instnace clickthe Edit button above the table displaying the routes
bull Click the red X next to the row for 00000 to remove the existing route
bull There should be a blank row with empty fields for a new route Enter 00000 in the Destinationfield and the Network Interface ID of the interface on the new instance in the Target field Click on theSave button
bull If there were multiple private subnets in the VPC which were pointed to interfaces on the pfSense instancerepeat this process for the other Route Tables associated with the VPC
bull The new instance should now be functioning as the old one did
32 AWS VPC Wizard User Guide
This guide will explain how to use the AWS VPC Wizard to simplify the configuration of a VPN to a remote VPC Theadministrator is asked for the minimum amount of basic information required to establish the VPN The configurationsboth on the AWS VPC side and on the pfSense side are then automatically created When the wizard is finishedexecuting a functioning VPN connection to a VPC should be established
321 AWS Access Keys
In order to connect to the AWS API to make certain required configuration changes the AWS VPC Wizard requiresAccess Keys to retrieve and modify VPC configurations
See also
Find more information about AWS Security Credential including Access Keys by reading AWS Security Credentials
Access keys consist of two parts
1 An access key ID
copy Copyright 2020 Rubicon Communications LLC 48
Security Gateway Manual Amazon AWS
bull For example AKIAIOSFODNN7EXAMPLE
2 A secret access key
bull For example wJalrXUtnFEMIK7MDENGbPxRfiCYEXAMPLEKEY
Access keys are like a usernamepassword and needed for programmatic requests to AWS including the AWS VPCWizard Use both the access key ID and secret access key together to authenticate requests
Important Manage access keys as securely as a user name and password
Managing Access Keys
To create modify or delete IAM user access keys do the following
1 Sign in to the IAM console
2 In the navigation bar on the upper right choose a user name and then choose My Security Credentials
3 On the AWS IAM Credentials tab in the Access keys for CLI SDK and API access section choose Createaccess key
4 Choose Download csv file to save the access key ID and secret access key to a csv file on your computerStore the file in a secure location There is no access to the secret access key again after this dialog box closesAfter the csv file has been downloaded choose Close When an access key is created the key pair is active bydefault and the pair can be used right away
bull To disable an active access key choose Make inactive
bull To reenable an inactive access key choose Make active
bull To delete an access key choose its X button at the far right of the row Then choose Delete to confirmWhen an access key is deleted itrsquos gone forever and cannot be retrieved However new keys can alwaysbe created
To create modify or delete another IAM userrsquos access keys do the following
1 Sign in to the IAM console
2 In the navigation pane choose Users
3 Choose the name of the user whose access keys to manage and then choose the Security credentials tab
4 In the Access keys section choose Create access key
5 Choose Download csv file to save the access key ID and secret access key to a CSV file on your computer
Rotating Access Keys
As a security best practice we recommend to regularly rotate (change) IAM user access keys Rotating access keyscan be done from the AWS Management Console
To rotate access keys for an IAM user without interrupting the applications (console) create a second access key whilethe first access key is still active
1 Sign in to the IAM console
2 In the navigation pane choose Users
3 Choose the name of the user whose access keys to manage and then choose the Security credentials tab
4 In the Access keys section choose Create access key
copy Copyright 2020 Rubicon Communications LLC 49
Security Gateway Manual Amazon AWS
5 Choose Download csv file to save the access key ID and secret access key to a CSV file on your computer
6 The new access key is active by default At this point the user has two active access keys
After waiting some period of time to ensure that all applications and tools have been updated delete the first accesskey
1 Sign in to the IAM console
2 In the navigation pane choose Users
3 Choose the name of the user whose access keys to manage and then choose the Security credentials tab
4 Locate the access key to delete and choose its X button at the far right of the row Then choose Delete to confirm
Determining When Access Keys Need Rotating
To determine when access keys need rotating (console) do the following
1 Sign in to the IAM console
2 In the navigation pane choose Users
3 If necessary add the Access key age column to the users table by completing the following steps
1 Above the table on the far right click the settings icon
2 In Manage columns select Access key age
3 Choose Close to return to the list of users
4 The Access key age column shows the number of days since the oldest active access key was created Usethis information to find users with access keys that need rotating The column displays None for users with noaccess key
322 Using the Wizard
1 Gather your AWS Access Key ID and Secret Key
2 Navigate to VPN gt AWS VPC Wizard in the main menu in the pfSensereg webGUI
copy Copyright 2020 Rubicon Communications LLC 50
Security Gateway Manual Amazon AWS
3 The first screen of the wizard prompts for the AWS Credentials Enter the Access Key ID and Secret AccessKey in the appropriate text fields and select the Region to connect to in the dropdown menu then click Next
The wizard will then query the AWS API using those credentials to find which VPCrsquos exist in the selectedregion If the credentials were rejected an error message will be displayed and return to the first screen
4 The next screen will prompt to select from the available VPCrsquos in the selected region Select the one to connectto from the dropdown menu The wizard will not create a new VPC it will only connect to an existing VPC
Click Next after selecting the desired VPC
copy Copyright 2020 Rubicon Communications LLC 51
Security Gateway Manual Amazon AWS
Note If the desired VPCrsquos to connect to isnrsquot available create one via the AWS Management Console and tryagain
The wizard will then query the AWS API to check whether there is a VPN Gateway attached to the selectedVPC If none exists one will be created via the API Then the next screen will be displayed
5 On the next screen specify routing and network data
A description of what should be entered for each of these fields follows
copy Copyright 2020 Rubicon Communications LLC 52
Security Gateway Manual Amazon AWS
Routing Type AWS offers either static routing or BGP routing Select the appropriate type fromthe dropdown menu If unsure static routing is likely to be adequate
BGP AS Number If static routing was choosen leave this field blank Otherwise it is possible tospecify an AS number to use If left blank the value will default to 65000
Local Public IP Address On an AWS Netgate appliance instance this should be the public IP ad-dress of the Elastic IP associated with the instance If configuring a hardware device runningpfSense this could be the public address assigned to the WAN (or other) interface of the device
Local subnets The subnets connected to the pfSense instance that should be routed over the tunnelfrom hosts in the remote VPC As an example if connecting a pfSense instance to a remote VPCin the AWS us-east-1 region enter the subnets (or a single subnet) that are local to the pfSenseinstance and when hosts in your VPC in us-east-1 attempted to reach addresses within thosesubnets the traffic will be sent through the VPN tunnel that is being configured
Note When selecting static routing as the routing type there will be a delay that is typically between 2-5minutes before the next screen is displayed This is because static routes must be added to the VPN Connectionvia the AWS API This operation fails until the VPN Connection reaches the ldquoavailablerdquo state This can take afew minutes to occur
Click Next when done
The wizard will then query the AWS API to find whether a Customer Gateway is configured with the selectedPublic IP Address If none exists one will be created If one already exists the ID will be retrieved and it willbe used
The wizard will then query the AWS API to see if a VPC Connection already exists that matches the dataentered If one exists it will be used Otherwise one will be created
If static routing was selected static routes will be added to the VPN Connection for the Local subnets entered
Route propagation will be enabled for the VPN Gateway in each of the Route Tables that are associated withthe VPC All of these configurations are carried out in the AWS API nothing has been changed in the pfSenseVPN configurations yet
Warning Important Note on Billing Once this step is carried out and the VPN Connection is createdAWS will start billing your AWS account the hourly rate for a VPN Connection This is $005 as of thiswriting and that is a charge that goes entirely to AWS itself They will do this until the VPN Connection isdeleted via the VPC Management Console
Nothing in pfSense will ever cause AWS to stop billing for this VPN Connection Whether it works or notwhether the pfSense instance is up or down whether the IPsec tunnels have been deleted or reconfiguredAWS will continue to bill the hourly fee for a VPN Connection if the creation of it succeeds until it is deletedthrough their web interface
The wizard helps establish an initial configuration that works and configures the appropriate elements inAWSrsquos API to facilitate this You are responsible for making sure you understand what yoursquore being billedfor and disabling any functions including VPN Connections that are no longer necessary
6 If the operations of the previous step succeeded the next screen will appear
copy Copyright 2020 Rubicon Communications LLC 53
Security Gateway Manual Amazon AWS
Select an Interface to act as the local endpoint of the VPN tunnels that will be created In most cases thisshould be the WAN interface It should generally be whatever interface is associated with the Local Public IPAddress entered in the previous step
On an AWS Netgate pfSense instance this will be whatever interface the Elastic IP is associated with On ahardware device running pfSense that has the Local Public IP Address directly configured on an interface thiswill be the interface that the Local Public IP Address is configured on
After clicking Next the wizard will configure the VPN and associated settings within pfSense itself using datareturned by the AWS API in the previous step
It will configure 2 IPsec tunnels a firewall rule 2 Aliases (referenced by the firewall rule) and 2 Virtual IPAddresses If BGP was selected as the Routing Type in the previous step it will install the OpenBGPDpackage automatically and configure it appropriately
7 The next screen will appear and prompt to apply the configuration changes that have been made
copy Copyright 2020 Rubicon Communications LLC 54
Security Gateway Manual Amazon AWS
After clicking Next all the configuration changes that were made will be applied
8 The wizard will be completed and the browser will be redirected to the IPsec status page The VPN to the VPCshould now be fully configured
Note Sometimes there is a delay of 5-10 minutes before the tunnels are fully functional and passing trafficThis has been observed particularly often during the setup of tunnels using BGP routing
copy Copyright 2020 Rubicon Communications LLC 55
Security Gateway Manual Amazon AWS
323 Testing Connectivity
Verify that the IPsec tunnels are functioning by attempting to ping the ldquoinside tunnel addressesrdquo of the VPC side ofthe tunnel by navigating to Firewall -gt Virtual IP There should be two virtual IP addresses configured that haveDescriptions like ldquoInside address for tunnel to ltremote IP addressgtrdquo
Amazon provides inside addresses for each end of the tunnel in a 30 subnet in IPv4 link local address space(169254xy) Typically the first usable address in the 30 is the inside address for the VPC end of the tunnel andthe other usable address is the inside address for your end of the tunnel So if you ping from one of the virtual IPaddresses configured on the pfSensereg instance to the IP address that is one less (for example if the virtual IP addresswere 16925425322 ping from 16925425322 to 16925425321) that checks whether the other end of the tunnelis responding and whether the tunnel is functioning properly
Note It sometimes takes a few minutes for the tunnels to begin working after the configuration wizard completes
To ping log into the pfSense instance via SSH and execute ping from a shell prompt For the previous example of16925425322 the proper syntax is
ping -S 16925425322 16925425321
When pinging from a shell prompt it is possible leave the command running indefinitely and interrupt it there is aresponse
copy Copyright 2020 Rubicon Communications LLC 56
Security Gateway Manual Amazon AWS
It is also possible to ping via the Diagnostics -gt Ping page by selecting the appropriate source address and enteringthe remote tunnel inside address in the Host field This will only send a limited number of ping packets so it may benecessary to repeat this a few times
324 VPC Configuration Details
The AWS documentation for connecting a hardware device to a VPC provides a great amount of detail on configuringVPN Connections to VPC
The main configuration elements that exist in Amazonrsquos data model are the Virtual Private Gateway the CustomerGateway and the VPN Connection In order to configure a VPN connection to a VPC all 3 of these need to exist TheVirtual Private Gateway is the VPN endpoint on Amazonrsquos side The customer gateway is the VPN endpoint on thepfSensereg instancedevice being configured The VPN Connection is the IPsec VPN between Amazon and the pfSenseinstancedevice
A Virtual Private Gateway needs to exist and be associated to the VPC A particular VPN Gateway can only beassociated to one VPC at a time Once the VPC to connect to has been selected the wizard invokes the AWS API callDescribeVpnGateways to determine if a VPN Gateway already exists that is attached to the VPC If none exists itcreates one with the CreateVpnGateway API call and attaches it to the VPC with the AttachVpnGateway call
A Customer Gateway needs to be created for the public IP address of the device or virtual machine that will be used toconnect to the VPC The wizard invokes the AWS API call DescribeCustomerGateways to determine if a CustomerGateway already exists If none exists one is created with the CreateCustomerGateway API call
The VPN Connection connects the Virtual Private Gateway and Customer Gateway The wizard checks to see if thereis an existing VPN Connection configured that connects those endpoints by invoking the AWS API call DescribeVp-nConnections If none exists one is created using the CreateVpnConnection call One of the fields returned by thiscall is a block of XML configuration data that contains configuration data assigned by AWS for use with configuringthe VPN Connection This data is stored and used in subsequent steps to make the required configuration changeswithin pfSense
copy Copyright 2020 Rubicon Communications LLC 57
Security Gateway Manual Amazon AWS
Any objects created through API calls by the wizard will be tagged with names like auto-created by pfSenseVPC ltyour_VPC_IDgt This is accomplished by calling the AWS API call CreateTags and using Name as the keyfor the tag
In addition to creation of the items mentioned above required adjustments are made to Security Groups and RouteTables to facilitate communication over the VPN The Security Groups associated with the VPC are updated to allowinbound access from the local subnets on the pfSense end of the VPN They are checked first via the DescribeSecuri-tyGroups AWS API call to determine if the access is already allowed Any of the subnets that is not already allowedhas inbound access added via the AuthorizeSecurityGroupIngress AWS API call
Route Tables associated with the VPC are updated to receive routes from the VPN Gateway used by the VPN Con-nection They are checked first via the DescribeRouteTables AWS API call If the VPN Gateway ID is not includedin the list of VPN Gateways propagating routes route propagation for the VPN Gateway is enabled on that table usingthe EnableVgwRoutePropagation AWS API call
For VPN Connections using static routing static routes for the specified subnets are added to the VPN ConnectionThis is done via the CreateVpnConnectionRoute AWS API call
325 pfSense Configuration Details
On the pfSensereg side there are numerous configurations added to support the VPN to the VPC
Aliases
First aliases are created for use in a firewall rule These aliases are intended to contain the subnets that traffic shouldbe allowed to ingress over the IPsec tunnel One alias represents the local subnets on the pfSense side and is givena name like VPC_Local_vpc_12345678 and the other represents the remote subnets on the VPC side and is given aname like VPC_Remote_vpc_12345678
Virtual IP addresses
Next virtual IP addresses are added on the lo0 (loopback) interface These virtual IP addresses are the local ldquoinsideaddressesrdquo of the IPsec tunnels These addresses are used as the local address for BGP communication when BGProuting is selected These addresses are IPv4 link local addresses (see RFC 3297) AWS assigns 30rsquos out of thenetwork 1692540016 for this purpose
Note These addresses are also useful as a ping target to execute a basic test of whether the tunnel is functioningproperly Executing a ping from a source address of one of these IP addresses to the corresponding inside address ofthe other end of the tunnel helps determine whether the tunnel negotiation is completing properly
Firewall rules
Next a firewall rule is added on the IPsec interface that allows traffic from the VPC networks to the local subnetsThis rule uses the previously created Aliases as sourcedestination targets
IPsec
Then IPsec phase 1 and phase 2 associations are set up Most of the settings required are extracted from a blockof XML data that was returned by the CreateVpnConnection call made during the AWS configuration step Thisincludes parameters like endpoint IP addresses encryption ciphers timer values etc
copy Copyright 2020 Rubicon Communications LLC 58
Security Gateway Manual Amazon AWS
If BGP routing was selected the configurations for the OpenBGPD BGP daemon are established The required settingsare determined using the AS number entered into the wizard and the parameters returned by the CreateVpnConnec-tion call made during the AWS configuration step
326 Tested Configurations
Various topologies may be possible to establish using the AWS VPC Configuration Wizard This section enumeratessome of the configurations that were successfully tested
Platforms
bull Various hardware platforms
bull 64-bit virtual machines in VMware vSphereESX
bull Amazon EC2 instances (Xen virtual machines) of the Netgate pfSensereg RouterFirewallVPN AWS AMI
Local networkrouting configurations
bull pfSense with a public address configured on the WAN interface
bull pfSense with a private address configured on the WAN interface behind a 11 NAT
bull pfSense with a private address configured on the WAN interface behind a PAT (1many NAT)
VPC Topologies
bull pfSense connected to a single VPC
bull pfSense connected to multiple VPCrsquos in different regions
bull Amazon EC2 instance of the pfSense RouterFirewallVPN AWS AMI connected to a VPC belonging to thesame AWS account in a different region
bull Amazon EC2 instance of the pfSense RouterFirewallVPN AWS AMI connected to a VPC belonging to adifferent AWS account in the same region
The configuration recommended for the greatest amount of stability is to have a public IPv4 address directly configuredon the WAN interface of your pfSense firewall but VPNs have been successfully established under all of the conditionslisted above
Whether any of these solutions is appropriate should be evaluated in the context of personal needs and existing infras-tructure Other configurations not listed above may be possible as well
327 AWS VPC Wizard FAQ
1 What level of redundancy is provided by the two tunnels
Amazon provides two tunnel endpoints that will allow traffic to be sent between your networks and the remote VPCyou are connected to The racoon daemon in pfSensereg is only capable of establishing an active phase 2 associationfor a particular sourcedestination pair on a single tunnel
Phase 2 associations between the local subnets and the remote VPC subnet are configured in the pfSense GUI for bothtunnels but racoon will only actually establish an association for the first tunnel This means that racoon will onlyever try to send traffic destined for the remote VPC subnet over the first tunnel
copy Copyright 2020 Rubicon Communications LLC 59
Security Gateway Manual Amazon AWS
If that tunnel goes down the second tunnel may be up and inbound traffic from the remote VPC may be sent to yourlocal networks over that tunnel automatically But outbound traffic to your remote VPC would not automatically failover to the second tunnel In order for you to send your outbound traffic over the second tunnel you would need todisable the phase 2 associations for the first tunnel and apply the changes
2 I quit the wizard before finishing Now what
To finish setting up the VPN go back to the wizard and run through it again It should reuse any partial configurationsthat were generated before it was stopped and create the new elements that are required
3 What are the AWS charges for this
AWS determines their own pricing and provides details for EC2 pricing and VPC pricing There are many types ofcharges that may be incurred for operating instances on AWS (eg charges related to running an instance bandwidthstorage elastic IPs etc)
The charge of specific interest in this case is the hourly charge for a VPN Connection As of this writing it costs $005(USD) per hour in most regions to have a VPN Connection configured and available AWS will charge whether theVPN Connection is being used or not as long as it is configured This will be configured by the third step of the wizardand will never be removed by pfSense
If the VPN Connection is no longer needed and billing for it needs to be stopped visit AWSrsquos VPC ManagementConsole and delete the VPN Connection manually
4 Can I use the wizard to connect to the GovCloud region
This hasnrsquot been officially tested but at least one user has reported that they were able to successfully connect to theGovCloud region They manually added the region us-gov-west-1 to the list of regions in the first step of the wizardand were able to successfully connect to their VPC in that region This may be supported in a future build but to trywithout official support do the following
1 Under the System gt Advanced menu make sure the Enable Secure Shell box is checked This is already doneby default on AWS instances but is off by default on pfSense hardware devices
2 Log into the instance via SSH
3 Make sure the root filesystem is mounted as readwrite On an AWS instance or a hardware device running on anSSD this should be true On a hardware device using Compact Flash or an SD card for storage it will probablybe necessary to remount the root filesystem in readwrite mode by running
mount -uw
4 Edit the file usrlocalwwwwizardsvpc_vpn_wizardxml using vi Look for a section of the file that lookslike this
ltoptiongtltnamegtsa-east-1ltnamegtltvaluegtsa-east-1ltvaluegt
ltoptiongt
That should appear directly after several similar ltoptiongt specifications containing all of the other availableregions Right underneath that section add the following
copy Copyright 2020 Rubicon Communications LLC 60
Security Gateway Manual Amazon AWS
ltoptiongtltnamegtus-gov-west-1ltnamegtltvaluegtus-gov-west-1ltvaluegt
ltoptiongt
Then save the file and exit vi
5 If the filesystem had to be remounted in readwrite mode earlier remount it in read-only mode by running
The GovCloud region should now appear as a choice in the first step of the wizard
copy Copyright 2020 Rubicon Communications LLC 61
CHAPTER
FOUR
REFERENCES
41 Support Resources
411 Commercial Support
In order to keep prices low the software is not bundled with a support subscription For users who need commercialsupport Netgate Gloabal Support can be purchased at httpswwwnetgatecomsupport
412 Community Support
Community support for pfSensereg software is available through the Netgate Forum
42 Additional Resources
421 Netgate Training
Netgate training offers training courses for increasing your knowledge of pfSensereg products and services Whetheryou need to maintain or improve the security skills of your staff or offer highly specialized support and improve yourcustomer satisfaction Netgate training has got you covered
httpswwwnetgatecomtraining
422 Resource Library
To learn more about how to use your pfSense appliance and for other helpful resources make sure to browse ourResource Library
httpswwwnetgatecomresources
423 Professional Services
Support does not cover more complex tasks such as CARP configuration for redundancy on multiple firewalls orcircuits network design and conversion from other firewalls to pfSensereg These items are offered as professionalservices and can be purchased and scheduled accordingly
httpswwwnetgatecomour-servicesprofessional-serviceshtml
62
Security Gateway Manual Amazon AWS
424 Community Options
If you elected not to get a paid support plan you can find help from the active and knowledgeable pfSense communityon our forums
httpsforumnetgatecom
copy Copyright 2020 Rubicon Communications LLC 63
- Getting Started
- Instance Usage
- Virtual Private Cloud (VPC)
- References
-

CHAPTER
THREE
VIRTUAL PRIVATE CLOUD (VPC)
31 AWS VPC User Guide
The pfSensereg Certified firewall and VPN appliance from Netgate for Amazon EC2 is a stateful firewall and VPNappliance In addition to itrsquos capabilities as a VPN gateway and firewall for users and offices it is capable of actingas a firewall to protect instances providing services in Amazonrsquos Virtual Private Cloud or VPC service This servicediffers from the classic EC2 service in that it allows for management of instances on private subnets
This guide will explain how to launch manage and use an instance of the appliance to act as a gateway for otherinstances in a VPC subnet
311 Preparing your VPC
In order to use a Netgate appliance instance to protect your VPC subnets you will need the following
bull One internet-facing subnet which the Netgate appliance instance will have itrsquos primaryWAN interface con-nected to
bull One or more private subnets which the Netgate appliance instance will have itrsquos secondaryLAN interface (andpossibly additional optional interfaces) connected to
bull Separate routing tables for the internet-facing subnet and the private subnet(s)
bull If you already have all of these in place with an existing VPC feel free to skip ahead to Launching an Instance
These instructions will demonstrate how to create a single private subnet and set it up behind an instance of thepfSensereg Certified firewall and VPN appliance from Netgate In the Amazon VPC Management Console create anew VPC subnets and routing table(s)
1 Go to Your VPCs view in the menu on the left side of the VPC Management Console under the Virtual PrivateClouds grouping Click the Create VPC button
28
Security Gateway Manual Amazon AWS
2 Enter a CIDR block to use in the box that pops up If you will connect to hosts in your VPC using a VPNfrom hosts at other sites in your infrastructure be sure to select address space that does not conflict with theprivate address space used elsewhere by your organization Make sure the block you choose is large enoughto contain all subnets you may want to include within it Eg if you plan to use a 24 for your internet-facingsubnet and a 24 for your private network the CIDR block you select here will need to be at least a 23 to holdthose 2 subnets The maximum size block you can select is a 16 For the purposes of this example we will use1020016 Leave the value of Tenancy set to Default Click on the Yes Create button
3 To create the subnets required go to the Subnets view in the menu on the left side of the VPC ManagementConsole Click the Create Subnet button Select the VPC you just created and choose the availability zone youdesire Enter the subnet you wish to use for the internet-facing hosts in the CIDR Block field This subnet willbe the one that the WAN interface of the Netgate appliance instance is attached to and could include any otherhosts or appliances that you wish to be available directly from the Internet and not protected behind the Netgate
copy Copyright 2020 Rubicon Communications LLC 29
Security Gateway Manual Amazon AWS
appliance The subnet you select here must be a block that is within the address space you assigned to the VPCFor this example we will use 1020024 Click on the Yes Create button
4 Create the private subnet Still in the Subnets view of the VPC Management Console click the Create Subnetbutton In the box that pops up select the appropriate VPC and the same Availability Zone that you assignedto your public subnet Enter the subnet you wish to use for your private network in the CIDR Block field Thisnetwork should be a subnet of the address space you assigned to the VPC and should be distinct from the subnetyou assigned to the public subnet For this example we will use 1021024 Click on the Yes Create button
5 Both subnets that you created will have been created to use a default route table that was created for the VPCThe private subnet can continue to use that default table A new route table will need to be created for the publicsubnet Go to the Route Tables view in the menu on the left side of the VPC Management Console The singleexisting route table should be displayed Click on the Create Route Table button Select the VPC and click on
copy Copyright 2020 Rubicon Communications LLC 30
Security Gateway Manual Amazon AWS
the Yes Create button
6 Associate the public subnet (1020024 in our examples) with the routing table that was just created Go to theSubnets view on the left hand side of the VPC Management Console Check the checkbox next to the publicsubnet and scroll down to look at the Details tab for that subnet At the top of the Details tab will be listed theCIDR block VPC and Availability Zone Under those items the Route Table will be listed and will have a linklabeled replace next to it Click on the link Select the route table in the box that pops up and click on the YesReplace button
7 In order to send traffic from the public subnet to the Internet we will need to add a default route to an InternetGateway We must first create one Go to the Internet Gateways view in the menu on the left hand side of theVPC Management Console Click on the Create Internet Gateway button Click the Yes Create button onthe box that pops up Click the checkbox next to the new Internet Gateway and then click the Attach to VPC
copy Copyright 2020 Rubicon Communications LLC 31
Security Gateway Manual Amazon AWS
button Select the VPC and click on the Yes Attach button
8 The route table for the public subnet will need to be updated so that it has a default route to the Internet GatewayGo to the Route Tables view on the left hand side of the VPC Management Console Check the checkbox nextto the route table for the public subnet Under the Routes tab for that route table there should only be listed asingle route for the CIDR block of the VPC (1020016 in our example) that has a target of local There is arow underneath this route with a text box in the Destination field and a pop up menu for the Target field Enter00000 for the Destination and select the Internet Gateway (should be formatted like igw-XXXXXXXX)for the target Click on the Add button that appears at the right side of the row Click the Yes Add button onthe box that pops up
There are a few more VPC configuration changes that will be required later but next you must launch a Netgateappliance instance
copy Copyright 2020 Rubicon Communications LLC 32
Security Gateway Manual Amazon AWS
312 Launching an Instance in a VPC
In the Amazon EC2 Management Console launch a new instance of the pfSensereg firewall and VPN appliance Thisprocess is the same as the one for launching an EC2 (non-VPC) instance up until step 11 which details the values toenter for the Configure Instance Details screen in order to specify the instance should be created in your VPC
1 Select the region to run the instance in using the tab at the upper right corner of the page
2 Launch a new instance by clicking on the Launch Instance button under the Create Instance section of theEC2 dashboard
copy Copyright 2020 Rubicon Communications LLC 33
Security Gateway Manual Amazon AWS
3 Select AWS Marketplace on the Create a New Instance menu Type Netgate pfSense FirewallVPNRouter in the search box and press enter (or click on the Search button next to the text box)
4 Click on the link for the Netgate pfSense FirewallVPNRouter appliance in the search results
5 Click on the Continue button on the info page for the Netgate pfSense FirewallVPNRouter
copy Copyright 2020 Rubicon Communications LLC 34
Security Gateway Manual Amazon AWS
6 Click on the Launch with EC2 Console tab
7 If the license terms havenrsquot been accepted click on the Accept Terms button
8 A message should be displayed indicating that the subscription is being processed
copy Copyright 2020 Rubicon Communications LLC 35
Security Gateway Manual Amazon AWS
9 Select the version of the image to run under the popup menu labeled Select a Version Generally the mostrecently issued version should be selected Identify which region to launch the instances in and click on theLaunch in EC2 Console button to the right of that region
10 Choose the instance type to run on Click Next Configure Instance Details
copy Copyright 2020 Rubicon Communications LLC 36
Security Gateway Manual Amazon AWS
11 On the Configure Instance Details page under the Network field select the VPC that was created For theSubnet field that appears right below the Network field select the public subnet that was created earlier In ourexamples this is 1020024
12 Scroll down to the Network Interfaces heading A single interface named eth0 should be displayed by defaultClick on the Add Device button underneath eth0 Select the private subnet that was created (1021024 in ourexample) Pick an IP address within the range of the private subnet and enter it in the Private IP field Keep inmind that the first 3 or 4 IP addresses are reserved For this example we will use 10215
copy Copyright 2020 Rubicon Communications LLC 37
Security Gateway Manual Amazon AWS
Optionally expand the Advanced Details section and set parameters as text in the User Data field The availableoptions are
password Setting a value via a directive like password=abcdefg will set the password for theadministrative account to the specified value - abcdefg in this example If no value is set here arandom password will be assigned in order to keep administrative access from being exposed tothe internet with a default password
mgmtnet Setting a value via a directive like mgmtnet=1001024 will restrict managementaccess (http https ssh) to the specified network - 1001024 in this example This will causethe firewall rule on the instance (not on Amazons access lists but on the Netgate appliancersquosown firewall) to restrict management traffic for the instance to the specified source network Thedefault behavior is to allow management from any host
These directives can be set by placing them on a single line in the User Data field and separating them withcolons Specify both parameters by typing a statement similar to
password=abcdefgmgmtnet=1001024
Click Next Add Storage after optionally setting these parameters
Note If setting a password using the password parameter listed above the password is retrieved by the instancevia an unencrypted HTTP request when the system is configured the first time it boots The request is made toan Amazon Web Services-operated server on the local LAN that stores metadata about each instance runningThe data for an instance is only made available to that instance but is available to be queried from the instancewithout providing any authentication credentials
It is advised to change the admin password via the pfSense webGUI after the instance comes up or choose notto set the password at all and let a random password be set
copy Copyright 2020 Rubicon Communications LLC 38
Security Gateway Manual Amazon AWS
13 Click Next Tag Instance to accept the Storage Device Configuration
14 Optionally a tag can be set on the instance to differentiate this instance from other VMrsquos that were started byentering a value for the Name tag Click Next Configure Security Group after setting any desired tags
copy Copyright 2020 Rubicon Communications LLC 39
Security Gateway Manual Amazon AWS
15 Select a security group to launch the instance with The recommended settings for a security group should allowat least the following traffic
bull TCP port 443 from 00000 - HTTPS - This is the port that the management web GUI listens on
bull TCP port 22 from 00000 - SSH - This port can be used to connect to a command prompt with an sshclient
bull UDP port 1194 from 00000 - OpenVPN - The OpenVPN server that is configured by default is boundto this port
bull UDP port 500 from 00000 - IKE for IPsec VPN
bull UDP port 4500 from 00000 - IPsecNAT-T for IPsec VPN
copy Copyright 2020 Rubicon Communications LLC 40
Security Gateway Manual Amazon AWS
If you have an existing security group that includes this access select Select an existing security group thenselect the group(s) to use and click Continue Otherwise select Create a new security group and add rulesfor this access by filling in the form for each rule and clicking the Add Rule button When all of the rules havebeen added click Review and Launch
16 Verify the details for the instance and click Launch
17 Select an existing key pair or create a new key pair to connect to the instance with Do not select Proceed
copy Copyright 2020 Rubicon Communications LLC 41
Security Gateway Manual Amazon AWS
Without a Key Pair Click the checkbox that indicates you acknowledge having access to the selected privatekey file and then click Launch Instance
18 In order to reach the instance from the Internet associate an Elastic IP with the WAN interface of the instanceIn the VPC Management Console go to the Elastic IPs view by clicking on Elastic IPs on the left side of thepage Click on the Allocate New Address button Select that you want the EIP used in VPC and click on theYes Allocate button in the box that pops up After the Elastic IP address is allocated associate the address withthe WAN interface of the Netgate appliance by clicking on the Associate Address button
A box will pop up that will either let you specify the instance and Private IP address of the interface or theNetwork Interface and the Private IP Address of the interface Use one of these methods to select the correctinterface and click on the Yes Associate button The instance should now be reachable via ssh or https
copy Copyright 2020 Rubicon Communications LLC 42
Security Gateway Manual Amazon AWS
19 In order for traffic to be allowed to be routed from the private subnet through the public interface of the instancethe SourceDest AddressCheck on the private interfaces needs to be disabled In the EC2 Management Con-sole go to the ldquoNetwork Interfacesrdquo view by clicking on Network Interfaces in the menu on the lefthand sideof the page
Click the checkbox to the left of the privateLAN interface on the Netgate appliance instance Click on theActions button at the top of the page and select Change SourceDesk Check on the popup menu Select theradio button labeled Disabled on the box that pops up and click on the Save button
Non-local traffic from the private subnet should now be sent through the privateLAN interface on the Netgateappliance instance
copy Copyright 2020 Rubicon Communications LLC 43
Security Gateway Manual Amazon AWS
313 Managing a VPC Instance
Once the instance is launched you can connect to it via the Elastic IP that was attached to the primary interface duringthe provisioning phase
In order to manage the configuration of the instance you can connect to it via https or ssh A limited set of configura-tions is possible through the SSH interface the preferred method for managing most of the configurations or viewingdata on the status of the pfSensereg instance is through the https webGUI
Connecting via SSH
To connect via SSH you would use the key pair you chose while creating the instance to connect to the admin accountFrom the command line on a UnixLinux host you would use a command similar to
ssh -i my_ec2_key admin232020454
Where the appropriate private key file and public IP or hostname are substituted
Note The first time you log into your instance the SSH key of the instance will not be cached on your computerand you will need to type yes when asked whether you want continue connecting This should not be necessary onsubsequent sessions
Once logged in you should see the console menu similar to the one below
copy Copyright 2020 Rubicon Communications LLC 44
Security Gateway Manual Amazon AWS
Connecting via HTTPS
To connect via https you would enter a URL containing the public IP address or hostname of your instance intoa web browser For example https232020454 Itrsquos very likely that you will receive a browser warningindicating that the security certificate of the site is not trusted This is because the instance uses a self-signed certificatefor https communication You should click on the option to proceed to the site anyway The pfSense login screen withthe Netgate logo should appear
The username to log in with is admin The password to use is either a value that you set in the User Data during thecreation of the instance or a random password
Tip It is preferable to explicitly set a password by passing a value in with the User Data field so the password willbe known in advance
If you did not set a specific password you can find out that value that the random password was set to through one of2 different methods
1 The first method is to log in over SSH with the key pair that you selected when the instance was created andexamine the contents of the file located at etcmotd You would do this by selecting option 8) Shell in theconsole menu that is presented when you SSH in then run this command in the shell
cat etcmotd
2 The second method is to view the System Log for the instance in the EC2 Management Console After themessages that are displayed that show the status of the boot process a message should appear that indicates what
copy Copyright 2020 Rubicon Communications LLC 45
Security Gateway Manual Amazon AWS
the administrative password was changed to Be aware that the System Log output in the EC2 ManagementConsole is not updated in real time and may take a few minutes to show up
The message you should look for using either of the methods mentioned about will look like this
Admin password changed to abcdefg
Once yoursquove determined your password and entered it into the login form the pfSense WebGUI should be availableto you
314 Forwarding traffic from VPC subnets through the instance
Some additional configuration is required within the VPC instancersquos pfSensereg webGUI before you are able to managetraffic from the private subnet
1 Log into the pfSense WebGUI for the instance
2 Click on the Interfaces heading on the left and then click the Assign link
3 Click on the + icon to add a new Interface under the Interface assignments tab A LAN interface shouldautomatically be added with the next available network interface (xn1)
4 Click on the Interfaces heading on the left again and then click on LAN Click the checkbox to enable the LANinterface Set the IPv4 Configuration Type to Static IPv4 and enter the IP address you assigned to the 2ndinterface during the provisioning phase Click the Save button
Now you can create other instances attached to your private subnet and protect them with the firewall on the pfSenseinstance
Common ways to manage private hosts
Allowing private hosts to connect to the Internet
To allow private hosts to be able to connect to the Internet you can allow any traffic from the LAN in your firewallrules there should be a rule like this in place by default
Next set up NAT rules to cause addresses in the private subnet to be NATed to the IP address of the WAN interface
1 Under the Firewall heading on the left click on the NAT link
2 On the Outbound tab click the radio button for Manual Outbound NAT rule generation (AON - AdvancedOutbound NAT)
3 Click the Save button
4 Click on the Aliases link under the Firewall heading on the left
5 Add your private subnet to the Networks_to_NAT alias
Note There is an existing NAT rule configured by default that uses the alias Networks_to_NAT
copy Copyright 2020 Rubicon Communications LLC 46
Security Gateway Manual Amazon AWS
Allow private hosts to connect to each other
If your hosts should only contact each other and a private network segment elsewhere you can configure an IPsecor OpenVPN tunnel from your remote networks to the Netgate appliance instance and set up the appropriate firewallrules routes and security policies to allow access to your private subnet through a VPN tunnel
Allow direct inbound access from the internet to hosts
If you wish to enable direct inbound access from the internet to hosts on the private subnet you can set up portforwarding on the WAN interface to direct traffic to particular hosts in the private subnet
315 Establishing a VPN connection to a VPC in another region
To establish a VPN that allows instances on the VPC subnet(s) that sit behind a Netgate appliance to communicate withinstances that reside in a VPC in another region the Netgate appliance has a VPC configuration wizard that assists byconfiguring both the Netgate appliance as well as the VPC configuration elements that would normally have to be setmanually through the AWS Management Console
For detailed instructions see the AWS VPC User Guide
316 Upgrading a VPC Instance
Periodically new releases of the AMI are issued to track new releases of pfSensereg that may provide new functionalitybug fixes and security updates
The lower risk approach to upgrading is to bring up a new instance alongside the existing one and executing a cutoverThese instructions detail the procedure for moving your existing instance to one running the latest version
1 Back up the configuration of your exsting instance by navigating to BackupRestore under the Diagnosticsmenu in the Web GUI Click the Download configuration button under the Backup Configuration headingand save your config file to your local system
2 Bring up a new instance of the pfSense Certified RouterFirewallVPN running the latest version
3 When creating the instance make sure the interfaces match the interfaces on the existing instance Make surethat the new instance is in the same VPC as the existing instance and that it has the same number of interfacesattached and that the interfaces are connected to the same Subnets
4 Make sure any interfaces on the new instance that will communicate with private Subnets have theSourceDestination check disabled
5 Allocate a new Elastic IP and associate it to the WAN interface of the new instance to allow yourself managementaccess
6 Restore the backed up configuration file to the new instance Navigate to BackupRestore under the Diagnosticsmenu in the Web GUI Under the Restore Configuration heading click the Choose File button and browsefor the configuration file you backed up from the existing instance earlier Once you have selected that fileclick the Restore configuration button The configuration file will be uploaded and the instance will rebootautomatically
7 If you had packages installed on the old instance navigate to Packages under the System menu in the pfSenseweb GUI and install the same packages
8 If there was any external dependency on the public IP address of the existing instance you can remove theElastic IP Address from the upgraded instance and move the Elastic IP Address from the existing instance tothe upgraded instance External dependencies that might cause you to want to do this include things like VPNrsquos
copy Copyright 2020 Rubicon Communications LLC 47
Security Gateway Manual Amazon AWS
configured to external devices that rely on the existing instancersquos Elastic IP address or access lists on externaldevices that allow access to traffic from the existing instancersquos IP address There may be other reasons why youwould wish to keep the existing address as well (to preserve existing bookmarks to the Web GUI reduce theneed for updates to existing internal documentation etc) The process for moving the old Elastic IP address tothe new instance is as follows
bull Disassociate the Elastic IP address from the new instance In the EC2 Management Console click onElastic IPs under the Network amp Security heading Check the box next to the Elastic IP address assignedto the new instance and click on the Disassociate Address button
bull Disassociate the Elastic IP address from the old instance The procedure is the same as in the previousstep just repeated for the Eastic IP address of the old instance this time
bull Associate the Elastic IP address that was previously associated to the old instance to public interface of thenew instance In the EC2 Management Console click on Elastic IPs Check the box next to the Elastic IPaddress you are moving and click the Associate Address button Fill in the correct value for the Instanceor Network Interface and select the Private IP Address of the public interface on the new instance Clickthe Associate button The management interface of the new instance should now be accessible
9 Move any default routes that pointed to an interface on the old instance to point to the equivalent interface onthe new instance In the VPC Management Console click on Route Tables under the Virtual Private Cloudheading Check the box next to a Route Table associated with the VPC that the instances is located in
bull In the detail pane that appears at the bottom of the screen click on the Routes tab
bull If a route exists for 00000 with a Target that is an interface ID of an interface on the old instnace clickthe Edit button above the table displaying the routes
bull Click the red X next to the row for 00000 to remove the existing route
bull There should be a blank row with empty fields for a new route Enter 00000 in the Destinationfield and the Network Interface ID of the interface on the new instance in the Target field Click on theSave button
bull If there were multiple private subnets in the VPC which were pointed to interfaces on the pfSense instancerepeat this process for the other Route Tables associated with the VPC
bull The new instance should now be functioning as the old one did
32 AWS VPC Wizard User Guide
This guide will explain how to use the AWS VPC Wizard to simplify the configuration of a VPN to a remote VPC Theadministrator is asked for the minimum amount of basic information required to establish the VPN The configurationsboth on the AWS VPC side and on the pfSense side are then automatically created When the wizard is finishedexecuting a functioning VPN connection to a VPC should be established
321 AWS Access Keys
In order to connect to the AWS API to make certain required configuration changes the AWS VPC Wizard requiresAccess Keys to retrieve and modify VPC configurations
See also
Find more information about AWS Security Credential including Access Keys by reading AWS Security Credentials
Access keys consist of two parts
1 An access key ID
copy Copyright 2020 Rubicon Communications LLC 48
Security Gateway Manual Amazon AWS
bull For example AKIAIOSFODNN7EXAMPLE
2 A secret access key
bull For example wJalrXUtnFEMIK7MDENGbPxRfiCYEXAMPLEKEY
Access keys are like a usernamepassword and needed for programmatic requests to AWS including the AWS VPCWizard Use both the access key ID and secret access key together to authenticate requests
Important Manage access keys as securely as a user name and password
Managing Access Keys
To create modify or delete IAM user access keys do the following
1 Sign in to the IAM console
2 In the navigation bar on the upper right choose a user name and then choose My Security Credentials
3 On the AWS IAM Credentials tab in the Access keys for CLI SDK and API access section choose Createaccess key
4 Choose Download csv file to save the access key ID and secret access key to a csv file on your computerStore the file in a secure location There is no access to the secret access key again after this dialog box closesAfter the csv file has been downloaded choose Close When an access key is created the key pair is active bydefault and the pair can be used right away
bull To disable an active access key choose Make inactive
bull To reenable an inactive access key choose Make active
bull To delete an access key choose its X button at the far right of the row Then choose Delete to confirmWhen an access key is deleted itrsquos gone forever and cannot be retrieved However new keys can alwaysbe created
To create modify or delete another IAM userrsquos access keys do the following
1 Sign in to the IAM console
2 In the navigation pane choose Users
3 Choose the name of the user whose access keys to manage and then choose the Security credentials tab
4 In the Access keys section choose Create access key
5 Choose Download csv file to save the access key ID and secret access key to a CSV file on your computer
Rotating Access Keys
As a security best practice we recommend to regularly rotate (change) IAM user access keys Rotating access keyscan be done from the AWS Management Console
To rotate access keys for an IAM user without interrupting the applications (console) create a second access key whilethe first access key is still active
1 Sign in to the IAM console
2 In the navigation pane choose Users
3 Choose the name of the user whose access keys to manage and then choose the Security credentials tab
4 In the Access keys section choose Create access key
copy Copyright 2020 Rubicon Communications LLC 49
Security Gateway Manual Amazon AWS
5 Choose Download csv file to save the access key ID and secret access key to a CSV file on your computer
6 The new access key is active by default At this point the user has two active access keys
After waiting some period of time to ensure that all applications and tools have been updated delete the first accesskey
1 Sign in to the IAM console
2 In the navigation pane choose Users
3 Choose the name of the user whose access keys to manage and then choose the Security credentials tab
4 Locate the access key to delete and choose its X button at the far right of the row Then choose Delete to confirm
Determining When Access Keys Need Rotating
To determine when access keys need rotating (console) do the following
1 Sign in to the IAM console
2 In the navigation pane choose Users
3 If necessary add the Access key age column to the users table by completing the following steps
1 Above the table on the far right click the settings icon
2 In Manage columns select Access key age
3 Choose Close to return to the list of users
4 The Access key age column shows the number of days since the oldest active access key was created Usethis information to find users with access keys that need rotating The column displays None for users with noaccess key
322 Using the Wizard
1 Gather your AWS Access Key ID and Secret Key
2 Navigate to VPN gt AWS VPC Wizard in the main menu in the pfSensereg webGUI
copy Copyright 2020 Rubicon Communications LLC 50
Security Gateway Manual Amazon AWS
3 The first screen of the wizard prompts for the AWS Credentials Enter the Access Key ID and Secret AccessKey in the appropriate text fields and select the Region to connect to in the dropdown menu then click Next
The wizard will then query the AWS API using those credentials to find which VPCrsquos exist in the selectedregion If the credentials were rejected an error message will be displayed and return to the first screen
4 The next screen will prompt to select from the available VPCrsquos in the selected region Select the one to connectto from the dropdown menu The wizard will not create a new VPC it will only connect to an existing VPC
Click Next after selecting the desired VPC
copy Copyright 2020 Rubicon Communications LLC 51
Security Gateway Manual Amazon AWS
Note If the desired VPCrsquos to connect to isnrsquot available create one via the AWS Management Console and tryagain
The wizard will then query the AWS API to check whether there is a VPN Gateway attached to the selectedVPC If none exists one will be created via the API Then the next screen will be displayed
5 On the next screen specify routing and network data
A description of what should be entered for each of these fields follows
copy Copyright 2020 Rubicon Communications LLC 52
Security Gateway Manual Amazon AWS
Routing Type AWS offers either static routing or BGP routing Select the appropriate type fromthe dropdown menu If unsure static routing is likely to be adequate
BGP AS Number If static routing was choosen leave this field blank Otherwise it is possible tospecify an AS number to use If left blank the value will default to 65000
Local Public IP Address On an AWS Netgate appliance instance this should be the public IP ad-dress of the Elastic IP associated with the instance If configuring a hardware device runningpfSense this could be the public address assigned to the WAN (or other) interface of the device
Local subnets The subnets connected to the pfSense instance that should be routed over the tunnelfrom hosts in the remote VPC As an example if connecting a pfSense instance to a remote VPCin the AWS us-east-1 region enter the subnets (or a single subnet) that are local to the pfSenseinstance and when hosts in your VPC in us-east-1 attempted to reach addresses within thosesubnets the traffic will be sent through the VPN tunnel that is being configured
Note When selecting static routing as the routing type there will be a delay that is typically between 2-5minutes before the next screen is displayed This is because static routes must be added to the VPN Connectionvia the AWS API This operation fails until the VPN Connection reaches the ldquoavailablerdquo state This can take afew minutes to occur
Click Next when done
The wizard will then query the AWS API to find whether a Customer Gateway is configured with the selectedPublic IP Address If none exists one will be created If one already exists the ID will be retrieved and it willbe used
The wizard will then query the AWS API to see if a VPC Connection already exists that matches the dataentered If one exists it will be used Otherwise one will be created
If static routing was selected static routes will be added to the VPN Connection for the Local subnets entered
Route propagation will be enabled for the VPN Gateway in each of the Route Tables that are associated withthe VPC All of these configurations are carried out in the AWS API nothing has been changed in the pfSenseVPN configurations yet
Warning Important Note on Billing Once this step is carried out and the VPN Connection is createdAWS will start billing your AWS account the hourly rate for a VPN Connection This is $005 as of thiswriting and that is a charge that goes entirely to AWS itself They will do this until the VPN Connection isdeleted via the VPC Management Console
Nothing in pfSense will ever cause AWS to stop billing for this VPN Connection Whether it works or notwhether the pfSense instance is up or down whether the IPsec tunnels have been deleted or reconfiguredAWS will continue to bill the hourly fee for a VPN Connection if the creation of it succeeds until it is deletedthrough their web interface
The wizard helps establish an initial configuration that works and configures the appropriate elements inAWSrsquos API to facilitate this You are responsible for making sure you understand what yoursquore being billedfor and disabling any functions including VPN Connections that are no longer necessary
6 If the operations of the previous step succeeded the next screen will appear
copy Copyright 2020 Rubicon Communications LLC 53
Security Gateway Manual Amazon AWS
Select an Interface to act as the local endpoint of the VPN tunnels that will be created In most cases thisshould be the WAN interface It should generally be whatever interface is associated with the Local Public IPAddress entered in the previous step
On an AWS Netgate pfSense instance this will be whatever interface the Elastic IP is associated with On ahardware device running pfSense that has the Local Public IP Address directly configured on an interface thiswill be the interface that the Local Public IP Address is configured on
After clicking Next the wizard will configure the VPN and associated settings within pfSense itself using datareturned by the AWS API in the previous step
It will configure 2 IPsec tunnels a firewall rule 2 Aliases (referenced by the firewall rule) and 2 Virtual IPAddresses If BGP was selected as the Routing Type in the previous step it will install the OpenBGPDpackage automatically and configure it appropriately
7 The next screen will appear and prompt to apply the configuration changes that have been made
copy Copyright 2020 Rubicon Communications LLC 54
Security Gateway Manual Amazon AWS
After clicking Next all the configuration changes that were made will be applied
8 The wizard will be completed and the browser will be redirected to the IPsec status page The VPN to the VPCshould now be fully configured
Note Sometimes there is a delay of 5-10 minutes before the tunnels are fully functional and passing trafficThis has been observed particularly often during the setup of tunnels using BGP routing
copy Copyright 2020 Rubicon Communications LLC 55
Security Gateway Manual Amazon AWS
323 Testing Connectivity
Verify that the IPsec tunnels are functioning by attempting to ping the ldquoinside tunnel addressesrdquo of the VPC side ofthe tunnel by navigating to Firewall -gt Virtual IP There should be two virtual IP addresses configured that haveDescriptions like ldquoInside address for tunnel to ltremote IP addressgtrdquo
Amazon provides inside addresses for each end of the tunnel in a 30 subnet in IPv4 link local address space(169254xy) Typically the first usable address in the 30 is the inside address for the VPC end of the tunnel andthe other usable address is the inside address for your end of the tunnel So if you ping from one of the virtual IPaddresses configured on the pfSensereg instance to the IP address that is one less (for example if the virtual IP addresswere 16925425322 ping from 16925425322 to 16925425321) that checks whether the other end of the tunnelis responding and whether the tunnel is functioning properly
Note It sometimes takes a few minutes for the tunnels to begin working after the configuration wizard completes
To ping log into the pfSense instance via SSH and execute ping from a shell prompt For the previous example of16925425322 the proper syntax is
ping -S 16925425322 16925425321
When pinging from a shell prompt it is possible leave the command running indefinitely and interrupt it there is aresponse
copy Copyright 2020 Rubicon Communications LLC 56
Security Gateway Manual Amazon AWS
It is also possible to ping via the Diagnostics -gt Ping page by selecting the appropriate source address and enteringthe remote tunnel inside address in the Host field This will only send a limited number of ping packets so it may benecessary to repeat this a few times
324 VPC Configuration Details
The AWS documentation for connecting a hardware device to a VPC provides a great amount of detail on configuringVPN Connections to VPC
The main configuration elements that exist in Amazonrsquos data model are the Virtual Private Gateway the CustomerGateway and the VPN Connection In order to configure a VPN connection to a VPC all 3 of these need to exist TheVirtual Private Gateway is the VPN endpoint on Amazonrsquos side The customer gateway is the VPN endpoint on thepfSensereg instancedevice being configured The VPN Connection is the IPsec VPN between Amazon and the pfSenseinstancedevice
A Virtual Private Gateway needs to exist and be associated to the VPC A particular VPN Gateway can only beassociated to one VPC at a time Once the VPC to connect to has been selected the wizard invokes the AWS API callDescribeVpnGateways to determine if a VPN Gateway already exists that is attached to the VPC If none exists itcreates one with the CreateVpnGateway API call and attaches it to the VPC with the AttachVpnGateway call
A Customer Gateway needs to be created for the public IP address of the device or virtual machine that will be used toconnect to the VPC The wizard invokes the AWS API call DescribeCustomerGateways to determine if a CustomerGateway already exists If none exists one is created with the CreateCustomerGateway API call
The VPN Connection connects the Virtual Private Gateway and Customer Gateway The wizard checks to see if thereis an existing VPN Connection configured that connects those endpoints by invoking the AWS API call DescribeVp-nConnections If none exists one is created using the CreateVpnConnection call One of the fields returned by thiscall is a block of XML configuration data that contains configuration data assigned by AWS for use with configuringthe VPN Connection This data is stored and used in subsequent steps to make the required configuration changeswithin pfSense
copy Copyright 2020 Rubicon Communications LLC 57
Security Gateway Manual Amazon AWS
Any objects created through API calls by the wizard will be tagged with names like auto-created by pfSenseVPC ltyour_VPC_IDgt This is accomplished by calling the AWS API call CreateTags and using Name as the keyfor the tag
In addition to creation of the items mentioned above required adjustments are made to Security Groups and RouteTables to facilitate communication over the VPN The Security Groups associated with the VPC are updated to allowinbound access from the local subnets on the pfSense end of the VPN They are checked first via the DescribeSecuri-tyGroups AWS API call to determine if the access is already allowed Any of the subnets that is not already allowedhas inbound access added via the AuthorizeSecurityGroupIngress AWS API call
Route Tables associated with the VPC are updated to receive routes from the VPN Gateway used by the VPN Con-nection They are checked first via the DescribeRouteTables AWS API call If the VPN Gateway ID is not includedin the list of VPN Gateways propagating routes route propagation for the VPN Gateway is enabled on that table usingthe EnableVgwRoutePropagation AWS API call
For VPN Connections using static routing static routes for the specified subnets are added to the VPN ConnectionThis is done via the CreateVpnConnectionRoute AWS API call
325 pfSense Configuration Details
On the pfSensereg side there are numerous configurations added to support the VPN to the VPC
Aliases
First aliases are created for use in a firewall rule These aliases are intended to contain the subnets that traffic shouldbe allowed to ingress over the IPsec tunnel One alias represents the local subnets on the pfSense side and is givena name like VPC_Local_vpc_12345678 and the other represents the remote subnets on the VPC side and is given aname like VPC_Remote_vpc_12345678
Virtual IP addresses
Next virtual IP addresses are added on the lo0 (loopback) interface These virtual IP addresses are the local ldquoinsideaddressesrdquo of the IPsec tunnels These addresses are used as the local address for BGP communication when BGProuting is selected These addresses are IPv4 link local addresses (see RFC 3297) AWS assigns 30rsquos out of thenetwork 1692540016 for this purpose
Note These addresses are also useful as a ping target to execute a basic test of whether the tunnel is functioningproperly Executing a ping from a source address of one of these IP addresses to the corresponding inside address ofthe other end of the tunnel helps determine whether the tunnel negotiation is completing properly
Firewall rules
Next a firewall rule is added on the IPsec interface that allows traffic from the VPC networks to the local subnetsThis rule uses the previously created Aliases as sourcedestination targets
IPsec
Then IPsec phase 1 and phase 2 associations are set up Most of the settings required are extracted from a blockof XML data that was returned by the CreateVpnConnection call made during the AWS configuration step Thisincludes parameters like endpoint IP addresses encryption ciphers timer values etc
copy Copyright 2020 Rubicon Communications LLC 58
Security Gateway Manual Amazon AWS
If BGP routing was selected the configurations for the OpenBGPD BGP daemon are established The required settingsare determined using the AS number entered into the wizard and the parameters returned by the CreateVpnConnec-tion call made during the AWS configuration step
326 Tested Configurations
Various topologies may be possible to establish using the AWS VPC Configuration Wizard This section enumeratessome of the configurations that were successfully tested
Platforms
bull Various hardware platforms
bull 64-bit virtual machines in VMware vSphereESX
bull Amazon EC2 instances (Xen virtual machines) of the Netgate pfSensereg RouterFirewallVPN AWS AMI
Local networkrouting configurations
bull pfSense with a public address configured on the WAN interface
bull pfSense with a private address configured on the WAN interface behind a 11 NAT
bull pfSense with a private address configured on the WAN interface behind a PAT (1many NAT)
VPC Topologies
bull pfSense connected to a single VPC
bull pfSense connected to multiple VPCrsquos in different regions
bull Amazon EC2 instance of the pfSense RouterFirewallVPN AWS AMI connected to a VPC belonging to thesame AWS account in a different region
bull Amazon EC2 instance of the pfSense RouterFirewallVPN AWS AMI connected to a VPC belonging to adifferent AWS account in the same region
The configuration recommended for the greatest amount of stability is to have a public IPv4 address directly configuredon the WAN interface of your pfSense firewall but VPNs have been successfully established under all of the conditionslisted above
Whether any of these solutions is appropriate should be evaluated in the context of personal needs and existing infras-tructure Other configurations not listed above may be possible as well
327 AWS VPC Wizard FAQ
1 What level of redundancy is provided by the two tunnels
Amazon provides two tunnel endpoints that will allow traffic to be sent between your networks and the remote VPCyou are connected to The racoon daemon in pfSensereg is only capable of establishing an active phase 2 associationfor a particular sourcedestination pair on a single tunnel
Phase 2 associations between the local subnets and the remote VPC subnet are configured in the pfSense GUI for bothtunnels but racoon will only actually establish an association for the first tunnel This means that racoon will onlyever try to send traffic destined for the remote VPC subnet over the first tunnel
copy Copyright 2020 Rubicon Communications LLC 59
Security Gateway Manual Amazon AWS
If that tunnel goes down the second tunnel may be up and inbound traffic from the remote VPC may be sent to yourlocal networks over that tunnel automatically But outbound traffic to your remote VPC would not automatically failover to the second tunnel In order for you to send your outbound traffic over the second tunnel you would need todisable the phase 2 associations for the first tunnel and apply the changes
2 I quit the wizard before finishing Now what
To finish setting up the VPN go back to the wizard and run through it again It should reuse any partial configurationsthat were generated before it was stopped and create the new elements that are required
3 What are the AWS charges for this
AWS determines their own pricing and provides details for EC2 pricing and VPC pricing There are many types ofcharges that may be incurred for operating instances on AWS (eg charges related to running an instance bandwidthstorage elastic IPs etc)
The charge of specific interest in this case is the hourly charge for a VPN Connection As of this writing it costs $005(USD) per hour in most regions to have a VPN Connection configured and available AWS will charge whether theVPN Connection is being used or not as long as it is configured This will be configured by the third step of the wizardand will never be removed by pfSense
If the VPN Connection is no longer needed and billing for it needs to be stopped visit AWSrsquos VPC ManagementConsole and delete the VPN Connection manually
4 Can I use the wizard to connect to the GovCloud region
This hasnrsquot been officially tested but at least one user has reported that they were able to successfully connect to theGovCloud region They manually added the region us-gov-west-1 to the list of regions in the first step of the wizardand were able to successfully connect to their VPC in that region This may be supported in a future build but to trywithout official support do the following
1 Under the System gt Advanced menu make sure the Enable Secure Shell box is checked This is already doneby default on AWS instances but is off by default on pfSense hardware devices
2 Log into the instance via SSH
3 Make sure the root filesystem is mounted as readwrite On an AWS instance or a hardware device running on anSSD this should be true On a hardware device using Compact Flash or an SD card for storage it will probablybe necessary to remount the root filesystem in readwrite mode by running
mount -uw
4 Edit the file usrlocalwwwwizardsvpc_vpn_wizardxml using vi Look for a section of the file that lookslike this
ltoptiongtltnamegtsa-east-1ltnamegtltvaluegtsa-east-1ltvaluegt
ltoptiongt
That should appear directly after several similar ltoptiongt specifications containing all of the other availableregions Right underneath that section add the following
copy Copyright 2020 Rubicon Communications LLC 60
Security Gateway Manual Amazon AWS
ltoptiongtltnamegtus-gov-west-1ltnamegtltvaluegtus-gov-west-1ltvaluegt
ltoptiongt
Then save the file and exit vi
5 If the filesystem had to be remounted in readwrite mode earlier remount it in read-only mode by running
The GovCloud region should now appear as a choice in the first step of the wizard
copy Copyright 2020 Rubicon Communications LLC 61
CHAPTER
FOUR
REFERENCES
41 Support Resources
411 Commercial Support
In order to keep prices low the software is not bundled with a support subscription For users who need commercialsupport Netgate Gloabal Support can be purchased at httpswwwnetgatecomsupport
412 Community Support
Community support for pfSensereg software is available through the Netgate Forum
42 Additional Resources
421 Netgate Training
Netgate training offers training courses for increasing your knowledge of pfSensereg products and services Whetheryou need to maintain or improve the security skills of your staff or offer highly specialized support and improve yourcustomer satisfaction Netgate training has got you covered
httpswwwnetgatecomtraining
422 Resource Library
To learn more about how to use your pfSense appliance and for other helpful resources make sure to browse ourResource Library
httpswwwnetgatecomresources
423 Professional Services
Support does not cover more complex tasks such as CARP configuration for redundancy on multiple firewalls orcircuits network design and conversion from other firewalls to pfSensereg These items are offered as professionalservices and can be purchased and scheduled accordingly
httpswwwnetgatecomour-servicesprofessional-serviceshtml
62
Security Gateway Manual Amazon AWS
424 Community Options
If you elected not to get a paid support plan you can find help from the active and knowledgeable pfSense communityon our forums
httpsforumnetgatecom
copy Copyright 2020 Rubicon Communications LLC 63
- Getting Started
- Instance Usage
- Virtual Private Cloud (VPC)
- References
-

Security Gateway Manual Amazon AWS
appliance The subnet you select here must be a block that is within the address space you assigned to the VPCFor this example we will use 1020024 Click on the Yes Create button
4 Create the private subnet Still in the Subnets view of the VPC Management Console click the Create Subnetbutton In the box that pops up select the appropriate VPC and the same Availability Zone that you assignedto your public subnet Enter the subnet you wish to use for your private network in the CIDR Block field Thisnetwork should be a subnet of the address space you assigned to the VPC and should be distinct from the subnetyou assigned to the public subnet For this example we will use 1021024 Click on the Yes Create button
5 Both subnets that you created will have been created to use a default route table that was created for the VPCThe private subnet can continue to use that default table A new route table will need to be created for the publicsubnet Go to the Route Tables view in the menu on the left side of the VPC Management Console The singleexisting route table should be displayed Click on the Create Route Table button Select the VPC and click on
copy Copyright 2020 Rubicon Communications LLC 30
Security Gateway Manual Amazon AWS
the Yes Create button
6 Associate the public subnet (1020024 in our examples) with the routing table that was just created Go to theSubnets view on the left hand side of the VPC Management Console Check the checkbox next to the publicsubnet and scroll down to look at the Details tab for that subnet At the top of the Details tab will be listed theCIDR block VPC and Availability Zone Under those items the Route Table will be listed and will have a linklabeled replace next to it Click on the link Select the route table in the box that pops up and click on the YesReplace button
7 In order to send traffic from the public subnet to the Internet we will need to add a default route to an InternetGateway We must first create one Go to the Internet Gateways view in the menu on the left hand side of theVPC Management Console Click on the Create Internet Gateway button Click the Yes Create button onthe box that pops up Click the checkbox next to the new Internet Gateway and then click the Attach to VPC
copy Copyright 2020 Rubicon Communications LLC 31
Security Gateway Manual Amazon AWS
button Select the VPC and click on the Yes Attach button
8 The route table for the public subnet will need to be updated so that it has a default route to the Internet GatewayGo to the Route Tables view on the left hand side of the VPC Management Console Check the checkbox nextto the route table for the public subnet Under the Routes tab for that route table there should only be listed asingle route for the CIDR block of the VPC (1020016 in our example) that has a target of local There is arow underneath this route with a text box in the Destination field and a pop up menu for the Target field Enter00000 for the Destination and select the Internet Gateway (should be formatted like igw-XXXXXXXX)for the target Click on the Add button that appears at the right side of the row Click the Yes Add button onthe box that pops up
There are a few more VPC configuration changes that will be required later but next you must launch a Netgateappliance instance
copy Copyright 2020 Rubicon Communications LLC 32
Security Gateway Manual Amazon AWS
312 Launching an Instance in a VPC
In the Amazon EC2 Management Console launch a new instance of the pfSensereg firewall and VPN appliance Thisprocess is the same as the one for launching an EC2 (non-VPC) instance up until step 11 which details the values toenter for the Configure Instance Details screen in order to specify the instance should be created in your VPC
1 Select the region to run the instance in using the tab at the upper right corner of the page
2 Launch a new instance by clicking on the Launch Instance button under the Create Instance section of theEC2 dashboard
copy Copyright 2020 Rubicon Communications LLC 33
Security Gateway Manual Amazon AWS
3 Select AWS Marketplace on the Create a New Instance menu Type Netgate pfSense FirewallVPNRouter in the search box and press enter (or click on the Search button next to the text box)
4 Click on the link for the Netgate pfSense FirewallVPNRouter appliance in the search results
5 Click on the Continue button on the info page for the Netgate pfSense FirewallVPNRouter
copy Copyright 2020 Rubicon Communications LLC 34
Security Gateway Manual Amazon AWS
6 Click on the Launch with EC2 Console tab
7 If the license terms havenrsquot been accepted click on the Accept Terms button
8 A message should be displayed indicating that the subscription is being processed
copy Copyright 2020 Rubicon Communications LLC 35
Security Gateway Manual Amazon AWS
9 Select the version of the image to run under the popup menu labeled Select a Version Generally the mostrecently issued version should be selected Identify which region to launch the instances in and click on theLaunch in EC2 Console button to the right of that region
10 Choose the instance type to run on Click Next Configure Instance Details
copy Copyright 2020 Rubicon Communications LLC 36
Security Gateway Manual Amazon AWS
11 On the Configure Instance Details page under the Network field select the VPC that was created For theSubnet field that appears right below the Network field select the public subnet that was created earlier In ourexamples this is 1020024
12 Scroll down to the Network Interfaces heading A single interface named eth0 should be displayed by defaultClick on the Add Device button underneath eth0 Select the private subnet that was created (1021024 in ourexample) Pick an IP address within the range of the private subnet and enter it in the Private IP field Keep inmind that the first 3 or 4 IP addresses are reserved For this example we will use 10215
copy Copyright 2020 Rubicon Communications LLC 37
Security Gateway Manual Amazon AWS
Optionally expand the Advanced Details section and set parameters as text in the User Data field The availableoptions are
password Setting a value via a directive like password=abcdefg will set the password for theadministrative account to the specified value - abcdefg in this example If no value is set here arandom password will be assigned in order to keep administrative access from being exposed tothe internet with a default password
mgmtnet Setting a value via a directive like mgmtnet=1001024 will restrict managementaccess (http https ssh) to the specified network - 1001024 in this example This will causethe firewall rule on the instance (not on Amazons access lists but on the Netgate appliancersquosown firewall) to restrict management traffic for the instance to the specified source network Thedefault behavior is to allow management from any host
These directives can be set by placing them on a single line in the User Data field and separating them withcolons Specify both parameters by typing a statement similar to
password=abcdefgmgmtnet=1001024
Click Next Add Storage after optionally setting these parameters
Note If setting a password using the password parameter listed above the password is retrieved by the instancevia an unencrypted HTTP request when the system is configured the first time it boots The request is made toan Amazon Web Services-operated server on the local LAN that stores metadata about each instance runningThe data for an instance is only made available to that instance but is available to be queried from the instancewithout providing any authentication credentials
It is advised to change the admin password via the pfSense webGUI after the instance comes up or choose notto set the password at all and let a random password be set
copy Copyright 2020 Rubicon Communications LLC 38
Security Gateway Manual Amazon AWS
13 Click Next Tag Instance to accept the Storage Device Configuration
14 Optionally a tag can be set on the instance to differentiate this instance from other VMrsquos that were started byentering a value for the Name tag Click Next Configure Security Group after setting any desired tags
copy Copyright 2020 Rubicon Communications LLC 39
Security Gateway Manual Amazon AWS
15 Select a security group to launch the instance with The recommended settings for a security group should allowat least the following traffic
bull TCP port 443 from 00000 - HTTPS - This is the port that the management web GUI listens on
bull TCP port 22 from 00000 - SSH - This port can be used to connect to a command prompt with an sshclient
bull UDP port 1194 from 00000 - OpenVPN - The OpenVPN server that is configured by default is boundto this port
bull UDP port 500 from 00000 - IKE for IPsec VPN
bull UDP port 4500 from 00000 - IPsecNAT-T for IPsec VPN
copy Copyright 2020 Rubicon Communications LLC 40
Security Gateway Manual Amazon AWS
If you have an existing security group that includes this access select Select an existing security group thenselect the group(s) to use and click Continue Otherwise select Create a new security group and add rulesfor this access by filling in the form for each rule and clicking the Add Rule button When all of the rules havebeen added click Review and Launch
16 Verify the details for the instance and click Launch
17 Select an existing key pair or create a new key pair to connect to the instance with Do not select Proceed
copy Copyright 2020 Rubicon Communications LLC 41
Security Gateway Manual Amazon AWS
Without a Key Pair Click the checkbox that indicates you acknowledge having access to the selected privatekey file and then click Launch Instance
18 In order to reach the instance from the Internet associate an Elastic IP with the WAN interface of the instanceIn the VPC Management Console go to the Elastic IPs view by clicking on Elastic IPs on the left side of thepage Click on the Allocate New Address button Select that you want the EIP used in VPC and click on theYes Allocate button in the box that pops up After the Elastic IP address is allocated associate the address withthe WAN interface of the Netgate appliance by clicking on the Associate Address button
A box will pop up that will either let you specify the instance and Private IP address of the interface or theNetwork Interface and the Private IP Address of the interface Use one of these methods to select the correctinterface and click on the Yes Associate button The instance should now be reachable via ssh or https
copy Copyright 2020 Rubicon Communications LLC 42
Security Gateway Manual Amazon AWS
19 In order for traffic to be allowed to be routed from the private subnet through the public interface of the instancethe SourceDest AddressCheck on the private interfaces needs to be disabled In the EC2 Management Con-sole go to the ldquoNetwork Interfacesrdquo view by clicking on Network Interfaces in the menu on the lefthand sideof the page
Click the checkbox to the left of the privateLAN interface on the Netgate appliance instance Click on theActions button at the top of the page and select Change SourceDesk Check on the popup menu Select theradio button labeled Disabled on the box that pops up and click on the Save button
Non-local traffic from the private subnet should now be sent through the privateLAN interface on the Netgateappliance instance
copy Copyright 2020 Rubicon Communications LLC 43
Security Gateway Manual Amazon AWS
313 Managing a VPC Instance
Once the instance is launched you can connect to it via the Elastic IP that was attached to the primary interface duringthe provisioning phase
In order to manage the configuration of the instance you can connect to it via https or ssh A limited set of configura-tions is possible through the SSH interface the preferred method for managing most of the configurations or viewingdata on the status of the pfSensereg instance is through the https webGUI
Connecting via SSH
To connect via SSH you would use the key pair you chose while creating the instance to connect to the admin accountFrom the command line on a UnixLinux host you would use a command similar to
ssh -i my_ec2_key admin232020454
Where the appropriate private key file and public IP or hostname are substituted
Note The first time you log into your instance the SSH key of the instance will not be cached on your computerand you will need to type yes when asked whether you want continue connecting This should not be necessary onsubsequent sessions
Once logged in you should see the console menu similar to the one below
copy Copyright 2020 Rubicon Communications LLC 44
Security Gateway Manual Amazon AWS
Connecting via HTTPS
To connect via https you would enter a URL containing the public IP address or hostname of your instance intoa web browser For example https232020454 Itrsquos very likely that you will receive a browser warningindicating that the security certificate of the site is not trusted This is because the instance uses a self-signed certificatefor https communication You should click on the option to proceed to the site anyway The pfSense login screen withthe Netgate logo should appear
The username to log in with is admin The password to use is either a value that you set in the User Data during thecreation of the instance or a random password
Tip It is preferable to explicitly set a password by passing a value in with the User Data field so the password willbe known in advance
If you did not set a specific password you can find out that value that the random password was set to through one of2 different methods
1 The first method is to log in over SSH with the key pair that you selected when the instance was created andexamine the contents of the file located at etcmotd You would do this by selecting option 8) Shell in theconsole menu that is presented when you SSH in then run this command in the shell
cat etcmotd
2 The second method is to view the System Log for the instance in the EC2 Management Console After themessages that are displayed that show the status of the boot process a message should appear that indicates what
copy Copyright 2020 Rubicon Communications LLC 45
Security Gateway Manual Amazon AWS
the administrative password was changed to Be aware that the System Log output in the EC2 ManagementConsole is not updated in real time and may take a few minutes to show up
The message you should look for using either of the methods mentioned about will look like this
Admin password changed to abcdefg
Once yoursquove determined your password and entered it into the login form the pfSense WebGUI should be availableto you
314 Forwarding traffic from VPC subnets through the instance
Some additional configuration is required within the VPC instancersquos pfSensereg webGUI before you are able to managetraffic from the private subnet
1 Log into the pfSense WebGUI for the instance
2 Click on the Interfaces heading on the left and then click the Assign link
3 Click on the + icon to add a new Interface under the Interface assignments tab A LAN interface shouldautomatically be added with the next available network interface (xn1)
4 Click on the Interfaces heading on the left again and then click on LAN Click the checkbox to enable the LANinterface Set the IPv4 Configuration Type to Static IPv4 and enter the IP address you assigned to the 2ndinterface during the provisioning phase Click the Save button
Now you can create other instances attached to your private subnet and protect them with the firewall on the pfSenseinstance
Common ways to manage private hosts
Allowing private hosts to connect to the Internet
To allow private hosts to be able to connect to the Internet you can allow any traffic from the LAN in your firewallrules there should be a rule like this in place by default
Next set up NAT rules to cause addresses in the private subnet to be NATed to the IP address of the WAN interface
1 Under the Firewall heading on the left click on the NAT link
2 On the Outbound tab click the radio button for Manual Outbound NAT rule generation (AON - AdvancedOutbound NAT)
3 Click the Save button
4 Click on the Aliases link under the Firewall heading on the left
5 Add your private subnet to the Networks_to_NAT alias
Note There is an existing NAT rule configured by default that uses the alias Networks_to_NAT
copy Copyright 2020 Rubicon Communications LLC 46
Security Gateway Manual Amazon AWS
Allow private hosts to connect to each other
If your hosts should only contact each other and a private network segment elsewhere you can configure an IPsecor OpenVPN tunnel from your remote networks to the Netgate appliance instance and set up the appropriate firewallrules routes and security policies to allow access to your private subnet through a VPN tunnel
Allow direct inbound access from the internet to hosts
If you wish to enable direct inbound access from the internet to hosts on the private subnet you can set up portforwarding on the WAN interface to direct traffic to particular hosts in the private subnet
315 Establishing a VPN connection to a VPC in another region
To establish a VPN that allows instances on the VPC subnet(s) that sit behind a Netgate appliance to communicate withinstances that reside in a VPC in another region the Netgate appliance has a VPC configuration wizard that assists byconfiguring both the Netgate appliance as well as the VPC configuration elements that would normally have to be setmanually through the AWS Management Console
For detailed instructions see the AWS VPC User Guide
316 Upgrading a VPC Instance
Periodically new releases of the AMI are issued to track new releases of pfSensereg that may provide new functionalitybug fixes and security updates
The lower risk approach to upgrading is to bring up a new instance alongside the existing one and executing a cutoverThese instructions detail the procedure for moving your existing instance to one running the latest version
1 Back up the configuration of your exsting instance by navigating to BackupRestore under the Diagnosticsmenu in the Web GUI Click the Download configuration button under the Backup Configuration headingand save your config file to your local system
2 Bring up a new instance of the pfSense Certified RouterFirewallVPN running the latest version
3 When creating the instance make sure the interfaces match the interfaces on the existing instance Make surethat the new instance is in the same VPC as the existing instance and that it has the same number of interfacesattached and that the interfaces are connected to the same Subnets
4 Make sure any interfaces on the new instance that will communicate with private Subnets have theSourceDestination check disabled
5 Allocate a new Elastic IP and associate it to the WAN interface of the new instance to allow yourself managementaccess
6 Restore the backed up configuration file to the new instance Navigate to BackupRestore under the Diagnosticsmenu in the Web GUI Under the Restore Configuration heading click the Choose File button and browsefor the configuration file you backed up from the existing instance earlier Once you have selected that fileclick the Restore configuration button The configuration file will be uploaded and the instance will rebootautomatically
7 If you had packages installed on the old instance navigate to Packages under the System menu in the pfSenseweb GUI and install the same packages
8 If there was any external dependency on the public IP address of the existing instance you can remove theElastic IP Address from the upgraded instance and move the Elastic IP Address from the existing instance tothe upgraded instance External dependencies that might cause you to want to do this include things like VPNrsquos
copy Copyright 2020 Rubicon Communications LLC 47
Security Gateway Manual Amazon AWS
configured to external devices that rely on the existing instancersquos Elastic IP address or access lists on externaldevices that allow access to traffic from the existing instancersquos IP address There may be other reasons why youwould wish to keep the existing address as well (to preserve existing bookmarks to the Web GUI reduce theneed for updates to existing internal documentation etc) The process for moving the old Elastic IP address tothe new instance is as follows
bull Disassociate the Elastic IP address from the new instance In the EC2 Management Console click onElastic IPs under the Network amp Security heading Check the box next to the Elastic IP address assignedto the new instance and click on the Disassociate Address button
bull Disassociate the Elastic IP address from the old instance The procedure is the same as in the previousstep just repeated for the Eastic IP address of the old instance this time
bull Associate the Elastic IP address that was previously associated to the old instance to public interface of thenew instance In the EC2 Management Console click on Elastic IPs Check the box next to the Elastic IPaddress you are moving and click the Associate Address button Fill in the correct value for the Instanceor Network Interface and select the Private IP Address of the public interface on the new instance Clickthe Associate button The management interface of the new instance should now be accessible
9 Move any default routes that pointed to an interface on the old instance to point to the equivalent interface onthe new instance In the VPC Management Console click on Route Tables under the Virtual Private Cloudheading Check the box next to a Route Table associated with the VPC that the instances is located in
bull In the detail pane that appears at the bottom of the screen click on the Routes tab
bull If a route exists for 00000 with a Target that is an interface ID of an interface on the old instnace clickthe Edit button above the table displaying the routes
bull Click the red X next to the row for 00000 to remove the existing route
bull There should be a blank row with empty fields for a new route Enter 00000 in the Destinationfield and the Network Interface ID of the interface on the new instance in the Target field Click on theSave button
bull If there were multiple private subnets in the VPC which were pointed to interfaces on the pfSense instancerepeat this process for the other Route Tables associated with the VPC
bull The new instance should now be functioning as the old one did
32 AWS VPC Wizard User Guide
This guide will explain how to use the AWS VPC Wizard to simplify the configuration of a VPN to a remote VPC Theadministrator is asked for the minimum amount of basic information required to establish the VPN The configurationsboth on the AWS VPC side and on the pfSense side are then automatically created When the wizard is finishedexecuting a functioning VPN connection to a VPC should be established
321 AWS Access Keys
In order to connect to the AWS API to make certain required configuration changes the AWS VPC Wizard requiresAccess Keys to retrieve and modify VPC configurations
See also
Find more information about AWS Security Credential including Access Keys by reading AWS Security Credentials
Access keys consist of two parts
1 An access key ID
copy Copyright 2020 Rubicon Communications LLC 48
Security Gateway Manual Amazon AWS
bull For example AKIAIOSFODNN7EXAMPLE
2 A secret access key
bull For example wJalrXUtnFEMIK7MDENGbPxRfiCYEXAMPLEKEY
Access keys are like a usernamepassword and needed for programmatic requests to AWS including the AWS VPCWizard Use both the access key ID and secret access key together to authenticate requests
Important Manage access keys as securely as a user name and password
Managing Access Keys
To create modify or delete IAM user access keys do the following
1 Sign in to the IAM console
2 In the navigation bar on the upper right choose a user name and then choose My Security Credentials
3 On the AWS IAM Credentials tab in the Access keys for CLI SDK and API access section choose Createaccess key
4 Choose Download csv file to save the access key ID and secret access key to a csv file on your computerStore the file in a secure location There is no access to the secret access key again after this dialog box closesAfter the csv file has been downloaded choose Close When an access key is created the key pair is active bydefault and the pair can be used right away
bull To disable an active access key choose Make inactive
bull To reenable an inactive access key choose Make active
bull To delete an access key choose its X button at the far right of the row Then choose Delete to confirmWhen an access key is deleted itrsquos gone forever and cannot be retrieved However new keys can alwaysbe created
To create modify or delete another IAM userrsquos access keys do the following
1 Sign in to the IAM console
2 In the navigation pane choose Users
3 Choose the name of the user whose access keys to manage and then choose the Security credentials tab
4 In the Access keys section choose Create access key
5 Choose Download csv file to save the access key ID and secret access key to a CSV file on your computer
Rotating Access Keys
As a security best practice we recommend to regularly rotate (change) IAM user access keys Rotating access keyscan be done from the AWS Management Console
To rotate access keys for an IAM user without interrupting the applications (console) create a second access key whilethe first access key is still active
1 Sign in to the IAM console
2 In the navigation pane choose Users
3 Choose the name of the user whose access keys to manage and then choose the Security credentials tab
4 In the Access keys section choose Create access key
copy Copyright 2020 Rubicon Communications LLC 49
Security Gateway Manual Amazon AWS
5 Choose Download csv file to save the access key ID and secret access key to a CSV file on your computer
6 The new access key is active by default At this point the user has two active access keys
After waiting some period of time to ensure that all applications and tools have been updated delete the first accesskey
1 Sign in to the IAM console
2 In the navigation pane choose Users
3 Choose the name of the user whose access keys to manage and then choose the Security credentials tab
4 Locate the access key to delete and choose its X button at the far right of the row Then choose Delete to confirm
Determining When Access Keys Need Rotating
To determine when access keys need rotating (console) do the following
1 Sign in to the IAM console
2 In the navigation pane choose Users
3 If necessary add the Access key age column to the users table by completing the following steps
1 Above the table on the far right click the settings icon
2 In Manage columns select Access key age
3 Choose Close to return to the list of users
4 The Access key age column shows the number of days since the oldest active access key was created Usethis information to find users with access keys that need rotating The column displays None for users with noaccess key
322 Using the Wizard
1 Gather your AWS Access Key ID and Secret Key
2 Navigate to VPN gt AWS VPC Wizard in the main menu in the pfSensereg webGUI
copy Copyright 2020 Rubicon Communications LLC 50
Security Gateway Manual Amazon AWS
3 The first screen of the wizard prompts for the AWS Credentials Enter the Access Key ID and Secret AccessKey in the appropriate text fields and select the Region to connect to in the dropdown menu then click Next
The wizard will then query the AWS API using those credentials to find which VPCrsquos exist in the selectedregion If the credentials were rejected an error message will be displayed and return to the first screen
4 The next screen will prompt to select from the available VPCrsquos in the selected region Select the one to connectto from the dropdown menu The wizard will not create a new VPC it will only connect to an existing VPC
Click Next after selecting the desired VPC
copy Copyright 2020 Rubicon Communications LLC 51
Security Gateway Manual Amazon AWS
Note If the desired VPCrsquos to connect to isnrsquot available create one via the AWS Management Console and tryagain
The wizard will then query the AWS API to check whether there is a VPN Gateway attached to the selectedVPC If none exists one will be created via the API Then the next screen will be displayed
5 On the next screen specify routing and network data
A description of what should be entered for each of these fields follows
copy Copyright 2020 Rubicon Communications LLC 52
Security Gateway Manual Amazon AWS
Routing Type AWS offers either static routing or BGP routing Select the appropriate type fromthe dropdown menu If unsure static routing is likely to be adequate
BGP AS Number If static routing was choosen leave this field blank Otherwise it is possible tospecify an AS number to use If left blank the value will default to 65000
Local Public IP Address On an AWS Netgate appliance instance this should be the public IP ad-dress of the Elastic IP associated with the instance If configuring a hardware device runningpfSense this could be the public address assigned to the WAN (or other) interface of the device
Local subnets The subnets connected to the pfSense instance that should be routed over the tunnelfrom hosts in the remote VPC As an example if connecting a pfSense instance to a remote VPCin the AWS us-east-1 region enter the subnets (or a single subnet) that are local to the pfSenseinstance and when hosts in your VPC in us-east-1 attempted to reach addresses within thosesubnets the traffic will be sent through the VPN tunnel that is being configured
Note When selecting static routing as the routing type there will be a delay that is typically between 2-5minutes before the next screen is displayed This is because static routes must be added to the VPN Connectionvia the AWS API This operation fails until the VPN Connection reaches the ldquoavailablerdquo state This can take afew minutes to occur
Click Next when done
The wizard will then query the AWS API to find whether a Customer Gateway is configured with the selectedPublic IP Address If none exists one will be created If one already exists the ID will be retrieved and it willbe used
The wizard will then query the AWS API to see if a VPC Connection already exists that matches the dataentered If one exists it will be used Otherwise one will be created
If static routing was selected static routes will be added to the VPN Connection for the Local subnets entered
Route propagation will be enabled for the VPN Gateway in each of the Route Tables that are associated withthe VPC All of these configurations are carried out in the AWS API nothing has been changed in the pfSenseVPN configurations yet
Warning Important Note on Billing Once this step is carried out and the VPN Connection is createdAWS will start billing your AWS account the hourly rate for a VPN Connection This is $005 as of thiswriting and that is a charge that goes entirely to AWS itself They will do this until the VPN Connection isdeleted via the VPC Management Console
Nothing in pfSense will ever cause AWS to stop billing for this VPN Connection Whether it works or notwhether the pfSense instance is up or down whether the IPsec tunnels have been deleted or reconfiguredAWS will continue to bill the hourly fee for a VPN Connection if the creation of it succeeds until it is deletedthrough their web interface
The wizard helps establish an initial configuration that works and configures the appropriate elements inAWSrsquos API to facilitate this You are responsible for making sure you understand what yoursquore being billedfor and disabling any functions including VPN Connections that are no longer necessary
6 If the operations of the previous step succeeded the next screen will appear
copy Copyright 2020 Rubicon Communications LLC 53
Security Gateway Manual Amazon AWS
Select an Interface to act as the local endpoint of the VPN tunnels that will be created In most cases thisshould be the WAN interface It should generally be whatever interface is associated with the Local Public IPAddress entered in the previous step
On an AWS Netgate pfSense instance this will be whatever interface the Elastic IP is associated with On ahardware device running pfSense that has the Local Public IP Address directly configured on an interface thiswill be the interface that the Local Public IP Address is configured on
After clicking Next the wizard will configure the VPN and associated settings within pfSense itself using datareturned by the AWS API in the previous step
It will configure 2 IPsec tunnels a firewall rule 2 Aliases (referenced by the firewall rule) and 2 Virtual IPAddresses If BGP was selected as the Routing Type in the previous step it will install the OpenBGPDpackage automatically and configure it appropriately
7 The next screen will appear and prompt to apply the configuration changes that have been made
copy Copyright 2020 Rubicon Communications LLC 54
Security Gateway Manual Amazon AWS
After clicking Next all the configuration changes that were made will be applied
8 The wizard will be completed and the browser will be redirected to the IPsec status page The VPN to the VPCshould now be fully configured
Note Sometimes there is a delay of 5-10 minutes before the tunnels are fully functional and passing trafficThis has been observed particularly often during the setup of tunnels using BGP routing
copy Copyright 2020 Rubicon Communications LLC 55
Security Gateway Manual Amazon AWS
323 Testing Connectivity
Verify that the IPsec tunnels are functioning by attempting to ping the ldquoinside tunnel addressesrdquo of the VPC side ofthe tunnel by navigating to Firewall -gt Virtual IP There should be two virtual IP addresses configured that haveDescriptions like ldquoInside address for tunnel to ltremote IP addressgtrdquo
Amazon provides inside addresses for each end of the tunnel in a 30 subnet in IPv4 link local address space(169254xy) Typically the first usable address in the 30 is the inside address for the VPC end of the tunnel andthe other usable address is the inside address for your end of the tunnel So if you ping from one of the virtual IPaddresses configured on the pfSensereg instance to the IP address that is one less (for example if the virtual IP addresswere 16925425322 ping from 16925425322 to 16925425321) that checks whether the other end of the tunnelis responding and whether the tunnel is functioning properly
Note It sometimes takes a few minutes for the tunnels to begin working after the configuration wizard completes
To ping log into the pfSense instance via SSH and execute ping from a shell prompt For the previous example of16925425322 the proper syntax is
ping -S 16925425322 16925425321
When pinging from a shell prompt it is possible leave the command running indefinitely and interrupt it there is aresponse
copy Copyright 2020 Rubicon Communications LLC 56
Security Gateway Manual Amazon AWS
It is also possible to ping via the Diagnostics -gt Ping page by selecting the appropriate source address and enteringthe remote tunnel inside address in the Host field This will only send a limited number of ping packets so it may benecessary to repeat this a few times
324 VPC Configuration Details
The AWS documentation for connecting a hardware device to a VPC provides a great amount of detail on configuringVPN Connections to VPC
The main configuration elements that exist in Amazonrsquos data model are the Virtual Private Gateway the CustomerGateway and the VPN Connection In order to configure a VPN connection to a VPC all 3 of these need to exist TheVirtual Private Gateway is the VPN endpoint on Amazonrsquos side The customer gateway is the VPN endpoint on thepfSensereg instancedevice being configured The VPN Connection is the IPsec VPN between Amazon and the pfSenseinstancedevice
A Virtual Private Gateway needs to exist and be associated to the VPC A particular VPN Gateway can only beassociated to one VPC at a time Once the VPC to connect to has been selected the wizard invokes the AWS API callDescribeVpnGateways to determine if a VPN Gateway already exists that is attached to the VPC If none exists itcreates one with the CreateVpnGateway API call and attaches it to the VPC with the AttachVpnGateway call
A Customer Gateway needs to be created for the public IP address of the device or virtual machine that will be used toconnect to the VPC The wizard invokes the AWS API call DescribeCustomerGateways to determine if a CustomerGateway already exists If none exists one is created with the CreateCustomerGateway API call
The VPN Connection connects the Virtual Private Gateway and Customer Gateway The wizard checks to see if thereis an existing VPN Connection configured that connects those endpoints by invoking the AWS API call DescribeVp-nConnections If none exists one is created using the CreateVpnConnection call One of the fields returned by thiscall is a block of XML configuration data that contains configuration data assigned by AWS for use with configuringthe VPN Connection This data is stored and used in subsequent steps to make the required configuration changeswithin pfSense
copy Copyright 2020 Rubicon Communications LLC 57
Security Gateway Manual Amazon AWS
Any objects created through API calls by the wizard will be tagged with names like auto-created by pfSenseVPC ltyour_VPC_IDgt This is accomplished by calling the AWS API call CreateTags and using Name as the keyfor the tag
In addition to creation of the items mentioned above required adjustments are made to Security Groups and RouteTables to facilitate communication over the VPN The Security Groups associated with the VPC are updated to allowinbound access from the local subnets on the pfSense end of the VPN They are checked first via the DescribeSecuri-tyGroups AWS API call to determine if the access is already allowed Any of the subnets that is not already allowedhas inbound access added via the AuthorizeSecurityGroupIngress AWS API call
Route Tables associated with the VPC are updated to receive routes from the VPN Gateway used by the VPN Con-nection They are checked first via the DescribeRouteTables AWS API call If the VPN Gateway ID is not includedin the list of VPN Gateways propagating routes route propagation for the VPN Gateway is enabled on that table usingthe EnableVgwRoutePropagation AWS API call
For VPN Connections using static routing static routes for the specified subnets are added to the VPN ConnectionThis is done via the CreateVpnConnectionRoute AWS API call
325 pfSense Configuration Details
On the pfSensereg side there are numerous configurations added to support the VPN to the VPC
Aliases
First aliases are created for use in a firewall rule These aliases are intended to contain the subnets that traffic shouldbe allowed to ingress over the IPsec tunnel One alias represents the local subnets on the pfSense side and is givena name like VPC_Local_vpc_12345678 and the other represents the remote subnets on the VPC side and is given aname like VPC_Remote_vpc_12345678
Virtual IP addresses
Next virtual IP addresses are added on the lo0 (loopback) interface These virtual IP addresses are the local ldquoinsideaddressesrdquo of the IPsec tunnels These addresses are used as the local address for BGP communication when BGProuting is selected These addresses are IPv4 link local addresses (see RFC 3297) AWS assigns 30rsquos out of thenetwork 1692540016 for this purpose
Note These addresses are also useful as a ping target to execute a basic test of whether the tunnel is functioningproperly Executing a ping from a source address of one of these IP addresses to the corresponding inside address ofthe other end of the tunnel helps determine whether the tunnel negotiation is completing properly
Firewall rules
Next a firewall rule is added on the IPsec interface that allows traffic from the VPC networks to the local subnetsThis rule uses the previously created Aliases as sourcedestination targets
IPsec
Then IPsec phase 1 and phase 2 associations are set up Most of the settings required are extracted from a blockof XML data that was returned by the CreateVpnConnection call made during the AWS configuration step Thisincludes parameters like endpoint IP addresses encryption ciphers timer values etc
copy Copyright 2020 Rubicon Communications LLC 58
Security Gateway Manual Amazon AWS
If BGP routing was selected the configurations for the OpenBGPD BGP daemon are established The required settingsare determined using the AS number entered into the wizard and the parameters returned by the CreateVpnConnec-tion call made during the AWS configuration step
326 Tested Configurations
Various topologies may be possible to establish using the AWS VPC Configuration Wizard This section enumeratessome of the configurations that were successfully tested
Platforms
bull Various hardware platforms
bull 64-bit virtual machines in VMware vSphereESX
bull Amazon EC2 instances (Xen virtual machines) of the Netgate pfSensereg RouterFirewallVPN AWS AMI
Local networkrouting configurations
bull pfSense with a public address configured on the WAN interface
bull pfSense with a private address configured on the WAN interface behind a 11 NAT
bull pfSense with a private address configured on the WAN interface behind a PAT (1many NAT)
VPC Topologies
bull pfSense connected to a single VPC
bull pfSense connected to multiple VPCrsquos in different regions
bull Amazon EC2 instance of the pfSense RouterFirewallVPN AWS AMI connected to a VPC belonging to thesame AWS account in a different region
bull Amazon EC2 instance of the pfSense RouterFirewallVPN AWS AMI connected to a VPC belonging to adifferent AWS account in the same region
The configuration recommended for the greatest amount of stability is to have a public IPv4 address directly configuredon the WAN interface of your pfSense firewall but VPNs have been successfully established under all of the conditionslisted above
Whether any of these solutions is appropriate should be evaluated in the context of personal needs and existing infras-tructure Other configurations not listed above may be possible as well
327 AWS VPC Wizard FAQ
1 What level of redundancy is provided by the two tunnels
Amazon provides two tunnel endpoints that will allow traffic to be sent between your networks and the remote VPCyou are connected to The racoon daemon in pfSensereg is only capable of establishing an active phase 2 associationfor a particular sourcedestination pair on a single tunnel
Phase 2 associations between the local subnets and the remote VPC subnet are configured in the pfSense GUI for bothtunnels but racoon will only actually establish an association for the first tunnel This means that racoon will onlyever try to send traffic destined for the remote VPC subnet over the first tunnel
copy Copyright 2020 Rubicon Communications LLC 59
Security Gateway Manual Amazon AWS
If that tunnel goes down the second tunnel may be up and inbound traffic from the remote VPC may be sent to yourlocal networks over that tunnel automatically But outbound traffic to your remote VPC would not automatically failover to the second tunnel In order for you to send your outbound traffic over the second tunnel you would need todisable the phase 2 associations for the first tunnel and apply the changes
2 I quit the wizard before finishing Now what
To finish setting up the VPN go back to the wizard and run through it again It should reuse any partial configurationsthat were generated before it was stopped and create the new elements that are required
3 What are the AWS charges for this
AWS determines their own pricing and provides details for EC2 pricing and VPC pricing There are many types ofcharges that may be incurred for operating instances on AWS (eg charges related to running an instance bandwidthstorage elastic IPs etc)
The charge of specific interest in this case is the hourly charge for a VPN Connection As of this writing it costs $005(USD) per hour in most regions to have a VPN Connection configured and available AWS will charge whether theVPN Connection is being used or not as long as it is configured This will be configured by the third step of the wizardand will never be removed by pfSense
If the VPN Connection is no longer needed and billing for it needs to be stopped visit AWSrsquos VPC ManagementConsole and delete the VPN Connection manually
4 Can I use the wizard to connect to the GovCloud region
This hasnrsquot been officially tested but at least one user has reported that they were able to successfully connect to theGovCloud region They manually added the region us-gov-west-1 to the list of regions in the first step of the wizardand were able to successfully connect to their VPC in that region This may be supported in a future build but to trywithout official support do the following
1 Under the System gt Advanced menu make sure the Enable Secure Shell box is checked This is already doneby default on AWS instances but is off by default on pfSense hardware devices
2 Log into the instance via SSH
3 Make sure the root filesystem is mounted as readwrite On an AWS instance or a hardware device running on anSSD this should be true On a hardware device using Compact Flash or an SD card for storage it will probablybe necessary to remount the root filesystem in readwrite mode by running
mount -uw
4 Edit the file usrlocalwwwwizardsvpc_vpn_wizardxml using vi Look for a section of the file that lookslike this
ltoptiongtltnamegtsa-east-1ltnamegtltvaluegtsa-east-1ltvaluegt
ltoptiongt
That should appear directly after several similar ltoptiongt specifications containing all of the other availableregions Right underneath that section add the following
copy Copyright 2020 Rubicon Communications LLC 60
Security Gateway Manual Amazon AWS
ltoptiongtltnamegtus-gov-west-1ltnamegtltvaluegtus-gov-west-1ltvaluegt
ltoptiongt
Then save the file and exit vi
5 If the filesystem had to be remounted in readwrite mode earlier remount it in read-only mode by running
The GovCloud region should now appear as a choice in the first step of the wizard
copy Copyright 2020 Rubicon Communications LLC 61
CHAPTER
FOUR
REFERENCES
41 Support Resources
411 Commercial Support
In order to keep prices low the software is not bundled with a support subscription For users who need commercialsupport Netgate Gloabal Support can be purchased at httpswwwnetgatecomsupport
412 Community Support
Community support for pfSensereg software is available through the Netgate Forum
42 Additional Resources
421 Netgate Training
Netgate training offers training courses for increasing your knowledge of pfSensereg products and services Whetheryou need to maintain or improve the security skills of your staff or offer highly specialized support and improve yourcustomer satisfaction Netgate training has got you covered
httpswwwnetgatecomtraining
422 Resource Library
To learn more about how to use your pfSense appliance and for other helpful resources make sure to browse ourResource Library
httpswwwnetgatecomresources
423 Professional Services
Support does not cover more complex tasks such as CARP configuration for redundancy on multiple firewalls orcircuits network design and conversion from other firewalls to pfSensereg These items are offered as professionalservices and can be purchased and scheduled accordingly
httpswwwnetgatecomour-servicesprofessional-serviceshtml
62
Security Gateway Manual Amazon AWS
424 Community Options
If you elected not to get a paid support plan you can find help from the active and knowledgeable pfSense communityon our forums
httpsforumnetgatecom
copy Copyright 2020 Rubicon Communications LLC 63
- Getting Started
- Instance Usage
- Virtual Private Cloud (VPC)
- References
-
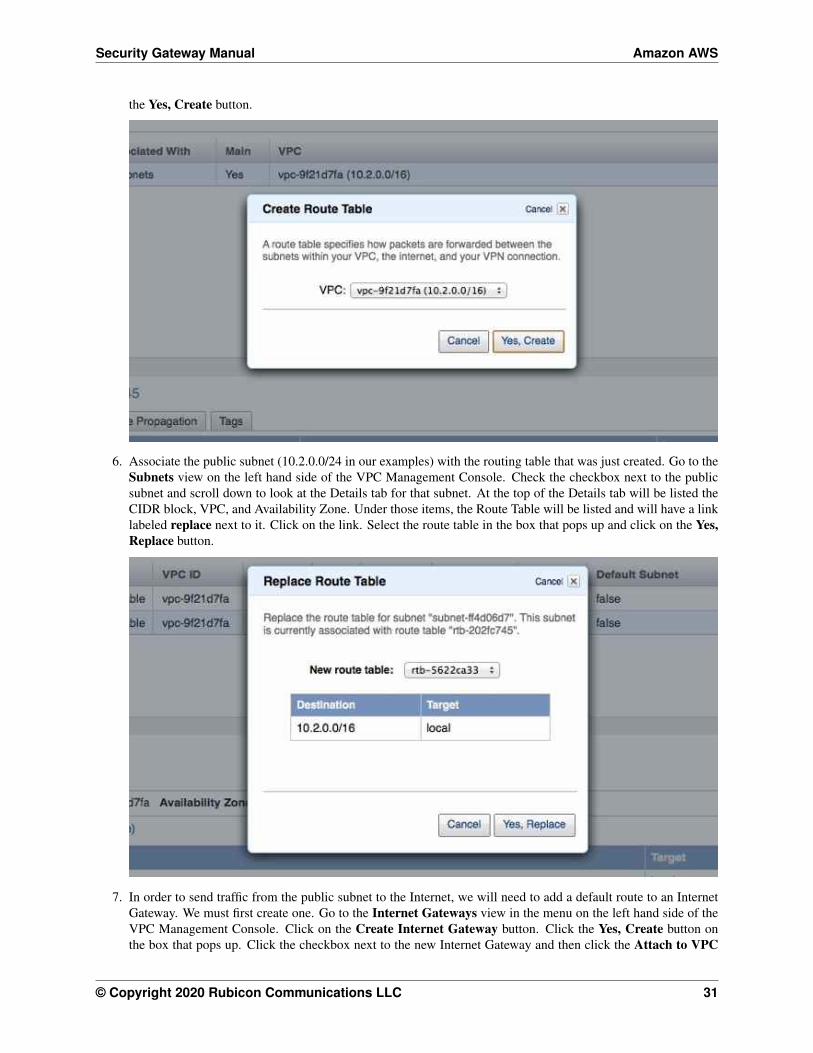
Security Gateway Manual Amazon AWS
the Yes Create button
6 Associate the public subnet (1020024 in our examples) with the routing table that was just created Go to theSubnets view on the left hand side of the VPC Management Console Check the checkbox next to the publicsubnet and scroll down to look at the Details tab for that subnet At the top of the Details tab will be listed theCIDR block VPC and Availability Zone Under those items the Route Table will be listed and will have a linklabeled replace next to it Click on the link Select the route table in the box that pops up and click on the YesReplace button
7 In order to send traffic from the public subnet to the Internet we will need to add a default route to an InternetGateway We must first create one Go to the Internet Gateways view in the menu on the left hand side of theVPC Management Console Click on the Create Internet Gateway button Click the Yes Create button onthe box that pops up Click the checkbox next to the new Internet Gateway and then click the Attach to VPC
copy Copyright 2020 Rubicon Communications LLC 31
Security Gateway Manual Amazon AWS
button Select the VPC and click on the Yes Attach button
8 The route table for the public subnet will need to be updated so that it has a default route to the Internet GatewayGo to the Route Tables view on the left hand side of the VPC Management Console Check the checkbox nextto the route table for the public subnet Under the Routes tab for that route table there should only be listed asingle route for the CIDR block of the VPC (1020016 in our example) that has a target of local There is arow underneath this route with a text box in the Destination field and a pop up menu for the Target field Enter00000 for the Destination and select the Internet Gateway (should be formatted like igw-XXXXXXXX)for the target Click on the Add button that appears at the right side of the row Click the Yes Add button onthe box that pops up
There are a few more VPC configuration changes that will be required later but next you must launch a Netgateappliance instance
copy Copyright 2020 Rubicon Communications LLC 32
Security Gateway Manual Amazon AWS
312 Launching an Instance in a VPC
In the Amazon EC2 Management Console launch a new instance of the pfSensereg firewall and VPN appliance Thisprocess is the same as the one for launching an EC2 (non-VPC) instance up until step 11 which details the values toenter for the Configure Instance Details screen in order to specify the instance should be created in your VPC
1 Select the region to run the instance in using the tab at the upper right corner of the page
2 Launch a new instance by clicking on the Launch Instance button under the Create Instance section of theEC2 dashboard
copy Copyright 2020 Rubicon Communications LLC 33
Security Gateway Manual Amazon AWS
3 Select AWS Marketplace on the Create a New Instance menu Type Netgate pfSense FirewallVPNRouter in the search box and press enter (or click on the Search button next to the text box)
4 Click on the link for the Netgate pfSense FirewallVPNRouter appliance in the search results
5 Click on the Continue button on the info page for the Netgate pfSense FirewallVPNRouter
copy Copyright 2020 Rubicon Communications LLC 34
Security Gateway Manual Amazon AWS
6 Click on the Launch with EC2 Console tab
7 If the license terms havenrsquot been accepted click on the Accept Terms button
8 A message should be displayed indicating that the subscription is being processed
copy Copyright 2020 Rubicon Communications LLC 35
Security Gateway Manual Amazon AWS
9 Select the version of the image to run under the popup menu labeled Select a Version Generally the mostrecently issued version should be selected Identify which region to launch the instances in and click on theLaunch in EC2 Console button to the right of that region
10 Choose the instance type to run on Click Next Configure Instance Details
copy Copyright 2020 Rubicon Communications LLC 36
Security Gateway Manual Amazon AWS
11 On the Configure Instance Details page under the Network field select the VPC that was created For theSubnet field that appears right below the Network field select the public subnet that was created earlier In ourexamples this is 1020024
12 Scroll down to the Network Interfaces heading A single interface named eth0 should be displayed by defaultClick on the Add Device button underneath eth0 Select the private subnet that was created (1021024 in ourexample) Pick an IP address within the range of the private subnet and enter it in the Private IP field Keep inmind that the first 3 or 4 IP addresses are reserved For this example we will use 10215
copy Copyright 2020 Rubicon Communications LLC 37
Security Gateway Manual Amazon AWS
Optionally expand the Advanced Details section and set parameters as text in the User Data field The availableoptions are
password Setting a value via a directive like password=abcdefg will set the password for theadministrative account to the specified value - abcdefg in this example If no value is set here arandom password will be assigned in order to keep administrative access from being exposed tothe internet with a default password
mgmtnet Setting a value via a directive like mgmtnet=1001024 will restrict managementaccess (http https ssh) to the specified network - 1001024 in this example This will causethe firewall rule on the instance (not on Amazons access lists but on the Netgate appliancersquosown firewall) to restrict management traffic for the instance to the specified source network Thedefault behavior is to allow management from any host
These directives can be set by placing them on a single line in the User Data field and separating them withcolons Specify both parameters by typing a statement similar to
password=abcdefgmgmtnet=1001024
Click Next Add Storage after optionally setting these parameters
Note If setting a password using the password parameter listed above the password is retrieved by the instancevia an unencrypted HTTP request when the system is configured the first time it boots The request is made toan Amazon Web Services-operated server on the local LAN that stores metadata about each instance runningThe data for an instance is only made available to that instance but is available to be queried from the instancewithout providing any authentication credentials
It is advised to change the admin password via the pfSense webGUI after the instance comes up or choose notto set the password at all and let a random password be set
copy Copyright 2020 Rubicon Communications LLC 38
Security Gateway Manual Amazon AWS
13 Click Next Tag Instance to accept the Storage Device Configuration
14 Optionally a tag can be set on the instance to differentiate this instance from other VMrsquos that were started byentering a value for the Name tag Click Next Configure Security Group after setting any desired tags
copy Copyright 2020 Rubicon Communications LLC 39
Security Gateway Manual Amazon AWS
15 Select a security group to launch the instance with The recommended settings for a security group should allowat least the following traffic
bull TCP port 443 from 00000 - HTTPS - This is the port that the management web GUI listens on
bull TCP port 22 from 00000 - SSH - This port can be used to connect to a command prompt with an sshclient
bull UDP port 1194 from 00000 - OpenVPN - The OpenVPN server that is configured by default is boundto this port
bull UDP port 500 from 00000 - IKE for IPsec VPN
bull UDP port 4500 from 00000 - IPsecNAT-T for IPsec VPN
copy Copyright 2020 Rubicon Communications LLC 40
Security Gateway Manual Amazon AWS
If you have an existing security group that includes this access select Select an existing security group thenselect the group(s) to use and click Continue Otherwise select Create a new security group and add rulesfor this access by filling in the form for each rule and clicking the Add Rule button When all of the rules havebeen added click Review and Launch
16 Verify the details for the instance and click Launch
17 Select an existing key pair or create a new key pair to connect to the instance with Do not select Proceed
copy Copyright 2020 Rubicon Communications LLC 41
Security Gateway Manual Amazon AWS
Without a Key Pair Click the checkbox that indicates you acknowledge having access to the selected privatekey file and then click Launch Instance
18 In order to reach the instance from the Internet associate an Elastic IP with the WAN interface of the instanceIn the VPC Management Console go to the Elastic IPs view by clicking on Elastic IPs on the left side of thepage Click on the Allocate New Address button Select that you want the EIP used in VPC and click on theYes Allocate button in the box that pops up After the Elastic IP address is allocated associate the address withthe WAN interface of the Netgate appliance by clicking on the Associate Address button
A box will pop up that will either let you specify the instance and Private IP address of the interface or theNetwork Interface and the Private IP Address of the interface Use one of these methods to select the correctinterface and click on the Yes Associate button The instance should now be reachable via ssh or https
copy Copyright 2020 Rubicon Communications LLC 42
Security Gateway Manual Amazon AWS
19 In order for traffic to be allowed to be routed from the private subnet through the public interface of the instancethe SourceDest AddressCheck on the private interfaces needs to be disabled In the EC2 Management Con-sole go to the ldquoNetwork Interfacesrdquo view by clicking on Network Interfaces in the menu on the lefthand sideof the page
Click the checkbox to the left of the privateLAN interface on the Netgate appliance instance Click on theActions button at the top of the page and select Change SourceDesk Check on the popup menu Select theradio button labeled Disabled on the box that pops up and click on the Save button
Non-local traffic from the private subnet should now be sent through the privateLAN interface on the Netgateappliance instance
copy Copyright 2020 Rubicon Communications LLC 43
Security Gateway Manual Amazon AWS
313 Managing a VPC Instance
Once the instance is launched you can connect to it via the Elastic IP that was attached to the primary interface duringthe provisioning phase
In order to manage the configuration of the instance you can connect to it via https or ssh A limited set of configura-tions is possible through the SSH interface the preferred method for managing most of the configurations or viewingdata on the status of the pfSensereg instance is through the https webGUI
Connecting via SSH
To connect via SSH you would use the key pair you chose while creating the instance to connect to the admin accountFrom the command line on a UnixLinux host you would use a command similar to
ssh -i my_ec2_key admin232020454
Where the appropriate private key file and public IP or hostname are substituted
Note The first time you log into your instance the SSH key of the instance will not be cached on your computerand you will need to type yes when asked whether you want continue connecting This should not be necessary onsubsequent sessions
Once logged in you should see the console menu similar to the one below
copy Copyright 2020 Rubicon Communications LLC 44
Security Gateway Manual Amazon AWS
Connecting via HTTPS
To connect via https you would enter a URL containing the public IP address or hostname of your instance intoa web browser For example https232020454 Itrsquos very likely that you will receive a browser warningindicating that the security certificate of the site is not trusted This is because the instance uses a self-signed certificatefor https communication You should click on the option to proceed to the site anyway The pfSense login screen withthe Netgate logo should appear
The username to log in with is admin The password to use is either a value that you set in the User Data during thecreation of the instance or a random password
Tip It is preferable to explicitly set a password by passing a value in with the User Data field so the password willbe known in advance
If you did not set a specific password you can find out that value that the random password was set to through one of2 different methods
1 The first method is to log in over SSH with the key pair that you selected when the instance was created andexamine the contents of the file located at etcmotd You would do this by selecting option 8) Shell in theconsole menu that is presented when you SSH in then run this command in the shell
cat etcmotd
2 The second method is to view the System Log for the instance in the EC2 Management Console After themessages that are displayed that show the status of the boot process a message should appear that indicates what
copy Copyright 2020 Rubicon Communications LLC 45
Security Gateway Manual Amazon AWS
the administrative password was changed to Be aware that the System Log output in the EC2 ManagementConsole is not updated in real time and may take a few minutes to show up
The message you should look for using either of the methods mentioned about will look like this
Admin password changed to abcdefg
Once yoursquove determined your password and entered it into the login form the pfSense WebGUI should be availableto you
314 Forwarding traffic from VPC subnets through the instance
Some additional configuration is required within the VPC instancersquos pfSensereg webGUI before you are able to managetraffic from the private subnet
1 Log into the pfSense WebGUI for the instance
2 Click on the Interfaces heading on the left and then click the Assign link
3 Click on the + icon to add a new Interface under the Interface assignments tab A LAN interface shouldautomatically be added with the next available network interface (xn1)
4 Click on the Interfaces heading on the left again and then click on LAN Click the checkbox to enable the LANinterface Set the IPv4 Configuration Type to Static IPv4 and enter the IP address you assigned to the 2ndinterface during the provisioning phase Click the Save button
Now you can create other instances attached to your private subnet and protect them with the firewall on the pfSenseinstance
Common ways to manage private hosts
Allowing private hosts to connect to the Internet
To allow private hosts to be able to connect to the Internet you can allow any traffic from the LAN in your firewallrules there should be a rule like this in place by default
Next set up NAT rules to cause addresses in the private subnet to be NATed to the IP address of the WAN interface
1 Under the Firewall heading on the left click on the NAT link
2 On the Outbound tab click the radio button for Manual Outbound NAT rule generation (AON - AdvancedOutbound NAT)
3 Click the Save button
4 Click on the Aliases link under the Firewall heading on the left
5 Add your private subnet to the Networks_to_NAT alias
Note There is an existing NAT rule configured by default that uses the alias Networks_to_NAT
copy Copyright 2020 Rubicon Communications LLC 46
Security Gateway Manual Amazon AWS
Allow private hosts to connect to each other
If your hosts should only contact each other and a private network segment elsewhere you can configure an IPsecor OpenVPN tunnel from your remote networks to the Netgate appliance instance and set up the appropriate firewallrules routes and security policies to allow access to your private subnet through a VPN tunnel
Allow direct inbound access from the internet to hosts
If you wish to enable direct inbound access from the internet to hosts on the private subnet you can set up portforwarding on the WAN interface to direct traffic to particular hosts in the private subnet
315 Establishing a VPN connection to a VPC in another region
To establish a VPN that allows instances on the VPC subnet(s) that sit behind a Netgate appliance to communicate withinstances that reside in a VPC in another region the Netgate appliance has a VPC configuration wizard that assists byconfiguring both the Netgate appliance as well as the VPC configuration elements that would normally have to be setmanually through the AWS Management Console
For detailed instructions see the AWS VPC User Guide
316 Upgrading a VPC Instance
Periodically new releases of the AMI are issued to track new releases of pfSensereg that may provide new functionalitybug fixes and security updates
The lower risk approach to upgrading is to bring up a new instance alongside the existing one and executing a cutoverThese instructions detail the procedure for moving your existing instance to one running the latest version
1 Back up the configuration of your exsting instance by navigating to BackupRestore under the Diagnosticsmenu in the Web GUI Click the Download configuration button under the Backup Configuration headingand save your config file to your local system
2 Bring up a new instance of the pfSense Certified RouterFirewallVPN running the latest version
3 When creating the instance make sure the interfaces match the interfaces on the existing instance Make surethat the new instance is in the same VPC as the existing instance and that it has the same number of interfacesattached and that the interfaces are connected to the same Subnets
4 Make sure any interfaces on the new instance that will communicate with private Subnets have theSourceDestination check disabled
5 Allocate a new Elastic IP and associate it to the WAN interface of the new instance to allow yourself managementaccess
6 Restore the backed up configuration file to the new instance Navigate to BackupRestore under the Diagnosticsmenu in the Web GUI Under the Restore Configuration heading click the Choose File button and browsefor the configuration file you backed up from the existing instance earlier Once you have selected that fileclick the Restore configuration button The configuration file will be uploaded and the instance will rebootautomatically
7 If you had packages installed on the old instance navigate to Packages under the System menu in the pfSenseweb GUI and install the same packages
8 If there was any external dependency on the public IP address of the existing instance you can remove theElastic IP Address from the upgraded instance and move the Elastic IP Address from the existing instance tothe upgraded instance External dependencies that might cause you to want to do this include things like VPNrsquos
copy Copyright 2020 Rubicon Communications LLC 47
Security Gateway Manual Amazon AWS
configured to external devices that rely on the existing instancersquos Elastic IP address or access lists on externaldevices that allow access to traffic from the existing instancersquos IP address There may be other reasons why youwould wish to keep the existing address as well (to preserve existing bookmarks to the Web GUI reduce theneed for updates to existing internal documentation etc) The process for moving the old Elastic IP address tothe new instance is as follows
bull Disassociate the Elastic IP address from the new instance In the EC2 Management Console click onElastic IPs under the Network amp Security heading Check the box next to the Elastic IP address assignedto the new instance and click on the Disassociate Address button
bull Disassociate the Elastic IP address from the old instance The procedure is the same as in the previousstep just repeated for the Eastic IP address of the old instance this time
bull Associate the Elastic IP address that was previously associated to the old instance to public interface of thenew instance In the EC2 Management Console click on Elastic IPs Check the box next to the Elastic IPaddress you are moving and click the Associate Address button Fill in the correct value for the Instanceor Network Interface and select the Private IP Address of the public interface on the new instance Clickthe Associate button The management interface of the new instance should now be accessible
9 Move any default routes that pointed to an interface on the old instance to point to the equivalent interface onthe new instance In the VPC Management Console click on Route Tables under the Virtual Private Cloudheading Check the box next to a Route Table associated with the VPC that the instances is located in
bull In the detail pane that appears at the bottom of the screen click on the Routes tab
bull If a route exists for 00000 with a Target that is an interface ID of an interface on the old instnace clickthe Edit button above the table displaying the routes
bull Click the red X next to the row for 00000 to remove the existing route
bull There should be a blank row with empty fields for a new route Enter 00000 in the Destinationfield and the Network Interface ID of the interface on the new instance in the Target field Click on theSave button
bull If there were multiple private subnets in the VPC which were pointed to interfaces on the pfSense instancerepeat this process for the other Route Tables associated with the VPC
bull The new instance should now be functioning as the old one did
32 AWS VPC Wizard User Guide
This guide will explain how to use the AWS VPC Wizard to simplify the configuration of a VPN to a remote VPC Theadministrator is asked for the minimum amount of basic information required to establish the VPN The configurationsboth on the AWS VPC side and on the pfSense side are then automatically created When the wizard is finishedexecuting a functioning VPN connection to a VPC should be established
321 AWS Access Keys
In order to connect to the AWS API to make certain required configuration changes the AWS VPC Wizard requiresAccess Keys to retrieve and modify VPC configurations
See also
Find more information about AWS Security Credential including Access Keys by reading AWS Security Credentials
Access keys consist of two parts
1 An access key ID
copy Copyright 2020 Rubicon Communications LLC 48
Security Gateway Manual Amazon AWS
bull For example AKIAIOSFODNN7EXAMPLE
2 A secret access key
bull For example wJalrXUtnFEMIK7MDENGbPxRfiCYEXAMPLEKEY
Access keys are like a usernamepassword and needed for programmatic requests to AWS including the AWS VPCWizard Use both the access key ID and secret access key together to authenticate requests
Important Manage access keys as securely as a user name and password
Managing Access Keys
To create modify or delete IAM user access keys do the following
1 Sign in to the IAM console
2 In the navigation bar on the upper right choose a user name and then choose My Security Credentials
3 On the AWS IAM Credentials tab in the Access keys for CLI SDK and API access section choose Createaccess key
4 Choose Download csv file to save the access key ID and secret access key to a csv file on your computerStore the file in a secure location There is no access to the secret access key again after this dialog box closesAfter the csv file has been downloaded choose Close When an access key is created the key pair is active bydefault and the pair can be used right away
bull To disable an active access key choose Make inactive
bull To reenable an inactive access key choose Make active
bull To delete an access key choose its X button at the far right of the row Then choose Delete to confirmWhen an access key is deleted itrsquos gone forever and cannot be retrieved However new keys can alwaysbe created
To create modify or delete another IAM userrsquos access keys do the following
1 Sign in to the IAM console
2 In the navigation pane choose Users
3 Choose the name of the user whose access keys to manage and then choose the Security credentials tab
4 In the Access keys section choose Create access key
5 Choose Download csv file to save the access key ID and secret access key to a CSV file on your computer
Rotating Access Keys
As a security best practice we recommend to regularly rotate (change) IAM user access keys Rotating access keyscan be done from the AWS Management Console
To rotate access keys for an IAM user without interrupting the applications (console) create a second access key whilethe first access key is still active
1 Sign in to the IAM console
2 In the navigation pane choose Users
3 Choose the name of the user whose access keys to manage and then choose the Security credentials tab
4 In the Access keys section choose Create access key
copy Copyright 2020 Rubicon Communications LLC 49
Security Gateway Manual Amazon AWS
5 Choose Download csv file to save the access key ID and secret access key to a CSV file on your computer
6 The new access key is active by default At this point the user has two active access keys
After waiting some period of time to ensure that all applications and tools have been updated delete the first accesskey
1 Sign in to the IAM console
2 In the navigation pane choose Users
3 Choose the name of the user whose access keys to manage and then choose the Security credentials tab
4 Locate the access key to delete and choose its X button at the far right of the row Then choose Delete to confirm
Determining When Access Keys Need Rotating
To determine when access keys need rotating (console) do the following
1 Sign in to the IAM console
2 In the navigation pane choose Users
3 If necessary add the Access key age column to the users table by completing the following steps
1 Above the table on the far right click the settings icon
2 In Manage columns select Access key age
3 Choose Close to return to the list of users
4 The Access key age column shows the number of days since the oldest active access key was created Usethis information to find users with access keys that need rotating The column displays None for users with noaccess key
322 Using the Wizard
1 Gather your AWS Access Key ID and Secret Key
2 Navigate to VPN gt AWS VPC Wizard in the main menu in the pfSensereg webGUI
copy Copyright 2020 Rubicon Communications LLC 50
Security Gateway Manual Amazon AWS
3 The first screen of the wizard prompts for the AWS Credentials Enter the Access Key ID and Secret AccessKey in the appropriate text fields and select the Region to connect to in the dropdown menu then click Next
The wizard will then query the AWS API using those credentials to find which VPCrsquos exist in the selectedregion If the credentials were rejected an error message will be displayed and return to the first screen
4 The next screen will prompt to select from the available VPCrsquos in the selected region Select the one to connectto from the dropdown menu The wizard will not create a new VPC it will only connect to an existing VPC
Click Next after selecting the desired VPC
copy Copyright 2020 Rubicon Communications LLC 51
Security Gateway Manual Amazon AWS
Note If the desired VPCrsquos to connect to isnrsquot available create one via the AWS Management Console and tryagain
The wizard will then query the AWS API to check whether there is a VPN Gateway attached to the selectedVPC If none exists one will be created via the API Then the next screen will be displayed
5 On the next screen specify routing and network data
A description of what should be entered for each of these fields follows
copy Copyright 2020 Rubicon Communications LLC 52
Security Gateway Manual Amazon AWS
Routing Type AWS offers either static routing or BGP routing Select the appropriate type fromthe dropdown menu If unsure static routing is likely to be adequate
BGP AS Number If static routing was choosen leave this field blank Otherwise it is possible tospecify an AS number to use If left blank the value will default to 65000
Local Public IP Address On an AWS Netgate appliance instance this should be the public IP ad-dress of the Elastic IP associated with the instance If configuring a hardware device runningpfSense this could be the public address assigned to the WAN (or other) interface of the device
Local subnets The subnets connected to the pfSense instance that should be routed over the tunnelfrom hosts in the remote VPC As an example if connecting a pfSense instance to a remote VPCin the AWS us-east-1 region enter the subnets (or a single subnet) that are local to the pfSenseinstance and when hosts in your VPC in us-east-1 attempted to reach addresses within thosesubnets the traffic will be sent through the VPN tunnel that is being configured
Note When selecting static routing as the routing type there will be a delay that is typically between 2-5minutes before the next screen is displayed This is because static routes must be added to the VPN Connectionvia the AWS API This operation fails until the VPN Connection reaches the ldquoavailablerdquo state This can take afew minutes to occur
Click Next when done
The wizard will then query the AWS API to find whether a Customer Gateway is configured with the selectedPublic IP Address If none exists one will be created If one already exists the ID will be retrieved and it willbe used
The wizard will then query the AWS API to see if a VPC Connection already exists that matches the dataentered If one exists it will be used Otherwise one will be created
If static routing was selected static routes will be added to the VPN Connection for the Local subnets entered
Route propagation will be enabled for the VPN Gateway in each of the Route Tables that are associated withthe VPC All of these configurations are carried out in the AWS API nothing has been changed in the pfSenseVPN configurations yet
Warning Important Note on Billing Once this step is carried out and the VPN Connection is createdAWS will start billing your AWS account the hourly rate for a VPN Connection This is $005 as of thiswriting and that is a charge that goes entirely to AWS itself They will do this until the VPN Connection isdeleted via the VPC Management Console
Nothing in pfSense will ever cause AWS to stop billing for this VPN Connection Whether it works or notwhether the pfSense instance is up or down whether the IPsec tunnels have been deleted or reconfiguredAWS will continue to bill the hourly fee for a VPN Connection if the creation of it succeeds until it is deletedthrough their web interface
The wizard helps establish an initial configuration that works and configures the appropriate elements inAWSrsquos API to facilitate this You are responsible for making sure you understand what yoursquore being billedfor and disabling any functions including VPN Connections that are no longer necessary
6 If the operations of the previous step succeeded the next screen will appear
copy Copyright 2020 Rubicon Communications LLC 53
Security Gateway Manual Amazon AWS
Select an Interface to act as the local endpoint of the VPN tunnels that will be created In most cases thisshould be the WAN interface It should generally be whatever interface is associated with the Local Public IPAddress entered in the previous step
On an AWS Netgate pfSense instance this will be whatever interface the Elastic IP is associated with On ahardware device running pfSense that has the Local Public IP Address directly configured on an interface thiswill be the interface that the Local Public IP Address is configured on
After clicking Next the wizard will configure the VPN and associated settings within pfSense itself using datareturned by the AWS API in the previous step
It will configure 2 IPsec tunnels a firewall rule 2 Aliases (referenced by the firewall rule) and 2 Virtual IPAddresses If BGP was selected as the Routing Type in the previous step it will install the OpenBGPDpackage automatically and configure it appropriately
7 The next screen will appear and prompt to apply the configuration changes that have been made
copy Copyright 2020 Rubicon Communications LLC 54
Security Gateway Manual Amazon AWS
After clicking Next all the configuration changes that were made will be applied
8 The wizard will be completed and the browser will be redirected to the IPsec status page The VPN to the VPCshould now be fully configured
Note Sometimes there is a delay of 5-10 minutes before the tunnels are fully functional and passing trafficThis has been observed particularly often during the setup of tunnels using BGP routing
copy Copyright 2020 Rubicon Communications LLC 55
Security Gateway Manual Amazon AWS
323 Testing Connectivity
Verify that the IPsec tunnels are functioning by attempting to ping the ldquoinside tunnel addressesrdquo of the VPC side ofthe tunnel by navigating to Firewall -gt Virtual IP There should be two virtual IP addresses configured that haveDescriptions like ldquoInside address for tunnel to ltremote IP addressgtrdquo
Amazon provides inside addresses for each end of the tunnel in a 30 subnet in IPv4 link local address space(169254xy) Typically the first usable address in the 30 is the inside address for the VPC end of the tunnel andthe other usable address is the inside address for your end of the tunnel So if you ping from one of the virtual IPaddresses configured on the pfSensereg instance to the IP address that is one less (for example if the virtual IP addresswere 16925425322 ping from 16925425322 to 16925425321) that checks whether the other end of the tunnelis responding and whether the tunnel is functioning properly
Note It sometimes takes a few minutes for the tunnels to begin working after the configuration wizard completes
To ping log into the pfSense instance via SSH and execute ping from a shell prompt For the previous example of16925425322 the proper syntax is
ping -S 16925425322 16925425321
When pinging from a shell prompt it is possible leave the command running indefinitely and interrupt it there is aresponse
copy Copyright 2020 Rubicon Communications LLC 56
Security Gateway Manual Amazon AWS
It is also possible to ping via the Diagnostics -gt Ping page by selecting the appropriate source address and enteringthe remote tunnel inside address in the Host field This will only send a limited number of ping packets so it may benecessary to repeat this a few times
324 VPC Configuration Details
The AWS documentation for connecting a hardware device to a VPC provides a great amount of detail on configuringVPN Connections to VPC
The main configuration elements that exist in Amazonrsquos data model are the Virtual Private Gateway the CustomerGateway and the VPN Connection In order to configure a VPN connection to a VPC all 3 of these need to exist TheVirtual Private Gateway is the VPN endpoint on Amazonrsquos side The customer gateway is the VPN endpoint on thepfSensereg instancedevice being configured The VPN Connection is the IPsec VPN between Amazon and the pfSenseinstancedevice
A Virtual Private Gateway needs to exist and be associated to the VPC A particular VPN Gateway can only beassociated to one VPC at a time Once the VPC to connect to has been selected the wizard invokes the AWS API callDescribeVpnGateways to determine if a VPN Gateway already exists that is attached to the VPC If none exists itcreates one with the CreateVpnGateway API call and attaches it to the VPC with the AttachVpnGateway call
A Customer Gateway needs to be created for the public IP address of the device or virtual machine that will be used toconnect to the VPC The wizard invokes the AWS API call DescribeCustomerGateways to determine if a CustomerGateway already exists If none exists one is created with the CreateCustomerGateway API call
The VPN Connection connects the Virtual Private Gateway and Customer Gateway The wizard checks to see if thereis an existing VPN Connection configured that connects those endpoints by invoking the AWS API call DescribeVp-nConnections If none exists one is created using the CreateVpnConnection call One of the fields returned by thiscall is a block of XML configuration data that contains configuration data assigned by AWS for use with configuringthe VPN Connection This data is stored and used in subsequent steps to make the required configuration changeswithin pfSense
copy Copyright 2020 Rubicon Communications LLC 57
Security Gateway Manual Amazon AWS
Any objects created through API calls by the wizard will be tagged with names like auto-created by pfSenseVPC ltyour_VPC_IDgt This is accomplished by calling the AWS API call CreateTags and using Name as the keyfor the tag
In addition to creation of the items mentioned above required adjustments are made to Security Groups and RouteTables to facilitate communication over the VPN The Security Groups associated with the VPC are updated to allowinbound access from the local subnets on the pfSense end of the VPN They are checked first via the DescribeSecuri-tyGroups AWS API call to determine if the access is already allowed Any of the subnets that is not already allowedhas inbound access added via the AuthorizeSecurityGroupIngress AWS API call
Route Tables associated with the VPC are updated to receive routes from the VPN Gateway used by the VPN Con-nection They are checked first via the DescribeRouteTables AWS API call If the VPN Gateway ID is not includedin the list of VPN Gateways propagating routes route propagation for the VPN Gateway is enabled on that table usingthe EnableVgwRoutePropagation AWS API call
For VPN Connections using static routing static routes for the specified subnets are added to the VPN ConnectionThis is done via the CreateVpnConnectionRoute AWS API call
325 pfSense Configuration Details
On the pfSensereg side there are numerous configurations added to support the VPN to the VPC
Aliases
First aliases are created for use in a firewall rule These aliases are intended to contain the subnets that traffic shouldbe allowed to ingress over the IPsec tunnel One alias represents the local subnets on the pfSense side and is givena name like VPC_Local_vpc_12345678 and the other represents the remote subnets on the VPC side and is given aname like VPC_Remote_vpc_12345678
Virtual IP addresses
Next virtual IP addresses are added on the lo0 (loopback) interface These virtual IP addresses are the local ldquoinsideaddressesrdquo of the IPsec tunnels These addresses are used as the local address for BGP communication when BGProuting is selected These addresses are IPv4 link local addresses (see RFC 3297) AWS assigns 30rsquos out of thenetwork 1692540016 for this purpose
Note These addresses are also useful as a ping target to execute a basic test of whether the tunnel is functioningproperly Executing a ping from a source address of one of these IP addresses to the corresponding inside address ofthe other end of the tunnel helps determine whether the tunnel negotiation is completing properly
Firewall rules
Next a firewall rule is added on the IPsec interface that allows traffic from the VPC networks to the local subnetsThis rule uses the previously created Aliases as sourcedestination targets
IPsec
Then IPsec phase 1 and phase 2 associations are set up Most of the settings required are extracted from a blockof XML data that was returned by the CreateVpnConnection call made during the AWS configuration step Thisincludes parameters like endpoint IP addresses encryption ciphers timer values etc
copy Copyright 2020 Rubicon Communications LLC 58
Security Gateway Manual Amazon AWS
If BGP routing was selected the configurations for the OpenBGPD BGP daemon are established The required settingsare determined using the AS number entered into the wizard and the parameters returned by the CreateVpnConnec-tion call made during the AWS configuration step
326 Tested Configurations
Various topologies may be possible to establish using the AWS VPC Configuration Wizard This section enumeratessome of the configurations that were successfully tested
Platforms
bull Various hardware platforms
bull 64-bit virtual machines in VMware vSphereESX
bull Amazon EC2 instances (Xen virtual machines) of the Netgate pfSensereg RouterFirewallVPN AWS AMI
Local networkrouting configurations
bull pfSense with a public address configured on the WAN interface
bull pfSense with a private address configured on the WAN interface behind a 11 NAT
bull pfSense with a private address configured on the WAN interface behind a PAT (1many NAT)
VPC Topologies
bull pfSense connected to a single VPC
bull pfSense connected to multiple VPCrsquos in different regions
bull Amazon EC2 instance of the pfSense RouterFirewallVPN AWS AMI connected to a VPC belonging to thesame AWS account in a different region
bull Amazon EC2 instance of the pfSense RouterFirewallVPN AWS AMI connected to a VPC belonging to adifferent AWS account in the same region
The configuration recommended for the greatest amount of stability is to have a public IPv4 address directly configuredon the WAN interface of your pfSense firewall but VPNs have been successfully established under all of the conditionslisted above
Whether any of these solutions is appropriate should be evaluated in the context of personal needs and existing infras-tructure Other configurations not listed above may be possible as well
327 AWS VPC Wizard FAQ
1 What level of redundancy is provided by the two tunnels
Amazon provides two tunnel endpoints that will allow traffic to be sent between your networks and the remote VPCyou are connected to The racoon daemon in pfSensereg is only capable of establishing an active phase 2 associationfor a particular sourcedestination pair on a single tunnel
Phase 2 associations between the local subnets and the remote VPC subnet are configured in the pfSense GUI for bothtunnels but racoon will only actually establish an association for the first tunnel This means that racoon will onlyever try to send traffic destined for the remote VPC subnet over the first tunnel
copy Copyright 2020 Rubicon Communications LLC 59
Security Gateway Manual Amazon AWS
If that tunnel goes down the second tunnel may be up and inbound traffic from the remote VPC may be sent to yourlocal networks over that tunnel automatically But outbound traffic to your remote VPC would not automatically failover to the second tunnel In order for you to send your outbound traffic over the second tunnel you would need todisable the phase 2 associations for the first tunnel and apply the changes
2 I quit the wizard before finishing Now what
To finish setting up the VPN go back to the wizard and run through it again It should reuse any partial configurationsthat were generated before it was stopped and create the new elements that are required
3 What are the AWS charges for this
AWS determines their own pricing and provides details for EC2 pricing and VPC pricing There are many types ofcharges that may be incurred for operating instances on AWS (eg charges related to running an instance bandwidthstorage elastic IPs etc)
The charge of specific interest in this case is the hourly charge for a VPN Connection As of this writing it costs $005(USD) per hour in most regions to have a VPN Connection configured and available AWS will charge whether theVPN Connection is being used or not as long as it is configured This will be configured by the third step of the wizardand will never be removed by pfSense
If the VPN Connection is no longer needed and billing for it needs to be stopped visit AWSrsquos VPC ManagementConsole and delete the VPN Connection manually
4 Can I use the wizard to connect to the GovCloud region
This hasnrsquot been officially tested but at least one user has reported that they were able to successfully connect to theGovCloud region They manually added the region us-gov-west-1 to the list of regions in the first step of the wizardand were able to successfully connect to their VPC in that region This may be supported in a future build but to trywithout official support do the following
1 Under the System gt Advanced menu make sure the Enable Secure Shell box is checked This is already doneby default on AWS instances but is off by default on pfSense hardware devices
2 Log into the instance via SSH
3 Make sure the root filesystem is mounted as readwrite On an AWS instance or a hardware device running on anSSD this should be true On a hardware device using Compact Flash or an SD card for storage it will probablybe necessary to remount the root filesystem in readwrite mode by running
mount -uw
4 Edit the file usrlocalwwwwizardsvpc_vpn_wizardxml using vi Look for a section of the file that lookslike this
ltoptiongtltnamegtsa-east-1ltnamegtltvaluegtsa-east-1ltvaluegt
ltoptiongt
That should appear directly after several similar ltoptiongt specifications containing all of the other availableregions Right underneath that section add the following
copy Copyright 2020 Rubicon Communications LLC 60
Security Gateway Manual Amazon AWS
ltoptiongtltnamegtus-gov-west-1ltnamegtltvaluegtus-gov-west-1ltvaluegt
ltoptiongt
Then save the file and exit vi
5 If the filesystem had to be remounted in readwrite mode earlier remount it in read-only mode by running
The GovCloud region should now appear as a choice in the first step of the wizard
copy Copyright 2020 Rubicon Communications LLC 61
CHAPTER
FOUR
REFERENCES
41 Support Resources
411 Commercial Support
In order to keep prices low the software is not bundled with a support subscription For users who need commercialsupport Netgate Gloabal Support can be purchased at httpswwwnetgatecomsupport
412 Community Support
Community support for pfSensereg software is available through the Netgate Forum
42 Additional Resources
421 Netgate Training
Netgate training offers training courses for increasing your knowledge of pfSensereg products and services Whetheryou need to maintain or improve the security skills of your staff or offer highly specialized support and improve yourcustomer satisfaction Netgate training has got you covered
httpswwwnetgatecomtraining
422 Resource Library
To learn more about how to use your pfSense appliance and for other helpful resources make sure to browse ourResource Library
httpswwwnetgatecomresources
423 Professional Services
Support does not cover more complex tasks such as CARP configuration for redundancy on multiple firewalls orcircuits network design and conversion from other firewalls to pfSensereg These items are offered as professionalservices and can be purchased and scheduled accordingly
httpswwwnetgatecomour-servicesprofessional-serviceshtml
62
Security Gateway Manual Amazon AWS
424 Community Options
If you elected not to get a paid support plan you can find help from the active and knowledgeable pfSense communityon our forums
httpsforumnetgatecom
copy Copyright 2020 Rubicon Communications LLC 63
- Getting Started
- Instance Usage
- Virtual Private Cloud (VPC)
- References
-
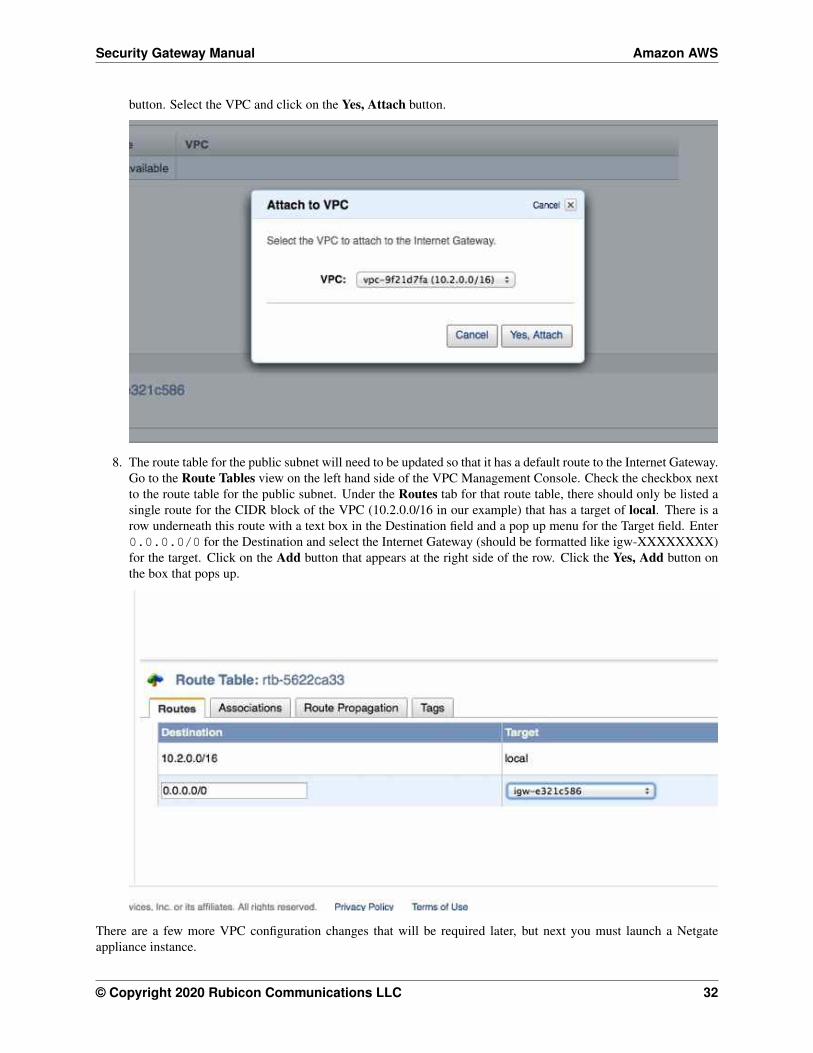
Security Gateway Manual Amazon AWS
312 Launching an Instance in a VPC
In the Amazon EC2 Management Console launch a new instance of the pfSensereg firewall and VPN appliance Thisprocess is the same as the one for launching an EC2 (non-VPC) instance up until step 11 which details the values toenter for the Configure Instance Details screen in order to specify the instance should be created in your VPC
1 Select the region to run the instance in using the tab at the upper right corner of the page
2 Launch a new instance by clicking on the Launch Instance button under the Create Instance section of theEC2 dashboard
copy Copyright 2020 Rubicon Communications LLC 33
Security Gateway Manual Amazon AWS
3 Select AWS Marketplace on the Create a New Instance menu Type Netgate pfSense FirewallVPNRouter in the search box and press enter (or click on the Search button next to the text box)
4 Click on the link for the Netgate pfSense FirewallVPNRouter appliance in the search results
5 Click on the Continue button on the info page for the Netgate pfSense FirewallVPNRouter
copy Copyright 2020 Rubicon Communications LLC 34
Security Gateway Manual Amazon AWS
6 Click on the Launch with EC2 Console tab
7 If the license terms havenrsquot been accepted click on the Accept Terms button
8 A message should be displayed indicating that the subscription is being processed
copy Copyright 2020 Rubicon Communications LLC 35
Security Gateway Manual Amazon AWS
9 Select the version of the image to run under the popup menu labeled Select a Version Generally the mostrecently issued version should be selected Identify which region to launch the instances in and click on theLaunch in EC2 Console button to the right of that region
10 Choose the instance type to run on Click Next Configure Instance Details
copy Copyright 2020 Rubicon Communications LLC 36
Security Gateway Manual Amazon AWS
11 On the Configure Instance Details page under the Network field select the VPC that was created For theSubnet field that appears right below the Network field select the public subnet that was created earlier In ourexamples this is 1020024
12 Scroll down to the Network Interfaces heading A single interface named eth0 should be displayed by defaultClick on the Add Device button underneath eth0 Select the private subnet that was created (1021024 in ourexample) Pick an IP address within the range of the private subnet and enter it in the Private IP field Keep inmind that the first 3 or 4 IP addresses are reserved For this example we will use 10215
copy Copyright 2020 Rubicon Communications LLC 37
Security Gateway Manual Amazon AWS
Optionally expand the Advanced Details section and set parameters as text in the User Data field The availableoptions are
password Setting a value via a directive like password=abcdefg will set the password for theadministrative account to the specified value - abcdefg in this example If no value is set here arandom password will be assigned in order to keep administrative access from being exposed tothe internet with a default password
mgmtnet Setting a value via a directive like mgmtnet=1001024 will restrict managementaccess (http https ssh) to the specified network - 1001024 in this example This will causethe firewall rule on the instance (not on Amazons access lists but on the Netgate appliancersquosown firewall) to restrict management traffic for the instance to the specified source network Thedefault behavior is to allow management from any host
These directives can be set by placing them on a single line in the User Data field and separating them withcolons Specify both parameters by typing a statement similar to
password=abcdefgmgmtnet=1001024
Click Next Add Storage after optionally setting these parameters
Note If setting a password using the password parameter listed above the password is retrieved by the instancevia an unencrypted HTTP request when the system is configured the first time it boots The request is made toan Amazon Web Services-operated server on the local LAN that stores metadata about each instance runningThe data for an instance is only made available to that instance but is available to be queried from the instancewithout providing any authentication credentials
It is advised to change the admin password via the pfSense webGUI after the instance comes up or choose notto set the password at all and let a random password be set
copy Copyright 2020 Rubicon Communications LLC 38
Security Gateway Manual Amazon AWS
13 Click Next Tag Instance to accept the Storage Device Configuration
14 Optionally a tag can be set on the instance to differentiate this instance from other VMrsquos that were started byentering a value for the Name tag Click Next Configure Security Group after setting any desired tags
copy Copyright 2020 Rubicon Communications LLC 39
Security Gateway Manual Amazon AWS
15 Select a security group to launch the instance with The recommended settings for a security group should allowat least the following traffic
bull TCP port 443 from 00000 - HTTPS - This is the port that the management web GUI listens on
bull TCP port 22 from 00000 - SSH - This port can be used to connect to a command prompt with an sshclient
bull UDP port 1194 from 00000 - OpenVPN - The OpenVPN server that is configured by default is boundto this port
bull UDP port 500 from 00000 - IKE for IPsec VPN
bull UDP port 4500 from 00000 - IPsecNAT-T for IPsec VPN
copy Copyright 2020 Rubicon Communications LLC 40
Security Gateway Manual Amazon AWS
If you have an existing security group that includes this access select Select an existing security group thenselect the group(s) to use and click Continue Otherwise select Create a new security group and add rulesfor this access by filling in the form for each rule and clicking the Add Rule button When all of the rules havebeen added click Review and Launch
16 Verify the details for the instance and click Launch
17 Select an existing key pair or create a new key pair to connect to the instance with Do not select Proceed
copy Copyright 2020 Rubicon Communications LLC 41
Security Gateway Manual Amazon AWS
Without a Key Pair Click the checkbox that indicates you acknowledge having access to the selected privatekey file and then click Launch Instance
18 In order to reach the instance from the Internet associate an Elastic IP with the WAN interface of the instanceIn the VPC Management Console go to the Elastic IPs view by clicking on Elastic IPs on the left side of thepage Click on the Allocate New Address button Select that you want the EIP used in VPC and click on theYes Allocate button in the box that pops up After the Elastic IP address is allocated associate the address withthe WAN interface of the Netgate appliance by clicking on the Associate Address button
A box will pop up that will either let you specify the instance and Private IP address of the interface or theNetwork Interface and the Private IP Address of the interface Use one of these methods to select the correctinterface and click on the Yes Associate button The instance should now be reachable via ssh or https
copy Copyright 2020 Rubicon Communications LLC 42
Security Gateway Manual Amazon AWS
19 In order for traffic to be allowed to be routed from the private subnet through the public interface of the instancethe SourceDest AddressCheck on the private interfaces needs to be disabled In the EC2 Management Con-sole go to the ldquoNetwork Interfacesrdquo view by clicking on Network Interfaces in the menu on the lefthand sideof the page
Click the checkbox to the left of the privateLAN interface on the Netgate appliance instance Click on theActions button at the top of the page and select Change SourceDesk Check on the popup menu Select theradio button labeled Disabled on the box that pops up and click on the Save button
Non-local traffic from the private subnet should now be sent through the privateLAN interface on the Netgateappliance instance
copy Copyright 2020 Rubicon Communications LLC 43
Security Gateway Manual Amazon AWS
313 Managing a VPC Instance
Once the instance is launched you can connect to it via the Elastic IP that was attached to the primary interface duringthe provisioning phase
In order to manage the configuration of the instance you can connect to it via https or ssh A limited set of configura-tions is possible through the SSH interface the preferred method for managing most of the configurations or viewingdata on the status of the pfSensereg instance is through the https webGUI
Connecting via SSH
To connect via SSH you would use the key pair you chose while creating the instance to connect to the admin accountFrom the command line on a UnixLinux host you would use a command similar to
ssh -i my_ec2_key admin232020454
Where the appropriate private key file and public IP or hostname are substituted
Note The first time you log into your instance the SSH key of the instance will not be cached on your computerand you will need to type yes when asked whether you want continue connecting This should not be necessary onsubsequent sessions
Once logged in you should see the console menu similar to the one below
copy Copyright 2020 Rubicon Communications LLC 44
Security Gateway Manual Amazon AWS
Connecting via HTTPS
To connect via https you would enter a URL containing the public IP address or hostname of your instance intoa web browser For example https232020454 Itrsquos very likely that you will receive a browser warningindicating that the security certificate of the site is not trusted This is because the instance uses a self-signed certificatefor https communication You should click on the option to proceed to the site anyway The pfSense login screen withthe Netgate logo should appear
The username to log in with is admin The password to use is either a value that you set in the User Data during thecreation of the instance or a random password
Tip It is preferable to explicitly set a password by passing a value in with the User Data field so the password willbe known in advance
If you did not set a specific password you can find out that value that the random password was set to through one of2 different methods
1 The first method is to log in over SSH with the key pair that you selected when the instance was created andexamine the contents of the file located at etcmotd You would do this by selecting option 8) Shell in theconsole menu that is presented when you SSH in then run this command in the shell
cat etcmotd
2 The second method is to view the System Log for the instance in the EC2 Management Console After themessages that are displayed that show the status of the boot process a message should appear that indicates what
copy Copyright 2020 Rubicon Communications LLC 45
Security Gateway Manual Amazon AWS
the administrative password was changed to Be aware that the System Log output in the EC2 ManagementConsole is not updated in real time and may take a few minutes to show up
The message you should look for using either of the methods mentioned about will look like this
Admin password changed to abcdefg
Once yoursquove determined your password and entered it into the login form the pfSense WebGUI should be availableto you
314 Forwarding traffic from VPC subnets through the instance
Some additional configuration is required within the VPC instancersquos pfSensereg webGUI before you are able to managetraffic from the private subnet
1 Log into the pfSense WebGUI for the instance
2 Click on the Interfaces heading on the left and then click the Assign link
3 Click on the + icon to add a new Interface under the Interface assignments tab A LAN interface shouldautomatically be added with the next available network interface (xn1)
4 Click on the Interfaces heading on the left again and then click on LAN Click the checkbox to enable the LANinterface Set the IPv4 Configuration Type to Static IPv4 and enter the IP address you assigned to the 2ndinterface during the provisioning phase Click the Save button
Now you can create other instances attached to your private subnet and protect them with the firewall on the pfSenseinstance
Common ways to manage private hosts
Allowing private hosts to connect to the Internet
To allow private hosts to be able to connect to the Internet you can allow any traffic from the LAN in your firewallrules there should be a rule like this in place by default
Next set up NAT rules to cause addresses in the private subnet to be NATed to the IP address of the WAN interface
1 Under the Firewall heading on the left click on the NAT link
2 On the Outbound tab click the radio button for Manual Outbound NAT rule generation (AON - AdvancedOutbound NAT)
3 Click the Save button
4 Click on the Aliases link under the Firewall heading on the left
5 Add your private subnet to the Networks_to_NAT alias
Note There is an existing NAT rule configured by default that uses the alias Networks_to_NAT
copy Copyright 2020 Rubicon Communications LLC 46
Security Gateway Manual Amazon AWS
Allow private hosts to connect to each other
If your hosts should only contact each other and a private network segment elsewhere you can configure an IPsecor OpenVPN tunnel from your remote networks to the Netgate appliance instance and set up the appropriate firewallrules routes and security policies to allow access to your private subnet through a VPN tunnel
Allow direct inbound access from the internet to hosts
If you wish to enable direct inbound access from the internet to hosts on the private subnet you can set up portforwarding on the WAN interface to direct traffic to particular hosts in the private subnet
315 Establishing a VPN connection to a VPC in another region
To establish a VPN that allows instances on the VPC subnet(s) that sit behind a Netgate appliance to communicate withinstances that reside in a VPC in another region the Netgate appliance has a VPC configuration wizard that assists byconfiguring both the Netgate appliance as well as the VPC configuration elements that would normally have to be setmanually through the AWS Management Console
For detailed instructions see the AWS VPC User Guide
316 Upgrading a VPC Instance
Periodically new releases of the AMI are issued to track new releases of pfSensereg that may provide new functionalitybug fixes and security updates
The lower risk approach to upgrading is to bring up a new instance alongside the existing one and executing a cutoverThese instructions detail the procedure for moving your existing instance to one running the latest version
1 Back up the configuration of your exsting instance by navigating to BackupRestore under the Diagnosticsmenu in the Web GUI Click the Download configuration button under the Backup Configuration headingand save your config file to your local system
2 Bring up a new instance of the pfSense Certified RouterFirewallVPN running the latest version
3 When creating the instance make sure the interfaces match the interfaces on the existing instance Make surethat the new instance is in the same VPC as the existing instance and that it has the same number of interfacesattached and that the interfaces are connected to the same Subnets
4 Make sure any interfaces on the new instance that will communicate with private Subnets have theSourceDestination check disabled
5 Allocate a new Elastic IP and associate it to the WAN interface of the new instance to allow yourself managementaccess
6 Restore the backed up configuration file to the new instance Navigate to BackupRestore under the Diagnosticsmenu in the Web GUI Under the Restore Configuration heading click the Choose File button and browsefor the configuration file you backed up from the existing instance earlier Once you have selected that fileclick the Restore configuration button The configuration file will be uploaded and the instance will rebootautomatically
7 If you had packages installed on the old instance navigate to Packages under the System menu in the pfSenseweb GUI and install the same packages
8 If there was any external dependency on the public IP address of the existing instance you can remove theElastic IP Address from the upgraded instance and move the Elastic IP Address from the existing instance tothe upgraded instance External dependencies that might cause you to want to do this include things like VPNrsquos
copy Copyright 2020 Rubicon Communications LLC 47
Security Gateway Manual Amazon AWS
configured to external devices that rely on the existing instancersquos Elastic IP address or access lists on externaldevices that allow access to traffic from the existing instancersquos IP address There may be other reasons why youwould wish to keep the existing address as well (to preserve existing bookmarks to the Web GUI reduce theneed for updates to existing internal documentation etc) The process for moving the old Elastic IP address tothe new instance is as follows
bull Disassociate the Elastic IP address from the new instance In the EC2 Management Console click onElastic IPs under the Network amp Security heading Check the box next to the Elastic IP address assignedto the new instance and click on the Disassociate Address button
bull Disassociate the Elastic IP address from the old instance The procedure is the same as in the previousstep just repeated for the Eastic IP address of the old instance this time
bull Associate the Elastic IP address that was previously associated to the old instance to public interface of thenew instance In the EC2 Management Console click on Elastic IPs Check the box next to the Elastic IPaddress you are moving and click the Associate Address button Fill in the correct value for the Instanceor Network Interface and select the Private IP Address of the public interface on the new instance Clickthe Associate button The management interface of the new instance should now be accessible
9 Move any default routes that pointed to an interface on the old instance to point to the equivalent interface onthe new instance In the VPC Management Console click on Route Tables under the Virtual Private Cloudheading Check the box next to a Route Table associated with the VPC that the instances is located in
bull In the detail pane that appears at the bottom of the screen click on the Routes tab
bull If a route exists for 00000 with a Target that is an interface ID of an interface on the old instnace clickthe Edit button above the table displaying the routes
bull Click the red X next to the row for 00000 to remove the existing route
bull There should be a blank row with empty fields for a new route Enter 00000 in the Destinationfield and the Network Interface ID of the interface on the new instance in the Target field Click on theSave button
bull If there were multiple private subnets in the VPC which were pointed to interfaces on the pfSense instancerepeat this process for the other Route Tables associated with the VPC
bull The new instance should now be functioning as the old one did
32 AWS VPC Wizard User Guide
This guide will explain how to use the AWS VPC Wizard to simplify the configuration of a VPN to a remote VPC Theadministrator is asked for the minimum amount of basic information required to establish the VPN The configurationsboth on the AWS VPC side and on the pfSense side are then automatically created When the wizard is finishedexecuting a functioning VPN connection to a VPC should be established
321 AWS Access Keys
In order to connect to the AWS API to make certain required configuration changes the AWS VPC Wizard requiresAccess Keys to retrieve and modify VPC configurations
See also
Find more information about AWS Security Credential including Access Keys by reading AWS Security Credentials
Access keys consist of two parts
1 An access key ID
copy Copyright 2020 Rubicon Communications LLC 48
Security Gateway Manual Amazon AWS
bull For example AKIAIOSFODNN7EXAMPLE
2 A secret access key
bull For example wJalrXUtnFEMIK7MDENGbPxRfiCYEXAMPLEKEY
Access keys are like a usernamepassword and needed for programmatic requests to AWS including the AWS VPCWizard Use both the access key ID and secret access key together to authenticate requests
Important Manage access keys as securely as a user name and password
Managing Access Keys
To create modify or delete IAM user access keys do the following
1 Sign in to the IAM console
2 In the navigation bar on the upper right choose a user name and then choose My Security Credentials
3 On the AWS IAM Credentials tab in the Access keys for CLI SDK and API access section choose Createaccess key
4 Choose Download csv file to save the access key ID and secret access key to a csv file on your computerStore the file in a secure location There is no access to the secret access key again after this dialog box closesAfter the csv file has been downloaded choose Close When an access key is created the key pair is active bydefault and the pair can be used right away
bull To disable an active access key choose Make inactive
bull To reenable an inactive access key choose Make active
bull To delete an access key choose its X button at the far right of the row Then choose Delete to confirmWhen an access key is deleted itrsquos gone forever and cannot be retrieved However new keys can alwaysbe created
To create modify or delete another IAM userrsquos access keys do the following
1 Sign in to the IAM console
2 In the navigation pane choose Users
3 Choose the name of the user whose access keys to manage and then choose the Security credentials tab
4 In the Access keys section choose Create access key
5 Choose Download csv file to save the access key ID and secret access key to a CSV file on your computer
Rotating Access Keys
As a security best practice we recommend to regularly rotate (change) IAM user access keys Rotating access keyscan be done from the AWS Management Console
To rotate access keys for an IAM user without interrupting the applications (console) create a second access key whilethe first access key is still active
1 Sign in to the IAM console
2 In the navigation pane choose Users
3 Choose the name of the user whose access keys to manage and then choose the Security credentials tab
4 In the Access keys section choose Create access key
copy Copyright 2020 Rubicon Communications LLC 49
Security Gateway Manual Amazon AWS
5 Choose Download csv file to save the access key ID and secret access key to a CSV file on your computer
6 The new access key is active by default At this point the user has two active access keys
After waiting some period of time to ensure that all applications and tools have been updated delete the first accesskey
1 Sign in to the IAM console
2 In the navigation pane choose Users
3 Choose the name of the user whose access keys to manage and then choose the Security credentials tab
4 Locate the access key to delete and choose its X button at the far right of the row Then choose Delete to confirm
Determining When Access Keys Need Rotating
To determine when access keys need rotating (console) do the following
1 Sign in to the IAM console
2 In the navigation pane choose Users
3 If necessary add the Access key age column to the users table by completing the following steps
1 Above the table on the far right click the settings icon
2 In Manage columns select Access key age
3 Choose Close to return to the list of users
4 The Access key age column shows the number of days since the oldest active access key was created Usethis information to find users with access keys that need rotating The column displays None for users with noaccess key
322 Using the Wizard
1 Gather your AWS Access Key ID and Secret Key
2 Navigate to VPN gt AWS VPC Wizard in the main menu in the pfSensereg webGUI
copy Copyright 2020 Rubicon Communications LLC 50
Security Gateway Manual Amazon AWS
3 The first screen of the wizard prompts for the AWS Credentials Enter the Access Key ID and Secret AccessKey in the appropriate text fields and select the Region to connect to in the dropdown menu then click Next
The wizard will then query the AWS API using those credentials to find which VPCrsquos exist in the selectedregion If the credentials were rejected an error message will be displayed and return to the first screen
4 The next screen will prompt to select from the available VPCrsquos in the selected region Select the one to connectto from the dropdown menu The wizard will not create a new VPC it will only connect to an existing VPC
Click Next after selecting the desired VPC
copy Copyright 2020 Rubicon Communications LLC 51
Security Gateway Manual Amazon AWS
Note If the desired VPCrsquos to connect to isnrsquot available create one via the AWS Management Console and tryagain
The wizard will then query the AWS API to check whether there is a VPN Gateway attached to the selectedVPC If none exists one will be created via the API Then the next screen will be displayed
5 On the next screen specify routing and network data
A description of what should be entered for each of these fields follows
copy Copyright 2020 Rubicon Communications LLC 52
Security Gateway Manual Amazon AWS
Routing Type AWS offers either static routing or BGP routing Select the appropriate type fromthe dropdown menu If unsure static routing is likely to be adequate
BGP AS Number If static routing was choosen leave this field blank Otherwise it is possible tospecify an AS number to use If left blank the value will default to 65000
Local Public IP Address On an AWS Netgate appliance instance this should be the public IP ad-dress of the Elastic IP associated with the instance If configuring a hardware device runningpfSense this could be the public address assigned to the WAN (or other) interface of the device
Local subnets The subnets connected to the pfSense instance that should be routed over the tunnelfrom hosts in the remote VPC As an example if connecting a pfSense instance to a remote VPCin the AWS us-east-1 region enter the subnets (or a single subnet) that are local to the pfSenseinstance and when hosts in your VPC in us-east-1 attempted to reach addresses within thosesubnets the traffic will be sent through the VPN tunnel that is being configured
Note When selecting static routing as the routing type there will be a delay that is typically between 2-5minutes before the next screen is displayed This is because static routes must be added to the VPN Connectionvia the AWS API This operation fails until the VPN Connection reaches the ldquoavailablerdquo state This can take afew minutes to occur
Click Next when done
The wizard will then query the AWS API to find whether a Customer Gateway is configured with the selectedPublic IP Address If none exists one will be created If one already exists the ID will be retrieved and it willbe used
The wizard will then query the AWS API to see if a VPC Connection already exists that matches the dataentered If one exists it will be used Otherwise one will be created
If static routing was selected static routes will be added to the VPN Connection for the Local subnets entered
Route propagation will be enabled for the VPN Gateway in each of the Route Tables that are associated withthe VPC All of these configurations are carried out in the AWS API nothing has been changed in the pfSenseVPN configurations yet
Warning Important Note on Billing Once this step is carried out and the VPN Connection is createdAWS will start billing your AWS account the hourly rate for a VPN Connection This is $005 as of thiswriting and that is a charge that goes entirely to AWS itself They will do this until the VPN Connection isdeleted via the VPC Management Console
Nothing in pfSense will ever cause AWS to stop billing for this VPN Connection Whether it works or notwhether the pfSense instance is up or down whether the IPsec tunnels have been deleted or reconfiguredAWS will continue to bill the hourly fee for a VPN Connection if the creation of it succeeds until it is deletedthrough their web interface
The wizard helps establish an initial configuration that works and configures the appropriate elements inAWSrsquos API to facilitate this You are responsible for making sure you understand what yoursquore being billedfor and disabling any functions including VPN Connections that are no longer necessary
6 If the operations of the previous step succeeded the next screen will appear
copy Copyright 2020 Rubicon Communications LLC 53
Security Gateway Manual Amazon AWS
Select an Interface to act as the local endpoint of the VPN tunnels that will be created In most cases thisshould be the WAN interface It should generally be whatever interface is associated with the Local Public IPAddress entered in the previous step
On an AWS Netgate pfSense instance this will be whatever interface the Elastic IP is associated with On ahardware device running pfSense that has the Local Public IP Address directly configured on an interface thiswill be the interface that the Local Public IP Address is configured on
After clicking Next the wizard will configure the VPN and associated settings within pfSense itself using datareturned by the AWS API in the previous step
It will configure 2 IPsec tunnels a firewall rule 2 Aliases (referenced by the firewall rule) and 2 Virtual IPAddresses If BGP was selected as the Routing Type in the previous step it will install the OpenBGPDpackage automatically and configure it appropriately
7 The next screen will appear and prompt to apply the configuration changes that have been made
copy Copyright 2020 Rubicon Communications LLC 54
Security Gateway Manual Amazon AWS
After clicking Next all the configuration changes that were made will be applied
8 The wizard will be completed and the browser will be redirected to the IPsec status page The VPN to the VPCshould now be fully configured
Note Sometimes there is a delay of 5-10 minutes before the tunnels are fully functional and passing trafficThis has been observed particularly often during the setup of tunnels using BGP routing
copy Copyright 2020 Rubicon Communications LLC 55
Security Gateway Manual Amazon AWS
323 Testing Connectivity
Verify that the IPsec tunnels are functioning by attempting to ping the ldquoinside tunnel addressesrdquo of the VPC side ofthe tunnel by navigating to Firewall -gt Virtual IP There should be two virtual IP addresses configured that haveDescriptions like ldquoInside address for tunnel to ltremote IP addressgtrdquo
Amazon provides inside addresses for each end of the tunnel in a 30 subnet in IPv4 link local address space(169254xy) Typically the first usable address in the 30 is the inside address for the VPC end of the tunnel andthe other usable address is the inside address for your end of the tunnel So if you ping from one of the virtual IPaddresses configured on the pfSensereg instance to the IP address that is one less (for example if the virtual IP addresswere 16925425322 ping from 16925425322 to 16925425321) that checks whether the other end of the tunnelis responding and whether the tunnel is functioning properly
Note It sometimes takes a few minutes for the tunnels to begin working after the configuration wizard completes
To ping log into the pfSense instance via SSH and execute ping from a shell prompt For the previous example of16925425322 the proper syntax is
ping -S 16925425322 16925425321
When pinging from a shell prompt it is possible leave the command running indefinitely and interrupt it there is aresponse
copy Copyright 2020 Rubicon Communications LLC 56
Security Gateway Manual Amazon AWS
It is also possible to ping via the Diagnostics -gt Ping page by selecting the appropriate source address and enteringthe remote tunnel inside address in the Host field This will only send a limited number of ping packets so it may benecessary to repeat this a few times
324 VPC Configuration Details
The AWS documentation for connecting a hardware device to a VPC provides a great amount of detail on configuringVPN Connections to VPC
The main configuration elements that exist in Amazonrsquos data model are the Virtual Private Gateway the CustomerGateway and the VPN Connection In order to configure a VPN connection to a VPC all 3 of these need to exist TheVirtual Private Gateway is the VPN endpoint on Amazonrsquos side The customer gateway is the VPN endpoint on thepfSensereg instancedevice being configured The VPN Connection is the IPsec VPN between Amazon and the pfSenseinstancedevice
A Virtual Private Gateway needs to exist and be associated to the VPC A particular VPN Gateway can only beassociated to one VPC at a time Once the VPC to connect to has been selected the wizard invokes the AWS API callDescribeVpnGateways to determine if a VPN Gateway already exists that is attached to the VPC If none exists itcreates one with the CreateVpnGateway API call and attaches it to the VPC with the AttachVpnGateway call
A Customer Gateway needs to be created for the public IP address of the device or virtual machine that will be used toconnect to the VPC The wizard invokes the AWS API call DescribeCustomerGateways to determine if a CustomerGateway already exists If none exists one is created with the CreateCustomerGateway API call
The VPN Connection connects the Virtual Private Gateway and Customer Gateway The wizard checks to see if thereis an existing VPN Connection configured that connects those endpoints by invoking the AWS API call DescribeVp-nConnections If none exists one is created using the CreateVpnConnection call One of the fields returned by thiscall is a block of XML configuration data that contains configuration data assigned by AWS for use with configuringthe VPN Connection This data is stored and used in subsequent steps to make the required configuration changeswithin pfSense
copy Copyright 2020 Rubicon Communications LLC 57
Security Gateway Manual Amazon AWS
Any objects created through API calls by the wizard will be tagged with names like auto-created by pfSenseVPC ltyour_VPC_IDgt This is accomplished by calling the AWS API call CreateTags and using Name as the keyfor the tag
In addition to creation of the items mentioned above required adjustments are made to Security Groups and RouteTables to facilitate communication over the VPN The Security Groups associated with the VPC are updated to allowinbound access from the local subnets on the pfSense end of the VPN They are checked first via the DescribeSecuri-tyGroups AWS API call to determine if the access is already allowed Any of the subnets that is not already allowedhas inbound access added via the AuthorizeSecurityGroupIngress AWS API call
Route Tables associated with the VPC are updated to receive routes from the VPN Gateway used by the VPN Con-nection They are checked first via the DescribeRouteTables AWS API call If the VPN Gateway ID is not includedin the list of VPN Gateways propagating routes route propagation for the VPN Gateway is enabled on that table usingthe EnableVgwRoutePropagation AWS API call
For VPN Connections using static routing static routes for the specified subnets are added to the VPN ConnectionThis is done via the CreateVpnConnectionRoute AWS API call
325 pfSense Configuration Details
On the pfSensereg side there are numerous configurations added to support the VPN to the VPC
Aliases
First aliases are created for use in a firewall rule These aliases are intended to contain the subnets that traffic shouldbe allowed to ingress over the IPsec tunnel One alias represents the local subnets on the pfSense side and is givena name like VPC_Local_vpc_12345678 and the other represents the remote subnets on the VPC side and is given aname like VPC_Remote_vpc_12345678
Virtual IP addresses
Next virtual IP addresses are added on the lo0 (loopback) interface These virtual IP addresses are the local ldquoinsideaddressesrdquo of the IPsec tunnels These addresses are used as the local address for BGP communication when BGProuting is selected These addresses are IPv4 link local addresses (see RFC 3297) AWS assigns 30rsquos out of thenetwork 1692540016 for this purpose
Note These addresses are also useful as a ping target to execute a basic test of whether the tunnel is functioningproperly Executing a ping from a source address of one of these IP addresses to the corresponding inside address ofthe other end of the tunnel helps determine whether the tunnel negotiation is completing properly
Firewall rules
Next a firewall rule is added on the IPsec interface that allows traffic from the VPC networks to the local subnetsThis rule uses the previously created Aliases as sourcedestination targets
IPsec
Then IPsec phase 1 and phase 2 associations are set up Most of the settings required are extracted from a blockof XML data that was returned by the CreateVpnConnection call made during the AWS configuration step Thisincludes parameters like endpoint IP addresses encryption ciphers timer values etc
copy Copyright 2020 Rubicon Communications LLC 58
Security Gateway Manual Amazon AWS
If BGP routing was selected the configurations for the OpenBGPD BGP daemon are established The required settingsare determined using the AS number entered into the wizard and the parameters returned by the CreateVpnConnec-tion call made during the AWS configuration step
326 Tested Configurations
Various topologies may be possible to establish using the AWS VPC Configuration Wizard This section enumeratessome of the configurations that were successfully tested
Platforms
bull Various hardware platforms
bull 64-bit virtual machines in VMware vSphereESX
bull Amazon EC2 instances (Xen virtual machines) of the Netgate pfSensereg RouterFirewallVPN AWS AMI
Local networkrouting configurations
bull pfSense with a public address configured on the WAN interface
bull pfSense with a private address configured on the WAN interface behind a 11 NAT
bull pfSense with a private address configured on the WAN interface behind a PAT (1many NAT)
VPC Topologies
bull pfSense connected to a single VPC
bull pfSense connected to multiple VPCrsquos in different regions
bull Amazon EC2 instance of the pfSense RouterFirewallVPN AWS AMI connected to a VPC belonging to thesame AWS account in a different region
bull Amazon EC2 instance of the pfSense RouterFirewallVPN AWS AMI connected to a VPC belonging to adifferent AWS account in the same region
The configuration recommended for the greatest amount of stability is to have a public IPv4 address directly configuredon the WAN interface of your pfSense firewall but VPNs have been successfully established under all of the conditionslisted above
Whether any of these solutions is appropriate should be evaluated in the context of personal needs and existing infras-tructure Other configurations not listed above may be possible as well
327 AWS VPC Wizard FAQ
1 What level of redundancy is provided by the two tunnels
Amazon provides two tunnel endpoints that will allow traffic to be sent between your networks and the remote VPCyou are connected to The racoon daemon in pfSensereg is only capable of establishing an active phase 2 associationfor a particular sourcedestination pair on a single tunnel
Phase 2 associations between the local subnets and the remote VPC subnet are configured in the pfSense GUI for bothtunnels but racoon will only actually establish an association for the first tunnel This means that racoon will onlyever try to send traffic destined for the remote VPC subnet over the first tunnel
copy Copyright 2020 Rubicon Communications LLC 59
Security Gateway Manual Amazon AWS
If that tunnel goes down the second tunnel may be up and inbound traffic from the remote VPC may be sent to yourlocal networks over that tunnel automatically But outbound traffic to your remote VPC would not automatically failover to the second tunnel In order for you to send your outbound traffic over the second tunnel you would need todisable the phase 2 associations for the first tunnel and apply the changes
2 I quit the wizard before finishing Now what
To finish setting up the VPN go back to the wizard and run through it again It should reuse any partial configurationsthat were generated before it was stopped and create the new elements that are required
3 What are the AWS charges for this
AWS determines their own pricing and provides details for EC2 pricing and VPC pricing There are many types ofcharges that may be incurred for operating instances on AWS (eg charges related to running an instance bandwidthstorage elastic IPs etc)
The charge of specific interest in this case is the hourly charge for a VPN Connection As of this writing it costs $005(USD) per hour in most regions to have a VPN Connection configured and available AWS will charge whether theVPN Connection is being used or not as long as it is configured This will be configured by the third step of the wizardand will never be removed by pfSense
If the VPN Connection is no longer needed and billing for it needs to be stopped visit AWSrsquos VPC ManagementConsole and delete the VPN Connection manually
4 Can I use the wizard to connect to the GovCloud region
This hasnrsquot been officially tested but at least one user has reported that they were able to successfully connect to theGovCloud region They manually added the region us-gov-west-1 to the list of regions in the first step of the wizardand were able to successfully connect to their VPC in that region This may be supported in a future build but to trywithout official support do the following
1 Under the System gt Advanced menu make sure the Enable Secure Shell box is checked This is already doneby default on AWS instances but is off by default on pfSense hardware devices
2 Log into the instance via SSH
3 Make sure the root filesystem is mounted as readwrite On an AWS instance or a hardware device running on anSSD this should be true On a hardware device using Compact Flash or an SD card for storage it will probablybe necessary to remount the root filesystem in readwrite mode by running
mount -uw
4 Edit the file usrlocalwwwwizardsvpc_vpn_wizardxml using vi Look for a section of the file that lookslike this
ltoptiongtltnamegtsa-east-1ltnamegtltvaluegtsa-east-1ltvaluegt
ltoptiongt
That should appear directly after several similar ltoptiongt specifications containing all of the other availableregions Right underneath that section add the following
copy Copyright 2020 Rubicon Communications LLC 60
Security Gateway Manual Amazon AWS
ltoptiongtltnamegtus-gov-west-1ltnamegtltvaluegtus-gov-west-1ltvaluegt
ltoptiongt
Then save the file and exit vi
5 If the filesystem had to be remounted in readwrite mode earlier remount it in read-only mode by running
The GovCloud region should now appear as a choice in the first step of the wizard
copy Copyright 2020 Rubicon Communications LLC 61
CHAPTER
FOUR
REFERENCES
41 Support Resources
411 Commercial Support
In order to keep prices low the software is not bundled with a support subscription For users who need commercialsupport Netgate Gloabal Support can be purchased at httpswwwnetgatecomsupport
412 Community Support
Community support for pfSensereg software is available through the Netgate Forum
42 Additional Resources
421 Netgate Training
Netgate training offers training courses for increasing your knowledge of pfSensereg products and services Whetheryou need to maintain or improve the security skills of your staff or offer highly specialized support and improve yourcustomer satisfaction Netgate training has got you covered
httpswwwnetgatecomtraining
422 Resource Library
To learn more about how to use your pfSense appliance and for other helpful resources make sure to browse ourResource Library
httpswwwnetgatecomresources
423 Professional Services
Support does not cover more complex tasks such as CARP configuration for redundancy on multiple firewalls orcircuits network design and conversion from other firewalls to pfSensereg These items are offered as professionalservices and can be purchased and scheduled accordingly
httpswwwnetgatecomour-servicesprofessional-serviceshtml
62
Security Gateway Manual Amazon AWS
424 Community Options
If you elected not to get a paid support plan you can find help from the active and knowledgeable pfSense communityon our forums
httpsforumnetgatecom
copy Copyright 2020 Rubicon Communications LLC 63
- Getting Started
- Instance Usage
- Virtual Private Cloud (VPC)
- References
-
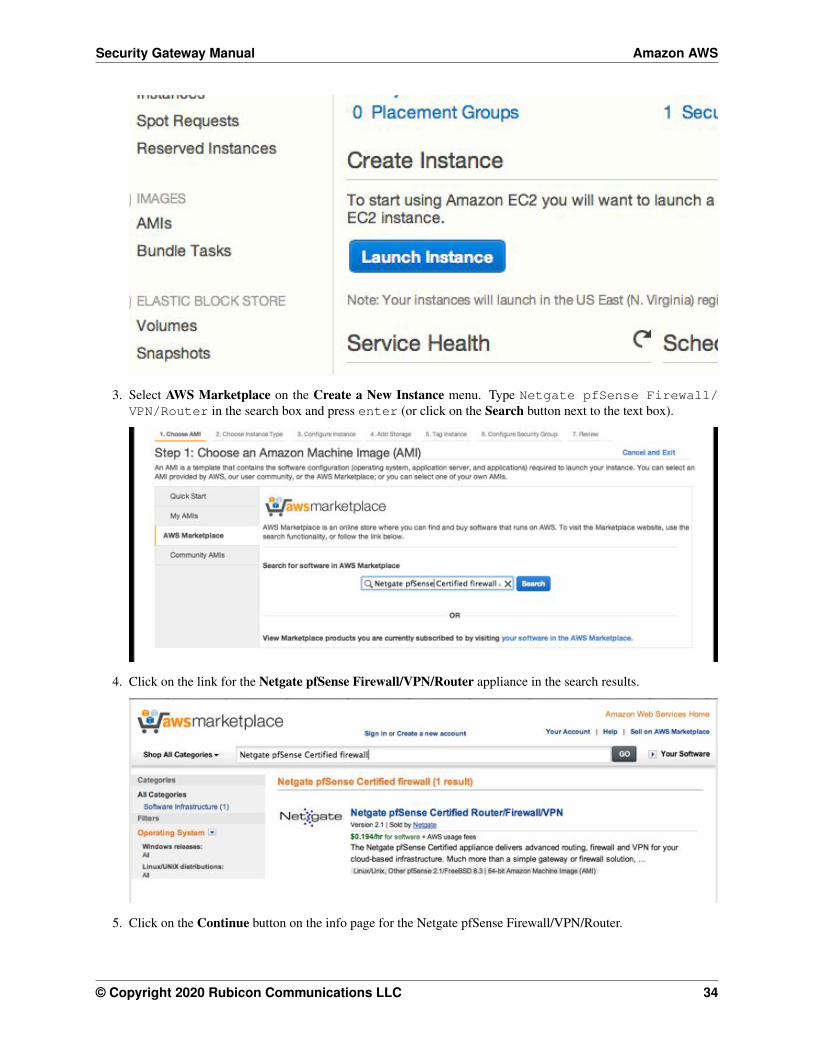
Security Gateway Manual Amazon AWS
3 Select AWS Marketplace on the Create a New Instance menu Type Netgate pfSense FirewallVPNRouter in the search box and press enter (or click on the Search button next to the text box)
4 Click on the link for the Netgate pfSense FirewallVPNRouter appliance in the search results
5 Click on the Continue button on the info page for the Netgate pfSense FirewallVPNRouter
copy Copyright 2020 Rubicon Communications LLC 34
Security Gateway Manual Amazon AWS
6 Click on the Launch with EC2 Console tab
7 If the license terms havenrsquot been accepted click on the Accept Terms button
8 A message should be displayed indicating that the subscription is being processed
copy Copyright 2020 Rubicon Communications LLC 35
Security Gateway Manual Amazon AWS
9 Select the version of the image to run under the popup menu labeled Select a Version Generally the mostrecently issued version should be selected Identify which region to launch the instances in and click on theLaunch in EC2 Console button to the right of that region
10 Choose the instance type to run on Click Next Configure Instance Details
copy Copyright 2020 Rubicon Communications LLC 36
Security Gateway Manual Amazon AWS
11 On the Configure Instance Details page under the Network field select the VPC that was created For theSubnet field that appears right below the Network field select the public subnet that was created earlier In ourexamples this is 1020024
12 Scroll down to the Network Interfaces heading A single interface named eth0 should be displayed by defaultClick on the Add Device button underneath eth0 Select the private subnet that was created (1021024 in ourexample) Pick an IP address within the range of the private subnet and enter it in the Private IP field Keep inmind that the first 3 or 4 IP addresses are reserved For this example we will use 10215
copy Copyright 2020 Rubicon Communications LLC 37
Security Gateway Manual Amazon AWS
Optionally expand the Advanced Details section and set parameters as text in the User Data field The availableoptions are
password Setting a value via a directive like password=abcdefg will set the password for theadministrative account to the specified value - abcdefg in this example If no value is set here arandom password will be assigned in order to keep administrative access from being exposed tothe internet with a default password
mgmtnet Setting a value via a directive like mgmtnet=1001024 will restrict managementaccess (http https ssh) to the specified network - 1001024 in this example This will causethe firewall rule on the instance (not on Amazons access lists but on the Netgate appliancersquosown firewall) to restrict management traffic for the instance to the specified source network Thedefault behavior is to allow management from any host
These directives can be set by placing them on a single line in the User Data field and separating them withcolons Specify both parameters by typing a statement similar to
password=abcdefgmgmtnet=1001024
Click Next Add Storage after optionally setting these parameters
Note If setting a password using the password parameter listed above the password is retrieved by the instancevia an unencrypted HTTP request when the system is configured the first time it boots The request is made toan Amazon Web Services-operated server on the local LAN that stores metadata about each instance runningThe data for an instance is only made available to that instance but is available to be queried from the instancewithout providing any authentication credentials
It is advised to change the admin password via the pfSense webGUI after the instance comes up or choose notto set the password at all and let a random password be set
copy Copyright 2020 Rubicon Communications LLC 38
Security Gateway Manual Amazon AWS
13 Click Next Tag Instance to accept the Storage Device Configuration
14 Optionally a tag can be set on the instance to differentiate this instance from other VMrsquos that were started byentering a value for the Name tag Click Next Configure Security Group after setting any desired tags
copy Copyright 2020 Rubicon Communications LLC 39
Security Gateway Manual Amazon AWS
15 Select a security group to launch the instance with The recommended settings for a security group should allowat least the following traffic
bull TCP port 443 from 00000 - HTTPS - This is the port that the management web GUI listens on
bull TCP port 22 from 00000 - SSH - This port can be used to connect to a command prompt with an sshclient
bull UDP port 1194 from 00000 - OpenVPN - The OpenVPN server that is configured by default is boundto this port
bull UDP port 500 from 00000 - IKE for IPsec VPN
bull UDP port 4500 from 00000 - IPsecNAT-T for IPsec VPN
copy Copyright 2020 Rubicon Communications LLC 40
Security Gateway Manual Amazon AWS
If you have an existing security group that includes this access select Select an existing security group thenselect the group(s) to use and click Continue Otherwise select Create a new security group and add rulesfor this access by filling in the form for each rule and clicking the Add Rule button When all of the rules havebeen added click Review and Launch
16 Verify the details for the instance and click Launch
17 Select an existing key pair or create a new key pair to connect to the instance with Do not select Proceed
copy Copyright 2020 Rubicon Communications LLC 41
Security Gateway Manual Amazon AWS
Without a Key Pair Click the checkbox that indicates you acknowledge having access to the selected privatekey file and then click Launch Instance
18 In order to reach the instance from the Internet associate an Elastic IP with the WAN interface of the instanceIn the VPC Management Console go to the Elastic IPs view by clicking on Elastic IPs on the left side of thepage Click on the Allocate New Address button Select that you want the EIP used in VPC and click on theYes Allocate button in the box that pops up After the Elastic IP address is allocated associate the address withthe WAN interface of the Netgate appliance by clicking on the Associate Address button
A box will pop up that will either let you specify the instance and Private IP address of the interface or theNetwork Interface and the Private IP Address of the interface Use one of these methods to select the correctinterface and click on the Yes Associate button The instance should now be reachable via ssh or https
copy Copyright 2020 Rubicon Communications LLC 42
Security Gateway Manual Amazon AWS
19 In order for traffic to be allowed to be routed from the private subnet through the public interface of the instancethe SourceDest AddressCheck on the private interfaces needs to be disabled In the EC2 Management Con-sole go to the ldquoNetwork Interfacesrdquo view by clicking on Network Interfaces in the menu on the lefthand sideof the page
Click the checkbox to the left of the privateLAN interface on the Netgate appliance instance Click on theActions button at the top of the page and select Change SourceDesk Check on the popup menu Select theradio button labeled Disabled on the box that pops up and click on the Save button
Non-local traffic from the private subnet should now be sent through the privateLAN interface on the Netgateappliance instance
copy Copyright 2020 Rubicon Communications LLC 43
Security Gateway Manual Amazon AWS
313 Managing a VPC Instance
Once the instance is launched you can connect to it via the Elastic IP that was attached to the primary interface duringthe provisioning phase
In order to manage the configuration of the instance you can connect to it via https or ssh A limited set of configura-tions is possible through the SSH interface the preferred method for managing most of the configurations or viewingdata on the status of the pfSensereg instance is through the https webGUI
Connecting via SSH
To connect via SSH you would use the key pair you chose while creating the instance to connect to the admin accountFrom the command line on a UnixLinux host you would use a command similar to
ssh -i my_ec2_key admin232020454
Where the appropriate private key file and public IP or hostname are substituted
Note The first time you log into your instance the SSH key of the instance will not be cached on your computerand you will need to type yes when asked whether you want continue connecting This should not be necessary onsubsequent sessions
Once logged in you should see the console menu similar to the one below
copy Copyright 2020 Rubicon Communications LLC 44
Security Gateway Manual Amazon AWS
Connecting via HTTPS
To connect via https you would enter a URL containing the public IP address or hostname of your instance intoa web browser For example https232020454 Itrsquos very likely that you will receive a browser warningindicating that the security certificate of the site is not trusted This is because the instance uses a self-signed certificatefor https communication You should click on the option to proceed to the site anyway The pfSense login screen withthe Netgate logo should appear
The username to log in with is admin The password to use is either a value that you set in the User Data during thecreation of the instance or a random password
Tip It is preferable to explicitly set a password by passing a value in with the User Data field so the password willbe known in advance
If you did not set a specific password you can find out that value that the random password was set to through one of2 different methods
1 The first method is to log in over SSH with the key pair that you selected when the instance was created andexamine the contents of the file located at etcmotd You would do this by selecting option 8) Shell in theconsole menu that is presented when you SSH in then run this command in the shell
cat etcmotd
2 The second method is to view the System Log for the instance in the EC2 Management Console After themessages that are displayed that show the status of the boot process a message should appear that indicates what
copy Copyright 2020 Rubicon Communications LLC 45
Security Gateway Manual Amazon AWS
the administrative password was changed to Be aware that the System Log output in the EC2 ManagementConsole is not updated in real time and may take a few minutes to show up
The message you should look for using either of the methods mentioned about will look like this
Admin password changed to abcdefg
Once yoursquove determined your password and entered it into the login form the pfSense WebGUI should be availableto you
314 Forwarding traffic from VPC subnets through the instance
Some additional configuration is required within the VPC instancersquos pfSensereg webGUI before you are able to managetraffic from the private subnet
1 Log into the pfSense WebGUI for the instance
2 Click on the Interfaces heading on the left and then click the Assign link
3 Click on the + icon to add a new Interface under the Interface assignments tab A LAN interface shouldautomatically be added with the next available network interface (xn1)
4 Click on the Interfaces heading on the left again and then click on LAN Click the checkbox to enable the LANinterface Set the IPv4 Configuration Type to Static IPv4 and enter the IP address you assigned to the 2ndinterface during the provisioning phase Click the Save button
Now you can create other instances attached to your private subnet and protect them with the firewall on the pfSenseinstance
Common ways to manage private hosts
Allowing private hosts to connect to the Internet
To allow private hosts to be able to connect to the Internet you can allow any traffic from the LAN in your firewallrules there should be a rule like this in place by default
Next set up NAT rules to cause addresses in the private subnet to be NATed to the IP address of the WAN interface
1 Under the Firewall heading on the left click on the NAT link
2 On the Outbound tab click the radio button for Manual Outbound NAT rule generation (AON - AdvancedOutbound NAT)
3 Click the Save button
4 Click on the Aliases link under the Firewall heading on the left
5 Add your private subnet to the Networks_to_NAT alias
Note There is an existing NAT rule configured by default that uses the alias Networks_to_NAT
copy Copyright 2020 Rubicon Communications LLC 46
Security Gateway Manual Amazon AWS
Allow private hosts to connect to each other
If your hosts should only contact each other and a private network segment elsewhere you can configure an IPsecor OpenVPN tunnel from your remote networks to the Netgate appliance instance and set up the appropriate firewallrules routes and security policies to allow access to your private subnet through a VPN tunnel
Allow direct inbound access from the internet to hosts
If you wish to enable direct inbound access from the internet to hosts on the private subnet you can set up portforwarding on the WAN interface to direct traffic to particular hosts in the private subnet
315 Establishing a VPN connection to a VPC in another region
To establish a VPN that allows instances on the VPC subnet(s) that sit behind a Netgate appliance to communicate withinstances that reside in a VPC in another region the Netgate appliance has a VPC configuration wizard that assists byconfiguring both the Netgate appliance as well as the VPC configuration elements that would normally have to be setmanually through the AWS Management Console
For detailed instructions see the AWS VPC User Guide
316 Upgrading a VPC Instance
Periodically new releases of the AMI are issued to track new releases of pfSensereg that may provide new functionalitybug fixes and security updates
The lower risk approach to upgrading is to bring up a new instance alongside the existing one and executing a cutoverThese instructions detail the procedure for moving your existing instance to one running the latest version
1 Back up the configuration of your exsting instance by navigating to BackupRestore under the Diagnosticsmenu in the Web GUI Click the Download configuration button under the Backup Configuration headingand save your config file to your local system
2 Bring up a new instance of the pfSense Certified RouterFirewallVPN running the latest version
3 When creating the instance make sure the interfaces match the interfaces on the existing instance Make surethat the new instance is in the same VPC as the existing instance and that it has the same number of interfacesattached and that the interfaces are connected to the same Subnets
4 Make sure any interfaces on the new instance that will communicate with private Subnets have theSourceDestination check disabled
5 Allocate a new Elastic IP and associate it to the WAN interface of the new instance to allow yourself managementaccess
6 Restore the backed up configuration file to the new instance Navigate to BackupRestore under the Diagnosticsmenu in the Web GUI Under the Restore Configuration heading click the Choose File button and browsefor the configuration file you backed up from the existing instance earlier Once you have selected that fileclick the Restore configuration button The configuration file will be uploaded and the instance will rebootautomatically
7 If you had packages installed on the old instance navigate to Packages under the System menu in the pfSenseweb GUI and install the same packages
8 If there was any external dependency on the public IP address of the existing instance you can remove theElastic IP Address from the upgraded instance and move the Elastic IP Address from the existing instance tothe upgraded instance External dependencies that might cause you to want to do this include things like VPNrsquos
copy Copyright 2020 Rubicon Communications LLC 47
Security Gateway Manual Amazon AWS
configured to external devices that rely on the existing instancersquos Elastic IP address or access lists on externaldevices that allow access to traffic from the existing instancersquos IP address There may be other reasons why youwould wish to keep the existing address as well (to preserve existing bookmarks to the Web GUI reduce theneed for updates to existing internal documentation etc) The process for moving the old Elastic IP address tothe new instance is as follows
bull Disassociate the Elastic IP address from the new instance In the EC2 Management Console click onElastic IPs under the Network amp Security heading Check the box next to the Elastic IP address assignedto the new instance and click on the Disassociate Address button
bull Disassociate the Elastic IP address from the old instance The procedure is the same as in the previousstep just repeated for the Eastic IP address of the old instance this time
bull Associate the Elastic IP address that was previously associated to the old instance to public interface of thenew instance In the EC2 Management Console click on Elastic IPs Check the box next to the Elastic IPaddress you are moving and click the Associate Address button Fill in the correct value for the Instanceor Network Interface and select the Private IP Address of the public interface on the new instance Clickthe Associate button The management interface of the new instance should now be accessible
9 Move any default routes that pointed to an interface on the old instance to point to the equivalent interface onthe new instance In the VPC Management Console click on Route Tables under the Virtual Private Cloudheading Check the box next to a Route Table associated with the VPC that the instances is located in
bull In the detail pane that appears at the bottom of the screen click on the Routes tab
bull If a route exists for 00000 with a Target that is an interface ID of an interface on the old instnace clickthe Edit button above the table displaying the routes
bull Click the red X next to the row for 00000 to remove the existing route
bull There should be a blank row with empty fields for a new route Enter 00000 in the Destinationfield and the Network Interface ID of the interface on the new instance in the Target field Click on theSave button
bull If there were multiple private subnets in the VPC which were pointed to interfaces on the pfSense instancerepeat this process for the other Route Tables associated with the VPC
bull The new instance should now be functioning as the old one did
32 AWS VPC Wizard User Guide
This guide will explain how to use the AWS VPC Wizard to simplify the configuration of a VPN to a remote VPC Theadministrator is asked for the minimum amount of basic information required to establish the VPN The configurationsboth on the AWS VPC side and on the pfSense side are then automatically created When the wizard is finishedexecuting a functioning VPN connection to a VPC should be established
321 AWS Access Keys
In order to connect to the AWS API to make certain required configuration changes the AWS VPC Wizard requiresAccess Keys to retrieve and modify VPC configurations
See also
Find more information about AWS Security Credential including Access Keys by reading AWS Security Credentials
Access keys consist of two parts
1 An access key ID
copy Copyright 2020 Rubicon Communications LLC 48
Security Gateway Manual Amazon AWS
bull For example AKIAIOSFODNN7EXAMPLE
2 A secret access key
bull For example wJalrXUtnFEMIK7MDENGbPxRfiCYEXAMPLEKEY
Access keys are like a usernamepassword and needed for programmatic requests to AWS including the AWS VPCWizard Use both the access key ID and secret access key together to authenticate requests
Important Manage access keys as securely as a user name and password
Managing Access Keys
To create modify or delete IAM user access keys do the following
1 Sign in to the IAM console
2 In the navigation bar on the upper right choose a user name and then choose My Security Credentials
3 On the AWS IAM Credentials tab in the Access keys for CLI SDK and API access section choose Createaccess key
4 Choose Download csv file to save the access key ID and secret access key to a csv file on your computerStore the file in a secure location There is no access to the secret access key again after this dialog box closesAfter the csv file has been downloaded choose Close When an access key is created the key pair is active bydefault and the pair can be used right away
bull To disable an active access key choose Make inactive
bull To reenable an inactive access key choose Make active
bull To delete an access key choose its X button at the far right of the row Then choose Delete to confirmWhen an access key is deleted itrsquos gone forever and cannot be retrieved However new keys can alwaysbe created
To create modify or delete another IAM userrsquos access keys do the following
1 Sign in to the IAM console
2 In the navigation pane choose Users
3 Choose the name of the user whose access keys to manage and then choose the Security credentials tab
4 In the Access keys section choose Create access key
5 Choose Download csv file to save the access key ID and secret access key to a CSV file on your computer
Rotating Access Keys
As a security best practice we recommend to regularly rotate (change) IAM user access keys Rotating access keyscan be done from the AWS Management Console
To rotate access keys for an IAM user without interrupting the applications (console) create a second access key whilethe first access key is still active
1 Sign in to the IAM console
2 In the navigation pane choose Users
3 Choose the name of the user whose access keys to manage and then choose the Security credentials tab
4 In the Access keys section choose Create access key
copy Copyright 2020 Rubicon Communications LLC 49
Security Gateway Manual Amazon AWS
5 Choose Download csv file to save the access key ID and secret access key to a CSV file on your computer
6 The new access key is active by default At this point the user has two active access keys
After waiting some period of time to ensure that all applications and tools have been updated delete the first accesskey
1 Sign in to the IAM console
2 In the navigation pane choose Users
3 Choose the name of the user whose access keys to manage and then choose the Security credentials tab
4 Locate the access key to delete and choose its X button at the far right of the row Then choose Delete to confirm
Determining When Access Keys Need Rotating
To determine when access keys need rotating (console) do the following
1 Sign in to the IAM console
2 In the navigation pane choose Users
3 If necessary add the Access key age column to the users table by completing the following steps
1 Above the table on the far right click the settings icon
2 In Manage columns select Access key age
3 Choose Close to return to the list of users
4 The Access key age column shows the number of days since the oldest active access key was created Usethis information to find users with access keys that need rotating The column displays None for users with noaccess key
322 Using the Wizard
1 Gather your AWS Access Key ID and Secret Key
2 Navigate to VPN gt AWS VPC Wizard in the main menu in the pfSensereg webGUI
copy Copyright 2020 Rubicon Communications LLC 50
Security Gateway Manual Amazon AWS
3 The first screen of the wizard prompts for the AWS Credentials Enter the Access Key ID and Secret AccessKey in the appropriate text fields and select the Region to connect to in the dropdown menu then click Next
The wizard will then query the AWS API using those credentials to find which VPCrsquos exist in the selectedregion If the credentials were rejected an error message will be displayed and return to the first screen
4 The next screen will prompt to select from the available VPCrsquos in the selected region Select the one to connectto from the dropdown menu The wizard will not create a new VPC it will only connect to an existing VPC
Click Next after selecting the desired VPC
copy Copyright 2020 Rubicon Communications LLC 51
Security Gateway Manual Amazon AWS
Note If the desired VPCrsquos to connect to isnrsquot available create one via the AWS Management Console and tryagain
The wizard will then query the AWS API to check whether there is a VPN Gateway attached to the selectedVPC If none exists one will be created via the API Then the next screen will be displayed
5 On the next screen specify routing and network data
A description of what should be entered for each of these fields follows
copy Copyright 2020 Rubicon Communications LLC 52
Security Gateway Manual Amazon AWS
Routing Type AWS offers either static routing or BGP routing Select the appropriate type fromthe dropdown menu If unsure static routing is likely to be adequate
BGP AS Number If static routing was choosen leave this field blank Otherwise it is possible tospecify an AS number to use If left blank the value will default to 65000
Local Public IP Address On an AWS Netgate appliance instance this should be the public IP ad-dress of the Elastic IP associated with the instance If configuring a hardware device runningpfSense this could be the public address assigned to the WAN (or other) interface of the device
Local subnets The subnets connected to the pfSense instance that should be routed over the tunnelfrom hosts in the remote VPC As an example if connecting a pfSense instance to a remote VPCin the AWS us-east-1 region enter the subnets (or a single subnet) that are local to the pfSenseinstance and when hosts in your VPC in us-east-1 attempted to reach addresses within thosesubnets the traffic will be sent through the VPN tunnel that is being configured
Note When selecting static routing as the routing type there will be a delay that is typically between 2-5minutes before the next screen is displayed This is because static routes must be added to the VPN Connectionvia the AWS API This operation fails until the VPN Connection reaches the ldquoavailablerdquo state This can take afew minutes to occur
Click Next when done
The wizard will then query the AWS API to find whether a Customer Gateway is configured with the selectedPublic IP Address If none exists one will be created If one already exists the ID will be retrieved and it willbe used
The wizard will then query the AWS API to see if a VPC Connection already exists that matches the dataentered If one exists it will be used Otherwise one will be created
If static routing was selected static routes will be added to the VPN Connection for the Local subnets entered
Route propagation will be enabled for the VPN Gateway in each of the Route Tables that are associated withthe VPC All of these configurations are carried out in the AWS API nothing has been changed in the pfSenseVPN configurations yet
Warning Important Note on Billing Once this step is carried out and the VPN Connection is createdAWS will start billing your AWS account the hourly rate for a VPN Connection This is $005 as of thiswriting and that is a charge that goes entirely to AWS itself They will do this until the VPN Connection isdeleted via the VPC Management Console
Nothing in pfSense will ever cause AWS to stop billing for this VPN Connection Whether it works or notwhether the pfSense instance is up or down whether the IPsec tunnels have been deleted or reconfiguredAWS will continue to bill the hourly fee for a VPN Connection if the creation of it succeeds until it is deletedthrough their web interface
The wizard helps establish an initial configuration that works and configures the appropriate elements inAWSrsquos API to facilitate this You are responsible for making sure you understand what yoursquore being billedfor and disabling any functions including VPN Connections that are no longer necessary
6 If the operations of the previous step succeeded the next screen will appear
copy Copyright 2020 Rubicon Communications LLC 53
Security Gateway Manual Amazon AWS
Select an Interface to act as the local endpoint of the VPN tunnels that will be created In most cases thisshould be the WAN interface It should generally be whatever interface is associated with the Local Public IPAddress entered in the previous step
On an AWS Netgate pfSense instance this will be whatever interface the Elastic IP is associated with On ahardware device running pfSense that has the Local Public IP Address directly configured on an interface thiswill be the interface that the Local Public IP Address is configured on
After clicking Next the wizard will configure the VPN and associated settings within pfSense itself using datareturned by the AWS API in the previous step
It will configure 2 IPsec tunnels a firewall rule 2 Aliases (referenced by the firewall rule) and 2 Virtual IPAddresses If BGP was selected as the Routing Type in the previous step it will install the OpenBGPDpackage automatically and configure it appropriately
7 The next screen will appear and prompt to apply the configuration changes that have been made
copy Copyright 2020 Rubicon Communications LLC 54
Security Gateway Manual Amazon AWS
After clicking Next all the configuration changes that were made will be applied
8 The wizard will be completed and the browser will be redirected to the IPsec status page The VPN to the VPCshould now be fully configured
Note Sometimes there is a delay of 5-10 minutes before the tunnels are fully functional and passing trafficThis has been observed particularly often during the setup of tunnels using BGP routing
copy Copyright 2020 Rubicon Communications LLC 55
Security Gateway Manual Amazon AWS
323 Testing Connectivity
Verify that the IPsec tunnels are functioning by attempting to ping the ldquoinside tunnel addressesrdquo of the VPC side ofthe tunnel by navigating to Firewall -gt Virtual IP There should be two virtual IP addresses configured that haveDescriptions like ldquoInside address for tunnel to ltremote IP addressgtrdquo
Amazon provides inside addresses for each end of the tunnel in a 30 subnet in IPv4 link local address space(169254xy) Typically the first usable address in the 30 is the inside address for the VPC end of the tunnel andthe other usable address is the inside address for your end of the tunnel So if you ping from one of the virtual IPaddresses configured on the pfSensereg instance to the IP address that is one less (for example if the virtual IP addresswere 16925425322 ping from 16925425322 to 16925425321) that checks whether the other end of the tunnelis responding and whether the tunnel is functioning properly
Note It sometimes takes a few minutes for the tunnels to begin working after the configuration wizard completes
To ping log into the pfSense instance via SSH and execute ping from a shell prompt For the previous example of16925425322 the proper syntax is
ping -S 16925425322 16925425321
When pinging from a shell prompt it is possible leave the command running indefinitely and interrupt it there is aresponse
copy Copyright 2020 Rubicon Communications LLC 56
Security Gateway Manual Amazon AWS
It is also possible to ping via the Diagnostics -gt Ping page by selecting the appropriate source address and enteringthe remote tunnel inside address in the Host field This will only send a limited number of ping packets so it may benecessary to repeat this a few times
324 VPC Configuration Details
The AWS documentation for connecting a hardware device to a VPC provides a great amount of detail on configuringVPN Connections to VPC
The main configuration elements that exist in Amazonrsquos data model are the Virtual Private Gateway the CustomerGateway and the VPN Connection In order to configure a VPN connection to a VPC all 3 of these need to exist TheVirtual Private Gateway is the VPN endpoint on Amazonrsquos side The customer gateway is the VPN endpoint on thepfSensereg instancedevice being configured The VPN Connection is the IPsec VPN between Amazon and the pfSenseinstancedevice
A Virtual Private Gateway needs to exist and be associated to the VPC A particular VPN Gateway can only beassociated to one VPC at a time Once the VPC to connect to has been selected the wizard invokes the AWS API callDescribeVpnGateways to determine if a VPN Gateway already exists that is attached to the VPC If none exists itcreates one with the CreateVpnGateway API call and attaches it to the VPC with the AttachVpnGateway call
A Customer Gateway needs to be created for the public IP address of the device or virtual machine that will be used toconnect to the VPC The wizard invokes the AWS API call DescribeCustomerGateways to determine if a CustomerGateway already exists If none exists one is created with the CreateCustomerGateway API call
The VPN Connection connects the Virtual Private Gateway and Customer Gateway The wizard checks to see if thereis an existing VPN Connection configured that connects those endpoints by invoking the AWS API call DescribeVp-nConnections If none exists one is created using the CreateVpnConnection call One of the fields returned by thiscall is a block of XML configuration data that contains configuration data assigned by AWS for use with configuringthe VPN Connection This data is stored and used in subsequent steps to make the required configuration changeswithin pfSense
copy Copyright 2020 Rubicon Communications LLC 57
Security Gateway Manual Amazon AWS
Any objects created through API calls by the wizard will be tagged with names like auto-created by pfSenseVPC ltyour_VPC_IDgt This is accomplished by calling the AWS API call CreateTags and using Name as the keyfor the tag
In addition to creation of the items mentioned above required adjustments are made to Security Groups and RouteTables to facilitate communication over the VPN The Security Groups associated with the VPC are updated to allowinbound access from the local subnets on the pfSense end of the VPN They are checked first via the DescribeSecuri-tyGroups AWS API call to determine if the access is already allowed Any of the subnets that is not already allowedhas inbound access added via the AuthorizeSecurityGroupIngress AWS API call
Route Tables associated with the VPC are updated to receive routes from the VPN Gateway used by the VPN Con-nection They are checked first via the DescribeRouteTables AWS API call If the VPN Gateway ID is not includedin the list of VPN Gateways propagating routes route propagation for the VPN Gateway is enabled on that table usingthe EnableVgwRoutePropagation AWS API call
For VPN Connections using static routing static routes for the specified subnets are added to the VPN ConnectionThis is done via the CreateVpnConnectionRoute AWS API call
325 pfSense Configuration Details
On the pfSensereg side there are numerous configurations added to support the VPN to the VPC
Aliases
First aliases are created for use in a firewall rule These aliases are intended to contain the subnets that traffic shouldbe allowed to ingress over the IPsec tunnel One alias represents the local subnets on the pfSense side and is givena name like VPC_Local_vpc_12345678 and the other represents the remote subnets on the VPC side and is given aname like VPC_Remote_vpc_12345678
Virtual IP addresses
Next virtual IP addresses are added on the lo0 (loopback) interface These virtual IP addresses are the local ldquoinsideaddressesrdquo of the IPsec tunnels These addresses are used as the local address for BGP communication when BGProuting is selected These addresses are IPv4 link local addresses (see RFC 3297) AWS assigns 30rsquos out of thenetwork 1692540016 for this purpose
Note These addresses are also useful as a ping target to execute a basic test of whether the tunnel is functioningproperly Executing a ping from a source address of one of these IP addresses to the corresponding inside address ofthe other end of the tunnel helps determine whether the tunnel negotiation is completing properly
Firewall rules
Next a firewall rule is added on the IPsec interface that allows traffic from the VPC networks to the local subnetsThis rule uses the previously created Aliases as sourcedestination targets
IPsec
Then IPsec phase 1 and phase 2 associations are set up Most of the settings required are extracted from a blockof XML data that was returned by the CreateVpnConnection call made during the AWS configuration step Thisincludes parameters like endpoint IP addresses encryption ciphers timer values etc
copy Copyright 2020 Rubicon Communications LLC 58
Security Gateway Manual Amazon AWS
If BGP routing was selected the configurations for the OpenBGPD BGP daemon are established The required settingsare determined using the AS number entered into the wizard and the parameters returned by the CreateVpnConnec-tion call made during the AWS configuration step
326 Tested Configurations
Various topologies may be possible to establish using the AWS VPC Configuration Wizard This section enumeratessome of the configurations that were successfully tested
Platforms
bull Various hardware platforms
bull 64-bit virtual machines in VMware vSphereESX
bull Amazon EC2 instances (Xen virtual machines) of the Netgate pfSensereg RouterFirewallVPN AWS AMI
Local networkrouting configurations
bull pfSense with a public address configured on the WAN interface
bull pfSense with a private address configured on the WAN interface behind a 11 NAT
bull pfSense with a private address configured on the WAN interface behind a PAT (1many NAT)
VPC Topologies
bull pfSense connected to a single VPC
bull pfSense connected to multiple VPCrsquos in different regions
bull Amazon EC2 instance of the pfSense RouterFirewallVPN AWS AMI connected to a VPC belonging to thesame AWS account in a different region
bull Amazon EC2 instance of the pfSense RouterFirewallVPN AWS AMI connected to a VPC belonging to adifferent AWS account in the same region
The configuration recommended for the greatest amount of stability is to have a public IPv4 address directly configuredon the WAN interface of your pfSense firewall but VPNs have been successfully established under all of the conditionslisted above
Whether any of these solutions is appropriate should be evaluated in the context of personal needs and existing infras-tructure Other configurations not listed above may be possible as well
327 AWS VPC Wizard FAQ
1 What level of redundancy is provided by the two tunnels
Amazon provides two tunnel endpoints that will allow traffic to be sent between your networks and the remote VPCyou are connected to The racoon daemon in pfSensereg is only capable of establishing an active phase 2 associationfor a particular sourcedestination pair on a single tunnel
Phase 2 associations between the local subnets and the remote VPC subnet are configured in the pfSense GUI for bothtunnels but racoon will only actually establish an association for the first tunnel This means that racoon will onlyever try to send traffic destined for the remote VPC subnet over the first tunnel
copy Copyright 2020 Rubicon Communications LLC 59
Security Gateway Manual Amazon AWS
If that tunnel goes down the second tunnel may be up and inbound traffic from the remote VPC may be sent to yourlocal networks over that tunnel automatically But outbound traffic to your remote VPC would not automatically failover to the second tunnel In order for you to send your outbound traffic over the second tunnel you would need todisable the phase 2 associations for the first tunnel and apply the changes
2 I quit the wizard before finishing Now what
To finish setting up the VPN go back to the wizard and run through it again It should reuse any partial configurationsthat were generated before it was stopped and create the new elements that are required
3 What are the AWS charges for this
AWS determines their own pricing and provides details for EC2 pricing and VPC pricing There are many types ofcharges that may be incurred for operating instances on AWS (eg charges related to running an instance bandwidthstorage elastic IPs etc)
The charge of specific interest in this case is the hourly charge for a VPN Connection As of this writing it costs $005(USD) per hour in most regions to have a VPN Connection configured and available AWS will charge whether theVPN Connection is being used or not as long as it is configured This will be configured by the third step of the wizardand will never be removed by pfSense
If the VPN Connection is no longer needed and billing for it needs to be stopped visit AWSrsquos VPC ManagementConsole and delete the VPN Connection manually
4 Can I use the wizard to connect to the GovCloud region
This hasnrsquot been officially tested but at least one user has reported that they were able to successfully connect to theGovCloud region They manually added the region us-gov-west-1 to the list of regions in the first step of the wizardand were able to successfully connect to their VPC in that region This may be supported in a future build but to trywithout official support do the following
1 Under the System gt Advanced menu make sure the Enable Secure Shell box is checked This is already doneby default on AWS instances but is off by default on pfSense hardware devices
2 Log into the instance via SSH
3 Make sure the root filesystem is mounted as readwrite On an AWS instance or a hardware device running on anSSD this should be true On a hardware device using Compact Flash or an SD card for storage it will probablybe necessary to remount the root filesystem in readwrite mode by running
mount -uw
4 Edit the file usrlocalwwwwizardsvpc_vpn_wizardxml using vi Look for a section of the file that lookslike this
ltoptiongtltnamegtsa-east-1ltnamegtltvaluegtsa-east-1ltvaluegt
ltoptiongt
That should appear directly after several similar ltoptiongt specifications containing all of the other availableregions Right underneath that section add the following
copy Copyright 2020 Rubicon Communications LLC 60
Security Gateway Manual Amazon AWS
ltoptiongtltnamegtus-gov-west-1ltnamegtltvaluegtus-gov-west-1ltvaluegt
ltoptiongt
Then save the file and exit vi
5 If the filesystem had to be remounted in readwrite mode earlier remount it in read-only mode by running
The GovCloud region should now appear as a choice in the first step of the wizard
copy Copyright 2020 Rubicon Communications LLC 61
CHAPTER
FOUR
REFERENCES
41 Support Resources
411 Commercial Support
In order to keep prices low the software is not bundled with a support subscription For users who need commercialsupport Netgate Gloabal Support can be purchased at httpswwwnetgatecomsupport
412 Community Support
Community support for pfSensereg software is available through the Netgate Forum
42 Additional Resources
421 Netgate Training
Netgate training offers training courses for increasing your knowledge of pfSensereg products and services Whetheryou need to maintain or improve the security skills of your staff or offer highly specialized support and improve yourcustomer satisfaction Netgate training has got you covered
httpswwwnetgatecomtraining
422 Resource Library
To learn more about how to use your pfSense appliance and for other helpful resources make sure to browse ourResource Library
httpswwwnetgatecomresources
423 Professional Services
Support does not cover more complex tasks such as CARP configuration for redundancy on multiple firewalls orcircuits network design and conversion from other firewalls to pfSensereg These items are offered as professionalservices and can be purchased and scheduled accordingly
httpswwwnetgatecomour-servicesprofessional-serviceshtml
62
Security Gateway Manual Amazon AWS
424 Community Options
If you elected not to get a paid support plan you can find help from the active and knowledgeable pfSense communityon our forums
httpsforumnetgatecom
copy Copyright 2020 Rubicon Communications LLC 63
- Getting Started
- Instance Usage
- Virtual Private Cloud (VPC)
- References
-
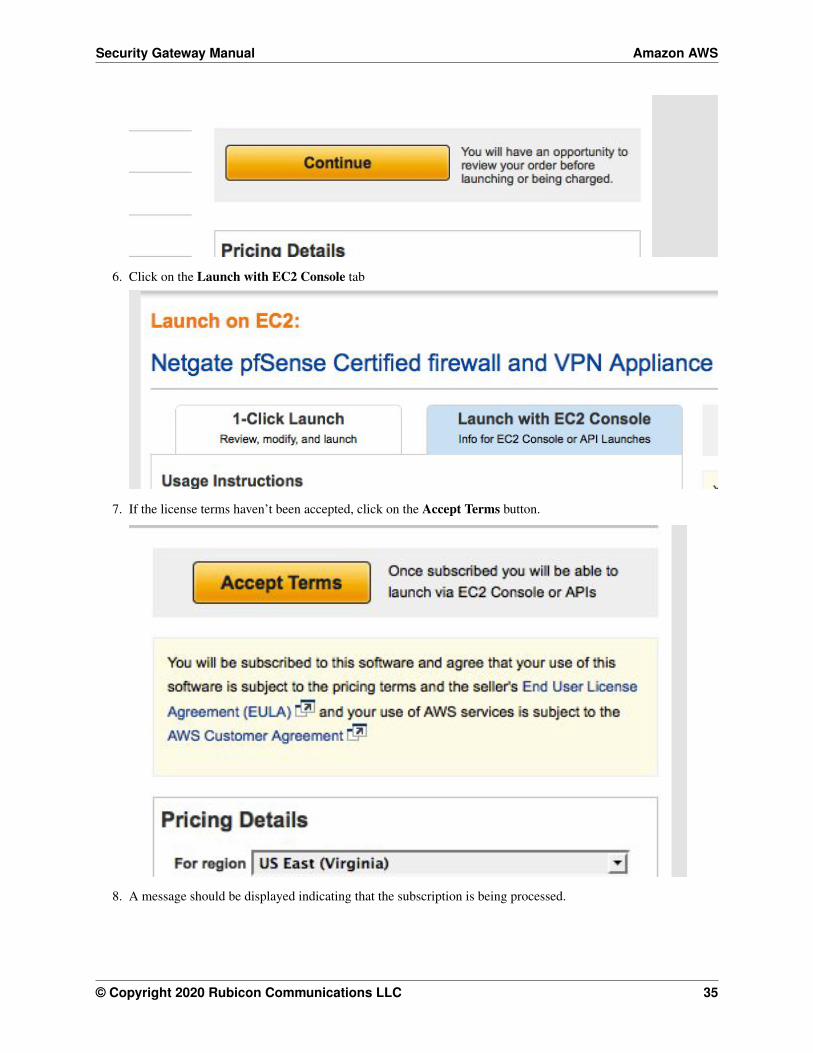
Security Gateway Manual Amazon AWS
6 Click on the Launch with EC2 Console tab
7 If the license terms havenrsquot been accepted click on the Accept Terms button
8 A message should be displayed indicating that the subscription is being processed
copy Copyright 2020 Rubicon Communications LLC 35
Security Gateway Manual Amazon AWS
9 Select the version of the image to run under the popup menu labeled Select a Version Generally the mostrecently issued version should be selected Identify which region to launch the instances in and click on theLaunch in EC2 Console button to the right of that region
10 Choose the instance type to run on Click Next Configure Instance Details
copy Copyright 2020 Rubicon Communications LLC 36
Security Gateway Manual Amazon AWS
11 On the Configure Instance Details page under the Network field select the VPC that was created For theSubnet field that appears right below the Network field select the public subnet that was created earlier In ourexamples this is 1020024
12 Scroll down to the Network Interfaces heading A single interface named eth0 should be displayed by defaultClick on the Add Device button underneath eth0 Select the private subnet that was created (1021024 in ourexample) Pick an IP address within the range of the private subnet and enter it in the Private IP field Keep inmind that the first 3 or 4 IP addresses are reserved For this example we will use 10215
copy Copyright 2020 Rubicon Communications LLC 37
Security Gateway Manual Amazon AWS
Optionally expand the Advanced Details section and set parameters as text in the User Data field The availableoptions are
password Setting a value via a directive like password=abcdefg will set the password for theadministrative account to the specified value - abcdefg in this example If no value is set here arandom password will be assigned in order to keep administrative access from being exposed tothe internet with a default password
mgmtnet Setting a value via a directive like mgmtnet=1001024 will restrict managementaccess (http https ssh) to the specified network - 1001024 in this example This will causethe firewall rule on the instance (not on Amazons access lists but on the Netgate appliancersquosown firewall) to restrict management traffic for the instance to the specified source network Thedefault behavior is to allow management from any host
These directives can be set by placing them on a single line in the User Data field and separating them withcolons Specify both parameters by typing a statement similar to
password=abcdefgmgmtnet=1001024
Click Next Add Storage after optionally setting these parameters
Note If setting a password using the password parameter listed above the password is retrieved by the instancevia an unencrypted HTTP request when the system is configured the first time it boots The request is made toan Amazon Web Services-operated server on the local LAN that stores metadata about each instance runningThe data for an instance is only made available to that instance but is available to be queried from the instancewithout providing any authentication credentials
It is advised to change the admin password via the pfSense webGUI after the instance comes up or choose notto set the password at all and let a random password be set
copy Copyright 2020 Rubicon Communications LLC 38
Security Gateway Manual Amazon AWS
13 Click Next Tag Instance to accept the Storage Device Configuration
14 Optionally a tag can be set on the instance to differentiate this instance from other VMrsquos that were started byentering a value for the Name tag Click Next Configure Security Group after setting any desired tags
copy Copyright 2020 Rubicon Communications LLC 39
Security Gateway Manual Amazon AWS
15 Select a security group to launch the instance with The recommended settings for a security group should allowat least the following traffic
bull TCP port 443 from 00000 - HTTPS - This is the port that the management web GUI listens on
bull TCP port 22 from 00000 - SSH - This port can be used to connect to a command prompt with an sshclient
bull UDP port 1194 from 00000 - OpenVPN - The OpenVPN server that is configured by default is boundto this port
bull UDP port 500 from 00000 - IKE for IPsec VPN
bull UDP port 4500 from 00000 - IPsecNAT-T for IPsec VPN
copy Copyright 2020 Rubicon Communications LLC 40
Security Gateway Manual Amazon AWS
If you have an existing security group that includes this access select Select an existing security group thenselect the group(s) to use and click Continue Otherwise select Create a new security group and add rulesfor this access by filling in the form for each rule and clicking the Add Rule button When all of the rules havebeen added click Review and Launch
16 Verify the details for the instance and click Launch
17 Select an existing key pair or create a new key pair to connect to the instance with Do not select Proceed
copy Copyright 2020 Rubicon Communications LLC 41
Security Gateway Manual Amazon AWS
Without a Key Pair Click the checkbox that indicates you acknowledge having access to the selected privatekey file and then click Launch Instance
18 In order to reach the instance from the Internet associate an Elastic IP with the WAN interface of the instanceIn the VPC Management Console go to the Elastic IPs view by clicking on Elastic IPs on the left side of thepage Click on the Allocate New Address button Select that you want the EIP used in VPC and click on theYes Allocate button in the box that pops up After the Elastic IP address is allocated associate the address withthe WAN interface of the Netgate appliance by clicking on the Associate Address button
A box will pop up that will either let you specify the instance and Private IP address of the interface or theNetwork Interface and the Private IP Address of the interface Use one of these methods to select the correctinterface and click on the Yes Associate button The instance should now be reachable via ssh or https
copy Copyright 2020 Rubicon Communications LLC 42
Security Gateway Manual Amazon AWS
19 In order for traffic to be allowed to be routed from the private subnet through the public interface of the instancethe SourceDest AddressCheck on the private interfaces needs to be disabled In the EC2 Management Con-sole go to the ldquoNetwork Interfacesrdquo view by clicking on Network Interfaces in the menu on the lefthand sideof the page
Click the checkbox to the left of the privateLAN interface on the Netgate appliance instance Click on theActions button at the top of the page and select Change SourceDesk Check on the popup menu Select theradio button labeled Disabled on the box that pops up and click on the Save button
Non-local traffic from the private subnet should now be sent through the privateLAN interface on the Netgateappliance instance
copy Copyright 2020 Rubicon Communications LLC 43
Security Gateway Manual Amazon AWS
313 Managing a VPC Instance
Once the instance is launched you can connect to it via the Elastic IP that was attached to the primary interface duringthe provisioning phase
In order to manage the configuration of the instance you can connect to it via https or ssh A limited set of configura-tions is possible through the SSH interface the preferred method for managing most of the configurations or viewingdata on the status of the pfSensereg instance is through the https webGUI
Connecting via SSH
To connect via SSH you would use the key pair you chose while creating the instance to connect to the admin accountFrom the command line on a UnixLinux host you would use a command similar to
ssh -i my_ec2_key admin232020454
Where the appropriate private key file and public IP or hostname are substituted
Note The first time you log into your instance the SSH key of the instance will not be cached on your computerand you will need to type yes when asked whether you want continue connecting This should not be necessary onsubsequent sessions
Once logged in you should see the console menu similar to the one below
copy Copyright 2020 Rubicon Communications LLC 44
Security Gateway Manual Amazon AWS
Connecting via HTTPS
To connect via https you would enter a URL containing the public IP address or hostname of your instance intoa web browser For example https232020454 Itrsquos very likely that you will receive a browser warningindicating that the security certificate of the site is not trusted This is because the instance uses a self-signed certificatefor https communication You should click on the option to proceed to the site anyway The pfSense login screen withthe Netgate logo should appear
The username to log in with is admin The password to use is either a value that you set in the User Data during thecreation of the instance or a random password
Tip It is preferable to explicitly set a password by passing a value in with the User Data field so the password willbe known in advance
If you did not set a specific password you can find out that value that the random password was set to through one of2 different methods
1 The first method is to log in over SSH with the key pair that you selected when the instance was created andexamine the contents of the file located at etcmotd You would do this by selecting option 8) Shell in theconsole menu that is presented when you SSH in then run this command in the shell
cat etcmotd
2 The second method is to view the System Log for the instance in the EC2 Management Console After themessages that are displayed that show the status of the boot process a message should appear that indicates what
copy Copyright 2020 Rubicon Communications LLC 45
Security Gateway Manual Amazon AWS
the administrative password was changed to Be aware that the System Log output in the EC2 ManagementConsole is not updated in real time and may take a few minutes to show up
The message you should look for using either of the methods mentioned about will look like this
Admin password changed to abcdefg
Once yoursquove determined your password and entered it into the login form the pfSense WebGUI should be availableto you
314 Forwarding traffic from VPC subnets through the instance
Some additional configuration is required within the VPC instancersquos pfSensereg webGUI before you are able to managetraffic from the private subnet
1 Log into the pfSense WebGUI for the instance
2 Click on the Interfaces heading on the left and then click the Assign link
3 Click on the + icon to add a new Interface under the Interface assignments tab A LAN interface shouldautomatically be added with the next available network interface (xn1)
4 Click on the Interfaces heading on the left again and then click on LAN Click the checkbox to enable the LANinterface Set the IPv4 Configuration Type to Static IPv4 and enter the IP address you assigned to the 2ndinterface during the provisioning phase Click the Save button
Now you can create other instances attached to your private subnet and protect them with the firewall on the pfSenseinstance
Common ways to manage private hosts
Allowing private hosts to connect to the Internet
To allow private hosts to be able to connect to the Internet you can allow any traffic from the LAN in your firewallrules there should be a rule like this in place by default
Next set up NAT rules to cause addresses in the private subnet to be NATed to the IP address of the WAN interface
1 Under the Firewall heading on the left click on the NAT link
2 On the Outbound tab click the radio button for Manual Outbound NAT rule generation (AON - AdvancedOutbound NAT)
3 Click the Save button
4 Click on the Aliases link under the Firewall heading on the left
5 Add your private subnet to the Networks_to_NAT alias
Note There is an existing NAT rule configured by default that uses the alias Networks_to_NAT
copy Copyright 2020 Rubicon Communications LLC 46
Security Gateway Manual Amazon AWS
Allow private hosts to connect to each other
If your hosts should only contact each other and a private network segment elsewhere you can configure an IPsecor OpenVPN tunnel from your remote networks to the Netgate appliance instance and set up the appropriate firewallrules routes and security policies to allow access to your private subnet through a VPN tunnel
Allow direct inbound access from the internet to hosts
If you wish to enable direct inbound access from the internet to hosts on the private subnet you can set up portforwarding on the WAN interface to direct traffic to particular hosts in the private subnet
315 Establishing a VPN connection to a VPC in another region
To establish a VPN that allows instances on the VPC subnet(s) that sit behind a Netgate appliance to communicate withinstances that reside in a VPC in another region the Netgate appliance has a VPC configuration wizard that assists byconfiguring both the Netgate appliance as well as the VPC configuration elements that would normally have to be setmanually through the AWS Management Console
For detailed instructions see the AWS VPC User Guide
316 Upgrading a VPC Instance
Periodically new releases of the AMI are issued to track new releases of pfSensereg that may provide new functionalitybug fixes and security updates
The lower risk approach to upgrading is to bring up a new instance alongside the existing one and executing a cutoverThese instructions detail the procedure for moving your existing instance to one running the latest version
1 Back up the configuration of your exsting instance by navigating to BackupRestore under the Diagnosticsmenu in the Web GUI Click the Download configuration button under the Backup Configuration headingand save your config file to your local system
2 Bring up a new instance of the pfSense Certified RouterFirewallVPN running the latest version
3 When creating the instance make sure the interfaces match the interfaces on the existing instance Make surethat the new instance is in the same VPC as the existing instance and that it has the same number of interfacesattached and that the interfaces are connected to the same Subnets
4 Make sure any interfaces on the new instance that will communicate with private Subnets have theSourceDestination check disabled
5 Allocate a new Elastic IP and associate it to the WAN interface of the new instance to allow yourself managementaccess
6 Restore the backed up configuration file to the new instance Navigate to BackupRestore under the Diagnosticsmenu in the Web GUI Under the Restore Configuration heading click the Choose File button and browsefor the configuration file you backed up from the existing instance earlier Once you have selected that fileclick the Restore configuration button The configuration file will be uploaded and the instance will rebootautomatically
7 If you had packages installed on the old instance navigate to Packages under the System menu in the pfSenseweb GUI and install the same packages
8 If there was any external dependency on the public IP address of the existing instance you can remove theElastic IP Address from the upgraded instance and move the Elastic IP Address from the existing instance tothe upgraded instance External dependencies that might cause you to want to do this include things like VPNrsquos
copy Copyright 2020 Rubicon Communications LLC 47
Security Gateway Manual Amazon AWS
configured to external devices that rely on the existing instancersquos Elastic IP address or access lists on externaldevices that allow access to traffic from the existing instancersquos IP address There may be other reasons why youwould wish to keep the existing address as well (to preserve existing bookmarks to the Web GUI reduce theneed for updates to existing internal documentation etc) The process for moving the old Elastic IP address tothe new instance is as follows
bull Disassociate the Elastic IP address from the new instance In the EC2 Management Console click onElastic IPs under the Network amp Security heading Check the box next to the Elastic IP address assignedto the new instance and click on the Disassociate Address button
bull Disassociate the Elastic IP address from the old instance The procedure is the same as in the previousstep just repeated for the Eastic IP address of the old instance this time
bull Associate the Elastic IP address that was previously associated to the old instance to public interface of thenew instance In the EC2 Management Console click on Elastic IPs Check the box next to the Elastic IPaddress you are moving and click the Associate Address button Fill in the correct value for the Instanceor Network Interface and select the Private IP Address of the public interface on the new instance Clickthe Associate button The management interface of the new instance should now be accessible
9 Move any default routes that pointed to an interface on the old instance to point to the equivalent interface onthe new instance In the VPC Management Console click on Route Tables under the Virtual Private Cloudheading Check the box next to a Route Table associated with the VPC that the instances is located in
bull In the detail pane that appears at the bottom of the screen click on the Routes tab
bull If a route exists for 00000 with a Target that is an interface ID of an interface on the old instnace clickthe Edit button above the table displaying the routes
bull Click the red X next to the row for 00000 to remove the existing route
bull There should be a blank row with empty fields for a new route Enter 00000 in the Destinationfield and the Network Interface ID of the interface on the new instance in the Target field Click on theSave button
bull If there were multiple private subnets in the VPC which were pointed to interfaces on the pfSense instancerepeat this process for the other Route Tables associated with the VPC
bull The new instance should now be functioning as the old one did
32 AWS VPC Wizard User Guide
This guide will explain how to use the AWS VPC Wizard to simplify the configuration of a VPN to a remote VPC Theadministrator is asked for the minimum amount of basic information required to establish the VPN The configurationsboth on the AWS VPC side and on the pfSense side are then automatically created When the wizard is finishedexecuting a functioning VPN connection to a VPC should be established
321 AWS Access Keys
In order to connect to the AWS API to make certain required configuration changes the AWS VPC Wizard requiresAccess Keys to retrieve and modify VPC configurations
See also
Find more information about AWS Security Credential including Access Keys by reading AWS Security Credentials
Access keys consist of two parts
1 An access key ID
copy Copyright 2020 Rubicon Communications LLC 48
Security Gateway Manual Amazon AWS
bull For example AKIAIOSFODNN7EXAMPLE
2 A secret access key
bull For example wJalrXUtnFEMIK7MDENGbPxRfiCYEXAMPLEKEY
Access keys are like a usernamepassword and needed for programmatic requests to AWS including the AWS VPCWizard Use both the access key ID and secret access key together to authenticate requests
Important Manage access keys as securely as a user name and password
Managing Access Keys
To create modify or delete IAM user access keys do the following
1 Sign in to the IAM console
2 In the navigation bar on the upper right choose a user name and then choose My Security Credentials
3 On the AWS IAM Credentials tab in the Access keys for CLI SDK and API access section choose Createaccess key
4 Choose Download csv file to save the access key ID and secret access key to a csv file on your computerStore the file in a secure location There is no access to the secret access key again after this dialog box closesAfter the csv file has been downloaded choose Close When an access key is created the key pair is active bydefault and the pair can be used right away
bull To disable an active access key choose Make inactive
bull To reenable an inactive access key choose Make active
bull To delete an access key choose its X button at the far right of the row Then choose Delete to confirmWhen an access key is deleted itrsquos gone forever and cannot be retrieved However new keys can alwaysbe created
To create modify or delete another IAM userrsquos access keys do the following
1 Sign in to the IAM console
2 In the navigation pane choose Users
3 Choose the name of the user whose access keys to manage and then choose the Security credentials tab
4 In the Access keys section choose Create access key
5 Choose Download csv file to save the access key ID and secret access key to a CSV file on your computer
Rotating Access Keys
As a security best practice we recommend to regularly rotate (change) IAM user access keys Rotating access keyscan be done from the AWS Management Console
To rotate access keys for an IAM user without interrupting the applications (console) create a second access key whilethe first access key is still active
1 Sign in to the IAM console
2 In the navigation pane choose Users
3 Choose the name of the user whose access keys to manage and then choose the Security credentials tab
4 In the Access keys section choose Create access key
copy Copyright 2020 Rubicon Communications LLC 49
Security Gateway Manual Amazon AWS
5 Choose Download csv file to save the access key ID and secret access key to a CSV file on your computer
6 The new access key is active by default At this point the user has two active access keys
After waiting some period of time to ensure that all applications and tools have been updated delete the first accesskey
1 Sign in to the IAM console
2 In the navigation pane choose Users
3 Choose the name of the user whose access keys to manage and then choose the Security credentials tab
4 Locate the access key to delete and choose its X button at the far right of the row Then choose Delete to confirm
Determining When Access Keys Need Rotating
To determine when access keys need rotating (console) do the following
1 Sign in to the IAM console
2 In the navigation pane choose Users
3 If necessary add the Access key age column to the users table by completing the following steps
1 Above the table on the far right click the settings icon
2 In Manage columns select Access key age
3 Choose Close to return to the list of users
4 The Access key age column shows the number of days since the oldest active access key was created Usethis information to find users with access keys that need rotating The column displays None for users with noaccess key
322 Using the Wizard
1 Gather your AWS Access Key ID and Secret Key
2 Navigate to VPN gt AWS VPC Wizard in the main menu in the pfSensereg webGUI
copy Copyright 2020 Rubicon Communications LLC 50
Security Gateway Manual Amazon AWS
3 The first screen of the wizard prompts for the AWS Credentials Enter the Access Key ID and Secret AccessKey in the appropriate text fields and select the Region to connect to in the dropdown menu then click Next
The wizard will then query the AWS API using those credentials to find which VPCrsquos exist in the selectedregion If the credentials were rejected an error message will be displayed and return to the first screen
4 The next screen will prompt to select from the available VPCrsquos in the selected region Select the one to connectto from the dropdown menu The wizard will not create a new VPC it will only connect to an existing VPC
Click Next after selecting the desired VPC
copy Copyright 2020 Rubicon Communications LLC 51
Security Gateway Manual Amazon AWS
Note If the desired VPCrsquos to connect to isnrsquot available create one via the AWS Management Console and tryagain
The wizard will then query the AWS API to check whether there is a VPN Gateway attached to the selectedVPC If none exists one will be created via the API Then the next screen will be displayed
5 On the next screen specify routing and network data
A description of what should be entered for each of these fields follows
copy Copyright 2020 Rubicon Communications LLC 52
Security Gateway Manual Amazon AWS
Routing Type AWS offers either static routing or BGP routing Select the appropriate type fromthe dropdown menu If unsure static routing is likely to be adequate
BGP AS Number If static routing was choosen leave this field blank Otherwise it is possible tospecify an AS number to use If left blank the value will default to 65000
Local Public IP Address On an AWS Netgate appliance instance this should be the public IP ad-dress of the Elastic IP associated with the instance If configuring a hardware device runningpfSense this could be the public address assigned to the WAN (or other) interface of the device
Local subnets The subnets connected to the pfSense instance that should be routed over the tunnelfrom hosts in the remote VPC As an example if connecting a pfSense instance to a remote VPCin the AWS us-east-1 region enter the subnets (or a single subnet) that are local to the pfSenseinstance and when hosts in your VPC in us-east-1 attempted to reach addresses within thosesubnets the traffic will be sent through the VPN tunnel that is being configured
Note When selecting static routing as the routing type there will be a delay that is typically between 2-5minutes before the next screen is displayed This is because static routes must be added to the VPN Connectionvia the AWS API This operation fails until the VPN Connection reaches the ldquoavailablerdquo state This can take afew minutes to occur
Click Next when done
The wizard will then query the AWS API to find whether a Customer Gateway is configured with the selectedPublic IP Address If none exists one will be created If one already exists the ID will be retrieved and it willbe used
The wizard will then query the AWS API to see if a VPC Connection already exists that matches the dataentered If one exists it will be used Otherwise one will be created
If static routing was selected static routes will be added to the VPN Connection for the Local subnets entered
Route propagation will be enabled for the VPN Gateway in each of the Route Tables that are associated withthe VPC All of these configurations are carried out in the AWS API nothing has been changed in the pfSenseVPN configurations yet
Warning Important Note on Billing Once this step is carried out and the VPN Connection is createdAWS will start billing your AWS account the hourly rate for a VPN Connection This is $005 as of thiswriting and that is a charge that goes entirely to AWS itself They will do this until the VPN Connection isdeleted via the VPC Management Console
Nothing in pfSense will ever cause AWS to stop billing for this VPN Connection Whether it works or notwhether the pfSense instance is up or down whether the IPsec tunnels have been deleted or reconfiguredAWS will continue to bill the hourly fee for a VPN Connection if the creation of it succeeds until it is deletedthrough their web interface
The wizard helps establish an initial configuration that works and configures the appropriate elements inAWSrsquos API to facilitate this You are responsible for making sure you understand what yoursquore being billedfor and disabling any functions including VPN Connections that are no longer necessary
6 If the operations of the previous step succeeded the next screen will appear
copy Copyright 2020 Rubicon Communications LLC 53
Security Gateway Manual Amazon AWS
Select an Interface to act as the local endpoint of the VPN tunnels that will be created In most cases thisshould be the WAN interface It should generally be whatever interface is associated with the Local Public IPAddress entered in the previous step
On an AWS Netgate pfSense instance this will be whatever interface the Elastic IP is associated with On ahardware device running pfSense that has the Local Public IP Address directly configured on an interface thiswill be the interface that the Local Public IP Address is configured on
After clicking Next the wizard will configure the VPN and associated settings within pfSense itself using datareturned by the AWS API in the previous step
It will configure 2 IPsec tunnels a firewall rule 2 Aliases (referenced by the firewall rule) and 2 Virtual IPAddresses If BGP was selected as the Routing Type in the previous step it will install the OpenBGPDpackage automatically and configure it appropriately
7 The next screen will appear and prompt to apply the configuration changes that have been made
copy Copyright 2020 Rubicon Communications LLC 54
Security Gateway Manual Amazon AWS
After clicking Next all the configuration changes that were made will be applied
8 The wizard will be completed and the browser will be redirected to the IPsec status page The VPN to the VPCshould now be fully configured
Note Sometimes there is a delay of 5-10 minutes before the tunnels are fully functional and passing trafficThis has been observed particularly often during the setup of tunnels using BGP routing
copy Copyright 2020 Rubicon Communications LLC 55
Security Gateway Manual Amazon AWS
323 Testing Connectivity
Verify that the IPsec tunnels are functioning by attempting to ping the ldquoinside tunnel addressesrdquo of the VPC side ofthe tunnel by navigating to Firewall -gt Virtual IP There should be two virtual IP addresses configured that haveDescriptions like ldquoInside address for tunnel to ltremote IP addressgtrdquo
Amazon provides inside addresses for each end of the tunnel in a 30 subnet in IPv4 link local address space(169254xy) Typically the first usable address in the 30 is the inside address for the VPC end of the tunnel andthe other usable address is the inside address for your end of the tunnel So if you ping from one of the virtual IPaddresses configured on the pfSensereg instance to the IP address that is one less (for example if the virtual IP addresswere 16925425322 ping from 16925425322 to 16925425321) that checks whether the other end of the tunnelis responding and whether the tunnel is functioning properly
Note It sometimes takes a few minutes for the tunnels to begin working after the configuration wizard completes
To ping log into the pfSense instance via SSH and execute ping from a shell prompt For the previous example of16925425322 the proper syntax is
ping -S 16925425322 16925425321
When pinging from a shell prompt it is possible leave the command running indefinitely and interrupt it there is aresponse
copy Copyright 2020 Rubicon Communications LLC 56
Security Gateway Manual Amazon AWS
It is also possible to ping via the Diagnostics -gt Ping page by selecting the appropriate source address and enteringthe remote tunnel inside address in the Host field This will only send a limited number of ping packets so it may benecessary to repeat this a few times
324 VPC Configuration Details
The AWS documentation for connecting a hardware device to a VPC provides a great amount of detail on configuringVPN Connections to VPC
The main configuration elements that exist in Amazonrsquos data model are the Virtual Private Gateway the CustomerGateway and the VPN Connection In order to configure a VPN connection to a VPC all 3 of these need to exist TheVirtual Private Gateway is the VPN endpoint on Amazonrsquos side The customer gateway is the VPN endpoint on thepfSensereg instancedevice being configured The VPN Connection is the IPsec VPN between Amazon and the pfSenseinstancedevice
A Virtual Private Gateway needs to exist and be associated to the VPC A particular VPN Gateway can only beassociated to one VPC at a time Once the VPC to connect to has been selected the wizard invokes the AWS API callDescribeVpnGateways to determine if a VPN Gateway already exists that is attached to the VPC If none exists itcreates one with the CreateVpnGateway API call and attaches it to the VPC with the AttachVpnGateway call
A Customer Gateway needs to be created for the public IP address of the device or virtual machine that will be used toconnect to the VPC The wizard invokes the AWS API call DescribeCustomerGateways to determine if a CustomerGateway already exists If none exists one is created with the CreateCustomerGateway API call
The VPN Connection connects the Virtual Private Gateway and Customer Gateway The wizard checks to see if thereis an existing VPN Connection configured that connects those endpoints by invoking the AWS API call DescribeVp-nConnections If none exists one is created using the CreateVpnConnection call One of the fields returned by thiscall is a block of XML configuration data that contains configuration data assigned by AWS for use with configuringthe VPN Connection This data is stored and used in subsequent steps to make the required configuration changeswithin pfSense
copy Copyright 2020 Rubicon Communications LLC 57
Security Gateway Manual Amazon AWS
Any objects created through API calls by the wizard will be tagged with names like auto-created by pfSenseVPC ltyour_VPC_IDgt This is accomplished by calling the AWS API call CreateTags and using Name as the keyfor the tag
In addition to creation of the items mentioned above required adjustments are made to Security Groups and RouteTables to facilitate communication over the VPN The Security Groups associated with the VPC are updated to allowinbound access from the local subnets on the pfSense end of the VPN They are checked first via the DescribeSecuri-tyGroups AWS API call to determine if the access is already allowed Any of the subnets that is not already allowedhas inbound access added via the AuthorizeSecurityGroupIngress AWS API call
Route Tables associated with the VPC are updated to receive routes from the VPN Gateway used by the VPN Con-nection They are checked first via the DescribeRouteTables AWS API call If the VPN Gateway ID is not includedin the list of VPN Gateways propagating routes route propagation for the VPN Gateway is enabled on that table usingthe EnableVgwRoutePropagation AWS API call
For VPN Connections using static routing static routes for the specified subnets are added to the VPN ConnectionThis is done via the CreateVpnConnectionRoute AWS API call
325 pfSense Configuration Details
On the pfSensereg side there are numerous configurations added to support the VPN to the VPC
Aliases
First aliases are created for use in a firewall rule These aliases are intended to contain the subnets that traffic shouldbe allowed to ingress over the IPsec tunnel One alias represents the local subnets on the pfSense side and is givena name like VPC_Local_vpc_12345678 and the other represents the remote subnets on the VPC side and is given aname like VPC_Remote_vpc_12345678
Virtual IP addresses
Next virtual IP addresses are added on the lo0 (loopback) interface These virtual IP addresses are the local ldquoinsideaddressesrdquo of the IPsec tunnels These addresses are used as the local address for BGP communication when BGProuting is selected These addresses are IPv4 link local addresses (see RFC 3297) AWS assigns 30rsquos out of thenetwork 1692540016 for this purpose
Note These addresses are also useful as a ping target to execute a basic test of whether the tunnel is functioningproperly Executing a ping from a source address of one of these IP addresses to the corresponding inside address ofthe other end of the tunnel helps determine whether the tunnel negotiation is completing properly
Firewall rules
Next a firewall rule is added on the IPsec interface that allows traffic from the VPC networks to the local subnetsThis rule uses the previously created Aliases as sourcedestination targets
IPsec
Then IPsec phase 1 and phase 2 associations are set up Most of the settings required are extracted from a blockof XML data that was returned by the CreateVpnConnection call made during the AWS configuration step Thisincludes parameters like endpoint IP addresses encryption ciphers timer values etc
copy Copyright 2020 Rubicon Communications LLC 58
Security Gateway Manual Amazon AWS
If BGP routing was selected the configurations for the OpenBGPD BGP daemon are established The required settingsare determined using the AS number entered into the wizard and the parameters returned by the CreateVpnConnec-tion call made during the AWS configuration step
326 Tested Configurations
Various topologies may be possible to establish using the AWS VPC Configuration Wizard This section enumeratessome of the configurations that were successfully tested
Platforms
bull Various hardware platforms
bull 64-bit virtual machines in VMware vSphereESX
bull Amazon EC2 instances (Xen virtual machines) of the Netgate pfSensereg RouterFirewallVPN AWS AMI
Local networkrouting configurations
bull pfSense with a public address configured on the WAN interface
bull pfSense with a private address configured on the WAN interface behind a 11 NAT
bull pfSense with a private address configured on the WAN interface behind a PAT (1many NAT)
VPC Topologies
bull pfSense connected to a single VPC
bull pfSense connected to multiple VPCrsquos in different regions
bull Amazon EC2 instance of the pfSense RouterFirewallVPN AWS AMI connected to a VPC belonging to thesame AWS account in a different region
bull Amazon EC2 instance of the pfSense RouterFirewallVPN AWS AMI connected to a VPC belonging to adifferent AWS account in the same region
The configuration recommended for the greatest amount of stability is to have a public IPv4 address directly configuredon the WAN interface of your pfSense firewall but VPNs have been successfully established under all of the conditionslisted above
Whether any of these solutions is appropriate should be evaluated in the context of personal needs and existing infras-tructure Other configurations not listed above may be possible as well
327 AWS VPC Wizard FAQ
1 What level of redundancy is provided by the two tunnels
Amazon provides two tunnel endpoints that will allow traffic to be sent between your networks and the remote VPCyou are connected to The racoon daemon in pfSensereg is only capable of establishing an active phase 2 associationfor a particular sourcedestination pair on a single tunnel
Phase 2 associations between the local subnets and the remote VPC subnet are configured in the pfSense GUI for bothtunnels but racoon will only actually establish an association for the first tunnel This means that racoon will onlyever try to send traffic destined for the remote VPC subnet over the first tunnel
copy Copyright 2020 Rubicon Communications LLC 59
Security Gateway Manual Amazon AWS
If that tunnel goes down the second tunnel may be up and inbound traffic from the remote VPC may be sent to yourlocal networks over that tunnel automatically But outbound traffic to your remote VPC would not automatically failover to the second tunnel In order for you to send your outbound traffic over the second tunnel you would need todisable the phase 2 associations for the first tunnel and apply the changes
2 I quit the wizard before finishing Now what
To finish setting up the VPN go back to the wizard and run through it again It should reuse any partial configurationsthat were generated before it was stopped and create the new elements that are required
3 What are the AWS charges for this
AWS determines their own pricing and provides details for EC2 pricing and VPC pricing There are many types ofcharges that may be incurred for operating instances on AWS (eg charges related to running an instance bandwidthstorage elastic IPs etc)
The charge of specific interest in this case is the hourly charge for a VPN Connection As of this writing it costs $005(USD) per hour in most regions to have a VPN Connection configured and available AWS will charge whether theVPN Connection is being used or not as long as it is configured This will be configured by the third step of the wizardand will never be removed by pfSense
If the VPN Connection is no longer needed and billing for it needs to be stopped visit AWSrsquos VPC ManagementConsole and delete the VPN Connection manually
4 Can I use the wizard to connect to the GovCloud region
This hasnrsquot been officially tested but at least one user has reported that they were able to successfully connect to theGovCloud region They manually added the region us-gov-west-1 to the list of regions in the first step of the wizardand were able to successfully connect to their VPC in that region This may be supported in a future build but to trywithout official support do the following
1 Under the System gt Advanced menu make sure the Enable Secure Shell box is checked This is already doneby default on AWS instances but is off by default on pfSense hardware devices
2 Log into the instance via SSH
3 Make sure the root filesystem is mounted as readwrite On an AWS instance or a hardware device running on anSSD this should be true On a hardware device using Compact Flash or an SD card for storage it will probablybe necessary to remount the root filesystem in readwrite mode by running
mount -uw
4 Edit the file usrlocalwwwwizardsvpc_vpn_wizardxml using vi Look for a section of the file that lookslike this
ltoptiongtltnamegtsa-east-1ltnamegtltvaluegtsa-east-1ltvaluegt
ltoptiongt
That should appear directly after several similar ltoptiongt specifications containing all of the other availableregions Right underneath that section add the following
copy Copyright 2020 Rubicon Communications LLC 60
Security Gateway Manual Amazon AWS
ltoptiongtltnamegtus-gov-west-1ltnamegtltvaluegtus-gov-west-1ltvaluegt
ltoptiongt
Then save the file and exit vi
5 If the filesystem had to be remounted in readwrite mode earlier remount it in read-only mode by running
The GovCloud region should now appear as a choice in the first step of the wizard
copy Copyright 2020 Rubicon Communications LLC 61
CHAPTER
FOUR
REFERENCES
41 Support Resources
411 Commercial Support
In order to keep prices low the software is not bundled with a support subscription For users who need commercialsupport Netgate Gloabal Support can be purchased at httpswwwnetgatecomsupport
412 Community Support
Community support for pfSensereg software is available through the Netgate Forum
42 Additional Resources
421 Netgate Training
Netgate training offers training courses for increasing your knowledge of pfSensereg products and services Whetheryou need to maintain or improve the security skills of your staff or offer highly specialized support and improve yourcustomer satisfaction Netgate training has got you covered
httpswwwnetgatecomtraining
422 Resource Library
To learn more about how to use your pfSense appliance and for other helpful resources make sure to browse ourResource Library
httpswwwnetgatecomresources
423 Professional Services
Support does not cover more complex tasks such as CARP configuration for redundancy on multiple firewalls orcircuits network design and conversion from other firewalls to pfSensereg These items are offered as professionalservices and can be purchased and scheduled accordingly
httpswwwnetgatecomour-servicesprofessional-serviceshtml
62
Security Gateway Manual Amazon AWS
424 Community Options
If you elected not to get a paid support plan you can find help from the active and knowledgeable pfSense communityon our forums
httpsforumnetgatecom
copy Copyright 2020 Rubicon Communications LLC 63
- Getting Started
- Instance Usage
- Virtual Private Cloud (VPC)
- References
-
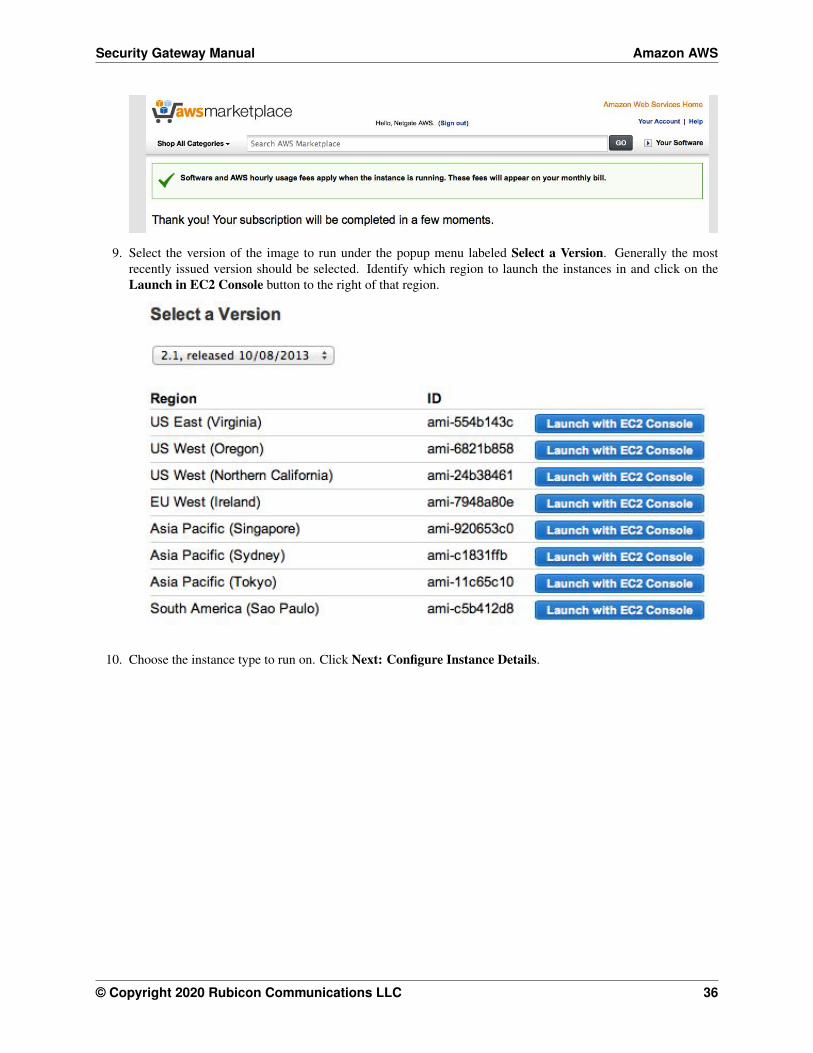
Security Gateway Manual Amazon AWS
9 Select the version of the image to run under the popup menu labeled Select a Version Generally the mostrecently issued version should be selected Identify which region to launch the instances in and click on theLaunch in EC2 Console button to the right of that region
10 Choose the instance type to run on Click Next Configure Instance Details
copy Copyright 2020 Rubicon Communications LLC 36
Security Gateway Manual Amazon AWS
11 On the Configure Instance Details page under the Network field select the VPC that was created For theSubnet field that appears right below the Network field select the public subnet that was created earlier In ourexamples this is 1020024
12 Scroll down to the Network Interfaces heading A single interface named eth0 should be displayed by defaultClick on the Add Device button underneath eth0 Select the private subnet that was created (1021024 in ourexample) Pick an IP address within the range of the private subnet and enter it in the Private IP field Keep inmind that the first 3 or 4 IP addresses are reserved For this example we will use 10215
copy Copyright 2020 Rubicon Communications LLC 37
Security Gateway Manual Amazon AWS
Optionally expand the Advanced Details section and set parameters as text in the User Data field The availableoptions are
password Setting a value via a directive like password=abcdefg will set the password for theadministrative account to the specified value - abcdefg in this example If no value is set here arandom password will be assigned in order to keep administrative access from being exposed tothe internet with a default password
mgmtnet Setting a value via a directive like mgmtnet=1001024 will restrict managementaccess (http https ssh) to the specified network - 1001024 in this example This will causethe firewall rule on the instance (not on Amazons access lists but on the Netgate appliancersquosown firewall) to restrict management traffic for the instance to the specified source network Thedefault behavior is to allow management from any host
These directives can be set by placing them on a single line in the User Data field and separating them withcolons Specify both parameters by typing a statement similar to
password=abcdefgmgmtnet=1001024
Click Next Add Storage after optionally setting these parameters
Note If setting a password using the password parameter listed above the password is retrieved by the instancevia an unencrypted HTTP request when the system is configured the first time it boots The request is made toan Amazon Web Services-operated server on the local LAN that stores metadata about each instance runningThe data for an instance is only made available to that instance but is available to be queried from the instancewithout providing any authentication credentials
It is advised to change the admin password via the pfSense webGUI after the instance comes up or choose notto set the password at all and let a random password be set
copy Copyright 2020 Rubicon Communications LLC 38
Security Gateway Manual Amazon AWS
13 Click Next Tag Instance to accept the Storage Device Configuration
14 Optionally a tag can be set on the instance to differentiate this instance from other VMrsquos that were started byentering a value for the Name tag Click Next Configure Security Group after setting any desired tags
copy Copyright 2020 Rubicon Communications LLC 39
Security Gateway Manual Amazon AWS
15 Select a security group to launch the instance with The recommended settings for a security group should allowat least the following traffic
bull TCP port 443 from 00000 - HTTPS - This is the port that the management web GUI listens on
bull TCP port 22 from 00000 - SSH - This port can be used to connect to a command prompt with an sshclient
bull UDP port 1194 from 00000 - OpenVPN - The OpenVPN server that is configured by default is boundto this port
bull UDP port 500 from 00000 - IKE for IPsec VPN
bull UDP port 4500 from 00000 - IPsecNAT-T for IPsec VPN
copy Copyright 2020 Rubicon Communications LLC 40
Security Gateway Manual Amazon AWS
If you have an existing security group that includes this access select Select an existing security group thenselect the group(s) to use and click Continue Otherwise select Create a new security group and add rulesfor this access by filling in the form for each rule and clicking the Add Rule button When all of the rules havebeen added click Review and Launch
16 Verify the details for the instance and click Launch
17 Select an existing key pair or create a new key pair to connect to the instance with Do not select Proceed
copy Copyright 2020 Rubicon Communications LLC 41
Security Gateway Manual Amazon AWS
Without a Key Pair Click the checkbox that indicates you acknowledge having access to the selected privatekey file and then click Launch Instance
18 In order to reach the instance from the Internet associate an Elastic IP with the WAN interface of the instanceIn the VPC Management Console go to the Elastic IPs view by clicking on Elastic IPs on the left side of thepage Click on the Allocate New Address button Select that you want the EIP used in VPC and click on theYes Allocate button in the box that pops up After the Elastic IP address is allocated associate the address withthe WAN interface of the Netgate appliance by clicking on the Associate Address button
A box will pop up that will either let you specify the instance and Private IP address of the interface or theNetwork Interface and the Private IP Address of the interface Use one of these methods to select the correctinterface and click on the Yes Associate button The instance should now be reachable via ssh or https
copy Copyright 2020 Rubicon Communications LLC 42
Security Gateway Manual Amazon AWS
19 In order for traffic to be allowed to be routed from the private subnet through the public interface of the instancethe SourceDest AddressCheck on the private interfaces needs to be disabled In the EC2 Management Con-sole go to the ldquoNetwork Interfacesrdquo view by clicking on Network Interfaces in the menu on the lefthand sideof the page
Click the checkbox to the left of the privateLAN interface on the Netgate appliance instance Click on theActions button at the top of the page and select Change SourceDesk Check on the popup menu Select theradio button labeled Disabled on the box that pops up and click on the Save button
Non-local traffic from the private subnet should now be sent through the privateLAN interface on the Netgateappliance instance
copy Copyright 2020 Rubicon Communications LLC 43
Security Gateway Manual Amazon AWS
313 Managing a VPC Instance
Once the instance is launched you can connect to it via the Elastic IP that was attached to the primary interface duringthe provisioning phase
In order to manage the configuration of the instance you can connect to it via https or ssh A limited set of configura-tions is possible through the SSH interface the preferred method for managing most of the configurations or viewingdata on the status of the pfSensereg instance is through the https webGUI
Connecting via SSH
To connect via SSH you would use the key pair you chose while creating the instance to connect to the admin accountFrom the command line on a UnixLinux host you would use a command similar to
ssh -i my_ec2_key admin232020454
Where the appropriate private key file and public IP or hostname are substituted
Note The first time you log into your instance the SSH key of the instance will not be cached on your computerand you will need to type yes when asked whether you want continue connecting This should not be necessary onsubsequent sessions
Once logged in you should see the console menu similar to the one below
copy Copyright 2020 Rubicon Communications LLC 44
Security Gateway Manual Amazon AWS
Connecting via HTTPS
To connect via https you would enter a URL containing the public IP address or hostname of your instance intoa web browser For example https232020454 Itrsquos very likely that you will receive a browser warningindicating that the security certificate of the site is not trusted This is because the instance uses a self-signed certificatefor https communication You should click on the option to proceed to the site anyway The pfSense login screen withthe Netgate logo should appear
The username to log in with is admin The password to use is either a value that you set in the User Data during thecreation of the instance or a random password
Tip It is preferable to explicitly set a password by passing a value in with the User Data field so the password willbe known in advance
If you did not set a specific password you can find out that value that the random password was set to through one of2 different methods
1 The first method is to log in over SSH with the key pair that you selected when the instance was created andexamine the contents of the file located at etcmotd You would do this by selecting option 8) Shell in theconsole menu that is presented when you SSH in then run this command in the shell
cat etcmotd
2 The second method is to view the System Log for the instance in the EC2 Management Console After themessages that are displayed that show the status of the boot process a message should appear that indicates what
copy Copyright 2020 Rubicon Communications LLC 45
Security Gateway Manual Amazon AWS
the administrative password was changed to Be aware that the System Log output in the EC2 ManagementConsole is not updated in real time and may take a few minutes to show up
The message you should look for using either of the methods mentioned about will look like this
Admin password changed to abcdefg
Once yoursquove determined your password and entered it into the login form the pfSense WebGUI should be availableto you
314 Forwarding traffic from VPC subnets through the instance
Some additional configuration is required within the VPC instancersquos pfSensereg webGUI before you are able to managetraffic from the private subnet
1 Log into the pfSense WebGUI for the instance
2 Click on the Interfaces heading on the left and then click the Assign link
3 Click on the + icon to add a new Interface under the Interface assignments tab A LAN interface shouldautomatically be added with the next available network interface (xn1)
4 Click on the Interfaces heading on the left again and then click on LAN Click the checkbox to enable the LANinterface Set the IPv4 Configuration Type to Static IPv4 and enter the IP address you assigned to the 2ndinterface during the provisioning phase Click the Save button
Now you can create other instances attached to your private subnet and protect them with the firewall on the pfSenseinstance
Common ways to manage private hosts
Allowing private hosts to connect to the Internet
To allow private hosts to be able to connect to the Internet you can allow any traffic from the LAN in your firewallrules there should be a rule like this in place by default
Next set up NAT rules to cause addresses in the private subnet to be NATed to the IP address of the WAN interface
1 Under the Firewall heading on the left click on the NAT link
2 On the Outbound tab click the radio button for Manual Outbound NAT rule generation (AON - AdvancedOutbound NAT)
3 Click the Save button
4 Click on the Aliases link under the Firewall heading on the left
5 Add your private subnet to the Networks_to_NAT alias
Note There is an existing NAT rule configured by default that uses the alias Networks_to_NAT
copy Copyright 2020 Rubicon Communications LLC 46
Security Gateway Manual Amazon AWS
Allow private hosts to connect to each other
If your hosts should only contact each other and a private network segment elsewhere you can configure an IPsecor OpenVPN tunnel from your remote networks to the Netgate appliance instance and set up the appropriate firewallrules routes and security policies to allow access to your private subnet through a VPN tunnel
Allow direct inbound access from the internet to hosts
If you wish to enable direct inbound access from the internet to hosts on the private subnet you can set up portforwarding on the WAN interface to direct traffic to particular hosts in the private subnet
315 Establishing a VPN connection to a VPC in another region
To establish a VPN that allows instances on the VPC subnet(s) that sit behind a Netgate appliance to communicate withinstances that reside in a VPC in another region the Netgate appliance has a VPC configuration wizard that assists byconfiguring both the Netgate appliance as well as the VPC configuration elements that would normally have to be setmanually through the AWS Management Console
For detailed instructions see the AWS VPC User Guide
316 Upgrading a VPC Instance
Periodically new releases of the AMI are issued to track new releases of pfSensereg that may provide new functionalitybug fixes and security updates
The lower risk approach to upgrading is to bring up a new instance alongside the existing one and executing a cutoverThese instructions detail the procedure for moving your existing instance to one running the latest version
1 Back up the configuration of your exsting instance by navigating to BackupRestore under the Diagnosticsmenu in the Web GUI Click the Download configuration button under the Backup Configuration headingand save your config file to your local system
2 Bring up a new instance of the pfSense Certified RouterFirewallVPN running the latest version
3 When creating the instance make sure the interfaces match the interfaces on the existing instance Make surethat the new instance is in the same VPC as the existing instance and that it has the same number of interfacesattached and that the interfaces are connected to the same Subnets
4 Make sure any interfaces on the new instance that will communicate with private Subnets have theSourceDestination check disabled
5 Allocate a new Elastic IP and associate it to the WAN interface of the new instance to allow yourself managementaccess
6 Restore the backed up configuration file to the new instance Navigate to BackupRestore under the Diagnosticsmenu in the Web GUI Under the Restore Configuration heading click the Choose File button and browsefor the configuration file you backed up from the existing instance earlier Once you have selected that fileclick the Restore configuration button The configuration file will be uploaded and the instance will rebootautomatically
7 If you had packages installed on the old instance navigate to Packages under the System menu in the pfSenseweb GUI and install the same packages
8 If there was any external dependency on the public IP address of the existing instance you can remove theElastic IP Address from the upgraded instance and move the Elastic IP Address from the existing instance tothe upgraded instance External dependencies that might cause you to want to do this include things like VPNrsquos
copy Copyright 2020 Rubicon Communications LLC 47
Security Gateway Manual Amazon AWS
configured to external devices that rely on the existing instancersquos Elastic IP address or access lists on externaldevices that allow access to traffic from the existing instancersquos IP address There may be other reasons why youwould wish to keep the existing address as well (to preserve existing bookmarks to the Web GUI reduce theneed for updates to existing internal documentation etc) The process for moving the old Elastic IP address tothe new instance is as follows
bull Disassociate the Elastic IP address from the new instance In the EC2 Management Console click onElastic IPs under the Network amp Security heading Check the box next to the Elastic IP address assignedto the new instance and click on the Disassociate Address button
bull Disassociate the Elastic IP address from the old instance The procedure is the same as in the previousstep just repeated for the Eastic IP address of the old instance this time
bull Associate the Elastic IP address that was previously associated to the old instance to public interface of thenew instance In the EC2 Management Console click on Elastic IPs Check the box next to the Elastic IPaddress you are moving and click the Associate Address button Fill in the correct value for the Instanceor Network Interface and select the Private IP Address of the public interface on the new instance Clickthe Associate button The management interface of the new instance should now be accessible
9 Move any default routes that pointed to an interface on the old instance to point to the equivalent interface onthe new instance In the VPC Management Console click on Route Tables under the Virtual Private Cloudheading Check the box next to a Route Table associated with the VPC that the instances is located in
bull In the detail pane that appears at the bottom of the screen click on the Routes tab
bull If a route exists for 00000 with a Target that is an interface ID of an interface on the old instnace clickthe Edit button above the table displaying the routes
bull Click the red X next to the row for 00000 to remove the existing route
bull There should be a blank row with empty fields for a new route Enter 00000 in the Destinationfield and the Network Interface ID of the interface on the new instance in the Target field Click on theSave button
bull If there were multiple private subnets in the VPC which were pointed to interfaces on the pfSense instancerepeat this process for the other Route Tables associated with the VPC
bull The new instance should now be functioning as the old one did
32 AWS VPC Wizard User Guide
This guide will explain how to use the AWS VPC Wizard to simplify the configuration of a VPN to a remote VPC Theadministrator is asked for the minimum amount of basic information required to establish the VPN The configurationsboth on the AWS VPC side and on the pfSense side are then automatically created When the wizard is finishedexecuting a functioning VPN connection to a VPC should be established
321 AWS Access Keys
In order to connect to the AWS API to make certain required configuration changes the AWS VPC Wizard requiresAccess Keys to retrieve and modify VPC configurations
See also
Find more information about AWS Security Credential including Access Keys by reading AWS Security Credentials
Access keys consist of two parts
1 An access key ID
copy Copyright 2020 Rubicon Communications LLC 48
Security Gateway Manual Amazon AWS
bull For example AKIAIOSFODNN7EXAMPLE
2 A secret access key
bull For example wJalrXUtnFEMIK7MDENGbPxRfiCYEXAMPLEKEY
Access keys are like a usernamepassword and needed for programmatic requests to AWS including the AWS VPCWizard Use both the access key ID and secret access key together to authenticate requests
Important Manage access keys as securely as a user name and password
Managing Access Keys
To create modify or delete IAM user access keys do the following
1 Sign in to the IAM console
2 In the navigation bar on the upper right choose a user name and then choose My Security Credentials
3 On the AWS IAM Credentials tab in the Access keys for CLI SDK and API access section choose Createaccess key
4 Choose Download csv file to save the access key ID and secret access key to a csv file on your computerStore the file in a secure location There is no access to the secret access key again after this dialog box closesAfter the csv file has been downloaded choose Close When an access key is created the key pair is active bydefault and the pair can be used right away
bull To disable an active access key choose Make inactive
bull To reenable an inactive access key choose Make active
bull To delete an access key choose its X button at the far right of the row Then choose Delete to confirmWhen an access key is deleted itrsquos gone forever and cannot be retrieved However new keys can alwaysbe created
To create modify or delete another IAM userrsquos access keys do the following
1 Sign in to the IAM console
2 In the navigation pane choose Users
3 Choose the name of the user whose access keys to manage and then choose the Security credentials tab
4 In the Access keys section choose Create access key
5 Choose Download csv file to save the access key ID and secret access key to a CSV file on your computer
Rotating Access Keys
As a security best practice we recommend to regularly rotate (change) IAM user access keys Rotating access keyscan be done from the AWS Management Console
To rotate access keys for an IAM user without interrupting the applications (console) create a second access key whilethe first access key is still active
1 Sign in to the IAM console
2 In the navigation pane choose Users
3 Choose the name of the user whose access keys to manage and then choose the Security credentials tab
4 In the Access keys section choose Create access key
copy Copyright 2020 Rubicon Communications LLC 49
Security Gateway Manual Amazon AWS
5 Choose Download csv file to save the access key ID and secret access key to a CSV file on your computer
6 The new access key is active by default At this point the user has two active access keys
After waiting some period of time to ensure that all applications and tools have been updated delete the first accesskey
1 Sign in to the IAM console
2 In the navigation pane choose Users
3 Choose the name of the user whose access keys to manage and then choose the Security credentials tab
4 Locate the access key to delete and choose its X button at the far right of the row Then choose Delete to confirm
Determining When Access Keys Need Rotating
To determine when access keys need rotating (console) do the following
1 Sign in to the IAM console
2 In the navigation pane choose Users
3 If necessary add the Access key age column to the users table by completing the following steps
1 Above the table on the far right click the settings icon
2 In Manage columns select Access key age
3 Choose Close to return to the list of users
4 The Access key age column shows the number of days since the oldest active access key was created Usethis information to find users with access keys that need rotating The column displays None for users with noaccess key
322 Using the Wizard
1 Gather your AWS Access Key ID and Secret Key
2 Navigate to VPN gt AWS VPC Wizard in the main menu in the pfSensereg webGUI
copy Copyright 2020 Rubicon Communications LLC 50
Security Gateway Manual Amazon AWS
3 The first screen of the wizard prompts for the AWS Credentials Enter the Access Key ID and Secret AccessKey in the appropriate text fields and select the Region to connect to in the dropdown menu then click Next
The wizard will then query the AWS API using those credentials to find which VPCrsquos exist in the selectedregion If the credentials were rejected an error message will be displayed and return to the first screen
4 The next screen will prompt to select from the available VPCrsquos in the selected region Select the one to connectto from the dropdown menu The wizard will not create a new VPC it will only connect to an existing VPC
Click Next after selecting the desired VPC
copy Copyright 2020 Rubicon Communications LLC 51
Security Gateway Manual Amazon AWS
Note If the desired VPCrsquos to connect to isnrsquot available create one via the AWS Management Console and tryagain
The wizard will then query the AWS API to check whether there is a VPN Gateway attached to the selectedVPC If none exists one will be created via the API Then the next screen will be displayed
5 On the next screen specify routing and network data
A description of what should be entered for each of these fields follows
copy Copyright 2020 Rubicon Communications LLC 52
Security Gateway Manual Amazon AWS
Routing Type AWS offers either static routing or BGP routing Select the appropriate type fromthe dropdown menu If unsure static routing is likely to be adequate
BGP AS Number If static routing was choosen leave this field blank Otherwise it is possible tospecify an AS number to use If left blank the value will default to 65000
Local Public IP Address On an AWS Netgate appliance instance this should be the public IP ad-dress of the Elastic IP associated with the instance If configuring a hardware device runningpfSense this could be the public address assigned to the WAN (or other) interface of the device
Local subnets The subnets connected to the pfSense instance that should be routed over the tunnelfrom hosts in the remote VPC As an example if connecting a pfSense instance to a remote VPCin the AWS us-east-1 region enter the subnets (or a single subnet) that are local to the pfSenseinstance and when hosts in your VPC in us-east-1 attempted to reach addresses within thosesubnets the traffic will be sent through the VPN tunnel that is being configured
Note When selecting static routing as the routing type there will be a delay that is typically between 2-5minutes before the next screen is displayed This is because static routes must be added to the VPN Connectionvia the AWS API This operation fails until the VPN Connection reaches the ldquoavailablerdquo state This can take afew minutes to occur
Click Next when done
The wizard will then query the AWS API to find whether a Customer Gateway is configured with the selectedPublic IP Address If none exists one will be created If one already exists the ID will be retrieved and it willbe used
The wizard will then query the AWS API to see if a VPC Connection already exists that matches the dataentered If one exists it will be used Otherwise one will be created
If static routing was selected static routes will be added to the VPN Connection for the Local subnets entered
Route propagation will be enabled for the VPN Gateway in each of the Route Tables that are associated withthe VPC All of these configurations are carried out in the AWS API nothing has been changed in the pfSenseVPN configurations yet
Warning Important Note on Billing Once this step is carried out and the VPN Connection is createdAWS will start billing your AWS account the hourly rate for a VPN Connection This is $005 as of thiswriting and that is a charge that goes entirely to AWS itself They will do this until the VPN Connection isdeleted via the VPC Management Console
Nothing in pfSense will ever cause AWS to stop billing for this VPN Connection Whether it works or notwhether the pfSense instance is up or down whether the IPsec tunnels have been deleted or reconfiguredAWS will continue to bill the hourly fee for a VPN Connection if the creation of it succeeds until it is deletedthrough their web interface
The wizard helps establish an initial configuration that works and configures the appropriate elements inAWSrsquos API to facilitate this You are responsible for making sure you understand what yoursquore being billedfor and disabling any functions including VPN Connections that are no longer necessary
6 If the operations of the previous step succeeded the next screen will appear
copy Copyright 2020 Rubicon Communications LLC 53
Security Gateway Manual Amazon AWS
Select an Interface to act as the local endpoint of the VPN tunnels that will be created In most cases thisshould be the WAN interface It should generally be whatever interface is associated with the Local Public IPAddress entered in the previous step
On an AWS Netgate pfSense instance this will be whatever interface the Elastic IP is associated with On ahardware device running pfSense that has the Local Public IP Address directly configured on an interface thiswill be the interface that the Local Public IP Address is configured on
After clicking Next the wizard will configure the VPN and associated settings within pfSense itself using datareturned by the AWS API in the previous step
It will configure 2 IPsec tunnels a firewall rule 2 Aliases (referenced by the firewall rule) and 2 Virtual IPAddresses If BGP was selected as the Routing Type in the previous step it will install the OpenBGPDpackage automatically and configure it appropriately
7 The next screen will appear and prompt to apply the configuration changes that have been made
copy Copyright 2020 Rubicon Communications LLC 54
Security Gateway Manual Amazon AWS
After clicking Next all the configuration changes that were made will be applied
8 The wizard will be completed and the browser will be redirected to the IPsec status page The VPN to the VPCshould now be fully configured
Note Sometimes there is a delay of 5-10 minutes before the tunnels are fully functional and passing trafficThis has been observed particularly often during the setup of tunnels using BGP routing
copy Copyright 2020 Rubicon Communications LLC 55
Security Gateway Manual Amazon AWS
323 Testing Connectivity
Verify that the IPsec tunnels are functioning by attempting to ping the ldquoinside tunnel addressesrdquo of the VPC side ofthe tunnel by navigating to Firewall -gt Virtual IP There should be two virtual IP addresses configured that haveDescriptions like ldquoInside address for tunnel to ltremote IP addressgtrdquo
Amazon provides inside addresses for each end of the tunnel in a 30 subnet in IPv4 link local address space(169254xy) Typically the first usable address in the 30 is the inside address for the VPC end of the tunnel andthe other usable address is the inside address for your end of the tunnel So if you ping from one of the virtual IPaddresses configured on the pfSensereg instance to the IP address that is one less (for example if the virtual IP addresswere 16925425322 ping from 16925425322 to 16925425321) that checks whether the other end of the tunnelis responding and whether the tunnel is functioning properly
Note It sometimes takes a few minutes for the tunnels to begin working after the configuration wizard completes
To ping log into the pfSense instance via SSH and execute ping from a shell prompt For the previous example of16925425322 the proper syntax is
ping -S 16925425322 16925425321
When pinging from a shell prompt it is possible leave the command running indefinitely and interrupt it there is aresponse
copy Copyright 2020 Rubicon Communications LLC 56
Security Gateway Manual Amazon AWS
It is also possible to ping via the Diagnostics -gt Ping page by selecting the appropriate source address and enteringthe remote tunnel inside address in the Host field This will only send a limited number of ping packets so it may benecessary to repeat this a few times
324 VPC Configuration Details
The AWS documentation for connecting a hardware device to a VPC provides a great amount of detail on configuringVPN Connections to VPC
The main configuration elements that exist in Amazonrsquos data model are the Virtual Private Gateway the CustomerGateway and the VPN Connection In order to configure a VPN connection to a VPC all 3 of these need to exist TheVirtual Private Gateway is the VPN endpoint on Amazonrsquos side The customer gateway is the VPN endpoint on thepfSensereg instancedevice being configured The VPN Connection is the IPsec VPN between Amazon and the pfSenseinstancedevice
A Virtual Private Gateway needs to exist and be associated to the VPC A particular VPN Gateway can only beassociated to one VPC at a time Once the VPC to connect to has been selected the wizard invokes the AWS API callDescribeVpnGateways to determine if a VPN Gateway already exists that is attached to the VPC If none exists itcreates one with the CreateVpnGateway API call and attaches it to the VPC with the AttachVpnGateway call
A Customer Gateway needs to be created for the public IP address of the device or virtual machine that will be used toconnect to the VPC The wizard invokes the AWS API call DescribeCustomerGateways to determine if a CustomerGateway already exists If none exists one is created with the CreateCustomerGateway API call
The VPN Connection connects the Virtual Private Gateway and Customer Gateway The wizard checks to see if thereis an existing VPN Connection configured that connects those endpoints by invoking the AWS API call DescribeVp-nConnections If none exists one is created using the CreateVpnConnection call One of the fields returned by thiscall is a block of XML configuration data that contains configuration data assigned by AWS for use with configuringthe VPN Connection This data is stored and used in subsequent steps to make the required configuration changeswithin pfSense
copy Copyright 2020 Rubicon Communications LLC 57
Security Gateway Manual Amazon AWS
Any objects created through API calls by the wizard will be tagged with names like auto-created by pfSenseVPC ltyour_VPC_IDgt This is accomplished by calling the AWS API call CreateTags and using Name as the keyfor the tag
In addition to creation of the items mentioned above required adjustments are made to Security Groups and RouteTables to facilitate communication over the VPN The Security Groups associated with the VPC are updated to allowinbound access from the local subnets on the pfSense end of the VPN They are checked first via the DescribeSecuri-tyGroups AWS API call to determine if the access is already allowed Any of the subnets that is not already allowedhas inbound access added via the AuthorizeSecurityGroupIngress AWS API call
Route Tables associated with the VPC are updated to receive routes from the VPN Gateway used by the VPN Con-nection They are checked first via the DescribeRouteTables AWS API call If the VPN Gateway ID is not includedin the list of VPN Gateways propagating routes route propagation for the VPN Gateway is enabled on that table usingthe EnableVgwRoutePropagation AWS API call
For VPN Connections using static routing static routes for the specified subnets are added to the VPN ConnectionThis is done via the CreateVpnConnectionRoute AWS API call
325 pfSense Configuration Details
On the pfSensereg side there are numerous configurations added to support the VPN to the VPC
Aliases
First aliases are created for use in a firewall rule These aliases are intended to contain the subnets that traffic shouldbe allowed to ingress over the IPsec tunnel One alias represents the local subnets on the pfSense side and is givena name like VPC_Local_vpc_12345678 and the other represents the remote subnets on the VPC side and is given aname like VPC_Remote_vpc_12345678
Virtual IP addresses
Next virtual IP addresses are added on the lo0 (loopback) interface These virtual IP addresses are the local ldquoinsideaddressesrdquo of the IPsec tunnels These addresses are used as the local address for BGP communication when BGProuting is selected These addresses are IPv4 link local addresses (see RFC 3297) AWS assigns 30rsquos out of thenetwork 1692540016 for this purpose
Note These addresses are also useful as a ping target to execute a basic test of whether the tunnel is functioningproperly Executing a ping from a source address of one of these IP addresses to the corresponding inside address ofthe other end of the tunnel helps determine whether the tunnel negotiation is completing properly
Firewall rules
Next a firewall rule is added on the IPsec interface that allows traffic from the VPC networks to the local subnetsThis rule uses the previously created Aliases as sourcedestination targets
IPsec
Then IPsec phase 1 and phase 2 associations are set up Most of the settings required are extracted from a blockof XML data that was returned by the CreateVpnConnection call made during the AWS configuration step Thisincludes parameters like endpoint IP addresses encryption ciphers timer values etc
copy Copyright 2020 Rubicon Communications LLC 58
Security Gateway Manual Amazon AWS
If BGP routing was selected the configurations for the OpenBGPD BGP daemon are established The required settingsare determined using the AS number entered into the wizard and the parameters returned by the CreateVpnConnec-tion call made during the AWS configuration step
326 Tested Configurations
Various topologies may be possible to establish using the AWS VPC Configuration Wizard This section enumeratessome of the configurations that were successfully tested
Platforms
bull Various hardware platforms
bull 64-bit virtual machines in VMware vSphereESX
bull Amazon EC2 instances (Xen virtual machines) of the Netgate pfSensereg RouterFirewallVPN AWS AMI
Local networkrouting configurations
bull pfSense with a public address configured on the WAN interface
bull pfSense with a private address configured on the WAN interface behind a 11 NAT
bull pfSense with a private address configured on the WAN interface behind a PAT (1many NAT)
VPC Topologies
bull pfSense connected to a single VPC
bull pfSense connected to multiple VPCrsquos in different regions
bull Amazon EC2 instance of the pfSense RouterFirewallVPN AWS AMI connected to a VPC belonging to thesame AWS account in a different region
bull Amazon EC2 instance of the pfSense RouterFirewallVPN AWS AMI connected to a VPC belonging to adifferent AWS account in the same region
The configuration recommended for the greatest amount of stability is to have a public IPv4 address directly configuredon the WAN interface of your pfSense firewall but VPNs have been successfully established under all of the conditionslisted above
Whether any of these solutions is appropriate should be evaluated in the context of personal needs and existing infras-tructure Other configurations not listed above may be possible as well
327 AWS VPC Wizard FAQ
1 What level of redundancy is provided by the two tunnels
Amazon provides two tunnel endpoints that will allow traffic to be sent between your networks and the remote VPCyou are connected to The racoon daemon in pfSensereg is only capable of establishing an active phase 2 associationfor a particular sourcedestination pair on a single tunnel
Phase 2 associations between the local subnets and the remote VPC subnet are configured in the pfSense GUI for bothtunnels but racoon will only actually establish an association for the first tunnel This means that racoon will onlyever try to send traffic destined for the remote VPC subnet over the first tunnel
copy Copyright 2020 Rubicon Communications LLC 59
Security Gateway Manual Amazon AWS
If that tunnel goes down the second tunnel may be up and inbound traffic from the remote VPC may be sent to yourlocal networks over that tunnel automatically But outbound traffic to your remote VPC would not automatically failover to the second tunnel In order for you to send your outbound traffic over the second tunnel you would need todisable the phase 2 associations for the first tunnel and apply the changes
2 I quit the wizard before finishing Now what
To finish setting up the VPN go back to the wizard and run through it again It should reuse any partial configurationsthat were generated before it was stopped and create the new elements that are required
3 What are the AWS charges for this
AWS determines their own pricing and provides details for EC2 pricing and VPC pricing There are many types ofcharges that may be incurred for operating instances on AWS (eg charges related to running an instance bandwidthstorage elastic IPs etc)
The charge of specific interest in this case is the hourly charge for a VPN Connection As of this writing it costs $005(USD) per hour in most regions to have a VPN Connection configured and available AWS will charge whether theVPN Connection is being used or not as long as it is configured This will be configured by the third step of the wizardand will never be removed by pfSense
If the VPN Connection is no longer needed and billing for it needs to be stopped visit AWSrsquos VPC ManagementConsole and delete the VPN Connection manually
4 Can I use the wizard to connect to the GovCloud region
This hasnrsquot been officially tested but at least one user has reported that they were able to successfully connect to theGovCloud region They manually added the region us-gov-west-1 to the list of regions in the first step of the wizardand were able to successfully connect to their VPC in that region This may be supported in a future build but to trywithout official support do the following
1 Under the System gt Advanced menu make sure the Enable Secure Shell box is checked This is already doneby default on AWS instances but is off by default on pfSense hardware devices
2 Log into the instance via SSH
3 Make sure the root filesystem is mounted as readwrite On an AWS instance or a hardware device running on anSSD this should be true On a hardware device using Compact Flash or an SD card for storage it will probablybe necessary to remount the root filesystem in readwrite mode by running
mount -uw
4 Edit the file usrlocalwwwwizardsvpc_vpn_wizardxml using vi Look for a section of the file that lookslike this
ltoptiongtltnamegtsa-east-1ltnamegtltvaluegtsa-east-1ltvaluegt
ltoptiongt
That should appear directly after several similar ltoptiongt specifications containing all of the other availableregions Right underneath that section add the following
copy Copyright 2020 Rubicon Communications LLC 60
Security Gateway Manual Amazon AWS
ltoptiongtltnamegtus-gov-west-1ltnamegtltvaluegtus-gov-west-1ltvaluegt
ltoptiongt
Then save the file and exit vi
5 If the filesystem had to be remounted in readwrite mode earlier remount it in read-only mode by running
The GovCloud region should now appear as a choice in the first step of the wizard
copy Copyright 2020 Rubicon Communications LLC 61
CHAPTER
FOUR
REFERENCES
41 Support Resources
411 Commercial Support
In order to keep prices low the software is not bundled with a support subscription For users who need commercialsupport Netgate Gloabal Support can be purchased at httpswwwnetgatecomsupport
412 Community Support
Community support for pfSensereg software is available through the Netgate Forum
42 Additional Resources
421 Netgate Training
Netgate training offers training courses for increasing your knowledge of pfSensereg products and services Whetheryou need to maintain or improve the security skills of your staff or offer highly specialized support and improve yourcustomer satisfaction Netgate training has got you covered
httpswwwnetgatecomtraining
422 Resource Library
To learn more about how to use your pfSense appliance and for other helpful resources make sure to browse ourResource Library
httpswwwnetgatecomresources
423 Professional Services
Support does not cover more complex tasks such as CARP configuration for redundancy on multiple firewalls orcircuits network design and conversion from other firewalls to pfSensereg These items are offered as professionalservices and can be purchased and scheduled accordingly
httpswwwnetgatecomour-servicesprofessional-serviceshtml
62
Security Gateway Manual Amazon AWS
424 Community Options
If you elected not to get a paid support plan you can find help from the active and knowledgeable pfSense communityon our forums
httpsforumnetgatecom
copy Copyright 2020 Rubicon Communications LLC 63
- Getting Started
- Instance Usage
- Virtual Private Cloud (VPC)
- References
-
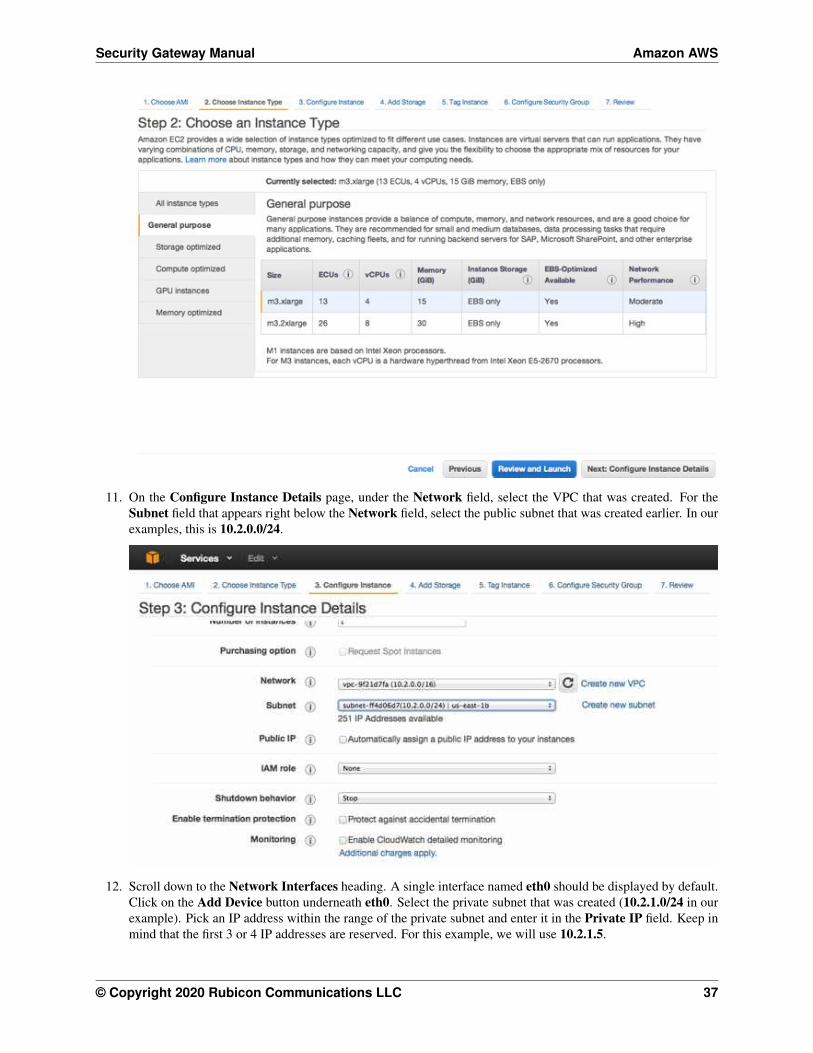
Security Gateway Manual Amazon AWS
If you have an existing security group that includes this access select Select an existing security group thenselect the group(s) to use and click Continue Otherwise select Create a new security group and add rulesfor this access by filling in the form for each rule and clicking the Add Rule button When all of the rules havebeen added click Review and Launch
16 Verify the details for the instance and click Launch
17 Select an existing key pair or create a new key pair to connect to the instance with Do not select Proceed
copy Copyright 2020 Rubicon Communications LLC 41
Security Gateway Manual Amazon AWS
Without a Key Pair Click the checkbox that indicates you acknowledge having access to the selected privatekey file and then click Launch Instance
18 In order to reach the instance from the Internet associate an Elastic IP with the WAN interface of the instanceIn the VPC Management Console go to the Elastic IPs view by clicking on Elastic IPs on the left side of thepage Click on the Allocate New Address button Select that you want the EIP used in VPC and click on theYes Allocate button in the box that pops up After the Elastic IP address is allocated associate the address withthe WAN interface of the Netgate appliance by clicking on the Associate Address button
A box will pop up that will either let you specify the instance and Private IP address of the interface or theNetwork Interface and the Private IP Address of the interface Use one of these methods to select the correctinterface and click on the Yes Associate button The instance should now be reachable via ssh or https
copy Copyright 2020 Rubicon Communications LLC 42
Security Gateway Manual Amazon AWS
19 In order for traffic to be allowed to be routed from the private subnet through the public interface of the instancethe SourceDest AddressCheck on the private interfaces needs to be disabled In the EC2 Management Con-sole go to the ldquoNetwork Interfacesrdquo view by clicking on Network Interfaces in the menu on the lefthand sideof the page
Click the checkbox to the left of the privateLAN interface on the Netgate appliance instance Click on theActions button at the top of the page and select Change SourceDesk Check on the popup menu Select theradio button labeled Disabled on the box that pops up and click on the Save button
Non-local traffic from the private subnet should now be sent through the privateLAN interface on the Netgateappliance instance
copy Copyright 2020 Rubicon Communications LLC 43
Security Gateway Manual Amazon AWS
313 Managing a VPC Instance
Once the instance is launched you can connect to it via the Elastic IP that was attached to the primary interface duringthe provisioning phase
In order to manage the configuration of the instance you can connect to it via https or ssh A limited set of configura-tions is possible through the SSH interface the preferred method for managing most of the configurations or viewingdata on the status of the pfSensereg instance is through the https webGUI
Connecting via SSH
To connect via SSH you would use the key pair you chose while creating the instance to connect to the admin accountFrom the command line on a UnixLinux host you would use a command similar to
ssh -i my_ec2_key admin232020454
Where the appropriate private key file and public IP or hostname are substituted
Note The first time you log into your instance the SSH key of the instance will not be cached on your computerand you will need to type yes when asked whether you want continue connecting This should not be necessary onsubsequent sessions
Once logged in you should see the console menu similar to the one below
copy Copyright 2020 Rubicon Communications LLC 44
Security Gateway Manual Amazon AWS
Connecting via HTTPS
To connect via https you would enter a URL containing the public IP address or hostname of your instance intoa web browser For example https232020454 Itrsquos very likely that you will receive a browser warningindicating that the security certificate of the site is not trusted This is because the instance uses a self-signed certificatefor https communication You should click on the option to proceed to the site anyway The pfSense login screen withthe Netgate logo should appear
The username to log in with is admin The password to use is either a value that you set in the User Data during thecreation of the instance or a random password
Tip It is preferable to explicitly set a password by passing a value in with the User Data field so the password willbe known in advance
If you did not set a specific password you can find out that value that the random password was set to through one of2 different methods
1 The first method is to log in over SSH with the key pair that you selected when the instance was created andexamine the contents of the file located at etcmotd You would do this by selecting option 8) Shell in theconsole menu that is presented when you SSH in then run this command in the shell
cat etcmotd
2 The second method is to view the System Log for the instance in the EC2 Management Console After themessages that are displayed that show the status of the boot process a message should appear that indicates what
copy Copyright 2020 Rubicon Communications LLC 45
Security Gateway Manual Amazon AWS
the administrative password was changed to Be aware that the System Log output in the EC2 ManagementConsole is not updated in real time and may take a few minutes to show up
The message you should look for using either of the methods mentioned about will look like this
Admin password changed to abcdefg
Once yoursquove determined your password and entered it into the login form the pfSense WebGUI should be availableto you
314 Forwarding traffic from VPC subnets through the instance
Some additional configuration is required within the VPC instancersquos pfSensereg webGUI before you are able to managetraffic from the private subnet
1 Log into the pfSense WebGUI for the instance
2 Click on the Interfaces heading on the left and then click the Assign link
3 Click on the + icon to add a new Interface under the Interface assignments tab A LAN interface shouldautomatically be added with the next available network interface (xn1)
4 Click on the Interfaces heading on the left again and then click on LAN Click the checkbox to enable the LANinterface Set the IPv4 Configuration Type to Static IPv4 and enter the IP address you assigned to the 2ndinterface during the provisioning phase Click the Save button
Now you can create other instances attached to your private subnet and protect them with the firewall on the pfSenseinstance
Common ways to manage private hosts
Allowing private hosts to connect to the Internet
To allow private hosts to be able to connect to the Internet you can allow any traffic from the LAN in your firewallrules there should be a rule like this in place by default
Next set up NAT rules to cause addresses in the private subnet to be NATed to the IP address of the WAN interface
1 Under the Firewall heading on the left click on the NAT link
2 On the Outbound tab click the radio button for Manual Outbound NAT rule generation (AON - AdvancedOutbound NAT)
3 Click the Save button
4 Click on the Aliases link under the Firewall heading on the left
5 Add your private subnet to the Networks_to_NAT alias
Note There is an existing NAT rule configured by default that uses the alias Networks_to_NAT
copy Copyright 2020 Rubicon Communications LLC 46
Security Gateway Manual Amazon AWS
Allow private hosts to connect to each other
If your hosts should only contact each other and a private network segment elsewhere you can configure an IPsecor OpenVPN tunnel from your remote networks to the Netgate appliance instance and set up the appropriate firewallrules routes and security policies to allow access to your private subnet through a VPN tunnel
Allow direct inbound access from the internet to hosts
If you wish to enable direct inbound access from the internet to hosts on the private subnet you can set up portforwarding on the WAN interface to direct traffic to particular hosts in the private subnet
315 Establishing a VPN connection to a VPC in another region
To establish a VPN that allows instances on the VPC subnet(s) that sit behind a Netgate appliance to communicate withinstances that reside in a VPC in another region the Netgate appliance has a VPC configuration wizard that assists byconfiguring both the Netgate appliance as well as the VPC configuration elements that would normally have to be setmanually through the AWS Management Console
For detailed instructions see the AWS VPC User Guide
316 Upgrading a VPC Instance
Periodically new releases of the AMI are issued to track new releases of pfSensereg that may provide new functionalitybug fixes and security updates
The lower risk approach to upgrading is to bring up a new instance alongside the existing one and executing a cutoverThese instructions detail the procedure for moving your existing instance to one running the latest version
1 Back up the configuration of your exsting instance by navigating to BackupRestore under the Diagnosticsmenu in the Web GUI Click the Download configuration button under the Backup Configuration headingand save your config file to your local system
2 Bring up a new instance of the pfSense Certified RouterFirewallVPN running the latest version
3 When creating the instance make sure the interfaces match the interfaces on the existing instance Make surethat the new instance is in the same VPC as the existing instance and that it has the same number of interfacesattached and that the interfaces are connected to the same Subnets
4 Make sure any interfaces on the new instance that will communicate with private Subnets have theSourceDestination check disabled
5 Allocate a new Elastic IP and associate it to the WAN interface of the new instance to allow yourself managementaccess
6 Restore the backed up configuration file to the new instance Navigate to BackupRestore under the Diagnosticsmenu in the Web GUI Under the Restore Configuration heading click the Choose File button and browsefor the configuration file you backed up from the existing instance earlier Once you have selected that fileclick the Restore configuration button The configuration file will be uploaded and the instance will rebootautomatically
7 If you had packages installed on the old instance navigate to Packages under the System menu in the pfSenseweb GUI and install the same packages
8 If there was any external dependency on the public IP address of the existing instance you can remove theElastic IP Address from the upgraded instance and move the Elastic IP Address from the existing instance tothe upgraded instance External dependencies that might cause you to want to do this include things like VPNrsquos
copy Copyright 2020 Rubicon Communications LLC 47
Security Gateway Manual Amazon AWS
configured to external devices that rely on the existing instancersquos Elastic IP address or access lists on externaldevices that allow access to traffic from the existing instancersquos IP address There may be other reasons why youwould wish to keep the existing address as well (to preserve existing bookmarks to the Web GUI reduce theneed for updates to existing internal documentation etc) The process for moving the old Elastic IP address tothe new instance is as follows
bull Disassociate the Elastic IP address from the new instance In the EC2 Management Console click onElastic IPs under the Network amp Security heading Check the box next to the Elastic IP address assignedto the new instance and click on the Disassociate Address button
bull Disassociate the Elastic IP address from the old instance The procedure is the same as in the previousstep just repeated for the Eastic IP address of the old instance this time
bull Associate the Elastic IP address that was previously associated to the old instance to public interface of thenew instance In the EC2 Management Console click on Elastic IPs Check the box next to the Elastic IPaddress you are moving and click the Associate Address button Fill in the correct value for the Instanceor Network Interface and select the Private IP Address of the public interface on the new instance Clickthe Associate button The management interface of the new instance should now be accessible
9 Move any default routes that pointed to an interface on the old instance to point to the equivalent interface onthe new instance In the VPC Management Console click on Route Tables under the Virtual Private Cloudheading Check the box next to a Route Table associated with the VPC that the instances is located in
bull In the detail pane that appears at the bottom of the screen click on the Routes tab
bull If a route exists for 00000 with a Target that is an interface ID of an interface on the old instnace clickthe Edit button above the table displaying the routes
bull Click the red X next to the row for 00000 to remove the existing route
bull There should be a blank row with empty fields for a new route Enter 00000 in the Destinationfield and the Network Interface ID of the interface on the new instance in the Target field Click on theSave button
bull If there were multiple private subnets in the VPC which were pointed to interfaces on the pfSense instancerepeat this process for the other Route Tables associated with the VPC
bull The new instance should now be functioning as the old one did
32 AWS VPC Wizard User Guide
This guide will explain how to use the AWS VPC Wizard to simplify the configuration of a VPN to a remote VPC Theadministrator is asked for the minimum amount of basic information required to establish the VPN The configurationsboth on the AWS VPC side and on the pfSense side are then automatically created When the wizard is finishedexecuting a functioning VPN connection to a VPC should be established
321 AWS Access Keys
In order to connect to the AWS API to make certain required configuration changes the AWS VPC Wizard requiresAccess Keys to retrieve and modify VPC configurations
See also
Find more information about AWS Security Credential including Access Keys by reading AWS Security Credentials
Access keys consist of two parts
1 An access key ID
copy Copyright 2020 Rubicon Communications LLC 48
Security Gateway Manual Amazon AWS
bull For example AKIAIOSFODNN7EXAMPLE
2 A secret access key
bull For example wJalrXUtnFEMIK7MDENGbPxRfiCYEXAMPLEKEY
Access keys are like a usernamepassword and needed for programmatic requests to AWS including the AWS VPCWizard Use both the access key ID and secret access key together to authenticate requests
Important Manage access keys as securely as a user name and password
Managing Access Keys
To create modify or delete IAM user access keys do the following
1 Sign in to the IAM console
2 In the navigation bar on the upper right choose a user name and then choose My Security Credentials
3 On the AWS IAM Credentials tab in the Access keys for CLI SDK and API access section choose Createaccess key
4 Choose Download csv file to save the access key ID and secret access key to a csv file on your computerStore the file in a secure location There is no access to the secret access key again after this dialog box closesAfter the csv file has been downloaded choose Close When an access key is created the key pair is active bydefault and the pair can be used right away
bull To disable an active access key choose Make inactive
bull To reenable an inactive access key choose Make active
bull To delete an access key choose its X button at the far right of the row Then choose Delete to confirmWhen an access key is deleted itrsquos gone forever and cannot be retrieved However new keys can alwaysbe created
To create modify or delete another IAM userrsquos access keys do the following
1 Sign in to the IAM console
2 In the navigation pane choose Users
3 Choose the name of the user whose access keys to manage and then choose the Security credentials tab
4 In the Access keys section choose Create access key
5 Choose Download csv file to save the access key ID and secret access key to a CSV file on your computer
Rotating Access Keys
As a security best practice we recommend to regularly rotate (change) IAM user access keys Rotating access keyscan be done from the AWS Management Console
To rotate access keys for an IAM user without interrupting the applications (console) create a second access key whilethe first access key is still active
1 Sign in to the IAM console
2 In the navigation pane choose Users
3 Choose the name of the user whose access keys to manage and then choose the Security credentials tab
4 In the Access keys section choose Create access key
copy Copyright 2020 Rubicon Communications LLC 49
Security Gateway Manual Amazon AWS
5 Choose Download csv file to save the access key ID and secret access key to a CSV file on your computer
6 The new access key is active by default At this point the user has two active access keys
After waiting some period of time to ensure that all applications and tools have been updated delete the first accesskey
1 Sign in to the IAM console
2 In the navigation pane choose Users
3 Choose the name of the user whose access keys to manage and then choose the Security credentials tab
4 Locate the access key to delete and choose its X button at the far right of the row Then choose Delete to confirm
Determining When Access Keys Need Rotating
To determine when access keys need rotating (console) do the following
1 Sign in to the IAM console
2 In the navigation pane choose Users
3 If necessary add the Access key age column to the users table by completing the following steps
1 Above the table on the far right click the settings icon
2 In Manage columns select Access key age
3 Choose Close to return to the list of users
4 The Access key age column shows the number of days since the oldest active access key was created Usethis information to find users with access keys that need rotating The column displays None for users with noaccess key
322 Using the Wizard
1 Gather your AWS Access Key ID and Secret Key
2 Navigate to VPN gt AWS VPC Wizard in the main menu in the pfSensereg webGUI
copy Copyright 2020 Rubicon Communications LLC 50
Security Gateway Manual Amazon AWS
3 The first screen of the wizard prompts for the AWS Credentials Enter the Access Key ID and Secret AccessKey in the appropriate text fields and select the Region to connect to in the dropdown menu then click Next
The wizard will then query the AWS API using those credentials to find which VPCrsquos exist in the selectedregion If the credentials were rejected an error message will be displayed and return to the first screen
4 The next screen will prompt to select from the available VPCrsquos in the selected region Select the one to connectto from the dropdown menu The wizard will not create a new VPC it will only connect to an existing VPC
Click Next after selecting the desired VPC
copy Copyright 2020 Rubicon Communications LLC 51
Security Gateway Manual Amazon AWS
Note If the desired VPCrsquos to connect to isnrsquot available create one via the AWS Management Console and tryagain
The wizard will then query the AWS API to check whether there is a VPN Gateway attached to the selectedVPC If none exists one will be created via the API Then the next screen will be displayed
5 On the next screen specify routing and network data
A description of what should be entered for each of these fields follows
copy Copyright 2020 Rubicon Communications LLC 52
Security Gateway Manual Amazon AWS
Routing Type AWS offers either static routing or BGP routing Select the appropriate type fromthe dropdown menu If unsure static routing is likely to be adequate
BGP AS Number If static routing was choosen leave this field blank Otherwise it is possible tospecify an AS number to use If left blank the value will default to 65000
Local Public IP Address On an AWS Netgate appliance instance this should be the public IP ad-dress of the Elastic IP associated with the instance If configuring a hardware device runningpfSense this could be the public address assigned to the WAN (or other) interface of the device
Local subnets The subnets connected to the pfSense instance that should be routed over the tunnelfrom hosts in the remote VPC As an example if connecting a pfSense instance to a remote VPCin the AWS us-east-1 region enter the subnets (or a single subnet) that are local to the pfSenseinstance and when hosts in your VPC in us-east-1 attempted to reach addresses within thosesubnets the traffic will be sent through the VPN tunnel that is being configured
Note When selecting static routing as the routing type there will be a delay that is typically between 2-5minutes before the next screen is displayed This is because static routes must be added to the VPN Connectionvia the AWS API This operation fails until the VPN Connection reaches the ldquoavailablerdquo state This can take afew minutes to occur
Click Next when done
The wizard will then query the AWS API to find whether a Customer Gateway is configured with the selectedPublic IP Address If none exists one will be created If one already exists the ID will be retrieved and it willbe used
The wizard will then query the AWS API to see if a VPC Connection already exists that matches the dataentered If one exists it will be used Otherwise one will be created
If static routing was selected static routes will be added to the VPN Connection for the Local subnets entered
Route propagation will be enabled for the VPN Gateway in each of the Route Tables that are associated withthe VPC All of these configurations are carried out in the AWS API nothing has been changed in the pfSenseVPN configurations yet
Warning Important Note on Billing Once this step is carried out and the VPN Connection is createdAWS will start billing your AWS account the hourly rate for a VPN Connection This is $005 as of thiswriting and that is a charge that goes entirely to AWS itself They will do this until the VPN Connection isdeleted via the VPC Management Console
Nothing in pfSense will ever cause AWS to stop billing for this VPN Connection Whether it works or notwhether the pfSense instance is up or down whether the IPsec tunnels have been deleted or reconfiguredAWS will continue to bill the hourly fee for a VPN Connection if the creation of it succeeds until it is deletedthrough their web interface
The wizard helps establish an initial configuration that works and configures the appropriate elements inAWSrsquos API to facilitate this You are responsible for making sure you understand what yoursquore being billedfor and disabling any functions including VPN Connections that are no longer necessary
6 If the operations of the previous step succeeded the next screen will appear
copy Copyright 2020 Rubicon Communications LLC 53
Security Gateway Manual Amazon AWS
Select an Interface to act as the local endpoint of the VPN tunnels that will be created In most cases thisshould be the WAN interface It should generally be whatever interface is associated with the Local Public IPAddress entered in the previous step
On an AWS Netgate pfSense instance this will be whatever interface the Elastic IP is associated with On ahardware device running pfSense that has the Local Public IP Address directly configured on an interface thiswill be the interface that the Local Public IP Address is configured on
After clicking Next the wizard will configure the VPN and associated settings within pfSense itself using datareturned by the AWS API in the previous step
It will configure 2 IPsec tunnels a firewall rule 2 Aliases (referenced by the firewall rule) and 2 Virtual IPAddresses If BGP was selected as the Routing Type in the previous step it will install the OpenBGPDpackage automatically and configure it appropriately
7 The next screen will appear and prompt to apply the configuration changes that have been made
copy Copyright 2020 Rubicon Communications LLC 54
Security Gateway Manual Amazon AWS
After clicking Next all the configuration changes that were made will be applied
8 The wizard will be completed and the browser will be redirected to the IPsec status page The VPN to the VPCshould now be fully configured
Note Sometimes there is a delay of 5-10 minutes before the tunnels are fully functional and passing trafficThis has been observed particularly often during the setup of tunnels using BGP routing
copy Copyright 2020 Rubicon Communications LLC 55
Security Gateway Manual Amazon AWS
323 Testing Connectivity
Verify that the IPsec tunnels are functioning by attempting to ping the ldquoinside tunnel addressesrdquo of the VPC side ofthe tunnel by navigating to Firewall -gt Virtual IP There should be two virtual IP addresses configured that haveDescriptions like ldquoInside address for tunnel to ltremote IP addressgtrdquo
Amazon provides inside addresses for each end of the tunnel in a 30 subnet in IPv4 link local address space(169254xy) Typically the first usable address in the 30 is the inside address for the VPC end of the tunnel andthe other usable address is the inside address for your end of the tunnel So if you ping from one of the virtual IPaddresses configured on the pfSensereg instance to the IP address that is one less (for example if the virtual IP addresswere 16925425322 ping from 16925425322 to 16925425321) that checks whether the other end of the tunnelis responding and whether the tunnel is functioning properly
Note It sometimes takes a few minutes for the tunnels to begin working after the configuration wizard completes
To ping log into the pfSense instance via SSH and execute ping from a shell prompt For the previous example of16925425322 the proper syntax is
ping -S 16925425322 16925425321
When pinging from a shell prompt it is possible leave the command running indefinitely and interrupt it there is aresponse
copy Copyright 2020 Rubicon Communications LLC 56
Security Gateway Manual Amazon AWS
It is also possible to ping via the Diagnostics -gt Ping page by selecting the appropriate source address and enteringthe remote tunnel inside address in the Host field This will only send a limited number of ping packets so it may benecessary to repeat this a few times
324 VPC Configuration Details
The AWS documentation for connecting a hardware device to a VPC provides a great amount of detail on configuringVPN Connections to VPC
The main configuration elements that exist in Amazonrsquos data model are the Virtual Private Gateway the CustomerGateway and the VPN Connection In order to configure a VPN connection to a VPC all 3 of these need to exist TheVirtual Private Gateway is the VPN endpoint on Amazonrsquos side The customer gateway is the VPN endpoint on thepfSensereg instancedevice being configured The VPN Connection is the IPsec VPN between Amazon and the pfSenseinstancedevice
A Virtual Private Gateway needs to exist and be associated to the VPC A particular VPN Gateway can only beassociated to one VPC at a time Once the VPC to connect to has been selected the wizard invokes the AWS API callDescribeVpnGateways to determine if a VPN Gateway already exists that is attached to the VPC If none exists itcreates one with the CreateVpnGateway API call and attaches it to the VPC with the AttachVpnGateway call
A Customer Gateway needs to be created for the public IP address of the device or virtual machine that will be used toconnect to the VPC The wizard invokes the AWS API call DescribeCustomerGateways to determine if a CustomerGateway already exists If none exists one is created with the CreateCustomerGateway API call
The VPN Connection connects the Virtual Private Gateway and Customer Gateway The wizard checks to see if thereis an existing VPN Connection configured that connects those endpoints by invoking the AWS API call DescribeVp-nConnections If none exists one is created using the CreateVpnConnection call One of the fields returned by thiscall is a block of XML configuration data that contains configuration data assigned by AWS for use with configuringthe VPN Connection This data is stored and used in subsequent steps to make the required configuration changeswithin pfSense
copy Copyright 2020 Rubicon Communications LLC 57
Security Gateway Manual Amazon AWS
Any objects created through API calls by the wizard will be tagged with names like auto-created by pfSenseVPC ltyour_VPC_IDgt This is accomplished by calling the AWS API call CreateTags and using Name as the keyfor the tag
In addition to creation of the items mentioned above required adjustments are made to Security Groups and RouteTables to facilitate communication over the VPN The Security Groups associated with the VPC are updated to allowinbound access from the local subnets on the pfSense end of the VPN They are checked first via the DescribeSecuri-tyGroups AWS API call to determine if the access is already allowed Any of the subnets that is not already allowedhas inbound access added via the AuthorizeSecurityGroupIngress AWS API call
Route Tables associated with the VPC are updated to receive routes from the VPN Gateway used by the VPN Con-nection They are checked first via the DescribeRouteTables AWS API call If the VPN Gateway ID is not includedin the list of VPN Gateways propagating routes route propagation for the VPN Gateway is enabled on that table usingthe EnableVgwRoutePropagation AWS API call
For VPN Connections using static routing static routes for the specified subnets are added to the VPN ConnectionThis is done via the CreateVpnConnectionRoute AWS API call
325 pfSense Configuration Details
On the pfSensereg side there are numerous configurations added to support the VPN to the VPC
Aliases
First aliases are created for use in a firewall rule These aliases are intended to contain the subnets that traffic shouldbe allowed to ingress over the IPsec tunnel One alias represents the local subnets on the pfSense side and is givena name like VPC_Local_vpc_12345678 and the other represents the remote subnets on the VPC side and is given aname like VPC_Remote_vpc_12345678
Virtual IP addresses
Next virtual IP addresses are added on the lo0 (loopback) interface These virtual IP addresses are the local ldquoinsideaddressesrdquo of the IPsec tunnels These addresses are used as the local address for BGP communication when BGProuting is selected These addresses are IPv4 link local addresses (see RFC 3297) AWS assigns 30rsquos out of thenetwork 1692540016 for this purpose
Note These addresses are also useful as a ping target to execute a basic test of whether the tunnel is functioningproperly Executing a ping from a source address of one of these IP addresses to the corresponding inside address ofthe other end of the tunnel helps determine whether the tunnel negotiation is completing properly
Firewall rules
Next a firewall rule is added on the IPsec interface that allows traffic from the VPC networks to the local subnetsThis rule uses the previously created Aliases as sourcedestination targets
IPsec
Then IPsec phase 1 and phase 2 associations are set up Most of the settings required are extracted from a blockof XML data that was returned by the CreateVpnConnection call made during the AWS configuration step Thisincludes parameters like endpoint IP addresses encryption ciphers timer values etc
copy Copyright 2020 Rubicon Communications LLC 58
Security Gateway Manual Amazon AWS
If BGP routing was selected the configurations for the OpenBGPD BGP daemon are established The required settingsare determined using the AS number entered into the wizard and the parameters returned by the CreateVpnConnec-tion call made during the AWS configuration step
326 Tested Configurations
Various topologies may be possible to establish using the AWS VPC Configuration Wizard This section enumeratessome of the configurations that were successfully tested
Platforms
bull Various hardware platforms
bull 64-bit virtual machines in VMware vSphereESX
bull Amazon EC2 instances (Xen virtual machines) of the Netgate pfSensereg RouterFirewallVPN AWS AMI
Local networkrouting configurations
bull pfSense with a public address configured on the WAN interface
bull pfSense with a private address configured on the WAN interface behind a 11 NAT
bull pfSense with a private address configured on the WAN interface behind a PAT (1many NAT)
VPC Topologies
bull pfSense connected to a single VPC
bull pfSense connected to multiple VPCrsquos in different regions
bull Amazon EC2 instance of the pfSense RouterFirewallVPN AWS AMI connected to a VPC belonging to thesame AWS account in a different region
bull Amazon EC2 instance of the pfSense RouterFirewallVPN AWS AMI connected to a VPC belonging to adifferent AWS account in the same region
The configuration recommended for the greatest amount of stability is to have a public IPv4 address directly configuredon the WAN interface of your pfSense firewall but VPNs have been successfully established under all of the conditionslisted above
Whether any of these solutions is appropriate should be evaluated in the context of personal needs and existing infras-tructure Other configurations not listed above may be possible as well
327 AWS VPC Wizard FAQ
1 What level of redundancy is provided by the two tunnels
Amazon provides two tunnel endpoints that will allow traffic to be sent between your networks and the remote VPCyou are connected to The racoon daemon in pfSensereg is only capable of establishing an active phase 2 associationfor a particular sourcedestination pair on a single tunnel
Phase 2 associations between the local subnets and the remote VPC subnet are configured in the pfSense GUI for bothtunnels but racoon will only actually establish an association for the first tunnel This means that racoon will onlyever try to send traffic destined for the remote VPC subnet over the first tunnel
copy Copyright 2020 Rubicon Communications LLC 59
Security Gateway Manual Amazon AWS
If that tunnel goes down the second tunnel may be up and inbound traffic from the remote VPC may be sent to yourlocal networks over that tunnel automatically But outbound traffic to your remote VPC would not automatically failover to the second tunnel In order for you to send your outbound traffic over the second tunnel you would need todisable the phase 2 associations for the first tunnel and apply the changes
2 I quit the wizard before finishing Now what
To finish setting up the VPN go back to the wizard and run through it again It should reuse any partial configurationsthat were generated before it was stopped and create the new elements that are required
3 What are the AWS charges for this
AWS determines their own pricing and provides details for EC2 pricing and VPC pricing There are many types ofcharges that may be incurred for operating instances on AWS (eg charges related to running an instance bandwidthstorage elastic IPs etc)
The charge of specific interest in this case is the hourly charge for a VPN Connection As of this writing it costs $005(USD) per hour in most regions to have a VPN Connection configured and available AWS will charge whether theVPN Connection is being used or not as long as it is configured This will be configured by the third step of the wizardand will never be removed by pfSense
If the VPN Connection is no longer needed and billing for it needs to be stopped visit AWSrsquos VPC ManagementConsole and delete the VPN Connection manually
4 Can I use the wizard to connect to the GovCloud region
This hasnrsquot been officially tested but at least one user has reported that they were able to successfully connect to theGovCloud region They manually added the region us-gov-west-1 to the list of regions in the first step of the wizardand were able to successfully connect to their VPC in that region This may be supported in a future build but to trywithout official support do the following
1 Under the System gt Advanced menu make sure the Enable Secure Shell box is checked This is already doneby default on AWS instances but is off by default on pfSense hardware devices
2 Log into the instance via SSH
3 Make sure the root filesystem is mounted as readwrite On an AWS instance or a hardware device running on anSSD this should be true On a hardware device using Compact Flash or an SD card for storage it will probablybe necessary to remount the root filesystem in readwrite mode by running
mount -uw
4 Edit the file usrlocalwwwwizardsvpc_vpn_wizardxml using vi Look for a section of the file that lookslike this
ltoptiongtltnamegtsa-east-1ltnamegtltvaluegtsa-east-1ltvaluegt
ltoptiongt
That should appear directly after several similar ltoptiongt specifications containing all of the other availableregions Right underneath that section add the following
copy Copyright 2020 Rubicon Communications LLC 60
Security Gateway Manual Amazon AWS
ltoptiongtltnamegtus-gov-west-1ltnamegtltvaluegtus-gov-west-1ltvaluegt
ltoptiongt
Then save the file and exit vi
5 If the filesystem had to be remounted in readwrite mode earlier remount it in read-only mode by running
The GovCloud region should now appear as a choice in the first step of the wizard
copy Copyright 2020 Rubicon Communications LLC 61
CHAPTER
FOUR
REFERENCES
41 Support Resources
411 Commercial Support
In order to keep prices low the software is not bundled with a support subscription For users who need commercialsupport Netgate Gloabal Support can be purchased at httpswwwnetgatecomsupport
412 Community Support
Community support for pfSensereg software is available through the Netgate Forum
42 Additional Resources
421 Netgate Training
Netgate training offers training courses for increasing your knowledge of pfSensereg products and services Whetheryou need to maintain or improve the security skills of your staff or offer highly specialized support and improve yourcustomer satisfaction Netgate training has got you covered
httpswwwnetgatecomtraining
422 Resource Library
To learn more about how to use your pfSense appliance and for other helpful resources make sure to browse ourResource Library
httpswwwnetgatecomresources
423 Professional Services
Support does not cover more complex tasks such as CARP configuration for redundancy on multiple firewalls orcircuits network design and conversion from other firewalls to pfSensereg These items are offered as professionalservices and can be purchased and scheduled accordingly
httpswwwnetgatecomour-servicesprofessional-serviceshtml
62
Security Gateway Manual Amazon AWS
424 Community Options
If you elected not to get a paid support plan you can find help from the active and knowledgeable pfSense communityon our forums
httpsforumnetgatecom
copy Copyright 2020 Rubicon Communications LLC 63
- Getting Started
- Instance Usage
- Virtual Private Cloud (VPC)
- References
-
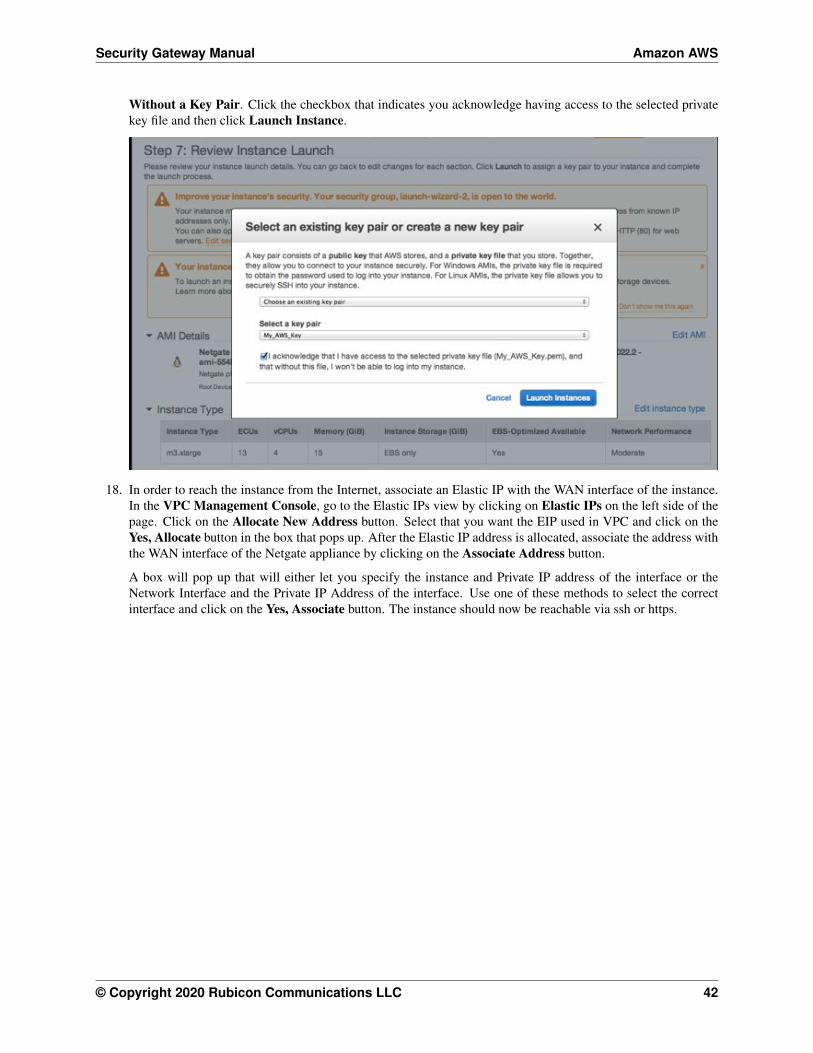
Security Gateway Manual Amazon AWS
313 Managing a VPC Instance
Once the instance is launched you can connect to it via the Elastic IP that was attached to the primary interface duringthe provisioning phase
In order to manage the configuration of the instance you can connect to it via https or ssh A limited set of configura-tions is possible through the SSH interface the preferred method for managing most of the configurations or viewingdata on the status of the pfSensereg instance is through the https webGUI
Connecting via SSH
To connect via SSH you would use the key pair you chose while creating the instance to connect to the admin accountFrom the command line on a UnixLinux host you would use a command similar to
ssh -i my_ec2_key admin232020454
Where the appropriate private key file and public IP or hostname are substituted
Note The first time you log into your instance the SSH key of the instance will not be cached on your computerand you will need to type yes when asked whether you want continue connecting This should not be necessary onsubsequent sessions
Once logged in you should see the console menu similar to the one below
copy Copyright 2020 Rubicon Communications LLC 44
Security Gateway Manual Amazon AWS
Connecting via HTTPS
To connect via https you would enter a URL containing the public IP address or hostname of your instance intoa web browser For example https232020454 Itrsquos very likely that you will receive a browser warningindicating that the security certificate of the site is not trusted This is because the instance uses a self-signed certificatefor https communication You should click on the option to proceed to the site anyway The pfSense login screen withthe Netgate logo should appear
The username to log in with is admin The password to use is either a value that you set in the User Data during thecreation of the instance or a random password
Tip It is preferable to explicitly set a password by passing a value in with the User Data field so the password willbe known in advance
If you did not set a specific password you can find out that value that the random password was set to through one of2 different methods
1 The first method is to log in over SSH with the key pair that you selected when the instance was created andexamine the contents of the file located at etcmotd You would do this by selecting option 8) Shell in theconsole menu that is presented when you SSH in then run this command in the shell
cat etcmotd
2 The second method is to view the System Log for the instance in the EC2 Management Console After themessages that are displayed that show the status of the boot process a message should appear that indicates what
copy Copyright 2020 Rubicon Communications LLC 45
Security Gateway Manual Amazon AWS
the administrative password was changed to Be aware that the System Log output in the EC2 ManagementConsole is not updated in real time and may take a few minutes to show up
The message you should look for using either of the methods mentioned about will look like this
Admin password changed to abcdefg
Once yoursquove determined your password and entered it into the login form the pfSense WebGUI should be availableto you
314 Forwarding traffic from VPC subnets through the instance
Some additional configuration is required within the VPC instancersquos pfSensereg webGUI before you are able to managetraffic from the private subnet
1 Log into the pfSense WebGUI for the instance
2 Click on the Interfaces heading on the left and then click the Assign link
3 Click on the + icon to add a new Interface under the Interface assignments tab A LAN interface shouldautomatically be added with the next available network interface (xn1)
4 Click on the Interfaces heading on the left again and then click on LAN Click the checkbox to enable the LANinterface Set the IPv4 Configuration Type to Static IPv4 and enter the IP address you assigned to the 2ndinterface during the provisioning phase Click the Save button
Now you can create other instances attached to your private subnet and protect them with the firewall on the pfSenseinstance
Common ways to manage private hosts
Allowing private hosts to connect to the Internet
To allow private hosts to be able to connect to the Internet you can allow any traffic from the LAN in your firewallrules there should be a rule like this in place by default
Next set up NAT rules to cause addresses in the private subnet to be NATed to the IP address of the WAN interface
1 Under the Firewall heading on the left click on the NAT link
2 On the Outbound tab click the radio button for Manual Outbound NAT rule generation (AON - AdvancedOutbound NAT)
3 Click the Save button
4 Click on the Aliases link under the Firewall heading on the left
5 Add your private subnet to the Networks_to_NAT alias
Note There is an existing NAT rule configured by default that uses the alias Networks_to_NAT
copy Copyright 2020 Rubicon Communications LLC 46
Security Gateway Manual Amazon AWS
Allow private hosts to connect to each other
If your hosts should only contact each other and a private network segment elsewhere you can configure an IPsecor OpenVPN tunnel from your remote networks to the Netgate appliance instance and set up the appropriate firewallrules routes and security policies to allow access to your private subnet through a VPN tunnel
Allow direct inbound access from the internet to hosts
If you wish to enable direct inbound access from the internet to hosts on the private subnet you can set up portforwarding on the WAN interface to direct traffic to particular hosts in the private subnet
315 Establishing a VPN connection to a VPC in another region
To establish a VPN that allows instances on the VPC subnet(s) that sit behind a Netgate appliance to communicate withinstances that reside in a VPC in another region the Netgate appliance has a VPC configuration wizard that assists byconfiguring both the Netgate appliance as well as the VPC configuration elements that would normally have to be setmanually through the AWS Management Console
For detailed instructions see the AWS VPC User Guide
316 Upgrading a VPC Instance
Periodically new releases of the AMI are issued to track new releases of pfSensereg that may provide new functionalitybug fixes and security updates
The lower risk approach to upgrading is to bring up a new instance alongside the existing one and executing a cutoverThese instructions detail the procedure for moving your existing instance to one running the latest version
1 Back up the configuration of your exsting instance by navigating to BackupRestore under the Diagnosticsmenu in the Web GUI Click the Download configuration button under the Backup Configuration headingand save your config file to your local system
2 Bring up a new instance of the pfSense Certified RouterFirewallVPN running the latest version
3 When creating the instance make sure the interfaces match the interfaces on the existing instance Make surethat the new instance is in the same VPC as the existing instance and that it has the same number of interfacesattached and that the interfaces are connected to the same Subnets
4 Make sure any interfaces on the new instance that will communicate with private Subnets have theSourceDestination check disabled
5 Allocate a new Elastic IP and associate it to the WAN interface of the new instance to allow yourself managementaccess
6 Restore the backed up configuration file to the new instance Navigate to BackupRestore under the Diagnosticsmenu in the Web GUI Under the Restore Configuration heading click the Choose File button and browsefor the configuration file you backed up from the existing instance earlier Once you have selected that fileclick the Restore configuration button The configuration file will be uploaded and the instance will rebootautomatically
7 If you had packages installed on the old instance navigate to Packages under the System menu in the pfSenseweb GUI and install the same packages
8 If there was any external dependency on the public IP address of the existing instance you can remove theElastic IP Address from the upgraded instance and move the Elastic IP Address from the existing instance tothe upgraded instance External dependencies that might cause you to want to do this include things like VPNrsquos
copy Copyright 2020 Rubicon Communications LLC 47
Security Gateway Manual Amazon AWS
configured to external devices that rely on the existing instancersquos Elastic IP address or access lists on externaldevices that allow access to traffic from the existing instancersquos IP address There may be other reasons why youwould wish to keep the existing address as well (to preserve existing bookmarks to the Web GUI reduce theneed for updates to existing internal documentation etc) The process for moving the old Elastic IP address tothe new instance is as follows
bull Disassociate the Elastic IP address from the new instance In the EC2 Management Console click onElastic IPs under the Network amp Security heading Check the box next to the Elastic IP address assignedto the new instance and click on the Disassociate Address button
bull Disassociate the Elastic IP address from the old instance The procedure is the same as in the previousstep just repeated for the Eastic IP address of the old instance this time
bull Associate the Elastic IP address that was previously associated to the old instance to public interface of thenew instance In the EC2 Management Console click on Elastic IPs Check the box next to the Elastic IPaddress you are moving and click the Associate Address button Fill in the correct value for the Instanceor Network Interface and select the Private IP Address of the public interface on the new instance Clickthe Associate button The management interface of the new instance should now be accessible
9 Move any default routes that pointed to an interface on the old instance to point to the equivalent interface onthe new instance In the VPC Management Console click on Route Tables under the Virtual Private Cloudheading Check the box next to a Route Table associated with the VPC that the instances is located in
bull In the detail pane that appears at the bottom of the screen click on the Routes tab
bull If a route exists for 00000 with a Target that is an interface ID of an interface on the old instnace clickthe Edit button above the table displaying the routes
bull Click the red X next to the row for 00000 to remove the existing route
bull There should be a blank row with empty fields for a new route Enter 00000 in the Destinationfield and the Network Interface ID of the interface on the new instance in the Target field Click on theSave button
bull If there were multiple private subnets in the VPC which were pointed to interfaces on the pfSense instancerepeat this process for the other Route Tables associated with the VPC
bull The new instance should now be functioning as the old one did
32 AWS VPC Wizard User Guide
This guide will explain how to use the AWS VPC Wizard to simplify the configuration of a VPN to a remote VPC Theadministrator is asked for the minimum amount of basic information required to establish the VPN The configurationsboth on the AWS VPC side and on the pfSense side are then automatically created When the wizard is finishedexecuting a functioning VPN connection to a VPC should be established
321 AWS Access Keys
In order to connect to the AWS API to make certain required configuration changes the AWS VPC Wizard requiresAccess Keys to retrieve and modify VPC configurations
See also
Find more information about AWS Security Credential including Access Keys by reading AWS Security Credentials
Access keys consist of two parts
1 An access key ID
copy Copyright 2020 Rubicon Communications LLC 48
Security Gateway Manual Amazon AWS
bull For example AKIAIOSFODNN7EXAMPLE
2 A secret access key
bull For example wJalrXUtnFEMIK7MDENGbPxRfiCYEXAMPLEKEY
Access keys are like a usernamepassword and needed for programmatic requests to AWS including the AWS VPCWizard Use both the access key ID and secret access key together to authenticate requests
Important Manage access keys as securely as a user name and password
Managing Access Keys
To create modify or delete IAM user access keys do the following
1 Sign in to the IAM console
2 In the navigation bar on the upper right choose a user name and then choose My Security Credentials
3 On the AWS IAM Credentials tab in the Access keys for CLI SDK and API access section choose Createaccess key
4 Choose Download csv file to save the access key ID and secret access key to a csv file on your computerStore the file in a secure location There is no access to the secret access key again after this dialog box closesAfter the csv file has been downloaded choose Close When an access key is created the key pair is active bydefault and the pair can be used right away
bull To disable an active access key choose Make inactive
bull To reenable an inactive access key choose Make active
bull To delete an access key choose its X button at the far right of the row Then choose Delete to confirmWhen an access key is deleted itrsquos gone forever and cannot be retrieved However new keys can alwaysbe created
To create modify or delete another IAM userrsquos access keys do the following
1 Sign in to the IAM console
2 In the navigation pane choose Users
3 Choose the name of the user whose access keys to manage and then choose the Security credentials tab
4 In the Access keys section choose Create access key
5 Choose Download csv file to save the access key ID and secret access key to a CSV file on your computer
Rotating Access Keys
As a security best practice we recommend to regularly rotate (change) IAM user access keys Rotating access keyscan be done from the AWS Management Console
To rotate access keys for an IAM user without interrupting the applications (console) create a second access key whilethe first access key is still active
1 Sign in to the IAM console
2 In the navigation pane choose Users
3 Choose the name of the user whose access keys to manage and then choose the Security credentials tab
4 In the Access keys section choose Create access key
copy Copyright 2020 Rubicon Communications LLC 49
Security Gateway Manual Amazon AWS
5 Choose Download csv file to save the access key ID and secret access key to a CSV file on your computer
6 The new access key is active by default At this point the user has two active access keys
After waiting some period of time to ensure that all applications and tools have been updated delete the first accesskey
1 Sign in to the IAM console
2 In the navigation pane choose Users
3 Choose the name of the user whose access keys to manage and then choose the Security credentials tab
4 Locate the access key to delete and choose its X button at the far right of the row Then choose Delete to confirm
Determining When Access Keys Need Rotating
To determine when access keys need rotating (console) do the following
1 Sign in to the IAM console
2 In the navigation pane choose Users
3 If necessary add the Access key age column to the users table by completing the following steps
1 Above the table on the far right click the settings icon
2 In Manage columns select Access key age
3 Choose Close to return to the list of users
4 The Access key age column shows the number of days since the oldest active access key was created Usethis information to find users with access keys that need rotating The column displays None for users with noaccess key
322 Using the Wizard
1 Gather your AWS Access Key ID and Secret Key
2 Navigate to VPN gt AWS VPC Wizard in the main menu in the pfSensereg webGUI
copy Copyright 2020 Rubicon Communications LLC 50
Security Gateway Manual Amazon AWS
3 The first screen of the wizard prompts for the AWS Credentials Enter the Access Key ID and Secret AccessKey in the appropriate text fields and select the Region to connect to in the dropdown menu then click Next
The wizard will then query the AWS API using those credentials to find which VPCrsquos exist in the selectedregion If the credentials were rejected an error message will be displayed and return to the first screen
4 The next screen will prompt to select from the available VPCrsquos in the selected region Select the one to connectto from the dropdown menu The wizard will not create a new VPC it will only connect to an existing VPC
Click Next after selecting the desired VPC
copy Copyright 2020 Rubicon Communications LLC 51
Security Gateway Manual Amazon AWS
Note If the desired VPCrsquos to connect to isnrsquot available create one via the AWS Management Console and tryagain
The wizard will then query the AWS API to check whether there is a VPN Gateway attached to the selectedVPC If none exists one will be created via the API Then the next screen will be displayed
5 On the next screen specify routing and network data
A description of what should be entered for each of these fields follows
copy Copyright 2020 Rubicon Communications LLC 52
Security Gateway Manual Amazon AWS
Routing Type AWS offers either static routing or BGP routing Select the appropriate type fromthe dropdown menu If unsure static routing is likely to be adequate
BGP AS Number If static routing was choosen leave this field blank Otherwise it is possible tospecify an AS number to use If left blank the value will default to 65000
Local Public IP Address On an AWS Netgate appliance instance this should be the public IP ad-dress of the Elastic IP associated with the instance If configuring a hardware device runningpfSense this could be the public address assigned to the WAN (or other) interface of the device
Local subnets The subnets connected to the pfSense instance that should be routed over the tunnelfrom hosts in the remote VPC As an example if connecting a pfSense instance to a remote VPCin the AWS us-east-1 region enter the subnets (or a single subnet) that are local to the pfSenseinstance and when hosts in your VPC in us-east-1 attempted to reach addresses within thosesubnets the traffic will be sent through the VPN tunnel that is being configured
Note When selecting static routing as the routing type there will be a delay that is typically between 2-5minutes before the next screen is displayed This is because static routes must be added to the VPN Connectionvia the AWS API This operation fails until the VPN Connection reaches the ldquoavailablerdquo state This can take afew minutes to occur
Click Next when done
The wizard will then query the AWS API to find whether a Customer Gateway is configured with the selectedPublic IP Address If none exists one will be created If one already exists the ID will be retrieved and it willbe used
The wizard will then query the AWS API to see if a VPC Connection already exists that matches the dataentered If one exists it will be used Otherwise one will be created
If static routing was selected static routes will be added to the VPN Connection for the Local subnets entered
Route propagation will be enabled for the VPN Gateway in each of the Route Tables that are associated withthe VPC All of these configurations are carried out in the AWS API nothing has been changed in the pfSenseVPN configurations yet
Warning Important Note on Billing Once this step is carried out and the VPN Connection is createdAWS will start billing your AWS account the hourly rate for a VPN Connection This is $005 as of thiswriting and that is a charge that goes entirely to AWS itself They will do this until the VPN Connection isdeleted via the VPC Management Console
Nothing in pfSense will ever cause AWS to stop billing for this VPN Connection Whether it works or notwhether the pfSense instance is up or down whether the IPsec tunnels have been deleted or reconfiguredAWS will continue to bill the hourly fee for a VPN Connection if the creation of it succeeds until it is deletedthrough their web interface
The wizard helps establish an initial configuration that works and configures the appropriate elements inAWSrsquos API to facilitate this You are responsible for making sure you understand what yoursquore being billedfor and disabling any functions including VPN Connections that are no longer necessary
6 If the operations of the previous step succeeded the next screen will appear
copy Copyright 2020 Rubicon Communications LLC 53
Security Gateway Manual Amazon AWS
Select an Interface to act as the local endpoint of the VPN tunnels that will be created In most cases thisshould be the WAN interface It should generally be whatever interface is associated with the Local Public IPAddress entered in the previous step
On an AWS Netgate pfSense instance this will be whatever interface the Elastic IP is associated with On ahardware device running pfSense that has the Local Public IP Address directly configured on an interface thiswill be the interface that the Local Public IP Address is configured on
After clicking Next the wizard will configure the VPN and associated settings within pfSense itself using datareturned by the AWS API in the previous step
It will configure 2 IPsec tunnels a firewall rule 2 Aliases (referenced by the firewall rule) and 2 Virtual IPAddresses If BGP was selected as the Routing Type in the previous step it will install the OpenBGPDpackage automatically and configure it appropriately
7 The next screen will appear and prompt to apply the configuration changes that have been made
copy Copyright 2020 Rubicon Communications LLC 54
Security Gateway Manual Amazon AWS
After clicking Next all the configuration changes that were made will be applied
8 The wizard will be completed and the browser will be redirected to the IPsec status page The VPN to the VPCshould now be fully configured
Note Sometimes there is a delay of 5-10 minutes before the tunnels are fully functional and passing trafficThis has been observed particularly often during the setup of tunnels using BGP routing
copy Copyright 2020 Rubicon Communications LLC 55
Security Gateway Manual Amazon AWS
323 Testing Connectivity
Verify that the IPsec tunnels are functioning by attempting to ping the ldquoinside tunnel addressesrdquo of the VPC side ofthe tunnel by navigating to Firewall -gt Virtual IP There should be two virtual IP addresses configured that haveDescriptions like ldquoInside address for tunnel to ltremote IP addressgtrdquo
Amazon provides inside addresses for each end of the tunnel in a 30 subnet in IPv4 link local address space(169254xy) Typically the first usable address in the 30 is the inside address for the VPC end of the tunnel andthe other usable address is the inside address for your end of the tunnel So if you ping from one of the virtual IPaddresses configured on the pfSensereg instance to the IP address that is one less (for example if the virtual IP addresswere 16925425322 ping from 16925425322 to 16925425321) that checks whether the other end of the tunnelis responding and whether the tunnel is functioning properly
Note It sometimes takes a few minutes for the tunnels to begin working after the configuration wizard completes
To ping log into the pfSense instance via SSH and execute ping from a shell prompt For the previous example of16925425322 the proper syntax is
ping -S 16925425322 16925425321
When pinging from a shell prompt it is possible leave the command running indefinitely and interrupt it there is aresponse
copy Copyright 2020 Rubicon Communications LLC 56
Security Gateway Manual Amazon AWS
It is also possible to ping via the Diagnostics -gt Ping page by selecting the appropriate source address and enteringthe remote tunnel inside address in the Host field This will only send a limited number of ping packets so it may benecessary to repeat this a few times
324 VPC Configuration Details
The AWS documentation for connecting a hardware device to a VPC provides a great amount of detail on configuringVPN Connections to VPC
The main configuration elements that exist in Amazonrsquos data model are the Virtual Private Gateway the CustomerGateway and the VPN Connection In order to configure a VPN connection to a VPC all 3 of these need to exist TheVirtual Private Gateway is the VPN endpoint on Amazonrsquos side The customer gateway is the VPN endpoint on thepfSensereg instancedevice being configured The VPN Connection is the IPsec VPN between Amazon and the pfSenseinstancedevice
A Virtual Private Gateway needs to exist and be associated to the VPC A particular VPN Gateway can only beassociated to one VPC at a time Once the VPC to connect to has been selected the wizard invokes the AWS API callDescribeVpnGateways to determine if a VPN Gateway already exists that is attached to the VPC If none exists itcreates one with the CreateVpnGateway API call and attaches it to the VPC with the AttachVpnGateway call
A Customer Gateway needs to be created for the public IP address of the device or virtual machine that will be used toconnect to the VPC The wizard invokes the AWS API call DescribeCustomerGateways to determine if a CustomerGateway already exists If none exists one is created with the CreateCustomerGateway API call
The VPN Connection connects the Virtual Private Gateway and Customer Gateway The wizard checks to see if thereis an existing VPN Connection configured that connects those endpoints by invoking the AWS API call DescribeVp-nConnections If none exists one is created using the CreateVpnConnection call One of the fields returned by thiscall is a block of XML configuration data that contains configuration data assigned by AWS for use with configuringthe VPN Connection This data is stored and used in subsequent steps to make the required configuration changeswithin pfSense
copy Copyright 2020 Rubicon Communications LLC 57
Security Gateway Manual Amazon AWS
Any objects created through API calls by the wizard will be tagged with names like auto-created by pfSenseVPC ltyour_VPC_IDgt This is accomplished by calling the AWS API call CreateTags and using Name as the keyfor the tag
In addition to creation of the items mentioned above required adjustments are made to Security Groups and RouteTables to facilitate communication over the VPN The Security Groups associated with the VPC are updated to allowinbound access from the local subnets on the pfSense end of the VPN They are checked first via the DescribeSecuri-tyGroups AWS API call to determine if the access is already allowed Any of the subnets that is not already allowedhas inbound access added via the AuthorizeSecurityGroupIngress AWS API call
Route Tables associated with the VPC are updated to receive routes from the VPN Gateway used by the VPN Con-nection They are checked first via the DescribeRouteTables AWS API call If the VPN Gateway ID is not includedin the list of VPN Gateways propagating routes route propagation for the VPN Gateway is enabled on that table usingthe EnableVgwRoutePropagation AWS API call
For VPN Connections using static routing static routes for the specified subnets are added to the VPN ConnectionThis is done via the CreateVpnConnectionRoute AWS API call
325 pfSense Configuration Details
On the pfSensereg side there are numerous configurations added to support the VPN to the VPC
Aliases
First aliases are created for use in a firewall rule These aliases are intended to contain the subnets that traffic shouldbe allowed to ingress over the IPsec tunnel One alias represents the local subnets on the pfSense side and is givena name like VPC_Local_vpc_12345678 and the other represents the remote subnets on the VPC side and is given aname like VPC_Remote_vpc_12345678
Virtual IP addresses
Next virtual IP addresses are added on the lo0 (loopback) interface These virtual IP addresses are the local ldquoinsideaddressesrdquo of the IPsec tunnels These addresses are used as the local address for BGP communication when BGProuting is selected These addresses are IPv4 link local addresses (see RFC 3297) AWS assigns 30rsquos out of thenetwork 1692540016 for this purpose
Note These addresses are also useful as a ping target to execute a basic test of whether the tunnel is functioningproperly Executing a ping from a source address of one of these IP addresses to the corresponding inside address ofthe other end of the tunnel helps determine whether the tunnel negotiation is completing properly
Firewall rules
Next a firewall rule is added on the IPsec interface that allows traffic from the VPC networks to the local subnetsThis rule uses the previously created Aliases as sourcedestination targets
IPsec
Then IPsec phase 1 and phase 2 associations are set up Most of the settings required are extracted from a blockof XML data that was returned by the CreateVpnConnection call made during the AWS configuration step Thisincludes parameters like endpoint IP addresses encryption ciphers timer values etc
copy Copyright 2020 Rubicon Communications LLC 58
Security Gateway Manual Amazon AWS
If BGP routing was selected the configurations for the OpenBGPD BGP daemon are established The required settingsare determined using the AS number entered into the wizard and the parameters returned by the CreateVpnConnec-tion call made during the AWS configuration step
326 Tested Configurations
Various topologies may be possible to establish using the AWS VPC Configuration Wizard This section enumeratessome of the configurations that were successfully tested
Platforms
bull Various hardware platforms
bull 64-bit virtual machines in VMware vSphereESX
bull Amazon EC2 instances (Xen virtual machines) of the Netgate pfSensereg RouterFirewallVPN AWS AMI
Local networkrouting configurations
bull pfSense with a public address configured on the WAN interface
bull pfSense with a private address configured on the WAN interface behind a 11 NAT
bull pfSense with a private address configured on the WAN interface behind a PAT (1many NAT)
VPC Topologies
bull pfSense connected to a single VPC
bull pfSense connected to multiple VPCrsquos in different regions
bull Amazon EC2 instance of the pfSense RouterFirewallVPN AWS AMI connected to a VPC belonging to thesame AWS account in a different region
bull Amazon EC2 instance of the pfSense RouterFirewallVPN AWS AMI connected to a VPC belonging to adifferent AWS account in the same region
The configuration recommended for the greatest amount of stability is to have a public IPv4 address directly configuredon the WAN interface of your pfSense firewall but VPNs have been successfully established under all of the conditionslisted above
Whether any of these solutions is appropriate should be evaluated in the context of personal needs and existing infras-tructure Other configurations not listed above may be possible as well
327 AWS VPC Wizard FAQ
1 What level of redundancy is provided by the two tunnels
Amazon provides two tunnel endpoints that will allow traffic to be sent between your networks and the remote VPCyou are connected to The racoon daemon in pfSensereg is only capable of establishing an active phase 2 associationfor a particular sourcedestination pair on a single tunnel
Phase 2 associations between the local subnets and the remote VPC subnet are configured in the pfSense GUI for bothtunnels but racoon will only actually establish an association for the first tunnel This means that racoon will onlyever try to send traffic destined for the remote VPC subnet over the first tunnel
copy Copyright 2020 Rubicon Communications LLC 59
Security Gateway Manual Amazon AWS
If that tunnel goes down the second tunnel may be up and inbound traffic from the remote VPC may be sent to yourlocal networks over that tunnel automatically But outbound traffic to your remote VPC would not automatically failover to the second tunnel In order for you to send your outbound traffic over the second tunnel you would need todisable the phase 2 associations for the first tunnel and apply the changes
2 I quit the wizard before finishing Now what
To finish setting up the VPN go back to the wizard and run through it again It should reuse any partial configurationsthat were generated before it was stopped and create the new elements that are required
3 What are the AWS charges for this
AWS determines their own pricing and provides details for EC2 pricing and VPC pricing There are many types ofcharges that may be incurred for operating instances on AWS (eg charges related to running an instance bandwidthstorage elastic IPs etc)
The charge of specific interest in this case is the hourly charge for a VPN Connection As of this writing it costs $005(USD) per hour in most regions to have a VPN Connection configured and available AWS will charge whether theVPN Connection is being used or not as long as it is configured This will be configured by the third step of the wizardand will never be removed by pfSense
If the VPN Connection is no longer needed and billing for it needs to be stopped visit AWSrsquos VPC ManagementConsole and delete the VPN Connection manually
4 Can I use the wizard to connect to the GovCloud region
This hasnrsquot been officially tested but at least one user has reported that they were able to successfully connect to theGovCloud region They manually added the region us-gov-west-1 to the list of regions in the first step of the wizardand were able to successfully connect to their VPC in that region This may be supported in a future build but to trywithout official support do the following
1 Under the System gt Advanced menu make sure the Enable Secure Shell box is checked This is already doneby default on AWS instances but is off by default on pfSense hardware devices
2 Log into the instance via SSH
3 Make sure the root filesystem is mounted as readwrite On an AWS instance or a hardware device running on anSSD this should be true On a hardware device using Compact Flash or an SD card for storage it will probablybe necessary to remount the root filesystem in readwrite mode by running
mount -uw
4 Edit the file usrlocalwwwwizardsvpc_vpn_wizardxml using vi Look for a section of the file that lookslike this
ltoptiongtltnamegtsa-east-1ltnamegtltvaluegtsa-east-1ltvaluegt
ltoptiongt
That should appear directly after several similar ltoptiongt specifications containing all of the other availableregions Right underneath that section add the following
copy Copyright 2020 Rubicon Communications LLC 60
Security Gateway Manual Amazon AWS
ltoptiongtltnamegtus-gov-west-1ltnamegtltvaluegtus-gov-west-1ltvaluegt
ltoptiongt
Then save the file and exit vi
5 If the filesystem had to be remounted in readwrite mode earlier remount it in read-only mode by running
The GovCloud region should now appear as a choice in the first step of the wizard
copy Copyright 2020 Rubicon Communications LLC 61
CHAPTER
FOUR
REFERENCES
41 Support Resources
411 Commercial Support
In order to keep prices low the software is not bundled with a support subscription For users who need commercialsupport Netgate Gloabal Support can be purchased at httpswwwnetgatecomsupport
412 Community Support
Community support for pfSensereg software is available through the Netgate Forum
42 Additional Resources
421 Netgate Training
Netgate training offers training courses for increasing your knowledge of pfSensereg products and services Whetheryou need to maintain or improve the security skills of your staff or offer highly specialized support and improve yourcustomer satisfaction Netgate training has got you covered
httpswwwnetgatecomtraining
422 Resource Library
To learn more about how to use your pfSense appliance and for other helpful resources make sure to browse ourResource Library
httpswwwnetgatecomresources
423 Professional Services
Support does not cover more complex tasks such as CARP configuration for redundancy on multiple firewalls orcircuits network design and conversion from other firewalls to pfSensereg These items are offered as professionalservices and can be purchased and scheduled accordingly
httpswwwnetgatecomour-servicesprofessional-serviceshtml
62
Security Gateway Manual Amazon AWS
424 Community Options
If you elected not to get a paid support plan you can find help from the active and knowledgeable pfSense communityon our forums
httpsforumnetgatecom
copy Copyright 2020 Rubicon Communications LLC 63
- Getting Started
- Instance Usage
- Virtual Private Cloud (VPC)
- References
-
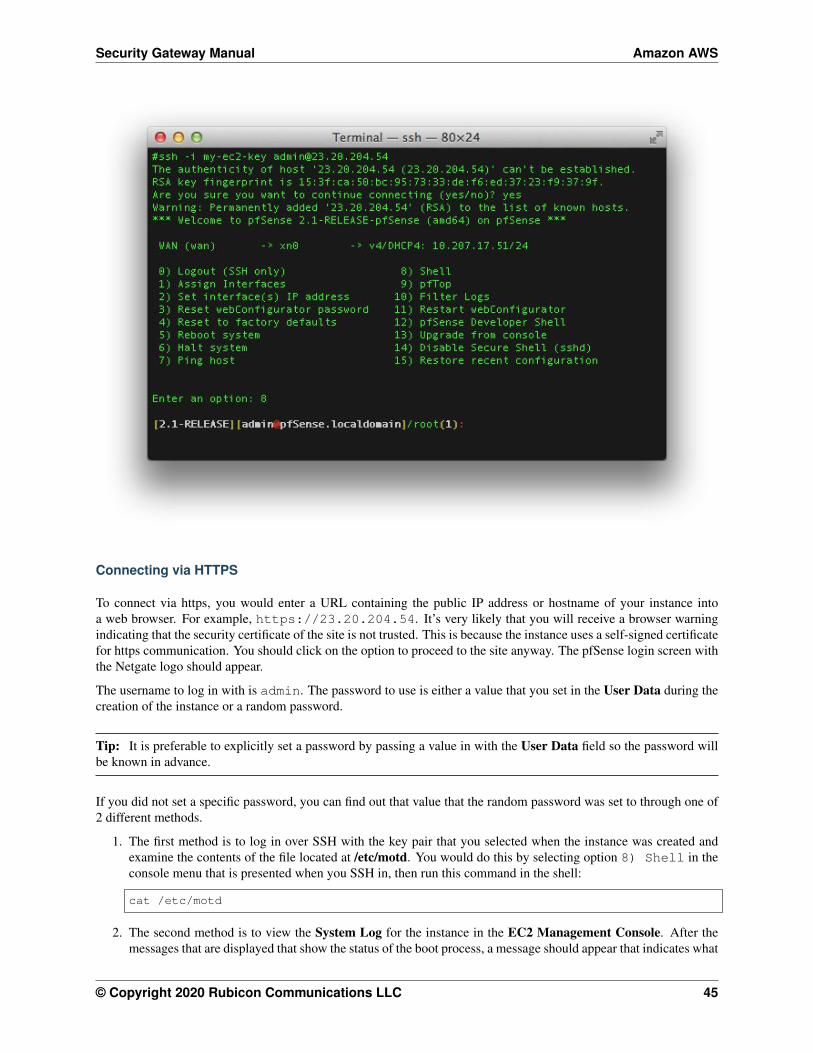
Security Gateway Manual Amazon AWS
Connecting via HTTPS
To connect via https you would enter a URL containing the public IP address or hostname of your instance intoa web browser For example https232020454 Itrsquos very likely that you will receive a browser warningindicating that the security certificate of the site is not trusted This is because the instance uses a self-signed certificatefor https communication You should click on the option to proceed to the site anyway The pfSense login screen withthe Netgate logo should appear
The username to log in with is admin The password to use is either a value that you set in the User Data during thecreation of the instance or a random password
Tip It is preferable to explicitly set a password by passing a value in with the User Data field so the password willbe known in advance
If you did not set a specific password you can find out that value that the random password was set to through one of2 different methods
1 The first method is to log in over SSH with the key pair that you selected when the instance was created andexamine the contents of the file located at etcmotd You would do this by selecting option 8) Shell in theconsole menu that is presented when you SSH in then run this command in the shell
cat etcmotd
2 The second method is to view the System Log for the instance in the EC2 Management Console After themessages that are displayed that show the status of the boot process a message should appear that indicates what
copy Copyright 2020 Rubicon Communications LLC 45
Security Gateway Manual Amazon AWS
the administrative password was changed to Be aware that the System Log output in the EC2 ManagementConsole is not updated in real time and may take a few minutes to show up
The message you should look for using either of the methods mentioned about will look like this
Admin password changed to abcdefg
Once yoursquove determined your password and entered it into the login form the pfSense WebGUI should be availableto you
314 Forwarding traffic from VPC subnets through the instance
Some additional configuration is required within the VPC instancersquos pfSensereg webGUI before you are able to managetraffic from the private subnet
1 Log into the pfSense WebGUI for the instance
2 Click on the Interfaces heading on the left and then click the Assign link
3 Click on the + icon to add a new Interface under the Interface assignments tab A LAN interface shouldautomatically be added with the next available network interface (xn1)
4 Click on the Interfaces heading on the left again and then click on LAN Click the checkbox to enable the LANinterface Set the IPv4 Configuration Type to Static IPv4 and enter the IP address you assigned to the 2ndinterface during the provisioning phase Click the Save button
Now you can create other instances attached to your private subnet and protect them with the firewall on the pfSenseinstance
Common ways to manage private hosts
Allowing private hosts to connect to the Internet
To allow private hosts to be able to connect to the Internet you can allow any traffic from the LAN in your firewallrules there should be a rule like this in place by default
Next set up NAT rules to cause addresses in the private subnet to be NATed to the IP address of the WAN interface
1 Under the Firewall heading on the left click on the NAT link
2 On the Outbound tab click the radio button for Manual Outbound NAT rule generation (AON - AdvancedOutbound NAT)
3 Click the Save button
4 Click on the Aliases link under the Firewall heading on the left
5 Add your private subnet to the Networks_to_NAT alias
Note There is an existing NAT rule configured by default that uses the alias Networks_to_NAT
copy Copyright 2020 Rubicon Communications LLC 46
Security Gateway Manual Amazon AWS
Allow private hosts to connect to each other
If your hosts should only contact each other and a private network segment elsewhere you can configure an IPsecor OpenVPN tunnel from your remote networks to the Netgate appliance instance and set up the appropriate firewallrules routes and security policies to allow access to your private subnet through a VPN tunnel
Allow direct inbound access from the internet to hosts
If you wish to enable direct inbound access from the internet to hosts on the private subnet you can set up portforwarding on the WAN interface to direct traffic to particular hosts in the private subnet
315 Establishing a VPN connection to a VPC in another region
To establish a VPN that allows instances on the VPC subnet(s) that sit behind a Netgate appliance to communicate withinstances that reside in a VPC in another region the Netgate appliance has a VPC configuration wizard that assists byconfiguring both the Netgate appliance as well as the VPC configuration elements that would normally have to be setmanually through the AWS Management Console
For detailed instructions see the AWS VPC User Guide
316 Upgrading a VPC Instance
Periodically new releases of the AMI are issued to track new releases of pfSensereg that may provide new functionalitybug fixes and security updates
The lower risk approach to upgrading is to bring up a new instance alongside the existing one and executing a cutoverThese instructions detail the procedure for moving your existing instance to one running the latest version
1 Back up the configuration of your exsting instance by navigating to BackupRestore under the Diagnosticsmenu in the Web GUI Click the Download configuration button under the Backup Configuration headingand save your config file to your local system
2 Bring up a new instance of the pfSense Certified RouterFirewallVPN running the latest version
3 When creating the instance make sure the interfaces match the interfaces on the existing instance Make surethat the new instance is in the same VPC as the existing instance and that it has the same number of interfacesattached and that the interfaces are connected to the same Subnets
4 Make sure any interfaces on the new instance that will communicate with private Subnets have theSourceDestination check disabled
5 Allocate a new Elastic IP and associate it to the WAN interface of the new instance to allow yourself managementaccess
6 Restore the backed up configuration file to the new instance Navigate to BackupRestore under the Diagnosticsmenu in the Web GUI Under the Restore Configuration heading click the Choose File button and browsefor the configuration file you backed up from the existing instance earlier Once you have selected that fileclick the Restore configuration button The configuration file will be uploaded and the instance will rebootautomatically
7 If you had packages installed on the old instance navigate to Packages under the System menu in the pfSenseweb GUI and install the same packages
8 If there was any external dependency on the public IP address of the existing instance you can remove theElastic IP Address from the upgraded instance and move the Elastic IP Address from the existing instance tothe upgraded instance External dependencies that might cause you to want to do this include things like VPNrsquos
copy Copyright 2020 Rubicon Communications LLC 47
Security Gateway Manual Amazon AWS
configured to external devices that rely on the existing instancersquos Elastic IP address or access lists on externaldevices that allow access to traffic from the existing instancersquos IP address There may be other reasons why youwould wish to keep the existing address as well (to preserve existing bookmarks to the Web GUI reduce theneed for updates to existing internal documentation etc) The process for moving the old Elastic IP address tothe new instance is as follows
bull Disassociate the Elastic IP address from the new instance In the EC2 Management Console click onElastic IPs under the Network amp Security heading Check the box next to the Elastic IP address assignedto the new instance and click on the Disassociate Address button
bull Disassociate the Elastic IP address from the old instance The procedure is the same as in the previousstep just repeated for the Eastic IP address of the old instance this time
bull Associate the Elastic IP address that was previously associated to the old instance to public interface of thenew instance In the EC2 Management Console click on Elastic IPs Check the box next to the Elastic IPaddress you are moving and click the Associate Address button Fill in the correct value for the Instanceor Network Interface and select the Private IP Address of the public interface on the new instance Clickthe Associate button The management interface of the new instance should now be accessible
9 Move any default routes that pointed to an interface on the old instance to point to the equivalent interface onthe new instance In the VPC Management Console click on Route Tables under the Virtual Private Cloudheading Check the box next to a Route Table associated with the VPC that the instances is located in
bull In the detail pane that appears at the bottom of the screen click on the Routes tab
bull If a route exists for 00000 with a Target that is an interface ID of an interface on the old instnace clickthe Edit button above the table displaying the routes
bull Click the red X next to the row for 00000 to remove the existing route
bull There should be a blank row with empty fields for a new route Enter 00000 in the Destinationfield and the Network Interface ID of the interface on the new instance in the Target field Click on theSave button
bull If there were multiple private subnets in the VPC which were pointed to interfaces on the pfSense instancerepeat this process for the other Route Tables associated with the VPC
bull The new instance should now be functioning as the old one did
32 AWS VPC Wizard User Guide
This guide will explain how to use the AWS VPC Wizard to simplify the configuration of a VPN to a remote VPC Theadministrator is asked for the minimum amount of basic information required to establish the VPN The configurationsboth on the AWS VPC side and on the pfSense side are then automatically created When the wizard is finishedexecuting a functioning VPN connection to a VPC should be established
321 AWS Access Keys
In order to connect to the AWS API to make certain required configuration changes the AWS VPC Wizard requiresAccess Keys to retrieve and modify VPC configurations
See also
Find more information about AWS Security Credential including Access Keys by reading AWS Security Credentials
Access keys consist of two parts
1 An access key ID
copy Copyright 2020 Rubicon Communications LLC 48
Security Gateway Manual Amazon AWS
bull For example AKIAIOSFODNN7EXAMPLE
2 A secret access key
bull For example wJalrXUtnFEMIK7MDENGbPxRfiCYEXAMPLEKEY
Access keys are like a usernamepassword and needed for programmatic requests to AWS including the AWS VPCWizard Use both the access key ID and secret access key together to authenticate requests
Important Manage access keys as securely as a user name and password
Managing Access Keys
To create modify or delete IAM user access keys do the following
1 Sign in to the IAM console
2 In the navigation bar on the upper right choose a user name and then choose My Security Credentials
3 On the AWS IAM Credentials tab in the Access keys for CLI SDK and API access section choose Createaccess key
4 Choose Download csv file to save the access key ID and secret access key to a csv file on your computerStore the file in a secure location There is no access to the secret access key again after this dialog box closesAfter the csv file has been downloaded choose Close When an access key is created the key pair is active bydefault and the pair can be used right away
bull To disable an active access key choose Make inactive
bull To reenable an inactive access key choose Make active
bull To delete an access key choose its X button at the far right of the row Then choose Delete to confirmWhen an access key is deleted itrsquos gone forever and cannot be retrieved However new keys can alwaysbe created
To create modify or delete another IAM userrsquos access keys do the following
1 Sign in to the IAM console
2 In the navigation pane choose Users
3 Choose the name of the user whose access keys to manage and then choose the Security credentials tab
4 In the Access keys section choose Create access key
5 Choose Download csv file to save the access key ID and secret access key to a CSV file on your computer
Rotating Access Keys
As a security best practice we recommend to regularly rotate (change) IAM user access keys Rotating access keyscan be done from the AWS Management Console
To rotate access keys for an IAM user without interrupting the applications (console) create a second access key whilethe first access key is still active
1 Sign in to the IAM console
2 In the navigation pane choose Users
3 Choose the name of the user whose access keys to manage and then choose the Security credentials tab
4 In the Access keys section choose Create access key
copy Copyright 2020 Rubicon Communications LLC 49
Security Gateway Manual Amazon AWS
5 Choose Download csv file to save the access key ID and secret access key to a CSV file on your computer
6 The new access key is active by default At this point the user has two active access keys
After waiting some period of time to ensure that all applications and tools have been updated delete the first accesskey
1 Sign in to the IAM console
2 In the navigation pane choose Users
3 Choose the name of the user whose access keys to manage and then choose the Security credentials tab
4 Locate the access key to delete and choose its X button at the far right of the row Then choose Delete to confirm
Determining When Access Keys Need Rotating
To determine when access keys need rotating (console) do the following
1 Sign in to the IAM console
2 In the navigation pane choose Users
3 If necessary add the Access key age column to the users table by completing the following steps
1 Above the table on the far right click the settings icon
2 In Manage columns select Access key age
3 Choose Close to return to the list of users
4 The Access key age column shows the number of days since the oldest active access key was created Usethis information to find users with access keys that need rotating The column displays None for users with noaccess key
322 Using the Wizard
1 Gather your AWS Access Key ID and Secret Key
2 Navigate to VPN gt AWS VPC Wizard in the main menu in the pfSensereg webGUI
copy Copyright 2020 Rubicon Communications LLC 50
Security Gateway Manual Amazon AWS
3 The first screen of the wizard prompts for the AWS Credentials Enter the Access Key ID and Secret AccessKey in the appropriate text fields and select the Region to connect to in the dropdown menu then click Next
The wizard will then query the AWS API using those credentials to find which VPCrsquos exist in the selectedregion If the credentials were rejected an error message will be displayed and return to the first screen
4 The next screen will prompt to select from the available VPCrsquos in the selected region Select the one to connectto from the dropdown menu The wizard will not create a new VPC it will only connect to an existing VPC
Click Next after selecting the desired VPC
copy Copyright 2020 Rubicon Communications LLC 51
Security Gateway Manual Amazon AWS
Note If the desired VPCrsquos to connect to isnrsquot available create one via the AWS Management Console and tryagain
The wizard will then query the AWS API to check whether there is a VPN Gateway attached to the selectedVPC If none exists one will be created via the API Then the next screen will be displayed
5 On the next screen specify routing and network data
A description of what should be entered for each of these fields follows
copy Copyright 2020 Rubicon Communications LLC 52
Security Gateway Manual Amazon AWS
Routing Type AWS offers either static routing or BGP routing Select the appropriate type fromthe dropdown menu If unsure static routing is likely to be adequate
BGP AS Number If static routing was choosen leave this field blank Otherwise it is possible tospecify an AS number to use If left blank the value will default to 65000
Local Public IP Address On an AWS Netgate appliance instance this should be the public IP ad-dress of the Elastic IP associated with the instance If configuring a hardware device runningpfSense this could be the public address assigned to the WAN (or other) interface of the device
Local subnets The subnets connected to the pfSense instance that should be routed over the tunnelfrom hosts in the remote VPC As an example if connecting a pfSense instance to a remote VPCin the AWS us-east-1 region enter the subnets (or a single subnet) that are local to the pfSenseinstance and when hosts in your VPC in us-east-1 attempted to reach addresses within thosesubnets the traffic will be sent through the VPN tunnel that is being configured
Note When selecting static routing as the routing type there will be a delay that is typically between 2-5minutes before the next screen is displayed This is because static routes must be added to the VPN Connectionvia the AWS API This operation fails until the VPN Connection reaches the ldquoavailablerdquo state This can take afew minutes to occur
Click Next when done
The wizard will then query the AWS API to find whether a Customer Gateway is configured with the selectedPublic IP Address If none exists one will be created If one already exists the ID will be retrieved and it willbe used
The wizard will then query the AWS API to see if a VPC Connection already exists that matches the dataentered If one exists it will be used Otherwise one will be created
If static routing was selected static routes will be added to the VPN Connection for the Local subnets entered
Route propagation will be enabled for the VPN Gateway in each of the Route Tables that are associated withthe VPC All of these configurations are carried out in the AWS API nothing has been changed in the pfSenseVPN configurations yet
Warning Important Note on Billing Once this step is carried out and the VPN Connection is createdAWS will start billing your AWS account the hourly rate for a VPN Connection This is $005 as of thiswriting and that is a charge that goes entirely to AWS itself They will do this until the VPN Connection isdeleted via the VPC Management Console
Nothing in pfSense will ever cause AWS to stop billing for this VPN Connection Whether it works or notwhether the pfSense instance is up or down whether the IPsec tunnels have been deleted or reconfiguredAWS will continue to bill the hourly fee for a VPN Connection if the creation of it succeeds until it is deletedthrough their web interface
The wizard helps establish an initial configuration that works and configures the appropriate elements inAWSrsquos API to facilitate this You are responsible for making sure you understand what yoursquore being billedfor and disabling any functions including VPN Connections that are no longer necessary
6 If the operations of the previous step succeeded the next screen will appear
copy Copyright 2020 Rubicon Communications LLC 53
Security Gateway Manual Amazon AWS
Select an Interface to act as the local endpoint of the VPN tunnels that will be created In most cases thisshould be the WAN interface It should generally be whatever interface is associated with the Local Public IPAddress entered in the previous step
On an AWS Netgate pfSense instance this will be whatever interface the Elastic IP is associated with On ahardware device running pfSense that has the Local Public IP Address directly configured on an interface thiswill be the interface that the Local Public IP Address is configured on
After clicking Next the wizard will configure the VPN and associated settings within pfSense itself using datareturned by the AWS API in the previous step
It will configure 2 IPsec tunnels a firewall rule 2 Aliases (referenced by the firewall rule) and 2 Virtual IPAddresses If BGP was selected as the Routing Type in the previous step it will install the OpenBGPDpackage automatically and configure it appropriately
7 The next screen will appear and prompt to apply the configuration changes that have been made
copy Copyright 2020 Rubicon Communications LLC 54
Security Gateway Manual Amazon AWS
After clicking Next all the configuration changes that were made will be applied
8 The wizard will be completed and the browser will be redirected to the IPsec status page The VPN to the VPCshould now be fully configured
Note Sometimes there is a delay of 5-10 minutes before the tunnels are fully functional and passing trafficThis has been observed particularly often during the setup of tunnels using BGP routing
copy Copyright 2020 Rubicon Communications LLC 55
Security Gateway Manual Amazon AWS
323 Testing Connectivity
Verify that the IPsec tunnels are functioning by attempting to ping the ldquoinside tunnel addressesrdquo of the VPC side ofthe tunnel by navigating to Firewall -gt Virtual IP There should be two virtual IP addresses configured that haveDescriptions like ldquoInside address for tunnel to ltremote IP addressgtrdquo
Amazon provides inside addresses for each end of the tunnel in a 30 subnet in IPv4 link local address space(169254xy) Typically the first usable address in the 30 is the inside address for the VPC end of the tunnel andthe other usable address is the inside address for your end of the tunnel So if you ping from one of the virtual IPaddresses configured on the pfSensereg instance to the IP address that is one less (for example if the virtual IP addresswere 16925425322 ping from 16925425322 to 16925425321) that checks whether the other end of the tunnelis responding and whether the tunnel is functioning properly
Note It sometimes takes a few minutes for the tunnels to begin working after the configuration wizard completes
To ping log into the pfSense instance via SSH and execute ping from a shell prompt For the previous example of16925425322 the proper syntax is
ping -S 16925425322 16925425321
When pinging from a shell prompt it is possible leave the command running indefinitely and interrupt it there is aresponse
copy Copyright 2020 Rubicon Communications LLC 56
Security Gateway Manual Amazon AWS
It is also possible to ping via the Diagnostics -gt Ping page by selecting the appropriate source address and enteringthe remote tunnel inside address in the Host field This will only send a limited number of ping packets so it may benecessary to repeat this a few times
324 VPC Configuration Details
The AWS documentation for connecting a hardware device to a VPC provides a great amount of detail on configuringVPN Connections to VPC
The main configuration elements that exist in Amazonrsquos data model are the Virtual Private Gateway the CustomerGateway and the VPN Connection In order to configure a VPN connection to a VPC all 3 of these need to exist TheVirtual Private Gateway is the VPN endpoint on Amazonrsquos side The customer gateway is the VPN endpoint on thepfSensereg instancedevice being configured The VPN Connection is the IPsec VPN between Amazon and the pfSenseinstancedevice
A Virtual Private Gateway needs to exist and be associated to the VPC A particular VPN Gateway can only beassociated to one VPC at a time Once the VPC to connect to has been selected the wizard invokes the AWS API callDescribeVpnGateways to determine if a VPN Gateway already exists that is attached to the VPC If none exists itcreates one with the CreateVpnGateway API call and attaches it to the VPC with the AttachVpnGateway call
A Customer Gateway needs to be created for the public IP address of the device or virtual machine that will be used toconnect to the VPC The wizard invokes the AWS API call DescribeCustomerGateways to determine if a CustomerGateway already exists If none exists one is created with the CreateCustomerGateway API call
The VPN Connection connects the Virtual Private Gateway and Customer Gateway The wizard checks to see if thereis an existing VPN Connection configured that connects those endpoints by invoking the AWS API call DescribeVp-nConnections If none exists one is created using the CreateVpnConnection call One of the fields returned by thiscall is a block of XML configuration data that contains configuration data assigned by AWS for use with configuringthe VPN Connection This data is stored and used in subsequent steps to make the required configuration changeswithin pfSense
copy Copyright 2020 Rubicon Communications LLC 57
Security Gateway Manual Amazon AWS
Any objects created through API calls by the wizard will be tagged with names like auto-created by pfSenseVPC ltyour_VPC_IDgt This is accomplished by calling the AWS API call CreateTags and using Name as the keyfor the tag
In addition to creation of the items mentioned above required adjustments are made to Security Groups and RouteTables to facilitate communication over the VPN The Security Groups associated with the VPC are updated to allowinbound access from the local subnets on the pfSense end of the VPN They are checked first via the DescribeSecuri-tyGroups AWS API call to determine if the access is already allowed Any of the subnets that is not already allowedhas inbound access added via the AuthorizeSecurityGroupIngress AWS API call
Route Tables associated with the VPC are updated to receive routes from the VPN Gateway used by the VPN Con-nection They are checked first via the DescribeRouteTables AWS API call If the VPN Gateway ID is not includedin the list of VPN Gateways propagating routes route propagation for the VPN Gateway is enabled on that table usingthe EnableVgwRoutePropagation AWS API call
For VPN Connections using static routing static routes for the specified subnets are added to the VPN ConnectionThis is done via the CreateVpnConnectionRoute AWS API call
325 pfSense Configuration Details
On the pfSensereg side there are numerous configurations added to support the VPN to the VPC
Aliases
First aliases are created for use in a firewall rule These aliases are intended to contain the subnets that traffic shouldbe allowed to ingress over the IPsec tunnel One alias represents the local subnets on the pfSense side and is givena name like VPC_Local_vpc_12345678 and the other represents the remote subnets on the VPC side and is given aname like VPC_Remote_vpc_12345678
Virtual IP addresses
Next virtual IP addresses are added on the lo0 (loopback) interface These virtual IP addresses are the local ldquoinsideaddressesrdquo of the IPsec tunnels These addresses are used as the local address for BGP communication when BGProuting is selected These addresses are IPv4 link local addresses (see RFC 3297) AWS assigns 30rsquos out of thenetwork 1692540016 for this purpose
Note These addresses are also useful as a ping target to execute a basic test of whether the tunnel is functioningproperly Executing a ping from a source address of one of these IP addresses to the corresponding inside address ofthe other end of the tunnel helps determine whether the tunnel negotiation is completing properly
Firewall rules
Next a firewall rule is added on the IPsec interface that allows traffic from the VPC networks to the local subnetsThis rule uses the previously created Aliases as sourcedestination targets
IPsec
Then IPsec phase 1 and phase 2 associations are set up Most of the settings required are extracted from a blockof XML data that was returned by the CreateVpnConnection call made during the AWS configuration step Thisincludes parameters like endpoint IP addresses encryption ciphers timer values etc
copy Copyright 2020 Rubicon Communications LLC 58
Security Gateway Manual Amazon AWS
If BGP routing was selected the configurations for the OpenBGPD BGP daemon are established The required settingsare determined using the AS number entered into the wizard and the parameters returned by the CreateVpnConnec-tion call made during the AWS configuration step
326 Tested Configurations
Various topologies may be possible to establish using the AWS VPC Configuration Wizard This section enumeratessome of the configurations that were successfully tested
Platforms
bull Various hardware platforms
bull 64-bit virtual machines in VMware vSphereESX
bull Amazon EC2 instances (Xen virtual machines) of the Netgate pfSensereg RouterFirewallVPN AWS AMI
Local networkrouting configurations
bull pfSense with a public address configured on the WAN interface
bull pfSense with a private address configured on the WAN interface behind a 11 NAT
bull pfSense with a private address configured on the WAN interface behind a PAT (1many NAT)
VPC Topologies
bull pfSense connected to a single VPC
bull pfSense connected to multiple VPCrsquos in different regions
bull Amazon EC2 instance of the pfSense RouterFirewallVPN AWS AMI connected to a VPC belonging to thesame AWS account in a different region
bull Amazon EC2 instance of the pfSense RouterFirewallVPN AWS AMI connected to a VPC belonging to adifferent AWS account in the same region
The configuration recommended for the greatest amount of stability is to have a public IPv4 address directly configuredon the WAN interface of your pfSense firewall but VPNs have been successfully established under all of the conditionslisted above
Whether any of these solutions is appropriate should be evaluated in the context of personal needs and existing infras-tructure Other configurations not listed above may be possible as well
327 AWS VPC Wizard FAQ
1 What level of redundancy is provided by the two tunnels
Amazon provides two tunnel endpoints that will allow traffic to be sent between your networks and the remote VPCyou are connected to The racoon daemon in pfSensereg is only capable of establishing an active phase 2 associationfor a particular sourcedestination pair on a single tunnel
Phase 2 associations between the local subnets and the remote VPC subnet are configured in the pfSense GUI for bothtunnels but racoon will only actually establish an association for the first tunnel This means that racoon will onlyever try to send traffic destined for the remote VPC subnet over the first tunnel
copy Copyright 2020 Rubicon Communications LLC 59
Security Gateway Manual Amazon AWS
If that tunnel goes down the second tunnel may be up and inbound traffic from the remote VPC may be sent to yourlocal networks over that tunnel automatically But outbound traffic to your remote VPC would not automatically failover to the second tunnel In order for you to send your outbound traffic over the second tunnel you would need todisable the phase 2 associations for the first tunnel and apply the changes
2 I quit the wizard before finishing Now what
To finish setting up the VPN go back to the wizard and run through it again It should reuse any partial configurationsthat were generated before it was stopped and create the new elements that are required
3 What are the AWS charges for this
AWS determines their own pricing and provides details for EC2 pricing and VPC pricing There are many types ofcharges that may be incurred for operating instances on AWS (eg charges related to running an instance bandwidthstorage elastic IPs etc)
The charge of specific interest in this case is the hourly charge for a VPN Connection As of this writing it costs $005(USD) per hour in most regions to have a VPN Connection configured and available AWS will charge whether theVPN Connection is being used or not as long as it is configured This will be configured by the third step of the wizardand will never be removed by pfSense
If the VPN Connection is no longer needed and billing for it needs to be stopped visit AWSrsquos VPC ManagementConsole and delete the VPN Connection manually
4 Can I use the wizard to connect to the GovCloud region
This hasnrsquot been officially tested but at least one user has reported that they were able to successfully connect to theGovCloud region They manually added the region us-gov-west-1 to the list of regions in the first step of the wizardand were able to successfully connect to their VPC in that region This may be supported in a future build but to trywithout official support do the following
1 Under the System gt Advanced menu make sure the Enable Secure Shell box is checked This is already doneby default on AWS instances but is off by default on pfSense hardware devices
2 Log into the instance via SSH
3 Make sure the root filesystem is mounted as readwrite On an AWS instance or a hardware device running on anSSD this should be true On a hardware device using Compact Flash or an SD card for storage it will probablybe necessary to remount the root filesystem in readwrite mode by running
mount -uw
4 Edit the file usrlocalwwwwizardsvpc_vpn_wizardxml using vi Look for a section of the file that lookslike this
ltoptiongtltnamegtsa-east-1ltnamegtltvaluegtsa-east-1ltvaluegt
ltoptiongt
That should appear directly after several similar ltoptiongt specifications containing all of the other availableregions Right underneath that section add the following
copy Copyright 2020 Rubicon Communications LLC 60
Security Gateway Manual Amazon AWS
ltoptiongtltnamegtus-gov-west-1ltnamegtltvaluegtus-gov-west-1ltvaluegt
ltoptiongt
Then save the file and exit vi
5 If the filesystem had to be remounted in readwrite mode earlier remount it in read-only mode by running
The GovCloud region should now appear as a choice in the first step of the wizard
copy Copyright 2020 Rubicon Communications LLC 61
CHAPTER
FOUR
REFERENCES
41 Support Resources
411 Commercial Support
In order to keep prices low the software is not bundled with a support subscription For users who need commercialsupport Netgate Gloabal Support can be purchased at httpswwwnetgatecomsupport
412 Community Support
Community support for pfSensereg software is available through the Netgate Forum
42 Additional Resources
421 Netgate Training
Netgate training offers training courses for increasing your knowledge of pfSensereg products and services Whetheryou need to maintain or improve the security skills of your staff or offer highly specialized support and improve yourcustomer satisfaction Netgate training has got you covered
httpswwwnetgatecomtraining
422 Resource Library
To learn more about how to use your pfSense appliance and for other helpful resources make sure to browse ourResource Library
httpswwwnetgatecomresources
423 Professional Services
Support does not cover more complex tasks such as CARP configuration for redundancy on multiple firewalls orcircuits network design and conversion from other firewalls to pfSensereg These items are offered as professionalservices and can be purchased and scheduled accordingly
httpswwwnetgatecomour-servicesprofessional-serviceshtml
62
Security Gateway Manual Amazon AWS
424 Community Options
If you elected not to get a paid support plan you can find help from the active and knowledgeable pfSense communityon our forums
httpsforumnetgatecom
copy Copyright 2020 Rubicon Communications LLC 63
- Getting Started
- Instance Usage
- Virtual Private Cloud (VPC)
- References
-
Security Gateway Manual Amazon AWS
the administrative password was changed to Be aware that the System Log output in the EC2 ManagementConsole is not updated in real time and may take a few minutes to show up
The message you should look for using either of the methods mentioned about will look like this
Admin password changed to abcdefg
Once yoursquove determined your password and entered it into the login form the pfSense WebGUI should be availableto you
314 Forwarding traffic from VPC subnets through the instance
Some additional configuration is required within the VPC instancersquos pfSensereg webGUI before you are able to managetraffic from the private subnet
1 Log into the pfSense WebGUI for the instance
2 Click on the Interfaces heading on the left and then click the Assign link
3 Click on the + icon to add a new Interface under the Interface assignments tab A LAN interface shouldautomatically be added with the next available network interface (xn1)
4 Click on the Interfaces heading on the left again and then click on LAN Click the checkbox to enable the LANinterface Set the IPv4 Configuration Type to Static IPv4 and enter the IP address you assigned to the 2ndinterface during the provisioning phase Click the Save button
Now you can create other instances attached to your private subnet and protect them with the firewall on the pfSenseinstance
Common ways to manage private hosts
Allowing private hosts to connect to the Internet
To allow private hosts to be able to connect to the Internet you can allow any traffic from the LAN in your firewallrules there should be a rule like this in place by default
Next set up NAT rules to cause addresses in the private subnet to be NATed to the IP address of the WAN interface
1 Under the Firewall heading on the left click on the NAT link
2 On the Outbound tab click the radio button for Manual Outbound NAT rule generation (AON - AdvancedOutbound NAT)
3 Click the Save button
4 Click on the Aliases link under the Firewall heading on the left
5 Add your private subnet to the Networks_to_NAT alias
Note There is an existing NAT rule configured by default that uses the alias Networks_to_NAT
copy Copyright 2020 Rubicon Communications LLC 46
Security Gateway Manual Amazon AWS
Allow private hosts to connect to each other
If your hosts should only contact each other and a private network segment elsewhere you can configure an IPsecor OpenVPN tunnel from your remote networks to the Netgate appliance instance and set up the appropriate firewallrules routes and security policies to allow access to your private subnet through a VPN tunnel
Allow direct inbound access from the internet to hosts
If you wish to enable direct inbound access from the internet to hosts on the private subnet you can set up portforwarding on the WAN interface to direct traffic to particular hosts in the private subnet
315 Establishing a VPN connection to a VPC in another region
To establish a VPN that allows instances on the VPC subnet(s) that sit behind a Netgate appliance to communicate withinstances that reside in a VPC in another region the Netgate appliance has a VPC configuration wizard that assists byconfiguring both the Netgate appliance as well as the VPC configuration elements that would normally have to be setmanually through the AWS Management Console
For detailed instructions see the AWS VPC User Guide
316 Upgrading a VPC Instance
Periodically new releases of the AMI are issued to track new releases of pfSensereg that may provide new functionalitybug fixes and security updates
The lower risk approach to upgrading is to bring up a new instance alongside the existing one and executing a cutoverThese instructions detail the procedure for moving your existing instance to one running the latest version
1 Back up the configuration of your exsting instance by navigating to BackupRestore under the Diagnosticsmenu in the Web GUI Click the Download configuration button under the Backup Configuration headingand save your config file to your local system
2 Bring up a new instance of the pfSense Certified RouterFirewallVPN running the latest version
3 When creating the instance make sure the interfaces match the interfaces on the existing instance Make surethat the new instance is in the same VPC as the existing instance and that it has the same number of interfacesattached and that the interfaces are connected to the same Subnets
4 Make sure any interfaces on the new instance that will communicate with private Subnets have theSourceDestination check disabled
5 Allocate a new Elastic IP and associate it to the WAN interface of the new instance to allow yourself managementaccess
6 Restore the backed up configuration file to the new instance Navigate to BackupRestore under the Diagnosticsmenu in the Web GUI Under the Restore Configuration heading click the Choose File button and browsefor the configuration file you backed up from the existing instance earlier Once you have selected that fileclick the Restore configuration button The configuration file will be uploaded and the instance will rebootautomatically
7 If you had packages installed on the old instance navigate to Packages under the System menu in the pfSenseweb GUI and install the same packages
8 If there was any external dependency on the public IP address of the existing instance you can remove theElastic IP Address from the upgraded instance and move the Elastic IP Address from the existing instance tothe upgraded instance External dependencies that might cause you to want to do this include things like VPNrsquos
copy Copyright 2020 Rubicon Communications LLC 47
Security Gateway Manual Amazon AWS
configured to external devices that rely on the existing instancersquos Elastic IP address or access lists on externaldevices that allow access to traffic from the existing instancersquos IP address There may be other reasons why youwould wish to keep the existing address as well (to preserve existing bookmarks to the Web GUI reduce theneed for updates to existing internal documentation etc) The process for moving the old Elastic IP address tothe new instance is as follows
bull Disassociate the Elastic IP address from the new instance In the EC2 Management Console click onElastic IPs under the Network amp Security heading Check the box next to the Elastic IP address assignedto the new instance and click on the Disassociate Address button
bull Disassociate the Elastic IP address from the old instance The procedure is the same as in the previousstep just repeated for the Eastic IP address of the old instance this time
bull Associate the Elastic IP address that was previously associated to the old instance to public interface of thenew instance In the EC2 Management Console click on Elastic IPs Check the box next to the Elastic IPaddress you are moving and click the Associate Address button Fill in the correct value for the Instanceor Network Interface and select the Private IP Address of the public interface on the new instance Clickthe Associate button The management interface of the new instance should now be accessible
9 Move any default routes that pointed to an interface on the old instance to point to the equivalent interface onthe new instance In the VPC Management Console click on Route Tables under the Virtual Private Cloudheading Check the box next to a Route Table associated with the VPC that the instances is located in
bull In the detail pane that appears at the bottom of the screen click on the Routes tab
bull If a route exists for 00000 with a Target that is an interface ID of an interface on the old instnace clickthe Edit button above the table displaying the routes
bull Click the red X next to the row for 00000 to remove the existing route
bull There should be a blank row with empty fields for a new route Enter 00000 in the Destinationfield and the Network Interface ID of the interface on the new instance in the Target field Click on theSave button
bull If there were multiple private subnets in the VPC which were pointed to interfaces on the pfSense instancerepeat this process for the other Route Tables associated with the VPC
bull The new instance should now be functioning as the old one did
32 AWS VPC Wizard User Guide
This guide will explain how to use the AWS VPC Wizard to simplify the configuration of a VPN to a remote VPC Theadministrator is asked for the minimum amount of basic information required to establish the VPN The configurationsboth on the AWS VPC side and on the pfSense side are then automatically created When the wizard is finishedexecuting a functioning VPN connection to a VPC should be established
321 AWS Access Keys
In order to connect to the AWS API to make certain required configuration changes the AWS VPC Wizard requiresAccess Keys to retrieve and modify VPC configurations
See also
Find more information about AWS Security Credential including Access Keys by reading AWS Security Credentials
Access keys consist of two parts
1 An access key ID
copy Copyright 2020 Rubicon Communications LLC 48
Security Gateway Manual Amazon AWS
bull For example AKIAIOSFODNN7EXAMPLE
2 A secret access key
bull For example wJalrXUtnFEMIK7MDENGbPxRfiCYEXAMPLEKEY
Access keys are like a usernamepassword and needed for programmatic requests to AWS including the AWS VPCWizard Use both the access key ID and secret access key together to authenticate requests
Important Manage access keys as securely as a user name and password
Managing Access Keys
To create modify or delete IAM user access keys do the following
1 Sign in to the IAM console
2 In the navigation bar on the upper right choose a user name and then choose My Security Credentials
3 On the AWS IAM Credentials tab in the Access keys for CLI SDK and API access section choose Createaccess key
4 Choose Download csv file to save the access key ID and secret access key to a csv file on your computerStore the file in a secure location There is no access to the secret access key again after this dialog box closesAfter the csv file has been downloaded choose Close When an access key is created the key pair is active bydefault and the pair can be used right away
bull To disable an active access key choose Make inactive
bull To reenable an inactive access key choose Make active
bull To delete an access key choose its X button at the far right of the row Then choose Delete to confirmWhen an access key is deleted itrsquos gone forever and cannot be retrieved However new keys can alwaysbe created
To create modify or delete another IAM userrsquos access keys do the following
1 Sign in to the IAM console
2 In the navigation pane choose Users
3 Choose the name of the user whose access keys to manage and then choose the Security credentials tab
4 In the Access keys section choose Create access key
5 Choose Download csv file to save the access key ID and secret access key to a CSV file on your computer
Rotating Access Keys
As a security best practice we recommend to regularly rotate (change) IAM user access keys Rotating access keyscan be done from the AWS Management Console
To rotate access keys for an IAM user without interrupting the applications (console) create a second access key whilethe first access key is still active
1 Sign in to the IAM console
2 In the navigation pane choose Users
3 Choose the name of the user whose access keys to manage and then choose the Security credentials tab
4 In the Access keys section choose Create access key
copy Copyright 2020 Rubicon Communications LLC 49
Security Gateway Manual Amazon AWS
5 Choose Download csv file to save the access key ID and secret access key to a CSV file on your computer
6 The new access key is active by default At this point the user has two active access keys
After waiting some period of time to ensure that all applications and tools have been updated delete the first accesskey
1 Sign in to the IAM console
2 In the navigation pane choose Users
3 Choose the name of the user whose access keys to manage and then choose the Security credentials tab
4 Locate the access key to delete and choose its X button at the far right of the row Then choose Delete to confirm
Determining When Access Keys Need Rotating
To determine when access keys need rotating (console) do the following
1 Sign in to the IAM console
2 In the navigation pane choose Users
3 If necessary add the Access key age column to the users table by completing the following steps
1 Above the table on the far right click the settings icon
2 In Manage columns select Access key age
3 Choose Close to return to the list of users
4 The Access key age column shows the number of days since the oldest active access key was created Usethis information to find users with access keys that need rotating The column displays None for users with noaccess key
322 Using the Wizard
1 Gather your AWS Access Key ID and Secret Key
2 Navigate to VPN gt AWS VPC Wizard in the main menu in the pfSensereg webGUI
copy Copyright 2020 Rubicon Communications LLC 50
Security Gateway Manual Amazon AWS
3 The first screen of the wizard prompts for the AWS Credentials Enter the Access Key ID and Secret AccessKey in the appropriate text fields and select the Region to connect to in the dropdown menu then click Next
The wizard will then query the AWS API using those credentials to find which VPCrsquos exist in the selectedregion If the credentials were rejected an error message will be displayed and return to the first screen
4 The next screen will prompt to select from the available VPCrsquos in the selected region Select the one to connectto from the dropdown menu The wizard will not create a new VPC it will only connect to an existing VPC
Click Next after selecting the desired VPC
copy Copyright 2020 Rubicon Communications LLC 51
Security Gateway Manual Amazon AWS
Note If the desired VPCrsquos to connect to isnrsquot available create one via the AWS Management Console and tryagain
The wizard will then query the AWS API to check whether there is a VPN Gateway attached to the selectedVPC If none exists one will be created via the API Then the next screen will be displayed
5 On the next screen specify routing and network data
A description of what should be entered for each of these fields follows
copy Copyright 2020 Rubicon Communications LLC 52
Security Gateway Manual Amazon AWS
Routing Type AWS offers either static routing or BGP routing Select the appropriate type fromthe dropdown menu If unsure static routing is likely to be adequate
BGP AS Number If static routing was choosen leave this field blank Otherwise it is possible tospecify an AS number to use If left blank the value will default to 65000
Local Public IP Address On an AWS Netgate appliance instance this should be the public IP ad-dress of the Elastic IP associated with the instance If configuring a hardware device runningpfSense this could be the public address assigned to the WAN (or other) interface of the device
Local subnets The subnets connected to the pfSense instance that should be routed over the tunnelfrom hosts in the remote VPC As an example if connecting a pfSense instance to a remote VPCin the AWS us-east-1 region enter the subnets (or a single subnet) that are local to the pfSenseinstance and when hosts in your VPC in us-east-1 attempted to reach addresses within thosesubnets the traffic will be sent through the VPN tunnel that is being configured
Note When selecting static routing as the routing type there will be a delay that is typically between 2-5minutes before the next screen is displayed This is because static routes must be added to the VPN Connectionvia the AWS API This operation fails until the VPN Connection reaches the ldquoavailablerdquo state This can take afew minutes to occur
Click Next when done
The wizard will then query the AWS API to find whether a Customer Gateway is configured with the selectedPublic IP Address If none exists one will be created If one already exists the ID will be retrieved and it willbe used
The wizard will then query the AWS API to see if a VPC Connection already exists that matches the dataentered If one exists it will be used Otherwise one will be created
If static routing was selected static routes will be added to the VPN Connection for the Local subnets entered
Route propagation will be enabled for the VPN Gateway in each of the Route Tables that are associated withthe VPC All of these configurations are carried out in the AWS API nothing has been changed in the pfSenseVPN configurations yet
Warning Important Note on Billing Once this step is carried out and the VPN Connection is createdAWS will start billing your AWS account the hourly rate for a VPN Connection This is $005 as of thiswriting and that is a charge that goes entirely to AWS itself They will do this until the VPN Connection isdeleted via the VPC Management Console
Nothing in pfSense will ever cause AWS to stop billing for this VPN Connection Whether it works or notwhether the pfSense instance is up or down whether the IPsec tunnels have been deleted or reconfiguredAWS will continue to bill the hourly fee for a VPN Connection if the creation of it succeeds until it is deletedthrough their web interface
The wizard helps establish an initial configuration that works and configures the appropriate elements inAWSrsquos API to facilitate this You are responsible for making sure you understand what yoursquore being billedfor and disabling any functions including VPN Connections that are no longer necessary
6 If the operations of the previous step succeeded the next screen will appear
copy Copyright 2020 Rubicon Communications LLC 53
Security Gateway Manual Amazon AWS
Select an Interface to act as the local endpoint of the VPN tunnels that will be created In most cases thisshould be the WAN interface It should generally be whatever interface is associated with the Local Public IPAddress entered in the previous step
On an AWS Netgate pfSense instance this will be whatever interface the Elastic IP is associated with On ahardware device running pfSense that has the Local Public IP Address directly configured on an interface thiswill be the interface that the Local Public IP Address is configured on
After clicking Next the wizard will configure the VPN and associated settings within pfSense itself using datareturned by the AWS API in the previous step
It will configure 2 IPsec tunnels a firewall rule 2 Aliases (referenced by the firewall rule) and 2 Virtual IPAddresses If BGP was selected as the Routing Type in the previous step it will install the OpenBGPDpackage automatically and configure it appropriately
7 The next screen will appear and prompt to apply the configuration changes that have been made
copy Copyright 2020 Rubicon Communications LLC 54
Security Gateway Manual Amazon AWS
After clicking Next all the configuration changes that were made will be applied
8 The wizard will be completed and the browser will be redirected to the IPsec status page The VPN to the VPCshould now be fully configured
Note Sometimes there is a delay of 5-10 minutes before the tunnels are fully functional and passing trafficThis has been observed particularly often during the setup of tunnels using BGP routing
copy Copyright 2020 Rubicon Communications LLC 55
Security Gateway Manual Amazon AWS
323 Testing Connectivity
Verify that the IPsec tunnels are functioning by attempting to ping the ldquoinside tunnel addressesrdquo of the VPC side ofthe tunnel by navigating to Firewall -gt Virtual IP There should be two virtual IP addresses configured that haveDescriptions like ldquoInside address for tunnel to ltremote IP addressgtrdquo
Amazon provides inside addresses for each end of the tunnel in a 30 subnet in IPv4 link local address space(169254xy) Typically the first usable address in the 30 is the inside address for the VPC end of the tunnel andthe other usable address is the inside address for your end of the tunnel So if you ping from one of the virtual IPaddresses configured on the pfSensereg instance to the IP address that is one less (for example if the virtual IP addresswere 16925425322 ping from 16925425322 to 16925425321) that checks whether the other end of the tunnelis responding and whether the tunnel is functioning properly
Note It sometimes takes a few minutes for the tunnels to begin working after the configuration wizard completes
To ping log into the pfSense instance via SSH and execute ping from a shell prompt For the previous example of16925425322 the proper syntax is
ping -S 16925425322 16925425321
When pinging from a shell prompt it is possible leave the command running indefinitely and interrupt it there is aresponse
copy Copyright 2020 Rubicon Communications LLC 56
Security Gateway Manual Amazon AWS
It is also possible to ping via the Diagnostics -gt Ping page by selecting the appropriate source address and enteringthe remote tunnel inside address in the Host field This will only send a limited number of ping packets so it may benecessary to repeat this a few times
324 VPC Configuration Details
The AWS documentation for connecting a hardware device to a VPC provides a great amount of detail on configuringVPN Connections to VPC
The main configuration elements that exist in Amazonrsquos data model are the Virtual Private Gateway the CustomerGateway and the VPN Connection In order to configure a VPN connection to a VPC all 3 of these need to exist TheVirtual Private Gateway is the VPN endpoint on Amazonrsquos side The customer gateway is the VPN endpoint on thepfSensereg instancedevice being configured The VPN Connection is the IPsec VPN between Amazon and the pfSenseinstancedevice
A Virtual Private Gateway needs to exist and be associated to the VPC A particular VPN Gateway can only beassociated to one VPC at a time Once the VPC to connect to has been selected the wizard invokes the AWS API callDescribeVpnGateways to determine if a VPN Gateway already exists that is attached to the VPC If none exists itcreates one with the CreateVpnGateway API call and attaches it to the VPC with the AttachVpnGateway call
A Customer Gateway needs to be created for the public IP address of the device or virtual machine that will be used toconnect to the VPC The wizard invokes the AWS API call DescribeCustomerGateways to determine if a CustomerGateway already exists If none exists one is created with the CreateCustomerGateway API call
The VPN Connection connects the Virtual Private Gateway and Customer Gateway The wizard checks to see if thereis an existing VPN Connection configured that connects those endpoints by invoking the AWS API call DescribeVp-nConnections If none exists one is created using the CreateVpnConnection call One of the fields returned by thiscall is a block of XML configuration data that contains configuration data assigned by AWS for use with configuringthe VPN Connection This data is stored and used in subsequent steps to make the required configuration changeswithin pfSense
copy Copyright 2020 Rubicon Communications LLC 57
Security Gateway Manual Amazon AWS
Any objects created through API calls by the wizard will be tagged with names like auto-created by pfSenseVPC ltyour_VPC_IDgt This is accomplished by calling the AWS API call CreateTags and using Name as the keyfor the tag
In addition to creation of the items mentioned above required adjustments are made to Security Groups and RouteTables to facilitate communication over the VPN The Security Groups associated with the VPC are updated to allowinbound access from the local subnets on the pfSense end of the VPN They are checked first via the DescribeSecuri-tyGroups AWS API call to determine if the access is already allowed Any of the subnets that is not already allowedhas inbound access added via the AuthorizeSecurityGroupIngress AWS API call
Route Tables associated with the VPC are updated to receive routes from the VPN Gateway used by the VPN Con-nection They are checked first via the DescribeRouteTables AWS API call If the VPN Gateway ID is not includedin the list of VPN Gateways propagating routes route propagation for the VPN Gateway is enabled on that table usingthe EnableVgwRoutePropagation AWS API call
For VPN Connections using static routing static routes for the specified subnets are added to the VPN ConnectionThis is done via the CreateVpnConnectionRoute AWS API call
325 pfSense Configuration Details
On the pfSensereg side there are numerous configurations added to support the VPN to the VPC
Aliases
First aliases are created for use in a firewall rule These aliases are intended to contain the subnets that traffic shouldbe allowed to ingress over the IPsec tunnel One alias represents the local subnets on the pfSense side and is givena name like VPC_Local_vpc_12345678 and the other represents the remote subnets on the VPC side and is given aname like VPC_Remote_vpc_12345678
Virtual IP addresses
Next virtual IP addresses are added on the lo0 (loopback) interface These virtual IP addresses are the local ldquoinsideaddressesrdquo of the IPsec tunnels These addresses are used as the local address for BGP communication when BGProuting is selected These addresses are IPv4 link local addresses (see RFC 3297) AWS assigns 30rsquos out of thenetwork 1692540016 for this purpose
Note These addresses are also useful as a ping target to execute a basic test of whether the tunnel is functioningproperly Executing a ping from a source address of one of these IP addresses to the corresponding inside address ofthe other end of the tunnel helps determine whether the tunnel negotiation is completing properly
Firewall rules
Next a firewall rule is added on the IPsec interface that allows traffic from the VPC networks to the local subnetsThis rule uses the previously created Aliases as sourcedestination targets
IPsec
Then IPsec phase 1 and phase 2 associations are set up Most of the settings required are extracted from a blockof XML data that was returned by the CreateVpnConnection call made during the AWS configuration step Thisincludes parameters like endpoint IP addresses encryption ciphers timer values etc
copy Copyright 2020 Rubicon Communications LLC 58
Security Gateway Manual Amazon AWS
If BGP routing was selected the configurations for the OpenBGPD BGP daemon are established The required settingsare determined using the AS number entered into the wizard and the parameters returned by the CreateVpnConnec-tion call made during the AWS configuration step
326 Tested Configurations
Various topologies may be possible to establish using the AWS VPC Configuration Wizard This section enumeratessome of the configurations that were successfully tested
Platforms
bull Various hardware platforms
bull 64-bit virtual machines in VMware vSphereESX
bull Amazon EC2 instances (Xen virtual machines) of the Netgate pfSensereg RouterFirewallVPN AWS AMI
Local networkrouting configurations
bull pfSense with a public address configured on the WAN interface
bull pfSense with a private address configured on the WAN interface behind a 11 NAT
bull pfSense with a private address configured on the WAN interface behind a PAT (1many NAT)
VPC Topologies
bull pfSense connected to a single VPC
bull pfSense connected to multiple VPCrsquos in different regions
bull Amazon EC2 instance of the pfSense RouterFirewallVPN AWS AMI connected to a VPC belonging to thesame AWS account in a different region
bull Amazon EC2 instance of the pfSense RouterFirewallVPN AWS AMI connected to a VPC belonging to adifferent AWS account in the same region
The configuration recommended for the greatest amount of stability is to have a public IPv4 address directly configuredon the WAN interface of your pfSense firewall but VPNs have been successfully established under all of the conditionslisted above
Whether any of these solutions is appropriate should be evaluated in the context of personal needs and existing infras-tructure Other configurations not listed above may be possible as well
327 AWS VPC Wizard FAQ
1 What level of redundancy is provided by the two tunnels
Amazon provides two tunnel endpoints that will allow traffic to be sent between your networks and the remote VPCyou are connected to The racoon daemon in pfSensereg is only capable of establishing an active phase 2 associationfor a particular sourcedestination pair on a single tunnel
Phase 2 associations between the local subnets and the remote VPC subnet are configured in the pfSense GUI for bothtunnels but racoon will only actually establish an association for the first tunnel This means that racoon will onlyever try to send traffic destined for the remote VPC subnet over the first tunnel
copy Copyright 2020 Rubicon Communications LLC 59
Security Gateway Manual Amazon AWS
If that tunnel goes down the second tunnel may be up and inbound traffic from the remote VPC may be sent to yourlocal networks over that tunnel automatically But outbound traffic to your remote VPC would not automatically failover to the second tunnel In order for you to send your outbound traffic over the second tunnel you would need todisable the phase 2 associations for the first tunnel and apply the changes
2 I quit the wizard before finishing Now what
To finish setting up the VPN go back to the wizard and run through it again It should reuse any partial configurationsthat were generated before it was stopped and create the new elements that are required
3 What are the AWS charges for this
AWS determines their own pricing and provides details for EC2 pricing and VPC pricing There are many types ofcharges that may be incurred for operating instances on AWS (eg charges related to running an instance bandwidthstorage elastic IPs etc)
The charge of specific interest in this case is the hourly charge for a VPN Connection As of this writing it costs $005(USD) per hour in most regions to have a VPN Connection configured and available AWS will charge whether theVPN Connection is being used or not as long as it is configured This will be configured by the third step of the wizardand will never be removed by pfSense
If the VPN Connection is no longer needed and billing for it needs to be stopped visit AWSrsquos VPC ManagementConsole and delete the VPN Connection manually
4 Can I use the wizard to connect to the GovCloud region
This hasnrsquot been officially tested but at least one user has reported that they were able to successfully connect to theGovCloud region They manually added the region us-gov-west-1 to the list of regions in the first step of the wizardand were able to successfully connect to their VPC in that region This may be supported in a future build but to trywithout official support do the following
1 Under the System gt Advanced menu make sure the Enable Secure Shell box is checked This is already doneby default on AWS instances but is off by default on pfSense hardware devices
2 Log into the instance via SSH
3 Make sure the root filesystem is mounted as readwrite On an AWS instance or a hardware device running on anSSD this should be true On a hardware device using Compact Flash or an SD card for storage it will probablybe necessary to remount the root filesystem in readwrite mode by running
mount -uw
4 Edit the file usrlocalwwwwizardsvpc_vpn_wizardxml using vi Look for a section of the file that lookslike this
ltoptiongtltnamegtsa-east-1ltnamegtltvaluegtsa-east-1ltvaluegt
ltoptiongt
That should appear directly after several similar ltoptiongt specifications containing all of the other availableregions Right underneath that section add the following
copy Copyright 2020 Rubicon Communications LLC 60
Security Gateway Manual Amazon AWS
ltoptiongtltnamegtus-gov-west-1ltnamegtltvaluegtus-gov-west-1ltvaluegt
ltoptiongt
Then save the file and exit vi
5 If the filesystem had to be remounted in readwrite mode earlier remount it in read-only mode by running
The GovCloud region should now appear as a choice in the first step of the wizard
copy Copyright 2020 Rubicon Communications LLC 61
CHAPTER
FOUR
REFERENCES
41 Support Resources
411 Commercial Support
In order to keep prices low the software is not bundled with a support subscription For users who need commercialsupport Netgate Gloabal Support can be purchased at httpswwwnetgatecomsupport
412 Community Support
Community support for pfSensereg software is available through the Netgate Forum
42 Additional Resources
421 Netgate Training
Netgate training offers training courses for increasing your knowledge of pfSensereg products and services Whetheryou need to maintain or improve the security skills of your staff or offer highly specialized support and improve yourcustomer satisfaction Netgate training has got you covered
httpswwwnetgatecomtraining
422 Resource Library
To learn more about how to use your pfSense appliance and for other helpful resources make sure to browse ourResource Library
httpswwwnetgatecomresources
423 Professional Services
Support does not cover more complex tasks such as CARP configuration for redundancy on multiple firewalls orcircuits network design and conversion from other firewalls to pfSensereg These items are offered as professionalservices and can be purchased and scheduled accordingly
httpswwwnetgatecomour-servicesprofessional-serviceshtml
62
Security Gateway Manual Amazon AWS
424 Community Options
If you elected not to get a paid support plan you can find help from the active and knowledgeable pfSense communityon our forums
httpsforumnetgatecom
copy Copyright 2020 Rubicon Communications LLC 63
- Getting Started
- Instance Usage
- Virtual Private Cloud (VPC)
- References
-

Security Gateway Manual Amazon AWS
bull For example AKIAIOSFODNN7EXAMPLE
2 A secret access key
bull For example wJalrXUtnFEMIK7MDENGbPxRfiCYEXAMPLEKEY
Access keys are like a usernamepassword and needed for programmatic requests to AWS including the AWS VPCWizard Use both the access key ID and secret access key together to authenticate requests
Important Manage access keys as securely as a user name and password
Managing Access Keys
To create modify or delete IAM user access keys do the following
1 Sign in to the IAM console
2 In the navigation bar on the upper right choose a user name and then choose My Security Credentials
3 On the AWS IAM Credentials tab in the Access keys for CLI SDK and API access section choose Createaccess key
4 Choose Download csv file to save the access key ID and secret access key to a csv file on your computerStore the file in a secure location There is no access to the secret access key again after this dialog box closesAfter the csv file has been downloaded choose Close When an access key is created the key pair is active bydefault and the pair can be used right away
bull To disable an active access key choose Make inactive
bull To reenable an inactive access key choose Make active
bull To delete an access key choose its X button at the far right of the row Then choose Delete to confirmWhen an access key is deleted itrsquos gone forever and cannot be retrieved However new keys can alwaysbe created
To create modify or delete another IAM userrsquos access keys do the following
1 Sign in to the IAM console
2 In the navigation pane choose Users
3 Choose the name of the user whose access keys to manage and then choose the Security credentials tab
4 In the Access keys section choose Create access key
5 Choose Download csv file to save the access key ID and secret access key to a CSV file on your computer
Rotating Access Keys
As a security best practice we recommend to regularly rotate (change) IAM user access keys Rotating access keyscan be done from the AWS Management Console
To rotate access keys for an IAM user without interrupting the applications (console) create a second access key whilethe first access key is still active
1 Sign in to the IAM console
2 In the navigation pane choose Users
3 Choose the name of the user whose access keys to manage and then choose the Security credentials tab
4 In the Access keys section choose Create access key
copy Copyright 2020 Rubicon Communications LLC 49
Security Gateway Manual Amazon AWS
5 Choose Download csv file to save the access key ID and secret access key to a CSV file on your computer
6 The new access key is active by default At this point the user has two active access keys
After waiting some period of time to ensure that all applications and tools have been updated delete the first accesskey
1 Sign in to the IAM console
2 In the navigation pane choose Users
3 Choose the name of the user whose access keys to manage and then choose the Security credentials tab
4 Locate the access key to delete and choose its X button at the far right of the row Then choose Delete to confirm
Determining When Access Keys Need Rotating
To determine when access keys need rotating (console) do the following
1 Sign in to the IAM console
2 In the navigation pane choose Users
3 If necessary add the Access key age column to the users table by completing the following steps
1 Above the table on the far right click the settings icon
2 In Manage columns select Access key age
3 Choose Close to return to the list of users
4 The Access key age column shows the number of days since the oldest active access key was created Usethis information to find users with access keys that need rotating The column displays None for users with noaccess key
322 Using the Wizard
1 Gather your AWS Access Key ID and Secret Key
2 Navigate to VPN gt AWS VPC Wizard in the main menu in the pfSensereg webGUI
copy Copyright 2020 Rubicon Communications LLC 50
Security Gateway Manual Amazon AWS
3 The first screen of the wizard prompts for the AWS Credentials Enter the Access Key ID and Secret AccessKey in the appropriate text fields and select the Region to connect to in the dropdown menu then click Next
The wizard will then query the AWS API using those credentials to find which VPCrsquos exist in the selectedregion If the credentials were rejected an error message will be displayed and return to the first screen
4 The next screen will prompt to select from the available VPCrsquos in the selected region Select the one to connectto from the dropdown menu The wizard will not create a new VPC it will only connect to an existing VPC
Click Next after selecting the desired VPC
copy Copyright 2020 Rubicon Communications LLC 51
Security Gateway Manual Amazon AWS
Note If the desired VPCrsquos to connect to isnrsquot available create one via the AWS Management Console and tryagain
The wizard will then query the AWS API to check whether there is a VPN Gateway attached to the selectedVPC If none exists one will be created via the API Then the next screen will be displayed
5 On the next screen specify routing and network data
A description of what should be entered for each of these fields follows
copy Copyright 2020 Rubicon Communications LLC 52
Security Gateway Manual Amazon AWS
Routing Type AWS offers either static routing or BGP routing Select the appropriate type fromthe dropdown menu If unsure static routing is likely to be adequate
BGP AS Number If static routing was choosen leave this field blank Otherwise it is possible tospecify an AS number to use If left blank the value will default to 65000
Local Public IP Address On an AWS Netgate appliance instance this should be the public IP ad-dress of the Elastic IP associated with the instance If configuring a hardware device runningpfSense this could be the public address assigned to the WAN (or other) interface of the device
Local subnets The subnets connected to the pfSense instance that should be routed over the tunnelfrom hosts in the remote VPC As an example if connecting a pfSense instance to a remote VPCin the AWS us-east-1 region enter the subnets (or a single subnet) that are local to the pfSenseinstance and when hosts in your VPC in us-east-1 attempted to reach addresses within thosesubnets the traffic will be sent through the VPN tunnel that is being configured
Note When selecting static routing as the routing type there will be a delay that is typically between 2-5minutes before the next screen is displayed This is because static routes must be added to the VPN Connectionvia the AWS API This operation fails until the VPN Connection reaches the ldquoavailablerdquo state This can take afew minutes to occur
Click Next when done
The wizard will then query the AWS API to find whether a Customer Gateway is configured with the selectedPublic IP Address If none exists one will be created If one already exists the ID will be retrieved and it willbe used
The wizard will then query the AWS API to see if a VPC Connection already exists that matches the dataentered If one exists it will be used Otherwise one will be created
If static routing was selected static routes will be added to the VPN Connection for the Local subnets entered
Route propagation will be enabled for the VPN Gateway in each of the Route Tables that are associated withthe VPC All of these configurations are carried out in the AWS API nothing has been changed in the pfSenseVPN configurations yet
Warning Important Note on Billing Once this step is carried out and the VPN Connection is createdAWS will start billing your AWS account the hourly rate for a VPN Connection This is $005 as of thiswriting and that is a charge that goes entirely to AWS itself They will do this until the VPN Connection isdeleted via the VPC Management Console
Nothing in pfSense will ever cause AWS to stop billing for this VPN Connection Whether it works or notwhether the pfSense instance is up or down whether the IPsec tunnels have been deleted or reconfiguredAWS will continue to bill the hourly fee for a VPN Connection if the creation of it succeeds until it is deletedthrough their web interface
The wizard helps establish an initial configuration that works and configures the appropriate elements inAWSrsquos API to facilitate this You are responsible for making sure you understand what yoursquore being billedfor and disabling any functions including VPN Connections that are no longer necessary
6 If the operations of the previous step succeeded the next screen will appear
copy Copyright 2020 Rubicon Communications LLC 53
Security Gateway Manual Amazon AWS
Select an Interface to act as the local endpoint of the VPN tunnels that will be created In most cases thisshould be the WAN interface It should generally be whatever interface is associated with the Local Public IPAddress entered in the previous step
On an AWS Netgate pfSense instance this will be whatever interface the Elastic IP is associated with On ahardware device running pfSense that has the Local Public IP Address directly configured on an interface thiswill be the interface that the Local Public IP Address is configured on
After clicking Next the wizard will configure the VPN and associated settings within pfSense itself using datareturned by the AWS API in the previous step
It will configure 2 IPsec tunnels a firewall rule 2 Aliases (referenced by the firewall rule) and 2 Virtual IPAddresses If BGP was selected as the Routing Type in the previous step it will install the OpenBGPDpackage automatically and configure it appropriately
7 The next screen will appear and prompt to apply the configuration changes that have been made
copy Copyright 2020 Rubicon Communications LLC 54
Security Gateway Manual Amazon AWS
After clicking Next all the configuration changes that were made will be applied
8 The wizard will be completed and the browser will be redirected to the IPsec status page The VPN to the VPCshould now be fully configured
Note Sometimes there is a delay of 5-10 minutes before the tunnels are fully functional and passing trafficThis has been observed particularly often during the setup of tunnels using BGP routing
copy Copyright 2020 Rubicon Communications LLC 55
Security Gateway Manual Amazon AWS
323 Testing Connectivity
Verify that the IPsec tunnels are functioning by attempting to ping the ldquoinside tunnel addressesrdquo of the VPC side ofthe tunnel by navigating to Firewall -gt Virtual IP There should be two virtual IP addresses configured that haveDescriptions like ldquoInside address for tunnel to ltremote IP addressgtrdquo
Amazon provides inside addresses for each end of the tunnel in a 30 subnet in IPv4 link local address space(169254xy) Typically the first usable address in the 30 is the inside address for the VPC end of the tunnel andthe other usable address is the inside address for your end of the tunnel So if you ping from one of the virtual IPaddresses configured on the pfSensereg instance to the IP address that is one less (for example if the virtual IP addresswere 16925425322 ping from 16925425322 to 16925425321) that checks whether the other end of the tunnelis responding and whether the tunnel is functioning properly
Note It sometimes takes a few minutes for the tunnels to begin working after the configuration wizard completes
To ping log into the pfSense instance via SSH and execute ping from a shell prompt For the previous example of16925425322 the proper syntax is
ping -S 16925425322 16925425321
When pinging from a shell prompt it is possible leave the command running indefinitely and interrupt it there is aresponse
copy Copyright 2020 Rubicon Communications LLC 56
Security Gateway Manual Amazon AWS
It is also possible to ping via the Diagnostics -gt Ping page by selecting the appropriate source address and enteringthe remote tunnel inside address in the Host field This will only send a limited number of ping packets so it may benecessary to repeat this a few times
324 VPC Configuration Details
The AWS documentation for connecting a hardware device to a VPC provides a great amount of detail on configuringVPN Connections to VPC
The main configuration elements that exist in Amazonrsquos data model are the Virtual Private Gateway the CustomerGateway and the VPN Connection In order to configure a VPN connection to a VPC all 3 of these need to exist TheVirtual Private Gateway is the VPN endpoint on Amazonrsquos side The customer gateway is the VPN endpoint on thepfSensereg instancedevice being configured The VPN Connection is the IPsec VPN between Amazon and the pfSenseinstancedevice
A Virtual Private Gateway needs to exist and be associated to the VPC A particular VPN Gateway can only beassociated to one VPC at a time Once the VPC to connect to has been selected the wizard invokes the AWS API callDescribeVpnGateways to determine if a VPN Gateway already exists that is attached to the VPC If none exists itcreates one with the CreateVpnGateway API call and attaches it to the VPC with the AttachVpnGateway call
A Customer Gateway needs to be created for the public IP address of the device or virtual machine that will be used toconnect to the VPC The wizard invokes the AWS API call DescribeCustomerGateways to determine if a CustomerGateway already exists If none exists one is created with the CreateCustomerGateway API call
The VPN Connection connects the Virtual Private Gateway and Customer Gateway The wizard checks to see if thereis an existing VPN Connection configured that connects those endpoints by invoking the AWS API call DescribeVp-nConnections If none exists one is created using the CreateVpnConnection call One of the fields returned by thiscall is a block of XML configuration data that contains configuration data assigned by AWS for use with configuringthe VPN Connection This data is stored and used in subsequent steps to make the required configuration changeswithin pfSense
copy Copyright 2020 Rubicon Communications LLC 57
Security Gateway Manual Amazon AWS
Any objects created through API calls by the wizard will be tagged with names like auto-created by pfSenseVPC ltyour_VPC_IDgt This is accomplished by calling the AWS API call CreateTags and using Name as the keyfor the tag
In addition to creation of the items mentioned above required adjustments are made to Security Groups and RouteTables to facilitate communication over the VPN The Security Groups associated with the VPC are updated to allowinbound access from the local subnets on the pfSense end of the VPN They are checked first via the DescribeSecuri-tyGroups AWS API call to determine if the access is already allowed Any of the subnets that is not already allowedhas inbound access added via the AuthorizeSecurityGroupIngress AWS API call
Route Tables associated with the VPC are updated to receive routes from the VPN Gateway used by the VPN Con-nection They are checked first via the DescribeRouteTables AWS API call If the VPN Gateway ID is not includedin the list of VPN Gateways propagating routes route propagation for the VPN Gateway is enabled on that table usingthe EnableVgwRoutePropagation AWS API call
For VPN Connections using static routing static routes for the specified subnets are added to the VPN ConnectionThis is done via the CreateVpnConnectionRoute AWS API call
325 pfSense Configuration Details
On the pfSensereg side there are numerous configurations added to support the VPN to the VPC
Aliases
First aliases are created for use in a firewall rule These aliases are intended to contain the subnets that traffic shouldbe allowed to ingress over the IPsec tunnel One alias represents the local subnets on the pfSense side and is givena name like VPC_Local_vpc_12345678 and the other represents the remote subnets on the VPC side and is given aname like VPC_Remote_vpc_12345678
Virtual IP addresses
Next virtual IP addresses are added on the lo0 (loopback) interface These virtual IP addresses are the local ldquoinsideaddressesrdquo of the IPsec tunnels These addresses are used as the local address for BGP communication when BGProuting is selected These addresses are IPv4 link local addresses (see RFC 3297) AWS assigns 30rsquos out of thenetwork 1692540016 for this purpose
Note These addresses are also useful as a ping target to execute a basic test of whether the tunnel is functioningproperly Executing a ping from a source address of one of these IP addresses to the corresponding inside address ofthe other end of the tunnel helps determine whether the tunnel negotiation is completing properly
Firewall rules
Next a firewall rule is added on the IPsec interface that allows traffic from the VPC networks to the local subnetsThis rule uses the previously created Aliases as sourcedestination targets
IPsec
Then IPsec phase 1 and phase 2 associations are set up Most of the settings required are extracted from a blockof XML data that was returned by the CreateVpnConnection call made during the AWS configuration step Thisincludes parameters like endpoint IP addresses encryption ciphers timer values etc
copy Copyright 2020 Rubicon Communications LLC 58
Security Gateway Manual Amazon AWS
If BGP routing was selected the configurations for the OpenBGPD BGP daemon are established The required settingsare determined using the AS number entered into the wizard and the parameters returned by the CreateVpnConnec-tion call made during the AWS configuration step
326 Tested Configurations
Various topologies may be possible to establish using the AWS VPC Configuration Wizard This section enumeratessome of the configurations that were successfully tested
Platforms
bull Various hardware platforms
bull 64-bit virtual machines in VMware vSphereESX
bull Amazon EC2 instances (Xen virtual machines) of the Netgate pfSensereg RouterFirewallVPN AWS AMI
Local networkrouting configurations
bull pfSense with a public address configured on the WAN interface
bull pfSense with a private address configured on the WAN interface behind a 11 NAT
bull pfSense with a private address configured on the WAN interface behind a PAT (1many NAT)
VPC Topologies
bull pfSense connected to a single VPC
bull pfSense connected to multiple VPCrsquos in different regions
bull Amazon EC2 instance of the pfSense RouterFirewallVPN AWS AMI connected to a VPC belonging to thesame AWS account in a different region
bull Amazon EC2 instance of the pfSense RouterFirewallVPN AWS AMI connected to a VPC belonging to adifferent AWS account in the same region
The configuration recommended for the greatest amount of stability is to have a public IPv4 address directly configuredon the WAN interface of your pfSense firewall but VPNs have been successfully established under all of the conditionslisted above
Whether any of these solutions is appropriate should be evaluated in the context of personal needs and existing infras-tructure Other configurations not listed above may be possible as well
327 AWS VPC Wizard FAQ
1 What level of redundancy is provided by the two tunnels
Amazon provides two tunnel endpoints that will allow traffic to be sent between your networks and the remote VPCyou are connected to The racoon daemon in pfSensereg is only capable of establishing an active phase 2 associationfor a particular sourcedestination pair on a single tunnel
Phase 2 associations between the local subnets and the remote VPC subnet are configured in the pfSense GUI for bothtunnels but racoon will only actually establish an association for the first tunnel This means that racoon will onlyever try to send traffic destined for the remote VPC subnet over the first tunnel
copy Copyright 2020 Rubicon Communications LLC 59
Security Gateway Manual Amazon AWS
If that tunnel goes down the second tunnel may be up and inbound traffic from the remote VPC may be sent to yourlocal networks over that tunnel automatically But outbound traffic to your remote VPC would not automatically failover to the second tunnel In order for you to send your outbound traffic over the second tunnel you would need todisable the phase 2 associations for the first tunnel and apply the changes
2 I quit the wizard before finishing Now what
To finish setting up the VPN go back to the wizard and run through it again It should reuse any partial configurationsthat were generated before it was stopped and create the new elements that are required
3 What are the AWS charges for this
AWS determines their own pricing and provides details for EC2 pricing and VPC pricing There are many types ofcharges that may be incurred for operating instances on AWS (eg charges related to running an instance bandwidthstorage elastic IPs etc)
The charge of specific interest in this case is the hourly charge for a VPN Connection As of this writing it costs $005(USD) per hour in most regions to have a VPN Connection configured and available AWS will charge whether theVPN Connection is being used or not as long as it is configured This will be configured by the third step of the wizardand will never be removed by pfSense
If the VPN Connection is no longer needed and billing for it needs to be stopped visit AWSrsquos VPC ManagementConsole and delete the VPN Connection manually
4 Can I use the wizard to connect to the GovCloud region
This hasnrsquot been officially tested but at least one user has reported that they were able to successfully connect to theGovCloud region They manually added the region us-gov-west-1 to the list of regions in the first step of the wizardand were able to successfully connect to their VPC in that region This may be supported in a future build but to trywithout official support do the following
1 Under the System gt Advanced menu make sure the Enable Secure Shell box is checked This is already doneby default on AWS instances but is off by default on pfSense hardware devices
2 Log into the instance via SSH
3 Make sure the root filesystem is mounted as readwrite On an AWS instance or a hardware device running on anSSD this should be true On a hardware device using Compact Flash or an SD card for storage it will probablybe necessary to remount the root filesystem in readwrite mode by running
mount -uw
4 Edit the file usrlocalwwwwizardsvpc_vpn_wizardxml using vi Look for a section of the file that lookslike this
ltoptiongtltnamegtsa-east-1ltnamegtltvaluegtsa-east-1ltvaluegt
ltoptiongt
That should appear directly after several similar ltoptiongt specifications containing all of the other availableregions Right underneath that section add the following
copy Copyright 2020 Rubicon Communications LLC 60
Security Gateway Manual Amazon AWS
ltoptiongtltnamegtus-gov-west-1ltnamegtltvaluegtus-gov-west-1ltvaluegt
ltoptiongt
Then save the file and exit vi
5 If the filesystem had to be remounted in readwrite mode earlier remount it in read-only mode by running
The GovCloud region should now appear as a choice in the first step of the wizard
copy Copyright 2020 Rubicon Communications LLC 61
CHAPTER
FOUR
REFERENCES
41 Support Resources
411 Commercial Support
In order to keep prices low the software is not bundled with a support subscription For users who need commercialsupport Netgate Gloabal Support can be purchased at httpswwwnetgatecomsupport
412 Community Support
Community support for pfSensereg software is available through the Netgate Forum
42 Additional Resources
421 Netgate Training
Netgate training offers training courses for increasing your knowledge of pfSensereg products and services Whetheryou need to maintain or improve the security skills of your staff or offer highly specialized support and improve yourcustomer satisfaction Netgate training has got you covered
httpswwwnetgatecomtraining
422 Resource Library
To learn more about how to use your pfSense appliance and for other helpful resources make sure to browse ourResource Library
httpswwwnetgatecomresources
423 Professional Services
Support does not cover more complex tasks such as CARP configuration for redundancy on multiple firewalls orcircuits network design and conversion from other firewalls to pfSensereg These items are offered as professionalservices and can be purchased and scheduled accordingly
httpswwwnetgatecomour-servicesprofessional-serviceshtml
62
Security Gateway Manual Amazon AWS
424 Community Options
If you elected not to get a paid support plan you can find help from the active and knowledgeable pfSense communityon our forums
httpsforumnetgatecom
copy Copyright 2020 Rubicon Communications LLC 63
- Getting Started
- Instance Usage
- Virtual Private Cloud (VPC)
- References
-
Security Gateway Manual Amazon AWS
5 Choose Download csv file to save the access key ID and secret access key to a CSV file on your computer
6 The new access key is active by default At this point the user has two active access keys
After waiting some period of time to ensure that all applications and tools have been updated delete the first accesskey
1 Sign in to the IAM console
2 In the navigation pane choose Users
3 Choose the name of the user whose access keys to manage and then choose the Security credentials tab
4 Locate the access key to delete and choose its X button at the far right of the row Then choose Delete to confirm
Determining When Access Keys Need Rotating
To determine when access keys need rotating (console) do the following
1 Sign in to the IAM console
2 In the navigation pane choose Users
3 If necessary add the Access key age column to the users table by completing the following steps
1 Above the table on the far right click the settings icon
2 In Manage columns select Access key age
3 Choose Close to return to the list of users
4 The Access key age column shows the number of days since the oldest active access key was created Usethis information to find users with access keys that need rotating The column displays None for users with noaccess key
322 Using the Wizard
1 Gather your AWS Access Key ID and Secret Key
2 Navigate to VPN gt AWS VPC Wizard in the main menu in the pfSensereg webGUI
copy Copyright 2020 Rubicon Communications LLC 50
Security Gateway Manual Amazon AWS
3 The first screen of the wizard prompts for the AWS Credentials Enter the Access Key ID and Secret AccessKey in the appropriate text fields and select the Region to connect to in the dropdown menu then click Next
The wizard will then query the AWS API using those credentials to find which VPCrsquos exist in the selectedregion If the credentials were rejected an error message will be displayed and return to the first screen
4 The next screen will prompt to select from the available VPCrsquos in the selected region Select the one to connectto from the dropdown menu The wizard will not create a new VPC it will only connect to an existing VPC
Click Next after selecting the desired VPC
copy Copyright 2020 Rubicon Communications LLC 51
Security Gateway Manual Amazon AWS
Note If the desired VPCrsquos to connect to isnrsquot available create one via the AWS Management Console and tryagain
The wizard will then query the AWS API to check whether there is a VPN Gateway attached to the selectedVPC If none exists one will be created via the API Then the next screen will be displayed
5 On the next screen specify routing and network data
A description of what should be entered for each of these fields follows
copy Copyright 2020 Rubicon Communications LLC 52
Security Gateway Manual Amazon AWS
Routing Type AWS offers either static routing or BGP routing Select the appropriate type fromthe dropdown menu If unsure static routing is likely to be adequate
BGP AS Number If static routing was choosen leave this field blank Otherwise it is possible tospecify an AS number to use If left blank the value will default to 65000
Local Public IP Address On an AWS Netgate appliance instance this should be the public IP ad-dress of the Elastic IP associated with the instance If configuring a hardware device runningpfSense this could be the public address assigned to the WAN (or other) interface of the device
Local subnets The subnets connected to the pfSense instance that should be routed over the tunnelfrom hosts in the remote VPC As an example if connecting a pfSense instance to a remote VPCin the AWS us-east-1 region enter the subnets (or a single subnet) that are local to the pfSenseinstance and when hosts in your VPC in us-east-1 attempted to reach addresses within thosesubnets the traffic will be sent through the VPN tunnel that is being configured
Note When selecting static routing as the routing type there will be a delay that is typically between 2-5minutes before the next screen is displayed This is because static routes must be added to the VPN Connectionvia the AWS API This operation fails until the VPN Connection reaches the ldquoavailablerdquo state This can take afew minutes to occur
Click Next when done
The wizard will then query the AWS API to find whether a Customer Gateway is configured with the selectedPublic IP Address If none exists one will be created If one already exists the ID will be retrieved and it willbe used
The wizard will then query the AWS API to see if a VPC Connection already exists that matches the dataentered If one exists it will be used Otherwise one will be created
If static routing was selected static routes will be added to the VPN Connection for the Local subnets entered
Route propagation will be enabled for the VPN Gateway in each of the Route Tables that are associated withthe VPC All of these configurations are carried out in the AWS API nothing has been changed in the pfSenseVPN configurations yet
Warning Important Note on Billing Once this step is carried out and the VPN Connection is createdAWS will start billing your AWS account the hourly rate for a VPN Connection This is $005 as of thiswriting and that is a charge that goes entirely to AWS itself They will do this until the VPN Connection isdeleted via the VPC Management Console
Nothing in pfSense will ever cause AWS to stop billing for this VPN Connection Whether it works or notwhether the pfSense instance is up or down whether the IPsec tunnels have been deleted or reconfiguredAWS will continue to bill the hourly fee for a VPN Connection if the creation of it succeeds until it is deletedthrough their web interface
The wizard helps establish an initial configuration that works and configures the appropriate elements inAWSrsquos API to facilitate this You are responsible for making sure you understand what yoursquore being billedfor and disabling any functions including VPN Connections that are no longer necessary
6 If the operations of the previous step succeeded the next screen will appear
copy Copyright 2020 Rubicon Communications LLC 53
Security Gateway Manual Amazon AWS
Select an Interface to act as the local endpoint of the VPN tunnels that will be created In most cases thisshould be the WAN interface It should generally be whatever interface is associated with the Local Public IPAddress entered in the previous step
On an AWS Netgate pfSense instance this will be whatever interface the Elastic IP is associated with On ahardware device running pfSense that has the Local Public IP Address directly configured on an interface thiswill be the interface that the Local Public IP Address is configured on
After clicking Next the wizard will configure the VPN and associated settings within pfSense itself using datareturned by the AWS API in the previous step
It will configure 2 IPsec tunnels a firewall rule 2 Aliases (referenced by the firewall rule) and 2 Virtual IPAddresses If BGP was selected as the Routing Type in the previous step it will install the OpenBGPDpackage automatically and configure it appropriately
7 The next screen will appear and prompt to apply the configuration changes that have been made
copy Copyright 2020 Rubicon Communications LLC 54
Security Gateway Manual Amazon AWS
After clicking Next all the configuration changes that were made will be applied
8 The wizard will be completed and the browser will be redirected to the IPsec status page The VPN to the VPCshould now be fully configured
Note Sometimes there is a delay of 5-10 minutes before the tunnels are fully functional and passing trafficThis has been observed particularly often during the setup of tunnels using BGP routing
copy Copyright 2020 Rubicon Communications LLC 55
Security Gateway Manual Amazon AWS
323 Testing Connectivity
Verify that the IPsec tunnels are functioning by attempting to ping the ldquoinside tunnel addressesrdquo of the VPC side ofthe tunnel by navigating to Firewall -gt Virtual IP There should be two virtual IP addresses configured that haveDescriptions like ldquoInside address for tunnel to ltremote IP addressgtrdquo
Amazon provides inside addresses for each end of the tunnel in a 30 subnet in IPv4 link local address space(169254xy) Typically the first usable address in the 30 is the inside address for the VPC end of the tunnel andthe other usable address is the inside address for your end of the tunnel So if you ping from one of the virtual IPaddresses configured on the pfSensereg instance to the IP address that is one less (for example if the virtual IP addresswere 16925425322 ping from 16925425322 to 16925425321) that checks whether the other end of the tunnelis responding and whether the tunnel is functioning properly
Note It sometimes takes a few minutes for the tunnels to begin working after the configuration wizard completes
To ping log into the pfSense instance via SSH and execute ping from a shell prompt For the previous example of16925425322 the proper syntax is
ping -S 16925425322 16925425321
When pinging from a shell prompt it is possible leave the command running indefinitely and interrupt it there is aresponse
copy Copyright 2020 Rubicon Communications LLC 56
Security Gateway Manual Amazon AWS
It is also possible to ping via the Diagnostics -gt Ping page by selecting the appropriate source address and enteringthe remote tunnel inside address in the Host field This will only send a limited number of ping packets so it may benecessary to repeat this a few times
324 VPC Configuration Details
The AWS documentation for connecting a hardware device to a VPC provides a great amount of detail on configuringVPN Connections to VPC
The main configuration elements that exist in Amazonrsquos data model are the Virtual Private Gateway the CustomerGateway and the VPN Connection In order to configure a VPN connection to a VPC all 3 of these need to exist TheVirtual Private Gateway is the VPN endpoint on Amazonrsquos side The customer gateway is the VPN endpoint on thepfSensereg instancedevice being configured The VPN Connection is the IPsec VPN between Amazon and the pfSenseinstancedevice
A Virtual Private Gateway needs to exist and be associated to the VPC A particular VPN Gateway can only beassociated to one VPC at a time Once the VPC to connect to has been selected the wizard invokes the AWS API callDescribeVpnGateways to determine if a VPN Gateway already exists that is attached to the VPC If none exists itcreates one with the CreateVpnGateway API call and attaches it to the VPC with the AttachVpnGateway call
A Customer Gateway needs to be created for the public IP address of the device or virtual machine that will be used toconnect to the VPC The wizard invokes the AWS API call DescribeCustomerGateways to determine if a CustomerGateway already exists If none exists one is created with the CreateCustomerGateway API call
The VPN Connection connects the Virtual Private Gateway and Customer Gateway The wizard checks to see if thereis an existing VPN Connection configured that connects those endpoints by invoking the AWS API call DescribeVp-nConnections If none exists one is created using the CreateVpnConnection call One of the fields returned by thiscall is a block of XML configuration data that contains configuration data assigned by AWS for use with configuringthe VPN Connection This data is stored and used in subsequent steps to make the required configuration changeswithin pfSense
copy Copyright 2020 Rubicon Communications LLC 57
Security Gateway Manual Amazon AWS
Any objects created through API calls by the wizard will be tagged with names like auto-created by pfSenseVPC ltyour_VPC_IDgt This is accomplished by calling the AWS API call CreateTags and using Name as the keyfor the tag
In addition to creation of the items mentioned above required adjustments are made to Security Groups and RouteTables to facilitate communication over the VPN The Security Groups associated with the VPC are updated to allowinbound access from the local subnets on the pfSense end of the VPN They are checked first via the DescribeSecuri-tyGroups AWS API call to determine if the access is already allowed Any of the subnets that is not already allowedhas inbound access added via the AuthorizeSecurityGroupIngress AWS API call
Route Tables associated with the VPC are updated to receive routes from the VPN Gateway used by the VPN Con-nection They are checked first via the DescribeRouteTables AWS API call If the VPN Gateway ID is not includedin the list of VPN Gateways propagating routes route propagation for the VPN Gateway is enabled on that table usingthe EnableVgwRoutePropagation AWS API call
For VPN Connections using static routing static routes for the specified subnets are added to the VPN ConnectionThis is done via the CreateVpnConnectionRoute AWS API call
325 pfSense Configuration Details
On the pfSensereg side there are numerous configurations added to support the VPN to the VPC
Aliases
First aliases are created for use in a firewall rule These aliases are intended to contain the subnets that traffic shouldbe allowed to ingress over the IPsec tunnel One alias represents the local subnets on the pfSense side and is givena name like VPC_Local_vpc_12345678 and the other represents the remote subnets on the VPC side and is given aname like VPC_Remote_vpc_12345678
Virtual IP addresses
Next virtual IP addresses are added on the lo0 (loopback) interface These virtual IP addresses are the local ldquoinsideaddressesrdquo of the IPsec tunnels These addresses are used as the local address for BGP communication when BGProuting is selected These addresses are IPv4 link local addresses (see RFC 3297) AWS assigns 30rsquos out of thenetwork 1692540016 for this purpose
Note These addresses are also useful as a ping target to execute a basic test of whether the tunnel is functioningproperly Executing a ping from a source address of one of these IP addresses to the corresponding inside address ofthe other end of the tunnel helps determine whether the tunnel negotiation is completing properly
Firewall rules
Next a firewall rule is added on the IPsec interface that allows traffic from the VPC networks to the local subnetsThis rule uses the previously created Aliases as sourcedestination targets
IPsec
Then IPsec phase 1 and phase 2 associations are set up Most of the settings required are extracted from a blockof XML data that was returned by the CreateVpnConnection call made during the AWS configuration step Thisincludes parameters like endpoint IP addresses encryption ciphers timer values etc
copy Copyright 2020 Rubicon Communications LLC 58
Security Gateway Manual Amazon AWS
If BGP routing was selected the configurations for the OpenBGPD BGP daemon are established The required settingsare determined using the AS number entered into the wizard and the parameters returned by the CreateVpnConnec-tion call made during the AWS configuration step
326 Tested Configurations
Various topologies may be possible to establish using the AWS VPC Configuration Wizard This section enumeratessome of the configurations that were successfully tested
Platforms
bull Various hardware platforms
bull 64-bit virtual machines in VMware vSphereESX
bull Amazon EC2 instances (Xen virtual machines) of the Netgate pfSensereg RouterFirewallVPN AWS AMI
Local networkrouting configurations
bull pfSense with a public address configured on the WAN interface
bull pfSense with a private address configured on the WAN interface behind a 11 NAT
bull pfSense with a private address configured on the WAN interface behind a PAT (1many NAT)
VPC Topologies
bull pfSense connected to a single VPC
bull pfSense connected to multiple VPCrsquos in different regions
bull Amazon EC2 instance of the pfSense RouterFirewallVPN AWS AMI connected to a VPC belonging to thesame AWS account in a different region
bull Amazon EC2 instance of the pfSense RouterFirewallVPN AWS AMI connected to a VPC belonging to adifferent AWS account in the same region
The configuration recommended for the greatest amount of stability is to have a public IPv4 address directly configuredon the WAN interface of your pfSense firewall but VPNs have been successfully established under all of the conditionslisted above
Whether any of these solutions is appropriate should be evaluated in the context of personal needs and existing infras-tructure Other configurations not listed above may be possible as well
327 AWS VPC Wizard FAQ
1 What level of redundancy is provided by the two tunnels
Amazon provides two tunnel endpoints that will allow traffic to be sent between your networks and the remote VPCyou are connected to The racoon daemon in pfSensereg is only capable of establishing an active phase 2 associationfor a particular sourcedestination pair on a single tunnel
Phase 2 associations between the local subnets and the remote VPC subnet are configured in the pfSense GUI for bothtunnels but racoon will only actually establish an association for the first tunnel This means that racoon will onlyever try to send traffic destined for the remote VPC subnet over the first tunnel
copy Copyright 2020 Rubicon Communications LLC 59
Security Gateway Manual Amazon AWS
If that tunnel goes down the second tunnel may be up and inbound traffic from the remote VPC may be sent to yourlocal networks over that tunnel automatically But outbound traffic to your remote VPC would not automatically failover to the second tunnel In order for you to send your outbound traffic over the second tunnel you would need todisable the phase 2 associations for the first tunnel and apply the changes
2 I quit the wizard before finishing Now what
To finish setting up the VPN go back to the wizard and run through it again It should reuse any partial configurationsthat were generated before it was stopped and create the new elements that are required
3 What are the AWS charges for this
AWS determines their own pricing and provides details for EC2 pricing and VPC pricing There are many types ofcharges that may be incurred for operating instances on AWS (eg charges related to running an instance bandwidthstorage elastic IPs etc)
The charge of specific interest in this case is the hourly charge for a VPN Connection As of this writing it costs $005(USD) per hour in most regions to have a VPN Connection configured and available AWS will charge whether theVPN Connection is being used or not as long as it is configured This will be configured by the third step of the wizardand will never be removed by pfSense
If the VPN Connection is no longer needed and billing for it needs to be stopped visit AWSrsquos VPC ManagementConsole and delete the VPN Connection manually
4 Can I use the wizard to connect to the GovCloud region
This hasnrsquot been officially tested but at least one user has reported that they were able to successfully connect to theGovCloud region They manually added the region us-gov-west-1 to the list of regions in the first step of the wizardand were able to successfully connect to their VPC in that region This may be supported in a future build but to trywithout official support do the following
1 Under the System gt Advanced menu make sure the Enable Secure Shell box is checked This is already doneby default on AWS instances but is off by default on pfSense hardware devices
2 Log into the instance via SSH
3 Make sure the root filesystem is mounted as readwrite On an AWS instance or a hardware device running on anSSD this should be true On a hardware device using Compact Flash or an SD card for storage it will probablybe necessary to remount the root filesystem in readwrite mode by running
mount -uw
4 Edit the file usrlocalwwwwizardsvpc_vpn_wizardxml using vi Look for a section of the file that lookslike this
ltoptiongtltnamegtsa-east-1ltnamegtltvaluegtsa-east-1ltvaluegt
ltoptiongt
That should appear directly after several similar ltoptiongt specifications containing all of the other availableregions Right underneath that section add the following
copy Copyright 2020 Rubicon Communications LLC 60
Security Gateway Manual Amazon AWS
ltoptiongtltnamegtus-gov-west-1ltnamegtltvaluegtus-gov-west-1ltvaluegt
ltoptiongt
Then save the file and exit vi
5 If the filesystem had to be remounted in readwrite mode earlier remount it in read-only mode by running
The GovCloud region should now appear as a choice in the first step of the wizard
copy Copyright 2020 Rubicon Communications LLC 61
CHAPTER
FOUR
REFERENCES
41 Support Resources
411 Commercial Support
In order to keep prices low the software is not bundled with a support subscription For users who need commercialsupport Netgate Gloabal Support can be purchased at httpswwwnetgatecomsupport
412 Community Support
Community support for pfSensereg software is available through the Netgate Forum
42 Additional Resources
421 Netgate Training
Netgate training offers training courses for increasing your knowledge of pfSensereg products and services Whetheryou need to maintain or improve the security skills of your staff or offer highly specialized support and improve yourcustomer satisfaction Netgate training has got you covered
httpswwwnetgatecomtraining
422 Resource Library
To learn more about how to use your pfSense appliance and for other helpful resources make sure to browse ourResource Library
httpswwwnetgatecomresources
423 Professional Services
Support does not cover more complex tasks such as CARP configuration for redundancy on multiple firewalls orcircuits network design and conversion from other firewalls to pfSensereg These items are offered as professionalservices and can be purchased and scheduled accordingly
httpswwwnetgatecomour-servicesprofessional-serviceshtml
62
Security Gateway Manual Amazon AWS
424 Community Options
If you elected not to get a paid support plan you can find help from the active and knowledgeable pfSense communityon our forums
httpsforumnetgatecom
copy Copyright 2020 Rubicon Communications LLC 63
- Getting Started
- Instance Usage
- Virtual Private Cloud (VPC)
- References
-

Security Gateway Manual Amazon AWS
After clicking Next all the configuration changes that were made will be applied
8 The wizard will be completed and the browser will be redirected to the IPsec status page The VPN to the VPCshould now be fully configured
Note Sometimes there is a delay of 5-10 minutes before the tunnels are fully functional and passing trafficThis has been observed particularly often during the setup of tunnels using BGP routing
copy Copyright 2020 Rubicon Communications LLC 55
Security Gateway Manual Amazon AWS
323 Testing Connectivity
Verify that the IPsec tunnels are functioning by attempting to ping the ldquoinside tunnel addressesrdquo of the VPC side ofthe tunnel by navigating to Firewall -gt Virtual IP There should be two virtual IP addresses configured that haveDescriptions like ldquoInside address for tunnel to ltremote IP addressgtrdquo
Amazon provides inside addresses for each end of the tunnel in a 30 subnet in IPv4 link local address space(169254xy) Typically the first usable address in the 30 is the inside address for the VPC end of the tunnel andthe other usable address is the inside address for your end of the tunnel So if you ping from one of the virtual IPaddresses configured on the pfSensereg instance to the IP address that is one less (for example if the virtual IP addresswere 16925425322 ping from 16925425322 to 16925425321) that checks whether the other end of the tunnelis responding and whether the tunnel is functioning properly
Note It sometimes takes a few minutes for the tunnels to begin working after the configuration wizard completes
To ping log into the pfSense instance via SSH and execute ping from a shell prompt For the previous example of16925425322 the proper syntax is
ping -S 16925425322 16925425321
When pinging from a shell prompt it is possible leave the command running indefinitely and interrupt it there is aresponse
copy Copyright 2020 Rubicon Communications LLC 56
Security Gateway Manual Amazon AWS
It is also possible to ping via the Diagnostics -gt Ping page by selecting the appropriate source address and enteringthe remote tunnel inside address in the Host field This will only send a limited number of ping packets so it may benecessary to repeat this a few times
324 VPC Configuration Details
The AWS documentation for connecting a hardware device to a VPC provides a great amount of detail on configuringVPN Connections to VPC
The main configuration elements that exist in Amazonrsquos data model are the Virtual Private Gateway the CustomerGateway and the VPN Connection In order to configure a VPN connection to a VPC all 3 of these need to exist TheVirtual Private Gateway is the VPN endpoint on Amazonrsquos side The customer gateway is the VPN endpoint on thepfSensereg instancedevice being configured The VPN Connection is the IPsec VPN between Amazon and the pfSenseinstancedevice
A Virtual Private Gateway needs to exist and be associated to the VPC A particular VPN Gateway can only beassociated to one VPC at a time Once the VPC to connect to has been selected the wizard invokes the AWS API callDescribeVpnGateways to determine if a VPN Gateway already exists that is attached to the VPC If none exists itcreates one with the CreateVpnGateway API call and attaches it to the VPC with the AttachVpnGateway call
A Customer Gateway needs to be created for the public IP address of the device or virtual machine that will be used toconnect to the VPC The wizard invokes the AWS API call DescribeCustomerGateways to determine if a CustomerGateway already exists If none exists one is created with the CreateCustomerGateway API call
The VPN Connection connects the Virtual Private Gateway and Customer Gateway The wizard checks to see if thereis an existing VPN Connection configured that connects those endpoints by invoking the AWS API call DescribeVp-nConnections If none exists one is created using the CreateVpnConnection call One of the fields returned by thiscall is a block of XML configuration data that contains configuration data assigned by AWS for use with configuringthe VPN Connection This data is stored and used in subsequent steps to make the required configuration changeswithin pfSense
copy Copyright 2020 Rubicon Communications LLC 57
Security Gateway Manual Amazon AWS
Any objects created through API calls by the wizard will be tagged with names like auto-created by pfSenseVPC ltyour_VPC_IDgt This is accomplished by calling the AWS API call CreateTags and using Name as the keyfor the tag
In addition to creation of the items mentioned above required adjustments are made to Security Groups and RouteTables to facilitate communication over the VPN The Security Groups associated with the VPC are updated to allowinbound access from the local subnets on the pfSense end of the VPN They are checked first via the DescribeSecuri-tyGroups AWS API call to determine if the access is already allowed Any of the subnets that is not already allowedhas inbound access added via the AuthorizeSecurityGroupIngress AWS API call
Route Tables associated with the VPC are updated to receive routes from the VPN Gateway used by the VPN Con-nection They are checked first via the DescribeRouteTables AWS API call If the VPN Gateway ID is not includedin the list of VPN Gateways propagating routes route propagation for the VPN Gateway is enabled on that table usingthe EnableVgwRoutePropagation AWS API call
For VPN Connections using static routing static routes for the specified subnets are added to the VPN ConnectionThis is done via the CreateVpnConnectionRoute AWS API call
325 pfSense Configuration Details
On the pfSensereg side there are numerous configurations added to support the VPN to the VPC
Aliases
First aliases are created for use in a firewall rule These aliases are intended to contain the subnets that traffic shouldbe allowed to ingress over the IPsec tunnel One alias represents the local subnets on the pfSense side and is givena name like VPC_Local_vpc_12345678 and the other represents the remote subnets on the VPC side and is given aname like VPC_Remote_vpc_12345678
Virtual IP addresses
Next virtual IP addresses are added on the lo0 (loopback) interface These virtual IP addresses are the local ldquoinsideaddressesrdquo of the IPsec tunnels These addresses are used as the local address for BGP communication when BGProuting is selected These addresses are IPv4 link local addresses (see RFC 3297) AWS assigns 30rsquos out of thenetwork 1692540016 for this purpose
Note These addresses are also useful as a ping target to execute a basic test of whether the tunnel is functioningproperly Executing a ping from a source address of one of these IP addresses to the corresponding inside address ofthe other end of the tunnel helps determine whether the tunnel negotiation is completing properly
Firewall rules
Next a firewall rule is added on the IPsec interface that allows traffic from the VPC networks to the local subnetsThis rule uses the previously created Aliases as sourcedestination targets
IPsec
Then IPsec phase 1 and phase 2 associations are set up Most of the settings required are extracted from a blockof XML data that was returned by the CreateVpnConnection call made during the AWS configuration step Thisincludes parameters like endpoint IP addresses encryption ciphers timer values etc
copy Copyright 2020 Rubicon Communications LLC 58
Security Gateway Manual Amazon AWS
If BGP routing was selected the configurations for the OpenBGPD BGP daemon are established The required settingsare determined using the AS number entered into the wizard and the parameters returned by the CreateVpnConnec-tion call made during the AWS configuration step
326 Tested Configurations
Various topologies may be possible to establish using the AWS VPC Configuration Wizard This section enumeratessome of the configurations that were successfully tested
Platforms
bull Various hardware platforms
bull 64-bit virtual machines in VMware vSphereESX
bull Amazon EC2 instances (Xen virtual machines) of the Netgate pfSensereg RouterFirewallVPN AWS AMI
Local networkrouting configurations
bull pfSense with a public address configured on the WAN interface
bull pfSense with a private address configured on the WAN interface behind a 11 NAT
bull pfSense with a private address configured on the WAN interface behind a PAT (1many NAT)
VPC Topologies
bull pfSense connected to a single VPC
bull pfSense connected to multiple VPCrsquos in different regions
bull Amazon EC2 instance of the pfSense RouterFirewallVPN AWS AMI connected to a VPC belonging to thesame AWS account in a different region
bull Amazon EC2 instance of the pfSense RouterFirewallVPN AWS AMI connected to a VPC belonging to adifferent AWS account in the same region
The configuration recommended for the greatest amount of stability is to have a public IPv4 address directly configuredon the WAN interface of your pfSense firewall but VPNs have been successfully established under all of the conditionslisted above
Whether any of these solutions is appropriate should be evaluated in the context of personal needs and existing infras-tructure Other configurations not listed above may be possible as well
327 AWS VPC Wizard FAQ
1 What level of redundancy is provided by the two tunnels
Amazon provides two tunnel endpoints that will allow traffic to be sent between your networks and the remote VPCyou are connected to The racoon daemon in pfSensereg is only capable of establishing an active phase 2 associationfor a particular sourcedestination pair on a single tunnel
Phase 2 associations between the local subnets and the remote VPC subnet are configured in the pfSense GUI for bothtunnels but racoon will only actually establish an association for the first tunnel This means that racoon will onlyever try to send traffic destined for the remote VPC subnet over the first tunnel
copy Copyright 2020 Rubicon Communications LLC 59
Security Gateway Manual Amazon AWS
If that tunnel goes down the second tunnel may be up and inbound traffic from the remote VPC may be sent to yourlocal networks over that tunnel automatically But outbound traffic to your remote VPC would not automatically failover to the second tunnel In order for you to send your outbound traffic over the second tunnel you would need todisable the phase 2 associations for the first tunnel and apply the changes
2 I quit the wizard before finishing Now what
To finish setting up the VPN go back to the wizard and run through it again It should reuse any partial configurationsthat were generated before it was stopped and create the new elements that are required
3 What are the AWS charges for this
AWS determines their own pricing and provides details for EC2 pricing and VPC pricing There are many types ofcharges that may be incurred for operating instances on AWS (eg charges related to running an instance bandwidthstorage elastic IPs etc)
The charge of specific interest in this case is the hourly charge for a VPN Connection As of this writing it costs $005(USD) per hour in most regions to have a VPN Connection configured and available AWS will charge whether theVPN Connection is being used or not as long as it is configured This will be configured by the third step of the wizardand will never be removed by pfSense
If the VPN Connection is no longer needed and billing for it needs to be stopped visit AWSrsquos VPC ManagementConsole and delete the VPN Connection manually
4 Can I use the wizard to connect to the GovCloud region
This hasnrsquot been officially tested but at least one user has reported that they were able to successfully connect to theGovCloud region They manually added the region us-gov-west-1 to the list of regions in the first step of the wizardand were able to successfully connect to their VPC in that region This may be supported in a future build but to trywithout official support do the following
1 Under the System gt Advanced menu make sure the Enable Secure Shell box is checked This is already doneby default on AWS instances but is off by default on pfSense hardware devices
2 Log into the instance via SSH
3 Make sure the root filesystem is mounted as readwrite On an AWS instance or a hardware device running on anSSD this should be true On a hardware device using Compact Flash or an SD card for storage it will probablybe necessary to remount the root filesystem in readwrite mode by running
mount -uw
4 Edit the file usrlocalwwwwizardsvpc_vpn_wizardxml using vi Look for a section of the file that lookslike this
ltoptiongtltnamegtsa-east-1ltnamegtltvaluegtsa-east-1ltvaluegt
ltoptiongt
That should appear directly after several similar ltoptiongt specifications containing all of the other availableregions Right underneath that section add the following
copy Copyright 2020 Rubicon Communications LLC 60
Security Gateway Manual Amazon AWS
ltoptiongtltnamegtus-gov-west-1ltnamegtltvaluegtus-gov-west-1ltvaluegt
ltoptiongt
Then save the file and exit vi
5 If the filesystem had to be remounted in readwrite mode earlier remount it in read-only mode by running
The GovCloud region should now appear as a choice in the first step of the wizard
copy Copyright 2020 Rubicon Communications LLC 61
CHAPTER
FOUR
REFERENCES
41 Support Resources
411 Commercial Support
In order to keep prices low the software is not bundled with a support subscription For users who need commercialsupport Netgate Gloabal Support can be purchased at httpswwwnetgatecomsupport
412 Community Support
Community support for pfSensereg software is available through the Netgate Forum
42 Additional Resources
421 Netgate Training
Netgate training offers training courses for increasing your knowledge of pfSensereg products and services Whetheryou need to maintain or improve the security skills of your staff or offer highly specialized support and improve yourcustomer satisfaction Netgate training has got you covered
httpswwwnetgatecomtraining
422 Resource Library
To learn more about how to use your pfSense appliance and for other helpful resources make sure to browse ourResource Library
httpswwwnetgatecomresources
423 Professional Services
Support does not cover more complex tasks such as CARP configuration for redundancy on multiple firewalls orcircuits network design and conversion from other firewalls to pfSensereg These items are offered as professionalservices and can be purchased and scheduled accordingly
httpswwwnetgatecomour-servicesprofessional-serviceshtml
62
Security Gateway Manual Amazon AWS
424 Community Options
If you elected not to get a paid support plan you can find help from the active and knowledgeable pfSense communityon our forums
httpsforumnetgatecom
copy Copyright 2020 Rubicon Communications LLC 63
- Getting Started
- Instance Usage
- Virtual Private Cloud (VPC)
- References
-
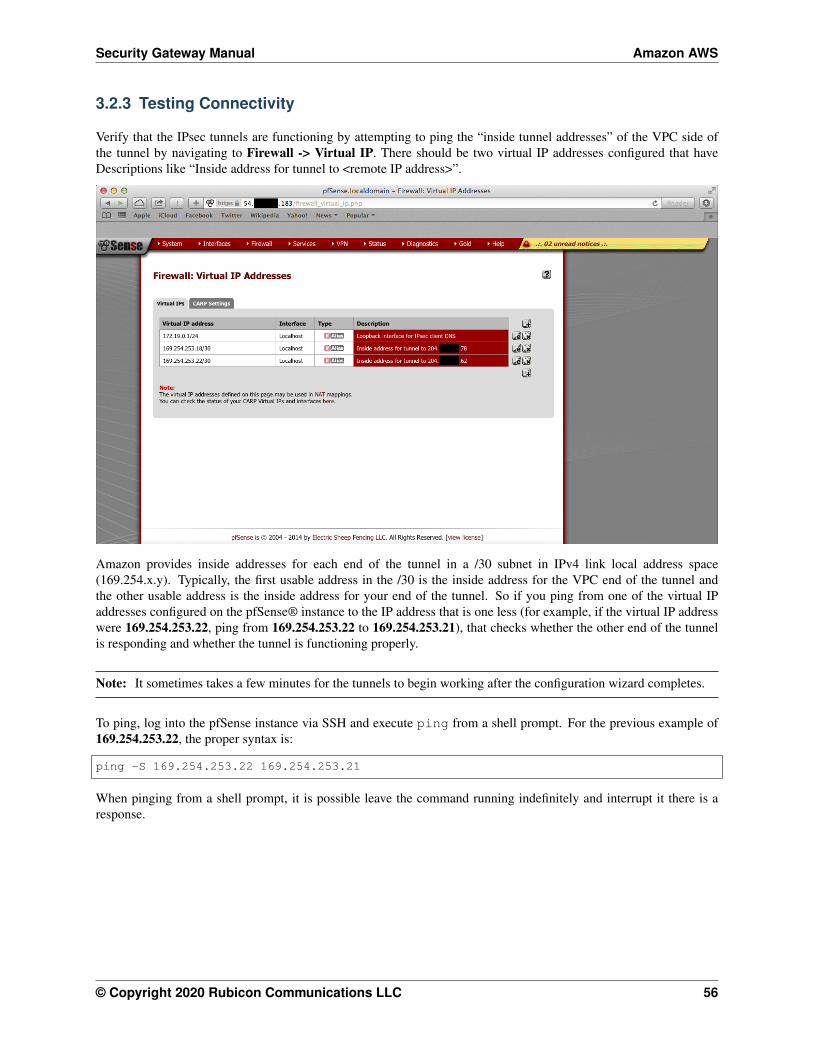
Security Gateway Manual Amazon AWS
323 Testing Connectivity
Verify that the IPsec tunnels are functioning by attempting to ping the ldquoinside tunnel addressesrdquo of the VPC side ofthe tunnel by navigating to Firewall -gt Virtual IP There should be two virtual IP addresses configured that haveDescriptions like ldquoInside address for tunnel to ltremote IP addressgtrdquo
Amazon provides inside addresses for each end of the tunnel in a 30 subnet in IPv4 link local address space(169254xy) Typically the first usable address in the 30 is the inside address for the VPC end of the tunnel andthe other usable address is the inside address for your end of the tunnel So if you ping from one of the virtual IPaddresses configured on the pfSensereg instance to the IP address that is one less (for example if the virtual IP addresswere 16925425322 ping from 16925425322 to 16925425321) that checks whether the other end of the tunnelis responding and whether the tunnel is functioning properly
Note It sometimes takes a few minutes for the tunnels to begin working after the configuration wizard completes
To ping log into the pfSense instance via SSH and execute ping from a shell prompt For the previous example of16925425322 the proper syntax is
ping -S 16925425322 16925425321
When pinging from a shell prompt it is possible leave the command running indefinitely and interrupt it there is aresponse
copy Copyright 2020 Rubicon Communications LLC 56
Security Gateway Manual Amazon AWS
It is also possible to ping via the Diagnostics -gt Ping page by selecting the appropriate source address and enteringthe remote tunnel inside address in the Host field This will only send a limited number of ping packets so it may benecessary to repeat this a few times
324 VPC Configuration Details
The AWS documentation for connecting a hardware device to a VPC provides a great amount of detail on configuringVPN Connections to VPC
The main configuration elements that exist in Amazonrsquos data model are the Virtual Private Gateway the CustomerGateway and the VPN Connection In order to configure a VPN connection to a VPC all 3 of these need to exist TheVirtual Private Gateway is the VPN endpoint on Amazonrsquos side The customer gateway is the VPN endpoint on thepfSensereg instancedevice being configured The VPN Connection is the IPsec VPN between Amazon and the pfSenseinstancedevice
A Virtual Private Gateway needs to exist and be associated to the VPC A particular VPN Gateway can only beassociated to one VPC at a time Once the VPC to connect to has been selected the wizard invokes the AWS API callDescribeVpnGateways to determine if a VPN Gateway already exists that is attached to the VPC If none exists itcreates one with the CreateVpnGateway API call and attaches it to the VPC with the AttachVpnGateway call
A Customer Gateway needs to be created for the public IP address of the device or virtual machine that will be used toconnect to the VPC The wizard invokes the AWS API call DescribeCustomerGateways to determine if a CustomerGateway already exists If none exists one is created with the CreateCustomerGateway API call
The VPN Connection connects the Virtual Private Gateway and Customer Gateway The wizard checks to see if thereis an existing VPN Connection configured that connects those endpoints by invoking the AWS API call DescribeVp-nConnections If none exists one is created using the CreateVpnConnection call One of the fields returned by thiscall is a block of XML configuration data that contains configuration data assigned by AWS for use with configuringthe VPN Connection This data is stored and used in subsequent steps to make the required configuration changeswithin pfSense
copy Copyright 2020 Rubicon Communications LLC 57
Security Gateway Manual Amazon AWS
Any objects created through API calls by the wizard will be tagged with names like auto-created by pfSenseVPC ltyour_VPC_IDgt This is accomplished by calling the AWS API call CreateTags and using Name as the keyfor the tag
In addition to creation of the items mentioned above required adjustments are made to Security Groups and RouteTables to facilitate communication over the VPN The Security Groups associated with the VPC are updated to allowinbound access from the local subnets on the pfSense end of the VPN They are checked first via the DescribeSecuri-tyGroups AWS API call to determine if the access is already allowed Any of the subnets that is not already allowedhas inbound access added via the AuthorizeSecurityGroupIngress AWS API call
Route Tables associated with the VPC are updated to receive routes from the VPN Gateway used by the VPN Con-nection They are checked first via the DescribeRouteTables AWS API call If the VPN Gateway ID is not includedin the list of VPN Gateways propagating routes route propagation for the VPN Gateway is enabled on that table usingthe EnableVgwRoutePropagation AWS API call
For VPN Connections using static routing static routes for the specified subnets are added to the VPN ConnectionThis is done via the CreateVpnConnectionRoute AWS API call
325 pfSense Configuration Details
On the pfSensereg side there are numerous configurations added to support the VPN to the VPC
Aliases
First aliases are created for use in a firewall rule These aliases are intended to contain the subnets that traffic shouldbe allowed to ingress over the IPsec tunnel One alias represents the local subnets on the pfSense side and is givena name like VPC_Local_vpc_12345678 and the other represents the remote subnets on the VPC side and is given aname like VPC_Remote_vpc_12345678
Virtual IP addresses
Next virtual IP addresses are added on the lo0 (loopback) interface These virtual IP addresses are the local ldquoinsideaddressesrdquo of the IPsec tunnels These addresses are used as the local address for BGP communication when BGProuting is selected These addresses are IPv4 link local addresses (see RFC 3297) AWS assigns 30rsquos out of thenetwork 1692540016 for this purpose
Note These addresses are also useful as a ping target to execute a basic test of whether the tunnel is functioningproperly Executing a ping from a source address of one of these IP addresses to the corresponding inside address ofthe other end of the tunnel helps determine whether the tunnel negotiation is completing properly
Firewall rules
Next a firewall rule is added on the IPsec interface that allows traffic from the VPC networks to the local subnetsThis rule uses the previously created Aliases as sourcedestination targets
IPsec
Then IPsec phase 1 and phase 2 associations are set up Most of the settings required are extracted from a blockof XML data that was returned by the CreateVpnConnection call made during the AWS configuration step Thisincludes parameters like endpoint IP addresses encryption ciphers timer values etc
copy Copyright 2020 Rubicon Communications LLC 58
Security Gateway Manual Amazon AWS
If BGP routing was selected the configurations for the OpenBGPD BGP daemon are established The required settingsare determined using the AS number entered into the wizard and the parameters returned by the CreateVpnConnec-tion call made during the AWS configuration step
326 Tested Configurations
Various topologies may be possible to establish using the AWS VPC Configuration Wizard This section enumeratessome of the configurations that were successfully tested
Platforms
bull Various hardware platforms
bull 64-bit virtual machines in VMware vSphereESX
bull Amazon EC2 instances (Xen virtual machines) of the Netgate pfSensereg RouterFirewallVPN AWS AMI
Local networkrouting configurations
bull pfSense with a public address configured on the WAN interface
bull pfSense with a private address configured on the WAN interface behind a 11 NAT
bull pfSense with a private address configured on the WAN interface behind a PAT (1many NAT)
VPC Topologies
bull pfSense connected to a single VPC
bull pfSense connected to multiple VPCrsquos in different regions
bull Amazon EC2 instance of the pfSense RouterFirewallVPN AWS AMI connected to a VPC belonging to thesame AWS account in a different region
bull Amazon EC2 instance of the pfSense RouterFirewallVPN AWS AMI connected to a VPC belonging to adifferent AWS account in the same region
The configuration recommended for the greatest amount of stability is to have a public IPv4 address directly configuredon the WAN interface of your pfSense firewall but VPNs have been successfully established under all of the conditionslisted above
Whether any of these solutions is appropriate should be evaluated in the context of personal needs and existing infras-tructure Other configurations not listed above may be possible as well
327 AWS VPC Wizard FAQ
1 What level of redundancy is provided by the two tunnels
Amazon provides two tunnel endpoints that will allow traffic to be sent between your networks and the remote VPCyou are connected to The racoon daemon in pfSensereg is only capable of establishing an active phase 2 associationfor a particular sourcedestination pair on a single tunnel
Phase 2 associations between the local subnets and the remote VPC subnet are configured in the pfSense GUI for bothtunnels but racoon will only actually establish an association for the first tunnel This means that racoon will onlyever try to send traffic destined for the remote VPC subnet over the first tunnel
copy Copyright 2020 Rubicon Communications LLC 59
Security Gateway Manual Amazon AWS
If that tunnel goes down the second tunnel may be up and inbound traffic from the remote VPC may be sent to yourlocal networks over that tunnel automatically But outbound traffic to your remote VPC would not automatically failover to the second tunnel In order for you to send your outbound traffic over the second tunnel you would need todisable the phase 2 associations for the first tunnel and apply the changes
2 I quit the wizard before finishing Now what
To finish setting up the VPN go back to the wizard and run through it again It should reuse any partial configurationsthat were generated before it was stopped and create the new elements that are required
3 What are the AWS charges for this
AWS determines their own pricing and provides details for EC2 pricing and VPC pricing There are many types ofcharges that may be incurred for operating instances on AWS (eg charges related to running an instance bandwidthstorage elastic IPs etc)
The charge of specific interest in this case is the hourly charge for a VPN Connection As of this writing it costs $005(USD) per hour in most regions to have a VPN Connection configured and available AWS will charge whether theVPN Connection is being used or not as long as it is configured This will be configured by the third step of the wizardand will never be removed by pfSense
If the VPN Connection is no longer needed and billing for it needs to be stopped visit AWSrsquos VPC ManagementConsole and delete the VPN Connection manually
4 Can I use the wizard to connect to the GovCloud region
This hasnrsquot been officially tested but at least one user has reported that they were able to successfully connect to theGovCloud region They manually added the region us-gov-west-1 to the list of regions in the first step of the wizardand were able to successfully connect to their VPC in that region This may be supported in a future build but to trywithout official support do the following
1 Under the System gt Advanced menu make sure the Enable Secure Shell box is checked This is already doneby default on AWS instances but is off by default on pfSense hardware devices
2 Log into the instance via SSH
3 Make sure the root filesystem is mounted as readwrite On an AWS instance or a hardware device running on anSSD this should be true On a hardware device using Compact Flash or an SD card for storage it will probablybe necessary to remount the root filesystem in readwrite mode by running
mount -uw
4 Edit the file usrlocalwwwwizardsvpc_vpn_wizardxml using vi Look for a section of the file that lookslike this
ltoptiongtltnamegtsa-east-1ltnamegtltvaluegtsa-east-1ltvaluegt
ltoptiongt
That should appear directly after several similar ltoptiongt specifications containing all of the other availableregions Right underneath that section add the following
copy Copyright 2020 Rubicon Communications LLC 60
Security Gateway Manual Amazon AWS
ltoptiongtltnamegtus-gov-west-1ltnamegtltvaluegtus-gov-west-1ltvaluegt
ltoptiongt
Then save the file and exit vi
5 If the filesystem had to be remounted in readwrite mode earlier remount it in read-only mode by running
The GovCloud region should now appear as a choice in the first step of the wizard
copy Copyright 2020 Rubicon Communications LLC 61
CHAPTER
FOUR
REFERENCES
41 Support Resources
411 Commercial Support
In order to keep prices low the software is not bundled with a support subscription For users who need commercialsupport Netgate Gloabal Support can be purchased at httpswwwnetgatecomsupport
412 Community Support
Community support for pfSensereg software is available through the Netgate Forum
42 Additional Resources
421 Netgate Training
Netgate training offers training courses for increasing your knowledge of pfSensereg products and services Whetheryou need to maintain or improve the security skills of your staff or offer highly specialized support and improve yourcustomer satisfaction Netgate training has got you covered
httpswwwnetgatecomtraining
422 Resource Library
To learn more about how to use your pfSense appliance and for other helpful resources make sure to browse ourResource Library
httpswwwnetgatecomresources
423 Professional Services
Support does not cover more complex tasks such as CARP configuration for redundancy on multiple firewalls orcircuits network design and conversion from other firewalls to pfSensereg These items are offered as professionalservices and can be purchased and scheduled accordingly
httpswwwnetgatecomour-servicesprofessional-serviceshtml
62
Security Gateway Manual Amazon AWS
424 Community Options
If you elected not to get a paid support plan you can find help from the active and knowledgeable pfSense communityon our forums
httpsforumnetgatecom
copy Copyright 2020 Rubicon Communications LLC 63
- Getting Started
- Instance Usage
- Virtual Private Cloud (VPC)
- References
-
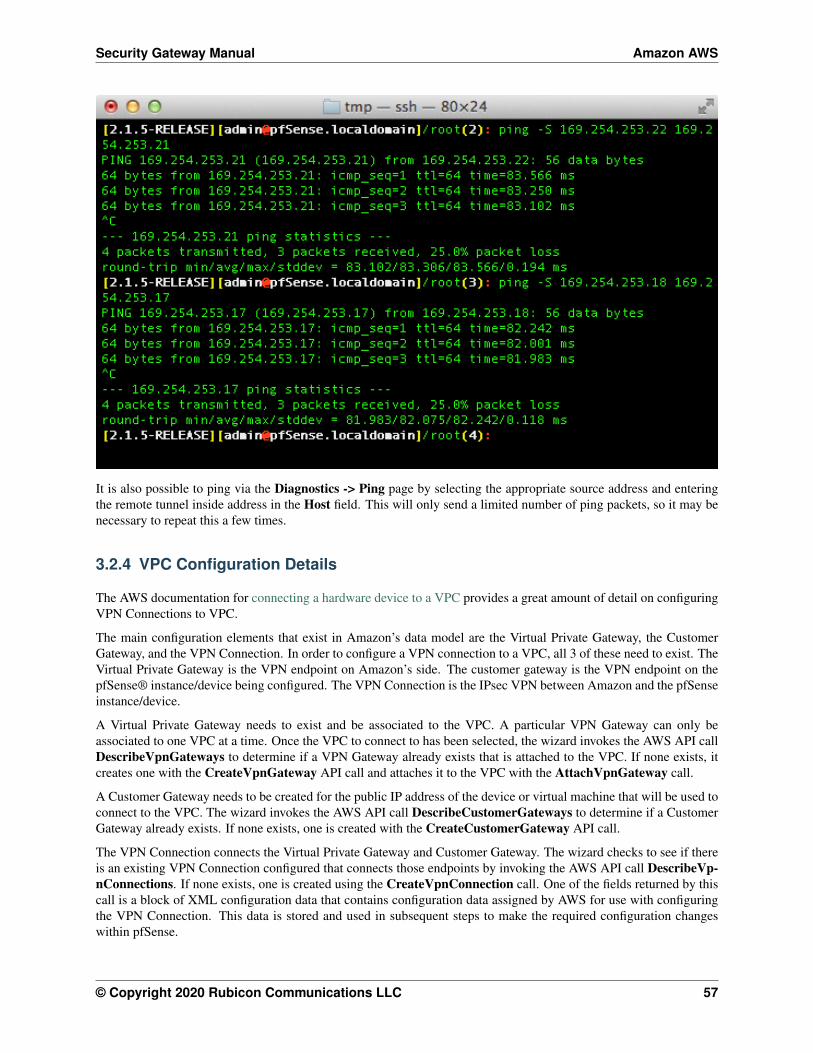
Security Gateway Manual Amazon AWS
It is also possible to ping via the Diagnostics -gt Ping page by selecting the appropriate source address and enteringthe remote tunnel inside address in the Host field This will only send a limited number of ping packets so it may benecessary to repeat this a few times
324 VPC Configuration Details
The AWS documentation for connecting a hardware device to a VPC provides a great amount of detail on configuringVPN Connections to VPC
The main configuration elements that exist in Amazonrsquos data model are the Virtual Private Gateway the CustomerGateway and the VPN Connection In order to configure a VPN connection to a VPC all 3 of these need to exist TheVirtual Private Gateway is the VPN endpoint on Amazonrsquos side The customer gateway is the VPN endpoint on thepfSensereg instancedevice being configured The VPN Connection is the IPsec VPN between Amazon and the pfSenseinstancedevice
A Virtual Private Gateway needs to exist and be associated to the VPC A particular VPN Gateway can only beassociated to one VPC at a time Once the VPC to connect to has been selected the wizard invokes the AWS API callDescribeVpnGateways to determine if a VPN Gateway already exists that is attached to the VPC If none exists itcreates one with the CreateVpnGateway API call and attaches it to the VPC with the AttachVpnGateway call
A Customer Gateway needs to be created for the public IP address of the device or virtual machine that will be used toconnect to the VPC The wizard invokes the AWS API call DescribeCustomerGateways to determine if a CustomerGateway already exists If none exists one is created with the CreateCustomerGateway API call
The VPN Connection connects the Virtual Private Gateway and Customer Gateway The wizard checks to see if thereis an existing VPN Connection configured that connects those endpoints by invoking the AWS API call DescribeVp-nConnections If none exists one is created using the CreateVpnConnection call One of the fields returned by thiscall is a block of XML configuration data that contains configuration data assigned by AWS for use with configuringthe VPN Connection This data is stored and used in subsequent steps to make the required configuration changeswithin pfSense
copy Copyright 2020 Rubicon Communications LLC 57
Security Gateway Manual Amazon AWS
Any objects created through API calls by the wizard will be tagged with names like auto-created by pfSenseVPC ltyour_VPC_IDgt This is accomplished by calling the AWS API call CreateTags and using Name as the keyfor the tag
In addition to creation of the items mentioned above required adjustments are made to Security Groups and RouteTables to facilitate communication over the VPN The Security Groups associated with the VPC are updated to allowinbound access from the local subnets on the pfSense end of the VPN They are checked first via the DescribeSecuri-tyGroups AWS API call to determine if the access is already allowed Any of the subnets that is not already allowedhas inbound access added via the AuthorizeSecurityGroupIngress AWS API call
Route Tables associated with the VPC are updated to receive routes from the VPN Gateway used by the VPN Con-nection They are checked first via the DescribeRouteTables AWS API call If the VPN Gateway ID is not includedin the list of VPN Gateways propagating routes route propagation for the VPN Gateway is enabled on that table usingthe EnableVgwRoutePropagation AWS API call
For VPN Connections using static routing static routes for the specified subnets are added to the VPN ConnectionThis is done via the CreateVpnConnectionRoute AWS API call
325 pfSense Configuration Details
On the pfSensereg side there are numerous configurations added to support the VPN to the VPC
Aliases
First aliases are created for use in a firewall rule These aliases are intended to contain the subnets that traffic shouldbe allowed to ingress over the IPsec tunnel One alias represents the local subnets on the pfSense side and is givena name like VPC_Local_vpc_12345678 and the other represents the remote subnets on the VPC side and is given aname like VPC_Remote_vpc_12345678
Virtual IP addresses
Next virtual IP addresses are added on the lo0 (loopback) interface These virtual IP addresses are the local ldquoinsideaddressesrdquo of the IPsec tunnels These addresses are used as the local address for BGP communication when BGProuting is selected These addresses are IPv4 link local addresses (see RFC 3297) AWS assigns 30rsquos out of thenetwork 1692540016 for this purpose
Note These addresses are also useful as a ping target to execute a basic test of whether the tunnel is functioningproperly Executing a ping from a source address of one of these IP addresses to the corresponding inside address ofthe other end of the tunnel helps determine whether the tunnel negotiation is completing properly
Firewall rules
Next a firewall rule is added on the IPsec interface that allows traffic from the VPC networks to the local subnetsThis rule uses the previously created Aliases as sourcedestination targets
IPsec
Then IPsec phase 1 and phase 2 associations are set up Most of the settings required are extracted from a blockof XML data that was returned by the CreateVpnConnection call made during the AWS configuration step Thisincludes parameters like endpoint IP addresses encryption ciphers timer values etc
copy Copyright 2020 Rubicon Communications LLC 58
Security Gateway Manual Amazon AWS
If BGP routing was selected the configurations for the OpenBGPD BGP daemon are established The required settingsare determined using the AS number entered into the wizard and the parameters returned by the CreateVpnConnec-tion call made during the AWS configuration step
326 Tested Configurations
Various topologies may be possible to establish using the AWS VPC Configuration Wizard This section enumeratessome of the configurations that were successfully tested
Platforms
bull Various hardware platforms
bull 64-bit virtual machines in VMware vSphereESX
bull Amazon EC2 instances (Xen virtual machines) of the Netgate pfSensereg RouterFirewallVPN AWS AMI
Local networkrouting configurations
bull pfSense with a public address configured on the WAN interface
bull pfSense with a private address configured on the WAN interface behind a 11 NAT
bull pfSense with a private address configured on the WAN interface behind a PAT (1many NAT)
VPC Topologies
bull pfSense connected to a single VPC
bull pfSense connected to multiple VPCrsquos in different regions
bull Amazon EC2 instance of the pfSense RouterFirewallVPN AWS AMI connected to a VPC belonging to thesame AWS account in a different region
bull Amazon EC2 instance of the pfSense RouterFirewallVPN AWS AMI connected to a VPC belonging to adifferent AWS account in the same region
The configuration recommended for the greatest amount of stability is to have a public IPv4 address directly configuredon the WAN interface of your pfSense firewall but VPNs have been successfully established under all of the conditionslisted above
Whether any of these solutions is appropriate should be evaluated in the context of personal needs and existing infras-tructure Other configurations not listed above may be possible as well
327 AWS VPC Wizard FAQ
1 What level of redundancy is provided by the two tunnels
Amazon provides two tunnel endpoints that will allow traffic to be sent between your networks and the remote VPCyou are connected to The racoon daemon in pfSensereg is only capable of establishing an active phase 2 associationfor a particular sourcedestination pair on a single tunnel
Phase 2 associations between the local subnets and the remote VPC subnet are configured in the pfSense GUI for bothtunnels but racoon will only actually establish an association for the first tunnel This means that racoon will onlyever try to send traffic destined for the remote VPC subnet over the first tunnel
copy Copyright 2020 Rubicon Communications LLC 59
Security Gateway Manual Amazon AWS
If that tunnel goes down the second tunnel may be up and inbound traffic from the remote VPC may be sent to yourlocal networks over that tunnel automatically But outbound traffic to your remote VPC would not automatically failover to the second tunnel In order for you to send your outbound traffic over the second tunnel you would need todisable the phase 2 associations for the first tunnel and apply the changes
2 I quit the wizard before finishing Now what
To finish setting up the VPN go back to the wizard and run through it again It should reuse any partial configurationsthat were generated before it was stopped and create the new elements that are required
3 What are the AWS charges for this
AWS determines their own pricing and provides details for EC2 pricing and VPC pricing There are many types ofcharges that may be incurred for operating instances on AWS (eg charges related to running an instance bandwidthstorage elastic IPs etc)
The charge of specific interest in this case is the hourly charge for a VPN Connection As of this writing it costs $005(USD) per hour in most regions to have a VPN Connection configured and available AWS will charge whether theVPN Connection is being used or not as long as it is configured This will be configured by the third step of the wizardand will never be removed by pfSense
If the VPN Connection is no longer needed and billing for it needs to be stopped visit AWSrsquos VPC ManagementConsole and delete the VPN Connection manually
4 Can I use the wizard to connect to the GovCloud region
This hasnrsquot been officially tested but at least one user has reported that they were able to successfully connect to theGovCloud region They manually added the region us-gov-west-1 to the list of regions in the first step of the wizardand were able to successfully connect to their VPC in that region This may be supported in a future build but to trywithout official support do the following
1 Under the System gt Advanced menu make sure the Enable Secure Shell box is checked This is already doneby default on AWS instances but is off by default on pfSense hardware devices
2 Log into the instance via SSH
3 Make sure the root filesystem is mounted as readwrite On an AWS instance or a hardware device running on anSSD this should be true On a hardware device using Compact Flash or an SD card for storage it will probablybe necessary to remount the root filesystem in readwrite mode by running
mount -uw
4 Edit the file usrlocalwwwwizardsvpc_vpn_wizardxml using vi Look for a section of the file that lookslike this
ltoptiongtltnamegtsa-east-1ltnamegtltvaluegtsa-east-1ltvaluegt
ltoptiongt
That should appear directly after several similar ltoptiongt specifications containing all of the other availableregions Right underneath that section add the following
copy Copyright 2020 Rubicon Communications LLC 60
Security Gateway Manual Amazon AWS
ltoptiongtltnamegtus-gov-west-1ltnamegtltvaluegtus-gov-west-1ltvaluegt
ltoptiongt
Then save the file and exit vi
5 If the filesystem had to be remounted in readwrite mode earlier remount it in read-only mode by running
The GovCloud region should now appear as a choice in the first step of the wizard
copy Copyright 2020 Rubicon Communications LLC 61
CHAPTER
FOUR
REFERENCES
41 Support Resources
411 Commercial Support
In order to keep prices low the software is not bundled with a support subscription For users who need commercialsupport Netgate Gloabal Support can be purchased at httpswwwnetgatecomsupport
412 Community Support
Community support for pfSensereg software is available through the Netgate Forum
42 Additional Resources
421 Netgate Training
Netgate training offers training courses for increasing your knowledge of pfSensereg products and services Whetheryou need to maintain or improve the security skills of your staff or offer highly specialized support and improve yourcustomer satisfaction Netgate training has got you covered
httpswwwnetgatecomtraining
422 Resource Library
To learn more about how to use your pfSense appliance and for other helpful resources make sure to browse ourResource Library
httpswwwnetgatecomresources
423 Professional Services
Support does not cover more complex tasks such as CARP configuration for redundancy on multiple firewalls orcircuits network design and conversion from other firewalls to pfSensereg These items are offered as professionalservices and can be purchased and scheduled accordingly
httpswwwnetgatecomour-servicesprofessional-serviceshtml
62
Security Gateway Manual Amazon AWS
424 Community Options
If you elected not to get a paid support plan you can find help from the active and knowledgeable pfSense communityon our forums
httpsforumnetgatecom
copy Copyright 2020 Rubicon Communications LLC 63
- Getting Started
- Instance Usage
- Virtual Private Cloud (VPC)
- References
-
Security Gateway Manual Amazon AWS
Any objects created through API calls by the wizard will be tagged with names like auto-created by pfSenseVPC ltyour_VPC_IDgt This is accomplished by calling the AWS API call CreateTags and using Name as the keyfor the tag
In addition to creation of the items mentioned above required adjustments are made to Security Groups and RouteTables to facilitate communication over the VPN The Security Groups associated with the VPC are updated to allowinbound access from the local subnets on the pfSense end of the VPN They are checked first via the DescribeSecuri-tyGroups AWS API call to determine if the access is already allowed Any of the subnets that is not already allowedhas inbound access added via the AuthorizeSecurityGroupIngress AWS API call
Route Tables associated with the VPC are updated to receive routes from the VPN Gateway used by the VPN Con-nection They are checked first via the DescribeRouteTables AWS API call If the VPN Gateway ID is not includedin the list of VPN Gateways propagating routes route propagation for the VPN Gateway is enabled on that table usingthe EnableVgwRoutePropagation AWS API call
For VPN Connections using static routing static routes for the specified subnets are added to the VPN ConnectionThis is done via the CreateVpnConnectionRoute AWS API call
325 pfSense Configuration Details
On the pfSensereg side there are numerous configurations added to support the VPN to the VPC
Aliases
First aliases are created for use in a firewall rule These aliases are intended to contain the subnets that traffic shouldbe allowed to ingress over the IPsec tunnel One alias represents the local subnets on the pfSense side and is givena name like VPC_Local_vpc_12345678 and the other represents the remote subnets on the VPC side and is given aname like VPC_Remote_vpc_12345678
Virtual IP addresses
Next virtual IP addresses are added on the lo0 (loopback) interface These virtual IP addresses are the local ldquoinsideaddressesrdquo of the IPsec tunnels These addresses are used as the local address for BGP communication when BGProuting is selected These addresses are IPv4 link local addresses (see RFC 3297) AWS assigns 30rsquos out of thenetwork 1692540016 for this purpose
Note These addresses are also useful as a ping target to execute a basic test of whether the tunnel is functioningproperly Executing a ping from a source address of one of these IP addresses to the corresponding inside address ofthe other end of the tunnel helps determine whether the tunnel negotiation is completing properly
Firewall rules
Next a firewall rule is added on the IPsec interface that allows traffic from the VPC networks to the local subnetsThis rule uses the previously created Aliases as sourcedestination targets
IPsec
Then IPsec phase 1 and phase 2 associations are set up Most of the settings required are extracted from a blockof XML data that was returned by the CreateVpnConnection call made during the AWS configuration step Thisincludes parameters like endpoint IP addresses encryption ciphers timer values etc
copy Copyright 2020 Rubicon Communications LLC 58
Security Gateway Manual Amazon AWS
If BGP routing was selected the configurations for the OpenBGPD BGP daemon are established The required settingsare determined using the AS number entered into the wizard and the parameters returned by the CreateVpnConnec-tion call made during the AWS configuration step
326 Tested Configurations
Various topologies may be possible to establish using the AWS VPC Configuration Wizard This section enumeratessome of the configurations that were successfully tested
Platforms
bull Various hardware platforms
bull 64-bit virtual machines in VMware vSphereESX
bull Amazon EC2 instances (Xen virtual machines) of the Netgate pfSensereg RouterFirewallVPN AWS AMI
Local networkrouting configurations
bull pfSense with a public address configured on the WAN interface
bull pfSense with a private address configured on the WAN interface behind a 11 NAT
bull pfSense with a private address configured on the WAN interface behind a PAT (1many NAT)
VPC Topologies
bull pfSense connected to a single VPC
bull pfSense connected to multiple VPCrsquos in different regions
bull Amazon EC2 instance of the pfSense RouterFirewallVPN AWS AMI connected to a VPC belonging to thesame AWS account in a different region
bull Amazon EC2 instance of the pfSense RouterFirewallVPN AWS AMI connected to a VPC belonging to adifferent AWS account in the same region
The configuration recommended for the greatest amount of stability is to have a public IPv4 address directly configuredon the WAN interface of your pfSense firewall but VPNs have been successfully established under all of the conditionslisted above
Whether any of these solutions is appropriate should be evaluated in the context of personal needs and existing infras-tructure Other configurations not listed above may be possible as well
327 AWS VPC Wizard FAQ
1 What level of redundancy is provided by the two tunnels
Amazon provides two tunnel endpoints that will allow traffic to be sent between your networks and the remote VPCyou are connected to The racoon daemon in pfSensereg is only capable of establishing an active phase 2 associationfor a particular sourcedestination pair on a single tunnel
Phase 2 associations between the local subnets and the remote VPC subnet are configured in the pfSense GUI for bothtunnels but racoon will only actually establish an association for the first tunnel This means that racoon will onlyever try to send traffic destined for the remote VPC subnet over the first tunnel
copy Copyright 2020 Rubicon Communications LLC 59
Security Gateway Manual Amazon AWS
If that tunnel goes down the second tunnel may be up and inbound traffic from the remote VPC may be sent to yourlocal networks over that tunnel automatically But outbound traffic to your remote VPC would not automatically failover to the second tunnel In order for you to send your outbound traffic over the second tunnel you would need todisable the phase 2 associations for the first tunnel and apply the changes
2 I quit the wizard before finishing Now what
To finish setting up the VPN go back to the wizard and run through it again It should reuse any partial configurationsthat were generated before it was stopped and create the new elements that are required
3 What are the AWS charges for this
AWS determines their own pricing and provides details for EC2 pricing and VPC pricing There are many types ofcharges that may be incurred for operating instances on AWS (eg charges related to running an instance bandwidthstorage elastic IPs etc)
The charge of specific interest in this case is the hourly charge for a VPN Connection As of this writing it costs $005(USD) per hour in most regions to have a VPN Connection configured and available AWS will charge whether theVPN Connection is being used or not as long as it is configured This will be configured by the third step of the wizardand will never be removed by pfSense
If the VPN Connection is no longer needed and billing for it needs to be stopped visit AWSrsquos VPC ManagementConsole and delete the VPN Connection manually
4 Can I use the wizard to connect to the GovCloud region
This hasnrsquot been officially tested but at least one user has reported that they were able to successfully connect to theGovCloud region They manually added the region us-gov-west-1 to the list of regions in the first step of the wizardand were able to successfully connect to their VPC in that region This may be supported in a future build but to trywithout official support do the following
1 Under the System gt Advanced menu make sure the Enable Secure Shell box is checked This is already doneby default on AWS instances but is off by default on pfSense hardware devices
2 Log into the instance via SSH
3 Make sure the root filesystem is mounted as readwrite On an AWS instance or a hardware device running on anSSD this should be true On a hardware device using Compact Flash or an SD card for storage it will probablybe necessary to remount the root filesystem in readwrite mode by running
mount -uw
4 Edit the file usrlocalwwwwizardsvpc_vpn_wizardxml using vi Look for a section of the file that lookslike this
ltoptiongtltnamegtsa-east-1ltnamegtltvaluegtsa-east-1ltvaluegt
ltoptiongt
That should appear directly after several similar ltoptiongt specifications containing all of the other availableregions Right underneath that section add the following
copy Copyright 2020 Rubicon Communications LLC 60
Security Gateway Manual Amazon AWS
ltoptiongtltnamegtus-gov-west-1ltnamegtltvaluegtus-gov-west-1ltvaluegt
ltoptiongt
Then save the file and exit vi
5 If the filesystem had to be remounted in readwrite mode earlier remount it in read-only mode by running
The GovCloud region should now appear as a choice in the first step of the wizard
copy Copyright 2020 Rubicon Communications LLC 61
CHAPTER
FOUR
REFERENCES
41 Support Resources
411 Commercial Support
In order to keep prices low the software is not bundled with a support subscription For users who need commercialsupport Netgate Gloabal Support can be purchased at httpswwwnetgatecomsupport
412 Community Support
Community support for pfSensereg software is available through the Netgate Forum
42 Additional Resources
421 Netgate Training
Netgate training offers training courses for increasing your knowledge of pfSensereg products and services Whetheryou need to maintain or improve the security skills of your staff or offer highly specialized support and improve yourcustomer satisfaction Netgate training has got you covered
httpswwwnetgatecomtraining
422 Resource Library
To learn more about how to use your pfSense appliance and for other helpful resources make sure to browse ourResource Library
httpswwwnetgatecomresources
423 Professional Services
Support does not cover more complex tasks such as CARP configuration for redundancy on multiple firewalls orcircuits network design and conversion from other firewalls to pfSensereg These items are offered as professionalservices and can be purchased and scheduled accordingly
httpswwwnetgatecomour-servicesprofessional-serviceshtml
62
Security Gateway Manual Amazon AWS
424 Community Options
If you elected not to get a paid support plan you can find help from the active and knowledgeable pfSense communityon our forums
httpsforumnetgatecom
copy Copyright 2020 Rubicon Communications LLC 63
- Getting Started
- Instance Usage
- Virtual Private Cloud (VPC)
- References
-

Security Gateway Manual Amazon AWS
ltoptiongtltnamegtus-gov-west-1ltnamegtltvaluegtus-gov-west-1ltvaluegt
ltoptiongt
Then save the file and exit vi
5 If the filesystem had to be remounted in readwrite mode earlier remount it in read-only mode by running
The GovCloud region should now appear as a choice in the first step of the wizard
copy Copyright 2020 Rubicon Communications LLC 61
CHAPTER
FOUR
REFERENCES
41 Support Resources
411 Commercial Support
In order to keep prices low the software is not bundled with a support subscription For users who need commercialsupport Netgate Gloabal Support can be purchased at httpswwwnetgatecomsupport
412 Community Support
Community support for pfSensereg software is available through the Netgate Forum
42 Additional Resources
421 Netgate Training
Netgate training offers training courses for increasing your knowledge of pfSensereg products and services Whetheryou need to maintain or improve the security skills of your staff or offer highly specialized support and improve yourcustomer satisfaction Netgate training has got you covered
httpswwwnetgatecomtraining
422 Resource Library
To learn more about how to use your pfSense appliance and for other helpful resources make sure to browse ourResource Library
httpswwwnetgatecomresources
423 Professional Services
Support does not cover more complex tasks such as CARP configuration for redundancy on multiple firewalls orcircuits network design and conversion from other firewalls to pfSensereg These items are offered as professionalservices and can be purchased and scheduled accordingly
httpswwwnetgatecomour-servicesprofessional-serviceshtml
62
Security Gateway Manual Amazon AWS
424 Community Options
If you elected not to get a paid support plan you can find help from the active and knowledgeable pfSense communityon our forums
httpsforumnetgatecom
copy Copyright 2020 Rubicon Communications LLC 63
- Getting Started
- Instance Usage
- Virtual Private Cloud (VPC)
- References
-


![[AWS Black Belt Online Seminar] Amazon Athena · • Amazon EMR ログ • AWS Global Accelerator ログ • Amazon GuardDuty ログ • Amazon VPC フローログ • AWS WAF ログ](https://static.fdocuments.net/doc/165x107/601d01fb736ace68ef3b87a8/aws-black-belt-online-seminar-amazon-athena-a-amazon-emr-f-a-aws-global.jpg)


![[AWSマイスターシリーズ] Amazon Route53](https://static.fdocuments.net/doc/165x107/5565fd2dd8b42aa6628b45b9/aws-amazon-route53.jpg)