Aluminium 3 Section Loft Ladder - Welcome to mySDS · Stowed Requirements Deployed Requirements 1....
8
Hatch & Ladder Ladder Hatch Hatch Hatch Ladder Ladder Ladder Model No. LT-304 IMPORTANT: DO NOT use the loft ladder until fully installed. Before installation carefully read all of the safety, installation and user instructions. This loft ladder should only be used to provide short term access to domestic lofts, subject to the height and load restrictions. It is not intended for work place applications or for continuous use. Please check that you have all the components and that they are in good condition before installation. If any of the components are missing contact the retailer. Components Aluminium 3 Section Loft Ladder Installation and User Instructions 35mm Screw x 6 Pivot bar assembly x 1 18mm Screw x 12 Catch bracket x 1 Hinge x 2 Twist catch assembly x 1 1. Nut x 2 2. Catch lever x 1 3. Small catch collar x 1 4. Large catch collar x 1 5. Catch pivot pin x 1 Handrail bracket assembly x 2 1. Nut x 2 2. Washer x 4 3. Mounting block x 2 4. 65mm Bolt x 2 Retaining bar assembly x 1 1. Nut x 2 2. Washer x 6 3. 35mm Bolt x 2 4. Retaining bar x 1 5. Angle bracket x 1 Pivot bar stop x 4 Stowing pole x 1 Handrail x 1 3 Section loft ladder x 1 Issue No. 1/09 3 4 5 1 2 2 2 4 3 1 2 1 4 2 3 2 1 5
Transcript of Aluminium 3 Section Loft Ladder - Welcome to mySDS · Stowed Requirements Deployed Requirements 1....
Hatch & Ladder
Ladder
Hatch Hatch
Hatch
Ladder
Ladder
Ladder
Model No. LT-304
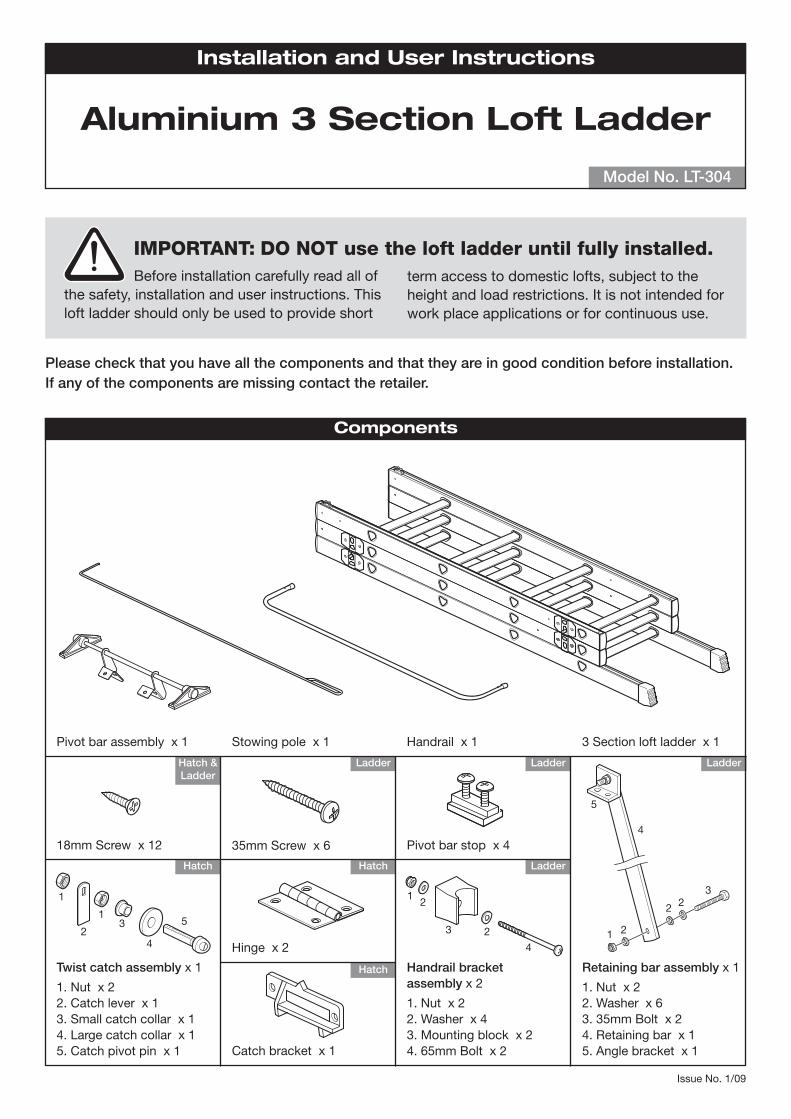
IMPORTANT: DO NOT use the loft ladder until fully installed.Before installation carefully read all of
the safety, installation and user instructions. This loft ladder should only be used to provide short
term access to domestic lofts, subject to the height and load restrictions. It is not intended for work place applications or for continuous use.
Please check that you have all the components and that they are in good condition before installation. If any of the components are missing contact the retailer.
Components
Aluminium 3 Section Loft Ladder
Installation and User Instructions
35mm Screw x 6
Pivot bar assembly x 1
18mm Screw x 12
Catch bracket x 1
Hinge x 2
Twist catch assembly x 1
1. Nut x 2 2. Catch lever x 13. Small catch collar x 14. Large catch collar x 15. Catch pivot pin x 1
Handrail bracket assembly x 2
1. Nut x 2 2. Washer x 43. Mounting block x 24. 65mm Bolt x 2
Retaining bar assembly x 1
1. Nut x 2 2. Washer x 63. 35mm Bolt x 24. Retaining bar x 15. Angle bracket x 1
Pivot bar stop x 4
Stowing pole x 1 Handrail x 1 3 Section loft ladder x 1
Issue No. 1/09
3
4
5
1 2
22
4
31
2
1
4
23
21
5
• WARNING: The loft ladder MUST NOT be used until it has been FULLY installed.
• A separate suitable ladder is needed to access the loft during installation.
• IMPORTANT: Two persons are needed to safely complete the installation, one person working from inside the loft, the other on the ground below.
• WARNING: The side locking catches are not load bearing and the loft ladder must not be used unless the pivot bar stops have been correctly and fully installed.
• WARNING: Ensure there is a good flat access area at the base of the ladder to dismount safely. A minimum area of 1 square metre is recommended.
• DO NOT use the loft ladder for any purpose other than that for which it was designed.
• DO NOT install or use until you have read the instructions completely. Ensure you understand the limitations and potential hazards.
• IMPORTANT: Read and follow all of the safety information on the side of the ladder.
• DO NOT use if parts are missing or damaged.
• DO NOT allow children to climb the ladder.
• DO NOT use when tired, under the influence of alcohol, drugs or intoxicating medication.
• Wear non-slip footwear and if necessary clean the soles before using the ladder.
• WARNING: Always ensure the locking catches are fully engaged before use.
• Ensure the ladder rungs are horizontal and both ladder feet are on the floor.
• Only use the ladder for a maximum of 15 - 30 minutes at a time.
1
• DO NOT install if parts are missing or damaged.
• Check and ensure there is enough clear internal loft space for the ladder to be stowed before attempting installation (see the specifications).
• IMPORTANT: In some cases it may be necessary to install additional wooden braces or noggins to be able to fix the pivot bar and retaining bar in their correct positions.
• During installation ensure the work area is kept clean and free from obstructions.
• Keep children, animals and unauthorised persons away from the working area.
• Ensure there is sufficient lighting in the work areas.
• Maintain the loft ladder in good condition.
• This product has no serviceable or replacement parts. Any damage to the ladder will require the complete replacement of the ladder.
• Non-authorised parts may be dangerous and will invalidate the warranty.
• Always grip the ladder when climbing. Always try to keep three points of contact with the ladder.
• Always face the ladder when ascending and descending.
• Only carry light materials (up to 10kg) up the ladder. Never exceed the total static load of 150kg.
• WARNING: Only to be used by one person at a time.
• WARNING: Never over-reach when on the ladder.
• When not in use, stow the ladder securely.
• All ladders have potential injury risks, please follow these instructions at all times.
• Keep these instructions in a safe place for future reference.
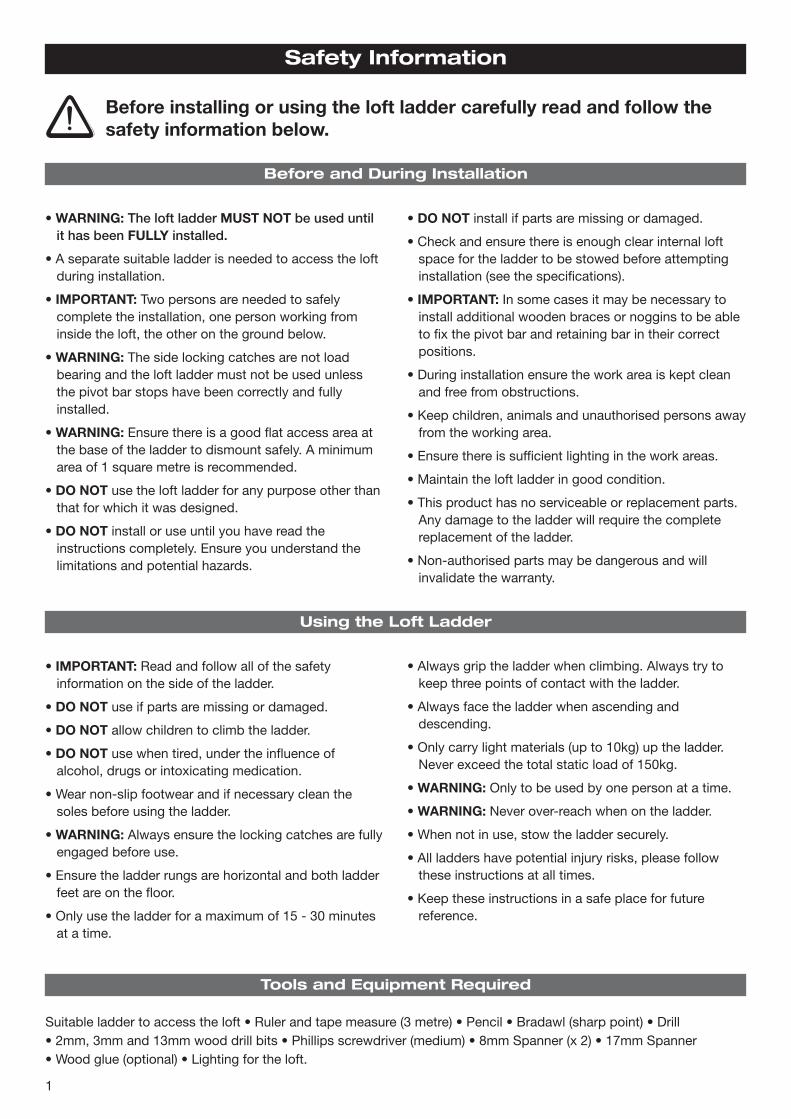
Safety Information
Before and During Installation
Using the Loft Ladder
Before installing or using the loft ladder carefully read and follow the safety information below.
Tools and Equipment Required
Suitable ladder to access the loft • Ruler and tape measure (3 metre) • Pencil • Bradawl (sharp point) • Drill • 2mm, 3mm and 13mm wood drill bits • Phillips screwdriver (medium) • 8mm Spanner (x 2) • 17mm Spanner • Wood glue (optional) • Lighting for the loft.

Stowed Requirements
Deployed Requirements
1. Hanging the trapdoor
Note: The trapdoor will attach to the same side of the hatch frame as the ladder.
Attach hinges to the trapdoor: Drill 2mm pilot holes and screw the hinges (equally spaced) to one end of the trapdoor using 4 x 18mm screws. Note: To increase the strength of the fixings, fill the screw holes with wood glue before inserting the screws.
Note: There MUST be a minimum gap of 50mm between the top of the trapdoor (when closed) and top edge of the frame.
Install the trapdoor: Position the fitted hinges against the hatch frame and mark the fixing hole positions. Drill 2mm pilot holes and screw the hinges to the hatch surround using 4 x 18mm screws.
2
Preparing the Hatch and Trapdoor: There should be no obstructions to the movement of the trapdoor, any old supports or hinges from previous trapdoors should be removed. The new trapdoor should be a minimum of 20mm thick with a 2mm gap all they way around when fitted in the hatch.
IMPORTANT: DO NOT use the loft ladder until fully installed.
Specifications
Number of ladder sections: 3
Maximum height: 3 metres
Minimum height: 2.3 metres
Pitch: 300mm
Vertical pitch: 280mm
Minimum internal loft height: 730mm
Maximum permitted static load: 150kg
Assembly and Installation - The Hatch and Trapdoor
50mm min.
Pitch: 300mm
Vertical pitch: 280mm
Floor to loft floor
min. height 2.3m
max. height 3m
65º - 80º
Hatch opening: 800mm min.
Trapdoor closed height
18mm
18mmTrapdoor
Stowed length: 950mm min.
Internal loft height: 730mm min.

2. Preparing the trapdoorClose the trapdoor and hold in position.
a & b: At the opposite end to the hinges, measure and mark a line onto the trapdoor, 31mm in from the edge of the hatch frame.
Measure and mark a centre line.
c: Open the trapdoor and drill a 13mm hole where the lines meet and sand off any rough edges.
Note: Drilling a small pilot hole first may help.
3. Fitting the twist catch assemblyPush the twist catch collars (3 & 4) into either side of the hole in the trapdoor with the large catch collar (4) on the outside.
From the outside, insert the pivot pin (5) through the hole and secure with a nut (1). Note: The pivot pin must still be able to turn freely.
Place the catch lever (2) onto the pivot pin (as shown) and secure using the second nut (1), again ensure the pivot pin still turns freely.
Measure the thickness of the trapdoor and add 9mm. Draw a line this distance up from the bottom edge and parallel with the hatch opening.
4. Fitting the catch bracketa: From inside the loft. Close the trapdoor and mark a vertical line on the inside of the hatch frame in line with the centre of the twist catch.
b: Open the trapdoor. Position the catch bracket on the hatch frame, lining up with the vertical and horizontal lines as shown. Mark the fixing hole positions.
Drill 2mm pilot holes and attach the catch bracket using 2 x 18mm screws.
3
Assembly and Installation - The Hatch and Trapdoor
31 mm
Outside of trapdoor
1
2
13
4
5
18mm
18mm
Trapdoor closed
a
b
Thickness of trapdoor
+ 9mmThickness of trapdoor
Hinged end of trapdoor
Centre line
b
a
Ø 13mm
TrapdoorHatch frame
Gap between trapdoor and hatch frame
c
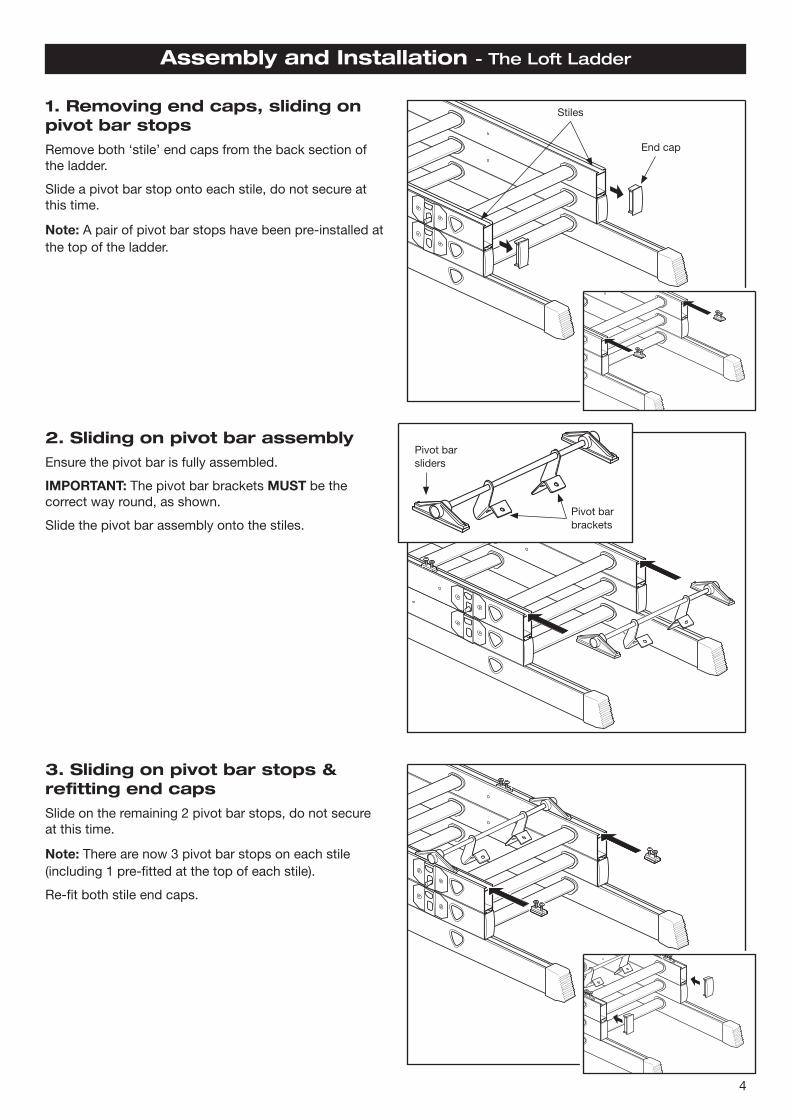
1. Removing end caps, sliding on pivot bar stops Remove both ‘stile’ end caps from the back section of the ladder.
Slide a pivot bar stop onto each stile, do not secure at this time.
Note: A pair of pivot bar stops have been pre-installed at the top of the ladder.
2. Sliding on pivot bar assemblyEnsure the pivot bar is fully assembled.
IMPORTANT: The pivot bar brackets MUST be the correct way round, as shown.
Slide the pivot bar assembly onto the stiles.
3. Sliding on pivot bar stops & refitting end capsSlide on the remaining 2 pivot bar stops, do not secure at this time.
Note: There are now 3 pivot bar stops on each stile (including 1 pre-fitted at the top of each stile).
Re-fit both stile end caps.
4
Assembly and Installation - The Loft Ladder
Stiles
End cap
Pivot bar brackets
Pivot bar sliders
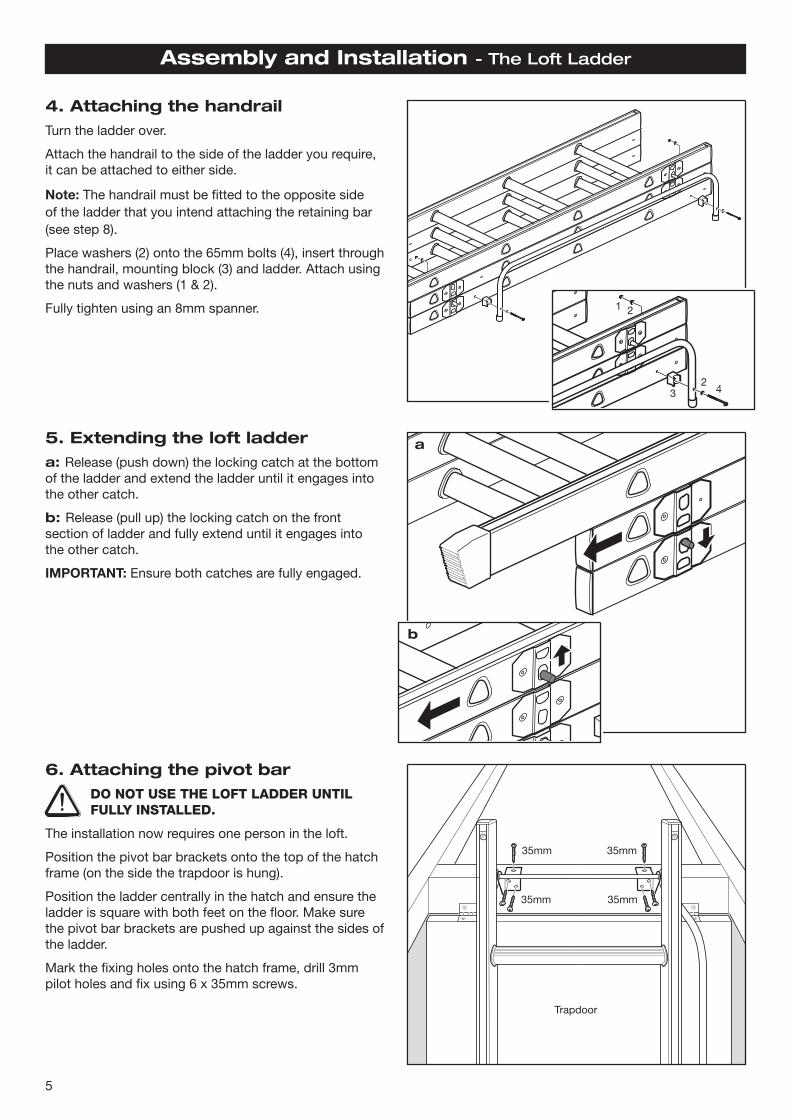
6. Attaching the pivot barDO NOT USE THE LOFT LADDER UNTIL FULLY INSTALLED.
The installation now requires one person in the loft.
Position the pivot bar brackets onto the top of the hatch frame (on the side the trapdoor is hung).
Position the ladder centrally in the hatch and ensure the ladder is square with both feet on the floor. Make sure the pivot bar brackets are pushed up against the sides of the ladder.
Mark the fixing holes onto the hatch frame, drill 3mm pilot holes and fix using 6 x 35mm screws.
5. Extending the loft laddera: Release (push down) the locking catch at the bottom of the ladder and extend the ladder until it engages into the other catch.
b: Release (pull up) the locking catch on the front section of ladder and fully extend until it engages into the other catch.
IMPORTANT: Ensure both catches are fully engaged.
4. Attaching the handrailTurn the ladder over.
Attach the handrail to the side of the ladder you require, it can be attached to either side.
Note: The handrail must be fitted to the opposite side of the ladder that you intend attaching the retaining bar (see step 8).
Place washers (2) onto the 65mm bolts (4), insert through the handrail, mounting block (3) and ladder. Attach using the nuts and washers (1 & 2).
Fully tighten using an 8mm spanner.
Assembly and Installation - The Loft Ladder
5
23
21
4
35mm
35mm35mm
35mm
Trapdoor
a
b
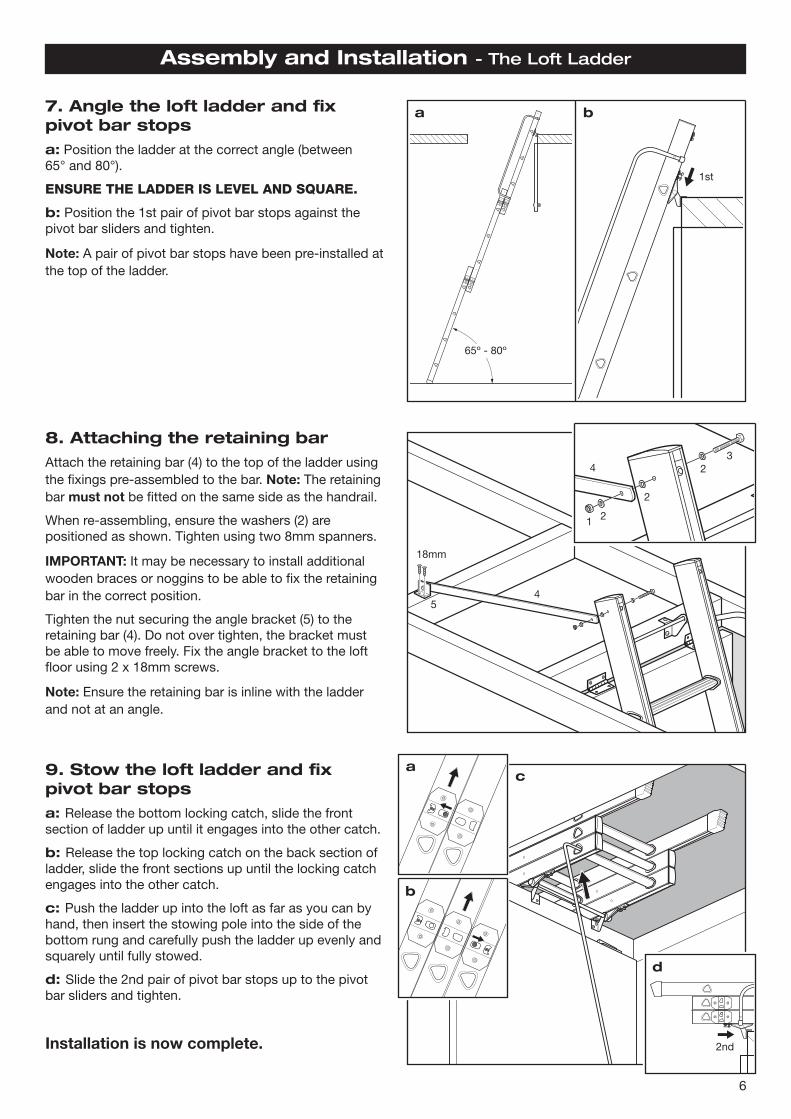
8. Attaching the retaining barAttach the retaining bar (4) to the top of the ladder using the fixings pre-assembled to the bar. Note: The retaining bar must not be fitted on the same side as the handrail.
When re-assembling, ensure the washers (2) are positioned as shown. Tighten using two 8mm spanners.
IMPORTANT: It may be necessary to install additional wooden braces or noggins to be able to fix the retaining bar in the correct position.
Tighten the nut securing the angle bracket (5) to the retaining bar (4). Do not over tighten, the bracket must be able to move freely. Fix the angle bracket to the loft floor using 2 x 18mm screws.
Note: Ensure the retaining bar is inline with the ladder and not at an angle.
7. Angle the loft ladder and fix pivot bar stopsa: Position the ladder at the correct angle (between 65° and 80°).
ENSURE THE LADDER IS LEVEL AND SQUARE.
b: Position the 1st pair of pivot bar stops against the pivot bar sliders and tighten.
Note: A pair of pivot bar stops have been pre-installed at the top of the ladder.
9. Stow the loft ladder and fix pivot bar stopsa: Release the bottom locking catch, slide the front section of ladder up until it engages into the other catch.
b: Release the top locking catch on the back section of ladder, slide the front sections up until the locking catch engages into the other catch.
c: Push the ladder up into the loft as far as you can by hand, then insert the stowing pole into the side of the bottom rung and carefully push the ladder up evenly and squarely until fully stowed.
d: Slide the 2nd pair of pivot bar stops up to the pivot bar sliders and tighten.
Installation is now complete.
Assembly and Installation - The Loft Ladder
6
ba
65º - 80º
18mm
1st
ac
2nd
b
d
4
1 2
2
23
45

1. Closing and opening the trapdoorTo close the trapdoor: Insert the stowing pole into the twist catch. Push the trapdoor up into its closed position and rotate the catch clockwise to engage (lock).
To open the trapdoor: Insert the stowing pole into the twist catch, rotate the catch anticlockwise (unlock) and carefully lower the trapdoor.
2. Stowing and deploying the loft laddera: Insert the stowing pole into the side of the bottom rung and carefully pull out and down at the same time.
IMPORTANT: Always carefully control the descent of the ladder and ensure that no persons or animals are in danger of being hit.
b: When the ladder stops, release the locking catch (at the bottom of the ladder) and extend the ladder until it engages into the other catch.
c: Release the locking catch (on the front ladder section) and fully extend the ladder until it engages into the other catch.
IMPORTANT: Do not use the ladder unless both locking catches are fully engaged.
Using the Loft Ladder
IMPORTANT SAFETY WARNINGS: Before using the loft ladder you must ensure that:
• All 4 pivot bar stops are secured in position and the screws are fully tightened.
• The handrail and all other fixings have been fully tightened.
• You have read all of the safety information contained in these instructions and on the ladder.
• When the ladder is deployed, check that:
• the locking catches are fully engaged. • both feet are on the ground. • the ladder is at the correct angle.
SFD Ltd.
I NS
T R U C T I O
NS
To close
To open
a
b c