ALPHACOM E USER GUIDEstentofon.com.au/datasheet_PDF/AlphaCom/A100K 10602... · 8 AlphaCom E User...
40
ALPHACOM E USER GUIDE IP & ANALOG MASTER STATIONS USER GUIDE A100K10602 2009.08.26
Transcript of ALPHACOM E USER GUIDEstentofon.com.au/datasheet_PDF/AlphaCom/A100K 10602... · 8 AlphaCom E User...

ALPHACOM E USER GUIDEIP & ANALOG MASTER STATIONS
USER GUIDE A100K10602
2009.08.26

Menu Selection buttonsInformation display
LoudspeakerIndicator LED &volume control
Cancel/Private
Direct Access Keys (DAKs)
Dialing keys
Manual speechdirection control
Handset
Microphone
Menu Selection buttons
Information display
Display illumination control
Loudspeaker
Volume control
Cancel/Private
Direct Access Keys with LED indication
(DAKs)Dialing keys
Manual speechdirection control
MicrophoneIndicator LED
IP Desktop Master Station
IP Flush Master Station

Volume control
Loudspeaker
Indicator LEDDirect Access Keys
(DAK)
DAK information displayInformation displayArrow keys
Menu selection keys
Dialing keys Cancel
Manual speechdirection control Microphone
Privacy button
Volume controll
Loudspeaker
Indicator LED
Direct Access Keys(DAK)
Information display
Dialing keys
Cancel
Manual speechdirection controlMicrophone
Privacy selectorHandset
Dual Display Station
Analog Desk/Wall Master Station

ContentsINTRODUCTION ................................................................................6
MAKING INTERCOM CALLS ..............................................................7
Starting and Ending a Hands-free Call ........................................7
Using the Handset to Call ...........................................................7
Setting to Private Mode ..............................................................7
Calling to and From Noisy Environments .....................................9
Adjusting the Sound / Volume Level ............................................9
Muting the Microphone ..............................................................9
If Someone is Not at Their Station .............................................10
Waiting For a Busy Station to Become Free ...............................10
Re-dialing ...............................................................................10
SEARCHING FOR A PERSON ...........................................................11
Voice Paging - Calling a Group of Stations ................................11
Answering Voice Paging (Meet Me) ...........................................12
Search List - Options for Transferring Calls to Another Destination 12
Automatic Search ....................................................................12
PRIORITIES ....................................................................................13
Priority Features ......................................................................13
Priority Setting for the Station ...................................................13
ABSENCE MESSAGES ....................................................................14
Leaving an Absence Message at Your Station ............................14
Leaving an Absence Message from a Remote Station ................15
Deleting an Absence Message ..................................................15
VOICE / TEXT MESSAGES ...............................................................16
Leaving a Call-back Message ...................................................16
Answering a Call-back Message ...............................................16
Leaving a Voice / Text Message at a Remote Station ..................16
Playing Back / Deleting Messages ............................................17
Playing Back / Deleting Messages from a Remote Station ..........17
Voice Help ...............................................................................18
TRANSFER FEATURES ....................................................................18
Inquiry Call ..............................................................................18
Call Transfer ...........................................................................18
Call Forwarding from Own Station ............................................19
Follow Me - Forwarding from Remote Station ............................19
REMINDER / WAKE-UP CALL ..........................................................20

RE-DIALING ...................................................................................20
CALL REQUEST ..............................................................................21
RADIO / MUSIC PROGRAMS ...........................................................22
Selecting a Program ................................................................22
Turning Off or Toggling a Program ............................................22
Scrolling Through Available Programs .......................................22
Turning On/Off Programs to Other Stations ................................23
CONFERENCE ................................................................................24
Simplex Conference (Push To Talk) ............................................24
Duplex Conference (Handsfree) ................................................24
DOOR OPENING .............................................................................25
TELEPHONE CALLS ........................................................................26
Making an Internal Telephone Call ............................................26
Making an External Telephone Call ............................................26
Calling From a Telephone To an Intercom Station .......................27
Receiving a Telephone Call at Your Station .................................27
POCKET PAGING ............................................................................28
Paging With Answer Option ......................................................28
Paging Without Answer Option .................................................29
Paging Without Calling an Intercom Station ...............................29
Answering Paging (Meet Me) ....................................................30
DISPLAY INFORMATION ..................................................................31
Information Display ..................................................................31
Idle Station ..............................................................................31
Menu Selection .......................................................................31
Conventional Name Search ......................................................32
Name Search in Subscriber Directory ........................................33
Check Station Identity ..............................................................33
PROGRAMMING DIRECT ACCESS KEYS - DAK .................................34
Programming DAK Directory Numbers and Functions .................34
Deleting DAK Call Numbers and Functions ................................34
Direct Access Key Display Information .......................................35
Editing DAK Text ......................................................................35
LED INDICATIONS FOR IP FLUSH MASTER .......................................36
Example of LED Indicator Use ...................................................36
SUBSCRIBER LIST ..........................................................................37
QUICK REFERENCE GUIDE ..............................................................39

6 AlphaCom E User Guide A100K10602
INTRODUCTION
AlphaCom is a powerful and fl exible communication exchange, designed to provide Critical Communication over IP (CCoIP) and serve a wide range of applications.
The information in this document may be used with all STENTOFON IP & Analog Master Stations with or without display, including IP and Analog Desk Master stations, IP and Analog Flush Master stations, Industrial Master stations and Dual Display stations.
Special functions that require additional equipment are indicated in the document where necessary.
Note that factory default settings for directory numbers and time-out periods are used in this manual. They may have been changed to meet the specifi c requirements of your AlphaCom exchange installation. If you are in doubt, please consult the STENTOFON supervisor at your company.
Zenitel Norway AS and its subsidiaries assume no responsibilities for any errors that may appear in this publication, or for
damages arising from the information in it. No information in this publication should be regarded as a warranty made by
Zenitel Norway AS.
The information in this publication may be updated or changed without notice. Product names mentioned in this publication
may be trademarks, they are used only for identifi cation.
Zenitel Norway AS, August 2009

A100K10602 AlphaCom E User Guide 7
MAKING INTERCOM CALLSStarting and Ending a Handsfree Call
To call another station:
● Dial the number of the station
or, if the number has been pre-programmed:
● Press the direct access key (DAK)
The LED indicator lights up on both stations when the call is connected and you will hear a short tone.
To terminate the conversation:
Press C ●The LED indicator goes out.
Using the Handset to Call
To call another station:
Lift the handset1. You will hear a dial tone. –
Dial the number of the station.2.
To terminate the conversation:
Replace the handset or press C ●
Setting to Private Mode
In Private mode, calls do not come through directly but are indicated by a ringing tone at both stations.
The privacy switch is different depending on whether it is an IP, Analog or Dual Display station.
To set the station to Private mode for IP Master stations:
Press C and hold for 2 seconds. ●“PRIVATE” will be displayed briefl y and the “P” symbol –
will appear and start to fl ash.
17/03-2009 10:45 1001 Subscriber Name
Menu NamePRIVATE
8 AlphaCom E User Guide A100K10602
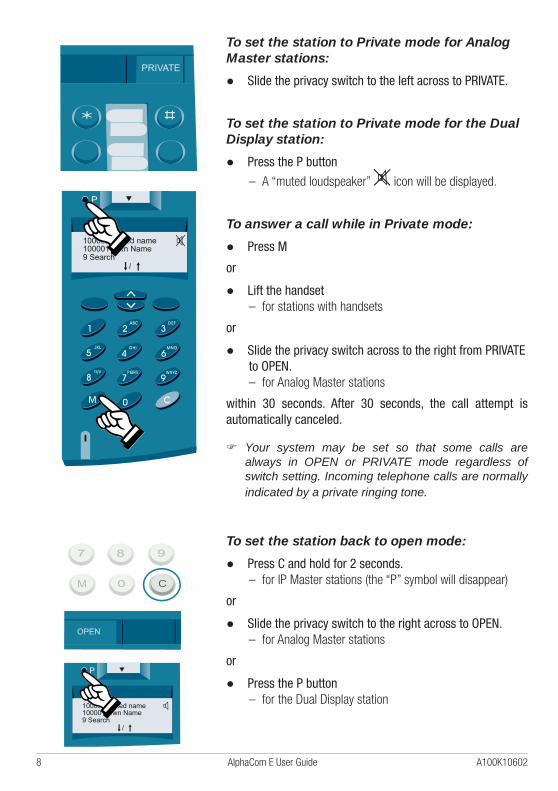
To set the station to Private mode for Analog Master stations:
Slide the privacy switch to the left across to PRIVATE. ●
To set the station to Private mode for the Dual Display station:
Press the P button ●A “muted loudspeaker” – icon will be displayed.
To answer a call while in Private mode:
Press M ●or
Lift the handset ●for stations with handsets –
or
Slide the privacy switch across to the right from PRIVATE ●to OPEN.
for Analog Master stations –
within 30 seconds. After 30 seconds, the call attempt is automatically canceled.
Your system may be set so that some calls are always in OPEN or PRIVATE mode regardless of switch setting. Incoming telephone calls are normally indicated by a private ringing tone.
To set the station back to open mode:
Press C and hold for 2 seconds. ●for IP Master stations (the “P” symbol will disappear) –
or
Slide the privacy switch to the right across to OPEN. ●for Analog Master stations –
or
Press the P button ●for the Dual Display station –
P
100002 Called name100001 Own Name9 Search
/
P
100002 Called name100001 Own Name9 Search
/

A100K10602 AlphaCom E User Guide 9
Calling to and From Noisy Environments
If there is disturbing background noise:
Press M and hold while you speak. ●
Release M while you listen. ●You are now in simplex mode.
The volume will increase at the listening end.
To go back to automatic direction switching:
Tap M briefl y. ●Either party can use the M function.
Adjusting the Sound / Volume Level
For the IP Desk Master, the volume control is located on the LED indicator. For the IP/Analog Flush Master stations, the volume control is located on a separate button.
● Press the volume control button at either end to adjust the volume up or down to the level desired.
For the Analog Desk Master stations, the volume control is located on a slide switch.
Slide the switch to the left or right to adjust the volume ●up or down to the level desired.
For the Dual Display station, the volume control is located on a control knob.
Turn the volume control knob to adjust the volume up or ●down to the level desired.
Muting the Microphone
To mute the microphone:
Press 0 and hold during the conversation. ●To un-mute the microphone:
Release 0. ●
- +
P

10 AlphaCom E User Guide A100K10602
If Someone is Not at Their Station
Sometimes, the person you’re calling may not be present at his/her station.
In this situation, you have several options:
Cancel and make a Group Call (or All Call) ●
Activate the pre-programmed search list ●
Leave a Call Back message ●
Leave a predefi ned voice/text message ●
Cancel and use the re-dial feature later ●
Activate the person’s pocket pager ●
Waiting For a Busy Station to Become Free
If a station or a feature that you call is busy, you will hear a busy tone and your display will show Busy.
You can either:
Press C to disconnect and try again later. ●or
Wait for up to 30 seconds. ●If the station or feature becomes free within 30 seconds, you will be connected automatically.
For information on the Busy Notify and Busy Override features, see the Priorities section on page 13.
Re-dialing
You can program one of the single-touch DAKs on your station to re-dial the last intercom number dialed from the station. For information on how to program DAKs, see page 34.
The default directory number for the re-dial feature is 9532.
For more information on re-dialing, see page 20.
P
Page 11
Page 12
Page 16
Page 16
Page 20
Page 28

A100K10602 AlphaCom E User Guide 11
SEARCHING FOR A PERSON Voice Paging - Calling a Group of Stations
You can search for somebody by making a Group Call from any station if this function is not disabled in the exchange.
Each group has its own directory number. Default numbers are:
Group 1 - 5 : 84 - 88 (84 includes all subscribers)
Group 6 - 15 : 890 - 899
To make a Group Call:
Dial the directory number for the group.1.
Wait for the chime signal.2.
Press M while you are speaking.3.
The audio goes to all stations in the group.
If you want an answer:
Wait ●If not:
Press C ●The time-out period for answering is one minute by default.
To repeat your message:
Press M while you are speaking. ●
To extend the waiting period by another minute:
Tap M briefl y ●
To make an All Call (all stations in the system):
Dial 84 ●
For programming your group membership, consult the STENTOFON supervisor at your company.
+

12 AlphaCom E User Guide A100K10602
Answering Voice Paging (Meet Me)
To answer voice paging:
Dial 99 on the nearest intercom station within the ●answer period (1 minute).
You will be automatically connected to the person who initiated the call.
Search List - Options for Transferring Calls to Another Destination
Each station can have a pre-programmed search list for transferring calls to another destination when the subscriber is absent. The list can include an ordinary directory number, a Group Call number, or a message to a pocket pager.
To search for a person:
Dial the subscriber number. ●
When no one answers the call:
Press 9 to activate the fi rst step on the search list. ●
If no one answers your search, you can activate the next step by pressing 9 once more.
If the station you call has no search list or if you have come to the end of the list, pressing 9 has no effect.
For programming your search list, consult the STENTOFON supervisor at your company.
Automatic Search
The system can be set up so that the search list is automati-cally activated when you get an absence message, busy tone or after a time-out for private calling.

A100K10602 AlphaCom E User Guide 13
PRIORITIES
Priority Features
Your station can be assigned one of several priority features. Please consult your STENTOFON supervisor for the assign-ment of these priority features to your station.
PRIVATE / Message Override
When the station you call is in Private mode:
Dial 59 or press M to break through a private mode or an ●absence message (e.g. “Busy at the moment”) left at the station.
Busy Notify (factory default)
When the station you call is busy:
Dial 57 or press M to send an attention tone to the busy ●station. At the other end, the display shows the person who is calling.
Busy Override
When the station you call is busy:
Dial 58 or tap M twice. This cancels the ongoing ●conversation and you will be connected.
Priority Setting for the Station
Your station is set up to have a priority level (one of four levels). Depending on the priority setting, outgoing calls will behave differently:
Make outgoing calls in private ●
Override private setting ●
Override an absence message ●
Connect you to a busy station (and disconnect the ●ongoing conversation)

14 AlphaCom E User Guide A100K10602
ABSENCE MESSAGESThis feature requires additional equipment in the exchange for voice messages.
The message numbers are factory default settings and may have been changed in your installation.
Leaving an Absence Message at Your Station
You can leave a prerecorded absence message at your inter-com station. Whoever calls your station will hear the message. The messages also allow you to include appropriate informa-tion on the time, date and phone number.
You can choose from a list of prerecorded messages. See the list of messages and their numbers in the Quick Reference Guide on page 39.
To leave an absence message:
Enter the message number ●+ digits for time/date/phone no. (optional) or M
If you enter the additional digits, you need not press M. The message is also accepted after a time-out.
For example, to leave the absence message “At lunch until 1 pm” at your station, do the following:
Enter 7761. You will then be prompted for the time which you enter –
in the 24-hour clock notation, e.g. 1300 for 1 pm.
Enter hhmm 2.
The message will then be played back and displayed to you.
If you select the wrong absence message or enter the wrong time, date or number, press C to cancel the operation and you can begin again.
The LED light will fl ash and there will be an intermittent beep to indicate that there is an absence message.
+ 1300
At lunch until 1 pm

A100K10602 AlphaCom E User Guide 15
Leaving an Absence Message from a Remote Station
If you are at another station and you want to leave an absence message on your own station:
Dial your own station no. + 50 + message no. + digits ●for time/date/phone no. + M
Deleting an Absence Message
To delete an absence message:
Dial 70 ●
You will hear: “No Messages”.
And your display will show: No Messages
Your absence message is automatically deleted and the LED indicator will stop to fl ash.
To delete an absence message from a remote station:
Dial 73 + own station number ●
No messages

16 AlphaCom E User Guide A100K10602
VOICE / TEXT MESSAGESThis feature requires additional equipment for voice messages.
The message numbers are factory default settings and may have been changed in your installation.
Leaving a Call-back Message
To leave a call-back message:
Press 8 while connected to a station. ●The voice message “Call me on number xxxx” is automatically registered at the other station, while the following text message will be displayed: Call me back
If there is no support for voice messages, only the text message will be displayed.
Answering a Call-back Message
The LED indicator and display on your station will indicate that there is a message waiting. The number of messages is also shown.
Dial 70 to play back the message. ●
Press 8 to set up a conversation with the station that left ●the message.
Press 9 to scroll through call-back messages without ●deleting them.
Leaving a Voice / Text Message at a Remote Station
Refer to the list of messages in the Quick Reference Guide on page 39.
Dial the remote station number + 7 + message no. ●+ additional digits for time/date/phone no. or M
For example, to leave the message “Call home” at remote station number 2525, dial:
2525 + 7 + 663 + M
The message “Call home” will then be registered at the remote station.
+ + +
Call home
Call me on number xxxx
Call me on number xxxx
A100K10602 AlphaCom E User Guide 17
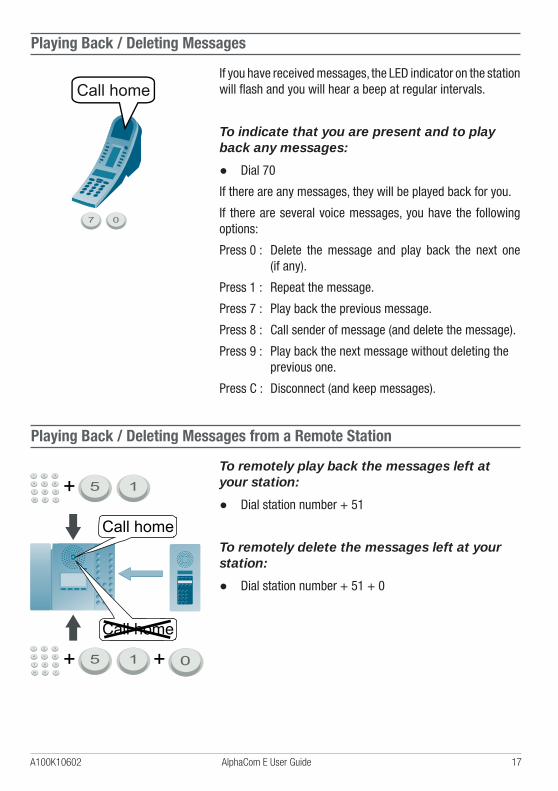
Playing Back / Deleting Messages
If you have received messages, the LED indicator on the station will fl ash and you will hear a beep at regular intervals.
To indicate that you are present and to play back any messages:
Dial 70 ●If there are any messages, they will be played back for you.
If there are several voice messages, you have the following options:
Press 0 : Delete the message and play back the next one (if any).
Press 1 : Repeat the message.
Press 7 : Play back the previous message.
Press 8 : Call sender of message (and delete the message).
Press 9 : Play back the next message without deleting the previous one.
Press C : Disconnect (and keep messages).
Playing Back / Deleting Messages from a Remote Station
To remotely play back the messages left at your station:
Dial station number + 51 ●
To remotely delete the messages left at your station:
Dial station number + 51 + 0 ●
Call home
Call home
Call home
+
+ +

18 AlphaCom E User Guide A100K10602
Voice Help
This feature requires additional equipment.
The intercom station has a built-in system of voice help messages.
In some situations you will get a voice help message if you hesitate before carrying out the next step in a function. The help message stops when you press a key.
If you already know exactly what to do, there is no need to wait for a help message.
You will also get help information in the display.
TRANSFER FEATURESInquiry Call
When in conversation with a person:
Press 2 to park the ongoing conversation.1.
Dial the directory number of the other person or feature 2. you want to reach.
By pressing 2 you can switch between the two conver-3. sations by keeping one parked (Broker function).
Press C to disconnect the ongoing conversation.4.
Call Transfer
When you have made an Inquiry Call, you can establish a conversation between the two other parties and disconnect yourself.
When in conversation with a person:
Make an Inquiry Call to another station by pressing 2 + ●directory number.
Press 3 to connect the two stations. Your own station is ●automatically disconnected.
. . . .
HELP

A100K10602 AlphaCom E User Guide 19
Call Forwarding from Own Station
To forward your calls to a remote station:
Dial 71 + remote station number + M. ●All calls to your station will now be forwarded to the remote station and the message “Call Forwarded” will be displayed.
To cancel Call Forwarding:
Dial 70 from your own station. ●
To cancel Call Forwarding from a remote station:
Dial 73 + your own station number. ●It is also possible to forward your calls to a telephone or personal pager.
To forward your calls to a telephone:
Assuming there is a telephone gateway.
Dial 71 + 0 + phone number + M. ●
To forward your calls to a personal pager:
Dial 71 + station number + 44 + M. ●
Follow Me - Forwarding from Remote Station
To turn on Follow Me from a remote station:
Dial 72 + own station number. ●All calls to your station will now be forwarded to the remote station.
To cancel Follow Me:
Dial 70 from your own station. ●
To cancel Follow Me from a remote station:
Dial 73 + your own station number. ●
+ +
+

20 AlphaCom E User Guide A100K10602
REMINDER / WAKE-UP CALLTo set the reminder time that is within 24 hours:
Dial 7883 + hour, minutes ●(7883 + hhmm)
You will be prompted for the time which you enter in the 24-hour clock notation, e.g. 1500 for 3 pm.
For the above example, the display will show:
WaUp 15:00 28/03
To set the reminder time that is NOT within 24 hours:
Dial 7883 + hour, minutes, day, month ●(7883 + hhmm + DDMM)
Your station will ring at the time you have set.
To stop the ringing:
Press any key on the station. ●
To delete the reminder time:
Dial 7883 + M ●There can only be one reminder / wake-up call per station.
RE-DIALINGTo re-dial the last number:
Dial 9532 ●
You can program the re-dial directory number (9532) into one of the Direct Access Keys - see page 34 for more information.
It is not possible to re-dial telephone numbers.

A100K10602 AlphaCom E User Guide 21
CALL REQUESTTo make a Call Request:
Dial 623 + the station number ●You will hear a voice message:
“Your call is registered. Please wait.”The message is spoken in English, German and French.
The display will show: Call registered.
The LED indicator will fl ash and the station will beep until the call is answered.
To answer a Call Request at the called station:
Dial 70 ●The display shows the number and name for the fi rst Call Request sender.
Press 8 to call the sender and delete the Call Request ●from the list.
There is a notifi cation tone for each Call Request and the LED indicator will start to fl ash.
The display shows the number of messages at your station waiting to be answered.
You also have the following options:
0 delete message without answering 1 repeat message 7 go to previous message 9 go to next message C disconnect without deleting messages
For handling call requests on stations with displays, the following codes, that are normally programmed in DAKs, are used:
7638 (Answer) ●
7637 (Up) ●
7639 (Down) ●
7630 (Delete) ●
The Call Request feature is usually used for dialing from a substation to a defi ned master station. The Call Request number is programmed on one of the buttons on the substation.
Your call is registered,please wait.
+
Your call is registered,please wait.

22 AlphaCom E User Guide A100K10602
RADIO / MUSIC PROGRAMSThis feature requires additional audio sources. The radio channels, music or internal programs available will depend on your installation.
Selecting a Program
To select an audio program:
Dial the Program Number ●Program 1 - 6 dial 801- 806Program 7 - 38 dial 8101 - 8132
Frequently used programs can be programmed to a DAK.
The program is, by default, temporarily interrupted by outgo-ing and incoming calls, but it remains on during Group Calls and All Calls.
Turning Off or Toggling a Program
To turn off an audio program:
Press C ●or
Dial 800 ●
To toggle on/off a program that has already been selected:
Dial 792 ●
Scrolling Through Available Programs
To scroll through the available programs:
Dial 790 for the next program. ●
Dial 791 for the previous program. ●
The numbers above for scrolling through may be programmed to a DAK. “Program off” (800) is included in the program list.

A100K10602 AlphaCom E User Guide 23
Turning On/Off Programs to Other Stations
To set up a program to another station:
Dial 74 + station number + program number ●
To turn off a program at another station:
Dial 74 + station number + 800 ●
To set up a program to a group of subscribers:
Dial 75 + group number + program number ●
To turn off a program at another group:
Dial 75 + group number + 800 ●
All the dialing sequences above can also be programmed on single-touch DAKs.
Access to setting up programs remotely may be restricted to certain stations.
+ +
24 AlphaCom E User Guide A100K10602
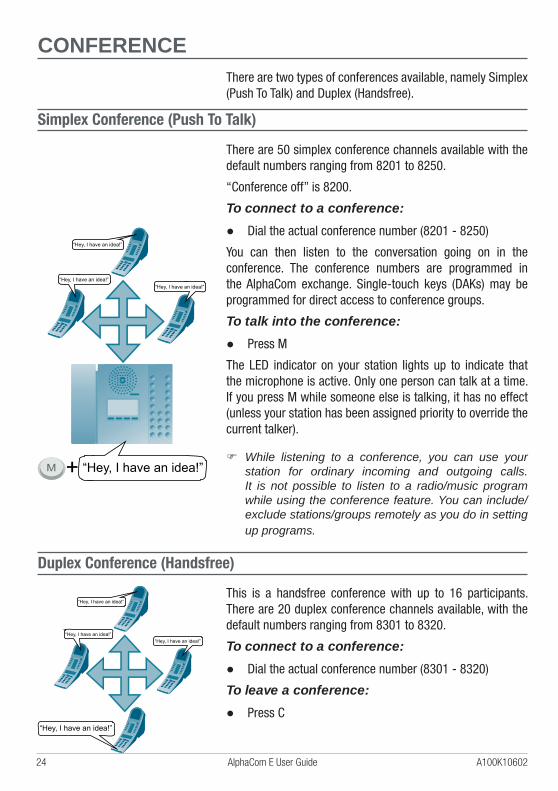
CONFERENCEThere are two types of conferences available, namely Simplex (Push To Talk) and Duplex (Handsfree).
Simplex Conference (Push To Talk)
There are 50 simplex conference channels available with the default numbers ranging from 8201 to 8250.
“Conference off” is 8200.
To connect to a conference:
Dial the actual conference number (8201 - 8250) ●You can then listen to the conversation going on in the conference. The conference numbers are programmed in the AlphaCom exchange. Single-touch keys (DAKs) may be programmed for direct access to conference groups.
To talk into the conference:
Press M ●The LED indicator on your station lights up to indicate that the microphone is active. Only one person can talk at a time. If you press M while someone else is talking, it has no effect (unless your station has been assigned priority to override the current talker).
While listening to a conference, you can use your station for ordinary incoming and outgoing calls. It is not possible to listen to a radio/music program while using the conference feature. You can include/exclude stations/groups remotely as you do in setting up programs.
Duplex Conference (Handsfree)
This is a handsfree conference with up to 16 participants. There are 20 duplex conference channels available, with the default numbers ranging from 8301 to 8320.
To connect to a conference:
Dial the actual conference number (8301 - 8320) ●To leave a conference:
Press C ●
“Hey, I have an idea!”
“Hey, I have an idea!”
“Hey, I have an idea!”
“Hey, I have an idea!”
+
“Hey, I have an idea!”
“Hey, I have an idea!”
“Hey, I have an idea!”
“Hey, I have an idea!”

A100K10602 AlphaCom E User Guide 25
To include other stations while in conference:
Dial 56 + station number ●
You can include/exclude stations/groups remotely with the codes 74 and 75 as you do in setting up programs.
For example, to include remote station number 2525 in conference number 8301:
Dial 74 + 2525 + 8301 ●
Stations participating in a duplex conference can not make or receive ordinary calls.
DOOR OPENINGThis feature requires additional door lock equipment.
Door Group Call:
Pressing the door station key sets up a Group Call to a number of stations.
Answer by dialing 99 ●You can then talk to the person who is at the door.
To open the door:
Press 6 while in conversation with the door station. ●
Direct call from a door:
Pressing the door station key sets up a conversation to one station.
To Open the door from the called station:
Press 6 while in conversation with the door station. ●

26 AlphaCom E User Guide A100K10602
TELEPHONE CALLSThis feature requires additional equipment.
If you have a telephone gateway installed, you can reach telephone subscribers with both internal and external numbers from your intercom station.
Making an Internal Telephone Call
This function is available only if the telephone gateway is connected to a local PABX.
To make an internal telephone call:
Press 0 and wait for the dial tone.1.
Dial the internal telephone number.2.
Press C to end the call.3.
Consult the STENTOFON supervisor at your company for more information on your system setup.
Making an External Telephone Call
Depending on the system confi guration you can:
Either
Press 0.1.
Wait for the dial tone.2.
Dial the external telephone number.3.
or
Press 0.1.
Enter PIN number.2.
Wait for the dial tone.3.
Dial the telephone number.4.
Press C to end the call. ●
Telephone numbers may be programmed to a DAK.
Consult the STENTOFON supervisor at your company for more information on your system setup.
+
+

A100K10602 AlphaCom E User Guide 27
Calling From a Telephone To an Intercom Station
The telephone interface is set up to allow either direct calls to one specifi c intercom station or two-step calls to the intercom station you choose.
To call the intercom station:
Dial the telephone number for the telephone interface.1.
Wait for the dial tone.2.
Dial the number for the intercom station.3.
If your telephone has # and * keys, you can use them to activate intercom features:
Press ● * to activate the M key (0.5 second).
Press # to deactivate the M key. ●
To terminate the call:
Hang up the telephone. ●
If two-step dialing is used, telephone callers have access to intercom features like Group Call and leaving voice messages by default. They are normally restricted from activating features like audio program selection and making outgoing telephone calls.
For more information on available features, please consult the STENTOFON supervisor at your company.
Receiving a Telephone Call at Your Station
For incoming telephone calls to your intercom station:
Press M or lift the handset to accept the call. ●
Press C or replace the handset to terminate the call. ●
+
28 AlphaCom E User Guide A100K10602
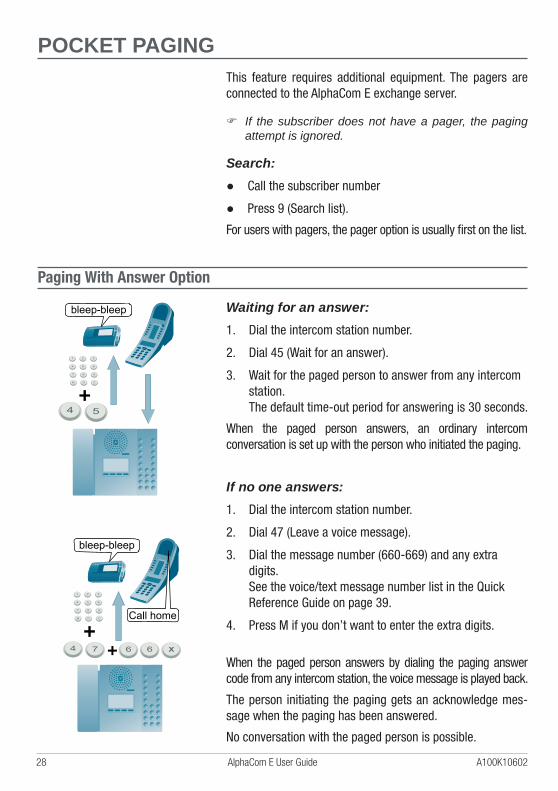
POCKET PAGINGThis feature requires additional equipment. The pagers are connected to the AlphaCom E exchange server.
If the subscriber does not have a pager, the paging attempt is ignored.
Search:
Call the subscriber number ●
Press 9 (Search list). ●For users with pagers, the pager option is usually fi rst on the list.
Paging With Answer Option
Waiting for an answer:
Dial the intercom station number.1.
Dial 45 (Wait for an answer).2.
Wait for the paged person to answer from any intercom 3. station.The default time-out period for answering is 30 seconds.
When the paged person answers, an ordinary intercom conversation is set up with the person who initiated the paging.
If no one answers:
Dial the intercom station number.1.
Dial 47 (Leave a voice message).2.
Dial the message number (660-669) and any extra 3. digits.See the voice/text message number list in the Quick Reference Guide on page 39.
Press M if you don’t want to enter the extra digits. 4.
When the paged person answers by dialing the paging answer code from any intercom station, the voice message is played back.
The person initiating the paging gets an acknowledge mes-sage when the paging has been answered.
No conversation with the paged person is possible.
+
bleep-bleep
++
Call home
bleep-bleep

A100K10602 AlphaCom E User Guide 29
Paging Without Answer Option
To send the station number as a text message:
Dial the intercom station number.1.
Dial 44 (Own station number).2.
The pager display shows the directory number of the station activating the paging.
Answer the paging by dialing the shown directory number at the nearest intercom station.
To send a text message to the pager:
Dial the intercom station number.1.
Dial 46 (Text message).2.
Dial the message number (660-669) and any extra 3. digits.See the voice/text message number list in the Quick Reference Guide on page 39.
Press M when fi nished.4.
The text message and the directory number will appear in the pager display.
If the pager in question does not have a display, the attempt is canceled with a failure tone after 3 digits have been pressed.
Paging Without Calling an Intercom Station
You can activate a paging call from your intercom station to a pager directly, without calling a station fi rst.
Dial the pager directory number ●
You will then have the following options:Dial 44 = Send your own station no. as a text message –
Dial 45 = Wait for an answer –
Dial 46 = Send a text message –
Dial 47 = Leave a voice message –
+
2024
++
2024 Call home
30 AlphaCom E User Guide A100K10602
Answering Paging (Meet Me)
If you have been paged with an answer option, there are different ways of answering, depending on the pager type and the exchange programming.
At a convenient intercom station:
Either
Dial your personal answer code. ●or
Dial the answer code shown in the pocket receiver ●display (default is 980 - 989).
If your pager has no display:
Dial 96 ●
Depending on the type of paging sent out, you are either connected to the person who initiated the paging, or you will hear a voice message.

A100K10602 AlphaCom E User Guide 31
DISPLAY INFORMATIONInformation Display
The IP Master stations have displays with 4 lines and 20 characters each, while the Analog Master stations have displays with only 2 lines. The information displayed may be the date and time, own and called name and directory number, available functions, help text, messages, and status. The last line shows the selection button functions in the actual mode.
For the IP Master and Dual Display stations, there are 4 buttons located just below the display that correspond to the menu choices displayed. The buttons on the Dual Display station are slightly different in that there are two arrow buttons in the middle.
The text displayed will change according to your actions and the options in the actual station mode.
The information and menu text that is displayed will depend on how your intercom station is confi gured in the AlphaPro program.
Interactive context help information for every function and feature is available as text messages to help guide and instruct you through each step of the procedure.
There is a separate display illumination control button for both the IP Flush Master and IP OR Master.
Idle Station
In idle mode, the display shows the date and time, own station number and name (as set in the AlphaPro program).
In the upper-right corner of the display, there are symbols for privacy (P), handset, and volume.
Menu Selection
Dial 60 to access the main menu info. ●For IP and Dual Display stations:
Press the [Menu] selection button to open the main func- ●tions menu.
Scroll up/down through the menu with the [arrow] 1. selection buttons (the two middle buttons).
17/03-2009 10:45
Menu Name
1001 Subscriber Name
20/088-2009 13:021002 SubscriberName
Menu NameDak
- +
60 Info menu
Ok Esc

32 AlphaCom E User Guide A100K10602
Confi rm the desired main function by pressing [Ok].2. The secondary menu will then be shown. –
Scroll up/down the secondary menu and confi rm by 3. pressing [Ok].
The function will then be executed. –
Return to the main menu by pressing [Esc]. –
Press C to return to idle mode or wait for the time-out. –
For Analog stations:
The DAK 9 (lower left) key is pre-programmed as INFO key by default.
Press the INFO key to enter the info menu. –
Press 7 to Scroll up –
Press 9 to Scroll down –
Press 8 to Make a selection –
Press C to exit the menu or wait for time-out. –
Conventional Name Search
For IP and Dual Display stations:
Dial 6141. The letters a-m is then displayed. The letters n-z will be –
displayed when the cursor passes the last letter (m).
Use the [arrow] selection buttons to scroll through the 2. alphabet and select the fi rst letter in the name.
Press the [Ok] selection button to confi rm or the [Esc] 3. selection button to cancel.
The fi rst name starting with this letter is displayed.4.
Use the [arrow] selection buttons to scroll to the desired 5. name.
Press the [Ok] selection button to initiate a call.6.
For Analog stations:
The DAK 10 (lower right) key is pre-programmed as NAME key by default.
Press the NAME key –
Press 7 to Scroll back –
Press 9 to Scroll forward –
Press 8 to Make a selection –
INFO
NAME
60 Info menu7 8=Ok 8
610 Group menu
Ok Esc
abcdefghijkl
Ok Esc
m

A100K10602 AlphaCom E User Guide 33
Name Search in Subscriber Directory
For IP and Dual Display stations:
The [Name] selection button is used to open and search for a number in the subscriber directory.
Press the [Name] selection button. ●The display will show: AlphaNumSrch
Confi rm by pressing the [Ok] selection button. ●The keyboard is now changed to alphanumeric format as used on mobile phones. Letters are not printed on the keys.
Type in a name to search for. ●The complete name or only the fi rst characters may be typed in.
The [up-arrow] selection button acts as a delete key –
(character to the left).
The [down-arrow] selection button acts as a space bar. –
Press the [Ok] selection button to confi rm when the ●search character(s) are typed in.
The matching name or the closest match is displayed.
Use the [arrow] selection buttons to scroll in the ●directory table if needed.
Press the [Ok] selection button to make the call or the ●[Esc] selection button to cancel.
The [Esc] selection button brings you back to the alphanumeric input for additional changes or input.
Press C to go back to idle mode. ●For Analog stations:
Dial 9537 –
Press M to display the fi rst directory entry –
Press 9 to Scroll down the alphabet –
Press 7 to Scroll up the alphabet –
Press 8 to Make a selection –
Check Station Identity
To check the identity of the station:
Dial 789 ●After a few seconds, the display will automatically show the station’s directory number, physical number, node number, IP address, MAC address, AMC software version, et al.
GHI
ABC
JKL
DEF
MNO
PQRS TUV WXYZ
Enter Name:
Ok EscDel Spc
9537 AlphaNumSrch
Ok Esc
M=Find 0=Del

34 AlphaCom E User Guide A100K10602
PROGRAMMING DIRECT ACCESS KEYS - DAKThe DAKs provide single-touch, immediate access to your most frequently used directory numbers and functions.
Programming DAK Directory Numbers and Functions
Different stations have different number of DAK keys.
The IP Desk Master Station has 10 DAKs while the IP OR and Flush Master Stations have 4 DAKs.
The Dual Display Master Station has 20 or more DAKs divided into pages of 10 DAKs with information text for each DAK on a 5-8 character display.
Desk and Wall Master Stations have 10 DAK keys.
To enter a directory number on a DAK:
Press the [Name] selection button in idle state (or dial 1. 784 and skip to step 4).
Press the [arrow] selection button until you come to 2. 9541 ProgramKey.
Press the [Ok] selection button.3.
You will be prompted to enter a directory or function 4. number.
Press the DAK you want to program.5.
If the DAK is already in use, the new entry will override the old.
For a list of function numbers, see the Quick Reference Guide or select the function from the Menu and note the number displayed in front of the function name.
Deleting DAK Call Numbers and Functions
To delete a number from a DAK:
Press the [Name] selection button in idle state (or dial 1. 784 and skip to step 3).
Press the [arrow] selection button until you come to 2. 9541 ProgramKey.
Press the DAK you want to delete the number from. 3.
Confi rm by pressing the [Del] selection button4. or press the M key.
9541 ProgramKey
Delete DAKDel Esc
9541 ProgramKey(To delete DAKpress DAK key)New number:

A100K10602 AlphaCom E User Guide 35
Direct Access Key Display Information
Dual Display Station
The Direct Access Key functions are shown on a display between the two key columns.
An arrow symbol at the top or bottom of the display indicates the previous or next page respectively. The arrow keys are used to scroll between two DAK pages in idle mode.
The text shown in the DAK display is of 3 types:
User-defi ned text programmed in the DAK string. ●
The fi rst letters (5-8) of the name related to the feature ●or directory number assigned to the DAK.
The directory number assigned to the DAK. ●
Editing DAK Text
Dual Display Station
If the predefi ned text on a DAK is not suitable, it may be changed by the user.
To edit DAK text:
Press the [Name] selection key in idle state1.
Press the [up-arrow] key until you come to 2. 9540 EditDAKText.
Press the [Ok] selection key3.
Press the DAK you want to edit4. The keyboard is now ready to accept alphanumeric –
entries.
If the DAK text was previously edited, the text is –
displayed.
5. Use the arrow keys to navigateThe up-arrow key acts as a delete key (character to the –
left).
The down-arrow key acts as a space bar. –
Enter the new text (max 8 characters).6.
Press the [Ok] selection key to confi rm.7.
P
Name 1Name 2Name 3Name 4Name 5Funct 1Funct 2Funct 3Funct 4Funct 5
9540 EditDAKTextSelect key
Ok Esc
Enter name:Name 1
Ok EscDel/Spc
36 AlphaCom E User Guide A100K10602
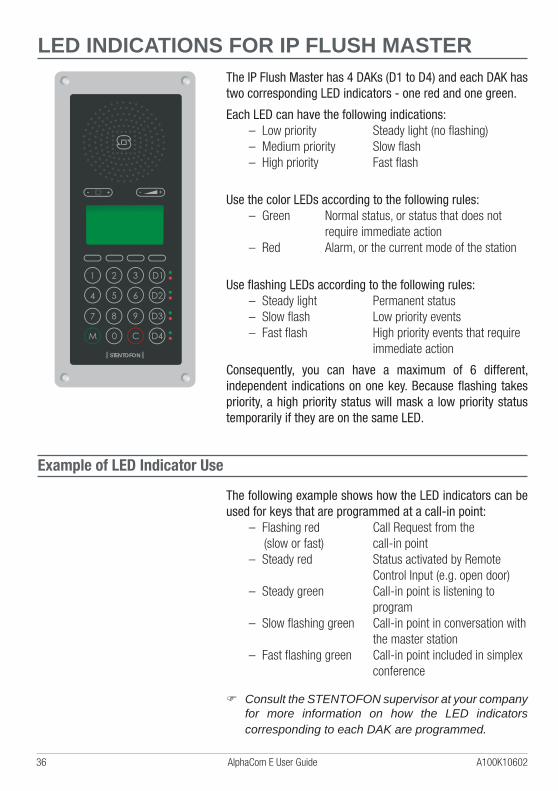
LED INDICATIONS FOR IP FLUSH MASTERThe IP Flush Master has 4 DAKs (D1 to D4) and each DAK has two corresponding LED indicators - one red and one green.
Each LED can have the following indications:Low priority Steady light (no fl ashing) –
Medium priority Slow fl ash –
High priority Fast fl ash –
Use the color LEDs according to the following rules:Green Normal status, or status that does not –
require immediate action
Red Alarm, or the current mode of the station –
Use fl ashing LEDs according to the following rules:Steady light Permanent status –
Slow fl ash Low priority events –
Fast fl ash High priority events that require –
immediate action
Consequently, you can have a maximum of 6 different, independent indications on one key. Because fl ashing takes priority, a high priority status will mask a low priority status temporarily if they are on the same LED.
Example of LED Indicator Use
The following example shows how the LED indicators can be used for keys that are programmed at a call-in point:
Flashing red Call Request from the –
(slow or fast) call-in point
Steady red Status activated by Remote –
Control Input (e.g. open door)
Steady green Call-in point is listening to –
program
Slow fl ashing green Call-in point in conversation with –
the master station
Fast fl ashing green Call-in point included in simplex –
conference
Consult the STENTOFON supervisor at your company for more information on how the LED indicators corresponding to each DAK are programmed.
- -+ +
STENTOFON

A100K10602 AlphaCom E User Guide 37
SUBSCRIBER LISTName Number

38 AlphaCom E User Guide A100K10602
Name Number

A100K10602 AlphaCom E User Guide 39
Functions ActionsProgramming Direct Access Keys 784 + number + press DAK
Make a call Dial subscriber number
High background noise level Press M when you speak
End a call C
Re-dial 9532
All Call 84 + M to speak
Group Call 85-89 + M to speak
Answer All Call / Group Call 99
Paging Subscriber number + 44-47
Answer Paging 96 or answer code shown in display
Radio Programs 801-806 (off: C or 800)
Connect to telephone 0
Call Forwarding 71 + station number + M
Follow Me 72 + own number
Reset Call Forward / Follow Me remotely 73 + station number
Play back messages / Delete absence message 70
Wake-up / reminder within 24 hours 7883 + hour + minute + M
Wake-up / reminder after 24 hours 7883 + hour + minute + day + month
Call Request 623 + station number
Call Request transfer 7870
Conference, Simplex 8201 - 8250 (Off: 8200) M to speak
Conference, Duplex 8301 - 8320 (Off: 8300) C to leave
Ringing Group 6701 - 6710
Number or key to press during conversationMute/Unmute microphone / Menu step 0 Paging with calling station number 44
Repeat absence message 1 Paging with answer 45
Inquiry Call & Broker Function 2 Text message paging 46
Call Transfer 3 Voice message paging 47
Door opening 6 Remotely change message 50
Leave voice/text message 7 + 66X Remotely read message 51
Call Back 8 Busy Notify 57 or M
Search 9 Busy Override 58 or MM
Private/Message Override 59 or M
Absence messages Standard voice and text messagesOut at the moment (until time: hhmm) 771 Contact the switchboard 660
At a meeting (until time: hhmm) 772 Call phone number xxxxxxxx 661
Gone for the day (Back tomorrow at time: hhmm) 773 Call home 663
Absent today (until date: ddmm) 774 Call your spouse 664
Busy at the moment (until time: hhmm) 775 Call me 666
At lunch (until time: hhmm) 776 Remember meeting (at time: hhmm) 667
On holiday (until date: ddmm) 777 There is a fax for you 668
Away for a few days (until date: ddmm) 778 There are deliveries for you 669
Not available (Available on phone number: xxxx) 779
QUICK REFERENCE GUIDE
The numbers on this page are factory default settings and may have been changed in your AlphaCom exchange installation.

www.stentofon.com
Zenitel Norway ASP.O. Box 4498 NydalenNO-0403 OSLONorway
STENTOFON products are developed and marketed by Zenitel Norway AS. The company’s Quality Assurance System is certifi ed to meet the requirements in NS-EN ISO 9001:2002. Zenitel Norway AS reserves the right to modify designs and alter specifi cations without prior notice, in pursuance of a policy of continuous improvement. © 2009 Zenitel Norway AS.
A100K10602 [email protected]