All consumer inkjet printers feature some form of a - INKJET411
231
1 All consumer inkjet printers feature some form of a printer self-test or basic cartridge nozzle test. Most of the HP printer models include a cartridge health electrical test (i.e. ‘Tap 41′). These tests can be used to also verify the printer’s internal firmware is functioning properly. The various HP diagnostic tests enclosed in the attachment below can help evaluate general ink cartridge performance* NOTE: “Non-Genuine”/”Counterfeit” ink alert messages can be bypassed, however if “Incompatible Print Cartridge” / “Print Cartridge(s) Problem” / “Refer to printer documentation” / “Cartridge Error: Cartridge must be replaced” / “Cartridge in left or right slot is not intended for use in this printer” / “Replace Ink Cartridge” / “Ink Cartridge Failure” is displayed then the cartridge may be electrically damaged (internal micro-electronics). Remove and clean ink cartridge (or printhead) electrical contacts. Re-install and re-test printer using the suggested procedures provided. HP Photosmart C4600-C4700 Bypass Instructions - Video Tags (HP 60s) HP 60 Cartridge Error Bypass - HP Photosmart C4600 C4700 D110a Printer Models HP Photosmart C4600 C4700 D110a Printers – HP 60 Cartridge Error Bypass Description: As the electronics in the HP 60 ink cartridges and the printer communicate with each other, sometimes the printer will incorrectly identify an ink cartridge as empty or non-functional. These error messages can appear as PC screen messages, printer LCD display messages, or as blinking lights on the printer. Depending on your Photosmart C4600, C4700 and D110a series printer model and type of error condition, please review printer bypass/clear procedures as the button selections vary slightly between printer models. In many cases the ink cartridge may have internal electrical damage and may need to be replaced – refer to printer Tap 41 diagnostic test procedures for advanced cartridge health diagnosis. A marginally performing HP 60 ink cartridge may produce the following severe cartridge error messages which do not allow printing: - Incompatible Print Cartridges - Print Cartridges Missing or Not Detected - Cartridges Installed Incorrectly
Transcript of All consumer inkjet printers feature some form of a - INKJET411
1
All consumer inkjet printers feature some form of a printer self-test or basic cartridge nozzle test. Most of
the HP printer models include a cartridge health electrical test (i.e. ‘Tap 41′). These tests can be used to
also verify the printer’s internal firmware is functioning properly.
The various HP diagnostic tests enclosed in the attachment below can help evaluate general ink cartridge
performance* NOTE: “Non-Genuine”/”Counterfeit” ink alert messages can be bypassed, however if
“Incompatible Print Cartridge” / “Print Cartridge(s) Problem” / “Refer to printer documentation” / “Cartridge
Error: Cartridge must be replaced” / “Cartridge in left or right slot is not intended for use in this printer” /
“Replace Ink Cartridge” / “Ink Cartridge Failure” is displayed then the cartridge may be electrically
damaged (internal micro-electronics). Remove and clean ink cartridge (or printhead) electrical contacts.
Re-install and re-test printer using the suggested procedures provided.
HP Photosmart C4600-C4700 Bypass Instructions - Video Tags (HP 60s)
HP 60 Cartridge Error Bypass - HP Photosmart C4600 C4700 D110a Printer Models
HP Photosmart C4600 C4700 D110a Printers – HP 60 Cartridge Error Bypass
Description: As the electronics in the HP 60 ink cartridges and the printer communicate with each other,
sometimes the printer will incorrectly identify an ink cartridge as empty or non-functional. These error
messages can appear as PC screen messages, printer LCD display messages, or as blinking lights on
the printer. Depending on your Photosmart C4600, C4700 and D110a series printer model and type of
error condition, please review printer bypass/clear procedures as the button selections vary slightly
between printer models. In many cases the ink cartridge may have internal electrical damage and may
need to be replaced – refer to printer Tap 41 diagnostic test procedures for advanced cartridge health
diagnosis.
A marginally performing HP 60 ink cartridge may produce the following severe cartridge error messages
which do not allow printing:
- Incompatible Print Cartridges
- Print Cartridges Missing or Not Detected
- Cartridges Installed Incorrectly
2
- Print Cartridges Problem
- Cartridge in slot on left/right is not intended for use in this product
- Cartridge not intended for use in this printer
- Power ‘On’ light blinking
Tags: 60, 60XL, Color, Black, Cartridge, Problem, Error, Message, Failure, HP, Photosmart, C4600,
C4610, C4635, C4640, C4650, C4670, C4673, C4680, C4683, C4685, C4688, C4690, C4700, C4740,
C4750, C4780, C4783, C4785, C4788, C4793, C4795, C4798, C4799, D110a, Inkjet printer, HP,
Incompatible Print Cartridges, Print Cartridges Missing, Not Detected, Installed Incorrectly, Not intended
for use, In this product, in wrong slot, not printing, wont print, refill, blinking, light, lights, errors, ink, dead,
cartridge, bad, support, help, refilled, Costco, Frys Electronics
HP Photosmart C-Series Bypass / Clear / Reset Instructions - Inkjet Printer
(HP74 HP75 HP74XL HP75XL) Title: HP Photosmart 4200 4300 4400 4500 5200 5300 Printer Bypass / Clear Instructions
Description: As the electronics in the HP 74 & HP 75 ink cartridges and the printer communicate
with each other, sometimes the printer will incorrectly identify an ink cartridge as empty or non-
functional. These error messages can appear as PC screen messages, printer LCD display
messages, or as blinking lights on the printer. Depending on your Photosmart C4xxx/C5xxx
series printer model and type of error condition, please review printer bypass/clear procedures
as the button selections vary slightly between printer models. In many cases the ink cartridge
may have internal electrical damage and may need to be replaced – refer to printer Tap 41
diagnostic test procedures for advanced cartridge health diagnosis.
HP 74/75 ink cartridges which have been newly refilled and installed into the HP printer may
produce the following ‘printer shutdown’ error messages:
- Incompatible Print Cartridges
- Print Cartridges Missing or Not Detected
- Cartridges Installed Incorrectly
- Refer to printer documentation
3
- Cartridge in slot on left/right is not intended for use in this product
- Cartridge not intended for use in this printer
- Low ink light blinking
Tags: HP, Incompatible Print Cartridges, Print Cartridges Missing, Not Detected, Cartridges, Installed
Incorrectly, Cartridge in slot on left right, PhotoSmart, C4200, C4205, C4210, C4225, C4235, C4240,
C4250, C4270, C4272, C4273, C4275, C4280, C4283, C4285, C4288, C4293, C4294, C4345, C4380, C4385,
C4440, C4450, C4472, C4473, C4480, C4483, C4485, C5225, C5240, C5250, C5280, D5345, D5360, D5363,
D5368, OfficeJet, J5730, J5740, J5750, J5780, J5785, J5788, J6410, J6413, J6415, J6450, J6480
Clogged IPH Ink Cartridge Recovery Procedure HP Inkjet Printer
Title: Clogged Ink Cartridge Recovery (HP, Canon, Lexmark & Dell Integrated Cartridges)
Description: To help recover a severely clogged HP, Canon, Lexmark or Dell integrated ink cartridge that fails to print or is believed to have suffered prolonged cartridge printhead drying, perform the following procedure: NOTE: This procedure assumes that the integrated ink cartridge has an adequate amount of ink inside and that the internal cartridge foam has not completely hardened due to cartridge age or prolonged exposure to the environment. This procedure is most effective on tri-color integrated ink cartridge recovery (i.e. dye-based inks). To begin, obtain a flat bottomed container and water. Distilled or de-ionized water is suggested to prevent ink contamination. Heat water until hot and carefully pour into container. Immerse the bottom portion of the ink cartridge into the hot water for approximately 5 minutes. The hot water will help loosen up the dried ink which has formed inside the cartridge nozzle plate holes. Using a towel, gently blot nozzle plate to see if ink appears – this is commonly referred to as “stamping”. For color cartridges, all 3 color bands should be vibrant and solid. If not, repeat the cleaning process again until ink is visible on towel during cartridge blotting. Once recovered, completely dry the outside of ink cartridge with a towel. Re-install cartridge into the printer and re-test.
Tags: Inkjet, cartridge, cartridges, ink, integrated, drops, ink drops, jetting, cleaning, printer,
maintenance, service, printhead, image, quality, printing, HP, 15, 17, 21, 22, 23, 41, 45, 54, 56, 57, 58,
60, 61, 60xl, 61xl, 74, 75, 74XL, 75XL HP 92, HP 93, HP 94, HP 95, HP 96, HP 97, 98, 99, Canon, 210, 211,
210xl, 211xl, 240, 241, 30, 31, 40, 41, 50, 51, 3e, Canon, Lexmark 33, 34, 35, Lexmark, Dell,
microelectronics, nozzle, jetting, jets, recovery, fix, correct, issue, no printing, how to clean
HP 901 Checksum Code Bypass - Inkjet Printer Title:
4
Video #16: HP 901 HP901 HP901XL Cartridge Error Bypass (Checksum code clear) Procedure – Incompatible Print Cartridges Video #17: HP Officejet J4500 J4600 4500 Cartridge Error Bypass – HP901 HP 901 HP901XL Cartridge Errors
Description: Following a severe cartridge error message which prevents printing operations, to
temporarily bypass a HP 901 black or color cartridge (or HP 901XL black cartridge) cartridge error,
perform the cartridge error bypass (checksum code clear) procedure at the Officejet J4500, J4600 or
4500 series printer control panel. NOTE: Success will vary depending on cartridge’s electrical health.
Error messages such as Incompatible Print Cartridges, Refer to device documentation to troubleshoot,
Print Cartridges Error, Print Cartridges Missing or Not Detected, Cartridge in slot on left (or right) is not
intended for use in this product, Refer to Printer Documentation or the exclamation light is blinking are
considered more severe errors (i.e. no printing is allowed). It is possible to temporarily bypass a fatal
cartridge error which will allow limited print operations by performing the cartridge error bypass
(checksum code clear) procedure. Verify the cartridge(s) are thoroughly clean and firmly reseat
cartridges before performing any advanced clears or tests, such as the Tap 41 (or Tap 10) diagnostic
test. Verify ink cartridge’s warranty expiration date (imprinted on front of ink cartridge) before refilling
as the cartridge might be at risk for potential failure due to internal electrical damage. Visit
Inkjet411.com for more information.
NOTE: After the HP 901 ink cartridges are refilled a variety of error messages may be observed at the
printer and/or host computer. The printer will continue to attempt to communicate low ink warning
messages during the life of the refilled ink cartridge – this is normal and nothing to be alarmed over.
While the ink level cannot be tracked or reset in the HP Officejet J4500 thru J4600 and 4500 series
printers, the majority, if not all, of these warning messages and/or steady indicator lights, may simply be
ignored and the printer should continue to printer normally. Ink level warnings and indicators provide
estimates for planning purposes only.
Tags: Officejet, color, refill, J4524, J4525, J4535, J4680, J4680c J4540, J4550, J4580, J4585, J4640, J4660,
J4680, J4680c, 4500, 4575, G510a, G510g, G510n, DeskJet P2500, HP, HP 901 refill, black, 901, 901XL,
Incompatible Print Cartridges, Refer to device documentation, to troubleshoot, Print Cartridges Missing,
Not Detected, cartridges problem, Installed Incorrectly, Not intended for use, In this product, Print
cartridges in wrong slot, Print cartridge problem, not printing, HP ink refill, troubleshooting, no printing,
help, errors, messages, blinking lights, ink, cartridge, reset
HP21 / HP22 / HP27 & HP54 / HP56 / HP57 / HP58 Ink Refill & Cartridge Care Tips
Inkjet Printer
Title: HP 21 / HP22 / HP27 & HP 54 / HP56 / HP57 / HP58 Ink Refill & Cartridge Care Tips – HP Deskjet / Officejet Printers
5
Description: When using HP21 / HP22 / HP27 or HP 54 / HP56 / HP57 / HP58 refilled inkjet ink cartridges, it is
suggested to adhere to these general guidelines to help minimize accidental cartridge damage. This
includes cartridge transportation to and from a refill location, general cartridge and printer care, and
print diagnosis and general ink cartridge recovery.
NOTE: After the HP 21/22/27 or HP 54/56/57/58 ink cartridges are refilled a variety of cartridge alerts may
be observed at the printer and/or host computer. The printer will continue to attempt to communicate
"low ink" warning messages during the life of the refilled ink cartridge -- this is COMPLETELY NORMAL
and nothing to be alarmed over. While the ink level cannot be tracked or reset, the majority, if not all, of
these warning messages and/or steady indicator lights, can simply be ignored and the printer should
continue to printer normally. Ink level warnings and indicators provide estimates for planning purposes
only. Additional nuisance messages may also be observed following initial refilled cartridge installation
including 'non-genuine ink/cartridge', 'depleted cartridge', 'refilled cartridge', 'counterfeit', etc. These
alerts messages may be bypassed by selecting ‘OK’/’Resume’/’Dismiss’.
Tags: HP, 21, 22, 27, 54, 56, 57, 58, color, black, ink, cartridge, refill, refilled, inkjet, printer, cartridges,
error, Non Genuine, Cartridge, Used Print Cartridge, Low Ink, Deskjet, Officejet, warning, alert, message,
printer, Incompatible Cartridges, Print Cartridges Missing, Not Detected, error, Printer, Problem,
Installed Incorrectly, message, refilled, Depleted Cartridge Detected, Not intended for use, In this
product, in wrong slot, not printing, ink out, will not print, troubleshooting, no printing, printer ink,
support, blinking, LED, lights, ink cartridge, bad cartridge, service, support, help, Costco, Frys, Inkjet411
HP 60-60XL (61/61XL) Ink Refill & Cartridge Care Tips
Inkjet Printer
Title: HP 60 / HP 60XL (HP 61 /HP 61XL ) Ink Refill & Cartridge Care Tips – HP Deskjet / Photosmart Printers
Description: When using HP60 / HP60XL ( HP61 / HP61XL ) refilled inkjet ink cartridges, it is suggested to
adhere to these general guidelines to help minimize accidental cartridge damage. This includes cartridge
transportation to and from a refill location, general cartridge and printer care, and print diagnosis and
general ink cartridge recovery.
NOTE: After the 60/60XL (61/61XL) ink cartridges are refilled a variety of cartridge alerts may be observed
at the printer and/or host computer. The printer will continue to attempt to communicate "low ink"
warning messages during the life of the refilled ink cartridge -- this is COMPLETELY NORMAL and nothing
to be alarmed over. While the ink level cannot be tracked or reset, the majority, if not all, of these
warning messages and/or steady indicator lights, can simply be ignored and the printer should continue
to printer normally. Ink level warnings and indicators provide estimates for planning purposes only.
Additional nuisance messages may also be observed following initial refilled cartridge installation
6
including 'non-genuine cartridge', 'depleted cartridge', 'refilled cartridge', 'counterfeit', etc. These alerts
messages may be bypassed by selecting ‘OK’/’Resume’/’Dismiss’.
Tags: HP, 60, 60XL, 61, 61XL, color, black, ink, cartridge, refill, refilled, inkjet, printer, cartridges, error,
Non-Genuine Cartridge, Used Print Cartridge, Low Ink, Warning, Alert, message, printer, Incompatible
Print Cartridges, Print Cartridges Missing, Not Detected, Tri-Color, Print, Cartridge Problem, Installed
Incorrectly, Print cartridge, Refilled cartridge, Depleted Cartridge Detected, Not intended for use, In this
product, in wrong slot, not printing, wont print, refilling, troubleshooting, no printing, printer ink,
support, error, blinking lights, ink cartridge, bad cartridge, cartridge, service, support, help, Photosmart
Express, cartridges refilled, Costco, Deskjet, Photosmart, Officejet, Pro, Costco, Frys,
HP 60 / 61 Cartridge Refills HP Inkjet Printer
Title: HP 60 60XL 61 61XL Ink Cartridge Refills - Solving Errors & Warnings
Description: After the HP 60, 60XL, 61, or 61XL ink cartridges are refilled a variety of error messages may be displayed at the printer and/or host computer. The printer will continue to attempt to communicate low ink warning messages during the life of the refilled ink cartridge – this is normal and nothing to be alarmed over. With the majority of HP 60-61 ink series printer models, the ink level cannot be tracked or reset -- however the majority, if not all, of these warning messages may simply be ignored and the printer should continue to printer normally. Ink level warnings and indicators provide estimates for planning purposes only. NOTE: Error messages such as Incompatible Print Cartridges, Print Cartridges Error, Print Cartridges Missing or Not Detected, Cartridge in slot on left (or right) is not intended for use in this product, or Low Ink light is blinking are considered more severe errors (i.e. printer shutdown commands) and usually require the cartridge(s) to be firmly reseated or running of advanced internal diagnostics, such as the Tap 41 or Tap 10 diagnostic test. Verify ink cartridge’s warranty expiration date before refilling as the cartridge might be at risk for potential failure due to internal electrical damage, or similar.
Tags: HP 60, HP 60XL, HP 61, HP 61XL, cartridge, refill, refilled, inkjet printer, cartridges error, Non-
Genuine Cartridge, Used Print Cartridge, Low Ink Warning, HP printer, Incompatible Print Cartridges,
Print Cartridges Missing, Not Detected, Tri-Color, Black Cartridge Problem, Installed Incorrectly, Print
cartridge, Refilled cartridge, Depleted Cartridge Detected, Not intended for use, In this product, Print
cartridges in wrong slot, Print cartridge problem, not printing, wont print, refilling, troubleshooting, no
printing, Costco, Frys, printer ink, technology, refiller, need assistance, error messages, blinking lights,
ink, ink cartridges, bad cartridges, cartridge, service, support, help, cartridges refilled, Costco, HP
Deskjet, HP Photosmart, HP Officejet, HP Officejet Pro, HP Photosmart Express,
7
HP Officejet OJ J5700 6400 Bypass/Clear Instructions ( HP74 HP75 )
Inkjet Printer Title: HP Officejet J5700 J6400 Printer – HP 74 HP75 Cartridge Error Bypass
Description: As the electronics in the HP 74-75 ink cartridges and the printer communicate with
each other, sometimes the printer will incorrectly identify an ink cartridge as empty or non-
functional. These error messages can appear as PC screen messages, printer LCD display
messages, or blinking lights on the printer. Depending on your Officejet J5700 or OJ J6400
series printer model and type of error condition, please review printer bypass/clear procedures
as the button selections vary slightly between printer models. In many cases the ink cartridge
may have internal electrical damage and may need to be replaced – refer to printer Tap 41
diagnostic test procedures for advanced cartridge health diagnosis.
HP 74/75 ink cartridges which have been newly refilled and installed into the HP printer may
produce the following ‘printer shutdown’ error messages:
- Incompatible Print Cartridges
- Print Cartridges Problem
- Print Cartridges Missing or Not Detected
- Cartridges Installed Incorrectly
- Refer to printer/device documentation
- Cartridge in slot on left/right is not intended for use in this product
- Cartridge not intended for use in this printer
- Exclamation light blinking
Tags: HP, OfficeJet, ink, bad, cartridge, refill, 74, 75, 74XL, 75XL, cartridges, J5730, J5740, J5750, J5780,
J5785, J5788, J6410, J6413, J6415, J6450, J6480, Incompatible Print Cartridges, Refer to, device
documentation, to troubleshoot, Print Cartridges Missing, Not Detected, Tri-Color, Black Cartridge
Problem, Installed Incorrectly, Not intended for use, In this product, Print cartridges in wrong slot, Print
cartridge problem, not printing, HP ink refill, troubleshooting, no printing, printer ink, refiller, help,
errors, messages, blinking lights, color, black, refilled, wont print,
HP 74 / 75XL Cartridge Refills Inkjet Printer
Title: HP 74 / HP75 and HP 74XL / 75XL Ink Cartridge Refills - Solving Errors & Warnings
8
Description: After the HP 74 / HP75 or HP 74XL / 75XL ink cartridges are refilled a variety of error messages may be observed at the printer and/or host computer. The printer will continue to attempt to communicate low ink warning messages during the life of the refilled ink cartridge – this is normal and nothing to be alarmed over. With the majority of HP74 HP75 ink series printer models, the ink level cannot be tracked or reset -- however the majority, if not all, of these warning messages and/or steady indicator lights, may simply be ignored and the printer should continue to printer normally. Ink level warnings and indicators provide estimates for planning purposes only. NOTE: Error messages such as Incompatible Print Cartridges, Print Cartridges Error, Print Cartridges Missing or Not Detected, Cartridge in slot on left (or right) is not intended for use in this product, Refer to Printer Documentation or Low Ink light is blinking are considered more severe errors (i.e. no printing is allowed) and usually require the cartridge(s) to be firmly reseated or running of advanced internal diagnostics, such as the Tap 41 or Tap 10 diagnostic test. Verify ink cartridge’s warranty expiration date before refilling as the cartridge might be at risk for potential failure due to internal electrical damage.
Tags: HP 74, HP 75, HP 74XL, HP 75XL, cartridge, refill, refilled, inkjet printer, cartridges error,
Non-Genuine Cartridge, Used Print Cartridge, Low Ink Warning, HP printer, Incompatible Print
Cartridges, Print Cartridges Missing, Not Detected, Tri-Color, Black, Cartridge Problem, Installed
Incorrectly, Print cartridge, Refilled cartridge, Depleted Cartridge Detected, Not intended for
use, In this product, Print cartridges in wrong slot, HP Deskjet, HP Photosmart, HP Officejet, HP
Officejet Pro, HP Photosmart Express, troubleshooting, no printing, Costco, Frys, printer ink,
technology, refiller, need assistance, error messages, blinking lights, ink, ink cartridges, bad
cartridges, cartridge, service, support, help, cartridges refilled,
HP 60 HP60XL ( HP74 / HP75 ) Ink Refill & Cartridge Care Tips
Inkjet Printer Title: HP 74 / HP 75 ( HP74XL / HP75XL) Ink Refill & Cartridge Care Tips – HP Photosmart / Officejet Printers
Description: When using HP74 HP75 ( 74XL / 75XL ) refilled inkjet ink cartridges, it is suggested to adhere to
these general guidelines to help minimize accidental cartridge damage. This includes cartridge
transportation to and from a refill location, general cartridge and printer care, and print diagnosis and
general ink cartridge recovery.
9
NOTE: After the HP 74/75 (74XL/75XL) ink cartridges are refilled a variety of cartridge alerts may be
observed at the printer and/or host computer. The printer will continue to attempt to communicate
"low ink" warning messages during the life of the refilled ink cartridge -- this is COMPLETELY NORMAL
and nothing to be alarmed over. While the ink level cannot be tracked or reset, the majority, if not all, of
these warning messages and/or steady indicator lights, can simply be ignored and the printer should
continue to printer normally. Ink level warnings and indicators provide estimates for planning purposes
only. Additional nuisance messages may also be observed following initial refilled cartridge installation
including 'non-genuine ink/cartridge', 'depleted cartridge', 'refilled cartridge', 'counterfeit', etc. These
alerts messages may be bypassed by selecting ‘OK’/’Resume’/’Dismiss’.
Tags: HP, 74, 75, 74XL, 75XL, color, black, ink, cartridge, refill, refilled, inkjet, printer, cartridges, error,
Non-Genuine Cartridge, Used Print Cartridge, Low Ink, Photosmart, Officejet, Warning, Alert, message,
printer, Incompatible Print Cartridges, Print Cartridges Missing, Not Detected, Tri-Color, Print, Cartridge
Problem, Installed Incorrectly, Print cartridge, refilled, Depleted Cartridge Detected, Not intended for
use, In this product, in wrong slot, not printing, wont print, refilling, troubleshooting, no printing, printer
ink, support, error, blinking lights, ink cartridge, bad cartridge, cartridge, service, support, help, Costco,
Pro, Costco, Frys Electronics,
HP 74 / 75XL Cartridge Refills HP Inkjet Printer
Title: HP 74/75 and HP 74XL/75XL Ink Cartridge Refills - Solving Errors & Warnings
Description: After the HP 74/75 or HP 74XL/75XL ink cartridges are refilled a variety of error messages may be observed at the printer and/or host computer. The printer will continue to attempt to communicate low ink warning messages during the life of the refilled ink cartridge – this is normal and nothing to be alarmed over. With the majority of HP 74-75 ink series printer models, the ink level cannot be tracked or reset -- however the majority, if not all, of these warning messages and/or steady indicator lights, may simply be ignored and the printer should continue to printer normally. Ink level warnings and indicators provide estimates for planning purposes only. NOTE: Error messages such as Incompatible Print Cartridges, Print Cartridges Error, Print Cartridges Missing or Not Detected, Cartridge in slot on left (or right) is not intended for use in this product, Refer to Printer Documentation or Low Ink light is blinking are considered more severe errors (i.e. no printing is allowed) and usually require the cartridge(s) to be firmly reseated or running of advanced internal diagnostics, such as the Tap 41 or Tap 10 diagnostic test. Verify ink cartridge’s warranty expiration date before refilling as the cartridge might be at risk for potential failure due to internal electrical damage.
10
Tags: HP 74, HP 75, HP 74XL, HP 75XL, cartridge, refill, refilled, inkjet printer, cartridges error,
Non-Genuine Cartridge, Used Print Cartridge, Low Ink Warning, HP printer, Incompatible Print
Cartridges, Print Cartridges Missing, Not Detected, Tri-Color, Black, Cartridge Problem, Installed
Incorrectly, Print cartridge, Refilled cartridge, Depleted Cartridge Detected, Not intended for
use, In this product, Print cartridges in wrong slot, HP Deskjet, HP Photosmart, HP Officejet, HP
Officejet Pro, HP Photosmart Express, troubleshooting, no printing, Costco, Frys, printer ink,
technology, refiller, need assistance, error messages, blinking lights, ink, ink cartridges, bad
cartridges, cartridge, service, support, help, cartridges refilled,
HP 60-60XL (74/75) Ink Refill & Cartridge Care Tips
Inkjet Printer
Title: HP 74/75 (74XL/75XL) Ink Refill & Cartridge Care Tips – HP Photosmart/Officejet Printers
Description: When using HP 74/75 (74XL/75XL) refilled inkjet ink cartridges, it is suggested to adhere to
these general guidelines to help minimize accidental cartridge damage. This includes cartridge
transportation to and from a refill location, general cartridge and printer care, and print diagnosis and
general ink cartridge recovery.
NOTE: After the HP 74/75 (74XL/75XL) ink cartridges are refilled a variety of cartridge alerts may be
observed at the printer and/or host computer. The printer will continue to attempt to communicate
"low ink" warning messages during the life of the refilled ink cartridge -- this is COMPLETELY NORMAL
and nothing to be alarmed over. While the ink level cannot be tracked or reset, the majority, if not all, of
these warning messages and/or steady indicator lights, can simply be ignored and the printer should
continue to printer normally. Ink level warnings and indicators provide estimates for planning purposes
only. Additional nuisance messages may also be observed following initial refilled cartridge installation
including 'non-genuine ink/cartridge', 'depleted cartridge', 'refilled cartridge', 'counterfeit', etc. These
alerts messages may be bypassed by selecting ‘OK’/’Resume’/’Dismiss’.
Tags: HP, 74, 75, 74XL, 75XL, color, black, ink, cartridge, refill, refilled, inkjet, printer, cartridges, error,
Non-Genuine Cartridge, Used Print Cartridge, Low Ink, Photosmart, Officejet, Warning, Alert, message,
printer, Incompatible Print Cartridges, Print Cartridges Missing, Not Detected, Tri-Color, Print, Cartridge
Problem, Installed Incorrectly, Print cartridge, refilled, Depleted Cartridge Detected, Not intended for
use, In this product, in wrong slot, not printing, wont print, refilling, troubleshooting, no printing, printer
ink, support, error, blinking lights, ink cartridge, bad cartridge, cartridge, service, support, help, Costco,
Pro, Costco, Frys Electronics,
HP92, HP93, HP94, HP95, HP96, HP97, HP98, HP99
Ink Cartridge Refills – Solving Errors
Inkjet Printer
11
Title: HP92, HP93, HP94, HP95, HP96, HP97, HP98, HP99 Ink Cartridge Refills– Solving Error Messages & Warnings Low Ink Warnings & Solving Errors – HP 92, 93, 94, 95, 96, 97, 98, 99 Ink Cartridges
Description: After the HP 92, 93, 94, 95, 96, 97, 98 or 99 ink cartridge is refilled a variety of cartridge
alerts may be observed at the printer and/or host computer. The printer will continue to attempt to
communicate "low ink" warning messages during the life of the refilled ink cartridge -- this is
COMPLETELY NORMAL and nothing to be alarmed over. While the ink level cannot be tracked or reset,
the majority, if not all, of these warning messages and/or steady indicator lights, can simply be ignored
and the printer should continue to printer normally. Ink level warnings and indicators provide estimates
for planning purposes only. Additional nuisance messages may also be observed following initial refilled
cartridge installation including 'non-genuine cartridge', 'depleted cartridge', 'refilled cartridge',
'counterfeit', etc. These alerts messages may also be bypassed by selecting ‘OK’/’Resume’/’Dismiss’.
For severe cartridge error messages which prohibit printing it is suggested you run an internal self test
print or the cartridge health diagnostic’s Tap 41 test print to evaluate whether or not the ink cartridge is
electrically damaged (i.e. internal micro-electronics). Please visit Inkjet411.com printer diagnostic
support page.
Tags: HP, 92, 93, 94, 95, 96, 97, 98, 99, color, black, ink, cartridge, refill, refilled, cartridges, error, Non-
Genuine Cartridge, Low Ink, Warning, incorrect, message, printer, Incompatible, Deskjet, Missing, Not
Detected, PSC, Deskjet, Officejet, Photosmart, Cartridge Problem, remove and check cartridge, refused,
wrong slot, Refilled, Depleted, Not intended for use, In this product, not printing, wont print, refilling,
troubleshooting, no printing, support, error, blinking lights, ink cartridge, bad cartridge, cartridge,
service, support, help, cartridges refilled,
HP 92-99 Ink Refill & Cartridge Care Tips
Inkjet Printer Title: HP 92-99 Ink Refill & Cartridge Care Tips – HP Deskjet / Officejet / Photosmart
Description: When using HP92, HP93, HP94, HP95, HP96, HP97, HP98 or HP99 refilled inkjet ink cartridges, it
is suggested to adhere to these general guidelines to help minimize accidental cartridge damage. This
includes cartridge transportation to and from a refill location, general cartridge and printer care, and
print diagnosis and general ink cartridge recovery.
NOTE: After the HP 92, 93, 94, 95, 96, 97, 98 or 99 ink cartridge is refilled a variety of cartridge alerts may be
observed at the printer and/or host computer. The printer will continue to attempt to communicate
"low ink" warning messages during the life of the refilled ink cartridge -- this is COMPLETELY NORMAL
and nothing to be alarmed over. While the ink level cannot be tracked or reset, the majority, if not all, of
these warning messages and/or steady indicator lights, can simply be ignored and the printer should
12
continue to printer normally. Ink level warnings and indicators provide estimates for planning purposes
only. Additional nuisance messages may also be observed following initial refilled cartridge installation
including 'non-genuine cartridge', 'depleted cartridge', 'refilled cartridge', 'counterfeit', etc. These alerts
messages may also be bypassed by selecting ‘OK’/’Resume’/’Dismiss’.
Tags: HP, 92, 93, 94, 95, 96, 97, 98, 99, color, black, ink, cartridge, refill, refilled, cartridges, error, Non-
Genuine Cartridge, Low Ink, Warning, incorrect, message, printer, Incompatible, Deskjet, Missing, Not
Detected, Officejet, Photosmart, Cartridge Problem, remove and check cartridge, refused, wrong slot,
Refilled, Depleted, Not intended for use, In this product, not printing, wont print, refilling,
troubleshooting, no printing, support, error, blinking lights, ink cartridge, bad cartridge, cartridge,
service, support, help, cartridges refilled,
HP 564 Ink Cartridge Refilling & Care Tips Video Tags
Title: HP 564 Ink Cartridge Refilling & Care Tips – HP Inkjet Printer Series
Description: When refilling and using HP 564 ink cartridges (tanks) in your inkjet printer, it is suggested
to adhere to these general guidelines to help maximize print quality output and maintain a healthy
printer to avoid problems.
Tags: HP, printer, ink, cartridge, tank, color, black, cyan, magenta, yellow, refill, 564, Deskjet, e-AiO,
Photosmart, Plus, Touchsmart, refilled, C5300, C5324, C5370, C5373, C5380, C5383, C5388, C5390,
C5393, C6300, C6324, C6340, C6350, C6375, C6380, C6383, C6388, B8550, D5400, D5445, D5460,
D5463, D5468, D7560, B8550, B8553, B8558, 5510, 5511, 5512, 5514, 5515, 6510, 6512, 6515, 7510,
7515, Premium, C309c, C309a, C309n, C310a, C310b, C310c, C410a, 3520, 3521, 3522, 4620, 5520, 5522,
5524, 5525, 6520, 7520, 7525, C510, eStation, B209a, B210a, B210b, B210c, B210d, B210e, Inkjet411,
13
help, support, how to, printhead, problem, issue, error, Costco, Frys, ASDA, refilling, color balance,
issues, problems, missing color, photo black, inkjet, technology, engineering,
PhotoSmart
Premium Fax
Premium Fax All-in-One
TouchSmart Web All-in-One
Premium e-All-in-One
Plus e-All-in-One
eStation All-in-One
Plus All-in-One
All-in-One Printer
100
100 Series
130
130 Series
145
145v
145xi
200 Series
230
230 Series
230v
230xi
245
245v
245xi

14
320 Series
325
325v
325xi
330 Series
335
335v
335xi
370 Series
375
375B
375v
385
385v
385xi
420
422
425
425v
428
428xi
475
475v
475xi
1000

15
1100
1100xi
1115
1115cvr
1215
1215vm
1218
1218xi
1315
1315vm
2570
2575
2575v
2575xi
2605
2608
2610
2610v
2610xi
2613
2710
2710xi
3110
3210
3210v

16
3210xi
3310
3310xi
5510 e-All-in-One
5511 e-All-in-One
5512 e-All-in-One
5514 e-All-in-One
5515 e-All-in-One
5520 e-All-in-One
5522 e-All-in-One
5524 e-All-in-One
5525 e-All-in-One
6510 e-All-in-One
6512 e-All-in-One
6515 e-All-in-One
6520 e-All-in-One
6525 e-All-in-One
7150
7260
7260v
7260w
7350
7350v
7350w
7450

17
7450v
7450xi
7510 e-All-in-One
7515 e-All-in-One
7520 e-All-in-One
7550
7550v
7550w
7660
7660v
7660w
7755
7760
7760v
7760w
7850
7960
7960w
8049
8050
8150
8150v
8150xi
8250
8400

18
8450
8450xi
8750
8750gp
8750xi
8753
8758
A310
A311
A314
A316
A320
A430
A432
A433
A434
A436
A440
A441
A442
A444
A445
A446
A447
A448

19
A510
A512
A516
A520
A522
A522xi
A526
A532
A536
A610
A612
A616
A617
A618
A620
A622
A626
A627
A628
A630
A636
A637
A640
A646
A710

20
A712
A716
A717
A820
A826
A827
A828
B209a
B210a
B8300
B8330
B8338
B8350
B8353
B8500
B8550
B8553
B8558
B8800
B8850
B9180
C309 Series
C309a
C309g
C310

21
C510
C510a
C3100
C3110
C3125
C3135
C3140
C3150
C3170
C3173
C3175
C3180
C3183
C3188
C3190
C3193
C3194
C4100
C4110
C4140
C4150
C4180
C4183
C4188
C4200

22
C4205
C4210
C4225
C4235
C4240
C4250
C4270
C4272
C4273
C4275
C4280
C4283
C4285
C4288
C4293
C4294
C4300
C4340
C4342
C4343
C4344
C4345
C4348
C4380
C4382

23
C4383
C4384
C4385
C4400
C4410
C4424
C4435
C4440
C4450
C4470
C4472
C4473
C4475
C4480
C4483
C4485
C4488
C4493
C4494
C4500
C4524
C4540
C4550
C4575
C4580

24
C4583
C4585
C4588
C4599
C4600
C4610
C4635
C4640
C4650
C4680
C4683
C4685
C4690
C4700
C4740
C4750
C4780
C4783
C4795
C4799
C5100
C5140
C5150
C5175
C5180

25
C5183
C5185
C5188
C5190
C5200
C5225
C5240
C5250
C5270
C5273
C5275
C5280
C5283
C5288
C5290
C5293
C5300
C5324
C5370
C5373
C5380
C5383
C5388
C5390
C5393

26
C5500
C5540
C5550
C5580
C6100
C6150
C6175
C6180
C6183
C6185
C6188
C6200
C6240
C6250
C6270
C6275
C6280
C6283
C6285
C6286
C6288
C6300
C6324
C6340
C6350

27
C6375
C6380
C6383
C6388
C7150
C7180
C7200
C7250
C7275
C7280
C7283
C7288
C8150
C8180
C8183
D110a
D5060
D5065
D5069
D5100 Series
D5145
D5155
D5160
D5300 Series
D5345

28
D5360
D5363
D5368
D5400 Series
D5445
D5460
D5463
D5468
D6160
D7145
D7155
D7160
D7168
D7245
D7255
D7260
D7263
D7268
D7345
D7355
D7360
D7460
D7500 Series
D7560
P1000

29
P1000 Series
P1000xi
P1100
P1100 Series
P1100xi
P2100
P2100xi
Premium Fax e-All-in-One - C410a
PSC 2410v
Deskjet
Plus
(1st Version)
300
310
320
330
340
340cbi
340cm
340cv
350
350c
350c-cbi
400
400L

30
420
420C
450
450cbi
450ci
450wbt
460
460c
460cb
460wbt
460wf
500
500C
510
520
540
540C
550
550C
560
560C
600
600C
610
610C

31
610CL
612
612C
630
630C
632
632C
640
640C
642
642C
648
648C
656
656C
656CVR
660
660C
660Cse
670
670C
670TV
672
672C
680

32
680C
682
682C
690
690C
692
692C
693
693C
694
694C
695
695C
697
697C
710
710C
712
712C
720
720C
722
722C
782
782C

33
810
810C
812
812C
815
815C
820
820C
820Cse
820Cxi
825
825C
825Cvr
830
830C
832
832C
840
840C
841
841C
842
842C
843
843C

34
845
845C
845Cvr
850
850C
855
855C
855Cse
855Cxi
870
870C
870Cse
870Cxi
880
880C
882
882C
890
890C
890Cse
890cxi
895
895cse
895Cxi
920

35
920C
920Cvr
930
930C
932
932C
935
935C
940
940C
940Cvr
950
950C
952
952C
960
960Cse
960Cxi
970
970C
970Cse
970Cxi
990C
990cm
990Cse

36
990cxi
995
995C
995ck
1000
1000cse
1000cxi
1050
1051
1055
1056
1100
1100C
1120C
1120cse
1120cxi
1200c
1200c-ps
1220c-ps
1220cse
1220cxi
1600
1600c
1600cm
1600cn

37
2050
2510
2512
3000
3050
3050A
3052A
3054
3056A
3070a e-All-in-One
3320
3322
3420
3425
3450
3510
3512
3516
3520
3520 e-all-in-one
3520v
3521
3522
3526
3550

38
3620v
3650
3650v
3651
3740
3740v
3744
3745
3745v
3747
3820
3840
3843
3845
3845xi
3847
3910
3915
3920
3930
3930v
3940
3940v
5150
5150w

39
5420
5420v
5440
5440v
5440xi
5442
5443
5550
5650
5650w
5740
5740xi
5743
5745
5748
5850
5850w
5940
5940xi
6122
6127
6520
6520xi
6540
6540dt

40
6540xi
6620
6620xi
6830
6830v
6840
6840dt
6840xi
6940
6940dt
6980
6980dt
6988
6988dt
9300
9650
9670
9680
9800
9800d
3051A e-All-in-One Printer - J611h
D1311
D1320
D1330
D1341

41
D1360
D1368
D1415
D1420
D1430
D1445
D1455
D1460
D1468
D1470
D1520
D1530
D1558
D1560
D1568
D1660
D1663
D2320
D2330
D2345
D2360
D2430
D2445
D2460
D2530

42
D2545
D2560
D2563
D2566
D2568
D2645
D2660
D2663
D2680
D4145
D4155
D4160
D4260
D4263
D4268
D4280
D4360
D4363
D4368
F300
F310
F325
F335
F340
F350

43
F370
F375
F380
F385
F390
F394
F2110
F2120
F2128
F2140
F2180
F2187
F2188
F2210
F2212
F2214
F2235
F2238
F2240
F2250
F2275
F2280
F2288
F2290
F2400

44
F2420
F2423
F2430
F2480
F2483
F2488
F2492
F2493
F4135
F4140
F4150
F4172
F4180
F4185
F4210
F4213
F4230
F4235
F4240
F4250
F4272
F4273
F4274
F4275
F4280

45
F4283
F4288
F4292
F4293
F4400
F4435
F4440
F4450
F4480
F4500
OfficeJet
Lx
100
145
150
300
330
350
500
520
570
580
590
600

46
610
630
635
700
710
720
1170
1170C
4110
4110v
4110xi
4215
4215v
4215xi
4315
4315v
4315xi
4500
4620
4622 Inkjet Multifunction
5110
5110v
5110xi
5505
5510

47
5510v
5510xi
5600
5605
5610
5610v
5610xi
6000
6100
6105
6110
6110v
6110xi
6200
6210
6210v
6210xi
6213
6215
6310
6310v
6310xi
6500
6500a
6500a Plus

48
6600
6700
7000
7110
7110 Wide Format ePrinter
7110xi
7130
7130xi
7140
7140xi
7210
7210v
7210xi
7310
7310xi
7410
7410xi
7500a
7610 Wide Format e-All-in-One
9110
9120
9130
5110A2l
7110A2L
All-in-One (1st Version)

49
D125
D125xi
D135
D135xi
D145
D155
D155xi
G55
G55xi
G85
G85xi
G95
G510a
G510g
G510n
H470
H470b
H470wbt
J3608
J3625
J3635
J3640
J3650
J3680
J4524

50
J4540
J4550
J4580
J4624
J4660
J4680
J4680c
J5725
J5730
J5735
J5738
J5740
J5750
J5780
J5783
J5785
J5788
J5790
J6405
J6410
J6413
J6415
J6424
J6450
J6480

51
J6488
K60
K60xi
K80
K80xi
R40
R60
R80
T45
T45xi
T46
T65
T65xi
V40
V40xi
OfficeJet Pro
251dw
276dw MFP
1150
1150C
1150Cse
1150Cxi
1170
1170C
1170Cse

52
1170Cxi
1175
1175C
1175Cse
1175Cxi
8000
8100
8500
8500 Wireless
8500a
8500a Plus
8500A Premium
8600
8600 Plus
8600 Premium
K550
K550dtn
K550dtwn
K850
K850dn
K5400
K5400dn
K5400dtn
K5400tn
K8600

53
K8600dn
L7480
L7500
L7550
L7555
L7580
L7590
L7600
L7650
L7680
L7681
L7700
L7750
L7780
X451dn
X451dw
X476dn
X476dw
X551dw
X576dw
ENVY
ENVY 120
ENVY 121
ENVY 4500 e-All-in-One
ENVY 5530 e-All-in-One

54
ENVY 100 e-All-in-One - D410a
ENVY 100 e-All-in-One - D410b
ENVY 110 e-All-in-One - D411a
ENVY 110 e-All-in-One - D411b
ENVY 111 e-All-in-One - D411d
ENVY 114 e-All-in-One D411c
PSC
PSC 370
PSC 380
PSC 500
PSC 500xi
PSC 750
PSC 750xi
PSC 950
PSC 950vr
PSC 950xi
PSC 1110
PSC 1209
PSC 1210
PSC 1210L
PSC 1210v
PSC 1210xi
PSC 1310
PSC 1311
PSC 1312

55
PSC 1315
PSC 1315v
PSC 1315xi
PSC 1317
PSC 1318
PSC 1350
PSC 1350v
PSC 1350xi
PSC 1401
PSC 1402
PSC 1403
PSC 1406
PSC 1408
PSC 1410
PSC 1410v
PSC 1410xi
PSC 1417
PSC 1507
PSC 1510
PSC 1510v
PSC 1510xi
PSC 1600
PSC 1610
PSC 1610v
PSC 1610xi

56
PSC 2100
PSC 2110
PSC 2110v
PSC 2110xi
PSC 2170
PSC 2175
PSC 2175v
PSC 2175xi
PSC 2200
PSC 2210
PSC 2210v
PSC 2210xi
PSC 2350
PSC 2355
PSC 2355v
PSC 2355xi
PSC 2410
PSC 2410v
PSC 2410xi
PSC 2510
PSC 2510xi
HP 564-920 Refilling Ink Cartridges – Low Ink Warnings & Alerts
Video Tags
Title:
57
HP 564-920 Refilling Ink Cartridges – Low Ink Warnings & Alerts
Description: “Empty” and “Low Ink” alerts are COMPLETELY NORMAL for all HP 564/920 ink cartridges
which have been refilled! While at first this may be considered an unusual workflow, it does allow print
operations to proceed. However, losing this feature is not necessarily significant, because the ink level
indicator usually has substantial usable ink remaining when it shows "low on ink". Ink level monitoring is
primarily for planning purposes only – it is not required to support printing.
If you observe "Unauthorized ink", “Counterfeit Cartridge", “Non-HP ink", "Depleted ink", “Refilled Ink”,
“Cartridge Warranty will be Void” or similar ‘nuisance/annoyance’ messages, you may ignore/bypass
each message by pressing ‘Dismiss’, ‘Continue’ or 'OK' for respective ink cartridge, so that the printer
resumes its normal operation. These types of annoyance messages should be expected when using
refilled ink cartridges.
NOTE: HP does not allow an automatic reset of the electronic chip on the cartridge after a refill, so the
ink level indicator is sending a false message that the ink level is low. Your cartridge is not low on ink,
and nothing is wrong with your printer or cartridges. The ink level indicator usually cannot be manually
re-set, so the ink level indicator is often not usable. For more information on this, please visit
Inkjet411.com
CAUTION: do not allow printhead or cartridges to dry out, this will help maintain satisfactory print
quality and long term printer performance.
Tags: HP, printer, ink, cartridge, tank, color, black, cyan, magenta, yellow, refill, 564, 564, 920, 920XL, XL,
Deskjet, e-AiO, Photosmart, Plus, Touchsmart, refilled, C5300, C5324, C5370, C5373, C5380, C5383,
C5388, C5390, C5393, C6300, C6324, C6340, C6350, C6375, C6380, C6383, C6388, B8550, D5400, D5445,
D5460, D5463, D5468, D7560, B8550, B8553, B8558, 5510, 5511, 5512, 5514, 5515, 6510, 6512, 6515,
7510, 7515, Premium, C309c, C309a, C309n, C310a, C310b, C310c, C410a, 3520, 3521, 3522, 4620, 5520,
5522, 5524, 5525, 6520, 7520, 7525, C510, eStation, B209a, B210a, B210b, B210c, B210d, B210e, 6500,
6500A, Inkjet411, help, support, how to, printhead, problem, issue, error, Costco, Frys, ASDA, refilling,
color balance, issues, problems, missing color, photo black
HP 901 Ink Refill & Cartridge Care Tips HP Inkjet Printer
Title: Video #19: HP 901 Ink Refill & Cartridge Care Tips

58
Description: When using HP 901 refilled inkjet ink cartridges, it is suggested to adhere to these general
guidelines to help minimize cartridge damage. This includes cartridge transportation to and from a refill
location, general cartridge and printer care, and print diagnosis and recovery.
please refer to Cartridge If your HP 901 ink cartridge experiences any of the following error messages
Error bypass and Diagnostic (Tap 41) test procedures on Inkjet411.com. This includes errors such as
Incompatible Print Cartridges, Refer to device documentation to troubleshoot, Print Cartridges Error,
Print Cartridges Missing or Not Detected, Cartridge in slot on left (or right) is not intended for use in this
product, Refer to Printer Documentation or the exclamation light is blinking are considered more severe
errors (i.e. no printing is allowed). It is possible to temporarily bypass a fatal cartridge error which will
allow limited print operations by performing the cartridge error bypass (checksum code clear)
procedure. Verify the cartridge(s) are thoroughly clean and firmly reseat cartridges before performing
any advanced clears or tests, such as the Tap 41 (or Tap 10) diagnostic test. Verify ink cartridge’s
warranty expiration date (imprinted on front of ink cartridge) before refilling as the cartridge might be at
risk for potential failure due to internal electrical damage. Visit Inkjet411.com for more information.
NOTE: After the HP 901 ink cartridges are refilled a variety of error messages may be observed at the
printer and/or host computer. The printer will continue to attempt to communicate low ink warning
messages during the life of the refilled ink cartridge – this is normal and nothing to be alarmed over.
While the ink level cannot be tracked or reset in the HP Officejet J4500 thru J4600 and 4500 series
printers, the majority, if not all, of these warning messages and/or steady indicator lights, may simply be
ignored and the printer should continue to printer normally. Ink level warnings and indicators provide
estimates for planning purposes only.
Tags: Officejet, color, refill, J4524, J4525, J4535, J4680, J4680c J4540, J4550, J4580, J4585, J4640, J4660,
J4680, J4680c, 4500, 4575, G510a, G510g, G510n, DeskJet P2500, HP, HP 901 refill, black, 901, 901XL,
Incompatible Print Cartridges, Refer to device documentation, to troubleshoot, Print Cartridges Missing,
Not Detected, cartridges problem, Installed Incorrectly, Not intended for use, In this product, Print
cartridges in wrong slot, Print cartridge problem, not printing, HP ink refill, troubleshooting, no printing,
help, errors, messages, blinking lights, ink, cartridge, reset
HP 932-933-950-951 Refilled Cartridge Swap HP Inkjet Printers
Title: HP 932 933 950 951 Refilled Ink Cartridge Swap – HP Officejet Printers HP 932/933 & 950/951 Refilled Ink Cartridge Swap – HP Printers
Description: To use refilled HP 932, 933, 950 or 951 (or 932XL, 933XL, 950XL, 951XL) ink cartridges, you
will need to have spare cartridges available to activate the refilled ink cartridges. For non-reprogrammed

59
cartridge chips, HP rejects an empty cartridge that is removed from the printer, refilled, and
immediately put back in the printer. But if a same color spare cartridge is put in the printer for
approximately 30 seconds, before inserting the refill, then the refill works normally. A spare cartridge
can be a setup, new, empty or even a refilled ink cartridge of the same type & color. You may continue
this two-set rotation pattern indefinitely, for each color.
NOTE: There are two ink refill swap usage options: The first is the 2-Refill Set rotation method (refill
both sets of cartridges) or the Permanent Spare Set method. For the latter, the second set of tanks can
be temporarily used to re-set the printer, then removed from the printer; the refill set can then be
inserted into the printer and used until empty.
Tags: HP, printer, ink, cartridge, tank, Officejet, Officejet Pro, 8100, 6100, 8600, 8700, Premium, 6600,
6700, color, black, cyan, magenta, yellow, refill, XL, 932, 933, 950, 951, 932XL, 933XL, 950XL, 951XL,
refilled, Inkjet411, help, support, how to, printhead, problem, issue, error, Costco, Frys, ASDA, refilling,
reset, method, swap, non-chipped, Pro, 276dw, MFP, 8600 e-All-In-One, N911g, 8600 Plus, N911n, 8600
Premium, N911a, PRO, 251dw, 8100 ePrinter, N811a, e-All-in-One, H711a, 6600 e-All-in-One, H711g,
6700 Premium, e-AiO, H711n, OfficeJet 6100, ePrinter, H611a, OfficeJet 7110, ePrinter, H812a
Ink Cartridge Refilling & Care Tips (ink tanks)
Inkjet Printers
Title: Ink Cartridge Refilling & Care Tips (ink tanks) – HP, Epson, Canon
Description: When refilling and using ink cartridges (tanks) in your inkjet printer, it is suggested to
adhere to these general guidelines to help maximize print quality output, maintain a healthy printer and
help avoid printhead damage.
Tags: HP, Epson, Canon, printer, ink, cartridge, tank, Officejet, Officejet Pro, color, black, cyan, magenta,
yellow, refill, 88, 564, 02, T124, T126, T078, T069, T098, T099, CLI-8, PGI-5, T098, T125, 920, 932, 933,
940, 950, 951, 220, 221, 225, 226, Pixma, Stylus, Photosmart, Plus, Touchsmart, T068, refilled, Inkjet411,
help, support, how to, printhead, problem, issue, error, Costco, Frys, ASDA, refilling,
HP Inkjet Printer
Title: Low Ink Warning and Other Cartridge Error Messages, HP 60-61 Ink Cartridges

60
Description: After the HP 60 (or 61) cartridges are refilled, the printer may continue to attempt to communicate low ink warning messages. With most HP 60-61 ink series printer models, the ink level cannot be tracked -- however the majority of these warning messages may simply be ignored and the printer should continue to printer normally. Ink level warnings and indicators provide estimates for planning purposes only. NOTE: Error messages such as Incompatible Print Cartridges, Print Cartridges Missing or Not Detected, Cartridge in slot on left (or right) is not intended for use in this product, or Low Ink light is blinking are considered more severe errors (i.e. printer shutdown commands) and usually require the cartridge(s) to be firmly reseated or running of advanced internal diagnostics, such as the Tap 41 or Tap 10 diagnostic test.
Tags: Inkjet printer, Non-Genuine Cartridge, Used Print Cartridge, Low Ink Warning, HP printer,
Incompatible Print Cartridges, Print Cartridges Missing, Not Detected, Tri-Color, Black Cartridge Problem,
Installed Incorrectly, Print cartridge, Refilled cartridge, Depleted Cartridge Detected, Not intended for
use, In this product, Print cartridges in wrong slot, Print cartridge problem, not printing, wont print,
refill, refilling, troubleshooting, no printing, Costco, Frys, printer ink, technology, refiller, need
assistance, error messages, blinking lights, ink, ink cartridges, bad cartridges, cartridge, service, support,
help, cartridges refilled at Costco, HP Deskjet, HP Photosmart, HP Officejet, HP Officejet Pro, HP
Photosmart Express, Inkjet industry
Title: Low Ink Warning and Other Cartridge Error Messages, HP 74-75 Ink Cartridges http://www.youtube.com/watch?v=KEkCP2jCUVc
Description: After the HP 74 - HP 75 ink cartridges are refilled, the printer may continue to attempt to communicate low ink warning messages. With most HP 74-75 ink series printer models, the ink level cannot be tracked or reset – however the majority of these warning messages may simply be ignored and the printer should continue to printer normally. Ink level warnings and indicators provide estimates for planning purposes only. NOTE: Error messages such as Incompatible Print Cartridges, Print Cartridges Missing or Not Detected, Refer to Printer Documentation, Cartridge in slot on left (or right) is not intended for use in this product, or Low Ink light is blinking are considered more severe errors (i.e. printer shutdown commands) and usually require the cartridge to be firmly reseated or running of advanced internal diagnostics, such as the Tap 41 test.
Reset, Bypass, Remanufactured Ink Cartridges

61
Tags: Non-Genuine Cartridge, Not Detected, Low Ink Warning, HP printer, Incompatible Print
Cartridges, HP Deskjet, D4260, D4263, D4268, D4280, D4360, D4363, D4368, OfficeJet, J5730, J5740,
J5750, J5780, J5785, J5788, J6410, J6413, J6415, J6450, J6480, PhotoSmart, C4200, C4205, C4210,
C4225, C4235, C4240, C4250, C4270, C4272, C4273, C4275, C4280, C4283, C4285, C4288, C4293, C4294,
C4345, C4380, C4385, C4440, C4450, C4472, C4473, C4480, C4483, C4485, C5225, C5240, C5250, C5280,
D5345, D5360, D5363, D5368, Print Cartridges Missing, Cartridge Problem, Installed Incorrectly, Print
cartridge, Refilled cartridge, Depleted Cartridge Detected, Not intended for use, In this product, Print
cartridges in wrong slot
HP 901 Low Ink Warnings: Inkjet Printer Title: SHORT: HP 901 & 901XL Ink Cartridge Alerts – Low Ink Warnings HP Officejet J4500 J4600 4500 Printers – HP 901 Low Ink Warnings FULL: HP 901 901XL Ink Cartridge Errors – Solving Ink Cartridge Alerts and Warnings HP Officejet J4500 J4600 4500 Printer Error Messages – HP 901 & 901XL Cartridges
Description: After the HP 901/901XL ink cartridges are refilled, the printer will attempt to attempt to communicate low ink warning messages. With HP Officejet J4500, J4600, and 4500 printer models, the ink level cannot be tracked or reset – however the majority of these alert and warning messages may simply be ignored and the printer should continue to printer normally. Ink level warnings and indicators provide estimates for planning purposes only and do not interfere with normal printing operations. Unfortunately, sometimes a marginally performing ink cartridge may prohibit print operations and display up to 7 different cartridge error messages. In most cases, the cartridge has suffered internal micro-electronic damage and will eventually need to be replaced.
Error messages such as Incompatible Print Cartridges, Print Cartridges Error, Print Cartridges Missing or Not Detected, Refer to Device Documentation to Troubleshoot, Cartridge in slot on left (or right) is not intended for use in this product, or blinking exclamation light (or blinking printer power button light) are considered more severe cartridge errors (i.e. fatal cartridge errors) and usually require the cartridge to be firmly reseated or running of advanced internal diagnostics, such as the Tap 41 test, to check cartridge’s electrical health. Many of these cartridges errors can be temporarily bypassed by performing the Cartridge Error Bypass (checksum code clear) procedure. Refer to Inkjet411.com for instructions.
Tags: Non-Genuine, Used, Not Detected, Low Ink Warning, HP, Officejet, depleted, counterfeit, color,
black, refill, empty, J4524, J4525, J4535, J4680, J4680c, J4540, J4550, J4580, J4585, J4640, J4660, J4680,
J4680c, 4500, 4575, G510a, G510g, G510n, DeskJet, P2500, HP, 901, refill, black, 901XL, Incompatible
Print Cartridges, Refer to, device documentation, to troubleshoot, problem, Print, Cartridge, Cartridges,

62
Missing, Not Detected, cartridges problem, Not intended for use, In this product, in wrong slot, not
printing, ink, alert, refill, no printing, help, error, messages, blinking light, ink, cartridge, reset, bypass,
warning, Costco, Frys
HP 901 Tap 41 Diagnostics Test - Inkjet Printer Title: HP 901 Ink Cartridge Error (Tap 41 Diagnostics Electrical Check) – Incompatible Print Cartridges
Description: Following a severe cartridge error message which prevents printing operations, to
determine if either of the HP 901 black or color cartridges (and/or HP 901XL Black cartridge) has (1)
electrically failed, (2) is potentially mating improperly and (3) all nozzles are firing properly, conduct an
internal ‘Tap 41’ diagnostic test on the printer.
Error messages such as Incompatible Print Cartridges, Refer to device documentation to troubleshoot,
Print Cartridges Error, Print Cartridges Missing or Not Detected, Cartridge in slot on left (or right) is not
intended for use in this product, Refer to Printer Documentation or the exclamation light is blinking are
considered more severe errors (i.e. no printing is allowed) and usually require the cartridge(s) to be
firmly reseated or running of advanced internal diagnostics, such as the Tap 41 or Tap 10 diagnostic test.
Verify ink cartridge’s warranty expiration date before refilling as the cartridge might be at risk for
potential failure due to internal electrical damage. It is possible to temporarily bypass a fatal cartridge
error which will allow limited print operations - refer to Checksum Code Clear video procedure or
Inkjet411 for more information.
NOTE: After the HP 901 ink cartridges are refilled a variety of error messages may be observed at the
printer and/or host computer. The printer will continue to attempt to communicate low ink warning
messages during the life of the refilled ink cartridge – this is normal and nothing to be alarmed over.
While the ink level cannot be tracked or reset in the HP Officejet J4500 thru J4600 and 4500 series
printers, the majority, if not all, of these warning messages and/or steady indicator lights, may simply be
ignored and the printer should continue to printer normally. Ink level warnings and indicators provide
estimates for planning purposes only.
Tags: Officejet, J4524, J4525, J4535, J4680, J4680c J4540, J4550, J4580, J4585, J4640, J4660, J4680,
J4680c, 4500, 4575, G510a, G510g, G510n, DeskJet P2500, HP, HP 901 refill, color, black, 901, 901XL,
Incompatible Print Cartridges, Refer to device documentation, to troubleshoot, Print Cartridges Missing,
Not Detected, Tri-Color, Black Cartridge Problem, Installed Incorrectly, Not intended for use, In this
product, Print cartridges in wrong slot, Print cartridge problem, not printing, HP ink refill,
troubleshooting, no printing, printer ink, technology, refiller, help, errors, messages, blinking lights, ink,
ink cartridges, bad cartridges, cartridge, support, All-in-One Printer

63
HP Inkjet Printer Title: HP Deskjet 4200 Printer Series Tap 41 Diagnostic Print Report
Description: To check the performance of the HP Deskjet F4200 printer model series, perform
the Tap 41 test to help determine if either of the HP 60 ink cartridges has (1) electrically failed,
(2) is potentially mating improperly and (3) all nozzles are firing properly.
Tags: Inkjet printer, HP printer, Incompatible Print Cartridges, Print Cartridges Missing, Not Detected,
Tri-Color, Black Cartridge Problem, Installed Incorrectly, Print cartridge, Not intended for use, In this
product, Print cartridges in wrong slot, Print cartridge problem, not printing, wont print, refill, refilling,
troubleshooting, no printing, Costco, Frys, printer ink, technology, refiller, need help, error messages,
blinking lights, ink, ink cartridges, bad cartridges, cartridge, service, support, help, cartridges refilled at
Costco, HP Deskjet F4200, F4210, F4213, F4224, F4230, F4235, F4240, F4250, F4272, F4273, F4274,
F4275, F4280, F4283, F4288, F4292, F4293
HP Photosmart C4600, C4610, C4635, C4640, C4650, C4670, C4673, C4680, C4683, C4685, C4688,
C4690, C4700, C4740, C4750, C4780, C4783, C4785, C4788, C4793, C4795, C4798, C4799, D110a, Inkjet
printer, HP printer, incompatible error message, not printing, wont print, refill, refilling, troubleshooting,
no printing, Costco, Frys, printer ink, technology, refiller, need help, error messages, blinking lights, ink,
ink cartridges, bad cartridges, cartridge, service, support, help, cartridges refilled at Costco
Tap 41 – HP 61 - Inkjet Printer Title: HP Deskjet 1000-3056 Printer Models – HP 61 Ink Cartridges Tap 41 Diagnostic Test HP 61-61XL Ink Cartridge Diagnostics - HP Deskjet 1000-3056 Printer Models
Description: To check the performance of the HP Deskjet 1000 through 3056 printer model
series, perform the Tap 41 cartridge health diagnostics test to help determine if either of the HP
61/61XL color or black ink cartridges has (1) electrically failed, (2) is potentially mating
improperly and (3) all nozzles are firing properly.
Tags:, HP, printer, Cartridges, Error, Incompatible Print Cartridges, Missing, Not Detected, Tri-Color,
Color, Black, Cartridge, Problem, Refill, 61, 61XL, Installed Incorrectly, Print cartridge, Not intended, left,
right, for use, In this product, Unrecognized, wrong slot, blinking, lights, ink light, not printing, wont
print, refilled, Deskjet 1000, 1050, 1051, 1055, 2000, 2000c, 2050, 2510, 2511, 2512, 2514, 3000, 3050,
3052, 3054, 3056, 3510, 3511, 3512, troubleshooting, no printing, Costco, Frys, printer, ink, refiller, help,
error, warning, messages, blinking lights, ink, bad cartridges, cartridge, service, support, help, Costco,

64
Tap 41 – Diagnostic Test Report ( HP74 HP75 ) Inkjet Printer Systems
Title: HP Photosmart 4200 and 5200 Printer Series - Tap 41 Diagnostic Test Report HP Officejet J5700/J6400 Printers – HP 74/75 Tap 41 Diagnostic Test Report
Description: If the “Incompatible Print Cartridges” or similar severe cartridge error message is
observed, which prevents printing, perform the Tap 41 diagnostic test to help determine if the
either the HP 74 (74XL) or HP 75 (75XL) ink cartridges has (1) electrically failed, (2) is
potentially mating improperly and (3) all cartridge nozzles are firing properly.
NOTE: Only the Tri-color ink cartridge (75 or 75XL) is used to print the Tap 41 diagnostic test
print so it must be partially functioning (prints as composite gray/black using the CMY colors).
The black ink cartridge (74 or 74XL) is NOT used for printing this test, though detailed technical
information about the black ink cartridge's electrical performance will be shown in the printout.
However, you can remove the color cartridge and re-initiate the Tap 41 test, the pattern will then
be printed in black ink from the black cartridge.
TECHNICAL NOTE: If the printer's error message prohibits you from accessing the diagnostics
menu, first replace the suspect cartridge with a new/good cartridge, then access the diagnostics
menu using the steps included. Just prior to activating the Tap 41 test print, swap the good
cartridge out with the suspected faulty cartridge. Select Ok, the diagnostic test pattern should
print out.
Tags: Inkjet, HP, OfficeJet, J5730, J5740, J5750, J5780, J5785, J5788, J6410, J6413, J6415, J6450, J6480,
printer, HP74, HP75, HP74XL, HP75XL, Incompatible Cartridges, Missing, Not Detected, Cartridge
Problem, Installed Incorrectly, Not intended for use, In this product, Print cartridges in wrong slot, ink,
refill, refilling, troubleshooting, error messages, blinking lights, cartridges, cartridge, service, support,
help, Costco, Frys, refilled, PhotoSmart, C4200, C4205, C4210, C4225, C4235, C4240, C4250, C4270,
C4272, C4273, C4275, C4280, C4283, C4285, C4288, C4293, C4294, C4345, C4380, C4385, C4440, C4450,
C4472, C4473, C4480, C4483, C4485, C5225, C5240, C5250, C5280, D5345, D5360, D5363, D5368
HP Deskjet Series D4260, D4263, D4268, D4280, D4360, D4363, D4368
Low Ink Warning ( HP74 HP75 ): HP Inkjet Printers
When a set of brand new HP 74-75 ink cartridges are inserted into your printer, the printer begins to
track the ink used for each cartridge. When a cartridge has used about 80% of its ink, the printer may
begin to communicate “your ink level is low” warning messages; eventually the cartridge empty state
will be reached.

65
After the cartridge is refilled and installed, the printer will continue to attempt to communicate these
low ink level warning messages.
With most HP 74-75 ink series printer models, the refilled cartridge ink levels cannot be tracked or reset.
The majority of the various printer or Windows pop-up warning messages may simply be ignored and
the printer should continue to printer normally.
NOTE: Ink level warnings and indicators provide estimates for planning purposes only.
Under certain circumstances, a “Print Cartridge Error” message can be ignored and printing may be
allowed until the printer prohibits such operations from continuing – but this is not always the case.
Often, when the refilled cartridge is installed back into the printer, the printer recalls the cartridge was
already used and may display:
- Non-genuine cartridge
- Counterfeit or Used Cartridge Detected
- Used Tri-color or Black print cartridge installed
- Original HP ink in black/color cartridge has been depleted
These types of messages/indications are completely normal and are nothing to be alarmed over; simply
press proceed, continue, accept, yes, or Ok to dismiss the warning prompt.
This should allow you to resume print operations following a cartridge alignment.
NOTE: After a cartridge is refilled, the printer is unable to track the ink levels. In most cases, the only
way to gauge ink levels is by monitoring output print quality (i.e. watch for color loss or dropout during
printing).
Many of the HP 74-75 ink series printer models include a ‘Self-Test Report’ under the printer’s Tools
menu; the 4-color bar pattern can aid in identifying which color is degraded or completely out.
It is suggested to keep a set of replacement cartridges available at all times to avoid possible printing
delays.
Unfortunately, sometimes the printer will incorrectly identify an ink cartridge as either: empty,
unrecognized or non-functional. These error messages can appear as PC screen messages, printer LCD
display messages, or as blinking lights on the printer.
These ‘printer shutdown’ error messages include:

66
- Incompatible Print Cartridges
- Print Cartridges Missing or Not Detected
- Cartridges Installed Incorrectly
- Refer to printer documentation
- Cartridge in slot on left/right is not intended for use in this product
- Cartridge not intended for use in this printer
- Low ink light blinking
First verify you have repeatedly reseated both ink cartridges, and have verified both ink cartridges rear
electrical contacts and printer flex cable contacts are thoroughly clean of all ink residues.
If cleaning has already been performed then one (or both) of the ink cartridges is likely electrically
damaged and will need to be replaced when these types of error messages persist.
Refer to the suggested Cleaning procedures, Printer Reset or HP Printer Tap Test diagnostic procedures
on inkjet411.com for your HP printer model series to help diagnose further.
If the ink cartridge has an expired warranty date (the imprinted date on front of ink cartridge) then the
cartridge age is typically over 2 years old and could be at risk for potential failure if refilled.
INKJET411 Youtube Video List:
HP 15-58
HP 21/22/27 & 54/56/57/58 Ink Refilling & Cartridge Care Tips – Everything you need to know:
*Same audio track as HP 901 refill video
http://www.youtube.com/watch?v=aCRttrSxWKs
HP 60s
HP 60 & 60XL Ink Refill & Cartridge Care Tips – Everything you need to know:
*Same audio track as HP 901 refill video
http://www.youtube.com/watch?v=_zV9hE3rrPg

67
HP 60/60XL (61/61XL) Ink Cartridges - Solving Errors & Warnings:
http://www.youtube.com/watch?v=BskAfa6NJSg
Low Ink Warning and Other (i.e Incompatible Cartridge) Errors, HP 60 & HP 61 Ink Cartridges:
http://www.youtube.com/watch?v=5_suW3U6e08
Ink Refilling & Cartridge Care Tips – Everything you need to know:
http://www.youtube.com/watch?v=FnXoDIblpdU
HP Photosmart C4600 & C4700 Printers – Tap 41 Diagnostic Test:
http://www.youtube.com/watch?v=ghxjLCn07Jo
HP Photosmart C4600 C4700 D110a Printers – HP 60 Cartridge Error Bypass (primary):
http://www.youtube.com/watch?v=rNVJmKPlLsg
HP 60 Cartridge Error Bypass - HP Photosmart C4600 C4700 D110a Printers (secondary):
http://www.youtube.com/watch?v=u97jfLNi9to
HP Deskjet F2400 F4400 and F4500 Printers – Tap 41 Diagnostics Test:
http://www.youtube.com/watch?v=m-OM09NvNqg
HP Deskjet F4200 Printers – Tap 41 Diagnostics Test:
http://www.youtube.com/watch?v=16uXSBwTan8
HP Deskjet D2500 & D2600 Printer (HP 60 cartridges) -Tap 10 Diagnostic Test:
http://www.youtube.com/watch?v=RTFOBtdthAc
HP 61s
HP Deskjet 1000-3056 Printer Models -- HP 61 Ink Cartridges Tap 41 Diagnostic Test
http://www.youtube.com/watch?v=tMZkqE36ifk
HP 61-61XL Ink Cartridge Diagnostics -- HP Deskjet 1000-3056 Printer Models
http://www.youtube.com/watch?v=Dbmf5af1Ass
HP 74-75s
HP 74/75 (74XL/75XL) Ink Refill & Cartridge Care Tips – Everything You Need To Know
*Same audio track as HP 901 refill video
http://www.youtube.com/watch?v=UxSQ3rErcUc
68
HP 74/75 (74XL/75XL) Cartridges - Solving Errors & Warnings:
http://www.youtube.com/watch?v=C5ISTGyScWU
Low Ink Warning and Other Alerts -HP 74 & 75 Cartridges:
http://www.youtube.com/watch?v=KEkCP2jCUVc
HP Photosmart 4200-4500 5200-5500 Printer Bypass / Clear Instructions:
http://www.youtube.com/watch?v=UDxRkAGOJaI
HP Photosmart C4200-C4500 and C5200-C5500 Printers - Diagnostic Tap 41 Test:
http://www.youtube.com/watch?v=8fE-IM4AVMc
Ink Refilling & Cartridge Care Tips – Everything you need to know:
http://www.youtube.com/watch?v=FnXoDIblpdU
HP Officejet J5700/J6400 Cartridge Error Bypass - HP 74-75 Cartridges:
http://www.youtube.com/watch?v=3X3_D90SSq4
HP Officejet J5700/J6400 Printers -Tap 41 Diagnostics (HP 74-75):
http://www.youtube.com/watch?v=Z42IzVR2tp0
HP 92-98
HP 93-97 Ink Cartridge Errors & Diagnostics - HP Deskjet 6800-6900 Printers
http://www.youtube.com/watch?v=P2Fzit2nZyA
HP 92-99 Ink Refilling & Cartridge Care Tips – Everything you need to know:
*Same audio track as HP 901 refill video
http://www.youtube.com/watch?v=TrPSf9P8L1o
HP 92-99 Ink Cartridge Refills-- Solving Error Messages & Warnings: (Primary)
http://www.youtube.com/watch?v=OdjQxAQek_4
Low Ink Warnings & Solving Errors - HP 92-99 Ink Cartridges:
http://www.youtube.com/watch?v=8rII8clS958
HP 564s

69
HP 564 Ink Cartridge Refilling & Care Tips -- HP Inkjet Printer Series: (Primary)
*Same audio track as Primary IIT refill video (partial)
http://www.youtube.com/watch?v=eyWRow75_M4
HP 564/920 Refilled Ink Cartridges – Low Ink Warnings & Alerts: (Primary)
*Same audio track as Primary IIT refill video (partial)
http://www.youtube.com/watch?v=QY8tWYQ0tA4
HP 901s
HP Officejet J4500 J4600 4500 Cartridge Error Bypass - HP 901 Cartridge Errors:
http://www.youtube.com/watch?v=I4-m_RLdRE4
HP Officejet J4500 J4600 4500 Printers Tap 41 Diagnostics - HP 901 Incompatible Print
Cartridges: http://www.youtube.com/watch?v=S6uATgXxQlE
HP 901 Ink Cartridge Error (Tap 41 Diagnostics Electrical Check) --Incompatible Print
Cartridges: http://www.youtube.com/watch?v=KUytBUXd4Y4
HP 901 Ink Refilling & Cartridge Care Tips – Everything you need to know: (Primary)
http://www.youtube.com/watch?v=jTtNj6rN4g4
HP 901 & 901XL Ink Cartridge Alerts – Low Ink Warnings: (secondary) http://www.youtube.com/watch?v=hzLM5mlkTt4 HP Officejet J4500 J4600 4500 Printers – HP 901 Low Ink Warnings: http://www.youtube.com/watch?v=EgFbsJv2ybY FULL: HP 901 & 901XL Ink Cartridge Errors – Solving Ink Cartridge Alerts and Warnings http://www.youtube.com/watch?v=KMRhmTJAcNg HP Officejet J4500 J4600 4500 Printer Error Messages –HP 901 & 901XL Cartridges (primary) http://www.youtube.com/watch?v=RivHgvWCkJ8
HP 901 – Extended Self-Test (Tap 10): (Primary)
http://www.youtube.com/watch?v=Jx6Dhf1QNzs
HP 932/933 & HP 950/951
HP 932 933 950 951 Refilled Ink Cartridge Swap Procedure - HP Officejet Printers: (Secondary – 2 links)

70
http://www.youtube.com/watch?v=oH9iglvrptc
HP 932-933 & 950-951 Refilled Ink Cartridge Swap Procedure - HP Printers: (NEW Primary – 2 links)
http://www.youtube.com/watch?v=uKfGFn1-yxI
Canon
Canon 30-211 Ink Cartridge Error Reset Procedure - Canon IP-MP-MX Series Printers (primary)
http://www.youtube.com/watch?v=V5IOzCAcbL0
Canon 30-211 Cartridge Ink Level Reset Procedure (MG / iP / MX Printers)
http://www.youtube.com/watch?v=4MmB__plaUY
Canon 240-241 Cartridge Ink Level Reset Procedure ( MG / MX Printers)
http://www.youtube.com/watch?v=e3szkBuBW0Q
General Info & Tips
Ink Refilling & Cartridge Care Tips (IPH) – Everything you need to know: (Primary)
http://www.youtube.com/watch?v=FnXoDIblpdU
Low Ink Warnings (HP Integrated Printhead Cartridges) ----[cannot locate source video]
http://www.youtube.com/watch?v=OA-DsIDuq6k
How an Integrated Ink Cartridge Works: (Primary)
http://www.youtube.com/watch?v=RgXA8nA-Cko
Ink Refilling & Cartridge Care Tips - Integrated Printheads and Individual Ink Tanks:
http://www.youtube.com/watch?v=XFM3ux-WJUg
Ink Cartridge Refilling and Care Tips - All Types (IPH & Tanks)
http://www.youtube.com/watch?v=z6qjBN2IHag
Clogged Ink Cartridge Recovery (Integrated Cartridges): (Primary)
http://www.youtube.com/watch?v=KKwKzNJRPUw

71
HP Nuisance Alert Messages - HP 21-99 & 901 Ink Cartridges
http://www.youtube.com/watch?v=pCp3aSTk3nw
Ink Cartridge Refilling & Care Tips (INK TANKS) -- HP, Epson, Canon (Primary)
http://www.youtube.com/watch?v=I1Kl3QEQbs8
How an Inkjet Printhead Works -- 4, 5 & 6 Ink Cartridge Printers: (Primary)
http://www.youtube.com/watch?v=XgcjgkNBLB0
Stylus CX5000, Stylus CX6000, Stylus CXEPSON T068 & T069
Stylus 1500, Stylus C20, Stylus C20ux, Stylus C40, Stylus C40s, Stylus C40ux, Stylus C42, Stylus C42ux,
Stylus C44, Stylus C44ux, Stylus C60, Stylus C62, Stylus C62ux, Stylus C64, Stylus C66, Stylus C68, Stylus
C70, Stylus C80, Stylus C80n, Stylus C80wn, Stylus C82, Stylus C82n, Stylus C82wn, Stylus C84, Stylus
C84n, Stylus C84wn, Stylus C86, Stylus C88, Stylus C88Plus, Stylus C120, Stylus CX1500, Stylus CX1500v,
Stylus CX3200, Stylus CX3800, Stylus CX3810, Stylus CX4200, Stylus CX4400, Stylus CX4450, Stylus
CX4600, Stylus CX4800, Stylus CX5000, Stylus CX5200, Stylus CX5400, Stylus CX5800f, Stylus CX6000,
Stylus CX6400, Stylus CX6600, Stylus CX7000F, Stylus CX7400, Stylus CX7450, Stylus CX7800, Stylus
CX8400, Stylus CX9400Fax, Stylus CX9475Fax, Stylus N11, Stylus NX11, Stylus NX100, Stylus NX105,
Stylus NX110, Stylus NX115, Stylus NX125, Stylus NX127, Stylus NX130, Stylus NX200, Stylus NX215,
Stylus NX230 Small-in-One, Stylus NX300, Stylus NX305, Stylus NX330, Stylus NX400, Stylus NX410,
Stylus NX415, Stylus NX420, Stylus NX430, Stylus NX510, Stylus NX515, Stylus NX530, Stylus NX625
Stylus CX7400, Stylus CX7450, Stylus CX8400, Stylus
EPSON T069 only
CX9400F, Stylus CX9475F, Stylus NX100, Stylus NX105, Stylus NX110 Series, Stylus NX115, Stylus NX200,
Stylus NX215, Stylus NX300, Stylus NX305, Stylus NX400, Stylus NX410, Stylus NX415, Stylus NX510,
Stylus NX515, WorkForce 310, WorkForce 315, WorkForce 500, WorkForce 600, WorkForce 610,
WorkForce 615, Epson Inkjet Printers, Stylus N11, WorkForce 30, WorkForce 40, Epson Wide Format
Printers: WorkForce 1100
Epson 69 Ink Cartridges are engineered with the latest fade-resistant technology to last longer than
bargain brand cartridges. Epson ink cartridges dry instantly for smudge resistant prints every time.
Epson 68 T068X20
Epson 69 T069X20
Epson 88 T088X20
Epson 97 T097120

72
Epson 79 T079X20
Epson 78 T078X20
Epson 77 T077X20
Epson 98 T098X20
Epson 99 T099X20
Epson 124 T124X20
Epson 125 T125X20
Epson 126 T126X20
Epson 127 T127X20
Durabrite Ultra High capacity 69
Durabrite Ultra Standard capacity
Durabrite Ultra lowest capacity 69/68
Durabrite Ultra extra-high capacity black- wider body
Claria Hi-Def Stylus Photo 1400
Claria Hi-Def Artisan 50
Claria Hi-Def high capacity 78
Claria Hi-Def high capacity 99
Claria Hi-Def No 99 black
Durabrite Ultra "Moderate" capacity version of 125
Durabrite Ultra Standard capacity
Durabrite Ultra High capacity version of 125
Durabrite Ultra EXTRA High capacity 125, blk double width
EPSON T124

73
Epson All-in-One Machines, Stylus NX125, Stylus NX127, Stylus NX230, Stylus NX330, Stylus NX420,
Stylus NX430, WorkForce 320, WorkForce 323, WorkForce 325, Workforce 435
Epson 124 Yellow Ink Cartridge (T124420), Moderate Yield fast-drying, long-lasting ink delivers vivid,
true-to-life photos and laser-sharp text. Only original Epson 124 Ink Cartridges are engineered with the
latest fade-resistant technology to last longer than bargain brand cartridges. Epson ink cartridges dry
instantly for smudge resistant prints every time. Epson 124 Ink Cartridges are specially formulated to
deliver photographic-quality prints with true-to-life color. DURABrite Ultra Inks offer superior image
quality with smudge, water and fade resistance for durable prints. Ideal for Double-Sided printing,
DURABrite Ultra inks do not bleed through Quick-drying for worry-free handling of photos. Incredible
print quality for everyday text documents, plain paper and photo printing on glossy papers. Patented Ink
Level Sensors for reliable printing.
EPSON T125
Epson All-in-One Machines, Stylus NX125, Stylus NX127, Stylus NX230, Stylus NX420, Stylus NX625,
WorkForce 320, WorkForce 323, WorkForce 325, WorkForce 520,
EPSON T126 T127
Epson All-in-One Machines, WorkForce 545, WorkForce 630, WorkForce 633, WorkForce 635,
WorkForce 645, WorkForce 840, WorkForce 845, Workforce WF-3520, Workforce WF-3540, Workforce
WF-7010, Workforce WF-7510, Workforce WF-7520, Epson Inkjet Printers. WorkForce 60, Epson Wide
Format Printers Workforce WF-7010, Workforce WF-7510, Workforce WF-7520, WorkForce
WorkForce 30, WorkForce 40, WorkForce 60, WorkForce 310, WorkForce 315, WorkForce 320,
WorkForce 323, WorkForce 325, WorkForce 435, WorkForce 500, WorkForce 520, WorkForce 545,
WorkForce 600, WorkForce 610, WorkForce 615, WorkForce 630, WorkForce 633, WorkForce 635,
WorkForce 645, WorkForce 840, WorkForce 845, WorkForce 1100, WorkForce 1300, WorkForce WF-
2520, WorkForce WF-2530, WorkForce WF-2540, WorkForce WF-3520, WorkForce WF-3540
Artisan, Artisan 50, Artisan 700, Artisan 710, Artisan 725, Artisan 730, Artisan 800, Artisan 810, Artisan
835, Artisan 837, Artisan 1430

74
Canon PIXMA MP240, MP250, MP260, MP270, MP280, MP480, MP490, MP495
First attempt the basic (universal) ink level reset procedure before attempting any of the more advanced
procedures provided:
1. At computer screen message, select ‘Stop’/’Reset’, ‘OK’, or ‘Resume’,
or….
2. Select ‘Stop’/’Reset’, ‘OK’ or the ‘Resume’ button (triangle-circle icon) on your printer for 5-8
seconds: Please refer to the 1st support video: http://inkjet411.com/?page_id=62
- Printing may continue under the ‘ink out’ condition.
- You may also want to refer to the 2nd video at the above link.
If you still have an error condition which prohibits printing (and/or printing is partially permitted but the
ink alarm indicators remain lit/flashing) then the ink cartridge probably has marginal internal electrical
damage (micro-electronics failure). Many integrated ink cartridges eventually do encounter problems or
failures, especially after their original ink is gone and they are re-used, and this is often unrelated to the
refill process (i.e. typically ~2 years from original manufacturing date). Refer to picture at bottom of this
page: http://inkjet411.com/?page_id=1533
______________
B. Canon Ink Level Reset Procedure #2:
NOTE: Canon “iP” Printer Model Series Only, PIXMA ip2700, PIXMA iP2702
1. Press and Hold the Resume (triangle-circle) button
2. Press and Hold the Power Button; hold both buttons for 5 seconds
3. Release the Resume (triangle-circle) button.
4. Press the Resume button 5 times.
5. Release the Power button. The blinking ink level/power light should go steady after a few
seconds.
- Printing may continue under the ‘ink out’ condition.
Canon PIXMA MX320, MX330, MX340, MX350, MX360, MX410, MX420 Printer Models
A. Printers connected to Win Vista/XP Computer:
1. Install refilled cartridges into printer (“Ink Has Run Out” message is displayed)
2. Open Properties in "Printers" from "Start Bar"-"Settings" on left lower corner.
3. Open "Advance".
4. Uncheck "Enable advanced printing features".
5. Apply and close.

75
6. Hold "Stop" button on MX330 printer for 10-20 seconds. The "Ink Has Run Out" message will
disappear.
7. Open "Properties" in "Printers" again as in Step 2.
8. Check "Enable advance printing features" to reset counter.
9. Printer should work again with refilled ink cartridge.
B. Canon Pixma MP/MX/MG Series - Printer & Ink Counter Reset Procedure:
1. Press the power button to turn off the printer.
2. Hold the "Stop/Reset" button while pushing the power button. While still holding down the
power button, release the "Stop/Reset" button and then push it twice in a row.
3. Wait approximately 20 to 30 seconds until the LED shows 0.
4. Push the "Stop/Reset" button four times in a row.
5. Push the power button twice.
6. Turn off the printer by pushing the power button one more time. The printer is now reset.
Canon MP Models
A. Canon Ink Level Reset Procedure.
NOTE: Most MP200 thru MP400 Series Printer Models
1. Turn off the Canon MP printer and unplug it from the outlet.
2. Press the "On/Off" button while you plug the cable back in.
3. Hit the "Stop/Reset" button two times while holding down the "On/Off" button, then let go of
the "On/Off" button. This puts the printer into factory mode.
4. Hit the right arrow button until you see "Shipping Mode 3" on the LCD display. Hit "OK" to select
it.
5. Hit the "Stop/Reset" button when you see a message that says "Without Cleaning." This tells the
Canon printer to print out a test page.
6. Lift up the Canon MP 470 printer cover and wait for the cartridges to move to the left. Then
unplug the printer from the outlet.
7. Lift out both ink cartridges and close the cover.
8. Plug the power cable back in and hit the "On/Off" button.
9. Place the ink cartridges back inside once you see a message that says "Replace Cartridges." Wait
a few minutes for the printer to recognize the cartridges before trying to print.
B. Canon MP Printers - Universal MP Printer Reset Procedure:
NOTE: Canon MP140 thru MP830 Printer Models with ‘Tools’ button
1. Turn ON the printer.
2. Press and Hold the “Reset button” on the printer.
3. While pressing the “Reset button“, press and hold the “Color Start” button.
4. Wait for 5 seconds.
5. Release the “Color Start” button, and then release the “Reset Button“.
76
6. Wait until the printer starts to configure itself. This should take approximately around 20
seconds.
7. The no. “1″ should be on the display, press and hold the “Tool” button and the letter “A” should
now be on the display.
8. While pressing on the “Tool” button, press and hold the “Reset button“.
9. Wait until there are no more blinking lights on the printer.
10. Release the “Tool” button, and then release the “Reset Button“.
C. Canon MP Ink Level Reset Procedure - Safe Factory Reset Method:
NOTE: Canon MP Series Printer Models that feature a screen display
1. Disconnect power from printer (unplug cable).
2. Press and hold the power button while connecting the power outlet back.
3. While still holding down the power button, press the reset button twice (red circle with a
triangle)
4. Release the power button
5. The printer takes about 10 seconds to show the number 0.
6. Press + to change the value from 0 to 1.
7. When this value is 1, press color button; this will light up two leds.
8. One is for plain paper and the other for photo paper. At this point is feed the printer with paper.
9. Press the power button twice and the printer will print a test page (if it doesn't print by itself,
then press the "color" button once and the test sheet will print).
10. When the test page is printed the value in the display returns to zero.
11. Open the printer/cartridge access cover (not the scanner cover) and remove the refilled ink
cartridges. With the printer still open, disconnect power from printer (unplug cable).
12. Close the lid and turn on the printer.
13. Following printer power up, open cover/cartridge access cover and reinstall the refilled ink
cartridges.
A. Canon MX310 Ink Level Reset Procedure #1 (Canon 40/41 ink cartridges)
1. Power off printer
2. Hold RESUME button then press and hold POWER, the beeper will sound once.
3. Hold POWER and release RESUME
4. Press RESUME twice
5. Release POWER button
6. When the indicator lights steady, press RESUME three (3) times. The indicator should be orange.
7. Press POWER (to lock data)
B. Canon MX310 Ink Level Reset Procedure #2 (Canon 40/41 ink cartridges)
1. Power off the printer.
2. Holding the stop/reset button, press and hold power button also. Hold both buttons together for 5
secs.
3. Still holding the power button, release the stop/reset button, then press the stop/reset button twice.
77
4. Release power button (the screen should now say 'Service Mode').
5. Wait until the power button lights steady green, then press the stop/reset button three times with a 3
sec space between each press. On the 3rd press the indicator should turn steady orange.
6. Press the power button once, (the orange light should go off).
7. Open the printer and remove both cartridges. Wait for 20 seconds. Replace the cartridges and close
printer. Wait for 30 seconds.
8. Press the power button, and wait until printer has shut down.
9. Press power button to power up. The printer will feed one piece of paper, then ask you to set the
language.
10. The ink counter should now be reset.
I. Canon MX310 Ink Level Reset Procedure #3 (Canon 40/41 ink cartridges)
1. Power off the printer
2. Hold the stop/reset button then press and hold power (for 5 secs)
3. Hold Power and release the stop/reset button
4. Press the stop/reset button twice
5. Release power button
6. Wait until the power button lights a steady/still green, press the stop/reset button three times
with a 3 sec space between each press.
7. On the 3rd press the indicator should be orange.
8. Press the power button to set data
9. To set data remove cartridges then replace; allow printer to sit idle for 20 or 30 secs
10. Press the power button again to shut down
11. Then press power button to power up.
12. The printer will feed one piece of paper through
13. Then set language and country.
14. Then ink should be reset.
*210/211 Systems = Canon PIXMA MP240, MP250, MP260, MP270, MP280, MP480, MP490, MP495,
MX320, MX330, MX340, MX350, MX360, MX410, MX420, ip2700, iP2702
CANON 210, 211 ERROR MESSAGE / NO PRINTING Basic Resets (A & B): Canon PIXMA MP240, MP250, MP260, MP270, MP280, MP480, MP490, MP495
Basic Reset Procedure (B): Canon “iP” Printer Model Series, PIXMA ip2700, PIXMA iP2702
Advanced Resets (C & D): Canon PIXMA MX320, MX330, MX340, MX350, MX360, MX410, MX420 Printer Models
http://inkjet411.com/?page_id=1765
To help reset the ink level monitoring feature:

78
A. Canon BASIC Ink Level Reset Procedure: [refer to both videos here:
http://inkjet411.com/?page_id=1765 ]
1. Install cartridge and start print job.
2. After first message appears, click ‘OK’ to continue. Printer should start printing.
3. If second message appears and printer’s LCD screen displays error code “E”, then DO NOT click
‘CANCEL PRINTING’.
4. Press and hold down ‘Stop’/’Reset’ button (triangle-circle icon) on your printer for 5-8 seconds.
Printer should start printing.
B. Canon Ink Level Reset Procedure #2 [primarily intended for Canon iP printer models]:
1. Press and Hold the Resume (triangle-circle) button
2. Press and Hold the Power Button; hold both buttons for 5 seconds
3. Release the Resume (triangle-circle) button.
4. Press the Resume button 5 times.
5. Release the Power button. The blinking ink level/power light should go steady after a few
seconds.
- Printing may continue under the ‘ink out’ condition.
C. Printers connected to Win Vista/XP Computer:
1. Install refilled cartridges into printer (“Ink Has Run Out” message is displayed)
2. Open Properties in "Printers" from "Start Bar"-"Settings" on left lower corner.
3. Open "Advance".
4. Uncheck "Enable advanced printing features".
5. Apply and close.
6. Hold "Stop" button on MX330 printer for 10-20 seconds. The "Ink Has Run Out" message will
disappear.
7. Open "Properties" in "Printers" again as in Step 2.
8. Check "Enable advance printing features" to reset counter.
9. Printer should work again with refilled ink cartridge.
D. Canon Pixma MP/MX/MG Series - Printer & Ink Counter Reset Procedure:
1. Press the power button to turn off the printer.
2. Hold the "Stop/Reset" button while pushing the power button. While still holding down
the power button, release the "Stop/Reset" button and then push it twice in a row.
3. Wait approximately 20 to 30 seconds until the LED shows 0.
4. Push the "Stop/Reset" button four times in a row.
5. Push the power button twice.
6. Turn off the printer by pushing the power button one more time. The printer is now
reset.
If you still have an error condition which prohibits printing, then the ink cartridge probably has internal
electrical damage (micro-electronics failure); such a failure is unrelated to the ink cartridge refilling

79
process. Typically, when the cartridge fails the problem is 'masked' by the ink out/empty condition so it
can be difficult to distinguish between the two. Many cartridges eventually do encounter problems or
failures, especially after their original ink is gone and they are re-used, and this is often unrelated to the
refill process.
However, if your printer works routinely after inserting a new Canon ink cartridge in it, you should discuss the possibility of a refund with your local Costco (for refilled cartridge purchase). We regret your inconvenience, and we hope that you will continue to consider the compelling value of inkjet refilling in the future. -Thank you
To reset the Canon 210/211 cartridge low ink alert message(s),
http://inkjet411.com/?page_id=1533
If you still have an error condition which prohibits printing, then the ink cartridge probably has internal
electrical damage (micro-electronics failure); such a failure is unrelated to the ink cartridge refilling
process. Typically, when the cartridge fails the problem is 'masked' by the ink out/empty condition so it
can be difficult to distinguish between the two. Many cartridges eventually do encounter problems or
failures, especially after their original ink is gone and they are re-used, and this is often unrelated to the
refill process.
___________________
Service Menu Printer/Waste Reservoir Reset Procedure:
A. Pixma MP/MX/MG Series: Printer & Ink Counter Reset
a. Press the power button to turn off the printer.
b. Hold the "Stop/Reset" button while pushing the power button. While still holding down the
power button, release the "Stop/Reset" button and then push it twice in a row.
c. Wait approximately 20 to 30 seconds until the LED shows 0.
d. Push the "Stop/Reset" button four (4) times in a row.
e. Push the power button twice.
f. Turn off the printer by pushing the power button one more time. The printer is now reset.
Next, reset the cartridge ink counter:
a. Unplug the power and the USB cables from the printer.
b. Open the cartridge door and hold down the power button.
c. Reconnect the power cables while still holding down the power button.
d. Close the cartridge door and release the power button. The ink cartridge is now reset.
- Your printer should respond as normal.
B. For Printer Model: Canon S9000, S300, S400, i550, i560, i850, i860, i865, i9100, i9950, PIXMA iP3000:

80
1. Turn off printer
2. Hold down Resume button and press Power button.
3. Keep holding down Power button and let Resume button go.
4. Press Resume button 2 times then let BOTH buttons go.
5. Green lights will flash and then stop blinking.
6. When green lights are solid, press the Resume button 4 times.
7. Press the Power button and the printer should turn off, if not, press the Power button once more.
- Your printer should respond as normal.
2. Pixma iP/MP/MX/MG Series: Waste Ink Counter Reset
a. With the printer powered off but still connected to a power source, press the Power button
while pressing and holding the Stop/ Reset button.
b. When the Power LED is lit, press the Stop/Reset button two (2) times while pressing and holding
the Power button.
c. When releasing the Power button and the Stop / Reset button (regardless of order), the printer
will move into a service mode (…waits for a menu selection)
d. When the LED lights green, press the Stop/Reset button the specified number of time(s)
according to the function listed in the table below (each time the Stop/Reset button is pressed, the LED
alternatively lights in orange and green, starting with orange)
- Your printer should respond as normal.
LED Function:
0 time Green - Power off
1 time Orange - Service pattern print
2 times Green - EEPROM print
3 times Orange - EEPROM reset
4 times Green - Waste ink counter reset
5 times Orange - Destination setting
6 times Green - Print head deep cleaning
11 times Orange - Button / LCD checking
12 or more times - Returns to a menu selection
CANON BLACK 225 VS. 226 (not yet linked)
Canon cartridges, 225 black vs. Canon 226
> The Black 225 cartridge uses a pigment-based ink...this cartridge is primarily intended for
document/text printing. Pigment based inks provide strong longevity / archivability and increase the
black dot gain, especially important when printing small text characters on the page...they must be rich
so they are legible to the eye.
>> The Black 226 cartridge uses a dye-based ink formulation specific to photo printing (this is a Photo
Black cartridge). Dye inks provide a greater amount of light to refract through the paper surface/inkjet
81
medium and effectively increase the amount of reflected color to bounce back to the eye (commonly
referred to as color 'pop'color pop to the eye - very effective for enhanced photo printing on photo
inkjet papers.
HP OfficeJet Pro
8000 K5400tn L7400 L7600
8000A K550 L7480 L7650
8500 K550dtn L7500 L7680
8500A K550dtwn L7550 L7700
K5400 K8600 L7555 L7750
K5400dn K8600dn L7580 L7780
K5400dtn K8600dtn L7590
HP OfficeJet Pro 8500
Premier Wireless
Other
HP OfficeJet Pro 8000 Wireless
3RD PARTY REQUEST TO LINK INJET411 PAGES
ISSUE UNRELATED TO REFILL
MORE INFO NEEDED
REPLY DELAY
COMPATIBLE / RE-BRANDED INDIVIDUAL INK TANKS (ALL) –NOT SUPPORTED
NEW OR NON-CARTRIDGE SUPPORT
STORE LOCATION / SERVICES
LASER TONER / REMAN / COMPATIBLE / REBRANDED CARTRIDGES SUPPORTED?
SEVERE CARTRIDGE ERROR ALERTS /PRINTER LIGHTS BLINKING (GENERAL BLANKET RESPONSE)
ERROR MESSAGES - REFUND
PRINTER REPLACEMENT (FAILED PRINTHEAD)
POOR PRINT QUALITY & LOW INK MESSAGES (IPH)
PRINT QUALITY (DEGRADED IQ / PQ / COLOR PERFORMANCE)
PRINTER WORKING - NO INK APPEARS ON PAPER [ IPH CARTRIDGE RECOVERY ]
HP PS C4200-C4500 & C5200-C5500 ERROR MESSAGES - NOT RECOGNIZING CARTRIDGE (74-75)
HP OJ J5700-J6400 ERROR MESSAGES - NOT RECOGNIZING CARTRIDGE (74/75)
HP Deskjet D4200-D4300 SERIES ERROR MESSAGES - NOT RECOGNIZING CARTRIDGE (74-75)
82
ERROR MESSAGES - NOT RECOGNIZING CARTRIDGE (901); OJ J4500, J4600 & 4500 Series)
PHOTOSMART C4600/4700/D110a ERROR MESSAGES - NOT RECOGNIZING CARTRIDGE (HP 60s)
DESKJET F2400/F4400/F4500 & F4200 ERROR MESSAGES - NOT RECOGNIZING CARTRIDGE (60)
DESKJET D2500/D2600 ERROR MESSAGES - NOT RECOGNIZING CARTRIDGE (HP 60s)
ERROR MESSAGES - NOT RECOGNIZING CARTRIDGE (61)
HP Officejet K60/K80xi ERROR MESSAGES - NOT RECOGNIZING CARTRIDGE (15, 23, 45, 78)
HP Deskjet 5000-5100-5500-5600-5800 (HP 56 / 57/ 58 )
HP Deskjet 5440 & 6000, PSC 2335/2355, PS 2600/2610xi/2710 - NOT RECOGNIZING CARTRIDGE (92-98)
HP PSC 1610 - NOT RECOGNIZING CARTRIDGE (92-98)
SEVERE ERROR MESSAGES – HP 92-98 Rejection (> No Tap 41)
HP OFFICEJET 6210/6310/7210/7310/7410 ERRORS - NOT RECOGNIZING CARTRIDGE (95/98)
HP PS 8049, 8050, 8100, 8150, 8400, 8450 (7800 & 7850?) - NOT RECOGNIZING CARTRIDGE (94-97)
HP DESKJET D4100 SERIES - NOT RECOGNIZING CARTRIDGE (92-93)
HP PS C3110-C3194 --- NOT RECOGNIZING CARTRIDGE (92/93)
HP PS C4100 PRINTER SERIES --- NOT RECOGNIZING CARTRIDGE (92/93/95)
HP PSC 1503-1514 --- NOT RECOGNIZING CARTRIDGE (92/93)
HP OJ J3680/4215/4315/5610 -PSC1200-1300, D1300-D2300, PS 7960, Deskjet 3000 & F2200 Series –
CARTRIDGE ERRORS (21/22/27/28/56-58)
HP PSC 2175xi, 2210, 2400, 2410, 2500 - (HP 56/57 CARTRIDGE ERRORS)
CARTRIDGE SELF-DIAGNOSIS PERFORMED
LEXMARK – DELL PRINTING FAILURE
LOW INK MESSAGE (GENERAL)
LOW INK MESSAGE (Dell - Lexmark)
LOW INK MESSAGE (PRINTING NOT ALLOWED)
GENERAL ‘LOW INK’ OR ‘NUISANCE MESSAGES’ (CUSTOMER IS ALREADY AWARE)
CARTRIDGE ALIGNMENT
SLOW PRINTING / CAN’T COPY OR SCAN (IPH CARTRIDGES)
CARTRIDGE EXPIRATION
CARTRIDGE REFILL 90 DAY "EXPIRATION"
CARTRIDGE LEAKING (ERROR MESSAGES & NO PRINTING)
CANON, EPSON, HP 02/88 -- RESETTABLE CARTRIDGE ERROR MESSAGES
EPSON UNRECOGNIZED CARTRIDGE ERROR
EPSON CARTRIDGE FAILURE – 2ND RESPONSE FOLLOW UP
“COMPATIBLE (RE-MAN)” IIT CARTRIDGE - CARTRIDGE ERROR MESSAGE
EPSON OR CANON IIT: “NON-GENUINE” & “UNRECOGNIZED CARTRIDGE” ALERT MESSAGES
HP 940/88 - PRINT QUALITY / POOR PRINTING / FADED TEXT / MISSING COLORS
HP 564 - PRINT QUALITY / POOR PRINTING / FADED TEXT / MISSING COLORS__PRINTHEAD FLUSHING
HP 564 – POOR PRINT QUALITY (SEVERE) – PRINTHEAD CLEANING/REPLACEMENT
HP 920 - PRINT QUALITY / POOR PRINTING / FADED TEXT / MISSING COLORS
HP 920 – POOR PRINT QUALITY (SEVERE) / ONGOING COLOR SHIFT – PRINTHEAD CLEANING
HP 920 – POOR PRINT QUALITY (SEVERE) – PRINTHEAD CLEANING/FLUSHING REPLACEMENT
HP 564/920 – POSSIBLE PRINTHEAD FAILURE
83
HP 564 PRINTHEAD FAILURE (“INCOMPATIBLE PRINTHEAD”)
HP 02 – CARTRIDGE PROBLEM – MULTIPLE CARTRIDGES
HP 02 - PRINT QUALITY / POOR PRINTING / FADED TEXT / MISSING COLORS
HP 02 – EXPIRED INK / THE CARTRIDGE IS NOT INTENDED FOR THIS PRINTER…ERROR MESSAGES
HP-CANON-EPSON IIT SYSTEMS - IDENTIFYING WHICH COLOR HAS RUN OUT
HP 02 OVERALL PERFORMANCE CONCERNS – INK MONITORING / POTENTIAL PRINTER DAMAGE CANON-
EPSON IIT SYSTEMS - IDENTIFYING WHICH COLOR HAS RUN OUT
EPSON ARTISAN (6-COLOR) PRINTERS - IDENTIFYING WHICH COLOR HAS RUN OUT
CANON / EPSON - MISSING COLORS OR POOR/INCONSISTENT PRINT QUALITY
EPSON - MISSING COLORS FOLLOWING REPEATED “HEAD CLEANING”
EPSON - SEVERE PRINT QUALITY PROBLEM (MISSING COLOR/COLORS)
QUESTIONING OF COLOR/INK PERFORMANCE (REFILL SERVICES - QUALITY ASSURANCE)
GREYSCALE PRINTING & COLOR USAGE
REFILL FRIENDLY PRINTER MODELS
HP 564 “Incompatible Older Generation Cartridge Installed” ERROR MESSAGE
HP 564/920/940/88 "Incompatible Printhead" (“Cartridge”, “Printhead” “Ink System Failure” errors)
HP 564/920 - UNAUTHORIZED / FRAUD INK MESSAGE / LOW INK
HP 940 - UNAUTHORIZED / FRAUD INK MESSAGE / LOW INK
CANON 30-241 ERROR MESSAGE (GENERAL)
CANON 210/211 240/241 -- ERROR MESSAGE / NO PRINTING
CANON 30-241 ERROR MESSAGE (ADVANCED – NO PRINTING ALLOWED)
HARD RESET
IIT Ink Shelf Life (NON FOAM) - HP88/940/932/933/950/951/02
HP OFFICEJET PRO K5xxx/Lxxx (HP 88s) – CARTRIDGE ERROR
HP OFFICEJET PRO Kxxx/Lxxx (HP 88s) – POOR PRINT QUALITY / IMPROPER OR MISSING COLORS
HP OFFICEJET PRO 8500A (HP 940s) – POWER OFF/CARTRIDGE ACCESS DOOR TRICK
HP OFFICEJET PRO 8500A (HP 940s) – “NO INK” / “MISSING OR DAMAGED” PRINTER ERROR
HP OFFICEJET PRO 8500/8500A (HP 940s) – CONFUSION OVER INK LOW AND CHIP REPLACEMENT
HP OFFICEJET PRO 8500/8500A (HP 940s) – PRINTHEAD FAILURE MESSAGE
HP 932/933 CARTRIDGE SWAP / ACTIVATION & LOW INK WARNINGS
HP 950/951 CARTRIDGE SWAP / ACTIVATION & LOW INK WARNINGS
HP 932/933 & 950/951: WHY 2ND SET OF CARTRIDGES MUST BE PURCHASED/OBTAINED
HP 932/933 & 950/951: “LOW INK” / “INK CARTRIDGES DEPLETED” MESSAGES
HP 932/933 & 950/951: "Black Cartridge Damaged" / “Ink Cartridge Failure”
HP 950/951 – POOR PRINT QUALITY (SEVERE) – PRINTHEAD CLEANING/FLUSHING/REPLACEMENT
84
3RD PARTY REQUEST TO LINK INJET411 PAGES
As several other vendors/companies are already providing links to our support site today, this is fine
with us. Please note we have two sites at the moment, but will soon be expanding another into Mexico:
USA: www.inkjet411.com
Canada: www.ca.inkjet411.com (currently being developed for French-Canadian support...should be
complete by X-mas 2013)
NOTE: the Inkjet411 support site is intended to primarily support customers for Costco
USA/Canada/Mexico, Frys Electronics (all stores), Best Buy Canada (select stores) and many major
Universities (USA/Canada). We also have refilling services in a few other smaller retail locations.
If you have any specific questions, please e-mail us at [email protected]
-Thank you
RME
Inkjet411 Support
ISSUE UNRELATED TO REFILL
Regarding your recent inquiry about refilling, your _____ issue is not related to your cartridge refill. You
should consult your printer User Manual or printer manufacturer help site (or Fixya.com printer user
help forum: http://www.fixya.com/ )
Regarding your recent inquiry, it is suggested to consult your printer User Manual or printer
manufacturer help site (or Fixya.com printer user help forum: http://www.fixya.com/ )
MORE INFO NEEDED
Regarding your recent inquiry about refilling, we need more information from you before we can
recommend a solution. Please describe your issue in more detail. Please let us know if the problem falls
into one of these categories:
1) Low Ink Alert Message (low ink lights on/pop-up messages)....these are normal.
2) Nuisance Alert Messages (i.e. "counterfeit" / "fraud cartridge")....these are normal.
3) Severe Error Messages (i.e. Unrecognized cartridge" / Missing or Not Detected")........these
are NOT normal.
4) Missing color or colors during printing
5) Poor print/color performance
In the interim, we suggest that you go to the "Solve My Problem" section of the Inkjet411 website:
http://www.inkjet411.com/ and select the appropriate ink series family and your printer model.
Follow the suggestions shown, including cartridge/printer cleaning procedures and running applicable
diagnostic printer tests.
85
REPLY DELAY
We apologize for the delay in responding, but we experienced temporary system connectivity issues
which have since been resolved.
COMPATIBLE / RE-BRANDED INDIVIDUAL INK TANKS (ALL) –NOT SUPPORTED
Regarding your recent inquiry about a cartridge error message associated with your Epson/HP/Canon
series "compatible" ink cartridge, Costco/Frys do not support re-branded individual ink tank/cartridge
refilling or smart chip programming.
NOTE: A compatible, remanufactured or re-branded ink cartridge can be problematic when installed into
the printer following refilling. Compatible cartridges are typically purchased on-line or at select retailers
(i.e sold under a different label than the regular HP, Canon, Epson, Lexmark or Dell cartridge packaging)
and is essentially a “remanufactured tank” of the original HP/Canon/Epson/Lexmark/Dell genuine ink
cartridge. For the best refilling experience, only use genuine ink tanks.
The reason is that the compatible cartridge smart chip (which is attached to cartridge's base) comes
from an unknown source and the Costco/Frys reprogramming tools do not have the ability to properly
program the smart chip (i.e. was never tested/certified for re-branded ink tanks).
We regret your inconvenience, and we hope that you will continue to consider the compelling value of
inkjet refilling in the future (USING GENUINE/ORIGINAL OEM INK CARTRIDGES).
NEW OR NON-CARTRIDGE SUPPORT
Regarding your recent inquiry about Brother ink cartridge refill services, unfortunately Costco nor Fry's
Electronics do not support the Brother ink series. However, we are continually evaluating and
introducing support on different cartridge types so you may want to check back later.
NOTE: The Costco/Fry's in-store representatives (at either Photo/Electronics support center) are trained
to refill over 240 different ink cartridge types from most of the major printer manufacturers (i.e. HP,
Epson, Canon, Lexmark and Dell) and can answer any additional questions you may have. It typically
takes about an hour to complete the refill from the time you drop the cartridges off.
Costco's ink refill service website which includes supported cartridges and refill pricing information:
http://www.costcoinkjetrefill.com/pricing
Fry’s Electronics ink refill service information website: http://www.frys.com/ads/page51
Please let us know if you have any other questions.
-Thank you
----
86
Regarding your recent inquiry about refilling the Canon 240/241 ink cartridges, currently these are not
supported....however Costco USA, Costco Canada and Frys Electronics will begin supporting these
cartridge sometime in the next 3 weeks.
We suggest you check either of the retailers listed above in the coming months to learn if the list has
been expanded to include your cartridges. Costco’s Site: http://www.costcoinkjetrefill.com/pricing
-Thank you
----
Regarding your recent inquiry about refilling the Canon 240/241 ink cartridges, these are currently
supported in 70+ Costco stores in South California, along with select beta sites in Illinois, New York and
Florida.
However, the rest of Costco USA & Costco Canada stores will begin supporting them beginning in ~3
weeks - most should be on-line by mid September. Fry's Electronics (all 34 locations) will also be
supporting the new cartridges; estimated launch date is approximately 3 months from now.
To find the nearest refill Costco store location and/or Costco pricing information, you can find this
information at http://www.costcoinkjetrefill.com
Depending on the cartridge size (240, 240XL, 240XXL), prices will range between $7 and $13 at the
stores listed above.
-----
We suggest you check with your local Costco Photo Center personnel - they should be able to tell you
approx. when the new Canon 240/241 (and 240XL, 240XXL and 241XL) cartridge support will be up and
on-line. Costco’s Site will soon be updated to reflect the corresponding pricing:
http://www.costcoinkjetrefill.com/pricing
-Thank you
STORE LOCATION / SERVICES
Regarding your recent inquiry about refill services, just your bring your cartridges into any of our
authorized refill center locations [Costco USA (most locations), Fry's Electronics (all), Costco Mexico and
Canada (select stores), & Best Buy Canada (select stores)]. To find the nearest refill Costco store
location, you can find this information at http://www.costcoinkjetrefill.com
87
The in-store representatives (at either Photo/Electronics support center) are trained to refill over 240
different ink cartridge types from all the major manufacturers (i.e. HP, Epson, Canon, Lexmark and Dell)
and can answer any additional questions you may have. It typically takes about an hour to complete the
refill from the time you drop the cartridges off.
Below is Costco's refill service website which includes supported cartridges and refill pricing information
- new cartridges and pricing will be updated as they become available:
http://www.costcoinkjetrefill.com/pricing
Let us know if you have any other questions.
-Thank you
LASER TONER / REMAN / COMPATIBLE / REBRANDED CARTRIDGES SUPPORTED?
Our service is limited to ink refilling of consumer desktop inkjet ink cartridges only and we do not
include sales of remanufactured or compatible ink cartridges. To date, we provide ink cartridge refilling
services for over 240 different ink cartridge types (HP, Canon, Epson, Dell, Lexmark).
Unfortunately, Costco and Fry's Electronics currently only provide ink cartridge refilling services (i.e. for consumer/desktop inkjet printer models)...however, there are numerous 'toner' refilling services (i.e. for laser printers) available in just about every major city in North America. We suggest you conduct an internet search for such services for your zip code. Let us know if you have any other questions.
-Thank you
SEVERE CARTRIDGE ERROR ALERTS /PRINTER LIGHTS BLINKING (GENERAL BLANKET RESPONSE)
Regarding your recent inquiry about the cartridge error message, this is apparently an electrical
connection issue between the printer and the cartridge. To ensure you have performed a full diagnosis,
please go to the "Solve My Problem" page at http://www.inkjet411.com/ and follow the error
resolutions provided, even if your exact error message or cartridge is not listed.
Please note that many cartridges eventually do encounter problems or failures, especially after their
original ink is gone and they are re-used, and this is often unrelated to the refill process.
-Thank you
ERROR MESSAGES – REFUND [ FOLLOW-UP MESSAGE / DIAGNOSIS ALREADY PERFORMED ]
Regarding your recent inquiry about the cartridge error message along with the diagnostic steps you’ve
already taken (thank you), it sounds like your cartridge’s internal micro-electronics have electrically
failed and will need to be replaced.
88
In some cases the ink cartridges just need to be FIRMLY re-seated into the carriage assembly (also check
the cartridge restraining mechanism/arms if present – sometimes these mechanical restraints/arms
become loose over time…please double-check these if applicable). Based on your feedback it sounds like
you already reseated the cartridges several times though. We also suggest that you ensure BOTH
carriage/flex cables (where the cartridge interfaces to the carriage inside the printer) and BOTH ink
cartridge rear electrical contacts are thoroughly clean to rule out connectivity as root cause:
http://inkjet411.com/?page_id=1519
Many cartridges eventually do encounter problems or failures, especially after their original ink is gone
and they are re-used, and this is often unrelated to the refill process (these same problems also occur
with brand new ink cartridges from time to time). The “Cartridge Problem" error message is typically
indicative of failed micro-electronics internal to the ink cartridge.
NOTE: It is also common to have a marginally performing ink cartridge (which was performing ok before)
in the adjacent slot (i.e. color), then when a faulty cartridge is installed into the other slot (i.e. black),
both of the ink cartridge(s) then get flagged with electrical errors. This type of failure is quite rare with
an ink cartridge that that has only been refilled once or twice. Typically the ink cartridge's nozzle plate
suffers a break at one of the flexible circuit lines within the base of the cartridge nozzle plate...refer to
photo at bottom of this page: http://inkjet411.com/?page_id=509
The more severe printer error messages which result in non-permitted print operations, represent a
very small percentage of the mass experience (for this cartridge family), so please consider the problem
you encountered as being relatively rare with an ink cartridge that has only been filled once or twice
(~1-2% range).
The integrated ink cartridge electrical wire runs, at rear and lower sides of the ink cartridge, are
somewhat delicate and are susceptible to ink attack and subsequent internal electrical damage, which
can lead to premature failures. In addition, the older the cartridge the higher the chance of an internal
micro-electronic failure. It is discouraged to use old ink cartridges which have been left in a drawer as
internal corrosion of the electrical wire runs can occur in a period of time.
If the ink cartridge has an expired warranty date (imprinted date on front of ink cartridge) then the
cartridge age is typically over 2 years old and could be at significantly higher risk for potential failure
when refilled.
However, if your printer works routinely after inserting a brand new ink cartridge in it, you should
discuss the possibility of a refund with your local Costco (for the refilled cartridge purchase). We regret
your inconvenience, and we hope that you will continue to consider the compelling value of inkjet
refilling in the future.
We trust this detailed technical information provides you some additional insight into the issue you have
endured. If, at any point in the future, you would like information on more 'refill friendly' printer models
89
just let us know. Here is a sample of such models we support today:
http://inkjet411.com/?page_id=1991
-Thank you
The fact that you have experienced 2 cartridge failures in a row is either a coincidence, the ink cartridges
are past their useful usage date (see NOTE below) or your printer is suffering intermittent connectivity
issues.
As the cartridge's ink nozzle plate (i.e. bottom of ink cartridge) contains all of the micro-electronics, no
damage can occur to the printer as a result of a cartridge 'short'. Assuming the printer's flexible printed
circuit cables (inside the printer - where the ink cartridge mates to the printer) are thoroughly clean and
not damaged, then the failures are limited to the ink cartridges themselves........this is the case most (i.e.
99.9%) of the time based on our observation of reported cartridge failure and or detection issues.
For reference, the following page provides a complete review of the majority of cartridge error
messages and causes of failure that you may observe on your printer at one point or another:
http://inkjet411.com/?page_id=1216 (HP 92-99)
NOTE: The more severe printer error messages which result in non-permitted print operations,
represent a very small percentage of the mass experience (HP 93/95/97/99 cartridge family specific), so
please consider the problem you encountered as being relatively rare (1-3% range). The HP 93/95/97/99
ink cartridge electrical wire runs, at rear and lower sides of the ink cartridge, are very delicate and are
considered somewhat susceptible to ink attack and subsequent damage, which can lead to premature
failures. In addition, the older the cartridge the higher the chance of an internal electrical failure. It is
discouraged to use old ink cartridges which have been left in a drawer - internal corrosion of the
electrical wire runs will occur. In some limited cases the ink cartridge(s) just needs to be FIRMLY re-
seated into the carriage assembly. If the ink cartridge has an expired warranty date (imprinted date on
front of ink cartridge) then the cartridge age is typically over 2 years old and could be at significantly
higher risk for potential failure when refilled.
We trust this detailed technical information provides you some additional insight into the issue you have
endured. If, at any point in the future, you would like information on more 'refill friendly' printer models
just let us know.
-Thank you
PRINTER REPLACEMENT (FAILED PRINTHEAD/IPH DAMAGE CLAIM)
This is quite unfortunate but also coincidental in our view.
90
While policies do vary between different Costco stores (state to state), you could discuss with the lead
store manager and request to fill out Costco's standard 'liability form'.
NOTE: You will need to supply images of the error images, along with images of your printer, when you
fill out the Costco 'liability form' at Costco's Photo Dept. You will also need to bring in all the refilled ink
cartridges that are involved in the claim. An approval is not our decision as you will first need to fill out
the 'liability form' and then be approved by the local store manager along with the regional account
manager.
-Thank you
POOR PRINT QUALITY & LOW INK MESSAGES (IPH)
Regarding your recent inquiry about the low ink message and the light text/partial fading during
printing, our answers are provided below in two sections:
DEGRADED IMAGE QUALITY
A. For the poor print quality problem (degraded image quality) you are observing, we suggest you first
visit the "Print Quality" page of the "General Information" section of the Inkjet 411 website and follow
the suggestions provided: http://inkjet411.com/?page_id=1432
A. 1. Cartridge & Printer maintenance should also be evaluated - ensure both ink cartridges and flexible
driver contact cables (where the cartridge interfaces to the carriage inside the printer) are thoroughly
clean: http://inkjet411.com/?page_id=1519
A.2. Perform a hot-water flush on the suspect ink cartridge, refer to video procedure here:
http://inkjet411.com/?page_id=1519
A.3. Run a quick test print to evaluate cartridge performance (i.e. 4-color test print):
http://inkjet411.com/?page_id=146
LOW INK MESSAGES
B. “Empty” and “Low Ink” alerts are COMPLETELY NORMAL for all integrated ink cartridges which have
been refilled! While at first this may be an unusual workflow, it does allow print operations to proceed.
As you just returned from the refill store, your ink cartridge(s) is full of ink - you may ignore low ink
warnings (along with any other nuisance message) and print normally until you observe one of the
colors to begin to fade.
B.1. The "low ink" or "no status" message typically occurs soon after a refill. It is a false signal, because
the printer cannot recognize that the cartridge has been refilled. Your cartridge is not low on ink, and
nothing is wrong with your refilled cartridge or printer. Unfortunately, you may also observe multiple
‘nuisance alert’ messages, these can be ignored as well. For more information on ‘low ink’ and
91
‘nuisance messages’ and what you should expect, please watch the video at the following link (HP 60
series): http://inkjet411.com/?page_id=396 (HP 60/61 Low Ink)
B. 2. The ink level indicator cannot be manually re-set in the newer HP cartridges, thus making it not
usable. However, losing this feature is not necessarily significant, because the ink level indicator usually
has 20%-30% ink remaining when it shows "low on ink". Therefore, the warning has limited value,
because customers who prematurely replace their cartridges when they see the "low ink" message are
wasting a lot of residual ink. In order to use as much available ink as possible, many customers (not only
those who refill their cartridges, but many who have not yet tried refilling) always ignore the ink level
indicator "low" warning, and wait to replace/refill their cartridge until immediately after seeing ink begin
to fade on their printouts. Many customers who disregard the low ink indicator keep a spare set of
cartridges so that their printing productivity is not disrupted when the cartridge runs out of ink.
B. 3. If the cartridge completely runs out of ink and continues to be used when it is dry, this could
damage the cartridge, so customers should promptly refill/replace their cartridge when the ink begins to
fade. This fading process is gradual, so that you will have sufficient time to refill/replace the cartridge
before the risk of empty cartridge printing. In summary, most refill customers agree that the huge
savings of refilling is much greater than the potential loss of the low ink indicator feature.
C. Before you refill your next ink cartridge, please refer to this video which provides some helpful
transportation tips to avoid any potential issues:
http://inkjet411.com/?page_id=1437
-Thank you
PRINT QUALITY (DEGRADED IQ / PQ / COLOR PERFORMANCE)
Regarding your recent inquiry about the poor print quality problem (degraded image quality) you are
experiencing, we suggest you first visit the "Print Quality" page of the "General Information" section of
the Inkjet 411 website and follow the suggestions provided: http://inkjet411.com/?page_id=1432
Run a quick printer 'self test' or Inkjet411 test print to evaluate cartridge performance (i.e. 4-color test
print): http://inkjet411.com/?page_id=146
Cartridge & Printer maintenance should also be evaluated - ensure both ink cartridges and flex cable
contact surfaces (where the cartridge interfaces to the carriage inside the printer) are thoroughly clean:
http://inkjet411.com/?page_id=1519
1) Gently blot the cartridge Nozzle Plate with a damp lint-free towel/wipe – a small amount of
ink should be dispensed, and be visible, on the towel (all 3 colors should be present for a Tri-
color cartridge).
92
2) If no ink is dispersed from nozzle plate (i.e. visible on towel) or ink cartridge completely fails
to print on paper after installed in printer, then more drastic cartridge and printer cleaning steps
will likely need to be performed to recover ink cartridge (NOTE: foam inside cartridge can dry
out and become very hard – the foam must be moist with ink to function correctly (i.e. ink flows
and wets the nozzle plate). Refer to 'clogged ink cartridge recovery' video here:
http://inkjet411.com/?page_id=1519
Providing the ink cartridges are clean, the problem may be caused by a dirty wiper blade or poor seal in
the service station (capping station where the ink cartridges park when not in use) and this is causing
the poor jetting / print performance issue you are observing. Remove the ink cartridges and thoroughly
clean the wipers and seals: http://inkjet411.com/?page_id=151
If the issue continues then please refer to 'Troubleshooting' section on our website - the printer
manufacturer websites are also provided here: http://inkjet411.com/?page_id=106
-Thank you
PRINTER WORKING - NO INK APPEARS ON PAPER [ IPH CARTRIDGE RECOVERY ]
Based on your response it sounds like the ink cartridge is clogged and will need to be recovered; please
follow these steps: http://inkjet411.com/?page_id=1519
1) Gently blot the cartridge Nozzle Plate with a damp lint-free towel/wipe – a small amount of ink should
be dispensed, and be visible, on the towel (all 3 colors should be present for a Tri-color cartridge).
2) If no ink is dispersed from nozzle plate (i.e. visible on towel) or ink cartridge completely fails to print
on paper after installed in printer, then more drastic cartridge and printer cleaning steps will likely need
to be performed to recover ink cartridge (NOTE: foam inside cartridge can dry out and become very hard
– it must be moist to function correctly.
3) Immerse cartridge base (lower ¼ inch) in very hot, near boiling, distilled or de-ionized water for ~3-4
minutes (CAUTION!). Remove and blot cartridge nozzle plate to see if any ink is drawn out. If not repeat
this step until some ink is dispensed and visible. Thoroughly dry ink cartridge surface with towel before
reinstalling into printer. Refer to video here: http://inkjet411.com/?page_id=1519
4) Ensure flexible cable contacts are thoroughly clean inside the printer. Clean printer carriage flexible
cable contacts using isopropyl alcohol (99%) on damp cloth (or cotton swab). Remove all ink residue.
IMPORTANT: Ensure NO fibers remain on contact surfaces.
Ensure cartridge and flexible cable contacts are thoroughly dry before re-installing ink cartridges into
printer (suggested to wait up to 10 minutes).
93
To help rule out any other variables, please select “Solve My Problem” at the Inkjet411 website:
http://www.inkjet411.com/
-Thank you
HP PS C4200-C4500 & C5200-C5500 ERROR MESSAGES - NOT RECOGNIZING CARTRIDGE (74-75)
NOTE: For purposes of our communication please note that the HP 350/351 UK cartridges are the same
as the HP 74/75 USA versions; all the features and functions discussed below will work on your printer as
the printer platforms are identical.
Regarding your recent inquiry about the HP 75XL Tri-color cartridge error message ("cartridge in slot on left is not intended for use in this printer. Remove and replace") and inability to print with your HP PS C5550 printer, this type of error is normally associated to an electrical connection issue between the printer and the cartridge, or more likely, an internal micro-electronic failure inside the cartridge itself. An electronic failure of the cartridge would be unrelated to the ink cartridge refill process; these same failures can (and frequently do!) occur with brand new ink cartridges.* To help identify the root cause, and to confirm which of the two ink cartridges is causing the failure condition, please run the 'Tap 41' cartridge's electrical diagnostic test below (refer to C.) VERY IMPORTANT. First verify the age of the ink cartridge(s)....look at imprinted date on front of ink cartridge. If this ‘warranty expiration date’ has expired, then potential internal electrical cartridge failures can (and frequently do) occur due to prolonged internal corrosion of cartridge micro-circuits, etc. An internal electrical failure of a cartridge can be confirmed by performing the following steps which will help rule out other variables which could also be causing the issue. A. Ensure BOTH carriage/flex cables and BOTH ink cartridge contacts are thoroughly clean before proceeding: http://inkjet411.com/?page_id=1519 B. Print Self Test Page: 1. Press and hold the CANCEL button. 2. Press the COLOR COPY button. Release both buttons. 3. The self test page should print. The printed pattern will verify printer is generally functional --- The self test page is a ‘forced’ test print whether the ink cartridges are good or bad. Inspect color bars to verify proper nozzle/jetting health. If normal/regular printing is still not permitted then the problem is with either one, or both, of the ink cartridges. Activate Tap 41 test to confirm which cartridge is causing the issue. C. Validate the cartridge’s electrical health by running the ‘Tap 41’ diagnostics test. Refer to video procedure or .pdf document at the following links on how to activate and read the service test report: http://inkjet411.com/?page_id=536
94
1. Load Letter/A4-size paper into paper feed tray. 2. If any lights are blinking, first press Cancel to attempt to clear. 3. Press and HOLD the Cancel button, press Ok button once. 4. At ‘Mfg Commands’ menu, click Right Arrow once until ‘uiaux service’ menu is displayed. 5. At ‘uiaux service’ menu, click the Right Arrow until Special Reports menu is displayed. 6. Select Ok, then click Right Arrow until the ‘print-mech button tap’ menu is displayed. 7. Select Ok (Code = 0 will be displayed); click and hold Right Arrow until ‘code = 41’ is displayed. Use the Left Arrow if you need to decrease numerical count. 8. Select Ok. Within one minute the Tap 41 diagnostic test report should be initiated and print (whether ink cartridges are good or not, i.e. this is a forced print test). See following 4 paragraphs (or video) on how to interpret diagnostic report..... NOTE: You may also refer to this document for specific printer model ‘Tap 41’ diagnostic & ‘Cartridge Error Bypass’ step-by-step instructions: http://inkjet411.retailinkjet.com/wp-content/uploads/2013/04/HP-74-75-Problem-Resolution_v10.pdf --- Providing the color cartridge is partially functioning the Tap 41 diagnostic test print will be printed (this is a forced service print test which is mainly used for the evaluation of ink cartridge electrical health). A good HP 75/75XL color cartridge should display 600 good nozzles, while a good HP 74/74XL black ink cartridge should show 672 good nozzles. If the results yield anything different then the ink cartridge is likely damaged and will need to be replaced. Refer to video on how to read the printout. ---- If the printer attempts to print the diagnostic test pattern (1 page) then the printer is generally considered operational and functional, if nothing is printed, but the printer attempts to print the pattern, then the tri-color ink cartridge is either empty, clogged or severely electrically damaged (black ink cartridge is not used). You can remove the tri-color cartridge, reactivate the tap 41 test and the printer will print the diagnostic test print in black ink. You can also test general printer performance by running the 'Tap 10' diagnostic test, use same procedure above and enter "code = 10". Both the ‘Tap 41’ and ‘Tap 10’ tests are ‘forced print tests’ – the printer will make every attempt to print the pattern whether the ink cartridges are good or bad…the patterns should be utilized to diagnose cartridge health. If ‘regular’ printing is still not possible then one or both of the ink cartridges is damaged. NOTE: It is possible to 'temporarily' bypass the cartridge error message (for emergency printing purposes only), please refer to link above/below for video/documentation instructions: http://inkjet411.retailinkjet.com/wp-content/uploads/2013/04/HP-74-75-Problem-Resolution_v10.pdf However, if the cartridge is determined to be electrically damaged, largely dependent on the 'Tap 41' diagnostic test results, the cartridge will eventually need to be replaced with a new one. With a marginally performing ink cartridge, this typically results in allowing 1 entire print job to be printed at a time. If this does not permit any print operations then the cartridge has severe internal electrical damage and will need to be replaced. *Many cartridges eventually do encounter problems or failures, especially after their original ink is gone and they are re-used, and this is often unrelated to the refill process. The “Incompatible Print Cartridge(s)" / “Print Cartridge(s) Problem” / “Refer to printer documentation” / “Cartridge Error: Cartridge must be replaced” / “Cartridge in left/right slot is not intended for use in this printer“ / "Now
95
printing alignment page" error messages are typically indicative of failed micro-electronics internal to the ink cartridge(s). Also note that it is common to have a marginally performing ink cartridge (which was performing ok before) in the adjacent slot (i.e. color), then when a marginally performing cartridge is installed into the other slot (i.e. black), both of the ink cartridge(s) then get flagged with electrical errors. Running the 'Tap 41' cartridge health diagnostics test will confirm the active electrical state of both cartridges. Please note these types of failures are quite rare with an ink cartridge that that has only been refilled once or twice. For reference, the following page provides a complete review of the majority of cartridge error messages you may observe on your printer at one point or another: http://inkjet411.com/?page_id=509 However, if your printer works routinely after inserting a brand new HP75 (or HP75XL) ink cartridge in it, you should discuss the possibility of a refund with your local Costco (for the refilled cartridge purchase). We regret your inconvenience, and we hope that you will continue to consider the compelling value of inkjet refilling in the future. If you do decide to run the 'Tap 41' cartridge health diagnostics test mentioned above and have any questions about the printed test report, please relay the results to our team for failure confirmation (you should observe exactly 600 & 672 nozzles in the test report). For additional printer diagnostics information please visit: http://inkjet411.com/?page_id=1813 Please let us know if you have any additional questions regarding procedures outlined above and/or questions relating to the provided technical information. Before refilling your next each cartridge please refer to the following video and proper handling and care of integrated ink cartridges: http://inkjet411.com/?page_id=1437 -Thank you
HP OJ J5700-J6400 ERROR MESSAGES - NOT RECOGNIZING CARTRIDGE (74-75)
NOTE: For purposes of our communication please note that the HP 350/351 UK cartridges are the same
as the HP 74/75 USA versions; all the features and functions discussed below will work on your printer as
the printer platforms are identical.
Regarding your recent inquiry about the HP 75XL cartridge error message (“xxx”) and inability to print
with your HP OJ J5700 printer, this type of error is normally associated to an electrical connection issue
between the printer and the cartridge, or more likely, an internal micro-electronic failure inside the
cartridge itself. An electronic failure of the cartridge would be unrelated to the ink cartridge refill
process; these same failures can (and frequently do) occur with brand new ink cartridges.* To help
identify the root cause, and to confirm/determine which of the two ink cartridges is causing the failure
condition, please run the 'Tap 41' cartridge's electrical diagnostic test below (refer to C.)

96
Please first verify the age of the ink cartridge(s)....look at imprinted date on front of ink cartridge. If this
‘warranty expiration date’ has expired, then potential internal electrical cartridge failures can occur due
to internal corrosion, etc.
NOTE: As a temporary workaround, or if you are unable to determine which cartridge is causing the issue, remove one of the ink cartridges from the printer....this will place the printer into the 'single cartridge printer mode'....print jobs may then be executed from the computer (only): To see if your printer model supports this particular feature please refer to your printer’s User Guide. An internal electrical failure of a cartridge can be confirmed by performing the following steps which will
help rule out other variables which could also be causing the issue.
A. Ensure BOTH carriage/flex cables and BOTH ink cartridge contacts are thoroughly clean before
proceeding: http://inkjet411.com/?page_id=1519
B. Print Extended Self Test:
1. Press CANCEL + OK buttons at the same time.
2. The extended self test page should print.
--- Verify all colors and all stair-step nozzles are firing (i.e. no missing horizontal lines should be
visible in the stair-step grid patterns). (NOTE: the self test page is a 'forced' test print whether the
ink cartridges are good or bad). Inspect color bars to verify proper nozzle/jetting health. If
normal/regular printing is still not permitted then the problem is with either one, or both, of the ink
cartridges. Activate Tap 41 test to confirm which cartridge is causing the issue.
C. Validate the cartridge’s electrical health by running the ‘Tap 41’ diagnostics test. Refer to video
procedure (or .pdf document) at the following links on how to activate and read the service test:
http://inkjet411.com/?page_id=544
1. Press the * and # keys simultaneously.
2. Enter 124 (or 123) at keypad.
3. Use the arrow keys to navigate to the System Menu. Select Ok.
4. Use the arrow keys to navigate to the ‘print-mech tap test’. Select Ok. Should display ‘code
= 0’.
5. Use the arrow keys to enter ‘code = 41’ (or just enter 41 on keypad). Select Ok. The Tap 41
diagnostic test pattern should begin to print.
NOTE 1: The ‘Tap 10’ (extended self test) can also be activated by pressing CANCEL + OK buttons
at the same time. Whether ink cartridges are good or not, i.e. this is a forced print test). Refer
to following 4 paragraphs (or video) on how to interpret diagnostic report.....
97
NOTE 2: You may also refer to this document for specific printer model ‘Tap 41’ diagnostic &
‘Cartridge Error Bypass’ step-by-step instructions: http://inkjet411.retailinkjet.com/wp-
content/uploads/2013/04/HP-74-75-Problem-Resolution_v10.pdf
--- Providing the color cartridge is partially functioning the Tap 41 diagnostic test print will be printed
(this is a forced service print test which is mainly used for the evaluation of ink cartridge electrical
health). A good HP 75/75XL color cartridge should display 600 good nozzles, while a good HP 74/74XL
black ink cartridge should show 672 good nozzles. If the results yield anything different then the ink
cartridge is likely damaged and will need to be replaced. Refer to video on how to read the printout.
---- If the printer attempts to print the diagnostic test pattern (1 page) then the printer is generally
considered operational and functional, if nothing is printed, but the printer attempts to print the
pattern, then the tri-color ink cartridge is either empty, clogged or severely electrically damaged (black
ink cartridge is not used). You can remove the tri-color cartridge, reactivate the tap 41 test and the
printer will print the diagnostic test print in black ink.
You can also test general printer performance by running the 'Tap 10' diagnostic test, use same
procedure above and enter "code = 10". Both the ‘Tap 41’ and ‘Tap 10’ tests are ‘forced print tests’ –
the printer will make every attempt to print the pattern whether the ink cartridges are good or bad…the
patterns should be utilized to diagnose cartridge health. If ‘regular’ printing is still not possible then one
or both of the ink cartridges is damaged.
NOTE 3: It is possible to 'temporarily' bypass the cartridge error message (for emergency printing
purposes only), please refer to link above/below for video/documentation instructions. However, if the
cartridge is determined to be electrically damaged, largely dependent on the 'Tap 41' diagnostic test
results, the cartridge will eventually need to be replaced with a new one. With a marginally performing
ink cartridge, this typically results in allowing 1 entire print job to be printed at a time. If this does not
permit any print operations then the cartridge has severe internal electrical damage and will need to be
replaced:
http://inkjet411.retailinkjet.com/wp-content/uploads/2013/04/HP-74-75-Problem-Resolution_v10.pdf
D. Cartridge Error Bypass ( Emergency Printing Only - http://inkjet411.com/?page_id=544 ):
1. Press the * and # keys simultaneously.
2. Enter 123 (or 124) at keypad. The ‘Underware’ menu should be displayed.
3. Use the arrow keys to navigate to the Information Menu. Select Ok.
4. Use the arrow keys to navigate to the 'checksum for relock data input'. Select Ok. LCD should
display a 5-digit number after a few seconds.
5. Attempt to send a print job to printer
NOTE: with a marginally performing ink cartridge, this typically results in allowing 1 entire print job to be
printed at a time. If this does not permit any print operations then the cartridge has severe internal
electrical damage and will need to be replaced.
98
*Many cartridges eventually do encounter problems or failures, especially after their original ink is gone
and they are re-used, and this is often unrelated to the refill process. The “Incompatible Print
Cartridge(s)" / “Print Cartridge(s) Problem” / “Refer to printer documentation” / “Cartridge Error:
Cartridge must be replaced” / “Cartridge in left/right slot is not intended for use in this printer“ /
"Now printing alignment page" error messages are typically indicative of failed micro-electronics
internal to the ink cartridge(s). Also note that it is common to have a marginally performing ink
cartridge (which was performing ok before) in the adjacent slot (i.e. color), then when a marginally
performing cartridge is installed into the other slot (i.e. black), both of the ink cartridge(s) then get
flagged with electrical errors. Running the 'Tap 41' cartridge health diagnostics test will confirm the
active state of both cartridges.
Please note these types of failures are quite rare with an ink cartridge that that has only been refilled
once or twice. For reference, the following page provides a complete review of the majority of cartridge
error messages you may observe on your printer at one point or another:
http://inkjet411.com/?page_id=509
However, if your printer works routinely after inserting a brand new HP 74 and/or HP 75 ink cartridge in
it, you should discuss the possibility of a refund with your local Costco (for the refilled cartridge
purchase). We regret your inconvenience, and we hope that you will continue to consider the
compelling value of inkjet refilling in the future.
If you do decide to run the 'Tap 41' cartridge health diagnostics test mentioned above and have any questions about the printed test report, please relay the results to our team for failure confirmation (you should observe exactly 600 & 672 nozzles in the test report). For additional printer diagnostics information please visit: http://inkjet411.com/?page_id=1813 Please let us know if you have any additional questions regarding procedures outlined above and/or questions relating to the provided technical information. Before refilling your next each cartridge please refer to the following video and proper handling and care of integrated ink cartridges: http://inkjet411.com/?page_id=1437 -Thank you PHOTOSMART C4600/4700/D110a ERROR MESSAGES - NOT RECOGNIZING CARTRIDGE (HP 60s)
Regarding your recent inquiry about the HP 60XL cartridge error message (“Incompatible Print Cartridges”) and inability to print with your HP PHOTOSMART C4600 printer, this type of error is either an electrical connection issue between the printer and the cartridge, or more likely, an internal micro-electronic failure inside one of the ink cartridges. An electronic failure of the cartridge would be unrelated to the ink cartridge refill process; these same failures can (and frequently do) occur with brand new ink cartridges.* To help identify the root cause please run the 'Tap 41' cartridge's electrical / diagnostic tests below (refer to B. and C), this will also identify which ink cartridge is causing the issue: NOTE: “Empty” and “Low Ink” alerts are COMPLETELY NORMAL for all newer HP integrated ink cartridges which have been refilled! While at first this may be an unusual workflow, it does allow print
99
operations to proceed. The ink level monitoring feature cannot be reset (i.e. in the newer line of integrated ink cartridges, HP blows the ink monitoring resistors inside the cartridge the first time it is used - thus it is impossible to reset them). Printer nuisance messages may also be ignored: http://inkjet411.com/?page_id=420 Please first verify the age of the ink cartridge(s)....look at imprinted date on front of ink cartridge. If this ‘warranty expiration date’ has expired, then potential internal electrical cartridge failures can occur due to internal corrosion, etc. A. Ensure BOTH carriage/flex cables and BOTH ink cartridge contacts are thoroughly clean before proceeding: http://inkjet411.com/?page_id=1519 B. Validate the cartridge’s electrical health by running the ‘Tap 41’ diagnostics test. Refer to DIAGNOSTIC TAP 41 video procedure at the following link on how to activate and read the service test: http://inkjet411.com/?page_id=434 1. Using two fingers, gently tap the 'Return' and 'Home' keys on touchscreen until the ‘Support’ Menu is displayed (for example, press the button 3-4 times each in rapid & alternating succession). 2. At ‘Support’ menu, select the upper right button until the ‘Reports Menu’ is visible. Select OK. 3. Press upper right button until ‘print mech button tap’ menu is displayed. 4. Press OK, the ‘code = 0’ menu should be displayed. 5. Use arrows keys to change value to 'code = 41' (i.e. press and hold right arrow key). When 'code = 41', select 'OK'. 6. The diagnostic ‘tap 41’ test pattern should print. --- Providing the color cartridge is partially functioning the Tap 41 diagnostic test print will be printed (this is a forced service print test which is mainly used for the evaluation of ink cartridge electrical health). A good HP 60/60XL color cartridge should display 1248 good nozzles, while a good HP 60/60XL black ink cartridge should show 336 good nozzles. If the results yield anything different then the ink cartridge is likely damaged and will need to be replaced. Refer to video on how to read the printout. http://inkjet411.com/?page_id=434 ---- If the printer attempts to print the diagnostic test pattern (1 page) then the printer is generally considered operational and functional, if nothing is printed, but the printer attempts to print the pattern, then the tri-color ink cartridge is either empty, clogged or severely electrically damaged (black ink cartridge is not used). You can remove the tri-color cartridge, reactivate the tap 41 test and the printer will print the diagnostic test print in black ink. C. Print the Self Test Page: 1. Load plain white paper in the input tray. 2. Touch the lower-left corner of the control panel 4 times until Support Menu displays on the control panel, and then touch OK. NOTE: The OK button becomes visible when you access the Support Menu 3. Touch the Menu button next to Support in the upper-right corner of the control panel until Reports Menu displays, and then touch OK.
100
4. Touch the button in the upper-right corner of the control panel until Printer Status Report displays, and then touch OK. The self-test report should print. --- If the self test page prints (illustrates that printer is functional) but normal/regular printing from the computer/host workstation is not permissible, then one of the ink cartridges likely has a problem and may need to be replaced. Evaluate test page to ensure all ink nozzles are firing from both ink cartridges; use to check color printing performance. NOTE: It is possible to 'temporarily' bypass the cartridge error message (for emergency printing purposes only), please refer to link above for video/documentation instructions. However, if the cartridge is determined to be electrically damaged, largely dependent on the 'Tap 41' diagnostic test results, the cartridge will eventually need to be replaced with a new one. You can also test general printer performance by running the 'Tap 10' diagnostic test, use same procedure above and enter "code = 10". Both the ‘Tap 41’ and ‘Tap 10’ tests are ‘forced print tests’ – the printer will make every attempt to print the pattern whether the ink cartridges are good or bad…the patterns should be utilized to diagnose cartridge health. If ‘regular’ printing is still not possible then one or both of the ink cartridges is damaged. *Many cartridges eventually do encounter problems or failures, especially after their original ink is gone and they are re-used, and this is often unrelated to the refill process. The “Incompatible Cartridge(s)" / “Print Cartridge(s) Problem” / “Refer to printer documentation” / “Cartridge Error: Cartridge must be replaced” / “Cartridge in left/right slot is not intended for use in this printer “ or even "Now printing alignment page" error messages are typically indicative of failed micro-electronics internal to the ink cartridge(s). Also note that it is common to have a marginally performing ink cartridge (which was performing ok before) in the adjacent slot (i.e. color), then when a marginally performing cartridge is installed into the other slot (i.e. black), both of the ink cartridge(s) then get flagged with electrical errors. Running the 'Tap 41' cartridge health diagnostics test will confirm the active state of both cartridges. Please note these types of failures are quite rare with an ink cartridge that that has only been refilled once or twice. For reference, the following page provides a complete review of the majority of cartridge error messages you may observe on your printer at one point or another: http://inkjet411.com/?page_id=415 However, if your printer works routinely after inserting a brand new HP 60 (or 60XL) cartridge in it, you should discuss the possibility of a refund with your local Costco (for the refilled cartridge purchase). We regret your inconvenience, and we hope that you will continue to consider the compelling value of inkjet refilling in the future. If you do decide to run the 'Tap 41' cartridge health diagnostics test mentioned above and require assistance in interpreting the diagnostic test information, please relay the results to our team for failure confirmation. For advanced/complete HP printer diagnostics information please visit: http://inkjet411.com/?page_id=1813 -Thank you DESKJET F2400/F4400/F4500 & F4200 ERROR MESSAGES - NOT RECOGNIZING CARTRIDGE (HP 60s)
101
NOTE: For purposes of our communication please note that the HP300 UK cartridges are the same as the HP60 USA
versions; all the features and functions discussed below will work on your printer as the printer platforms are
identical.
Regarding your recent inquiry about the HP 60 cartridge error message (“Incompatible Print Cartridges”)
and inability to print with your HP Deskjet Fxxx printer, this type of error is normally associated to an
electrical connection issue between the printer and the cartridge, or more likely, an internal micro-
electronic failure inside the cartridge itself. An electronic failure of the cartridge would be unrelated to
the ink cartridge refill process; these same failures can (and frequently do) occur with brand new ink
cartridges.* To help identify the root cause, please run the 'Tap 41' cartridge's electrical / diagnostic
tests below (refer to B. and C), this will identify which ink cartridge is causing the issue:
NOTE: “Empty” and “Low Ink” alerts are COMPLETELY NORMAL for all newer HP integrated ink
cartridges which have been refilled! While at first this may be an unusual workflow, it does allow print
operations to proceed. The ink level monitoring feature cannot be reset (i.e. in the newer line of
integrated ink cartridges, HP blows the ink monitoring resistors inside the cartridge the first time it is
used - thus it is impossible to reset them). Printer nuisance messages may also be ignored:
http://inkjet411.com/?page_id=420
Please first verify the age of the ink cartridge(s)....look at imprinted date on front of ink cartridge. If this
‘warranty expiration date’ has expired, then potential internal electrical cartridge failures can occur due
to internal corrosion, etc.
As a temporary workaround, or if you are unable to determine which cartridge is causing the issue,
remove one of the ink cartridges from the printer....this might place the printer into the 'single cartridge
printer mode'....print jobs may then be executed from the computer (only):
An internal electrical failure of a cartridge can be confirmed by performing the following
corrective/diagnostic steps:
A. Ensure BOTH carriage/flex cables and BOTH ink cartridge contacts are thoroughly clean before
proceeding: http://inkjet411.com/?page_id=1519
B. Validate the cartridge’s electrical health by running the ‘Tap 41’ diagnostics test. Refer to
DIAGNOSTIC TAP 41 video procedure at the following link on how to activate and read the service
test:
http://inkjet411.com/?page_id=440 (HP 60 – Deskjet F2400/F4400/F4500 models)
1. While holding the Power button, press Cancel (X) button 4 times, then press the Color Copy button once.
2. Release the Power button.
3. The 'Tap 41' diagnostic test print should print.

102
http://inkjet411.com/?page_id=444 (HP 60 – Deskjet F4200 model)
1. While holding the Power button, press Cancel (X) button 4 times, then press the ‘Resume’ button once.
2. Release the Power button.
3. The 'Tap 41' diagnostic test print should print.
--- Providing the color cartridge is partially functioning the Tap 41 diagnostic test print will be printed
(this is a forced service print test which is mainly used for the evaluation of ink cartridge electrical
health). A good HP 60/60XL color cartridge should display 1248 good nozzles, while a good HP 60/60XL
black ink cartridge should show 336 good nozzles. If the results yield anything different then the ink
cartridge is likely damaged and will need to be replaced. Refer to 2nd video on how to read the printout.
http://inkjet411.com/?page_id=440 (HP 60 – Deskjet F2400/F4400/F4500 models)
http://inkjet411.com/?page_id=444 (HP 60 – Deskjet F4200 model)
---- If the printer attempts to print the diagnostic test pattern (1 page) then the printer is generally
considered operational and functional, if nothing is printed, but the printer attempts to print the
pattern, then the tri-color ink cartridge is either empty, clogged or severely electrically damaged (black
ink cartridge is not used). You can remove the tri-color cartridge, reactivate the tap 41 test and the
printer will print the diagnostic test print in black ink.
C. Print the Self Test Page: http://inkjet411.com/?page_id=579 (Deskjet D2500/D2600 series)
1. Press and HOLD the Power button, press the Cancel button. Release both buttons.
........or…..
2. Press and HOLD the CANCEL button, press the COPY button once.
3. The self test page should print.
--- If the self test page prints (illustrates that printer is functional) but normal/regular printing from the
computer/host workstation is not permissible, then one of the ink cartridges likely has a problem and
may need to be replaced. Evaluate test page to ensure all ink nozzles are firing from both ink cartridges;
use to check color printing performance.
NOTE: To our team's knowledge there is no 'cartridge error bypass' method available for the HP Deskjet printer model. You can also test general printer performance by running the 'Tap 10' diagnostic test, use same
procedure above except only press the CANCEL + COPY/RESUME buttons once each together. Both the
‘Tap 41’ and ‘Tap 10’ tests are ‘forced print tests’ – the printer will make every attempt to print the
pattern whether the ink cartridges are good or bad…the patterns should be utilized to diagnose
cartridge health. If ‘regular’ printing is still not possible then one or both of the ink cartridges is
damaged.
103
*Many cartridges eventually do encounter problems or failures, especially after their original ink is gone
and they are re-used, and this is often unrelated to the refill process. The “Incompatible Cartridge(s)" /
“Print Cartridge(s) Problem” / “Refer to printer documentation” / “Cartridge Error: Cartridge must be
replaced” / “Cartridge in left/right slot is not intended for use in this printer “ or even "Now printing
alignment page" error messages are typically indicative of failed micro-electronics internal to the ink
cartridge(s). Also note that it is common to have a marginally performing ink cartridge (which was
performing ok before) in the adjacent slot (i.e. color), then when a marginally performing cartridge is
installed into the other slot (i.e. black), both of the ink cartridge(s) then get flagged with electrical errors.
Running the 'Tap 41' cartridge health diagnostics test will confirm the active state of both cartridges.
Please note these types of failures are quite rare with an ink cartridge that that has only been refilled
once or twice. For reference, the following page provides a complete review of the majority of cartridge
error messages you may observe on your printer at one point or another:
http://inkjet411.com/?page_id=415
However, if your printer works routinely after inserting a brand new HP 60 (or 60XL) cartridge in it, you
should discuss the possibility of a refund with your local Costco (for the refilled cartridge purchase). We
regret your inconvenience, and we hope that you will continue to consider the compelling value of inkjet
refilling in the future.
If you do decide to run the 'Tap 41' cartridge health diagnostics test mentioned above and require assistance in interpreting the diagnostic test information, please relay the results to our team for failure confirmation. For advanced/complete HP printer diagnostics information please visit: http://inkjet411.com/?page_id=1813 -Thank you
DESKJET D2500/D2600 ERROR MESSAGES - NOT RECOGNIZING CARTRIDGE (HP 60s)
Regarding your recent inquiry about the HP 60 (or 60XL) ink cartridge error message (“Incompatible
Print Cartridges”, or similar) and inability to print with your HP Deskjet D2545 printer, this type of error
is normally associated to an electrical connection issue between the printer and the cartridge, or more
likely, an internal micro-electronic failure inside one of the ink cartridges. An electronic failure of the
cartridge would be unrelated to the ink cartridge refill process; these same failures can (and frequently
do) occur with brand new ink cartridges.* To help identify the root cause, and to determine which
cartridge is causing the error condition, please activate the self-test below (please refer to B.).
NOTE: “Empty” and “Low Ink” alerts are COMPLETELY NORMAL for all newer HP integrated ink
cartridges which have been refilled! While at first this may be an unusual workflow, it does allow print
operations to proceed. The ink level monitoring feature cannot be reset (i.e. in the newer line of
integrated ink cartridges, HP blows the ink monitoring resistors inside the cartridge the first time it is
used - thus it is impossible to reset them). Printer nuisance messages may also be ignored:
http://inkjet411.com/?page_id=420

104
Please first verify the age of the ink cartridge(s)....look at imprinted date on front of ink cartridge. If this
‘warranty expiration date’ has expired, then potential internal electrical cartridge failures can occur due
to internal corrosion, etc.
As a temporary workaround, or if you are unable to determine which cartridge is causing the issue,
remove one of the ink cartridges from the printer....this might place the printer into the 'single cartridge
printer mode'....print jobs may then be executed from the computer (only): To confirm if this feature is
supported on your particular printer model, please refer to your printer's User Guide.
An internal electrical failure of a cartridge can be confirmed by performing the following
corrective/diagnostic steps:
A. Ensure BOTH carriage/flex cables and BOTH ink cartridge contacts are thoroughly clean before
proceeding: http://inkjet411.com/?page_id=1519
B. Print the Self Test Page: http://inkjet411.com/?page_id=579
1. Press and HOLD the Power button, press the Cancel button. Release both buttons.
2. The self test page should print.
--- If the self test page prints (illustrates that printer is functional) but normal/regular printing from the
computer/host workstation is not permissible, then one of the ink cartridges likely has a problem and
may need to be replaced. Evaluate test page to ensure all ink nozzles are firing from both ink cartridges;
use to check color printing performance. A good HP 60/60XL color cartridge normally has 1248 good
nozzles, while a good HP 60/60XL black ink cartridge has 336 functioning nozzles.
---- If the printer attempts to print the diagnostic test pattern (1 page) then the printer is generally
considered operational and functional, if nothing is printed, but the printer attempts to print the
pattern, then the tri-color ink cartridge is either empty, clogged or severely electrically damaged (black
ink cartridge is not used). You can remove the tri-color cartridge, reactivate the self test and the printer
should print the self test print in black ink.
To help determine which cartridge is causing the problem:
1. Open the cartridge access door.
2. Remove either cartridge (not both).
3. Close the cartridge access door/cover.
-- If the computer message is Print Cartridge Error, then the print cartridge that is still in the printer is
the problem cartridge. If the computer message is NOT Print Cartridge Error (instead, it says that the
cartridge you have removed is ...Either missing, not detected, or incorrectly installed), then the cartridge
you have removed is the problem cartridge. On some printer models, if you notice the blinking error
lights stops blinking following a cartridge removal, then this is the defective cartridge.
105
*Many cartridges eventually do encounter problems or failures, especially after their original ink is gone
and they are re-used, and this is often unrelated to the refill process. The “Incompatible Cartridge(s)" /
“Print Cartridge(s) Problem” / “Refer to printer documentation” / “Cartridge Error: Cartridge must be
replaced” / “Cartridge in left/right slot is not intended for use in this printer “ or even "Now printing
alignment page" error messages are typically indicative of failed micro-electronics internal to the ink
cartridge(s). Also note that it is common to have a marginally performing ink cartridge (which was
performing ok before) in the adjacent slot (i.e. color), then when a marginally performing cartridge is
installed into the other slot (i.e. black), both of the ink cartridge(s) then get flagged with electrical errors.
Please note these types of failures are quite rare with an ink cartridge that that has only been refilled
once or twice. For reference, the following page provides a complete review of the majority of cartridge
error messages you may observe on your printer at one point or another:
http://inkjet411.com/?page_id=415
However, if your printer works routinely after inserting a brand new HP 60 (or 60XL) cartridge in it, you
should discuss the possibility of a refund with your local Costco (for the refilled cartridge purchase). We
regret your inconvenience, and we hope that you will continue to consider the compelling value of inkjet
refilling in the future.
For advanced HP printer diagnostics information please see our Diagnostics.pdf document at:
http://inkjet411.com/?page_id=1813
-Thank you
HP Deskjet D4200-D4300 SERIES ERROR MESSAGES - NOT RECOGNIZING CARTRIDGE (74-75)
Regarding your recent inquiry about the HP 74XL black ink cartridge error message (“unrecognized cartridge”, or similar ink lamp error indicators) and inability to print with your HP Deskjet D4360 printer, this type of error is normally associated to an electrical connection issue between the printer and the cartridge, or more likely, an internal micro-electronic failure inside the cartridge itself. An electronic failure of the cartridge would be unrelated to the ink cartridge refill process; these same failures can (and frequently do) occur with brand new ink cartridges.* To help identify the root cause and to confirm/validate the electrical health of both ink cartridges, please run the 'Tap 41' cartridge's electrical / diagnostic test below. Please first verify the age of BOTH ink cartridges....look at imprinted date on front of ink cartridge. If this ‘warranty expiration date’ has expired, then potential internal electrical cartridge failures can occur due to internal corrosion, etc. NOTE: As a temporary workaround (which is supported on most HP Deskjet printer models) remove one of the ink cartridges from the printer....this will place the printer into the 'single cartridge printer mode'....print jobs may then be executed from the computer (only): For more information, refer to your printer user guide. An internal electrical failure of a cartridge can be confirmed by performing the following steps which will help rule out other variables which could also be causing the issue.
106
1) Ensure BOTH carriage/flex cables and BOTH ink cartridge contacts are thoroughly clean before proceeding: http://inkjet411.com/?page_id=1519 2) Validate the cartridge’s electrical health by running the ‘Tap 41’ diagnostics test. Refer to video procedure at the following link on how to activate and read the service test: http://inkjet411.com/?page_id=792 (HP 74/75 – Deskjet D4200/D4300 models) a. If any lights are blinking, first press Cancel to attempt to clear. b. Press and HOLD the Power button, press ‘Cancel’ button 4 times, then ‘Resume’ button (down arrow) once. c. Release the Power button. The Tap 41 diagnostic test should print. - Providing the color cartridge is partially functioning the Tap 41 diagnostic test print will be printed (this is a forced service print test which is mainly used for the evaluation of ink cartridge electrical health). A good HP 75/75XL color cartridge should display 600 good nozzles, while a good HP 74/74XL black ink cartridge should show 672 good nozzles. If the results yield anything different then the ink cartridge is likely damaged and will need to be replaced. Refer to Photosmart C4200-C5200 ‘Tap 41’ diagnostic test video at link above on how to read the printout. If the printer attempts to print the diagnostic test pattern (1 page) then the printer is generally considered operational and functional, if nothing is printed, but the printer attempts to print the pattern, then the tri-color ink cartridge is either empty, clogged or severely electrically damaged (black ink cartridge is not used). You can remove the tri-color cartridge, reactivate the tap 41 test and the printer will print the diagnostic test print in black ink. NOTE: To our team's knowledge there is no 'cartridge error bypass' method available for the HP Deskjet D4200/D4300 printer model series. *Many cartridges eventually do encounter problems or failures, especially after their original ink is gone and they are re-used, and this is often unrelated to the refill process. Blinking ink lamp indicators (or Window's ink error messages) are typically indicative of failed micro-electronics internal to the ink cartridge(s). Also note that it is common to have a marginally performing ink cartridge (which was performing ok before) in the adjacent slot (i.e. color), then when a marginally performing cartridge is installed into the other slot (i.e. black), both of the ink cartridge(s) then get flagged with electrical errors. Running the 'Tap 41' cartridge health diagnostics test will confirm the active state of both cartridges. Please note these types of failures are quite rare with an ink cartridge that that has only been refilled once or twice. For reference, the following page provides a complete review of the majority of cartridge error messages you may observe on your printer at one point or another: http://inkjet411.com/?page_id=509 However, if your printer works routinely after inserting a brand new HP 74XL cartridge in it, you should discuss the possibility of a refund with your local Costco (for the refilled cartridge purchase). We regret your inconvenience, and we hope that you will continue to consider the compelling value of inkjet refilling in the future.
107
If you do decide to run the 'Tap 41' cartridge health diagnostics test mentioned above and have any questions about the printed test report, please relay the results to our team for failure confirmation (you should observe exactly 600 & 672 nozzles in the test report). For additional printer diagnostics information please visit: http://inkjet411.com/?page_id=1813 Please let us know if you have any additional questions regarding procedures outlined above and/or questions relating to the provided technical information. Before refilling your next each cartridge please refer to the following video and proper handling and care of integrated ink cartridges: http://inkjet411.com/?page_id=1437 -Thank you
ERROR MESSAGES - NOT RECOGNIZING CARTRIDGE (901)
Regarding your recent inquiry about the HP 901 cartridge error message (“Incompatible Print
Cartridge”) and inability to print with your HP OJ J4550 printer, this type of error condition is either an
electrical connection issue between the printer and the cartridge, or more likely, an internal micro-
electronic failure inside the HP 901 ink cartridge itself. An electronic failure of the cartridge would be
unrelated to the ink cartridge refill process; these same failures can (and frequently do) occur with
brand new ink cartridges.* To confirm root cause and check the internal electrical condition of both
black and color ink cartridges, please execute the 'Tap 41' cartridge's electrical diagnostic test below
(refer to procedure B).
Please first verify the age of the ink cartridge(s)....look at imprinted date on front of ink cartridge(s). If
the ‘warranty expiration date’ has expired, then potential internal electrical cartridge failures can occur
due to internal corrosion, etc.
An internal electrical failure of a cartridge can be confirmed by performing the following steps which will
help rule out other variables which could also be causing the issue.
A. Ensure BOTH carriage/flex cables and BOTH ink cartridge contacts are thoroughly clean before
proceeding: http://inkjet411.com/?page_id=1519
B. Validate the cartridge’s electrical health by running the ‘Tap 41’ diagnostics test. Refer to 2nd
video procedure at the following link on how to activate and read the service test:
http://inkjet411.com/?page_id=620
a. Load Letter/A4-size paper into paper feed tray.
b. If any lights are blinking, first press Cancel to attempt to clear.
c. Press the * and # keys simultaneously.
d. Enter 124 at keypad. The 'Underware' menu should be displayed.
e. Use the arrow keys to navigate to the System Menu. Select Ok.
f. Use the arrow keys to navigate to the 'print-mech tap test'. Select Ok. Should display “code = 0”.
g. Use the arrow keys to enter “code = 41” (or just enter 41 on keypad). Select Ok. The Tap 41
diagnostic test pattern prints.
108
--- Providing the HP 901 (or 901XL) color cartridge is partially functioning the Tap 41 diagnostic test
print will be printed (this is a forced service print test which is mainly used for the evaluation of ink
cartridge electrical health – the printer will attempt to print the diagnostic test print). A good HP 901
color cartridge should display 1248 good nozzles, while a good HP 901/901XL black ink cartridge
should show 336 good nozzles. If the results yield anything different then the ink cartridge is likely
damaged and will need to be replaced. Refer to 2nd video on how to read the diagnostic test print:
http://inkjet411.com/?page_id=620
---- If the printer attempts to print the diagnostic test pattern (1 page) then the printer is generally
considered operational and functional, if nothing is printed, but the printer attempts to print the
pattern, then the tri-color ink cartridge is either empty, clogged or severely electrically damaged (black
ink cartridge is not used). You can remove the tri-color cartridge, reactivate the tap 41 test and the
printer will print the diagnostic test print in black ink.
NOTE: It is possible to 'temporarily' bypass the cartridge error message (for emergency printing
purposes only), please refer to link below (see 3rd video): http://inkjet411.com/?page_id=620
However, if the cartridge is determined to be electrically damaged, largely dependent on the 'Tap 41'
diagnostic test results, the cartridge will eventually need to be replaced with a new one.
You can also test general printer performance by running the 'Tap 10' diagnostic test, use same
procedure above and enter "code = 10". Both the ‘Tap 41’ and ‘Tap 10’ tests are ‘forced print tests’ –
the printer will make every attempt to print the pattern whether the ink cartridges are good or bad…the
patterns should be utilized to diagnose cartridge health. If ‘regular’ printing is still not possible then one
or both of the ink cartridges is damaged.
*Many cartridges eventually do encounter problems or failures, especially after their original ink is gone
and they are re-used, and this is often unrelated to the refill process. The “Incompatible Cartridge(s)" /
“Print Cartridge(s) Problem” / “Refer to printer documentation” / “Cartridge Error: Cartridge must be
replaced” / “Cartridge in left/right slot is not intended for use in this printer” error messages along
with the ‘Blinking Exclamation Light’ are typically indicative of failed micro-electronics internal to the
HP 901 ink cartridge(s). Also note that it is common to have a marginally performing ink cartridge
(which was performing ok before) in the adjacent slot (i.e. color), then when a marginally performing
cartridge is installed into the other slot (i.e. black), both of the ink cartridge(s) then get flagged with
electrical errors. Running the 'Tap 41' cartridge health diagnostics test will confirm the active state of
both cartridges.
Please note these types of failures are quite rare with an ink cartridge that that has only been refilled
once or twice. For reference, the following page provides a complete review of the majority of cartridge
error messages you may observe on your printer at one point or another:
http://inkjet411.com/?page_id=596

109
However, if your printer works routinely after inserting a brand new HP 901 cartridge in it, you should
discuss the possibility of a refund with your local Costco (for the refilled cartridge purchase). We regret
your inconvenience, and we hope that you will continue to consider the compelling value of inkjet
refilling in the future.
If you do decide to run the 'Tap 41' cartridge health diagnostics test mentioned above, please relay the results to our team for failure confirmation should you have any questions about interpreting the test report. For additional printer diagnostics information please visit: http://inkjet411.com/?page_id=1813 Please let us know if you have any further questions on this or any of the technical information provided above. -Thank you
HP Deskjet 5440 & 6000, PSC 2335/2355/2600/2610xi/2710 - NOT RECOGNIZING CARTRIDGE (92-98)
Regarding your recent inquiry about the HP 96 cartridge error message and inability to print with your
HP Deskjet 6988 printer, this type of error is normally associated to an electrical connection issue
between the cartridge and carriage flex cables, or even more likely, an internal micro-electronic failure
inside the cartridge itself. An electronic failure of the cartridge would be unrelated to the ink cartridge
refill process; this same type of failure can also (and frequently do!) occur with brand new ink
cartridge*. Let's run a few checks to check the electrical state of both ink cartridges and validate an
internal micro-electronic failure of the ink cartridge or cartridges....
Please first verify the age of the ink cartridge(s)....look at imprinted date on front (or back) of ink
cartridge. If this ‘warranty expiration date’ has expired, then potential cartridge failures can occur due to
internal corrosion, etc.
As a temporary workaround, or if you are unable to determine which cartridge is causing the issue,
remove one of the ink cartridges from the printer....this may place the printer into the 'single cartridge
printer mode'....print jobs may then be executed from the computer (only): For more information, refer
to your printer's User Guide to see if this feature is supported for your printer model.
Please perform the following corrective/diagnostic printer checks:
A. Ensure BOTH carriage/flex cables and BOTH ink cartridge contacts are thoroughly clean before
proceeding: http://inkjet411.com/?page_id=1519
B. Perform either of the 3 service diagnostic tests (one of these procedures should provide you direct
service menu access into your printer model):
B.1. Perform Tap 41 Cartridge Health Diagnostics Test: [HP Deskjet 5440]
http://inkjet411.com/?page_id=1741 (refer to 2nd video to understand how to read the printed pattern)
1. Turn the printer on.

110
2. Press and hold the POWER button.
3. Press the RESUME button four times.
4. Release the POWER button.
B. Perform Tap 41 Cartridge Health Diagnostics Test: [HP Deskjet 6800/6900/9800]
http://inkjet411.com/?page_id=1741 (refer to 2nd video to understand how to read the printed pattern)
1. With printer power on, press and hold the POWER button.
2. Press the Cancel (X) button four (4) times.
3. Press the RESUME button (Down Arrow) once.
4. Release the POWER button.
5. The Diagnostic Test Report should print.
B.1. Perform Tap 41 Cartridge Health Diagnostics Test: [Possibly HP PS C2600.??]
1. Load Letter/A4-size paper into paper feed tray.
2. Press and HOLD the Cancel button, press Ok button once.
3. At ‘Mfg Commands’ menu, click Right Arrow until ‘uiaux service’ menu is displayed.
4. At ‘uiaux service’ menu, click the Right Arrow until Special Reports menu is displayed.
5. Select Ok, then click Right Arrow until the ‘print-mech button tap’ menu is displayed.
6. Select Ok (Code = 0 will be displayed); click and hold Right Arrow until code = 41’ is displayed.
Use the Left Arrow if you need to decrease numerical count.
7. Select Ok. Within one minute the Tap 41 diagnostic test pattern should be initiated and print
(whether ink cartridges are good or not, i.e. this is a forced print test). Refer to 2nd video at
following link on how to interpret the diagnostic test report:
http://inkjet411.com/?page_id=1741
NOTE: If access code '41' does not yield a test print, then enter "code = 43").
B.2. Perform Tap 41 Cartridge Health Diagnostics Test: [PSC 2335/2350/2355xi/ (94-97)]
1. Press * and # keys at same time (you may observe "Enter special key combo")
2. Enter ‘123’ (or 124) using number keys.
3. Using left/right arrow keys, navigate to Special Reports. Select Enter.
4. Using left/right arrow keys, navigate to Extended Self Test.
a. Select Enter to print test print - evaluate test print.
5. Access 'Special Reports' menu again, using left/right arrow keys, navigate to ‘print-mech button
tap’ menu.
6. Select Ok (‘code = 0’ will be displayed); click and hold Right Arrow until ‘code = 41’ is displayed.
7. Select Ok. Within one minute the Tap 41 diagnostic test pattern should be initiated and print.
Refer to 2nd video at following link on how to interpret the diagnostic test report:
http://inkjet411.com/?page_id=1741
NOTE: If access code '41' does not yield a test print, then enter "code = 43").

111
B. Perform Tap 41 Cartridge Health Diagnostics Test (select printer models only):
Press and HOLD the CANCEL (X) button.
1. Depress the COLOR COPY button four (4) times, then…
2. Depress the SCAN (START SCAN) button three (3) times.
3. Release the CANCEL (X) button. The test prints.
--- A good HP 93/95/97/99 color cartridge should display 600 good nozzles, while a good HP
92/94/96/98 black ink cartridge should show 672 good nozzles. If the results yield anything different
then the ink cartridge is likely damaged and will need to be replaced. Refer to 2nd video on how to read
the printout: http://inkjet411.com/?page_id=1741
---- If the printer attempts to print the diagnostic test pattern (1 page) then the printer is generally
considered operational and functional, if nothing is printed, but the printer attempts to print the
pattern, then the tri-color ink cartridge is either empty, clogged or severely electrically damaged (black
ink cartridge is not used). You can remove the tri-color cartridge, reactivate the tap 41 test and the
printer will print the diagnostic test print in black ink (special "ink back-up mode").
C. Print Self-Test Page (varies by printer model – attempt Procedures A thru C below):
Deskjet 5440 Self-Test Page:
1. Turn the printer on.
2. Press and hold the RESUME button until the printer starts printing.
3. Release the RESUME button.
Procedure A:
1. Press and hold the CANCEL button.
2. Press the COLOR COPY button. Release both buttons.
3. The self test prints. The printed pattern will verify printer is generally functional. Inspect color
bars to verify proper nozzle/jetting health.
Procedure B:
1. Press the Setup button, select Print Report and select Self-Test Report
Procedure C:
1. Make sure the printer is on and loaded with unused, plain, white paper.
2. Press Setup. The Setup Menu appears.
3. Press the Down-arrow button to select the Print Report Menu, and then press OK. The Self-Test
Report option displays.
4. Press OK to print the self-test report.
112
5. Evaluate test pattern. The color stair-step patterns at top-left are printed by the color cartridge.
The black stair-step pattern at top-right is printed by the black cartridge.
-- If the Self Test Page prints ok then the printer is functioning correctly and the problem is with the ink
cartridges - replace the suspect ink cartridge and retest. Refer to 2nd video procedure at the following
link on how to read the Tap 10 test (NOTE: the HP 74/75 cartridges are electrically identical to the HP 92
thru 98 cartridges): http://inkjet411.com/?page_id=579
[Keypad equipped printer models]
NOTE: It is possible to 'temporarily' bypass the cartridge error message (for emergency printing
purposes only), please refer to link below (see 3rd video): http://inkjet411.com/?page_id=620
However, if the cartridge is determined to be electrically damaged, largely dependent on the 'Tap 41'
diagnostic test results, the cartridge will eventually need to be replaced with a new one.
Cartridge Error Bypass (procedure has not been validated): [PSC 2335 thru 2710]
1. Press * and # keys at same time.
2. You will see the following message "Enter special key combo", then
3. Enter "123" (or 124)
4. Using left/right arrow keys, navigate to Special Reports. Select OK/Enter.
5. Press the right arrow until you find "Print Cartridges", click OK
If there is a print job in the queue, it may begin printing. Results will vary depending on severity of
cartridge’s electrical state.
*Many cartridges eventually do encounter problems or failures, especially after their original ink is gone
and they are re-used, and this is often unrelated to the refill process. The “Incompatible Print Cartridge"
/ “Print Cartridge(s) Problem” / “Check Print Cartridge” / “Remove and check cartridge on right” / “Refer
to printer documentation” / “Incorrect Cartridge: Black print cartridge inserted now is not intended for
use in this printer” / "Cartridge Not Intended For Use In This Printer" / “Print cartridge in right stall not
supported” error message is typically indicative of failed micro-electronics internal to the ink
cartridge(s). In addition, It is common to have a marginally performing ink cartridge (which was
performing ok before) in the adjacent slot (i.e. color), then when a marginally performing cartridge is
installed into the other slot (i.e. black), both of the ink cartridge(s) then get flagged with electrical errors.
Please note this type of failure is quite rare with an ink cartridge that that has only been refilled once or
twice. Severe cartridge errors are primarily caused by an electrical breakdown at the cartridge’s nozzle
plate. Ink penetration or corrosion into the nozzle plate will cause a failure of the tiny micro-electronics
resulting in a variety of different error messages being displayed – see picture at bottom of this page:
http://inkjet411.com/?page_id=1216
113
However, if your printer works routinely after inserting a brand new cartridge in it, you should discuss
the possibility of a refund with your local Costco (for the refilled cartridge purchase). We regret your
inconvenience, and we hope that you will continue to consider the compelling value of inkjet refilling in
the future.
Please let us know the age of the cartridge and if the diagnostic procedures were able to confirm the
cartridge(s) electrical condition.
-Thank you
HP PSC 1610 - NOT RECOGNIZING CARTRIDGE (92-98)
Regarding your recent inquiry about the HP 94 cartridge error message and inability to print with your
HP PSC 1610 printer, this type of error is normally associated to an electrical connection issue between
the cartridge and carriage flex cables, or even more likely, an internal micro-electronic failure inside the
cartridge itself. An electronic failure of the cartridge would be unrelated to the ink cartridge refill
process; this same type of failure can also (and frequently do!) occur with brand new ink cartridge*.
Let's run a few checks to check the electrical state of both ink cartridges and validate an internal micro-
electronic failure of the ink cartridge or cartridges.... ....please refer to A thru E below:
Please first verify the age of the ink cartridge(s)....look at imprinted date on front (or back) of ink
cartridge. If this ‘warranty expiration date’ has expired, then potential cartridge failures can occur due to
internal corrosion, etc.
A. Ensure BOTH carriage/flex cables and BOTH ink cartridge contacts are thoroughly clean before
proceeding: http://inkjet411.com/?page_id=1519
B. Print the ‘Tap 41/43’ Cartridge Health Diagnostics Test Report:
1. Depress BOTH arrow keys simultaneously.
2. Press the Left arrow key.
3. Select the OK key.
4. Press the Right arrow key. The "Underware" menu should be displayed.
5. Press the right arrow key until the ‘print-mech button tap’ menu is displayed.
6. Select Ok (Code = 0 will be displayed); click and hold Right Arrow until code = 41’ is displayed.
Use the Left Arrow if you need to decrease numerical count.
7. Select Ok. Within one minute the Tap 41 diagnostic test pattern should be initiated and print
(whether ink cartridges are good or not, i.e. this is a forced print test). Refer to 2nd video at
following link on how to interpret the diagnostic test report:
http://inkjet411.com/?page_id=1741
NOTE: If access code '41' does not yield a test print, then try and enter "code = 43").
114
--- A good HP 93/95/97/99 color cartridge should display 600 good nozzles, while a good HP
92/94/96/98 black ink cartridge should show 672 good nozzles. If the results yield anything different
then the ink cartridge is likely damaged and will need to be replaced. Refer to 2nd video on how to read
the printout: http://inkjet411.com/?page_id=1741
---- If the printer attempts to print the diagnostic test pattern (1 page) then the printer is generally
considered operational and functional, if nothing is printed, but the printer attempts to print the
pattern, then the tri-color ink cartridge is either empty, clogged or severely electrically damaged (black
ink cartridge is not used). You can remove the tri-color cartridge, reactivate the tap 41 test and the
printer will print the diagnostic test print in black ink (special "ink back-up mode").
D. Print Self-Test Page:
1. Ensure letter size paper is loaded.
2. Press Setup until Print Report appears on the display.
3. Select OK.
4. Press OK again. The self-test page should attempt to print.
-- If the Self Test Page prints ok then the printer is functioning correctly and the problem is with the ink
cartridges - replace the suspect ink cartridge and retest. Refer to 2nd video procedure at the following
link on how to read the Tap 10 test (NOTE: the HP 74/75 cartridges are electrically identical to the HP 92
thru 98 cartridges): http://inkjet411.com/?page_id=579
It may be possible to 'temporarily' bypass the cartridge error messages for emergency printing purposes
only or you can also try and reset the printer to see if the error condition clears. Refer to procedures
below.
E. Cartridge Error Bypass Procedure (this procedure has not yet been validated):
1. Depress BOTH arrow keys simultaneously.
2. Press the Left arrow key.
3. Select the OK key.
4. Press the Left arrow key. The "Service" menu should be displayed (or Press Right arrow key and
enter the ‘Underware’ menu)
5. Navigate until you locate the ‘Checksum’ menu. Select OK.
6. Press Cancel 2-3 times to exit menu from service menus.
7. Attempt to send a print job to the printer. If successful, please note this action typically only
allows 1 single print job to come thru at a time with each ‘Checksum’ clearing action.
F. Printer Reset:
115
1. Unplug the power cord.
2. Press and hold the OK and CANCEL buttons on the front panel keypad.
3. While still holding the buttons, plug the power cord back in. Continue to hold the
buttons for two seconds, and then release both buttons.
4. After a few seconds, the screen will display the message “Deriv Clear” confirming that
the reset is done.
*Many cartridges eventually do encounter problems or failures, especially after their original ink is gone
and they are re-used, and this is often unrelated to the refill process. The “Incompatible Print Cartridge"
/ “Print Cartridge(s) Problem” / “Check Print Cartridge” / “Remove and check cartridge on left (right)” /
“Refer to printer documentation” / “Incorrect Cartridge: Black print cartridge inserted now is not
intended for use in this printer” / "Cartridge Not Intended For Use In This Printer" / “Print cartridge in
right stall not supported” error message is typically indicative of failed micro-electronics internal to the
ink cartridge(s). In addition, It is common to have a marginally performing ink cartridge (which was
performing ok before) in the adjacent slot (i.e. color), then when a marginally performing cartridge is
installed into the other slot (i.e. black), both of the ink cartridge(s) then get flagged with electrical errors.
Please note this type of failure is quite rare with an ink cartridge that that has only been refilled once or
twice. Severe cartridge errors are primarily caused by an electrical breakdown at the cartridge’s nozzle
plate. Ink penetration or corrosion into the nozzle plate will cause a failure of the tiny micro-electronics
resulting in a variety of different error messages being displayed – see picture at bottom of this page:
http://inkjet411.com/?page_id=1216
However, if your printer works routinely after inserting a brand HP new cartridge in it, you should
discuss the possibility of a refund with your local Costco (for the refilled cartridge purchase). We regret
your inconvenience, and we hope that you will continue to consider the compelling value of inkjet
refilling in the future.
Please let us know the age of the cartridge and if the diagnostic procedures were able to confirm the
cartridge(s) electrical condition.
-Thank you
ERROR MESSAGES - NOT RECOGNIZING CARTRIDGE (61)
NOTE: For purposes of our communication please note that the HP 301 UK cartridges are the same as the
HP 61 USA versions; all the features and functions discussed below will work on your printer as the
printer platforms are identical.
Regarding your recent inquiry about the HP 61 cartridge error message and inability to print to your HP
Deskjet 3050 printer, this type of problem is normally an electrical connection issue between the printer
and the cartridge, or more likely, an internal micro-electronic failure inside one of the HP61 ink
cartridges. An electronic failure of the cartridge would be unrelated to the ink cartridge refill process;
these same failures can occur with brand new ink cartridges*. To determine which cartridge is causing

116
the error condition and to check the electrical health of both ink cartridges, please run the 'Tap 41'
diagnostic test below….
Please first verify the age of the ink cartridge(s)....look at imprinted date on front (or back) of ink
cartridge. If this ‘warranty expiration date’ has expired, then potential cartridge failures can occur due to
internal corrosion, etc.
An internal electrical failure of a cartridge can be confirmed by performing the following steps which will
help rule out other variables which could also be causing the issue.
A. Ensure BOTH carriage/flex cables and BOTH ink cartridge contacts are thoroughly clean before
proceeding: http://inkjet411.com/?page_id=1519
B. Validate the cartridge’s electrical health by running the ‘Tap 41’ diagnostics test (refer to 2nd
video at the following link so you understand how to analyze the test print):
http://inkjet411.com/?page_id=1476
1. Turn printer Power ON; wait 15 seconds for printer to fully energize.
2. PRESS AND HOLD the Power Button
3. Press the Cancel (X) button 4 times
4. Press the Scan button once
5. Release the Power button. The Tap 41 test report should print within 30 seconds.
[HP Deskjet 1000 Series Only:]
B. Validate the cartridge’s electrical health by running the ‘Tap 41’ diagnostics test (refer to video
so you understand how to analyze the test print): http://inkjet411.com/?page_id=1476
1. PRESS AND HOLD the Power Button
2. Open and close the 'Cartridge Access' door four (4) times.
3. Release the Power button
C. Perform ‘Tap 10’ Internal Self Test: [HP Deskjet 2000-3050]
1. Press and hold the Power button, and then press the Cancel button once.
2. Release the buttons. The 10-tap test prints.
3. Review test pattern; ensure all colors are firing. A missing block or blocks within the nozzle
stair step pattern indicates a misfiring ink nozzle. Perform cartridge cleaning to correct.
-- Providing the color cartridge is partially functioning the Tap 41 diagnostic test print will be printed
(this is a forced service print test which is mainly used for the evaluation of ink cartridge electrical
health. A good HP 61/61XL color cartridge should display 612 good nozzles, while a good HP 61/61XL
black ink cartridge should show 336 good nozzles. If the results yield anything different then the ink
cartridge is likely damaged and will need to be replaced.
117
--- If the printer attempts to print the diagnostic test pattern (1 page) then the printer is generally
considered operational and functional, if nothing is printed, but the printer attempts to print the
pattern, then the tri-color ink cartridge is either empty, clogged or severely electrically damaged (black
ink cartridge is not used). You can remove the tri-color cartridge, reactivate the tap 41 test and the
printer will print the diagnostic test print in black ink. Both the ‘Tap 41’ and ‘Tap 10’ tests are ‘forced
print tests’ – the printer will make every attempt to print the pattern whether the ink cartridges are
good or bad…the patterns should be utilized to diagnose cartridge health. If ‘regular’ printing is still not
possible then one (or both) of the ink cartridges is damaged.
*Many cartridges eventually do encounter problems or failures, especially after their original ink is gone
and they are re-used, and this is often unrelated to the refill process. The “Incompatible Cartridge(s)" /
“Print Cartridge(s) Problem - Refer to printer documentation." error message is typically indicative of
failed micro-electronics internal to the ink cartridge(s). Also, it is common to have a marginally
performing ink cartridge (which was performing ok before) in the adjacent slot (i.e. color), then when a
marginally performing cartridge is installed into the other slot (i.e. black), both of the ink cartridge(s)
then get flagged with electrical errors. Running the 'Tap 41' cartridge health diagnostics test will confirm
the active state of both cartridges.
Please note this type of failure is quite rare with an ink cartridge that that has only been refilled once or
twice. For reference, the following page provides a complete review of the majority of cartridge error
messages you may observe on your printer at one point or another:
http://inkjet411.com/?page_id=415
As a temporary workaround, or if you are unable to determine which cartridge is causing the issue,
remove one of the ink cartridges from the printer....this will place the printer into the 'single cartridge
printer mode'....print jobs may then be executed from the computer (only). To see if this feature is
supported with your printer model, please refer to your printer's User Guide.
If your printer works routinely after inserting a brand new cartridge in it, you should discuss the
possibility of a refund with your local Costco (for the refilled cartridge purchase). We regret your
inconvenience, and we hope that you will continue to consider the compelling value of inkjet refilling in
the future.
-Thank you
HP Officejet K60/K80xi ERROR MESSAGES - NOT RECOGNIZING CARTRIDGE (15, 23, 45, 78)
Regarding your recent inquiry about the HP 45/78 cartridge error messages ("Remove and check black
cartridge" and "Remove and check color cartridge") and inability to print with your HP Officjet K80xi
printer, this type of problem is either an electrical connection issue between the printer and the
cartridge, or more likely based on the reported cartridges errors, very likely internal micro-electronic
failures inside the cartridges themselves. An electronic failure of the cartridge would be unrelated to the
ink cartridge refill process; in fact these same types of failures can occur with brand new ink cartridges.*
118
Please verify the age of the ink cartridge(s)....look at imprinted date on front (or back) of ink cartridge. If
this ‘warranty expiration date’ has expired, then potential cartridge failures can occur due to internal
corrosion, etc.
As a possible temporary workaround, or if you are unable to determine which cartridge is causing the issue, remove one of the ink cartridges from the printer....this will place the printer into the 'single cartridge printer mode'....print jobs may then be executed from the computer (only): To see if this feature is supported on your printer please refer to your printer’s User Guide.
To confirm a cartridge electrical failure, please eliminate all other variables which may be causing the
issue:
1) Ensure BOTH carriage/flex cables and BOTH ink cartridge contacts are thoroughly clean before
proceeding: http://inkjet411.com/?page_id=1519
Officejet and LX, Officejet 300 series, 700 series, T series, D series, K series, G series, V series, 4100
series, 5100 series, 6100 series, 7100 series (HP 45/78 ink cartridges)
2) Perform Self Test Print:
http://h10025.www1.hp.com/ewfrf/wc/document?cc=us&lc=en&dlc=en&docname=bpu00734
1. On the front panel of the product, press Menu (or Setup).
2. Press the Right Arrow until Print Reports displays, and then press Enter, Start, or OK.
3. Press the Right Arrow until Self-Test Report displays, and then press Enter, Start, or OK.
3) Perform Printer Error Reset:
1. Open the printer/cover as if replacing the cartridge and allow the carriage assembly to move to
the cartridges access/loading position.
2. Unplug the power cable from the rear of printer and close the printer’s cover.
3. While depressing the power button, plug in the power cable. Keep the power button pressed for
about 10-15 seconds, allowing the error flag to reset.
4. After printer powers on, cycle printer power once again and allow printer to fully initialize (may
take ~5 minutes for the message/error condition to disappear).
NOTE: If ink cartridge error persists then replace ink cartridge.
3) Verify HP 15 ink cartridge’s electrical health. To check ink cartridge's electrical health, please activate
the Printer Diagnostic test (HP Deskjet 842c):
1. Turn the printer on.
2. Press and hold the POWER button.
3. Press the RESUME button four times.
4. Release the POWER button.
119
3) Print a HP Self-Test Report (older HP printer models) – click here for instructions/sample prints:
http://h10025.www1.hp.com/ewfrf/wc/document?cc=us&lc=en&dlc=en&docname=bpu00734
4) Verify the cartridge’s warranty expiration date (imprinted on front of ink cartridge) to see if it still
covered under warranty. If out of warranty, then the cartridge has a significantly higher chance of failure
due to age and internal microelectronic corrosion.
http://h10025.www1.hp.com/ewfrf/wc/document?docname=c00206040&tmp_task=prodinfoCategory
&lc=en&dlc=en&cc=us&lang=en
*Many cartridges eventually do encounter problems or failures, especially after their original ink is gone
and they are re-used, and this is often unrelated to the refill process. The “Incompatible Cartridge(s)",
“Print Cartridge(s) Problem", “Incorrect Print Cartridge at least one of the print cartridges currently
installed is not intended for use in this printer”, “Check and Remove Cartridge”, error message is
typically indicative of failed micro-electronics internal to the ink cartridge(s). As well, it is common to
have a marginally performing ink cartridge (which was performing ok before) in the adjacent slot (i.e.
color), then when a marginally performing cartridge is installed into the other slot (i.e. black), both of
the ink cartridge(s) then get flagged with electrical errors.
For reference, the following page provides a complete review of the majority of cartridge error
messages you may observe on your printer at one point or another:
http://inkjet411.com/?page_id=1802
Please note this type of failure is quite rare with an ink cartridge that that has only been refilled once or
twice.
Now, if your printer works routinely after inserting a brand new HP45 and/or HP78 cartridge in it, you
should discuss the possibility of a refund with your local Costco (for the refilled cartridge purchase). We
regret your inconvenience, and we hope that you will continue to consider the compelling value of inkjet
refilling in the future.
-Thank you
HP 56 / 57/ 58 Ink Cartridge Errors -- Deskjet 5000-5100-5500-5600-5800:
Regarding your recent inquiry about the HP 57 (or 58) color cartridge error message (“Print Cartridge
Not intended for use in this printer”) and inability to print with your HP Deskjet 5160 printer, this type of
problem is either an electrical connection issue between the printer and the cartridge, or more likely, an
internal micro-electronic failure inside the cartridge itself. An electronic failure of the cartridge would be
unrelated to the ink cartridge refill process; these same failures can occur with brand new ink
cartridges*.
120
NOTE: To help confirm which ink cartridge is causing the issue, typically you would first remove the right
ink cartridge first to see if the ink error indicator extinguishes, if the light stops blinking then you have
identified the damaged cartridge. If not, then the left cartridge is causing the issue.
Please verify the age of the ink cartridge(s)....look at imprinted date on front (or back) of ink cartridge. If
this ‘warranty expiration date’ has expired, then potential cartridge failures can occur due to internal
corrosion, etc.
As a temporary workaround, or if you are unable to determine which cartridge is causing the issue,
remove one of the ink cartridges from the printer....this will place the printer into the 'single cartridge
printer mode'....print jobs may then be executed from the computer (only): For more information, refer
to your printer user guide.
To confirm a cartridge electrical failure, please eliminate all other variables which may be causing the
issue:
1) Ensure BOTH carriage/flex cables and BOTH ink cartridge contacts are thoroughly clean before
proceeding: http://inkjet411.com/?page_id=1519
2) Perform the following printer 'service' tests....in particular, please perform the 'Tap 43' diagnostic test
in C. below: http://inkjet411.com/?page_id=2358
A. Running a sample page:
1. Turn the printer on.
2. Press and hold the RESUME button until the printer starts printing.
3. Release the RESUME button.
B. Running a self-test:
1. Turn the printer on.
2. Press and hold the POWER button.
3. Press the RESUME button four times (4X).
4. Release the POWER button.
C. Activate 'Tap 43' Cartridge Health Diagnostics: http://inkjet411.com/?page_id=2358
NOTE: You must first stop the blinking ink error light by pressing the Cancel button. You may need to
remove one of the ink cartridges first in order to do this before you can proceed, then re-install cartridge
just prior to commencing the diagnostic test.
1. To begin, Press and HOLD the Power Button.
2. Press the Cancel (X) button 4 times, then…
3. Press the Resume/Down Arrow button 3 times.
4. Release the Power button; the Tap 43 report will print. See video:
http://inkjet411.com/?page_id=2358
121
NOTE 1: The Tap 43 test report will be printed using the black ink cartridge by default; if a blank page
appears then remove the black ink cartridge from the printer and repeat steps; report will be printed
using the Color cartridge. This can also help you isolate the problem to one of the ink cartridges. The
‘Current' error message should state ‘None’, however if you any other message then either the ink
cartridge is incorrectly seated in the carriage assembly or a severe cartridge error condition is present
and the ink cartridge may need to be replaced.
5. The Left and Right ‘Status’ columns should state ‘Okay’. If not, then the respective ink cartridge
may be electrically damaged and may need to be replaced.
6. If ‘TSR Shorted’ states anything other than ‘No’, then the respective ink cartridge is electrically
damaged and will need to be replaced.
7. If diagnostic test data information is satisfactory, then confirm all 4 colors are firing properly by
inspecting the printed stair-step patterns.
NOTE 2: Ideally, a good Color cartridge will display 300 nozzles (for example, check the printed 10 x 10
stair step patterns for each of the 3 colors), while a good Black cartridge will display 416 nozzles (for
example, check the printed 26 x 16 stair-step pattern).
NOTE 3: Ensure the top cover is closed and that the interlock switch at top-right side is properly closing
the circuit – you may need to depress with a small pencil to ensure this is not causing a false error
condition.
*Many cartridges eventually do encounter problems or failures, especially after their original ink is gone
and they are re-used, and this is often unrelated to the refill process. The “Print Cartridge Not intended
for use in this printer” / “Cartridge Error - Cartridge not right for this printer" error message is typically
indicative of failed micro-electronics internal to the ink cartridge(s). As well, it is common to have a
marginally performing ink cartridge (which was performing ok before) in the adjacent slot (i.e. color),
then when a marginally performing cartridge is installed into the other slot (i.e. black), both of the ink
cartridge(s) then get flagged with electrical errors.
Please note this type of failure is quite rare with an ink cartridge that that has only been refilled once or
twice.
Now, if your printer works routinely after inserting a brand new cartridge in it, you should discuss the
possibility of a refund with your local Costco (for the refilled cartridge purchase). We regret your
inconvenience, and we hope that you will continue to consider the compelling value of inkjet refilling in
the future.
-Thank you
SEVERE ERROR MESSAGES – HP 92-98 Rejection (> No Tap 41)
122
Regarding your recent inquiry about the HP 92 cartridge error message ("cartridge is not intended for
use in this printer") and inability to print to your HP PS C4180 printer, this type of problem is either an
electrical connection issue between the printer and the cartridge, or more likely, an internal micro-
electronic failure inside the cartridge. An electronic failure of the cartridge would be unrelated to the ink
cartridge refill process; these same failures can occur with brand new ink cartridges*.
Please verify the age of the ink cartridge(s)....look at imprinted date on front (or back) of ink cartridge. If
this ‘warranty expiration date’ has expired, then potential cartridge failures can occur due to internal
corrosion, etc.
As a temporary workaround, or if you are unable to determine which cartridge is causing the issue, remove one of the ink cartridges from the printer....this will place the printer into the 'single cartridge printer mode'....print jobs may then be executed from the computer (only): For more information, refer to your printer user guide.
An internal electrical failure of a cartridge can be confirmed by performing the following steps which can
help rule out other variables which could also be causing the issue.
A. Ensure BOTH carriage/flex cables and BOTH ink cartridge contacts are thoroughly clean before
proceeding: http://inkjet411.com/?page_id=1519
B. Depending on the cartridge's electrical state - you might be able to run a cartridge health
diagnostics test– refer to the Inkjet411 HP printer diagnostic’s support document for your
printer model: http://inkjet411.com/?page_id=1813
For reference, the following page provides a complete review of the majority of cartridge error
messages you may observe on your printer at one point or another:
http://inkjet411.com/?page_id=1216
NOTE: Unfortunately, we do not have a cartridge error bypass procedure or cartridge health diagnostics
print instructions for your printer model.
*Many cartridges eventually do encounter problems or failures, especially after their original ink is gone
and they are re-used, and this is often unrelated to the refill process. Severe cartridge error messages
which prevent printing are typically indicative of failed micro-electronics internal to the ink cartridge(s).
In addition, it is equally common to have a marginally performing ink cartridge (which was performing
ok before) in the adjacent slot (i.e. color), then when a marginally performing cartridge is installed into
the other slot (i.e. black), both of the ink cartridge(s) then get flagged with electrical errors.
Please note this type of failure is quite rare with an ink cartridge that that has only been refilled once or
twice.
123
However, if your printer works routinely after inserting a new cartridge in it, you should discuss the
possibility of a refund with your local Costco (for the refilled cartridge). We regret your inconvenience,
and we hope that you will continue to consider the compelling value of inkjet refilling in the future.
-Thank you
HP OFFICEJET 6210/6310/7210/7310/7410 ERRORS - NOT RECOGNIZING CARTRIDGE (95/98)
HP PSC 2610xi?
Yes, we completely agree....that HP ink cartridge error message is very misleading!!
Regarding your recent inquiry about the HP 98 cartridge error message and inability to print to your HP
OJ 7210 printer, this type of problem is normally associated to an electrical connection issue between
the printer and the cartridge, or more likely, an internal micro-electronic failure inside the cartridge
itself. An electronic failure of the cartridge would be unrelated to the ink cartridge refill process; this
same failure can occur with a brand new ink cartridge*. While there are workarounds available, they
are considered temporary in nature (and do not always work). Please execute the 'Tap 41' Diagnostics
Test Report below to confirm which cartridge is actually causing the issue and to check the cartridge's
overall electrical health (refer to Procedure C. below):
Please first verify the age of the ink cartridge(s)....look at imprinted date on front (or back) of ink
cartridge. If this ‘warranty expiration date’ has expired, then potential cartridge failures can occur due to
internal corrosion, etc.
An internal electrical failure of a cartridge can be confirmed by performing the following steps which will help rule out other variables which could also be causing the issue.
A. Ensure BOTH carriage/flex cables and BOTH ink cartridge contacts are thoroughly clean before
proceeding: http://inkjet411.com/?page_id=1519
B. Verify the carriage clip (metal restraining band) for the black cartridge stall is installed/present
(if applicable for your printer model)....remove the color cartridge and look at the color clip/stall
position for a direct comparison. If the carriage restraining clip is missing then you have a
mechanical failure of the printer. Check your user manual.
C. You can confirm the black and color ink cartridge’s electrical health by running the ‘Tap 41’
diagnostics test: NOTE: SERVICE MENU ACCESS IS SLIGHTLY DIFFERENT FOR OJ 6310 MODEL,
YOU WILL NEED TO EXPLORE THRU MENUS TO FIND THE 'print mech button tap' MENU.
a. Load Letter/A4-size paper into paper feed tray.
b. Press the * and # keys simultaneously.
c. Enter 124 (or 123 on some models) at keypad. The ‘Underware xxxx’ menu should be
displayed (or ‘Support xxxx’ menu).
124
d. Use the arrow keys to navigate to the System Menu (on certain Officejet models you
may need to go to ‘Reports Menu’). Select Ok.
e. Use the arrow keys to navigate to the “print-mech button tap” menu. Select Ok. LCD
screen should display “code = 0”.
f. Use the arrow keys to enter “code = 41” (or just enter 41 on keypad). Select Ok. The
Tap 41 diagnostic test pattern should begin to print. Refer to 2nd video at link below on
how to analyze the printed diagnostic pattern.
NOTE: If nothing prints, then try entering ‘code=43’ (select OJ printer models leverage different test codes).
REFERENCE: Tap 41 Diagnostics [HP Deskjet 6900 -use HP 93 thru 97 cartridges]: http://inkjet411.com/?page_id=1741
---- If the printer attempts to print the diagnostic test pattern (1 page) then the printer is generally
considered operational and functional, if nothing is printed, but the printer attempts to print the
pattern, then the tri-color ink cartridge is either empty, clogged or severely electrically damaged (black
ink cartridge is not used). A good HP 93/95/97 color cartridge should display 600 good nozzles, while a
good HP 92/94/96/98 black ink cartridge should show 672 good nozzles. You can remove the tri-color
cartridge, reactivate the tap 41 test and the printer will print the diagnostic test print in black ink. If the
results yield anything different then the ink cartridge is likely damaged and will need to be replaced.
Refer to video above on how to read the printout.
You can also test general printer performance by running the 'Tap 10' diagnostic test, use same
procedure above and enter "code = 10". Both the ‘Tap 41’ and ‘Tap 10’ tests are ‘forced print tests’ –
the printer will make every attempt to print the pattern whether the ink cartridges are good or bad…the
patterns should be utilized to diagnose cartridge health. If ‘regular’ printing is still not possible then one
or both of the ink cartridges is damaged.
CARTRIDGE ERROR BYPASS PROCEDURE: It is possible to 'temporarily' bypass the cartridge error message (for emergency printing purposes only - REFER TO 3RD VIDEO). However, if the cartridge is determined to be electrically damaged it will eventually need to be replaced with a new one. http://inkjet411.com/?page_id=544 NOTE: There are 2 main branches under the service menu, so finding the ‘CHECKSUM’ menu for your particular printer model may involve some exploring thru the various menus…. 1. Press the * and # keys simultaneously. 2. Enter 123 (or 124, or 1234) at keypad. The ‘Underware’ menu should be displayed. 3. Use the arrow keys to navigate to the Information Menu. Select Ok. 4. Use the arrow keys to navigate to the 'checksum for relock data input' (or simply ‘checksum’).
Select Ok. LCD should display a 5-digit number after a few seconds. 5. Press Cancel several times to completely exit out of service menu. 6. Attempt to send a print job to printer.
NOTE: with a marginally performing ink cartridge, this typically results in allowing 1 entire print job to be printed at a time. If this does not permit any print operations then the cartridge has internal micro-electronic damage and will need to be replaced.
125
*Many cartridges eventually do encounter problems or failures, especially after their original ink is gone
and they are re-used, and this is often unrelated to the refill process. The “Incompatible Cartridge(s)" /
“Print Cartridge(s) Problem”, “Refer to printer documentation", "Cartridge is not intended for use in
this printer" / “Remove and check color/black cartridge” error messages are typically indicative of
failed micro-electronics internal to the ink cartridge(s). Also, it is common to have a marginally
performing ink cartridge (which was performing ok before) in the adjacent slot (i.e. color), then when a
marginally performing cartridge is installed into the other slot (i.e. black), both of the ink cartridge(s)
then get flagged with electrical errors. Running the 'Tap 41' cartridge health diagnostics test will confirm
the active state of both cartridges.
Please note this type of failure is quite rare with an ink cartridge that that has only been refilled once or
twice. Severe cartridge errors are primarily caused by an electrical breakdown at the cartridge’s nozzle
plate. Ink penetration or corrosion into the nozzle plate will cause a failure of the tiny micro-electronics
resulting in a variety of different error messages being displayed – see picture at bottom of this page:
http://inkjet411.com/?page_id=1216
However, if your printer works routinely after inserting a brand new cartridge in it, you should discuss
the possibility of a refund with your local Costco (for the refilled cartridge). We regret your
inconvenience, and we hope that you will continue to consider the compelling value of inkjet refilling in
the future.
Please let us know if the above test procedure was successful and able to provide any clarity on the HP
95/98 cartridge issue.
-Thank you
HP PS C3110-C3194 --- NOT RECOGNIZING CARTRIDGE (92/93)
Regarding your recent inquiry about the HP 92/93 cartridge error message ("Check print cartridge") and
inability to print to your HP Photosmart C3150, this type of problem is normally associated to an
electrical connection issue between the printer and the cartridge, or more likely, an internal micro-
electronic failure inside the cartridge itself. An electronic failure of the cartridge would be unrelated to
the ink cartridge refill process; these same failures can (and frequently do!!) occur with brand new ink
cartridges*. We suggest you perform the procedures outlined below to either determine which
cartridge is causing the issue or to confirm an internal micro-electronic failure of the suspect ink
cartridge.
Please first verify the age of the ink cartridge(s)....look at imprinted date on front (or back) of ink
cartridge. If this ‘warranty expiration date’ has expired, then potential cartridge failures can occur due to
internal corrosion, etc.
126
An internal electrical failure of a cartridge can be confirmed by performing the following steps which will
help rule out other variables which could also be causing the issue:
To help determine/confirm which cartridge is causing the problem: 1. Open the cartridge access door. 2. Remove either cartridge (not both). 3. Close the cartridge access door. -- If the computer message is Print Cartridge Error, then the print cartridge that is still in the printer is the problem cartridge. If the computer message is NOT Print Cartridge Error (instead, it says that the cartridge you have removed is ...Either missing, not detected, or incorrectly installed), then the cartridge you have removed is the problem cartridge. On some printer models, if you notice the blinking error lights stops blinking following a cartridge removal, then this is the defective cartridge. This type of problem (i.e. “E” / ‘Blinking Error Lights’) is typically an internal micro-electronic failure inside the cartridge itself. An electronic failure of the cartridge would be unrelated to the ink cartridge refill process; these same failures can occur with brand new ink cartridges*. At the moment, we suggest you attempt to clean all electrical contacts and then run the internal self-test to confirm the type of electrical failure: A. Ensure BOTH carriage/flex cables and BOTH ink cartridge contacts are thoroughly clean before proceeding: http://inkjet411.com/?page_id=1519 B. Internal Self Test Print: 1. Press and HOLD the CANCEL (X) button 2. Depress the COLOR COPY button The diagnostic test page should print. --- Understand that the 'self-test print' is a "forced print"...the printer will attempt to print it whether the cartridges are good or bad.....if the diagnostic test page prints, but normal printing is still not permitted, then the suspect ink cartridge is likely electrically degraded or damaged internally since the self-test print is the only print the printer will yield.
C. Print the Demo Print:
1. Press and HOLD the CANCEL (X) button
2. Depress the COPIES button once.
Print should attempt to print the demo print (photo of dog and boy).
If the printer attempts to print the Self Test Page or Demo Print then the printer is generally considered
operational and functional, if nothing is printed, but the printer attempts to print the pattern, then the
tri-color ink cartridge is either empty, clogged or severely electrically damaged (black ink cartridge is not
used). A good HP 93/95/97 color cartridge should display 600 good nozzles (3 stair-step color grid
patterns), while a good HP 92/94/96/98 black ink cartridge should show 672 good nozzles (large stair-
step black grid pattern). If the results yield anything different then the ink cartridge is likely damaged
and will need to be replaced.
127
NOTE: Unfortunately, there is no cartridge error bypass available for this model series (HP Photosmart
C3110, C3125, C3135, C3140, C3150, C3170, C3173, C3175, C3180, C3183, C3188, C3190, C3193, C3194
All-in-One). This printer line is 'extremely sensitive to electrical performance of the ink cartridges... both
ink cartridges have to be in perfect electrical working order to allow any printing.
For reference, the following link contains a video about HP low ink, nuisance and severe cartridge error
messages. http://inkjet411.com/?page_id=1261
*Many cartridges eventually do encounter problems or failures, especially after their original ink is gone
and they are re-used, and this is often unrelated to the refill process. The “Check print cartridge" error
message is typically indicative of failed micro-electronics internal to the ink cartridge(s). It is common to
have a marginally performing ink cartridge (which was performing ok before) in the adjacent slot (i.e.
color), then when a marginally performing cartridge is installed into the other slot (i.e. black), both of
the ink cartridge(s) then get flagged with electrical errors.
Please note this type of failure is quite rare with an ink cartridge that that has only been refilled once or
twice. Severe cartridge errors are primarily caused by an electrical breakdown at the cartridge’s nozzle
plate. Ink penetration or corrosion into the nozzle plate will cause a failure of the tiny micro-electronics
resulting in a variety of different error messages being displayed – see picture at bottom of this page:
http://inkjet411.com/?page_id=1216
Now, if your printer works routinely after inserting a brand new HP 92/93 cartridge in it, you should
discuss the possibility of a refund with your local Costco (for the refilled cartridge purchase). We regret
your inconvenience, and we hope that you will continue to consider the compelling value of inkjet
refilling in the future.
Please let us know if the above test procedure was successful and able to provide any clarity on the HP
92/93 cartridge issue. We apologize for the inconvenience.
-Thank you
Successful printing of the test page illustrates that the printer itself is fully operational. If you printed the
Tap 41 print, does the test show exactly 600 good nozzles? If not, then the HP93 cartridge is bad. See
video for reference: http://inkjet411.com/?page_id=1741
A good HP 93/95/97 color cartridge should display 600 good nozzles, while a good HP 92/94/96/98 black
ink cartridge should show 672 good nozzles.
Unfortunately it sounds like the HP93 ink cartridge is electrically damaged (an internal micro-electronic
failure)...not sure what else we can tell you at this point.
128
You can return to Costco and they will refund your money. Just let them know you troubleshot the
problem via the Inkjet411 rep and we confirmed root cause of failure.
In the meantime, you can print using just one (black) cartridge in the printer (called the 'single cartridge
print mode')...it will allow print jobs to be processed via the computer only however.
We sincerely apologize for the inconvenience.
-Thank you
HP PS C4100 PRINTER SERIES --- NOT RECOGNIZING CARTRIDGE (92/93/95)
Regarding your recent inquiry about the HP 95 Tri-color ink cartridge error message ("Incompatible Print Cartridge", or similar) and inability to print with your HP PS C4180 printer, this type of error appears to an internal micro-electronic failure inside the cartridge itself - unfortunately the Costco electrical cartridge tester does not screen cartridges for everything, your printer is much more sensitive in this respect. An electronic failure of the cartridge would be unrelated to the ink cartridge refill process; this same type of failure can also occur with brand new ink cartridge*. Let's run a few checks to check the electrical state of both ink cartridges and validate an internal micro-electronic failure of the ink cartridge.... Please first verify the age of the ink cartridge(s)....look at imprinted date on front (or back) of ink cartridge. If this ‘warranty expiration date’ has expired, then potential cartridge failures can occur due to internal corrosion, etc. As a temporary workaround, or if you are unable to determine which cartridge is causing the issue, remove one of the ink cartridges from the printer....this may place the printer into the 'single cartridge printer mode'....print jobs may then be executed from the computer (only): For more information, refer to your printer's User Guide to see if this feature is supported for your printer model. Please perform the following corrective/diagnostic printer checks: A. Ensure BOTH carriage/flex cables and BOTH ink cartridge contacts are thoroughly clean before proceeding: http://inkjet411.com/?page_id=1519 (it sounds like you already did this, so you may disregard). B. Perform Tap 41 Cartridge Health Diagnostics Test: 1. Press and HOLD the ‘LEFT ARROW’ button. 2. Press the ‘Setup’ button. Release both buttons. The ‘Mfg Commands’ menu should be displayed. 3. At ‘Mfg Commands’ menu, click Right Arrow once until ‘uiaux service’ menu is displayed. 4. At ‘uiaux service’ menu, click the Right Arrow until ‘Special Reports’ menu is displayed. 5. Select Ok. Click Right Arrow until the ‘print-mech button tap’ menu is displayed. 6. Select Ok. (‘code = 0’ will be displayed); click and hold Right Arrow until ‘code = 41’ is displayed. 7. Select Ok. The test page prints. Refer to 2nd video at following link on how to interpret the diagnostic test report: http://inkjet411.com/?page_id=1741 NOTE 1: If access code '41' does not yield a test print, then enter "code = 43").
129
--- A good HP 93/95/97/99 color cartridge should display 600 good nozzles, while a good HP 92/94/96/98 black ink cartridge should show 672 good nozzles. If the results yield anything different then the ink cartridge is likely damaged and will need to be replaced. Refer to 2nd video on how to read the printout: http://inkjet411.com/?page_id=1741 ---- If the printer attempts to print the diagnostic test pattern (1 page) then the printer is generally considered operational and functional, if nothing is printed, but the printer attempts to print the pattern, then the tri-color ink cartridge is either empty, clogged or severely electrically damaged (black ink cartridge is not used). You can remove the tri-color cartridge, reactivate the tap 41 test and the printer will print the diagnostic test print in black ink (special "ink back-up mode"). C. Perform Self Test Page 1. Press and hold the CANCEL button. 2. Press the COLOR COPY button. Release both buttons. 3. The self test prints. The printed pattern will verify printer is generally functional. Inspect color bars to verify proper nozzle/jetting health. -- Inspect printed nozzle stair step patterns - verify all ink nozzles are properly firing. Generally, if the Self Test Page prints ok then the printer is functioning correctly and the problem is with the ink cartridges - replace the suspect ink cartridge and retest. Refer to 2nd video procedure at the following link on how to read the Self Test page test (NOTE: HP74/75 cartridges are electrically identical to the HP92 thru 98 cartridges). http://inkjet411.com/?page_id=579 *Many cartridges eventually do encounter problems or failures, especially after their original ink is gone and they are re-used, and this is often unrelated to the refill process. A blinking ‘Check Print Cartridge’ error light or “Incompatible Print Cartridge" / “Print Cartridge(s) Problem” / “Check Print Cartridge” / “Remove and check cartridge on right” / “Refer to printer documentation” / “Incorrect Cartridge: Black(Tri-color) print cartridge inserted now is not intended for use in this printer” / "Cartridge Not Intended For Use In This Printer" / “Print cartridge in right stall not supported” error messages are typically indicative of failed micro-electronics internal to the ink cartridge(s). In addition, It is common to have a marginally performing ink cartridge (which was performing ok before) in the adjacent slot (i.e. color), then when a marginally performing cartridge is installed into the other slot (i.e. black), both of the ink cartridge(s) then get flagged with electrical errors. Please note this type of failure is quite rare with an ink cartridge that that has only been refilled once or twice. Severe cartridge errors are primarily caused by an electrical breakdown at the cartridge’s nozzle plate. Ink penetration or corrosion into the nozzle plate will cause a failure of the tiny micro-electronics resulting in a variety of different error messages being displayed – see picture at bottom of this page: http://inkjet411.com/?page_id=1216 However, if your printer works routinely after inserting a brand new HP95 color ink cartridge in it, you should discuss the possibility of a refund with your local Costco (for the refilled cartridge purchase). We regret your inconvenience, and we hope that you will continue to consider the compelling value of inkjet refilling in the future.
130
Please let us know the age of the cartridge and if the diagnostic procedures were able to confirm the cartridge(s) electrical condition. -Thank you
HP PSC 1503-1514 --- NOT RECOGNIZING CARTRIDGE (92/93)
Regarding your recent inquiry about the HP 92 cartridge error message ("Check print cartridge", blinking
error lights, etc.) and inability to print to your HP PSC 1510 printer, it sounds like either....
1) The new HP92 cartridge is bad....or
2) The color ink cartridge (HP93?) could be causing the problem.
To help determine which cartridge is causing the problem:
1. Open the cartridge access door.
2. Remove either cartridge (not both).
3. Close the cartridge access door.
-- If the computer message is Print Cartridge Error, then the print cartridge that is still in the printer is
the problem cartridge. If the computer message is NOT Print Cartridge Error (instead, it says that the
cartridge you have removed is ...Either missing, not detected, or incorrectly installed), then the cartridge
you have removed is the problem cartridge. On some printer models, if you notice the blinking error
lights stops blinking following a cartridge removal, then this is the defective cartridge.
This type of problem is an internal micro-electronic failure inside the cartridge itself. An electronic
failure of the cartridge would be unrelated to the ink cartridge refill process; these same failures can
occur with brand new ink cartridges*. At the moment, we suggest you attempt to clean all electrical
contacts and then run the internal self-test to confirm the type of electrical failure:
A. Ensure BOTH carriage/flex cables and BOTH ink cartridge contacts are thoroughly clean before
proceeding: http://inkjet411.com/?page_id=1519
B. Print the Internal Self Test Page:
1. Press and HOLD the CANCEL (X) button
2. Depress the COLOR COPY button.
3. The diagnostic test page should print.
--- Understand that the 'self-test print' is a "forced print"...the printer will attempt to print it whether
the cartridges are good or bad.....if the diagnostic test page prints, but normal printing is still not
permitted, then the suspect ink cartridge is electrically degraded/damaged since the self-test print is the
only print the printer will yield.
---- If the printer attempts to print the diagnostic test pattern (1 page) then the printer is generally
considered operational and functional, if nothing is printed, but the printer attempts to print the
pattern, then the ink cartridges are either empty, clogged or severely electrically damaged. A good HP
131
93/95/97 color cartridge has 600 ink nozzles, while a good HP 92/94/96/98 black ink cartridge has 672
ink nozzles.
NOTE: Unfortunately, there is no cartridge error bypass available for this printer model series.
As a temporary workaround (or if you are unable to determine which cartridge is causing the issue)
remove one of the ink cartridges from the printer....this might place the printer into the 'single cartridge
printer mode'....print jobs may then be executed from the computer (only): For more information, refer
to your printer's User Guide to see if this mode is supported.
*Many cartridges eventually do encounter problems or failures, especially after their original ink is gone
and they are re-used, and this is often unrelated to the refill process. The “Check print cartridge",
blinking error lights, etc. are typically indicative of failed micro-electronics internal to the ink
cartridge(s). It is common to have a marginally performing ink cartridge (which was performing ok
before) in the adjacent slot (i.e. color), then when a marginally performing cartridge is installed into the
other slot (i.e. black), both of the ink cartridge(s) then get flagged with electrical errors.
Please note this type of failure is quite rare with an ink cartridge that that has only been refilled once or
twice. Severe cartridge errors are primarily caused by an electrical breakdown at the cartridge’s nozzle
plate. Ink penetration or corrosion into the nozzle plate will cause a failure of the tiny micro-electronics
resulting in a variety of different error messages being displayed – see picture at bottom of this page:
http://inkjet411.com/?page_id=1216
Now, if your printer works routinely after inserting a brand new HP 92 and/or HP93 cartridge in it, you
should discuss the possibility of a refund with your local Costco (for the refilled cartridge purchase). We
regret your inconvenience, and we hope that you will continue to consider the compelling value of inkjet
refilling in the future.
Please let us know if the above test procedure was successful and able to provide any clarity on the HP
92/93 (?) cartridge issue. We apologize for the inconvenience.
-Thank you
HP PS 8049, 8050, 8100, 8150, 8400, 8450 (7800 & 7850?)- NOT RECOGNIZING CARTRIDGE (94-97)
Regarding your recent inquiry about the HP94 or HP95 cartridge error message ("???") and inability to
print to your HP PS 7850 printer, this type of problem could be an electrical connection issue between
the printer and one of the ink cartridges, or more likely, there is an internal micro-electronic failure
inside one of the ink cartridges. An electronic failure of the cartridge would be unrelated to the ink
cartridge refill process; these same failures can occur with brand new ink cartridges.* To determine
which cartridge is causing the issue and/or to confirm an electrical problem with one of the ink
cartridges (or possibly both which is 'very' rare), please perform both the Internal Self-Test page along
with the Pen Electrical tests (diagnostics) to evaluate the electrical condition of both ink cartridges....
132
Please first verify the age of the ink cartridge(s)....look at imprinted date on front (or back) of ink
cartridge. If this ‘warranty expiration date’ has expired, then potential cartridge failures can occur due to
internal corrosion, etc.
As a temporary workaround, or if you are unable to determine which cartridge is causing the issue, remove one of the ink cartridges from the printer....this should place the printer into the 'single cartridge printer mode'....print jobs may then be executed from the computer (only). Please refer to your printer's User Guide to see if this feature is supported on your printer model. http://h10032.www1.hp.com/ctg/Manual/c00458612.pdf (7000 series)
A. Ensure BOTH carriage/flex cables and BOTH ink cartridge contacts are thoroughly clean before proceeding:
http://inkjet411.com/?page_id=1519
B. Perform Printer Self-Test Page:
7000 Printer Series:
1. Press and hold the OK button, and then press the Left Arrow button once.
2. Release the buttons. The internal test page prints.
8000 Printer Series:
1. Press CANCEL and SAVE simultaneously (SAVE is the left-most button before POWER on/off.)
2. Using left/right arrow keys, navigate to ‘pen electrical test’.
3. Select Enter to print test - evaluate nozzle test pattern.
-- If the printer prints the self test page then this demonstrates the printer is generally functional and
that the problem is likely with one of the ink cartridges. Please note this is a ‘forced’ service test…the
printer will attempt to print the test page whether the cartridges are good or bad. If the Self-Test
page can be successfully printed but regular/normal printing cannot, then one of the ink cartridges is
likely internally damaged. Remove and replace suspect cartridge to confirm.
C. Perform Cartridge Diagnostics tests using either C.1 or C.2 procedure below (varies by printer model):
C.1. Tap 41/43 Diagnostics Test:
1. To enter the Manufacturing Tests menu, press the 3 small, round buttons on the front panel
simultaneously for >5secs: ‘OK’, ‘CANCEL’, & ‘SELECT PHOTOS’ (or ‘Print Photos’)
2. Using left/right arrow keys, navigate to Special Reports (or System Menu). Select Enter.
3. Navigate to 'print-mech button tap' menu.
4. Select Ok (‘code = 0’ will be displayed); click and hold Right Arrow until ‘code = 41' (or attempt ‘code = 43’
if nothing prints using ‘41’) is displayed.
5. Select Ok. Within one minute the Tap 41 (or 43) diagnostic test pattern should be initiated and print.
Refer to video to help evaluate test pattern. Refer to 2nd video for guidance on how to read the
diagnostic test pattern: http://inkjet411.com/?page_id=1741
133
NOTE 1: A good HP 93/95/97/99 color cartridge should display 600 good nozzles, while a good HP 92/94/96/98 black
ink cartridge should show 672 good nozzles. If the results yield anything different then the ink cartridge is likely
damaged and will need to be replaced. For reference only, refer to the following HP Deskjet video which shows how
to read the HP 93-97 ink cartridge diagnostic test print: http://inkjet411.com/?page_id=1741 (refer to 2nd
video)
C.2. Pen Electrical / Error Bypass Procedure:
1. To enter the Manufacturing Tests menu, press the 3 small, round buttons on the front panel
simultaneously for >5secs: ‘OK’, ‘CANCEL’, & ‘SELECT PHOTOS’ (or ‘Print Photos’)
2. Using left/right arrow keys, navigate to Reports Menu (or System Menu). Select 'pen electrical test'.
3. Select Level 1, 2, or 3. Enter to print test - evaluate nozzle electrical test print.
NOTE 2: Pen recovery level 1, 2 or 3 clears cartridge errors, unblocking the printer to permit you to print the TEST
PAGE with the normal MENU / TOOLS /PRINT TEST PAGE choice to aid in printer evaluation.
NOTE 3: Cartridge Error Bypass Message (Emergency Printing only): The Pen Recovery Level 1 clears cartridge errors
and permits you to print the TEST PAGE with the normal MENU / TOOLS / PRINT TEST PAGE choice.
*Many cartridges eventually do encounter problems or failures, especially after their original ink is gone
and they are re-used, and this is often unrelated to the refill process. The "Incompatible Print
Cartridges" / “Check print cartridge" / “Color cartridge is not compatible. Use appropriate HP
cartridge" error messages are typically indicative of failed micro-electronics internal to the ink
cartridge(s). It is common to have a marginally performing ink cartridge (which was performing ok
before) in the adjacent slot (i.e. color), then when a marginally performing cartridge is installed into the
other slot (i.e. black), both of the ink cartridge(s) then get flagged with electrical errors.
Please note this type of failure is quite rare with an ink cartridge that that has only been refilled once or
twice. Severe cartridge errors are primarily caused by an electrical breakdown at the cartridge’s nozzle
plate. Ink penetration or corrosion into the nozzle plate will cause a failure of the tiny micro-electronics
resulting in a variety of different error messages being displayed – see bottom image at this page:
http://inkjet411.com/?page_id=1216
Now, if your printer works routinely after inserting a brand new cartridge in it, you should discuss the
possibility of a refund with your local Costco (for the ink refill purchase). We regret your inconvenience,
and we hope that you will continue to consider the compelling value of inkjet refilling in the future.
Please let us know if you have any questions on the technical information provided above.
-Thank you
HP DESKJET D4100 SERIES - NOT RECOGNIZING CARTRIDGE (92-93)
Regarding your recent inquiry about the HP92/93 cartridge error message ("???") and inability to print
to your HP DESKJET 4160 printer, this type of problem could be an electrical connection issue between
the printer and one of the ink cartridges, or more likely, there is an internal micro-electronic failure
inside one of the ink cartridges. An electronic failure of the cartridge would be unrelated to the ink
cartridge refill process; these same failures can occur with brand new ink cartridges.* To determine
134
which cartridge is causing the issue and/or to confirm an electrical problem with one of the ink
cartridges (or both cartridges which is 'very' rare), please perform both the Internal Self-Test page along
with the Cartridge Health diagnostics ‘Tap 41’ test to evaluate the electrical condition of both ink
cartridges....
Please first verify the age of the ink cartridge(s)....look at imprinted date on front (or back) of ink
cartridge. If this ‘warranty expiration date’ has expired, then potential cartridge failures can occur due to
internal corrosion, etc.
As a temporary workaround, or if you are unable to determine which cartridge is causing the issue, remove one of the ink cartridges from the printer....this should place the printer into the 'single cartridge printer mode'....print jobs may then be executed from the computer (only). If you do not have a replacement cartridge, you can still print in ink backup mode. Simply remove the problem cartridge, and print with the remaining cartridge.
1. If you remove the tri-color cartridge, printouts will be in grayscale.
2. If you remove the black or photo cartridge, the product prints slowly and the colors in the
printouts might differ.
Resolutions/Diagnostic Tests:
A. Ensure BOTH carriage/flex cables and BOTH ink cartridge contacts are thoroughly clean before
proceeding: http://inkjet411.com/?page_id=1519
B. Perform Extended Self-Test (see 2nd video for REFENCE ONLY:
http://inkjet411.com/?page_id=792):
1. Make sure plain white paper is loaded in the product.
2. Press and hold the Power button.
3. Press the Photosmart Essential button, and then release both buttons. NOTE: The self-test prints. Review test pattern; ensure all colors are firing. A missing horizontal line within
the nozzle stair step pattern indicates a misfiring ink nozzle. Perform cartridge cleaning to correct.
C. Perform Cartridge Health Diagnostics Test (‘Tap 41’) – refer to 2nd video:
http://inkjet411.com/?page_id=1741
1. Turn the printer on.
2. Press and hold the ‘POWER’ button.
3. Press the ‘Cancel’ (X) button four (4) times.
4. Press the ‘RESUME’ button (Down Arrow) once.
5. Release the POWER button.
6. The Tap 41 diagnostics page prints. NOTE: A good HP 93/95/97 color cartridge should display 600 good nozzles, while a good HP 92/94/96/98
black ink cartridge should show 672 good nozzles. On some models you may remove the tri-color cartridge,
reactivate the tap 41 test and the printer will print the diagnostic test print in black ink.
135
*Many cartridges eventually do encounter problems or failures, especially after their original ink is gone
and they are re-used, and this is often unrelated to the refill process. It is common to have a marginally
performing ink cartridge (which was performing ok before) in the adjacent slot (i.e. color), then when a
marginally performing cartridge is installed into the other slot (i.e. black), both of the ink cartridge(s)
then get flagged with electrical errors.
Please note this type of failure is quite rare with an ink cartridge that that has only been refilled once or
twice. Severe cartridge errors are primarily caused by an electrical breakdown at the cartridge’s nozzle
plate. Ink penetration or corrosion into the nozzle plate will cause a failure of the tiny micro-electronics
resulting in a variety of different error messages being displayed – see bottom image at this page:
http://inkjet411.com/?page_id=1216
Now, if your printer works routinely after inserting a brand new HP93 cartridge in it, you should discuss
the possibility of a refund with your local Costco (for the ink refill purchase). We regret your
inconvenience, and we hope that you will continue to consider the compelling value of inkjet refilling in
the future.
Please let us know if you have any questions on the technical information provided above.
-Thank you
HP OFFICEJET J3680/4215/4315/5610, PSC 1300-1400, D1300-D2300, Deskjet 3000 and F2200 Series –
CARTRIDGE ERRORS (21/22/27/28/56-58)
Regarding your recent inquiry about the HP 27 cartridge error message and inability to print with your
HP OJ 3680/4315, this type of problem is typically an electrical connection issue between the printer and
the cartridge, or more likely, an internal micro-electronic failure inside the cartridge itself. To be clear,
the error message language that HP chose for this kind of error is confusing...the cartridge is correct for
you model. An electronic failure of the cartridge would be unrelated to the ink cartridge refill process;
these same failures can occur with brand new ink cartridges*. Let's first run a few checks to see which
ink cartridge is causing the issue and to validate if an electrical failure of the ink cartridge has
occurred....please refer to Procedure B. below....
Please first verify the age of the ink cartridge(s)....look at imprinted date on front (or back) of ink
cartridge. If this ‘warranty expiration date’ has expired, then potential cartridge failures can occur due to
internal corrosion, etc.
As a temporary workaround, or if you are unable to determine which cartridge is causing the issue, remove one of the ink cartridges from the printer....this may place the printer into the 'single cartridge printer mode'....print jobs may then be executed from the computer (only): To confirm if your printer supports this feature, please refer to your printer user guide. This may also help you determine which cartridge is causing the issue.
136
To completely rule out connectivity issues, we suggest you follow perform the following...depending on
your printer model, please attempt either procedure B.1 and/or B.2 - please advise if either do not work
for your printer model:
A. Clean cartridge/printer electrical contacts. Also inspect printer's internal carriage flex cables for
surface damage (i.e. burn marks) or an uneven contact surface (by which the cartridge's rear
electrical contacts mates with).
http://inkjet411.com/?page_id=1519
B. Perform either of the ‘B’ procedures below as steps vary by printer model:
B.1. Perform Tap 43 test: [most Officejet printer models with keypads]
1. Press * and # keys at same time
2. Enter 1234 (or 124)
3. Using left/right arrow keys, navigate to Special Reports/Reports Menu (……or ‘System Menu’ /
‘Information Menu’ if Reports Menu is not available). Select Enter.
4. Using left/right arrow keys, navigate to ‘Extended Self Test’.
5. Select Enter to print test print - evaluate test print. If excessive nozzles are missing from the stair step
pattern, then perform cartridge cleaning to correct.
6. Using left/right arrow keys, navigate to ‘print-mech button tap’ menu.
7. Select Ok (‘code = 0’ will be displayed); click and hold Right Arrow until ‘code = 43’ is displayed. NOTE:
enter 'code = 41' if ‘code =43’ does not activate the diagnostic print report.
8. Select Ok. Within one minute the Tap 43/41 diagnostic test pattern should be initiated and print. The
test page prints.
B.2. Diagnostic Self-Test Page: [HP OJ 5600, OJ J3600?]
1. Press the Setup Button located on the bottom center of the control panel, beneath the LED
readout.
2. Press 2 to select “Print Reports”
3. Press 6 to select “Self-Test Report” on the number keypad
4. Examine the resulting self-test page that prints. There should be lines extending all the way
across the page in black, yellow, cyan and magenta. A missing black line indicates a problem
with the black or photo cartridge. Faded, streaked or missing lines in the other colors indicates a
problem with the color ink cartridge. Refer to video at link below to help evaluate test pattern.
B.3. Deskjet D1300, D1400, D2300, F300 series printers (HP 21/22 Cartridges)
Printer self-test:
1. Turn the printer on.
2. Press and hold down the Power button.
137
3. While holding down the Power button, open and shut the lid of the printer four times.
4. Release the Power button. The self-test prints.
5. Review test pattern; ensure all colors are firing. A missing horizontal line within the nozzle stair
step pattern indicates a misfiring ink nozzle. Perform cartridge cleaning to correct.
NOTE: When running the test on an HP Deskjet D2300/D2400 series printer it may be
helpful to use a pen or pencil to hold down the Power button.
B.4. PSC 1200, 1310, 1315, 1340, 1350 Printer series (HP 27, 28, 56, 57 ink cartridges) Self Test Report: 1. Load plain, white paper into the paper tray. 2. Press and hold the Cancel button, and then press the Start Copy Color button. 3. The product prints a self-test report. --- Examine the resulting self-test page that prints. There should be lines extending all the way across the page in black, yellow, cyan and magenta. A missing black line indicates a problem with the black or photo cartridge. Faded, streaked or missing lines in the other colors indicates a problem with the color ink cartridge. Refer to video at link below to help evaluate test pattern. NOTE: A good HP 56 black cartridge should display 416 good nozzles, while a good HP 57/58 color ink cartridge should show 300 good nozzles. REFERENCE: [HP Deskjet 5650 -use HP 56/57/58 cartridges]: http://inkjet411.com/?page_id=2358 B.5. PSC 1400 series printers (HP 21/22 Cartridges) Self Test Report:
1. Load plain, white paper into the paper tray. 2. Press and hold the Cancel button, and then press the Start Copy Color button. 3. The self-test report should print.
If the self test page prints then this illustrates that the printer is functional and the problem is likely limited to either one of the ink cartridges. There should be lines extending across the page in black, yellow, cyan and magenta. A missing black line indicates a problem with the black or photo cartridge. Faded, streaked or missing lines in the other colors indicates a problem with the color ink cartridge. To determine which cartridge is causing the problem: 1. Open the cartridge access door. 2. Remove either cartridge (not both). 3. Close the cartridge access door. -- If the computer message is Print Cartridge Error , then the print cartridge that is still in the printer is the problem cartridge. If the computer message is NOT Print Cartridge Error (instead, it says that the cartridge you have removed is ...Either missing, not detected, or incorrectly installed), then the cartridge you have removed is the problem cartridge.
B.6. Deskjet F2200 Printer series (HP 21/22 ink cartridges)
Print Self-Test Page:
1. Press the Setup or Menu button until Print Report appears in the display then press Enter.
2. Press the Setup or Menu button until Self-Test appears in the display, and then press Enter.
138
3. Review test pattern; ensure all 4 colors are firing. A missing horizontal line within the nozzle stair step
pattern indicates a misfiring ink nozzle. If the test page prints (or attempts to print a blank page) but
normal printing is still not possible then the printer is functionally ok; the ink cartridge is damaged and will
need to be replaced.
NOTE 1: A good HP 21 black cartridge should have 416 good nozzles (26 x 16 stair-step pattern), while a good HP 22
color ink cartridge should have 300 good nozzles (100 for each color, 10x10 stair-step pattern).
NOTE 2: Reference Video: http://inkjet411.com/?page_id=2358
B.7. Photosmart 7960 (HP 56/57/58 ink cartridges)
Internal Test Print:
1. Ensure that the memory card has been removed from the memory card slot.
2. Make sure plain paper is loaded in the In Tray.
3. Press the Menu button.
4. Press the Up/Down arrow button to display the Tools menu. Then press the OK button.
5. Press the Down arrow button to highlight Print a Test Page. Then press the OK button.
--- If the self test page prints then this illustrates that the printer is functional and the problem is likely limited to
either one of the ink cartridges. There should be lines extending across the page in black, yellow, cyan and
magenta. A missing black line indicates a problem with the black or photo cartridge. Faded, streaked or missing
lines in the other colors indicates a problem with the color ink cartridge.
NOTE: Ideally, a good Color cartridge will have/display 300 nozzles (for example, check the printed 10 x 10 stair step patterns
for each of the 3 colors), while a good Black cartridge will have/display 416 nozzles (for example, check the printed 26 x 16 stair-
step pattern).
Cartridge Health Diagnostics Test (Pen Tests)………(SERVICE MENU ACCESS VALIDATION STILL REQUIRED!)
1. To enter the Manufacturing Tests menu, press the 3 small, round buttons on the front panel
simultaneously for >5secs: ‘OK’, ‘CANCEL’, & ‘PRINTS’ (???)
2. Using left/right arrow keys, navigate to Special Reports (or System Menu). Select Enter.
3. Navigate to 'print-mech button tap' menu.
4. Select Ok (‘code = 0’ will be displayed); click and hold Right Arrow until ‘code = 41' (or attempt ‘code = 43’
if nothing prints using ‘41’) is displayed.
5. Select Ok. Within one minute the Tap 41 (or 43) diagnostic test pattern should be initiated and print.
Refer to video to help evaluate test pattern: http://inkjet411.com/?page_id=2358
NOTE: The Tap 41/43 test report will be printed using the black ink cartridge by default; if a blank page appears then remove
the black ink cartridge from the printer and repeat steps; report will be printed using the Color cartridge. This can also help you
isolate the problem to one of the ink cartridges. The ‘Current' error message should state ‘None’, however if you any other
message then either the ink cartridge is incorrectly seated in the carriage assembly or a severe cartridge error condition is
present and the ink cartridge may need to be replaced.
B.8. Deskjet 3000 series (HP 27/28 ink cartridges)
Print Self-Test Page:
1. Turn the printer on. 2. Press and hold down the POWER button.
139
3. Open and close the top cover four times. 4. Release the POWER button. NOTE: When running the test on the HP Deskjet 3600-3800 series printers it may be helpful to use a pen or pencil to hold down the Power button. --- A good HP 27 black cartridge should have 416 good nozzles (26 x 16 stair-step pattern), while a good HP 28 color ink
cartridge should have 300 good nozzles (100 for each color, 10x10 stair-step pattern).
---- If the self test page prints then this illustrates that the printer is functional and the problem is likely limited to either one of the ink cartridges. There should be lines extending across the page in black, yellow, cyan and magenta. A missing black line indicates a problem with the black or photo cartridge. Faded, streaked or missing lines in the other colors indicates a problem with the color ink cartridge.
To determine which cartridge is causing the problem: 1. Open the cartridge access door. 2. Remove either cartridge (not both). 3. Close the cartridge access door. -- If the computer message is Print Cartridge Error , then the print cartridge that is still in the printer is the problem cartridge. If the computer message is NOT Print Cartridge Error (instead, it says that the cartridge you have removed is ...Either missing, not detected, or incorrectly installed), then the cartridge you have removed is the problem cartridge.
--- Providing the color cartridge is partially functioning, the diagnostic test print will be printed (this is a forced service print test which is mainly used for the evaluation of ink cartridge electrical health). A good HP 21/27/56 black cartridge should display 416 good nozzles (26x16 grid), while a good HP 22/28/57/58 color ink cartridge should show 300 good nozzles (10x10 color grid). For reference, please refer to video at link below to help evaluate test pattern. [NOTE: HP 56/57/58 and HP21/22 cartridges are electrically
similar]: http://inkjet411.com/?page_id=2358
*Many cartridges eventually do encounter problems or failures, especially after their original ink is gone
and they are re-used, and this is often unrelated to the refill process. The “Wrong Cartridge
Type/Installed" / “Print cartridge is not compatible with this device” / “Cartridge Error” / “Print
Cartridge Error” / ‘blinking lights” alert/error message is typically indicative of failed micro-electronics
internal to the ink cartridge(s). Also note that it is common to have a marginally performing ink cartridge
(which was performing ok before) in the adjacent slot (i.e. color), then when a marginally performing
cartridge is installed into the other slot (i.e. black), both of the ink cartridge(s) then get flagged with
electrical errors.
Please note this type of failure is quite rare with an ink cartridge that that has only been refilled once or
twice. Severe cartridge errors are primarily caused by an electrical breakdown at the cartridge’s nozzle
plate. Ink penetration or corrosion into the nozzle plate will cause a failure of the tiny micro-electronics
resulting in a variety of different error messages being displayed – see bottom image at this page:
http://inkjet411.com/?page_id=1216

140
However, if your printer works routinely after inserting a brand new cartridge in it, you should discuss
the possibility of a refund with your local Costco (for the refill purchase). We regret your inconvenience,
and we hope that you will continue to consider the compelling value of inkjet refilling in the future.
Please let us know if you have any questions on the technical information provided above.
-Thank you
HP PSC 2175xi, 2210, 2400, 2410, 2500 - (HP 56/57 CARTRIDGE ERRORS)
Regarding your recent inquiry about the HP 56 cartridge error message and inability to print with your
HP PSC 2410 printer, this type of problem is typically an electrical connection issue between the printer
and the cartridge, or more likely, an internal micro-electronic failure inside the cartridge itself. An
electronic failure of the cartridge would be unrelated to the ink cartridge refill process; these same
failures can occur with brand new ink cartridges*. Let's first run a few checks to validate an electrical
failure of the ink cartridge....
Please first verify the age of the ink cartridge(s)....look at imprinted date on front (or back) of ink
cartridge. If this ‘warranty expiration date’ has expired, then potential cartridge failures can occur due to
internal corrosion, etc.
As a temporary workaround, or if you are unable to determine which cartridge is causing the issue,
remove one of the ink cartridges from the printer....this may place the printer into the 'single cartridge
printer mode'....print jobs may then be executed from the computer (only): To confirm if your printer
supports this feature, please refer to your printer's User Guide. This may also help you determine which
cartridge is causing the issue.
To help determine/confirm which cartridge is causing the problem:
1. Open the cartridge access door.
2. Remove either cartridge (not both).
3. Close the cartridge access door.
-- If the computer message is Print Cartridge Error, then the print cartridge that is still in the printer is
the problem cartridge. If the computer message is NOT Print Cartridge Error (instead, it says that the
cartridge you have removed is ...Either missing, not detected, or incorrectly installed), then the cartridge
you have removed is the problem cartridge.
To completely rule out connectivity issues, we suggest you follow perform the following...depending on
your printer model, please attempt either procedure B.1 and/or B.2 - please advise if either do not work
for your printer model:
A. Clean cartridge/printer electrical contacts. Also inspect printer's internal carriage flex cables for
surface damage (i.e. burn marks) or an uneven contact surface (by which the cartridge's rear electrical
contacts mates with). http://inkjet411.com/?page_id=1519
141
B. Perform either of the ‘B’ procedures below - please note that steps may vary by printer model:
B.1. Self Test Print:
1. From the front panel, press Setup, press 1, and then press 4.
2. Refer to test print sample at HP’s website to evaluate your test print. Inspect nozzle test
pattern; missing bars or lines in the stair-step pattern represent an ink clog, a mis-firing nozzle or a
damaged ink nozzle.
NOTE: A good HP 56 black cartridge should have 432 good nozzles, while a good HP 57/58 color ink
cartridge should have 300 good nozzles.
http://h20000.www2.hp.com/bizsupport/TechSupport/Document.jsp?objectID=c00048607
B.2. Tap 41/43 Cartridge Diagnostics (validation required):
1. Press * and # keys at same time
2. Enter 124 (or 1234)
3. Using left/right arrow keys, navigate to either System Menu or Special Reports menu. Select
Enter.
4. Select Ok, then click Right Arrow until the ‘print-mech button tap’ menu is displayed.
5. Select Ok (‘code = 0’ will be displayed); click and hold Right Arrow until ‘code = 43’ is displayed.
Use the Left Arrow if you need to decrease numerical count.
6. Select Ok. The test page prints. NOTE: If the test page does not print, then try and enter 'code =
41'.
7. Select Enter to print test print. REFERENCE VIDEO: http://inkjet411.com/?page_id=2358
--- Providing the color cartridge is partially functioning, the diagnostic test print will be printed (this is a
forced service print test which is mainly used for the evaluation of ink cartridge electrical health). A good
HP 21/27/56 black cartridge should display 416 good nozzles (26x16 grid), while a good HP 22/28/57/58
color ink cartridge should show 300 good nozzles (10x10 color grid). For reference, please refer to video
at link below to help evaluate test pattern. [NOTE: HP 56/57/58 and HP21/22 cartridges are electrically
similar]: http://inkjet411.com/?page_id=2358
*Many cartridges eventually do encounter problems or failures, especially after their original ink is gone
and they are re-used, and this is often unrelated to the refill process. The “Wrong Cartridge
Type/Installed" / “Print cartridge is not compatible with this device” / “Cartridge Error” / “Print Cartridge
Error” / ‘blinking lights” alert/error message is typically indicative of failed micro-electronics internal to
the ink cartridge(s). Also note that it is common to have a marginally performing ink cartridge (which
was performing ok before) in the adjacent slot (i.e. color), then when a marginally performing cartridge
is installed into the other slot (i.e. black), both of the ink cartridge(s) then get flagged with electrical
errors.
Please note this type of failure is quite rare with an ink cartridge that that has only been refilled once or
twice. Severe cartridge errors are primarily caused by an electrical breakdown at the cartridge’s nozzle
142
plate. Ink penetration or corrosion into the nozzle plate will cause a failure of the tiny micro-electronics
resulting in a variety of different error messages being displayed – see bottom image at this page:
http://inkjet411.com/?page_id=1216
However, if your printer works routinely after inserting a brand new HP56 cartridge in it, you should
discuss the possibility of a refund with your local Costco (for the refill purchase). We regret your
inconvenience, and we hope that you will continue to consider the compelling value of inkjet refilling in
the future.
-Thank you
CARTRIDGE SELF-DIAGNOSIS PERFORMED
Regarding your recent self-diagnosis of the HP XXX cartridge using the cartridge clear/bypass procedure,
it appears the ink cartridge is internally damaged. Based on the steps you followed it appears you
performed everything correctly. An electronic failure of the cartridge would be unrelated to the ink
cartridge refill process; these same failures can occur with brand new ink cartridges*
Once you reach the checksum menu (with 5-digit number displayed), you should be able to send one (1)
print job thru successfully at that point in time. If the same printer/cartridge error returns, or a new
blocking error message is then displayed, then the ink cartridge is likely internally damaged (micro-
electronics) and will need to be replaced with a new one.
*Many cartridges eventually do encounter problems or failures, especially after their original ink is gone
and they are re-used, and this is often unrelated to the refill process. The “Incompatible Cartridge(s)" /
“Print Cartridge(s) Problem - Refer to printer documentation." error message is typically indicative of
failed micro-electronics internal to the ink cartridge(s). It is common to have a marginally performing
ink cartridge (which was performing ok before) in the adjacent slot (i.e. color), then when a marginally
performing cartridge is installed into the other slot (i.e. black), both of the ink cartridge(s) then get
flagged with electrical errors. Running the 'Tap 41' cartridge health diagnostics test will confirm the
active state of both cartridges. Please note this type of failure is quite rare with an ink cartridge that that
has only been refilled once or twice.
For reference, the following page provides a complete review of the majority of cartridge error
messages you may observe on your printer at one point or another:
http://inkjet411.com/?page_id=415 (60/61s)
However, if your printer works routinely after inserting a brand new cartridge in it, you should discuss
the possibility of a refund with your local Costco. We regret your inconvenience, and we hope that you
will continue to consider the compelling value of inkjet refilling in the future.
Please let us know if you have any further questions on this...we apologize for the inconvenience this
has caused you.
143
- Thank you
++CARTRIDGE SELF-DIAGNOSIS PERFORMED (74/75 System)
Regarding your recent self-diagnosis of the HP 74/75 cartridge using the cartridge clear/bypass
procedure, it appears the ink cartridge is internally damaged, particularly since you are seeing the
"Incompatible Print Cartridge" error message ----- this is typically indicative of failed micro-electronics
internal to the ink cartridge(s). It is common to have a marginally performing ink cartridge (which was
performing ok before) in the adjacent slot (i.e. color), then when a marginally performing cartridge is
installed into the other slot (i.e. black), both of the ink cartridge(s) then get flagged with electrical errors.
As a temporary workaround, or if you are unable to determine which cartridge is causing the issue,
remove one of the ink cartridges from the printer....this will place the printer into the 'single cartridge
printer mode'....print jobs may then be executed from the computer (only): For more information, refer
to your printer user guide.
Running the 'Tap 41' cartridge health diagnostics test will confirm the active state of both cartridges -
see video here: http://inkjet411.com/?page_id=792
>> Providing the color cartridge is partially functioning the Tap 41 diagnostic test print will be printed
(this is a forced service print test which is mainly used for the evaluation of ink cartridge electrical
health. A good HP 75/75XL color cartridge should display 600 good nozzles, while a good HP 74/74XL
black ink cartridge should show 672 good nozzles. If the results yield anything different then the ink
cartridge is likely damaged and will need to be replaced. Refer to video on how to read the printout.
*Many cartridges eventually do encounter problems or failures, especially after their original ink is gone
and they are re-used, and this is often unrelated to the refill process. Please note this type of failure is
quite rare with an ink cartridge that that has only been refilled once or twice. These same failures can
occur with brand new ink cartridges.
For additional reference, the following page provides a complete review of the majority of cartridge
error messages you may observe on your printer at one point or another: http://inkjet411.
com/?page_id=509
However, if your printer works routinely after inserting a brand new 74/75 cartridge in it, you should
discuss the possibility of a refund with your local Costco. We regret your inconvenience, and we hope
that you will continue to consider the compelling value of inkjet refilling in the future.
Please let us know if you have any further questions on this...we apologize for the inconvenience this
has caused you.
- Thank you
LEXMARK – DELL PRINTING FAILURE
144
Regarding your recent inquiry about the Dell ink cartridge error message ("Alignment problem, remove
tape from cartridges or check troubleshooting") and inability to print to your Dell V305 printer. Based
on your reported problem description, this type of problem is normally associated to an electrical
connection issue between the printer and the cartridge, or more likely, an internal micro-electronic
failure inside the cartridge itself. The failure is unrelated to the ink cartridge refill process*. An internal
electrical failure of a cartridge can be confirmed by performing the following steps which can help rule
out other variables which may be causing the issue:
A. Ensure BOTH carriage/flex cables and BOTH ink cartridge contacts are thoroughly clean before
proceeding: http://inkjet411.com/?page_id=1519
NOTE: “Empty” and “Low Ink” alerts are COMPLETELY NORMAL for all integrated ink cartridges which
have been refilled! While at first this may be an unusual workflow, it does allow print operations to
proceed. Your printer/computer may display an ink alert message, such as “non-genuine cartridge”.
Press proceed/continue/accept/yes/OK to dismiss this prompt. After refills, the printer cannot track the
ink level. The ink level indicator will falsely signal empty. In many cases, additional nuisance messages
may also appear – this is normal. Bypass all low ink warnings and nuisance alert messages.
Now, if printing is still prohibited, then is it likely an internal micro-electronic failure inside the cartridge.
These types of failures are relatively rare (i.e. 1-2 out of every hundred cartridges which get refilled).
*Many cartridges eventually do encounter problems or internal electrical failures, especially after their
original ink is gone and they are re-used, and this is often unrelated to the refill process. If both ink
cartridges are older than 2 years old then they are beyond their usable life (ink corrosion on contacts, or
nozzle plate contact points, ultimately leads to internal micro-electronic failure of the cartridge).
However, if your printer works routinely after inserting a brand new cartridge in it, you should discuss
the possibility of a refund with your local Costco (for refilled cartridge purchase). We regret your
inconvenience, and we hope that you will continue to consider the compelling value of inkjet refilling in
the future.
-Thank you
LOW INK MESSAGE (GENERAL)
Regarding your recent inquiry about the low ink message, please note that “Empty” and “Low Ink” alerts
are COMPLETELY NORMAL for all newer HP integrated ink cartridges which have been refilled! While at
first this may be an unusual workflow, it does allow print operations to proceed. The ink level
monitoring feature cannot be reset (i.e. in the newer line of integrated ink cartridges, HP blows the ink
monitoring resistors inside the cartridge the first time it is used - thus it is impossible to reset them).
145
As you just returned from the refill store, your ink cartridge(s) is full of ink - you may ignore low ink
warnings (along with any other nuisance message) and print normally until you observe one of the
colors to begin to fade.
As soon as you observe one of the 4 colors "drop out" [i.e. Black cartridge or Tri-color
(cyan/magenta/yellow) cartridge], then it's time to refill the respective ink cartridge. To help determine
if all 4 colors are firing properly we suggest you run our 4-color CMYK test print....open and print our
standard 4-color test file: http://inkjet411.retailinkjet.com/wp-content/uploads/2013/02/4-Color-Test-
Print_CMYK_sm.pdf
NOTE: It is possible to reset the HP 15, 17, 23, 41, 45, 78 ink cartridges – click here for more
information: http://inkjet411.com/?page_id=1419
It is possible to reset the HP 21/22/27/28/56/57/58 ink cartridges – click here for more information:
http://inkjet411.com/?page_id=1915
In many cases nuisance alert messages may also be displayed, including ‘counterfeit cartridge’ or ‘non-
genuine ink cartridge’...these are normal nuisance alerts that can just be ignored by pressing
continue/dismiss/Ok. We suggest you select 'OK' (or similar) at the printer's control panel up to 6 times
to ensure all nuisance errors are cleared. You should then be able to continue with print operations until
the print quality begins to fade.
The "low ink" or "no status" message typically occurs soon after a refill. It is a false signal, because the
printer cannot recognize that the cartridge has been refilled. Your cartridge is not low on ink, and
nothing is wrong with your refilled cartridge or printer. Unfortunately, you may also observe multiple
‘nuisance alert’ messages, these can be ignored as well. For more information on ‘low ink’ and
‘nuisance messages’ and what you should expect, please visit:
http://inkjet411.com/?page_id=396 (HP 60/61 Low Ink)
http://inkjet411.com/?page_id=420 (HP 60/61 Nuisance Messages)
http://inkjet411.com/?page_id=517 (HP 74/75 Low Ink)
http://inkjet411.com/?page_id=523 (HP 74/75 Nuisance Messages)
http://inkjet411.com/?page_id=598 (HP 901 Low Ink)
http://inkjet411.com/?page_id=613 (HP 901 Nuisance Messages)
http://inkjet411.com/?page_id=1216 (HP 92-99 Cartridge Errors)
http://inkjet411.com/?page_id=1261 (HP 92-99 Nuisance Messages)
http://inkjet411.com/?page_id=1802 (HP 15-58, 78 Cartridge Errors)
ADDITIONAL NOTES:
The ink level indicator cannot be manually re-set in the newer HP cartridges, thus making it not usable.
HP leverages 'fusible links' in the nozzle plate (base of ink cartridge) which physically blows the resistors
as the original ink is consumed...thus resetting the ink cartridge's ink level monitoring capability is simply
not possible. The ink tracking feature is only available with a brand new ink cartridge.
146
However, losing this feature is not necessarily significant, because the ink level indicator usually has
20%-30% ink remaining when it shows "low on ink". Therefore, the warning has limited value, because
customers who prematurely replace their cartridges when they see the "low ink" message are wasting a
lot of residual ink. In order to use as much available ink as possible, many customers (not only those
who refill their cartridges, but many who have not yet tried refilling) always ignore the ink level indicator
"low" warning, and wait to replace/refill their cartridge until immediately after seeing ink begin to fade
on their printouts. Many customers who disregard the low ink indicator keep a spare set of cartridges
so that their printing productivity is not disrupted when the cartridge runs out of ink.
If the cartridge completely runs out of ink and continues to be used when it is dry, this could damage the
cartridge, so customers should promptly refill/replace their cartridge when the ink begins to fade. This
fading process is gradual, so that you will have sufficient time to refill/replace the cartridge before the
risk of empty cartridge printing. In summary, most refill customers agree that the huge savings of
refilling is much greater than the potential loss of the low ink indicator feature.
Before you refill your next ink cartridge, please refer to this video which provides some helpful
transportation tips to avoid any potential issues:
http://inkjet411.com/?page_id=1437
We hope this provides you with a thorough explanation as to why ink level monitoring is not available
when using refilled ink cartridges.
-Thank you
____
If, after bypassing ‘ink low alerts’ messages, the printer will still not print, then this might be an electrical
issue with the cartridge or printer itself. Please refer to “Troubleshooting” if this is the case.
LOW INK MESSAGE (Dell - Lexmark)
Regarding your recent inquiry about the Dell/Lexmark cartridge(s) low ink message, please note that
“Empty” and “Low Ink” alerts are COMPLETELY NORMAL for all newer integrated ink cartridges which
have been refilled! While at first this may be an unusual workflow, it does allow print operations to
proceed. The ink level monitoring feature cannot be reset (i.e. in the newer line of integrated ink
cartridges, Lexmark physically blows the ink monitoring resistors inside the cartridge the first time it is
used - thus it is impossible to reset them). Only brand new ink cartridges provide ink level monitoring.
As you just returned from the refill store, your ink cartridge(s) is full of ink - you may ignore low ink
warnings (along with any other nuisance message) and print normally until you observe one of the
colors to begin to fade.
The "low ink" or "no status" message typically occurs soon after a refill. It is a false signal, because the
printer cannot recognize that the cartridge has been refilled. Your cartridge is not low on ink, and
nothing is wrong with your refilled cartridge or printer. Unfortunately, you may also observe multiple

147
‘nuisance alert’ messages, these can be ignored as well. For more information on ‘low ink’ and
‘nuisance messages’ and what you should expect, please visit:
http://inkjet411.com/?page_id=396 (HP 60/61 Low Ink Messages)
Alternative Procedure - Low Ink Warning Bypass:
It may be possible to disable all printer warning messages by disabling ALL communication from the
printer back to your PC. To disable ALL communication from your printer to your PC, do the following:
From the WINDOWS™ START Menu, Click on “Settings → Printers”
RIGHT CLICK on your Printer Model, and Select “Properties”
From the Properties Menu, Click on the “Ports” Tab
Un-Select the Box that reads: “Enable Bi-Directional Support”
Click “APPLY” then click “OK” to exit
NOTE: This operation will disable ALL COMMUNICATION being sent from your printer to your PC,
including paper out, paper jams, low on ink, etc. For All-in-One printers, this will ALSO DISABLE
CERTAIN OTHER FUNCTIONALITY SUCH AS SCANNING. This operation can be reversed by repeating
these steps and checking the “Enable Bi-Directional Support” Box.
ADDITIONAL LOW INK WARNING INFORMATION:
The ink level indicator cannot be manually re-set in the newer cartridges, thus making it not usable. The
ink tracking feature is only available with a brand new ink cartridge.
However, losing this feature is not necessarily significant, because the ink level indicator usually has
20%-30% ink remaining when it shows "low on ink". Therefore, the warning has limited value, because
customers who prematurely replace their cartridges when they see the "low ink" message are wasting a
lot of residual ink. In order to use as much available ink as possible, many customers (not only those
who refill their cartridges, but many who have not yet tried refilling) always ignore the ink level indicator
"low" warning, and wait to replace/refill their cartridge until immediately after seeing ink begin to fade
on their printouts. Many customers who disregard the low ink indicator keep a spare set of cartridges
so that their printing productivity is not disrupted when the cartridge runs out of ink.
If the cartridge completely runs out of ink and continues to be used when it is dry, this could damage the
cartridge, so customers should promptly refill/replace their cartridge when the ink begins to fade. This
fading process is gradual, so that you will have sufficient time to refill/replace the cartridge before the
risk of empty cartridge printing. In summary, most refill customers agree that the huge savings of
refilling is much greater than the potential loss of the low ink indicator feature.
Before you refill your next ink cartridge, please refer to this video which provides some helpful
transportation tips to avoid any potential issues:
http://inkjet411.com/?page_id=1437

148
We hope this provides you with a thorough explanation as to why ink level monitoring is not available
when using refilled ink cartridges.
-Thank you
LOW INK MESSAGE (PRINTING NOT ALLOWED)
Regarding your recent inquiry about the 'counterfeit cartridge' alert. Please note that “Ink Low”, ‘Non-
genuine ink cartridge’ & 'Counterfeit' messages alerts are COMPLETELY NORMAL for all newer HP
integrated ink cartridges which have been refilled! While at first this may be considered an unusual
workflow, it does allow print operations to proceed.
These are normal nuisance alerts that can just be ignored by pressing continue/dismiss/Ok. You should
be able to continue with print operations until the print quality begins to fade.
The "low ink" or "no status" message typically occurs soon after a refill. It is a false signal, because the
printer cannot recognize that the cartridge has been refilled. Your cartridge is not low on ink, and
nothing is wrong with your refilled cartridge or printer. Unfortunately, you may also observe multiple
‘nuisance alert’ messages, these can be ignored as well. For more information on ‘low ink’ and
‘nuisance messages’ and what you should expect, please visit:
http://inkjet411.com/?page_id=396 (HP 60/61 Low Ink)
http://inkjet411.com/?page_id=420 (HP 60/61 Nuisance Messages)
http://inkjet411.com/?page_id=517 (HP 74/75 Low Ink)
http://inkjet411.com/?page_id=523 (HP 74/75 Nuisance Messages)
However, if the 'low ink' / 'nuisance messages' cannot be bypassed, there could be another issue. It is
suggested that you select 'OK' at the printer's control panel, up to six times to see if the impending
errors (hang) is cleared. Other potential issues can be verified by going to the "Solve My Problem"
section of the Inkjet411 website: http://www.inkjet411.com/ and select the HP 60/61 ink series family
and your printer model - follow the suggestions shown, including cartridge/printer cleaning procedures
and by running the diagnostic tests.
Before you refill your next ink cartridge, please refer to this video which provides some helpful
transportation tips to avoid any potential issues:
http://inkjet411.com/?page_id=1437
Thank you
CARTRIDGE ALIGNMENT
Regarding your recent inquiry about cartridge alignment following a refill, after inserting the cartridge
into the printer, the printer/cartridge system should follow the same alignment procedure as for an
original cartridge. It is suggested you perform the alignment at the printer’s control panel and that you
may have to depress the ‘OK’ (or Copy/Resume) button up to 6 times in order to initiate the alignment.
149
For more information, please visit the "Nuisance Messages" page of your particular ink series section of
the Inkjet411 website: http://www.inkjet411.com/
If you continue to encounter alignment issues, then this is probably an electrical connection issue
between the printer and the cartridge (or an internal micro-electronic failure of the integrated ink
cartridge or built-in printhead). To help rule out other variables, please select “Solve My Problem” at
the Inkjet411 website: http://www.inkjet411.com/
Follow the error message instructions shown, even if your exact error message is not listed. Please note
that many cartridges eventually do encounter problems or failures, especially after their original ink is
gone and they are re-used, and this is often unrelated to the refill process. Replacement of the cartridge
or printhead may be required.
SLOW PRINTING / CAN’T COPY OR SCAN (IPH CARTRIDGES)
Regarding your recent inquiry about 'slow printing'/’failure to copy’ following the cartridge refill, after
inserting the cartridge into the printer, the printer/cartridge system should follow the same start-up and
alignment procedure as for an original cartridge. From your description it sounds like a connectivity
issue between the ink cartridge and the printer control board, we suggest you perform a thorough
cleaning:
http://inkjet411.com/?page_id=1296
Please verify the age of the ink cartridge(s)....look at imprinted date on front (or rear) of ink cartridge. If the ‘warranty expiration date’ has expired, then potential internal electrical cartridge failures can occur due to internal corrosion, etc.
If you continue to encounter slow printing or other functional printer issues, we suggest you perform a
printer reset, refer to your printer's user manual, Fixya.com support site or our suggestions on the
following Inkjet411 support page:
http://inkjet411.com/?page_id=1008 (HP 92-98)
http://inkjet411.com/?page_id=644 (HP 15-58)
If the slow printing/failure to copy problem persists, then this is probably an electrical connection issue
between the printer and the cartridge (or more likely an internal micro-electronic failure of the
integrated ink cartridge). Replacing the ink cartridge(s) will provide a definitive determination if this is
the case. To help rule out additional variables, please select “Solve My Problem” at the Inkjet411
website: http://www.inkjet411.com/
Please note that many cartridges eventually do encounter problems or failures, especially after their
original ink is gone and they are re-used, and this is often unrelated to the refill process. Replacement of
the cartridge may be required.
150
GENERAL ‘LOW INK’ OR ‘NUISANCE MESSAGES’ (CUSTOMER IS ALREADY AWARE)
With respect to the 'ink low' and/or 'nuisance error' messages, this is normal with refilled ink cartridges.
Please visit the following pages on general HP "Nuisance Messages"; please watch the education video
on ‘Low Ink Warnings’ provided:
http://inkjet411.com/?page_id=420 (60/61 Nuisance)
http://inkjet411.com/?page_id=396 (60/61 Low Ink Alerts)
CARTRIDGE EXPIRATION
Regarding your recent inquiry about cartridge expiration dates, consult your printer manual or fixya.com
for suggested instructions on how to reset the cartridges. Then you should proceed using the cartridge,
because it should work routinely.
CARTRIDGE REFILL 90 DAY "EXPIRATION"
Regarding your recent inquiry about the 90-day cartridge refill expiration dates, these dates are the
official instructions for integrated ink cartridges (i.e. those typically found in 2-cartridge printer models
and that feature an electronic nozzle plate attached to base of ink cartridge). If you can comply with
using the cartridge within the 90 day window, you will be assured of standard quality. If you have
recently discovered you are beyond the 90 day period, you should proceed with using the cartridge,
because it may work routinely.
CARTRIDGE LEAKING (ERROR MESSAGES & NO PRINTING)
Regarding your recent inquiry about the HP 56 cartridge error message and inability to print with your
HP Deskjet 5510, it sounds like the cartridge's nozzle plate has suffered 'delamination' and this is why
you are observing ink leaking at base of cartridge. The cartridge will likely be non-functional in this
condition and will need to be replaced with a new one*. Furthermore, the leaking has probably already
lead to an internal micro-electronic failure inside the cartridge. Inspect base of ink cartridge for cracks or
breaks – refer to last photo at the following link: http://inkjet411.com/?page_id=415
Please verify the age of the ink cartridge(s)....look at imprinted date on front (or back) of ink cartridge. If
this ‘warranty expiration date’ has expired, then potential cartridge failures can occur due to internal
corrosion, etc.
As a temporary workaround, remove the suspect ink cartridge from the printer, and apply printer
power. This should place the printer into the 'single cartridge printer mode'....print jobs may then be
executed from the computer (only): For more information, refer to your printer user guide.
*Many cartridges eventually do encounter problems or failures, especially after their original ink is gone and they are re-used, and this is often unrelated to the refill process. Refilled 'compatible' ink cartridges are typically on their 3rd life of usage, or more...reliability of a compatible ink cartridge is therefore an unknown variable.
151
Thank you
CANON, EPSON, HP 02/88 -- RESETTABLE CARTRIDGE ERROR MESSAGES
Regarding your recent inquiry about the Epson/Canon/HP cartridge error message associated with your
Canon/Epson/HP printer, the cartridge probably has a defective chip which was mis-programmed
during the refill process. We suggest you take the suspect ink cartridge back to Costco and request they
either re-program the chip (or replace it) since it is not being recognized....however, let's run just a few
simple checks first to screen out all variables.
Remove the ink cartridge from the printer and carefully inspect the small chip on the bottom/rear side
of ink cartridge - ensure there is no ink residue on gold contact surfaces. Clean contact surface with an
isopropyl alcohol dampened lint-free towel or cloth. Refer to picture at following Inkjet411 site link:
http://inkjet411.com/?page_id=35 (HP 02)
http://inkjet411.com/?page_id=973 (HP 88)
http://inkjet411.com/?page_id=1939 (Epson)
Please confirm if this is just a nuisance/annoyance alert (i.e. “non-genuine” cartridge ) vs. an actual
'unrecognized cartridge' alert (i.e. Red X's on printer display / Windows pop-up message). Please visit
the following Inkjet411 support page which will help you delineate the difference:
http://inkjet411.com/?page_id=73 (Epson)
http://inkjet411.com/?page_id=1537 (Canon)
http://inkjet411.com/?page_id=1372 (HP 02)
http://inkjet411.com/?page_id=973 (HP 88)
On some Epson printer models you may need to scroll thru the menu options (i.e. right arrow key) to
help determine which specific ink cartridge is actually causing the ‘Unrecognized Cartridge’ error
condition. You only need to replace the actual cartridge which is causing the issue.
Otherwise, we suggest you bring the cartridge, or cartridges, back to the Costco Photo Department and
have it re-programmed (or replaced as applicable). Also, have it weighed at the Costco Photo
Department to ensure that it was properly filled.
If this does not remedy the problem, then we suggest you remove the ink cartridge and thoroughly
inspect the PRINTHEAD’s electrical contact points for ink residue, etc. Reinstall cartridge(s) and test.
http://inkjet411.com/?page_id=35 (HP02 main page)
http://inkjet411.com/?page_id=973 (HP88 main page)
Worst case scenario, the PRINTHEAD may be defective, or at end of life, but typically you will receive
and ‘Ink System Failure’ or ‘Replace Printhead’ message (or similar) when this type of electronic
assembly failure occurs. Refer to video at following link which illustrates how the PRINTHEAD (or
PRINTHEADS) function in the printer: http://inkjet411.com/?page_id=2054
152
We apologize for the inconvenience in advance. Please let us know if chip re-programming/replacement
does not correct the printer/cartridge issue.
-Thank you
________________
*While the HP 02 permanent printhead is rated for ~20,000 pages, the average life is typically less than 10,000 pages due to infrequent use and age of electrical components. This is just part of the natural degradation of this printer writing system over time & with usage (i.e. image content/print density). The printhead is the core electronic engine behind firing the drops onto the paper...not the ink cartridges (these are just plastic ink holding tanks). You can verify PRINTHEAD electrical performance by running the Tap 41 diagnostic test from the Service Menu – depending on your printer model, two procedures are provided here (see Advanced HP Printer Diagnostics): http://inkjet411.com/?page_id=1372
Emergency Canon MX700 Ink Tank Level Reset Procedure (CLI-8 & PG-5):
Return printer to "factory mode". There are some interesting settings in here, but I'm not sure of what
everything does, so be careful with them. This works temporarily (as it seems to reset after a few days),
and does not permanently disable ink level detection (as it correctly showed full ink after replacing it):
1. Unplug the printer.
2. Press and hold the Power button while plugging the printer back in.
3. Continue to hold the Power button and press the Reset button twice.
4. Let go of the Power button and wait 10 seconds. It will eventually show the number 1 on the
LCD.
5. Once the printer also shows "Idle" on the screen, cycle through the settings with the left and
right arrow buttons until you see "USER MODE POWER OFF". Press the OK button.
6. You should now be able to print or scan.
________________
EPSON UNRECOGNIZED CARTRIDGE ERROR
Regarding your recent inquiry about the Epson T126 cartridge error message (“Cartridge Not
Recognized", "Replace Cartridge" or similar) associated with your Epson NX430 printer, the cartridge
probably has a mis-programmed smart chip during the refill process. Refill operators utilize smart chip
re-programming equipment; in rare cases during the re-programming which typically yields a green light
to show success, it does not always result in correct smart chip reprogramming. In this case, they may
have forgot to re-program the entire set of tanks. Unfortunately there is nothing you can do from
home....the chip(s) need to be re-programmed at the store. We suggest you return to the store and
request the operators to re-program and check the weight of all cartridges.
OTHER POSSIBLE CAUSES OF FAILURE:
153
1) Either the external chip or internal ink sensor is electrically bad (the internal ink sensor detects if
cartridge is really out of ink). If you program the cartridges a 2nd time and the “replace cartridge”
messages, or similar persist, then this is the likely cause and the cartridge will need to be replaced.
2) Ink cartridge may not be filled properly – your refiller would need to weigh cartridge to verify. If the
ink sensor does not see ink in the printer it does not matter how many times you reset the tank.
3) The chip resetter (at refill store) has an issue – if we suspect this is an issue we would contact the
store directly. Please disregard for now.
Now, you indicated that you attempted some troubleshooting steps. Please quickly double-check a few additional items from the checklist below before returning to store:
1) Confirm if this is just a nuisance/annoyance alert (i.e. “non-genuine” cartridge ) vs. an actual
'unrecognized cartridge' alert (i.e. Red X's on printer display / Windows pop-up message). Please visit
the following Inkjet411 support page which will help you delineate the difference:
http://inkjet411.com/?page_id=73
2) On some Epson printer models you may need to scroll thru the menu options AT THE PRINTER'S
CONTROL MENU (i.e. right arrow key) to help determine which specific ink cartridge is actually causing
the ‘Unrecognized Cartridge’ error condition. On the other hand, for general 'non-genuine' cartridge
alerts, typically you can bypass these errors by clicking thru the acknowledgement prompts or via the
arrow keys: http://inkjet411.com/?page_id=1939
3) We suggest you remove all the ink cartridges, inspect the smart-chips condition (on rear side) and
ensure there are no cuts/gashes or ink residue present on the micro-chip surfaces. To be sure we
suggest you clean the micro-chip surfaces; click here to see 2 different pictures of this along with
cleaning instructions: http://inkjet411.com/?page_id=1939
4) If an 'unrecognized' cartridge alert message, or similar, continues to be observed and cannot be
bypassed, we suggest you bring the cartridge, or cartridges, back to the Costco Photo Department and
have it re-programmed. Also, have them check it to ensure that it was properly filled.
5) If the error continues (following ink tank re-programming a 2nd time), then we suggest you install a
new genuine Epson ink cartridge into the printer to verify the permanent PRINTHEAD is functioning ok.
Here is how the PRINTHEAD works: http://inkjet411.com/?page_id=2054
NOTE: Following refilled cartridge installation, your printer/computer may display an ink alert message
such as “non-genuine cartridge” or "you have not installed genuine Epson ink cartridges" – these are
COMPLETELY NORMAL alerts when using refilled ink cartridges. Press proceed/continue/accept/yes/OK
to dismiss the prompt. In some cases you may have to scroll over using the arrow keys to dismiss the
154
alerts. Additional alerts may be displayed the first time you go to print or copy – dismiss the alerts
accordingly to resume normal print operations. For more information on Epson ink cartridge alert
messages please visit: http://inkjet411.com/?page_id=1939
Please let us know if the 2nd chip re-programming does not solve the issue - we apologize for the
inconvenience in advance.
-Thank you
We sincerely apologize for the major inconvenience here; we are currently checking with the store to
see if their Epson re-programming tool is functioning correctly. We will advise as soon as we hear back.
-Thank you
___________________________
NOTE 2: If, after replacing the cartridge, or cartridges, with brand new Epson Original ink cartridges,
correct the problem, then you may have a defective cartridge (internal ink level monitoring circuit),
unrelated to the refilled cartridges. If, after replacing the cartridge, or cartridges, with brand new Epson
Original ink cartridges, does NOT correct the problem, then you may have a defective PRINTHEAD (i.e.
permanent electrical sub-assembly which the cartridges plug into).
___________________________
Regarding your recent inquiry about the Epson T125 cartridge error message associated with your Epson
NX625 printer, based on the observed 'Red X' on the display, it sounds like the cartridge probably has a
defective chip which was mis-programmed during the refill process.
OTHER POSSIBLE CAUSES OF FAILURE:
1) Either the external chip or internal ink sensor is electrically bad (the internal ink sensor detects if
cartridge is really out of ink)
2) Ink cartridge may not be filled properly – refiller would need to weigh cartridge to verify. If the ink
sensor does not see ink in the printer it does not matter how many times you reset the tank.
3) The chip resetter (at refill store) has an issue – if we suspect this is an issue we contact the store
directly.
On some Epson AiO printer models you may need to scroll thru the menu options (i.e. right arrow key)
to help determine which specific ink cartridge is actually causing the ‘Unrecognized Cartridge’ error
condition and/or to bypass the nuisance messages/prompts. On the other hand, for general 'non-
genuine' cartridge alerts, typically you can bypass these errors by clicking thru the acknowledgement
prompts or via the arrow keys.
155
If an 'unrecognized' cartridge alert message (i.e. Red X), or similar, is observed and cannot be bypassed,
we suggest you bring the YELLOW cartridge back to the Costco Photo Department and have it re-
programmed.
Please visit the following Inkjet411 support page which will help you understand the various caveats and
messages you will see at the printer when using refilled Epson cartridges:
http://inkjet411.com/?page_id=73
We sincerely apologize for the inconvenience in advance.
-Thank you
EPSON CARTRIDGE FAILURE – 2ND RESPONSE FOLLOW UP
First of all, out team extends an apology over the ongoing ink cartridge issue.
We suggest you remove the suspect ink cartridge(s), inspect the smart-chips condition (on rear side) and
ensure there are no cuts/gashes or ink residue present on the micro-chip surfaces. Clean dirty micro-
chip surfaces if present; click here to see 2 different pictures of this along with cleaning instructions:
http://inkjet411.com/?page_id=1939
If you have already returned from Costco a 2nd time (2nd attempt at chip reprogramming) and the
cartridge is still not recognized, then the cartridge’s internal ink low/empty detection circuit is likely
defective and the cartridge will need to be replaced with a new one. Unfortunately there is no way for
the operator to screen the cartridge for this unusual type of failure condition (it is quite rare).
There is an outside chance that the Epson chip resetter could be defective, but then we would have
observed many customers from the same refill store reporting the same issue - if you had other
cartridges refilled successfully, then this will rule out the chip resetter as the cause of failure.
We suggest you install a new original/genuine Epson ink cartridge to eliminate the suspect refilled ink
cartridge as the failure variable........this will also rule-out the printer’s built-in PRINTHEAD as being the
cause of failure. We regret your inconvenience, and we hope that you will continue to consider the
compelling value of inkjet refilling in the future.
NOTE: If the problem occurs with a new original/genuine cartridge, then you may have a defective
PRINTHEAD in the printer (worst case scenario), unrelated to the refilled cartridges. Unfortunately this
electronic assembly is ‘not easily’ customer replaceable....here's just a glance of what's involved (3rd
party video): http://www.youtube.com/watch?v=9D2uYopOrlI
Epson WF 610 Usage/Cleaning Tips from Epson:
http://www.epson.com/cgi-
bin/Store/support/supDetail.jsp?BV_UseBVCookie=yes&infoType=Videos&oid=130786&prodoid=63084
540
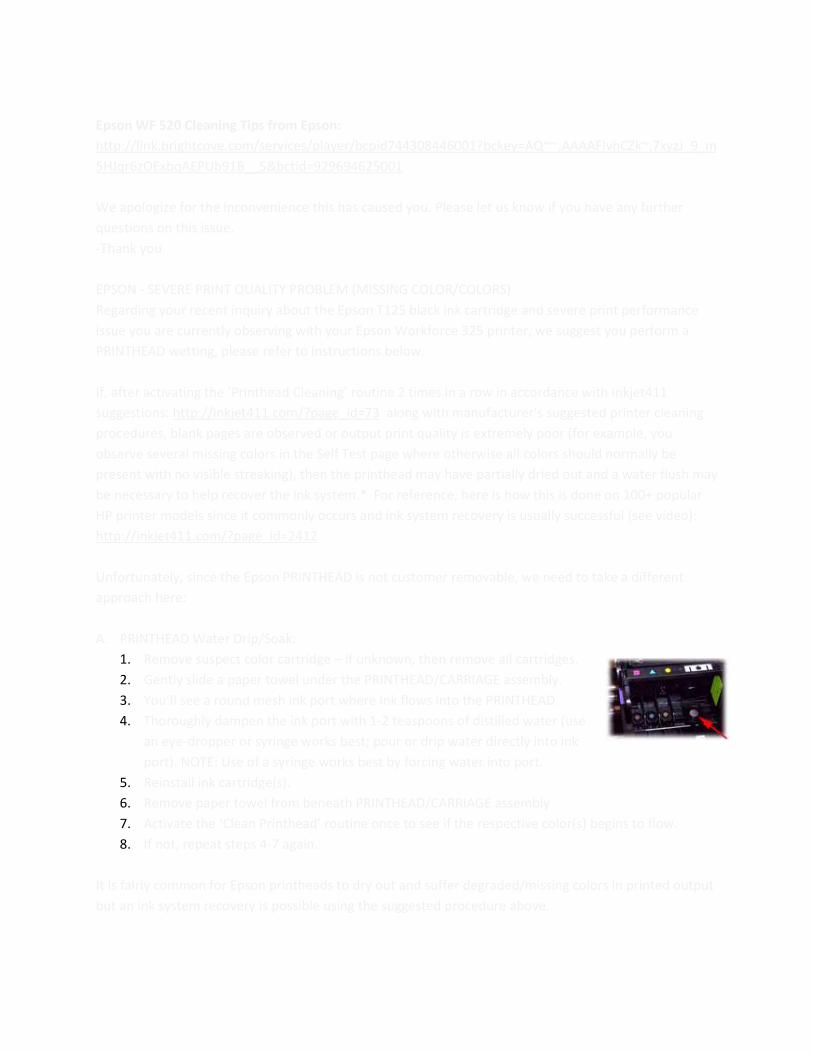
156
Epson WF 520 Cleaning Tips from Epson:
http://link.brightcove.com/services/player/bcpid744308446001?bckey=AQ~~,AAAAFIvhCZk~,7xyzJ_9_m
5HJqr6zOExbqAEPUb91B__5&bctid=929694625001
We apologize for the inconvenience this has caused you. Please let us know if you have any further
questions on this issue.
-Thank you
EPSON - SEVERE PRINT QUALITY PROBLEM (MISSING COLOR/COLORS)
Regarding your recent inquiry about the Epson T125 black ink cartridge and severe print performance
issue you are currently observing with your Epson Workforce 325 printer, we suggest you perform a
PRINTHEAD wetting, please refer to instructions below.
If, after activating the ‘Printhead Cleaning’ routine 2 times in a row in accordance with Inkjet411
suggestions: http://inkjet411.com/?page_id=73 along with manufacturer’s suggested printer cleaning
procedures, blank pages are observed or output print quality is extremely poor (for example, you
observe several missing colors in the Self Test page where otherwise all colors should normally be
present with no visible streaking), then the printhead may have partially dried out and a water flush may
be necessary to help recover the ink system.* For reference, here is how this is done on 100+ popular
HP printer models since it commonly occurs and ink system recovery is usually successful (see video):
http://inkjet411.com/?page_id=2412
Unfortunately, since the Epson PRINTHEAD is not customer removable, we need to take a different
approach here:
A. PRINTHEAD Water Drip/Soak:
1. Remove suspect color cartridge – if unknown, then remove all cartridges.
2. Gently slide a paper towel under the PRINTHEAD/CARRIAGE assembly.
3. You’ll see a round mesh ink port where ink flows into the PRINTHEAD.
4. Thoroughly dampen the ink port with 1-2 teaspoons of distilled water (use
an eye-dropper or syringe works best; pour or drip water directly into ink
port). NOTE: Use of a syringe works best by forcing water into port.
5. Reinstall ink cartridge(s).
6. Remove paper towel from beneath PRINTHEAD/CARRIAGE assembly
7. Activate the ‘Clean Printhead’ routine once to see if the respective color(s) begins to flow.
8. If not, repeat steps 4-7 again.
It is fairly common for Epson printheads to dry out and suffer degraded/missing colors in printed output
but an ink system recovery is possible using the suggested procedure above.

157
*Typically the printhead should not reach it’s end-of-life until after a minimum of 8 or more complete sets of
cartridge changes; Epson Workforce/WF PRO models typically have a higher print page throughput average, but this is
not always the case. While some printheads may last 15,000+ pages others may only last 3000 pages, actual results
will vary. The printhead will eventually fail in time due to an internal micro-electronics failure, due to the following
leading factors: general customer print usage and printer care, printer duty cycle (i.e. # pages printed per month),
printing frequency (i.e. time between each print job), print mode (i.e. draft vs. normal) and content printed (i.e.
photos vs plain pages) and color mode (black and white only vs. color/greyscale printing). Paper types used (i.e. plain
paper, photo papers & matte/heavy bond papers) and paper edge curl (due to age in printer or low relative humidity)
can also quickly lead to premature printhead failures due to physical ‘head strikes’ of the paper edges making
repeated contact with the printhead nozzle plate.
NOTE: In the event of a failed printhead (flagged by a printer error such as “Replace Printhead”, etc.,
unfortunately the electronic PRINTHEAD assembly is ‘not easily’ customer replaceable....here's just a
glance of what's involved (3rd party video): http://www.youtube.com/watch?v=9D2uYopOrlI
We apologize for the inconvenience this has caused you. Please let us know if you cannot recover or
have any further questions on the current issue.
-Thank you
“COMPATBILE” IIT CARTRIDGE - CARTRIDGE ERROR MESSAGE
Regarding your recent inquiry about a cartridge error message associated with your Epson T098
cartridge, you stated that the ink cartridge was 'compatible' - just so you are aware, Costco only
provides refilling services for genuine Epson ink tanks for reprogramming (there is far too much
variability with compatible/remanufactured or rebranded ink tanks - see NOTE below for more
information on this). Now, if this is truly a compatible ink cartridge, there is no guarantee of cartridge
smart chip reprogramming success. If you only have original/genuine ink tanks (i.e. with manufacturer’s
logo/artwork), then please disregard.
NOTE: A compatible, remanufactured or re-branded ink cartridge can be problematic when installed into
the printer following refilling. Compatible cartridges are typically purchased on-line or at select retailers
(i.e sold under a different label than the regular HP, Canon, Epson, Lexmark or Dell cartridge packaging)
and is essentially a “remanufactured tank (aka….” It’s a remanufactured tank”) of the original
HP/Canon/Epson/Lexmark/Dell genuine ink cartridge. For the best refilling experience, only use
original/genuine ink tanks.
Based on your reported error/problem description, the cartridge probably has a defective chip which
was mis-programmed during the refill process. Let's first confirm if one (1) or all cartridges are
registering as empty (i.e. Red X's on printer display / Windows pop-up message). Please visit the
following Inkjet411 support page which will help you further determine this:
http://inkjet411.com/?page_id=73 (Epson)
158
NOTE 2: On some Epson printer models you may need to scroll thru the menu options (i.e. right arrow
key) to help determine which specific ink cartridge is actually causing the ‘Unrecognized Cartridge’ error
condition. You only need to replace the actual cartridge which is causing the issue.
Once you have determined the suspect cartridge(s), we suggest you bring the cartridge, or cartridges,
back to the Costco Photo Department and have it re-programmed. Also, have it weighed at the Costco
Photo Department to ensure that it was properly filled.
If this does not remedy the problem, then you may have a defective print head in the printer (worst case
scenario), unrelated to the refilled cartridges.
We apologize for the inconvenience in advance.
Thank you
EPSON OR CANON IIT: “NON-GENUINE” & “UNRECOGNIZED CARTRIDGE” ALERT MESSAGES
Regarding your recent inquiry about the printer alert messages, please note that "non-genuine ink"
messages are completely normal. You can dismiss this message by pressing 'OK', 'Proceed', 'Continue',
etc. on your computer or printer display. However, if you receive other messages (i.e. “Unrecognized
Cartridge”, Red X’s, etc.) and printing is not permitted, then that particular ink cartridge probably has a
mis-programmed chip during the refill process.
If this is the first time you have refilled an ink cartridge, please be aware that ‘multiple’ non-genuine ink
alert messages will be displayed…often you will need to navigate thru the menu (i.e. click right arrow
button) etc. to move thru the prompts. Select ‘OK’, ‘Dismiss’ or ‘Continue’ to bypass these alerts. As
well, additional alert messages may be displayed the first time you go to print or copy a document. Once
again, dismiss the ‘non-genuine’ prompts. For more information on this, please click here:
http://inkjet411.com/?page_id=73 (Epson tanks)
http://inkjet411.com/?page_id=1537 (Canon tanks)
For “Unrecognized Cartridge” and similar alert messages where printing is not permitted please identify
the respective cartridge and return it to the photo center for reprogramming. Also, have them check the
cartridge to ensure is has been properly filled.
NOTE: On some printer models you may need to scroll thru the menu options (i.e. right arrow key, etc.)
to help determine which specific ink cartridge is actually causing the ‘Unrecognized Cartridge’ error
condition. You only need to replace the actual cartridge which is causing the issue.
http://inkjet411.com/?page_id=1689 (Epson Advanced)
If this does not remedy the problem, then you may have a defective print head in the printer (worst case
scenario!), unrelated to the refilled cartridges.
Thank you.
159
HP 940/88 - PRINT QUALITY / POOR PRINTING / FADED TEXT / MISSING COLORS
Regarding your recent inquiry about the HP 940/88 cartridge print quality problems, let's first make sure
that the printer is firing all 4 tanks correctly. Based on your problem description, it sounds like there is
an air bubble in one of the printer ink lines, so you should perform a "Clean PrintHead" procedure from
your printer control panel.
NOTE: If one or more the colors were previously dry fired during printing (i.e. if you continued printing
using only a few colors to one, air may have been accidently ingested into the ink lines between the
cartridge(s) and PRINTHEAD. To recover from this problem, you may have to run the "Clean Printhead"
procedure 2-3 times.
Then to verify the lines are clear and working correctly, print the “INK RECOVERY TEST PRINT” from our
Test Prints page: http://inkjet411.com/?page_id=146
Then we suggest you run the self-test print (under maintenance/tools menu), this will verify nozzle
performance and that each color is firing a solid band of color.
We also suggest that you thoroughly review the steps outlined on our support page, including printhead
removal/printer cleaning and service station cleaning. It is suggested you refer to printer manufacturer
instructions first as the Inkjet411 procedures are provided for general guidance purposes only. A dirty
service station can cause poor image quality and/or ink cross-contamination between different colors.
http://inkjet411.com/?page_id=1457 (940 main page)
http://inkjet411.com/?page_id=973 (88 main page)
If this still does not address the problem, we suggest you return the cartridges to the Costco Photo
Department to get them weighed to ensure that were properly filled.
If this does not remedy the problem, then you may have a defective print head in the printer (worst case
scenario), unrelated to the refilled cartridges. This electronic assembly (either the Yellow/Black
printhead or Cyan/Magenta printhead, depending on which color is providing the issue) is available from
HP.com.
NOTE: The HP 88 printer models have two (2) electronic printheads (responsible for pulling ink from the
ink cartridges and then firing the ink droplets onto the paper). One for Yellow/Black colors, the other for
Cyan/Magenta colors. Either will eventually fail depending on print usage type and printer duty cycle
(i.e. rated for ~41,500 printed pages). Here is a video on how the PRINTHEAD(S) function in the printer:
http://inkjet411.com/?page_id=2054
NOTE: The HP 940 printer models have two (2) electronic printheads (responsible for pulling ink from
the ink cartridges and then firing the ink droplets onto the paper). One for Yellow/Black colors, the other
for Cyan/Magenta colors. Either will eventually fail depending on print usage type and printer duty cycle

160
(i.e. rated for ~30,000 printed pages). Here is a video on how the PRINTHEAD(S) function in the printer:
http://inkjet411.com/?page_id=2054
-Thank you
HP 564 - PRINT QUALITY / POOR PRINTING / FADED TEXT / MISSING COLORS__PRINTHEAD FLUSHING
Regarding your recent inquiry about the HP 564XL cartridge print quality problems (fade - no ink hitting
the paper) with your HP Photosmart 7515 printer, let's see if we can recover the ink system by
performing the steps outlined below:
NOTE: 'LOW INK' or 'EMPTY INK' messages, “Empty” and “Low Ink” alerts are COMPLETELY NORMAL for
all HP 564 (or 564XL) ink cartridges which have been refilled! While at first this may be an unusual
workflow, it does allow print operations to proceed. Only brand new ink cartridges support ink level
monitoring. Please watch video at the following link which explains normal operation when using refilled
ink cartridges: http://inkjet411.com/?page_id=2317
Based on your problem description, it sounds like there are numerous air bubbles in the printer ink lines,
so you should perform a "Clean PrintHead" procedure from your printer control panel 'TOOLS MENU',
once or twice. To avoid wasting too much ink right out the gate, we suggest you FIRST REVIEW all
procedures below, along with the video at the following link, and then perform the tasks described
below to recover the ink system: http://inkjet411.com/?page_id=1983
A complete lack of printing is typically not a single cartridge problem, but is either the fluids interface
into the PRINTHEAD* (foam connections are dry), electrical connectivity or an electrical failure of the
PRINTHEAD itself. Please follow the steps at the following link to eliminate all variables:
http://inkjet411.com/?page_id=1451
NOTE 1: If one or more the colors were previously dry fired during printing (i.e. if you continued printing
using only a few colors, then down to one, air may have been accidently ingested into the ink lines
between the cartridge(s) and PRINTHEAD. To recover from this problem, you may have to run the "Clean
Printhead" procedure 2 or 3 times. Please watch the video on the HP 564 support page which describes
some of the issues you could encounter: http://inkjet411.com/?page_id=1983
To verify the lines are clear and working correctly, print the “INK RECOVERY TEST PRINT” from our Test
Prints page (or the Print Quality Report from your printer's Tools menu): http://inkjet411.
com/?page_id=146
If the problem persists, then you'll need to review the steps outlined on our support page, including
printhead removal/printer cleaning and service station cleaning. It is suggested you refer to printer
manufacturer instructions first as the Inkjet411 procedures are provided for general guidance purposes
only.
161
If this does not remedy the problem, then you may have an unseated PRINTHEAD or dirty PRINTHEAD
electrical contacts (connects to the carriage assembly); it is suggested to thoroughly clean Printhead
electrical contacts and carriage contacts (inside printer): http://inkjet411.com/?page_id=1925
a. Remove all 4/5 ink cartridges, then remove the internal PRINTHEAD and thoroughly
clean rear electrical contacts and carriage electrical contacts.
b. Inspect ink foam ports to see if they are ‘wet with ink’…this will confirm whether ink is
being pulled into the PRINTHEAD or not.
c. If the ink foam ports are completely dry (no significant amount of ink present when
blotted with a paper towel, etc.), then the PRINTHEAD is likely considered too dry to
support proper ink flow and subsequent printing operations. Refer to PRINTHEAD
removal process at HP.com (link down below) or at the following Inkjet411 link to
provide general guidance: http://inkjet411.com/?page_id=1451
d. Re-install PRINTHEAD* and Retest.
If the missing colors/poor image quality problem still cannot be corrected, then the PRINTHEAD may
be completely/partially dry and may need to be flushed with warm water (if removable!) – see video
here: http://inkjet411.com/?page_id=2412
Removable PRINTHEAD Flushing Steps:
a. Remove all ink cartridges from the printer.
b. Remove the printhead – in most cases you will need to pull up on the lever at right side of
carriage assembly to unlock the printhead. Lift printhead straight up to remove.
c. Over a sink, run warm tap water directly into the 4 (or 5) ink ports for approximately 2 minutes –
this will effectively saturate the foam ports and blow ink out/thru the nozzle plate bottom.
d. Using a lint-free towel, remove water from rear/bottom electrical contacts. Ensure printhead
electrical contacts and exposed surfaces are fully dry.
e. Install the printhead into the printer. You may observe a “Replace Printhead message” so you
will need to cycle printer power by turning printer off and then on to clear the error.
f. Install ink cartridges and retest printer. You should observe a New PRINTHEAD alert message
followed by an approx. 4-minute preparation countdown prompt.
g. If permissible, activate the ‘Clean Printhead’. This can be done from the printer’s control panel
or software printer driver (for example, by selecting ‘Tools’ – ‘Clean Printhead’, or similar).
h. If you have reached this point of the troubleshooting and all the previous troubleshooting steps
did not work, then the printhead could be electrically damaged or at end of life* and may need
to be replaced. To check the electrical state of the HP564 printhead, perform the PRINTHEAD
Health Diagnostics Test procedure ( refer to Diagnostic’s pdf file at link below, refer to your
printer model for specific testing instructions: http://inkjet411.com/?page_id=1813 )
---- If you perform the printhead flush we suggest you return to Costco and request a free refill (all
cartridges) since a large quantity (i.e. >20%) of ink will be consumed whenever the printhead is removed
and reinstalled into the printer as the ink system needs to full reprime and recharge. We apologize for
the inconvenience here.
162
Non-removable PRINTHEAD Flushing Steps:
a. Remove suspect ink cartridge(s).
b. Take a damp towel and repeatedly blot/saturate the respective color ink port with water
(distilled water is recommended). Ink should be visible (fully saturated) on towel.
c. Place a paper towel under the PRINTHEAD assembly.
d. You’ll see a round mesh ink port where ink flows into the PRINTHEAD.
e. Thoroughly dampen the ink port with 0.5 to 1 teaspoon of distilled water (use an eye-dropper,
small spoon, or similar – pour or drip water directly into the ink port).
f. Remove towel from below PRINTHEAD.
g. Reinstall ink cartridge(s).
h. Activate the ‘Clean Printhead’ routine once or twice (2X) to see if the respective color(s) has
recovered.
Worst case scenario the PRINTHEAD may simply be damaged or at end-of-life and may require
replacement, but usually you will see error messages like "Incompatible Printhead" or "Ink Delivery
System Failure" when this occurs. Please note that a failure of the PRINTHEAD is unrelated to the refilled
cartridges as the PRINTHEAD will eventually fail in time*. For more information on the how the
PRINTHEAD works, watch the video here: http://inkjet411.com/?page_id=1983
NOTE 2: A dirty service station can cause poor image quality and/or ink cross-contamination between
different colors. http://inkjet411.com/?page_id=1451 (564 service station cleaning)
* The HP 564 printer models have an electronic PRINTHEAD (customer replaceable) within the base of
the carriage assembly (responsible for pulling ink from the 4 (or 5) ink cartridges and then firing the ink
droplets onto the paper) – these will eventually fail depending on print usage type and printer duty cycle
(i.e. rated for max. of ~12,000 printed pages over life, but the average PRINTHEAD life under typical
consumer printing conditions is more in the neighborhood of ~6000+ pages, or approximately 7-8 sets of
ink cartridges). The Print Quality Report reveals total number of pages printed.
http://inkjet411.com/?page_id=2054
For information on HP 564 refilling tips please watch the video here:
http://inkjet411.com/?page_id=1983
Please review all steps and let us know if you have any further questions...
-Thank you
HP 920 - PRINT QUALITY / POOR PRINTING / FADED TEXT / MISSING COLORS
Regarding your recent inquiry about the HP 920 cartridge print quality/missing color issue in your
Officejet 6500 printer, please note this type of problem is common and is completely recoverable. Based
on your problem description, it sounds like there is an air bubble in one of the printer ink lines or a
portion of the PRINTHEAD* is dry, so you should perform a "Clean PrintHead" procedure from your
163
printer control panel (i.e. select 'Tools' - 'Clean Printhead', or similar), you may need to perform it twice
(2X) to recover the ink system. If this doesn't work you may wish to jump straight to procedure E. Please
read thru all the checks below prior to beginning:
NOTE: If one or more the colors were previously dry fired during printing (i.e. if you continued printing
using only a few colors to one, air may have been accidently ingested into the ink lines between the
cartridge(s) and PRINTHEAD*. To recover from this problem, you may have to run the "Clean Printhead"
procedure 2-3 times: http://inkjet411.com/?page_id=1589
A. Watch the video on the HP 920 support page which describes some of the common issues you
may encounter with refilled ink cartridges: http://inkjet411.com/?page_id=1983
- Please note that poor print problems are somewhat common and is completely
recoverable in most cases.
B. Then to verify the lines are clear and working correctly, print the “INK RECOVERY TEST PRINT”
from our Test Prints page: http://inkjet411.com/?page_id=146
C. Then we suggest you run the self-test print (under maintenance/tools menu), this will verify
nozzle performance and that each color is firing a solid band of color (i.e. you should not see any
bands or missing lines in the pattern). This is also a good test to help isolate which color (or
portion of the electronic PRINTHEAD*) may be causing the issue.
D. If a problem persists (poor print quality/missing colors, etc.), then we suggest that you
thoroughly review the steps outlined on our HP 920 support pages, including PRINTHEAD*
removal/printer cleaning and service station cleaning. It is suggested you refer to printer
manufacturer instructions first as the Inkjet411 procedures are provided for general guidance
purposes only. Please note that a dirty service station can also cause poor image quality and/or
ink cross-contamination or bleed between different colors:
http://inkjet411.com/?page_id=1495
E. If the poor/degraded print quality problem still cannot be corrected, then the PRINTHEAD may
be dry and may need to be flushed. Refer to PRINTHEAD flushing video procedure at the
following link or refer to steps below: http://inkjet411.com/?page_id=2412
1. Remove all ink cartridges from the printer.
2. Remove the printhead – in most cases you will need to pull up on the lever at right side of
carriage assembly to unlock the printhead. Lift printhead straight up to remove.
3. Over a sink, run warm tap water directly into the 4 ink ports for approximately 2 minutes –
this will effectively saturate the foam ports and blow ink out/thru the nozzle plate bottom.
4. Using a lint-free towel, remove water from rear/bottom electrical contacts. Ensure
printhead electrical contacts and exposed surfaces are fully dry.
164
5. Install the printhead into the printer. You may observe a “Replace Printhead message” so
you will need to cycle printer power by turning printer off and then on to clear the error.
6. Install ink cartridges and retest printer. You should observe a New PRINTHEAD alert
message followed by an approx. 4-minute preparation countdown prompt.
7. If permissible, activate the ‘Clean Printhead’. This can be done from the printer’s control
panel or software printer driver (for example, by selecting ‘Tools’ – ‘Clean Printhead’, or
similar).
F. To perform advanced PRINTHEAD diagnosis please visit our 'HP Printer Diagnostic Test' page:
http://inkjet411.com/?page_id=1813
*The HP 920 printer models have an electronic PRINTHEAD (customer replaceable) within the base of
the carriage assembly (responsible for pulling ink from the 4 ink cartridges and then firing the ink
droplets onto the paper) – the PRINTHEAD will eventually fail over time depending on printed content,
frequency of printing and printer duty cycle (i.e. rated for max. of ~15,000 printed pages over life, but
the average throughput is more in the neighborhood of ~9000 pages). Video of how the PRINTHEAD
functions: http://inkjet411.com/?page_id=2054
NOTE: “Empty” and “Low Ink” alerts are COMPLETELY NORMAL for HP 920 ink cartridges which have
been refilled! While at first this may be an unusual workflow, it does allow print operations to proceed.
Only brand new ink cartridges support ink level monitoring. For “Low Ink”, "Unauthorized ink", "Non-HP
ink", "Fraud", "Counterfeit ink" or similar messages, you may ignore/dismiss this message by pressing
'OK' once for each cartridge, so that the printer resumes its normal operation. We suggest you do this at
the printer's control panel immediately following ink cartridge(s) installation.
For information on HP 920 refilling tips please watch the video here:
http://inkjet411.com/?page_id=1983
We trust this helps remedy and/or explain the issue your Officejet printer is currently experiencing.
Please let us know if you have any questions regarding the technical information provided above.
-Thank you
HP 920 – POOR PRINT QUALITY (SEVERE) / ONGOING COLOR SHIFT – PRINTHEAD TESTING/CLEANING
Thank you for adhering to the suggestions our team provided. Based on your latest feedback, are you
saying that the color black is not printing black, but instead a 'grey' color tone, or similar? Since you just
performed a flush on the PRINTHEAD, a diluted black color should be initially expected. We suggest you
perform a 'Clean Printhead' from the printer's control panel menu to see if the color density improves.
Refer to video: http://inkjet411.com/?page_id=1983
If this is the case, there could be several causes for the composite greyscale print color you are
observing. Let's run a few additional checks to make sure everything is in working order:
165
A. Initiate the 'Print Quality Report' and evaluate:
1. Load Letter or A4, unused, plain white paper into the input tray.
2. On the product control panel, touch the Right Arrow to display the second navigation screen.
3. Touch the Setup icon. The Setup Menu displays.
4. Touch the Down Arrow, and then touch Reports.
5. Touch Print Quality Report. The print quality diagnostic report prints.
6. Verify each color is solid and dense with no visible streaking.
7. Perform a 'Clean Printhead' from the printer's control panel menu if print quality issues persist or if
you observe a color shift as there could be an air bubble between the cartridge and PRINTHEAD. Refer
to video: http://inkjet411.com/?page_id=1983
B. Conduct ‘Tap 41’ PRINTHEAD Health Diagnostics Test:
1. Load Letter/A4-size paper into paper feed tray.
2. Press the * and # keys simultaneously.
3. Enter 124 at keypad. The ‘Underware’ menu should be displayed.
4. Use the arrow keys to navigate to the System Menu. Select Ok.
5. The 'print-mech button tap' menu should be displayed.
6. Select Ok. Screen should display “code = 0”.
7. Use the arrow keys to enter “code = 41” (or just enter 41 on keypad). Select Ok. The Tap 41
diagnostic test pattern prints.
NOTE: The Tap 10 self-test print may also be initiated via ‘code = 10’ (use to verify ink nozzle
performance)
8. Check the 4th line at the top of the printed report; an electrically good/stable PRINTHEAD will
state “Pen Status: Pen OK”………if any other message is displayed then the PRINTHEAD may have failed
and may need to be replaced.
C. Clean printer's service station - see link for cleaning instructions.
NOTE: A dirty service station can cause cross-contamination between the colors:
http://inkjet411.com/?page_id=1495
D. If the color shift / color intensity issue only occurs with printed content from your computer,
etc...then the printer driver settings may be set to either 'draft mode' or 'greyscale', etc.. Click here for
more information: http://inkjet411.com/?page_id=1432
E. Perform a 'Clean Printhead' from the printer's control panel menu if print quality issues persist or if
you observe a color shift as there could still be an air bubble in the ink cartridge(s), or between the
cartridge(s) and PRINTHEAD. Refer to video: http://inkjet411.com/?page_id=1983
F. Return HP920/920XL black ink cartridge to your refiller store and ask them to refill it since the ink
cartridge color continues to produce a color shift in printed output.

166
G. Worst case scenario the PRINTHEAD* may simply be damaged or at end-of-life and may require
replacement, but usually you will see error messages like "Incompatible Printhead" or "Ink Delivery
System Failure" when this occurs. Please note that failure of the printhead is unrelated to the refilled
cartridges as the PRINTHEAD will eventually fail in time*.
NOTE: To perform additional HP920 PRINTHEAD* diagnosis, please visit our 'HP Printer Diagnostic Test'
page: http://inkjet411.com/?page_id=1813
*The HP 920 ink-series printer models have an electronic PRINTHEAD (customer replaceable) within the
base of the carriage assembly (responsible for pulling ink from the 4 ink cartridges and then firing the ink
droplets onto the paper) – the PRINTHEAD will eventually fail over time depending on printed content,
frequency of printing and printer duty cycle (i.e. rated for max. of ~15,000 printed pages over life, but
the average throughput is more in the neighborhood of ~9000 pages).
http://inkjet411.com/?page_id=2054
Please advise following the above round of additional tests.
-Thank you
HP 564 – POOR PRINT QUALITY (SEVERE) – PRINTHEAD CLEANING/REPLACEMENT
Providing you have already adhered to the general guidance outlined on the 'HP 564 Cartridge Errors'
page, it sounds like ink is not being properly delivered into and/or fired thru the PRINTHEAD assembly,
which is leading to the poor image quality, or lack thereof, you are observing*.
http://inkjet411.com/?page_id=1925
To verify the PRINTHEAD is ok, please activate the 'Tap 41' PRINTHEAD Health Diagnostics:
1. Access the Service Menu (several different methods depending on printer model); the
‘Support/Manufacturing’ menu (or similar) will be displayed if entry is successful
a. Press ‘Return’ and ‘Home’ buttons in an alternating sequence (i.e. 4-5 times) This is a bit tricky. See 3rd video here for guidance: http://inkjet411.com/?page_id=434
........or......
b. Press ‘Down’ arrow, press ‘Cancel’, then press the ‘Return’ button:
2. At the ‘Support’ menu, use arrow key to navigate to the ‘Service Menu’, press Ok.
3. Use arrow keys to advance to the ‘Special Reports’ Menu. Select OK.
4. Use arrow keys to advance to the ‘print mech button tap’ menu. Select Ok.
5. ‘Code = 0’ will be displayed. Use arrows keys to change value to ‘41’ (i.e. press and hold right
arrow key).
6. When ‘code = 41’, select ‘OK’. The ‘Tap 41’ diagnostic test pattern will print.
7. Check the 4th line at the top of the printed report; an electrically good/stable PRINTHEAD will
state “Pen Status: Pen OK”………if any other message is displayed then the PRINTHEAD has likely failed,
or has marginal electrical performance issues, and may need to be replaced. Re-seat PRINTHEAD and
repeat ‘Tap 41’ test to verify connectivity is not the issue.
167
Do you happen to know if you have exceeded 4000 printed pages to date? The HP PS 6525 is a relatively
new printer model, so we suspect this is probably not the case.....(At the 'Maintenance' menu you can
print the Print Quality Diagnostic Report; in the lower-center portion of the report refer to #7: Total
Pages Printed: XXXX)
Is the printer still under the 1 year warranty?....you may have a defective PRINTHEAD, so 'the printer'
should be covered.
Now, we are not completely convinced the current printer issue can be fully resolved by just installing
new/fully loaded ink tanks (following numerous cleaning actions with no resolve). Assuming you are not
observing any PRINTHEAD error messages (see NOTE below, i.e. "Incompatible Printhead"), then the
PRINTHEAD is either severely clogged with ink residue or the ink port(s) are completely dry (i.e. the foam
pads that you can see in the bottom when you remove one of the ink cartridges from the carriage
assembly). The ink ports can easily dry out if the printer is rarely used, a color has been depleted for
awhile or if cartridges are not installed for long periods of time. Suggested next steps:
1) Remove all 4/5 ink cartridges, then remove the internal PRINTHEAD and thoroughly clean rear
electrical contacts and carriage electrical contacts. Inspect ink foam ports to see if they are ‘wet with
ink’…this will confirm whether ink is being pulled into the PRINTHEAD or not. If the ink foam ports are
completely dry (no significant amount of ink present when blotted with a paper towel, etc.), then the
PRINTHEAD is likely considered too dry to support proper ink flow and subsequent printing operations.
Refer to PRINTHEAD removal process at HP.com (link down below) or at the following Inkjet411 link to
provide general guidance: http://inkjet411.com/?page_id=1451
2) If after thorough electrical contact cleaning the problem persists, you may need to replace the
PRINTHEAD ASSEMBLY (i.e. get from HP or Amazon), however, as a last ditch effort, you might want to
perform a hot water flush on the PRINTHEAD.
i. Remove all ink cartridges from the printer.
j. Remove the printhead – in most cases you will need to pull up on the lever at right side of
carriage assembly to unlock the printhead. Lift printhead straight up to remove.
k. Over a sink, run warm tap water directly into the 4 (or 5) ink ports for approximately 2 minutes –
this will effectively saturate the foam ports and blow ink out/thru the nozzle plate bottom.
l. Using a lint-free towel, remove water from rear/bottom electrical contacts. Ensure printhead
electrical contacts and exposed surfaces are fully dry.
m. Install the printhead into the printer. You may observe a “Replace Printhead message” so you
will need to cycle printer power by turning printer off and then on to clear the error.
n. Install ink cartridges and retest printer. You should observe a New PRINTHEAD alert message
followed by an approx. 4-minute preparation countdown prompt.
o. If permissible, activate the ‘Clean Printhead’. This can be done from the printer’s control panel
or software printer driver (for example, by selecting ‘Tools’ – ‘Clean Printhead’, or similar).
p. If you have reached this point of the troubleshooting and all the previous troubleshooting steps
did not work, then the printhead is likely damaged or at end of life* and may need to be
168
replaced. To check the electrical state of the HP920 printhead, perform the following
PRINTHEAD Health Diagnostics Test procedure.
3) Conduct ‘Tap 41’ PRINTHEAD Health Diagnostics Test:
a. Load Letter/A4-size paper into paper feed tray.
b. Press the * and # keys simultaneously.
c. Enter 124 at keypad. The ‘Underware’ menu should be displayed.
d. Use the arrow keys to navigate to the System Menu. Select Ok.
e. The 'print-mech button tap' menu should be displayed.
f. Select Ok. Screen should display “code = 0”.
g. Use the arrow keys to enter “code = 41” (or just enter 41 on keypad). Select Ok. The Tap
41 diagnostic test pattern prints.
NOTE: The Tap 10 self-test print may also be initiated via ‘code = 10’ (use to
verify ink nozzle performance)
h. Check the 4th line at the top of the printed report; an electrically good/stable
PRINTHEAD will state “Pen Status: Pen OK”………if any other message is displayed then
the PRINTHEAD may have failed and may need to be replaced.
3) Replace the PRINTHEAD (it is suggested to refer to HP’s Procedure)
http://h10025.www1.hp.com/ewfrf/wc/document?docname=c01643079&lc=en&cc=us&dlc=en
4) As an outside chance, the internal suction pump might be faulty = new printer unfortunately. Best to
troubleshoot this with HP personnel if that is the case. Run a 'Tap 21' test (using same/1st procedure
provided above to test).
*Ink cartridges are merely plastic holding tanks for the ink....other than connecting and being recognized
by the printhead, there isn't really anything that can go wrong here (Costco ink formulations and HP ink
formulations are 'very' similar, both are based on a dye ink based formulation, so this is not a significant
contributor toward this type of condition based on our internal testing).
*Typically the printhead should not reach its end-of-life until after a minimum of 8 or more complete sets of cartridge
changes; officejet models typically have a higher print page throughput average, but this is not always the case. While
some printheads may last 15,000+ pages others may only last 1000 pages, actual results will vary. The printhead will
eventually fail in time due to an internal micro-electronics failure, due to the following leading factors: adverse
customer printer usage/ care, printer duty cycle (i.e. # pages printed per month), printing frequency (i.e. time
between each print job), print mode (i.e. draft vs. normal) and content printed (i.e. photos vs plain pages) and color
mode (black and white only vs. color/greyscale printing). Paper types used (i.e. plain paper, photo papers &
matte/heavy bond papers) and paper edge curl (i.e. duration in printer and/or exposure to low relative humidity) can
also quickly lead to premature printhead failures due to physical ‘head strikes’ of the paper edges making repeated
contact with the printhead nozzle plate surfaces.
169
NOTE: For more severe PRINTER error messages which prevent printing altogether [i.e. “Incompatible
Printhead" or “Ink System Failure”] this is typical of failed micro-electronics within the PRINTHEAD
assembly (nothing to do with the HP 564 refilled ink cartridges). The PRINTHEAD assembly is a separate
electronic unit in which the cartridges plug into and feed ink to and is essentially the heart of the
printing system. For reference, here is how the PRINTHEAD works: http://inkjet411.com/?page_id=2054
-Thank you.
HP 920 – POOR PRINT QUALITY (SEVERE) – PRINTHEAD CLEANING/FLUSHING REPLACEMENT
Regarding your HP920 cartridge usage inquiry and observed missing colors/degraded print quality in
your HP OJ 6500A printer output, given the steps that you have taken up to this point, we are not
completely convinced the current printer issue can be resolved by just installing new/fully loaded ink
cartridges [i.e. and/or by following numerous 'Clean Printhead' actions with no resolve - thank you for
first attempting these procedures as the ‘Clean Printhead’ action (2-3 times) typically recovers the ink
system]*.
Providing you have already adhered to the general guidance outlined on the 'HP 920 Cartridge Errors'
page, it sounds like ink is not being properly delivered into and/or fired thru the PRINTHEAD**
assembly, which is leading to the poor image quality, or lack thereof, you are observing. Review the
suggested steps up to this point to ensure we have not overlooked anything:
http://inkjet411.com/?page_id=1925
Assuming you are not observing any PRINTHEAD** error messages (see NOTE below, i.e. "Incompatible
Printhead"), then the PRINTHEAD is either severely clogged with ink residue or the ink port(s) are
completely/partially dried out (i.e. the foam pads that you can see in the bottom of the PRINTHEAD
when you remove one of the ink cartridges from the carriage). The ink ports can easily dry out if the
printer is rarely used, a color has been depleted for a while or if cartridges are not installed for long
periods of time.
Please review steps 1 thru 4 below prior to beginning so you fully understand the suggested ‘next steps’
from our team:
1) Remove all 4 ink cartridges, then remove the internal PRINTHEAD** and thoroughly clean rear
electrical contacts and carriage electrical contacts. Inspect ink foam ports to see if they are ‘wet with
ink’…this will confirm whether ink is being pulled into the PRINTHEAD or not. If the ink foam ports are
completely dry (no significant amount of ink present when blotted with a paper towel, etc.), then the
PRINTHEAD is likely considered too dry to support proper ink flow and subsequent printing operations.
Refer to PRINTHEAD removal process at HP.com (link down below) or at the following Inkjet411 link to
provide general guidance: http://inkjet411.com/?page_id=1495
2) While the PRINTHEAD is removed, perform a hot water flush on the PRINTHEAD assembly (this is not
approved by HP....they will just tell you to replace the PRINTHEAD (~$75):
170
Flushing Procedure: http://inkjet411.com/?page_id=2412
a. Remove all ink cartridges from the printer.
b. Remove the printhead – in most cases you will need to pull up on the lever at right side of
carriage assembly to unlock the printhead. Lift printhead straight up to remove.
c. Over a sink, run warm tap water directly into the 4 ink ports for approximately 2 minutes – this
will effectively saturate the foam ports and blow ink out/thru the nozzle plate bottom.
d. Using a lint-free towel, remove water from rear/bottom electrical contacts. Ensure printhead
electrical contacts and exposed surfaces are fully dry.
e. Install the printhead into the printer. You may observe a “Replace Printhead message” so you
will need to cycle printer power by turning printer off and then on to clear the error.
f. Install ink cartridges and retest printer. You should observe a New PRINTHEAD alert message
followed by an approx. 4-minute preparation countdown prompt.
g. If permissible, activate the ‘Clean Printhead’. This can be done from the printer’s control panel
or software printer driver (for example, by selecting ‘Tools’ – ‘Clean Printhead’, or similar).
h. If you have reached this point of the troubleshooting and all the previous troubleshooting steps
did not work, then the printhead is likely damaged or at end of life* and may need to be
replaced. To check the electrical state of the HP920 printhead, perform the following
PRINTHEAD Health Diagnostics Test procedure.
3) You can verify the HP920 PRINTHEAD's electrical performance by activating the PRINTHEAD
Health Diagnostics Test Report (NOTE: only applicable to printer models with keypad, i.e. 1-9):
a. Load Letter/A4-size paper into paper feed tray.
b. Press the * and # keys simultaneously.
c. Enter 123 (or 124) at keypad. The ‘Support xxxxxx’ menu should be displayed.
d. Use the arrow keys to navigate to the Reports Menu. Select Ok.
e. Use the arrow keys to navigate to the 'print-mech button tap' menu.
f. Select Ok. Screen should display “code = 0”.
g. Use the arrow keys to enter “code = 43” (or just enter 43 on keypad). Select Ok. The Tap 41
diagnostic test pattern prints.
NOTE 1: On newer printer models you may need to input ‘code = 41’.
NOTE 2: The Tap 10 self-test print (or extended self-test) also be initiated via ‘code = 10’ (use to
verify color output and general ink nozzle performance)
h. Check the 4th line at the top of the printed report; an electrically good/stable PRINTHEAD will
state “Pen Status: Pen OK”………if any other message is displayed then the PRINTHEAD may
have failed and may need to be replaced.
i. Re-seat the PRINTHEAD and repeat ‘Tap 43’ test to verify connectivity is not the issue. Refer to
HP.com for PRINTHEAD removal procedures or general instructions here:
http://inkjet411.com/?page_id=1495
171
4) As an outside chance, the internal suction pump might be faulty = new printer unfortunately. Best to
troubleshoot this with HP personnel if that is the case. You could run a 'Tap 21' test (using procedure
similar to ‘Tap 41’ test, except enter ‘code = 21’).
*Ink cartridges are merely plastic holding tanks for the ink....other than connecting and being recognized
by the printhead, there isn't really anything that can go wrong here (Costco ink formulations and HP ink
formulations are 'very' similar, both are based on a dye ink based formulation, so this is not a significant
contributor toward this type of condition based on our internal longevity testing). Printing frequently,
perhaps once or twice a week, is one of the best ways to maintain your printer’s overall PRINTHEAD
health. Here is a video of how the PRINTHEAD functions in the printer:
http://inkjet411.com/?page_id=2054
**The HP 920 ink-series printer models have an electronic PRINTHEAD within the base of the carriage
assembly (responsible for pulling ink from the 4 ink cartridges and then firing the ink droplets onto the
paper) – these will eventually fail depending on printed content, frequency of printing and printer duty
cycle (i.e. HP rates them with a duty cycle of "up to 1000 pages a month", which translated is ~15,000
printed pages maximum over life, but the typical/average life is closer to ~12,000 pages).
http://inkjet411.com/?page_id=2054
NOTE: For more severe PRINTER error messages which prevent printing altogether [i.e. “Incompatible
Printhead", “Replace PRINTHEAD” or “Ink System Failure”] this is typical of failed micro-electronics
within the PRINTHEAD assembly (nothing to do with the HP 920 refilled ink cartridges). The PRINTHEAD
assembly is a separate electronic unit in which the cartridges plug into and feed ink to and is essentially
the heart of the printing system. For reference, here is how the PRINTHEAD works:
http://inkjet411.com/?page_id=2054
-Thank you.
HP 564/920 – POSSIBLE PRINTHEAD FAILURE
Regarding your recent inquiry about the HP 564/920 cartridge print quality problems and the repeated
attempts to 'recover' the ink system, it sounds like the PRINTHEAD assembly (in base of printer) may be
causing the issue. If determined to be a failure, it is unrelated to the refilled ink cartridges as all
printheads will eventually fail over time*.
Please note that the Inkjet411 team receives this same type of problem about every 2 days. The issue is
normally recoverable by performing the following ‘aggressive’ ink system recovery steps:
1. Remove all 4 ink cartridges and PRINTHEAD from printer. Clean PRINTHEAD’s rear electrical copper contacts and interfacing carriage electrical copper contacts: http://inkjet411.com/?page_id=1451
2. Perform hot water flush on printhead (distilled water is recommended, though tap water may be used since this is more of a ‘last ditch effort’: http://inkjet411.com/?page_id=2412
172
3. Perform ‘Clean Printhead’ 3X (3 times) from the printer’s control panel (all tanks will need to be at least 40% full of ink for success) – see video instruction: http://inkjet411.com/?page_id=1925
4. Print the ‘Ink Recovery Test Print’ 2X (twice) to blow ink thru all ink nozzles and ensure print quality is satisfactory: http://inkjet411.retailinkjet.com/wp-content/uploads/2013/02/Test-Print_CMYK.pdf
5. Printer should now be good-to-go. If printing partially recovers, perform Step 3 again (once or twice).
6. If not, then replace PRINTHEAD (covered under HP warranty for 1-year), otherwise get a new assembly on Amazon.com for ~$55)
At this point we can only suggest that you thoroughly review the steps outlined, including printhead
removal and cleaning and thorough service station cleaning. It is suggested you refer to printer
manufacturer instructions first as the Inkjet411 procedures are provided for general informational
purposes only.
NOTE: A dirty service station can cause poor image quality and/or ink cross-contamination between
different colors: http://inkjet411.retailinkjet.com/?page_id=1495
If, after following the steps above, this does not remedy the problem, then you may have an electrically
defective print head in the printer and it may need to be replaced with a new one.
You can verify the HP564 PRINTHEAD's electrical performance by running the Tap 41 Cartridge Health
Diagnostics test: [PhotoSmart Premium C309c, C309a, C309n, C310a, C310b, C310c, C410a, Touchsmart Web, PhotoSmart
Premium Web C309n] NOTE: If this service menu access procedure does not work then refer to ‘Photosmart Plus B series’ printers – refer to
Diagnostics document here: http://inkjet411.com/?page_id=1813
Tap 41 PRINTHEAD Health Diagnostics:
1. Using two fingers, gently tap the ‘Return’ and ‘Home’ keys on touchscreen until the Engineering
Menu is displayed (for example, press the button 3-4 times each in alternating succession).
Using arrow keys navigate to Service Menu.
2. ……..or if a keypad is available: Press * and # keys simultaneously. Service Menu should be
displayed.
3. Use arrow keys to advance to the Special Reports Menu. Select OK.
4. Use arrow keys to advance to the ‘print mech button tap’ menu. Select Ok.
5. ‘Code = 0’ will be displayed. Use arrows keys to change value to ‘41’ (i.e. press and hold right arrow key).
6. When ‘code = 41’, select ‘OK’. The diagnostic test pattern will print.
i. NOTE: The Tap 10 self-test print may also be initiated via ‘code = 10’ (use to verify all nozzles are
firing)
7. Check the 4th
line at the top of the printed report; an electrically good/stable PRINTHEAD will state “Pen
OK”………if any other message is displayed then the PRINTHEAD has likely failed and may need to be
replaced. Re-seat PRINTHEAD and repeat ‘Tap 41’ test to verify connectivity is not the issue.
You can verify the HP920 PRINTHEAD's electrical performance by running the Tap 43 Cartridge Health
Diagnostics test (NOTE: only applicable to printer models with keypad, i.e. 1-9):
1. Load Letter/A4-size paper into paper feed tray.
173
2. Press the * and # keys simultaneously.
3. Enter 123 (or 124) at keypad. The ‘Support xxxxxxxx’ menu should be displayed.
4. Use the arrow keys to navigate to the Reports Menu. Select Ok.
5. Use the arrow keys to navigate to the 'print-mech button tap' menu.
7. Select Ok. Screen should display “code = 0”.
8. Use the arrow keys to enter “code = 43” (or just enter 43 on keypad). Select Ok. The Tap 43
diagnostic test pattern prints.
NOTE 1: On newer printer models you may need to input ‘code = 41’.
NOTE 2: The Tap 10 self-test print (or extended self-test) also be initiated via ‘code = 10’ (use to
verify color output and general ink nozzle performance)
9. Check the 4th line at the top of the printed report; an electrically good/stable PRINTHEAD will
state “Pen Status: Pen OK”………if any other message is displayed then the PRINTHEAD may have failed
and may need to be replaced.
9. Re-seat the PRINTHEAD and repeat ‘Tap 43’ test to verify connectivity is not the issue. Refer to
HP.com for PRINTHEAD removal procedures or general instructions here:
http://inkjet411.com/?page_id=1495
*The HP 564 ink-series printer models have an electronic PRINTHEAD within the base of the carriage
assembly [responsible for pulling ink from the 4 (or 5) ink cartridges and then firing the ink droplets onto
the paper] – this assembly will eventually fail depending on printed content, frequency of printing and
printer duty cycle (i.e. HP rates them with a duty cycle of "up to 1000 pages a month", which translated
is ~12,000 printed pages maximum over life, but the typical/average life is closer to ~6000 pages).
http://inkjet411.com/?page_id=2054
*The HP 920 ink-series printer models have an electronic PRINTHEAD within the base of the carriage
assembly (responsible for pulling ink from the 4 ink cartridges and then firing the ink droplets onto the
paper) – these will eventually fail depending on printed content, frequency of printing and printer duty
cycle (i.e. HP rates them with a duty cycle of "up to 1000 pages a month", which translated is ~15,000
printed pages maximum over life, but the typical/average life is closer to ~9,000 pages).
http://inkjet411.com/?page_id=2054
-Thank you
HP 564 PRINTHEAD FAILURE (“INCOMPATIBLE PRINTHEAD”)
Regarding your recent inquiry about the HP 564 ink-series printer system error message ("Incompatible
Printhead") associated with your HP Photosmart Premium C309a printer, this is either an electrical
connectivity issue (between Printhead and Carriage Assembly) or an internal electrical failure of the
PRINTHEAD assembly*. The issue may be recoverable by performing the following steps:
1. Remove all 4 ink cartridges and PRINTHEAD from printer. Using a water-dampened (distilled
water recommended) lint free towel, thoroughly clean PRINTHEAD’s rear electrical copper contacts and
174
interfacing carriage electrical copper contacts. Ensure no ink residue or towel fibers remain following
cleaning. Re-install PRINTHEAD and all ink cartridges, retest: http://inkjet411.com/?page_id=1451
2. If the 'Incompatible Printhead' error condition remains, attempt to perform the 'Tap 41'
diagnostic test below to check the printhead's electrical health:
NOTE: If the service menu access procedure below does not work then see ‘Photosmart Plus B series’
printers – refer to Diagnostics document (pdf file) here: http://inkjet411.com/?page_id=1813
Tap 41 PRINTHEAD Health Diagnostics:
a. Using two fingers, gently tap the ‘Return’ and ‘Home’ keys on touchscreen until the Engineering
Menu is displayed (for example, press the button 3-4 times each in alternating succession). Using arrow
keys navigate to Service Menu.
b. ……..or if a keypad is available: Press * and # keys simultaneously. Service Menu should be
displayed.
c. Use arrow keys to advance to the Special Reports Menu. Select OK.
d. Use arrow keys to advance to the ‘print mech button tap’ menu. Select Ok.
e. ‘Code = 0’ will be displayed. Use arrows keys to change value to ‘41’ (i.e. press and hold right
arrow key).
f. When ‘code = 41’, select ‘OK’. The diagnostic test pattern will print.
NOTE: The Tap 10 self-test print may also be initiated via ‘code = 10’ (use to verify all nozzles are
firing)
g. Check the 4th line at the top of the printed report; an electrically good/stable PRINTHEAD will
state “Pen OK”………if any other message is displayed then the PRINTHEAD has likely failed and may
need to be replaced.
h. Re-seat PRINTHEAD and repeat ‘Tap 41’ test to check electrical performance.
3) If, after following the steps above, this does not remedy the problem, then you may have an
electrically defective PRINTHEAD* in the printer and it may need to be replaced with a new one. The
PRINTHEAD is normally covered under HP warranty for 1-year, otherwise you can obtain a new
PRINTHEAD assembly (note that printhead prices will range between $50 and $90 - it suggested to only
purchase a new OEM/HP printhead assembly).
*The HP 564 ink-series printer models have an electronic PRINTHEAD within the base of the carriage
assembly [responsible for pulling ink from the 4 (or 5) ink cartridges and then firing the ink droplets onto
the paper] – this assembly will eventually fail. Rate of failure largely depends on printed content,
frequency of printing and printer duty cycle (i.e. HP rates them to a duty cycle of "up to 1000 pages a
month", which translated is ~12,000 printed pages maximum over printer life, but the typical/average
printhead life is closer to ~8000 pages). A failure of the PRINTHEAD is unrelated to the ink refill process
or use of refilled ink cartridges and normally occurs in time with all semi-permanent printhead-based
printer models. For information on how the printhead functions, watch this video:
http://inkjet411.com/?page_id=2054
175
-Thank you
HP 02 – CARTRIDGE PROBLEM ERROR – MULTIPLE CARTRIDGES
Regarding your recent inquiry about the HP02 cartridge error messages ("Cartridge Problem; The
following cartridge appears to be missing or damaged") associated with your HP PS C7100 printer, it
sounds like either the refill operator forgot to replace all the smart chips (attached to bottom of each ink
cartridge) or the permanent built-in printhead has suffered an electrical failure. We first suggest you
take your cartridges back to Costco and request they either re-program the chip (or replace them) since
none are being recognized....however, let's run just a few simple checks first to screen out all variables,
including PRINTHEAD electrical performance (if possible to perform)....
A. Remove the ink cartridge from the printer and carefully inspect the small chip on the bottom/rear
side of ink cartridge - ensure there is no ink residue on gold contact surfaces. Clean with an isopropyl
dampened lint free clean, as necessary. Refer to picture at following Inkjet411 site link:
http://inkjet411.com/?page_id=35
....or....
refer to instructions at HP.com:
http://h10025.www1.hp.com/ewfrf/wc/document?docname=c01135910&cc=no&dlc=no&lang=no&lc=
en&printable=no&product=3315742&rule=4205
B. Verify you are NOT using HP02 ink cartridges with the following serial numbers (these are ‘one time use only cartridges’ that are intended to be used once during the initial printer setup – you will need to dispose them as they can no longer be used): C9338, C9339, C9340, C9341, C9357, C9358 For more information from HP on this:
http://h10025.www1.hp.com/ewfrf/wc/document?docname=c01135910&cc=no&dlc=no&lang=no&lc=
en&printable=no&product=3315742&rule=4205
C. To verify overall printer performance and to check the electrical health of the built-in PRINTHEAD (i.e.
run the ‘Tap 43’ diagnostic test) please refer to the applicable video procedure*
http://inkjet411.com/?page_id=2377 (Printers without 1-9 keypad)
http://inkjet411.com/?page_id=2391 (Printers with 1-9 keypad)
D. If the cartridge chip has been replaced/reprogrammed (i.e. a 2nd time), then this ink cartridge alert
may be a printer defect and not a cartridge issue. It is suggested to reset the printer by:
1) Printers with 1-9 keypad
a. Unplug the power cable from the back of printer.
b. Hold down number 9 & # keys, plug in the power and turn the printer on.
c. The printer will reset itself.
176
2) Printers without 1-9 keypad:
a. Turn off the HP All-in-One by pressing the On button.
b. Unplug the power cord from the back of the HP All-in-One.
c. Plug the power cord back into the HP All-in-One.
d. Turn on the HP All-in-One by pressing the On button.
e. Check the printer for the error message. If the error message still displays, go to the next step.
E. If an error condition persists then we suggest that you thoroughly review the steps outlined on our HP
02 support page: http://inkjet411.com/?page_id=35
F. Refer to the HP Printer Diagnostic’s document (PDF file) at the following link for more advanced
diagnostic tests for your specific printer model: http://inkjet411.com/?page_id=1813
G. If the PRINTHEAD is ok (pending the results of the ‘Tap 43’ test performed above) and this still does
not provide clarity to the issue or remedy the problem, then you may need to replace the suspect ink
cartridge(s) with a brand new HP ink cartridge to rule out the cartridge/chip as a contributing variable.
*The HP 02 ink-series printer models have an electronic PRINTHEAD within the base of the carriage
assembly (responsible for pulling ink from the 4 ink cartridges and then firing the ink droplets onto the
paper) – the HP 02 PRINTHEAD typically has a maximum life of approximately 40,000 pages (~30,000
page average). Unfortunately, the permanent PRINTHEAD is not replaceable - here is how it functions:
http://inkjet411.com/?page_id=2054
If, after performing the suggested procedures above, you still have not reached resolution please let us
know.
-Thank you
HP 02 - PRINT QUALITY / POOR PRINTING / FADED TEXT / MISSING COLORS
Regarding your recent inquiry about the HP 02 cartridge print quality/missing color issue in your HP
Photosmart C6180 printer, let's first make sure that the printer is firing all 6 cartridges correctly. Based
on your problem description, it sounds like there either an air bubble in one of the printer ink lines or a
portion of the PRINTHEAD* could be dry, so you should first perform a "Clean PrintHead" procedure
from your printer’s ‘TOOLS’ button on the control panel.
NOTE: If one or more the colors were previously dry fired during printing (i.e. if you continued printing
using only a few colors to one, air may have been accidently ingested into the ink lines between the
cartridge(s) and PRINTHEAD. To recover from this problem, you may have to run the "Clean Printhead"
procedure 2-3 times. Depending on your printer model, refer to the applicable video procedure:
http://inkjet411.com/?page_id=2377 (Printers without 1-9 keypad)
http://inkjet411.com/?page_id=2391 (Printers with 1-9 keypad)
177
However, if you have already attempted to clean the printhead and one or more colors are missing, then
it is suggested to run the ‘Tap 43’ printer diagnostic test to ensure the built-in PRINTHEAD (inside the
printer) is functioning properly*
http://www.youtube.com/watch?v=X8Hr5YgSqT4 (Printers without 1-9 keypad)
http://www.youtube.com/watch?v=kEfCWJMpfZ8 (Printers with 1-9 keypad)
Refer to the HP Printer Diagnostic’s document (PDF file) at the following link for advanced diagnostic
tests for your printer model: http://inkjet411.com/?page_id=1813
To completely verify the ink lines are clear and working correctly, print the “INK RECOVERY TEST PRINT”
from our Test Prints page (intense color drop pattern): http://inkjet411.com/?page_id=146
As an option (to help conserve ink), you could just run the Self-Test Report (under ‘PRINT REPORT’
menu), this will verify nozzle performance and that each color is firing a solid band of color (i.e. you
should not see any bands or missing lines in the pattern). This is also a good test to help isolate which
color (or portion of the electronic PRINTHEAD*) may be causing the issue.
If a problem persists (poor print quality/nozzle misfiring/missing colors, etc.), then we suggest that you
thoroughly review the steps outlined on our HP 02 support pages, including printer cleaning and service
station cleaning. It is suggested you refer to printer manufacturer instructions first as the Inkjet411
procedures are provided for informational purposes only. A dirty service station can cause poor image
quality and/or ink cross-contamination between different colors.
http://inkjet411.com/?page_id=35 (HP 02 main page)
If this does not remedy the problem, then you may have a defective PRINTHEAD* in the printer (worst
case scenario), unrelated to the refilled cartridges.
*The HP 02 ink series printer models have an electronic PRINTHEAD within the base of the carriage
assembly (responsible for pulling ink from the 4 ink cartridges and then firing the ink droplets onto the
paper) – the HP 02 PRINTHEAD typically has a maximum life of approximately 40,000 pages (~30,000
page average). Unfortunately, the permanent PRINTHEAD is not replaceable.
http://inkjet411.com/?page_id=2054
We trust this helps explain the issue your printer is currently experiencing.
Thank you
HP 02 – EXPIRED INK / THE CARTRIDGE IS NOT INTENDED FOR THIS PRINTER…ERROR MESSAGES
Regarding your recent inquiry about the HP 02 cartridge error message (“EXPIRED INK” / “THE
CARTRIDGE IS NOT INTENDED FOR THIS PRINTER”) in your HP Photosmart C6180 printer, based on your
problem description, this could be either cartridge’s smart chip is improperly programmed, the chip has
expired (25 month life!), startup cartridges are installed in the printer or there is poor connectivity
between the ink cartridge and the printer.
178
Verify none of the ink cartridges have “expired ink”:
1) Check your printer software’s ‘Device Information’ (…the full driver package needs to be
installed to view this). The installation and expiration dates for each cartridge should be displayed.
2) Return the ink cartridge to your refill center for reprogramming (or chip replacement).
NOTE: An ‘Expired Ink’ message cannot be bypassed nor can you switch into a different print mode (i.e.
black/greyscale, etc.). Light Cyan and Light Magenta colors are typically not used for plain paper printing
and will last much longer (i.e. 4-5X) than the 4 primary colors (CMYK).
If you receive the ‘CARTRIDGE NOT INTENDED FOR USE IN THIS PRINTER’ / ‘INCORRECT INK CARTRIDGES
INSTALLED’ error messages, please verify you are not using HP02 ink cartridges with the following serial
numbers (these are ‘one time use only cartridges’ that are intended to be used once during the initial
printer setup – you will need to dispose them as they can no longer be used): C9338, C9339, C9340,
C9341, C9357, C9358
For more information from HP on this:
http://h10025.www1.hp.com/ewfrf/wc/document?docname=c01135910&cc=no&dlc=no&lang=no&lc=en&printa
ble=no&product=3315742&rule=4205
If the cartridge chip has been replaced/reprogrammed (i.e. a 2nd time), then this ink level alert may be a
printer defect and not a cartridge issue. It is suggested to reset the printer by:
1) Printers with 1-9 keypad
a. Unplug the power cable from the back of printer.
b. Hold down number 9 & # keys, plug in the power and turn the printer on.
c. The printer will reset itself.
2) Printers without 1-9 keypad:
a. Turn off the HP All-in-One by pressing the On button.
b. Unplug the power cord from the back of the HP All-in-One.
c. Plug the power cord back into the HP All-in-One.
d. Turn on the HP All-in-One by pressing the On button.
e. Check the printer for the error message. If the error message still displays, go to the
next step.
If the problem still cannot be corrected, then remove and thoroughly clean the smart chip surfaces on
the rear side of each ink cartridge. Instructions can be found here:
http://h10025.www1.hp.com/ewfrf/wc/document?docname=c01135910&cc=no&dlc=no&lang=no&lc=
en&printable=no&product=3315742&rule=4205
179
If an error condition persists then we suggest that you thoroughly review the steps outlined on our HP
02 support page: http://inkjet411.com/?page_id=35
To verify overall printer performance and to check the electrical health of the built-in PRINTHEAD (i.e.
run the ‘Tap 43’ diagnostic test) please refer to the applicable video procedure*
http://inkjet411.com/?page_id=2377 (Printers without 1-9 keypad)
http://inkjet411.com/?page_id=2391 (Printers with 1-9 keypad)
Refer to the HP Printer Diagnostic’s document (PDF file) at the following link for more advanced
diagnostic tests for your specific printer model: http://inkjet411.com/?page_id=1813
If the PRINTHEAD is ok (pending the results of the ‘Tap 43’ test performed above) and this still does not
provide clarity to the issue or remedy the problem, then you may need to replace the suspect ink
cartridge(s) with a brand new HP ink cartridge to rule out the cartridge/chip as a contributing variable.
*The HP 02 ink series printer models have an electronic PRINTHEAD within the base of the carriage
assembly (responsible for pulling ink from the 4 ink cartridges and then firing the ink droplets onto the
paper) – the HP 02 PRINTHEAD typically has a maximum life of approximately 40,000 pages (~30,000
page average). Unfortunately, the permanent PRINTHEAD is not replaceable.
http://inkjet411.com/?page_id=2054
If, after performing the suggested procedures above, you still have not reached resolution please let us
know.
-Thank you
HP-CANON-EPSON IIT SYSTEMS - IDENTIFYING WHICH COLOR HAS RUN OUT
Regarding your recent inquiry about how to identify which color has run out, use the following
suggestions in sequence until you are able to identify the empty color:
1) Generate a Print Quality Test Page from your printer control panel; a faded color band indicates
empty.
2) To distinguish between a black and photo black cartridge, print a text document and/or a photo.
Faded black in a text document indicates the black cartridge is empty; faded black in a photo indicates
the photo black cartridge is empty.
3) To distinguish between cyan, yellow, and magenta, click on the "Test Print" menu button at the left of
the home page of www.inkjet411.com Select and download the appropriate file(s):
http://inkjet411.com/?page_id=146
Print the test page(s). A faded color band indicates empty.
EPSON ARTISAN (6-COLOR) PRINTERS - IDENTIFYING WHICH COLOR HAS RUN OUT / POOR QUALITY
Regarding your recent inquiry about 1) the change of magenta to purple color and 2) the ink empty out
message (which color?), we should first determine which color is presently causing the no printing
180
messages to appear. As the Artisan is a 6-color printer system, be advised you have 2 Magentas and 2
Cyans, one regular and one "light" on each. You should be able to go into the printer's
maintenance/tools menu to identify which color is giving the current problem. You may need to replace
that particular color (please note that Costco does not refill Light Cyan nor Light Magenta cartridges).
If they were a recent purchase, accompanied by an “Unrecognized Cartridge” message, return the
cartridge to the refill store to have the cartridge re-programmed.
If this does not remedy the problem, then you may have a defective print head in the printer (worst case
scenario), unrelated to the refilled cartridges. The printhead is a separate electronic assembly (which the
cartridges are installed into) and is responsible for firing the ink drops onto the paper. Over time and
based on usage this assembly will eventually fail.
I would also check your user’s manual to see if there are any procedures on cleaning the service
station/capping station assembly (this is where the carriage/cartridges 'park' when not in use). A dirty
service station can cause all kinds of improper color output problems (assuming the printhead is working
correctly of course). See video on how the PRINTHEAD works: http://inkjet411.com/?page_id=2054
NOTES: To determine which color has run out, use the following suggestions in sequence until you are
able to identify the empty color: 1) Generate a Print Quality Test Page from your printer control panel; a
faded color band indicates empty. 2) To distinguish between a black and photo black cartridge, print a
text document and/or a photo. Faded black in a text document indicates the black cartridge is empty;
faded black in a photo indicates the photo black cartridge is empty. 3) To distinguish between cyan,
yellow, and magenta, or Light Cyan/Light Magenta click here:
http://inkjet411.com/?page_id=146
Print the "6-color" test print. A faded/missing color band indicates empty.
CANON / EPSON - MISSING COLORS OR POOR/INCONSISTENT PRINT QUALITY
Regarding your recent inquiry about the poor print quality/lack of printing performance, please perform
the following steps (if you have already performed a step, please continue to the next one in order
shown):
1. Go into the printer's maintenance/tools menu and print a print quality test (i.e. heading
cleaning, nozzle test or similar) to help identify which color (of number of colors) is impacted.
NOTES: To determine which color has run out, use the following suggestions in
sequence until you are able to identify the empty color: 1) Generate a Print Quality Test
Page from your printer control panel; a faded color band indicates empty. 2) To
distinguish between a black and photo black cartridge, print a text document and/or a
photo. Faded black in a text document indicates the black cartridge is empty; faded
black in a photo indicates the photo black cartridge is empty. 3) To distinguish between
181
cyan, yellow, and magenta click here: http://inkjet411.com/?page_id=146 A faded or
missing color band indicates empty.
2. At the printer’s control panel under the ‘Maintenance’ or ‘Tools’ menu, activate a ‘CLEANING’ or
‘HEAD CLEANING’ to prime the ink system. Then Run the Inkjet411 ‘Ink Recovery Test Print’ from
our Test Prints page to verify all colors are firing properly (all printers also provide some form of
a Self Test page): http://inkjet411.com/?page_id=146
3. Check your user’s manual to see if there are any procedures on cleaning the service
station/capping station assembly (this is where the carriage/cartridges 'park' when not in use). A
dirty service station can cause all kinds of improper color output problems (assuming the
printhead is working correctly of course). NOTE: May not be applicable for your model
depending on the printer design.
4. The Ink Absorber, if applicable depending on print model, may also be full which could also
cause printing related issues (typically an error code will be displayed when the ink absorber is
full)…here is a customer/yahoo response on this particular issue:
http://answers.yahoo.com/question/index?qid=20130523085451AAE1TqW
5. Refer to our print quality support page to ensure other variables are not causing the issue such
as printer driver settings or operating system device conflict, etc:
http://inkjet411.com/?page_id=1432
6. If this does not remedy the problem, then one or more of the ink ports may be dry within the
PRINTHEAD assembly (the ink cartridges physically connect to this electronic assembly). We
suggest you either remove the printhead and perform a hot water flush for 2 minutes or using
an eye-dropper, or similar, drip 4-5 mls of distilled water into the respective color ink port.
3rd party solutions for reference:
http://www.youtube.com/watch?v=FL8QaFVwsEs (Canon)
http://www.youtube.com/watch?v=ZheZf-vdho8 (Canon Printhead removal / water flush)
http://www.youtube.com/watch?v=3kKULRjqaLg (Epson #1)
http://www.youtube.com/watch?v=i78Tu3RVO3s (Epson #2)
7. If the problem persists, then you may have a damaged PRINTHEAD (worst case scenario),
unrelated to the refilled cartridges. The printhead is a separate electronic assembly (which the
cartridges are installed into) and is responsible for firing the ink drops onto the paper. Over time
and based on usage this assembly will eventually fail (typically lasts ~5000 printed pages on avg).
Refer to video on how the PRINTHEAD functions: http://inkjet411.com/?page_id=2054
Please advise if the above suggestions do not help remedy the current issue.
-Thank you
182
EPSON - MISSING COLORS FOLLOWING REPEATED “HEAD CLEANING”
Regarding your recent inquiry about the T127 cartridges poor print quality (lack of yellow printing), be
advised that Epson printer systems are notorious for getting dried ink nozzles and/or dried PRINTHEAD
ink ports. Often the ink cartridge only has to be uninstalled for less than 8 hours and dried ink (ink
starvation) issues can easily occur. You indicated that you already recovered the black ink by performing
the 'head cleaning' twice, this is a sure sign that the PRINTHEAD has suffered prolonged drying and is the
likely culprit which is still causing the yellow ink starvation.
Please perform the following steps - A. thru C:
A. At the printer’s control panel under the ‘Maintenance’ or ‘Tools’ menu, activate the ‘HEAD CLEANING’
2-3 times to fully re-prime the ink system until the Yellow recovers. Retest by printing a self-test page to
verify all colors are firing properly. We also provide a more intense ‘Ink Recovery Test Print’ on our
Inkjet411 Test Prints page: http://inkjet411.com/?page_id=146
> If all colors do not recover then proceed to Step B.
B. If this does not remedy the yellow starvation issue, then the yellow ink port may be partially dry
within the PRINTHEAD assembly (the ink cartridges physically connect to this electronic assembly). We
suggest you 'wet' the PRINTHEAD INK PORT. Using an eye-dropper, or similar, drip ~5-6 milliliters (or
approx. 1 teaspoon) of distilled water into the respective YELLOW ink port. Re-install ink cartridge and
perform a 'Head Cleaning' to flush the water out & re-prime yellow ink line. Refer to video on how the
PRINTHEAD functions: http://inkjet411.com/?page_id=2054
Additional 3rd party PRINTHEAD recovery solutions for reference:
http://www.youtube.com/watch?v=3kKULRjqaLg (Epson #1)
http://www.youtube.com/watch?v=i78Tu3RVO3s (Epson #2)
C. Return to Costco and get all your ink tanks (CMYK) refilled, at no charge, following the PRINTHEAD
cleaning since you lost so much ink from the 4+ 'Head Cleaning' actions (typically ~8% per cleaning
action) - just tell them an Inkjet411 representative sent you. If you have any troubles with this we will
contact the regional account manager whom will contact the store directly for authorization.
NOTE: Cartridges may be rejected for refilling if each cartridge ink level is not below 25%.
Please advise if the above suggestions do not help remedy the current issue. We apologize for the major
inconvenience this has caused you.
-Thank you
QUESTIONING OF COLOR/INK PERFORMANCE (REFILL SERVICES - QUALITY ASSURANCE)
Regarding your recent inquiry about the HP 920 cartridge color print quality problems, specifically color matching, customer feedback has been extremely favorable to date. The inks (within the ink refill system) are closely matched across several manufacturers and provide satisfactory color performance from in-house testing performed. While not an exact color match to the HP 920 CMY inks, they have
183
been tested for general color appeal and comparison performance; passing all quality performance expectations. Many customers (i.e. in the tens of thousands) are quite pleased with Costco's HP 920 ink refill service since inception. As far a general color print performance, there are other things which could be causing the Cyan issue you are seeing. 1) Run a self test print (under tools/maintenance menu) to ensure all magenta (and cyan & yellow) ink nozzles are firing. We would be very interested in receiving a .pdf of the self-test print (or one of our Test Prints) to evaluate your Cyan ink color performance...is it possible to mail an electronic file to us via the 'Contact Us' form? 2) There could be an air bubble in the printer ink lines, so you should perform a "Clean PrintHead" procedure (I suggest Level 2 'Deep Clean' if available in your printer's control panel); you may also print one of our 'heavier' 4-color test prints from our Test Prints page, there is a link from our main page: http://www.inkjet411.com/ 3) Clean service station wipers/pad. 3) If this does not remedy the problem, then you may have a defective print head in the printer, unrelated to the refilled cartridges (the printhead is the electronic assembly which actually fires the ink onto the paper - the part will eventually fail under moderate printing workflow conditions in time - I believe it is rated for ~12,000 pages maximum). http://inkjet411.com/?page_id=2054 HP 920 support page: http://inkjet411.com/?page_id=856 If that does not fix the problem, you should return the cartridges to the Costco Photo Department to get them refilled (they will perform a full ink evacuation and refill, so the cyan ink will be 'effectively' new).
------------------------
Regarding your inquiry of the Canon CLI-8 ink cartridges and the observed color shift in your Canon 9000
Pro Mark II printer, the Costco refill inks are closely matched to the Canon OEM inks and provide
satisfactory color performance from in-house testing performed (at least in all A4 printers evaluated).
While not an exact color formulation match to the Canon CLI-8 CMYK inks, they have been tested for
general color appeal and comparison performance - passing all quality performance expectations in A4
printers.
However, since you are using a B-Size printer, and effectively merging 4 refill ink colors (CMYK) with the
4 OEM inks (LcLmRG), color stability can shift slightly. The only way to overcome this is to re-profile for
the new color set (i.e. using a grey color balance target and each type of photo media).
REFERENCE: Canon 9000 Pro Mark II printer Ink Spec Page:
http://www.usa.canon.com/cusa/consumer/products/printers_multifunction/professional_photo_inkje
t_printers/pixma_pro9000_mark_ii#SuppliesAndAccessories
Now, as far a general color print performance, there are other things which could be causing the color
shift issue you are seeing.....several items to verify:
184
1) Run a self test print (under tools/maintenance menu) to ensure all ink nozzles are firing.
2) If self-test has poor print quality (streaking/missing colors, etc.), there could be an air bubble between
one of the ink cartridges and printhead, so you should perform a "Head Cleaning" / "Cleaning"
procedure in your printer's control panel.
3) To validate proper output print performance, run a printer self test or select the 6-color test print
from our 'Test Prints' page:
4) Clean service station wipers/pad (only if printer is >2+ years of age).
If this does not remedy the problem, then the refill vs. OEM ink formulation differences, albeit ever so
slight, could be causing the color shift issue you are currently observing....and hence, the refill is
unfortunately incompatible.
Please advise following the suggested testing prescribed above.
-Thank you
------------------------
Regarding your inquiry over Epson smart chip reprogramming, this is nothing to be concerned over.
Epson smart chip tanks are reprogrammed immediately following the refill by Costco photo center
personnel. The refill cartridge will behave just like an Epson genuine ink tank once installed.
Assuming that you may have not utilized ink refill services before, you should be aware that the
Inkjet411.com sitelet is for post-sales issues only, so we cover the gamut of any and all issues that could
possibly arise. Nothing to be initially alarmed over. Problems with post-fill Epson issues is quite rare;
when customers run into an issue it is typically just a smart chip mis-programming issue by the
respective store. If it ever occurs, you just need to return that particular ink cartridge to Costco and they
will reprogram it for you. In addition, refill ink formulations and color output are quite comparable to
Epson quality - side by side comparison studies have yielded quite favorable reviews to date.
-Thank you
CANON / EPSON CLOGGING ISSUES
Regarding your recent inquiry about the Canon CLI-8 and PGI-5 cartridge color print quality problems in
your MP600 printer and the type of ink used...the colorants are all dye-based formulas (i.e. water based
dye to be specific). We never see issues with dye-based formulas (Canon OEM or remanufactured tanks
made in the USA/Europe, unless you are using compatible cartridges from China which are known to
have select 'chemicals' which can be harmful to the removable PRINTHEAD assembly.
With respect to color matching and general print performance, customer feedback has been extremely
favorable to date. The inks (within the ink refill system) are closely matched across several
manufacturers and provide satisfactory color performance from in-house testing performed. While not
an exact color match to the Canon OEM inks, they have been tested for general color appeal,
compatibility and comparison performance -- passing all quality performance expectations. Many
185
customers (i.e. in the tens of thousands) are quite pleased with Costco's Canon ink refill service since
inception.
As far a general printer performance, there are other things which could be causing the current/ongoing
clogging issue:
1) As this printer writing system is ~5-6 years old, we suspect your PRINTHEAD (which can be removed
and flushed with water or 3rd party cleaning fluid) is likely nearing it's end of life (usually around 6-8,000
pages). It may need to be replaced.
2) There could be trapped particulates inside the printhead, so you should perform a 'flush' on the head
either using our procedure or a 3rd party procedure. Here is how we advise customers to do it on the
HP564/920 systems today: http://inkjet411.com/?page_id=2412
3) A dirty service station/wiper assembly can interfere with printed output; clean service station
wipers/pad - refer to your User's Manual.
4) If this does not remedy the problem, then you may have a defective print head in the printer,
unrelated to the refilled cartridges (the printhead is the electronic assembly which actually fires the ink
onto the paper - the part will eventually fail under moderate printing workflow conditions in time - I
believe it is rated for ~12,000 pages maximum, but most customers only see half of that, on average).
http://inkjet411.com/?page_id=2054
Please let us know if you have any questions regarding the technical information provided.
-Thank you
HP 02 OVERALL PERFORMANCE CONCERNS – INK MONITORING / POTENTIAL PRINTER DAMAGE
Regarding your recent inquiry about the HP 02 cartridge ink expiration (ink level monitoring) and ink
formulation/potential printer damage concerns, allow me to answer your questions in two parts:
A. With respect to ink level monitoring, Costco physically replaced the smart chips on each HP 02
cartridge/tank that you took in for refill...so the ink counting should be fairly accurate. However,
depending on the HP printer model, the firmware can sometimes begin flagging 'ink low/warning'
messages as soon 1/3rd of the ink has been used - most manufacturer inkjet printer models wait until
the tank is 70-80% empty. Also, with HP 02 ink refills, you have up to 1 year to install and use.
B. With respect to ink formulation and potential damage to your built-in printhead. As far as ink color
matching, customer feedback to date has been extremely favorable. The Costco HP inks are closely
matched across several manufacturers/platform lines and provide satisfactory color performance from
in-house testing performed. While not an 'exact' chemistry/color match to the HP 02 colorants, they
have been tested for printer reliability, color appeal and print comparison performance; passing all
quality performance expectations. Many customers (i.e. in the tens of thousands) are quite pleased with
186
Costco's HP 02 ink refill service since inception 3-4 years ago. We have not observed any PRINTHEAD
failures* which were caused by the subtle formulation introduction.
* The electronic PRINTHEAD, which the ink cartridges plug into within carriage, is responsible for pulling
ink from the 6 ink cartridges and firing ink drops onto the page, will eventually fail over time. This is
primarily based on a combination of total printed pages (rated duty cycle) vs. image content and printing
frequency. Dry firing, where one particular color is not printing, can significantly increase the chances of
a permanent PRINTHEAD failure. The HP 02 PRINTHEAD typically has a maximum life of approximately
15,000 pages (~7,500 page average). Unfortunately, we do not believe the PRINTHEAD can be purchased
separately anymore since this printer platform was initially sold into market between 2005 and 2008.
http://inkjet411.com/?page_id=2054
Please let me know if this answers your questions and/or if you have any additional concerns.
-Thank you
GREYSCALE PRINTING & COLOR USAGE
Regarding your recent inquiry about the color usage during greyscale printing. Unfortunately, with many
of the newer printer models & printer drivers, printing in greyscale actually consumes more color ink
than normal draft printing. If you wish to save on color ink, it is suggested to do one of the following as
available in your specific printer driver/software:
- Print in Normal – Draft mode (or super draft if available), plain paper.
- Print in Black & White mode only*, plain paper.
- For internet page printing, print using CleanPrint (3rd party software for printing most internet-
based content from all major internet browsers. NOTE: not affiliated with Inkjet411):
http://www.formatdynamics.com/cleanprint-4-0/
* Most printer models will still consume a small percentage of color ink due to normal ink/printer
maintenance, such as between job ‘spitting’. The purpose is to ensure the printhead is maintained to
avoid clogging.
Please let me know if you have any further questions on this.
Thank you
REFILL FRIENDLY PRINTER MODELS
Regarding your question over refill friendly printer models, it really depends on how much you print.
If you print less than 2 pages per week, or so, you are way better off sticking with an integrated printer
system (i.e. 2-cartridge printers from HP or Canon) as the printer will only use a little bit of ink at a time
(mainly for printing). These types of printer systems do not invoke between job spitting, meaning your
cartridges can last 6 months to a year with limited printing (per above).
187
However, if you print 5-10 pages every week, or more on average, then it is suggested to migrate to an
individual ink tank printer model (i.e. 4, 5 or 6 cartridges are installed into the printer). These types of
printer systems do invoke between job ‘spitting’ and many have time based cleaning routines to protect
the health of the electronic printhead (which the cartridges are installed into/connected to) – this can
add up to a lot of ink over time if you are not printing a lot to offset the delta. The exception is the HP
Officejet Pro printer models (i.e. 8500/8500A/8600/8700s, etc.) – these have an electronic eye built-in
to the printer which helps maximize ink efficiency by only performing spit routines when it notices
misfiring ink jets. How the Printhead Works: http://inkjet411.com/?page_id=2054
Most of the older Canon individual ink tank printer models (i.e. for example those that use Canon
220/221 or 225/226 ink cartridges) seem to have one of the best refill friendly track records...ink level
monitoring is restored since the ink chips are reset and customer satisfaction has been quite high to
date.
Any of the HP printer models which use HP 564, 920, 932/933, 940, or 950/951 cartridges also have a
very high reliability rating, though you will lose ink level monitoring when using refilled ink cartridges (so
you'll receive ink low messages here and there - you just ignore them until print quality begins to fade).
NOTE: For all HP564 ink-series printer models it is suggested you leave the printer on as much as
possible since turning the printer off and on will ‘suck’ a small percentage of ink (i.e. this ‘ink
maintenance’ action protects/wets the replaceable PRINTHEAD). Most of the new HP's printers, i.e.
those sold at Costco or Best Buy, use either HP564, HP932/933 or HP950/951 ink cartridges.
Epson printers which use T124-T127 ink cartridges are also considered quite friendly as the chips are
reset and ink level monitoring is restored, just like the Canons. However, since many use pigmented inks
which have a tendency to clog if not used, you will need to be printing on a frequent basis (like every 2
days or so).
Kodak ink cartridges (i.e. #10s or #30s) are not refilled to our knowledge by any of the refillers in the
marketplace.
-Thank you
IPH PRINTER PROBLEMS – MOVE OVER TO REFILL FRIENDLY PRINTER MODELS
Regarding your inquiry, our bottom line suggestion is to move over to a more refill friendly printer model (SEE REFILL FRIENDLY PRINTER MODEL SUGGESTIONS DOWN BELOW). Allow me to explain why...... Most IPH ink cartridges (i.e. all 2-cartridge printer models) eventually do encounter problems or failures, especially after their original ink is gone and they are re-used, and this is often unrelated to the refill process (these same problems also occur with brand new ink cartridges from time to time). You indicated you have an HP Photosmart C4680, you should be aware that this particular AiO printer is 'extremely sensitive' to any minor electrical fluctuations within the ink cartridge(s)...based on our Q1 2013 internal testing with HP60 ink cartridges which were returned for failures (i.e. "Cartridge Problem"
188
/ "Incompatible Cartridge" ink alert errors, etc), these same cartridges performed satisfactory in several other printer models which use HP60 cartridges. Now, generally the more severe printer error messages which result in non-permitted print operations, represent a very small percentage of the mass experience (for this cartridge family), so please consider the problem you previously encountered as being relatively rare with an ink cartridge that has only been filled once or twice (~1-2% failure range). The integrated ink cartridge electrical wire runs, at rear and lower sides of the ink cartridge, are somewhat delicate and are susceptible to ink attack and subsequent internal electrical damage, which can lead to premature failures. In addition, the older the cartridge the higher the chance of an internal micro-electronic failure. It is discouraged to use old ink cartridges which have been left in a drawer as internal corrosion of the electrical wire runs can occur in a period of time. If the ink cartridge has an expired warranty date (imprinted date on front of ink cartridge) then the cartridge age is typically over 2 years old and could be at significantly higher risk for potential failure when refilled. NOTE: It is also common to have a marginally performing ink cartridge (which was performing ok before) in the adjacent slot (i.e. color), then when a faulty cartridge is installed into the other slot (i.e. black), both of the ink cartridge(s) then get flagged with electrical errors. This type of failure is quite rare with an ink cartridge that that has only been refilled once or twice. Typically the ink cartridge's nozzle plate suffers a break at one of the flexible circuit lines within the base of the cartridge nozzle plate...refer to photo at bottom of this page: http://inkjet411.com/?page_id=509 REFILL FRIENDLY PRINTER MODELS: With respect to refill friendly printer models, it really depends on how much you print. If you print less than 2 pages per week, or so, you are way better off sticking with an integrated printer system (i.e. 2-cartridge printers from HP or Canon) as the printer will only use a little bit of ink at a time (mainly for printing). These types of printer systems do not invoke between job spitting, meaning your cartridges can last 6 months to a year with limited printing (per above). Withstanding the HP Photosmart C4600 and C4700 All-In-One (AiO) printer series have been found to be a bit finicky if a cartridge has marginal electrical performance. However, if you print 5-10 pages every week, or more on average, then it is suggested to migrate to an individual ink tank printer model (i.e. 4, 5 or 6 cartridges are installed into the printer). These types of printer systems do invoke between job ‘spitting’ and many have time based cleaning routines to protect the health of the electronic printhead (which the cartridges are installed into/connected to) – this can add up to a lot of ink over time if you are not printing a lot to offset the delta. The exception is the HP Officejet Pro printer models (i.e. 8500/8500A/8600/8700s, etc.) – these have an electronic eye built-in to the printer which helps maximize ink efficiency by only performing spit routines when it notices misfiring ink jets. How the Printhead Works: http://inkjet411.com/?page_id=2054 Most of the older Canon individual ink tank printer models (i.e. for example those that use Canon 220/221 or 225/226 ink cartridges) seem to have one of the best refill friendly track records...ink level monitoring is restored since the ink chips are reset and customer satisfaction has been quite high to date.
189
Any of the HP printer models which use HP 564, 920, 932/933, 940, or 950/951 cartridges also have a very high reliability rating, though you will lose ink level monitoring when using refilled ink cartridges (so you'll receive ink low messages here and there - you just ignore them until print quality begins to fade). NOTE: For all HP564 ink-series printer models it is suggested you leave the printer on as much as possible since turning the printer off and on will ‘suck’ a small percentage of ink (i.e. this ‘ink maintenance’ action protects/wets the replaceable PRINTHEAD). Most of the new HP's printers, i.e. those sold at Costco or Best Buy, use either HP564, HP932/933 or HP950/951 ink cartridges. Epson printers which use T124-T127 ink cartridges are also considered quite friendly as the chips are reset and ink level monitoring is restored, just like the Canons. However, since many use pigmented inks which have a tendency to clog if not used, you will need to be printing on a frequent basis (like every 2 days or so). We trust the provided information above has thoroughly answered your question. -Thank you
HP 564 “Incompatible Older Generation Cartridge Installed” ERROR MESSAGE
Regarding your recent inquiry about the HP 564 cartridge error (“Incompatible Older Generation
Cartridge Installed”) which is preventing printing, unfortunately your ink cartridge was likely
manufactured before Sept 2010 and is incompatible with the newer line of HP Photosmart and Deskjet
printer models. You will need to obtain a new ink cartridge manufactured after September 2010 (all
cartridges at retail should now be >July 2012).
Refer to HP’s website for more information on this change:
http://h10025.www1.hp.com/ewfrf/wc/document?docname=c02435884&lc=en&cc=us&dlc=en
You should discuss the possibility of a refill refund with your local Costco stating that an Inkjet411
representative verified the HP564 ink tank version/date was not compatible with your printer model.
We regret your inconvenience, and we hope that you will continue to consider the compelling value of
inkjet refilling in the future.
Please watch video at the following link which explains typical printer operations when using refilled
HP564 ink cartridges: http://inkjet411.com/?page_id=2317
Please let us know if you have any further questions on this.
- Thank you
HP 564/920/940 "Incompatible Printhead" (or “Cartridge Error”, “Printhead installed is not intended for
use in this printer”, or “is damaged”, or “Ink System Failure” message)
Regarding your recent inquiry about the HP 920 cartridge error which is preventing printing....let's run
thru a quick checklist to ensure we cover all variables which could be causing the issue:
190
1) If you received an "Unauthorized ink", "non-HP ink", "counterfeit ink" or similar message, you can
simply ignore/dismiss these messages by pressing 'OK' once for each cartridge, so that the printer
resumes its normal operation. NOTE: Receiving these kinds of ongoing alert messages is COMPLETELY
NORMAL when using refilled ink cartridges. Refer to NOTE 2 below for more information. Refilling the
ink cartridges does not include reprogramming of the ink cartridges, so this will not be a factor.
http://inkjet411.com/?page_id=1407 (564s)
http://inkjet411.com/?page_id=1589 (920s)
2) Remove ink cartridge and inspect for smart chip surface – check for scratches or ink residue. See
pictures of cartridge chips at following link for reference (see ‘Abnormal Cartridge Errors’):
http://inkjet411.com/?page_id=1925
3) Perform a Printer Reset:
HP OJ 6500 Printer Reset:
a. Ensure printer is powered ON.
b. While the printer is Turned ON, unplug the power cord from the back of the printer. This should
turn OFF your Officejet 6500.
c. Connect the power cord back into the printer while pressing the “#” and “6″ keys on the
keypads of your printer.
d. Wait until the screen turns black before release the keys. Your printer should turn ON by itself. If
not, press the power button to turn ON the printer.
e. The printer should now start to do the a Semi-Full Reset on your printer. Wait until it finishes
the whole process and settles down.
HP OJ6500A/7500A Printer Reset:
a. At Touchscreen, using two fingers, quickly press the 'OK' & 'Return' buttons in a quick
alternating method (refer to video link below which ‘generally’ illustrates how to perform this):
b. After a few seconds the Support Menu should be displayed.
c. Navigate to Semi-Full (or Full Reset) and reset the printer.
d. Send Test Page to test.
REFERENCE ONLY [ HP PS C4600 - Tap 41 Diagnostic Procedure – REFER TO 3rd video]:
http://inkjet411.com/?page_id=434
HP Officejet 7000 Printer Reset:
http://h20000.www2.hp.com/bizsupport/TechSupport/Document.jsp?lang=en&cc=us&taskId=110&pro
dSeriesId=3882903&prodTypeId=18972&objectID=c01759607
a. Press the Power button to turn the product off.
b. Disconnect the power cord from the back of the product.
c. Wait 30 seconds.
d. Reconnect the power cord to the back of the product.
e. Press the Power button to turn the product on.
191
3) For more severe HP 920 cartridge error messages which prevent printing [i.e. Incompatible Printhead"
or Ink System Failure] is typical of failed micro-electronics within the PRINTHEAD assembly*. To verify
PRINTHEAD electrical function, conduct the ‘Tap 41’ diagnostic test:
a. Load Letter/A4-size paper into paper feed tray.
b. Press the * and # keys simultaneously.
c. Enter 124 at keypad. The ‘Underware’ menu should be displayed.
d. Use the arrow keys to navigate to the System Menu. Select Ok.
e. The 'print-mech button tap' menu should be displayed.
f. Select Ok. Screen should display “code = 0”.
g. Use the arrow keys to enter “code = 41” (or just enter 41 on keypad). Select Ok. The Tap 41
diagnostic test pattern prints.
NOTE: The Tap 10 self-test print may also be initiated via ‘code = 10’ (use to verify ink nozzle performance)
Check the 4th
line at the top of the printed report; an electrically good/stable PRINTHEAD will state “Pen Status:
Pen OK”………if any other message is displayed then the PRINTHEAD may have failed and may need to be replaced.
* Failure of the PRINTHEAD has nothing to do with refilled ink cartridges; the PRINTHEAD assembly is a
separate electronic unit in which the cartridges plug into and feed ink into. Refer to NOTE below.
4) To rule out printer/cartridge connectivity (assembly interface/connection) issues please ensure you
have followed all steps on the Inkjet411 support page - this includes PRINTHEAD removal and thorough
cleaning of the electrical surfaces on the PRINTHEAD and on the CARRIAGE ASSEMLBY:
http://inkjet411.com/?page_id=1451 (564 PH Removal-Cleaning)
http://inkjet411.com/?page_id=1495 (920 PH Removal-Cleaning)
5) If this does not remedy the problem, then you may have a defective PRINTHEAD in the printer (worst
case scenario), unrelated to the refilled cartridges.**
NOTE 1: The HP 564 printer models have an electronic PRINTHEAD within the base of the
carriage assembly (responsible for pulling ink from the 4 (or 5) ink cartridges and then firing the
ink droplets onto the paper) – these will eventually fail depending on print usage type and
printer duty cycle (i.e. rated for ~8,000 printed pages over life, but the consumer average is
typically closer ~6,000 pages). The printhead is replaceable and can be ordered directly from
HP.com. For information on how the PRINTHEAD functions, please watch the following video:
http://inkjet411.com/?page_id=2054
NOTE 1: The HP 920 / 920XL ink-series printer models have an electronic PRINTHEAD within the
base of the carriage assembly (responsible for pulling ink from the 4 ink cartridges and then
firing the ink droplets onto the paper) – this electronic assembly will eventually fail depending
on print usage type and printer duty cycle (i.e. rated for ~12,000 printed pages over life, but the
average throughput is closer to 6,000 to 7,500 pages). The printhead is replaceable and can be
ordered directly from HP.com. For information on how the PRINTHEAD functions, please watch
the following video: http://inkjet411.com/?page_id=2054
192
NOTE 1: The HP 88 printer models have two (2) electronic PRINTHEADS (responsible for pulling
ink from the ink cartridges and then firing the ink droplets onto the paper). One for
Yellow/Black, the other for Cyan/Magenta colors. Either will eventually fail depending on print
usage type and printer duty cycle (i.e. rated for ~ 41,500 maximum printed pages).
http://inkjet411.com/?page_id=2054
NOTE 1: The HP 940 printer models have two (2) electronic PRINTHEADS (responsible for pulling
ink from the ink cartridges and then firing the ink droplets onto the paper). One for
Yellow/Black, the other for Cyan/Magenta colors. Either PRINTHEAD will eventually fail
depending on print usage type and printer duty cycle (i.e. rated for ~20,000 maximum printed
pages). http://inkjet411.retailinkjet.com/?page_id=2054
NOTE 2: HP does not allow an automatic reset of the HP 564 / 564XL / HP 920 / 920XL electronic
chip on the cartridge after a refill, so the ink level indicator is sending a false message that the
ink level is low. Your cartridge is not low on ink, and nothing is wrong with your printer or
cartridges. The ink level indicator usually cannot be manually re-set, so the ink level indicator is
often not usable. However, losing this feature is not necessarily significant, because the ink level
indicator usually has substantial usable ink remaining when it shows "low on ink". If you observe
"Unauthorized ink", "non-HP ink", "counterfeit ink" or similar messages, you may ignore/dismiss
this message by pressing 'OK' once for each cartridge, so that the printer resumes its normal
operation.
**Typically the printhead should not reach it’s end-of-life until after a minimum of 8 or more
complete sets of cartridge changes; officejet models typically have a higher print page
throughput average, but this is not always the case. While some printheads may last 15,000+
pages others may only last 1000 pages, actual results will vary. The printhead will eventually fail
in time due to an internal micro-electronics failure, due to the following leading factors: general
customer print usage and printer care, printer duty cycle (i.e. # pages printed per month),
printing frequency (i.e. time between each print job), print mode (i.e. draft vs. normal) and
content printed (i.e. photos vs plain pages) and color mode (black and white only vs.
color/greyscale printing). Paper types used (i.e. plain paper, photo papers & matte/heavy bond
papers) and paper edge curl (i.e. duration in printer and/or exposure to low relative humidity)
can also quickly lead to premature printhead failures due to physical ‘head strikes’ of the paper
edges making repeated contact with the printhead nozzle plate surfaces.
-Thank you
HP 564/920 - UNAUTHORIZED / FRAUD INK MESSAGE / LOW INK
Regarding your recent inquiry about the HP 564/920 cartridge's 'LOW INK' or 'EMPTY INK' messages,
“Empty” and “Low Ink” alerts are COMPLETELY NORMAL for all HP 564/920 ink cartridges which have
been refilled! While at first this may be an unusual workflow, it does allow print operations to proceed.
193
The ink level monitoring feature cannot be reset since only brand new HP ink cartridges support ink level
monitoring.
As you just returned from the refill store, your ink cartridge(s) is full of ink - you may ignore low ink
warnings (along with any other nuisance message) and print normally until you observe one of the
colors to begin to fade.
Please watch video at the following link which explains normal operation when using refilled ink
cartridges:
http://inkjet411.com/?page_id=2317
NOTE 1: In addition to “Low Ink” alerts, for "Unauthorized ink", "Non-HP ink", "Fraud", "Counterfeit ink"
or similar messages, you may ignore/dismiss this message by pressing 'OK' once for each cartridge, so
that the printer resumes its normal operation. We suggest you do this at the printer's control panel
immediately following ink cartridge(s) installation. For more information on this, please visit:
http://inkjet411.com/?page_id=1925 (564/920 cartridge errors page)
http://inkjet411.com/?page_id=856 (564/920 main page)
Now, if you observe missing colors or poor image quality then air may have been accidently ingested
into the ink lines between the cartridge(s) and PRINTHEAD. To recover from this problem, you will have
to run the "Clean Printhead" procedure 1-2 times to recover the ink system. Watch the video on the HP
support page which describes some of the common issues you may encounter with refilled ink
cartridges. This type of problem is common and completely recoverable.
http://inkjet411.com/?page_id=1407 (564 Tips page)
http://inkjet411.com/?page_id=1589 (920 Tips page)
There is no ‘lock-out’ feature on the HP 564/920 ink series printer models to our knowledge...you should
be able to resume normal printer operations. If not, please let us know the 'exact language' of the error
message you are observing and for which ink cartridge (Cyan, Magenta, Yellow, Black, or Photo Black if
applicable).
NOTE 2: HP does not allow an automatic reset of the electronic chip on the cartridge after a refill, so the
ink level indicator is sending a false message that the ink level is low. Your cartridge is not low on ink,
and nothing is wrong with your printer or cartridges. The ink level indicator usually cannot be manually
re-set, so the ink level indicator is often not usable. For more information on this, click here:
http://inkjet411.com/?page_id=1925 (564 cartridge errors page)
http://inkjet411.com/?page_id=856 (564/920 main page)
However, losing this feature is not necessarily significant, because the ink level indicator usually has
substantial usable ink remaining when it shows "low on ink". Therefore, the warning has limited value,
because customers who prematurely replace their cartridges when they see the "low ink" message are
wasting a lot of residual ink. In order to use as much available ink as possible, many customers (not only
194
those who refill their cartridges, but many who have not yet tried refilling) always ignore the ink level
indicator "low" warning, and wait to replace or refill the cartridge until immediately after seeing ink
begin to fade on their printouts.
Many customers who disregard the low ink indicator keep a spare set of cartridges so that their printing
productivity is not disrupted when the cartridge runs out of ink. If the cartridge completely runs out of
ink and continues to be used when it is dry, this could damage the cartridge, so customers should
promptly refill their cartridge when the ink begins to fade. This fading process is gradual, so that you will
have sufficient time to refill the cartridge before the risk of empty cartridge printing. In summary, most
refill customers agree that the huge savings of refilling is much greater than the potential loss of the low
ink indicator feature.
On the other hand, if you observe Red X's (i.e. "unrecognized cartridge"/ "incompatible printhead"/ "ink system has failed") on your printer display panel or Window's popup, then this is a different type of error (i.e. possible cartridge connection issue or failure of permanent printhead assembly). For advanced printer diagnostics, please refer to .pdf file at the following link: http://inkjet411.com/?page_id=1813 To provide additional insight on how the semi-permanent PRINTHEAD works in your printer, please refer to video at the following support page: http://inkjet411.com/?page_id=2054
Please advise if a no-printing error condition persists.
-Thank you
HP 940 - UNAUTHORIZED / FRAUD INK MESSAGE / LOW INK
Regarding your recent inquiry about the HP 940XL cartridge's 'LOW INK' or 'EMPTY INK' messages, “Empty” and “Low Ink” alerts are COMPLETELY NORMAL for all HP 940 / 940XL ink cartridges which have been refilled! While at first this may be an unusual workflow, it does allow print operations to proceed. The ink level monitoring feature cannot be reset since only brand new HP ink cartridges support ink level monitoring. As you just returned from the refill store, your ink cartridge(s) is full of ink - you may ignore low ink warnings (along with any other nuisance message) and print normally until you observe one of the colors to begin to fade. When you do observe print fade, run a quick 'test print' (from printer's menu), to see which color is out and then bring that cartridge, or cartridges, in for refilling. Please watch video at the following link which explains normal operation when using refilled ink cartridges: http://inkjet411.com/?page_id=2317 NOTE 1: In addition to “Low Ink” alerts, for "Unauthorized ink", "Non-HP ink", "Fraud", "Counterfeit ink" or similar messages, you may ignore/dismiss this message by pressing 'OK' once for each cartridge, so that the printer resumes its normal operation. We suggest you do this at the printer's control panel immediately following ink cartridge(s) installation. For more information on this, please visit: http://inkjet411.com/?page_id=1423
195
Now, if you observe missing colors or poor image quality then air may have been accidentally ingested into the ink lines between the cartridge(s) and PRINTHEAD. To recover from this problem, you will have to run the "Clean Printhead" procedure 1-2 times to recover the ink system. Watch the video on the HP support page which describes some of the common issues you may encounter with refilled ink cartridges. This type of problem is common and completely recoverable. http://inkjet411.com/?page_id=1457 There is no ‘lock-out’ feature on the HP 940 ink series printer models to our knowledge...you should be able to resume normal printer operations. If not, please let us know the 'exact language' of the error message you are observing and for which ink cartridge (Cyan, Magenta, Yellow, Black). NOTE 2: HP does not allow an automatic reset of the electronic chip on the cartridge after a refill, so the ink level indicator is sending a false message that the ink level is low. Your cartridge is not low on ink, and nothing is wrong with your printer or cartridges. The ink level indicator usually cannot be manually re-set, so the ink level indicator is often not usable. For more information on this, click here: http://inkjet411.com/?page_id=1423 However, losing this feature is not necessarily significant, because the ink level indicator usually has substantial usable ink remaining when it shows "low on ink". Therefore, the warning has limited value, because customers who prematurely replace their cartridges when they see the "low ink" message are wasting a lot of residual ink. In order to use as much available ink as possible, many customers (not only those who refill their cartridges, but many who have not yet tried refilling) always ignore the ink level indicator "low" warning, and wait to replace or refill the cartridge until immediately after seeing ink begin to fade on their printouts. Many customers who disregard the low ink indicator keep a spare set of cartridges so that their printing productivity is not disrupted when the cartridge runs out of ink. If the cartridge completely runs out of ink and continues to be used when it is dry, this could damage the cartridge, so customers should promptly refill their cartridge when the ink begins to fade. This fading process is gradual, so that you will have sufficient time to refill the cartridge before the risk of empty cartridge printing. In summary, most refill customers agree that the huge savings of refilling is much greater than the potential loss of the low ink indicator feature. On the other hand, if you observe Red X's (i.e. "unrecognized cartridge"/ "incompatible printhead"/ "ink system has failed") on your printer display panel or Window's popup, then this is a different type of error (i.e. possible cartridge connection issue or failure of permanent printhead assembly). For advanced printer diagnostics, please refer to .pdf file at the following link: http://inkjet411.com/?page_id=1813 To provide additional insight on how the semi-permanent PRINTHEAD works in your printer, please refer to video at the following support page: http://inkjet411.com/?page_id=2054 -Thank you
CANON 30-241 ERROR MESSAGE (GENERAL)
Canon PIXMA MP240, MP250, MP260, MP270, MP280, MP480, MP490, MP495
196
Regarding your recent inquiry about the refilled Canon PGI-40 black ink cartridge ink alert/error
condition, you will need to reset the cartridge low ink level monitoring in order to clear the ink level
alarm condition*. However, if you can still print at the moment, then you may need to wait until the "Ink
Has Run Out" message, or similar, appears....then you can go ahead and perform the printer reset as
described below.
We suggest you first attempt the basic/universal ink level reset procedures before attempting any of the
more advanced procedures provided on the Inkjet411 site:
A. Standard Ink Level Reset Procedure (printers without LCD display):
[ Refer to the 1st support video: http://inkjet411.com/?page_id=62 ]
1) At computer screen message, select ‘Stop’/’Reset’, ‘OK’, or ‘Resume’.
….or….
2) Select ‘Stop’/’Reset’, ‘OK’ or the ‘Resume’ button (triangle symbol inside of a circle) on your printer
for 5-8 seconds:
- Printing may continue under the ‘ink out’ condition.
B. Standard Ink Level Reset Procedure (printers with LCD display):
[ Refer to the 2nd support video: http://inkjet411.com/?page_id=62 ]
1) Install cartridge and start print job.
2) After first message appears, click ‘OK’ to continue. Printer should start printing.
3) If second message appears and printer’s LCD screen displays error code “E”, then DO NOT click
‘CANCEL PRINTING’.
4) Press and hold down ‘Stop’/’Reset’ button (triangle-circle icon) on your printer for 5-8 seconds.
Printer should start printing.
If you are able to produce a self test print, this is good since it illustrates that the cartridges are
electrically stable...if you observe any 'E' or 'V' error states (i.e. E13 or V162 for example), this may
indicate there is possibly an internal electrical problem with one of the ink cartridges. Refer to your user
guide if E/V error messages are displayed.
*If, after following the suggested ink monitoring/level reset procedures, you still have an error condition
which prohibits regular printing, then the ink cartridge probably has internal electrical damage (micro-
electronics failure); such a failure is unrelated to the ink cartridge refilling process. Typically, when the
cartridge fails the problem is 'masked' by the ink out/empty condition so it can be difficult to distinguish
between the two. Many cartridges eventually do encounter problems or failures, especially after their
original ink is gone and they are re-used, and this is often unrelated to the refill process (i.e. typically ~2
years from original manufacturing date). Refer to picture at bottom of this page:
http://inkjet411.com/?page_id=1533
197
NOTE: Additional ‘printer reset’ procedures are provided on Inkjet411 (see SUPPORT DOCUMENTATION
- CANON RESET METHODS pdf document): http://inkjet411.com/?page_id=62
However, if your printer works routinely after inserting a brand new PGI-40 ink cartridge in it, you
should discuss the possibility of a refund with your local Costco (for the refilled cartridge purchase). If
this turns out to be the case, then we regret your inconvenience, and we hope that you will continue to
consider the compelling value of inkjet refilling in the future.
Please let us know if you have any questions regarding the technical information provided herein.
-Thank you
ALREADY ATTEMPTED THE BASIC CANON RESET
Regarding your recent inquiry about the refilled Canon PGI-40 (or CLI-41?) ink cartridge ink alert/error condition with your MP470 printer, if after following the suggested ink monitoring/level reset procedures (below), you still have an error condition which prohibits regular printing, then one of the ink cartridges probably has internal electrical damage (micro-electronics failure)*; such a failure is unrelated to the ink cartridge refilling process. Typically, when the cartridge fails the problem is 'masked' by the ink out/empty condition so it can be difficult to distinguish between the two. Question: can you identify which ink cartridge is causing the issue? Normally you would reset the cartridge low ink level monitoring in order to clear the ink level alarm condition using the procedures below (sounds like you already tried this). However, if you can still print at the moment, then you may need to wait until the "Ink Has Run Out" message, or similar, appears....then you can go ahead and perform the printer reset as described below. We suggest you first attempt the basic/universal ink level reset procedures before attempting any of the more advanced procedures provided on the Inkjet411 site: A. Standard Ink Level Reset Procedure (printers without LCD display): [ Refer to the 1st support video: http://inkjet411.com/?page_id=62 ] 1) At computer screen message, select ‘Stop’/’Reset’, ‘OK’, or ‘Resume’. ….or…. 2) Select ‘Stop’/’Reset’, ‘OK’ or the ‘Resume’ button (triangle symbol inside of a circle) on your printer for 5-8 seconds: - Printing may continue under the ‘ink out’ condition. B. Standard Ink Level Reset Procedure (printers with LCD display): [ Refer to the 2nd support video: http://inkjet411.com/?page_id=62 ] 1) Install cartridge and start print job. 2) After first message appears, click ‘OK’ to continue. Printer should start printing. 3) If second message appears and printer’s LCD screen displays error code “E”, then DO NOT click ‘CANCEL PRINTING’. 4) Press and hold down ‘Stop’/’Reset’ button (triangle-circle icon) on your printer for 5-8 seconds. Printer should start printing.
198
If you are able to produce a self test print, this is good since it illustrates that the cartridges are electrically stable...if you observe any 'E' or 'V' error states (i.e. E13 or V162 for example), this may indicate there is possibly an internal electrical problem with one of the ink cartridges. Refer to your user guide if E/V error messages are displayed. NOTE: There are additional ‘reset’ procedures provided on Inkjet411 (see SUPPORT DOCUMENTATION - CANON RESET METHODS pdf document): http://inkjet411.com/?page_id=62 *Many cartridges eventually do encounter problems or failures, especially after their original ink is gone and they are re-used, and this is often unrelated to the refill process (i.e. typically ~2 years from original manufacturing date). Refer to picture at bottom of this page: http://inkjet411.com/?page_id=1533 However, if your printer works routinely after inserting a brand new PGI-40 or CLI-41 ink cartridge in it, you should discuss the possibility of a refund with your local Costco (for the refilled cartridge purchase). If this turns out to be the case, then we regret your inconvenience, and we hope that you will continue to consider the compelling value of inkjet refilling in the future. Please let us know if you have any questions regarding the technical information provided herein. -Thank you
B. Canon Ink Level Reset Procedure #2:
NOTE: Canon “iP” Printer Model Series Only, PIXMA ip2700, PIXMA iP2702
6. Press and Hold the Resume (triangle-circle) button
7. Press and Hold the Power Button; hold both buttons for 5 seconds
8. Release the Resume (triangle-circle) button.
9. Press the Resume button 5 times.
10. Release the Power button. The blinking ink level/power light should go steady after a few
seconds.
- Printing may continue under the ‘ink out’ condition.
Canon PIXMA MX320, MX330, MX340, MX350, MX360, MX410, MX420 Printer Models
A. Printers connected to Win Vista/XP Computer:
1. Install refilled cartridges into printer (“Ink Has Run Out” message is displayed)
2. Open Properties in "Printers" from "Start Bar"-"Settings" on left lower corner.
3. Open "Advance".
4. Uncheck "Enable advanced printing features".
5. Apply and close.
6. Hold "Stop" button on MX330 printer for 10-20 seconds. The "Ink Has Run Out" message will
disappear.
7. Open "Properties" in "Printers" again as in Step 2.
8. Check "Enable advance printing features" to reset counter.
199
9. Printer should work again with refilled ink cartridge.
B. Canon Pixma MP/MX/MG Series - Printer & Ink Counter Reset Procedure:
1. Press the power button to turn off the printer.
2. Hold the "Stop/Reset" button while pushing the power button. While still holding down the
power button, release the "Stop/Reset" button and then push it twice in a row.
3. Wait approximately 20 to 30 seconds until the LED shows 0.
4. Push the "Stop/Reset" button four times in a row.
5. Push the power button twice.
6. Turn off the printer by pushing the power button one more time. The printer is now reset.
Canon MP Models
A. Canon Ink Level Reset Procedure.
NOTE: Most MP200 thru MP400 Series Printer Models
10. Turn off the Canon MP printer and unplug it from the outlet.
11. Press the "On/Off" button while you plug the cable back in.
12. Hit the "Stop/Reset" button two times while holding down the "On/Off" button, then let go of
the "On/Off" button. This puts the printer into factory mode.
13. Hit the right arrow button until you see "Shipping Mode 3" on the LCD display. Hit "OK" to select
it.
14. Hit the "Stop/Reset" button when you see a message that says "Without Cleaning." This tells the
Canon printer to print out a test page.
15. Lift up the Canon MP 470 printer cover and wait for the cartridges to move to the left. Then
unplug the printer from the outlet.
16. Lift out both ink cartridges and close the cover.
17. Plug the power cable back in and hit the "On/Off" button.
18. Place the ink cartridges back inside once you see a message that says "Replace Cartridges." Wait
a few minutes for the printer to recognize the cartridges before trying to print.
B. Canon MP Printers - Universal MP Printer Reset Procedure:
NOTE: Canon MP140 thru MP830 Printer Models with ‘Tools’ button
11. Turn ON the printer.
12. Press and Hold the “Reset button” on the printer.
13. While pressing the “Reset button“, press and hold the “Color Start” button.
14. Wait for 5 seconds.
15. Release the “Color Start” button, and then release the “Reset Button“.
16. Wait until the printer starts to configure itself. This should take approximately around 20
seconds.
17. The no. “1″ should be on the display, press and hold the “Tool” button and the letter “A” should
now be on the display.
18. While pressing on the “Tool” button, press and hold the “Reset button“.

200
19. Wait until there are no more blinking lights on the printer.
20. Release the “Tool” button, and then release the “Reset Button“.
C. Canon MP Ink Level Reset Procedure - Safe Factory Reset Method:
NOTE: Canon MP Series Printer Models that feature a screen display
14. Disconnect power from printer (unplug cable).
15. Press and hold the power button while connecting the power outlet back.
16. While still holding down the power button, press the reset button twice (red circle with a
triangle)
17. Release the power button
18. The printer takes about 10 seconds to show the number 0.
19. Press + to change the value from 0 to 1.
20. When this value is 1, press color button; this will light up two leds.
21. One is for plain paper and the other for photo paper. At this point is feed the printer with paper.
22. Press the power button twice and the printer will print a test page (if it doesn't print by itself,
then press the "color" button once and the test sheet will print).
23. When the test page is printed the value in the display returns to zero.
24. Open the printer/cartridge access cover (not the scanner cover) and remove the refilled ink
cartridges. With the printer still open, disconnect power from printer (unplug cable).
25. Close the lid and turn on the printer.
26. Following printer power up, open cover/cartridge access cover and reinstall the refilled ink
cartridges.
A. Canon MX310 Ink Level Reset Procedure #1 (Canon 40/41 ink cartridges)
8. Power off printer
9. Hold RESUME button then press and hold POWER, the beeper will sound once.
10. Hold POWER and release RESUME
11. Press RESUME twice
12. Release POWER button
13. When the indicator lights steady, press RESUME three (3) times. The indicator should be orange.
14. Press POWER (to lock data)
B. Canon MX310 Ink Level Reset Procedure #2 (Canon 40/41 ink cartridges)
1. Power off the printer.
2. Holding the stop/reset button, press and hold power button also. Hold both buttons together for 5
secs.
3. Still holding the power button, release the stop/reset button, then press the stop/reset button twice.
4. Release power button (the screen should now say 'Service Mode').
5. Wait until the power button lights steady green, then press the stop/reset button three times with a 3
sec space between each press. On the 3rd press the indicator should turn steady orange.
6. Press the power button once, (the orange light should go off).
201
7. Open the printer and remove both cartridges. Wait for 20 seconds. Replace the cartridges and close
printer. Wait for 30 seconds.
8. Press the power button, and wait until printer has shut down.
9. Press power button to power up. The printer will feed one piece of paper, then ask you to set the
language.
10. The ink counter should now be reset.
I. Canon MX310 Ink Level Reset Procedure #3 (Canon 40/41 ink cartridges)
15. Power off the printer
16. Hold the stop/reset button then press and hold power (for 5 secs)
17. Hold Power and release the stop/reset button
18. Press the stop/reset button twice
19. Release power button
20. Wait until the power button lights a steady/still green, press the stop/reset button three times
with a 3 sec space between each press.
21. On the 3rd press the indicator should be orange.
22. Press the power button to set data
23. To set data remove cartridges then replace; allow printer to sit idle for 20 or 30 secs
24. Press the power button again to shut down
25. Then press power button to power up.
26. The printer will feed one piece of paper through
27. Then set language and country.
28. Then ink should be reset.
NOTE: Here is a 3rd party site which provides reset solutions by printer model:
http://resetprinters.com/how-to-reset-canon-mp-series-printers-and-fix-common-errors/
If you still have an error condition which prohibits printing, then the ink cartridge probably has internal
electrical damage (micro-electronics failure); such a failure is unrelated to the ink cartridge refilling
process. Typically, when the cartridge fails the problem is 'masked' by the ink out/empty condition so it
can be difficult to distinguish between the two. Many cartridges eventually do encounter problems or
failures, especially after their original ink is gone and they are re-used, and this is often unrelated to the
refill process (i.e. typically ~2 years from original manufacturing date). Refer to picture at bottom of this
page: http://inkjet411.com/?page_id=1533
Please advise if the error condition persists.
Thank you
*210/211 Systems = Canon PIXMA MP240, MP250, MP260, MP270, MP280, MP480, MP490, MP495,
MX320, MX330, MX340, MX350, MX360, MX410, MX420, ip2700, iP2702
202
CANON 210/211 ERROR MESSAGE / NO PRINTING Basic Resets (A & B): Canon PIXMA MP240, MP250, MP260, MP270, MP280, MP480, MP490, MP495
Basic Reset Procedure (B): Canon “iP” Printer Model Series, PIXMA ip2700, PIXMA iP2702
Advanced Resets (C & D): Canon PIXMA MX320, MX330, MX340, MX350, MX360, MX410, MX420 Printer Models
Regarding your recent inquiry about the Canon 210 (black)/211 (color) ink cartridge ink alert/error
condition and the inability to print to your Canon MX340 printer, to reset the cartridge ink low/empty
alert message condition, depending on your printer model, we suggest you follow the documented
procedures below and/or provided on Inkjet411 at the following link.
http://inkjet411.com/?page_id=1765
Essentially, in most cases, all you need to do is press the 'Stop/Reset' button (triangle symbol inside of a
circle) for 5-8 seconds and the ink error ("ink has run out", etc.) indicators should extinguish; two
common reset procedures are provided below (please refer to both videos):
http://inkjet411.com/?page_id=1765
NOTE: If you are able to print the internal self test print, this will demonstrate that the ink cartridge is 'at
least' partially functioning. If this is the case, then we suggest you continue printing until the software
prompts you to press the 'Stop/Reset' button for >5 seconds. For poor print quality performance issues
(as you indicated in your inquiry), we suggest you run a nozzle/cartridge clean test from your Canon
software, followed by printing our 'Ink Recovery Test' print: http://inkjet411.com/wp-
content/uploads/2013/02/Test-Print_CMYK.pdf
To help reset the ink level monitoring feature, please attempt the following to rule out all variables:
1. To rule out connectivity issues, please ensure BOTH carriage/flex cables (point where the cartridge
connects to carriage inside the printer) and BOTH ink cartridge rear electrical contact surfaces are
thoroughly clean before proceeding: http://inkjet411.com/?page_id=1519
2. We suggest you first attempt the basic (universal) ink level reset procedures (A. and B. below) before
attempting the more advanced procedures:
A. Canon BASIC Ink Level Reset Procedure: [refer to both videos here: http://inkjet411.com/?page_id=1765 ]
5. Install cartridge and start print job.
6. After first message appears, click ‘OK’ to continue. Printer should start printing.
7. If second message appears and printer’s LCD screen displays error code “E”, then DO NOT click
‘CANCEL PRINTING’.
8. Press and hold down ‘Stop’/’Reset’ button (triangle-circle icon) on your printer for 5-8 seconds.
Printer should start printing.
B. Canon Ink Level Reset Procedure #2 [primarily intended for Canon iP printer models]:
6. Press and Hold the Resume (triangle-circle) button
7. Press and Hold the Power Button; hold both buttons for 5 seconds
203
8. Release the Resume (triangle-circle) button.
9. Press the Resume button 5 times.
10. Release the Power button. The blinking ink level/power light should go steady after a few
seconds.
- Printing may continue under the ‘ink out’ condition.
Providing none of the above procedures were successful, then you could attempt the various printer
reset procedures at the following link (refer to .pdf SUPPORT DOCUMENTATION):
http://inkjet411.com/?page_id=62
If you still have an error condition which prohibits computer/host based printing (or permit copy/scan
functions), then the ink cartridge probably has internal electrical damage (micro-electronics failure);
such a failure is unrelated to the ink cartridge refilling process. Typically, when the cartridge fails the
problem is 'masked' by the ink out/empty condition so it can be difficult to distinguish between the two.
Many cartridges eventually do encounter problems or failures, especially after their original ink is gone
and they are re-used, and this is often unrelated to the refill process (i.e. typically ~2 years from original
manufacturing date). Refer to picture at bottom of this page: http://inkjet411.com/?page_id=1533
However, if your printer works routinely after inserting a new Canon 240 black (or 240XL/240XXL) or 241 (or 241 XL) color ink cartridge in it, you should discuss the possibility of a refund with your local Costco (for refilled cartridge purchase). We regret your inconvenience, and we hope that you will continue to consider the compelling value of inkjet refilling in the future. Please let us know if you have any questions regarding the technical information provided above.
-Thank you
CANON 30-241 ERROR MESSAGE (ADVANCED – NO PRINTING ALLOWED) …..need to validate
Regarding your recent inquiry about the Canon 210XL ink cartridge ink alert/error condition, to reset the
Canon 210/211 cartridge low ink alert message(s), depending on your printer model, we suggest you
follow the documented procedures provided at the following link (see SUPPORT DOCUMENTATION -
CANON RESET METHODS pdf document):
http://inkjet411.com/?page_id=1533
If you still have an error condition which prohibits printing, then the ink cartridge probably has internal
electrical damage (micro-electronics failure); such a failure is unrelated to the ink cartridge refilling
process. Typically, when the cartridge fails the problem is 'masked' by the ink out/empty condition so it
can be difficult to distinguish between the two. Many cartridges eventually do encounter problems or
failures, especially after their original ink is gone and they are re-used, and this is often unrelated to the
refill process (i.e. typically ~2 years from original manufacturing date). Refer to picture at bottom of this
page: http://inkjet411.com/?page_id=1533
204
___________________
Service Menu Printer/Waste Reservoir Reset Procedure:
A. Pixma MP/MX/MG Series: Printer & Ink Counter Reset
a. Press the power button to turn off the printer.
b. Hold the "Stop/Reset" button while pushing the power button. While still holding down the
power button, release the "Stop/Reset" button and then push it twice in a row.
c. Wait approximately 20 to 30 seconds until the LED shows 0.
d. Push the "Stop/Reset" button four (4) times in a row.
e. Push the power button twice.
f. Turn off the printer by pushing the power button one more time. The printer is now reset.
Next, reset the cartridge ink counter:
a. Unplug the power and the USB cables from the printer.
b. Open the cartridge door and hold down the power button.
c. Reconnect the power cables while still holding down the power button.
d. Close the cartridge door and release the power button. The ink cartridge is now reset.
- Your printer should respond as normal.
B. For Printer Model: Canon S9000, S300, S400, i550, i560, i850, i860, i865, i9100, i9950, PIXMA iP3000:
1. Turn off printer
2. Hold down Resume button and press Power button.
3. Keep holding down Power button and let Resume button go.
4. Press Resume button 2 times then let BOTH buttons go.
5. Green lights will flash and then stop blinking.
6. When green lights are solid, press the Resume button 4 times.
7. Press the Power button and the printer should turn off, if not, press the Power button once more.
- Your printer should respond as normal.
2. Pixma iP/MP/MX/MG Series: Waste Ink Counter Reset
a. With the printer powered off but still connected to a power source, press the Power button
while pressing and holding the Stop/ Reset button.
b. When the Power LED is lit, press the Stop/Reset button two (2) times while pressing and holding
the Power button.
c. When releasing the Power button and the Stop / Reset button (regardless of order), the printer
will move into a service mode (…waits for a menu selection)
d. When the LED lights green, press the Stop/Reset button the specified number of time(s)
according to the function listed in the table below (each time the Stop/Reset button is pressed, the LED
alternatively lights in orange and green, starting with orange)
- Your printer should respond as normal.
LED Function:
205
0 time Green - Power off
1 time Orange - Service pattern print
2 times Green - EEPROM print
3 times Orange - EEPROM reset
4 times Green - Waste ink counter reset
5 times Orange - Destination setting
6 times Green - Print head deep cleaning
11 times Orange - Button / LCD checking
12 or more times - Returns to a menu selection
CANON BLACK 225 VS. 226 (not yet linked)
Regarding your question of Canon cartridges, 225 black vs. Canon 226, our answers are provided below:
> The Black 225 cartridge uses a pigment-based ink...this cartridge is primarily intended for
document/text printing. Pigment based inks provide strong longevity / archivability and increase the
black dot gain; this is especially important when printing small black text characters on the page - they
must be rich so they are easily legible to the eye.
>> The Black 226 cartridge uses a dye-based ink formulation specific to photo printing (this is a Photo
Black cartridge). Dye inks provide a greater amount of light to refract through the paper surface/inkjet
medium and effectively increase the amount of reflected color to bounce back to the eye (commonly
referred to as color 'pop', with respect to color appeal to the eyes. This ink formula is very effective for
enhanced photo printing on photo inkjet papers.
HARD RESET
Regarding your recent inquiry about the cartridge error message, you should try a hard reset: turn off
the printer, unplug the power cable from the wall/strip power outlet, wait 30 seconds, then reconnect
your power cable and turn the printer back on.
IIT Ink Shelf Life (NON FOAM) - HP88/940/932/933/950/951/02
Regarding your inquiry over shelf life (i.e. 3-months of in-operation), the HP940 ink cartridges will be ok
as these tanks do not have foam inside (ink is contained within a heavy duty foil bag)....typically these
can be stored for at least a year without any problems (just keep them out of sunlight). Now, with
respect to the PRINTHEAD (which there are 2 inside your HP OJPRO 8500 printer), they should
automatically 'seal' when the printer is powered down. If you encounter a start-up issue after such a
long period of time, such as missing colors/streaking, then you may need to run a 'PRIME' or
'PRINTHEAD CLEAN' to recover the system.
Please refer to our video on how the INK CARTRIDGES vs. PRINTHEADS interact:
http://inkjet411.com/?page_id=2054
-Thank you

206
HP OFFICEJET PRO 8500A (HP 940s) – POWER OFF/CARTRIDGE ACCESS DOOR TRICK
With respect to the HP OJ PRO 8500A Plus workflow of having to power off the printer to get the
printing/copying to function following the printer dropping into standby mode, this is indeed quite
unusual. I suspect this might be a driver issue, and you may just need to reinstall your printer driver
software.
However, before you do that, instead of powering off the printer on the next print job attempt, try
opening and closing the cartridge access door....see if a print job comes thru. If it does, then this will
confirm there is a probable printer driver 'hand-shaking' issue.
We also suggested you press and hold the reset button on the printer for five seconds...this will reset
the cartridge's smart chip, and may correct the current ‘interface’ issue.
If the error continues, then we suggest you remove the refilled ink cartridge and inspect the smart chip
contact surface (located in bottom/rear portion of cartridge). If there is any ink on the surface of the
chip please clean thoroughly using isopropyl alcohol dampened lint-free towel, or similar.
ADDITIONAL NOTES:
1) Printer nuisance messages, such as "counterfeit" / "non-genuine ink", are COMPLETELY NORMAL and
should be expected when using HP 940 refilled ink cartridges.
A. If you observe an ink cartridge "expired ink" message then there is a trick to bypass this alert
message, please click here for instructions: http://inkjet411.com/?page_id=1457
B.
Please let us know if the problem persists.
-Thank you
HP OFFICEJET PRO LXXX (HP 88s) – CARTRIDGE ERROR
Regarding your recent inquiry about a cartridge error message associated with your HP 88 refilled ink
cartridge(s). The cartridge probably has a defective chip which was mis-programmed during the refill
process. You should bring the cartridge back to the Costco Photo Department and have it re-
programmed. Also, have it weighed at the Costco Photo Department to ensure that it was properly
filled.
OTHER CARTRIDGE RECOGNITION FAILURES/CAUSES:
NOTE: --assumes chip has already been replaced---
The failure to recognize an ink cartridge(s) could either be a possible Cartridge connectivity,
PRINTHEAD* connectivity or an end-of-life PRINTHEAD issue. We suggest you remove all the ink
cartridges and thoroughly clean BOTH PRINTHEADS manually along with cartridge chip contact surfaces
207
(located on bottom-rear side of each ink cartridge). Clean all electrical contacts, including those inside
the printer which mate to the PRINTHEADS. Reinstall both PRINTHEADS and cartridges and retest. You
may refer to HP's 'manual' cleaning procedures here:
http://h20000.www2.hp.com/bizsupport/TechSupport/Document.jsp?lang=en&cc=us&taskId=125&pro
dSeriesId=2511747&prodTypeId=18972&objectID=c00844045
Ensure an "expired ink cartridge" alert state is not causing the issue, refer to this page on how to check
& bypass: http://inkjet411.com/?page_id=1384
---- If you observe an “Expired xxxx ink cartridge” alert or message, this error may be bypassed
by performing the following:
a. Press and HOLD the Power button.
b. Press Resume button 3 times.
c. Release the Power button
If, following HP 88 cartridge re-programming and complete cartridge/printhead/printer manual
electrical contact cleaning, the cartridge alert message(s) continue, then you may have a damaged
PRINTHEAD* (there are two printheads inside the printer) which may require re-priming or replacement
depending on problem symptoms.
* The HP 88 ink-series printer models have two electronic PRINTHEADS (each of these electronic devices
are responsible for pulling ink from the ink cartridges and then firing the ink droplets onto the paper) –
both PRINTHEADS will eventually fail depending on printed content, printer duty cycle (i.e. typically
rated for ~41, 500 printed pages depending on image content & frequency of printing). The average
inkjet printer can typically be refilled with ~20+ complete sets of ink cartridges over the life of the
printhead, after which, either the Yellow/Black and/or Cyan/Magenta printhead may need to be
replaced (available at HP.com). Refer to video on how the HP PRINTHEAD functions:
http://inkjet411.com/?page_id=2054
When the PRINTHEAD electronically fails typically the printer will provide an alert message when this
happens, but if a printhead has suffered a deprime (i.e. loss of ink/pressure which results in no printing
of color), it is possible to recover the system using a 3rd party PRINTHEAD priming tool, such as this one:
http://www.inkowl.com/?p=product&product=5035
Please let us know if you have any further questions or cannot reach resolution.
-Thank you
___________________________________________
Regarding your recent inquiry about an HP 88 black ink cartridge error message ("MISSING OR
DAMAGED") associated with your HP 88 refilled ink cartridge, this is not the typical error message we
normally see when a refilled ink cartridge that has a correctly installed and properly programmed smart
chip. We suggest you verify that there is no ink residue on the surface of the smart chip (at rear/lower
side of ink cartridge) – refer to 4th picture at the following link: http://inkjet411.com/?page_id=973
208
It is also possible that either of the PRINTHEADs may have poor connectivity with the rear electrical
pad/interface. It is suggested that you attempt to re-seat (i.e. remove and re-install) the Yellow/Black
printhead assembly. HP.com instructions can be found here.
http://h10025.www1.hp.com/ewfrf/wc/document?cc=us&lc=en&dlc=en&docname=c01289505
___________________________________________
The inclusion of the statement "intended for single use only" is standard manufacturer language since
HP does not refill or allow customers to reuse their tanks. The ink cartridge/tank is just a plastic body
with an internal foil bag and ink port...nothing can really go bad. As long as the chip is re-programmed
(or replaced) following each use you can use it over and over again. In addition, with the HP 88s, you can
use the ink within a year following refill so there is no rush.
If you continue to see Magenta problems/errors following the chip re-programming, then this could be a
Cyan/Magenta PRINTHEAD issue (this is an electronic assembly which performs the actual 'firing' of
drops onto the page). However, in most of these cases you would get either a PRINTHEAD failed/error
type message or you would observe unrecoverable poor print quality. How the Printhead Works:
http://inkjet411.com/?page_id=2054
HP OFFICEJET PRO Kxxx/Lxxx (HP 88s) – POOR PRINT QUALITY / IMPROPER OR MISSING COLORS
Regarding your recent inquiry about the HP88 poor print quality problems ("pink color output"), it sounds like the Cyan/Magenta OR Yellow/Black PRINTHEAD is causing the problem or there are air bubbles in the ink lines/PRINTHEAD assembly. We suggest you perform the following: 1. Activate a 'Clean Printhead' routine, 2 times, from your TOOLS/MAINTENANCE menu, to see if this corrects the problem. This action will perform a printhead prime and try to re-establish proper internal pressures. 2. To verify the lines are clear and working correctly, print the “INK RECOVERY TEST PRINT” from our Test Prints page: http://inkjet411.com/?page_id=146 3. Run the self-test print (under maintenance/tools menu), this will verify nozzle performance and that each color is firing a solid band of color (i.e. you should not see any bands or missing lines in the pattern). This is also a good test to help isolate which color (or portion of the electronic PRINTHEAD*) may be causing the issue. 4. It is also possible that either of the PRINTHEADs may have poor connectivity with the rear electrical pad/interface. It is suggested that you attempt to re-seat (i.e. remove and re-install) either the Cyan/Magenta or Yellow/Balck PRINTHEAD assembly. HP.com instructions can be found here. http://h10025.www1.hp.com/ewfrf/wc/document?cc=us&lc=en&dlc=en&docname=c01289505 5. This could be a PRINTHEAD 'firing' or electronic failure issue (…electronic assembly which performs the actual 'firing' of drops onto the page)*. However, in most of these cases you would get either a ‘Printhead failed’, ‘Printhead missing, or ‘Replace Printhead’ alert message or you would observe
209
unrecoverable poor/severe print quality. Refer to video to see how the Printhead works: http://inkjet411.com/?page_id=2054 6. Check the 'WARRANTY ENDS' date on the PRINTHEADS*. If either PRINTHEAD is expired then it may need to be replaced: For more information on this please visit: http://h30434.www3.hp.com/t5/Ink-Toner-Cartridge-Printhead-Issues/Significance-of-quot-Warranty-ends-quot-date-on-Officejet/td-p/1081607 * The HP 88 ink-series printer models have two electronic PRINTHEADS (each of these electronic devices are responsible for pulling ink from the ink cartridges and then firing the ink droplets onto the paper) – both PRINTHEADS will eventually fail depending on printed content, printer duty cycle (i.e. typically rated for ~41, 500 printed pages depending on image content & frequency of printing). The average inkjet printer can typically be refilled with ~20+ complete sets of ink cartridges over the life of the printhead, after which, either the Yellow/Black and/or Cyan/Magenta printhead may need to be replaced (available at HP.com). Refer to video on how the HP PRINTHEAD functions: http://inkjet411.com/?page_id=2054 When the PRINTHEAD electronically fails typically the printer will provide an alert message when this happens, but if a printhead has suffered a deprime (i.e. loss of ink/pressure which results in no printing of color), it is possible to recover the system using a 3rd party PRINTHEAD priming tool, such as this one: http://www.inkowl.com/?p=product&product=5035 A PRINTHEAD "missing" / "damaged" / "problem" error has nothing to do with the HP88 refilled ink cartridges since these are just plastic tanks which hold ink - all ink formulations have been fully tested for compatibility with all HP printer systems. The timing of a printer/printhead failure is merely coincidental with respect to the use of refilled ink cartridges. Each PRINTHEAD is a complex electronic ink-firing assembly which sits directly behind the ink cartridges during the printer idle state; the cartridges plug into and feed ink to both the Yellow/Black PRINTHEAD and Cyan/Magenta PRINTHEAD. 7. If the above resolutions do not correct the issue, then replacement of the suspect PRINTHEAD may likely be required. As the refilled ink cartridge has nothing to do with the failure of the electronic PRINTHEAD assembly, printhead replacement cost is not covered. All printheads will eventually fail depending on printed content, usage and time via natural electronics degradation. The Inkjet411 test labs have never observed a correlation between a refilled HP88 cartridge and the failure of the HP88 PRINTHEAD assembly. We trust you clearly understand our position with respect to this type of micro-electronics failure of a PRINTHEAD, should this turn out to be the root cause of failure. 8. If problem persists after following all suggestions above, then we suggest you discuss the possibility of a refund with your local Costco (for the refilled cartridge purchase). We apologize for the inconvenience this may have caused you. Please let us know if you have any further questions on the technical information provided. -Thank you
210
HP OFFICEJET PRO 8500A (HP 940s) – “NO INK” / “MISSING OR DAMAGED” PRINTER ERROR
Regarding your recent inquiry about the HP 940 ink cartridge error ("MISSING OR DAMAGED") which is
preventing printing....let's run thru a quick checklist to ensure we cover everything:
http://inkjet411.com/?page_id=1457
CLEARING AN INK ALERT/ERROR CONDITION:
1) Press and HOLD the printer’s ‘Reset/Resume’ button for five (5) seconds...this will reset the HP 940
cartridge's smart chip, and may correct the current issue (primarily applies to 8500 models only).
2) If you received an "Unauthorized ink", "non-HP ink", "counterfeit ink" or similar message, you can
simply ignore/dismiss these messages by pressing 'OK' once for each cartridge, so that the printer
resumes its normal operation. Receiving these alert messages are COMPLETELY NORMAL when using
refilled ink cartridges. Refilling the ink cartridges does not include reprogramming of the ink cartridges,
so this is not a factor - see video: http://inkjet411.com/?page_id=2008
3) If the error continues, then we suggest you remove the refilled ink cartridge and inspect the smart
chip contact surface (located in bottom/rear portion of cartridge). If there is any ink on the surface of
the chip please clean thoroughly using isopropyl alcohol dampened lint-free towel, or similar:
http://inkjet411.com/?page_id=1457
4) Open and close the cartridge access door - in the past we have observed firmware/communication
issues which were caused by the interlocked cartridge access door.
5) Reset the printer (FULL-RESET PROCEDURE):
a. Turn the printer off with the front panel button
b. Disconnect the power cord from the product, and then wait 20 seconds.
c. Press and hold # and 9 while reconnecting the power cord.
d. Wait 10 seconds, and then release both buttons. The product resets and prints an alignment
page.
6) Ensure an "expired ink cartridge" alert state is not causing the issue, refer to this page on how to
check & bypass: http://inkjet411.com/?page_id=1457
---- If you observe an “Expired xxxx ink cartridge” alert or message, this error may be bypassed
by performing the following:
a. Press and HOLD the Power button.
b. Press Resume button 3 times.
c. Release the Power button
7) Ensure the cartridge actually has enough ink inside (there is an ink empty sensor in the base of the ink
cartridge). While ink tracking is not available when using refilled ink cartridges, when the cartridge gets
down to less than ~5% ink remaining, an 'out of ink' error condition will be communicated. If necessary,
return to your refiller and have them weigh it to ensure it was properly refilled.
211
8) For more severe cartridge error messages which prevent printing [i.e. “The Following Printhead
Appears to be Missing or Damaged' or 'The Following Printhead has a Problem'] are usually caused by
failed micro-electronics within either of the PRINTHEAD assemblies (…which has nothing to do with the
HP 940 refilled ink cartridges since these are just plastic tanks that hold ink). The printhead assembly is a
separate electronic unit in which the cartridges plug into and feed ink to. Review HP.com PRINTHEAD
removal/replacement procedures to see if this is causing the issue or refer to the bottom half of this
page - you may need to re-seat both PRINTHEAD(S) - click here for instructions:
http://inkjet411.com/?page_id=1457
How the Printhead Works: http://inkjet411.com/?page_id=2054
9) If this does not remedy the problem, then you may have a defective PRINTHEAD in the printer (worst
case scenario), unrelated to the refilled cartridges. Refer to HP.com for troubleshooting support. It is
first suggested you remove either the Cyan/Magenta or Yellow/Black PRINTHEAD (depending on which
one may be causing the error condition) and thoroughly clean the electrical contacts. Reinstall and test.
In rare cases, re-priming or replacement of the PRINTHEAD will eventually be required.
NOTE 1: HP does not allow an automatic reset of the HP 940 electronic chip on the cartridge after a
refill, so the ink level indicator is sending a false message that the ink level is low. Your cartridge is not
low on ink, and nothing is wrong with your printer or cartridges. The ink level indicator usually cannot be
manually re-set, so the ink level indicator is often not usable. However, losing this feature is not
necessarily significant, because the ink level indicator usually has substantial usable ink remaining when
it shows "low on ink". If you observe "Unauthorized ink", "non-HP ink", "counterfeit ink" or similar
messages, you may ignore/dismiss this message by pressing 'OK' once for each cartridge, so that the
printer resumes its normal operation.
NOTE 2: The HP 940 printer models have two electronic PRINTHEADS (each of these electronic devices
are responsible for pulling ink from the ink cartridges and then firing the ink droplets onto the paper) –
both PRINTHEADS will eventually fail depending on printed content, printer duty cycle (i.e. typically
rated for ~30,000 printed pages depending on image content & frequency of printing). The average
inkjet printer can typically be refilled with ~8+ complete sets of ink cartridges over the life of the
printhead, after which, either the Yellow/Black and/or Cyan/Magenta printhead may need to be
replaced (available at HP.com). Refer to video on how the HP PRINTHEAD functions:
http://inkjet411.com/?page_id=2054
NOTE 3: When the PRINTHEAD electronically fails typically the printer will provide an alert message
when this happens, but if a printhead has suffered a deprime (i.e. loss of ink/pressure which results in
no printing of color), it is possible to recover the system using a 3rd party PRINTHEAD priming tool, such
as this one: http://www.inkowl.com/?p=product&product=5035
Please let us know if the problem persists.

212
-Thank you
HP OFFICEJET PRO 8500/8500A (HP 940s) – CONFUSION OVER INK LOW AND CHIP REPLACEMENT
Regarding your recent inquiry about the HP 940 cartridge low ink message, HP does not allow an
automatic reset of the electronic chip on the cartridge after a refill, so the ink level indicator is sending a
false message that the ink level is low. Your cartridge is not low on ink, and nothing is wrong with your
printer or cartridges.
Your printer/computer will display “ink alert” message(s). Press ‘OK’ to dismiss this prompt. Additional
alert messages, such as “non-genuine cartridge” or “fraud” may also be displayed. Press ‘OK’ or ‘Dismiss’
to bypass these prompts.
However, if you observe strange printer behavior or encounter ‘unrecognized cartridge’ or ‘expired ink’
alert messages, perform the following steps:
1) Press and HOLD the printer’s ‘Reset’ button for five (5) seconds...this will reset the HP 940 cartridge's
smart chip, and may correct the current issue.
2) For expired ink/cartridge error messages, please refer to the following information on how to bypass:
http://inkjet411.com/?page_id=1457
---- If you observe an “Expired xxxx ink cartridge” alert or message, this error may be bypassed
by performing the following:
a. Press and HOLD the Power button.
b. Press Resume button 3 times.
c. Release the Power button
NOTE: The only way to fully reset the ink level monitoring is to replace the chip, but Costco
photo center personnel do not do this as it is not vital/required to support HP OJ PRO 8500 (or
8500A) printer operations. Since it is not essential to supporting printing operations, chip
replacement is not included.
Now, since the ink level indicator is not re-set, it is not 'feature usable', meaning that you just need to
ignore incoming 'ink low' alert messages as they appear. Continue to print until you notice a missing
color, then replace that color (please see attached warning as a reminder).
However, losing this feature is not necessarily significant, because the ink level indicator usually has
substantial usable ink remaining when it shows "low on ink". Therefore, the warning has limited value,
because users who prematurely replace their cartridges when they see the "low ink" message are
wasting a lot of residual ink. In order to use as much available ink as possible, many users (not only
those who refill their cartridges, but many who have not yet tried refilling) always ignore the ink level
indicator "low" warning, and wait to replace/refill their cartridge until immediately after seeing ink begin
to fade on their printouts.
213
Many customers who disregard the low ink indicator keep a spare set of cartridges so that their printing
productivity is not disrupted when the cartridge runs out of ink. If the cartridge completely runs out of
ink and continues to be used when it is dry, this could damage the cartridge, so users should promptly
refill/replace their cartridge when the ink begins to fade. This fading process is gradual, so that you will
have sufficient time to refill/replace the cartridge before the risk of empty cartridge printing. In
summary, most refill customers agree that the huge savings of refilling is much greater than the
potential loss of the low ink indicator feature.
For more information on HP 940 cartridge 'Quick/Usage Tips', please refer to the following information
on Inkjet411: http://inkjet411.com/?page_id=1423
NOTE 1: The HP 940 printer models have two electronic PRINTHEADS (each of these electronic devices
are responsible for pulling ink from the ink cartridges and then firing the ink droplets onto the paper) –
both PRINTHEADS will eventually fail depending on printed content, printer duty cycle (i.e. typically
rated for 30, 000+ printed pages depending on image content & frequency of printing). The average
inkjet printer can typically be refilled with ~20+ complete sets of ink cartridges over the life of the
printhead (warranted for only 650ml of ink however, or approximately 9 cartridge refills), after which,
either the Yellow/Black and/or Cyan/Magenta printhead may need to be replaced (available at HP.com).
Refer to video on how the HP PRINTHEAD functions: http://inkjet411.com/?page_id=2054
When the PRINTHEAD electronically fails typically the printer will provide an alert message when this
happens, but if a printhead has suffered a deprime (i.e. loss of ink/pressure which results in no printing
of color), it is possible to recover the system using a 3rd party PRINTHEAD priming tool, such as this one:
http://www.inkowl.com/?p=product&product=5035
We apologize if this HP 8500/8500A 'workflow caveat' caused you any confusion.
-Thank you
HP OFFICEJET PRO 8500/8500A (HP 940s) – PRINTHEAD FAILURE MESSAGE
Regarding your inquiry over HP940 refilled ink cartridges and the reported printer error message on
your HP OJPRO 8500 printer ( “The Following Printhead Appears to be Missing or Damaged” / “The
Following Printhead has a Problem”), please note this type of problem is usually severe in nature and is
typically caused by failed micro-electronics within either of the two (2) PRINTHEAD assemblies.
A PRINTHEAD "missing" / "damaged" / "problem" error has nothing to do with the HP 940 refilled ink
cartridges since these are just plastic tanks which hold ink - all ink formulations have been fully tested
for compatibility with all HP printer systems. It has been our observation that HP OJPRO 8500/8500A
printhead life does vary widely from printer to printer (anywhere from 1000 pages to 20,000+ pages!!).
The timing of a printer/printhead failure is merely coincidental with with respect to the use of refilled
ink cartridges. Each PRINTHEAD is a complex electronic ink-firing assembly which sits directly behind the
ink cartridges during the printer idle state; the cartridges plug into and feed ink to both the Yellow/Black
PRINTHEAD and Cyan/Magenta PRINTHEAD.*
214
A. To help resolve the current printer alert state, we suggest you refer to the lower half of the
following Inkjet411 support page. Remove all four (4) ink cartridges and both PRINTHEADs from
the printer. Thoroughly clean the electrical contacts on one (or both) PRINTHEAD assemblies.
Reinstall PRINTHEAD(s) and ink cartridges, and retest. http://inkjet411.com/?page_id=1457
NOTE: Here are HP’s steps for resolving, removing/replacing and cleaning the PRINTHEADs:
http://h10025.www1.hp.com/ewfrf/wc/document?cc=us&lc=en&docname=c01817398
B. Check the 'WARRANTY ENDS' date on the PRINTHEADS*. If either are expired then they may need to be replaced: For more information on this please visit: http://h30434.www3.hp.com/t5/Ink-Toner-Cartridge-Printhead-Issues/Significance-of-quot-
Warranty-ends-quot-date-on-Officejet/td-p/1081607
C. If the above resolutions do not correct the issue, then replacement of the PRINTHEAD will likely
be required. As the refilled ink cartridge has nothing to do with the failure of the electronic
PRINTHEAD assembly, printhead replacement is not covered. All printheads will eventually fail
depending on printed content, usage and time via natural electronics degradation. The
Inkjet411 test labs have never observed a correlation between a refilled HP940 cartridge and
the failure of the HP940 PRINTHEAD assembly. We trust you clearly understand our position
with respect to this type of micro-electronics failure of a PRINTHEAD.*
D. We suggest you discuss the possibility of a refund with your local Costco (for the refilled
cartridge purchase).
NOTE: If you DO NOT observe a PRINTHEAD alert or error message, but instead observe substandard
print quality (or completely missing colors) and suspect the PRINTHEAD may be clogged, then you
may want to consider flushing the PRINTHEAD using an advanced 3rd party procedure:
http://www.youtube.com/watch?v=y6YjL7mff5c&list=TLzK8FY3Lh_iA
*The HP940 ink-series printer models have two removable/replaceable electronic PRINTHEADS (each of
these electronic devices are responsible for pulling ink from the ink cartridges and then firing the ink
droplets onto the paper) – both PRINTHEADS will eventually fail in time depending on printed content,
printer duty cycle (i.e. typically rated for ~20,000+ printed pages depending on image content &
frequency of printing). While some printheads may last 15,000+ pages others may only last 1000 pages,
actual results will vary.
The printhead will eventually fail in time due to an internal micro-electronics failure, due to the
following leading factors: natural electronic components degradation from liquids corrosion over time,
printer duty cycle (i.e. # pages printed per month), printing frequency (i.e. time between each print job),
print mode (i.e. draft vs. normal) and content printed (i.e. photos vs plain pages) and color mode (black
215
and white only vs. color/greyscale printing). Paper types used (i.e. plain paper, photo papers &
matte/heavy bond papers) and paper edge curl (due to age in printer or low relative humidity) can also
quickly lead to premature printhead failures due to physical ‘head strikes’ of the paper edges making
repeated contact with the printhead nozzle plate.
The average inkjet printer can typically be refilled with ~8 to 20 complete sets of ink cartridges over the
life of the printhead, after which, either the Yellow/Black and/or Cyan/Magenta printhead will
eventually need to be replaced (available at HP.com). Based on HP.com’s customer support forum, some
HP940 PRINTHEADS have reportedly only functioned for 1100-2000 printed pages (with HP OEM inks),
so reliability results do appear to vary widely.
Please refer to video on how the HP PRINTHEAD functions: http://inkjet411.com/?page_id=2054
We suggest you contact HP for additional troubleshooting help. Replacement PRINTHEAD assemblies
may be ordered from HP.com.
-Thank you
_______________________________________________________________________________
*Typically the printhead should not reach it’s end-of-life until after a minimum of 8 or more complete sets of
cartridge changes; officejet models typically have a higher print page throughput average, but this is not always the
case. While some printheads may last 15,000+ pages others may only last 1000 pages, actual results will vary. The
printhead will eventually fail in time due to an internal micro-electronics failure, due to the following leading factors:
general customer print usage and printer care, printer duty cycle (i.e. # pages printed per month), printing frequency
(i.e. time between each print job), print mode (i.e. draft vs. normal) and content printed (i.e. photos vs plain pages)
and color mode (black and white only vs. color/greyscale printing). Paper types used (i.e. plain paper, photo papers &
matte/heavy bond papers) and paper edge curl (due to age in printer or low relative humidity) can also quickly lead to
premature printhead failures due to physical ‘head strikes’ of the paper edges making repeated contact with the
printhead nozzle plate.
HP 932/933 CARTRIDGE SWAP / ACTIVATION & LOW INK WARNINGS
Regarding your HP933 ink cartridge refill inquiry and cartridge error "Depleted cartridges must be
replaced"....you should have been advised that each color must be activated by inserting the spare into
the printer for at least 30 seconds (i.e. you MUST have a complete set of spare cartridges to activate a
full set of refilled ink cartridges - these can be empties, starters, or another set of tanks)...
Regarding your HP932/933 ink cartridge inquiry over 'low ink' messages, please note that “Depleted”,
“Refilled”, and similar “Ink out” alerts are COMPLETELY NORMAL for HP 932/933 ink cartridges which
have been refilled! While at first this may be an unusual workflow, it does allow print operations to
216
proceed. Unfortunately you cannot bypass or correct these conditions as the embedded smart chips (at
bottom of each ink cartridge) were not replaced during the refill process; there would be additional
costs associated with chip replacement)…
Please watch this video which explains this further: http://inkjet411.com/?page_id=1995
You may use either the HP 932/933 Setup Cartridges or the regular HP 932/933 [HP 932XL/HP 933XL]
cartridges for activating the refilled 932/933 cartridges - you may cycle between each set or use one set
thereafter. See our FAQs document here for complete ink cartridge usage information:
http://inkjet411.com/?page_id=913
3 important usage caveats to be aware of:
1) Ensure that the refilled cartridges are not the ones you just took out of the printer - as long as you
install one of the previously used (non-refilled ink cartridges, full or empty, doesn't matter) into the
printer first, it immediately recognize this as a different cartridge. After ~30 seconds you can then
remove the spare and install the refilled cartridge, it should then be activated & permitted for use.
2) Ensure you bypass the anticipated printer 'alerts' (i.e. “Counterfeit” and “Non-Genuine Ink”) in the
prescribed manner when the refilled cartridge(s) are first installed. Click here for more information on
this: http://inkjet411.com/?page_id=913
>> IMPORTANT - Press ‘No‘ when prompted with the following question: “Was this cartridge sold to you
as a new genuine HP-branded cartridge that has not been previously used?
3) “Depleted”, “Refilled”, and similar “Ink out” alerts are COMPLETELY NORMAL for HP 932/933 ink
cartridges which have been refilled! While at first this may be an unusual workflow, it does allow print
operations to proceed. Spare cartridge refills have no expiration date.
If not already performed, we suggest you watch both of the following support videos:
http://inkjet411.com/?page_id=1991
NOTE: Attempting to refill ink cartridges before the 'ink out/empty' alert condition hits will actually work
one time. Since the printer monitors ink usage/drop counts, it will display the ‘Ink Sensor Warning’
messages when it 'predicts' the cartridge should be out of ink, but these messages may be ignored and
you can continue printing. Eventually the ‘Cartridge(s) Depleted’ alert message will be displayed when
the cartridge truly is out of ink. After this the printer will not know what the level of the ink is. Watch
this video which shows both of these alert messages: http://inkjet411.com/?page_id=1999
Please let us know if you have any other questions.
-Thank you

217
HP 950/951 CARTRIDGE SWAP / ACTIVATION & LOW INK WARNINGS
Regarding your HP950/951 ink cartridge refill inquiry and cartridge error "Depleted cartridges must be
replaced"....you should have been advised that each color must be activated by inserting the spare into
the printer for at least 30 seconds (i.e. you MUST have a complete set of spare cartridges to activate a
full set of refilled ink cartridges - these can be empties, starters, or another set of tanks)...
Please watch this video which explains this further: http://inkjet411.com/?page_id=913
NOTE: You can use either the HP 950/951 Setup Cartridges or the regular HP 950/951 [950XL/951XL]
cartridges for activating the refilled 950/951 cartridges - you may cycle between each set or use one set
thereafter. See our FAQs document here for complete usage information:
http://inkjet411.com/?page_id=1999
3 important usage caveats to be aware of:
1) Ensure that the refilled cartridges are not the ones you just took out of the printer - as long as you
install one of the previously used (non-refilled ink cartridges, full or empty, doesn't matter) into the
printer first, it immediately recognize this as a different cartridge. After ~30 seconds you can then
remove the spare and install the refilled cartridge, it should then be activated & permitted for use.
2) Ensure you bypass the anticipated printer 'alerts' (i.e. “Counterfeit” and “Non-Genuine Ink”) in the
prescribed manner when the refilled cartridge(s) are first installed. Click here for more information on
this: http://inkjet411.com/?page_id=913
>> IMPORTANT - Press ‘No‘ when prompted with the following question: “Was this cartridge sold to you
as a new genuine HP-branded cartridge that has not been previously used?
3) “Depleted”, “Refilled”, and similar “Ink out” alerts are COMPLETELY NORMAL for HP 950/951 ink
cartridges which have been refilled! While at first this may be an unusual workflow, it does allow print
operations to proceed. Spare cartridge refills have no expiration date.
We suggest you watch the following videos:
http://inkjet411.com/?page_id=1991
NOTE: Attempting to refill ink cartridges before the 'ink out/empty' alert condition hits will actually work
one time. Since the printer monitors ink usage/drop counts, it will display the ‘Ink Sensor Warning’
messages when it 'predicts' the cartridge should be out of ink, but these messages may be ignored and
you can continue printing. Eventually the ‘Cartridge(s) Depleted’ alert message will be displayed when
the cartridge truly is out of ink. After this the printer will not know what the level of the ink is. Watch
this video which shows both of these alert messages: http://inkjet411.com/?page_id=1999
Please let us know if you have any other questions.
218
-Thank you
_____
HP 932/933 & 950/951: WHY 2ND SET OF CARTRIDGES MUST BE PURCHASED/OBTAINED
Regarding your recent inquiry about the need to obtain a 2nd set of tanks to enable HP 950/951 refilled
cartridges to work in your HP OJPRO 8600 printer, unfortunately, HP rejects (“locks-out”) an empty
cartridge that is removed from the printer (newer HP model series), refilled, and immediately put back
in the printer. Since Costco does not replace the smart chip (at base of cartridge), the printer will
recognize the previously installed cartridge as such and block it from working in the printer. But if a
same color spare cartridge is put in the printer before inserting the refill (for ~30 seconds), then the refill
works normally*.
Besides, you would normally be purchasing new cartridges repeatedly if you did not decide to refill
them. But with refilling you only buy once more to get the second set. Then these rotated cartridge sets
can be inexpensively refilled indefinitely, never buying a full price new cartridge again. Please refer to
the refill tips video(s) to familiarize yourself with the installation and usage when using refilled HP ink
tanks: http://inkjet411.com/?page_id=1991
*A spare cartridge can be a setup, new, empty or refilled ink cartridge of the same type/color. Spare
cartridge refills have no expiration date.
Each color must be activated by inserting the spare into the printer for at least 30 seconds (i.e. you
MUST have a complete set of spare cartridges to activate a full set of refilled ink cartridges - these can
be empties, starters, or another set of tanks)...
Please watch this video which explains this further: http://inkjet411.com/?page_id=913
NOTE: You can use either the Setup Cartridges or the regular cartridges for activating the refilled
cartridges - you may cycle between each set or use one set thereafter. See our FAQs document here for
complete usage information:
http://inkjet411.com/?page_id=1999
3 important refill cartridge usage tips:
1) Ensure that the refilled cartridges are not the ones you just took out of the printer - as long as you
install one of the previously used (non-refilled ink cartridges, full or empty, doesn't matter) into the
printer first, it immediately recognize this as a different cartridge. After ~30 seconds you can then
remove the spare and install the refilled cartridge, it should then be activated & permitted for use.
219
2) Ensure you bypass the anticipated printer 'alerts' (i.e. “Counterfeit” and “Non-Genuine Ink”) in the
prescribed manner when the refilled cartridge(s) are first installed. Click here for more information on
this: http://inkjet411.com/?page_id=913
3) “Depleted”, “Refilled”, and similar “Ink out” alerts are COMPLETELY NORMAL for refilled ink
cartridges which have been refilled! While at first this may be an unusual workflow, it does allow print
operations to proceed. Spare cartridge refills have no expiration date.
Cartridge Swap Requirement Information Disclosures:
1. The ink refilling center attaches a ‘yellow sticker’ to each cartridge advising the need for a
spare cartridge to enable refilled ink cartridge (i.e. “To Activate Refill, Spare Cartridges
Needed”).
2. The HP932/933/950/951 ink refill information card should have been included with your
purchase.
NOTE 1: Accessing the printer’s hidden ‘support’ menu and then going into the ‘system configuration’
menu to the ‘ink initialization’ menu and clearing it, it is possible to bypass the cartridge swap
requirement. WARNING: When the ink status is cleared it treats the cartridges like brand new first time
set up cartridges which goes through a lengthy printhead/cartridge priming sequence where the printer
pulls ~3 grams of ink per cartridge, which is roughly 50% of total ink volume (i.e. standard size refilled
cartridge). If you wish to proceed, you may refer to the HP Diagnostics file for complete service menu
access instructions for your printer model: http://inkjet411.com/?page_id=1813
NOTE 2: Attempting to refill ink cartridges before the 'ink out/empty' alert condition hits will actually
work one time. Since the printer monitors ink usage/drop counts, it will display the ‘Ink Sensor Warning’
messages when it 'predicts' the cartridge should be out of ink, but these messages may be ignored and
you can continue printing. Eventually the ‘Cartridge(s) Depleted’ alert message will be displayed when
the cartridge truly is out of ink. After this the printer will not know what the level of the ink is. Watch
this video which shows both of these alert messages: http://inkjet411.com/?page_id=1999
Please let us know if you have any other questions.
-Thank you
Ink
1) Press the ‘Return’ button at lower left of touchscreen a total of 4 times (please note the Return
button will NOT be lit).
2) At ‘support’ menu, navigate to the ‘system configuration’ menu.
220
3) Navigate to the ‘ink initialization’ menu.
4) At Ink Initialization menu, select Set, Clear or Reset (varies by printer model)
WARNING: This will bypass the cartridge swap requirement. When the ink status is cleared it treats
the cartridges like brand new first time set up cartridges which goes through a lengthy
printhead/cartridge priming sequence where the printer pulls ~3 grams of ink per cartridge, which is
roughly 50% of total ink volume (i.e. standard size refilled cartridge).
See HP Diagnostics file for complete service menu access instructions for your printer model:
http://inkjet411.com/?page_id=1813
HP 932/933 & 950/951: “LOW INK” / “INK CARTRIDGES DEPLETED” MESSAGES
Regarding your recent inquiry about low ink/depleted HP932/950 black ink cartridge error message(s),
let’s ensure that all steps have been completed properly when using refilled tanks. First and foremost,
please understand that in order to use a refilled ink cartridge you need to first install another HP932
black ink cartridge in the printer for approx. 30 seconds (i.e. i.e. spare set must be available when using
refilled ink cartridges), then you can install the newly refilled cartridge and it will be recognized by the
printer. You can then bypass the various 'non-HP', 'counterfeit' alert messages - eventually you should
be permitted to print using the black ink cartridge.
Please refer to our FAQ document which covers everything: http://inkjet411.retailinkjet.com/wp-
content/uploads/2013/05/HP-932-933-950-951-Spare-Cartridge-Swap_FAQs_v4.pdf
NOTE: “Depleted”, “Refilled”, and similar “Ink Low” alerts should be expected and are COMPLETELY
NORMAL for ink cartridges which have been refilled! In addition, the ink level tracking feature will NOT
be available - your ink cartridges are indeed full providing you just returned from the refill store. While
at first this may be an unusual workflow, it does allow print operations to proceed. We suggest you
watch the following videos so you completely understand what to expect when using refilled ink
cartridges: http://inkjet411.com/?page_id=913
KEY REMINDERS:
1) Ensure that the refilled cartridges are not the ones you just took out of the printer - as long as you
install one of the previously used (non-refilled ink cartridges, full or empty, doesn't matter) into the
printer first for approx. 30 seconds, it immediately recognize this as a different cartridge. After ~30
seconds you can then remove the spare and install the refilled cartridge, it should then be activated &
permitted for use. If the ink cartridges are not rotated in this manner then the “Ink Cartridge Depleted”
alert message will be encountered. Refer to page 3 in our FAQ document:
http://inkjet411.retailinkjet.com/wp-content/uploads/2013/05/HP-932-933-950-951-Spare-Cartridge-
Swap_FAQs_v4.pdf
221
2) The “Ink Cartridge Depleted” message will be observed, and the printer will cease print operations,
when an ink cartridge ‘really is’ out of ink. HP has small sensors which look into the bottom of the ink
tank to ensure ink is present. Typically you will receive ‘Low Ink Warning’ messages just before this
occurs. Please refer to page 6 in our FAQ support document: http://inkjet411.retailinkjet.com/wp-
content/uploads/2013/05/HP-932-933-950-951-Spare-Cartridge-Swap_FAQs_v4.pdf
3) Ensure you bypass the anticipated printer 'alerts' (i.e. “Counterfeit” and “Non-Genuine Ink”) in the
prescribed manner when the refilled cartridge(s) are first installed. Click here for more information on
this: http://inkjet411.com/?page_id=913
>> IMPORTANT - Press ‘No‘ when prompted with the following question: “Was this cartridge sold to you
as a new genuine HP-branded cartridge that has not been previously used? If you accidentally select yes,
then you will need to bypass a few additional alert message screen…not a big deal.
4) You may use either the HP 950/951 Setup Cartridges or the regular HP 950/951 [950XL/951XL]
cartridges for activating the refilled 950/951 cartridges - you may cycle between each set or use one set
thereafter. Spare cartridge refills have no expiration date.
See our FAQs document here for complete usage information: http://inkjet411.com/?page_id=1999
4) You may use either the HP 932/933 Setup Cartridges or the regular HP 932/933 [932XL/933XL]
cartridges for activating the refilled 932/933 cartridges - you may cycle between each set or use one set
thereafter. Spare cartridge refills have no expiration date.
See our FAQs document here for complete usage information: http://inkjet411.com/?page_id=1999
5) If you bring in an ink cartridge for 'topping off', in most cases, the refill store operator will weigh the
ink cartridge to ensure it is not 'over' the acceptable weight limit - it is possible they will deny the refill
request if considered too full (i.e. >25%-40% ink remaining). As the refill process typically involves a
complete 'ink evacuation', cartridges with too much ink can be problematic for a satisfactory refill.
If the "Ink Cartridges Depleted" message persists then the ink cartridge may 'really' be out of ink - return
to Costco and have them weigh and check as necessary.
NOTE: Attempting to refill ink cartridges before the 'ink out/empty' alert condition hits will actually work
one time. Since the printer monitors ink usage/drop counts, it will display the ‘Ink Sensor Warning’
messages when it 'predicts' the cartridge should be out of ink, but these messages may be ignored and
you can continue printing. Eventually the ‘Cartridge(s) Depleted’ alert message will be displayed when
the cartridge truly is out of ink. After this the printer will not know what the level of the ink is. Watch
this video which shows both of these alert messages: http://inkjet411.com/?page_id=1999
Please let us know if you have any other questions.
-Thank you
222
HP 932/933 & 950/951: "Black Cartridge Damaged" / “Ink Cartridge Failure”
Regarding your recent inquiry about the HP950 "Black Cartridge Damaged" / “Ink Cartridge Failure” alert
message, this condition is most likely being caused by poor contact (i.e. electrical connectivity) between
the ink cartridge's 'smart chip' and the carriage assembly (which the ink cartridge plugs into). Typically a
'Red X' will also be displayed on printer control panel LCD or Window's pop-up screen when this
condition is present.
It is suggested you remove the respective ink cartridge from the printer and thoroughly clean the
cartridge’s smart chip electrical surface using an isopropyl dampened lint-free towel. Ensure no ink
residue is present on surface of the chip. Refer to page 7 of the FAQs (Frequently Asked Questions)
document at either of the links provided below:
http://inkjet411.com/?page_id=1991
http://inkjet411.retailinkjet.com/wp-content/uploads/2013/05/HP-932-933-950-951-Spare-Cartridge-
Swap_FAQs_v4.pdf
Following cartridge 'smart chip' cleaning, please reinstall the ink cartridge and retest.
NOTE: Attempting to refill ink cartridges before the 'ink out/empty' alert condition hits will actually work
one time. Since the printer monitors ink usage/drop counts, it will display the ‘Ink Sensor Warning’
messages when it 'predicts' the cartridge should be out of ink, but these messages may be ignored and
you can continue printing. Eventually the ‘Cartridge(s) Depleted’ alert message will be displayed when
the cartridge truly is out of ink. After this the printer will not know what the level of the ink is. Watch
this video which shows both of these alert messages: http://inkjet411.com/?page_id=1999
Please let us know if this does not remedy the current problem.
-Thank you
HP932/933/950/951 "HP Protected Cartridge Installed. Replace Cartridge K" ALERT MESSAGE
Regarding your recent inquiry about the HP950 "HP Protected Cartridge Installed. Replace Cartridge K"
alert message, unfortunately this particular lock-out may have been initiated on your printer during
initial printer/software installation. If you enabled ‘HP Cartridge Protection’ (within your printer
software driver on your computer) this will lock your cartridges to your printer and may not allow a
refilled cartridge to function.…meaning the cartridge(s) cannot be used in any other printer (i.e. another
similar printer model within your home/office or an identical replacement printer). It is therefore
suggested you ensure this 'PROTECTION' feature disabled.
To ensure the 'Protection' feature is disabled in your printer driver, please refer to page 8 in our FAQ pdf
file, the link is provided below.
http://inkjet411.com/?page_id=1991
223
http://inkjet411.retailinkjet.com/wp-content/uploads/2013/05/HP-932-933-950-951-Spare-Cartridge-
Swap_FAQs_v4.pdf
If the problem continues, then we need to verify a few things...
-- Is the HP950 cartridge yours (i.e. did you purchase it?) or did you obtain from elsewhere? They may
have enabled the lockout feature for their entire set of ink cartridges on their printer, in which case,
these cartridges will not work in your printer.
If the error condition cannot be reversed, since the lock-out data is written to the smart chip at base of
the HP950 black ink cartridge, then you may need to discuss the possibility of a refund with Costco for
the ink refill purchase.
Please let us know if this does not remedy the current problem.
-Thank you
HP 950/951 – POOR PRINT QUALITY (SEVERE) – PRINTHEAD CLEANING/FLUSHING/REPLACEMENT
Regarding your recent inquiry about the HP950/951 ink refill issue/question ("Ink head won't clean.
What to do?”), what is the exact nature of the current problem you are experiencing?...perhaps poor
image quality or missing color(s)?
If the current printer issue cannot be resolved by either activating the ‘Clean Printhead’ routine 2-3
times or by installing new/fully loaded ink tanks (following numerous cleaning actions with no resolve),
and assuming you are NOT observing any PRINTHEAD error messages (see NOTE below, i.e. "Replace
Printhead"), then the PRINTHEAD* is either severely clogged with ink residue or the ink port(s) are
completely dry (i.e. the foam pads that you can see in the bottom when you remove one of the ink
cartridges from the carriage assembly). The ink ports can easily dry out if the printer is rarely used, a
color has been depleted for awhile or if cartridges are not installed for long periods of time. Suggested
next steps to recover the ink system:
1) PERFORM PRINTHEAD DIAGNOSTIC TEST:
To verify the PRINTHEAD is ok, please activate the 'Tap 41' PRINTHEAD Health Diagnostics:
(NOTE: applies to touchscreen printer models only):
1. Press ‘Return’ button (lower left side) four (4) times until ‘Support’ menu is displayed.
2. At ‘Support’ Menu, using the arrow key, navigate to the ‘Service Menu’, press Ok.
3. Use arrow keys to advance to the ‘Special Reports’ Menu. Select OK.
4. Use arrow keys to advance to the ‘print mech button tap’ menu. Select Ok.
5. ‘code = 0’ will be displayed. Use arrows keys to change value to ‘41’ (i.e. press and hold right arrow
key).
6. When ‘Code = 41’, select ‘OK’. The diagnostic test pattern will print.
Check the 4th
line at the top of the printed report; an electrically good/stable PRINTHEAD will state “Pen
Status: Pen OK”………if any other message is displayed then the PRINTHEAD may have failed and may
need to be replaced. Re-seat PRINTHEAD and/or clean rear electrical contacts and repeat ‘Tap 41’ test to
verify connectivity is not the issue.
224
NOTE: Refer to our support document which includes more detailed diagnostic procedures:
http://inkjet411.com/?page_id=1813
2) If Pen is NOT ok…..Is your printer still under the 1 year warranty?....you may have a defective
PRINTHEAD* and it may need to be replaced….'the printer' should be covered in this case. You will need
to discuss with HP.
3) MANUALLY CLEAN PRINTHEAD:
NOTE: you will need at least 30% of remaining ink, within each cartridge, to successfully perform this
procedure
http://h10025.www1.hp.com/ewfrf/wc/document?cc=us&lc=en&dlc=en&docname=c02871867
1) Remove all 4 ink cartridges.
2) Remove the internal PRINTHEAD and thoroughly clean rear electrical contacts and carriage
electrical contacts.
3) Inspect ink foam ports to see if they are ‘wet with ink’…this will confirm whether ink is being
pulled into the PRINTHEAD or not. If the ink foam ports are completely dry (no significant
amount of ink present when blotted with a paper towel, etc.), then the PRINTHEAD is likely
considered too dry to support proper ink flow and subsequent printing operations.
4) Print the ‘Print Quality Diagnostic Page’ (also use to determine if print cartridge to printhead
alignment is correct):
a. Press return arrow 4 times
b. Press support menu
c. Press right hand arrow 7 times to reports menu and press ok
d. Press right hand arrow 2 times to Print Quality diagnostic report and press ok
4) FLUSH PRINTHEAD:
REFERENCE: HP 564/920 printhead water flushing procedure: http://inkjet411.com/?page_id=2412
NOTE: you will need at least 30% of remaining ink, within each cartridge, to successfully perform this
procedure
If after thorough electrical contact cleaning the problem persists, you may need to replace the
PRINTHEAD ASSEMBLY (i.e. get from HP or Amazon), however, as a last ditch effort, you might want to
perform a hot water flush on the PRINTHEAD.
a. Remove all ink cartridges from the printer.
b. Remove the printhead – refer to instructions here:
http://h10025.www1.hp.com/ewfrf/wc/document?cc=us&lc=en&dlc=en&docname=c02871
867
225
c. Over a sink, run warm tap water directly into the 4 ink ports for approximately 2 minutes –
this will effectively saturate the foam ports and blow ink out/thru the nozzle plate bottom.
d. Using a lint-free towel, remove water from rear/bottom electrical contacts. Ensure
printhead electrical contacts and exposed surfaces are fully dry.
e. Install the printhead into the printer. You may observe a “Replace Printhead message” so
you will need to cycle printer power by turning printer off and then on to clear the error.
f. Install ink cartridges and retest printer. You should observe a New PRINTHEAD alert
message followed by an approx. 4-minute preparation countdown prompt.
g. Test printer output by activating an internal test print or print a test page from our ‘Test
Prints’ page: http://inkjet411.com/?page_id=146
h. If you have reached this point of the troubleshooting and all the previous troubleshooting
steps did not work, then the printhead is likely damaged or at end of life* and may need to
be replaced.
5) REPLACE PRINTHEAD*:
Replace the PRINTHEAD (it is suggested to refer to HP’s Procedure)
http://h10025.www1.hp.com/ewfrf/wc/document?cc=us&lc=en&dlc=en&docname=c02871867
6) OTHER PRINTER MALFUNCTION:
As an outside chance, the internal ink/suction pump could be faulty. Best to troubleshoot this type of
problem directly with HP personnel if that is the case.
--- *Ink cartridges are merely plastic holding tanks for the ink....other than connecting and being recognized by the
printhead, there isn't really anything that can go wrong here (our ink formulations and HP ink formulations are 'very'
similar so this is not a significant contributor toward this type of condition based on our extensive internal benchmark
testing).
Typically the printhead should not reach its end-of-life until after a minimum of 8 or more complete sets of cartridge
changes; officejet models typically have a higher print page throughput average, but this is not always the case. While
some printheads may last 12,000+ pages others may only last 2000 pages, your printer results will vary. The printhead
will eventually fail in time due to an internal micro-electronics failure, due to the following leading factors: natural
electronics degradation over time, printer duty cycle (i.e. # pages printed per month), printing frequency (i.e. time
between each print job), print mode (i.e. draft vs. normal), image content printed (i.e. photos vs plain pages) and
color mode (black and white only vs. color/greyscale printing).
Paper types used (i.e. plain paper, photo papers & matte/heavy bond papers) and paper edge curl (i.e. duration in
printer and/or exposure to low relative humidity) can also quickly lead to premature printhead failures due to
physical ‘head strikes’ of the paper edges making repeated contact with the printhead nozzle plate surfaces.
---

226
NOTE: For more severe PRINTER error messages which prevent printing altogether [i.e. “Replace
Printhead”, “Missing Printhead” or “Incompatible Printhead"] this is typical of failed micro-electronics
within the PRINTHEAD assembly (nothing to do with the HP 950/951 refilled ink cartridges). The
PRINTHEAD assembly is a separate electronic unit in which the cartridges plug into and feed ink to and is
essentially the heart of the printing system. For reference, please refer to our video on how the
PRINTHEAD works: http://inkjet411.com/?page_id=2054
-Thank you.
Ink Refilling is Easy (Tanks)
Video Tags Title: HP 02 & 02XL Ink Cartridges -Ink Refilling is Easy, but be careful ! HP 88 & 88XL Ink Cartridges – Ink Refilling is Easy, but be careful ! HP 564 & 564XL Ink Cartridges – Ink Refilling is Easy, but be careful ! HP 920 & 920XL Ink Cartridges – Ink Refilling is Easy, but be careful ! HP 940 & 940XL Ink Cartridges – Ink Refilling is Easy, but be careful ! HP 932, 933, 932XL & 933XL Ink Cartridges -Ink Refilling is Easy, but be careful ! HP 950, 951, 950XL & 951XL Ink Cartridges -Ink Refilling is Easy, but be careful ! Epson T068 Ink Cartridges -Ink Refilling is Easy, but be careful ! Epson T069 Ink Cartridges -Ink Refilling is Easy, but be careful ! Epson T077 Ink Cartridges -Ink Refilling is Easy, but be careful ! Epson T078 Ink Cartridges -Ink Refilling is Easy, but be careful ! Epson T088 Ink Cartridges -Ink Refilling is Easy, but be careful ! Epson T098 & T099 Ink Cartridges -Ink Refilling is Easy, but be careful ! Epson T098 & T097 Ink Cartridges -Ink Refilling is Easy, but be careful ! Epson T099 & T098 Ink Cartridges -Ink Refilling is Easy, but be careful ! Epson T124 Ink Cartridges -Ink Refilling is Easy, but be careful ! Epson T126 Ink Cartridges -Ink Refilling is Easy, but be careful ! Canon CLI-8 & PGI-5 Ink Cartridges -Ink Refilling is Easy, but be careful ! Canon BCI-6 Ink Cartridges - Ink Refilling is Easy, but be careful ! Canon CLI-221 & PGI-220 Ink Cartridges -Ink Refilling is Easy, but be careful ! Canon CLI-226 & PGI-225 Ink Cartridges -Ink Refilling is Easy, but be careful !
Description: http://www.inkjet411.com http://www.ca.inkjet411.com -- Refilling your inkjet ink
cartridges is easier than ever…just let someone else do the work while you’re shopping at your favorite
retailer. Contact us at http://www.inkjet411.com to find your nearest North American refill center
location and you’ll save around 50% on ink costs, on average, vs. buying a new ink cartridge.

227
If you have never refilled your cartridges before, the process is simple and usually takes less an hour. In
addition to the money savings and it is good for the environment since you get to reuse your ink
cartridge over and over.
As America’s #1 alternative ink refill source give us a try and we’re sure you’ll be pleased as our ink
quality rivals that of the original manufacturer. The highly trained in-store refill operators use
commercial grade ink refilling equipment that preps, evacuates, cleans and then fills your cartridge
automatically. Typically, cartridges are refilled with up to 20% more ink versus what the printer
manufacturer puts inside.
CAUTION: for those of you who have ever thought about, or are currently refilling your ink cartridges via
one of those Do-It-Yourself refill kits, please desist and stop the pain! Similar to the days of changing
your own oil, it’s just not worth it, plus you don’t get the retailers money-back guarantee if it doesn’t
work. The best solution is to visit any of the North American ink refill centers and let a trained operator
do the work while you shop.
With printer manufacturers making ink cartridges more and more sophisticated these days, should you
try and do-it-yourself, you will need to ensure that a proper ink fill occurs to avoid issues like cross-
contamination between colors, cartridge bleed, and the inevitable streaking or white lines in printed
output. The hassle associated with manual ink refilling and potential permanent micro-electric damage
to your printer’s PRINTHEAD just don’t add up for the marginal cost savings that you may think you’re
getting.
This is also true for most compatible cartridges which come from China – ink compatibility and
subsequent printer reliability of such cartridges is considered somewhat questionable. Print quality and
longevity are generally substandard due to the unknown chemical compounds…why put your printer at
unnecessary risk?
All of our inks are made in America and have been tested for 100% compatibility with your printer
model. They do NOT contain any dangerous volatile organic compounds (…that’s the bad stuff that can
be harmful to the environment and your health).

228
It is recommended to only refill manufacturer’s genuine ink cartridges (versus compatibles or
remanufactured cartridges) – look for references to GENUINE or ORIGINAL on ink packaging along with
manufacturer’s trademark logo.
For more information on North American ink refill services at a major retailer located near you (and
should you wish to save around 50% on ink costs and support the environment) or if you are seeking
advanced printer problem resolutions, please visit http://www.inkjet411.com
Tags HP 564: HP, printer, ink, cartridge, tank, color, black, cyan, magenta, yellow, refill, 564, 564, 564XL,
Deskjet, e-AiO, Photosmart, Plus, Touchsmart, refilled, C5300, C5324, C5370, C5373, C5380, C5383,
C5388, C5390, C5393, C6300, C6324, C6340, C6350, C6375, C6380, C6383, C6388, B8550, D5400, D5445,
D5460, D5463, D5468, D7560, B8550, B8553, B8558, 5510, 5511, 5512, 5514, 5515, 6510, 6512, 6515,
7510, 7515, Premium, C309c, C309a, C309n, C310a, C310b, C310c, C410a, 3520, 3521, 3522, 4620, 5520,
5522, 5524, 5525, 6520, 7520, 7525, C510, eStation, B209a, B210a, B210b, B210c, B210d, B210e,
printhead, problem, issue, error, compatible, refilling, color balance, issues, problems, missing color,
photo black
Tags HP 920: HP, printer, ink, cartridge, color, black, cyan, magenta, yellow, refill, 920, 920XL, All in
One, Plus, refilled, Officejet, 6000, 6500, 6500A, 7000, 7500A, Inkjet411, blank page, quality, no colors,
poor, missing, failed, replace, printhead, problem, issue, error, color balance, problems, missing colors,
no printing, Inkjet411.com, Inkjet411, troubleshooting, failed, failure, bad, image, quality, compatible,
remanufactured, refilling,
Tags HP 88: HP, printer, ink, cartridge, color, black, cyan, magenta, yellow, refill, 88, 88XL, Officejet,
Pro, L7480, L7000, L7400, L7500, L7550, L7555, L7580, L7590, L7600, L7650, L7680, L7700 Series, L7750,
L7780, K5400, K5400 dn, K5400 dtn, K5400 tn, K550, K550 dtn, K550 Dtwn, K8600, K8600 dn, K8600 dtn,
K8600, Inkjet411, blank page, quality, no colors, poor, missing, failed, replace, printhead, problem, issue,
error, color balance, problems, missing colors, no printing, Inkjet411, troubleshooting, failed, failure,
bad, image, quality, compatible, remanufactured, refilling,
Tags HP 940: HP, printer, ink, cartridge, color, black, cyan, magenta, yellow, refill, 940, 940XL, Officejet,
Pro, 8500, 8500 Plus e, A910g, 8500 Premier, A909n, 8500 Premium, A910n, 8500, Wireless, A909g,
8500A e, A910, HP Inkjet Printers, OfficeJet 8000 Enterprise, A811a, 8000, 8000 Wireless, Inkjet411,
blank page, quality, no colors, poor, missing, failed, replace, printhead, problem, issue, error, color
balance, problems, missing colors, no printing, Inkjet411, troubleshooting, failed, failure, bad, image,
quality, compatible, remanufactured, refilling,
Tags HP 932/933/950/951: HP, printer, ink, cartridge, tank, Officejet, Officejet Pro, 8100, 6100, 8600,
8700, Premium, 6600, 6700, color, black, cyan, magenta, yellow, refill, XL, 932, 933, 950, 951, 932XL,
933XL, 950XL, 951XL, refilled, Inkjet411, help, support, how to, printhead, problem, issue, error, Costco,

229
Frys, ASDA, refilling, reset, method, swap, non-chipped, Pro, 276dw, MFP, 8600 e-All-In-One, N911g,
8600 Plus, N911n, 8600 Premium, N911a, PRO, 251dw, 8100 ePrinter, N811a, e-All-in-One, H711a, 6600
e-All-in-One, H711g, 6700 Premium, e-AiO, H711n, OfficeJet 6100, ePrinter, H611a, OfficeJet 7110,
ePrinter, H812a
Tags Epson T068: Epson, printer, T068, T068120, T068220, T068320, T068420, ink, cartridge, tank,
color, black, cyan, magenta, yellow, refill, refilled, Stylus, NX400, WorkForce, 500, 600, C120, CX5000,
CX6000, CX7000, CX7000F, CX8400, CX9400, CX9400Fax, CX9475Fax, NX510, NX515, 1100, 30, 310, 315,
40, 610, 615, Inkjet411, help, support, printhead, problem, issue, error, Costco, Frys, ASDA, refilling,
reset, compatible, compatibles, remanufactured
Tags Epson T069: Epson, printer, T069120, T069220, T069320, T069420, T069520, ink, cartridge, tank,
color, black, cyan, magenta, yellow, refill, refilled, Stylus, CX5000, CX6000, CX7000F, CX7400, CX7450,
CX8400, CX9400F, CX9475F, NX100, NX105, NX110, NX115, NX200, NX215, NX300, NX305, NX400,
NX410, NX415, NX510, NX515, WorkForce, 310, 315, 500, 600, 610, 615, N11, 30, 40, Wide Format,
1100, Inkjet411, help, support, printhead, problem, issue, error, Costco, Frys, ASDA, refilling, reset,
Tags Epson T077: Epson, T077, printer, ink, cartridge, tank, color, black, cyan, magenta, yellow, refill,
refilled, T077120, T077220, T077320, T077420, Inkjet411, Artisan 50, Stylus, Photo, R260, R280, R380,
RX580, RX595, RX680, help, support, printhead, problem, issue, error, Costco, Frys, ASDA, refilling, reset,
compatible, compatibles, remanufactured
Tags Epson T078: Epson, T078, printer, ink, cartridge, tank, color, black, cyan, magenta, yellow, refill,
refilled, T078120, T078220, T0782, T078320, T0783, T078420, T0784 , Inkjet411, Stylus, Photo, RX580,
RX595, RX680, Artisan, 50, R260, R280, R380, help, support, printhead, problem, issue, error, Costco,
Frys, ASDA, refilling, reset, compatible, compatibles, remanufactured
Tags Epson T097/T098: Epson, T097, T098 printer, ink, cartridge, tank, color, black, cyan, magenta,
yellow, refill, refilled, WorkForce, 600, Stylus, NX510, NX515, WorkForce 40, 610, 615 , help, support,
printhead, problem, issue, error, Costco, Frys, ASDA, refilling, reset, compatible, compatibles,
remanufactured
Tags Epson T098/T099: Epson, T098, T099 printer, ink, cartridge, tank, color, black, cyan, magenta,
yellow, refill, refilled, , T098120, T0981, T099220, T0992, T099320, T0993, T099420, T0994, Inkjet411,
Artisan, 700, 710, 725, 730, 800, 810, 835, 837 help, support, printhead, problem, issue, error, Costco,
Frys, ASDA, refilling, reset, compatible, compatibles, remanufactured

230
Tags Epson T124s: Epson, T124, ink, printer, T124120, T124220, T124320, T124420, T124520, inks,
cartridge, tank, color, black, cyan, magenta, yellow, refill, refilled, Epson All-in-One, Stylus, NX125,
NX127, NX230, NX330, NX420, NX430, WorkForce, 320, 323, 325, 435, Inkjet411, help, support,
printhead, problem, issue, error, Costco, Frys, ASDA, refilling, reset, compatible, compatibles,
remanufactured
Tags Epson T126s: Epson, T126, ink, printer, T126120, T126220, T126320, T126420, T126520, inks, cartridge, tank,
color, black, cyan, magenta, yellow, refill, refilled, Epson All-in-One, Stylus, NX330, NX430, WorkForce 435, WorkForce
520, WorkForce 545, WorkForce 630, WorkForce 633, WorkForce 635, WorkForce 645, WorkForce 840, WorkForce
845, Workforce WF-3520, Workforce WF-3540, WorkForce 60, Wide Format, Workforce WF-7010, Workforce WF-
7510, Workforce WF-7520, Inkjet411, help, support, printhead, problem, issue, error, Costco, Frys, ASDA, refilling, reset,
compatible, compatibles, remanufactured,
Tags HP02s: HP, Photosmart, HP02, 02, 02XL, cartridge, HP363, refill, color, black, poor, quality, nozzles,
3110, 3210, 3210 xi, 3310, 3310 xi, C5140, C5150, C5180, C6100, C6150, C6180, C6240, C6250, C6280, C6283, C6288,
C7150, C7180, C7250, C7275, C7280, C7283, C7288, C8150, C8180, C8183, PSC 7280, D6160, D7145, D7155,
D7160, D7260, D7345, D7355, D7360, D7460, inkjet, printer, compatible, blinking, light, lamp, indicator,
blinking, lights, Problem, unrecognized, no printing, not printing, ink refill, refill, troubleshooting, no
printing, printer ink, refiller, help, errors, messages, ink, cartridges, error, failure, poor color, bad,
cartridge, Costco, Frys, Inkjet411, printhead
Tags Canon CLI-8 & PGI-5: Canon, CLI-8, 8, PGI-5, 5, ink, ink cartridge, cyan, magenta, black, yellow,
photo black, CLI-8 Black, Color Ink Cartridges, 0620B015, reset, problem, refill, color balance, Costco,
Frys, CLI-8BK, 0620B002, PGI-5, 0628B002, CLI-8C, 0621B002, CLI-8M, 0622B002, CLI-8Y, 0623B002,
MP500, MP510, MP520, MP530, MP600, MP610, MP800, MP800R, MP810, MP830, MP950, MP960,
MP970, MX700, MX850, ix4000, ix5000, Pro9000, Pixus, MP500, MP510, MP600, MP770, MP790,
MP800, MP810, MP830, MP900, MP950, MP960, iP3300, iP3500, iP4200, iP4300, iP4500, iP5200,
iP5200R, iP5300, MP81,
Tags Canon BCI-6: Canon, BJC, BCI, 6, 6BK, ink, ink cartridge, cyan, magenta, black, yellow, 8200,
Bubble Jet, Printer, i900D, InkJet, i950, i960, i9900, PIXMA, iP8500, S800, S820, S820D, S830D, S900,
S9000, 4706A003, 4705A003, 4707A003, 4708A003, reset, problem, error, refill, issue, color balance,
Costco, Frys, compatible, remanufactured, refill, refill problem, inkjet411,
Tags Canon CLI-221 & PGI-220: Canon, CLI-221, 8, PGI-220, 220BK, 220, 221, color, cartridge,
cartucho, ink, ink cartridge, cyan, magenta, black, yellow, photo black, CLI-8 Black, Color Ink Cartridges,
PIXMA, MP560, MP620, MP640, MP980, MP990, MX860, MX870, Photo Printer, iP3600, iP4600, iP4700,
MP620, MP980, MP990, reset, problem, refill, color balance, Costco, Frys, compatible, remanufactured

231
Tags Canon CLI-226 & PGI-225: Canon, CLI-226, 8, PGI-225, 226, color, 225BK, 225, cartridge,
cartucho, ink, ink cartridge, cyan, magenta, black, yellow, photo black, CLI-8 Black, Color Ink Cartridges,
PIXMA, MG5120, MG5220, MG5320, MG6120, MG6220, MG8120, MG8220, MX712, MX882, MX892,
Photo Printers, iP4820, ix6520, MG5120, MG5220, MG5320, MG6120, MG6220, MG8120, MG8220,
MX882, Wide Format, iX6520, reset, problem, refill, color balance, Costco, Frys, compatible,
remanufactured