Airstream Manual 1978
98
Transcript of Airstream Manual 1978


Insurance
The Exclusive Caravanner Travel Trailer Insurance Plan · A complete comprehensive policy, including these five big bonus benefits at no additional cost: • Collision coverage (low deductible) • Theft coverage against personal effects • Personal effects coverage against damage or loss by collision,
etc. • Vacation expense allowance • Mexico travel coverage (90 days) And, there are no other deductiblesl
Already over 25,000 Airstream owners are benefiting from this program. Fast, efficient claim service, coast to coast. Underwritten hy Central National Insurance Company of Omaha, with assets of over $60 million. This program also includes complete protection against these losses: fire, lightning, explosion, windstorm, hai l, landslide, flood, all accessories, vandalism, and many more peri ls commonly insured by comprehensive coverage.
The New Airstream Owner's Association Accident Insurance Program A big bonus benefit avai lable only to Airstream owners.
This program includes 24-hour protection for accidental death or dismemberment-anywhere in the world, on or off the job; on business, on vacation-or at home PLUS 2Y2 times the benefits whi le on a trip with your Airstream.
No medical statement is required and you will not be bothered by a physical examination or investigation. But you must be an Airstream owner, und~r age 70. There are 4 specialized plans from which to choose. Here's all example of benefits:
Plan B-1 (Whi le at home) Plan offers the owner and spouse full 24-hour prot~tion against accidents anywhere in the world, whether on or off the job, on business, pleasure, o r vacation. This plan pays $20,000 and $10,000 to owner and spouse respectively in event of accidental death or dismemberment, and $14.00 a day for up to 365 days while in the hospital.
Plan B-1 (While on a trip with an Airstream) Benefits are payable if the accident occurs when the insured is away from his permanent address while on a trip with his Airstream Travel Trailer. Coverage is provided 24-hours a day for all types of accidents during a trip. At this time the accidental death benef it would Increase to $50,000 and $25,000 respectively. The dai ly in-hospital allowance would increase to $35.00 a day for up to 365 days. The annual premium for plan B-1 is only $89.
For fast efficient service and answers to your specific questions, ca ll TOLL FREE 800-423-4403.
Travel carefree. Fi ll out and mai l the following request card today!
Please rush information on these exclusive Airstream moneysaving programs:
0 Caravanner Travel Trailer Insurance Plan
0 Airstream Owner's Association Accident Insurance Program
Name __________________________________________ __
Address ________________________________ ~-------
City ________ State ________________ Zip ______ _

Business Reply Mail No postage necessary if mailed in the United States
Postage will be paid by
Caravanner Insurance, Inc. P.O. Box 54855 Los Angeles , CA 90054
First Class Permit No. 44397 lo• An~t<>l<·s. CA
'

t.,· 1978 Excella Service Manual For most owners, this Owner's Manual provides the answers for normal use and maintenance of an Excella. But some owners who are mechanically inc lined want detailed informat ion on all systems and equipment and basic construction of an Excella. For these people we have made available a smaller, more convenient sized copy of the same Service Manual provided to our Certified Service Centers. The Excella Service Manual includes il lustrated parts lists, procedures for maintenance and adjustments, service operations, removal and installation for components, includi ng options for all Excella models.
The 1978 Excel la Service Manual wi ll be avai lable in December, 1978.
To receive your copy, fill in the order form below and mail to:
Airstream, Inc. Jackson Center, Ohio 45334 or
Airstream, Inc. 15939 Piuma Avenue Cerritos, Cal ifornia 90701
1000 Mile Check ~utlllafjizatian Card This card entitles you, under the exclusive Airstream Certified performance checkout program, to a 1000 mi le (or 60 day ... whichever comes sooner) Performance Check of your A irstream travel trailer.
In the event you are traveling or moving, this service may be performed by any franchised Airstream dealer in the United States or Canada but, of course it is recommended that the check-up be performed by your sell ing dealer because of his logical interest in you as his customer.
We would suggest that you make an appointment with your dealer in advance of your arrival or inspection date.

1978 Excella 500 Owner's Manual

Introduction
An Airstream travel trailer offers you excellence in travel luxury and mobility. This owner's manual is your key to carefree travel fun. It contains information necessary to avoid problems. Consult it when you have a question about your new Airstream. It has been designed to aid you in knowing your tra iler better. All information, i llustrations and specifications contained in this l iterature are based on the latest product information available at the time of publication approval. The right is reserved to make changes at any time without notice. Should you trade or sell your Airstream, please leave the manual w ith the trailer. Go Airstream and make th is your year for carefree vacations.
. Note: If and when new materials and production techniques are developed which can improve the quality of its product or material substitutions are necessary due to availability, Airstream reserves the right to make such changes.

Contents Wally Byam Caravans and Clubs .... .. 2 Airstream limited Warranty .. . . . .. . .. 4 Warranty and Service . ...... .. . . . .... 5 Explanation of Airstream
limited Warranty .. . ........... . ... 6 Service Centers ..................... 8 Wally Byam Stores ...... ....... : ..... 13 Tow Car Equipment ................. 14 Brakes .............................. 15 Loading .......... . ................. 18 Tires ................. . .... .. . . . . . . . 26 Hitching Up . . . . . . . . ...... .......... 27 Towing Tips .......... ............... 30 Overnight Stop . . · . . . . . . . ... . . . ...... 33 Extended Stay ...... . ................ 34 Winter Airstreaming . ................ 36 Storage and Winterizing ........... .. 37 Exterior ............................. 40 Floor Plans .. ....... ....... . . . . . .... .42 Interior ......... . ............ . ... . . . 46 l.P.G. System . . . . . . .... .. . . .. . . . . . .. 56 Refrigerator .... . .. . .... .. . ..... . ... .58 Microwave Oven ........... . . . . . .... 60 Range and Oven .. . ...... . . . . . ...... 61 Furnace ............................ 63 Water Heater ....................... 65 Water System ......... . . . .... .. ..... 66 Drain and Waste System ........... . . 69 Electrical System .................... 72 Battery ........... . ................ . 74 Electrical Outlet locations ......... .. 76 Electrical Wiring Diagrams . . ...... .. . 77 Electrical Trouble Shooting .. ..... . ... 85 Specifications ...... . ..... . .......... 86 Pre-Travel Check list . . . . . . ... ..... .. 88 l ubrication arid Maintenance ......... 90 Maintenance Record ....... . ........ . 91 Index ............................... 92

•
Wally Byam Caravans, Rallies and Clubs
When you bought your Airstream , you bo ught a whole new way of life. Airstream owners enjoy endless opportunities for friendship, fun and adventure, You may join every Airstream Wally Byam Caravan and Airstream Company Rally, we arrange fo r such rallies to various areas each year. You also become eligible to jo in the Wall y Byam Caravan Club International, the largest single make trailer cl ub iri the wo rld. The WBCCI is made up of 26,500 fami ly memberships and 166 1ocal chapters or units throughout the United States, Canada and Mexico . They meet at monthly ralli es, or where weather conditions prevent year round ral lies, Caravanners come together for pot luck dinners to plan events for the good seasons.
Since the first Wally Byam Caravan in 1951, 115 Airstream Caravans have gone to most parts of the world . Caravans to Canada and Mexico are now so popular that there are several each year . Many a li felong friendship was started on these trips. Old-timers and new owners share experiences and find a new kind of fellowship, and there is no better way to learn to use you r Airstream. Caravanners enjoy many advantages : th e security of traveling in a group, planned entertainment and exceptional sightseeing o pportunities. The prestige and good wi ll established over many years by our Caravans adds further benefit to Caravanner membership.
2
The " Caravanner" is the Airstream publication and the "Blue Beret" is the official Caravan Club publication. The " Caravanner" is for general d istribution to owners and prospective buyers, while the monthly " Blue Beret" is fo r WBCCI members only.
Several months befo re a Caravan rolls, the " Caravanner" and the " Bl ue Beret " publish a description and a registration coupon. Everyone who regi sters receives a detai led bulletin with complete info rmation on the caravan . When goi ng abroad, all officia l matters such as insurance, tourist cards and border crossing fo rmalities are handled fo r you by the Caravan staff . O n every Airstream Caravan , the route is carefull y planned, and a day by day itinerary, including mail stops, is given to all
Caravanners in advance. Our staff also makes all the arrangements for parking, entertainment, tours, etc. well ahead of the starting date. Airstream Caravan Programs always take caravanners of all ages into account. Airstream provides the Caravan Staff : a leader, a recreation advisor, a service representative and an advance representati ve . This staff is backed by committees composed o f interested Caravan members who ass ist in the day-to-day operations.
Wally Byam, pioneer trailer traveler, and founder of the Airstream Company, was born on July Fourth and the first International Rally was in the form of a huge birthday party fo r him at Bull Shoals, Arkansas. It was patterned after the International Rall ies in Europe which Wally and his wife Stella had attended

fo r many years. Everyone enjoyed this first big rally so much that the club decided to make it an annual event. Since then, International Rallies have grown and grown . Some 3949 Airstream Travel Trailer families recently gathered at Bozeman, Mont. , for the 1977 International Rally.
Only Airstream Wally Byam Caravanners and WBCCI members are entitled to have an official Trailer Number and be listed in the 1979 Annual Directory. This directory contains a schedule of al l majo r WBCCI activities and Airstream Wally Byam Caravans and Rallies for the year. It also lists such things as Freewheelers Club membership, C. B. Radio and Amateur Radio Club memberships and ca ll signs, members who offer courtesy parking, and a
complete list of Autho rized Service Centers.
Along with the fun, Airstream owners recognize the need fo r better legislat ion, more and better overnight parking facilities , mo re sanitary stations and other travel conveniences.
They are alert to adverse bil ls governing travel trailers and have achieved much through the actions of thestrong WBCCI National legislative Committee.
The Way of life Department, of the Airstream Company dedicates its full time staff to improving the owners' fun and makes use of all the information and experience gained by owners over the years to help develop even better
Airstreams and Way of Life programs fo r the enjoyment of all Airstream owners.
Become part of the Airstream Way of life. Join our WBCCI activities and we believe you will enrich your life. Owners join through a local unit of WBCCI. All operate autonomously, elect their own officers and fix their own dues. Annual International dues are paid with the unit dues at the time of application. These are at present : International dues, $7.50 per trailer and unit does from $1 to $10. If you are interested, please write to the following address for information regarding units in your area:
WBCCI Headquarters Office 15939 Piuma Avenue Cerritos, California 90701
3
4
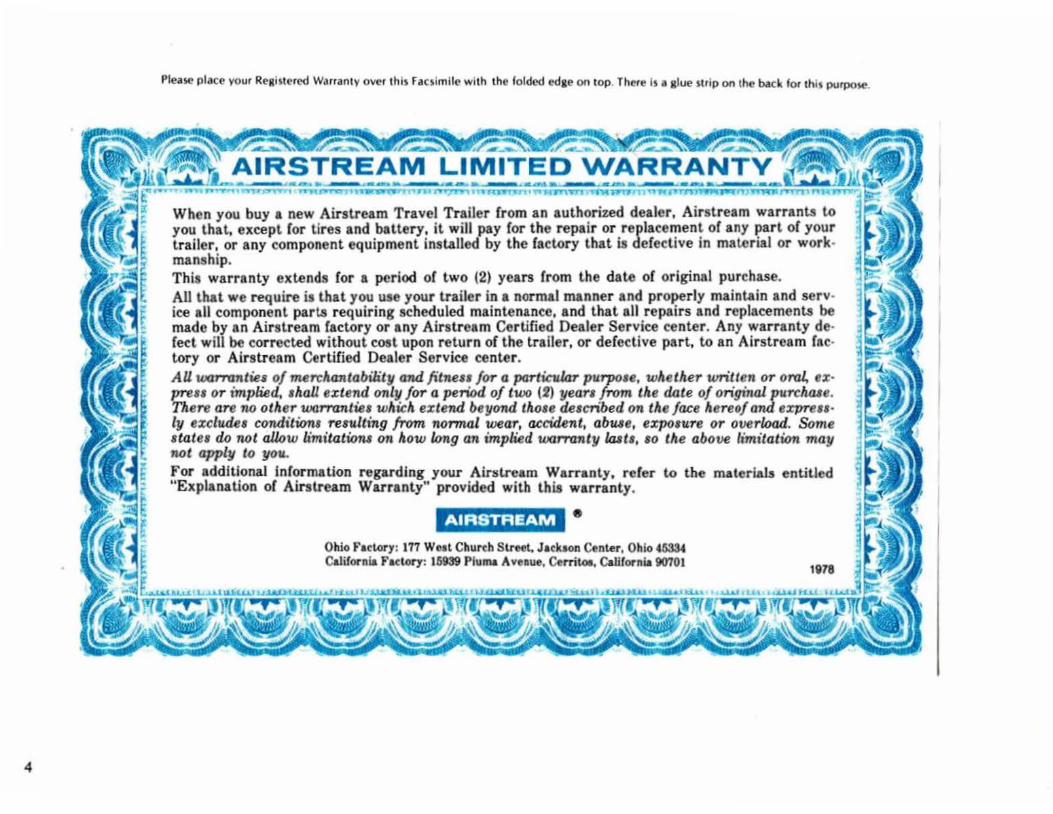
Please place yo ur ReKhtered Warranty over this Facsimile with the folded t.>dge oo top. ThNe is a glue strip on the back for this purpose.
When you buy a new Airstream Travel Trailer from an authorized dealer, Airstream warrants to you that, except for tires and battery, it will pay for the repair or replacement of any part of your t railer, or any component equipment installed by the factory that is defective in material or work· manship. This warranty extends for a period of two (2) years from the date of original purchase. All that we require is that you uJe your trailer in a normal manner and properly maintain and serv· ice all component part.s requiring scheduled maintenance, and that all repairs and replacements be made by an Airstream factory or any Airstream Certified Dealer Service center. Any warranty de· feet will be corrected without cost upon return of the trailer, or defective part, to an Airstream fac· tory or Airstream Certified Dealer Service center. AU wam~ntiu of merclumtability and fitneufor a partU:ular purpo1e, whether written or oral, ex· pre11 or implied~ 1haU extend only for a peribd of two (2) year• from the date of original purcha4e. There are no other WCmJ1ltiel which extefld beyond thou de1cribed on the face hereof and e:cprell· ly excludes condition• resulting from mrmal wear, accide11t, abuse, expo~Ure or overload. Some state• do not allow limitatiom on how long an implied wam~nty la8t1, so the above limitation may not apply to you.. For addit.ional information regarding your Airstream Warranty, rerer to the materials entitled "Explanation of Airstream Warranty" provided with this warranty .
AIRSTREAM • Ohio Fa~t.ory : 177 West Church Str~t, Jaeklon Center , Ohio 46334 California Factory: 16939 Pluma Avenue, Cerritoe, California 90701
1878

Warranty and Service
Airstream offers the most complete and explicit warranty in the industry. Your va luable warranty covers every item in your trailer (except tires and battery) against failures result ing from defects in either material or workmanship for two years from date of original purchase.
~lease read the facsimile warranty carefully. As soon as the factory has received your signed check-out and acceptance sheet, a formal warranty is i ssued to you, together with an owner's identification card. As soon as you receive your warranty, please attach it over the facsimi le for safekeeping. In order to qualify for service without charge under the Airstream Warranty Program, your owner's identification card or authorization for Interim Warranty must be presented to the service representative.
The Airstream Certified Performance Checkout, or C.P.C., is an exclusive Airstream program. Before leaving the factory, each arid every vital part of an Airstream is tested for performance. Each test is signed and certi fied by an inspector. After the Airstream arrives on your dealer's lot, all of these vital parts and systems are again tested. When you take delivery of your new Ai rstream, a factory trained tra iler expert personally gives you a complete check-out on the trailer.
C. P.C. does not stop here. After you have traveled wi th your Airstream for 1000 miles (or 60 days, whichever comes first)
you can make an appointment with any one of the 156 Ai rst ream dealers or service centers for still another check-out o f your trailer. At that time, a.,specified l ist of performance checks on your trai ler equipment will be conducted and any deficiencies you have experienced since taking del ivery will be corrected. Give the C. P.C. card overleaf to the dealer when you take your Airstream for the 1000 mile check.
Please contact your dealer if you need service. Major service under your Airstream Warranty is available through our nationwide network of factory trained specia l ists at Airstream Certified Dealer Service Centers listed on pages 8-12 of this manual. All centers operate on an appointment basis for the utmost efficiency. When you require service from the Airstream factory o r a certified service center, please contact the service manager for an appointment, and ki nd ly inform him if you are unable to keep the appointment date or wish to change it.
Airstream factory service may be arranged by con tacting the service manager at:
Airstream · 15939 Piuma Avenue Cerritos, California 90701 (213) 860-4411
Airstream Jackson Center, Ohio 45334 (513) 596-6111
5

Explanation of Airstream Limited Warranty
The Airstream Limited Warranty applies for a period of two (2) years from the date of original purchase, and the applicable date of all warranties is that indicated on the owner's I. D. card. (Owner's identi fication.) Warranty defects (except tires and battery) wi l l be corrected without cost upon the return at the owner's expense of the trailer or defective part to any Airstream factory, Airstream Certified Dealer Service Center, o r participating Argosy Certified Dealer Service center.
The Airstream axle is manufactured to a tolerance of 1° camber and Ya" toe-in. These tolerances will only change if the trailer is subjected to abuse, such as dropping off a sharp berm, striking a curb, or hitting a deep hole in the road. Such damage would be considered as resulting from an accident which risks are not covered under the warranty. Abnormal tire wear and/or wheel al ignment resul ting from such damage is not covered under the terms of the warranty.
The ti re and battery warranties will be handled by their respective service points and according to their written policy.
Caution: Your Airstream is equipped with the all new Excella-Vac brake system which for the first time brings all of the advantages of full disc braking to travel trailers. It is extremely important to note, however, that Excella-Vac uses an entirely different system-·for -
6
controlling brake operation. It is not compatible in any way with the old electric brake control system. If you do not use the control system designed for use with the Excella-Vac disc bral(es, the terms of your Airstream Limited warranty will be voided with respect to any damages incurred as a result of the use of a noncompatible system. In addition, many advantages of the exclusive Airstream disc brakes will be lost if the Excella-Vac control system is not used.
Inasmuch as this warranty covers defective material and/or workmanship, adjustments and checking are excluded. All adjustments are made at the factory prior to shipment, and rechecked by the dealer prior to del ivcry to the customer. An additional check-up, including adjustments, is given at the 1,000 mile or 60 day inspection. Adjustments thereafter become a customer responsibility.
Each Airstream exterior (not including the underside) is sprayed with a plasticoating material to prevent oxidation. This application is covered by the two year warranty against peeling. Prolonged exposure to salt air or industrial fall -out wi ll permit penetration through the coat ing material, causing damage to the exterior metal. Since Airstream has no control over these conditions, it is necessary for the owner to wash his trailer as instructed in the Owner's Manual.
Damage to enameled or porcelain
surfaces resulting from abrasion or blows is the resu lt of accident or abuse, and is not covered by warranty. Window glass breakage, and what is termed by the automotive industry as " mysterious explosions," although not covered under this limited warranty, is covered by the comprehensive clause of most insurance policies.
This l imited warranty does not include failure caused by accident, abuse, normal wear, overload, or any cause not attributable to a defect in original material or workmanship of the trailer or component equipment as installed by the factory.
Exclusions: 1 . Normal Wear.
Items such as tires, water heater flints, water purifier packs, curtains, upholstery, floor coverings, window, door and vent seals will show wear or may even wear out within the two year warranty period depending upon the amount of usage, weather, and atmospheric conditions.
2. Accident. We can all recognize damage caused by accident because it is visible, and we strongly urge our dealers and customers to inspect the trailer upon receipt of delivery for any damage caused by accident while being delivered to the dealer, or while it is on the dealer's lot. Damage of this nature becomes the dealer's or customer's responsibility upon acceptance of

1.
delivery, unless Airstream is notified and the damage is verified by the person making the del ivery.
3. Abuse. Lack of customer care and/or improper maintenance will result in early failure for which Airstream cannot be held responsible.
4. Exposure. Not unlike a car, the steel parts of a trailer can and will rust if subjected to prolonged exposure to moisture, salt air, or corrosive air-borne pollutants without repainting. Aluminum oxidizes when unprotected under similar conditions, and refinery chemicals of a sulfurous nature are harmful to finishes if not washed off periodically. Extremely hot or direct sunlight will deteriorate rubber and fade curtains and upholstery. Conditions of this nature, although they may be normal for the area, are beyond Airstream's control and become the responsibility of the owner.
One other type of exposure is that resulting from an accident, rain or plumbing leak. Although it is our obligation to correct a rain or plumbing leak within the terms of the limited warranty, it is the owner's responsibility to use reasonable, prudent care to minimize foreseeable secondary damage, such as a delaminated floor, stained upholstery, carpeting, drapes, etc.
5. Overload. Damage due to loading, either beyond capacity or to cause improper towing because of improper balance, is beyond Airstream's responsibility. The Airstream trailer is engineered to properly handle the gross vehicle load rating on the certification label. Load distribution has a definite effect upon the towing characteristics and attitudes of the trailer. Level hitch installations are a necessity, and very important on a tandem axle trailer. There are limits to the amount of load that can be safely transported depending upon speed and road conditions, and reasonable cause to believe these factors have been exceeded could void the Airstream warranty. For additional information on the loading of your trailer, consult your Owners Manual or gross vehicle weight rating plate.
Airstream will not be responsible for any consequential damages incurred as a result of any warranty defect. Consequential damages include, but are not limited to, travel expenses, gasol ine, oi l, lodging, meals, telephone tolls, loss of work and loss of use of the trailer.
In the event of a warranty defect, the warranty holder should take corrective action to lessen the damages which might result from such defect. Airstream will not be responsible for resulting damages which could have been avoided.
The full extent of Airstream's warranty is set forth in the "Airstream's Limited Warranty" and this " Explanation of Airstream Warranty." Ai rstream wi II not be responsible for additional representations or implied warranties made by any of its dealers to the ex tent those representations are not a part of, or are contrary to, the terms and conditions of the Airstream Limited Warranty and Explanation of Limited Warranty.
If you believe your trailer needs repairs under the terms of the Airstream Limited Warranty, you should contact the Service Manager at any Airstream factory. Airstream Certified Dealer Service center or participating Argosy Certified Dealer Service center . The trailer or defective part must be returned to a facto ry or authorized service center at the owner's expense.
This limited warranty is transferrable to subsequent owners for the duration of the warranty period. Warranty transfer application forms are available from your dealer or any Airstream factory.
7

Factory Authorized Certified Service Centers
Alabama Alabama Auto Carriage Inc. 2359 West Fairview P.O. Box 2763 Montgo mery, Alabama' 36105 205-262-3563 or 262·3564
R & S Camper S.1les 2405 Jordan Lane Huntsville, Alabama 35806 205-837-5241
Arkansas Fred and Jack Trailer Sales 10318 New Benton Highway l-30 West Li ttle Rock, Arkansas 72209 501 -565-0131
Arizona Robert Crist & Company 2025 East Main Street Mesa, Arizona 85203 602-834-9410
Robert Crist & Company 8833 North Black Canyon Hwy. Phoenix, Arizo na 85021 602-944-2288
O'Rielly RV Center, Inc. 4780 E. 22nd Street Tucson, Arizona 85711 602-748-1414
California Adventure Recreational Vehicles 5610 S. Union Avenue Bakersfield, California 93307 605-831-5451
Caswell's Vacation Vehicles 700 East Footh ill Boulevard Po mona, California 91767 213-331-0163
Coastline Trailer Sales 303 North Ventura Avenue Ventura, California 93001 605-648-1772
Haller Trailer Sales 15711 South l a ke wood Boulevard Paramount, California 90723 213-&34-3553
Holiday Trailer Sales 770 Easr Baseline San Bernardino, California 92410 714-889-8918
Manteca Trailer Sales 9862 E. Yosemite Avenue Manteca, Califo rnia 95336 209-239-1267
Murray's RV Center 1201 E. Washington Escondido, California 92025 714-743-2422
Nelson's RV Enterprises, Inc. 28001 Mission Boulevard Hayward, Califo rnia 94544 41 5-582-9433
Pulmobile Trailer Sales 4563 San Fernando Road Glendale, California 91204 213-241-0310 or 245-6068
Ralph's Trailer Sales and Supply 1025 East Main El Cajon , Califo rnia 92021 714-442-4435
Santa Rosa Airstream 3534 Santa Rosa Avenue Santa Rosa, California 95401 707-525-8330
Toscano Recreation Center 617 W . Pachec() Boulevard Los Banos, California 93635 209-826·4923
Valley Trailer Sa'les, Inc. '1650 El Camino Avenue Sacra me nto, California 95815 916-929-2200
Valley Motors Camper/and 2370 S. Broadway · Santa Maria, California 93454 805-925-8617
Colorado Chisman Trailer Sales 2500 East Boulder Street Colorado Springs, Colorado 80909 303-473-7043
Trailer/and 8200 W. Colfax Avenue Denver, Colorado 80521 303-237-9591
Trailer/and 25'15 E. Mulberry Street Ft. Collins, Colorado 80215 303-493-3676
Connecticut A-7 Trailer and Motorhome Sales Route 66 & Jackson Hill Road Middlefield, Connecticut 06455 203-344-0338 or 344-0339
Camperama, Inc. Mill Plain, Rourte 6, Btw. Exil 1 & 3, 1·84 Danbury, Connecticut 06810 203·743-2726
Delaware Marty's Travel Trailers, Inc. 2343 South DuPont Highway Dover, Delaware 19901 302-697-3173
Florida General R. V. 5610 Okeechobee Road . West Palm Beach , Florida 33406 305-686-3707
Airstreams by General 1881 St. Rd . 84 Ft. lauderdale, Florida 33315 305-525-3374
Bell's Trailer Park and Sales, Inc. 6401 W . Tennessee St. Hwy 90W Tallahassee, Florida 32304 904-576-2915
Camptown USA, Inc. 23905 SW 132nd Avenue 6 mi. S. o f Perrine o n US 1 at Princeton Miami, Florida 33032 305-245·2353
Carpenter's Campers, Inc. 8450 Pensacola Boulevard US 29 North , Between 1·10 & 90 Pensacola, Florida 32504 904-477-6666
Fallin Camper Sales, Inc. 100 Edgewood Avenue, S. Jacksonville, Florida 32205 904-783-0630
Indian River RV Sales, Inc. 5855 US Highway 1 Between Cocoa and Tit usvi lle Cocoa, Florida 32922 305-636-1422

Kropf Eldorado, Inc. 6915 14th Street West us 41 , s. Bradento n, Florida 33507 813-755-1586
C.}. Stoll, Inc. 5985 34th St . N us 19 St. Petersburg, Florida 33774 813-527-2189
Georgia Three-Way Camp ers, Inc. 1660 Cobb Parkway, N.W. Marietta, Georgia 300&2 404-422-9300
Idaho Wheels Unlimited 709 N. 5 th , P.O. Box 4685 Pocatello, Idaho 83201 208-233-4230
Il linois Crystal Valley, Inc. 4220 Northwest Highway US 14 at Rou te 31 Crystal Lake, Illinois 60014 815-459-6611
Four Winds of America, Inc. U.S. 51 N, RR #1 Maroa, Illinois 61756 217-794-2292
Rocket Trailer Sales 528 W . Route 30 Rock Falls, Illinois 61071 815-625-6245
Wilderness Lake Campground, Inc. Route # 2 Martinsvi lle , Illinois 62442 217-279-3396
Indiana Berning Trailer Sales, Inc. 5220 New Haven Ave nue Fort Wayne, Indiana 46803 219-749-9415
Four Seasons Trailer Sales, Corp. 8225 W . W ashington Stree t Indianapolis, Indiana 46231 317-241-8348
Mid-West Trailer Mart, Inc. 2409 Corydon Pike New Albany, Indiana 47150 812-945-1173
Iowa Barrows Camp-0-Rama 1912 Washingto n Bo ulevard Caman che, Iowa 52730 319-259-8391
Ace Fogda/1, Inc. 5424 University Avenue Cedar Falls, Iowa 50613 319-277-2641
Imperial RV Center 17l7 South Ankeny Blvd. Hwy. 69 Ankeny, Iowa 50021 515-964-1424
Kansas Scholfield Winnebago, Inc. 11516 East Kellogg Wichita , Kansas 67207 316-684-0236
Kentucky Crouch Campers & Trailers 5081 Reidland Rd ., Ro ute 4 Highway 62 - 68 S.E. Paducah , Kentucky 42001 502-898-7373
Murphy Sales Company, Inc. Winch ester Road (US 60W) Box 404 Mt. Sterl ing, Ke ntuc ky 40353 606-498-1168
louisiana Camper Village, Inc. 705 Florida Boulevard , S.W. Denham Springs, l ouisiana 70726 504-664-7104
Superior Pontiac CMC, Inc. 200 Wright Avenue Gretna, l ouisiana 70053 504-368-5640
Maryland 8 & J Trailer Sales Box 369, US Route 40 Aberdee n, Maryland 21001 301-575-6840
Koons Ford of Annapolis, Inc. 2540 Riva Road Annapo lis, Maryland 21401 301-224-2100
Massachusetts Donahue's Trailer Sales 88 Mountain Road , Box 126 Off Route 128 a t Exit 41-S Burlington , Massachusetts 01803 617-272-9830
Michigan Bay Valley RV Center 2717 Delta Road, RR #4 Bay City, Michigan 48706 517-684-0930
Caswell and Company 243 South Dexte r Io nia, Michigan 48846 616-527-3310
Ewins Trailer Sales 4251 W . Columbia Avenue Battle Creek, Michigan 4901 7 616-965-0597
Kolbe Trailer Sales 4401 Eas t Eight Mile Road W arren , Mich igan 48091 313-536-0265 or 754-8310
Moore's Recreation 1222 E. North Territorial Road U.S. 23 - 5 miles N. Ann Arbor Exit 49E Wh itmore lake , (Ann Arbor) Michigan 48189 313-662-4548
Northwoods Recreational Veh icle Clr. G--6369 No rth Dort Highway Mt. Morris, Michigan 48458 313-686-4330
Vicars Trailer Sales, Inc. 9080 Pelham at Wick Taylor, Mi ch igan 48180 313-291-9000 o r 291-1980
Woodland Travel Center, Inc. 5190 Plainfield Road Grand Rapids, Michigan 49505 616-363-9038
Minnesota Hart Trailer Sales Highway 71 l ong Prair ie, Min nesota 56347 612-732-6106
Minnesota Trailer Sales, Inc. 11350 Highway 65 N.E. Blaine, Minnesota 55434 612-757-1420
Rochester RV Center Airport Overpass and Highway 63S, Rt. 2 Roch ester, M innesota 55901 507-285-9102
9

Missouri Kansas City Trailer Sales, Inc. 11530 South 71 Highway Kansas City, Missou ri 64~37 816·761-3322
Bill Thomas Camper Sales, Inc. 5217 N. lindbergh Bou levard Bridgeton, (St. l o u is) Missouri 63044 314-731-2217
Mont ;ana Big Sky Airstream 1923 Old Hardin Road Billings, Montana 59101 406-259-5571
Bretz Trailer Sales 1023 Kensington Missoula, Montana 59801 406-543-sn1
Nebrasb Autosport RV Center, Inc. 6101 " L" Street Omaha, Nebraska 68117 402-734-1133
Nevad;a "95" Trailer Sales 3105 E. Sahara Avenue las Vegas, Nevada 89104 702-457-5544
New Hampshire Ray's Marina, Inc. Route 116 Milton, New Hampshire 03851 603-652-4523
New Jersey Airstream by Angell, Inc. Route 78 & 173 Interchange Box 94 Bloomsbury, New Jersey 08804 201-479-4118
10
South jersey Travel Trailer Center, Inc. Route 47 and leonard Cake Rd. Franklinville, New Jersey 08322 609·694-1700 o r 694-1701
New Mexico Wayne's Recreational Vehicles, Inc. 12020 Central Ave., S.E. Albuquerque, New Mexico 87123 505-296-0507
New York Bailey-Momot, Inc. RR 1, Box 316 Plattsburgh , New York 12901 518-563-2440 or 563-2441
Ballantyne Trailer City, Inc. 7447 Route 96 VIctor, New York 14564 716-924·3264
Ralph Bubbs Sport Center RD 5, Route 57 Fulton, New York 13069 315-695-5020
Maroone Family Travel Center, Inc. 2550 Walden Avenue, Exit 52 E from NY Thruway Buffalo, New York 14225 716·681-1700
Niblack Trailer Sales 691 Mclean Avenue Corner NY Thruway Yonkers, New York 10704 914-965·5685
O'Malley Enterprises, Inc. Traffic Circle - Ro ute 9 & 7 P.O . Box 116 Latham, New York 12110 518-785-6654
#'or-rh u)d y _//, ..-J r>"c-a,.,
/ , J)P" .lA/A/ - (> S' /l-1
Walker's Four Seasons Route 17, Box 265 Big Flats, New York 14814 607-562-8731
North Carolina ' College Park 4208 New Bern Avenue Raleigh , North Carolina 27610 919-833-7015
College Park North Chu rch Street Extension US 301 and 301A North Rocky Mount, North Carolina 27801 919-446-7166 or 446-9233
Hawley's Cycle and Camping Ctr., Inc. 4784 Raeford Road Fayetteville, North Carolina 28304 919-425-3145
Out of Doors Mart , Inc. 1-40 at Sandy Ridge Road Exit Drawer 799 Kernersville, North Carolina 27284 919-993-4518
North Dakota McLaughlin Equipment Co. 320 27th Street, South fargo , North Dakota 58102 701-237·6046
Ohio Avalon Travel Center, Inc. 11761 Portage Road Canal Fulton , Ohio 44614 216-854-2222
Blckeye Airstream Service & Sales, Inc. Baltimore Road, Box 13 N. of E. 1-70 on 310 at Rt. 40 Etna, Ohio 43018 614-861·6389
Coachmen Camping Center 410 East Sandusky Street Findlay, Ohio 45840 41 9·423-1912
jerry Creer Airstream Argosy, Inc. 4855 Groveport Road Columbus, Ohio 43207 614-491-8544
H & H Recreational World, Inc. Box 108, N. County Road 25A Piqua, Ohio 45356 513-773-2212
Murphy Travel Trailers of Ohio 11526 Chester Road 3 Doors N. of Windjammer Cincinnati, Ohio 45246 513-771-5771
Frank B. Ricketts Travel Trailers P.O. Box 683 1-77 at US 40 Cambridge, Ohio 43n5 614-432-4040
Oklahoma Brassfield Travel Trailers n27 N.W. 39th Expressway Bethany, Oklahoma 73008 405-789·4941
Oregon Cascade Trailer Sales 1876 Highway 99, No rth Eugene, Oregon 97402 503-688-8505
Spencer's RV Center, Inc. 9341 S.E. 82nd Avenue Portland, Oregon 97266 503-777-1484

Pennsylvania Farnsworth Camping Center, Inc. Route 54 Elysburg, Pennsylvania 17824 717-672-2332
Glasgow Recreattonal Veh icles, Inc. 1650 Lincoln Way East Chambersburg, Pennsylvania 17201 71 7-264-955 1
Robtson Trailer Sales Route 198 at Blooming Valley R.D. #3 Meadville, Pennsylvania 16335 814-724-8129
Trav·L·Homes Lewis Road Royersford , Pennsylvania 19468 21 5·948-5900
Tumer Airstream Sales 472 lincoln Highway W., Adamsburg Jeannette, Pennsylvania 15644 412-523-6545 or 523·&54&
Wtse Trailer Sales Division or r .W. Wise Gas Co. 1501 Airstream Way Clearfield, Pennsylvania '16830 814·765·780 I
Wiles Trailer Sales 1030 North Main Street Route 8 & 422 Butler, Pennsylvania 16001 412·287-4745
Vtllage Green Trailer Sales Co. Rout e 452, Pennell Road Media, Pennsylvania 19063 215·494·4155 or 494·4035
Rhode Island Arlington Trailer Sales 966 Q uaker Lane, Route 2 Warwick, Rhode Island 02818 40 1·884·7550
South Carolina Dixie Lee Trailer Sales Highways US I & 78 P.O. Box 306 Clearwater, South Carolina 29822 803-593·2162
Camping Wotld, Inc. U.S. Hwy 17 South Myrtle Beach. South Carolina 29577 803·238·5532
Wray Frazier Camping Center 3630 Fernandina Rd., and 1·26 West Columbia, South Carolina 29210 803-798·0450
South Dakota Spader Camper Center 5500 North CIIH, Box 963 Sroux falls, South Dakota 57101 605·339·3230
Tenne see Cullum & Maxey Camping Center Music Valley Drive 2 Miles North or O pryland Donel on (Nashville), Tennessee 3n14 615·889·1600
Jewell's Camping Center Ro ute 4, Hrghway 45 Trenton, Tennessee 38382 901-855·9590
Bobby Jones Trailer Sales 4222 James Road {In Raleigh) Memphis, Tennes~ee 38128 901-386·5833
Murphy Motor Manors 3163 Airpo rt Highway Alcoa, Tennessee 37701 615-984·2380
Texas A & A Trailt?r Sales 118 Arnold Boulevard Abilene, Texas 79605 915·692·1555
A-1 Inc. 2619 E. 8th Street Odessa, Texas 79761 915·563·0544
Lloyd's Tratler Sales, Inc. 350 Twin City Hwy. Port Neches, Texas 77651 713-727·1666
Abbott Trailer Sales 408 Avenue Q Lubbock, Texas 79401 806-76)-4747
Frank Gtllman Travel Trailers 7620 Bellaire Blvd . Houston, Texas 77036 713·776-7111
Buchanan's Campers & Trailer Sales, Inc. 4109 Forest Lane Garland, Texas 75042 214·276·2244 or 276·8524
0 & M Tratler Sales, Inc. 3900 1·40 Ea I Amarillo, Texas 79103 806·374·1211 or 374·3789
Land Yach t Trailer Sales, Inc. 4616 Titanic Avenue El Paso, Texas 79904 915·75 1-0591
Bear Trailer Sales South of Dallas on 1·35 Bear Creek Road Exit Lancaster, Texas 751 46 214·221·6025
Otis Thomas Sales, Inc. 2606 Jacksboro Highway Wichita Falls, Texas 76302 817-767-1234 or 767-0220
South Texas Tr;ulers & Suppltes Highway 77 S., P.O . Box 880 Sinton, Texas 78387 512·364· 1118
South Texas Trailers & Supplies 11210 Interstate 35 N. San Antonio , Texas 78233 512·653·4161
Sout') Texas Tratlers & Suppltes 101 Expressway 83 P.O. Box 457 Donna, Texas 78537 512-464·3432
Utah 8 & K Sales 3371 S. State Sal t Lake City, Utah 8411 5 801 ·466· 5501
Vlrsinia }ames Rtver Camper Sales, Inc. Box 834, US 460E Lynchburg, Vuginia 24505 804-845·6127 or 846-7444
Poquoson Motors, Inc. 4116 West Mercury Blvd . Hampton, Virginia 23666 804·826-1100
I 1

Koons Pontiac-Oldsmobile, Inc. 7105 Sudley Road Manassas, Virginia 22110 70:!-&31·9500
Travel Trailers of V,1. 221 ·1 South Main StTeet P.O. Box 1089 Harrisonburg, Virginia 22801 703-434·9676
Washington Central Trailer Exchange 14433 Pacific Highway, South Seattle, Washington 981&8 206·244-9600
Devon Lee RV Center 11257 Kirkland Way, P.O. Box 464 Kirkland, Washington 98033 206·822-2211
AI Lundgren Traveland P.O. Box 2949 Yakima, Washington 98903 509-248-4700
Tveten Motor Company 45th and Pacific Avenues Tacoma, Washington 98408 206·472-1600 or 472·7112
Spokane Travel Center N. 2'16 Dyer Road Spokane, Washington 99206 509·535-3675
West Virginia Airstream by Stanley 1400 N. Eisenhower Drive Box 1545 Beckley, West Virginia 25801 304·252·6121
Don 's Tmvel Trailers, Inc. 459 Winfield Road St. Albans, West Virginia 25'177 304-727-2153
Wisconsin Northside Trailer Sales, Inc. N56 WH180 Silver Spring Road 1 mi. W. of Hwy 100 on Silver Spring Rd. Menomonee Falls, Wisconsin 53051 414-781-9646 or 781 -9647
Swe<.> Ttailct Sales US 2 and US 51 Hurley, Wisconsin 54534 715·561-4887
Motor Vacation Unlimited of Wisconsin Route 2, Box 201 Edgerton, Wisconsin 53534 608·884·3.196
Wyoming Bundy's M;uine ,wd Ski 320'1 CY Aven ue Casper, ·wyoming 82601 307·237-2509
Canada Batber Motors, Ltd. 19 2nd Street Weyburn, Saskatchewan 306-842·5421
C.1n-Am Trailers Ltd. Box .170 Hwy 4, 112 mile N. 401 , Exit 19 Lambeth , Ontario NOL ISO 519·652·3284
Claynor Trailer Sales 4053 208th Street Langley, B.C. V3A 2H3 604·5Jo-9141
Co Camping Limited Route #4, Highway 7 Brampton, Ontario l6T 35·1 416·794·0031
Maurice Gareau, Inc. 7695 Henri·Bourassa E. Blvd. Montreal, Quebec H1E 1N9 514·321-7933
Kanata Trailer Sales Div. of K. Dilawri Automobiles, Inc. Highway 7, Box 900 Stittsville, Ontario 613·836-1421
Pik-A-Dilly Trailer and Marine Sales, Ltd. 34th Street & Victoria Avenue Brandon , Manitoba R7B OMO 204·728-8570
Totem Trailers, Ltd. 1035 Howard Road Burlington, O ntario 416·632-0703
Travel Trailers Southern 2620A Barlow Trail, N.E. Calgary, Alberta T1Y 1A1 403-285-8666
Travel Trailers Western, Ltd. 5934 '104th Street Edmonton, Alberta T2N 2K3 403-434-6555 or 434·6939
Twin City Trailer Sales, Ltd. Dartmouth Highway, Box 395 Bedford, Halifax Co., Nova Scotia BON 1BO 902-835-8375

Wally Byam Stores
To make trailering more enjoyable, there are Wally Byam Stores established at the majority of Airstream dealers. All Airstream dealers have the ·opportunity of purchasing for you the neces~ary equipment which would enable you to enjoy your new Airstream trailer to the utmost. The Wally Byam Stores authorized dealerships stretch from coast to coast, and these dealers stock hundreds of items which are tested and approved by travel experts. Be sure and get a Wally Byam Stores Catalog from your dealer or write to:
Wally Byam Stores Ohio Building Ohio Avenue Sidney, Ohio 45365
The following is a list of equipment we recommend:
1. First aid kit 2 . Flashlight 3. Emergency road flares 4. Pop rivets (3 sizes) plus pop rivet gun 5. Battery booster cables 6. Tire gauge (up to 100 lbs. P.S.I. ) 7. Hitch ball lube 8. Small bi-directional spirit level 9. Heavy-duty turn signal flasher
10. Leveling ramps and chocks to fit against and under tires for level ing. and to prevent trailer from moving while parked
11 . One 50 ft ., one 25 ft. length of 5/ 8" high pressure water hose, spare rubber washers and two "y'' connections with caps which enable two trailers to be hooked up to one faucet
12. Two plastic pai ls for carrying fresh ' water
13. Quick disconnect garden hose coupling
14. One 10 ft. or 20 ft. sewer hose and coupler
15. One rubber sewer elbow, plus two 2-1/2 to 3-3/4 adjustable hose clamps
16. One Thetford sewer hose adaptor (elbow or straight)
17. One Y2 gal. holding tank cleaner and deodorizer
18. 25 ft. electric cord (#12-3 wire) 19. Cord adapter, 30-15 amp 20. Spare fuses & light bulbs, refer to
pages 86 & 87 21 . Can of Spra-Kieen 22. Short handled shovel (C .I. type,
Army surplus) 23. One ·1 0 gal. Tote Tank
13

Tow Car Equipment
If you plan to buy a new car to tow your Airstream, we suggest that you in~ude in your purchase the trailer towing options offered by most automobile manufacturers. These include such things as a heavy duty generator and radiator, heavy duty springs and shock absorbers, automatic transmission cooler, heavy duty fan, heavy duty flusher unit and others, depending on the make of the vehicle.
Transmissions may be manual or automatic, but an automatic transmission will prolong your car's engine life and does a better job of controlling engine loads than the average driver using a manual shift.
Having adequate power is very important when considering the purchase of a new car or the trailer towing capability of your present one. Emission controls that are required by the Federal Government have reduced overall engine power. To determine generally what the tow capability of your car is, divide the total weight of your trailer by the cubic inch displacement of your automobile engine. This ratio should be between 10 and 20 pounds of trailer weight per cubic inch of engine displacement with 15 pounds per cubic inch considered optimal. For example, with a 31' Airstream weighing 7000 pounds totally loaded for travel and a car with 400 cubic inch displacement engine, divide 7000 by 400 giving a value of 17.50 pounds of trailer
weight per cubic inch engine displacement. This is very close to the optimal value and the automobile should have adequate power for towing the trailer. Remember that engine power is only one indication of the car's towing capabilities; the axle ratio and cooling capabilities certainly must be considered. We suggest you review the owner's manual of your present car and discuss your automobile towing capabilities with your Airstream dealer and your automobile dealer.
Inspect your vehicle's hitch regularly for loose bolts or nuts, cracked welds, loose ball mounts, worn parts, etc.
The majority of new trai lerists carry more food and other supplies than really needed. Remember that every item you take along is one more thing to stow and adds weight to the total load you must pull. Consolidate items in shelves, lockers, and in the refrigerator. It is better to have one full and one empty locker than two half empty ones. Special care must be taken not to overload the front and rear ends of the trailer.
See tire section for correct tire sizes and pressures for your trailer and load on page 26.

Brakes
The Excella-Vac disc brake system is operated by 12 vo lt negative ground cu rrent and engine vacuum from your tow vehicle. The system's controller and trailer disc brakes improve brake balance, braking control, reliability, and reduce brake fade from high speed stops or frequent brake application.
Disc brake components consist of a controller, power brake booster, brake release valve, d isc brake cal ipers, and hub and rotor. Tow vehicle's and trailer's vacuum lines, brake hoses and brake lines should be checked periodi ca lly for abrasion and signs of leakage at fittings.
The Exceii~-Vac system controller furni shed in your d isc brake tow vehicle kit must be installed in your tow vehicle for proper brake operation. The controller is activated when you apply the brakes of the tow veh icle. This sends a modulated electrical signal to the power brake booster assembly located on the tongue. Trailer brakes may be applied manually, independent from your tow vehicle brake system, by moving the control ler's lever to the right. (see photo)
Note: The tow vehicle's engine should be warm (near operating temperatu re) to insure maximum braking.
A Trailer brake sensitivity lever located on the top of the controller (see photo) provides adjustment to synchronize the trai ler brakes with your tow vehicle's
brakes. It is designed to balance the trai ler brakes wi th you r car brakes. Move the lever away from you to increase or toward you to decrease the sensi ti vity of your trailer brakes. Set the sensi ti vity ad.:-justment to the maximum setting, then reduce sensitivity setting as required to obtain smooth braking.
There are two indicator lights on your controller. During brake application, the green light glowing indicates normal system operation. A red light wil l glow if the brake elect rical wiring is faul ty. Loss of electrical input to your controller wi ll be indicated by neither light glowing when brakes are applied.
Do not use a selective resistor.
A vacuum line assembly furnished in your disc brake tow vehicle kit must be installed in your tow vehicle, which provides vacuum to the power brake booster assembly located in your trai ler. Vacuum b supplied to the trailer by coupling the trailer vacuum hose (see photo) to tow vehicle vacuum connector. To couple, push knurled coupling sleeve forward, firmly insert trai ler's vacuum hose fitting and pull sleeve back. Check for proper locking by firmly pulling trailer's hose fitting. Important: A coupl ing plug must be inserted in the tow vehicle's vacuum connector, when the trai ler is d isconnected. Opera ting your engine wi thout the plug will result in a vacuum leak. Th is may re-
fxc<'IIJ·Vac System Controller
Trailer Vacvum Hose Connection
15

suit in engine misfiring, inoperative vacuum boosted accessories (brakes, emissions, etc.) and engine damage. An e)<tra plug is supplied in the kit.
The power brake booster located on the tongue behind the L.P.G. tanks supplies hydraulic pressure to the disc brake calipers. The fluid level in the booster's master cylinder (see photo) should be checked twice a year. If necessary, add f luid to bring level to within !4 inch of the top of the reservoir. With disc brakes, fluid level can be expected to fall as the brake pads wear. Only brake fluid conforming to DOT 3 should be used. Use only f resh brake fluid that has been in a tightly closed container to avoid contamination from foreign matter or moisture.
When the trailer vacuum hose is disconnected from the tow vehicle, the trailer brakes are.automatically applied. This provides break-away protection should the trailer break away from the tow vehicle. Disconnecting the supply line engages the trailer brakes. The trailer brakes must be disengaged by pushing and holding knob on brake release va lve for 10 seconds. (see photo) Blocking or chocking wheels is necessary when parking your trai ler. Do not use trailer brakes as parking brakes by disconnecting the trai ler vacuum line.
The self-adjusting disc brake calipers should be inspected for wear any time
16
Power Brakl? Actuator and Breather Brake Re/ea~c Knob
Trailer V,1cut1m Nose Storage Disc Brake Calipers. /lub ancl Rotor

the wheels are removed for tire rotation, wheel bearing maintenance, etc. The lining will need replacement if there is evidence of brake fluid leakage or if there is less 'than Y,e" between the liner and liner's steel backing plate. See your Airstream dealer for all trailer braking service.
17

18
Loading
For over 40 years, Airstream has been building trailers and has rarely found an instance where people have overloaded their trailer. Because it can happen we are givi ng you instructio'?ls for weighing your trailer. We are also providing you with an alternate method of determining the weight of your trailer without the use of scales. The following weight information and form will help you determine the actual weight of your trailer, with all its options and variable weights, and how much personal cargo weight can be added, staying within the weight ratings of your trailer.
Per Federal regulations, your trailer is placarded on the front roadside area with a gross vehicle weight rating and a gross axle weight rating. The gross vehicle weight rating is the maximum the trailer can weigh when it is being towed. The gross axle weight rating is the maximum load that can be on each axle when the trailer is being towed.
The Dura-Torque axle is designed to last the life of your trailer without service, except for lubrication of the wheel bearings. Under no circumstances should welding be done on or near the axle.
The diagrams on the following pages illustrates the use of scales in determining (1) your trailer's total weight, (2) weight on axle assemblies and (3) weight on tongue.
0
0
MFD. BY: AIRSTREAM INC. DATE OF MFR. 1 1 --=78 __ G.V.W.R. 8500 G.A.W.R. FRONT __1QQQ_ WITH 7.00x15
TlRES, 7.0K15 RIMS, AT _60_ PSI COLD SINGLE
REAR ...1QQ!_ WITH 7.00K 15 TlRES, 7.0x15 RIMS, AT _6_0 _ PSI COLD SINGLE
THIS VEHICLE CONFORMS TO All APPLICABLE FEDERAL MOTOR VEHICLE SAFETY STANDARDS IN EFFECT ON THE DATE OF MANUFACTURE SHOWN ABOVE.
V.I.N. E31 08-81103 TYPE: TRAILER
Cross Vehiclt! Weight Rating
0
0
The allowable personal cargo, and placement within the trailer, may be determined by the following methods.
Before weighing trailer add all trailer's variable weights which are full water tank, LPG tanks and water heater.
Note: The variable weights of the main and auxiliary holding tanks are not used because, under typical usage, if the water tank is full, there is storage capacity in the holding tanks. As the water tank is emptied, the holding tanks are filled.
Remove personal cargo which includes food, clothing, kitchen utensi ls, etc. from trailer. Your trailer is now ready for weighing.

Trailer Weighing
1. Trailer's Total Weight (cannot {'Xct..'ed C .VW.R.)
The trailer's total weight is determined by placing the trailer, without tow vehicle, on a scale. This weight indicates your trailer' s total weight without personal cargo. The allowable personal cargo that you add to your trailer shall not exceed the difference between the Cross Vehicle Weight Rating (C .V.W.R.) and this weight. Example: if the C.V.W.R. rating on the placard is 8500 lbs and the trai ler's total weight is 7500 lbs, your personal cargo may not exceed 1000 lbs (8500- 7500= 1000).
The allowable personal cargo, determined above, must be distributed in your trailer in such a manner that the Gross Axle Weight Rating (C.A.W.R.) is not exceeded.
2. Trailer's Weight on Axle Assemblies (cnnnot exceed C .A.W.R.)
To determine this, it is necessary to load all of your allowable personal cargo (example above 1000 lbs total ) and variable weights. Then hitch trailer to tow vehicle with load equalizing hitch properly adjusted, see diagram page 27.
Place trailer on scale with both axles only on scale, see (2). If the weight on the axles exceeds the axle system C.A.W.R. then some personal cargo must be redistributed forward in order to place some of this weight on the tongue.
The tongue weight should be between 10%-15% of the trai ler's total weight but must not exceed 1000 lbs. Some tow vehicle manufacturers may restrict the amount of tongue load to a lower value. To determine tongue load, unhitch tow
'
3. Weight on Trailer's Tongue
vehicle and place tongue hitch post on scale, see (3). The trailer must be properly loaded, as determined above, with your allowable personal cargo and variable weights.
19

Bathroom Scale Wood
Tongue Weight
A scale which has a lower weight limit than your tongue load, such as a bathroom scale, may be used to check the tongue weight by using the following method (see il lustration):
Place a piece of wood of approximately the same thickness as the bathroom scales on the ground in line with the trailer hitch jack as shown. It should be so spaced that a short pier.e of pipe or other round piece will lay exactly one foot from the center line of the jack extension. Place the scales so that another round piece can be exactly two feet from the center line of the jack extension in the other direction. Place a 4x4 on the two round pieces and screw the jack extension down on the top of the 4 x 4 unti I the tongue of the
20
trai ler is supported by it. Multiply the scale reading by three. Th is will be the tongue weight of your trailer. If you ex~ ceed the capacity of the bathroom ' scales, increase the two foot d imension to three or four or more feet but always mult iply the scale reading by the total number of feet between the wood and scales.
Caution: Be sure t railer is level when you read scales.
An alternate method for determining the weight of your trailer, without the use of scales, is by using the following information and form.
Before you f i ll in the blank form that pertains to your trailer, please read the sample form, page 22, to see what type of information will be needed.
First enter the model length, t ype of beds, and type of bathroom of your trai ler on the fi rst line (i.e. Excella Twin Rear Bath).
Column A Column A represents the Total Maximum Personal Cargo weight that can be added to your trailer. Personal Cargo includes food supplies, clothing, other personal items, etc. Find the Factory Weight of your trailer, Chart A, page 24 and enter it across from ITEM 1 Column A (Factory Weight = weight without options and variable weights (i.e. 5634lbs.).
Next f ill in t he total weights of the opt ions and variable weights with which your trailer is equipped . This information is on Charts B and C, page 25. Add all of the weights together and th is total becomes ITEM 2, Column A (i.e. 736 Jbs.).
Next add ITEM 1 and ITEM 2. This becomes ITEM 4, Column A (i.e. 6370 lbs.). This is the sum total of your trailer's Factory Weight plus the Options and Variable Weights.
Next enter in ITEM 5, Column A (i.e. 8500 lbs.), your t railer's Cross Vehicle Weight Rating (G.V.W.R.). This information is on the placard located on the front road side area of your t ra iler which corresponds to informat ion on Chart A, page 24. The Gross Vehicle Weight Rating is the maximum the t ra iler can weigh when it is being towed. Next subtract ITEM 4, Column A from ITEM 5 Column A; th is amount indicates the Total Maximum Personal Cargo that can be added to your t railer (i.e. 2130 lbs.). Under no ci rcumstances shall the G.V.W.R. be exceeded.
Column B Column B represents the Recommended Personal Cargo that can be added to your trailer's tongue. Find the Factory Tongue Weight of your trailer and enter it in ITEM 1 Column B (Factory Tongue = weight without options and variable weights (i .e. 713 lbs.). This information is on Chart A page 24. Column B has+
weight and - weight. Due to the location of optional items within the tcailer, their weight will either have a + weight or - weight effect on the tongue. If the option is behind the axle system, or rear of trailer, it will tend to have a - weight, or lifting effect on the tongue; if t he option. is forward of the axle system, or the front of the trailer, it will have a + weight or loading effect on the tongue. Next fill in + weights or- weights of the options and variable weights with whi ch your trailer is equipped, indicated in the Tongue Weight Columns on Chart B, or C.
Next total both the + weight (i.e. 94 lbs.) and - weight ( i.e. 32 lbs. ) columns and find the difference between the two columns; this becomes ITEM 2 Column B (i.e. + 62 lbs.). Next add ITEM 1 Column B and ITEM 2 Column B; th is becomes ITEM 4 (i.e. 775 lbs.). This is the total of your trailer's Factory Tongue Weight, plus the weight of the Options
.and Variable Weights on the tongue. Next enter in ITEM 5 Column B 12Y2% of your trailer's G.V.W.R. or 1000 lbs., whichever is smaller (i.e . . 125x8500= 1063, therefore use 1000 lbs.). This information is located on Chart A, page 24.
Next subtract ITEM 4 Column B from ITEM 5 Column B and the amount indicates the amount of Recommended Personal Cargo that can be added to your t railer's tongue (i.e. 225 lbs.).
The maximum tongue load must not exceed 1000 pounds. Some tow vehicl es may restrict the amount of tongue load to a lower value. The tongue load is a total of the weight in ITEM 4 Column B plus your personal cargo.
Column C Column C represents the Maximum Personal Cargo that can be added to your trailer's axle system. Find the Factory Axle Weight of your trailer and enter it in ITEM 1 Column C (i.e. 4921 lbs.-Factory Axle Weight = weight without options and variable weights). This information is on Chart A page 24. Next fill in the axle system weights of the options and variab le weights with which your trailer is eq uipped from the Axle System co lumns on Chart B or C, page 25. Add all of the weights together and this total becomes ITEM 2, Column C (i .e. 674 lbs.).
Next calculate 34% of ITEM 5 Column B (i.e . . 34x1000 = 340). This becomes ITEM 3 Column C and represents the amount of tongue weight that is transferred to the trailer's axle system when properly hitched with a load equalizing assembly. (The remaining 66% is transferred to the tow vehicle.) Next add ITEM 1 Column C, ITEM 2 Column C, and ITEM 3 Column C; this becomes ITEM 4 Column C (i .e. 5935 lbs.). This is the sum total of your trailer's Factory Axle Weight, the weight of the Options and Variable Weights on the axle system; and 34% of the tongue weight. Next
enter in ITEM 5 Column C, the sum of your trailer's Gross Axle Weight Rating (G.A.W.R. - i.e. 4000 + 4000 = 8000 lbs.).
Th is information is on the placard on the front roadside area of your trailer .which corresponds to information on Chart A page 24.
The Gross Axle Weight Rating is the maximum load that can be carried on the axle system when the trailer is being towed. Next subtract ITEM 4 Column C from ITEM 5 Column C. The remainder is the amount of total Maximum Personal Cargo that can be added to your trailer's axle system (i.e. 2065 lbs.).
Under no ci rcumstances shall the G.A.W.R. be exceeded.
21

I
Sample Form
Column A Column 8 Column C
Maximum Personal Recommended Personal Cargo Maximum Personal Cargo
Model: exteU;A /WIN RMilfM111 Cargo Total
(includes axle systems & tongue) . on Tongue per Axle System
Factory Weight (without opt1ons and variable weights} Item 1 ..5{,!5+
Factory Axle Weight (without options and variable weights}
- - __. - - -+ - - ---. - - -+ - - -+ 1-9ZI ~ Item 1
~~
Factory Ton~ue Wei~ht ~ ~ ~
(without op 1ons an variable weights} --+ -- --+ -- -+ ~~ 1 ~~ 713
Options:
. ~~ ~ei~f . - Weight
Bunk Bed (each) 90 ~ -10 / 1'7)
Microwave Oven (p/, '"~~~ 6 d6 Spare Tire Bracket 1!3 ~~ ~~-~-
'~ 10 ..3
Spare Ti re ~2-........ ,
~-# +o IZ ~
L.P.G. 10 Gal. (tank and liquid)
Vanable We1ghts:
Water Heater $0 -zz 7Z. Water Tank +Ui' -"1-25 L.P.G. Std . 7Vl Gal. (tank and liquid) -+o .3~ +
Item 2 Total ?3/, ..... 7-'fl +q+ - 32 = /,Z. {,1-/- ..... ~J,?+
Item 3 34% of Item 5 Column B - --+ -- --+ - ---+ -- -+ -- -+ -- -+ .3+0 I Item 4 Items 1 & 2 Total IJ,;3 70 il Add Items 1 & 2 776 Add Items 1, 2, 3 c59.B5 I
Item 5 G.V.W.R . /j.SIJ/) Enter 12 V.% G.V.W.R. or 1000 lbs. whichever is smaller. I /Jb I> G.A.W.R. {jooo
Enter Item 4 and subtract from Item 5 - (,370 .... u - 776,. -59.36 Maximum Personal Cargo Zl.3o Recommended Personal Cargo on Tongue-+ - --+ - - -+ 225
Maximum Personal Cargo per Axle System --+ - - -+ - - -+ - - -+ - --+ Z ot,5 I
22

Blank Form
Column A Column 8 Column C
M.uimum Person~l Recommended Person~l C~rgo Maximum Person~l C~rgo
Model: Cargo Total on Tongue per Axle System
(includes axle systems & tongue)
Factory Weight (without opt1ons and variable weights) Item 1
Factory Axle Weight (without options and variable weights) -- -+ -- -+ - - -+ - - --. -- -.. Item 1
Fac~ry Ton~ue Wei§ht (wit out op 10ns an variable weights) -+ -- -+ -- -+ Item 1 - -+
Options: + Weight - Weight
Bunk Bed (each)
Microwave Oven -
Spare Tire Bracket
Spare Tire
l.P.G. 10 Gal. (tank and liquid)
Variable Weights:
Water Heater
Water Tank
l.P.G. Std. 7~ Gal. (tank and liquid)
Item 2 Total -+ + - = __. Item 3 34% of Item 5 Column B - -+ - - -+ - - -+ - - -+ - - -+ -- __. I Item 4 Items 1 & 2 Total 1 Add Items 1 & 2 ~dd Items 1, 2, 3 I
Item 5 G V.W.R. lnce< 1 2 Yt~ G.VWR Of
C.A.W.R. 1000 ~ wt"c~ IJ smallfl.
Enter Item 4 and subtract from Item 5 - • u - • -Madmum Personal Carao
Recommended Personal Cargo on Tongue-+ - - -+ -- -+
Maximum Personal C~rao per Axle Syt&tnt -+ - - -+ - -r -+ - - -+ - - -+ If
23

Chart A-Weights and Ratings
T
Rear Bath
D
T
Center Bath
D
Gross Vehicle Weight Rating
G.V.W.R.
8500
8500
8500
8500
Factory Weight Without Options
or Variable Weights
5634
5704
5610
5600
Allowable Additional
Total Weight Incl. Personal Cargo
2786
2796
2890
2900
*Allowable additional weight includes all T-Twin Bed Models options and accessories. l.P.C . water, waste,
food supplies, clothing, other personal cargo, etc. D-Double Bed Models
24
Gross Axle Weight Rating
G.A.W.R. (A~e System)
8000
8000
8000
8000
Factory Axle Weight
(Axle System)
4921
4980
4900
4890
Allowable Additional
Weight (Axle System)
3079
3020
3100
3110
Factory Tongue Weight Without
Options or variable Weights
713
704
710
710
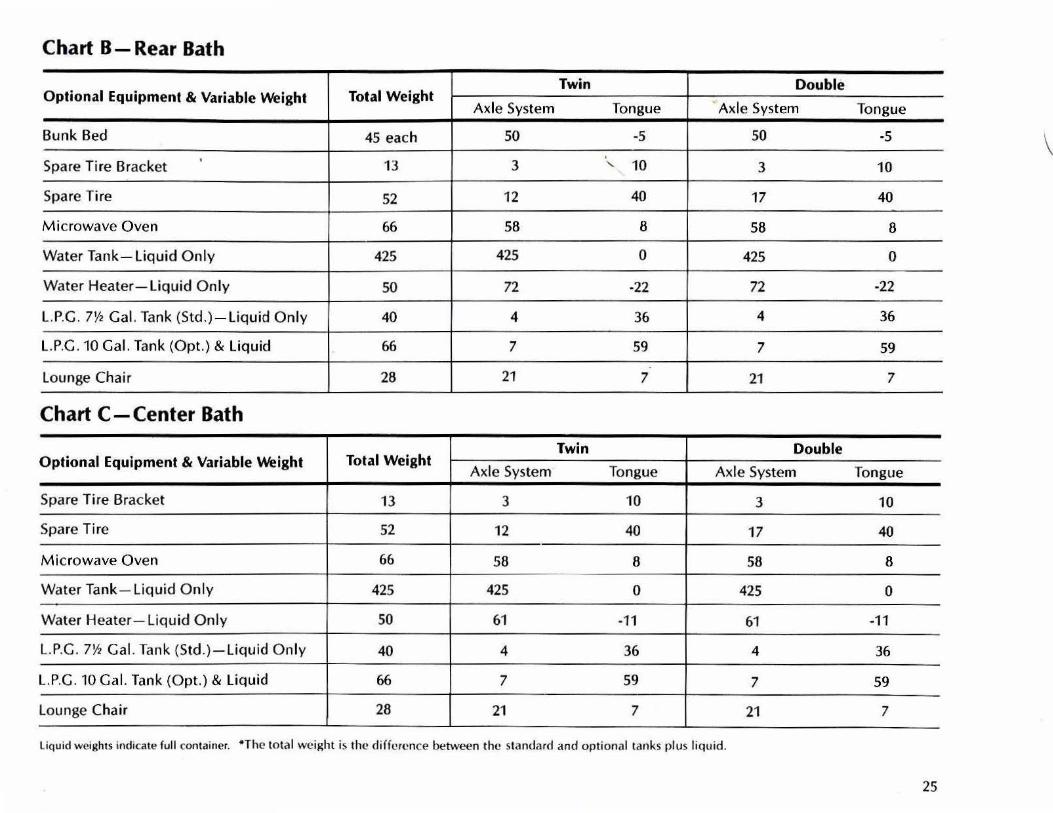
Chart B- Rear Bath
Twin Double Optional Equipment & Variable Weight Total Weight
Axle System Tongue Axle System Tongue
Bunk Bed 45 each so -5 50 -5 \ Spare Tire Bracket
I
13 3 ' 10 3 10
Spare Tire 52 12 40 17 40
Microwave Oven 66 58 8 58 8
Water Tank- Liquid Only 425 425 0 425 0
Water Heater-Liquid Only 50 72 -22 72 -22
l.P.G. 7Y2 Gal. Tank (Std.) - Liquid Only 40 4 36 4 36
l.P.G. 10 Gal. Tank (Opt.) & liquid 66 7 59 7 59
Lounge Chair 28 21 7 21 7
Chart C-Center Bath
Twin Double Optional Equipment & Variable Weight Total Weight
Axle System Tongue Axle System Tongue
Spare Tire Bracket 13 3 10 3 10
Spare Tire 52 12 40 17 40
M icrowave Oven 66 58 8 58 8
Water Tank - Liquid Only 425 425 0 425 0
Water Heater- Liquid Only 50 61 -11 61 -11
L.P.G. 7~ Gal. Tank (Std.)-Liquid Only 40 4 36 4 36
l.P.G. 10 Gal. Tank (Opt.) & Liquid 66 7 59 7 59
Lounge Chair 28 21 7 21 7
Liquid weights indicate full container. *The total weight is the difference between the standard and optional tanks plus liquid .
25

Tires
Your Excella is equipped at the factory with steel radial tires. Airstream dealers cannot make adjustments to tires. This must be done by a dealer who handles that particular brand. If you ever have tire problems, check the loca l telephone directory for the nearest dealer.
To get the maximum performance from your tires check the ai r pressure often, but only when the tires are cool. Never bleed out air immediately after driving.
It is also important to periodically check on the tightness of lug bolts. They should be tightened to a torque of 90-95-ft.-lbs. on both the steel and forged aluminum wheels. Care should be taken at all times when handl ing the forged aluminum wheel because of possible damage to its appearance.
In a warm climate, park out of the sun whenever possible. In desert regions use the tire covers to prevent ultraviolet deterioration to tires.
To change a tire with a jack, see the label affixed to the underbelly just to the rear of the wheels. This indicates the proper jack placement. On tandem axle models a flat tire may be changed without the aid of a jack. Drive the unit up a ramp 8" wide, 6" high and about 3 feet long at the base so that the fl at tire is hanging free. (see photo) All tire, wheel, hub and drum assembl ies are dynamically balanced at the factory.
26
Be sure to rebalance the tire, wheel, hub and drum assemblies each time a tire is changed or rotated.
In an emergency remove the flat t ire. The independent suspension of the DuraTorque Axle allows a four wheel unit to be safely towed on three wheels for a short distance (100 miles maximum) and only at a low speed (30 MPH). Be especially cautious in crossing holes or dips in the road. It is good practice to set your rear view mirrors so that you can observe your tires at all times.
Tire Load and Inflation Pressure Notes 1. Tire inflation pressure may increase as
much as 6 pounds per square inch (PSI) when hot.
2. Cold tire inflation pressure: after vehicle has been inoperative for 3 hours or more, or driven less than 1 mile. Hot tire inflation pressure: after vehicle has been driven 10 miles or at speeds of more than 60 miles per hour.
----~- - - ---- ----
'.
Tire Changing
M inimum Tire Pressure (cold inflation)
Tire Size Load Per Axle (pounds) Pressure
7.00-lSXC up to 2820 35 p.s.i. Steel radia I -2 8=--2- 0---3-1-30 _____ 4_0__,;,.,p_. s-. i.
Load range 3130 3440 45 · D
- p.S.I. -------------~~ 3440-3600 50 p.s.i. 3600-3780 55 p.s.i.
3780-4000 60 p.s.i.
Tire Rotation (steel rad ial )

Hitching Up
Hitching up your Airstream trailer is something that will become almost second nature with practice. The following section includes proper hitch load distribution and a procedure for hitching up.
Your electric jack makes hitching and unhitching a much easier operation. A two position toggle switch on the underside of the jack motor operates the jack. Emergency manual operation is made possible by removing the electrical jack head and engaging a manual crank handle in the post coupler.
To Remove the Electrical Head 1. Disconnect trailer battery. 2. Disconnect jack motor positive lead
from solderless connector located under "A" frame coupler.
3. Loosen two Allen Lock Screws securing jack head to jack post. Remove jack head. (NOTE: Use care when removing jack head lead wire from wire channel to prevent the sharp edges of the channel from cutting into the wire insulation.)
To Install Electrical Head 1. With 12V lead temporarily
connected, ground the jack head assembly to" A" frame and operate motor in a "lowering" direction until it stops.
2. Manually crank jack post clockwise until fully retracted. Turn crank one complete turn counterclockwise.
3. Reinsert motor electrical connection into wire channel and replace jack·, head on jack post. Make sure that drive pin on motor assembly is engaged in post coupler.
4. Tighten Allen Lock Screws, re-connect lead wires and stow under coupler assembly. Re-connect battery.
Equalizing Hitch Load Distribution When a trailer is hitched up properly to
. a tow vehicle, with a load equalizing hitch, 1/ 3 of the trailer's tongue weight will be on the trailer's axles and 2/3 will be transferred to the tow vehicle. 1/3 of this weight transfer will be carried by the front wheels and 1/3 by the rear wheels of the tow vehicle (see diagram). Thus, the tire loading of each wheel on the tow vehicle will be increased by 1/6 of the trailer's tongue weight. The tire air pressure of the tow vehicle should be increased to compensate for this additional weight. Refer to the tow vehicle owner's manual for this information.
The tongue weight should be between 10%-15% of the trailer's total weight but must not exceed 1000 lbs. and under no condition exceed the hitch rating. Some tow vehicle manufacturers may restrict amount of tongue load to a lower value.
Equalizing Hitch Load Distribution
Proper Installation
( 00
I 34%
I I 33% 33%
Perce ntage o f Tongue Load distributed to car and/ or trailer wheels
Hitch High
( '00
I I I 40 to 50% - 20 to +20% 40 to 70%
Hitch Low
{ oo
I I 60 to 90% -10 to + 20%
I 0 to 20%
27

Steps for Hitching Up 1. Jack up the trailer hitch until there is
clearance for the hitch ball to slide under, remove safety pin and raise the locking lever. Back the car straight back to the hitch. This can best be accomplished through the use of prearranged hand signals with the help of another person, but if you are hitching up by yourself we recommend the use of a hook-up view mirror.
2. Lower the trailer hitch onto the hitch ball; then close the locking lever and insert safety pin.
3. Now raise the trailer and car to the full height of the hitch jack and then attach the leveling bars. Lower the car and trailer. The hitch ball should be level to slightly higher (see photo). Readjust leveling bars until this condition is correct . This will result in the best balance for towing and steering control as the weight equalizing hitch distributes the hitch load . Approximately 1/3 of the load is distributed onto the front wheels of the tow vehicle, 1/ 3 onto the rear wheels of the tow vehicle and 1/3 onto the trailer axle assembly. With proper hitch installation and hitching up the bar should have a noticeable amount of deflection or bending (see photo 3.d.). A little practice with your rig will teach you how far to pull up the bar, and you may wish to mark the chain links that match your rig. Always choose level ground for checking correct hook-up. For further information
28
locking Lever Safety Pin
Hitching Up Equipment
see hitch manufacturers' literature.
Note: If your car is equipped with adjustable load leveling air shocks, you must load the car first with typical luggage and passengers and bring it back to level. Then attach the trailer and adjust the load leveling bars. Otherwise the air shocks on your car wi II overload the rear wheels.
The hitch ball on your hould be in-stalled at a height of 9-1/2" to the top of the hitch ball , measure when the car is loaded. A low hitch ball increases tail-
//itching Up Step 1.
Step 2.
wagging tendencies by lowering the nose of the trailer thus changing the center of support for the trailer and reducing the weight on the front wheels of the car.
4. Plug in the electrical connector cord and check running, directional , and brake lights. The electrical connector cord should be completely removed and stored when not in use. Remove plug from tow vehicle's vacuum coupling and insert trailer's vacuum line plug. To couple, push knurled coupli ng sleeve forward, firmly insert trailer's vacuum hose fitting and pull

Step Ja
sleeve back. Check for proper locking by firmly pulling trailer's hose fitting. Attach the safety chains to the welded portion of the hitch or the car's frame, but never to the removable ball mount. Cross the safety chains under the hitch.
5. Retract the hitch jack completely for maximum ground clearance. Remove the do lly wheel and jack pad, and stow them in the car's trunk, along with leveling jack and other gear used when stopped. Never tow your trailer with the jack down or the dolly wheel on. Check that the fold-away step is
up and that the main door is completely closed and locked for towing. If it is not locked the constant vibration of travel may cause it to open with possible damage.
6. Move the rig ahead about 50 feet and test the trailer brakes, then check the ground for forgotten objects. Regularly check the condition of your tires, air pressure, and the tightness of the lug bolts. For speci fi c tire pressures refer to page 26.
511"/) 4 .
.'>tep 5.
29

Towing Tips
WP want every Airstre.un owrwr to be ,, safe .wd courtt~ous driver.
A few hours of towinH pr.tetice in a I.Hge empty supern1.1rket parking lot will make pulling your Airstream over th(• ro.l<l much e.t~ier. line out tvvo corrwr~ for both left ,md right turns. You m.ty .tlso use these corners to pr.1ctin• backing and parking. Observe that the tracks made by the trailer wheels are distinctly different from those made by your car. Studying thb will make it Pasicr for you to correct mistakes. Truck or trail('f type fender or door grip rt•ar vi('W mirror~ .trl'
a must for maximum visibility and in most states they are required hy law.
After thoroughly inspecting your hitch, brakes ,tnd tires you should be ready to tow. Check traffic, signal that you are ,tbout to pull away, and start slowly. look often in your mirrors, .md obsprve the a<:tion of the tr,lilt•r, then c.ndullv move into the proper lane of traffic Remember that the trailer whel'ls will not follow the path of tht~ car's wheels, ther(.•fort.•, wider turns are necessary when turning to the left or to the right.
On freeways or expressways try to pick the lane you want. .tnd st<ty in it. Alw,tys maint.tin plenty of span• betwt:>(.•n you .md the c.n .thcad, at le.ht ttw lt.>ngth o( the car plus tr.lilt>r, for (.'very ten milt''> per hour. R<'nwmher that in ordt•r to p.w. "notlwr veh ide, you wi II rwPd longer to ,l(((.•ler.lte. You must also ,tl low for tlw
JO
lr.wkttl~
length of tlw tr.tiler when returning to the right hand I.Hw.
On a two lane ro.td, cars \Viii b(• lining up behind you bPc.w~e you tr,tvd ,tt ,, lower ~1wed. It is both courtt•ous and wn-.ibiP to signa l, pull onto the -;hou ldN, and let tht•m p.t-.s. Your Airstream i-. dPsigned to be towed e.tsily .tt ,my leg.tl spl'C'd, -;o if )'OU ,m• not rardul you nl.ly bt• inclirwd to forgt•t it is tlwrt•.
The br.lke controller i~ .Ktivah•d when you .tpply tlw br,tkPs of tlw tow vehidt•. This st~mb ,, modul.ttl'd <'le<tril al sign.tl to tl'w power brclke booster .1~-.embly locatt•d on tlw tongue. Tr,tilt>r br.tkes m.ty IJl' .tppl i1•d m.ulu.tlly. indt•penlh•nt irorn your tow V<•hi< IP br.tk(.• systt•m. b)· moving tlw rontroll('r's lt.•Vl'f to tlw riHht.
Note: The tow whicl!•'s t!ngirw "hould bt> w,trrn (ne.H opl'ratinH tt•mpPr.tturl') to in-.urt.• m.tximum br,tking.
When tr.tilering. you might t'n!'ountl'r ,, tf~mporary !'Ooling syst(.•m overlo.td dur· ing wvere conditiom- such .1s hot d,tys wlwn pulling on .1 long gr.td1•, wlwn -;lowing clown .tftt•r higlwr-'.pl't'd driving, or driving long idle periods in tr.tflic j.tms. If the hot indk.ttor light c onw~ on or tlw tempPratUH' g.lllgf> indic.tte~ ovt.•rhe.tl and you h.tV<' your air conditioning turrwd on, turn it off. Pull ovl'r in ·• s.tit• place and put on your t•mNg<•rKy hr,tke. Don't turn off tlw PllginP. lnne.t"e tlw Pngirw iclll.' ~IWPd . lift the l'ngirw hood .111d dwck for (luid lt>.tb .tt the r.tdi.ltor hos<•..,, r,tdiator or r.Hiiator ovprflow outIt>!. ChPck to S<'t> that .til driw twits arP

Passing
intact and the fan is turning. If you have a problem, have it fixed at the next opportunity. If there is no problem, l ight should go off or temperature should come down within one minute. Proceed on the highway a little slower. Ten minutes later resume normal driving.
Caution: Never open a radiator cap when the car is hot! Check the car coolant level when the car is cool.
When going downhill in dry weather, down shift so that engine compression wi ll slow the whole rig down. Take dips and depressions in the road slowly and do not resume normal driving speeds until you are sure that the trai ler wheels are clear of the dip.
On slippery pavement do not use engine drag to help slow down as this may cause the rear wheels of the car to skid. On icy pavement drive slowly and if you feel the car is skidding, gently apply the trailer brakes only. This will bring the car and trailer back into a straight line. Chains do not help trai ler wheels.
When driving in mud and sand let the momentum carry the rig through. Apply power gently and use as little as possible. Stay in the tracks of the vehicle ahead and keep the car in the highest possible gear. If you do get stuck it is best to tow out both car and trailer together without unhitching.
If you have to tow long distances over bad roads, the stones and gravel thrown
back by your tires will dent and scratch the aluminum finish ot your Airstream. To prevent this, use masking tape to secure heavy sheets of cardboard to the lower front end of the trailer.
Despite the best hitch, you will notice that whenever a large bus or truck overtakes your rig the displaced ai r first p~o~shes the trailer rear slightly to the right and then affects the front. It may be necessary to steer very slightly, momentari ly, toward the bus or truck, to help compensate for the sway induced by the passing vehicle. Do not apply the vehicle b rakes, as this can tend to exaggerate the situation. You may find, however, that briefly applying the trailer brakes with your manual control will help el iminate sway.
When stopping on a hill or slope, leaving your car in gear is not enough for standstill-safety. Chock the trailer wheels to be double sure. Do not use trailer brakes as parking brakes by disconnecting the trailer vacuum l ine.
31

Backing Up
(1)
Position (A) start, turning steering wheel as shown in (1) will put you in trailer position (B), turning steering wheel shown in (2) puts you in trailer position (C), steering wheel position (3) returns front wheels for straight backing.
Indicates steering direction
In backing up, the important thing to remember is to do everything slowly and to correct immediately if you see the trailer turning the wrong way. Concentrate on the rear of the trailer. With your car and trailer in a straight line, back up slowly and turn the bottom of the steering wheel in the direction you want the
32
'
trailer to go. Watch out the window or in the mirror until the rear of the trailer is pointing in the desired direction. Then turn the steering wheel in the opposite direction.
Your car will be following the trailer in an arc. Straighten the car and trailer by
(3)
~
turning the steering wheel more sharply, then when they are in line, straighten the steering wheel. Always try to back to your left because the visibility is much better. (See illustration.) When you don't make it on the first try it is usually much easier to pull forward to your original position and start over.

Overnight Stop
Airstream owners have parked virtually every place imaginable from fi lli ng stations to fa rm lands. In time you w ill develop a knack for spotting wonderful l ittle roadside locat ions by turning off the main highway and exploring.
There are many modern trailer parks including State, County and Federal parks with good faciliti es, where you may obtain hook-ups of electrical, water and sewer connections. Directories are published which describe in detail these parks and tell what is avai lable in the way of serv ices and hook-ups.
On overnight or weekend trips, chances are you will not use up the capacity of the sewage holding tank, deplete the w ater supply or run down the battery which supplies the 12 volt current.
On a longer trip, when you have stayed where sewer connections and utility hook-ups were not avai lable, it will be necessary for you to stop from time to time to dispose o f the waste in the holding tank and replenish the water supply. M any gas stations (chain and individually owned) have installed sanitary dumping stations for just th is purpose. Booklets are available which list these clumping stations.
When stopping for the night your Airstream is built to be safely parked in any spot that is relat ive ly level and where the ground is firm.
Your facilities are with you, you are selfcontained. Unless the car is needed for transportation, it is not necessary to unhitch. Try to pick as level a parking spot as possible. Stabilizing jacks or blocks probably won 't be req uired for an overnight stay; however if you put the jack pad on the hitch jack and run the hitch jack clo wn to take the weight off the car's springs thi s will provide some stability. If you must park on a slope, park facing downhill; it is easier to level the Airstream thi s way.
All you need to do to enjoy the selfcontained luxury of your Airstream is to: 1. Light the water heater and refrigerator
pilots if required. See pages 56-66 for complete detai Is on LPG systt-! m and gas operated appliances.
2. 'lurn on the range gas supply and ligh t the pilot .
Before moving on, check your carnpsi te, both for cleanliness and also to be sure you haven't left anything behind, turn off the gas supply petcock to the range and make sure everyth ing is properly stowed. Use your Pre-Travel Check List on page 88 and you are ready fo r more travel adventure.
33

Extended Stay
Making a long trip in your Ai rstream is not very different f rom making a weekend excursion. Since everything you need is right at hand you are at ho me wherever you go. When packing for an extended t rip take everything you need, but on ly what you need.
When you plan to stay in the same place for several days, weeks, or months, you will want your trailer to be as level and steady as possible. Check the attitude of your Ai rstream with a small spi rit level set on the inside work counter o r the trai ler hitch "A-Frame~' If a correct ion is necessary then you must level from side to side first. This can be done mos t easily up a small ramp consisting of 2"x 6" boards about four feet long and tapered at both ends. (See photo.) We do not recommend placing tires in a hole for leveling.
Level from front to rear by disconnecting the hitch from the car, putting the jack pad under the hitch jack and adjusting the jack up or down unti l you are level. Block or chock the wheels to keep the trailer from rolling. Use the wrench, located in the hose carrier, to lower the two B.A.L. stabilizing jacks on the low side. Bring the trailer to a level position side to side. Lower opposite stabilizing units to a firm position. Note: Whenever the trailer must be lifted with a jack as when changing a tire or leveling on very rough terrain, always place the jack under the main frame rail. A label is provided to indicate the proper position for the jack. Never
34
Trailer LPvcling
I . Ll'vl'l from S1d1' to Sid~·
S H
11 - 1-/ydr.wllr Jack Po.1 1tinn.~
5 - B.A.L StahilizNs
Spirit Level
2. LPwl from Front to R(•ar
s

8.1\.L Stabilizing jack
City Water and Power Inlets
WastC' /)rain Hose Hook-Up (Cen rer fJath )
use stabilizing jacks to lift the trailer.
When you stay for ex tended periods where electric or water are not avail able, you must make regu lar checks on the condit ion of your 12 vol t battery and the contents of your water tank. Try to conserve elec tric ity. You ca n recharge your battery by hooking up the eM/trailer electri cal connector and running the car engine .lt a fast idle. 45 minutes per day should provide about 3-4 hours of power. Carry drinking water in a clean bucket to refill your tank. When your tank nears capacity, move to a dumping IOC<ltion.
The water line connection for city water and electrical connection for 120 volt, 60 cycle city power is located on the road-
side of the trailer in back of the wheels. Unlatch the access cover and pull t he connectio ns out to the desired length. They will au tomatically lock in this position. The access door can now be c losed to prevent the entry o f any foreign objects. O n the electrica l connection, be sure you have the w ire grounded and have the proper polarity (see pages 66 and 72 for water and electrica l system details).
To stow the electrical cable when leaving, unlatch the access cover, unhook the electrica l cable from its connectio n, give a sl ight pul l on the cable, and it wil l automatica lly wind up. To stow the water hose, move the relea se lever to its left hand posit io n. Cau tion: Keep a light hold on the cable and hose as they are winding up so that they do not whiplash against the side of the trailer.
Hook your waste drain hose into the sewer disposal fac il it y and attach to the drain outlet in your trailer. For details o n this procedure refer to page 69.
Turn on gas supply; light the range and oven pilots, light the water heater and refrige rator pi lots. See pages 56-65 for complete detai ls on L. P.G . system and gas operated appl iances.
35

Winter Airstreaming
Traveling in an Airstream during the cold winter months can be one of the most exhilarating experiences in all trailering. When we speak of cold, we are talking about temperat.ures on zero to -10 degrees. Airstreams properly outfitted with dual-pane windows have been cold-soaked at -20 degrees with no adverse effects and with no real discomfort. Dual-pane side windows which are offered as an option , do not require storm windows. Dual-pane side windows, galley, bathroom and optional window shades improve the efficiency of the heating system.
There are of course certain precautions which must be taken as you would in your own home in low temperatures.
1. There should be heat in the trailer at all times*.
2. You must have a plentiful supply of propane gas.
3. If your stay is longer than overnight, then you should endeavor to have 110 V electricity available. The battery (fully charged) will not last more than about 10 hours in zero weather. Of course you can always run your car to recharge the battery and normally the battery will attain sufficient power to run another 3-4 hours by running
• Some states do not allow L.P.G. to be tu rned o n while moving. While travel ing in these states it will be necessary to take other precautio ns to p revent freez ing ot the water and waste drain systems. (See ·•storage and Winte rizing") Addi tionally, L.P.G. should always be shut o ft as a safety preca ution when gasoline is added to the tow vehicle.
36
your engine for approximately 45 minutes to one hour at fast idle. For more detailed information on the battery see page 74.
4 . Minimize use of electricity if 110 volt power source is not available.
5. Your Airstream has forced air heating in the holding tank area. There is also heating around the water tank.
6. leave cabinet doors, bed doors and wardrobe doors slightly open at night to allow circulation of air around all furniture components.
7. For extended stays in cold weather, insulate the water line outside the trailer.
You should remember that low temperatures in combination with high winds cause an equivalent chill temperature much below what your thermometer is reading. For instance, with an outside temperature of zero degrees and the wind velocity of 10 miles per hour, the equivalent chill temperature is minus 20 degrees F. Whenever possible, experienced winter campers try to park their trailer so it heads into prevailing winds. Use trees and other natural barriers as wind breaks. Be sure to check all tires before setting out. There should be plenty of tread left on each one for safety and maximum traction.
It is also important to guard against excessive humidity inside your trailer during winter camp-outs. When windows and window frames fog up or
" sweat", it means that there is too much moisture in the air. Moisture comes from water vapor, and water vapor is the direct result of water evaporating. Many things such as baths and showers, boiling foods , washing dishes, mopping the floor, washing clothes, even breathing, contribute to eyaporation. The inside air can only absorb so much of this moisture before it becomes saturated. At this point, it can hold no more, and any additional water vapor condenses back to liquid water in the form of droplets on any available cool solid surface. Temperature has a direct effect on the air's saturation point. Cold air holds less moisture than warm air. For this reason, the air immediately adjacent to cold outside walls and windows cools down and causes water vapor to condense and form moisture droplets even though warmer inside surfaces are still dry.
The best way to keep condensation under control is to reduce moisture producing activities. It is also important to provide adequate ventilation and keep the air ci rculating as much as possible. Use your exhaust fans to remove moisture before water vapor mixes with the air. Open windows slightly once in a while, while operating fans to bring in drier outside air and aid in overall air circilation. In extremely cold weather , when outside ventilation is not practical , it may be necessary to u e a small de-humidifier to aid in reducing condensation.
/
Storage and Winterizing
When storing your trailer for short or long periods use the same precautions as you would in your own home in regard to perishables, ventilation and rain protection. In addition, for prolonged storage periods, flush out all the drain lines and the holding tanks. Also, drain the entire water system including the water heater and the water storage tank. Instructions for draining the water system are expla ined in the following paragraphs.
Twice a year or after a long storage period, we suggest you take your unit in for a check-up and cleaning of the gas operated appliances.
The main consideration in winterizing is to guard against freezing damage to the hot and cold water systems, the waste drain system (including the traps), the waste-holding tanks, the water hedter and the battery. To completely winterize your Airstream, follow this procedure:
1. Level the trailer from side to side and front to rear. Open all faucets.
2. Turn the water pump switch to the ON position to expel water from the storage tank.
3. Open all drain valves.Tw_2_are located in the rear trunk on rear bath models and in the wardrobe on center bath models. On all models one is located on the water heater accessible through the exterior access panel. ~ully uncoil hose on ground to allow complete draining.
4 . While the water is draining from the system, open and flush the toi let (Lu.s.hing_v a I ve. Depress__hancLspra')L l ~'i.Cr wb ile_ho~Jl(ay_hearl_ d_pwn inside the bowl. Depress hftnd SRray_thumb button on.ibe-telef)bgRe~weLb.e_acLwhll.e.JlOlcHng_<imYo.Jn: side the tub and drain all water from the fl exible hose. Unscrew tile b~ds QQ both spra~ units and store.,
5. After pump has removed all water from the storage tank, turn the pump switch OFF.
6. Remove exhaust hose from water pump. ~
7. Disconnect the water JlliillP inlet co-;:)nectiondnd with check valve removed,turn the pump by hand until all the water is expelled.
8. Lower the front of the trailer as far as t~~W--UOtil water ceases to drain, then crank the iack u as high as it wiTLgo and ~t any remjlining water drain o_ul the r.ear drain valves.
9. Pour a cup of nontoxic antifreeze into the lavatory, sink, and tub drains to pre\lent trap fr~e-up. -
10. Be sure to open the waste-holding tank drain valves and drain and flush the tanks thoroughly. (This is very important as the sewage in the tanks, if frozen, could seriously damage the tanks.)
11. Remove the cartridge of the water pud_fier and leave the purifier valve in the op_en position. .----
12 . Remove the batteries from your Air-
stream and store in a cool dry place where there is no danger of freezing. It is very important for optimum life of a battery to check it periodically and to keep it fully charged.
13. Remove any items (food, cosmeti cs, etc.) from trailer interior that might be damaged by freezing-or might damage the trailer if containers break.
For additiQnal winterizing protectio.o add a nontoxic antifreeze (approved for drinking wafer syste o_t e_water lines
-- usu1g the foll owing pro_cedure:_ 1. Reconnect all lines except the hose to
the pump inlet port. Close all drain valves (see step No. 3}.
2. Attach a length of hose to pump i!llet_Rort. T · iece-o.Lhos.e._sboulci be longJill.QJ.Jgb for the free end to_be inserted into and reach the bottom of theantifreeze ~_ainer.
3. Dilutethe antifreeze solution in accordance with the manufacturer's instructions.
4. ~all wated ucets. 5.1D_sert hose len th into the a_ntif~eze
CQ.Dtainer, t Y.ID.. tb.e...ruJm~ switch on, ~nd run tb_e water puf_!!p until the antifreeze solution fills all waru lines ang the water heater. Flush toilet, work hand spray whi le holding down in bowl. Work hand shower spray while holding down in tub.
6. Shut off the pump and close all faucets.
7. Disconnect the hose length from pump inlet fitting and reconnect water system inlet line.
37

Exterior Identifications
0
No. Description Page No.
1. Cluster lights .. . . . ... . . . . ........ 86 7. Exterior light ..... . ... . . . ... . ... 86 13. Stop, tail, turn and 2. Roof vent .......... .. ..... . .. ... 53 8. Clearance light . . . ........ .. .... 86 back up lights .. . . . . . .... ..... .. 86 3. Air conditioner . ............ ..... 51 9. Main door step . . ... . . . ........ .40 14. license plate light . .. .. .. . ... . .. 86 4. Range exhaust vent .... . . . . .... . . 62 10. Furnace vent ..... . .. . . . ...... . . 63 15. Was te outlet (rear bath) . . ...... . 69 5. Main door light ............... . . 86 11. 120 Volt outlet . . .. .... .. . . ..... 72 6. Vista view window .............. .41 12. Exterior storage ..... .. ... .. . .. .
38

No. Description Page No.
16. L.P .G. tanks and regulator .. . . ... 56 21. Water heater access panel ....... 65 26. Refrigerator access door . ..... . . 58 17. Univolt vent ..... .. ..... .... . .. .73 22. Waste outlet (center bath) ...... . 69 27. Battery compartment .. ......... 74 18. T.V. antenna .................. .41 23. B.A.l. stabi lizing jacks .......... 34 28. Brake vacuum hose .... . ........ 15 19. Refrigerator vent . . ... . ....... . . 58 24. Electrical inlet (city) .......... . . .72 29. Safety chains ••...... ......... . . 28 20. Water inlet (tank) ........... . ... 66 25. Water inlet (city) ............... 66 30. Power jack .... . ............. . .. 28
39

Exterior
The Airstream exterior has been covered by an acrylic lacquer finish providing years of envi ronrnentttl protection. W ttshing the exterior of yo ur Airstream is simi lar to washing an au tomobile. Both have high quality fin ishes and certain precautions must be taken to protect them. Oil, grcilse, dust, and di rt may be removed by washing with any mild nonabrasive soap or detergent. Automatic dishwasher detergents and acid etch cleaners are too strong and should never be used. Always clean your Airstream in the shade or on a cloudy day when the aluminum skin is cool. Cleaning should be followed by a thorough clean water
1rinse. Spots and streaks may be prevented by drying the unit with a chamois or a soft cloth.
After clean ing and drying, a good grade of nonabrasive automotive paste or liquid wax will increase the life of the finbh, especial ly in coastal areas where the finish is exposed to sa lt .l ir or in polluted industrial areas. It will also protect the shell from minor scratches and make subsequent cleaning easier. Wax should normally be applied every three to six months. The fi rst applica tion should not be sooner than 90 clays after purchase to allow acrylic finish to cure.
II is important to remove sap, seeds, gum, resin, asphalt, etc., as soon as possible after they appear by washing and rewaxing. Sunligh t and time will bakeharden these materials making them almost impossible to remove without
40
heavy buffi ng. If asphalt remains on the trailer after washing, use a small amount of kerosene on a rag and wipe the spots individuall y, being careful not to scratch the aluminum.
For small areas of damage to the acryl ic protective coating, or where oxidation is beginning to occur, rerTlove all traces of the acrylic coating with a good grade of lilcquer solvent and then thoroughly clean the aluminum with an aluminum cleaner. Respray the area with clear acrylic lacquer. All items needed for these minor repairs to the exteri or shell are available at Wally Byam Stores. For extensive refini shing we recommend that you contact an Airstream Servi ce Center or the factory for instructions. To l<cep your trailer looking new, paint the "A" frame, L.P.G. tanks, and rear frame periodica lly, by brushing on aluminum lacquer or, if possible, by spraying.
Each time you connect the 7-way electrical connector check for dirt and corrosion. Keep the contacts clean with " Spra-Kieen ."
It is important that the main door be completely closed and locked during towing. If it is not locked the constant vibration of travel may cause it to open wi th possible damage.
For your security the lock has been designed as a dead bolt . For th is reason never try to sh ut the door when it is locked. The door is properly closed
Fold-Away Step
when the handle is firm. If the door is difficult to open, push o r pull in to release the latch. When the doo r swings all the way open it wi ll autornatically latch against the trai ler. An optional d ead bolt lock installed on the inside of the door frame, provides added secu rity . This lock operat es by twisti ng the knob clockwise to lock, counterclockwise to open .
The screen door latches to the main door using a manually operated slide bolt latch. It can be released from the main door to operate independently. Velcro st rips on the screen door and main door jamb hold the screen door closed. A second slide bolt latch on the door frame can be used to provide positive screen door locking while inside the t railer. To operate the fold-away step just

Motorized TV Antenna Controls
press down the latch on either side and the step will automatically drop into posit ion. To stow the step simply lift the front edge and then push it up under the t rai ler to its stowed posit ion.
The extension step is permanently attached to the main step and when needed it is simply fllpped out.
Never travel with step lowered. The exterior windows in your trailer are of heat strengthened safety plate glass. To open: rel ease the two lever locks at the bottom, pull the two side operator hand les toward the center and pull down until the window is in the desired position and place the operators into one of the five posi tioning holes. To close: pull the two side operator handles toward the center and slowly lift.
The high strength safety glass front center window is cleaned in the same manner that ordinary windows are. Clean the seals with a damp cloth or mild detergent every three to six months taking care not to use strong solvents as they will damage the seals. A coat of natural silicone lubricant applied after the seal has dried will keep it fl ex ible.
Spread the lubricant evenly with a brush or finger, working it into the surface. Th is is a good practice for all rubber sea ls in your Ai rstream. For replacement of a damaged window contact an Airstream Service Center or the factory.
The double paned side windows include mylar tint. They eliminate the need for storm w indows and improve the effic iency of the air conditioning sys;.tem.
Screens are made of plastic for hard wear and easy maintenance. Clean with a damp cloth. Note: They will melt at the point of contact if touched by a cigarette.
Vista view windows are double paned, allow for interior lighting while maintaining privacy and are equipped with integral shades.
Factory recommended awnings give shade during trips and rallies. They are easy to operate and can be installed by your dealer.
The aluminum construction of your trailer creates a radio-sh ield and you will need outside antennas for good reception. This can be accomplished by a whip rad io antenna or T.V. antenna with an auto coupler.
The motorized radio/T.V. antenna is connected to an auto-coupler. This enables you to utilize your T.V. antenna in the raised position for AM-FM radio reception .
The control panel is located on the curb side wall just above the arm rest. A two position rocker-type switch is used to control the antenna. When the upper portion o f the switch is pushed, the antenna raises to the full " up" posi tion then start s to turn in a clockwise direction . When the strongest signal point is reached, antenna rotation is stopped by pushing the bottom portion of the switch rocker to bring it to the center o r "off" position . Counterclockwise rotation and antenna lowering are accomplished by pushing the rocker bottom portion all the way in . A green light on the switch panel indicates when antenna is in motion. The antenna m ust be fully stowed for t ravel.
41

Floor Plans
I \ ,_J
Center Bath
No. Description Page No.
1. Vacuum cleaner . .. ........ . . . .. 55 2. Water in let- city . ...... . ....... 66 3. Electrical inlet- city ....... . ..... 72 4. 120 vo lt ci rcuit
breaker panel ... . .............. 72 5. Waste outlet ................ . .. 69 6. Water pump ................... 66 .. 7. Water in let - tank ...... . ........ 66 8. Microwave oven (optio nal) ...... 60 9. Air cond itioner .. .. .... . ...... . . 51
42
10. Refrigerato r ...... . . . . . .... . .... 58 11 . Front lounge .................. .46
20. Appliance center . ..... . ...... . . 53 21. Sink .. .. . ..... . ..... ... . ., .... . . 51
12. Entertainment center .......... .48 13. Table ...... . ............ ... .... 50
22. Range and oven .............. . . 61 23. Furnace ....... . ................ 63
14. Battery ........ . ...... . ... . . . ... 74 24. 12 volt distribution panel .. ... .. . 83 15. Power brake booster ............ 15 16. Hitch ..... . ........ . . . ......... 27
25. Digital clock .. . ......... . ..... .48 26. Univolt ................. . ...... 73
17. Toilet . . ... .. ..... . ... . .. .. . . ... 70 18. Water hea ter ................... 65
27. L.P.C. tanks and regulator . .. . . . . 56
19. Water pu rifier .................. 67

®® ® .. Center Bath
No. Description Page No.
1. Vacuum cleaner .... . ... .. . ..... 55 10. Refrigerator .................... 58 19. Toilet ....... ................. .. 70 2. Electrical inlet- city ...... ... .... 72 11. Front lounge .................. .46 20. Water heater ...... .. . .... ...... 65 3. Water inlet - city .. ........ . . ... 66 12. Table .. ... ................... .. 50 21. Water purifier . .... ...... ....... 67 4. Waste outlet ...... ..... ...... .. 69 13. Digital clock .................. .48 22. Appliance center ..... ...... .. .. 53 5. 120 volt circuit breaker panel . ... 72 14. Entertainment center .......... .48 23. Sink ............ ...... ........ . 51 6. Water pump ................... 66 15. Battery ... ..... ................. 74 24. Furnace .. . .... .... ..... .... ... . 63 7. Water inlet- tank ...... .. ....... 66 16. lJnivolt ........................ 73 25. Range and oven . ............... 61 8. Air conditioner . ..... ........ ... 51 17. Power brake booster ............ 15 26. 12 volt distribution panel ....... . 83 9. Microwave oven (optional) ...... 60 18. Hitch .......................... 27 27. L.P.G. tanks and regulator ....... 56
43

11
17
Rear Bath
No. Description Page No.
1. Waste outlet .... . ......... ... .. 69 9. Air condit ioner ....... . ......... 51 18. Water purifier ... . . . ... . ........ 67 2. 120 volt circuit 10. Refrigerator .................... 58 19. Appliance center ........... . ... 53
breaker panel ........ ..... ..... 72 11. Front lounge . .......... ..... ... 46 20. Sink ................. . . . . .. .... 51 3. Toilet ........ . ...... . . ......... 70 12. Entertainment center .. . ....... .48 21. Range and oven ................ 61 4. Water pump . ... . .... .. . .. ..... 66 "13. Digital clock ...... ....... . . .... 48 22. Furnace .......... . ... .......... 63 5. Water heate r ................... 65 14. Battery ..................... . . .. 74 23. Table ........... . ..... .... ... .. 50 6. Electri ca l inlet - city ......... . ... 72 15. Power brake booster ....... .... . 1 5 24. 12 volt distribution panel . .. .. . .. 83 7. Water inlet - ci ty ... .. .. .... .... 66 16. Hitch ............ . .. ... . ..... .. 27 25. Univolt ................ . . . ..... 73 8. Microwave oven (opt ional) ...... 60 17. Vacuum cleaner ................ 55 26. l.P. G. tanks and regulator ....... 56
44

'
45

Interior
The Airstream interior has been designed for comfort, convenience, durability and appearance. An understanding of the operational procedures and maintenance techniques of the interior appointments wi ll add to your pleasure as well as the long I ife of you!f tra iler.
Drapery, upholstery and mattress covers must be profess ionally dry cleaned with a mild, pure, water-free solvent. Frequent vacuum cleaning is recommended.
Your Ai rstream upholstery is treated with Scotchgard® and will repel moisture. Minor spi l ls should be removed by blotting. Avoid rubbing as this will cause a stain to work itself into the fabric .
Professional carpet cleaning methods should be used for heavy carpet cleaning. However, you can clean your carpet more frequent ly with a broom or vacuum cleaner. Consult a professional carpet cleaner for hard to remove stains.
The coynter areas around the sink are of a high-pressure laminate and can be cleaned with soap and water, or you can use a common cleaning solvent on tough spots. 13e sure no abrasive cleaner is used as there is the possibi lity it could scratch the surface. A protective pad should always be placed under hot utensils.
The walls can be cleaned wi th any vinyl cleaner or mild household detergent with
46
water. But, again, no abrasives.
The high-pressure laminate wood of the wardrobes and cabinets may be waxed, if des ired, or may be cleaned simply with a damp cloth . '
See the bathroom section for cleaning and maintenance suggestions for the AI3S plastic surfaces.
To convert the lounge into a bed, grasp the front edge of the seat lift up sl ightly and pull lounge assembly out until it stops and the lounge back is in a horizontal position.
To return bed to lounge posi tion, push lounge back toward wal l until seat back is in upright position.
The bunk beds (optional), located in the bedroom, serve as the bolster fo r the bed when not in use.
In order to place bunk into s'eeping posi tion : 1. Depress latch located on the center
back side of the bolster. 2. With latch depressed pull up on fabric
loop located on the center front bottom of bolster. Th is will al low bolster filler to hinge down.
3. Bring bolster filler up to horizontal position and attach both straps onto bracket on cei ling.
Lounge Into Bed
Central Control Panel

2
L.1mp wtlh Dtmmet S•vttrh
To lower bunk: 1 . Release straps. 2. Rotate hoi ter filler into latched
position. 3. Lower bolster down against wal l.
To make fixed twin b ds, lift mattress slightly. pull it away from the wall and then tuck bedding in along wall. Note: Please do not launder mattress ticking; i t has to be dry cleaned to prevent shrinkage.
The Central Control Panel, located in the galley roof locker of your unit, monitors your Airstream systems.
The panel display button lights up the indicator lights. The AC power light indicates that you are operating on 120V A C.
The battery condition tester lights indicate whether the trailer batteries are in good, fair, weak or bad condition. When they show weak or bad cond111on, you should take every reasonable step to conserve power by using as few lights as possible and switching off appl iances. The battery should be charged as soon as practical with the tow vehicle charging system or by connection to 120 volt power.
The charging system in your trai ler is much l ike the charging system in your car. The univolt package performs a similar function to the car alternator by constantly recharging your battery as power is used. It is important to remember, however, that if the total current draw is greater than the univolt's capaci ty to recharge, your battery may become discharged even though the univo lt is attempting to keep it charged. In this event, it will be necessary to reduce current usage.
The water pump switch, when on, also lights the indicator light. For a complete discussion of the pump, please refer to page 66.
The water tank, main holding tank and auxiliary holding tank indicator lights show the amount o f l iquid in their respective tanks. Measurements are made by means of a series of electronically controlled probes located at various levels in each tank. The gauge lights will indicate in one of the five positions (see diagram).
Accumulation of oxides, dirt, etc. on the probes may result in inaccurate readings. In this case remove probes from the tank and scrape clean. Apply sealant to thread area only and replace probes. Care must be taken to keep the probes free of ealant.
47

The L.P.G. gauge lights indicate the amount o f liquid in each tank. To check the level, press the test switch near the L.P.G. gauge on the Central Contro l Panel and read the amount of liquid in either the roadside or curbside tank.
The power-on light wil l glow automatically when you are hooked up to city power. This light and the polarity warning light are your checks on a proper 120 volt connect ion.
The optiona l electronic digital clock operates at all times whether you are on self-conta ined battery power or hooked up to 120 vol t city power.
To opera te the clock, push display switch to ON. To set correct time, push set sw itch to SET MINUTES and then to SET HOURS.
To conserve electricity, the d isplay switch may be turned OFF. (See Fig. 1.) The correct time is held in memory until the display is turned back on. If, when the display is turned back on, the time shown is incorrect, there has l ikely been a power interrupt ion.
After some time you may experience what appears to be a malfunction in the set switch; that is, the displays may not turn on at all o r they may " rapid fi re." This is caused by dust on the swi tch
48
contacts and is easily corrected by moving the swi tches back and forth 10-20 times.
A combination Motorola Stereo AM-FM radio with separate 8 track stereo tape playe r is available. The "fader" control allows the front speakers to be turned on by themselves, o r the rear speakers by themselves, or any combination of f ront and rear speakers.
Operating Instructions
1. Switch power on by press ing POWER button to " in" position . Switch power off by pressing POWER button again, releasing it to " out" position.
2. Turn SELECT control to desired mode of operation (AM, FM, FM STEREO, FMLC, or TAPE) NO TE : FMLC position is useful o nly in strong FM signal areas, especially where many FM stations may tend to interfere with each other. FMLC posit ion min imizes th is type of interference. Fo r best FM reception under normal conditions the " FM STEREO" posit ion shou ld be used. The "FM " position is useful in fringe areas to lock receiver into monaural mode, thus elim inating stereo th reshold no ise.
3. Turn TUNING control to select desired stat ion .
Electronic Digital Clock
Stereo Tape and AMIFM Radio

Stereo Operation
The indicator light will go on automatically when selected FM station is broadcasting in Stereo. The light is not on when monaural broadcasts are being received, or when a stereo signal drops below a predetermined level. The rad io is designed to reproduce weak stereo signals monaurally to provide more noise free reception. When the signal increases beyond the threshold level, the stereo indicator will light again.
Tape Deck Operation
Insert tape cartridge into slot (behind hinged panel, see Fig. 2) to a fully seated position to switch tape deck on. Receiver SELECT switch must be in TAPE position to operate tape deck. Retracting tape cartridge approximately one inch from seated position or removing tape cartridge completely switches tape deck off.
The program indicator lights indicate which tape program is playing.
When REPEAT button is in " IN" position, the tape deck will continue playing the same program that is playing until another program is selected or button is released to "OUT" position.
Press and release PROGRAM button to position tape deck pick-up head to the next program on the tape. NOTE: If PROGRAM selector feature is not used, the four programs will play in sequenc~ except when " REPEAT" button is in "REPEAT" position. The tape deck will play continuously in this manner until tape cartridge is pulled out from its seated position.
In time, oxide from recording tape will accumulate on the tape head and capstan shaft which can cause tape hiss and erratic operation. The more often the tape player is used, the more often it should be cleaned.
Clean the head with a cotton swab moistened with isopropyl alcohol. Do not use carbon tetrachloride.
To clean the capstan shaft, first turn on the motor by depressing the motor switch (next to the capstan shaft) with the eraser end of a pencil. Use a cotton swab moistened with alcohol on the shaft.
The fuse for the radio, or radio/tape is located behind the unit. To gain access to the fuse, lift up the table. The fuse is secured with an inl ine fuse holder.
49

To open the table, lift the tab le into a horizontal position and pull the folding leg down until it locks in posit ion. To extend the table pull the extension frame and leg out as far as they will go. Release the catch on the forward curbside edge of the extension table leaf and rotate the leaf over onto the extended frame. To stow simply reverse the procedure.
50
Table OpcninR 1 2
3. TV in Credenza

Air Conditioning Ducts ancl Filter
Wardrobe Catches
The Armstrong air conditioner can be used for cooling or heating your trailer or for air circulation only.
To operate for cooling: ' 1. Close doors, windows and ventilators. 2. Set wall thermostat to "COOL" posi
tion and set thermostat indicator to your desired comfort level.
3. Set system switch (located at ceiling cover of air conditioner) to your preferred speed setting. Note: The air conditioner will not operate until speed selection is made. The recommended cooling speed for various outdoor temperature ranges are:
Hi- Cool 70-120 F Med- Cool 60-110 F Lo-Cool 50-100 F
To operate for heating: / 1. Set wall thermostat to " HEAT" position
and set thermostat indicator to your desired comfort level.
2. Set system switch to your preferred speed setting. Note: The heater will not operate until speed selection is made.
To use for air circulation, set wall thermostat to "OFF" position and system switch to any of the three speed selections. To shut unit off, set system switch to "OFF" position.
Shut unit off to dean or replace the filters . Clean both filters with vacuum cleaner once a week. Once a month, remove filters and wash in warm soapy water.
Stainless steel sinks cannot be harmed by boiling water. However, sa lt , mustard, mayonnaise and ketchup can cause pitting. Stubborn stains will yield to paste made of water and slightly abrasive household cleaner. Be sure to work in the d irection of the polish-lines on the steel, to keep the original fin ish. Fingerprints are sometimes a problem. They can be minimized by applying a cleaner that leaves a film of thin wax: simply wipe it on and remove the excess with a dry cloth. After this, fingerprints can be wiped off with a soft dry cloth, or one moistened with a little wax cleaner. The surface should always be washed before wax is applied. Regular cleaning will prevent build-up of scale and film. Ordinary soaps or detergents a·re best for routine cleaning of the stainless steel sinks. Rinse thoroughly with warm water and wipe dry with a cloth to avoid streaks and spots.
For fu rther information on galley equipment refer to page 58 for the refrigerator and page 61 for the range and oven.
51

All the drawers are removable al lowing you storage flexibi lity and ease of packing and unpacking. Wardrobe catches are se lf- locking and they may be opened by lightly pulling the cover plate toward you.
The below bed storage is provided for added storage of bedding a •• ...;~linen or fishing and hunting gear.
When attaching wall hung improvements, like hooks for c lothing, bookshelves and extra towel racks, secure with hal f-inch No. 8 sheet metal screws ~ with flat binder heads. Make holes in the aluminum inner walls with a small hand dri ll (No. 30 dril l bit).
1\ space locker attached to the bedroom roof locker is provided in rear bath models. This provides additional storage space for bedding, etc.
Bed- lights are operated by a switch in the cen ter of the lens. To replace bulbs remove screws securing lamp top frame, and remove frame. Li ft up fo il covered insulation pad to reveal bu lbs and sockets . Carefu lly pull burned out bulb and its socket from plasti c retainer cl ip. Pull bu lb from socket and replace. Replacement bulbs are avai lable from your Airstream dealer. Area lights have switches on the ri m .
52
Space Locker Bed Lights
Ceil ing Light Fix ture Nu-Tonc Appliance Center

Bath Lights are operated by a switch on the rear wall above and just roadside of the sink. Access for bulb replacement is inside the cabinet (above toilet) for the road~ ide light, and on the upper rear panel of the shower stall for the curbside light.
Ceiling light fixtures are incorporated with the ceiling fresh air vents. To operate the lights turn the forward control knob clockwise; first position 2 lights, second position 4 lights, third position 6 lights, fourth position off.
To remove t~ lens and replace the bulbs, pull knob from light switch shaft and remove nut. Remove the screw from the vent control handle. Remove 4 screws attaching lens to lamp base. This will release the lens.
The fresh air vents are operated by the control handle. Turning clockwise will raise the vent and atthe maximum extension vents with fans will automatically turn on. For maximum air without fan, open until fan starts and back up just enough to turn farn off. Turning counterclockwise will close the vent.
Airstream vents are designed to allow air circulation while still keeping out rain and can be used in any weather. Screens should be removed for periodic cleaning.
The NuTone food Center allows you to operate several appliances with just one
built-in power unit. Your Excella is equipped with three attachments, mixer, blender, and knife sharpener. Other appliance attachments are available.
' Your power unit was oiled at the time of manufacture but a storage period may have permitted oil to drain back into the reservoi r. Before using it for the first time, please run the power unit for one to two minutes to insure lubrication . .. before attaching an appliance. At intervals of from one to two months, depending on the amount of use, a few drops of ordinary household oil should be placed around the motor shaft opening.
The unit will warm up in proportion to the length of time it's run and the load it carries. If you run it unusually long or hard, give it a rest before putting it to work again.
The mixer was designed for convenience and effic ient operation. The bowl rests on a turntable directly connected to power unit. The motor, not the beater, turns the bowl - automatically keeps it revolving during mixing, regardl ess of the consistency of the batter. This feature eliminates hand-turning the bowl. And, while the bowl revolves automatically, the beater turns in the opposite direction. This 'counter-motion' feature helps prevent lumpy, incomplete mixing.
To operate the mixer: 1. Place turntable in position on the
power unit.
2. Lock the turntable in place by pressing the locking lever clockwise.
3. Place the.mixing bowl on the turntable.
4. Push the beater blade into the beater head. Blade will'click' when it's locked in position.
5. Insert beater head shaft into center tube of bowl. Place it in one of six positions until it snaps into turntable.
6. Turn dial to des ired speed.
Note: To remove beater head, turn· counter-clockwise, and lift it out of mixing bowl. If the turntable shou ld become locked into power unit and cannot be easily removed, insert beater head and turn it counter-clockwise.
The blender makes meal preparation and entertaining less work and more fun. It performs, quickly and easily the timeconsuming and tiring tasks of grating, chopping, shredding and mincing; it even liquefies solids and blends them to perfection.
To operate the blender:
1. Place blender in position on power unit, and turn clockwise to lock securely in place. Never attempt to place blender in position while power unit is running.
2. Put food in blender. Cover. Turn dial to desired speed. Or. ..
3. When adding solids, cover, then turn dial to desired speed. Remove insert from lid. Add food through opening while blades are in motion .
53

4 .. To remove contents from blender, use a long-handled rubber bottle and jar scraper or a wooden spoon or fork. Don't use a metal spatula or spoon.
The knife sharpener wi II allow you to sharpen your knives in just seconds.
To operate the knife sharpener: 1. Place sharpener in power unit; tu rn
clockwise to lock in position. Be sure sharpening stone is on left as you face the knife sharpener.
2. Turn control dial to speed 3. Be sure knife is clean and dry.
3. Place heel of knife blade into guide slot next to sharpening stone (left or right). Hold knife firmly by the handle and draw it slowly toward you with cutting edge against stone. Allow weight of the knife and the guide slot to apply necessary pressure and positioning.
4. Repeat operation, alternating to left and right side of stone with each stroke, until desired sharpness is obtained.
Caution: Don't test blade edge with fingers. Don't place hands, fingers or other objects on spinning sharpening stone.
Don't sharpen knives with an irregular edge such as serrated, scalloped, fluted, corrugated or ho l low edges ... and don't sharpen scissors. Don't clean sharpener while attached to power unit. Be sure speed control dial is turned 'off before attaching or removi ng sharpener.
54
The area above the refrigerator and refrigerator cabinet incorporates a built-in china cabinet for the handy storage of dishes and glassware. Decorative translucent by-pass sliding doors provide easy access and thei r design compliments the overal l interior decor.
A 12 volt two-tone door bell is installed on the forward side of the main door with the ch imes located under the credenza,
The bathroom exhaust fan is in the bathroom ceiling and is operated by a switch on the rear bathroom wall above and roadside of the sink.
The lavatory bowl, counter top, tub or shower pan in your Airstream bathroom are made of a special ABS long-wearing, light weight, high strength plastic material. When cleaning, use soap or detergent only-never use scouring powder. Always rewax the ABS plastic surfaces after each heavy clean ing with a good grade paste wax (wi thout solvents or cleaners). The wax will protect the surfaces from discoloration and stains. When you first purchase your trailer, Airstream recommends that you give all ABS plastic surfaces a heavy coating of paste wax. This will assure easier cleaning and lasting beauty.
The telephone shower head is designed to give maximum flexibi lity in usage and provide for water sav ing techniques when
I
Cllinll Cabinet
Bath

Vacuum Cleaner
using your trailer on self-containment. When using the shower head, it should be held in the hand and moved about the body. Normally the best water conservation procedure is to wet the enti re body and then turn the water off with the push button at the shower head. Apply soap, lather thoroughly, then rinse the soap off. The shower can be turned on and off without disturbing the hot-cold adjustment. The telephone shower head is also used to fi II the tub for taking a bath.
The 120 volt and 12 volt outlets in the rear bath are located on the under surface of the roo flocker near the window. In the center bath, the 120 vo lt and 12 volt outlets are located behind the mirror.
The Vacuum Cleaner dust canister is located in the center of the rear trunk (exterior access only) on both Rear Bath and Center Bath twin bed models. The dust canister on the Center Bath doubte bed model is located in an exterior roadside compartment behind the forward nightstand . To remove the canister for cleaning, release the two latches near the top of the canister and lift out. You w ill see a filter on the air inlet to the vacuum motor, this should be checked and cleaned, if necessary, each time you empty the dust canister (about every three months under normal use). The vacuum outlet is below the center of the rear bathroom cabinet on the Rear Bath model and in a like location in the rear n ightstand (between beds) on the Center Bath twin bed model. The outlet for the Center Bath double bed model is located in the forward roadside nightstand next to the bed.
The Vacuum Cleaner Switch is located inside the undersink cabinet on rear bath models, adjacent to the rear nightstand on center bath twin models, and inside the roadside nightstand on cente r bath double models.
55

L.P.G. System
Your Airstream is equipped with two tanks for LPG (Liquid Petroleum Gas). LPG burns with a clean blue flame. There are two basic types of LPG in common usage ~ Butane and Propane. Butane is widely used where temperatures are normally above freezing the year round and Propane is usf>rf where subfreezing temperatures are common, since Butane freezes at 32° as compared to - 40° for Propane. All of the orifices in your Airstream LPG appliances are of the universal type which will burn either fuel.
How long a full tank of gas will last is dependent on usage. In cold weather when you are using the furnace, large amounts of hot water, and are doing extensive cooking, you will naturally use more than you will in warm weather when you may do limited cook ing. On the average, with normal cooking and other appliance use, you can probably count on three weeks service from each 30-lb. tank.
The Excella is equipped with an automatic gas regulator. Both tanks are connected to this regulator and when turned on, gas is drawn from only one tank at a time. When the tank being used is depleted the regulator automatically switches to the full tank. An indicator on the regulator points toward the tank being used to give you a visual reminder when one tank is empty. Note: The tank in use is not completely
56
em pty until the red warning flag is fully visible in the indicator window. The empty tank can be removed for refilling without disturbing the tank being used.
Simply close the tank valve, disconnect it, have it refi lled and reconnect.
The vent at the bottom of the regulator must be kept free of any obstruction. Inspect the vent opening regularly.
" l " Handle-----""
Regulator ----""'
Shut-off Valve
The LPG gas bottles are secu rely mounted on the front "A" frame of your trailer. If these bottles must be removed for service or replacement, it is important that they be reinstalled correctly in order to prevent any possibility of their falling off or becoming dislodged duril'lg travel. The following step by step procedure gives you the proper method for removing and installing these bottles:
,·
Aluminum Hold Down
Bracket
Hold Down Rod
Stop Pin Flange
Fig. 1 · LPG • Bottle Jnstallation

1. Turn the knob on your automatic regulator so the arrow points to the tank opposite the one to be removed. Shut off the gas valve on the bo ttle to be removed.
2. Disconnect the rubber gas line at the bo ttle to be removed. (This fitting has a left hand thread and turns in the opposite direction to most threaded fittings).
3. Turn the large clamping " T" handle counterclockwise until the hold down bracket is loose enough to remove the bottle.
DO NOT REMOVE THE CENTER HOLD DOWN ROD.
To install :
1. Place the bottle in position on the" A" frame and bottle crossmember so that the verti cal locking flange (See Fig. 1) projects up inside the bottle lower co llar and the open gap in the upper co llar faces the rear of the trailer.
2. Place the cast aluminum hold down bracket in a position so that it rests on the upper co llar of both bott les with the co llar rim s engaged in the grooves on the underside of the bracket.
3. Make sure that the stop pin in the lower end of the hold down rod (See Fig. 1) passes through the opening in the stop pin flange and protrudes at
approximately 1/4" past the flange f ront face .
4. Replace the " T" handle and tighten down until the bottles are held firm lx in place.
5. Reattach rubber gas lines, turn on gas shut off valves and test all fittings fo r leaks. To test , paint fi ttin gs with a soap suds o r detergent so lut ion and watch fo r bubbles.
If you have allowed both tanks to run out, air may have gotten into the lines. In this event, the air must be forced out through the lines by gas pressure before you will be able to light the pilots. Ho ld a match to the pilot of the appliance closest to the tanks unt il it l ights and stays lit. Then move to the next closest, etc. For complete appl iance operating instructio ns, refer to pages 58-65.
Close the shutoff valves on the gas tanks if you smell LP-gas, or if appliance pilot light fails to stay on. Contact an LP gas company service man to correct the problem .
Note: In some states it is illegal to leave gas tanks turned on while towing a trai ler.
Additional info rmation on the LPG system will be available in the Airstream Service Manual.
L. P. C. Tanks and Regulator
57

Refrigerator
Your Airstream is equipped with an A.G.A. approved Dometic gas-electric refrigerator. These are the finest refrigerators available for trai ler use and will give you many years of faithful service . . For best operation of this refrigerator it is important to level your trailer. When parking try to avoid having a strong wind blowing direct ly against the vent out let for most efficient operation.
Controls for both gas and electric operation are located inside the food storage compartment, at the bottom of the unit, and in the Outside Access Compartment. (See photos.)
For gas operation, fol low these i nstructions: 1. Open refri gerator door, all controls for
gas operation are located at bottom of unit.
2. To start the refrigerator turn the valve knob (A) to gas position. The gas valve is now open and the electric circuits are not in use. Set thermostat knob (C) to setting No.4.
3. Pul l knob (D) of the automatic pilot, and keep it out for 15 seconds. Press in knob (E) of the piezo lighter. The pressing may have to be repeated.
4. After the burner is lit, which can be seen through reflector window( F), keep the knob (D) pulled outward for an addi t ional 15 seconds.
5. Release the knob (0) and check that the burner is operating.
58
If the burner is not operating, repeat the lighting procedure.
After a replacement of a gas bottle or a long shut-off period the gas lines are l ikely to be fill ed with air. In such cases the lighting procedure has to be repeated until the air is pushed out of the lines and the gas has reached the burner.
As soon as the required cold temperature inside the cabinet is reached, the thermostat cut s the burner main flame to the by-pass flame sufficient to keep the safety va lve open during gas operation . During electric operation the thermostat cycles the f low of the elect rical current to maintain the set temperature.
Incorporated in the burner bracket is an automatic flame fai lure device which allows gas to pass only when the burner is lighted, keeping the thermocouple hot. Should the flame be blown out, the thermocouple will cool and the device w il l cut off the flow of gas to the burner.
The refrigerator is fitted with a piezo lighter which docs not requ ire flint.
For electric operation, fol low these instructions. 1. Open refrigerator door and outside
access compartment door. Outside access doors arc opened by unlocking and turning the handle 1/ 4 turn counterclockwise. Controls for electric operation are located in both areas.
·'~ • / I 1(1; -./ • ~ .~ ' I I I I I F I 'i I I ~ -- -:_ \ ,\
---· --- .
Sj 9 J
1 i :::: ::.'f t . E F DC A G
Controls Inside Refrigerator
2. To start the refri gerator turn the va lve knob (A) to the off position .
3. Plug the electrica l cord into the 120 vol t outlet (B) located on the back wall of the storage compartment below the Micro Wave oven.
4. Press knob (A) in, until it stops, then turn to electric position.
5. Turn the electric thermostat knob (G) to setting No. 4.
For best operation even during extended stays in parks your unit should be periodically run on gas.
The refrigerator has automatic thermostatic control of the temperature in the food storage space. The gas thermostat (C) controls the temperature during gas operation, while the electri c thermostat

(C) controls the temperature during electric operation. Be sure to make the temperature setting on the correct thermostat.
Your Dometic incorporates a unique, fully automatic defrosting device for the general food storage compartment, which el iminates the necessity for manual defrosting at frequent intervals normally associated with most conventional refrigerators in the medium size range. Furthermore, the time interval of each defrosting cycle, and the frequency, have been so arranged that during defrosting there is no noticeable effect upon the temperature of the foods stored in the refrigerator, and the frozen food storage conditions can be maintained at all times in the frozen storage compartment.
When cleaning, remove all food and clean the interior and all other plastic parts with warm water, and mild detergents. Never use abrasive or caustic cleaning powders, polishes, cleaning paste, gasoline, turpentine or other so lvent type cleaners . Use a damp cloth for cleaning and finish w ith a soft dry cloth .
When the refrigerator is to be out of operation for some time, always leave the door slightly open or place a pie tin of barbecue charcoal on the shelf.
The following are some trouble shooting tips for emergency use only. They relate
to gas operation and should normally be done by the dealer.
Problem: Flame goes out. The thermostat is out of adjustment. To adjust it, turn the dial to "zero~' If the flame does not go down to the " low" by-pass setting, follow this procedure: 1 . Unscrew the large cap screw at the
rear of the thermostat and remove the valve. Clean the seat and valve, and replace.
2. If procedure (1) does not correct the problem, adjust the set screw out (in counterclockwise direction) until the flame goes down to the "low" position.
If the flame keeps going out when the dial is turned to (0), remove and clean the by-pass screw which is located as shown in the diagram above.
Problem : Burner does not I ight. Remove and clean the burner barrel, and/ or check the gas supply.
On gas refrigerators, the flue will require cleaning at least every six months. To do this, it will be necessary to gain access to the back of the cabinet. When cleaning the flue proceed as fo llows :
Unscrew the burner housing, then lift out the baffle on its support wire from the top of the boi ler tube. From the top, clean the f lue with a suitable flue brush. Also clean the baffle, before putting
Spring
Cap
Th ~Jrnwstat
Bv·Pass Scr€'W
+
' Th<-rmostat Adjustment Screw
back in place. An obstruction in the flue will reduce or stop flue draft. Flue obstructions will cause odors outside refrigerator, slow freezing and higher cabinet temperatures.
Additional information on the refrigerator is available in the Excella Service Manual.
59

Microwave Oven
The Litton Industries , portable microwave oven is available as an option in your Airstream. Airstream dealers cannot service or make adjustments to the oven. Thi,s must be done by an authorized Litton Industries service agency. If you ever have problems with the oven check the list of au thorized service agents. This list is packed in your microwave oven.
To operate your litton microwave oven:
1. OPEN DOOR by pushing down door release.
2. PLACE FOOD IN OVEN. 3. SELECT COOK* OR DEFROST** 4. CLOSE DOOR-cooking or
defrosting cycle begins when oven door is closed. Microwave oven may be opened at any point to check food even if time is left on the dial.
5. ALWAYS turn timer back to "OFF" when food is taken out.
Please read your cooking guide carefully. It will help you learn about your new Litton Electronic Oven quick ly.
•For fast cooking of food when recipe ca lls for " MICROWAVE".
.. Provides conven ience for defrosting frozen foods. When microwaves first contact the outer section of the food, heat is created and conducted tolard the center. Without automatic defrosting there is danger of overheating the outside of the food before the cen ter is hot. In extreme cases, the outside of the food could be cooking before the center is defrosting. Automatic defrosting alternates " defrost cycles" and " rest cycles". The rest cycles allow heat to be conducted toward the cen ter providing an evenly defrosted food.
60
Your microwave oven is portable and can be removed for use in your home when your trai ler is not in use. IMPORTANT Safety and Maintenance Instructions Litton microwave ovens are one of the safest kitchen appl iances. Each litton microwave oven meets all safety standards set by the U.S. Dept. of Haith, Educat ion and Welfare. Look for the safety seal and UL tested label on your oven. However, it is important for you as a user to observe certain precautions and care in util izing your Litto n oven for maximum performance and safety. The door on your oven has been carefully designed to contain the microwave energy; therefore, it is important that you observe the following: 1. Do not attempt to operate thi s oven
w ith the door open si nce open-door opera tion can result in harmful exposure to microwave energy. It is important not to defeat or tamper with the sa fety interlocks.
2. Do not place any object between the oven front face and the door or allow soil or cleaner res idue to accumu late on sealing surfaces.
3. Do not operate the oven if it is damaged. It is particularly important that the oven door close properly and that there is no damage to the: a. Door (bent) . b. Hinges and latches (broken or loosened). c. Door seals and sealing surfaces.
4. The oven should not be ad justed or repaired by anyone except properly qualified service personnel.
Microwave Oven
Your new oven requires very little maintenance except for cleaning. Do not allow grease, soil o r splatter to build up on the door seal to the oven cavity. Use only mild detergent, water and soft cloth to clean the door surface and the interior surfaces. Odors can be eliminated by boiling a solution of one cup of water and several tablespoons of lemon juice in the oven for 5-7 minutes. Litton maintains trained servi ce technicians in all principal metropol itan areas. It is suggested that these authorized service agencies be utilized fo r proper repair and adjustment of your oven. NOTE: Never operate the microwave oven unless the shelf is in place. The steam that is present during cooking and the moisture on the inside of your microwave oven are normal and nothing to worry about. The moisture is caused by the steam from the cooking food hitting a cool oven surface.

Range and Oven
Your Airstream is equipped with a Magic Chef gas range and oven. The foll owi ng are some hints on how to keep them operating at their best.
Note: The range gas li ne shut-off valve, located on the lower exterior of the trailer below the range, must be turned off when towing the trail er, when changing the gas tanks, or if the gas supply is turned off for any reason . 13e sure oven and top pilot lights have been relighted as soon as range shut-off valve is turned on. If the range has not been operating for a long time, a longer waiting peri od for ignition of the pi lot may be necessary due to air in the gas lines.
To light the pilots: 1. 13e sure al l valves are in the ''OFF"
posi tion. The oven thermostat dial should be in the " PILOTS OFF" position.
2. Turn on main gas supply to range. 3. Depress and turn the thermostat d ial
to the " OFF" position. 4. Lift main cook top panel and light top
burner pilot with a match. 5. Open oven door and light pilot with a
match. A smal l flame wil l be noted at the top of the pilot burner.
The oven thermostat control knob is combined with the constant oven and top burner pilot shut-off. For normal use: turn only between " OFF" and " BROIL:' When traveling, turn to ''PILOTS OFF:' Relight only when you want to use the
range, by turning from " PILOTS OFF" to "OFF" and lighting pilots with a match.
Range Top St!clion The range top burners <1re equipped with orifices for use with L.P. gas only. The ' flame wi ll be approximately Y2 inch long. Do not attempt to adjust gas to burner. The orifices have no readjustment.
Air shutters The top burners have pre-set air openings and need no adjustment. The flame should separate into distinct cones. An orange flame is probably caused by small fi lings in the new burners o r by dust in the air , clean the burners to correct this .
Top burner pilot adjustment: Adjust top pilot so that t ip of fl ame is just over the edge of inner cone. Top burner pilot adjustment screw can be reached by removing thermostat knob. Burners should light within 4 seconds. If lighting is difficult, check height of pilot.
Warning: Never allow the top cover to be closed while the range is in operation, as this could extinguish the flame and permit gas to escape into the trailer.
Range and OvC'n
Range Exhaust 1/ood
61

•"
Oven Section The thermostat on your oven does not have a by-pass setting. It will cycle off and on at all temperature settings except broi I. No by-pass adjustment is necessary. There are no oven pilot adjustments on the thermostat. Contol has been factory preset for use on L.P. gas. No field .acljustment is necessary. The air shutter has been adjusted at the factory, however, it may require additional adjustment when used at high altitudes.
To adjust main oven burner air shutter: Open air shutter to the full open position where you have a blowing condition. Begin closing the shutter slowly. When you reach the correct adjustment, blowing will stop. Burner should have a sharp blue flame approximately 3 inches long.
Important: Your oven is equipped with a safety ignition that requires a minimum of 30 seconds to operate after turning the oven control knob on. The oven pilot may be slow in lighting due to air in the gas lines.
Cleaning Instructions: 1. The main top has been hinged from
the back so that it can be raised or removed for cleaning around the top burners.
2. When cleaning the top burner heads, care should be taken that all ports are opened up with a toothpick afterwards.
62
Oven Thcrmosta (
3. Spill-over or spotting in the oven or broiler are more easily cleaned when removed promptly after they occur. Never wash porcelain when warm. Never use cleaning powder containing grit or acid. When oven bottom is replaced after cleaning and servicing, be sure that it is locked in place.
The range exnaust hood vents cooking heat and smoke from the trailer. To operate, pull down on lever located to the right of central control panel. This will open the shutter and turn on the switch for the power fan. Clean the filter at least every six months with warm water and detergent. To remove the filter, remove the two screws that secure it to the housing and let it drop out while
supporting it with your hand. Keep the vent housing clean of grease and dirt by frequent washing.
Additional information on the Range and Oven is available in the Airstream Service Manual.

Furnace
The Airstream furnace is an American Gas Association approved Suburban unit with an electronic ignition designed specifically fo r travel trai lers. It has a sealed combustion system with a dual blower for maximum air ci rculation. O ne blower circulates room air while the other draws in ai r fo r combustion. The adjustable louvered heat registers control warm air flow while co ld air returns through the galley cabinet toe kick opening.
The heat duct sy tem also circula tes warm air around the holding tank, water tank, and one-stop-service center, a vital feature when operating in below freezing weather.
The Suburban furnace is thermostatically controlled. When the thermostat calls for heat, the blower starts and only after it has reached nearly full speed will the burner light. After the temperature set on the thermostat is reached the blower will con tinue to run for a short time removing most of th e remaining heat from the furnace as w ell as forcing the combustion gases from the heat exchanger. To turn the furnace off fo r an ex tended period o f time turn the thermostat and the gas valve to their "OFF" positions. The gas shut-off va lve is ou tside the trailer below the furnace. Operating instructions are printed inside the furnace door.
Trouble-free operation of the Suburban furnace will depend on your adherence
to recommended operating proced ures and precautions. Regular preventive maintenance is important.
Recommendations and instruction s arc.._ cove red under " Maintenance and Cleaning" on page 64. Corrections of pos i ble malfunctions presented here will be helpfu l in an emergency situalion , but servicing should be done by a dealer. One note of caution regarding flue gases: they are vented from the furnace to the outside of the traile r through a vent in the outside wall . Do not in any way obstruct this vent by placing clothing or other flammable material on the vent assembly. Check it often to make certain it does not become clogged.
To start the furnace:
1. To light the furnace, turn the manual valve to the " off" position and wait 5 minutes with blower running. (Set thermostat above actual temperature to operate blower.)
2. After 5 minutes, se t the thermostat to the "off" position .
3. Open manual valve. (Correct operating characteri stics depend on thi valve being posi tioned fully open. Never attempt to operate with valve partia lly closed.)
4. Set thermostat on desired temperature.
5. If burner does not l ight, set thermostat on "off" and repeat steps 1 thru 5.
Furnace Thermostat
6. If after 3 trys and no ignition, go to shut down and determine cause. Do no t attempt to light burner with matches.
TO SHUTDOWN
1. Turn manual valve to the "off" position.
2. Set thermostat on off.
Caution: The air shutter adjustment cover must be tightly secu red for proper operation of the heater.
If your fue l supply is depleted the main burner will go into lockout. To reset the lockout , turn gas valve to " OFF" and set thermostat to " OFF". Wait 5 minutes and return to operation.
63

Adjustment of Main Burner (Primary air): Set the furnace into operation by advancing the thermostat and allow to run until it reaches near-maximum operating t~mperature. Observe the main burners through the burner observation window. The flame should be without a trace of yellow and be " sitting" on the burner. As the furnace was tested at the factory before shipment, it may be found that the primary air is already in proper adjustment. However, adjustments may vary from one location to another d ue to differences in elevation and in characteri sti cs of the fuel gases.
If the flame burns yellow or " l ifts" off the burner, it needs adjustment. Take out the screws retaining the rectangular cover plate and lift the plate off.
Inside the opening is a threaded rod with the visible end slotted to receive a screwdriver. By turning the rod you will adjust the position of the main bu rner air shutter. This air shu tter should be adjusted to the point where a hard blue flame is present at the burner. Replace the cover and check to be certain that the flame is st ill hard blue. Caution: The primary air adjustment cover plate must be in place for proper operation of the furnace.
·Note: If burner is allowed to operate in yellow condition, " soot" will accumulate on vent cap and in radiators. This should not be allowed to occur .
64
When the humidity is high inside your trailer and you wish to remove moisture, open a roof vent and turn on a vent or open a window slightly for cross ventilation.
Addi tional information on the Furnace is available in the Ai rstream Service Manual.
Maintenance and Cleaning We recommend that the furnace be inspected and thoroughly cleaned by a qual ified servi ce agency before each heating season. This would include the combustion chamber, the main burner, the blower assembly, and all control parts. A careful inspection of all gaskets should be made and if any gaskets show signs of leakage or deterioration, they should be replaced.
Cleaning of th~ chamber and main burner will be required if the unit has been allowed to operate with a high yellow flame. The yellow f lame is due to incomplete combustion (lack of air) and will deposit a soot formation inside the chamber and on the main burner.
To clean the chamber, main bu rner , blower assembly and control s, the chamber assembly must be pulled f rom the furnace.
The furnace is equipped with an oi led, sealed moto r and requ ires no oi ling.
Removin g Furnace Access Door

Water Heater
The Atwood-Bowen Gas Water Heater is equipped wi th a Robertshaw LP gas pressure regulator control with a 100% shutoff safety valve which shuts off the gas supply if the pilot flame is extingui shed or the water temperature becomes excessively hot. It is lighted and serviced from the outside through an access panel at the roadside, rear, of the trai ler.
Procedure for lighting or relighting: 1 . Be sure the water heater is filled
with water. Open the hot water faucet at the sink and when the water flows, the heater is full.
2. Turn gas supply line va lve, on the lower exterior of the trai ler below the water heater, to the "ON" pos ition.
3. Turn the gas valve knob (A) to the "OFF" position and the temperature indicator dial (B) to the lowest temperature position.
4. Wait suffic ient length of time to allow gas, which may have accumulated in the burner compartment, to escape (approximately five minutes).
5. Turn gas valve knob (A) to ''PILOT.'' 6. Depress and hold the red reset knob
(E) and push the ligh ter (0) in and turn until the pilot flame ignites. Th is may take several turns of the knob. O r you may I ight it with a match. Note: use cigarette lighter flint for flint replacement in pilot lighter.
7. Keep the reset knob depressed for one-half minute after the pi lot flame ignites.
8 . Turn the gas cock knob to " ON ."
9. Set the temperature indicator dia l to the desired water temperature.
10. To shut down the water heater, turn the gas cock knob to the "OFF" pos it ion.
' Pilot Flame Adjustment If the pilot flame docs not have a small orange tip, the pilot is not getting enough gas. The flame should be about ~ inch in verti ca l height when the water in the tank is cold and the burner is off, 1/4 to :Ya inch in horizontal length when the tank is warm.
A large orange flame indicates excessive gas supply, which wi ll result in short pilot life and earl y replacement. The pilot has been properly adjusted at the factory and should operate wi th a blue, orange tipped flame enveloping the pilot thermocouple. Removal of the pilot adjustment cap (C) in the lower right corner of the control will reveal the pilot adjustment screw . Turn ing this screw counterclockwise reduces the flow of gas to the pi lot (blue flame) and clockwise, the gas supply will increase (orange flame). Replace pilot adjustment cap.
Air Shutter Adjustment All fuels depend upon air (oxygen) to give them proper burning characteri sti<.:s. A ye llow, smoking flame indicates a lack of air and a no isy hard blue flame inclicates too much air. The air shutter sl ides back and forth along the burner tube and is held in p lace by a small shutter adjust-
W,llt'r Hearer Conrrol~ and Drain Valve
ment screw (F). Loosen the screw for adjustment. A good method of adjusting the air shutter is to ~lide the shutter to the ri ght until yellow tipping occurs on the main burner flame (not the pilot) and then slowly slide the shutter to the left unti l al l signs of yellow tipping are gone. When proper adjustment has been obtained, tighten the screw holding the air shutter. The outside access door must be kept firmly locked for proper operation.
Additional information on the Water Hea ter is available in the Airstream Serv ice Manual.
65

Water System
The Airstream water system provides full service both when the trailer is self-contained or when ci ty water is available. Water heater capacity is 6 gallons. The water tank stores 45 gallon of clean fresh water for all your need .
When self-contained, the water pump should be turned on. The switch is located on the Central Control Panel in the galley roof locker of your Airstream. The water pump will run whenever a faucet is opened, and will shut o ff whenever a faucet is closed . It will deliver 3 gallons per minute under constant pressure.
Note: The water pump must be turned off and the pressure in the system relieved prior to hooking up to ci ty water supply and when you leave your Airstream unattended.
The water pump and filter are in the bathroom cabinet on rear bath models and bedroom wardrobe on CB models. The fil ter screen should be checked periodi cally to inspect for accumulation of dirt and sand . To clean the screen disconnect the rubber hoses from both ends, separate the screen housing, remove the screen , clean and replace, taking care that all connections are air tight.
Fo r city water supply, use the standard hose reel o r connect a 1/2" minimum high pressure hose to the water inlet fi tting located under the rear roadside comer of the trai ler, just forward of the bumper, rear bath models or just back
66
of roadside wheel well on center bath models. Turn the hose on and slowly open an inside faucet until the water flows free o f air. The system will now be ready fo r use. If you are staying for some time where ci ty water is available, drain I he water torage tank . To d rain the tank, open a drain valve or faucet and turn the water pump switch on until the tank is empty. Be sure to refi ll the tank with fresh water before departing. The system has check va lves in the water lines to protect the water tank while you are connected to the city water supply.
The water tank is located under the floor between the axles. To fill the water storage tank , open the filler spout (sec photo) on the exterior roadside wall between the wheels, and fill with a hose or a bucket. Close and lock the spout and the water system is ready to use.
To clean the tank, pour some bicarbonate of soda in to the filler spout with severa l gallons of water and allow to stand for a minimum of four hours. Then flu sh the tank out by opening a faucet , allowing the water pump to drain the system. Then refill with fresh drinking water . If the wa ter tank must be cleaned further, the following p rocedure is recommended.
'1. Prepare a sodium hypochlorite so lution using potable water and household bleach (51/4 or 6%) in the rat io of '1/4 cup of bleach to 1 gallon of wate r. (Common household bleaches are Purex and Chlorox. )
W,ller Supply Inlet <~nd Water /-lost' Storag('
WMer Tank Fill Spout

2. Po ur 1 gallon o f hypochlori te so lutio n fo r each 15 gallons of capaci ty into the empty wat t: r tank.
3. Add enough fresh drinking water to completely fill the w ater sys tem .
4. Allow closed system to stand for three hours.
5. Drain the hypochlori te sol ution from system unci refil l with potab le water.
6. ExrE:>s~ivc hypochlorite taste or odor remain ing in the w.ller systern is removed by ri nsing the system wi th a vinegar solution mi xed in thf' ratio of 1 qu,ut vinegar to 5 gallons water.
7. D rt1 in the system and fl ush wi th fresh d rinking w ater.
8. Drain the system and refill wi th fresh dri nking w Jter.
The Everpure QC-2 W ater Purifier is located under the galley . It w ill remove all d irt and collo idJ I matter, .m d eliminate most ch lorine, phenol ,md simi lar odors t1 nd tastes while del ivering spJrkling tJste-free water for drinking and cooking. The fi lter is connected to the cold water galley drinking faucet only. The filter is not guaranteed to remove the tastes and odors o f irun and sulfu r. To remove these tastes, ch lorinate the w<J tcr supply. Super chlorin,llion will prec ipitate dissolved iron, which will be removed by the QC-2 f ilter.
If the b,1Cterial qual ity of the w.1ter is questionable, fill the Everpure chlorine disinfectant dispenser wi th c1n ordinury househo ld l iquid bleach <l nd <lCid one teaspoon of the '>t1me b lccKh to each I 0
WaiN Pump and Filter Water Drain Valw (Rear Bath)
Wa tN Drain Va lve (Cc•ntcr Bath ) Water Puri fie r
67

•• • Water I teater (Exterior)
• Water Tank l1ne Drain <Bath Cab111etl
Rear Bath
• • Water Tank line Drdin • (Ward robe I
• Water Heat (Exterio r)
Center Bath
• ()rain V<t /v(' Loc,wun\
gallon-, of water in the water tank(i.e.S tsp. for a 50 gallon tank). The quality of the water never varies even at the end of the fi lter pack life, however as the minute pores slowly fi ll up with impurities, this wi ll gradually reduce the rate of flow until it is necessary to change the filter. Instructions Me in each box and we advise buying two at a time, always keeping one in reserve.
To remove used cartridge: I. Shut off wa ter by lifting va lve handle
counterclockwise as fa r as possible. 2 . Turn colored ring al l the way to the
left. Ring will drop about 1/2 ." 3. Lift cartridge slightly and turn it further
to the left until it can be disengaged. 4 . Lower cartridge to disengage it from
ring. Discard used cartridge.
68
To install new cartridge: I . With colored ring in lowered position
(turned <1ll the way to the left) orient lug o n cartridge with c uto ut under l t~be l on ring.
2. In crt cartridge strJight up into ring as far a~ i t will go. Holding co lored ring steady, turn cartridge as far to the right as possible.
3. Then turn colored ring far to right to drive cartridge up in to head.
4. To lock ring in place and turn water on, move v.1lve handle down. Be sure h.mcl le leg engages ring lock ing- lug.
The Water Pressure Regulator is on the roadside of the rear trunk in rear bath models, bedroom wardrobe in center bath models. It protects the plumbing inside your trailer , regardless of the varia tion in ci ty water pressures. The pressure at the fa ucet is kept constant.
The wa ter system has built in drain valve~ to protect it from winter freezing. For complete detai ls cc page 37.
Your Dish-Quik~ automatic spray is designed to use liquid detergents only. Do not usc OJps or oap powders.
To fill with detergent : Rernove clear piJstic detergent capsule, fill it wi th detergent Jnd replace on Dish-Q uik. When Slld S arc no lo nger produced, refil l.
To operate your Dish-Quik: I . Turn on fauC"et (a medium stream of
wJter fl owing from spout is best). Adjust w.1tc r to desired temper<tture.
2. Squeeze "on-off" lever or trigger. Clear water will ~pray from DishQuik. (Some water may con tinue to trickle from wing pQul.)
3 . Press round button on top of DishQuik. Suds will be Jdded to the water ~praying from Dish-Qu ik. Release button to ~top suds.
4. Rclea"c " on-off" lever. Spray from Dish-Quik wi l l stop and flow of wt~ter will return lo swing spout.
Pre~s the round button only briefly when you want suds. Don' t hold it down continuously a th i-, wastes detergent. When washing a glas-,, pan or bowl, fill wi th sudsy Wil ler from Dish-Quik. Then release controls (so flow of water returns to swing spout). Scrub item w ith DishQuik. Then rin e with cleM water spray, or under ~wing pout. The fastest method for rinsing i to accumulate the di~hcs in r~1 ck , then pray rinse Jl l at one time with Dish-Quik.
Additional information on the water system is available in the Excella Servi ce M anual.

Drain and Waste System
Your Airstream has a drain and waste system. The system includes waste holding tanks made from molded plastic, free from corrosion problems. with trouble free dump valves. The main holding tank t•nablcs you to use the toilet for several days Jway from disposal facili ties. The waste water from the sink, shower, bath and l~watory drains into the auxiliary holding tank. Each tank has its own dump valve, however, both lilnks drain through a common outlet. Therefore you need to make only one connection when hooking up in a trailer park wi th sewer f aci I ities.
When the toilet will no longer drain, the main holding tank is full and must be emptied. Watch this closely, because when the tank is full, sewage cannot be emptied from the toilet bowl. Check the main holding tank gauge lights on central contro l panel. The auxil iary holding tan k must be empt ied when the central control panel lights indicate full.
On reM ba th models the dump valves <He located in the rear trunk compartment. The main holding tank dump valve is loca ted on the roadside and the auxiliary holding tank dump valve is located on the curbside. On center bath models the dump va l ve~ Me located on the roadside, ju t behind the rear wtwcb, on the main frilmc rail. The main holding tank clump valve b located rear of the !.>cwage outlet.
Rear Bath Dump Valves
Rear Bath Sl•wagC' Otltlet
~~ . -
Center Hath Dump ValvC'S- Center Bath Scwagr Outlet
69

Toilet Hand Spray
Toilet Pedal Operation
70
To empty one or both tanks attach the sewer hose by pressing the bayonne! fitting onto the dump valve ou tlet and rotate c lockwise until it feels solid and secure. Attach the outlet end of the hose to the sewage outlet, maki ng sure that the hose is placed so it wi II drain completel y. The dump valves have two wire loops that lock the handle in the closed position. To unlock push outward on the wire loops and they will snap loose, permitting you to open the valve. Pull up the dump valve handle as far as it will go and wait until the tank is drained. When dumping, the main holding tank should be dumped first; then the auxi l iary holding tank. This will help to rinse out the sewer line with auxiliary holding tank water.
The rna in holding tank must be flushed out until all pJper and waste marerial is removed. Close the dump valve and refill the tJnk with 5 to 10 gallons of clean water and repe<H until clea n.
On rear bath models, a convenient fitting for flushing the holding tank is in the cen ter of the rear trunk compartment.
Replace the plug after using the fitting. The sewer hose is stored in the rear bumper compJrtment. Rinse out the sew er line before storing.
When in a park and connected to a sewer outlet, keep the ma in holding tank dump valve closed Jnd empty the tank
every few days or whenever it becomes almost fu ll . Only by sending a large volume of liquid through the main holding tank a.t a time will toilet paper and other solids completely wash away.
This practice will avoid the accumulation of solids in the mJin holding tank which could lead to an unpleasant cleaning job. Should solids accumuiJte ilnd close the dump valve, fill the tank about half full with water; then tow the trailer for a few mi les. The turbulence and surging of the water will usually dissolve the so lids into suspension so the tank can be drained. Keep the auxi liary holding tank va lve open when connected to a sewer outlet.
The Aqua Magic toilet employs a sliding self-cleaning positive seal blade. Odors cannot escape from the holding tank into the trai ler. The unit use!. less than 2 quarts of wa ter for automatic flu sh. A special feature is the second pedal attadled to the main foot pedal w hich, when pressed by itself, allows fresh water through either the fill rim or hand spray w ithou t opening the slide valve.
When conserving water, usc the hand spray in the following way: I . Hold the hand spray in ready position
over bowl. 2. Depress thumb button and step on the
foot pedal, wh ich sprays wa ter and dumps the contents at the same time.
3. Spray bowl c lean. 4. Release foot pedal , shutting off water
flow.
I

5. If you wish to refill bowl w ith water for next use, depress sma l l foot pedal till water reaches desired level.
When using automatic flush: 1. Step on main foot pedal , and this will
automatical ly open the sl ide valve and drop the waste into holding tank.
2. Hold pedal down until water begins to swirl. This fills rim storage and rinses ti"\e bowl.
3. Release the foot pedal. This will close the valve blade and stop fresh water from flowing. The bowl will refill automatica lly.
If you are certain to empty your holding tank every few days, you can use the toilet on automatic flush. It uses very little water and the tank will provide for the requirements of two adults from 2 to 4 days.
Whenever water is scarce, the hand spray flush makes it possible to stay a week or longer in areas where you cannot empty the holding tank. In flushing for urine on ly, first, wet the bowl with fresh water, and again after use. Starting with a dry bowl takes more water for the final rinse. To flush for urine and solid matter: spray just enough water in the dry bowl to provide for floating the paper and solids. After use, rin se down the s'ides w ith the hand spray and empty the bowl. Holu the sliue valve open ~mel spray and rinse the lower surfaces. Even if it appears clean, quickly rinse it one
more time, then release the pedal and it is ready for the next usc.
There are certain items that should never be put into the toilet or tank. ' Facial and other similar ti ssues: because they have wet strength and do not dissolve easi ly. Toi let paper, especially wh ite, dissolves well after a period of traveling.
Use only trailer sewage tank deodorizers. Antifreeze, ammonias, alcohols and acetones may cause damage to the tank, valve parts, tank fittings, and drain hose. For protection against freezing, use recommended fluids (see Winterizing, page 37).
Some state and federal parks prohibit draining sink and bath waters into the ground, although this is done in the wilderness. Your aux iliary hold ing tank w ill hold th is water until you are at a dump area.
The auxiliary holding tank should be flushed out periodically to wash away sediments that may accumulate on the bottom of the tank. To flush, close dump valve, fill tank with water and then release dump valve. This volume of water wi ll wash sediment away.
Additional information on the Drain and Waste System is available in the Airstream Service M anual.
71

Electrical System
The exclusive J'.irstream Univolt Sys-tem enables you to use the lights and appl iances whether operating on selfcontained battery power or hooked up to 120 volt city power. This combination un it is designed for protection from damage up to and includi ng a dead short . The 12 volt light bulbs give off the same light as regu lar household bulbs, so that when operat ing on sel f-contained battery power, everyth ing works normally except the 120 vo lt convenience outlets and elect rica l operat ion of the refri gerato r.
Convenience outlets for 120 vo lts and 12 volts arc located throughout the interior of the trailer, see d iagrams page 76.
Exterior outlets for 120 vo lts are located on the curbside exterior wall , between the wheels.
Each 120 vol t c ircuit is protected w ith ci rcuit breakers to prevent damage due to electrical shorts or overload.
A 30 amp main breaker is provided for additiona l protection, which wi l l trip should you overl oad the overall 120 volt system. Example: If you are operati ng the ai r condi ti oner, M icro Wave oven and vacuum cleaner at one time, the trai ler's main breaker would trip . The operation of two of these appliances alone in any combination would not t rip the breaker.
When operating with city power, make very certain that the service is 120 volt
72
and not 220 volt. Rol l out the power cord from the automatic reel to the desired length and plug it into the city power source.
The univolt system has a transformer designed to main tain constant output voltages regardless of the variances that occur in ci ty power systems. The t ransformer design eliminates the need for complex electronic sensing systems to charge the battery, mi ni mizing the possibi li ty of fa i lures and great ly increasing its overal l re liability.
When the three pronged plug can be used, there will be no problem with proper polarity or grounding. In some older parks and other locations where three pronged outlets are not available, certain precautions to insure proper grounding and polarity must be taken:
1. Attach the three pronged plug to a two prong adapter. The th i rd conductor line of thi s adapter has a short wi re lead which must be grounded.
2. For proper grounding connect the ground lead to a grounded outlet box or to a cold water pipe. When no water pipe is available, experienced t rail ering people wil l drive a metal rod two feet into the ground and attach the ground lug to it thus provid ing the unit w ith proper grounding.
3. Check the polarity light located on ro<1dsidc rear area.
r
120 Volt Exterior Ovtle t
Po larit y Wil rn ing Light

fhe polarity warning light indicates improper polarity and it should be off when the power supply cable is used with a two pronged adapter. It may occastonally glow when the three wire system is in use, but your trader is properly grounded, and in this case you may ignore the light.
lo operate self-contained, unhook electrical cable from it!t connection, give a slight pull on tht• cable and i t wi II automatically wind up
When your Airstream is hooked up to 120 volt A.C. the Univolt System automatically charges the trailer battery and, if it is hooked up, your automobi le battery as well. The speed and degree of charge de· pcnds on how much power is used for lights and appliances, as only th surplus goes to chargrng the battery. (Please refer to the specifications section for more information on power consumption.) I f you arc making an extended stay or storing your Airstream, then you should (if it is available) keep your trailer hooked up to 120 volt current.
Whenever possible, use the automatic built-in charger of the Univolt System for charging. The charging ci rcuit automatically contro ls the current, reducing it as the battery increases in charge. At service stations, make certain they give your battery a slow charge because quick charges wtll drastically shorten the li fe o f the battery as wi ll allowing repeated complete discharges.
The Univolt Fu e Panel is behind the front lounge or fixed lounge on model so equipped. On models with a fron t credenza, it is behind the fold down table. While you arc connected to the 120 volt receptacle, the wiring i protected by ci rcuit breakers in the breaker panel providing the po larity and grounding i correct. On rear ba th models the 120 volt circuit breaker panel is accessible in the bathroom cnbinetto the right of the sink. O n center bath models it i located in the road ide . wardrobc.ln the event of failure of a 120 volt circuit, check your ci rcuit breaker first. If a breaker continue to trip after you have reset it several times, your ci rcuit may be overloaded with appliances or there may be a short in the circuit. If lessening the load does not solve the problem consult an Airstream Service Center or the factory.
When being towed, the 12 volt battery in your Airstream is receiving a constant charge from the car's generator or alternator through the Seven Way Cormector. The charge rate is contro lled by your automobile's voltage regulator. It is important to keep the seven way connector clean: one method is to usc " SpraKiecn:'
Addi tional information on the <' l<'c trical syst<'m is available m the [ cella Serv1ce Manual.
120 Vo lt lnl\'1
73

Battery
A normal battery will discharge hy itself in 30 to 45 days, therefore it is neces· sary to periodically check the battery and cha1rge it as is necessary. We suggest checking the battery at least every two weeks in freezing weather. A fully charged battery w il l not freeze under any normal ci rcumstances, therefore, it is imperat ive that you keep your battery charged during the winter. A safe level of charge is a specific gravity reading of 1.225. A fully charged battery has a spe· cific gravity of 1.250 to 1.280. A lways use a hydrometer which has a temperature correction scale.
Maintain a clean battery top and check terminals and cables for tightness and cleanliness. A dirty battery will dissipate its charge through surface contamination. Clean battery top with a damp cloth and dry thoroughly.
The terminals should be tight and free of corrosion. To clean terminals, neutralize with a solution of baking soda, rinse in clear water, and dry.
ro insure maximum battery capacity on both charge and discharge, the battery terminals and the inside portion of the cable connector should be craped or brushed until both of these surfaces arc shiny bright. The cable connectors should then be reconnected to the battery and tightened. The complete assembly battery post and cable connector should be coated with a heavy bodied
74
mineral grease or petroleum .
Important: Reconnect the battery cables to the correct battery posts. For example. if negative ground the black cable should be connected to the negative (-) post and the red cable to (+) post. The polarity may be determined by inspecting the battery post which is grounded on the tow vehicle, since it must always match the trailer. For example, if negative pole of the tow vehicle is grounded, the polarity of the traiiN battery is negative ground.
Add water to cells as necessary. Check the electrolyte level at least once a month. When you arre traveli ng steadily and for an extended period of time, or you arc in climates above 90°F check the electrolyte level every two weeks.
Caution: The gases generated within a storage battery cell may be ignited by an open flame or spark in the vicinity of the battery. Do not use a match to provide light fo r checking the level of water.
During the winter the battery should be removed from the Ai rstream and stored in a cool, dry place, kept full of water, cleaned and charged monthly. A ba ttery which is allowed to completely lose its charge will never regain its original power, or a full charge.
8a11erv CJblc Qwck DISConnects
Batteries are located in roadside and curbside co mpartments adjacent to the L.P. G. tanks. The battery slides out on to the opened door for service and removal. For removal it is not necessary to remove cables from ba ttery terminals, just pull quick disconnects apart (see photo).
For battery service or replacement, go to any servi ce station or dealer who sells and services this battery. The battery is rated for 105 amp. hours at 80°F and has a 5 year prorated warranty.

'
75
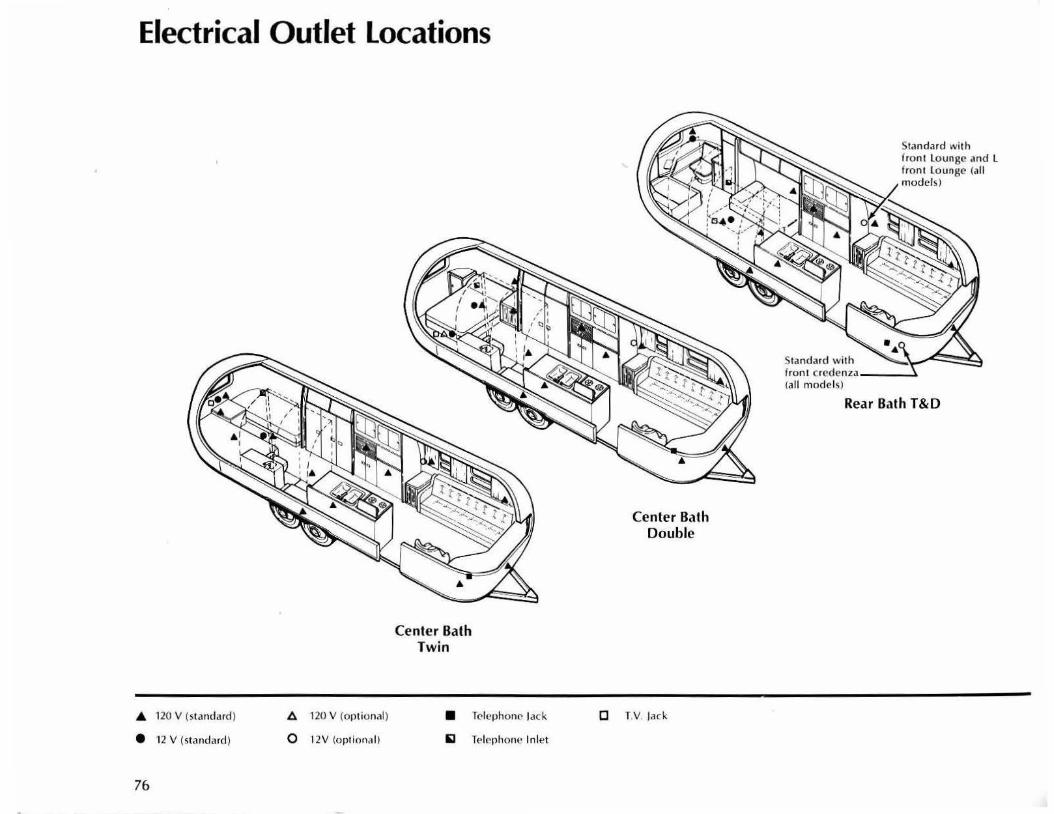
Electrical Outlet Locations
£ 120 V (standard)
e 12 V (standard)
76
l:l. 120 V (optional)
0 12V (optional)
Center Bath Twin
• Tcll'phonc lack
~ Telephone Inlet
Center Bath Double
C T.V. lack
Standard with
Standard with fron t Lounge and L front lounge (all models)
front crcdenza----.~o (all models)
Rear Bath T&D

Electrical Wiring Diagrams
120 Volt Distribution System-Rear Bath T&O
120 vol• -....JL~•r.:~:;41r Distribution Panel
G) Appl•ance C~rcuit-20 amp
Q) A•r Condition(•r - 20 ,,mp
0 Ccnf'r,l l Circuit -IS amp
30amp
Bedroom
Oeclroorn
EM Prior
Nutone
Dining Room
_ Ref"Rl~~---- - -4-Living-Room
77

120 Volt Distribution System-Center Bath Twin
- - - ---aiYPower 120Volt 30 Amp
Dining Room
Microwave Refrigerator -----i+- 120 Voh --+--
Dostributor Panel
-------
Bedroom Bathroom hterior Galley Nutone
G) Apphancc Circuu - 20 amp
0 Air Conditioner- 20 amp
G) Genera l Circuit- 15 amp
78

120 Volt Distribution System-Center Bath Double
Bedroom Microwave
'
Refrigerator
Dining Room
----t+- 120 Volt ---+-- --------
G) Appliance Circuit - 20 amp
@ Air Conditioner- 20 amp
® General Circuit -15 amp
Bedroom Bathroom h teriur
Distribution Panel
Calley Nutone
79

12 Volt Interior
I
Wlrlna Color Code BLUE - Main Charge Line Wt11T£- Ground Linl'
80
l o Power on light 12 Volt
Distribution-----Panel
Circuits for 12 v DC Components
To7Way (~4:LJ Plug ==:=
"Univolt converts 120 volts ACto l2 volt s DC.
To Power Jack MJon t2 V Cargo line
Bauery #1
1l0 Volt AC General Cir<uil

12 Volt Exterior
Wlrlna Color Codt R£0- Stop/ lch lurn GR[(N- Talllr~thi/Cif'aranrtOROWN-Stop/RIRhl furn lllACK- Oack Up WHil E- Ground
'
•All lamp .u~>emblies arc groondl'd to e•tcrior skin
81

Mam and Brake Circuit . Charge Circuit
( • m atfa ) Codl' RL\ CK - ' Wirins Color Charge Un(' I 1
BlUE - M;;l;~und line BlU( _ Canad•l WHIT£ - Braloit> linl' I YELLOW-
82
Balle ry l l
• 0 0 t9~· • .,.w,, Conhol

Low Voltage Distribution Panel
' I
No. Description
1 Power on, Gray 2 Back up light, Black 3 Clearance and ta il l ight, Green 4 Left turn and stop light, Red 5 Right tu rn and stop light, Brown 6 Circuit No. 5, Blue 7 Circuit No. 4, Brown 8 Circuit No. 3, Pink 9 Ci rcuit No. 2, Yellow
10 Circuit No. 1, Purple 11 Battery No. 1, positive Red 12 Battery No. 2, positive Red 13 Battery No. 1, negative Black 14 Battery No. 2, negat ive Black 15 Main 12 volt charge, Blue (B lack Can.) 16 Power jack, Orange 17 Ground, White 18 Univo lt, negative 19 Univolt, positive 20 Power on, White
83

Central Control Panel
0 AIRSTREAM CENTRAL
0AC POWER ~ ~ PANEl BAD GOOD E F
@oiSPlAY BATTERY FRESH WATER
0
PANEL DISPLAY BATTERY FRESH WATER l. .. .. .. .. .. 1---:-
'-- GRAY (POWER ON>
84
0 CONTROL PANEl 0
~ ~ 0 ~ E F E r AUXILIARY MAIN
HOLDI NG TANK HO LDING TANK WATER PUMP
0 0
AUXI liARY MAIN WATER PUMP HOLDING TANK--HOLDING TANK ... ...
~ .. rfl: ~ .... .. .. .. .. .. .. ..
r-t '-
~
O RANGE PINK/WHITE
WHITE GROUND PINK +12 VOLT
O RANGE/WHITE PUMP ON LT BLUE/YELLO W
.QRANGEIYELLOW
REQ~ll~~LLOW BRO WN/YELLOW
PURPLE/WHITE ORANGE/WHITE
GREEN/WHITE REO/WHITE
BROWN/WHITE
BLUE/ ORANGE YELLOW/ ORANGE
GREEN/ORANGE RED/ORANGE
BROWN/ORANGE
BV.CK (ROADSIDE> GRHN (CURBSIDE)

Electrical Trouble Shooting
Symptom
No 12-volt power (Light.s, appliances do not work)
Blown fuse
Dim I ights or sluggish fan motor
UNIVOLT will not charge battery
Possible Cause
1. Input line and/or battery not connected 2. Discharged trailer battery
' 3. Trailer battery on wrong polarity
4. Overloaded ci rcuit (over SO amps)
5. Electrical short
6. Shorted battery 7. Battery terminals not properly connected
to UNIVOLT +and- terminals
8. 25- or 50-cycle power (some foreign countries)
9. Discharged battery (when operating without 120-volt line)
10. Battery is low on water
11. Input line not connected 12. Battery not connected (or polarity
reversed) 13. Bad battery 14. Too many lights and appliances in use 15. Fuse blown
Additional electrical trouble shooting information is available in the Excella Service Manual.
Remedy
1. Make necessary connections 2. Charge battery 3. See Item 7
4. Turn off switches to reduce load. Replace blown fuse in Univolt or next to Univolt.
5. Find blown fuse in Univolt and identify circuit. From wiring diagrams check the circuit for defective wiring, lamps or motors.
6. Replace battery and fuse. 7. Make proper connections; replace fuse.
8. Use 6Q-cycle power
9. Charge battery
10. Add distilled water to battery
11 . Connect input line 12. Connect battery to UNIVOLT
(Check polarity) 13. Replace battery 14. Reduce electrical load 15. Replace fuse
85

Specifications
Capacities
Appliance
Main Holding Tank- Rear Bath Main Holding Tank-Center Bath Auxiliary Holding Tank- Rear Bath Auxiliary Holding Tank-Center Bath Water Tank Water Heater
Specifications l isted herein are those which are designed to be in your trailer. There may be some small differences in the capacities of individual trailers.
86
Capacity
20 gal. 23 gal. 16 gal. 13 gal. 50 gal. 6 gal.
Light and Appliance Amperages
Item
Control Panel Light Water Pump Ceiling Fan Bathroom Exhaust Fan Range Exhaust Fan Furnace Fan Toilet Exhaust Fan Reading Lights:
Liv ing Room Bedroom
Main Door Light Exterior light Cei ling light (6 Bulbs):
living Room, Galley Bedroom, Bathroom
Galley and Vanity Lights under Roof locker
Trunk Lights: Service Center, Trunk
Clearance & Cluster Lights Stop & Turn Signal Tail Light License Plate Light Backup lights Battery
I
lamp Number Amperage
53 X . I 9.9 max. 4.8 2.0 2.0 5.0 2.0
!383 1.6 each bulb 1141 1.6 each bulb 1141 1.6 1156
1141F I .6 each bulb 1141f 1 .6 each bulb
1141 1.6 each bulb
67 .6 each bulb 1895 11 56 1157 89 11 56
105 amp hrs. at 80°F.
------- - - --

Fuses and Circuit Breakers
Circuit Location Rating
Main Breaker 120 volt panel 30 amp General Circuit 120 volt panel 15 amp Appliance Circuit 120 volt panel 20 amp Air Conditioner 1 20 volt panel 20 amp Charge Line from Car Univolt AGU 40 amp
fuse Low Voltage Circuits Univolt SFE 20 amp fuse Trailer Battery Fuse ( +) Univolt AGU 50 amp
fuse Trailer Battery Fuse(- ) Nxt. to Univolt AGU 50 amp
fuse Power On Circuit Univolt SFE 4 amp fuse Ammeter Nxt. to Univolt SFE 4 amp fuse Central Control Panel Main Cen. Ctrl. Pnl. AGC 15 amp
fuse Radio, Radioffape Radio, Radioffape lAG 5 amp fuse Water Pump Water Pump 6Y2 SLO-BLO
87

Pre-Travel Check List
Interior
1. Turn off wat~r pump switch. 2. Check battery water level. 3. Close windows and vents. 4. Turn off Gas to Range & Oven. 5. Lock all interior cabinet doors. 6. Lock refrigerator door
(Seal containers first.) 7. Hold down or stack securely, all loose,
hard and sharp objects. 8. Fasten sliding & foldette doors. 9. Drain toilet bowl.
10. Turn off interior lights. 11. Secure and lock the Main door. 12. Pull up step. 13. Stow table lamp.
88
Exterior
1. Disconnect and stow: a) electrica l hook-up cord b) sewer-hose hook-up hose. (flush out) c) water hook-up hose.
2. Turn off gas line shut-off valve to appliances.
3. Remove and stow leveling jacks and wheel chocks.
4. Check hitch: it must be properly attached. 5. Check safety chains and breakaway
switch cable. 6. Ful ly retract jack. Remove and stow dolly
wheel. 7. Check clearance and stop lights. 8. Check lug bolts. 7'tJ <)~ ;: r tJo,c n ds 9. Check tires, for correct pressure
see page 26. 10. Check that TV antenna is pointed forward
and dipoles closed. 11 . Adjust car mirrors. 12. Pull forward some 50 ft., test brakes, and
check site for forgotten objects and cleanl iness.
Home
1. Leave key with your neighbor. 2. Store valuables and important papers in
a safe place. 3. Discontinue newspaper, milk and other
deliveries. 4. Ask the Post Office to hold your mail
for you. 5. Arrange with the Te lephone Company for
discontinued or 'Vacati on Service'. 6. Arrange care for your pets . 7. Have your lawn, garden and house plants
cared for. 8. Lock all windows and doors securely.
Keep shades open for a lived-in look. 9. Cover all food to keep out mice and
insects. 10. Eliminate all fire hazards. Place matches
in a tin box or glass jar. 11. Store oil, gasoline and other inflammables
properly. 12. Destroy all newspapers, magazines and
oi ly rags. 13. Notify police.
Personal
14. Automobile insurance to cover you and your family fully.
15. Avoid cash. Use travelers checks and credit cards.
16. Confirm reservations. 17. Have sunglasses for everyone. 18. Pack cameras and films . 19. M ake a check list of clothing for
everyone, and toilet articles.

Motoring Essentials
1. Display car and trailer registration properly.
2. Carry driver's license. In Canada you will need a non-resident liability insurance card.
3. In Mexico you must have special auto insurance.
4. Carry an extra set of ignition and trunk keys in a separate pocket, or in your wallet.
5. Keep an operating flashlight with fresh batteries in the glove compartment.
6. Pack the trunk so that you can reach the tools and spare tire without completely unpacking.
7. Keep sharp or hard articles securely packed wherever they may be.
8. Do not pack things in the passenger sitting area, you need maximum space for comfort.
9. Wear easy-wash, drip-dry traveling clothes.
10. Do not make your vacation trips a mileage marathon! Stop and relax frequently.
11 . Carry a first aid kit. 12. Carry your pet's dish, food, leash and
health and registration papers.
'
89

Lubrication and Maintenance
Your Airstream is without a doubt the finest engineered travel trailer ever to be mass-produced. Every design feature and component has been chosen with the thought in mind of giving you thousands of miles of trouble-free operation. By adhering to the following minimum maintenance schedule and the additional
Item
A II Exterior Door Locks Axle Battery Brake Fluid Brakes Entrance Door Hinges Hitch Ball Latch Hitch j ack
L PC Hold Down Knob M ain Door Step Range Exhaust Hood Refrigerator Flue Cleaning
T.V. Antenna Tires Water Pump Whee l Bearings Wheel Lug Dolts Window Seals/ Door Seals 7-Way Plugs and Receptacle
Every 1,000 miles or 30 days
X
X
X X X
X X
X X X X
NotP: If and when nrw materials and production tE>chnlques arC' developed which can improve thr quality of i ts produc t, Airstream reserv('s the right to makC' such changes.
90
exterior and interior maintenance suggestions you will enjoy all of the pleasure you dream of from your trailer ... and more.
Every 5,000 miles or 90 days
X
X
X
X
X* X X
Every 10,000 miles or 6 months
X
Procedure
Lubricate by shooting in dry graphite. None, except wheel bearings. Check water level - fill with distilled water only. Remove reservoir cover. Add Dot 3 fluid . Inspect and repl ace as necessary. Lubricate with light household oil. Lubri cate with. engine motor oil. Lubricate with light household oil (put oil can spout up under handle and allow oil to run down post). Lubricate with light household oil. Lubricate moving parts.
Coat with paraffin. Lubricate exterior moving parts with sili con spray or WD40. Check for foreign objects. Air pressure- page 26. Check belt for wear and proper tension. Clean, repack, and adjust. Check for tightness. '/<? l)' j' (r ;k,, n d ., Clean with mild detergent and coat with "Siipicone~'
Clean contacts and coat with "SPRA-KLEEN:'
"Note. On new tra ill'rs chC'ck lug holts every 200 mil('s for the fi rst 1,000 miles.

""'
~aintenance Record
late Mileage Address Dealer Service Performed Remarks
bl '
ii..
..!_
'
' ~ ~ ~ I ~
'
91

Index Air Conditioner .......... 51 Aluminum Shell .......... 40 AM/FM Stereo ... . .... . .. 48 Amperage Chart ......... 87 Automatic Gas Regulator .. 56 Axle . . . . ...... . . . ....... 18
. Backing ..... . .. ~ ........ 32 Ball (Hitch) . . ... ....... . . 28 Battery ............ ..... .74 Battery Condition Tester . .47 Beds ................ .46,47
Electr ic jack (Hitch) ....... 27 Equipment List . . .. . ...... 13 Explanation of Airstream limited Warranty .. . .... . 6
Extended Stay ....... . .... 34 Extension Step .......... .41 Exterior ........ . . . . ... 40,41 Exterior Identification ... 38,39 Factory Service . . . . . . . . . . . 5 Fan Switch, Bathroom . .... 54 Fan Switch, Vents ........ 53
Motoring Check List ...... 88 Nutone Food Center ..... 53 Oven .. .............. . 61,62 Oven Cleaning . .. ... .. . . . 62 Overheating .. .... ....... 30 Overnight Stop .. ... .... . 33 Personal C:heck list .... 88,89 Pilot Adjustment
Oven .. . ..... ......... 62 Range .. . .......... . ... 61 Water Heater ...... . . . . 65
Tire Rotation ....... . .... . 2(, Toilet .................•• 70 Tow Car Equipment . ..... 14 Towing Tips .......... ... 30 Trailer Storage .......... . 37 Trailer Weight
Information .......... 18.25 Trouble Shooting
Electrical . . . .• ... . ... .. 85 Refrigerator . .. ........ . 5
TV Antenna ............. • 41 Brake Controller . . .... . .. 15 Filter (Air Conditioner) .. . . 51 Power On .......... . .... 48 TV jacks . . . ..... .... . ... . 'J, Brakes (Hydraulic Disc) .15-17 Bulbs (Replacement) ...... 86 Bunk Beds ............. . 46
Filter (Water) ............ 66 Flat Tires ....... . ... . ... . 26 Floor Plans . ........... 42-44
Polarity light ............. 73 Pre-Travel Check list . .. 88,89 Radio .......... . .... . ... 48
Univolt .. ........ .. .....• 73 Utility Connection .. . .... . Vents ........ .. .. .. .... • 53
Capacities ... ....... .. . .. 86 Caravanner Insurance .. . . . 3 Car Connector ... 28,29,73,82 Cargo Capacity . . ...... 19-25 Ceiling Fans . . ... . . .. .. 53,54 Ceiling Vents .. ... . ... . 53,54 Central Control Panel .... .47 Certified Service
Centers .... . .......... 8-12 Check lists ........... 88,89 Circuit Breakers (120 V) . .. ... .. ... . 72,77-79
City Power .. .. ... . .72,77-79 Clock . ... . ...... . .... . .. 48 Defrosting ........ . .... . . 59 Drainage System .. . .... 69-71 Drain Valve locations .. ... 68 Dump Valves .. ... ... . . 69-71 Electrical Connector . ... . . 28,29,73,82
Electrical Inlet . ........... 72 Electrical O utlet locations ............ 77-79
Electrical Panels .... .47,83 ,84 Electrical System ...... .72-74 Electrical Trouble-shooting ...... .. .. ..... 85
Electrical Wiring
Foldaway Step .. ... ...... 40 Furnace ... . . .. . . . ... . ... 63 Fuses and Circuit Breakers ........... .. 83,87
Fuse Panel (12 V) . ....... . 83 Gas (LPG) System ........ 56 Gas Tank .... . ........... 56 Grounding . . .. . ....... .. 72 Hitch ..... . . ... ....... 27,28 Hitch Ball Height .. .... . .. 28 H itching Up ............. 27 Holding Tanks ... .. ... . 69,86 Home Check list ...... 88,89 Interior Check list .... . ... 88 Interior Maintenance .. . .. 46 Jacking Trailer .. . ...... 26,34 leveling .... ... .......... 34 leveling Bars ..... . ...... 28 light Bulb
Replacement . ... . . . 52,53,86 L.P.G. System . ........... 56 Load Charts ........... 24,25 loading .............. . .. 18 Low Voltage Distribution Panel ............ . . ... 80,83 Lubrication and Maintenance . ........ . .. 90
Maintenance Record ... . . . 91
Range .............. .. .. 61 Range Exhaust Hood .. . ... 62 Refrigerator .. ... ... .. . ... 58 Registration ............. 2,3 Regulator (LPG) ... ... . ... 56 Repair Centers ... ...... 8-12 Removing Moisture ... /36,64 Self-Contained
(Drainage) ......... . . 34,69 Self-Contained
(Electrical) ............ 35,72 Service Centers .. .. ... .. 8·12 Seven Way
Connector ....... .. 28,73,82 Sewer Connection .... . 35,70 Shower Head ... . ........ 54 Sink Maintenance ........ 51 Specifications .. . ... . . .. .. 86 Stabilizing Jack Positions .. 34 Stereo Tape Player ....... 49 Storage and Winterizing .. . 37 Switches: lights . .. . ... 52,53 Table ........... . .. . . . . . 50 Tank (Sewage) ... ...... .. 69 Tank (Water) . . . ... . . ..... 66 Telephone Jacks .. . .... .. 76 Telephone Shower Head .. 54 Tires ....... .. ........... 26
Vista View Windows . . .... ~1 Wally Byam Caravans,
Rallies and Clubs ... . .. . Wally Byam Stores .... . .. . 1 Warranty, Limited .. ..... . Warranty and Service ... . . Water Drainage
Procedure . . ....... . 35,6 Water Drain Valves ...... . Water Filter (Water Pump) .' Water Heater ........... . Water Inlet .. ......... .. . Water Level Indicator .... .4 Water Pressure Regulator . . Water Pump . . .... ..... . . Water Purifier (Everpure) . . 6 Water System . .. ... ... . .. 66 Water Tank ... . .... ..... . Way of life . . . . . . . . . . . . . . 3 Weight : HP Ratio ... . ... . 14 Windows . .. ............. 41 Winter Airstreaming . ..... 36 Winterizing .. ...... . ..... 37 Wiring Diagrams .. . ... . 77-84 Wiring, 12 V Exterio r . . . ... 81 Wiring, 12 V Interior ...... 80 Wiring Main Charge
Circuit ... ... . . .... ..... 82 Diagram .... . ... . .... 77-82 Microwave Oven ..... . ... 60 Tire Pressures ... . . .. ... .. 26
92