
AIR COMBAT - Brookstone · helicopters and start the process all over again. Before syncing, ......
6
USER MANUAL THIS PACKAGE CONTAINS: Colors and styles may slightly vary. WARNING: Never leave product charging unattended for extended periods of time. Always disconnect helicopter from charger immediately after the helicopter is fully charged. Please refer to enclosed safety instructions. Made in China Conforms to safety requirements of ASTM, CPSIA, FCC and EN. CHOKING HAZARD - Small parts. Not suitable for children under 3 years. Spare Rotor Blades User Manual 11 Helicopter AIR COMBAT 2.4Ghz Motion Controlled Battling Helicopter PROPEL RC ™ and AIR COMBAT ™ are trademarks of Rooftop Brands. 15760 West Hardy road, Suite 400, Houston, TX 77060 tel: 949.566.9573 © 2015 Rooftop Brands™. All Rights Reserved. www.propelrc.com. USB Charging Cord Remote Control
Transcript of AIR COMBAT - Brookstone · helicopters and start the process all over again. Before syncing, ......

USER MANUAL
THIS PACKAGE CONTAINS:
Colors and styles may slightly vary.
WARNING: Never leave product charging unattended for extended periods of time. Always disconnect helicopter from charger immediately after the helicopter is fully charged. Please refer to enclosed safety instructions.
Made in China
Conforms to safety requirements of ASTM, CPSIA, FCC and EN.
CHOKING HAZARD - Small parts. Not suitable for children under 3 years.
Spare Rotor Blades User Manual
11
Helicopter
AIR COMBAT2.4Ghz Motion Controlled Battling Helicopter
PROPEL RC™ and AIR COMBAT™are trademarks of Rooftop Brands.15760 West Hardy road, Suite 400, Houston, TX 77060 tel: 949.566.9573 © 2015 Rooftop Brands™. All Rights Reserved. www.propelrc.com.
USB Charging CordRemote Control
1
TABLE OF CONTENTS Features. . . . . . . . . . . . . . . . . . . . . . . . . . . . . . . . . . . . . . . . . . . . . . . . . . . . . . . . . . . . . . . . . . . . . . . . . . . . . . . . . . . . . . . . . 1Remote Battery Installation. . . . . . . . . . . . . . . . . . . . . . . . . . . . . . . . . . . . . . . . . . . . . . . . . . . . . . . . . . . . . . . . . . . . . 2Charging the Helicopter. . . . . . . . . . . . . . . . . . . . . . . . . . . . . . . . . . . . . . . . . . . . . . . . . . . . . . . . . . . . . . . . . . . . . . . . . 2Helicopter diagram, Remote Control diagram. . . . . . . . . . . . . . . . . . . . . . . . . . . . . . . . . . . . . . . . . . . . . . . . . . . . 3Preparing for Flight . . . . . . . . . . . . . . . . . . . . . . . . . . . . . . . . . . . . . . . . . . . . . . . . . . . . . . . . . . . . . . . . . . . . . . . . . . . . . 3Flying Tips. . . . . . . . . . . . . . . . . . . . . . . . . . . . . . . . . . . . . . . . . . . . . . . . . . . . . . . . . . . . . . . . . . . . . . . . . . . . . . . . . . . . . . . 4How to Sync your Helicopter . . . . . . . . . . . . . . . . . . . . . . . . . . . . . . . . . . . . . . . . . . . . . . . . . . . . . . . . . . . . . . . . . . . . . 4Understanding Helicopter Trim Adjustments. . . . . . . . . . . . . . . . . . . . . . . . . . . . . . . . . . . . . . . . . . . . . . . . . . . . 4Flight Controls. . . . . . . . . . . . . . . . . . . . . . . . . . . . . . . . . . . . . . . . . . . . . . . . . . . . . . . . . . . . . . . . . . . . . . . . . . . . . . . . . . . 5Interactive Battle Modes. . . . . . . . . . . . . . . . . . . . . . . . . . . . . . . . . . . . . . . . . . . . . . . . . . . . . . . . . . . . . . . . . . . . . . . . . 6Helicopter Warning And Safety Precautions. . . . . . . . . . . . . . . . . . . . . . . . . . . . . . . . . . . . . . . . . . . . . . . . . . . . . . 6Part Replacement Instructions. . . . . . . . . . . . . . . . . . . . . . . . . . . . . . . . . . . . . . . . . . . . . . . . . . . . . . . . . . . . . . . . . . . 7Contents. . . . . . . . . . . . . . . . . . . . . . . . . . . . . . . . . . . . . . . . . . . . . . . . . . . . . . . . . . . . . . . . . . . . . . . . . . . . . . . . . . . . . . . . . 7Air Combat Propeller System. . . . . . . . . . . . . . . . . . . . . . . . . . . . . . . . . . . . . . . . . . . . . . . . . . . . . . . . . . . . . . . . . . . . . 7Replacing the Upper Propeller Blade. . . . . . . . . . . . . . . . . . . . . . . . . . . . . . . . . . . . . . . . . . . . . . . . . . . . . . . . . . . . . 8Replacing the Bottom Propeller Blade. . . . . . . . . . . . . . . . . . . . . . . . . . . . . . . . . . . . . . . . . . . . . . . . . . . . . . . . . . . . 8Battery Warnings. . . . . . . . . . . . . . . . . . . . . . . . . . . . . . . . . . . . . . . . . . . . . . . . . . . . . . . . . . . . . . . . . . . . . . . . . . . . . . . . 9Care and Maintenance. . . . . . . . . . . . . . . . . . . . . . . . . . . . . . . . . . . . . . . . . . . . . . . . . . . . . . . . . . . . . . . . . . . . . . . . . . . 9FCC Information. . . . . . . . . . . . . . . . . . . . . . . . . . . . . . . . . . . . . . . . . . . . . . . . . . . . . . . . . . . . . . . . . . . . . . . . . . . . . . . . . 9
FEATURES• Advanced motion control technology gives you more real-flight maneuvers and battle action than ever before! • Using advanced infrared battling technology Air Combat copters “dog-fight” in Mid-air.• With each successful “hit” side-lights illuminate and the copter performs a spin. • After three strikes, the defeated players copter automatically spirals to the ground-game over! Reset your copter and get back into the battle!• Realistic lights, sound and vibration feedback keeps players engaged• On board 2.4Ghz digital spread spectrum allows up to 8 Players to battle simultaneously.
2
Thank you for purchasing the AIR COMBAT™ 2.4Ghz Motion Controlled Battling Helicopter from Propel RC. Please read this instruction booklet carefully as it contains valuable information on how to properly fly and care for your helicopter.
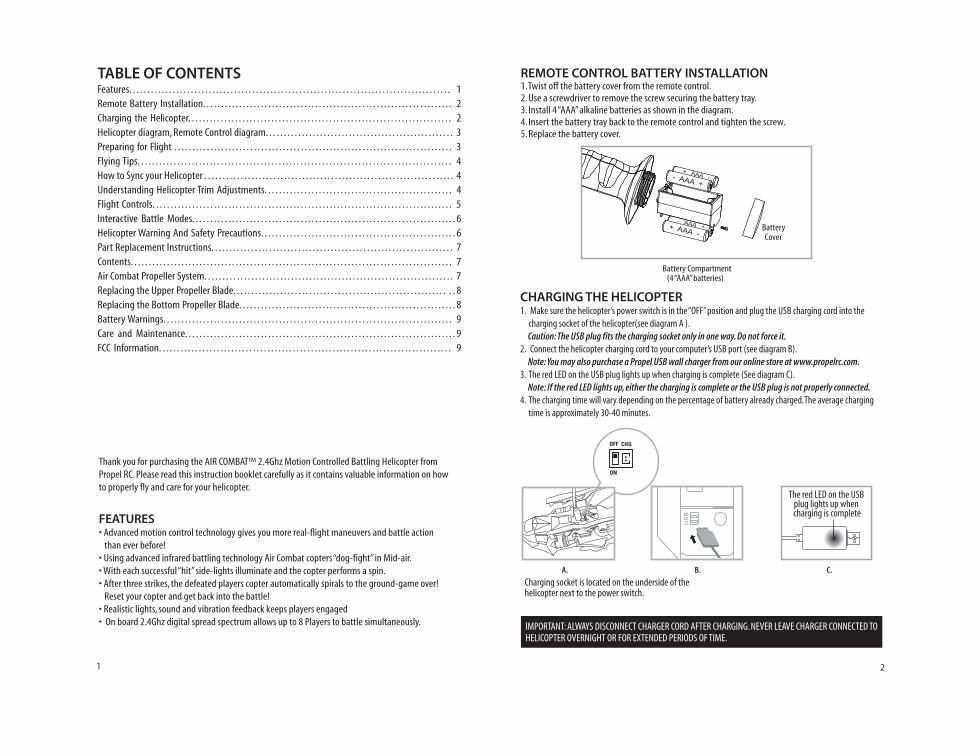
REMOTE CONTROL BATTERY INSTALLATION1. Twist off the battery cover from the remote control.2. Use a screwdriver to remove the screw securing the battery tray.3. Install 4 “AAA” alkaline batteries as shown in the diagram.4. Insert the battery tray back to the remote control and tighten the screw.5. Replace the battery cover.
Battery Compartment(4 “AAA” batteries)
CHARGING THE HELICOPTER1. Make sure the helicopter’s power switch is in the “OFF” position and plug the USB charging cord into the charging socket of the helicopter(see diagram A ). Caution: The USB plug fits the charging socket only in one way. Do not force it.2. Connect the helicopter charging cord to your computer’s USB port (see diagram B). Note: You may also purchase a Propel USB wall charger from our online store at www.propelrc.com.3. The red LED on the USB plug lights up when charging is complete (See diagram C). Note: If the red LED lights up, either the charging is complete or the USB plug is not properly connected.4. The charging time will vary depending on the percentage of battery already charged. The average charging time is approximately 30-40 minutes.
Charging socket is located on the underside of the helicopter next to the power switch.
B.A. C.
IMPORTANT: ALWAYS DISCONNECT CHARGER CORD AFTER CHARGING. NEVER LEAVE CHARGER CONNECTED TO HELICOPTER OVERNIGHT OR FOR EXTENDED PERIODS OF TIME.
BatteryCover
- AAA +
+ AAA -
+ AAA -
- AAA +
The red LED on the USB plug lights up when charging is complete

Trim Controls
UNDERSTANDING HELICOPTER TRIM ADJUSTMENTSIf your helicopter over-rotates CLOCKWISE (to the right), push and release the LEFT trim button repeatedly until the turning stops and proper flight is maintained. If your helicopter over-rotates COUNTERCLOCKWISE (to the left), push and release the RIGHT trim button in the same manner until the problem is resolved. Occasionally, you may need to adjust the left and right trim to ensure the helicopter flies straight and responds accurately to control commands.
HELICOPTER DIAGRAM
REMOTE CONTROL DIAGRAM
• Verify that there are 4 “AAA” fresh batteries inside the remote control unit and the helicopter has been fully charged.• Make sure your helicopter is turned on and properly synced to your remote control (See “SYNC YOUR HELICOPTER” below).• Fly only in a large room free of obstacles with an open radius of at least 25 feet. Close all windows and doors, turn off fans and close air ducts or any other openings that may cause drafts in the room.IMPORTANT: YOUR AIR COMBAT HELICOPTER IS DESIGNED FOR INDOOR FLYING. DO NOT FLY OUTDOORS.
Your Air Combat™ utilizes an automatic 2.4G channel selection system that allows up to 8 people to fly side by side in the same wireless range.FOR ONE PERSON PLAY:1. Before starting, make sure that both your remote control and helicopter are turned OFF. Make sure that there are no other 2.4G devices nearby. 2. Turn ON the helicopter and set it down on a flat surface. The three red LED indicators on the tail blink. This means your helicopter is searching for a controller to pair with.3. Turn ON your remote control. The LED indicators on the helicopter tail flash very quickly, then blink intermittently, indicating that the helicopter and remote control are synced. When this happens you have properly synced your helicopter and you are ready to fly. Note: If the LED indicators do not blink, repeat steps 1-3 to sync the helicopter again.4. SAFETY TRIGGER: After syncing, simply pull the throttle and release once. The LED indicators on the tail stop blinking and stay on. This means that you have released the safety trigger and are ready to fly. Note: the safety trigger mechanism is to protect you against an unprepared or accidental flight. FOR MULTI-PERSON PLAY: 5. Before starting, make sure that all of the helicopters and remote controls are turned off. Make sure that there are no other 2.4G devices nearby.6. Players must sync their helicopters successively. Make sure that no one else is syncing while you sync your helicopter by following steps 1 to 3 above.7. When a player’s helicopter is synced and working it should be left ON while the other players sync their helicopters.8. Should there be a mistake or interference, all players must turn off their remote controls and helicopters and start the process all over again.
Before syncing, make sure the remote control's throttle is at its default position. However, to prevent damage and injury, your helicopter has been fitted with a safety trigger mechanism (see step 4 above)
FLYING TIPS• Parental guidance or adult supervision is suggested at all times.• If you are flying the helicopter with others, make sure all spectators are behind you.
SYNCING YOUR HELICOPTER
PREPARING FOR FLIGHT
3 4
If over-rotating to the right... If over-rotating to the left...
LTRIM
R
Push left trim.RL Push right trim.RL
Power IndicatorLight
Shoot Button
Trim Controls
POWER ON/OFF
Throttle Control
Battery Compartment
Slow SpeedShoot Button
Fast Speed
Shoot Button
Speaker
Stabilizer bar
Tail rotor
Landing Gear
Main Rotor Blades
Helicopter Charging Socket Power Switch
Battle Indicator Light

5 6
One-handed free form flight.
FLIGHT CONTROLS While you’re learning to fly your helicopter, it is best to start with a large room until you get used to the basic controls.
HELICOPTER WARNING AND SAFETY PRECAUTIONSThe helicopter blades revolve at high speeds and can cause damage to the user, spectators, and animals. Stand away from the helicopter to reduce the risk of getting into the flight path. Warn spectators that you will be flying your helicopter so that they are aware of its position. Before flight, inspect the rotor blades to make certain that the blades are securely fastened to the helicopter.WARNINGS• Choking/Cutting Hazard. Small Parts/Sharp Rotor Blades.• Keep hands, hair, and loose clothing away from the propeller when the power switch is turned to the ON position.• Turn off the transmitter and helicopter power switches when not in use.• The charging cable is for charging the helicopter’s Li-poly battery. Do not use it to charge any other battery.• New alkaline batteries are recommended for maximum performance.• Parental supervision recommended when flying the helicopter.
INTERACTIVE BATTLE MODESGet ready for aerial combat missions with your friends (Note Requires additional Air Combat helicopter.)PREPARATION FOR MISSION:1. Make sure all battling helicopters are fully charged, properly synced and ready to fly (refer to SYNCING YOUR HELICOPTER).READY, AIM, FIRE!1. While your helicopter’s in flight, aim the nose your helicopter at the cockpit of your opponent’s helicopter and press one of the FIRE buttons on your remote control.2. If you score a hit, your opponent's remote control will vibrate and explosion sound come out, one of the helicopter's battle indicator lights will turn off, and the helicopter will quickly turn 180 degrees to defend its cockpit from the next strike. THREE STRIKES YOU'RE OUT!3. On the third direct hit, your opponent’s helicopter battle indicator lights will simultaneously flash red and your opponent will not be able to control the helicopter. The copter will gradually descend safely to the ground. Mission accomplished! 4. After 10 seconds the downed helicopter will recover (reset) and will be ready for the next dogfight.
Pull the trigger to increase the speed of the main rotor, and release the trigger to decrease the speed of the main rotor. The helicopter will rise or descend accordingly.
Tilt the controller forward and to move forward.
Tilt the controller left to spin counterclockwise.
Tilt the controller right to spin clockwise.
Tilt the controller backward to move backward.
SPEED CONTROLS: Your air combat helicopter can operate in beginner (slower) or advanced (faster) speed mode. Simply press the SLOW button (green LED lights on) or FAST button (red LED lights on) while the helicopter is in flight (See REMOTE CONTROL Diagram).

CONTENTS:(1) upper rotor blade x 1 (3) connecting rods x 4
(2) bottom rotor blade x 1 (4) screws x 4
AIR COMBAT PROPELLER SYSTEMYour Air Combat propeller system is a precision instrument that may need repair or replacement from time to time for optimal flight function. Crash landing from high-speed aerial flights may damage your Air Combat rotor blades or connecting rods. TROUBLESHOOTING:If your Air Combat loses its ability to fly correctly, inspect the propeller system carefully for the following two common issues:1. Replacing The Connecting Rod: The connecting rod is a small “handcuff” style device that stabilizes the “upper” rotors. There is one connecting rod on the upper rotor. Please see Diagram 1. If a connecting rod is broken or missing simply replace it by removing the existing broken unit and replacing it with a new one. You may have to use slight pressure when reattaching both ends of the new connecting rod. Make sure that the new connecting rod is secured and locked in place. See Diagram 2. Make sure there is no damage to the actual blade or arm that holds the connecting rod in place. If there is, you must replace the entire blade system.2. Replacing The Upper and Bottom rotor blades: The rotor is subject to damage as you learn to properly fly and control your Air Combat. If after a crash your helicopter has loss of control or flies erratically you should carefully inspect your entire propeller system for any sign of damage. Most common are cracked or chipped blade, broken connecting rod, and frozen balance bar (this is when the balancing bar and blade are jammed and can not move freely up and down). See diagrams 3 through 12.
7 8
Diagram3
Diagram4
REPLACING THE UPPER ROTOR BLADE
Diagram5
Diagram6
Upper Blade
Diagram7
Diagram8
Diagram9
REPLACING THE BOTTOM ROTOR BLADE
Diagram10
Diagram11
When you tighten the screw you should test the blade to make sure that it still has free movement. If the blade cannot move freely, slightly loosen the screw.
Bottom Blade
Diagram12
Please note the design of the bottom blade.
Please note the design of the upper blade.
Using a screwdriver turn counterclock-wise to remove the screw.
Using the screwdriver turn clockwise to tighten the screw.
Using a screwdriver turn counterclock-wise to remove the screw.
Remove the broken blade and carefully replace with a new one.
Remove the broken blade and carefully replace with a new one.
Using the screwdriver turn clockwise to tighten the screw.
When you tighten the screw you should test the blade to make sure that it still has free movement. If the blade cannot move freely, slightly loosen the screw.
Diagram 1
REPLACING CONNECTING RODS
There is one connecting rod on the upper rotor.
Diagram 2
Proper connectionReplacing connecting rod
Broken connecting rod Broken connecting rod
PART REPLACEMENT INSTRUCTIONS

BATTERY WARNINGSRECHARGEABLE BATTERY:This helicopter uses an internal Li-Poly rechargeable battery and is not replaceable. If the battery can no longer be charged, dispose of the helicopter properly according to local disposal requirements.CONTROLLER BATTERIES:Remote control requires 4 “AAA” batteries (not included). Please read the important battery safety warning below.• Do not mix alkaline, standard (carbon-zinc) and rechargeable batteries (Nickel Metal Hydride).• Do not mix old and new batteries.• Non-rechargeable batteries are not to be recharged.• Rechargeable batteries are to be removed from the item before being charged (if removable).• Rechargeable batteries are only to be charged under adult supervision.• Exhausted batteries should be removed immediately and must be recycled or disposed of properly according to state or local government ordinances and regulations.• The supply terminals are not to be short-circuited.• Only batteries of the same or equivalent type as recommended are to be used.• Batteries are to be inserted with the correct polarity.• Do not dispose batteries in a fire - batteries may leak or explode.CARE AND MAINTENANCE• Always remove the batteries from the remote control when it is not being used for an extended period of time.• To clean, gently wipe the remote control and helicopter with a clean damp cloth.• Keep the toy away from direct heat or sunlight.• Do not submerge the toy into water. This can damage the unit beyond repair.• Parental guidance recommended when installing or replacing the batteries.
FCC Part 15 B NoticeCAUTION: Changes or modifications not expressly approved by the party responsible for compliance could void the user’s authority to operate the equipment.NOTE: This equipment has been tested and found to comply with the limits for a Class B digital device, pursuant to Part 15 of the FCC Rules. These limits are designed to provide reasonable protection against harmful interference in a residential installation. This equipment generates, uses and can radiate radio frequency energy and, if not installed and used in accordance with the instructions, may cause harmful interference to radio communications. However, there is no guarantee that interference will not occur in a particular installation. If this equipment does cause harmful interference to radio or television reception, which can be determined by turning the equipment off and on, the user is encouraged to try to correct the interference by one or more of the following measures:• Reorient or relocate the receiving antenna.• Increase the separation between the equipment and receiver.• Connect the equipment into an outlet on a circuit different from that to which the receiver is connected.• Consult the dealer or experienced radio/TV technician for help.This device complies with Part 15 of the FCC Rules. Operation is subject to the following two conditions : (1) This device may not cause harmful interference, and(2) this device must accept any interference received, including interference that may cause undesired operation.
109


