Agilent SureCall 3 · Agilent SureCall 3.5 Installation Guide For Research Use Only. Not for use in...
116
Agilent Technologies Agilent SureCall 3.5 Installation Guide For Research Use Only. Not for use in diagnostic procedures.
Transcript of Agilent SureCall 3 · Agilent SureCall 3.5 Installation Guide For Research Use Only. Not for use in...
Agilent SureCall 3.5
Installation Guide For Research Use Only. Not for use in diagnostic procedures.
Agilent Technologies
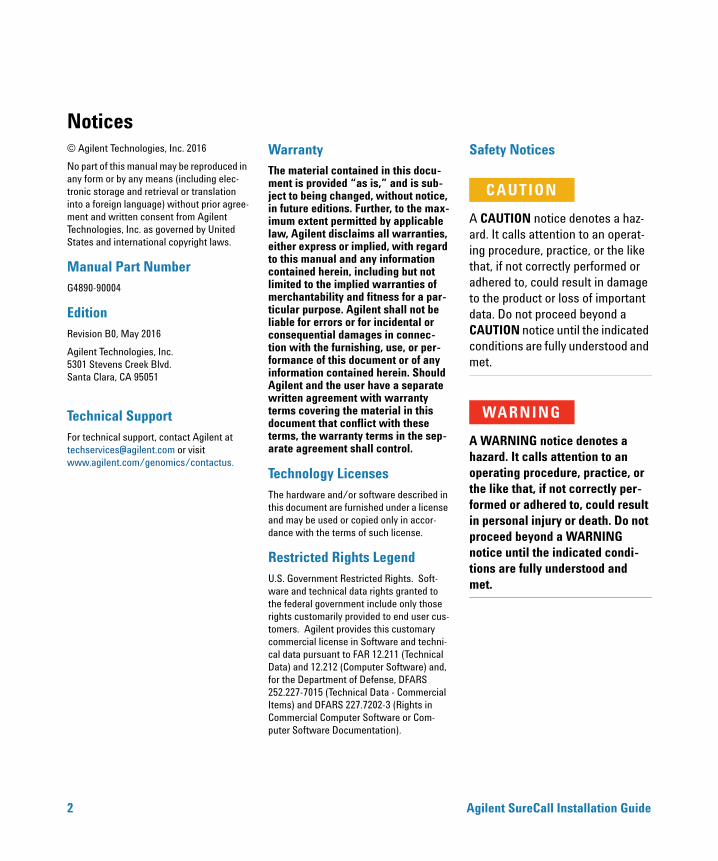
Notices© Agilent Technologies, Inc. 2016
No part of this manual may be reproduced in any form or by any means (including elec-tronic storage and retrieval or translation into a foreign language) without prior agree-ment and written consent from Agilent Technologies, Inc. as governed by United States and international copyright laws.
Manual Part NumberG4890-90004
EditionRevision B0, May 2016
Agilent Technologies, Inc. 5301 Stevens Creek Blvd. Santa Clara, CA 95051
WarrantyThe material contained in this docu-ment is provided “as is,” and is sub-ject to being changed, without notice, in future editions. Further, to the max-imum extent permitted by applicable law, Agilent disclaims all warranties, either express or implied, with regard to this manual and any information contained herein, including but not limited to the implied warranties of merchantability and fitness for a par-ticular purpose. Agilent shall not be liable for errors or for incidental or consequential damages in connec-tion with the furnishing, use, or per-formance of this document or of any information contained herein. Should Agilent and the user have a separate written agreement with warranty terms covering the material in this document that conflict with these terms, the warranty terms in the sep-arate agreement shall control.
Technology Licenses The hardware and/or software described in this document are furnished under a license and may be used or copied only in accor-dance with the terms of such license.
Restricted Rights LegendU.S. Government Restricted Rights. Soft-ware and technical data rights granted to the federal government include only those rights customarily provided to end user cus-tomers. Agilent provides this customary commercial license in Software and techni-cal data pursuant to FAR 12.211 (Technical Data) and 12.212 (Computer Software) and, for the Department of Defense, DFARS 252.227-7015 (Technical Data - Commercial Items) and DFARS 227.7202-3 (Rights in Commercial Computer Software or Com-puter Software Documentation).
Safety Notices
CAUTION
A CAUTION notice denotes a haz-ard. It calls attention to an operat-ing procedure, practice, or the like that, if not correctly performed or adhered to, could result in damage to the product or loss of important data. Do not proceed beyond a CAUTION notice until the indicated conditions are fully understood and met.
WARNING
A WARNING notice denotes a hazard. It calls attention to an operating procedure, practice, or the like that, if not correctly per-formed or adhered to, could result in personal injury or death. Do not proceed beyond a WARNING notice until the indicated condi-tions are fully understood and met.
Technical SupportFor technical support, contact Agilent at [email protected] or visit www.agilent.com/genomics/contactus.
2 Agilent SureCall Installation Guide
In This Guide…
Agilent SureCall Installation Guide
This Installation Guide provides instructions for installing SureCall 3.5.
1
Installation of SureCall 3.5 for Windows – Fresh Install InstructionsThis chapter provides instructions for new SureCall users on how to install and get started using SureCall 3.5 on computers running the Windows operating system.
2
Installation of SureCall 3.5 for Windows – Software Upgrade InstructionsThis chapter provides instructions for users of SureCall 2.1 or 3.0 who want to upgrade to SureCall 3.5 while retaining all records currently in their SureCall database. It also contains instructions on uninstalling SureCall. The instructions in this chapter are specific for Windows computers.
3
Installation of SureCall 3.5 for Macintosh – Fresh Install InstructionsThis chapter shows you how to install and get started using SureCall 3.5 on computers running the Macintosh OS X Mavericks or Yosemite operating system.
4
Installation of SureCall 3.5 for Macintosh – Software Upgrade InstructionsThis chapter provides instructions for Macintosh users of SureCall 2.1 or 3.0 who want to upgrade to SureCall 3.5 while retaining all records currently in their SureCall database. It also contains instructions on uninstalling SureCall. The instructions in this chapter are specific for Macintosh computers running the Macintosh OS X Mavericks or Yosemite operating system.
3
5
4
Installation of Sequence Alignment Tools
This chapter shows you how to install the sequence alignment tools provided by Agilent for use with SureCall 3.5.
Agilent SureCall Installation Guide
1 Installation of SureCall 3.5 for Windows – Fresh Install Instructions 7
Preparing for installation 8
Download the software and release notes 8Check system requirements before you start 9Set up permissions for installer and users 9Adjust user account settings 10
Installing a standalone version of SureCall 3.5 – Windows 11
Installing SureCall 3.5 client on additional computers – Windows 27
Opening the SureCall 3.5 client software 30
Adding users and assign roles 32
Adding a SureDesign user name and password 34
Checking the data download 35
Downloading Software Updates 36
2 Installation of SureCall 3.5 for Windows – Software Upgrade Instructions 37
Upgrading a standalone version of SureCall 38
Upgrading SureCall on client computers 54
Uninstalling SureCall 62
Uninstall the client and server software for SureCall 62Uninstall the SureCall client software only 64
3 Installation of SureCall 3.5 for Macintosh – Fresh Install Instructions 67
Preparing for installation 68
Download the software and release notes 68Check system requirements before you start 69Set up permissions for installer and users 69
Installing a standalone version of SureCall 3.5 – Macintosh 70
Opening the SureCall 3.5 client software 86
Agilent SureCall Installation Guide 5

Adding a SureDesign user name and password 88
Checking the data download 89
4 Installation of SureCall 3.5 for Macintosh – Software Upgrade Instructions 91
Upgrading a standalone version of SureCall – Macintosh 92
Uninstalling SureCall – Macintosh 102
Uninstall the client and server software for SureCall 102Uninstall the SureCall client software only 103
5 Installation of Sequence Alignment Tools 107
Installing Sequence Alignment Tools (GenAligners 3.0) 108
Step 1. Uninstall the previous version of GenAligners (if applicable) 108Step 1. Download the GenAligners installer from the Agilent website 108Step 2. Install the alignment tools on your computer 109
6 Agilent SureCall Installation Guide
1Installation of SureCall 3.5 for Windows – Fresh Install Instructions
Preparing for installation 8
Installing a standalone version of SureCall 3.5 – Windows 11
Installing SureCall 3.5 client on additional computers – Windows 27
Opening the SureCall 3.5 client software 30
Adding users and assign roles 32
Adding a SureDesign user name and password 34
Checking the data download 35
Downloading Software Updates 36
This chapter provides instructions for new SureCall users on how to install and get started using SureCall 3.5 on computers running the Windows operating system.
For instructions on upgrading from a previous version of SureCall to SureCall 3.5, see Chapter 2, “Installation of SureCall 3.5 for Windows – Software Upgrade Instructions” on page 37.
For instructions on installing SureCall 3.5 on a Macintosh computer, see Chapter 3, “Installation of SureCall 3.5 for Macintosh – Fresh Install Instructions” on page 67.
Agilent Technologies
1 Installation of SureCall 3.5 for Windows – Fresh Install Instructions Preparing for installation
Preparing for installation
Download the software and release notes
8
1 Go to http://www.agilent.com/genomics/surecall_soft.
2 Click Download Software.
3 Click the Download link for the Windows version of the software.
4 Select Save File to save the installer on your computer. (This file is a large file. Depending on your internet connection speed, the download can take a long time.)
5 Browse to a location where you want to save the installer program, and then click Save. (Do not start the installation at this time.)
6 Return to http://www.agilent.com/genomics/surecall_soft and click Download Software again.
7 Click the Download link for the Release Notes.
8 Click Save As.
9 Browse to a location where you want to save the release notes.
10 Click Save.
You will also need to download the installer for the sequence alignment tools from the
NOTEhttp://www.agilent.com/genomics/surecall_soft website. See “Installing Sequence Alignment Tools (GenAligners 3.0)” on page 108 for instructions.Agilent SureCall Installation Guide

Installation of SureCall 3.5 for Windows – Fresh Install Instructions 1 Preparing for installation
Check system requirements before you start
Agilent SureCall Ins
Check to make sure that your computer systems meet the following requirements. All client installations point to the computer on which the server software is installed. See Table 1 for minimum and recommended requirements.
Set up permissions for installer and users
Table 1 System requirements for running SureCall on Windows computers
Operating system 64-bit Windows 7 Enterprise, Windows 10 Enterprise, or Windows Server 2008
Programs Any program that enables you to open PDF files (for example, Adobe Reader)
Processor Minimum: > 2 GHzRecommended: > 3 GHz, 8-core
Working memory (RAM) Without aligners installed: 8 GBWith aligners installed: 12 GB (16 GB recommended)
Hard disk space 500 GB (50 GB for genome reference data and annotation data and 450 GB for your sequencing data)
Display Resolution 1280 x 768 or higher
• Make sure that the user account used to install the SureCall 3.5 software has administrator permissions on the installation computer.
• Make sure that every user account running the SureCall 3.5 software has read/write permissions in the computer where the client software is installed. In addition, users must have read/write permissions in the installation folder of the computer where the database server is installed.
The way you set permissions varies between operating systems. Contact your network administrator for help in checking or changing user account permissions. If the correct user account permissions are not set correctly, the software will fail to install or run properly.
tallation Guide 9
1 Installation of SureCall 3.5 for Windows – Fresh Install Instructions Preparing for installation
Adjust user account settings
10
Change the User Account Control settings from the default setting to “Never Notify.”
1 Go to Control Panel.
2 Click User Accounts.
3 Click Change User Account Control setting.
4 Change the setting to “Never Notify” and click OK.
5 Restart the computer.
Agilent SureCall Installation Guide
Installation of SureCall 3.5 for Windows – Fresh Install Instructions 1 Installing a standalone version of SureCall 3.5 – Windows
Installing a standalone version of SureCall 3.5 – Windows
Agilent SureCall Ins
SureCall consists of two parts: a PostgreSQL database server and the client software. This section includes detailed instructions and important notes for installing SureCall 3.5 as a standalone program (i.e. the SureCall client software and server software are on a single computer).
Once you have installed a standalone version of SureCall on one computer, you can install additional copies of the client software on client computers that have network access to the database computer. See “Installing SureCall 3.5 client on additional computers – Windows” on page 27.
Only one copy of the server software is installed, and the server software cannot be
NOTEinstalled without also installing the client software on the same machine. The client is the program you run when you want to use SureCall. To run the client software, the database server must be installed. You can run the client software on the same computer as the server, or from any other computer with the client software installed. After installation, the server software runs silently in the background and manages the shared database for all SureCall 3.5 users. All client computers must have network access to the server computer and users must have read/write permissions.1 Log on to the computer where you want to install a standalone version of SureCall 3.5. Use an account that has administrator permissions.
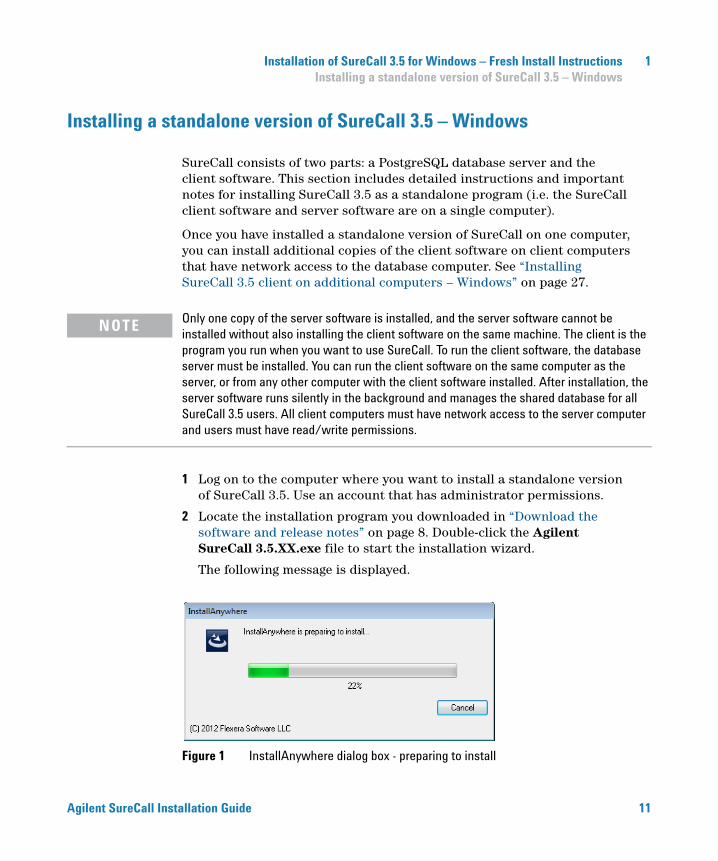
2 Locate the installation program you downloaded in “Download the software and release notes” on page 8. Double-click the Agilent SureCall 3.5.XX.exe file to start the installation wizard.
The following message is displayed.
Figure 1 InstallAnywhere dialog box - preparing to install
tallation Guide 11
1 Installation of SureCall 3.5 for Windows – Fresh Install Instructions Installing a standalone version of SureCall 3.5 – Windows
12
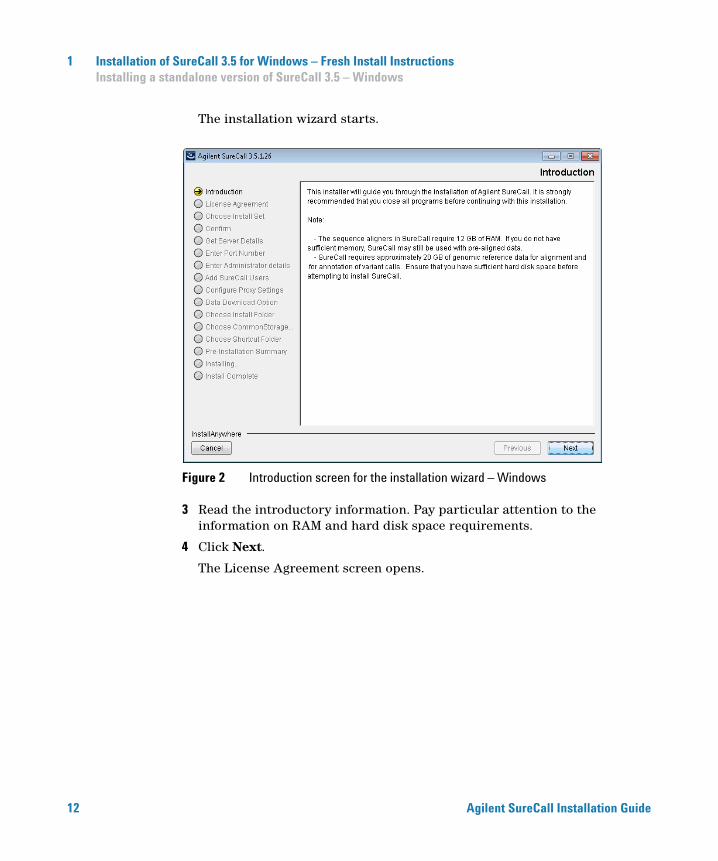
The installation wizard starts.
Figure 2 Introduction screen for the installation wizard – Windows
3 Read the introductory information. Pay particular attention to the information on RAM and hard disk space requirements.
4 Click Next.
The License Agreement screen opens.
Agilent SureCall Installation Guide
Installation of SureCall 3.5 for Windows – Fresh Install Instructions 1 Installing a standalone version of SureCall 3.5 – Windows
Agilent SureCall Ins
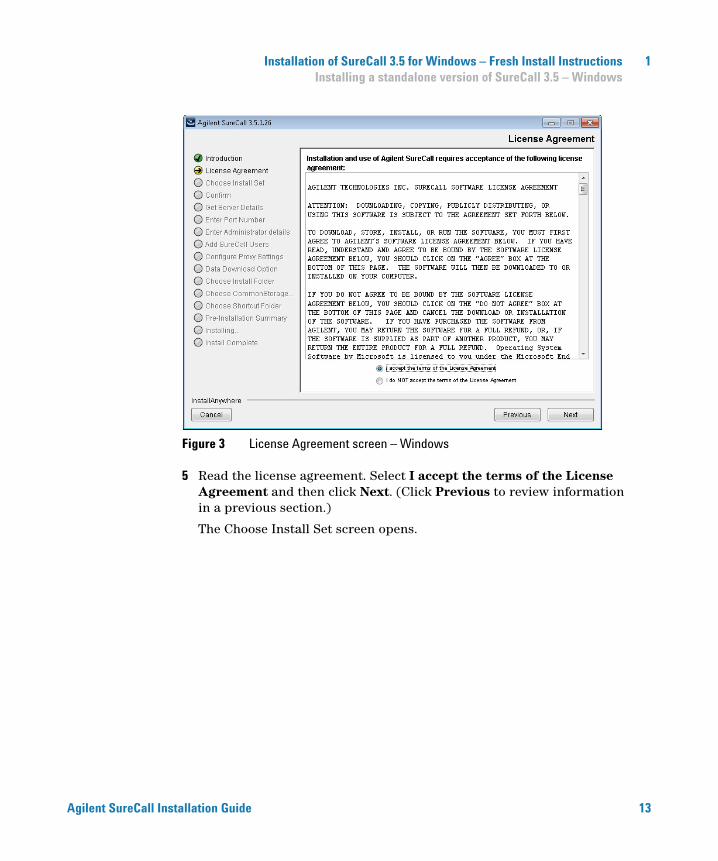
Figure 3 License Agreement screen – Windows
5 Read the license agreement. Select I accept the terms of the License Agreement and then click Next. (Click Previous to review information in a previous section.)
The Choose Install Set screen opens.
tallation Guide 13
1 Installation of SureCall 3.5 for Windows – Fresh Install Instructions Installing a standalone version of SureCall 3.5 – Windows
14
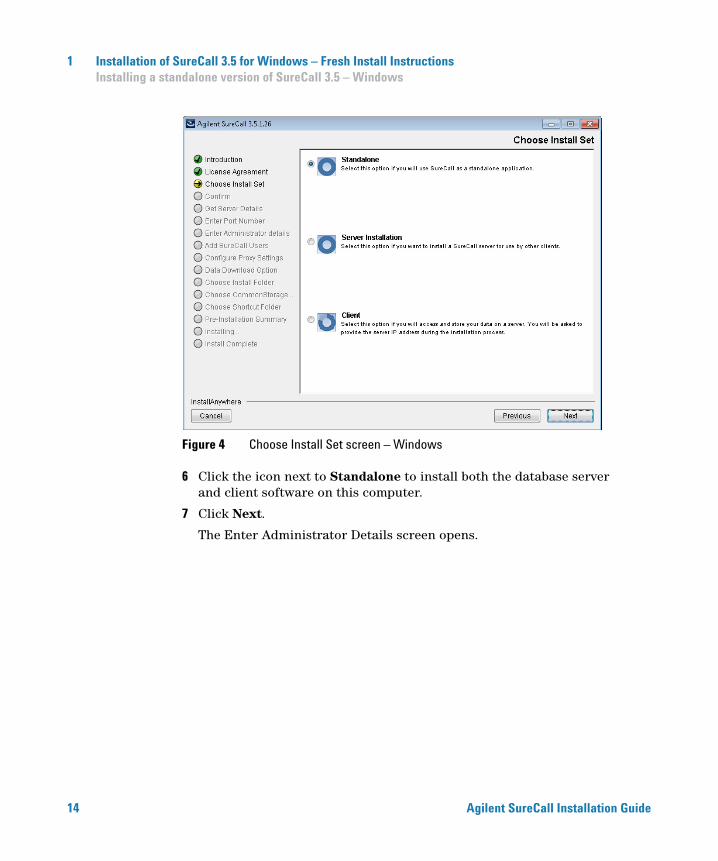
Figure 4 Choose Install Set screen – Windows
6 Click the icon next to Standalone to install both the database server and client software on this computer.
7 Click Next.
The Enter Administrator Details screen opens.
Agilent SureCall Installation Guide
Installation of SureCall 3.5 for Windows – Fresh Install Instructions 1 Installing a standalone version of SureCall 3.5 – Windows
Agilent SureCall Ins
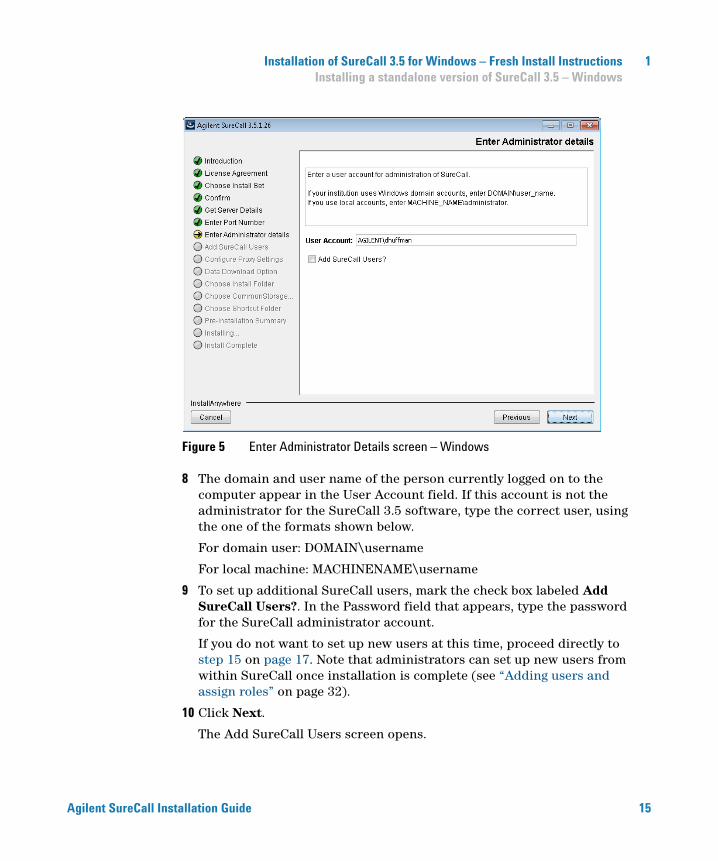
Figure 5 Enter Administrator Details screen – Windows
8 The domain and user name of the person currently logged on to the computer appear in the User Account field. If this account is not the administrator for the SureCall 3.5 software, type the correct user, using the one of the formats shown below.
For domain user: DOMAIN\username
For local machine: MACHINENAME\username
9 To set up additional SureCall users, mark the check box labeled Add SureCall Users?. In the Password field that appears, type the password for the SureCall administrator account.
If you do not want to set up new users at this time, proceed directly to step 15 on page 17. Note that administrators can set up new users from within SureCall once installation is complete (see “Adding users and assign roles” on page 32).
10 Click Next.
The Add SureCall Users screen opens.
tallation Guide 15
1 Installation of SureCall 3.5 for Windows – Fresh Install Instructions Installing a standalone version of SureCall 3.5 – Windows
16
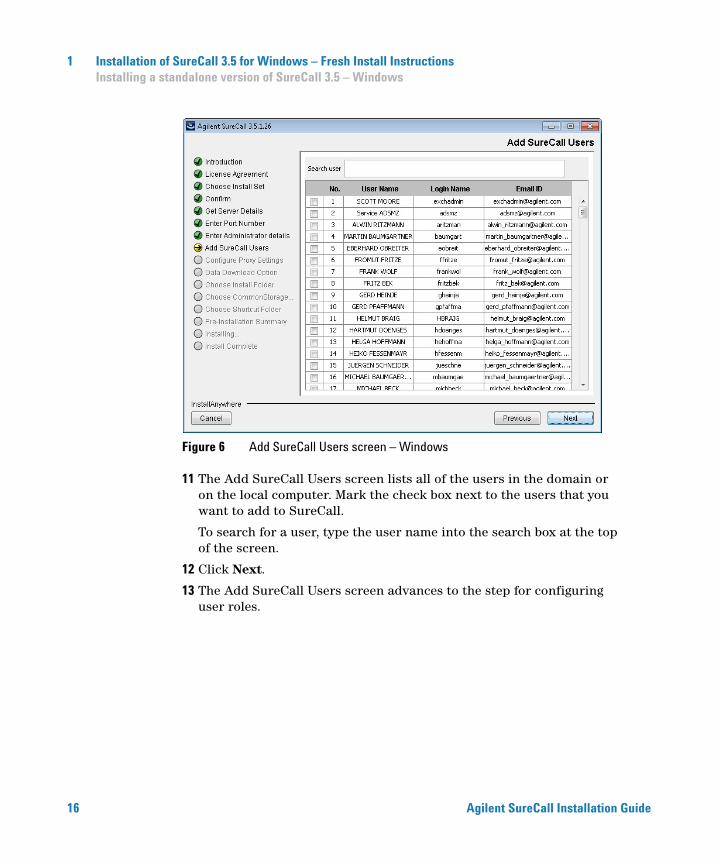
Figure 6 Add SureCall Users screen – Windows
11 The Add SureCall Users screen lists all of the users in the domain or on the local computer. Mark the check box next to the users that you want to add to SureCall.
To search for a user, type the user name into the search box at the top of the screen.
12 Click Next.
13 The Add SureCall Users screen advances to the step for configuring user roles.
Agilent SureCall Installation Guide
Installation of SureCall 3.5 for Windows – Fresh Install Instructions 1 Installing a standalone version of SureCall 3.5 – Windows
Agilent SureCall Ins
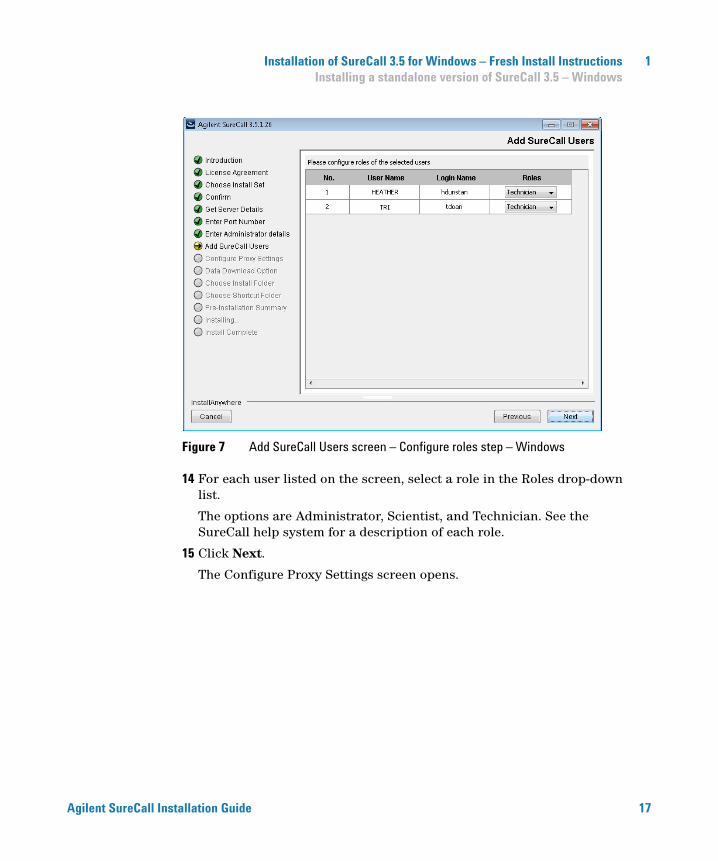
Figure 7 Add SureCall Users screen – Configure roles step – Windows
14 For each user listed on the screen, select a role in the Roles drop-down list.
The options are Administrator, Scientist, and Technician. See the SureCall help system for a description of each role.
15 Click Next.
The Configure Proxy Settings screen opens.
tallation Guide 17
1 Installation of SureCall 3.5 for Windows – Fresh Install Instructions Installing a standalone version of SureCall 3.5 – Windows
18
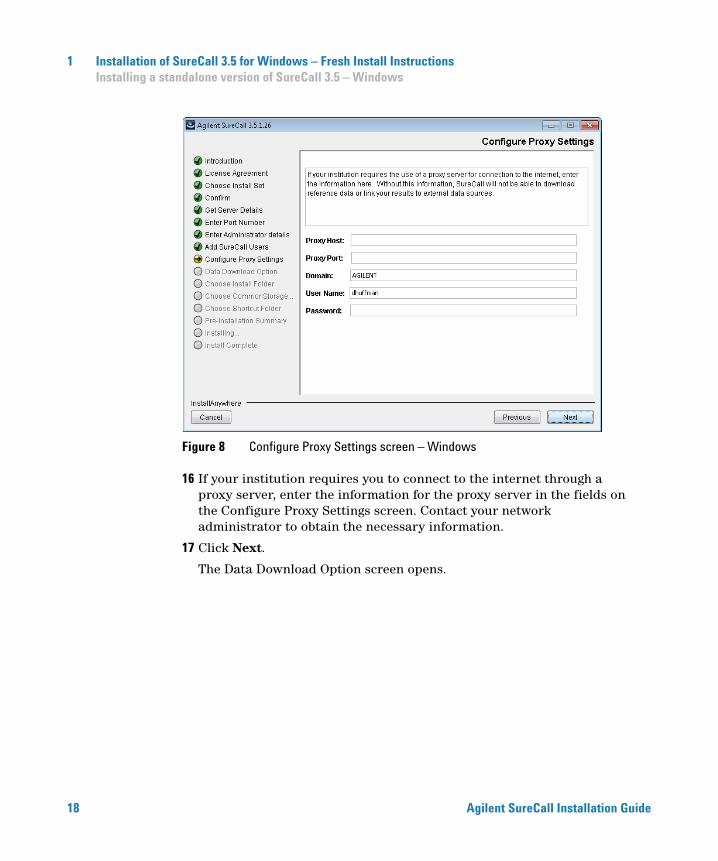
Figure 8 Configure Proxy Settings screen – Windows
16 If your institution requires you to connect to the internet through a proxy server, enter the information for the proxy server in the fields on the Configure Proxy Settings screen. Contact your network administrator to obtain the necessary information.
17 Click Next.
The Data Download Option screen opens.
Agilent SureCall Installation Guide
Installation of SureCall 3.5 for Windows – Fresh Install Instructions 1 Installing a standalone version of SureCall 3.5 – Windows
Agilent SureCall Ins
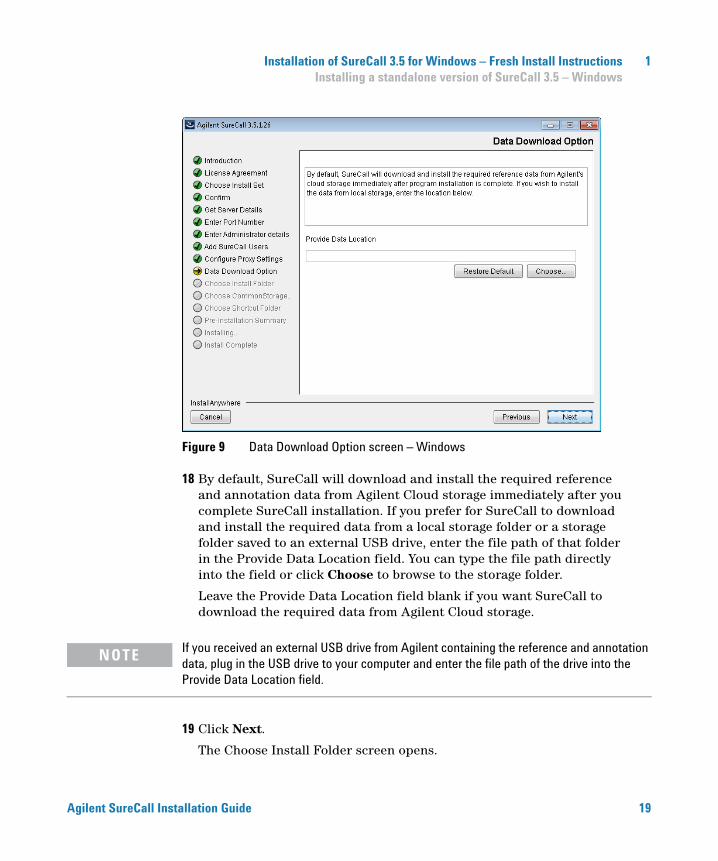
Figure 9 Data Download Option screen – Windows
18 By default, SureCall will download and install the required reference and annotation data from Agilent Cloud storage immediately after you complete SureCall installation. If you prefer for SureCall to download and install the required data from a local storage folder or a storage folder saved to an external USB drive, enter the file path of that folder in the Provide Data Location field. You can type the file path directly into the field or click Choose to browse to the storage folder.
Leave the Provide Data Location field blank if you want SureCall to download the required data from Agilent Cloud storage.
If you received an external USB drive from Agilent containing the reference and annotation
NOTEdata, plug in the USB drive to your computer and enter the file path of the drive into the Provide Data Location field.19 Click Next.
The Choose Install Folder screen opens.
tallation Guide 19
1 Installation of SureCall 3.5 for Windows – Fresh Install Instructions Installing a standalone version of SureCall 3.5 – Windows
20
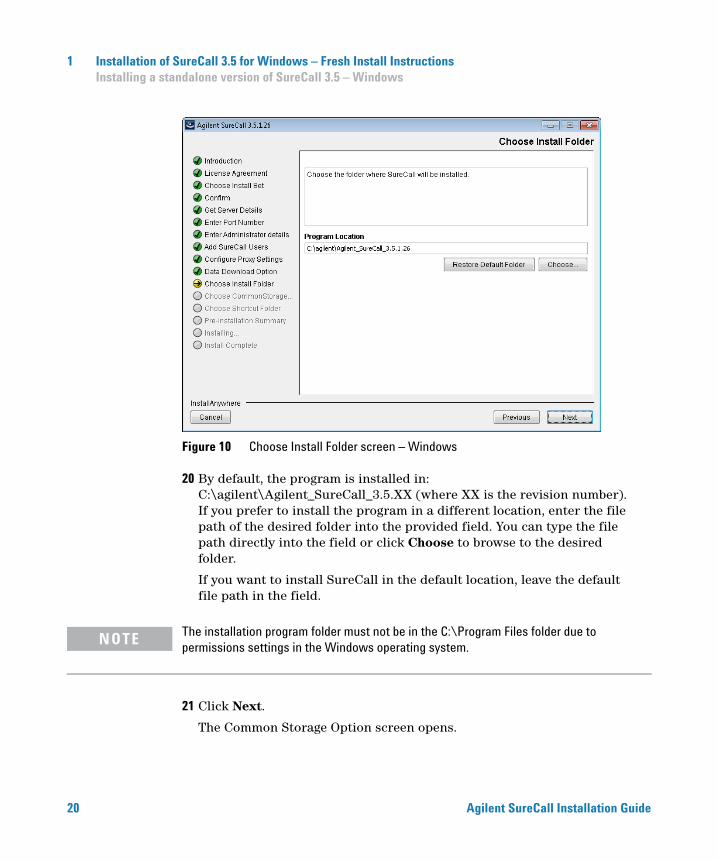
Figure 10 Choose Install Folder screen – Windows
20 By default, the program is installed in: C:\agilent\Agilent_SureCall_3.5.XX (where XX is the revision number). If you prefer to install the program in a different location, enter the file path of the desired folder into the provided field. You can type the file path directly into the field or click Choose to browse to the desired folder.
If you want to install SureCall in the default location, leave the default file path in the field.
NOTE The installation program folder must not be in the C:\Program Files folder due to permissions settings in the Windows operating system.
21 Click Next.
The Common Storage Option screen opens.
Agilent SureCall Installation Guide
Installation of SureCall 3.5 for Windows – Fresh Install Instructions 1 Installing a standalone version of SureCall 3.5 – Windows
Agilent SureCall Ins
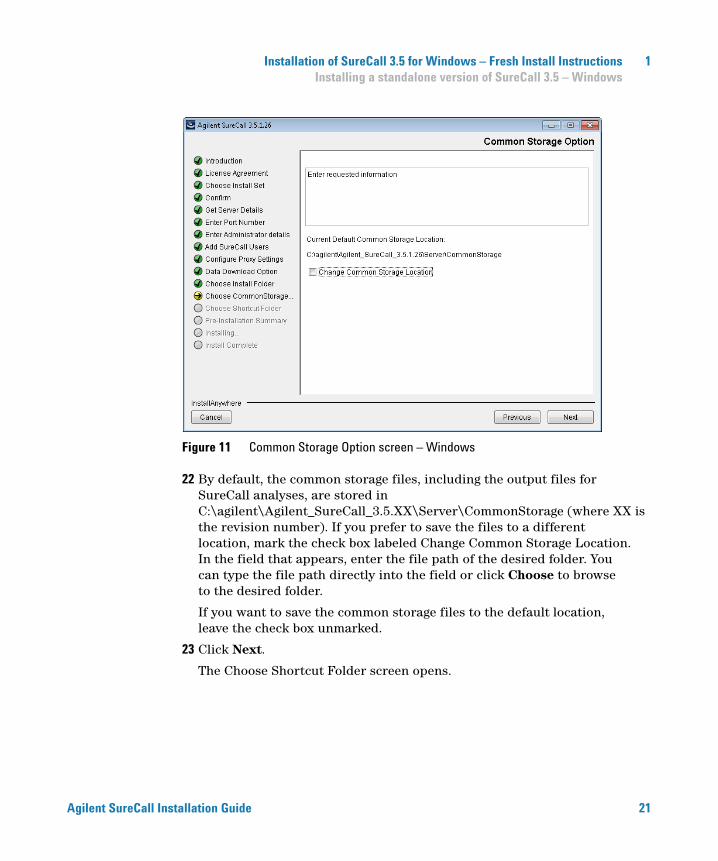
Figure 11 Common Storage Option screen – Windows
22 By default, the common storage files, including the output files for SureCall analyses, are stored in C:\agilent\Agilent_SureCall_3.5.XX\Server\CommonStorage (where XX is the revision number). If you prefer to save the files to a different location, mark the check box labeled Change Common Storage Location. In the field that appears, enter the file path of the desired folder. You can type the file path directly into the field or click Choose to browse to the desired folder.
If you want to save the common storage files to the default location, leave the check box unmarked.
23 Click Next.
The Choose Shortcut Folder screen opens.
tallation Guide 21
1 Installation of SureCall 3.5 for Windows – Fresh Install Instructions Installing a standalone version of SureCall 3.5 – Windows
22
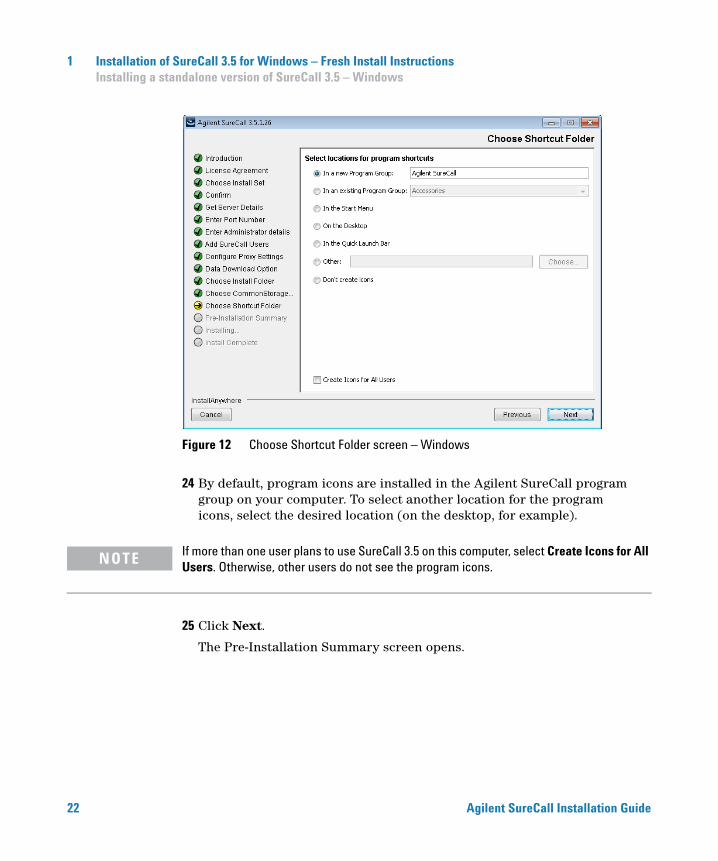
Figure 12 Choose Shortcut Folder screen – Windows
24 By default, program icons are installed in the Agilent SureCall program group on your computer. To select another location for the program icons, select the desired location (on the desktop, for example).
NOTE If more than one user plans to use SureCall 3.5 on this computer, select Create Icons for All Users. Otherwise, other users do not see the program icons.
25 Click Next.
The Pre-Installation Summary screen opens.
Agilent SureCall Installation Guide
Installation of SureCall 3.5 for Windows – Fresh Install Instructions 1 Installing a standalone version of SureCall 3.5 – Windows
Agilent SureCall Ins
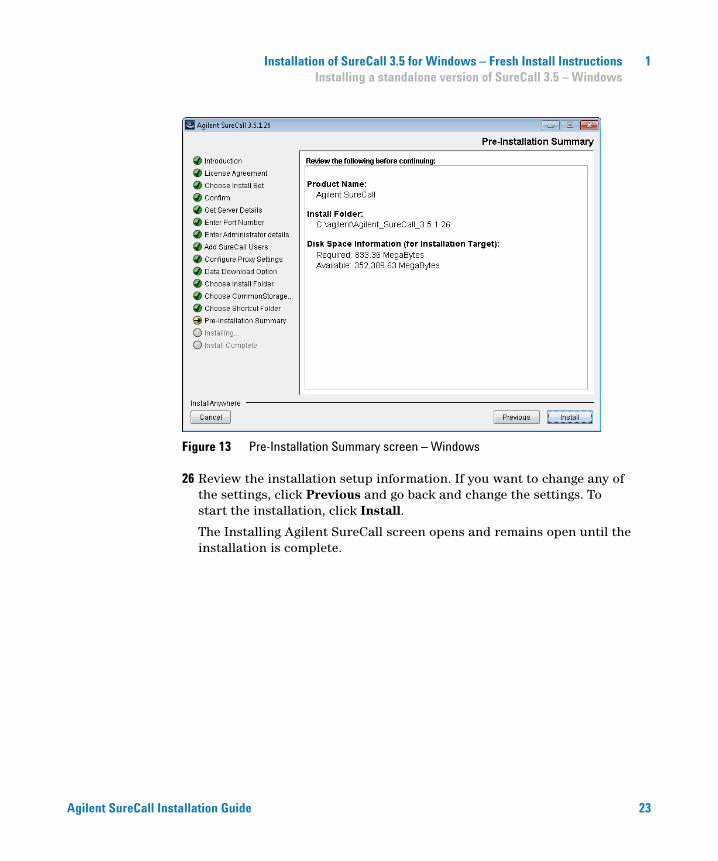
Figure 13 Pre-Installation Summary screen – Windows
26 Review the installation setup information. If you want to change any of the settings, click Previous and go back and change the settings. To start the installation, click Install.
The Installing Agilent SureCall screen opens and remains open until the installation is complete.
tallation Guide 23
1 Installation of SureCall 3.5 for Windows – Fresh Install Instructions Installing a standalone version of SureCall 3.5 – Windows
24
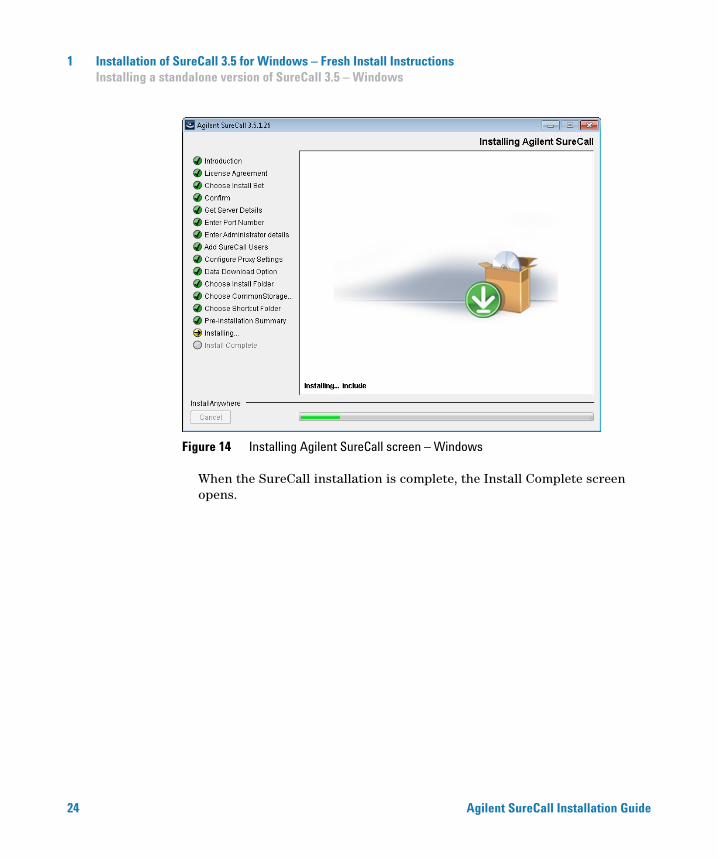
Figure 14 Installing Agilent SureCall screen – Windows
When the SureCall installation is complete, the Install Complete screen opens.
Agilent SureCall Installation Guide
Installation of SureCall 3.5 for Windows – Fresh Install Instructions 1 Installing a standalone version of SureCall 3.5 – Windows
Agilent SureCall Ins
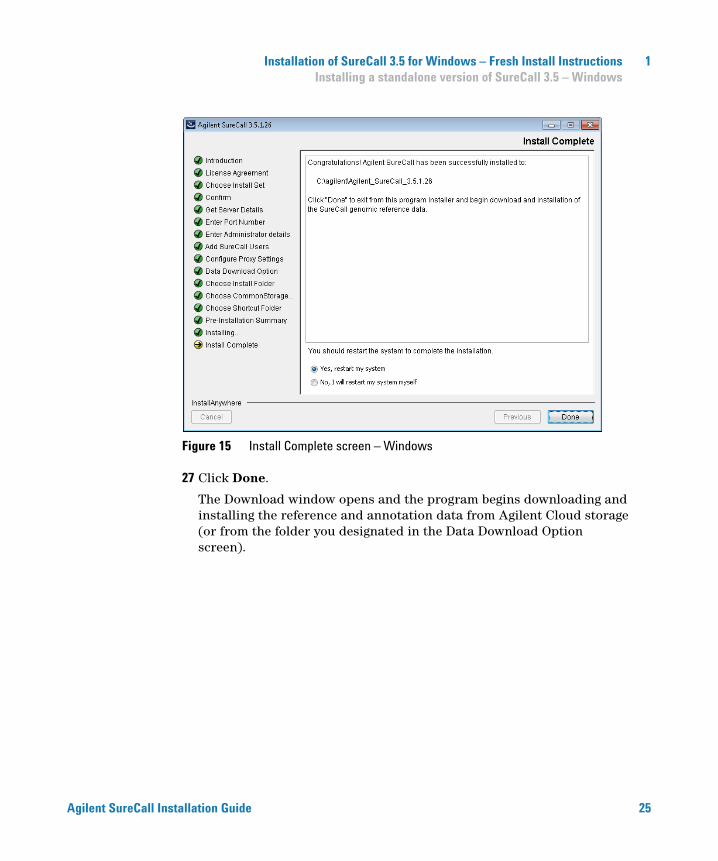
Figure 15 Install Complete screen – Windows
27 Click Done.
The Download window opens and the program begins downloading and installing the reference and annotation data from Agilent Cloud storage (or from the folder you designated in the Data Download Option screen).
tallation Guide 25
1 Installation of SureCall 3.5 for Windows – Fresh Install Instructions Installing a standalone version of SureCall 3.5 – Windows
26
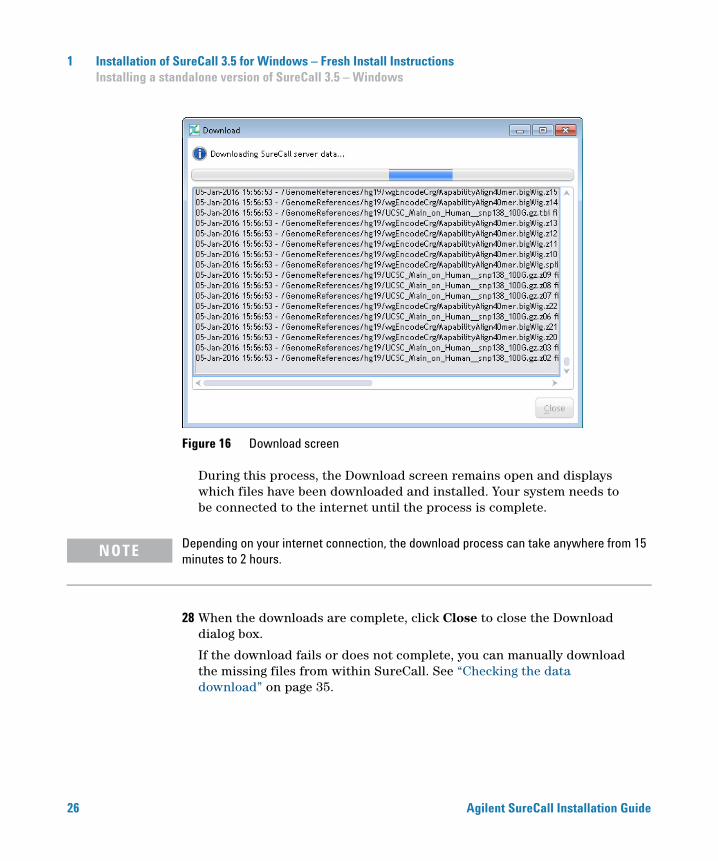
Figure 16 Download screen
During this process, the Download screen remains open and displays which files have been downloaded and installed. Your system needs to be connected to the internet until the process is complete.
Depending on your internet connection, the download process can take anywhere from 15
NOTEminutes to 2 hours.28 When the downloads are complete, click Close to close the Download dialog box.
If the download fails or does not complete, you can manually download the missing files from within SureCall. See “Checking the data download” on page 35.
Agilent SureCall Installation Guide
Installation of SureCall 3.5 for Windows – Fresh Install Instructions 1 Installing SureCall 3.5 client on additional computers – Windows
Installing SureCall 3.5 client on additional computers – Windows
Agilent SureCall Ins
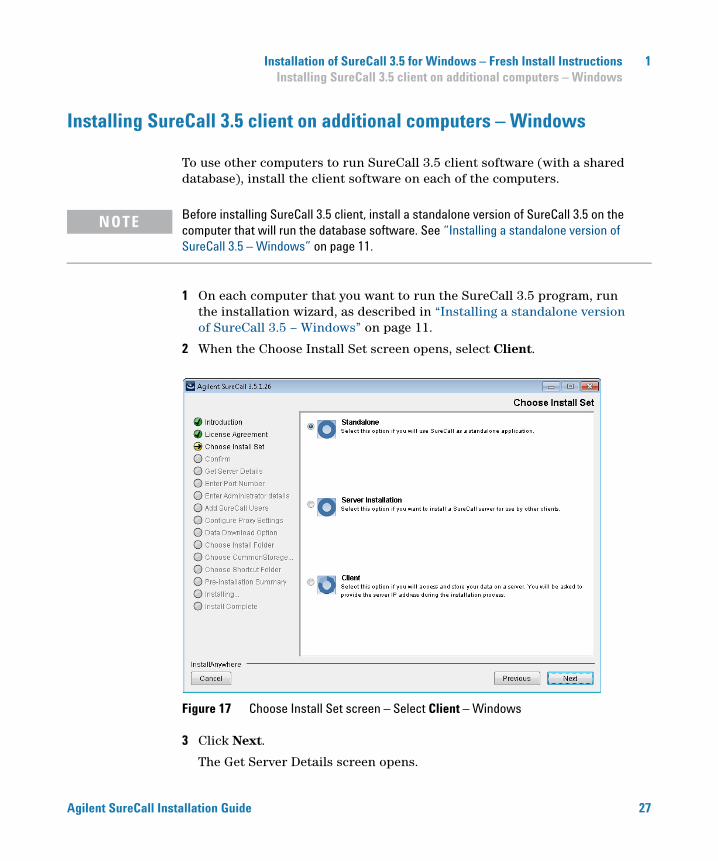
To use other computers to run SureCall 3.5 client software (with a shared database), install the client software on each of the computers.
Before installing SureCall 3.5 client, install a standalone version of SureCall 3.5 on the
NOTEcomputer that will run the database software. See “Installing a standalone version of SureCall 3.5 – Windows” on page 11.1 On each computer that you want to run the SureCall 3.5 program, run the installation wizard, as described in “Installing a standalone version of SureCall 3.5 – Windows” on page 11.
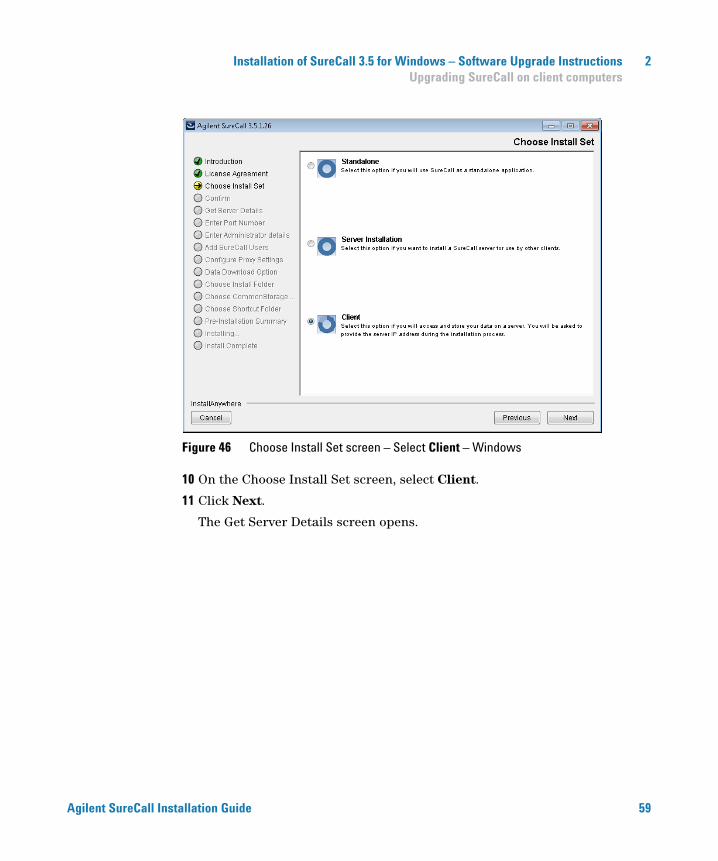
2 When the Choose Install Set screen opens, select Client.
Figure 17 Choose Install Set screen – Select Client – Windows
3 Click Next.
The Get Server Details screen opens.
tallation Guide 27

1 Installation of SureCall 3.5 for Windows – Fresh Install Instructions Installing SureCall 3.5 client on additional computers – Windows
28
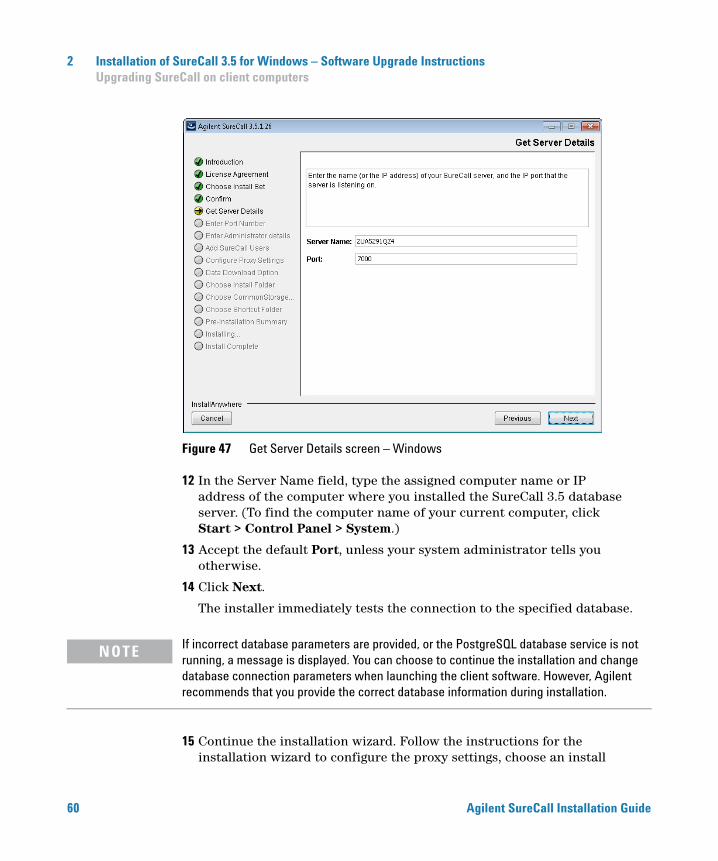
Figure 18 Get Server Details screen – Windows
4 In the Server Name field, type the assigned computer name or IP address of the computer where you installed the SureCall 3.5 database server. (To find the computer name of your current computer, click Start > Control Panel > System.)
5 Accept the default Port, unless your system administrator tells you otherwise.
6 Click Next.
The installer immediately tests the connection to the specified database.
If incorrect database parameters are provided, or the PostgreSQL database service is not
NOTErunning, a message is displayed. You can choose to continue the installation and change database connection parameters when launching the client software. However, Agilent recommends that you provide the correct database information during installation.7 Continue the installation wizard. Follow the instructions for the installation wizard to enter administrator information, choose a
Agilent SureCall Installation Guide
Installation of SureCall 3.5 for Windows – Fresh Install Instructions 1 Installing SureCall 3.5 client on additional computers – Windows
Agilent SureCall Ins
shortcut location, and start the installation. For information, see step 8 through step 28 in the section “Installing a standalone version of SureCall 3.5 – Windows” on page 11.
tallation Guide 29
1 Installation of SureCall 3.5 for Windows – Fresh Install Instructions Opening the SureCall 3.5 client software
Opening the SureCall 3.5 client software
30
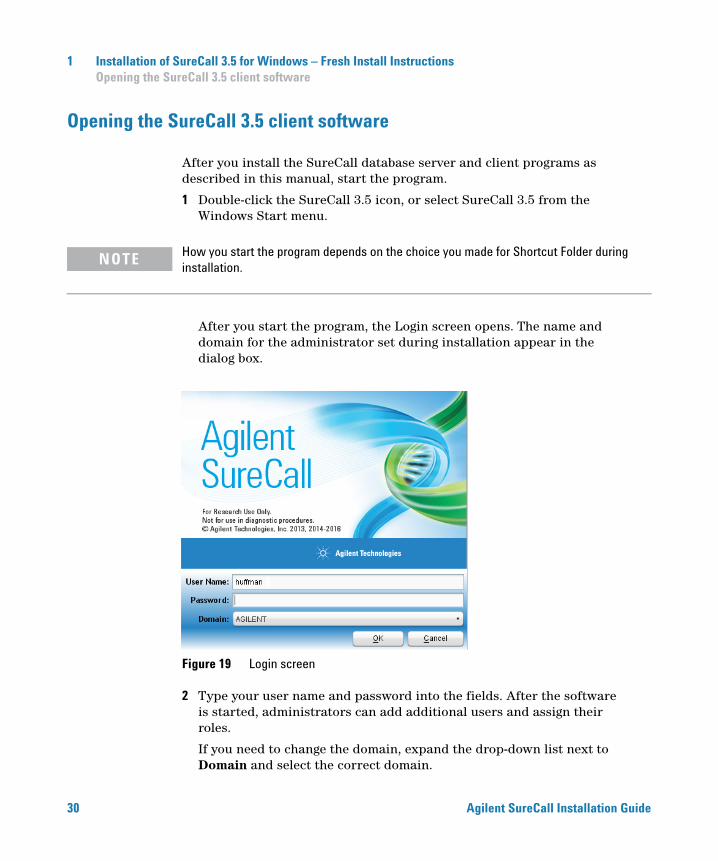
After you install the SureCall database server and client programs as described in this manual, start the program.
1 Double-click the SureCall 3.5 icon, or select SureCall 3.5 from the Windows Start menu.
How you start the program depends on the choice you made for Shortcut Folder during
NOTEinstallation.After you start the program, the Login screen opens. The name and domain for the administrator set during installation appear in the dialog box.
Figure 19 Login screen
2 Type your user name and password into the fields. After the software is started, administrators can add additional users and assign their roles.
If you need to change the domain, expand the drop-down list next to Domain and select the correct domain.
Agilent SureCall Installation Guide
Installation of SureCall 3.5 for Windows – Fresh Install Instructions 1 Opening the SureCall 3.5 client software
Agilent SureCall Ins
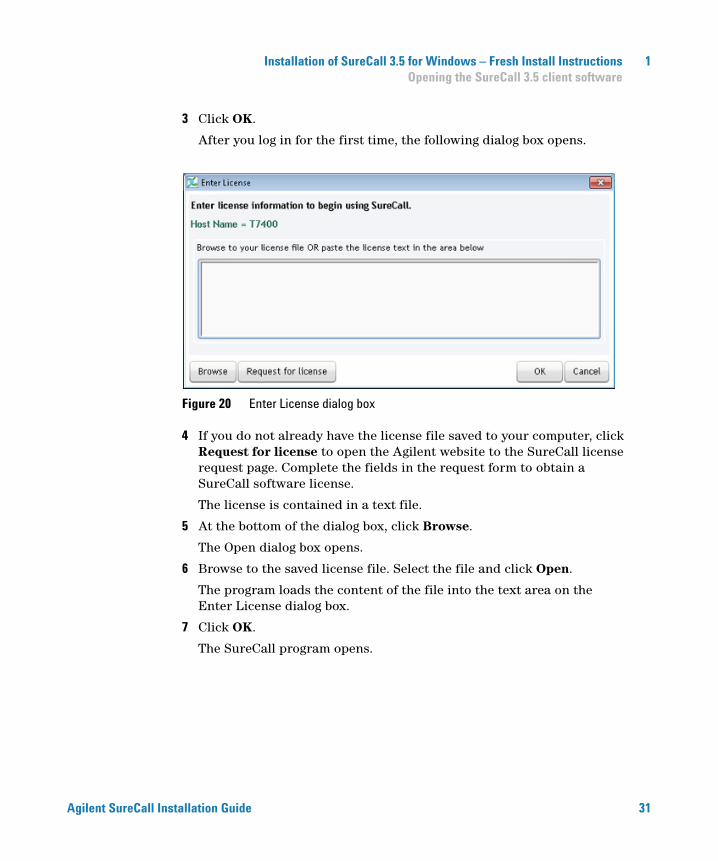
3 Click OK.
After you log in for the first time, the following dialog box opens.
Figure 20 Enter License dialog box
4 If you do not already have the license file saved to your computer, click Request for license to open the Agilent website to the SureCall license request page. Complete the fields in the request form to obtain a SureCall software license.
The license is contained in a text file.
5 At the bottom of the dialog box, click Browse.
The Open dialog box opens.
6 Browse to the saved license file. Select the file and click Open.
The program loads the content of the file into the text area on the Enter License dialog box.
7 Click OK.
The SureCall program opens.
tallation Guide 31
1 Installation of SureCall 3.5 for Windows – Fresh Install Instructions Adding users and assign roles
Adding users and assign roles
32
If multiple client users will be connecting to the same SureCall database, the administrator must add the users and assign user roles. The user role determines what capabilities the user has within SureCall. For information on what capabilities each user role has, see the SureCall help system.
1 Go to the User Accounts screen in SureCall.
a At the top of the program window, click Admin.
b On the left side of the screen, click User Accounts.
2 Click Add New User.
The Add New User dialog box opens.
3 If your computer is on a network, add the new user using the following instructions.
a In the Add New User field at the top of the dialog box, type the user name for the new user and click Find. The table in the dialog box lists the users on your network that match the user name you entered.
b Click the row in the table for the user you want to add and click Add User. A message box opens asking you to confirm that you want to add the user.
c Click Yes in the message box. A message box opens confirming that the user was successfully added. Click OK.
4 If your computer is a local machine with no Domain, add the new user using the following instructions.
a In the Add New User field at the top of the dialog box, type the computer name and user in the format machinename\username. (Do not click Find).
b Click Add User. A message box opens asking you to confirm that you want to add the user.
c Click Yes in the message box. A message box opens confirming that the user was successfully added. Click OK.
5 Click Close in the Add New User dialog box to close the dialog box.
The added user is now listed in the table on the User Accounts screen. By default, new users are assigned the role of Technician.
Agilent SureCall Installation Guide
Installation of SureCall 3.5 for Windows – Fresh Install Instructions 1 Adding users and assign roles
Agilent SureCall Ins
6 If desired, change the role of the new user.
a In the Action column of the table, click Edit.
The Edit User Role dialog box opens.
b In the drop-down list next to Role, select the desired role for the user.
The options are Administrator, Scientist, and Technician. See the SureCall help system for a description of each role.
c Click Save.
The new role is saved and the Edit User Role dialog box closes.
tallation Guide 33
1 Installation of SureCall 3.5 for Windows – Fresh Install Instructions Adding a SureDesign user name and password
Adding a SureDesign user name and password
34
Before other users can download a design file from SureDesign into SureCall, the administrator must add the SureDesign account information.
1 Go to the SureDesign Settings screen in SureCall.
a At the top of the program window, click Admin.
b On the left side of the screen, click SureDesign Settings.
2 Type the user name for the SureDesign account into the SureDesign Username field.
In SureDesign, the user name is the e-mail address of the user.
3 In the SureDesign Password field, type the password for the SureDesign account.
4 Click Apply.
5 Click Test Connection.
A message box opens notifying you if the connection test succeeded or failed.
If the connection test passes, you can download design files from SureDesign into SureCall using the tools on the Supporting Files screen.
If the connection test fails, go to the SureDesign website (www.agilent.com/genomics/suredesign) and try logging in. If the login fails, you can reset the password or register for a new account.
Agilent SureCall Installation Guide
Installation of SureCall 3.5 for Windows – Fresh Install Instructions 1 Checking the data download
Checking the data download
Agilent SureCall Ins
When you first installed SureCall, the program automatically downloaded the necessary reference and annotation files from Agilent Cloud storage or from a specified local folder or drive. Downloading the files requires an internet connection and a minimum of 20 GB of disk space.
Before you start running analyses in SureCall, make sure that the program successfully completed the data download process.
1 Go to the Annotation Download screen in SureCall.
a At the top of the program window, click Admin.
b On the left side of the screen, click Annotation Download.
2 Click Refresh Annotation Status.
3 In the message box that opens, click Yes to continue.
The program obtains the status of the data file downloads and displays the statuses in a table on the Annotation Download screen.
4 Check the status of the downloads.
• If all files were successfully downloaded. the top right corner of the screen displays the message “All data files downloaded successfully.”
• If some files were not successfully downloaded, click Start Download. The program will connect to the Agilent Cloud storage system, or the local folder or drive specified during SureCall installation, to download the missing files.
The source location for the files is specified on the Admin > Annotation Download screen.
NOTEBy default, the source location is the Agilent Cloud system, or whichever local folder was specified during installation (see the Data Download Option installation screen, step 18). SureCall administrators can change the location from the Admin > Annotation Download screen.tallation Guide 35

1 Installation of SureCall 3.5 for Windows – Fresh Install Instructions Downloading Software Updates
Downloading Software Updates
36
When an update is available, a dialog box automatically displays upon opening SureCall.
Figure 21 Updates Available message box
To automatically download these software updates:
1 Mark the Software update check box in the Updates Available dialog box. This will enable the Download button.
2 Click the Download button.
The Confirm message box opens asking you to confirm that you want to start downloading software update files.
3 Click OK to start the download process.
A Progress Status message displays. The application is unavailable for use during the software update download.
4 Once the download is complete, a Download Successful message box opens, and counts down from 5 seconds to close the application. Skip the countdown by clicking OK.
5 A dialog box indicates that the application has been updated. Click OK to launch SureCall.
6 Upon logging in, a dialog box indicates that the Agilent SureCall application was upgraded successfully. Click OK to continue.
Agilent SureCall Installation Guide

2Installation of SureCall 3.5 for Windows – Software Upgrade Instructions
Upgrading a standalone version of SureCall 38
Upgrading SureCall on client computers 54
Uninstalling SureCall 62
This chapter provides instructions for users of SureCall 2.1 or 3.0 who want to upgrade to SureCall 3.5 while retaining all records currently in their SureCall database. It also contains instructions on uninstalling SureCall. The instructions in this chapter are specific for Windows computers.
If you want to upgrade from a previous version of SureCall to SureCall 3.5, but do not want to retain the records in your current database, first completely uninstall your existing version of SureCall (see “Uninstall the client and server software for SureCall” on page 62), then follow the instructions in Chapter 1, “Installation of SureCall 3.5 for Windows – Fresh Install Instructions” on page 37.
If you want to upgrade to SureCall 3.5 from a previous version on a Macintosh computer, then see Chapter 4, “Installation of SureCall 3.5 for Macintosh – Software Upgrade Instructions” on page 37.
Agilent Technologies
2 Installation of SureCall 3.5 for Windows – Software Upgrade Instructions Upgrading a standalone version of SureCall
Upgrading a standalone version of SureCall
38
These instructions are for users who are running an earlier standalone version of SureCall (i.e. the SureCall client software and server software are on a single computer) and want to upgrade to SureCall 3.5 while retaining the data in the existing database.
You can upgrade from SureCall 2.1 or 3.0 to SureCall 3.5 using the instructions provided
NOTEhere. If you are running SureCall 1.0, 1.1,or 2.0, you must first upgrade to SureCall 2.1 before upgrading to SureCall 3.5.Reboot your computer just prior to starting these instructions.
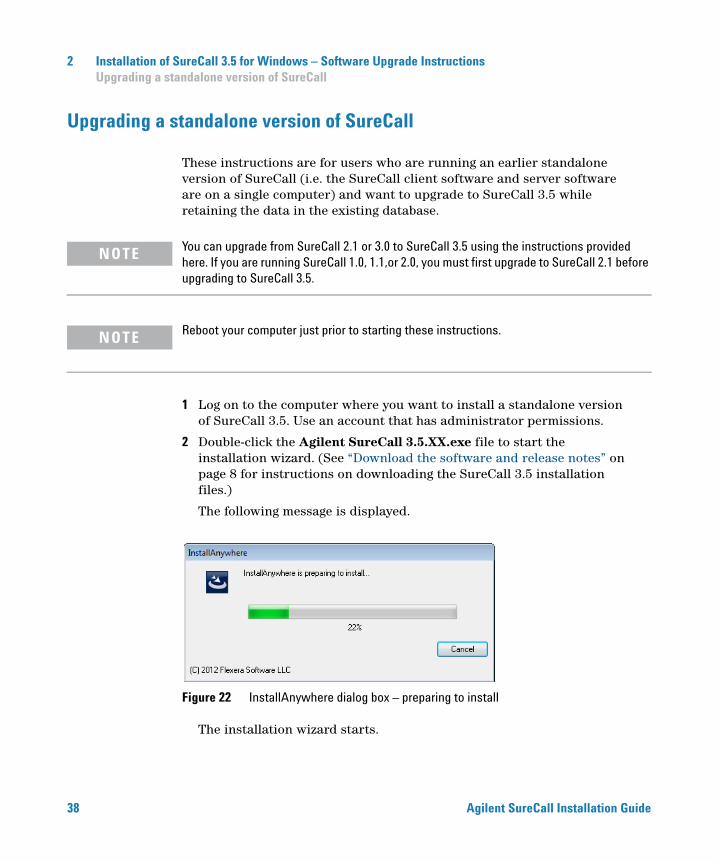
NOTE1 Log on to the computer where you want to install a standalone version of SureCall 3.5. Use an account that has administrator permissions.
2 Double-click the Agilent SureCall 3.5.XX.exe file to start the installation wizard. (See “Download the software and release notes” on page 8 for instructions on downloading the SureCall 3.5 installation files.)
The following message is displayed.
Figure 22 InstallAnywhere dialog box – preparing to install
The installation wizard starts.
Agilent SureCall Installation Guide

Installation of SureCall 3.5 for Windows – Software Upgrade Instructions 2 Upgrading a standalone version of SureCall
Agilent SureCall Ins
Figure 23 Introduction screen for the installation wizard – Windows
3 Read the introductory information. Pay particular attention to the information on RAM and hard disk space requirements.
4 Click Next.
The following warning message opens, notifying you that if you continue with the software upgrade, any analysis jobs that are still running/waiting will be aborted.
Figure 24 Warning message – Abort all running/waiting jobs
tallation Guide 39
2 Installation of SureCall 3.5 for Windows – Software Upgrade Instructions Upgrading a standalone version of SureCall
40
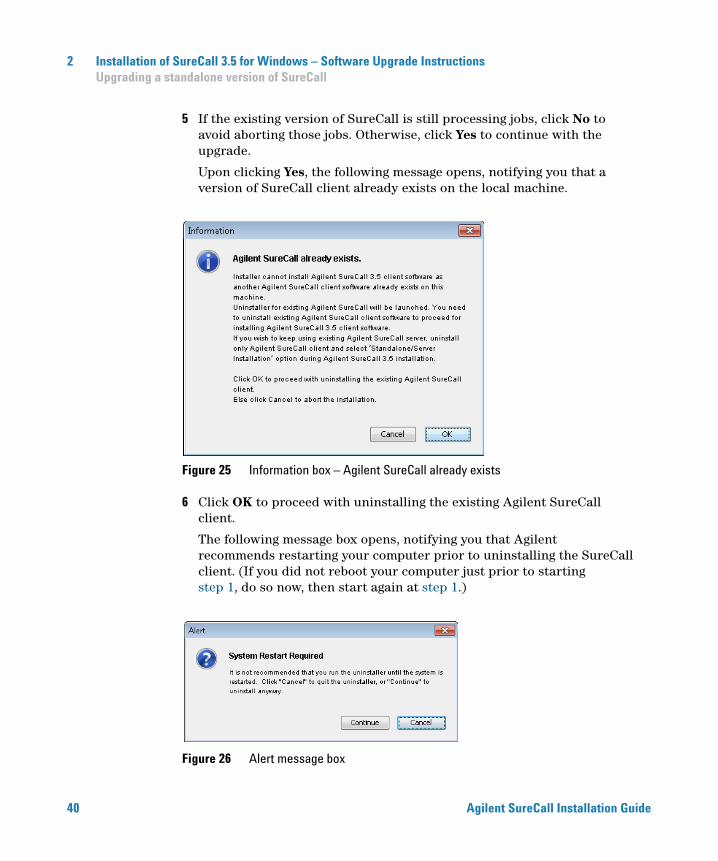
5 If the existing version of SureCall is still processing jobs, click No to avoid aborting those jobs. Otherwise, click Yes to continue with the upgrade.
Upon clicking Yes, the following message opens, notifying you that a version of SureCall client already exists on the local machine.
Figure 25 Information box – Agilent SureCall already exists
6 Click OK to proceed with uninstalling the existing Agilent SureCall client.
The following message box opens, notifying you that Agilent recommends restarting your computer prior to uninstalling the SureCall client. (If you did not reboot your computer just prior to starting step 1, do so now, then start again at step 1.)
Figure 26 Alert message box
Agilent SureCall Installation Guide
Installation of SureCall 3.5 for Windows – Software Upgrade Instructions 2 Upgrading a standalone version of SureCall
Agilent SureCall Ins
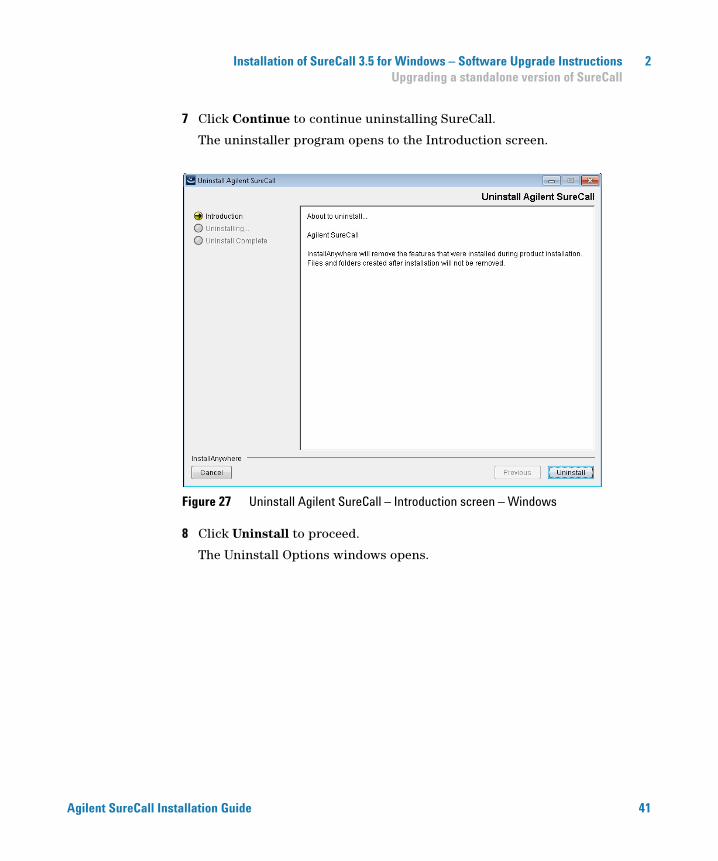
7 Click Continue to continue uninstalling SureCall.
The uninstaller program opens to the Introduction screen.
Figure 27 Uninstall Agilent SureCall – Introduction screen – Windows
8 Click Uninstall to proceed.
The Uninstall Options windows opens.
tallation Guide 41

2 Installation of SureCall 3.5 for Windows – Software Upgrade Instructions Upgrading a standalone version of SureCall
42
Figure 28 Uninstall Agilent SureCall – Uninstall Options screen – Windows
9 Select Uninstall specific features, and click Next.
The Choose Product Features screen opens.
Agilent SureCall Installation Guide

Installation of SureCall 3.5 for Windows – Software Upgrade Instructions 2 Upgrading a standalone version of SureCall
Agilent SureCall Ins
Figure 29 Uninstall Agilent SureCall – Choose Product Features screen – Windows
10 In the top panel, mark the Client check box. Make sure that the Server check box is not marked.
11 Click Uninstall.
A message box opens asking you to confirm that you want to uninstall the SureCall client.
12 Click Yes in the message box to continue uninstalling.
The SureCall client is uninstalled. When the uninstallation is complete, the Uninstall Complete screen opens.
13 Click Done.
The uninstaller program closes and the SureCall 3.5 installation wizard opens to the License Agreement screen. You can now continue installing SureCall 3.5.
tallation Guide 43
2 Installation of SureCall 3.5 for Windows – Software Upgrade Instructions Upgrading a standalone version of SureCall
44
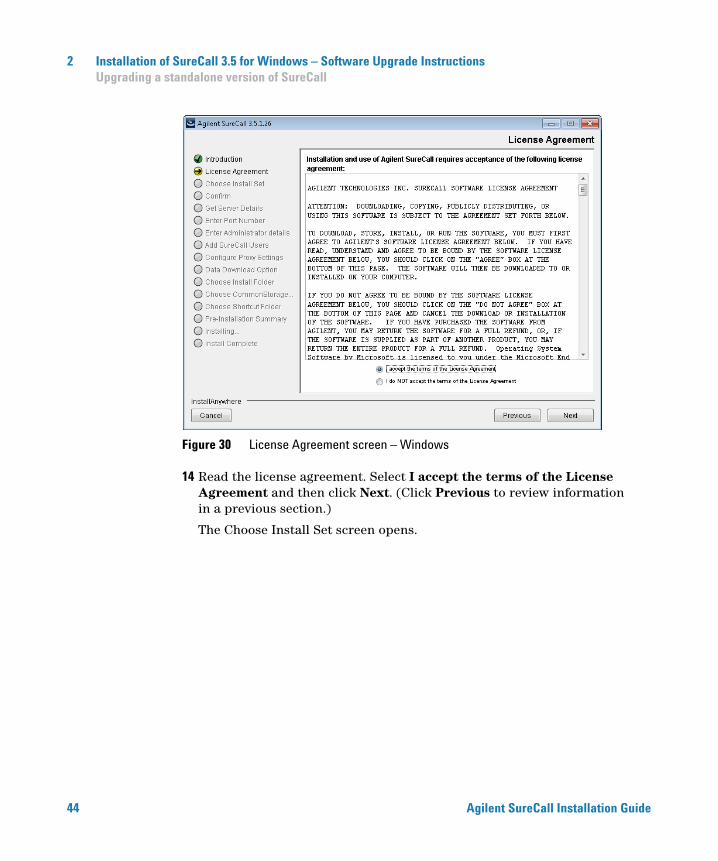
Figure 30 License Agreement screen – Windows
14 Read the license agreement. Select I accept the terms of the License Agreement and then click Next. (Click Previous to review information in a previous section.)
The Choose Install Set screen opens.
Agilent SureCall Installation Guide
Installation of SureCall 3.5 for Windows – Software Upgrade Instructions 2 Upgrading a standalone version of SureCall
Agilent SureCall Ins
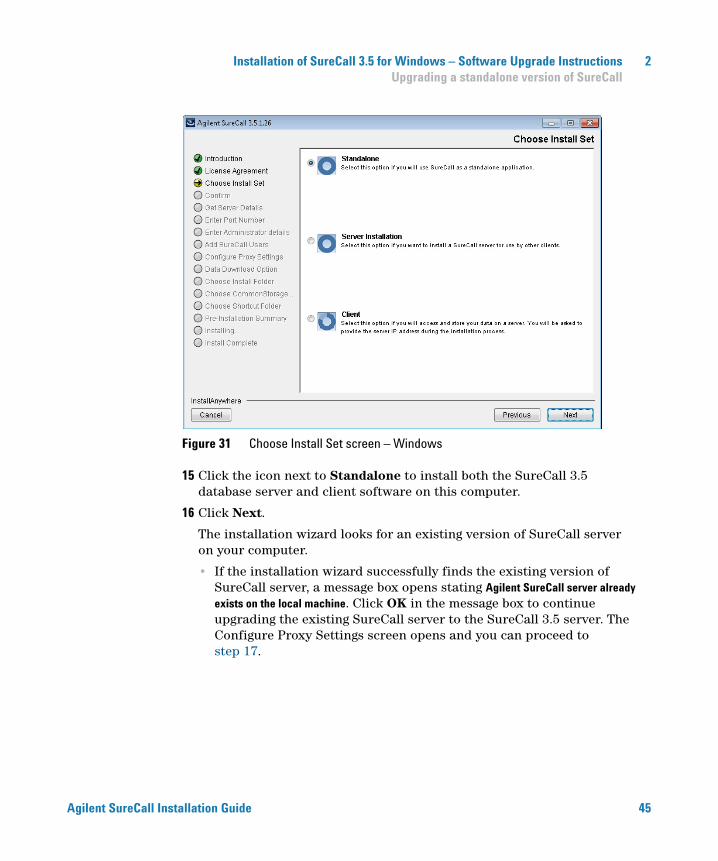
Figure 31 Choose Install Set screen – Windows
15 Click the icon next to Standalone to install both the SureCall 3.5 database server and client software on this computer.
16 Click Next.
The installation wizard looks for an existing version of SureCall server on your computer.
• If the installation wizard successfully finds the existing version of SureCall server, a message box opens stating Agilent SureCall server already exists on the local machine. Click OK in the message box to continue upgrading the existing SureCall server to the SureCall 3.5 server. The Configure Proxy Settings screen opens and you can proceed to step 17.
tallation Guide 45
2 Installation of SureCall 3.5 for Windows – Software Upgrade Instructions Upgrading a standalone version of SureCall
46
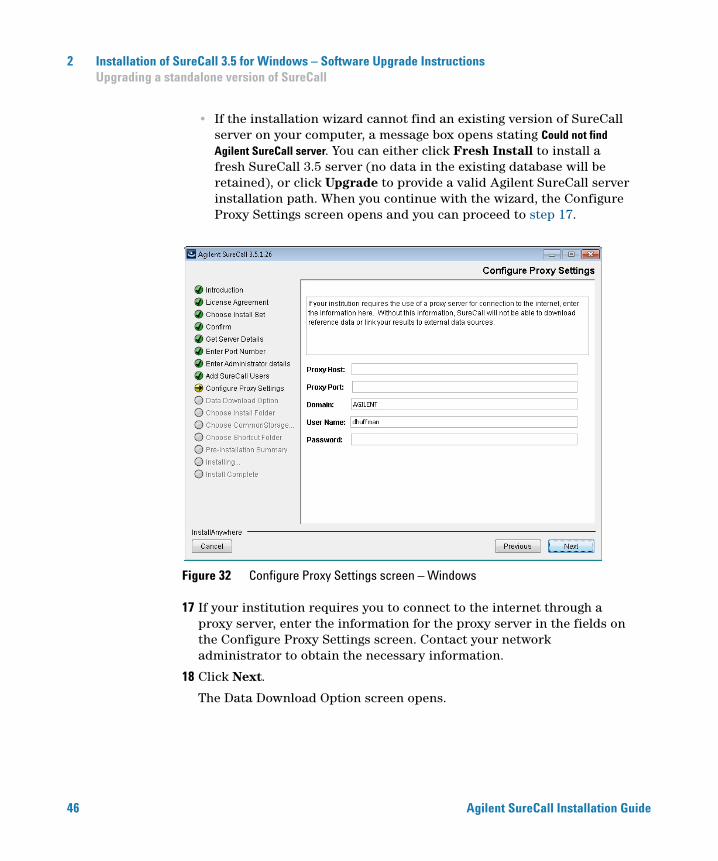
• If the installation wizard cannot find an existing version of SureCall server on your computer, a message box opens stating Could not find Agilent SureCall server. You can either click Fresh Install to install a fresh SureCall 3.5 server (no data in the existing database will be retained), or click Upgrade to provide a valid Agilent SureCall server installation path. When you continue with the wizard, the Configure Proxy Settings screen opens and you can proceed to step 17.
Figure 32 Configure Proxy Settings screen – Windows
17 If your institution requires you to connect to the internet through a proxy server, enter the information for the proxy server in the fields on the Configure Proxy Settings screen. Contact your network administrator to obtain the necessary information.
18 Click Next.
The Data Download Option screen opens.
Agilent SureCall Installation Guide
Installation of SureCall 3.5 for Windows – Software Upgrade Instructions 2 Upgrading a standalone version of SureCall
Agilent SureCall Ins
Figure 33 Data Download Option screen – Windows
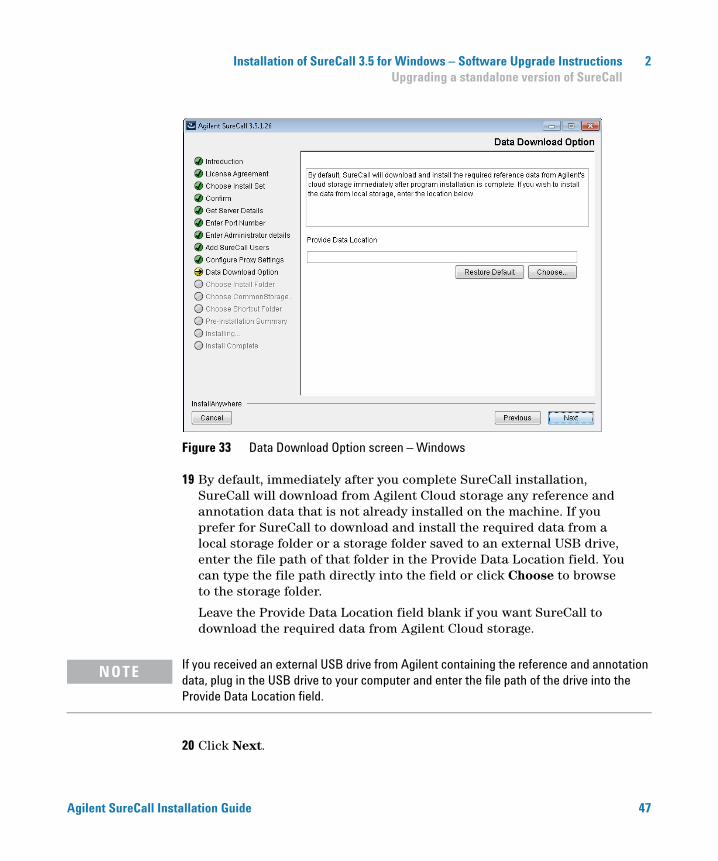
19 By default, immediately after you complete SureCall installation, SureCall will download from Agilent Cloud storage any reference and annotation data that is not already installed on the machine. If you prefer for SureCall to download and install the required data from a local storage folder or a storage folder saved to an external USB drive, enter the file path of that folder in the Provide Data Location field. You can type the file path directly into the field or click Choose to browse to the storage folder.
Leave the Provide Data Location field blank if you want SureCall to download the required data from Agilent Cloud storage.
If you received an external USB drive from Agilent containing the reference and annotation
NOTEdata, plug in the USB drive to your computer and enter the file path of the drive into the Provide Data Location field.20 Click Next.
tallation Guide 47
2 Installation of SureCall 3.5 for Windows – Software Upgrade Instructions Upgrading a standalone version of SureCall
48
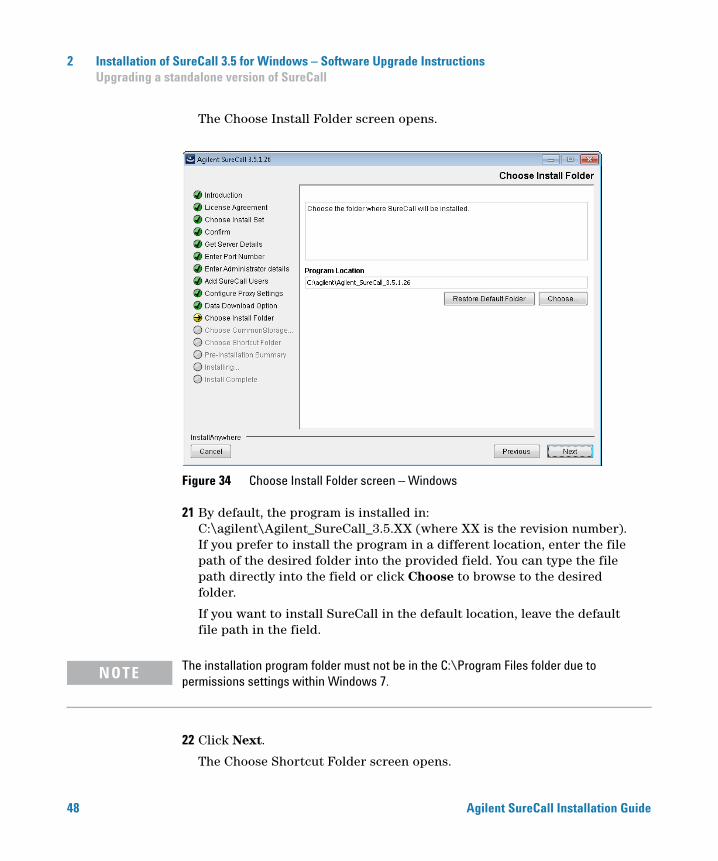
The Choose Install Folder screen opens.
Figure 34 Choose Install Folder screen – Windows
21 By default, the program is installed in: C:\agilent\Agilent_SureCall_3.5.XX (where XX is the revision number). If you prefer to install the program in a different location, enter the file path of the desired folder into the provided field. You can type the file path directly into the field or click Choose to browse to the desired folder.
If you want to install SureCall in the default location, leave the default file path in the field.
NOTE The installation program folder must not be in the C:\Program Files folder due to permissions settings within Windows 7.
22 Click Next.
The Choose Shortcut Folder screen opens.
Agilent SureCall Installation Guide
Installation of SureCall 3.5 for Windows – Software Upgrade Instructions 2 Upgrading a standalone version of SureCall
Agilent SureCall Ins
Figure 35 Choose Shortcut Folder screen – Windows
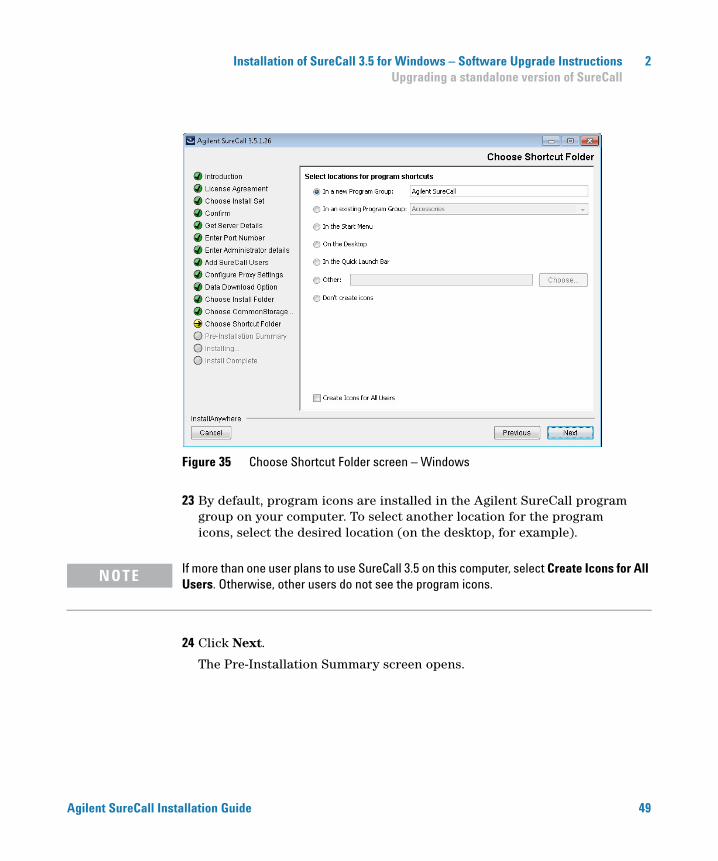
23 By default, program icons are installed in the Agilent SureCall program group on your computer. To select another location for the program icons, select the desired location (on the desktop, for example).
NOTE If more than one user plans to use SureCall 3.5 on this computer, select Create Icons for All Users. Otherwise, other users do not see the program icons.
24 Click Next.
The Pre-Installation Summary screen opens.
tallation Guide 49
2 Installation of SureCall 3.5 for Windows – Software Upgrade Instructions Upgrading a standalone version of SureCall
50
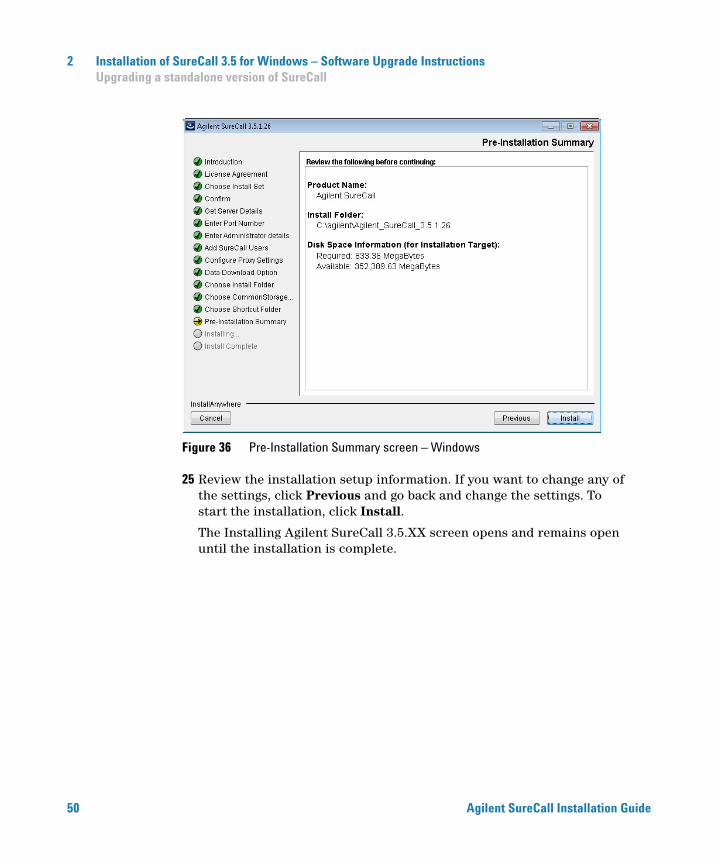
Figure 36 Pre-Installation Summary screen – Windows
25 Review the installation setup information. If you want to change any of the settings, click Previous and go back and change the settings. To start the installation, click Install.
The Installing Agilent SureCall 3.5.XX screen opens and remains open until the installation is complete.
Agilent SureCall Installation Guide
Installation of SureCall 3.5 for Windows – Software Upgrade Instructions 2 Upgrading a standalone version of SureCall
Agilent SureCall Ins
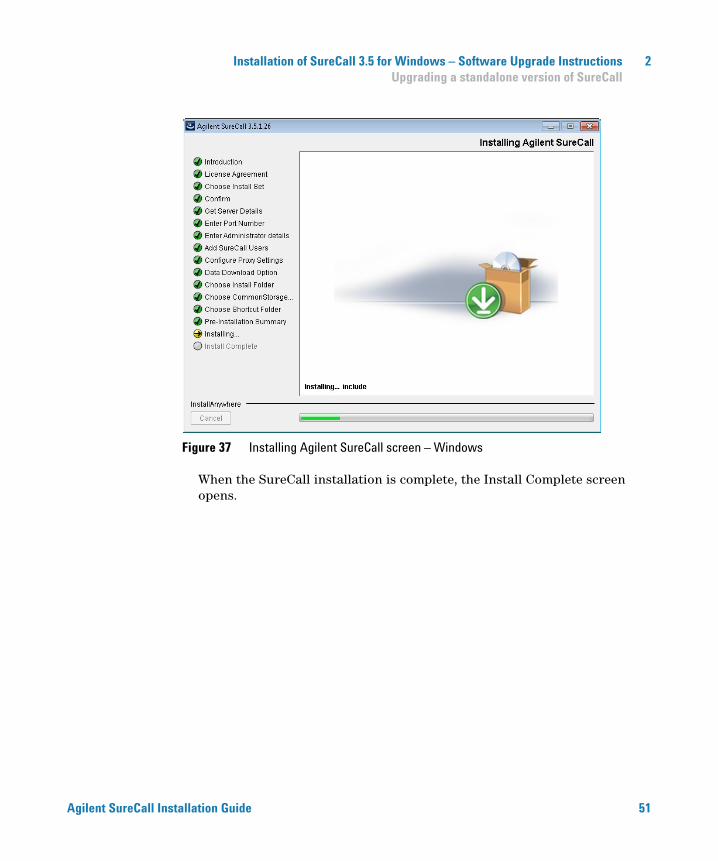
Figure 37 Installing Agilent SureCall screen – Windows
When the SureCall installation is complete, the Install Complete screen opens.
tallation Guide 51
2 Installation of SureCall 3.5 for Windows – Software Upgrade Instructions Upgrading a standalone version of SureCall
52
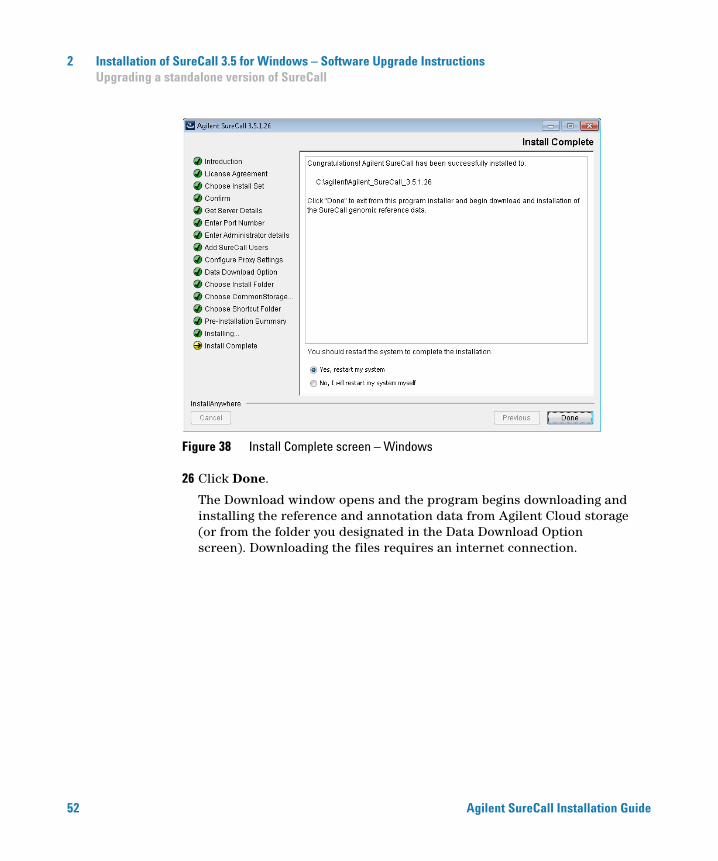
Figure 38 Install Complete screen – Windows
26 Click Done.
The Download window opens and the program begins downloading and installing the reference and annotation data from Agilent Cloud storage (or from the folder you designated in the Data Download Option screen). Downloading the files requires an internet connection.
Agilent SureCall Installation Guide

Installation of SureCall 3.5 for Windows – Software Upgrade Instructions 2 Upgrading a standalone version of SureCall
Agilent SureCall Ins
Figure 39 Download screen
During this process, the Download screen remains open and displays which files have been downloaded and installed. Your system needs to be connected to the internet until the process is complete.
27 When the downloads are complete, click Close to close the Download dialog box.
If the download fails or does not complete, you can manually download the missing files from within SureCall. See “Checking the data download” on page 35.
Start the SureCall program, log in, and enter your license information. See “Opening the SureCall 3.5 client software” on page 30.
tallation Guide 53
2 Installation of SureCall 3.5 for Windows – Software Upgrade Instructions Upgrading SureCall on client computers
Upgrading SureCall on client computers
54
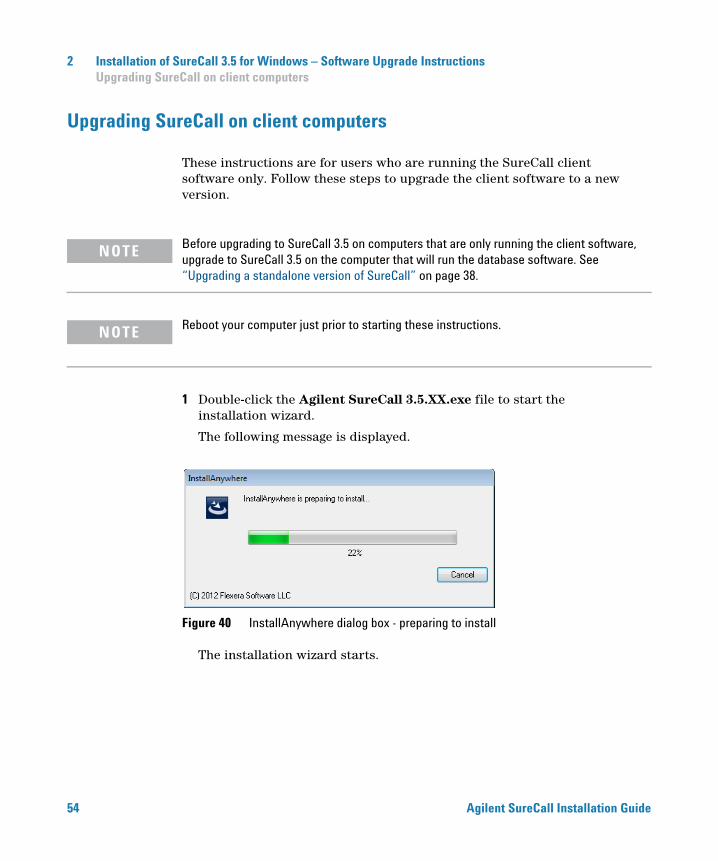
These instructions are for users who are running the SureCall client software only. Follow these steps to upgrade the client software to a new version.
Before upgrading to SureCall 3.5 on computers that are only running the client software,
NOTEupgrade to SureCall 3.5 on the computer that will run the database software. See “Upgrading a standalone version of SureCall” on page 38.NOTE Reboot your computer just prior to starting these instructions.
1 Double-click the Agilent SureCall 3.5.XX.exe file to start the installation wizard.
The following message is displayed.
Figure 40 InstallAnywhere dialog box - preparing to install
The installation wizard starts.
Agilent SureCall Installation Guide
Installation of SureCall 3.5 for Windows – Software Upgrade Instructions 2 Upgrading SureCall on client computers
Agilent SureCall Ins
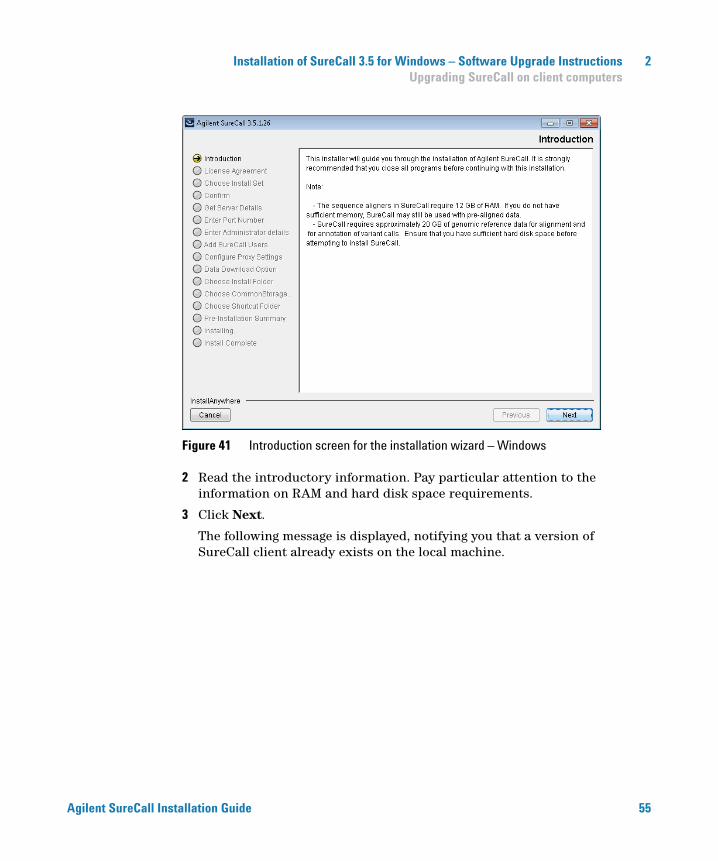
Figure 41 Introduction screen for the installation wizard – Windows
2 Read the introductory information. Pay particular attention to the information on RAM and hard disk space requirements.
3 Click Next.
The following message is displayed, notifying you that a version of SureCall client already exists on the local machine.
tallation Guide 55
2 Installation of SureCall 3.5 for Windows – Software Upgrade Instructions Upgrading SureCall on client computers
56
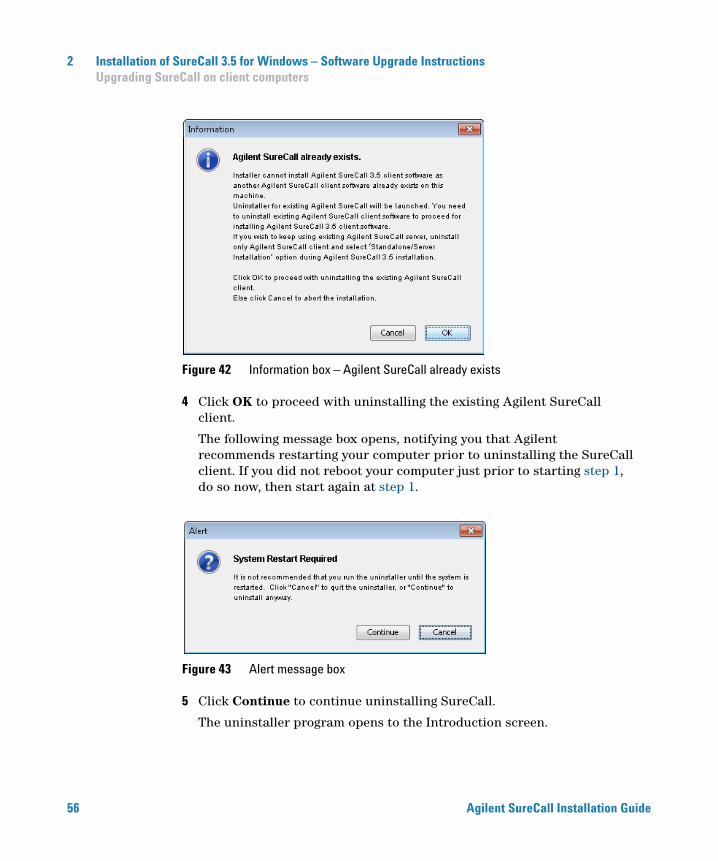
Figure 42 Information box – Agilent SureCall already exists
4 Click OK to proceed with uninstalling the existing Agilent SureCall client.
The following message box opens, notifying you that Agilent recommends restarting your computer prior to uninstalling the SureCall client. If you did not reboot your computer just prior to starting step 1, do so now, then start again at step 1.
Figure 43 Alert message box
5 Click Continue to continue uninstalling SureCall.
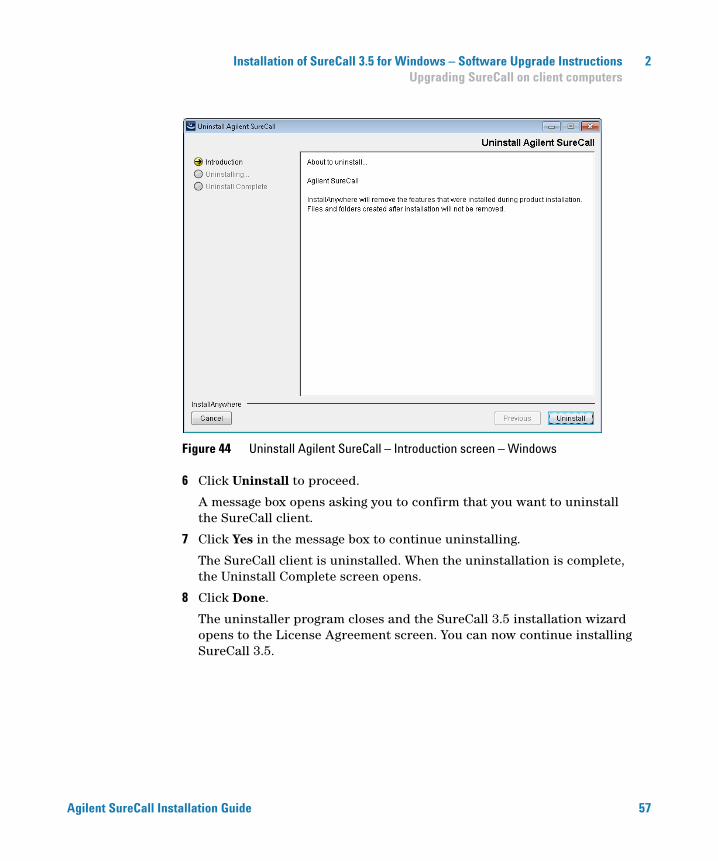
The uninstaller program opens to the Introduction screen.
Agilent SureCall Installation Guide
Installation of SureCall 3.5 for Windows – Software Upgrade Instructions 2 Upgrading SureCall on client computers
Agilent SureCall Ins
Figure 44 Uninstall Agilent SureCall – Introduction screen – Windows
6 Click Uninstall to proceed.
A message box opens asking you to confirm that you want to uninstall the SureCall client.
7 Click Yes in the message box to continue uninstalling.
The SureCall client is uninstalled. When the uninstallation is complete, the Uninstall Complete screen opens.
8 Click Done.
The uninstaller program closes and the SureCall 3.5 installation wizard opens to the License Agreement screen. You can now continue installing SureCall 3.5.
tallation Guide 57
2 Installation of SureCall 3.5 for Windows – Software Upgrade Instructions Upgrading SureCall on client computers
58
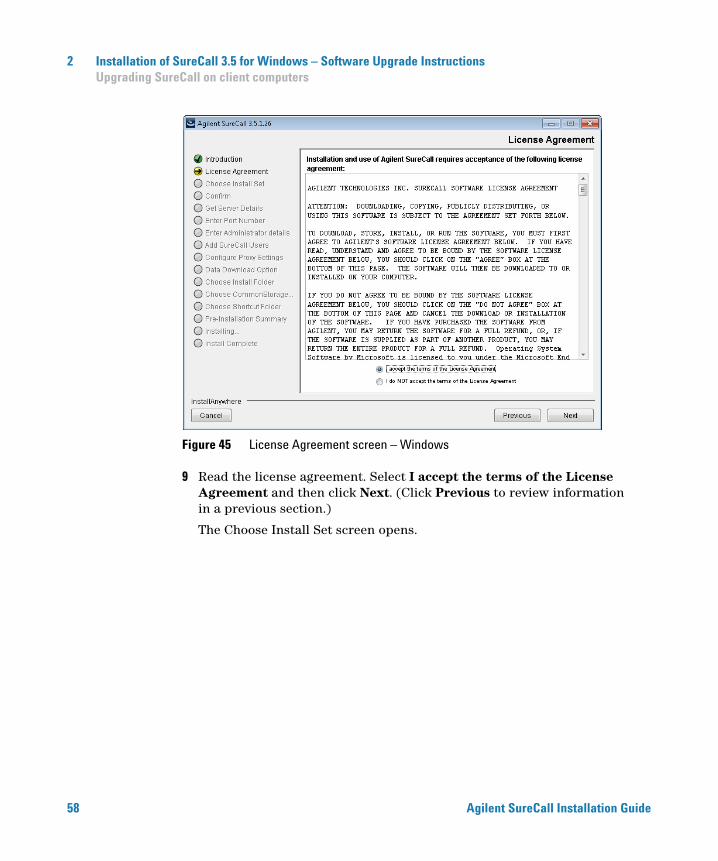
Figure 45 License Agreement screen – Windows
9 Read the license agreement. Select I accept the terms of the License Agreement and then click Next. (Click Previous to review information in a previous section.)
The Choose Install Set screen opens.
Agilent SureCall Installation Guide
Installation of SureCall 3.5 for Windows – Software Upgrade Instructions 2 Upgrading SureCall on client computers
Agilent SureCall Ins
Figure 46 Choose Install Set screen – Select Client – Windows
10 On the Choose Install Set screen, select Client.
11 Click Next.
The Get Server Details screen opens.
tallation Guide 59
2 Installation of SureCall 3.5 for Windows – Software Upgrade Instructions Upgrading SureCall on client computers
60
Figure 47 Get Server Details screen – Windows
12 In the Server Name field, type the assigned computer name or IP address of the computer where you installed the SureCall 3.5 database server. (To find the computer name of your current computer, click Start > Control Panel > System.)
13 Accept the default Port, unless your system administrator tells you otherwise.
14 Click Next.
The installer immediately tests the connection to the specified database.
If incorrect database parameters are provided, or the PostgreSQL database service is not
NOTErunning, a message is displayed. You can choose to continue the installation and change database connection parameters when launching the client software. However, Agilent recommends that you provide the correct database information during installation.15 Continue the installation wizard. Follow the instructions for the installation wizard to configure the proxy settings, choose an install
Agilent SureCall Installation Guide
Installation of SureCall 3.5 for Windows – Software Upgrade Instructions 2 Upgrading SureCall on client computers
Agilent SureCall Ins
folder, choose a shortcut location, and start the installation. For information, see step 17 through step 26 in the section “Upgrading a standalone version of SureCall” on page 38.
tallation Guide 61
2 Installation of SureCall 3.5 for Windows – Software Upgrade Instructions Uninstalling SureCall
Uninstalling SureCall
62
This section provides instructions on uninstalling the SureCall software. On a computer in which a standalone copy of SureCall is installed, you can select to uninstall only the client software or both the client software and server software.
Uninstall the client and server software for SureCall
The Uninstall program for SureCall provides an easy way to remove the SureCall client, server, and PostgreSQL programs from your computer.CAUTION When you completely uninstall SureCall, the database, the data contained in the database, and the reference data, including the reference genome file, are all completely removed. Do not uninstall the entire program unless you have backed up your database or no longer wish to use it.
NOTE Reboot your computer just prior to starting these instructions.
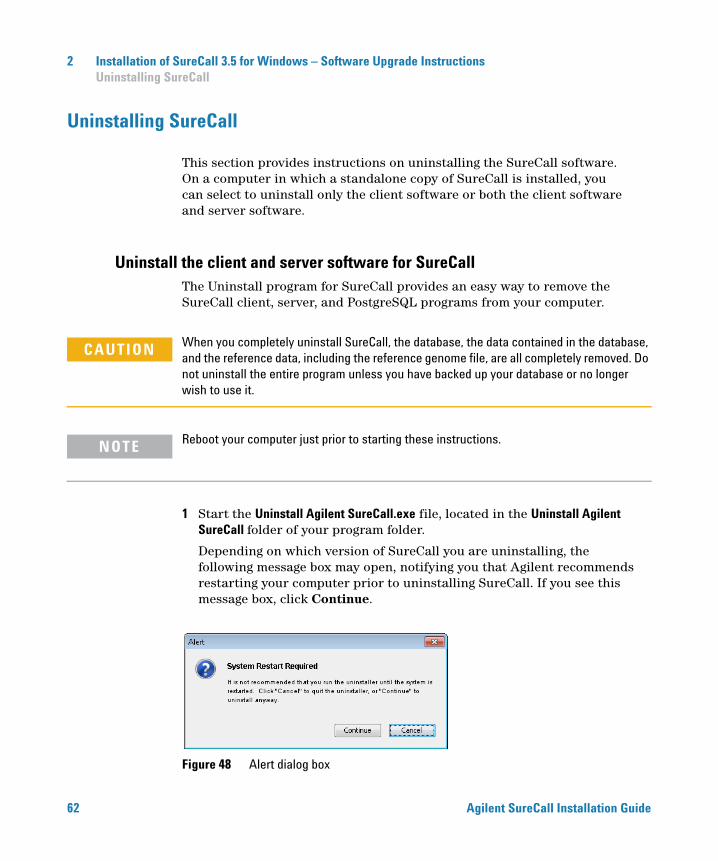
1 Start the Uninstall Agilent SureCall.exe file, located in the Uninstall Agilent SureCall folder of your program folder.
Depending on which version of SureCall you are uninstalling, the following message box may open, notifying you that Agilent recommends restarting your computer prior to uninstalling SureCall. If you see this message box, click Continue.
Figure 48 Alert dialog box
Agilent SureCall Installation Guide
Installation of SureCall 3.5 for Windows – Software Upgrade Instructions 2 Uninstalling SureCall
Agilent SureCall Ins
The uninstaller program starts.
2 Read the introductory information, and then click Next.
3 Read the warning information. You are cautioned not to stop the uninstaller once it has started to remove the programs. Click Next.
The Uninstall Options screen opens.
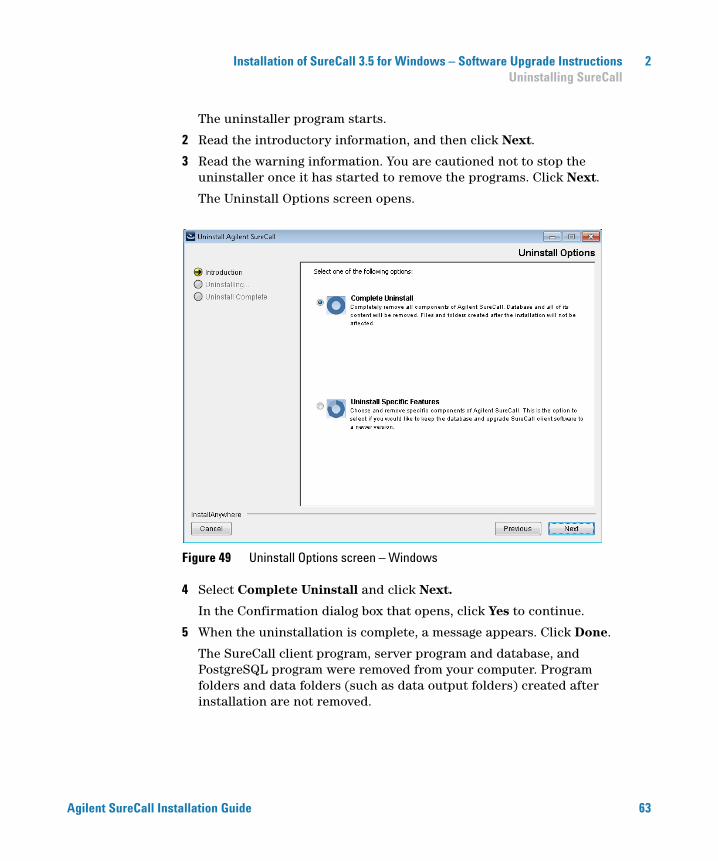
Figure 49 Uninstall Options screen – Windows
4 Select Complete Uninstall and click Next.
In the Confirmation dialog box that opens, click Yes to continue.
5 When the uninstallation is complete, a message appears. Click Done.
The SureCall client program, server program and database, and PostgreSQL program were removed from your computer. Program folders and data folders (such as data output folders) created after installation are not removed.
tallation Guide 63

2 Installation of SureCall 3.5 for Windows – Software Upgrade Instructions Uninstalling SureCall
Uninstall the SureCall client software only
64
Reboot your computer just prior to starting these instructions.
NOTE1 Start the Uninstall Agilent SureCall.exe file, located in the Uninstall Agilent SureCall folder of your program folder.
Depending on which version of SureCall you are uninstalling, the following message box may open, notifying you that Agilent recommends restarting your computer prior to uninstalling SureCall. If you see this message box, click Continue.
Figure 50 Alert dialog box
The uninstaller program starts.
2 Read the introductory information, and then click Next.
3 Read the warning information. You are cautioned not to stop the uninstaller once it has started to remove the programs. Click Next.
The Uninstall Options screen opens.
Agilent SureCall Installation Guide
Installation of SureCall 3.5 for Windows – Software Upgrade Instructions 2 Uninstalling SureCall
Agilent SureCall Ins
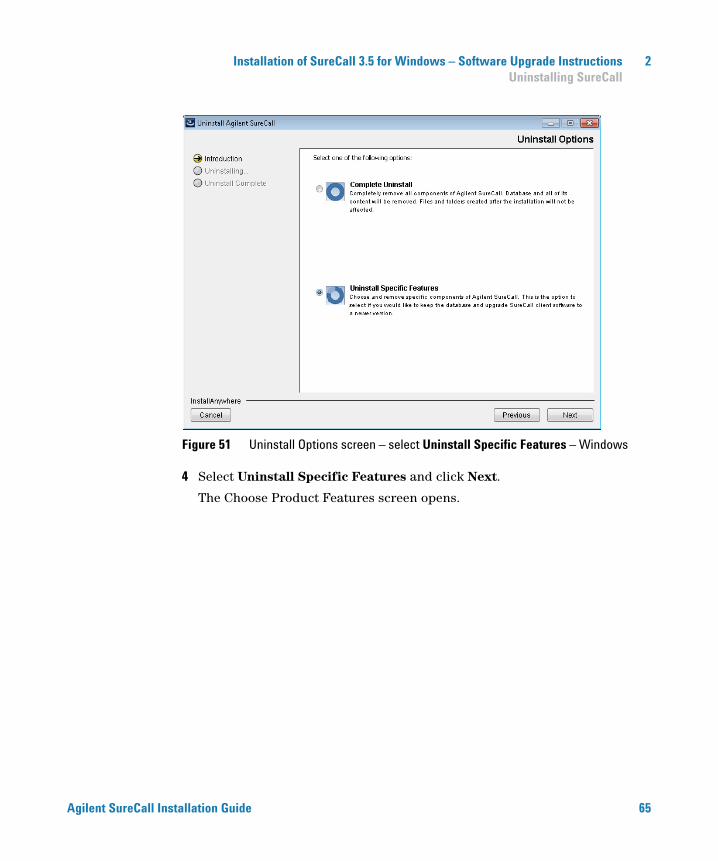
Figure 51 Uninstall Options screen – select Uninstall Specific Features – Windows
4 Select Uninstall Specific Features and click Next.
The Choose Product Features screen opens.
tallation Guide 65

2 Installation of SureCall 3.5 for Windows – Software Upgrade Instructions Uninstalling SureCall
66
Figure 52 Choose Product Features screen – mark Client – Windows
5 In the Choose Product Features screen, mark Client. When the Client check box is selected, only the client program is removed from the computer. The client program folder and any data folders created after installation are not removed.
The Uninstall button becomes active.
Do not select Server unless you want to remove client and server software completely,
CAUTIONincluding the database, from your computer.6 Click Uninstall.
In the Confirmation dialog box that opens, click Yes to continue.
7 When the uninstallation has completed, click Done.
Agilent SureCall Installation Guide

3Installation of SureCall 3.5 for Macintosh – Fresh Install Instructions
Preparing for installation 68
Installing a standalone version of SureCall 3.5 – Macintosh 70
Opening the SureCall 3.5 client software 86
Adding a SureDesign user name and password 88
Checking the data download 89
This chapter shows you how to install and get started using SureCall 3.5 on computers running the Macintosh OS X Mavericks or Yosemite operating system.
For instructions on upgrading from a previous version of SureCall to SureCall 3.5, see Chapter 4, “Installation of SureCall 3.5 for Macintosh – Software Upgrade Instructions” on page 91.
For instructions on installing SureCall 3.5 on a Windows computer, see Chapter 1, “Installation of SureCall 3.5 for Windows – Fresh Install Instructions” on page 7.
Agilent Technologies
3 Installation of SureCall 3.5 for Macintosh – Fresh Install Instructions Preparing for installation
Preparing for installation
Download the software and release notes
68
1 Go to http://www.agilent.com/genomics/surecall_soft.
2 Click Download Software.
3 Click the Download link for the Macintosh version of the software.
4 Select Save File to save the installer zip folder to your computer. (This folder contains large files. Depending on your internet connection speed, the download can take a long time.)
5 Browse to a location where you want to save the installer zip folder, and then click Save. (Do not start the installation at this time.)
6 Return to http://www.agilent.com/genomics/surecall_soft and click Download Software again.
7 Click the Download link for the Release Notes.
8 Click Save As.
9 Browse to a location where you want to save the release notes.
10 Click Save.
You will also need to download the installer for the sequence alignment tools from the
NOTEhttp://www.agilent.com/genomics/surecall_soft website. See “Installing Sequence Alignment Tools (GenAligners 3.0)” on page 108 for instructions.Agilent SureCall Installation Guide
Installation of SureCall 3.5 for Macintosh – Fresh Install Instructions 3 Preparing for installation
Check system requirements before you start
Agilent SureCall Ins
Check to make sure that your computer systems meet the following requirements. See Table 2 for minimum and recommended requirements.
Set up permissions for installer and users
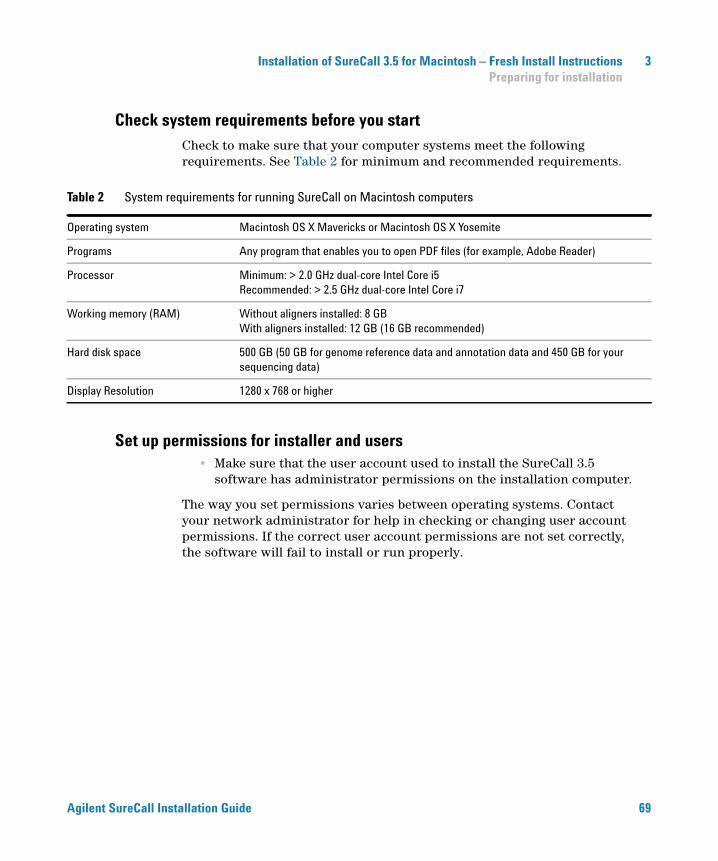
Table 2 System requirements for running SureCall on Macintosh computers
Operating system Macintosh OS X Mavericks or Macintosh OS X Yosemite
Programs Any program that enables you to open PDF files (for example, Adobe Reader)
Processor Minimum: > 2.0 GHz dual-core Intel Core i5Recommended: > 2.5 GHz dual-core Intel Core i7
Working memory (RAM) Without aligners installed: 8 GBWith aligners installed: 12 GB (16 GB recommended)
Hard disk space 500 GB (50 GB for genome reference data and annotation data and 450 GB for your sequencing data)
Display Resolution 1280 x 768 or higher
• Make sure that the user account used to install the SureCall 3.5 software has administrator permissions on the installation computer.
The way you set permissions varies between operating systems. Contact your network administrator for help in checking or changing user account permissions. If the correct user account permissions are not set correctly, the software will fail to install or run properly.
tallation Guide 69
3 Installation of SureCall 3.5 for Macintosh – Fresh Install Instructions Installing a standalone version of SureCall 3.5 – Macintosh
Installing a standalone version of SureCall 3.5 – Macintosh
70
SureCall consists of two parts: a PostgreSQL database server and the client software. To run SureCall on a Macintosh computer, you must install SureCall as a standalone program, which requires installing both the database server and client software on the same computer. The client is the program that your run when you want to use SureCall. The database server runs silently in the background. While the Windows version of SureCall allows you to install additional copies of the client software on client computers that have network access to the database computer, the Macintosh version does not support that setup.
This section includes detailed instructions and important notes for installing SureCall 3.5 as a standalone program.
1 Log on to the computer where you want to install SureCall 3.5. Use an account that has administrator permissions.
2 Locate the installation program you downloaded in Step 1, “Download the software and release notes” on page 68. Double-click the Agilent SureCall Edition 3.5.XX.zip folder to extract the installer.
3 Double-click the Agilent SureCall Edition 3.5.XX icon to start the installation wizard.
The Authentication screen opens.
Agilent SureCall Installation Guide
Installation of SureCall 3.5 for Macintosh – Fresh Install Instructions 3 Installing a standalone version of SureCall 3.5 – Macintosh
Agilent SureCall Ins
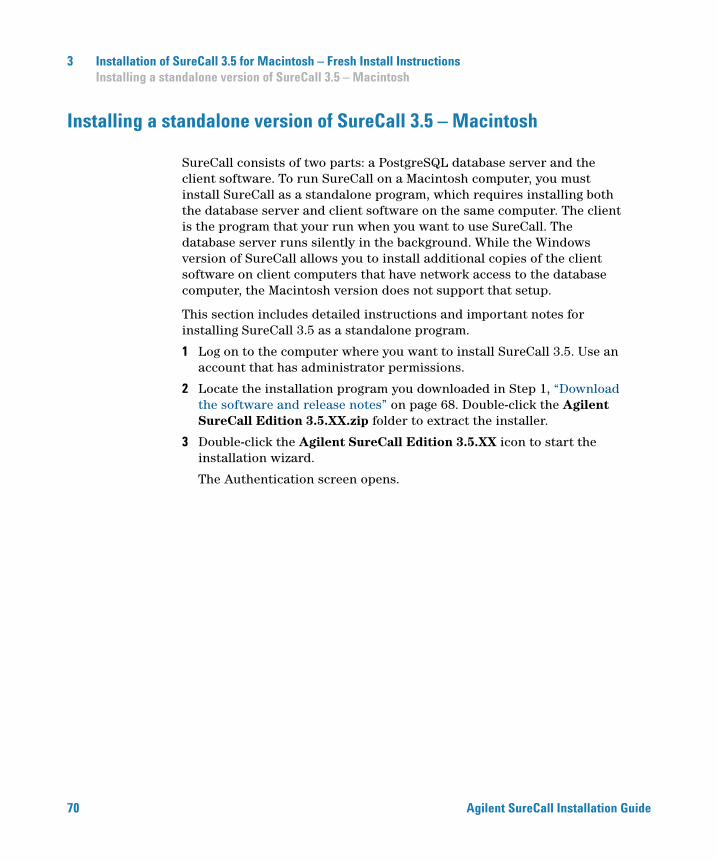
Figure 53 Authentication screen for the installation wizard – preparing to install
4 Click directly on the lock icon near the bottom of the screen.
A dialog box opens with fields for entering a Name and Password.
5 In the dialog box, type the Name and Password for a user with administrator rights to the computer, then click OK.
The installation wizard starts.
tallation Guide 71
3 Installation of SureCall 3.5 for Macintosh – Fresh Install Instructions Installing a standalone version of SureCall 3.5 – Macintosh
72
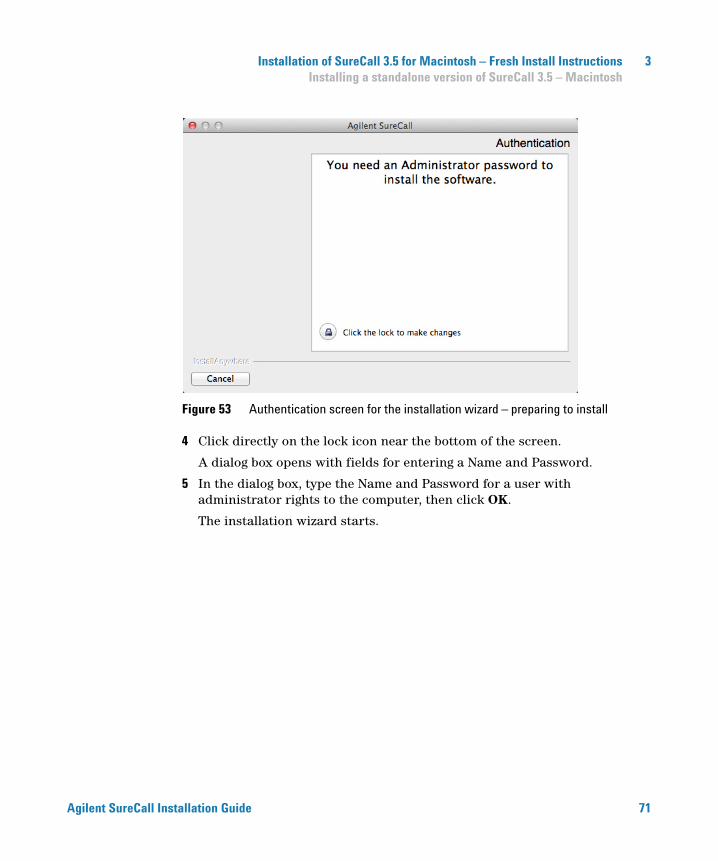
Figure 54 Introduction screen for the installation wizard – Macintosh
6 Read the introductory information. Pay particular attention to the information on RAM and hard disk space requirements.
7 Click Next.
The License Agreement screen opens.
Agilent SureCall Installation Guide
Installation of SureCall 3.5 for Macintosh – Fresh Install Instructions 3 Installing a standalone version of SureCall 3.5 – Macintosh
Agilent SureCall Ins
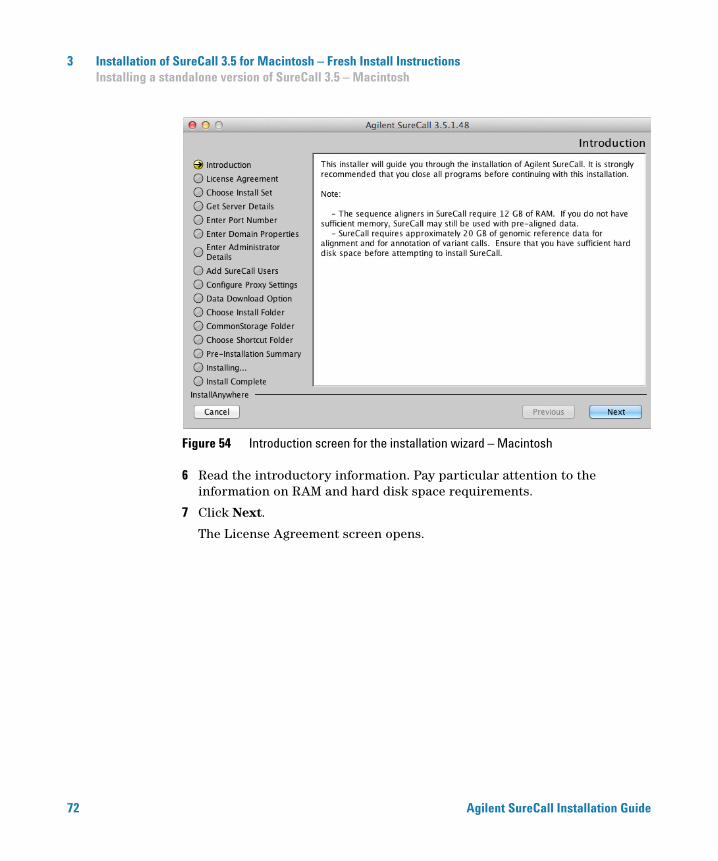
Figure 55 License Agreement screen – Macintosh
8 Read the license agreement. Select I accept the terms of the License Agreement and then click Next. (Click Previous to review information in a previous section.)
The Choose Install Set screen opens.
tallation Guide 73
3 Installation of SureCall 3.5 for Macintosh – Fresh Install Instructions Installing a standalone version of SureCall 3.5 – Macintosh
74
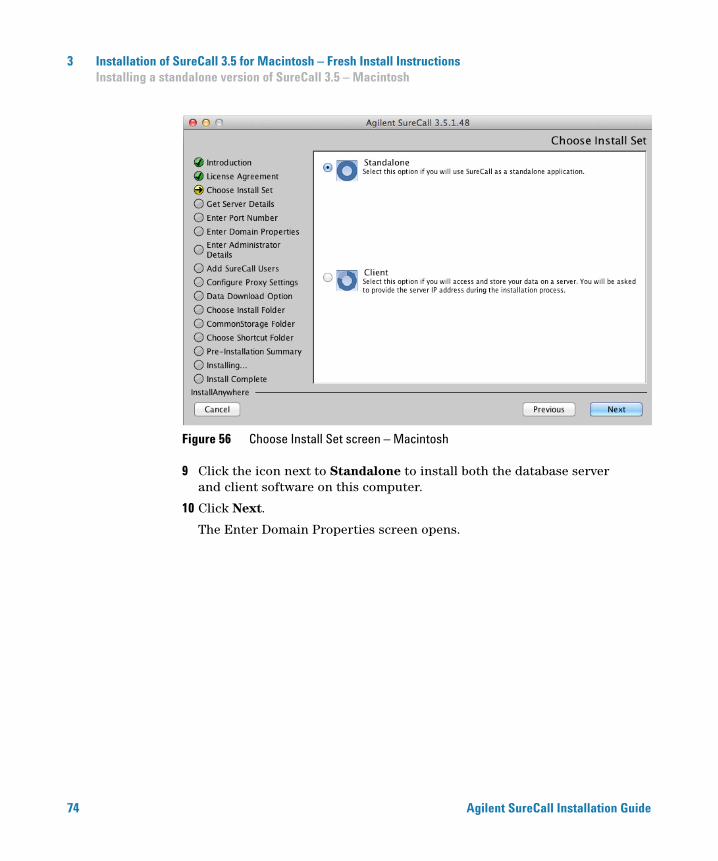
Figure 56 Choose Install Set screen – Macintosh
9 Click the icon next to Standalone to install both the database server and client software on this computer.
10 Click Next.
The Enter Domain Properties screen opens.
Agilent SureCall Installation Guide
Installation of SureCall 3.5 for Macintosh – Fresh Install Instructions 3 Installing a standalone version of SureCall 3.5 – Macintosh
Agilent SureCall Ins
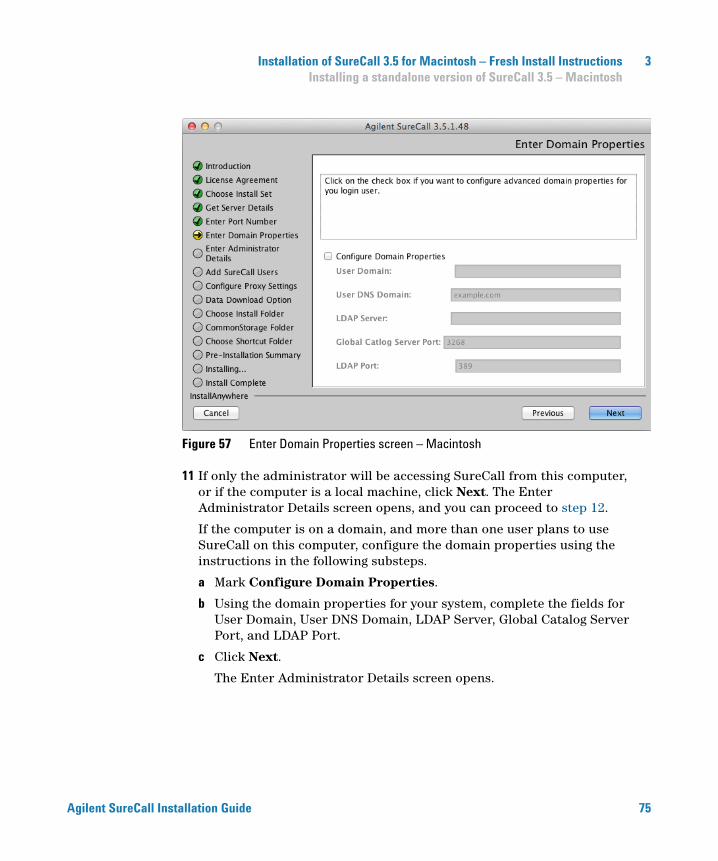
Figure 57 Enter Domain Properties screen – Macintosh
11 If only the administrator will be accessing SureCall from this computer, or if the computer is a local machine, click Next. The Enter Administrator Details screen opens, and you can proceed to step 12.
If the computer is on a domain, and more than one user plans to use SureCall on this computer, configure the domain properties using the instructions in the following substeps.
a Mark Configure Domain Properties.
b Using the domain properties for your system, complete the fields for User Domain, User DNS Domain, LDAP Server, Global Catalog Server Port, and LDAP Port.
c Click Next.
The Enter Administrator Details screen opens.
tallation Guide 75
3 Installation of SureCall 3.5 for Macintosh – Fresh Install Instructions Installing a standalone version of SureCall 3.5 – Macintosh
76
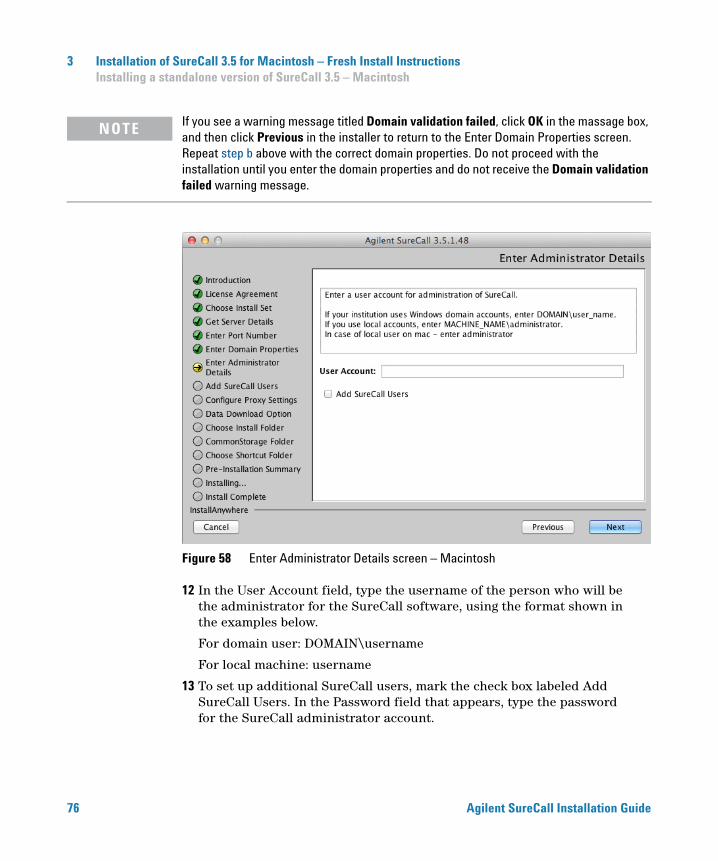
If you see a warning message titled Domain validation failed, click OK in the massage box,
NOTEand then click Previous in the installer to return to the Enter Domain Properties screen. Repeat step b above with the correct domain properties. Do not proceed with the installation until you enter the domain properties and do not receive the Domain validation failed warning message.Figure 58 Enter Administrator Details screen – Macintosh
12 In the User Account field, type the username of the person who will be the administrator for the SureCall software, using the format shown in the examples below.
For domain user: DOMAIN\username
For local machine: username
13 To set up additional SureCall users, mark the check box labeled Add SureCall Users. In the Password field that appears, type the password for the SureCall administrator account.
Agilent SureCall Installation Guide
Installation of SureCall 3.5 for Macintosh – Fresh Install Instructions 3 Installing a standalone version of SureCall 3.5 – Macintosh
Agilent SureCall Ins
If you do not want to set up new users at this time, proceed directly to step 18 on page 78. Note that the administrator can set up new users from within SureCall once installation is complete.
To set up SureCall users during installation, you need to have entered the domain properties
NOTEback in step 11.14 Click Next.
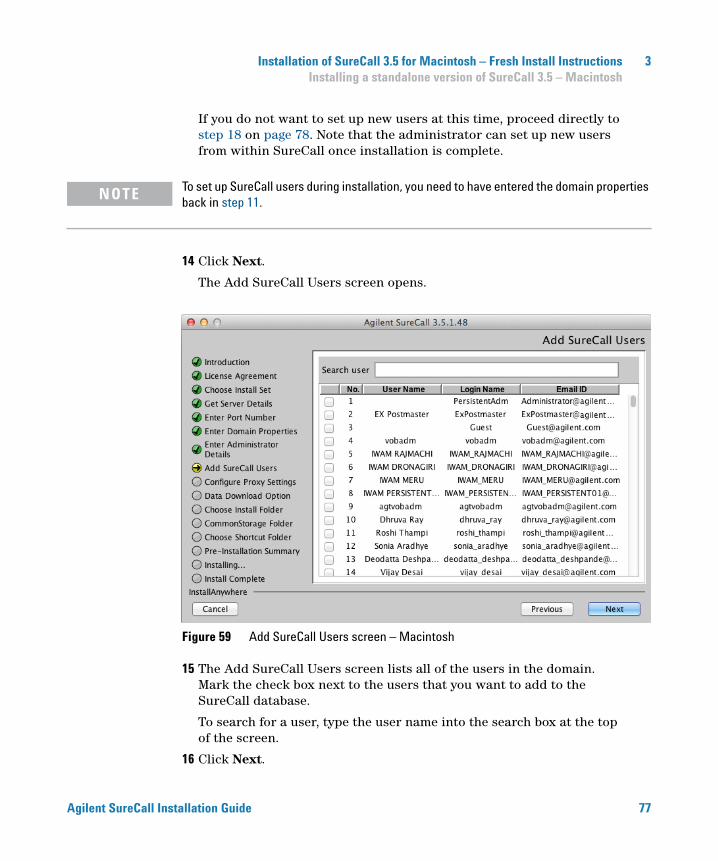
The Add SureCall Users screen opens.
Figure 59 Add SureCall Users screen – Macintosh
15 The Add SureCall Users screen lists all of the users in the domain. Mark the check box next to the users that you want to add to the SureCall database.
To search for a user, type the user name into the search box at the top of the screen.
16 Click Next.
tallation Guide 77

3 Installation of SureCall 3.5 for Macintosh – Fresh Install Instructions Installing a standalone version of SureCall 3.5 – Macintosh
78
The Add SureCall Users screen advances to the step for configuring user roles.
Figure 60 Add SureCall Users screen – Configure roles step – Macintosh
17 For each user listed on the screen, select a role in the Roles drop-down list. The default selection is Technician.
Administrators can also edit user roles from within SureCall once installation is complete.
18 Click Next.
The Configure Proxy Settings screen opens.
Agilent SureCall Installation Guide
Installation of SureCall 3.5 for Macintosh – Fresh Install Instructions 3 Installing a standalone version of SureCall 3.5 – Macintosh
Agilent SureCall Ins
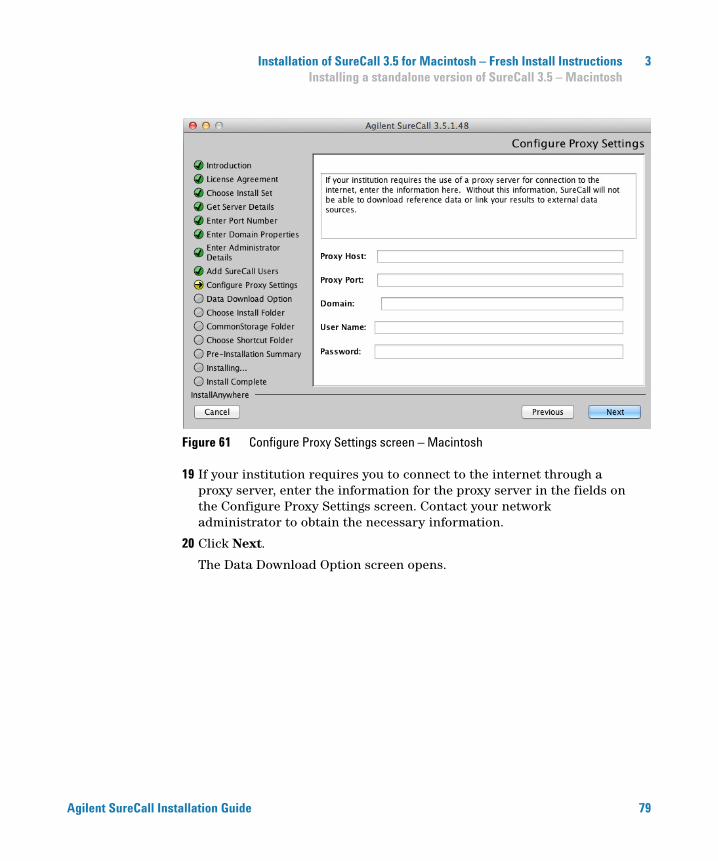
Figure 61 Configure Proxy Settings screen – Macintosh
19 If your institution requires you to connect to the internet through a proxy server, enter the information for the proxy server in the fields on the Configure Proxy Settings screen. Contact your network administrator to obtain the necessary information.
20 Click Next.
The Data Download Option screen opens.
tallation Guide 79
3 Installation of SureCall 3.5 for Macintosh – Fresh Install Instructions Installing a standalone version of SureCall 3.5 – Macintosh
80
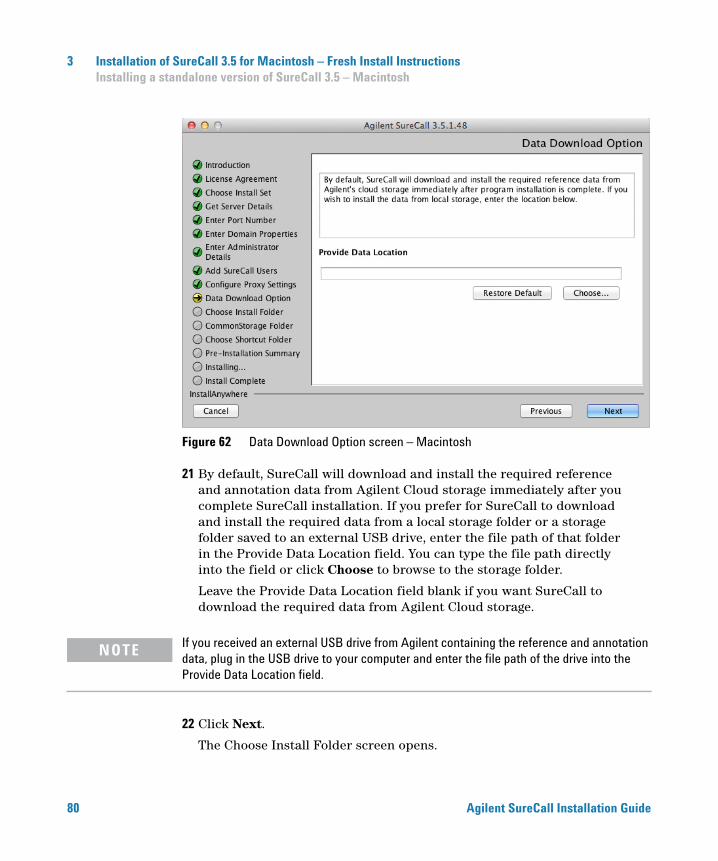
Figure 62 Data Download Option screen – Macintosh
21 By default, SureCall will download and install the required reference and annotation data from Agilent Cloud storage immediately after you complete SureCall installation. If you prefer for SureCall to download and install the required data from a local storage folder or a storage folder saved to an external USB drive, enter the file path of that folder in the Provide Data Location field. You can type the file path directly into the field or click Choose to browse to the storage folder.
Leave the Provide Data Location field blank if you want SureCall to download the required data from Agilent Cloud storage.
If you received an external USB drive from Agilent containing the reference and annotation
NOTEdata, plug in the USB drive to your computer and enter the file path of the drive into the Provide Data Location field.22 Click Next.
The Choose Install Folder screen opens.
Agilent SureCall Installation Guide
Installation of SureCall 3.5 for Macintosh – Fresh Install Instructions 3 Installing a standalone version of SureCall 3.5 – Macintosh
Agilent SureCall Ins
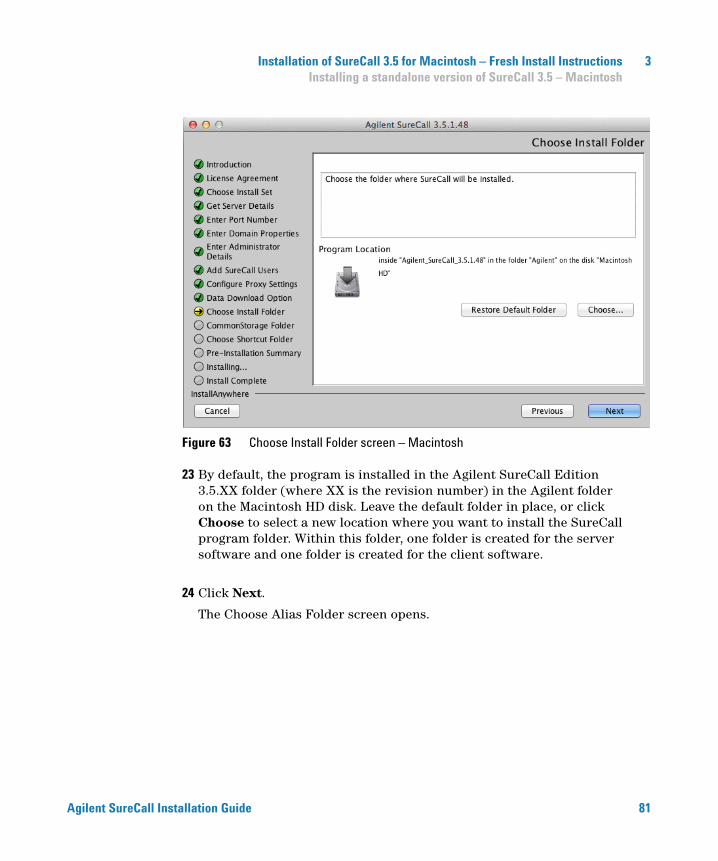
Figure 63 Choose Install Folder screen – Macintosh
23 By default, the program is installed in the Agilent SureCall Edition 3.5.XX folder (where XX is the revision number) in the Agilent folder on the Macintosh HD disk. Leave the default folder in place, or click Choose to select a new location where you want to install the SureCall program folder. Within this folder, one folder is created for the server software and one folder is created for the client software.
24 Click Next.
The Choose Alias Folder screen opens.
tallation Guide 81

3 Installation of SureCall 3.5 for Macintosh – Fresh Install Instructions Installing a standalone version of SureCall 3.5 – Macintosh
82
Figure 64 Choose Alias Folder screen – Macintosh
25 By default, program icon is installed on the Desktop of your computer. To select another location for the program icon, select the desired location (In the Dock, for example) and then click Next.
The Pre-Installation Summary screen opens.
Agilent SureCall Installation Guide
Installation of SureCall 3.5 for Macintosh – Fresh Install Instructions 3 Installing a standalone version of SureCall 3.5 – Macintosh
Agilent SureCall Ins
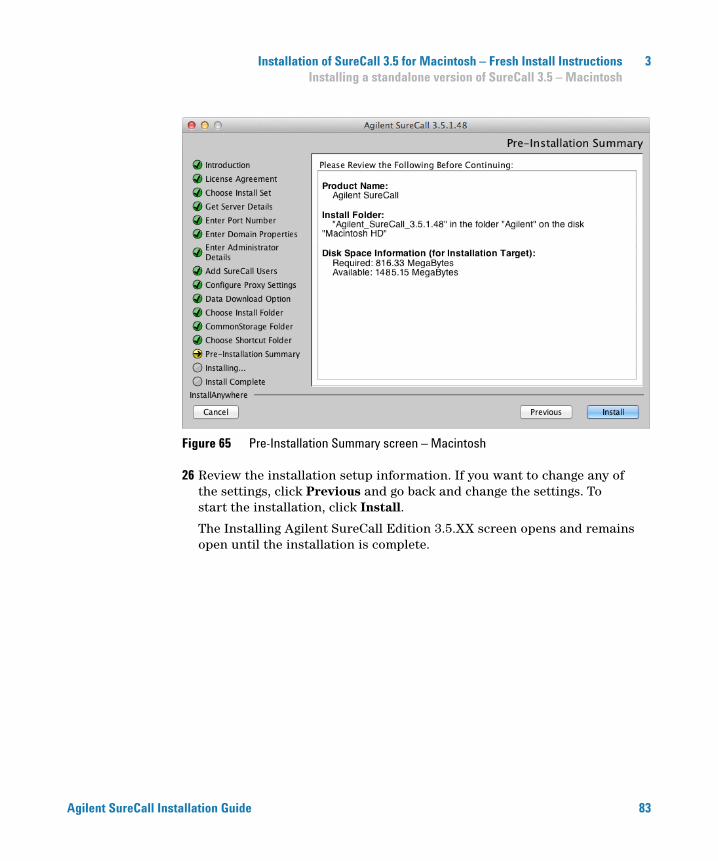
Figure 65 Pre-Installation Summary screen – Macintosh
26 Review the installation setup information. If you want to change any of the settings, click Previous and go back and change the settings. To start the installation, click Install.
The Installing Agilent SureCall Edition 3.5.XX screen opens and remains open until the installation is complete.
tallation Guide 83
3 Installation of SureCall 3.5 for Macintosh – Fresh Install Instructions Installing a standalone version of SureCall 3.5 – Macintosh
84
Figure 66 Installing Agilent SureCall screen – Macintosh
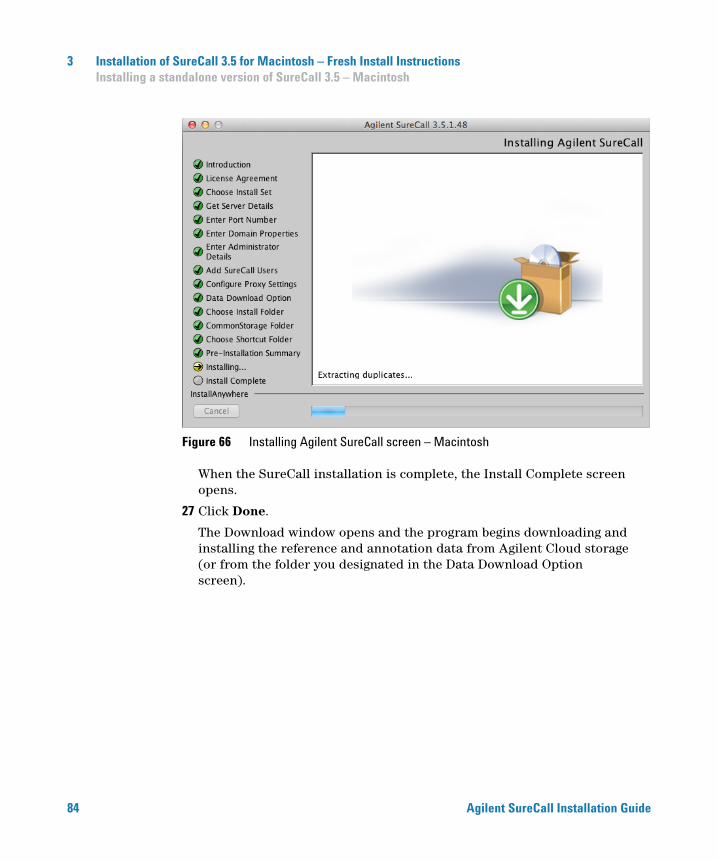
When the SureCall installation is complete, the Install Complete screen opens.
27 Click Done.
The Download window opens and the program begins downloading and installing the reference and annotation data from Agilent Cloud storage (or from the folder you designated in the Data Download Option screen).
Agilent SureCall Installation Guide
Installation of SureCall 3.5 for Macintosh – Fresh Install Instructions 3 Installing a standalone version of SureCall 3.5 – Macintosh
Agilent SureCall Ins
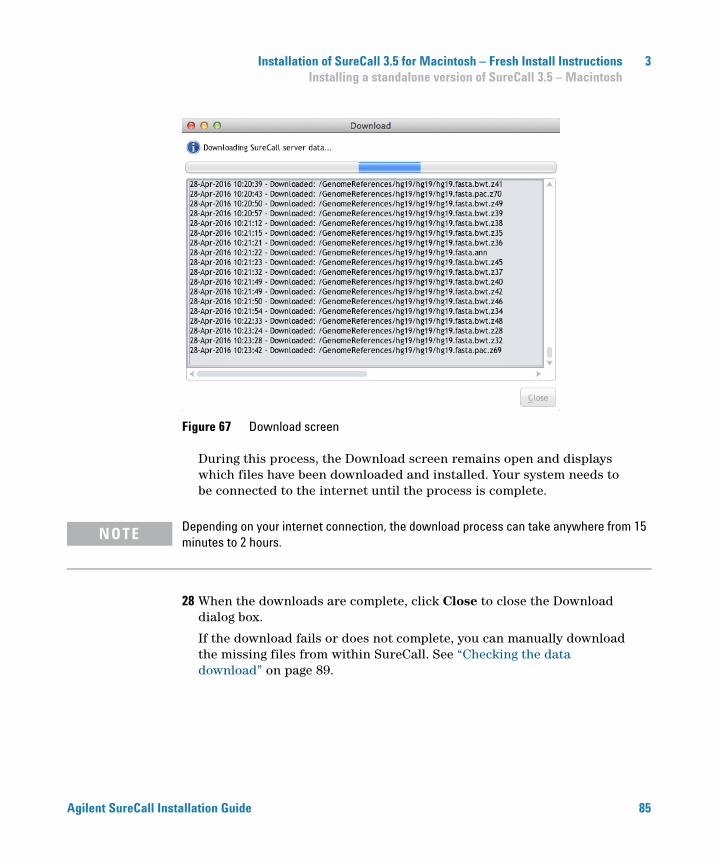
Figure 67 Download screen
During this process, the Download screen remains open and displays which files have been downloaded and installed. Your system needs to be connected to the internet until the process is complete.
Depending on your internet connection, the download process can take anywhere from 15
NOTEminutes to 2 hours.28 When the downloads are complete, click Close to close the Download dialog box.
If the download fails or does not complete, you can manually download the missing files from within SureCall. See “Checking the data download” on page 89.
tallation Guide 85

3 Installation of SureCall 3.5 for Macintosh – Fresh Install Instructions Opening the SureCall 3.5 client software
Opening the SureCall 3.5 client software
86
After you install the SureCall database server and client program, start the program.
1 Double-click the SureCall 3.5 icon to open the program.
NOTE How you start the program depends on the choice you made for the Alias or Install Folder during installation of the client software.
After you start the program, the Login screen opens. The name and domain for the administrator set during installation appears in the dialog box.
Figure 68 Login screen
2 Log in with your user name and password.
3 If you need to change the domain, expand the drop-down list next to Domain and select the correct domain.
4 Click OK.
After you log in for the first time, the Enter License dialog box opens.
Agilent SureCall Installation Guide
Installation of SureCall 3.5 for Macintosh – Fresh Install Instructions 3 Opening the SureCall 3.5 client software
Agilent SureCall Ins
5 If you do not already have the license file saved to your computer, click Request for license to open the Agilent website to the SureCall license request page. Complete the fields in the request form to obtain a SureCall software license.
The license is contained in a text file.
6 At the bottom of the dialog box, click Browse.
The Open dialog box opens.
7 Browse to the saved license file. Select the file and click Open.
The program loads the content of the file into the text area on the Enter License dialog box.
8 Click OK.
The SureCall program opens.
tallation Guide 87
3 Installation of SureCall 3.5 for Macintosh – Fresh Install Instructions Adding a SureDesign user name and password
Adding a SureDesign user name and password
88
Before you can download a design file from SureDesign into SureCall, you must add the SureDesign account information.
1 Go to the SureDesign Settings screen in SureCall.
a At the top of the program window, click Admin.
b On the left side of the screen, click SureDesign Settings.
2 Type the user name for the SureDesign account into the SureDesign Username field.
In SureDesign, the user name is the e-mail address of the user.
3 In the SureDesign Password field, type the password for the SureDesign account.
4 Click Apply.
5 Click Test Connection.
A message box opens notifying you if the connection test succeeded or failed.
If the connection test passes, you can download design files from SureDesign into SureCall using the tools on the Supporting Files screen.
If the connection test fails, go to the SureDesign website (www.agilent.com/genomics/suredesign) and try logging in. If the login fails, you can reset the password or register for a new account.
Agilent SureCall Installation Guide

Installation of SureCall 3.5 for Macintosh – Fresh Install Instructions 3 Checking the data download
Checking the data download
Agilent SureCall Ins
When you first installed SureCall, the program automatically downloaded the necessary reference and annotation files from Agilent Cloud storage or from a specified local folder or drive (see step 27 through step 28 on page 84.) Downloading the files requires an internet connection and a minimum of 20 GB of disk space.
Before you start running analyses in SureCall, make sure that the program successfully completed the data download process.
1 Go to the Annotation Download screen in SureCall.
a At the top of the program window, click Admin.
b On the left side of the screen, click Annotation Download.
2 Click Refresh Annotation Status.
3 In the message box that opens, click Yes to continue.
The program obtains the status of the data file downloads and displays the statuses in a table on the Annotation Download screen.
4 Check the status of the downloads.
• If all files were successfully downloaded. the top right corner of the screen displays the message “All data files downloaded successfully.”
• If some files were not successfully downloaded, click Start Download. The program will connect to the Agilent Cloud storage system, or the local folder or drive specified during SureCall installation, to download the missing files.
The source location for the files is specified on the Admin > Annotation Download screen.
NOTEBy default, the source location is the Agilent Cloud system, or whichever local folder was specified during installation (see the Data Download Option installation screen, step 21). SureCall administrators can change the location from the Admin > Annotation Download screen.tallation Guide 89
3 Installation of SureCall 3.5 for Macintosh – Fresh Install Instructions Checking the data download
90
Agilent SureCall Installation Guide
4Installation of SureCall 3.5 for Macintosh – Software Upgrade Instructions
Upgrading a standalone version of SureCall – Macintosh 92
Uninstalling SureCall – Macintosh 102
Uninstall the client and server software for SureCall 102
Uninstall the SureCall client software only 103
This chapter provides instructions for Macintosh users of SureCall 2.1 or 3.0 who want to upgrade to SureCall 3.5 while retaining all records currently in their SureCall database. It also contains instructions on uninstalling SureCall. The instructions in this chapter are specific for Macintosh computers running the Macintosh OS X Mavericks or Yosemite operating system.
If you want to upgrade from a previous version of SureCall to SureCall 3.5, but do not want to retain the records in your current database, first completely uninstall your existing version of SureCall (see “Uninstall the client and server software for SureCall” on page 102), then follow the instructions in Chapter 3, “Installation of SureCall 3.5 for Macintosh – Fresh Install Instructions” on page 67.
If you want to upgrade to SureCall 3.5 from a previous version on a Windows computer, then see Chapter 2, “Installation of SureCall 3.5 for Windows – Software Upgrade Instructions” on page 37.
Agilent Technologies
4 Installation of SureCall 3.5 for Macintosh – Software Upgrade Instructions Upgrading a standalone version of SureCall – Macintosh
Upgrading a standalone version of SureCall – Macintosh
92
These instructions are for users who are running an earlier standalone version of SureCall (i.e. the SureCall client software and server software are on a single computer) and want to upgrade to SureCall 3.5 while retaining the data in the existing database.
You can upgrade from SureCall version 2.1 or 3.0 to SureCall 3.5 using the instructions
NOTEprovided here. If you are running SureCall 1.0, 1.1, or 2.0, you must first upgrade to SureCall 2.1 before upgrading to SureCall 3.5.Reboot your Macintosh computer just prior to starting these instructions.
NOTE1 Log on to the Macintosh computer where you want to upgrade to SureCall 3.5. Use an account that has administrator permissions.
2 Uninstall the SureCall client software for the existing version of SureCall. See “Uninstall the SureCall client software only” on page 103 for instructions.
3 When uninstallation of the client is complete, start the installation program for SureCall 3.5 that you downloaded from Agilent.
4 On the Authentication screen, click the lock icon and in the dialog box that opens, enter the Name and Password for a user with Administrator rights to the computer.
5 Read the Introduction and then click Next.
6 Select I accept the terms of the License Agreement and then click Next to accept the license agreement.
7 On the Choose Install Set screen opens, select Standalone.
Agilent SureCall Installation Guide
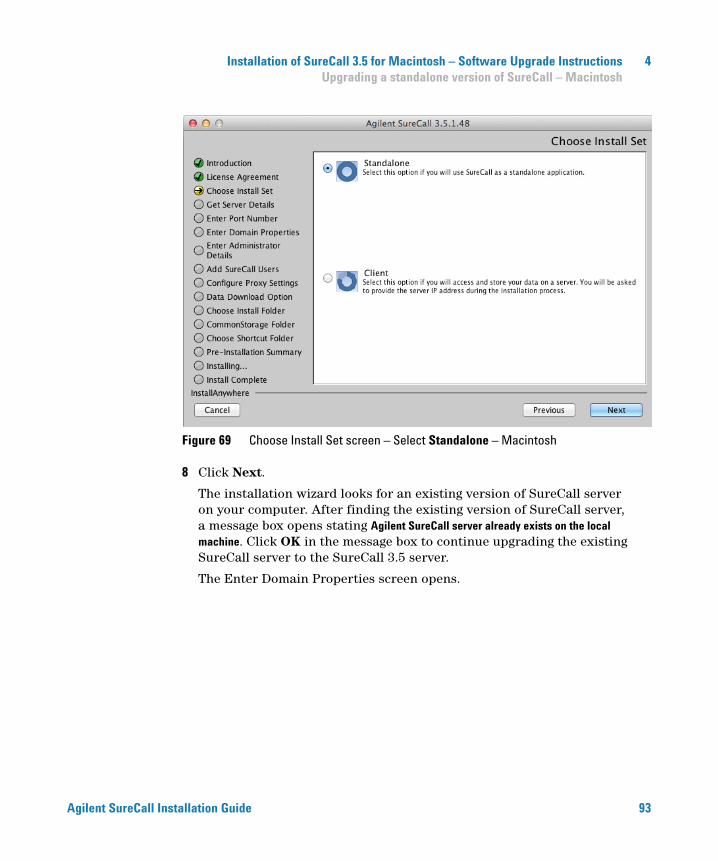
Installation of SureCall 3.5 for Macintosh – Software Upgrade Instructions 4 Upgrading a standalone version of SureCall – Macintosh
Agilent SureCall Ins
Figure 69 Choose Install Set screen – Select Standalone – Macintosh
8 Click Next.
The installation wizard looks for an existing version of SureCall server on your computer. After finding the existing version of SureCall server, a message box opens stating Agilent SureCall server already exists on the local machine. Click OK in the message box to continue upgrading the existing SureCall server to the SureCall 3.5 server.
The Enter Domain Properties screen opens.
tallation Guide 93
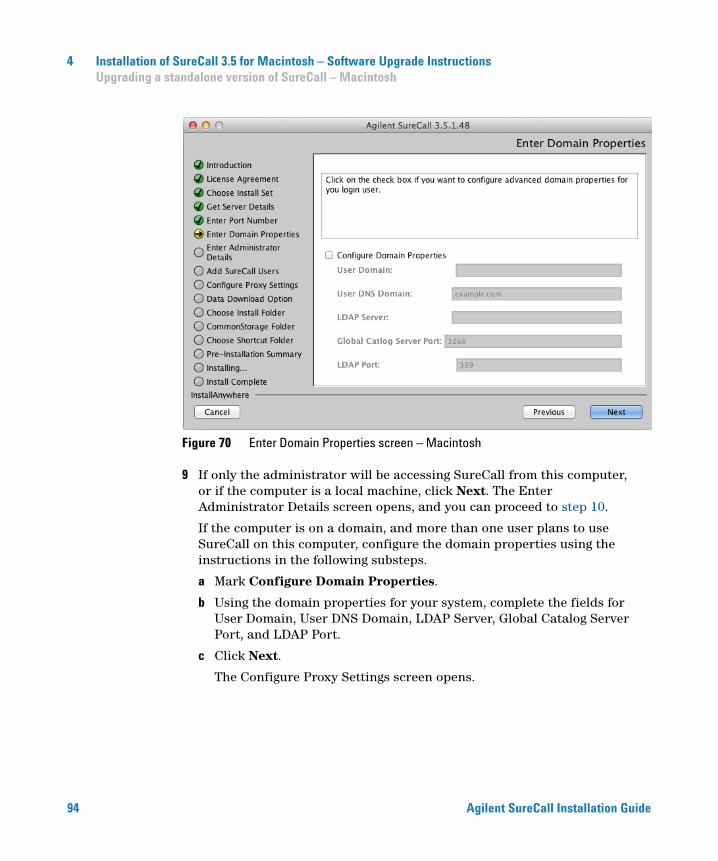
4 Installation of SureCall 3.5 for Macintosh – Software Upgrade Instructions Upgrading a standalone version of SureCall – Macintosh
94
Figure 70 Enter Domain Properties screen – Macintosh
9 If only the administrator will be accessing SureCall from this computer, or if the computer is a local machine, click Next. The Enter Administrator Details screen opens, and you can proceed to step 10.
If the computer is on a domain, and more than one user plans to use SureCall on this computer, configure the domain properties using the instructions in the following substeps.
a Mark Configure Domain Properties.
b Using the domain properties for your system, complete the fields for User Domain, User DNS Domain, LDAP Server, Global Catalog Server Port, and LDAP Port.
c Click Next.
The Configure Proxy Settings screen opens.
Agilent SureCall Installation Guide
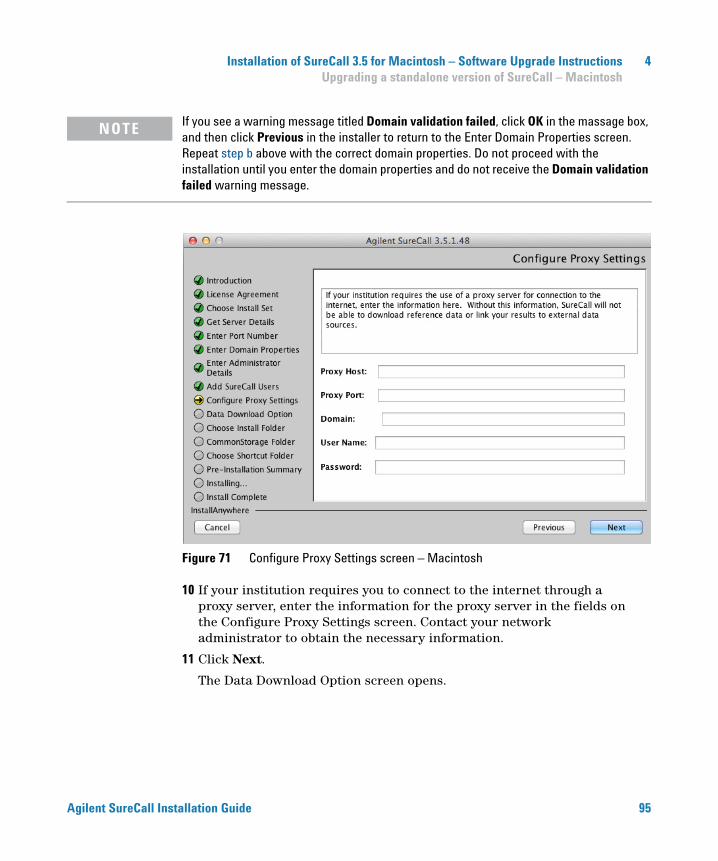
Installation of SureCall 3.5 for Macintosh – Software Upgrade Instructions 4 Upgrading a standalone version of SureCall – Macintosh
Agilent SureCall Ins
If you see a warning message titled Domain validation failed, click OK in the massage box,
NOTEand then click Previous in the installer to return to the Enter Domain Properties screen. Repeat step b above with the correct domain properties. Do not proceed with the installation until you enter the domain properties and do not receive the Domain validation failed warning message.Figure 71 Configure Proxy Settings screen – Macintosh
10 If your institution requires you to connect to the internet through a proxy server, enter the information for the proxy server in the fields on the Configure Proxy Settings screen. Contact your network administrator to obtain the necessary information.
11 Click Next.
The Data Download Option screen opens.
tallation Guide 95

4 Installation of SureCall 3.5 for Macintosh – Software Upgrade Instructions Upgrading a standalone version of SureCall – Macintosh
96
Figure 72 Data Download Option screen – Macintosh
12 By default, SureCall will download and install the required reference and annotation data from Agilent Cloud storage immediately after you complete SureCall installation. If you prefer for SureCall to download and install the required data from a local storage folder or a storage folder saved to an external USB drive, enter the file path of that folder in the Provide Data Location field. You can type the file path directly into the field or click Choose to browse to the storage folder.
Leave the Provide Data Location field blank if you want SureCall to download the required data from Agilent Cloud storage.
If you received an external USB drive from Agilent containing the reference and annotation
NOTEdata, plug in the USB drive to your computer and enter the file path of the drive into the Provide Data Location field.13 Click Next.
The Choose Install Folder screen opens.
Agilent SureCall Installation Guide
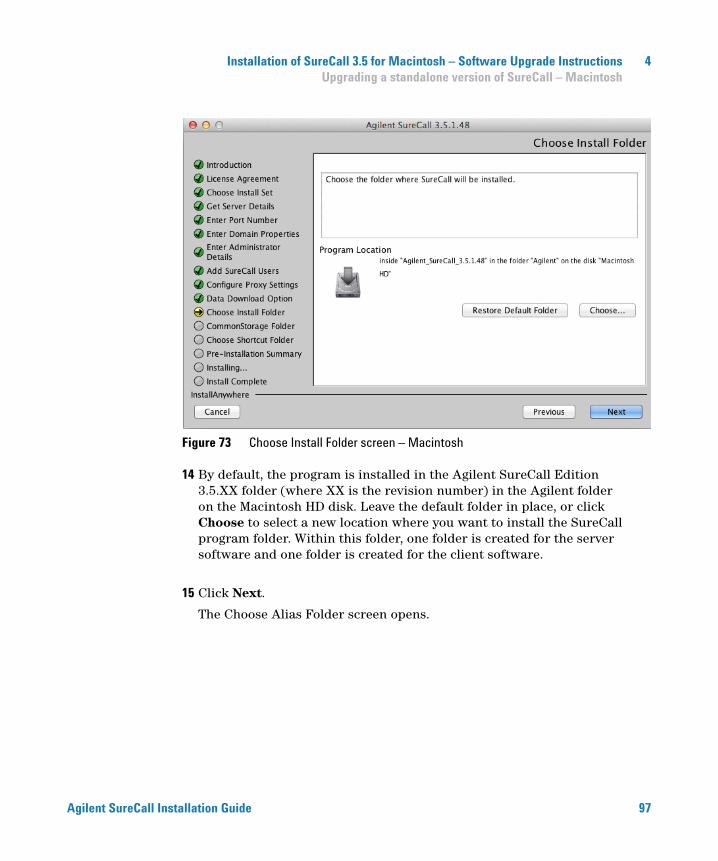
Installation of SureCall 3.5 for Macintosh – Software Upgrade Instructions 4 Upgrading a standalone version of SureCall – Macintosh
Agilent SureCall Ins
Figure 73 Choose Install Folder screen – Macintosh
14 By default, the program is installed in the Agilent SureCall Edition 3.5.XX folder (where XX is the revision number) in the Agilent folder on the Macintosh HD disk. Leave the default folder in place, or click Choose to select a new location where you want to install the SureCall program folder. Within this folder, one folder is created for the server software and one folder is created for the client software.
15 Click Next.
The Choose Alias Folder screen opens.
tallation Guide 97
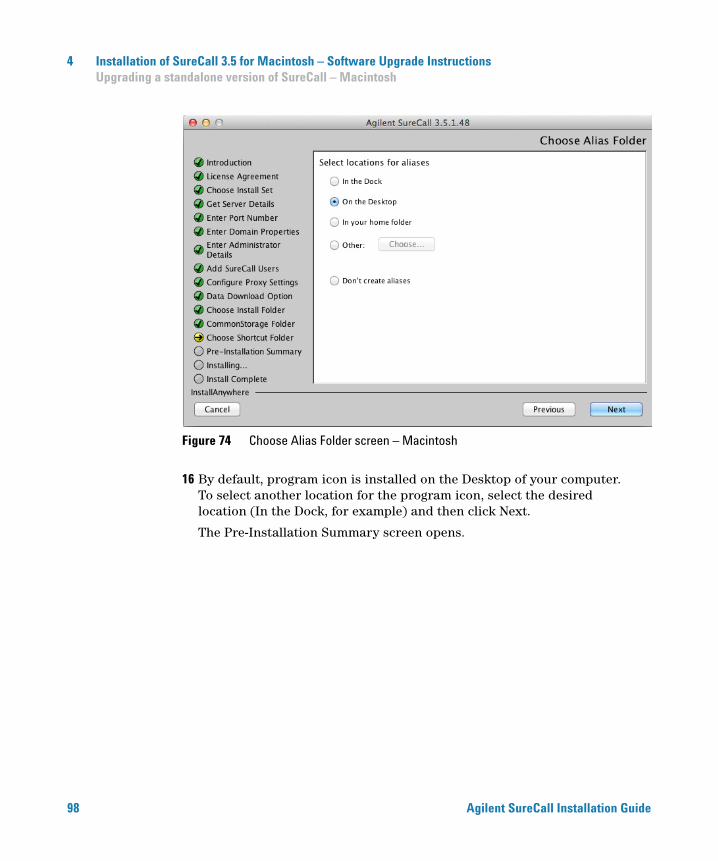
4 Installation of SureCall 3.5 for Macintosh – Software Upgrade Instructions Upgrading a standalone version of SureCall – Macintosh
98
Figure 74 Choose Alias Folder screen – Macintosh
16 By default, program icon is installed on the Desktop of your computer. To select another location for the program icon, select the desired location (In the Dock, for example) and then click Next.
The Pre-Installation Summary screen opens.
Agilent SureCall Installation Guide
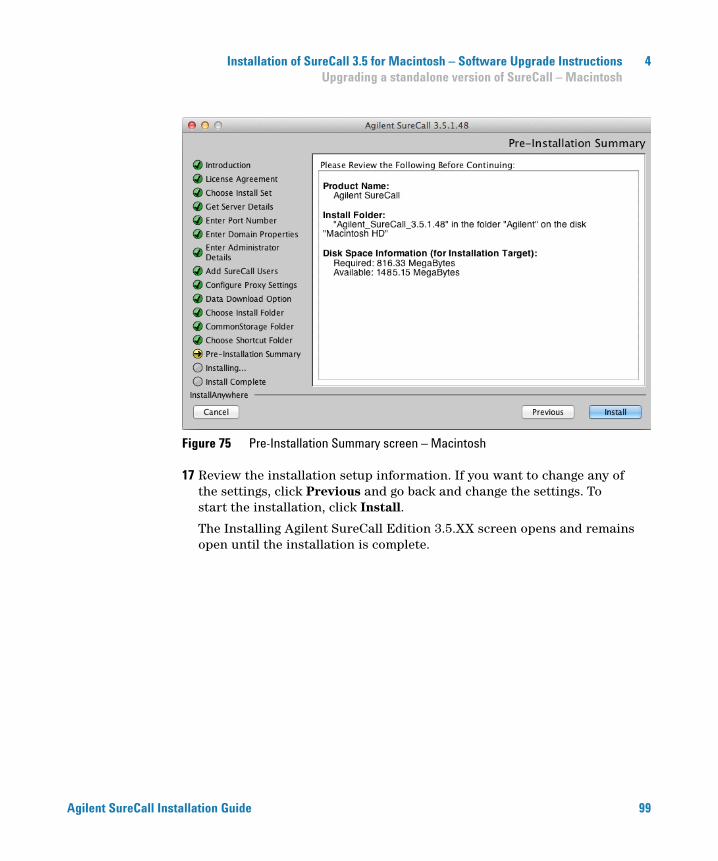
Installation of SureCall 3.5 for Macintosh – Software Upgrade Instructions 4 Upgrading a standalone version of SureCall – Macintosh
Agilent SureCall Ins
Figure 75 Pre-Installation Summary screen – Macintosh
17 Review the installation setup information. If you want to change any of the settings, click Previous and go back and change the settings. To start the installation, click Install.
The Installing Agilent SureCall Edition 3.5.XX screen opens and remains open until the installation is complete.
tallation Guide 99
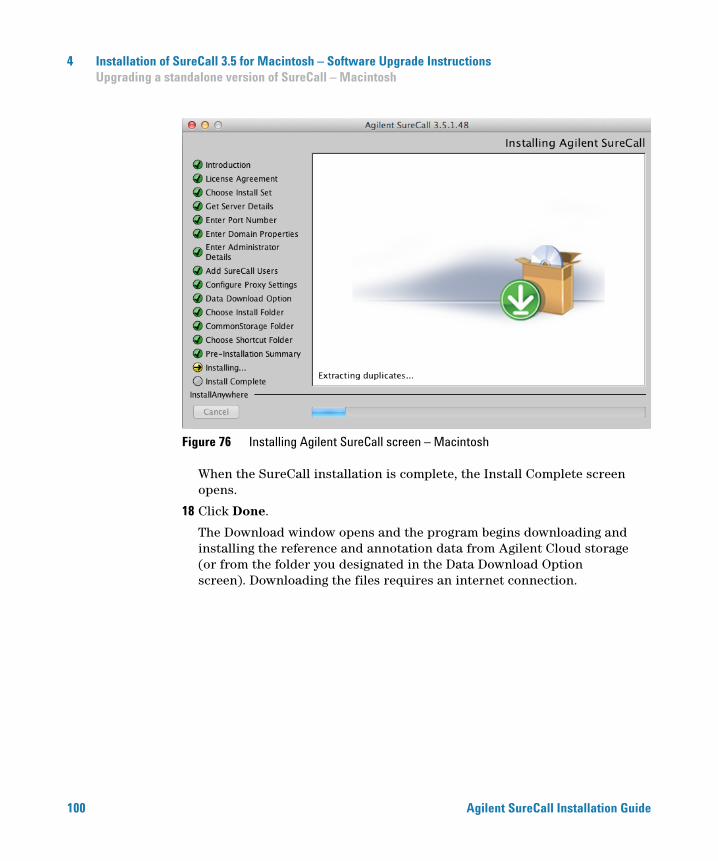
4 Installation of SureCall 3.5 for Macintosh – Software Upgrade Instructions Upgrading a standalone version of SureCall – Macintosh
100
Figure 76 Installing Agilent SureCall screen – Macintosh
When the SureCall installation is complete, the Install Complete screen opens.
18 Click Done.
The Download window opens and the program begins downloading and installing the reference and annotation data from Agilent Cloud storage (or from the folder you designated in the Data Download Option screen). Downloading the files requires an internet connection.
Agilent SureCall Installation Guide

Installation of SureCall 3.5 for Macintosh – Software Upgrade Instructions 4 Upgrading a standalone version of SureCall – Macintosh
Agilent SureCall Ins
Figure 77 Download screen
During this process, the Download screen remains open and displays which files have been downloaded and installed. Your system needs to be connected to the internet until the process is complete.
19 When the downloads are complete, click Close to close the Download dialog box.
If the download fails or does not complete, you can manually download the missing files from within SureCall. See “Checking the data download” on page 89.
20 Start the SureCall program, log in, and enter your license information. See “Opening the SureCall 3.5 client software” on page 86.
tallation Guide 101
4 Installation of SureCall 3.5 for Macintosh – Software Upgrade Instructions Uninstalling SureCall – Macintosh
Uninstalling SureCall – Macintosh
102
This section provides instructions on uninstalling the SureCall software. On a Macintosh computer on which a standalone copy of SureCall is installed, you can select to uninstall only the client software or both the client software and server software.
Uninstall the client and server software for SureCall
The Uninstaller program for SureCall provides an easy way to remove the SureCall client, server, and PostgreSQL programs from your computer.CAUTION When you completely uninstall SureCall, the database, the data contained in the database, and the reference data, including the reference genome file, are all completely removed. Do not uninstall the entire program unless you have backed up your database or no longer wish to use it.
1 Double-click the Uninstaller icon, located in the Uninstall Agilent SureCall XX folder of your program folder (where XX is the version of SureCall that you want to uninstall).
The uninstaller program starts.
2 Read the introductory information, and then click Next.
3 Read the warning information. You are cautioned not to stop the uninstaller once it has started to remove the programs. Click Next.
The Uninstall Options screen opens.
Agilent SureCall Installation Guide
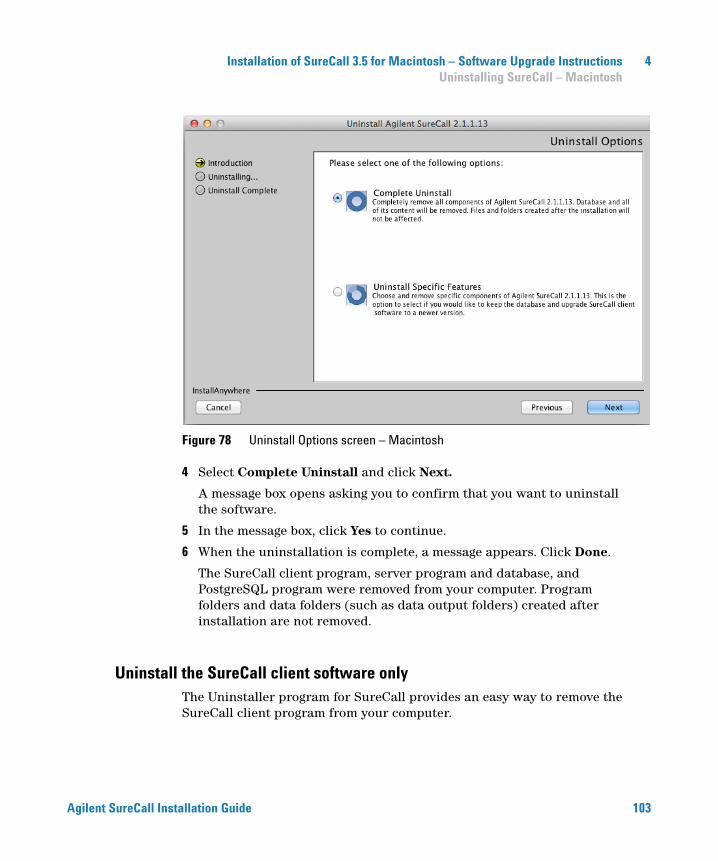
Installation of SureCall 3.5 for Macintosh – Software Upgrade Instructions 4 Uninstalling SureCall – Macintosh
Agilent SureCall Ins
Figure 78 Uninstall Options screen – Macintosh
4 Select Complete Uninstall and click Next.
A message box opens asking you to confirm that you want to uninstall the software.
5 In the message box, click Yes to continue.
6 When the uninstallation is complete, a message appears. Click Done.
The SureCall client program, server program and database, and PostgreSQL program were removed from your computer. Program folders and data folders (such as data output folders) created after installation are not removed.
Uninstall the SureCall client software only
The Uninstaller program for SureCall provides an easy way to remove the SureCall client program from your computer.tallation Guide 103

4 Installation of SureCall 3.5 for Macintosh – Software Upgrade Instructions Uninstalling SureCall – Macintosh
104
1 Double-click the Uninstaller icon, located in the Uninstall Agilent SureCall XX folder of your program folder (where XX is the version of SureCall that you want to uninstall).
The uninstaller program starts.
2 Read the introductory information, and then click Next.
3 Read the warning information. You are cautioned not to stop the uninstaller once it has started to remove the programs. Click Next.
The Uninstall Options screen opens.
Figure 79 Uninstall Options screen – select Uninstall Specific Features – Macintosh
4 Select Uninstall Specific Features and click Next.
The Choose Product Features screen opens.
Agilent SureCall Installation Guide

Installation of SureCall 3.5 for Macintosh – Software Upgrade Instructions 4 Uninstalling SureCall – Macintosh
Agilent SureCall Ins
Figure 80 Choose Product Features screen – mark Client – Macintosh
5 In the Choose Product Features screen, mark Client. When the Client check box is selected, only the client program is removed from the computer. The client program folder and any data folders created after installation are not removed.
The Uninstall button becomes active.
Do not select Server unless you want to remove client and server software completely,
CAUTIONincluding the database, from your computer.6 Click Uninstall.
A message box opens asking you to confirm that you want to uninstall the client software.
7 In the message box, click Yes to continue.
8 When the uninstallation has completed, click Done.
tallation Guide 105

4 Installation of SureCall 3.5 for Macintosh – Software Upgrade Instructions Uninstalling SureCall – Macintosh
106
Agilent SureCall Installation Guide
5Installation of Sequence Alignment Tools
Installing Sequence Alignment Tools (GenAligners 3.0) 108
Step 1. Download the GenAligners installer from the Agilent website 108
Step 2. Install the alignment tools on your computer 109
This chapter shows you how to install the sequence alignment tools provided by Agilent for use with SureCall 3.5.
Agilent Technologies

5 Installation of Sequence Alignment Tools Installing Sequence Alignment Tools (GenAligners 3.0)
Installing Sequence Alignment Tools (GenAligners 3.0)
108
In order to use SureCall to analyze unaligned sequencing files, you must download and install the compatible alignment tools provided by Agilent. SureCall uses the Burrows-Wheeler aligner (BWA) for alignment of Illumina data (Illumina GA, HiSeq, and MiSeq).
As of version 3.0, SureCall does not support alignment of Ion Torrent sequencing data.
NOTEConsequently, the GenAligners application no longer includes the TMAP aligner.To analyze Ion Torrent data in SureCall, align the FASTQ files in Torrent Server then use the BAM files in the SureCall analysis.
This section provides instructions for downloading and installing the alignment tools.
Step 1. Uninstall the previous version of GenAligners (if applicable)
GenAligners version 2.0 is not compatible with SureCall 3.5. If you have GenAligners 2.0 installed on your computer, uninstall it before installing GenAligners 3.0. To check the version number, open the installation folder (default installation folder is C:\Program Files\GenAligners), then open the file version.txt.• Uninstalling GenAligners on a Windows computer: Uninstall GenAligners from the Windows Control Panel. If you cannot find the utility for uninstalling, search for “uninstall a program” within the Control Panel search field.
• Uninstalling GenAligners on a Macintosh computer: Uninstall GenAligners by deleting the application.
Step 1. Download the GenAligners installer from the Agilent website
1 Go to http://www.agilent.com/genomics/surecall_soft.2 Click Download Software.
3 Download the Sequence Aligner software (Windows or Macintosh), saving the file to your computer.
Agilent SureCall Installation Guide
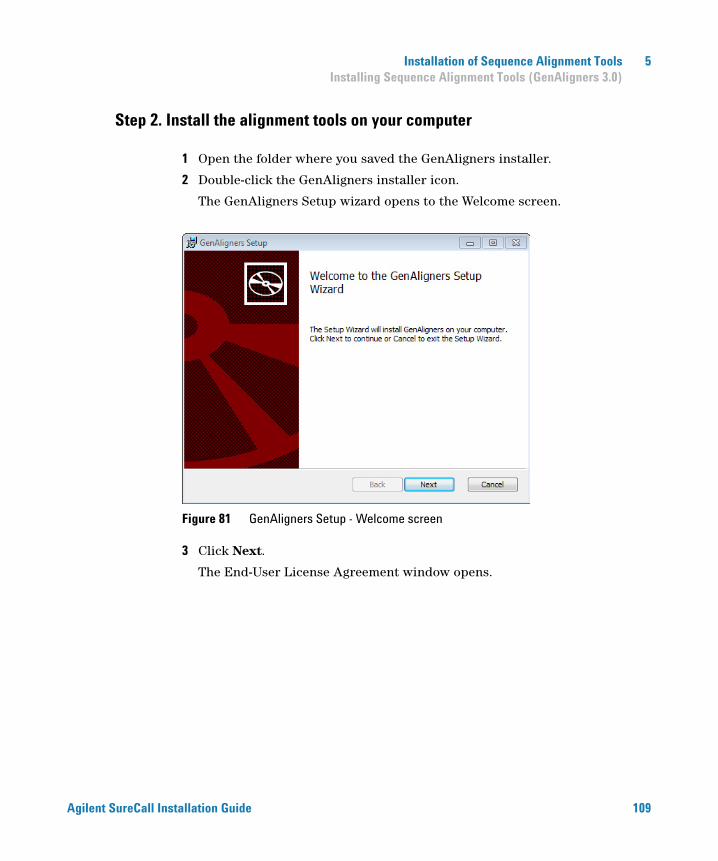
Installation of Sequence Alignment Tools 5 Installing Sequence Alignment Tools (GenAligners 3.0)
Step 2. Install the alignment tools on your computer
Agilent SureCall Ins
1 Open the folder where you saved the GenAligners installer.
2 Double-click the GenAligners installer icon.
The GenAligners Setup wizard opens to the Welcome screen.
Figure 81 GenAligners Setup - Welcome screen
3 Click Next.
The End-User License Agreement window opens.
tallation Guide 109
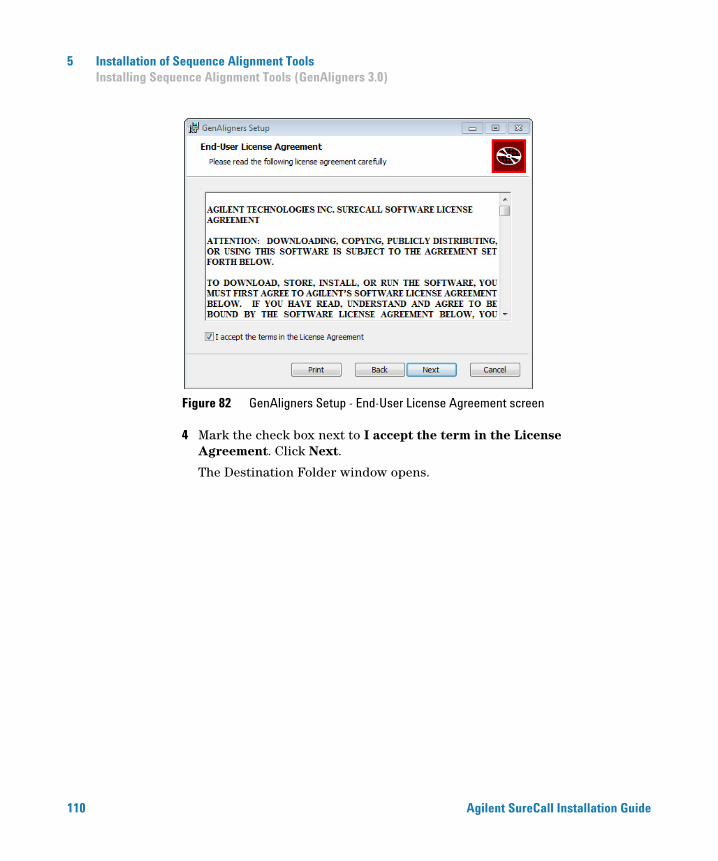
5 Installation of Sequence Alignment Tools Installing Sequence Alignment Tools (GenAligners 3.0)
110
Figure 82 GenAligners Setup - End-User License Agreement screen
4 Mark the check box next to I accept the term in the License Agreement. Click Next.
The Destination Folder window opens.
Agilent SureCall Installation Guide
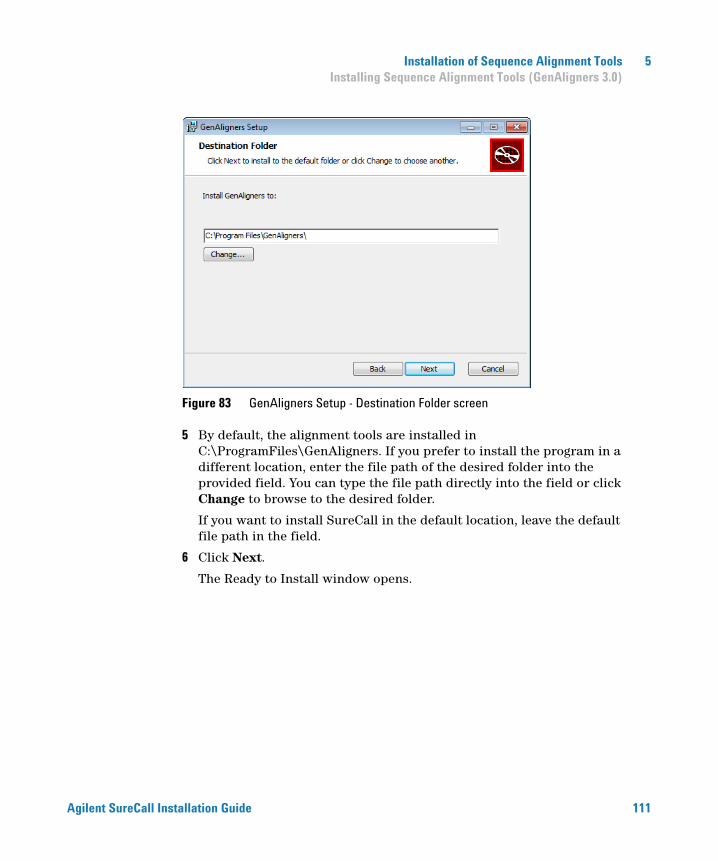
Installation of Sequence Alignment Tools 5 Installing Sequence Alignment Tools (GenAligners 3.0)
Agilent SureCall Ins
Figure 83 GenAligners Setup - Destination Folder screen
5 By default, the alignment tools are installed in C:\ProgramFiles\GenAligners. If you prefer to install the program in a different location, enter the file path of the desired folder into the provided field. You can type the file path directly into the field or click Change to browse to the desired folder.
If you want to install SureCall in the default location, leave the default file path in the field.
6 Click Next.
The Ready to Install window opens.
tallation Guide 111
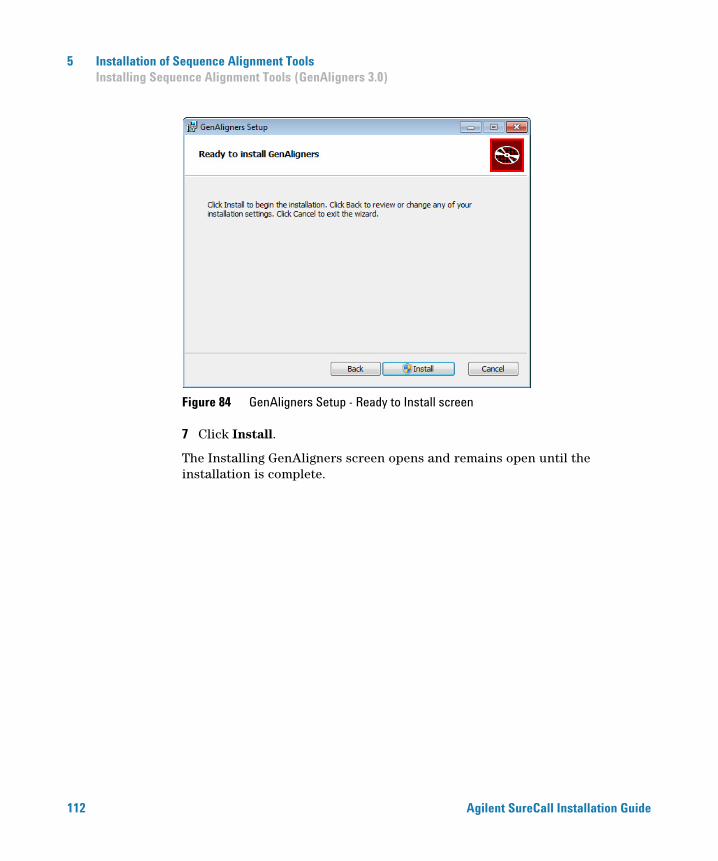
5 Installation of Sequence Alignment Tools Installing Sequence Alignment Tools (GenAligners 3.0)
112
Figure 84 GenAligners Setup - Ready to Install screen
7 Click Install.
The Installing GenAligners screen opens and remains open until the installation is complete.
Agilent SureCall Installation Guide
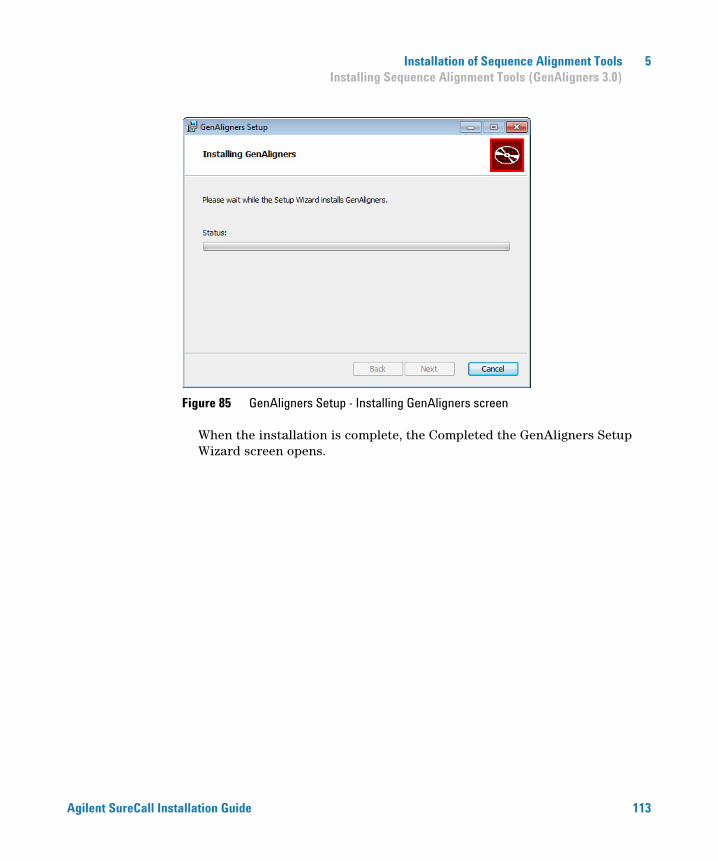
Installation of Sequence Alignment Tools 5 Installing Sequence Alignment Tools (GenAligners 3.0)
Agilent SureCall Ins
Figure 85 GenAligners Setup - Installing GenAligners screen
When the installation is complete, the Completed the GenAligners Setup Wizard screen opens.
tallation Guide 113
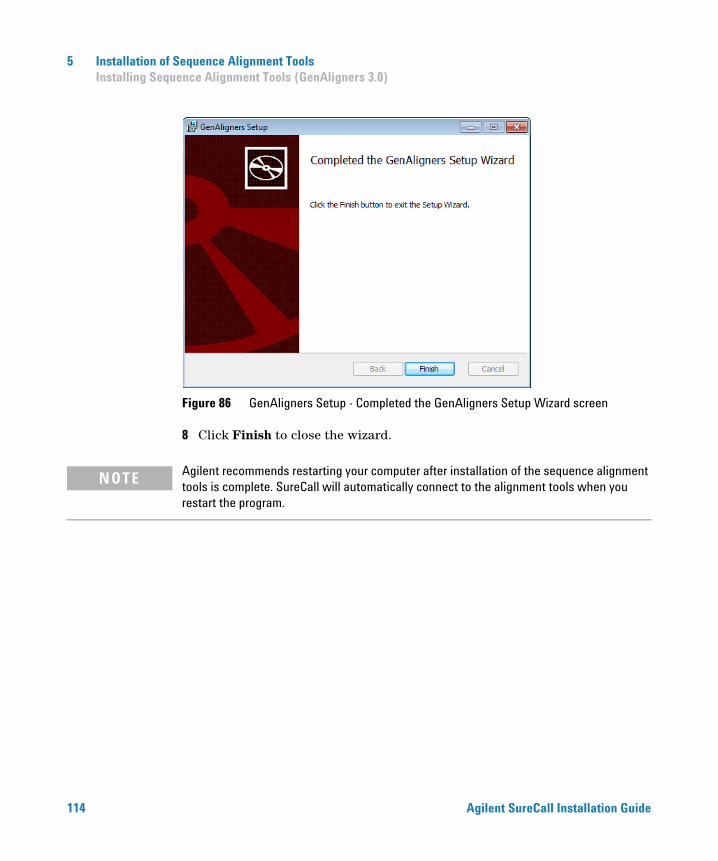
5 Installation of Sequence Alignment Tools Installing Sequence Alignment Tools (GenAligners 3.0)
114
Figure 86 GenAligners Setup - Completed the GenAligners Setup Wizard screen
8 Click Finish to close the wizard.
Agilent recommends restarting your computer after installation of the sequence alignment
NOTEtools is complete. SureCall will automatically connect to the alignment tools when you restart the program.Agilent SureCall Installation Guide
Installation of Sequence Alignment Tools 5 Installing Sequence Alignment Tools (GenAligners 3.0)
Agilent SureCall Ins
tallation Guide 115
www.agilent.com
In this book
This book gives you instructions for installing SureCall 3.5.
Agilent Technologies, Inc. 2016
Revision B0, May 2016
*G4890-90004*G4890-90004
Agilent Technologies