Agilent MassHunter Workstation Software - United States Home | Agilent
Agilent MassHunter OptimizerAutomated MS Method Development Software for K6460/K6420 Triple Quad MS
Quick Start GuideFor In Vitro Diagnostic UseWhat is MassHunter Optimizer? 2Startup 3User Interface 4
Menus and Toolbar 5Compound Setup Tab 8Precursor Ion Selection Tab 8Product Ion Selection Tab 8Optimizer Setup Tab 8Database Browser Window 9Ion Breakdown Profile Dialog Box 9
Getting Started 10Setting Optimization Parameters 14Setting Up Compounds in Optimizer Window 18Using Database Browser 25Setting Up Sequences 32Optimization and Results 38
Where to find more informationUse the online help for in-depth information not included in this Quick Start Guide.
Display online help by pressing the F1 key to get more information about a window, tab, or dialog box.

What is MassHunter Optimizer?Where to find more information
What is MassHunter Optimizer?Automated MS
MethodDevelopment
Software
MassHunter Optimizer lets you automatically optimize the data acquisition parameters for MRM mode (multiple-reaction monitoring) on a triple quad mass spectrometer instrument for each individual compound analyzed. Specifically, it automates the selection of the best precursor ions, the optimization of the fragmentor voltage for each precursor ion, selection of the best product ions, and optimization of collision energy values for each transition for a list of compounds you specify.
AutomatedOptimization
Automation of the following optimization tasks results in a significant time saving over manual optimization procedures:
• Selection of optimum precursor ion via rules, such as M+H, M+Na, M+K, and M+NH4.
• Optimization of fragmentor voltage to maximize precursor ion intensity for up to 4 precursor ions (adducts and/or charge states) for each polarity in MS SIM
• Selection of multiple best product ions (MS/MS full scan)
• Optimization of collision energy to maximize product ion intensity (MS/MS full scan)
• Optionally perform fine fragmentor optimization for maximum sensitivity.
• Ion breakdown profile shows you a graphical representation of the optimization results and lets you select the optimum collision energy that work for your selective product ions.
AdditionalFeatures
• Stores optimum precursor and product ions and parameters in a compound database.
• Imports optimization results into the Agilent MassHunter Data Acquisition for Triple Quad program.
• Lets you import compounds for optimization and update compound retention times from Data Acquisition methods
• Supports sample introduction via manual infusion (syringe pump), automatic infusion (via loop injection at lower flows), and injection analysis with column (to maximize optimization yield).
• Data that is acquired during the optimization run can be displayed with Agilent MassHunter Qualitative Analysis program.
2 Agilent Optimizer Software Quick Start Guide

StartupTo open Optimizer
StartupMassHunter Optimizer is automatically installed with the MassHunter Data Acquisition program. Two versions of MassHunter Optimizer are installed on your system: one for small molecules and one for peptides.
To open OptimizerOpen MassHunter Optimizer in either of the following ways:
• Double-click the Optimizer icon on the desktop, or
• Select Programs> Agilent> MassHunter Workstation> Optimizer from the Windows Start menu.
To open Optimizer for PeptidesA version of MassHunter Optimizer is available for optimizing peptides. Open Optimizer for Peptides in either of the following ways:
• Double-click the Optimizer for Peptides icon on the desktop, or
• Select Programs> Agilent> MassHunter Workstation> Optimizer for Peptides from the Windows Start menu.
NOTE Projects are specific to the version of Optimizer that you use to create them. In other words, projects created with Optimizer for Peptides cannot be opened in MassHunter Optimizer and vice versa.
Agilent Optimizer Software Quick Start Guide 3

User InterfaceTo open Optimizer for Peptides
User InterfaceThe MassHunter Optimizer has the following user interface elements that let you enter parameters, set options, view status, and perform functions:
• “Menus and Toolbar” on page 5
• “Status Bar” on page 7
Tabs• “Optimizer Setup Tab” on page 8
• “Precursor Ion Selection Tab” on page 8
• “Product Ion Selection Tab” on page 8
• “Compound Setup Tab” on page 8
Other Windows and Dialog Boxes• “Peptide Fragment Ion Predictor Dialog Box” on page 9
• “Database Browser Window” on page 9
• “Ion Breakdown Profile Dialog Box” on page 9
4 Agilent Optimizer Software Quick Start Guide

User InterfaceMenus and Toolbar
Menus and ToolbarThe following menu items and toolbar buttons are available in MassHunter Optimizer main window.
File menu
New Project Clears the current settings and lets you set up a new project for use in MassHunter Optimizer. See “To create a project” on page 12.
Open Project Lets you open a project. See “To open a project” on page 12.
Save Project Lets you save changes to the current project.
Save As Project Lets you save the current project under a new name.
Save Compounds Lets you save compound information to a database, for use with other projects. See “To save a database in Database Browser” on page 29.
Delete Projects Lets you select projects and remove them.
Open Database Lets you open a different database. The newly opened database becomes the default database.
Exit Closes the MassHunter Optimizer window.
Edit menuCopy Copies the selected rows, which can then be pasted into another position in the table.
Cut Cuts the selected rows from the table, which can then be pasted into another position in the table.
Paste Pastes the most recently copied or cut rows into the selected position in the table.
Delete Removes the selected rows from the table
Agilent Optimizer Software Quick Start Guide 5

User InterfaceMenus and Toolbar
Select All Selects all rows in the table.
Fill Copies the value in the top cell down to the rest of the cells of a highlighted block or to the entire column.
Clear Results Lets you clear all fragmentor values, all collision energy values, or all results, including methods and all precursor and product ions for all compounds in the selected row and below in the table.
View menuShow/Hide Columns Lets you select which columns of information to display in the table. At least one column in every row must be displayed.
Expand/Collapse All Rows Lets you display all rows in the table or collapse the table to show only Compound rows. This affects the currently selected row and all rows below it in the table.
Import/Export menuImport from Database Opens Database Browser, which lets you select compounds for optimization from the database. See “Database Browser Window” on page 9.
Import from Excel Lets you import compounds from an Excel file. See “To import compounds from an Excel file” on page 22.
Import from Acquisition Methods Lets you import all compounds from Acquisition methods into the current project.
Export to Excel Lets you export the current compound list for use in Excel. See “To export compound information to an Excel file” on page 23.
Optimization menuStart Optimization Starts the optimization process with the current parameters. The results are saved to the database and displayed in the Compound Setup tab. A report is automatically printed on completion. See “To start optimization” on page 39
6 Agilent Optimizer Software Quick Start Guide

User InterfaceStatus Bar
Ion Breakdown Profile Runs optimization with the current parameters and displays the results in the Ion Breakdown Profile dialog box when optimization is complete. Collision energy values can be selected from the graphs, instead of using those determined by optimization. See “To start optimization and display ion breakdown profiles” on page 40.
Stop Optimization Lets you terminate optimization before completion.
Tools menu
Update RT Lets you update compound retention times from Data Acquisition methods. See “To update retention times from a MassHunter Data Acquisition method” on page 24.
The following items only appear in Optimizer for Peptides.
Extract Peptide Opens the Peptide Fragment Ion Predictor dialog box, which lets you extract peptide sequences for optimization from a selected MassHunter Qualitative Analysis method. See “Peptide Fragment Ion Predictor Dialog Box” on page 9.
Convert .csv to .psq Lets you convert multiple peptide sequences with or without modification into multiple .psq files that can be imported into the MassHunter Qualitative Analysis program. See “To convert multiple peptide sequences for import into MassHunter Qualitative Analysis” on page 37.
Help menu
Help Topics Opens the online help window with the Contents tab displayed.
About Optimizer Displays version information for Optimizer.
Status BarThe following items appear in the status bar at the bottom of Optimizer main window: Database, Project Name, Optimizer Status, Current Record progress bar, and All Records progress bar.
Agilent Optimizer Software Quick Start Guide 7

User InterfaceOptimizer Setup Tab
Optimizer Setup TabLets you set the acquisition parameters used for optimization, including sample introduction method, Acquisition methods, and ranges for optimization of fragmentor and collision energy voltages. See “To set Optimizer acquisition parameters” on page 14.
Precursor Ion Selection TabLets you select adduct species to include in the search for precursor ions. The default is +H for positive and -H for negative. See “To select precursor ions” on page 15.
Product Ion Selection TabLets you set criteria to use in the search for product ions. See “To select product ions” on page 16.
Compound Setup TabDisplays the list of compounds to optimize, and lets you enter precursor and product ion values, if known. You can also set different injection volumes for each compound to use for optimization, if needed. It also displays the results of optimization, when you mark the Show results summary check box. Sequences rather than compounds are used for optimization in Optimizer for Peptides.
8 Agilent Optimizer Software Quick Start Guide
User InterfacePeptide Fragment Ion Predictor Dialog Box
Peptide Fragment Ion Predictor Dialog BoxAvailable in Optimizer for Peptides only.
This lets you select peptide sequences for optimization from a MassHunter Qualitative Analysis method. The selected sequences are added to the Compound Setup tab. After you click the Extract Peptide toolbar button shown at the left, you are prompted to select the method of interest. See “To import peptide sequences from a MassHunter Qualitative Analysis method” on page 33.
Database Browser WindowThis window appears when you click the Import from Database toolbar button. It lets you select compounds for optimization from the database. The selected compounds are added to the Compound Setup tab. See “To import compounds from a database” on page 26.
Database Browser also lets you open a different database, save the current database with a new name, and make the current database the default database.
Ion Breakdown Profile Dialog BoxThis dialog box automatically appears after optimization is complete when you click the Ion Breakdown Profile toolbar button. The product ion profiles determined by optimization are displayed and you can manually select collision energy values for each ion to replace the results of optimization. See “To start optimization and display ion breakdown profiles” and “To manually set collision energy voltages” on page 40.
Agilent Optimizer Software Quick Start Guide 9

Getting Started
Getting StartedThis figure shows the general workflow to use Optimizer.
Step 1Set up LC/MS
• Prepare sample with a concentration around 1 ng/µL.• Prepare a suitable mobile phase.• Use either a short column or length of tubing.
(5042-6462 PEEK Tubing 1/16 inch, 0.007/0.18 mm ID, 5 m). • Use a generic gradient with 5% to 75% organic.• Acquire data in MS2 Scan mode, check for ions of interest, run in MS2
SIM mode to confirm precursor ions, and save MS2 SIM method.
Step 2Set up projectin Optimizer
Step 3Start Optimizer
• Create a Project in Optimizer.• Follow the setup described in this guide.• Select the MS2 SIM method from Step 1 (this ensures that Optimizer
will use the LC and source conditions from Step 1).
• Optimizer automatically runs four separate acquisitions foreach target ion in the sequence:
• MS2 SIM > Product Ion > MRM > Product Ion• Review the report that provides you with the optimized.• MS conditions for the target ions
10 Agilent Optimizer Software Quick Start Guide

Getting Started
When Optimizer starts, it automatically proceeds through the following scan types, in the order shown, for each precursor listed in the Compound Setup table.
Refer to the steps in the rest of this guide for detailed instructions on how to use Optimizer.
SIM
ProductIon
MRM
ProductIon
Sets the Scan type to MS2 SIM for each precursor and acquires the data to optimize the Fragmentor voltage for each precursor.
Sets the Scan type to Product Ion and acquires the data to find product ions for each precursor.
Sets the Scan type to MRM on the Product Ions found in the previous step and acquires the data to optimize Collision Energy.
Validates the optimal Collision Energy and masses using a smaller scan range for Product Ions.
Agilent Optimizer Software Quick Start Guide 11

Using ProjectsTo create a project
Using Projects• “To create a project” on page 12
• “To open a project” on page 12
• “To edit a project” on page 13
• “To save parameters to the current project” on page 13
• “To save parameters to a new project” on page 13
To create a projectUse this procedure to store all the values and settings used for optimization in a project.1 Click the New Project button on the toolbar.
If current parameters have not already been saved, you are prompted to save the project. The current parameters are cleared.
2 Make the desired changes to parameters on the following tabs:
• Optimizer Setup tab
• Precursor and Product Ion Selection tabs
• Compound Setup tab3 Click the Save Project or Save As Project button and enter a name for the
project.
To open a projectUse this procedure to use optimization values and settings from an existing project.1 Click the Open Project button on the toolbar.
2 Click to select the project on the Select Project Name dialog box.
3 Click the Open button.
12 Agilent Optimizer Software Quick Start Guide

Using ProjectsTo edit a project
To edit a project1 Open the project to edit as described above.
2 Make the desired changes to parameters on the following tabs:
• Optimizer Setup tab
• Precursor and Product Ion Selection tabs
• Compound Setup tab
3 Save the parameters. See “To save parameters to the current project” on page 13 or “To save parameters to a new project” on page 13.
To save parameters to the current project1 Click the Save Project toolbar button.
To save parameters to a new project1 Click the Save As Project toolbar button.
2 Enter a name for the project and click the Save button.
Agilent Optimizer Software Quick Start Guide 13

Setting Optimization ParametersTo set Optimizer acquisition parameters
Setting Optimization ParametersUse the following procedures to set up the optimization parameters for MassHunter Optimizer.
“To set Optimizer acquisition parameters” on page 14
“To select data path and methods to use for optimization” on page 15
“To select precursor ions” on page 15
“To select product ions” on page 16
Workflow for Peptides“To set Optimizer acquisition parameters for peptides” on page 17
“To select data path and methods to use for optimization” below
To set Optimizer acquisition parameters1 Click the Optimizer Setup tab.
2 Set the desired Sample introduction method (Injection, Automatic infusion, or Manual infusion).
3 Set the Fragmentor ramp parameters as follows:
a Set the range for ramping the Fragmentor values.
b (optional) Mark the Fragmentor Fine check box and enter a Step size for Fine ramping. Fine optimization refines the coarse ramping values and provides better optimization but takes longer to run.
4 Set the range for ramping the Collision Energy values.
5 Continue to select data path and methods to use for optimization as described below.
14 Agilent Optimizer Software Quick Start Guide

Setting Optimization ParametersTo select data path and methods to use for optimization
To select data path and methods to use for optimization1 If not already displayed, click the Optimizer Setup tab.
2 Select a Path for data files to store the optimization run data. The data can be displayed later with the MassHunter Qualitative Analysis program.
3 In the table on the right side of the screen, select the acquisition methods with the appropriate LC and source parameters to use for optimization.
a Right-click in the table and select Add Method from the shortcut menu. This adds a row to the end of the table for a new method.
b Click the button on the right side of the Acq Method cell to open the Open Method dialog box.
c Select the method of interest and click OK. The Polarity and Ion Source will be filled in from the values set in the selected method.
d Check to make sure that the Ion Source from the method matches the physical configuration of your instrument.
e (optional) Repeat step a through step d to select additional methods for optimization.
Tip Additional options are available by right-clicking in the method table, such as Delete Methods, Copy, and Fill.
To select precursor ionsUse this procedure to specify precursor ions to use to optimize the fragmentor voltage. The information entered here will be used for all compounds, except for those that have precursor ions specified on the Compound Setup tab.
1 Click the Precursor Ion Selection tab.
2 Select the Positive and Negative adduct ions to include.
If necessary, add Positive or Negative adduct ions to the list by typing the value in the box and clicking the button.
3 Set the search priority of the precursor ions in one of the following ways:
• Mark the Use most abundant precursor ion option to use the most abundant precursor ion.
• Clear the Use most abundant precursor ion option and use the Up and Down arrow buttons to set the search order (ions at the top of the list are given more priority).
Agilent Optimizer Software Quick Start Guide 15

Setting Optimization ParametersTo select product ions
4 To exclude certain masses from consideration, click Exclude masses at the bottom of the screen. Enter the m/z values to exclude separated by commas and/or enter a Minimum abundance value in counts.
To select product ionsUse this procedure to specify product ions to use to optimize the collision energy voltage. The information entered here will be used for all compounds, except for those that have product ions specified on the Compound Setup tab.
1 Click the Product Ion Selection tab.
2 Enter the Maximum number of product ions to find during the product ion scan phase.
• For Triggered MRM applications, the recommended value is 10.
• For MRM and Dynamic MRM applications, the recommended value is 4.
3 Enter a Low mass cut-off value. Select whether to specify the value as Mass (m/z) or as a % Precursor mass (m/z) and enter the cut-off value.
4 To exclude certain masses from consideration, click the Exclude masses option at the bottom of the screen. Enter the m/z values to exclude separated by commas and/or enter a Minimum abundance value in counts.
5 If desired, you can also enter Neutral Losses to exclude, e.g. water (H20). Enter a formula in the box and click the button to add it to the list.
16 Agilent Optimizer Software Quick Start Guide
Setting Optimization ParametersTo set Optimizer acquisition parameters for peptides
To set Optimizer acquisition parameters for peptides1 Click the Optimizer Setup tab in Optimizer for Peptides.
2 Set the desired Sample introduction method (Injection, Automatic infusion, or Manual infusion).
3 Set the Fragmentor Ramp Settings parameters as follows:
a Mark the Fixed Fragmentor check box and enter the fragmentor voltage to use for optimization. This value will be used for all compounds, unless you enter specific values for individual compounds on the Compound Setup tab.
Tip Using a fixed fragmentor voltage saves time by skipping the SIM run to determine the optimal fragmentor voltage. However, if multiple adducts are specified, then a SIM run is made to determine the precursor ion to use.
b Mark the Overwrite existing check box to use this value for all compounds, even if values are set for individual compounds on the Compound Setup tab.
4 In the Collision Energy area, mark the Start from predicted value check box, which lets Optimizer set a collision energy value, using the formula shown. In the formula, m/z is the mass of the precursor ion.
5 (optional) Mark the Put instrument into standby mode at end check box to put the instrument into standby mode at the end of the optimization run.
See “To select data path and methods to use for optimization” on page 15.
Agilent Optimizer Software Quick Start Guide 17

Setting Up Compounds in Optimizer WindowTo set Optimizer acquisition parameters for peptides
Setting Up Compounds in Optimizer WindowUse the following procedures to set up compounds for use in MassHunter Optimizer.
Setting up compounds
• “To set up a compound list” on page 19
• “To use known ions for individual compounds” on page 21
Using compound databases• “To open a database in Optimizer Window” on page 22
• “To save compounds to a database” on page 22
Importing and exporting compound information from Excel• “To import compounds from an Excel file” on page 22
• “To export compound information to an Excel file” on page 23
Using compound information from MassHunter Data Acquisition methods• “To import compounds from a MassHunter Data Acquisition method” on
page 23
• “To update retention times from a MassHunter Data Acquisition method” on page 24
18 Agilent Optimizer Software Quick Start Guide
Setting Up Compounds in Optimizer WindowTo set up a compound list
To set up a compound listUse this procedure to set up the list of compounds to optimize and enter precursor and product ion values, if known.
1 Click the Compound Setup tab.
2 (optional) Import compounds as described in “To import compounds from an Excel file” on page 22 or “To import compounds from a database” on page 26.
3 Clear the Show results summary check box above the table while you set up the compound list.
4 To add a compound:
a Right-click in the table and select Add Compound from the shortcut menu to add a row to the end of the table.
b Enter the Compound Name for the new compound.
c (optional) If you want to be able to find groups of compounds in the database such as sulfa drugs or pesticides, assign a group name in the Groups column. You can then specify the desired group names when you filter compounds to import from the database as described on page 26.
d Enter the Formula of the compound. The Mass will be automatically calculated from the formula. If you don’t know the formula, then enter the monoisotopic mass in the Mass column.
e Enter the Sample Position (physical location in the autosampler) for the new compound.
f To use the injection volume set in the Optimization method for optimization, for Set Inj Vol, select As Method. To set a specific injection volume for this compound, for Set Inj Vol, select Specified Value. Enter the desired injection volume in the Inj Vol column and the Product Ion Scan Injection Factor value in the PI Scan Inj Factor column. Note that the injection volume for the Phase 2 – Product Ion Scan optimization step is determined by multiplying the Inj Vol by the PI Scan Inj Factor.
g (optional) Adjust the Optimization dwell time value to set a shorter or longer cycle time if desired; otherwise a default value is used.
h (optional) To speed up optimization, specify precursor and product ions for the compound as described in “To use known ions for individual compounds” below. If no methods or ions are specified here, then optimization for the compound uses the methods from the Optimizer
Agilent Optimizer Software Quick Start Guide 19

Setting Up Compounds in Optimizer WindowTo set up a compound list
Setup tab and information from the Precursor Ion Selection and Product Ion Selection tabs to generate the ions.
i Repeat the steps above to add more compounds to the table.
Tip To cut or copy and paste compounds (rows) in the table:
a Select the rows of interest in the table.
b Right-click on the selected rows and select Cut or Copy from the shortcut menu.
c Right-click on the new location for the cut or copied rows and select Paste from the shortcut menu.
5 Mark the Select columns for the compounds (rows) to use for optimization.
6 Save the compound list as described in “To save a database in Database Browser” on page 29 or “To save parameters to the current project” on page 13.
7 (optional) Export the compound list as described in “To export compound information to an Excel file” on page 23.
NOTE Compounds are global to all projects. Compound information such as name, group, formula, and mass in one project will be reflected in the entire database.
20 Agilent Optimizer Software Quick Start Guide

Setting Up Compounds in Optimizer WindowTo use known ions for individual compounds
To use known ions for individual compoundsUse this procedure to optionally specify methods, precursor ions, and product ions for individual compounds on the Compound Setup tab. Using known ions speeds up the optimization process.
1 Add compounds to the Compound List as described in “To set up a compound list” on page 19.
2 To add methods for the current compound:
a Right-click in the Compound row of interest and select Add Method from the shortcut menu. This adds a Method row below the selected compound.
b Click the down arrow button on the right end of the Acq Method cell and select an acquisition method to use for the selected compound. If you don’t see the method of interest, add it to the Method Table on the Optimizer Setup tab as described in “To set Optimizer acquisition parameters” on page 14.
c Repeat the above steps to add more methods for the current compound.
3 To specify a known precursor ion for the current compound:
a Right-click in the Method row for the compound of interest and select Add Precursor Ion from the shortcut menu. This adds a Precursor Ion row for the current compound.
b Enter a value for the Precursor Ion.
4 To specify product ions for the current compound:
a Right-click in the Precursor Ion row for the compound of interest and select Add Product Ion from the shortcut menu. This adds a Product Ion row for the current compound.
b Enter a value for the Product Ion.
c Repeat the above steps to add the product ions for the current compound and precursor ion.
5 Repeat step 2 through step 4 to specify methods and ions for other compounds in the Compound Table.
Agilent Optimizer Software Quick Start Guide 21

Setting Up Compounds in Optimizer WindowTo open a database in Optimizer Window
To open a database in Optimizer WindowUse this procedure when you want to use a database other than the default Optimizer database.
1 In the Optimizer Window, click File > Open Database.
2 Select the database of interest and click OK.
When you open an Optimizer database, it becomes the default database. Any work done in Optimizer is saved to that database.
If you are building a unique database, open the database in Database Browser, rename it with a unique name, then save it as the default. As you build projects in Optimizer in this new database, you save those compounds to that uniquely named database.
To save compounds to a database• To save compounds to the current database, click the Save Compounds
button on the main toolbar.
Changes made to transitions and triggers are saved with the database.
You can import the compounds into other projects at a later time as described in “To import compounds from a database” on page 26.
To import compounds from an Excel file1 Click the Import from Excel button on the main toolbar.
2 Select the .xls, .xlsx, or .csv file to import, and then click Open. All compounds from the file will be imported and listed on the Compound Setup tab.
The Select Method for Linking Compounds dialog box may be displayed to assign methods to the compounds.
22 Agilent Optimizer Software Quick Start Guide

Setting Up Compounds in Optimizer WindowTo export compound information to an Excel file
To export compound information to an Excel file1 Click the Export to Excel button on the main toolbar.
2 Enter a name to export the compound list in .xls format for use in Excel, click Save.
To import compounds from a MassHunter Data Acquisition method1 Create MassHunter Data Acquisition methods for the compounds you want
to import.
2 Click the Import from Acquisition Methods toolbar button in Optimizer.
3 Select the MassHunter Data Acquisition methods from step 1 that contain the compounds of interest, and then click the Open button.
All compounds in the data acquisition methods will be added to the current project and can be seen on the Compound Setup tab.
Agilent Optimizer Software Quick Start Guide 23

Setting Up Compounds in Optimizer WindowTo update retention times from a MassHunter Data Acquisition method
To update retention times from a MassHunter Data Acquisition method
1 Create MassHunter Data Acquisition methods for the compounds of interest.
2 Be sure that compounds whose retention times you want to update are part of a project. Only retention times for compounds that are part of a project will be updated. Retention times for compounds that are not in a project will not be updated, even if those compounds are in the database.
3 Click the Update RTs button on the Optimizer main toolbar.
4 Select the MassHunter Data Acquisition methods from step 1 that contain the compounds of interest, and then click the Open button.
5 When the Update Retention Time Options dialog box appears:
a Select whether to Update in current project or to Search database for eligible projects.
b To update retention time windows, mark the Update RT Windows check box. If marked, the retention time windows in the acquisition method will be used to update the retention time windows in the database.
c If transition ions are found that do not match existing transition ions, you can add them by marking the Add new transitions found check box. Otherwise these transitions will be ignored.
d Click OK.
6 Several scenarios may result:
Projects are found that contain the same methods and transition ions In this case, select the project to update, and click OK.
or
No project matches for update In this case, you are prompted to select whether to add the transition ions to the Current Project or a New Project. Click the desired option, and then click OK.
All transition ions of the same compound will be updated with the first retention time in the acquisition method. The updated compound information can be seen on the Compound Setup tab.
7 Be sure to save the project to save the updated retention times.
24 Agilent Optimizer Software Quick Start Guide

Using Database BrowserTo open a database and make it the default database
Using Database BrowserUse these procedures to work with Database Browser.
• “To open a database and make it the default database” on page 25
• “To import compounds from a database” on page 26
• “To select transitions and triggers for Dynamic and Triggered MRM” on page 28
• “To save a database in Database Browser” on page 29
• “To filter compounds in Database Browser” on page 30
• “To search compounds in Database Browser” on page 31
To open a database and make it the default databaseUse this procedure when you want to use a database other than the default optimizer database.
1 If Database Browser is not already open, click the Import from Database button on the Optimizer window toolbar to open it.
2 Click the Open Database button on the Database Browser toolbar.
3 Select the database of interest and click OK.
4 You are asked if you want to make this database the default database.
Tip
If you decide later to make this database the default database, click the Set Default Database button on the Database Browser toolbar.
NOTE If you are importing additional compounds into an existing project, click No. Otherwise, unsaved changes made to the current project will be lost. All saved compound information in the previous project will still exist in the previous default database, but it won't be available for use with the new default database.
Agilent Optimizer Software Quick Start Guide 25

Using Database BrowserTo import compounds from a database
To import compounds from a databaseUse this procedure to import compounds that have previously been saved as described in “To save a database in Database Browser” on page 29.
1 Click the Import from Database toolbar button in Optimizer window to open Database Browser.
2 If not already open, open the database of interest as described on page 25.
3 Select compounds for optimization from the database.
• If desired, filter compounds as described on page 30.
• If desired, search compounds as described on page 31.
• To display all compounds in the database, mark the Show All Records check box.
4 When the compounds from step 3 appear in the Compound table in the lower half of Database Browser, select the transition ions to import in one of the following ways:
• Individually mark the check boxes in the first column of the table for the transition ions you want to import.
• Click the Select top ranked transitions option, enter the number of top transitions to import for each compound, and then click the Select Transitions button. You can rank the top transitions by either Abundance or Response Factor.
• To select the primary transitions, click the Primary Transitions option, and then click the Select Transitions button.
• To select the secondary transitions, click the Secondary Transitions option, and then click the Select Transitions button.
5 Do one of the following:
• If the compounds in the table are the only ones you want to import at this time, click Import. This closes Database Browser and adds the compounds to the Compound Setup tab.
• If you want to do additional search and filter operations on the current database or a different database, click Add to Import List.
NOTE To set up the primary and trigger transition ions to import, see “To select transitions and triggers for Dynamic and Triggered MRM” on page 28.
26 Agilent Optimizer Software Quick Start Guide

Using Database BrowserTo import compounds from a database
6 Do one of the following:
• To find more compounds in the same database, repeat step 3 through step 5.
• To select compounds from a different database, repeat step 2 through step 5.
7 Click the Import List tab to review the list of compounds.
• Right-click and select Remove from the shortcut menu to remove any compounds you don’t want to import.
8 Click the Import button.
The imported compounds will appear on the Compound Setup tab.
Agilent Optimizer Software Quick Start Guide 27

Using Database BrowserTo select transitions and triggers for Dynamic and Triggered MRM
To select transitions and triggers for Dynamic and Triggered MRM1 If not already open, open the database of interest as described on page 25.
2 In Database Browser, display compounds for optimization from the database.
• If desired, filter compounds as described on page 30.
• If desired, search compounds as described on page 31.
• To display all compounds in the database, mark the Show All Records check box.
3 For any unwanted compound, clear the check box next to the Compound Name in the first column of the Compound table.
Triggered MRMmethod
4 Select transitions for a triggered MRM method as follows:
a In the Select top ranked transitions field, enter the maximum number of transitions per compound that you want to show in the import list. You can have two primary transitions, plus additional secondary transitions (see step c below).
b Click the Select Transitions button to display the transitions in the Compound table.
c In the Set primary and trigger flags area, specify the number of Primary transitions to use. The rest are assigned as Secondaries. Typically, two primaries are used.
d Click Set Primaries and Trigger. The most abundant transition is automatically assigned as the Trigger.
e Review the compound list and edit as needed.
• A very abundant low m/z ion may be unsuitable as a Primary transition.
• You can manually select a different transition for a compound as the Primary transition, and define a low m/z ion as a Secondary.
• You may want to select two Primaries as triggers for a compound.
Dynamic MRMmethod
5 Select transitions for a dynamic MRM method as follows:
a Click Primary transitions.
b Click the Select Transitions button to display the transitions in the Compound table.
• At this point, all transitions are displayed as primaries.
28 Agilent Optimizer Software Quick Start Guide

Using Database BrowserTo save a database in Database Browser
• Typically, the transitions are ranked by abundance.
c Review the compound list and edit as needed.
• Clear any unwanted transitions.
6 When the list of transitions is set, click the Add to Import List button below the Compound table.
7 Do one of the following:
• To find more compounds in the same database, repeat step 2 through step 6.
• To select compounds from a different database, repeat step 1 through step 6.
8 Click the Import List tab to review the list of compounds.
• Right-click and select Remove from the shortcut menu to remove any compounds you don’t want to import.
9 Click the Import button.
The imported compounds will appear on the Compound Setup tab.
To save a database in Database BrowserDo one of the following to save compounds to a database:
• To save compounds to the current database, click the Save Database button on the Database Browser toolbar.
• To save compounds to a new database, click the Save As Database button on the Database Browser toolbar. When prompted, enter a name for the new database, and click Save.
Once saved, you can import the compounds into other projects at a later time.
NOTE Changes made to transitions and triggers in Database Browser are not saved with the database.
Agilent Optimizer Software Quick Start Guide 29

Using Database BrowserTo filter compounds in Database Browser
To filter compounds in Database Browser1 If not already open, open the database of interest as described on page 25.
2 Enter the Filter criteria in the upper left area of the Database Browser Search/Filter tab. Note that filter criteria are unavailable if Show All Records is selected.
• Mark the Enable Filters check box.
• Mark the check boxes for the filter criteria to use, such as Optimized Compounds, Date, Group Name, Project Name, Polarity, Model, and Method. Enter values for each selected criteria.
3 Click the Search/Filter button.
The compounds that pass the filter are displayed in the Compound table in the lower part of the screen.
30 Agilent Optimizer Software Quick Start Guide

Using Database BrowserTo search compounds in Database Browser
To search compounds in Database Browser1 If not already open, open the database of interest as described on page 25.
2 Enter the Search Text in the upper right area of the Database Browser Search/Filter tab, such as Compound Name and Formula. This can be either a partial or complete entry as described in step 4.
The best parameter to use in a search is the CAS number or the formula as you have specified. You will not get a match if you misspell the name or if the name is spelled differently in the database.
3 Mark the columns to search or click the top entry in the list (Select Columns) to search all columns.
4 Do one of the following:
• To find compounds that match only a partial name or formula, clear the Match entire word for each string check box.
• To find only compounds that exactly match the text you entered in step 2, mark the Match entire word for each string check box.
5 To ignore all filters for this search, clear the Enable filters check box.
6 Click the Search/Filter button.
• The compounds that meet the search criteria are displayed in the Compound Table in the lower part of the screen.
• Search text that was not found in the search is shown in red.
NOTE The values you enter here for Product or Precursor ions are treated as numeric values rather than text. Matches are returned whose values fall between 0.7 amu below the entered mass and 0.3 amu above the specified mass.
NOTE If you want to display all items in the database, mark the Show All Records check box. This automatically disables all the search and filter options.
Agilent Optimizer Software Quick Start Guide 31
Setting Up SequencesTo set up a sequence list for peptides
Setting Up SequencesUse the following procedures to set up peptide sequences for use in Optimizer for Peptides.
• “To set up a sequence list for peptides” below
• “To import peptide sequences from a MassHunter Qualitative Analysis method” on page 33
• “To convert multiple peptide sequences for import into MassHunter Qualitative Analysis” on page 37
To set up a sequence list for peptidesUse this procedure to set up the list of peptides to optimize in Optimizer for Peptides.
1 Click the Compound Setup tab.
2 Clear the Show results summary check box above the table while you set up the sequence list.
3 Import sequences as described in “To import peptide sequences from a MassHunter Qualitative Analysis method” on page 33.
4 (optional) If you want to be able to find groups of sequences in the database, assign a group name in the Groups column. You can then specify the desired group name when you filter sequences to import from the database.
5 Leave the Formula column blank. The Mass is imported from the method and displayed in the table automatically.
6 Enter the Sample Position for the sequence.
7 Mark the Select columns for the sequences (rows) that you want to use for optimization.
8 Mark the Perform multi-compound run check box. This lets you perform collision energy optimization when all the fragment ions are known, a typical case in peptides using ion prediction.
9 (optional) Adjust the Optimization dwell time value to set a shorter or longer cycle time if desired.
32 Agilent Optimizer Software Quick Start Guide

Setting Up SequencesTo import peptide sequences from a MassHunter Qualitative Analysis method
10 Click the Fill Values button to calculate the Cycle Time parameters and the peak width necessary to obtain ten data points required for optimization when using Fixed Fragmentor or CE value formula on the Optimizer Setup tab. See “To set Optimizer acquisition parameters for peptides” on page 17.
11 Save the sequence list as described in “To save a database in Database Browser” on page 29 or “To save parameters to the current project” on page 13.
12 (optional) Export the sequence list as described in “To export compound information to an Excel file” on page 23.
To import peptide sequences from a MassHunter Qualitative Analysis method
Applies to Optimizer for Peptides only.
1 Create a MassHunter Qualitative Analysis method that contains the peptide sequences you want to import.
• If desired, create the .psq files for MassHunter Qualitative Analysis as described in “To convert multiple peptide sequences for import into MassHunter Qualitative Analysis” on page 37.
2 If you need to add custom modifications:
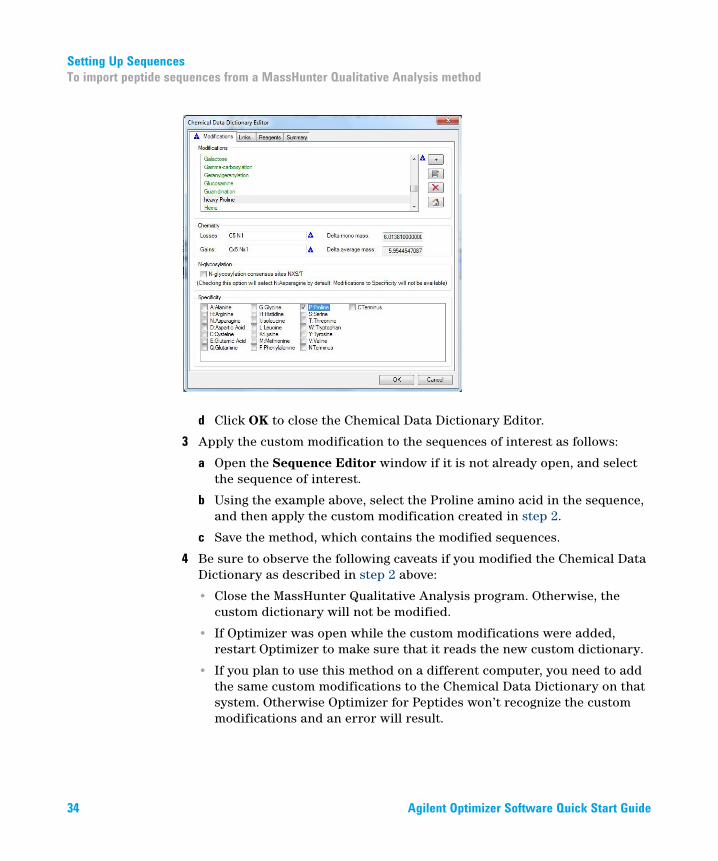
a Select Open Chemical Data Dictionary Editor from the Tools menu.
b Click the + button on the Modifications tab to add a custom modification.
c Type in a name for a new modification, and then enter its Chemistry values.
Example Assume you wish to add a custom modification “heavy Proline”, where the carbons and nitrogen in Proline are replaced with 13-C and 15-N. A Proline residue has five Carbons and one Nitrogen. Assuming complete labeling, specify Losses of C5 N1 and Gains of Cx5 Nx1 for a Delta mass of 6.01381. Mark the check box for Proline and clear all others to specify this custom modification for Proline only.
Agilent Optimizer Software Quick Start Guide 33
Setting Up SequencesTo import peptide sequences from a MassHunter Qualitative Analysis method
d Click OK to close the Chemical Data Dictionary Editor.
3 Apply the custom modification to the sequences of interest as follows:
a Open the Sequence Editor window if it is not already open, and select the sequence of interest.
b Using the example above, select the Proline amino acid in the sequence, and then apply the custom modification created in step 2.
c Save the method, which contains the modified sequences.
4 Be sure to observe the following caveats if you modified the Chemical Data Dictionary as described in step 2 above:
• Close the MassHunter Qualitative Analysis program. Otherwise, the custom dictionary will not be modified.
• If Optimizer was open while the custom modifications were added, restart Optimizer to make sure that it reads the new custom dictionary.
• If you plan to use this method on a different computer, you need to add the same custom modifications to the Chemical Data Dictionary on that system. Otherwise Optimizer for Peptides won’t recognize the custom modifications and an error will result.
34 Agilent Optimizer Software Quick Start Guide

Setting Up SequencesTo import peptide sequences from a MassHunter Qualitative Analysis method
5 Import the sequences into MassHunter Optimizer for Peptides as follows:
a Review the charge states in the Precursor Ion Selection tab. Make sure that the desired charge states are listed, and add them if they are not.
Tip For peptide analysis, charge state precursors 2+ and 3+ are usually preferred, and singly-charged precursors are ignored.
b Click Extract Peptide on the toolbar in Optimizer for Peptides.
Select the MassHunter Qualitative Analysis method from step 1 that contains the peptide sequences of interest, and then click the Open button.
All sequences from the selected method are displayed in the “Peptide Fragment Ion Predictor Dialog Box” on page 9.
c Right-click in the table and select Expand/Collapse All from the shortcut menu to see the Precursor Ions and Charge states for each sequence.
d Mark the sequences that you want to use for optimization.
Tip To make it easier to edit long transitions lists, mark the Show selected ions option above the table to display only the selected ions.
• Within each peptide sequence, mark the precursor charge state to use for that peptide and deselect all charge states that you don't want to use. For example, you may want to examine only the 2+ charge state precursor because it produces abundant product ions, but the 3+ charge state precursor does not.
• If you decide to examine multiple charge states for a given peptide, then select all of the charge states of interest.
• Select the product ions of interest that result from each peptide precursor. Use the following check boxes in combination with selecting individual product ions in the table to make your selections.
e Click the Add button. The selected peptide sequences from the method are imported and listed on the “Compound Setup Tab” on page 8.
• Show selected ions • Show ions > than mz value• Show only y-ions • Show ions > than % of precursor• Show only b-ions
Agilent Optimizer Software Quick Start Guide 35

Setting Up SequencesTo import peptide sequences from a MassHunter Qualitative Analysis method
6 Review the list of precursors and product ions.
a Right-click in the table and select Expand/Collapse All Rows from the shortcut menu to show all precursors and product ions.
b To edit the list, right-click on a product ion row, and select Delete Product Ions or Add Product Ion from the shortcut menu.
7 If you want to use only a single charge state for each peptide to optimize, then edit the charge states on the Precursor Ion Selection tab to make sure that only one charge state is selected for each peptide. That is, remove the charge state selection from all but one charge state. For example, clear charge state selections except for Charge State 2.
8 (optional) Save the compounds.
NOTE If more than one charge state is active, then during optimization, Optimizer tries to determine which charge state has the highest abundance.
36 Agilent Optimizer Software Quick Start Guide
Setting Up SequencesTo convert multiple peptide sequences for import into MassHunter Qualitative Analysis
To convert multiple peptide sequences for import into MassHunter Qualitative Analysis
Applies to Optimizer for Peptides only.
Use this procedure to convert multiple peptide sequences with or without modification into multiple .psq files for import into MassHunter Qualitative Analysis program.
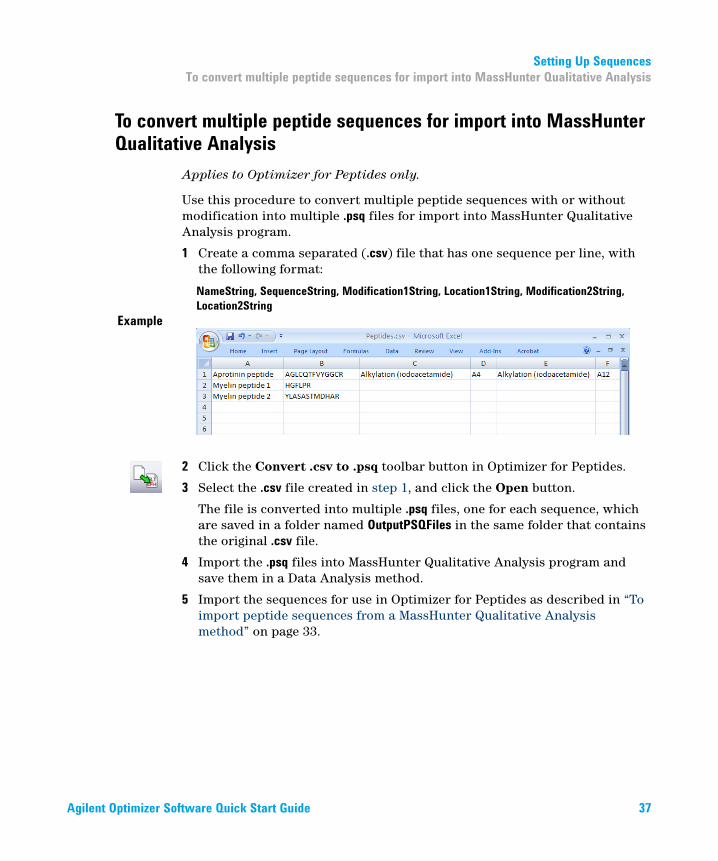
1 Create a comma separated (.csv) file that has one sequence per line, with the following format:
NameString, SequenceString, Modification1String, Location1String, Modification2String, Location2String
Example
2 Click the Convert .csv to .psq toolbar button in Optimizer for Peptides.
3 Select the .csv file created in step 1, and click the Open button.
The file is converted into multiple .psq files, one for each sequence, which are saved in a folder named OutputPSQFiles in the same folder that contains the original .csv file.
4 Import the .psq files into MassHunter Qualitative Analysis program and save them in a Data Analysis method.
5 Import the sequences for use in Optimizer for Peptides as described in “To import peptide sequences from a MassHunter Qualitative Analysis method” on page 33.
Agilent Optimizer Software Quick Start Guide 37

Optimization and ResultsTo convert multiple peptide sequences for import into MassHunter Qualitative Analysis
Optimization and ResultsUse the following procedures to run the optimization procedure, evaluate the results, and import them into the MassHunter Data Acquisition program.
“To start optimization” on page 39
“To review optimization results” on page 39
“To start optimization and display ion breakdown profiles” on page 40
“To manually set collision energy voltages” on page 40
“To import optimization results to Acquisition for dMRM/tMRM” on page 42
“To import optimization results to Acquisition for MRM time segments” on page 45
38 Agilent Optimizer Software Quick Start Guide

Optimization and ResultsTo start optimization
To start optimization1 Set the optimization parameters as described on page 14.
2 Set up the compound list as described in “To set up a compound list” on page 19 or “To set up a sequence list for peptides” on page 32.
3 Start the optimization process in either of the following ways:
• Click the Start Optimization button on the toolbar.
• Click the Ion Breakdown Profile button on the toolbar if you want to display the product ion profiles determined by optimization before they are saved to the database. For more information, see “To start optimization and display ion breakdown profiles” on page 40.
4 If necessary, you can stop the optimization process by clicking the Stop Optimization button on the toolbar.
5 Review results as described below.
6 (optional) Use the MassHunter Qualitative Analysis program to look at the data acquired during the optimization run.
To review optimization results1 Run the optimization procedure as described above.
2 Click the Compound Setup tab.
3 Mark the Show results summary check box above the table.
4 Review the following values for each transition in the Compound table:
Fragmentor—The optimum voltage to apply to the exit end of the capillary for the compound, determined by MassHunter Optimizer. (Does not apply to instrument model 6490 LC/MS.)
Collision Energy—The optimum voltage to apply to the ions in the collision cell for the compound, determined by MassHunter Optimizer.
5 Review the printed optimization report.
6 See “To import optimization results to Acquisition for MRM time segments” on page 45, to use optimization values for data acquisition.
Agilent Optimizer Software Quick Start Guide 39

Optimization and ResultsTo start optimization and display ion breakdown profiles
To start optimization and display ion breakdown profilesUse this procedure to display the product ion profiles determined by optimization before they are saved to the database and to manually select collision energy values for each ion if desired.
1 Set the optimization parameters as described on page 14.
2 Set up the compound list as described on page 19.
3 Click the Ion Breakdown Profile toolbar button to start optimization.
4 When optimization is complete, the Ion Breakdown Profile dialog box is displayed. Review the graphs, which plot collision energy steps on the x- axis and abundance values on the y-axis for each product ion. The values shown in the table are the collision energy values determined by optimization. See an example of Ion Breakdown Profile results in Figure 1 on the next page.
5 If desired, you can override the collision energy values as described below. Otherwise, click Save & Exit to close the Ion Breakdown Profile dialog box.
To manually set collision energy voltages1 Set optimization parameters and start optimization as described above.
2 Click on the Ion Breakdown Profile graph to select the desired collision energy value. See an example Ion Breakdown Profile graph in Figure 1 on the next page.
3 Apply the selected value to either All ions or only the Selected ion by clicking the appropriate option for Apply manual selection to.
4 If desired, you can reload the collision energy values set by optimization at any time by clicking the Load Optimizer Defaults button. Doing this overwrites the manual selections you made above.
5 Click the Save & Exit button to close the Ion Breakdown Profile dialog box.
40 Agilent Optimizer Software Quick Start Guide

Optimization and ResultsTo manually set collision energy voltages
Figure 1 Ion Breakdown Profile Results
Agilent Optimizer Software Quick Start Guide 41

Optimization and ResultsTo import optimization results to Acquisition for dMRM/tMRM
To import optimization results to Acquisition for dMRM/tMRM1 Display the Method pane in MassHunter Data Acquisition program.
2 Create or open the method of interest.
3 Click the MS QQQ tab in the Method Editor pane.
4 Click the Acquisition tab on the right side of the screen.
5 Select the time segment of interest or create a new one.
6 Set Scan Type to Dynamic MRM as shown above.
7 For triggered MRM:
a Mark the Triggered check box in the lower right area of the Acquisition tab.
b Notice that additional columns are now available in the Scan segments table, including Primary, Trigger, Trigger Window, Trigger MRM Threshold, and Trigger Entrance Delay.
8 Use the expected retention time and RT window parameters to set the timetable for monitoring transitions. Usually only a single Time segment is used for Dynamic MRM and Triggered MRM. Note that the Cycle time remains constant.
• As transitions are added to the list in real time, the Dwell time is reduced for each transition that is active to keep the Cycle time constant.
• The reverse happens for transitions whose time has elapsed, and dwell times are increased for the remaining active transitions.
42 Agilent Optimizer Software Quick Start Guide

Optimization and ResultsTo import optimization results to Acquisition for dMRM/tMRM
• For a single compound on the list, one transition serves as the quantitation response. Other transitions for the same compound are used as qualifiers.
9 Right-click in the Acquisition tab and select Import from Data Browser from the shortcut menu.
10 When Database Browser appears:
a If desired, filter the compounds as described on page 30.
b If desired, search compounds as described on page 31.
c Mark the transition ions of interest from the Compound table in the lower half of Database Browser in one of the following ways:
• Manually select the transition ions you want to import for each compound, or
• Enter the top number of transitions to import for each compound, and then click the Select button. You can select the top transitions based on either Abundance or Response Factor. Clear the check box for any transitions that you don’t want to use.
11 If the transition ions selected in the table are the only ones you want to import at this time, click Import. This closes the Data Browser window and adds the transition ions into the current time segment.
• Otherwise, to do additional search and filter operations on the current database or a different database, click Add to Import List.
12 To select additional compounds:
a To select compounds from a different database, open the database of interest as described on page 25.
b Repeat step 10 to select the transition ions of interest.
c Click Add to Import List.
13 Click the Import List tab to review the list of transition ions. To remove any transition ions you don't want to import, right-click and select Remove from the shortcut menu.
NOTE When asked if you want to make this database the default database, click No. Otherwise, unsaved changes made to the current project will be lost. All saved compound information in the previous project will still exist in the previous default database, but won't be available for use with the new default database.
Agilent Optimizer Software Quick Start Guide 43

Optimization and ResultsTo import optimization results to Acquisition for dMRM/tMRM
14 Click the Import button. The selected transitions are imported into the current time segment.
15 Review the timings to make sure that not too many transitions are being monitored concurrently:
a Right-click in the Scan segments table and select Edit dMRM method from the shortcut menu.
b When the Dynamic MRM Viewer appears, review how many transitions are active at any point in time during the run.
c If necessary, change the retention time windows or delete transitions to increase the average dwell time.
d You can also use the Split Method feature in the Options and Parameters pane of the Dynamic MRM Viewer to divide the transitions from the current method across two or more methods.
• Select the criteria for splitting the method from one of the following: Minimum dwell time, Maximum concurrent MRM, or Number of new methods.
• Note that all transitions for the same compound are assigned to the same method.
16 (optional) Save the method.
NOTE When too many transitions are active at the same time, the dwell time per transition may become too short (1-2 msec per transition or less). Under these conditions, the signal/noise ratio is low, and the quantitation accuracy and precision may suffer.
44 Agilent Optimizer Software Quick Start Guide

Optimization and ResultsTo import optimization results to Acquisition for MRM time segments
To import optimization results to Acquisition for MRM time segments
1 Display the Method pane in the MassHunter Data Acquisition window.
2 Create or open the method of interest.
3 Click the MS QQQ tab in the Method Editor pane.
4 Click the Acquisition tab on the right side of the screen.
5 Select the time segment of interest or create a new one.
6 Set Scan Type to MRM.
7 Right-click in the Acquisition tab and select Import from Data Browser from the shortcut menu.
8 When Database Browser appears:
a If desired, filter the compounds as described on page 30.
b If desired, search compounds as described on page 31.
c Mark the transition ions of interest from the Compound table in the lower half of Database Browser in one of the following ways:
• Manually select the transition ions you want to import for each compound, or
• Enter the top number of transitions to import for each compound and click the Select button. You can select the top transitions based on either Abundance or Response Factor. Deselect any transitions that you don’t want to use by clearing their check box.
9 If the transition ions selected in the table are the only ones you want to import at this time, click Import. This closes the Data Browser window and adds the transition ions into the current time segment.
• Otherwise, to do additional search and filter operations on the current database or a different database, click Add to Import List.
Agilent Optimizer Software Quick Start Guide 45

Optimization and ResultsTo import optimization results to Acquisition for MRM time segments
10 To select additional compounds:
a To select compounds from a different database, open the database of interest as described on page 25.
• Repeat step 8 to select the transition ions of interest.
• Click Add to Import List.
b Click the Import List tab to review the list of transition ions. To remove any transition ions you don't want to import, right-click and select Remove from the shortcut menu.
c Click the Import button. The selected transitions are imported into the current time segment.
11 Repeat step 5 through step 10 for each time segment of interest.
12 (optional) Save the method.
NOTE When asked if you want to make this database the default database, click No. Otherwise, unsaved changes made to the current project will be lost. All saved compound information in the previous project will still exist in the previous default database, but won't be available for use with the new default database.
46 Agilent Optimizer Software Quick Start Guide

47 Agilent Optimizer Software Quick Start Guide
This page intentionally left blank.

Agilent Technologies
Agilent Technologies, Inc. 2017
Printed in USA Revision B, March 2017
*K3793-90008*K3793-90008
www.agilent.com
In this guideThis Quick Start Guide describes how to use MassHunter Optimizer Automated MS Method Development software.
This guide is valid for the B.07.00 revision or higher of the Agilent MassHunter Optimizer Automated MS Method Development software, until superseded.
For In Vitro Diagnostic Use
The K6460/K6420 mass spectrometer is intended to be used to identify inorganic or organic compounds in human specimens by ionizing the compounds and separating the resulting ions by means of electrical field according to their mass.