
agentTRAX - SoftPro
30
agentTRAX USER GUIDE OCTOBER 17, 2019
Transcript of agentTRAX - SoftPro

agentTRAX USER GUIDE
OCTOBER 17, 2019
Page 1 of 29
Dated: 10.17.2019
agentTRAX
User Guide
Table of Contents
Accessing agentTRAX ......................................................................................................................................................................................... 2
Selecting the Company/Underwriter ............................................................................................................................................................. 3
Closing Protection Letters ................................................................................................................................................................................. 6
Submitting the Initial Request ................................................................................................................................................................ 6
Editing a Closing Protection Letter ....................................................................................................................................................... 9
Canceling (Voiding) a Closing Protection Letter ............................................................................................................................. 11
High Liability Approval Requests .................................................................................................................................................................. 13
Submitting the Initial Request .............................................................................................................................................................. 13
Adding Document(s) ............................................................................................................................................................................... 15
Editing an HLA Request .......................................................................................................................................................................... 17
Canceling (Voiding) a HLA Request.................................................................................................................................................... 19
Creating Policy Jackets ..................................................................................................................................................................................... 21
Endorsements: Matched versus Unmatched ................................................................................................................................... 23
Reviewing Policy Jacket(s) ...................................................................................................................................................................... 26
Submitting Final Policy Documents ....................................................................................................................................................... 28
Page 2 of 29
Dated: 10.17.2019
agentTRAX
User Guide
The agentTRAX application allows you to order Closing Protection Letters, Policy Jackets, obtain High Liability
Approvals while in your SoftPro order. The application pulls information from your SoftPro order into agentTRAX
eliminating duplicate entry.
Accessing agentTRAX
You do not need to have an order open to access agentTRAX.
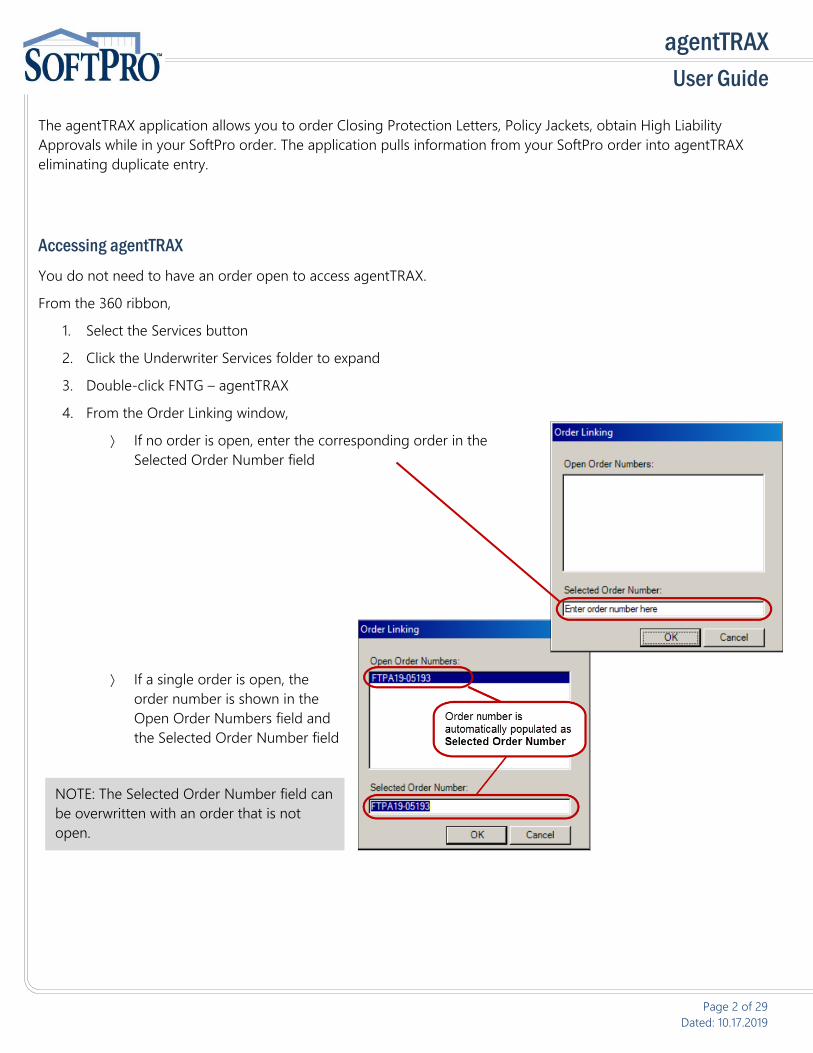
From the 360 ribbon,
1. Select the Services button
2. Click the Underwriter Services folder to expand
3. Double-click FNTG – agentTRAX
4. From the Order Linking window,
If no order is open, enter the corresponding order in the
Selected Order Number field
If a single order is open, the
order number is shown in the
Open Order Numbers field and
the Selected Order Number field
NOTE: The Selected Order Number field can
be overwritten with an order that is not
open.

Page 3 of 29
Dated: 10.17.2019
agentTRAX
User Guide
If multiple orders are open, all order numbers appear in the
Open Order Numbers field and the first order is displayed in
the Selected Order Number field
a) Highlight an order in the Open Order Numbers field
to select the applicable order
5. Press the OK button to continue
Selecting the Company/Underwriter
The Company/Underwriter Selection window opens showing companies that are available and identifies if the
Company/Underwriter can issue a CPL and/or Policy Jacket for the Property State entered in your SoftPro
order.
The default setting is to group the
Companies alphabetically by those that
can,
issue the Jacket and the CPL
only issue the CPL
only issue the Jacket

Page 4 of 29
Dated: 10.17.2019
agentTRAX
User Guide
6. Highlight the applicable entry
7. Click the Next button
8. Agent Name to be shown, check
the applicable radio button
9. Click the Next button
NOTE: The columns can be sorted in ascending or descending order by any of the column headers (i.e.
Company or Underwriter).
1. Click the title field to sort
2. Click the Refresh Data button to
return to the original view
Page 5 of 29
Dated: 10.17.2019
agentTRAX
User Guide
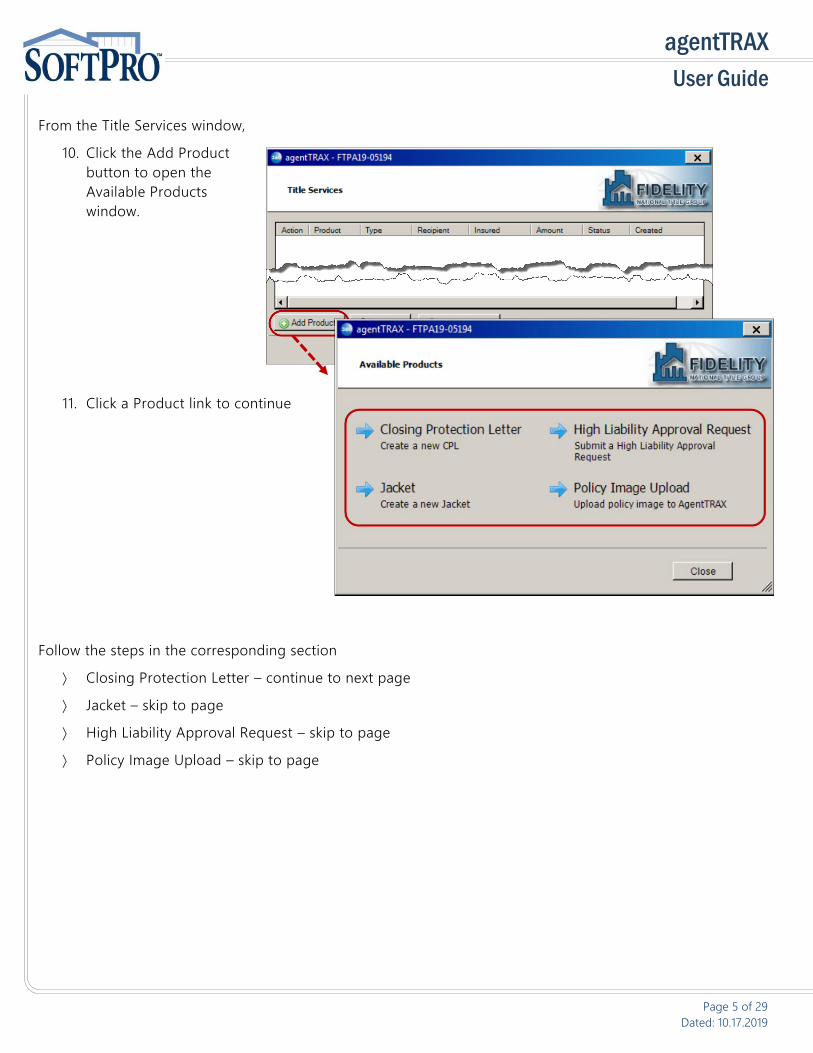
From the Title Services window,
10. Click the Add Product
button to open the
Available Products
window.
11. Click a Product link to continue
Follow the steps in the corresponding section
Closing Protection Letter – continue to next page
Jacket – skip to page
High Liability Approval Request – skip to page
Policy Image Upload – skip to page

Page 6 of 29
Dated: 10.17.2019
agentTRAX
User Guide
Closing Protection Letters
Submitting the Initial Request
1. Click the Closing Protection Letter
link
2. From the Letter Selection window, verify or select the,
a) Type – the type of Letter
available is determiend by the
state of the Agent’s ID; the
default is Standard CPL
b) Covered – the available
parties (Lender, Buyer and
Seller) is determined by the
Type of Letter
» If Type = Agent in Good
Standing the available
parties is Lender
» If Type = Standard Letter,
the available parties is
Lender, Buyer and/or
Seller (depending upon
the type of transaction)
c) If your order has more than one loan, select the loan
d) Settlement Agent – click the <Click here to add a Settlement Agent> link
NOTE: Attorney – shows <Not supported> based on your profile settings; reach out to your Sales
Representative or the agentTRAX helpdesk if you need access to the approved attorney list.

Page 7 of 29
Dated: 10.17.2019
agentTRAX
User Guide
3. Select an approved Settlement Agent
4. Verify Details to confirm your
selection is correct
5. Click the OK button
The Settlement Agent shows your selection
on the Letter Selection window.
6. Click the Next button
HINT: Use the Filter field if you
know the name or part of the name
of the Settlement Agent to quickly
locate the entry. The list filters as
you type.

Page 8 of 29
Dated: 10.17.2019
agentTRAX
User Guide
7. From the CPL Information window,
a) Verify the information shown;
the information is pulled from
your SoftPro order but may
be changed if needed
b) Lender Clause, select from the
drop-down, if needed
c) Click Submit
Once the request is submitted, the Review Closing Protection Letter(s) window is shown listing the requested CPL(s).
8. Check the individual check box for
the corresponding CPL or the All
check box to accept all CPL(s)
From the Review window you can,
Click the View icon to view
the CPL on screen
Click the Copy icon; this
copies the CPL to the clipboard
9. Click the Accept button
NOTE: Any information
changed here does not
write back to your SoftPro
order.
NOTE: A copy of the document is also
saved to the Order Attachments
screen.

Page 9 of 29
Dated: 10.17.2019
agentTRAX
User Guide
The Title Services window shows the Status
updated to Completed and a copy of the
document is saved to the order Attachments
screen.
Editing a Closing Protection Letter
From the Title Services window, you can edit an active (not canceled) Closing Protection Letter.
1. With the applicable order open, access the Title Services window; refer to Steps 1-9 (pages 1-4) if needed
The Title Services window shows all agentTRAX activity for the corresponding order.
2. Highlight the applicable CPL
3. Click the Edit/View button
Page 10 of 29
Dated: 10.17.2019
agentTRAX
User Guide
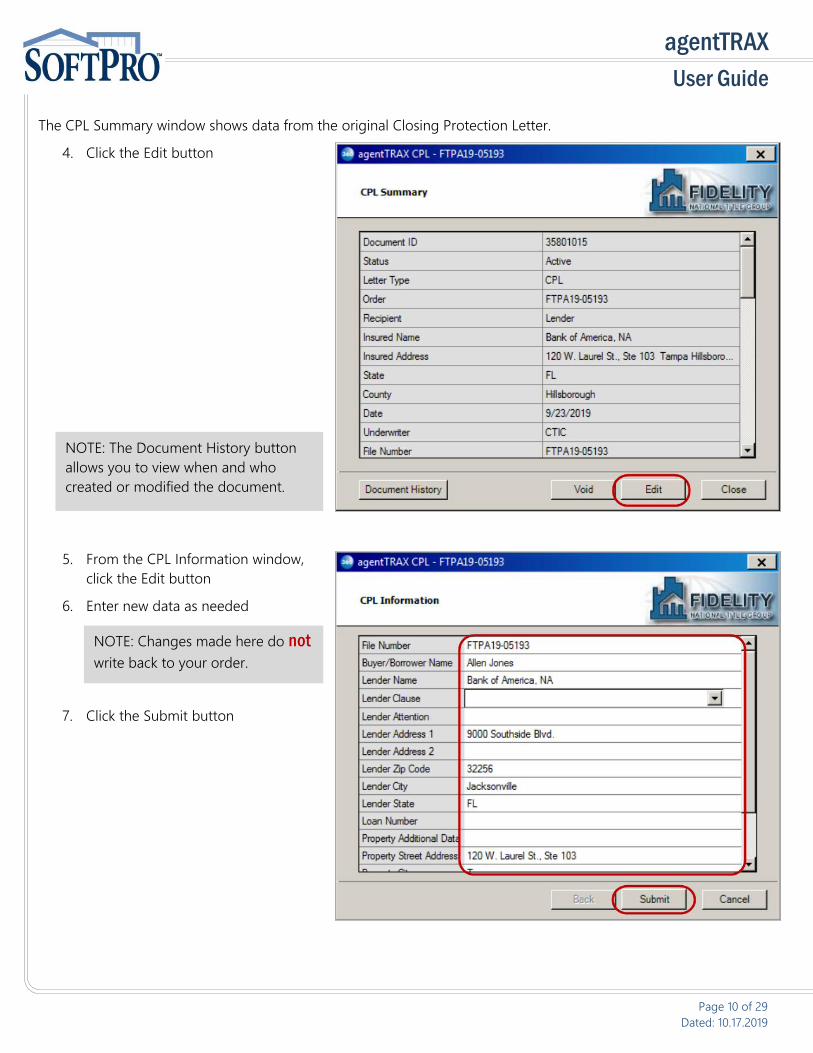
The CPL Summary window shows data from the original Closing Protection Letter.
4. Click the Edit button
5. From the CPL Information window,
click the Edit button
6. Enter new data as needed
7. Click the Submit button
NOTE: Changes made here do not
write back to your order.
NOTE: The Document History button
allows you to view when and who
created or modified the document.

Page 11 of 29
Dated: 10.17.2019
agentTRAX
User Guide
8. Click the Action icon
9. From the Review window, if multiple
CPLs, check the corresponding
check box for the edited CPL
10. Click the Accept button
The Title Services window shows the Status
as Completed.
11. Click the Close button
Canceling (Voiding) a Closing Protection Letter
1. With the applicable order open, access the Title Services window; refer to Steps 1-9 (pages 1-4) if needed
The Title Services window shows all agentTRAX activity for the corresponding order.
IMPORTANT: Once canceled, a CPL cannot be reinstated. You must create a new CPL if needed.
Page 12 of 29
Dated: 10.17.2019
agentTRAX
User Guide
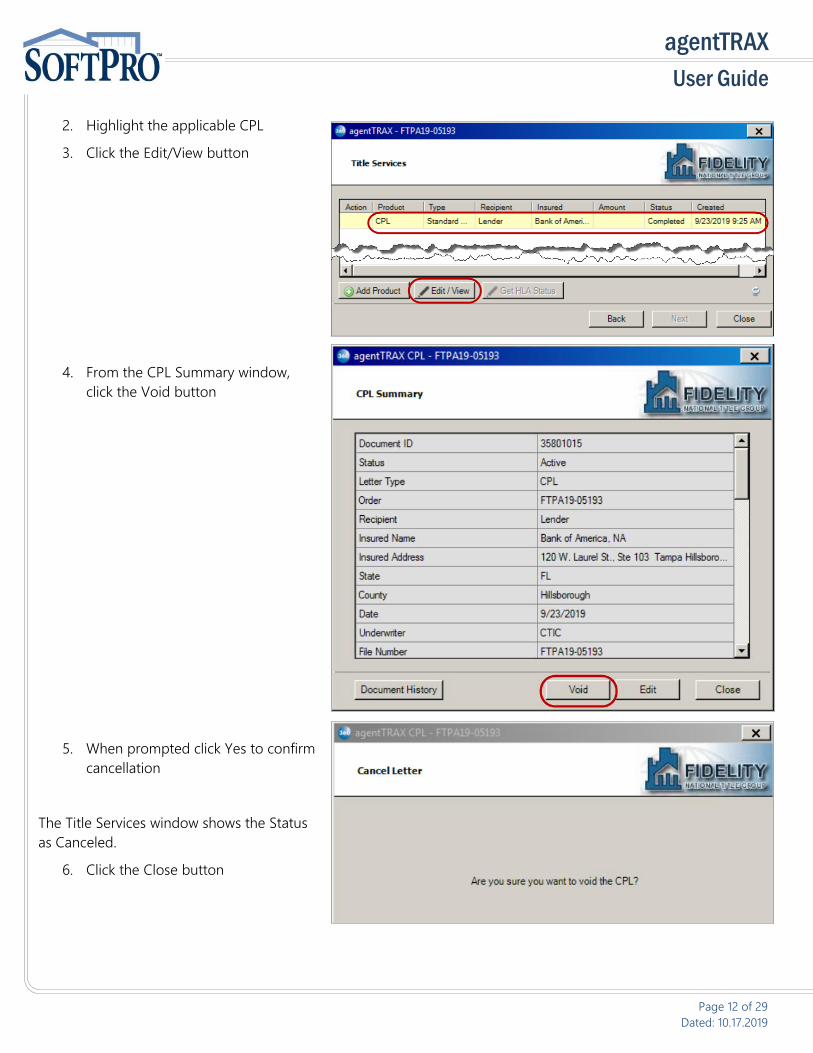
2. Highlight the applicable CPL
3. Click the Edit/View button
4. From the CPL Summary window,
click the Void button
5. When prompted click Yes to confirm
cancellation
The Title Services window shows the Status
as Canceled.
6. Click the Close button

Page 13 of 29
Dated: 10.17.2019
agentTRAX
User Guide
High Liability Approval Request
With agentTRAX, you can create and submit, edit or cancel a High Liability Approval Request with information pulled
from your order.
1. Access the Title Services window; refer to Steps 1-9 (pages 1-4) if needed
From the Title Services window,
2. Click the Add Product
button to open the
Available Products
window.
3. Click the High Liability Approval
Request link
The High Liability Approval Request window pulls information from your SoftPro order.

Page 14 of 29
Dated: 10.17.2019
agentTRAX
User Guide
4. Verify (or select) the,
a. Address shows the first
property address from your
order
b. County, if blank, select from
drop-down; change if needed
c. Property Type, if blank, select
from drop-down; change if
needed
d. Estimated Closing Date;
change if needed
e. Does this transaction involve construction defaults to,
i. Yes = Construction option is selected in SoftPro order
ii. No = Construction option is not selected in SoftPro order
f. Has construction commenced defaults to,
i. Yes = Construction option is selected in SoftPro order
ii. No = Construction option is not selected in SoftPro order
g. Is mechanical lien coverage requested = select from drop-down; this is a required field as indicated
by the red asterisk
h. Brief description of transaction and improvements = optional, enter as needed
5. Click the Next button
NOTE: If changes are made
in fields populated with
information from your
SoftPro order, the new
information does not write
back to your order.
Page 15 of 29
Dated: 10.17.2019
agentTRAX
User Guide
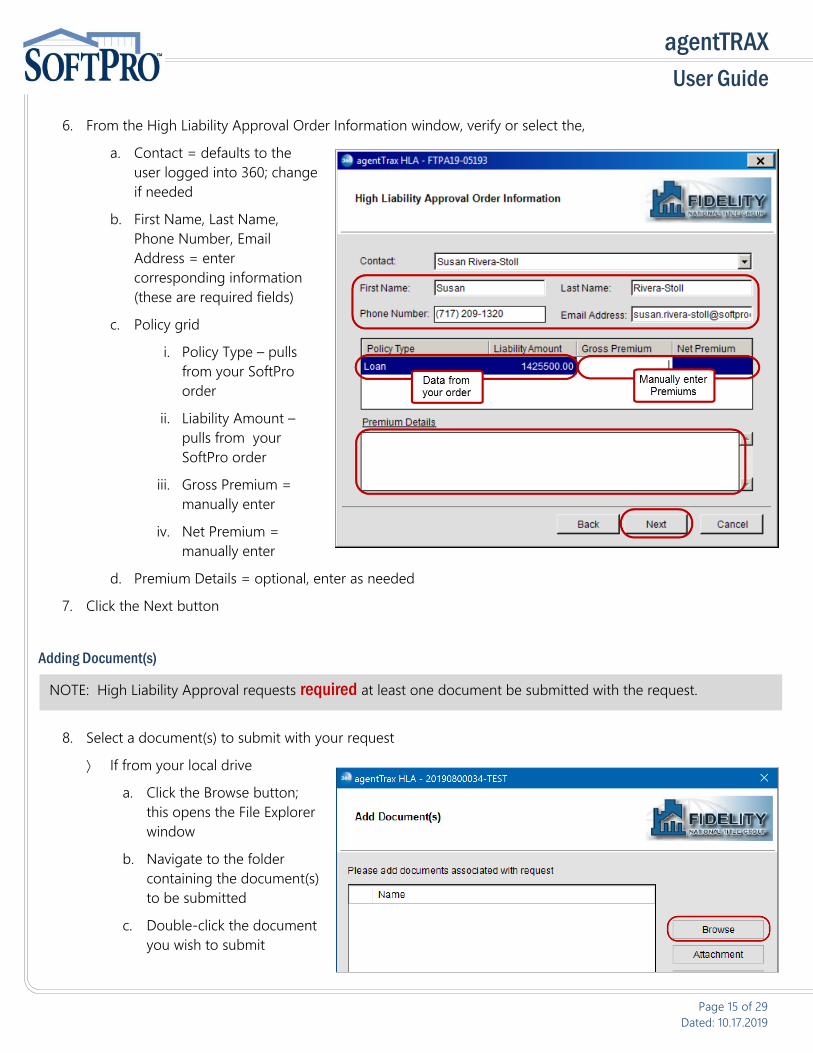
6. From the High Liability Approval Order Information window, verify or select the,
a. Contact = defaults to the
user logged into 360; change
if needed
b. First Name, Last Name,
Phone Number, Email
Address = enter
corresponding information
(these are required fields)
c. Policy grid
i. Policy Type – pulls
from your SoftPro
order
ii. Liability Amount –
pulls from your
SoftPro order
iii. Gross Premium =
manually enter
iv. Net Premium =
manually enter
d. Premium Details = optional, enter as needed
7. Click the Next button
Adding Document(s)
8. Select a document(s) to submit with your request
If from your local drive
a. Click the Browse button;
this opens the File Explorer
window
b. Navigate to the folder
containing the document(s)
to be submitted
c. Double-click the document
you wish to submit
NOTE: High Liability Approval requests required at least one document be submitted with the request.

Page 16 of 29
Dated: 10.17.2019
agentTRAX
User Guide
If from your Attachment folder in SoftPro
a. Click the Attachment
button; this opens the list of
attachments in your SoftPro
order
b. Double-click the document
you wish to submit
9. If needed, use the
Rename button to enter a new
document name
Delete button to remove the
attachement
10. Click the Submit button if no changes
are needed
Page 17 of 29
Dated: 10.17.2019
agentTRAX
User Guide
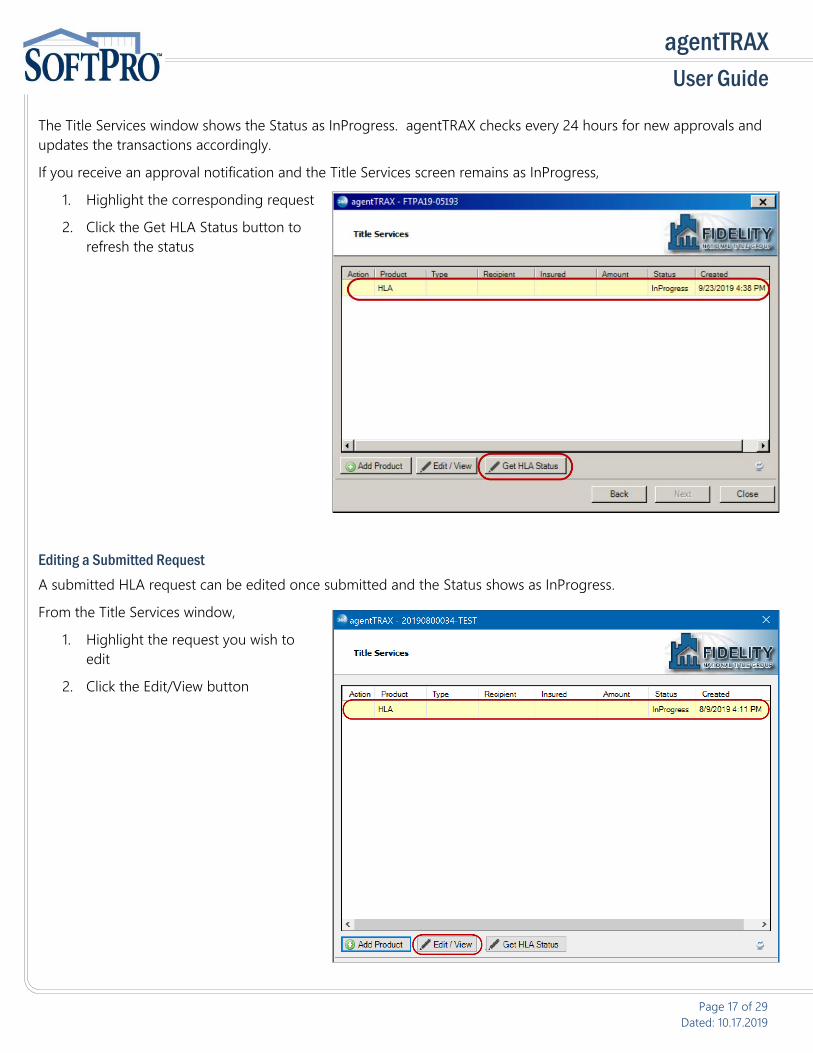
The Title Services window shows the Status as InProgress. agentTRAX checks every 24 hours for new approvals and
updates the transactions accordingly.
If you receive an approval notification and the Title Services screen remains as InProgress,
1. Highlight the corresponding request
2. Click the Get HLA Status button to
refresh the status
Editing a Submitted Request
A submitted HLA request can be edited once submitted and the Status shows as InProgress.
From the Title Services window,
1. Highlight the request you wish to
edit
2. Click the Edit/View button

Page 18 of 29
Dated: 10.17.2019
agentTRAX
User Guide
The High Liability Approval window shows the
details of your original request.
3. Click the Edit button
4. Click OK to confirm you wish to edit
5. Make the necessary edits on the applicable window; the original request information is shown
a) High Liability Approval Request window
i. Overwrite original information as needed
ii. Click Next once edits are entered or if no edits are needed
b) High Liability Approval Order Information window
i. Overwrite original information as needed
ii. Click Next once edits are entered or if no edits are needed
c) Add Document(s); you are not required to add additional documents
i. Add a document(s) – repeat steps in Adding Document(s) section, if needed

Page 19 of 29
Dated: 10.17.2019
agentTRAX
User Guide
6. Click the Submit button
Canceling a Request
From the Title Services window,
1. Highlight the request you wish to cancel
2. Click the Edit/View button

Page 20 of 29
Dated: 10.17.2019
agentTRAX
User Guide
The High Liability Approval window shows the details of your original request.
3. Click the Void button
4. Click OK to confirm you wish to void
(cancel) the request
The Void (cancel) request is submitted to
agentTRAX and the Status is updated to show
Canceled.

Page 21 of 29
Dated: 10.17.2019
agentTRAX
User Guide
Creating the Policy Jacket(s)
1. Access the Title Services window; refer to Steps 1-9 (pages 1-4) if needed
From the Title Services window,
2. Click the Add Product
button to open the
Available Products
window.
3. Click the Jacket link
4. From the Property Information
window, verify or select the,
a) Address
b) County
c) Property Type
d) Effective Date

Page 22 of 29
Dated: 10.17.2019
agentTRAX
User Guide
5. Check the radio button for the Jacket
to be issued
6. If a Lender policy and multiple loans,
select the corresponding loan from
the drop-down
7. Check the Proforma check box if
applicable
8. Click the Next button
9. From the Loan Jacket Rate Selection
window, highlight the applicable rate
10. Click the Next button
11. From the Loan Jacket Form Selection
window, select the applicable Jacket
Form
12. Click the Next button
Page 23 of 29
Dated: 10.17.2019
agentTRAX
User Guide
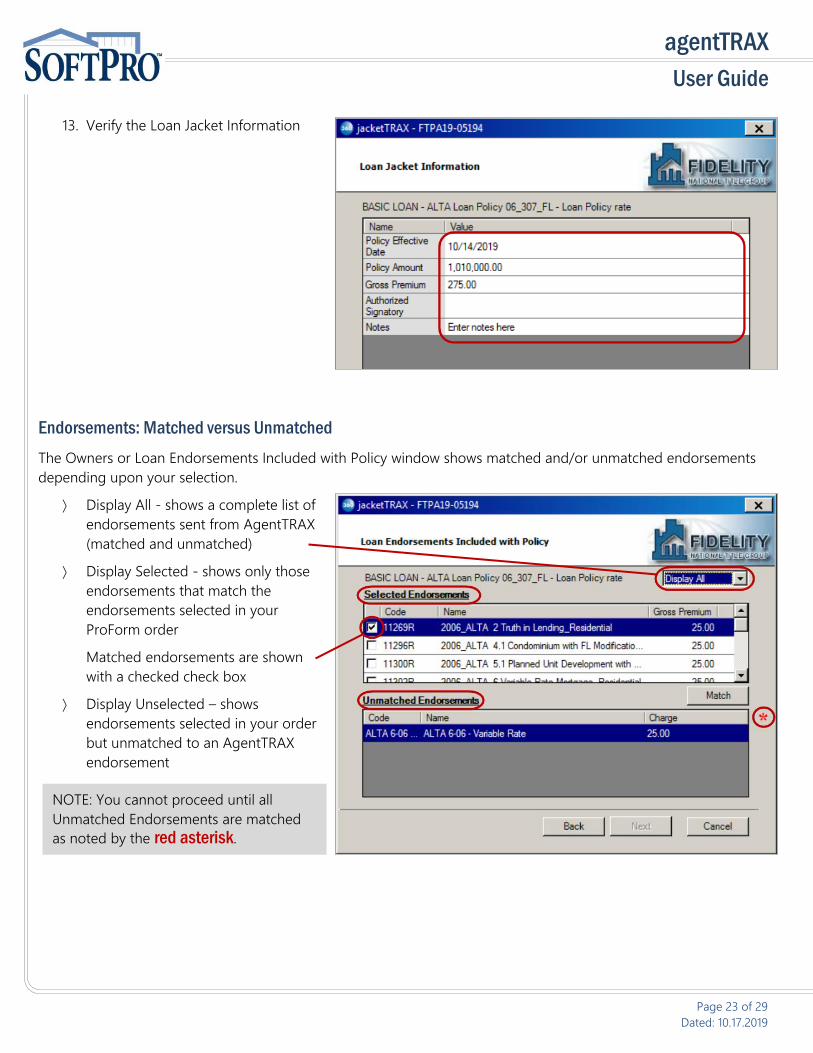
13. Verify the Loan Jacket Information
Endorsements: Matched versus Unmatched
The Owners or Loan Endorsements Included with Policy window shows matched and/or unmatched endorsements
depending upon your selection.
Display All - shows a complete list of
endorsements sent from AgentTRAX
(matched and unmatched)
Display Selected - shows only those
endorsements that match the
endorsements selected in your
ProForm order
Matched endorsements are shown
with a checked check box
Display Unselected – shows
endorsements selected in your order
but unmatched to an AgentTRAX
endorsement
NOTE: You cannot proceed until all
Unmatched Endorsements are matched
as noted by the red asterisk.

Page 24 of 29
Dated: 10.17.2019
agentTRAX
User Guide
Unmatched Endorsements
If endorsements are shown in the Unmatched Endorsements grid, a red asterisk is shown indicating an action is
required. You must manually select (or match) each entry to an AgentTRAX endorsement to continue.
1. Highlight an endorsement in the
Unmatched Endorsements grid
2. Click the Match button
3. From the agentTRAX Endorsements
drop-down, select the
corresponding endorsement
4. Click the OK button
5. Repeat Steps 1-4 until all unmatched
endorsements are matched

Page 25 of 29
Dated: 10.17.2019
agentTRAX
User Guide
Once no endorsements are shown in the
Unmatched Endorsements grid, the Next
button becomes active.
6. Click Next to continue
7. If Other Fees are applicable, check
the corresponding check box
8. Click the Next button

Page 26 of 29
Dated: 10.17.2019
agentTRAX
User Guide
9. Enter (or verify) Optional Information
as needed
10. Click the Submit button
Reviewing the Policy Jacket(s)
The Review window displays,
Groups – lists of all Jackets requested
Data – shows specific information to
the highlighted Jacket
» Name = policy type
» Current Value = SoftPro
order number
» New Value =
agentTRAX
number
Click the Edit
icon to
modify the New Value as needed.

Page 27 of 29
Dated: 10.17.2019
agentTRAX
User Guide
Documents – shows the Policy
Jacket(s) issued
» View – allows you to view the
document on screen
» Copy – places a copy of the
document on your Clipboard
allowing you to paste it to
another program
11. Click the Accept button
The document is processed and the Title
Services window shows the Status as
Completed.
12. Click the Close button
Page 28 of 29
Dated: 10.17.2019
agentTRAX
User Guide
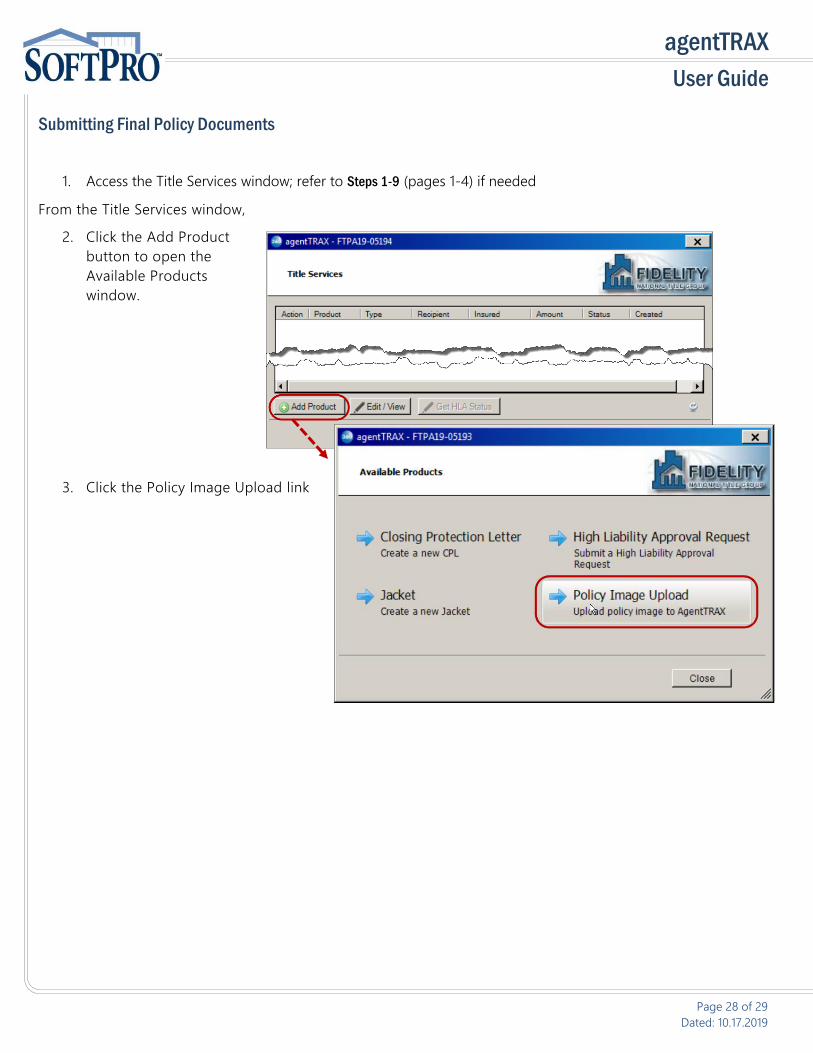
Submitting Final Policy Documents
1. Access the Title Services window; refer to Steps 1-9 (pages 1-4) if needed
From the Title Services window,
2. Click the Add Product
button to open the
Available Products
window.
3. Click the Policy Image Upload link
Page 29 of 29
Dated: 10.17.2019
agentTRAX
User Guide
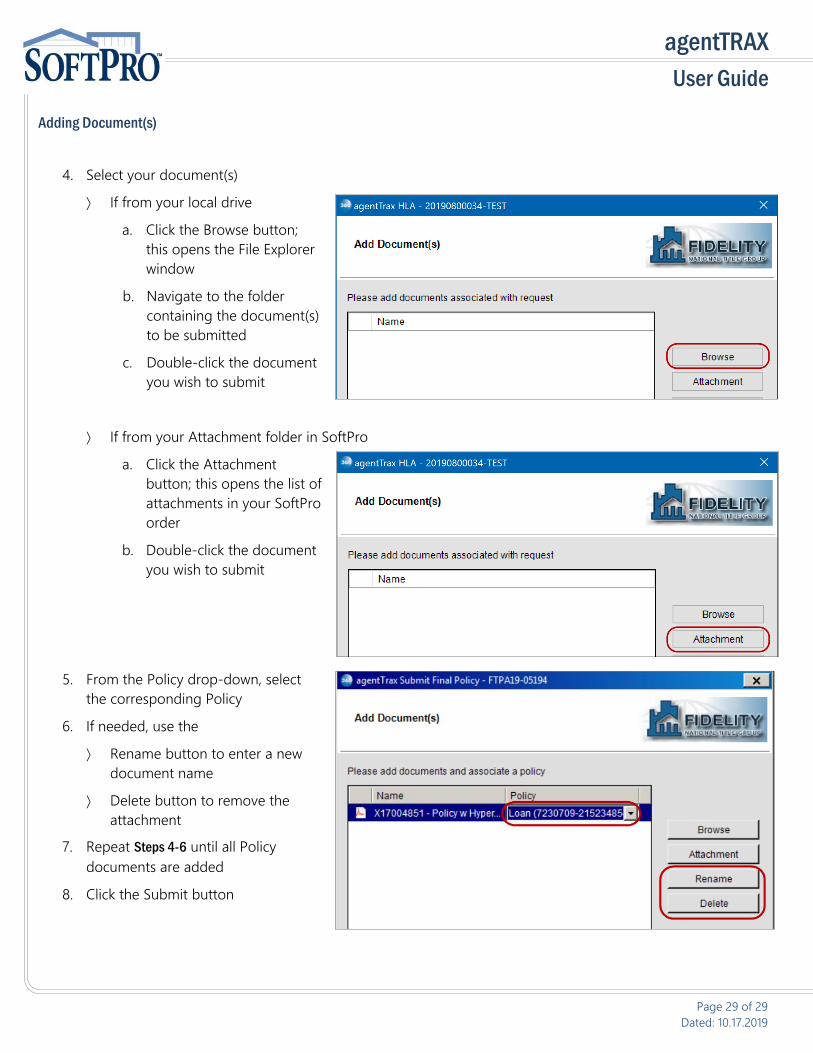
Adding Document(s)
4. Select your document(s)
If from your local drive
a. Click the Browse button;
this opens the File Explorer
window
b. Navigate to the folder
containing the document(s)
to be submitted
c. Double-click the document
you wish to submit
If from your Attachment folder in SoftPro
a. Click the Attachment
button; this opens the list of
attachments in your SoftPro
order
b. Double-click the document
you wish to submit
5. From the Policy drop-down, select
the corresponding Policy
6. If needed, use the
Rename button to enter a new
document name
Delete button to remove the
attachment
7. Repeat Steps 4-6 until all Policy
documents are added
8. Click the Submit button